Refrigerator
Contents
Appliance Registration 2 Model and Serial Numbers 2
Base Grille 4 Moving &Vacation Tips 13
Care and Cleaning 12, 13 Power Saver Switch 7
Drawer and Covers 11, 12 Problem Solver 14, 15
Energy-Saving Tips 2 Quick Serve System 9
Food Storage Suggestions 8 Quick Store 10
Ice Dispenser 5, 6 Repair Service 13
Icemaker 5, 6 Safety Instructions $
Installation 3, 4 Shelves 9
Adapter Plug 4 Temperature Controls 7
Adjustable Rollers 4 Warranty Back Cover
Clearances 4 Water Filter Accessory 6
Electrical Requirements 3, 4
Extension Cord 4
Grounding 3
Location 4
Water Supply to Icemaker 4 G--CA/_wm' C_
Light Bulb Replacement 13 800,_8_2008
Models TBX22R
TBX25R
TBXW25R
with Ice Dispenser
"[-T,_|n n_ k_iw_ =,,.,..
L_a v u_ ia_a v .yuu. • •
Rpstfl thi_ ll_r_k t._rwfi,llw
r _VAI _ _A_e_e
It is intended to help you operate
jv_a aa_€* L_Jtli_toJLfOg_l
properly.
Keep it handy for answers to your
questions.
If you don't understand something
or need more help, Write (include
your phone number):
Consumer Affairs
GE Appliances
Appliance Park
l .nni_vill_ Id'V A¢199_
Wri_ dnwn the mndol sand
serial numbers.
xou tt see mem on a lat3el at the
bottom, just inside the fresh food
compartment door.
These numbers are also on the
Congumer PrMtmt Oturt_rehin
Registration Card that came with
your refrigerator.
I_I_IVI U ])t_ilUIII]_ Ill UICI FU_l,_Lrll[lOll
card, please write these numbers
here:
Model Number
Serial Number
Use these numbers in any
correspondence or service calls
concerning vour r_fria_rntctr
If you received a damaged
IP_fl_atl_f'nr_ Jmm_tlJ_t_l,tr r*nntat,t
= =-_ a_tw_ _wva_ _aa_ax_,q.tAttWJLff _li,,.qlliil.r, llll*,,,,t
the dealer (or builder) that sold you
the refrigerator.
Save time and money.
Before you request service,
check the Problem Solver on pages
14 and 15. It lists causes of minor
vt._xguul_ i#iVl)lliil# Ul_t _UU t_ilIl
correct yourself.
To obtain a Spanish language
version of this book, call
GE Answer Center*
800.626.2000
Para obtener la versi6n en
espafiol de este manual,
llame a
%.1I/.:,t'i./lllWUI LUIILUI_"
sere,tie de informaci6n
para el consumidor,
teMfono 800.626.2000.
rmergy-savmg zips
"_at!on o! your remgerator is
important. Avoid locating it next
toyour range, aheati_ _nt or whe_
the sun will shine directly on it.
• Don't o_n tSedoors mo_ oO n
thannecessary.
• Clct._ th_ dctnr_ t_ tnnn n_ .a_elhl_,
particularly in hot, humid weather,
• T,_'_t'_ I_,iultlll'* _ouA¢ mil, i#_l,I vii' ttlzl,
_tl_ J_vw_',_i lllll IWitlil ill Ull
left position unless moisture forms
on the outside of the refrigerator,
* Be sure the doors are closed
tightly. Betbre leaving the house
or retiring for the night, cheek to
be sure the doors haven't been left
UIJI,_JJ Illlq_ii_llllJiall_,
IS_re o_y _os¢ foods requ!ring
rcff]guI-dtton m your remgera[or.
• Wipe moisture from bottles and
cartons before putting them in the
refrigerator.
• Keep foods covered to reduce
moisture buildup inside the
* If you turn the controls to the
_UiU_Dt [JUblUUU IOl qUIUK Idilllllllg
or freezing, be sure to turn them
back to regular settings.
* Don't overcrowd your refrigerator.
Overcrowdin_ can rennir_ _xtr_
electrical energy to keep everything
cool.
]"8,,JifPd"3h_A NJ'T _ A lffql_T'W,,r _TIJ)T Tf_'Td_Id_T_
..n._v._ _,..rJLl.ltZ"lk_ m k..grZ'l.L'Jl.t¢ m .It .I.Jt.'Wk,_PJtA'gkq,JIk.JlJUqLJH.N_
Read all instructions before using this appliance.
mut i,
InInN In I l__£t tl__ .............
WARNING--When using this
appliance, always exercise basic
safety precautions, including the
IV|LL/VV Jll_,
o Use this appliance only for its
in#andad nnrnn_a a_ t!_erlhad in
this Use and Care Book.
o This refrigerator must be
properlyinstalled inaccordance
with the Installation Instructions
_-_--- -" u,_eu.U¢lOl'4g It is .... :n _ ...... ,,
_ee grounolng
instructions below and on page 4.
by pulling on the power cord:
Always grip plugfirmly and pull
straight out from the outlet.
* Repair or replace immediately all
electric service cords that have
become frayed or otherwise
¢iflmflootl. F)n nnt zz_ m _'nrd that
shows cracks or abrasion damage
along its length or at either the plug
or connector end.
• Do not allow children to climb,
stand or hang on the shelves in
the refrigerator. They could
damage the refri_,erator and
seriously injure themselves.
After your refrigerator is in
operation, do not touch the cold
surfaces, particularly when hands
are damp or wet. Skin may adhere
to these extremely cold surfaces.
• Once you have removed the ice
cube storage container from your
refrigerator, do not place fingers
Uf IliliiUEi UII I,llU UUIUlll_ll|llg
icemaking mechanism while
the refrigerator is plugged in.
This will help protect you from
possible injury. It will also prevent
IIII,_II_I_IIUI_ WII, II 1,11_ IIlUVIlI_ _lgll t_
of the ejecto r mechanism , or with
the heating element that releases
the cubes.
• When moving your refrigerator
away from the wail, be careful not to
roll over or damage the power cord.
- uon't refreeze frozen foods which
have thawed completely. The
United States Department of
Agriculture in Home and Garden
Bulletin No: 69 says:
"...You may safely refreeze frozen
foods that have thawed if they still
L;Olltillll lld_ l:-.I,ySl.i:ll8 Uf 11 tll!iS_/ ill_
still cold--below 40°F.
or fish that have any off-odor or
off-color should not be refrozen and
should not be eaten. Thawed ice
cream should be discarded• If the
UUUl ul _UIUl Ul allff IUUU I_ puul UZ
questionable, get rid of it. The food
may be dangerous to eat.
"Even partial thawing and refreezing
reduce the eating quality of foods,
particularly fruits, vegetables and
prepared foods. The eating quality
of red meats is affected less than
that of many other foods. Use
.._.it +...... _r, j___ ..... !LI- ._
re|rozen zoous as soon as posmme m
save as much of their eating quality
as you can','
• If your old refrigerator Is still
around the house but not in ume,
be sure to remove the doors. This
will reduce the possibility of
d_no_r tf_ ohildrtan
• ul_., i
• Unplug your refrigerator:
Note: We strongly recommend
that any servicing be performed
by a qualified individual.
B. Before cleaning.
C, Before replacing a burned-out
light bulb, the.refrigerator should
be unplugged in order to avoid
contact with a live wire filament.
(A hummed-ant light hnlh may
break when being replaced.)
Note: Turning control to OFF
position does not remove power
to the light circuit.
+ Do not operate your refrigerator
in the presence of explosive fumes.
SAVETHESE
INSTRUCTIONS
How toconnect
dectr dty
For personal safety,
properly grounded•
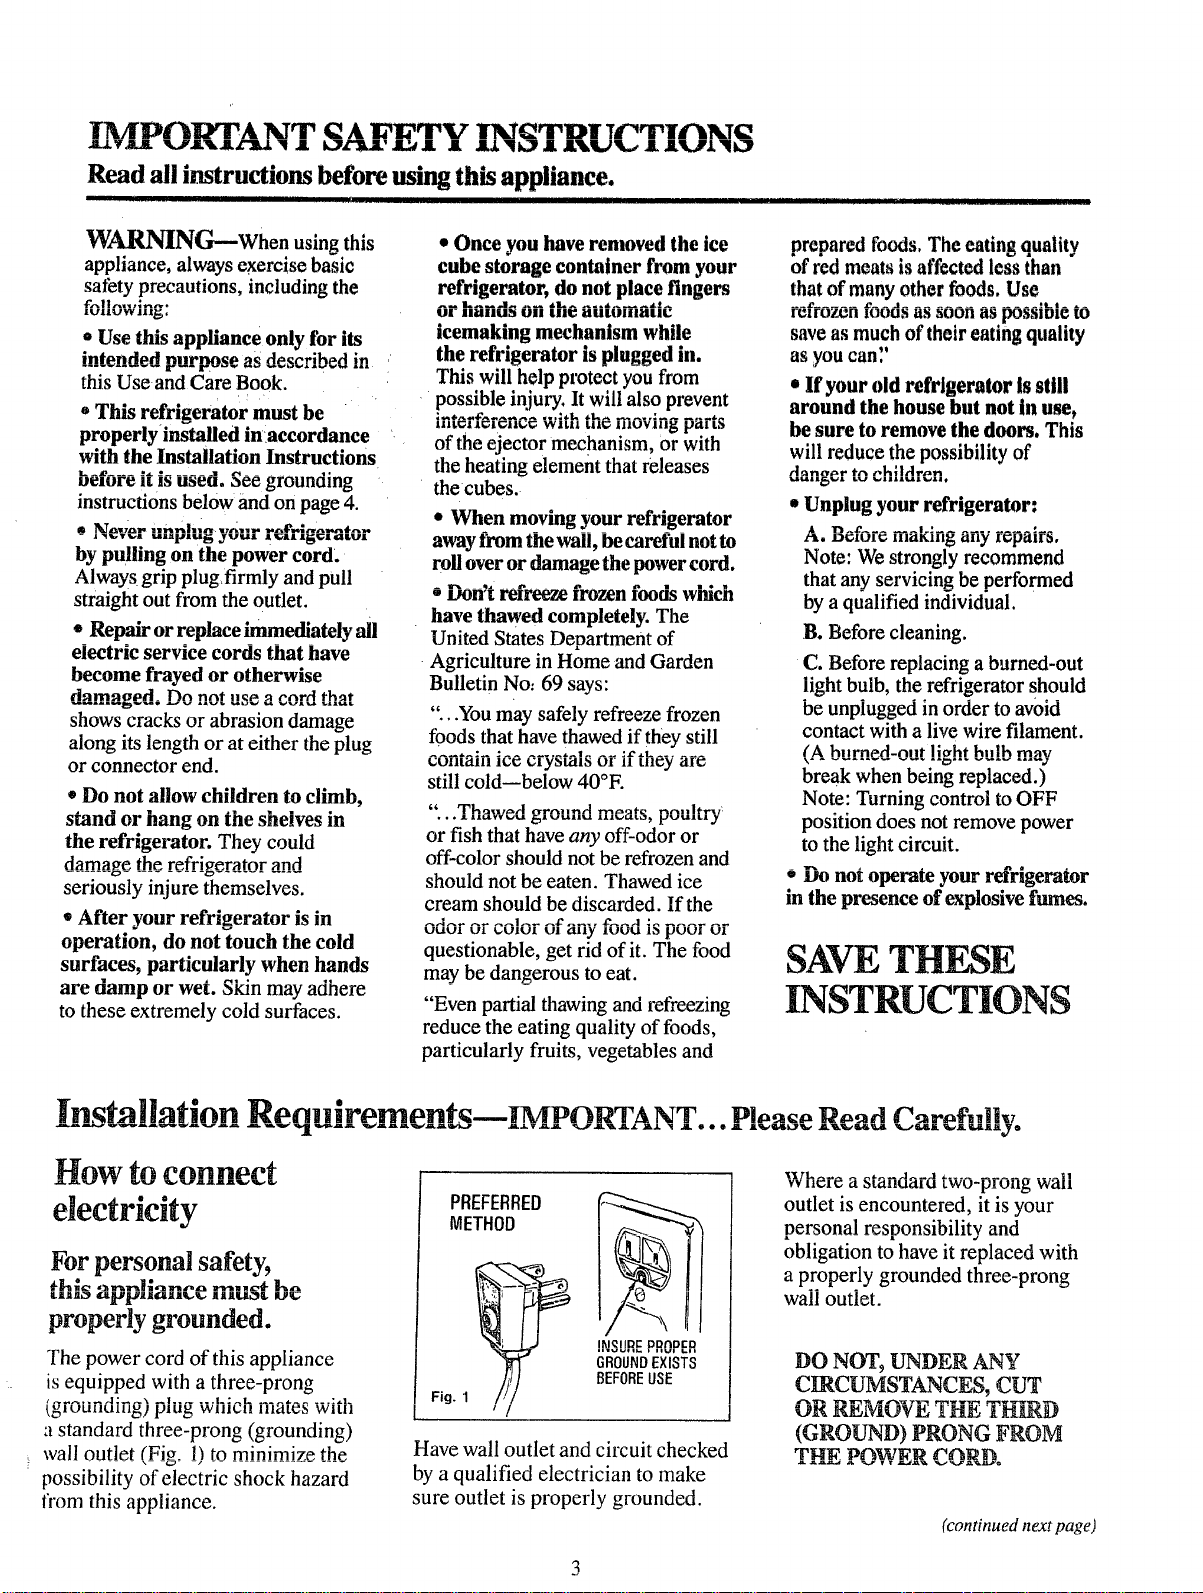
The power cord of this appliance
is equipped with a three-prong
_luuHUlllg} plug WIII_II IIIHtC_ Wltll
a standard three-prong (grounding)
wall outlet (Fig. !) to minimize the,
possibility of electric shock hazard
from this appliance.
PREFERRED
METHOD
Fig. 1
,/
IEIqlIDI: DD_Dt'-D
lllOUmlh I llUl I,,,II
GROUNDEXISTS
BEFOREUSE
Have wall outlet and circuit checked
by a qualified electrician to make
sure outlet is properly grounded.
[][Yk ..... +-_-- ,_1 ^--.i 6, .............. tl
vv 11_1_ _'1 _iti:lllUHIU LWU-I)IUII g Wi_.ll
outlet is encountered, it is your
personal responsibility and
obligation to have it replaced with
a properly grounded three-prong
wail outlet.
DO NOT_ UNDER ANY
CIRCUMSTANCES, CUT
UK _EIVIUVE ]'H_ 'l'l-ll.tgD
(GROUND) PRONG FROM
(continued next page)
.aioqafion Requi ments (continued)-iMPOgTANT... Please Read Carefully.
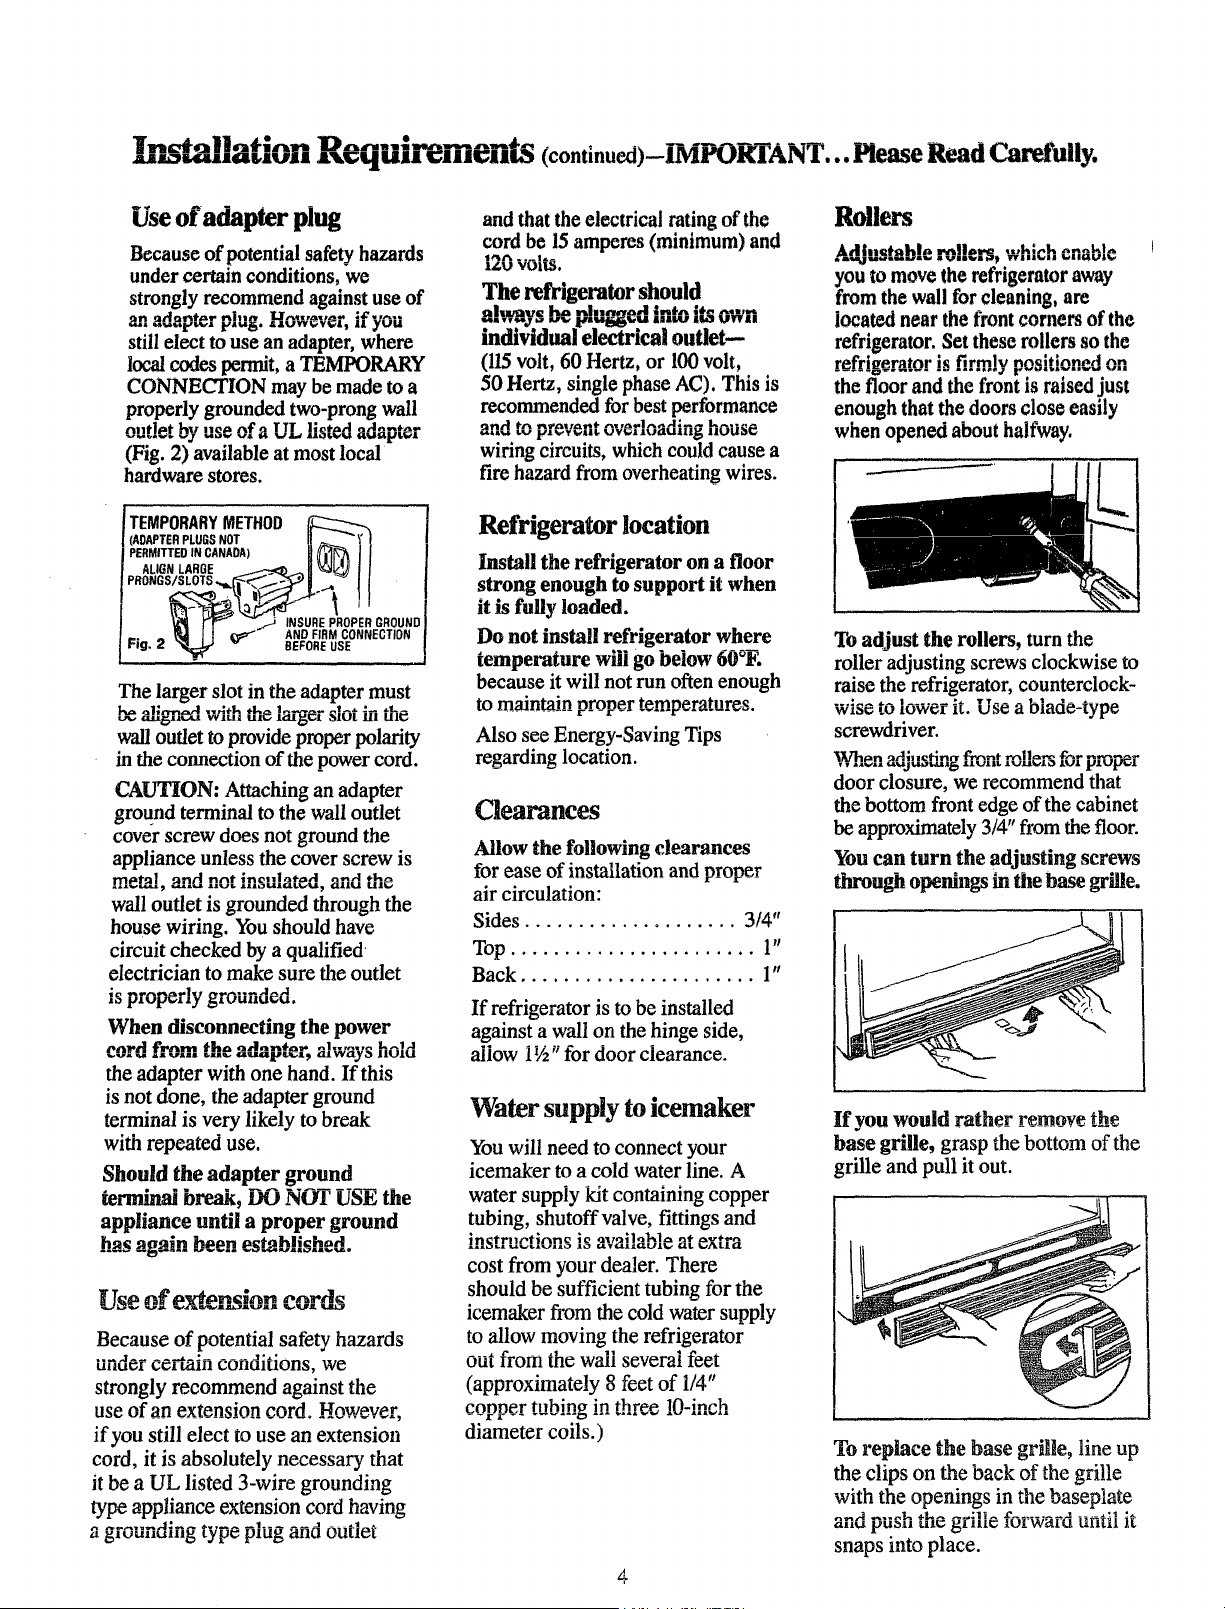
Use of adapter plug
Because of potential safety hazards
under certain conditions, we
strongly recommend against use of
an adap_r plug. However, if you
still elect to use an adapter, where
local codes permit, a TEMPORARY
CONNECTION may be made to a
properly grounded two-prong wall
alztlPt by nee af_ TTT i;o*aA ,_An.,_-
(Fig. 2) available at most !ocal
hardware stores.
TEMPORARYMETHOD _ I
(AOAPterPLUOSNOt
pERM,_O,_CA.DA) II_ I I
ALIONLAROE _ _ 11_j | |
I_-_ _SURE PIROPEROROUNDI
-. - _t4 I I _ AND FIRMCONNECTIONI
t-lg. ;_ "_ • BEFORE USE {
, I
The larger slot in the adapter must
ah'gn_ v,'ith the '..... '-"1,atom_lut hathe
wall outlet to provide proper polarity
in the connection of the power cord.
CAUTION: Attaching an adapter
ground terminal to the wall outlet
cover screw does not ground the
appliance unless the cover screw is
wall outlet is grounded through the
house wiring. You should have
circuit checked by a qualified
electrician to make sure the outlet
Jo _zvlJ_,x,t y _tuuzlu_;u.
When disconnecting the power
t. Pt] tglm, _ha oxl.a'r.,t,_,.,.
.o ..... m ...... =t'-_,, always _'^_-_IIUIU
the adapter with one hand. If this
is not done, the adapter ground
terminal is very likely to break
with repeated use.
Should the adapter ground
terminal break, DO NOT USE the
appliance until a proper ground
ha_ again been est_b!Jshed.
Because of potential safety hazards
tlllUl_l L;K;EI21111 conoltlOnS, we
strongly recommend against the
use of an extension cord. However,
if you still elect to use an extension
cord, it is absolutely necessary that
it be a UL listed 3-wire grounding
type appliance extension cord having
a grou.um_ type pxug and outlet
and that the electrical rating of the
cord be 15amperes (minimum) and
I/.u VOlLg.
The refrigerator should
.= v*'.._ff _._ lu'_,¢ J[_lqbljJ_qbeU illtM.I llk_l I,I119"11
individual electrical outlet--
(115volt, 60 Hertz, or 100 volt,
50 Hertz, single phase AC). This is
recommended for best performance
...... z,','-,'.," ,.,v_,.uau.._ house
wiring circuits, which could cause a
fire hazard from overheating wires.
Refrigerator location
Install the refrigerator on a floor
strong enough to support it when
it is fully loaded.
Do not install refrigerator where
temperature will go below 60°E
because it will not run often enough
to maintain prover temo_-ratures.
Also see Energy-Saving Tips
regarding location.
Clearances
Allow the following clearances
for ease of installation and proper
air circulation:
Sides .................... 3/4"
Top ....................... 1"
Back ...................... 1"
If refrigerator is to be installed
against a wall on the hinge side,
allow i½" for door clearance.
Water supply to icemaker
You will need to connect your
icemaker to a cold water line. A
water supply kit containing copper
tubing, shutoff valve, fittings and
;nctrtv,f;ars¢ ;o a,tzo;1,ahla _ ,_-_'--
1al0_i _l.luaio 1o gVGLIIGUI_ _/.L _ALIO_
cost from your dealer. There
should be sufficient tubing for the
icemakerfromthecold watersupply
to allow moving the refrigerator
out_ffomthe wailseveralfeet
(approximately8feetof1/4"
copper tubing in three !O-inch
diameter coils.)
4
Rollers
_mtab!e m!!e_, which enable
you W move therefrigerator away
from the wall for cleaning, are
locatednearthefrontcornersofthe
refrigerator. Set these rollers so the
r frieeratcw i_ firmly nndtion_A an
the floor and the front is raised just
enough that the doors close easily
when opened about halfway.
To adjust the rollers, turn the
roller adjusting screws clockwise to
raise the refrigerator, counterclock-
wise to lower it. Use a blade-type
screwdriver.
When adjm_ng firontm_ers for proper
door closure, we recommend that
the bottom front edge of the cabinet
be approximately 3/4" from the floor.
You can turn the adjusting screws
through openings in the base grille.
If you would rather remove the
base grille, grasp the bottom of the
grille and pull it out.
I
To replace the base grille, line up
the clips on the back of the grille
with the openings in the baseptate
and push the grille forward until it
snaps into place.
A.tmnntle Tcemaker & lee Di nen er
"E
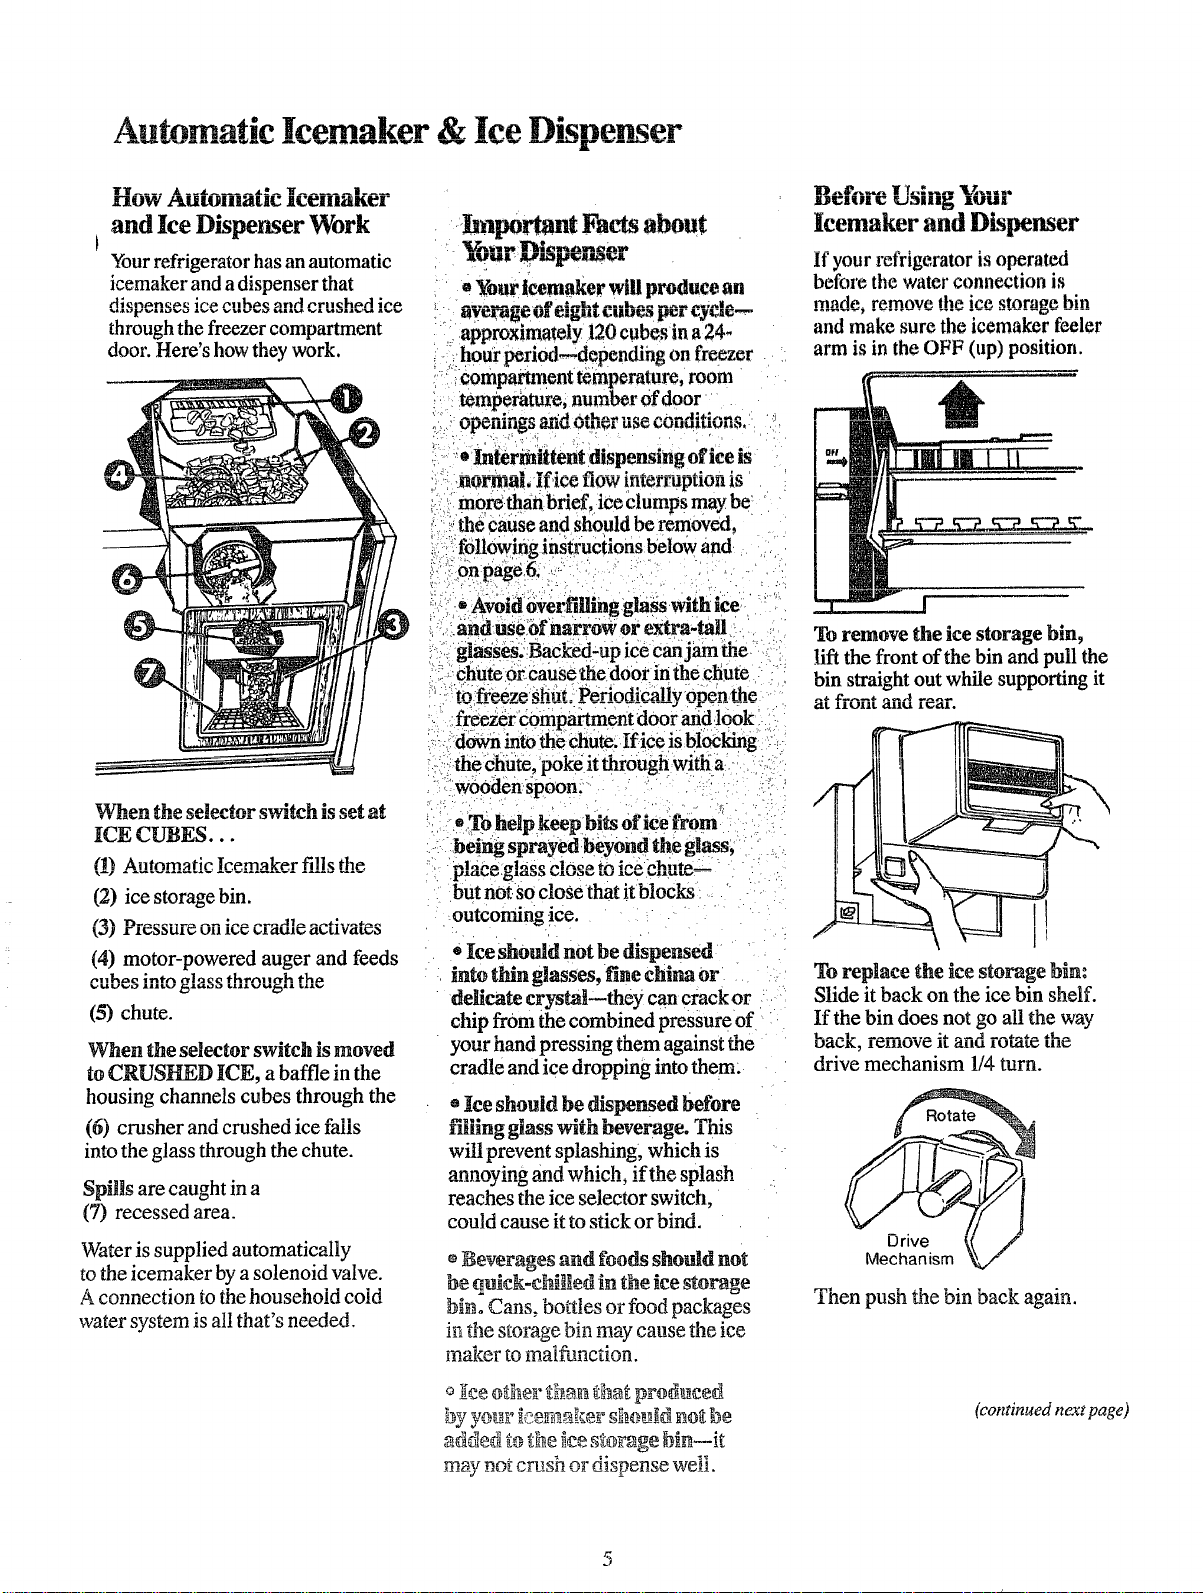
110147 !'l.UlI.Uilllllll, llg iU_lllalil_l-
and Ice Dispenser Work
Your refrigerator has an automatic
icemaker and a dispenser that
rllcn_ne_ac io_ onh_ ,anti ornch_d it,_
through the freezer compartment
door. Here's how they work.
_A
git -Ttg
ICE CUBES;...
(!) Automatic !cema_ker rials the
(2) ice storage bin.
_..)J l-l_;_Ll/t_; Ull ll.,_ g.,Ii:ILIIK; _btlval£9_
(4) motor-powered auger and feeds
(5) chute.
When the selector switch is moved
to CRUSHED ICE, a baffle in the
housing channels cubes through the
(6) crusher and crushed ice falls
into the glass through the chute.
Spills are caught in a
(7) recessed area.
Water is supplied automatically
to the icemaker by a solenoid valve.
A connection to the household cold
water system is all that's needed.
hnporianl Facts abom
Your icemaker wi!l produce an
uyu!TUgCUl _lllUt t:uu!_ l_l- _31_ai_-_"
. approx!m!tely 120 ubes in a 24-
-_hour periodI_idepending on freezer
i:eoml_arm_ent tethperattire, room
number of door
l_tJt_lllll_t t/$1tdt UIlIII tl_ tal, tllUll+lW!l_,
r ' "
'_ rlnierilttent dispensing of ice is
J!lormah!i'lce HOW lnterizupuon is
.=.',:,m0re thanbdef, ice clumps may be'
::_i,'the eaiise and should be removed,
:.: :following mstructmns below and
!i(.:i; AT:_iii:_verfillingglaiSw_il_ if:eL "1_r'/_
i:,:';;mad.uSe;iffnarrO_ or extra-iall L', :,
;., glasses, tmcl_ea-up ICecan jam me,
_!]..ehuteoreausethedo0r in thechute :
_:io ffe_ze: _hfat_Periodicaliv :oi_en the
::i:d_ into th_ Chate; Ifice is bl_king
:::: the chute, poke atmrougn :wlm a: :,:::
i.r);woodeil:spoon:, • :.) . :., ,!, :
• To help keepbits of ice from : ;
being sprayed beyond the glass,
but not:so closethat itblocks --
outcoming ice. ' " '
e Ice should not be dispensed
into thin glasses, fine china or
delicate crystal-they can crack or
chip from the combined pressure of
your hand pressing them against the
cradle and ice dropping into them.
- Ice should be dispensed before
filling glass with beverage. This
will prevent splashing, which is
annovino and which if the gnlagh
...... d ---_ ..... 7 ...... 1-".....
reaches the ice selector switch,
could cause it to stick or bind.
_everages and foods shouM not
be quick-chilled in the lee storage
bin. Cans, bo_tes or food packages
in the storage bin may cause the ice
mal_er to malfunction.
gee other tha_ that produced
by y_ur _oe_ak_r _heuid not be
added to the _eestorage bin--it
may not crush or dispense well.
ltlllilqll !Ii 1.13111_ lldllll
Icemaker and Dispenser
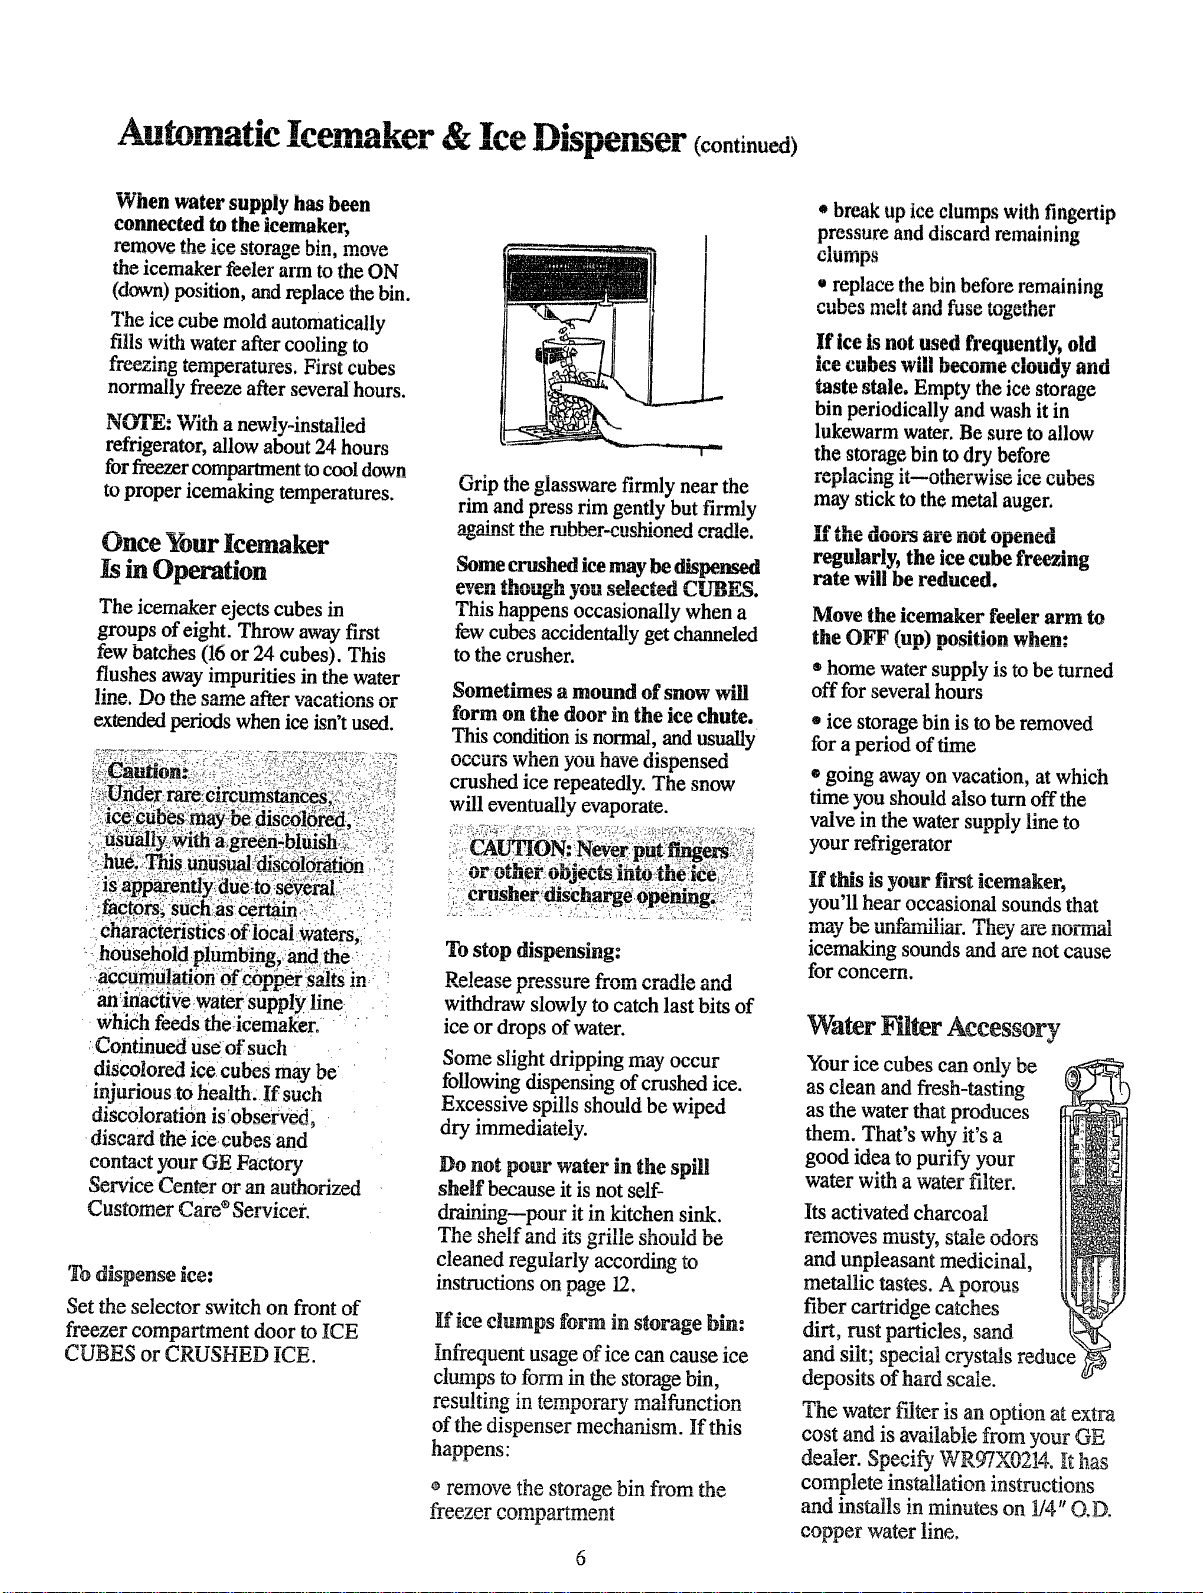
if your refrigerator is operated
before the water connection is
made r_movfl the ice gtora_e hin
and make sure the icemaker feeler
arm is in the OFF (up) position.
,_& ............
I
To remove the lee storage bin,
lift the front of the bin and pull the
bin straight out while supporting it
I
I
To replace the ice storage bin:
Slide it back on the ice bin shelf.
If the bin does not go all the way
Ll_l.¢..;g, lt:_lllOVt3 It _LIILI lOt2tU3 1.11t2,
drive mechanism 1/4 turn.
Urlve VMechanism
Then push the bin back again.
(continued next page)
When water supply has been
connected to the icemaker,
remove the ice _tora¢,_.hln mnv_*
--, ............... _ vs_a 5 aaa_T_
the_cemakerfeelerarmtothe ON
(down) position, and replace the bin.
The ice cube mold automatically
fills with water after cooling to
xlb_g, lli_ tg::llll._l_tUl'_ , r_IgS[ capes
normally freeze after several hours.
"_'_ ........ iy,,_olr_: wire a new -installed
refrigerator, allow about 24 hours
for freezer compartment to cool down
to proper icemaking temperatures.
Once Your Icemaker
in Operation
The icemaker ejects cubes in
groups of eight. Throw away first
few batches (16 or 24 cubes). This
flushes away impurities in the water
lina Do th_ _nrn_, _f-I-_rw_,._;r, ....
extended periods when ice isn't used.
characteristics ot local waters,i :
:: h6uSehbid piumbingi_ _d the/..::_
' angina€rive water Supply line:
Wh!dhfe_Sthe:icethal{er. ".
:Continued useofsuch. -
discolored ice cubes may be
injurious to health. If such
discoloration is obseSS;
discard the ice cubes and
contact your GE Factory
Service Center or an authorized
Customer Care ®Servicer.
To d_spense ice:
Set the selector switch on front of
freezer compartment door to ICE
CU_SN8 or CRUSHED ICE.
Grip the glassware firmly near the
rim and press rim gently but firmly
a_ain_t th_ ruhh_r.on_M,,_n_rl r,rorll_
Some crushed ice may be dispensed
This happens occasionally when a
few cubes accidentally get channeled
to the crusher.
Sometimes a mound of snow will
form on the door in the ice chute.
This condition is normal, and usually
u_,_u:_ w.¢n you nave ulspensea
crushed ice repeatedly. The snow
will eventually evaporate.
To stop dispensing:
withdraw slowly to catch last bits of
ice or drops of water.
Some slight dripping may occur
followingdispensingof crushed ice.
Excessive spills should be wiped
dry immediately.
Do not pour water in the spill
shelf because it is not self-
draining--pour it in kitchen sink.
cleaned regularly according to
instructions on p_e 12.
If ice clumps form in storage bin:
infrequent usage of ice can cause ice
clumps to form in the storage bin,
r_qnltincr in t_mnaravw mMG,,_,-÷{,_,_
of the dispenser mechanism. If this
happens:
o remove the storage bin from the
freeTer ennqnartm_nt
, break up ice clumps with fingertip
pressure and discard remaining
clumps
replace the bin before remaining
If ice is not used frequently, old
taste stale. Empty the ice storage
bin periodically and wash it in
lukewarm water. Be sure to allow
the storage bin to dry before
may stick to the metal auger.
11 uite u_m_ _lr_ nu[ Ol_Illetll
regularly, the ice cube freezing
rate will be reduced.
Move the ieemaker feeler arm to
the OFF (up) posRion when:
®home watersupply is to be turned
off for several hours
ice storage bin is to be removed
for a period of time
®going away on vacation, at which
time you should also turn offthe
valve in the water supply line to
your refrigerator
If tiffs is your first icemaker,
you'll hear occasional sounds that
m.'axr ka ,,n'_t_m{l{_. el_k .......... 1
aaao.y u_ _lLtOJ.ll.Ulal. J. llg_ _,1_ llOllUi:tl
icemaking sounds and are not cause
for concern.
WaterFRter Accessory
Your ice cubes can only be
as clean and fresh-tasting
as the water that produces
them. That's why it's a
good idea to purify your
wd_l WILII _ Wi:_tel" lllLer.
Its activated charcoal
and unpleasant medicinal,
metallic tastes. A oorous
fiber cartridge catches
dirt, rust particles, sand
I
and silt; special crystals reduce
deposits of hard scale.
The water filter is an option at extra
cost and is available from your GE
complete installation instructions
and installs in minutes on 1/4" O.D.
copper water line.
Nn r, Hno Vm=r R frlopr, tnr
Set Temperature ....
uontrols
Your refrigerator has two controls
that let you regulate the temperature
in the fresh food and freezer
o_mn_rtt_l_nt_
i_=iII
FREEZER AL_ lJ
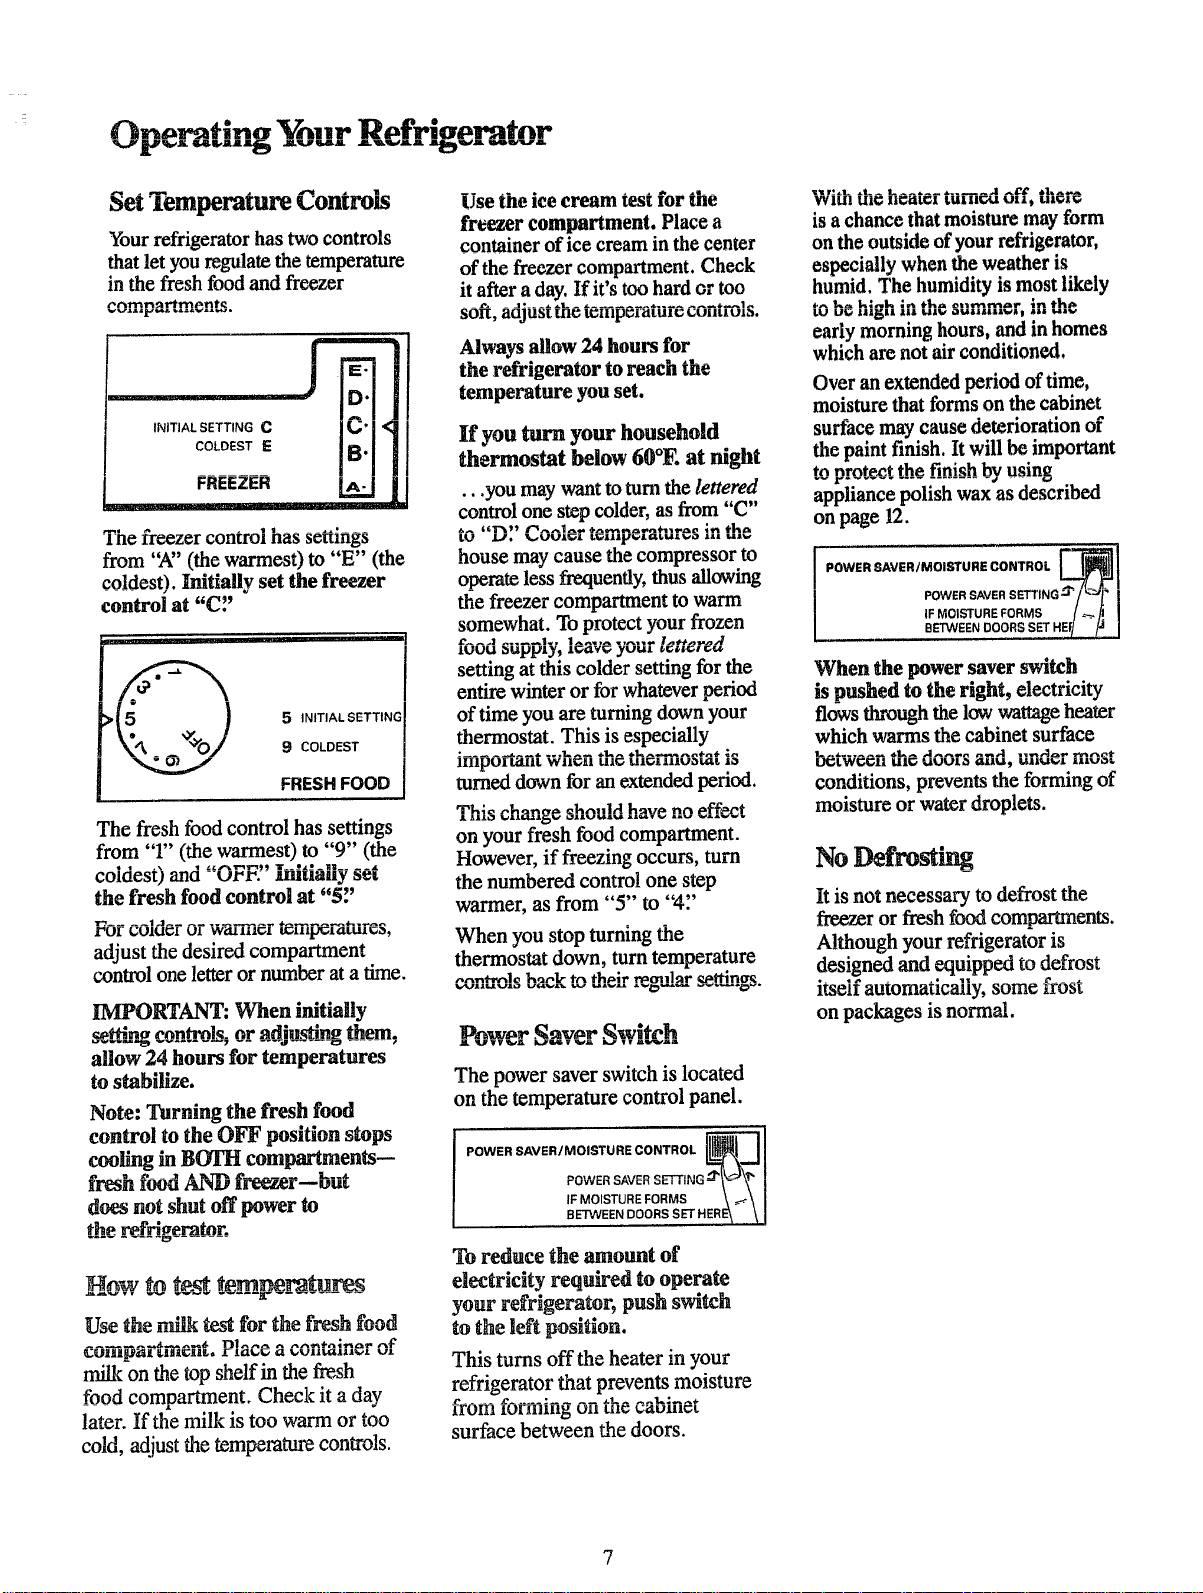
rne Ireezer controz has semngs
from 'W' (the warmest) to "E" (the
coldes 0. Initially set the freezer
control at "C"
[
5 INITIAL SETTING
COLDEST
FRESH FOOD
The fresh food control has settings
from 'T' (the warmest) to "9" (the
coldest) and "OFE" ..............
• lmuany set
the fresh food control at "5:'
FOE €,.;Ult.l_l U.t WtttJtllc;l IX:;tll[,JGlatuttt_,
adjust the desired compartment
control one letter or number at a time.
IMPORTANT: When initially
_no etmh'nk, nr _diwl_ing them.
allow 24 hours for temperatures
to stabilize.
Note: Turning the fresh food
control to the OFF position stops
coolhag in BOTH compartments--
]{l'eSil IOOQ k_kt'_lJLVi_r_uut
does not shut off power to
the _fHge_ramr.
_¢_w tn t_. t_rnrm_r,_tur_
Use the milk test for the fresh food
_._.Oltl!_[._[Jtl[-Ig|lll_lll[,. J['- li_l._; _I. IaUIIIA_AII_L U£
milk on the top shelf in the fresh
food compartment. Check it a day
later. If the milk is too warm or too
cold, adjust the temperature controls.
Use the ice cream test for the
freezer compartment. Place a
container of ice cream in the center
of the freezer compartment. Check
it after a day. If it's too hard or too
sort, afljust me I_III[JUI'tItLIlUt;UllttOl_.
Always allow 24 hours for
me remgermor m reacn me
temperature you set.
If you turn your household
thermostat below 60°F. at night
...you may want to turn the lettered
control one step colder, as from "C"
mu AJ. _k_UUI_;;;I_|UlJ_tfltl.UJt_,-,i_ ax_ I._ts_
house may cause the compressor to
operate less frequently, thus allowing
the freezer compartment to warm
somewhat. To protect your frozen
IUUU _ttlJlT/y, A_V_ you* _t_t*
settingatthiscoldersettingforthe
entirewinterorforwhateverperiod
oftimeyou areturningdown your
thermostat. This is especially
111113Oll21111, Wll_;II UII_ LII_ilAIUOU0t_, 10
turned down for an extended period.
q'h;o td_r_er_ _ht_ttld h_ rt_ _ft=C_t
on your fresh food compartment.
However, if freezing occurs, turn
the numbered control one step
warmer, as from "5" to "4:'
When you stop turning the
thermostat down, turn temperature
_an_r_lo _t_b" ta tht=i'r mer111_r _ttlncr_
The power saver switch is located
on the temperature control panel.
S_-rVVEE_DOORSS_._._ \
To reduce the amount of
electricity required to operate
your refrigermo5 push sw_tch
to the left position.
This turns off the heater in your
refrigerator that prevents moisture
]_rom IOI-lIllIlg Oil tile &;i_OlliCt
surface between the doors.
is a chance that moisture may form
on the outside of your refrigerator,
especially when the weather is
humid. The humidity is most likely
• ^ k_ k'_k 1_ iha o**mm_ i_ th_
early morning hours, and in homes
which are not air conditioned.
Over an extended period of time,
moisture that forms on the cabinet
surface may cause deterioration of
the paint finish. It will be important
to nrote_t the finish by using
appliance polish wax as described
on page 12.
co..o
l _OWERs_w.SSTT,N_-/,=,/"I
IF MOISTURE FORMS 1.--.__/I I
e_rWEENDOORSSETHEq _ I
When the power saver switch
is pushed to the right, electricity
flows through the low wattage heater
which warms the cabinet surface
conditions, prevents the forming of
moisture or water droplets.
No Defrosth _
R is not necessary to defrost the
freezer or fresh food compamnents.
Although your refrigerator is
designed and equipped to defrost
ltsett automaucauy, some _rost
on packages is normal.
Food _rageSugge io.n
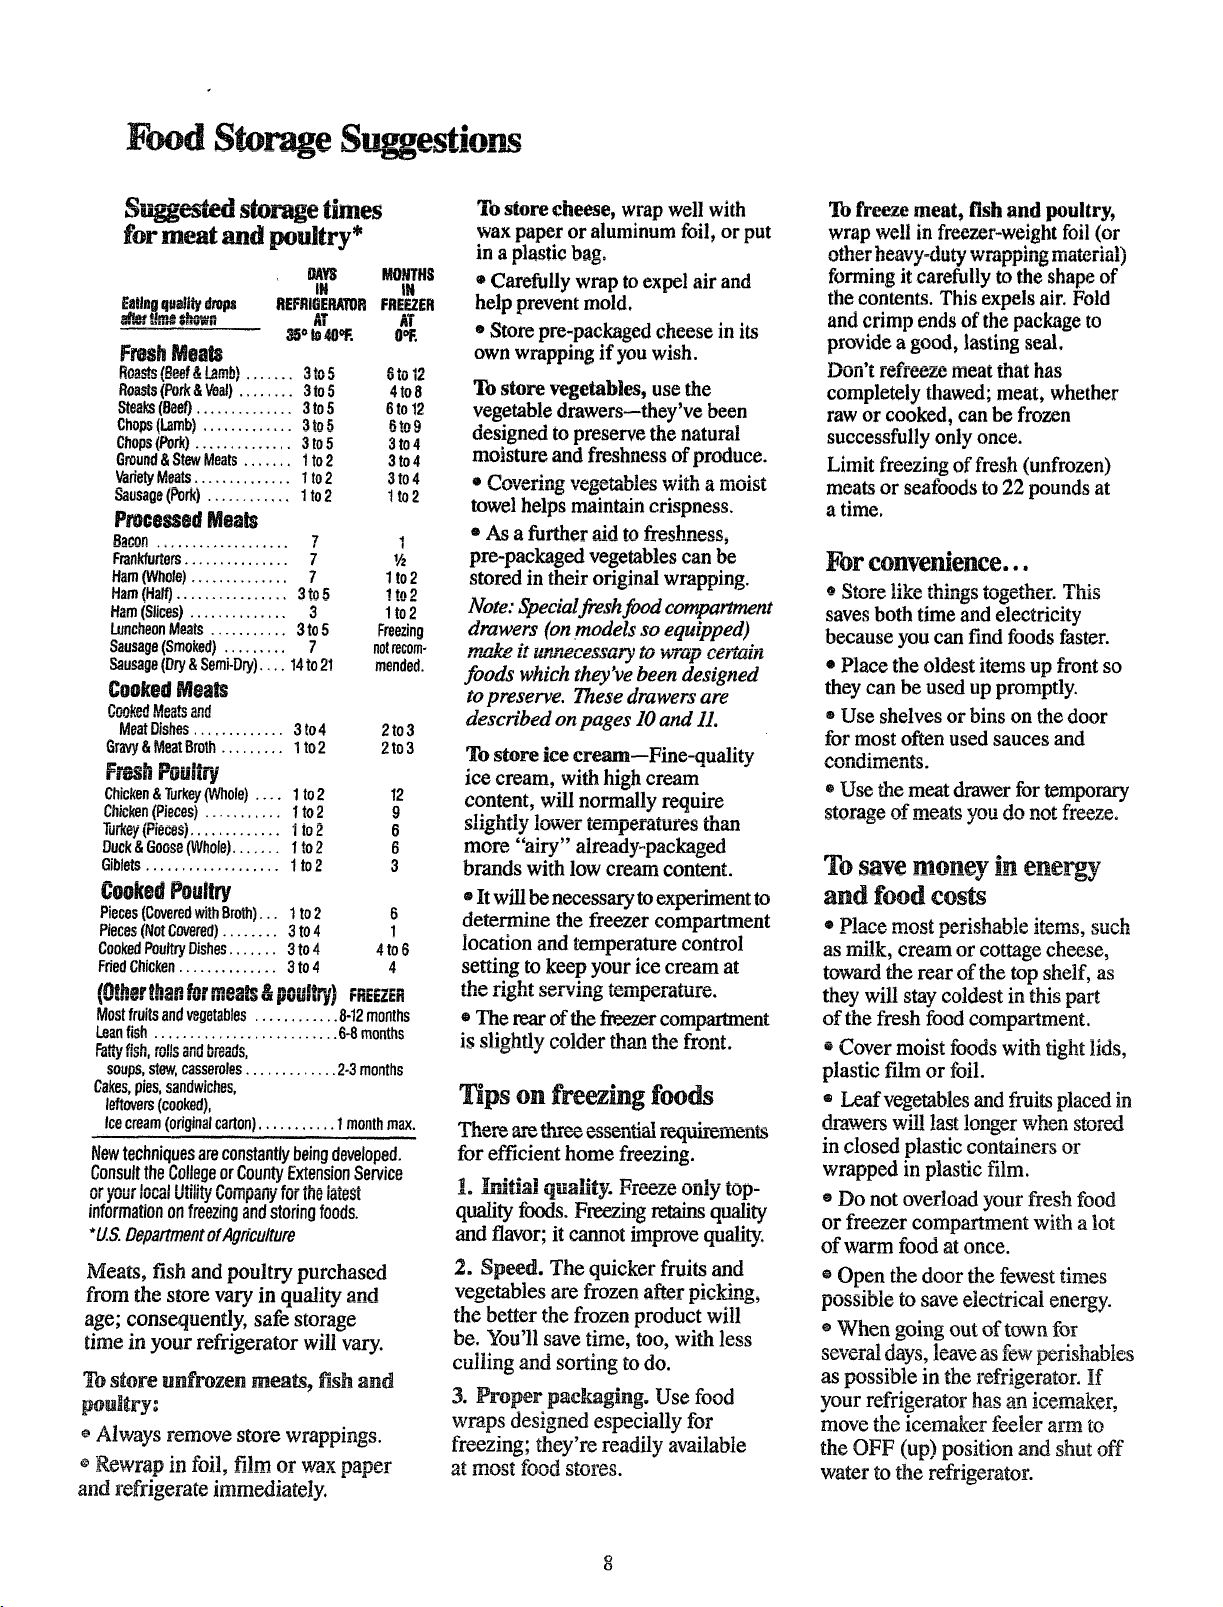
Surfeited s_o_ge times
for meat and poultry*
PAW MOHTH8
IH iN
Eatingquait_ d_ps REFRIGERMORFREEZER
t!r',,+....... AT AT
35*la40"!=. O*F.
FreshMeats
ROa.+d'_{RRaf A I,_,mh) q _'A€; _ +^...... v tu 12
Roasts(Pork&Veal)........ 3to5 4to8
Steaks(Beef).............. 3to5 6 to12
Chops(Lamb)............. 3to5 6to9
Chops(Pork).............. 3 to5 3to4
Ground&StewMeats....... 1to2 3to4
VarietyMeats.............. 1to2 3to4
Sausage(Pork)............ 1to2 1to2
ProcessedMeats
Bacon................... 7 I
Frankfurters...............7 V2
Ham(Whole).............. 7 1to2
Ham(Halo................ 3to_5 ! to2
Ham(Slices).............. 3 1to2
LuncheonMeats........... 3to5 Freezing
Sausage(Smoked)......... 7 notreturn-
Sausage(Dry&Semi-Dry).... 14to21 mended.
CookedMeats
Cook_Ueatsand
MeatDishes............. 3 to4 2to3
Gravy&MeatBroth......... 1to2 2to3
r+_. rOuury
Chicken&Turkey(Whole).... I to2 !2
Chicken(Pieces)........... 1to2 9
TurkW(Pieces)............. i to2 6
Duck&Goose(Whole).......1to2 6
Giblets................... 1to2 3
Cooked Poultry
Pieces(CoveredwithBroth)... 1to2 6
Pieces(NotCovered)........ 3to4 !
CookedPoultryDishes....... 3to4 4 to6
FriedChicken.............. 3to4 4
Ilfllfh=P fh_n fae mn_afe, ,9-nn.l#=,=,l
t............. u, ,,,=u_ = pure. Yl FREEZER
Mostfruitsandvegetables............ 8-12months
Leanfish .......................... 6-8months
I gl, t 3 llgll I 11/1151 OlIU UI_IIU_Ij
soups,mew,casseroles............. 2-3months
Cakes,pies,sandwiches,
leftovers(cooked),
Icecream(originalcarton)........... 1monthmax.
Newtechniquesareconstantlybeingdeveloped.
ConsulttheCollegeorCountyExtensionService
o,yu..,u_a,ut tyt,umpanyJurthelatest
informationonfreezingandstoringfoods.
*LLS.DepartmentofAgriculture
Meats, fish and poultry purchased
from the store vary in quality and
age; consequently, safe storage
time in your refrigerator will vary.
To stere unfrozen meats, fish and
[rumRry:
o Always remove store wrappings.
,+Rewrap in foil, fi!m or wax paper
and refrigerate immediately.
To store cheese, wrap well with
wax paper or aluminum foil, or put
in a plastic bag.
• Carefully wrap to expel air and
help prevent mold.
o Store pre-packaged cheese in its
own wrapping if you wish.
To store vegetables, use the
vegetable drawers--they've been
designed to preserve the natural
moisture and freshness of produce.
• Covering vegetables with a moist
towel helps maintain crispness.
• As a further aid to freshness,
pre-packaged vegetables can be
stored in their original wrapping.
Note: Special fresh food compartment
drawers (on models so equipped)
,_,_.q_it unnecessary to wrap cem2in
foods which they've been designed
to preserve. These drawers are
described on pages 10 and 11.
To store ice cream--Fine-quality
ice cream, with high cream
content, will normally require
Sl.'_k*l.,
._,,,,y lower temperatures than
more "airy" already-packaged
brands with low cream content.
• It will be necessary to expe "nment to
determine the freezer compartment
location and temperature control
setting to keep your ice cream at
the rigb_ serving temperaVare.
• The rear of the freezer compartment
is slightly colder th_n Lhe front.
T_ps on freezhng foods
,_.,x_,, O..L_ _li._ _;;_,_111,li3Llt I_IUI.I_lnI_I][[S
for efficient home freezing.
_u=_-.= tluamy. Freeze
. umy top-
quality foods. Freezing retains quality
and flavor; it cannot hnprove qual_ity.
2. Speed. The quicker fruits and
v_etables are frozen af-terpickJng,
the better the frozen product will
be. You'll save time, too, with less
culling and sorting to do.
3. Proper packaging. Use food
wraps designed especially for
freezing; they're readily available
To freeze meat, fish and poultry,
wrap well in freezer-weight foil (or
forming it carefully to the shape of
the contents. This expels air. Fold
and crimp ends of the package to
provide a good, lasting seal.
Don't refreeze meat that has
completely thawed; meat, whether
raw or cooked, can be frozen
successfully only once.
Limit freezing of fresh (unfrozen)
meats or seafoods to 22 pounds at
a time.
Forconvenience...
- I,JtUX_,_ lllk_,, 1,11111_) LU_UUIUI. J, JlJ_
saves both time and electricity
because you can find foods faster.
• Place the oldest items up front so
they can be used up promptly.
Use shelves or bins on the door
for most often used sauces and
_ _.e l lld, JLI 1 I_11 L+_I.
* Use the meat drawer for temporary
storage of meat_ vn,; dn -nt _--ze
To save money in anar_v
and food costs
* Place mostn_ri_hM_l,-- ;t_,r,_..... h
as milk, cream or cottage cheese,
toward the rear of the top shelf, as
they will stay coldest in this part
of the fresh food compartment.
* Cover moist foods with tight lids,
plastic film or foil.
® Leaf vegetables and fruits placed in
d_m_we_w_ !_t longer when stored
in closed plastic containers or
wrapped inplastic film.
, Do not overload your fresh food
or freezer compartment with a lot
ofwarm food atonce.
Open the door the fewest times
possible to save electrical energy.
¢ When going out of town for
_v_u d_y_, _cuveas few perishal_ies
as possible in the refrigerator. ]f
your refrigerator has anicemaker,
move the icemaker feeler arm to
the OFF (up) position and shut off
water to the refrigerator.
Shelf Pn. itlan
TT .... _. ...............
_ow w rearPang_
,our shelves
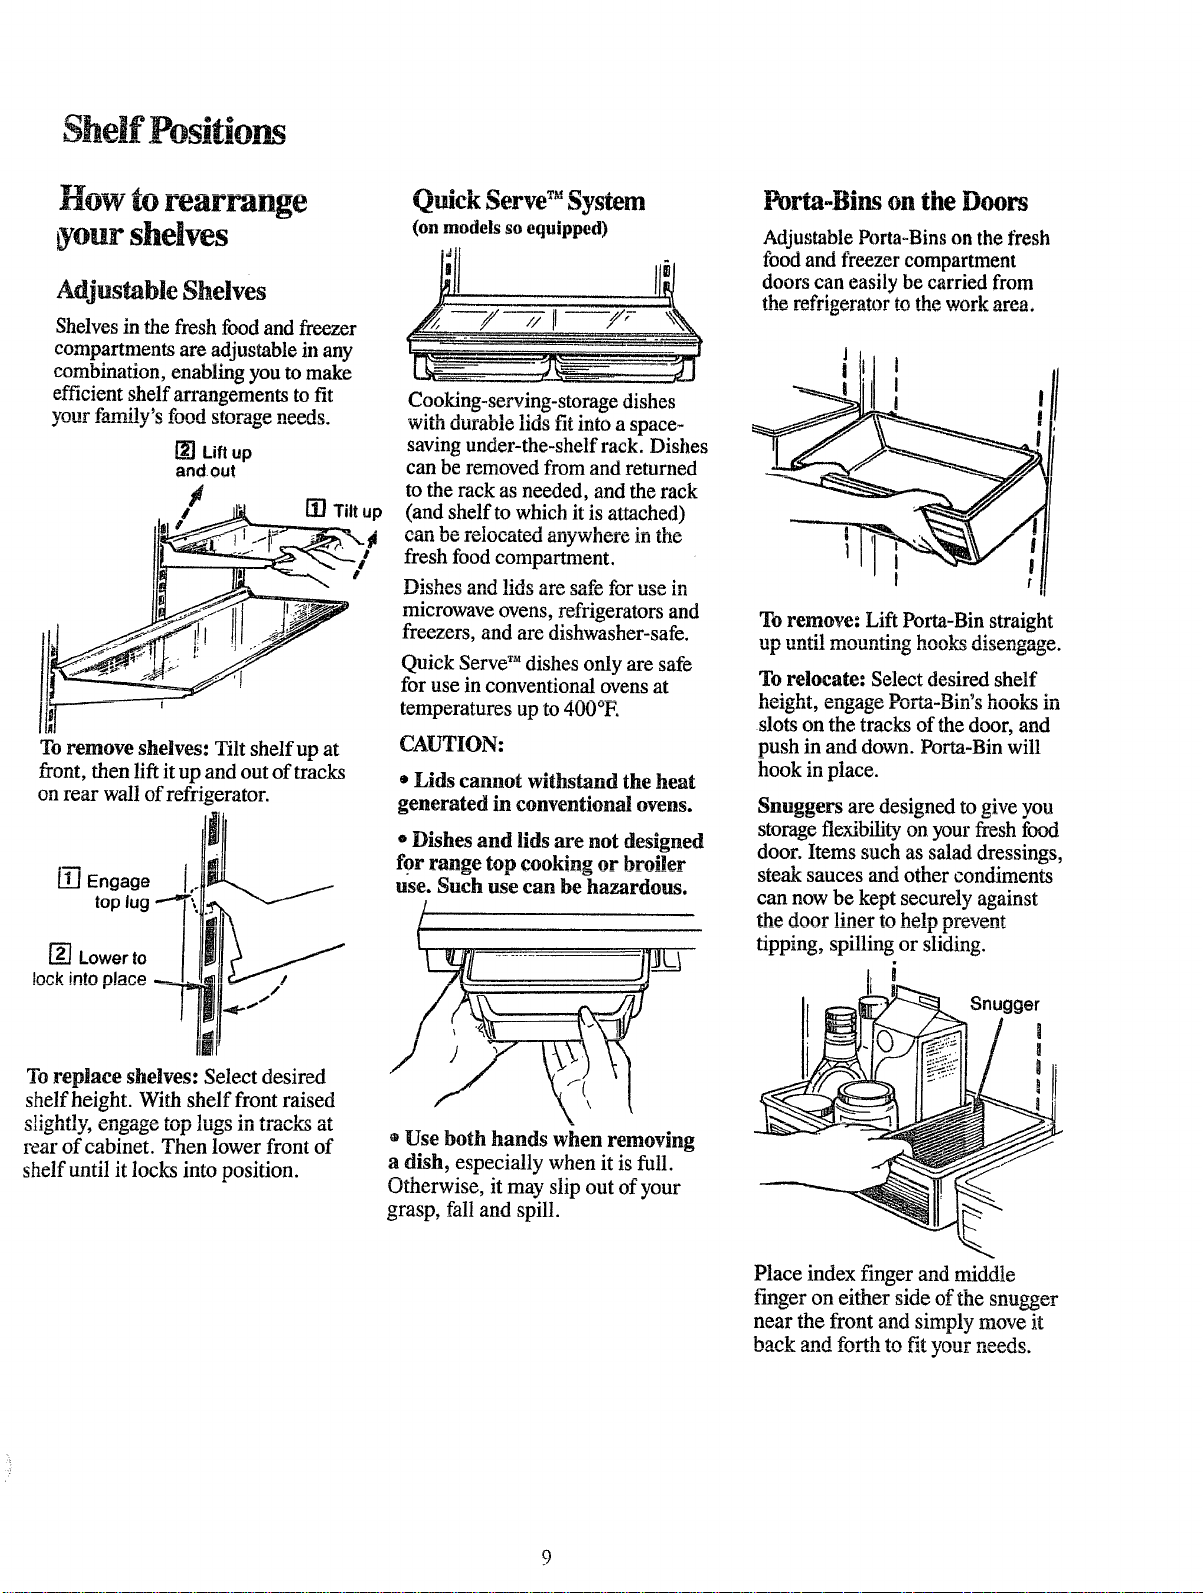
Adjustable Shelves
Shelves in the fresh food and freezer
compartments are adjustable in any
combination, enabling you to make
efficient shelf an'angements to fit
Vollr familv'_ fnnd _tnraae n_od_
ii.i
[_] Lift up
and.out
To remove shelves: Tilt shelf up at
front, then lift it up and out of tracks
on rear wall of refrigerator.
_
top lug
lnek intn nlaeA ....
...............- ,
'L ll
I1[1'
To replace shelves: Select desired
shelf height. With shelf front raised
_ear of cabinet. Then lower front of
shelf until it locks into position.
vmcK aerve- aystem
(on models so equipped)
m /j _-- - ....
Cooking-serving-storage dishes
...2Lt. J .... L1- 1]J_ Z'_ _ ___
WILII UUl'ilOle 1108 I1[ ln[o a space-
saving under-the-shelf rack. Dishes
can be removed from and returned
to the rack as needed, and the rack
(and shelf to which it is attached)
fresh food compartment.
I'_ichoc _nA I;Ao a_-t, o,_€_ €.-,.
microwave ovens, refrigerators and
freezers, and are dishwasher-safe.
Quick Serve _ dishes only are safe
for use in conventiona! ovens at
temperatures up to 400°E
CAUTION:
* Lids cannot withstand the heat
generated in conventional ovens.
o Dishes and lids are not designed
for range top cooking or broiler
use. Such use can be hazardous.
/
Use both hands when removing
a dish, especially when it is full.
Otherwise, it may slip out of your
grasp, fall and spill.
Porta-Bins on the Doors
Adjustable Porta-Bins on the fresh
food and freezer compartment
doors can easily be carried from
tha rafri_rntnr m tha wnrl_ ar_.n
L I I
To remove: Lift Porta-Bin straight
l_lri nntll l'v'lnllritlna hr_nl_c dJconnacro
To relocate: Select desired shelf
slots on the tracks of the door, and
push in and down. Porta-Bin will
hook in place.
Snuggers are designed to give vou
storage flexibility on your fresh food
door. Items such as salad dressings,
steak sauces and other condiments
can now be kept securely against
the door liner to hel_ nrevent
-£- £
tipping, spilling or sliding.
I, i
Place index finger and middle
finger on either side of the snugger
near the front and simply move it
hnolr _nd t_nrtl'l ¢r_ t_t xtnnr nooAc
Shelf Positions(continued)
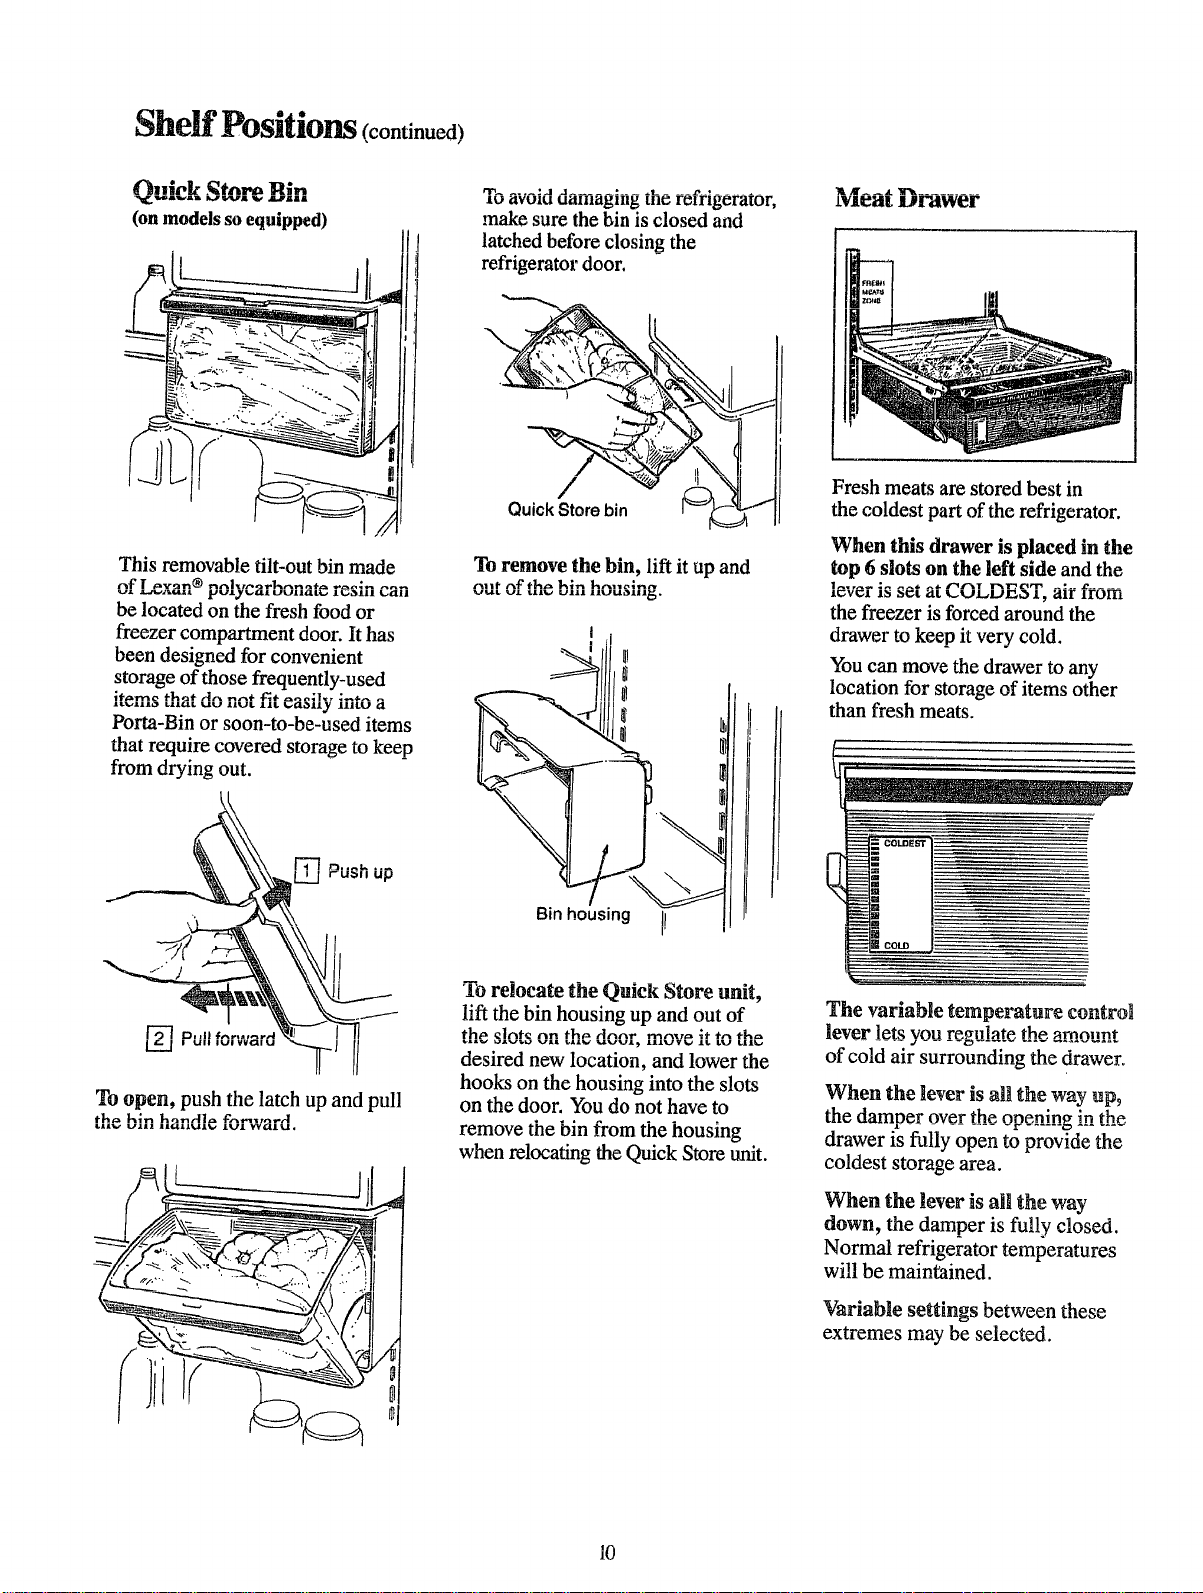
Quick Bin
(on models so equipped)
This removable tilt-out bin made
of Lexan ®polycarbonate resin can
be located on the fresh food or
freezer compartment door. It has
been designed for convenient
storage of those frequently-used
.._..o u.=_ ._...,_[ l.,.,_s,,ff lllto a
Porta-Bin or soon-to-be-used items
that require covered storage to keep
from drying out.
Push up
(!i
/
,o _tvuiu uamngmg me refrzgerator,
make sure the bin is closed and
latched before closing the
refrigerator door.
II
/
Quick Store bin
To remove the bin, lift it up and
ui. _JL ttl_ Ulll llUUDlll_.
Bin housing
II
relocate the Quick Store unit,
lift the bin housing up and out of
the- dote nn th_ An,_,- move it " ,k=
desired new location, and lower the
hooks on the housing into the slots
on the door. You do not have to
remove the bin from the housing
when relocating the Quick Store unit.
Meat Drawer
Fresh meats are stored best in
the coldest part of the refrigerator.
When this drawer is placed in the
top 6 slots on the left side and the
^ t_ x T,,, .o,_ air irom
lever is set at ,_OLt.,E_ x, ..........
the freezer is forced around the
drawer to keep it very cold.
You can move the drawer to any
location for storage of items other
than fresh meats.
The variable temperature control
lever !ets you regulate the amount
of cold air surrounding the drawer°
When the lever is all the way up,
the damper over the opening in the
drawer is fully open to provide the
coldest storage area.
When the lever is atl the way
down, the damper is fully closed.
Normal refrigerator temperatures
will be maintained.
Variable settings between these
extremes may be selected.
10
/
!
/
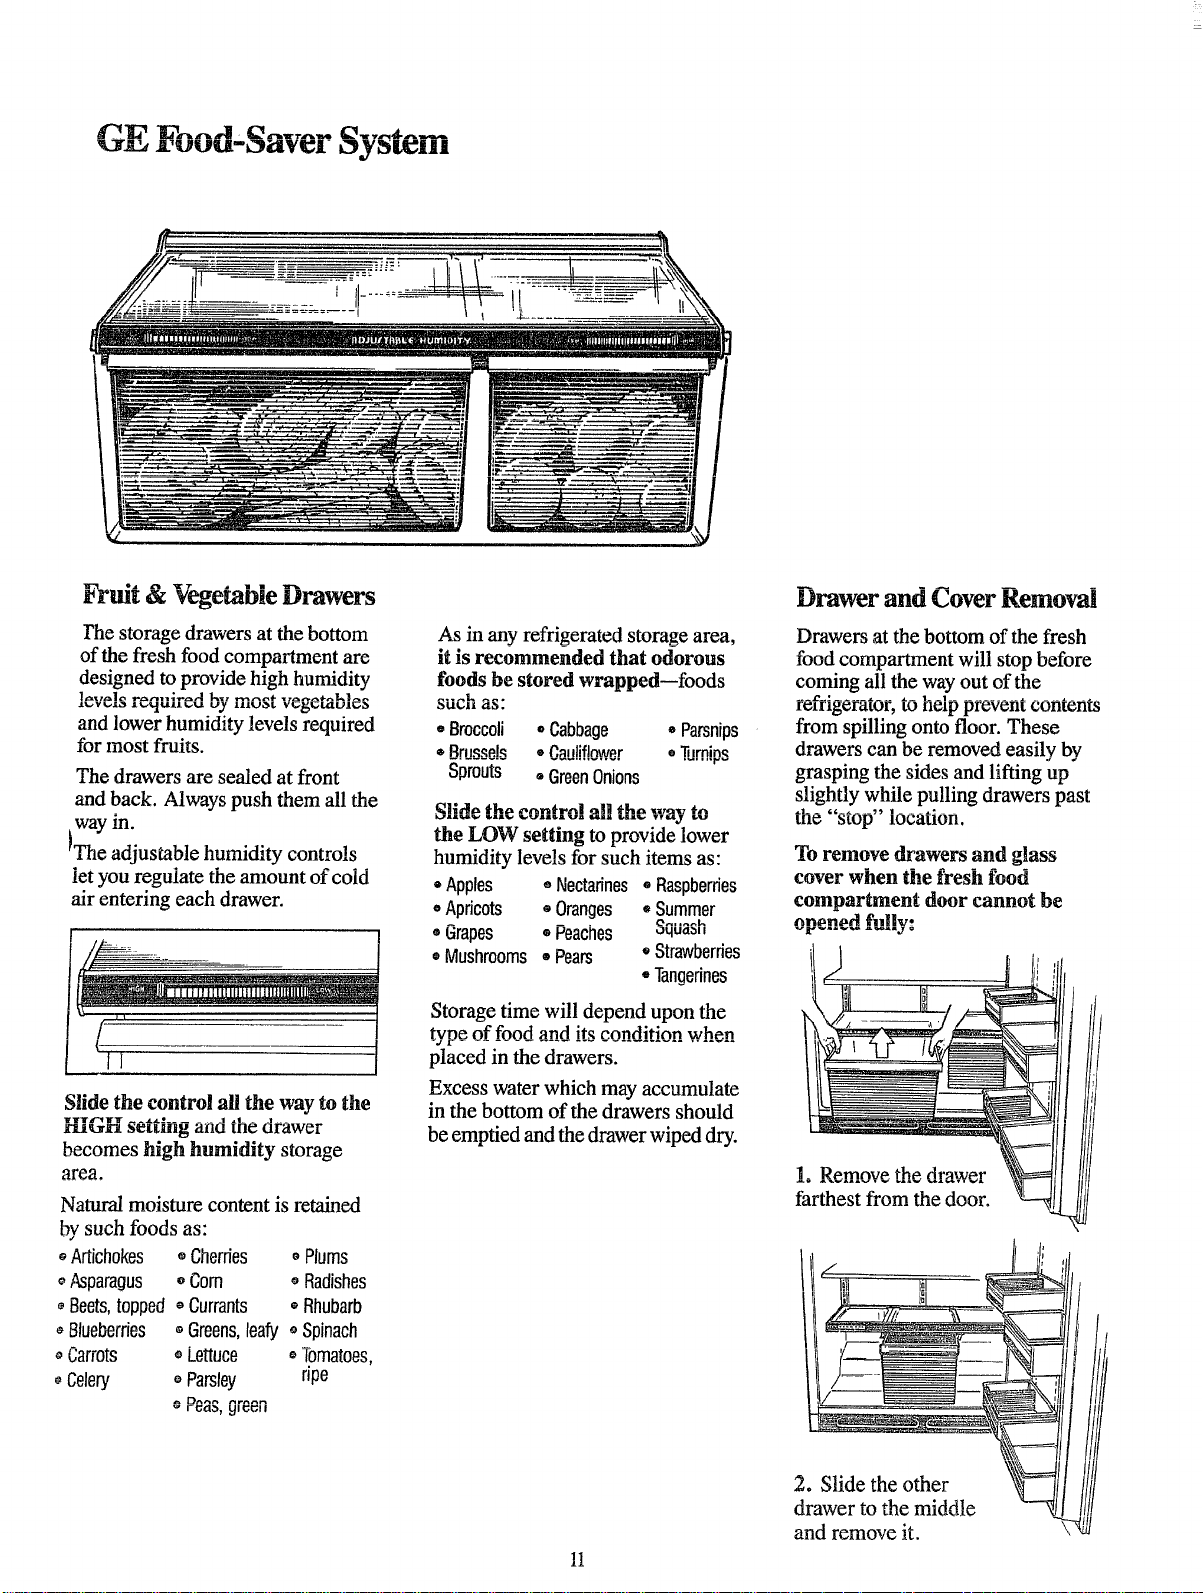
Fruit& VegetableDrawers
/'he storage drawers at the bottom
of the fresh food compartment are
designed to provide high humidity
!_..,_,lo ,-,_,-,,,;_A !-,4, _o* .._..1..1_
.tl_y_£+._ ltg_gtllalii.,.Kl U+y Xlli.Ji_tL VIt_I._L4LIUIII_
and lower humidity levels required
for most fruits.
The drawers are sealed at front
and back. Always push them all the
way in.
L
PThe adjustable humidity controls
let you regulate the amount of coid
air entering each drawer.
I.....
11
Slide the control all the way to the
TlrWf_TT
ruin setting and the .....arawer
becomes high humidity storage
area.
Natural moisture content is retained
by such foods as:
oArtichokes * Cherries * Plums
Asparagus o tom ° Radishes
+Beets,topped ®Currants • Rhubarb
+Blueberries _ Greens,leafy o Spinach
Carrots + Lettuce _Tomatoes,
+Celery o Parsley ripe
As in any refrigerated storage area,
it is recommended that odorous
tbods be stored wrapped--foods
_Llt..,ll (li_.
° Broccoli o Cabbage • Parsnips
®Br.s._Jq o RmdiflnwPr • "lilrnin_
.......................... v_
Sprouts =GreenOnions
the LOW setting to provide lower
humidity levels for such items as:
° Apples ° Nectarines° Raspberries
Apricots o Oranges + Summer
• Grapes ° Peaches 04Ll_Ibll
Mushrooms ° Pears • Strawberries
• Tangerines
Storage time will depend upon the
tvne of fond and it.q ennditinn wh_.n
+./17 ................................
placed in the drawers.
Excess water which may accumulate
in the bottom of the drawers should
be emptied and the drawer wiped dry.
1!
Drawer and Cover Removal
Drawers at the bottom of the fresh
food compartment will stop before
coming all the way out of the
l-t$11lge/_tor_ to [lelp prevent contents
from spilling onto floor. These
drawers can be removed easily by
grasping the sides and lifting up
slightly while pulling drawers past
the ....................
stop location.
To remove drawers and glass
cover when the fresh food
compartment door cannot be
nn_n_ad Pn||_,
!/) t li!
.( 1°tl L,
/}/
farthest from the door.
I
+lide+o,her
drawer to the middle
and remove it.
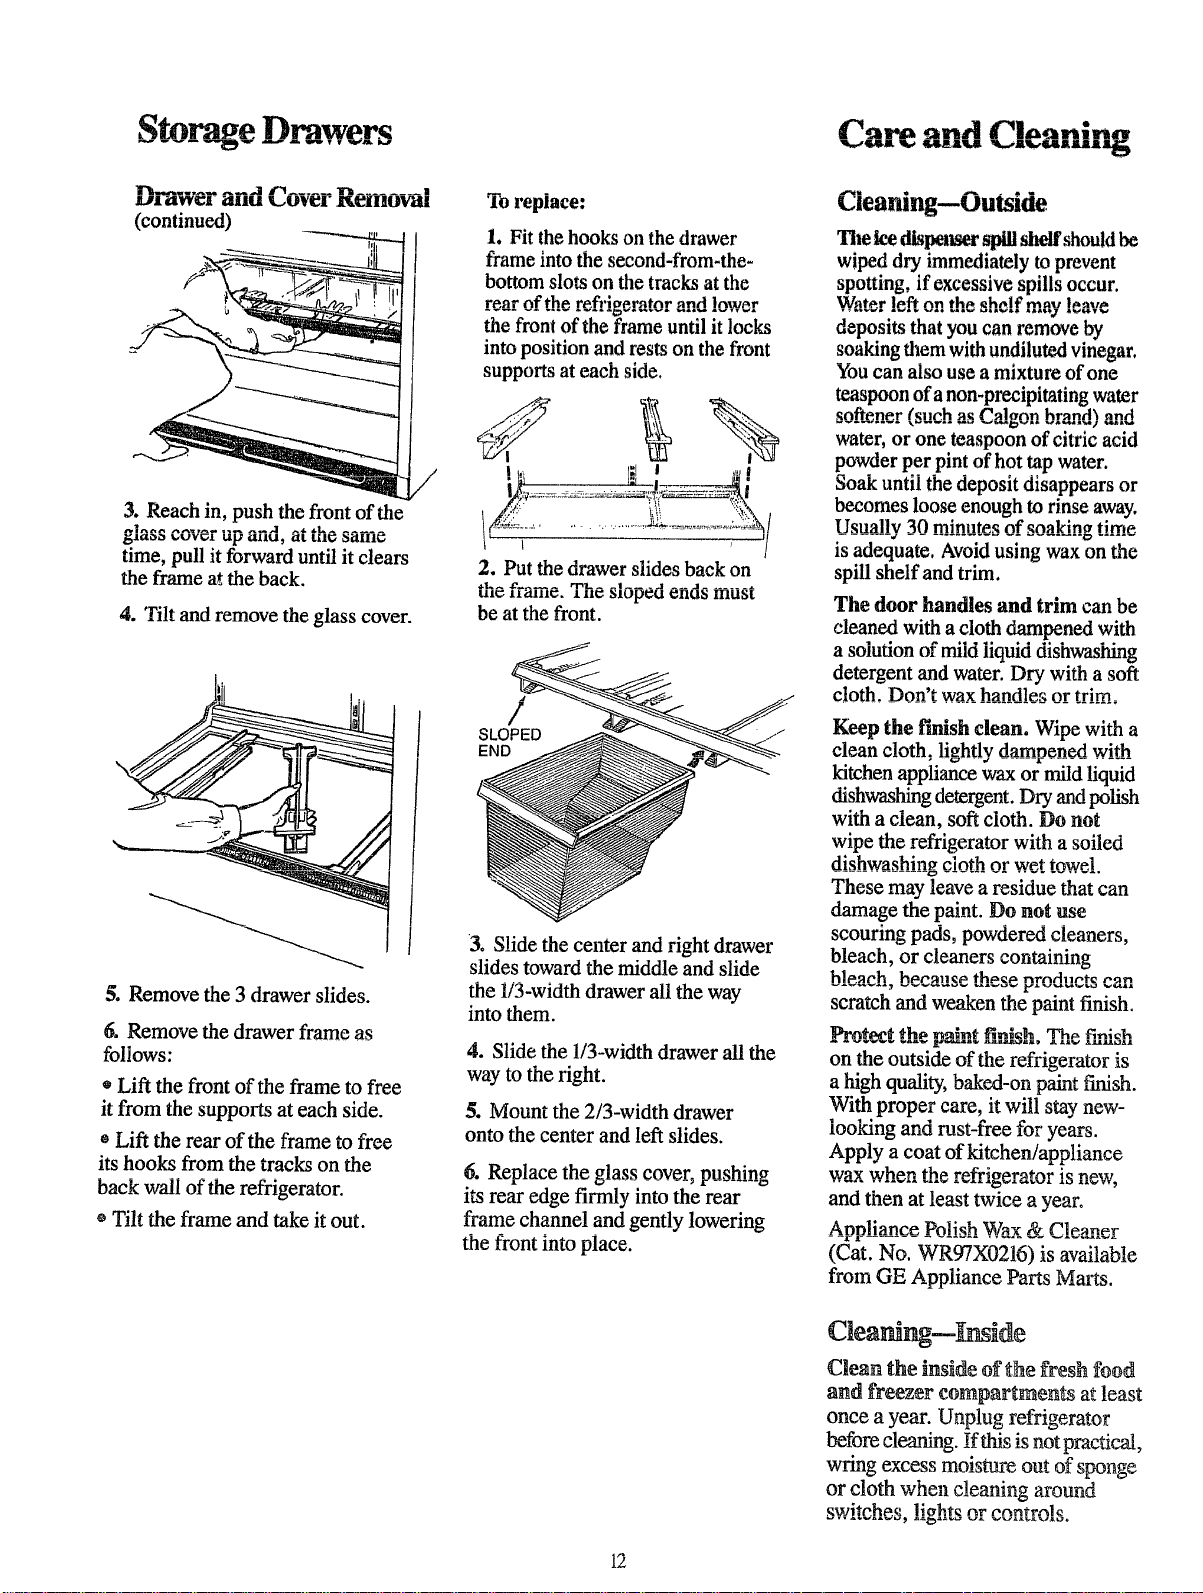
Jl/ld'€!'Cl ialllU UU¥1_I" J[_lllOV'dl
(continued)
3. Reach in, push the front of the
time, pull it forward unti! it clears
the frame at the back.
4. Tilt and remove the glass cover.
_ll ,.
J
5. Remove the 3 drawer slides.
6. Remove the drawer frame as
follows:
* Lift the front of the frame to free
it from the supports at each side.
e Lift the rear of the frame to free
its hooks from the tracks on the
back wail of the refrigerator.
o Tilt the frame and take it out.
1-o replace:
1. Fit the hooks on the drawer
frame into the second-from-the-
bottom slots on the tracks at the
r_ar of the r_fvlo_ratnr and lnw_r
the front of the frame until it locks
into position and rests on the front
supports at each side.
2. Putthedrawerslideshackon
IHII_, lli:illl_. 211e _SILIpe_l enos must
be at the front.
_J
3. Slide the center and right drawer
slides toward the middle and slide
the ii3-width drawer all the way
into them.
4. Slide the ll3-width drawer all the
way to the right.
5. Mount the 2/3-width drawer
onto the center and left slides.
6. Replace the glass cover, pushing
its rear edge firmly into the rear
frame channel and gently lowering
the front into place.
Cleaning--Outside
The ice dispenser spill shelf should be
wiped dry immediately to prevent
spotting, if excessive spills occur.
Writer I_fit nn th_ _h_lf malt l_,mt_,
deposits that you can remove by
soaking them with undiluted vinegar,
Youcan also usea mixture of one
teaspoon of a non-precipitating water
,qoften_r (._ll_h a._ ('_aionn hrand'_ and
water, or one teaspoon of citric acid
powder per pint of hot tap water.
Soak until the deposit disappears or
becomes loose enough to rinse away.
Usually 30 minutes of _oakino tlma
...... d ..................... _ ......
is adequate. Avoid using wax on the
spill shelf and trim.
The door handles and trim can be
cleaned with a cloth dampened with
a solution of mild liquid dishwashing
detergent and water. Dry with a soft
c!oth. Don't wax handles or trim,
Keep the finish clean. Wipe with a
clean cloth, lightly dampened with
kitchen appliance wax or mild liquid
dishwashing detergent. Dry and polish
with a clean, soft cloth. Do not
wipe the refrigerator with a soiled
dishwashin_ cloth or wet towel
These may leave a residue that can
damage the paint. Do not use
scouring pads, powdered cleaners,
bleach, or cleaners containing
scratch and weaken the paint finish.
on the outside of the refrigerator _s
a high quality, baked-on paint finish.
With proper care, it will stay new-
looking and rust-free for years.
Apply a coat of kitchen/appliance
wax wh_.n th_ r_frio_rut_r ie n_x_
and then at least twice a year.
Appliance Polish Wax & Clea_er
(Cat. No. WRg"/x0216) is available
from GE Appliance Parts Marts.
Clear_n_--Ir_ide
Clean the inside of the fresh f_d
and freezercompartmerg_atleast
once a year. Unplug refrigerator
before cleaning. If tiffs is not practical,
wring excess moisture out of sponge
or cloth when cleaning around
_witeh_ llaht_ nr,_ntr_le
12
!f You Ser ,.'ce
Use warm water and baking soda
_solution--about a tablespoon of
baking soda to a quart of water.
This both cleans and neutralizes
odors. Rinse thoroughly with water
unu wipe ory.
Other parts of the refrigerator--
vegetable drawers, Quick Store unit
on models so equipped, ice storage
bin and all plastic parts--can be
cleaned the same way. Do not use
cleaners.
Tn heln nrevent odnr_ lenv_
...... It" r ............ , .....
an open box of baking soda in
the rear of the refrigerator, on the
top shelf. Change the box every
three months. An open box of
baking roda in tha fr_?_r will
absorb stale freezer odors.
Donotwasha.y ofyour ....::
+_refiigerator'splastic par_ in _ Zr
Behind refrigerator
Care should be taken in moving
your refrigerator away from the
wall. All types of floor coverings
c'nn h_ d_m_o_d _mrtlo++l_rlx_
cushioned coverings and those
with embossed surfaces. Pull the
refrigerator straight out and return
it to position by pushing it straight
.ill* .LY.tUYXII_ )tlJl.ll l_lll_t_latUl 111 _t
side direction may result in damage
to your floor covering or refrigerator.
Condenser
Far rnn_t _ffiei_nt nn_rntlnn vnn
need to keep the condenser clean.
Turn temperature control to OFE
Remove the base grille--see page 4.
Sweep away or vacuum dust that is
++++°+,°
on condenser
coils, then turn
the control back _l
on.
results use a Condenser
_rush specially designed for this
appliance parts stores. This easy
cleaning operation should be done
at least once a year.
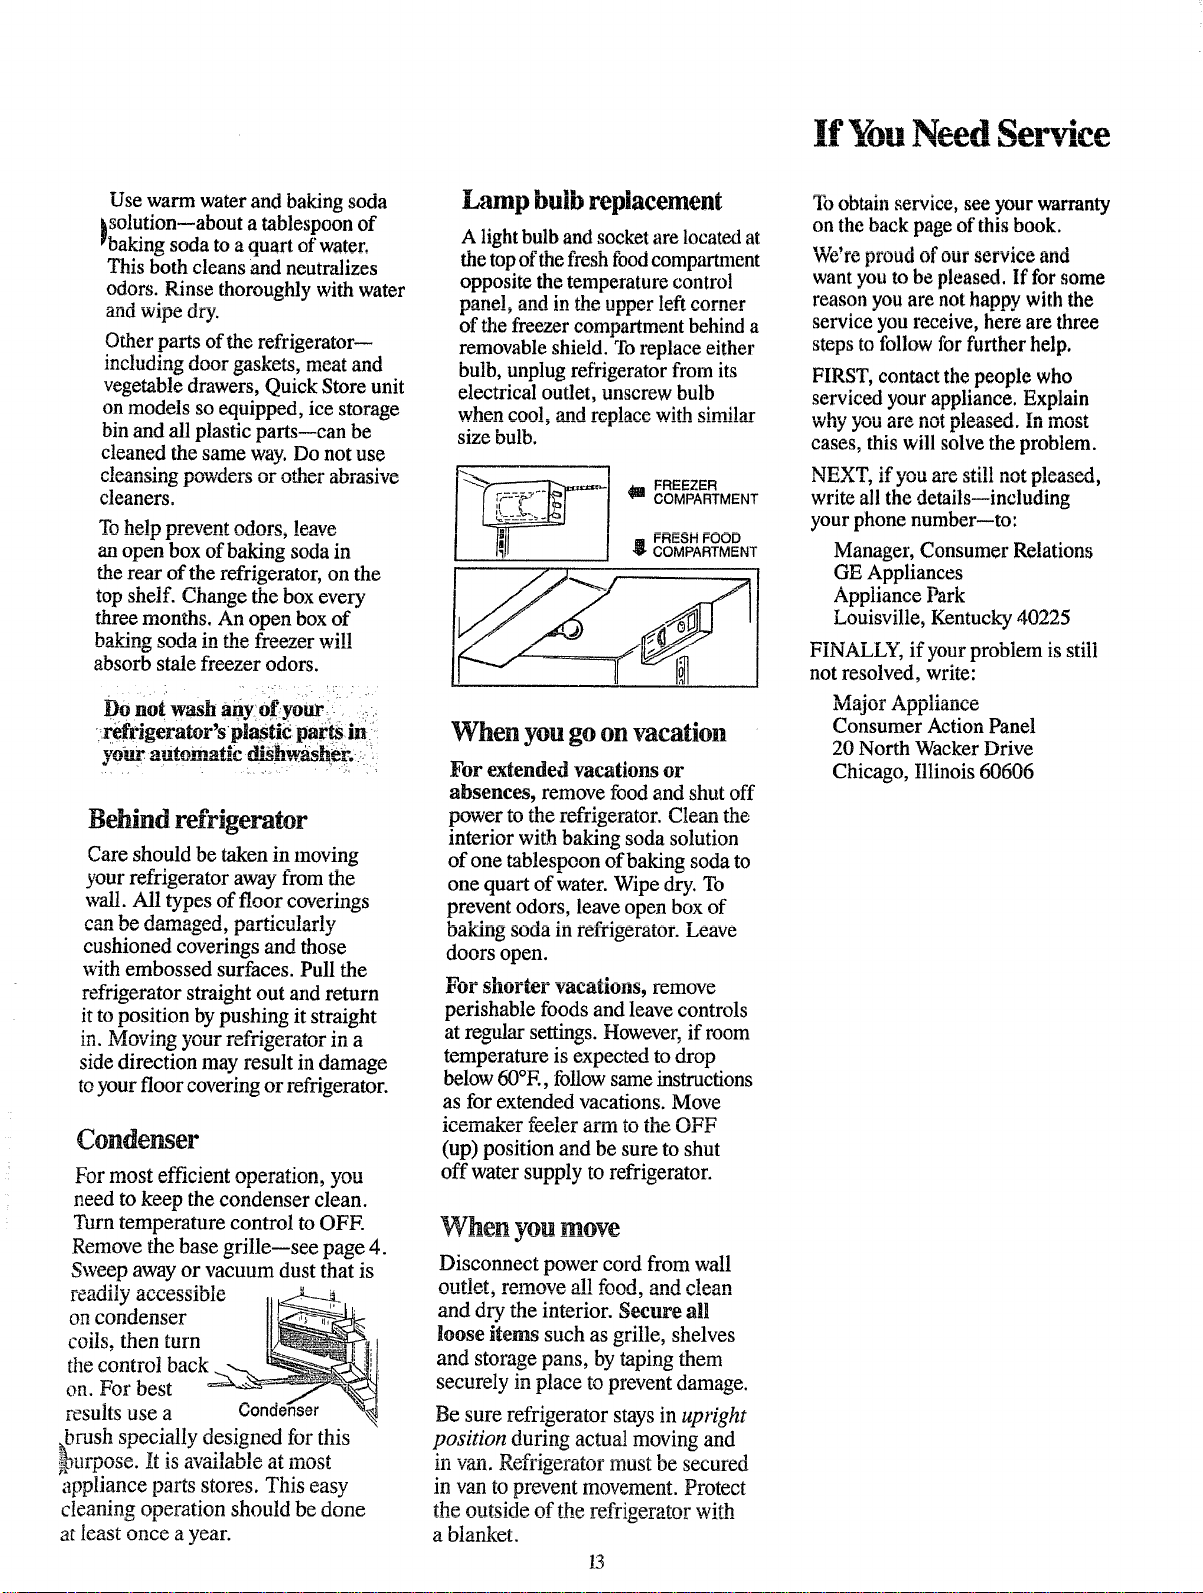
bulb replacement
A light bulb and socket are located at
the top of the fresh food compartment
opposite the temperature control
nanel_ and in the. nnn_.r le.ft _nrn_.r
r ..... _ ............. l'r .............
of the freezer compartment behind a
removable shield. To replace either
bulb, unplug refrigerator from its
electrical outlet, unscrew bulb
when coo!, a_ndreplace with simJ!ar
size bulb.
I'-- 1
I lilt I
I /'2"-.._/
FREEZER
COMPARTMENT
FRESH FOOD
COMPARTMENT
When you go on vacation
For extended vacations or
absences, remove food and shut off
interior with baking soda solution
of one tablespoon of baking soda to
one quart of water. Wipe dry. To
prevent odors, leave open box of
sotla in
oamng remgerator. Leave
doors open.
l_Or _illor[l_r vitlcliuons, remove
perishable foods and leave controls
at r_ular settings. However, if room
temperature is expected to drop
below 60°E, follow same instructions
as for extended vacations. Move
(up) position and be sure to shut
off water supply to refrigerator.
_Thell vou move
Disconnect power cord from wall
outlet, remove a!! food, and clean
and dry the interior. Secure all
loose items such as grille, shelves
and storage pans, by taping them
securely in place to prevent damage.
Be sure refrigerator stays in upright
position during actual moving and
111 WRII. xx_lrlgcrator must oe secureo
in van to prevent movement. Protect
the outside of the refri_,ermor with
...................... 121.............
a blanket.
!3
To obtain service, see your warranty
on the back page of this book.
we re proua (nour serwce anu
want you to be pleased. If for some
reason you are not happy with the
service you receive, here are three
steps to follow for further help.
FIRST, contact the people who
serviced your appliance. Explain
_€llff ,yLJIkl fll_ ilL_L I.JI_I_L_GId, lli IIIU_L
cases, this will solve the problem.
x N l.dd]k X ? II _01_ (_l_" OLLII IlK/I, [tJlq,dKI.Jl,,_,
write all the details--including
your phone number--to:
Manager, Consumer Relations
GE Appliances
Appliance Park
Louisville, Kentucky 40225
FINALLY, if your problem is still
not resolved, write:
wxajoi _ppa£ance
Consumer Action Panel
20 North Wacker Drive
Chicago, Illinois 60606
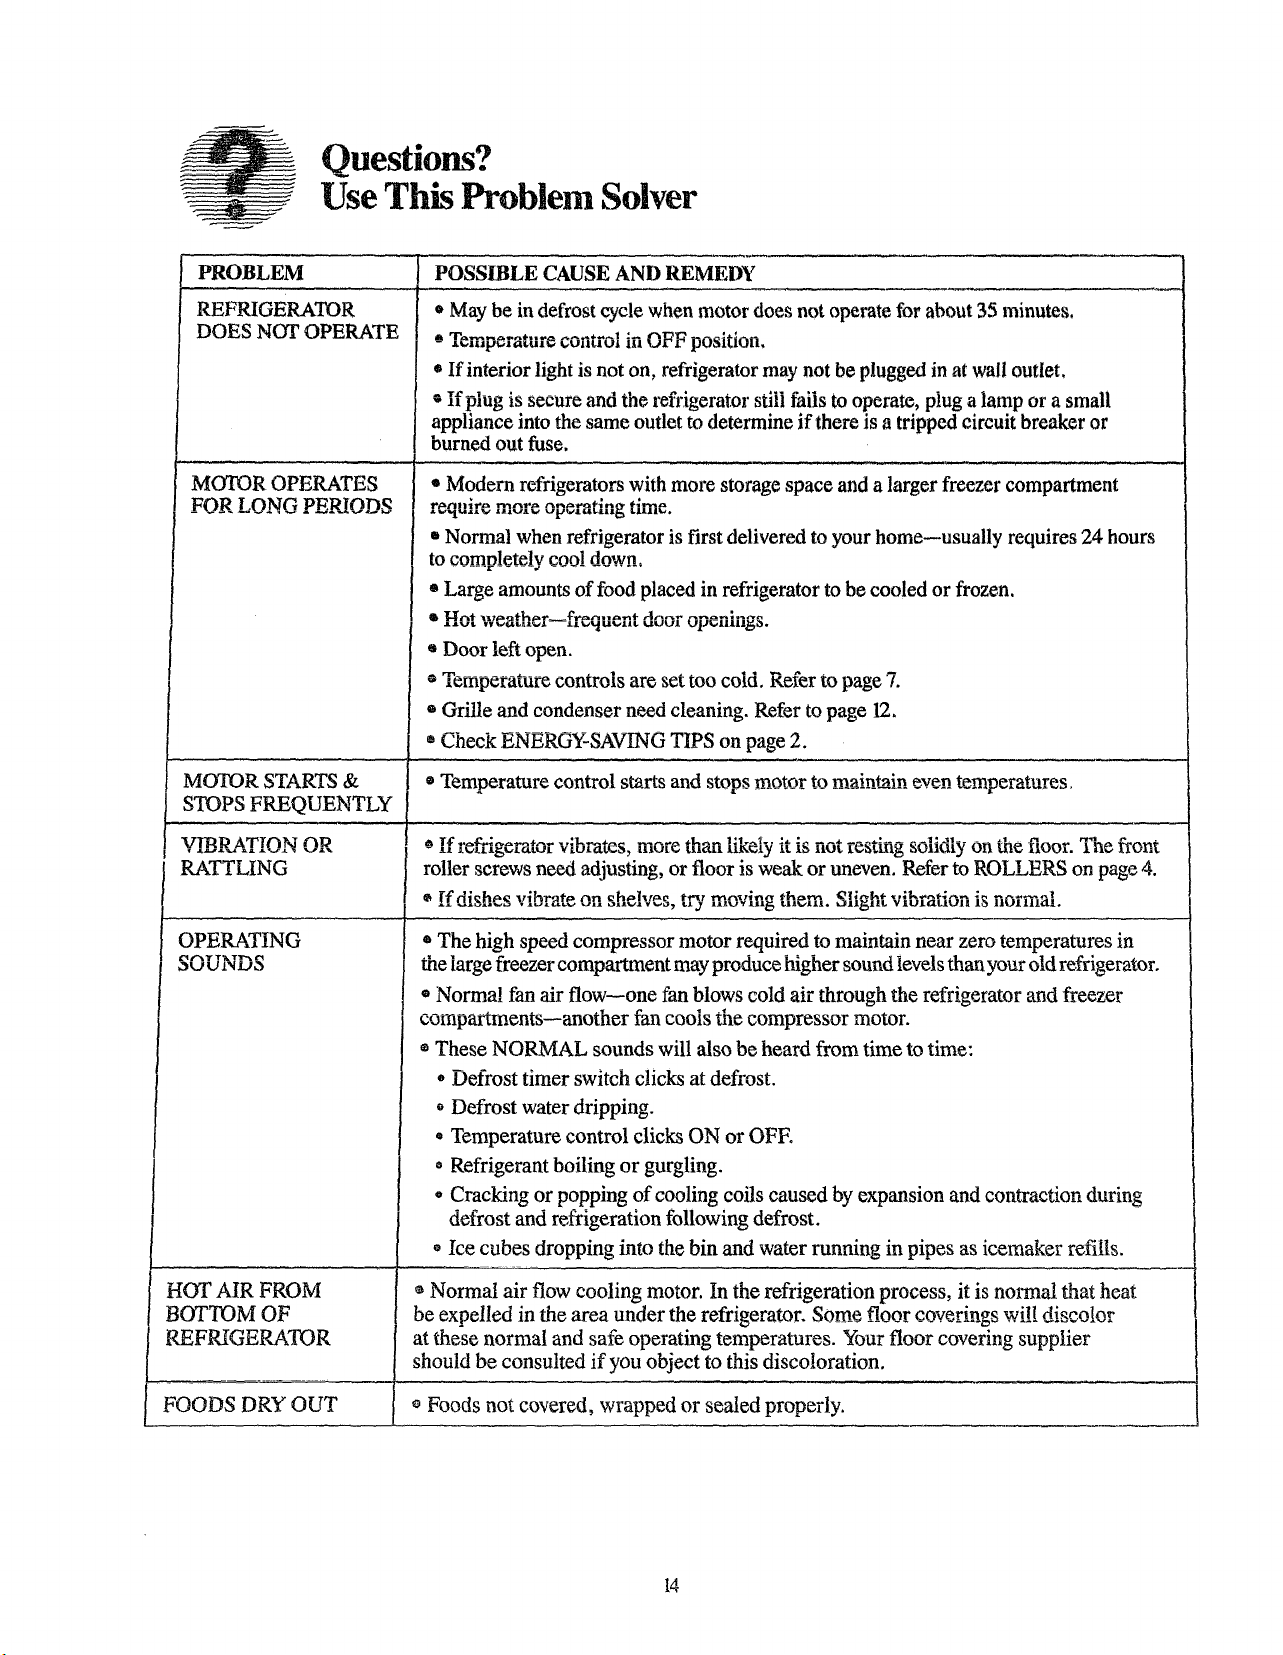
Questions?
Use This .Problem Solver
PROBLEM
REFRIGERATOR
DOES NOT OPERATE
MOTOR OPERATES
FOR LONG PERIODS
MOTOR STARTS &
STOPS FREQUENTLY
V!'BRAT!ON OR
RATTLING
OPERATING
SOUNDS
HOT AIR FROM
BOTTOM OF
REFRIGERATOR
POSSIBLE CAUSE AND REMEDY
* May be in defrost cycle when motor does not operate for about 35 minutes.
, Temperature control in OFF position,
* If interior light is not on, refrigerator may not be plugged in at wa!l outlet.
If plug is secure and the refrigerator still fails to operate, plug a lamp or a small
appliance into the same outlet to determine if there is a tripped circuit breaker or
burned out fuse.
• Modern refrigerators with more storage space and a larger freezer compartment
,enu,.,, more operating *"_-o
• Normal when refrigerator is first delivered to your home--usually requires 24 hours
to completely coo! down,
• Large amounts of food placed in refrigerator to be cooled or frozen.
............ _--_,,_,_..... ,,_,,,_ openings.
• Door left open.
_emperuture controls are set too cold. Refer to page 7.
o Grille and condenser need cleaning. Refer to page 12.
6 Check ENERG_SAV_G TIPS on page 2.
o Temperature control starts and stops motor to mai_n_taineven temperatures,
.... tt,_.taL,_t v,t, tat_, mote tuah _m_y tt is not resting solituy on me floor. The front
roller screws need adjusting, or floor is weak or uneven. Refer to ROLLERS on page 4.
* If dishes vib_ on o_,,,1.... tD' '_" _'; "'_'°"" c_;,.h,........... _o,_n_ ._,,_.... o,,_,,_ vibration is normal.
* The high speed compressor motor required to maintain near zero temperatures in
the large freezer compartment may produce higher sound levels than your old refrigerator.
* Normal fan air flow--one fan blows cold air through the refrigerator and freezer
compartments--another fan cools the compressor motor.
®These NORMAL sounds will also be heard from time to time:
* Defrost timer switch clicks at defrost.
Defrost water dripping.
, Temperature control clicks ON or OFE
Refrigerant boiling or gurgling.
° Cracking or popping of cooling coils caused by expansion and contraction during
defrost and refrigeration following defrost.
o Ice cubes dropping into the bin and water running in pipes as icemaker refills.
®Normal air flow cooling motor. In the refrigeration process, it is normal that heat
be expelled in the area under the refrigerator. Some floor coverings wi!! discolor
at these normal and safe operating temperatures. Your floor covering supplier
should be consulted if you object to this discoloration.
FOODS DRY OUT '_ Foods not covered, wrapped or sealed properly.
14
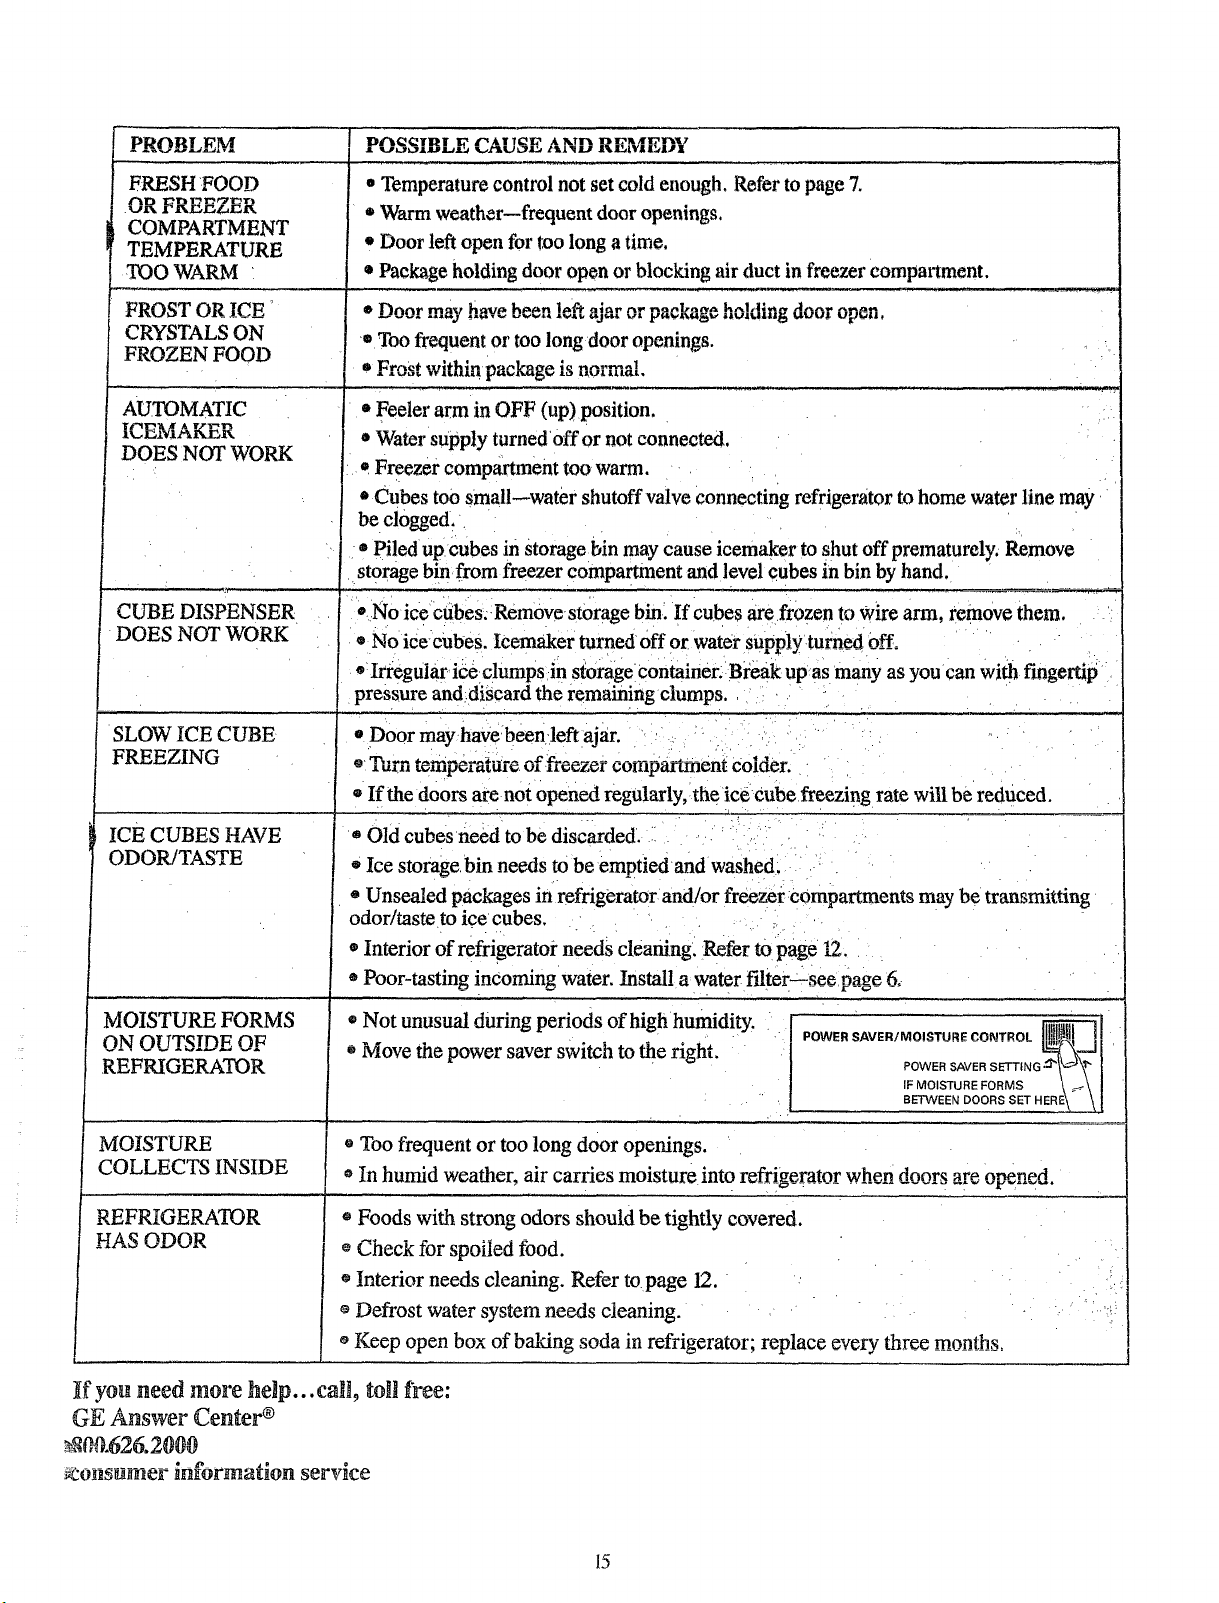
[ PROBLEM
f FRESHFOOD
i _,[%
COMPARTMENT
TEMPERATURE
TOO WARM
FROST OR ICE
CRYSTALS ON
FROZEN FOOD
AUTOMATIC
_['_rT_ A A YFT'yr_
IL,£AVIdatI_,I2,1K
DOES NOT WORK
CUBE DISPENSER
DOES NOT WORK
SLOW ICE CUBE
FREEZING
ICE CUBES HAVE
ODOR/TASTE
l
MOISTURE FORMS
ON OUTSIDE OF
REFRIGERATOR
I t.i,u,l_lll,llL.ilA_ LdlUUdll._ tll'tll ltil_d, Vll_,13|
1
t
* Temperature control not set cold enough. Refer to page 7.
* Warm weathermfrequent door openings,
e Door left open for too long a time,
o Package holding door open or blocking air duct in freezer compartment.
........... L-"
- Door may have h,_,,, 1,¢, °Jar ,.,,tarnar,l.-a_,_,hal,.i;,, .4....
! TOOfrequent or too long door openings.
kag'. _r,,_* .,.;,h;. pac e ISnormal
* Feeler arm in OFF (up) position.
o Water supply turnedoff or not connected.
e Freezer compartment too warm.
Cubes too small--water shutoff valve connecting refrigerator to home water line may
be clogged,
- Piled up cubes in Storage bin may cause icemaker to shut off prematurely. Remove [
storage b!n from freezercompartment and level cubes in bin by hand, _= .... I
'No ice Ctlbes. IRemove st6rage bin. If cubes are frozen to Wire arm, remov_them,'_
o No ice:cubes. Icemaker turned Off or water Supply turned Off. i
qrregular ice clumps in storage container. Break up as many as you can with fingertip
pressure anddigcard the remaining chmps,
o Door mayhave:beenteft ajar.
o _,_,,'-"temperature of freezer comp_ent Colder.
• If the doors are not opened regularly, theice Cubefreezing rate will be reduced.
*v--
• Old cubes need t° be discarded.
Ice storage bin needs to be emptiedand washed.
• Unsealed packages in refrigerator and/or freezer:compartments may be transmitting
odor/taste to ice cubes.
• Interior of refrigeratoi" needs cleaning. Refer to page 12.
o Poor-tasting incoming water. Instal! a water filter--see page 6_
r powEt SAVER/IVlOISTURE en_rrRn, _,
IF MOISTURE FORMS \ _..\ [
BETWEEN DOORS SET HERE\ \!
®Not unusual during periods of high humidity.
o Move the power saver switch to the right.
MOISTURE *Too frequent or too long door openings.
COLLECTS INSIDE oIn humid weather, air carries moisture into refrigerator when doors are opened.
,, Foods with strong odors should be tightly covered.
e Check for spoiled food.
o Interior needs cleaning. Refer to page 12.
Defrost water system needs cleaning.
e Keep open box of baking soda in refrigerator; replace every three months.
REFRIGERATOR
HAS ODOR
If you need more help...call_ toll free:
n
_ A swer cen[er _
_0.626.2000
_onsumer information servke
15
i
I
i
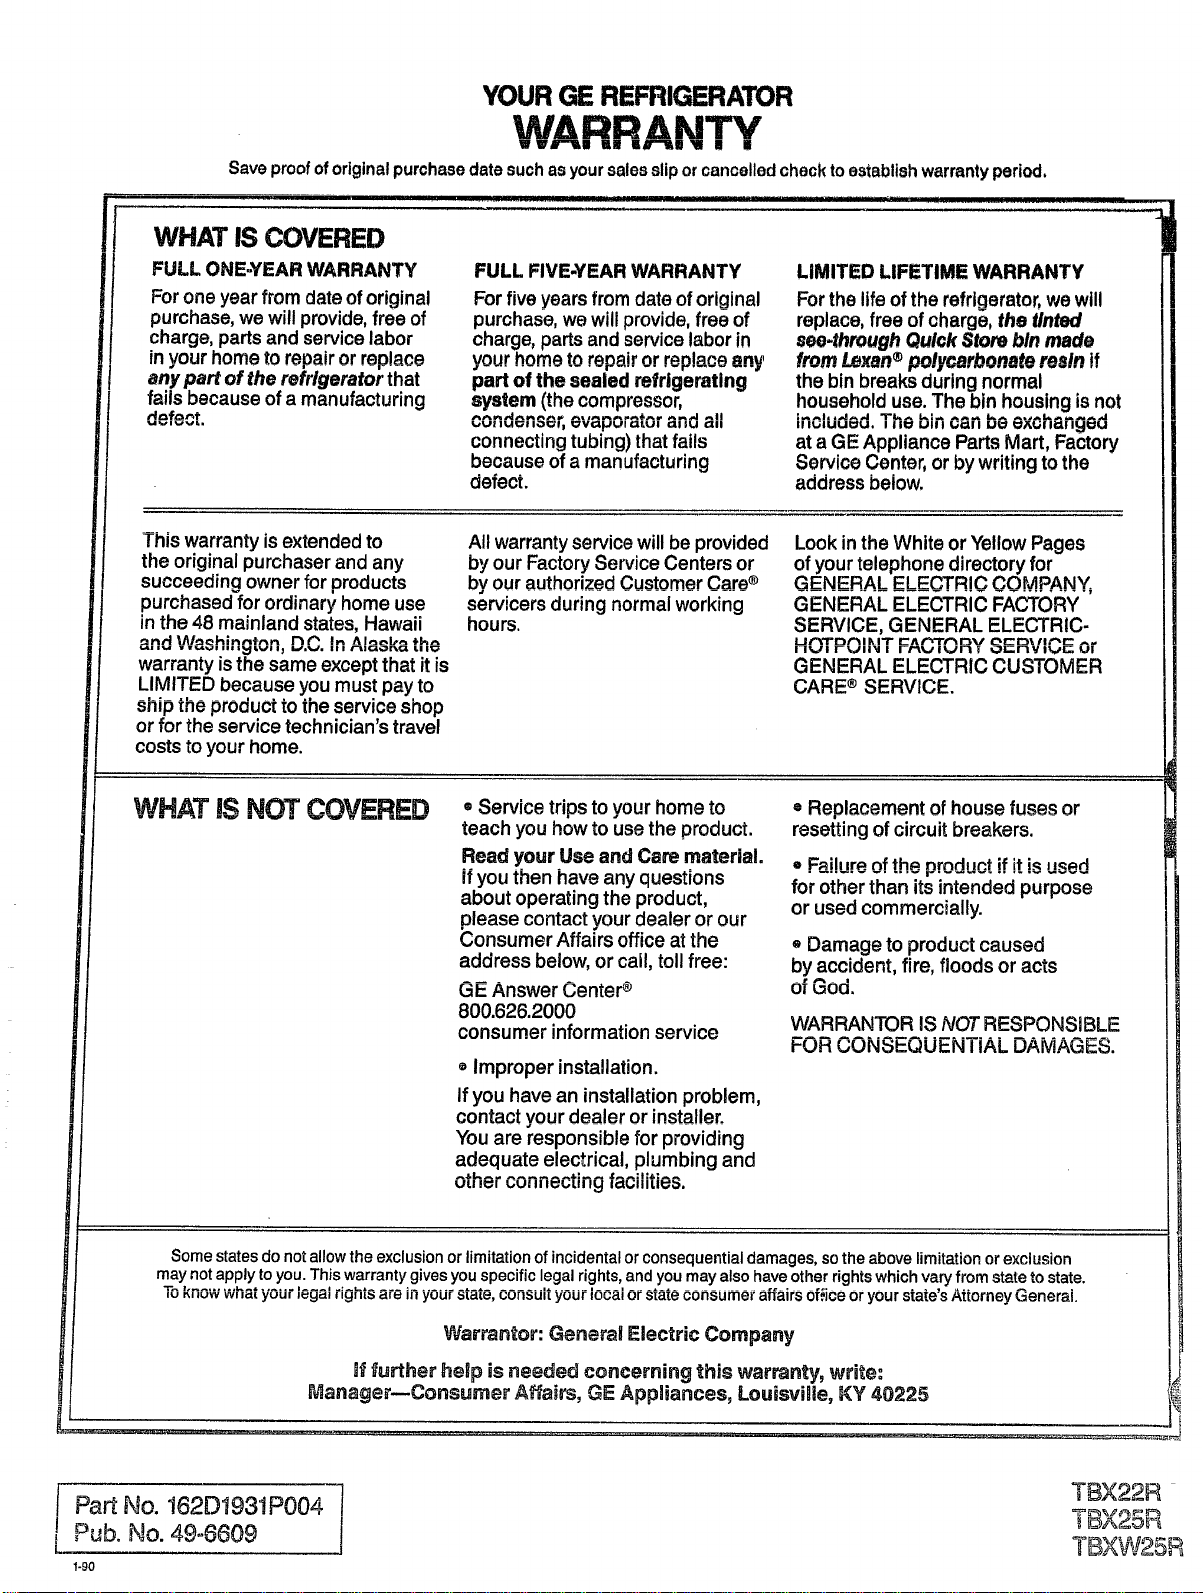
YOUR GE REFRIGERATOR
WAIQPAMTV
w win"'1| lag ai_""_ll NH B li
Saveproofoforiginalpurchasedatesuchasyoursalessliporcancelledchecktoestablishwarrantyperiod.
I
I
t
I
I
/
/
WHAT IS COVERED
FULL ONE.EAR WARRANTY
Forone year from date oforiginal
purchase, we will provide, free of
charge, parts and service labor
in yourhome to repair or replace
any part of the refrigerator that
fails because of a manufacturing
_l=_fa_t
FULL FIVE-YEAR WARRANTY
Forfive years from date oforiginal
purchase, we will provide, free of
charge, parts and servicelabor in
yourhnmAtn mn_ir nr r_nlRnRAny
part of the sealed refrigerating
system (the compressor,
Ugl I_;_l IOq;_l I _V(;;t_JUI IDtLUI _1[I IU €:ill
connecting tubing)that fails
because of a manufacturing
defect.
LIMITED LIFETIME WARRANTY
Forthe lifeofthe refrigerator,wewill
replace, free ofcharge, the tinted
see.through Quick Store bin made
frnrn I._vnn® nnluP_rhnnnt_ r_nin if
the bin breaks during normal
household use. The bin housing isnot
IIIUIMUI=IU, I II1_ gill U_I.II Uti_ _AUII_"III_ri;;_U
at a GE Appliance PartsMart, Factory
Service Center, or bywriting tothe
address below.
This warranty isextended to
the original purchaser and any
succeeding owner for products
purchased for ordinary home use
in the 48 mainland states, Hawaii
_r_ri _Alooktln_'h,'_r_ r'_t "_ !_ AI,'_e,b_ _._,_
ul|'_l VI_IIIII_LV, I, I_.%./. Ill f'I*IC;I*'._I_€;L LIIO
warranty isthe same except that itis
LIMITED because you must payto
ship the productto the service shop
or for the service technician's travel
coststo your home.
All warrantyservicewill be provided
byour Factory Service Centers or
by our authorized Customer Care®
servicers during normal working
hours.
Look in theWhite or Yellow Pages
ofyourtelephone directory for
GENERAL ELECTRIC COMPANY,
GENERAL ELECTRIC FACTORY
SERVICE, GENERAL ELECTRIC-
rlUl r%JIl_ I r_lUni ol_nvl_ UI
GENERAL ELECTRIC CUSTOMER
CARE® SERVICE,
WHAT !_ EICy'r.P.t3Vi=_l=l_ ,, Service tripsto your home to
teach you how to usethe product.
Read your Use and C_re material.
ifyou then have any questions
about operating the product,
please contact yourdealer or our
Consumer Affairs office at the
address below,or call, tollfree:
GE Answer Center _
800.626.2000
consumer informationservice
,, Improper installation.
If you have an installationproblem,
contact yourdealer or installer.
Youare responsible for providing
adequate electrical, plumbing and
ULI I_1 _JU! II I_ULII I_ I¢IUIIILI_.
o Replacement ofhouse fuses or
resetting of circuit breakers.
• Failure of the product ifit isused
for otherthan itsintended purpose
or used commercially.
Damage to product caused
by accident, fire, floods or acts
of God.
WARRANTOR IS NOT RESPONSIBLE
i-UH UUN_EP'(JU_N IIAL DAIVtAGES.
II
!
!
I
!
Some states do not allow the exclusion or limitation of incidental or consequential damages, so the above limitation or exclusion
may not apply to you. This warranty gives you specific legal rights, and you may also have other rights which vary from state to state.
,u r.__uww,,_ yuu, _u_,, ,_1_._-,u., yuu__P'tu, uun_u=[yuur _uua,or s[a[e consumer affairs office or your state's Attorney General.
Warrantor: General Electric Company
/
_ffurther help is needed concerning this warranty, _rite: L
_anager--Consumer Affairs, GE Appliances, Louisville, _Y 40225 _
..J'_
t Part No. 162D1931P004 ] TBX22R_,,,,_
I Pub. No. 49=6609 i __A_°_
, TBXW25R
1-90

