Washing Machine / User Manual
EN
WM3T94SSA
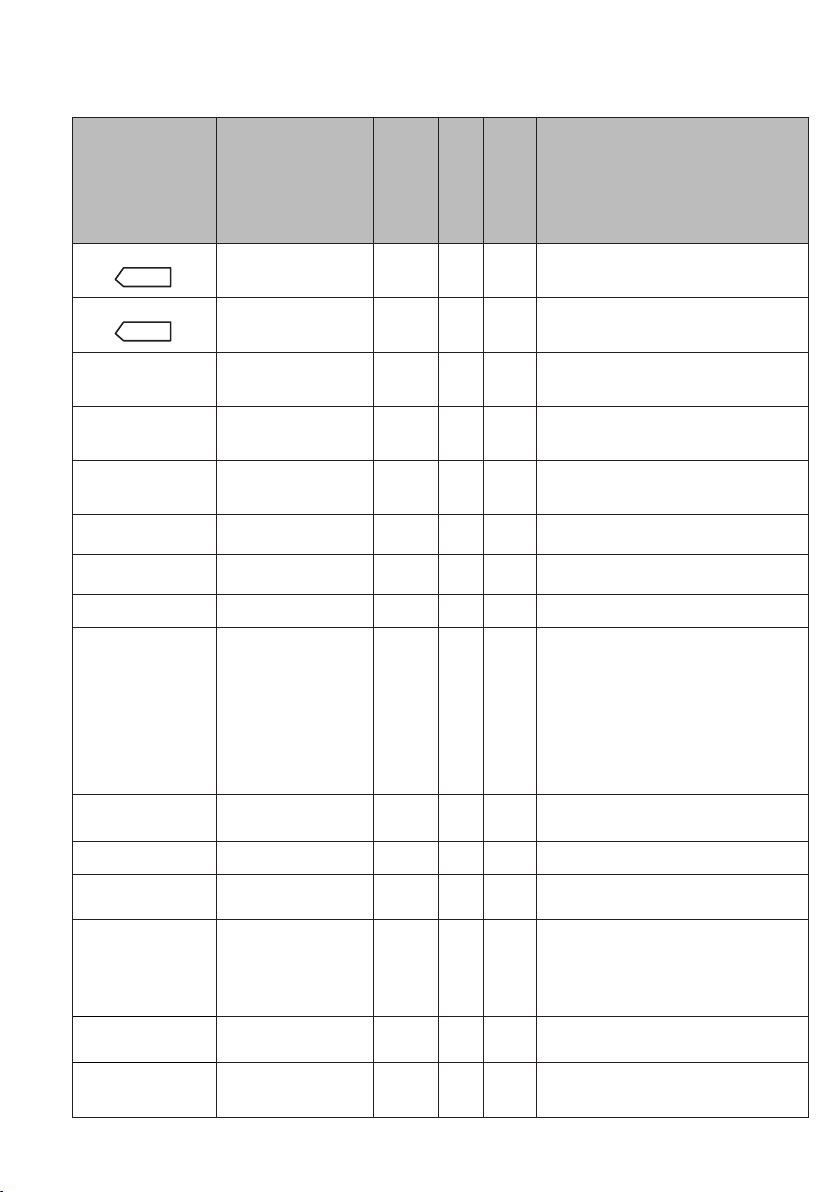
Icon Type Meaning
WARNING Serious injury or death risk
RISK OF ELECTRIC SHOCK Dangerous voltage risk
FIRE Warning; Risk of fire / flammable materials
CAUTION Injury or property damage risk
IMPORTANT / NOTE Operating the system correctly
Thank you for choosing this product.
This User Manual contains important safety information and instructions on the operation
and maintenance of your appliance.
Please take the time to read this User Manual before using your appliance and keep this
book for future reference.

CONTENTS
1. SAFETY INSTRUCTIONS ............................................................................................... .1
1.1 General Safety Warnings ...............................................................................................2
1.2 During Use ....................................................................................................................6
1.3 Packaging and Environment...........................................................................................8
1.4 Savings Information ........................................................................................................8
1.5 CE Declaration of conformity ..................................................................................... .8
1.6 Disposal of your old machine .....................................................................................8
2. TECHNICAL SPECIFICATIONS ...................................................................................... .9
2.1 General Appearance.......................................................................................................9
2.2 Technical Specifications .................................................................................................9
3. INSTALLATION .............................................................................................................. .10
3.1 Removing the Transit Bolts...........................................................................................10
3.2 Adjusting the Feet / Adjusting Adjustable Stays............................................................10
3.3 Electrical Connection ....................................................................................................10
3.4 Water Inlet Hose Connection ....................................................................................... .11
3.5 Water Discharge Connection ........................................................................................12
4. CONTROL PANEL OVERVIEW ..................................................................................... .12
4.1 Detergent Drawer .........................................................................................................12
4.2 Sections . ..................................................................................................................13
4.3 Program Dial.................................................................................................................13
4.4 Electronic Display ........................................................................................................ .13
5. USING YOUR WASHING MACHINE ............................................................................. .14
5.1 Preparing Your Laundry ................................................................................................14
5.2 Putting Laundry in the Machine ................................................................................... .14
5.3 Adding Detergent to the Machine .................................................................................15
5.4 Operating Your Machine .............................................................................................. .15
5.5 Selecting a Programme ............................................................................................... .15
5.6 Half-Load Detection System .........................................................................................15
5.7 Auxiliary Functions .......................................................................................................16
5.8 Auxiliary functions .....................................................................................................17
5.9 Child Lock . ..................................................................................................................19
5.10 If you want to pause/cancel a running program or add laundry: ...............................20
5.11 Program End ...............................................................................................................20
6. PROGRAMME TABLE ................................................................................................... .21
7.1 Warning . ..................................................................................................................23
7.2 Water Inlet Filters .........................................................................................................23
7.3 Pump Filter . ..................................................................................................................24
7.4 Detergent Drawer .........................................................................................................24
8. Body / Drum .................................................................................................................. .25
9. TROUBLESHOOTING ................................................................................................... .26
10. AUTOMATIC FAULT WARNINGS AND WHAT TO DO .............................................. .27
11. DESCRIBING THE ENERGY LABEL AND SAVING ENERGY................................... .28

1. SAFETY INSTRUCTIONS
Operating voltage / frequency
(220-240) V~/50Hz
Total current (A) 10
Water pressure (Mpa) Maximum 1 Mpa /
Minimum 0. 1Mpa
Total power (W)
2200
Maximum washing capacity
(dry laundry) (kg)
9
• Do not install your machine on a carpet or such
grounds that would prevent the ventilation of its
base.
• The appliance is not intended for use by people
(including children) with reduced physical,
sensory or mental capabilities, or lack of
experience and knowledge unless they have been
given supervision or instruction concerning use
of the appliance by a person responsible for their
safety.
• Children of less than 3 years should be kept away
unless continuously supervised.
• Call the nearest authorized service centre for a
replacement if the power cord malfunctions.
• Use only the new water inlet hose coming
with your machine when making water inlet
connections to your machine. Never use old, used
or damaged water inlet hoses.
• Children should not play with the appliance.
Cleaning and user maintenance should not be
made by children without supervision.
EN - 1

NOTE: For a softcopy of this user manual,
please visit www.smeg.com/info/download-manuals
Read this user manual carefully.
Your machine is for domestic use only.
Using it for commercial purposes will cause
your warranty to be cancelled.
This manual has been prepared for more than
one model therefore your appliance may not
have some of the features described within.
For this reason, it is important to pay particular
attention to any figures whilst reading the
operating manual.
1.1 General Safety Warnings
•
•
correctly.
•
• It is recommended that for your first wash,
you select the 90˚ Cotton programme without
laundry and half fill compartment II of the
detergent drawer with a suitable detergent.
•
EN - 2

•
•
•
•
•
laundry.
•
•
programme you have chosen.
•
•
EN - 3
• Make sure that the door of your Washing Machine
is not restricted and can be opened fully.
Install your machine in a location that can be
fully ventilated and preferably has constant air
circulation.
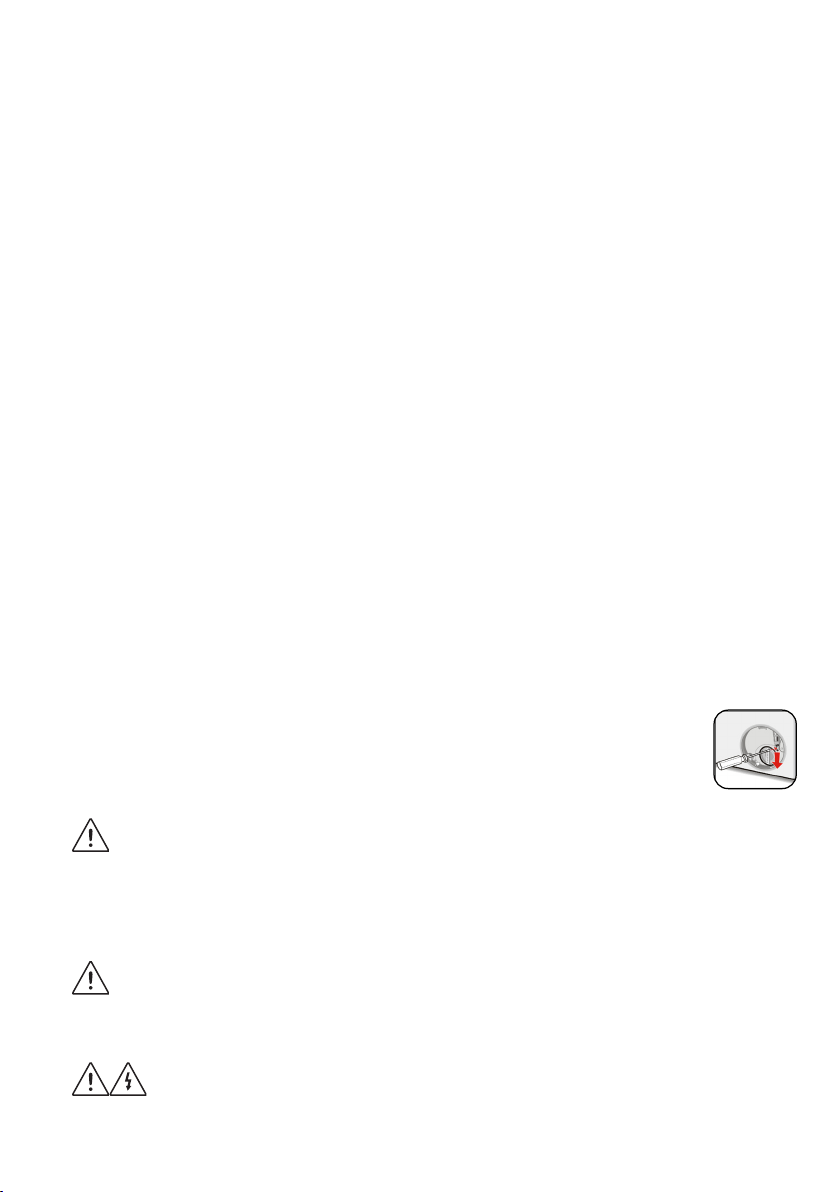
Door emergency opening function
When the machine is running, any power cut or
when the program is not yet complete, the door will
remain locked.
To open the door;
1. Please turn off the machine. Take off the power
plug from the mains socket.
2. To drain the waste water, follow the instructions
given in cleaning the pump filter section on page
24
3. Pull the down the emergency opening mechanism
with the help of a tool and open the door at the
same time.
4. Doors, move the emergency opening handle
to the open position after being closed again,
if the door remains locked.
Read these warnings. Follow the advice given
to protect yourself and others from risks and
fatal injuries.
RISK OF BURNS
Do not touch the drain hose or any discharged
water while your Washing Machine is running. The
high temperatures involved pose a burn risk.
RISK OF DEATH FROM ELECTRICAL
EN - 4
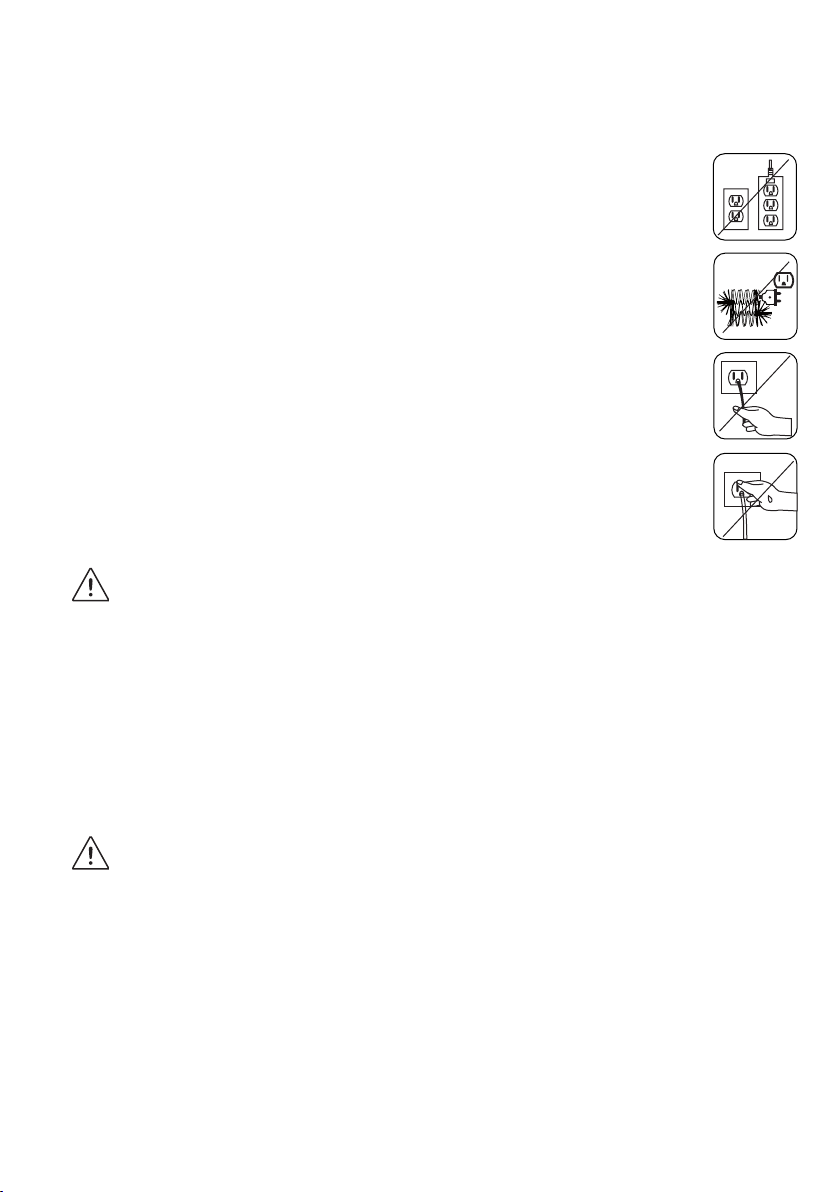
CURRENT
•
•
• Never remove the plug from the socket by
•
•
hands or feet are wet.
•
Risk of flooding
•
• Take necessary measures to prevent the hose
•
does not block the plug hole.
Danger of Fire
•
•
•
EN - 5
•
Risk of fire and explosion
Risk of falling and injury
•
•
hazard.
•
•
or detergent drawer.
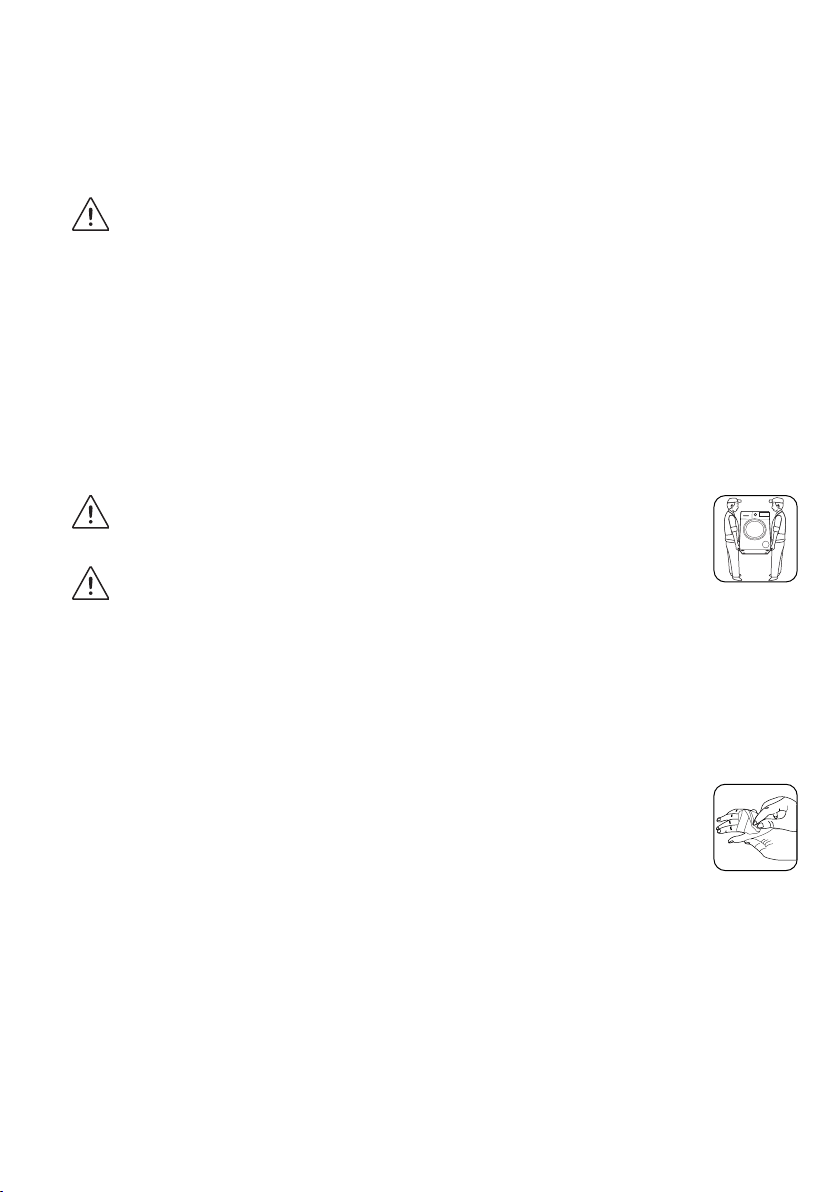
The machine must be carried by at least 2
people.
Child safety
•
•
•
•
1.2 During Use
•
•
EN - 6

•
• This appliance can be used by children aged
8 years and above and persons with reduced
physical, sensory or mental capabilities or lack
of experience and knowledge if they have been
given supervision or instruction concerning use of
the appliance in a safe way and understand the
hazards involved. Children shall not play with the
appliance. Cleaning and user maintenance shall
not be done by children without supervision.
•
• Before operating the washing machine,
remove the 4 transit bolts and rubber spacers
from the rear of the machine. If the bolts are
not removed they may cause heavy vibration,
noise and malfunction of the machine and
cause the guarantee to be void.
• Your warranty does not cover damage caused by
sources of damage.
•
owner.
EN - 7

1.3 Packaging and Environment
Removal of packaging materials
1.4 Savings Information
•
•
1.5 CE Declaration of conformity
1.6 Disposal of your old machine
the shop where you purchased the product.
EN - 8
EN - 9EN - 9
2. TECHNICAL SPECIFICATIONS
123
4
5
6
7
8
9
10
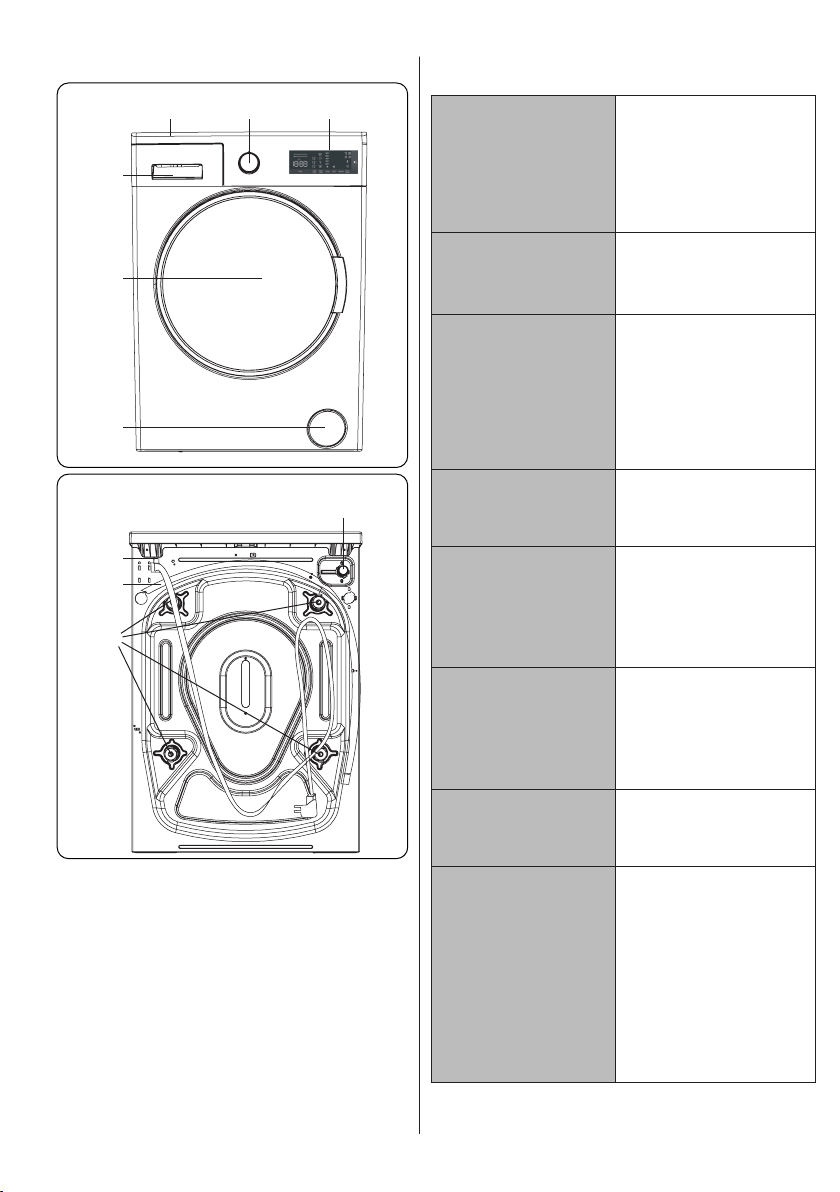
2.1 General Appearance
1.
2.
3. Upper Tray
4. Detergent Drawer
5. Drum
6.
7. Water Inlet Valve
8. Power Cable
9.
10.
2.2 Technical Specifications
voltage /
frequency
(V/Hz)
(220-240)
V~/50Hz
Total current
(A)
10
Water
pressure
(Mpa)
Mpa
Mpa
Total power
(W)
dry laundry
9
Programme
number
15
(mm)
Depth
845
597
2200
1400
582
EN - 10EN - 10
3. INSTALLATION
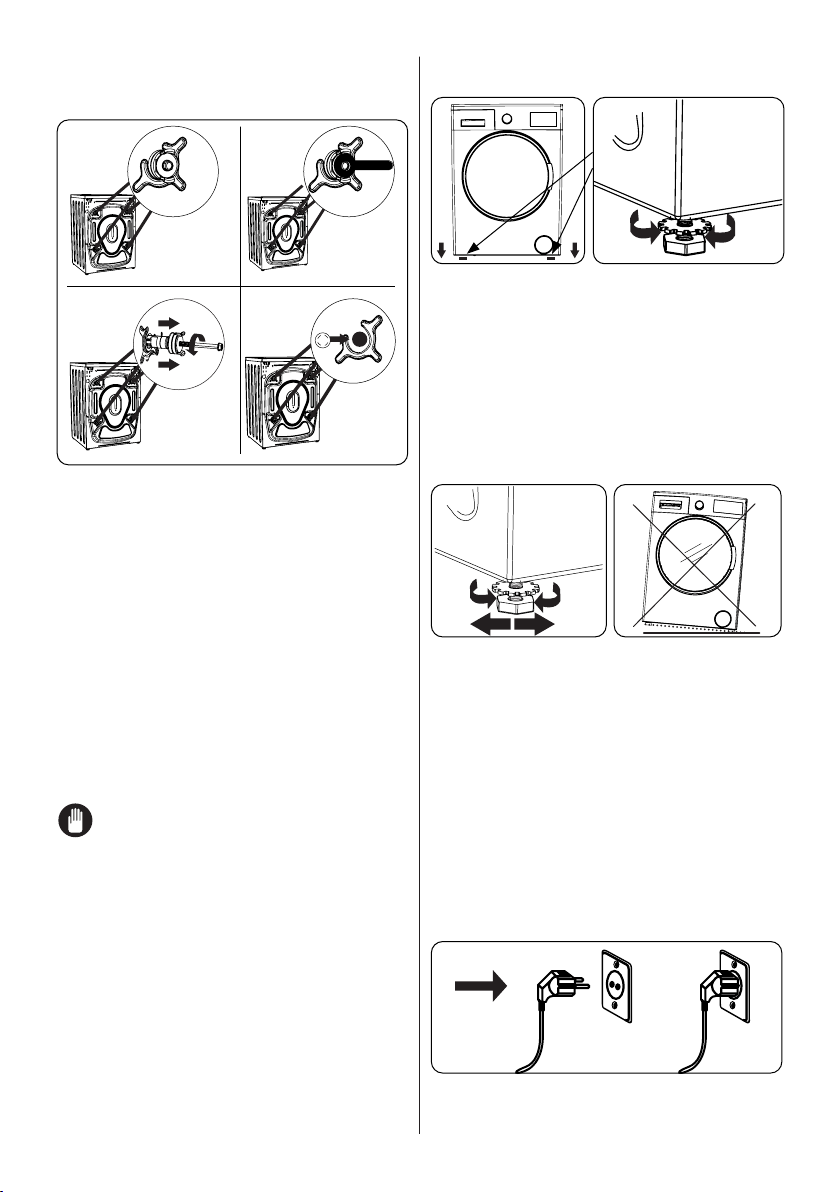
3.1 Removing the Transit Bolts
X X4 4
X
4
1
3
2
4
1.
If the bolts are not removed, they
warranty.
2.
spanner.
3.
pull.
4.
use.
NOTE:
the scope of the warranty.
3.2 Adjusting the Feet /
Adjusting Adjustable Stays
1
1.
(such as carpet) that would prevent
•
•
adjustable feet.
•
X
4
2 3
2.
•
3.
•
3.3 Electrical Connection
•
240V, 50
EN - 11EN - 11
•
amps.
•
•
damage that occurs due to the use of
NOTE:
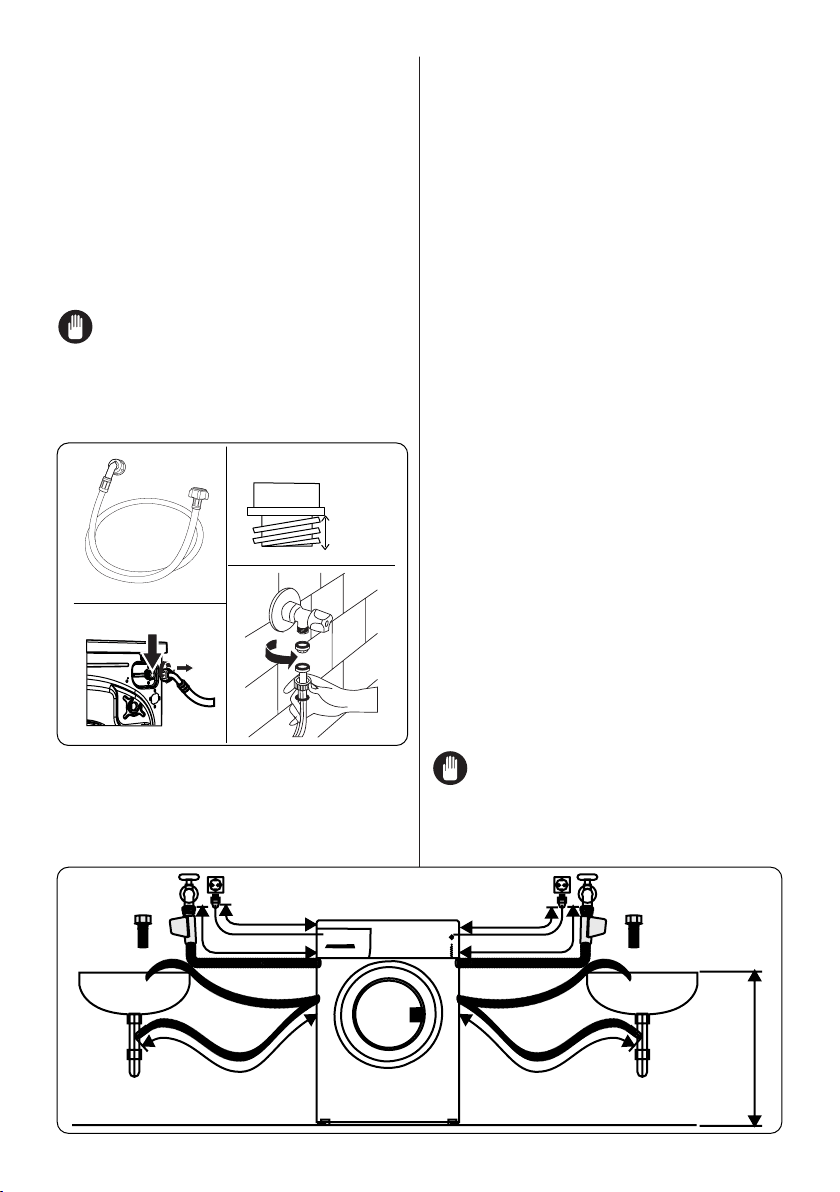
3.4 Water Inlet Hose Connection
3/4”
10 mm
1
3
2
4
1.
and red capped hose to the hot water
•
that connect to the water supply.
2.
threaded tap.
•
and the red capped end of the hose to
•
•
opened tap).
3. Once you have made all of the
supply on and check for leaks.
4.
or crushed.
•
NOTE:
must only be connected to your water
hoses must not be reused.
~ 95 cm ~ 140 cm
~ 145 cm ~ 95 cm
0 – max. 100 cm
˜
˜
95 cm
150 cm
EN - 12EN - 12
3.5 Water Discharge Connection
•
•
hose.
•
bathtub.
•
not bent, buckled, crushed or extended.
•
ground.
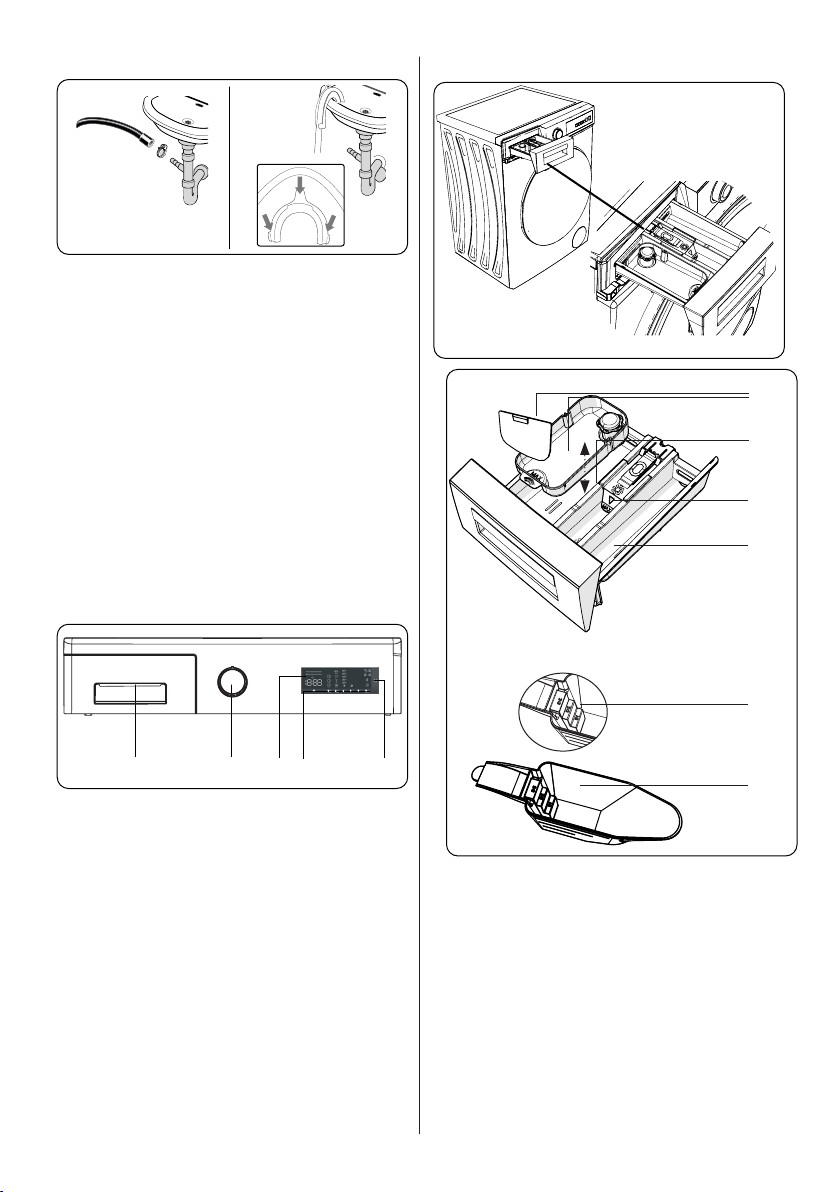
4. CONTROL PANEL OVERVIEW
1 2 3
4
5
1. Detergent Drawer
2.
3.
4.
5. Start/Pause Button
4.1 Detergent Drawer
1
2
3
4
5
6
1.
2.
3. Softener Compartment
4. Pre-Wash Detergent Compartment
5. Powder Detergent Levels
6.

EN - 13EN - 13
4.2 Sections
Main wash detergent compartment:
Fabric conditioner, starch, detergent
compartment:
Pre-wash detergent compartment:
4.3 Program Dial
•
programme.
•
set exactly to the programme you want.
4.4 Electronic Display
9
8
21 3 5
4 6 7
1.
2.
3.
4.
temperature
5.
6. Easy
7.
8. Start Pause Button
9. Energy/Water Efficiency Bar
EN - 14EN - 14
5. USING YOUR
WASHING MACHINE
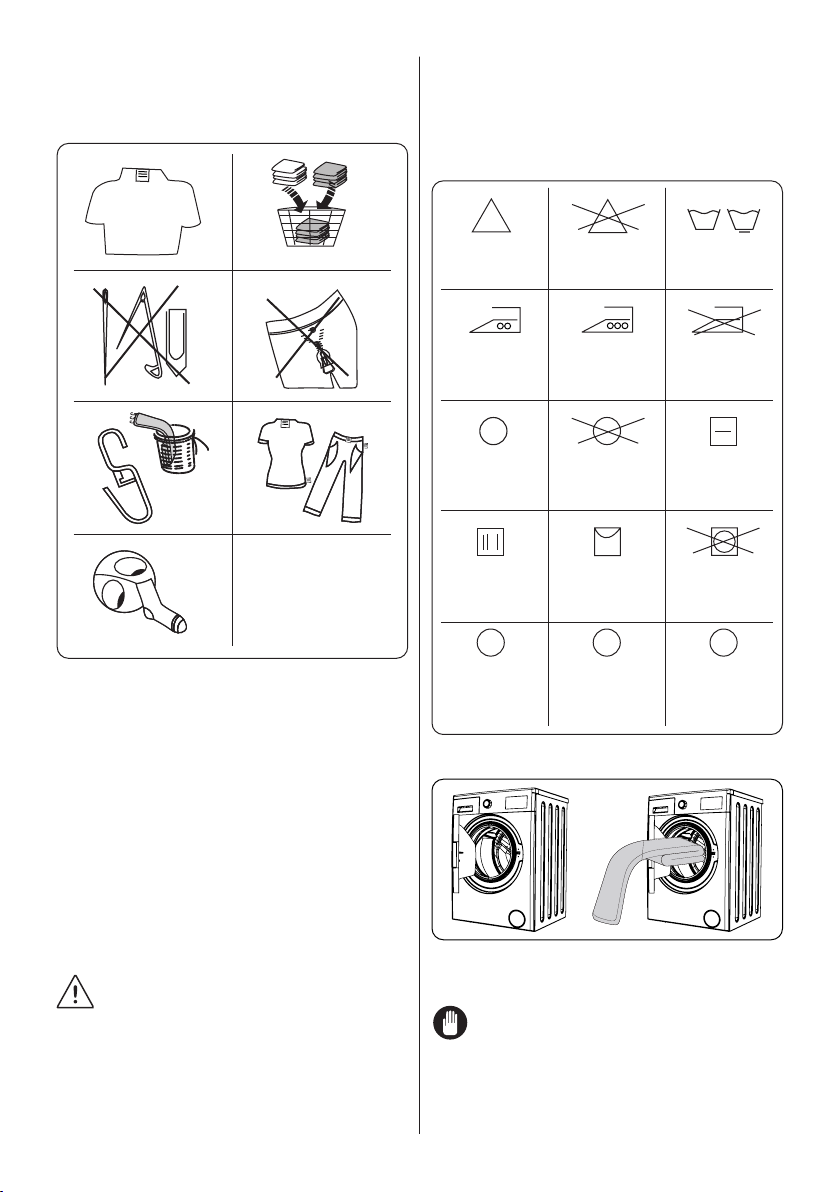
5.1 Preparing Your Laundry
1
3
5
7
2
4
6
D
G
V
D
S
H
DGVDS
1.
•
2.
together.
•
and should be washed separately
3.
CAUTION:
the warranty.
4.
eyes.
5.
or bag.
6.
7.
temperature
Cn be dry
cleaned
pure alcohol
allowed
temperature
No dry
Hang to dry
Perchloroethylene
R11, R13,
Petroleum
Normal
Dry flat
Do not tumble
dry
R11, R113, Gas
Can be
bleached
Do not bleach
F F A
5.2 Putting Laundry in the Machine
•
•
NOTE: Take care not to exceed
EN - 15EN - 15
LAUNDRY TYPE WEIGHT (gr)
Towel 200
500
Bathrobe 1200
700
200
Underwear 100
Tablecloth 250
•
•
trapped between the rubber seal and
the door.
•
•
5.3 Adding Detergent to the Machine
•
do not pre-wash. Put a small amount
detergent drawer.
•
compartment I of the detergent drawer
•
amount of detergent to use.
• In areas of hard water, more detergent
•
•
of the detergent drawer. Do not exceed
the MAX level.
•
•
5.4 Operating Your Machine
1 2
1.
supply.
2. Turn on the water supply.
•
•
•
5.5 Selecting a Programme
Use the programme tables to select the
laundry.
5.6 Half-Load Detection System
system.
regardless of the programme you selected.
less water and energy.
EN - 16EN - 16
5.7 Auxiliary Functions
want to select.
enabled.
Reason for not enabling the function:
•
program.
•
•
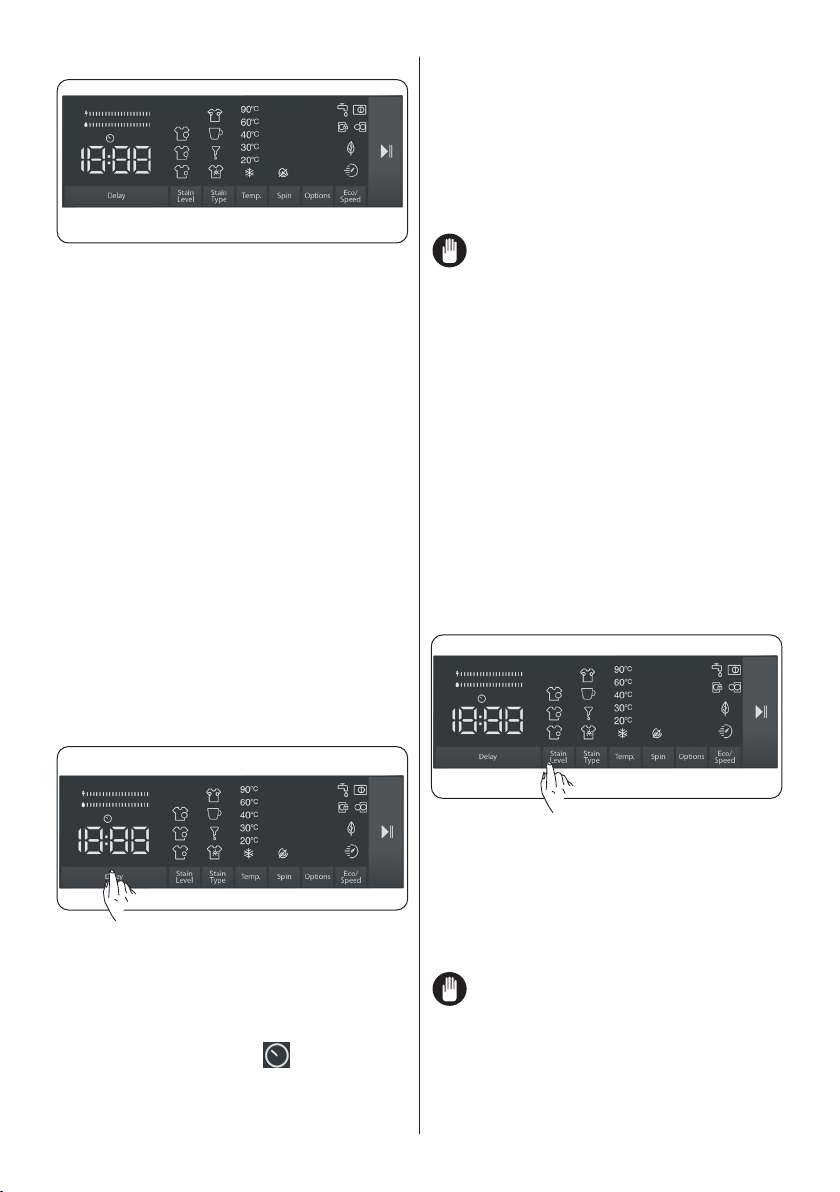
1. Delayed start auxiliary function
23 hours.
• Press the delay key once.
•
•
•
•
to press the Start/Pause key to start the
Note
you can touch the “Start/Pause” key to
To cancel the delay function:
• If you did not press the Start/Pause key,
keep touching the delay key until the
electronic display shows the duration
of the program you have selected.
Once you see the program time on the
electronic display, this means that the
delay has been cancelled.
• If you have pressed the Start/Pause key
to start the machine, you just need to
touch the delay key once. will go off
on the electronic display, press “Start/
Pause” key to start the washing cycle.
2. Selecting the level of soiling
programs. You can make changes at your
Note
the program you have selected.
EN - 17EN - 17
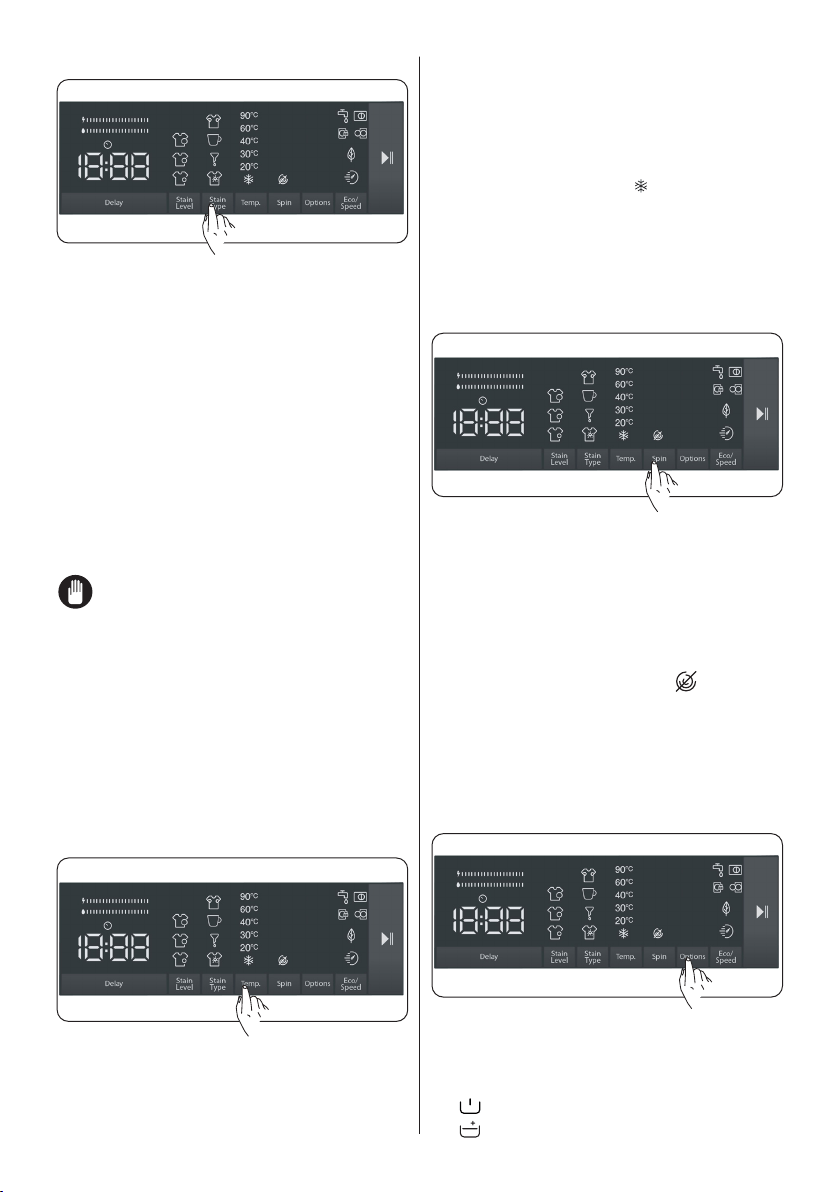
3. Stain selection
Warning: Do not let the stains on your
laundries to get dry and stuck in order
for the auxiliary function dedicated for
soiling level selection to fully perform its
functions. Clean the solids beforehand.
Warning: Press on the newly formed
stains on your laundries with a piece
of cloth before starting to wash them in
your product. Do not scrub!
Note
may have selected the wrong type; restart
4. Selecting the washing water
temperature
• When you select a new program,
•
temperature of the selected program
and cold water wash ( ).
•
temperature you wanted to set, keep
5. Spin speed selection
you select a new program, the selected
5.8 Auxiliary functions
1.
2.
EN - 18EN - 18
3.
4.
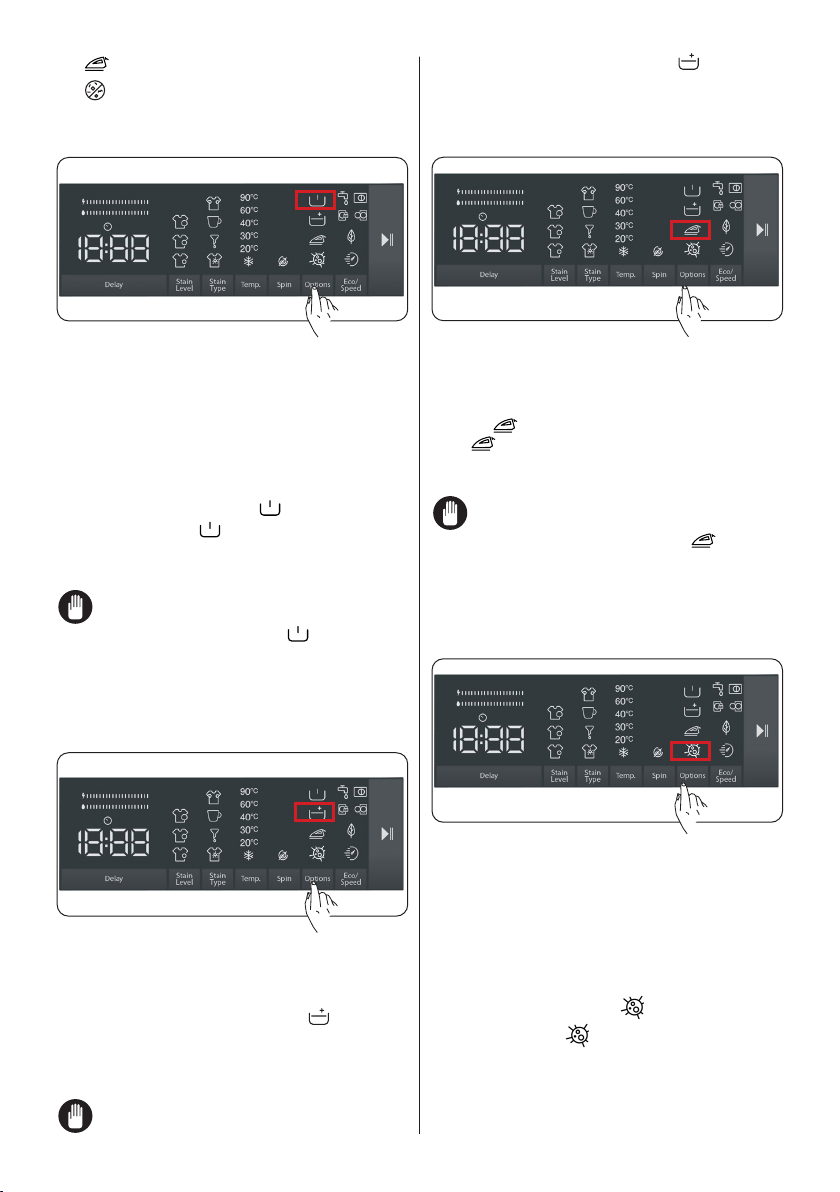
1. Prewash auxiliary function
detergent drawer. To enable the prewash
turns on. If
the prewash LED
Note: When you want to select the
does not
2. Extra rinse auxiliary function
turns
Note: When you want to select the
does
3. Easy ironing auxiliary function
symbol
LED
Note: When you want to select the
does
4. Anti-allergy auxiliary function
turns on. If the
on
EN - 19EN - 19
Note: When you want to select the
does
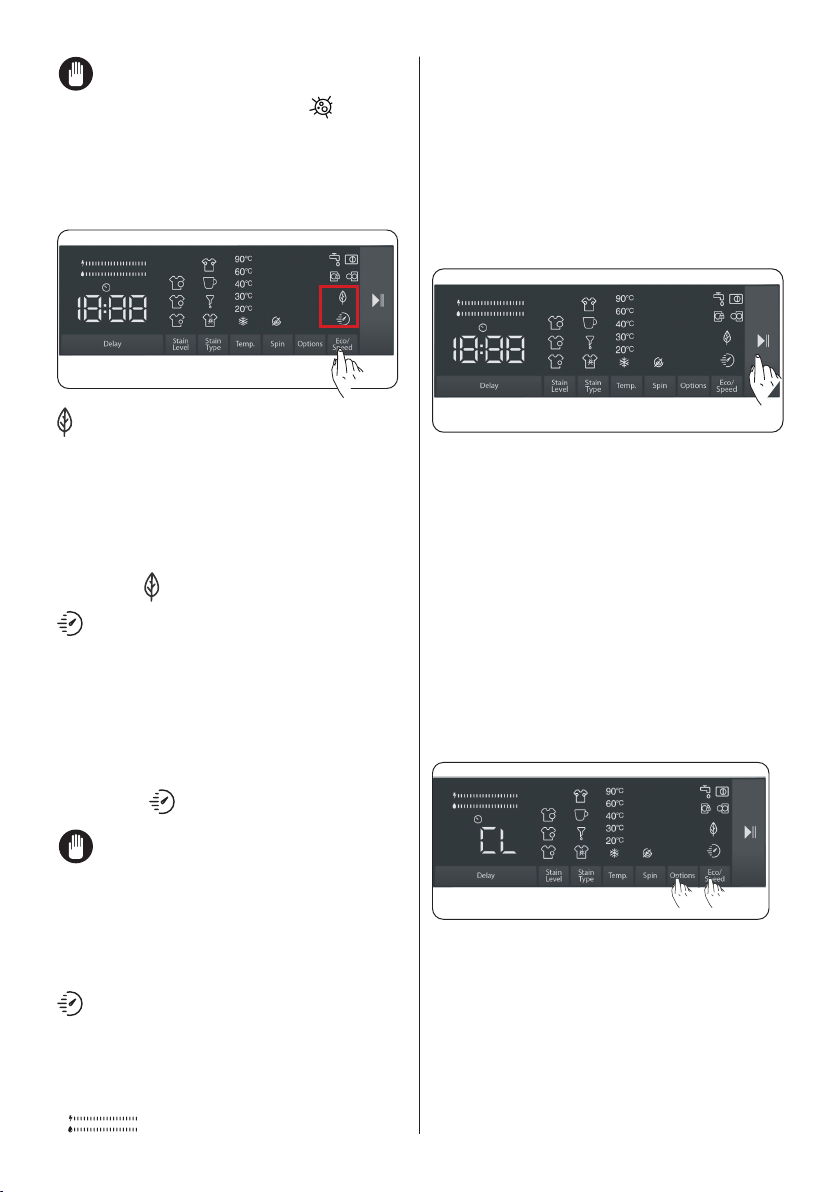
5. Eco/Quick Wash auxiliary function
Eco washing auxiliary function:
the symbol .
Quick Wash auxiliary function:
the symbol .
NOTE:
panel.
• Energy/Water Efficiency Bar:
“
Start/Pause button
you may start the programme you have
5.9 Child Lock
The Child Lock function allows you to lock
the buttons so that the wash cycle you have
chosen cannot be changed unintentionally.
To activate child lock, press and hold
button 2 and 3 simultaneously for at least
3 seconds. ‘’CL’’ will flash on the electronic
display for 2 seconds when the child lock is
activated.
2 3
If any button is pressed or selected
programme is changed by the programme
dial while the child lock is active, the “CL”
symbol will flash on the electronic display
for 2 seconds.
If the child lock function is active and
a programme is running, when the
programme dial is turned to the “Off”
position and another programme is selected
the previously selected programme
continues from where it was left.
EN - 20EN - 20
To deactivate the child lock, press and
hold button 2 and 3 simultaneously for at
least 3 seconds until the “CL” symbol on
the electronic display disappears.
Note
cut off
5.10 If you want to pause/cancel a
running program or add laundry:
• symbol key allows you to pause
or restart the selected program. When
you want to add laundry, you can use
• Touch
laundry.
• If
step where you can add laundry has
passed.
•
program, turn the program knob to
the program knob to any program
water and cancel the program. You
can select a new program and start
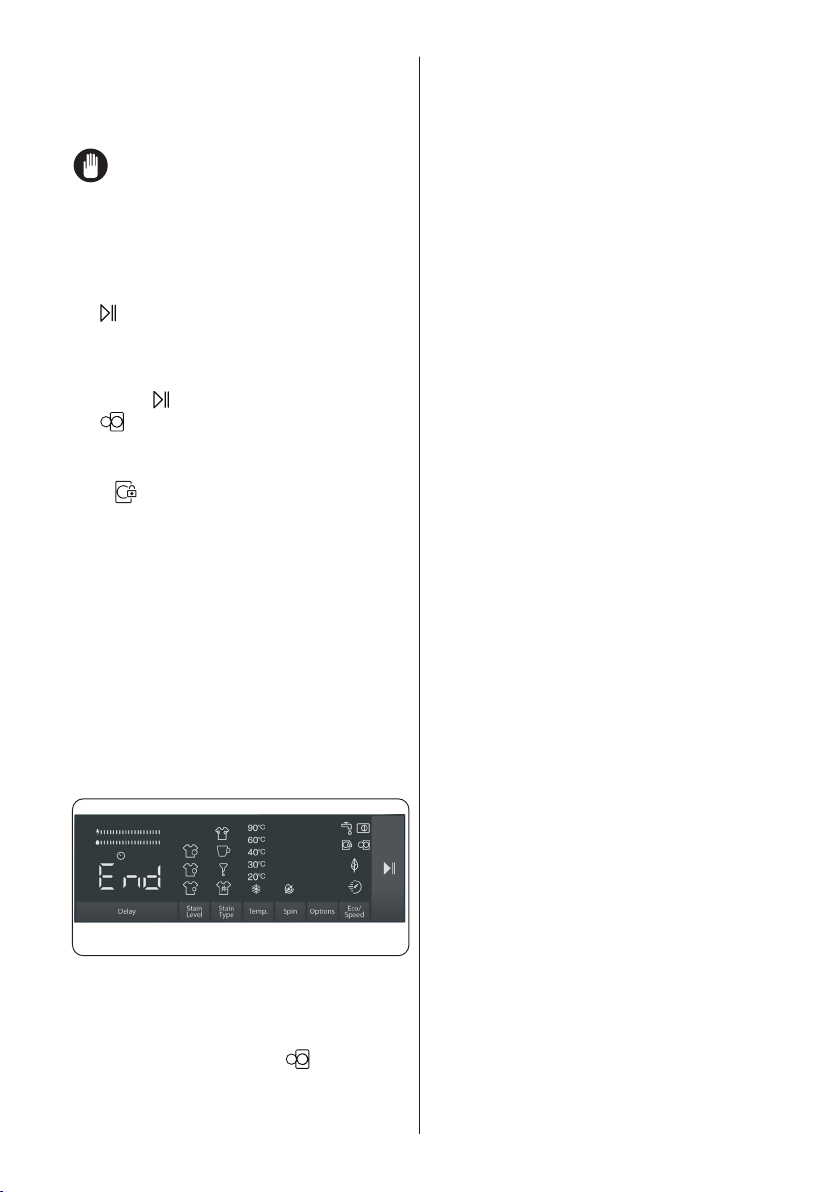
5.11 Program End
when the selected program ends.
•
• You can open the door and take
laundry, leave the door open so that
• Turn the program knob to CANCEL
•
• Turn off the water tap.
EN - 21EN - 21
6. PROGRAMME TABLE
Programme
laundry amount
(kg)
Detergent
compartment
Programme
2 240
4,5 kg), bedclothes, etc.)
COTTON
9,0
2 230
4,5 kg), bedclothes, etc.)
Pre-Wash Cotton
9,0
1&2 164
4,5 kg), bedclothes, etc.)
4,5
2 96
(Underwear, bedsheet, tablecloth, towel
(max.2,5 kg) bedcloth, etc.)
EASY CARE
3,5
2 110
WOOL
2,5
2 43
labels.
RINSING
9,0
- 30
ALLERGY SAFE
4,5
2 212 Baby laundry
9,0
- 17
start to run.
SENSITIVE/HAND
WASH
2,5
2 90
Laundry recommended for hand wash or
3,5
2 80
Duvet
3,5
-
2 100
For washing a fibre duvet with a
machine washable label. (max. 2.5 kg)
Jeans / Dark
Garments
3,5
2 96
separately
4,0
2 60
5.
2,0
2 15
5
your can wash.
9,0

EN - 22
NOTE: PROGRAMME DURATION MAY CHANGE ACCORDING TO THE
AMOUNT OF LAUNDRY, TAP WATER, AMBIENT TEMPERATURE AND SELECTED
ADDITIONAL FUNCTIONS.
(*) Washing water temperature of the programme is the factory default.
(**) 60 C° - 40 C° are energy label declaration programmes.
(***) If your machine has the rapid wash auxiliary function, you can enable the quick wash option on the
display panel and load the machine with 2 kg or less laundry to wash it in 30 minutes.
(****) Due to the short washing time of this programme, we recommend that less detergent is used. The
programme may last longer than 15 minutes if your machine detects an uneven load. You can open the
door of your machine 2 minutes after the completion of a washing operation. (The 2 minute period is
not included in the programme duration).
EN - 23EN - 23
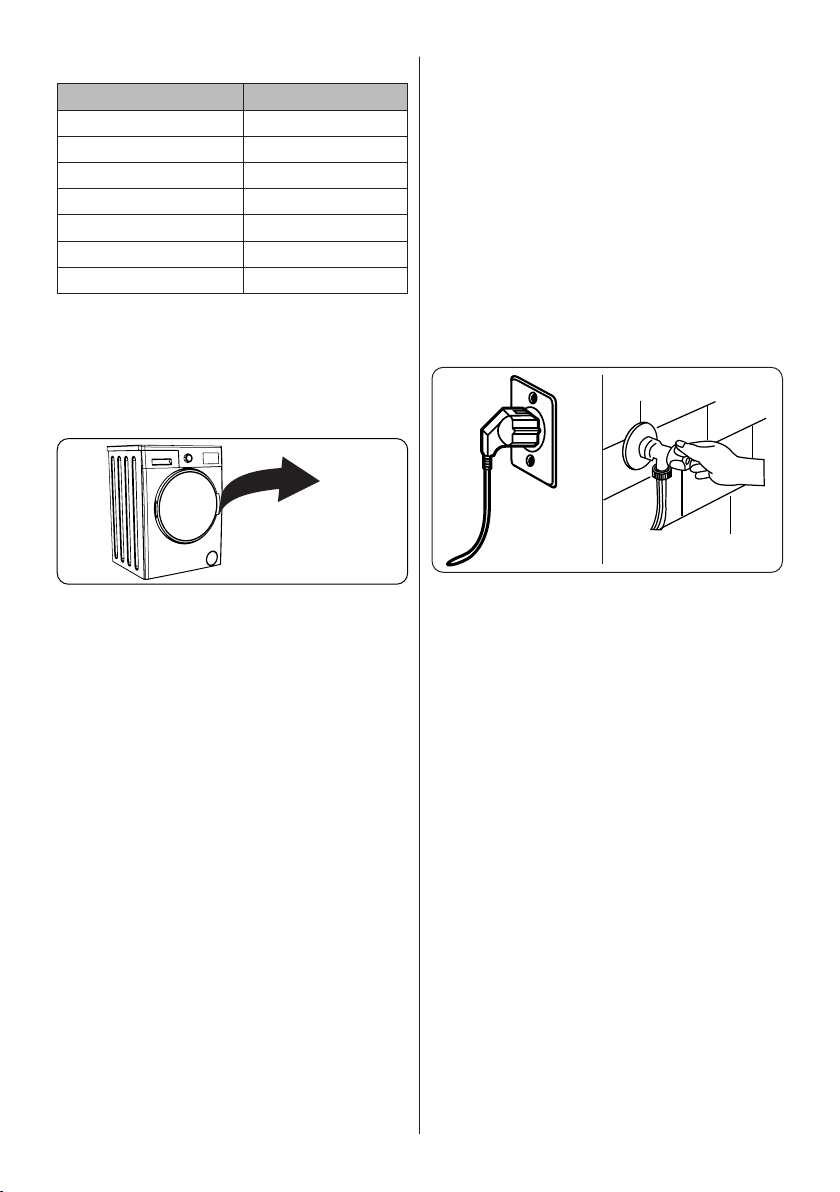
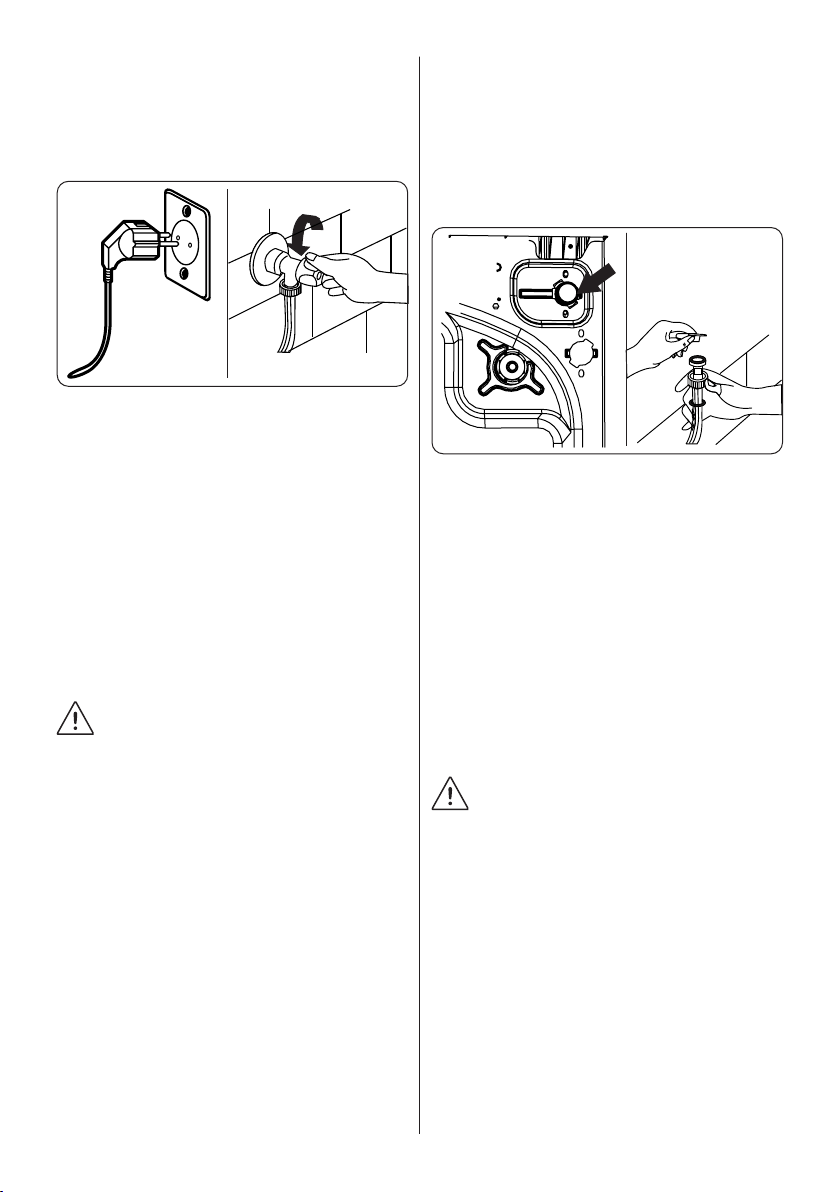
7. CLEANING AND
MAINTENANCE
7.1 Warning
supply off and remove the
plug from the socket
Turn off the water
CAUTION: Do not
cleaners, glass cleaners
agents to clean your
surfaces and other
7.2 Water Inlet Filters
2 months.
•
•
•
•
CAUTION:
breakdowns are out of the scope of the
warranty.
EN - 24EN - 24
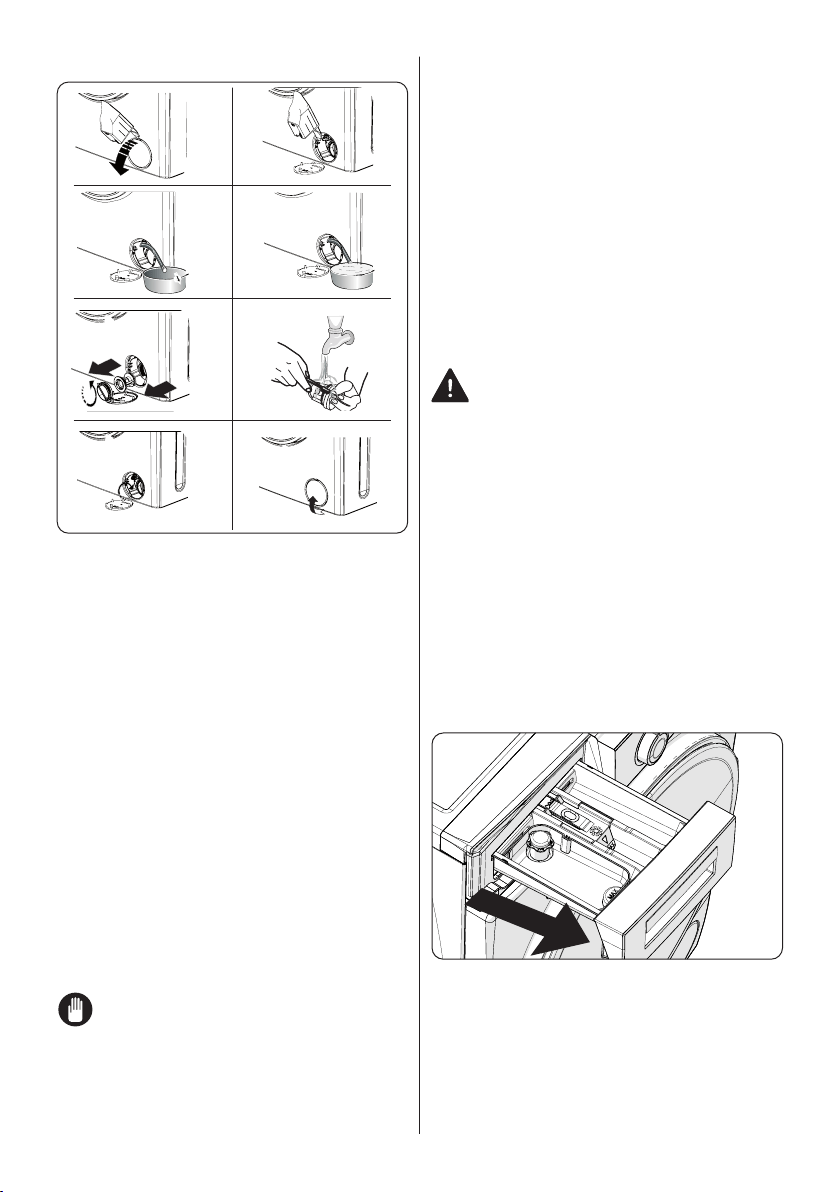
7.3 Pump Filter
1
3
5
7
2
4
6
8
We recommend that you clean the pump
1.
detergent level plate to open the pump
cover.
2. Lodge the end of the powder spade
3. Pull the black rubber hose forward
from the hose.
4.
NOTE:Depending on the amount of
water inside the machine, you may have to
empty the water collection container a few
times.
•
plug back on the hose.
•
5.
6.
7.
•
8.
•
meet the holes on the front panel of the
WARNING:
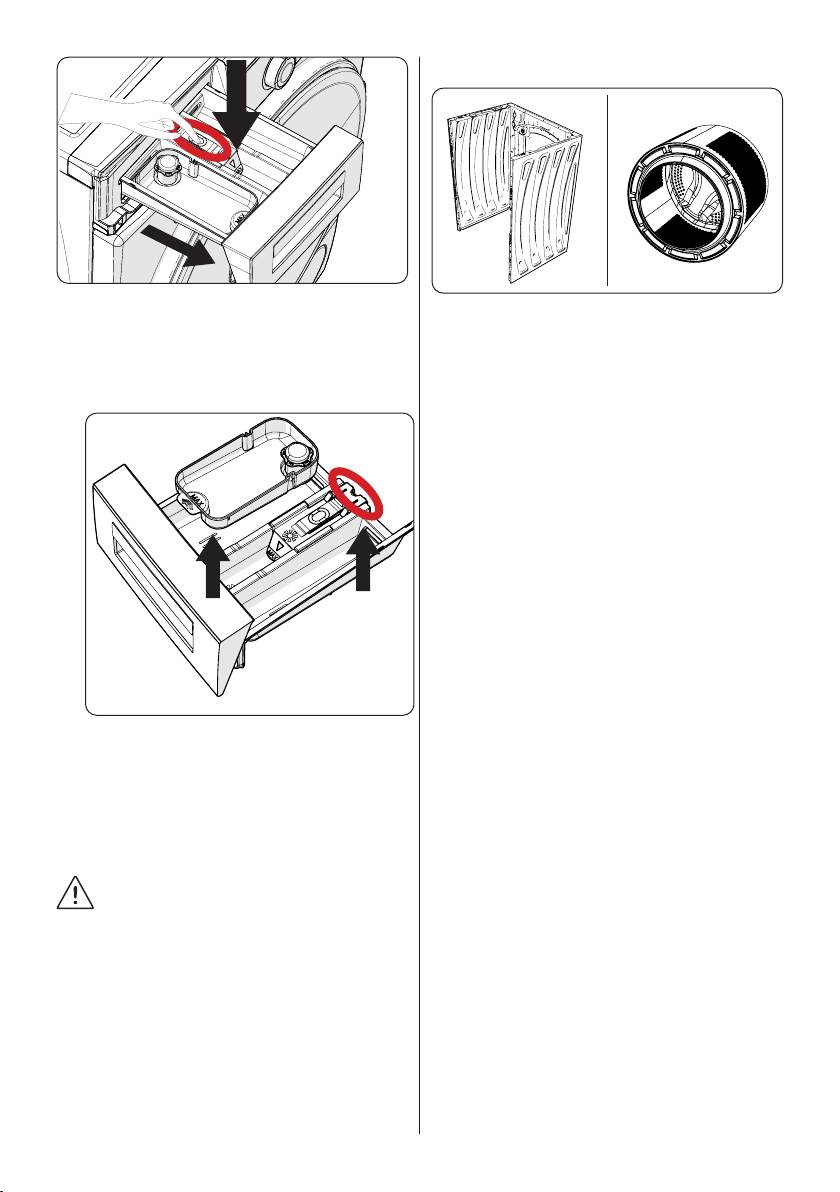
7.4 Detergent Drawer
We recommend that you remove the drawer
every 2 months to clean the accumulated
To remove the detergent drawer:
•
extended.
• Press the region shown below inside
the detergent drawer you have pulled
all the way back, and continue pulling
and remove the detergent drawer from
its place
EN - 25EN - 25
• Remove the detergent drawer and
disassemble the flush stopper. Clean
thoroughly to completely remove any
softener residue. Refit the flush stopper
after cleaning and check that it is seated
properly.
•
• Rinse with a brush and lots of water.
• Collect the residues inside the detergent
drawer slot so that they don’t fall inside
your machine.
• Dry the detergent drawer with a towel or
dry cloth and place it back
Do not wash your detergent drawer
in a dishwasher.
Liquid detergent apparatus(*)
For the cleaning and maintenance of the
liquid level detergent apparatus, remove
the apparatus from its location as shown
in the picture below, and thoroughly clean
the remaining detergent residues. Replace
the apparatus. Make sure that no residual
material remains inside the siphon.
8. Body / Drum
1 2
1. Body
or soap and water, to clean the external
2. Drum
EN - 26
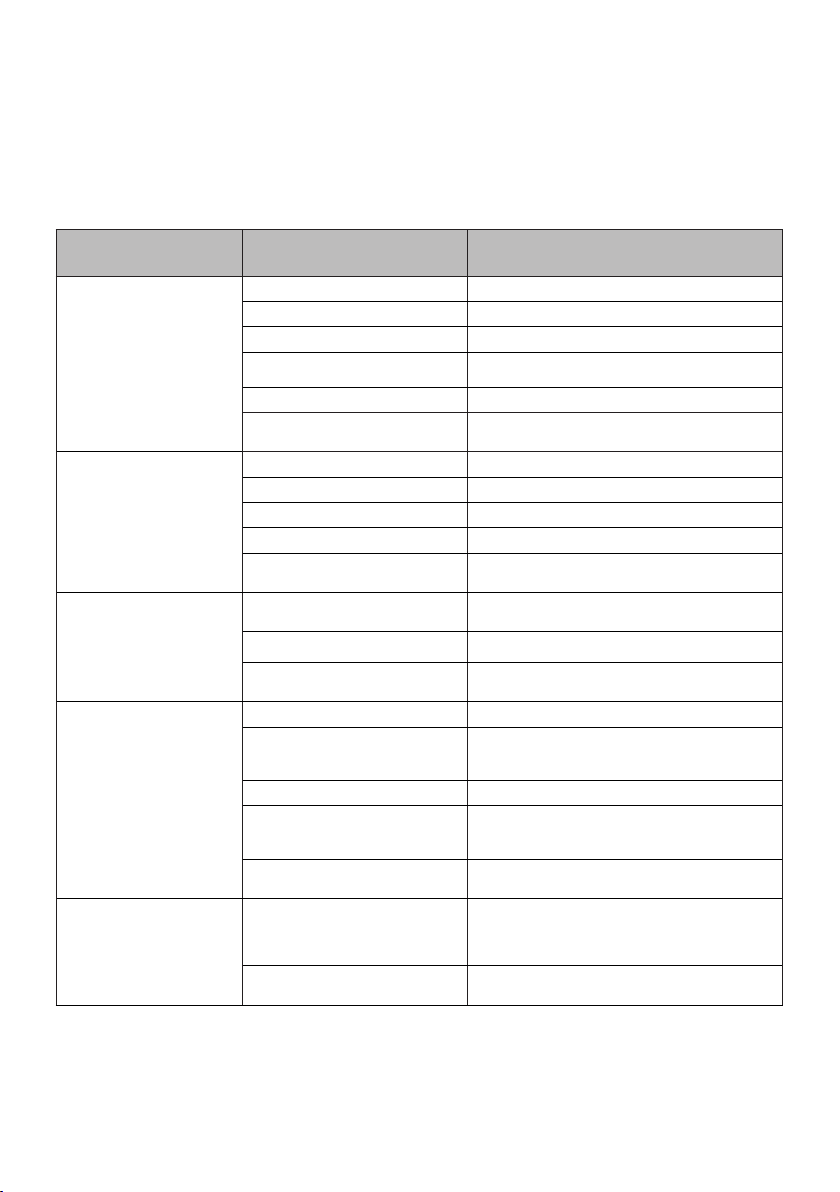
9. TROUBLESHOOTING
•
• Turn off the water supply.
FAULT POSSIBLE CAUSE TROUBLESHOOTING
Fuses are faulty. Replace the fuses.
Start/Pause button not pressed. Press the Start/Pause button.
completely closed.
Turn tap on.
completely closed.
The feet have not been adjusted.
removed.
spread.
Do not overload the drum. Spread laundry evenly
surface.
surface.
the detergent drawer.
used.
Press the Start/Pause button. To stop the foam,
Wrong detergent used.

EN - 27
FAULT POSSIBLE CAUSE TROUBLESHOOTING
result.
programme selected.
Amount of detergent used
selected programme has not been exceeded.
result.
Hard water.
part of the drum.
. . . . . . . . . . . . . . . . . . . . .
Laundry has
detergents may appear on your
Grey spots appear on the
laundry.
place or takes place later
than expected.
No fault. The Unbalanced load
evenly for the next wash.
10. AUTOMATIC FAULT WARNINGS AND WHAT TO DO
shown below.
TROUBLE CODE POSSIBLE FAULT WHAT TO DO
E01
properly.
E02
The water pressure or the water level
E03
E04
water.
EN - 28EN - 28
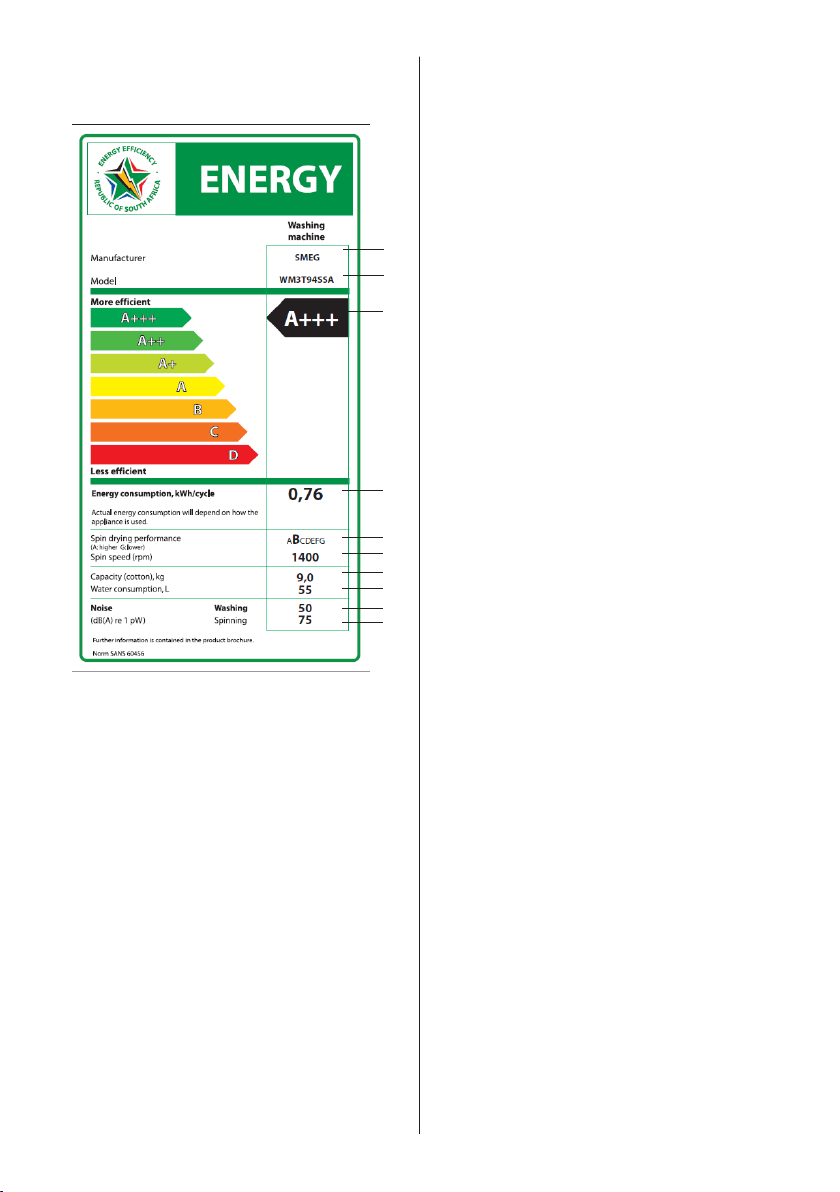
11. DESCRIBING THE ENERGY
LABEL AND SAVING ENERGY
1
2
3
4
5
6
7
8
9
10
1. Brand
2. Model
3. Energy class
4.
5.
6.
7.
8.
9.
10.
may vary based on water pressure,
water hardness, water temperature,

CUSTOMER CARE AND SERVICE
Always use original spare parts.
When contacting our Authorised Service Centre, ensure that you have the
following data available: Model, Serial Number and Service Index (SI).
The information can be found on the rating plate. Subject to change with-
out notice.
years from the placing on the market of the last unit of the model.
Visit our website to:
Get usage advice, service and repair information and download user
manuals
www.smeg.com/services/customer-service
52365533

