
INNOVATION AND INSPIRATION ON FIRE™
INSTALLATION, USE & CARE MANUAL
Please read this enre manual before installaon and use of this pellet fuel-burning appliance.
Failure to follow these instrucons could result in property damage, bodily injury or even death.
Contact your local building or re ocials about restricons and installaon inspecon
requirements in your area. Save these instrucons.
WOOD FIRED PELLET GRILL
MODELS:
TEPG36G
TEPG36RP/N: 17543J 08/20

ii | Twin Eagles Technical Support (562) 263-3600
A SPECIAL MESSAGE TO OUR CUSTOMERS...
Congratulaons on the purchase of your Wood Fired Pellet Grill! Our products are engineered
for precision and designed for style. Each Twin Eagles grill is manufactured in the USA at our
own state of the art facility in California.
This manual will give you easy to follow instrucons for installing, operang and maintaining
your grill. We recommend reading this manual before your rst use to ensure safety, proper
care and operaon.
At Twin Eagles, we want you to enjoy grilling and spending me together as much as we do –
making memories that linger long aer the grill cools down.
Thank you and welcome!
Dante Cantal
Owner and Founder
A MAJOR CAUSE OF FIRES IS FAILURE TO MAINTAIN
REQUIRED CLEARANCES (AIR SPACES) TO
COMBUSTIBLE MATERIALS.
IT IS OF UTMOST IMPORTANCE THAT THIS PRODUCT
BE INSTALLED ONLY IN
ACCORDANCE WITH THESE INSTRUCTIONS.

www.twineaglesgrills.com | iii
IMPORTANT SAFETY INSTRUCTIONS
Please read this enre manual before installaon and use of this pellet fuel-burning appliance. Failure
to follow these instrucons could result in property damage, bodily injury or even death.
Contact your local building or re ocials about restricons and installaon inspecon requirements in
your area. Save these instrucons.
• Placement and Location
◦ This grill is designed for outdoor use only.
◦ This grill is not designed to be installed in or
on recreaonal vehicles and / or boats.
◦ Do not locate your grill under or near windows
or vents that can be opened into your home.
◦ Grill should be installed on a level rm surface.
◦ Minimum clearance of 12 inches from the
back and sides of the grill to adjacent com-
busble construcon must be maintained.
This grill shall not be located under overhead
combusble construcon.
◦ Do not install grill on combusble ooring. It
is recommended that the grill is installed on
non-combusble ooring or on ooring pro-
tected with noncombusble surfaces where
the protecve surface has been approved by
the authority with jurisdicon.
◦ Keep your grill covered when not in use. Grill
covers are available and are designed to help
keep your grill safe from harmful elements.
◦ Care should be taken to ensure that no water
gets into the pellet hopper as wood pellets,
when wet or exposed to high humidity, ex-
pand greatly and break apart which can cause
blockage of the auger.
◦ Never use your grill in an excessively windy
area.
◦ Accessible parts of the grill will be very hot,
exercise cauon around the grill while it’s in
use.
◦ Keep young children away while grill is in use.
When children are present, adult supervision
is recommended.
• Set-up
◦ To prevent re and smoke damage, remove all
packaging materials before operang the grill.
◦ It is recommended that before using your grill
you wipe the inside clean with soap and water.
This is to remove any residual solvents, oil and
grease used in the manufacturing process. The
grates should also be thoroughly cleaned in
the same manner.
◦ This pellet grill is designed and approved for
pellezed, all-natural, wood fuel for cooking
only. DO NOT use pellets intended to heat
rooms, these may have harmful addives, and
are not suitable for cooking.
◦ Use only all natural wood pellets designed for
burning in grills. Do not use fuel labeled as
having addives.
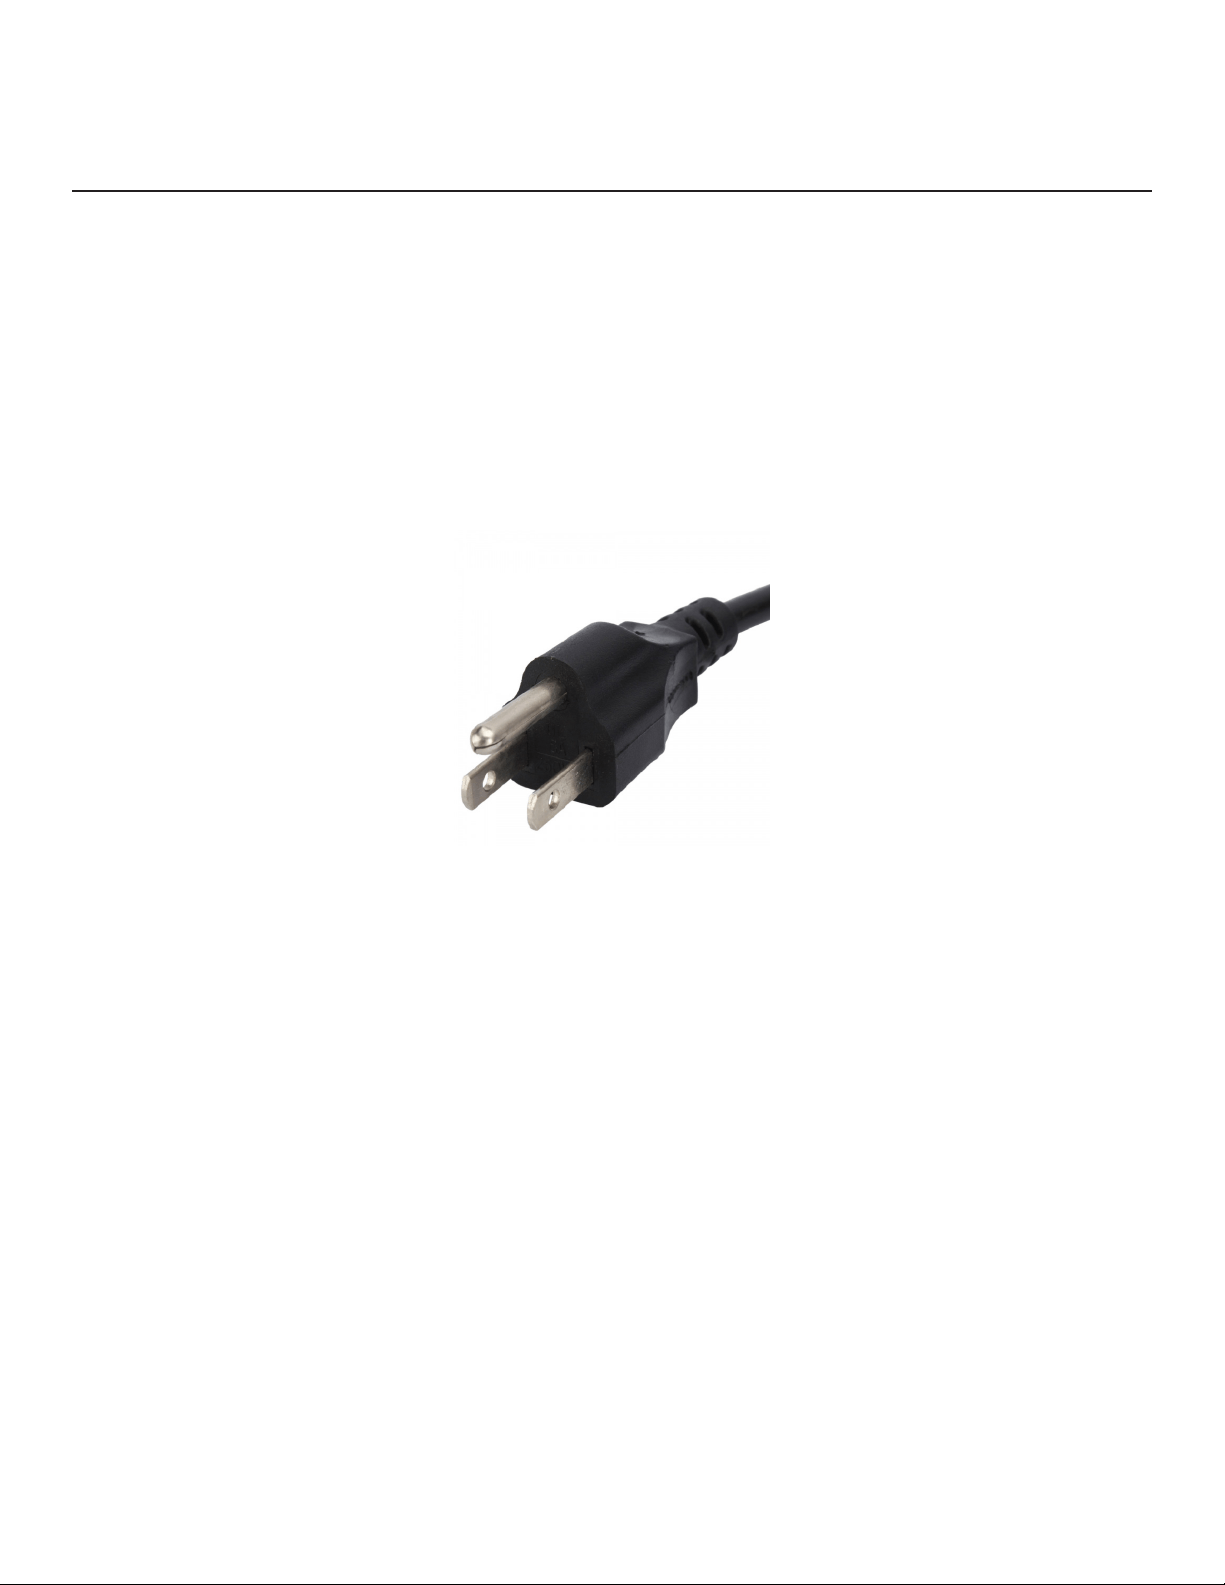
◦ This barbecue requires a 110 Volt 60Hz 5amp,
3 prong grounded plug.
◦ The electrical cord installed on your grill is
equipped with a three-prong (grounding) plug
for your protecon against shock hazard and
should be plugged directly into a grounded
three-prong receptacle. Do not cut or remove
the grounding prong from this plug.
◦ Do not aempt to rewire or alter the wiring
of this grill in any way. The grill must be able
to either be unplugged or power to the unit
must be shut o before any servicing may be
performed.
◦ When the grill is not in use the grill should be
powered o.
◦ If the power cord is damaged, do not operate
the grill.
◦ Keep any electrical wires away from heated
surfaces.
◦ If an external electrical source is ulized, this
outdoor cooking appliance, when installed,
must be electrically grounded in accordance
with the local codes or, in absence of local
codes with the following:
• USA:
◦ Naonal Electrical Code, ANSI/NFPA70
• CANADA:
◦ Canadian Electrical Code, CSA C22.1

iv | Twin Eagles Technical Support (562) 263-3600
• Operation
◦ Do not use the grill for other than its intended
purpose.
◦ Do not use accessories not specied for use
with this appliance.
◦ This grill can operate automacally, but it is
strongly recommended that the grill is never
le unaended when in use.
◦ Never use the grill if the Ash Drawer is not
installed or fully closed.
◦ Disposal of Ashes - Ashes should be placed in
a metal container with a ght-ng lid. The
closed container of ashes should be placed on
a non-combusble oor or on the ground, well
away from all other combusble materials,
pending nal disposal. When the ashes are
disposed by burial in soil or otherwise local-
ly dispersed, they should be retained in the
closed container unl all cinders have thor-
oughly cooled.
◦ Do not use charcoal in the burn pot, charcoal
is to be used with the Twin Eagles Charcoal
Tray accessory only.
◦ Use only Wood Pellet Fuel specied by Twin
Eagles. Do not use pellet fuel labeled as having
addives.
◦ Never use gasoline, gasoline-type lantern fuel,
kerosene, charcoal lighter uid, or similar
liquids to start or “freshen up” a re in this
appliance. Keep all such liquids well away from
the appliance when in use.
◦ It is strongly recommended that you regular-
ly check the repot for obstrucons to make
sure the air ow is properly maintained.
◦ Never wear loose ng or hanging garments
while using this grill.
◦ Use heat-resistant barbeque mis or gloves
when operang this grill.
◦ Never allow clothing, pot holders, or other
ammable materials to come into contact with
or be close to any grate or hot surface unl it
has fully cooled.
◦ To avoid serious injury, never lean on or reach
over an open grill surface, or place hands or
ngers on the front edge of the grill when hot.
IMPORTANT SAFETY INSTRUCTIONS - cont.
◦ Always operate the grill with the hood in the
closed posion, unless using a feature that
requires the hood in the open posion.
◦ Creosote - Formaon and need for removal.
When wood pellets are burned slowly, they
produce tar and other organic vapors that
combine with expelled moisture to form creo-
sote. The creosote vapors condense in a rela-
vely cool oven ue and exhaust hood. When
ignited, this creosote makes an extremely hot
re.
◦ The ue and interior of the grill should be
inspected at least twice a year to determine
when grease and/or creosote buildup has
occurred.
◦ When grease or creosote has accumulated, it
should be removed to reduce risk of re.
◦ DO NOT over-re your grill. To reduce the risk
of over-ring, never use the grill for anything
other than its intended purpose.
• CARBON MONOXIDE WARNING:
Follow these guidelines to prevent this colorless,
odorless gas from poisoning you, your family or
others.
◦ Know the symptoms of carbon monoxide
poisoning: headache, dizziness, weakness,
nausea, voming, sleepiness, and confusion.
Carbon monoxide reduces the blood’s ability
to carry oxygen. Low blood oxygen levels can
result in loss of consciousness and death.
◦ See a doctor if you or others develop a cold or
u-like symptoms while cooking or in the vicin-
ity of this appliance. Carbon monoxide poison-
ing, which can easily be mistaken for a cold or
u, is oen detected too late.
◦ Alcohol consumpon and drug use increase
the eects of carbon monoxide poisoning.
• Carbon monoxide is especially toxic to mother
and child during pregnancy, infants, the elderly,
smokers, and people with blood or circulato-
ry system problems, such as anemia, or heart
disease.
www.twineaglesgrills.com | v
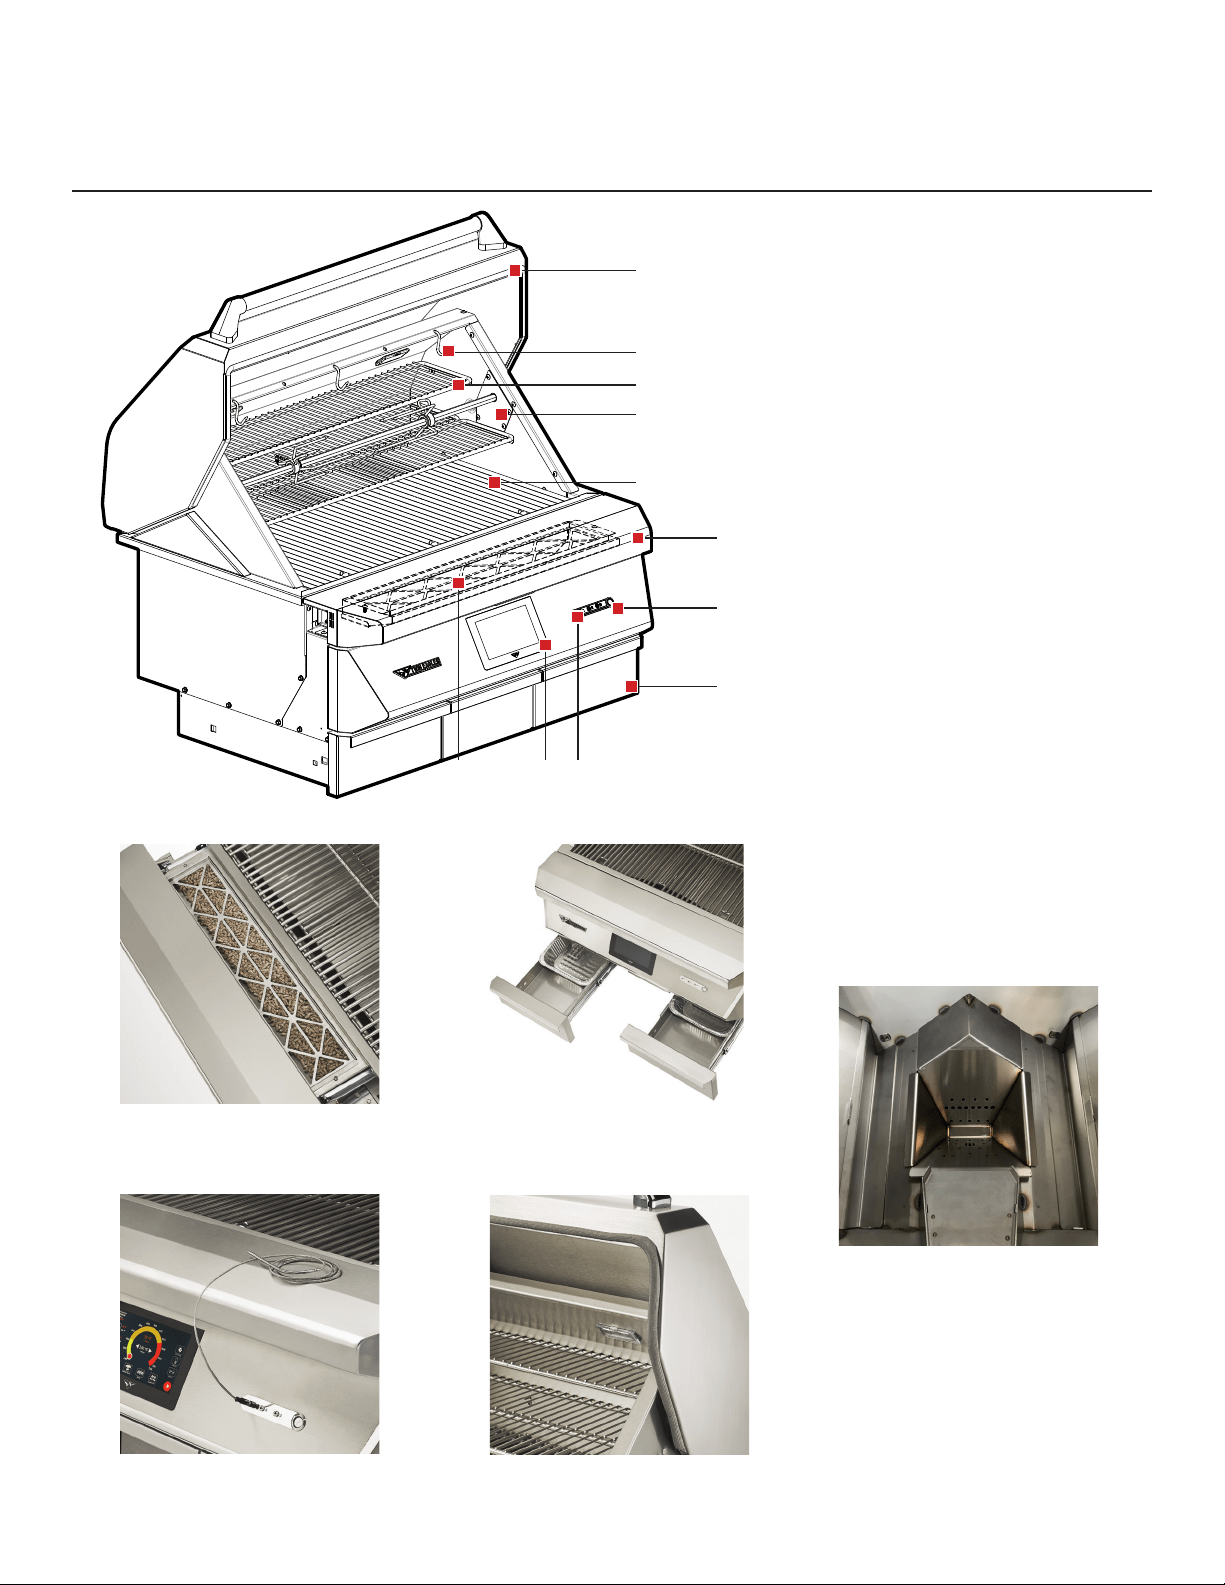
TWIN EAGLES | PELLET GRILL
FEATURES:
1
2
3
4
5
6
7
8
9 10 11
PELLET HOPPER GUARD REMOVABLE
ALUMINUM ASH TRAYS
HOOD GASKETTEMPERATURE PROBES
1. HOOD
2. FOOD HOOKS
3. COOKING RACKS
4. ROTISSERIE SPROCKET
5. COOKING GRATES
6. PELLET HOPPER COVER
7. ON/OFF SWITCH
8. ASH DRAWERS
9. PELLET HOPPER
10. CONTROL PANEL
11. PROBE STATION
REMOVABLE FIREPOT
&
ASH RESERVOIRS
vi | Twin Eagles Technical Support (562) 263-3600
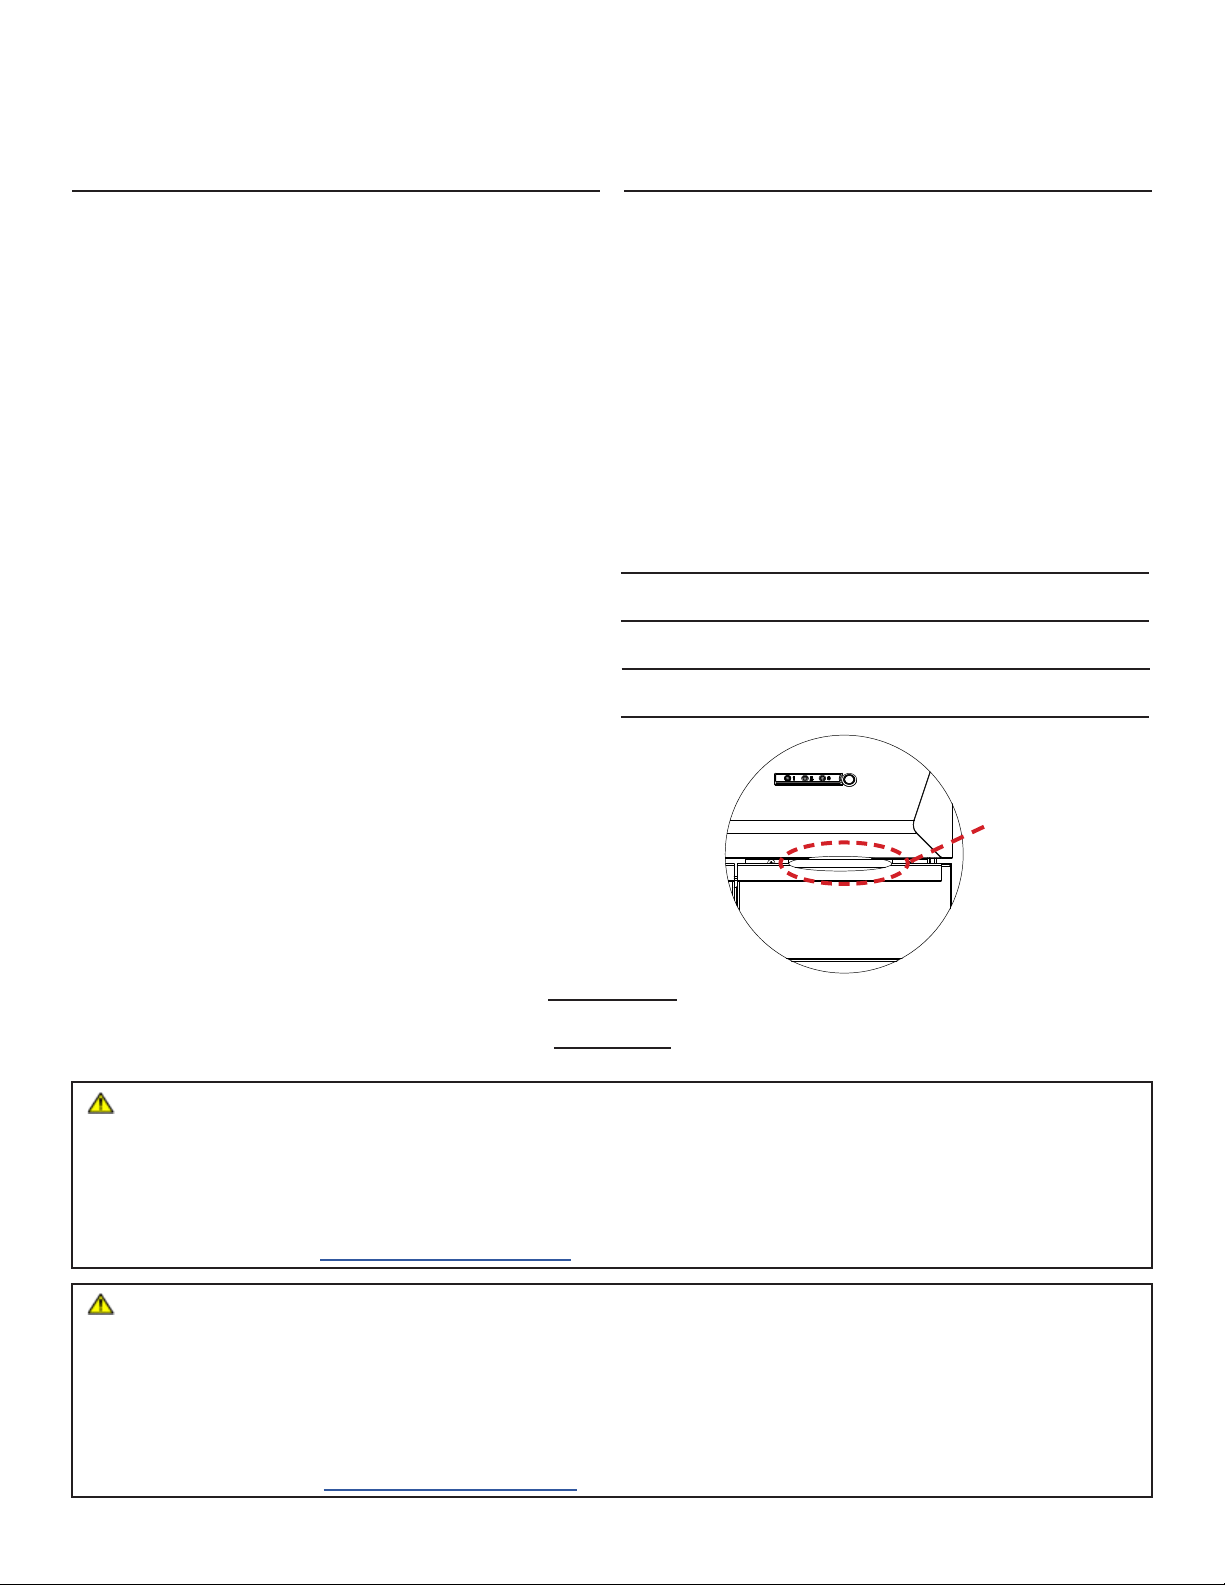
TABLE OF CONTENTS CUSTOMER CARE
Please record the product informaon below and
refer to it when contacng Twin Eagles.
This informaon is found on the data nameplate,
located under the right hand Ash Drawer. A second
label with model number and serial number is located
below the Front Panel above the right Ash Drawer,
shown below. Remove the right Ash Drawer to visually
access the nameplate from the front of the grill.
SERVICE INFORMATION
MODEL NUMBER
SERIAL NUMBER
DATE OF PURCHASE
PLACE OF PURCHASE
To the Installer:
Please read these instrucons completely and give this manual to the owner.
To the Owner:
Keep this manual in a safe place for future reference.
WARNING: CALIFORNIA PROPOSITION 65
This product can expose you to chemicals including carbon monoxide which is known to the State of Cali-
fornia to cause cancer and reproducve harm. To minimize exposure to the by-products of the burning fuel
or from combuson, always operate this unit according to the use and care manual and provide good ven-
laon. California law requires businesses to warn customers of potenal exposure to such substances. For
more informaon go to www.P65Warnings.ca.gov.
AVERTISSEMENT: PROPOSITION 65 DE L’ETAT DE LA CALIFORNIE
Cet appareil peut vous exposer aux produits chimiques et au gaz monoxyde de carbonne reconnue dans
l’Etat de la Californie pour causer le cancer et des problemes de ferlite. Pour minimiser l’exposion de ces-
sous produits combusbles ou de la combuson, uliser toujours cet appareil en conformitee au manuel
d’ulisaon et d’entreen en s’assurant egalement d’une bonne venlaon. La loi de la Californie exige aux
fabricants d’informer leurs clients aux risques d’exposion potenelle a de telles substances. Pour plus d’in-
formaon, visiter le site
www.P65Warnings.ca.gov
SERIAL NUMBER /
MODEL NUMBER
TEPG36 SN: XXXX XXXXXX
GETTING STARTED 1
LOCATING THE GRILL 2
CUT-OUT DIMENSIONS 3
INSULATION JACKET 4
ELECTRICAL REQUIREMENTS 5
WINDY CONDITIONS 6
PELLET GRILL MODE OVERVIEW 7-10
USING YOUR PELLET GRILL 11-14
RECOMMENDED PELLETS 15
PELLET GRILLING GUIDELINES 16
PELLET GRILLING TIMES AND TEMPS 17-18
CLEANING AND MAINTENANCE 19-20
EXPLODED VIEW 21-22
REPLACEMENT PARTS LIST 23-24
WIRING DIAGRAM 25
WARRANTY 26
HOW TO OBTAIN SERVICE 27
www.twineaglesgrills.com | 1
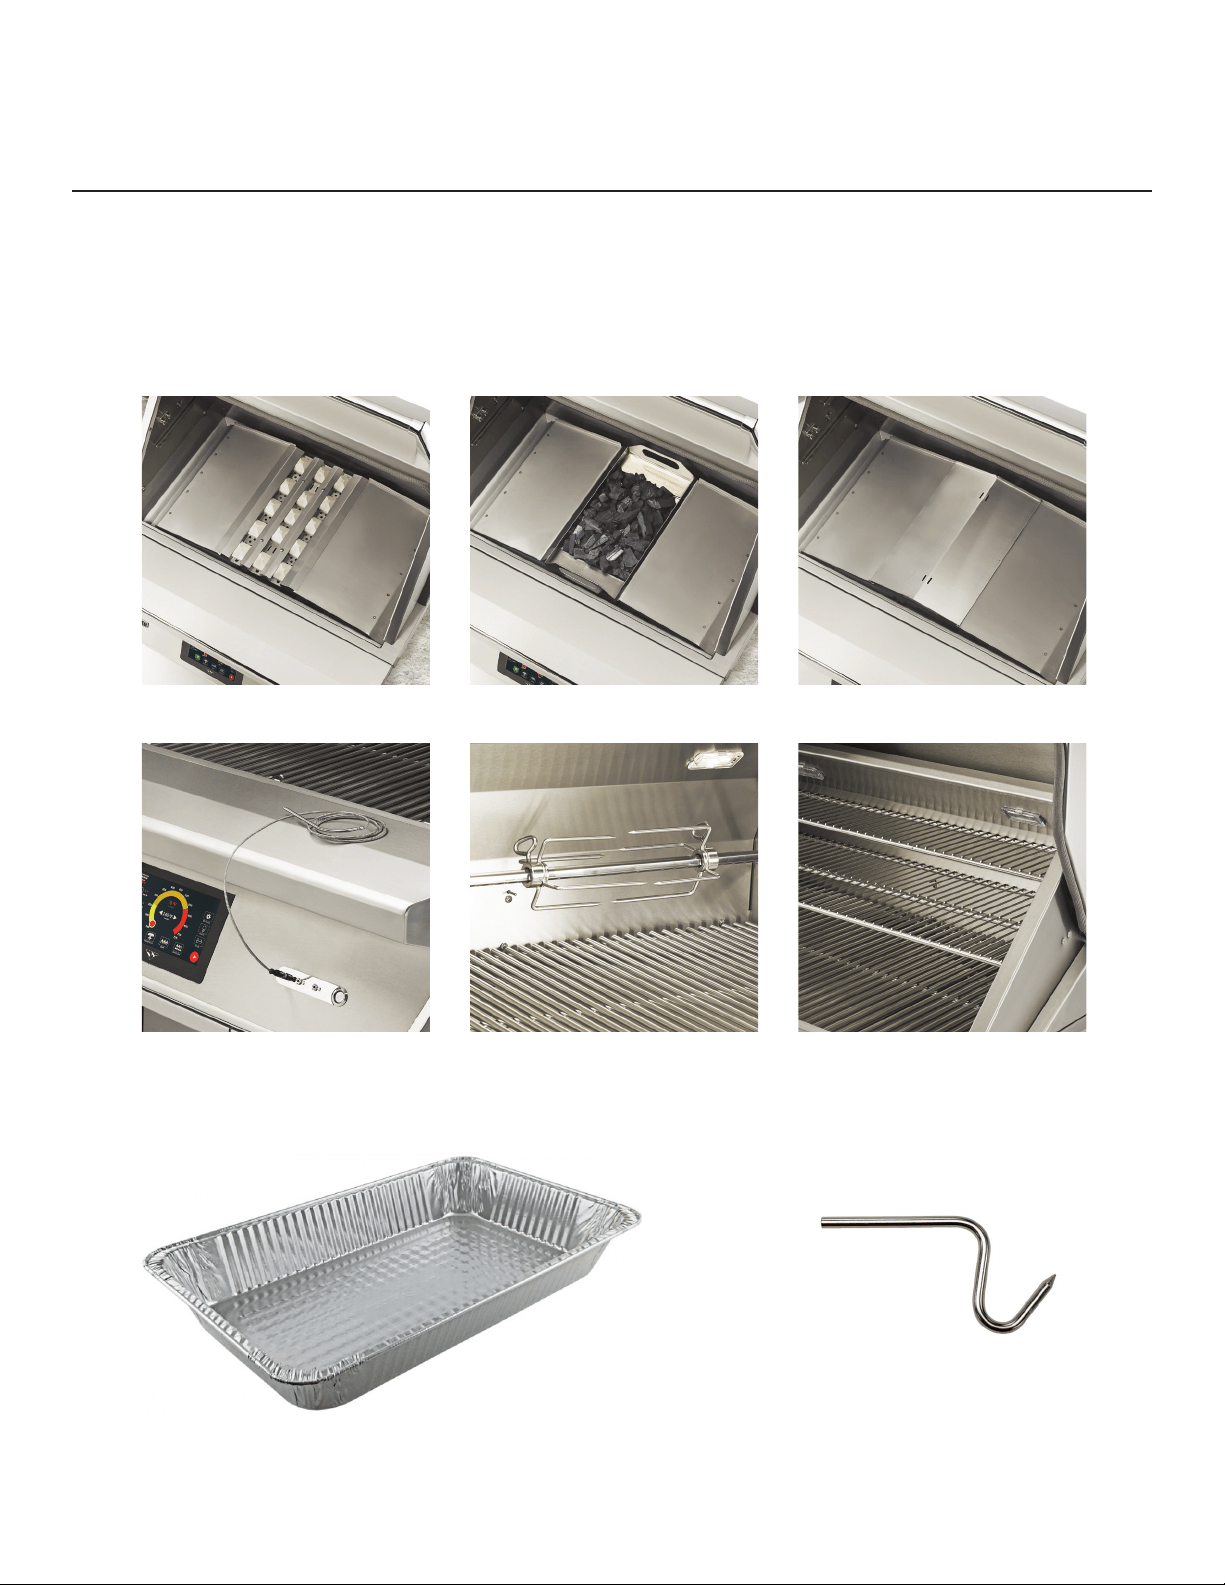
GETTING STARTED
1. Remove all packaging materials, labels and protecve lm. DO NOT LEAVE UNIT IN THE SUN WITH PRO-
TECTIVE PLASTIC FILM ON FOR AN EXTENDED PERIOD OF TIME AS IT WILL BECOME DIFFICULT TO RE-
MOVE.
2. Check to ensure all grill accessories listed below are included.
3. Fill out Warranty Registraon Card and mail it to the indicated address, or register Online. See page 23.
BRIQUETTE TRAY CHARCOAL TRAY INDIRECT/VAPORIZER PLATE
TEMPERATURE PROBES X3 MEAT FORKS X1 PAIR
&
ROTISSERIE ROD
COOKING RACKS X3
REMOVABLE ALUMINUM ASH TRAYS X2
FOOD HOOKS X3

2 | Twin Eagles Technical Support (562) 263-3600
LOCATING THE GRILL
This grill is designed for outdoor use only. Do not locate this grill under overhead combusble surfaces.
CAUTION should be taken when grills are used near glass, vinyl siding or other temperature sensive construc-
on materials. In some cases, it may be necessary to increase the clearance around the grill to avoid damage
to vinyl siding. Check with the manufacturer of the siding material for details.
DO NOT operate the grill inside a building, garage, recreaon vehicle or any enclosed area. When choosing an
area, consider exposure to wind, and proximity to trac paths. Keep the grill away from windy areas but keep
the grill in a well-venlated area. Do not obstruct the ow of combuson and venlaon air around the grill.
The supporng edges of the grill must be located level and at. The counter should also be leveled.
CLEARANCE TO COMBUSTIBLE CONSTRUCTION
A minimum clearance of 12” from the sides and 12”
from the back of the grill to adjacent vercal combus-
ble construcon must be maintained. For adjacent
combusble construcon extending above the count-
er-top surface, the minimum clearance from sides and
back of the grill is 18 inches.
DÉGAGEMENT de toute construcon combusble
Il faut maintenir une distance minimum de 12 po
(30.48 cm) sur les côtés et de 12 po (30.48 cm) sur
l’arrière du gril par rapport aux construcons com-
busbles vercales adjacentes. Pour une construc-
on combusble adjacente s’étendant au-dessus de
la surface du comptoir, le jeu minimal des côtés et de
l’arrière du gril est de 18 po (45.72 cm).
CLEARANCE TO NONCOMBUSTIBLE CONSTRUCTION
A minimum clearance of 3 1/4” from the back of the
grill above cooking surface to non-combusble con-
strucon is required to allow the grill hood to open
completely.
A minimum of 6” clearance to the sides of the grill
above cooking surface to non-combusble construc-
on is recommended. The grill can be installed direct-
ly next to non-combusble construcon below the
cooking surface.
DÉGAGEMENT DE TOUTE CONSTRUCTION IN-
COMBUSTIBLE
Une distance minimum de 3 1/4” po (8.25 cm) de
l’arrière du gril au-dessus de toute surface de cuisson
à la construcon incombusble est prescrite pour
permere à la hoe d’ouvrir complètement.
Une distance minimum de 6 po (15.24 cm) des
côtés du gril au-dessus de la surface de cuisson à la
construcon incombusble est recommandée pour
prévoir de l’espace pour le moteur de la rôssoire et
la poignée des broches de cuisson. Le gril peut être
installé directement à proximité d’une construcon
incombusble en-dessous de la surface de cuisson.
A MAJOR CAUSE OF FIRES IS FAILURE TO MAINTAIN
REQUIRED CLEARANCES (AIR SPACES) TO COMBUSTI-
BLE MATERIALS. IT IS OF UTMOST IMPORTANCE THAT
THIS PRODUCT BE INSTALLED ONLY IN ACCORDANCE
WITH THESE INSTRUCTIONS.
www.twineaglesgrills.com | 3
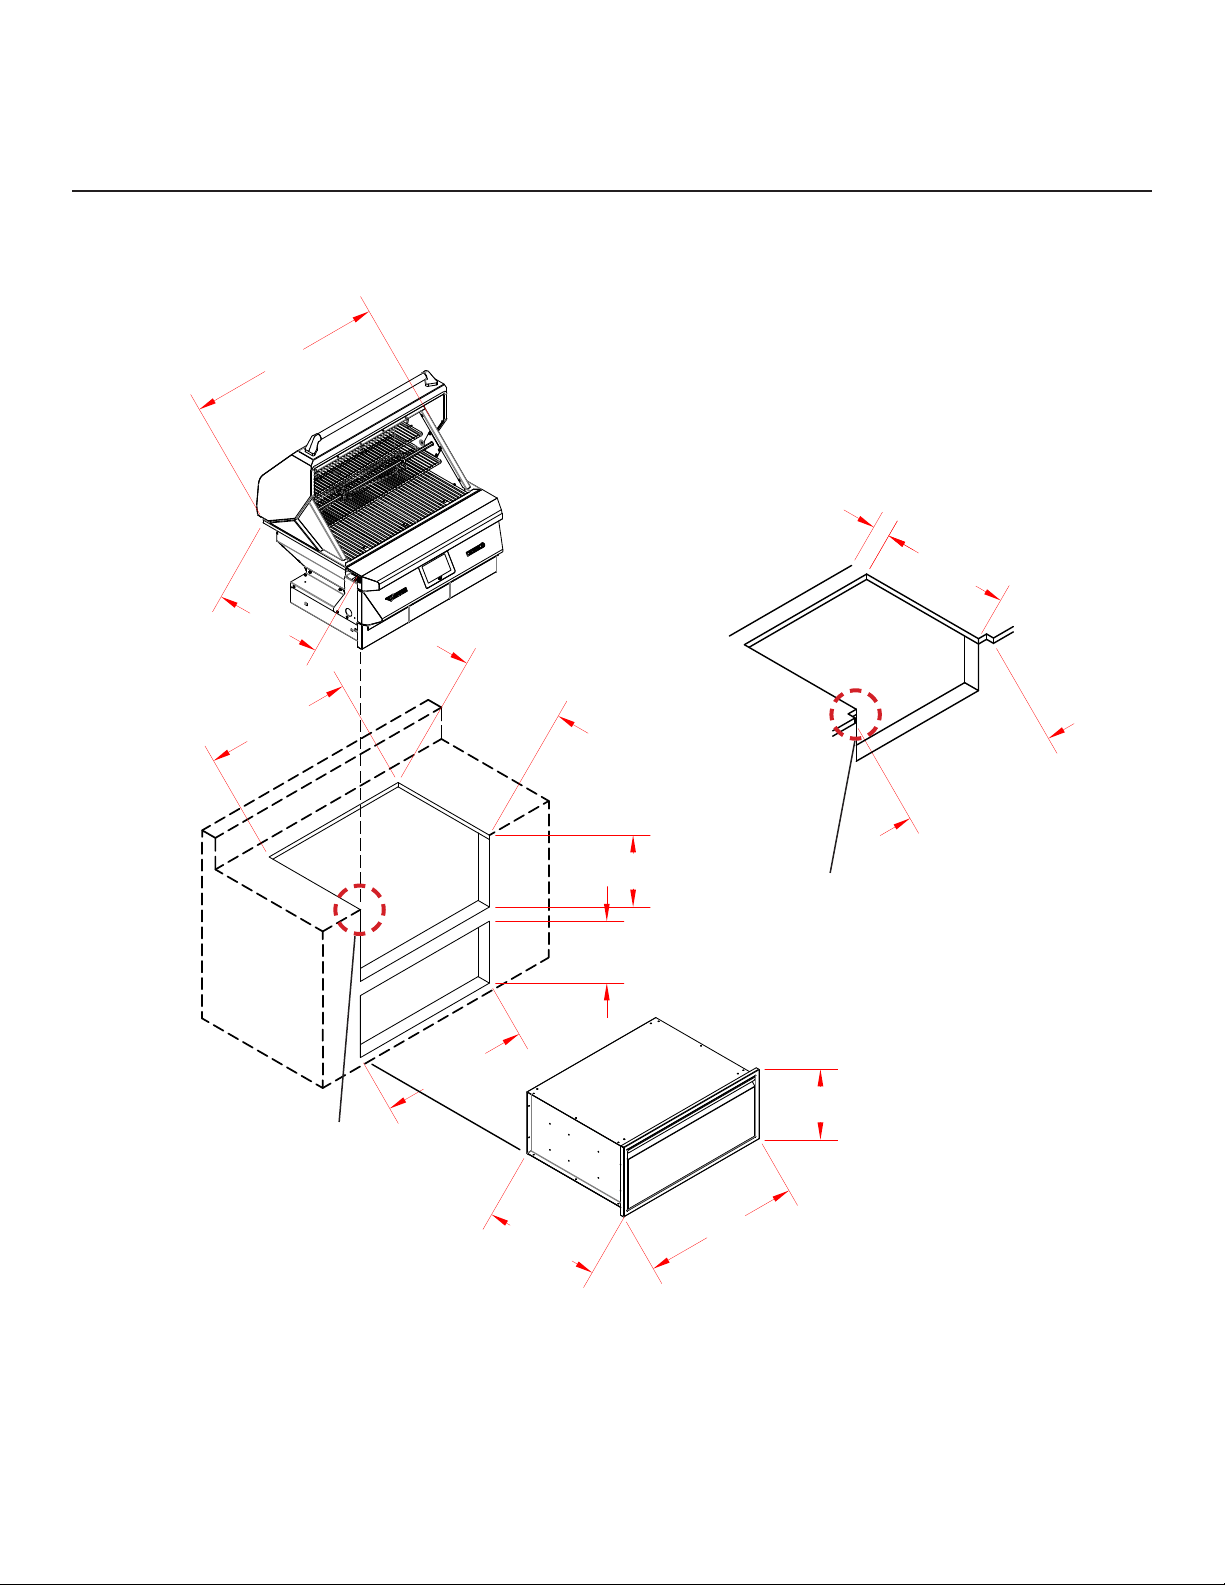
CUT-OUT DIMENSIONS
2425
25
NOTE:
THIS IS FOR NON-COMBUSTIBLE ENCLOSURES
ONLY. FOR COMBUSTIBLE ENCLOSURES REFER
TO THE NEXT PAGE.
SEE COUNTERTOP
NOTCH DETAIL
TEPG36R
(TEPG36G)
TESD361-C
DETAIL
* ADD 3.25 TO ALLOW
FOR HOOD OPENING
COUNTERTOP
NOTCH DETAIL
4 | Twin Eagles Technical Support (562) 263-3600
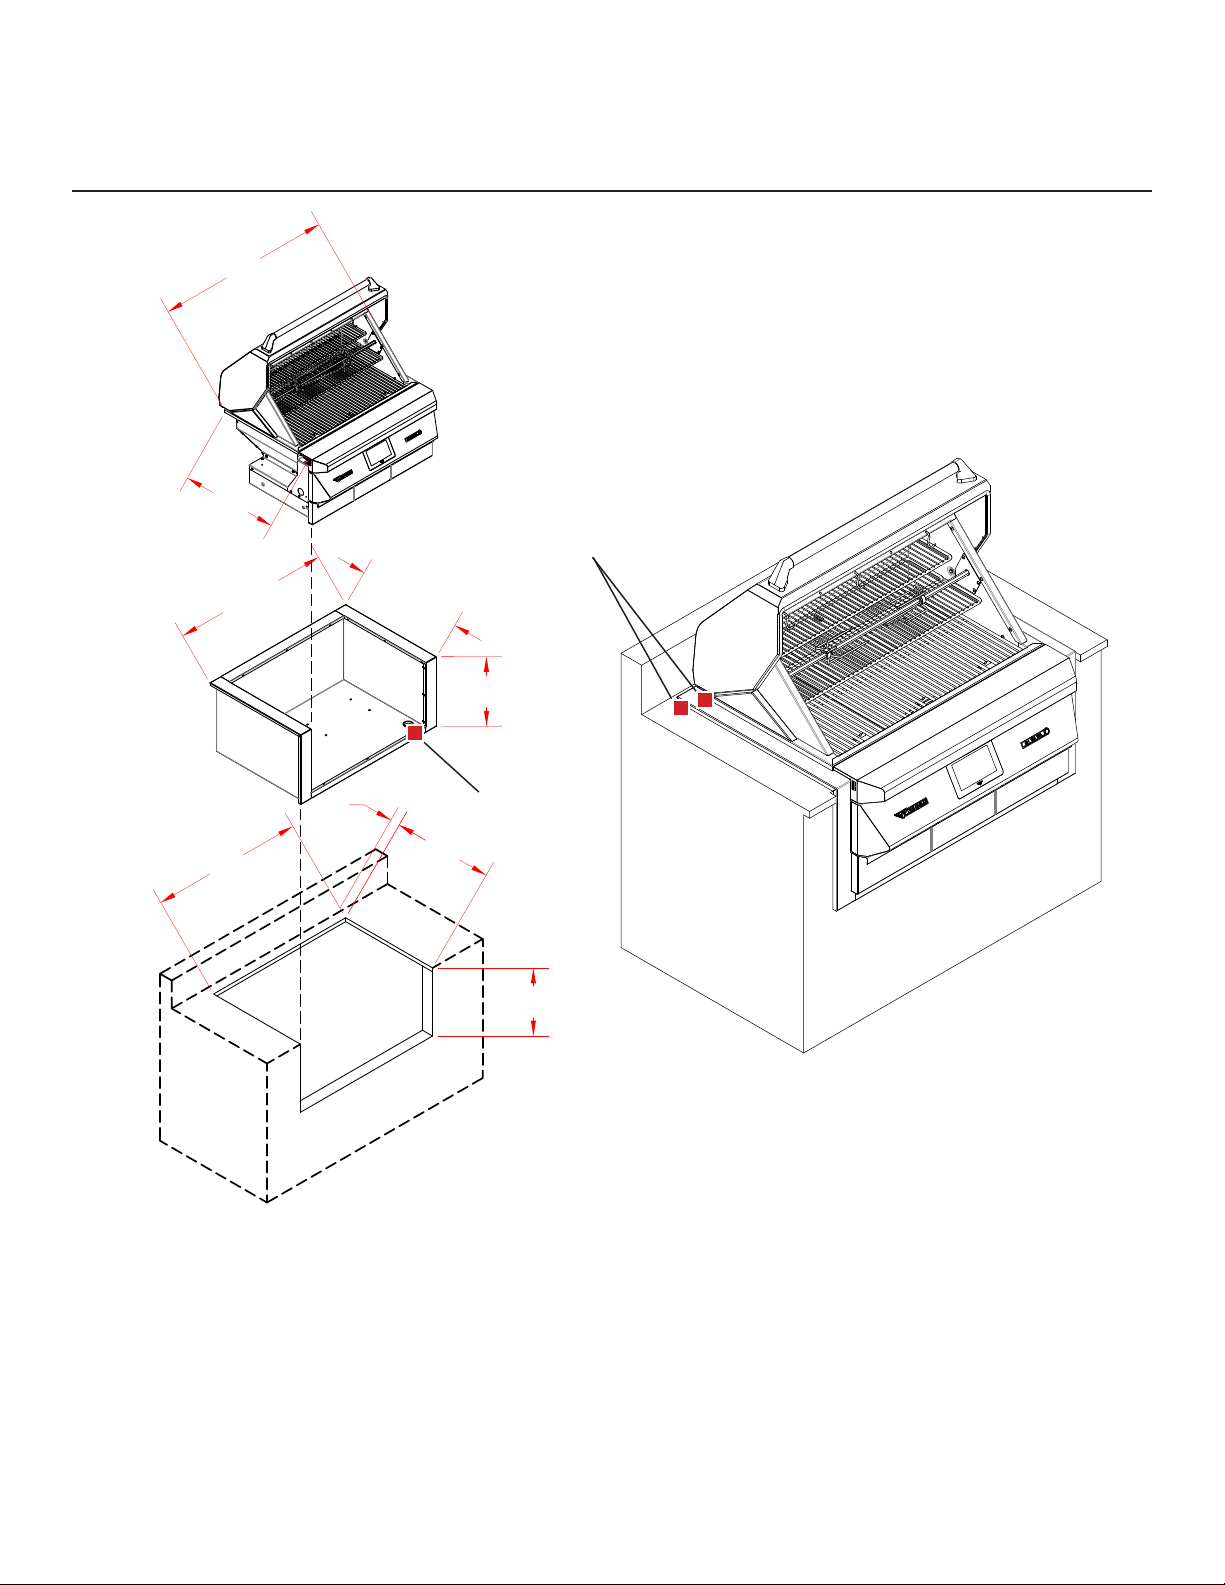
INSULATION JACKET
INSULATION JACKET WARNING:
Do not build the grill under overhead combusble construcon. If the grill is to be placed into a com-
busble enclosure, an approved insulang jacket is necessary to prevent re, property damage and bodily
injury. Use only Twin Eagles Pellet Grill insulang jacket (TEPIJ36).
To prevent damage to the power cord use the hole provided in the front right of the Insulang Jacket to
thread the power cord through.
TEPG36R
(TEPG36G)
TEPIJ36
4085
281�
19
26
3�
36
1850
25
APPLY
WATERPROOF
SEALANT
POWER
CORD
HOLE
NOTE:
THIS IS FOR COMBUSTIBLE ENCLOSURES ONLY.
FOR NON-COMBUSTIBLE ENCLOSURES REFER
TO PREVIOUS PAGE.
* ADD 1.50 TO ALLOW
FOR HOOD OPENING
www.twineaglesgrills.com | 5
ELECTRICAL REQUIREMENTS
This appliance should only be serviced by a qualied technician, or electrical shock may occur. It is rated
at 120V, 5A ,60Hz.
REMINDER:
Keep any electrical supply cord away from any heated surfaces.
WARNING
Electrical Grounding Instrucons:
This outdoor cooking appliance is equipped with a three prong (grounding) plug for your
protecon against shock hazard and should be plugged directly into properly grounded
three prong outlets. Do not cut or remove the third prong from this plug.
Electrical equipment provided with the outdoor cooking appliance shall follow these guidelines:
1. Do not use an outdoor wood red grill for purposes other than intended;
2. To protect against electrical shock, do not immerse cord or plugs in water or other liquid;
3. Unplug from the outlet when not in use and before cleaning. Allow to cool before pung on or taking o
parts;
4. Do not operate any outdoor wood red grill with a damaged cord, plug, or aer the appliance malfunc-
ons or has been damaged in any manner. Contact the manufacturer for repair;
5. Do not let cord hang over the edge or touch hot surfaces;
6. When connecng, rst plug appliance into outlet;
7. Use only Ground Fault Interrupter (GFI) protected circuit with this outdoor cooking appliance;
8. Never remove the grounding plug or use with an adapter of two prongs; and
9. Use only extension cords with three prong grounding plugs, rated for the power of the equipment, and
approved for outdoor use with a W-A marking.
!!
Storage:
During shipping the power plug for the Twin Eagles Pellet Grill is located in the front right ash drawer.

6 | Twin Eagles Technical Support (562) 263-3600
WINDY CONDITIONS
Your Wood Fired Pellet Grill has been designed and engineered to produce smoke that infuses your
food with a smoky avor. The repot requires air for ecient combuson. This fresh air is pulled through a
vent in the front of your grill and the intense hot air and smoke produced by the pellets is expelled through a
vent in the rear. If you are using your grill in windy condions, the wind can disrupt this important airow.
If the grill is set to a high heat seng and the hood is closed, wind can prevent the hot air from being
expelled through the rear vent – forcing heat to the front of the grill. This heat can make the hood handle and
front panel extremely hot. In some cases, this heat can damage important components.
To Prevent Overheang:
Install your grill in a locaon where a prevailing wind is less likely to hit the rear of the grill. If this is not
possible, install a windbreak behind your grill.
Damaged components such as wiring, heat probes, etc., and the discoloraon of the stainless steel by
using the grill in windy condions is not covered under the product warranty.
HOT AIR
FRESH AIR

www.twineaglesgrills.com | 7
PELLET GRILL OVERVIEW
START-UP
Your grill ulizes many advances in technology to bring greater control to your nger ps. Making use
of these advancements will help you perfect your techniques and get the most avor and best results every
me.
• Every perfect barbecue experience starts with selecng and lling the pellet hopper with your favorite all
natural wood cooking pellets. (Ensure they are completely dry) (See Page 10)
• Turn ON the switch to the right of the Probe Jacks; the grill will go into “STAND BY” mode. The display will
be locked by default. To unlock the display, tap the lock buon three mes.
Once in “STAND BY” mode you are able to set the temperature, recipe, and mer to the desired seng
that is opmal for the food you are cooking.
LIGHTS ON/OFF
ROTIS ON/OFF
PROBE 1
PROBE 2
PROBE 3
SETTINGS/WIFI
RUN TIME
TIMER
START/STOP
TARGET TEMPCURRENT TEMP
GRILL MODES
SEE Pg. 10
MANUAL TEMP SETTING
ON/OFF
SWITCH
PROBE
JACKS
CURRENT TEMP
TARGET TEMP
PROBE JACK INSERT
-Store in drawer
when not in use
LOCK BUTTON
LOCK / UNLOCK THE DISPLAY:
When the grill is turned on, the display will be locked. In the boom le
corner of the display screen is a yellow buon with a “LOCK” symbol in it, this is
the Lock buon. To unlock the display, tap the lock buon three mes in rapid
succession. The buon will now show that the display is unlocked by showing the
lock icon unlocked and the buon is gray. See images on the right.
UNLOCKEDLOCKED

8 | Twin Eagles Technical Support (562) 263-3600
SETTINGS MENU
OVERVIEW - cont.
CONNECTING TO WIFI
Your Twin Eagles Pellet Grill is designed to connect to the Internet via your HOME WIFI. When connect-
ed, it can receive soware updates and be monitored remotely through a mobile device using the Twin Eagles
App. Connecng to the Internet will also provide limited control to the grill such as changing the temperature
sengs and stopping operaon of the grill, but it will not start the grill or the rosserie for safety reasons. If
the Internet is not available, the grill can broadcast its own WIFI and can be monitored remotely with your
mobile device but at a shorter distance.
DEFINITIONS TO KNOW:
GRILL WIFI - The grill is broadcasng a WIFI signal.
HOME WIFI - The grill will look for and connect to the WIFI signal provided by the customer.
CONNECTING GRILL TO HOME WIFI:
1. Go to grill SETTINGS SCREEN.
2. Click top right buon unl it reads HOME WIFI
3. At the boom le box labeled SETUP HOME WIFI, enter your HOME WIFI NETWORK and PASSWORD and
hit SEND. Your Home WIFI Network name is usually found on your router. Note: Home WIFI Network
must be password protected, otherwise the grill will not connect to it.
4. Aer hing SEND, the HOME WIFI INFO box on the top right will display “CONNECTING” in orange and
then will change to “ESTABLISHED” in green when connected.
5. Your grill is now connected to your HOME WIFI and is capable to receive the latest soware updates
automacally.
NOTE: Establishing a connecon to your HOME WIFI Network will allow the grill to receive updates automa-
cally. A dialogue box will appear on the display nofying you of a new update. Please note that depending on
the quality and speed of your Internet connecon, along with the size of the update le, the upload process
may take up to 20 minutes. To save the update to the grill, simply turn the grill o and on again. The grill will
now be updated and ready to use.
If WIFI is not readily available, email SERVICE@TwinEaglesGrill.com and request instrucons on how to update
soware via the unit’s USB port.

www.twineaglesgrills.com | 9
OVERVIEW - cont.
TWIN EAGLES MOBILE APP:
To be able to monitor the grill via your mobile device, you must rst download the Twin Eagles APP.
Follow direcons in the App and sign up. Within a couple of minutes, you will receive nocaon via email
conrming the account acvaon. Make sure to receive nocaon and acvate the account. If not received,
check junk or spam folder.
NOTE: Once signed up, the username and email address are registered and cannot be used again to sign up as
a new user.
CONNECTING GRILL TO THE MOBILE DEVICE VIA HOME WIFI:
1. Open Twin Eagles Mobile App and log-in.
2. Go to grill SETTINGS SCREEN and make sure the HOME WIFI connecon is ESTABLISHED, otherwise con-
nect grill to your HOME WIFI following above steps.
3. Enter username under REGISTER USERS and hit SEND. Wait for “SEND OK” to appear below the send
buon.
4. On your Mobile App, the Twin Eagles Pellet Grill will appear among the INTERNET DEVICES. If not, swipe
down the screen on the Mobile APP to refresh screen.
5. Hit the grill name and you can now monitor your grill with your mobile device via Internet.
6. To edit grill’s name, delete users or delete the grill from the INTERNET DEVICES, swipe grill’s name to the
le.
CONNECTING GRILL TO THE MOBILE DEVICE VIA GRILL WIFI:
1. Go to grill SETTINGS SCREEN.
2. Click top right buon unl it reads GRILL WIFI.
3. Go to mobile device sengs and switch WIFI to BGX-TE_ network.
4. Open Twin Eagles Mobile App and click on CONTINUE TO USE LOCAL DEVICES.
5. Next to the LOCAL DEVICES, hit (+) sign. Click READY, then NEXT unl it asks for the PRODUCT KEY.
6. Enter PRODUCT KEY shown at the boom right box of the grill SETTING SCREEN.
7. Enter name you want to use for the grill and hit REGISTER.
8. The grill name will appear among the LOCAL DEVICES. Hit the grill name and you can now monitor the
grill using your mobile device.
9. To edit grill name or delete grill from the LOCAL DEVICES, swipe grill name to the le.
NOTE: When using the GRILL WIFI, your mobile device will not have access to the Internet.
10 | Twin Eagles Technical Support (562) 263-3600
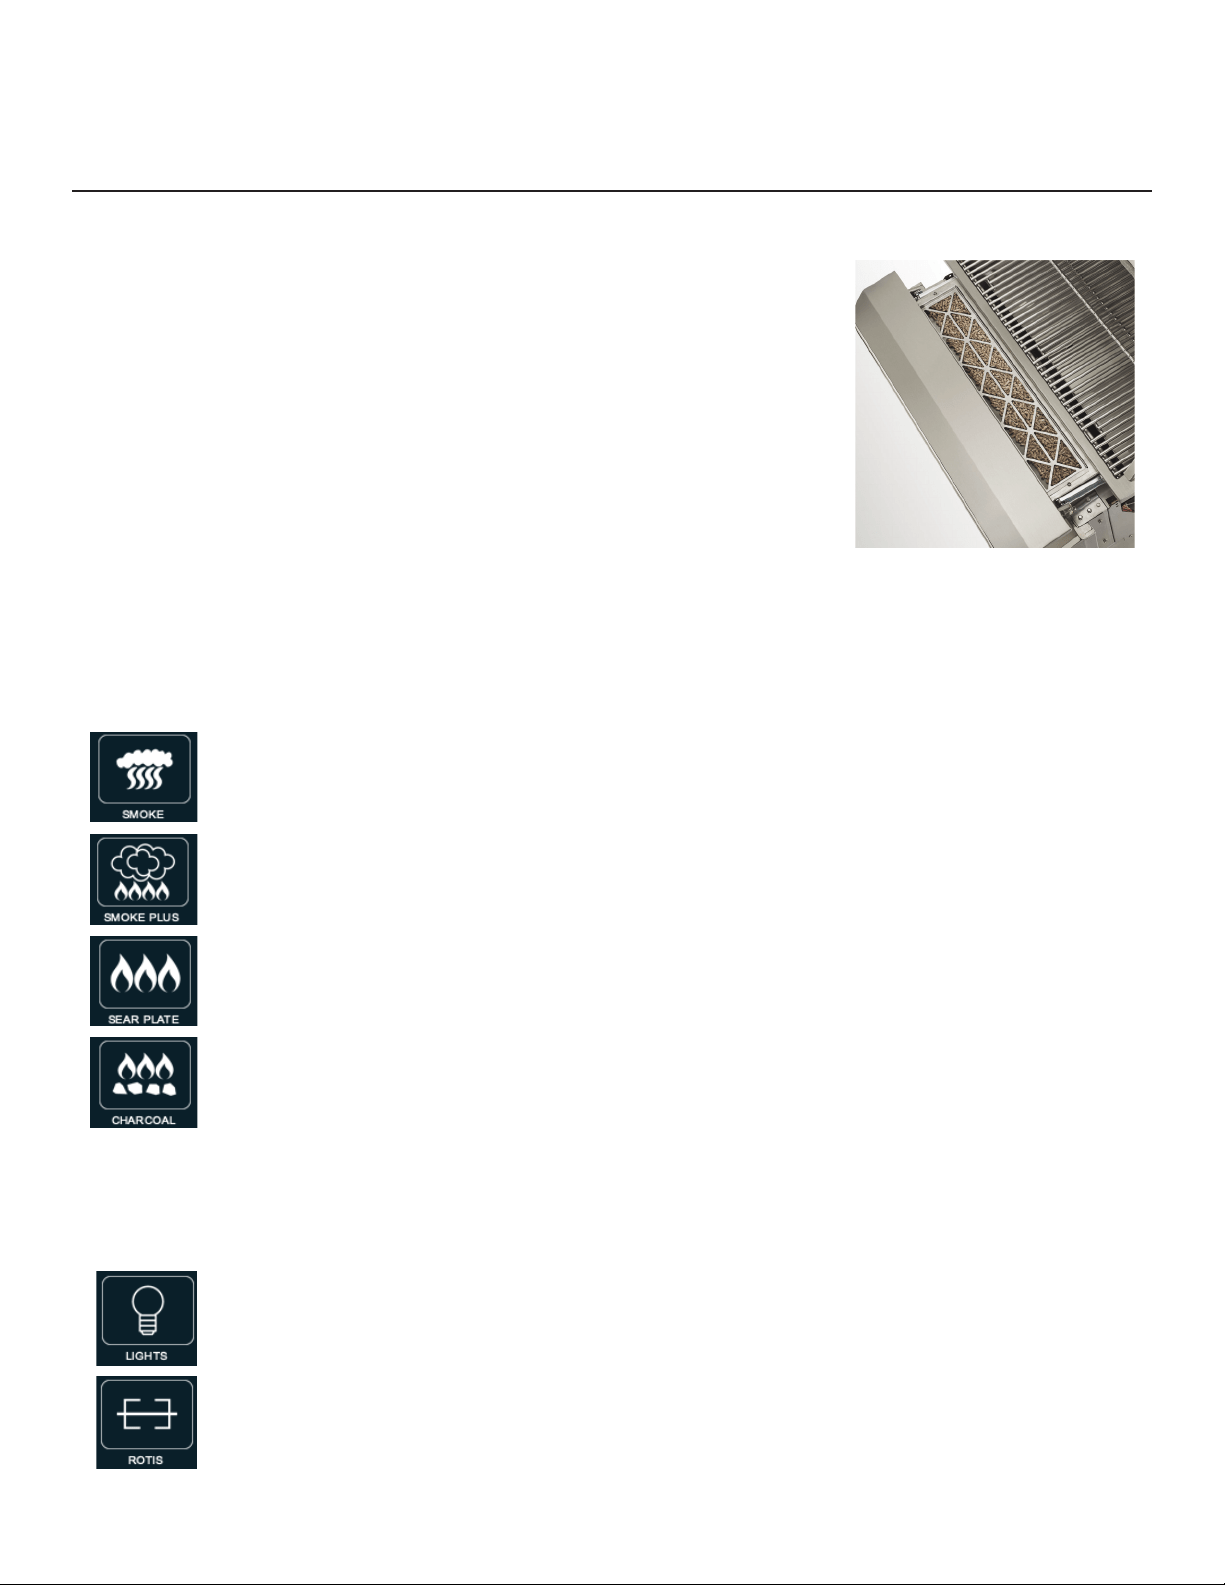
GRILLING MODES
The Wood Fired Pellet Grill has four dierent grilling modes:
• SMOKE - Most grilling/baking/roasng will take place using this mode. The grill will pro-
duce a moderate amount of smoke to infuse into your food.
• SMOKE PLUS - The Smoke Plus mode is for those that want more natural wood avor im-
parted into the food. It uses a reduced fan speed to increase smoke producon.
• SEAR PLATE - Sear Plate sets the grill to HIGH, MEDIUM or LOW to sear the outside of your
food using the hot grill grates, sealing in the delicious juices and avor of your food.
• CHARCOAL - In the Charcoal mode the repot is used to start the charcoal in the Charcoal
Tray. Once the charcoal is started the fan assist is used to stoke the charcoal to higher tem-
peratures if desired. Can be turned on/o as needed.
OVERVIEW - cont.
ADDITIONAL FEATURES
The Twin Eagles Wood Fired Pellet Grill comes equipped with two halogen lights and a Rosserie.
• Halogen Lights - To turn the lights ON/OFF simply press the lights buon.
• Rosserie - To turn ON/OFF the Rosserie simply press the “ROTIS” buon.
INITIAL SET-UP - FILLING THE HOPPER AND AUGER
Before you can start smoking, you will need to ll the hopper and
prime the auger with pellets.
1. Open the hood.
2. Remove center grate and indirect plate to gain access to the repot.
3. Pull open hopper and ll with chosen blend of pellets. Then close hop-
per.
4. Go to SETTINGS screen
5. Press PELLET AUGER buon which is located at the top le of the set-
ngs menu. Leave the auger running unl pellets can be heard falling
into the repot.
6. Remove the pellets that have fallen into the repot. They may be reused
since they are not burned.
7. The auger is now primed and you are ready to grill.
PELLET HOPPER
www.twineaglesgrills.com | 11
USING YOUR PELLET GRILL
COOKING
Using your Wood Fired Pellet Grill is easy, and it is packed with features. Here’s how to use them:
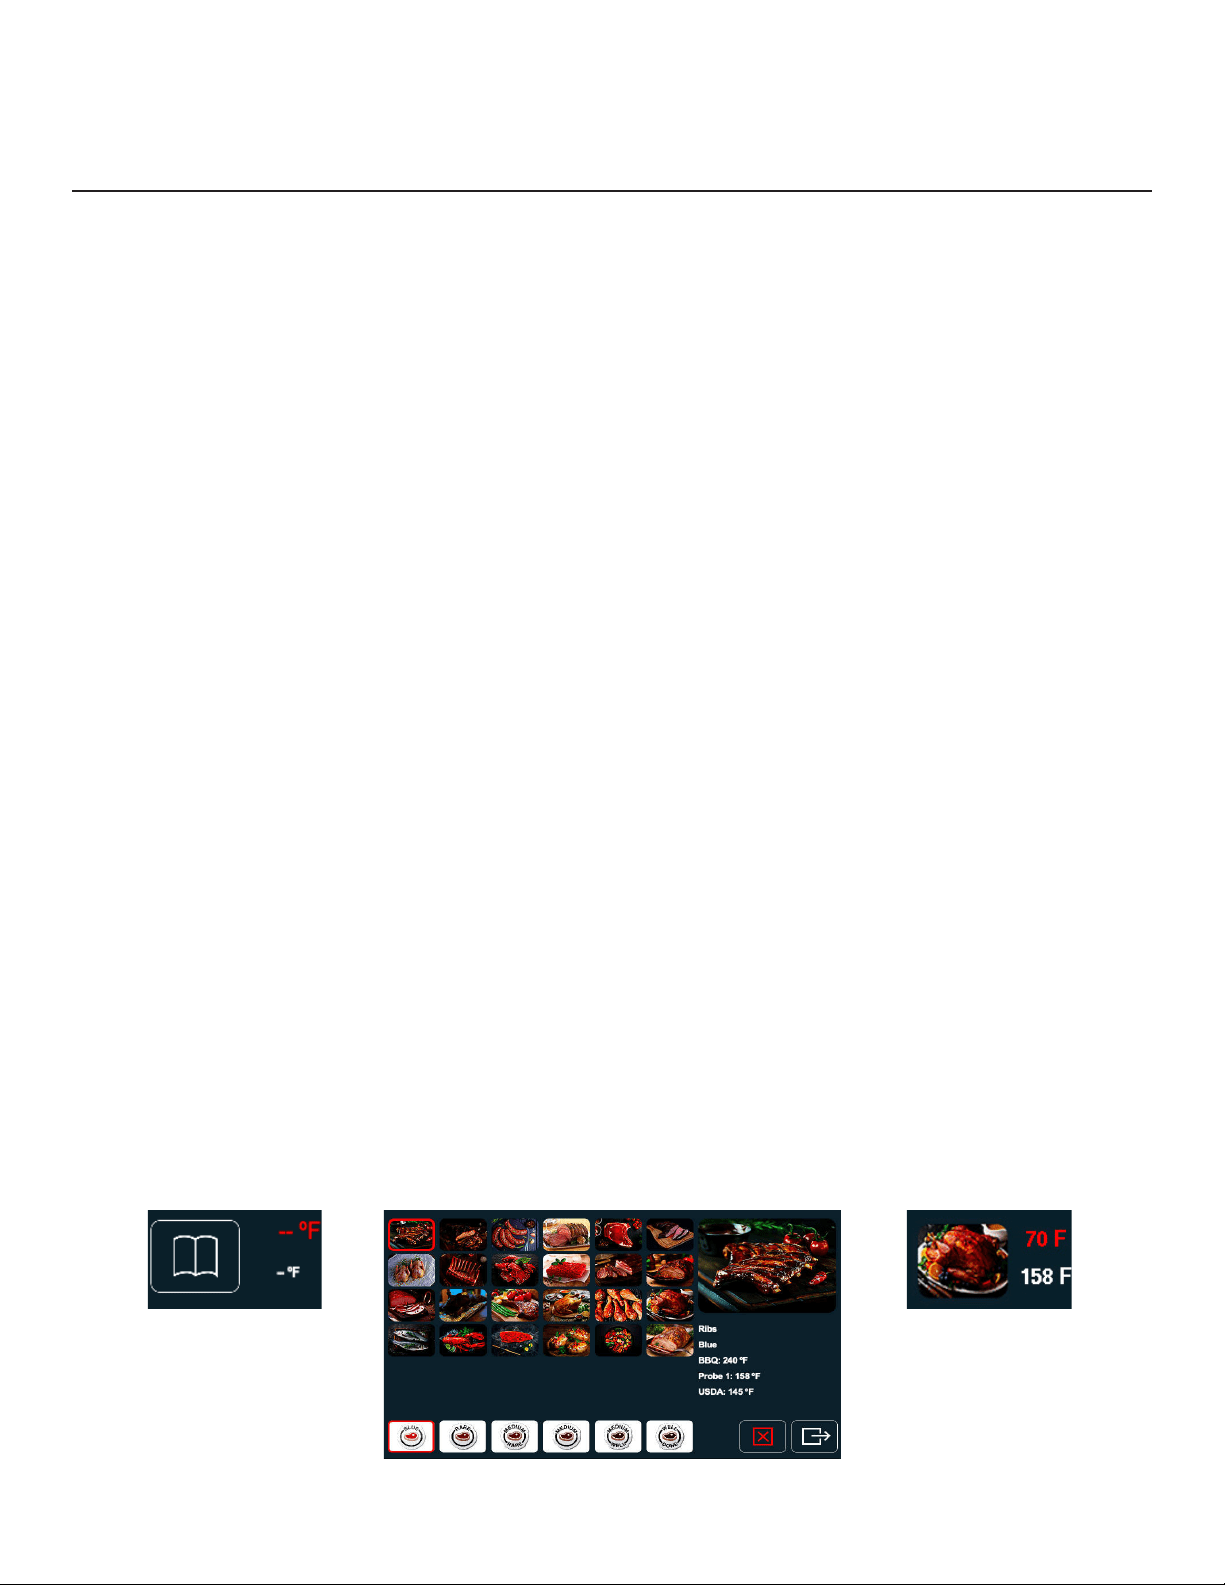
PROBE BUTTON
PRESET FOOD MENU
PROBE BUTTON AFTER
FOOD SELECTED
1. Turn on your grill.
2. The Control Panel will load the “STAND-BY” screen, which will have “SMOKE” preselected. Unlock the
Display Screen by tapping the “LOCK” three mes in rapid succession.
3. Set your target temp using the temperature adjustment slider or by tapping the arrows on either side
of the target temp, or by tapping the target temp and inpung the temperature on the keyboard that
appears.
4. Choose which probe you want to use. Tap the probe buon and select from the menu of preset food
temperatures/cooking mes and press enter. The picture of the selected food preset will appear in the
probe buon to the le of the temperature slider along with the current temperature in red and target
temperature in white.
5. Make sure there are no leover pellets or ash residue in the repot and Ash Reservoir from any previous
use. Tap the green “GO” buon to light the grill, the hood must be in the closed posion when lighng
the grill (Inially there may be a bit of smoke but that will dissipate).
6. Once your grill has reached the target temperature, set up your mer. Tap “Timer” in the top le corner
of the control screen and type in the cooking me desired. NOTE: the “Run Time” is the overall me the
grill has been running.
7. Place your desired food into the grill, insert your probe into the center of the food not touching any bone.
If using the rosserie funcon of the grill, the probe must be removed aer every temperature taken.
8. Once your food has nished cooking, tap the red “STOP” buon to start the cooldown cycle.
IMPORTANT
Prior to operang the grill in any capacity, ensure that the repot and Ash Reservoir is clear of any ash
build-up or unburned pellets. Make sure the Firebox is clean of any ash build up or grease. Making sure that
the inside of your pellet grill is clean and clear. This will help with the longevity of your grill, so make sure this
process is done regularly.
IMPORTANT
No preheang or priming required. When switching types of pellets to cook, purge the pellet hopper
using the “PELLET AUGER” buon in the “SETTINGS” menu. To prevent misres, ll the auger using the “PELLET
AUGER” buon. Keep the auger running unl your hear pellets falling into the repot. Clear the repot of the
pellets before cooking.
12 | Twin Eagles Technical Support (562) 263-3600
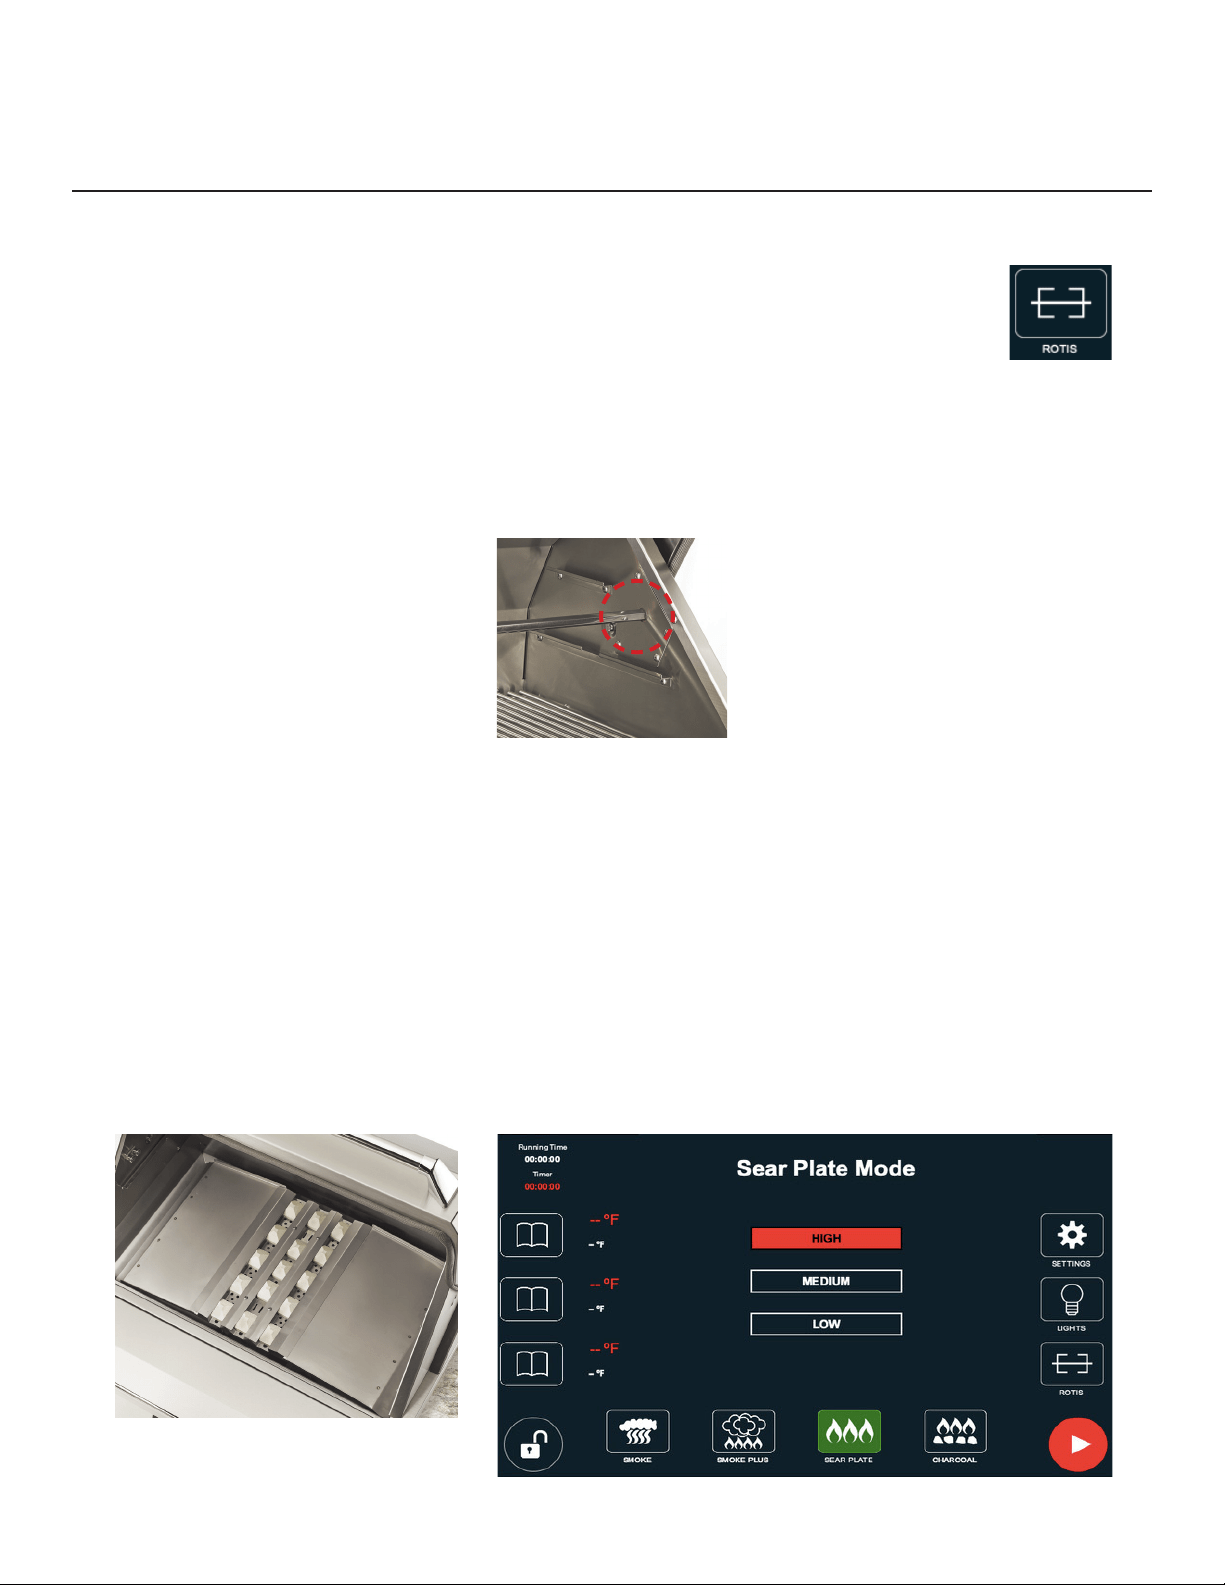
BRIQUETTE TRAY
SEAR PLATE
1. Turn on your grill. Unlock the Display Screen by tapping the “LOCK” three mes in rapid succession.
2. Make sure there are no leover pellets or ash residue in the repot and Ash Reservoirs from previous
use.
3. Replace the Indirect/Vaporizer Plate with the Briquee Tray as shown.
4. Select SEAR PLATE Mode. A Sear Plate Mode menu will appear that will show HIGH, MEDIUM and LOW
seng.
5. Choose the desired cooking seng.
6. Close the hood. Tap the green “GO”
7. Once the target temperature has been reached, a READY icon will appear just below the LOW seng
buon signifying that the grill reached the desired temperature.
8. Open the hood and place desired food on the center grate to begin searing.
9. Once nished, hit the red “STOP” to start the cooldown cycle.
USING YOUR PELLET GRILL - cont.
USING THE ROTISSERIE:
1. Insert food on rod and secure with meat forks. If mulple pieces of food are to be
cooked at the same me, make sure the food is evenly balanced to ensure the food is
cooked evenly.
2. Follow direcons for using the SMOKE mode up to step 6.
3. Insert rod into the rosserie sprocket.
4. Turn on the ros motor by pressing the ros buon.
5. Cook food to desired doneness, then remove from grill.
NOTE: Rosserie is only to be used
with “SMOKE” or “SMOKE PLUS”
modes.
NOTE: Over me your Rosserie may start to make noise or you might nd it doesn’t turn like it should. Sim-
ply spray a lile WD40 in and around your Rosserie Cog Assembly, while the Rosserie is on, to lubricate and
eliminate any noise or grinding.
www.twineaglesgrills.com | 13
USING YOUR PELLET GRILL - cont.
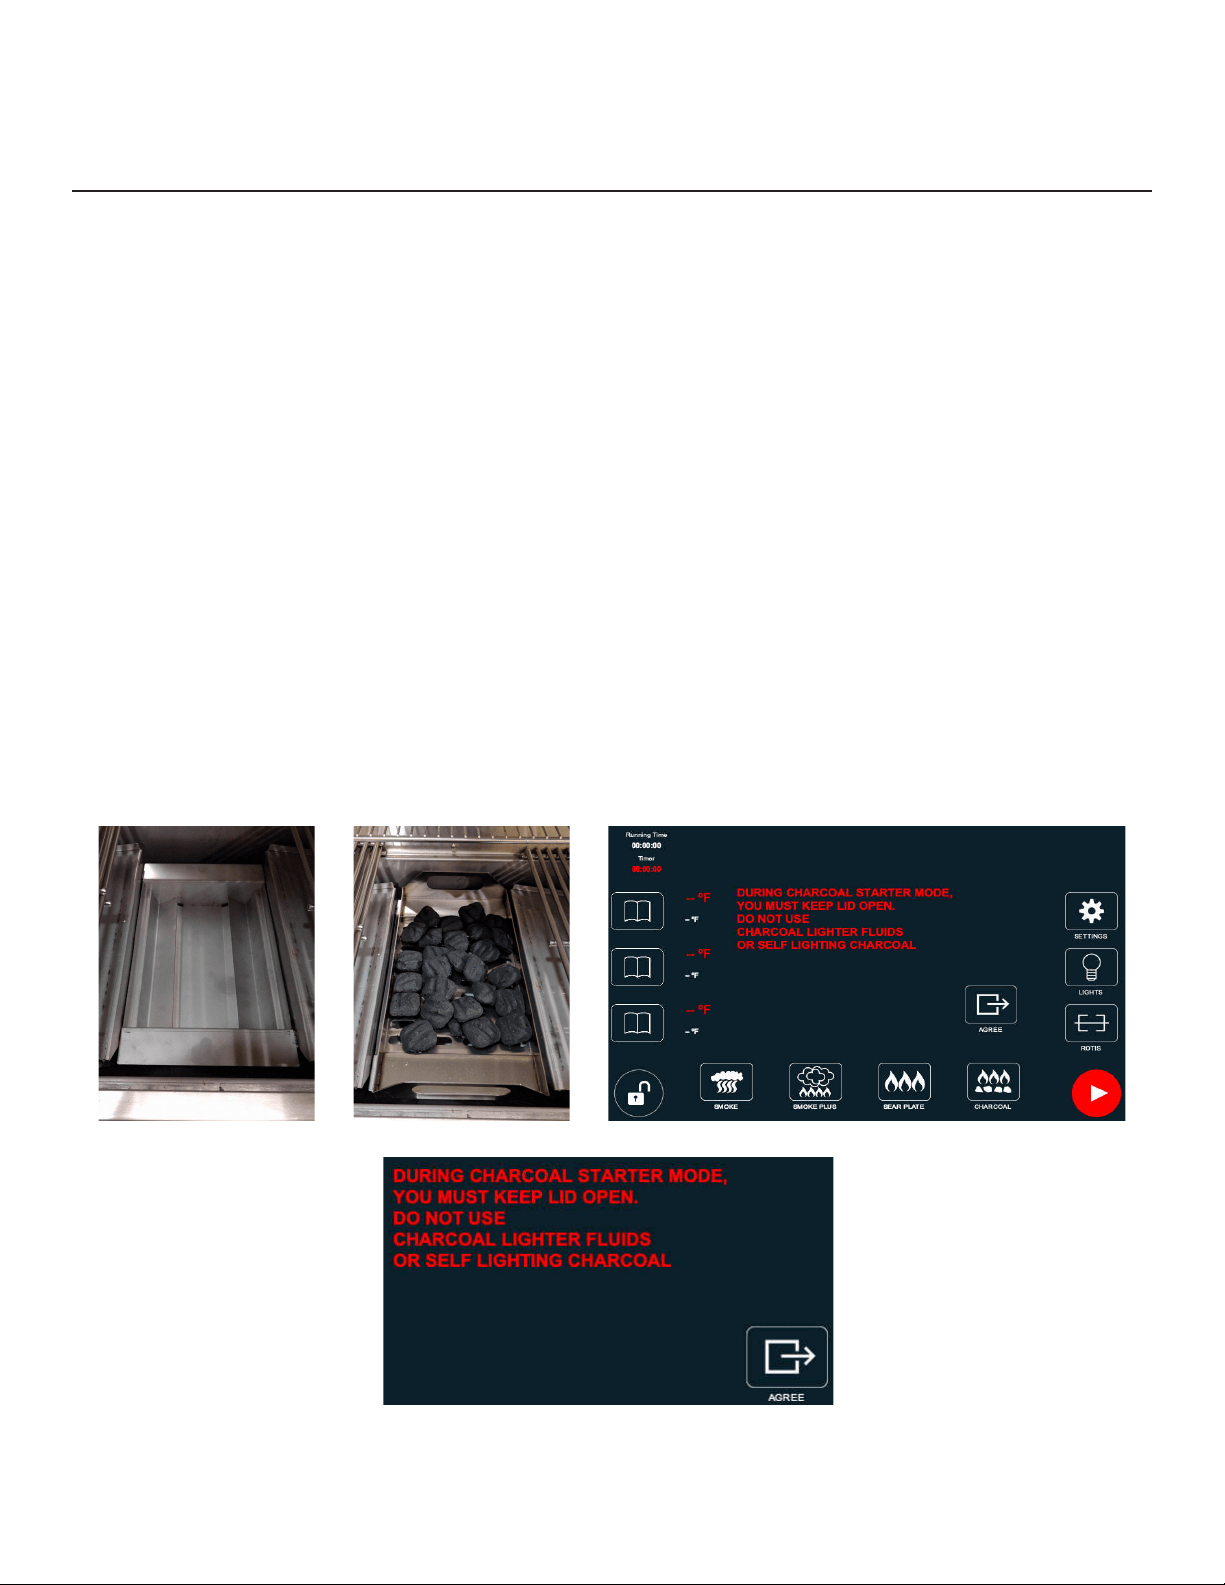
1. Turn on your grill. Unlock the Display Screen by tapping the “LOCK” three mes in rapid succession.
2. Remove the Indirect/Vaporizer Plate assembly from above the repot. Make sure there are no leover
pellets or ash residue in the repot and Ash Reservoir from previous use. Install in its place the Charcoal
Tray Assembly and above that install the Charcoal Tray Body.
3. Place a moderate amount of charcoal on the Tray Body. Spread out evenly, one layer of charcoal bri-
quees.
4. Press CHARCOAL Mode. A message should appear that reads: “DURING CHARCOAL STARTER MODE, YOU
MUST KEEP THE LID OPEN. DO NOT USE CHARCOAL LIGHTER FLUIDS OR SELF LIGHTING CHARCOAL.” In
order to proceed to starng your charcoal you must tap the “AGREE” buon. From there you will see “IN
CHARCOAL MODE, YOU MUST OPEN THE LID,” along with a “CHARCOAL STARTER,” the “FAN HIGH” and
“FAN LOW” buons. You will also noce that there is no temperature slider, in CHARCOAL Mode the re-
pot is used to start the charcoal only. The buon “CHARCOAL STARTER” will feed pellets into the repot
to start the charcoal. This may take some me to occur, APPROXIMATELY 10-15 minutes.
5. Once the charcoal has turned mostly ashy gray, it has started.
Cooking with charcoal is a visual and physical experience. The Fan Assist buons (FAN HIGH / FAN LOW)
turn on/o the fan to help increase the temperature of the charcoal. The fan is used to provide more air to the
charcoal aer it is already going. Providing more air will produce more heat, so FAN HIGH will make the coals
produce more heat than FAN LOW.
CHARCOAL
14 | Twin Eagles Technical Support (562) 263-3600
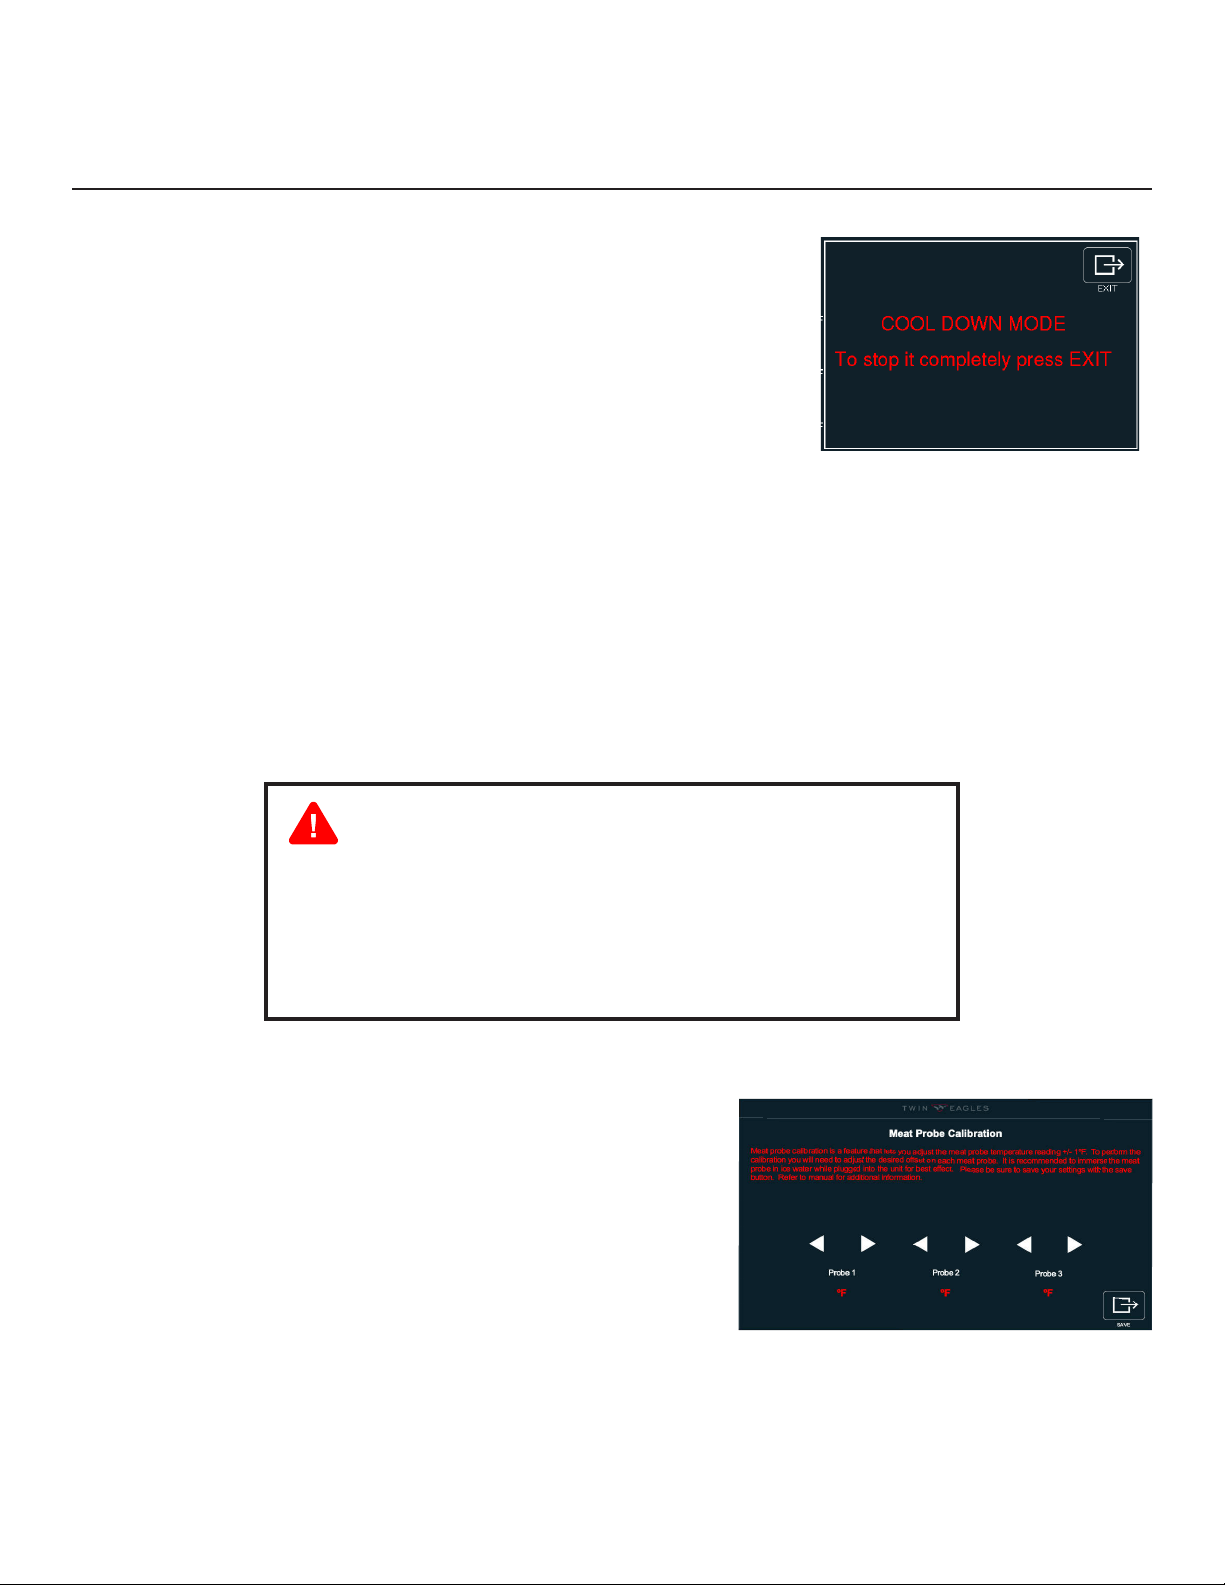
You are nished cooking your food and now it is me to shut down
your Wood Fired Pellet Grill. To shut down your grill, rst press the red stop
buon. This will shut the auger o and the fan speed will go up to high. A
dialog box will appear on the screen nofying you that the grill has gone
into Cooldown Mode. Cooldown Mode will proceed unl the tempera-
ture of the unit reads 130°F internally. Once 130°F has been reached the
Cooldown feature has nished and the fan will shut o. It is now safe to
turn o your grill. There is an Exit buon to manually bypass the Cooldown
feature if you intend to connue grilling (it is not recommended to bypass
the Cooldown Mode). It is recommended to keep the hood closed during
the cooldown cycle.
COOLDOWN MODE
USING YOUR PELLET GRILL - cont.
Your grill comes equipped with a Low Heat Alarm. This noes you that the pellets in the
hopper may be insucient to maintain the target temperature and more pellets will need to be
added to the hopper.
A warning window and set of instrucons will appear. To clear the warning, tap the Exit buon.
Under sengs menu, press the calibraon buon locat-
ed at the top le (next to the auger pellet buon), and the Meat
Probe Calibraon Menu will appear.
To calibrate:
1. Plug the supplied probe/s into the probe jack. The temperature
will show under their respecve probe locaon.
2. Place the probes in ice water for 1 minute.
3. Using the le or right arrow above the probe name, match the
temperature readings across all three probes.
4. Press save to exit.
Temperature dropping.
Keep hood closed and check hopper for pellets.
If temperature connues to drop, open hood and allow grill to cool
down. Empty the repot and ensure the aeraon holes are clear.
Re-start grill and close hood.
LOW HEAT ALARM
MEAT PROBE CALIBRATION

www.twineaglesgrills.com | 15
RECOMMENDED PELLETS
When cooking your favorite foods, its important to make the best pellet selecon. Pellets can come in
all kinds of combinaons and avors including Apple, Cherry, Hickory, Maple, Mesquite and Oak. Pellet fuel for
cooking burns with an average of 8,200 BTU’s per pound and have very lile ash and moisture content (less
than 0.5% ash and less than 6% moisture). Avoid using pellets longer than 1” long.
PELLET FLAVOR GUIDELINES
• APPLE: Has a sweet, fruity avor. Strongest Flavor of the fruit woods. Ideal for most foods.
• CHERRY: Has a mild, sweet fruity avor. Tends to give meat a rosy nt of color.
• HICKORY: Has a strong, bacon avor.
• MAPLE: Has a very mild, sweet light smoky avor.
• MESQUITE: Has a strong, spicy avor. King of southwest smoking.
• OAK: Has a mild, wood-red avor. This is your roasng wood.
CAUTION:
Some wood pellets produced for heang fuel have a high chance of containing addives that are harmful when
burned. For opmum performance from your grill, ensure that any pellets intended to be used as fuel are free
of addives. Low quality pellets may adversely aect your grilling temperatures, me, and avor.
Avoid using so woods for pellet fuel as it will impart a turpenne-like taste.
RECOMMENDED PELLET STORAGE:
Some manufacturer’s pellet bags have slits or air holes in them, we recommend that any unused pel-
lets, or any pellets to be store for long periods of me, should be emped into a waterproof container. The
5-gallon buckets obtainable from your local hardware store make great waterproof containers, and lids can
easily be ed to the top to completely seal the bucket. Ensure that any locaon to be used for pellet storage
is dry and away from sources of heat.

16 | Twin Eagles Technical Support (562) 263-3600
PELLET GRILLING GUIDELINES
The art of cooking with a pellet grill comes down to personal preference and the type of the food being
cooked. The longer the food remains on the grill, the more natural wood avor will be infused into the food.
With this knowledge in hand, you can decide how much natural wood avor you want.
For best results, we recommend a blended variety of natural wood pellets. The recommended tem-
peratures for cooking most meats is in the range of 180° to 400°F, this will guarantee the correct internal cook-
ing temperature is reached. Please note that the Pellet Grill can reach temperatures as low as 140°F but the
natural wood avor from cooking at this temperature are minimal. It should also be noted that the grill can get
hot from sing out in the sun or from being installed in a region of high heat (temperatures in excess of 90°F),
which could prevent your grill from maintaining temperatures close to 180°F.
The table below shows general guidelines to follow when learning to use your new Twin Eagles Pellet
Grill. We recommend experimenng with mes and temperatures to get the avor you desire. To speed up the
process cook on a higher temperature but be warned that this could result in a less tender product. We recom-
mend that enough me is adequately set aside to get the best results every me.
ITEM CONTROL SET POINT °F INTERNAL TEMP = °F
BEEF 180°F-400°F
MEDIUM RARE: 145
MEDIUM: 160
WELL DONE: 170
HAM 180°F-400°F 140-170
LAMB 180°F-400°F
MEDIUM RARE: 145
MEDIUM: 160
WELL DONE: 170
PORK, FRESH 180°F-400°F 145
VEAL 180°F-400°F
MEDIUM RARE: 145
MEDIUM: 160
WELL DONE: 170
VENISON 180°F-400°F
MEDIUM RARE: 145
MEDIUM: 160
WELL DONE: 170
CHICKEN 180°F-400°F 165
DUCK or
GOOSE
180°F-400°F 165
TURKEY 180°F-400°F 165 AS MEASURED IN THE THIGH

www.twineaglesgrills.com | 17
PELLET GRILLING TIMES AND TEMPS
At Twin Eagles, great grilling comes from knowledge of the right temperatures to use and how long to
cook your meat. The following suggesons are to help you nd the right starng point to begin your perfect
grilling experience.
Always be sure that proper safety precauons are observed when your Twin Eagles Pellet Grill is in use;
adult supervision is required when children are present. Be sure to cook poultry and ground meats thoroughly,
check internal temperatures with meat probes to guarantee internal temperatures meet suggested internal
cook temperatures. The mes and temperatures below are APPROXIMATE! Actual length of me and tem-
perature required may vary from user to user.
ITEM SIZE
CONTROL
SET POINT
APPROXIMATE
GRILLING TIME
INTERNAL TEMP =
°F
BEEF
STEAKS 3/4 in THICK 375°
3 TO 4 MINS/SIDE
4 TO 5 MINS/SIDE
5 TO 7 MINS/SIDE
MEDIUM RARE 136
MEDIUM 145
MEDIUM WELL 153
KABOBS 1 in CUBES 375° 3 TO 4 MINS/SIDE 145 TO 160
HAMBURGER PATTIES 1/2 in THICK 375°
3 MIN/SIDE
4 TO 5 MINS/SIDE
5 TO 7 MINS/SIDE
MEDIUM 158
MEDIUM WELL 167
WELL DONE 176
ROAST
ROLLED RUMP (INDIRECT HEAT)
SIRLOIN TIP (INDIRECT HEAT)
4 TO 6 lbs.
3 1/2 TO 4 lbs.
320° 18 TO 22 MINS/lb
20 TO 25 MINS/lb
133 TO 149
TENDERLOIN
HALF, 2 TO 3 lbs.
WHOLE, 4 TO 6 lbs.
375°
10 TO 12 MINS/SIDE
12 TO 15 MINS/SIDE
MEDIUM RARE 145
MEDIUM 160
HAM
FULLY COOKED (INDIRECT HEAT) ANY SIZE 325° 8 TO 10 MINS/SIDE 164
COOK-BEFORE-EATING (INDIRECT
HEAT)
WHOLE, 10 TO 14 lbs.
HALF, 5 TO 7 lbs.
PORTION, 3 TO 4 lbs.
350°-375°
10 TO 15 MINS/lb
12 TO 18 MINS/lb
30 TO 35 MINS/lb
160-170
LAMB
CHOPS, SHOULDER, LOIN, OR RIB 1 in THICK 400° 5 MINS/SIDE 136 TO 153
STEAKS, SIRLOIN, OR LEG 1 in THICK 350°-375° 5 MINS/SIDE 145 TO 160
KABOBS 1 in CUBES 350°-375° 4 MINS/SIDE 145 TO 160
PATTIES, GROUND 4 oz., 1/2 in THICK 450°-700° 3 MINS/SIDE MEDIUM 160
PORK
CHOPS, BONE-IN OR BONELESS
3/4 in THICK
1 1/2 in THICK
375°
3 TO 4 MINS/SIDE
7 TO 8 MINS/SIDE
MEDIUM 145
TENDERLOIN 1/2 TO 1 1/2 lbs. 450°-700° 15 TO 25 MIN TOTAL MEDIUM 160
PATTIES, GROUND 1/2 in THICK 450°-700° 4 TO 5 MINS/SIDE MEDIUM 158
VEAL
CHOPS, STEAK 1 in THICK 450°-700° 5 TO 7 MINS/SIDE 145 TO 160
ROAST, BONELESS (INDIRECT HEAT) 2 TO 3 lbs. 350°-375° 18 TO 20 MINS/lb 145 TO 160
VENISON
ROAST, SADDLE, OR LEG 6 TO 7 lbs. 225° 25 to 30 MINS/lb 140 to 150

18 | Twin Eagles Technical Support (562) 263-3600
TIMES AND TEMPS - cont.
ITEM SIZE
CONTROL
SET POINT
APPROXIMATE
GRILLING TIME
INTERNAL TEMP =
°F
VENISON
STEAKS 3/4 in THICK 375°
4 TO 5 MINS/SIDE
6 TO 7 MINS/SIDE
MEDIUM RARE 145
MEDIUM 160
CHICKEN
WHOLE (INDIRECT HEAT)
NOT STUFFED
BROILER FRYER
ROASTING HEN
CAPON
3 TO 4 lbs.
5 TO 7 lbs.
4 TO 8 lbs.
18 TO 24 oz.
375°F, 400°F
60 TO 75 MINS
18 TO 35 MINS/lb
15 TO 20 MINS/lb
45 to 55 MINS
160 AS MEASURED IN
THE THIGH
BREAST HALVES, BONE-IN
BONELESS
6 TO 8 oz. EACH
4 oz. EACH
375°F
10 TO 15 MINS/SIDE
6 TO 8 MINS/SIDE
170
OTHER PARTS: LEGS OR THIGHS
DRUMSTICKS
WINGS, WINGETTS
4 TO 8 oz.
4 oz.
2 TO 3 oz.
375°F
10 TO 15 MINS/SIDE
8 TO 12 MINS/SIDE
8 TO 12 MINS/SIDE
180
DUCK OR GOOSE
DUCKLING, WHOLE
QUARTERED (INDIRECT HEAT)
4 1/2 lbs. (NOT
STUFFED)
325°F
2 1/2 HRS
1 HR 25 MINS
180 TO 185
GOOSE, WHOLE (INDIRECT HEAT) 8 TO 12 lbs. 325°F 18 TO 20 MINS/lb 180 TO 185
TURKEY
WHOLE TURKEY (INDIRECT HEAT)
8 TO 12 lbs.
12 TO 16 lbs.
16 TO 24 lbs.
350°F
2 TO 3 HRS
3 TO 4 HRS
NOT RECOMMENDED
160 AS MEASURED IN
THE THIGH
BREAST, BONE-IN
BONELESS
4 TO 7 lbs.
2 3/4 TO 3 1/2 lbs.
350°F
1 TO 1 3/4 HRS
NOT RECOMMENDED
160
THIGHS, DRUMSTICKS (INDIRECT
HEAT)
8 TO 16 oz. 350°F
1 1/2 TO 2 HRS
8 TO 10 MINS/SIDE
160
BONELESS TURKEY ROLL (INDIRECT
HEAT)
350°F
1 1/2 TO 2 HRS
2 TO 3 1/2 HRS
170 TO 175

www.twineaglesgrills.com | 19
CLEANING AND MAINTENANCE
To keep your Wood Fired Pellet Grill free of surface corrosion and in good working order, it is important
to take addional precauons under certain condions.
If your Wood Fired Pellet Grill is located in corrosive condions, such as:
• A coastal environment where corrosive salty air is present.
• Near a swimming pool, hot tub or water feature with exposure to corrosive pool chemicals and/or
chlorinated water.
• Areas where muriac acid (hydrochloric acid) or other corrosive cleaning soluons are used to clean
concrete and masonry.
• Areas where corrosive masonry dust and debris are created by cung stone or mixing cements.
These condions can create a highly corrosive environment that will cause the corrosion resistant type
304 stainless steel to develop surface oxidaon, corrosion or rust. Follow these general guidelines to prolong
the life of your unit:
• It is recommended that your Twin Eagles products be kept dry and covered when not in use. Use the
Probe Jack Inserts to prevent water from geng into the probe jacks. This is even more important when
long-term storage is intended.
• Do not allow food parcles or grease to be le inside your Twin Eagles products. These can aract ro-
dents, which are unsanitary and are likely to cause physical damage by chewing on the wiring, which can
cause permanent damage to the electrical components.
• If you are located along the coast or in the desert, wind driven sand is extremely abrasive and can pit and
scratch the stainless steel. Keep your Twin Eagles products covered when not in use.
• With roune cleaning, maintenance and awareness of the condions outlined above, you can enjoy many
years of service from your Twin Eagles Wood Fired Pellet Grill.
• In the event that surface corrosion has developed on the stainless steel, it is typically not the stainless
steel that is corroding but corrosive parcles that have been deposited on the surface.
• Twin Eagles products are made of all welded 304 stainless steel. It is corrosion resistant and non-magnet-
ic. Never clean the stainless steel when it is hot. Aer the inial grilling use, certain areas of the grill may
discolor. This is a normal discoloraon caused by the intense heat given o by the repot.
WARNING
To prevent re, bodily harm, and property damage, always ensure that any grease or ash residue caught
in the Ash Drawers is cleaned out. The removable aluminum pans allow for easy removal of any ash or grease.
STAINLESS STEEL & GENERAL PRODUCT CARE

20 | Twin Eagles Technical Support (562) 263-3600
CLEANING AND MAINTENANCE - cont.
Regular use and me will cause your grill to get dirty, below are a few recommended cleaning materials
and methods to help keep your Twin Eagles Pellet Grill looking its best.
RECOMMENDED METHODS TO CLEAN YOUR PELLET GRILL
1. GRILL BRUSH
2. SCOTCH-BRITE PADS
3. MICROFIBER CLOTH
4. STAINLESS STEEL CLEANER
5. BAR KEEPERS FRIEND
INTERIOR:
1. Clean the Grates:
◦ Using the grill brush, scrape the bristles along the grate to dislodge any cooked on grease or food.
Repeat for both sides of the grate.
2. Clean the Interior and Ash Reservoir:
◦ Using the puy knife, scrape o all cooked on grease and food from the Indirect Plate and Firebox Heat
Bae. Start in the middle and work your way down, out towards the edges of the bae. Once the
Indirect Plate and Heat Bae are scraped clean, remove and set aside so that the interior of the Firebox
is exposed. Connue to scrape down the interior of the Firebox, making sure to get any food or grease
that may have goen below the Heat Bae. Remove and empty Ash Reservoirs from the le and right-
hand sides of the repot. Set them aside. Using the Paint brush, sweep all loose ash and debris down to
the right and le of the Firepot towards the Aluminum Trays in the Ash Drawers.
3. Clean the Firepot:
◦ Remove the Firepot by liing from the back and straight up. Scrape out any ash le behind. Set aside.
4. Vacuum
◦ Vacuum out all ash and debris visible in the Firebox. Including under the Firepot.
5. Ash Drawers
◦ Remove the Aluminum Trays and dispose of any ash or grease appropriately. Remove the drawers from
the slides to access the base of the Firebox. Using your vacuum, remove any pellets, ash, or grease that
may have goen behind the Ash Drawers.
6. Reassembly
◦ Reassemble your grill: Firepot rst, Ash reservoirs second, Firebox Bae and Indirect Plate third, then
the Grates. Last but not least, the Ash Drawers.
If the grill is to be stored for a long period of me, the pellets should be removed from the hopper and stored
in a dry locaon away from any heat source.
FOR MORE INFORMATION, PLEASE VISIT: hps://www.twineaglesgrills.com/resources/service/
6. 91% RUBBING ALCOHOL
7. FLAT HEAD SCREWDRIVER
8. PUTTY KNIFE
9. PAINT BRUSH
10. VACUUM WITH HOSE
RECOMMENDED PRODUCTS:
EXTERIOR:
1. Using the Stainless Steel cleaner and Microber cloth, clean the exterior of the grill.
NOTE: ALWAYS clean in the same direcon as the grain of the steel.
2. If there are any scratches or ping in the metal, use Bar Keepers Friend and the Scotch-Brite pad to gen-
tly bu out the imperfecons. ALWAYS with the grain.
www.twineaglesgrills.com | 21
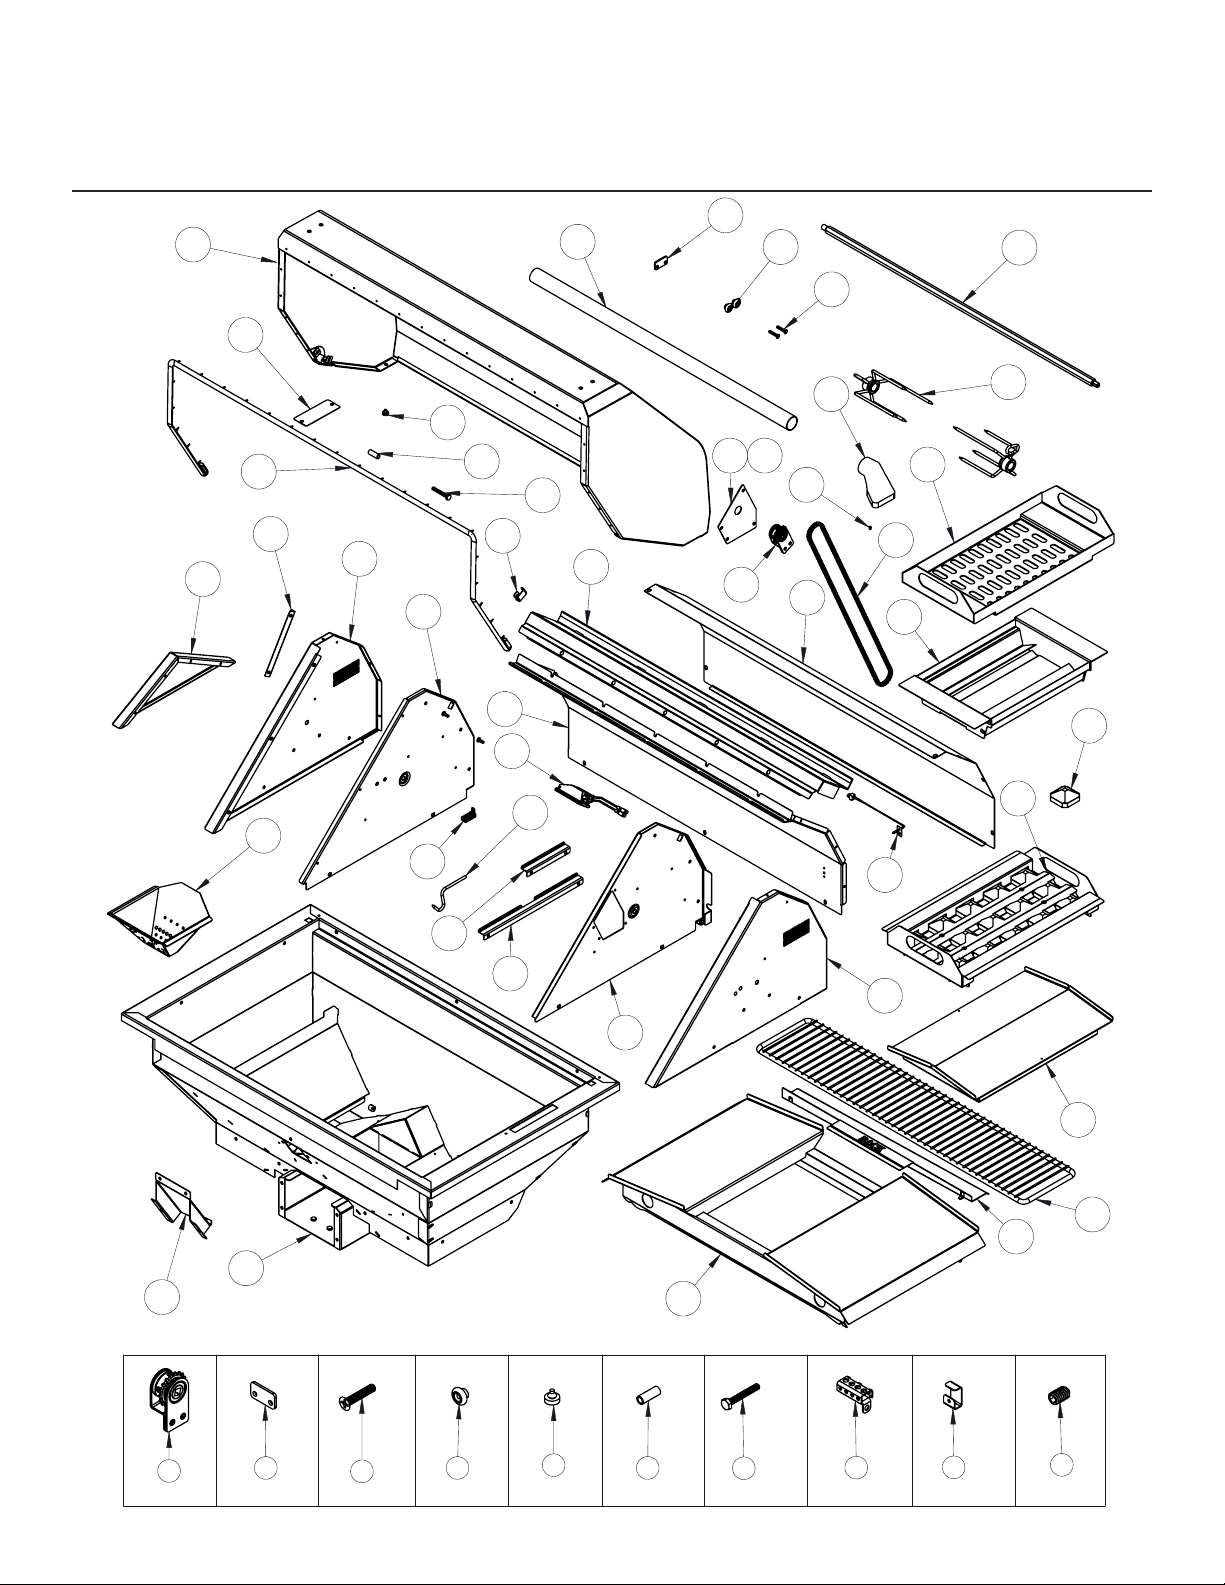
EXPLODED VIEW
16
41
32
33
34
36
8
38
39
40
37
35
20
21
22
13
42
14
24
25
19
43
9
12
26
1
28
27
11
2
4
3
17
18
5
31
6
7
10
29 30
44
15
103
1
2
3
5
6
7
4
8
9
23
27
22 | Twin Eagles Technical Support (562) 263-3600
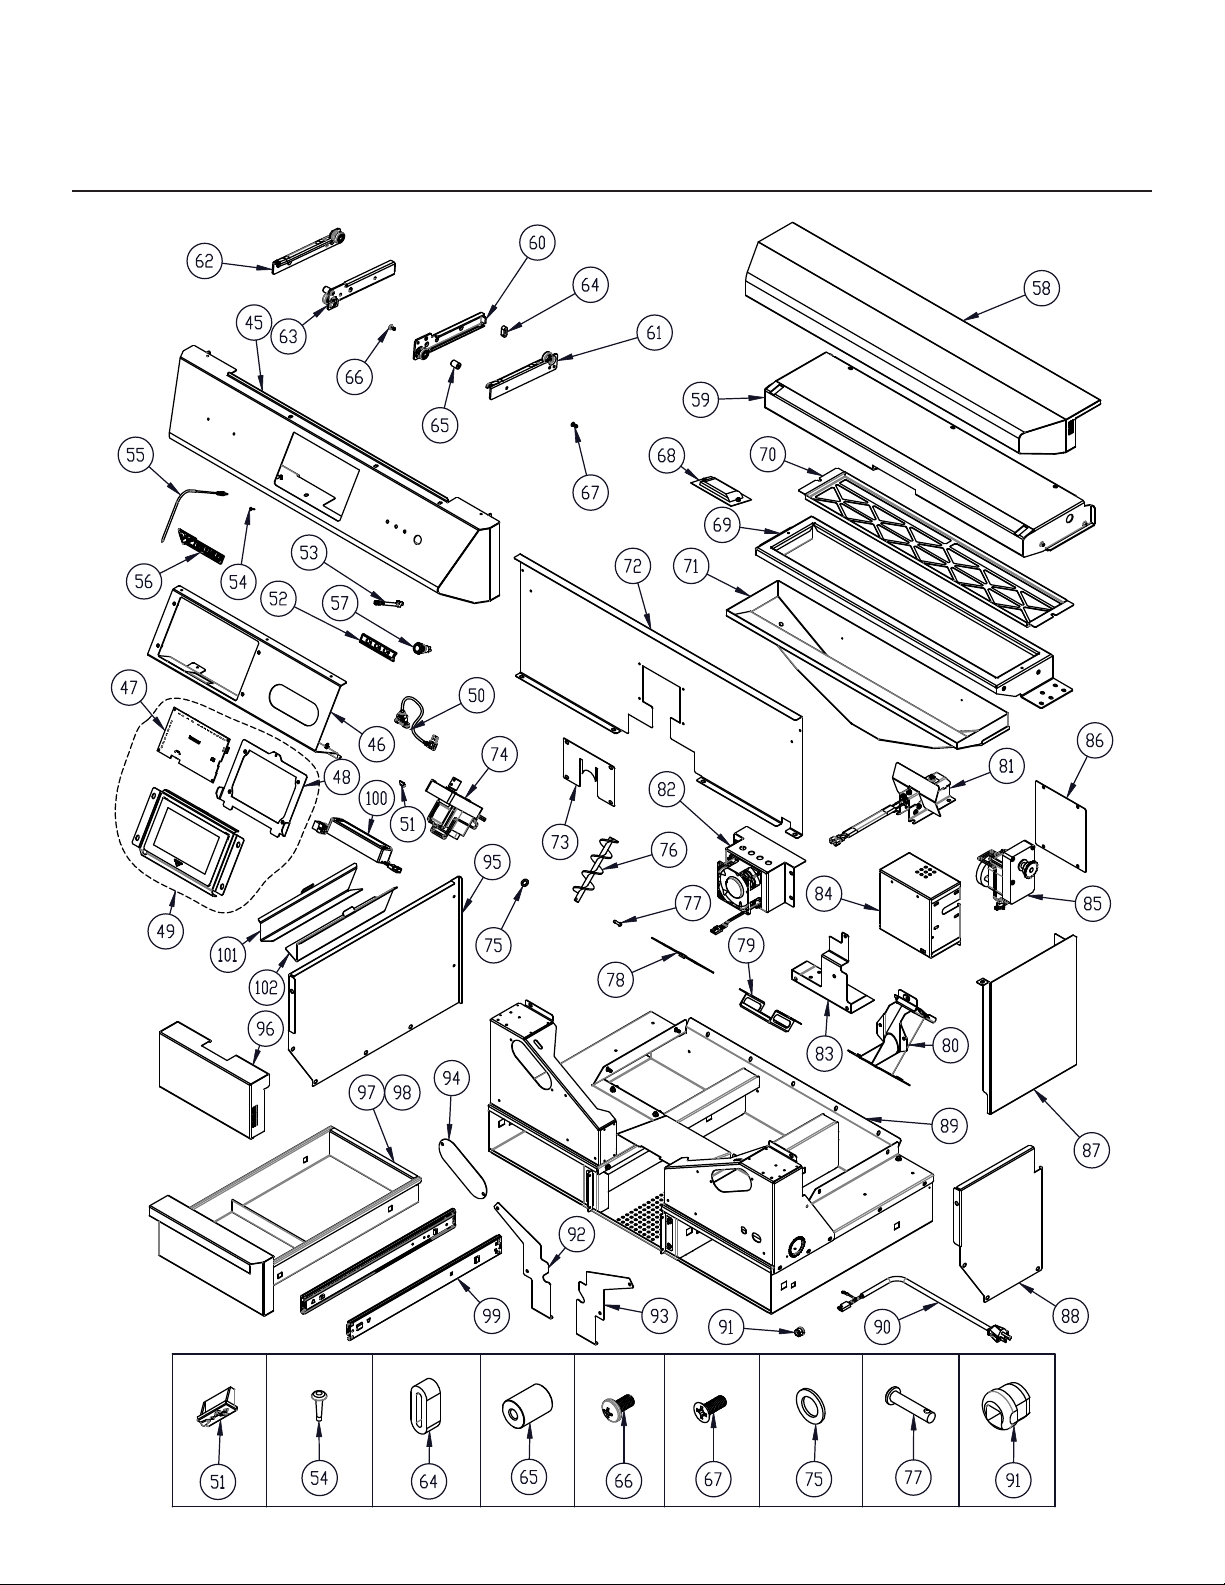
EXPLODED VIEW - cont.

www.twineaglesgrills.com | 23
REPLACEMENT PARTS LIST
ITEM
NO.
TE PART
NO.
DESCRIPTION
TEPG
36G
TEPG
36R
1 S27290Y SPROCKET ASSEMBLY - 1
2 S26310 SPACER, ROTIS PLATE - 1
3 S14337 SCREW, 10-32 X 1, PH, FLT, S/S - 2
4 S14420 ROLLER BEARING - 2
5 S14128 BUMPER 2 2
6 S14340 HOOD SPACER SLEEVE 2 2
7 S14303 SCREW, 1/4-20 X 1 3/4, HEX, S/S 2 2
8 S27285 REAR HOOD PROBE GUARD 1 1
9 S27299 FRONT HOOD GASKET CLAMP 2 2
10 S27294-36WY FRONT HOOD WELDED ASSEMBLY 1 1
11 S12339 ROUND TUBE, 1 1/4 X 30”, S/S 1 1
12 S27246-36 BRAIDED STEEL, HOOD GASKET 1 1
13 S27280-36WY REAR HOOD LINER WELDED ASSY. 1 1
14 S27293-36 REAR HOOD WRAPPER 1 1
15 S27382-36 TOP REAR HOOD 1 1
16 S27250-36WY FIREBOX, WELDED ASSEMBLY 1 1
17 S13928-36 ROD, ROTIS, 36 - 1
18 S13865 S/S MEAT FORKS (PAIR) - 1
19 S27319WY FIREBOX HEAT BAFFLE 1 1
20 S13955 COOKING RACK 3 3
21 S27321WY INDIRECT PLATE ASSEMBLY 1 1
22 S27248Y BRIQUETTE TRAY ASSEMBLY 1 1
23 S13295-15 BRIQUETTES (15 PACK) 1 1
24 S27325Y CHARCOAL TRAY ASSEMBLY 1 1
25 S27328 CHARCOAL TRAY BODY 1 1
26 S13258 HANDLE, END CAP 2 2
27 S14368 SET SCREW, 8-32 X 1/4 2 2
28 S13949 CHAIN - 1
29 S27288 COG PLATE COVER - 1
30 S27289 PLATE COVER 1 -
31 S27215 HANDLE COVER PLATE 2 2
32 S27283 REAR HOOD LOWER SEAL 2 2
33 S27284 REAR HOOD UPPER SEAL 2 2
34 S27282-L REAR HOOD SIDE, LH 1 1
35 S27282-R REAR HOOD SIDE, RH 1 1
36 S27281-L REAR HOOD LINER, LH 1 1
37 S27281-R REAR HOOD LINER, RH 1 1
38 S13957 FOOD HOOKS 3 3
39 S27287 SMALL COOKING RACK BRACKET 2 2
40 S27286 LARGE COOKING RACK BRACKET 2 2
41 S27318 FIREPOT 1 1
42 S16040 OVEN TEMPERATURE PROBE 1 1
43 S16240-CY HALOGEN LIGHTS 2 2
44 S27278 PELLET FEED SHIELD 1 1
ITEM
NO.
TE PART
NO.
DESCRIPTION
TEPG
36G
TEPG
36R
45 S27301-36WY FRONT PANEL WELDED ASSEMBLY 1 1
46 S27303Y INNER FRONT PANEL ASSEMBLY 1 1
47 S16441 ECU, BOARD 1 1
48 S27305Y ECU BRACKET ASSEMBLY 1 1
49 S27304Y DISPLAY SCREEN ASSEMBLY 1 1
50 S16046 USB CABLE 1 1
51 S14365 RUBBER USB PLUG 1 1
52 S13293 PROBE PLATE 1 1
53 S16431 WIRE HARNESS, PROBE JACK 3 3
54 S14363 TAPERED ROUND PLUG 3 3
55 S16041 FOOD PROBE 3 3
56 S13203 EMBLEM, TWIN EAGLES 1 1
57 S16365 SWITCH, 110V, BLUE 1 1
58 S27307-36WY
LANDING LEDGE HANDLE WELD-
ED ASSY.
1 1
59 S27309-36Y BRIDGE CHANNEL ASSEMBLY 1 1
60 S14469-LC CABINET RAIL SLIDE, LH 1 1
61 S14469-LD DRAWER RAIL SLIDE, LH 1 1
62 S14469-RC CABINET RAIL SLIDE, RH 1 1
63 S14469-RD DRAWER RAIL SLIDE, RH 1 1
64 S12370 SLIDE BUMPER 2 2
65 S14472 STAND OFF 2 2
66 S14473 SCREW M5 X 10mm 2 2
67 S14360 SCREW, 10-32 X 1/2 FLAT UC, PH 8 8
68 S14468 RECESSED PULL HANDLE 1 1
69 S27277-36Y HOPPER FRAME ASSEMBLY 1 1
70 S27324 HOPPER GRATE 1 1
71 S27274-36Y HOPPER ASSEMBLY 1 1
72 S27355 FIREBOX INNER BAFFLE 1 1
73 S27356 FIRE BOX INNER BAFFLE COVER 1 1
74 S16440Y AUGER MOTOR W/ COUPLING 1 1
75 S14353 AUGER WASHER 1 1
76 S13286 AUGER FLIGHTING W/ SHAFT 1 1
77 S14354 CLEVIS PIN W/ PIN COTTER 1 1
78 S27271Y AUGER SPACER PLATE ASSEMBLY 1 1
79 S27272 AUGER MOTOR MOUNT 1 1
80 S27268WY AUGER SUPPORT WELDED ASSY. 1 1
81 S27264Y IGNITER HOUSING ASSEMBLY 1 1
82 S27267Y FAN MOUNT ASSEMBLY 1 1
83 S27279 ROTIS MOTOR MOUNT - 1
84 S26349 BOX, MOTOR - 1
85 S16366Y ROTIS MOTOR ASSEMBLY - 1
86 S26351 COVER, MOTOR BOX - 1
87 S27317 CHAIN GUARD - 1

24 | Twin Eagles Technical Support (562) 263-3600
ITEM
NO.
TE PART
NO.
DESCRIPTION
TEPG
36G
TEPG
36R
88 S27358 RIGHT HEAT SHIELD (TEPG36R) - 1
89 S27261-36Y DRAWER BASE ASSEMBLY 1 1
90 S16433 POWER CORD HARNESS 1 1
91 S16112 STRAIN RELIEF 1 1
92 S27244-L FIREBOX FRONT BAFFLE, LH 1 1
93 S27244-R FIREBOX FRONT BAFFLE, RH 1 1
94 S27245 BRACKET MOUNT COVER 2 2
95 S27357 LEFT HEAT SHIELD 1 1
96 S27310 AUGER COVER 1 1
97 S27312-LY DRAWER ASSEMBLY, LH 1 1
98 S27312-RY DRAWER ASSEMBLY, RH 1 1
99 S14450 18” SLIDES 2 PR 2 PR
100 S16436 12V POWER SUPPLY 1 1
101 S27392-L LH ASH RESERVOIR 1 1
102 S27392-R RH ASH RESERVOIR 1 1
103 S27385 HEAT DIVERTER 1 1
PARTS NOT SHOWN
S16432 WIRE HARNESS, LIGHT 1 1
S16434 WIRE HARNESS, 110V 1 1
S16435
WIRE HARNESS, 110V COMPO-
NENT
1 1
S16437 WIRE HARNESS, 12V 1 1
S16465 WIRE HARNESS, ROTIS - 1
S27363 RIGHT HEAT SHIELD (TEPG36G) 1 -
REPLACEMENT PARTS LIST- cont.
www.twineaglesgrills.com | 25
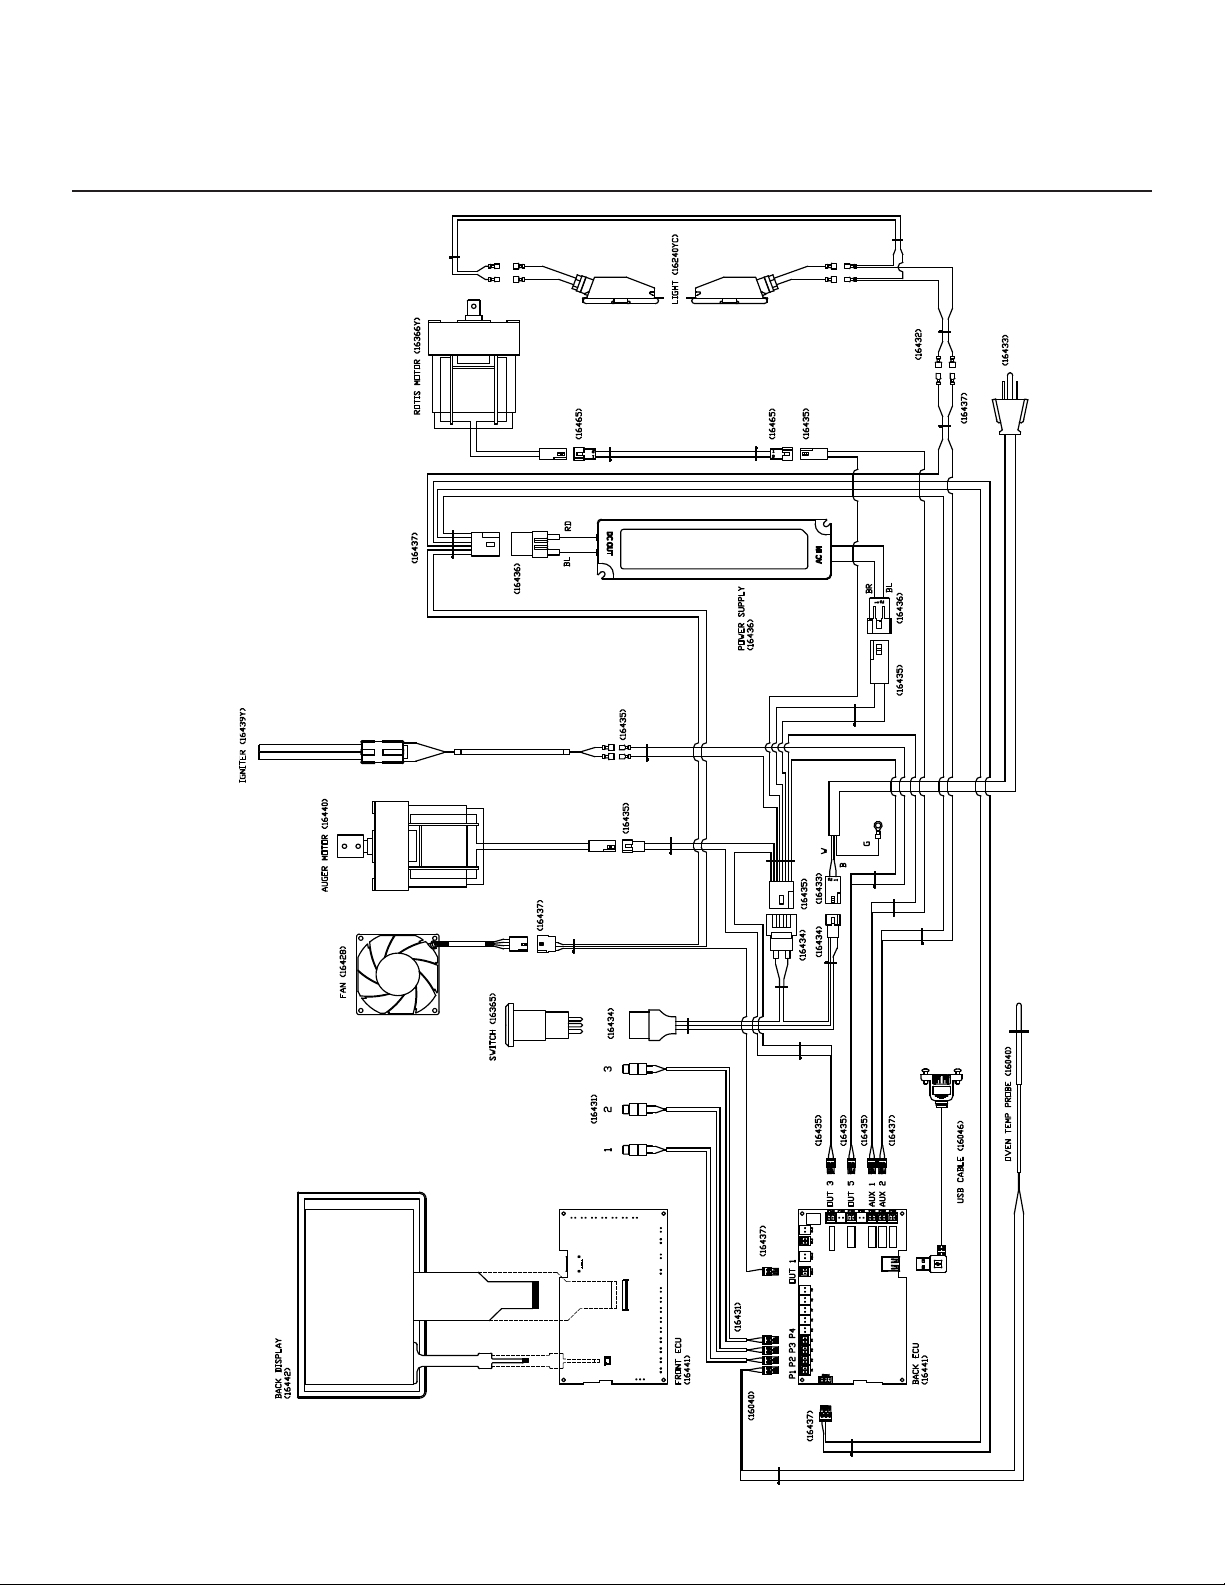
WIRING DIAGRAM

26 | Twin Eagles Technical Support (562) 263-3600
WARRANTY
• LIMITED LIFETIME WARRANTY: Twin Eagles warrants all fabricated stainless steel components, to be free from defects in
materials and workmanship under normal residenal use for the lifeme of the product. This warranty excludes discol-
oraon, surface scratches, weather and atmospheric related staining, and minor surface rust and oxidaon which are
normal condions and are to be expected with any outdoor product. The actual part will be repaired or replaced, free of
charge, with the owner paying for all other costs including labor, shipping and handling.
• LIMITED FIVE YEAR WARRANTY: Twin Eagles warrants the stainless steel cooking grates, briquee tray, charcoal tray,
indirect/vaporizer plate, repot, heat bae, and ash drawer to be free from defects in materials and workmanship under
normal residenal use for a period of ve years from the original date of purchase. The actual part will be repaired or
replaced, free of charge, with the owner paying for all other costs including labor, shipping and handling.
• LIMITED TWO YEAR WARRANTY: Twin Eagles warrants all other grill components to be free from defects in materials
and workmanship under normal residenal use for a period of two years from the original date of purchase. The actual
part will be repaired or replaced, free of charge, with the owner paying for all other costs including labor, shipping and
handling.
• ONE-YEAR FULL WARRANTY: Twin Eagles warrants the outdoor grill and all other components to be free from defects
in materials and workmanship under normal residenal use for a period of one year from the original date of purchase.
Twin Eagles will repair or replace parts found to be defecve at no cost to the original purchaser. Warranty service must
be performed by a Twin Eagles authorized representave during normal business hours.
• NINETY (90) DAY RESIDENTIAL PLUS WARRANTY: This warranty applies to applicaons where use of the product ex-
tends beyond normal residenal use such as bed and breakfast inn and private clubs. The actual part will be repaired or
replaced, free of charge, with the owner paying for all other costs including labor, shipping and handling. This warranty
excludes all commercial locaons such as restaurants and food service locaons.
WARRANTY LIMITATIONS & EXCLUSIONS
This warranty shall apply only to the products purchased and located in the connental United States and Canada. Service
must be provided in the country where the product is purchased. The warranty coverage begins on the original date of pur-
chase and proof of date of purchase is required. To acvate the warranty, we require that you send in the aached warranty
registraon card. This warranty applies only to the original purchaser and may not be transferred.
This warranty does not apply to damages resulng from negligence, alteraon, misuse, abuse, accident, natural disaster, loss
of electrical power to the product for any reason, improper installaon or improper operaon, unauthorized adjustments or
calibraons, dings, dents, scratches, or damages due to harsh cleaning chemicals. This warranty does not apply to commercial
use, or to products with altered or removed serial numbers. Display models are generally sold “as is” and are subject to the
following warranty exclusions: missing components, scratches, dents and other exterior or cosmec damages, electrical and
ignion system. All other warranes (ve year and lifeme) will remain in eect). Twin Eagles shall not be liable for incidental,
consequenal, special or conngent damages resulng from its breach of this wrien warranty or any implied warranty.
WARRANTY SERVICE & REPLACEMENT PARTS: Call your authorized selling dealer or call Twin Eagles directly at (562) 263-3600.
Be prepared to furnish the following informaon: Purchaser’s name, model and serial number of the grill, date of purchase and
the accurate descripon of the problem. Twin Eagles will not pay for service calls for correcng an installaon problem. Owner
shall be responsible for proper installaon, providing normal care and maintenance, providing proof of purchase upon request
and making the grill accessible for service. In the event of any warranty replacement, all removal, replacement, installaon and
shipping costs are the responsibility of the grill owner.
Some states do not allow limitaons on how long an implied warranty lasts, or the exclusions of or limitaons on consequen-
al damages. This warranty gives you specic legal rights and you may have other rights, which vary from state to state.

www.twineaglesgrills.com | 27
HOW TO OBTAIN SERVICE
For service, please contact your Twin Eagles dealer or call Twin Eagles direct at (562) 263-3600 or
(800) 789-2206 or (562) 802-3488 or fax (562) 802-3391
Mailing address:
Twin Eagles, Inc.
13259 East 166th Street
Cerritos, CA 90703
Visit us at www.twineaglesgrills.com
Please provide:
• Model number
• Serial Number (located under the right side of the control panel, below the On/O switch)
• Date of Purchase
• A descripon of the problem
This Warranty Registraon card must be returned within thirty days of purchase to properly acvate your
warranty. This informaon is for our internal use only.
Or you may register online at hps://www.twineaglesgrills.com/resources/warranty-registraon/
CUSTOMER NAME MODEL #
ADDRESS SERIAL #
CITY, STATE DATE PURCHASED
ZIP DEALER’S NAME
PHONE # DEALER’S ADDRESS
E-MAIL
WARRANTY REGISTRATION
CUT HERE

CUSTOMER SERVICE
ATTN: Warranty Dept.
13259 East 166th St
Cerritos, CA 90703
Direct line to Service: (562) 263-3600
Fax No. (562) 802-3391
PLACE
POSTAGE
HERE
CUT HERE