Loading ...
Loading ...
Loading ...
English 11
ATTENTION
Dry running of more than 2 minutes leads to damage of
the high-pressure pump. If the appliance does not build
up pressure within 2 minutes, switch the appliance off
and proceed in accordance with the instructions in
Chapter "Troubleshooting".
몇 CAUTION
Keep a distance of at least 30 cm when using the jet for
cleaning painted surfaces to avoid damage.
ATTENTION
Car tyres, paint or sensitive surfaces such as wood
should not be cleaned with the dirt blaster, as there is a
risk of damage.
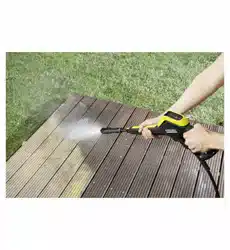
Select a spray lance suitable for the cleaning task.
Illustration
Push the spray lance into the trigger gun and fasten
it by a 90° rotation.
Turn on the appliance “I/ON”.
Unlock the lever of the trigger gun.
Push the lever of the trigger gun, the device will
switch on.
Note: Release the lever of the trigger gun; the de-
vice will switch off again. High pressure remains in
the system.
Full Control spray lance Vario Power
Turn the spray lance until the LED of the required
pressure level is on at the pressure indicator of the
trigger gun.
The pressure indicator on the trigger gun shows the cur-
rently set pressure level during operation with a Full
Control spray lance.
Note: The pressure indicator is not significant during
operation with the T-Racer and other accessories.
ATTENTION
The sensitivity of the materials can strongly differ de-
pending on the age and the condition. The so-called
recommendations are non-binding.
Most KÄRCHER detergents can be bought ready to use
in a Plug 'n' Clean detergent bottle.
Note: Detergent can only be added when the device is
operated in low pressure mode.
DANGER
When using detergents, the material data safety sheet
issued by the detergent manufacturer must be adhered
to, especially the instructions regarding personal pro-
tective equipment.
* Optional accessories
Remove the cap of the Plug 'n' Clean detergent
bottle.
Illustration
Push the detergent bottle with the opening pointing
downwards into the connection for the Plug 'n'
Clean detergent.
Use Vario Power spray lance.
Turn the spray lance towards "MIX" until the the
LED "MIX" is on on the pressure indicator of the
trigger gun.
Note: This will mix the detergent with the water
stream.
Spray the detergent sparingly on the dry surface
and allow it to react, but not to dry.
Spray off loosened dirt with the high pressure jet.
Remove the Plug 'n' Clean detergent bottle from
the intake and close it with the lid.
For storage, put the detergent bottle into the retain-
er with the cap pointing up.
Release the lever of the trigger gun.
Lock the lever of the trigger gun.
Illustration
Put the trigger gun with the spray lance into the
parking position.
During longer breaks (more than 5 minutes), also
turn the appliance off using the "0/OFF" switch.
Release the lever of the trigger gun.
Turn off the appliance "0/OFF".
Disconnect the mains plug from the socket.
몇 CAUTION
Only separate the high-pressure hose from the trigger
gun or the device when there is no pressure in the sys-
tem.
Turn off tap.
Press the lever of the trigger gun to release any re-
maining pressure in the system.
Release the lever of the trigger gun.
Lock the lever of the trigger gun.
ATTENTION
When disconnecting the supply or high pressure hose,
warm water may leak from the connections after opera-
tion.
Detach the appliance from the water supply.
Operation
High pressure operation
Full Control System
Pressure level For example, recommended for
HARD Stone terraces made of paving
stones or exposed aggregate con-
crete, asphalt, metal surfaces, gar-
den utensils (wheelbarrow, spade,
etc.)
MEDIUM Motorcar / motorcycle, brick sur-
faces, plastered walls, plastic furni-
ture
SOFT Wooden surfaces, bicycles, sand
stone surfaces, rattan furniture
MIX Operation with detergent
Operation with detergent
Recommended cleaning method
After operation with detergent
Interrupting operation
Finish operation
Loading ...
Loading ...
Loading ...