®
SENS-A-CLEAN TMSelf-Cleaning Gas Range
Cocina de gas de auto limpieza SENS-A-CLEAN TM
Models, Modelos 665.75842
665.75844
665.75849
TO THE INSTALLER: PLEASE LEAVE THIS INSTRUCTION BOOK WITH THE UNIT
TO THE CONSUMER: PLEASE READ AND KEEP THIS BOOK FOR FUTURE
REFERENCE.
PARA EL INSTALADOR: FAVOR DE DE JAR ESTE MANUAL DE INSTRUCClONES
CON LA UNIDAD.
PARA EL CONSUMIDOR: FAVOR DE LEER Y GUARDAR ESTE MANUAL PARA
FUTURAS REFERENCIAS.
Super Capacity with ULTP,.AJBAKETM System
Capacidad extra con el Sistema ULTPJI.B/IJ(E TM
8273782 Sears, Roebuck and Co., Hoffman Estates, IL 60179 U.S.A.
www.sears.com
TableofContents
A Note to You ............................................................ 2
Warranty ..................................................................... 3
Range Safety ............................................................. 4
Parts and Features ................................................... 6
Using Your Range .................................................... 7
Using the Surface Burners .................................... 7
Professional Burner Grate System ....................... 8
Characteristics of Cookware Materials ................ 9
Using the Oven .................................................... 10
Bakeware Choices .............................................. 11
Using Aluminum Foil ........................................... 11
The Electronic Oven Control ............................... 12
Setting the Clock ............................................. 13
Using the Oven Lockout ................................. 13
Using the Cooktop Lockout ........................... 14
Tones ................................................................ 14
Using the 12-Hour Shut-Off ........................... 14
Using the Electronic Kitchen Timer ............... 15
Starting/Canceling a Function ........................ 16
ULTRABAKE TM Baking/Roasting ................... 16
Readjusting the Oven Temperature Control_.18
Broiling ............................................................. 19
Using RECIPE RECALL TM .............................. 22
Using Serve Warm .......................................... 24
Using the Timed Oven Control ...................... 28
Using the Warm & Ready Warming Drawer ...........33
The Oven Vent ...................................... .......,.,,,,34
Using the SENS-A-CLEAN TM
Self-Cleaning Cycle ............................................... 35
Before You Start .................................................. 35
How the Cycle Works ......................................... 36
Setting the Controls ............................................ 36
Caring for Your Range ........................................... 39
Cleaning Chart ..................................................... 39
Sealed Surface Burners and Cooktop ............... 41
Removing the Oven Door ................................... 42
The Oven Light .................................................... 44
The Console Night Light ..................................... 45
Troubleshooting ...................................................... 46
Range Does Not Work ........................................ 46
Oven/Broiler Burner ............................................. 46
Surface Burners ................................................... 47
When Self-Cleaning Your Oven .......................... 47
Cooking Results .................................................. 48
Display Messages ............................................... 48
Index ......................................................................... 51
Service .................................................... Back Cover
A Noteto You
Tha " Iou Io DuF g a KI@£OII
t!! ttsoeo
Your KENMORE gas range takes on a new value
when you discover that Sears has service centers
around the country. Trained Sears Service
Professionals use fully-equipped trucks and Sears-
approved methods for expert repairs backing up all
Sears guarantees.
Whenever you call to request service for your
appliance, you need to know your complete model
number and serial number. You can find this
information on the model and serial number plate
(see diagram in the "Parts and Features," p. 6).
Please also record the purchase date of your
appliance and your store's name and telephone
number.
Model Number 665.
Serial Number R
Purchase Date
Keep this book and the sales slip together
in a safe place for future reference.
®
Free-Standing Range Warranty
FULLONEYEARWARRANTYONALLPARTS
If, within one year from the date of installation, any part fails to function 3roperly due to a defect in
material or workmanship, Sears will repair or replace it. at our option, free of charge.
If this product is subjected to other than private family use, the above warranty is effective for only
90 days.
WARRANTY SERVICE IS AVAILABLE BY CONTACTING THE NEAREST SEARS SERVICE CENTER IN
THE UNITED STATES.
This warranty gives you specific legal rights and you may also have other rights which vary from state
to state.
Sears Roebuck and Co. Dept. 817WA Hoffman Estates, IL 60179
ToFurtherAddToTheValueOfYourRange,Buya SearsMaintenanceAgreement.
Years of Ownership Coverage
1. Replacement of Defective Parts
2. Annual Preventive Maintenance
Check at Your Request
1st Year 2nd Year
W MA
MA MA
3rdYear
MA
MA
W = Warranty MA = Maintenance Agreement
Your Kenmore appliance is designed, manufactured and tested to provide years of dependable operation. Yet any major
appliance may require service from time to time. The Sears Maintenance Agreement offers you an outstanding service
program, affordably priced.
The table above shows the additional benefits a Sears Maintenance Agreement provides beyond the Sears Warranty.
Contact your Sears Sales Associate or call 1-800-827-6655 to purchase a Sears Maintenance Agreement.
I
WARNING: If the information in this manual is not followed exactly, a fire or I
explosion may result causing property damage, personal injury or death,
I
- Do not store or use gasoline or other flammable vapors and liquids in the vicinity
of this or any other appliance,
- WHAT TO DO IF YOU SMELL GAS
• Do not try to light any appliance.
• Do not touch any electrical switch.
• Do not use any phone in your building.
• Immediately call your gas supplier from a neighbor's phone. Follow the gas
supplier's instructions.
• If you cannot reach your gas supplier, call the fire department.
- Installation and service must be performed by a qualified installer, service
agency or the gas supplier,

Range Safety
Your safety and the safety of others are very important.
We have provided many important safety messages in this manual and on your appliance. Always read and
obey all safety messages.
This is the safety alert symbol.
This symbol alerts you to potential hazards that can kill or hurt you and others.
All safety messages will follow the safety alert symbol and either the word "DANGER" or
"WARNING." These words mean:
You can be killed or seriously injured if you don't
immediately follow instructions.
You can be killed or seriously injured if you don't
follow instructions.
All safety messages will tell you what the potential hazard is, tell you how to reduce the chance of injury,
and tell you what can happen if the instructions are not followed.
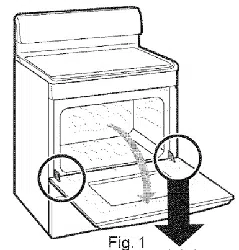
THE ANTI-TIP BRACKET
The range will not tip during normal use. However, the range can tip if you apply too much force or weight
to the open door without the anti-tip bracket fastened down properly.
Tip Over Hazard
A child or adult can tip the range and be killed.
Connect anti-tip bracket to rear range foot.
Reconnect the anti-tip bracket, if the range is moved.
See the installation instructions for details.
Failure to follow these instructions can result in death or serious burns
to children and adults.
Anti-Tip Bracket
Range Foot
Making sure the anti-tip bracket is installed:
• Slide range forward.
• Look for the anti-tip bracket securely attached to floor.
• Slide range back so rear range foot is under anti-tip bracket.
The illustration on the right shows the proper
placement of the anti-tip floor bracket. To install
correctly, see your installation instructions.
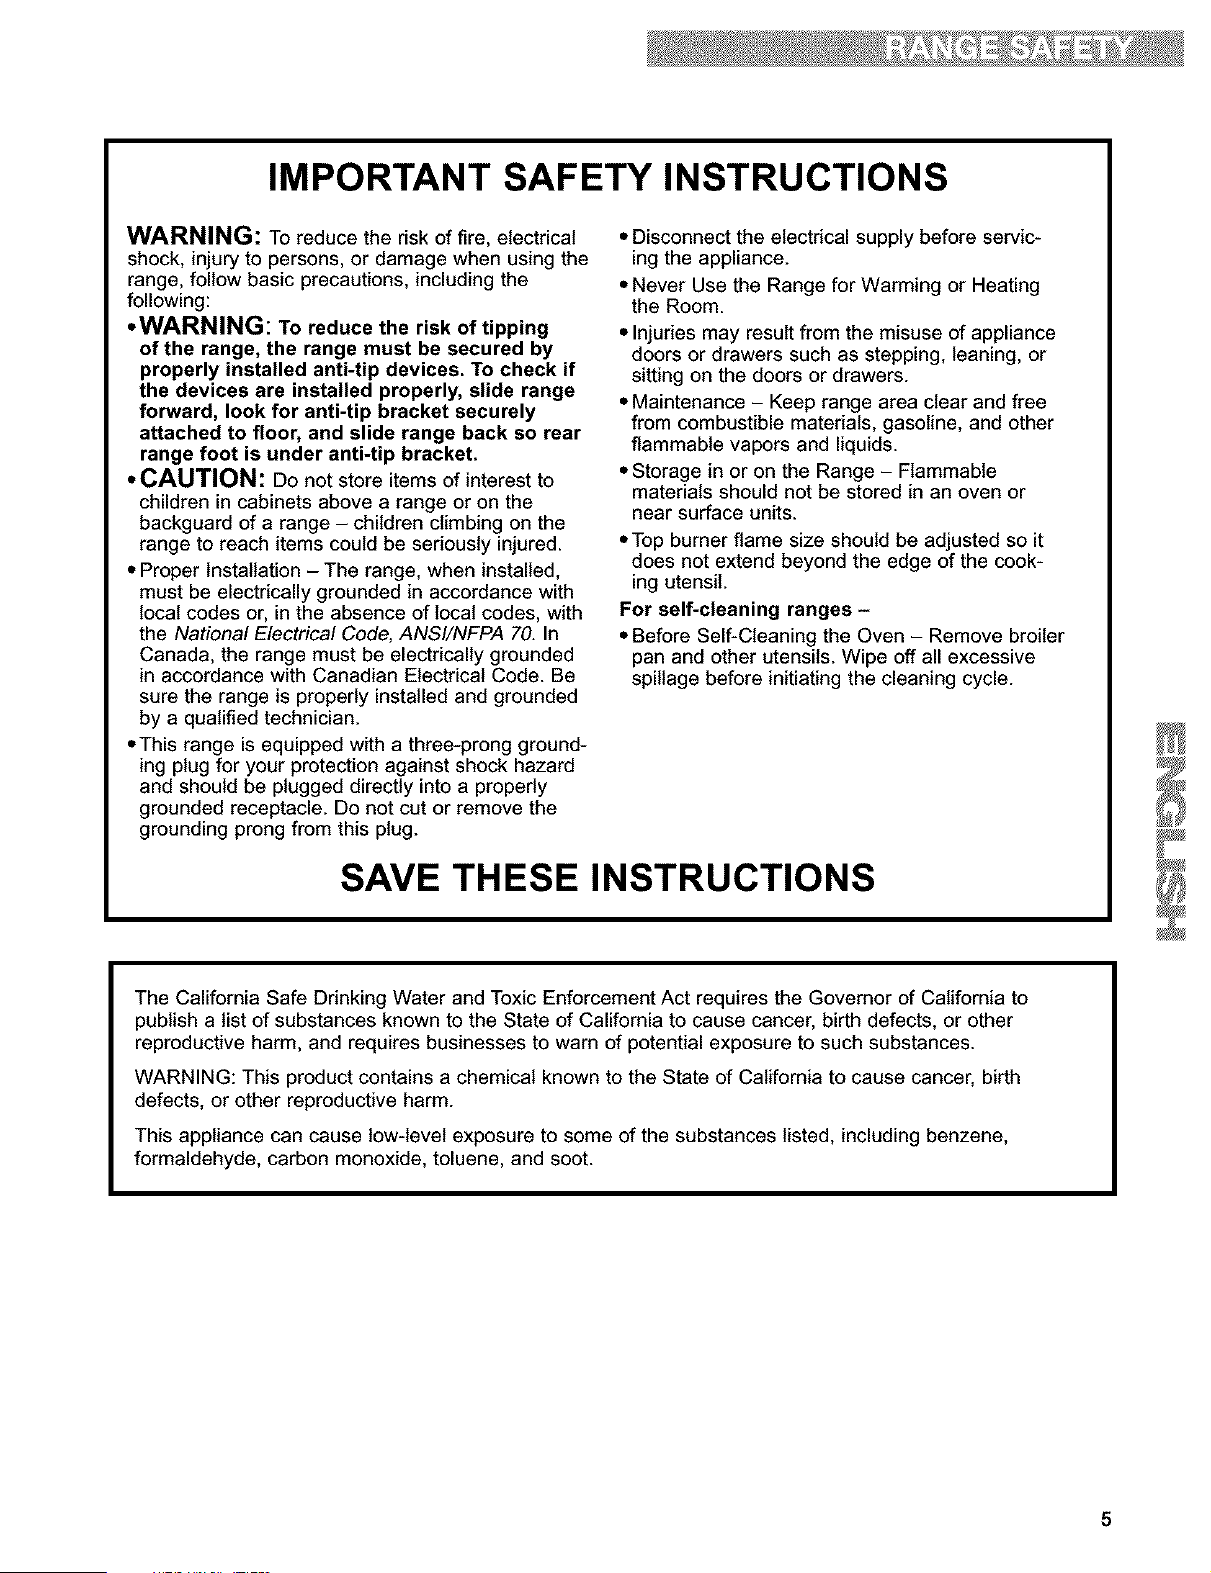
IMPORTANT SAFETY INSTRUCTIONS
WARNING: To reduce the risk of fire, electrical
shock, injury to persons, or damage when using the
range, follow basic precautions, including the
following:
• WARNING: To reduce the risk of tipping
of the range, the range must be secured by
properly installed anti-tip devices. To check if
the devices are installed properly, slide range
forward, look for anti-tip bracket securely
attached to floor, and slide range back so rear
range foot is under anti-tip bracket.
• CAUTION: Do not store items of interest to
children in cabinets above a range or on the
backguard of a range - children climbing on the
range to reach items could be seriously injured.
• Proper Installation - The range, when installed,
must be electrically grounded in accordance with
local codes or, in the absence of local codes, with
the National Electrical Code, ANSI/NFPA 70. In
Canada, the range must be electrically grounded
in accordance with Canadian Electrical Code. Be
sure the range is properly installed and grounded
by a qualified technician.
• This range is equipped with a three-prong ground-
ing plug for your protection against shock hazard
and should be plugged directly into a properly
grounded receptacle. Do not cut or remove the
grounding prong from this plug.
• Disconnect the electrical supply before servic-
ing the appliance.
• Never Use the Range for Warming or Heating
the Room.
• Injuries may result from the misuse of appliance
doors or drawers such as stepping, leaning, or
sitting on the doors or drawers.
• Maintenance - Keep range area clear and free
from combustible materials, gasoline, and other
flammable vapors and liquids.
• Storage in or on the Range - Flammable
materials should not be stored in an oven or
near surface units.
• Top burner flame size should be adjusted so it
does not extend beyond the edge of the cook-
ing utensil.
For self-cleaning ranges -
• Before Self-Cleaning the Oven - Remove broiler
pan and other utensils. Wipe off all excessive
spillage before initiating the cleaning cycle.
SAVE THESE INSTRUCTIONS
The California Safe Drinking Water and Toxic Enforcement Act requires the Governor of California to
publish a list of substances known to the State of California to cause cancer, birth defects, or other
reproductive harm, and requires businesses to warn of potential exposure to such substances.
WARNING: This product contains a chemical known to the State of California to cause cancer, birth
defects, or other reproductive harm.
This appliance can cause tow-level exposure to some of the substances listed, including benzene,
formaldehyde, carbon monoxide, toluene, and soot.
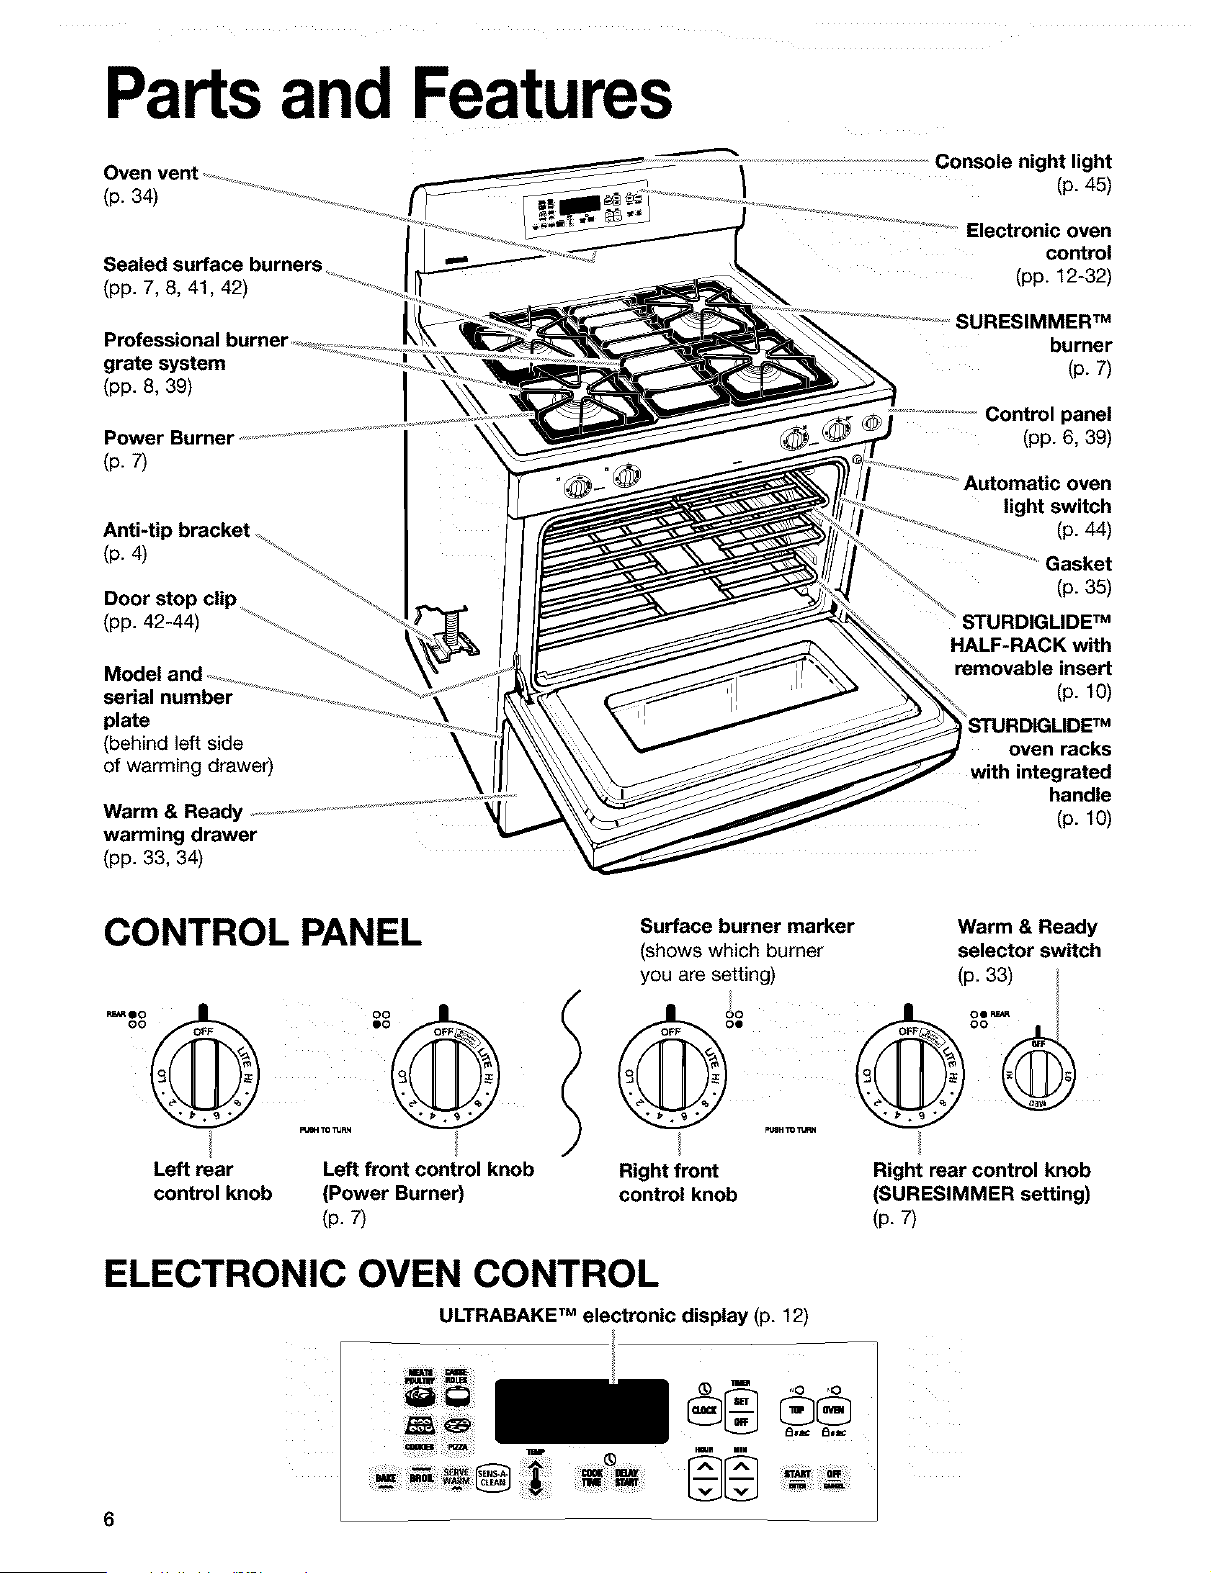
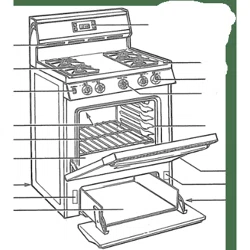
Parts and Features
Oven
(p. 34)
Sealed surface burners
(pp. 7, 8, 41, 42)
Professional
grate system
(pp. 8, 39)
Power Bu
(p. 7)
Anti-tip bracket _.
Door stop clip, '_%,_,
(pp. 42-44) ................................_ '
Mode .......
serial number
plate
(behind left side
of warming drawer)
Warm & Ready
warming drawer
(pp. 33, 34)
Console night light
(p. 45)
oven
control
(pp. 12-32)
SURESIMMER TM
burner
(p. 7)
...................................Control panel
(pp. 6, 39)
Automatic oven
tight switch
(p. 44)
Gasket
(p. 35)
STURDIGLIDE TM
HALF-RACK with
removable insert
(p. 10)
STURDIGLIDETM
oven racks
with integrated
handle
(p.lo)
CONTROL PANEL
Left rear
control knob
Left front control knob
(Power Burner)
(p. 7)
Surface burner marker Warm & Ready
(shows which burner selector switch
you are setting) (p. 33)
O0 oo
Right front
control knob
Right rear control knob
(SURESIMMER setting)
(p. 7)
ELECTRONIC OVEN CONTROL
ULTRABAKE TM electronic display (p. 12)
Rm.llf t _ ,_O ,,Q
6
Using Your Range
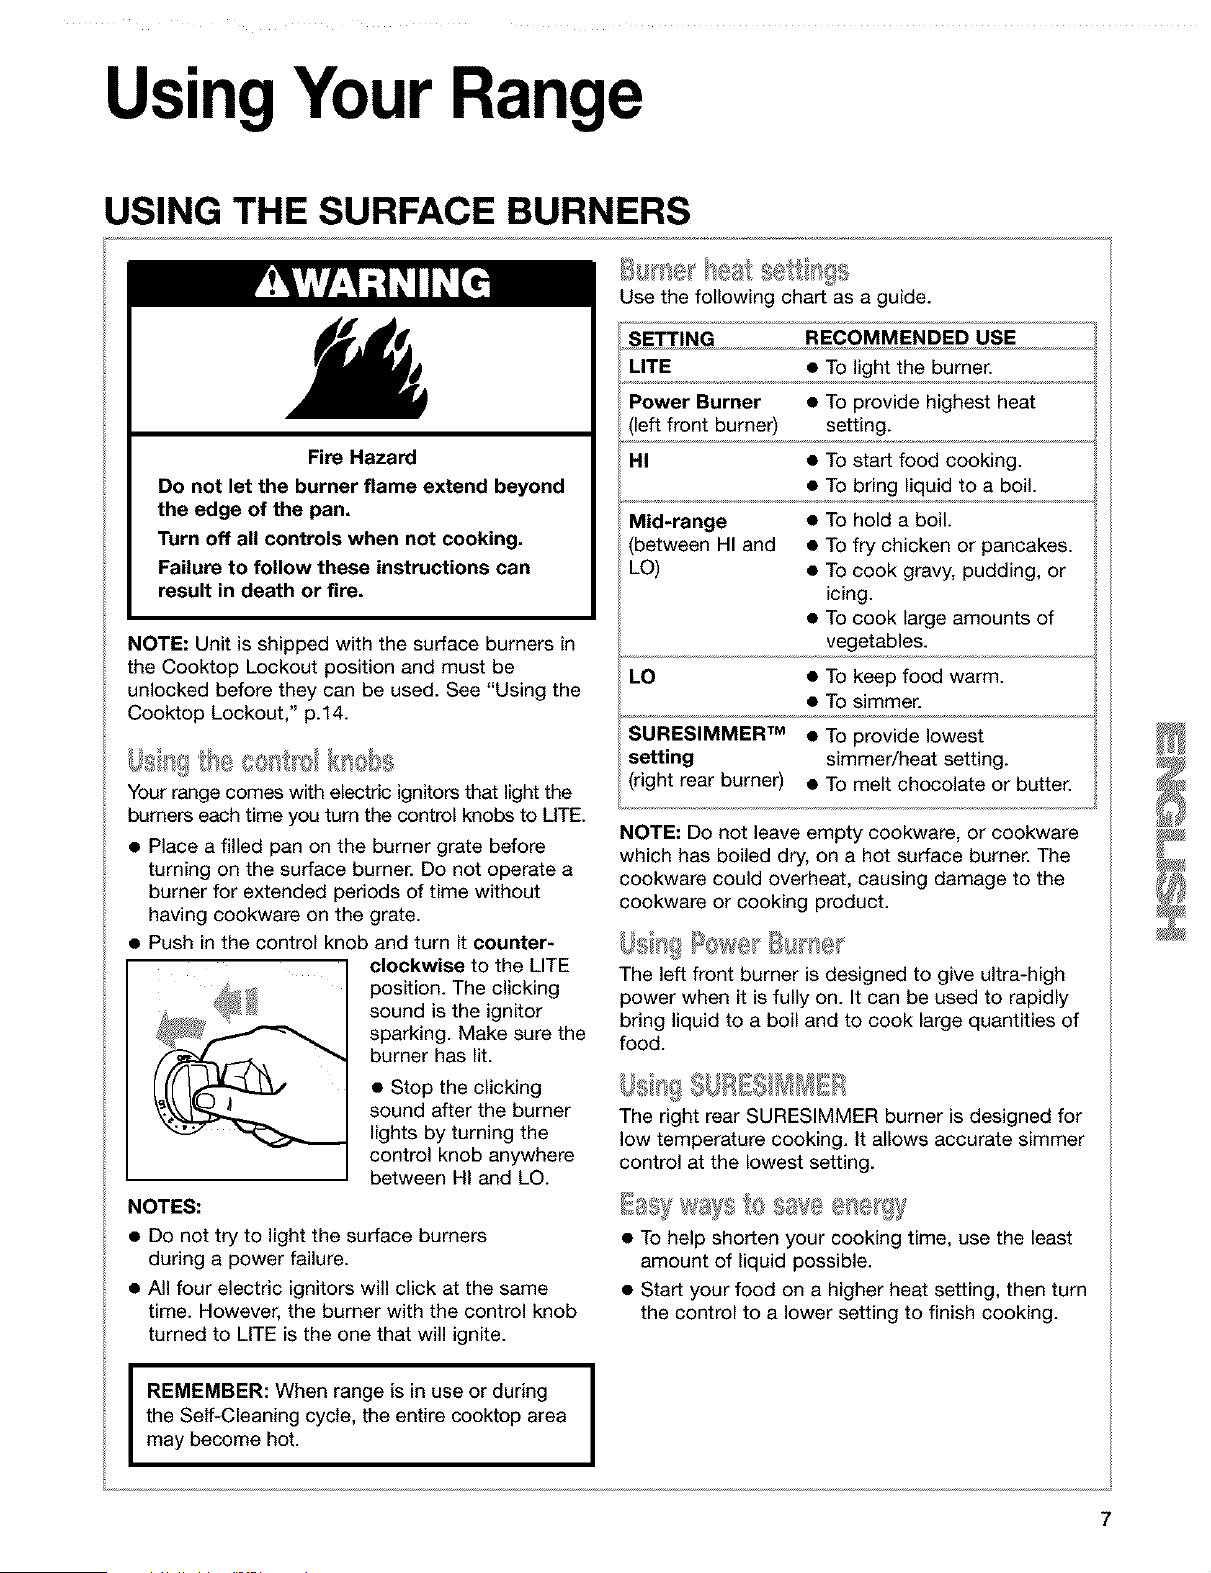
USING THE SURFACE BURNERS
Fire Hazard
Do not let the burner flame extend beyond
the edge of the pan.
Turn off all controls when not cooking.
Failure to follow these instructions can
result in death or fire.
NOTE: Unit is shipped with the surface burners in
the Cooktop Lockout position and must be
unlocked before they can be used. See "Using the
Cooktop Lockout," p.14.
Us 'tg con 'o knobs
Your range comes with electric ignitors that light the
burners each time you turn the control knobs to UTE.
• Place a filled pan on the burner grate before
turning on the surface burner. Do not operate a
burner for extended periods of time without
having cookware on the grate.
• Push in the control knob and turn it counter-
clockwise to the LITE
position. The clicking
sound is the ignitor
sparking. Make sure the
burner has lit.
• Stop the clicking
sound after the burner
lights by turning the
control knob anywhere
between HI and LO.
NOTES:
• Do not try to light the surface burners
during a power failure.
• All four electric ignitors will click at the same
time. However, the burner with the control knob
turned to LITE is the one that will ignite.
Use the following chart as a guide.
SETTING RECOMMENDED USE
LITE • To light the burner.
Power Burner • To provide highest heat
left front burner) setting.
HI • To start food cooking.
• To bring liquid to a boil.
Mid-range • To hold a boil.
between HI and • To fry chicken or pancakes.
LO) • To cook gravy, pudding, or
icing.
• To cook large amounts of
vegetables.
LO • To keep food warm.
• To simmer.
SURESIMMER TM • To provide lowest
setting simmer/heat setting.
(right rear burner) • To melt chocolate or butter.
NOTE: Do not leave empty cookware, or cookware
which has boiled dry, on a hot surface burner. The
cookware could overheat, causing damage to the
cookware or cooking product.
The left front burner is designed to give @tra-high
power when it is fully on. It can be used to rapidly
bring liquid to a boil and to cook large quantities of
food.
The right rear SURESIMMER burner is designed for
low temperature cooking. It allows accurate simmer
control at the lowest setting.
• To help shorten your cooking time, use the least
amount of liquid possible.
• Start your food on a higher heat setting, then turn
the control to a lower setting to finish cooking.
REMEMBER: When range is in use or during
the Self-Cleaning cycle, the entire cooktop area
may become hot.
I
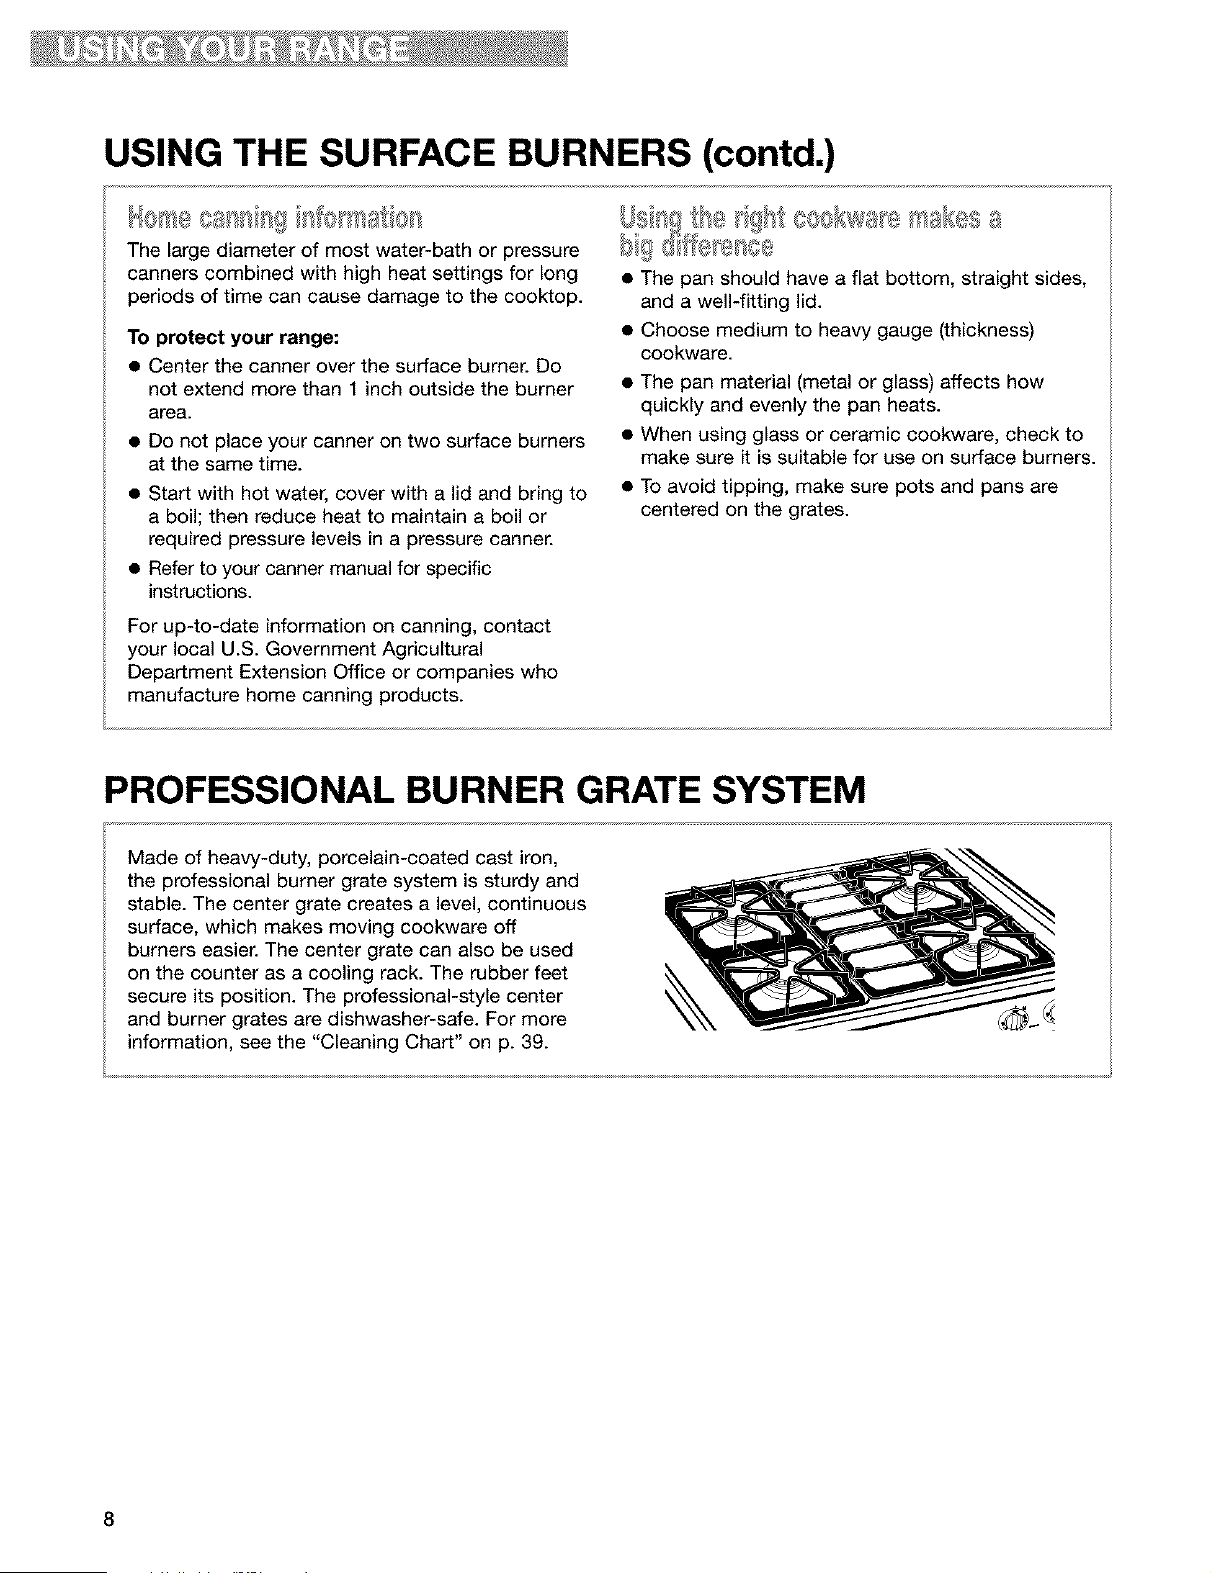
USING THE SURFACE BURNERS (contd.)
The large diameter of most water-bath or pressure
canners combined with high heat settings for long
periods of time can cause damage to the cooktop.
To protect your range:
• Center the canner over the surface burner. Do
not extend more than 1 inch outside the burner
area.
• Do not place your canner on two surface burners
at the same time.
• Start with hot water, cover with a lid and bring to
a boil; then reduce heat to maintain a boil or
required pressure levels in a pressure canner.
• Refer to your canner manual for specific
instructions.
For up-to-date information on canning, contact
your local U.S. Government Agricultural
Department Extension Office or companies who
manufacture home canning products.
D9 d'iffe ÷sc®
• The pan should have a flat bottom, straight sides,
and a well-fitting lid.
• Choose medium to heavy gauge (thickness)
cookware.
• The pan material (metal or glass) affects how
quickly and evenly the pan heats.
• When using glass or ceramic cookware, check to
make sure it is suitable for use on surface burners.
• To avoid tipping, make sure pots and pans are
centered on the grates.
PROFESSIONAL BURNER GRATE SYSTEM
Made of heavy-duty, porcelain-coated cast iron,
the professional burner grate system is sturdy and
stable. The center grate creates a level, continuous
surface, which makes moving cookware off
burners easier. The center grate can also be used
on the counter as a cooling rack. The rubber feet
secure its position. The professional-style center
and burner grates are dishwasher-safe. For more
information, see the "Cleaning Chart" on p. 39.
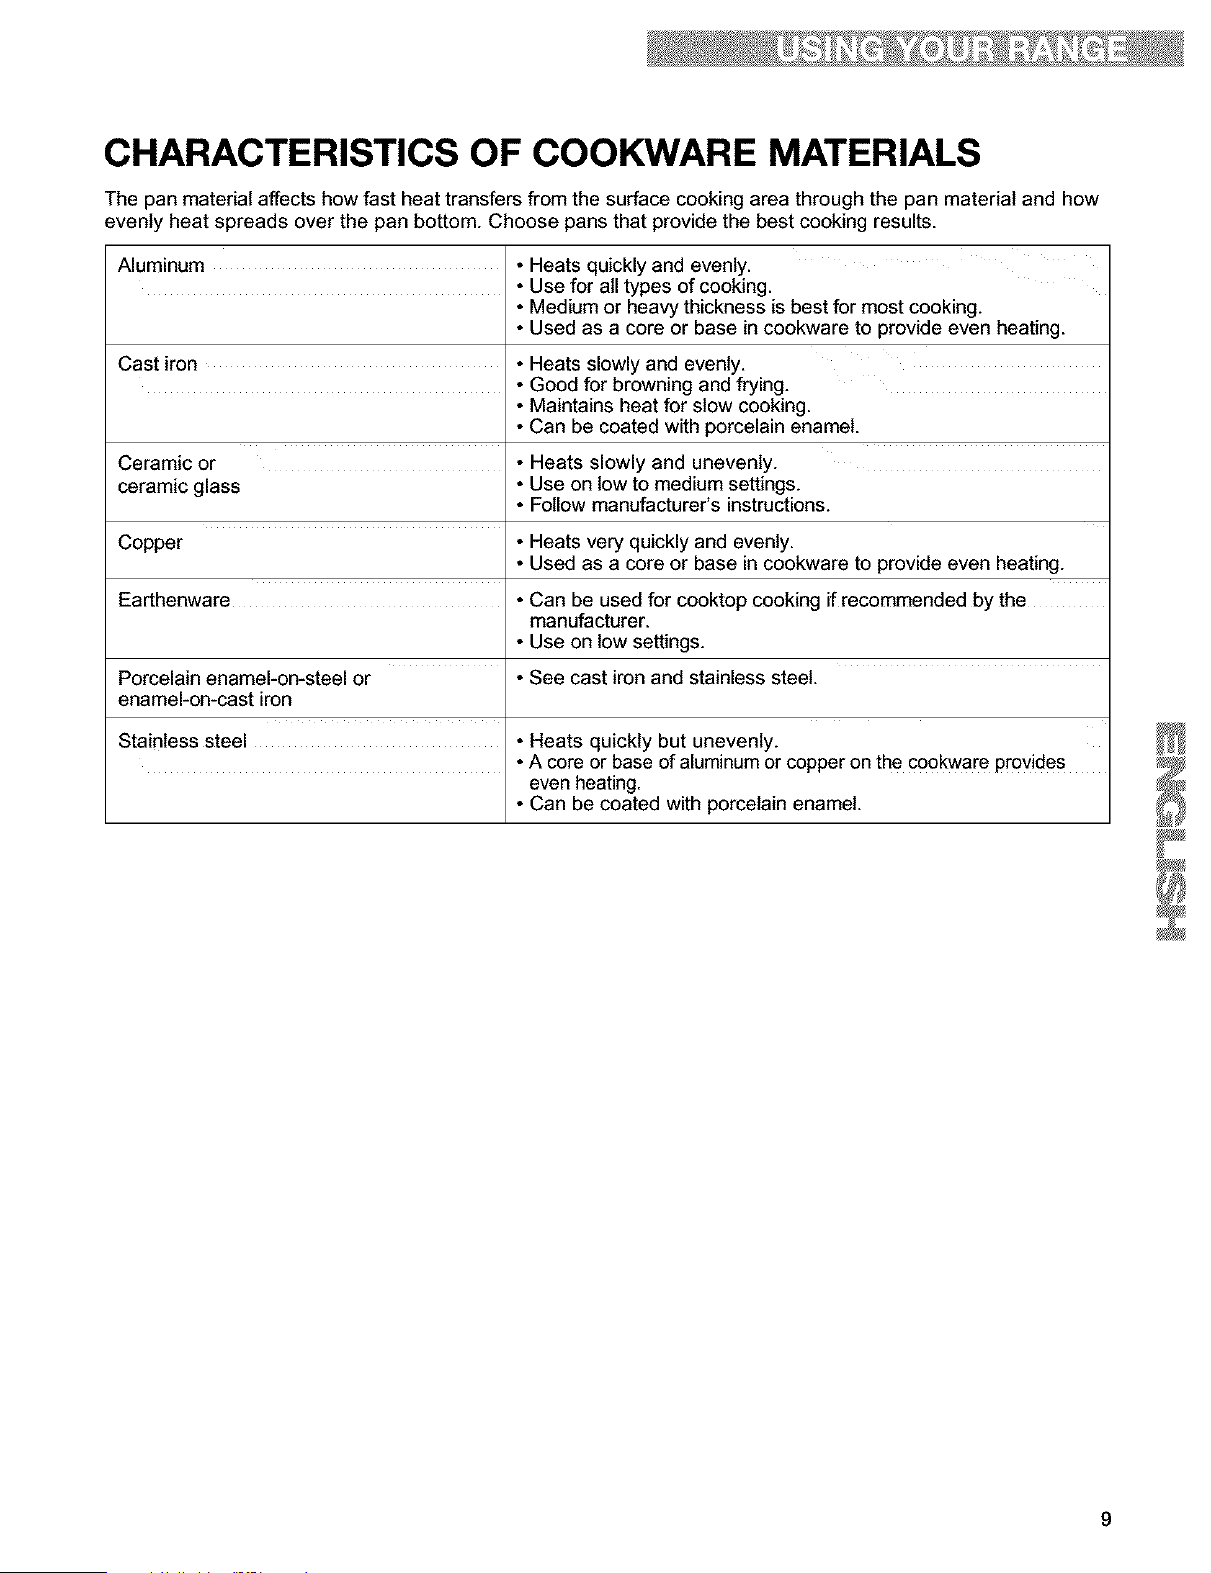
CHARACTERISTICS OF COOKWARE MATERIALS
The pan material affects how fast heat transfers from the surface cooking area through the pan material and how
evenly heat spreads over the pan bottom. Choose pans that provide the best cooking results.
Aluminum • Heats quickly and evenly.
• Use for all types of cooking.
• Medium or heavy thickness is best for most cooking.
• Used as a core or base in cookware to provide even heating.
Cast iron • Heats slowly and evenly.
• Good for browning and frying.
• Maintains heat for slow cooking.
• Can be coated with porcelain enamel.
Ceramic or • Heats slowly and unevenly.
ceramic glass • Use on tow to medium settings.
• Follow manufacturer's instructions.
Copper • Heats very quickly and evenly.
• Used as a core or base in cookware to provide even heating.
Earthenware • Can be used for cooktop cooking if recommended by the
manufacturer.
• Use on low settings.
Porcelain enamel-on-steel or • See cast iron and stainless steel.
enamel-on-cast iron
Stainless steel • Heats quickly but unevenly.
• A core or base of aluminum or copper on the €o0kware Pr0vides
even heating.
• Can be coated with porcelain enamel.
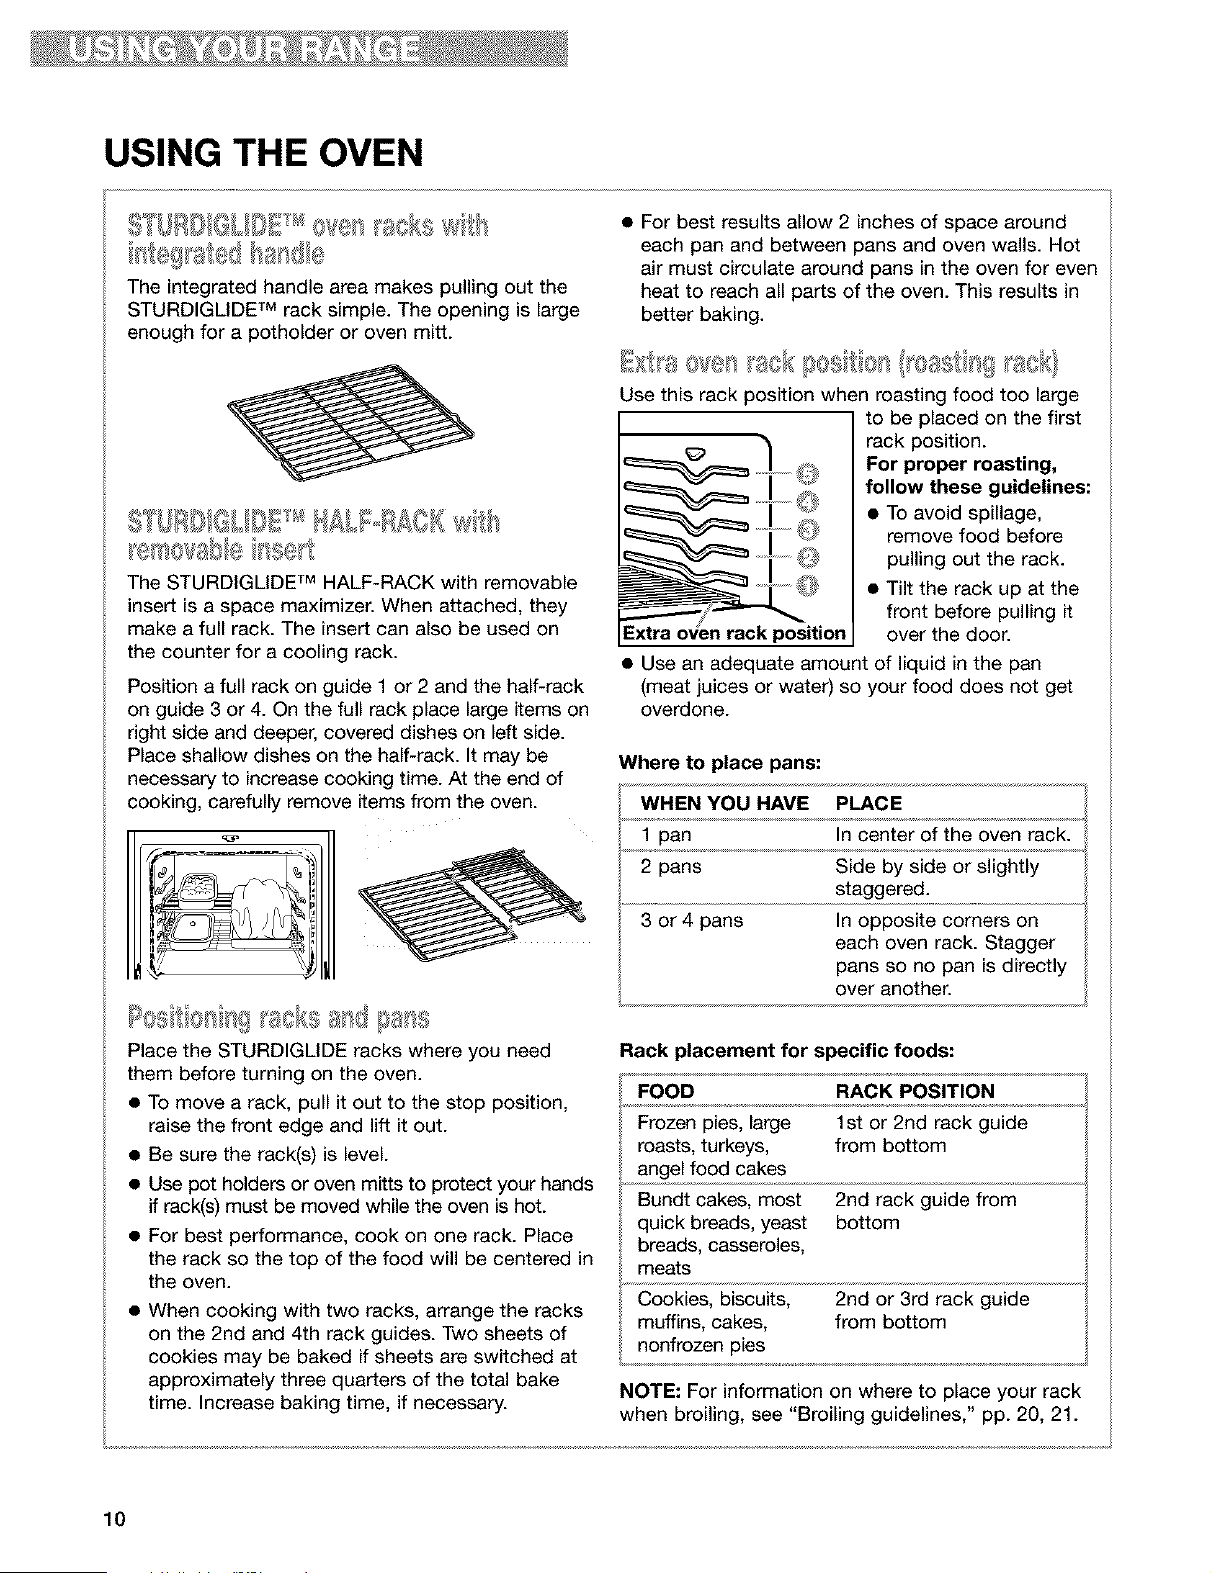
USING THE OVEN
S IXSR[£=dti scis wll
The integrated handle area makes pulling out the
STURDIGLIDE TM rack simple. The opening is large
enough for a potholder or oven mitt.
S [IJRBIQLIQI' HALFoRRCRIs
The STURDIGLIDE TM HALF-RACK with removable
insert is a space maximizer. When attached, they
make a full rack. The insert can also be used on
the counter for a cooling rack.
Position a full rack on guide 1 or 2 and the half-rack
on guide 3 or 4. On the full rack place large items on
right side and deeper, covered dishes on left side.
Place shallow dishes on the half-rack. It may be
necessary to increase cooking time. At the end of
cooking, carefully remove terns from the oven.
Place the STURDIGLIDE racks where you need
them before turning on the oven.
• To move a rack, pull it out to the stop position,
raise the front edge and lift it out.
• Be sure the rack(s) is level.
• Use pot holders or oven mitts to protect your hands
if rack(s) must be moved while the oven is hot.
• For best performance, cook on one rack. Place
the rack so the top of the food will be centered in
the oven.
• When cooking with two racks, arrange the racks
on the 2nd and 4th rack guides. Two sheets of
cookies may be baked if sheets are switched at
approximately three quarters of the total bake
time. Increase baking time, if necessary.
• For best results allow 2 inches of space around
each pan and between pans and oven walls. Hot
air must circulate around pans in the oven for even
heat to reach all parts of the oven. This results in
better baking.
Iii,.8'= OVel 80 110;_II101'_l'I]+';_.')_'_++,o,.°,,s*It[_;_=IA}
Use this rack position when roasting food too large
to be placed on the first
rack position.
For proper roasting,
follow these guidelines:
• To avoid spillage,
remove food before
pulling out the rack.
rack position
• Tilt the rack up at the
front before pulling it
over the door.
• Use an adequate amount of liquid in the pan
(meat juices or water) so your food does not get
overdone.
Where to place pans:
WHEN YOU HAVE PLACE
1 pan In center of the oven rack.
2 pans Side by side or slightly
staggered.
3 or 4 pans In opposite corners on
each oven rack. Stagger
pans so no pan is directly
over another.
Rack placement for specific foods:
FOOD RACK POSITION
Frozen pies, large 1 st or 2nd rack guide
roasts, turkeys, from bottom
angel food cakes
Bundt cakes, most 2nd rack guide from
quick breads, yeast bottom
breads, casseroles,
meats
Cookies, biscuits, 2nd or 3rd rack guide
muffins, cakes, from bottom
nonfrozen pies
NOTE: For information on where to place your rack
when broiling, see "Broiling guidelines," pp. 20, 21.
10
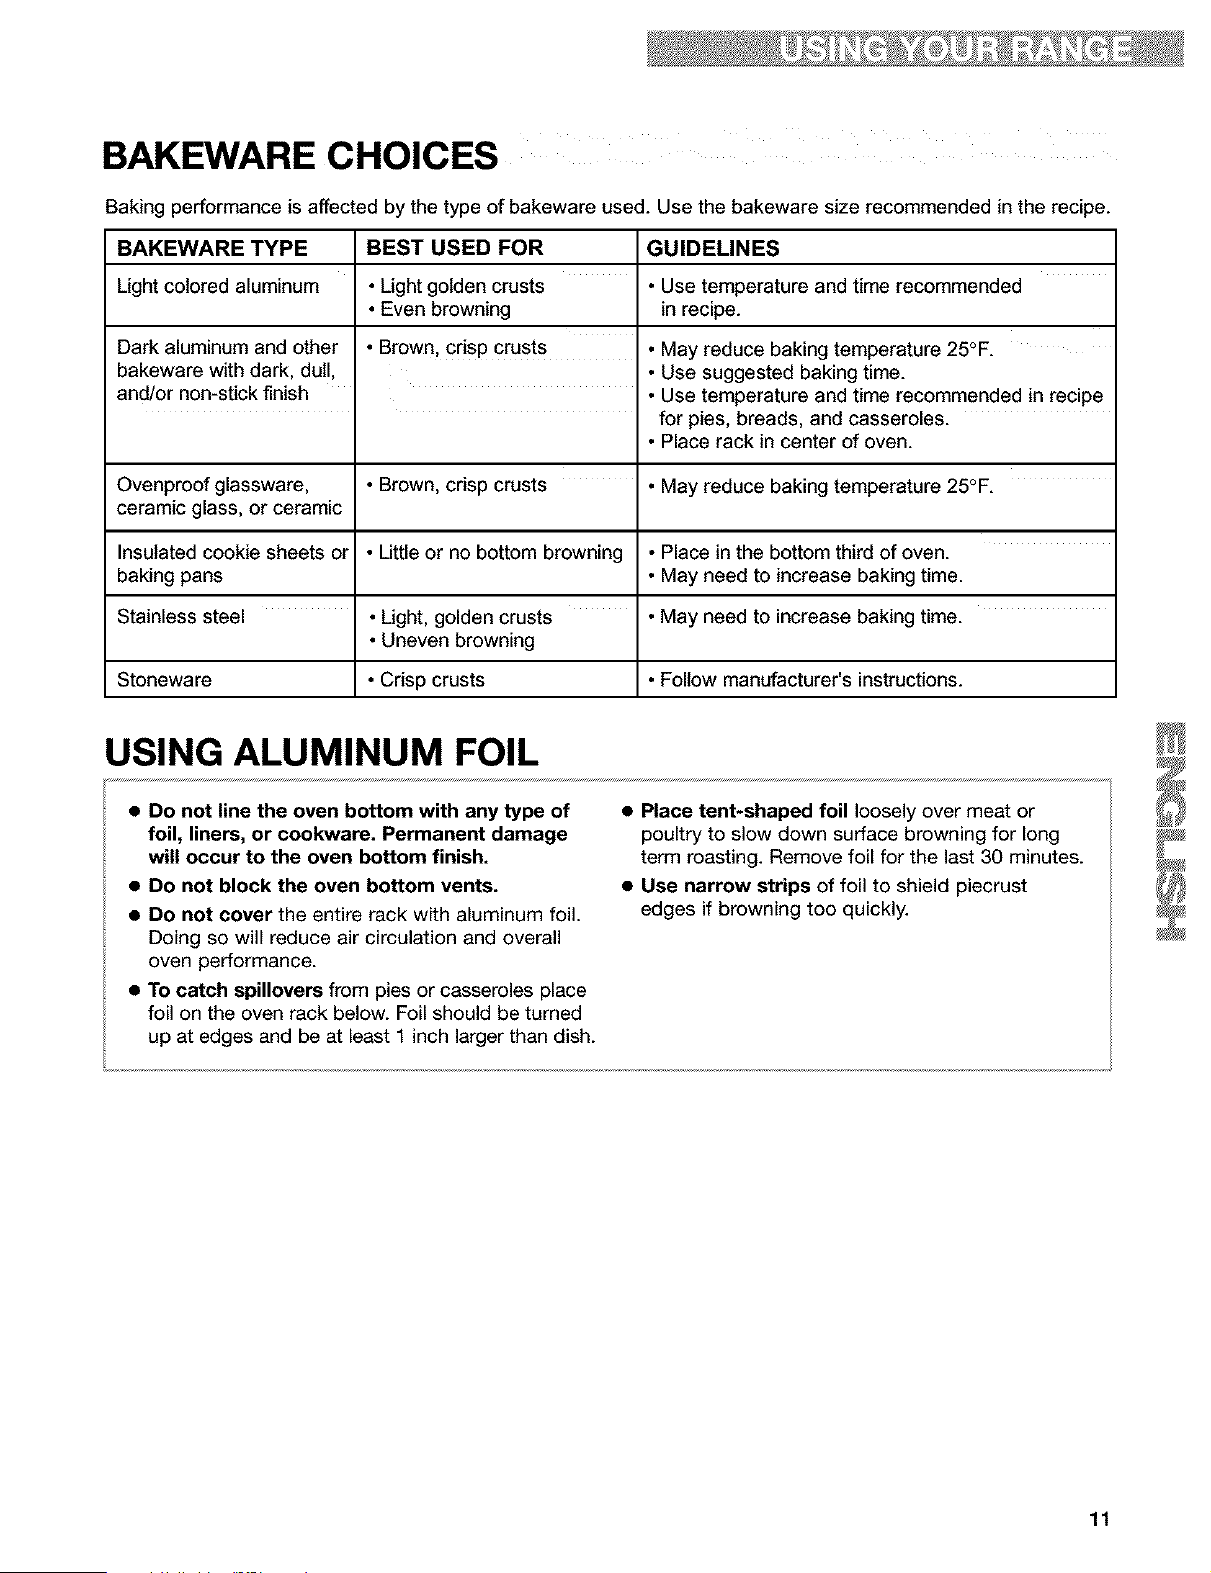
BAKEWARE CHOICES
Baking performance is affected by the type of bakeware used. Use the bakeware size recommended in the recipe.
BAKEWARE TYPE BEST USED FOR GUIDELINES
Light colored aluminum • Light golden crusts • Use temperature and time recommended
• Even browning in recipe.
Dark aluminum and other • Brown, crisp crusts • May reduce baking temperature 25°F.
bakeware with dark, dull, • Use suggested baking time.
and/or non-stick finish • Use temperature and time recommended in recipe
for pies, breads, and casseroles.
• Place rack in center of oven.
Ovenproof glassware, • Brown, crisp crusts • May reduce baking temperature 25°F.
ceramic glass, or ceramic
Insulated cookie sheets or • Little or no bottom browning • Place in the bottom third of oven.
baking pans • May need to increase baking time.
Stainless steel • Light, golden crusts • May need to increase baking time.
• Uneven browning
Stoneware • Crisp crusts • Follow manufacturer's instructions.
USING ALUMINUM FOIL
• Do not line the oven bottom with any type of
foil, liners, or cookware. Permanent damage
will occur to the oven bottom finish.
• Do not block the oven bottom vents.
• Do not cover the entire rack with aluminum foil.
Doing so will reduce air circulation and overall
oven performance.
• To catch spillovers from pies or casseroles place
foil on the oven rack below. Foil should be turned
up at edges and be at least 1 inch larger than dish.
• Place tent-shaped foil loosely over meat or
poultry to slow down surface browning for long
term roasting. Remove foil for the last 30 minutes.
• Use narrow strips of foil to shield piecrust
edges if browning too quickly.
11
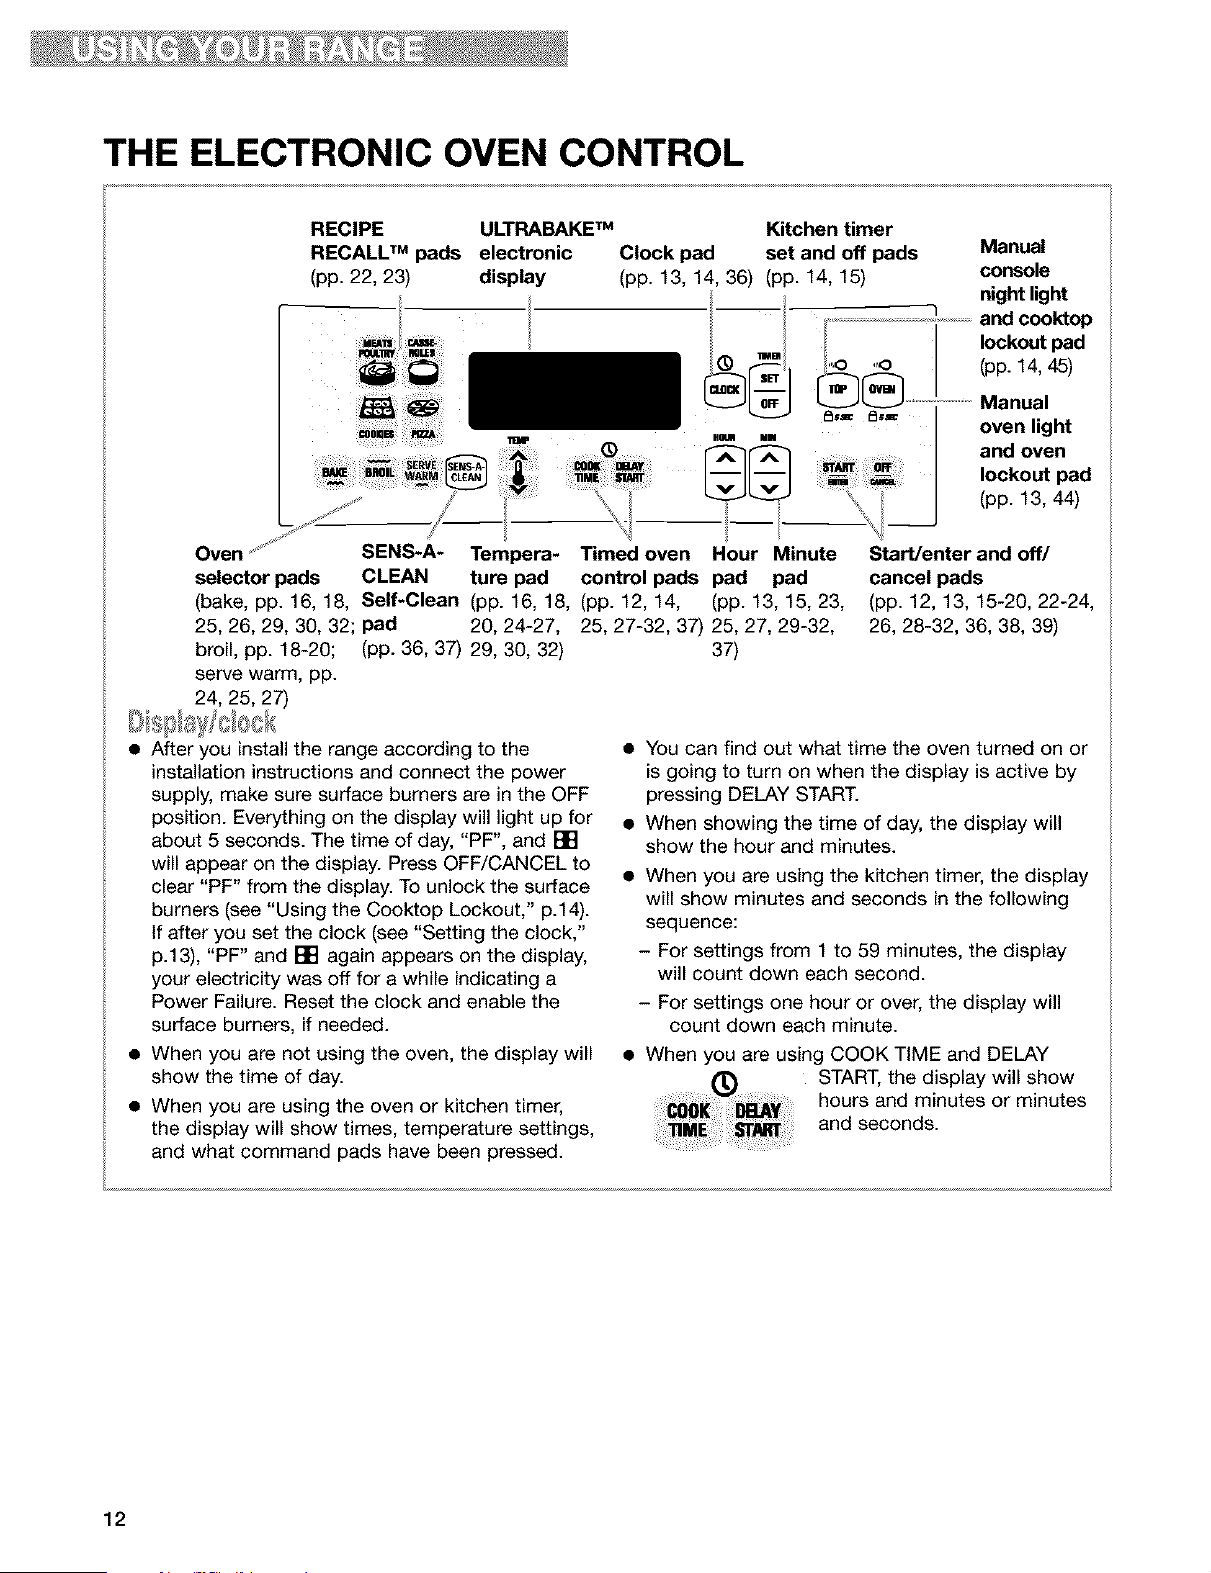
THE ELECTRONIC OVEN CONTROL
RECIPE ULTRABAKETM Kitchen timer
RECALU M pads electronic Clock pad set and off pads
(pp. 22, 23) display (pp. 13, 14, 36) (pp. 14, 15)
i'
.M ..
Oven ..... SENS-A- Tempera- Timed oven Hour Minute
selector pads CLEAN ture pad control pads pad pad
(bake, pp. 16, 18, Self-Clean (pp. 16, 18, (pp. 12, 14, (pp. 13, 15, 23,
25, 26, 29, 30, 32; pad 20, 24-27, 25, 27-32, 37) 25, 27, 29-32,
broil, pp. 18-20; (pp. 36, 37) 29, 30, 32) 37)
serve warm, pp.
24, 25, 27)
Manual
console
night light
and cooktop
Iockotrt pad
(pp. 14, 45)
Manual
oven light
and oven
lockout pad
(pp. 13, 44)
Start/enter and off/
cancel pads
(pp. 12, 13, 15-20, 22-24,
26, 28-32, 36, 38, 39)
• After you install the range according to the
installation instructions and connect the power
supply, make sure surface burners are in the OFF
position. Everything on the display will light up for
about 5 seconds. The time of day, "PF", and []
will appear on the display. Press OFF/CANCEL to
clear "PF" from the display. To unlock the surface
burners (see "Using the Cooktop Lockout," p.14).
If after you set the clock (see "Setting the clock,"
p.13), "PF" and [] again appears on the display,
your electricity was off for a while indicating a
Power Failure. Reset the clock and enable the
surface burners, if needed.
• When you are not using the oven, the display will
show the time of day.
• When you are using the oven or kitchen timer,
the display will show times, temperature settings,
and what command pads have been pressed.
• You can find out what time the oven turned on or
is going to turn on when the display is active by
pressing DELAY START.
• When showing the time of day, the display will
show the hour and minutes.
• When you are using the kitchen timer, the display
will show minutes and seconds in the following
sequence:
- For settings from 1 to 59 minutes, the display
will count down each second.
- For settings one hour or over, the display will
count down each minute.
• When you are using COOK TIME and DELAY
START, the display will show
hours and minutes or minutes
and seconds.
12
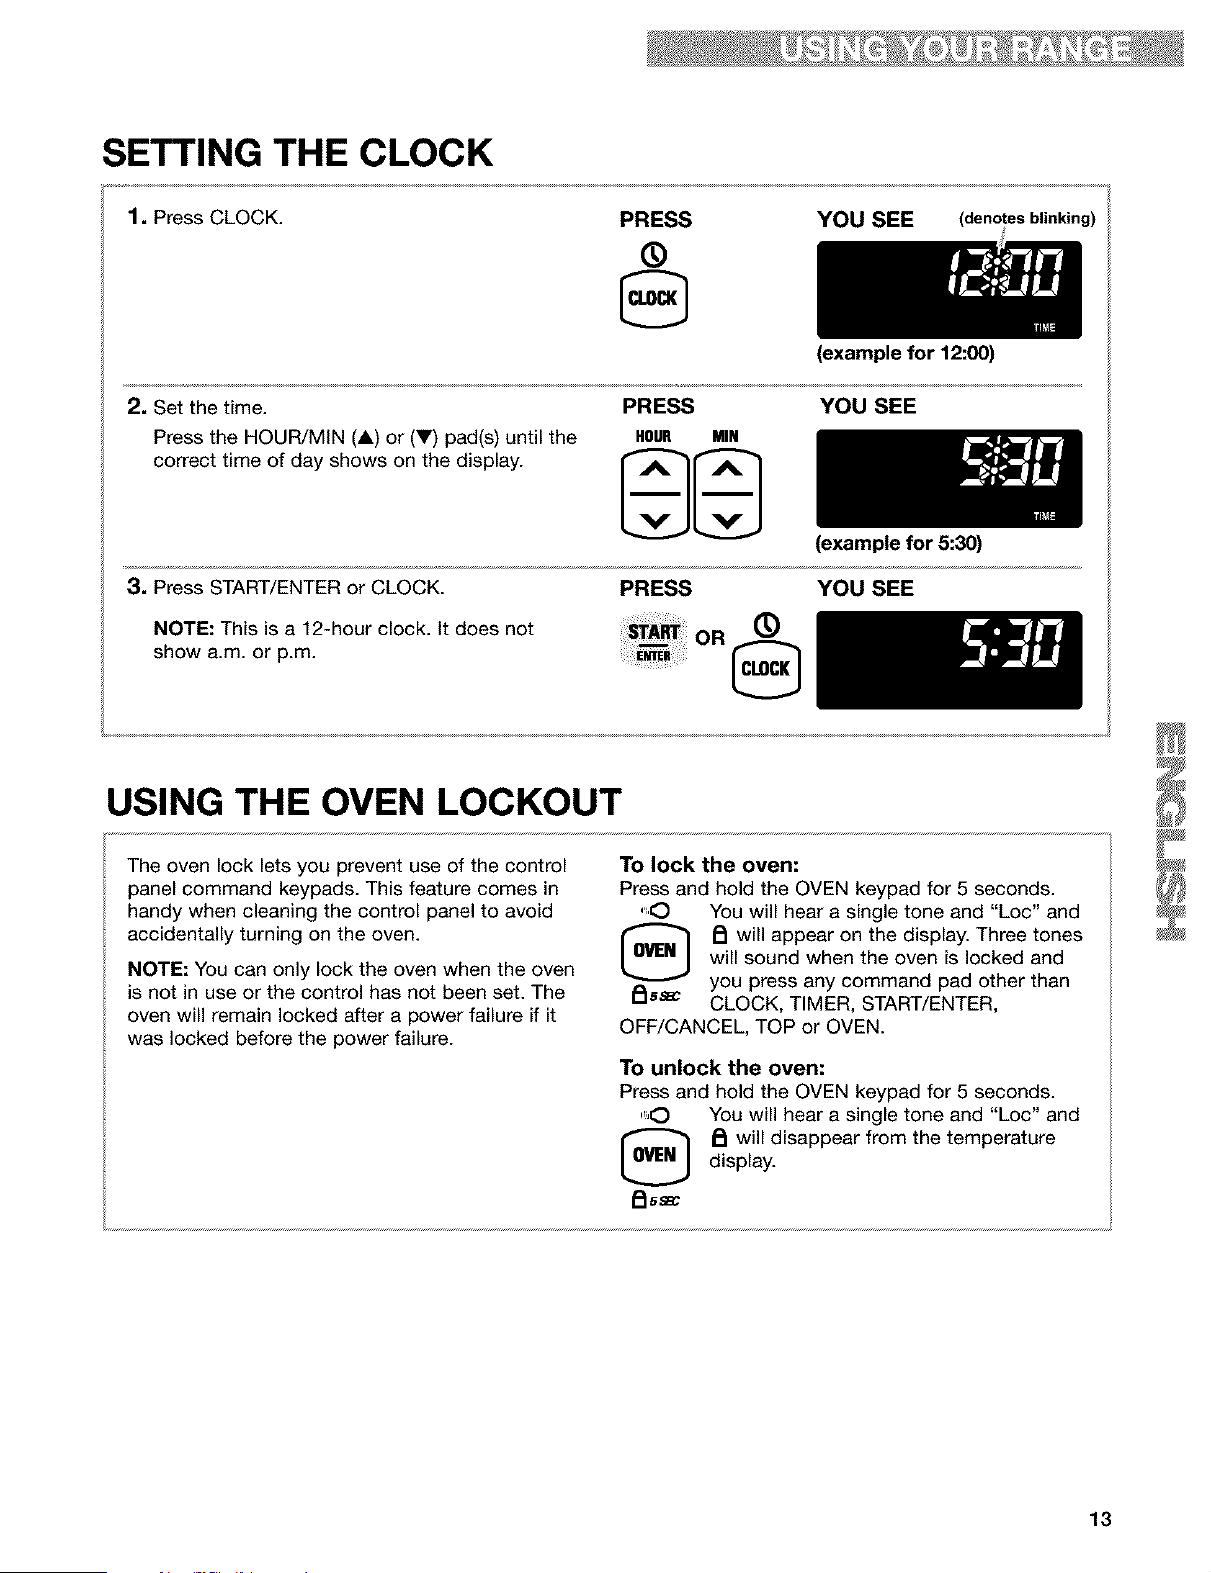
SETTING THE CLOCK
1. Press CLOCK.
PRESS
®
YOU SEE
(denotes blinking)
2, Set the time.
Press the HOUR/MIN (A) or (Y) pad(s) until the
correct time of day shows on the display.
PRESS
HOUR MIN
(example for 12:00)
YOU SEE
3, Press START/ENTER or CLOCK.
NOTE: This is a 12-hour clock. It does not
show a.m. or p.m.
PRESS
OR ®
(example for 5:30)
YOU SEE
USING THE OVEN LOCKOUT
The oven lock lets you prevent use of the control
panel command keypads. This feature comes in
handy when cleaning the control panel to avoid
accidentally turning on the oven.
NOTE: You can only lock the oven when the oven
is not in use or the control has not been set. The
oven will remain locked after a power failure if it
was locked before the power failure.
To lock the oven:
Press and hold the OVEN keypad for 5 seconds.
",.O You will hear a single tone and "Loc" and
[_ FI will appear on the display. Three tones
will sound when the oven is locked and
/_ss_ you press any command pad other than
CLOCK, TIMER, START/ENTER,
OFF/CANCEL, TOP or OVEN.
To unlock the oven:
Press and hold the OVEN keypad for 5 seconds.
....,O You will hear a single tone and "Loc" and
_ will disappear from the temperature
display.
Ass_c
13
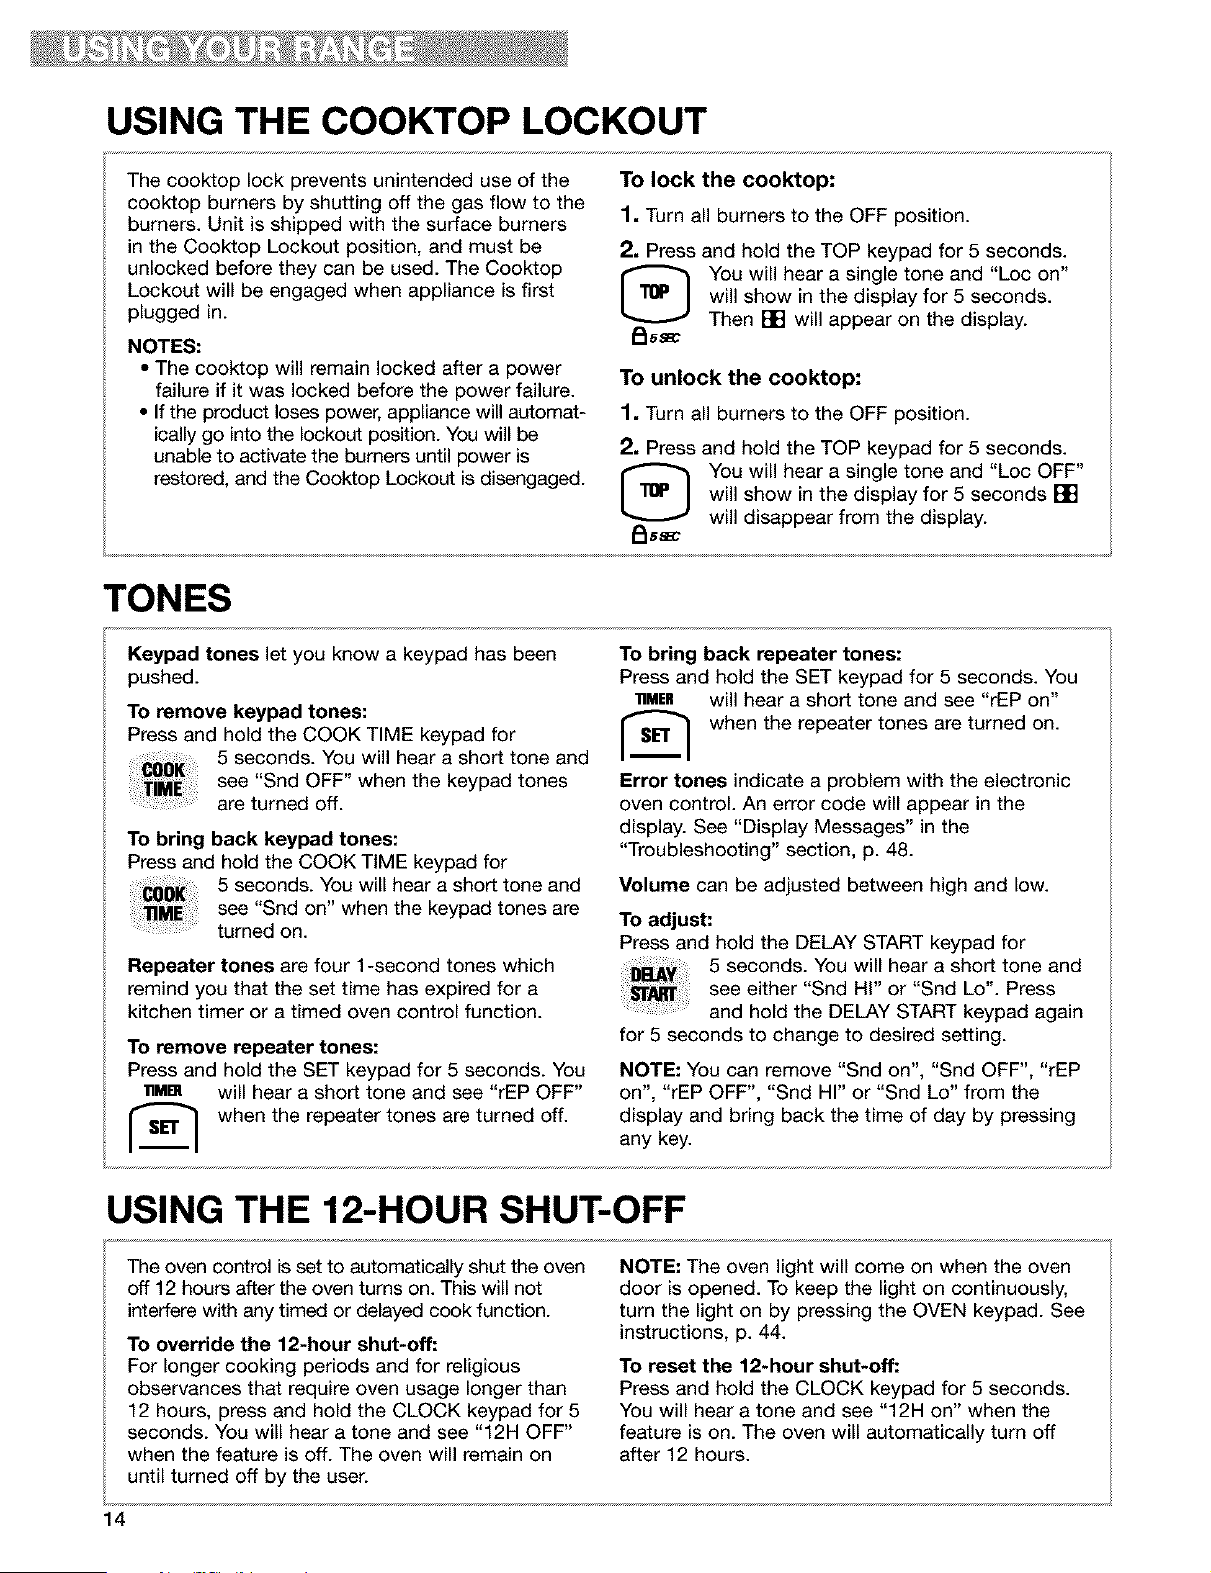
USING THE COOKTOP LOCKOUT
The cooktop lock prevents unintended use of the
cooktop burners by shutting off the gas flow to the
burners. Unit is shipped with the surface burners
in the Cooktop Lockout position, and must be
unlocked before they can be used. The Cooktop
Lockout will be engaged when appliance is first
plugged in.
NOTES:
• The cooktop will remain locked after a power
failure if it was locked before the power failure.
• If the product loses power, appliance will automat-
ically go into the lockout position. You will be
unable to activate the burners until power is
restored, and the Cooktop Lockout is disengaged.
To lock the cooktop:
1. Turn all burners to the OFF position.
2, Press and hold the TOP keypad for 5 seconds.
You will hear a single tone and "Loc on"
will show in the display for 5 seconds.
Then [] will appear on the display.
_ss_c
To unlock the cooktop:
1. Turn all burners to the OFF position.
2, Press and hold the TOP keypad for 5 seconds.
You will hear a single tone and "Loc OFF"
will show in the display for 5 seconds []
will disappear from the display.
TONES
Keypad tones let you know a keypad has been
pushed.
To remove keypad tones:
Press and hold the COOK TIME keypad for
5 seconds. You will hear a short tone and
see "Snd OFF" when the keypad tones
are turned off.
To bring back keypad tones:
Press and hold the COOK TIME keypad for
5 seconds. You will hear a short tone and
see "Snd on" when the keypad tones are
turned on.
Repeater tones are four 1-second tones which
remind you that the set time has expired for a
kitchen timer or a timed oven control function.
To remove repeater tones:
Press and hold the SET keypad for 5 seconds. You
lnMl_ will hear a short tone and see "rEP OFF"
when the repeater tones are turned off.
To bring back repeater tones:
Press and hold the SET keypad for 5 seconds. You
• MER will hear a short tone and see "rEP on"
I_ when the repeater tones are turned on.
Error tones indicate a problem with the electronic
oven control. An error code will appear in the
display. See "Display Messages" in the
"Troubleshooting" section, p. 48.
Volume can be adjusted between high and low.
To adjust:
Press and hold the DELAY START keypad for
5 seconds. You will hear a short tone and
see either "Snd Hi" or "Snd Lo'. Press
and hold the DELAY START keypad again
for 5 seconds to change to desired setting.
NOTE: You can remove "Snd on", "Snd OFF", "rEP
on", "rEP OFF", "Snd HI" or "Snd Lo" from the
display and bring back the time of day by pressing
any key.
USING THE 12-HOUR SHUT-OFF
The oven control is set to automatically shut the oven
off 12 hours after the oven turns on. This will not
interfere with any timed or delayed cook function.
To override the 12-hour shut-off:
For longer cooking periods and for religious
observances that require oven usage longer than
12 hours, press and hold the CLOCK keypad for 5
seconds. You will hear a tone and see "12H OFF"
when the feature is off. The oven will remain on
until turned off by the user.
NOTE: The oven light will come on when the oven
door is opened. To keep the light on continuously,
turn the light on by pressing the OVEN keypad. See
instructions, p. 44.
To reset the 12-hour shut-off:
Press and hold the CLOCK keypad for 5 seconds.
You will hear a tone and see "12H on" when the
feature is on. The oven will automatically turn off
after 12 hours.
14
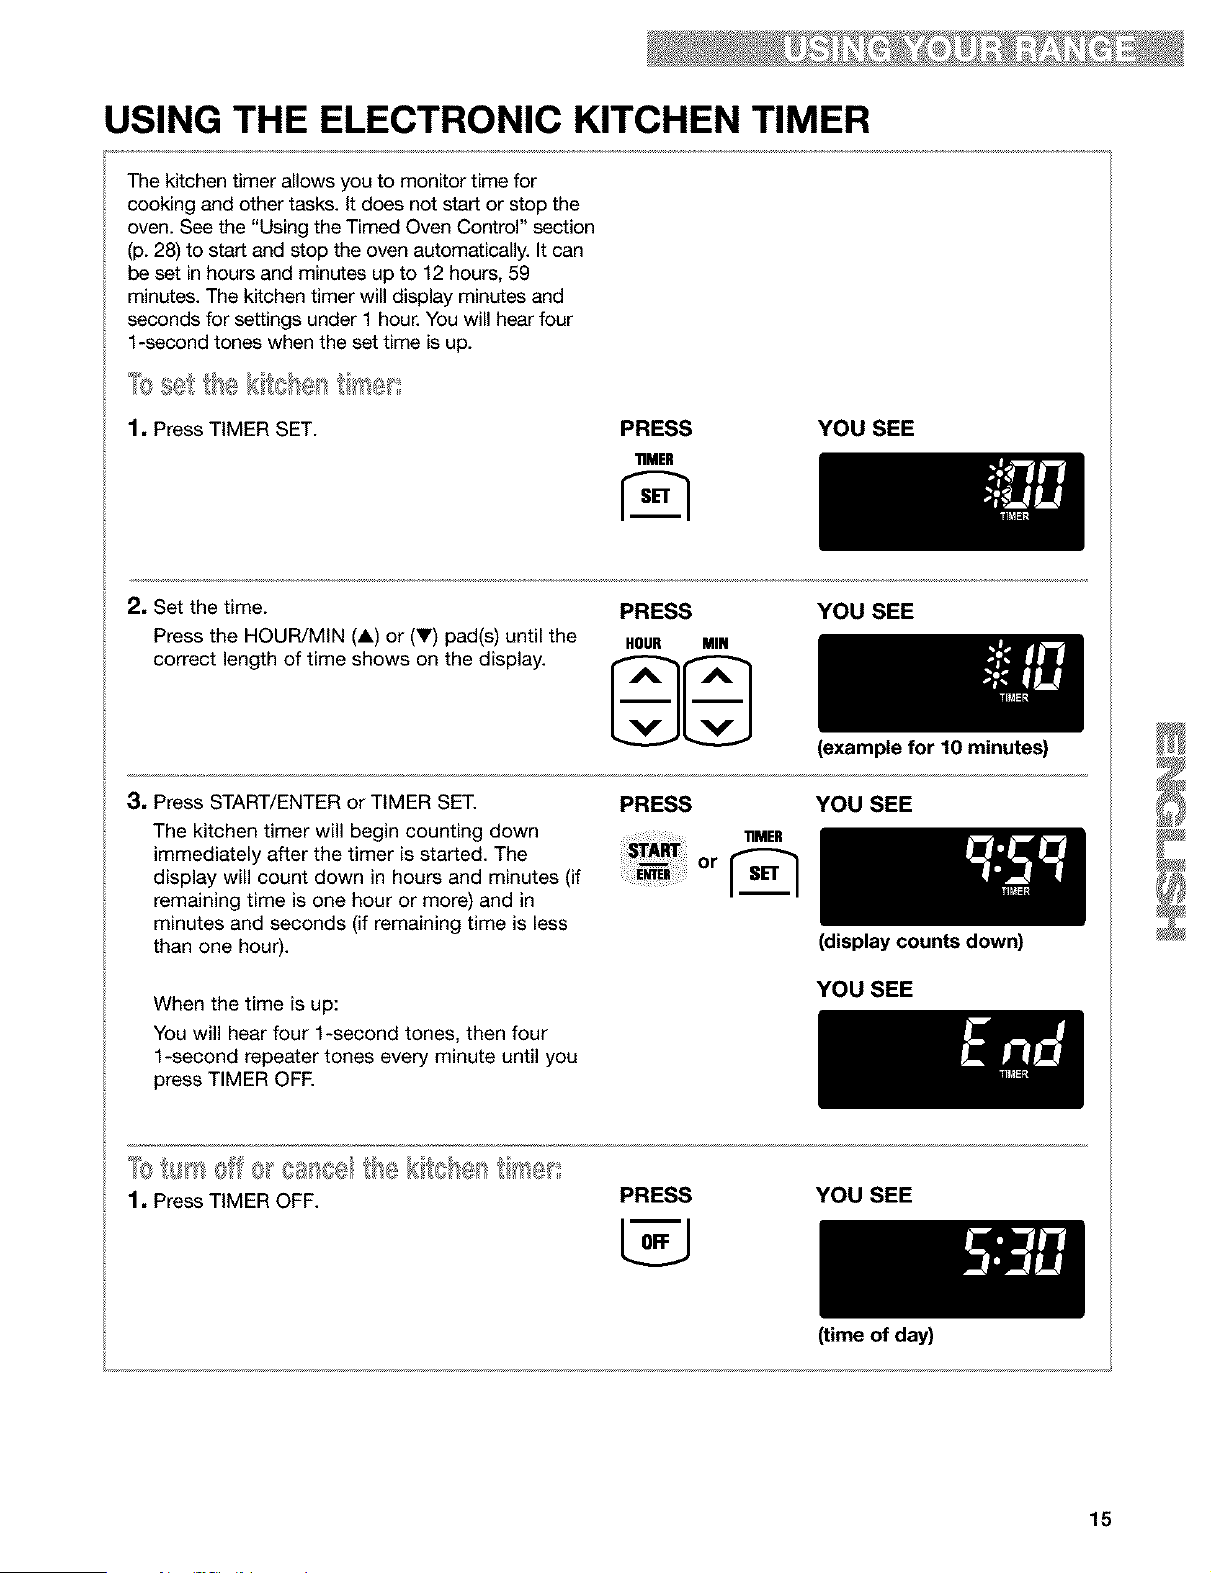
USING THE ELECTRONIC KITCHEN TIMER
The kitchen timer allows you to monitor time for
cooking and other tasks. It does not start or stop the
oven. See the "Using the Timed Oven Control" section
(p. 28) to start and stop the oven automatically. It can
be set in hours and minutes up to 12 hours, 59
min_es. The kitchen timer will display min_es and
seconds for settings under 1 hour. You will hear four
1-second tones when the set time is up.
1. Press TIMER SET. PRESS
"riMER
YOU SEE
2. Set the time.
Press the HOUR/MIN (A) or (Y) pad(s) until the
correct length of time shows on the display.
PRESS
HOUR MIN
YOU SEE
3. Press START/ENTER or TIMER SET.
The kitchen timer will begin counting down
immediately after the timer is started. The
display will count down in hours and minutes (if
remaining time is one hour or more) and in
minutes and seconds (if remaining time is less
than one hour).
When the time is up:
You will hear four 1-second tones, then four
1-second repeater tones every minute until you
press TIMER OFE
PRESS
11MER
(example for 10 minutes)
YOU SEE
(display counts down)
YOU SEE
1. Press TIMER OFF.
PRESS YOU SEE
(time of day)
15
STARTING/CANCELING A FUNCTION
After setting a function, you must press START/
ENTER to start the function. If you do not
press START/ENTER within 5 seconds of
setting, "START?" will show on the
display as a reminder. If you do not press
START/ENTER within 5 minutes of setting, the time
OFF/CANCEL will cancel any function except the
Clock, Timer, or Oven/Cooktop Lockouts.
When you press OFF/CANCEL, the display
will show the time of day or, if the minute
timer is also being used, the time remaining.
of day will appear. You must reset the function and
press START/ENTER.
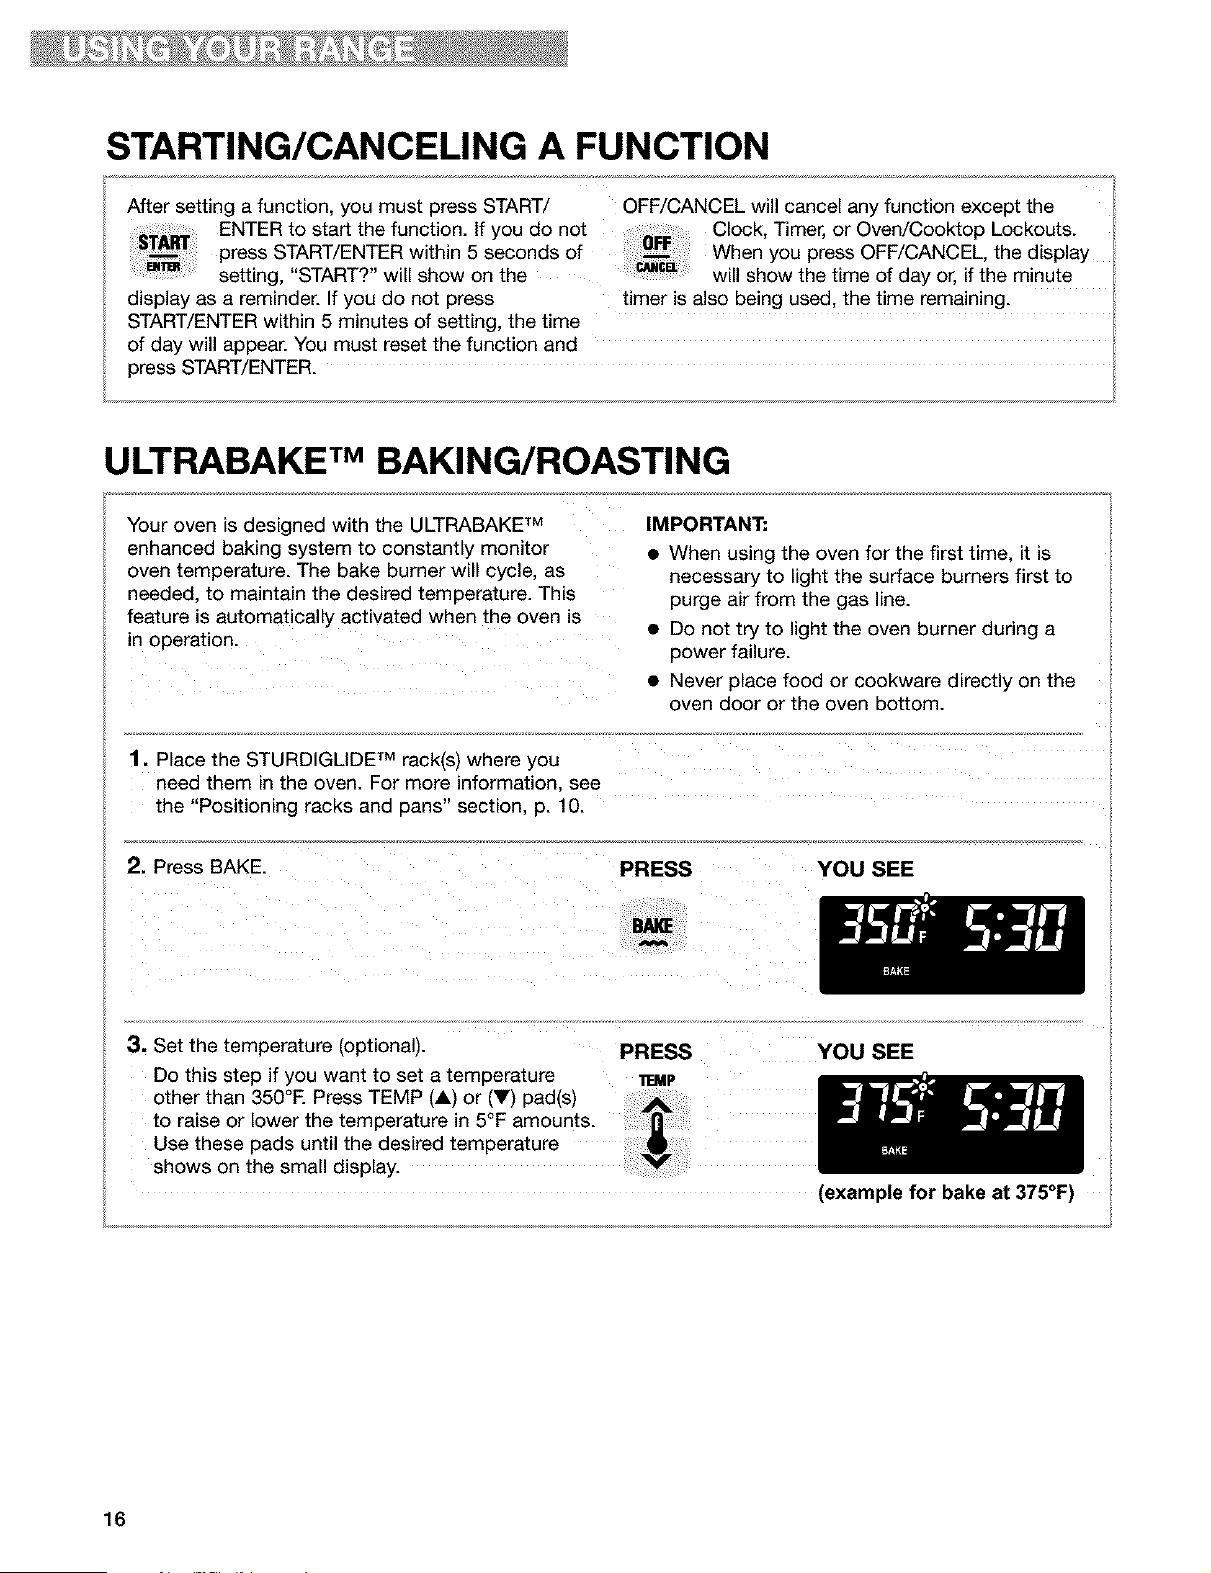
ULTRABAKE rMBAKING/ROASTING
Your oven _sdesigned with the tJ LTRABAKE TM
enhanced baking system to constantly monitor
oven temperature. The bake burner will cycle, as
needed, to maintain the desired ten" 3erature. This
feature is automatica y activated when the oven is
in operation.
IMPORTANT:
• When using the oven for the first time. it is
necessary to light the surface burners first to
purge air from the gas line.
• Do not try to light the oven burner during a
power failure.
• Never place food or cookware directly on the
oven door or the oven bottom.
1. Place the STURDIGLIDE TM rack(s) where you
need them in the oven. For more information, see
the "Positioning racks and pans" section, p. 10.
2. Press BAKE. PRESS YOU SEE
3. Set the temperature (optional). PRESS YOU SEE
Do this step if you want to set a temperature 1Tamp
other than 350°E Press TEMP (A) o r (y) pad(s)
to raise or lower the temperature in 5°F amounts.
Use these pads until the desired temperature
shows on the sma d sp ay.
(example for bake at 375°F)
16
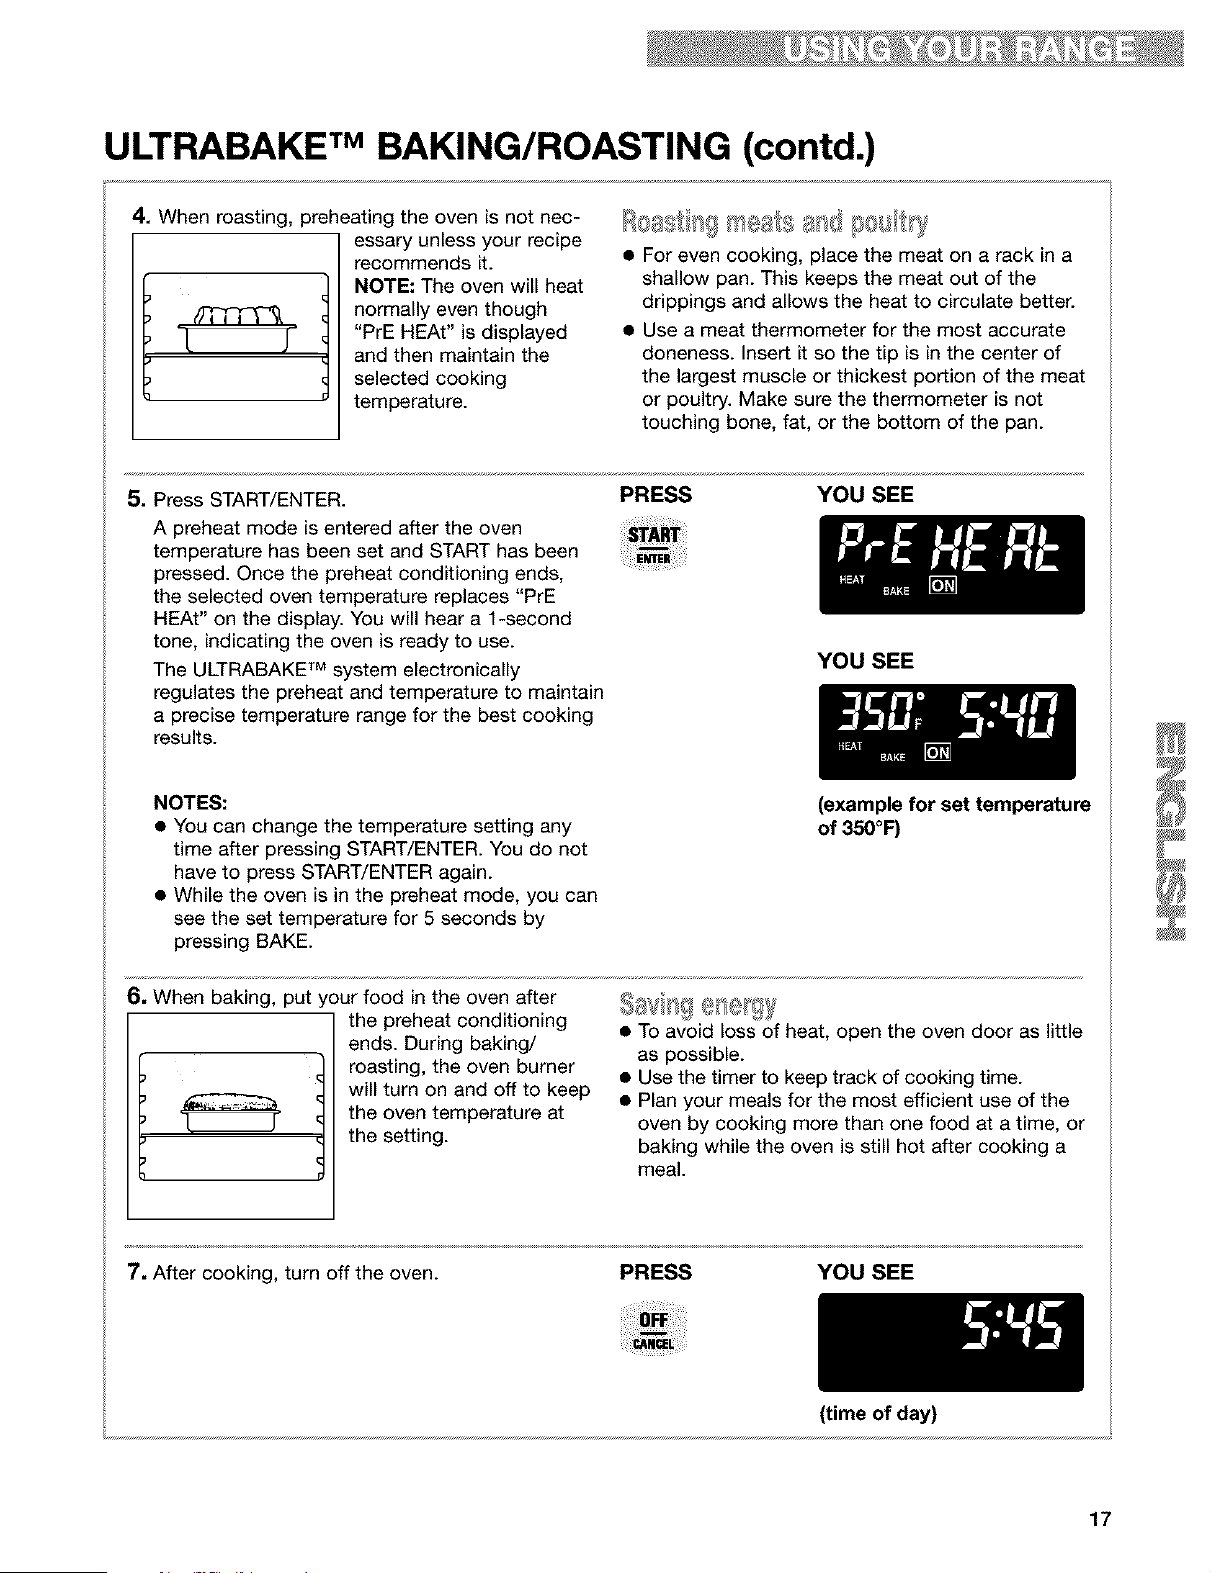
ULTRABAKE TM BAKING/ROASTING (contd.)
4. When roasting, preheating the oven is not nec-
essary unless your recipe
recommends it.
NOTE: The oven will heat
normally even though
"PrE HEAt" is displayed
and then maintain the
selected cooking
temperature.
• For even cooking, place the meat on a rack in a
shallow pan. This keeps the meat out of the
drippings and allows the heat to circulate better.
• Use a meat thermometer for the most accurate
doneness. Insert it so the tip is in the center of
the largest muscle or thickest portion of the meat
or poultry. Make sure the thermometer is not
touching bone, fat, or the bottom of the pan.
5. Press START/ENTER.
A preheat mode is entered after the oven
temperature has been set and START has been
pressed. Once the preheat conditioning ends,
the selected oven temperature replaces "PrE
HEAt" on the display. You will hear a 1-second
tone, indicating the oven is ready to use.
The ULTRABAKE TM system electronically
regulates the preheat and temperature to maintain
a precise temperature range for the best cooking
results.
PRESS YOU SEE
YOU SEE
NOTES:
• You can change the temperature setting any
time after pressing START/ENTER. You do not
have to press START/ENTER again.
• While the oven is in the preheat mode, you can
see the set temperature for 5 seconds by
pressing BAKE.
(example for set temperature
of 350°1=)
6, When baking, put your food in the oven after
<
<
<
J
the preheat conditioning
ends. During baking/
roasting, the oven burner
will turn on and off to keep
the oven temperature at
the setting.
• To avoid loss of heat, open the oven door as little
as possible.
• Use the timer to keep track of cooking time.
• Plan your meals for the most efficient use of the
oven by cooking more than one food at a time, or
baking while the oven is still hot after cooking a
meal.
7, After cooking, turn off the oven.
PRESS YOU SEE
(time of day)
17
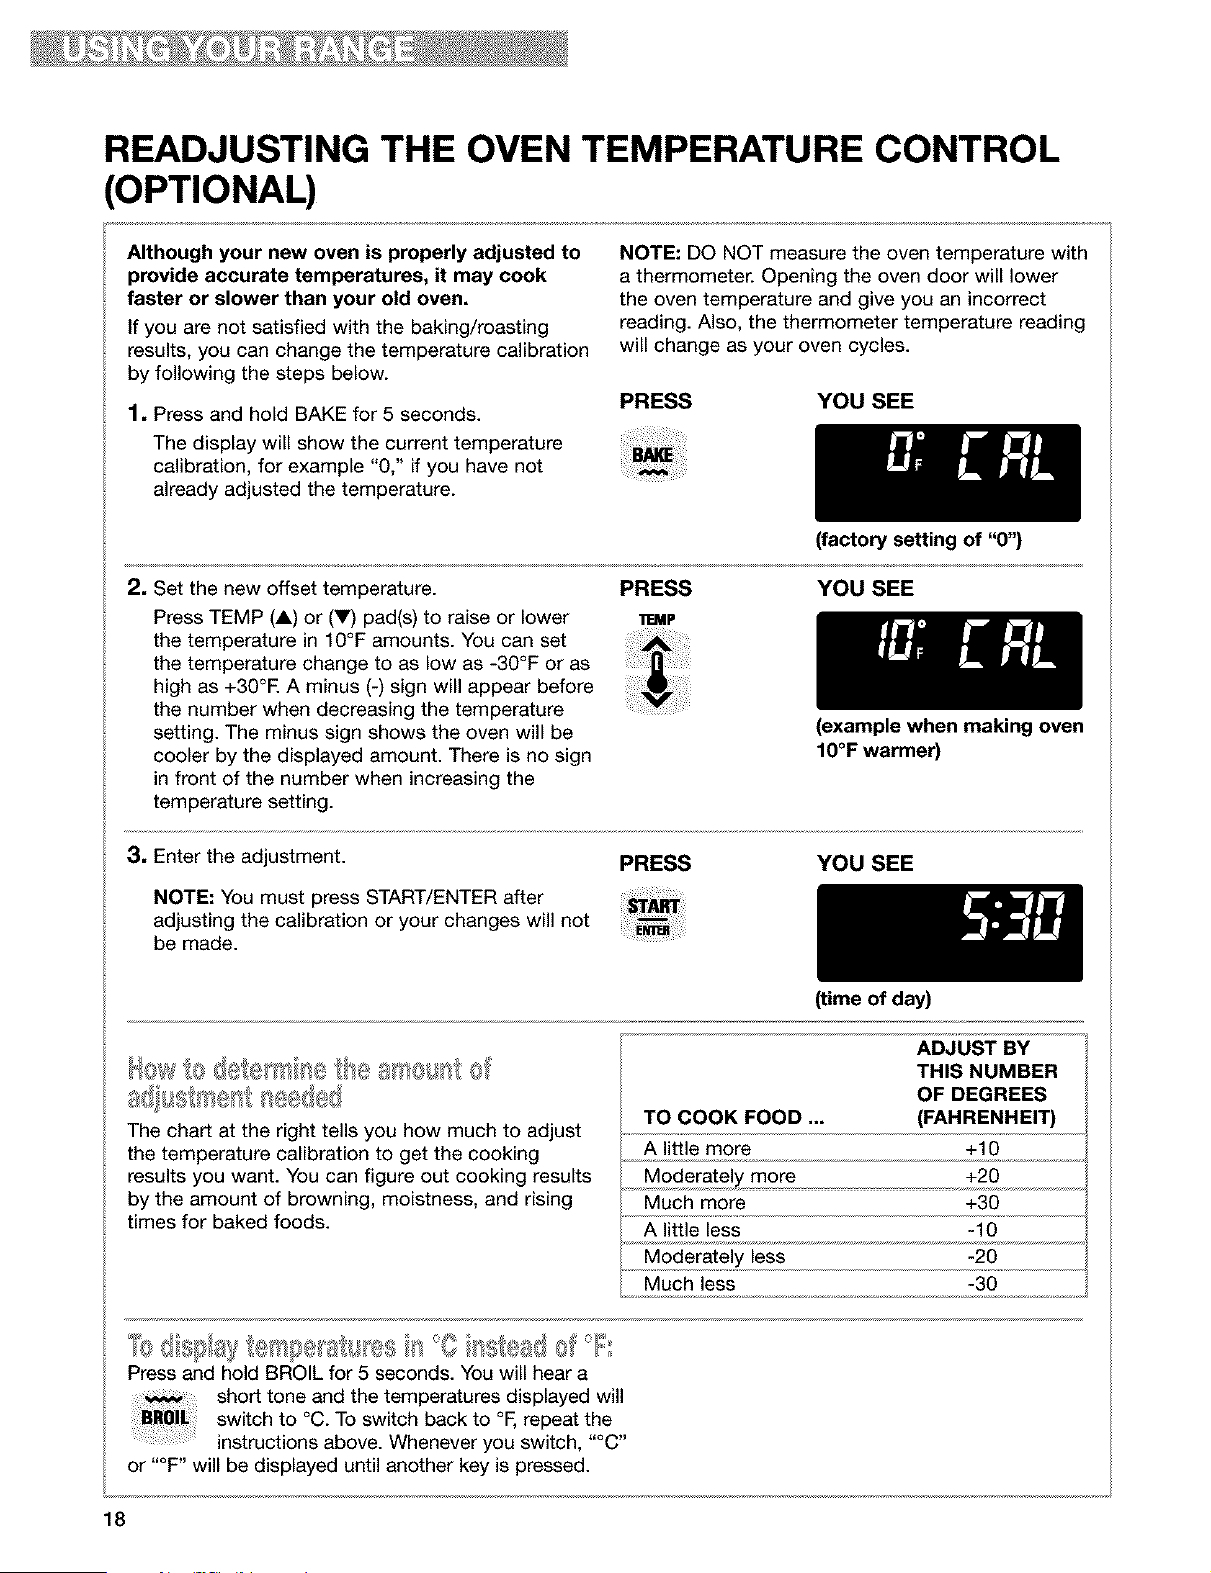
READJUSTING THE OVEN TEMPERATURE CONTROL
(OPTIONAL)
Although your new oven is properly adjusted to
provide accurate temperatures, it may cook
faster or slower than your old oven.
If you are not satisfied with the baking/roasting
results, you can change the temperature calibration
by following the steps below.
1. Press and hold BAKE for 5 seconds.
The display will show the current temperature
calibration, for example "0," if you have not
already adjusted the temperature.
NOTE: DO NOT measure the oven temperature with
a thermometer. Opening the oven door will lower
the oven temperature and give you an incorrect
reading. Also, the thermometer temperature reading
will change as your oven cycles.
PRESS YOU SEE
2. Set the new offset temperature.
Press TEMP (A) or (V) pad(s) to raise or lower
the temperature in 10°F amounts. You can set
the temperature change to as low as -30°F or as
high as +30°E A minus (-) sign will appear before
the number when decreasing the temperature
setting. The minus sign shows the oven will be
cooler by the displayed amount. There is no sign
in front of the number when increasing the
temperature setting.
(factory setting of "0")
PRESS YOU SEE
1lEaP
3. Enter the adjustment.
NOTE: You must press START/ENTER after
adjusting the calibration or your changes will not
be made.
(example when making oven
IO°F warmer)
PRESS YOU SEE
The chart at the right tells you how much to adjust
the temperature calibration to get the cooking
results you want. You can figure out cooking results
by the amount of browning, moistness, and rising
times for baked foods.
(time of day)
ADJUST BY
THIS NUMBER
OF DEGREES
TO COOK FOOD ... (FAHRENHEIT)
A little more +10
Moderately more +20
Much more +30
A little less -10
Press and hold BROIL for 5 seconds. You will hear a
short tone and the temperatures displayed will
switch to °C. To switch back to °F, repeat the
instructions above. Whenever you switch, "°g"
or "°F" will be displayed until another key is pressed.
Moderately less -20
Much less -30
18
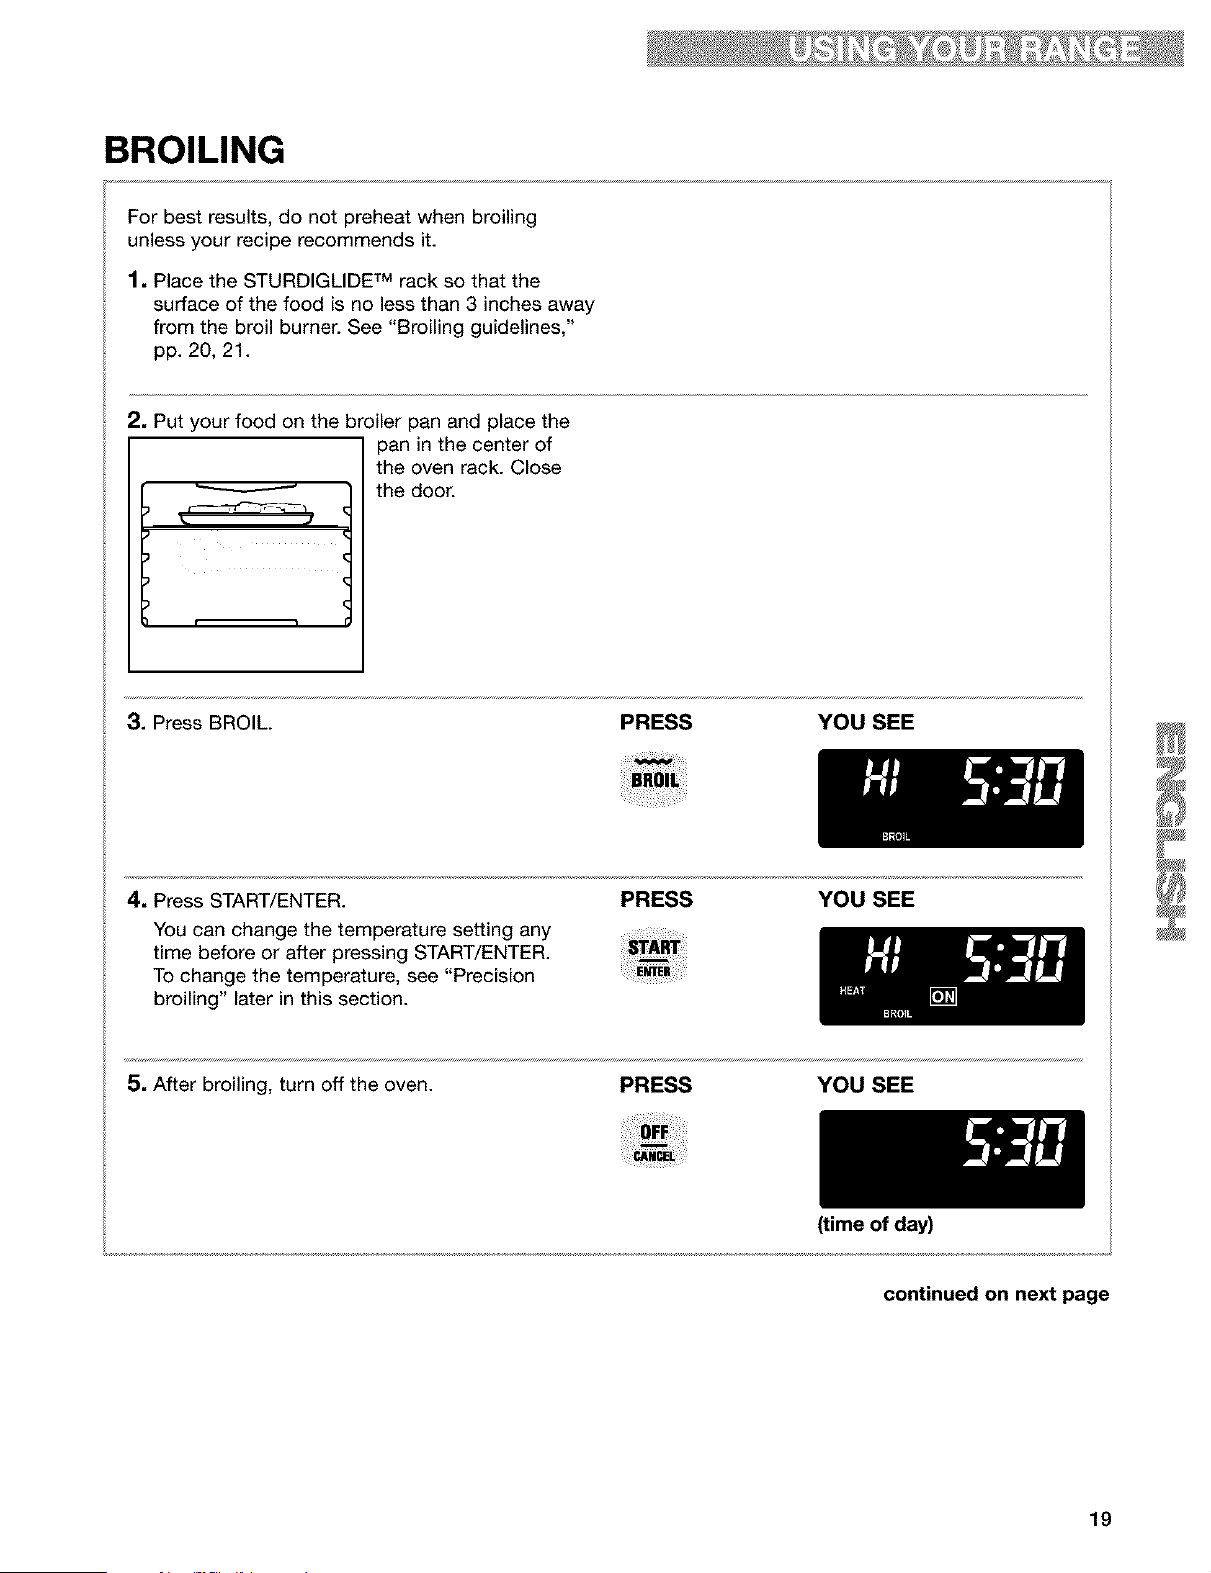
BROILING
For best results, do not preheat when broiling
unless your recipe recommends it.
1, Place the STURDIGLIDE TM rack so that the
surface of the food is no less than 3 inches away
from the broil burner. See "Broiling guidelines,"
pp. 20, 21.
2, Put your food on the broiler pan and place the
V
(
pan in the center of
the oven rack. Close
the door.
3. Press BROIL. PRESS YOU SEE
4. Press START/ENTER.
You can change the temperature setting any
time before or after pressing START/ENTER.
To change the temperature, see "Precision
broiling" later in this section.
PRESS YOU SEE
5. After broiling, turn off the oven.
PRESS YOU SEE
(time of day)
continued on next page
19
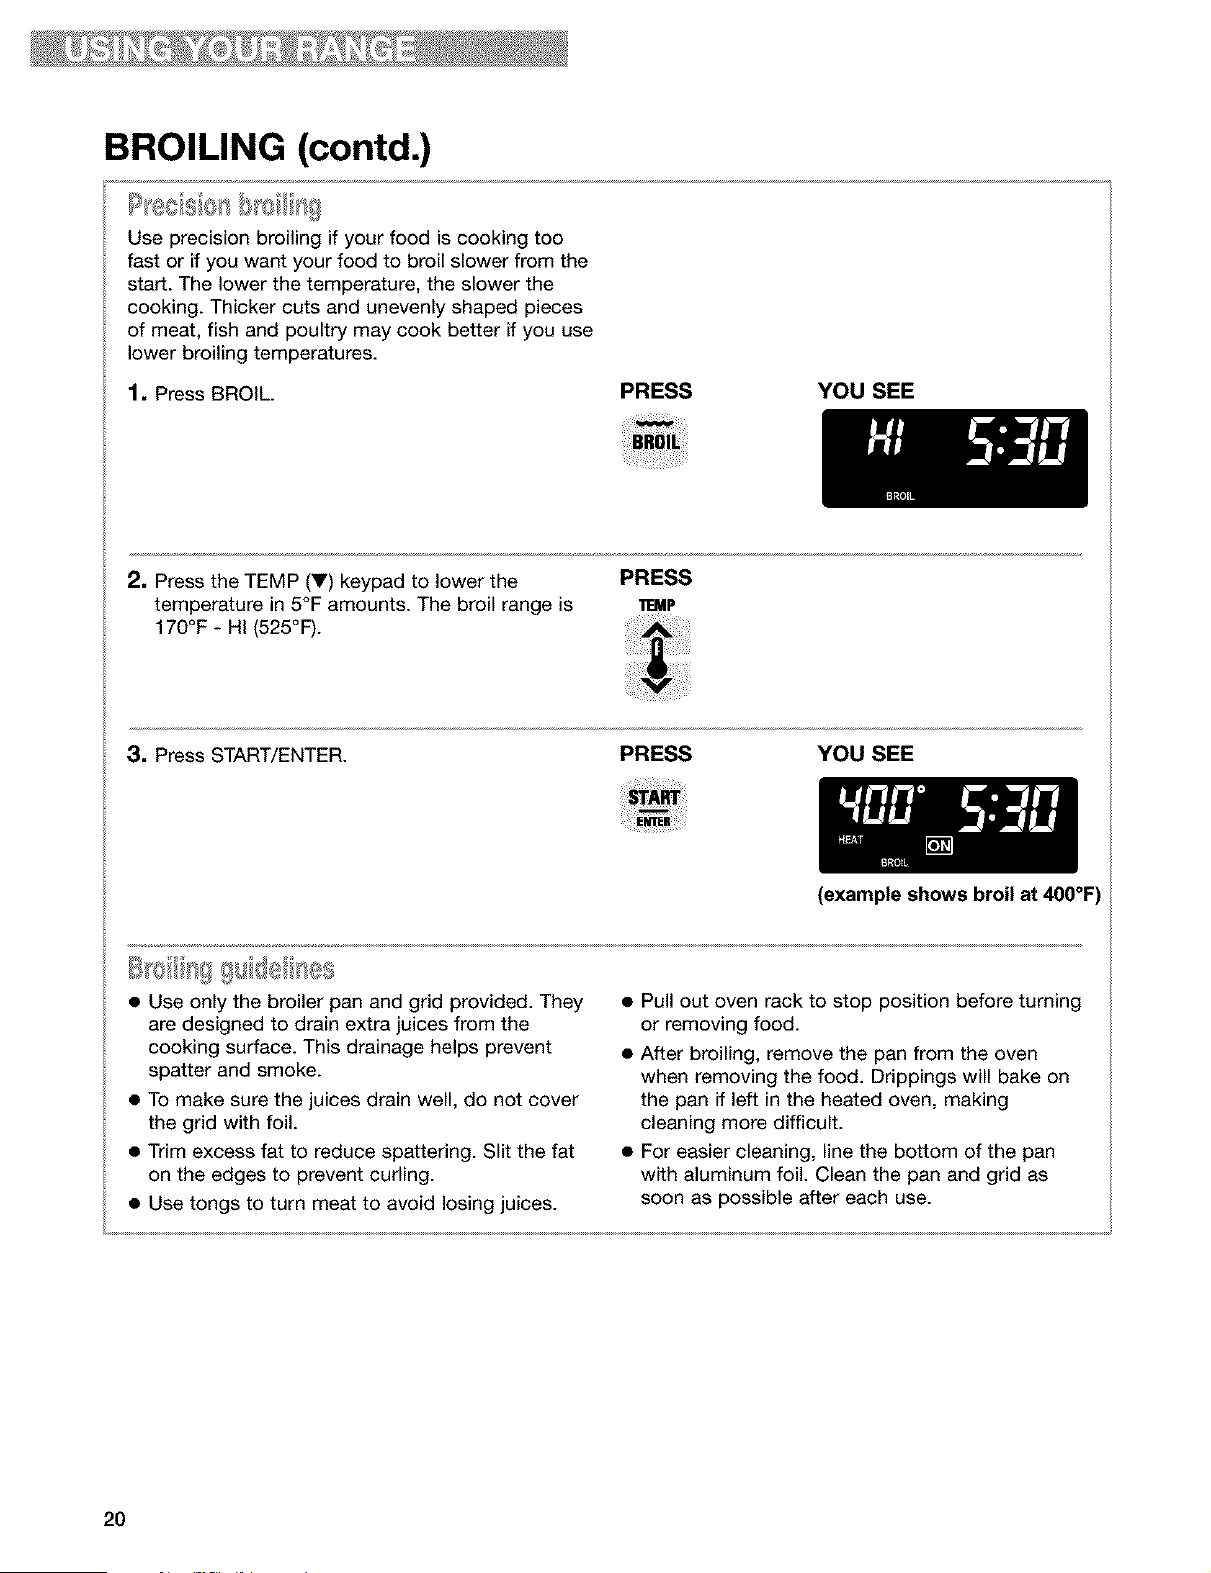
BROILING (contd.)
/@
I[e8_=;%o1 =
Use precision broiling if your food is cooking too
fast or if you want your food to broil slower from the
start. The lower the temperature, the slower the
cooking. Thicker cuts and unevenly shaped pieces
of meat, fish and poultry may cook better if you use
lower broiling temperatures.
1, Press BROIL.
PRESS YOU SEE
2, Press the TEMP (V) keypad to lower the
temperature in 5°F amounts. The broil range is
170°F - HI (525°F).
PRESS
_.MP
3, Press START/ENTER. PRESS YOU SEE
(example shows broil at 400°F)
S oiliF}££ sid6As s
• Use only the broiler pan and grid provided. They
are designed to drain extra juices from the
cooking surface. This drainage helps prevent
spatter and smoke.
• To make sure the juices drain well, do not cover
the grid with foil.
• Trim excess fat to reduce spattering. Slit the fat
on the edges to prevent curling.
• Use tongs to turn meat to avoid losing juices.
• Pull out oven rack to stop position before turning
or removing food.
• After broiling, remove the pan from the oven
when removing the food. Drippings will bake on
the pan if left in the heated oven, making
cleaning more difficult.
• For easier cleaning, line the bottom of the pan
with aluminum foil. Clean the pan and grid as
soon as possible after each use.
2O
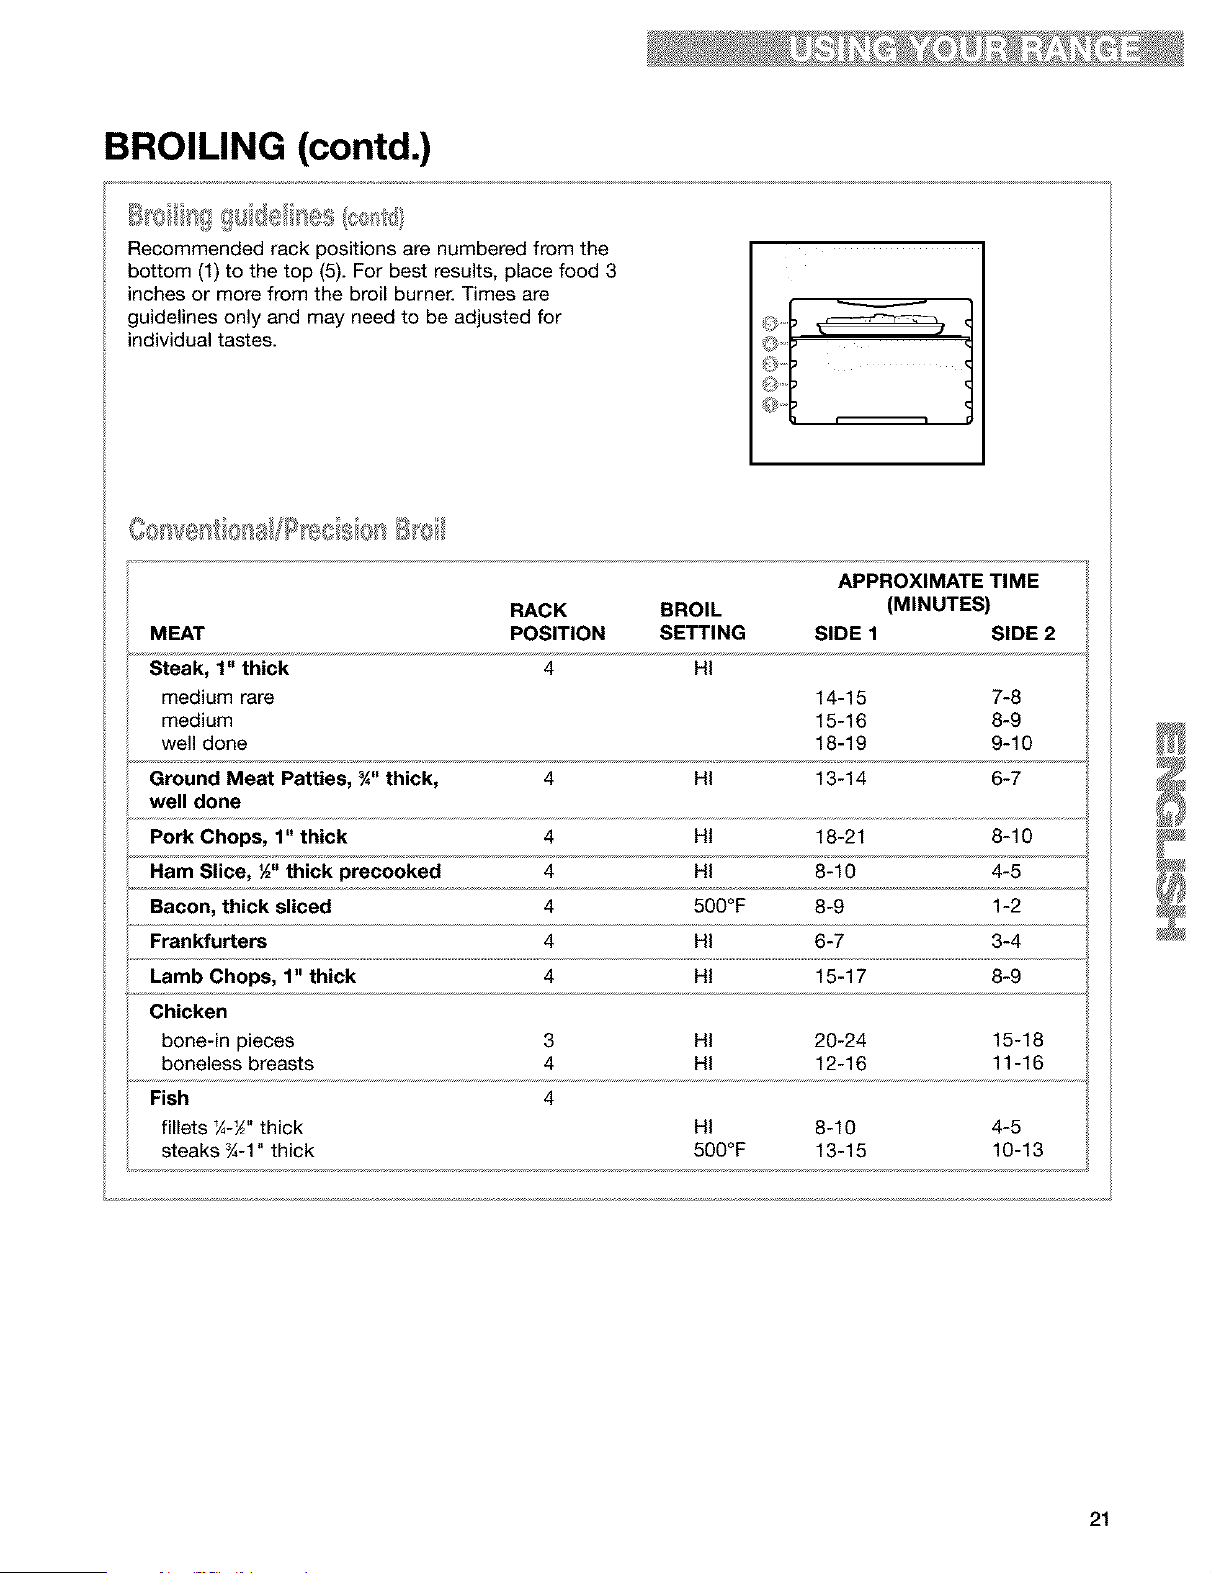
BROILING (contd.)
,_, iI _ _ =i ¸ _ _
Recommended rack positions are numbered from the
bottom (1) to the top (5). For best results, place food 3
inches or more from the broil burner. Times are
guidelines only and may need to be adjusted for
individual tastes.
APPROXIMATE TIME
RACK BROIL (MINUTES)
MEAT POSITION SETTING SIDE 1 SIDE 2
Steak, 1" thick 4 HI
medium rare 14-15 7-8
medium 15-16 8-9
well done 18-19 9-10
Ground Meat Patties, ¾" thick, 4 HI 13-14 6-7
well done
Pork Chops, 1" thick 4 Ht 18-21 8-10
Ham Slice, ½" thick precooked 4 HI 8-10 4-5
Bacon, thick sliced 4 500°F 8-9 1-2
Frankfurters 4 HI 6-7 3-4
Lamb Chops, 1" thick 4 HI 15-17 8-9
Chicken
bone-in pieces 3 HI 20-24 15-18
boneless breasts 4 HI 12-16 11-16
Fish 4
fillets ¼-_" thick HI 8-10 4-5
steaks _-1" thick 500°F 13-15 10-13
21

USING RECIPE RECALL TM
RECIPE RECALL makes cooking your favorite
foods faster and easier. The temperatures and
times have been chosen to cover a variety of
choices in each food category. Cooking times are
adjustable for individual recipes and can be saved.
Temperatures can be changed but not saved.
When changed, the display will not show
"PreHEAt" while the oven is preheating.
1, Place the STURDIGLIDE TM rack(s) where you
need them. To place your racks correctly, see
"Positioning racks and pans" section, p. 10.
If recipe recommends no preheat is needed, put your
food in the oven now. While CASSEROLES does not
enter "PrEHEAt", it is recommended to allow the
oven to preheat for 10 minutes before putting food
inthe oven.
2, Press one of the four keypads MEATS POULTRY,
CASSEROLES, COOKIES or PIZZA.
3, Press START/ENTER.
NOTE: You can change the cook time after
pressing START/ENTER by pressing the
HOUR/MIN pad(s). You do not have to press
any other pad. The oven will finish cooking with
the new time.
COOKIES and PIZZA keypads include a preheat.
When the preheat ends for COOKIES and PIZZA
you will hear a tone and the cooking time will
appear counting down on the display.
PRESS YOU SEE
(example for MEATS POULTRY)
PRESS YOU SEE
(counting down)
(example for MEATS POULTRY)
(example for PIZZA)
(counting down)
(example for PIZZA)
22
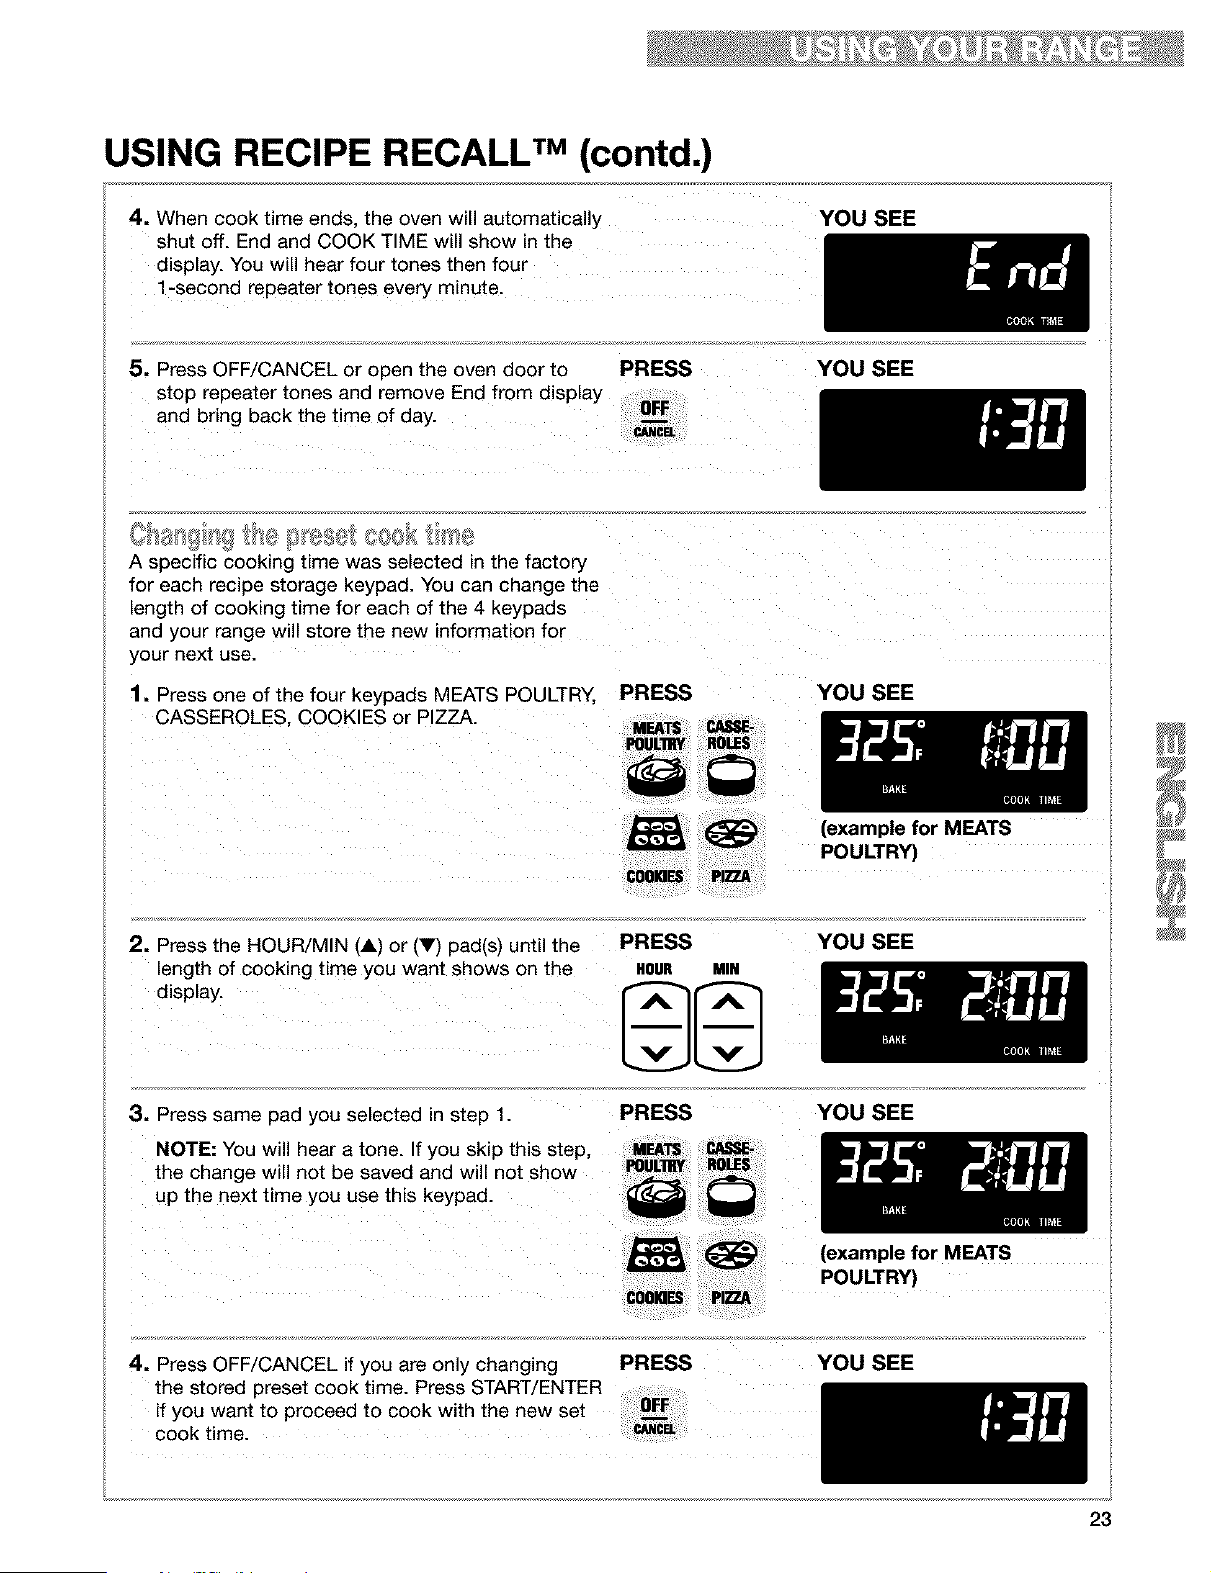
USING RECIPE RECALL TM (contd.)
4. When cook time ends. the oven will automatically
shut off. End and COOK TIME will show in the
display. You will hear four tones then four
1-second repeater tones every minute.
YOU SEE
5. Press OFF/CANCEL or open the oven door to PRESS
stop repeater tones and remove End from display
and bring back the time of day.
YOU SEE
A specific cooking time was selected in the factory
for each recipe storage keypad. You can change the
length of cooking time for each of the 4 keypads
and your range will store the new information for
your next use.
1. Press one of the four keypads MEATS POULTRY
CASSEROLES, COOKIES or PIZZA.
PRESS YOU SEE
2. Press the HOUR/MIN (A) or (V) pad(s) until the PRESS
length of cooking time you want shows on the HOUR MIN
display.
(example for MEATS
POULTRY)
YOU SEE
3. Press same pad you selected in step 1.
NOTE: You will hear a tone. If you skip this step,
the change will not be saved and will not show
up the next time you use this keypad.
PRESS YOU SEE
4. Press OFF/CANCEL if you are only changing
the stored preset cook time. Press START/ENTER
if you want to proceed to cook with the new set
cook time.
PRESS
(exampleforMEATS
POULTRY)
YOU SEE
23
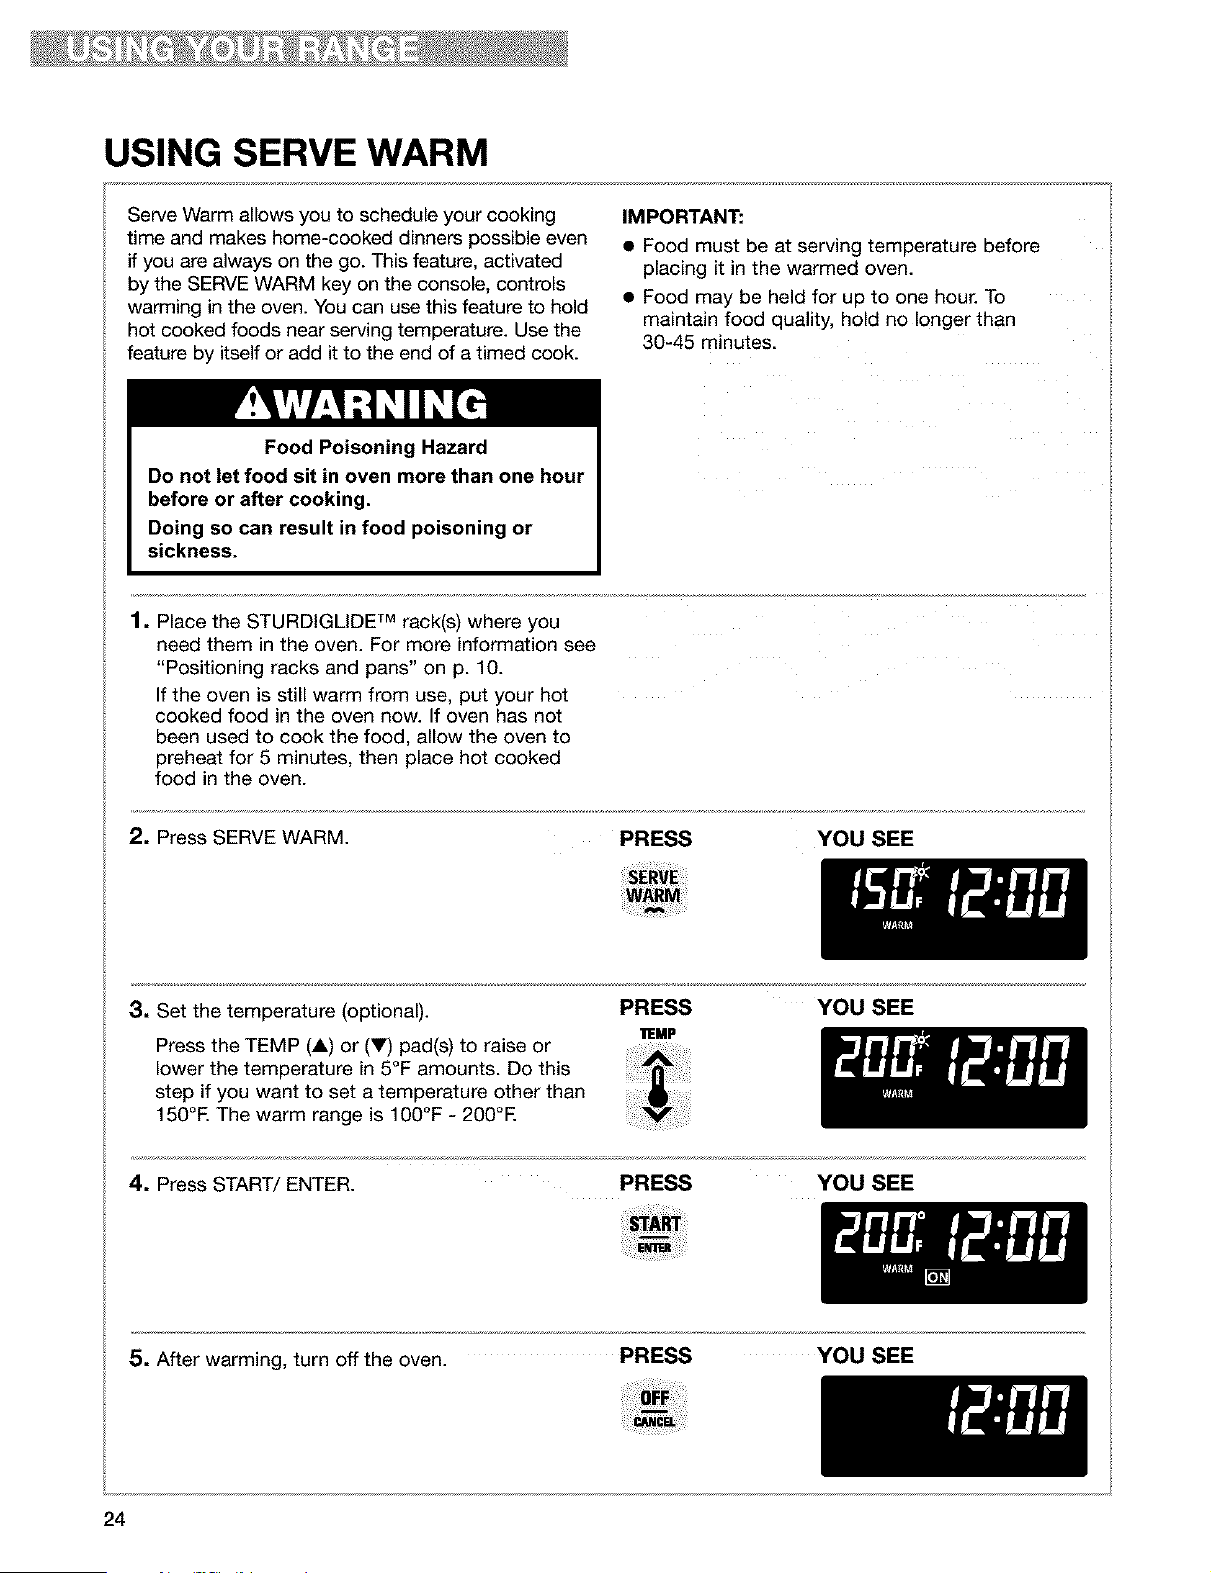
USING SERVE WARM
Serve Warm allows you to schedule your cooking
time and makes home-cooked dinners possible even
if you are always on the go. This feature, activated
by the SERVE WARM key on the console, controls
warming in the oven. You can use this feature to hold
hot cooked foods near serving temperature. Use the
feature by itself or add it to the end of a timed cook.
IMPORTANT:
• Food must be at serving temperature before
placing it in the warmed oven.
• Food may be held for up to one hour. To
maintain food quality, hold no longer than
30-45 minutes.
Food Poisoning Hazard
Do not let food sit in oven more than one hour
before or after cooking,
Doing so can result in food poisoning or
sickness.
1. Place the STURDIGLIDE TM rack(s) where you
need them in the oven. For more information see
"Positioning racks and pans" on p. 10.
If the oven is still warm from use, put your hot
cooked food in the oven now. If oven has not
been used to cook the food, allow the oven to
preheat for 5 minutes, then place hot cooked
food in the oven.
2. Press SERVE WARM. PRESS YOU SEE
3. Set the temperature (optional).
Press the TEMP (A) or (T) pad(s) to raise or
lower the temperature in 5°F amounts. Do this
step if you want to set a temperature other than
150°R The warm range is 100°F - 200°E
PRESS YOU SEE
'I1EMP
4. Press START/ENTER.
PRESS YOU SEE
5. After warming, turn off the oven. PRESS YOU SEE
24
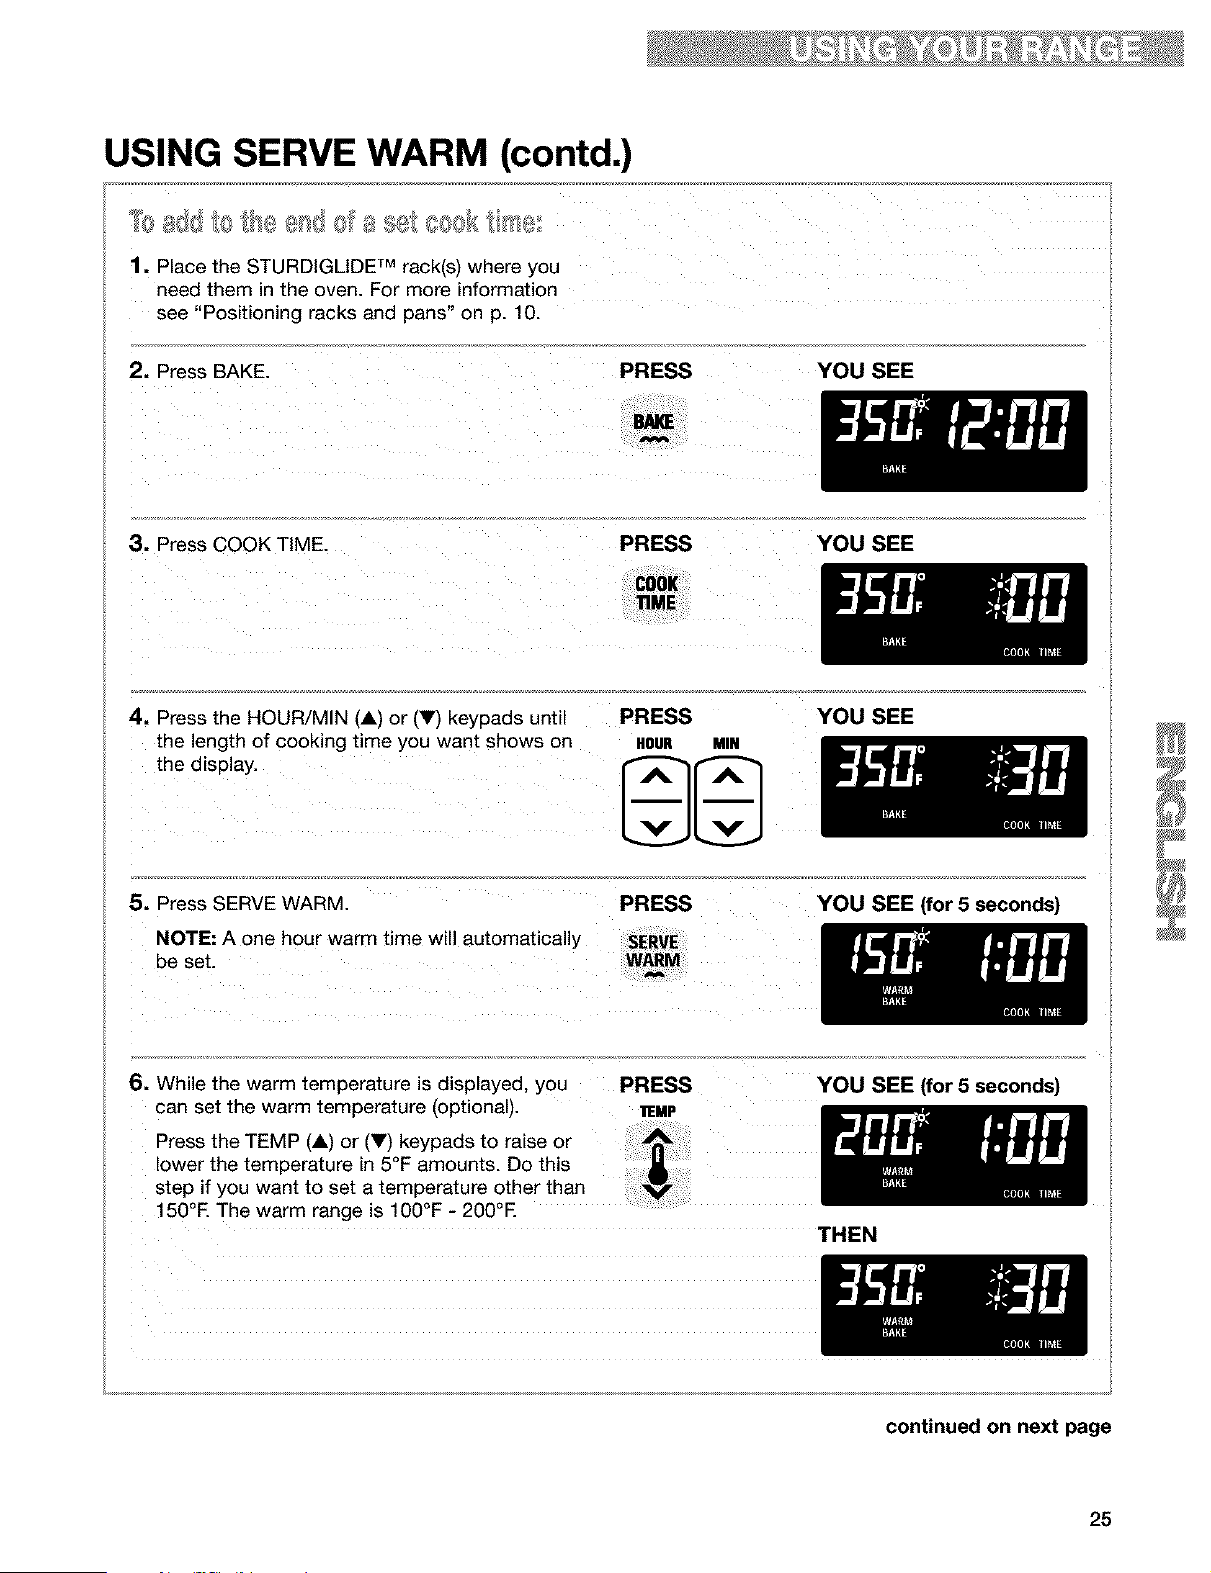
USING SERVE WARM (contd.)
1. Place the STURDIGLtDE TM rack(s) where you
need them in the oven. For more information
see "Positioning racks and pans" on p. 10.
2. Press BAKE. PRESS YOU SEE
3. Press COOK TIME.
PRESS YOU SEE
COOK
11ME
4. Press the HOUR/MIN (A) or (V) keypads until
the length of cooking time you want shows on
the display.
PRESS
HOUR MIN
YOU SEE
5. Press SERVE WARM. PRESS
NOTE: A one hour warm time will automatically SERVE
be set. WARM
YOU SEE (for 5 seconds)
6. While the warm temperature is displayed, you PRESS
can set the warm temperature (optional). teMP
Press the TEMP (A) or (V) keypads to raise or
lower the temperature in 5°F amounts. Do this
step if you want to set a temperature other than
150°E The warm range is 100°F - 200°E
YOU SEE {for 5 seconds)
THEN
continued on next page
25
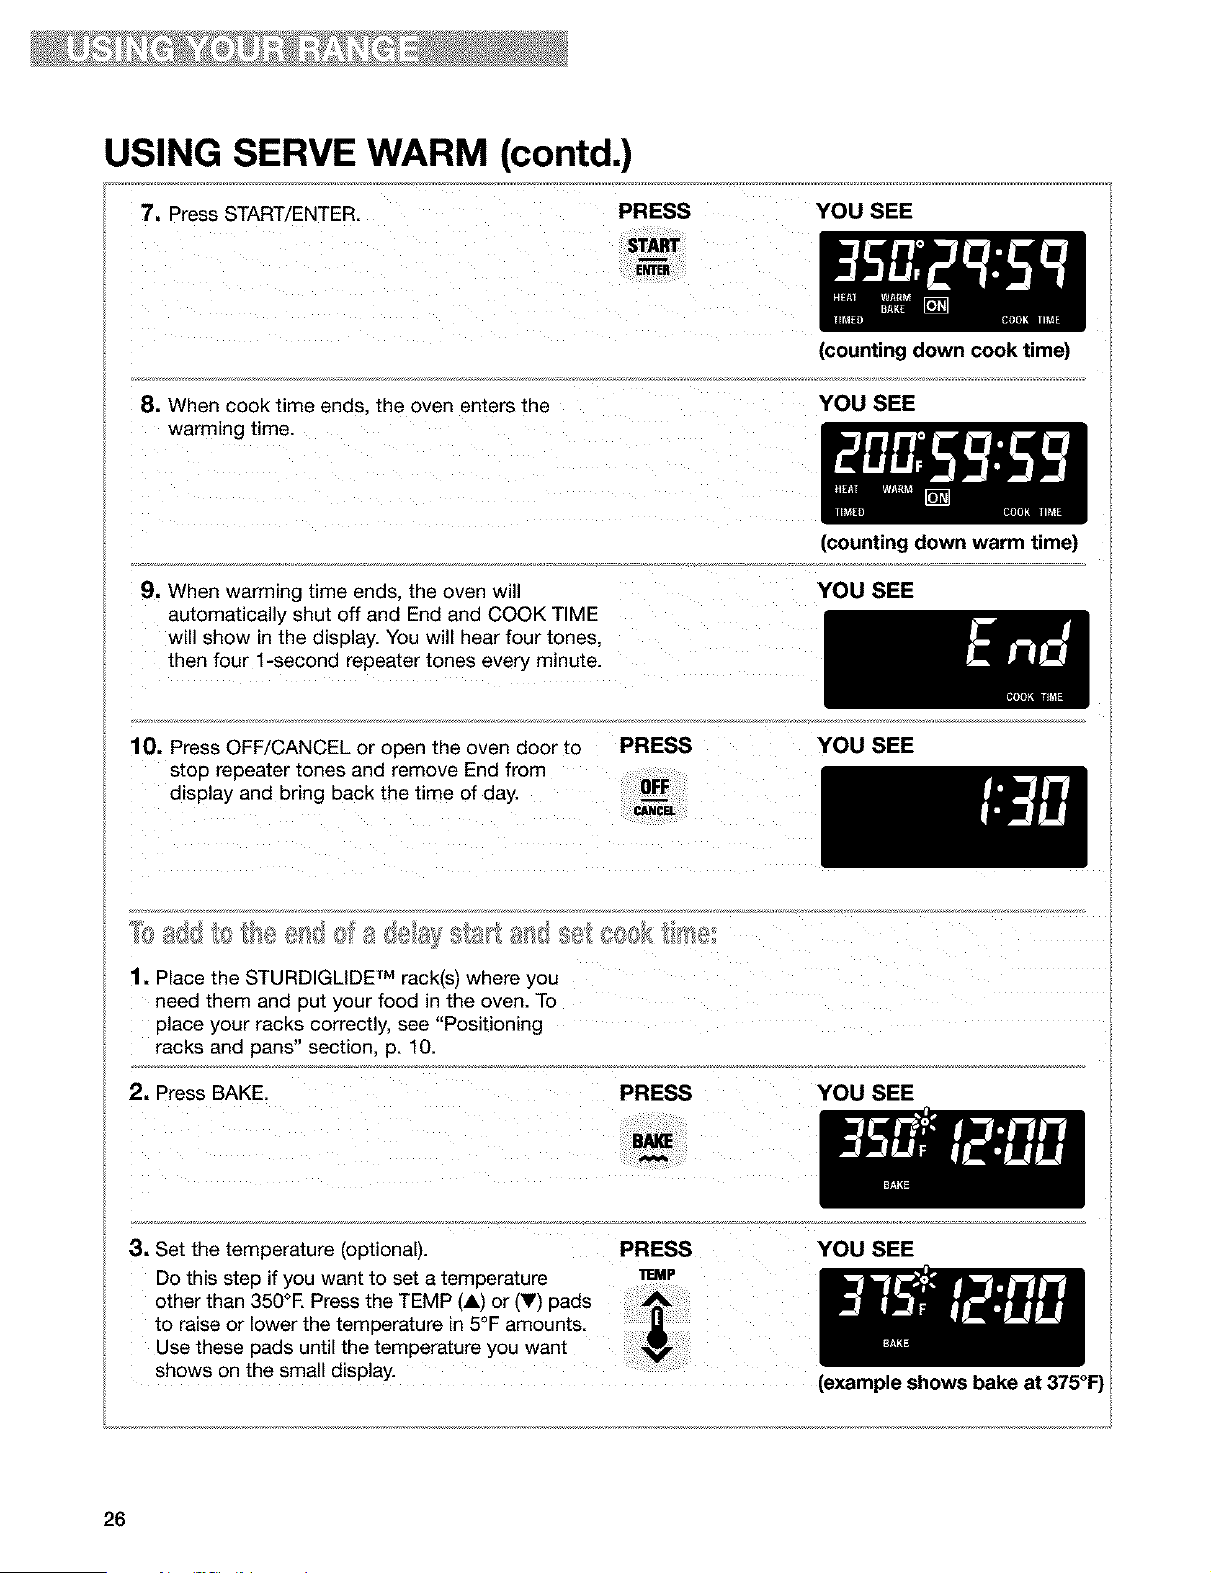
USING SERVE WARM (contd.)
7. Press START/ENTER. PRESS
YOU SEE
(counting down cook time)
8. When cook time ends. the oven enters the
warming time.
YOU SEE
9. When warming time ends. the oven will
automatically shut off and End and COOK TIME
will show in the display. You will hear four tones.
then four 1-second repeater tones every minute.
(counting down warm time)
YOU SEE
10. Press OFF/CANCEL or open the oven door to
stop repeater tones and remove End from
display and bring back the time of day.
PRESS
YOU SEE
1. Place the STURDIGLIDE TM rack(s) where you
need them and 3ut your food in the oven. To
place your racks correctly, see "Positioning
racks and pans" section, p. 10.
2. Press BAKE.
PRESS
YOU SEE
3. Set the temperature (optional).
Do this step if you want to set a temperature
other than 350°E Press the TEMP t&_ or t_'_ pads
to raise or lower the temperature in 5°F amounts.
Use these pads until the temperature you want
shows on the small display.
PRESS
"IT.MP
YOU SEE
(example shows bake at 375°F)
26

USING SERVE WARM (contd.)
4. Press COOK TIME. PRESS
COOK
"flME
YOU SEE
5. Set the cook time.
Press the HOUR/MIN (A) or (V) pad(s) until the
correct cook time shows on the display.
6. Press DELAY START.
PRESS
HOUR MIN
PRESS
YOU SEE
(example shows 30-minute
baking/roasting time)
YOU SEE
DB.AY
STAR[
7. Set the time of day to start.
Press the HOUR/MIN (A) or (V) pad(s) unti
the correct time of day to start shows on the
display.
PRESS
HOUR MIN
YOU SEE
(example shows 1:00
start time)
8. Press SERVE WARM. PRESS
NOTE: A one hour warm time will automatically SERVE
be set,
YOU SEE (for 5 seconds)
9. While the warm temperature is displayed you
can set the warm temperature (optional).
PRESS
I1EMP
YOU SEE (for 5 seconds)
Press the TEMP (A) or (V) keypads to raise or
lower the temperature in 5°F amounts. Do this
step if you want to set a temperature other than
15001=.The warm range is 100°F - 200°E
THEN
continued on next page
27
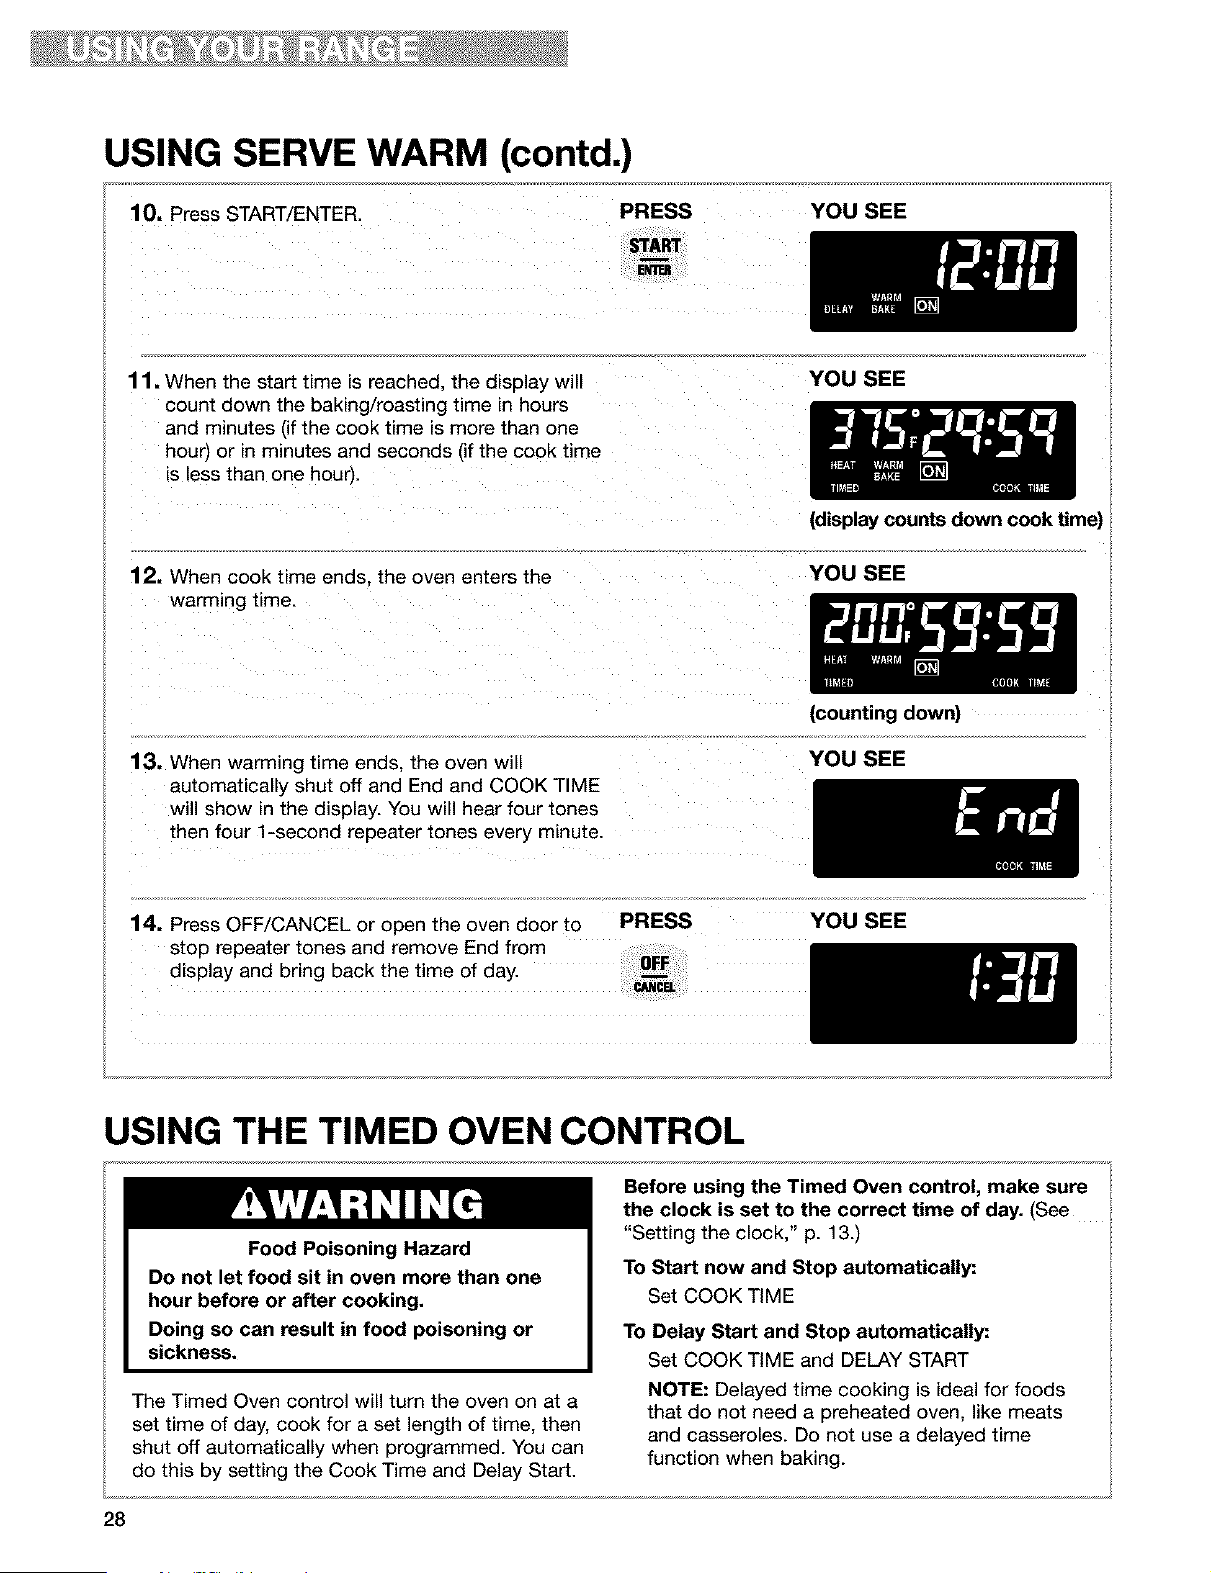
USING SERVE WARM (contd.)
10. Press START/ENTER. PRESS
YOU SEE
11. When the start time is reached, the display will
count down the baking/roasting time in hours
and minutes [if the cook time is more than one
houri or in minutes and seconds (if the cook time
is less than one hour).
12. When cook time ends. the oven enters the
warming time.
YOU SEE
(display counts down cook time)
YOU SEE
13, When warming time ends. the oven will
automatically shut off and End and COOK TIME
will show in the display. You will hear four tones
then four 1-second repeater tones every minute.
(counting down)
YOU SEE
14. Press OFF/CANCEL or open the oven door to
stop repeater tones and remove End from
display and bring back the time of day.
PRESS YOU SEE
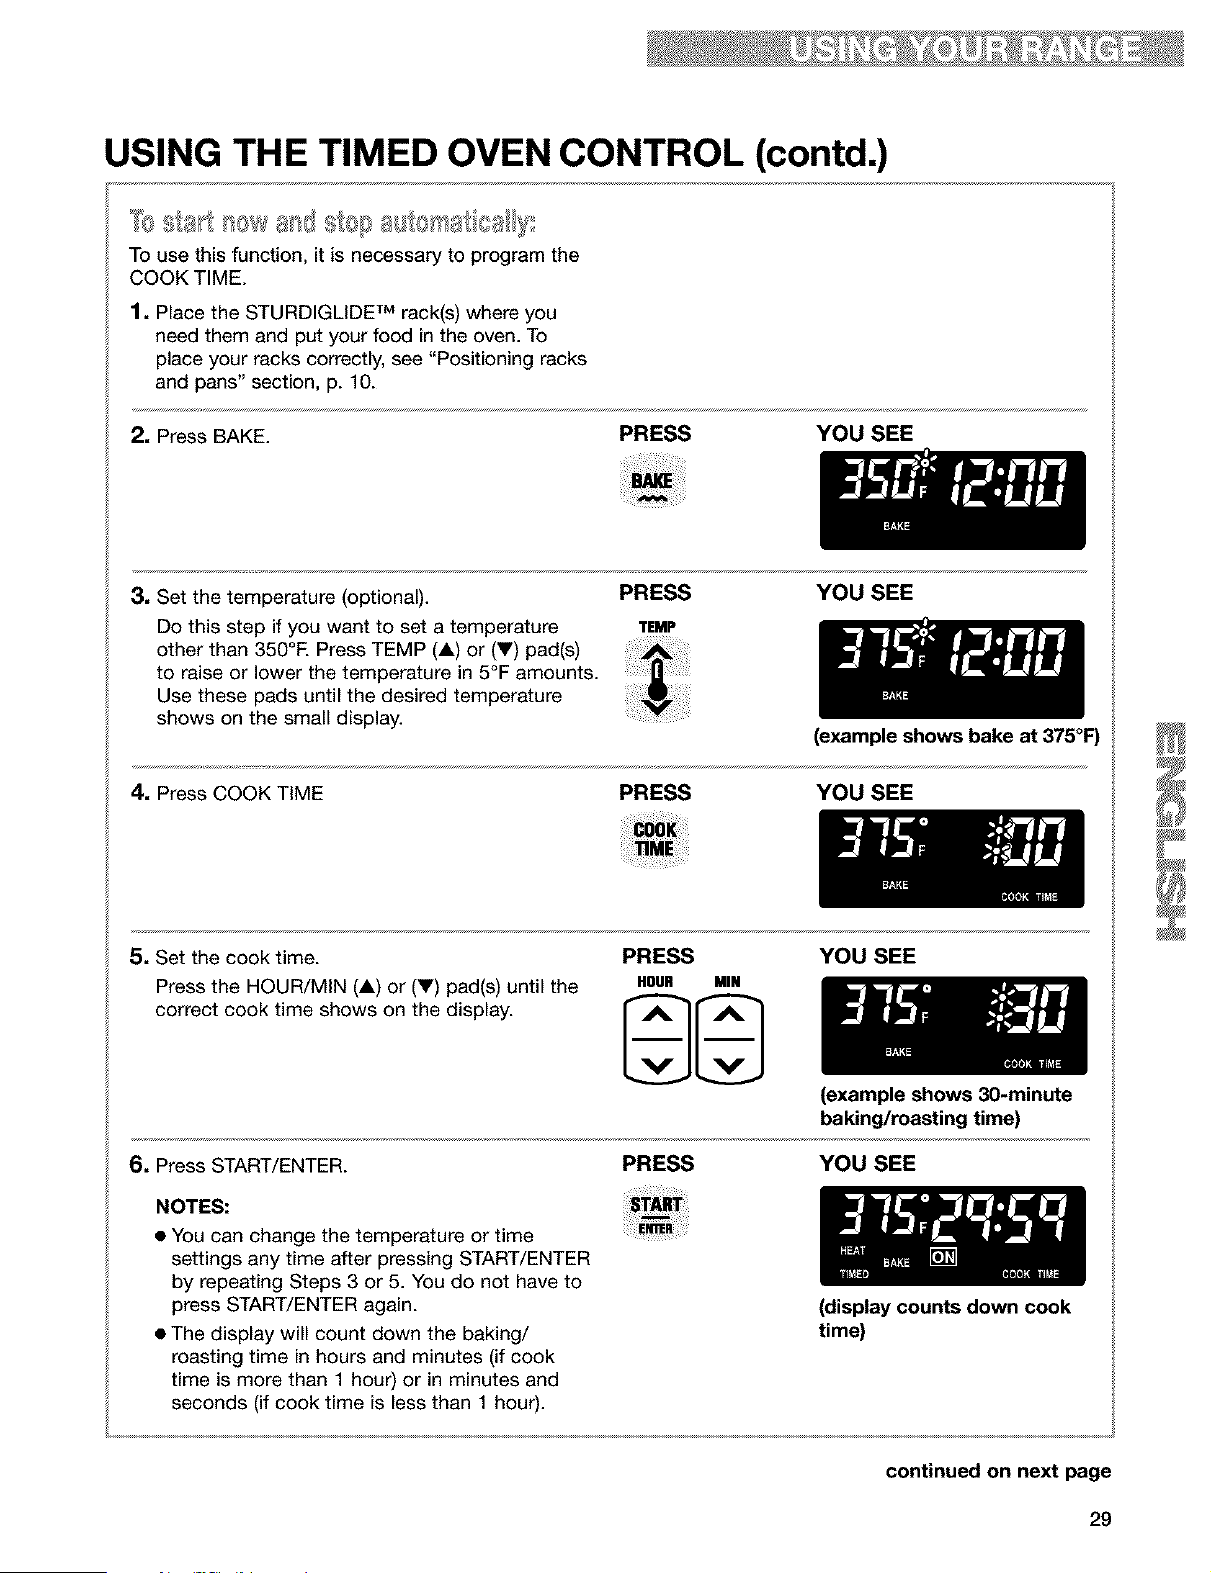
USING THE TIMED OVEN CONTROL
+
+
+
+
+
+
+
+
+
+
+
+
+
+
+
+
+
+
Food Poisoning Hazard
Do not let food sit in oven more than one
hour before or after cooking.
Doing so can result in food poisoning or
sickness.
The Timed Oven control will turn the oven on at a
set time of day, cook for a set length of time, then
shut off automatically when programmed. You can
do this by setting the Cook Time and Delay Start.
Before using the Timed Oven control, make sure
the clock is set to the correct time of day. (See
"Setting the clock," p. 13.)
To Start now and Stop automatically:
Set COOK TiME
To Delay Start and Stop automatically:
Set COOK TiME and DELAY START
NOTE: Delayed time cooking is ideal for foods
that do not need a preheated oven, like meats
and casseroles. Do not use a delayed time
function when baking.
28
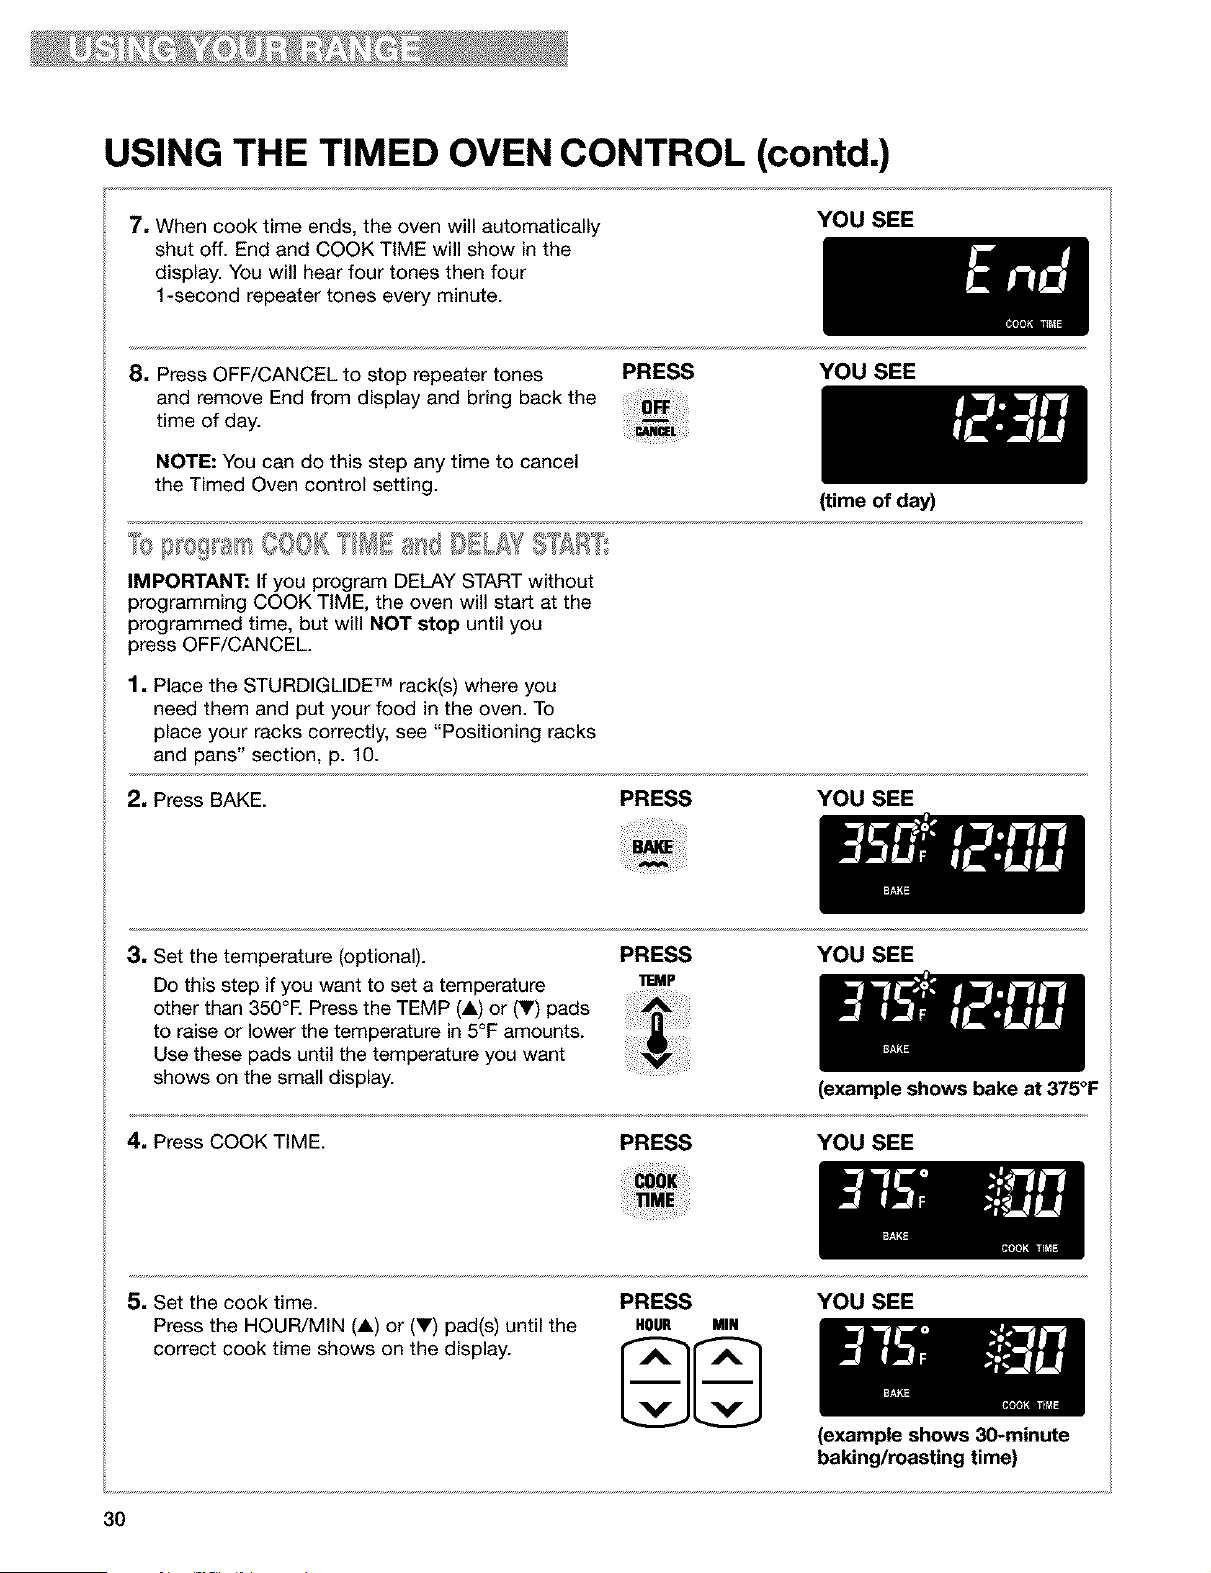
USING THE TIMED OVEN CONTROL (contd.)
To use this function, it is necessary to program the
COOK TIME.
1. Place the STURDIGLIDE TM rack(s) where you
need them and put your food in the oven. To
place your racks correctly, see "Positioning racks
and pans" section, p. 10.
2, Press BAKE. PRESS YOU SEE
3. Set the temperature (optional).
Do this step if you want to set a temperature
other than 350o1=. Press TEMP (1) or (V) pad(s)
to raise or lower the temperature in 5°F amounts.
Use these pads until the desired temperature
shows on the small display.
PRESS YOU SEE
TEMP
(example shows bake at 375°F)
4. Press COOK TIME PRESS YOU SEE
5. Set the cook time.
Press the HOUR/MIN (i) or (V) pad(s) until the
correct cook time shows on the display.
PRESS
HOUR MIN
YOU SEE
6. Press START/ENTER.
NOTES:
• You can change the temperature or time
settings any time after pressing START/ENTER
by repeating Steps 3 or 5. You do not have to
press START/ENTER again.
• The display will count down the baking/
roasting time in hours and minutes (if cook
time is more than 1 hour) or in minutes and
seconds (if cook time is less than 1 hour).
PRESS
(example shows 30-minute
baking/roasting time)
YOU SEE
(display counts down cook
time)
continued on next page
29
USING THE TIMED OVEN CONTROL (contd.)
7, When cook time ends, the oven will automatically
shut off. End and COOK TIME will show in the
display. You will hear four tones then four
1-second repeater tones every minute.
YOU SEE
8, Press OFF/CANCEL to stop repeater tones
and remove End from display and bring back the
time of day.
NOTE: You can do this step any time to cancel
the Timed Oven control setting.
PRESS YOU SEE
% O00K ?II+III II)IL61 I]:IR]';
IMPORTANT: If you program DELAY START without
programming COOK TIME, the oven will start at the
programmed time, but will NOT stop until you
press OFF/CANCEL.
1, Place the STURDIGLIDE TM rack(s) where you
need them and put your food in the oven. To
place your racks correctly, see "Positioning racks
and pans" section, p. 10.
(time of day)
2, Press BAKE. PRESS YOU SEE
3, Set the temperature (optional).
Do this step if you want to set a temperature
other than 350°E Press the TEMP (A) or (Y) pads
to raise or lower the temperature in 5°F amounts.
Use these pads until the temperature you want
shows on the small display.
PRESS YOU SEE
11B_P
(example shows bake at 375°F
4, Press COOK TIME.
PRESS YOU SEE
5, Set the cook time. PRESS
Press the HOUR/MIN (A) or (V) pad(s) until the HOUR MIN
correct cook time shows on the display.
YOU SEE
(example shows 30-minute
baking/roasting time)
3O

USING THE TIMED OVEN CONTROL (contd.)
6, Press DELAY START.
PRESS YOU SEE
7, Set the time of day to start.
Press the HOUR/MIN (A) or (Y) pad(s) until
the correct time of day to start shows on the
display.
The example at the right shows a chosen start
time of 1:00. The oven will shut off by itself at
1:30 (the set start time plus the set cook time).
PRESS YOU SEE
HOUR MIN
8. Press START/ENTER.
The stop time is calculated automatically.
NOTE: You can change the temperature and
time settings any time after pressing
START/ENTER by repeating Steps 3 through 8
unless the delay start time has been reached.
(example shows 1:00
start time)
PRESS YOU SEE
9, When the start time is reached:
The display will count down the baking/roasting
time in hours and minutes (if the cook time is
more than one hour) or in minutes and seconds
(if the cook time is less than one hour).
YOU SEE
(display counts down cook
time)
10, When cook time ends, the oven will
automatically turn off. End and COOK TIME
will show in the display. You will hear four tones
then four 1-second repeater tones every minute.
YOU SEE
11. Press OFF/CANCEL to stop repeater tones
and remove End from display and bring back
the time of day.
NOTE: You can do this step any time to cancel
the Timed Oven control setting.
PRESS YOU SEE
(time of day)
continued on next page
31
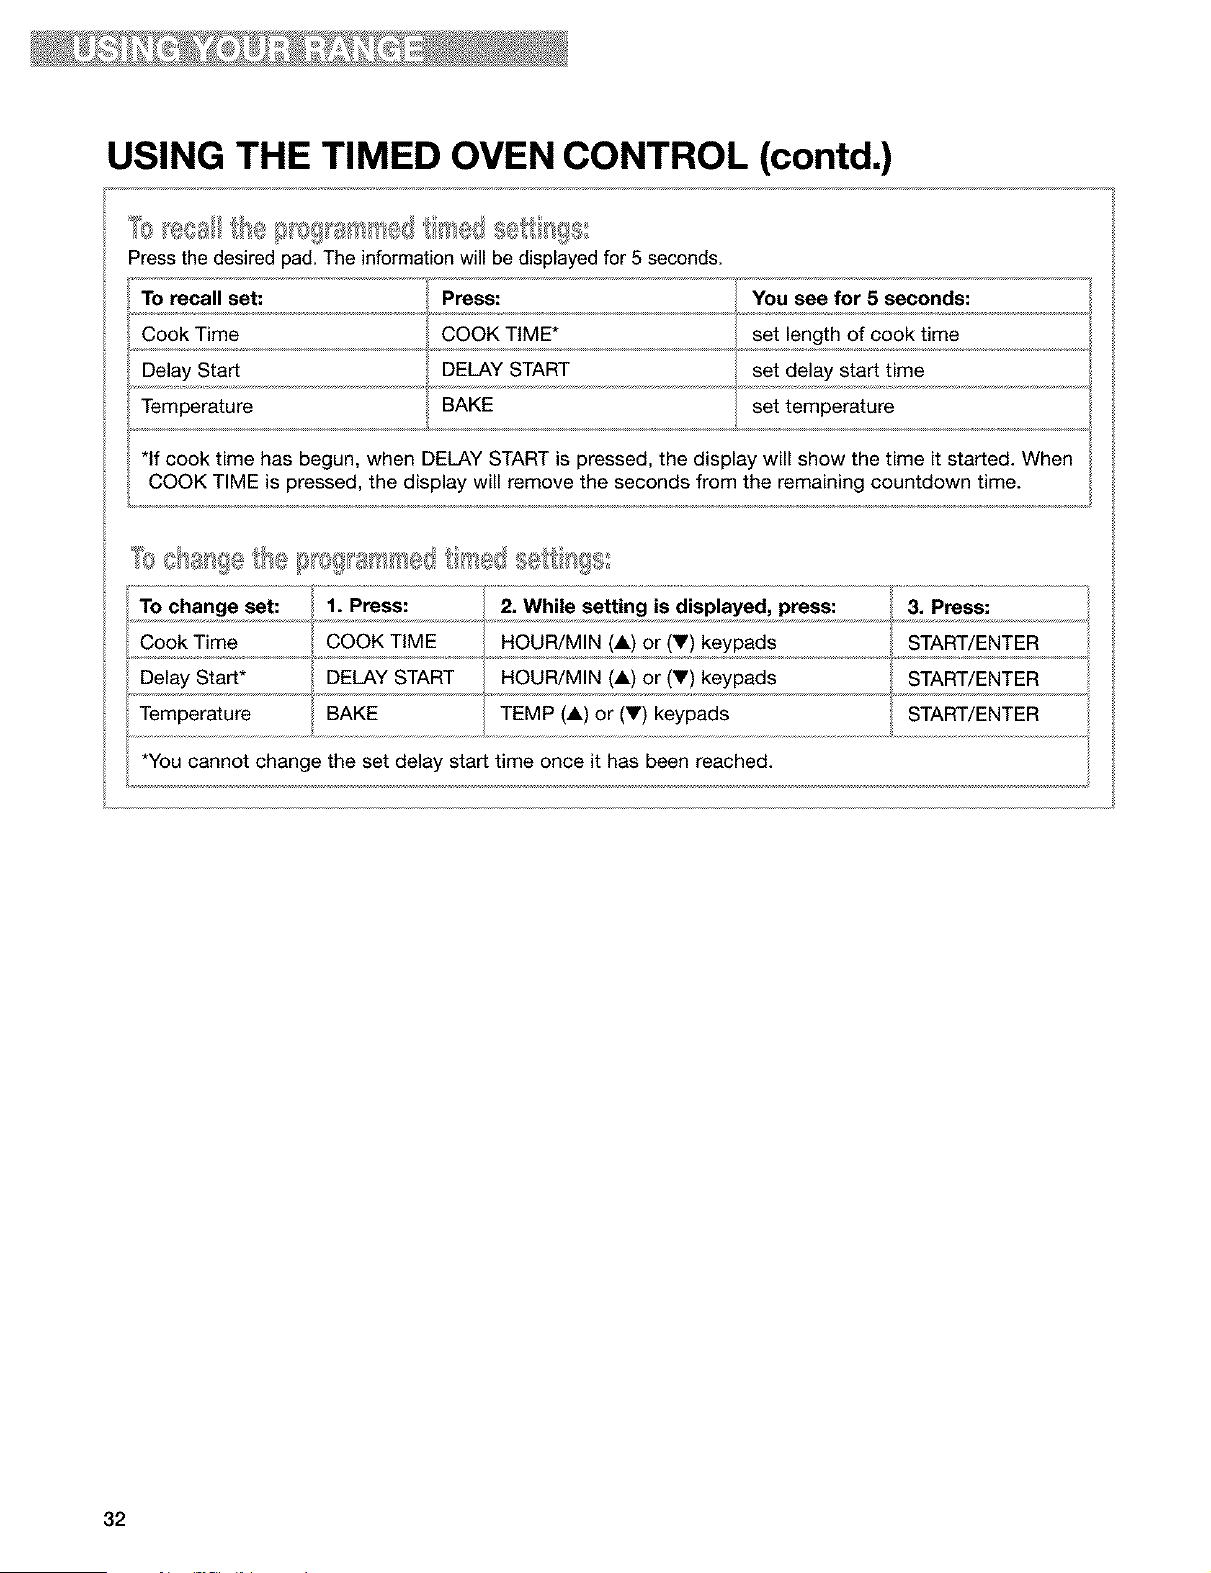
USING THE TIMED OVEN CONTROL (contd.)
Press the desired pad. The informationwill be displayed for 5 seconds.
To recall set: Press: You see for 5 seconds:
Cook Time COOK TIME* set length of cook time
Delay Start DELAY START set delay start time
Temperature BAKE set temperature
*If cook time has begun, when DELAY START is pressed, the display will show the time it started. When
COOK TIME is pressed, the display will remove the seconds from the remaining countdown time.
l •
To set: 1. Press: 2. While is
change setting displayed, press:
Time (A) or (Y) keypads
Cook
COOK TIME
HOUR/MIN
Delay Start* DELAY START HOUR/MIN (A) or (Y) keypads
Temperature BAKE TEMP (A) or (V) keypads
i *You cannot change the set delay start time once it has been reached.
3. Press:
START/ENTER
START/ENTER
START/ENTER
32
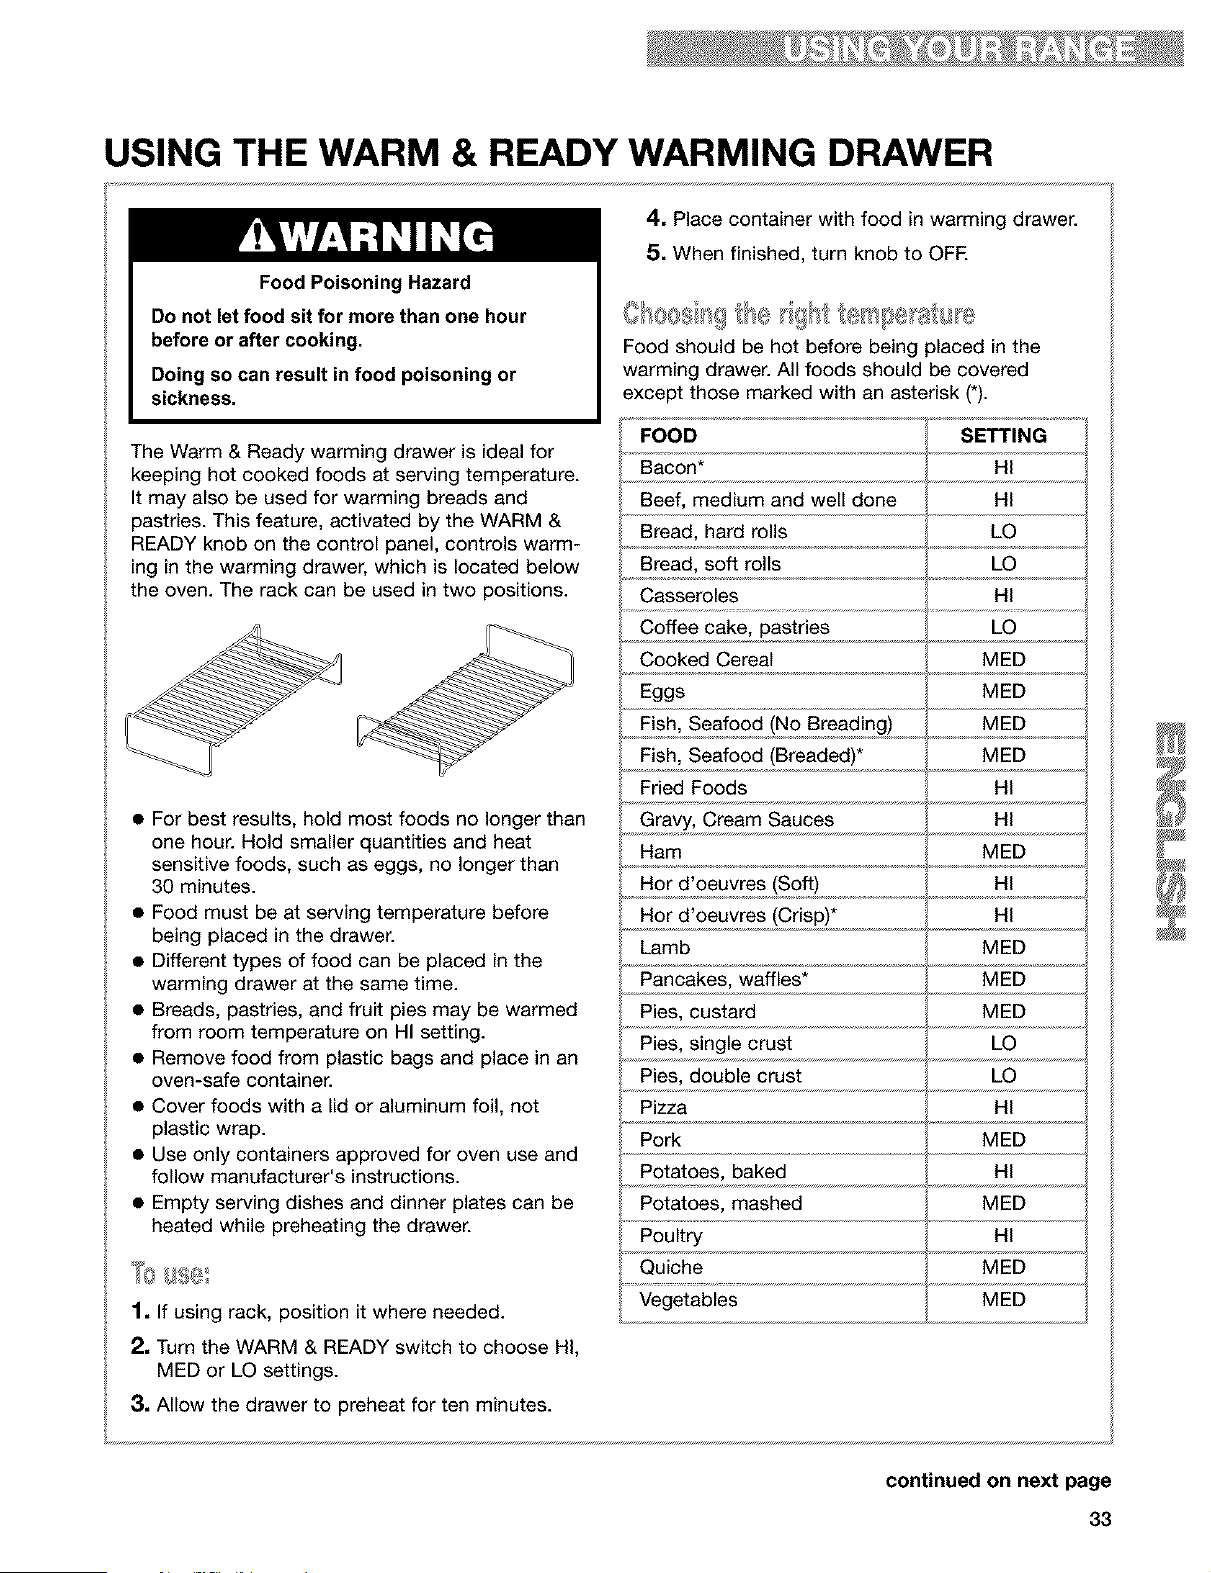
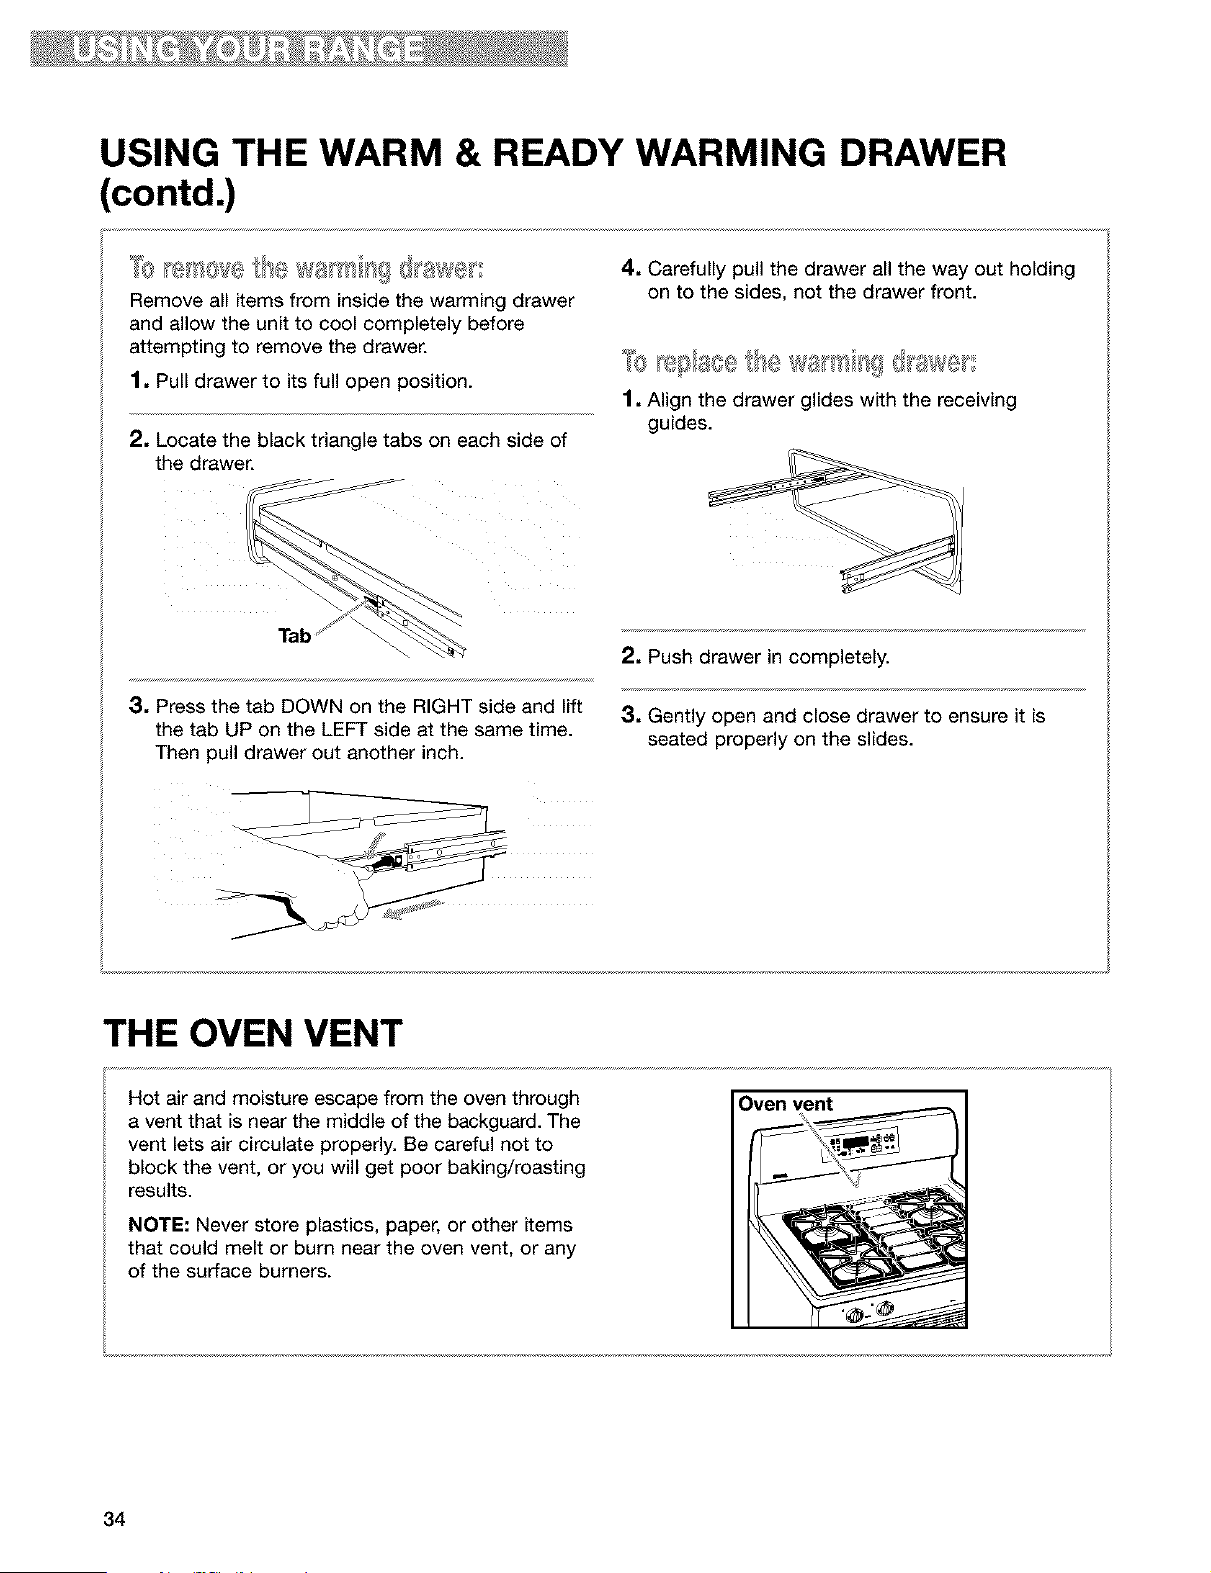
USING THE WARM & READY WARMING DRAWER
Food Poisoning Hazard
4, Place container with food in warming drawer.
5, When finished, turn knob to OFF.
Do not let food sit for more than one hour
before or after cooking.
Doing so can result in food poisoning or
sickness.
The Warm & Ready warming drawer is ideal for
keeping hot cooked foods at serving temperature.
It may also be used for warming breads and
pastries. This feature, activated by the WARM &
READY knob on the control panel, controls warm-
ing in the warming drawer, which is located below
the oven. The rack can be used in two positions.
• For best results, hold most foods no longer than
one hour. Hold smaller quantities and heat
sensitive foods, such as eggs, no longer than
30 minutes.
• Food must be at serving temperature before
being placed in the drawer.
• Different types of food can be placed in the
warming drawer at the same time.
• Breads, pastries, and fruit pies may be warmed
from room temperature on HI setting.
• Remove food from plastic bags and place in an
oven-safe container.
• Cover foods with a lid or aluminum foil, not
plastic wrap.
• Use only containers approved for oven use and
follow manufacturer's instructions.
• Empty serving dishes and dinner plates can be
heated while preheating the drawer.
1, If using rack, position it where needed.
2, Turn the WARM & READY switch to choose HI,
MED or LO settings.
3, Allow the drawer to preheat for ten minutes.
Food should be hot before being placed in the
warming drawer. All foods should be covered
except those marked with an asterisk (%
FOOD SETTING
Bacon* HI
Beef, medium and well done HI
Bread, hard rolls LO
Bread, soft rolls LO
Casseroles HI
Coffee cake, pastries LO
Cooked Cereal MED
Eggs MED
Fish, Seafood (No Breading) MED
Fish, Seafood (Breaded)* MED
Fried Foods HI
Gravy, Cream Sauces HI
Ham MED
Hor d'oeuvres (Soft) HI
Hor d'oeuvres (Crisp)* HI
Lamb MED
Pancakes, waffles* MED
Pies, custard MED
Pies, single crust LO
Pies, double crust LO
Pizza HI
Pork MED
Potatoes, baked HI
Potatoes, mashed MED
Poultry HI
Quiche MED
Vegetables MED
continued on next page
33
USING THE WARM & READY WARMING DRAWER
(contd,)
Remove all items from inside the warming drawer
and allow the unit to cool completely before
attempting to remove the drawer.
1, Pull drawer to its full open position.
2. Locate the black triangle tabs on each side of
the drawer.
4, Carefully pull the drawer all the way out holding
on to the sides, not the drawer front.
1. Align the drawer glides with the receiving
guides.
2. Push drawer in completely.
3. Press the tab DOWN on the RIGHT side and lift
the tab UP on the LEFT side at the same time.
Then pull drawer out another inch.
3, Gently open and close drawer to ensure it is
seated properly on the slides.
THE OVEN VENT
Hot air and moisture escape from the oven through
a vent that is near the middle of the backguard. The
vent lets air circulate properly. Be careful not to
block the vent, or you will get poor baking/roasting
results.
NOTE: Never store plastics, paper, or other items
that could melt or burn near the oven vent, or any
of the surface burners.
Oven vent
34
Usingthe SENS-A-CLEANTM
Self-CleaningCycle
Burn Hazard
Do not touch the oven during the Self-Cleaning cycle.
Keep children away from oven during Self-Cleaning cycle.
Do not use commercial oven cleaners in your oven.
Failure to follow these instructions can result in burns, or illness from inhaling
dangerous fumes.
BEFORE YOU START
NOTES:
• Heat and odors are normal during the Self-
Cleaning cycle. Keep the kitchen well ventilated
by opening a window or by turning on a vent
hood or other kitchen vent during the cycle.
• DO NOT clean, move, or bend the gasket. You
may get poor cleaning, baking, and roasting.
• The oven light will not work during the Self-
Cleaning cycle.
• The console night light will not work during the
Self-Cleaning cycle.
Before you start the Self-Cleaning cycle, make
sure you:
• Hand-clean the areas shown. They do not get
hot enough during the Self-Cleaning cycle for
soil to burn away. Use hot water and detergent
or a soapy, steel-wool pad for cleaning.
• Do not let water, cleaner, etc., enter slots on
door and frame.
• Remove the broiler pan and grid and any
cookware/bakeware being stored in the oven.
• Wipe out any loose soil or grease. This will help
reduce smoke during the Self-Cleaning cycle.
• Wipe up food spills containing sugar and/or milk
as soon as possible after the oven cools down.
When sugar is heated to a high temperature in
the Self-Cleaning cycle, the high temperature
can cause the sugar to burn and react with the
porcelain. This can cause staining and etching or
pitting.
• Remove the oven racks from the oven if you want
them to remain shiny. You can clean the oven
racks in the Self-Cleaning cycle, but they will
become harder to slide. (See the "Cleaning chart"
in the "Caring for Your Range" section, p. 40.) If
you clean the racks in the Self-Cleaning cycle,
place them on the 2nd and 4th rack guides. (The
guides are counted from bottom to top.)
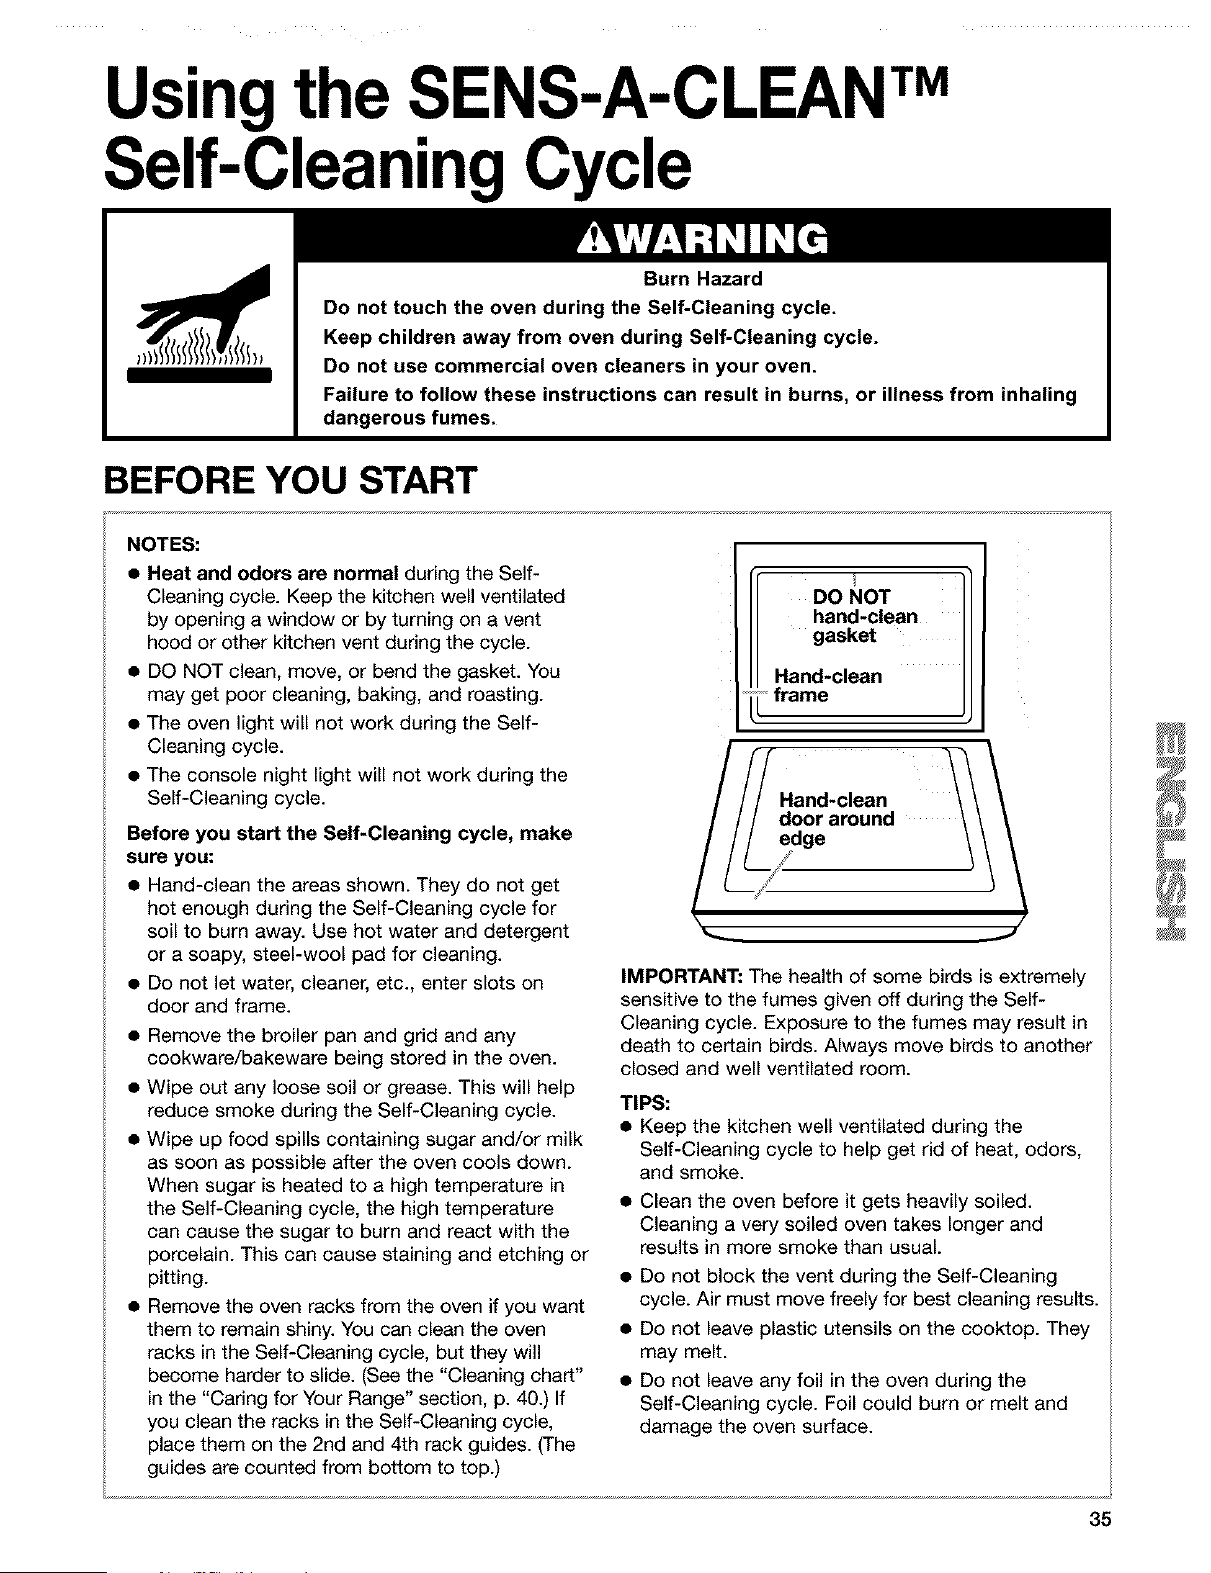
DO NOT
hand-clean
gasket
Hand-clean
• frame
IMPORTANT: The health of some birds is extremely
sensitive to the fumes given off during the Self-
Cleaning cycle. Exposure to the fumes may result in
death to certain birds. Always move birds to another
closed and well ventilated room.
TIPS:
• Keep the kitchen well ventilated during the
Self-Cleaning cycle to help get rid of heat, odors,
and smoke.
Clean the oven before it gets heavily soiled.
Cleaning a very soiled oven takes longer and
results in more smoke than usual.
Do not block the vent during the Self-Cleaning
cycle. Air must move freely for best cleaning results.
Do not leave plastic utensils on the cooktop. They
may melt.
Do not leave any foil in the oven during the
Self-Cleaning cycle. Foil could burn or melt and
damage the oven surface.
35
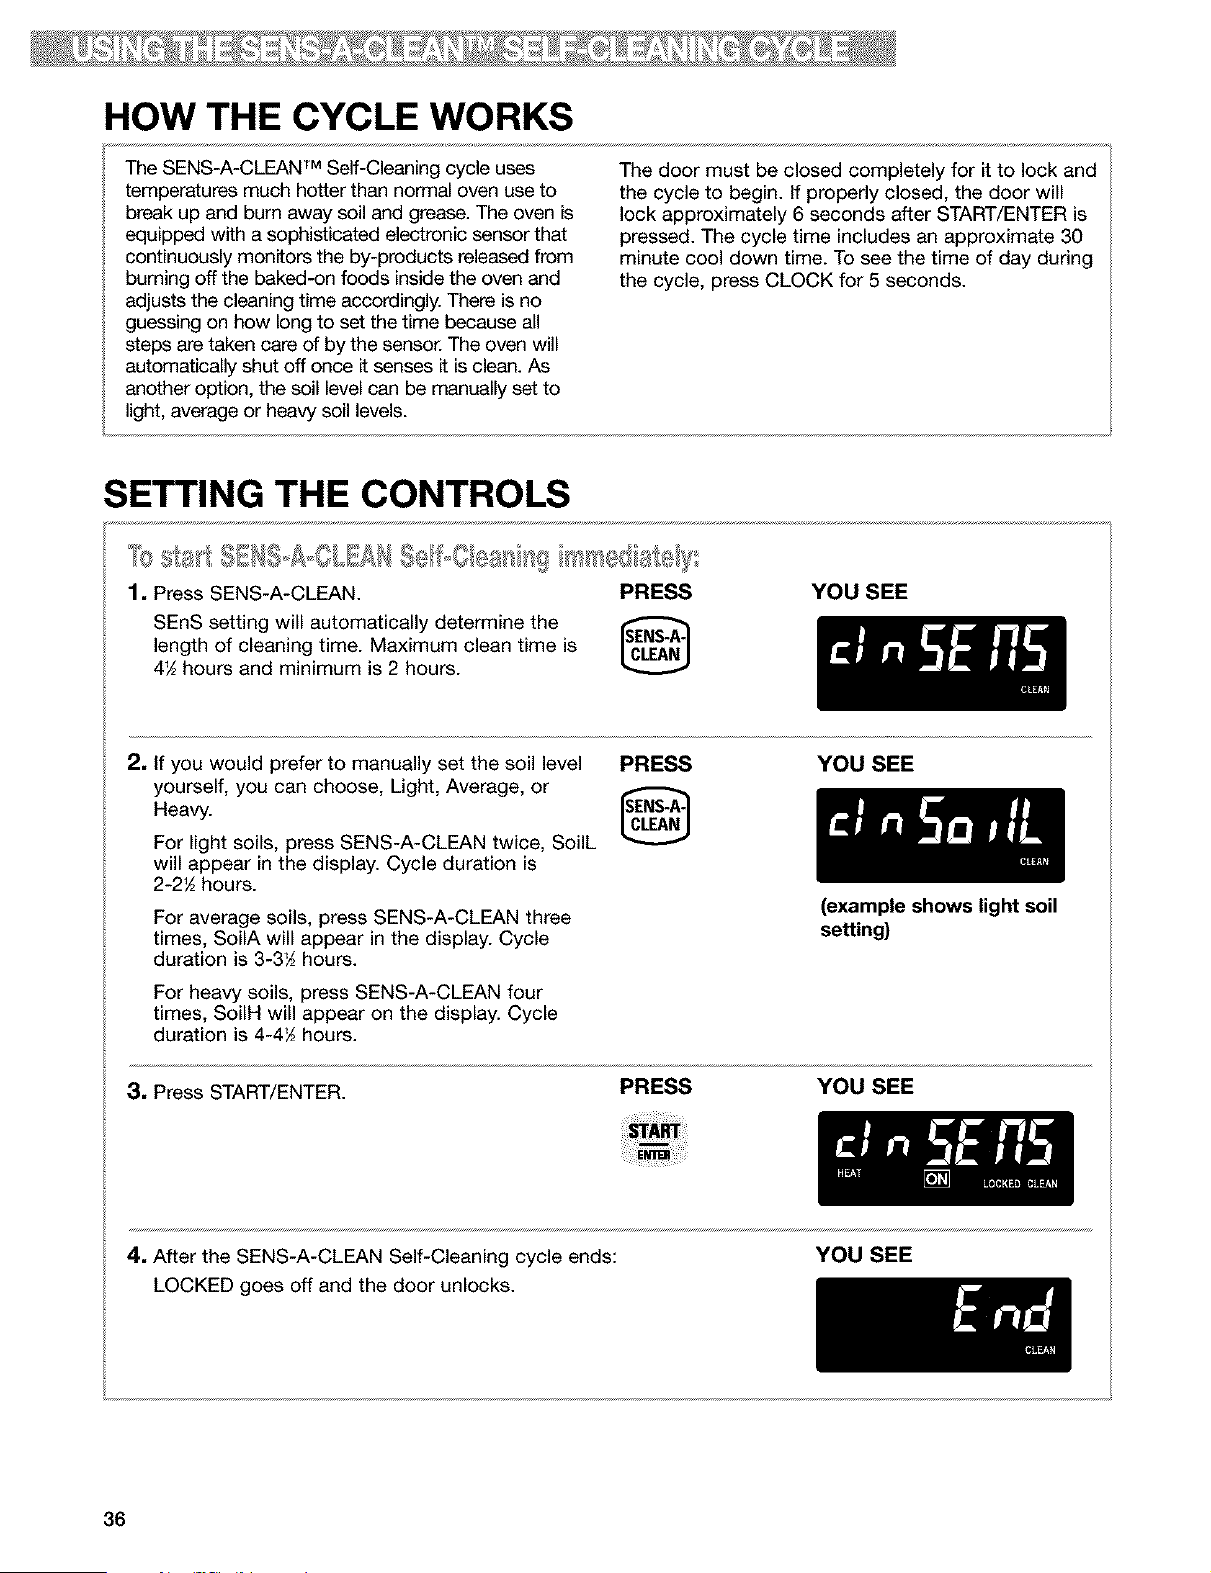
HOW THE CYCLE WORKS
The SENS-A-CLEAN TM Self-Cleaning cycle uses
temperatures much hotter than normal oven use to
break up and burn away soil and grease. The oven is
equipped with a sophisticated electronic sensor that
continuously monitors the by-products released from
burning off the baked-on foods inside the oven and
adjusts the cleaning time accordingly. There is no
guessing on how long to set the time because all
steps are taken care of by the sensor. The oven will
automatically shut off once it senses it is clean. As
another option, the soil level can be manually set to
light, average or heavy soil levels.
The door must be closed completely for it to lock and
the cycle to begin. If properly closed, the door will
lock approximately 6 seconds after START/ENTER is
pressed. The cycle time includes an approximate 30
minute cool down time. To see the time of day during
the cycle, press CLOCK for 5 seconds.
SETTING THE CONTROLS
1, Press SENS-A-CLEAN. PRESS
SEnS setting will automatically determine the
length of cleaning time. Maximum clean time is
4_ hours and minimum is 2 hours.
YOU SEE
2, If you would prefer to manually set the soil level PRESS
yourself, you can choose, Light, Average, or
Heavy.
For light soils, press SENS-A-CLEAN twice, SoilL
will appear in the display. Cycle duration is
2-2_ hours.
For average soils, press SENS-A-CLEAN three
times, SoilA will appear in the display. Cycle
duration is 3-3_ hours.
For heavy soils, press SENS-A-CLEAN four
times, SoiIH will appear on the display. Cycle
duration is 4-4_ hours.
YOU SEE
3, Press START/ENTER.
PRESS
(example shows light soil
setting)
YOU SEE
4, After the SENS-A-CLEAN Self-Cleaning cycle ends:
LOCKED goes off and the door unlocks.
YOU SEE
36
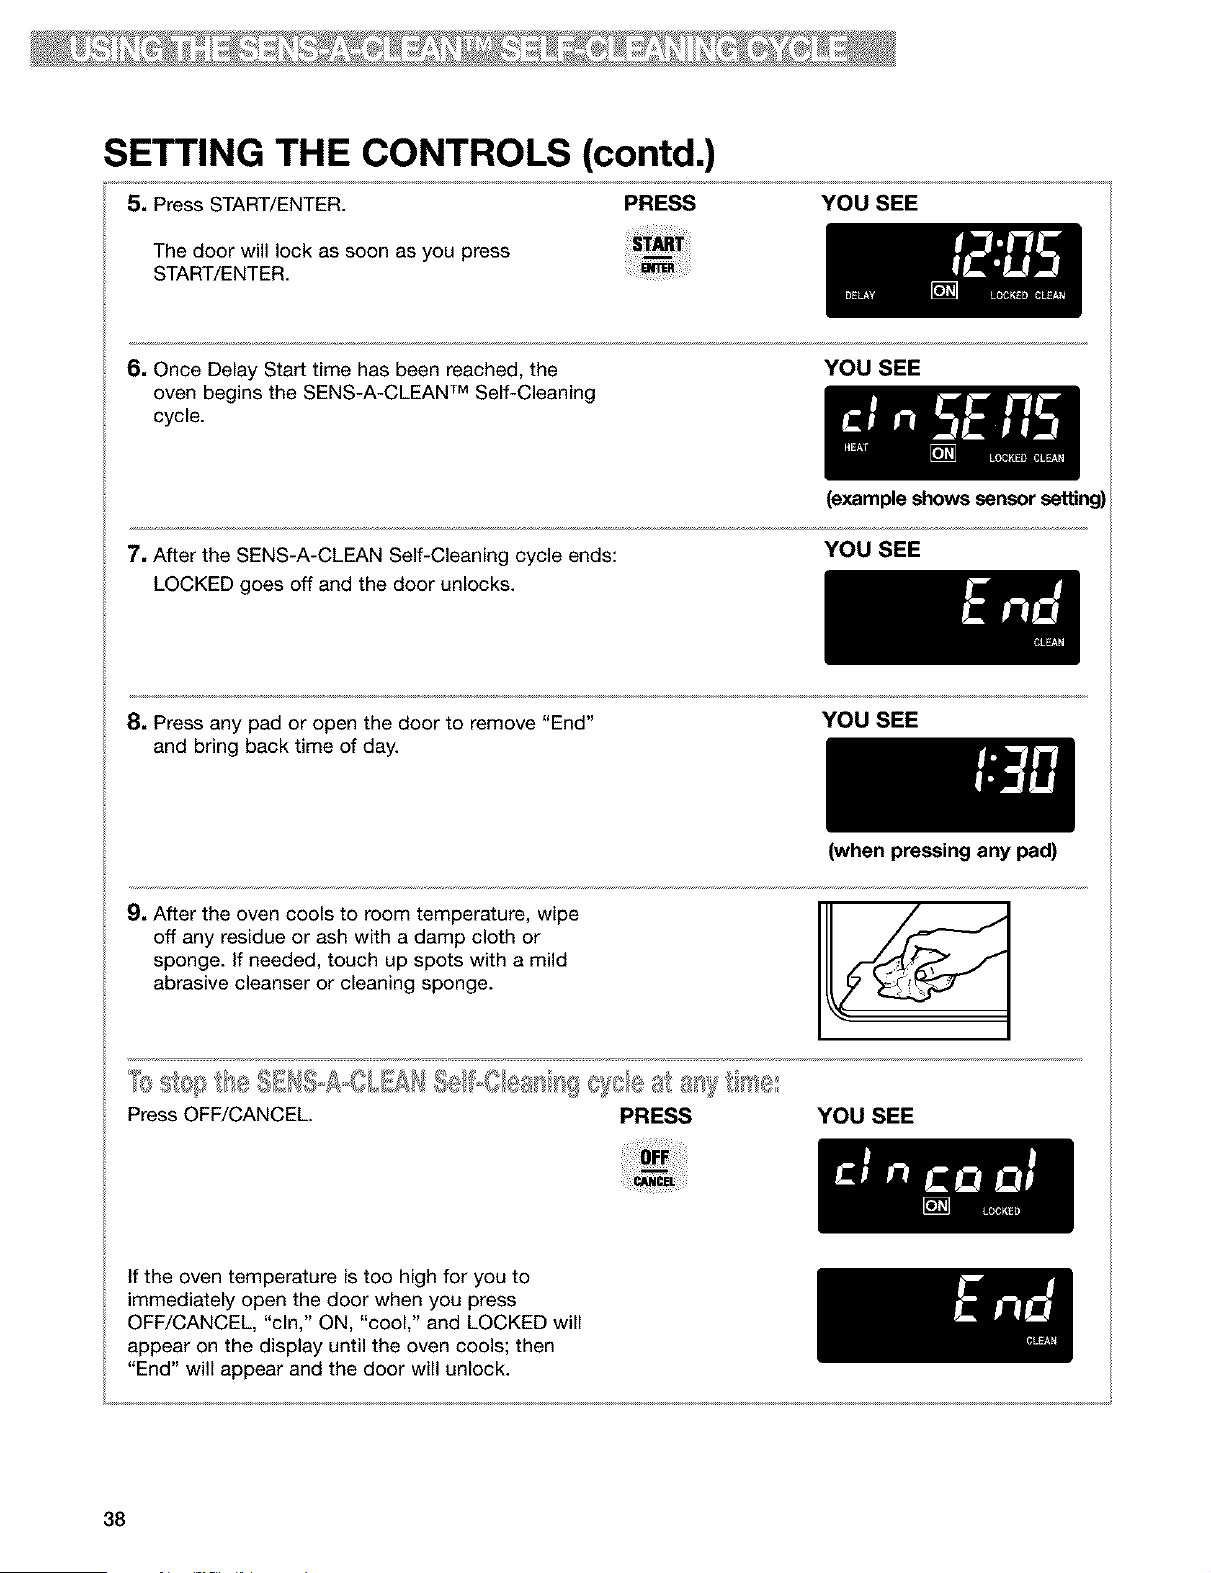
SETTING THE CONTROLS (contd.)
5, Press any pad or open the door to remove "End"
and bring back time of day.
YOU SEE
6, After the oven is cool, wipe off any residue or ash
with a damp cloth or sponge. If needed, touch up
spots with a mild abrasive cleanser or cleaning
sponge.
(when pressing any pad)
NOTE: Make sure the clock is set to the correct
time of day. (See "Setting the clock" in the "Using
Your Range" section, p. 13.)
1, Press SENS-A-CLEAN. PRESS
SEnS setting will automatically determine the
length of cleaning time. Maximum clean time is
4'/_ hours and minimum is 2 hours.
YOU SEE
2, If you would prefer to manually set the soil level PRESS
yourself, you can choose, Light, Average, or
Heavy.
For light soils, press SENS-A-CLEAN twice, SoilL
will appear in the display. Cycle duration is
2-2_ hours.
For average soils, press SENS-A-CLEAN three
times, SoilA will appear in the display. Cycle
duration is 3-3½ hours.
For heavy soils, press SENS-A-CLEAN four
times, SoilH will appear on the display. Cycle
duration is 4-4½ hours.
YOU SEE
3, Press DELAY START.
(example shows light soil
setting)
PRESS YOU SEE
4, Set the start time.
Press the HOUR/MIN (A) or (V) pad(s) until the
desired time of day to start the SENS-A-CLEAN
Self-Cleaning cycle shows on the display.
PRESS YOU SEE
HOUR MIN
(example for 12:30 start time)
continued on next page
37
SETTING THE CONTROLS (contd.)
5, Press START/ENTER. PRESS
YOU SEE
The door will lock as soon as you press
START/ENTER.
6, Once Delay Start time has been reached, the
oven begins the SENS-A-CLEAN TM Self-Cleaning
cycle.
YOU SEE
7. After the SENS-A-CLEAN Self-Cleaning cycle ends:
LOCKED goes off and the door unlocks.
(example shows sensor setting)
YOU SEE
8, Press any pad or open the door to remove "End"
and bring back time of day.
YOU SEE
9. After the oven cools to room temperature, wipe
off any residue or ash with a damp cloth or
sponge. If needed, touch up spots with a mild
abrasive cleanser or cleaning sponge.
(when pressing any pad)
Press OFF/CANCEL PRESS YOU SEE
If the oven temperature is too high for you to
immediately open the door when you press
OFF/CANCEL, "cln," ON, "cool," and LOCKED will
appear on the display until the oven cools; then
"End" will appear and the door will unlock.
38

Caring for Your Range
CLEANING CHART
Before cleaning, always make sure all controls are off and the range is cool. Refer to instructions on all
cleaning products before using them to clean your range.
PART CLEANING METHOD SPECIAL INSTRUCTIONS
Control knobs • Soap and water • DO NOT use steel wool or abrasive
• Dishwasher cleaners.
• Pull knobs straight away from
control panel.
• Wash, rinse and dry with soft cloth.
Control panel and console • Soap and water • Wash, rinse and dry with soft cloth.
night light lens
• Spray glass cleaner • Apply spray cleaner to paper towel;
do not spray directly on panel.
Exterior surfaces*
(excluding control panel and
oven door glass)
• Soap and water
• Mild liquid cleaner
• Spray glass cleaner
• Non-abrasive plastic scrubbing pad
Porcelain-coated cooktop
grates and surface
burner caps*
• Light to moderate so!l
• Heavy burned-on soils
• Sears Grate Cleaner
• Soap and water
• Non-abrasive plastic scrubbing pad
• Dishwasher (grates only)
• Non-abrasive plastic scrubbing pad
• Mild abrasive powdered cleanser
and water
• DO NOT use abrasive or harsh
cleaners like chlorine bleach,
ammonia or oven cleaners.
• Wash, rinse and dry with soft cloth.
• Gently clean around the model and
serial plate, too much scrubbing
could remove the numbers.
• NOTE: To avoid product damage,
do not remove the cooktop.
• Clean as soon as they become
dirty.
• Wash, rinse and dry well.
• Run dishwasher with only grates
loaded on the lower rack using the
most aggressive cycle.
• Repeat steps of cleaning process
(with items at left) as needed, until
soil is completely removed.
• Rinse thoroughly and dry.
• NOTE: Do not reassemble caps on
burners while wet. Do not wash caps
in dishwasher.
*When the cooktop is cool, remove all spills and clean. Food spills containing acids, such as vinegar and tomato,
may affect the finish. To avoid porcelain grate chipping, do not bang grates and caps against each other or other
hard surfaces such as cast iron cookware.
39
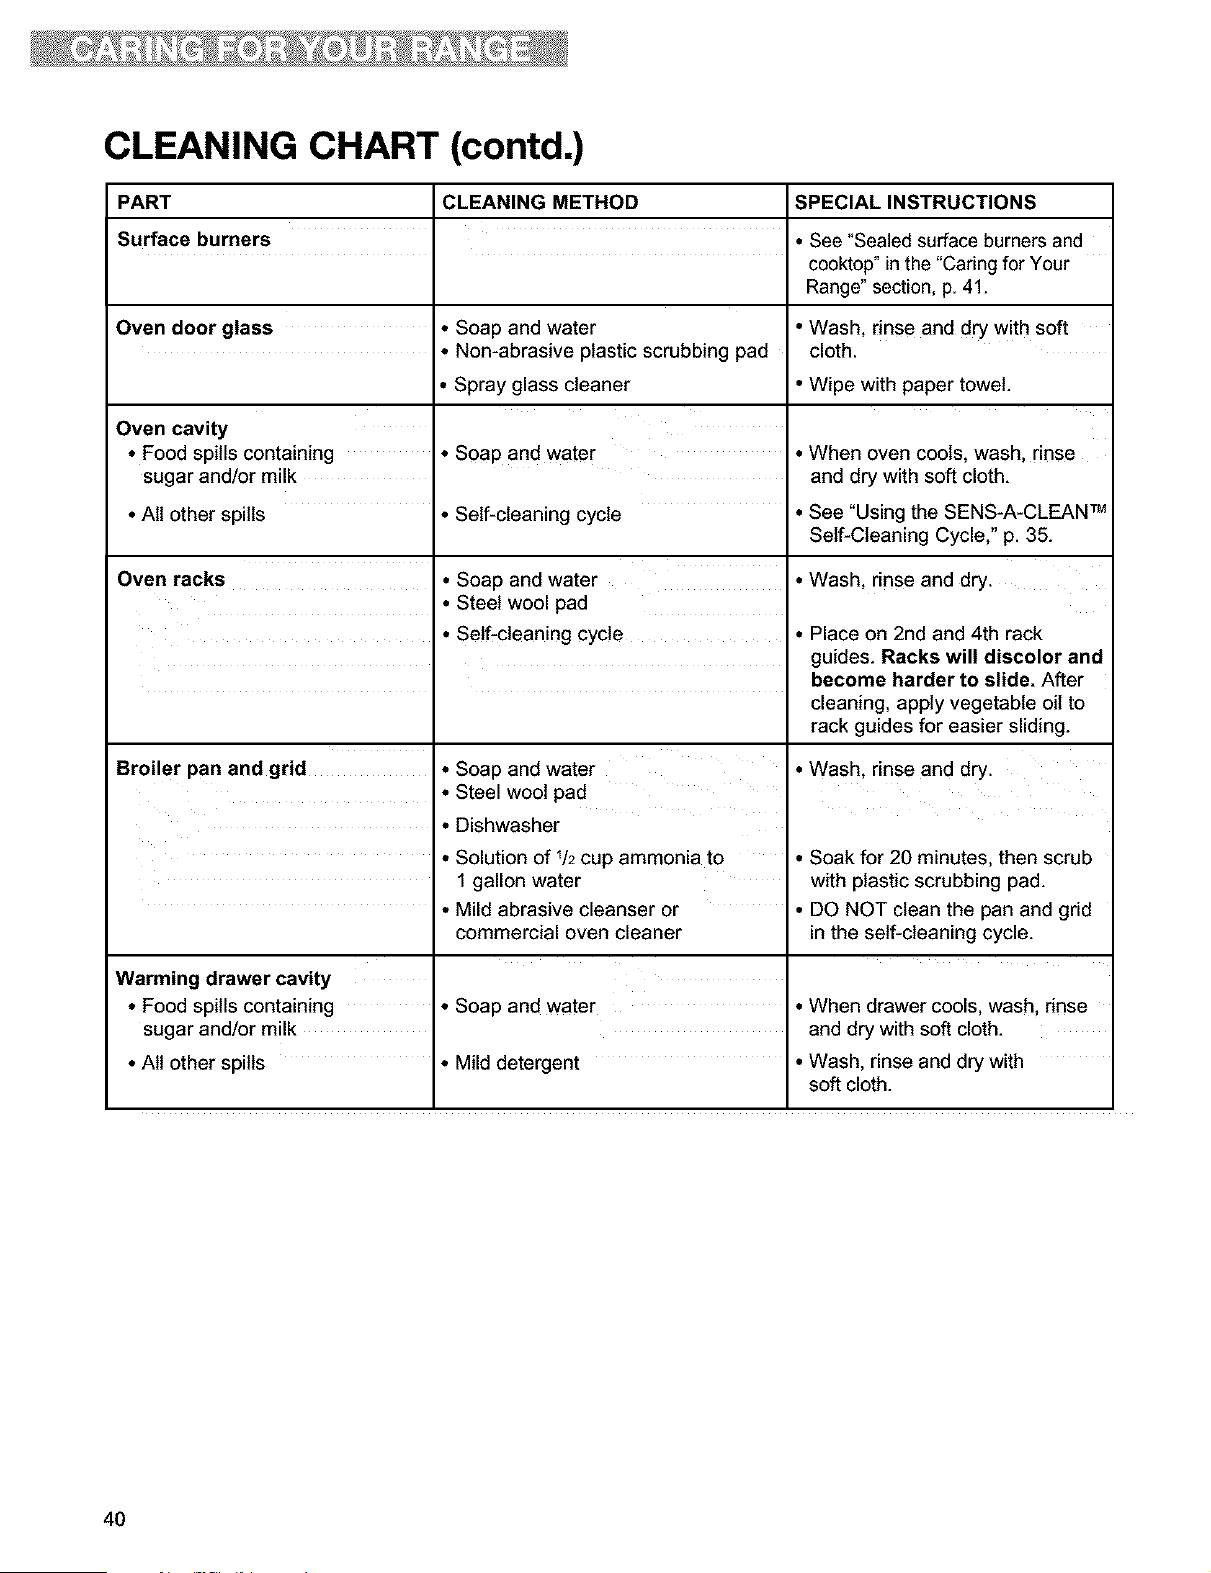
CLEANING CHART (contd.)
PART
Surface burners
Oven door glass
CLEANING METHOD
• Soap and water
• Non-abrasive plastic scrubbing pad
Oven cavity
• Food spills containing
sugar and/or milk
• All other spills
Oven racks
• Spray glass cleaner
• Soap and water
• Self-cleaning cycle
• Soap and water
• Steel wool pad
• Self-cleaning cycle
Broiler pan and grid • Soap and water
• Steel wool pad
• Dishwasher
SPECIAL INSTRUCTIONS
• See "Sealed surface burners and
cooktop" in the "Caring for Your
Range" section, p. 41.
• Wash, rinse and dry with soft
cloth.
• Wipe with paper towel.
• When oven cools, wash, rinse
and dry with soft cloth.
• See "Using the SENS-A-CLEAN TM
Self-Cleaning Cycle," p. 35.
• Wash, rinse and dry.
• Place on 2nd and 4th rack
guides. Racks will discolor and
become harder to slide. After
cleaning, apply vegetable oil to
rack guides for easier sliding.
• Wash, rinse and dry.
Warming drawer cavity
• Food spills containing
sugar and/or milk
• All other spills
• Solution of I/2 cup ammonia to
1 gallon water
• Mild abrasive cleanser or
commercial oven cleaner
• Soap and water
• Mild detergent
• Soak for 20 minutes, then scrub
with plastic scrubbing pad.
• DO NOT clean the pan and grid
in the self-cleaning cycle.
• When drawer cools, wash, rinse
and dry with soft cloth.
• Wash, rinse and dry with
soft cloth.
4O
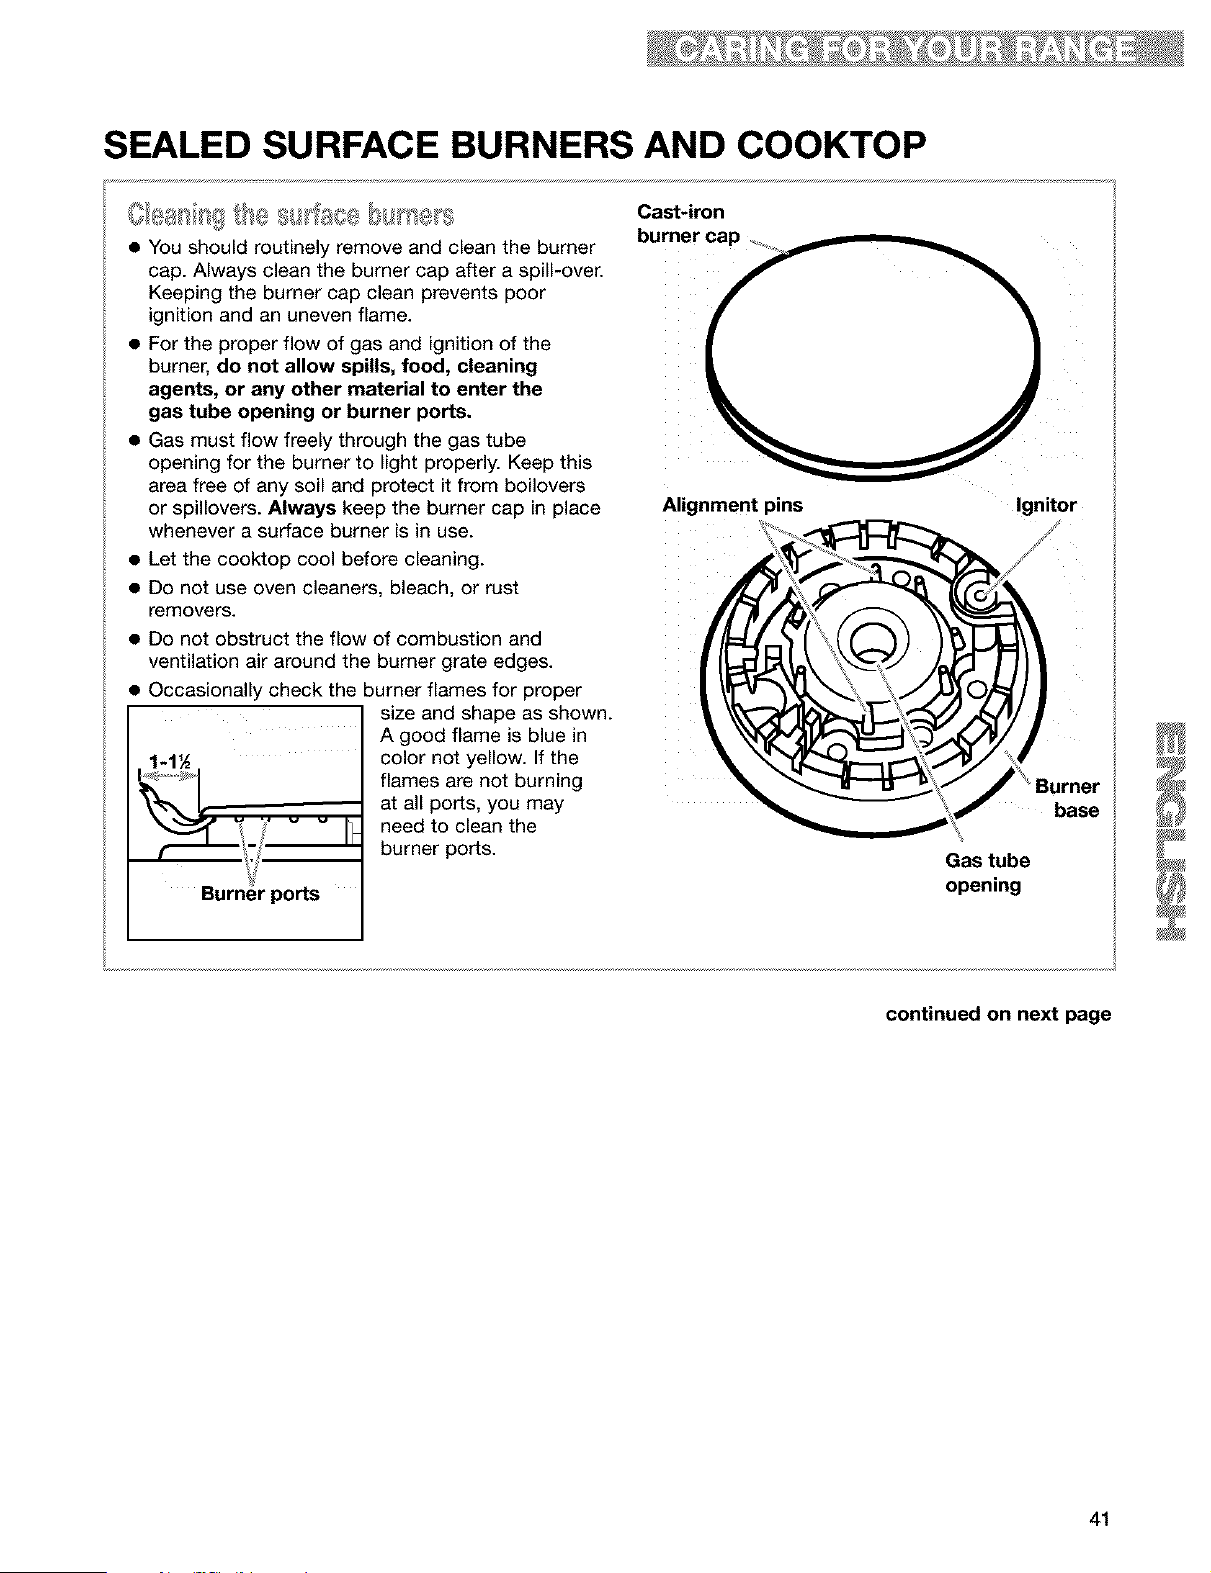
SEALED SURFACE BURNERS AND COOKTOP
• You should routinely remove and clean the burner
cap. Always clean the burner cap after a spill-over.
Keeping the burner cap clean prevents poor
ignition and an uneven flame.
• For the proper flow of gas and ignition of the
burner, do not allow spills, food, cleaning
agents, or any other material to enter the
gas tube opening or burner ports.
• Gas must flow freely through the gas tube
opening for the burner to light properly. Keep this
area free of any soil and protect it from boilovers
or spillovers. Always keep the burner cap in place
whenever a surface burner is in use.
• Let the cooktop cool before cleaning.
• Do not use oven cleaners, bleach, or rust
removers.
• Do not obstruct the flow of combustion and
ventilation air around the burner grate edges.
• Occasionally check the burner flames for proper
size and shape as shown.
A good flame is blue in
color not yellow. If the
flames are not burning
at all ports, you may
need to clean the
burner ports.
Cast-iron
Ignitor
Burner
base
Gas tube
opening
continued on next page
41
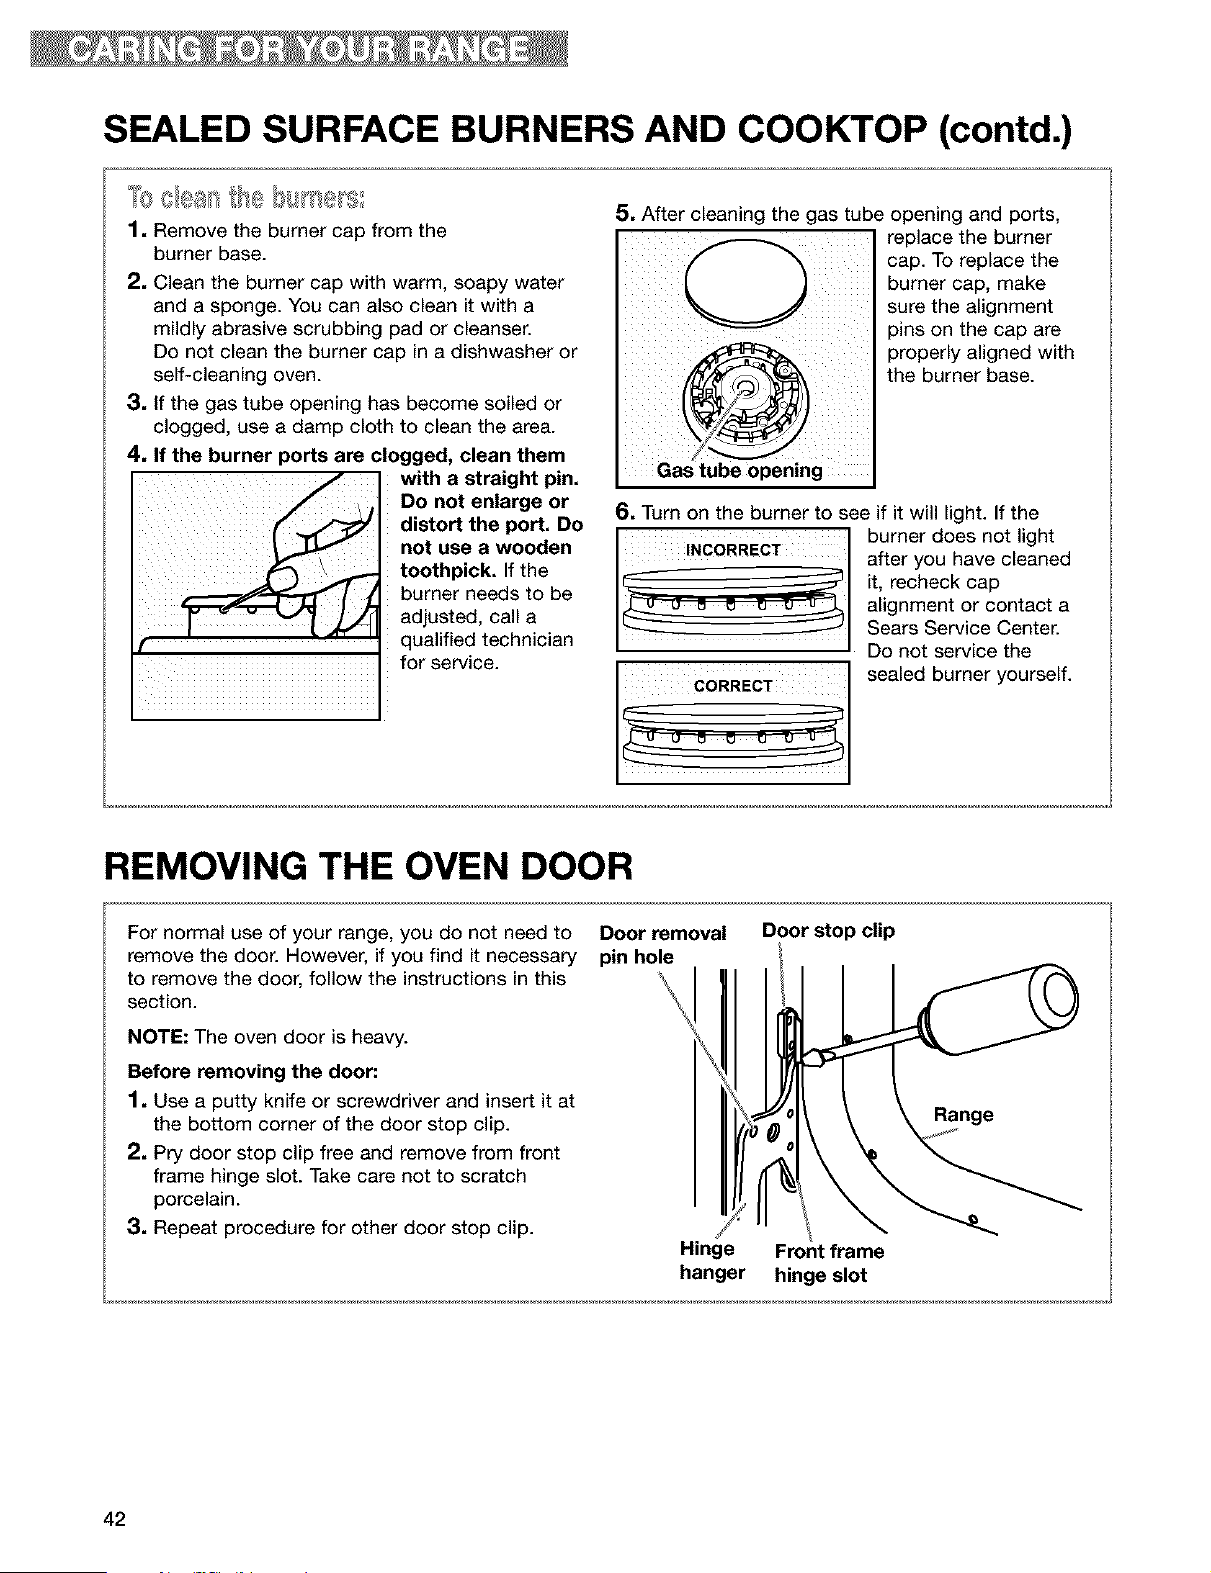
SEALED SURFACE BURNERS AND COOKTOP (contd.)
1. Remove the burner cap from the
burner base.
2. Clean the burner cap with warm, soapy water
and a sponge. You can also clean it with a
mildly abrasive scrubbing pad or cleanser.
Do not clean the burner cap in a dishwasher or
self-cleaning oven.
3. If the gas tube opening has become soiled or
clogged, use a damp cloth to clean the area.
4. If the burner ports are clogged, clean them
with a straight pin.
___,_ Do not enlarge or
_/ distort the port. Do
not use a wooden
toothpick. If the
burner needs to be
adjusted, call a
qualified technician
for service.
5. After cleaning the gas tube opening and ports,
replace the burner
cap. To replace the
burner cap, make
sure the alignment
pins on the cap are
properly aligned with
the burner base.
Gas tube opening
6. Turn on the burner to see if it will light. If the
burner does not light
after you have cleaned
it, recheck cap
alignment or contact a
Sears Service Center.
Do not service the
sealed burner yourself.
REMOVING THE OVEN DOOR
For normal use of your range, you do not need to
remove the door. However, if you find it necessary
to remove the door, follow the instructions in this
section.
NOTE: The oven door is heavy.
Before removing the door."
1. Use a putty knife or screwdriver and insert it at
the bottom corner of the door stop clip.
2. Pry door stop clip free and remove from front
frame hinge slot. Take care not to scratch
porcelain.
3. Repeat procedure for other door stop clip.
Door removal
pin hole
Hinge
hanger
Door stop clip
\
Front frame
hinge slot
42
iiiiiiiiiiiiii_j _i ii _ __iiiii_ .... _iiii__,i_ ii _i iiiii _i__i_ _, i ,iiiiiiiiiiiii
REMOVING THE OVEN DOOR (contd.)
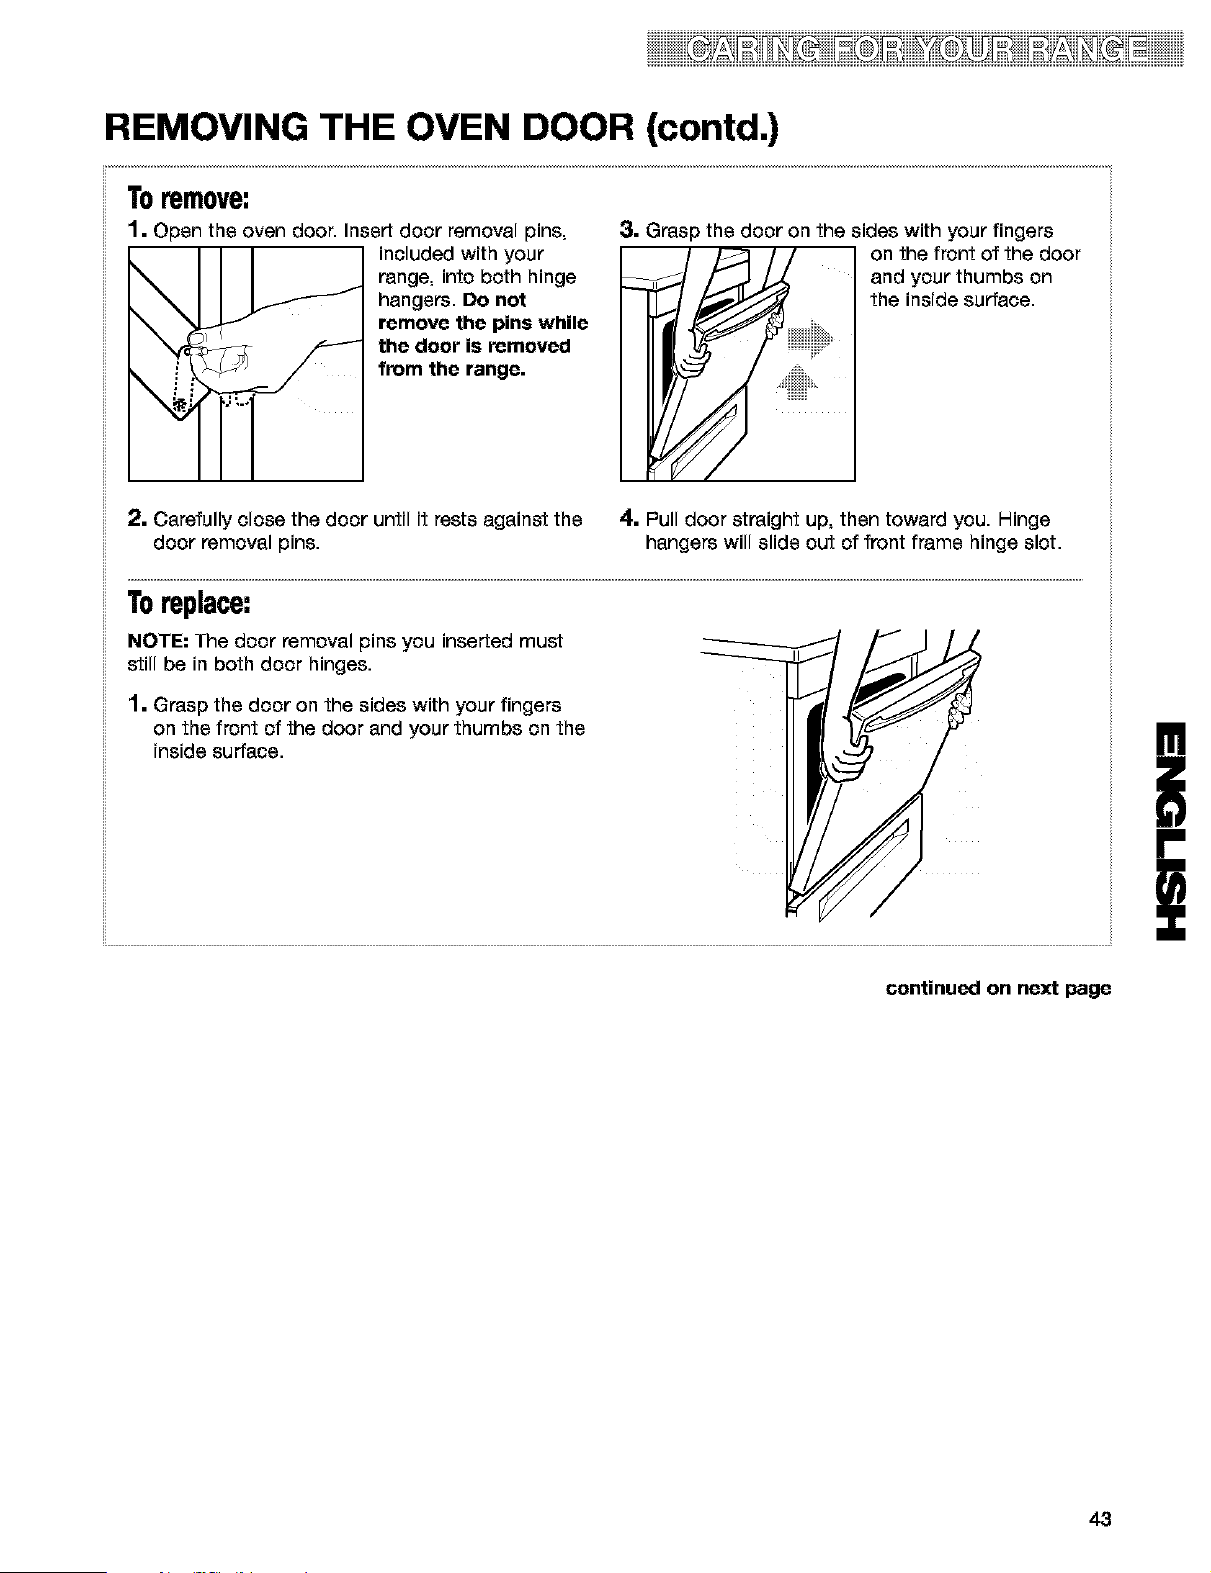
Toremove:
1. Open the oven door. Insert door removal pins,
included with your
range, into both hinge
hangers. Do not
remove the pins while
the door is removed
from the range.
3. Grasp the door on the sides with your fingers
on the front of the door
and your thumbs on
the inside surface.
2. Carefully close the door until it rests against the
door removal pins.
4. Pull door straight up, then toward you. Hinge
hangers will slide out of front frame hinge slot.
Toreplace:
NOTE: The door ramoval pine you inserted must
still be in both door hinges.
1. Grasp the door on the sides with your fingers
on the front of the door and your thumbs on the
inside surface.
continued on next page
43
iiiiiiiiiiiiiii ii i iii iii iii
REMOVING THE OVEN DOOR (contd.)
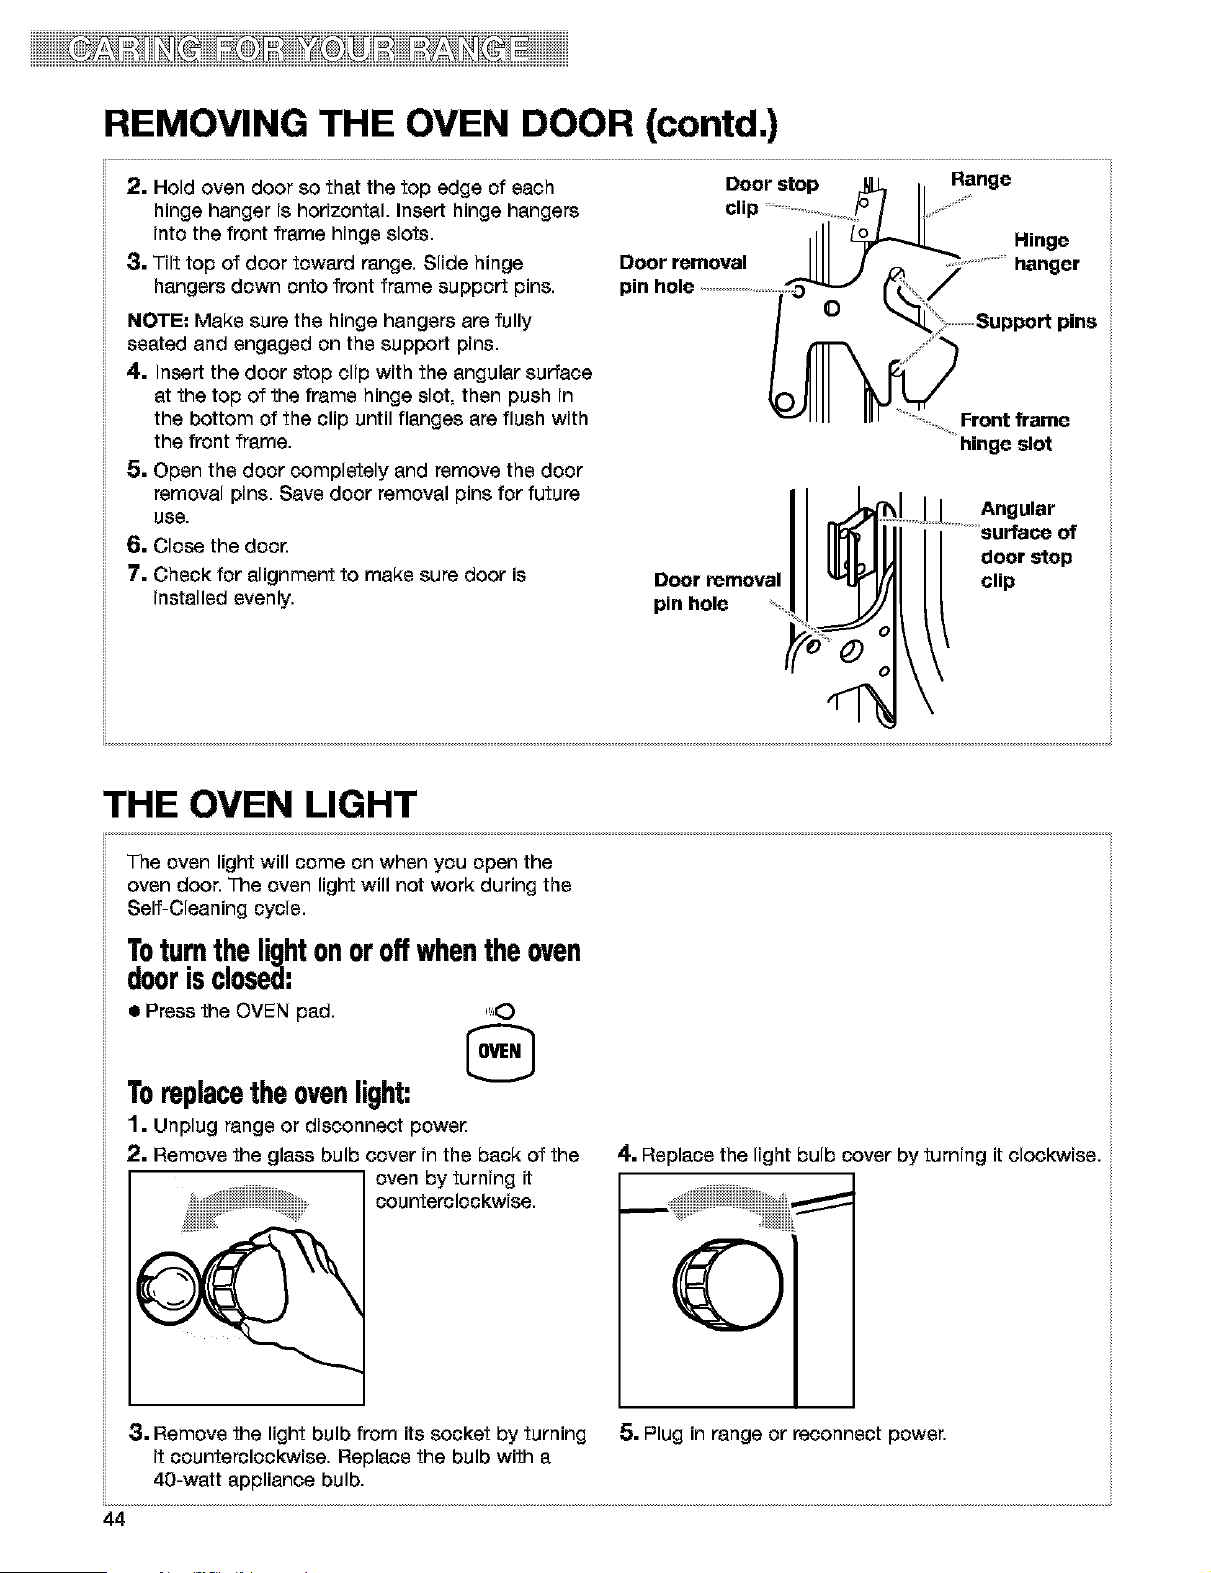
2. Hold oven door so that the top edge of each
hinge hanger is horizontal. Insert hinge hangers
into the front frame hinge slots.
3. Tilt top of door toward range. Slide hinge
hangers down onto front frame support pins.
NOTE: Make sure the hinge hangers are fully
seated and engaged on the support pins.
4. Insert the door stop clip with the angular surface
at the top of the frame hinge slot, then push in
the bottom of the clip until flanges are flush with
the front frame.
5. Open the door completely and remove the door
removal pins. Save door removal pins for future
use.
0. Close the dock
7. Check for alignment to make sure door is
installed evenly.
Door stop Range
clip
Hinge
Door removal / hanger
pin hole _;_,,,,_,,/
O _' Support pins
Front frame
hinge slot
Door removal
pin hole
Angular
surface of
door stop
clip
THE OVEN LIGHT
The oven light will come on when you open the
oven door. The oven light will not work during the
Self-Cleaning cycle.
Toturnthe lightonoroffwhentheoven
door,sclosed.
a Press the OVEN pad. ",0
Toreplacethe ovenlight:
1. Unplug range or disconnect powe_
2. Remove the glass bulb cover in the back of the
oven by turning it
counterclockwise.
4. Replace the light bulb cover by turning it clockwise.
_" iiiiiiiiiii
3. Remove the light bulb from its socket by turning 5. Plug in range or reconnect power.
it counterclockwise. Replace the bulb with a
40-watt appliance bulb.
44
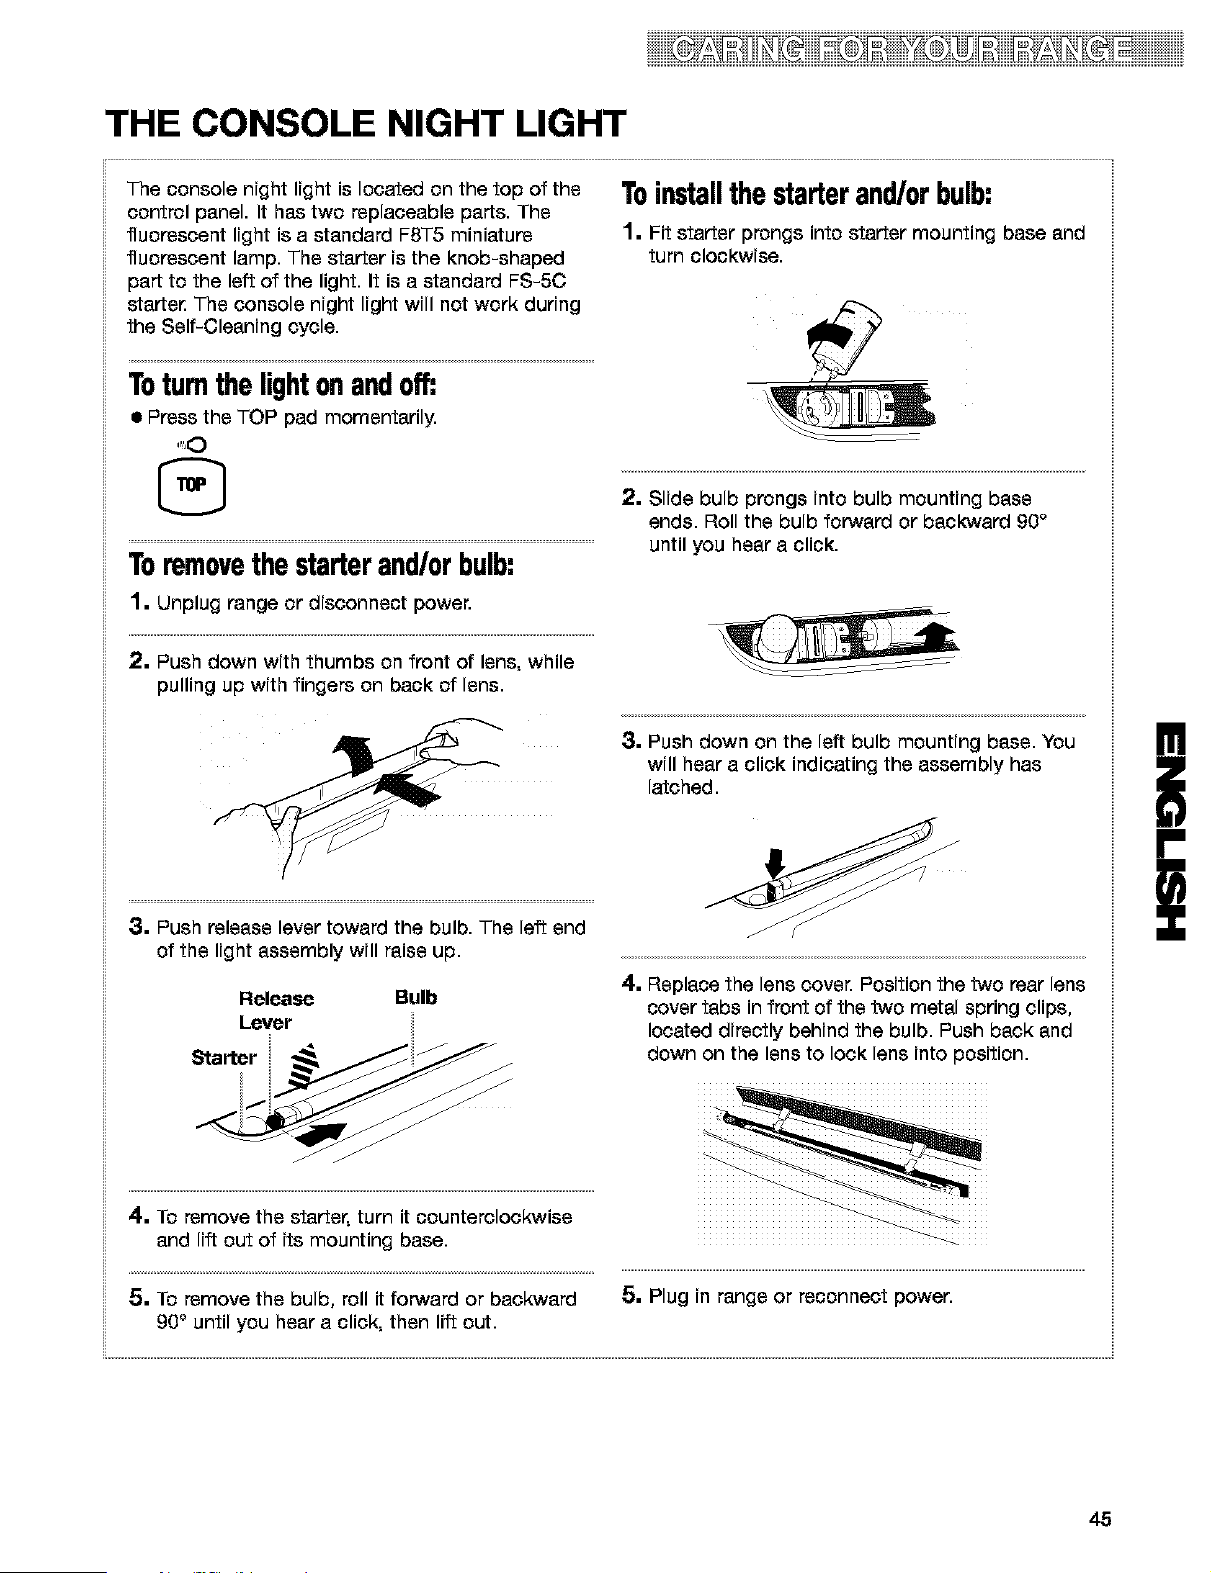
THE CONSOLE NIGHT LIGHT
The console night light is located on the top of the
control panel. It has two replaceable parts. The
fluorescent light is a standard FST5 miniature
fluorescent lamp. The starter is the knob-shaped
part to the left of the light. It is a standard FS-5C
starte_ The console night light will not work during
the Self-Cleaning cycle.
Toinstallthestarterand/orbulb:
1. Fit starter prongs into starter mounting base and
turn clockwise.
Toturnthe lightonandoff:
• Press the TOP pad momentarily.
d'J_)
Toremovethestarterand/orbulb:
1. Unplug range or disconnect power.
2. Push down with thumbs on front of lens, while
pulling up with fingers on back of lens.
2. Slide bulb prongs into bulb mounting base
ends. Roll the bulb forward or backward 90°
until you hear a click.
3. Push down on the left bulb mounting base. You
will hear a click indicating the assembly has
latched.
3. Push release lever toward the bulb. The left end
of the light assembly will raise up.
Release Bulb
Lever
4. Replace the lens cover. Position the two rear lens
cover tabs in front of the two metal spring clips,
located directly behind the bulb. Push back and
down on the lens to lock lens into position.
4. To remove the starter, turn it counterclockwise
and lift out of its mounting base.
!
i
45
Troubleshooting
Most cooking problems are caused by little things you can find and fix without tools of any
kind. Check the lists below and on the next page before calling for assistance or service.
RANGE DOES NOT WORK
PROBLEM CAUSE/SOLUTION
Nothing works • The range is not plugged into a properly wired and polarized outlet. Try
another outlet to check for proper wiring and polarity.
• The range is not plugged into a properly grounded 3 prong outlet (120v
polarized).
• The range is not properly connected to the gas supply. Contact a Sears
Service Center to reconnect the range to the gas supply. (See the Installation
Instructions.)
• A household fuse has blown or a circuit breaker has been tripped.
• The Oven and Cooktop Lockouts have been set.
OVEN/BROILER BURNER
PROBLEM CAUSE/SOLUTION
The oven does not work • The range is not plugged into a properly wired and polarized outlet. Try
another outlet to check for proper wiring and polarity.
• When using the oven for the first time, it is necessary to light the surface
burners first, to purge air from the gas lines.
• The electronic control is not set correctly. Refer to setting the electronic
oven control section. (See pp. 12-32.)
• A delay start has been set. Wait for the start time to be reached or cancel
and reset the control.
• The main or regulator gas shutoff valve is in the off position. (See the
Installation Instructions.)
• The Oven Lockout has been set.
Burner makes muffled • This is normal. This sound occurs when the oven burner cycles on and off
ticking noise when in use to hold the set oven temperature.
The burner fails to light • The ignition system is broken. Contact a Sears Service Center to replace it.
• A household fuse has blown or a circuit breaker has been tripped.
The burner flames lift • The air/gas mixture is incorrect. Contact a Sears Service Center to check the
away from the ports, are air/gas mixture or see the Installation Instructions.
yellow, or are noisy
Oven burner lights then • Press OFF/CANCEL, then wait 1 minute before trying again. The range is not
goes out after 1 minute plugged into a properly wired and polarized outlet. Try another outlet to
check for proper wiring and polarity.
46
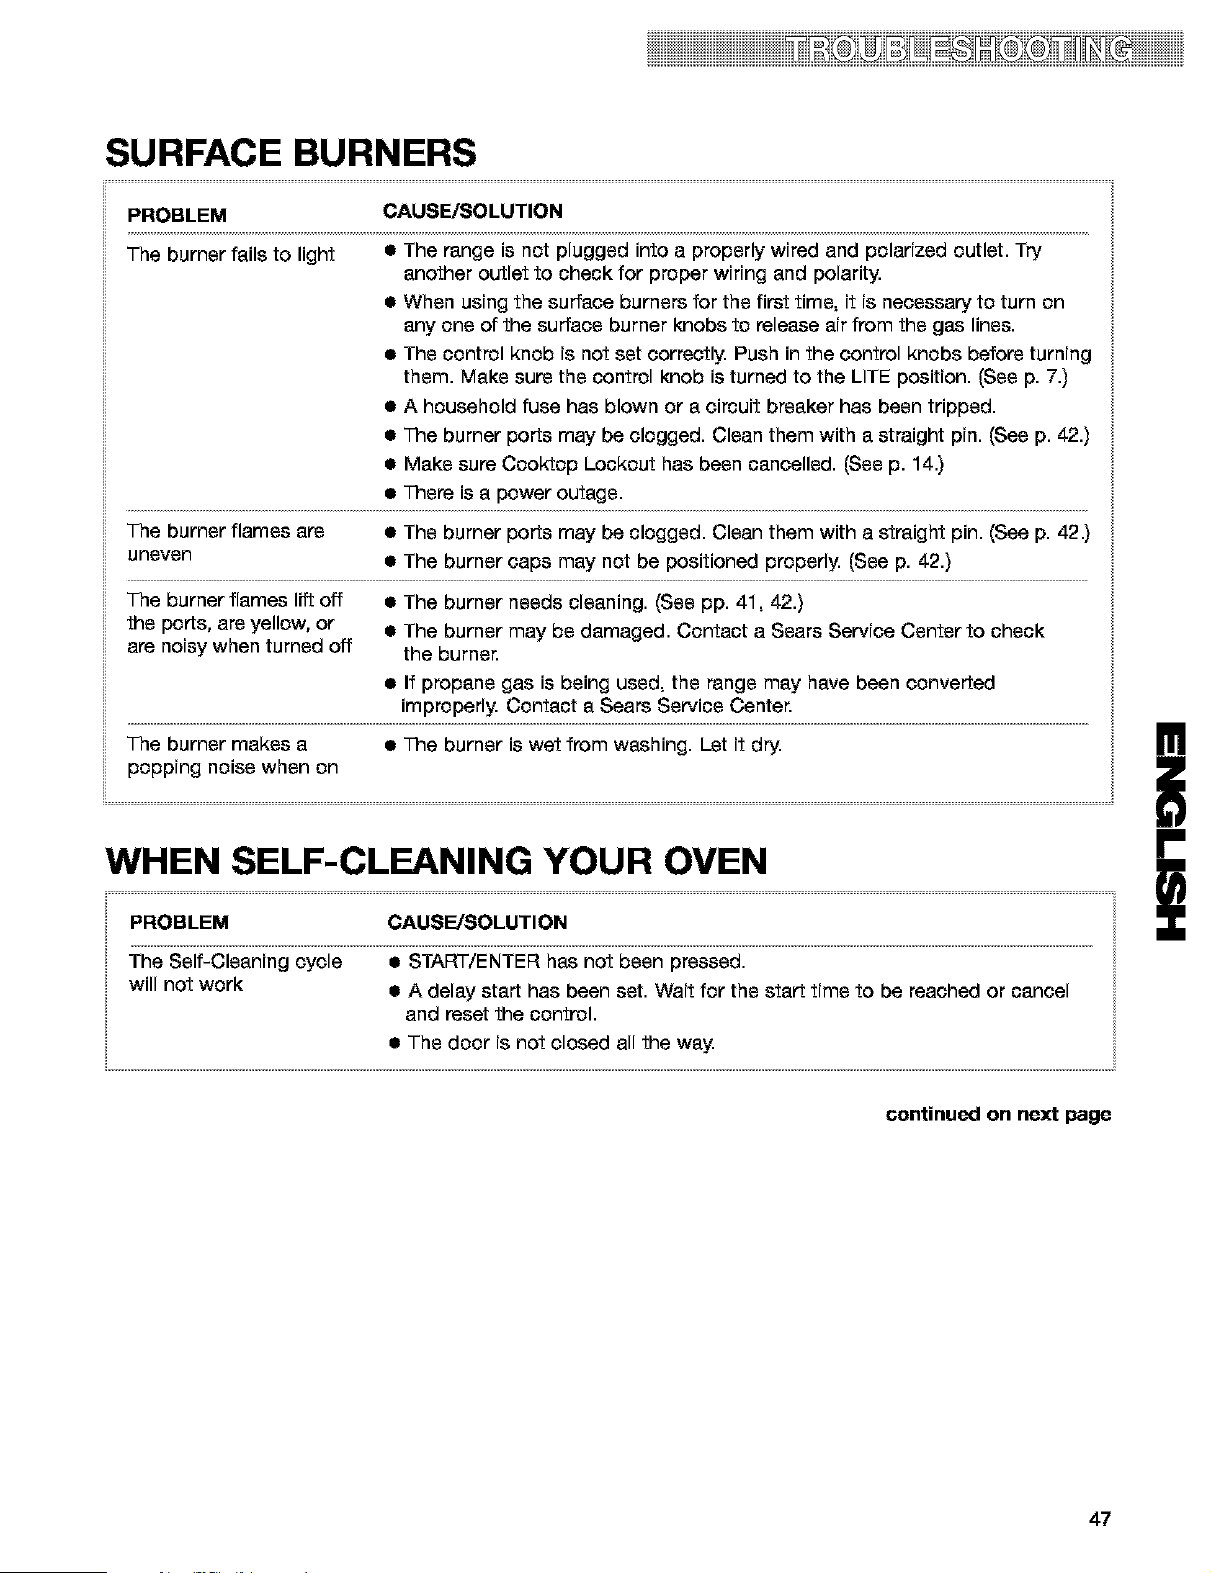
iiiiiiiiiiiiiiiiiiiiiiiiiiiiiiiiiiiiiiiiiiiiiiii D i i iiD iiiiiiiiiiiiiiiiii
SURFACE BURNERS
PROBLEM CAUSE/SOLUTION
The burner fails to light • The range is not plugged into a properly wired and polarized outlet. Try
another outlet to check for proper wiring and polarity.
• When using the surface burners for the first time, it is necessary to turn on
any one of the surface burner knobs to release air from the gas lines.
• The control knob is not set correctly. Push in the control knobs before turning
them. Make sure the control knob is turned to the LITE position. (See p. 7.)
• A household fuse has blown or a circuit breaker has been tripped.
• The burner ports may be clogged. Clean them with a straight pin. (See p. 42.)
• Make sure Cooktop Lockout has been cancelled. (See p. 14.)
• There is a power outage.
The burner flames are • The burner ports may be clogged. Clean them with a straight pin. (See p. 42.)
uneven • The burner caps may not be positioned properly. (See p. 42.)
The burner flames lift off • The burner needs cleaning. (See pp. 41, 42.)
the ports, are yellow, or • The burner may be damaged. Contact a Sears Service Center to check
are noisy when turned off the burner.
• If propane gas is being used, the range may have been converted
improperly. Contact a Sears Service Center.
The burner makes a • The burner is wet from washing. Let it dry.
popping noise when on
WHEN SELF-CLEANING YOUR OVEN
PROBLEM CAUSE/SOLUTION
The Self-Cleaning cycle • START/ENTER has not been pressed.
will not work • A delay start has been set. Wait for the start time to be reached or cancel
and reset the control.
• The door is not closed all the way.
!
i
continued on next page
47
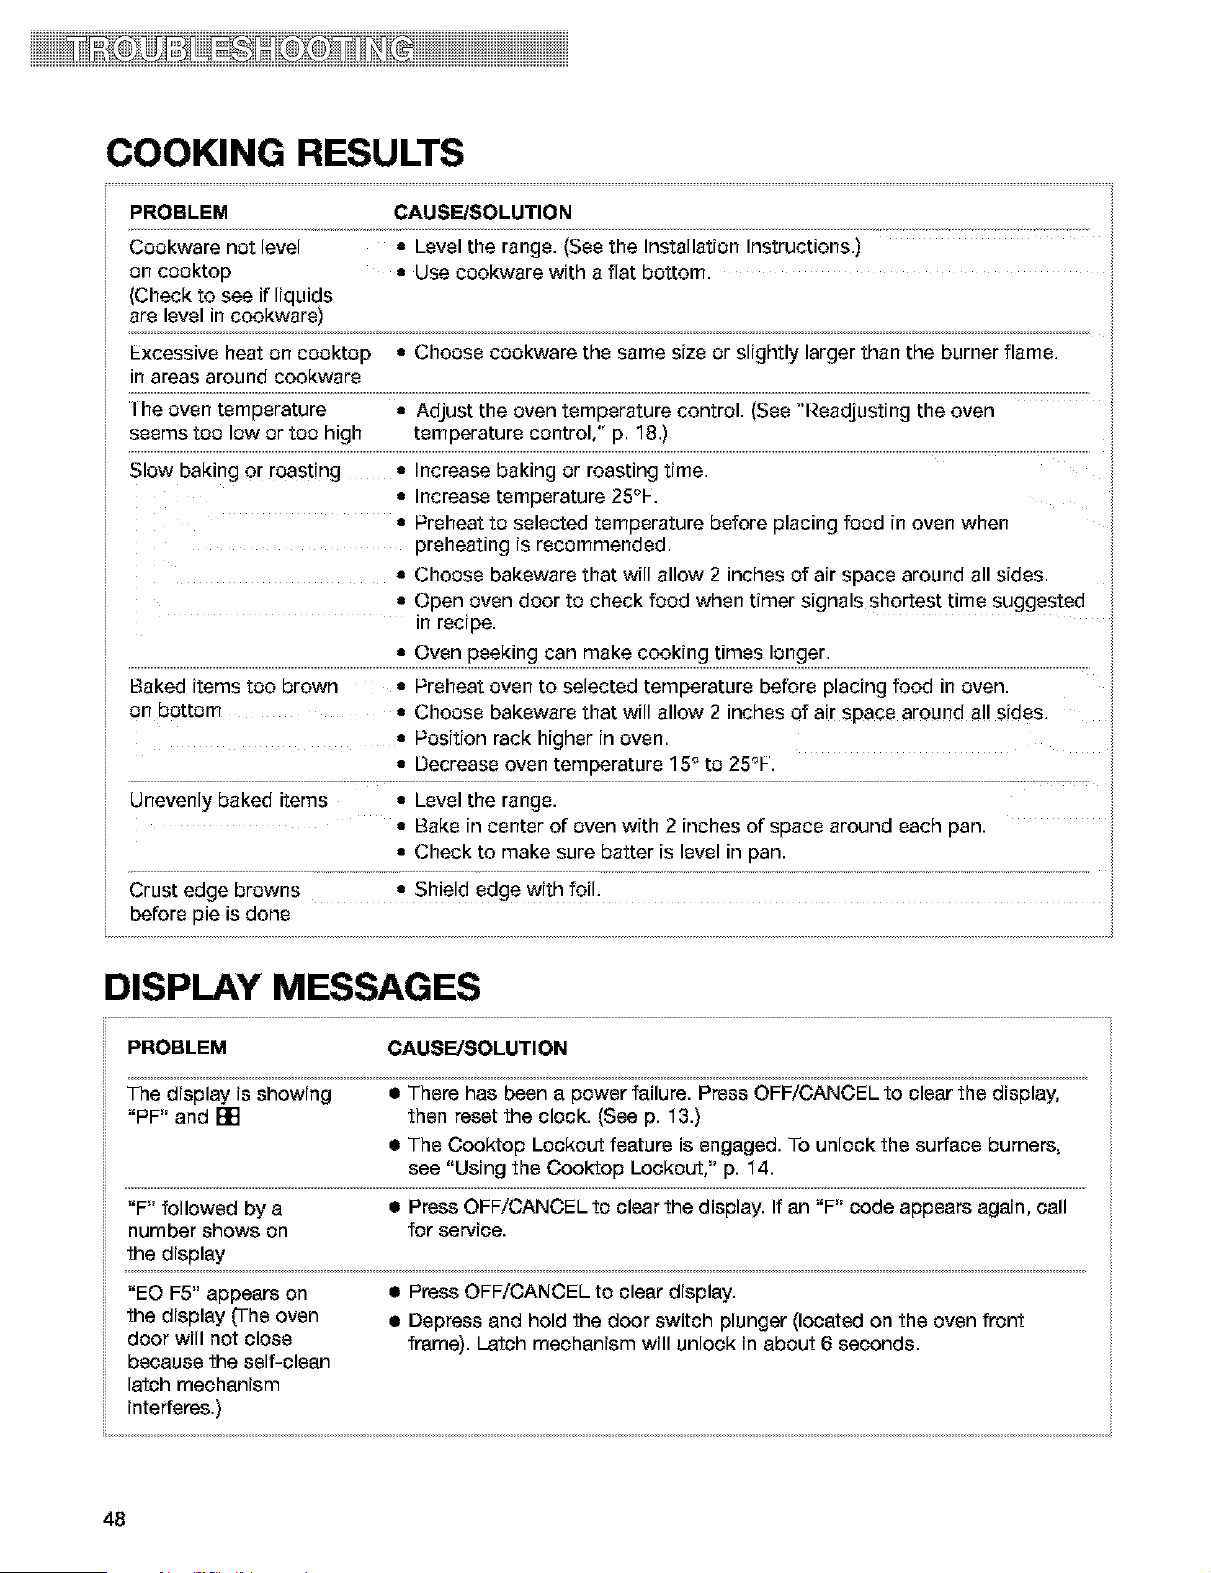
iiii DH
COOKING RESULTS
PROBLEM CAUSE/SOLUTION
Cookware not level • Level the range. (See the Installation Instructions.)
on cooktop • Use cookware with a flat bottom.
(Check to see if liquids
are level in cookware)
Excessive heat on cooktop • Choose cookware the same size or slightly larger than the burner flame.
in areas around cookware
I he oven temperature • Adjust the oven temperature control. (See "Readjusting the oven
seems too low or too high temperature control," p. 18.)
Slow baking or roasting • Increase baking or roasting time.
• Increase temperature 25°F.
• Preheat to selected temperature before placing food in oven when
preheating is recommended.
• Choose bakeware that will allow 2 inches of air space around all sides.
• Open oven door to check food when timer signals shortest time suggested
in recipe.
Baked items too brown • Preheat oven to selected temperature before placing food in oven.
on bottom • Choose bakeware that will allow 2 inches of air space around a!l sides.
• Position rack higher in oven.
• Decrease oven temperature 15 ° to 25°F.
Unevenly baked items • Level the range.
• Bake in center of oven with 2 inches of space around each pan.
• Check to make sure batter is level in pan.
Crust edge browns • Shield edge with foil.
before pie is done
DISPLAY MESSAGES
PROBLEM
CAUSE/SOLUTION
The display is showing • There has been a power failure. Press OFF/CANCEL to clear the display,
"PF" and [] then reset the clock. (See p. 13.)
• The Cooktop Lockout feature is engaged. To unlock the surface burners,
see "Using the Cook:top Lookout," p. 14.
"F" followed by a • Press OFF/CANCEL to clear the display. If an "F" code appears again, call
number shows on for service.
the display
"EO F5" appears on • Press OFF/CANCEL to clear display.
the display (The oven • Depress and hold the door switch plunger (located on the oven front
door will not close frame). Latch mechanism will unlock in about 6 seconds.
because the self-clean
latch mechanism
interferes.)
48

iiiiiiiiiiiiiiiiiiiiiiiiiiiiiiiiiiiiiiiiiiiiiiiiiiiiiiiiiiiiiiiiiiiiiiiiiiiiiiiiiiiiiiiiiiiiiiiiiiiiiiiiiiiiiiiiiiiiiiiiiiiiiiiii_iiiiiiiiiiiiiii
49

iiiiiiii_D_iiiiiiiiiiiii
5O

Index
TOPIC PAGE TOPIC PAGE
ANTI-TIP BRACKET ....................................... 4
BROILING
Grid. .................................................... .20
Guidelines ........................................ .20, 21
Pan ................................................. .19, 20
Setting cycle. .......................................... .19
Oven rack positions ................................... 21
CLEANING
Broiler pan and grid .................................. .40
Control knobs ......................................... 39
Control panel and console night light lens ........... 39
Exterior surfaces ..................................... 39
Oven cavity ........................................... .40
Oven door glass ..................................................... .40
Oven rack& ................................... 40
SENS-A-CLEAN TM Self-Cleaning ..................... .35-38
Surface burners .................................. .41, 42
Cooktop grates and surface burner caps ........... 39
Warming drawer cavity .............................. 40
CONSOLE NIGHT UGHT .............................. .45
CONTROL PANEL
Burner heat settings .................................... 7
Control knob& ....................................... .6, 7
Surface burner markers ................................ 6
COOl,A!ARE
Canning .................................................................... 8
Materials ................................................. 9
ELECTRONIC OVEN CONTROL
12-hour shut-off ...................................... .14
Canceling .............................................. .16
Celsius/Fahrenheit .................................... .18
Clock ..................................................................... .13
Cooktop Lockout ................................................... .14
Display/clock ......................................... .12
Kitchen timer ......................................... .15
Oven Lockout ......................................... .13
Starting .................................................................. .16
Tones ..................................................................... .14
FEATURES ................................................. 6
MODEL AND SERIAL NUMBER ................................. 2
OVEN DOOR ....................................................... 42-44
OVEN LIGHT ............................................ .44
OVEN TEMPERATURE
Readjusting .......................................................... .18
Setting ............................................ .16, 20
OVEN VENT .............................................................. ..34
PANS ..................................................................... 9-11
PARTS ..................................................... .6
RECIPE RECALL [_ ................................. 22, 23
ROASTING
Pans ............................................... 10, 11
Setting cycl& .......................................... .18
Oven rack positions .............................................. ..10
Tips. ....................................................................... ..17
SAFETY ................................................. 4, 5
SENS-A-CLEAN SELF-CLEANING CYCLE
Before you start ....................................... .35
Delay start ............................................ .37
How the cycle works ................................. .36
Setting the controls .................................. .36
Starting immediately ................................. .36
Stopping the cycle .................................... 38
SERVE WARM ..................................................... .24-28
SERVICE ....................................... .Back Cover
STURDIGUDE]r,_HALF-RACKW[]H RBV1OVABLEINSERT.10
STURDIGUDErMRACKS WITH INTEGRATFOHANDLE ....10
SURFACE BURNERS
Control knobs ................................... 6, 7, 39
Control setting guide .................................. .7
Power Burner ........................................... .7
Professional Burner Grate System .................... .8
SURESIMMER ]r'_setting .............................. .7
Surface burner markers ........................................... .6
Tips. .......................................................................... .7
TIMED OVEN CONTROL ..................................... .28-32
TROUBLESHOOTING ......................................... .46-48
ULTRABAKE ]r'_BAKING
Aluminum foil ........................................................ .11
Bakewara .............................................. .11
Pans ............................................... 10, 11
Preheat conditioning ............................................ ..17
Setting cycl& .......................................... .16
Oven rack positions .............................................. ..10
Tips. ....................................................................... ..17
ULTRABAKE system ............................. 16, 17
WARM & READY WARMING DRAWER.. .......... 33, 34
WARRANTY ............................................... .3
51
Contenido
Un mensaje loam usted .................................................52
Garanb'a ............................................................................53
Seguddad de la cocina ..................................................54
Componentes y Caracteristicas ..................................56
C.bmo usar su cocina .....................................................57
C,Smousar los quemadores extefiores ........................57
Sistema profesional de pardlla de quemadores ..........58
C.ere_etfsticas de los matedales
de los utenellios de cocina .............................................59
OSmo user el homo ........................................................
Selecci6n de utensilios para homear ............................51
OSmo user el papel de aluminio ....................................51
El control electr6nico del homo .....................................
C6mo ponar el reloj a la hora...................................._3
C6mo usar el bloqueo del homo .............................._3
C6mo usar el bloqueo de lasupenlde de oscci6n...64
SeSales audibles ........................................................64
C6mo usar el interrsptor de 12 horas ......................65
C6mo usar el temporizador eleclr6nico
de la cocina .................................................................65
C6mo comenzar/osncelar una funci6n ...................67
C6mo homear/asar con ULTRABAKE "_.................67
_o regular el corr#ol de ternperatura del homo..69
C6mo asar a la pardlla...............................................70
C6mo usar RECIPE RECALL rM...............................73
C6mo usar Serve Warm ............................................75
C6mo usar el controldel homo
con tiempo progrsmado ............................................79
_o usar lagaveta calar_adoraWarm & Ready...........84
El conducto de ventilaci6n del homo ...........................85
C.bmo usar el ciclo de auto Iimpieza
SENS-A-CLEAN TM ...........................................................86
Antes de comenzar .........................................................86
O6mo funciona el oiolo ...................................................67
O6mo progrsmar los controles ......................................67
El cuidado de su cocina ................................................91
Cuadro de Iimpieza.........................................................91
Quemadorss extefiores y la supenloie
de cocoi6n sellados ........................................................93
OSmo quitar la puerta del homo ...................................94
La luz del homo ...............................................................96
La luz noctuma de la consola ........................................97
DiagnSstico y soluci6n de problemas .........................98
La ccoina no funciona ....................................................98
El quernador para homear/asar .....................................98
Los quemadores extefiores ...........................................99
Cuando se usa el oiclo de auto limpieza del homo....gg
Resul'_dos de cocoi6n .................................................100
Mensajes en la pantalla luminosa ...............................101
indice ..............................................................................103
Servicio..........................................................Forro trasero
Un mensajepara
Leagradecem0ssucomprade unartefacto
elec{red0m6sticoKENMORE,
Su cocina de gas KENMORE adquiere un nuevo valor
cuando usted descubre que Sears tiene centros de
servicio por todo el pais. Los competer_tes
profesionales de servicfo t6cnico de Sears usar_
camiones totalmer_te equipados y m_todos aprobados
pot Sears para respaldar las garant{as de Sears
mediante reparacior_es expertas.
Sirvpsieregistrarlainformaci6ndesu
m00el0,
Siempre que Ilame para solicitar servicio t_cnico para
su artefacto, ter_ga a la mano el r_0mero de modelo y
de serie completos Usted puede er_contrar esta
ir_formaci6r_ er_la placa de n0mero de modelo y serie
(yea el diagrama "Componer_tes y Caracter/sticas," er_
lap. 56),
S/rvase asimismo registrar la feoPla de compra de su
artefacto electrodom_stios y el r_ombre y r_0mero tele-
f6r_ico de la tier_da dor_de Io compr6
Modelo Nt_mero 665.
Nt_mero de Sede R
Fecha de Compra
Guarde este manual y el comprobante de compra
juntos en un lugar seguro para referencia futura.
52
®
Garantiade la cocina autbnoma
GARANTiATOTALDE UNAI_OPARATODOSLOSCOMPONENTES
Si, durante el transcurso de ur_aSe desde la fecha de ir_stalaci6n, cualquier cemper_ente r_ofunciona
adecuadamer_te debido a ur_ defecto er_ el material e ]a mar_e de obra, Sears la reparar_ e reemplazar_,
a su opciOn, si_ costo alguno.
Si este producto se somete a otto use que r_osea el dom_stico familiar privado, ]a garar_t[a arriba citada
es v_lida per s61o 90 d{as.
EL SERVlCIO DE GARAN'['iA EST,_ DISPONIBLE AL PONERSE EN CON'FACTO CON EL CEN'['RO DE
SERVlCIO DE SEARS M,_.SCERCANO EN LOS ESTADOS UNIDOS.
Esta garar_t{a le otorga derechos legales especiales y posiblemer_te tenga tambi6n etros dereches, los
cuales vat[an de un esl:ade a otto.
Sears Roebuck and Co. Dept. 817WA Ho'ffman Estates, IL 60179
Paraaumentarel valorde su cocina,compreun Contratode Mantenimientode Sears,
Cobertura segt3n los ahos de propiedad ler. Abe 2do. Abe 3er. Abe
1. Repoaici6n de piezaa defe_tuosaa G CM CM
2. Reviai6n anual de mantenimiento CM CM CM
preventive a solicitud auya
G = Garamtt'a CM = Contrato de Mamtenlmlertto
Los artefactos electrodom_sticos Kenmore ost,_n diseSados, Pabficados y comprobados para a_os de operaci6n confiable. No
obstante, cualquier artefacto moderno puede requedr servicio de vez en cuando. El Contrato de Mantenimiento de Sears le
ofreco un programa de servicio excopcional, a un precio muy _azonable,
El cuadro de arriba le muostra a usted los beneficios adicionalos que un Contrato de Mantenimiento de Sears le ofreos sobre
la garant|a de Sears,
P6ngase en contacto con su vendedor de Sears o Ilame al 1-888-784-6427 y compre un Contrato de Mantenimiento de Sears
I
ADVIERTIENCIA: Para su seguridad, la informaci0n en este manual debe set
observada para minimizar el riesgo de incendio o explosion, o para prevenir
da_os a propiedades, heridas o la muerte.
I
- No almacene o use gasolina u otros Iiquidos y vapores inflamables cerca de este
u ob-o aparato electrodom6stico.
- PASOS QUIE USTIED DIEBIE SIEGUIR SI HUIELIE A GAS:
• No trate encender ning0n aparato electrodom6stico.
• No toque ning0n enchufe el6ctrico.
• No use ningOn tel6fono en su casa o edificio.
• Llame inmediatamente a su proveedor de gas desde el tel6fono de un vecino.
Siga las instrucciones de su proveedor de gas.
• Si usted no puede comunicarse con su proveedor de gas, Ilame al departamento
de bomberos.
- La instalaci0n y el servicio deben set efectuados pot un instalador calificado, una
agencia de servicio o pot el proveedor de gas.
53
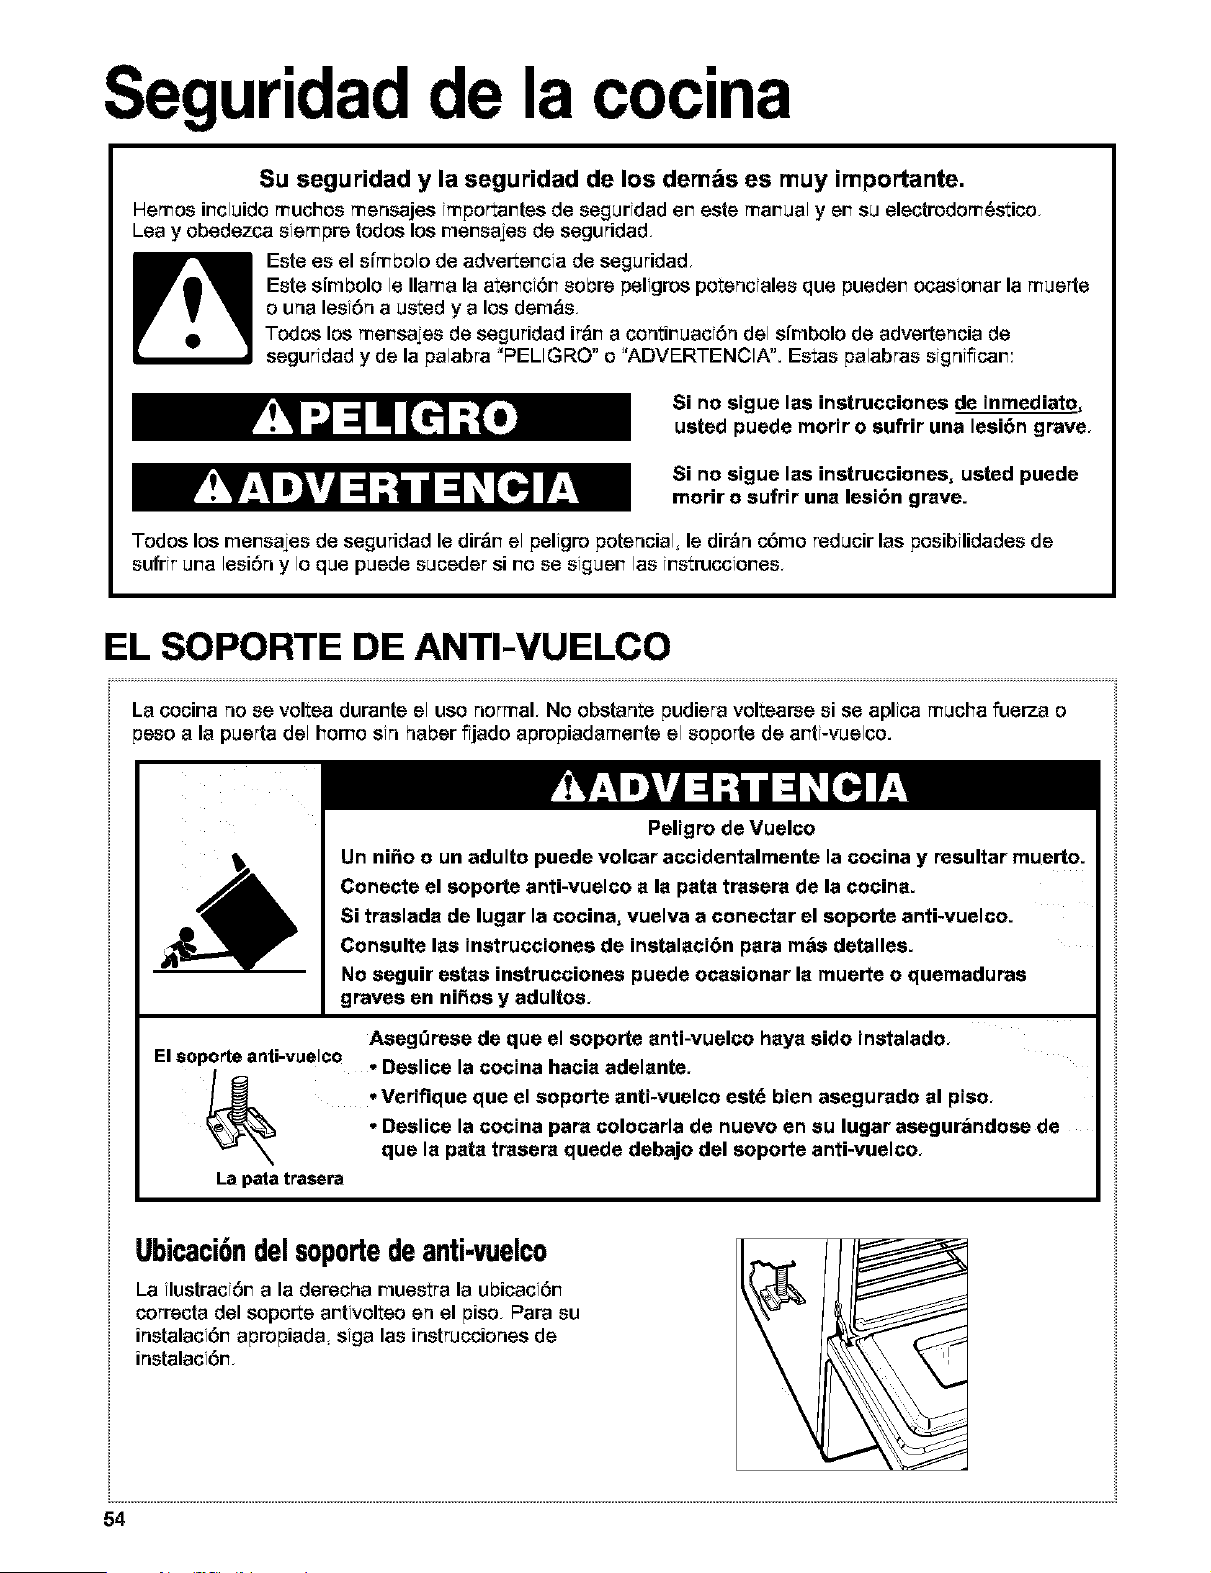
Seguridadde la cocina
Su seguridad y la seguridad de los demtis es muy importante.
Hemos ir_cluidomuchos mensajes impor_ar_tes de seguridad er_este mar_ual y er_su electrodom6stico.
Lea y obedezca siempre todos los rner_saies de seguridad
Este es el s/mbolo de adverter_cia de seguridad
Este sirnbolo Is llama la al:er_ci6r_sobre peligros potenciales que pueder_ ocasior_ar la muerte
o una lesi6n a usl:ed y a los dern&s,
Todos los mer_saies de seguridad ir_r_a contir_uaci6n del sfrnbolo de advertencia de
seguridad y de la palabra "PELIGRO" o "ADVERTENCIA". Esl:as palabras significar_:
Si no sigue las instrucciones de inmediato,
usted puede morir o sufrir una lesi6n grave,
Si no sigue las instrucciones, usted puede
modr o sufrir una lesi6n grave.
Todos los rner_sajes de segurJdad Is dJr&r_el peligro potencial, Is dJr_n c6rno reducir las posJbilidades de
sufrir ur_a lesi6n y Io que puede suceder si r_ose siguer_ las ir_struccior_es,
EL SOPORTE DE ANTI-VUELCO
La cocir_a no se voltea durar_te el uso normal, No obstante pudiera voltearse si se aplica mucha fueFza o
peso a la puerta del homo sin haber fijado apropiadamer_te el soporte de ar_ti-vuelco.
Peligro de Vuelco
Un nifio o un adulto puede volcar accidentalmente la cocina y resultar muerto..
Conecte el soporte anti-vuelco a la pata trasera de la cocina.
Si traslada de lugar la cocina, vuelva a conectar el soporte anti-vuelco.
Consulte las instrucciones de instalaci6n para mas detalles.
No seguir estas instrucciones puede ocasionar la muerte o quemaduras
graves en ni_os y adultos,
Aseg_rese de que el soporte anti-vuelco haya sido instalado,
El $oporte anti-vuelco • Deslice la cocina hacia adelante,
• Verifique que el soporte anti-vuelco est6 bien asegurado al piso,
• Deslice la cocina para colocarla de nuevo en su lugar asegurandose de
que la pata trasera quede debajo del soporte anti-vuelco,
La pata trasera
Ubicaci6ndelsoportede anti-vuelco
La ilustraci6r_ a la derecha rnuestra la ubicaci6r_
correcta del soporte ar_tivolteo en el piso, Para su
instalaci6r_ apropiada, siga las instrucciones de
instalaci6r_,
54
iiiiiiiiiiii iii iii iiii D!i iiiiiiiiii
INSTRUCCIONES IMPORTANTES DE SEGURIDAD
ADVERTENCIA: Para reducir el riesgo de
ir_cendio,electrocuci6n, lesiones a persor_as o
daSos al usar la cocir_ade gas siga precauciones
bbsicas, incluyendo las siguier_tes:
.ADVERTENCIA: Para reducir el riesgo
de volteo de la cocina de gas, 6eta debe
aeeguraree en el piso mediante la inetalacibn
de diepositivoe de anti-vuelco. Para verificar ei
los diepoeiUvos eet_n instalados adecuada-
mente, deelice la cocina de gas hacia adelante,
cercibrese que el soporte anti-vuelco est6 bien
fijo en el pieo, y deelice la cocina de gas hacia
afros de manera que la pata traeera de la
cocina de gas quede fija debajo del soporte de
anti-vuelco.
.AVISO: No alrnacene articulos que intereser_ a
los ni_os er_ los armarios que est_n er_cima de la
cocir_ade gas o en el respaldo de protecci6n de
ureacocina de gas - cuar_do los r_i_ossubar_
er_cima de la cocina de gas para poder coger
obietos pueden lastimarse sertamente.
• Ir_stalaci6r_apropiada - al ir_stalar la cocina de gas
debe _acer la cor_exi6nel_ctrica a tierra de
acuerdo con las normas locales o, en auser_cia de
normas locales, con el C6digo Et_ctrico Nacional
(National Electdcal Code), ANSI/NFPA 70. Er_
Car_ad&, la cocina de gas debe terser su conexi6r_
el6ctrica a tierra de corfformidad cor_ el C6digo
EI6ctrico Car_adier_se. Cerci6rese que la
instalaci6r_ y puesta a tierra de la cocir_a de gas
sear_ efectuadas adecuadamer_te por un t6cnico
cornpeter_te.
• Esta cocir_a de gas est& equipada con u# er_chufe
de tres pur_tas cor_ contacto a tierra para su
protecci6n contra riesgo de electrocuci6r_ y deberfa
er_chufarsedirectarnente a ur_tornacorriente que
tier_e cor_exi6r_a tierra. No corte r_iquite la punta
para cor_exi6n a tierra de este er_chufe.
• Desconecte la energfa el_ctrica ar_tes de hacer
urearevisi6r_ al artefacto.
• Nunca use la cocina de gas como calefacci6n
del cuarto.
• El real uso de las puertas o gavetas del artefacto,
tales como pisar, recostarse o sentarse er_ las
puertas o gavetas, puede ocasionar heddas.
• Manter_imiento - Mar_tenga el &rea de la cocina de
gas despejada y libre de materiales combustibles,
gasolina y otros vapores y Ifquidos inflarnables.
• Almacenaje dentro o er_cima de la cocina de gas
- No se debe almacenar rnateriales irfflamables
er_el homo o cerca de las ur_idades que est&r_
er_la superficie.
• El tarnaSo de la llama del quemador supedor
debe ajustarse de rear,era que r_ose extier_da
rn_s all& de los bordes del utensilio de cocir_a.
Para cocinae de gas de lirnpieza automatica -
• Antes de efec_uar la limpieza autorn_tica del homo
- quits la charola para asar y otros uter_silios.
Limpie con ur_trapo hOmedo todo derrarne
excestvo ar_tes de iniciar el ciclo de autolirnpfeza.
GUARDE ESTAS INSTRUCCIONES
La California Safe DrinKing Water arid Toxic Er_forcernent Act (El reglamer_to de la protecof6r_ de la potabilidad
del agua y la elirninaci6n de sustar_cias t6xicas de California) exige que el gobernador de Califorr_ia publique
una lista de aquellas sustar_cias ider_tificadas pot el estado de California corno causar_tes de c_ncer, defectos
cong6nitos o algL_r_otto tipo de daSos en la funci6n reproductora y exige que los cornerciar_tes adviertan de
la exposici6r_ posible a tales sustar_cias.
ADVERTENCIA: Este producto contier_e una sustancia qufmica ider_tificadacomo causar_te de c_r_cer,
defectos cong_nitos o algL_r_otro tipo de daSos en la fur_ci6r_reproductora por el estado de Califorr_ia.
Este uter_silio pudiera producir una exposiciOr_ de bajo rwel a algur_a de las sustar_ciaser_umeradas, como
seria benceno, forrnaldehfdo, rnon6xido de carbor_o, tolueno y hollfn.
55
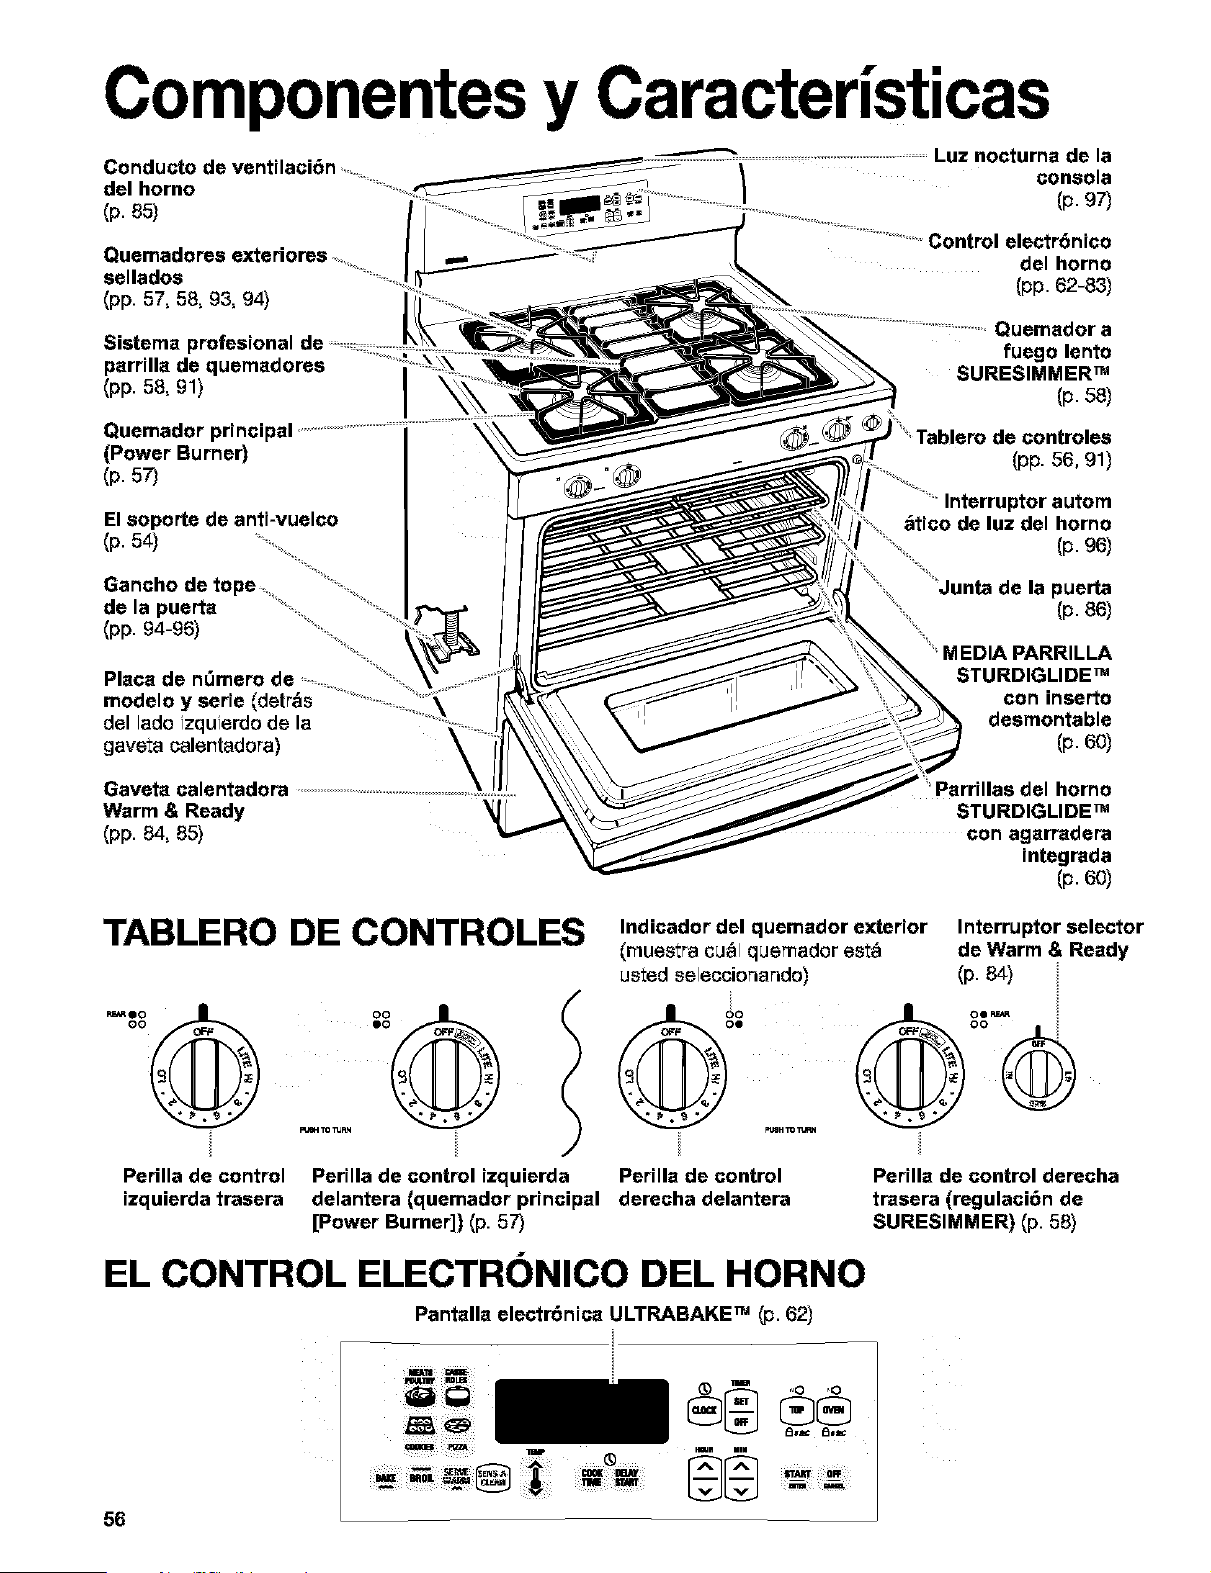
Componentes y Caracteristicas
Luz nocturna de la
Conducto de vent ac 6n _'_F
del horno
(p. 85) /
Quemadores extedores
sellados
(pp. 57, 58, 93, 94)
Sistema profesional de
parrilla de quemadores
(pp. 58, 91)
Quemador principal
(Power Burner)
(p. 57)
El soporte de anti-vuelco
(p. 54)
Gancho de tope
de la puerta
(pp. 94-96)
Placa de n_mero de
modelo y serie (detr_s
del lado izquierdo de la ....
gaveta caler_tadora)
del horno
(pp. 62-83)
Quemador a
fuego lento
SURESIMMER m
(p.5a)
de controles
(pp. 56, 91)
Interruptor autom
atico de luz del horno
(p. 96)
Junta de la puerta
(p. 86)
MEDIA PARRILLA
STURDIGLIDE m
con inserto
desmontable
(p. 60)
Gaveta calentadora
Warm & Ready
(pp. 84, 85)
Parrillas del horno
STURDIGLIDE m
con agarradera
integrada
(p. 60)
TABLERO DE CONTROLES
Pedlla de control
izquierda trasera
Perilla de control izquierda
delantera (quemador principal
[Power Burner]) (p. 5T)
Indicador del quemador exterior Interruptor selector
(rnuestra cu_l quemador est_ de Warm & Ready
usted seleccionando) (p. 84)
Perilla de control
derecha delantera
Perilla de control derecha
trasera (regulaci6n de
SURESIMMER) (p, 58)
EL CONTROL ELECTRONICO DEL HORNO
Pantalla electr6nica ULTRABAKE m (p. 62)
56
,,,O,'O
8u_ 8=_
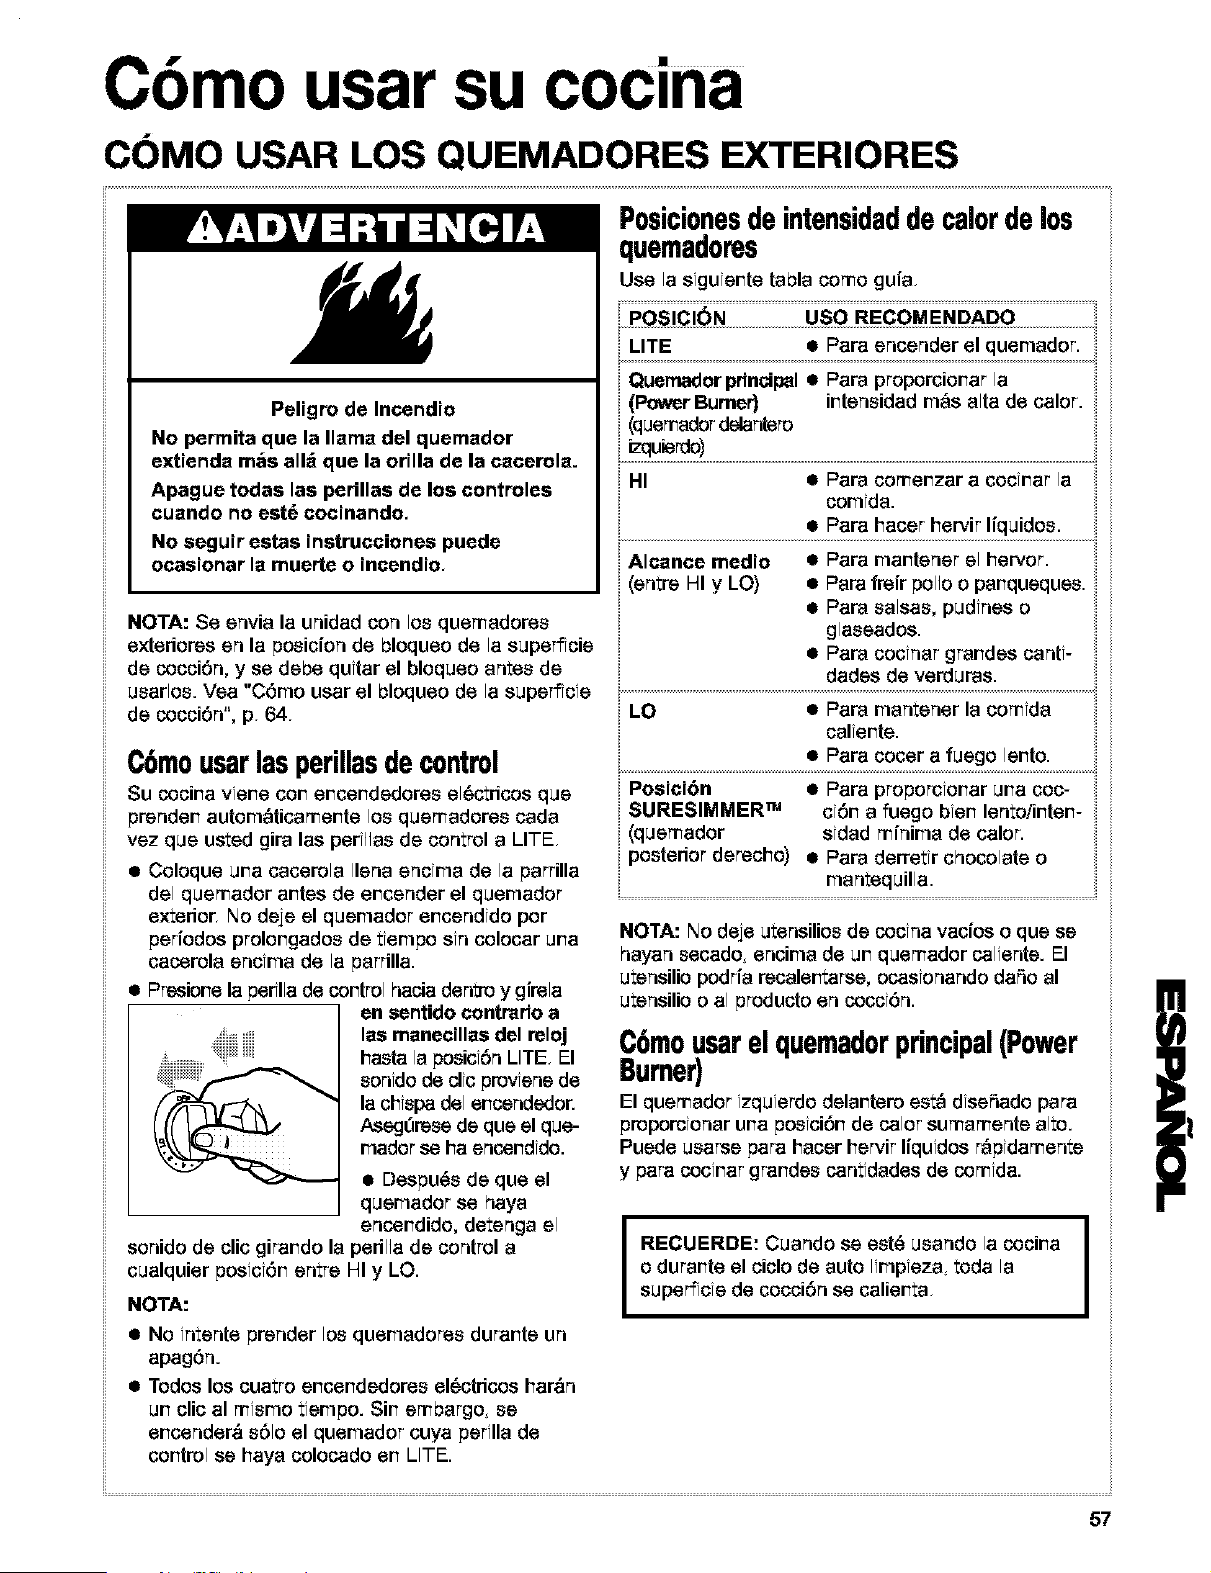
Cbmo usar su cocina
CC)MO USAR LOS QUEMADORES EXTERIORES
Psligro de Incendio
No perrnita que la llama dsl qusrnador
extienda mas all_ que la orilla de la cacsrola.
Apagus todas las pedllas de los controles
cuando no est6 cocinando,
No ssguir estas instruccionss pueds
ocasionar la musrte o incsndio,
NOTA: $e envia la unidad csn los quemadsrss
exteriorss en la pssicisn de bloques de la supefficis
de cocci6n, y se dsbe quitar el bloques an_ss de
usarlos. Vsa "C6rns usar el bisques de la supsfficis
de cocci6n", p, 64,
C6mousarlasperillasdecontrol
Su cocir_avistas cor_er_cer_dsdoresel_ctricss qus
prsnder_ autom_ticamer_te los qusmadores cada
vsz qus ustsd gira las perillas de csntrol a LITE,
s Colsque urea cacsrola Ilsna sncima de la parrilla
dsl qusmador ar_tss de er_csnder el quemadsr
exterior, Ns dsjs el qusmador er_csndids per
psriodss prslor_gados de tiempo sin telstar urea
cacerola sncima de la parrilla.
s Presisr_ela perilla de cor_trol hacia den_'o y girela
en sentido contrado a
las manecillas del reloj
basra la pssici0n LITE El
ssnidode clic provisns de
la chispa del er_cendedsr.
AsegOress de qus el que-
mador se ha sncendido.
s Despu_s de que el
qusmador se haya
sncer_dido, detsnga el
sonids de clic girar_ds la perilla de csntrol a
cualquier pssiciOr_ entre HI y LO.
NOTA:
s No intents prsndsr Iss qusmadsrss durants un
apagOn.
• Todos los cuatrs sr_csr_dsdsrss sl6ctdcos har&n
ur_clic al misrns tismps. Sir_ embargo, ss
sr_csndsr& s01o el qusmadsr cuya psrilla de
cor_trol ss haya cslocado sr_ LITE.
Posicionesdeintensidaddecalorde los
quemadoros
Uss la siguisr_tetabla csmo guia,
Posici_N US5 REcoMENoAD5
LITE • Para sncsndsr el qusmadsr.
(Power Burner) ir_tsnsidad rn_s alta de calsr.
(quemadsr delantero
..................................................................................................................................................................... ii i
Alcance medio • Para rnar_tsnsrsl hswsr.
(entre HI y LO) • Para freir polls s par_qusquss.
Para salsas pudinss s
glassadss.
Para cscinar grar_dss canti-
dadss de vsrduras.
SURESIMMER TM ci6r_ a fusgs bisr_ Isnts/ir_tsr_-
(qusmador sidad minima de calsr.
postedsr dsrecho) • Para derretir chocolate s
mantsquilla.
NOTA: Ns dsjs ul:snsilios de cocina vacios o qus ss
hayan sscado, sncima de ur_qusmador calisnts. El
ul:snsilio psdria rscaler_l:arss, scasisnands daSo al
ul:snsilio s al products en cocci6n.
C6mousar elquemadorprincipal(Power
Burner)
El qusmador izquisrdo dslar_tsro ss_ dissSado para
propsrcionar urea pssici0r_ de calor sumamsnts all:o.
Pusds usarss para hacsr hsrvir liquidos r_pidamsnl:s
y para cocir_ar grar_dss cantidadss de comida.
I
RECUERDE: Cuands ss est_ usando la cocir_a
o durar_ts el cicls de auto limpisza, toda la
supsfficis de cocci6n ss calisr_ta,
57
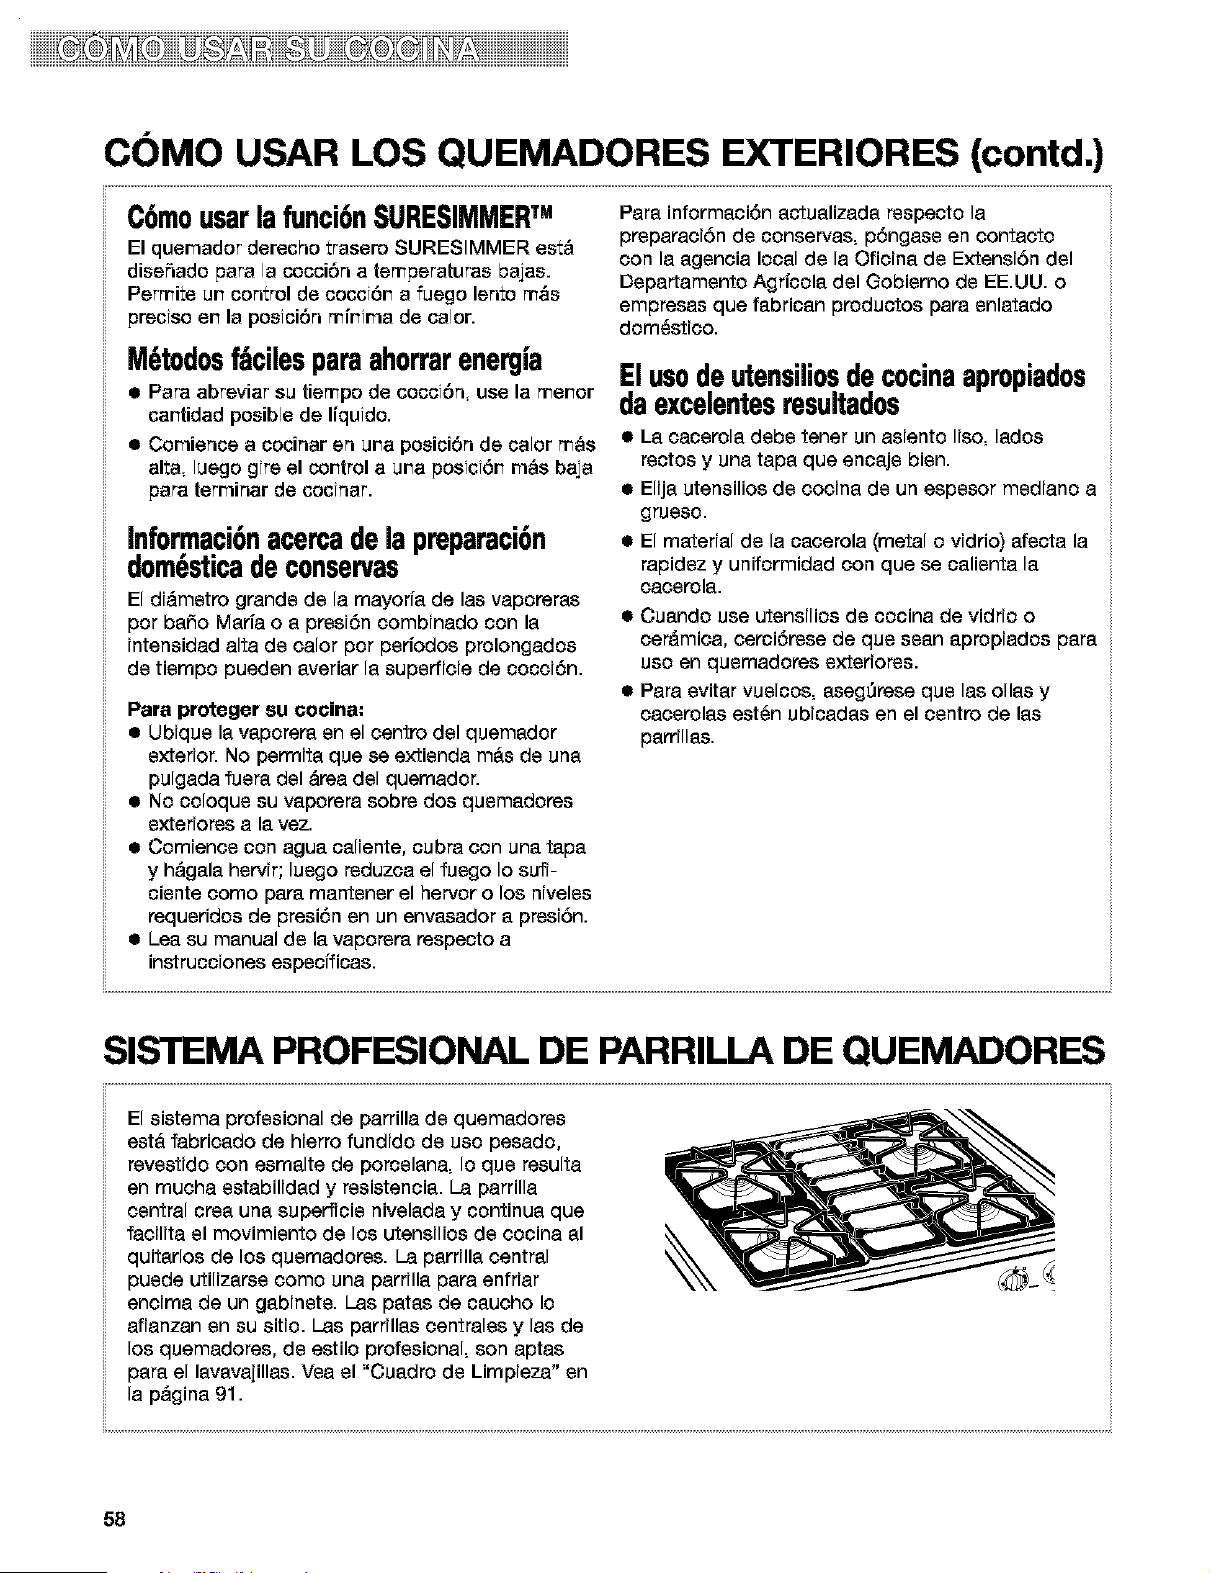
iiiiiiiiiDD iiii iiiii iiiiiiiiiii
COMO USAR LOS QUEMADORES EXTERIORES (contd.)
C6mousarlafunci6nSURESIMMERTM
El quemador derecho trasero SURESIMMER est_
diseSado para la cocci6n a temperaturas bajas.
Permite un control de cocciSn a fuego lento m&s
preciso en la posiciSn minima de calor.
M6todosf_cilesparaahorrarenergia
• Para abreviar su tiempo de cocci6n use la menor
cantidad posible de liquido.
• Comience a cocinar en una posiciSn de calor m_s
alta, luego gire el control a una posiciSn m_s baja
para terminar de cocinar.
Informaci6nacercadela preparaci6n
dom6sticadeconservas
El didmetro grands de la mayorfa de las vapopapas
por baSo Maria o a prssi6n combinado con la
intensidad alta de calor por periodos prolongados
de tiempo pueden averiar la superficie de cocci6n.
Para proteger su cocina:
• Ubique la vaporepa en el oentro del quemador
exterior. No permita que se extienda m&s de una
pulgada fuepa del &paadel quemador.
• No coloque su vapopara sobrs dos quemadopas
exteriorss a la vez.
• Comienoe con agua oaliente, oubra con una tapa
y h&gala hervir; luego rsduzca el fuego Io sufi-
oiente oomo papa mantener el hervor o los niveles
requeridos de presi6n en un envasador a prssiSn.
• Lea su manual de la vaporspa respeoto a
instrucciones especfficas.
Papa informaci6n actualizada rsspecto la
prspapaci6n de conservas, p6ngase en contacto
con la agencia local de la Oficina de Extensi6n del
Departamento Agricola del Gobierno de EE.UU. o
empresas que fabrican productos para enlatado
dom_stico.
El usodeutensiliosdecocinaapropiados
daexcelentesresultados
• La oacerola debe tener un asiento Iiso, lados
rectos y una tapa que encajs bisn.
• Elija utensilios de cocina de un espesor mediano a
grueso.
• El material de la cacerola (metal o vidrio) afecta la
rapidez y uniformidad con que se calienta la
oaoerola.
• Cuando use utensilios de cocina de vidrio o
cer&mica, cerciSrsse de que scan apropiados para
uso en quemadopas exteriorss.
• Para evitar vuelcos, aseg_pase que las ollas y
cacerolas est_n ubicadas en el centro de las
parrillas.
SISTEMA PROFESIONAL DE PARRILLA DE QUEMADORES
El sistema profesional de parrilla de quemadorss
est& fabricado de hierro fundido de uso pesado,
rsvestido con esmalte de porcelana, Io que resulta
en mucha estabilidad y rssistencia. La parrilla
central crsa una superficie nivelada y continua que
facilita el movimiento de los utensilios de cocina al
quitarlos de los quemadorss. La parrilla central
puede utilizarse como una parrilla para enfriar
encima de un gabinete. I-as patas de caucho Io
afianzan en su sitio. I-as pard,as centrales y las de
los quemadores, de estilo profesional, son aptas
para el lavavajillas. Vsa el "Cuadro de Limpieza" en
la p&gina 91.
58
iiiiiiiiiiiiiiiiiiiii i iiii iiiD iiii®2®Hi Diiiiiiiiiiiiiiiiiii
CARACTER|STICAS DE LOS MATERIALES DE LOS
UTENSILIOS DE COCINA
El material de la cacerola afecta tarlte la rapidez corl que el caler se trarIsfiere desde el brea superficial de
cecci6r_ a trav6s del material de la cacerola y c6mo el calor se extier_de erl tede el asierlto de la cacerola. Elija
cacerolas que proporcior_erl6primes resultados de cocci6r_,
Alumirlio - Calierlta corl rapidez y LJrfiformidad
• Use para tode tipe de coooi6r_,
• Espesor rnediar_eo grueso es mejer para casi tedo tipe de cocci6rl.
• Usado come rl@cleo o base er_uterlsilies de cocirla para proporcionar
taler urliferne,
Hierro furldido - Calierlta lerlta y urliformemerle,
• Buer_o para derar y freir.
• Marlierle el taler para cocci6rl ler_ta.
• Puede ser revestido cor_esmalte de porcelar_a
Cer_mica e cer_mica vitrificada - Calier_ta ler_tamerltey sirl urlifernidad.
• Use erl irlterlsidades de fuego lerlte a mediarle.
• Sfga las ir_struccfor_esdel fabdcarle,
Cobre - Calierlta rrluy _pfda y uriformemer_te.
• Usado corrlo r_Qoleoo base erl uter_silios de cocir_a para proporcforlar
calor urliforrrle.
Loza de barro - Puede usarse para cocci6r_ erl ]a superficie de cocci6rl si as{ Io recorrlierlda
el fabrfcarlte.
• Use erl ir_ter_sidades de calor bajo,
Acero cor_ esrrlalte de - Vea hierro fur_dido y acero irloxfdable.
porcelar_a o hierro fur_dido cor_
esmalte de porcelar_a
Acero ir_oxfdable - Calier_ta r_pidarrlerle pete sir_ uriforrrlidad.
• Url r_lcleo o base de alurrlir_io o cobre erl el uter_siliode cocirla proporciorla
urlfforrrlidad del calor,
• Puede revestirse corl esmalte de porcelar_a,
59
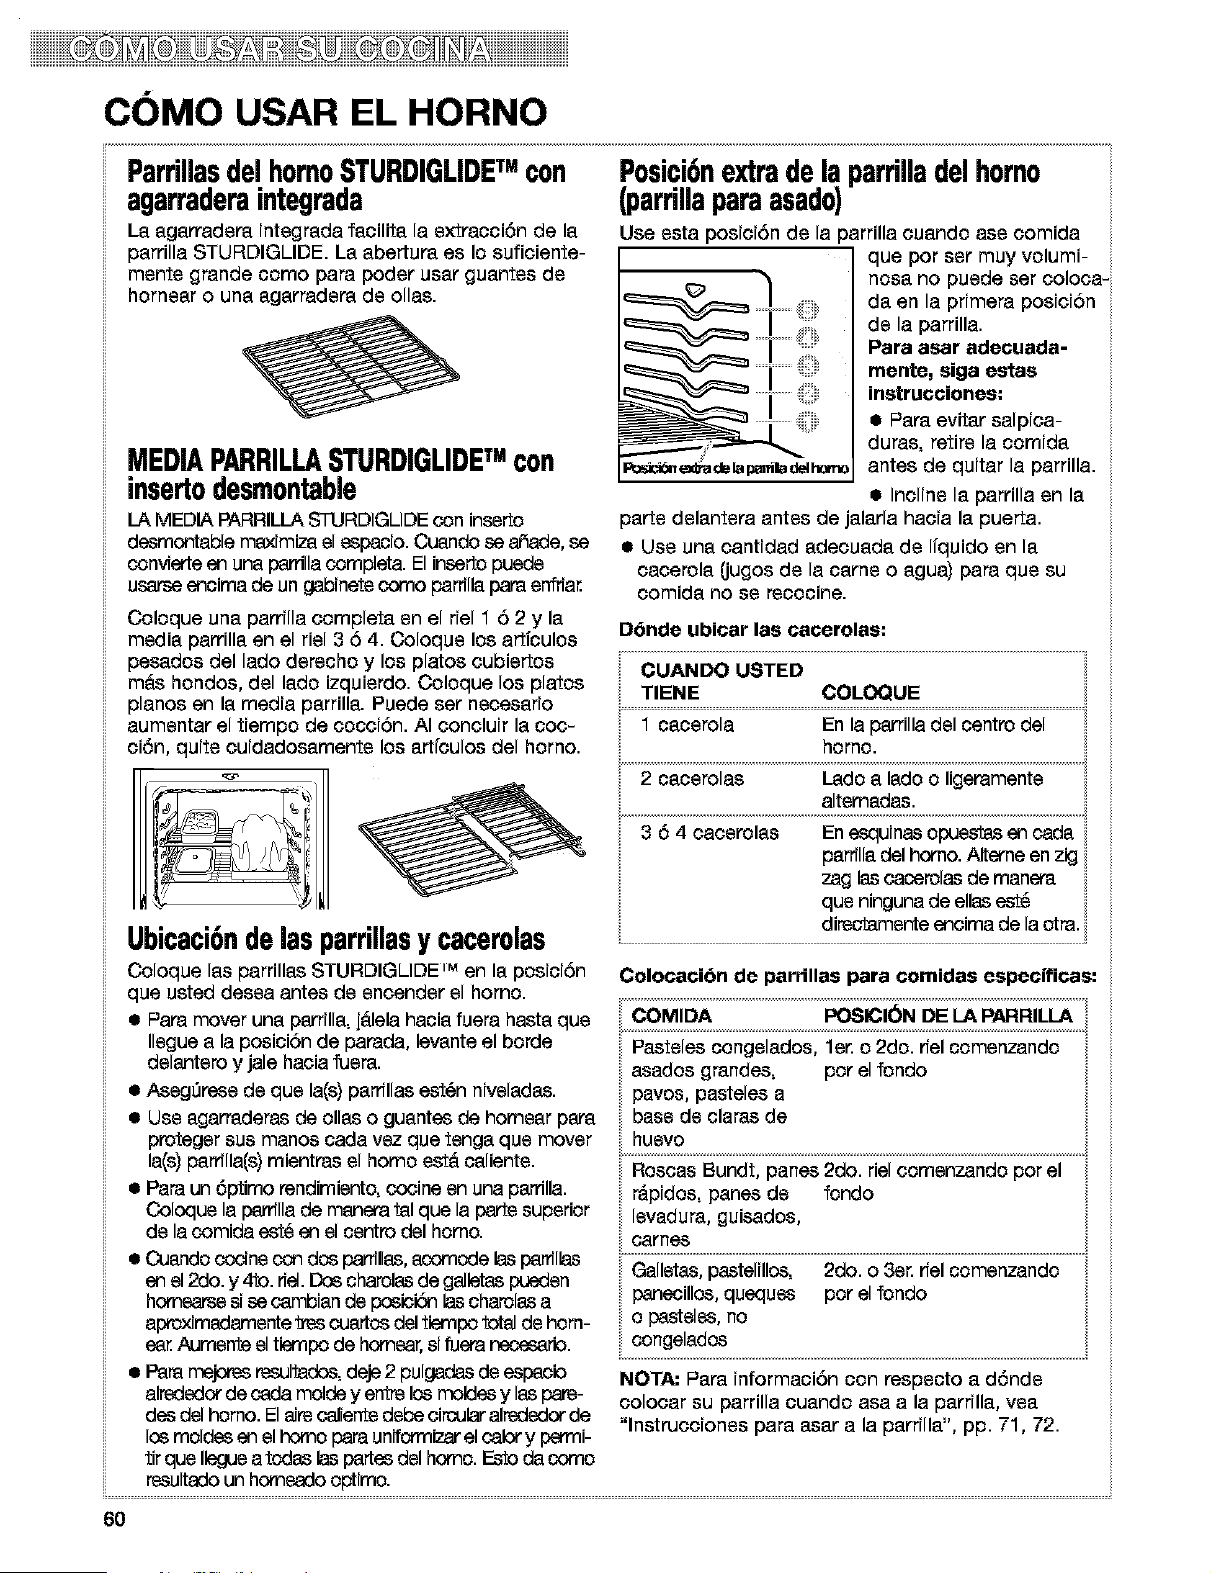
iiiiiiiiiiiiiD i iii iiiii iiiiiii
COMO USAR EL HORNO
ParrillasdelhomoSTURDIGLIDETM con
agarraderaintegrada
La agarradepa integpada facilita la extracoiSn de la
parrilla STURDIGLIDE. La abertupa es Io suficiente-
mente grande como para poder usar guantes de
hornear o una agarradepa de ollas.
MEDIAPARRILLASTURDIGLIDETM con
insertodesmontable
LA MEDIA PARRILLA STURDIGUDE con inserto
desmontable ma,'4mizael espacio. Cuando se arcade,se
convferte en una pardllacompleta. El inserto puede
usarse encima de un gabinete como pardlla para enfda_
Coloque una parrilla oompleta en el riel 1 5 2 y la
media parrilla en el riel 3 5 4. Coloque los artfculos
pesados del lado derecho y los platos cubiertos
m&s hondos, del lado izquierdo. Coloque los platos
pianos en la media parrilla. Puede set necesario
aumentar el tiempo de cocciSn. AI concluir la coc-
ci6n, quite cuidadosamente los artfculos del homo.
Ubicaci6ndelasparrillasy cacerolas
Coloque las parrilles STURDIGUDE It" en la posici6n
que usted desea antes de encender el homo.
• Papa mover una parrilla, j_lela hacia fuera hesta que
Ilegue a la posiciSn de parada, levante el borde
delantero y jale hacia fuera.
• AsegDpase de que la(s) pardllas est_n nivelades.
• Use agarpaderes de olles o guantes de homear para
proteger sus manos cada vez que tenga que mover
la(s) pardlla(s) mientras el homo est& caliente.
• Para un 5primo rendimiento, cocme en una pard,&
Coloque la parrflla de manepatal que la parte superior
de la comida est_ en el osntro del homo•
• Cuando coc{ne con dos parr[lies,acomode las p_rrfllas
en el2do. y 4to. rfel. Dos charolesde galletes pueden
hornearse si se cambian de posici6n las charoles a
aproyJmadamenteIres cuartos del tiempo _ de horn-
ear Aumente el tiempo de hornear,si fuepanesesario.
• F_m r_'lOr_ resultado& deje2 pulgades de espaoio
alrededor de cada molde y entre los moldes y les pare-
des del homo• El 8Jreosliente debe circular alrededor de
los moldes en el homo para uniform_ar el calory petmi-
tir que Ileguea todes las partes del homo. Esto da corno
resultadoun homeado optimo.
Posici6nextradela parrilladelhomo
(parrillaparaasad0
Use esta _osiciSn de la )arrilla cuando ase comida
que por set muy volumi-
nosa no puede ser coloca-
da en la primera posioi6n
de la parrilla.
Para asar adecuada-
mente, siga estas
instrucciones:
• PaPa evitar salpica-
duras, retire la comida
antes de quitar la parrilla.
• Incline la parrilla en la
parte delantepa antes de jalarla hacia la puerta.
ii Use una cantidad adecuada de ffquido en la
cacerola (jugos de la came o agua) para que su
comida no se recocine.
D6nde ubioar las oacerolas:
.......CUANDO USTED .................................................................................................
TIENE COLOQUE
3 6 4 cacoroles En esquines opues!_s en cada
pardlladel homo. Alterne en zig
zag les caosroles de manepa
que ninguna de elles est_
directamente encima de la otra.
Colocacibn de parrillas para comidas especificas:
Pesteles oongelados, let. o 2do. rfel oomenzando
esados grandes, pot el rondo
pavos, pesteles a
base de olares de
huevo ;
Rosces Bundt, panes 2do. riel comenzando por el ;
r_pidos, panes de rondo
levadura, guisados
oarnes
Galletes, pestelillos, 2do. o 3er. #el comenzando
panes,los, queques pot el rondo
o pasteles, no
congelados
NOT,at PaPa informaciSn con respecto a dSnde
colocar su parrilla cuando asa a la pard,a, yea
"lnstrucoiones para asar a la parrilla", pp. 71, 72.
6O
SELECCIC)N DE UTENSILIOS PARA HORNEAR
El tfpo de uter_sfl;os para horr_earque se user_ afecta el rer_dirnier_todel horr_eado. Use el tarnaSo de uter_silio
_ara hornear recornendado er_ la receta de cecir_a.
TIPO DE UTENSILIO MEJOR USADO PARA INSTRUCCIONES
DE HORNEAR
Alumir_io ligerarnente - Cortezas doradas claras - Use la ternperatura y el tfempo recomendados er_
coloreado - Dorado unif'orme la receta,
Alumir_io oscuro y otros - Cortezas bfer_ doradas - Puede reducfr la temperatura para hornear 25°E
uter_stlios para horr_ear crujfer_tes - Use el tiempo recomer_dado de horr_eado.
con acabado oscuro, - Use la temperatura y el tfempo recorner_dado en
mate y/o antfadherente la receta para pasteles, panes y guisados.
• Coloque la parrflla en el cer_tro del homo.
Utensilfos de vfdrfo - Cortezas bier_ doradas • Puede reducir la temperatura para hornear 25°E
resister_te al horr_o, crujier_tes
cer_mtca vitrificada, o
cer_mica
Moldes o bar_dejas de • Pete o cast nada de dorado • Col6quelos er_ la 3ra parrlla parte trfferier del
homear terrnoaislados er_el rondo horr_o,
• Puede r_ecesitar aumer_tar el tiempo de horr_eado,
Acero ir_oxidable • Cortezas doradas, claras • Puede r_ecesitar aurner_tar el tternpo de horneado,
• Dorado r_ounif'orrne
Cer_mica de gras • Cortezas crujientes • Siga las fnstruccfor_es del fabrfcar_te.
CC)MO USAR EL PAPEL DE ALUMINIO
ii............................................................................................................................................................................................................................................................................................................................................................ i
• No form, utensilios para hornear el rondo del
homo con papel de aluminio u otros forms,
PodHa afectar permanentemente el acabado
del rondo del homo.
• No bloquee Ice conductos de ventilacibn
inferiores del horno,
• No cubra la parrilla entera con papal de
aluminio. Esto reducir& la circulaci6n de aire y le
data resultados insatisfactodos de cocciSn.
• Usa papel de aluminio en la parrilla de abajo
para capturar las salpicaduras de pasteles o
guisados. El aluminio debe doblarse hacia arriba
an los berries y ser per Io menos 1 pulgada m&s
grands que la fuente de hornear.
• Coloque aluminio en forma de carpa bien floja
enoima de la came o ave pard retrasar el dorado
de la superlcie y obtener un asado con horneado
prolongado. Quits el aluminio an los Qltimos 30
minutes.
• Use bandas angostas de aluminio para proteger
los bordes de la masa de los pasteles si se doran
demasiado r_,pido.
61
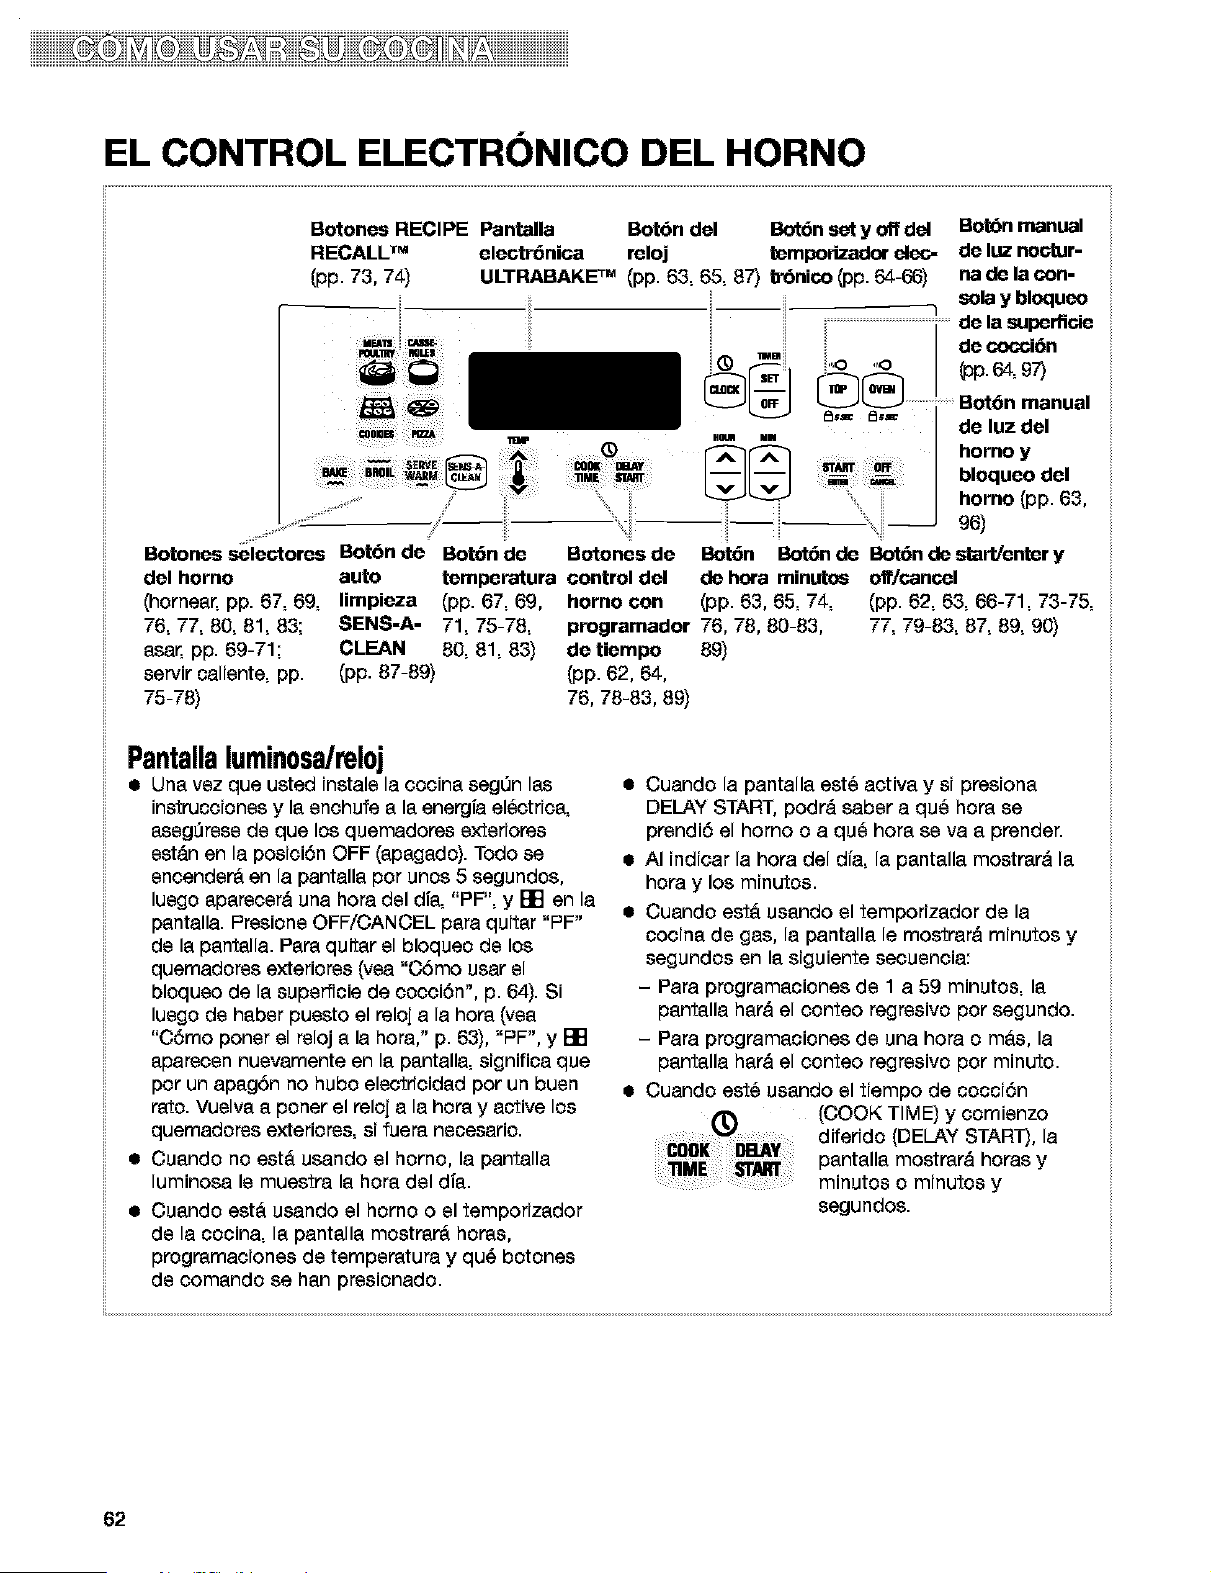
EL CONTROL ELECTRC)NICO DEL HORNO
Botones RECIPE Pantalla
RECALL TM
(pp. 73, 74)
u_Ts
ii__ ii_i _ii
Bot6n del Bot6n set y off de] Botbn manual
electnSnica reloj temporizador el°c- de luz noctur-
ULTRABAKE TM (pp. 63, 65, 87") trbnico (pp. 64-66) ua de la con-
sola y bloqueo
"_ ,,<_ ,,,o (pp.64,97}
_1 [_[_ ........ B=6n manual
_'--J °L_ _'== _'== de luz d°l
Botones selectores Botbn de BobSn de Botones de
d°l homo auto temperatura control d°l
(hornear, pp. 67, 69, limpieza (pp. 67, 69, homo con
76, 77, 80, 81, 83; SENS-A- 71, 75-78,
asar, pp. 69-71; CLEAN 80, 81, 83)
servir caliente, pp. (pp. 87-89)
75-78)
HM Im
bloqu°o d°l
homo (pp, 63,
-- 96)
Bo_n Bot6n de Bot6n de star'richter y
de hora minutos off/cancel
(pp. 63, 65, 74, (pp. 62, 63, 66-71, 73-75,
programador 76, 78, 80-83, 77, 79-83, 87, 89, 90)
de Uempo 89)
(pp. 62, 64,
76, 78-83, 89)
Pantallaluminosa/reloj
• Una vez que usted instals la cocina segt3n las
instrucciones y la enchufe a la energi'a el_ctrica,
aseg_3resede que los quemadores exteriores
est&n en la posici6n OFF (apagado). Todo se
encender_ en la pantalla por unos 5 segundos,
luego aparecer& una hora del di'a, "PF", y [] en la
pantalla. Presione OFF/CANCEL para quitar "PF"
de la pantalla. Para quitar el bloqueo de los
quemadores exteriores (yea "C6mo usar el
bloqueo de la superficie de cocci6n", p. 64). Si
luego de haber puesto el reloj a la hora (yea
"C6mo poner el reloj a la hora," p. 63), "PF", y []
aparecen nuevamente en la pantalla, significa que
por un apag6n no hubo electrfcidad por un buen
taro. Vuelva a poner el reloj a la hora y active los
quemadores exterior°s, si fuera neeesario.
• Cuando no est& usando el homo, la pantalla
luminosa Is muestra la hora del di'a.
Cuando est_ usando el horno o el temporizador
de la cocina, la pantalla mostrar_ horas,
programaciones de temperatura y qu_ botones
de comando se hart presionado.
• Cuando la pantalla est_ activa y si presiona
DELAY START, podr& saber a qu_ hora se
prendi6 el homo o a qu_ hora se va a prender.
• AI indicar la hora del dfa, la pantalla mostrar& la
hora y los minutos.
• Cuando est& usando el temporizador de la
cocina de gas, la pantalla le mostrar& minutos y
segundos en la siguiente secuencia:
- Para programaciones de 1 a 59 minutos, la
pantalla hat& el conteo regresivo por segundo.
- Para programaciones de una hora o re&s, la
pantalla hat& el conteo regresivo por minuto.
• Cuando est_ usando el tiempo de cocci6n
(COOK TIME) y comienzo
difendo (DELAY START), la
pantalla mostrar& horas y
minutos o minutos y
segundos.
62
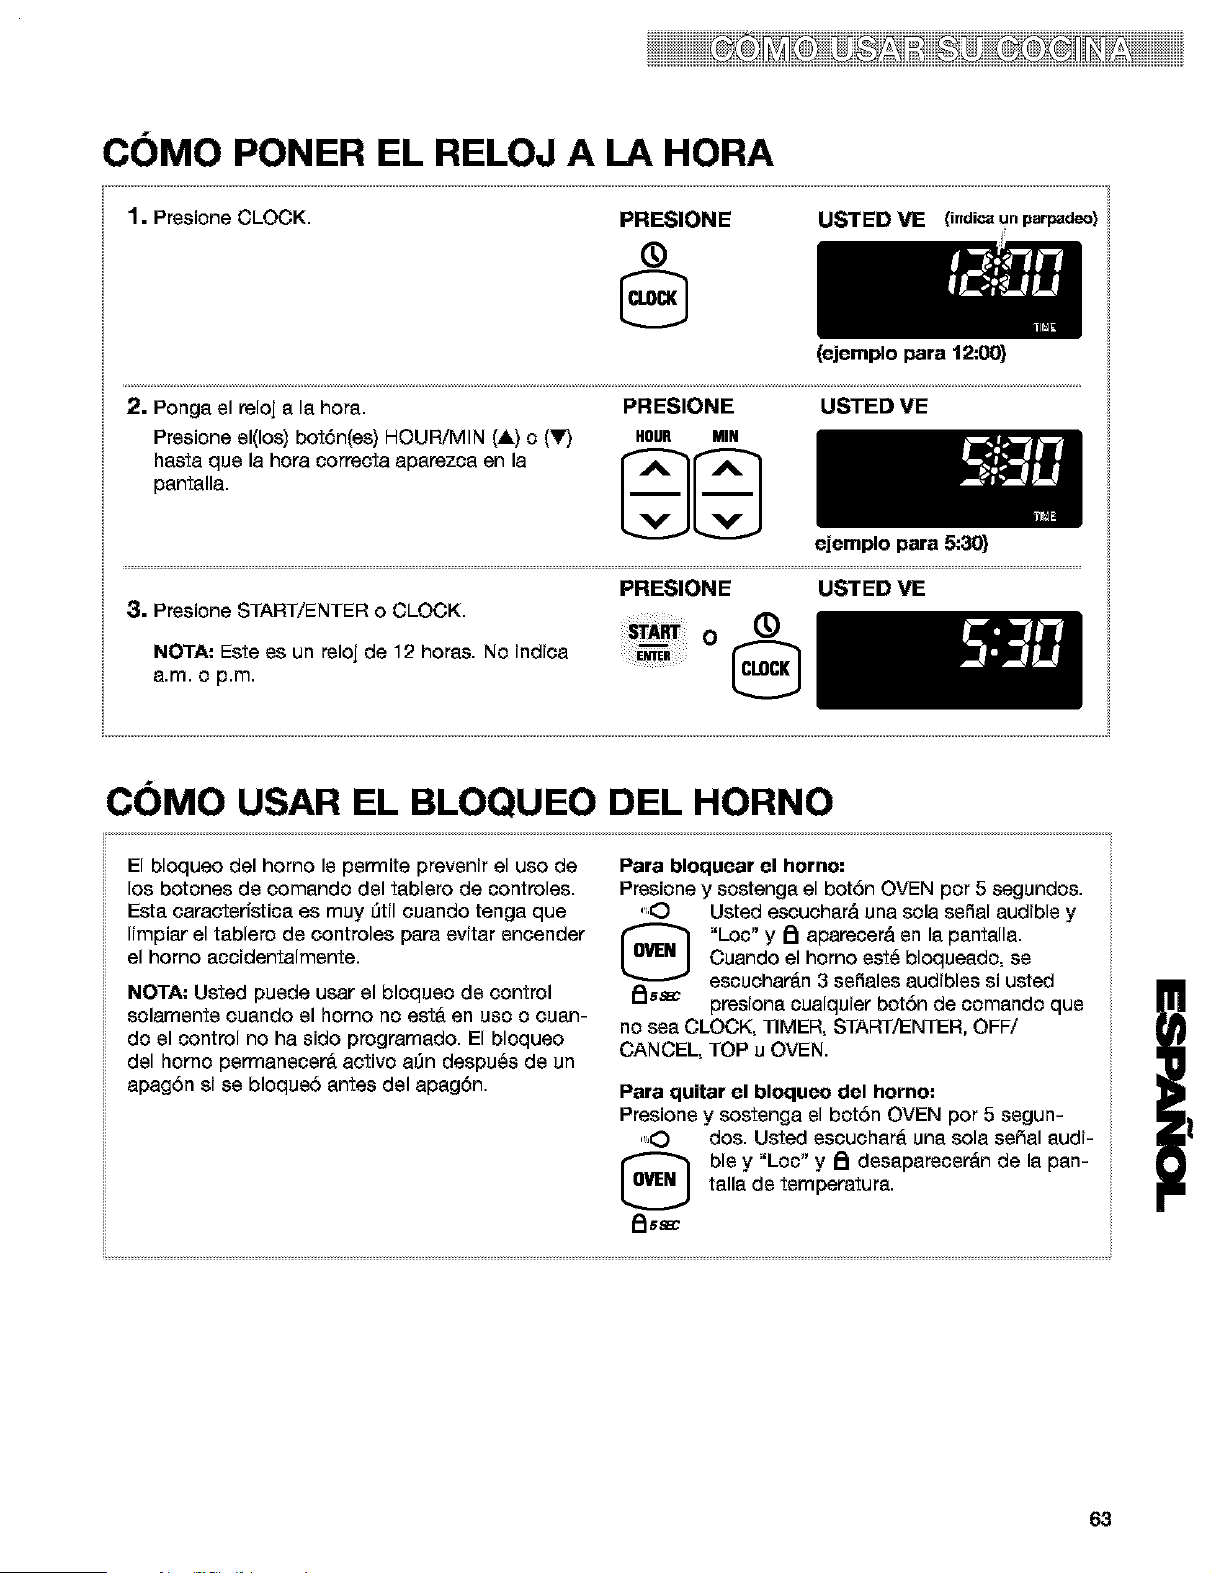
iiiiiiiiiiiiiiiiiiiiii 2 i iiii DiiiiD iiii DiiDDiiiiiiiiiiiiiiiiii
CC)MO PONER EL RELOJ A LA HORA
1. Presione CLOCK.
PRESIONE
®
USTED VE {indic_ un parp_deo}
#
2. Ponga el reloj a la hora.
Presione el(los) bot6n(es) HOUR/MIN (A) o (Y.)
basra que la hora correcta aparezca en la
pantalla.
(ejemplo para 12:00}
PRESIONE USTED VE
HOUR MIN
ejemplo para 5:30}
PRESIONE USTED VE
3. Presione START/ENTER o CLOCK.
o ®
NOTA: Este es un reloj de 12 horas. No indica
a.m. o p.m.
CC)MO USAR EL BLOQUEO DEL HORNO
El bloqueo del homo le permite prevenir el uso de
Ice botones de comando del tablero de controles.
Esta caracteristica es muy Dtil cuando tenga que
Iimpiar el tablero de controles para evitar encender
el homo accidentalmente.
NOTA: Usted puede usar el bloqueo de control
solamente cuando el homo no est,. en uso o cuan-
do el control no ha sido programado. El bloqueo
del homo permanecer_ activo aDn despu_s de un
apag6n si se bloque6 antes del apag6n.
Para bloquear el horno:
Presione y sostenga el bot6n OVEN por 5 segundos.
",.O Usted escuchard una sola serial audible y
[_ "Loc" y A aparecerd en la pantalla.
Cuando el homo est_ bloqueado, se
escuchar_n 3 sefiales audibles si usted
_ss_ presiona cualquier bot6n de comando que
no sea CLOCK, TIMER, START/ENTER, OFF/
CANCEL, TOP u OVEN.
Para quitar el bloqueo del horno:
Presione y sostenga el bot6n OVEN por 5 segun-
",O dos. Usted escuchar& una sola seSal audi-
ble y "Loc" y 8 desaparecer_n de la pan-
talla de temperatura.
FIss_
63

iiiiiiiiiiiii % iiii iiiD iiii 2q Diiiiiiiiiiiiiiiiiiiiiiiiii
CC)MO USAR EL BLOQUEO DE LA SUPERFICIE DE
COCClC)N
El bloqueo de la superficie de cocci6n evita el uso
accidental de los quemadores de superficie al
cerrar el paso de gas a los quemadores. Se envia
la unidad con los quemadores exteriores en la
posicfon de bloqueo de la superficie de cocci6n, y
se debe quitar el bloqueo antes de usarlos. El blo-
queo de la superficie de cocci6n estar& activado
cuando se enchufe el aparato por primera vez.
NOTAS:
a El bloqueo de la superficie de cocci6n per-
manecer& activo aQn despu_s de un apag6n si
se bloque6 antes del apag6n.
a Si hay un apag6n, el aparato pasar_ automatica-
mente a la posici6n de bloqueo. Usted no podr&
encender los quemadores hasta que se restaure
la energia el_ctrica, y el bloqueo de la superficie
de cocci6n se desactive.
Para bloquear la superficie de coccibn:
1. Gire todos los quemadores a la posici6n OFF
(apagado).
;2. Presione y sostenga el bot6n TOP por
[_ 5 segundos.Usted escuchar_ una sola
seSal audible y "Lot on" aparecer& en la
pantalla durante 5 segundos. Entonces
I_s_ aparecer_ [] en la pantalla.
Para quitar el bloqueo do la superficie de coccibn:
1. Gire todos los quemadores a la posici6n OFF
(apagado).
2. Presione y sostenga el bot6n TOP por
5 segundos. Usted escuchar& una sola
seSal audible y "Lot OFF" aparecer& en la
pantalla por 5 segundos [] desaparecer&
_ss_ de la pantalla.
SEI ALES AUDIBLES
I-as se_ales audibles del teclado le permiten
saber cudndo un bot6n ha sido presionado.
Para apagar todas las se_ales audibles del
teclado do funciones:
Presione y sostenga el bot6n COOK TIME por 5
segundos. Un sonido oorto se esouchar_
y usted ver_ "Snd OFF" cuando las
seSales audibles se hayan apagado.
Para restituir las se_ales audibles:
Presione y sostenga el bot6n COOK TIME por 5
segundos. Un sonido corto se esouchard
y usted ver& "Snd on" cuando las
seSales audibles se activen de nuevo.
I-as se_ales audibles recordatorias son cuatro
tonos de 1 segundo que le recuerdan que la hora
programada para el temporizador de la cocina o
una funci6n de control del homo con tiempo pro-
gramado ha expirado.
Para quitar las se_ales audibles recordatorias:
Presione y sostenga SET por 5 segundos. Un
_MBI sonido corto se escuchard y usted ver_
"rEP OFF" cuando las seSales audibles
se apaguen.
Para restituir las se_ales audibles recordatorias:
Presione y sostenga SET por 5 segundos. Un
• MER sonido corto se escuchar& y usted verd
"rEP ON" cuando las seSales audibles seenciendan.
Las se_ales audibles do error indican un problema
con el control eleotr6nico del homo. Un c6digo de
error aparecerd en la pantalla. Vea "Mensajes en la
pantalla luminosa" en la secci6n "Diagn6stioo y
soluci6n de problemas", p. 101.
El volumen puede graduarse entre alto y bajo.
Para ajustar:
Presione y sostenga el bot6n oomienzo diferido
(DELAY START) por 5 segundos. Un tono
corto sonar& y ver& ya sea "Snd HI" o
"Snd LO". Presione y sostenga el bot6n
DELAY START por 5 segundos para cambiar al
ajuste deseado.
NOTA= Usted puede eliminar "Snd on", "Snd OFF",
"rEP on", "rEP OFF", "end HI" o "Snd Lo" de la
pantalla y restaurar la hora del dfa si presiona
cualquier bot6n.
64
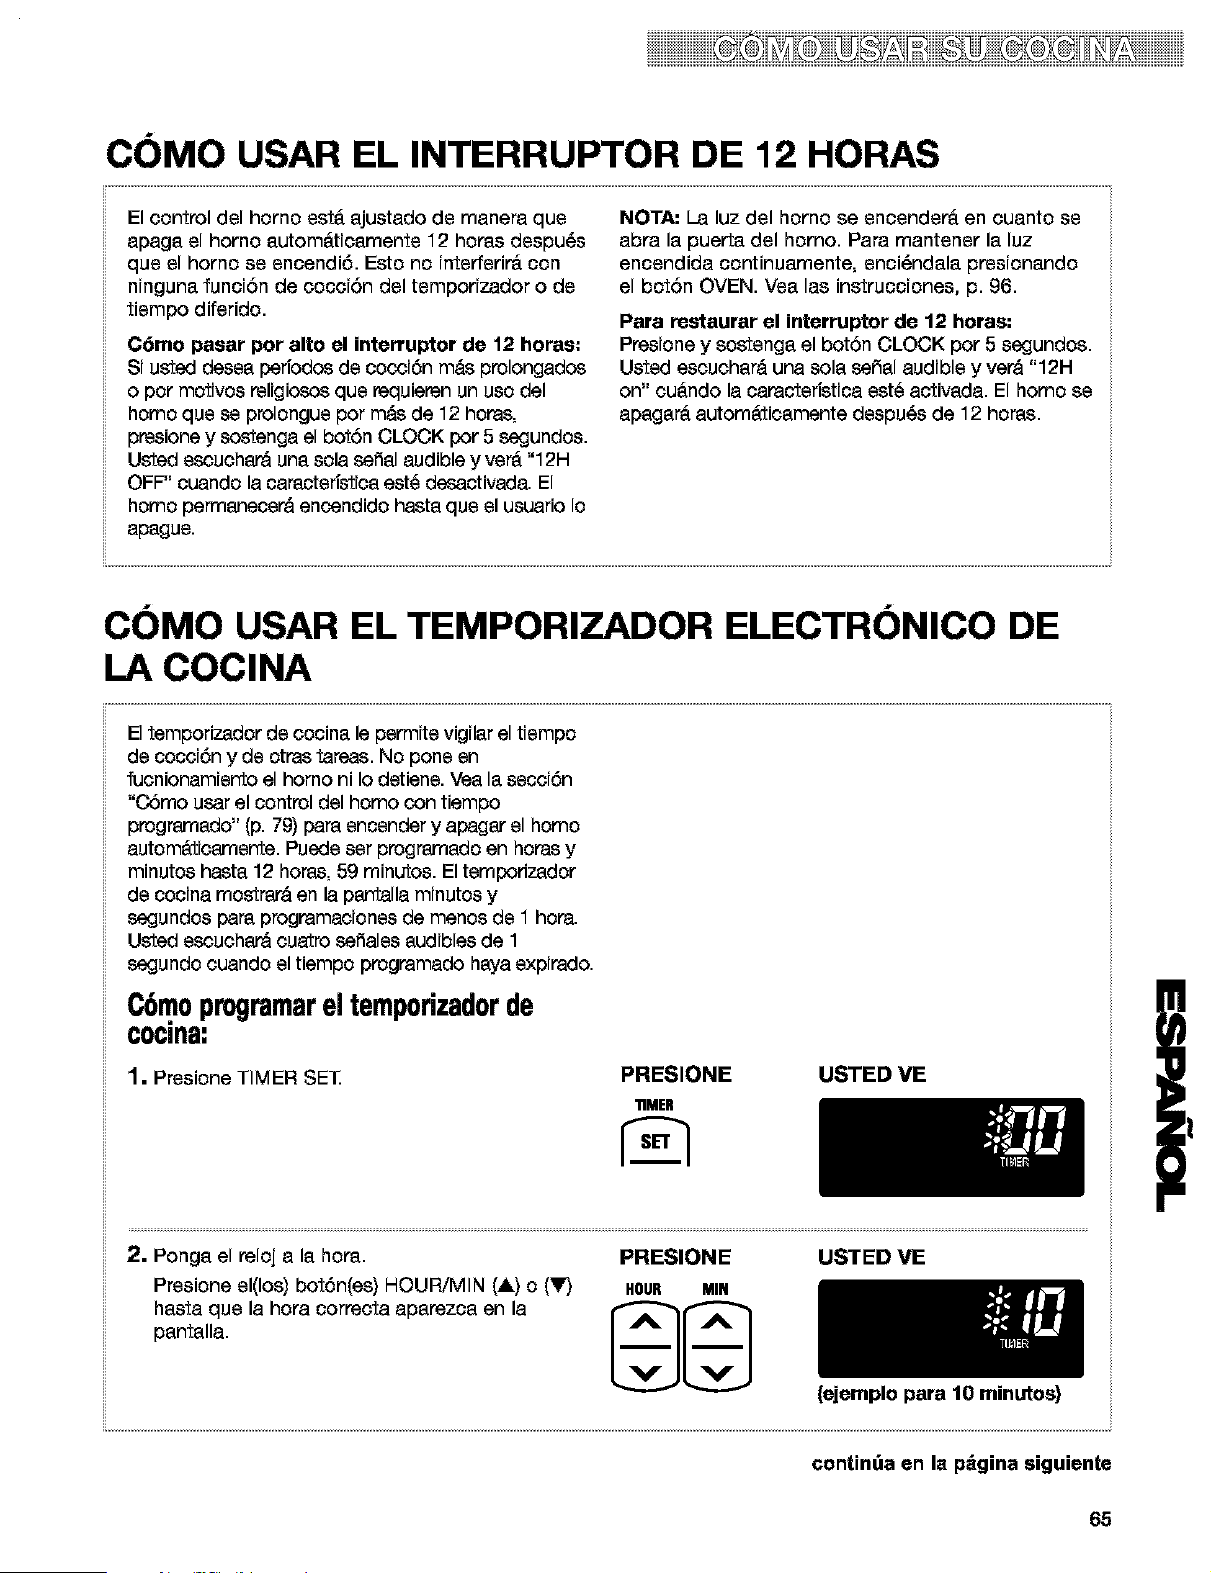
iiiiiiii iiii2iiiiiiiiiiiiiiii
CC)MO USAR EL INTERRUPTOR DE 12 HORAS
El control del homo est& ajustado de manera que
apaga el homo autom&ticamente 12 horas despu_s
que el homo se encendi6. Esto no interferir_ con
ninguna funciSn de cocciSn del tempodzador o de
tiempo diferido.
C6mo pasar por alto el interruptor de 12 horas:
Si usted desea pedodos de cocoi6n rods prolongados
o pot motivos religiocos que requieren un uso del
homo que se prolongue por m&s de 12 horas,
presione y sostenga el botSn CLOCK pot 5 segundos.
Usted escuchard una sola seSal audible y veto "12H
OFF" cuando la caracteri'stica est6 desactivada. El
homo perrnanecerd encendido hasta que el usuario Io
apague.
NOTA: La luz del homo se encender_ en cuanto se
abra la puerta del homo. Para mantener la luz
encendida continuamente, enci_ndala presionando
el botSn OVEN. Vea las instrucciones, p. 96.
Para restaurar el intorruptor do 12 horas:
Presione y sostenga el botSn CLOCK pot 5 segundos.
Usted escuchar& una sola se5al audible y verd "12H
on" cu&ndo la caracterfstica est6 activada. El homo se
apagam autom&ticamente despu_s de 12 horas.
CC)MO USAR EL TEMPORIZADOR ELECTRC)NICO DE
LA COCINA
Eltemporizador de cocina le permite vigilarel tiempo
de cocciSn y de otras tareas. No pone en
fucnionamiento el horno ni Io detiene. Vea la secciSn
"C6mo usar el control del homo con tiempo
prograrnado" (p. 79) para encender y apagar el homo
autom&ticarnente. Puede ser prograrnado en horas y
minutos hasta 12 horas, 59 minutos. El tempodzador
de cocina mostr'ard en la pantalla minutos y
segundos para programaciones de menos de 1 hora.
Usted escuchard cuatro seSales audibles de 1
segundo cuando el tiempo programado haya expirado.
C6moprogramareltemporizadorde
COclna:
1. Presione TIMER SEll
PRESIONE
11MER
USTED VE
2. Ponga el r_loj a la hoPa.
Presione el(los) bot6n(es) HOUR/MIN (,ilk)o ('_r,)
basra que la hora correcta aparezca en la
pantalla.
PRESIONE USTED VE
HOUR MIN
(ejemplo para 10 minutos}
contint_a en la p_gina siguiente
65
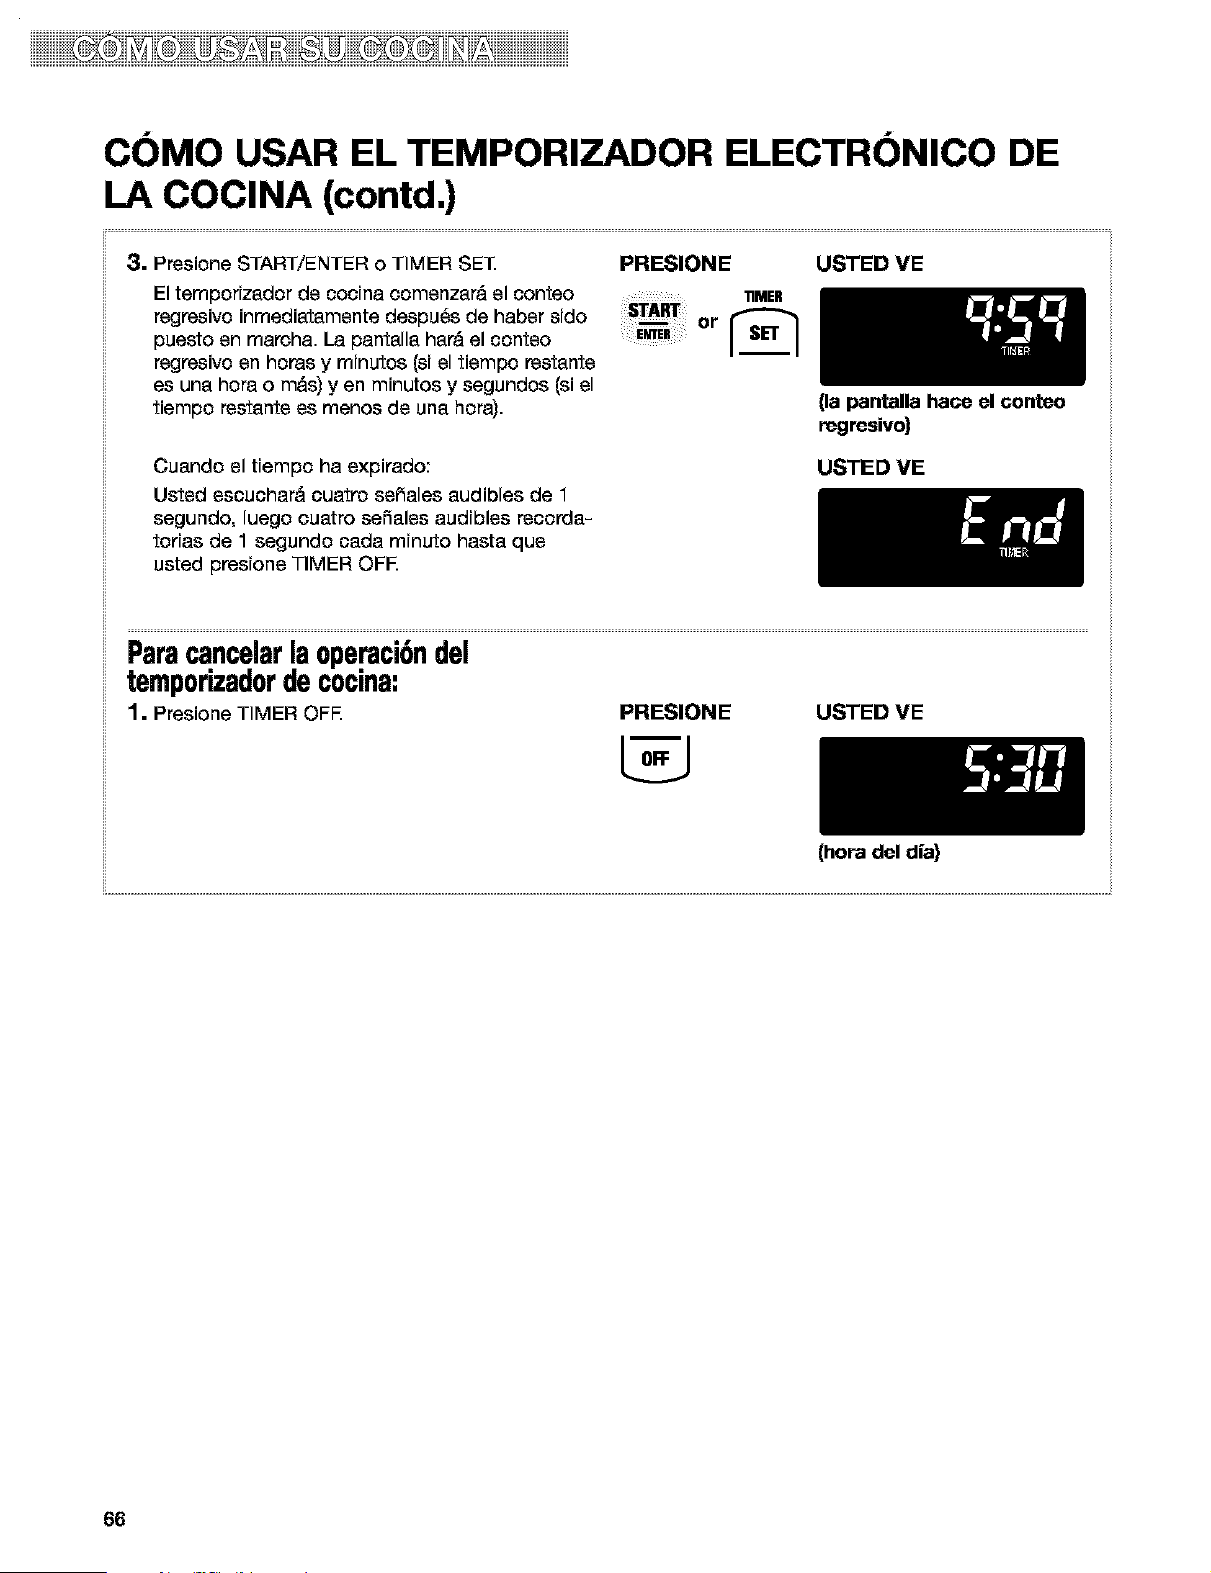
iiiiiiiiiiiiii i iiii iiiii Hiiiii
CC)MO USAR EL TEMPORIZADOR ELECTRC)NICO DE
LA COCINA (contd.)
3. Presione START/ENTER o TIMER SEll
El temporizador de cocina oomenzard el conteo
regresivo inmediatamente despu6s de haber sido
puesto an marcha. La pantalla hard el conteo
regresivo an horas y minutos (si el tiempo restante
es una hora o rods) yen minutos y segundos (si el
tiempo restante as rnenos de una hora).
PRESIONE
11MER
USTED VE
Cuando el tiempo ha expirado:
Usted escuchard cuatro seSales audibles de 1
segundo, luego cuatro sefiales audibles recorda-
torias de 1 segundo cada minuto hasta qua
usted presione TIMER OFE
(la pantalla hace el conteo
regresivo)
USTED VE
Paracancelarlaoperaci6ndel
temporizadorde cocina:
1. Presione TIMER OFE PRESIONE USTED VE
(hera del dia}
66
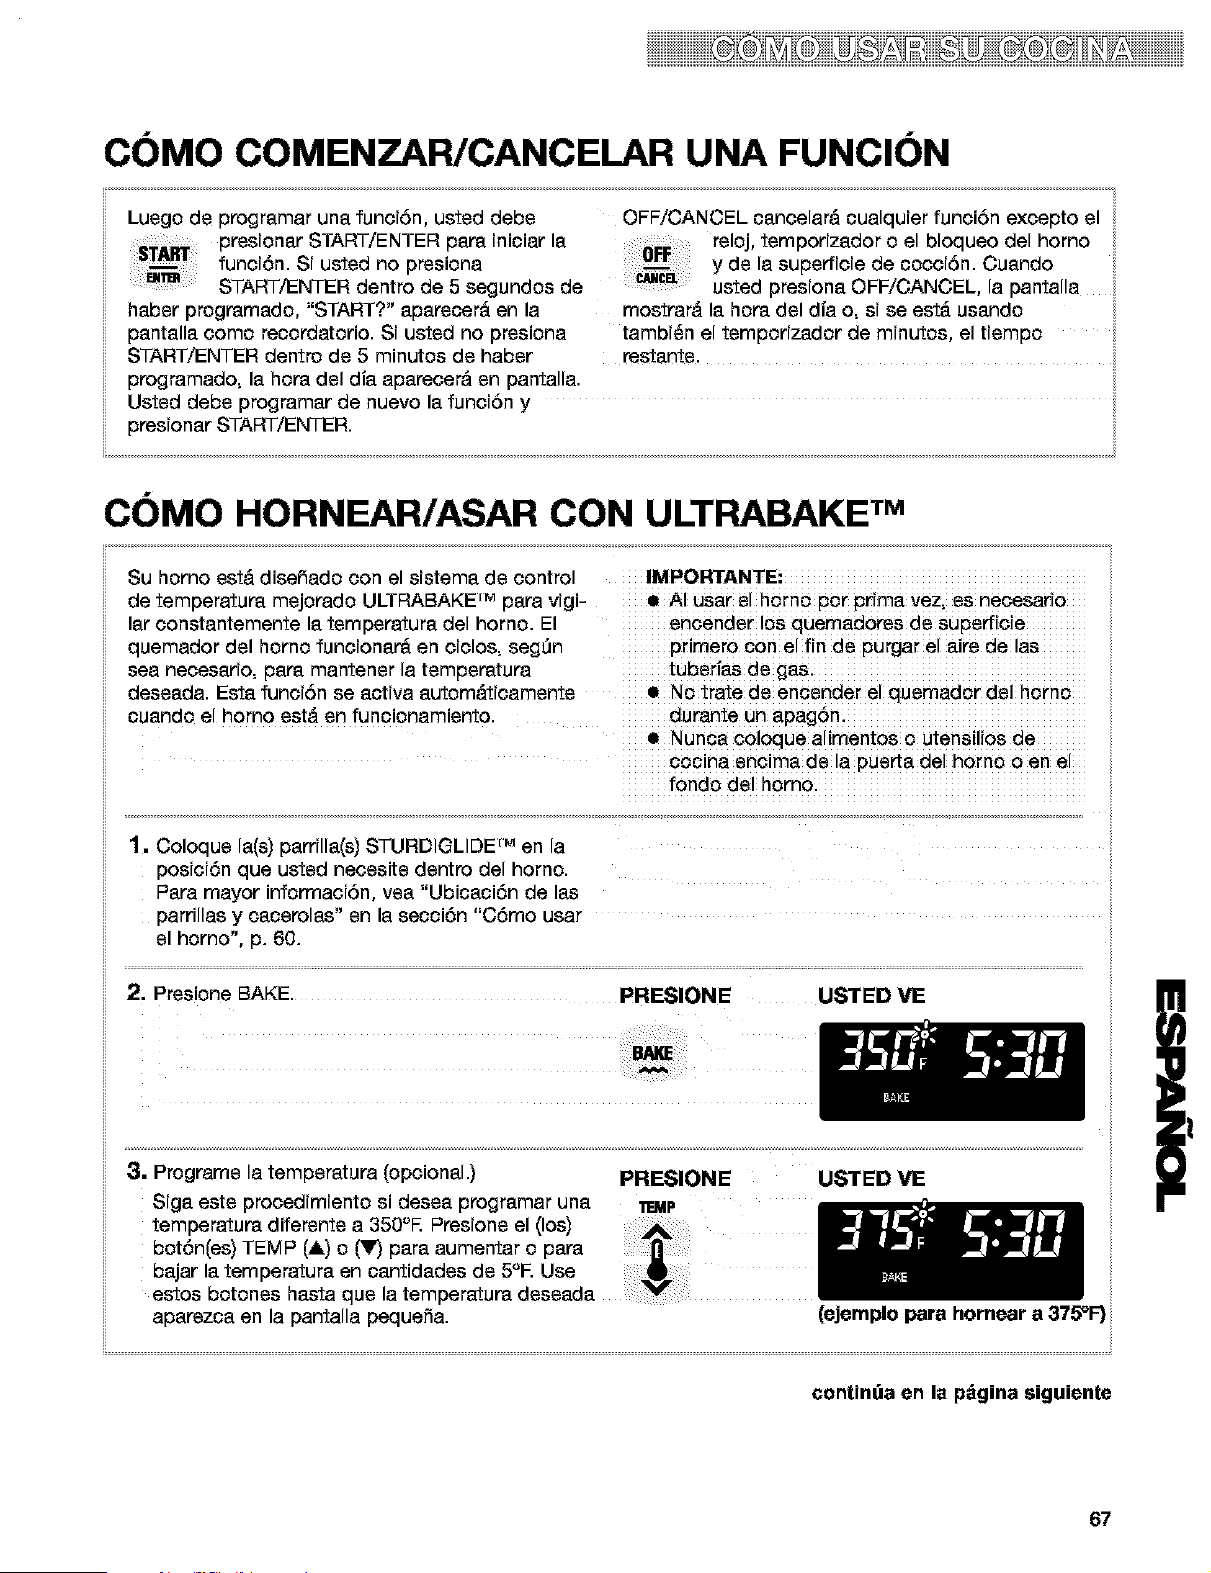
iiiiiiiiiiiiiiiiiiiiii @ iiii iiiii Hiiiiiiiiiiiiiiii
CC)MO COMENZAR/CANCELAR UNA FUNCIC)N
Luego de programar una funci6n, usted debe
presionar START/ENTER papa iniciar la
funci6n. Si usted no presiona
START/ENTER dentro de 5 segundos de
haber programado, "START?" aparecer& en la
pantalla como recordatorio. Si usted no presiona
START/ENTER dentro de 5 minutos de haber
programado, la hora del dfa aparecer& en pantalla.
OFF/CANCEL cancelar& cualquier funci6n excepto el
reloj, temporizador o el bloqueo del homo
y de la superficie de cocci6n. Cuando
usted presiona OFF/CANCEL, la pantalla
mostrar& la hora del dfa o, si se est_ usando
tambi_n el temporizador de minutos, el tiempo •
restante. •
Usted debe programar de nuevo la funci6n y
presionar START/ENTER.
CC)MO HORNEAR/ASAR CON ULTRABAKE TM
Su homo est& dise_ado con el sistema de control IMPOR3"ANTE:
de temperatura mejorado ULTRABAKE rM para vigi- • AI usar el homo pot prima vez, es necesario
lar constantemente la temperatura del homo. El encender !0s quernad0reS de SuPerf!cie
quemador del homo funoionar_ en oiolos, seg_n primero con el fin de purgar el 8.ire de las
sea necesado, papa mantener la temperatura tubedas de gas.
deseada. Esta funci6n se activa autom&ticamente • NO trate de encender el quemador del homo
ouando el horno est& en funoionamiento.
• Nunca _loque alimentos o utensilios de
cecina encima de la puerta del hQmo 0 en el
fondo del homo. ,
1. Coloque la(s) parrilla(s) STURDIGLIDE rMen la
posiciSn que usted necesite dentro del homo.
Para mayor informaciSn, yea "UbicaciSn de las
parrillas y cacerolas" en la secciSn "CSmo usar
el homo", p. 60.
2. Presione BAKE. PRESIONE USTED VE
3. Programe la temperatura (opcional.)
Siga este procedimiento si desea programar una
temperatura diferente a 350°E Presione el (los)
bot6n(es) TEMP (A) o (llr,_para aumentar o pare
bajar la temperatura en cantidades de 5°E Use
estos botones basra que la temperatura deseada
aparezca en la pantalla pequeSa.
PRESIONE USTED VE
11EMP
(ejemplo para hornear a 375°F)
continua en la p_gina siguiente
67
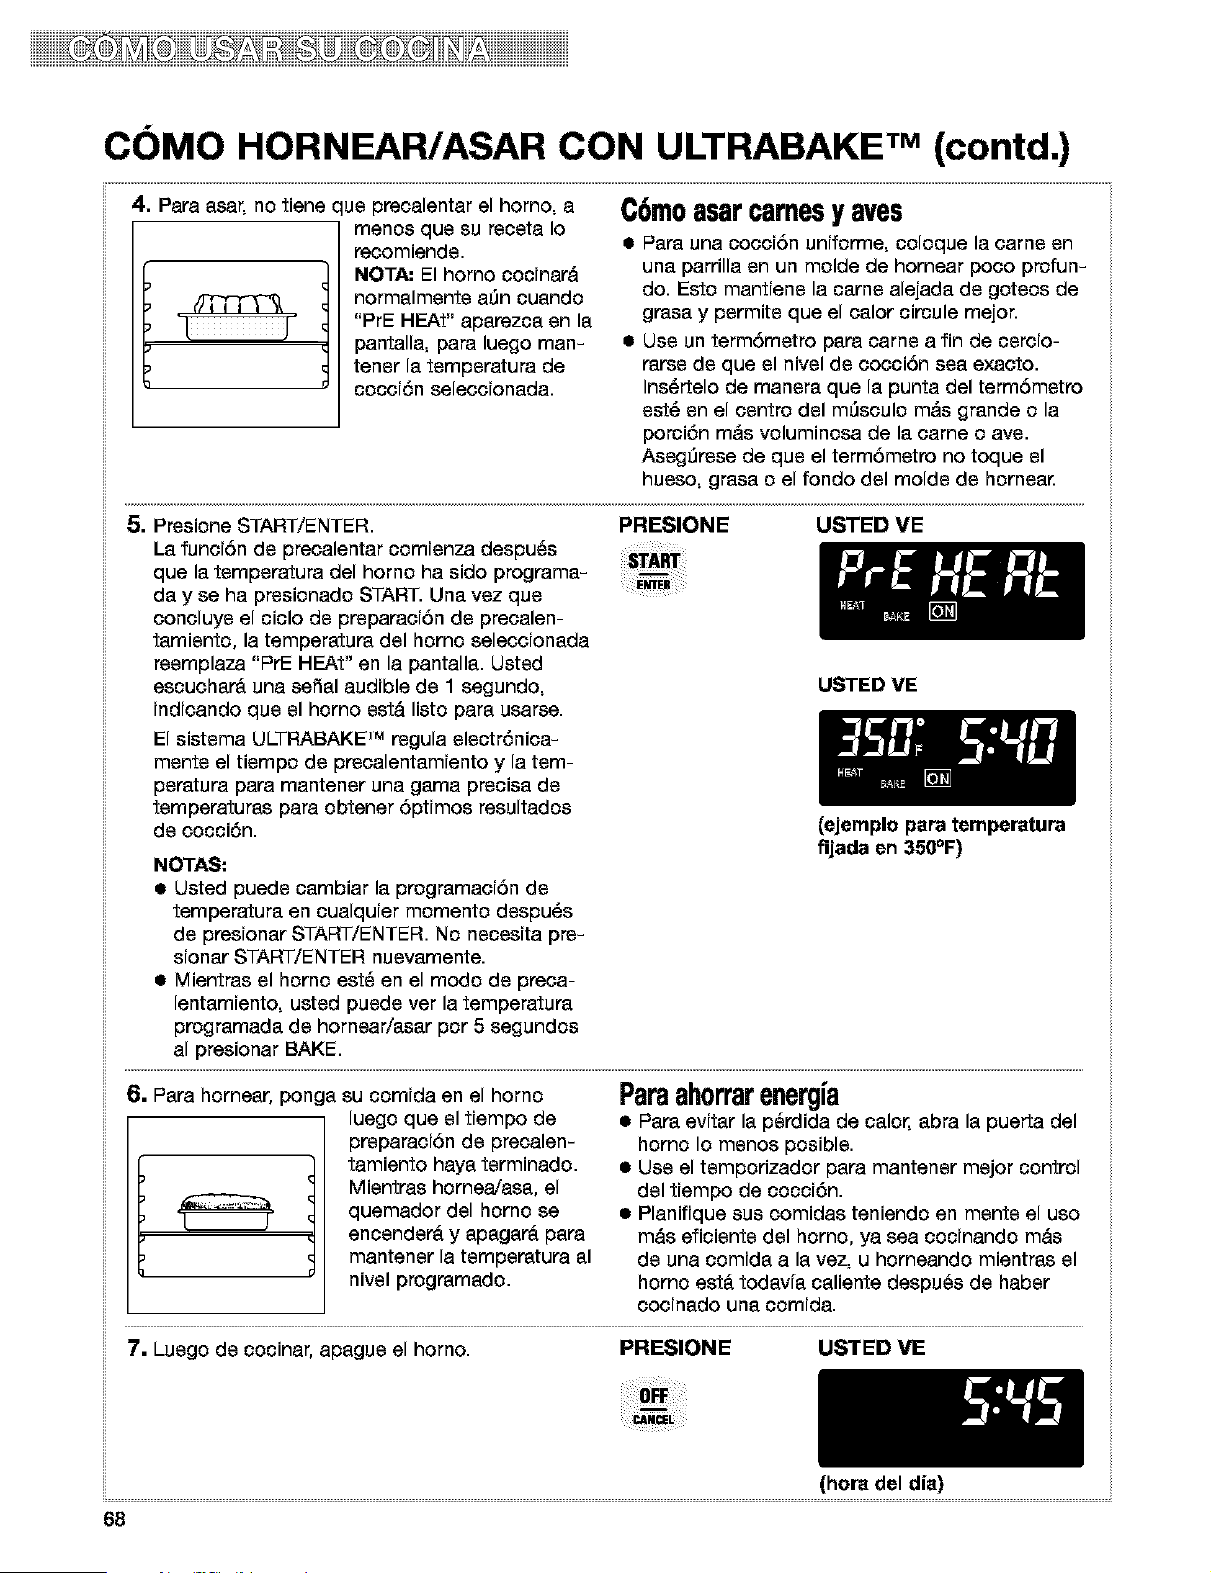
iiiiiiiiiiiii % iiii iiiD iiii 2q Diiiiiiiiiiiiiiiiiiiiiiiiii
C()MO HORNEAR/ASAR CON ULTRABAKE TM (contd.)
4. Papa asar, no tiene que preoalentar el homo, a
menos que su reoeta Io
reoomiende.
NOTA: El horno cocinar&
normalmente a0n cuando
L J "PrE HEAt" apapazca on la
pantalla, para luego man-
tenor la de
tempepatura
cocci6n seleccionada.
C6moasarcarnesy aves
• PaPauna coooi6n uniforrne, coloque la came on
una parrilla on un molde de hornear poco profun-
do. Esto mantiene la came alejada do goteos de
gpasa y permite que el calor circule mejor.
• Use un term6metro para came a fin de oercio-
Parse do que el nivel do cocci6n sea exacto.
Ins_rtelo de manepa que la punta del term6metro
est_ on el centro del m0sculo m&s gpande o la
porci6n rods voluminosa de la came o ave.
Aseg0rsse de que el term6metro no toque el
hueso, gpasa o el fondo del molde do hornea_
5. Presione START/ENTER. PRESIONE USTED VE
La funci6n do precalentar comienza despu_s
que la tempepatura del homo ha sido progpama-
day se ha presionado START. Una vez que
concluye el ciclo do prepapaci6n do precalen-
tamiento, la tempepatupa del homo seleccionada
reemplaza "PrE HEAt" en la pantalla. Usted
escuchar_ una serial audible do 1 segundo, USTED VE
indicando que el homo estd listo para usarse.
El sistema ULTRABAKE "_ regula electr6nica-
monte el tiempo do precalentamiento y la tom-
peratura para mantener una gama precisa do
tempepatupas para obtener 6ptimos resultados
do cocci6n.
(ejemplo para temperatura
fijada en 350_F)
NOTA$:
• Usted puede cambiar la progpamaci6n do
temperatupa en cualquier momento despu_s
do presionar START/ENTER. No necesita pro-
sionar START/ENTER nuevamente.
• Mientras el homo est_ en el modo do preca-
lentamiento, usted puede ver la temperatupa
progpamada do hornear/asar por 5 segundos
al presionar BAKE.
Paraahorrarenergia
• PaPa evitar la p_rdida de calor, abra la puerta del
homo Io menos posible.
• Use el temporizador para mantener mejor control
del tiempo de cocci6n.
• Planifique sus comidas teniendo en monte el uso
rods eficiente del homo, ya sea cocinando rods
do una comida a la vez, u horneando mientpas el
homo est& todavfa caliente despu_s do haber
oooinado una comida.
6. Papa hornear, ponga su comida en el homo
luego que el tiempo de
preparaci6n do precalen-
I _ I tamientO haya terminadO"
Mientpas hornea/asa, el
quemador del homo se
encender_ y apagar_ para
mantener la tempepatupa al
nivel progpamado.
7. Luego do cocinar, apague el homo.
PRESIONE USTED VE
OFF
(hora del dia)
68

iiiiiiii iiii2iiiiiiiiiiiiiiii
CC)MO REGULAR EL CONTROL DE TEMPERATURA DEL
HORNO (OPCIONAL)
Aunque s_Jhomo numtoestd regulado adecuadarnen_
para propordonar temperaturas pr_isas, pued_
oocinar rnds r_oido o rnds lento qu_ su horno _ejo.
Sf usted no estd satfsfecho con los resultados del
horneado/asado, puede cambfar la calibracfSn de
la temperatura sfguiendo los pasos fndicados a
contfnuacfSn.
NOTA: NO mfda la temperatura del homo con un
termSmetro. El abrir la puerta del horno bajard la
temperatura del horno y le dar_ una lectura
fncorrecta. Igualmente, la lectura de temperatura
del termSmetro cambiar_ cuando su homo cambia
de cfclo.
1. Presione y sostenga BAKE por 5 segundos.
La pantalla le mostrar& la calibracfSn actual de la
temperatura, por ejemplo "0," si usted no ha
ajustado a_n la temperatura.
PRESIONE USTED VE
(programad6n de fdbrica en "0")
2. Programe la nueva calibraciSn de temperatura. PRESIONE USTED VE
Presione los botones TEMP (&) para aumentar la _P
tamperatura c (V) para bajar la temperatura en can-
tidades de 10_E Usted puede programar el cambio
de temperatura tan bajc ccmo _0°F o tan alto
como +30°E Un sight de menos (-) aparecerd
antes del n_mero cuando se dismfnuye la progra-
macf6n de la tamperatura. El signo de menos fndfca
que el horno estam m_s fri'c en la proporcf6n fndf-
cada per la cffra que aparece en la pantalla. No hay
sight delante del n_mero cuandc se aumenta la
prograrnaciSn de la temperatura.
(ejemplo cuando se pone el
horno 10_F mas caliente)
3. Acepte el ajuste. PRESIONE
NOTA: Usted debe presionar START/ENTER, de
Io contrario sue cambios no ser&n activados.
USTED VE
(hora del alia)
CGm0determinarlacantidaddeajuste
necesari0
El cuadro a la derecha le dice cudnto tiene que
regular la temperatura para obtener los resultados
de cocciSn deseados. Usted puede deterrninar los
resultados de cocci6n por la cantidad de dorado,
humedad y tiempos de levantamiento de masa
para comidas horneadas.
ESTE NUMERO
DE GRADOS
PAPA COCINAR COMIDA... (FAHRENHEIT)
Mucho mds
Paraindicarlatemperaturaen°Cenvezde°F:
Presione y sostenga BROIL pot 5 segundos. Ustedescuchard
un sonido corto y las ternperatums en pantalla se
c_-nbiar_n a _. Para volver al programa de _Y,,
repita las instrucciones arriba indicadas. Cada
vez que usted haga un carnbio '_' o "_F" aparecera en la
pantalla h_'ta que se pmsione otro bot6n,
69

iiiiiiiiiiiii % iiii iiiD iiii 2q Diiiiiiiiiiiiiiiiiiiiiiiiii
COMO ASAR A LA PARRILLA
Para obtsner los mejorss rssultados, no prsoalisnts
cuando tsnga que asar a la parrilla a msnos qus su
rscsta Io recomisnds.
1. Coloque la parrllla STURDIGLIDE rM de manera
que la superflcle de la comida est_ alejada cuan-
do menos 3 pulgadas del quemador de asar. Vea
"lnstrucciones para asar" pp. 71, 72.
2. Ponga su comida en la charola de asar y coloque
V
% #
la charola en el centro
de la parrllla del homo.
Cierre la puerta del homo.
3. Presione BROIL. PRESIONE USTED VE
4. Presione START/ENTER.
PRESIONE USTED VE
Usted puede camblar la temperatura programa-
da en cualquler momento antes o despu_s de
presionar START/ENTER. Para cambiar la pro- !mE_
gramaci6n, yea" C6mo asar con precisi6n" m&s
adelante en esta secci6n.
5. Despu_s de asar, apague el homo.
PRESIONE USTED VE
(hora del dia)
7O
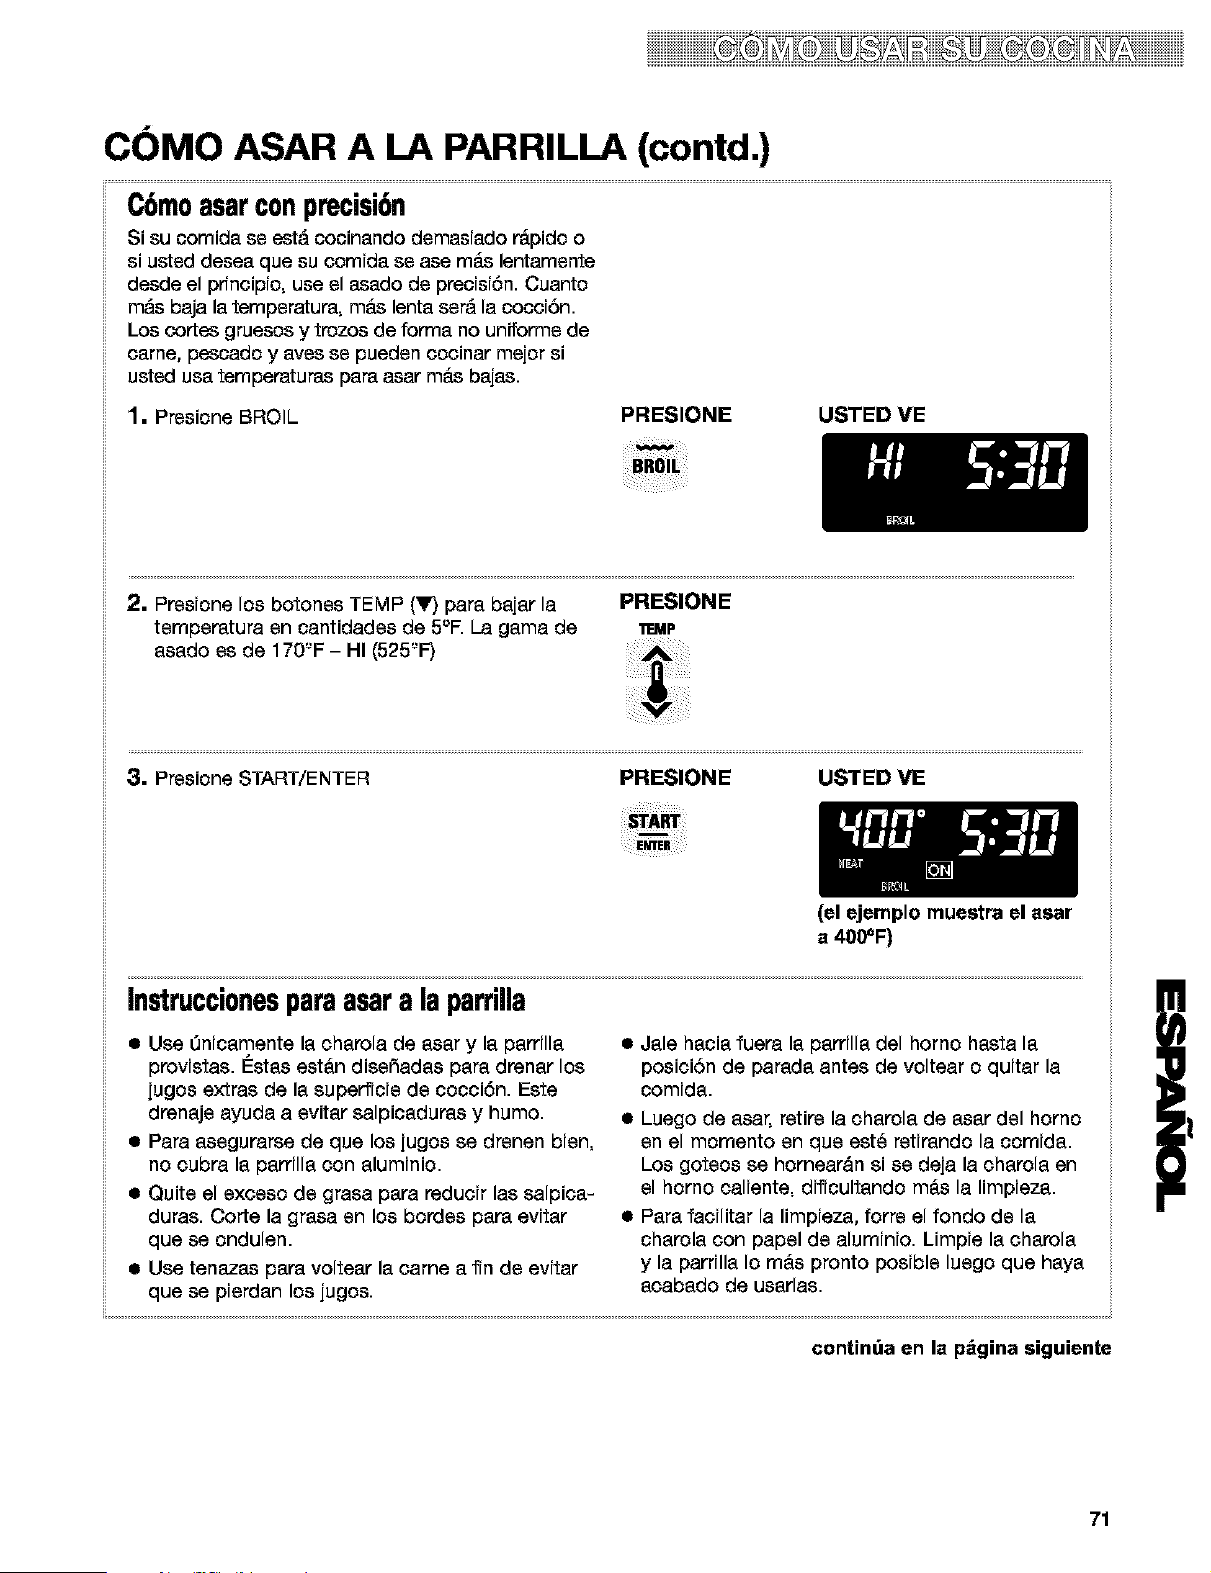
iiiiiiii iiii2iiiiiiiiiiiiiiii
CC)MO ASAR A LA PARRILLA (contd.)
C6mo
asarconprecisi6n
Si su comida se est& cocinando demasiado r_pido o
si usted desea que su comida se ase m&s lentamente
desde el pfincipio, use el asado de precisi6n. Cuanto
m&s baja la temperrturr, m&s lenta ser& la cocci6n.
Los cortes gruesos y trozos de forma no uniforme de
came, pesoado y ayes se pueden ocoinar mejor si
usted usa temperrturrs parr asar m&s bajas.
1. Presione BROIL
PRESIONE USTED VE
2. Presione los botones TEMP (Y) para bajar la PRESIONE
temperrturr en cantidades de 5°F. La gama de 1T=MP
asado es de 170'-'F - HI (525'-'F)
3. Presione START/ENTER PRESIONE USTED VE
(el ejemplo rnuestra el asar
a 400_F)
Instrucciones paraasara la parrilla
• Use t3nicamente la charola de asar y la parrilla
provistas. I_stas est&n disefiadas para drenar los
jugos extras de la superficie de cocci6n. Este
drenaje ayuda a evitar salpicadurrs y humo.
• Parr asegurarse de que los jugos se drenen bien,
no cubra la parrilla con aluminio.
• Quite el exceso de grrsa para reducir las salpica-
durrs. Corte la grrsa en los bordes parr evitar
que se ondulen.
• Use tenazas parr voltear la came a fin de evitar
que se pierdan los jugos.
e
Jale hacia fuera la parrilla del homo hasta la
posici6n de parada antes de voltear o quitar la
comida.
• Luego de asar, retire la charola de asar del homo
en el momento en que est6 retirrndo la comida.
Los goteos se homear&n si se deja la charola en
el homo caliente, dificultando m_s la limpieza.
• Parr facilitar la limpieza, forre el fondo de la
charola con papel de aluminio. Limpie la charola
y la parrilla Io m_s pronto posible luego que haya
acabado de usarlas.
contint_a an la p_gina siguiente
71
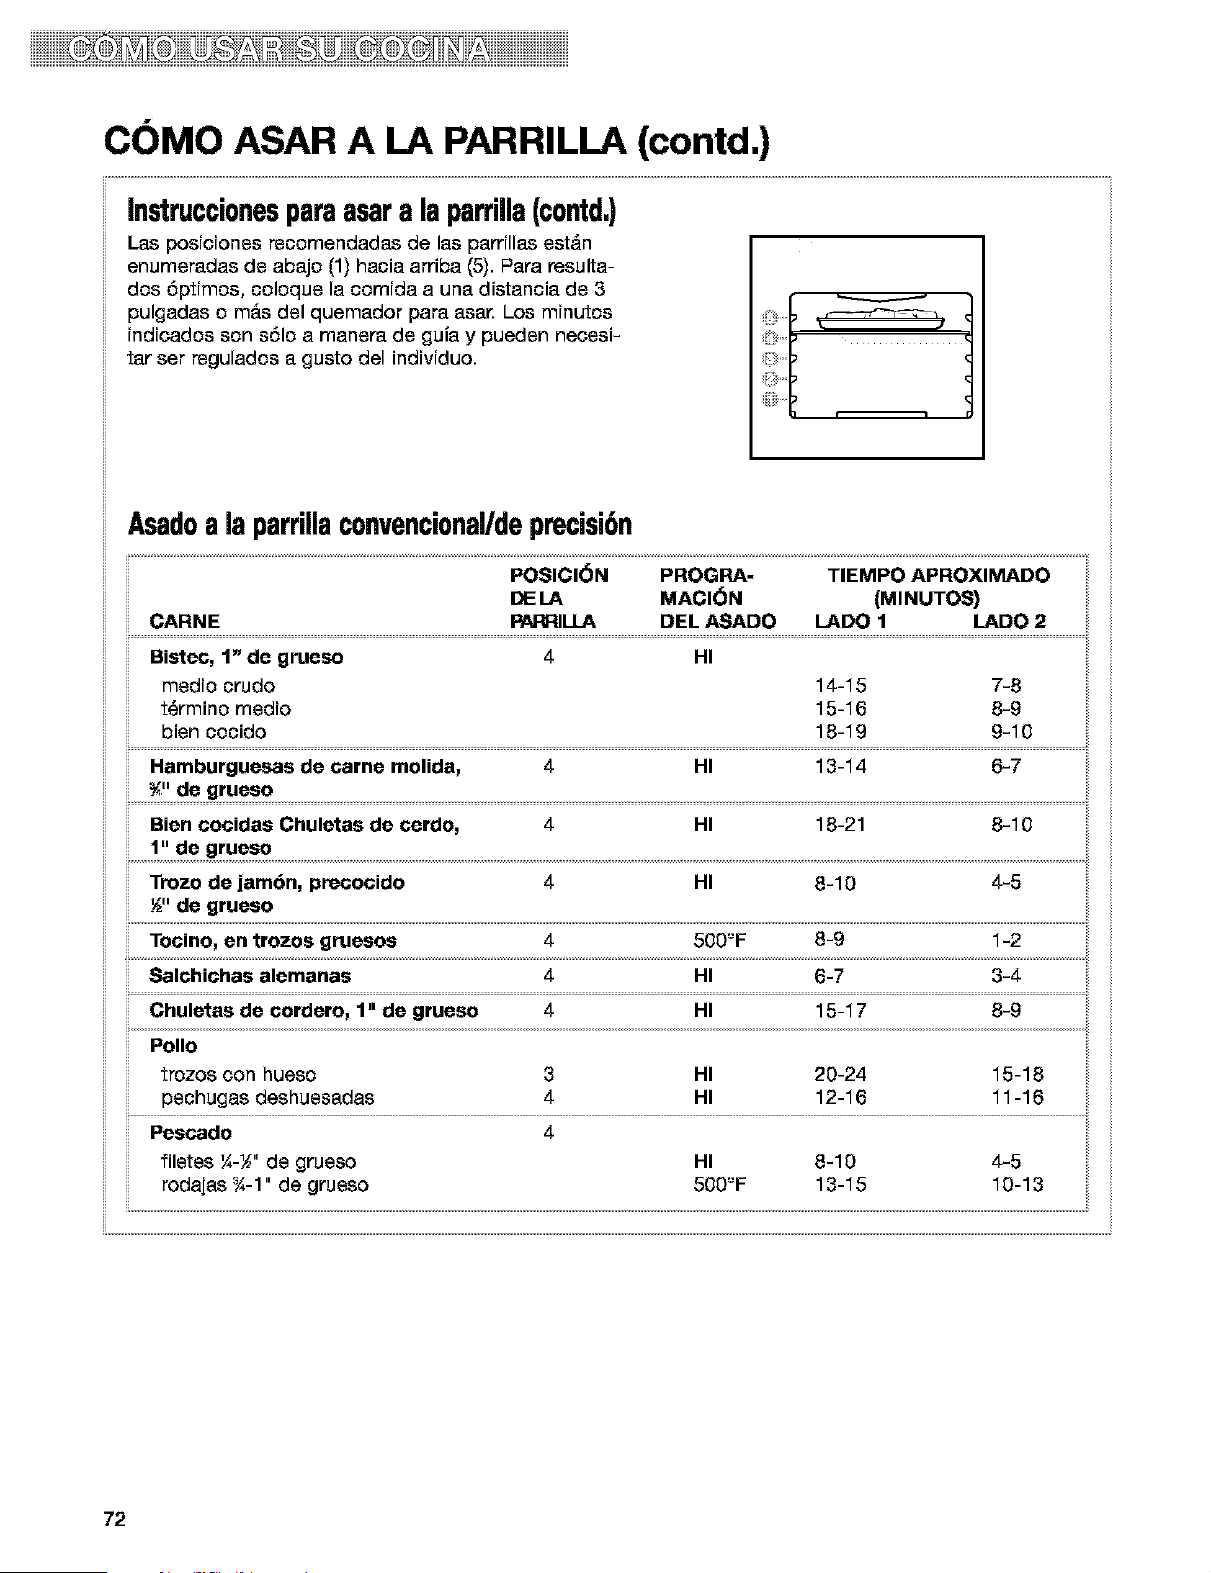
iiiiiiiiiiiii % iiii iiiD iiii 2q Diiiiiiiiiiiiiiiiiiiiiiiiii
CC)MO ASAR A LA PARRILLA (contd.)
Instruccionesparaasara laparrilla(contd.)
Las posiciones recomendadas de las parrillas est_n
enumeradas de abajo (1) hacia arriba (5). Para resulta-
dos 5ptimos, coloque la comida a una distancia de 3
pulgadas o m&s del quemador para asa_ Los minutos
indicados son sSIo a manera de guia y pueden necesi-
tar ser regulados a gusto del individuo.
ilv
Asadoa laparrillaconvencional/deprecisi6n
3 HI 20-24
P_s_do ,, 4
filetes Y_:_ de grueso HI 8-10 4-5
rodajas -X-1 de grueso 500'-'F 13-15 10-13
72
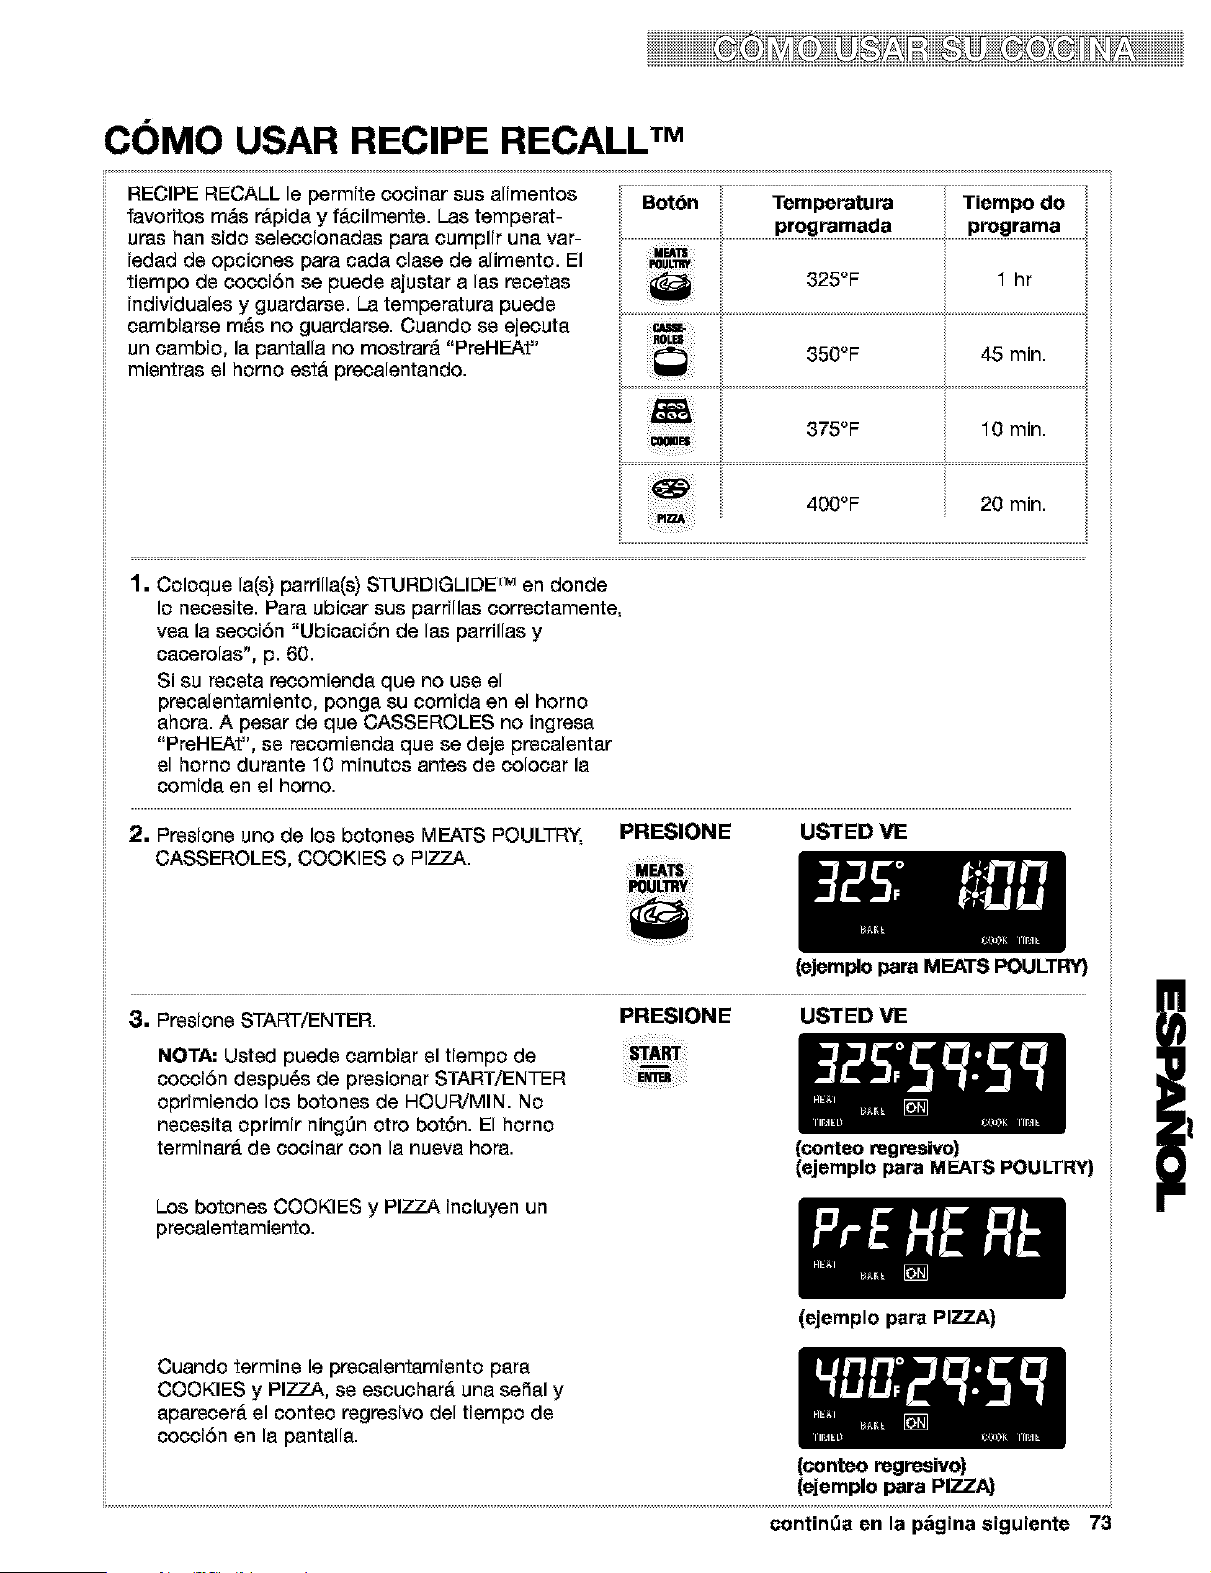
iiiiiiii iiii2iiiiiiiiiiiiiiii
CC)MO USAR RECIPE RECALL TM
RECIPE RECALL le permite cocinar sus alimentos
favoritos rods r_pida y f&cilmsnts. Las tempsrat-
uras ban sido seleccionadas papa cumplir una var-
iedad de opciones para cada clase de alimsnto. El
tismpo de cocciSn se pueds ajustar alas rscetas
individuales y guardarss. La temperatura pueds
cambiarse rods no guardarse. Cuando ss ejecuta
un cambio, la pantalla no mostrard "PreHEAt"
misntras el homo est& precalentando.
programada programa
POULllW
325°F 1 hr
ii _ ii i ii i
3sooF 4sm n.
400 F 20 rain.
1. Coloque la(s) parrilla(s) STURDIGLIDE rM en donde
Io necesite. Para ubicar sus parrillas correctamente:
vea la secciSn "Ubicaci6n de las parrillas y
cacerolas", p. 60.
Si su receta recomienda que no use el
precalentamiento, ponga su comida en el homo
ahora. A pesar de que CASSEROLES no ingresa
"PreHEAt", se recomienda que se deje precalentar
el homo durante 10 minutos antes de colocar la
comida en el homo.
2. Presione uno de los botones MEATS POULTRY, PRESIONE USTED VE
CASSEROLES, COOKIES o PIZZA ...........
{ejemplo para MEATS POULTRY}
3. Presione START/ENTER. PRESIONE USTED VE
NOTA: Usted puede cambiar el tiempo de
cocci6n despu_s de presionar START/ENTER
oprimiendo los botones de HOUR/MIN. No
necesita oprimir ning_n otro bot6n. El homo
terminar_ de oooinar con la nueva hora.
(conteo regresivo)
(ejemplo para MEATS POULTRY)
Los botones COOKIES y PIZZA incluyen un
precalentamiento.
Cuando termine le preoalentamiento para
COOKIES y PIZZA, ss escuchar& una seSal y
aparecer& el conteo regresivo del tiempo de
cocciSn en la pantalla.
(ejemplo para PIZZA)
(conteo regresivo)
(ejemplo para PIZZA)
continua en la pagina siguiente 73
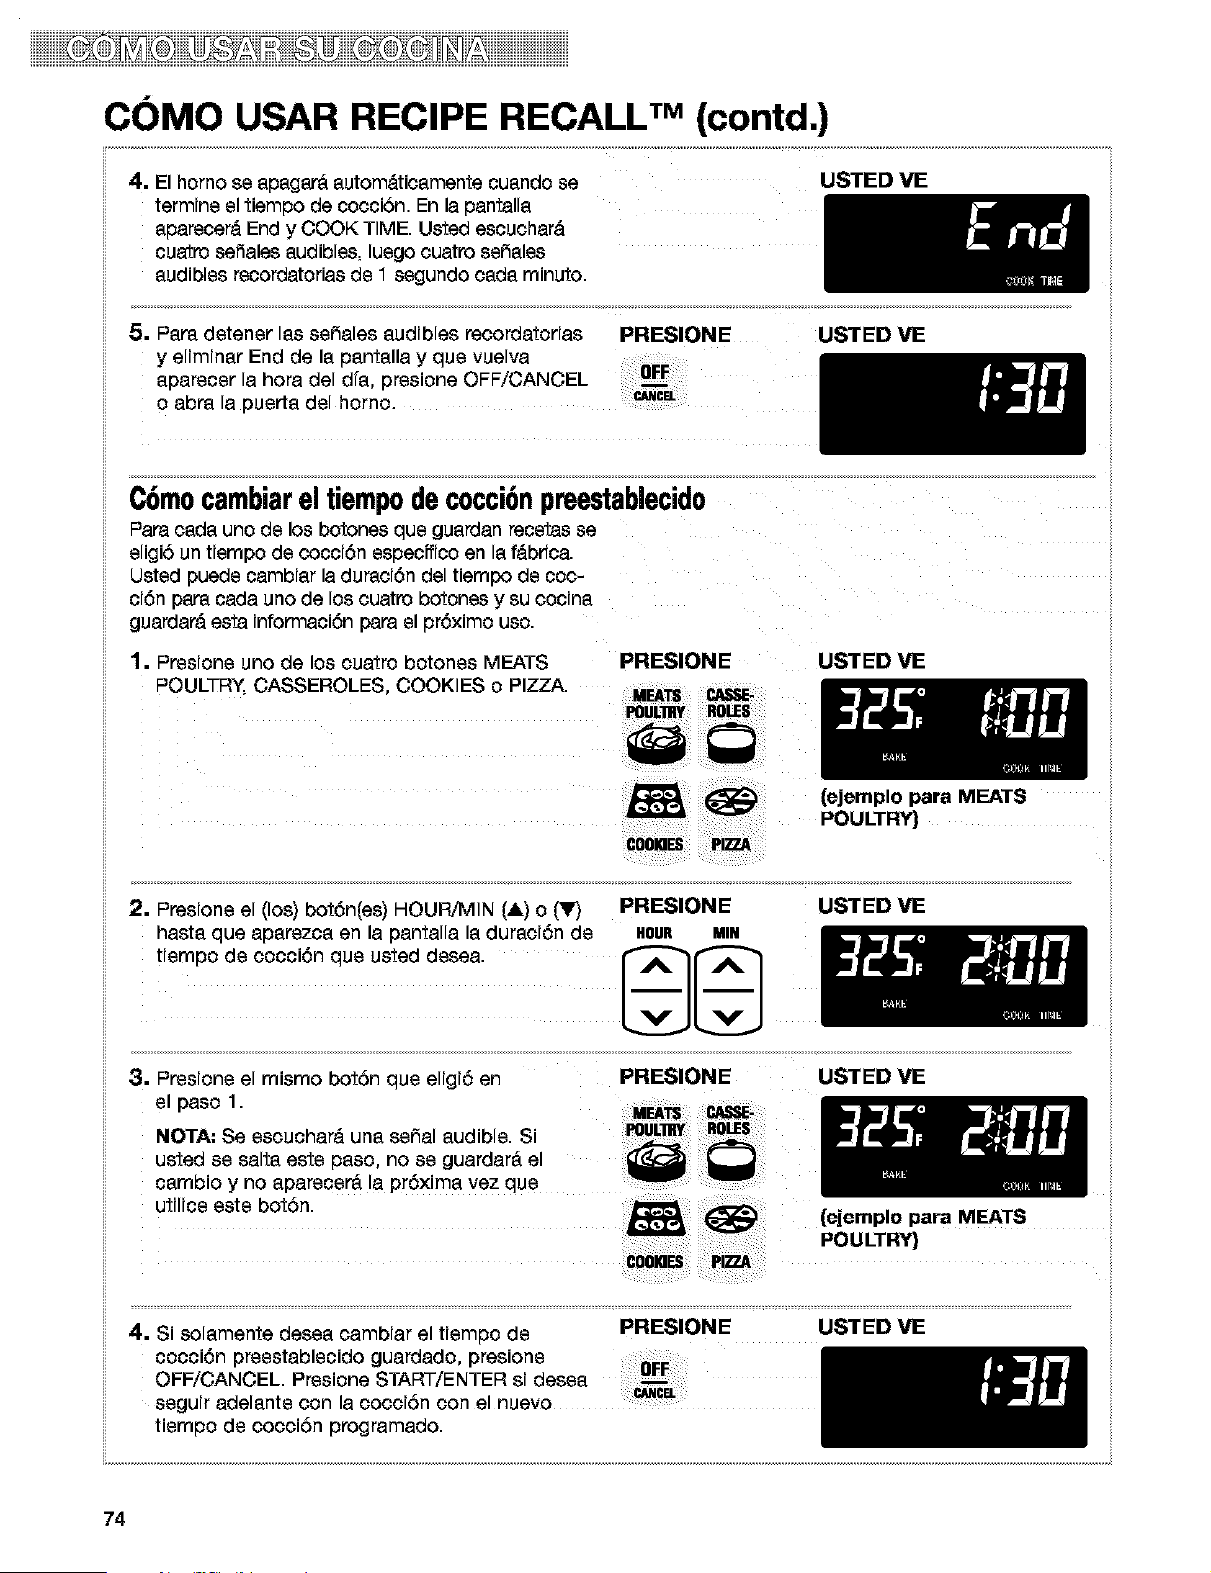
iiiiiiiiiiii i iiii iiiii Hiiiiiii
CC)MO USAR RECIPE RECALL TM(contd.)
4. El homo se apagar_ automdticamente cuando se
termine el tiempo de cocciEn. En la pantalla
aparecerd End y COOK TIME. Usted escuchard
cuatro sefiales audibles, luego cuatro seEales
audibles recordatorias de 1 segundo cada minuto.
USTED VE
5. Pars detener las seEales audibles recordatorias PRESIONE
y eliminar End de la pantalla y que vuelva ....
aparecer la hora del di'a presione OFF/CANCEL
o abra la puerta del homo.
USTEDVE
C6mocambiarel tiempodecocci6npreestablecido
PaPacads uno de los botones que guardan recetas se
eligi5 un tiempo de cocciEn especffico en a fdbrfca.
Usted puede cambiar la duraciEn del tiempo oe coc-
ciEn pars cads uno de los cuatro botches y su coclna
guardard esta informaciEn papa el prEximo uso.
1. Presione uric de los ouatro botones MEATS
POULTRY, CASSEROLES, COOKIES o PIZZA.
PRESIONE USTED VE
CO010ES
2. Presione el (los) bot6n(es) HOUR/MIN (A) o (_r) PRESIONE
hasta que aparezca en Is pantalla la duraci6n de HOUR MIR
tiempo de cocci6n que usted desea.
(ejemplo para MEATS
POULTRY)
USTEDVE
utilice este bot6n. (ejemplo para MEATS
POULTRY) •
coom_s
4. Si solamente desea cambiar el tiempo de PRESIONE USTED VE
cocci6n preestablecido guardado, presione
OFF/CANCEL Presione START/ENTER si desea
seguir adelante con la cocciEn con el nuevo
tiempo de cocciEn programado.
74
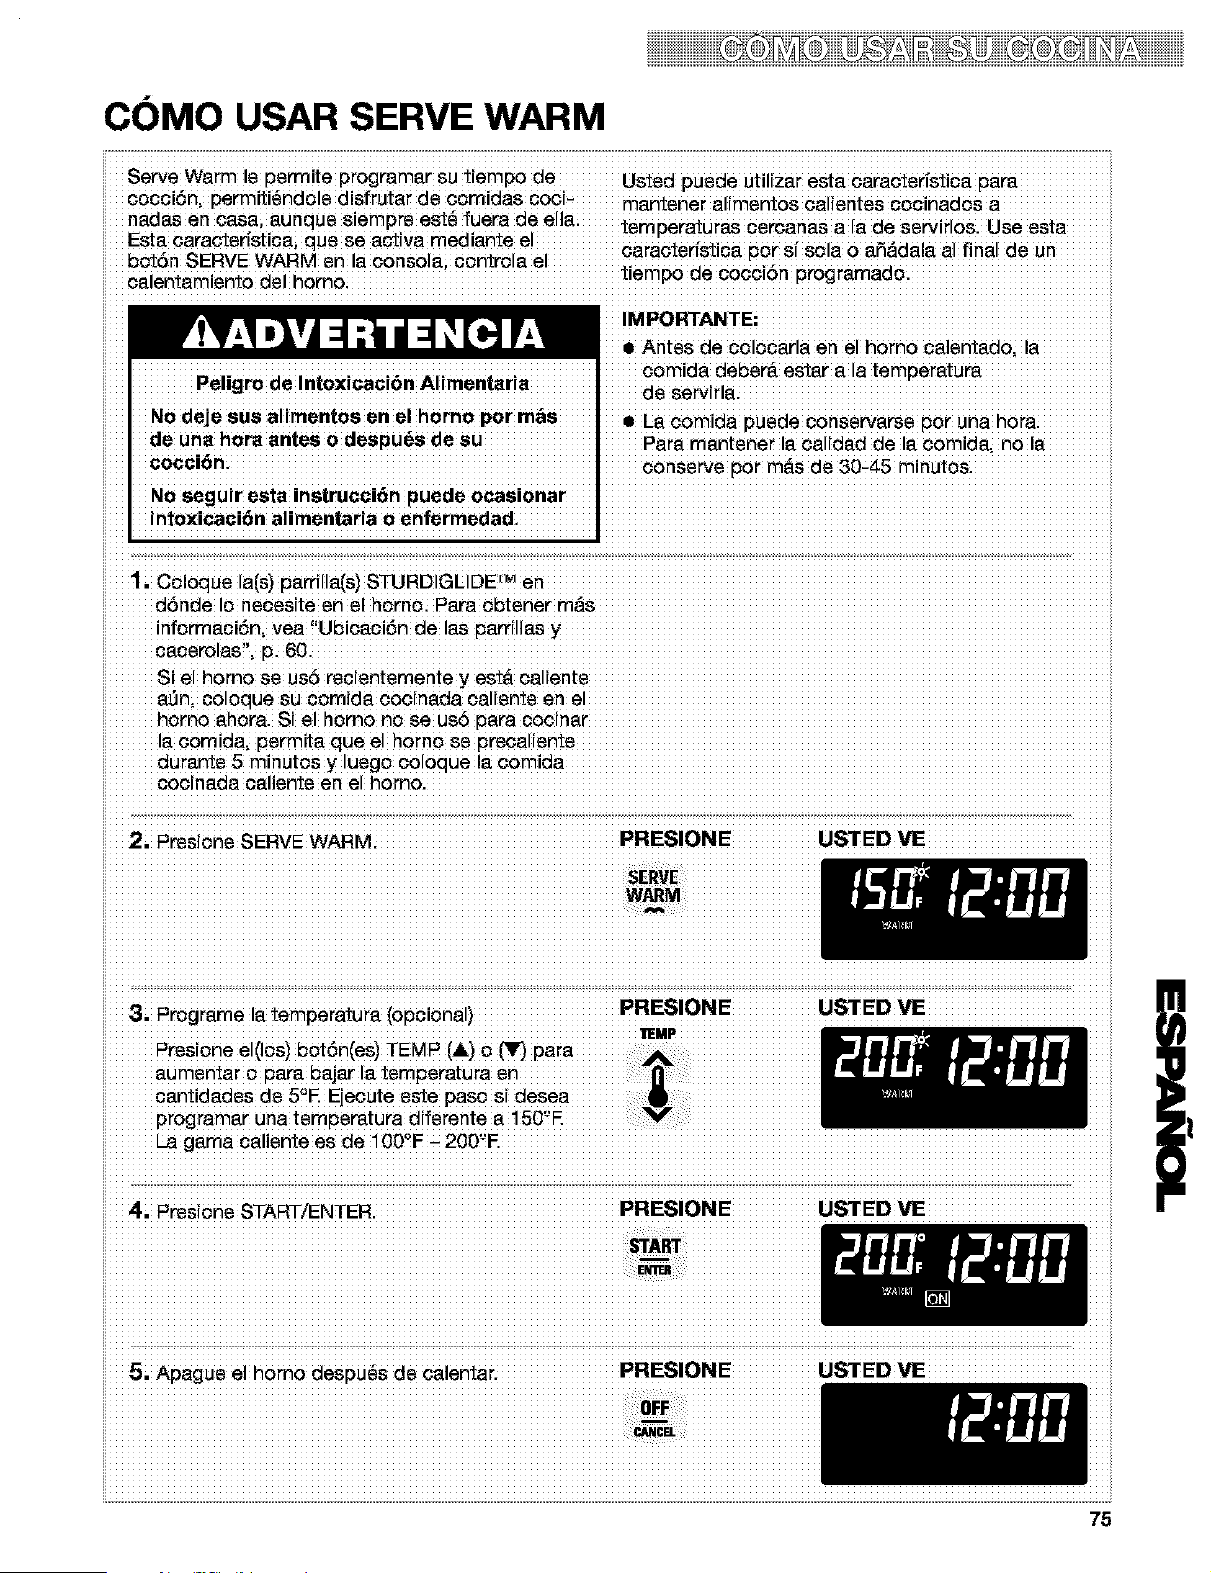
COMO USAR SERVE WARM
i
Peligro de Intoxicaci6n Alimentaria
Nodejesus alimentosen el homo pot mas ...... = La comida puede conservarse pot una hora.
de una horaanteso despu6s de su
coccmn, conserve pot
No seguir esta instrucci6n puede ocasionar
intoxicaci6n alirnentaria o enferrnedad
li Coloquela(s)parrilla(s)STURDIGLIDE'_en
d6nde Io necesite en el homo: Para obtener m&s
inforrnaoiSn, vea "UbicaciSn de las parrillas
caeerolas", p:
Si el homo se us5 recientemente y est& caliente
_n i coloque su comida cocinada caliente en el
la comida, permita que el homo se precaliente
durante 5 minutos y luego co!oque !a comida
el
2; I=resione SERVE WARM PRESIONE USTED _
aumentar o para bajar la temperatura en
cantidades de 5"E Ejecute este paso si desea
programar una temperatura diferente a 150'-'E
La gama caliente es de 1O0°F - 2O0'-'E
4; Presione START/ENTER. PRESIONE USTED VE
75
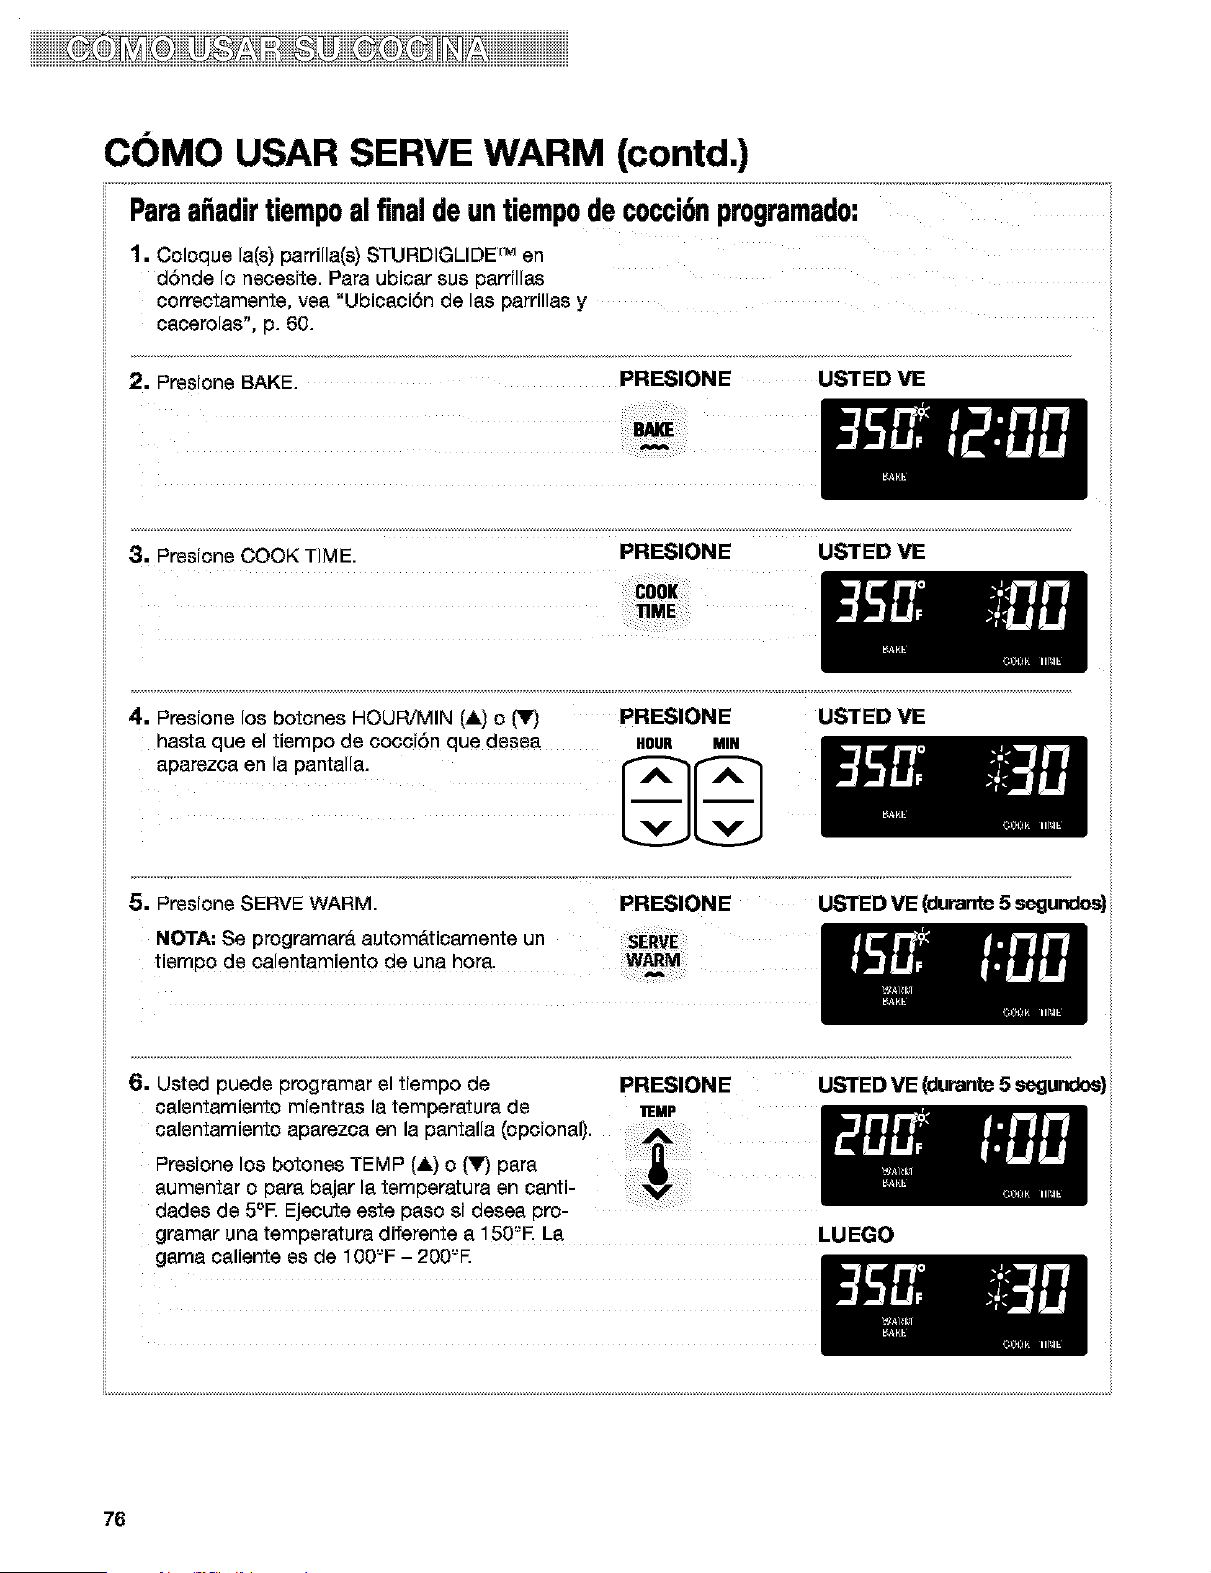
iiiiiiiiiiii i iiii iiiii Hiiiiiii
CC)MO USAR SERVE WARM (contd.)
Paraa_adirtiempoal finaldeuntiempodecocci6nprogramado:
1. Coloque la(s) parrilla(s) STURDIGLIDE rM en
dSnde Io necesite. Para ubicar sus parrillas
correctamente, yea "Ubicaci6n de las parrillas y
cacerolas", p. 60.
2. Presione BAKE. PRESIONE USTED VE
3. Presione COOK TIME. PRESIONE USTED VE
_ME
4. Presione los botones HOUR/MIN (A) o t_lF) PRESIONE
hasta que el tiempo de cocc[Sn que desea HOUR MIN
USTEDVE
5. Presione SERVE WARM. PRESIONE uS'rED VE (dumnte 5 segundos)
NOTA: Se programar_ autom_ticamente un
tiempo de calentamiento de una hora. wArM
6. Usted puede programar el tiempo de PRESIONE
oalentamiento mientras la temperatura de _uP
calentamiento aparezca en la pantalla (optional).
uS'rED VE (durante 5 segundos)
Presione los botones TEMP (&) o (Y,_para
aumentar o papa bajar la temperatura en canti-
dades de 5°E Ejecute este paso si desea pro-
gramar una temperatura diferente a 150'-'E La LUEGO
gama caliente es de 100'-'F - 200'-'E
76
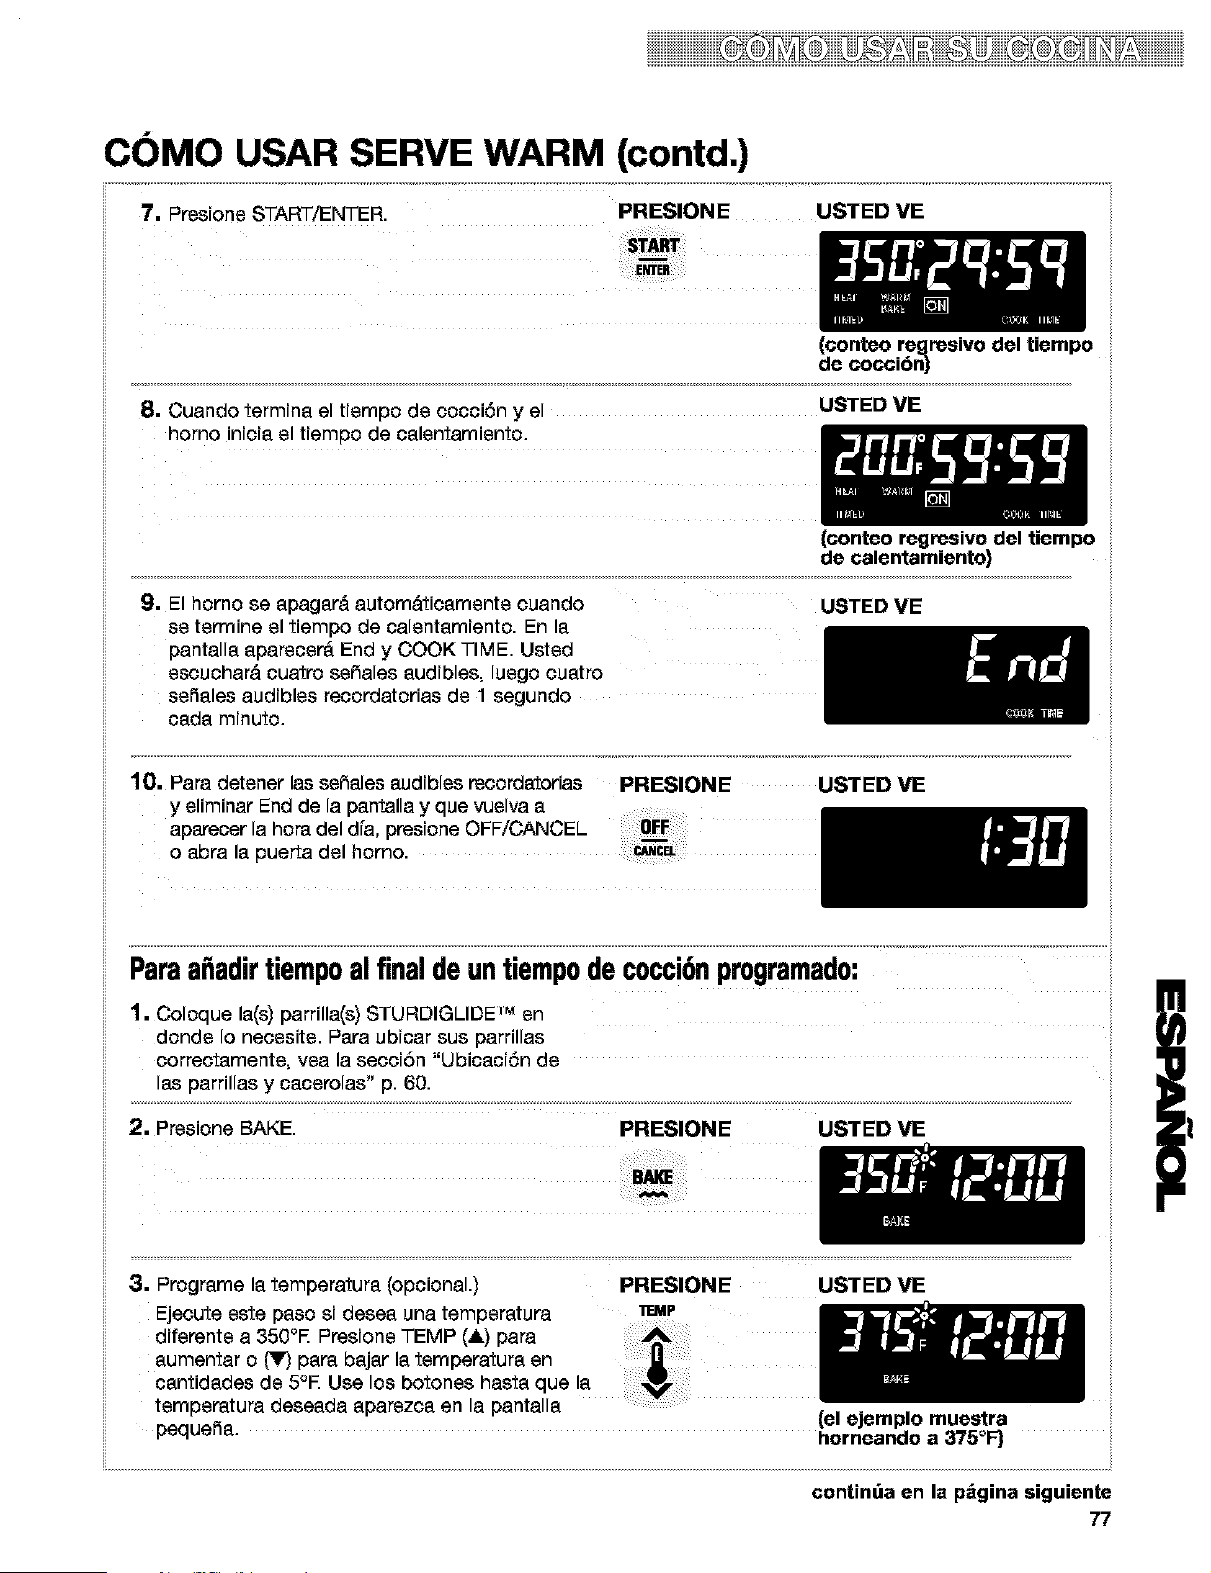
iiiiiiiiii iiii2qiiiiiiiiiiiii
CC)MO USAR SERVE WARM (contd.)
7. Presione START/ENTER. PRESIONE
ST_tr
USTED VE
(conteo regresivo del tiempo
de coccibn)
8. Cuando termina el tiempo de coooi6n y el USTED VE
homo inicia el tiempo de oalentamiento.
(conteo regresivo del tiempo
de calentamiento}
g. El homo se apagard automdticamente cuando
se termine el tiempo de calentamiento. En la
pantalla aparecer_ End y COOK TIME. Usted
escuchard cuatro seSales audibles, luego cuatro
seSales audibles recordatorias de 1 segundo
cada minuto.
USTED VE
lg. Para detener las seSales audibles recordatorias PRESIONE USTED VE
y eliminar End de la pantalla y que vuelva a
aparecer la hora del dfa, presione OFF/CANCEL
o abra la puerta del homo.
Paraa_adirtiempoal finaldeuntiempodecocc,onprogramado:
1, Coloque la(s) parrilla(s) STURDIGLIDE" an
donde Io necesite. Para ubicar sus parrillas
correctamente, yea la secciSn "Ubicaci6n de
las parrillas y cacerolas" p. 60.
2, Presione BAKE. PRESIONE USTED VE
3, Programe la temperatura (opcional.) PRESIONE USTED VE
Ejecute este paso si desea una temperatura _P
aumentar o t_lF)papa bajar la temperatura an
cantidades de 5°E Use los botones hasta que a
temperatura deseada aparezca en la pantalla
peque_a, horneando a 375°F)
(el ejemplo muestra
contint_a en la p_gina siguiente
77
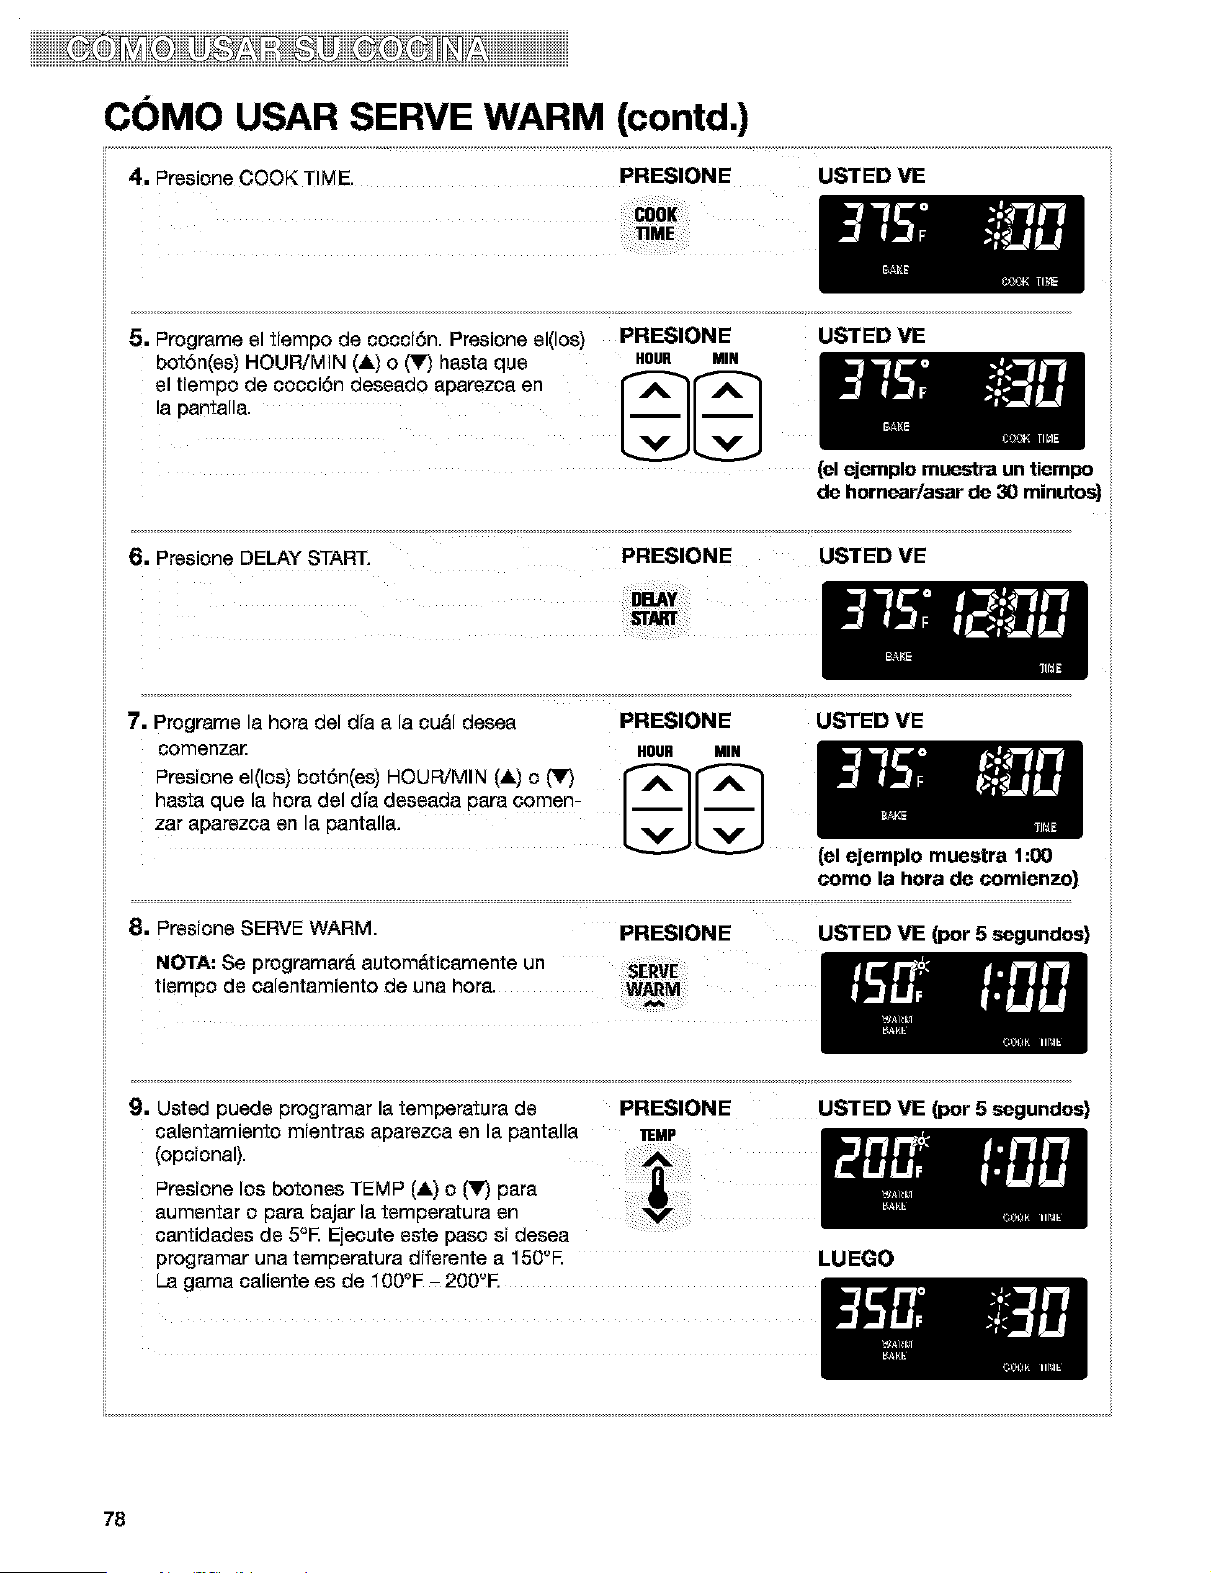
iiiiiiiiiiii i iiii iiiii Hiiiiiii
CC)MO USAR SERVE WARM (contd.)
4. Presione COOK TIME. PRESIONE USTEDVE
5. Progparneel tiernpo de cocci6n. Presione el(los) PRESIONE
bot6n(es) HOUR/MIN (&) o (V) basts que HOUR MIN
el tiernpo de cocci6n deseado aparezca en _l'_
la pantalla. _J_
USTEDVE
(el ejemplo muestra un tiempo
de hornear/asar de 30 minutos
6, Presione DELAY START. PRESIONE USTED VE
ii .........................................................................................................................................._7"7"7_'_'_'_
7. Programs la hora del dfa a la cu&l desea PRESIONE USTED VE
comerlzal_ HOUR MIN
Presione el(los) bot6n(es) HOUR/MIN (&) o t_lr,I I'_A_
hasta que la hopa del dia deseada para comen- I II I
zaraparezoaenlapan_a,a. V[_.lVl.VJ
(el ejernplo muestra 1:00
corno la hora de cornienzo}
8. Presione SERVE WARM. PRESIONE USTED VIE (per 5 segundos}
NOTA: Se progparnar_ autom_ticarnente un SERVE
tiempo de calentamiento de una hopa.
=
Usted puede progpamar la temperatupa de PRESIONE
calentarniento mientpas aparezca an la pantalla _Mp
<opo,o°a,)
Presione los botones TEMP (tk) 0 ('_) pars
aumentar o papa bajar la tempepatura an
cantidades de 5°E Ejecute este paso si desea
programar una ternpepatupa diferente a 150'-'E LUEGO
La garna caliente es de 100°E - 200'-'E
USTED VE (per 5 segundos}
78
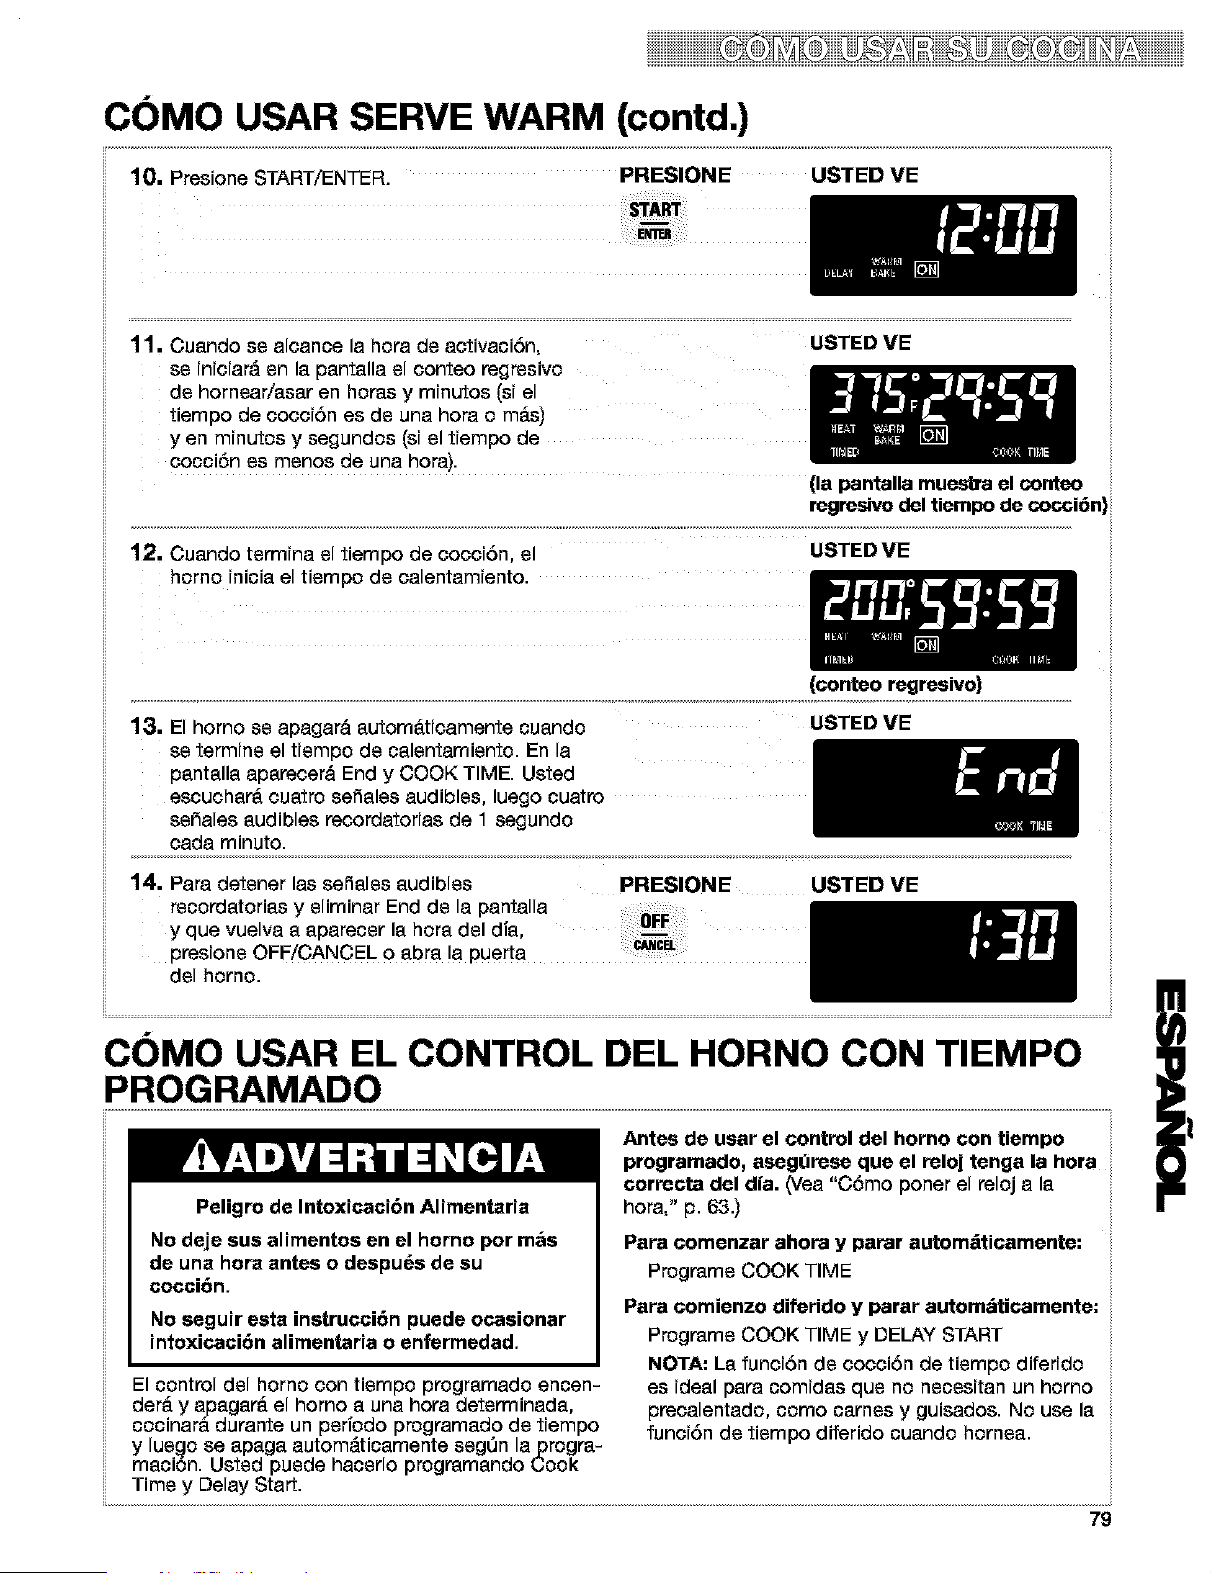
iiiiiiiiii iiii2qiiiiiiiiiiiii
CC)MO USAR SERVE WARM (contd.)
10. Presione START/ENTER. PRESIONE USTED VE
11. Cuando se aloance la hora de aotivaci6n, USTED VE
se inioiard en la pantalla el oonteo regresivo
de hornear/asar en horas y minutos (si el
tiempo de cocci6n es de una hora o re&s)
y en minutos y segundos (si el tiempo de
cocci6n es menos de una hora).
(la pantalla muestra el conteo
regresivo del tiempo do cocci6n
12. Cuando termina el tiempo de cocci6n, el
homo inicia el tiernpo de oalentamiento.
USTED VE
(conteo regresivo)
13. El homo se apagard autom&ticamente cuando USTED VE
se termine el tiempo de calentamiento. En la
pantalla aparecer& End y COOK TIME. Usted
escuohar_ cuatro se5ales audibles, luego cuatro
seSales audibles recordatorias de 1 segundo
cada minuto.
................................................................................................................................................................... ,.................................................. ,_,_,
14, Para detener las seSales audibles
recordatorias y eliminar End de la pantalla
y que vuelva a aparecer la hora del dfa,
presione OFF/CANCEL o abra !a puerta
del homo.
PRESIONE USTED VE
CC)MO USAR EL CONTROL DEL HORNO CON TIEMPO
PROGRAMADO
Peligro de Intoxicaci6n Alimentaria
No deje sue alimentos en el horno por mas
de una hera antes o despu6s de su
cocci6n,
No seguir esta instrucci6n puede ocasionar
intoxicaci6n alimentaria o enfermedad,
El control del horno con tiempo programado encen-
der_ y apagar_ el homo a una hora determinada,
cocinar_ durante un periodo programado de tiempo
y luego se apaga autom&ticamente segOn laprogra-
maci6n. Usted puede hacerlo programando Cook
Time y Delay Start.
Antes do usar el control del homo con tiempo
programado, asegdrese que el reloj tonga la hera
correcta del dia. _Vea "C6mo poner el r_loj a la
hora," p. 63.)
Para comenzar ahora y parar autom_ticamente:
Programe COOK TIME
Para comienzo diferido y parar autombUcamente:
ProgPame COOK TIME y DELAY START
NOTA: La funoi6n de ooooi6n de tiernpo diferido
es ideal para comidas que no necesitan un homo
precalentado, como carnes y guisados. No use la
funci6n de tiempo diferido cuando hornea.
79
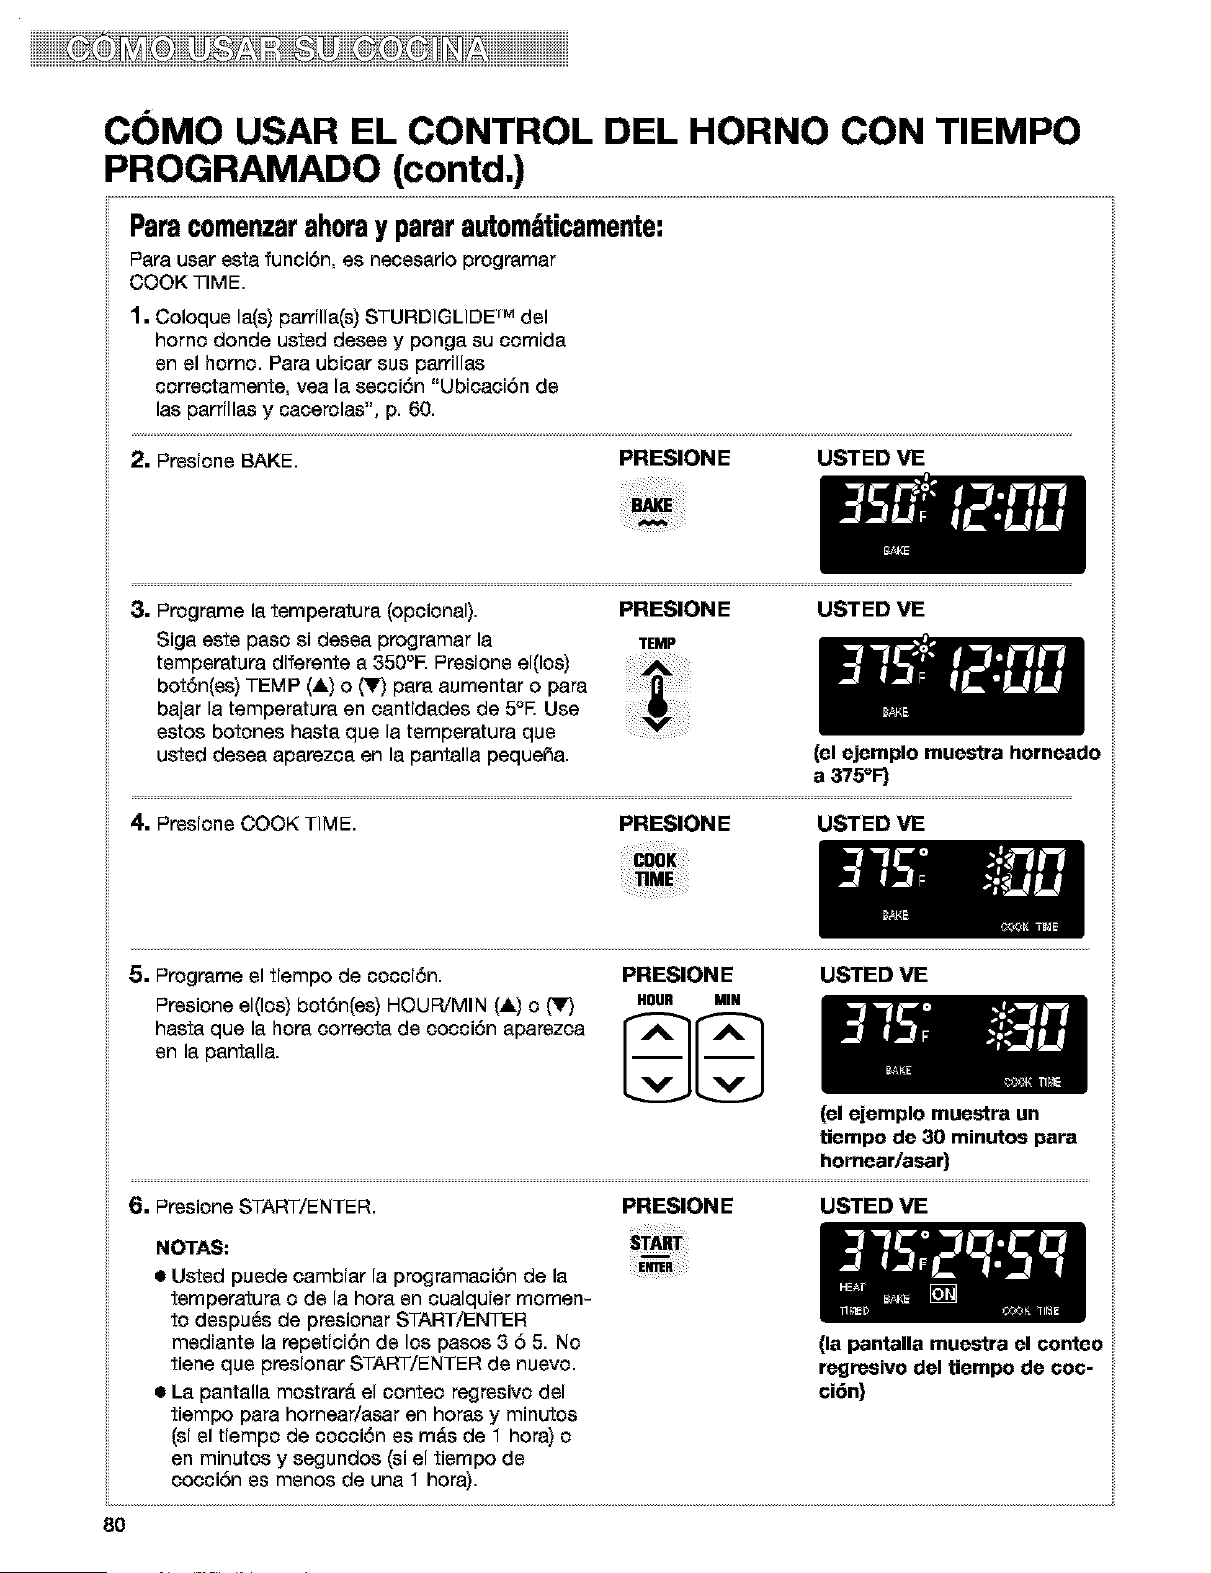
iiiiiiiiiiii i iiii iiiii Hiiiiiii
CC)MO USAR EL CONTROL DEL HORNO CON TIEMPO
PROGRAMADO (contd.)
Paracomenzarahoray pararautom_ticamente:
Pera user esta funci6n, es neceserio programar
COOK TIME.
1. Coloque le(s) perrille(s) STURDIOLIDE rM del
homo donde usted desee y ponge su comide
en el homo. Para ubicer sus perrillas
correctamente, yea le secci6n "Ubicaci6n de
las perrilles y cacerolas", p. 60.
2. Presione BAKE.
PRESIONE USTED VE
3. Progreme le temperature (opcional). PRESIONE USTED VE
Sige este peso si desee progremer le TEMP
temperature diferente e 350°E Presione el(los)
bot6n(es) TEMP (&) o (V) papa aumenter o para
bajar la temperetura en cantidedes de 5°E Use
estos botones haste qua la temperatura qua
usted desee aperezce en la pentalla peque_a. (el ejemplo muestra horneado
a 375°F)
4. Presione COOK TIME.
PRESIONE USTED VE
5. Programe el tiempo de cocci6n.
Presione el(los) botSn(es) HOUR/MIN (&) o t_lr,I
haste que le hora correcte de cocciSn eparezca
en le pentella.
PRESIONE USTED VE
HOUR MIN
• Usted puede cambier la programeci6n de le
temperature o de lahore an cualquier momen-
to despu_s de presionar START/ENTER
mediante la repeticiSn de los pasos 3 6 5. No
tiene qua presioner START/ENTER de nuevo.
• Le pentelle mostrar_ el conteo regresivo del
tiempo para hornear/esar en horas y minutos
(sJel tJempo de cocciSn as m&s de 1 hore) o
en minutos y segundos (si el tiempo de
cocci6n as menos de una 1 hora).
(la pantalla muestra el conteo
regresivo del tiempo de coc-
ci6n}
8O
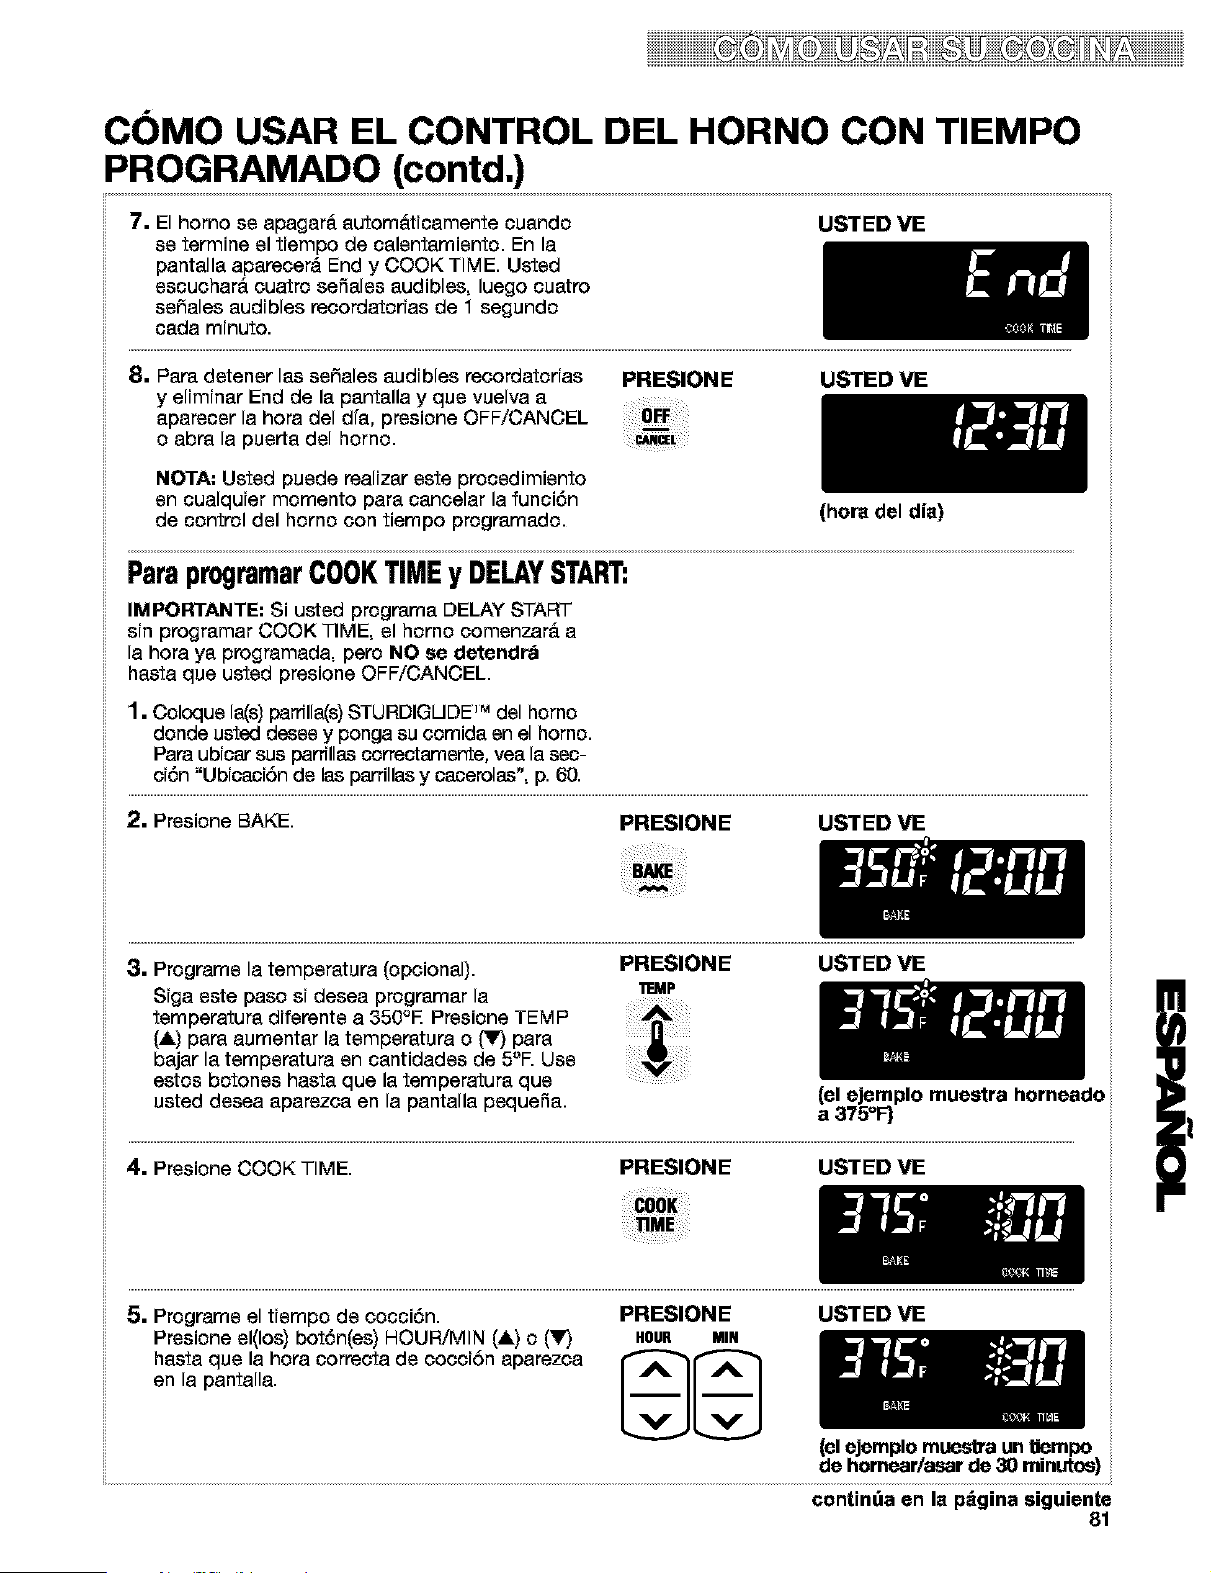
iiiiiiii iiii2iiiiiiiiiiiiiiii
CC)MO USAR EL CONTROL DEL HORNO CON TIEMPO
PROGRAMADO (contd.)
7. El horno se apagar& autom&ticamente cuando
se terrains el tiempo de calentamiento. En la
pantalla aparecerd End y COOK TIME. Usted
escuchar& cuatro seSales audibles, luego cuatro
se5ales audibles recordatorias de 1 segundo
cada minuto.
8. Para detener las se5ales audibles recordatorias
y eliminar End de la pantalla y que vuelva a
aparecer la hora del dfa, presione OFF/CANCEL
o abra la puerta del homo.
USTED VE
PRESIONE USTED VE
NOTA: Usted puede realizar este procedimiento
en cualquier momento para cancelar la funci6n
de control del homo con tiempo programado.
(hora del dia)
ParaprogramarCOOKTIMEy DELAYSTART:
IMPORTANTE: Si ueted programa DELAY START
sin programar COOK TIME, el homo comenzar& a
la hora ya programada, pero NO se detendrd
basra que usted presione OFF/CANCEL
1. Coloque la(s) pardlla(s) STURDIOLIDE]" del homo
donde usted desee y ponga su comida en el homo.
PaPaubicar sus parflllas correctamente, yea la sec-
ci6n "UbicaciSn de las parrillas y cacerolas', p. 60.
2. Presione BAKE.
PRESIONE USTED VE
3. Programs la temperatura (opcional). PRESIONE
Siga este paso si desea programar la 'i-=MP
temperaturadi,e n,ea350° Pre.ione
(,ilk)pare aumentar la tempemtura o (Y,_para
bajar la temperatura en cantidades de 5°F. Use
estos botones hasta que la temperatura que
usted desea aparezca en la pantalla peque5a.
USTEDVE
(el ejemplo muestra horneado
a 375°F)
4. Presione COOK TIME. PRESIONE USTED VE
5. Programs el tiempo de oocci6n.
Presione el(los) bot6n(es) HOUR/MIN (,ilk)o (Y,_
basra que la hora correcta de cocciSn aparezca
en la pantalla.
PRESIONE USTED VE
HOUR MIN
(el ejemplo mues_ra un Uempo
de homear/asar de 30 minutos}
contint_a en la p_gina siguiente
81
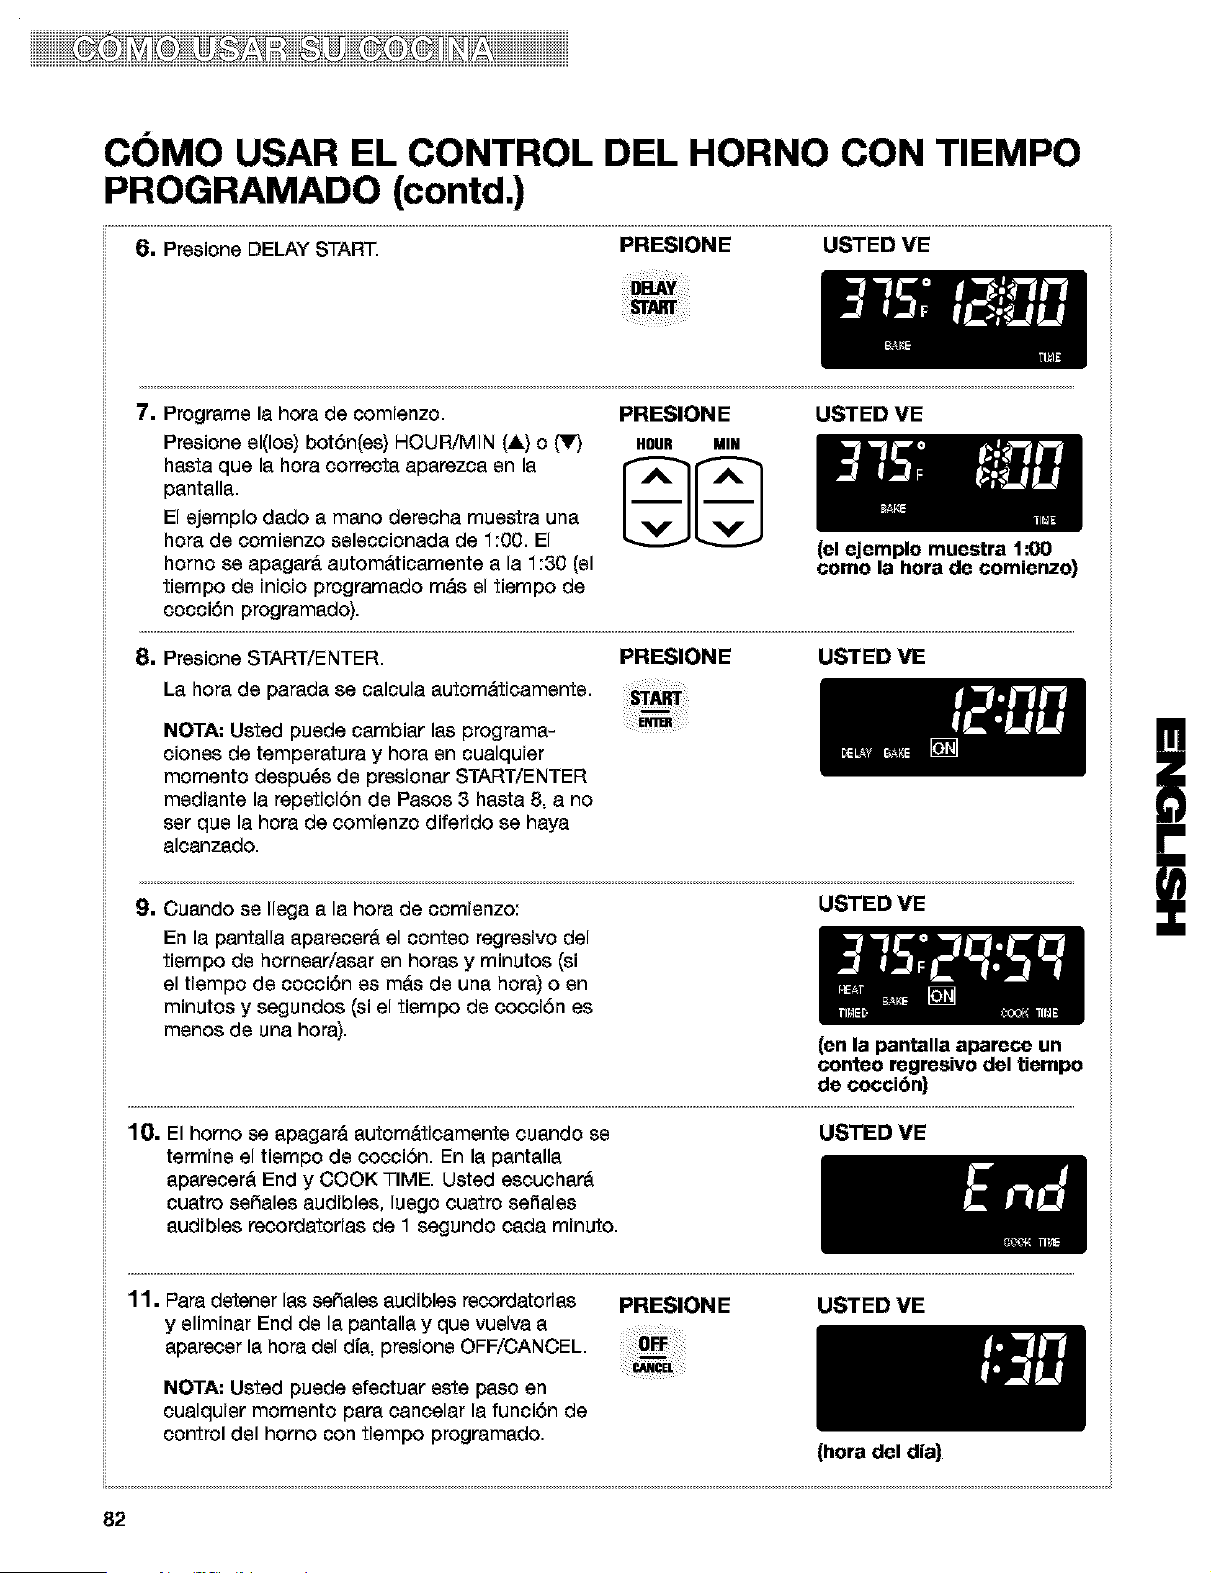
iiiiiiiiiiiiii iiii iiiii Hiiiii
CC)MO USAR EL CONTROL DEL HORNO CON TIEMPO
PROGRAMADO (contd.)
6. Presione DELAY START. PRESIONE USTED VE
7. USTED VE
Programs la hora de comienzo.
Presione el(los) bot6n(es) HOUR/MIN (&) o t_lr)
basra que la hora correcta aparezca en la
pantalla.
El ejemplo dado a mano derecha muestra una
hora de comienzo seleccionada de 1:00. El
homo se apagar_ autom&ticamente a la 1:30 (el
tiempo de inicio programado m&s el tiempo de
cocci6n programado).
PRESIONE
HOUR MIN
@@
(el ejemplo muestra 1:00
como la hora de comienzo}
8, Presione START/ENTER.
La hora de parada se calcula autom&ticamente.
NOTA: Usted puede cambiar las programa-
ciones de temperatura y hora en cualquier
momento despu_s de presionar START/ENTER
mediante la repeticiSn de Pasos 3 hasta 8, a no
set que la hora de comienzo diferido se haya
alcanzado.
PRESIONE USTED VE
9. Cuando se Ilega a la hora de comienzo:
En la pantalla aparecer_ el conteo regresivo del
tiempo de hornear/asar en horas y minutos (si
el tiempo de cocci6n es m_s de una hora) o en
minutos y segundos (si el tiempo de cocciSn es
menos de una hora).
USTED VE
(en la pantalla aparece un
10, El homo se apagard automdticamente cuando se
termine el tiempo de cocciSn. En la pantalla
aparecer& End y COOK TIME. Usted escuchar_
cuatro seSales audibles, luego cuatro sefiales
audibles recordatodas de 1 segundo cada minuto.
conteo regresivo del tiempo
de coccibn)
11. Para detener las seSales audibles recordatorias PRESIONE
y eliminar End de la pantalla y que vuelva a
aparecer la hora del dia, presione OFF/CANCEL
USTED VE
NOTA: Usted puede efectuar este paso en
oualquier momento papa cancelar la funciSn de
control del homo con tiempo programado.
USTED VE
(hera del dfa)
82

iiiiiiiiiiiiiiiiiiiiii D iiii DiiiD iiiiDD H Diiiiiiiiiiiiiiiii
CC)MO USAR EL CONTROL DEL HORNO CON TIEMPO
PROGRAMADO (contd.)
Paravolvera verlasprogramacionesdetiempo:
Presione el bot6n deseado. El tiempo aparecer_ en la pantalla por 5 segundos.
PaPa recordar el programa Presiofle: Ver_ por 5 segufldos:
Cook time COOK TIME* duraci6n de tiempo decocciEnprograrnado
.............................................................................................................................................................................................................Delay Start DELAY START horedo de comienzo difeddo prograrnado
Temperature BAKE temperature programada
*Si ha comenzado el tiempo de cocci6n, cuando presione DELAY STARE. la pantalla mostrar_ la hora a , ',
la que comenz6. Si presiona COOK TIME, se eliminar&n de la pantalla los segundos sobrantes de la ',
Delay Start*
Temperature
DELAY START
BAKE
bot6n(es) HOUR/MIN (&) o (V)
bot6n(es) TEMP (A) o (Y)
START/ENTER
*Una vez que se ha alcanzado la hora del comienzo diferido, usted no puede cambiar la programaci6n
del oomienzo diferido.
83
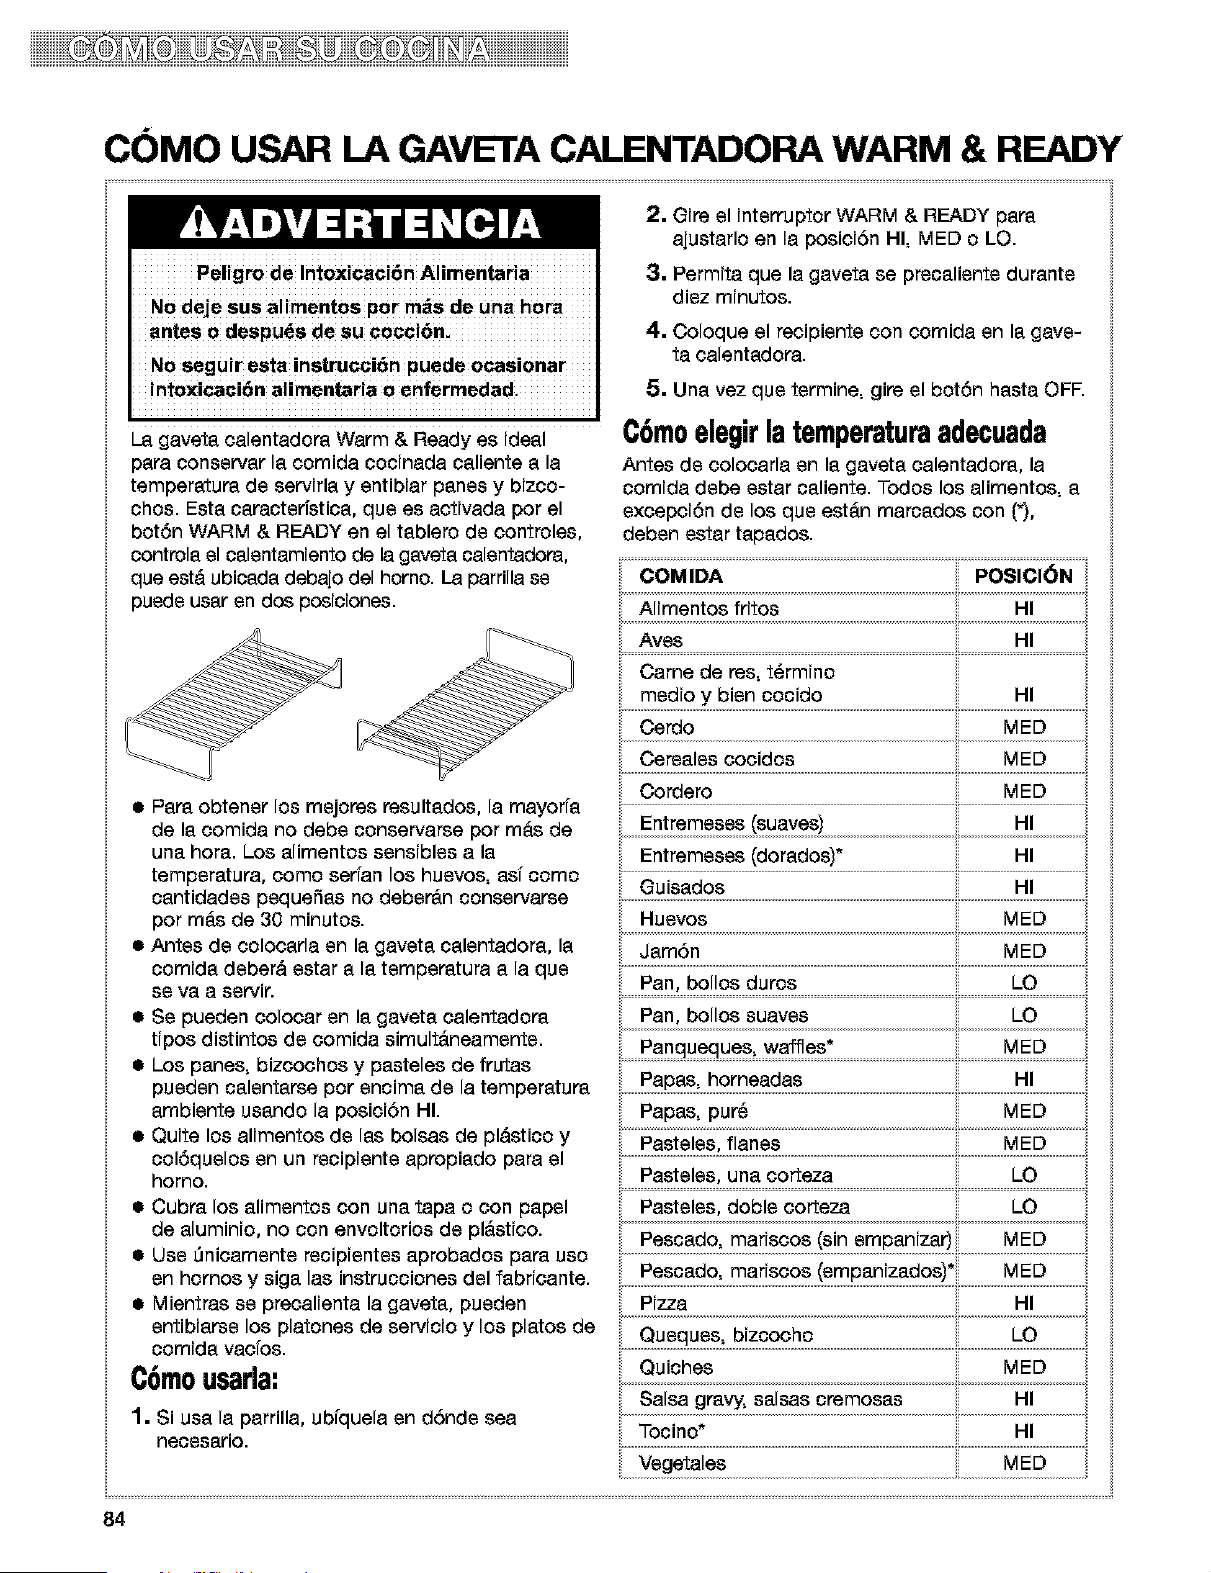
iiiiiiiiiiiii % iiii iiiD iiii 2q Diiiiiiiiiiiiiiiiiiiiiiiiii
CC)MO USAR LA GAVETA CALENTADORA WARM & READY
. Peligro de intoxicaci6n Alimentaria
|
No deje sue alimentos pot m_s de Una hora
. antes o despuds de sU €occi6n.
No segUir esta instrucci6n puede ocasionar
intoxicaci6n aiirnentaria o enferrnedad.
|
|
2. Gire el intsrruptor WARM & READY papa
ajustarlo en la posici6n HI, MED o LO.
3. Permita que la gaveta se prscalisnts durants
disz minutos.
4. Coloque el recipients con comida sn la gavs-
ta calentadora.
5. Una vez qus tsrmine, gire el bot6n hasta OFF.
C6mo
jq, | ._q,j_l -m
la
temperatura
adecuada
La gaveta calentadora Warm & Ready as ideal i=ll=ylr
para sonssrvar la comida sosinada saliente a la Antes de colocarla sn la gaveta calentadora, la
temperatura de servirla y sntibiar panes y bizco- comida dsbe sstar caliente. Todos los alimentos, a
chos. Esta caractsristica, qus es activada por el sxcepci6n de los qus est&n marcados con (_),
bot6n WARM & READY en el tablero de controles, debsn sstar tapados.
controla el calsntamiento de la gaveta calsntadora, ,
que estd ubicada debajo del horno. La parrilla ss COMIDA POSICI(_N
pusds usar sn dos posiciones.
Cerdo
Cersalss cocidos
• PaPa obtensr los msjores resultados, la mayori'a
de la comida no debs conservarse por m&s de
una hora. Los alimentos ssnsiblss a la Entremssss (dorados)*
tempsratura, como serfan los husvos, asf somo
cantidadss psqueSas no debsr_n conssrvarse
por m&s de 30 minutos.
• Antes de colocarla sn la gavsta calsntadora, la
comida dsberd sstar a la tsmpsratura a la qus
ss vfl a ssrvir.
• Ss pueden colocar sn la gaveta calentadora
tipos distintos de comida simult&neamsnts.
• Los panes, bizcochos y pasteles de frutas
pusdsn calsntarse pot sncima de la temperatura
ambisnte usando la posici6n HI. Papas, pur_
• Quite los alimentos de las bolsas de pl&stico y
col6quslos snun recipients apropiado para el
homo. Pastslss, una corteza
• Cubra los alimsntos con una tapa o con papsl Pastslss, dobls corteza
de aluminio, no con envoltorios de pl&stico. Pescado, mafiscos (sin smpanizar) MED
• Use Dnicamsnts rscipisntss aprobados papa uso
sn homos y siga las instrucciones dsl fabficante.
• Mientras ss precalienta la gaveta, pusden
sntibiarss los platones de servicio y los platos de
comida vacfos.
CSmousarla:
Salsa gravy, salsas sremosas
1. Si usa la parrilla, ubfquela sn d6nds sea
neessario. Toeino*
84
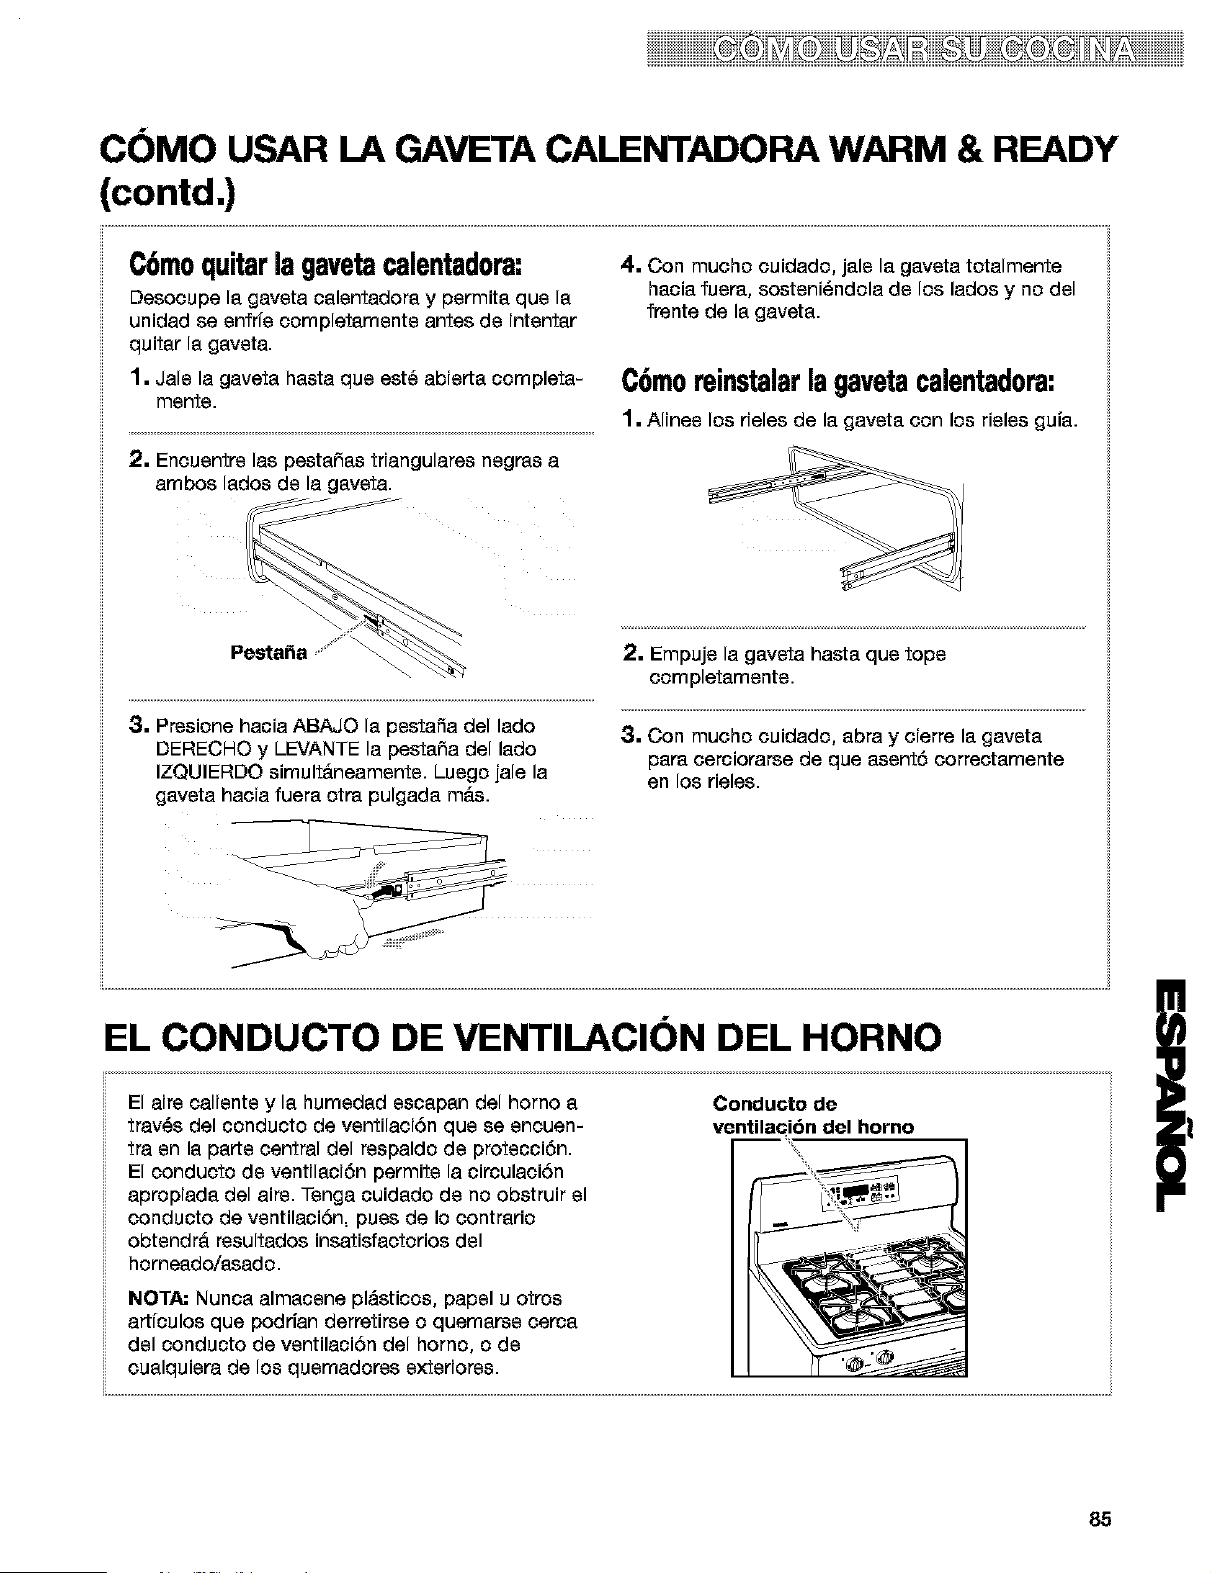
iiiiiiii iiii2iiiiiiiiiiiiiiii
CC)MO USAR LA GAVETA CALENTADORA WARM & READY
(contd,)
C6moquitarlagavetacalentadora:
Desocupe la gaveta calentadora y permita qua la
unidad se enfrfe completamente antes de intentar
quitar la gaveta.
1. Jale la gaveta hasta qua est_ abierta completa-
mente.
2. Encuentre las pestaSas triangulares negras a
ambos lados de la gaveta.
4. Con mucho cuidado, jale la gaveta totalmente
hacia fuera, sosteni_ndola de los lados y no del
frente de la gaveta.
C6moreinstalarlagavetacalentadora:
1. Alines los deles de la gaveta con los rieles gufa.
ii ..................................................................................................................................................................
3. Presione hacia ABAJO la pestaSa del lado
DERECHO y LEVANTE la pestaSa del lado
IZQUIERDO simult&neamente. Luego jale la
gaveta hacia fuera otra pulgada m&s.
2. Empuje la gaveta hasta qua tops
completamente.
8. Con mucho cuidado, abra y cierre la gaveta
para cerciorarse de que asent6 correctamente
en los deles.
EL CONDUCTO DE VENTILACIC)N DEL HORNO
El airs caliente y la humedad escapan del homo a
tray,s del conducto de ventilaciSn qua se encuen-
tra an la parts central del respaldo de protecci6n.
El conducto de ventilaciSn permits la circulaciSn
apropiada del airs. Tenga cuidado de no obstruir el
conducto de ventilaciSn, puss de Io contrario
obtendr& resultados insatisfactorios del
horneado/asado.
Conducto de
ventilaGibn del homo
NOTA= Nunca almacene pl&sticos, papal u otros
artfculos que podrfan derretirse o quemarse cerca
del conducto de ventilaciSn del homo, o de
cualquiera de los quemadores extedores.
85
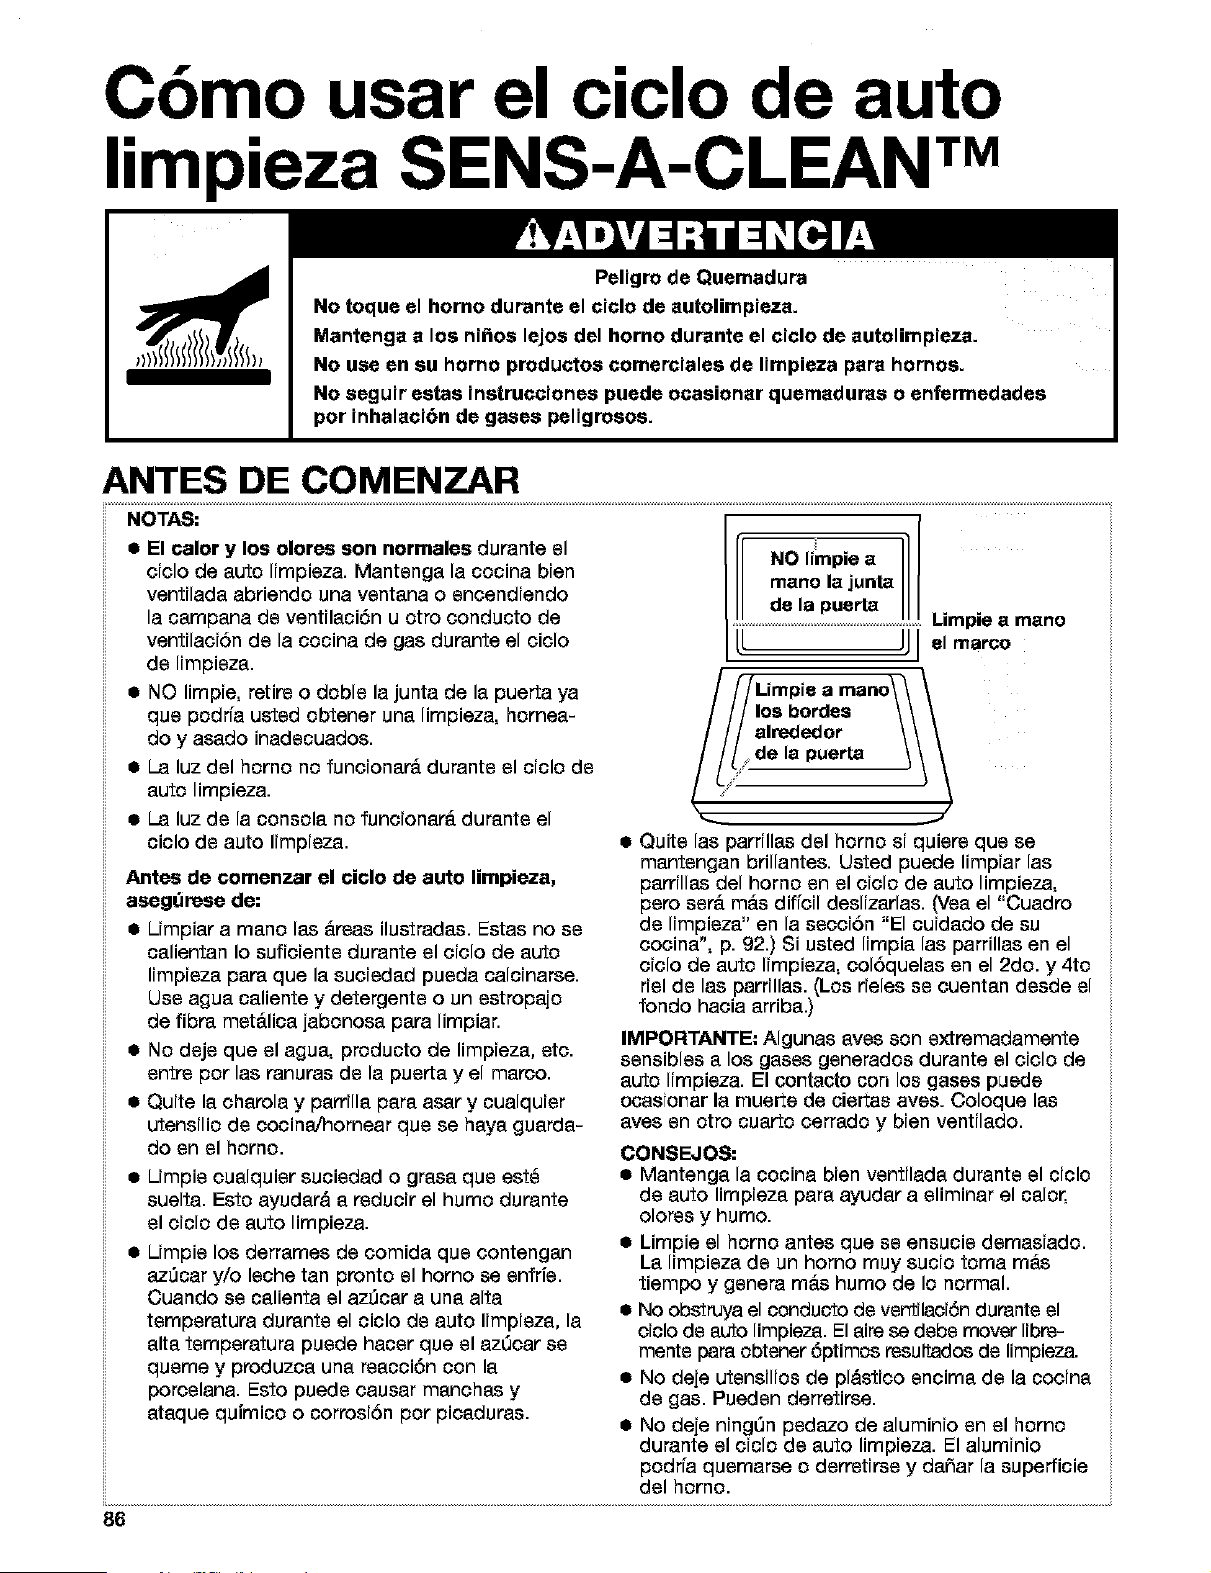
Cbmo usar el ciclo de auto
limpieza SENS-A-CLEAN TM
Peligro de Quemadura
No toque el horno durante el ciclo de autolimpieza.
Mantenga a los ni_os lejos del horno durente el ciclo de autolimpieza.
No use en su homo productos comerciales de limpieza para hornos.
No seguir estas instrucciones puede ocasionar quemaduras o enferrnedades
por inhalaci6n de gases peligrosos.
ANTES DE COMENZAR
a El calor y los olores son normalos durente el
oiolo de auto limpieza. Mantenge la cocina bien
ventilada abriendo una ventana o encendiendo
la campana de ventilaci6n u otro conducto de
ventilaci6n de la cocina de gas dupante el ciclo
de limpieza.
• NO limpie, retire o doble la junta de la puerta ya
qua podrfa usted obtener una limpieza, homea-
do y asado inadecuados.
• La luz del homo no funcionar_ dupante el ciclo de
auto limpieza.
• La luz de la consola no funcionar_ dupante el
ciclo de auto limpieza.
Antes de comenzar el ciclo de auto limpieze,
asegOrese do:
a Umpier a meno las _reas ilustpades. Estas no se
calientan Io suficiente durante el ciclo de auto
limpieza para que la suciedad pueda calcinarse.
Use agua caliente y detergente o un estropajo
de fibpa met&lica jabonosa para limpiar.
• No deje que el agua, producto de limpieza, etc.
entre por las ranuras de la puerta y el marco.
• Quite la charcla y parrilla para asar y cualquier
utensilio de cocina/hornear qua se haya guarda-
do en el homo.
a Umpie ouelquier suciedad o gpase qua est_
suelta. Esto ayuder& e reducir el humo durante
el ciclo de auto limpieza.
a Umpie los derpames de oomide qua oontengen
azDcar y/o leche tan pronto el homo se enfrie.
Cuando se celienta el azDcer a une alta
tempepatura dupante el ciclo de auto limpieze, la
alto temperatupa puede hacer que el azQcar se
queme y produzce une reecci6n con le
porcelana. Esto puede causar menchas y
eteque quimico o corrcsi6n pot piceduras.
NO limpie a I]
mano la junta I/
/I lapu rta I/
U JJ
Limpie a mano
el marco
Limpie a mano\\
los hordes \\
alrededor \!
de la puerta
jr'
_ ,..J
a Quite las parrilles del homo si quiere que se
mentengan brillantes. Usted puede limpiar las
perrillas del homo en el ciclo de auto limpieza,
perc ser_ m_s diffcil deslizerlas. (Vee el "Cuadrc
de limpieze" en la secci6n "El cuidedo de su
cocine", p. 92.) Si usted limpie las parrillas en el
ciclo de auto limpieza, col6quelas en el 2do. y 4to
riel de las parrilles. (Los deles se cuenten desde el
rondo hacia erribe.)
IMPORTANTE: Algunas ayes son extremadamente
sensibles e los gases genepados durante el ciclo de
auto limpieza. El co#tecto con los gases puede
ocesio#ar le muerte de ciertes ayes. Coloque los
eves en otro cuerto cerpado y bien ventiledo.
CONSEJOS:
a Mantenge la cocina bien ventilade dupante el ciclo
de auto limpieze pare ayuder a eliminar el color,
olores y humo.
• Limpie el homo antes que se ensucie demasiado.
Le limpieze de un horno muy sucio toma m&s
tiempo y genera m&s humo de Io normal.
• No obstruya el conducto de ventilaci6n dupante el
ciclo de auto limpieza. El eire se debe mover libre-
mente papa obtener 6ptimos resultados de limpieza.
• No deje utensilios de pl&stico encime de la cocine
de gas. Pueden derpatirse.
• No deje ningQn pedazo de aluminio en el homo
dupante el ciclo de auto limpieza. El aluminio
podrfa quemarse o derretirse y deSar la superficie
del homo.
86
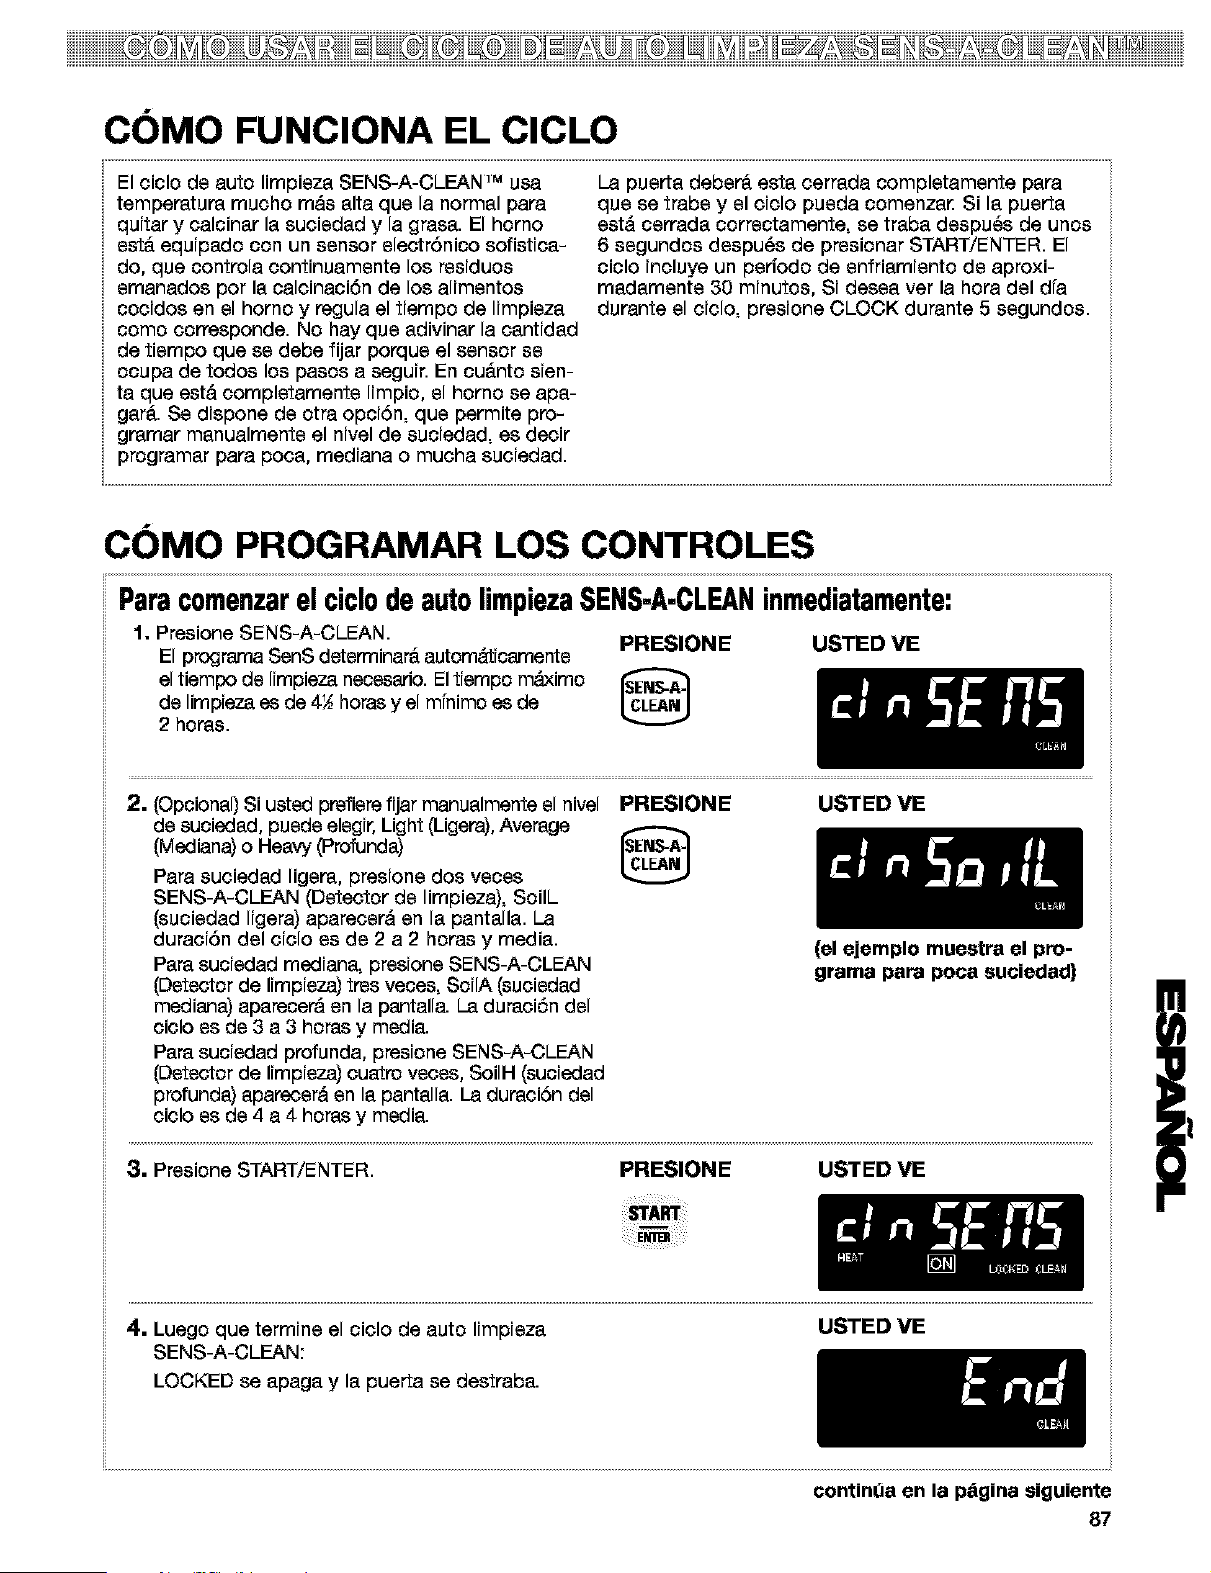
CC)MO FUNCIONA EL ClCLO
El ciclc de auto limpieza SENS-A-CLEAN TM usa
temperatura touche rods alta que la normal para
quitar y calcinar la suciedad y la grasa. El homo
est& equipadc con un sensor electrSnico sofistica-
do, que contrcla continuamente los residues
emanados por la calcinaci6n de los alimentos
cccidos en el homo y regula el tiempc de limpieza
come ccrresponde. No hay que adivinar la cantidad
de tiempo que se debe fijar porque el sensor se
ccupa de todos los pasts a seguir. En cu&ntc sien-
ta que estd completamente limpic, el homo se apa-
gar&. Se dispone de ctra opci6n, que permite pro-
gramar manualmente el nivel de suciedad, es decir
prcgramar para poca, mediana o mucha suciedad.
La puerta deber_ esta cerrada completamente para
que se trabe y el ciclo pueda comenza_ Si la puerta
estd cerrada correctamente, se traba despu_s de unos
6 segundos despu_s de presionar START/ENTER. El
ciclo incluye un perfodo de enfriamiento de aproxi-
madamente 30 minutos, Si desea ver la hora del dfa
durante el ciclo, presione CLOCK durante 5 segundos.
CC)MO PROGRAMAR LOS CONTROLES
Paracomenzarel ciclode autolimpiezaSENS-A-CLEANinmediatamente:
1, Prasione SENS-A-CLEAN. PRESIONE USTED VE
El programa SenS determinam autom_icamente
el tiempo de limpieza necesado. Eltiempo mdximo
de limpieza es de 4_ horas y el mfnimo es de
2 horas.
2. (Opcional) Si usted prefiere fUar manualmente el nivel PRESIONE
de suciedad, puede elegir,Light (Ligera), Average
(Mediana) o Heavy (Profunda)
USTEDVE
Para suciedad ligera, presione dos veces
SENS-A-CLEAN (Detector de limpieza), SoilL
(suciedad ligera) aparecerd en la pantalla. La
duraci6n del ciclo es de 2 a 2 horas y media.
Para suciedad mediana, presione SENS-A-CLEAN
(Detector de limpieza) tree veces, SoilA (suciedad
mediana) aparecer& en la pantalla. La duraci6n del
ciclo es de 3 a 3 horas y media.
Para suciedad profunda, presione SENS-A-CLEAN
(Detector de limpieza) cuatro veces, SoilH (suciedad
profunda) aparecerd en la pantalla. La duraci6n del
ciclo es de 4 a 4 horas y media.
(el ejemplo muestra el pro-
grama para poca suciedad)
3. Presione START/ENTER. PRESIONE USTED VE
4. Luego que termine el ciclo de auto limpieza USTED VE
SENS-A-CLEAN:
LOCKED se apaga y la puerta se destraba.
continda en la p_gina eiguiente
87
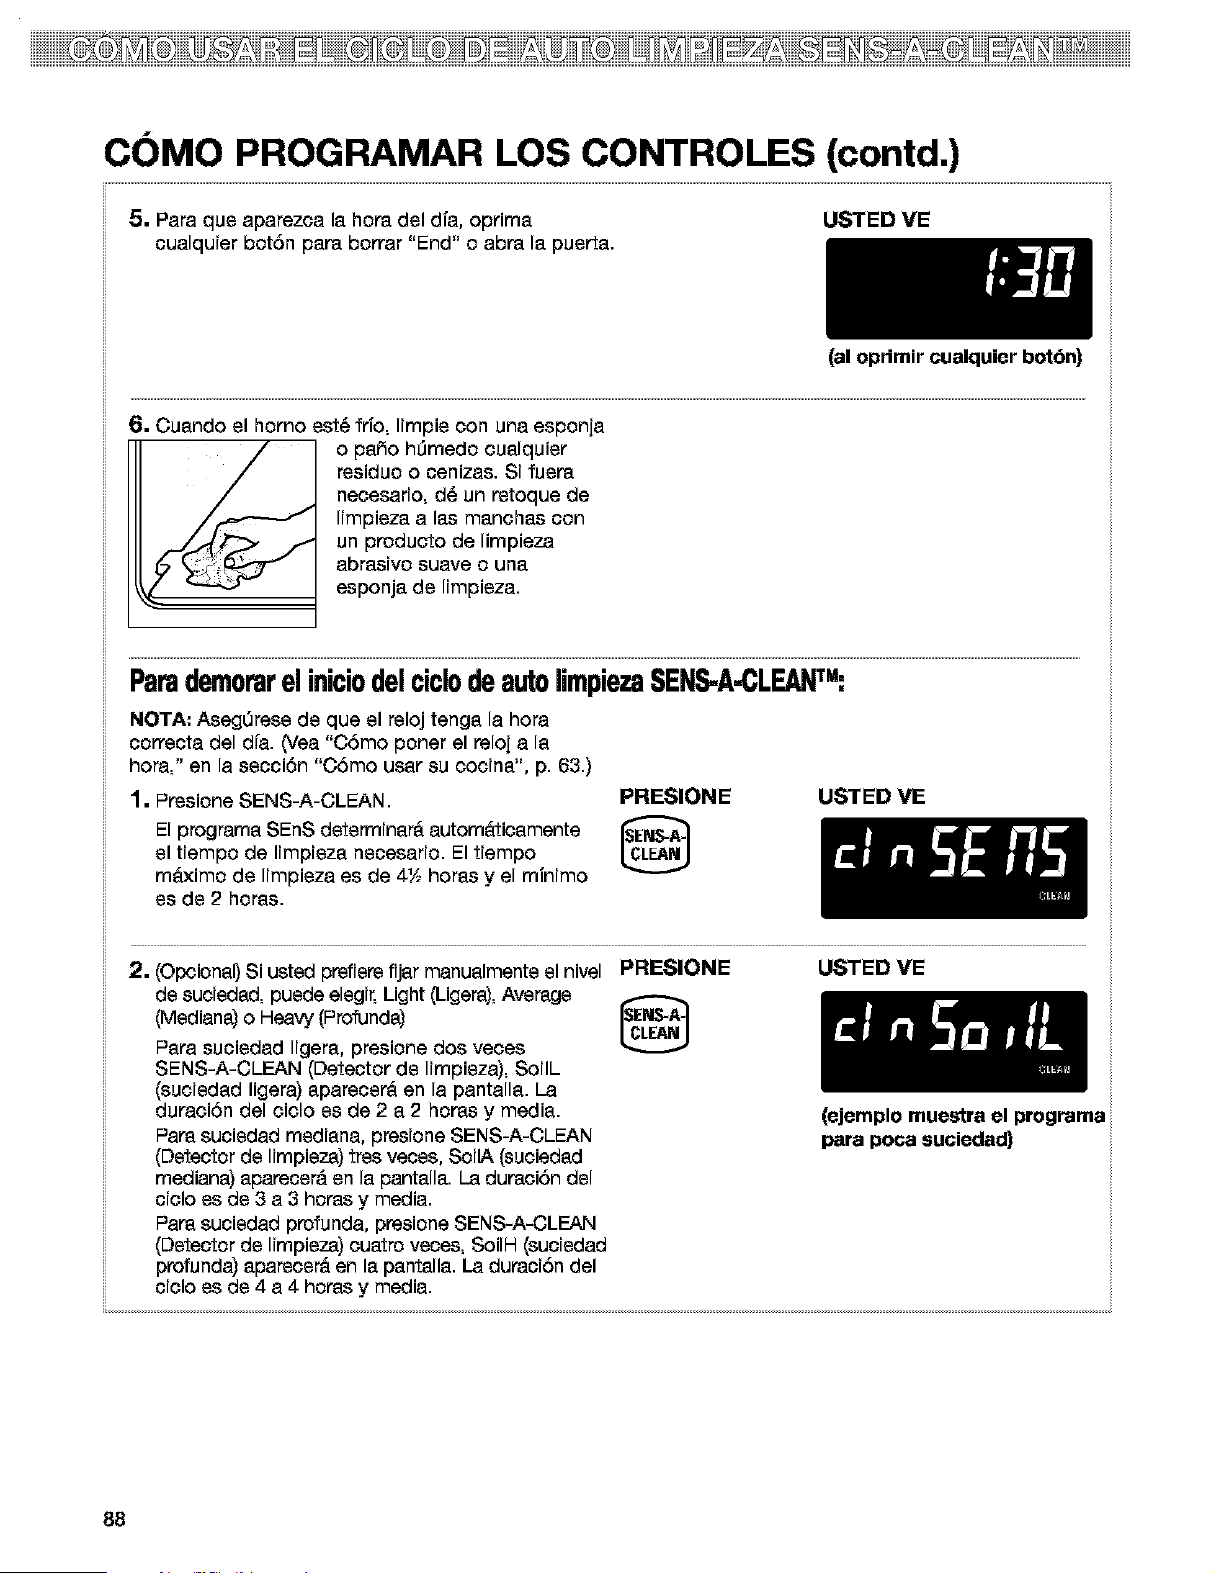
CC)MO PROGRAMAR LOS CONTROLES (contd.)
5. Para que aparezca la hopa del dfa, oprima
cualquier botSn papa borrar "End" o abpa la puerta.
USTED VE
(al oprimir cualquier botbn)
6. Cuando el homo eat_ frfo, limpie con una esponja
o paso hDrnedo cualquier
reaiduo o cenizas. Si fuepa
necesario, d_ un retoque de
limpieza alas manchas con
un producto de limpieza
abpasivo suave o una
esponja de limpieza.
Parademorarel iniciodelciclodeautolimpiezaSENS-A-CLEANT":
NOTA: AsegQrese de que el reloj tenga la hora
correcta del dfa. (Vea "CSmo poner el reloj a la
hora," en la secciSn "CSmo usar su cocina", p. 63.)
1. Preaione SENS-A-CLEAN.
El programa SEnS determinam automaticamente
el tiempo de limpieza necesario. El tiempo
mAximo de limpieza es de 4½ hopas y el mfnimo
as de 2 hopas.
PRESIONE USTEDVE
2. (Opciona[,_Si usted prefiere fijar manualmente el nivel PRESIONE USTED VE
de suoiedad, puede elegir, Light (Ligepa),Average
(Mediana) o Heavy (Profunda)
Papa suciedad ligepa, presione dos veces
SENS-A-CLEAN (Detector de limpieza), SoilL
(suciedad ligera) aparecer_ en la pantalla. La
dupaci6n del ciclo as de 2 a 2 hopas y media.
Papasuciedad mediana, presione SENS-A-CLEAN
(Detector de limpieza) tres veces, SoilA (suoiedad
mediana) apapacer& an la pantalla. La dupaciSn del
ciclo as de 3 a 3 hopas y media.
Papasuciedad profunda, presione SENS-A-CLEAN
(Detector de lirnpieza) cuatro veces, SoilH (suciedad
profunda) aparecera en la pantalla. La duraciSn del
ciclo as de 4 a 4 hopas y media.
(ejemplo muestra el programa
para poca suciedad)
88
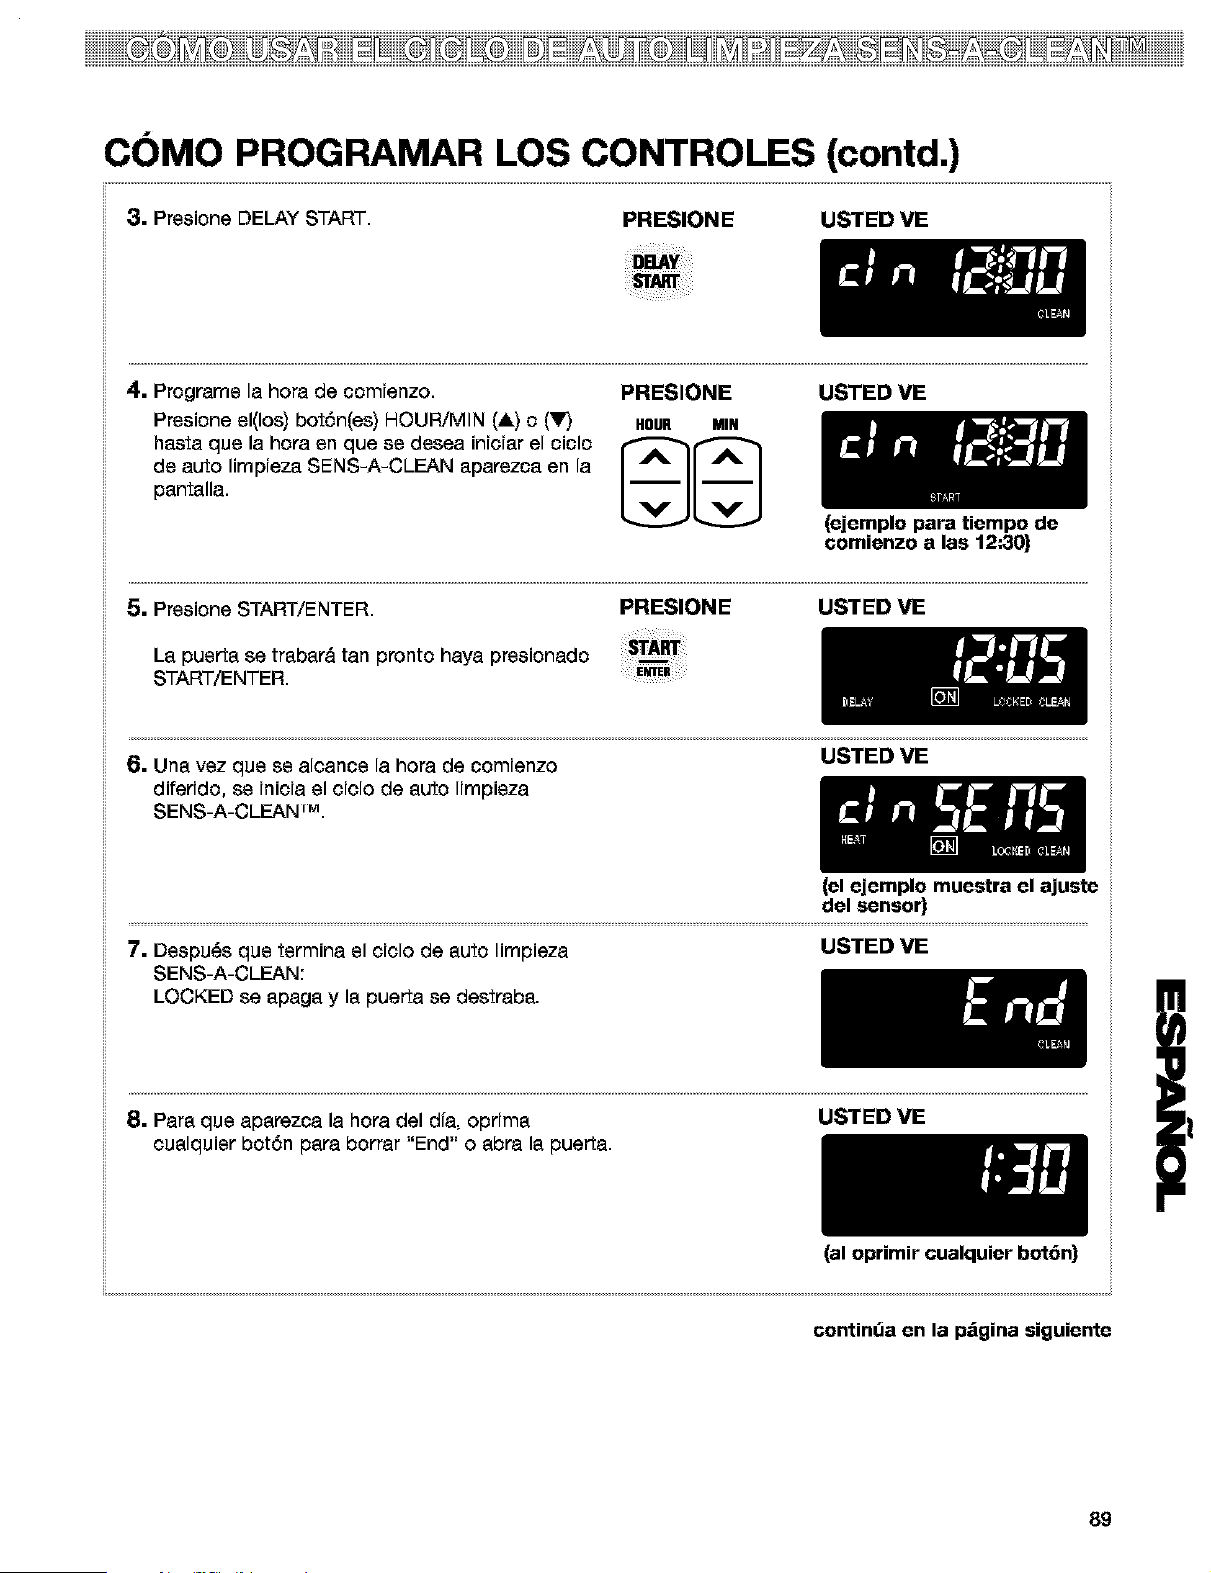
iiiiiiiiiiiiii iiii iiii2i iiiii ii @ iiiiii
CC)MO PROGRAMAR LOS CONTROLES (contd.)
3. Presione DELAY START.
PRESIONE USTED VE
4. Programs la hora de comienzo.
Presione el(los) bot6n(es) HOUR/MIN (A) o ('_F)
basra que la hora en que se desea iniciar el ciclo
de auto limpieza SENS-A-CLEAN aparezca en la
pantalla.
PRESIONE USTED VE
HOUR MIN
(ejemplo para tiempo de
comienzo a las 12:30)
5. Presione START/ENTER. PRESIONE USTED VE
La puerta se trabar_ tan pronto haya presionado
START/ENTER.
6. Una vez que se alcance la hora de comienzo USTED VE
difeddo, se inicia el ciclo de auto Impieza
SENS-A-CLEAN IM.
(el ejemplo muestra el ajuste
del sensor)
7. Despu_s que termina el cicIo de auto limpieza
SENS-A-CLEAN:
USTED VE
LOCKED se apaga y la puerta se destraba.
ii .............................................................................................................................................................................................................................................................................................................................................. }
8. Para que aparezca la hora del dfa, opdma USTED VE
cualquier bot6n para borrar "End" o abra la puerta.
(al oprimir cualquier bot6n)
continua en la p_gina siguiente
89
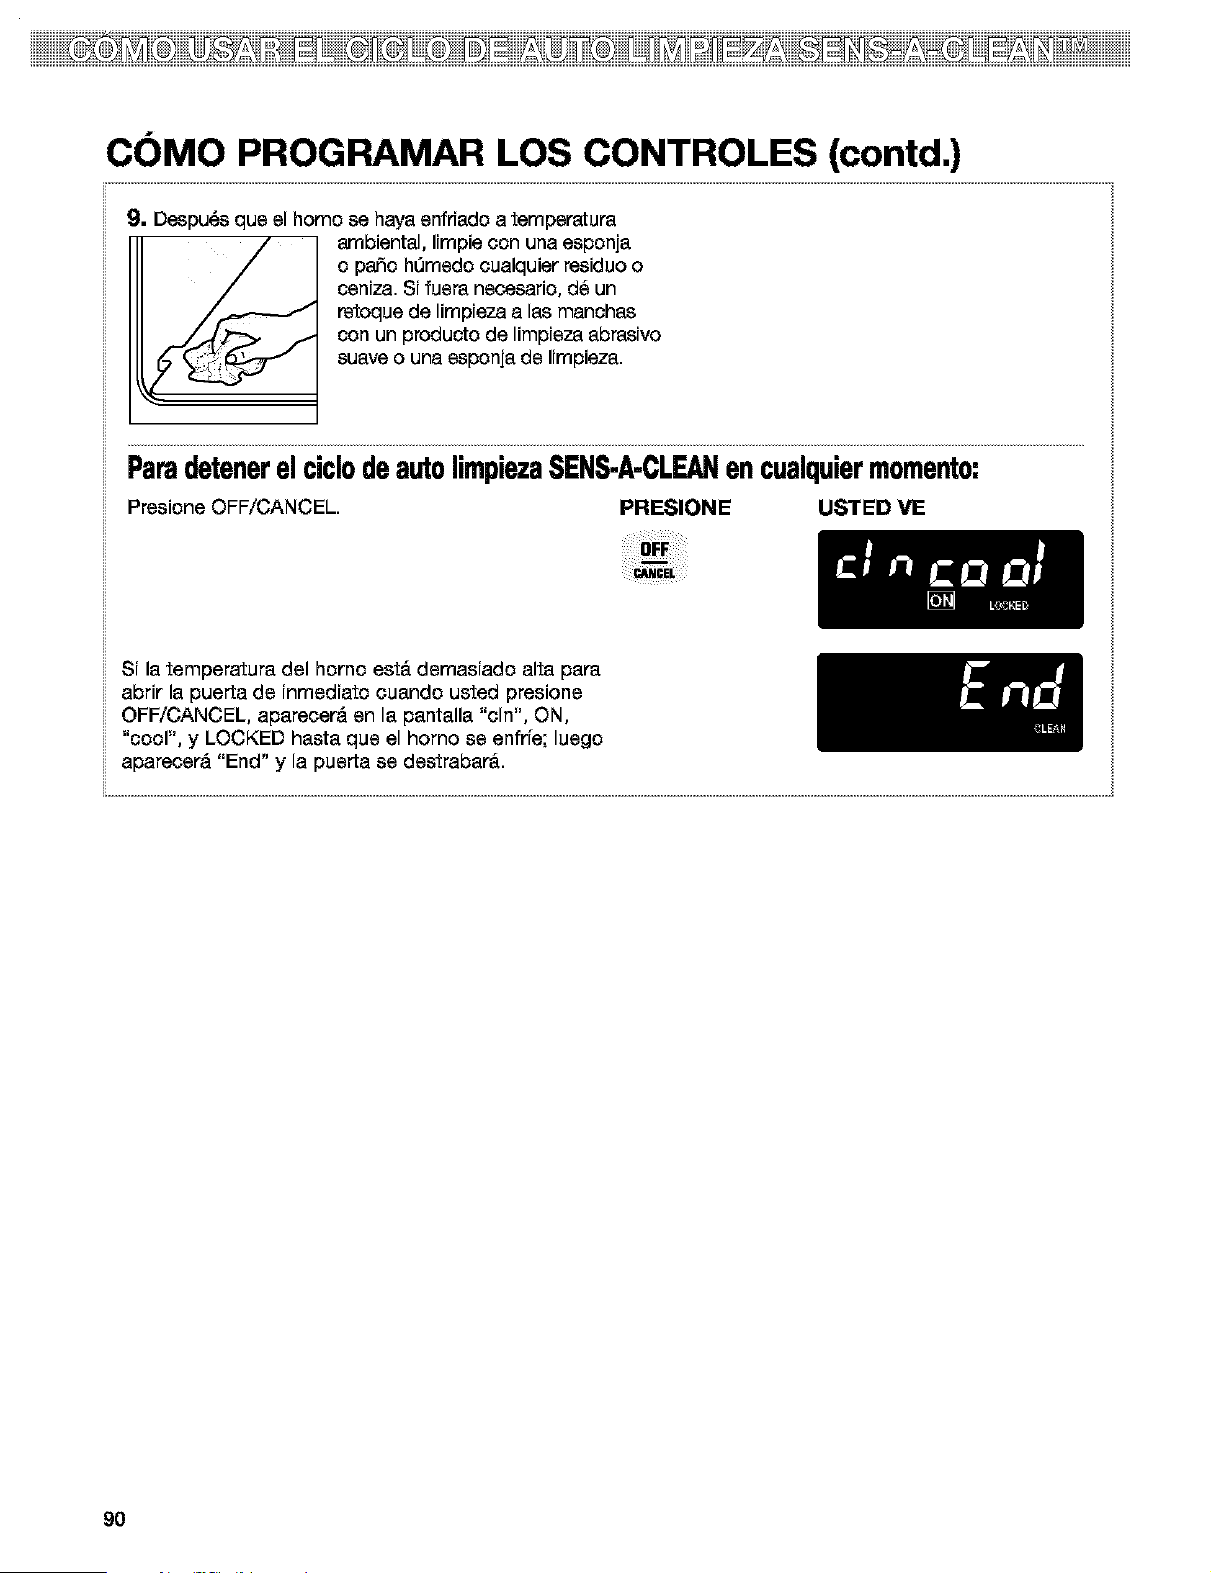
CC)MO PROGRAMAR LOS CONTROLES (contd.)
9. Despu_s que el homo se haya enfrfado a temperatura
arnbiental, limpie con una esponja
o patio h0medo cualquier residuo o
ceniza. Si fuera necesario, d_ un
retoque de limpieza alas manchas
con un producto de IJmpieza abrasivo
suave o una esponja de limpJeza.
ParadetenerelciclodeautolimpiezaSENS-A-CLEANencualquiermomento:
Presione OFF/CANCEL. PRESIONE USTED VE
Si la temperatura del homo est& demasiado alta para
abrir la puerta de inmediato cuando usted presione
OFF/CANCEL, aparecerd en la pantalla "tin", ON,
"cool", y LOCKED hasta que el homo se enfrfe; luego
aparecerd "End" y la puerta se destrabar_.
9O
El Cuidado de su cocina
CUADRO DE LIMPIEZA
Antes do limpiar, siompre asegOrese quo todos los controlos estdn apagados y do que la codna ost6 frfa.
Consulte las instrucciones que vienen con los productos de limpieza antes de usarlos para limpiar su cocina de gas.
PIEZA METODO DE LIMPIEZA
Perillas de control ° J_be_ y agua
• LavavajiHas
Tablero de controles y
cubierlas de la luz de la
consola
Superficies exteriores*
(excluyer_doel tablere de
cor_troles y el vidrio de la
puerta de] homo)
Las parrillas y tapas de los
quernadores exteriores
recubiertos de porcelana*
• Suciedad ligera a rnoderada
• J&bo_ y agua
• Limpiador de vidrios er_ atornizador
• J&bor_y agua
• Limpiador Ifquido suave
• Limpiador de vidrios er_ atornizador
• Estrapaio p]_stico de fregar no
abrasive
, Quemada Lirnpiador de parillas
Sears
• JabOn y agua
• Estrepajo pl_stico de fregar r_o
abrasive
• Lavavajillas (parrillas selamente)
INSTRUCCIONES ESPECIALES
• NO use esponja de libra rnet&lica o
productos de ]impieza
abrasives
• Jale las periqas directarnente desde
el tablere de controles
• Lave, er_iuague y s6quelas cer_ ur_
pa_e suave.
• Lavar, eniuagar y secar con un paso
SUaVe,
• Reciar el lirnpiader er_ urea toalle de
papel; r_ele aplique directarnente al
tablere.
• NO use limpiaderes abrasives e
&speros corno blanqueaderes cor_
clero, arnoniaco o limpiaderes de homo,
• Lavar, eniuagar y secar con ur_pa_e
suave.
• Lirnpie cor_ cuidado alrededor de la
placa con el rnodelo y la serie, el fTotar
dernasiado pedrfa berrar los n_rneres,
• NOTA: Para evitar daSar el preducte,
no quite la superficie de cocoi0n.
• Lirnpie tan pronto se er_sucien.
• Lave, er_iuague y seque biers,
• Coloque las pardi]as en la canasta
infedor del lavavajilJas y use el ciclo
rn&s fuerte.
*Cuando la superficie de cocoiSr_est6 frfa, quite todas las salpicaduras y Ifmpie. Las salpicaduras de comida que
cor_tienen _cidos, tales corno viagre y tornate, pueden afectar el acabado. Para evitar desportilladuras a la
porcelana de las parrillas, no golpee las parrillas y las tapas er_tre sf o contra superficies duras come utensilios
de cocir_a de hierro fundido,
continda en la p_gina siguiente
91
CUADRO DE LIMPIEZA (contd.)
PIEZA INSTRUCCIONES ESPECIALES
Las parrillas y tapas de los
quemadores exteriores
recubiertos de porcelana* (cont.)
• Suciedad profunda
Quemadores exteriores
Vidrio de la puerta del horno
Cavidad del homo
• Salpicaduras de cornida que
contienen azOcar y/o leche
• Todes las demos salpicadupas
Parrillas del horno
Charola y parrilla para asar
MI_TODO DE LIMPIEZA
• Estropajo pl_stico de fregar no
abrasfvo
• Umpiador abrasive suave en polvo
y agua
• Repita los pasos del _ooeso de
lirnpieza(con los artfsules indicados
a la izquierda) esg_n se necesite,
hasta elfminarcornpletame_e la
suciedad.
• Enjuague y esque metisulosarnente
• NOTA: No coloque las_ _ k_
JabOn y agua
Estrop_o pl_codefregarno abpasivo
• Limpiadorde vidnos en atomizador
• Jab6n y agua
• Ciclo de auto limpieza
• Jab6n y agua
• Estropajo de fibra met_lica
• Ciclo de auto lirnpieza
quemadores rniertrases_n _mecles.
No lave las tapa_en el lavavajilla&
• Yes "Losquemadoresexterioresy
lasupenlde de cocci6nsellados"en la
secci6n"Elcuidadode su cocina",p. 93
• Lave, limpie y seque con an
patio suave.
• Seque con una toalla de papel,
• Cuar_doel homoes err'de, lave,
enjuague y seque con an patio
suave.
• Vea "C6mo usar el ciclo de auto
limpieza SENS-A-CLEAN TM"p. 86.
• Lave, enjuague y seque.
• Col6quelas en el 2do. y4to. riel de
las parriHes.LaB pardllas perderdn
su celery se_ rrt_ difidl deslizarlas,
Despu_sde laimpi_a, apliqueaosite
vegetal a los deles de las pa,Tilles
papafacilitar su deslizarniento.
• Lave, enjuague y seque.
• Rornoje unos 20 minutes, luego
refTieguecon an estropa_o pl&stico.
• No limpie la charola y parrilla en
el ciclo de auto lirnpieza.
• JabOn y agua
• Estropajo de libra rnet&lica
• Lavavajillas
• Solution de V= taza de amoniaco
per 1 gal6n de agua
• Limpiador abrasive suave o
limpiador comercial para homes.
Cavidad de la gaveta calentadora
• Derrames de comides que
contiene leche o az_car
• Todos los otros derpames
• Jab6n y agua
• Lirnpiador liquido suave
• Cuando la gaveta es enfrfe, lave,
enjuaguey esque con an pa_o suave.
• Lave, enjuague y seque con an
paso suave.
*Cuando la superficie de cocoi6n est@fria, quite redes las salpicaduras y limpie. Les salpicadupas de cornida que
contienen &cidos, tales come viagre y tomate, pueden afectar el acabado. Para evitar desportilladuras a la
porcelana de les parrillas, no golpee las parrillas y les tapes entre si o contra superficies duras come utansilios
de cocina de hierro fundido.
92
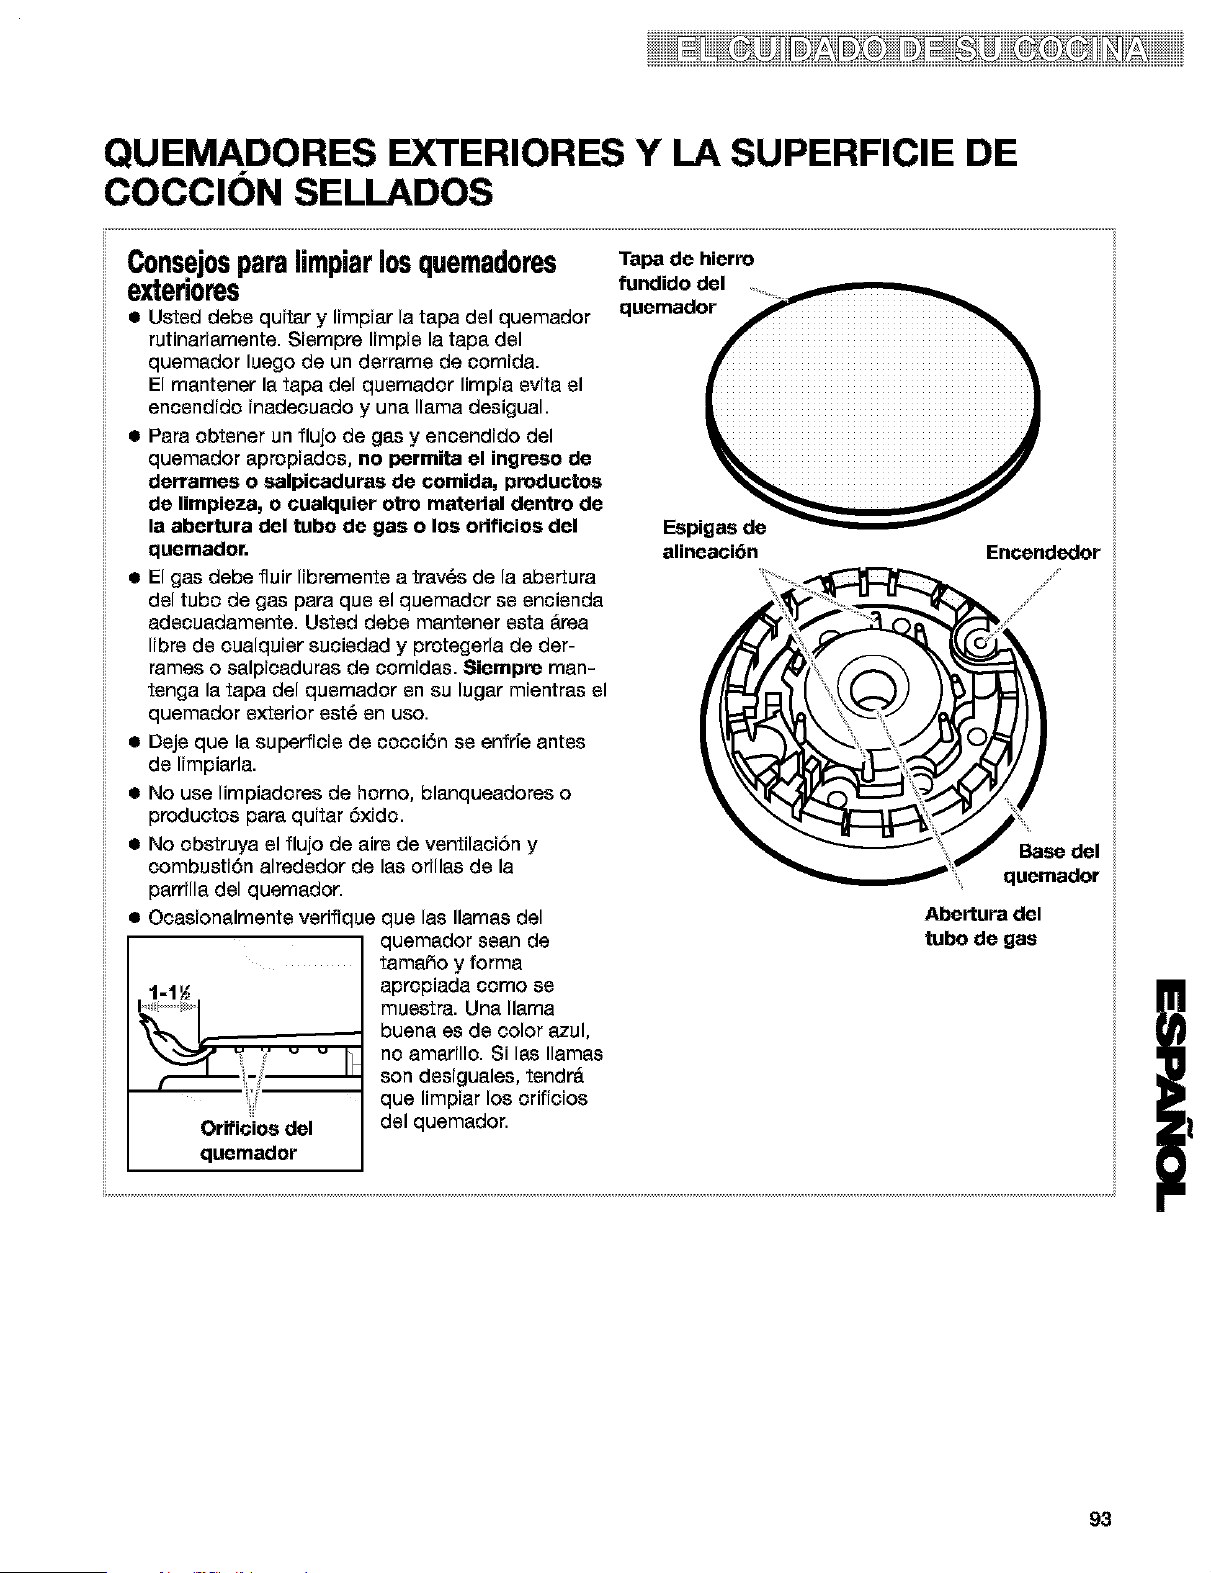
i ii Sii i iiii Di iiiiiiiiiiii
QUEMADORES EXTERIORES Y LA SUPERFICIE DE
COCClC)N SELLADOS
Consejosparalimpiarlosquemadores
exteriores
• Usted debe quitar y Iimpiar la tapa del quemador
rutinariarnente. Siernpre Iimpie la tapa del
quemador luego de un derrarne de ccrnida.
El rnantener la tapa del quernadcr lirnpia evita el
encendidc inadecuado y una llama desigual.
• Para cbtener un flujo de gas y encendido del
quemador apropiadcs, no I_rmita el ingr_so de
derrarnes o salpicaduras de cornida, productos
de lirnpieza, o cualquier otto material dentro de
la abertura del tubo de gas o los orificios del
quernador.
• El gas debe fluir Iibrernente a tray,s de la abertura
del tube de gas para que el quemadcr se encienda
adecuadamente. Usted debe mantener esta &tea
Iibre de cualquier suciedad y prctegerla de der-
rames o salpicaduras de ccrnidas. Siernpre rnan-
tenga la tapa del quernadcr en su lugar mientras el
quemador exterior est_ en uso.
• Deje que la superficie de cccciSn se enfrie antes
de Iimpiarla.
• No use lirnpiadcres de homo, blanqueadores o
productcs para quitar 5xidc.
• No cbstruya el flujo de airs de ventilaciSn y
combustiSn alrededor de las orillas de la
parrilla del quernador.
• Ocasionalrnente verifique que las llamas del
quemador sean de
I 1-1_
Orificies del
quernader
tamaSo y forma
apropiada corno se
muestra. Una llama
buena es de color azul,
no amarillo. Si las llamas
son desiguales, tendr_
que limpiar los orificios
del quemador.
Tapa de hierro
fundido del
quernador
Espigas de
alineaci6n
Base del
quernador
Abertura del
tube de gas
93
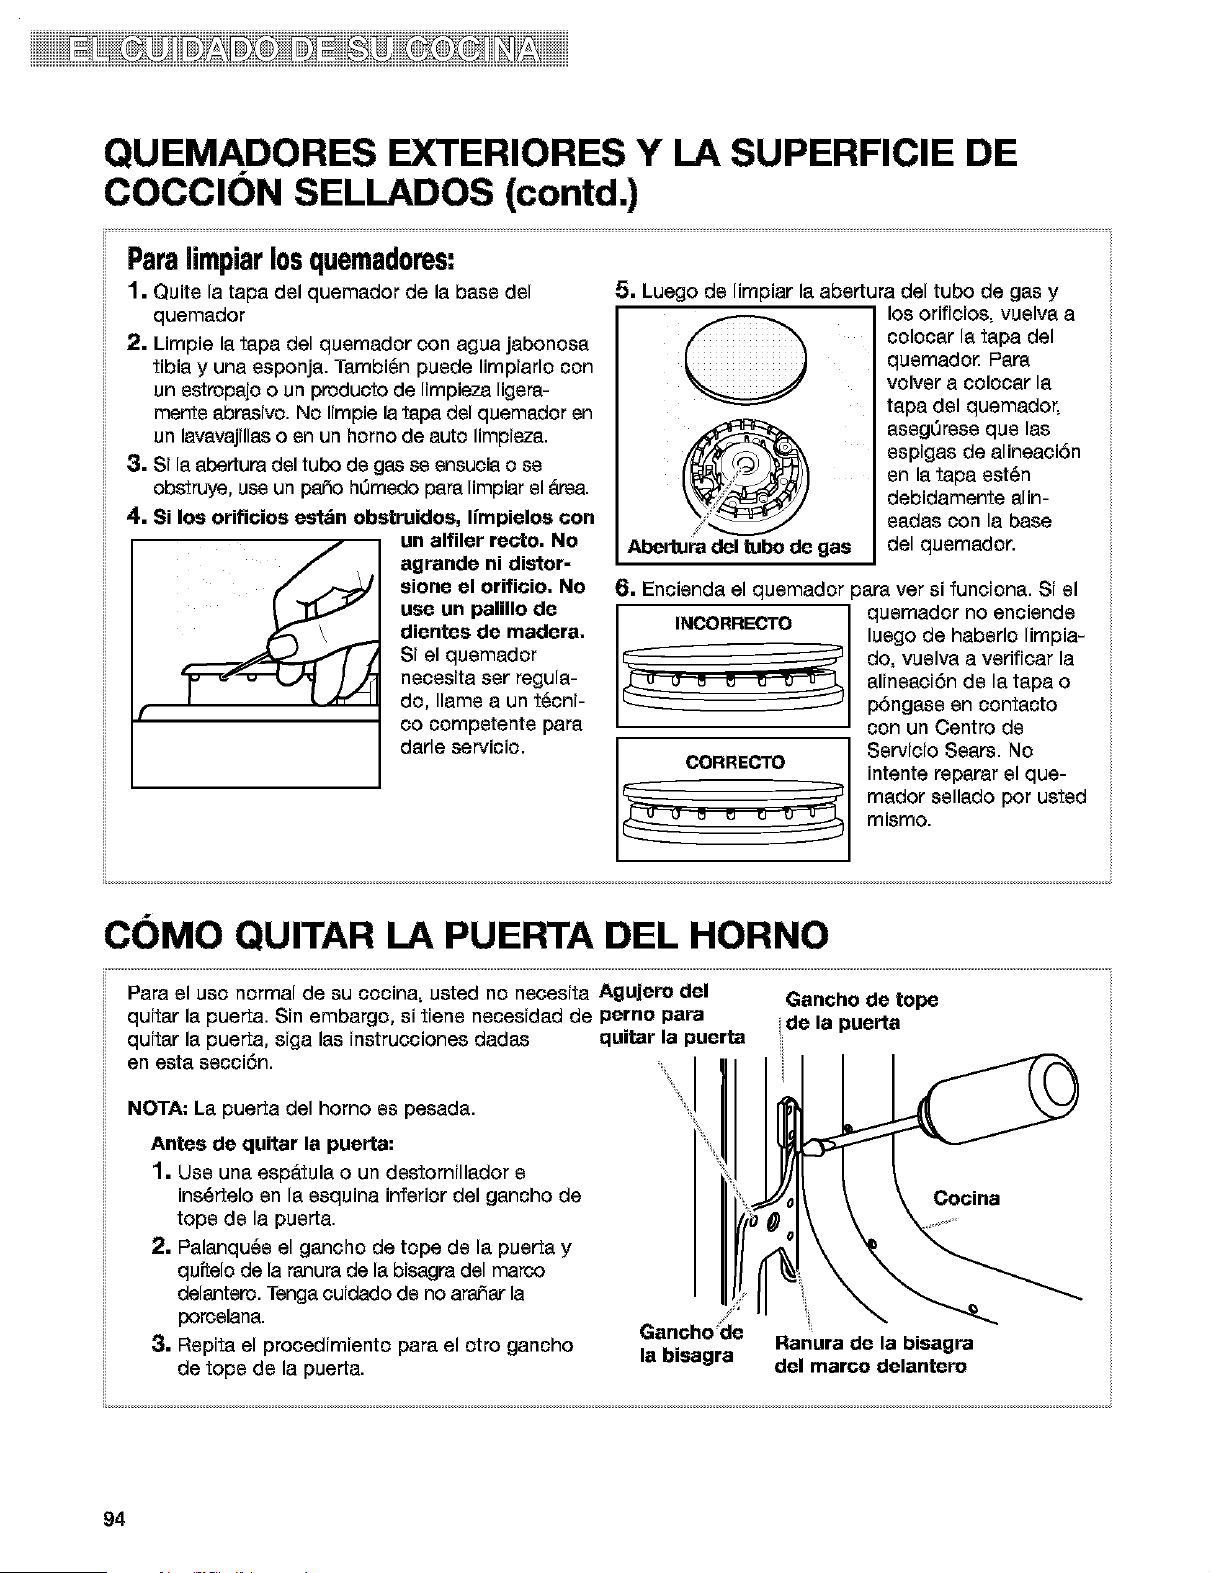
iiii ii i iiii @i iiiiiiiii
QUEMADORES EXTERIORES Y LA SUPERFICIE DE
COCCIC)N SELLADOS (contd.)
Paraiimpiarlosquemadores:
1. Quite la tapa del quemador de la base del
quemador
2. Limpie la tapa del quemador con agua jabonosa
tibia y una esponja. Tambi_n puede limpiarlo con
un estropajo o un producto de Iimpieza ligera-
mente abpasivo. No Iimpie la tapa del quemador en
un lavavajillas o en un homo de auto limpieza.
3. Si la abertupa del tubo de gas se ensucia o se
obstruye, use un patio ht3medo para limpiar el _rea.
4, Si los orificios est_n obstruidos, Iimpielos con
un alfiler recto. No
agrande ni distor-
sione el orificio, No
use un palillo de
dientes de madera,
Si el quemador
neoesita set regula-
do, Ilame a un t_cni-
co oompetente para
darle servicio.
5. Luego de limpiar la abertura del tubo de gas y
@
Abertura del tube de gas
Io8 orif[o[os, vuelva a
colocar la tapa del
quemado_ PaPa
volver a oolooar la
tapa del quemador,
asegt3rese que las
espigas de alineaciSn
en la tapa est_n
debidamente alin-
eadas con la base
del quemador.
6. Encienda el quemador paPaver si funciona. Si el
CORRECTO
quemador no enoiende
luego de haberlo limpia-
do, vuelva a verificar la
alineaciSn de la tapa o
pSngase en contacto
con un Centro de
Servicio Sears. No
intente repapar el que-
mador sellado por usted
mismo.
CC)MO QUITAR LA PUERTA DEL HORNO
Para el uso normal de su cocina, usted no necesita Agujero del
quitar la puerta. Sin embargo, si tiene necesidad de perno para
quitar la puerta, siga las instrucciones dadas quitar la puerta
en esta secciSn.
Gancho de tope
de la puerta
NOTA: La puerta del horno es pesada.
Antes de quitar Is puerta:
1. Use una espatula o un destornillador e
ins_rtelo en la esquina inferior del gancho de
tope de la puerta.
2. Palanqu_e el gancho de tope de la puerta y
quftelo de la rsnuPa de la bisagra del marco
delantero. Tenga cuidado de no ararat la
porcelana.
3. Repita el procedimiento para el otro gancho
de tope de la puerta.
Cocina
Gancho"de
Ranura de la bisagra
la bisagra del marco delantero
94

CC)MO QUITAR LA PUERTA DEL HORNO (contd.)
Paraquitaria:
1. Abra la puerta del horno. Inserte los pernos
para quitar la puerta,
que vienen con su
cocina, en ambos gan-
chos de las bisagras.
No quite los pernos
mientras est_ quitan-
do la puerta de la
cocina de gas.
3. Sujete la puerta por ambos lados con sus dedos
hacia la parte delantera
de la puerta y sus pul-
gares en la superficie
interior.
2. Cierre la puerta cuidadosamente hasta que
descanse sobre los pernos papa quitar la puerta.
4. Tire de la puerta en sentido recto hacia arriba,
luego hacia usted. Los ganchos de las bisagras
se deslizar_n fuera de la ranura de la bisagra del
marco delantero.
Parareinstalaria:
NOTA: Los pernos para quitar la puerta que usted
insert6 todavfa tienen que estar en ambas bisagras
de la puerta.
1. Sujete la puerta por ambos lados con sus dedos
hacia la parte delantera de la puerta y sus pul-
gares en superficie interio_
continda en la p_gina siguiente
95
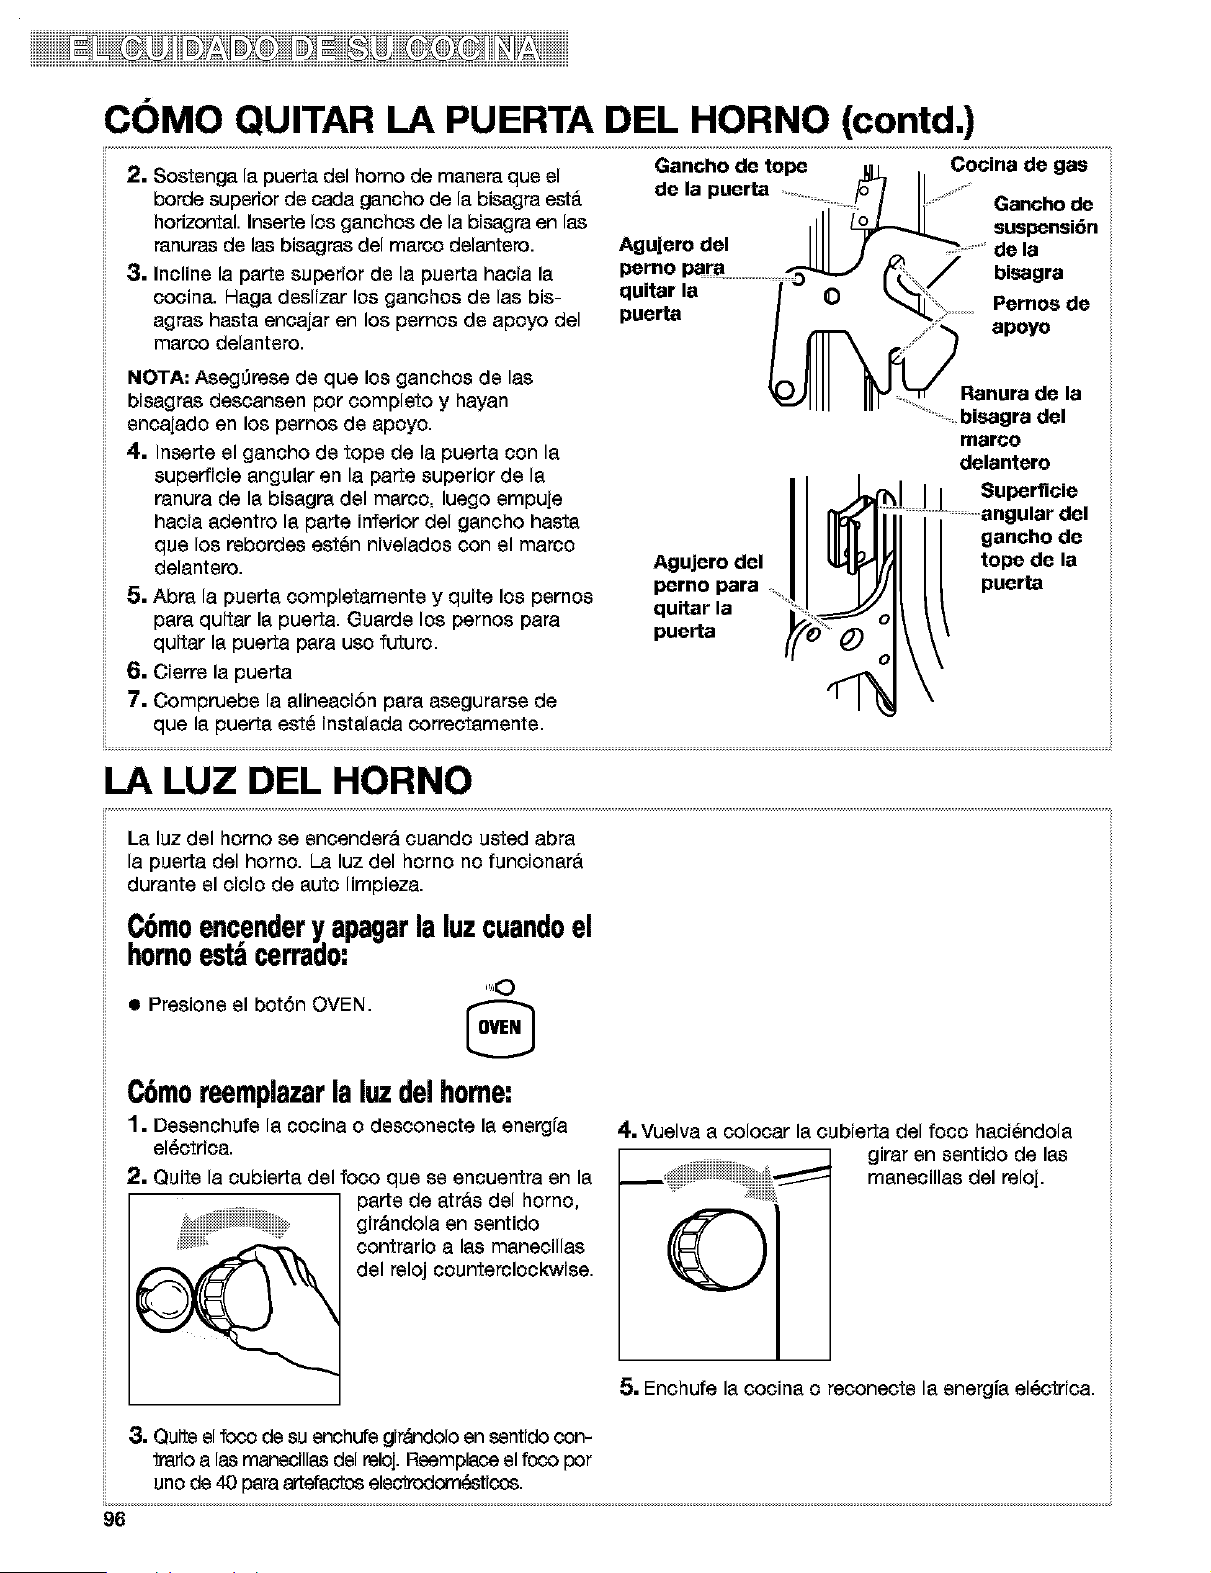
2. Sostsnga la puerta dsl homo de mansra qus el
Gancho de tope . _ .
de la puerta _ I A
s ua';".°,?.
Agujero del IIII [ _" " ' de la
perno .para ,_ p_%/ bisagra
qultar la 0 ....
/ _"I_ Pernos de
puerta / apoyo
SS f"
_Ranura de la
borde supsrfor de cada gancho de la bisagra est&
horizontal. Inserte los ganchos de la bisagra en las
ranuras de las bisagras del marco dslantsro.
3. Incline la parts superior de la pusrta hacia la
cocina. Haga dsslizar los ganchos de las bis-
agras hasta encajar en los psmos de apoyo del
marco delantsro.
NOTA: Aseg_rese de que los ganchos de las
bisagras descansen por oomplsto y hayan
sncajado en los psmos de apoyo.
4. Inserte el gancho de tope de la puerta con la
supsrficie angular en la parte superior de la
ranura de la bisagra dsl marco, luego smpuje
hacia adentro la parte inferior del gancho hasta
qus los rsbordes est_n nivelados con el marco
delantsrc.
5. Abra la pusrta completamsnts y quite los psrnos
papa quitar la puerta. Guards los pernos para
quitar la puerta para uso futurc.
6. Cisrrs la puerta
7. Compruebs la alineaci6n para assgurarss de
que la puerta est_ instalada correctamsnts.
bisagra del
marco
delantero
I Superficie
_lar del
gancho de
Agujero del tope de la
puerta
perno para
quitar la
puerta
LA LUZ DEL HORNO
La luz dsl homo se sncendsrd cuando usted abra
la pusrta del homo. La luz del homo no funcionar_
durante el ciclo de auto limpieza.
C6moencendery apagarlaluzcuandoel
homoesta cerrado,
Iru0
a Presions el bot6n OVEN. ,_,
Lt J
C6moreemplazarla Iuzdelhome:
1. Dsssnchufs la cocina o dssconscte la ensrgfa
el_ctrica.
2. Quits la cubisrta dsl foco qus ss encuentra sn la
parts de atr&s dsl homo,
girdndola sn ssntido
contrario alas manecillas
dsl rsloj counterclockwise.
4. Vuelva a oolooar la cubierta del foco haci_ndola
girar sn ssntido de las
manscillas del reloj.
©
5. Enchufe la oooina o reconects la snergfa el_ctrica.
3. Quits elfoco de su snchufs gir'_ndolo sn sentido con-
lradoa las manscillas dsl reloj. Reemplace el foco por
uno de 40 para artefactos elsclrcdorn_sticos.
96
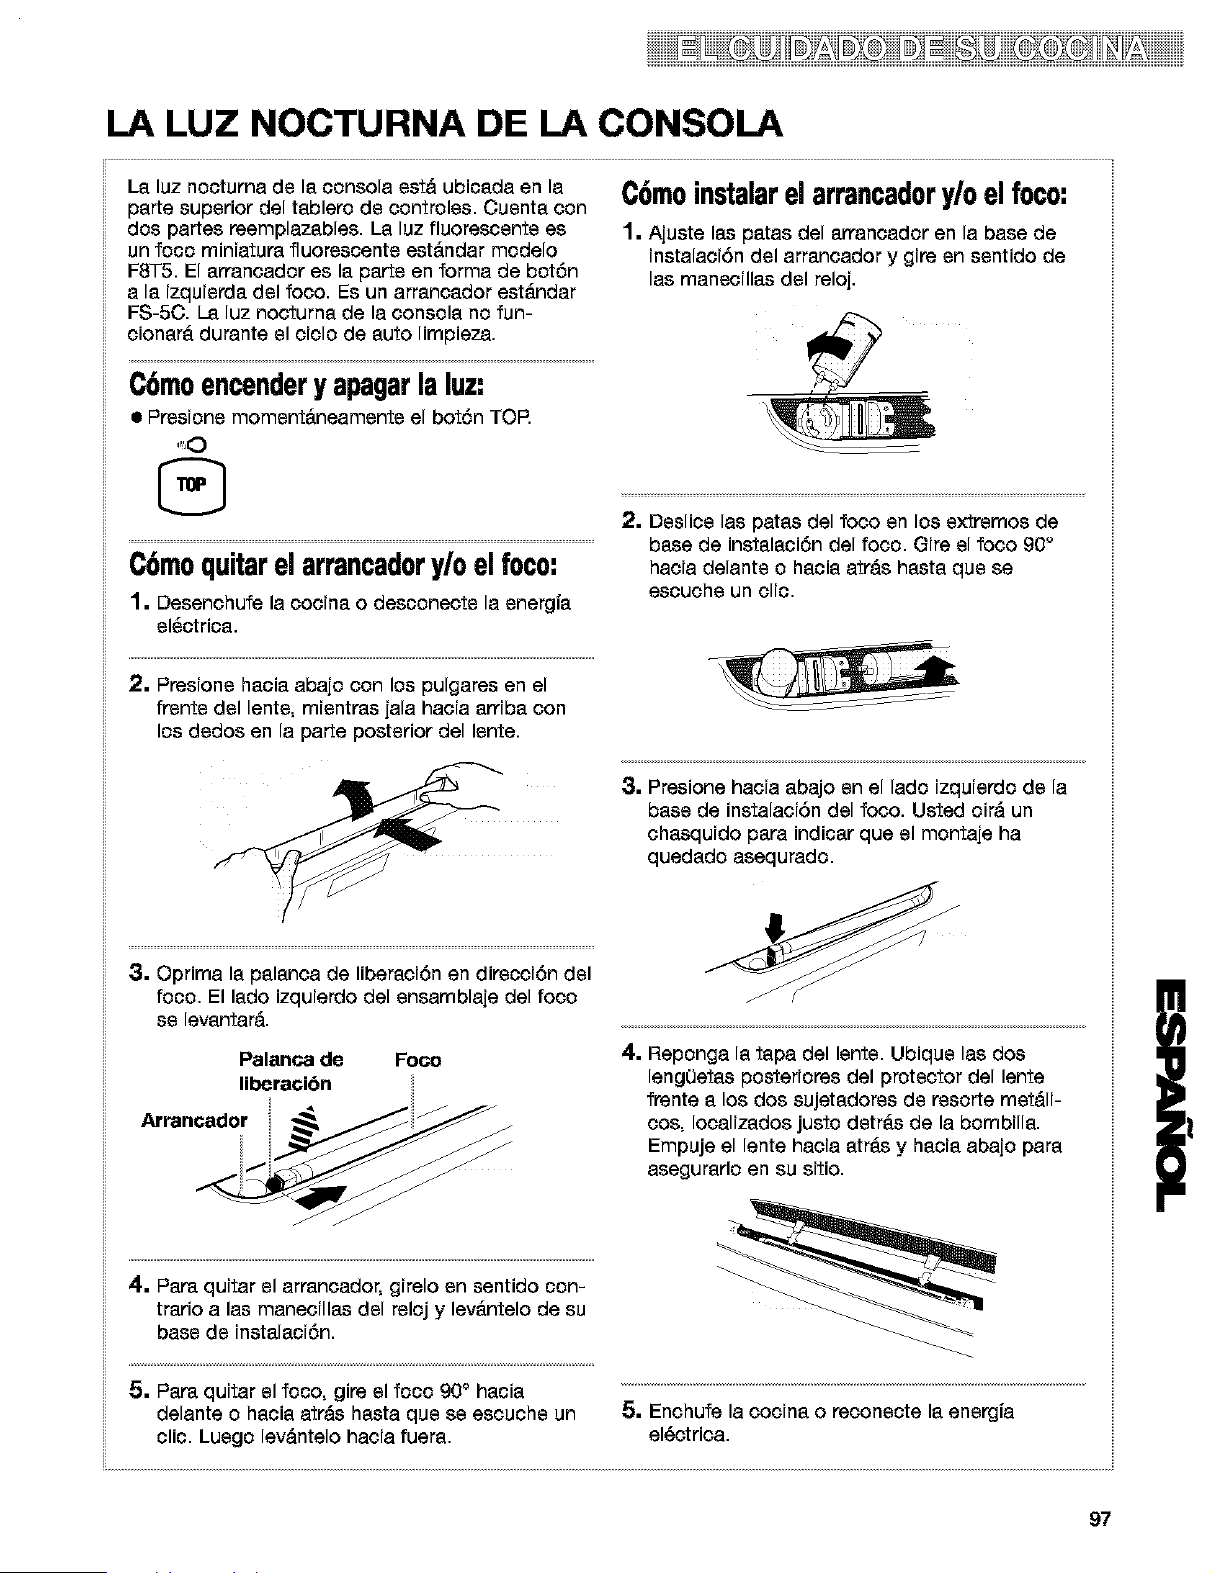
LA LUZ NOCTURNA DE LA CONSOLA
La luz nocturna de la consola estd ubicada en la
parte superior del tablero de controles. Cuenta con
dos partes reemplazables. La luz fluorescente es
un foco minfatura fluorescente est&ndar modelo
FST5. El arrancador es la parte en forma de bot6n
a la fzquferda del foco. Es un arrancador est&ndar
FS-5C. La luz nocturna de la consola no fun-
cionar& durante el cfclo de auto limpieza.
C6moencendery apagarlaIuz:
• Presione moment_neamente el bot6n TOP.
C6moinstalarel arrancadory/oel foco:
1. Ajuste las patas del arrancador en la base de
instalaci6n del arrancador y gire en sentido de
las manecillas del reloj.
2. Deslice las patas del foco en los extremos de
base de instalaci6n del foco. Gire el foco 90°
hacia delante o hacia atrds hasta que se
escuche un clio.
2. Presfone hacia abajo con los pulgares en el
frente del lente, mfentras jala hacfa arrfba con
los dedos en la parte posterior del lente.
3. Presione hacfa abajo en el lado fzquferdo de la
base de instalacf6n del foco. Usted oir_ un
chasqufdo para indicar que el montaje ha
quedado asequrado.
3. Oprima la palanca de liberaci6n en direcci6n del
foco. El lado izquierdo del ensamblaje del foco
se levantar&.
Palanca do Foco
Iiberaci6n
4. PaPaquitar el arrancador, girelo en sentido con-
trario a las manecillas del reloj y lev&ntelo de su
base de instalaci6n.
5. PaPaquftar el foco, gire el foco 90 ° hacia
delante o hacia atrds hasta que se escuche un
clic. Luego levdntelo hacfa fuera.
4. Reponga la tapa del lente. UbJque las dos
lengOetas posterfores del protector del lente
frente a los dos sujetadores de resorte met&If-
cos, Iocalfzados justo detr&s de la bombflla.
Empuje el lente hacfa atr&s y hacfa abajo para
asegurarlo en su sftio.
5. Enchufe la cocfna o reconecte la energfa
el_ctrica.
97
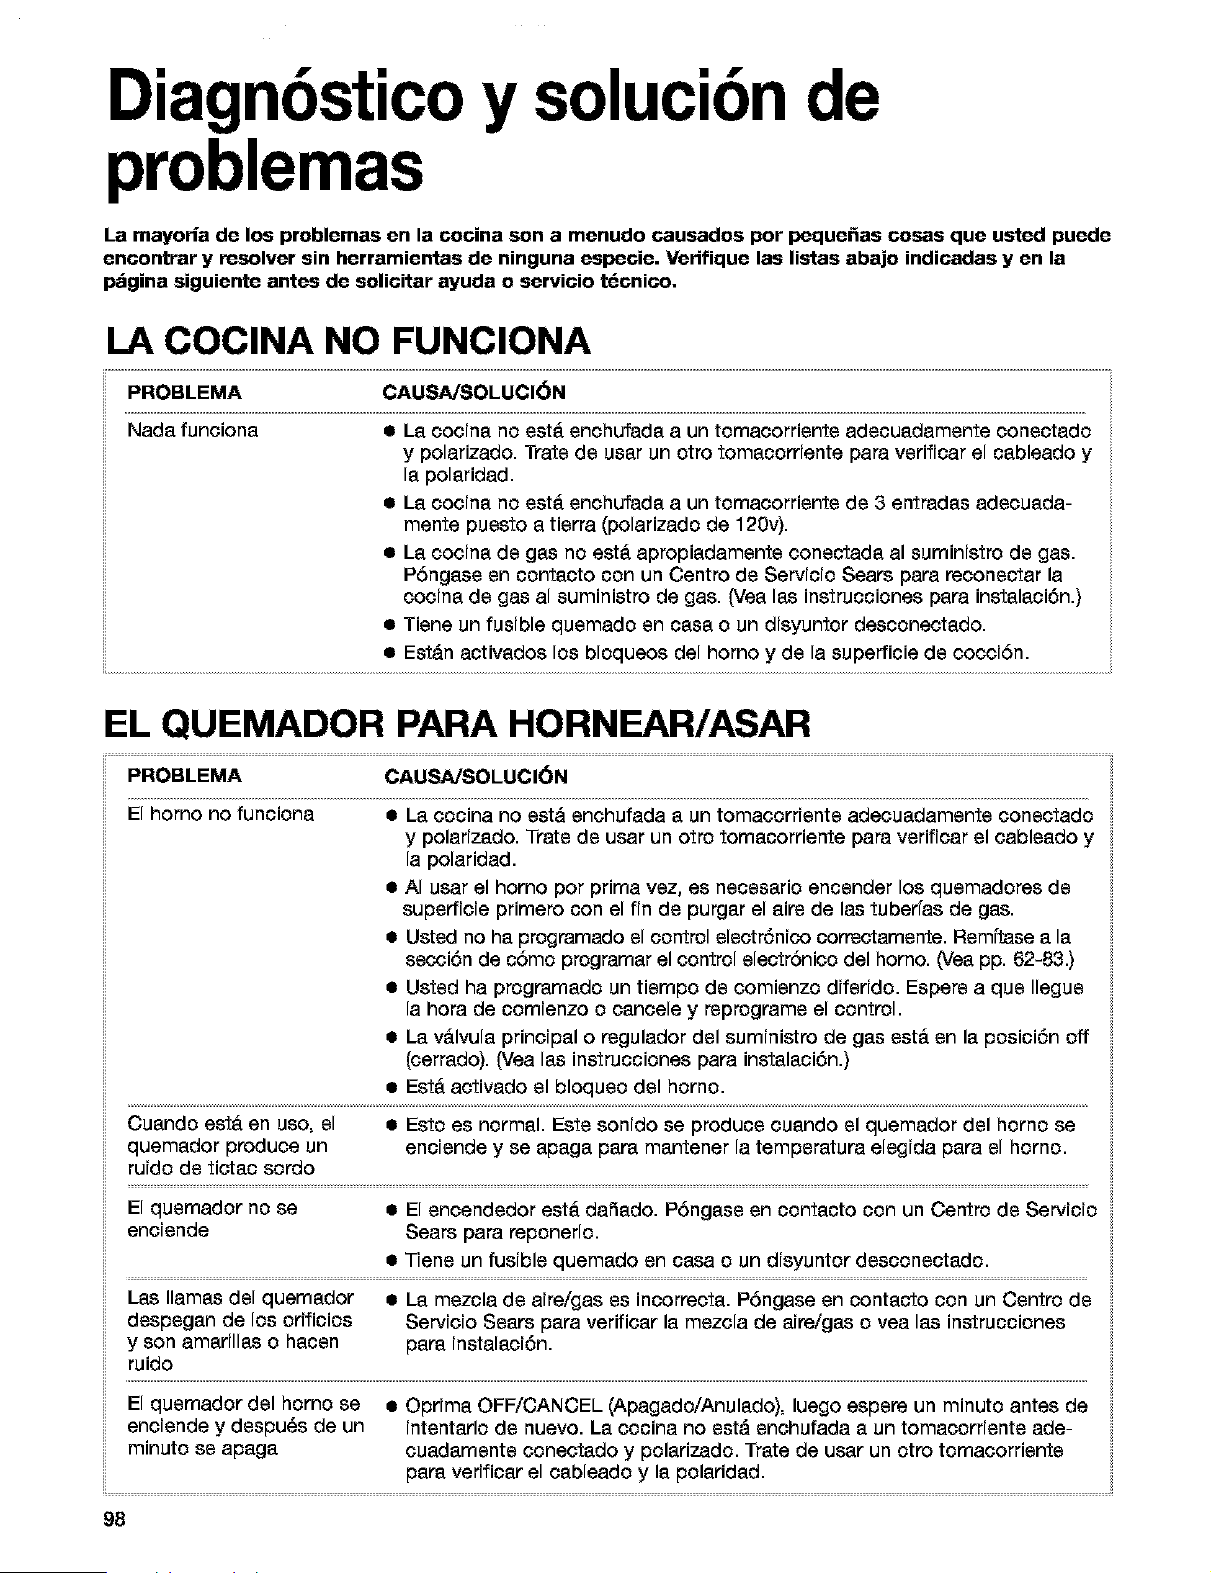
Diagnbsticoy solucibnde
problemas
La mayoria de los problemas en la cocina son a menudo causados por peque_as cosas que usted puede
encontrar y resolver sin herramientas de ninguna especie. Verifique las listas abajo indicadas y en Is
pdgina siguiente antes de solicitar ayuda o servicio tdcnico,
LA COClNA NO FUNClONA
PROBLEMA CAUSA/SOLUCI(_N
Nada funciona • La coc[na no est_ enchufada a un tomacorriente adecuadamente conectado
y polarizado. Tpate de usar un otro tomacorriente para verificar el cableado y
la polaridad.
• La cocina no est& enchufada a un tomacorriente de 3 entradas adecuada-
mente puesto a tierra (polarizado de 120v).
• La cocina de gas no est& apropiadamente conectada al suministro de gas.
PSngase an contacto con un Centro de Servicio Sears para reconectar la
cocina de gas al suministro de gas. (Vea las instrucciones para instalaciSn.)
• Tiene un fusible quemado an casa o un disyuntor desconectado.
• Est&n activados los bloqueos del homo y de la superficie de cocciSn.
EL QUEMADOR PARA HORNEAR/ASAR
PROBLEMA CAUSA/SOLUCI(_N
El homo no funoiona • La cooina no estd enchufada a un tomacorriente adecuadamente conectado
y polarizado. "Irate de usar un otro tomacorriente para verificar el cableado y
la polaridad.
• AI usar el homo por prima vez, es neoesario enoender los quemadores de
superficie primero con el fin de purgar el airs de las tuberfas de gas.
• Usted no ha programado el control electr6nico correctamente. Remffase a la
secci6n de cSmo programar el control electrSnico del homo. (Yea pp. 62-83.)
• Usted ha progpamado un tiempo de comienzo diferido. Espers a qua Ilegue
la hora de oomienzo o cancele y reprogpame el control.
• La v_lvula principal o regulador del suministro de gas est_ an la posici6n off
(cerpado). (Vea las instrucciones para instalaci6n.)
• Est_ activado el bloqueo del homo.
Cuando est_ en uso, el • Esto es normal. Este sonido se produce cuando el quemador del homo se
quemador produce un enciende y se apaga paPa mantener la tempepatupa elegida para el homo.
ruido de tictac sordo
El quemador no se • El encendedor est_ daSado. PSngase an contacto con un Centro de Servicio
enciende Sears para reponerlo.
• Tiene un fusible quemado an casa o un disyuntor desconectado.
Las llamas del quemador • La mezcla de aire/gas as incorpacta. PSngase an contacto con un Centro de
despegan de los odficios Servicio Sears para verificar la mezcla de aipa/gas o yea las instrucciones
y son amadllas o hacen papa instalaci6n.
ruido
El quemador del homo se • Oprima OFF/CANCEL (Apagado/Anulado), luego espepa un minuto antes de
enciende y despu_s de un intentarlo de nuevo. La cocina no est& enchufada a un tomacorriente ade-
minuto se apaga cuadamente conectado y polarizado. ]-rate de usar un otro tomacorriente
paPaverificar el cableado y la polaridad.
98
iiDi @ iiiiiiiiii
LOS QUEMADORES EXTERIORES
PROBLEMA CAUSA./SOLUCI(_N
El quemador no 8e • La oooina no est& enohufada a un tomaoorriente adecuadamente conectado y
enciende polarizado. Tpate de usar un otro tomacorriente para verificar el cableado y la
polaridad.
• AI usar los quemadopas exteriores por primepa vez, es neoesario enoender
cualquiepa de las perillas de los quemadopas exteriorss papa eliminar el airs
que se encuentpa en las tubedas del gas.
• La perilla de control no est& en posiciSn correcta. Empuje hacia dentro las
perillas de control antes de hacerlas gipa_ Aseg_rese de que la perilla de
control est_ en la posiciSn LITE. (Vea p. 57.)
• Tiene un fusible quemado en casa o un disyuntor desconectado.
• Los orificios del quemador pueden estar obstruidos. U'mpielos con un alfiler
recto. (Yea p. 94.)
• AsegDpase de que se desactiv5 el bloqueo e la superficie de cocciSn. (Yea p. 64)
• Hay un apagSn.
Las llamas de quemador • Los orificios del quemador pueden estar obstruidos. U'mpielos con un alfiler
son desiguales recto. (Yea p. 94.)
• I-as tapas del quemador pueden estar en posici6n incorrect& (Vea p. 94.)
Las llamas del quemador • El quemador necesita Iimpieza. (Vea pp. 93, 94.)
despegan de los orificios • El quemador puede haberse dafiado. P6ngase en contacto con un Centro de
y son amarillas o ruidosas Servicio Sears para que revise el quemado_
cuando se apagan • Si se utiliza gas propano, la conversi6n de la cocina puede ser incorrect&
P6ngase en contacto con un Centro de Servicio Sears.
El quemador hace un
ruido seco ouando
se enciende
• El quemador est& mojado luego de haberlo lavado. D_jelo secar.
CUANDO SE USA EL CICLO DE AUTO LIMPIEZA DEL
HORNO
PROBLEMA CAUSA./SOLUCI(_N
El ciclo de auto limpieza • Usted no presion6 START/ENTER.
no funciona • Usted ha programado un tiempo de comienzo diferido. Espere a que Ilegue
el tiempo de comienzo o cancele y reprogpame el control.
• La puerta no est& cerpada completamente.
continda en la p_gina siguiente
99
iii i @ i iiiiiiiiiiii
RESULTADOS DE COCClC)N
PROBLEMA CAUSA/SOLUCI_)N
Los utensilios de cocina r_o • Nivele la cocina de gas. (Vea las instrucciones para ir_stalaci6n.)
est_r_nivelados er_la supefficie • Use utensilios de cocina con un as]ante liso.
de cocci6r_(Verifique si los
liquidos est_n nivelades en ]a
cacerola)
Caler excesive de la superficie • Elija uterus]lies de cocina del misme l:amaSo o ]igeramente m_s
de cocci6n en _reas alrededor grandes que la llama del quemador.
del utensilie
La temperatura del homo • Regule el cer_trolde temperatura del berne. (Yea "C6me regular el
parece rnuy baja e rnuy alia control de ternperatura del borne," pp. 69.)
Horneado o asado ler_te • Aumente el tiernpo de horneado o de asade.
• Aurnente la ternperatura 25°F.
• Precalier_te el borne a la ternperatura seleccionada ar_tes de colocar
la comida dentro los er_ cases en que se recomier_da recalenl:ar.
• Elija uter_silios de horr_ear que permitan 2 pulgadas de espacio a_reo
per todos los lades.
• Abra la puerta del home para cer_trolar la cernida cuar_do el
temporizador ir_dica el tiernpe rn_s corto sugeride en la recel:a.
• El ejear censtar_ternente el home prelenga rn&s el tiernpe de cocci6r_.
Los art{cules horneades esl:&r_ • Precalier_te el borne a la temperatura seleccionada ar_tes de colecar
muy oscuros er_ el fer_do, la comida en el borne.
• Elija uter_silies de herr_ear que permitan 2 pulgadas de espacie a_ree
per tedos los lades.
• Celoque la parrilla en pesiciSn rn&s alta er_el borne.
• Dismir_uya la temperatura del home entre 15 ° a 25°F.
Articulos herr_eades • Nivele la cocina de gas.
desigualmer_te • Herr_ee er_el cer_tro del home con 2 pulgadas de espacio alrededor
de cada rnolde de hornear.
• Cerci6rese de que la masa est_ nivelada en el rnolde de hemear.
Los bordes de la corteza se • Cubra los berdes con papel de alurninio.
per_er_de color oscuro ar_tes
que el pastel est6 cocido
100
iiDi @ iiiiiiiiii
MENSAJES EN LA PANTALLA LUMINOSA
PROBLEMA CAUSAJSOLUCI(_N
La pantalla muestra "PF" • Hubo un apag6n. Presione OFF/CANCEL para despejar la pantalla,
y [] luego vuelva a poner el reloj a la hora. (Vea p. 63.)
• La caracterJ'stica del bloqueo de la superficie de cocci6n estd
activada. Para quitar el bloqueo de los quemadores exteriores, yea
"CSmo usar el bloqueo de la superficie de cocci6n", p. 64.
La pantalla muestra una "F" • Presione OFF/CANCEL para despejar la pantalla. Si el c6digo "F"
seguida de un n_mero aparece nuevamente, Ilame al servicio t_cnico.
La pantalla muestra "EO F5 (l_a • Presione OFF/CANCEL para despejar la pantalla
puerta del homo no cierra porque • Presione y retenga el impulsor del interruptor de la puerta (ubicado
le estorba el mecanismo de traba en el marco delantero del homo.) El mecanismo de traba se
del ciclo de auto limpieza), destrabard en unos 6 segundos.
lol

iiiiiii_ iiiiiiiiiiiiiiiiiiiiiiiiiiiiiiiiiiiiiiiiiiiiiiiiiiiiiiiiiiiiiiiiiiiiiiiiiiiiiiiiiiiiiiiiiiiiiiiiiiiiiiiiiiiiiiiiiiiiiiiiiiiiiiiiiiiiii
102
Indice
T(_PICO PAGINA T(_PICO PAGINA
ASADO
Cacerolas ...................................................... 50, 51
Consejos ............................................................. 58
Posiciones de las parrillas del homo .................. 60
Programaci6n del cic!o .................. _........... ::....... 67
ASARA LA PARRILLA
Charola .......................................................... 70, 71
]nstrucciones ................................................. 71, 72
Parrilla ................................................................. 71
Posiciones recomendadas de las
parrillas en el homo ............................................. 72
ProgramaciTn del ciclo ............................ _._......70
CONTROL ELECTR(_)NICO DEL HORNO
Bloqueo de la superfice de cocci6n ................... 64
Bloqueo del homo ............................................... 63
Cancelaci6n ......................................................... 67
Centigrados/Fahrenheit ....................................... 69
CSmo comenzar .................................................. 67
]nterruptor de 12 horas ....................................... 65
Pantalla/reloj ........................................................ 62
Reloj .................................................................... 63
SeSales audibles ................................................. 64
Temporizador electrTnico .............................. 65, 66
CARACTER[STICAS .................................................. 56
CONDUCTO DE VENTILACI6N DEL HORNO .......... 85
CACEROLAS ........................................................ 59-61
COMPONENTES ....................................................... 56
CICLO DE AUTO UMPIEZA SENS-A-CLEAN rM
Antes de comenzar ............................................. 86
Comienzo diferido ............................................... 88
Comienzo inmediato ........................................... 87
C6mo funciona el ciclo ....................................... 87
C6mo parar el ciclo ............................................. 90
ProgramaciTn de los controles ........................... 87
CONTROL ELECTR(_)NICO DEL HORNO ............ 79-83
DIAGN(_STICO Y SOLUCI(_N DE PROBLEMAS..98-101
GAVETA CALENTADORA WARM & READY ........ 84, 85
GARANT/A ................................................................. 53
HORNEO CON ULTRABAKE IM
Cacerolas ...................................................... 50, 51
Consejos ............................................................. 58
Papel aluminio ..................................................... 61
Posiciones recomendadas de las parfillas
en el homo .......................................................... 60
Preparaci6n de precalentamiento ....................... 68
ProgramaciSn del ciclo ....................................... 67
Sistema ULTRABAKE .................................... 67, 68
Utensilios para hornear ....................................... 61
LIMPIEZA
Auto limpieza SENS-A-CLEAN ...................... 86-90
Cavidad de la gaveta calentadora ...................... 92
Cavidad del homo ............................................... 92
Charola y parrilla para asar ................................. 92
Parrillas del homo ............................................... 92
Pefillas de control ............................................... 91
Quemadores de superficie ............................ 93, 94
Las parrJllas y tapas de los quemadores
exteriores recubiertos de porcelana ............. 91, 92
Superficies extefiores .......................................... 91
Tablero de controles y lente de la luz
nocturna de la consola ....................................... 91
Vidrio de la puerta del homo .............................. 92
LUZ NOCTURNA DE LA CONSOLA ......................... 97
LUZ DEL HORNO ...................................................... 96
MEDIA PARRILLA STURDIGLIDE rM
CON INSERTO DESMONTABLE ............................... 60
MODELO Y NOMERO DE SERIE .............................. 52
PARRILLAS DEL HORNO STURDIGLIDE rM
CON AGARRADERA INTEORADA ............................ 60
PUERTA DEL HORNO .......................................... 94-96
QUEMADORES DE SUPERFICIE
Consejos ............................................................. 58
Gufa papa programar los controles ..................... 57
Indicadores de los quemadores exterior ............ 56
Pefillas de control ................................... 56, 57, 91
Programaci6n de SUPERSIMMER rM.................. 58
Quemador principal ............................................. 57
Sistema profesional de parrilla de los
quemadores ........................................................ 58
RECIPE RECALL Ir'_.............................................. 73, 74
SEOURIDAD ........................................................ 54, 55
SERVE WARM ...................................................... 75-79
SERVlCIO .................................................. Forro trasero
SOPORTE DE ANTI-VUELCO .................................... 54
TABLERO DE CONTROL
Ajustes del calor de los quemadores .................. 57
Indicadores de los quemadores de superficie....56
Pefillas de control ......................................... 56, 57
TEMPERATURA DEL HORNO
Ajustes ........................................................... 67, 71
CalibraciSn .......................................................... 69
UTENSILIOS DE COCINA
Conservas ........................................................... 58
Matefiales ............................................................ 59
103
For repairof majorbrand appliancesin your own home...
no matter who made it, no matterwho soldit!
1"800"4"IVlY-HOME sMAnytime,dayor night
(1-8004694663)
www.sears.oBm
To bring in productssuchas vacuums,lawn equipmentand electronics
for repair,callfor the locationofyour nearest Sears Parts & Repair Center
1-800488-1222 _./dme,dayor night
WtANI/.._Ba13JEOIlt
Forthe replacementparts, accessoriesand owner's manuals
that you need to do-it-yourself,call Sears PartsDire_L_!
1-800-366-PART 6=m.-11p.m.CST,
(!"800"366"7278) 7 days aweek
www.s_rs.€om/partsdirect
To purchase or inquireabout a SearsServiceAgreement:
! -800-82 7-6655
7a_m.- S p.m. CST, Mon.- Sat.
Parapedirservidode reparacibna domicilio,
y paraordenarpiez_ conentmga a domidlio:
! -888-1H-IOGAR ='
(1-888-784-6427)
Au Canada pour senlice en francis:
1-877-LE-FOYBi _
(1-877-533-6937)
SEARS I
HomeCentrar J
8273782 4/00
© Sears= Roebuck and Co, @ F_egistensd Tradernark/i-M Trademark of Se_rs, Roebuck and Co. Printed in the U.S.A,
@ M_ Registr_da/TM rn_ de f_bric_ de Sears, Roebuck and Go. Irnprsso en EE.UU,