Loading ...
Loading ...
Loading ...
13
MAINTENANCE
FREQUENCY MAINTENANCE REQUIRED
Every 10 hours • Clean and re-oil the air filter. Refer to
Maintaining the Air Filter and Replacing the
Pre-Filter.
Every 25 hours • Check the spark plug condition and gap.
Refer to Maintaining the Spark Plug.
• Replace the pre-filter. Refer to Maintaining
the Air Filter and Replacing the Pre-Filter.
MAINTENANCE SCHEDULE
Perform these required maintenance procedures at the frequency
stated in the table. These procedures should also be a part of any
seasonal tune-up.
NOTE: Some maintenance procedures may require special tools or
skills. If you are unsure about these procedures, take the unit to
an authorized service dealer. Call 1-888-331-4569 for more
information.
NOTE: Maintenance, replacement, or repair of the emission control
devices and system may be performed by an authorized service
dealer. Call 1-888-331-4569 for more information.
NOTE: Please read the California/EPA statement that came with the
unit for a complete listing of terms and coverage for the
emissions control devices, such as the spark arrestor, muffler,
carburetor, etc.
WARNING:
To avoid serious personal injury, always stop
the engine and allow it to cool before cleaning or maintaining
the unit. Never perform cleaning or maintenance while the
unit is running. Disconnect the spark plug wire to prevent
the unit from starting accidentally.
WARNING:
Wear protective clothing and observe all
safety instructions to prevent serious personal injury.
MAINTAINING THE AIR FILTER AND REPLACING THE
PRE-FILTER
Failure to maintain the air filter or replace the pre-filter can result in
poor performance or can cause permanent damage to the engine.
Engine failure due to improper air filter maintenance is not covered by
the product warranty.
Cleaning the Air Filter
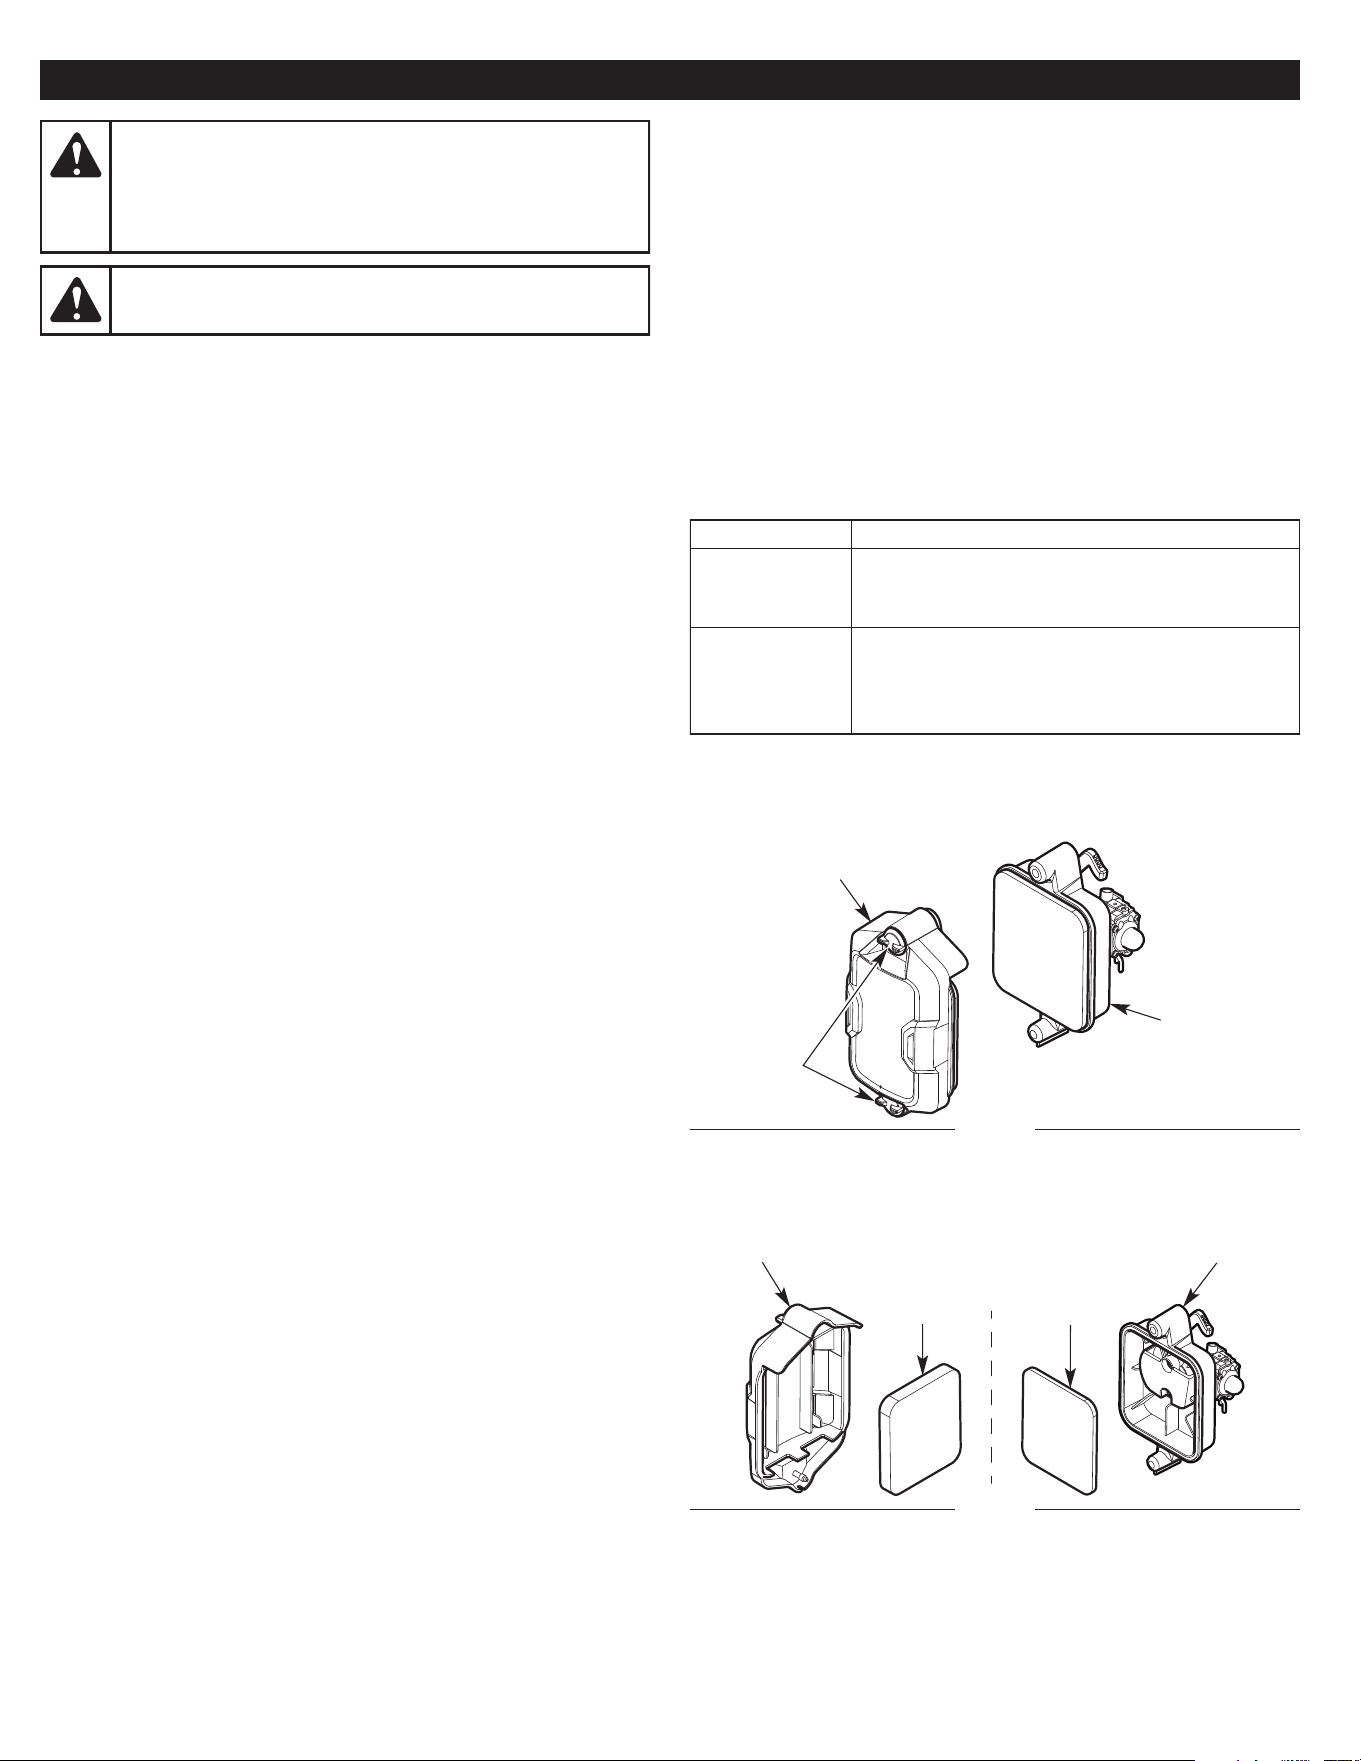
1. Turn the cover screws counterclockwise to loosen the air filter
cover (Fig. 14).
2. Slide the air filter cover off of the air filter housing (Fig. 14).
3. Remove the air filter and pre-filter from the air filter housing (Fig. 15).
4. Gently hand wash the air filter in detergent and water. Rinse the
air filter thoroughly and allow it to dry. DO NOT wash the pre-filter.
5. Lightly coat the air filter with clean SAE 30 oil. DO NOT apply oil
to the pre-filter.
6. Squeeze the air filter to spread and remove excess oil.
7. Reinstall the pre-filter inside the air filter housing or replace it
(Fig. 15).
8. Place the air filter inside the air filter cover (Fig. 15).
9. Slide the air filter cover onto the air filter housing.
NOTE: Operating the unit without the air filter, pre-filter, and air filter
cover will VOID the warranty.
10. Turn the cover screws clockwise to secure the air filter cover. To
avoid stripping the screw, DO NOT over tighten the cover screw.
Fig. 14
Air Filter
Housing
Air Filter
Cover
Fig. 15
Air Filter
Pre-Filter
Cover
Screws
Air Filter
Housing
Air Filter
Cover
Loading ...
Loading ...
Loading ...