Use & Care
iVlodel iVliVlV4205BA
Guide
iMPORTANT SAFETY iNSTRUCTiONS ........... 2
Precautions to Avoid Possible Exposure to Excessive
Microwave Energy ............................ 4
Getting The Best Cooking Results ............... 6
Features .................................... 7
Operating instructions ........................ 9
Cooking Utensils ............................ 22
Care and Cleaning ........................... 23
Troubleshooting ............................. 25
MAYTAG ® MAJOR APPLIANCE WARRANTY ..... 28
Guide d'utilisation et d'entretien ............... 29
Guia de uso y cuidado ....................... 57
Keep instructions for future reference.
Be sure Use & Care Guide stays with oven.
Part No, W10177930

IMPORTANT SAFETY INSTRUCTIONS
WHATYOU
KNOWABOUT
I UCT
TO
SAFETY
Warning and Important Safety Instructions appearing in this
Use & Care Guide are not meant to cover all possible
conditions and situations that may occur. Common sense,
caution, and care must be exercised when installing,
maintaining, or operating microwave.
Always contact your dealer, distributor, service agent, or
manufacturer about problems or conditions you do not
understand.
OG
SYM
LA
SAFETY
2
SAVE T ESE INST UCTIO
IMPORTANT SAFETY INSTRUCTIONS
GROU I G
I STRUCTIO
___ ven MUST be grounded. Grounding
reduces risk of electric shock by
providing an escape wire for the
electric current if an electrical short
occurs. This oven is equipped with a
cord having a grounding wire with a grounding plug. The
plug must be plugged into an outlet that is properly installed
and grounded. See Installation Instructions.
Consult a qualified electrician or servicer if grounding
instructions are not completely understood, or if doubt
exists as to whether the oven is properly grounded.
Do not use an extension cord. If the product power cord
is too short, have a qualified electrician install a three-slot
receptacle. This oven should be plugged into a separate
60 hertz circuit with the electrical rating as shown in
specifications table. When the oven is on a circuit with other
equipment, an increase in cooking times may be required
and fuses can be blown.
Microwave operates on standard household current, 110-
120V.
FEDERAL
COIVl
COIVl
RADIO
I
STATE
LY)
ICATION
CY
E ENCE
ENT ( .S.A
This equipment generates and uses ISM frequency energy
and if not installed and used properly, that is in strict
accordance with the manufacturer's instructions, may
cause interference to radio and television reception. It has
been type tested and found to comply with limits for ISM
Equipment pursuant to part 18 of FCC Rules, which are
designed to provide reasonable protection against such
interference in a residential installation.
However, there is no guarantee that interference will not
occur in a particular installation. If this equipment does cause
interference to radio or television reception, which can be
determined by turning the equipment off and on, the user is
encouraged to try to correct the interference by one or more
of the following:
• Reorient the receiving antenna of the radio or television.
• Relocate the microwave oven with respect to the receiver.
• Move the microwave oven away from the receiver.
• Plug the microwave oven into a different outlet so that the
microwave oven and the receiver are on different branch
circuits.
The manufacturer is not responsible for any radio or
television interference caused by unauthorized
modification to this microwave oven. It is the responsibility
of the user to correct such interference.
SAVE THESE I STRUCTIO
3
IMPORTANT SAFETY INSTRUCTIONS
ECAUT!
AVO! PO
EXPO U E
TO EXCESSIVE
C
E GY
TO
LE
A. DO NOT attempt to operate this oven with the door open
since open door operation can result in harmful exposure
to microwave energy. It is important not to defeat or tamper
with the safety interlocks.
B. DO NOT place any object between the oven front face and
the door or allow soil or cleaner residue to accumulate on
sealing surfaces.
C. DO NOT operate the oven if it is damaged. It is particularly
important that oven door close properly and that there is no
damage to:
1. door (bent),
2. hinges and latches (broken or loosened),
3. door seals and sealing surfaces.
D.Oven should not be adjusted or repaired by anyone except
properly qualified service personnel.
4
SAVE THESE I ST CTIO

IMPORTANT SAFETY INSTRUCTIONS
SAVE THE ST UCTIO
5

Getting T e Best Cooking Results
6
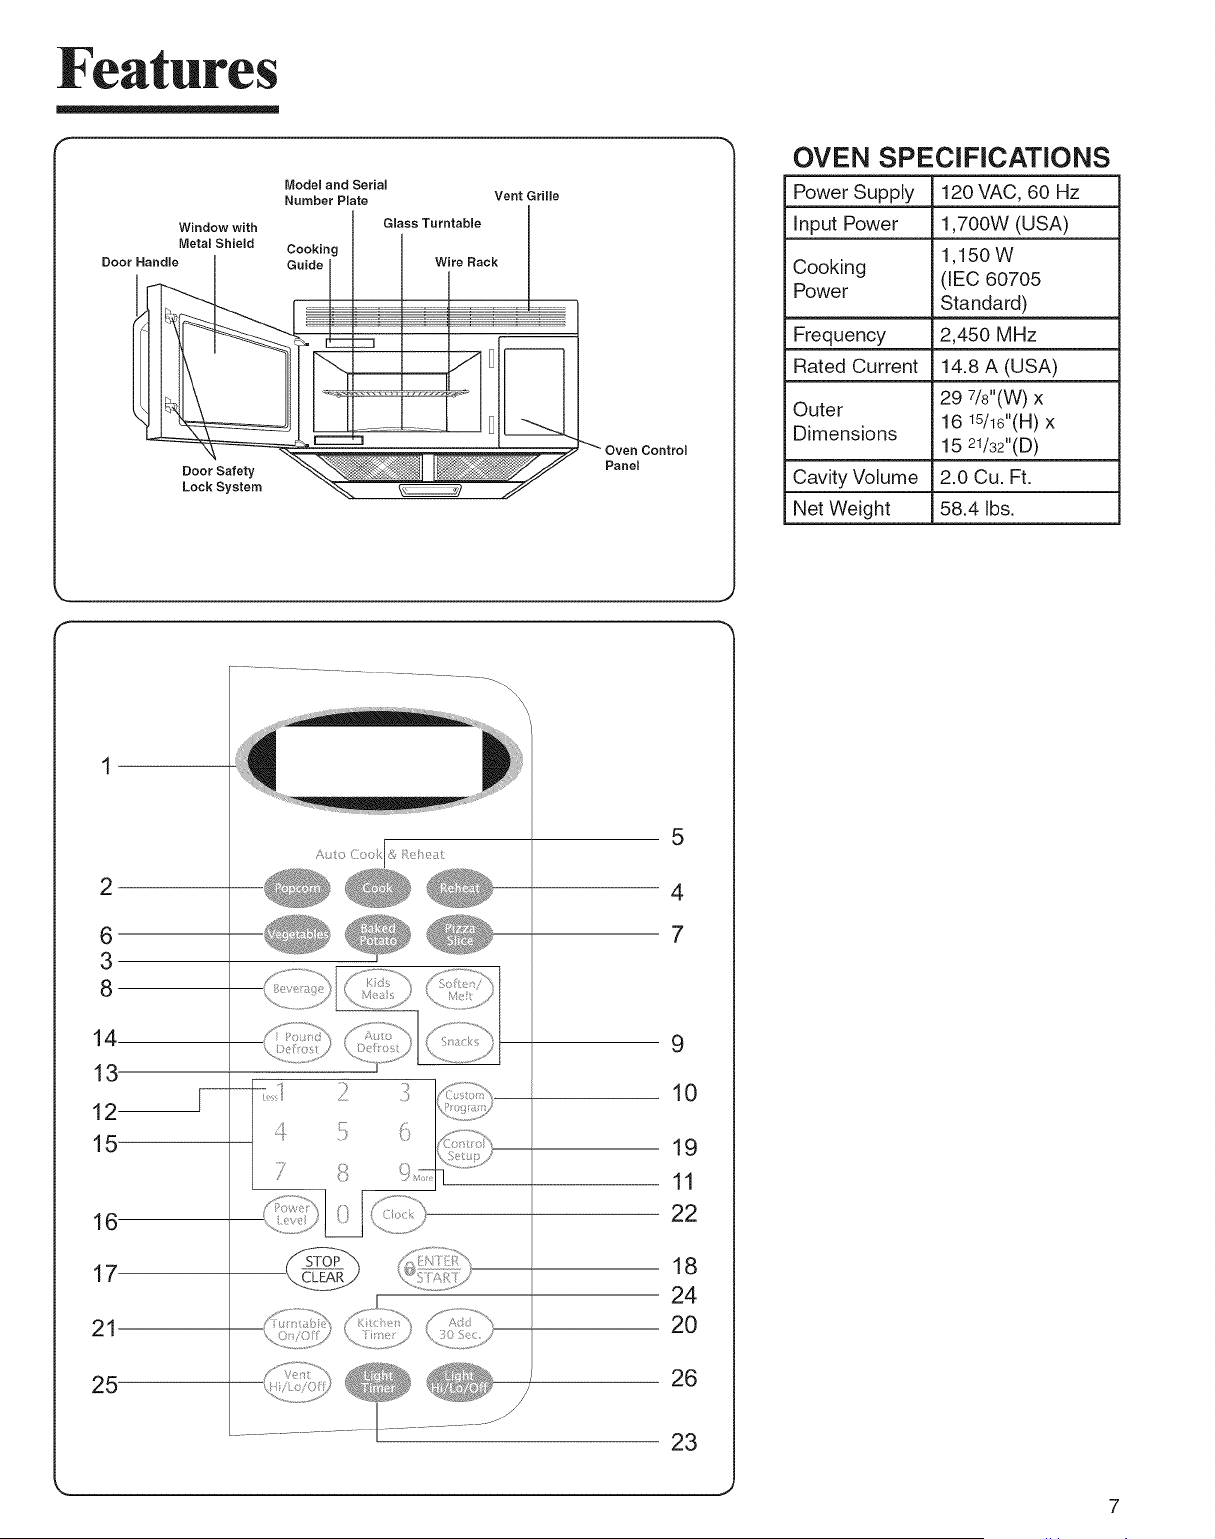
Features
Model and Serial
Number Plate
Window with
Metal Shield Cooking
Door Handle Guide
Vent Grille
Glass Turntable
Wire Rack
Door Safety
Lock System
Control
Panel
OVEN SPECIFICATIONS
Power Supply 120 VAC, 60 Hz
Input Power 1,700W (USA)
1,150W
Cooking (IEC 60705
Power
Standard)
Frequency 2,450 MHz
Rated Current 14.8 A (USA)
29 7/8"(W) x
Outer
16 15/16"(H)x
Dimensions
15 21/32"(D)
Cavity Volume 2.0 Cu. Ft.
Net Weight 58.4 Ibs.
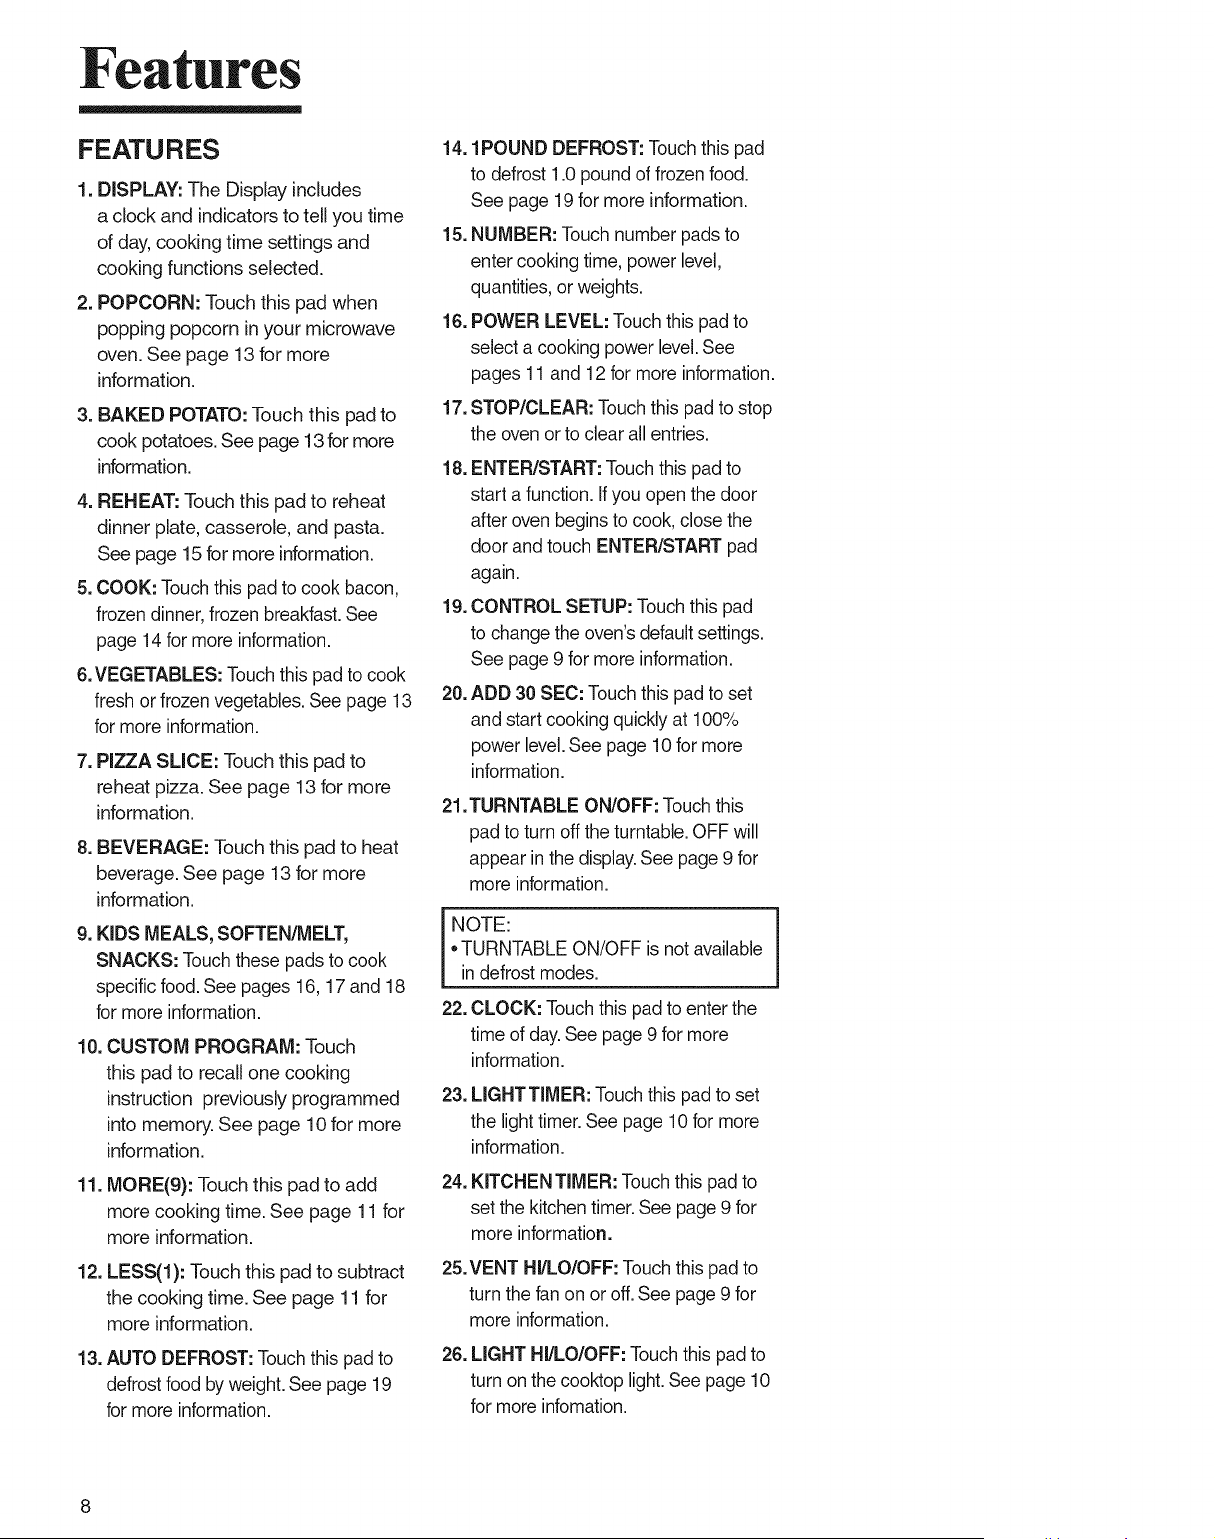
2
6
3
8
14
13-
12
15
16
17-
21
25
! '®
_, s, j
,!¢/ ::i)ff2
..................................... i....................................
j/
5
4
7
9
10
19
11
22
18
24
20
26
23
7
Features
FEATURES
1. DISPLAY: The Display includes
a clock and indicators to tell you time
of day, cooking time settings and
cooking functions selected.
2. POPCORN: Touch this pad when
popping popcorn in your microwave
oven. See page 13 for more
information.
3. BAKED POTATO: Touch this pad to
cook potatoes. See page 13 for more
information.
4. REHEAT: Touch this pad to reheat
dinner plate, casserole, and pasta.
See page 15 for more information.
5. COOK: Touch this pad to cook bacon,
frozen dinner, frozen breakfast. See
page 14 for more information.
&VEGETABLES: Touchthis pad to cook
fresh or frozen vegetables.See page 13
for more information.
7. PIZZA SLICE: Touch this pad to
reheat pizza. See page 13 for more
information.
8. BEVERAGE: Touch this pad to heat
beverage. See page 13 for more
information.
9. KIDS MEALS, SOFTEN/MELT,
SNACKS: Touchthese pads to cook
specific food. See pages 16, 17 and 18
for more information.
10. CUSTOM PROGRAM: Touch
this pad to recall one cooking
instruction previously programmed
into memory. See page 10 for more
information.
11. MORE(9): Touch this pad to add
more cooking time. See page 11 for
more information.
12. LESS(l): Touch this pad to subtract
the cooking time. See page 11 for
more information.
13. AUTO DEFROST: Touch this pad to
defrost food by weight. See page 19
for more information.
14.1POUND DEFROST: Touchthis pad
to defrost 1.0 pound of frozen food.
See page 19 for more information.
15. NUMBER: Touch number pads to
enter cooking time, power level,
quantities, or weights.
16. POWER LEVEL: Touch this pad to
select a cooking power level. See
pages 11 and 12 for more information.
17. STOP/CLEAR: Touchthis pad to stop
the oven or to clear all entries.
18. ENTER/START: Touch this pad to
start a function. If you open the door
after oven begins to cook, close the
door and touch ENTER/START pad
again.
19. CONTROL SETUP: Touch this pad
to change the oven's default settings.
See page 9 for more information.
20. ADD 30 SEC: Touch this pad to set
and start cooking quickly at 100%
power level.See page 10 for more
information.
21.TURNTABLE ON/OFF: Touchthis
pad to turn off the turntable. OFF will
appear in the display.See page 9 for
more information.
NOTE:
• TURNTABLE ON!OFF is not available
in defrost modes.
22. CLOCK: Touchthis pad to enter the
time of day.See page 9 for more
information.
23. LIGHTTIMER: Touch this pad to set
the light timer. See page 10 for more
information.
24. KITCHEN TIMER: Touch this pad to
set the kitchen timer. See page 9 for
more information.
25.VENT HI/LO/OFF: Touchthis pad to
turn the fan on or off. See page 9 for
more information.
26. LIGHT HI/LO/OFF: Touchthis pad to
turn on the cooktop light. See page 10
for more infomation.
Operating Instructions
LEARN ABOUT YOUR
MICROWAVE OVEN
This section introduces you to the
basics you need to know to operate
your microwave oven. Please read
this information before use.
CLOCK
Example: To set 8:00 AM.
qo_,. 1. Touch CLOCK
pad.
O O 2. Enter the time by
using the number
pads.
3. Touch ENTER/
START pad.
_°_ 4. Touch 1 for AM.
1 E@
5. Touch ENTER/
START pad.
NOTE:
Follow steps 1-3 above in the 24
hour clock mode.
KITCHEN TIMER
You can use your microwave oven
as a timer. Use the Kitchen Timer for
timing up to 99 minutes, 99 seconds.
Example: To set for 8 minutes.
Kit:che_/ 1. Touch KITCHEN
Timer'
TIMER pad.
O 0 2. Enter the time by
using the number
pads.
3. Touch ENTER/
START pad.
When the time is over, you will hear
beeps and END will display.
CONTROL SETUP
You can change the default values.
See following chart for more information.
Weight mode 1 Lbs.
selected 2 Kg.
Sound ON/OFF 1 Sound ON
2
control 2 Sound OFF
3 Clock display 1 12HR
control 2 24HR
1 Slow speed
4 Display 2 Normal speed
3 Fast speed
Remind end 1 ON
Signal 2 OFF
1 ON
Demo Mode
2 OFF
5
6
7 Daylight 1 ON
Saving Time 2 OFF
Example: To change weight mode
(from Lbs. to Kg).
Co_-,_,r.o_ 1. Touch CONTROL
SeLup
SETUP pad.
Less
1 2. Touch number 1
pad.
2 3. Touch number 2
pad.
TURNTABLE ON/OFF
For best cooking results, leave the
turntable on. It can be turned off for
large dishes.
Tupntable
On/Off
Touch TURNTABLE
ON/OFF pad to turn
the turntable on or
off.
NOTES:
This option is not available in
sen-sor cook, auto cook and
defrost modes.
Sometimes the turntable can
become hot to touch. Be careful
touching the turntable during and
after cooking.
Do not run the oven empty.
VENT HI/LO/OFF
The VENT moves steam and other
vapors from the cooking surface.
Ver_L
Hi/Lo/Off
To operate the vent
manually: Touch
VENT HI/LO/OFF
pad once for High
fan speed, twice for
Low fan speed, or
three times to turn
the fan off.
NOTE:
• If the temperaature gets too hot
around the microwave oven, the fan
in the vent hood will automatically
turn on at the LOW setting to cool
the oven. The fan will automatically
turn off when the internal parts are
cool. When this occurs, the vent
cannot be turned off.
9
Operating Instructions
CHILD LOCK
You may lock the control panel to
prevent the microwave from being
accidentally started or used by
children.
The Child Lock feature is also useful
when cleaning the control panel.
Child Lock prevents accidental
programming when wiping the control
panel.
Example: To set the child lock.
Touch and hold
ENTER/START
pad more than 3
seconds. CHILD
LOCK ON will
appear in the display
window with two
beeps.
Example: To cancel the child
lock.
Touch and hold
ENTER/START
pad more than 3
seconds. LOCKED
will disappear and
you hear two beeps.
LIGHTTIMER
You can set the LIGHT to turn on and
off automatically at any time. The light
comes on at the same time every day
until reset.
Example: Turn on 2:00 AM, turn off
7:00 PM.
12 hour clock mode.
2?00
i ess
!
700
2
1. Touch LIGHT
TIMER pad.
2. Enter the time you
want the LIGHT to
turn on.
3. Touch ENTER/
START pad.
4. Touch 1 for AM.
5. Touch ENTER/
START pad.
6. Enter the time you
want the LIGHT to
turn off.
7. Touch ENTER/
START pad.
8. Touch 2 for PM.
LIG HT Hi/LO/OFF
9. Touch ENTER/
START pad.
24 hour clock mode.
Touch LIGHT HI/LO/
OFF pad once for
bright light, twice for
night light, or three
times to turn the light
off.
ADD 30 SEC.
A time-saving pad, this simplified
control lets you quickly set and start
microwave cooking without the need
to touch the ENTER/START pad.
Example: To set ADD 30 SEC. for
2 minutes.
Add
3Q S_sc,
Touch ADD 30 SEC.
pad 4 times. The
oven begins cooking
and display shows
time counting down.
Light: 1 Touch LIGHT
Ti-n r_
TIMER pad.
200 2. Enter the time you
want the LIGHT to
turn on.
3. Touch ENTER/
START pad.
'#. v..,_O O 4. Enter the time you
want the LIGHT to
turn off.
5. Touch ENTER/
START pad.
Example: To cancel the LIGHT
TIMER.
Lbht 1 Touch LIGHT
H-ne_
TIMER pad.
0 2. Touch 0 pad.
NOTE:
• If you want to cancel the LIGHT
TIMER in operation, touch
the 0 pad.
CUSTOM PROGRAM
CUSTOM PROGRAM lets you recall
one cooking instruction previously
placed in memory and begin cooking
immediately.
Example: To cook for 2 minutes
at 70% power.
c_,_;tom 1. Touch CUSTOM
Progr rr
PROGRAM pad.
2 0 0 2. Enter the cook
time.
povv_,. 3. Touch POWER
LeveH
LEVEL pad.
7 4. Enter the power
level.
5. Touch ENTER/
START pad.
Example: To recall the custom
program.
(_}USLOM
P_'og_'sr r/
1. Touch CUSTOM
PROGRAM pad.
2. Touch ENTER/
START pad.
When the cook time is over, you
will hear four beeps and END will
display.
10
Operating Instructions
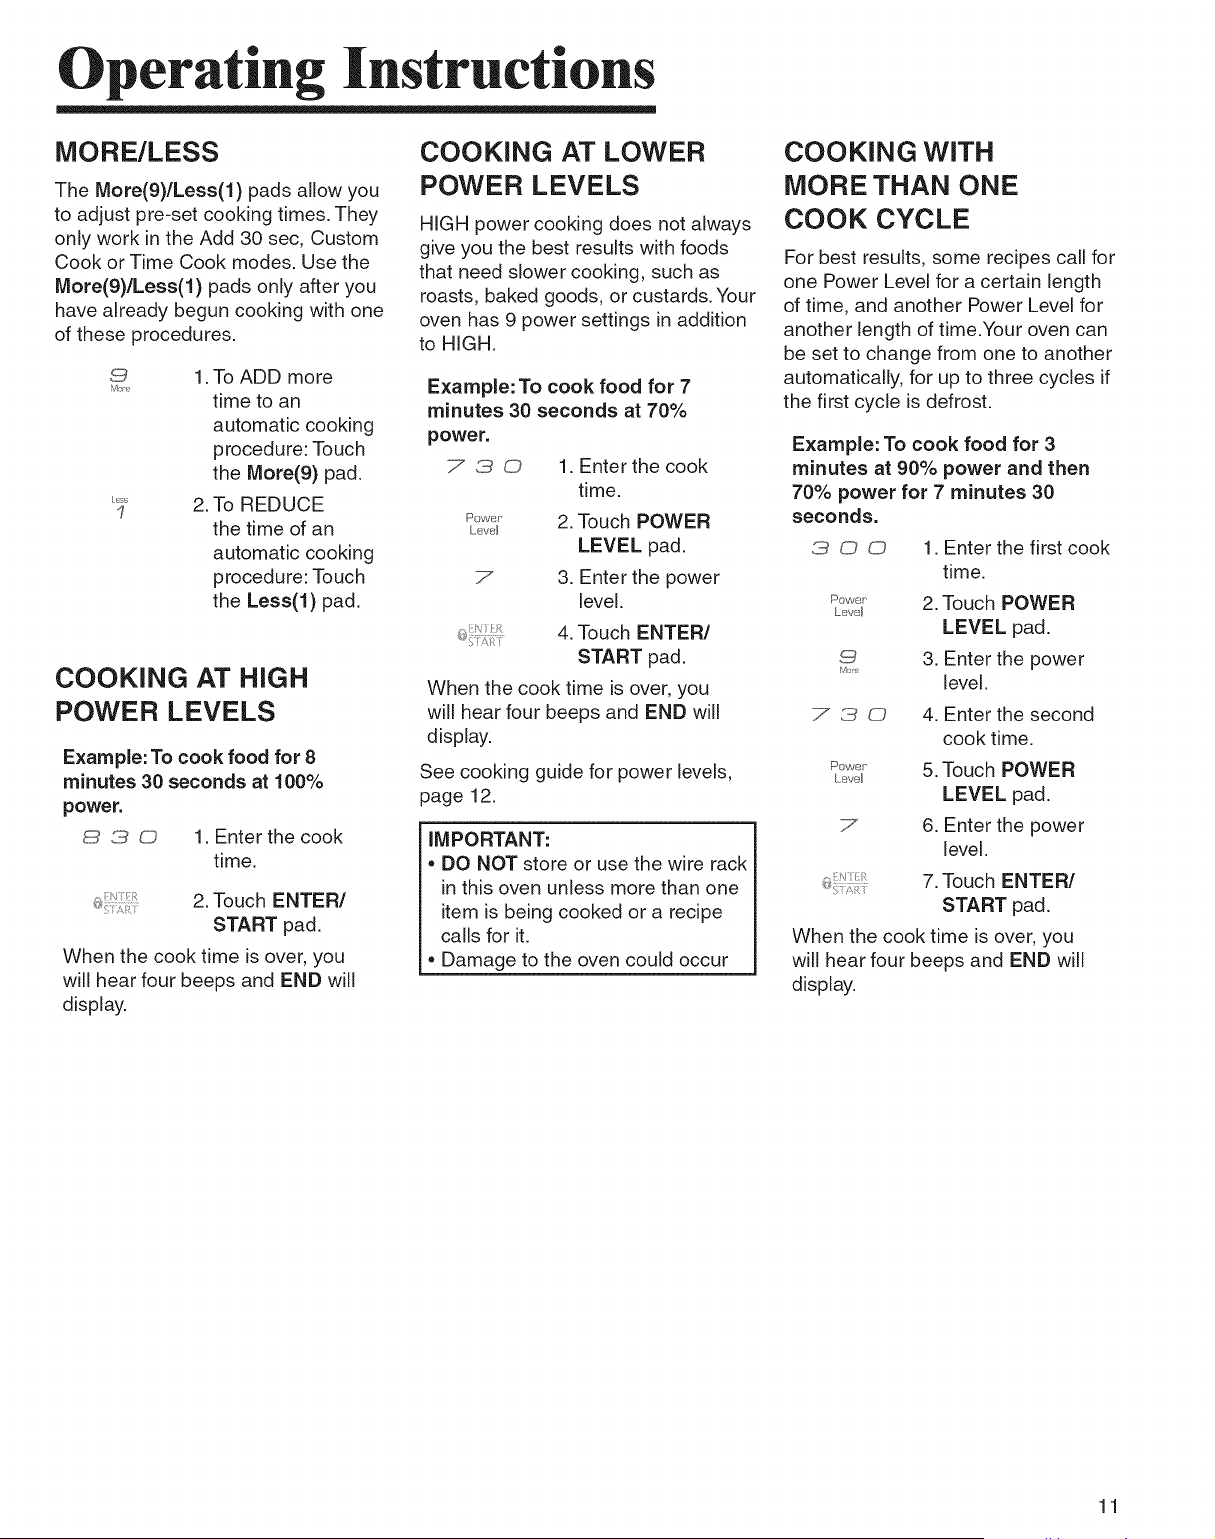
MORE/LESS
The More(9)/Less(1) pads allow you
to adjust pre-set cooking times. They
only work in the Add 30 sec, Custom
Cook or Time Cook modes. Use the
More(9)/Less(1) pads only after you
have already begun cooking with one
of these procedures.
9
Msre
Less
1
1. To ADD more
time to an
automatic cooking
procedure: Touch
the More(9) pad.
2. To REDUCE
the time of an
automatic cooking
procedure: Touch
the Less(l) pad.
COOKING AT HIGH
POWER LEVELS
Example: To cook food for 8
minutes 30 seconds at 100%
1. Enter the cook
time.
2. Touch ENTER/
START pad.
When the cook time is over, you
will hear four beeps and END will
display.
COOKING AT LOWER
POWER LEVELS
HIGH power cooking does not always
give you the best results with foods
that need slower cooking, such as
roasts, baked goods, or custards. Your
oven has 9 power settings in addition
to HIGH.
Example: To cook food for 7
minutes 30 seconds at 70%
power.
7 3 0 1. Enter the cook
time.
P°'_'_" 2. Touch POWER
Level
LEVEL pad.
7 3. Enter the power
level.
k
4. Touch ENTER/
START pad.
When the cook time is over, you
will hear four beeps and END will
display.
See cooking guide for power levels,
page 12.
IMPORTANT:
• DO NOT store or use the wire rack
in this oven unless more than one
item is being cooked or a recipe
calls for it.
• Damage to the oven could occur
COOKING WITH
MORE THAN ONE
COOK CYCLE
For best results, some recipes call for
one Power Level for a certain length
of time, and another Power Level for
another length of time.Your oven can
be set to change from one to another
automatically, for up to three cycles if
the first cycle is defrost.
Example: To cook food for 3
minutes at 90% power and then
70% power for 7 minutes 30
seconds.
3 0 0 1. Enter the first cook
time.
r:,_,_,,,e, 2. Touch POWER
Le/61
LEVEL pad.
9 3. Enter the power
M:'re
level.
7 3 0 4. Enter the second
cook time.
r:_o,_,÷-,, 5. Touch POWER
Le/el
LEVEL pad.
7 6. Enter the power
level.
7. Touch ENTER/
START pad.
When the cook time is over, you
will hear four beeps and END will
display.
11
Operating Instructions
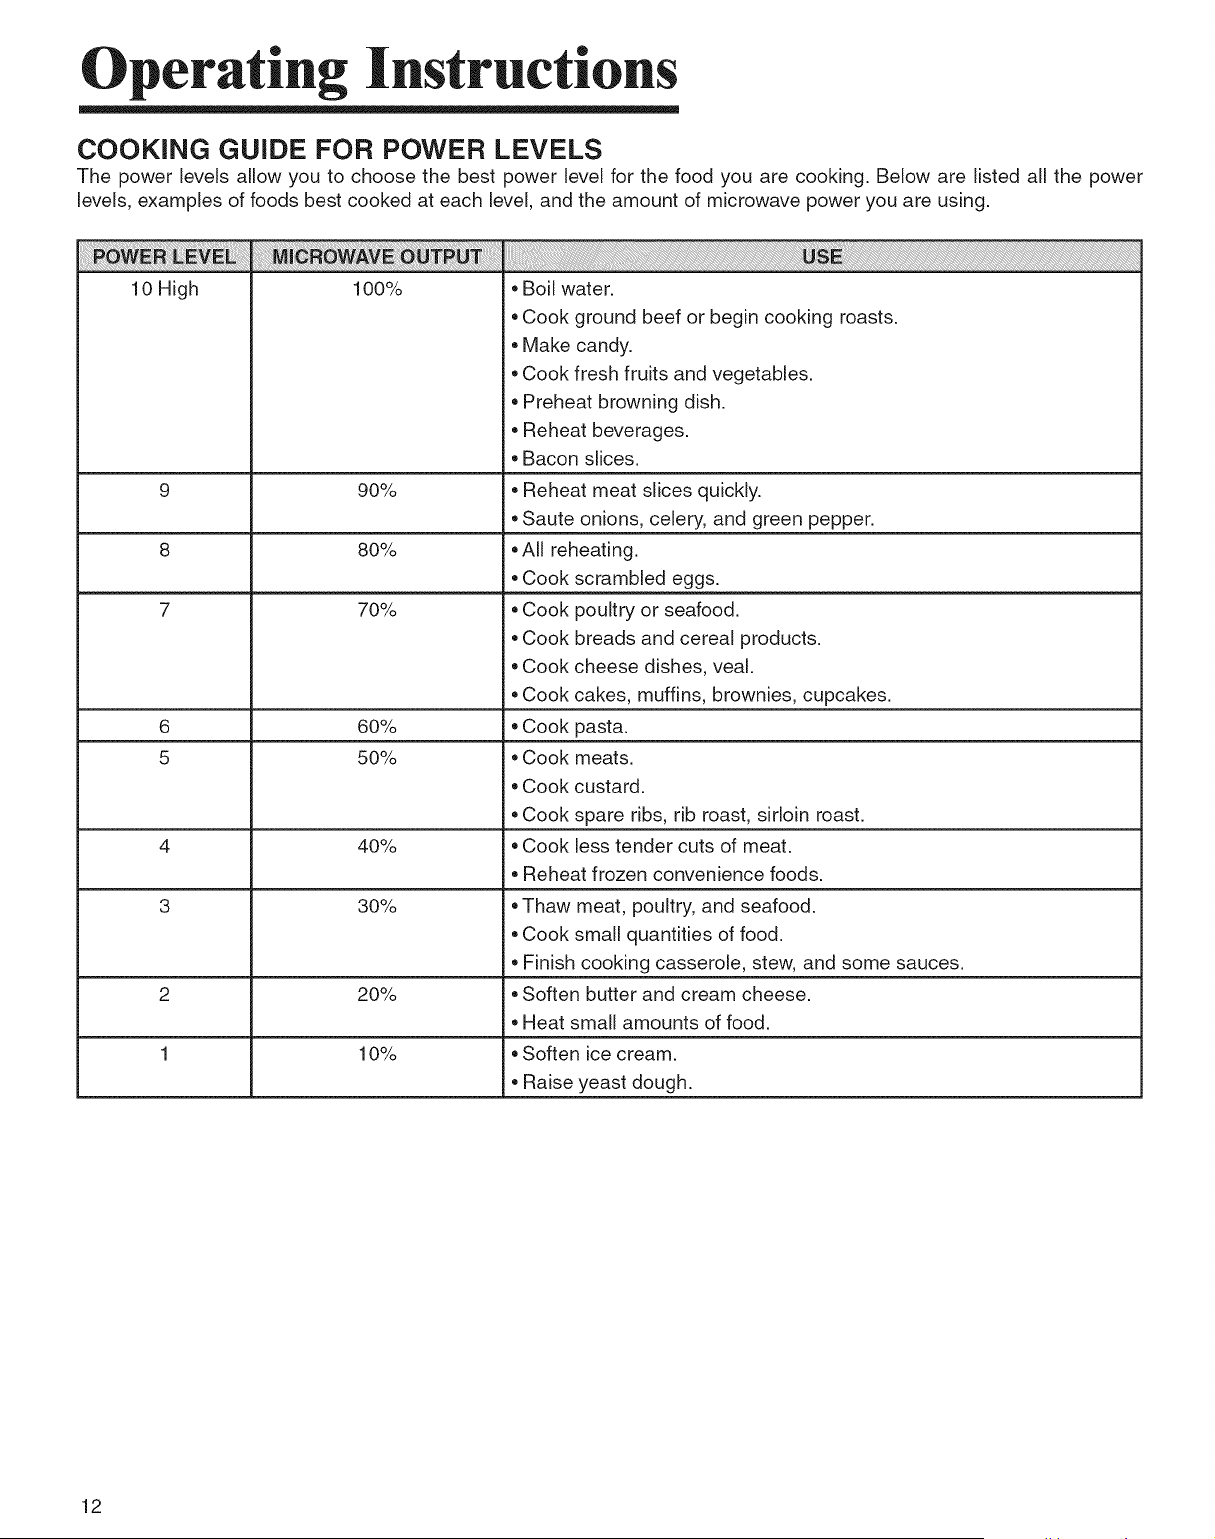
COOKING GUIDE FOR POWER LEVELS
The power levels allow you to choose the best power level for the food you are cooking. Below are listed all the power
levels, examples of foods best cooked at each level, and the amount of microwave power you are using.
10 High
100%
9 90%
8 80%
! ! !! iiiiiiii!ii i ! !! i i ! i ii! i! ! i i i i i i iii ii ii i ii i ii !ii ii !ii ii !ii ii !i! ii iiiii iii !iiii i!i !i i!i!iiiiiiiii! i!i!i!i!i!i! i! i! i! i i!i!i !i! !! !ii i i i i i i iiiiiiiiiiiiiiiiiiiiiiiiiiiiiiiiiiiiiiiiiiiiiiiiiiiiiiiiiiiiiiiiiiiiiiiiiiiiiiiiiiiiiiiiiiiiiiiiiiiiiiiiiiiiiiiiiiiiiiiiiiiiiiiiiiiiiiiiiiiiiiiiiiiiiiiiiiiiiiiiiiiiiiiiiiiiiiiiiiiiiiiiiiiiiiiiiiiiiiiiiiiiiiiiiiiiiiiiiiiiiiiiiiiiiiiiiiiiiiii i i ! i iiiiiiiiiiii iiiiiiiiiiiiiiiiiiiiiiiiiiiiiiiiiiiiiiiiiiiiiiiiiiiiiiiiiiiiiiiiiiiiiiiiiiiiiiiiiiiiiiiiiiiiiiiiiiiiiiiiiiiiiiiiiiiiiiiiiiiiiiiiiiiiiiiiiiiiiiiiiiiiiiiiiiiiiiiiiiiiiiiiiiiiiiiiiiiiiiiiiiiiiiiiiiiiiiiiiiiiiiiiiiiiiiiiiiiiiiiiiiiiiiiiiiiiiiiiiiiiiiiiiiiiiiiiiiiiiiiiiiiiiiiiiiiiiiiiiiiiiiiiiiiiiiiiiiiiiiiiiiiiiiiiiiiiiiiiiiiiiiiiiiiiiiiiiiiiiiiiiiiiiiiiiiiiiiiiiiiiiiiiiiiiiiiiiiiiiiiiiiiiiiiiiiiiiiiiiiiiiiiiiiiiiiiiiiiiiiiiiiiiiiiiiiiiiii!!
• Boil water.
• Cook ground beef or begin cooking roasts.
• Make candy.
• Cook fresh fruits and vegetables.
• Preheat browning dish.
• Reheat beverages.
• Bacon slices.
• Reheat meat slices quickly.
• Saute onions, celery, and green pepper.
• All reheating.
• Cook scrambled eggs.
7 70% • Cook poultry or seafood.
• Cook breads and cereal products.
• Cook cheese dishes, veal.
• Cook cakes, muffins, brownies, cupcakes.
6 60% • Cook pasta.
5 50% • Cook meats.
Cook custard.
Cook spare ribs, rib roast, sirloin roast.
4 40% • Cook less tender cuts of meat.
Reheat frozen convenience foods.
3 30% • Thaw meat, poultry, and seafood.
Cook small quantities of food.
Finish cooking casserole, stew, and some sauces.
2 20% • Soften butter and cream cheese.
Heat small amounts of food.
1 10% • Soften ice cream.
Raise yeast dough.
12
Operating Instructions
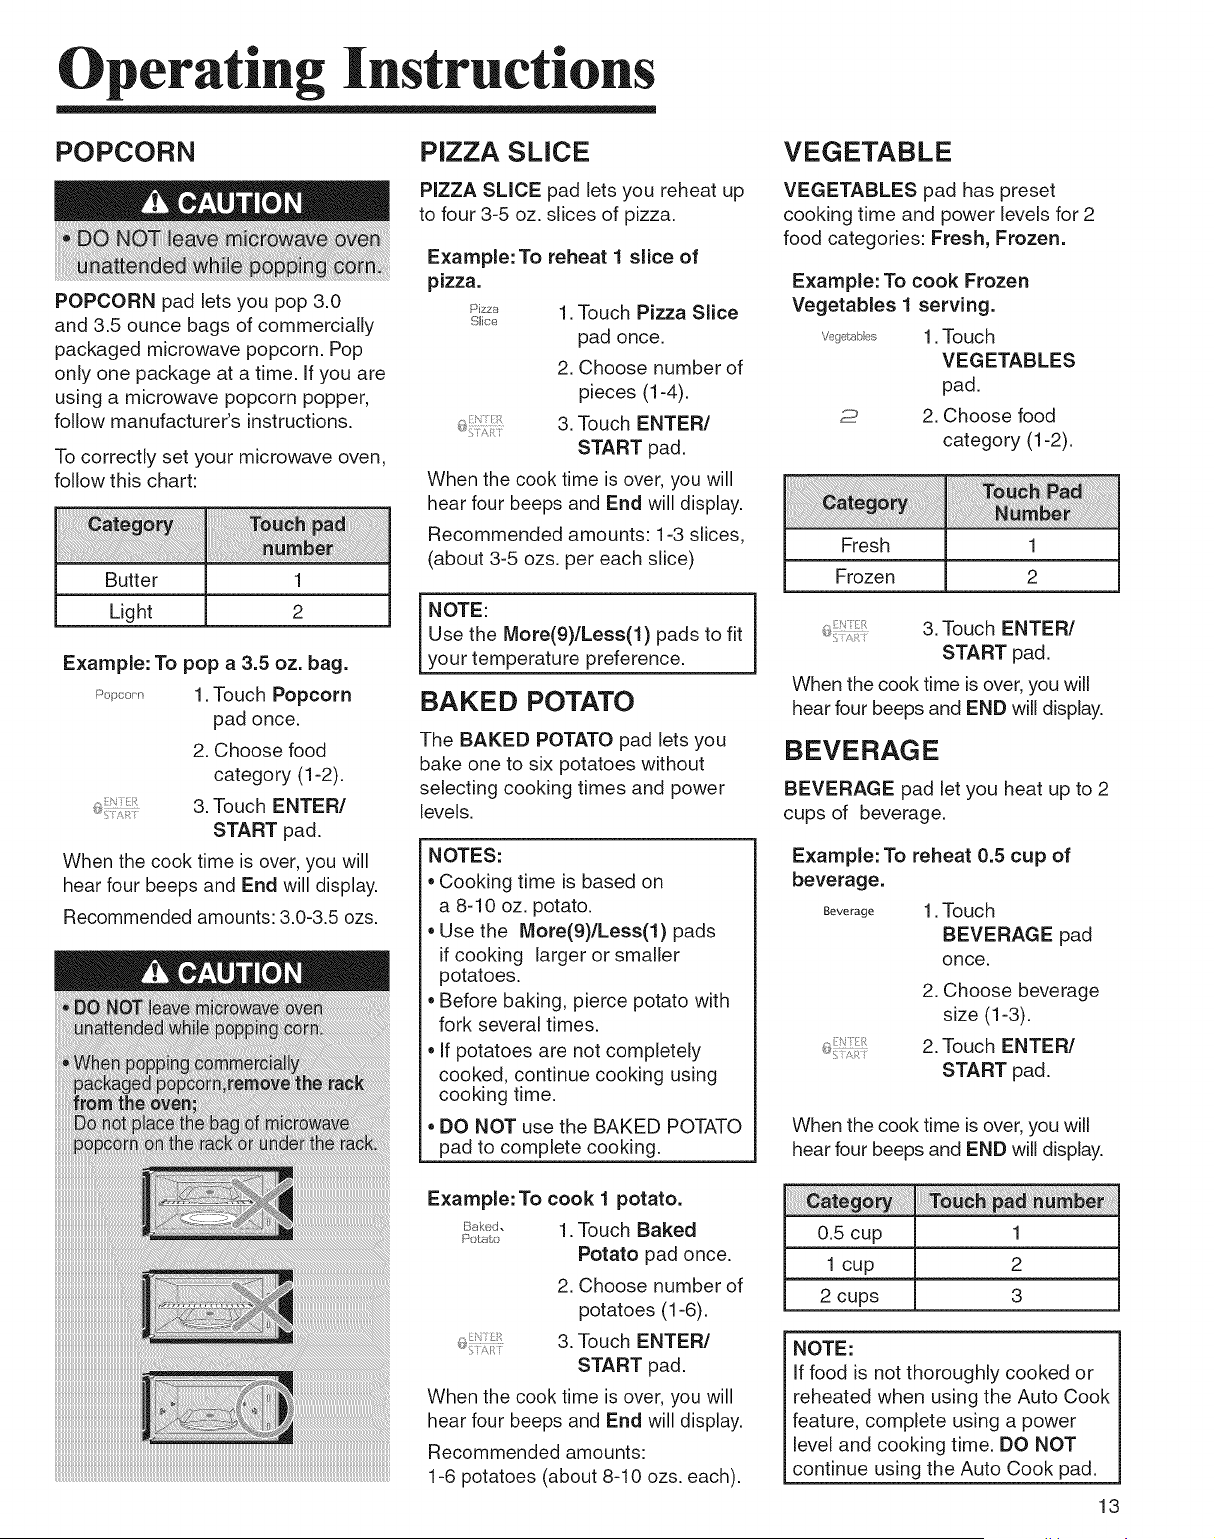
POPCORN
POPCORN pad lets you pop 3.0
and 3.5 ounce bags of commercially
packaged microwave popcorn. Pop
only one package at a time. If you are
using a microwave popcorn popper,
follow manufacturer's instructions.
To correctly set your microwave oven,
follow this chart:
Butter
Light
1
2
Example: To pop a 3.5 oz. bag.
po_........ 1. Touch Popcorn
pad once.
2. Choose food
category (1-2).
3. Touch ENTER/
START pad.
When the cook time is over, you will
hear four beeps and End will display.
Recommended amounts: 3.0-3.5 ozs.
PIZZA SLICE
PIZZA SLICE pad lets you reheat up
to four 3-5 oz. slices of pizza.
Example: To reheat 1 slice of
pizza.
Pizza
Sloe
1. Touch Pizza Slice
pad once.
2. Choose number of
pieces (1-4).
3. Touch ENTER/
START pad.
When the cook time is over, you will
hear four beeps and End will display.
Recommended amounts: 1-3 slices,
(about 3-5 ozs. per each slice)
NOTE:
Use the More(9)/Less(1) pads to fit
your temperature preference.
BAKED POTATO
The BAKED POTATO pad lets you
bake one to six potatoes without
selecting cooking times and power
levels.
NOTES:
• Cooking time is based on
a 8-10 oz. potato.
• Use the More(9)/Less(1) pads
if cooking larger or smaller
potatoes.
• Before baking, pierce potato with
fork several times.
• If potatoes are not completely
cooked, continue cooking using
cooking time.
• DO NOT use the BAKED POTATO
pad to complete cooking.
VEGETABLE
VEGETABLES pad has preset
cooking time and power levels for 2
food categories: Fresh, Frozen.
Example: To cook Frozen
Vegetables 1 serving.
,./_g_,_bl_s 1. Touch
VEGETABLES
pad.
2 2. Choose food
category (1-2).
Fresh 1
Frozen 2
3. Touch ENTER/
START pad.
When the cook time is over, you will
hear four beeps and END will display.
BEVERAGE
BEVERAGE pad let you heat up to 2
cups of beverage.
Example: To reheat 0.5 cup of
beverage.
Beverage 1. Touch
BEVERAGE pad
once.
2. Choose beverage
size (1-3).
2. Touch ENTER/
START pad.
When the cook time is over, you will
hear four beeps and END will display.
Example: To cook 1 potato.
B_k,;d. 1 Touch Baked
Pot,at.o
Potato pad once.
2. Choose number of
potatoes (1-6).
3. Touch ENTER/
START pad.
When the cook time is over, you will
hear four beeps and End will display.
Recommended amounts:
1-6 potatoes (about 8-10 ozs. each).
6:
0.5 cup 1
1 cup 2
2 cups 3
NOTE:
If food is not thoroughly cooked or
reheated when using the Auto Cook
feature, complete using a power
level and cooking time. DO NOT
continue using the Auto Cook pad.
13
Operating Instructions
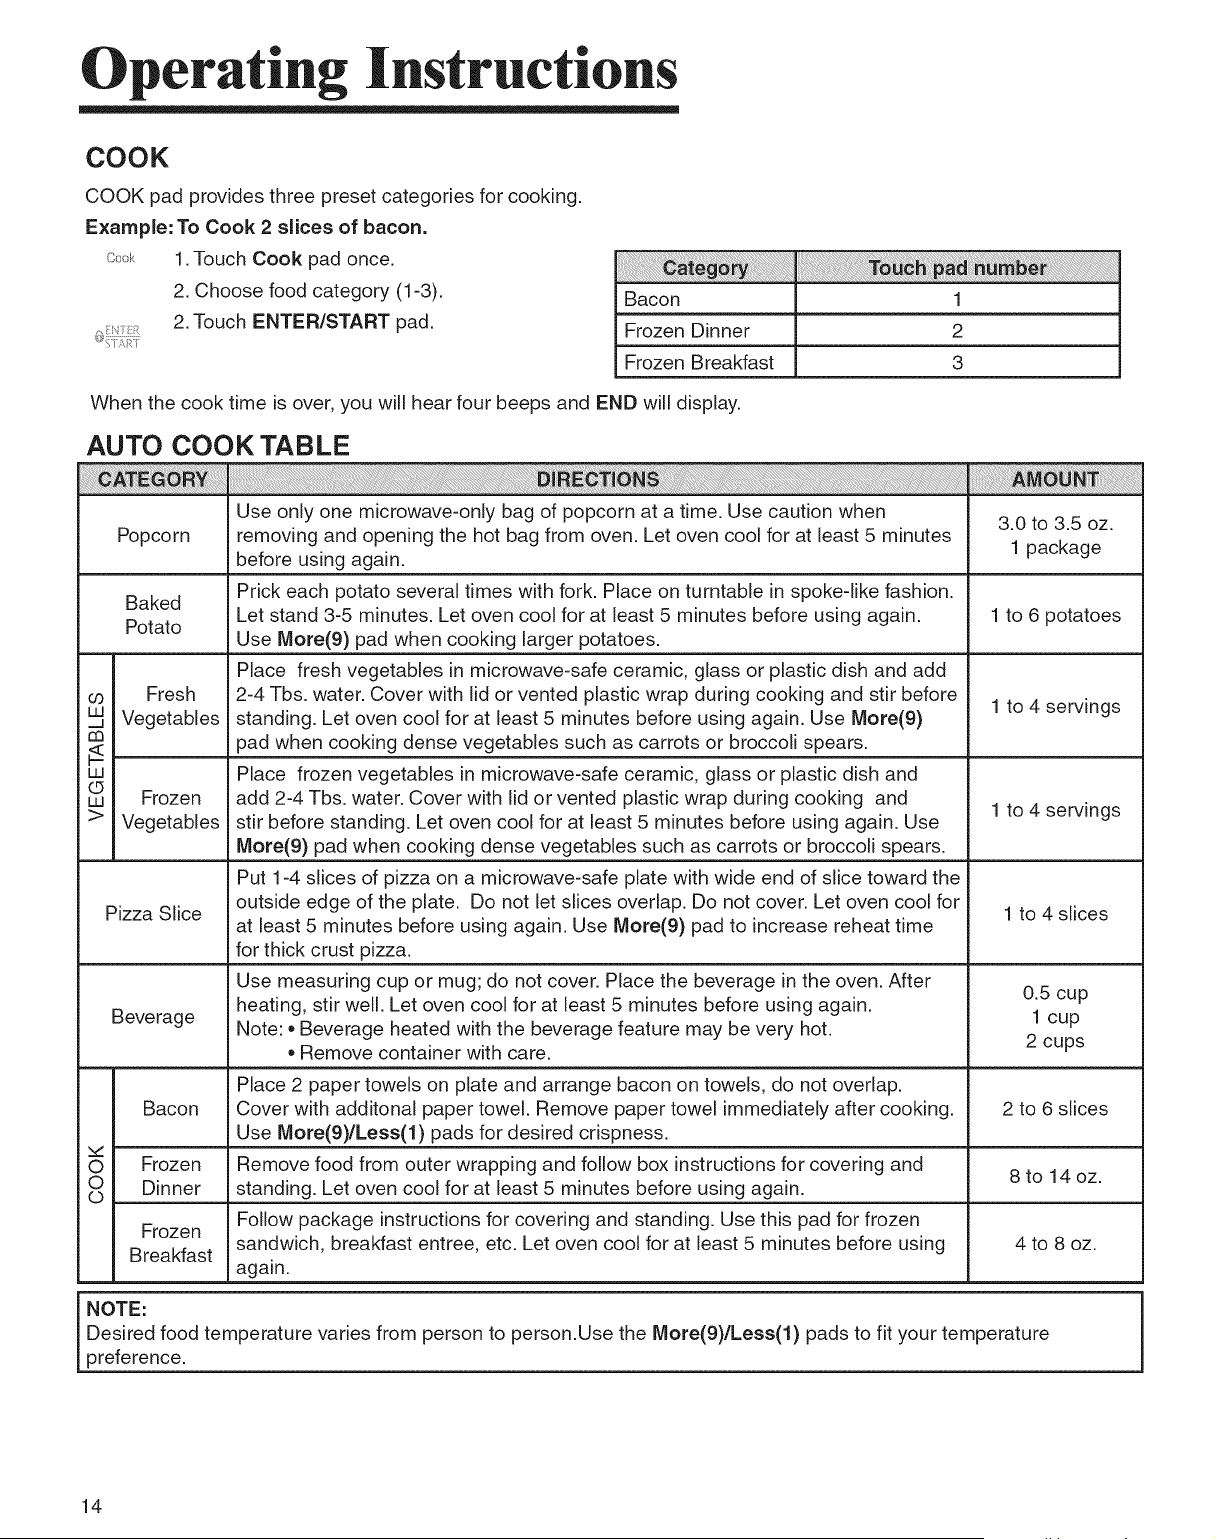
COOK
COOK pad provides three preset categories for cooking.
Example: To Cook 2 slices of bacon.
C_ok 1. Touch Cook pad once.
2. Choose food category (1-3).
2. Touch ENTER/START pad.
Bacon
Frozen Dinner
Frozen Breakfast
! !i i ! !i iiiiiiiiiiii!i iiiiiiiiii i iiiiiiii ii i iiiiii i ii i iiiii iiiii ! ! iii i i ! ;i!ii i ii i i ii i i i ii i ii i i ii iiiiiiiiiiiiiiiiiiiiiiiiiiiiiiiiiiiiiiiiiiiiiiiiiiiiiiiiiiiiiiiiiiiiiiiiiiiiiiiiiiiiiiiiiiiiiiiii i i¸
1
2
3
When the cook time is over, you will hear four beeps and END will display.
AUTO COOK TABLE
Use only one microwave-only bag of popcorn at a time. Use caution when
3.0 to 3.5 oz.
Popcorn removing and opening the hot bag from oven, Let oven cool for at least 5 minutes
before using again. 1 package
Prick each potato several times with fork. Place on turntable in spoke-like fashion.
Baked
Let stand 3-5 minutes. Let oven cool for at least 5 minutes before using again. 1 to 6 potatoes
Potato
Use More(9) pad when cooking larger potatoes.
Place fresh vegetables in microwave-safe ceramic, glass or plastic dish and add
co Fresh 2-4 Tbs. water. Cover with lid or vented plastic wrap during cooking and stir before
1 to 4 servings
Vegetables standing. Let oven cool for at least 5 minutes before using again. Use More(9)
ca pad when cooking dense vegetables such as carrots or broccoli spears.
uJ Place frozen vegetables in microwave-safe ceramic, glass or plastic dish and
Frozen add 2-4 Tbs. water. Cover with lid or vented plastic wrap during cooking and
1 to 4 servings
> Vegetables stir before standing. Let oven cool for at least 5 minutes before using again. Use
More(9) pad when cooking dense vegetables such as carrots or broccoli spears.
Put 1-4 slices of pizza on a microwave-safe plate with wide end of slice toward the
Pizza Slice outside edge of the plate. Do not let slices overlap. Do not cover. Let oven cool for 1 to 4 slices
at least 5 minutes before using again. Use More(9) pad to increase reheat time
for thick crust pizza.
Use measuring cup or mug; do not cover. Place the beverage in the oven. After
Beverage heating, stir well. Let oven cool for at least 5 minutes before using again. 0.51cupCUp
Note: • Beverage heated with the beverage feature may be very hot. 2 cups
• Remove container with care.
Place 2 paper towels on plate and arrange bacon on towels, do not overlap.
Bacon Cover with additonal paper towel. Remove paper towel immediately after cooking. 2 to 6 slices
Use More(9)/Less(1) pads for desired crispness.
Frozen Remove food from outer wrapping and follow box instructions for covering and
8 to 14 oz.
3 Dinner standing. Let oven cool for at least 5 minutes before using again.
Frozen Follow package instructions for covering and standing. Use this pad for frozen
Breakfast sandwich, breakfast entree, etc. Let oven cool for at least 5 minutes before using 4 to 8 oz.
again.
NOTE:
Desired food temperature varies from person to person.Use the More(9)/Less(1) pads to fit your temperature
preference.
14
Operating Instructions
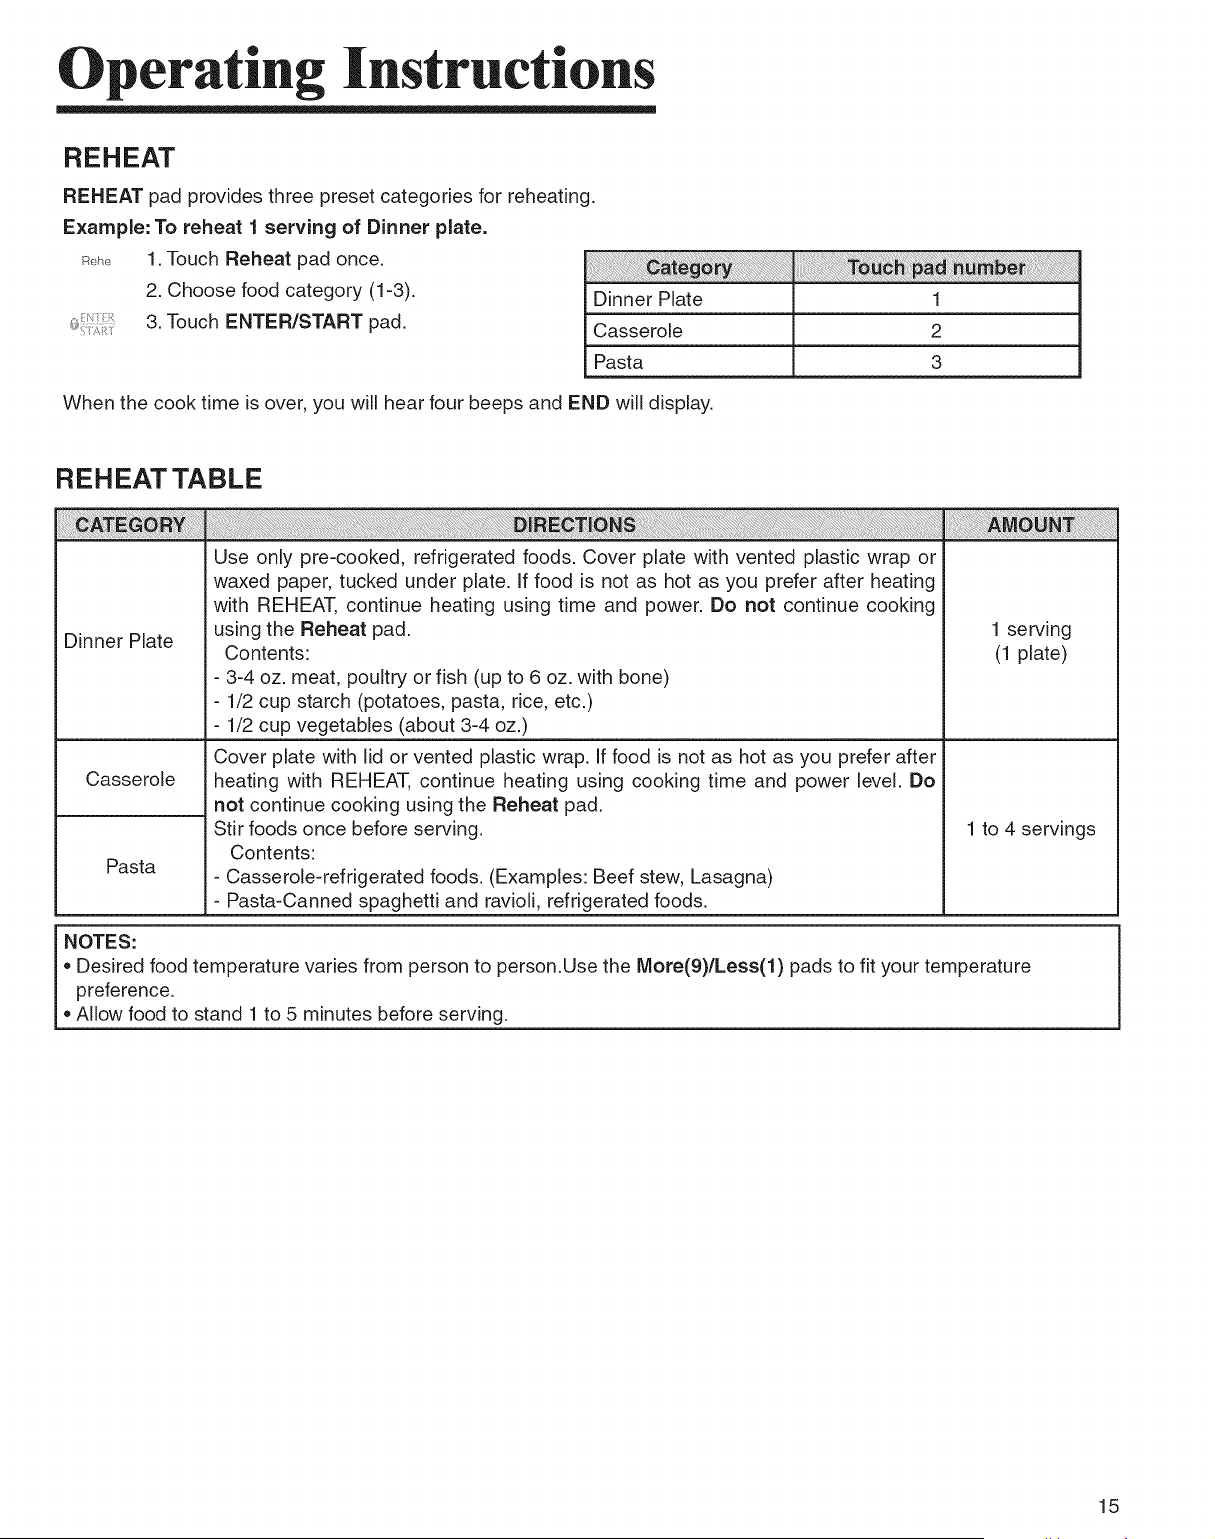
REHEAT
REHEAT pad provides three preset categories for reheating,
Example: To reheat 1 serving of Dinner plate.
_::_,_ 1. Touch Reheat pad once.
2. Choose food category (1-3).
3. Touch ENTER/START pad.
Dinner Plate
Casserole
Pasta
1
2
3
When the cook time is over, you will hear four beeps and END will display.
REHEAT TABLE
Dinner Plate
Casserole
Pasta
!!! !i!ii ii i !i!iiiiiii
Use only pre-cooked, refrigerated foods. Cover plate with vented plastic wrap or
waxed paper, tucked under plate. If food is not as hot as you prefer after heating
with REHEAT, continue heating using time and power. Do not continue cooking
using the Reheat pad.
Contents:
- 3-4 oz. meat, poultry or fish (up to 6 oz. with bone)
- 1/2 cup starch (potatoes, pasta, rice, etc.)
- 1/2 cup vegetables (about 3-4 oz.)
Cover plate with lid or vented plastic wrap. If food is not as hot as you prefer after
heating with REHEAT, continue heating using cooking time and power level. Do
not continue cooking using the Reheat pad.
Stir foods once before serving.
Contents:
- Casserole-refrigerated foods. (Examples: Beef stew, Lasagna)
- Pasta-Canned spaghetti and ravioli, refrigerated foods.
ijg !i! ii!i!ii ! i ii!i!ii i i iiiiiiililiiiiiiiiii i ! ii i ii i !i !i !i !i ! ! i i ii !i !i iiiii i ii ii ii iiiii i ii ii ii i!
1 serving
(1 plate)
1 to 4 servings
NOTES:
• Desired food temperature varies from person to person.Use the More(9)/Less(1) pads to fit your temperature
preference.
• Allow food to stand 1 to 5 minutes before serving.
15
Operating Instructions
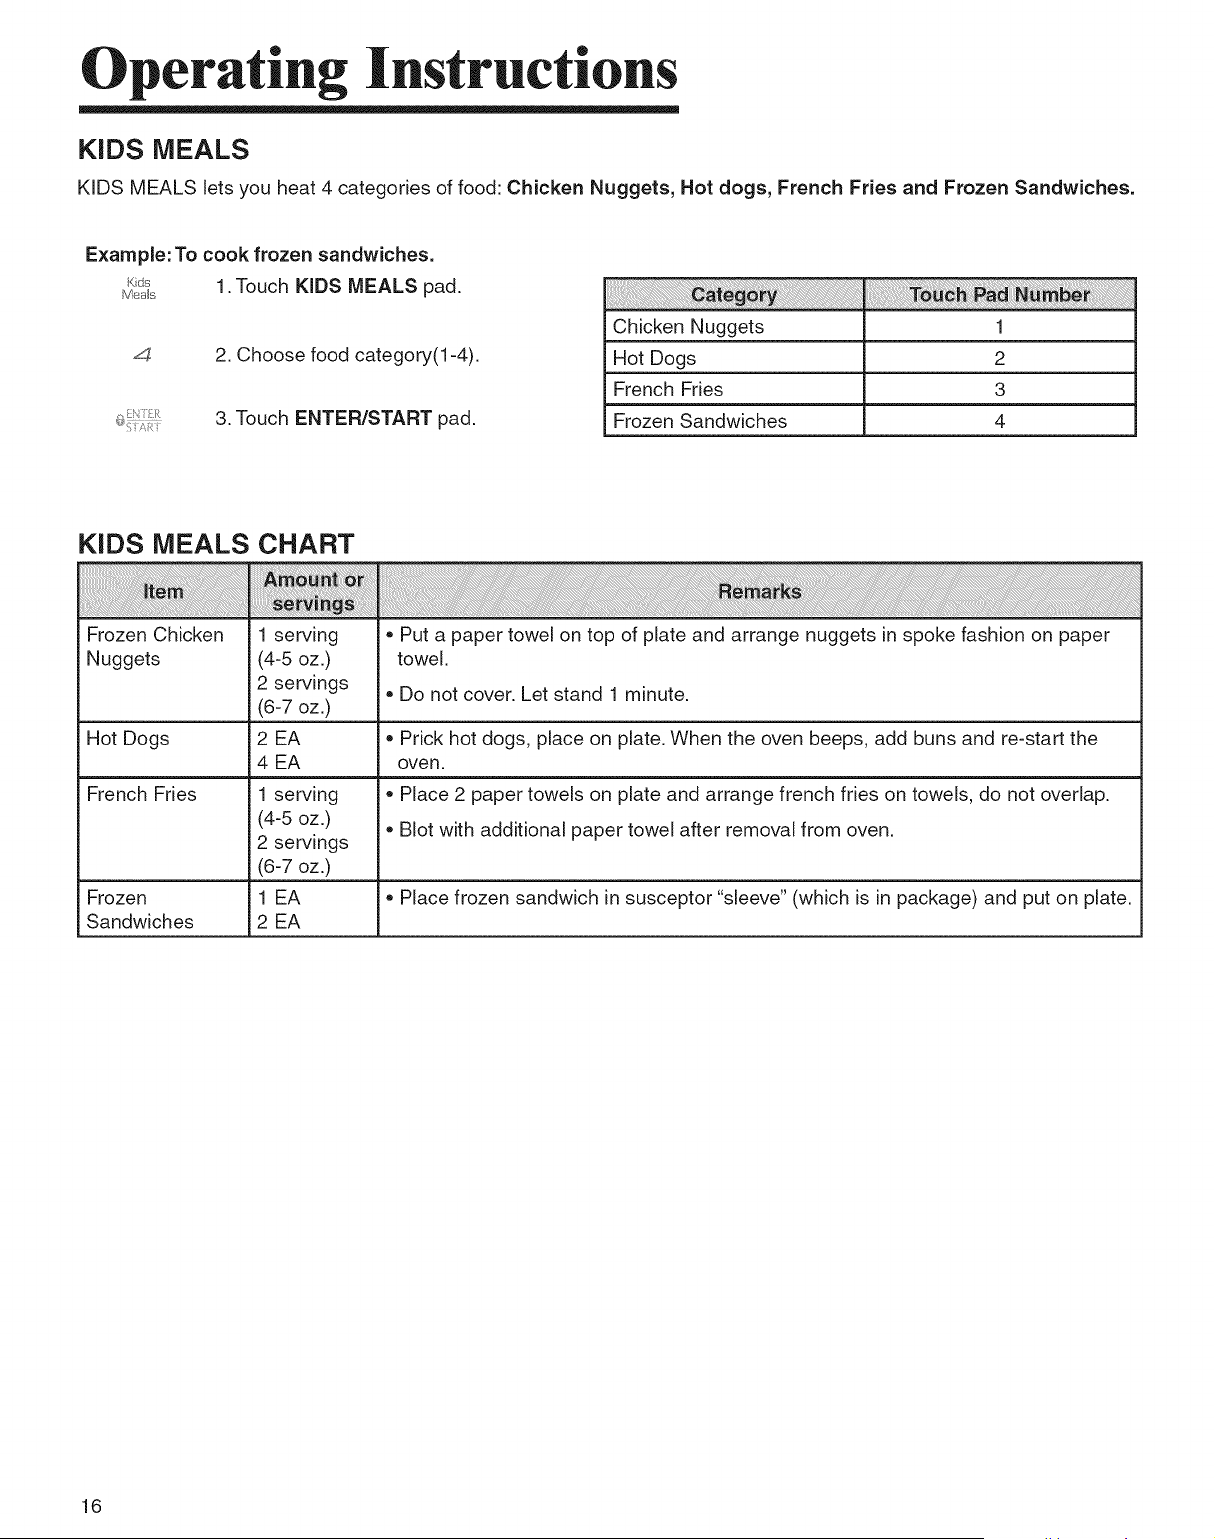
KIDS MEALS
KIDS MEALS lets you heat 4 categories of food: Chicken Nuggets, Hot dogs, French Fries and Frozen Sandwiches.
Example: To cook frozen sandwiches.
<_ 1 Touch KIDS MEALS pad.
4
2. Choose food category(1-4).
3. Touch ENTER/START pad.
Chicken Nuggets 1
Hot Dogs 2
French Fries 3
Frozen Sandwiches 4
KiDS MEALS CHART
Frozen Chicken
Nuggets
1 serving
(4-5oz.)
2 servings
(6-7 oz.)
2 EA
4 EA
Put a paper towel on top of plate and arrange nuggets in spoke fashion on paper
towel.
Do not cover. Let stand 1 minute.
Hot Dogs • Prick hot dogs, place on plate. When the oven beeps, add buns and re-start the
oven.
French Fries 1 serving • Place 2 paper towels on plate and arrange french fries on towels, do not overlap,
(4-5 oz.) • Blot with additional paper towel after removal from oven.
2 servings
(6-7 oz.)
Frozen 1 EA • Place frozen sandwich in susceptor "sleeve" (which is in package) and put on plate.
Sandwiches 2 EA
16
Operating Instructions
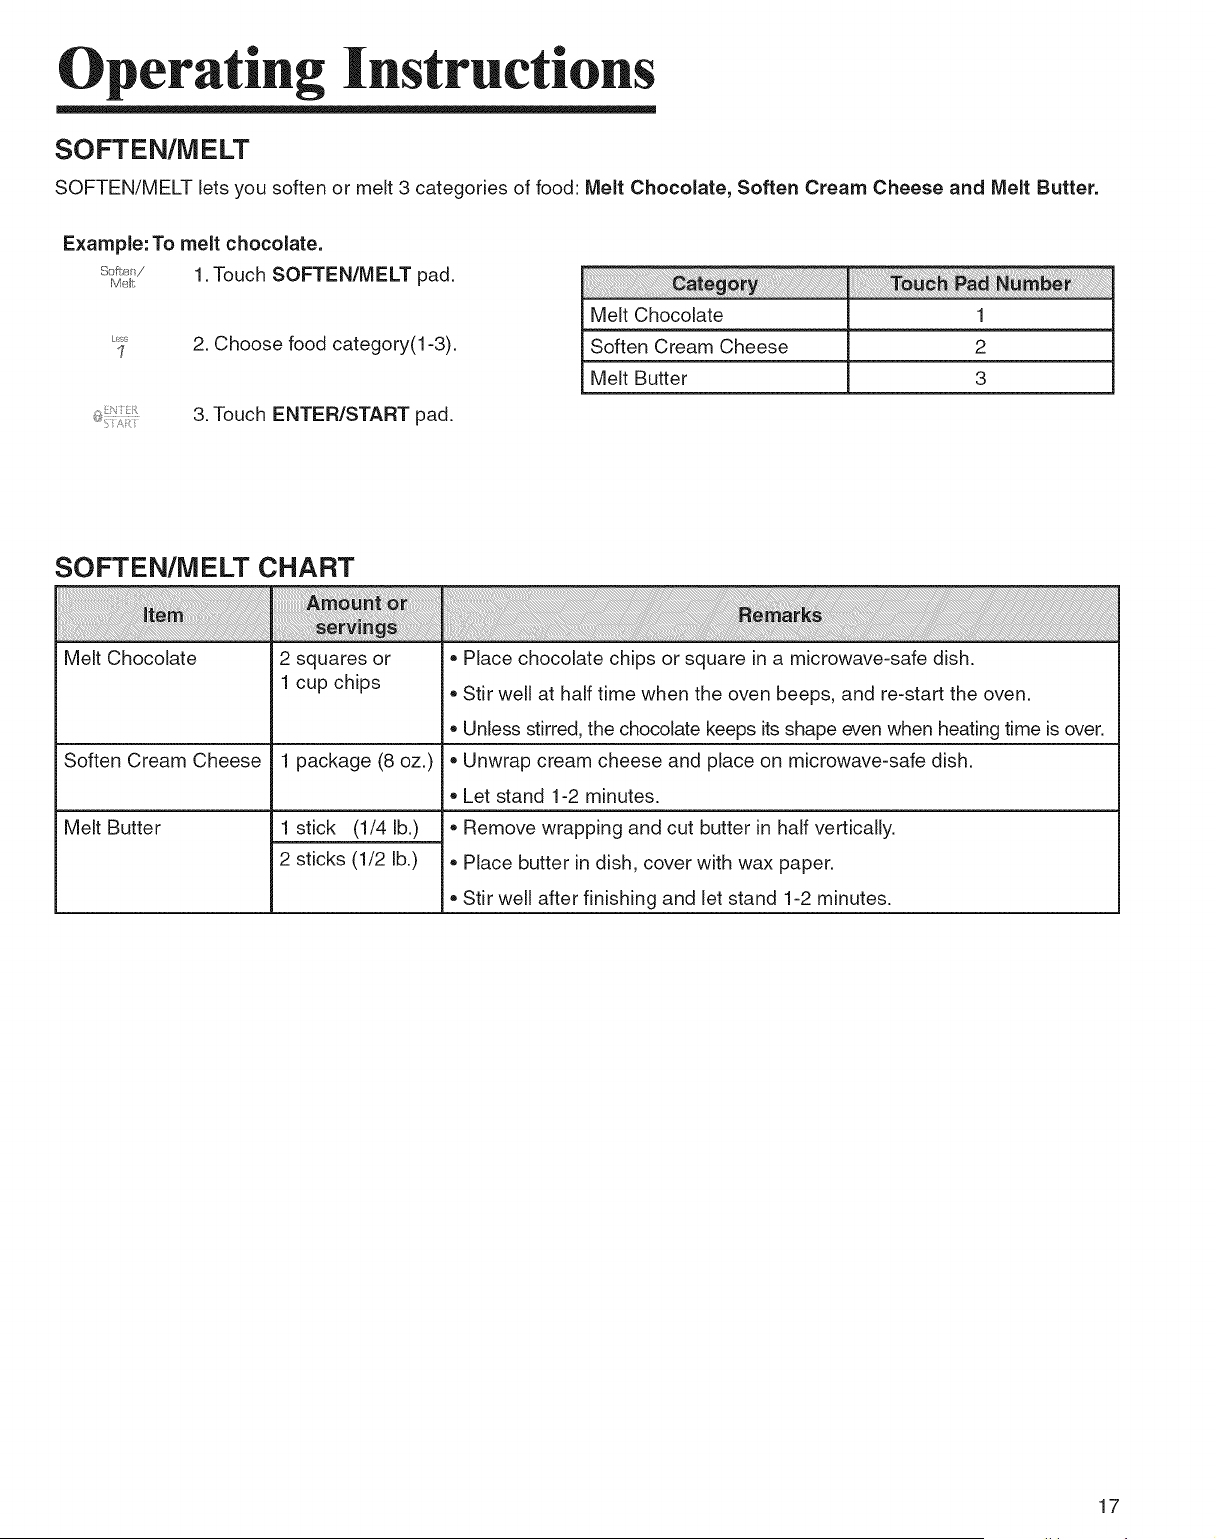
SOFTEN/MELT
SOFTEN/MELT lets you soften or melt 3 categories of food: Melt Chocolate, Soften Cream Cheese and Melt Butter.
Example: To melt chocolate.
SofL,_/ 1. Touch SOFTEN/MELT pad.
Melt
k}_ss
1
2. Choose food category(I-3).
i i !! ! ! ! ii ii!i i i i ii i i! !i ! i ! i ii ii ii ii ii ii ii ii ii ii ii iiii iii iiiiiiiiiiiiiiiiiii !i!!i! i!!ii!i!iiiiiii i !i i ! i !! !i! !i!i!iiiiiiii i i i !! i ! ! i! i! i! i! ii ii i ii ii ii i iii ii iiiiiiiiiiiiiiiiiiiiiiii iiiii iiiiiiiiiiiiiiiiiiiiiiiiiiiiiiiiiiiiiiiiiiiiiiiiiiiiiiiiiiiiiiiiiiiiiiiiiiiiiiiiiiiiiiiiiiiiiiiiii i i i
Melt Chocolate 1
L
Soften Cream Cheese 2
Melt Butter 3
3. Touch ENTER/START pad.
SOFTEN/MELT CHART
Melt Chocolate
2 squares or
1 cup chips
Soften Cream Cheese 1 package (8 oz.)
Melt Butter
1 stick (1/4 lb.)
2 sticks (1/2 lb.)
• Place chocolate chips or square in a microwave-safe dish.
• Stir well at half time when the oven beeps, and re-start the oven.
• Unless stirred, the chocolate keeps its shape even when heating time is over.
• Unwrap cream cheese and place on microwave-safe dish.
• Let stand 1-2 minutes.
• Remove wrapping and cut butter in half vertically.
• Place butter in dish, cover with wax paper.
• Stir well after finishing and let stand 1-2 minutes.
17
Operating Instructions
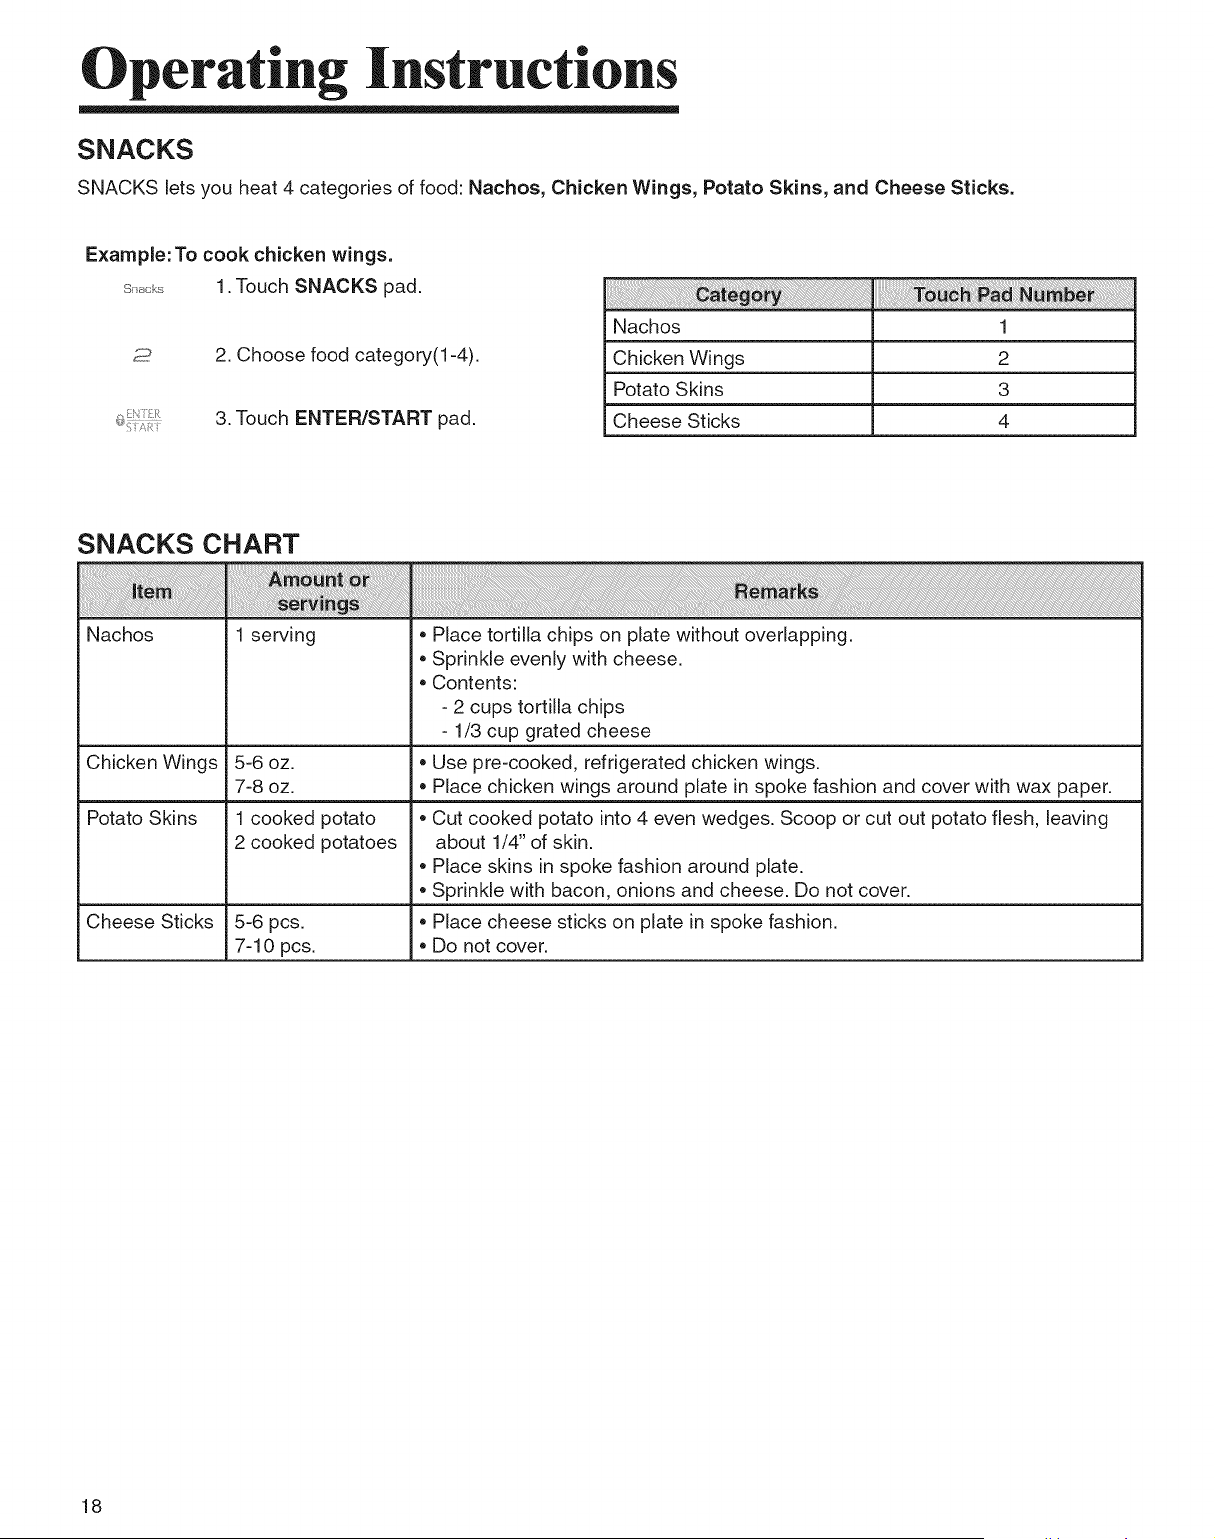
SNACKS
SNACKS lets you heat 4 categories of food: Nachos, Chicken Wings, Potato Skins, and Cheese Sticks.
Example: To cook chicken wings.
s,_,k 1. Touch SNACKS pad.
2
2. Choose food category(1-4).
3. Touch ENTER/START pad.
Nachos 1
Chicken Wings 2
Potato Skins 3
Cheese Sticks 4
SNACKS CHART
Nachos
1 serving
Chicken Wings 5-6 oz.
7-8 oz.
Potato Skins 1 cooked potato
2 cooked potatoes
Cheese Sticks 5-6 pcs.
7-10 pcs.
Place tortilla chips on plate without overlapping.
Sprinkle evenly with cheese.
Contents:
- 2 cups tortilla chips
- 1/3 cup grated cheese
Use pre-cooked, refrigerated chicken wings.
Place chicken wings around plate in spoke fashion and cover with wax paper.
Cut cooked potato into 4 even wedges. Scoop or cut out potato flesh, leaving
about 1/4" of skin.
Place skins in spoke fashion around plate.
Sprinkle with bacon, onions and cheese. Do not cover.
Place cheese sticks on plate in spoke fashion.
Do not cover.
18
Operating Instructions
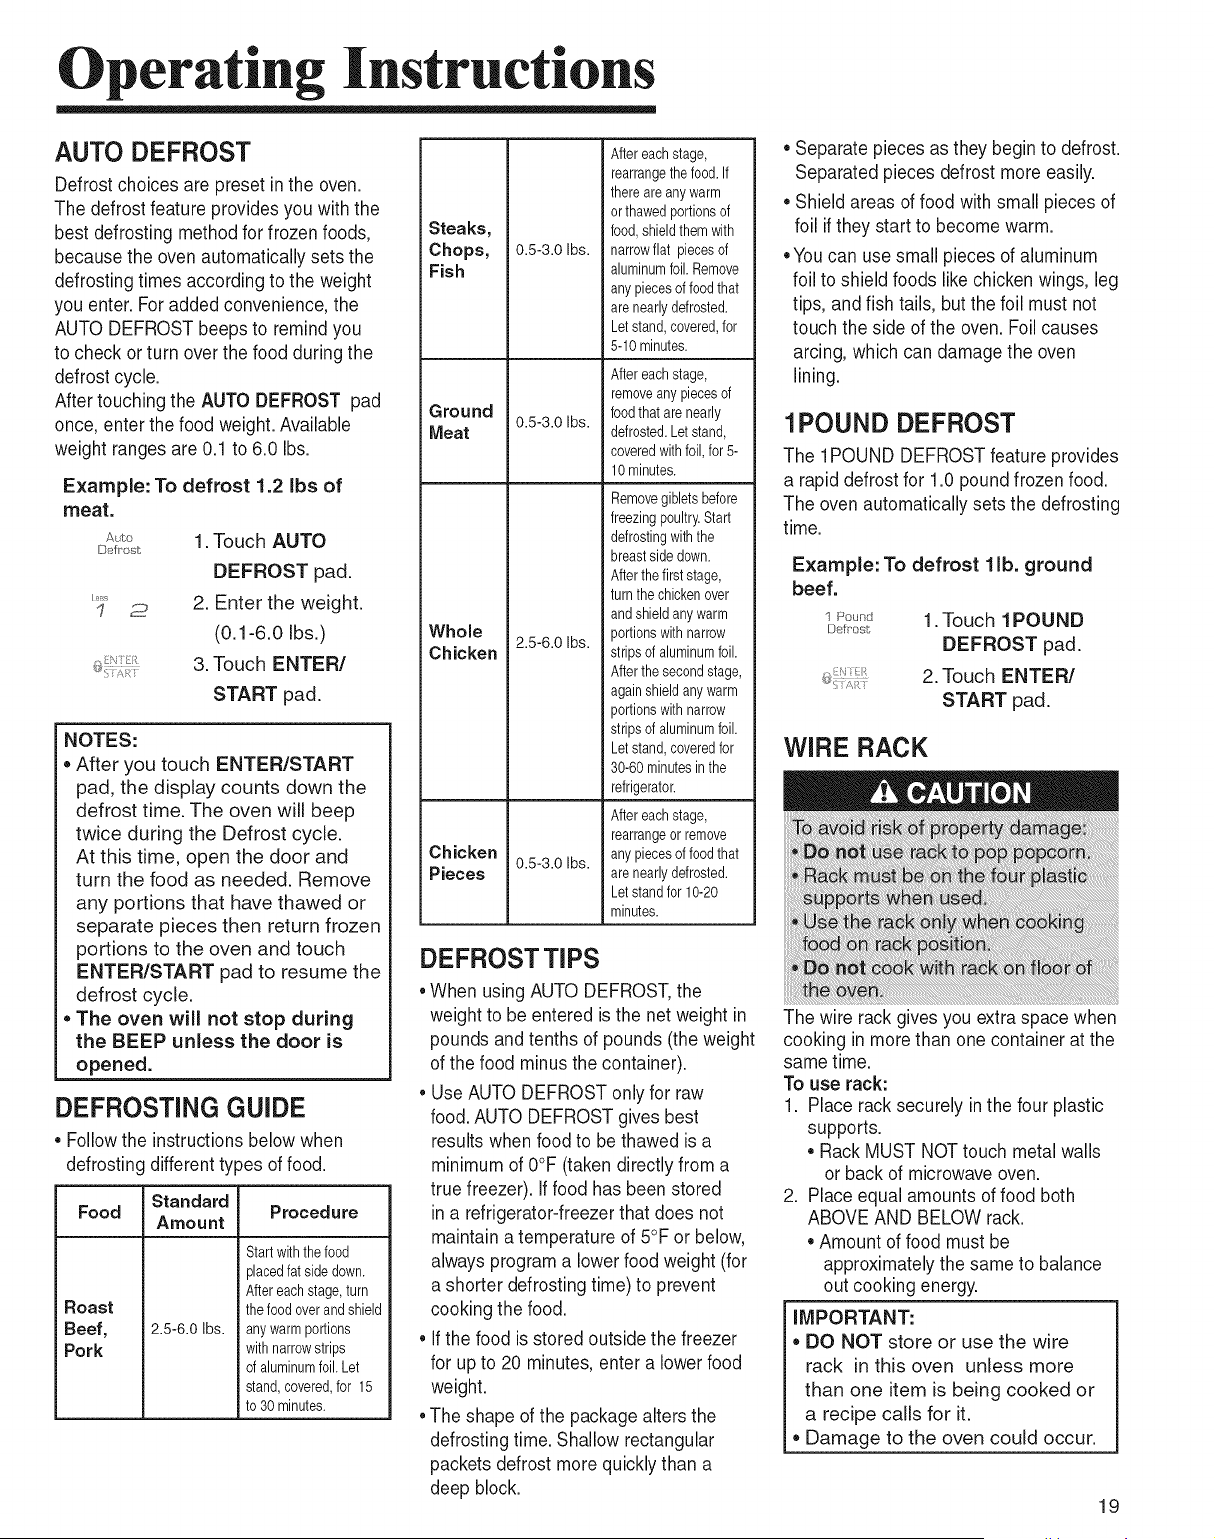
AUTO DEFROST
Defrost choices are preset in the oven.
The defrost feature provides you with the
best defrosting method for frozen foods,
because the oven automatically sets the
defrosting times according to the weight
you enter. For added convenience, the
AUTO DEFROST beeps to remind you
to check or turn over the food during the
defrost cycle.
After touching the AUTO DEFROST pad
once, enter the food weight. Available
weight ranges are 0.1 to 6.0 Ibs.
Example: To defrost 1.2 Ibs of
meat.
Aoi3o
Defrost
less
1 2
1. Touch AUTO
DEFROST pad.
2. Enter the weight.
(0.1-6.0 Ibs.)
3. Touch ENTER/
START pad.
NOTES:
After you touch ENTER/START
pad, the display counts down the
defrost time. The oven will beep
twice during the Defrost cycle.
At this time, open the door and
turn the food as needed. Remove
any portions that have thawed or
separate pieces then return frozen
portions to the oven and touch
ENTER/START pad to resume the
defrost cycle.
,, The oven will not stop during
the BEEP unless the door is
opened.
DEFROSTING GUIDE
• Followthe instructions below when
defrosting different types of food.
Standard
Food Procedure
Amount
Roast
Beef,
Pork
2.5-6.0 Ibs.
Startwiththe food
placedfat side down.
After eachstage, turn
the foodoverand shield
anywarmportions
withnarrowstrips
of aluminumfoil.Let
stand,covered,for 15
to 30 minutes.
Steaks,
Chops,
Fish
Ground
Meat
Whole
Chicken
Chicken
Pieces
0.5-3.0 Ibs.
0.5-3.0 Ibs.
2.5-6.0 Ibs.
0.5-3.0 Ibs.
Aftereach stage,
rearrangethe food.If
thereare anywarm
orthawedportionsof
food,shieldthemwith
narrowflat piecesof
aluminumfoil. Remove
anypiecesof foodthat
are nearlydefrosted.
Let stand,covered,for
5-10 minutes.
Aftereach stage,
removeanypiecesof
foodthatare nearly
defrosted.Letstand,
coveredwithfoil, for5-
10minutes.
Removegiblets before
freezingpoultry.Start
defrostingwiththe
breastside down.
Afterthe firststage,
turn the chickenover
andshieldanywarm
portionswithnarrow
stripsof aluminumfoil.
Afterthe secondstage,
againshieldany warm
portionswithnarrow
stripsof aluminumfoil.
Let stand,coveredfor
30-60minutesin the
refrigerator.
Aftereach stage,
rearrangeorremove
anypiecesof foodthat
are nearlydefrosted.
Let standfor 10-20
minutes.
DEFROSTTIPS
• When using AUTO DEFROST,the
weight to be entered is the net weight in
pounds and tenths of pounds (the weight
of the food minus the container).
• Use AUTO DEFROST only for raw
food. AUTO DEFROST gives best
results when food to be thawed is a
minimum of 0°F (taken directly from a
true freezer). If food has been stored
in a refrigerator-freezer that does not
maintain a temperature of 5°F or below,
always program a lower food weight (for
a shorter defrosting time) to prevent
cooking the food.
• Ifthe food is stored outside the freezer
for up to 20 minutes, enter a lower food
weight.
• The shape of the package alters the
defrosting time. Shallow rectangular
packets defrost more quickly than a
deep block.
• Separate pieces as they begin to defrost.
Separated pieces defrost more easily.
• Shield areas of food with small pieces of
foil if they start to become warm.
• You can use small pieces of aluminum
foil to shield foods like chicken wings, leg
tips, and fish tails, but the foil must not
touch the side of the oven. Foil causes
arcing, which can damage the oven
lining.
1POUND DEFROST
The 1POUND DEFROST feature provides
a rapid defrost for 1.0 pound frozen food.
The oven automatically sets the defrosting
time.
Example: To defrost 1lb. ground
beef.
Po,n_J 1 Touch 1POUND
Defrost,
DEFROST pad.
2. Touch ENTER/
START pad.
WIRE RACK
The wire rack gives you extra space when
cooking in more than one container at the
same time.
To use rack:
1. Place rack securely in the four plastic
supports.
• Rack MUST NOTtouch metal walls
or back of microwave oven.
2. Place equal amounts of food both
ABOVE AND BELOW rack.
• Amount of food must be
approximatelythe same to balance
out cooking energy.
IMPORTANT:
• DO NOT store or use the wire
rack in this oven unless more
than one item is being cooked or
a recipe calls for it.
,, Damage to the oven could occur.
19
Operating Instructions
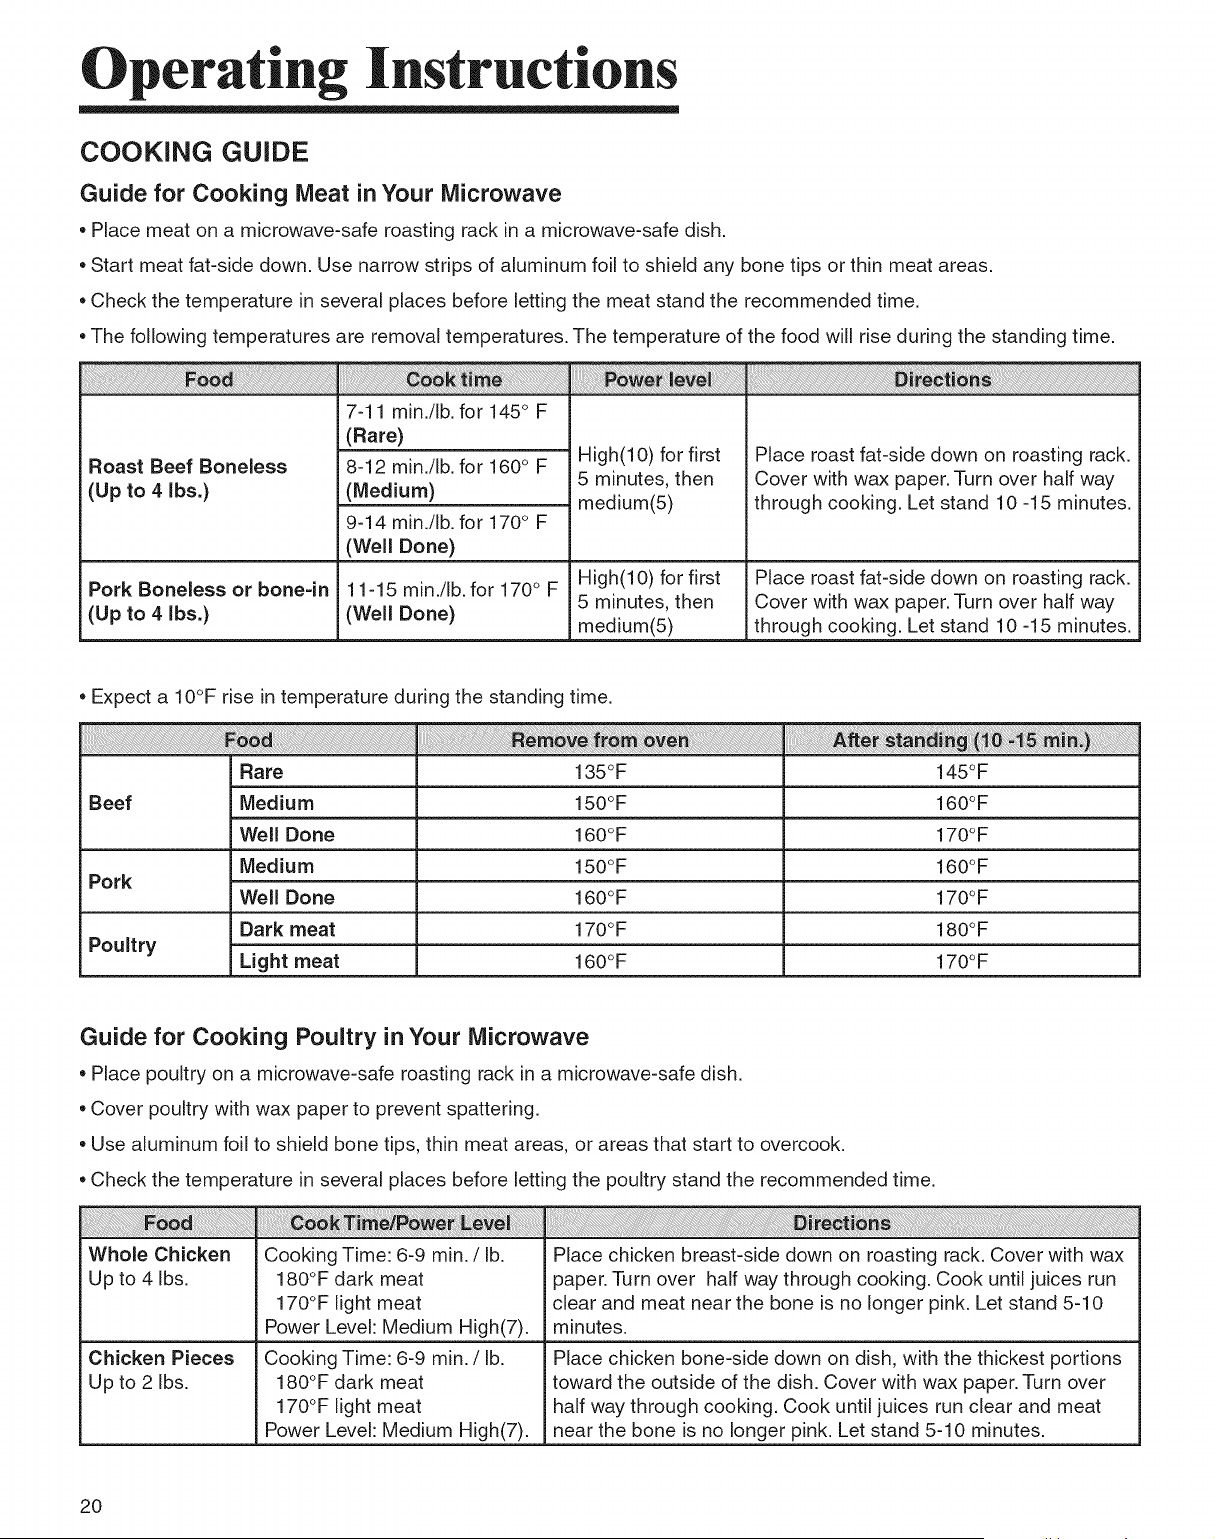
COOKING GUIDE
Guide for Cooking Meat in Your Microwave
• Place meat on a microwave-safe roasting rack in a microwave-safe dish.
• Start meat fat-side down. Use narrow strips of aluminum foil to shield any bone tips or thin meat areas.
• Check the temperature in several places before letting the meat stand the recommended time.
• The following temperatures are removal temperatures. The temperature of the food will rise during the standing time.
iii!i!i i ! i i i! i i i i i! iiii i i i i iiii i i i i iiiiiii ii iiiiiii ii ii iiiiiiiiiii i iiiiiiiiiiiii iiiiiiiiii i iiii i! ! i iiiiiiiii9 ii i iiiiii i i iiii iiii ii iiiiiii i i ii iiiiiiiiii i iiiiiiiiiii i iiiiiiiiii i iiiiiiiiii i iiiiiiiiii i iiiiiiiiii i ! !
7-11 min./Ib, for 145° F
(Rare)
Roast Beef Boneless 8-12 min./Ib, for 160° F
(Up to 4 Ibs.) (Medium)
9-14 min./Ib, for 170° F
(Well Done)
Pork Boneless or bone-in 11-15 min./Ib, for 170 ° F
(Up to 4 Ibs.) (Well Done)
High(lO) for first
5 minutes, then
medium(5)
High(lO) for first
5 minutes, then
medium(5)
!!! ! ! i i i ! ! i! i! i! i! i i i i i iii ii ii ii i i iiiiiiiiiiiiiiiiiiiiiiiiiiiiiiiiiiiiiiiiiiiiiiiiiiiiiiiiiiiiiiiiiiiiiiiiiiiiiiiiiiiiiiiiiiiiiiiiiiiiiiiiiiiiiiiiiiiiiiiiiiiiiiiiiiiiiiiiiiiiiiiiiiiiiiiiiiiiiiiiiiiiiii i i i ! i !i i i i i ii i i ii i i i iiiiiiiiiiiiiiiiiiiiiiiiiiiiiiiiiiiiiiiiiiiiiiiiiiiiiiiiiiiiiiiiiiiiiiiiiiiiiiiiiiiiiiiiiiiiiiiiiiiiiiiiiiiiiiiiiiiiiiiiiiiiiiiiiiiiiiiiiiiiiii
Place roast fat-side down on roasting rack.
Cover with wax paper. Turn over half way
through cooking. Let stand 10 -15 minutes.
Place roast fat-side down on roasting rack.
Cover with wax paper. Turn over half way
through cooking. Let stand 10 -15 minutes.
• Expect a IO°F rise in temperature during the standing time.
Rare 135°F
Beef
Well Done 160°F 170°F
Medium 150°F 160°F
Pork
Well Done 160°F 170°F
Dark meat 170°F 180°F
Poultry
Light meat 160°F 170°F
145°F
Medium 150°F 160°F
Guide for Cooking Poultry in Your Microwave
• Place poultry on a microwave-safe roasting rack in a microwave-safe dish.
• Cover poultry with wax paper to prevent spattering.
• Use aluminum foil to shield bone tips, thin meat areas, or areas that start to overcook.
• Check the temperature in several places before letting the poultry stand the recommended time.
Whole Chicken
Up to 4 Ibs.
Chicken Pieces
Up to 2 Ibs.
Cooking Time: 6-9 min./lb.
180°F dark meat
170°F light meat
Power Level: Medium High(7).
Cooking Time: 6-9 min./lb.
180°F dark meat
170°F light meat
Power Level: Medium High(7).
! ! i:!i:i i iiiii i i i! i !! i!i i i i i i i iiiiiiiiiiiiiiiiiiiiiii iiiiiiiiiiiiiiii!i i!!!!!!!!!!!i iiiii iiiiiiiiiiiiiii !! iiiii!iiiiii!ii!ii ii i iiiiiiiiiiiiiii iii iiii!i;!!i i!i!iiii ii! i ii ii iiiiiiiii ii iiiiiiiiiii ii i iii iii iiiiiiiii iiiiiiiii!i i!!!!!!!!! ! ! ! !! i!ii!i!i!i ! !!!! iiiiiiiiiiiiiiiiiiiii iiiiiiiiiii ! ! ! !!!!i!iiiii i! i ! i!i ;!! i i i i ii; !i i i i i !i!i!i i i ii !! i! i! i!i ii i !i i J; ii i ! i ii ! ! i ! i !ii! ; !
Place chicken breast-side down on roasting rack. Cover with wax
paper. Turn over half way through cooking. Cook until juices run
clear and meat near the bone is no longer pink. Let stand 5-10
minutes.
Place chicken bone-side down on dish, with the thickest portions
toward the outside of the dish. Cover with wax paper. Turn over
half way through cooking. Cook until juices run clear and meat
near the bone is no longer pink. Let stand 5-10 minutes.
2O
Operating Instructions
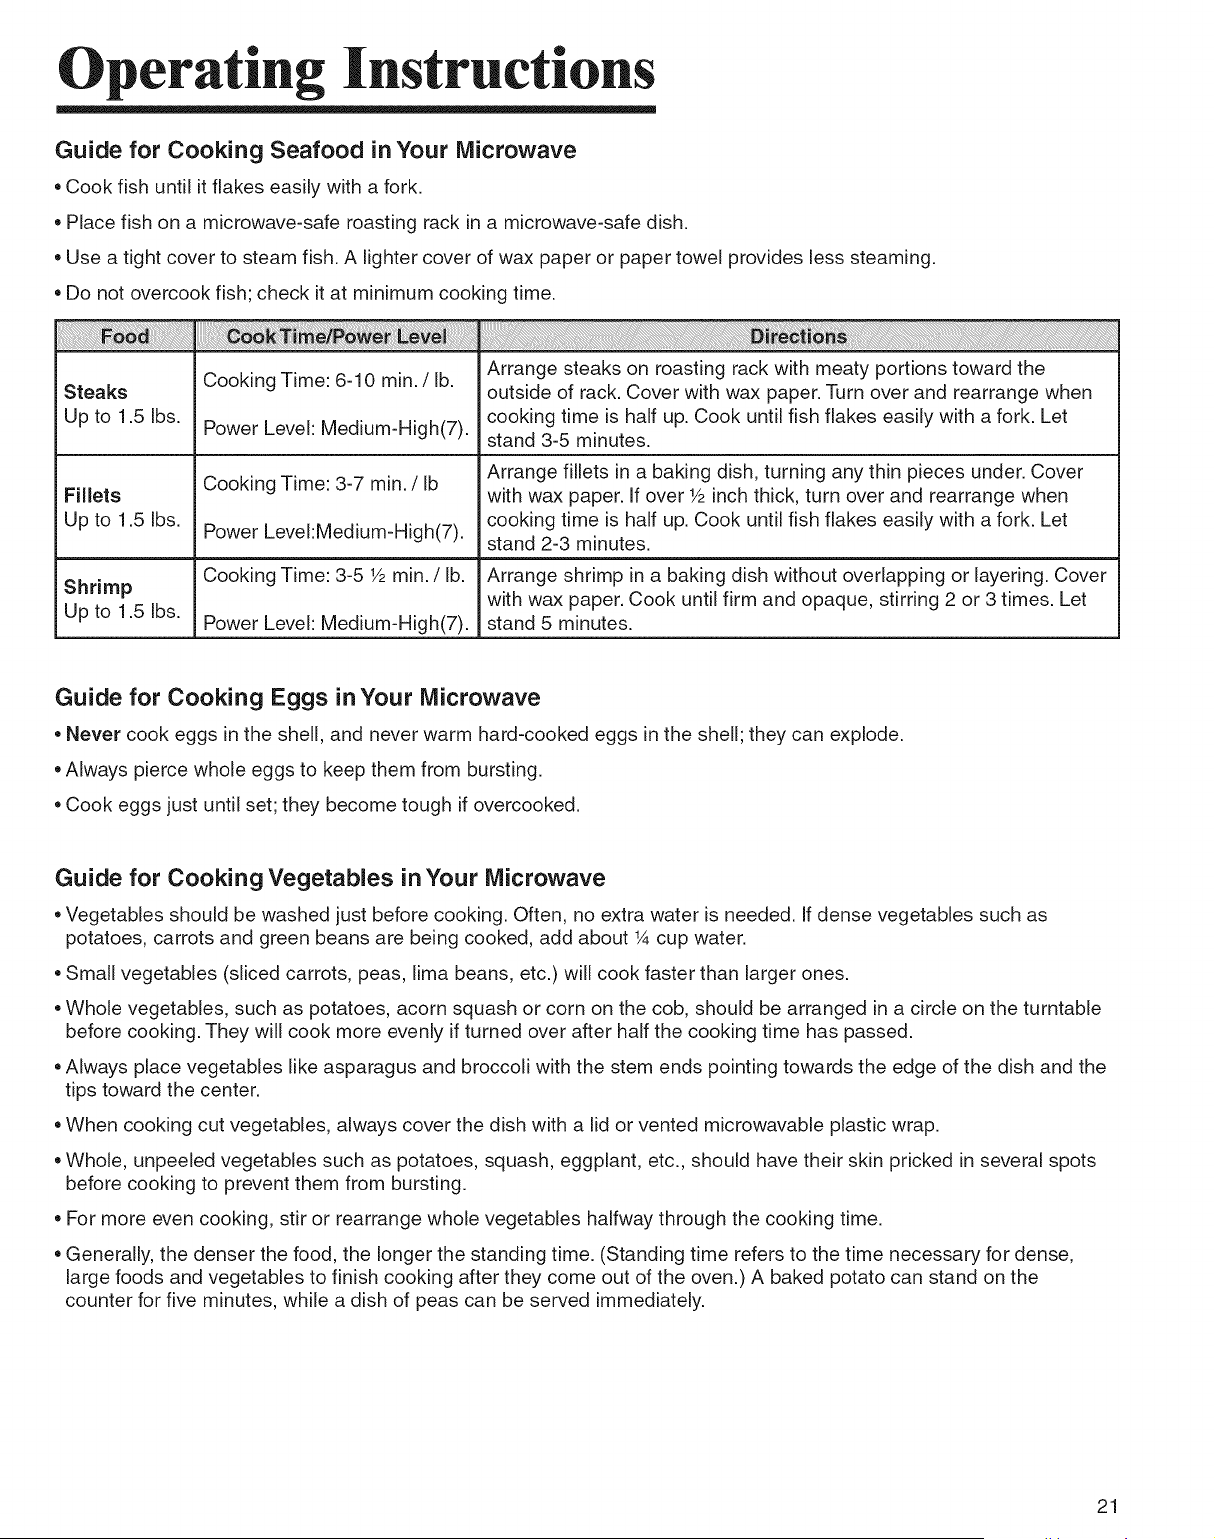
Guide for Cooking Seafood in Your Microwave
• Cook fish until it flakes easily with a fork.
• Place fish on a microwave-safe roasting rack in a microwave-safe dish.
• Use a tight cover to steam fish. A lighter cover of wax paper or paper towel provides less steaming.
• Do not overcook fish; check it at minimum cooking time.
Guide for Cooking Eggs in Your Microwave
• Never cook eggs in the shell, and never warm hard-cooked eggs in the shell; they can explode.
• Always pierce whole eggs to keep them from bursting.
• Cook eggs just until set; they become tough if overcooked.
Guide for Cooking Vegetables in Your Microwave
• Vegetables should be washed just before cooking. Often, no extra water is needed. If dense vegetables such as
potatoes, carrots and green beans are being cooked, add about 1Acup water.
• Small vegetables (sliced carrots, peas, lima beans, etc.) will cook faster than larger ones.
• Whole vegetables, such as potatoes, acorn squash or corn on the cob, should be arranged in a circle on the turntable
before cooking. They will cook more evenly if turned over after half the cooking time has passed.
• Always place vegetables like asparagus and broccoli with the stem ends pointing towards the edge of the dish and the
tips toward the center.
• When cooking cut vegetables, always cover the dish with a lid or vented microwavable plastic wrap.
• Whole, unpeeled vegetables such as potatoes, squash, eggplant, etc., should have their skin pricked in several spots
before cooking to prevent them from bursting.
• For more even cooking, stir or rearrange whole vegetables halfway through the cooking time.
• Generally, the denser the food, the longer the standing time. (Standing time refers to the time necessary for dense,
large foods and vegetables to finish cooking after they come out of the oven.) A baked potato can stand on the
counter for five minutes, while a dish of peas can be served immediately.
21
Cooking Utensils
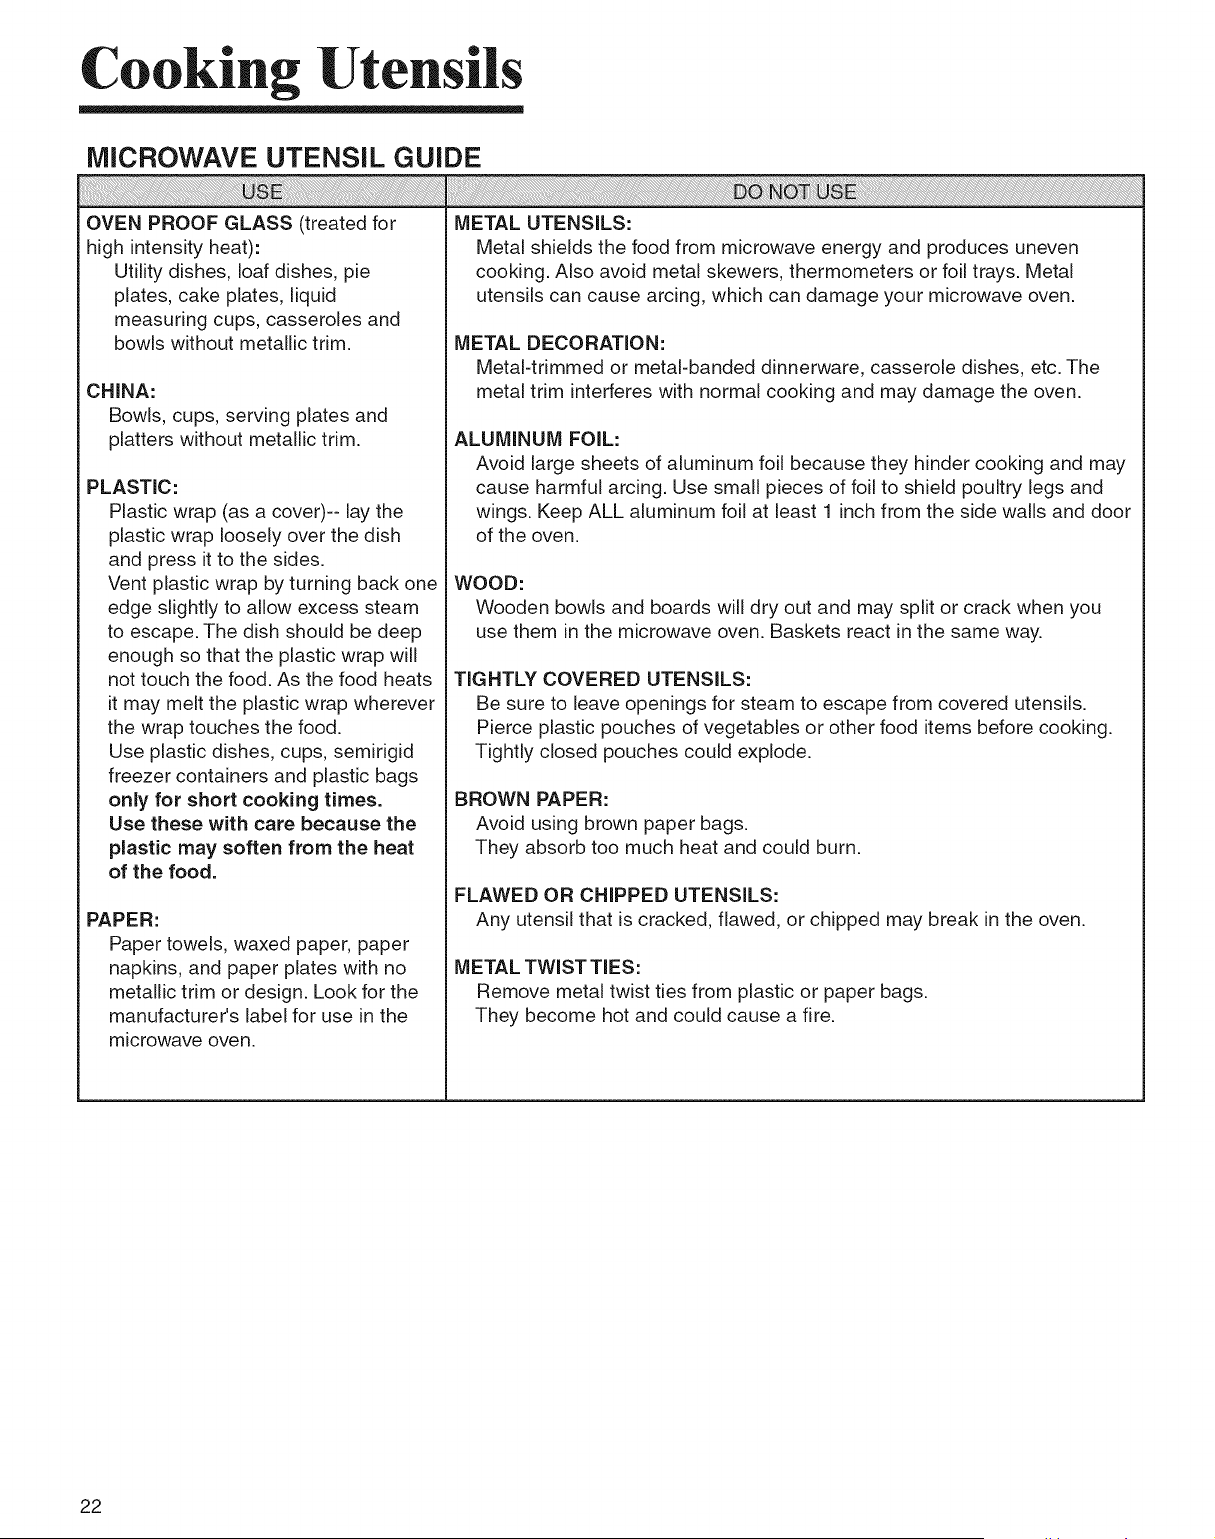
MICROWAVE UTENSIL GUIDE
OVEN PROOF GLASS (treated for
high intensity heat):
Utility dishes, loaf dishes, pie
plates, cake plates, liquid
measuring cups, casseroles and
bowls without metallic trim.
CHINA:
Bowls, cups, serving plates and
platters without metallic trim.
PLASTIC:
Plastic wrap (as a cover)-- lay the
plastic wrap loosely over the dish
and press it to the sides.
Vent plastic wrap by turning back one
edge slightly to allow excess steam
to escape. The dish should be deep
enough so that the plastic wrap will
not touch the food. As the food heats
it may melt the plastic wrap wherever
the wrap touches the food.
Use plastic dishes, cups, semirigid
freezer containers and plastic bags
only for short cooking times.
Use these with care because the
plastic may soften from the heat
of the food.
PAPER:
Paper towels, waxed paper, paper
napkins, and paper plates with no
metallic trim or design. Look for the
manufacturer's label for use in the
microwave oven.
METAL UTENSILS:
Metal shields the food from microwave energy and produces uneven
cooking. Also avoid metal skewers, thermometers or foil trays. Metal
utensils can cause arcing, which can damage your microwave oven.
METAL DECORATION:
Metal-trimmed or metal-banded dinnerware, casserole dishes, etc. The
metal trim interferes with normal cooking and may damage the oven.
ALUMINUM FOIL:
Avoid large sheets of aluminum foil because they hinder cooking and may
cause harmful arcing. Use small pieces of foil to shield poultry legs and
wings. Keep ALL aluminum foil at least 1 inch from the side walls and door
of the oven.
WOOD:
Wooden bowls and boards will dry out and may split or crack when you
use them in the microwave oven. Baskets react in the same way.
TIGHTLY COVERED UTENSILS:
Be sure to leave openings for steam to escape from covered utensils.
Pierce plastic pouches of vegetables or other food items before cooking.
Tightly closed pouches could explode.
BROWN PAPER:
Avoid using brown paper bags.
They absorb too much heat and could burn.
FLAWED OR CHIPPED UTENSILS:
Any utensil that is cracked, flawed, or chipped may break in the oven.
METAL TWIST TIES:
Remove metal twist ties from plastic or paper bags.
They become hot and could cause a fire.
22
Care and Cleaning
CARE AND CLEANING
For best performance and safety,
keep the oven clean inside and out-
side. Take special care to keep the
inner door panel and the oven front
frame free of food or grease build-up.
Never use rough powder or pads.
Wipe the microwave oven inside and
out, including the hood bottom cover,
with a soft cloth and a warm (not hot)
mild detergent solution. Then rinse and
wipe dry. Use a chrome cleaner and
polish on chrome, metal and aluminum
surfaces. Wipe spatters immediately
with a wet paper towel, especially after
cooking chicken or bacon. Clean your
oven weekly or more often, if needed.
Follow these instructions to clean and
care for your oven.
• Keep the inside of the oven clean.
Food particles and spilled liquids can
stick to the oven walls, causing the
oven to work less efficiently.
• Wipe up spills immediately. Use a
damp cloth and mild soap. Do not use
harsh detergents or abrasives.
• To help loosen baked on food particles
or liquids, heat two cups of water (add
the juice of one lemon if you desire
to keep the oven fresh) in a four-cup
measuring glass at High power for five
minutes or until boiling. Let stand in
the oven for one or two minutes.
• Remove the glass tray from the oven
when cleaning the oven or tray.To
prevent the tray from breaking, handle
it carefully and do not put it in water
immediately after cooking. Wash the
tray carefully in warm sudsy water or
in the dishwasher.
• Clean the outside surface of the oven
with soap and a damp cloth. Dry with
a soft cloth. To prevent damage to the
operating parts of the oven, don't let
water seep into the openings.
• Wash the door window with very mild
soap and water. Be sure to use a soft
cloth to avoid scratching.
• If steam accumulates inside or
outside the oven door, wipe with a soft
cloth. Steam can accumulate when
operating the oven in high humidity
and in no way indicates microwave
leakage.
• Never operate the oven without food
in it; this can damage the magnetron
tube or glass tray.You may wish to
leave a cup of water in the oven when
it is not in use to prevent damage if the
oven is accidentally turned on.
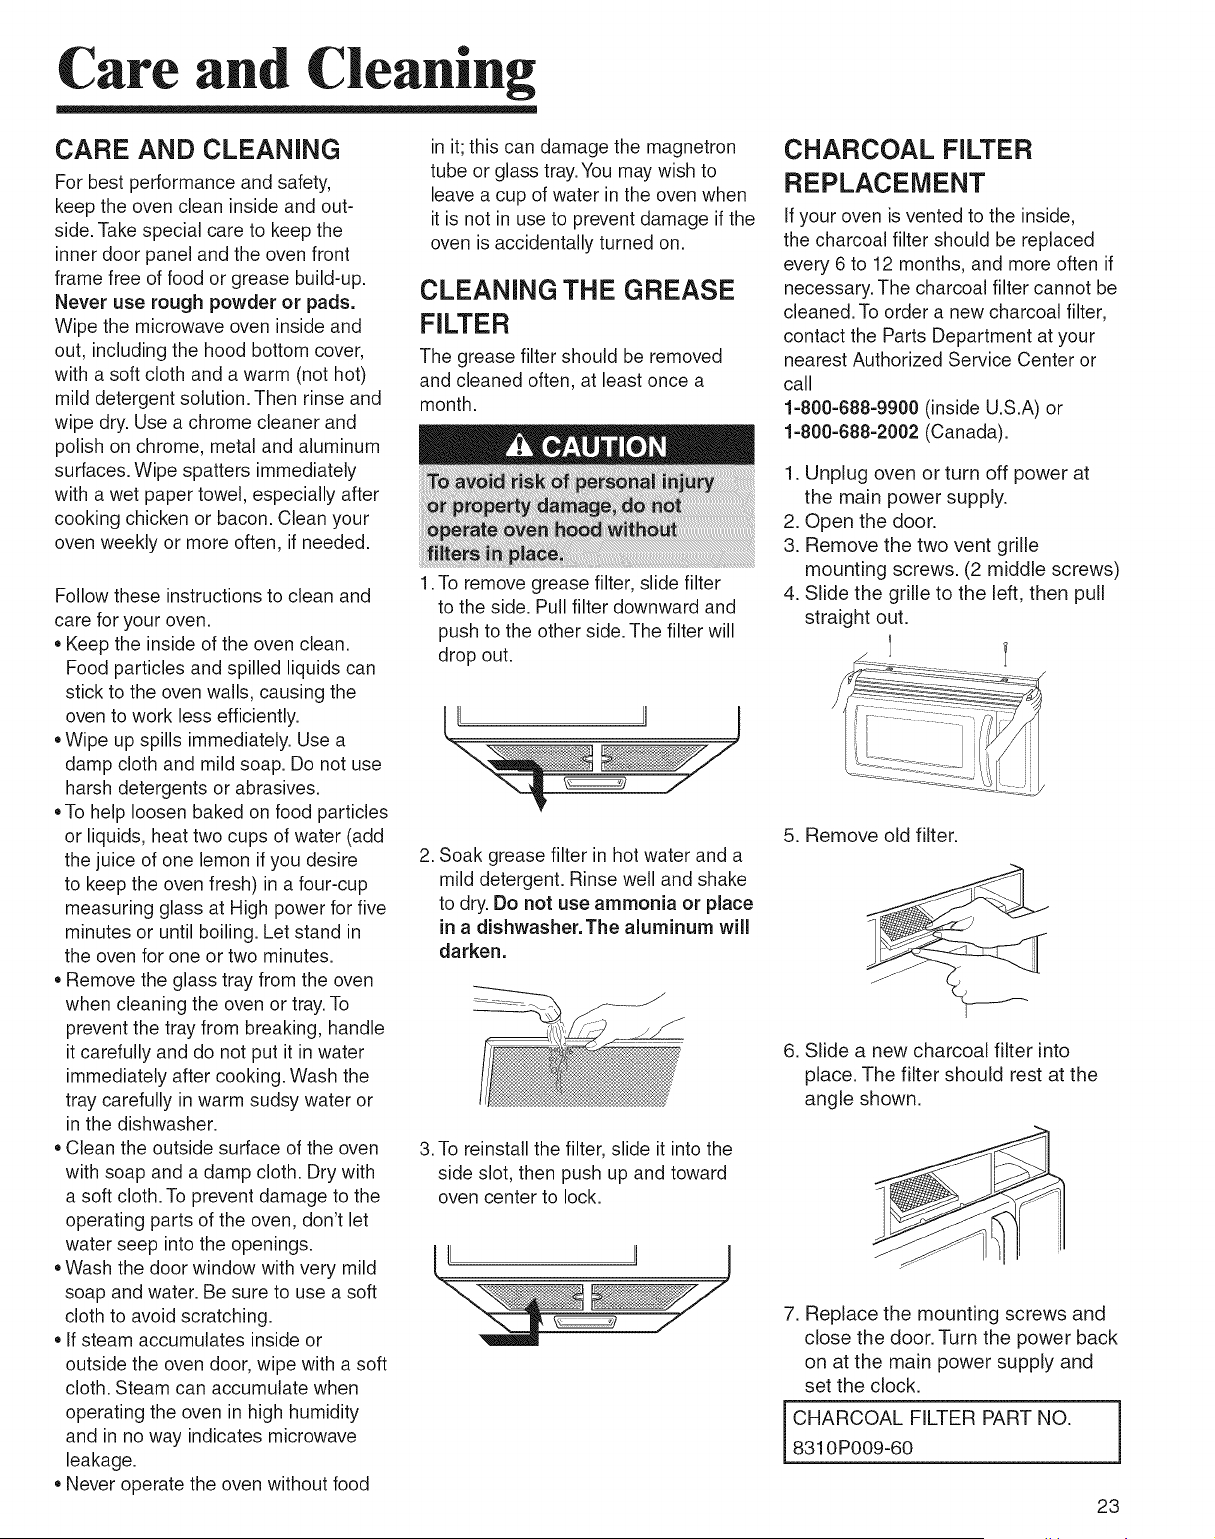
CLEANING THE GREASE
FILTER
The grease filter should be removed
and cleaned often, at least once a
month.
1. To remove grease filter, slide filter
to the side. Pull filter downward and
push to the other side. The filter will
drop out.
2. Soak grease filter in hot water and a
mild detergent. Rinse well and shake
to dry. Do not use ammonia or place
in a dishwasher.The aluminum will
darken.
3. To reinstall the filter, slide it into the
side slot, then push up and toward
oven center to lock.
J
CHARCOAL FILTER
REPLACEMENT
If your oven is vented to the inside,
the charcoal filter should be replaced
every 6 to 12 months, and more often if
necessary. The charcoal filter cannot be
cleaned. To order a new charcoal filter,
contact the Parts Department at your
nearest Authorized Service Center or
call
1=800=688-9900 (inside U.S.A) or
1=800=688=2002(Canada).
1. Unplug oven or turn off power at
the main power supply.
2. Open the door.
3. Remove the two vent grille
mounting screws. (2 middle screws)
4. Slide the grille to the left, then pull
straight out.
5. Remove old filter.
6. Slide a new charcoal filter into
place. The filter should rest at the
angle shown.
7. Replace the mounting screws and
close the door. Turn the power back
on at the main power supply and
set the clock.
CHARCOAL FILTER PART NO.
8310P009-60
23
Care and Cleaning
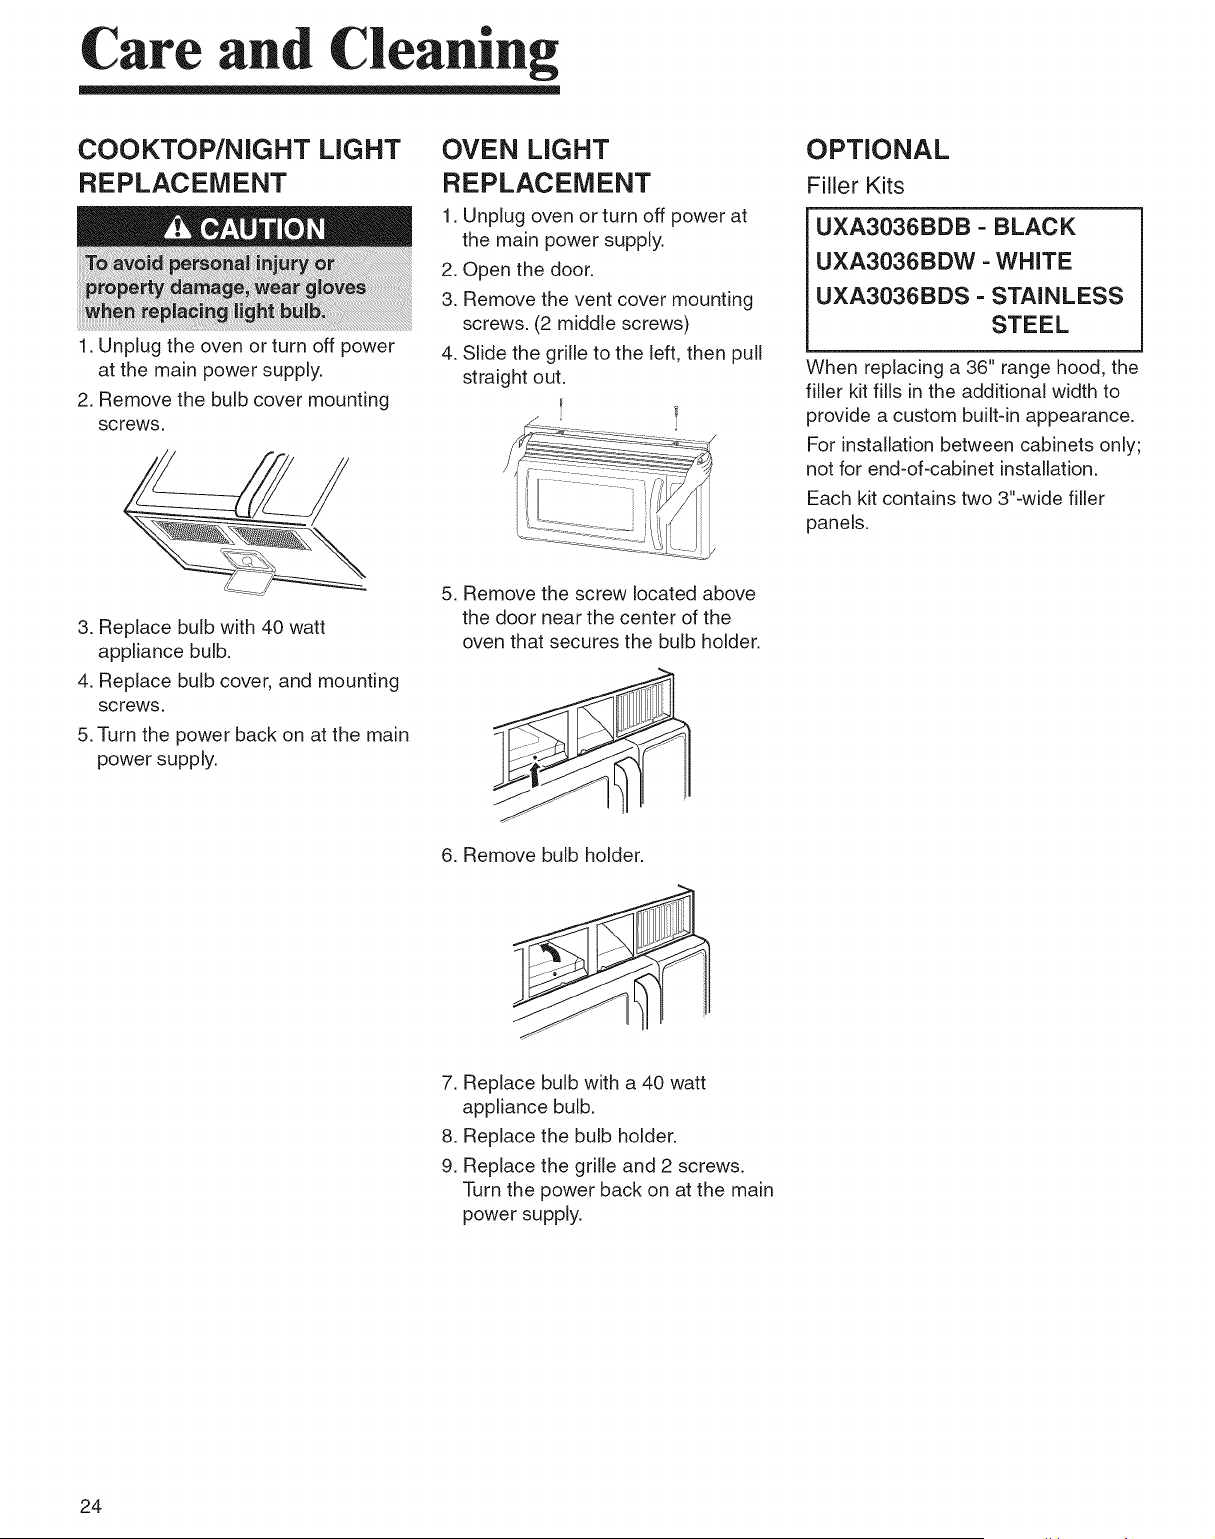
COOKTOP/NIGHT LIGHT
REPLACEMENT
1. Unplug the oven or turn off power
at the main power supply.
2. Remove the bulb cover mounting
screws.
3. Replace bulb with 40 watt
appliance bulb.
4. Replace bulb cover, and mounting
screws.
5. Turn the power back on at the main
power supply.
OVEN LIGHT
REPLACEMENT
1. Unplug oven or turn off power at
,
3.
,
the main power supply.
Open the door.
Remove the vent cover mounting
screws. (2 middle screws)
Slide the grille to the left, then pull
straight out.
_=_:_:___ =:;_::: ..........
5. Remove the screw located above
the door near the center of the
oven that secures the bulb holder.
6. Remove bulb holder.
OPTIONAL
Filler Kits
UXA3036BDB - BLACK
UXA3036BDW - WHITE
UXA3036BDS - STAINLESS
STEEL
When replacing a 36" range hood, the
filler kit fills in the additional width to
provide a custom built-in appearance.
For installation between cabinets only;
not for end-of-cabinet installation.
Each kit contains two 3"-wide filler
panels.
7. Replace bulb with a 40 watt
appliance bulb.
8. Replace the bulb holder.
9. Replace the grille and 2 screws.
Turn the power back on at the main
power supply.
24
Troubleshooting
TROUBLESHOOTING GUIDE
Before you call a repair person for your oven, check this list
of possible problems and solutions.
Neither the oven's display nor the oven operate.
• Properly insert the plug into a grounded outlet.
• If the outlet is controlled by a wail switch, make sure the
wail switch is turned on.
• Remove the plug from the outlet, wait ten seconds, then
plug it in again.
• Reset the circuit breaker or replace any blown fuse.
Plug another appliance into the outlet; if the other
appliance doesn't work, have a qualified electrician repair
the outlet.
Plug the oven into a different outlet.
The oven's display works, but the power won't come on.
• Make sure the door is closed securely.
• Check to see if packing material or other material is stuck
to the door seal.
• Check for door damage.
• Press STOP/CLEAR pad twice and re-enter all cooking
instructions.
The power goes off before the set time has elapsed.
• If there has not been a power outage, remove the plug
from the outlet, wait ten seconds, then plug it in again. If
there was a power outage, the time indicator will display:
PLEASE TOUCH CLOCK AND SETTIME OF DAY. Reset
the clock and any cooking instructions.
• Reset the circuit breaker or replace any blown fuse.
The food is cooking too slowly.
• Make sure the oven is on its own 20 amp circuit line.
Operating another appliance on the same circuit can
cause a voltage drop. If necessary, move the oven to its
own circuit.
You see sparks or arcing.
• Remove any metallic utensils, cookware, or metal ties. If
using foil, use only narrow strips and allow at least one
inch between the foil and interior oven walls.
The turntable makes noises or sticks.
• Clean the turntable, roller ring and oven floor.
• Make sure the turntable and roller ring are positioned
correctly.
Using your microwave causes TV or radio interference.
• This is similar to the interference caused by other small
appliances, such as hair dryers. Move your microwave
further away from other appliances, like your TV or radio.
Note:
ff the oven is set to cook for more than 25 minutes,
it will automatically adjust itself to 70 percent power
after 25 minutes to avoid overcooking.
If you have a problem you cannot solve,
please call our service line:
(1-800-688-9900)
25

Note
26

Note
27
MAYTAG ®MAJOR APPLIANCE WARRANTY
LiMiTED WARRANTY
For one year from the date of purchase, when this major appliance is operated and maintained according to
instructions attached to or furnished with the product, Maytag brand of Whirlpool Corporation or Whirlpool Canada LP
(hereafter "Maytag") will pay for factory specified parts and repair labor to correct defects in materials or workmanship.
Service must be provided by a Maytag designated service company. This limited warranty is valid only in the United
States or Canada and applies only when the major appliance is used in the country in which it was purchased. Outside
the 50 United States and Canada, this limited warranty does not apply. Proof of original purchase date is required to
obtain service under this limited warranty.
iTEMS EXCLUDED FROM WARRANTY
This limited warranty does not cover:
1. Service calls to correct the installation of your major appliance, to instruct you on how to use your major appliance,
to replace or repair house fuses, or to correct house wiring or plumbing.
2. Service calls to repair or replace appliance light bulbs, air filters or water filters. Consumable parts are excluded
from warranty coverage.
3. Repairs when your major appliance is used for other than normal, single-family household use or when it is used in
a manner that is contrary to published user or operator instructions and/or installation instructions.
4. Damage resulting from accident, alteration, misuse, abuse, fire, flood, acts of God, improper installation, installation
not in accordance with electrical or plumbing codes, or use of consumables or cleaning products not approved by
Maytag.
5. Cosmetic damage, including scratches, dents, chips or other damage to the finish of your major appliance, unless
such damage results from defects in materials or workmanship and is reported to Maytag within 30 days from the
date of purchase.
6. Any food loss due to refrigerator or freezer product failures.
7. Costs associated with the removal from your home of your major appliance for repairs. This major appliance is
designed to be repaired in the home and only in-home service is covered by this warranty.
8. Repairs to parts or systems resulting from unauthorized modifications made to the appliance.
9. Expenses for travel and transportation for product service if your major appliance is located in a remote area where
service by an authorized Maytag servicer is not available.
10. The removal and reinstallation of your major appliance if it is installed in an inaccessible location or is not installed
in accordance with published installation instructions.
11. Major appliances with original model/serial numbers that have been removed, altered or cannot be easily
determined. This warranty is void if the factory applied serial number has been altered or removed from your major
appliance.
The cost of repair or replacement under these excluded circumstances shall be borne by the customer.
DISCLAIMER OF IMPLIED WARRANTIES; LIMITATION OF REMEDIES
CUSTOMER'S SOLE AND EXCLUSIVE REMEDY UNDER THIS LIMITED WARRANTY SHALL BE PRODUCT
REPAIR AS PROVIDED HEREIN. IMPLIED WARRANTIES, INCLUDING WARRANTIES OF MERCHANTABILITY OR
FITNESS FOR A PARTICULAR PURPOSE, ARE LIMITED TO ONEYEAR OR THE SHORTEST PERIOD ALLOWED
BY LAW. MAYTAG SHALL NOT BE LIABLE FOR INCIDENTAL OR CONSEQUENTIAL DAMAGES. SOME STATES
AND PROVINCES DO NOT ALLOW THE EXCLUSION OR LIMITATION OF INCIDENTAL OR CONSEQUENTIAL
DAMAGES, OR LIMITATIONS ON THE DURATION OF IMPLIED WARRANTIES OF MERCHANTABILITY OR
FITNESS, SO THESE EXCLUSIONS OR LIMITATIONS MAY NOT APPLY TO YOU. THIS WARRANTY GIVES YOU
SPECIFIC LEGAL RIGHTS, AND YOU MAY ALSO HAVE OTHER RIGHTS WHICH VARY FROM STATE TO SATE OR
PROVINCE TO PROVINCE.
If outside the 50 United States and Canada, contact your authorized Maytag dealer to determine if another warranty
applies.
If you need service, first see the "Troubleshooting" section of the Use & Care Guide. After checking "Troubleshooting,"
you may find additional help by checking the "Assistance or Service" section or by calling Maytag. In the U.S.A., call
1=800-688-9900. In Canada, call 1=800=807-6777.
DE68-O3143Z
12/07
Printed in Malaysia
28

Guide d'utilisatiou et d'eutretieu
Modble MMV4205BA
CONSIGNES llVIPORTANTES DE SECURITE ...... 30
Consignes de securite pour eviter une exposition
excessive aux micro-ondes ................... 32
Obtenir des resultats optimaux pour la cuisson.. 34
Fonctions .................................. 35
Manuel d'exploitation ........................ 37
Ustensiles de cuisine ........................ 51
Entretien et nettoyage ........................ 52
Depannage ................................. 54
GARANTIE DES GROS APPAREILS iVlENAGERS
iVlAYTAGCORPORATION ...................... 56
Guia de uso y cuidado ....................... 57
Conservez ces instructions pour reference ulterieure.
Assurez=vous que le Guide d'utilisation et d'entretien reste avec le four.
N° de ref. W10177930
CONSIGNES TANTES
p, p,
SECURITE
Ce que vousdevez
savoir sur les
consignes de s_curit_
Les consignes de securite Avertissement et Important de
ce Guide d'utilisation et d'entretien ne sont pas reputees
couvrir ['ensemble des conditions et des situations
potentie[ies. I[ convient de faire preuve de bon sens, de
prudence et de discernement [ors de ['installation, de
['entretien ou du foncfionnement du micro-ondes.
Contactez toujours [e revendeur, [e distributeur, [e
reparateur agree ou le fabricant pour tout probl_me ou etat
suscitant I'incomprehension.
Apprenez _ reconnaitre
les symboles,avis et
_tiquettes de s_curit_
CONSERVEZ SOIGNEUSEIVlENT CES iNSTRUCTiONS
3O
CONSJGNES TANTES
p, p,
SECURITE
instructionspour
la misea terre
Votre four DOlT _tre mis a la terre. La raise a la terre
reduit le risque de choc electrique en fournissant on circuit
de fuite au courant electrique en cas de court-circuit. Ce
four est equip_ d'un cordon d'alimentation dote d'un fil de
masse et d'une prise de terre. La prise dolt _tre branchee
_. une prise secteur correctement installee et mise _.la
terre. Voir les Instructions d'installation.
Contactez un technicien qualifie si vous ne comprenez pas
les instructions de mise _. la terre ou si un doute subsiste
quant au raccordement correct du four _. la terre.
N'utilisez pas de rallonge. Si le cordon d'alimentation
du produit est trop court, fares installer une prise de terre
par un electricien qua!ifie. Ce four doit _tre branch6 sur un
circuit 60 hertz ne comportant aucun autre appareil et dote
des caract@istiques nominales indiquees dans le tableau
des caract@istiques techniques. Lorsque le four est
branche sur un circuit comportant d'autres appareils, une
augmentation du temps de cuisson peut _tre observee et
les fusibles peuvent griller.
Le micro-ondes fonctionne sur le courant domestique
standard, 110-120 V.
Interference
Lie
onde
remissionred,tale
des communications
des Etats-Onis
is uniquement)
Cet equipement gen@e et utilise de I'energie de
radiofrequence ; s'il n'est pas installe et utilise correctement,
en suivant scrupuleusement les instructions du fabricant,
il peut creer des interf@ences pour les emissions radio et
la reception de la tel6vision. II a et6 teste et respecte les
limites des equipements de radiofrequence dans le cadre de
la pattie 18 des regles de la FCC, destinees & assurer une
protection raisonnable contre ces interf@ences dans une
installation residentielle.
Cependant, rien ne garantit que ces interf@ences
n'interviendront pas dans une installation particuli@e. Si cet
equipement entratne des interf@ences avec les emissions
radio ou la reception de la television, interf@ences
v@ifiables en eteignant et en rallumant I'equipement,
I'utilisateur dolt essayer d'eliminer ces interf@ences gr&ce &
I'une des methodes suivantes:
• Reorienter ou deplacer I'antenne receptrice de la radio ou
de la television.
• Repositionner le four _. micro-ondes par rapport au
recepteur.
• Eloigner le four _. micro-ondes du recepteur.
Brancher le four _. micro-ondes sur une autre prise, pour
que le four _. micro-ondes et le recepteur soient sur des
circuits diff@ents.
Le fabricant n'est pas responsable pour toute interf@ence
radio ou televisuelle causee par une modification non
autoris*e de ce four _. micro-ondes. I 'elimination de telles
interf@ences relive de la responsabilite de I'utilisateur.
CONSERVEZ SOIGNEUSEMENT CES INSTRUCTIONS
31

CONSIGNES TANTES
p, p,
SECURITE
Consign.esde s_curit_
pourevn:erune
expositionexcess=ve
aux rnicro-ondes
A. NE FAITES JAMAIS fonctionner [e four avec la
porte ouverte, ce qui vous exposerait & une quantite
dangereuse de micro-ondes. I[ est essentie[ de ne
jamais manipuler ou neutraliser [es syst_mes de
verrouillage de securit&
B. NE PLACEZ JAMAIS un objet entre [a face avant et [a
porte du four et ne laissez pas s'accumuler de [a salete
ou des residus de produit de nettoyage au niveau des
joints.
C. NE METTEZ PAS [e four en marche s'i[ est
endommage. I[ est particuli_rement important que [a
porte du four se ferme correctement et que [es elements
suivants ne soient pas endommages:
1. [a porte (tordue),
2. [es charni_res et[es [oquets (cass6s ou desserres),
3. [es joints de [a porte et [es surfaces d'etancheit&
D.-route modification ou r@aration du four doit _tre
effectuee par un technicien qualifi&
CONSERVEZ SOIGNEUSEIVlENT CES iNSTRUCTiONS
32
CONSIGNES TANTES
p, p,
SECURITE
m
CONSERVEZ SOIGNEUSEMENT CES iNSTRUCTiONS
33
Obtenir des resultats optima pour la cuisson
34

Fonctions
Plaque du num6ro de module
et du num6ro de sdrie
Vitre avec protection
m6tallique
Poignee de la porte
Plateau tournant
en verre
Guide de
cuisson
Grille de ventilation
--Grille
de la porte
Penneau de
commandes du four
Filtre & greisse
Eclairage de le zone de cuisson
J
CARACTERISTIQUE$DU
FOUR
ANmentation 120V CA,
60Hz
Alimentationd'entr_e 1700W(Etats-Unis)
Puissance de 1150W
cuisson (normeCE160705)
Frequence 2450MHz
Courant nominal 14,8A(Etats-Unis)
Dimensions
759x430x 397mm
ext_rieures(L x H x P)
Volume interieur 56.6L
Poids net 26,4kg
2
6
3
8
14
13
12
15
16
17
21
25
5
4
7
10
19
11
22
18
24
20
26
23
35
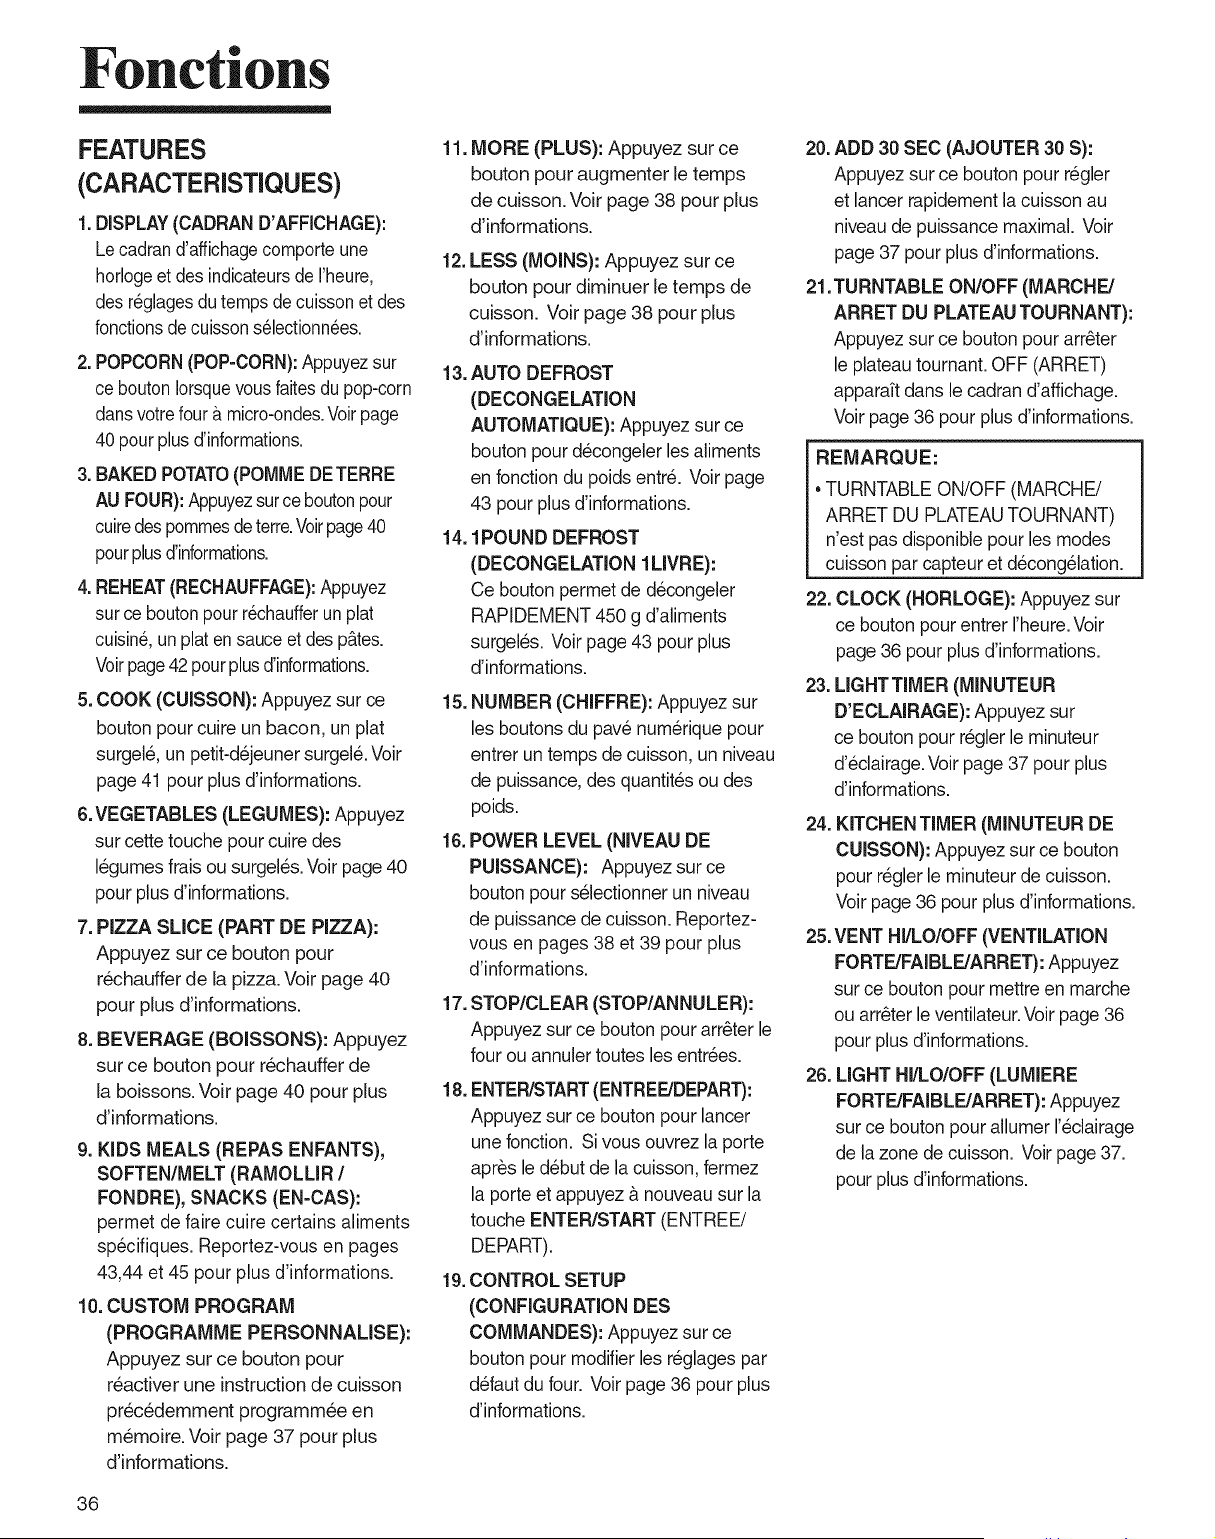
Fonctions
FEATURES
(CARACTERISTIQUES)
1. DISPLAY(CADRAND'AFFICHAGE):
Lecadran d'affichagecomporte une
horlogeet des indicateursde I'heure,
des r_glagesdu temps de cuissonet des
fonctionsdecuissons_lectionn_es.
2. POPCORN(POP-CORN):Appuyezsur
ce bouton Iorsquevous faites du pop-corn
dansvotre four _.micro-ondes.Voirpage
40 pour plus d'informations.
3. BAKED POTATO(POMME DETERRE
AU FOUR): Appuyezsurce boutonpour
cuiredes pommesdeterre.Voirpage40
pourplusd'informations.
4. REHEAT(RECHAUFFAGE):Appuyez
sur ce boutonpour r_chaufferun plat
cuisine, unplat en sauce et des p&tes.
Voirpage42 pourplus d'informations.
5. COOK (CUISSON): Appuyez sur ce
bouton pour cuire un bacon, un plat
surgele, un petit-dejeuner surgele.Voir
page 41 pour plus d'informations.
6.VEGETABLES (LEGUMES): Appuyez
sur cette touche pour cuire des
legumes frais ou surgeles. Voir page 40
pour plus d'informations.
7. PIZZA SLICE (PART DE PIZZA):
Appuyez sur ce bouton pour
rechauffer de la pizza. Voir page 40
pour plus d'informations.
8. BEVERAGE (BOISSONS): Appuyez
sur ce bouton pour rechauffer de
la boissons. Voir page 40 pour plus
d'informations.
9. KIDS MEALS (REPAS ENFANTS),
SOFTEN/MELT (RAMOLLIR /
FONDRE), SNACKS (EN-CAS):
permet de faire cuire certains aliments
sp_cifiques. Reportez-vous en pages
43,44 et 45 pour plus d'informations.
10. CUSTOM PROGRAM
(PROGRAMME PERSONNALISE):
Appuyez sur ce bouton pour
reactiver une instruction de cuisson
precedemment programmee en
memoire. Voir page 37 pour plus
d'informations.
11. MORE (PLUS): Appuyez sur ce
bouton pour augmenter le temps
de cuisson. Voir page 38 pour plus
d'informations.
12.
LESS (MOINS): Appuyez sur ce
bouton pour diminuer le temps de
cuisson. Voir page 38 pour plus
d'informations.
13. AUTO DEFROST
(DECONGELATION
AUTOMATIQUE): Appuyez sur ce
bouton pour decongeler les aliments
en fonction du poids entr& Voir page
43 pour plus d'informations.
14.1POUND DEFROST
(DECONGELATION 1LIVRE):
Ce bouton permet de decongeler
RAPIDEMENT 450 g d'aliments
surgeles. Voir page 43 pour plus
d'informations.
15. NUMBER (CHIFFRE): Appuyez sur
les boutons du pave numerique pour
entrer un temps de cuisson, un niveau
de puissance, des quantites ou des
poids.
16.
POWER LEVEL (NIVEAU DE
PUISSANCE): Appuyez sur ce
bouton pour selectionner un niveau
de puissance de cuisson. Reportez-
vous en pages 38 et 39 pour plus
d'informations.
17. STOP/CLEAR (STOP/ANNULER):
Appuyez sur ce bouton pour arr_ter le
four ou annulet toutes les entrees.
18. ENTER/START(ENTREE/DEPART):
Appuyez sur ce bouton pour lancer
une fonction. Si vous ouvrez la porte
apr_s le debut de la cuisson, fermez
la porte et appuyez & nouveau sur la
touche ENTER/START (ENTREE!
DEPART).
19.CONTROL SETUP
(CONFIGURATION DES
COMMANDES): Appuyez sur ce
bouton pour modifier les reglages par
defaut du four. Voir page 36 pour plus
d'informations.
20. ADD 30 SEC (AJOUTER 30 S):
Appuyez sur ce bouton pour regler
et lancer rapidement la cuisson au
niveau de puissance maximal. Voir
page 37 pour plus d'informations.
21.TURNTABLE ON/OFF (MARCHE/
ARRET DU PLATEAUTOURNANT):
Appuyez sur ce bouton pour arr_ter
le plateau tournant. OFF (ARRET)
apparaft dans le cadran d'affichage.
Voir page 36 pour plus d'informations.
REMARQUE:
, TURNTABLE ON/OFF (MARCHE!
ARRET DU PLATEAUTOURNANT)
n'est pas disponible pour les modes
cuisson par capteur et decongelation.
22. CLOCK (HORLOGE): Appuyez sur
ce bouton pour entrer I'heure.Voir
page 36 pour plus d'informations.
23.
LIGHTTIMER (MINUTEUR
D'ECLAIRAGE): Appuyez sur
ce bouton pour regler le minuteur
d'eclairage.Voir page 37 pour plus
d'informations.
24. KITCHEN TIMER (MINUTEUR DE
CUISSON): Appuyez sur ce bouton
pour regler le minuteur de cuisson.
Voir page 36 pour plus d'informations.
25. VENT HI/LO/OFF (VENTILATION
FORTE/FAIBLE/ARRET): Appuyez
sur ce bouton pour mettre en marche
ou arr_ter le ventilateur.Voir page 36
pour plus d'informations.
26. LIGHT HI/LO/OFF (LUMIERE
FORTE/FAIBLF_JARRET):Appuyez
sur ce bouton pour allumer I'edairage
de la zone de cuisson. Voir page 37.
pour plus d'informations.
36
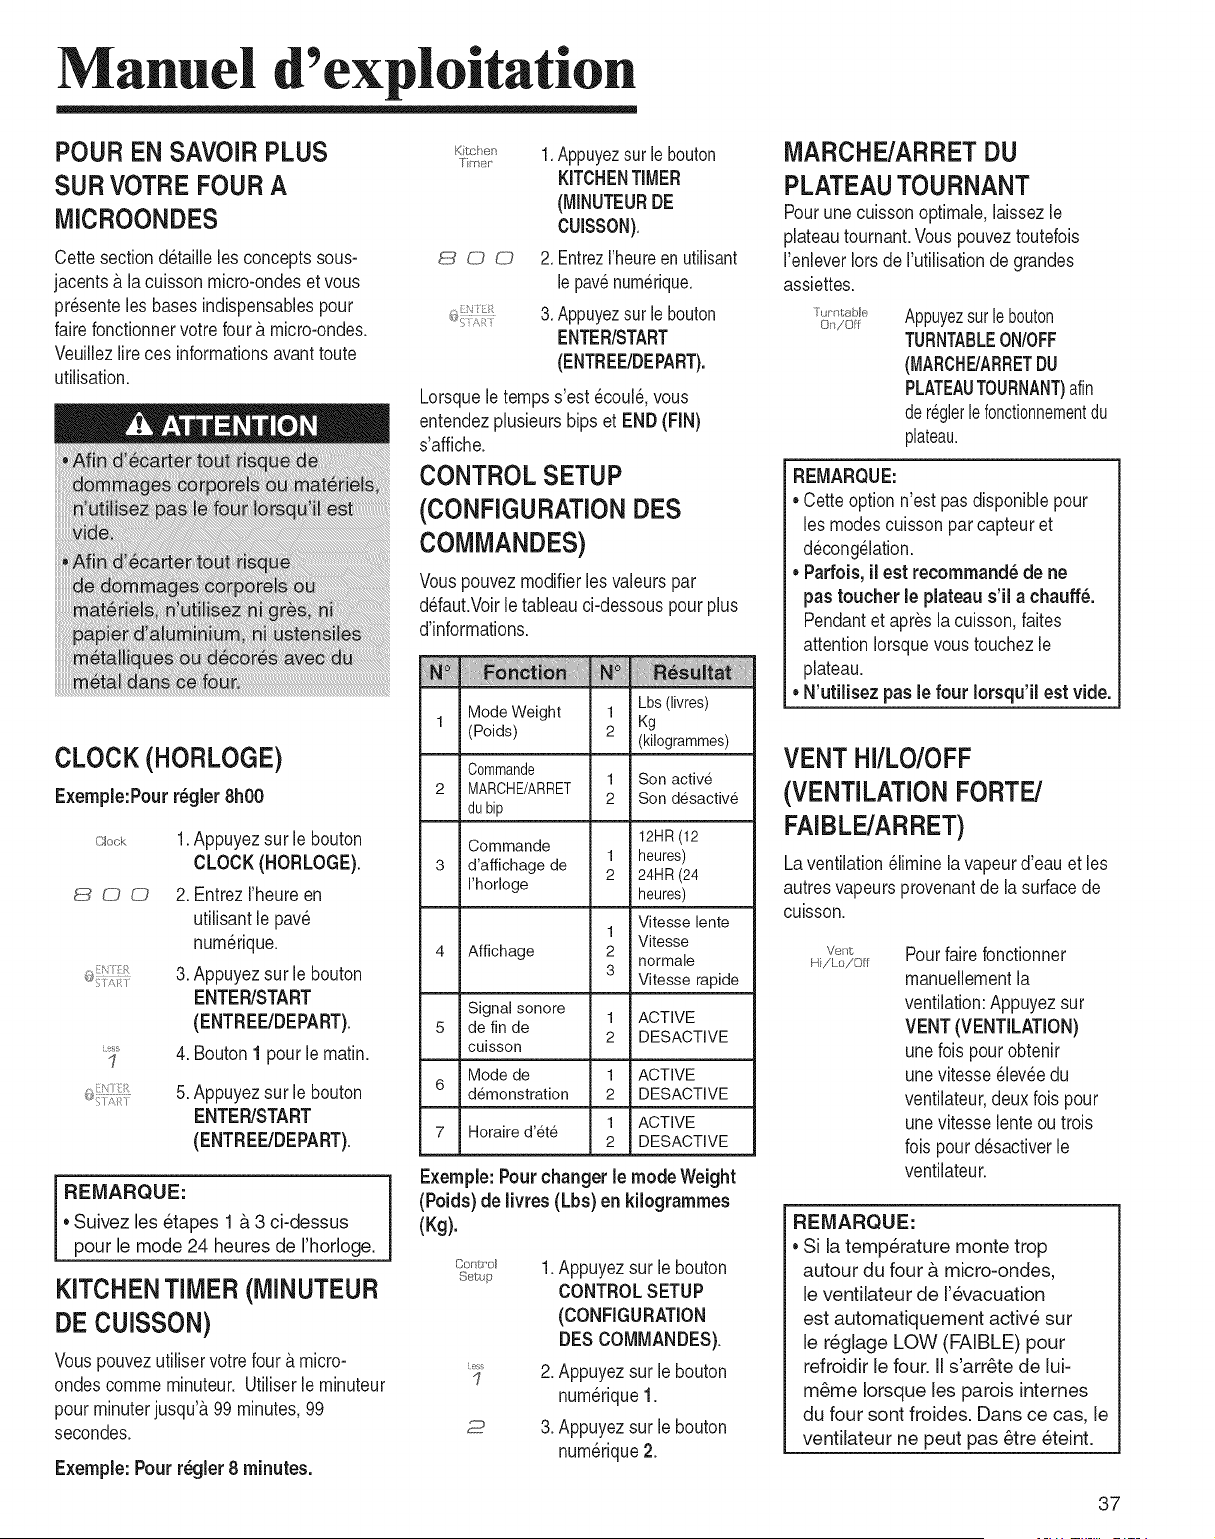
Manuel d'expioitation
POUR EN SAVOIR PLUS
SUR VOTRE FOUR A
MICROONDES
Cette sectiond_taillebs concepts sous-
jacents & la cuisson micro-ondeset vous
pr@ente les basesindispensablespour
faire fonctionnervotre four& micro-ondes.
Veuillezlire ces informationsavant toute
utilisation.
CLOCK (HORLOGE)
Exemple:Pour r_gler8h00
c_;k 1.Appuyezsur le bouton
CLOCK(NORLOGE).
8 t'D 0 2. EntrezI'heureen
utilisantle pav_
num_rique.
3.Appuyez sur le bouton
ENTER!START
(ENTREE/DEPART).
-_'_ 4. Bouton1 pour le matin.
5.Appuyez sur le bouton
ENTER/START
(ENTREE/DEPART).
REMARQUE:
, Suivez les etapes 1 &3 ci-dessus
pour le mode 24 heures de I'horloge.
KITCHENTIMER (MINUTEUR
DE CUISSON)
Vouspouvez utiliservotre four& micro-
ondes commeminuteur. Utiliserle minuteur
pour minuterjusqu'&99 minutes, 99
secondes.
Exemple: Pour r_gier 8 minutes.
Kitchen
Truer'
1.Appuyezsurle bouton
KITCHENTIMER
([v]INUTEURDE
CUISSON).
2. Entrezrheureen utilisant
lepa%numerique.
3.Appuyezsurle bouton
ENTER/START
(ENTREE/DEPART).
Lorsquele temps s'est @oul_,vous
entendezplusieursbips et END(FIN)
s'affiche.
CONTROL SETUP
(CONFIGURATION DES
COMMANDES)
Vouspouvez modifier les valeurs par
d_faut.Voirle tableauci-dessouspourplus
d'informations.
Mode Weight 1 Lbs (livres)
(Poids) 2 Kg
(kilogrammes)
Commande
1 Son active
MARCHE/ARRET
2 Son desactiv6
du hip
Commande 12HR (12
d'affichage de 1 heures)
rhorloge 2 24HR (24
heures)
Affichage
1
2
3
Vitesse lente
Vitesse
normale
Vitesse rapide
Signal sonore 1 ACTIVE
de fin de
2 DESACTIVE
cuisson
Mode de 1 ACTIVE
6
demonstration 2 DESACTIVE
1 ACTIVE
7 Horaire d'ete
2 DESACTIVE
Exemple: Pour changer le mode Weight
(Poids)de livres (Lbs) en kilogrammes
(Kg).
co,,r;,.o_ 1.Appuyezsur le bouton
Setup
CONTROLSETUP
(CONFiGURATiON
DES COMMANDES).
2. Appuyezsur lebouton
num_rique1.
2 3. Appuyezsur le bouton
num_rique2.
MARCHE/ARRET DU
PLATEAUTOURNANT
Pourunecuissonoptimale,laissezle
plateautournant.Vouspouveztoutefois
renleverlots de rutilisationde grandes
assiettes.
Turnl;able
On/Off
Appuyezsurle b0ut0n
TURNTABLEON/OFF
(MARCHFJARRETDU
PLATEAUTOURNANT)afin
dereglerlef0ncti0nnementdu
plateau.
REMARQUE:
• Cetteoption n'est pas disponiblepour
les modescuisson parcapteuret
d@ong_lation.
• Parfois, il est recommand_ de ne
pastoucher le plateaus'il a chauff&
Pendantet apr_s la cuisson,fakes
attention Iorsquevous touchezle
plateau.
• N'utilisez pas le four Iorsqu'i est vide.
VENT HI/LO/OFF
(VENTILATION FORTE/
FAIBLE/ARRET)
Laventilation_liminela vapeurd'eau et les
autresvapeursprovenantde la surfacede
cuisson.
Vet
H/Lo/Off
Pourfaire fonctionner
manuellementla
ventilation:Appuyezsur
VENT (VENTILATION)
une fob pour obtenir
unevitesse _lev_edu
ventilateur,deux fob pour
unevitesse lenteou trois
fob pourd@activerle
ventilateur.
REMARQUE:
, Si [atemperature monte trop
autour du four & micro-ondes,
[e ventilateur de revacuation
est automatiquement active sur
[e reglage LOW (FAIBLE) pour
refroidir [e four. I1s'arr_te de [ui-
m_me [orsque [es patois internes
du four sont froides. Dans ce cas, [e
ventilateur ne peut pas _tre eteint.
37
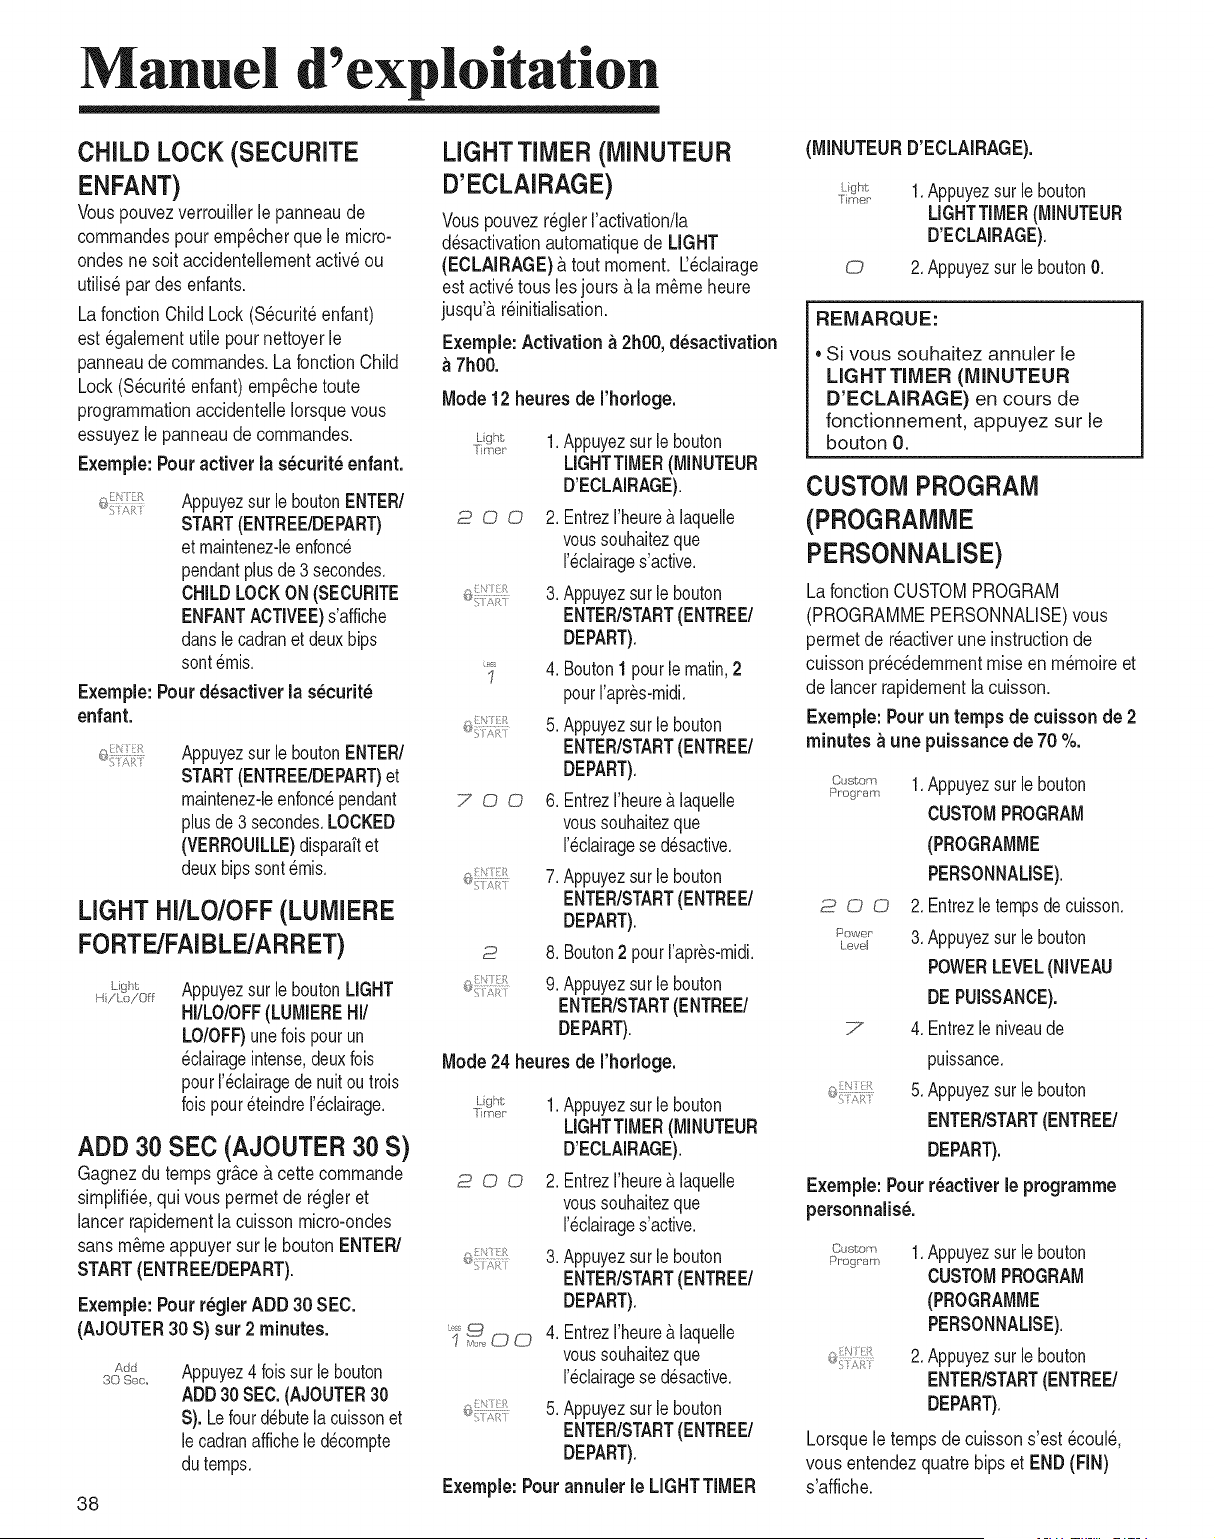
Manuel d exploitafion
CHILD LOCK (SECURITE
ENFANT)
Vous pouvezverrouillerle panneaude
commandespour emp@herque le micro-
ondes ne soit accidentellementactiv_ ou
utilis_pardes enfants.
LafonctionChild Lock (S@urit_ enfant)
est_galementutile pour nettoyerle
panneaudecommandes.La fonctionChild
Lock(S@urit_enfant)emp@hetoute
programmationaccidentelleIorsquevous
essuyezle panneaude commandes.
Exemple: Pour activer la s_curit_ enfant.
Appuyezsurle boutonENTER/
START(ENTREE/DEPART)
et maintenez-benfonce
pendantplusde 3 secondes.
CHILDLOCKON(SECURITE
ENFANTACTIVEE)s'affiche
dansle cadranet deuxbips
sontemis.
Exemple: Pourd_sactiver la s_curit_
enfant.
Appuyezsurle boutonENTER/
START(ENTREE/DEPART)et
maintenez-benfoncependant
plusde 3secondes.LOCKED
(VERROUILLE)dispara_tet
deuxbipssontemis.
LIGHT HI/LO/OFF (LUMIERE
FORTE/FAIBLE/ARRET)
Appuyezsurle boutonLIGHT
HI/LO/OFF(LUMIEREHI/
LO/OFF)unefoispourun
@lairageintense,deuxfob
pourr@lairagedenuitou trois
fob poureteindrer@lairage.
ADD 30 SEC (AJOUTER 30 S)
Gagnezdu temps gr&ce&cette commande
simplifi_e,qui vous permet de r_gleret
lancerrapidementla cuissonmicro-ondes
sans m_meappuyer sur le boutonENTER/
START(ENTREEIDEPART).
Exemple: Pour r_gler ADD 30 SEC.
(AJOUTER30 S) sur 2 minutes.
Add
80 Sec.
Appuyez4 fob surle bouton
ADD30SEC.(AJOUTER30
S). Lefourdebutela cuissonet
lecadranaffichele d@ompte
du temps.
38
LIGHTTIMER (MINUTEUR
D'ECLAIRAGE)
Vouspouvez r_glerractivation/la
d@activationautomatiquede LIGHT
(ECLAIRAGE)& tout moment. U@lairage
estactiv_ tousles jours &la m_meheure
jusqu'&r_initialisation.
Exemple: Activation_ 2h00,d_sactivation
7h00.
Mode12 heuresde rhodoge.
1.Appuyezsur lebouton
LIGHTTIMER(MINUTEUR
D'ECLAIRAGE).
2 O 0 2. Entrezrheurea,laquelle
voussouhaitezque
r@lairages'active.
3.Appuyezsur le bouton
ENTER/START(ENTREE/
DEPART).
I
4. Bouton1 pourle matin,2
pourrapres-midi.
5.Appuyezsur le bouton
ENTER/START(ENTREE/
DEPART).
7 _13@ 6. Entrezrheurea.laquelle
voussouhaitezque
r@lairagese d@active.
7.Appuyezsur le bouton
ENTER/START(ENTREE/
DEPART).
2 8. Bouton2 pourrapres-midi.
9.Appuyezsur le bouton
ENTER/START(ENTREE/
DEPART).
Mode24 heuresde rhorioge.
1.Appuyezsur lebouton
LIGHTTIMER(MINUTEUR
D'ECLAIRAGE).
2 0 0 2. Entrezrheurea,laquelle
voussouhaitezque
r@lairages'active.
3.Appuyezsur le bouton
ENTER/START(ENTREE/
DEPART).
_'-_J 0 0 4. Entrezrheurea.laquelle
voussouhaitezque
r@lairagese d@active.
5.Appuyezsur le bouton
ENTER/START(ENTREE/
DEPART).
Exemple: Pourannuler ie LIGNTTiMER
(MINUTEURD'ECLAIRAGE).
1.Appuyezsurle bouton
LIGHTTIMER(MINUTEUR
D'ECLAIRAGE).
0 2.Appuyezsurle boutonO.
REMARQUE:
• Si vous souhaitez annuler le
LIGHT TIMER (MINUTEUR
D'ECLAIRAGE) en cours de
fonctionnement, appuyez sur le
bouton O.
CUSTOM PROGRAM
(PROGRAMME
PERSONNALISE)
La fonctionCUSTOMPROGRAM
(PROGRAMMEPERSONNALISE)vous
permetde r_activeruneinstructionde
cuissonpr@_demmentmise enm_moireet
de lancer rapidementla cuisson.
Exemple: Pourun temps de cuisson de 2
minutes _ une puissancede 70 %.
c,st,om 1.Appuyezsurle bouton
Pr'og_'am
CUSTOMPROGRAM
(PROGRAMME
PERSONNALISE).
2 @ 0 2. Entrezle tempsdecuisson.
_ow_,,, 3.Appuyezsurle bouton
Level
POWERLEVEL(NIVEAU
DEPUISSANCE).
7 4. Entrezle niveaude
puissance.
5.Appuyezsurle bouton
ENTER/START(ENTREE/
DEPART).
E×emple:Pourr_activer le programme
personnalis&
Cus ofT/
Progr'am
1.Appuyezsurle bouton
CUSTOMPROGRAM
(PROGRAMME
PERSONNALISE).
2.Appuyezsurle bouton
ENTER/START(ENTREE/
DEPART).
Lorsquele tempsde cuissons'est @oul_,
vous entendezquatre bips et END(FIN)
s'affiche.
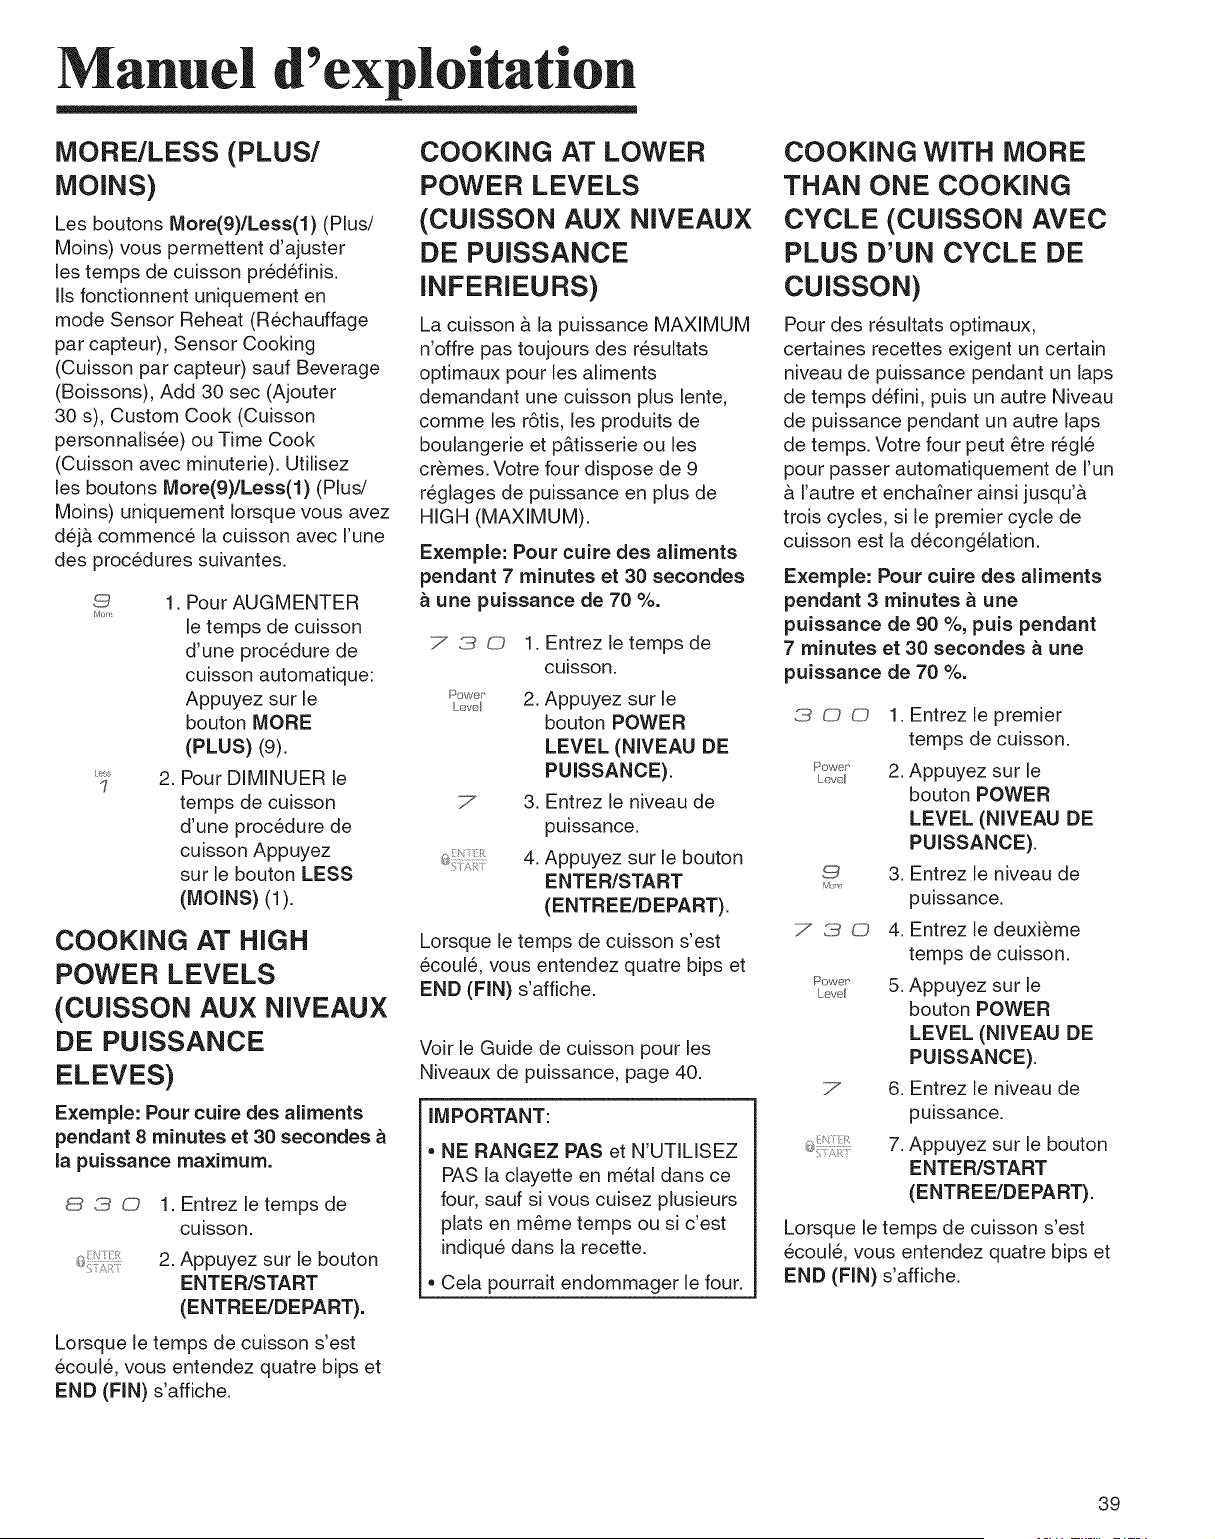
Manuel d'exploitation
MORE/LESS (PLUS/
MOINS)
Les boutons More(9)/Less(1) (Plus/
Moins) vous permettent d'ajuster
les temps de cuisson predefinis.
IIs fonctionnent uniquement en
mode Sensor Reheat (Rechauffage
par capteur), Sensor Cooking
(Cuisson par capteur) sauf Beverage
(Boissons), Add 30 sec (Ajouter
30 s), Custom Cook (Cuisson
personnalisee) ou Time Cook
(Cuisson avec minuterie). Utilisez
les boutons More(9)/Less(1) (Plus/
Moins) uniquement Iorsque vous avez
dejb. commence la cuisson avec I'une
des procedures suivantes.
9
Mol-e
ess
1
1. Pour AUGMENTER
[e temps de cuisson
d'une procedure de
cuisson automatique:
Appuyez sur le
bouton MORE
(PLUS) (9).
2. Pour DIMINUER le
temps de cuisson
d'une procedure de
cuisson Appuyez
sur le bouton LESS
(MOINS) (1).
COOKING AT HiGH
POWER LEVELS
(CUISSON AUX NIVEAUX
DE PUISSANCE
ELEVES)
Exemple: Pour cuire des aliments
pendant 8 minutes et 30 secondes
la puissance maximum.
3 0 1. Entrez [etemps de
cuisson.
2. Appuyez sur le bouton
ENTER/START
(ENTREE/DEPART).
Lorsque le temps de cuisson s'est
ecoule, vous entendez quatre bips et
END (FIN) s'affiche.
COOKING AT LOWER
POWER LEVELS
(CUISSON AUX NIVEAUX
DE PUISSANCE
INFERIEURS)
La cuisson & [a puissance MAXIMUM
n'offre pas toujours des resultats
optimaux pour [es aliments
demandant une cuisson plus [ente,
comme [es r6tis, [es produits de
boulangerie et p&tisserie ou [es
cremes. Votre four dispose de 9
reglages de puissance en plus de
HIGH (MAXIMUM).
Exemple: Pour cuire des aliments
pendant 7 minutes et 30 secondes
une puissance de 70 %.
7 3 0 1. Entrez [etemps de
cuisson.
_=,,we_, 2. Appuyez sur le
Le/el
bouton POWER
LEVEL (NIVEAU DE
PUISSANCE).
3. Entrez le niveau de
puissance.
4. Appuyez sur le bouton
ENTER/START
(ENTREE/DEPART).
7
Lorsque le temps de cuisson s'est
ecoule, vous entendez quatre bips et
END (FIN) s'affiche.
Voir [e Guide de cuisson pour [es
Niveaux de puissance, page 40.
IMPORTANT:
NE RANGEZ PAS et N'UTILISEZ
PAS [a clayette en metal dans ce
four, sauf si vous cuisez plusieurs
plats en m_me temps ou si c'est
indique dans [a recette.
Cela pourrait endommager le four.
COOKING WiTH MORE
THAN ONE COOKING
CYCLE (CUISSON AVEC
PLUS D'UN CYCLE DE
CUISSON)
Pour des resultats optimaux,
certaines recettes exigent un certain
niveau de puissance pendant un laps
de temps d_fini, puis un autre Niveau
de puissance pendant un autre laps
de temps. Votre four peut _tre regle
pour passer automatiquement de Fun
& I'autre et enchafner ainsi jusqu'a
trois cycles, si [e premier cycle de
cuisson est la decong61ation.
Exemple: Pour cuire des aliments
pendant 3 minutes _ une
puissance de 90 %, puis pendant
7 minutes et 30 secondes a une
puissance de 70 %.
_3 0 0 1. Entrez [e premier
temps de cuisson.
F_owe_, 2. Appuyez sur le
Lew_l
bouton POWER
LEVEL (NIVEAU DE
PUISSANCE).
,9 3. Entrez [e niveau de
M
puissance.
7 3 0 4. Entrez [e deuxi_me
temps de cuisson.
F'owe,, 5. Appuyez sur [e
Lew_l
bouton POWER
LEVEL (NIVEAU DE
PUISSANCE).
7 6. Entrez le niveau de
puissance.
7. Appuyez sur [e bouton
ENTER/START
(ENTREE/DEPART).
Lorsque le temps de cuisson s'est
ecoule, vous entendez quatre bips et
END (FIN) s'affiche.
39
Manuel d exploitation
GUIDE DE CUISSON POUR LES NIVEAUX DE PUISSANCE FAIBLES
Les 9 niveaux de puissance vous permettent de choisir le niveau le plus adapte aux aliments que vous cuisinez. Vous
trouverez ci-dessous la liste de tous les niveaux de puissance, des exemples d'aliments cuisines pour chaque niveau
et la puissance utilisee.
10 Eleve 1OO%
9 90%
8 80%
7O%
6 60%
5O%
Faire bouillir de I'eau.
Cuire du boeuf h&che.
Faire des bonbons.
Cuire des fruits et des legumes frais.
Prechauffer un plat brunisseur.
Rechauffer des boissons.
Cuire des tranches de bacon.
Rechauffer rapidement des filets de viande.
Faire sauter des oignons, du celeri et des poivrons verts.
Rechauffer tout type d'aliments.
Cuire des oeufs brouilles.
Cuire du pain et des produits cerealiers.
Cuire des plats & base de fromage et du veau.
Cuire des g&teaux, des muffins, des brownies, des petits
g&teaux.
Cuire des p&tes.
Cuire differentes sortes de viandes et de la volaille enti_re.
Cuire les cremes.
Cuire un une dinde, des c6tes levees, des c6tes de boeuf, des
r6tis de surlonge.
Cuire des morceaux de viande moins tendres.
4 40%
Rechauffer des plats prepares surgeles.
30%
2 2O%
1 10%
Decongeler de la viande, de la volaille et des fruits de met.
Cuire des aliments par petites quantites.
Finir la cuisson des plats mijotes, des ragoQts et de certaines
sauces.
• Ramollir le beurre et le fromage & la creme.
• Rechauffer des aliments par petites quantites.
• Ramollir les cremes glacees.
• Faire monter une p&te & beignets.
40
Manuel d'exploitation
POPCORN (POPCORN)
LatouchePOPCORN(POPCORN)vous
permetde fairecuiredes sachetsde pop-corn
de85et 100gdontI'emballageestadapteau
micro-ondes.Ne placezqu'unseulpaquet&
lafoisdansle four.Sivousutilisezun appareil
&pop-cornadapteau micro-ondes,suivezles
consignesdufabricant.
Pourreglercorrectementvotremicro-ondes,
respectezletableauci-dessous:
a
Beurre 1
LumJnosite 2
Exemple: pour un sachet de 100 g.
_'or_o_,_'r,1.Appuyezunefoissurla touche
Popcorn(Popcorn),
2. Choisissez la cat_gorie
d'aliments (1 _.2).
3. Appuyez sur la touche
ENTER/START (ENTREE/
DEMARRER).
Lorsque le temps de cuisson est _coul_,
quatre bips sonores retentissent et le
message END (FIN) s'affiche.
Quantit_s recommand_es: 85 _,100 g.
iiiiiiiiiiiiiiiiiiiiiiiiiiiiiiiiiiiiiiiiiiiiiiiiiiiiiiiiiiiiiiiiiiiiiiiiiiiiiiiiiiiiiiiiiiiiiiiiiiiiiiiiiiiiiiiiiiiiiiiiiiiiiiiiiiiiiiiiiiiiiiiiiiiiiiiiiiiiiiiiiiiiiiiiiiiiiiiiiiiiiiiiiiiiiiiiiiiiiiiiiiiiiiiiiiiiiiiiiiiiiiiiiiiiiiii¸
PIZZASLICE(PARTDE PIZZA)
Cettetouchevouspermetde fairer@hauffer
jusqu'&quatrepartsde pizzade 85& 140g.
Exemple:pourr_chauffer1 partde pizza.
P_ 1.Appuyezunefoissur latouche
Slice
PIZZASLICE(PARTDE
PIZZA).
2. Choisissezlenombrede parts
(1&4).
3. Appuyezsur latoucheENTER/
START(ENTREE/DE[v]ARRER).
Lorsqueletempsde cuissonest @oul&quatre
bipssonoresretentissentet lemessageEND
(FIN)s'affiche.
Quantitesrecommandees:De1 & 3 parts
(environ85 &140 g chacune).
RE[v]ARQUE:
UtilisezlestouchesMore(9)/Less(1)(Plus
(9)/MoJns (1))pour reglerla temp@ature
selonvos pref@ences.
BAKED POTATO(POMMEDE
TERREAU FOUR)
LafonctionBAKEDPOTATO(POMMEDE
TERREAUFOUR)vouspermetde cuireau
fourune ou plusieurspommesde terresans
selectionnerdestempsde cuissonet des
niveauxdepuissance.
RE[v]ARQUES:
. Letempsde cuissonest basesur un
calibrede pommedeterred'environ250g.
. UtilisezlestouchesMore(9)/Less(1)(Plus/
Moins)si vouscuisezdespommesde terre
plusgrossesou pluspetites.
. Avantla cuisson,piquezlespommesde
terreplusieursfois& I'aided'unefourchette.
. Sila pommedeterren'estpas
completementcuite,utilisezla fonction
CookingTime(Tempsde cuisson).
N'UTILISEZPASlatoucheBAKED
POTATO(Pommede terreaufour)pour
acheverla cuisson.
_'4 1.Appuyezunefoissurlatouche
Pntato
BAKEDPOTATO(POM[viEDE
TERREAUFOUR).
2.Choisissezle hombrede pommes
deterre(1&6).
3.AppuyezsurlatoucheENTER/
START(ENTREFJDEMARRER).
Lorsqueletempsde cuissonest @oul& quatre
bipssonoresretentissentet lemessageEND
(FIN)s'affiche.
Quantitesrecommandees:De1 a 6 potatoes
de terre(de230a285 g chacuneenv.).
VEGETABLE(LEGUMES)
LafonctionVEGETABLES(LEGUMES)a
des puissancesdecuissonpredefiniespour2
categories:Frais,Surgel_s.
Exemple:Pourcuiredes I_gumessurgel_s.
w_g__k_ 1,Appuyezsur lebouton
VEGETABLES(LEGUMES).
2,Choisissezla categorie(1-2),
3,Appuyezsur latoucheENTER/
START(ENTREE/DE[v]ARRER),
Lorsqueletempsde cuissonest@oul&quatre
bipssonoresretentissentet lemessageEND
(FIN)s'affiche.
Frais 1
Surgeles 2
BEVERAGE (BOISSONS)
Cettefonctionvouspermetdefairer@hauffer
jusqu'&2 tassesdeliquide.
Exemple:pourfairer@haufferY_tassede
liquide.
Beverage 1.Appuyezsur lebouton
BEVERAGE(BOISSONS),
'_ 2.Choisissezla quantitede
liquide(1a3).
3.Appuyezsur la touche
ENTER/START(ENTREE/
DE[v]ARRER),
Lorsqueletempsde cuissonest@oul&quatre
bipssonoresretentissentet lemessageEND
1
2
3
(FIN)s'affiche.
0.5 tasse
1 tasse
2 tasses
REMARQUE:
si lesalimentsnesontpasassezcultsou
pasassezchaudsaveclafonctionCuisson
automatique,terrninezlacuissonen
s_,lectionnantleniveaudepuissanceet le
tempsdecuissondevotrechoix.DESACTIVEZ
lafonctionCuissonautornatique.
41
Manuel d exploitation
COOK(CUISSON)
Cette fonction propose trois categories de cuisson programmees.
Exemple: pour faire cuire 2 tranches de lard.
Cook 1. Appuyez sur le bouton COOK (CUISSON).
2. Choisissez la cat6gorie (1-3).
3. Appuyez sur la touche ENTER/START (ENTREE/
DEIVlARRER).
i !! !!! !! !!i i ! iiiiiiiiiiiiiiiiiiiiiiiiii!i!!i !! i i! i! i! ii iii i ii !i ii i i i i i !! !ii ! i!i i! !i !i ii ii ii ii ii ii ii i i ii i ii i ii !ii ii iiiii i iiiiiiiii iiiiiiiiiiiiiiiii! ii
Lard
Plat surgel6
Petitd6jeuner surgel6
¸i i !! i i !i!i! !!i i !! ! ! ! ! ii iiiii iiiJii i i i iiiii iiiiiiiiiiiiiiiiiiiiiiiiiiiiiiiiiiii i iii
1
2
3
Lorsqueletempsde cuissonest 6coul6,quatrebipssonoresretentissentet le messageEND(FIN)s'affiche.
TABLEAU DE CUISINIER AUTOMATIQUE
Fakeschaufferunseul sachet de pop-corn& la fois(sachetsp6cial four & micro-ondes).Fakes
Pop-corn attentionIorsquevous sortez le sachetchaud du fouret Iorsquevous I'ouvrez.Laissezle four
refroidirpendant5 minutesau moins avantde I'utiliserde nouveau.
Pommes de
terre
Legumes
co frais
UJ
L5
LLI
J Legumes
surgeles
Part de pizza
Boissons
Lard
Piquezles pommesde terre plusieurslois & I'aided'une fourchette.Placez-lesen 6toile sur le
plateautournant.Laissezreposer3 a 5 minutes.Laissezle four refroidirpendant5 minutesau
moinsavantde I'utiliserde nouveau.Utilisezla touche More (Plus) (9) Iorsquevous cuisezde
grossespommesde terre.
Placezles 16gumesfrais dans un platen c6ramique,en verre ou enplastique,utilisableen four
micro-ondes,et ajoutez2 a 4 cuill@esa soupe d'eau.Durant la cuisson,couvreza I'aided'un
couvercleou d'un film plastique perc6, puism61angezavantde laisser reposer.Laissezle four
refroidirpendant5 minutesau moins avantde I'utiliserde nouveau.Utilisez la touche More (Plus)
(9) Iorsquevous cuisezdes 16gumesdensestelsque des carottesou des brocolis.
Placezles 16gumessurgel6sdans un plat en c6ramique,en verre ou en plastique,utilisableen
foura micro-ondes,et ajoutez2 a 4 cuill_res a souped'eau. Durantla cuisson,couvreza I'aide
d'un couvercleoud'un film plastiqueperc6, puis m61angezavant de laisserreposer.Laissezle
four refroidirpendant5 minutesau moins avantde I'utiliserde nouveau.Utilisezla touche More
(Plus) (9)Iorsquevous cuisezdes 16gumesdensestels que des carottesou des brocolis.
Placez1 & 4 partsde pizza dans un plat utilisableenfour a micro-ondes,en pla£antla partie
largeversI'ext6rieurdu plat. Les parts ne doiventpas d6passerdu plat.Ne couvrezpas. Laissez
le four refroidirpendant5 minutesau moins avantde I'utiliserde nouveau.Utilisezle bouton _ore
(Plus) (9)afin d'augmenterle temps de r6chauffagepourune pizza6paisseet croustillante.
Utilisezunetasse ou une chope pour mesurer les ingredients; ne couvrezpas.Placezla boisson
dans lefour.M61angezbienapr_s le r6chauffage.Laissezle four refroidirpendant5 minutesau
moinsavantde I'utiliserde nouveau.
Remarque:Les boissonsr6chauff6esavec cette fonctionpeuvent 6tretr_s chaudes.
Manipulezle r6cipientavec pr6caution.
Placez2 serviettesen papiersur uneassiette,puis posez les tranchesde lard sur les serviettes
enveillantace qu'ellesne se chevauchentpas.
Couvrezle toutd'autres serviettesen papier.Retirez imm6diatementles serviettesen papier une
lois la cuissontermin6e.
Utilisezles touchesMore(9)/Less(1)(Plus (9)/Moins (1)) pour obtenir le craquantsouhait6.
80 a 100 g,
1 sachet.
1&6
pommes de
terre
1 & 4 portions
1 & 4 portions
1 & 4 parts
0.5tasse
1 tasse
2tasses
2 & 6 tranches
z
0
Plat Retirezle plat de son emballageet observezles instructionsfourniessur la bo[te (couvercle
surgele nouveau.ettemps de repos).Laissezle four refroidirpendant5 minutesau moins avant de I'utiliserde 230 & 400 g
Petit Observezles instructionsfournies sur I'emballage(couvercleet temps de repos).Observezce
d6jeuner boutonpour les sandwichssurgel6s,les petitsd6jeuners, lescr6pes, les gaufres,etc.Laissezle 115 _.230 g
surgele four refroidirpendant5 minutesau moins avantde I'utiliserde nouveau.
Remarques:
Chaque personne a ses propres pref6rences en ce qui concerne la temperature des aliments. Ufilisez [es boutons
More(9)/Less(1) (Plus/Moins) pour adapter [a temperature & vos besoins.
42
Manuel d'exploitation
REHEAT(RECHAUFFER)
Cette foncfion propose trois categories de rechauffage programmees.
Exemple: pour r_chauffer une assiette-repas.
1.Appuyezset boutonRENEAT
(RECHAUFFER). Assiette repas
2. Choisissez la cat_gorie (1-3).
Plat en sauce
3. Appuyez sur la touche ENTER/START (ENTREE/
DEMARRER). Pasta 3
Lorsque le temps de cuisson est ecoul& quatre bips sonores retenfissent et le message END (FIN) s'affiche.
1
2
TABLEAU DE RECHAUFFAGE
Utilisez uniquement des aliments precuits refrig6r6s.Couvrez ['assiette_ I'aide d'un film plastique perc_
ou de papier paraffin& maintenu sous I'assiette. Si [us aliments ne sent pas assez chaud apres avoir
utilis6la fonction REHEAT(RECHAUFFAGE),continuezla cuissonen d_finissant[etemps et [eniveau de
puissancesouhait_s.N'utilisezpas latouche Reheat (R_chauffage)pour poursuivrela cuisson.
Assiette repas Ingredients
- 85 & 115g de viande, devo[aille oude poisson (jusqu'&170g avec os)
- _/2tassede f_culents (potatoesde terre, pftes, riz, etc.)
- _/2tassede [_gumes(entre 85et 115 g)
Plat en sauce
Couvrez le plat & I'aide d'un couvercle ou d'un film plastique perc& Si les aliments ne sent pas assez
chaud apres avoir utilis6 la fonction SENSOR REHEAT(RECHAUFFAGEPAR CAPTEUR),continuez la
cuissonen d6finissantle temps et le niveaude puissancesouhait_s.M_langezune foisavant de servir.
Ingredients
- Plats pr@ar_s a rechauffer(Exemples:ragoQtde bceuf,lasagnes)
- Spaghettiet ravioli en conserves, alimentsr_frig_r_s.
1 portion
(1 assiette)
1 & 4 portions
Pasta
Remarques:
Chaque personne a ses propres preferences en ce qui concerne la temperature des aliments, Utilisez les boutons
More(9)/Less(1) (Plus/Moins) pour adapter la temperature _.vos besoins.
Laissez les aliments reposer pendant 1 & 5 minutes avant de servir.
43

Manuel d exploitation
REPAS ENFANTS
La fonction KIDS MEALS (REPAS ENFANTS) vous permetde faire rechauffer les 4 categories d'aliments suivantes:
Beignets de poulet, Hot-dogs, frites et sandwiches surgel_s.
Exemple: pour faire cuire un sandwich surgel&
(ids
Meals
4
1. Appuyez sur la touche KiDS MEALS
(REPAS ENFANTS)
2. Selectionnez la categorie d'aliments (1
4).
3. Appuyez sur la touche ENTER/START
(ENTREE/DEMARRER).
Beignets de poulet
Hot-Dogs
Frites
Sandwiches congeles
1
2
3
4
TABLEAU DES REPAS ENFANTS
Beignets de
poulet congeles
1 portion
(113 & 142 g.)
2 portions
(170 & 200 g.)
2
Mettez une serviette en papier sur I'assiette et placez les aliments en cercle
sur la serviette en papier.
Ne couvrez pas. Laissez reposer 1 minute.
Hot-Dogs = Piquez les hot-dogs, posez-les sur une assiette. Quand le four emet un signal
4 sonore, ajoutez les petits pains ronds et redemarrez la cuisson.
Frites
1 portion
(113 a 142 g.)
2 portions
(170 & 200 g.)
Sandwiches 1
congeles 2
Mettez 2 serviettes en papier sur une assiette puis etalez les frites sur les
serviettes sans qu'elles se chevauchent.
Apres les avoir enlevees du four, sechez-les avec une autre serviette en
papier.
Mettez le sandwich congel_ dans son emballage (qui se trouve dans le
paquet) et posez-le sur une assiette.
44
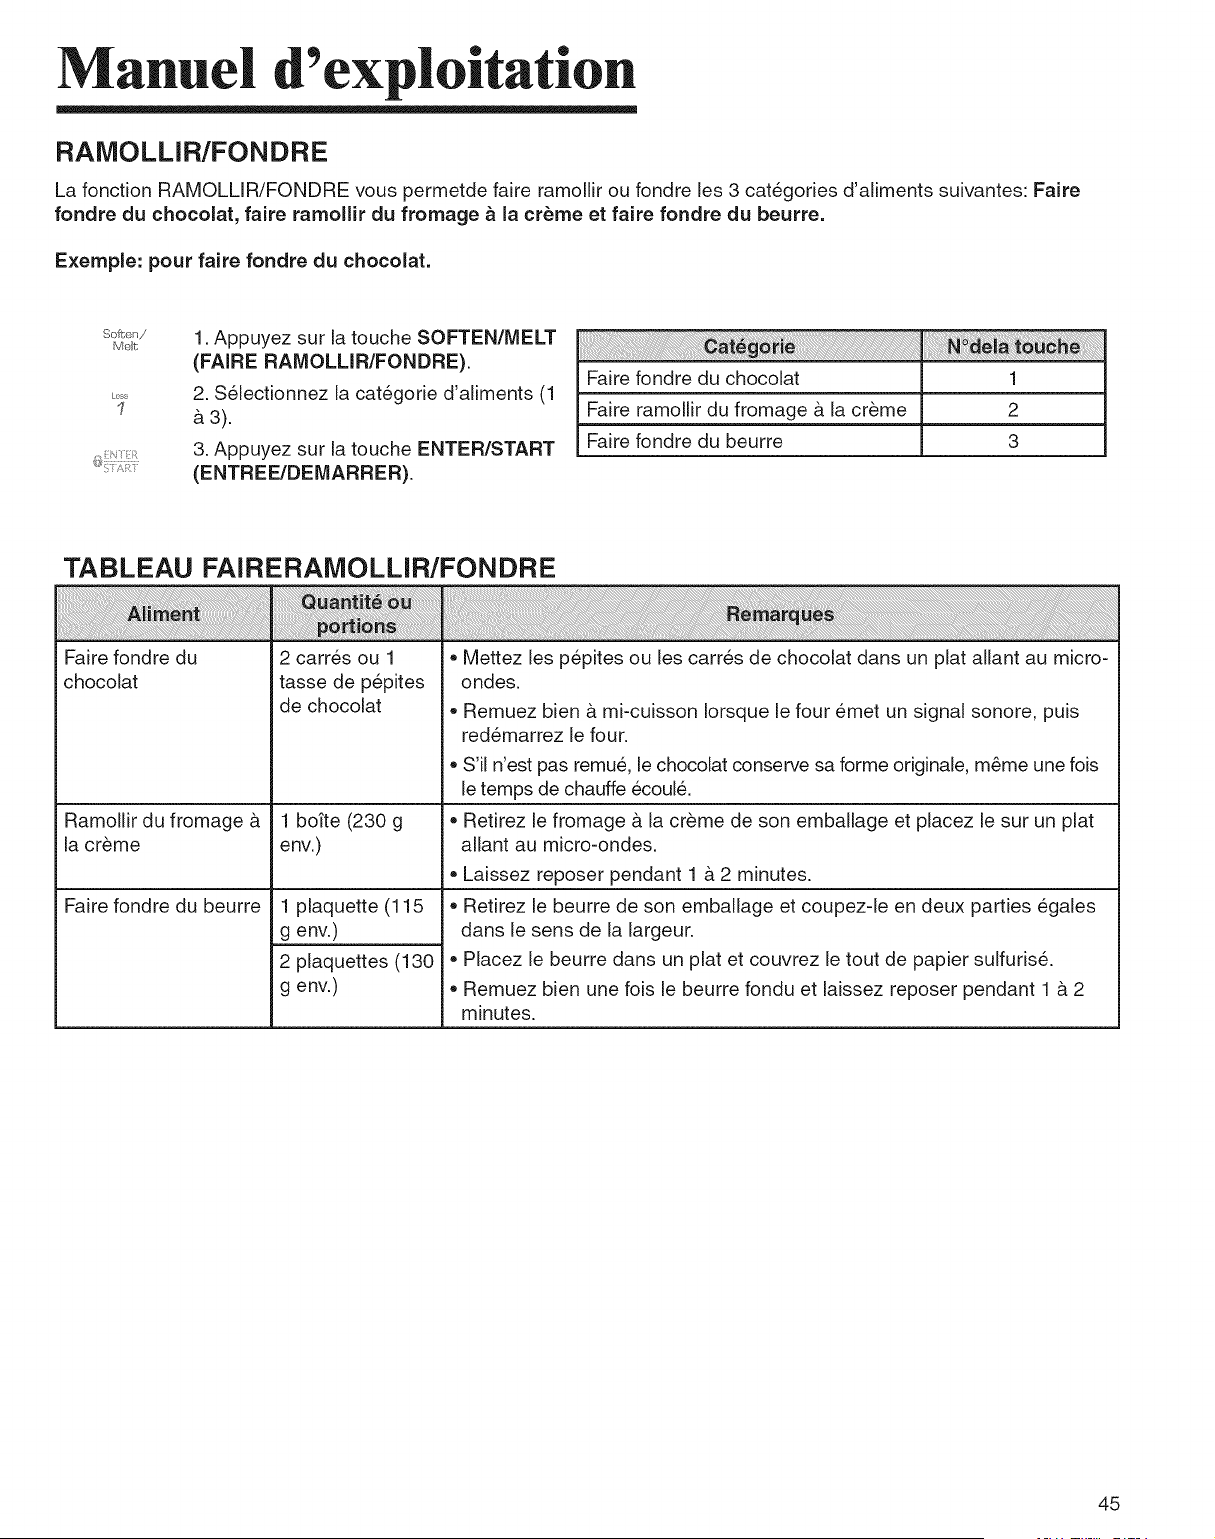
Manuel d'exploitation
RAMOLLIR/FONDRE
La fonction RAMOLLIR/FONDRE vous permetde faire ramollir ou fondre les 3 categories d'aliments suivantes: Faire
fondre du chocolat, faire ramollir du fromage a la cr_rne et faire fondre du beurre.
Exemple: pour faire fondre du chocolat.
So[t;en/
Melt
Less
1
1. Appuyez sur [a touche SOFTEN/MELT
(FAIRE RAMOLLIR/FONDRE).
2. Selectionnez [a categorie d'aliments (1
&3).
3. Appuyez sur la touche ENTER/START
(ENTREE/DEMARRER).
i J!iii i i i i iJi ii i ii i i ii iiiiiiiiiiiiiiiiiiiiiiiiiiiiiiiiiiiiiiiiiiiiiiiiiiiiiiiiiiiiiiiiiiiiiiiiiiiiiiiiiiiiiiiiiiiiiiiiiiiiiiiiiiiiiiiiiiiiiiiiiiiiiiiiiiiiiiiiii ! i
Faire fondre du chocolat
Faire ramollir du fromage & la creme
Faire fondre du beurre
I
2
3
TABLEAU FAIRERAMOLLIR/FONDRE
Faire fondre du
chocolat
Ramollir du fromage &
[a creme
Faire fondre du beurre
2 carres ou 1
tasse de pepites
de chocolat
1 bofte (230 g
env.)
o
1 plaquette (115
g env.)
2 plaquettes (130 •
g env.)
Mettez [es pepites ou [es carres de chocolat dans un plat allant au micro-
ondes.
Remuez bien & mi-cuisson [orsque [e four emet un signal sonore, puis
redemarrez le four.
S'i[ n'est pas remue, [e chocolat conserve sa forme originale, m_me une fois
[etemps de chauffe ecoul&
Retirez [e fromage & [a creme de son emballage et placez [e sur un plat
allant au micro-ondes.
Laissez reposer pendant 1 & 2 minutes.
Retirez le beurre de son emballage et coupezde en deux parties egales
dans le sens de la largeur.
Placez le beurre dans un plat et couvrez le tout de papier sulfuris&
Remuez bien une fois le beurre fondu et laissez reposer pendant 1 a 2
minutes.
45

Manuel d exploitation
SNACKS (EN-CAS)
SNACKS (EN-CAS) vous permetde rechauffer 4 categories d'aliments: des nachos, des ailes de poulet, des potatoes
de terrefarcies et des b_tonnets de fromage.
Exemple: Pour faire cuire des ailes de poulet.
1. Appuyez sur la touche SNACKS (EN-
CAS).
2. Selectionnez la categorie d'aliments (1
4).
3. Appuyez sur la touche ENTER/START
(ENTREE/DEMARRER).
ii! i iii!ii! i!ii i !i i ii ii ii i i i i iiiiiiiiiiiiiiiiii!ii i!!i!i!i!i !ii ii!i !i !i !i !i !i !i! i!!i!i!!ii!iiiii iii i i i i i i i i ! i ! ! ! ! ! ! i !i i ii i! ! i!i ! i! !! ! i ! i ii ii ii iiiiiiiiiiiiiiiiiiiiii ii i iiiiiiiiiiiii iiiiiiiiiiiiiiiiiiiiiiiiiiiiiiiiiiiiiiiiiiiiiiiiiiiiiiiiiiiiiiii i i! !
Nachos
Ailes de poulet
Pommes de terre farcies
B&tonnets de fromage
i!i! ! i !i!i!i!i!i i ii i iiiii i iiiiiiiiiii ii iiiiiiiiiiiiii iiiiiiiiiiiiii iiiiiiiiii i i i i S!ia i ii i!! i i ! !i i i i i! i i iiiiiiiii ii iiiiiiiiii i iiiiiiiiiii ii iiiiiiiiiiiiii iiiiiiiiiii i ii i ¸
1
2
3
4
TABLEAU DES EN-CAS
Nachos 1 portion = Posez les tortillas sur une assiette sans qu'elles se chevauchent.
Ailes de poulet
Pommes de
terre farcies
142 b. 170 g.
200 & 226 g.
1 pomme de terre cuite
2 pommes de terre cuites
o
B&tonnets de 5 & 6 morceaux
fromage 7 & 10 morceaux
Saupoudrez d'une couche uniforme de fromage.
Contient:
- 2 tasses de tortillas
- 1/3 de tasse de fromage r&p_
Utilisez des ailes de poulet precuites et conservees au frais.
Repartissez les ailes de poulet reguli_rement sur un plat et recouvrez-
les de papier sulfuris&
Coupez la pomme de terre cuite en 4 morceaux de taille egale. Evidez la
pomme de terre en laissant une epaisseur d'environ 6 mm.
Repartissez reguli_rement les pommes de terre evidees sur une
assiette.
Saupoudrez de lard, d'oignons et de fromage. Ne couvrez pas.
Repartissez reguli_rement les b&tonnets de fromage sur une assiette.
Ne couvrez pas.
46
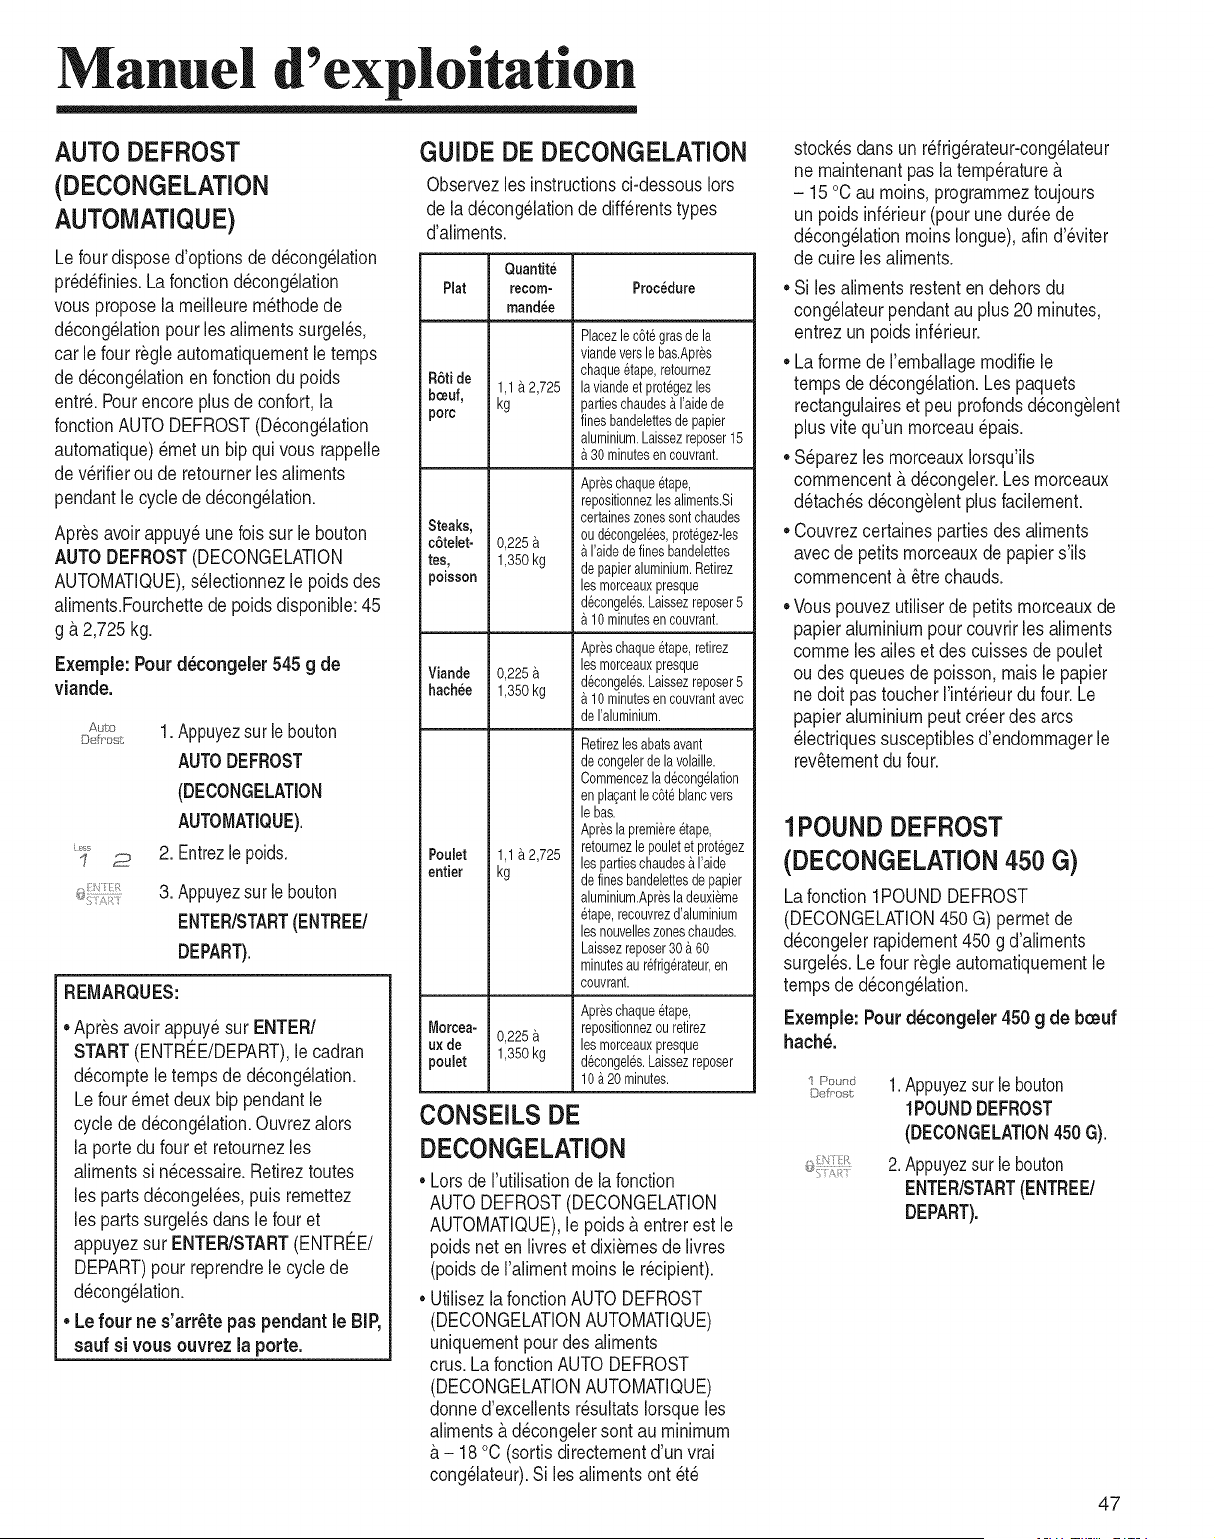
Manuel d'exploitation
AUTO DEFROST
(DECONGELATION
AUTOMATIQUE)
Le fourdisposed'options de d6cong61ation
pr6d6finies.La fonctiond6cong61ation
vousproposela meilleurem6thodede
d6cong61ationpourles alimentssurgel6s,
car le four r_gle automatiquementle temps
de d6cong61ationen fonctiondu poids
entr6.Pourencoreplus de confort,la
fonctionAUTODEFROST(D6cong61ation
automatique)6met un hip qui vous rappelle
de v6rifier ou de retournerles aliments
pendantle cycle ded6cong61ation.
Apr_s avoirappuy6une lois sur le bouton
AUTODEFROST(DECONGELATION
AUTOMATIQUE),s61ectionnezle poidsdes
aliments.Fourchettede poidsdisponible:45
g & 2,725 kg.
Exemple: Pourd6congeler 545g de
viande.
Aul;o
Defpus
Less
1 2
1. Appuyezsurle bouton
AUTODEFROST
(DECONGELATJON
AUTO[v]ATJQUE).
2. Entrezle poids.
3. Appuyezsurle bouton
ENTER/START(ENTREE/
DEPART).
REMARQUES:
• Apr_savoir appuy6sur ENTER/
START(ENTREE/DEPART),le cadran
d6comptele temps de d6cong61ation.
Le four 6met deux hip pendantle
cycle ded6cong61ation.Ouvrezalors
la porte du four et retournezles
alimentssi n6cessaire.Retireztoutes
les parts d6congel6es,puis remettez
les parts surgel6sdans le four et
appuyezsur ENTER/START(ENTREE/
DEPART)pour reprendrele cyclede
d6cong61ation.
• Le four ne s'arr6te pas pendant le BIP,
sauf si vous ouvrez la porte.
GUIDE DE DECONGELATION
Observezles instructionsci-dessous Iors
de la d6cong61ationde diff6rentstypes
d'aliments.
Quantite
Plat recom- Procedure
mandee
Placezlec6tegrasde la
viandeversle bas.Apres
R6ti de chaqueetape,retournez
1,1&2,725 laviandeet protegezles
bceuf, kg partieschaudes& raidede
porc finesbandelettesde papier
aluminium.Laissezreposer15
30 minutesencouvrant.
Apreschaqueetape,
repositionnezlesaliments.Si
certaineszonessontchaudes
Steaks,
c6telet- 0,225a ou decongel6es,protegez-les
raidedefinesbandelettes
tes, 1,350kg
poisson de papieraluminium.Retirez
les morceauxpresque
d6congeles.Laissezreposer5
10 minutesencouvrant.
Apreschaqueetape,retirez
Viande 0,225a les morceauxpresque
d6congeles.Laissezreposer5
hachee 1,350kg a 10 minutesencouvrantavec
de raluminium.
Pou[et 1,1a 2,725
entier kg
Retirezlesabatsavant
decongelerde lavolaille.
Commencezladecong61ation
en pla£antlec6teblancvers
le bas.
Apreslapremi@eetape,
retournezle pouletetprotegez
les partieschaudes&raide
definesbandelettesdepapier
aluminium.Apresla deuxieme
etape,recouvrezd'aluminium
les nouvelleszoneschaudes.
Laissezreposer30a 60
minutesaur6frig_rateur,en
couvrant.
Morcea- 0,225
ux de
poulet 1,350kg
Apreschaqueetape,
repositionnezou retirez
les morceauxpresque
d6congeles.Laissezreposer
10 a20 minutes.
CONSEILS DE
DECONGELATION
Lors de rutilisationde la fonction
AUTODEFROST(DECONGELATION
AUTOMATIQUE),le poids& entrerest le
poidsnet en livreset dixiemesde livres
(poidsde raliment moins le r6cipient).
UtilisezlafonctionAUTO DEFROST
(DECONGELATIONAUTOMATIQUE)
uniquementpourdes aliments
crus.La fonctionAUTO DEFROST
(DECONGELATIONAUTOMATIQUE)
donned'excellents r6sultatsIorsqueles
alimentsa d6congelersont au minimum
- 18 °C (sortisdirectementd'un vrai
cong61ateur).Si les alimentsont 6t6
stock6sdans un r6frig6rateur-cong61ateur
ne maintenantpas la temp6rature&
- 15°C au moins,programmeztoujours
un poids inf6rieur(pourunedur6ede
d6cong61ationmoinsIongue),afin d'6viter
de cuire les aliments.
• Si les aliments restenten dehorsdu
cong61ateurpendantau plus20 minutes,
entrezun poidsinf6rieur.
• La formede remballagemodifiele
tempsde d6cong61ation.Les paquets
rectangulaireset peu profondsd6cong61ent
plusvite qu'un morceau6pais.
• S6parezles morceauxIorsqu'ils
commencenta d6congeler.Les morceaux
d6tach6sd6cong_lentplusfacilement.
• Couvrezcertainesparties des aliments
avecde petitsmorceauxde papier s'ils
commencenta 6tre chauds.
• Vous pouvezutiliserde petits morceauxde
papieraluminiumpourcouvrirles aliments
comme les arieset des cuisses de poulet
ou des queues de poisson,mais le papier
nedoit pastoucher rint6rieur du four. Le
papieraluminiumpeutcr6er des arcs
61ectriquessusceptiblesd'endommagerle
rev6tementdu four.
1POUND DEFROST
(DECONGELATION 450 G)
Lafonction 1POUND DEFROST
(DECONGELATION450 G) permetde
d6congelerrapidement450 g d'aliments
surgeles.Le four r_gle automatiquementle
temps de d6cong61ation.
E×emple: Pourd6congeler 450 g de b_uf
hach6.
I Poured
Defr'est,
1.Appuyezsur le bouton
1POUNDDEFROST
(DECONGELATJON450G).
2.Appuyezsur le bouton
ENTER/START(ENTREE/
DEPART).
47
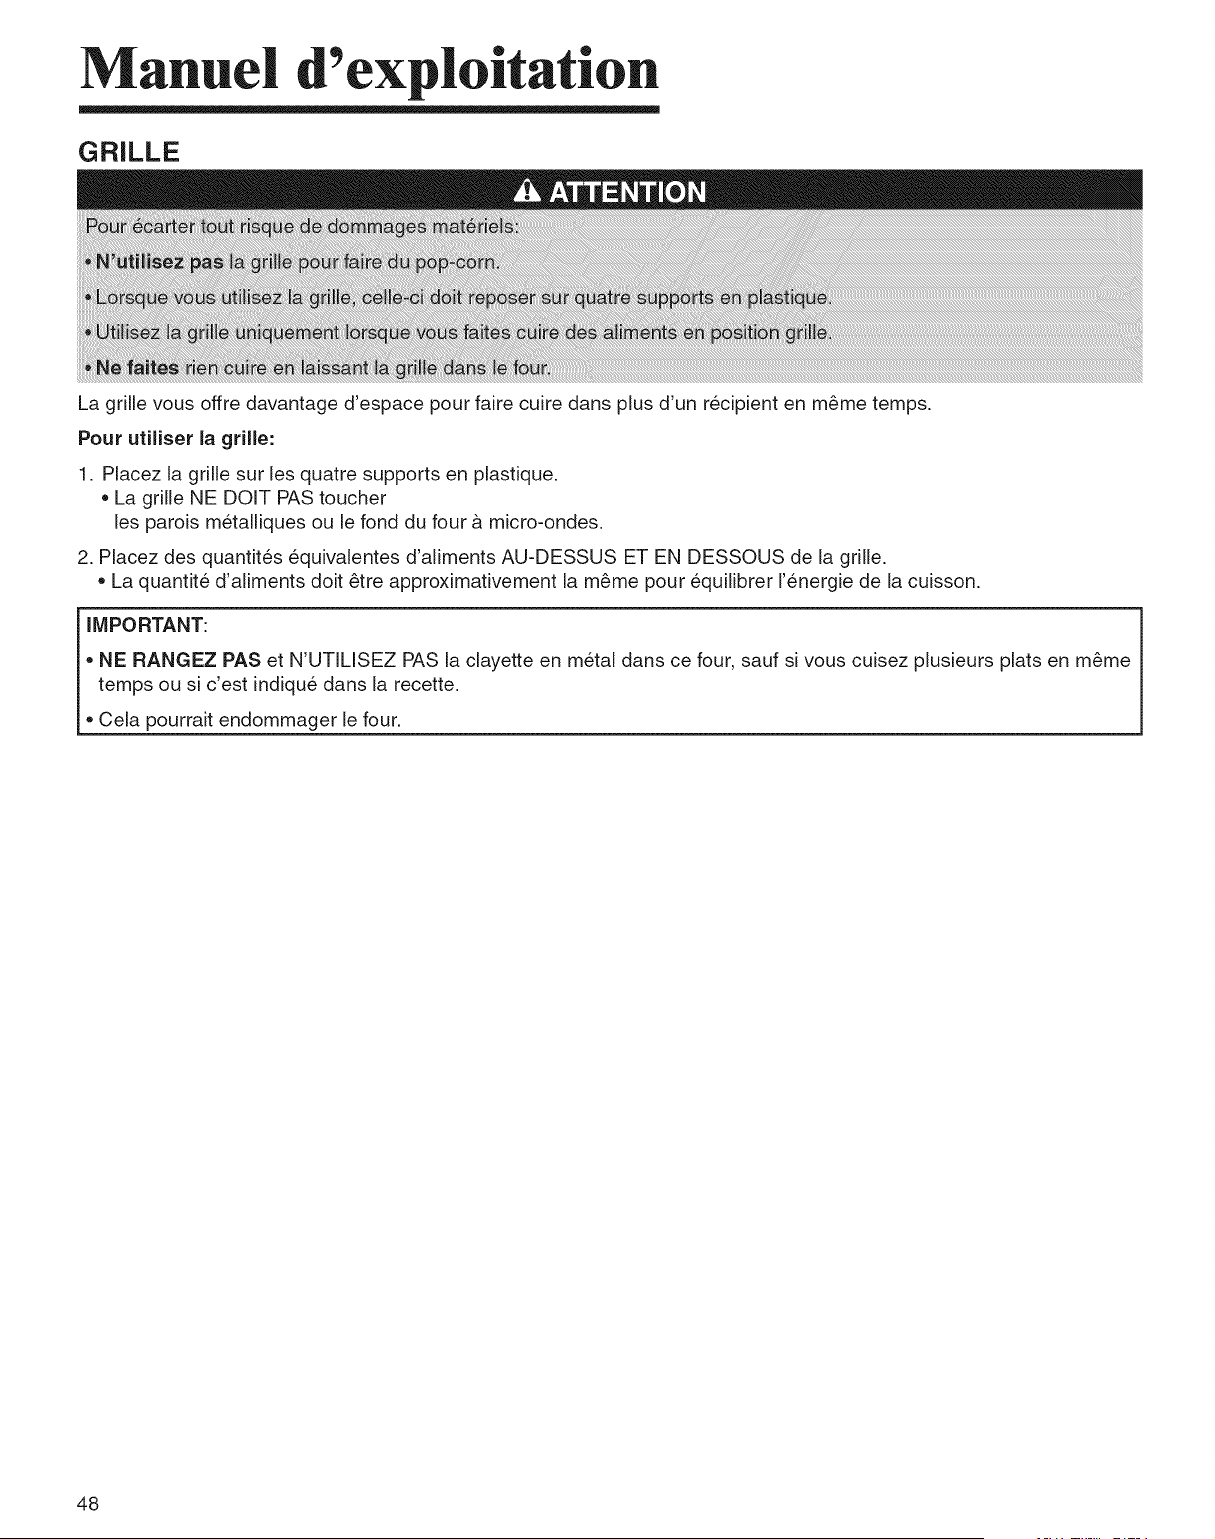
Manuel d exploitation
GRILLE
La grille vous offre davantage d'espace pour faire cuire dans plus d'un recipient en m_me temps.
Pour utiliser la grille:
1. Placez la grille sur les quatre supports en plastique.
= La grille NE DOlT PAS toucher
les parois metalliques ou le fond du four _. micro-ondes.
2. Placez des quantites equivalentes d'aliments AU-DESSUS ET EN DESSOUS de la grille.
= La quantite d'aliments doit _tre approximativement la m_me pour equilibrer I'energie de la cuisson.
iMPORTANT:
=NE RANGEZ PAS et N'UTILISEZ PAS la clayette en metal dans ce four, sauf si vous cuisez plusieurs plats en m_me
temps ou si c'est indique dans la recette.
Cela pourrait endommager le four.
48
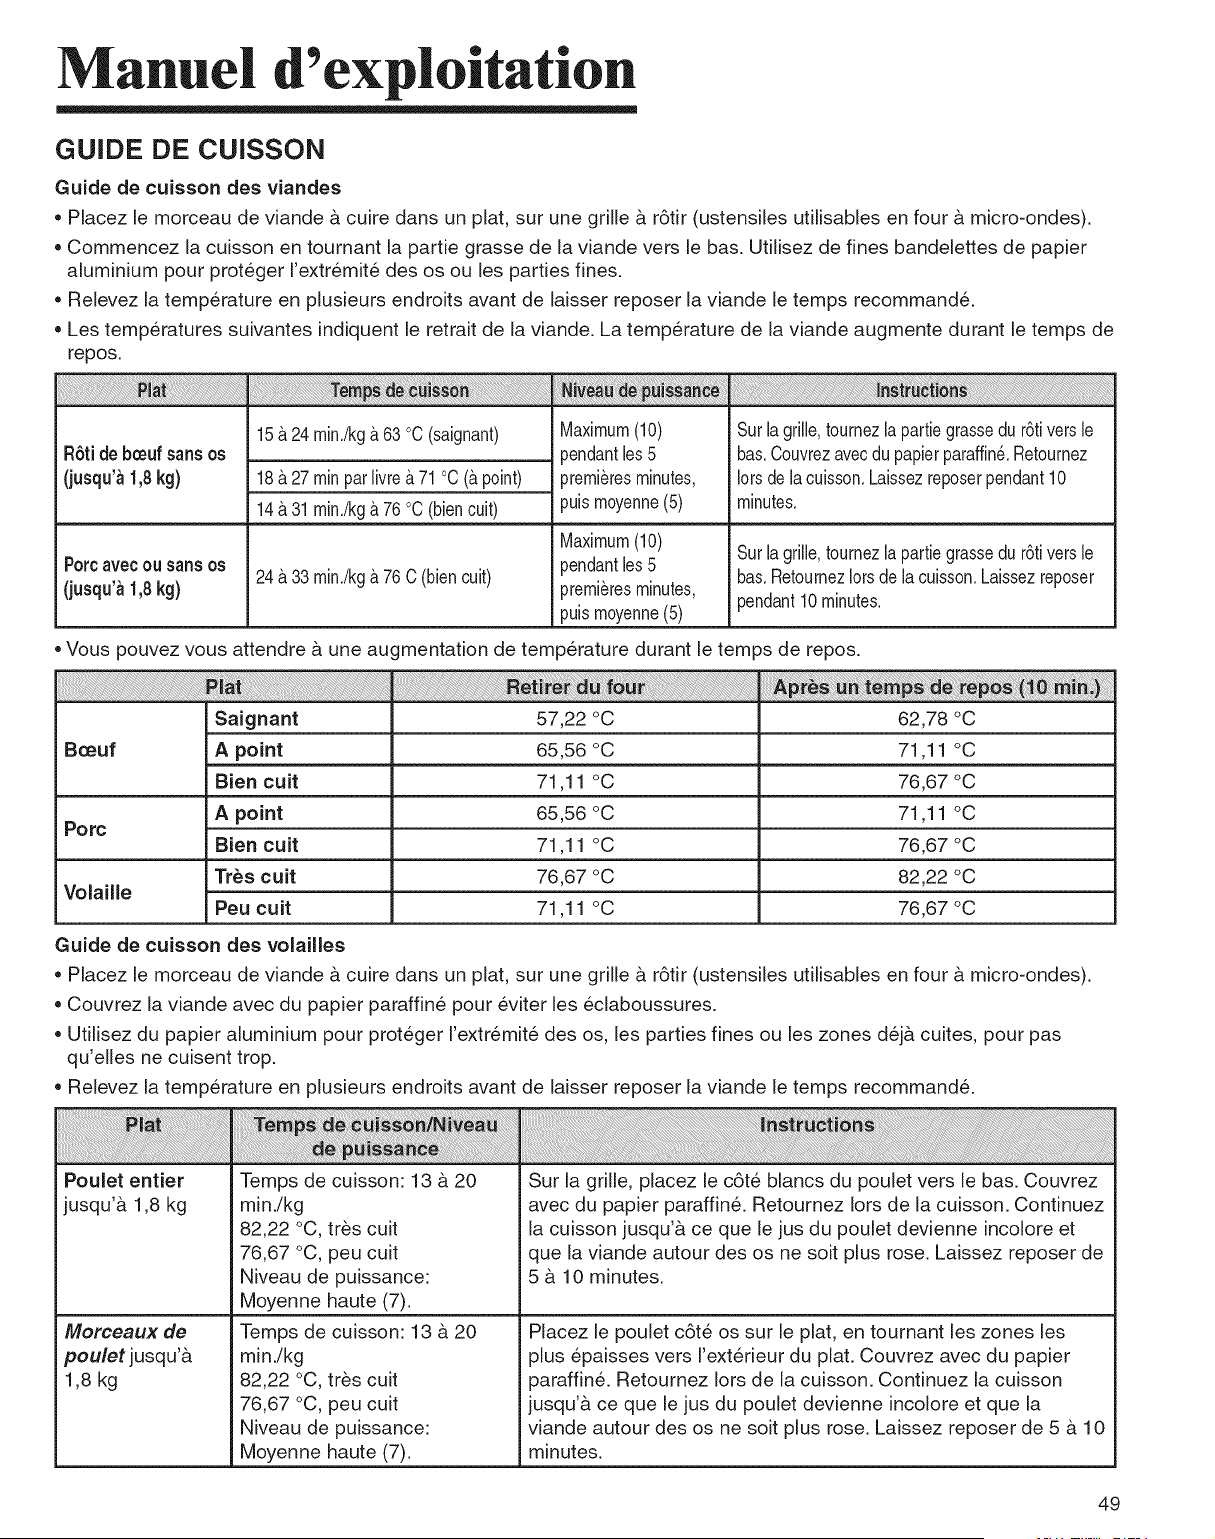
Manuel d'exploitation
GUIDE DE CUISSON
Guide de cuJsson des viandes
• Placez [e morceau de viande & cuire dans un plat, sur une grille & r6tir (ustensiles utilisables en four & micro-ondes).
Commencez la cuisson en tournant la partie grasse de la viande vers le bas. Utilisez de fines bandelettes de papier
aluminium pour proteger I'extremite des os ou les parties fines.
Relevez la temp@ature en plusieurs endroits avant de laisser reposer la viande le temps recommand&
Les temp@atures suivantes indiquent le retrait de la viande. La temp@ature de la viande augmente durant le temps de
repos.
R6tide bmufsans os
(jusqu'_ 1,8kg)
! i ! !i i ! iii!iii!ii!ii!iiii!!i i i i ii iiii i i i ii i i iiii ii ii i ii ii ii ii ii ii ii ii ii ii ii ii ii ii ii ii ii iiii i ii ii i i i !i ! i!i !i! i ! iii! i! ! !i ! ! ! !!i ! i! i! ! i!i !i!i ii ! !i!i!i!i!iiiiiiiiiiiiiiiiiiiiiiii i i i i ii iiiiiiiiiiiiiiiiiiiiiiiiiiiiiiiiiiiiiiiiiiiiiiiiiiiiiiiiiiiiiiiiiiiiii ! ii
15&24 min./kg&63 °C (saignant)
18&27 rainpar livre&71°C (&point)
14&31 min./kg&76 °C (biencult)
Maximum(10)
pendantles5
premi@esminutes,
puism0yenne(5)
Surlagrille,t0urnezlapattiegrassedu r6tiversle
bas.C0uvrezavecdupapierparaffin&Ret0urnez
10rsde la cuisson.Laissezreposerpendant10
minutes.
Maximum(10) Surlagrille,t0urnezlapattiegrassedu r6tiversle
Porcavecou sansos pendantles5
(jusqu'_ 1,8kg) 24a 33 min./kga 76 C(biencuit) premi@esminutes, bas.RetoumezIorsde la cuisson.Laissezreposer
puismoyenne(5) pendant10minutes.
• Vous pouvez vous attendre & une augmentation de temperature durant le temps de repos.
Saignant 57,22 °C 62,78 °C
Bceuf A point 65,56 °C 71,11 °C
Bien cuit 71,11 °C 76,67 °C
A point 65,56 °C 71,11 °C
Porc
Bien cuit 71,11 °C 76,67 °C
Tr_s cult 76,67 °C 82,22 °C
Voiaille
Peu cuit 71,11 °C 76,67 °C
Guide de cuisson des volailles
• Placez le morceau de viande & cuire dans un plat, sur une grille & r6tir (ustensiles utilisables en four & micro-ondes).
Couvrez la viande avec du papier paraffine pour eviter les eclaboussures.
Utilisez du papier aluminium pour proteger I'extremite des os, les parties fines ou les zones dej& cuites, pour pas
qu'elles ne cuisent trop.
Relevez la temp@ature en plusieurs endroits avant de laisser reposer la viande le temps recommande.
Poulet entier
jusqu'& 1,8 kg
Morceaux de
poulet jusqu'&
1,8 kg
Temps de cuisson: 13 & 20
min./kg
82,22 °C, tres cuit
76,67 °C, peu cuit
Niveau de puissance:
Moyenne haute (7).
Temps de cuisson: 13 & 20
min./kg
82,22 °C, tres cuit
76,67 °C, peu cuit
Niveau de puissance:
Moyenne haute (7).
Sur la grille, placez le c6te blancs du poulet vers le bas. Couvrez
avec du papier paraffin& Retournez Iors de la cuisson. Continuez
la cuisson jusqu'& ce que le jus du poulet devienne incolore et
que la viande autour des os ne soit plus rose. Laissez reposer de
5 & 10 minutes.
Placez le poulet c6te os sur le plat, en tournant les zones les
plus @aisses vers I'ext@ieur du plat. Couvrez avec du papier
paraffin& Retournez Iors de la cuisson. Continuez la cuisson
jusqu'& ce que le jus du poulet devienne incolore et que la
viande autour des os ne soit plus rose. Laissez reposer de 5 & 10
minutes.
49
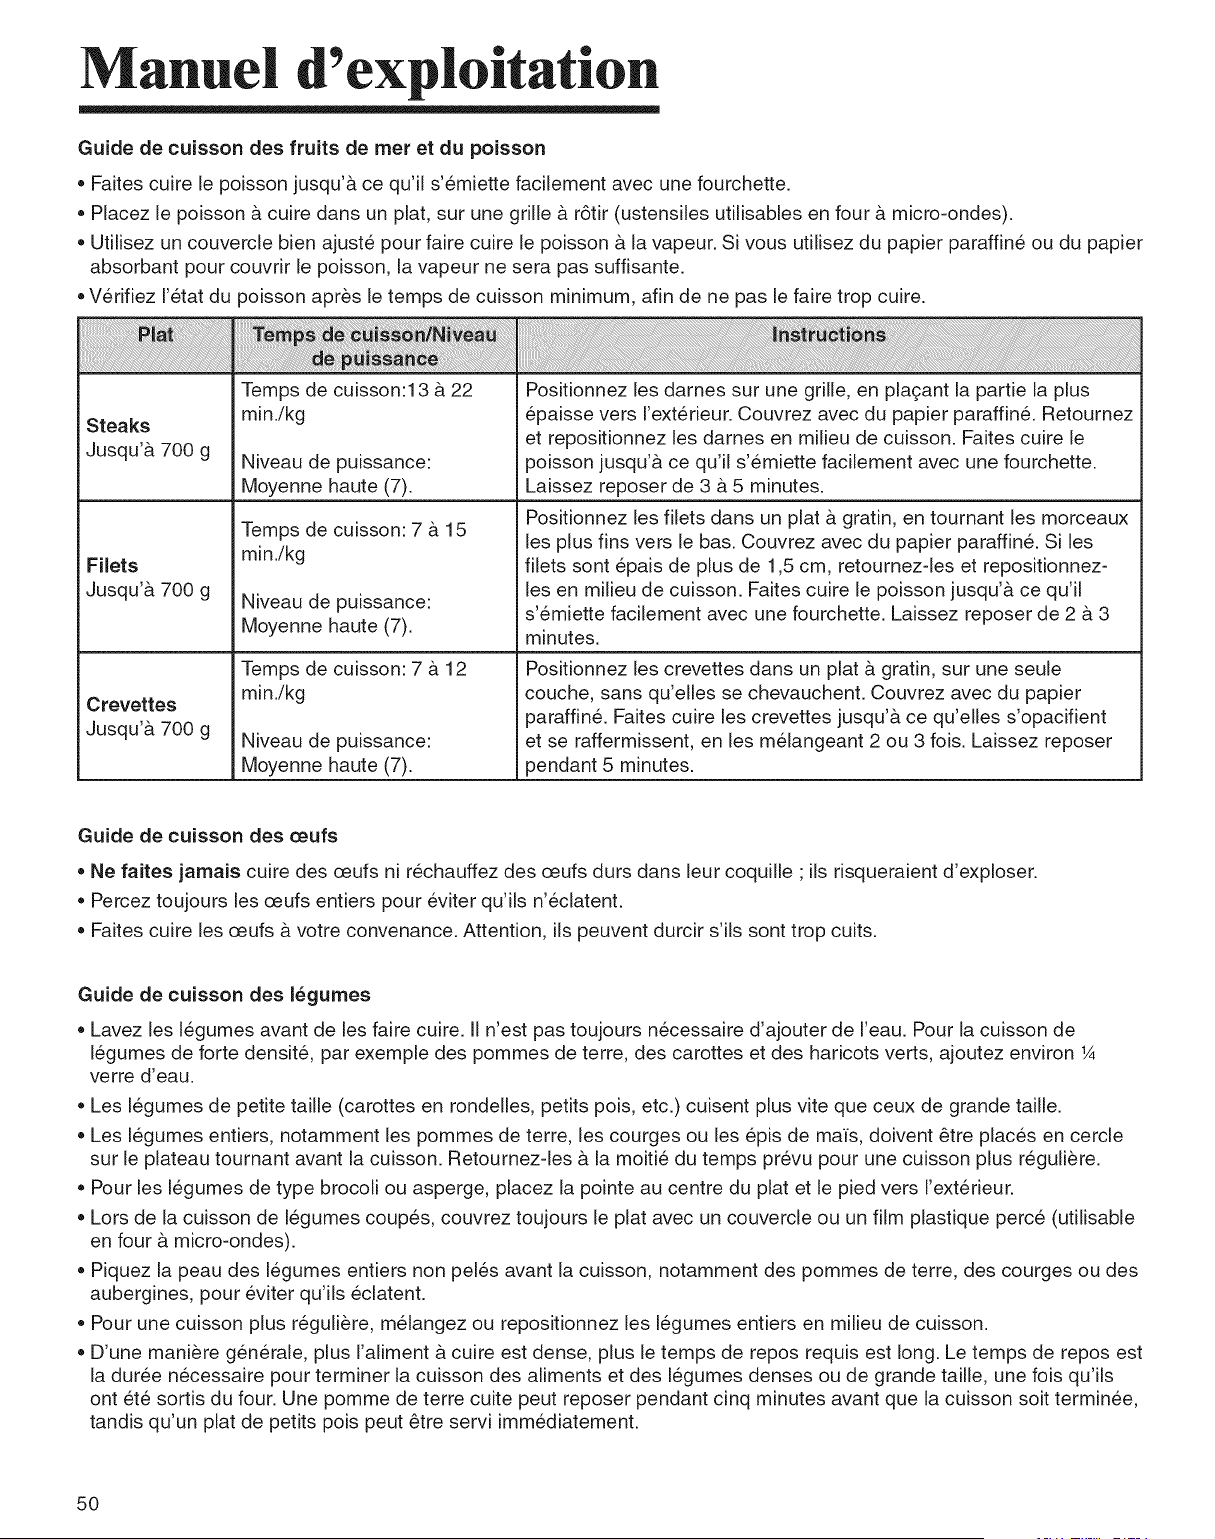
Manuel d exploitation
Guide de cuisson des fruits de rner et du poisson
Faites cuire le poisson jusqu'& ce qu'il s'emiette facilement avec une fourchette.
Placez le poisson & cuire dans un plat, sur une grille & r6tir (ustensiles utilisables en four & micro-ondes).
Utilisez un couvercle bien ajuste pour faire cuire le poisson & la vapeur. Si vous utilisez du papier paraffine ou du papier
absorbant pour couvrir le poisson, la vapeur ne sera pas suffisante.
V@ifiez I'etat du )oisson apres le temps de cuisson minimum, afin de ne pas le faire trop cuire.
Steaks
Jusqu'& 700 g
Filets
Jusqu'& 700 g
Crevettes
Jusqu'& 700 g
Temps de cuisson:l 3 & 22
min./kg
NJveau de puissance:
Moyenne haute (7).
Temps de cuisson: 7 _.15
min./kg
NJveau de puissance:
Moyenne haute (7).
Temps de cuisson: 7 & 12
min./kg
Niveau de puissance:
Moyenne haute (7).
Positionnez les dames sur une grille, en pla£;ant la partie la plus
epaisse vers I'ext@ieur. Couvrez avec du papier paraffine. Retournez
et repositionnez les dames en milieu de cuisson. Faites cuire le
poisson jusqu'b, ce qu'il s'emiette facilement avec une fourchette.
Laissez reposer de 3 & 5 minutes.
Positionnez les filets dans un plat & gratin, en tournant les morceaux
les plus fins vers le bas. Couvrez avec du papier paraffin& Si les
filets sont @ais de plus de 1,5 cm, retournezdes et repositionnez-
les en milieu de cuisson. Faites cuire le poisson jusqu'& ce qu'il
s'emiette facilement avec une fourchette. Laissez reposer de 2 & 3
minutes.
Positionnez les crevettes dans un plat & gratin, sur une seule
couche, sans qu'elles se chevauchent. Couvrez avec du papier
paraffin& Faites cuire les crevettes jusqu'& ce qu'elles s'opacifient
et se raffermissent, en les melangeant 2 ou 3 fois. Laissez reposer
pendant 5 minutes.
Guide de cuisson des ¢eufs
Ne faites jamais cuire des oeufs ni rechauffez des oeufs durs dans leur coquille ; ils risqueraient d'exploser.
Percez toujours les oeufs entiers pour eviter qu'ils n'eclatent.
Faites cuire les oeufs & votre convenance. Attention, ils peuvent durcir s'ils sont trop cuits.
Guide de cuisson des I_gumes
Lavez les legumes avant de les faire cuire. II n'est pas toujours necessaire d'ajouter de I'eau. Pour la cuisson de
legumes de forte densite, par exemple des pommes de terre, des carottes et des haricots verts, ajoutez environ 1A
verre d'eau.
Les legumes de petite taille (carottes en rondelles, petits pois, etc.) cuisent plus vite que ceux de grande taille.
Les legumes entiers, notamment les pommes de terre, les courges ou les epis de maYs,doivent _tre places en cercle
sur le plateau tournant avant la cuisson. Retournezdes & la moitie du temps prevu pour une cuisson plus reguli_re.
Pour les legumes de type brocoli ou asperge, placez la pointe au centre du plat et le pied vers I'ext@ieur.
Lors de la cuisson de legumes coup_s, couvrez toujours le plat avec un couvercle ou un film plastique perce (utilisable
en four & micro-ondes).
Piquez la peau des legumes entiers non peles avant la cuisson, notamment des pommes de terre, des courges ou des
aubergines, pour eviter qu'ils eclatent.
Pour une cuisson plus reguli_re, melangez ou repositionnez les legumes entiers en milieu de cuisson.
D'une mani_re gen@ale, plus I'aliment & cuire est dense, plus le temps de repos requis est long. Le temps de repos est
la duree necessaire pour terminer la cuisson des aliments et des legumes denses ou de grande taille, une fois qu'ils
ont ete sortis du four. Une pomme de terre cuite peut reposer pendant cinq minutes avant que la cuisson soit terminee,
tandis qu'un plat de petits pois peut _tre servi immediatement.
5O
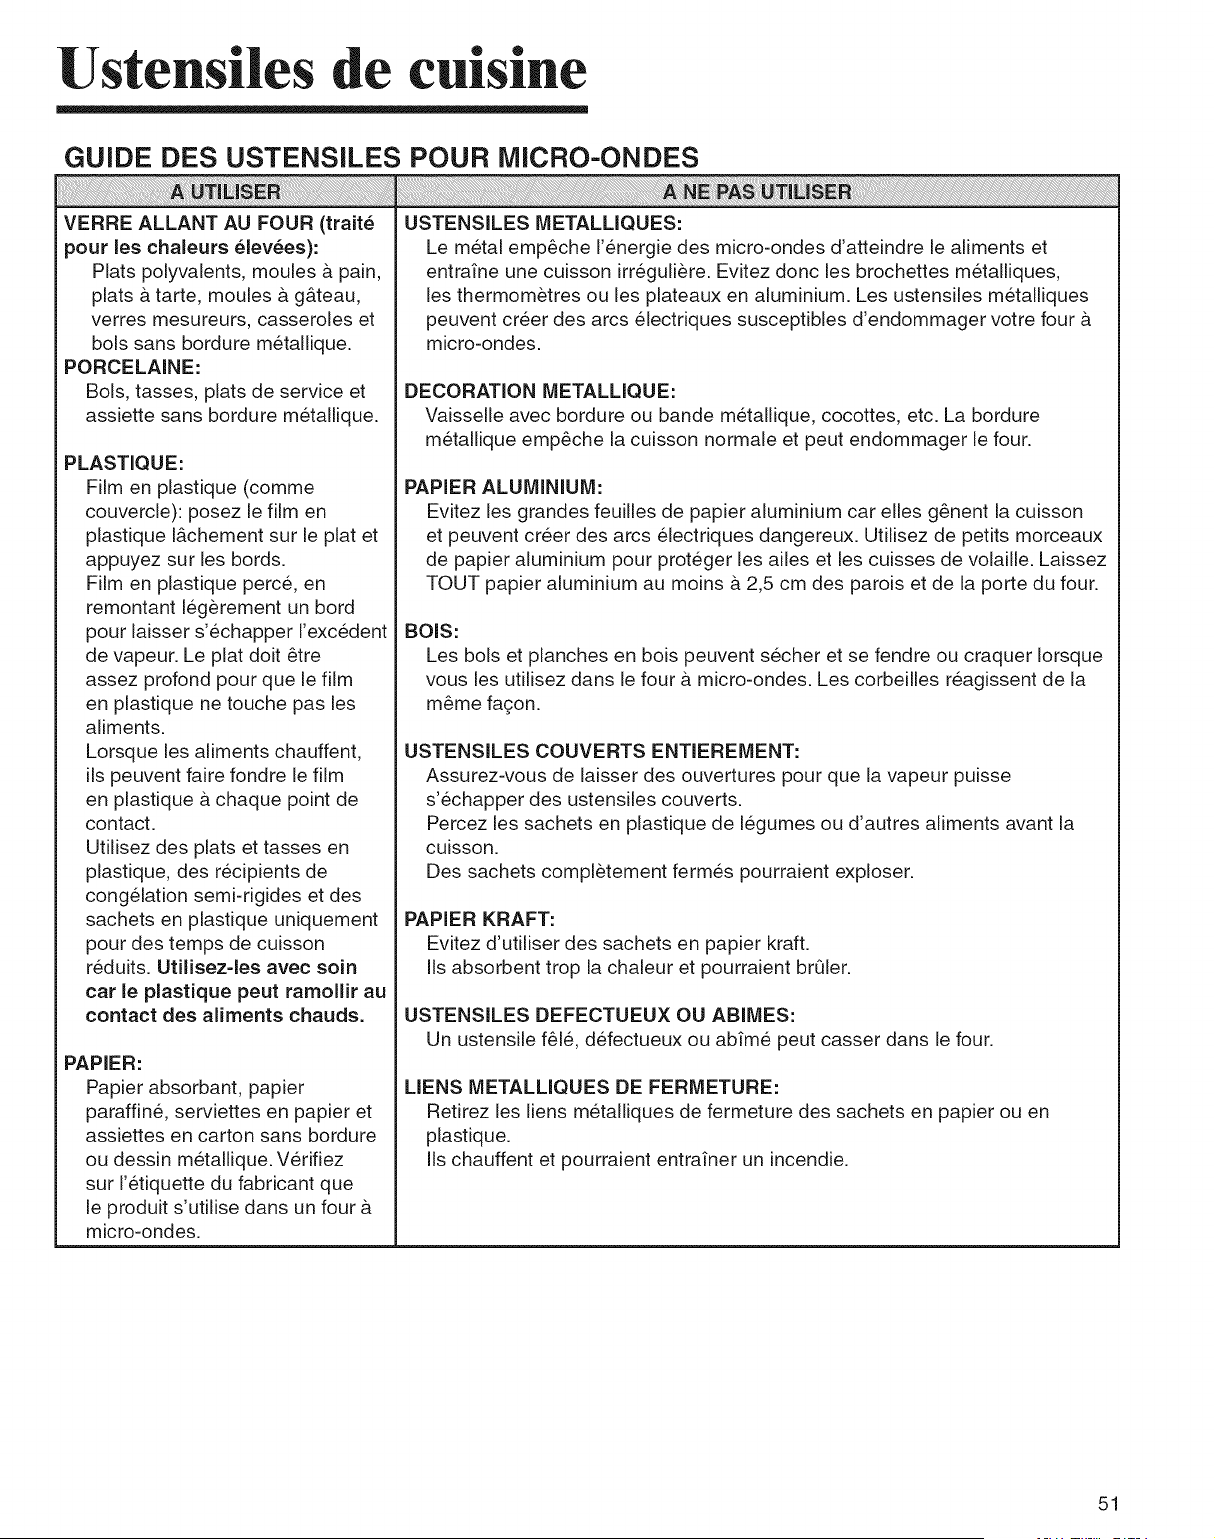
UstensUes
• ®
.e cuisine
GUIDE DES USTENSILES POUR MICRO-ONDES
VERRE ALLANT AU FOUR (trait_
pour [es chaleurs _lev_es):
Plats polyvalents, moules & pain,
plats & tarte, moules b. g&teau,
verres mesureurs, casseroles et
bols sans bordure metallique.
PORCELAINE:
Bols, tasses, plats de service et
assiette sans bordure metallique.
PLASTIQUE:
Film en plastique (comme
couvercle): posez [e film en
plastique [&chement sur [e plat et
appuyez sur les bords.
Film en plastique perce, en
remontant leg_rement un bord
pour laisser s'echapper ['excedent
de vapeur. Le plat doit _tre
assez profond pour que le film
en plastique ne touche pas [es
aliments.
Lorsque [es aliments chauffent,
ils peuvent faire fondre [e film
en plastique & chaque point de
contact.
Utilisez des plats et tasses en
plastique, des recipients de
congelation semi-rigides et des
sachets en plastique uniquement
pour des temps de cuisson
reduits. Utilisez-les avec soin
car le plastique peut ramollir au
contact des aliments chauds.
PAPIER:
Papier absorbant, papier
paraffine, serviettes en papier et
assiettes en carton sans bordure
ou dessin metallJque. VerJfJez
sur I'etiquette du fabricant que
le produit s'utilise dans un four &
micro-ondes.
USTENSILES METALUQUES:
Le metal emp_che ['energie des micro-ondes d'atteindre [e aliments et
entra_ne une cuisson irreguli_re. Evitez donc [es brochettes metalliques,
[es thermom_tres ou [es plateaux en aluminium. Les ustensiles metalliques
peuvent creer des arcs electriques suscepfibles d'endommager votre four
micro-ondes.
DECORATION METALLIQUE:
Vaisselle avec bordure ou bande metallique, cocottes, etc. La bordure
metallique emp_che la cuisson normale et peut endommager le four.
PAPIER ALUMINIUIV[:
Evitez [es grandes feuiiles de papier aluminium car elles g_nent [a cuisson
et peuvent creer des arcs electriques dangereux. Utilisez de petits morceaux
de papier aluminium pour proteger [es ailes et [es cuisses de volaiile. Laissez
TOUT papier aluminium au moins & 2,5 cm des parois et de [a porte du four.
BOIS:
Les bols et planches en bois peuvent secher et se fendre ou craquer Iorsque
vous les utilisez dans le four & micro-ondes. Les corbeilles reagissent de la
m_me fagon.
USTENSILES COUVERTS ENTIEREMENT:
Assurez-vous de [aisser des ouvertures pour que [a vapeur puisse
s'echapper des ustensiles couverts.
Percez [es sachets en plastique de legumes ou d'autres aliments avant [a
cuisson.
Des sachets compl_tement fermes pourraient exploser.
PAPIER KRAFT:
Evitez d'utiliser des sachets en papier kraft.
IIs absorbent trop la chaleur et pourraient brQler.
USTENSILES DEFECTUEUX OU ABIIV[ES:
Un ustensile f_[6, defectueux ou abtme peut casser dans [efour.
LIENS METALUQUES DE FERMETURE:
Retirez [es liens metalliques de fermeture des sachets en papier ou en
plastique.
Ils chauffent et pourraient entratner un incendie.
51

Entretien et nettoyage
ENTRETIEN ET
NETTOYAGE
Pour plus d'effJcacJte et de s6curJt6,
nettoyez regulJ_rement I'Jnt@Jeur
et I'ext@ieur du four. VeJllez tout
sp_cialement & ce que le panneau
int@ieur de la porte et la face avant
du four ne soient pas souilles par
de la graisse ou des aliments.
N'utilisez jamais de poudre ou de
tampons nettoyeurs agressifs.
Essuyez I'Jnt@Jeuret I'ext@ieur du
micro-ondes, y compris le couvercle
Jnf@Jeurde I'evacuation, avec
un chiffon doux et une solution
detergente douce et chaude
(et non brQlante). PuJs rJncez et
s_chez en essuyant. Utilisez un
nettoyant pour chrome et lustrez les
surfaces en chrome, en metal et en
alumJnJum. Essuyez immedJatement
les projections avec du papier
absorbant humide, notamment
apres avoir cuisine du poulet ou
du bacon. Nettoyez votre four une
fois par semaine ou plus souvent si
necessaire.
Observez les instructions suivantes pour
nettoyer et assurer I'entretien de votre
four.
Nettoyez r_guli@ementI'int@ieur du
four afin qu'il soit toujours propre. Les
r_sidus d'aliment et les _claboussures
de liquides coil,s sur les parois du four
peuvent diminuer I'efficacit_ du four.
Nettoyez imm_diatement tout liquide
ou aliment renvers& Utilisez un chiffon
humide et un d_tergent doux. N'utilisez
pas de produits d_tergents corrosifs ou
abrasifs.
Pour d_tacher plus facilement les
r_sidus d'aliments ou de liquides coil,s
_.I'int@ieurdu four, versez deux verres
d'eau (ajoutez le jus d'un citron pour
obtenir un parfum frais) dans un saladier
en verre et faites chauffer & la puissance
Maximum pendant 5 minutes ou jusqu'&
ce que I'eau bouille. Laissez reposer
I'int@ieur du four pendant 1 a 2 minutes.
Sortez le plateau tournant en verre
pour le laver ou pour nettoyer le four.
Pour _viter de casser le plateau en
verre, manipulez-le avec precaution
et _vitez de verser de I'eau dessus
imm_diatement apres une cuisson.
Lavez soigneusement le plateau dans
de I'eausavonneuse chaude ou au lave-
52
vaisselle.
Nettoyez I'ext@ieurdu four _.I'aide de
savon et d'un chiffon humide. S_chez
avec un chiffon doux. Pour _viter
d'endommager les pieces maftresses du
four, ne laissez pas d'eau rentrer par les
orifices de ventilation.
Lavez la vitre de la porte avec de I'eau
et un produit d_tergent doux. Utilisez
toujours une @onge ou un chiffon doux
pour @iter de rayer les surfaces.
,,Si de la vapeur a laiss_ des traces &
I'int@ieur ou _.I'ext@ieurde la porte du
four, nettoyez-les & I'aide d'un chiffon
doux. La vapeur peut se concentrer
Iorsque le four est en marche et
engendre un fort taux d'humidit6 ; cela
n'implique absolument pas une fuite du
four µ-ondes.
Ne mettez jamais le four en marche
Iorsqu'il est vide ; ceci pourrait
endommager le magn_tron ou le
plateau en verre. Vous pouvez laisser
en permanence unverre d'eau
dans le four, afin d'_viter tout risque
d'endommagement si le four est mis en
marche accidentellement.
NETTOYAGE DU FILTRE
A GRAISSE
Le filtre & graisse doit _tre retire et
nettoye souvent, au moins une fois
par mois.
1. Pour retirer le filtre _.graisse, faites-
le glisser sur le c6t& Tirez le filtre
vers le bas et poussezde de I'autre
c6te. Le filtre tombe.
\
2. Trempez le filtre & graisse dans
une solution d'eau chaude et
de detergent doux. Rincez-le
abondamment et secouez-le
pour le secher. N'utilisez pas
d'ammoniaque ; ne mettez
pas le filtre au lave-vaisselle.
L'aluminium risque de noircir.
3. Pour remettre le filtre en place,
faites-le glisser dans la fente
lat@ale, puis poussezde vers le
haut et vers le centre du four pour
le verrouiller.
J
REMPLACEMENT DU
FILTRE A CHARBON
Si votre four est ventile & I'int@ieur,
le filtre _.charbon doit _tre remplace
tousles 6 & 12 mois, voire plus
souvent si necessaire. Le filtre &
charbon ne peut pas _tre nettoy&
Pour commander un filtre _. charbon
neuf, contactez le service pi_ces
detachees du centre de service
agree le plus proche de chez vous
ou appelez le 1=800=688=9900 (Etats-
UnJs) ou le 1=800=688=2002 (Canada).
1. Debranchezlefourou coupezI'alimentation
secteur.
2. Ouvrezla porte.
3. Retirezles deuxvis defixationde la grillede
ventilation(2vis moyennes).
4. Faitescoulisserla grillevers la gauche,puis
tirezdatoutdroitversI'ext@ieur.
----ZZZZ-
5. Refirez le filtre usag&
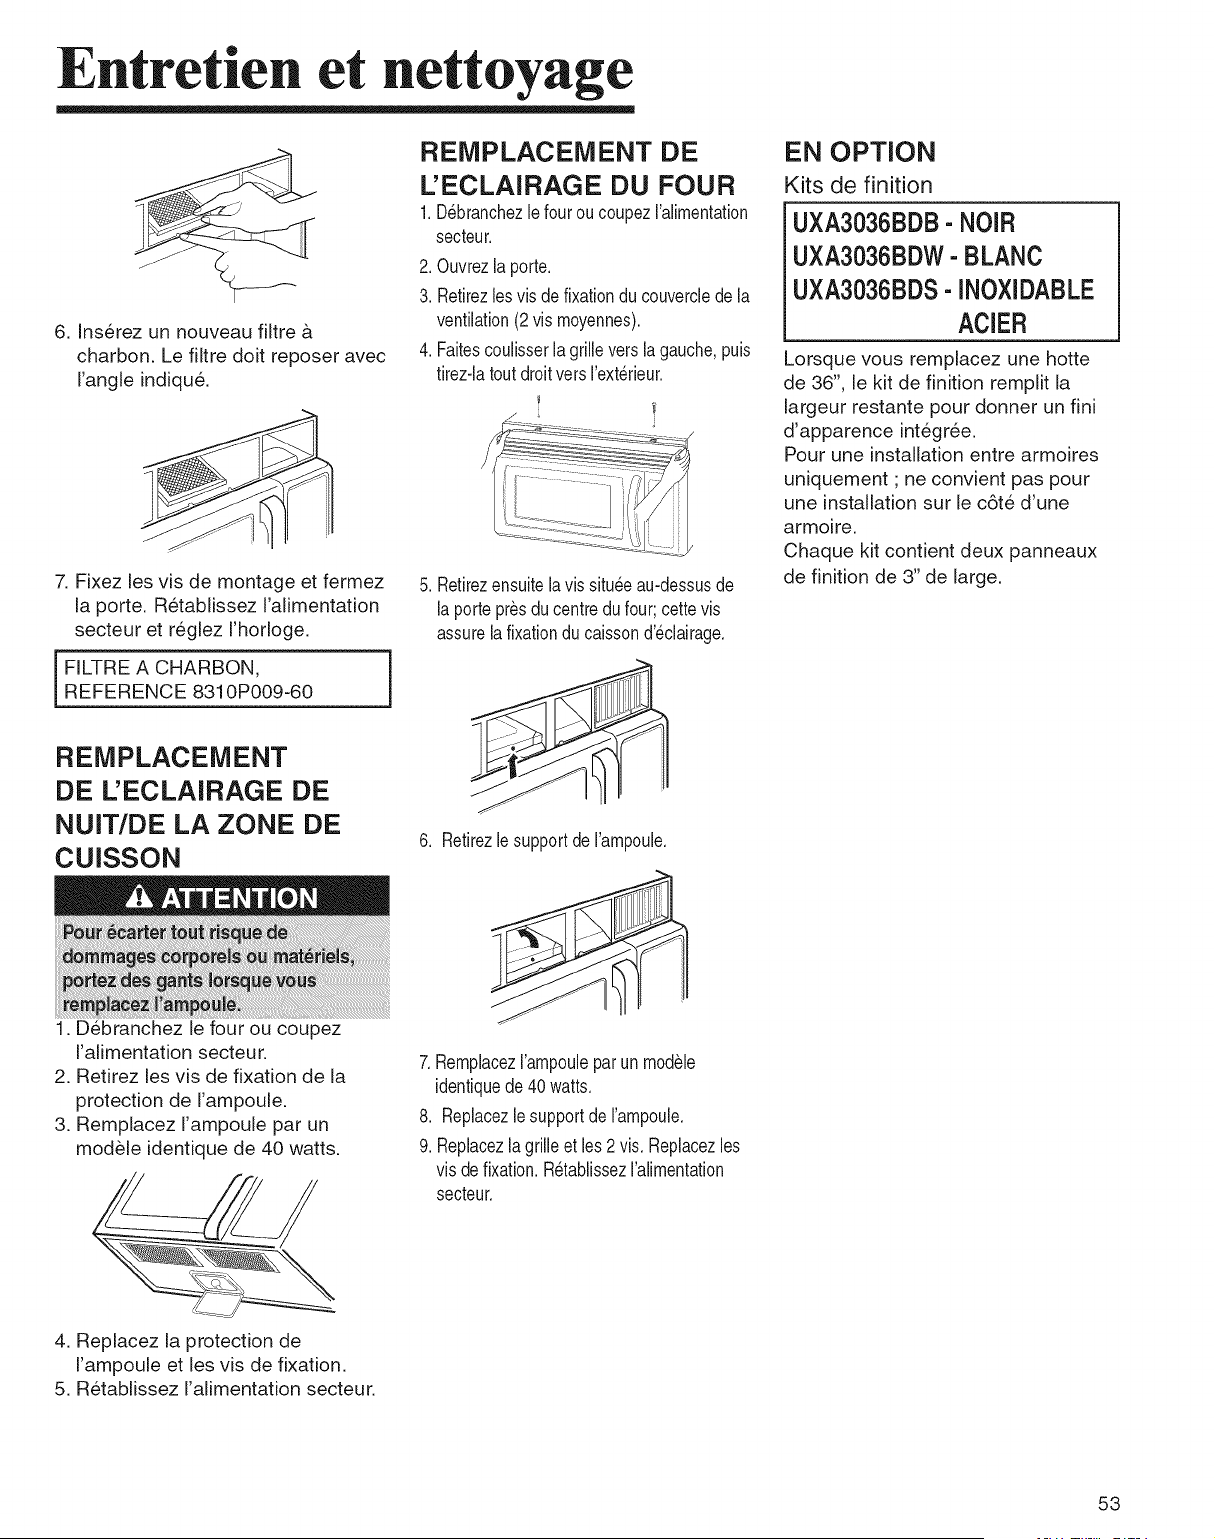
Entretien et nettoyage
6. Inserez un nouveau filtre &
charbon. Le filtre doit reposer avec
I'angle indique.
7. Fixez les vis de montage et fermez
la porte. Retablissez I'alimentation
secteur et reglez I'horloge.
FILTRE A CHARBON,
REFERENCE 8310P009-60
REMPLACEMENT
DE L'ECLAIRAGE DE
NUIT/DE LA ZONE DE
CUISSON
1. Debranchez le four ou coupez
I'alimentation secteur.
2. Retirez les vis de fixation de la
protection de I'ampoule.
3. Remplacez I'ampoule par un
module identique de 40 watts.
REMPLACEMENT DE
L'ECLAIRAGE DU FOUR
1.Debranchezle fouroucoupezI'alimentation
secteur.
2. Ouvrezla porte.
3. Retirezlesvis de fixationducouvercledela
ventilation(2vismoyennes).
4. Faitescoulisserla grille versla gauche,puis
tirez-latout droitversI'exterieur.
5. Retirezensuitela vis situeeau-dessusde
la portepresdu centredufour;cettevis
assurelafixationdu caissond'eclairage.
6. Retirez le support de I'ampoule.
/.J I
7. RemplacezI'ampouleparun modele
identiquede 40 watts.
8. Replacezlesupportde I'ampoule.
9. Replacezlagrilleet les2 vis. Replacezles
visdefixation.RetablissezI'alimentation
secteur.
EN OPTION
Kits de finition
UXA3036BDB- NOIR
UXA3036BDW- BLANC
UXA3036BDS- INOXIDABLE
AClER
Lorsque vous remplacez une hotte
de 36", le kit de finition remplit la
largeur restante pour donner un fini
d'apparence integree.
Pour une installation entre armoires
uniquement ; ne convient pas pour
une installation sur le c6te d'une
armoire.
Chaque kit contient deux panneaux
de finition de 3" de large.
4. Replacez la protection de
I'ampoule et les vis de fixation.
5. Retablissez I'alimentation secteur.
53

D pan ge
GUIDE DE DEPANNAGE
Avant d'appeler un r_parateur pour votre four, v_rifiez les
_l_ments indiqu_s dans la liste des problemes courants et de
leurs solutions.
Le four et r_cran d'affichage ne fonctionnent pas.
Branchez correctement le cordon d'alimentation sur une prise
secteur mise & la terre.
Si la prise est contr61_epar un interrupteur mural, assurez-vous
que celui-ci est allum&
D_branchez la prise du secteur, attendez dix secondes, puis
rebranchez-la.
R_armez le disjoncteur ou remplacez tout fusible grill&
Branchez un autre appareil sur cette prise ; s'il ne fonctionne
pas, contactez un _lectricien qualifi_ pour r@arer la prise.
Branchez le four sur une prise diff_rente.
L'_cran d'affichage fonctionne, mais le four ne se met pas en
marche.
Assurez-vous que la porte est correctement ferm_e.
Wrifiez qu'aucun morceau d'emballage ou d'un autre mat_riau
n'est coinc_ dans le joint de la porte.
Wrifiez que la porte n'est pas endommag_e.
Appuyez deux fois sur STOP/CLEAR (STOP/ANNULER) et
entrez de nouveau les instructions de cuisson.
Le four s'arr6te avant que le temps de cuisson soit terrain&
Si aucune coupure de courant n'a eu lieu, d_branchez la prise
du secteur, attendez dix secondes, puis rebranchez-la. Si une
coupure de courant a eu lieu, I'_cran affiche le message:
PLEASE TOUCH CLOCK AND SETTilVlE OF DAY.
(TOUCHEZ L'HORLOGE ET REGLEZ L'HEURE.)
R_initialisez I'horloge et entrez vos instructions de cuisson.
R_armez le disjoncteur ou remplacez tout fusible grill&
Les aliments cuisent trop lentement.
Assurez-vous que le four est branch_ sur une ligne de 20
amperes.
L_utilisationd'un autre appareil sur le m_me circuit peut entrafner
une chute de potentiel. Si n_cessaire, utilisez un circuit d_di_
pour lefour.
Des _tincelies ou des arcs _lectriques apparaissent.
Retirez du four tout ustensile, plat ou toute attache m_tallique. Si
vous utilisez du papier aluminium, servez-vous uniquement de
fines bandelettes et laissez un espace d'au moins 3 cm entre le
papier et les parois int_rieures du four.
Le plateau tournant fait du bruit ou est coil&
Nettoyez le plateau, I'anneau du guidage et la paroi inf_rieure
du four.
Assurez-vous que le plateau tournant et I'anneau de guidage
sont correctement mis en place.
L'utiiisation de votre four a micro-ondes entra'ine des
interferences avec un t_i_viseur ou une radio.
II s'agit du m_me type d'interf_rences que celles produites par
d'autres petits appareils m_nagers, tels qu'un seche-cheveux.
D@lacez votre four & micro-ondes afin de I'_loigner des autres
appareils _lectriques (t_l_viseur ou radio).
Remarque:
Si le four est r#gl# pour un temps de cuisson
sup#rieur _ 25 minutes, fl se r#glera de lui-m#me sur
une puissance _ 70 pour cent apr#s 25 minutes afin
de ne pas trop cuire les aliments.
Si vous n'arrivez pas a resoudre un probleme,
contactez notre service d'assistance:
(1-800-688-9900)
54

Re arque
55

F
GARANTIE DES GROS APPAREILS MENAGERS
MAYTAGCORPORATION
GARANTIE LIMITE_E
Pendant un an & compter de la date d'achat, Iorsque ce gros appareil menager est utilise et entretenu conformement aux
instructions jointes & ou fournies avec le produit, la marque Maytag de Whirlpool Corporation ou Whirlpool Canada LP
(ci-apres designees "Maytag") paiera pour les pieces specifiees par I'usine et la main-d'oeuvre pour corriger les vices de
mat@iaux ou de fabrication. Le service dolt _tre fourni par une compagnie de service designee par Maytag. Cette garantie
limitee est valide uniquement aux '_tats-Unis ou au Canada et s'applique exclusivement Iorsque I'appareil est utilise darts le
pays ot_il a ete achet& ,_ I'ext@ieur du Canada et des 50 Etats des Etats-Unis, cette garantie limitee ne s'applique pas. Une
preuve de la date d'achat original est exigee pour obtenir un service darts le cadre de la presente garantie limitee.
ARTICLES EXCLUS DE LA GARANTIE
La pr_sente garantie limit_e ne couvre pas :
1. Les visitesde service pourrectifierrinstallationdu gros appareil m_nager,montrer& rutilisateur commentutiliserrappareil, remplacer
ou r@arer des fusiblesou rectifierle c&blageou la plomberiedu domicile.
2. Les visitesde service pour r@arer ou remplacerles ampoules_lectriquesde rappareil, les filtres & air ou les filtres & eau.Les pi_ces
consomptiblesne sont pas couvertespar la garantie.
3. Les r@arationsIorsquele gros appareilm_nagerest utilis_ & des fins autres que rusage unifamilialnormalou Iorsqueles instructions
d'installationet/ou les instructionsde rop@ateurou de rutilisateurfourniesne sont pas respect_es.
4. Les dommagesimputables& :accident, modification,usageimpropreou abusif,incendie,inondation,acres de Dieu,installationfautive
ou installationnonconformeaux codesd'_lectricit_oude plomberie,ou rutilisation de pi_cesconsomptiblesou de pro@itsnettoyants
nonapprouv_spar Maytag.
5. Les d_fautsapparents,notammentles @aflures,les bosses,fissuresou tout autre dommageau fini du grosappareil m_nager,& moins
queces dommagessoient dus & desvices de mat@iauxou de fabricationet soientsignal,s & Maytagdans les 30 jours suivantla date
d'achat.
6. -routeperte d'alimentsdue &uned_faillancedu r_frig@ateurou ducongelateur.
7. Les coGtsassoci_sau transportdu gros appareil m_nagerdu domicilepourr@aration.Ce grosappareilm_nagerest con£upour _tre
r@ar_ &domicileet seul le service &domicile est couvertpar la pr_sente garantie.
8. Les r@arationsaux pi_cesou syst_mesr_sultantd'une modificationnon autoris_e fake & rappareik
9. Les fraisde transport pourle serviced'un pro@it si votre grosappareil est situ_dans une r_gion _loign_eoQunservice d'entretien
Maytagautoris_ n'est pas disponible.
10.La d@ose et la r_installationde votre grosappareil si celui-ci est install_dans un endroitinaccessibleou n'est pas install_
conform_mentaux instructionsd'installationfournies.
11.Les gros appareilsm_nagersdont les num@osde s@ieet de moduleoriginauxont _t_ enlev_s,modifiesou qui ne peuventpas _tre
facilementidentifies.La pr_sentegarantieest nullesi le num@ode s@ied'usinea _te modifi_ou enlev_du gros appareil m_nager.
Le coot d'une r@aration ou des pieces de rechange darts le cadre de ces circonstances exclues est & la charge du client.
CLAUSE D'EXONERATION DE RESPONSABILITE AU TITRE DES GARANTIES IMPLIClTES; LIMITATION DES RECOURS
LE SEUL ET EXCLUSIF RECOURS DU CLIENT DANS LE CADRE DE LA PRESENTE GARANTIE LIMITEE CONSISTE
EN LA R}_PARATION PR}_VUE CI-DESSUS. LES GARANTIES IMPLICITES, Y COMPRIS LES GARANTIES APPLICABLES
DE QUALITE MARCHANDE ET D'APTITUDE ,_ UN USAGE PARTICULIER, SONT LIMITEES ,_ UN AN OU ,_ LA PLUS
COURTE P}_RIODE AUTORISI_E PAR LA LOI. MAYTAG N'ASSUME AUCUNE RESPONSABILITE POUR LES DOMMAGES
FORTUITS OU INDIRECTS. CERTAINES JURIDICTIONS NE PERMETTENT PAS [_:EXCLUSIONOU LA LIMITATION
DES DOMMAGES FORTUITS OU INDIRECTS, OU LES LIMITATIONS DE LA DUREE DES GARANTIES IMPLICITES
DE QUALITE MARCHANDE OU D'APTITUDE ,_ UN USAGE PARTICULIER, DE SORTE QUE CES EXCLUSIONS OU
LIMITATIONS PEUVENT NE PAS S'APPLIQUER DANS VOTRE CAS. CETTE GARANTIE VOUS CONFERE DES DROITS
JURIDIQUES SPECIFIQUES ET VOUS POUVEZ EGALEMENT JOUIR D'AUTRES DROITS QU[ PEUVENT VARIER D'UNE
JURIDICTION ,_ UNE AUTRE.
,&,I'ext@ieur du Canada et des 50 t_tats des Etats-Unis, cette garantie ne s'applique pas. Contactez votre marchand Maytag
autorise pour determiner si une autre garantie s'applique.
Si vous avez besoin de service, voir d'abord la section "D@annage" du Guide d'utilisation et d'entretien. Apr_s avoir v@ifie
la section "Depannage", de I'aide supplementaire peut _tre trouvee en v@ifiant la section "Assistance ou service" ou en
appelant Maytag. Aux t_.-U., composer le 1-800-688-9900. Au Canada, composer le 1-800-807-6777.
56
DE68-03143Z
12/07
Imprime en Malaysia
Guia de uso y cuidado
iVlodelo iVliVlV4205BA
Instrucciones de seguridad importantes ........ 58
Precauciones para evitar la posibie exposici6n a
energfa de microondas excesiva ............... 60
Obtener los mejores resultados de coccion ...... 62
Caracterfsticas .............................. 63
Manual de instrucciones ...................... 65
Utensilios para cocinar ....................... 79
Cuidado y limpieza .......................... 80
Solucion de problemas ....................... 82
GARANTiA DE LOS ELECTRODOiVlESTICOS
PRINCIPALES DE iVlAYTAGCORPORATION ...... 84
Conserve las instrucciones para consultas futuras.
Aseg_rese de que esta Gu_a de uso y cuidado se conserve con el homo.
Parte Nro. W10177930
Instrucciones .e seguridad i portantes
Lo que necesitasaber
sobre las instrucciones
de seguridad
Las advertencias e instrucciones importantes sobre
seguridad que aparecen en esta Gu[a de uso y cuidado no
estan destinadas a cubrir todas [as posibles condiciones y
situaciones que pueden ocurrir. Debe actuar con sentido
comQn, precauci6n y cuidado cuando instale, rea[ice e[
mantenimiento o ponga en funcionamiento e[ microondas.
Comun[quese siempre con su vendedor, distribuidor,
agente de servicio o fabricante si surgen prob[emas o
situaciones que usted no comprende.
Reconozca los
s[mbolos,advertencias
y iquetas de
seguridad
58
CON ERVE ESTAS INST UCC ES
Instrucciones e seguridadi portantes
Instruccionesde
conexi6n a tierra
El homo DEBE estar conectado a tierra. La conexi6n
a fierra reduce el riesgo de descarga e[ectrica ya que
ofrece un cable de escape para [a corriente e[ectrica
en caso de que haya un cortocircuito. Este homo estA
equipado con un cable que tiene un conductor a fierra
con un enchufe con conexi6n a fierra. El enchufe debe
conectarse a un tomacorriente que este correctamente
insta[ado y conectado a fierra. Consu[te [as instrucciones
de insta[aci6n.
Consu[te a un electricista o centro de servicio ca[ificado
si no comprende bien [as instrucciones de conexi6n a
fierra, o si fiene a[guna duda respecto de si el homo estA
conectado a fierra correctamente
No utilice un cable prolongador. Si el cable de
a[imentaci6n de[ producto es demasiado corto, haga
que un e[ectricista ca[ificado insta[e un tomacorriente de
tres ranuras. Este homo debe enchufarse en un circuito
de 60 Hz separado con los va[ores el6ctricos nomina[es
mostrados en [a tab[a de especificaciones. Cuando el
homo comparte el circuito con otros equipos, quizAs sea
necesario un aumento en los fiempos de cocci6n y pueden
saltar los fusibles.
El microondas funciona con la corriente normal domestica,
110-120V.
Declaraci6nde
interferenciade
radiofrecuencia de la
Comisidn Federalde
Comunicaciones
(EE. U. solamente)
Este equipo genera y uti[iza energ[a de frecuencia ISM,
y si no se instala y se utiliza correctamente, es decir, en
estricto cump[imiento con [as instrucciones de[ fabricante,
puede causar interferencia con [a recepci6n de radio y
televisi6n. Se ha comprobado y confirmado que cumple
con los I[mites estipulados para Equipos ISM (Industriales,
Cientificos, Medicos) en virtud de [a secci6n 18 de los
reglamentos de [a FCC, que ban sido dise5ados para
proveer protecci6n razonable contra ta[ interferencia en
una instalaci6n residencia[.
Sin embargo, no se garantiza que no habra interferencia
en alguna instalaci6n determinada. Si este equipo causa
interferencia con [a recepci6n de radio o televisi6n, 1o
que puede determinarse apagando y encendiendo el
equipo, se recomienda que el usuario intente corregir [a
interferencia de una de [as siguientes maneras:
Cambie [a orientaci6n de [a antena de recepci6n de radio
o televisi6n.
Ubique en otro lugar el homo de microondas con
respecto al receptor.
Aleje el homo de microondas del receptor.
Enchufe el homo de microondas en un tomacorriente
distinto para que el homo de microondas y el receptor
esten en circuitos diferentes.
El fabricante no es responsable de ninguna interferencia
de radio o televisi6n causada por la modificaci6n
no autorizada de este horno de microondas. Es
responsabilidad del usuario corregir tal interferencia.
CO ERVE ESTAS INSTRUCC ES
59
Instrucciones .e seguridad i portantes
Precaucionesparaevitar
posibleexposici6na energ[a
de microondasexcesiva
A. NO intente hacer funcionar este horno con la puerta
abierta pues se puede producir una exposici6n perjudicial
a la energia de microondas. Es importante no alterar ni
modificar las trabas de seguridad.
B. NO coloque ning0n objeto entre la parte delantera del
homo y la puerta ni deje que se acumule suciedad o
residuos de limpiadores en las superficies de sellado.
C. NO ponga en funcionamiento el homo si est,. daSado. Es
particularmente importante que la puerta del homo cierre
bien y que no se ocasionen daSos a:
1. la puerta (doblada),
2. las bisagras y pestillos (rotos o sueltos),
3. las juntas de la puerta y las superficies de sellado.
D. El homo no debe ser regulado o reparado por ninguna
persona excepto el personal de servicio debidamente
calificado.
6O
ERVE ESTAS INST UCC ES
Instrucciones e seguridadi portantes
CO ERVE ESTAS INSTRUCC ES
61
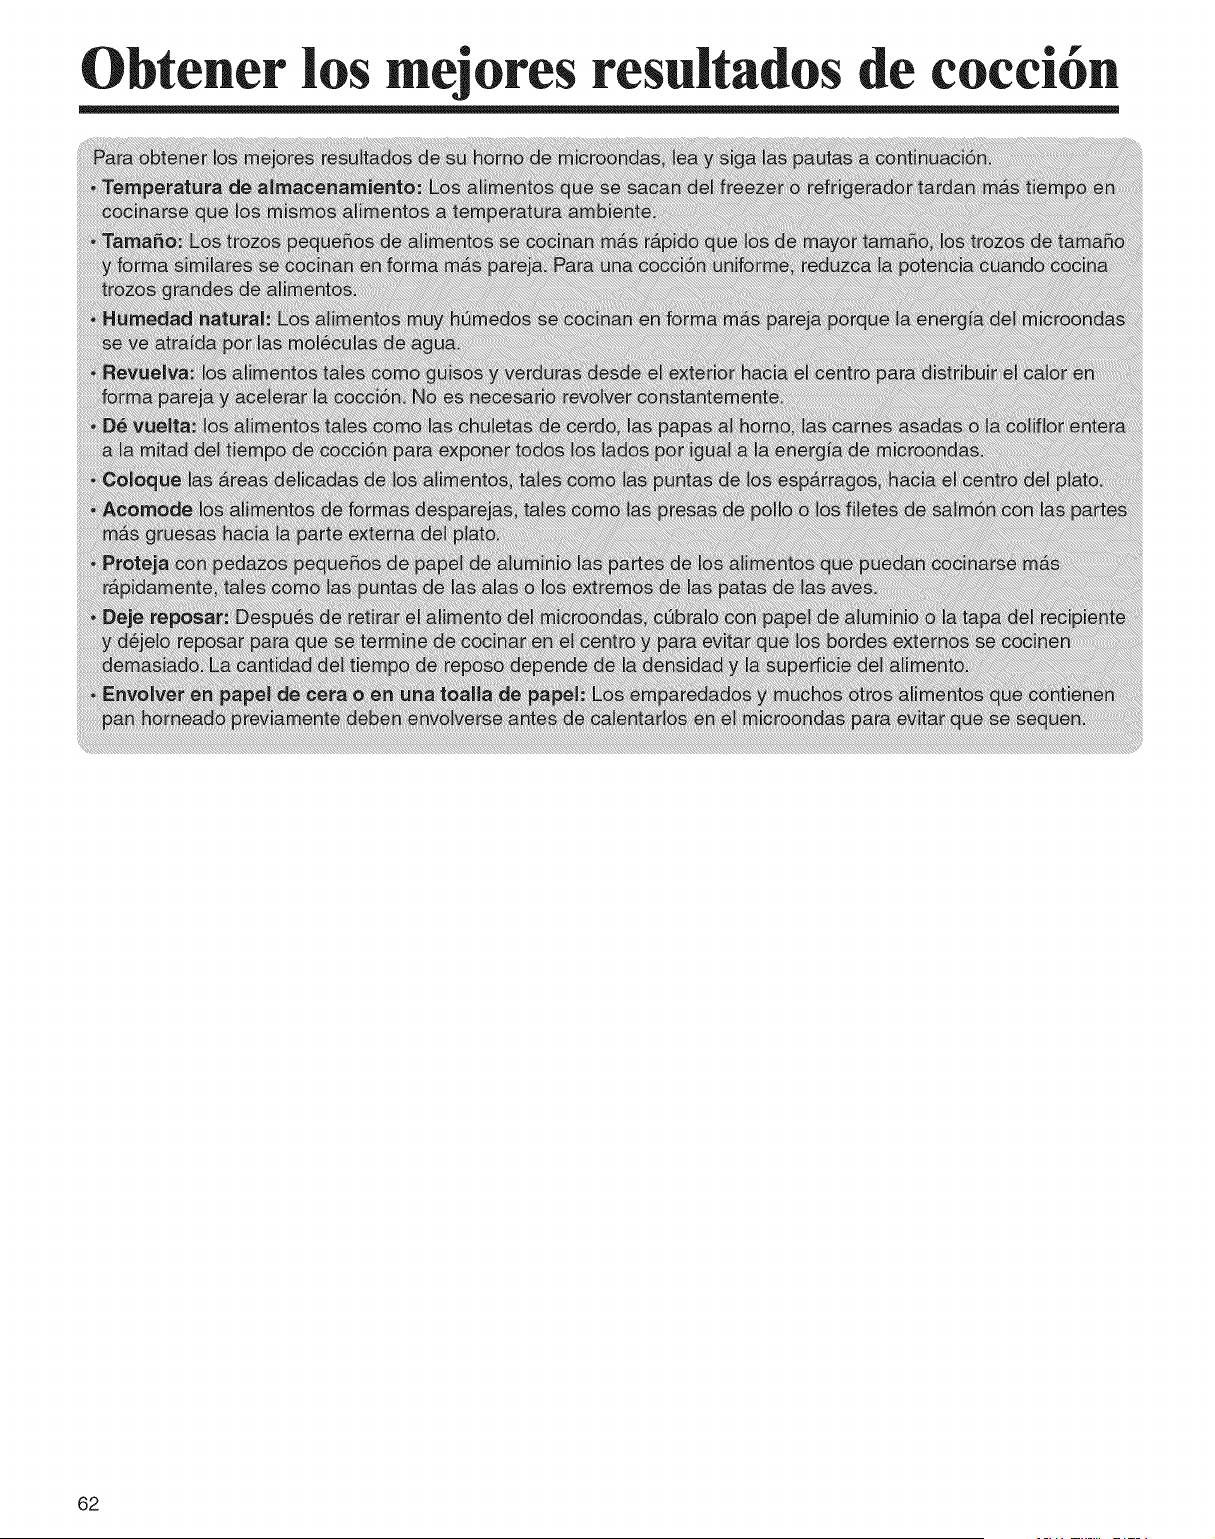
Obtener os e'ores resuitados de cocci6n
62
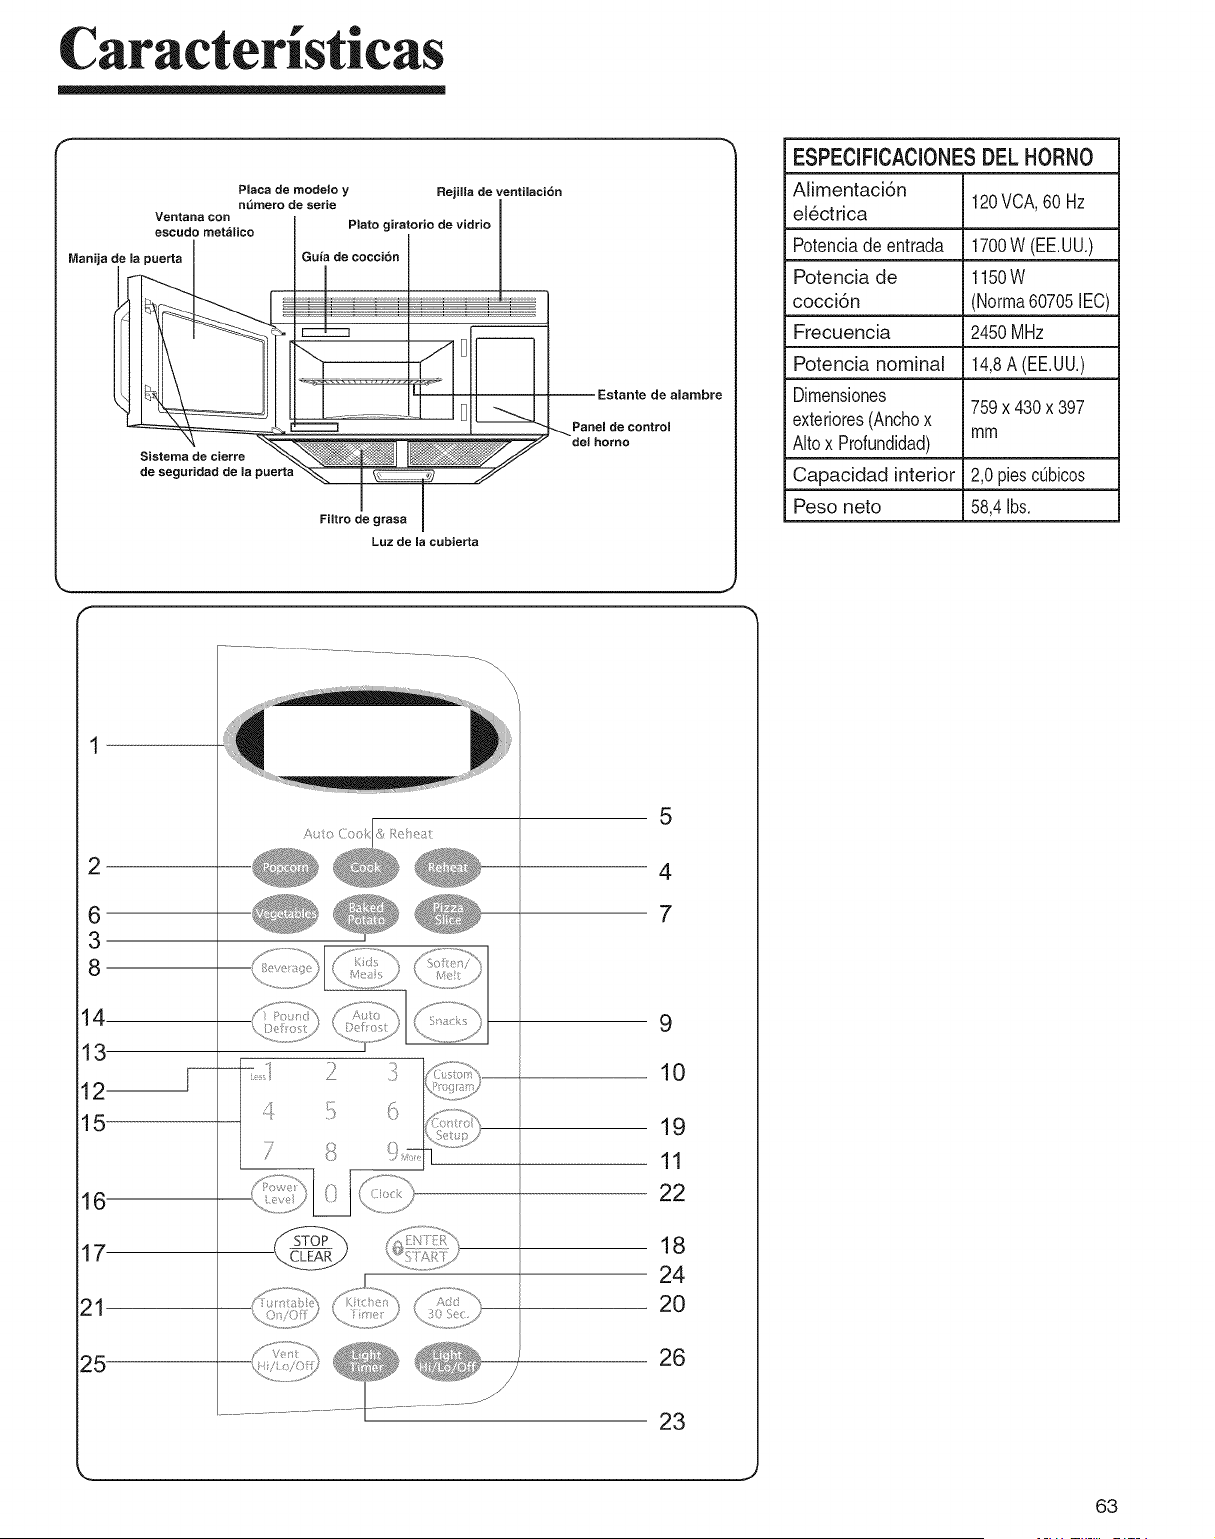
Caracteristicas
Placa de modelo y Rejilla de ventilaci6n
n_mero de serie
Ventsns con
escudo met_lico Plato giratorio de vidrio
Gu_a de coccibn
Sistema de cierre
de seguridad de la puert_
Manijs de Is puerta
Fiitro de grass
Luz de la cubierts
Panel de control
del homo
ESPECIFICACIONESDELHORNO
Alimentaci6n
electrica 120VCA,60 Hz
Potenciade entrada 1700W (EE.UU.)
Potencia de 1150W
cocci6n (Norma60705lEO)
Frecuencia 2450MHz
Potencia nominal 14,8A(EE.UU.)
Dimensiones
759x 430x 397
exteriores(Anchox
mm
Altox Profundidad)
Capacidad interior 2,0 piesc_bicos
Peso neto 58,4Ibs.
2
6
5
4
7
8
14
13
2
5
6
7-
25
9
10
19
11
22
18
24
20
23
63
Caracteristicas
CARACTER{STICAS
1. DISPLAY (PANTALLA): La pantalla
incluye un reloj e indicadores que le
muestran la hora del dia, los ajustes
de tiempo de cocci6n y las funciones
de cocci6n seleccionadas.
2. POPCORN (PALOMITAS DE MA|Z):
Oprima esta tecla cuando prepare
palomitas de maiz en su homo de
microondas. Consulte la p&gina 68
para obtener mas informaci6n.
3. BAKED POTATO (PAPA AL
HORNO): Oprima esta tecla para
cocinar papas. Consulte la p&gina 69
para obtener mas informaci6n.
4. REHEAT (RECALENTAMIENTO):
Oprima esta tecla para recalentar
un plato de comida, guisos y pastas.
Consulte la pagina 69 para obtener
mas informaci6n.
5. COOK (COCCJON): Oprima esta
tecla para cocinar tocino, comidas
congeladas, desayunos congelados.
Consulte la pagina 70 para obtener
mas informaci6n.
6. VEGETABLES (VERDURAS):
Oprima esta tecla para cocinar
verduras frescas o congeladas.
Consulte la p&gina 69 para obtener
m&s informaci6n.
7. PIZZA SLICE (REBANADA DE
PIZZA): Oprima esta tecla para
recalentar la pizza. Consulte la
p&gina 69 para obtener m&s
informaci6n.
8. BEVERAGE (BOISSONS): Oprima
esta tecla para calor la boissons.
Consulte la pagina 69 para obtener
mas informaci6n.
9. KIDS MEALS, SOFTEN/MELT,
SNACKS (Comidas para niSos,
Ablandar/Derretir, Snacks): Oprima
estas teclas para cocinar comidas
especificas. Consulte las paginas
72, 73 y 74 para obtener mas
informaci6n.
10. CUSTOM PROGRAM
(PROGRAMA PERSONALIZADO):
Oprima esta tecla para recuperar
una instrucci6n de cocci6n
previamente programada en la
memoria. Consulte la p&gina 64
para obtener m&s informaci6n.
11. MORE (MAS): Oprima esta tecla
para agregar m&s tiempo de
cocci6n. Consulte la p&gina 65 para
obtener mas informaci6n.
12.
13.
LESS (MENOS): Oprima esta tecla
para restar tiempo de cocci6n.
Consulte la pagina 65 para obtener
mas informaci6n.
AUTO DEFROST
(DESCONGELAMENTO
AUTOM.&.TICO): Oprima esta tecla
para descongelar alimentos segOn
el peso. Consulte la p&gina 75 para
obtener m&s informaci6n.
14. 1POUND DEFROST
(DESCONGELAMIENTO
1LIBRA): Esta tecla ofrece un
descongelamiento R,_.PIDOpara
1,0 libra de alimentos congelados.
Consulte la p&gina 75 para obtener
m&s informaci6n.
15. NOMERO: Oprima las teclas
num_ricas para ingresar el tiempo
de cocci6n, el nivel de potencia, las
cantidades o los pesos.
16. POWER LEVEL (NIVEL DE
POTENCJA): Oprima esta tecla
para seleccionar un nivel de
potencia de cocci6n. Consulte las
p&ginas 67 y 68 para obtener m&s
informaci6n.
17.
18.
STOP/CLEAR (APAGAR/
ANULAR): Oprima esta tecla para
apagar el homo o anular todas las
entradas.
ENTER/START (INGRESAR/
COMENZAR): Oprima esta tecla
para iniciar una funci6n. Si abre la
puerta despues de que el homo
comienza a cocinar, cierre la puerta
y oprima la tecla ENTER/START
(JNGRESAR/COMENZAR)
nuevamente.
19. CONTROL SETUP
(CONFIGURACION DE
CONTROLES): Oprima esta tecla
para modificar las configuraciones
predeterminadas del homo.
Consulte la pagina 65 para obtener
messinformaci6n.
20.
ADD 30 SEC (AGREGAR 30 SEG):
Oprima esta tecla para ajustar y
comenzar rapidamente en el nivel
de potencia de1100%. Consulte
la pagina 66 para obtener mas
informaci6n.
21.TURNTABLE ON/OFF (PLATO
GIRATORIO ACTJVADO/
DESACTIVADO): Oprima esta
tecla para desactivar el plato
giratorio. Aparecera la palabra
"OFF' (desactivado) en la pantalla.
Consulte la pagina 65 para obtener
mas informaci6n.
NOTA:
. TURNTABLE ON!OFF (PLATO
GIRATORIO ACTIVADO!
DESACTIVADO) no est,, disponible
en los modos cocci6n con sensor y
descongelamiento.
22. CLOCK (RELOJ): Oprima esta
tecla para ingresar la hora del dia.
Consulte la pagina 65 para obtener
mas informaci6n.
23.
LIGHTTIMER (TEMPORIZADOR
DE LA LUZ): Oprima esta tecla
para configurar el temporizador de
la luz. Consulte la pagina 66 para
obtener mas informaci6n.
24. KITCHEN TIMER
(TEMPORJZADOR DE LA
COCJNA): Oprima esta tecla para
configurar el temporizador de la
cocina. Consulte la p&gina 65 para
obtener m&s informaci6n.
25. VENT HI/LO/OFF (VENTILACK)N
ALTNBAJNAPAGADA): Oprima
esta tecla para encender o apagar
el ventilador. Consulte la p&gina 65
para obtener m&s informaci6n.
26. LIGHT HI/LO/OFF (LUZ ALTN
BAJNAPAGADA): Oprima esta
tecla para encender la luz de la
cubierta. Consulte la p&gina 66 para
obtener m&s informaci6n.
64
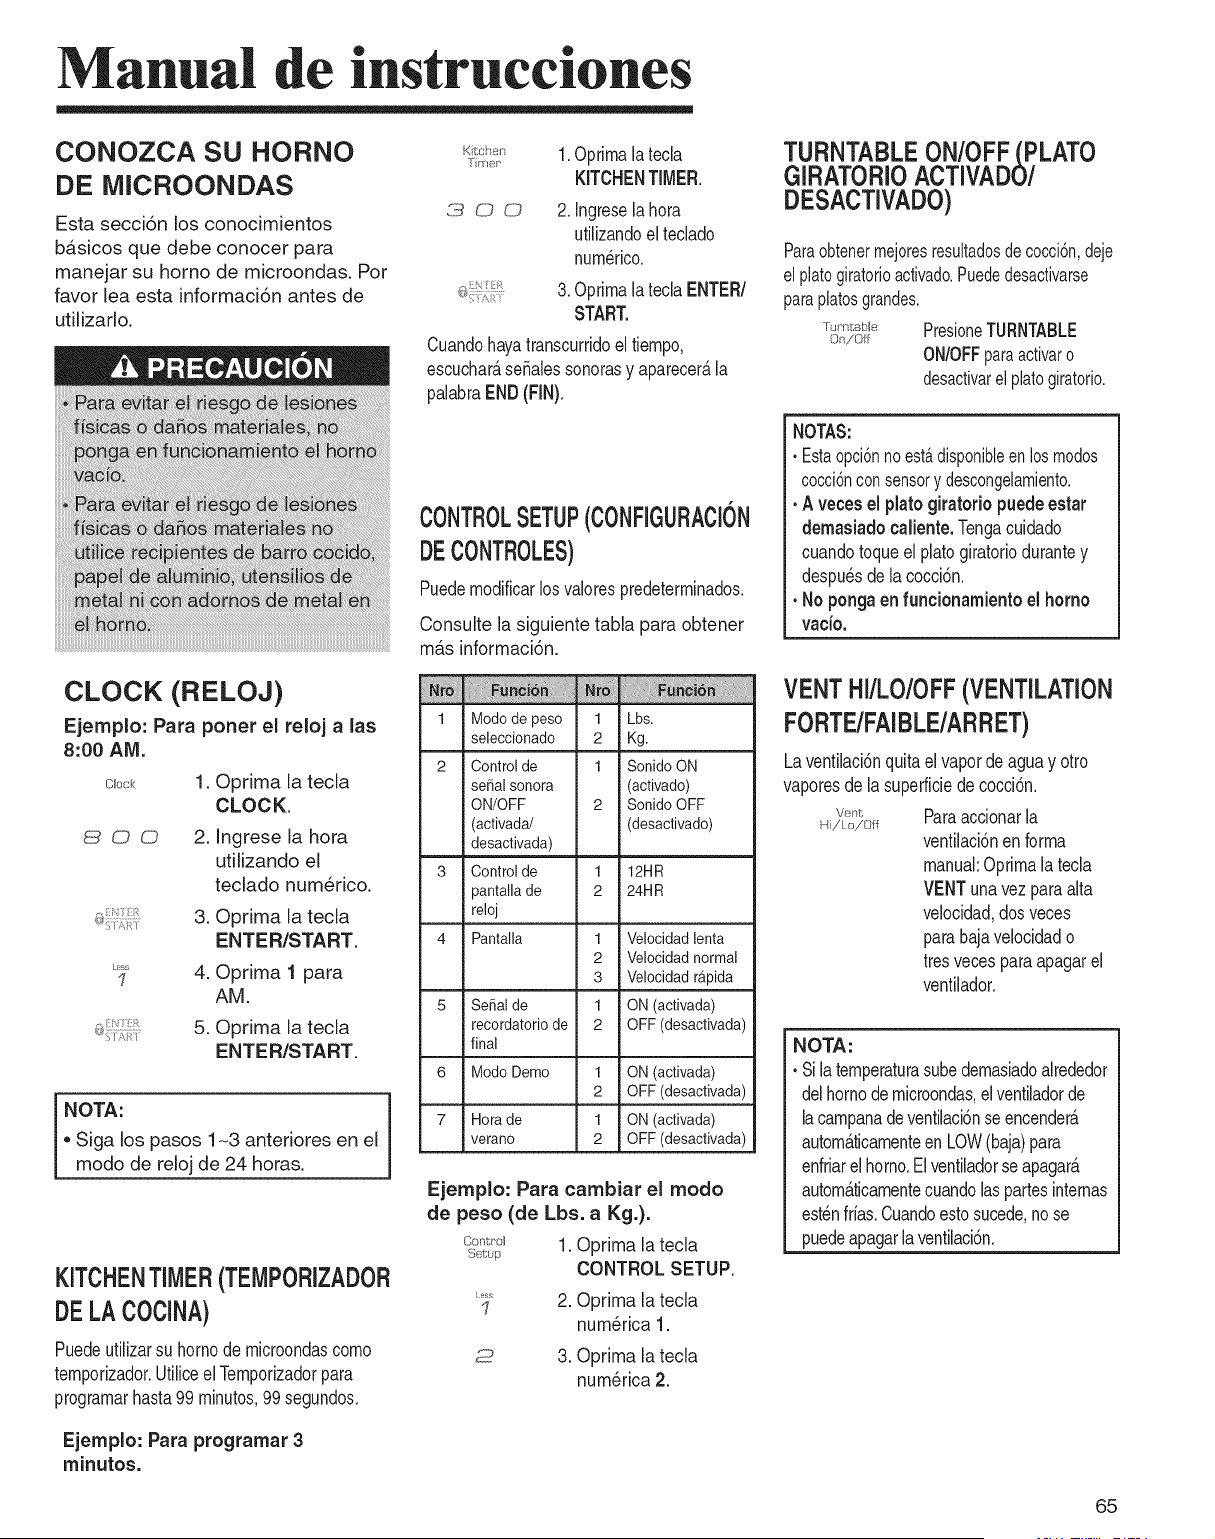
Manual de instrucciones
CONOZCA SU HORNO
DE MICROONDAS
Esta secci6n los conocimientos
basicos que debe conocer para
manejar su homo de microondas. Por
favor lea esta informaci6n antes de
utilizar[o.
Kt,:h,Jn 1.Oprimaia tecla
Timr_'
KITCHENTIMER
300
2. Ingresela hora
utilizandoelteclado
numerico.
3. OptimalateclaENTER/
START.
Cuandohayatranscurridoel tiempo,
escuchar_,sefialessonorasy aparecer_,la
palabraEND(FIN).
CONTROLSETUP(CONFIGURACION
DECONTROLES)
Puedemodificarlosvalorespredeterminados.
Consulte la siguiente tabla para obtener
m_,sinformaci6n.
TURNTABLEON/OFF(PLATO
GIRATORIOACTIVADO/
DESACTIVADO)
Paraobtenermejoresresultadosdecocci6n,deje
el platogiratorioactivado.Puededesactivarse
paraplatosgrandes.
_,J_,r_,_L_l_PresioneTURNTABLE
On/Off
ON/OFFparaactivaro
desactivarelplatogiratorio.
NOTAS:
oEstaopci6nnoestadisponibleenlosmodos
cocci6nconsensory descongelamiento.
• A vecesel platogiratoriopuedeestar
demasiadocaliente.Tengacuidado
cuandotoqueel platogiratoriodurantey
despuesdela cocci6n.
• No pongaen funcionamiento el homo
vac[o.
CLOCK (RELOJ)
Ejemplo: Para porter el reloj alas
8:00 AM.
CHock
1. Oprima [a tecia
CLOCK.
8OO
2. Ingrese [a hora
utilizando el
teclado numerico.
3. Oprima la tecla
ENTER/START.
L_
1 4. Oprima 1 para
AM.
5. Oprima la tecla
ENTER/START.
NOTA:
,, Siga los pasos 1~3 anteriores en el
modo de reloj de 24 horas.
KITCHENTIMER(TEMPORlZADOR
DELACOClNA)
Puedeutilizarsu homode microondascomo
temporizador.UtiliceelTemporizadorpara
programarhasta99minutos,99segundos.
1
2
Modo de peso 1 Lbs.
seleccionado 2 Kg.
Control de 1 Sonido ON
serial sonora (activado)
ON/OFF 2 Sonido OFF
(activada/ (desactivado)
desactivada)
3 Control de 1 12HR
pantalla de 2 24HR
reloj
4 Pantalla 1 Velocidad lenta
2 Velocidad normal
3 Velocidad r,_pida
5 Serial de 1 ON (activada)
recordatorio de 2 OFF (desactivada)
final
6
7
Modo Demo 1 ON (activada)
2 OFF (desactivada)
Hora de 1 ON (activada)
verano 2 OFF (desactivada)
Ejemplo: Para cambiar el modo
de peso (de Lbs. a Kg.).
c_,t,_,o_ 10prima la tecla
Seup
CONTROL SETUP.
_ 2. Oprima la tecla
num_rica 1.
_ 3. Oprima la tecla
num_rica 2.
VENTHI/LO/OFF(VENTILATION
FORTE/FAIBLE/ARRET)
Laventilaci6nquitael vaporde aguay otro
vaporesde la superficiedecocci6n.
w_t, Paraaccionarla
Hi/Lo/Off
ventilaci6nenforma
manual:Oprimala tecla
VENTunavezparaalta
velocidad,dosveces
parabajavelocidado
tresvecesparaapagarel
venfilador.
NOTA:
• Silatemperaturasubedemasiadoalrededor
delhomode microondas,el ventiladorde
lacampanadeventilaci6nseencender_.
autom_.ticamenteenLOW(baja)para
enfriarelhomo.Elventiladorse apagar_.
autom_.ticamentecuandolaspartesintemas
estenfrias.Cuandoestosucede,nose
puedeapagarlaventilaci6n.
Ejemplo: Para programar 3
minutos.
65

Manual de instrucciones
CHILD LOCK
(BLOQUEO PARA NINOS)
Puedebloquearel panelde controlparaevitar
queel microondasse inicieaccidentalmenteo
sea utilizadopornifios.
Lafunci6nChildLocktambienesOtilcuando
se limpiael panelde control.ChildLockevita
laprogramaci6naccidentalcuandose limpiael
panelde control.
Ejemplo:Paraconfigurar el bloqueopara
niSos.
Oprimay mantenga
oprimidalateclaENTER/
STARTdurantem_.sde3
segundos.Enlapantalla
se leer&CHILDLOCK
ON(Bloqueo para nifios
activado)y se escucharan
dossefialessonoras.
Ejemplo:Paracancelarel bloqueo para
niSos.
Optimay mantenga
oprimidalateclaENTER/
STARTdurantema.sde 3
segundos.Desaparecera
la palabraLOCKED
(BIoqueado)y se
escuchar_.ndossefiales
sonoras.
LIGHT HI/LO/OFF(LUZ ALTN
BAJNAPAGADA)
Ejemplo:Paraconfigurar el bloqueopara
niSos.
Optimala teclaLIGHTHI/
LO/OFFunavez paraluz
brillante,dosvecespara
hz nocturna,o tresveces
paraapagarla luz.
ADD 30 SEC(AGREGAR30
SEG.)
Estateclaahorratiempoy lepermiteconfigurar
r@idamentey comenzarla cocci6nen el
microondassin lanecesidadde oprimirlatecla
ENTER/START.
Ejemplo:ParaprograrnarAGREGAR30
SEGparaafiadir 2 minutos.
66
Add
30 Sec_
Optimalateda ADD30
SEC.4 veces.Elhomo
comienzalacocci6ny la
pantalb muestralacuenta
regresivadeltiempo.
LIGHTTIMER
(TEiVIPORIZADOR DE LA LUZ)
Puedeprogramarla LUZparaque seencienda
y seapagueautom_.ticamenteencualquier
momento.Laluzse enciendea la mismahora
cadadia hastaque se reinicia.
Ejemplo:Seenciendea las 2:00AM,se
apagaalas 7:00AM.
Modode reloj de 12horas.
2
7
0 0
L_ss
I
@ o
1.Optimala teda LIGHT
TIMER.
2. Ingresela horaa laque
deseaquese encienda
laLUZ.
3. Oprimala teda ENTER/
START.
4. Oprima1 paraAM.
5. Optimala teda ENTER/
START.
6. Ingresela horaa laque
deseaquese @aguela
LUZ.
7. Optimala teda ENTER/
START.
8. Oprima2 paraPM.
9. Optimala teda ENTER/
START.
Modode reloj de 24 horas.
1.Optimala teda LIGHT
TIMER.
2. Ingresela horaa laque
deseaquese encienda
laLUZ.
3. Optimala teda ENTER/
START.
_'_ 4. Ingresela horaa la que
1
deseaquese apaguela
LUZ.
5. Optimala teda ENTER/
START.
Ejemplo: Pour annulet le LIGHT
TIMER (MINUTEUR D'ECLAIRAGE).
1.OprimalateclaLIGHT
TIMER.
0 2. Oprimala teclaO.
NOTA:
• Si desea cancelar el LIGHT TIMER
en funcionamiento, oprima la tecla 0.
CUSTOM PROGRAM
(PROGRAMA
PERSONALIZADO)
CUSTOMPROGRAMle permiterecuperar
unainstrucci6ndecocci6npreviamente
incorporadaa la memoriay comenzara
cocinarr@idamente.
2 0 0
[DOW@P
Level
7
Ejemplo:Paracocinardurante 2 minutos
a una potenciade170%.
c'_"°'_' 1.Oprimala teclaCUSTOM
Program
PROGRAM.
2. Ingreseel fiempode
cocci6n.
3. OptimalateclaPOWER
LEVEL.
4. Ingreseen nivelde
potencia.
5. OptimalateclaENTER/
START.
Ejemplo:Pararecuperarel programa
personalizado.
Custom
Prog_'a l_
1.OprimalateclaCUSTOM
PROGRAM.
2. Oprimala teclaENTER/
START.
Cuandohayatranscurridoel tiempode
cocci6n,escuchar_,cuatrosefialessonorasy
aparecer_,la palabraEND.
Manual de instrucciones
iVlORE/LESS (lVlAS/IVlENOS)
Los botones More/Less le permiten
ajustarlos tiempos de cocci6n
preconfigurados. S61ofuncionan en los
modos Sensor Reheat (recalentamiento
con sensor), Sensor cooking (cocci6n
con sensor) (excepto para Bebidas),
Add 30 sec. (agregar 30 seg), Custom
Cook (cocci6n personalizada) o Time
Cook (cocci6n por tiempo). Utilice el
bot6n More/Less s61odespu_s de haber
comenzado a cocinar con uno de estos
procedimientos.
9
L_s
7
1. Para AGREGAR
m_.stiempo a un
procedimiento de
cocci6n automAtico:
Oprima el bot6n
MORE (9)(M_s).
2. Para REDUCIR
m_.stiempo de un
procedimiento de
cocci6n automAtico:
Oprima el bot6n LESS
(1)(Menos).
COClNAR CON NIVELES
DE POTENCIA iVlASBAJOS
La cocci6n con el nivel de potencia
HIGH no siempre le brinda los
mejores resultados con los alimentos
que necesitan una cocci6n mAs [enta,
tales como [as carnes asadas, los
alimentos horneados o los flanes.
Su homo tiene 9 ajustes de potencia
adem,;4.sde HIGH.
Ejemplo: Para cocinar alimentos
durante 7 minutos 30 segundos a
una potencia del 70%.
7 3 0 1. Ingrese eltiempo
de cocci6n.
Pow_. 2. Oprima [a tecia
L_vel
POWER LEVEL,
7 3. Ingrese en nive[ de
potencia.
4. Oprima [a tecla
ENTER/START.
Cuando haya transcurrido el tiempo
de cocci6n, escuchara cuatro seSaIes
sonoras y aparecer,;4,la palabra END.
COClNAR CON NIVELES
DE POTENClA ALTOS
Ejemplo: Para cocinar alimentos
durante 8 minutos 30 segundos a una
potencia de[ 100%.
_-} 3 0 1. Ingrese el tiempo de
cocci6n.
2. Oprima la tecla
ENTER/START.
Cuando haya transcurrido el tiempo
de cocci6n, escuchar_tcuatro sefiales
sonoras y aparecer_,la palabra END.
Para conocer los niveles de potencia
consulte [a gu[a de cocci6n en [a
pagina 68.
IMPORTANTE:
NO almacene ni utiIice el estante
de alambre en este homo a
menos que se vaya a cocinar m,;4.s
de un aIimento o una receta 1o
requiera.
Podria causar daSos en el homo.
COClNARCONMAS DEUN
ClCLO DE COCCI(SN
Para obtener mejores resultados,
algunas recetas requieren un nivel de
potencia durante un tiempo y otro nivel de
potencia durante otto tiempo. Su homo
puede configurarse para pasar de uno
a otto autom_.ticamente,durante tres
ciclos como m_tximosi el primer ciclo de
calentamiento es el de descongelamiento.
Ejemplo: Para cocinar alimentos
durante 3 m[nutos a una potencia de[
90% y luego a una potencia de[ 70%
durante 7 minutos 30 segundos.
£_ 0 © 1. Ingrese el primer
tiempo de cocci6n.
P°'_ 2. Oprima [a tecla
Level
POWER LEVEL,
9 3. Ingrese en nive[ de
potencia.
7 3 0 4. Ingrese el segundo
tiempo de cocci6n.
r::,_w_ 5. Oprima [a tecla
LeveH
POWER LEVEL,
7
6. Ingrese en nive[ de
potencia.
7. Oprima la tecIa
ENTER/START.
Cuando haya transcurrido el tiempo
de cocci6n, escuchara cuatro se5aIes
sonoras y aparecer,;4,la paIabra END.
67
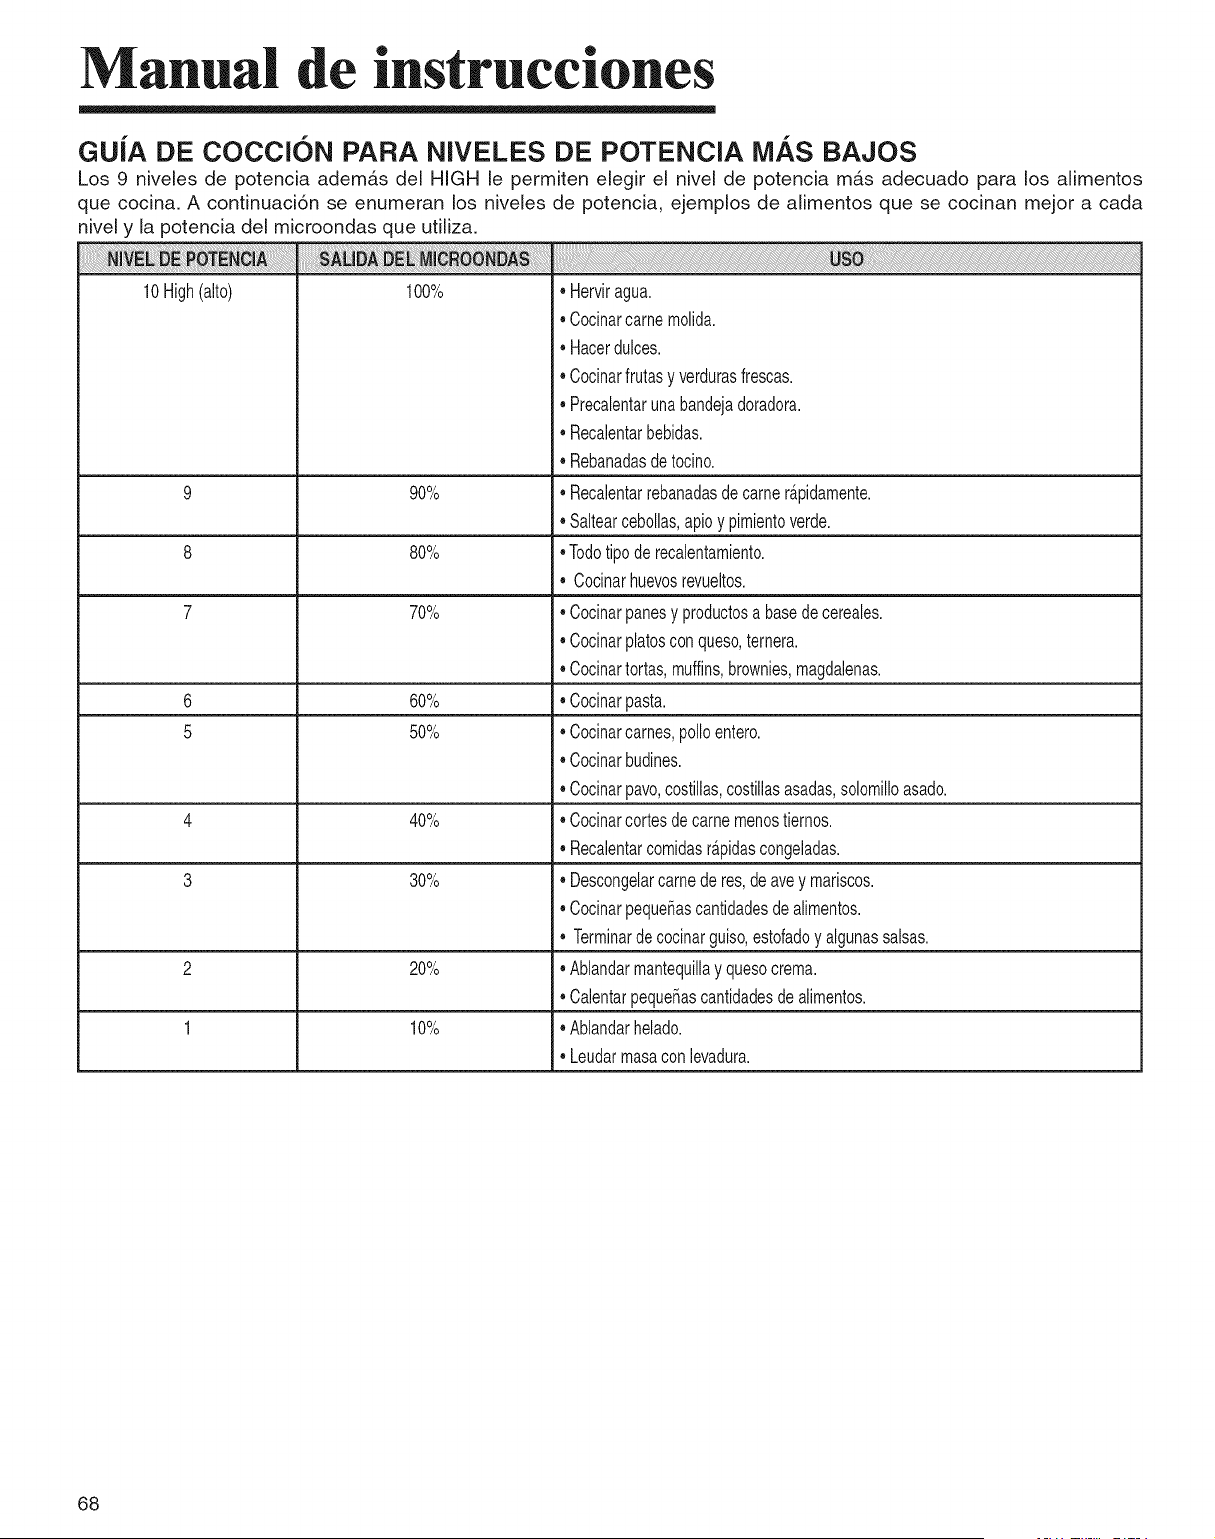
Manual de instrucciones
10High(alto)
100%
GU|A DE COCCl6N PARA NIVELES DE POTENCIA MAS BAJOS
Los 9 niveles de potencia ademAs del HiGH le permiten elegir el nivel de potencia mAs adecuado para los aNmentos
que cocina. A continuaci6n se enumeran los niveles de potencia, ejemplos de alimentos que se cocinan mejor a cada
nivel y la potencia del microondas que utiNza.
9 9O%
8 80%
7 70%
6 60%
5 50%
4 40%
3 30%
2 20%
1 10%
, Herviragua.
, Cocinarcamemolida.
, Hacerdulces.
,,Cocinarfrutasy verdurasfrescas.
,,Precalentarunabandejadoradora.
,,Recalentarbebidas.
,,Rebanadasdetocino.
,,Recalentarrebanadasdecamer_,pidamente.
,,Saltearcebollas,apioy pimientoverde.
,,Todotipoderecalentamiento.
,, Cocinarhuevosrevueltos.
,,Cocinarpanesy productosabasede cereales.
,,Cocinarplatosconqueso,ternera.
,,Cocinartortas,muffins,brownies,magdalenas.
,,Cocinarpasta.
,,Cocinarcarnes,polioentero.
,,Cocinarbudines.
,,Cocinarpavo,costillas,costillasasadas,solomilloasado.
,,Cocinarcortesdecamemenostiernos.
, Recalentarcomidasr_.pidascongeladas.
,,Descongelarcamederes,deavey mariscos.
,,Cocinarpeque_ascantidadesdealimentos.
,,Terminardecocinarguiso,estofadoy algunassalsas.
,,Ablandarmantequillay quesocrema.
,,Calentarpeque_ascantidadesdealimentos.
,,Ablandarhelado.
,,Leudarmasaconlevadura.
68
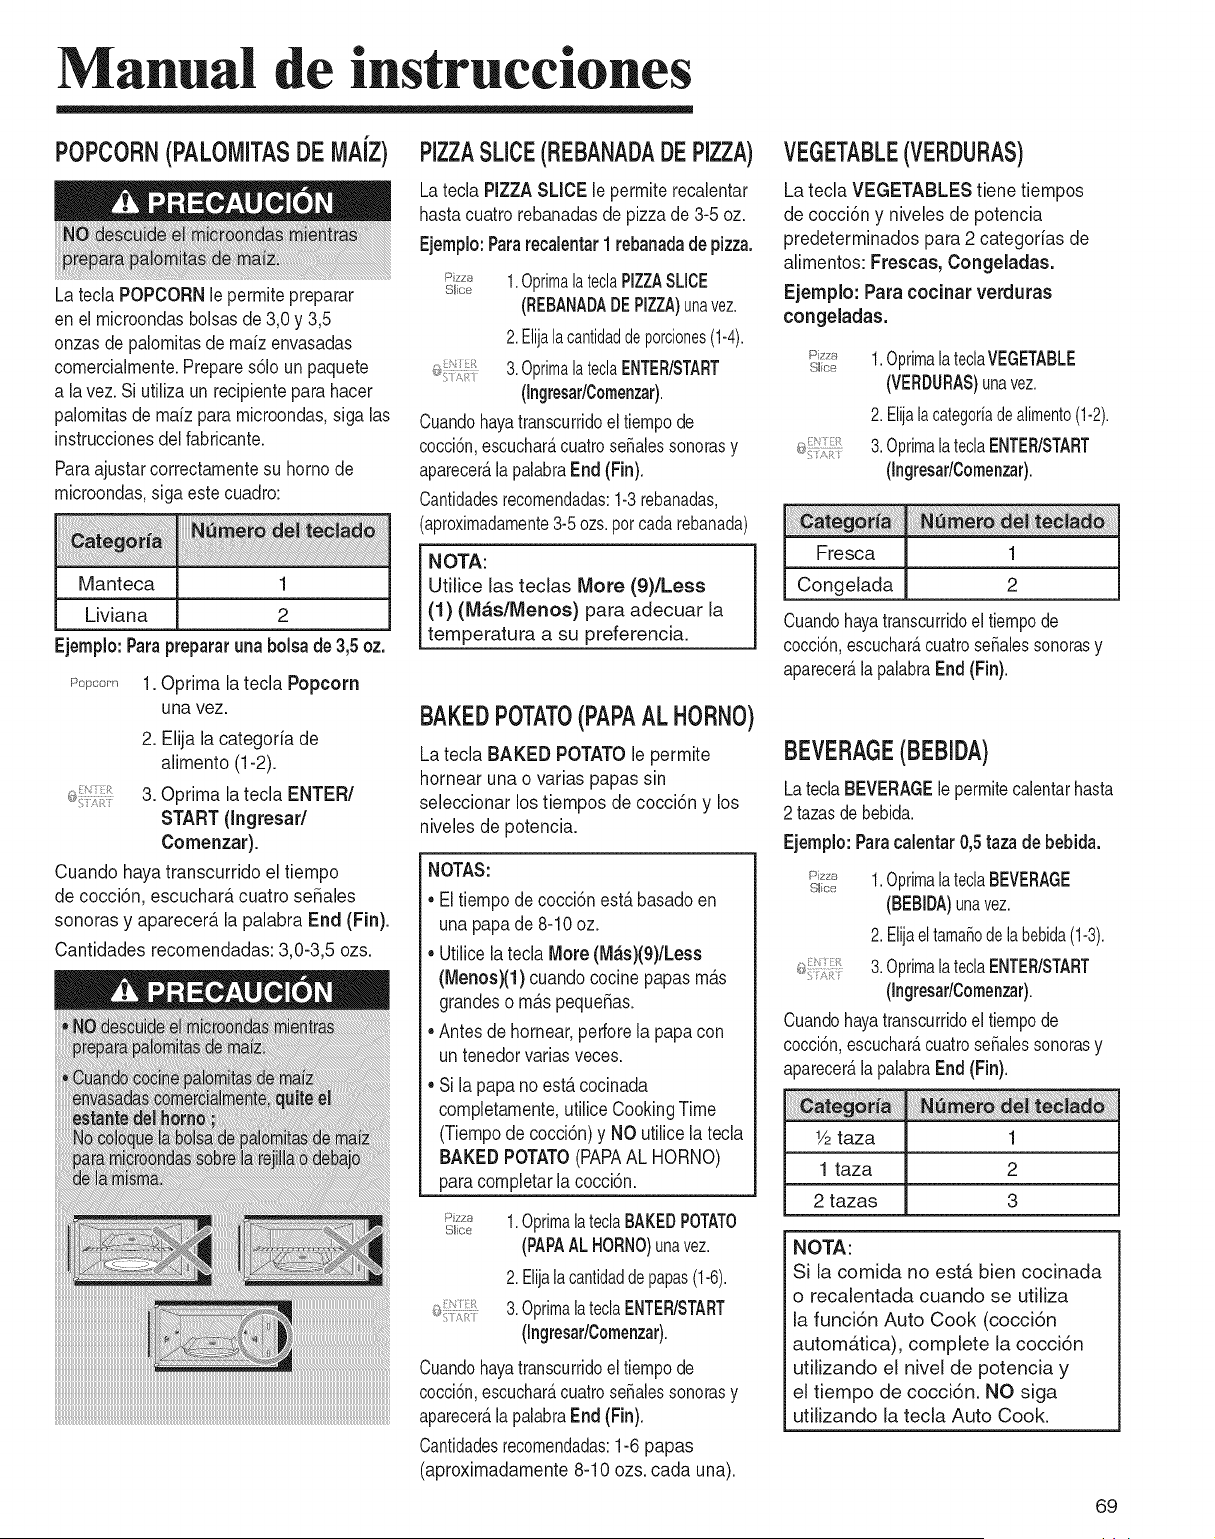
Manual de instrucciones
POPCORN(PALOMITASDEMAiZ)
La tecla POPCORNle permitepreparar
en el microondasbolsas de 3,0 y 3,5
onzasde palomitasde mafz envasadas
comercialmente.Prepares61oun paquete
a la vez.Si utiliza un recipientepara hacer
palomitasde mafz paramicroondas,siga las
instruccionesdel fabricante.
Paraajustarcorrectamentesu homo de
microondas,siga este cuadro:
Manteca 1
Liviana 2
Ejemplo:Paraprepararuna bolsa de 3,5oz.
r'el_c:e,',1.0prima latecla Popcorn
unavez.
2. Elija la categoria de
alimento (1-2).
3. Oprima latecla ENTER/
START (Ingresar/
Comenzar).
Cuando haya transcurrido el tiempo
de cocci6n, escuchar_,cuatro seSales
sonoras y aparecer_tla palabra End (Fin).
Cantidades recomendadas: 3,0-3,5 ozs.
PIZZASLICE(REBANADADEPIZZA)
Latecla PIZZASLICE le permiterecalentar
hastacuatro rebanadasde pizza de 3-5 oz.
Ejemplo:Pararecalentar1 rebanadade pizza.
P_' 1.OprimalateclaPIZZASLICE
Slice
(REBANADADEPIZZA)unavez.
2.Elijalacantidaddeporciones(1-4).
3.OprimalateclaENTER/START
(Ingresar/Comenzar).
Cuandohayatranscurridoel tiempode
cocci6n,escucharAcuatroseSalessonorasy
aparecer_,lapalabraEnd (Fin).
Cantidadesrecomendadas:1-3rebanadas,
(aproximadamente3-5 ozs.percadarebanada)
NOTA:
Utilice [as teclas More (9)/Less
(1) (M_s/Menos) para adecuar la
temperatura a su preferencia.
BAKEDPOTATO(PAPAAL HORNO)
La tecla BAKED POTATO le permite
hornear una o varias papas sin
seleccionar los tiempos de cocci6n y los
niveles de potencia.
NOTAS:
Eltiempode coccionest,.basado en
una papa de 8-10oz.
Utilicela tecla More(M_s)(9)/Less
(Menos)(1)cuando cocine papasmAs
grandeso mas pequeSas.
Antesde hornear,pen'orela papacon
un tenedorvariasveces.
Si la papano est,. cocinada
completamente,utilice CookingTime
(Tiempode cocci6n)y NO utilice la tecla
BAKED POTATO(PAPAAL HORNO)
paracompbtar la cocci6n.
;Sizza
Slce
1.OprimalateclaBAKEDPOTATO
(PAPAALHORNO)unavez.
2.Elijala cantidaddepapas(1-6).
3.OprimalateclaENTER/START
(Ingresar/Comenzar).
Cuandohayatranscurridoel tiempode
cocci6n,escuchar_,cuatrose_alessonorasy
apareceralapalabraEnd (Fin).
Cantidadesrecomendadas:1-6papas
(aproximadamente 8-10 ozs. cada una).
VEGETABLE(VERDURAS)
La tecla VEGETABLES tiene tiempos
de cocci6n y niveles de potencia
predeterminados para 2 categorias de
alimentos: Frescas, Congeladas.
Ejemplo: Para cocinar verduras
congeladas.
Pzza
Slice
1.OptimalateclaVEGETABLE
(VERDURAS)unavez.
2.Elijalacategoriadealimento(1-2).
3.OprimalateclaENTER/START
(Ingresar/Comenzar).
Fresca 1
Congelada 2
Cuandohayatranscurridoel tiempode
cocci6n,escuchar_,cuatroseSalessonorasy
aparecer_,lapalabraEnd (Fin).
BEVERAGE(BEBIDA)
LateclaBEVERAGElepermitecalentarhasta
2 tazasdebebida.
Ejemplo:Paracalentar 0,5tazade bebida.
P_ 1.OprimalatedaBEVERAGE
S_ice
(BEBIDA)unavez.
2.Elijaeltamaledelabebida(1-3).
3.OprimalateclaENTER/START
(Ingresar/Comenzar).
Cuandohayatranscurridoel tiempode
cocci6n,escuchar_,cuatroseSalessonorasy
apareceralapalabraEnd (Fin).
Y2taza 1
1 taza 2
2 tazas 3
NOTA:
Si la comida no esta bien cocinada
o recalentada cuando se utiliza
la funci6n Auto Cook (cocci6n
automatica), complete la cocci6n
utilizando el nivel de potencia y
el tiempo de cocci6n. NO siga
utilizando la tecla Auto Cook.
69
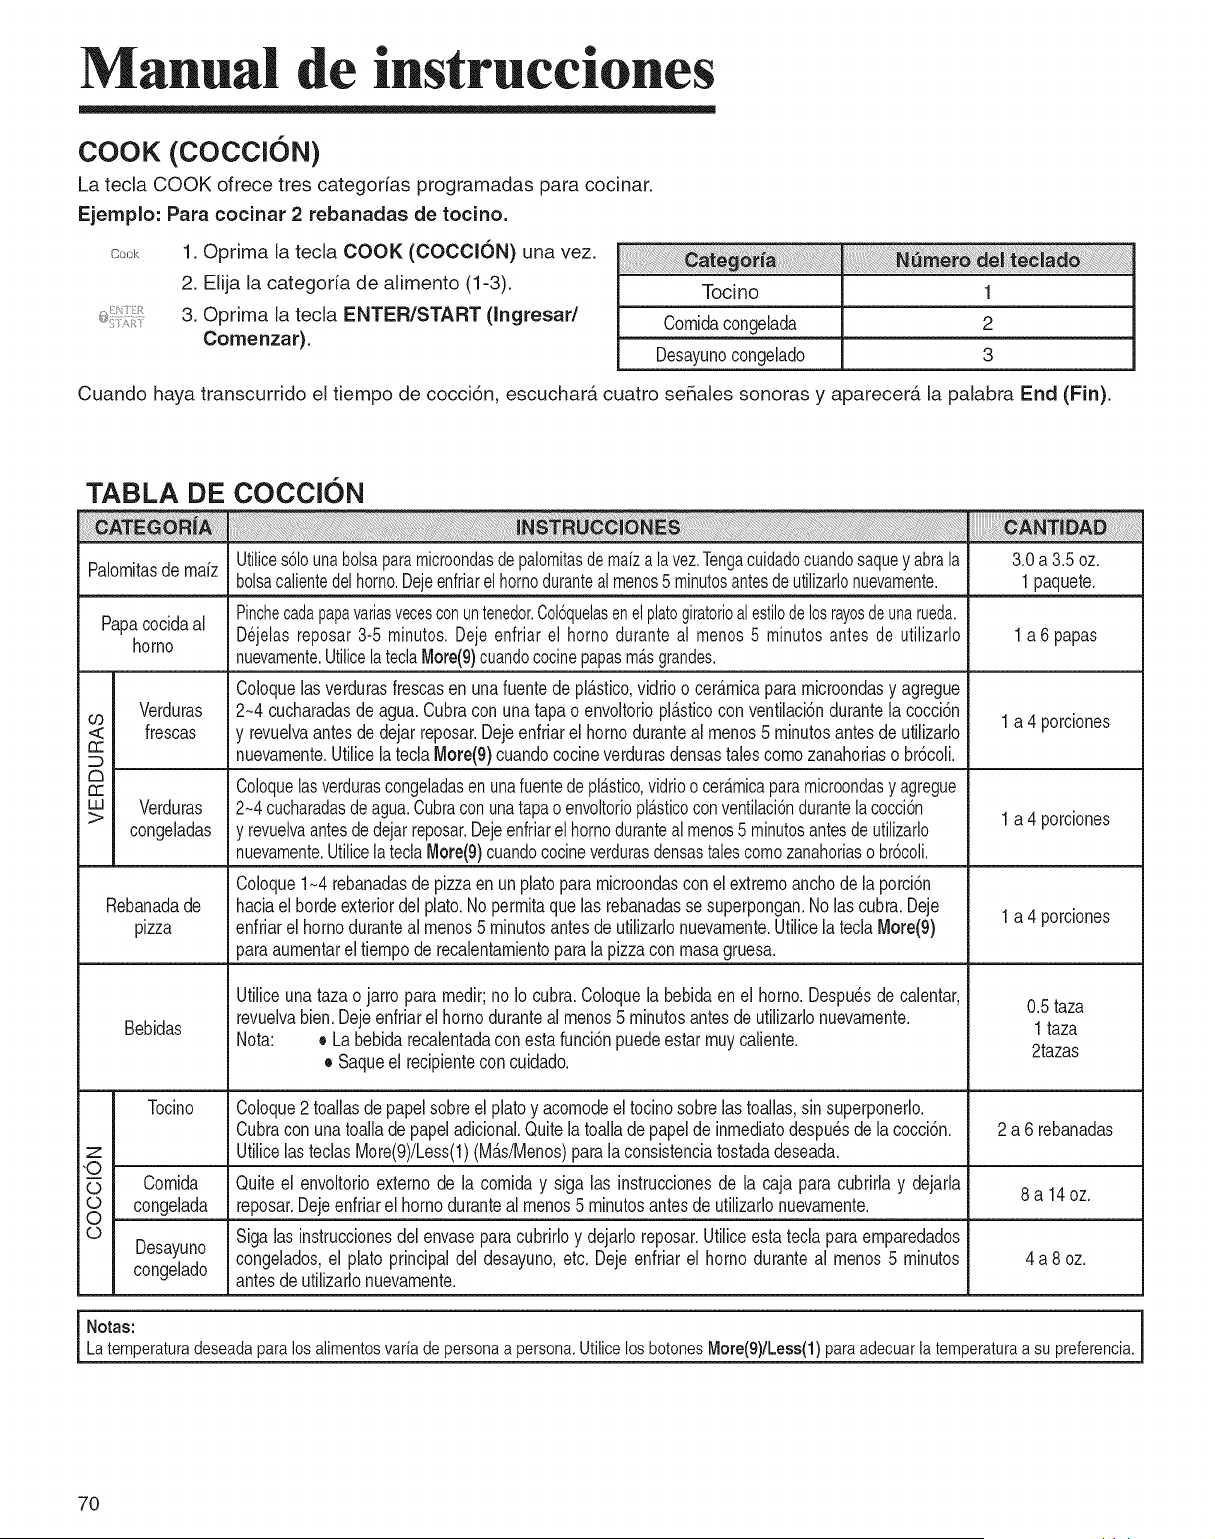
Manual de instrucciones
COOK (COCCl6N)
La tecla COOK ofrece tres categorias programadas para cocinar.
Ejemp[o: Para cocinar 2 rebanadas de tocino.
Co,_k 1. Optima la tecla COOK (COCCION) una vez.
2. Elija la categoria de alimento (1-3).
3. Oprima la tecla ENTER/START (Ingresad
Comenzar).
i iiiii!ii! i!ii i !i i ii ii ii i i i iiiiiiiiiiiiiiiiiiii iiiiiiiiiiiiiiiiiiiiiiiiiiiiiiiiiiiiiiiiiiiiiiiiiiiiiiiii i i i i i! i ! !i i ! !! ! !! ! ! i ! ! ! i i i i i!ii ! i iii ii ii ii i iiiiiiiiiii iiiiiiiiiiiiiii iiiiiiiiiiiiiiiiiiii i i i
Tocino
Comidacongelada
Desayunocongelado
! ! ! i !ai ! i i ii ii iii i ii ii ii ii iiiiiiiiiiiiiiiiiiiiiiiiiiiiiiiiiiiiiiiiiiiiiiiiiiiiiiiii !
1
2
3
Cuando haya transcurrido el tiempo de cocci6n, escuchar,;4,cuatro se5ales sonoras y aparecer,;4,la palabra End (Fin).
TABLA DE
Palomitasde maiz
Papacocidaal
homo
Verduras
frescas
rr
C3
rr
Verduras
congeladas
Rebanadade
pizza
Bebidas
COCC ON
Utilices6lounabolsaparamicroondasdepalomitasdemaiza la vez.Tengacuidadocuandosaquey abrala
bolsacalientede[homo.Dejeenfriarel homodurantea[menos5 minutosantesdeutilizarlonuevamente.
Pinchecadapapavariasvecesconuntenedor.Col6quelasenelplatogiratorioalestilodelosrayosdeunarueda.
Dejelasreposar3-5 minutos.Dejeenfriar el homo duranteal menos5 minutosantes de utilizarlo
nuevamente.Utilice[ateclaMore(9)cuandococinepapasm_.sgrandes.
Coloquelasverdurasfrescasen unafuentedepl_.stico,vidrioo cer_.micaparamicroondasy agregue
2~4cucharadasdeagua.Cubracon unatapao envoltoriopl_.sticoconventilaci6ndurantela cocci6n
y revuelvaantesdedejarreposar.Dejeenfriarel homoduranteal menos5 minutosantesdeutilizarlo
nuevamente.Utilicela teclaIv]ore(9)cuandococineverdurasdensastalescomozanahoriaso br6coli.
Coloquelasverdurascongeladasen unafuentede pl_.stico,vidrioo cer_.micaparamicroondasy agregue
2~4cucharadasdeagua.Cubraconunatapao envoltoriopl_.sticoconventilaci6ndurantela cocci6n
y revuelvaantesdedejarreposar.Dejeenfriarel hornodurantea] menos5minutosantesde utilizarlo
nuevamente.UtilicelateclaMore(9)cuandococineverdurasdensastalescomozanahoriaso br6coli.
Coloque1~4rebanadasde pizzaen un platoparamicroondasconel extremoanchodelaporci6n
haciael bordeexteriordelplato.No permitaque las rebanadasse superpongan.No lascubra.Deje
enfriarel homoduranteal menos5 minutosantesde utilizarlonuevamente.Utilicela teclaIv]ore(9)
paraaumentareltiempoderecalentamientoparala pizzacon masagruesa.
Utiliceuna taza o jarroparamedir;noIo cubra.Coloquela bebidaen el homo.Despuesde calentar,
revuelvabien.Dejeenfriarel homoduranteal menos5 minutosantesde utilizarlonuevamente.
Nota: o Labebidarecalentadaconesta funci6npuedeestarmuycaliente.
o Saqueel recipienteconcuidado.
3.0a 3.5oz.
1 paquete.
1a 6 papas
1 a 4 porciones
1 a 4 porciones
1 a 4 porciones
0.5 taza
1 taza
2tazas
Tocino Coloque2toallasdepapelsobreel platoy acomodeel tocinosobrelastoallas,sin superponerlo.
Cubraconunatoalladepapeladicional.Quitela toalladepapelde inmediatodespuesde la cocci6n. 2 a 6 rebanadas
z UtilicelasteclasMore(9)/Less(1)(M_.s/Menos)parala consistenciatostadadeseada.
"O
Comida Quiteel envoltorioexternode la comiday siga las instruccionesde la caja paracubrirlay dejarla 8 a 14oz.
congelada reposar.Dejeenfriarel homodurantealmenos5 minutosantesde utilizarlonuevamente.
Sigalasinstruccionesdel envaseparacubrirloy dejarloreposar.Utiliceesta tecla paraemparedados
© Desayuno congelados,el platoprincipaldeldesayuno,etc. Deje enfriarel homoduranteal menos5 minutos 4 a 8oz.
congelado antesde utilizarlonuevamente.
i Notas:
Latemperaturadeseadaparalosalimentosvariade personaa persona.UtilicelosbotonesMore(9)/Less(1)paraadecuarla temperaturaa supreferencia.
7O
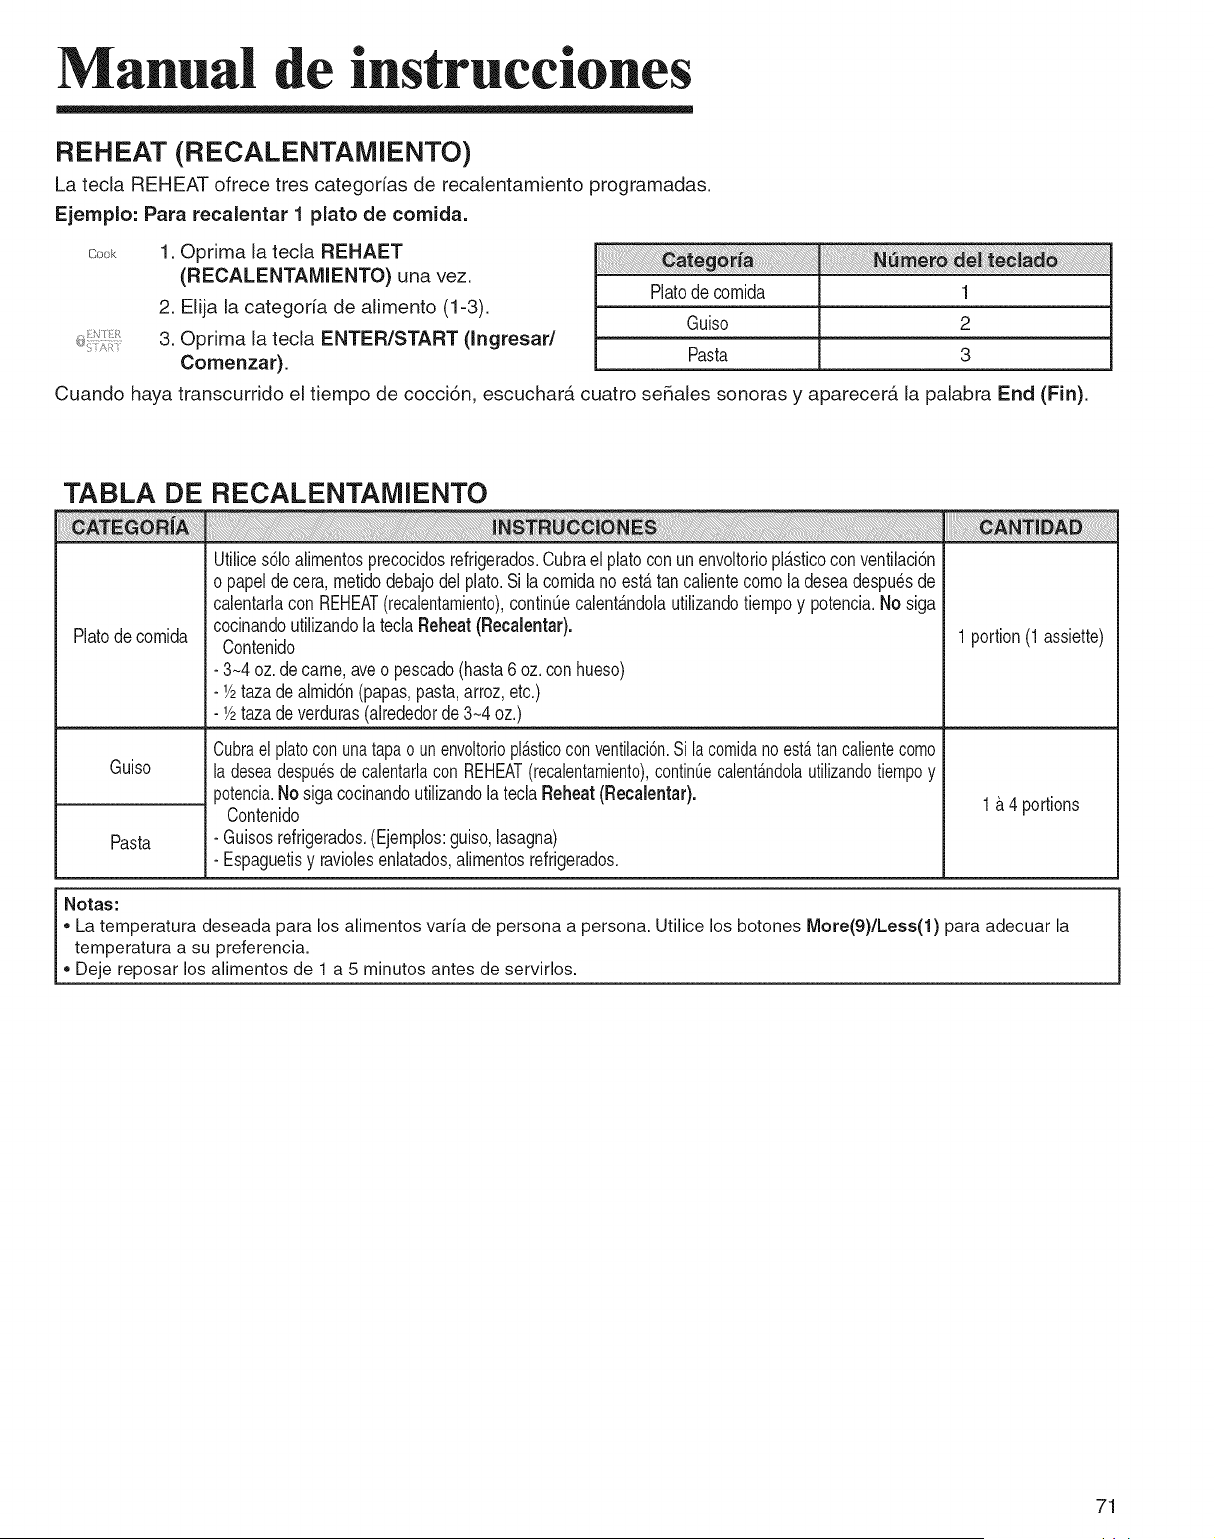
Manual de instrucciones
REHEAT (RECALENTAMIENTO)
La tecla REHEAT ofrece tres categorias de recalentamiento programadas.
Ejemplo: Para recalentar 1 plato de comida.
Cook
1. Oprima [a tec[a REHAET
(RECALENTAMIENTO) una vez.
2. Elija la categoria de alimento (1-3).
3. Oprima la tecla ENTER/START 0ngresad
Comenzar).
ii i ii ii !i ii iiiiiiii i ii i iiiiiiiiiii ii iiiiiiiiii i iiiiiiiiii i iiiiiiiiii i i !! ! i! ! i i i i i i ! i!i! !ii i ! ii iiiiiiiiiiiiiiiii iiiiiiiiiii iiii !i !ilii i ii i !i !i !i !i iii i i i i ii iiiiii i i ii iii iiiiiiiiiii iiii iiiii i !i iii i i i i i i i aa i!i J i i! a! !i !ii i i i i ii iii i ii iii iiii iii ii ii ii ii iii ii ii ii ii iii ii ii ii ii:i
Platode comida 1
Guiso 2
Pasta 3
Cuando haya transcurrido el fiempo de cocci6n, escuchar,;4,cuatro se5ales sonoras y aparecer,;4.[a palabra End (Fin).
TABLA DE
Platode comida
Guiso
Pasta
RECALENTAiVllENTO
Utilices61oalimentosprecocidosrefrigerados.Cubrael platoconunenvoltoriopl_.sticoconventilaci6n
o papelde cera, metidodebajodel plato.Si la comidano est,.tancalientecomola deseadespuesde
calentarlacon REHEAT(recalentamiento),continuecalent_.ndolautilizandotiempoy potencia.No siga
cocinandoutilizandola teclaReheat(Recalentar).
Contenido
o%4 oz.de came,aveo pescado(hasta6 oz.conhueso)
-Y2tazadealmid6n(papas,pasta,arroz,etc.)
-Y2tazadeverduras(alrededorde 3~4oz.)
Cubrael platoconunatapao unenvoltoriopl_,sticoconventilaci6n.Si la comidanoest&tancalientecomo
ladeseadespuesdecalentarlacon REHEAT(recalentamiento),continOecalent_.ndolautilizandotiempoy
potencia.NosigacocinandoutilizandolateclaReheat(Recalentar).
Contenido
-Guisosrefrigerados.(Ejemplos:guiso,lasagna)
- Espaguetisy raviobsenlatados,alimentosrefrigerados.
1portion(1 assiette)
1&4 portions
Notas:
• La temperatura deseada para los alimentos varia de persona a persona. Utilice los botones More(9)/Less(1) para adecuar la
temperatura a su preferencia.
• Deje reposar los alimentos de 1 a 5 minutos antes de servirlos.
71
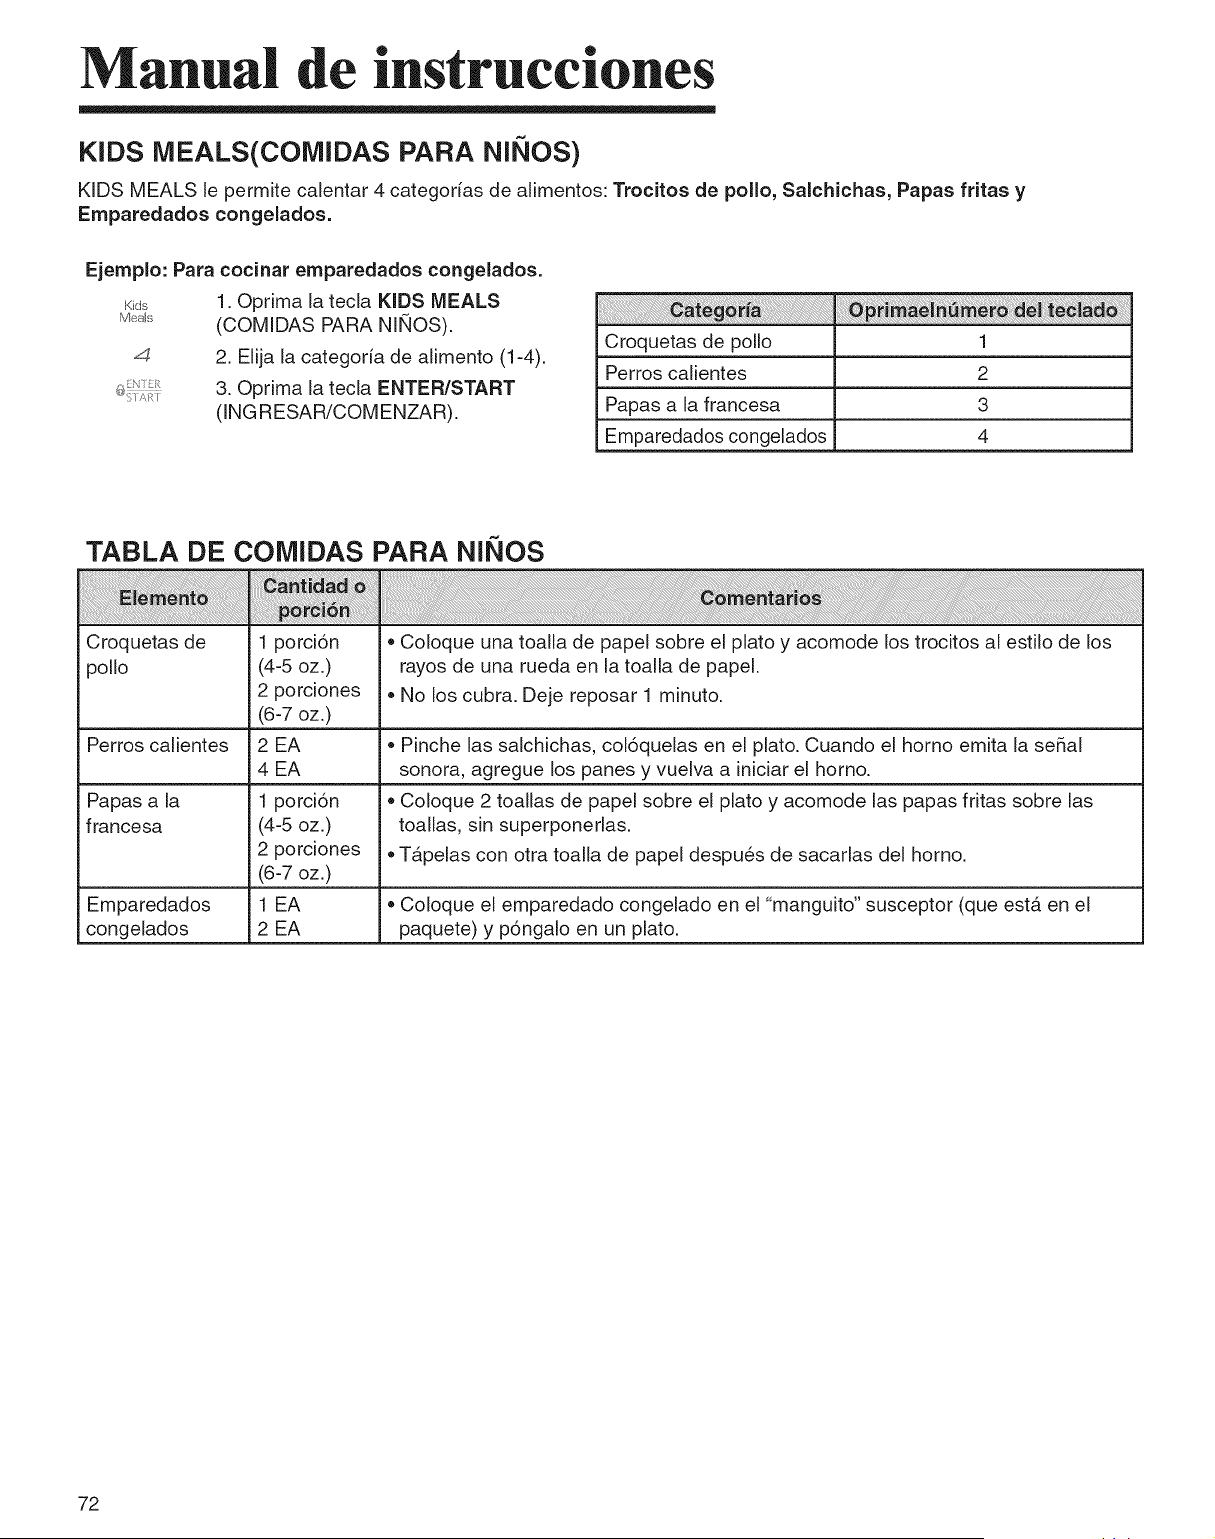
Manual de instrucciones
KIDS MEALS(COMIDAS PARA NINOS)
KIDS MEALS [e permite calentar 4 categor[as de alimentos: Trocitos de polio, Salchichas, Papas fritas y
Emparedados congelados.
Ejemplo: Para cocinar emparedados congelados.
K_ds 1. Oprima la tecla KIDS MEALS
M_,_ (COMIDAS PARA NINOS).
4 2. ElJja [a categor[a de alJmento (1-4).
3. Oprima [a tecla ENTER/START
(INGRESAR/COMENZAR).
Croquetas de polio
Perros calJentes
Papas a la francesa
Emparedados congelados
1
2
3
4
TABLA DE COiVllDAS PARA NINOS
Croquetas de
polio
1 porci6n
(4-5oz.)
2 porciones
(6-7 oz.)
2 EA
4 EA
Co[oque una toalla de pape[ sobre el plato y acomode los trocJtos a[ estilo de los
rayos de una rueda en la toalla de papel.
No los cubra. Deje reposar 1 mJnuto.
Perros calJentes • Pinche [as salchichas, co[6quelas en el plato. Cuando el homo emJta [a se_a[
sonora, agregue los panes y vuelva a JnJciarel homo.
Papas a [a 1 porci6n • Coloque 2 toallas de pape[ sobre el plato y acomode [as papas frJtas sobre [as
francesa (4-5 oz.) toallas, sin superponerlas.
2 porciones • Tapelas con otra toalla de pape[ despues de sacarlas de[ homo.
(6-7 oz.)
Emparedados 1 EA • Co[oque el emparedado congelado en el "manguJto" susceptor (que esta en el
congelados 2 EA paquete) y p6ngalo en un plato.
72
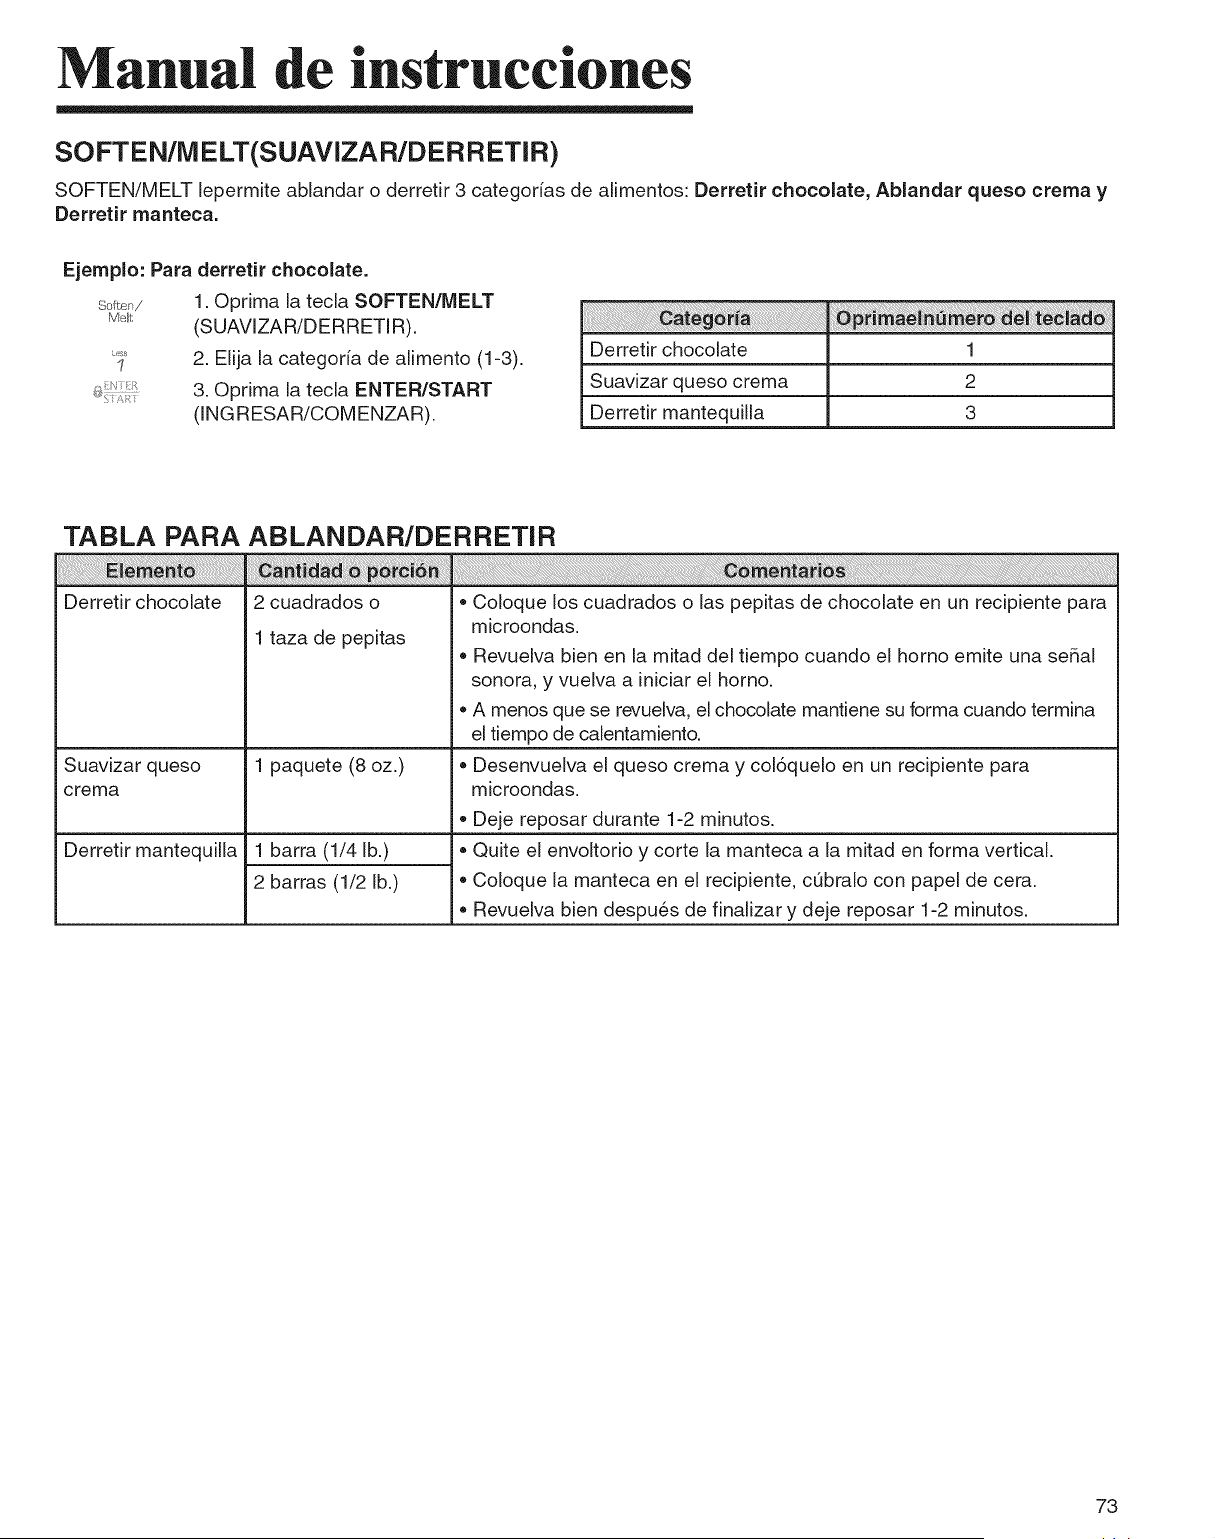
Manual de instrucciones
SOFTEN/M ELT(SUAVIZAR/DERRETIR)
SOFTEN/MELT [epermite abiandar o derretir 3 categorias de alimentos: Derretir chocolate, Abiandar queso crema y
Derretir manteca.
Ejemplo: Para derretir chocolate.
Sof,,_n/ 1. Oprima [a tecla SOFTEN/MELT
r,_n_, (SUAVIZAR/DERRETIR).
2. Elija la categoria de alimento (1-3).
3. Oprima [a tecla ENTER/START
(ING RESA R/COM ENZAR).
Derretir chocolate
Suavizar queso crema
Derretir mantequilla
1
2
3
TABLA PARA ABLANDAR/DERRETIR
Derretir chocolate 2 cuadrados o
1 taza de pepitas
1 paquete (8 oz.)Suavizar queso
crema
1 barra (1/4 lb.)
2 barras (1/2 lb.)
Derretir mantequilla
Co[oque los cuadrados o [as pepitas de chocolate en un recipiente para
microondas.
Revueiva bien en [a mitad de[ tiempo cuando el homo emite una se_a[
sonora, y vuelva a iniciar el homo.
A menos que se revuelva, el chocolate mantiene su forma cuando termina
el tiempo de calentamiento.
Desenvuelva el queso crema y co[6que[o en un recipiente para
microondas.
Deje reposar durante 1-2 minutos.
Quite el envoltorio y corte [a manteca a [a mitad en forma vertical.
Co[oque [a manteca en el recipiente, cQbra[o con pape[ de cera.
Revuelva bien despues de finalizar y deje reposar 1-2 minutos.
73
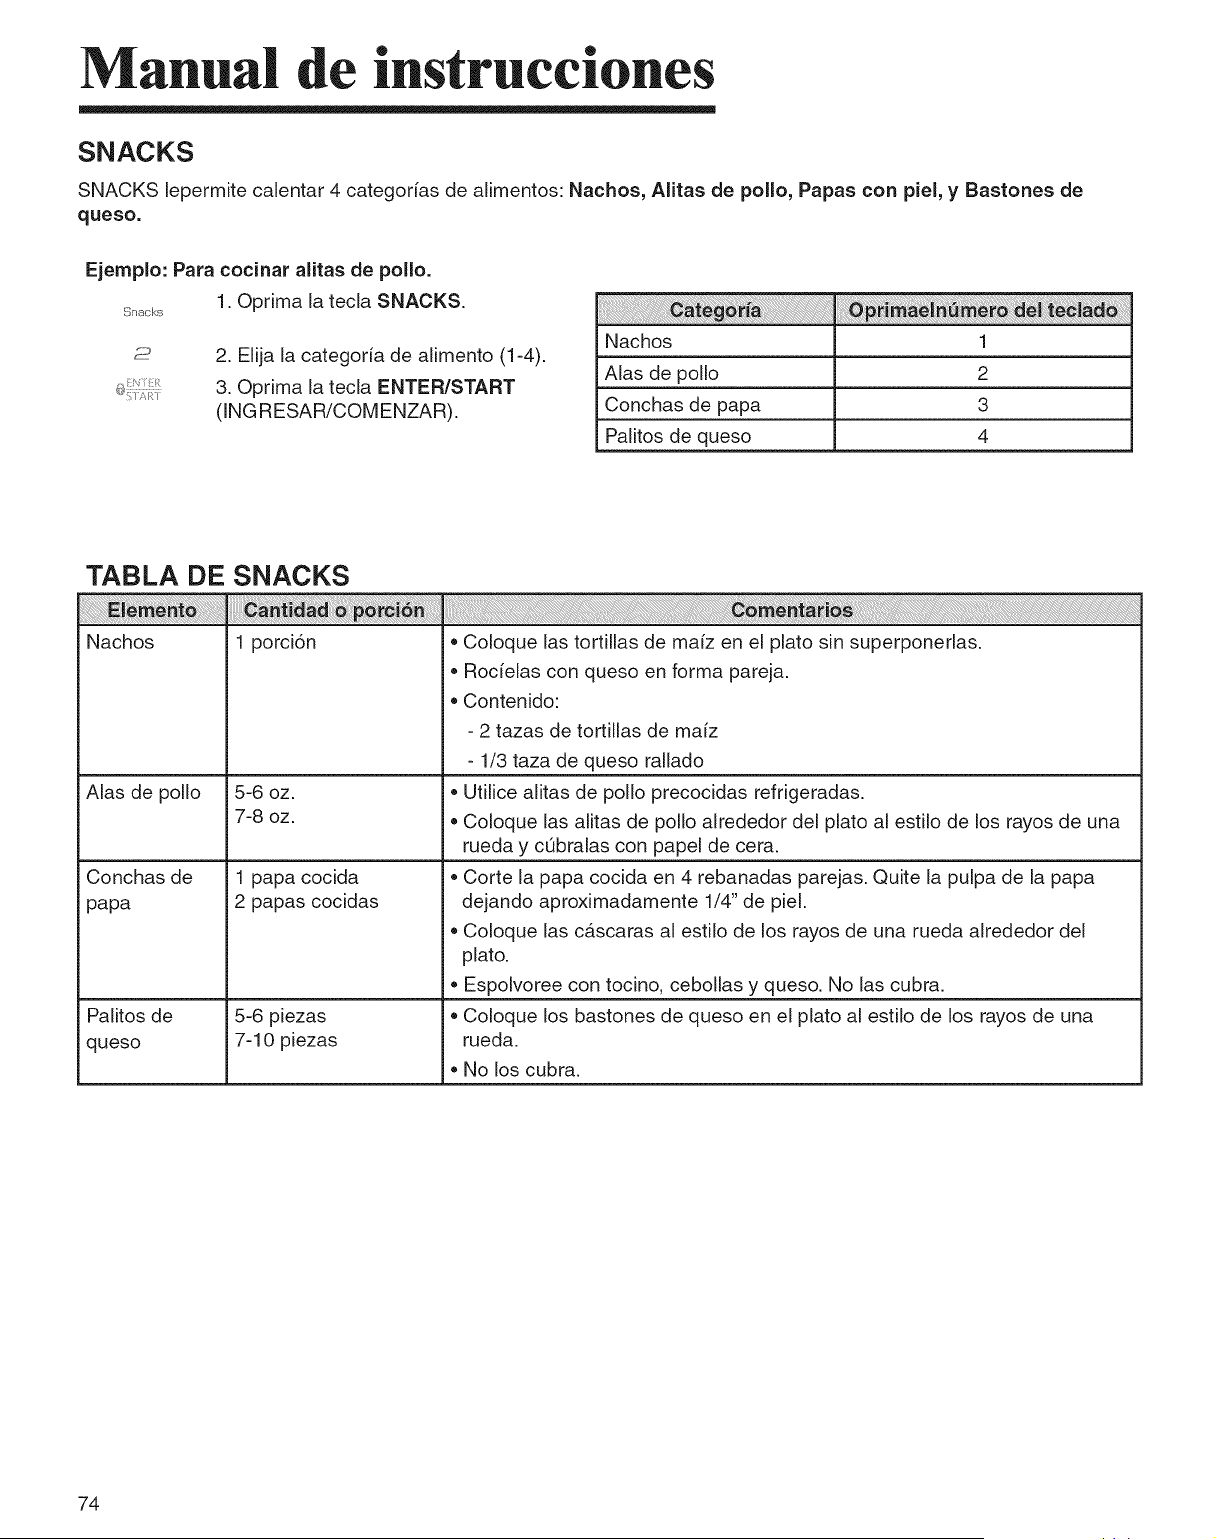
Manual de instrucciones
SNACKS
SNACKS lepermite calentar 4 categorias de alimentos: Nachos, Alitas de polio, Papas con piel, y Bastones de
queso.
Ejemplo: Para cocinar aiitas de polio.
1. OprJma [a tec[a SNACKS.
2. Elija la categoria de alimento (1-4).
3. OprJma [a tecla ENTER/START
(INGRESAR/COMENZAR).
Nachos
Alas de polio
Conchas de papa
Palitos de queso
i iii i! ii
1
2
3
4
TABLA DE SNACKS
Nachos 1 porci6n =Co[oque [as tortillas de ma[z en el plato sin superponerlas.
Alas de polio
Conchas de
papa
Palitos de
queso
5-6 oz.
7-8 oz.
1 papa cocida
2 papas cocidas
5-6 piezas
7-10 piezas
Rocielas con queso en forma pareja.
Contenido:
- 2 tazas de tortillas de maiz
- 1/3 taza de queso rallado
Utilice alitas de polio precocidas refrigeradas.
Coloque [as alitas de polio alrededor de[ plato a[ esti[o de los rayos de una
rueda y cObralas con papel de cera.
Corte la papa cocida en 4 rebanadas parejas. Quite la pulpa de la papa
dejando aproximadamente 1/4" de piel.
Coloque las cascaras a[ estilo de los rayos de una rueda alrededor de[
plato.
Espolvoree con tocino, cebollas y queso. No las cubra.
Coloque los bastones de queso en el plato a[ estilo de los rayos de una
rueda.
No los cubra.
74
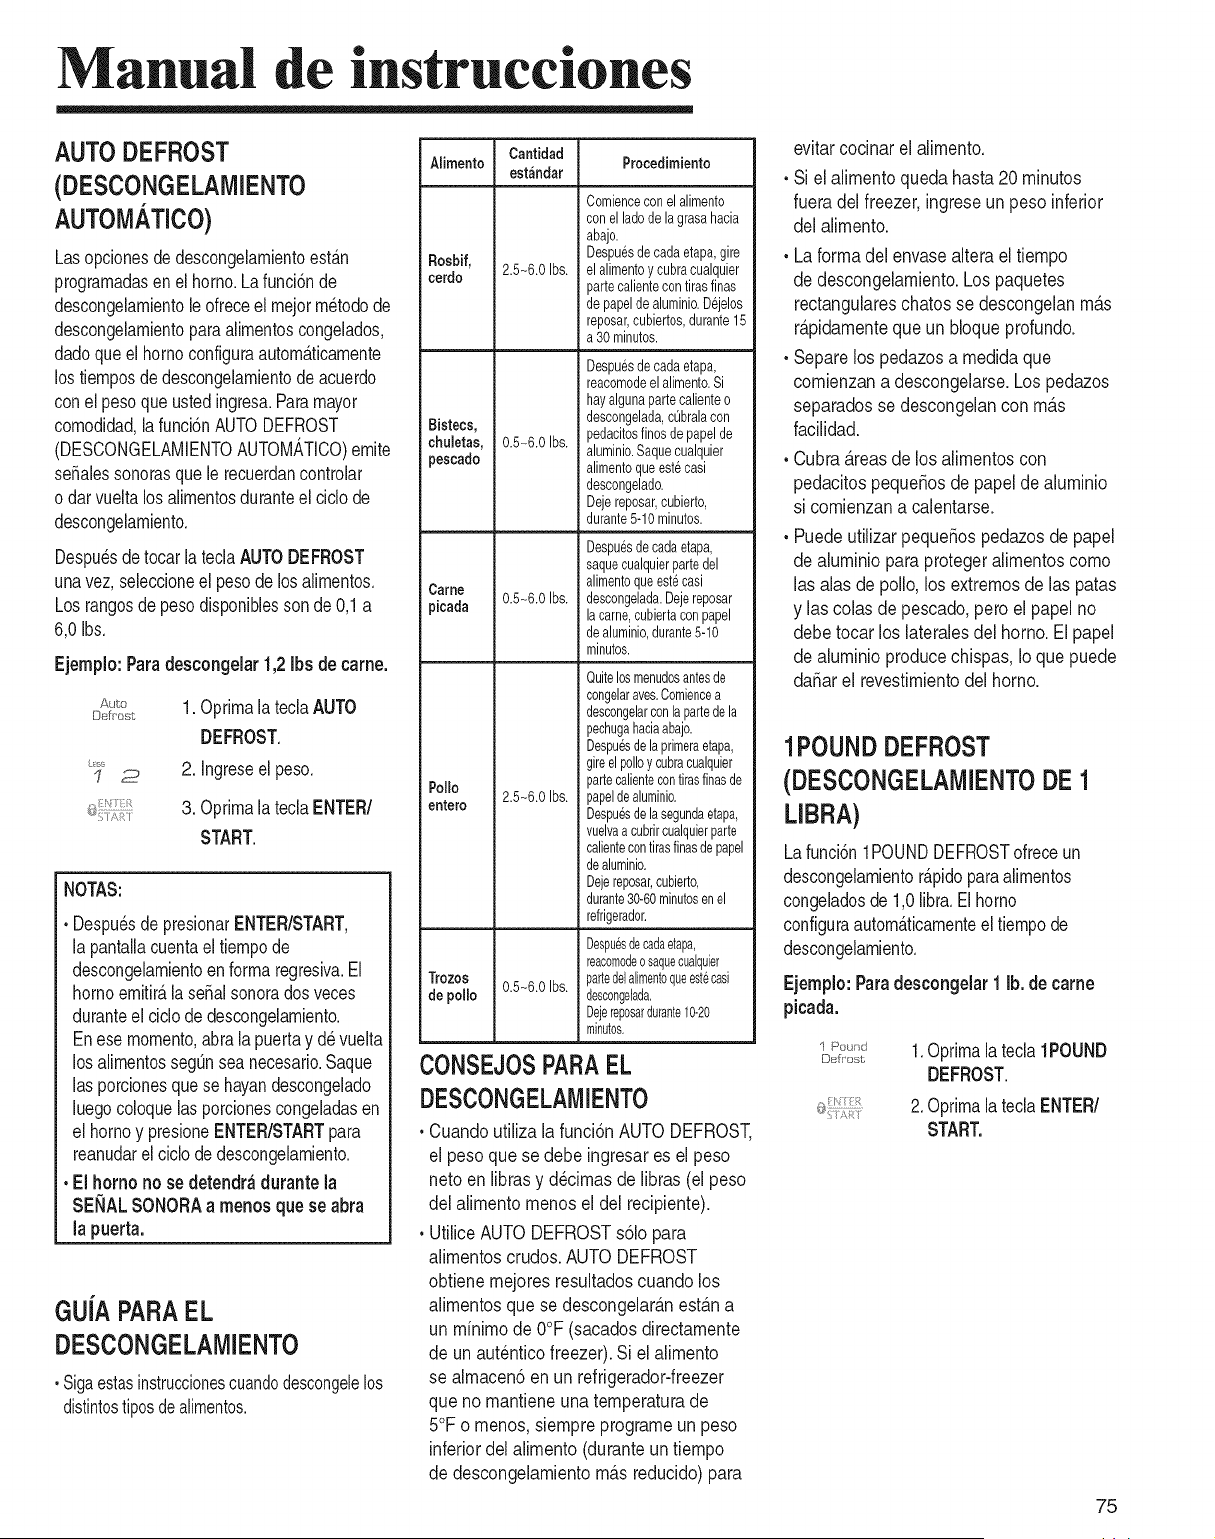
Manual de instrucciones
AUTODEFROST
(DESCONGELAMIENTO
AUTOMATICO)
Lasopcionesde descongelamientoest&n
programadasenel horno.La funci6nde
descongelamientoleofreceel mejormetodode
descongelamientoparaalimentoscongelados,
dadoqueelhomoconfigureautom&ticamente
lostiemposdedescongelamientodeacuerdo
conel pesoque ustedingresa.Paremayor
comodidad,lafunci6nAUTODEFROST
(DESCONGELAMIENTOAUTOMATICO)emite
seSalessonorasquele recuerdancontrolar
o darvueltalosalimentosduranteel ciclode
descongelamiento.
Despu6sdetocarlatecla AUTODEFROST
unavez,sebccioneel pesode losaiimentos.
Losrangosde pesodisponiblessonde 0,1a
6,0 Ibs.
Ejemplo:Paredescongeiar1,2Ibsdecame.
Auo 10prima lateclaAUTO
Defl'ost
DEFROST,
Les_
I 2 2. Ingreseel peso.
3. Oprimala teclaENTER/
START.
NOTAS:
• DespuesdepresionarENTER/START,
la pantallacuentaeltiempode
descongelamientoenformaregresiva.El
homoemitir_,la seSalsonoradosveces
duranteel ciclode descongelamiento.
Enesemomento,abrala puertay de vuelta
losalimentossegOnseanecesario.Saque
las porcionesquese hayandescongelado
luegocoloquelas porcionescongeladasen
el homoy presioneENTER/STARTpare
reanudarel ciclode descongelamiento.
• El homono sedetendr_durante la
SENALSONORAa mendsquese abra
la puerta.
GUJAPARAEL
DESOONGELAMIENTO
, Sigaestasinstruccionescuandodescongelelos
distintostiposdealimentos.
Cantidad
estfindar
A[imento Procedimiento
Comienceconelalimento
conel ladedelagrasahacia
abajo.
Rosbif, De@u@decadaetapa,gire
cerdo 2.5-6.0 Ibs. elalimentoy cubracualquier
partecalientecontirasfinas
depapeldealuminio.Dejelos
reposar,cubiertos,durante15
a 30minutes.
Despuesdecadaetapa,
reacomodeel alimento.Si
hayelgunapartecalienteo
Bistecs, descongelada,cObralacon
chuJetas, 0.5-6.01bs. pedacitosfinosdepapelde
pescado aluminio.Saquecualquier
alimentoqueestecasi
descongelado.
Dejereposar,cubierto,
durante5-10minutos.
De@u@decadaetapa,
saquecualquierpartedel
alimentoqueest6casi
Came
picada 0.5-6.01bs. descongelada.Dejereposar
lacame,cubiertaconpapel
dealuminio,durante5-10
minutos.
Quitelosmenudosantesde
congelaraves.Comiencea
descongelarconlapartedela
pechugahaciaabajo.
Despuesdelaprimeraetapa,
gireelpolioycubracualquier
Po!Io partecalientecontirasfinasde
entero 2.5-6.01bs. papeldeahminio.
Despuesdelasegundaetapa,
vuelvaa cubrircualquierparte
calientecontirasfinasdepapel
deahminio.
Dejereposar,cubierto,
durante30-60minutosenel
refrigerador.
Despuesdecadaetapa,
reacomodeo saquecualquier
Trozos 0.5-6.0 Ibs. partedelalimentoqueestecasi
depolio descongelada.
Dejereposardurante10-20
minutos.
CONSEJOSPARAEL
DESCONGELAMIENTO
• Cuandoutilize lafunci6nAUTODEFROST,
el peso que se debe ingresares el peso
neto en librasy d6cimasde libras (elpeso
del alimento menosel del recipient@.
• UtiliceAUTODEFROSTs61opara
alimentoscrudos.AUTODEFROST
obtiene mejoresresultadoscuando los
alimentosque se descongelar_.nest_.na
un minimo de O°F(sacadosdirectamente
de un aut6nticofreezer).Si el alimento
se almacen6en un refrigerador-freezer
que no mantieneunatemperaturade
5°F o menos,siempreprogrameun peso
inferiordel alimento(duranteun tiempo
de descongelamientom_.sreducido)para
evitarcocinarel alimento,
, Si el alimento queda hasta 20 minutos
fuera del freezer,ingreseun peso inferior
del alimento.
, Laformadel envasealtera el tiempo
de descongelamiento.Los paquetes
rectangulareschatos se descongelanm_.s
r@idamenteque un bloqueprofundo.
, Separelos pedazosa medidaque
comienzana descongelarse.Los pedazos
separadosse descongelancon m_.s
facilidad.
, Cubra_.reasde los alimentoscon
pedacitospequeSosde papelde aluminio
si comienzana calentarse.
, PuedeutilizarpequeSospedazosde papel
de aluminio para protegeralimentoscomo
las alas de polio,los extremosde las patas
y las colasde pescado,peroel papel no
debe tocar los lateralesdel homo. El papel
de aluminio producechispas, Io que puede
daSarel revestimientodel homo.
1POUNDDEFROST
(DESCONGELAMIENTODE 1
LIBRA)
Lafunci6n1POUNDDEFROSTofreceun
descongelamientor@idoparealimentos
congeladosde1,0libra.Elhomo
configureautom_.ticamenteeltiempode
descongelamiento.
Ejemplo:Paredescongelar 1 lb. decame
picada.
Po,.,_,J 1.Oprimalatecla1POUND
Dsfrest
DEFROST.
2.Optimala tecla ENTER/
START.
75

Manual de instrucciones
ESTANTE DE ALAiVlBRE
E[ estante de a[ambre [e ofrece espacio adiciona[ cuando cocina en mas de un recipiente a [a vez.
Para utilizar el estante:
1. Coloque el estante de manera segura sobre los cuatro soportes pl&sticos.
, El estante NO DEBE tocar [as paredes de metal ni [a parte trasera de[ homo de microondas.
2. Co[oque cantidades equivalentes de alimentos tanto ARRIBA COMO ABAJO de[ estante.
, La cantidad de alimentos debe ser aproximadamente [a misma para compensar [a energia de cocci6n.
IMPORTANTE:
=NO aimacene ni utilice el estante de alambre en este homo a menos que se vaya a cocinar m&s de un alimento o
una receta 1orequiera.
Podr[a causar da5os en el homo.
76
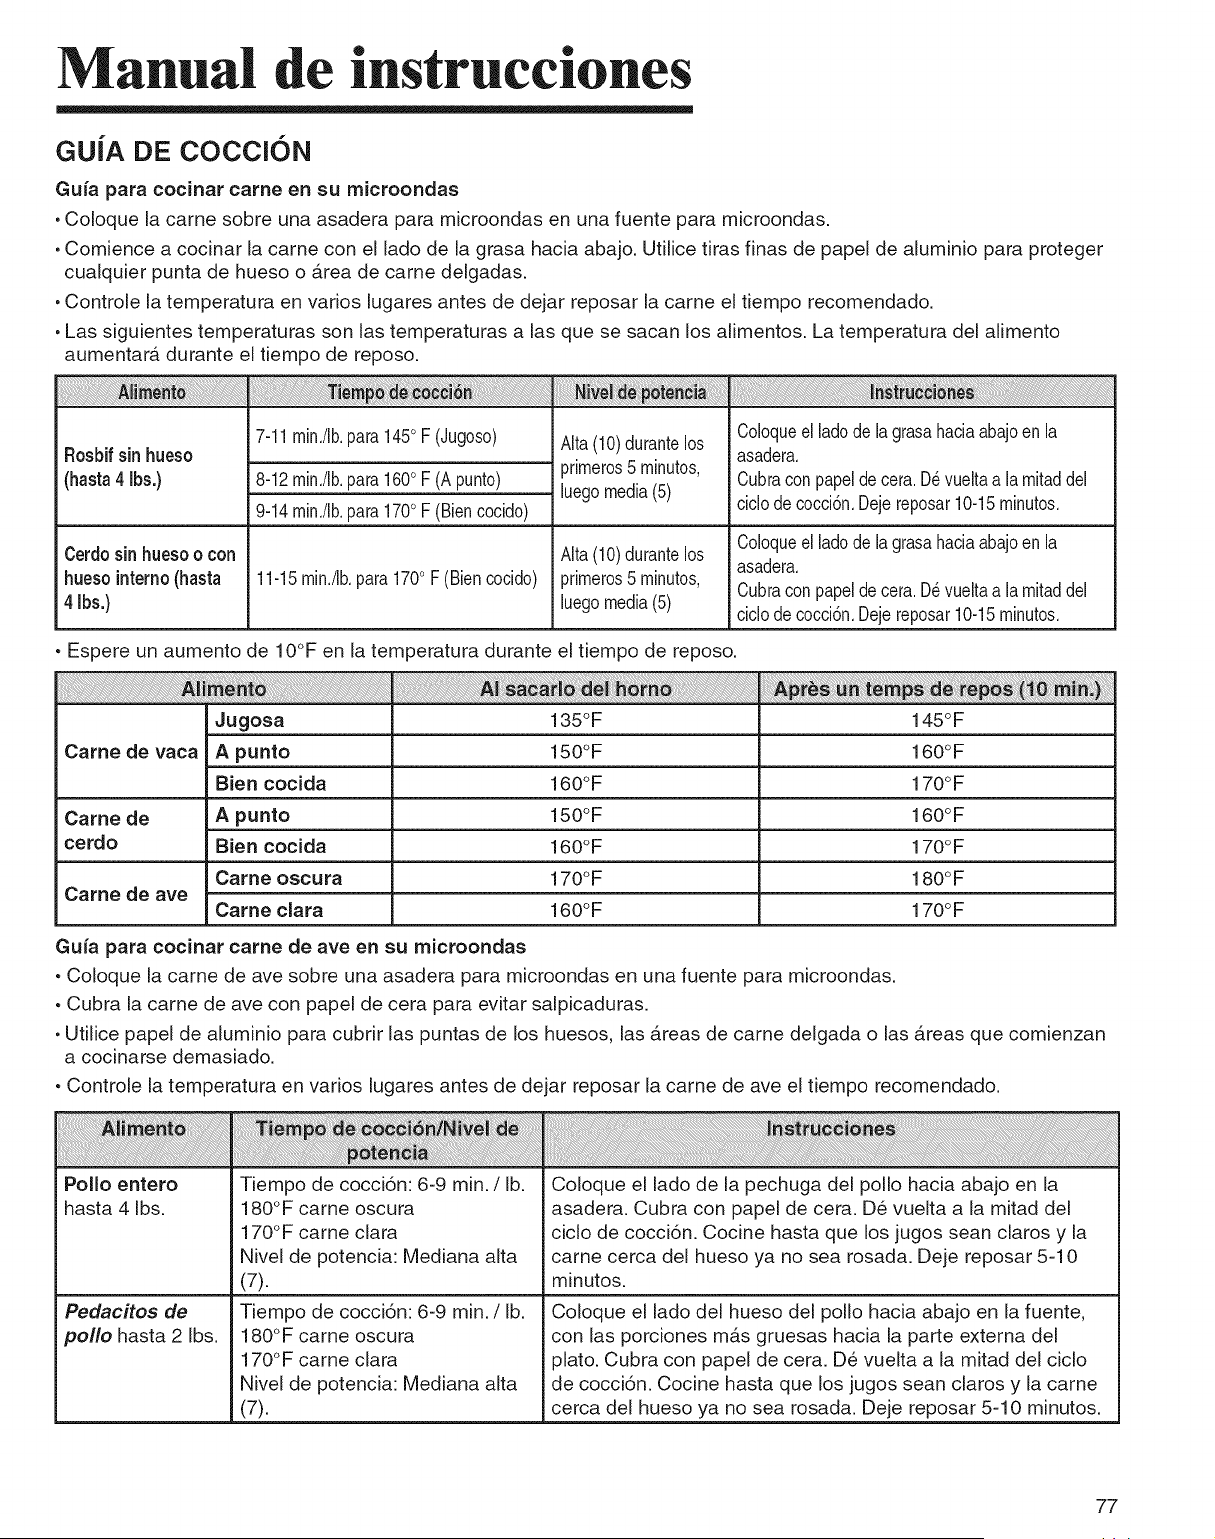
ManuaJ de instrucciones
GUiA DE COCClON
Guia para cocinar came en su microondas
, Co[oque [a came sobre una asadera para mJcroondas en una fuente para mJcroondas.
, Comience a cocJnar [a came con el [ado de [a grasa hacJa abajo. Uti[Jce tiras finas de pape[ de a[umJnJopara proteger
cua[quier punta de hueso o &rea de came de[gadas.
. Contro[e [a temperatura en varios [ugares antes de dejar reposar [a came el tiempo recomendado.
. Las siguientes temperaturas son [astemperaturas a [as que se sacan los a[imentos. La temperatura de[ a[imento
aumentara durante el tiempo de reposo.
7-11min./Ib,para145oF (Jugoso)
8-12min./Ib,para160oF (A punto)
9-14min./Ib,para170oF (Biencocido)
RosbJfsin hueso
(hasta4 Ibs.)
Alta(10)durantelos
primeros5 minutos,
hego media(5)
Coloqueel ladode lagrasahaciaabajoen la
asadera.
Cubracon papeldecera.Devueltaa lamitaddel
ciclode cocci6n.Dejereposar10-15minutos.
Coloqueel ladode lagrasahaciaabajoen la
Cerdosin huesoo con Alta(10)durantelos asadera.
hueso Jnterno(hasta 11-15min./Ib,para170o F (Biencocido) primeros5 minutos, Cubracon papelde cera.Devueltaa la mitaddel
4Ibs.) luegomedia(5) ciclode cocci6n.Dejereposar10-15minutos.
o Espere un aumento de IO°F en la temperatura durante el fiempo de reposo.
Jugosa 135°F 145°F
Came de vaca A punto 150°F 160°F
Bien cocida 160°F 170°F
Came de A punto 150°F 160°F
cerdo Bien cocida 160°F 170°F
Came oscura 170°F 180°F
Came de ave
Came clara 160°F 170°F
Guia para cocinar came de ave en su microondas
oColoque la came de ave sobre una asadera para mJcroondas en una fuente para mJcroondas.
oCubra la came de ave con papel de cera para evJtar saipJcaduras.
. Utilice pape[ de aluminio para cubrir [as puntas de los huesos, [as Areas de came delgada o [as Areas que comienzan
a cocJnarse demasiado.
oControle [a temperatura en varios [ugares antes de dejar reposar [a came de ave el fiempo recomendado.
Polio entero
hasta 4 Ibs.
Pedacitos de
polio hasta 2 [bs.
Tiempo de cocci6n: 6-9 min./lb.
180°F came oscura
170°F came clara
NJve[de potencia: MedJana alta
(7).
Tiempo de cocci6n: 6-9 min./lb.
180°F came oscura
170°F came clara
NJve[de potencia: MedJana alta
(7).
Coloque el lado de [a pechuga de[ polio hacJa abajo en la
asadera. Cubra con pape[ de cera. De vuelta a la mitad de[
cJclo de cocci6n. Cocine hasta que los jugos sean claros y la
came cerca del hueso ya no sea rosada. Deje reposar 5-10
mJnutos.
Coloque el lado de[ hueso del polio hacia abajo en la fuente,
con las porciones mAs gruesas hacia la parte externa de[
plato. Cubra con pape[ de cera. De vuelta a [a mitad de[ ciclo
de cocci6n. Cocine hasta que los jugos sean claros y la came
cerca del hueso ya no sea rosada. Deje reposar 5-10 mJnutos.
77
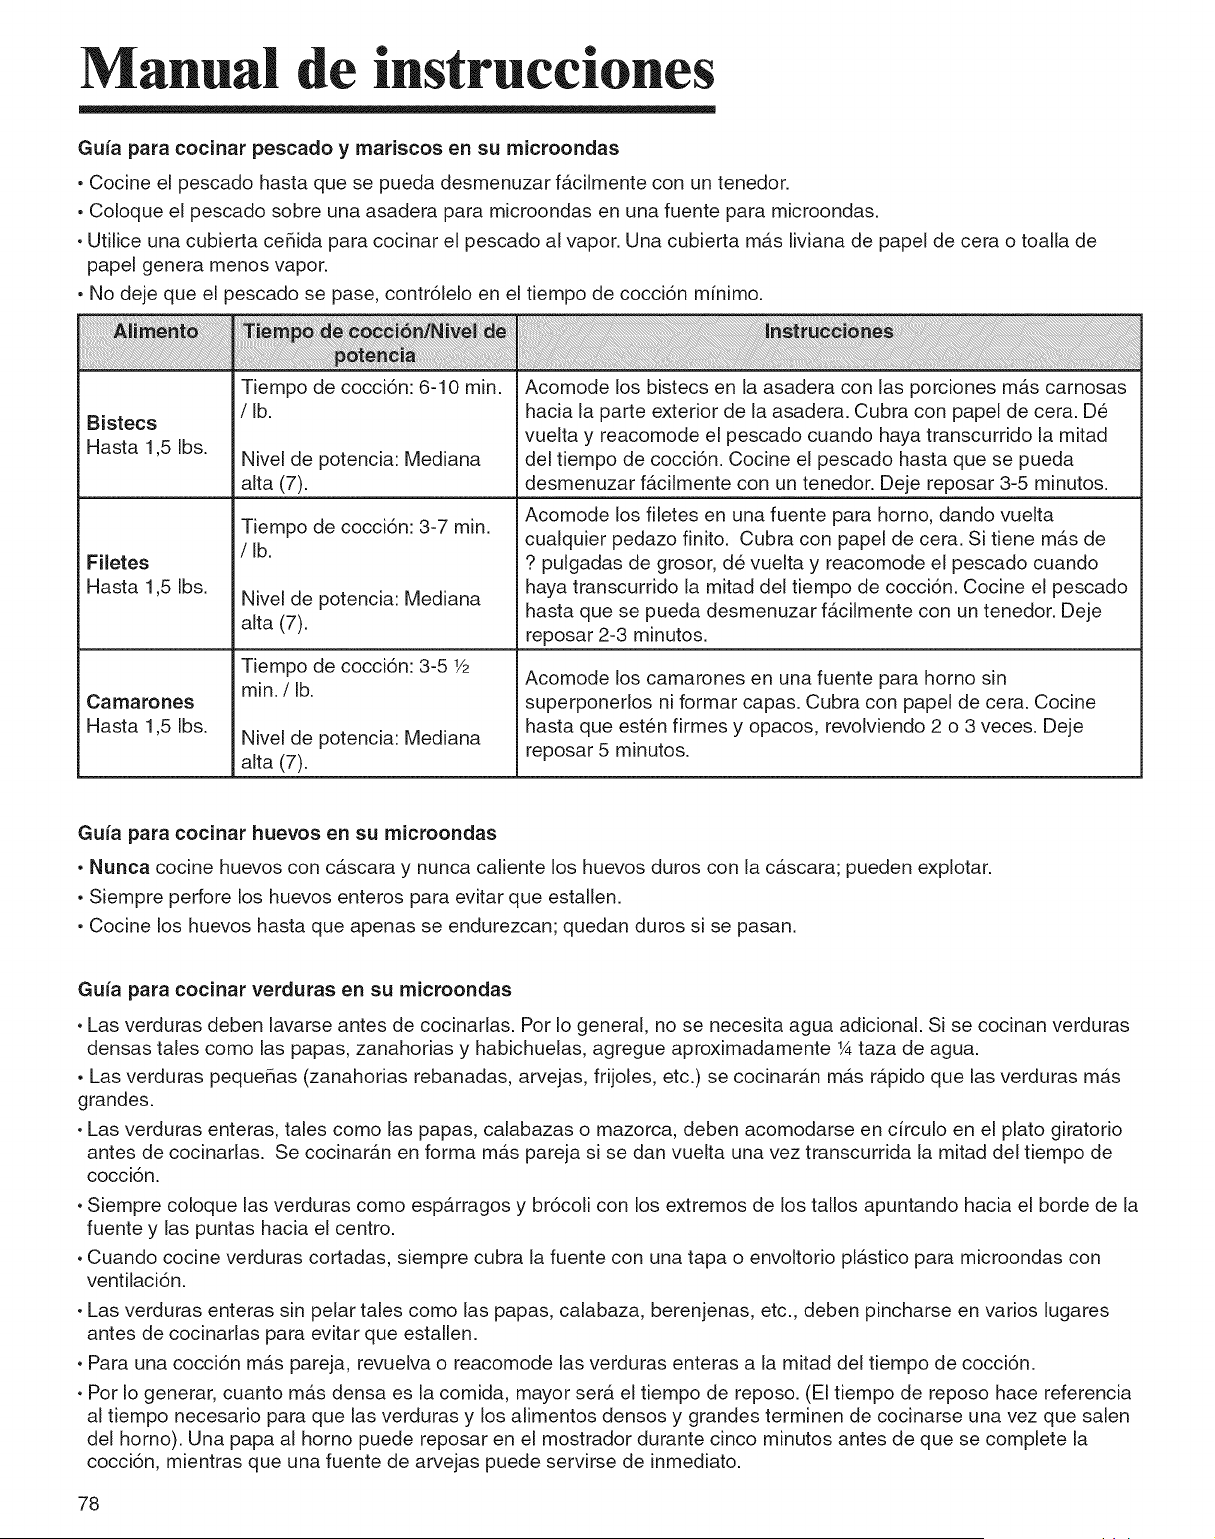
Manual de instrucciones
Gu{a para cocinar pescado y mariscos en su microondas
, Cocine el pescado hasta que se pueda desmenuzar facilmente con un tenedor.
, Co[oque el pescado sobre una asadera para microondas en una fuente para microondas.
. Utilice una cubierta ce_ida para cocinar el pescado a[ vapor. Una cubierta mas [iviana de pape[ de cera o toalla de
papel genera menos vapor.
, No deje que el pescado se pase, contr61elo en el tiempo de cocci6n m[nimo.
!ii:!i!i!!i!iiiiliiililiiiiilili!ii!!!!!!!!!!!!i_iiiiiiili_!i_i!i_ii{_!i!iiii!i!i!!ii!iiiiiiiiiiiiiiiiiiiiiiiiiiiiiiiii!iiiiiiiililililililtiii_!i_i_!!!!!i!!!_!!_!!iiiiii_i_i_iiili_ii_i!!ii_ii!iilliiii_i_iii!iiiiiiiiil_iii!ii!ii!iiiiiiiiiilIiiiiiiiiiiiiiiiiiii!iiiliiiiiiiiiiii!ili!ii!iii!ii!ii!ii!ii!i!ii!iiliiiiiiliiiiiiiiliiliiiiiiiiiiiliiiiiiiiiiiiiiiiiiiiiiiiiiiiiiiiiiiiiiiiiiiiiiiiiiiiiiiiiiiiiiiiiiiii!i!!i!!i!!i!!i!!i!!i!!i!!i!!i!!i!!i!!i!!i!!i!!i!!i!!i!!i!!i!!i!!i!!i!!i!!i!!i!!i!!i!iii!i!!!!!i!!i!!i!!i!iii!i!iii!iiiilililili!i!i!ii!ii!ii!iliiiiiiiiiiiiiiiiliiiiiiii!iiiiiiiiiiiiiiiiiiiii!i!!i!!i!!i!!i!!i!i!i!iiiiiiiiiiiiiiiiiiiiiiiiiiiiiiiiiiiiiiiiiiiiiiiiiiiiiiiiiiiiiiiiiiiiiiiiiiiiiiiiiiiiiiiiiiiiiiiiiiiiiiiii!ili!ji!_ii_i_i!i_ii!_i_:!_:!iii_!ili_i!_i_!!i!!i!!i!!i!iliiliiliiliiliiliiiiliiiliii!i!ill!ii!ii!iiiliiiiiiiiiiiiiiiiiiiiiiiiiiiiiiiiiliiliiliiiiiiiiiiiiiiiiiiiiiiiiiiiiiiiiiiiiiiiiiiiiiiiliiiiiiiiiiiiiiiiiiiiiiiiiiiiiiiiiiiiiiiiiiiiiiiiiiiiiiiiiiiiiiiiiiiiiiiiiiiiiiiiiiiiiiiiiiiiiiiiiiiiiiiiiiiiiiiiiiiiiiiiiiiiiiii!i!!!!!i!!i!!i!!i!!i!!i!!i!!i!i!i!i!i!iiiiiiiiiiiiiiiiiiiiiiiiiiiiiiiiiiiiiiiiiiiiiiiiiiiiiiiiiiiiiiiiiiiiiiiiiiiiiiiiiiiiiiiiiiiiiiiiiiiiiiiiiiiiiiiiiiiiiiiiiiiiiiiiiiiiiiiiiiiiiiiiiiiiiiiiiiiiiiiiiiiiiiiiiiiiiiiiiiiiiilililililili
Bistecs
Hasta 1,5 [bs.
Fiietes
Hasta 1,5 [bs.
Camarones
Hasta 1,5 [bs.
Tiempo de cocci6n: 6-10 min.
/lb.
Nive[ de potencia: Mediana
alta (7).
Tiempo de cocci6n: 3-7 min.
/lb.
Nive[ de potencia: Mediana
aita (7).
Tiempo de cocci6n: 3-5 V2
min./lb.
Nive[ de potencia: Mediana
aita (7).
Acomode los bistecs en la asadera con las porciones mAs carnosas
hacia la parte exterior de la asadera. Cubra con papel de cera. De
vuelta y reacomode el pescado cuando haya transcurrido la mitad
de[ tiempo de cocci6n. Cocine el pescado hasta que se pueda
desmenuzar facilmente con un tenedor. Deje reposar 3-5 minutos.
Acomode los filetes en una fuente para homo, dando vuelta
cualquier pedazo finito. Cubra con pape[ de cera. Si tiene mas de
? pulgadas de grosor, de vuelta y reacomode el pescado cuando
haya transcurrido [a mitad de[ tiempo de cocci6n. Cocine el pescado
hasta que se pueda desmenuzar facilmente con un tenedor. Deje
reposar 2-3 minutos.
Acomode los camarones en una fuente para homo sin
superponerlos ni formar capas. Cubra con papel de cera. Cocine
hasta que esten firmes y opacos, revolviendo 2 o 3 veces. Deje
reposar 5 minutos.
Guia para cocinar huevos en su microondas
. Nunca cocine huevos con cascara y nunca caliente los huevos duros con [a cascara; pueden explotar.
. Siempre perfore los huevos enteros para evitar que estailen.
. Cocine los huevos hasta que apenas se endurezcan; quedan duros si se pasan.
Guia para cocinar verduras en su microondas
• Las verduras deben lavarse antes de cocinarlas. Por Io general, no se necesita agua adicional. Si se cocinan verduras
densas tales como las papas, zanahorias y habichuelas, agregue aproximadamente % taza de agua.
, Las verduras peque5as (zanahorias rebanadas, arvejas, frijoles, etc.) se cocinaran mas rapido que las verduras mas
grandes.
• Las verduras enteras, tales como las papas, calabazas o mazorca, deben acomodarse en circulo en el plato giratorio
antes de cocinarlas. Se cocinaran en forma mas pareja si se dan vuelta una vez transcurrida la mitad del fiempo de
cocci6n.
• Siempre coloque [as verduras como esparragos y br6coli con los extremos de los tallos apuntando hacia el borde de la
fuente y las puntas hacia el centro.
• Cuando cocine verduras cortadas, siempre cubra la fuente con una tapa o envoltorio plAstico para microondas con
ventilaci6n.
• Las verduras enteras sin pelar tales como [as papas, calabaza, berenjenas, etc., deben pincharse en varios lugares
antes de cocinarlas para evitar que estallen.
• Para una cocci6n mAs pareja, revuelva o reacomode las verduras enteras a la mitad del tiempo de cocci6n.
• Por Io generar, cuanto mas densa es [a comida, mayor sera el tiempo de reposo. (El tiempo de reposo hace referencia
al tiempo necesario para que las verduras y los alimentos densos y grandes terminen de cocinarse una vez que salen
del homo). Una papa a[ homo puede reposar en el mostrador durante cinco minutos antes de que se complete la
cocci6n, mientras que una fuente de arvejas puede servirse de inmediato.
78

UtensUios para cocinar
GU|A DE UTENSILIOS PARA MICROONDAS
VIDRIO RESISTENTE AL HORNO
(tratado para calor de alta
densidad):
Platos de uso general, platos
para pastel de came, platos para
tartas, platos para tortas, tazas
para rnedir Ifquidos, cacerolas y
bols sin adornos met_.licos.
LOZA:
Bols, tazas, platos de servir y
bandejas sin adornos met_.licos.
PLASTICO:
Envoltorio pl_.stico (como por
ejemplo tapas)--coloque el
envoltorio pl_.sticosin apretar
sobre la fuente y presi6nelo hacia
los lados.
Ventile el envoltorio pl_.sticodando
vuelta un horde ligeramente para
permitir que salga el exceso
de vapor. La fuente debe ser Io
suficientemente profunda para que
el envoltorio pl_.stico no toque los
alimentos.
A medida que los alimentos se
calientan el envoltorio pl6.stico
puede derretirse en las partes
donde toca los alimentos.
Utilice fuentes, tazas y recipientes
para freezer semirfgidos de
pl_.stico. Utilicelos con cuidado
dado que el pl_stico puede
ablandarse pot el calor de la
comida.
PAPEL:
Toallas de papel, papel de cera,
servilletas de papel y platos
de papel sin adorno ni dise5os
met_.licos.
Observe las instrucciones en la
etiqueta del fabricante para su uso
en el homo de microondas.
UTENSILIOS DE METAL:
El metal protege a los alimentos de la energia del microondas y
produce una cocc[6n despareja. Tambi@n evite los pinchos de metal, los
term6metros y las bandejas de alumin[o. Los utensilios de metal pueden
producir chispas, Io que puede daSar su homo de microondas.
DECORACION DE METAL:
La vajilla, las fuentes etc adornados con metal o con bordes de metal.
Los adornos de metal interfieren con la cocci6n normal y pueden daSar
al homo.
PAPEL DE ALUMINIO:
Evite las hojas de papel de aluminio grandes porque dificultan la
cocci6n y pueden producir chispas daSinas. Utilice pedacitos pequeSos
de papel de aluminio para proteger las patas y alas de polio. Mantenga
TODO el papel de aluminio por Io menos a 1 pulgada de las paredes
laterales y la puerta del homo.
MADERA:
Los bols y tablas de madera se secar&n y pueden partirse o agrietarse
cuando los utiliza en el homo de microondas. Las cestas reaccionan de
la misma manera.
UTENSIMOS CON TAPAS APRETADAS:
AsegOrese de dejar aberturas para que salga el vapor de los utensilios
que est&n tapados.
Pen'ore las bolsas de pl&stico de verduras u otros alimentos antes de la
cocci6n.
Las bolsas cerradas herm@ticamente podrian explotar.
PAPEL MADERA:
Evite utilizar bolsas de papel madera.
Absorben demasiado calory podrian quemarse.
UTENSILIOS DEFORMADOS O PICADOS:
Cualquier utensilio que est@agrietado, deformado o picado puede
romperse en el homo.
ClERRES TRENZADOS DE METAL:
Retire los cierres trenzados de metal de las bolsas de pl,:5.sticoo papel.
Se calientan demasiado y podrian causar un incendio.
79
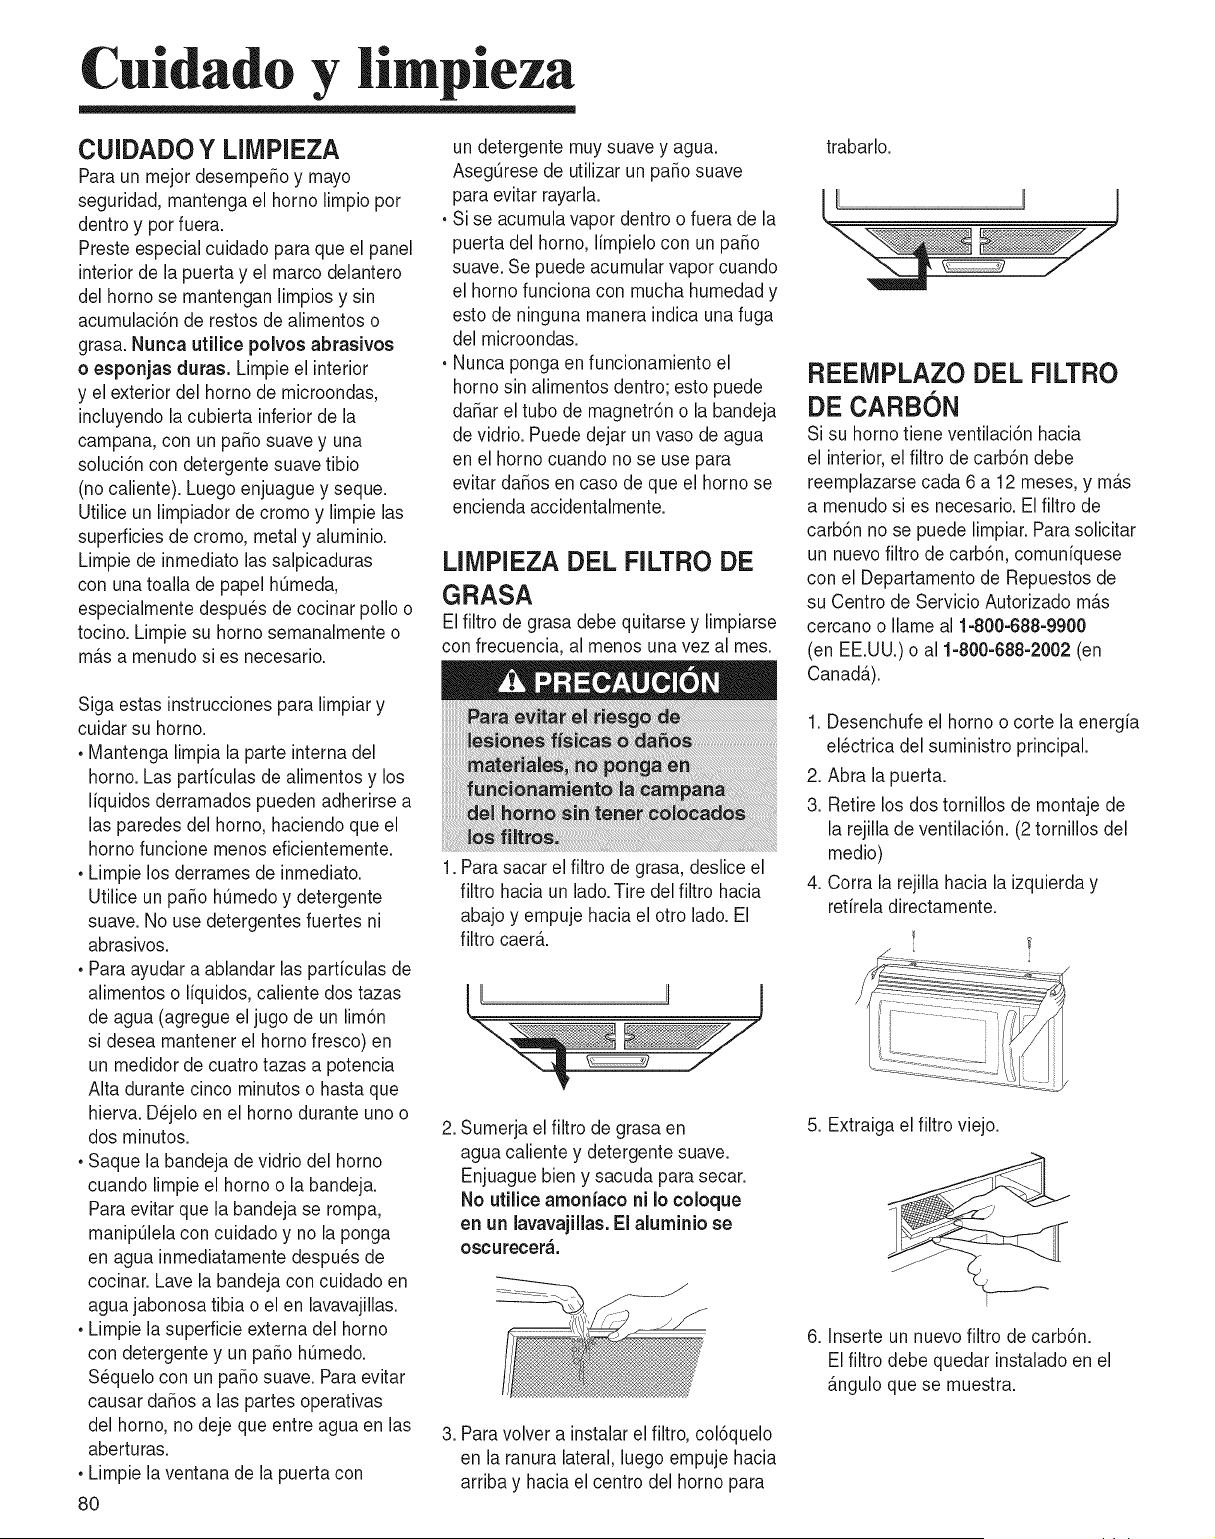
Cuidado y li pieza
CUIDADO Y LIMPIEZA
Para un mejor desempefio y mayo
seguridad, mantenga el homo limpio por
dentro y por fuera.
Preste especial cuidado para que el panel
interior de la puerta y el marco delantero
del homo se mantengan limpios y sin
acumulaci6n de restos de alimentos o
grasa. Nunca utilice polvos abrasivos
o esponjas duras. Limpie el interior
y el exterior del homo de microondas,
incluyendo la cubierta inferior de la
campana, con un patio suavey una
soluci6n con detergente suave tibio
(no caliente). Luego enjuague y seque.
Utilice un limpiador de cromo y limpie las
superficies de cromo, metaly aluminio.
Limpie de inmediato las salpicaduras
con una toalla de papel hL_meda,
especialmente despu_s de cocinar polio o
tocino. Limpie su homo semanalmente o
m_.sa menudo si es necesario.
Siga estas instrucciones para limpiar y
cuidar su homo.
• Mantenga limpia la parte interna del
horno. Las parficulas de alimentos y los
liquidos derramados pueden adherirse a
las paredes del homo, haciendo que el
homo funcione menos eficientemente.
• Limpie los derrames de inmediato.
Utilice un patio hQmedoy detergente
suave. No use detergentes fuertes ni
abrasivos.
• Para ayudar a ablandar las particulas de
alimentos o liquidos, caliente dos tazas
de agua (agregue el jugo de un lim6n
si desea mantener el homo fresco) en
un medidor de cuatro tazas a potencia
Alta durante cinco minutos o hasta que
hierva. D_jelo en el homo durante uno o
dos minutos.
• Saque la bandeja de vidrio del homo
cuando limpie el homo o la bandeja.
Para evitar que la bandeja se rompa,
manipQlelacon cuidado y no la ponga
en agua inmediatamente despu_s de
cocinar. Lave la bandeja con cuidado en
agua jabonosa tibia o el en lavavajillas.
• Limpie la superficie externa del homo
con detergente y un patio hQmedo.
S_quelo con un patio suave. Para evitar
causar dafios alas partes operativas
del homo, no deje que entre agua en las
aberturas.
• Limpie la ventana de la puerta con
8O
un detergente muy suave y agua.
Asegt_resede utilizar un patio suave
para evitar rayarla.
• Si se acumula vapor dentro o fuera de la
puerta del homo, limpielo con un patio
suave. Se puede acumular vapor cuando
el homo funciona con mucha humedad y
esto de ninguna manera indica una fuga
del microondas.
• Nunca ponga en funcionamiento el
homo sin alimentos dentro; esto puede
dafiar el tubo de magnetr6n o la bandeja
de vidrio. Puede dejar un vaso de agua
en el homo cuando no se use para
evitar dafios en caso de que el homo se
encienda accidentalmente.
LllVIPIEZA DEL FILTRO DE
GRASA
El filtro de grasa debe quitarse y limpiarse
con frecuencia, al menos una vez al mes.
1. Para sacar el filtro de grasa, deslice el
filtro hacia un lado.Tire del filtro hacia
abajo y empuje hacia el otro lado. El
filtro caer&
\
2. Sumerja el filtro de grasa en
agua caliente y detergente suave.
Enjuague bien y sacuda para secar.
No utilice amon[aco ni Io coloque
en un iavavajiiias.El aiuminio se
OSCUrecera.
3. Para volver a instalar el filtro, col6quelo
en la ranura lateral, luego empuje hacia
arriba y hacia el centro del homo para
trabarlo.
REEIVlPLAZO DEL FILTRO
DE CARBON
Si su horno tiene ventilaci6n hacia
el interior, el filtro de carb6n debe
reemplazarse cada 6 a 12 meses, y m_.s
a menudo si es necesario. El filtro de
carb6n no se puede limpiar. Para solicitar
un nuevo filtro de carb6n, comuniquese
con el Departamento de Repuestos de
su Centro de Servicio Autorizado m_.s
cercano o Ilame al 1-800-688-9900
(en EE.UU.) o al 1-800-688-2002 (en
Canada.).
1. Desenchufe el homo o corte la energia
el_ctrica del suministro principal.
2. Abra la puerta.
3. Retire los dos tornillos de montaje de
la rejilla de ventilaci6n. (2 tornillos del
medio)
4. Corra la rejilla hacia la izquierda y
retirela directamente.
.... i
5. Extraiga el filtro viejo.
6. Inserte un nuevo filtro de carbdn.
El filtro debe quedar instalado en el
fingulo que se muestra.
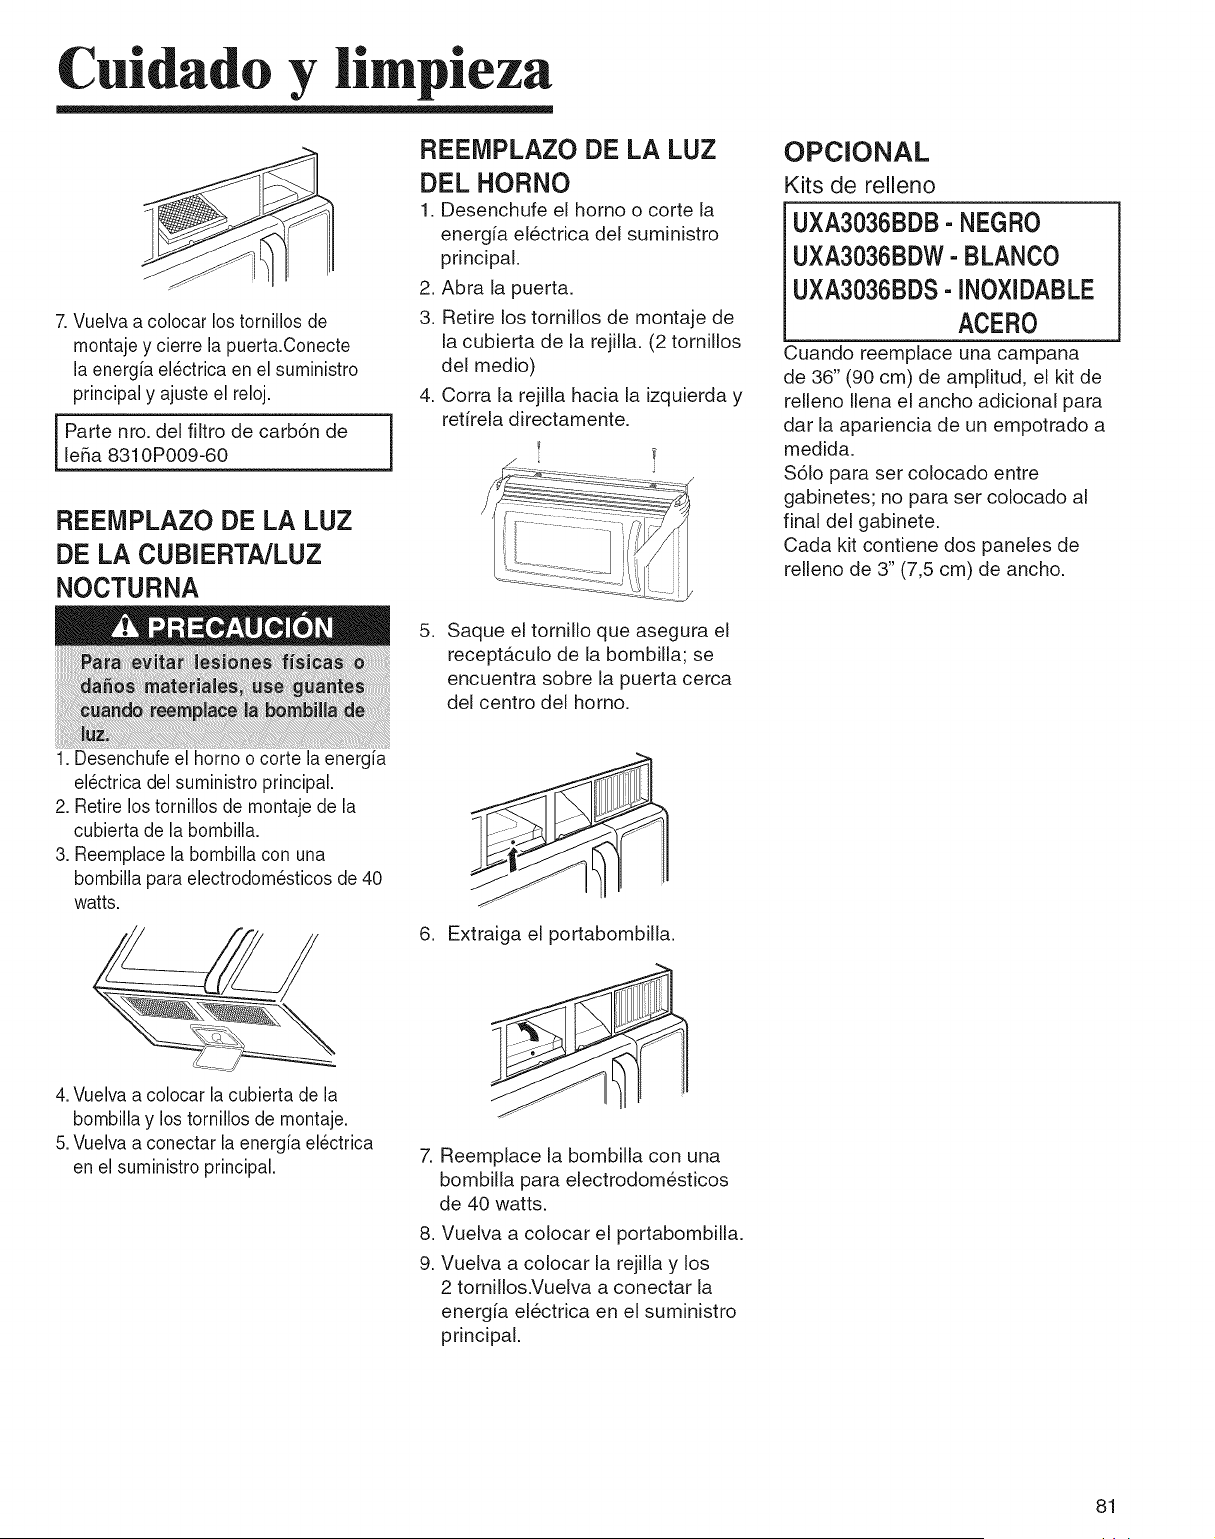
Cuidado y li pieza
7. Vuelva a colocar los tornillos de
montaje y cierre la puerta.Conecte
la energia el_ctrica en el suministro
principal y ajuste el reloj.
Parte nro. del filtro de carb6n de
[eRa 8310P009-60
REEIVIPLAZO DE LA LUZ
DE LA CUBIERTA/LUZ
NOCTURNA
J
REEIVIPLAZO DE LA LUZ
DEL HORNO
1. Desenchufe el homo o corte la
energ[a electrica de[ suministro
principal.
2. Abra [a puerta.
3. Retire los tornillos de montaje de
la cubierta de la rejilla. (2 tornillos
del medio)
4. Corra la rejilla hacia la izquierda y
ret[rela directamente.
.
Saque el tornil[o que asegura el
receptaculo de la bombilla; se
encuentra sobre la puerta cerca
del centro del homo.
OPClONAL
Kits de relleno
UXA3036BDB- NEGRO
UXA3036BDW- BLANCO
UXA3036BDS- INOXIDABLE
ACERO
Cuando reemplace una campana
de 36" (90 cm) de amplitud, el kit de
relleno Ilena el ancho adicional para
dar [a apariencia de un empotrado a
medida.
S61opara ser co[ocado entre
gabinetes; no para ser colocado al
final del gabinete.
Cada kit contiene dos paneles de
relleno de 3" (7,5 cm) de ancho.
1. Desenchufe el homo o corte la energia
el_ctrica del suministro principal.
2. Retire los tornillos de montaje de la
cubierta de la bombilla.
3. Reemplace la bombilla con una
bombilla para electrodom_sticos de 40
watts.
4. Vuelva a colocar la cubierta de la
bombilla y los tornillos de montaje.
5.Vuelva a conectar la energia el_ctrica
en el suministro principal.
.
Extraiga el portabombilla.
7.
.
9.
Reemplace [a bombilla con una
bombilla para electrodomesticos
de 40 watts.
Vuelva a colocar el portabombilla.
Vuelva a colocar la rejilla y los
2 tornillos.Vuelva a conectar la
energia electrica en el suministro
principal.
81
Soluci6n e proble as
GUiA DE SOLUCION DE PROBLEIVIAS
Antesde Ilamar a un t_cnicoparasu homo,verifiqueestalistade
posiblesproblemasy soluciones.
No funcionan ni la pantalladel homo ni el homo.
o Insertecorrectamenteel enchufea un tomacorrienteconectadoa
tierra.
, Si el tomacorrienteest,.controladopot un interruptorde pared,
asegQresede que el interruptorde paredest_encendido.
, Retireel enchufedel tomacorriente,esperediez segundosy vuelva
a enchufarlo.
, Reinicieel disyuntoro reemplacecualquierfusiblequemado.
o Enchufeotto aparato en eltomacorriente;si el otto aparato no
funciona,Ilame a un electricistacalificadoparaque repare el
tomacorriente.
, Enchufeel homo en un tomacorrientediferente.
El homo se apaga antes de que transcurra el tiempo
programatic.
. Aseg_resede que la puertaest_ bien cerrada.
, Controlesi qued6materialde embalajeu otto material en la traba
de la puerta.
. Controleque la puerta no est_daSada.
, PresioneSTOP/CLEARdos vecesy vuelvaa ingresarlas
instruccionesde cocci6n.
El homo se apaga antes de que transcurra el tiempo
programado.
o Si no huboun corte de electricidad,retireel enchufedel
tomacorriente,esperediez segundosy vuelva a enchufarlo.Si hubo
un corte de electricidad,aparecerael indicadorde la hora:
PLEASE TOUCH CLOCK AND SETTIME OF DAY. (POR
FAVOR OPRIMA CLOCK (RELOJ)Y CONFIGURE LA
HORA DEL DJA.) Reinicieel relojy cualquierinstrucci6nde
cocci6n.
, Reinicieel disyuntoro reemplacecualquierfusiblequemado.
La comida se cocina dernasiado lentamente.
. Assurez-vousque le four est branch_sur une ligne de 20 amperes.
Poneren funcionamientootro electrodom_sticoen el mismocircuito
puedecausaruna cafda de tensi6n.Si es necesario,enchufeel
homo ensu propiocircuito.
Ve chispas o arco ei_ctrico.
. Saquecualquierutensilio met_.lico,arficulosde cocina o cierres de
metal.Si usa papelde aluminio,utilice s61otiras pequeSasy deje
al menosuna pulgadaentre el papelde aluminioy lasparedes
interioresdel homo.
El plato giratodo hate ruido o se pega.
. Limpieel plato giratorio,elanillo giratorioy el pisodel homo.
° AsegOresede que el platoy el anillogiratorio est_ncolocados
correctamente.
El uso de su microondas causa interferenciadeTV o radio.
. Estoes similara la interferenciacausada porotrosartefactos
pequeSos,como pot ejemplolos secadores.Alejem_.ssu
microondasde otros electrodom_sticos,comosu TV o radio.
Nota:
Si el homo estb programado para cocinar durante mbs
de 25 minutos, despu_s de los 25 minutos se ajustarb
automdticamente a una potencia del 70pot ciento para evitar
que se pase la comida.
Si tiene alg_n problema que no puede
solucionar, Ilame a nuestra linea de
reparaciones:
(1-800-688-9900)
82 82

Nota
83
F F
GARANTIA DE LOS ELECTRODOMESTICOS PRINCIPALES
DE MAYTAG CORPORATION
GARANTIALIMITADA
DDuranteunaSoa partirde la fechade compra,siemprey cuandosedeaesteeiectrodomesticoprincipalun usoy mantenimientodeconformidadcon
lasinstruccionesadjuntasoprovistasconel producto,la marcaMaytagde WhirlpoolCorporationo WhirlpoolCanadaLP(enIosucesivodenominado
"Maytag")seharacargodel costode laspiezasespecificadasdefabricay deltrabajode reparaci6nparacorregirdefectosen losmaterialeso enla mano
deobra.ElserviciodeberasersuministradoporunacompaSiadeserviciodesignadaporMaytag.EstagarantialimitadaesvalidasolamenteenEstados
Unidoso enCanadA,y seaplicasolamentecuandoelelectrodomesticoprincipalseuseen el palsen elquese hacomprado.Estagarantialimitadano
tienevigorfuerade loscincuentaEstadosUnidosy CanadA.Serequiereunapruebadelafechadecompraoriginalparaobtenerserviciobajoestagarantia
limitada.
EXCLUSIONESDE LAGARANTIA
Estagarantialimitadano cubre:
1. Visitasdeserviciotecnicoparacorregirla instalaci6nde suelectrodomesticoprincipal,paraenseSarlea usarsuelectrodomesticoprincipal,para
cambiaro repararfusiNesdomesticoso paracorregirla instalaci6nelectricao de la tuberiadela casa.
2. Visitasdeserviciotecnicopararepararo reemplazarfocosparaelectrodomesticos,filtrosdeaireo filtrosdeagua.Estaspiezasdeconsumoestan
exduidasdelacoberturadelagarantia.
3. Reparacionescuandosuelectrodomesticoprincipalse usedeunmododiferenteal domesticonormalde unafamilia,o cuandoseusedeun modo
contrarioalasinstruccionespublicadasparaelusuariouoperadory/olasinstruccionesdeinstalaci6n.
4. DaSoscausadospotaccidente,alteraci6n,usoindebido,abuso,incendio,inundaci6n,actosfortuitos,instalaci6nincorrect&instalaci6nquenoestede
acuerdoconlosc6digoselectricosodeplomeria,oelempleodearficulosdeconsumoo productosde limpiezanoaprobadosporMaytag.
5. DaSosesteticos,induyendorayaduras,abolladuras,desportilladurasu otrodaSoalacabadodesuelectrodomesticoprincipal,a menosqueel mismo
seadebidoa defectosenlosmaterialeso lamanode obray se leinformeaMaytagenunlapsode30 diasa partirdelafechadecompra.
6. Cualquierperdidadecomidadebidoa fallasdelrefrigeradoro delcongelador.
7. Costosrelativosa la remoci6nde suelectrodomesticoprincipaldesdesu hogarparaobtenerreparaciones.Esteelectrodomesticoprincipalesta
diseSadoparaset reparadoenel hogary Qnicamenteel serviciode reparaci6nen el hogarestacubiertobajoestagarantia.
8. Reparacionesdepiezasosistemascomoresultadode modificacionesno autorizadasquesehayanefectuadoen el electrodomestico.
9. Gastosdeviajey transporteparaobtenerservicioparael producto,sisuelectrodomesticoprincipalestaubicadoen un lugarremotoenelcualnohaya
disponibleuntecnicodeservicioautorizadoporMaytag.
10.La remoci6ny reinstalaci6ndesu electrodomesticoprincipal,siestuvierainstaladoen unlugarinaccesiNeosi noestuvierainstaladode conformidad
conlasinstruccionesdeinstalaci6npublicadas.
11.ElectrodomesticosprincipalesconnQmerosdemodelo/seriequese hayanremovido,alteradoo quenopuedanseridentificadosconfacilidad.Esta
garantiaseanularAsi el nQmerodeserieaplicadoen la fabricahasidoalteradooremovidodesuelectrodomesticoprincipal.
Elcostodelareparaci6noelreemplazobajoestascircunstanciasexduidas,correraporcuentadeldiente.
EXCLUSIONDEGARANTiASIMPLiCITAS;LIMITACl0NDE RECURSOS
ELONICOY EXCLUSIVORECURSODELCLIENTESEGONLOS TERMINOSDE ESTAGARANTIALIMITADASER_,EL DEREPARAREL PRODUCTOSEGONSEESTIPULA
ENLA PRESENTE.LAS GARANTiASIMPLiCITAS,INCLUYENDOLAS GARANTiASDE COMERCIABILIDAD0 DECAPACIDADPARAUN PROPOSITOPARTICULAR,SERAN
LIMITADASA UNANO 0 AL PERiODOM_,SCORTOPERMITIDOPOR LEY.MAYTAGNO SERESPONSABILIZARAPOR DANOSINCIDENTALES0 CONSECUENTES.ALGUNOS
ESTADOSY PROVINCIASNO PERMITENLAS EXCLUSlONES0 LIMITACIONESPORDAIqOSINCIDENTALES0 CONSECUENTES,0 LIMITACIONESACERCADECUANTO
DEBEDURARUNAGARANTiAIMPLiCITADE COMERCIABILIDAD0 CAPACIDAD,DE MODOQUE LASLIMITACIONES0 EXCLUSIONESARRIBAMENCIONADASPUEDEN
NOAPLICARSEEN SUCASO.ESTAGARANTiALEOTORGADERECHOSLEGALESESPEC{FICOSY ESPOSIBLEQUE USTEDTENGATAMBIENOTROSDERECHOSQUE
PUEDENVARIARDE UNESTADOA OTROO DE UNA PROVINCIAA OTRA.
Si usted se encuentra fuera de los cincuenta Estados Unidos y CanadA, p6ngase en contacto con su distribuidor autorizado
de Maytag para determinar si corresponde otra garant[a.
Si necesita servicio, consulte primero la secci6n "Soluci6n de problemas" del Manual de uso y cuidado. Despues de
consultar [a secci6n "Soluci6n de problemas", puede encontrar ayuda adicional en [a secci6n "Ayuda o servicio tecnico," o
[[amando a Maytag. En EE.UU., [lame al 1-800-688-9900. En CanadA, [lame al 1-800-807-6777.
84
DE68-O3143Z
12/07
Impreso enMalaysia