Owner's Manual
[RI:IFTSMANo
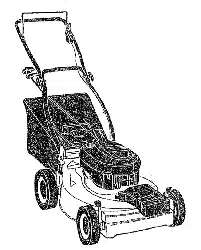
6.0 HORSEPOWER
22" REAR DISCHARGE
ROTARY LAWN MOWER
Model No.
917.387301
• Safety
, Assembly
, Operation
• Maintenance
• EspaSol
• Repair Parts
CAUTION:
Read and follow all
Safety Rules and Instructions
before operating this equipment
Sears, Roebuck and Co., Hoffman Estates, IL 60179
Warranty 2 Product Specifications 11
Safety Rules 2 Service and Adjustments 13
Assembly 4 Storage 14
Operation 6 Troubleshooting 15
Maintenance Schedule 10 Repair Parts 32
Maintenance 10 Parts Ordedng BackCover
LIMITED TWO YEAR WARRANTY ON CRAFTSMAN POWER MOWER
For two years from date of purchase, when this Craftsman Lawn Mower is maintained,
lubricated, and tuned up according to the operating and maintenance instructions in the
owner's manual, Sears will repair free of charge any defect in material or workmanship.
If this Craftsman Lawn Mower is used for commercial or rental purposes, this warranty
applies for only 90 days from the date of purchase°
This Warranty does not cover:
. Expendable items which become worn during normal use, such as rotary mower
blades, blade adapters, belts, air cleaners and spark plug.
• Repairs necessary' because of operator abuse or negligence, including bent crank-
shafts and the fa[ture to maintain the equipment accordinq to. the instructions con+
tained in the owner's manual,
Warranty service is available by returning the Craftsman power mower to the nearest
Sears Service Center/Department in the United States. This warranty applies only while
this product is in use in the United States,
This Warranty gives you specific legal rights, and you may also have other rights which
vary from state to state. +,
SEARS, ROEBUCK AND CO., D/817 WA, HOFFMAN ESTATES, ILLINOIS 60179
,i
TRAINING:
• Read this operator's manual carefufly+
Become familiar with the controls and
know how to operate your mower
properly. Learn how to quickly stop
mower°
o Do not allow children to use your mower.
Never allow adults to use mower without
proper instructions.
o Keep the area of operation clear of all
persons, especially small children and
pets.
o Use mower only as the manufacturer
intended and as describedin this manual.
o Do not operate mower if it has been
dropped or damaged in any manner°
Always have damage repaired before
using your mower.
- Do not use accessory attachments that
are not recommended by the manufac-
turer. Use of such attachments may be
hazardous.
° The blade turns when the engine is
running.
PREPARATION:
° Always thoroughly check the area to be
mowed and clear it of a!l stones, sticks,
wires, bones, and other foreign objects,
These objects wil! be thrown by the blade
and can cause severe injury.
• Always wear safely glasses or eye
shields when starting and while using
your mower.
° Dress properly. Do not operate mower
when barefoot or wearing open sandals.
Wear only solid shoes with good traction
when mowing+
• Check fuel tank before starting engine.
Do not fill gas tank indoors, when the
engine is running or when the engine is
o
hot° Allow the engine to coot for several
minutes before filling the gas tank. Clean
off any spilled gasoline before starting the
engine.
• Always make wheel height adjustments
before starting your mower. Never
attempt to do this while the engine is
running_
• Mow only in daylight or good artificial
light.
OPERATION'.
° Keep your eyes and mind on your mower
and the area being cut. Do not let other
interests distract you.
° Do not mow wet or slippery grass. Never
run while operating your mower. Always
be sure of your footing -- keep a firm
hold on the handles and walk,
° Do not put hands or feet near or under
rotating parts. Keep clear of the discharge
opening at all times.
° Always stop the engine whenever you
leave or are not using your mower, or
before crossing driveways, walks, roads,
and any gravel--covered areas_
, Never direct discharge of material toward
bystanders nor allow anyone near the
mower while you are operating it.
° Before cleaning, inspecting, or repairing
your mower, stop the engine and make
absolutely sure the blade and all moving
parts have stopped. Then disconnect the
spark plug wire and keep it away from the
spark plug to prevent accidental starling.
° Do not coniinue to run your mower if you
hit a foreign object. Fellow the procedure
outlined above, then repair any damage
before restarting and operating you
mower.
° Do not change the govemor settings or
overspeed the engine. Engine damage or
personal injury may result.
° Do not operate your moWer if it vibrates
abnormally, Excessive vibration is an
indication of damage; stop the engine,
safely check for the cause of vibration
and repair as required.
° Do not run the engine indoors. Exhaust
fumes are dangerous,
o Never cut grass by pulling] the mower
towards you. Mow across the face of
slopes, never up and clown or you might
lose your footing. Do not mow exces-
sively steep slopes. Use caution when
operating the mower on uneven terrain or
when changing directions-- maintain
good footing.
• Never operate your mower without
proper guards, plates," grass catcher or
other safety devices in place,
MAINTENANCE AND STORAGE:
° Check the blade and the engine mount-
ing bolts often to be sure they are
lightened properly.
• Check all bolts, nuts and screws at
frequent intervals for proper tightness to
be sure mower is in safe working
condition.
o Keep all safety devices in place and
working.
• To reduce fire hazard, keep the engine
free of grass, leaves or excessive grease
and oil.
° Check grass catcher often for deteriora-
tion and wear and replace worn bags.
Use only replacement bags that are
recommended by andcomply with
specifications of the manufacturer of your
mower.
° Always keep a sharp blade on your
mower°
o Allow engine to cool before storing in any
enclosure.
, Never store mower with fuel in the tank
inside a building where fumes may reach
an open flame or an ignition source such
as a hot water heater, space heater,
clothes dryer, etc.
CAUTION; Always disconnect spark plug
wire and place wire where it cannot contact
spark plug in order to prevent accidental
starting when setting up, transporting,
adjusting Or making repairs,
WARNING =
The engine exhaust from this product
contains chemicals known to the State of
California to cause cancer, birth defects, or
other reproductive harm.
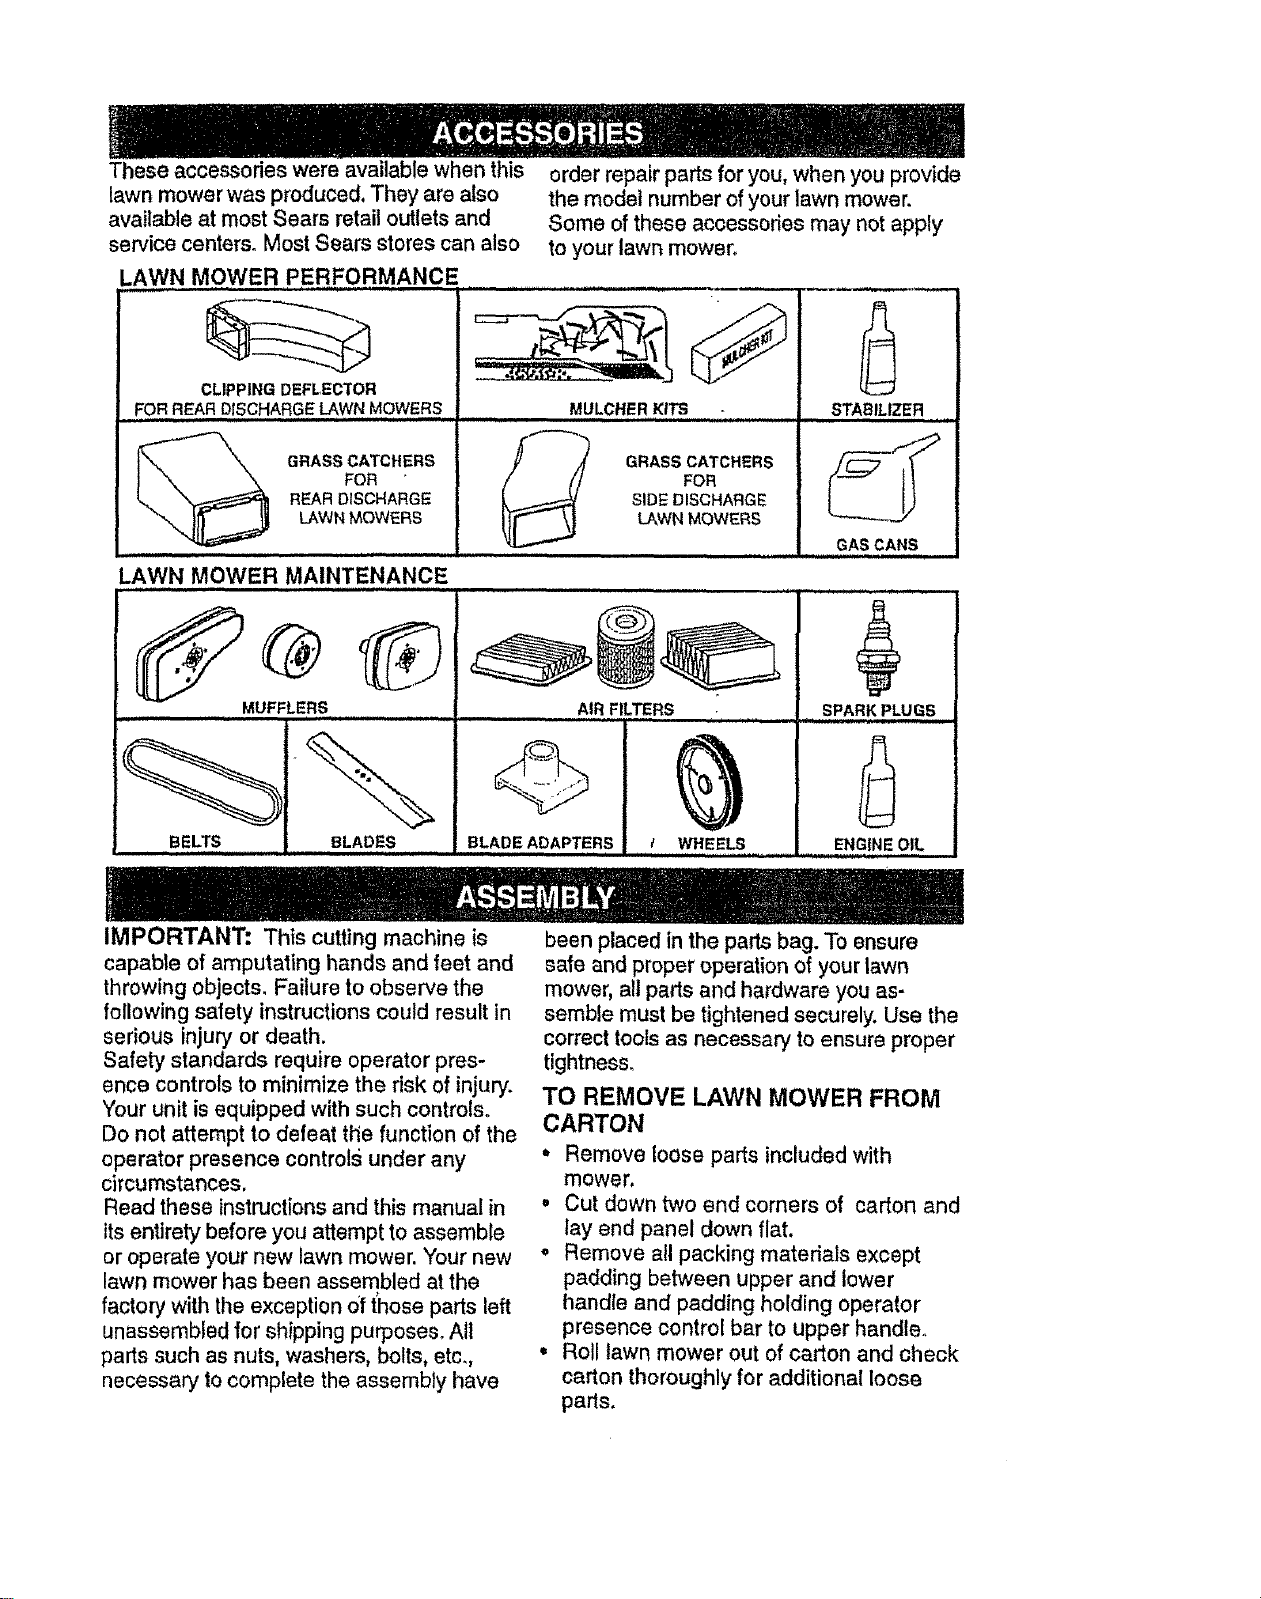
Theseaccessorieswereavailablewhenthis
lawnmowerwasproduced,Theyarealso
availableatmostSearsretailoutletsand
servicecenters.MostSearsstorescanalso to your lawn mower.
LAWN MOWER PERFORMANCE .................
CLIPPING DEFLECTOR
FOR,,,,REAR,DISCHARGE LAWN MOWERS
GRASS CATCHERS
FOR
REAR DISCHARGE
LAWN MOWERS
LAWN MOWER MAINTENANCE
MUFFLERS
BELTS
i H Hi
order repair parts for you, when you provide
the model number of your lawn mower.
Some of these accessories may not apply
MULCHER KITS
GRASS CATCHERS
FOR
! SIDE DISCHARGE
i LAWN MOWERS
, ,1,,
AIR FILTERS
WHEELS
BLADE ADAPTERS
, STABILIZER
GAS CANS
........., , , i,_ ,,, ,
SPARK PLUGS
ENGfNEOIL
IMPORTANT: This cutting machine is
capable of amputating hands and feet and
throwing objects, Failure to observe the
following safety instructions could result in
serious injury or death.
Safety standards require operator pres-
ence controls to minimize the risk of injury.
Your unit is equipped with such controls.
Do not attempt to defeat the function of the
operator presence controls under any
circumstances,
Read these instructions and this manual in
its entirety before you attempt to assemble
or operate your new lawn mower. Your new
lawn mower has been assembled at the
factory with the exception Of those parts left
unassembled for shipping purposes. All
parts such as nuts, washers, bolts, etc,,
necessary to complete the assembly have
been placed in the parts bag. To ensure
safe and proper operation of your lawn
mower, all parts and hardware you as-
semble must be tightened securely. Use the
correct tools as necessary to ensure proper
tightness.
TO REMOVE LAWN MOWER FROM
CARTON
• Remove loose parts included with
mower.
• Cut down two end comers of carton and
lay end panel down flat.
• Remove all packing materials except
padding between upper and lower
handle and padding holding operator
presence control bar to upper handle.
• Roll lawn mower out of carton and check
carton thoroughly for additional loose
parts,
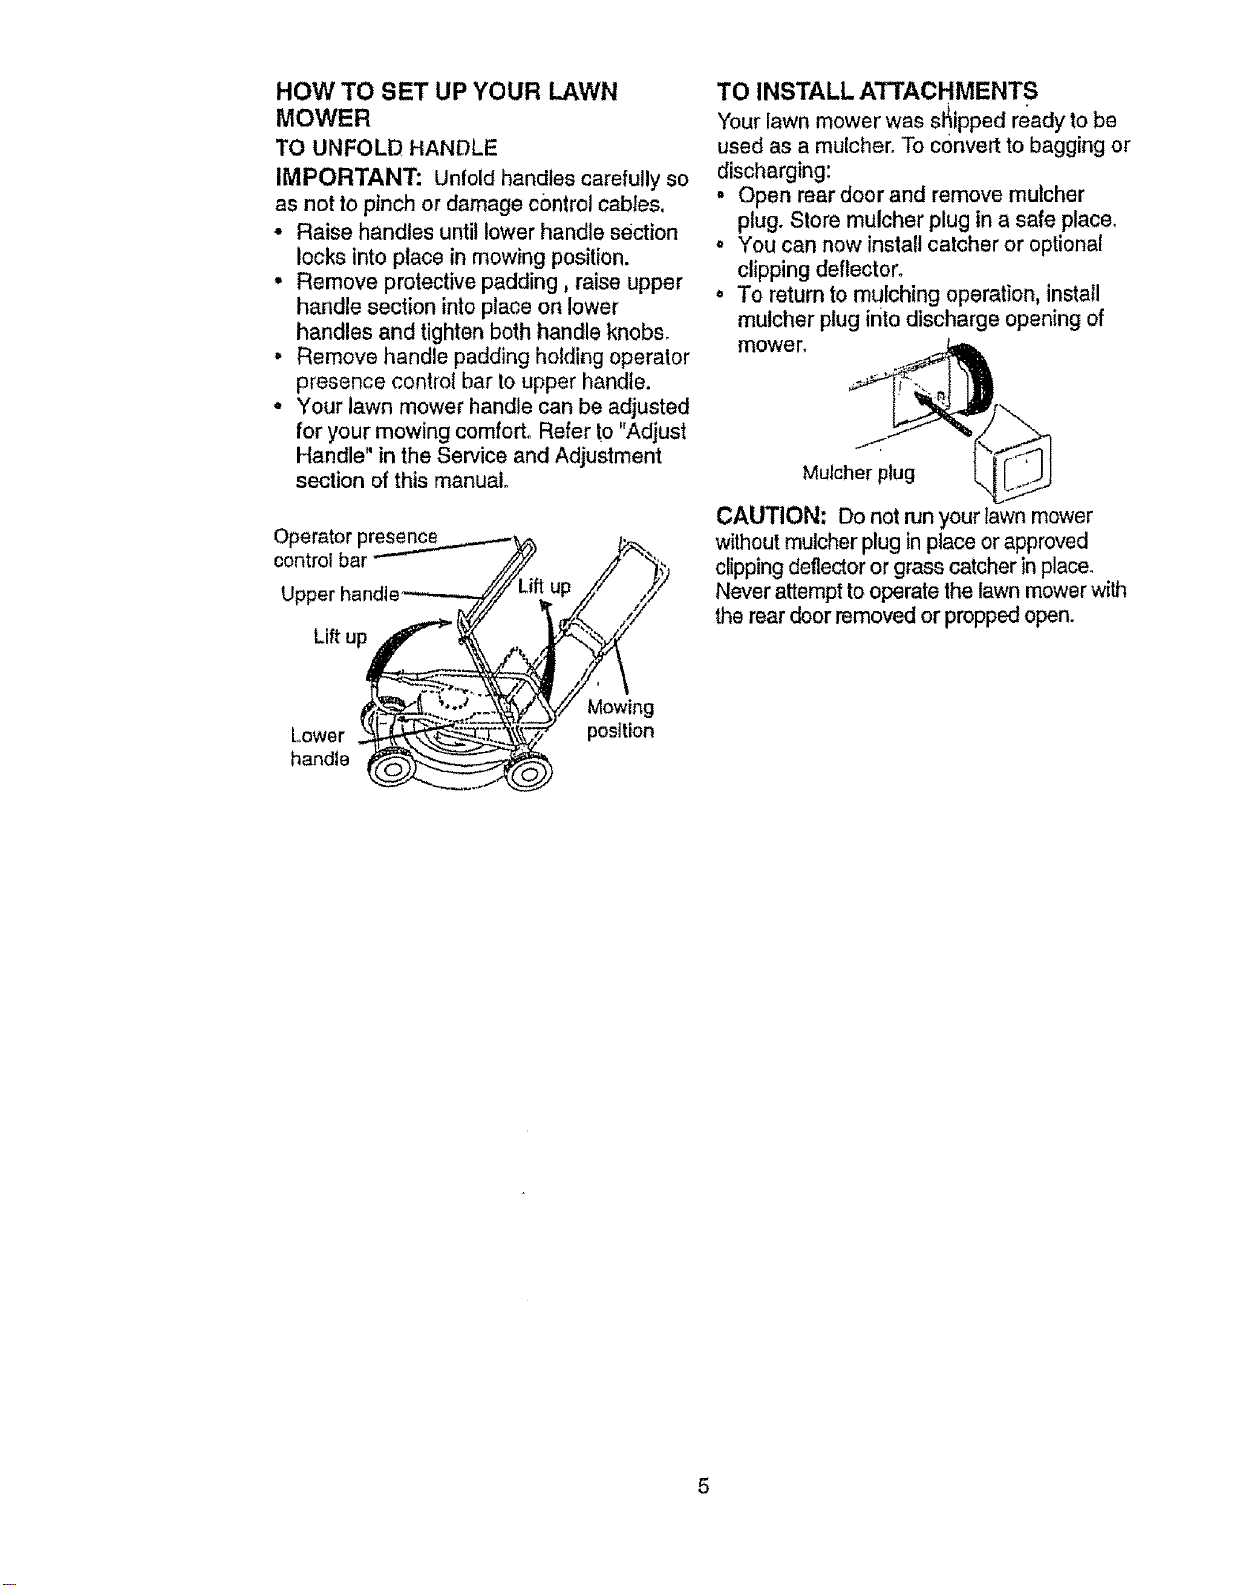
HOW TO SET UP YOUR LAWN
MOWER
TO UNFOLD HANDLE
IMPORTANT: Untold handles carefully so
as not to pinch or damage control cables.
• Raise handles until lower handle section
locks into place in mowing position.
• Remove protective padding, raise upper
handle section into place on lower
handles and tighten both handle knobs,
, Remove handle padding holding operator
presence control bar to upper handle.
• Your lawn mower handle can be adjusted
for your mowing comfort° Refer to "Adjust
Handle" in the Service and Adjustment
section of this manual,
Operator presenc_...,._...-_,_
control bar"-"-'- • ,.._ J''.,
Upper handle-__ Lift up i_
u,,u.rg
" _T -_'' _=,_' position
handle -_,_-_ _ _',
TO INSTALL ATTACHMENTS
Your lawnmower was sl_ipped ready to be
used as a mu[cheroTo convertto bagging or
discharging:
• Open rear door and remove mulcher
plug. Store mulcher plug in a safe place°
. You can now install catcher or optional
clipping deflector°
° To return to mulching operation, install
mulcher plug into discharge opening of
mower, fAgL
CAUTION: Do not run your lawn mower
without mulcher plug In place or approved
clippingdeflector or grass catcher in place.
Never attempt to operate the lawn mowerwith
the rear door removed or propped open.

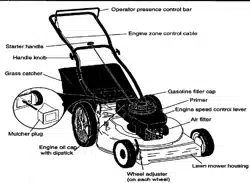
KNOWYOUR LAWN MOWER
READ THIS OWNER'S MANUALAND SAFETY RULES BEFORE OPERATING YOUR LAWN
MOWER, Compare the illustrations with your lawn mower to familiarize yourself with the location
of various controls and adjustments. Save this manual for future referenoe,
__. iiil'lUll'l ,1111111 _ rll[ll I ill i iil1,1111111,11,1111 .......
These symbols may appear on your lawn mower or in literature supplied with the
product, Learn and understand their meaning.
CAUTtON ENGINE ENGINE FAST SLOW CHOKE FUEL OIL ,DANGER, KEEP HANDS
OR WARNING ON OFF AND FEET AWAY
Operator presence contro{bar
Starter handle
Handle
Engine zone control cable
Air filler
Mulcher _lug
Engine
with dipstick
Lawn mower housing
Wheel adjuster
(on each wheel)
4.J IIII11II ' r ....... _ .............
MEETS CPSC SAFETY REQUIREMENTS
Sears rotary walk.obehind power lawn mowers conform to the safety standards of the American
National Standards Institute and the UoSoConsumer Product Safety Commission, The blade
!urn,.s,when the engine is running ......._.,.
Operator Presence Control Bar- must be
held down to the handle to start the engine.
Release to stop the engine.
Primer- pumps additional fuel from the
carburetor to the cylinder for use when starting
a cold engine.
Starter Handle - used for starting the engine.
Mulcher Plug - located at the discharge
opening must be removed when converting to
bagging or discharging operation.
Theoperationofanylawnmowercan resultin
foreignobjeclsthrownintotheeyes,whichcan
resultinsevereeyedamage.Alwayswear
safetyglassesoreyeshieldswhileoperating
yourlawnmowerorperforminganyadjust-
mentsorrepairs,Werecommendawide
visionsafetymaskoverthespectaclesor
standardsafetyglasses,
HOW TO USE YOUR LAWN MOWER
ENGINE SPEED CONTROL
The engine speed was set at the factory
for optimum performance, Speed is not
adjustable.
ENGINE ZONE CONTROL
CAUTION: Federal regulations require an
engine control to be installed on this lawn
mower in order to minimize the risk of blade
contact inju_o Do not under any circumstances
attempt to defeat the function of the operator
control, The blade turns when the engine is
running.
• Your lawn mower is equipped with an
operator presence control bar which
requires the operator to be positio6ed
behind the lawn mower handle to start and
operate the lawn mower,
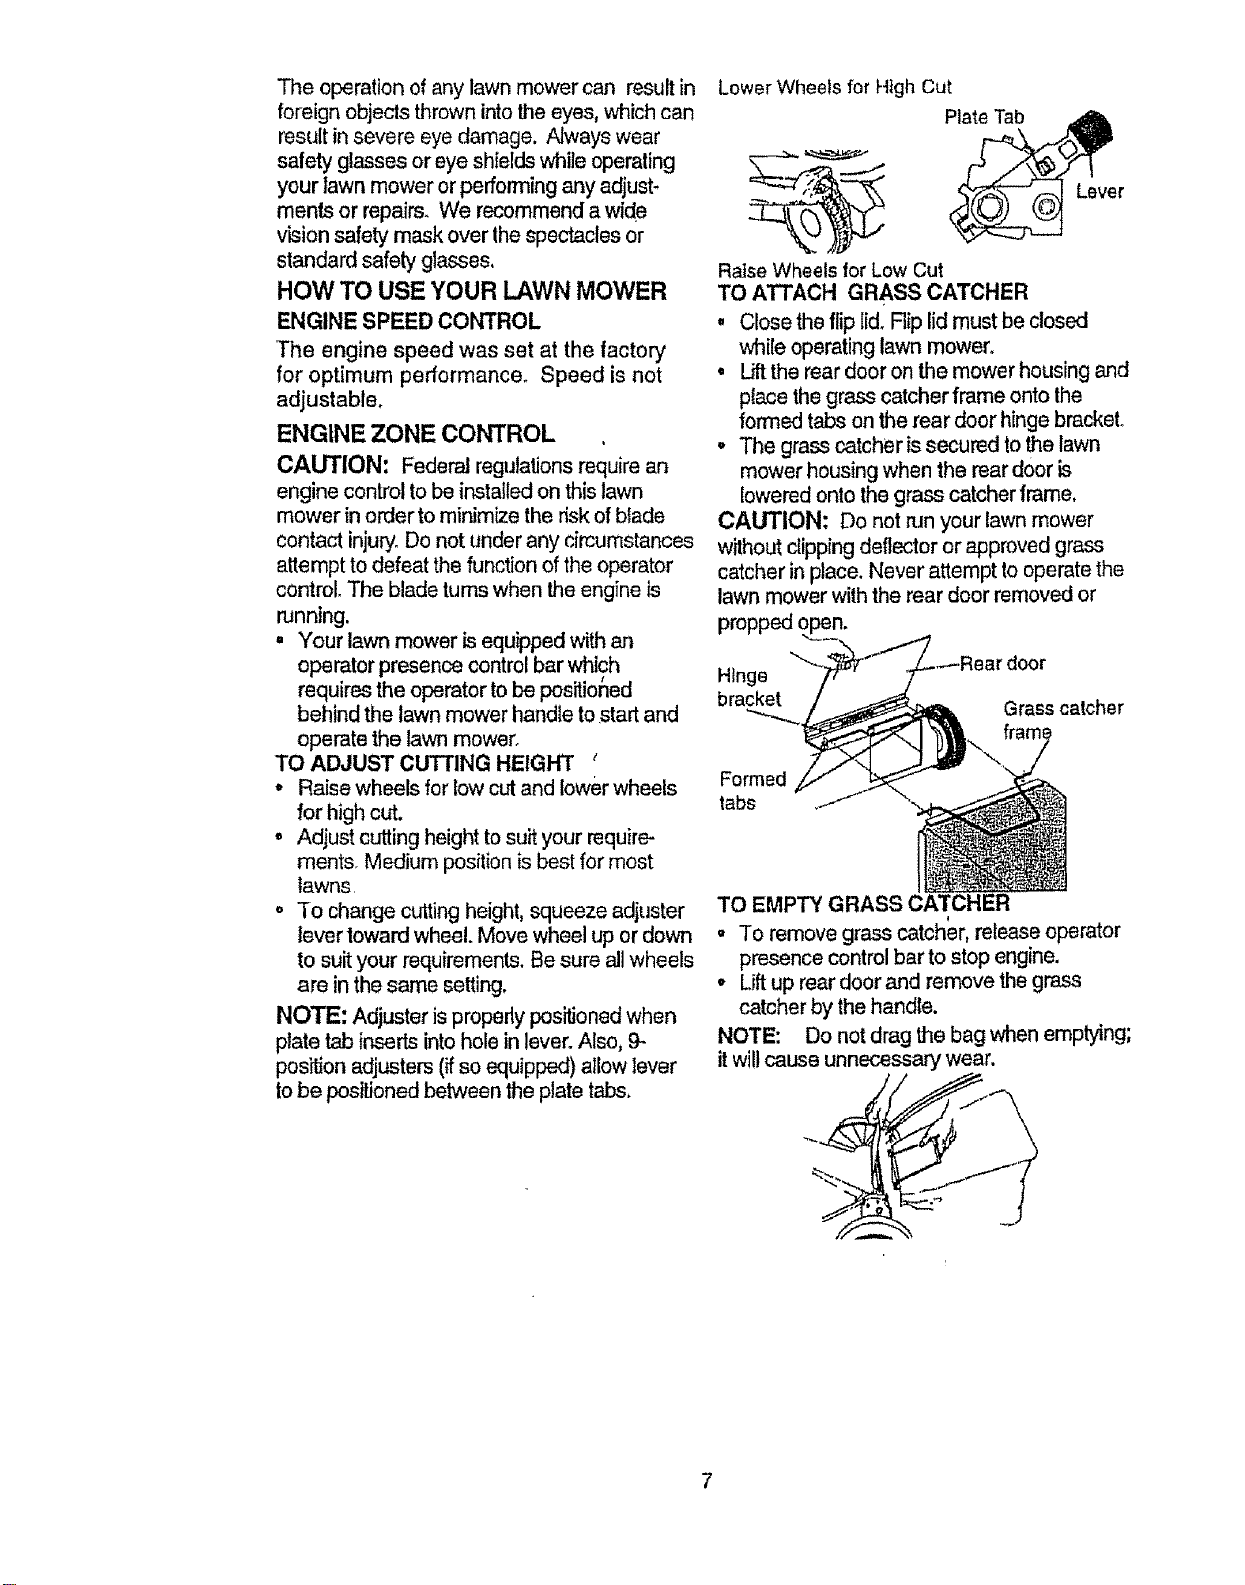
TO ADJUST CUTTING HEIGHT '
• Raise wheels for low cut and lower wheels
for high cut,
• Adjust cutting height to suit your require-
ments, Medium position is best for most
lawns
° To change cutting height, squeeze adjuster
lever toward wheel. Move wheel up or down
to suit your requirements. Be sure all wheels
are in the same setting,
NOTE: Adjuster is properly positioned when
plate tab inserts into hole in lever. Also, 9-
pos_on adjusters (if so equipped) allow lever
to be positioned between the plate tabs.
Lower Wheels for High Cut
Lever
Raise Wheels for Low Cut
TO ATTACH GRASS CATCHER
• Close the flip lid, Rip lid must be closed
while operating lawn mower°
• Lift the rear door on the mower housing and
place the grass catcher frame onto the
formed tabs on the rear door hinge bracket°
° The grass catcher is secured to the lawn
mower housing when the rear door is
lowered onto the grass catcher frame.
CAUTION: Do not run your lawn mower
without dipping deflector or approved grass
catcher in place. Never attempt to operate the
lawn mower with the rear door removed or
propped open.
Hinge
bracket
r door
Grass catcher
frame
Formed
tabs
TO EMPTY GRASS CATCHER
i
, To remove grass catcher, release operator
presence control bar to stop engine.
• Lift up rear door and remove the grass
catcher by the handle.
NOTE: Do not drag the bag when emptying;
it will cause unnecessary wear,

BEFORESTARTING ENGINE
OIL
Your lawn mower is shipped without oil inthe
engine°
• Be sure mower islevel and area around oil
fill is clean,
• Remove engine oil cap w/dipstick and fill to
the full line on the dipstick"
° Use 20 ozs. of ClioFor type and grade of oil
to use, see "ENGINE" in Maintenance
section of this manual.
° Pouroil slowly. Do not over fill.
° Check oil _evelbefore each use. Add oi! if
needed. Fill to full line on dipstick,
• To read proper level, tighten engine oil cap
each time.
° Reinstall engine oil cap and tighten.
• Change the oil after every 25 hours of
operation or each season. You may need
to change the oil more often under dusty,
dirty conditions
GAS
° Fill fuel tank. Use fresh, clean, regular
unleaded gasoline with a minimum of 87
octane, Do not mix oil "withgasoline.
Purchase fuel in quantities that can be used
within 30 days to assure fuel freshness.
WARNING; Experience indicates that
alcohol blended fuels (called gasohol or using
ethanol or methanol) can attract moisture
which leads to separation and formation of
acids during storage. Acidic gas can damage
the fue_system of an engine while in storage°
To avoid engine problems, the fuel system
should be emptied before storage of 30 days
or longer. Drain the fuel tank, start the engine
and let it run until fue! lines and carburetor are
empty. Use fresh fuel next season. See
Storage Instructions for additional information.
Never use engine or carburetor cleaner
products in fuel tank or permanent damage
may occur.
TO START ENGINE
• -ro start a cold engine, push primer five (5)
times before trying to start. Use a firm push.
This step is not usually necessary when
starting an engine which has already run for
a few minutes.
• Hold operator presence control bar down to
the handle and .pull starter handle quickly.
Do not allow starter rope to snap back.
• To stop engine,1 release operator presence
control bar.
NOTE: In cooler weather it may be neces-
sary to repeat priming steps, in warmer
weather over priming may cause flooding and
engine will not start. If you do flood engine,
wait a few minutes before attempting to start
and do not repeat priming steps
MOWING TIPS
• Under certain conditions, such as very tall
grass, it may be necessary to raise the
height of cut to reduce pushing effort and to
keep from overloading the engine and
leaving clumps of grass clippings.
• For extremely heavy cutting, reduce the
width of cut and raise the rear of the lawn
mower housing one (1) wheel adjuster
setting higher than the front for better
discharge of grass.
• When using a rear discharge lawn mower in
moist, heavy grass, dumps of cut grass
may not enter the grass catcher. Reduce
ground speed (pushing speed) and/or run
the lawn, mower over the area a second
time_
o If a trailof grass clippings is left on the right
side of a rear discharge lawn mower, mow
in a clockwise direction with a small overlap
to collect the clippings on the next pass.
° Keep top of engine around starter clear and
clean of grass clippings and chaff. This will
help engine air ffow and extend engine life.
° Pores in cloth grass catchers can become
filled with dirt and dust with use and
catchers will collect less grass. To prevent
this, regularly hose catchers off with water
and let dry before using,
o
MULCHING MOWING TIPS
IMPORTANT: For best performance, keep
mower housing free of built-up grass and trash.
Clean UNDERSIDE OF MOWER HOUSING
after each use° See "Cleaning" in
MAINTENANCE section of this manual,
• The special mulching blade will recut the
grass clippings many times and reduce
them in size so that as they fall onto the
lawn they will disperse into the grass and
not be noticed. Also, the mulched grass will
biodegrade quicldy to provide nutrients for
the lawn. Always mulch with your highest
engine (blade) speed as this will provide the
best recutting action of the blades.
. Avoid cutting your lawn when it is wet, Wet
grass tends to form clumps and interferes
with the mulching action. The best time to
mew your lawn is the eady afternoon. At this
time the grass has dded and the newly cut
area will not be exposed to the direct sun.
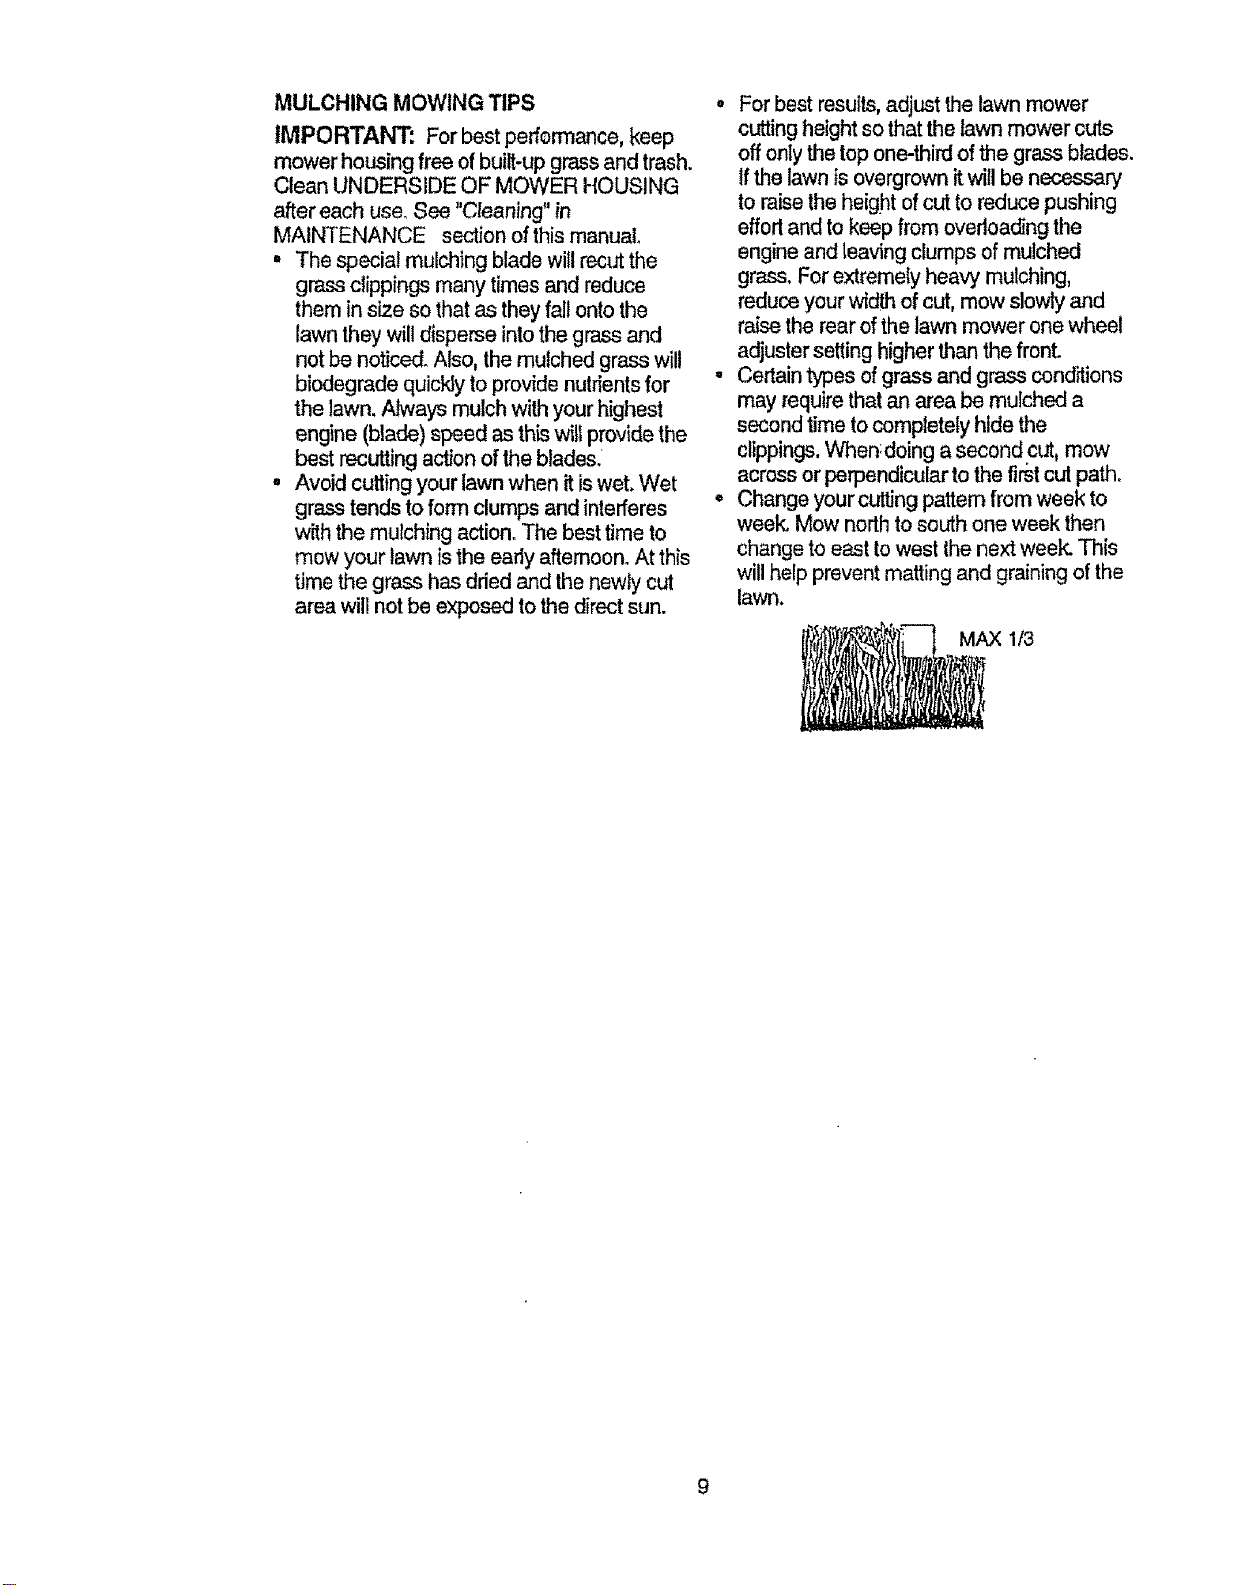
o Forbest results,adjust the lawn mower
cuttingheight so thatthelawn mower cuts
off only thetopone-third of the grass blades.
Ifthe lawn isovergrown itwill be necessary
to raisethe height of cut to reduce pushing
efforl and to keep from overloading the
engine and leaving clumps of mulched
grass. For extremety heavy mulching,
reduce your width of cut, mow slowly and
raise the rearof the lawn mower one wheel
adjuster setting higher than the front.
• Certaintypes of grass and grass conditions
may requirethat an area be mulched a
second time tocompletely hide the
clippings. When:doing a second cut, mow
across or perpendicular to the firstcut path.
• Change yourcutting patternfrom week to
week, Mow northto south one week then
change to east towest the next week, This
will help prevent matting and graining of the
lawn.
MAX 1/3
MAINTENANCE SCHEDULE ___"_._O_._ _"
REGULARSERWCE....... .____ ATES
Check for Loose F,aslsners II/ .... If . [ ..........
Clean/inspect GmsB Catcher
..V__.J#_ v'
M ,€lean Lawn Mower ............... tf If ......
O Glean Under Drive Cover
W (Power-prop,elted Mowers) ,
CheCk drive belt/pulleys
(P0wer-Propelled Mowers} _ ; = . _ ;__..____
R Check/Sharpen/Replace Blade ..... , ..... , ....... ......
Lubrication Chad V' Iv# .....
ctean eatteryiRecharge
(He=ri p Start Mowers! ...... _.... !/ 1/'4
Check EnBln,eO!!,L,evel __ .............
N _ Oly V'_,=
...... v' . _ ....
I Inspect Muffler _ ........
N CieanorFlephce"Spark Plug __.._
E Rap ace Air Filter Paper Cartridge 1/2
'1,,Ct_nllo rnc_omilan wijen operating Lm,dara tmaW loadortn Nob emblentlamporatur_s
2 - Service mor_ oflor= w_=.n opmrat|n_ IP, dtdy o_dL_ ¢_r,d_ionm
0 ,,Flcplm; ==b_ mo_o _llen wharf _J _ ser_y €.oR
4 - Ch_rg_148 t'iou_ at st!_ ,of_o.=t.on
GENERAL RECOMIVIENDATIONS
The warranty on this lawn mower does not
cover items that have been subjected to
operator abuse or negligence.To receive ful!
value from the warranty, operator must maintain
mower as instructed in this manual.
Some adjustments will need to be made
periodically to properly maintain your unit,
All adjustments in the Service and
Adjustments section of this manual should be
checked at least once each season.
• Once a year, replace the spark plug, replace
air filter element and check blade for wear. A
new spark plug and clean!new air filter
element assures proper air-fuel mixture and
helps your engine run better and last longer.
• Follow the maintenance schedule in this
manual.
BEFORE EACH USE
a Check engine oil level
• Check for loose fasteners_
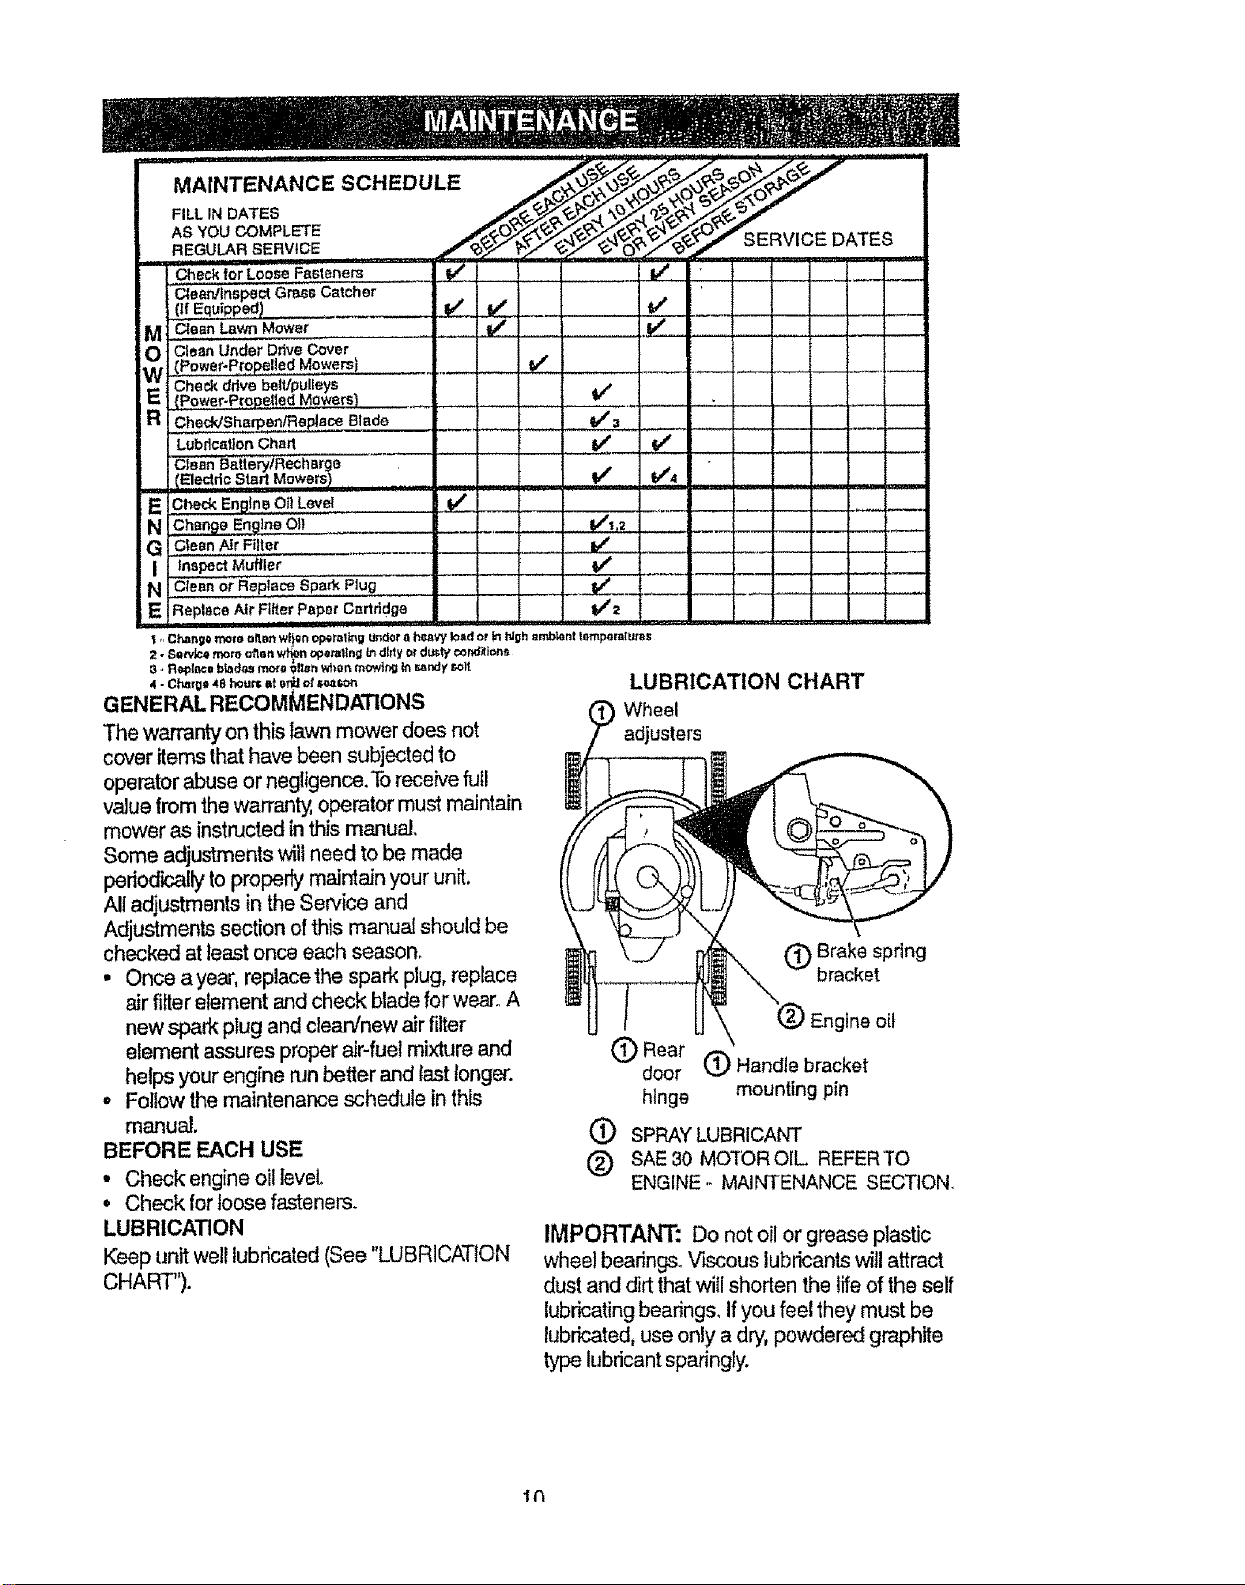
LUBRICATION
Keep unit wel! lubricated (See "LUBRICATION
CHART").
LUBRICATION CHART
Wheel
adjusters
(_) Brake spring
bracket
gtne o{I
(_1 Rear (_ Handle bracket
door
hinge mounting pin
(_ SPRAYLUBRICANT
SAE30 MO[OROIL REFERTO
ENGINE .- MAINTENANCE SECTION.
IMPORTANT: Do not oil or grease plastic
wheel bearings.VL_ous lubricants will attract
dust and dirt that will shorten the life of theself
lubricatingbearings. Ifyou feel they must be
lubricated,useonly a dry,powdered graphite
typelubricantsparingly.
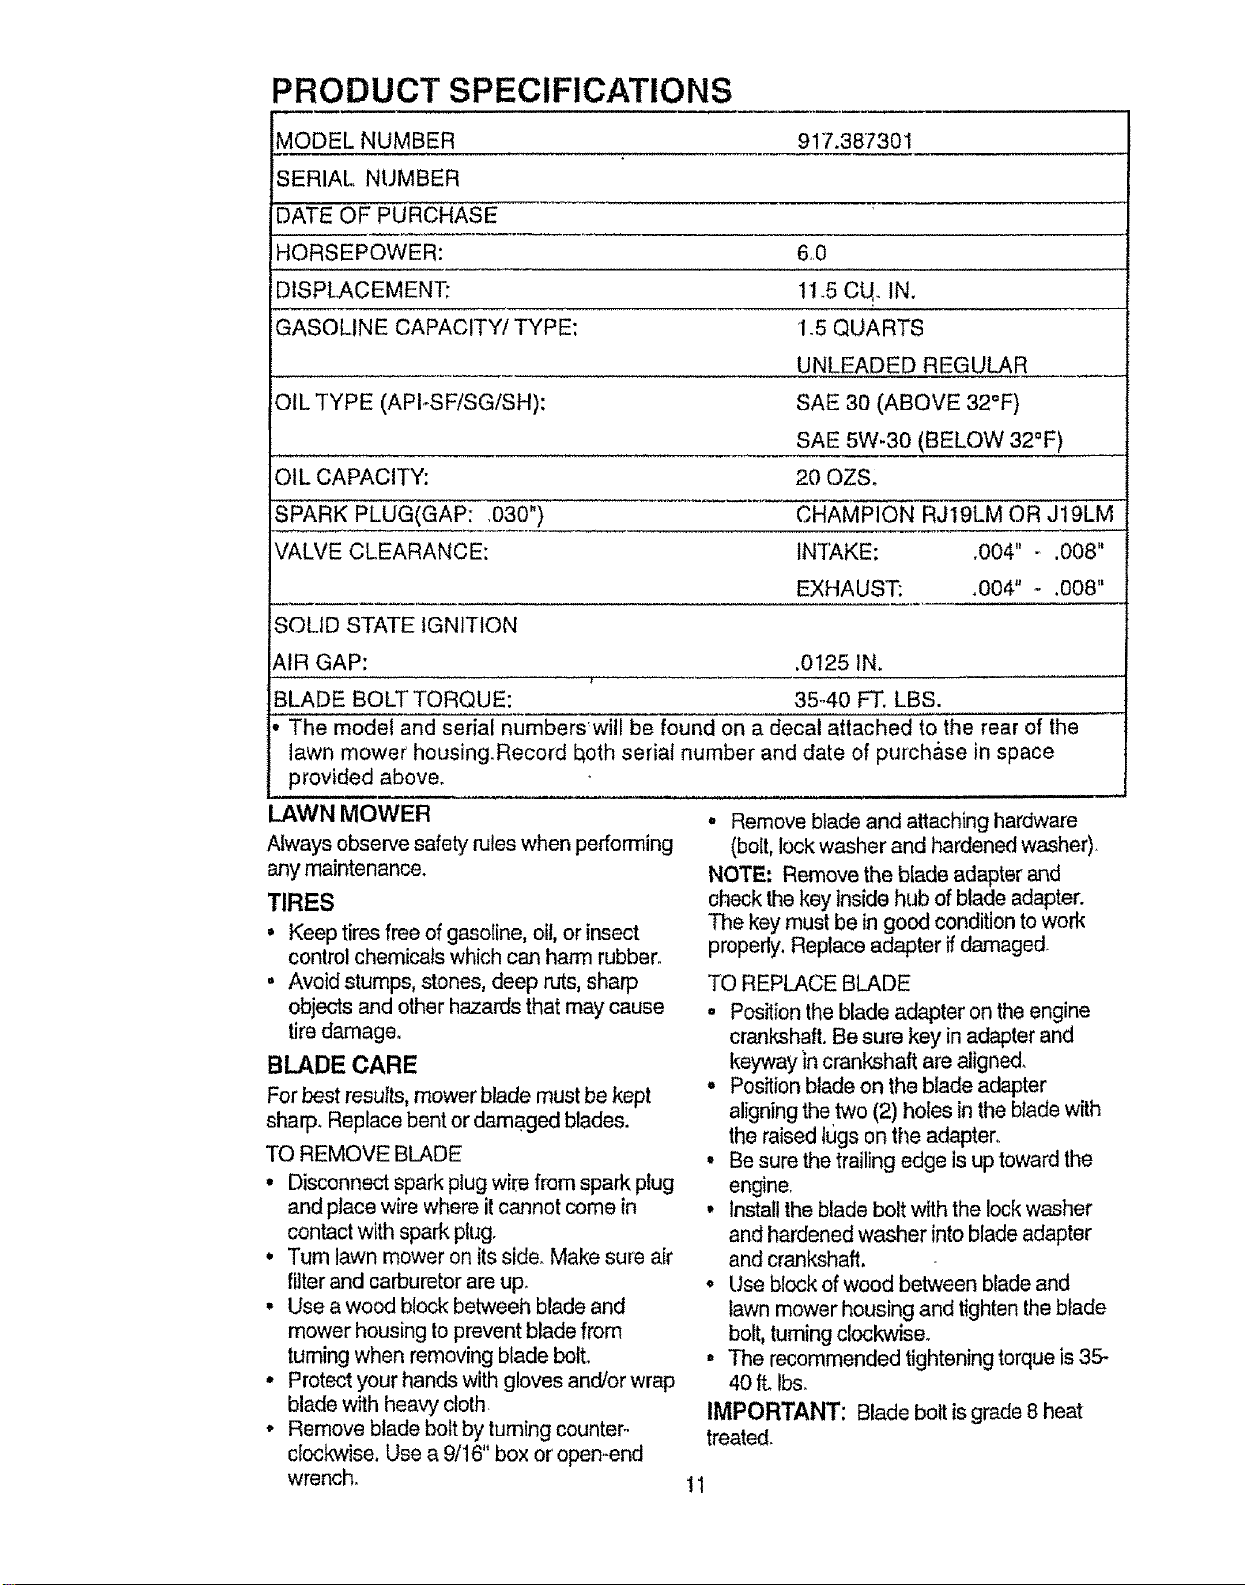
PRODUCT SPECIFICATIONS
_ODEL NUMBER 917.38"7301
SERIAL NUMBER
DATE OF PURCHASE
HORSEPOWER: 6,,0
DISPLACEMENT: 11.5 CU,. IN.
GASOLINE CAPACITY/TYPE: 1.5 QUARTS
UNLEADED REGULAR
OIL TYPE (API-SF!SG/SH): SAE 30 (ABOVE 320F)
SAE 5W-30 (BELOW 32°F)
OIL CAPACITY: 20 OZS.
SPARK PLUG(GAP: .030") CHAMPION RJt9LM OR J19LM
VALVE CLEARANCE: IN'fAKE: .004" - ,008"
EXHAUST; .004" - ,008"
SOLID STATE IGNITION
AIR GAP: ,0!25 IN.
BLADE BOLT TORQUE: 35°40 FT. LBS.
The model and serial numbers will be found on a decal attached to the rear of the
lawn mower housing.Record both serial number and date of purch&se in space
provided above.
..AWN MOWER
Always observe safety rdtes when pedorming
any maintenance.
TIRES
• Keep tires free of gasoline, oil, or insect
control chemicals which can harm rubber,
. Avoid stumps, stones, deep ruts, sharp
. Remove blade and attaching hardware
(bolt, lock washer and hardened washer).
NOTE: Remove the blade adapter and
check the key inside hub of blade adapter.
The key must be in good condition to work
properly, Replace adapter if damaged.
TO REPLACE BLADE
objects and other hazards that may cause
tire damage.
BLADE CARE
For best results, mower blade must be kept
sharp. Replace bent or damaged blades.
TO REMOVE BLADE
• Disconnect spark plug wire from spark plug
and place wire where it cannot come in
contact with spark plugo
, Turn lawn mower on its side. Make sure air
filter and carburetor are up.
• Use a wood block betweeh blade and
mower housing to prevent blade from
• Position the blade adapter on the engine
crankshaft. Be sure key in adapter and
keyway in crankshaft are aitgned.
• Posffion blade on the blade adapter
aligning the two (2) holes in the blade with
the raised tugs on tt_e adapter,
, Be sure the trailing edge is up toward the
engine.
• Install the blade bolt with the lock washer
and hardened washer into blade adapter
and crankshaft.
o Use block of wood between blade and
lawn mower housing and t_ghten the blade
bolt, turning clockwise.
turning when removing blade bolt.
• Protect your hands with gloves and/or wrap
blade with heavy cloth
° Remove blade bolt by turning counter-
c{ockwise, Use a 9/16" box or open-end
wrench.
= The recommended tightening torque is 35-
40ft. Ibs.
IMPORTANT: Blade bolt is grade 8 heat
treated.
11
NOTE: We do not recommend sharpening
blade- but ifyou do, be sure the blade is
balanced.
TO SHARPEN BLADE
Care should be taken to keep the blade
balanced. An unbalanced blade will cause
eventual damage to lawn mower or engine.
• The blade can be sharpened with a file or
on a grinding wheel, Do not attempt to
sharpen while on the mower.
• To check blade balance, drive a nail into a
beam or wall. Leave about one inch of the
straight nail exposed. Place center hole of
blade over the head of the nail. If blade is
balanced, it should remain in _ horizontal
position° tf either end of the blade moves
downward, sharpen the heavy end until the
blade is balanced.
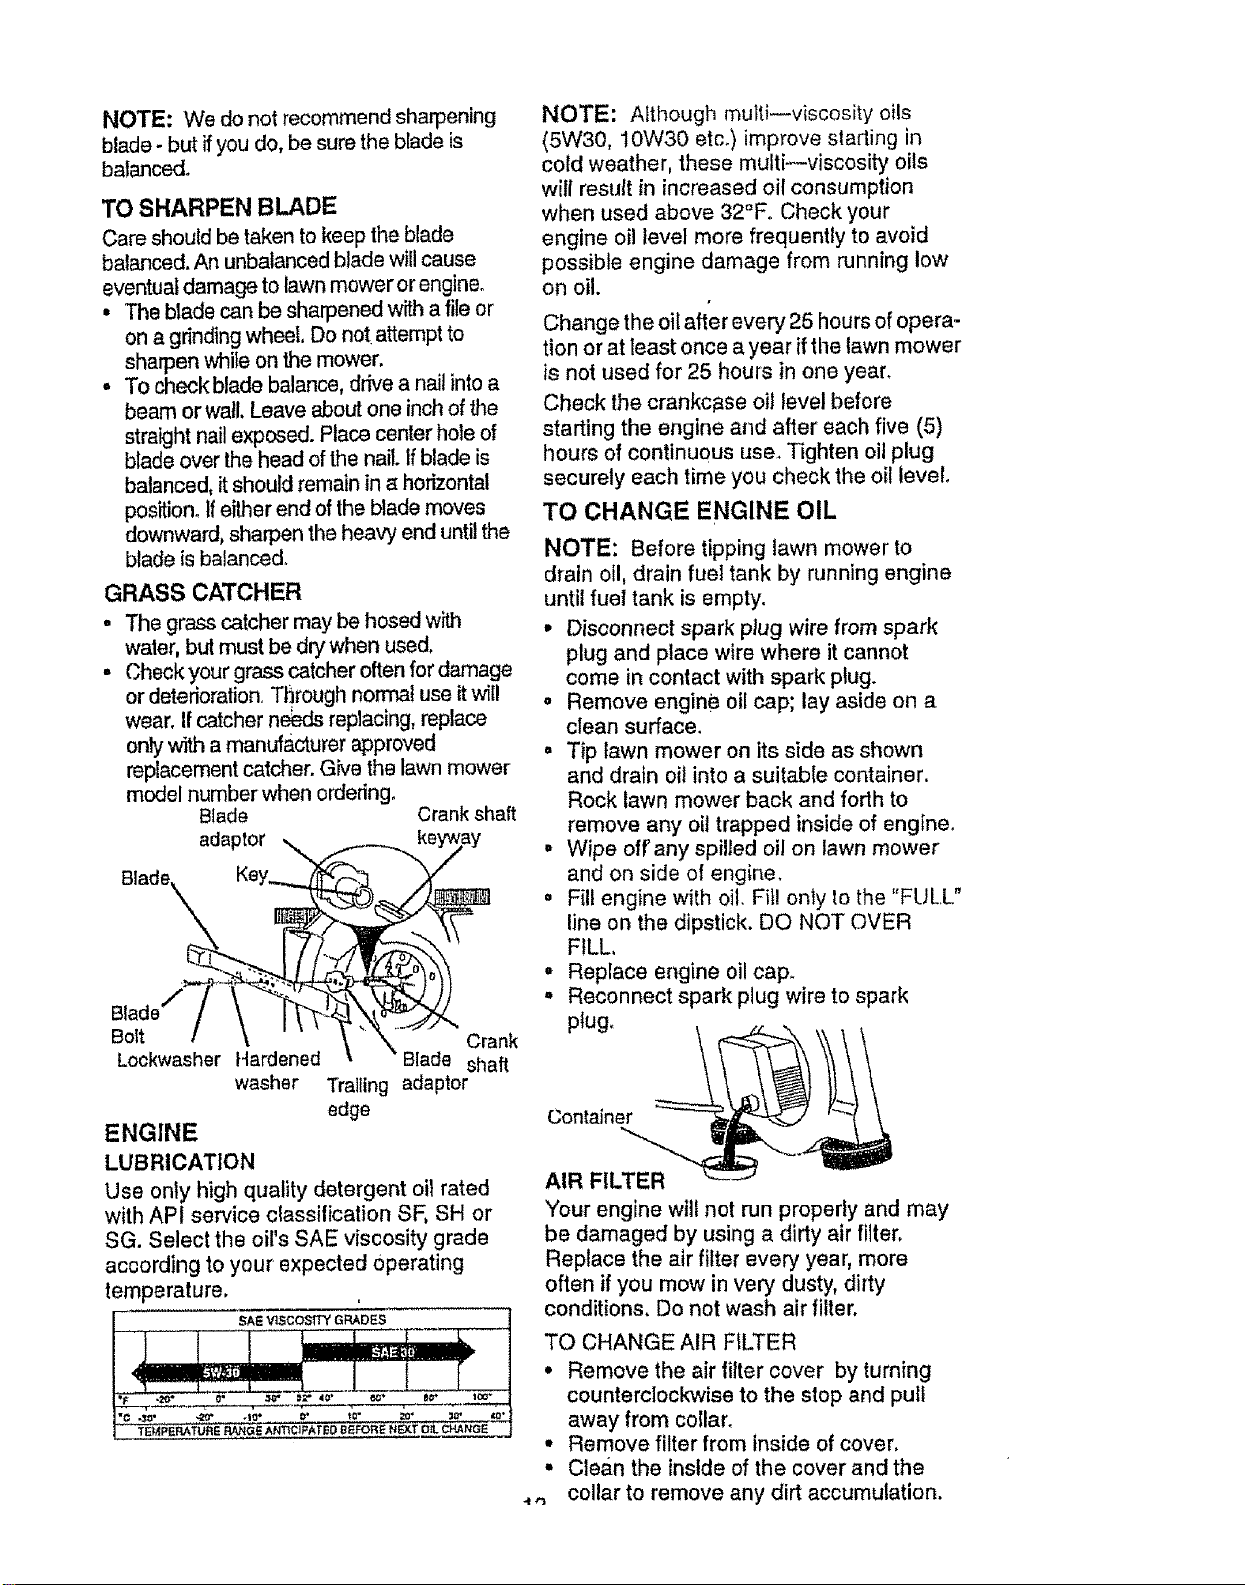
GRASS CATCHER
, The grass catcher may be hosed with
water, but must be dry when used°
• Check your grass catcher often for damage
or deterioration. Through normal use itwill
wear. If catcher neL=dsreplacing, replace
onlywith a manufacturer approved
replacement catcher. Give the lawn mower
model number when ordering°
Blade Crank shaft
adaptor ,_
Bolt Crank
Lockwasher Hardened Blade shaft
washer Trailing adaptor
edge
ENGINE
LUBRICATION
Use only high quality detergent oil rated
with API service classification SF, SH or
SG. Select the oil's SAE viscosity grade
according to your expected Operating
temperature,
SA_ VISCOSITY GRADES
NOTE: Although multi--viscosity oils
(5W30, 10W30 etc.) improve starling in
cold weather, these multi--viscosity oils
will result in increased oil consumption
when used above 32°E Check your
engine oil level more frequently to avoid
possible engine damage from running low
on oil.
Change the oil after every 25 hours of opera-
tion or at least once a year if the lawn mower
is not used for 25 hours in one year.
Check the crankcase oil level before
starting the engine and after each five (5)
hours of continuous use. Tighten oil plug
securely each time you check the oil level.
TO CHANGE ENGINE OIL
NOTE: Before tipping lawn mower to
drain oil, drain fuel tank by running engine
until fuel tank is empty.
* Disconnect spark plug wire from spark
plug and place wire where it cannot
come in contact with spark plug.
o Remove engine oil cap; lay aside on a
clean surface.
, Tip lawn mower on its side as shown
and drain oil into a suitable container.
Rock lawn mower back and forth to
remove any oil trapped inside of engine.
° Wipe oft any spilled oil on lawn mower
and on side of engine.
, Fill engine with oil. Fill only to the "FULL"
line on the dipstick. DO NOT OVER
FILL.
• Replace engine oil cap.
• Reconnect spark plug wire to spark
plug
Container
"i+'3
AIR FILTER
Your engine will not run properlyand may
be damaged by using a dirty air filter.
Replace the air filter every year, more
often if you mow in very dusty,dirty
conditions. Do not wash airfilter.
TO CHANGE AIR FILTER
• Remove the air _ter cover by turning
counterclockwise to the stop and pull
away from collar.
Remove filter from inside of cover,
Clean the instde of the cover and the
collar to remove any dirt accumulation.
• Insert new filter into cover°
• Put air filter cover and filter into collar
aligning the tab with the slot.
° Push in on cover and turn clockwise to
tighten.
MUFFLER
Inspect and replace corroded muffler as it
could create a
fire hazard and/or damage.
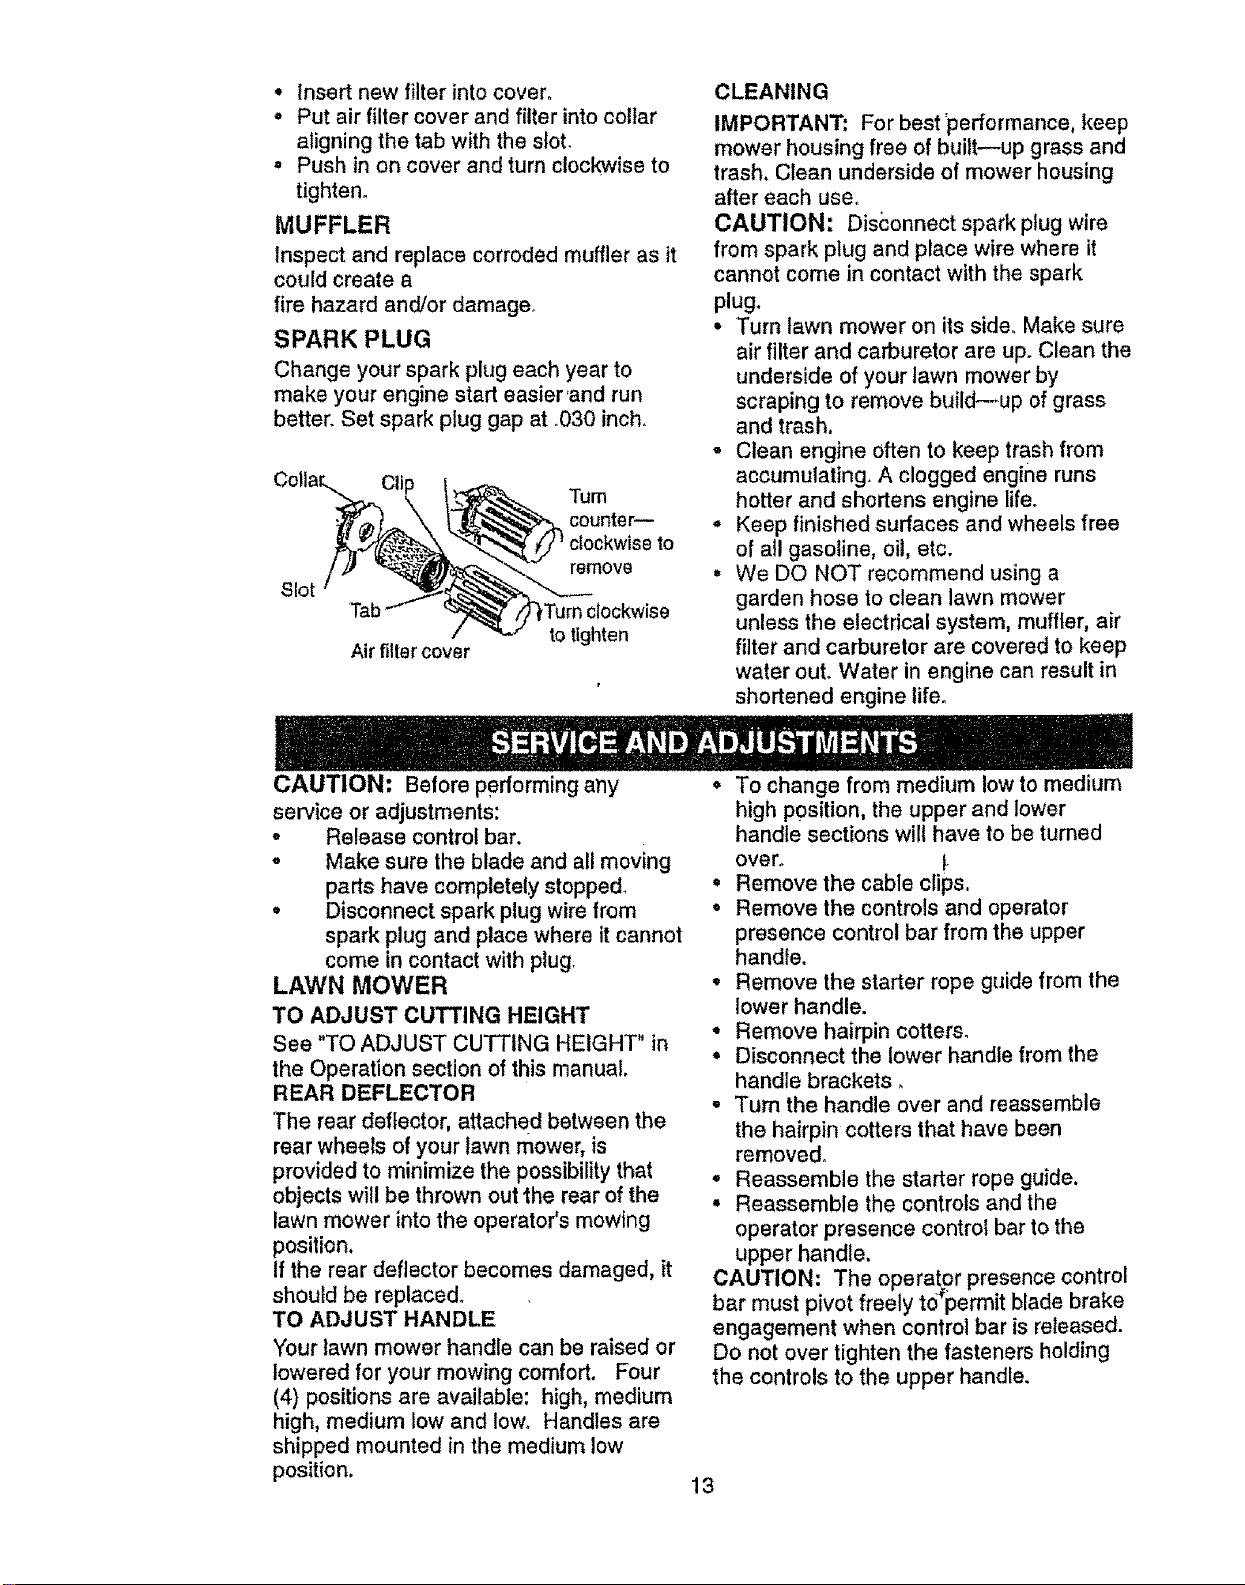
SPARK PLUG
Change your spark plug each year to
make your engine start easier 'and run
better. Set spark plug gap at .030 inch.
Tum
counter--
Slot
remove
Tab
to tighten
Air filter cover
CLEANING
IMPORTANT: For best performance, keep
mower housing free of built--up grass and
trash. Clean underside of mower housing
after each use,
CAUTION: Disconnect spark plug wire
from spark plug and place wire where it
cannot come in contact with the spark
plug.
• Turn lawn mower on its side. Make sure
air filter and carburetor are up. Clean the
underside of your lawn mower by
scraping to remove build--_up of grass
and trash.
• Clean engine often to keep trash from
accumulating. A clogged engine runs
hotter and shortens engine life.
• Keep finished surfaces and wheels free
of all gasoline, oil, etc.
° We DO NOT recommend using a
garden hose to clean lawn mower
unless the electrical system, muffler, air
filter and carburetor are covered to keep
water out. Water in engine can result in
shortened engine life.
CAUTION: Before performing any
service or adjustments:
° Release control bar.
• Make sure the blade and all moving
parts have completely stopped_
° Disconnect spark plug wire from
spark plug and place where it cannot
come in contact with plug.
LAWN MOWER
TO ADJUST CUTTING HEIGHT
See "TO ADJUST CUTTING HEIGHT" in
the Operation section of this manual.
REAR DEFLECTOR
The rear deflector, attached between the
rear wheels of your lawn mower, is
provided to minimize the possibility that
objects will be thrown out the rear of the
lawn mower into the operator's mowing
position.
If the rear deflector becomes damaged, it
should be replaced.
TO ADJUST HANDLE
Your lawn mower handle can be raised or
lowered for your mowing comfort. Four
(4) positions are available: high, medium
high, medium low and low. Handles are
shipped mounted in the medium low
position,
• To change from medium low to medium
high position, the upper and lower
handle sections wilt have to be turned
over°
° Remove the cable clips,
= Remove the controls and operator
presence control bar from the upper
handle,
• Remove the starter rope guide from the
lower handle.
• Remove hairpin cotters.
• Disconnect the lower handle from the
handle brackets.
• Turn the handle over and reassemble
the hairpin cotters that have been
removed.
• Reassemble the starter rope guide.
• Reassemble the controls and the
operator presence control bar to the
upper handle,
CAUTION: The operator presence control
bar must pivot freely t0_permit blade brake
engagement when control bar is released.
Do not over tighten the fasteners holding
the controls to the upper handle.
13
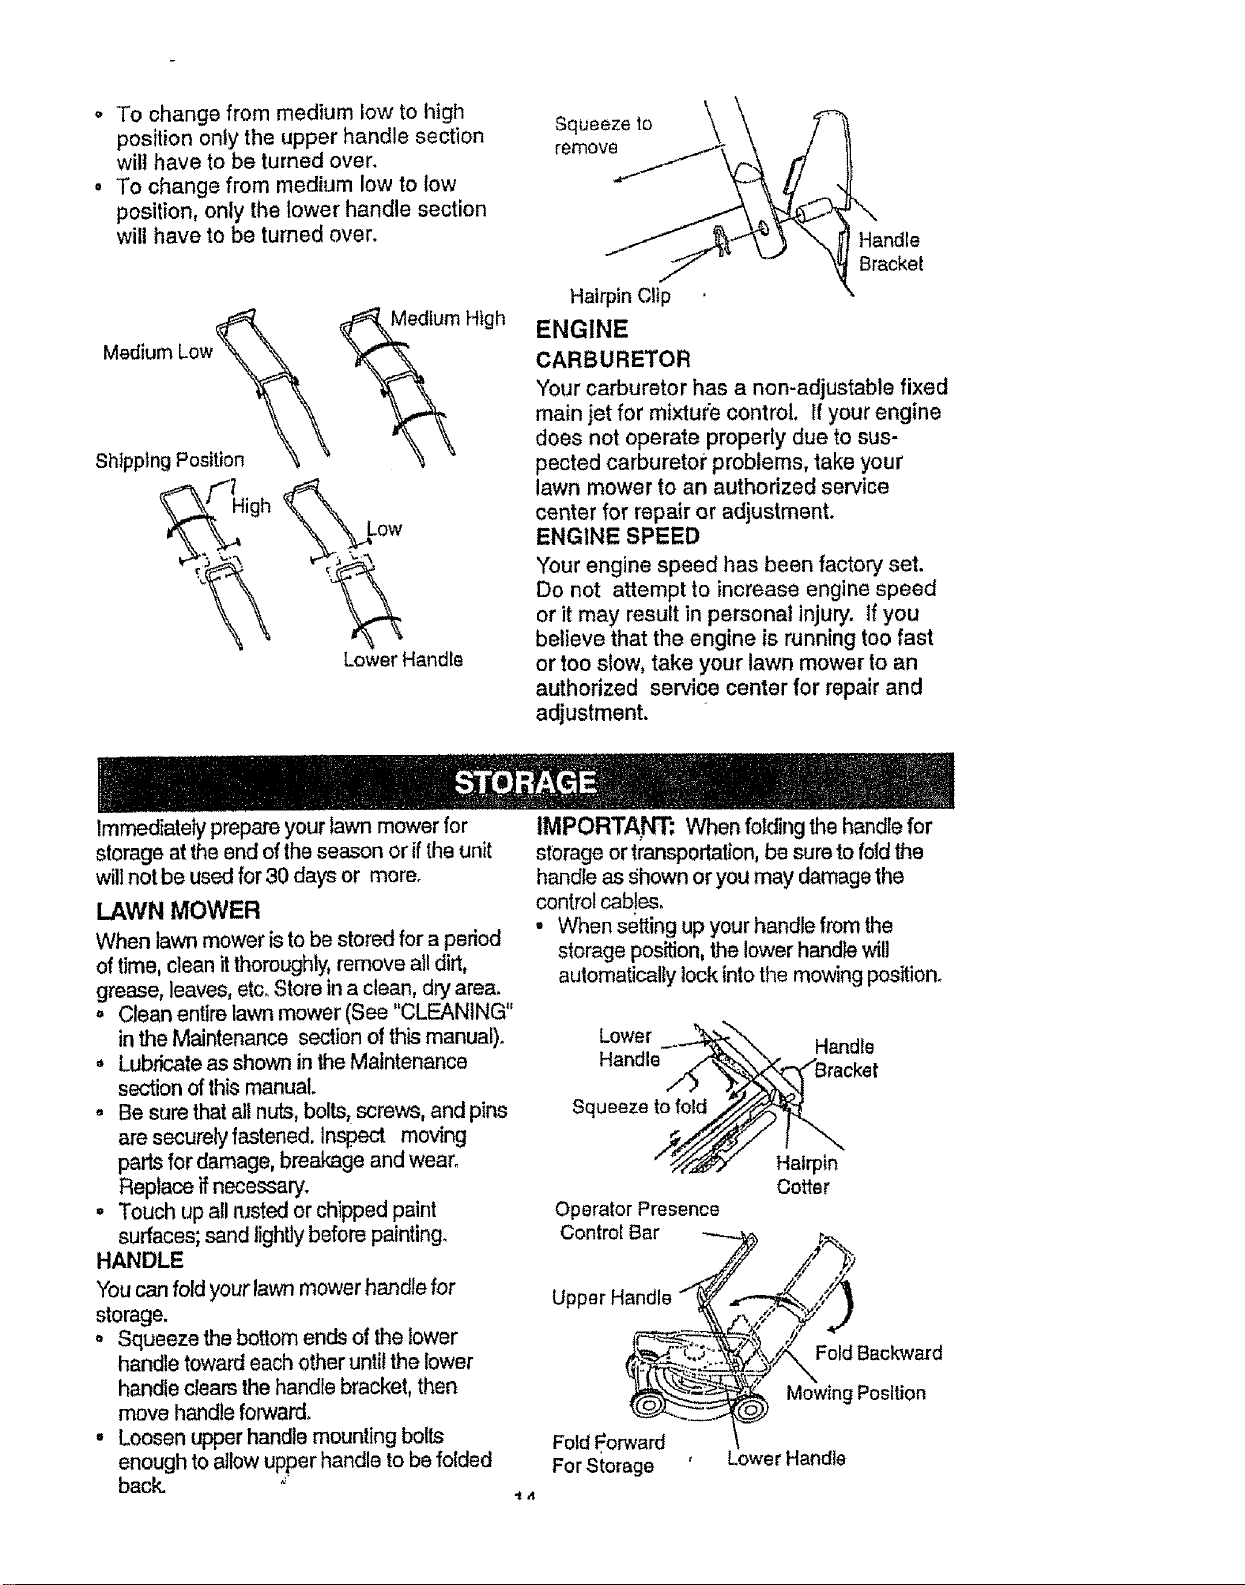
o To change from medium low to high
position only the upper handle section
wilt have to be turned over.
o To change from medium low to low
position, only the lower handle section
will have to be turned over.
Shtpp_ng Position
Low
Lower Handle
Squeeze to
remove
Handle
Bracket
Hairpin Clip
ENGINE
CARBURETOR
Your carburetor has a non-adjustable fixed
main jet for mixture control. If your engine
does not operate properly due to sus-
pected carburetor problems, take your
lawn mower to an authorized service
center for repair or adjustment.
ENGINE SPEED
Your engine speed has been factory set.
Do not attempt to increase engine speed
or it may result in personal injury, if you
believe that the engine is running too fast
or too slow, take your lawn mower to an
authorized service center for repair and
adjustment.
Immediately prepare your lawn mower for
storage at the end of the season or if the unit
will not be used for 30 days or more_
LAWN MOWER
When lawn mower is to be stored for a period
of time, clean itthoroughly, remove all dirt,
grease, leaves, etc. Store in a clean, dry area.
o Clean entire lawn mower (See "CLEANING"
in the Maintenance section of this manual).
• Lubricate as shown in the Maintenance
section of this manual.
. Be sure that all nuts, bolts, screws, and pins
are securely fastened. Inspect moving
parts for damage, breakage and wear.
Replace if necessary.
• Touch up all nJstedor chipped paint
surfaces; sand lightly before painting.
HANDLE
You can fold your lawn mower handle for
storage.
• Squeeze the bottom ends of the lower
handle toward each other until the lower
handle clears the handle bracket, then
move handle forward.
° Loosen upper handle mounting bolts
enough to allow upper handle to be folded
back.
IMPORTANT; When folding the handle for
storage or transportation, be sure to fold the
handle as shown or you may damage the
control cables.
• When sitting up your handle from the
storage position, the lower handle will
automatically lock into the mowing position.
Lower Handle
Handle
Squeeze to fold
Operator Presence
Control Bar
Upper Handle _ r--"
Fold Forward
For Storage
Hairpin
Ootter
_,_x,xFold Backward
Mowing Position
, Lower Handle
ENGINE
FUEL SYSTEM
IMPORTANT: It is importani to prevent gum
deposits from forming in essential fuel system
parts such as carburetor, fuel rifler, fuel hose,
or tank during storage. Also, experience
indicates that alcohol blended fuels (called
gasohot or using ethanol or methanol) can
attract moisture which leads to separation and
formation of acids during storage. Acidic gas
can damage the fue! system of an engine
while in storage.
• Drain the fuel tank.
• Start the engine and let it run until the fuel
lines and carburetor are empty,
• Never use engine or carburetor cleaner
products in the fuel tank or permanent
damage may occur.
° Use fresh fuel next season.
NOTE: Fuel stabilizer is an acceptable
alternative in minimizing the formation of fuel
gum deposits during storage. Add stabilizer to
gasoline in fuel tank or storage container.
Always follow the mix ratiofound on stabilizer
container. Run engine at least 10 minutes
after adding stabilizer to allow the stabilizer to
reach the carburetor. Do not drain the gas
tank and carburetor if using fuel stabilizer.
ENGINE OIL
Drain oil (with engine warm) and replace with
clean engine oil. (See "ENGINE" in the
Maintenance section of this manual).
CYLINDER
• Remove spark plug.
• Pour one ounce (29 ml) of oil through spark
plug hole into cylinder.
• Pull starter handle slowly a few times to
distribute oil.
• Replace with new spark plug.
OTHER
• Do not store gasoline from one season to
another.
° Replace your gasoline can ifyour can starts
to rust. Rust and/or dirt in your gasoline will
cause problems,
• If possibte, store your unit indoors and cover
itto give protection from dust and dirt.
o Cover your unit Witha suitable protective
cover that does not retain moisture. Do not
use plastic. Plastic cannot breathe which
allows condensation to form and will cause
your unit to rust°
IMPORTANT; Never cover mower while
engine and exhaust areas are still warm.
CAUTION: Never store the lawn mower with
gasoline in tile tank inside a building where
fumes may reach an open flame or spark,
Allow the engine to cool before storing in any
enclosure.
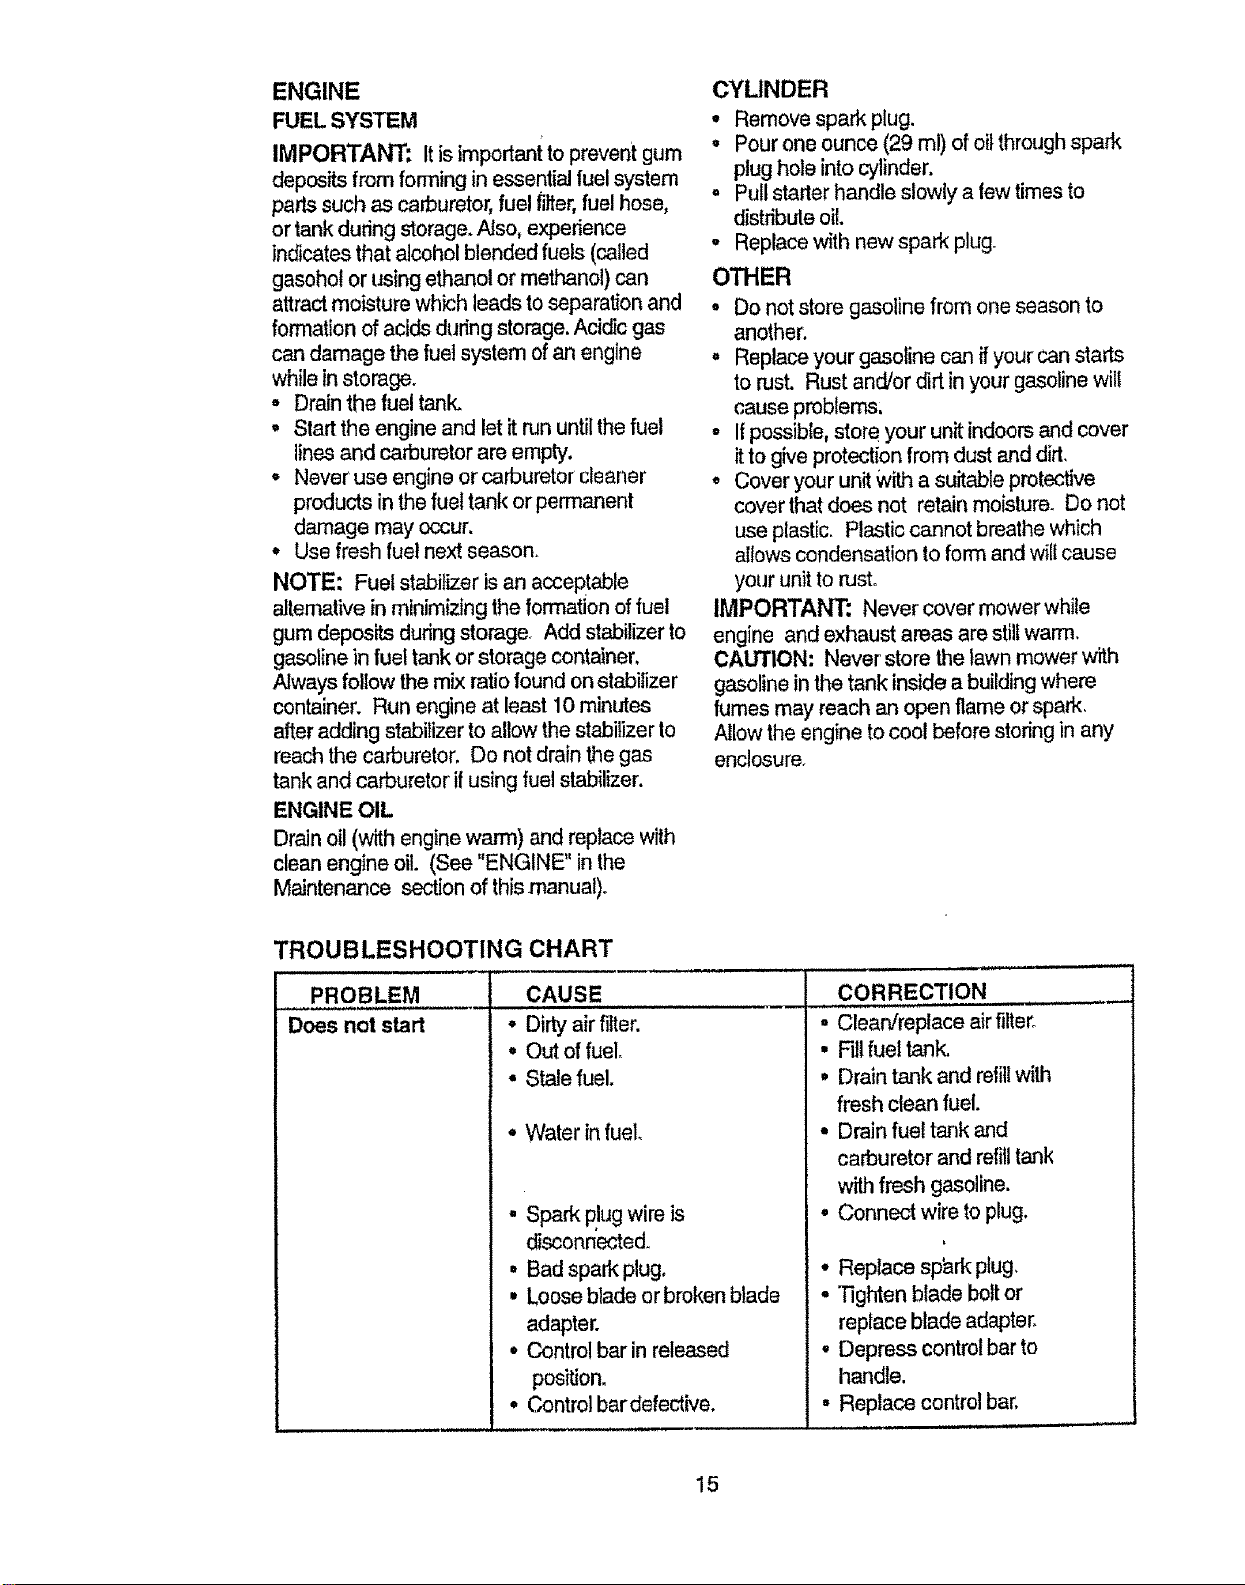
TROUBLESHOOTING CHART
PROBLEM CAUSE
Does not start • Dirty air fifler.
• Out of fuel.
• Stale fuel.
• Water in fuel.
• Spark plug wire is
disconnected.
• Bad spark plug,
, Loose blade or broken blade
adapter.
• Control bar in released
position,
• Control bar defective.
CORRECTION
• Clean/replace air filter°
• Fil! fuel tank.
, Drain tank and relill with
fresh clean fuel.
• Drain fuel tank and
carburetor and refill tank
with fresh gasoline.
• Connect wire to plug.
• Replace spark plug,
• Tighten blade boltor
replace blade adapter.
• Depress control bar to
handle.
• Replace control bar,
15

PROBLEM
o'ssofp wer
TROUBLESHOOTING CHART
3AUSE
o
Poor cut- uneven
, ,,,,,,, •
vibration
Starter rope hard
to pull
Grass catcher
not filling (if so
equipped)
Hard to push
Rear of lawn mower housing
or c_ing blade dragging
in heavy grass.
• Cutting too much grass.
• Dirty airfilter.
• Buildup ol grass, leaves,
and trash under mower.
Too much oilin engine.
• Walldngspeed too fast.
-Wom, bent or loose blade°
• Wheel heights uneven.
. Buildup of grass, leaves
and trashunder mower.
• Wom, bent or loose blade.
- Bent engine crankshaft.
= Engine flywheel brake ison
when control bar isreleased_
o Bentengine crankshaft.
° Blade adapter broken.
• Blade dragging in grass.
• Cutting height too low.
, [.fit on blade wom off.
• Catcher not venting air.
• Grass is too high or wheel
height is too low.
• Rear of lawn mower
housing or blade dragging
in grass.
• Grass catcher too full,
• Handle height position not
right for you.
CORRECTION
11,,,J, ,, 1,,, : .......
° Setto "Higher Cut"
position.
, Set to "Higher Cut"
position.
° Clean/replace air fitter_
• Clean underside of mower
housing.
• Chec k oil level.
• Cut at slower walking
• Replace blade. Tighten
blade bolt
° Set all wh_=_lsat same
height
° Clean underside of
mower housing.
, Replace blade. Tighten
blade bolt.
- Contact an authorized
service center.
Depress control bar to
upper handle before
pulling starter rope.
' - Contact an authorized
service center.
= Replace blade adapter.
= Move lawn mower to cut
grass or to hard surface
to start engtne.
° Raise cutting height.
• Replace bladeo
= Clean grass catcher.
, Raise cutting height.
° Raise rear of lawn mower
housing one (1) setting
higher.
• Empty grass catcher.
° Adjust handle height to
suit.
IR
Garant[a 17 Especificaciones de! Producto 25
Regtas de Seguddad _ 17 Se_cio y Adjustes 27
Montaje 19 Almacenamlento 2B
Operaci6n 20 Identlficaci6n de problemas 30
Mantenlmiento 24 Partes de rapuesto Vea el manual
Programa de Mantenimfento 24 ingles del dueSo
Orden de Partes Contratapa
GARANTIA LIMFFADA DE DOS Af'40S PAPA LA SEGADORAA MOTOR CRAFTSMAN
Fordos (2) aries, a pa.,lJrde la fecha de compra, cuando esta Segadora Craftsman se rnantenga,lubrique
y aline segOnlasinstrucciones para la operaci6n y el mantenimlento en el manual del dueSo,Sears
reparar_ gratis todo dafecfo en etmaterial y la mane do obra,
Si la Segadora Craftsman se usa para fines comerdales o de ardendo, esta gamntla s61ose aplica per
noventa (90) dies a parUrde tafecha de comprao
Esta GaranUano cubre:
• Art[culos qua sedesgastan durante eluse normal tales come las cuchnlassegad0ras rotatorias, los
adaptadores de la cuchitla, lascoffees, los _os de eke y tasbujIas.
• Reparac_onesnecesarias debklo al abuse o ata negligencla del operador, ir',duy_ndosaa los
clg0e_ales doblados y ala faltade mantenlmlento del equtpo segOnlas insbuoclonesqua selncluyen
en et manual del duefio..
EL SERVIClO DE GARANT[A ESTADI_PONIBLE aldevotver la segadpra a motor Craftsman al centrol
departmentode servtdo Sears mas cercano en los Estados Unidos. Esta garantfa se aplica solamente
mientras el producto esie en use an los Estados Untdos°
EstaGarantfa le otorga detaches tegales especfficos,y puede que tambi_n tenga otros derechos que
varfan de estade a estado.
Sears, Roebuck and Co., D/8lTYVA, Hoffrnan Estates, IL 60179 USA
Los estandraresde seguddad exigenla presencia
del operatoren bs controles pare reducir a un
mlnimo el riesgo de lesionarse, S u unldad viene
equipada con dichos conl_Yes,.Par ningun molivo
kate del ettmtnarla fund6n da loscontroles qua
exlgan la #resencia del opemdor.
ENTRENAMIENTO:
• Lea este manual del operador cuidadoeamente.
Famlltarfcesecon los controles y aprenda a
operar su segadora en forma adecuad&
Aprenda a parar su segadora r#4_Idamente.
• No permita qua los ntifiosusen susegaderao
Nunca permffaqua losadultos operen la
segadora sin center con tas lnstrucctones
adectJadas.
• Mantenga el _.reade operact6n despejada de
genre, espedalmente de niSospequeRosy de
anirnales dom_st_cos.
• Use la segadem solarnente pare los fines
propuestos per el fabricante yeegQnlas
explicaciones descrttas en este manual.
• No opera la segadera slse ha cafdo e dafiade
en cuaJquieraform& Slempre repare los darlos
antes de usarla_
• No use accesorios qua no hayan side
recomendados per el fabdcante. Etuse de
dichoeaccesodos puede ser peligroso.
° La _.hilla gka cuando el motor est_
funcionando.
PREPARAC16N_
• Slempre revise cuidadosamente el _rea cluese
va a segary desp_iela de todas laspledras,
pates,aJambres,huesos y atros ebjetos
exttaSos.Estos objetos ser'&ntanzades con la
cuchtllay pueden produc!r lesbnes graves,
• Slempre use anteojos de seguridad o
protectores de oJoscuando azfanque y durante
el tJempoque use la segador&
• Vistase en forrna adecuada. Noopera la
segadora sin zapatos o con sandalias abiertas.
Use solamente zapatos s6Ildoscon buena
traccl6ncuando siegue,
17
• Revise el estanque de combustible antes de
hater arranoar el motor. No tlene e! estanque
de gaso_tnaen rec{ntos cerrados, nl cuande el
motor es'_ func|onando o cuando est&
csllente. Permlta qua el motor se enfrfe per
vados minutes antes de Ilenar el estanque de
gasoltnao Umpie toda la gasolina derramada
antes de hacer arrancar el motor.
• Siempre haga los ajustes de altura de fas
ruedas antes de hater arrancar su segadora.
Nunca trate de hacer _sto mlentras qua el
motor est_ funcionando.
• Siegue slempre durante el dfa o con buena luz
artificial
OPERACl6N:
, Mantenga sus ojos y su mente en {asegadora
yen el &rea qua se est_ cortando. No perm{ta
qua otros Intereses Io distraigan.
• No corte c6sped mojado o resbaloso. Nunca
corra mientras est_ operando su segadora.
Siempre asegt_rese de rnantener el equil{brio
- mantenga el mango agarrado firmemente y
camlne.
. No ponga las manes o los pies cerca odebajo
de las partes rotatodas. Mant_ngase ale]ado
de laabertura de descarga en todo memento,.
• Sfempre pare el motor cuando se vaya
ocuando no est_ usando su segadora, o antes
de atravesar las entradae para autos, los
sendaros, camlnos y _reas cublertas de dpto.
• Nunca dtdJala desearga del matedal hacla los
espectadores nl perm_fa a nadle cerca de la
segadora mlentras la est_ operandoo
• Antes de limpiar, inspeccionar o de repamr a
segadora, pare el motor y est_ completamente
seguro de qua {a cuchilla y qua todas las
pades que se mueven se hayan detenldo.
Luego, desconecte el alambre de labuj{a y
mant_ngalo alejado de _sta para evitar et
arranque per accidents.
• No conttn_e hctendo funcionar su segadera si
le pega a un objeto extraJSo.Siga e{
procedim_ento descrito antedormente, tuego
repare cualquter dafio antes de volver a
arrancar y de operar su segadora.
o No cambie los ajustes del regulador o
hagaque el motor ands a una veloctdad
exceslva. Se pueden proddcir daF,os en el
motor y I estones personateso
. No spore su segadora sl vibra fuora de lo
normal. La vibraci6n excesiva esuna
tndlcacf6n de da_o; pare el motor, revise en
forma segura la causa de la vibraciOn y haga
las reparactones seg_n sea necesarioo
• No haga funclonar el motor en
recintoscerradoso Los gases de escape son
peligrosos.
- Nunca corte el c_sped tirando la segadora
hacla usted. Siegue atrav_s de la cara de las
pendienles, nunca hacla ardba o hacia abaJo
pues puede perder el equillbrfo. No slegue
pendientes demasiado empinadas. Tenga
culdado cuando opera la segadora en terreno
disparelo o cuando camble de direcciSn -
mantenga un buen equitibrio°
• Nunca spare la segadora sin las protecclones
adecuadas, las planchas, el recogedor de
c_sped y otros dlsposiUvos de seguddad en
su lugar.,
MANTEN1MIENTO Y ALMACENAMIEN-
TO:
° Revise la cuchllla y los pemos de rnontaJe del
motor a manudo, para asegurarse qua est_,n
apretados en la forma adecuada,
• Revise redes los pemos, tusrcas y lornillos a
intervatos frecuentes, para vedficar si est_n
apretados en forms adecuada, y
asegurarseque la segadora se encuentra en
condiclones de functonamlento seguro.
. Mantenga redes los dlspositivos de segurldad
en su lugar y ltstos para funcionar.
• Para reducir el peligro de Incendio, mantenga
et motor sin c_sped, hojas y grasa o aceite en
excess.
• Revise et recogedor de c_sped a menudo
para velificar si hay detefforo y desgaste y
cambte las bolsas desgastadaso Use
solamenta las bolsas de repuesto
reeomendadas per el fabdcante de su
segadora o qua cumplen con las
especi_caclones de _ste.
• Siempre mantenga una cuchilla afllada en su
segadoret.
J o
• Siempre permlta que el motor se enfrfe antes
de guardarta en cualquier rectnto eerradoo
. Nunca guarde la segadora con combustible
en el esianque dentro de un ediflcto en donde
los gases pueden alcanzar una llama
expuest&o una fuente de ignici6n, tal come et
calentador de agua, la estufa de catefacclSn,
ta secadora de ropa, etc.
PREOAUClON: 81empre desconecte el
alambre de la buj_ay p6ngalo donde no pueda
entrar en contacts con la bujfa, para evftar el
arranque per accidents, durante la preparaciSn,
el transpor}e, el ajuste o cuando se hacen
reparaciones.
PRECAUCION: Es conocido per el Estado de
California qua los gases de escape del motor de
este productor contienen qu{micos los cuales a
ciertos nlve{es, pueden ocasionar, c_ncer,
detectos de nacimlento, y sires danes al sistema
reproductive.
'JR
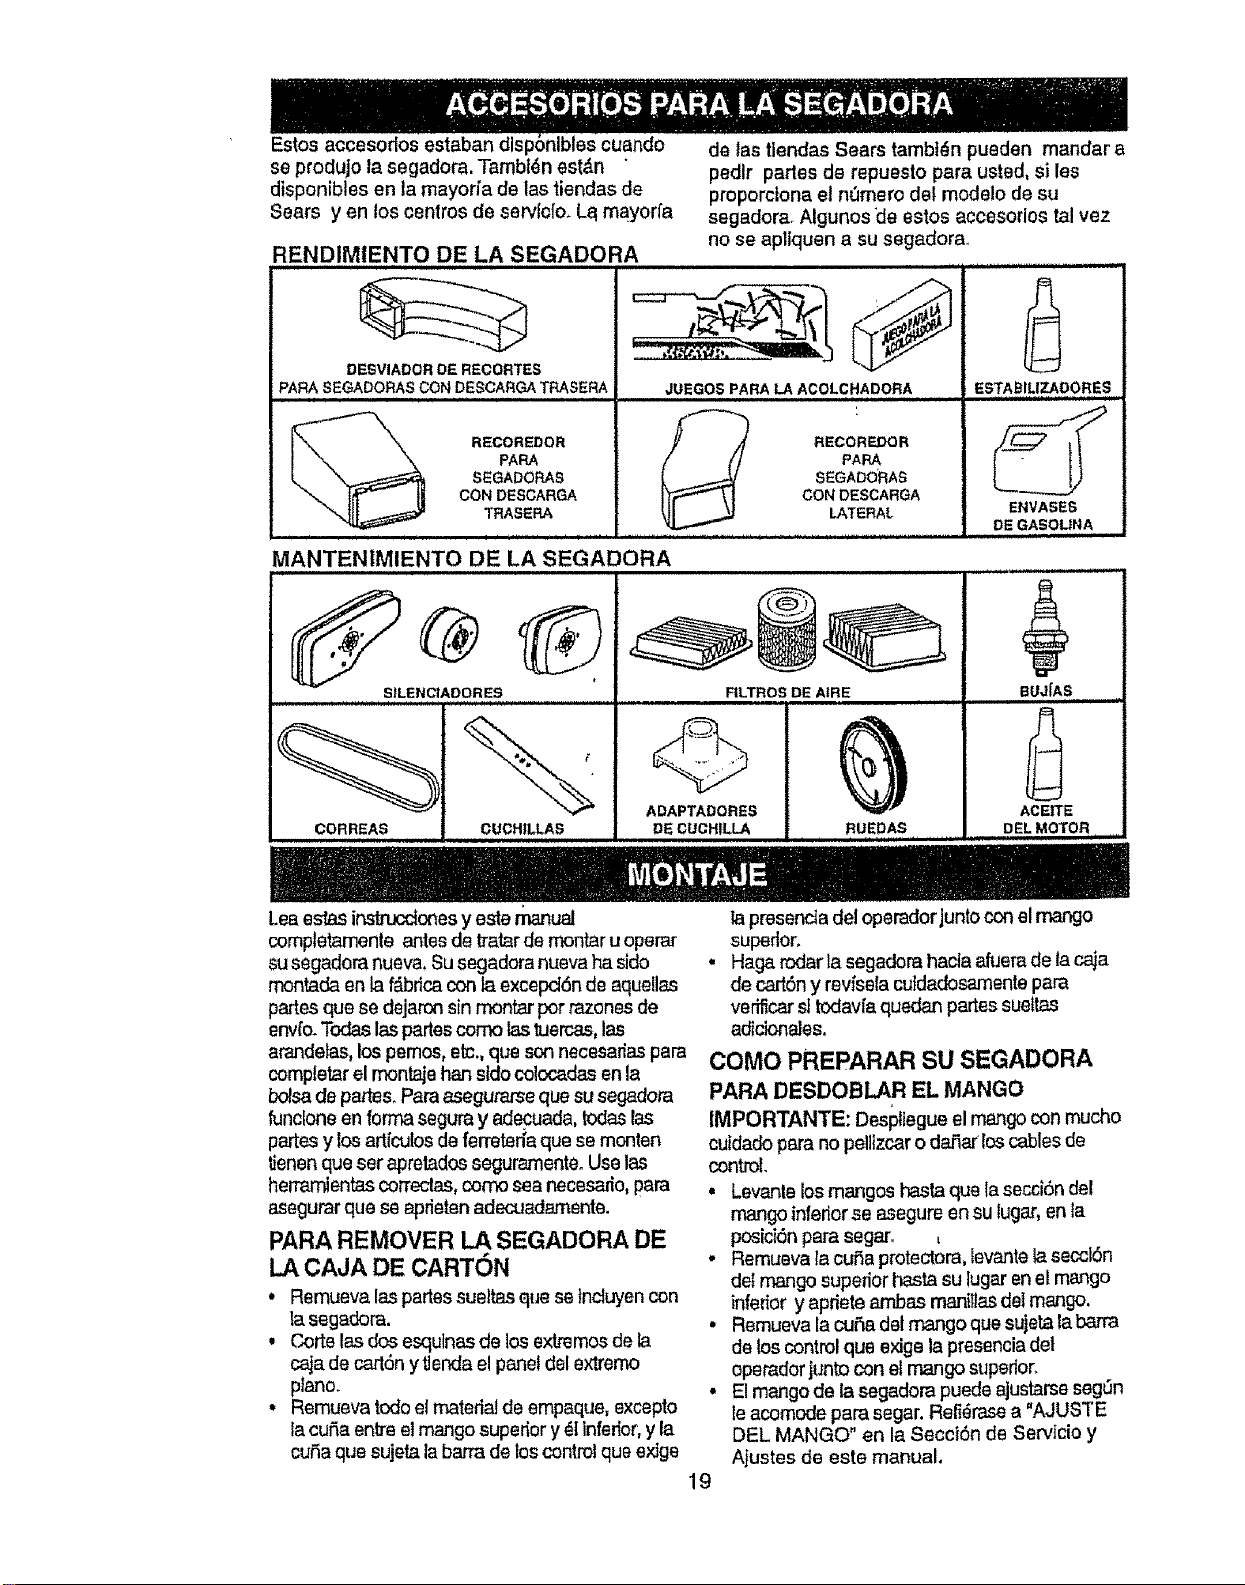
Estos accesodos estaban
se produjo |a segadora, Tambl6n estdn
dtsponibles en la mayofla de las tiendas de
Sears yen los centros de servlclo. Lelmayorfa
RENDIMIENTO DE LA SEGADORA
de las flendas Sears tambt6n pusden mender a
pedlr parles de repuesto para usted,si les
proporctona el n_3merodel modelo de su
segadora. Algunos 'de estos accesorios ta! vez
no se apliquen a su segadora..
DESVIADOR DE RECORTRS
PAPA SEGADORAS CON DESCARGA TRASERA
i
__ REGOREDOR
PAPA
SEGADORAS
CON DESGARGA
TRASERA
, i1,1 , i ......
JUEGOSPARA_ACOLCHADORA
RECORdeR
PAPA
SEGA_RAS
CON DESCARGA
LATERAL
ill ii ii ill
MANTENIMIENTO DE LA SEGADORA
StLENCIADOR ES
CORREAS
RLTROS DE AIRE
CLICH_LLAS
ADAPTADORES
DE CUCHILLA RUEDAS ........
ESTABILIZADORES
ENVASES
DE GASO_NA
BUJ|AS .
ACEffE
DELMOTOR .....
Lea esbs instruccionesy este manual
completamente antes de tratar demontar u operar
susegadora nueva. Su segadora nueva ha side
montada en la f_tbricacon la excepct6nde aqueUas
partes qua se dejaron sin reenter per razones de
envfo.Todas laspartescome lastuercas, las
arandefas, los pemos, etc., que sonnecssadas pare
completerel montaje hen sldocolcoadasenla
boise de peruse Pare asegurarse qua su segadora
funclone en formasegura y ad_uada, redes las
partes y los art[culos de ferreten'aqua se monten
Uenenqueser apreladosseguramenteoUselas
herramtentas correctas,come sea necesa_o,para
asegurarqua seaprietan adecuadamente.
PARA REMOVER LA SEGADORA DE
LA CAJA DE CARTON
, Remueva laspartes sueltas qua se}ncluyencon
|a segadora.
, C'_rtelas dos esquinas de los extremesde la
caja de carl,rn ytJendael panel del extreme
piano.
• Remueva todo el matedai de empaque, excepto
la curia entreel mango superior y61Inferior,y la
curia qua sujeta tabarra de los control qua extge
la presencla del operador junto con el mango
superior.
. Haga rodar la segadora hacta afuerade facaja
de cartony revisela cutdadosamente pare
ve_car sl todavla quedan partessueltas
adicionales.
COMe PREPARAR SU SEGADORA
PARA DESDOBLAR EL MANGO
IMPORTANTE: Des!_ltegueel mangocon touche
cuidadopara no peUizcarodaiiar loscables de
control.
, Levanla losmangos hasta qua Ia secci6ndel
mango inferior se asegure ensu lugar,en la
posiciOnpare segar. ,
• Remueva la curia protectora,Ievantela secci6n
de{mango superior haste su lugar en el mango
inferior y apriete ambas rnanitlasdel mango.
• Remueva la cu£=adel mango qua sujeta la barra
de loscontrol qua exlge la presencia de|
operador junto con el mango sttperior_
• El mango de la segadora pueda ajustarse seg0n
le acomode pare segar. Refi_rasea "AJUSTE
DEL MANGO" en la SecciOn de ServIcio y
Ajustes de eats manual.
19
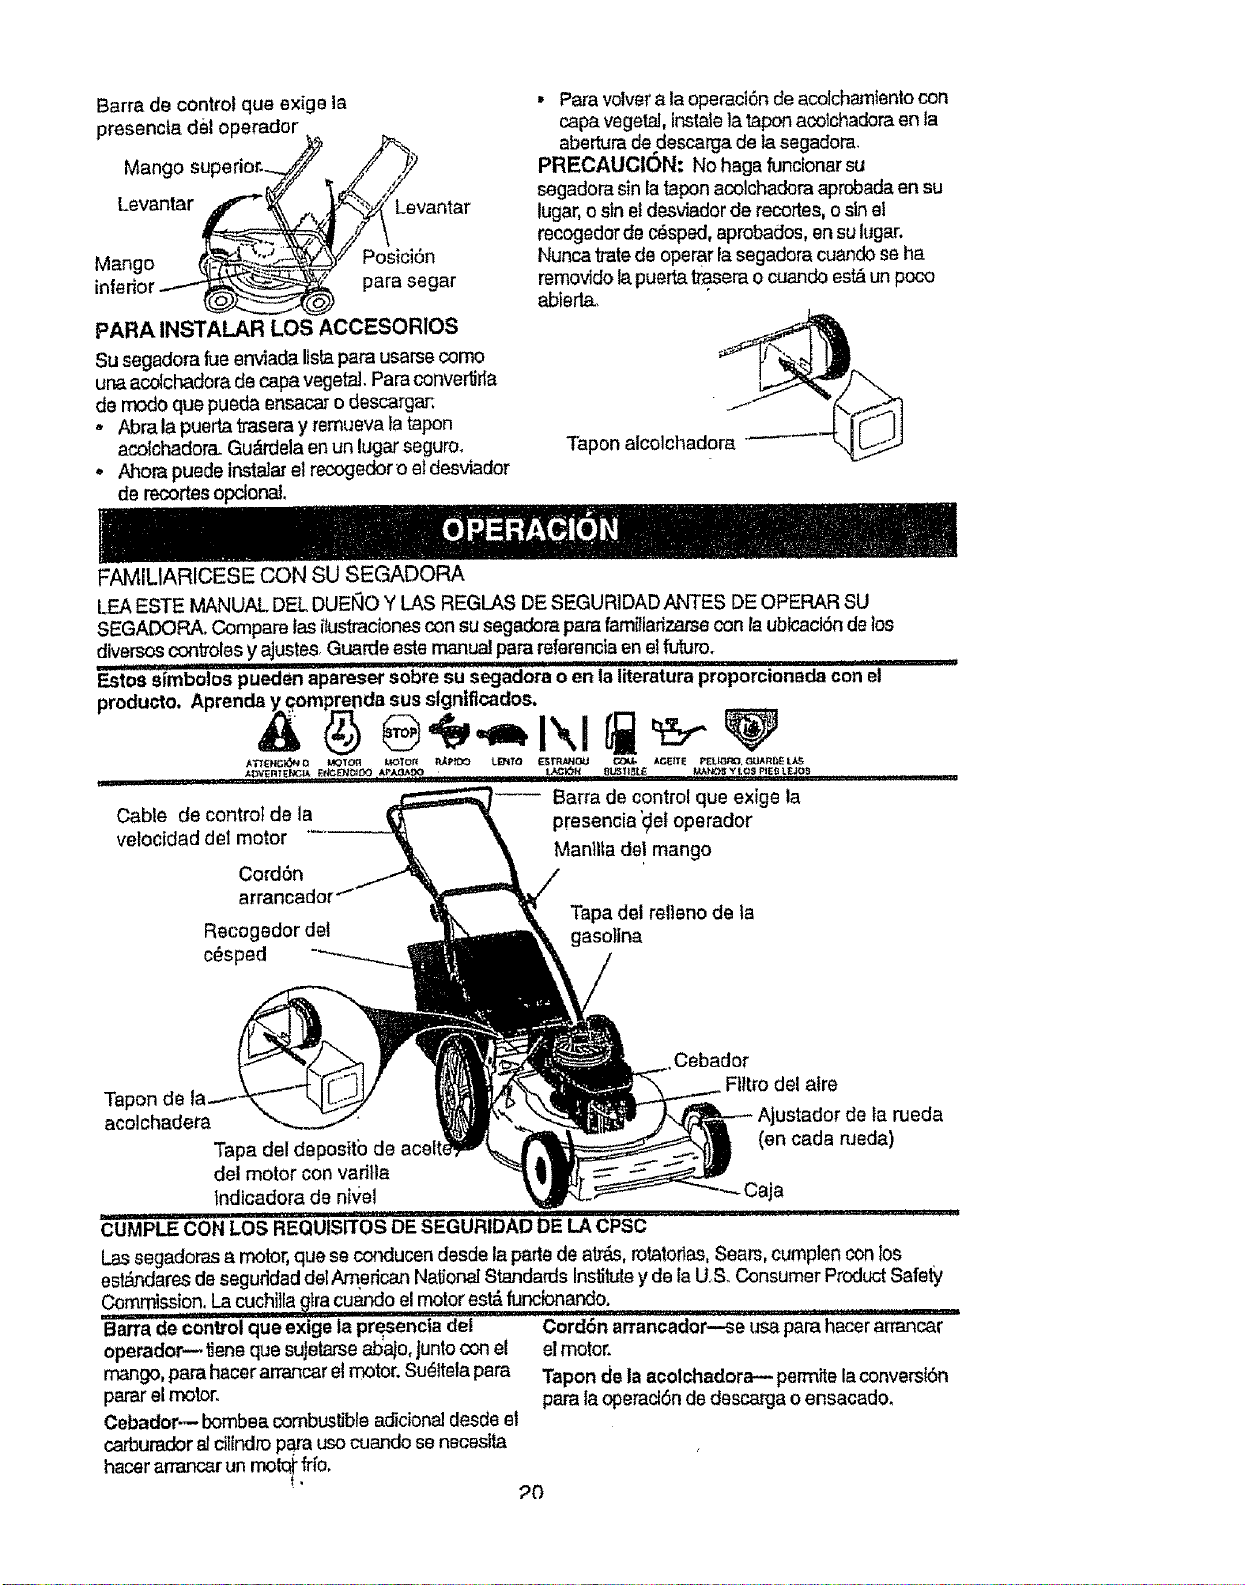
Barra de control que ex{ge la
presencta del operador.
Mango superior.j
Mango _.___--_
interior __
PARA INSTALAR LOS
_ Levantar
/ Po\sici6n
para segar
_,CCESORIOS
Su segadora rue enviada Itstapara usarse como
una acolcPadorade capa vegetal,Para convert#ta
de modo qua pueda ensacar o descargar:
° Abra lapuerta _sera y remueva latapon
acotchador& Gu_,rclelaenun lugar seguro.
. Ahora puede in-.staJarel recogedor o el desviador
de recortesopclonat,
• Para volverala operaci6n de acolchamtentocon
capa vegetal,instalela tapon acolchadora en la
abertura de descarga de la segadora.
PRECAUCiON: No haga funcfonarsu
segadora sin la lapon acolchadora aprobada en su
lugar,o sin el desviador de recortes, o sinel
recogedor de c_sped,aprobados, en sulugar,
Nunca iratede operar lasegadora cuandose ha
removido la puertatrasera o cuando est_un poco
abtert&
FAMILIARICESE CON SU SEGADORA
LEA ESTE MANUAL DEL DUEllO Y I.AS REGLAS DE SEGURIDAD ANTES DE OPERAR SU
SEGADORA. Compare tas itus_aciones con su segadora para familiarizarsecon la ublcaci6n de los
diversos con#oles y ajustes, Guarde este manual para referenclaen el t_',uro.
iiii II ...................
_tos simbolos pueden apareser sobre su segadora o en la literatura proporcionada con el
producto, Aprenda y comp.rendasus slgnlficados.
Oable de control da la
veloctdad del motor
---- Barra de control que exige la
presencia'_)el operador
Manltia de! mango
Cord6n
arrancador
Tapa det rellano de ta
Recogedor dei gasolina
c#spad
Cebador
Filtro del alre
la rueda
(en cada rueda)
mango, parahacer arrancaretmotor. Su_ttelapara
parar el motor.
Cebador=- bornbea combustible adicionaldesde el
carburedor a_ci_indropara usocua.ndose neceslta
Cord6n arrancador---se usa para hacerarrancar
Tapon de la acolchadora-.- permite la convers_Sn
para la operaci6n de descarga o ensacado.
haoerarrancar un mok_,_o.
Tapon de
acolchadera
Tapa del deposttb de
del motor con varilla
tndicadora de nl'_el Caja
conLosREouisr b's DEU C SC ' ' '
Las segadoras a motor,qua se conducen desde la parle de ab'&s,rotatortas,Sears, cumplen con Ios
est&qdaresde seguridad delAmerican National StandardsInstitutey de la US. Consumer ProductSafety
Commission, La cuchit[a_gtracuando el motor es_ funclonando;............ ,,,
Barra de'control qua exige la presencia det
operador_'dene qua suJetarsea_ajo, juntocon el el motor.

La operacl6n de cualquier segadora puede
hacer que saJtenobjetos extrafiosdentrode sus
oJos,Io qua puede producirdafios graves en _stos,
Siempre use anteojos de seguridad o protecd6n
para los ojos mianlzas opere su segadora o cuando
haga aJusteso reparaclones. Recomendamos una
mascara de segur;dad de visl6n amplia, para uso
espejuetos o an'teojosde segurtdad estandarte.
COMO USAR SU SEGADORA
CONTROL DE LA VELOCiDAD DEL
MOTOR
La velocidad del motor se establecl6 en la
f_brica para un rendimtento 6pttmo. La
velocidad no se puede ajustaro
CONTROL DE ZONA DEL MOTOR
PRECAUCION: Las regulacionesfederales
exigen que se instale un control para el motor en
esta segadora para reduclra un mfnlmo el r;esgo de
lesionarse dabtdo al conlactocon la cuchilla.Por
ning_inmotivo trate de etiminarla funci6n del control
del operador. La cuchilta gimcuando elmotor est_
funcionando.
= Su segadora vieneequipadacon una barra de
control que extge la presenclade!operador, lo
que requtereque el operador est6 detr&sde!
mango de lasegadorapara hacerla anancar y
operarla,
PARA AJUSTAR LA ALTURA DE CORTE
. Levante las ruedas para e(code bajo y baje las
ruedaspara el corte alto.
° Ajuste la altura de cortepara que se acomode a
sus requfsitos_La posict6ndel rnedio esla meJor
para lamayoria de losc6spedes,
• Para cambiar la alturade corte,empuje la
palanca del ajustador hacla la rueda.Mueva ta
rueda hacia arriba o hacla aba_ode modo que se
acomode a sus requtsitos,Asegereseque todas
las ruedasqueden igualmente &justadas,
/_TENCl6N: Et ajustador esta correctarnente
co_.ado cuando las orejasde la placaest,'_n
lnsertadasen el aguJerode!mango. Tambi_n,los
ajustes de 9 poslciones (slequlpado) pen_iten que
el mango pueda sermovtdoentrelas orejas de la
placa.
Para un corte alto, OreJas de la placa
baje las ruedas"_ _'_'_"_ "ngo
Para un corte bajo, tevante las ruedas
PARA MONTAR Y ADJUNTAR EL
RECOGEDOR DE CESPED
• Cierre latapasoltable, La tapasoltable debe
estar cerrada cuandose esla operando la
segador&
• Levante la puerta trasera de la caja de la
segadora y penga el basfidor del recogedor de
c6sped en las orejasformadas en el puntal de
bisagra de la puertatrasera,
• El rec_gedorde c_sped estaasegurado en la
caja de la segadora cuando se bajala puerta
trasera para descansar en el bas_dordel
recogedor de c_sped
PRECAUCION: No haga fundonar su segadora
sin el desviador de recorteso sinel recogedor de
c_sped, aprobados, en su kJgar.,Nunca trate de
operar la segadora cuando se ha rernovido fa
puerta trasera o cuando es_ un poco abierta.
Puntal de ,'i_,_.:_.f-_--Puerta trasera
Bastidor de
'recogedor det
eesped
Oreja!
formadas
PARA VAGIAR EL RECOGEDOR DE
CESPED
• Pararemover el recogedordel c6spedsuellela
barra de control del operador para poder parar el
motor_
o Levante la puerta dearras y remora el recogedor
de! c_sped pot el mango,
AVISO: No arraslre labotsa cuando la vacie; se
producir& un desgaste innecesario.
ANTES DE HACER ARRANCAR EL
MOTOR
ACE1TE
Su segadora rue enviadastn aceiteen el moto_
• Asegtirese que la segadora est_ ntvelada y que
el _rea alrededor del depSsito de acetteest6
Hmpi&
• Remueva la tapadet de!:_sito de aceite dei
motor con la varilla _dicadora de ntvely rellane
hasta la l[nea de tlenoen 6sta.,
• Use 0,6!(20oz.)de aceite. Para el _poy la
catidad yea "MOTOR" en la secol6n de las
"M&qtenimento"en este manual.
• Vacfe et ace_telentamenteoNo Iotlene
demastado,
• ReViseel niveldel aceite antes de carlauso,
Agregue aceite s! es necesado_Uene hasta la
Ifneade tteno en la vafilta indicadorade nivel,
21
,Para leer el nlvel adecuado, apdete [atapade1
dep6stto de aceite del motor cada vez.,
, Vuelva a instatar la _apadel dep6sito del aceite y
apri_lel&
• Cambie el ace_tedespu_s de 25 horas de
operac'_n o una vez pot temporada Puede
necesitar cambiar el aceite m&sa menudo
cuando lascondiciones son polvorosas o sucias.
GASOLINA
• Llene elestanque de combustible. Use gasolina
regular,sin plomo, nueva y limpiacon el minimo
de 87 oc'tanos.No mezde etace_tecon la
gasolin& Para asegurar que la gasoline utilizada
sea fresca compre estanques los cuaJespuedan
ser u',Jtizadosdurante lospdmeros 30 dfas.
ADVERTENCIA: La expefianda ttaindfcadoque
los con'bust_blesmezctados con alcohol (conocidos
corno gasohol, o el uso de etano{o metanol)
pueden a_'aer la humedad, la que conduce ala
separactdn y forfT_ciSn de &cidos duranteel
afmacenamlento, La gaso{inaacidica puededaSar
el s[stema del combustible de un motor duranle el
almacenamlentoo Para evitar losproblemas con el
motor, se debe vac|ar e!slstema del combuslible
antes de guardarlo por un per[odo de 30 dies o
m&s.Vac{e elestanque del combus_ble, haga
arm,..ncare!motor y h&galofuncionar haste que las
IIneasdet combustible y el carburador queden
ratio& La pr6xJmatemporada usecombustible
nuevo. Vea las lnstrucciones Pare El
Almacenamiento pare m_s informadSn. Nunca use
productos de limpleza pare el rnotoro para el
carburador en el estanque dal combustible pues se
pueden producir daSos permanentes.
PARA HAOER ARRANCAR EL MOTOR
'; Pare hater arrancar un motor No, empuje el
:_ cebadorclnco (5) veces antes detratarlo. Use un
empuje _rmemente. Este paso normalmente no
es necesaJriocuando se hace arrancar un motor
que ya ha estado funcbnando pot unos cuantos
m_nuto&
• Sujete la barra de control que exige la presenda
del operador abajo en elmango ytireel mango
del arrancador rdpidamente. No perm{taqua el
cord6n del arrancador se devuelva
abruptamente.
• Pare parerel motor,sualte la bane do control
qua exJgela presenctadel operador.
AVISO: En climes rr_s frfos puedeque sea
necesano repe_rlospesos del cebado. En climes
m&s calurosos el ceb_ demasiado puede producir
el ahogo y el motor no va a arrancaroSi se ahoga el
motor espere unos cuantos minutos antes de"6-atar
de hacedo arrancar y no repita ios pesos det
cebado.
CONSEJOS PARA SEGAR
• Bajo clertas condlctones, tel como c_sped muy
alto, puede ser necesario et elevartaaltura del
corte pare reduclr el esfuerzo necesario pare
empujarIasegadera y pare evilersobrecargar el
motor, dejandomontones de recortesde c_sped.
• Pare un certe mw pesado, reduzca el ancho del
code pasandoparcia.lmentepor encima dettugar
antedotmente cortado y stegue lenlamante.
• Cuando useuna segadora con descarga trasera
en c_sped ht]medo y pesado, losmontones de!
c_sped cortad0 puedeque no entrenen el
recogedorde e_spedoReduzca laveloc{daddel
recorrldo(veloctdaddo empuje) y/o hega
functonar lasegadora sobre el &tea pot segunda
vez,
• Si queda una huella de cortes en el )ado derecho
de una segadora con descarga _asera, s}egue
en la direcciSnen que giran _asmanillasde{ reloj,
solapando un poco para recat_ar los recortes en
la prd_dmapasad&
• Los poros en los recogedores de c_sped de tela
pueden Ilenarsecon mugre y polvocon e!uso y
los recogedores recaudardn menos c_sped_
Pare evitar _sto, rocheel recogedor con la
manguera de ague regularrnenle y d_je!o
secarse antes de usado.
• Mantenga la parte superiordel motor, alrededor
del arrancador,despeJaday sin recortesde
c_sped y pajaoEsto ayudard etflujode! aire del
motor y extender& IaduraciSn#ste.
CONSEJOS PARA SEGAR Y
ACOLCHAR
IMPORTANTE: Para obtener el mejor
rendfmiento mantenga la caja de la segadora
sin acumulacion de cesped y basura. Vea
"limpteza"en {a seccion de "Mantemiento" de
este manual.
• La cuchilla acolchadora_ especial vaa volver a
cortar |os recortes de c_sped muchas veces,
y los reduce en tamaf_o,de modo que slse
caen en el c_sped se van a dispesar entre
_ste y no se van a nora,', Tambl_n, el c6sped
acolchado se va a deshacer rgpidamente
entregando substancias nutritivas pare el
c6sped. Siempre acolche con la velocidad dal
motor (cuchilla) m&s alta, pues asi se
obtendr& la mejor acci6n de recorte de las
cuchillas.
• Evlte cortar el c_sped cuando est_ mojado. El
ceeped mojado tlende a former montones e
interflerecon la aecI6n de acolchadoo La
mejor hora pare segar el c_sped es temprano
en la tarde, A esa hora 6ste se ha secado y el
_rea recien cortada no querier& expueeta al
sol directo.
22
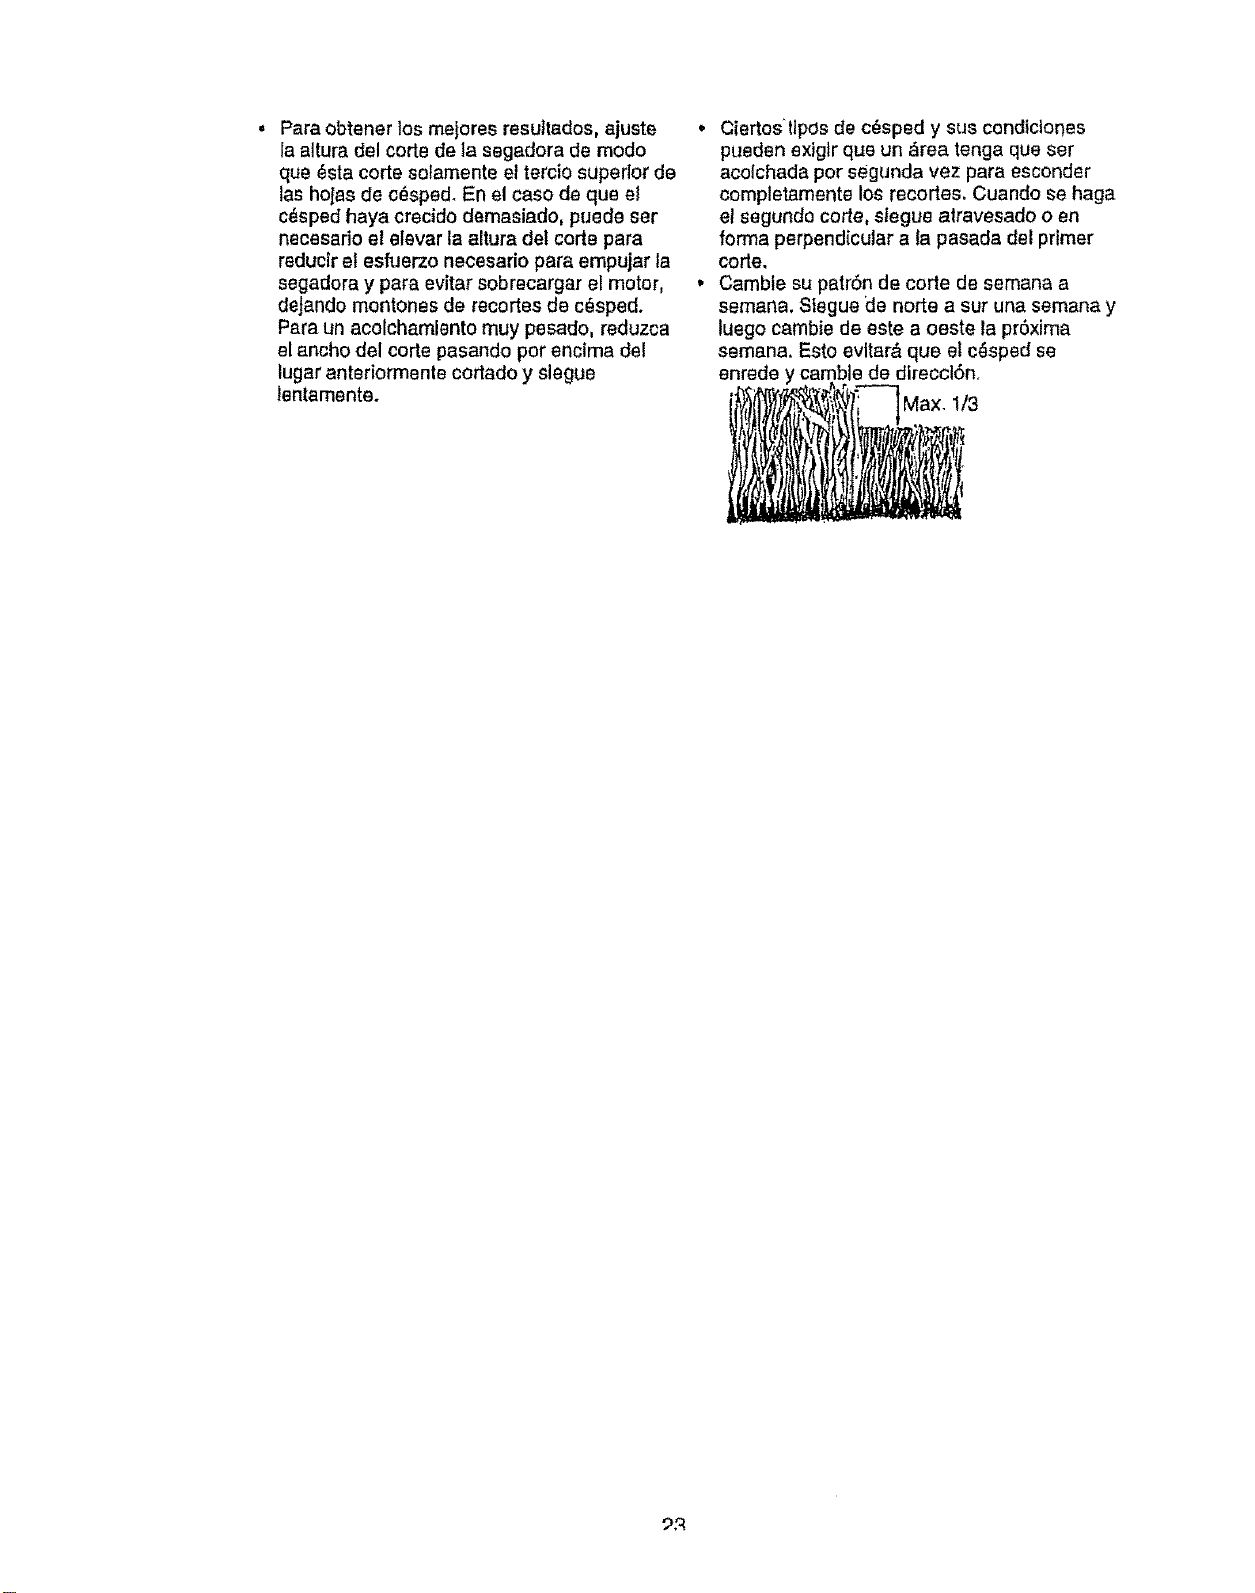
Para obtener los mejores resuttados, ajuste
la altura del corte de la segadora de mode
que _sta corte so_amente el tercio superior de
las hoJas de c_spe& En el case de que el
c_sped haya crecido demasiado, puede ser
necesado el elevar la altura det corte para
reducir e! esfiJerzo necesario para empujar la
segadora y para evitar sobrecargar el motor,
deJando montones de recortes de c6sped.
Para un acolchamlento muy pesado, reduzca
el ancho del corte pasando per enclma del
lugar anteriormente cortado y slegue
lentamente.
• Ciedos'tlpOs de c_sped y sus cendiciones
pueden exiglr que un _rea tenga que ser
acolchada per segunda vez para esconder
completamente los recodes. Cuando se haga
el segunde code, slegue alravesado o en
forma perpendicular a ta pasada del primer
code.
• Camble su patrSn de certe de semana a
semana. Siegue de node a sur una semana y
luego cambie de este a oeste la prSxima
semana. Esto evltar& que el c_sped se
enrede y camble de direcclSn.
'Max.
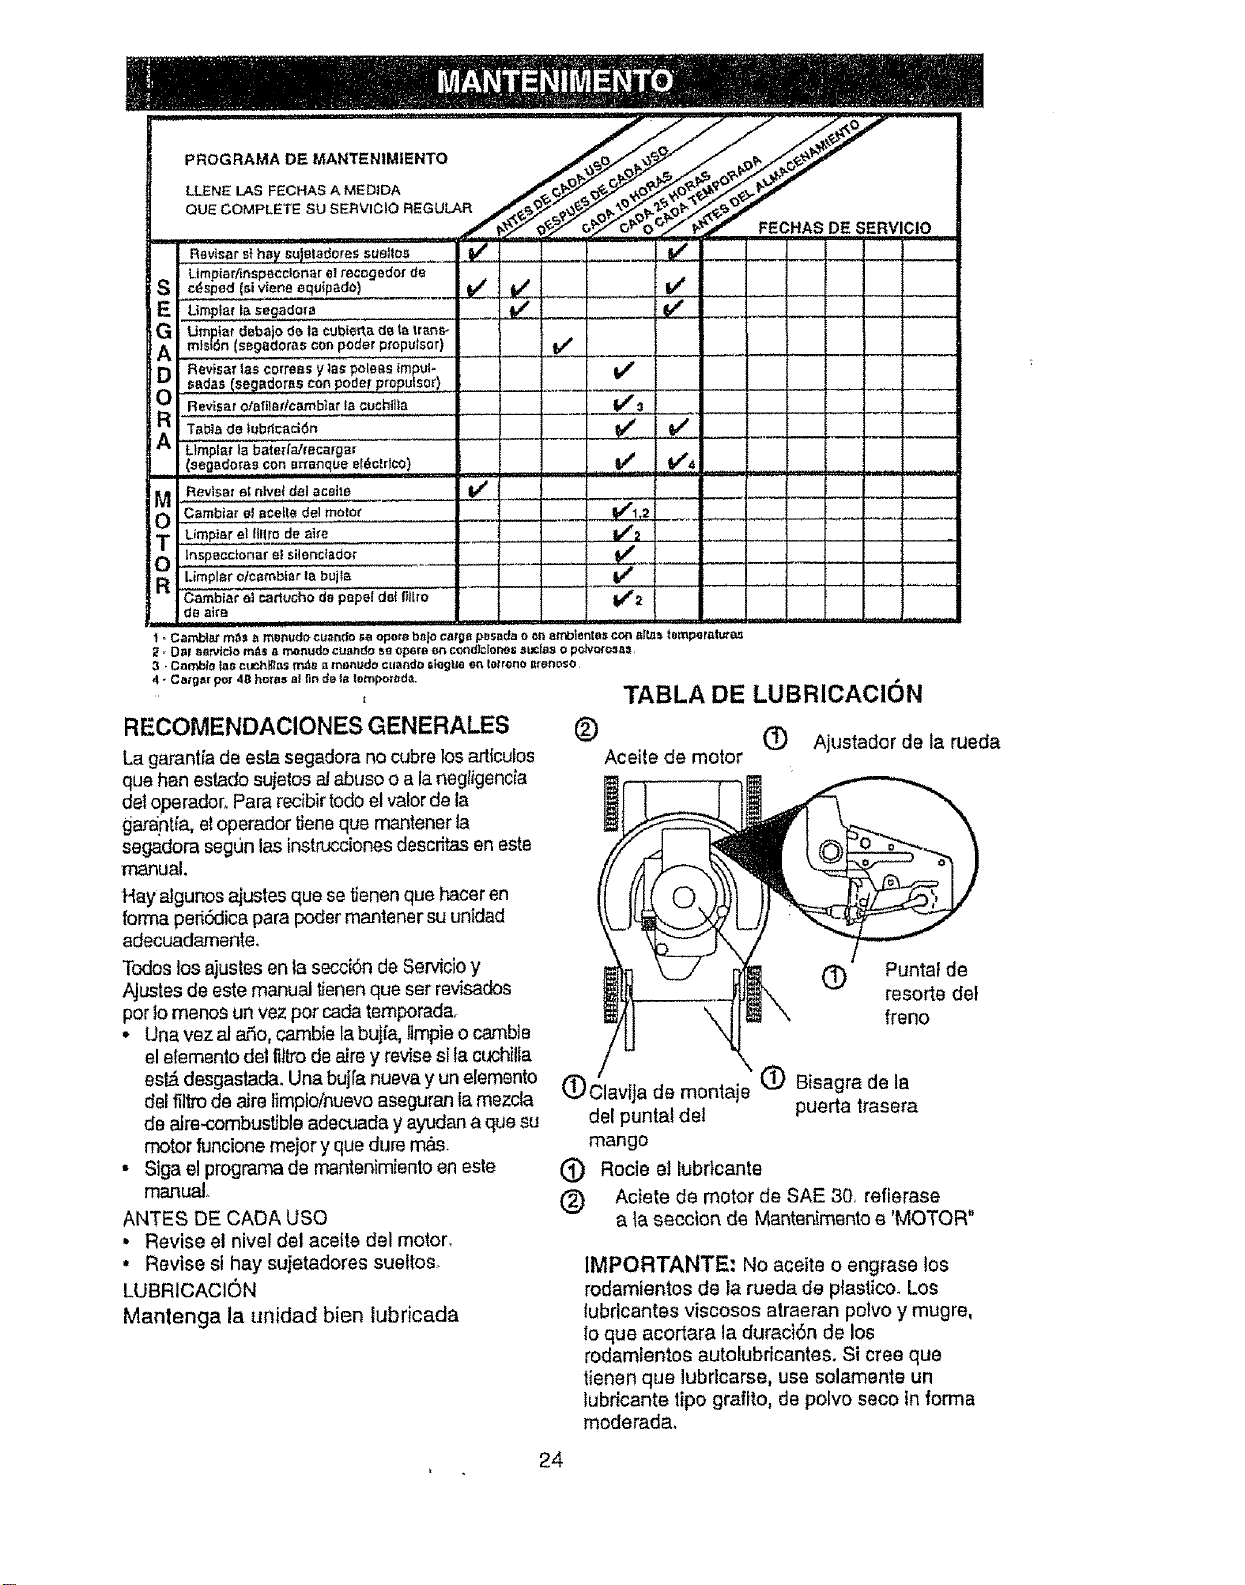
............... - EcNAs DESERVlC'O,
Revlsar s{ h_y su_ela_oreS sUBIIO.4 _ ....... J_ ..........
Limpiar/insp_cctonar e! recogodof de
c_sped (_i vtene equ_pado)
E Limptaft_segado_a
Umpf_r deba o de ta cubiet_a de la tranr,-
m_s*6.(ss_ado_asco.po_r,p(opu,_,or)
OD F_evisar las coffees y tas polees tmpul-
sadas(se_adorascon p,oder,#mpuls,m')
Revisar ofattlartcamb_r 1,3cuchilla
Llmpla_"la bater/a!recargar
(seg_doras con arranqUeel_o_rlCO)
i Revts,at et nlve_ del acelte
Cambiar of acet_e del molo_
Limpier el ltllro de ah'e
m _r'el silent;tador
de ah'a
.........
v'
v'
v'
t • Camb_t mt, s t= msnudo cu_ndo sa opor_ bs_o catga pBsada o on amblento_ cott _lL_s temperal_t_
, O1_! t=_rvtc_o mt_ a rno_d_ cui]ndo st! oporo on cor_dl3Ior_ _ucla_ o potvoto_a_l
,3, Carabao ta_ _u_hlt_as rn_s _ mottudo cuando _gtt_ ett Io,'rono _tenoso
4 - Ca_g_rpot 4B hm'asal _n _ la lompot_da.
RECOMENDACIONES GENERALES
La garantia de esta segadora no cubre losartbulos
que han estado sujetos al abusoo ala negtigencia
detoperador, Para redbir todoel valorde la
_iarantia,el operador tJeneque mantener ta
segadora segun las instruccionesdescritasen este
manual,
Hay algunos ajustes que setienen que hacer en
forma peri6dica pare poder mantener su unidad
adecuadamente.
Todos los ajustes en la secciSnde Servicio y
Ajustes de este manual tienenque ser revisados
por tomenos un vez pot cadatemporada.
• Unavezal aSo,cambte la buj_a,tlmpieo camble
el elemento del fillrode alre y revisesita cuchtlla
eslAdesgastad& Una bujfanueva y un elemento
del filtro de alre limpio/nuevo aseguran la mezcla
de aJre-combustJbleadecuada y ayudan a que su
motor funcione mejor y que dure n'_s.
• Siga el programa de mantenimiento en este
manual
ANTES DE CADA USO
, Revise el nivel del aceite del motor.
• Revise sl hay,sujetadores suettos.
LUBRICAClON
Mantenga la unidad bien lubricada
TABLA DE LUBRICACI6N
(_) (_) Ajustador de la rueda
Aceite de motor
I_ Puntal de
resorte del
freno
.de montaje t_) Bisagra de la
del puntat del puerta trasera
mango
(_ Rocie el lubrlcante
(_) Aclete de motor de SAE 3& relierase
a {aseecion de Mantenimento e 'MOTOR"
IMPORTANTE: No aceite o engrase los
rodamientos de la rueda de piastico. Los
tubricantes viscosos atraeran polvo y mugre,
Io que acortara la duraci6n de los
rodamlentos autolubrtcantes. Si cree que
tienen que lubricarse, use solamente un
fubricante tipo graftto, de polvo seco in forma
moderada,
24
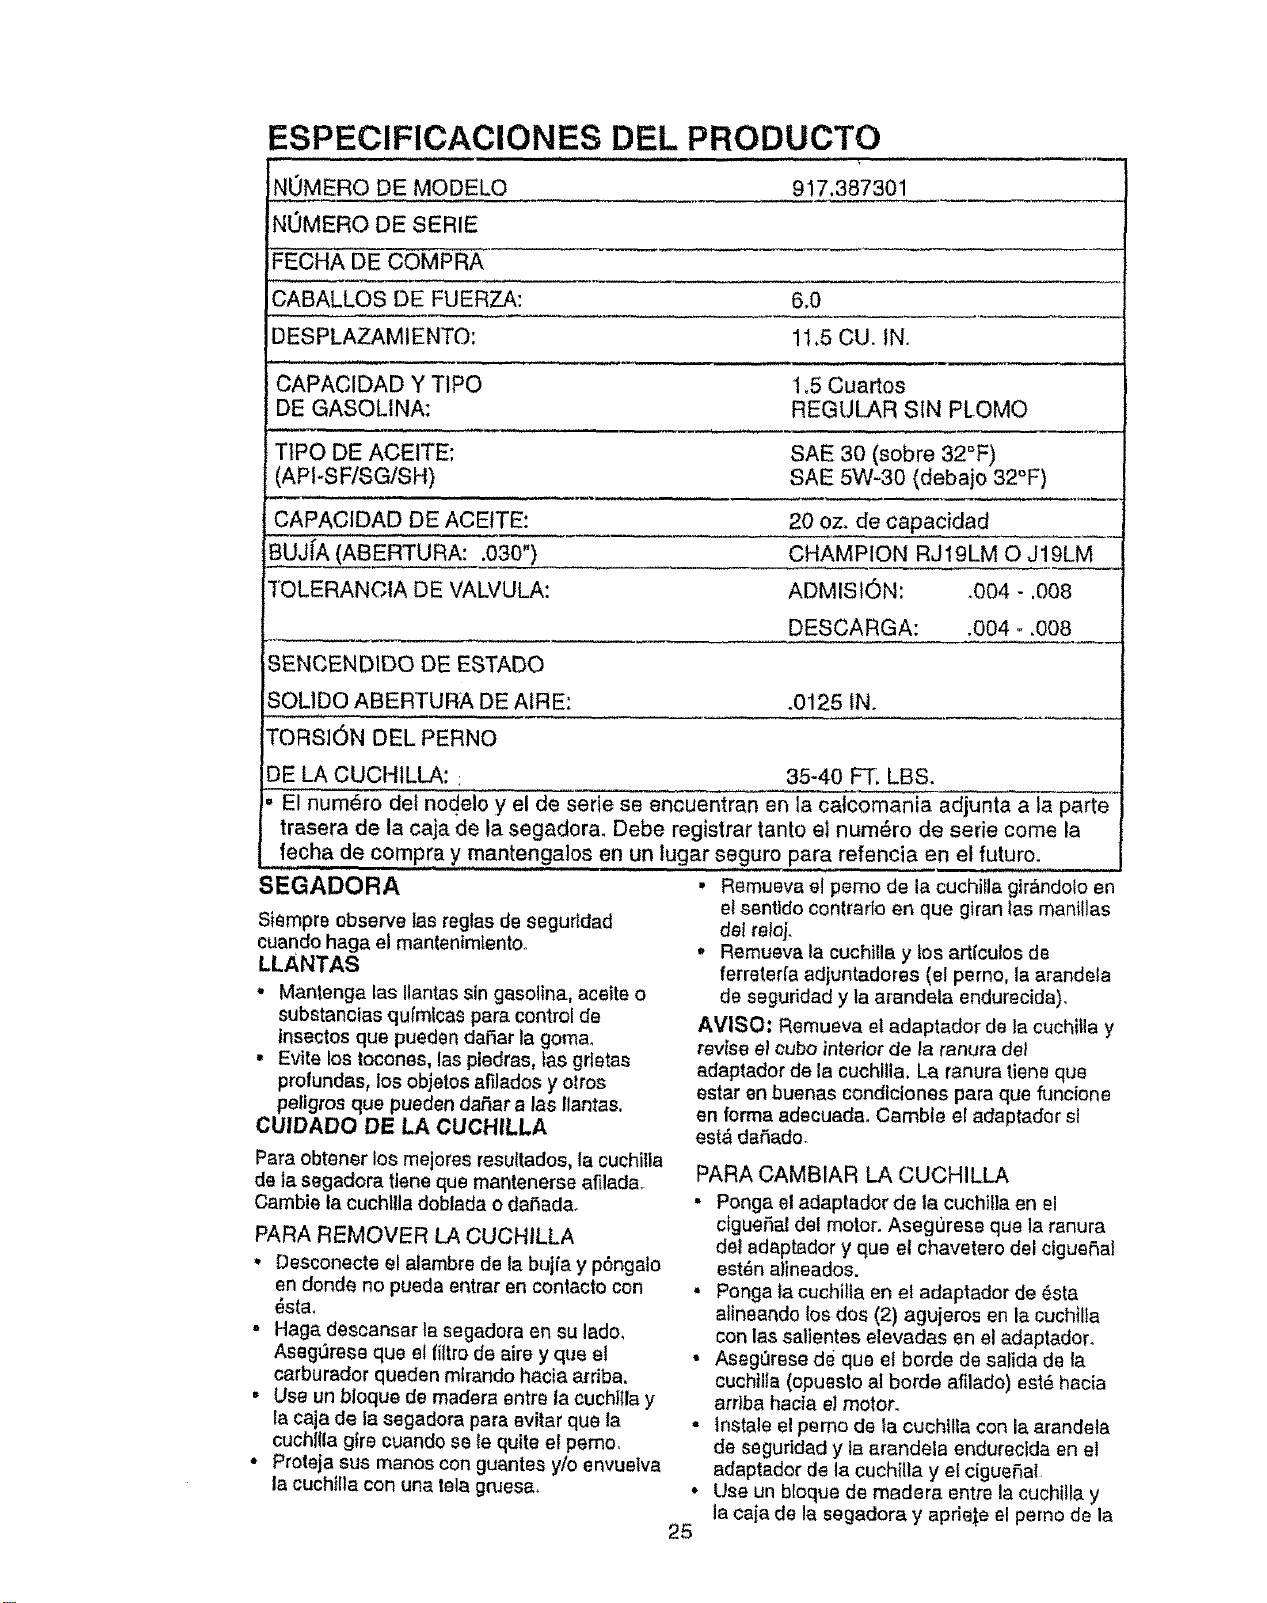
ESPEClFICACIONES DEL PRODUCTO
NOMERO DE MODELO 917,387301
NOMERO DE SERIE
FECHA DE COMPRA
CABALLOS DE FUERZA: 6.0
DESPLAZAMIENTO:
, ,i , i , i,llL.
CAPACIDAD Y TIPO
DE GASOLINA:
11.5 CU. IN.
1.5 Cuartos
REGULAR SIN PLOMO
L , ,,.,,,,,,J
T1PO DE ACEtTE: SAE 30 (sobre 32°F)
(API-SF/SG/SH) SAE 5W-30 (debajo 32°F)
CAPACIDAD DE ACEtTE: 20 oz. de capacidad
BUJ[A (ABERTURA: .030") CHAMPION RJ19LM O J19LM
TOLERANCIA DE VALVULA: ADMIStON: .004 - ,008
DESCARGA: .004 _ .008
SENCENDIDO DE ESTADO
SOL1DO ABERTURA DE AIRE: .0125 IN.
TORSION DEL PERNO
DE LA CUCHtLLA: : 35-40 FT. LBS.
• El num_.ro det nod elo y el de serie se encuentran en la calcomania adjunta ala parte
trasera de la caja de la segadora. Debe registrar tanto el num6ro de serie come la
fecl)a de compra y mantengalos en un lugar se.guro pare refencia en el future.
SEGADORA
Siempre observe las regtas de segurldad
cuando haga el mantenimtento°
LLANTAS
, Mantenga las Ilantas sin gasoline, aceite o
substanctas qurmfcas pare control de
insectosque pueden daSar la goma.
• Evite los tocones, las pledras, Ias grtetas
prolundas, los objetos atilados y otros
peligros que pueden daSar alas ilantas.
CUIDADO DE LA CUCHILLA
Para obtener los mejores resultados, la cuchitla
de la segadora tiene que mantenerse afilada..
Cambie ta cuchttla doblada o dar3adao
PARA REMOVER LA CUCHILLA
• Desconecte el atambre de la bujia y pSngalo
en deride no pueda entrar en contacto con
_sta_
, Hage descansar la segadora en su lade,
AsegQrese que el filtrode aire y que et
carburador queden mlrando hacia arriba.
• Use un bloque de madera entre la cuchllla y
la caja de la segadora pare evitar que la
cuchIIla gIre cuando se le quite el pemo.
• Proteja sus manes con guantes y/o envuelva
la cuchilla con una tela gruesa.
• Remueva el pemo de la cuchilla girandoio en
et sentldo contrarto en que giran las mani!las
del reloj.
• Remueva la cuchilla y los art{culos de
ferreter[a adjuntadores (el perno, la arandela
de seguridad y la arandela endurecida).
AVISO: Remueva el adaptador de la cuchitia y
revise el cube interfor de la ranura del
adaptador de la cuchilla, La ranura tiene que
ester en buenas condlclones pare que funciene
en forrna adecuada. Camble el adaptador sl
est_ dahado.
25
PARA CAMBIAR LA CUCHILLA
• Ponga el adaptador de la cuchil}a en el
cfgueSal del motor. Aseg0rese que la ranura
det adaptador y que el chavetero del cigueSal
est_n alineados.
• Ponga ta cuchitta en et adaptador de _sta
alineando los dos (2) agujeros en la cuchilla
con las salientes elevadas en el adaptador.
• Aseg,3rese de que el horde de salida de ta
cuchilla (opuesto al borde afilado) est6 hacia
arriba hacia el motor.
" lnstale el pemo de ta cuchilta con la arandeta
de seguridad y la arandela endureclda en el
adaptador de la cuchiUa y el cigueSal
Use un bloque de madera entre la cuchilla y
la caja de la segadora y apriej_eel perno de la
cuchiltagir_ndctoenelsentidoanquegiran
las manillas del retoj,
• La torsi6n pars apretar recemendada es de
35 .- 40 pies ltbras_
IMPORTANTE: El perno de la cuchilla es
clase 8 Iratado a taler.
AVlSO: No recomendamos el afilar Ia cuchilla
- pete si Io hace, asegurese de que quede
balancsada_
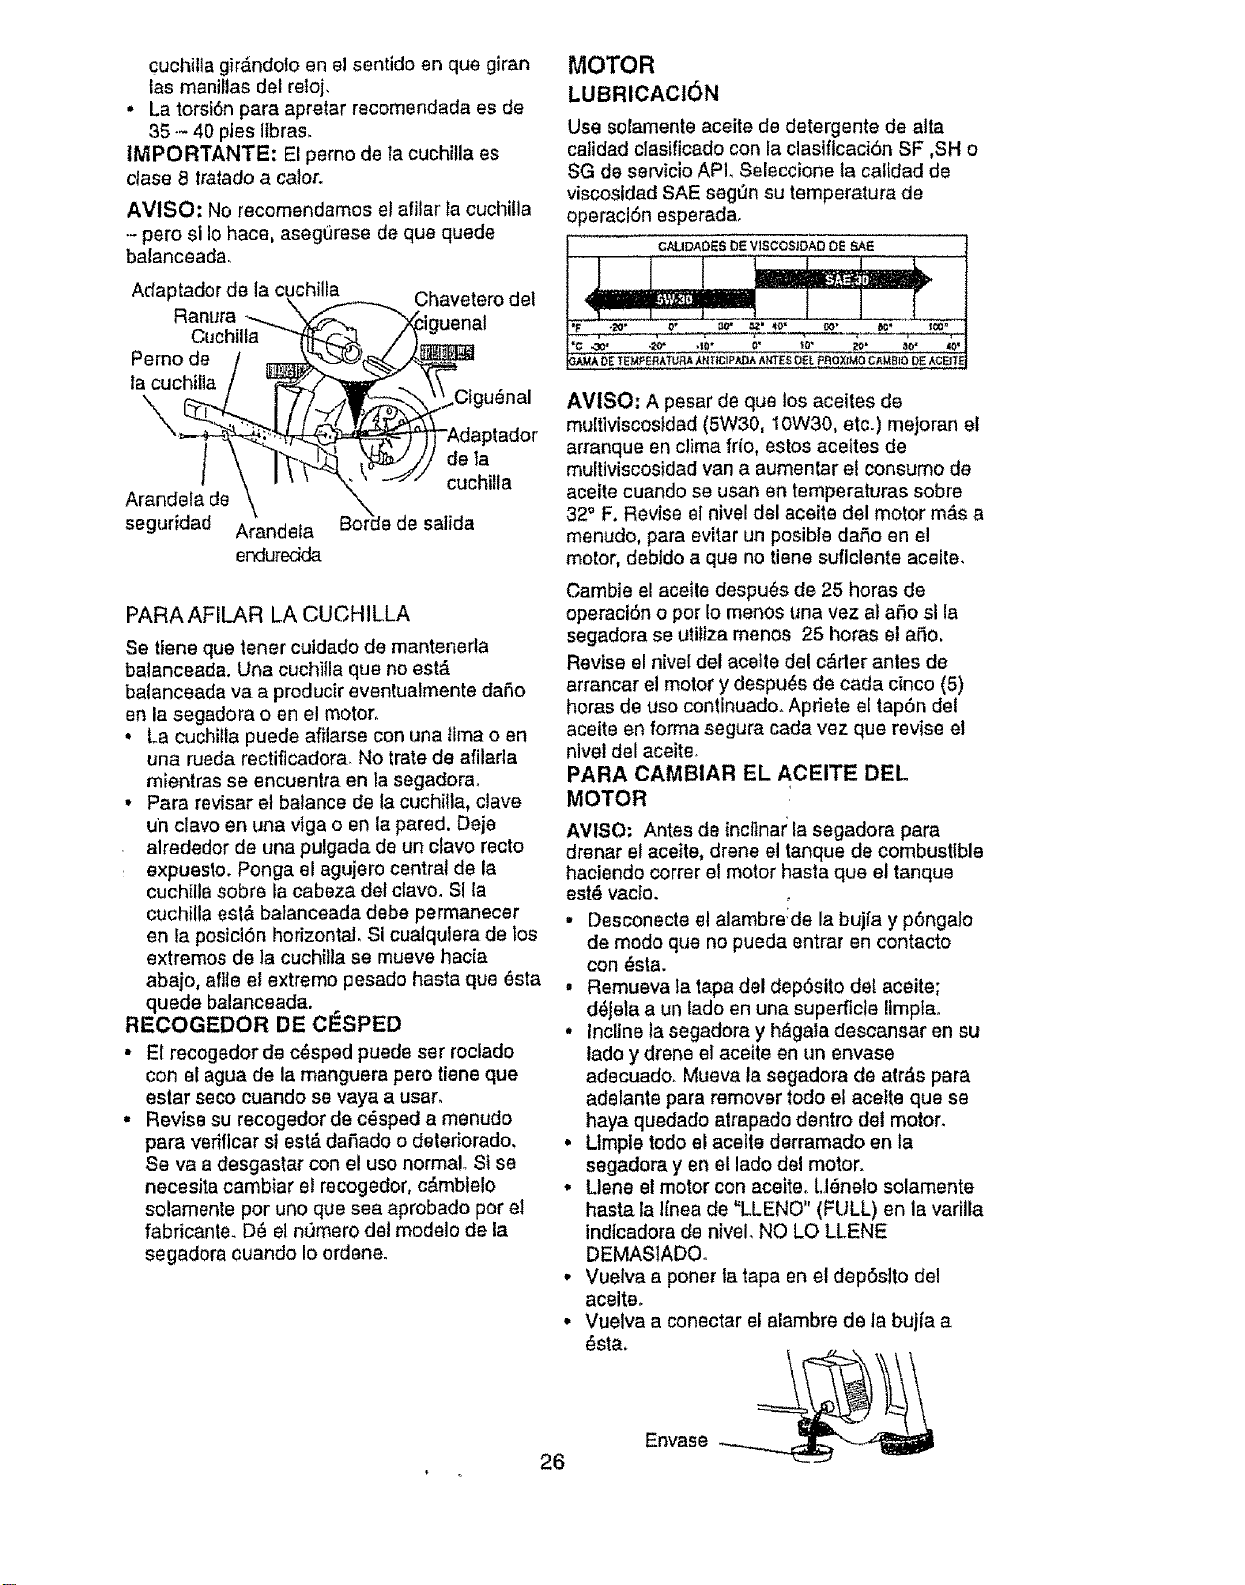
Adaptador de la cuchilla Chavetero del
Ranura o
tacuchilla/ ___ V\
-- Adaptado
seguridad Arandeta Borde de salida
endurecida
PARAAFILAR LA CUCHILLA
Se tiene que lener cutdado de mantenerta
balanceada. Una cuchilla que no est,.
balanceada va a producir eventualmente dale
en la segadora o en e! motor,
• La cuchilla puede afilarse con una time o en
una rueda rectiflcadora No Irate de afilarla
mientras se encuenlra en la segadorao
•Para revisar et balance de lacuchilla, clave
un clave en una viga o en la pared. Deje
almdedor de una pulgada de un clave recto
expuesto. Ponga el agujero central de la
cuchilla sobre la cabeza del clave. SI la
cuchiUa est& balanceada debe permanecer
en la posici6n horizontal SI cualqulera de los
extremes de la cuchitla se mueve hacia
abajo, afile el extreme pesado basra que 6sta
quede balanceada.
RECOGEDOR DE ClaSPED
• El recogedor de c_sped puede ser roclado
con el ague de la manguera pete tisne que
estar seco cuando se vaya a usar.
• Revise su recogedor de c_sped a menudo
pars veriflcar st est_ daSado o deteriorado,
Se va a desgastar con el use normal° St se
necesita cambiar el recogedor, c&mbielo
solamente per uno que sea aprobado per e!
fabricantm D8 el nQmero del modelo de la
segadora cuando Io ordene.
MOTOR
LUBRICACI6N
Use solamente aceite de detergents de alta
calidad clasificado con la clasiflcaci6n SF ,SHo
SG de servicio API, Seleccione la caltdad de
viscostdad SAE segt_n su temperatura de
operaciOn esperada.
C_L,DAOESDEV_SCOS_DAOO_SA_
AVISO: A pesar de qua los aceites de
multtviscosldad (5W30, 10W30, etc.) mejoran el
arranque en clime frio, estos aceites de
multiviscosidad van a aumentar el consume de
aceite cuando se usan en temperaluras sobre
32° F. Revise el nivel del aceite del motor m_,sa
menudo, para evitar un posible dale en el
motor, debldo a que no tiene suflclente aceile,
Cambie el aceite despu_s de 25 horas de
operacl6n o per Io menos una vez al aSo sl la
segadora se utilize menos 25 horas et apse,
Revise el nivel del aceffe del c_der anles de
arrancar el motor y despu_s de cada cinco (5)
horas de use contlnuado. Apdete el tap6n del
aceite en forma segura cads vez que revise et
nivel del aceite.
PARA CAMBIAR EL ACEITE DEL
MOTOR
AVISO: Antes de incttnat:la segadora para
dmnar e! aceite, drene el tanque de combustible
haciendo correr el motor haste que el tanque
est_ vacto.
• Desconecte el alambre-de la bujfa y pOngalo
de mode que no pueda entrar en contacto
con _sta.
, Remueva ta tapa del dep0sfto det aceite;
d_Jelaaun lade en una superficte limpla.
• Incline la segadora y h_gala descansar en su
tado y drene el aceite en un envase
adecuado. Mueva la segadora de aires pars
adelante para remover rode el acette que se
haya quedado atrapado dentro del motor.
• Llmple todo el acelte derramado en la
segadora y en el lade del motor.
• Liens et motor con aceite. Ll_nelo solamente
hasta la linea de "LLENO" (FULL) en la varilla
indicadora de nivel, NO LO LLENE
DEMAS1ADOo
• Vuetva a poner la taps en el dep6sito del
acelte.
• VueNa a conectar el alambre de la bujla a
_sta.
Envase
26
FILTRO DE AIRE
Su motor no funclonar_ en forma adecuada y
puede sufrir dafios si se usa un filtro de aire
sucloo
Cambie elfiltro de aim cada abe, y m_s a
menudo si siega en condiciones muy
polvorosas o sudas, No lave et filtro de airs,
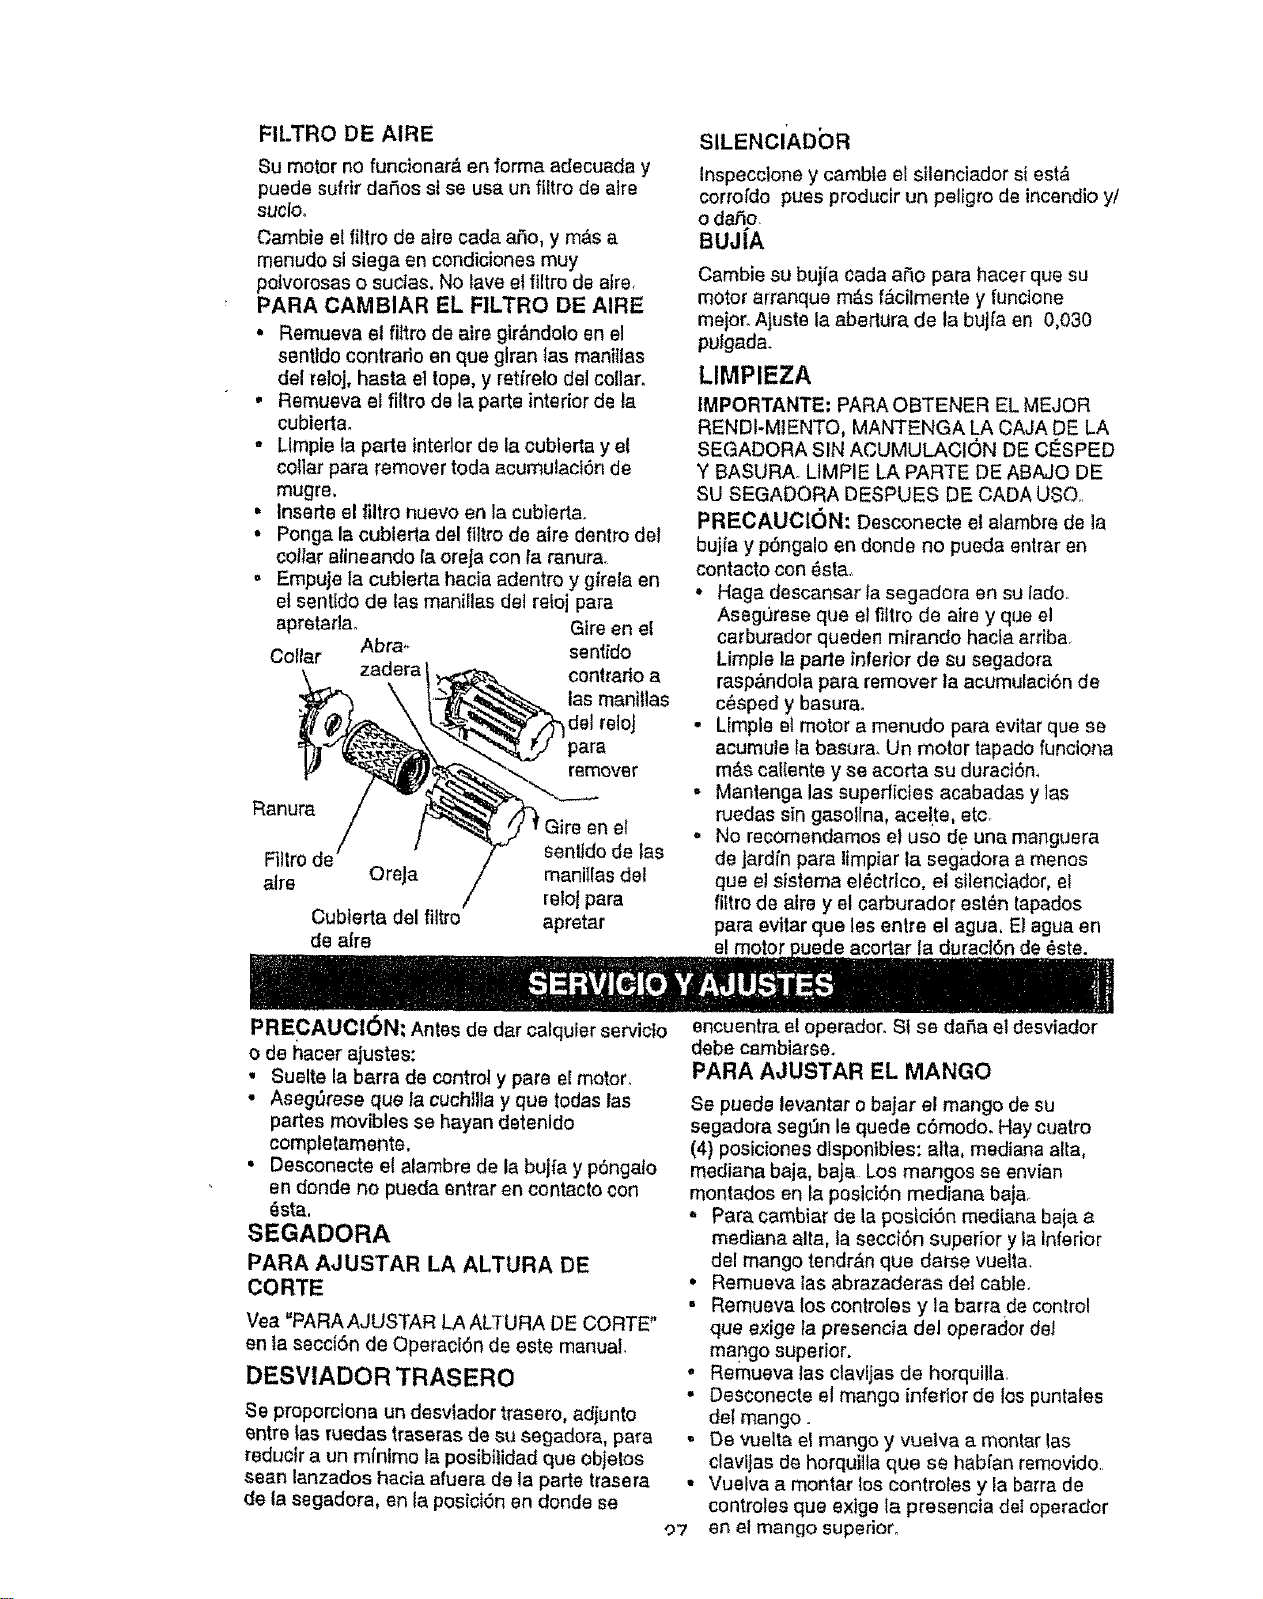
PARA CAMBIAR EL FILTRO DE AIRE
• Remueva et fittro de airs gir&ndolo en el
sentfdo contrario en que glran tas manillas
del reloj, hasta et tope, y retfrelo del collar.
• Remueva el filtro de la parts interiorde la
cubterta.
• Llmpie la parte interiorde la cubtertay et
collar para remover toda acumulaci6n de
mugre,
• Inserte el tiltro nuevo en la cubfertao
• Ponga la cublerta del fittro de aire dentro del
coltar alineando ta oreJacon la ranura.
o Empuje ta cubierta hacia adentro y gfrela en
el senttdo de las manillas del reloi para
apretarlao Gire en el
Collar Abra- sentido
zadera contrario a
las manillas
del reloj
para
remover
Ranura
Gire en el
Filtro de senttdo de las
airs OreJa manillas del
reloj para
Cubterta del filtro apretar
de a{re
SILENCIADOR
Inspecclone y camble el silenciador si est_
corrofdo pues producirun peligro de incendio y/
o da_o,
BUJ|A
Cambie su bujfa cada a_lo para hacer qua su
motor arranque m_,sf&cilmente y tunctone
meier. AJuste la abertura de la bujfa en 0,030
pufgada.
LIMPIEZA
IMPORTANTE: PARAOBTENER EL MEJOR
RENDI-MIENTO, MANTENGA LA CAJA DE LA
SEGADORA SIN ACUMULACION DE CESPED
Y BASURA. LIMPIE LA PARTE DE ABAJO DE
SU SEGADORA DESPUES DE CADA USQ.
PRECAUC|6N: Desconecte el alambre de la
bujia y p6ngalo en donde no pueda entrar en
contacto con _sta,.
° Haga descansar la segadora en su [ado.
Asegurese que et filtro de airs y qua el
carburador queden mirando hacfa arriba
Limple la parle inferior de su segadora
rasp&ndola para remover la acumulacibn de
c6sped y basura.
- Lfmple et motor a menudo para evitar qua se
acumule la basur& Un motor tapado funciona
m_s cal(ente y se acorta su duract6n,
= Mantenga las super!icies acabadas y las
ruedas sin gasollna, ace[te, etc.
• No recomendamos el use de una manguera
de jardfn para limpiar la segadora a manes
qua e! sislema el_ctrlco, el silenciador, el
fittro de airs y el carburador est_n lapados
para evttar qua les enlre el agua. E1agua en
e! acortar la duracl6n de 6ste.
PRECAUCI6N: Antes de dar oalquler servicto
o de hacer ajustes:
• Suelte la barra de control y pare e! motor.
• Aseg(Jrese qua la cuchllla y qua todas las
partes movibles se hayan detenldo
complelarnente,
• Desconecte el alambre de la bujfa y p6ngalo
en donde no pueda entrar en contacto con
6sta,
SEGADORA
PARA AJUSTAR LA ALTURA DE
CORTE
Vea "PARA AJUSTAR LA ALTURA DE CORTE"
en la secci6n de OperaciOn de este manual.
DESVIADOR TRASERO
So proporclona un desviador trasero, adjunto
entre tas ruedas traseras de su segadora, para
reducfra un mfnlmo la posibitidad qua objetos
sean lenzados hacta afuera de la parte trasera
de la segadora, en la posici6n en donda se
encuentra el operador. St se dafia el desviador
debe cambiarse.
PARA AJUSTAR EL MANGO
Se puede levantar o balar el mango de su
segadora segL1nle quede cOmodo. Hay cuatro
(4) posiciones dtspontbles: alia, mediana alia,
mediana baja, baja Los mangos se envian
montados en la poslci6n mediana bajao
• Para cambiar de la postci6n medlana baja a
mediana alia, la seccl6n superior y la inferior
del mango tendr&n qua darse vuelta.
, Remueva las abrazaderas dot cable.
• Remueva los controles y la barra de conlrol
que exige fa presencia del operador del
mango superior.
• Remueva las clavijas de horquilla.
• Desconecte el mango inferfor de los puntales
de{ mango.
• De vuelta el mango y vueiva a montar las
claviJas de horquilla que se habfan removido
• Vuelva a montar los controles y la barra de
controtes qua exige la presencia de{ operador
07 en elmango superior°
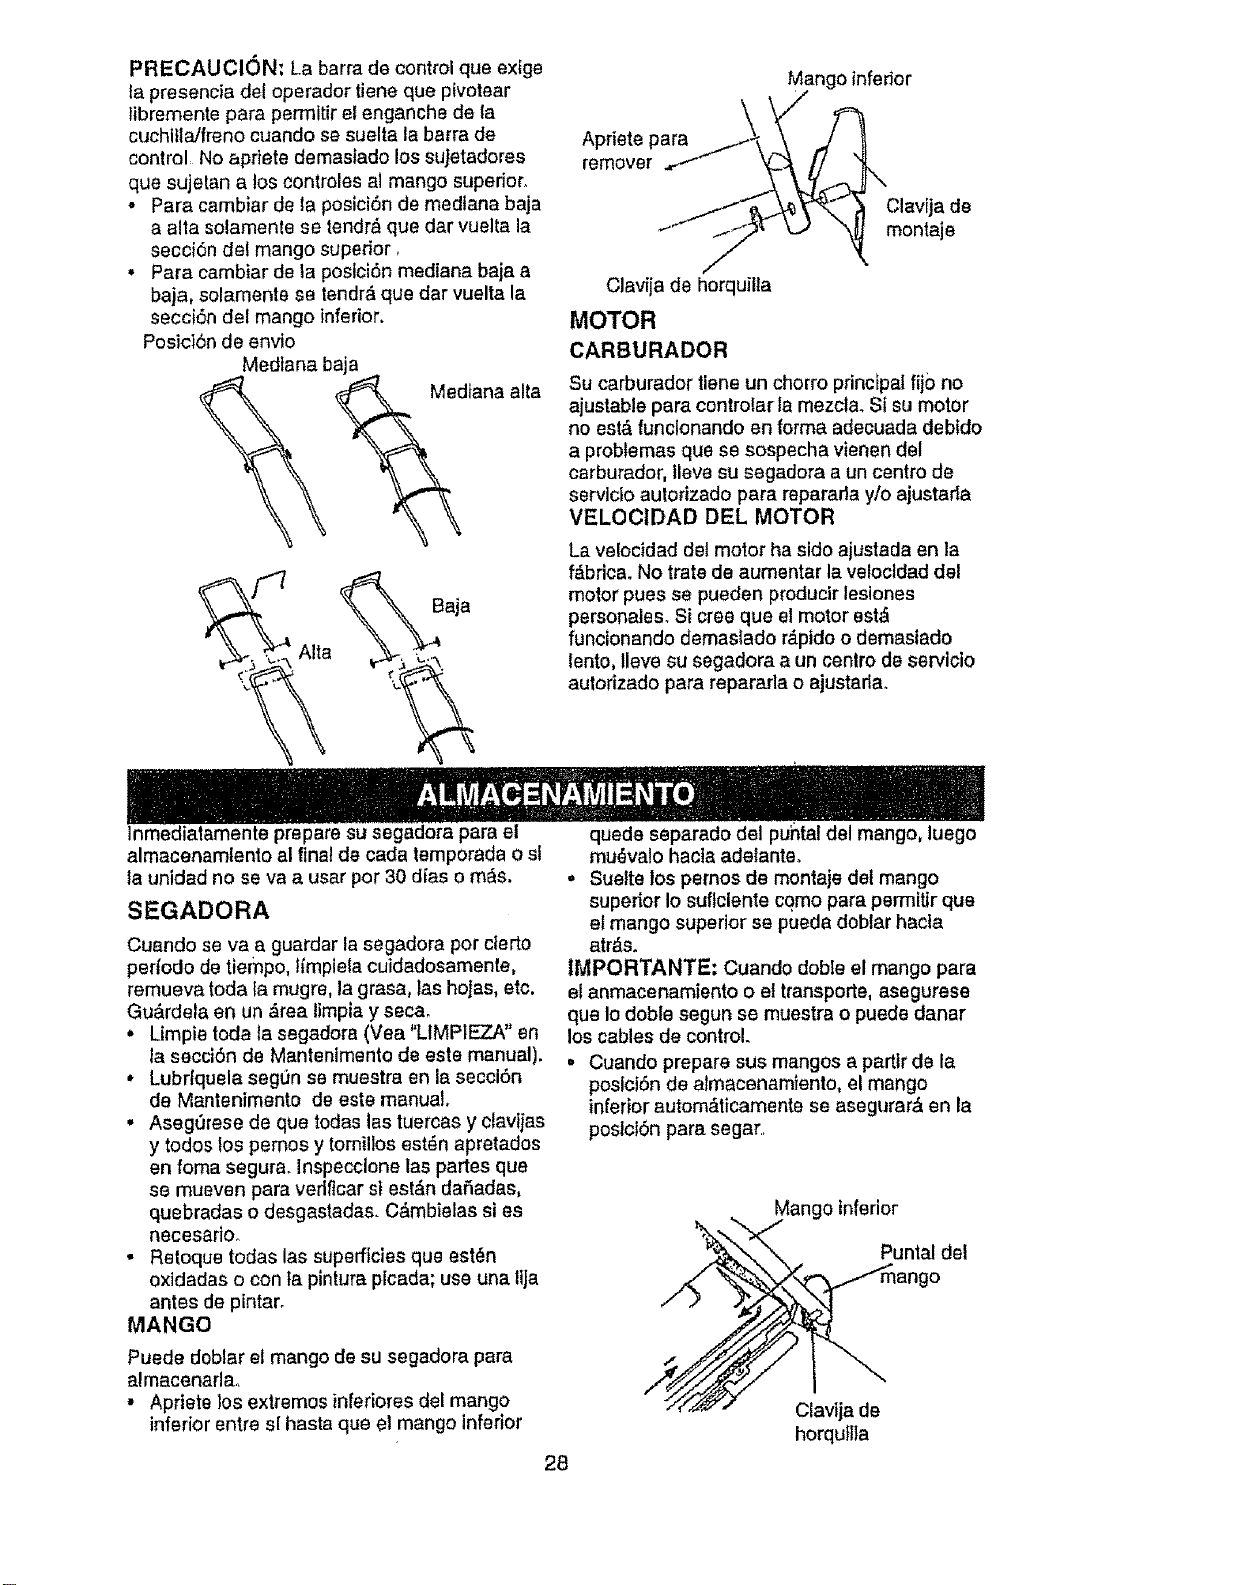
PRECAUCION:Labarradecontrolqueexige
lapresenciadeloperadortienequepivotear
_ibrementeparaperrnitirelenganchedela
cuchitta/frenocuandosesueltalabarrade
controlNoapriete demastado los sujetadores
que sujetan a los controles al mango superior_
- Para cambiar de la posiciSn de medtana baja
a alia solamenle se tendr_ que dar vuelta ia
secci6n del mango superior,
• Pare cambiar de la poslci6n mediana baja a
baja, solamente se tendr,_ quedar vuelta la
secci6n del mango inferior.
Posici6n de envio
Medlana baja
diana alta
Baja
Alia
Mango inferior
Aprieta para
remover
Clavija de
monlaje
Clavija de horquilta
MOTOR
CARBURADOR
Su carburador Iiene un chorro principal fij0 no
ajustable pare controlar la mezcta. St su motor
no est,_funclonando an forma adecuada debido
a problemas que se sospecha vienen del
carburador, tleve su segadora a un centro de
servlcio autorizado para reparada y/o ajustarla
VELOCIDAD DEL MOTOR
La velocidad del motor ha sido ajustada en la
f&brica. No trate de aumentar la velocldad del
motor pues sa puedan producir lesiones
personales, Si cree que el motor est,f
fundonando demaslado r&ptdo o demastado
lento, Ileva su segadora a un cenlro de servlcio
autorizado pare repararla o ajustada,
Inmediatamente prepare su segadora para el
almacenamlento al final de carla temporada o st
la unidad no se va a user pot 30 dies o m_s.
SEGADORA
Cuando se va a guardar la segadora pot clerto
perfodo de tiempo, ltmplefa cuidadosamente,
remueva toda Ia mugre, la grasa, las hoJas,etc.
Gu_.rdela en un Area limpia y secao
, Umpie toda la segadora (Vea "LIMPIEZA" en
la secciSn de Mantenimento de este manual).
• Lubrlquela segun se muestra en la secci6n
de Mantenimento de este manual.
• AsegOrese de que todas las tuercas y ctavtjas
y todos los pemos y tornillos est_n apretados
en foma segura. Inspecclone las partes qua
se mueven para verlftcar st est&n dafiadas,
quebradas o desgastadas. C&mbielas si as
necesario.
• Retoque todas las superficies que est_n
oxldadas o con la pintura picada; usa una ltja
antes de pintar.
MANGO
Puede doblar el mango de su segadora pare
almacenarlao
• Apriete los extremos infedores del mango
inferior entre s{ hasta que et mango inferior
quede separado del pui_taldel mango, luego
mu_valo hacta adelanteo
• Suelta los pernos de montaja de{ mango
superior Io suflclente como pare permiUr que
el mango superior se pueda doblar hacla
atr_s.
IMPORTANTE: Cuando doble el mango pare
el anmacenamiento o et transporte, asegurasa
qua Io dobte segun se muestra o puede danar
los cables de control.
= Cuando prepare sus mangos a partlr de la
poslcidnde almacenamtento, el mango
inferior autom_,ticamente se asegurar& en la
postclbn pare segar.
Mango inferior
Puntal del
28
Clavija de
horqu}lla
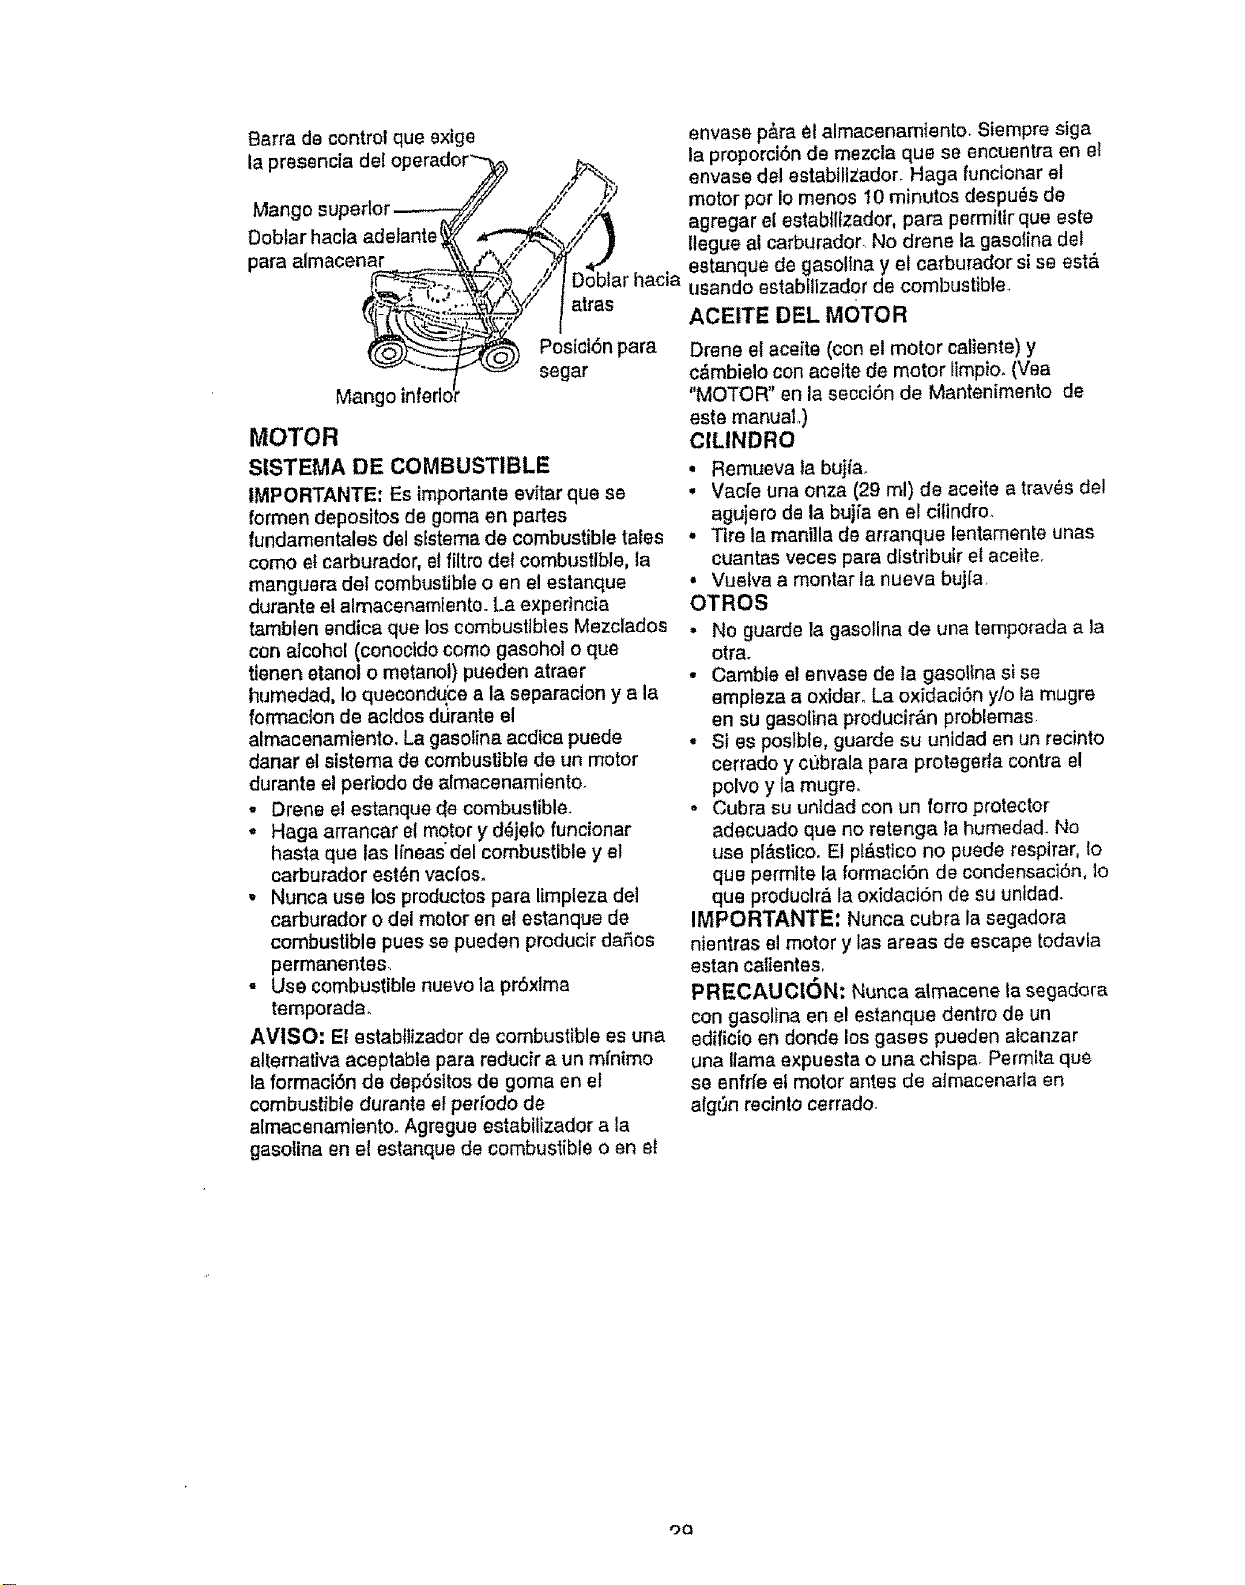
Barra de control que exige
la presencla del ol
Mango
Doblar hacia adelante
para almacenar
Mango
_,.,,Y Doblar haciaarras
Posici6npara
segar
MOTOR
SISTEMA DE COMBUSTIBLE
IMPORTANTE: Es importante evitar que se
formen depositos de goma en partes
(undamentales del sfstema de combustible tales
como et carburador, el filtro de( combustible, ia
manguera del combustible o en e! estanque
durante el almacenamiento. La experlncia
tambien endica que los combustibtes Mezclados
con alcohol (conocldo como gasohot o que
tienen etanol o metanol) pueden atraer
humedad, Io quecondu_ce a la separacion y a la
formation de acldos durante el
almacenamiento. La gasolina acdtca puede
danar el sistema de combustible de un motor
durante el pertodo de almacenamiento.
-Drene el estanque de combustible.
* Haga arrancar e( motor y d_jelo funcionar
basra que las Ifneas'del combustible y el
carburador est_n vac[os.
, Nunca use los productos para limpleza de1
carburador o del motor en el estanque de
combustible pues se pueden producirda_,os
permanentes.
- Use combustible nuevo la prSxlma
temporada.
AVISO: El estabttizador de combustible es una
alternativa aceptable para reducir a un mfntmo
la formaci6n de dep6sttos de goma en el
combustible durante et perfodo de
almacenamiento. Agregue estabilizador a la
gaso(ina en e! estanque de combustible o en e!
envase p_,rael almacenamiento. Siempre stga
la proporci6n de mezcla que se encuentra en el
envase del estabillZador. Haga funclonar el
motor pot Io menos 10 minutos despu_s de
agregar el establl(zador, para permJtfrque este
(legue al carburador No drene la gasolina det
estanque de gasoltna y el carburador si se est,,
usando estabflizador de combustible_
ACEITE DEL MOTOR
Drone el aceite (con et motor caliente) y
c&mbielo con aceite de motor )impio. (Vea
"MOTOR" en la secctSn de Mantenimento de
este manual.)
ClLINDRO
• Remueva la buj(a.
, Vacfe una onza (29 ml) de aceite a trav_s de!
agujero de la buj(a en el citindro.
, Tire la manilla de arranque lentamente unas
cuantas veces para dlstrtbuir el aceite.
° Vuetva a montar la nueva bujla.
OTROS
• No guarde la gasollna de una temporada a la
otra.
• Camble el envase de la gasol(na si se
empteza a oxidaro La oxidaciSn y/o la mugre
en su gasolina producirAn problemas
• Si es posible, guarde su unidad en un recinto
cerrado y ct)brala para protegerla contra el
polvo y ta mugre.
o Cubra su untdad con un lotto protector
adecuado que no retenga )a humedad. No
use pl&stico. El pl&stico no puede respirar, Io
que permlte la formaci6n de condensac]Sn, 1o
que produclr_ la oxidactSn de su unidad.
IMPORTANTE: Nunca cubra la segadora
nientras el motor y las areas de escape tedavla
estan catientes.
PRECAUClON: Nunca almacene la segadora
con gasolina en el estanque dentro de un
edificio en donde los gases pueden alcanzar
una llama expuesta ouna chtspa. Permita que
se enfrfe el motor antes de almacenaria en
algt)n recinto cerrado.
co
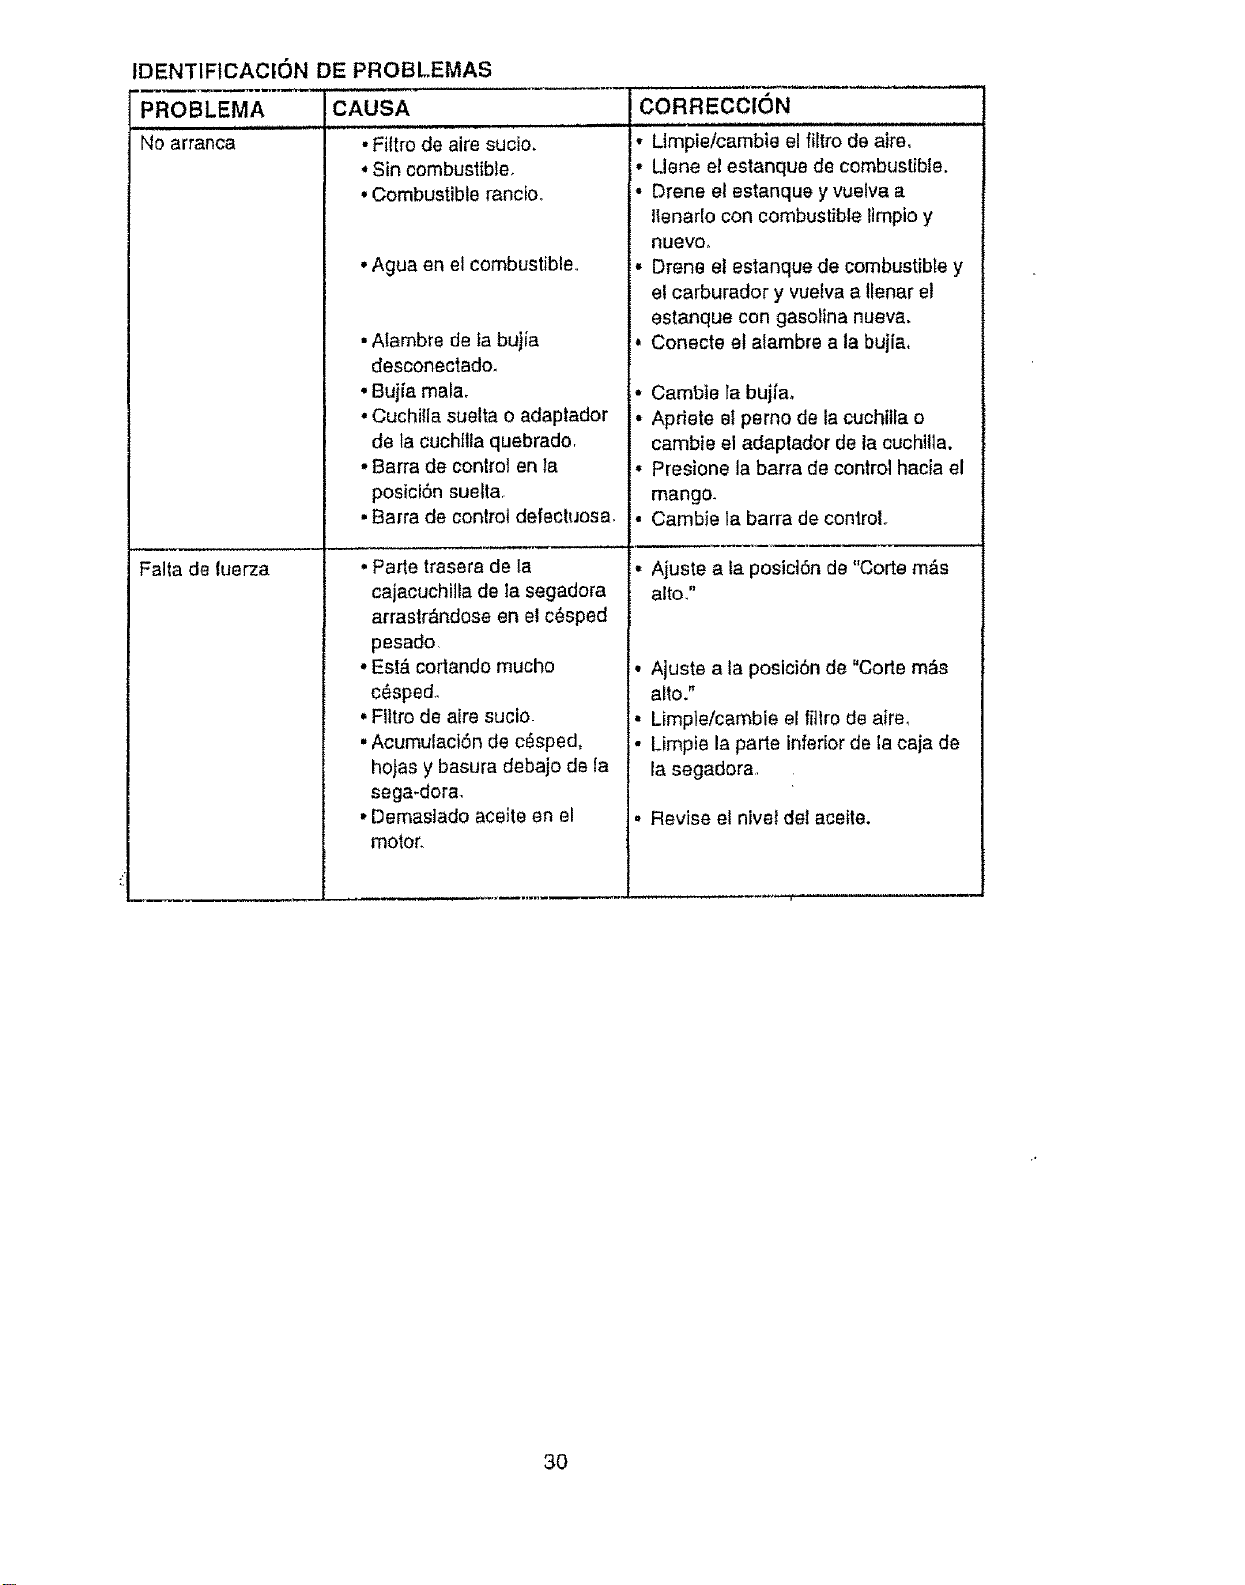
IDENTIFICACION DE PROBLEMAS
PROBLEMA CAUSA CORRECCION
{ i illl u ill, ii i,,,,,,L,
No arranca
Falta de luerza
• Filtro de aire sucio.
• Sin combust{bfe.
, Combustible ranctoo
•Ague en el combustible,,
•Alambre de la bujia
desconectado.
• Bujia mala.
• Cuchitla suelta o adaptador
de la cuchftla quebrado,
• Barra de control en la
posiciSn suelt&
• Barra de control defectuosa,
• Parte trasera de la
cajacuchilla de la segadora
arrastr&ndose en el c6sped
pesado,
° Est&cortando mucho
c_sped.,
, Filtro de aire sucio
• Acumu{act6n de c_sped,
hoJas y basura debajo de la
sega-dora.
,,Demaslado acelte en el
motor.
• Ltmpie/cambie el filtro de aire,
• Llene el estanque de combustible.
• Drene el estanque y vuelva a
Ilenarlo con combustible Itmpio y
nuevoo
• Drene et estanque de combustible y
el carburador y vuelva a Ilenar el
estanque con gasolina nueva.
, Conecte et a{ambre ala bujla,
• Cambte la bujfao
• Apriete et perno de la cuchitla o
cambie el adaptador de la cuchilla.
• Preslone la barra de control hacia el
mango.
• Cambie la barra de conlroL
• Ajuste ala posicl6n de "Code m&s
alto."
Ajuste ala posici6n de "Code m_s
alto."
Limple/cambie el fittro de aire_
Limpie la parte inferior de la caja de
la segadora,
Revise el nivet del aceite.
3O
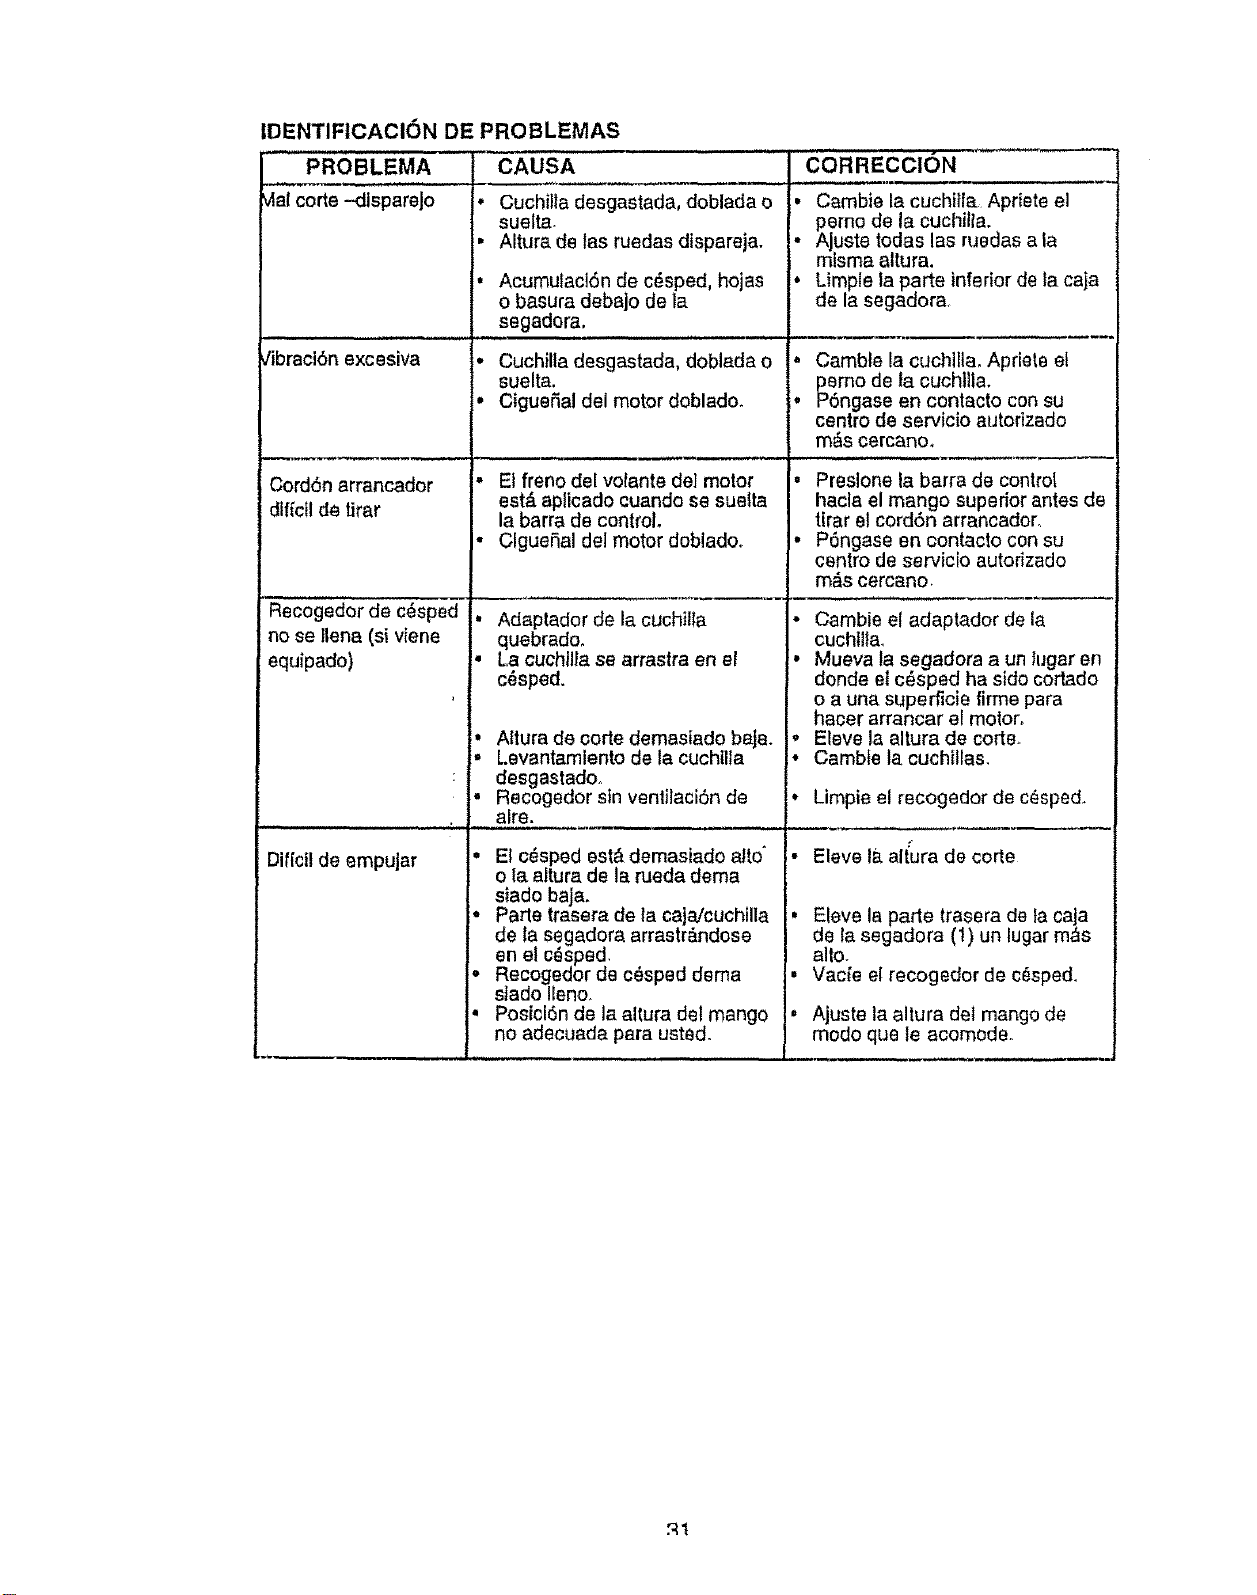
IDENTIFtCACI6NDE PROBLEMAS
PROBLEMA
Vtalcorte -disparejo
Jibraci6n excesiva
CordOn arrancador
dtf{cHde tirar
Recogedor de c_sped
no se llena (si viene
equipado)
Dif[cil de empujar
CAUSA
Cuchilla desgastada, doblada o
suelta.
Altura de los ruedas dispareja.
Acumulacl6n de c_sped, hojas
o basura debajo de la
segadora,
,,J, n, L,,, , i.......
Cuchilla desgastada, doblada o
suelta.
Cigue5al del motor doblado.
,,,,, ,L,,,.,_ _ ,, ,._,
Et freno del voiante deI motor
est#. aplicado cuando se suetta
la barra de control,
ClgueSal del motor doblado.,
• Adaptadordela cuchilla
quebrado.
o La cuchtlla se arrastra en el
c_sped.
, Altura de torte demasiado baja.
• Levantamiento de la cuchtlla
desgastado.
• Recogedor sin venlilaci6n de
alre.
,L,u ,,.
* Et c_sped est#,demasiado alto*
o {aaltura de la rueda dema
siado baja.
. Parte trasera de la caja/cuchilla
de {a segadora arrastr&ndose
en el c_sped.
o Recogedor de c_sped dema
stado IEeno.
o Posicl6n de la altura de! mango
no adecuada para usted.
CORRECCION
Cambie la cuchiila. Apriete el
,_,jernode la cuchilta.
uste todas las ruedas a la
mlsma altura.
Limple la parte inferior de _aca]a
de la segadora.
Camble la cuchillao Apriete el
_emo de la cuchllia.
ngase en contacto con su
centre de servicio autodzado
m&s cercano.
Presione la barra de control
hacla el mango superior antes de
tirar el cord6n arrancador.
P6ngase en contacto con su
centre de servicio autorizado
m_s cercano.
o Cambie el adaptador de la
cuchtltao
• Mueva la segadora a un lugar en
donde et c_sped ha side cortado
o a una superficie firme para
hater arrancar el motor_
, Eleve la altura de cort&
• Camble la cuchillas.
• Limpie el recogedor de c_sped.
t _
• Eleve la.altura de corte
Eleve la parte trasera de ta caja
de ta segadora (I) un lugar m,_s
alto
Vac{e el recogedor de c_sped.,
Ajuste la altura det mango de
mode que le acomode.
.... j,
."41
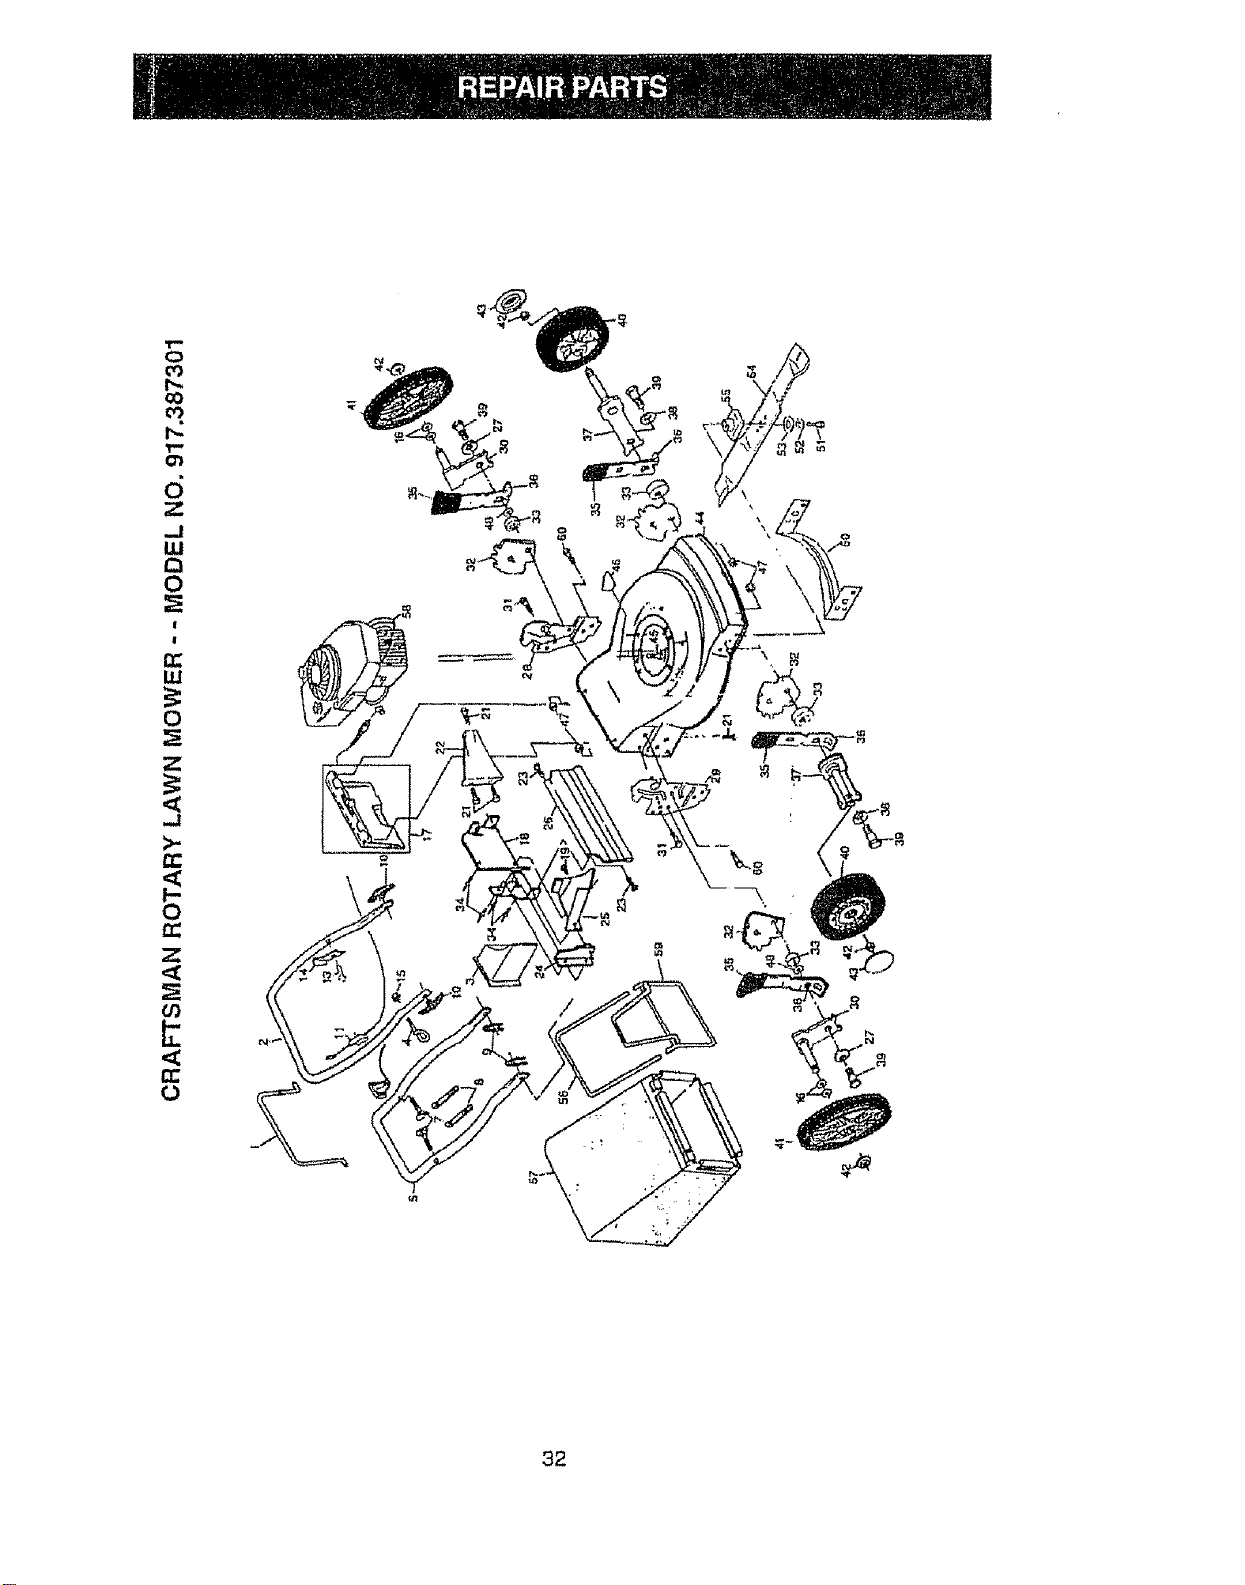
Tw_
Q
Tw,
cr_
Z
W
r_
O
!
I
W
0
Z
mJ
0
Q_
Z
_C
u_
rr
32
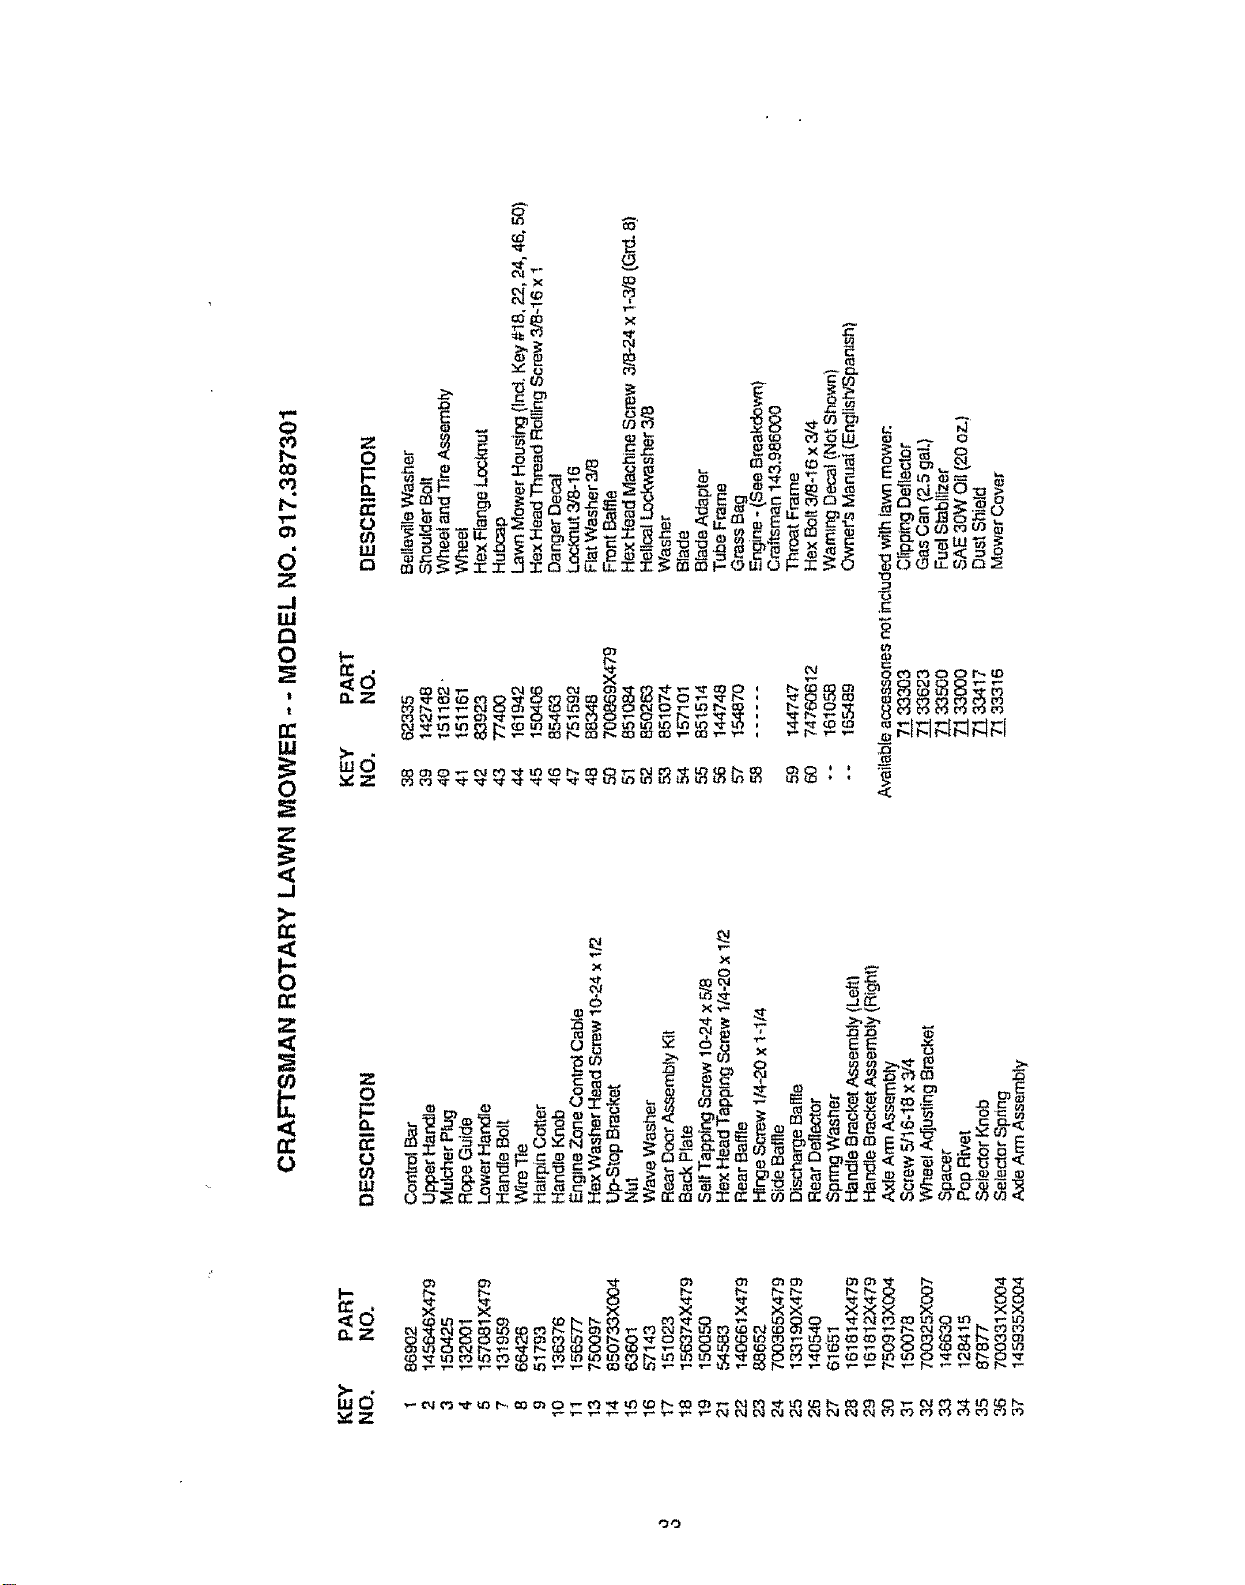
0
cO
,r"'
d
Z
-,1
ill
r'l
0
11
t
r¢
W
0
Z
<
-I
r¢
z
,<
0
z
.9.0
m
n-
O
_3
X
o _- _1_
o o _ _ °i° _ _
_Z ......
oO
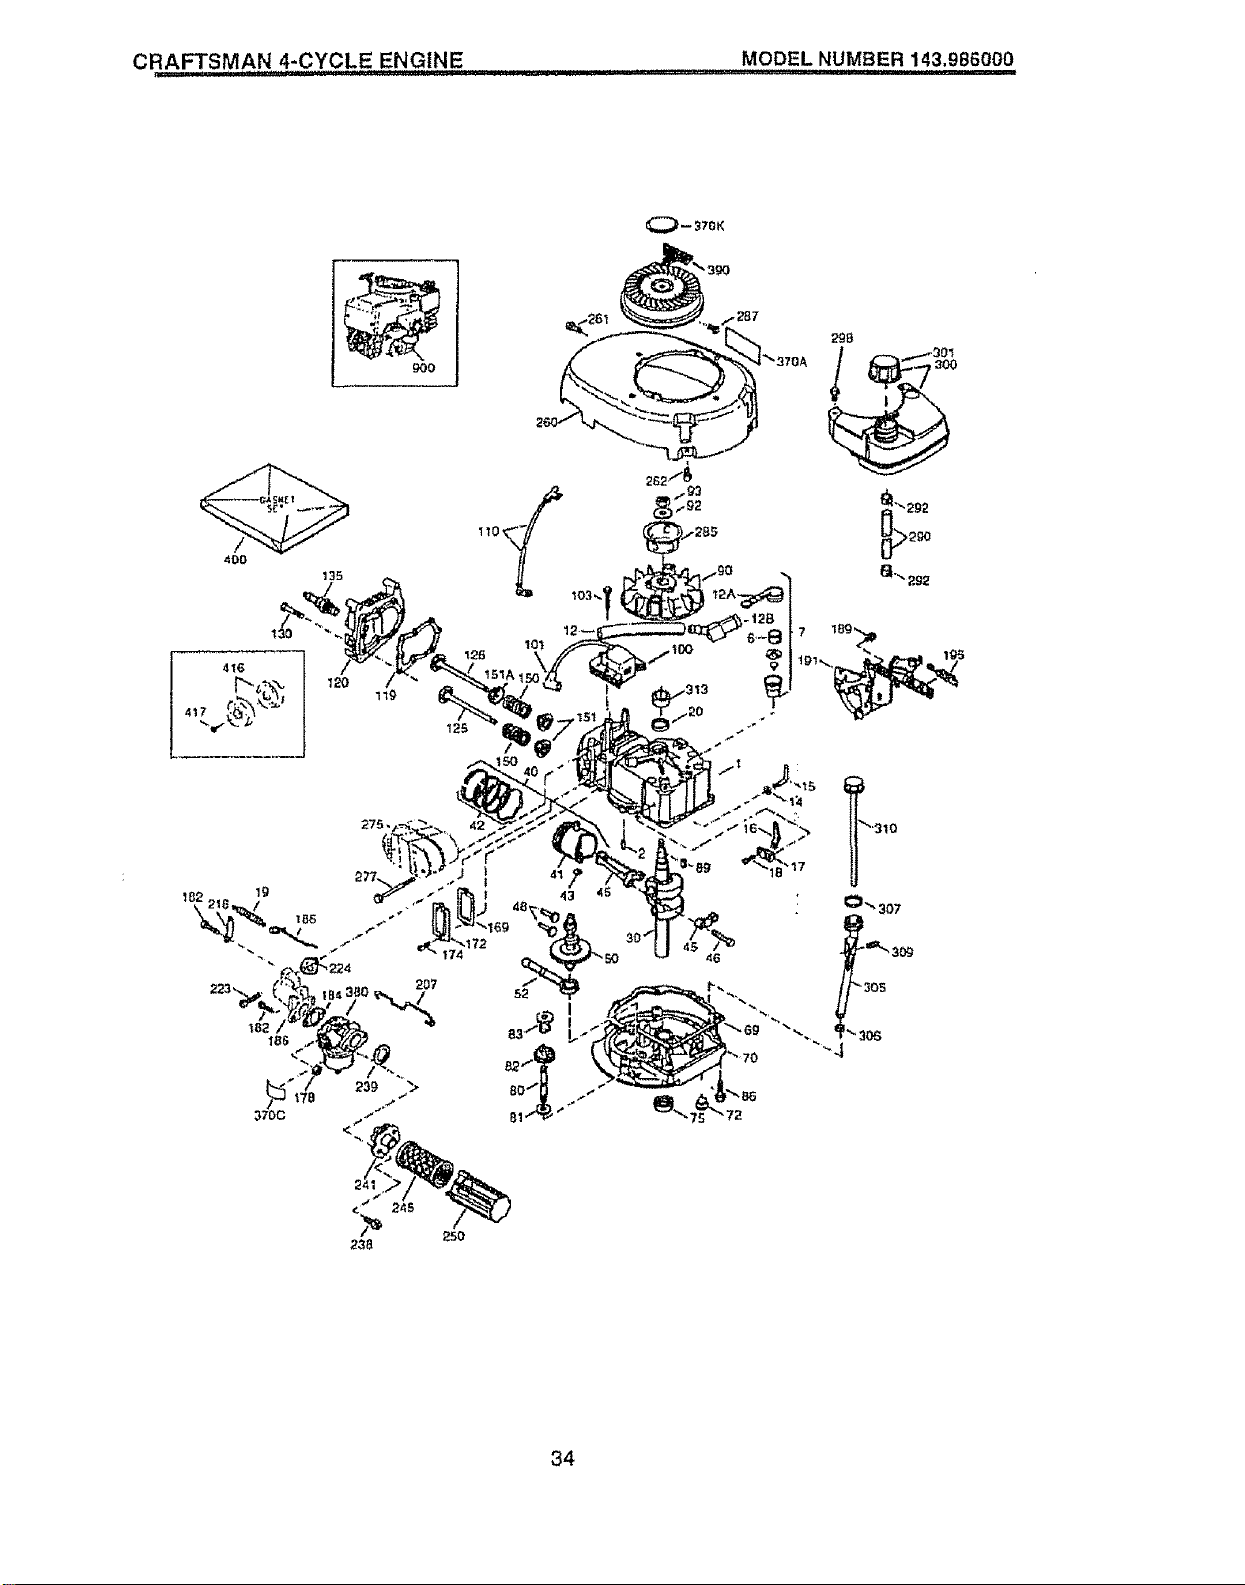
CRAFTSMAN 4-CYCLE ENGINE .... MODEL NUMBER 143.986000
....... ! ! I IIII =i i I,II,IIL i,
_ 370K
12S
i
275,
7 189_
'i
46
34
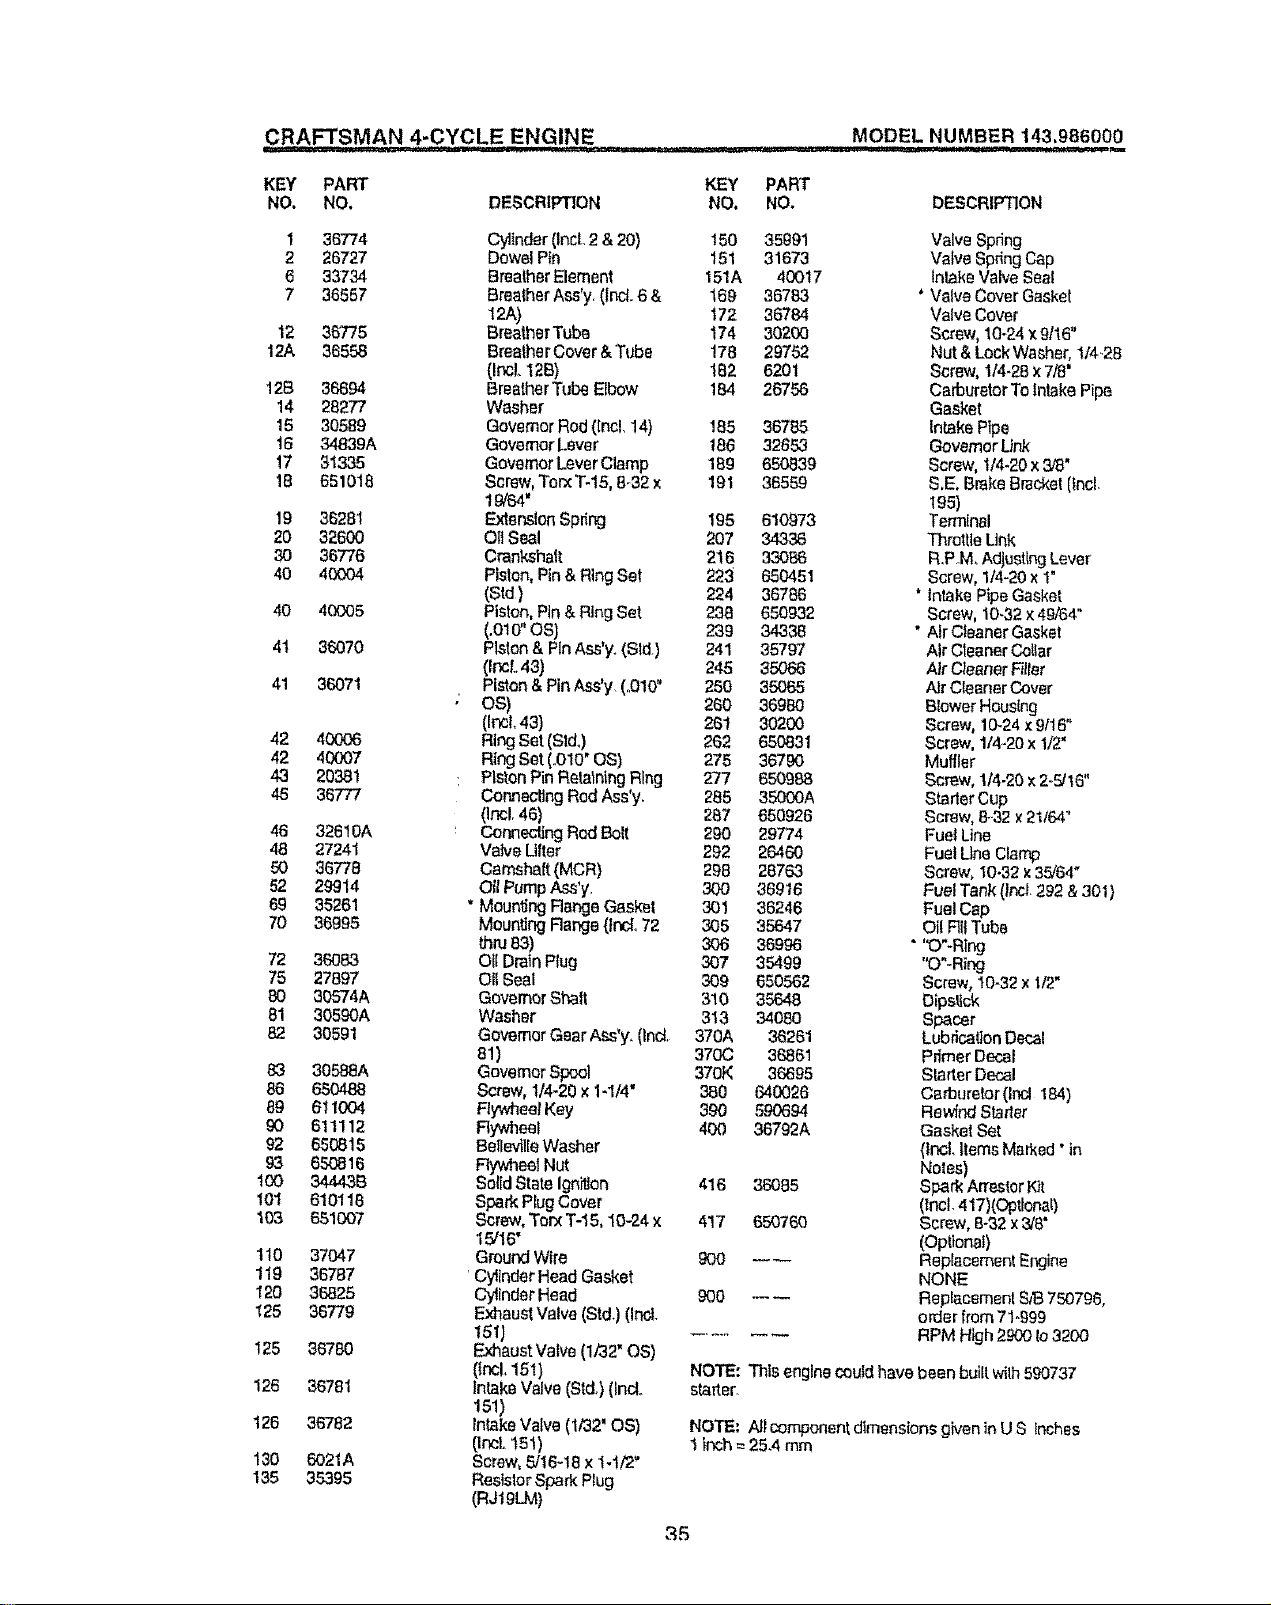
CRAFTSMAN 4-CYCLE ENGINE MODEL NUMBER 143,986000
KEY PART KEY PART
NO. NO. DE_CRIP11QN NO. NO. DESCRIPTION
1 36774 150 35991
2 26727 151 31673
6 33734 151A 40017
7 36557 169 38783
t72 36784
12 36775 174 30200
12A 36558 !78 29762
182 620t
12B 36694 184 26756
14 28277
15 30589 185 36785
16 34839A 186 32653
17 31335 169 650839
18 651018 191 36559
19 36281
20 32600
30 36776
40 40004
40 4OO05
41 38070
41 36071
42 40006
42 40007
43 20381
48 38777
46 326t0A
48 27241
50 36778
52 29914
69 35261
70 36995
72 36083
75 27897
80 30574A
81 30590A
82 30591
83
86
89
90
92
93
lO0
101
103
11o
119
12o
125
125
128
126
130
135
305&eA
65O488
811004
611112
650815
65O816
344.438
610118
651007
37O47
36787
36825
36779
36780
36781
36782
6021A
35395
Cylinder (IncL2 & 20)
Dowel Pin
Breather Element
Breather Ass'y. (Ind. 6 &
12A)
BreatherTube
BrealherCover& Tube
(Ir#!. 12B)
BreatherTube Elbow
Washer
GovernorRod (lncl, 14)
GovernorLever
Go_mor Lever Clamp
Screw,Torx T.t5, 8_32x
19/64"
ExtenalonSpring
OilSeal
Crankshalt
Piston,Pin &Ring Set
(Std)
Piston, Pin & Ring Set
(.OLO"os)
Plslon & Pin Ass'y. (Sld)
(Ir#L 43)
Piston & PinAss'y (o010"
os)
(Inel,43)
Ring Set (Std,)
Ring Set(°010' OS)
PistonPin Retaining Ring
Connecting Rod Ass'y.
0r#l, 46)
Cor_qectingRod Bolt
Valve Lifter
Camshaft (MCR)
Oil Pump Ass'y.
"Mounling Range Gasket
Mounting Range (IncL72
thru83)
01{DrainPlug
OilSeal
GovernorShall
Washer
Governor Gear Ass'y. (lnd,
81)
Governor Spool
Screw,1/4-20 x 1-1/4"
Flywheel Key
Flywheel
Bellevflle Washer
FlywheelNut
Soiid StateIgnition
Spark Plug Cover
Screw, Torx T-15,10-24 x
15116"
GroundWire
' CytinderHead Gasket
CylinderHead
ExhaustValve (Std.) (inoL
1511
Exhaust Valve (1/32" OS)
(tr#L 151)
Intake Valve(Std.) (Indo
161)
IntakeValve (I/32' OS)
ttr_L 151)
Sc[ew, 5/16-18 x t-t/2"
Resistor Spark Rug
(RJ19LM)
195 610973
207 34336
216 33O86
223 65O451
224 36786
238 65O932
239 34338
241 35797
245 35066
25O 35065
260 36980
281 30200
262 650831
275 36790
277 650988
285 35000A
287 650926
290 29774
292 26460
298 28763
300 36916
301 36246
305 35647
306 36996
307 35499
309 650562
310 35648
313 34O80
370A 36261
370(3 36881
370K 36695
380 640026
390 59O694
400 36792A
416 36085
417 650760
900 ----
NOTE: This engine couldhave
statler.
Valve Spring
Valve Spdng Cap
Intake Vaive Seal
'Vatve Cover Gasket
Valve Cover
Screw, 1(}-24x 9tl6"
Nut &Lock Washer, 1f4-28
Screw, I14-28 x7/8"
Carburetor To Intake Pipe
Gasket
Intake Pipe
GovernorUnk
Screw, t/4_20x 3/8"
S,E, Brake Bracket (lncL
195)
Terminal
Throttle Link
R_P.M.AdjustingLever
Screw, 1/4-20x I"
" Intake PipeGasket
Screw, 10-32×49/64"
• Air Cleaner Gasket
Air Cleaner Collar
Air C_eanerF_tler
Air Cleaner Cover
Blower Hous{ng
Screw, 10-24 x9116"
Screw, 1/4-20x 1/2"
Muffler
Screw, 1/4-20x 2-.5/16"
Starter Cup
Screw, 8-32 x21t64"
Fuet Line
Fuel Une Clamp
Screw, t0-32 z 35/64"
FuefTank (Incl_292 & 301)
Fuel Cap
Oil RIITube
"O_Ring
"O"-Ring
Screw, 10-32x 1/2"
Dipstick
Spacer
Lubrication Decal
Primer Decal
Slarter Decal
Carburetor (Incl184)
Rewind Starlet
Gasket Set
(tncL Items Marked' in
Notes)
Spark An'esterKit
(Incl.417)(Optional)
Screw, 8-32x3/8"
(Opttonaf)
Replacement Engine
NONE
ReplacementS_8750796,
order from 71o999
RPM High 2900 le 3200
been builtwilh 590737
NOTE: All componentdimensions given in U S Inches
1 inch= 25A mm
35
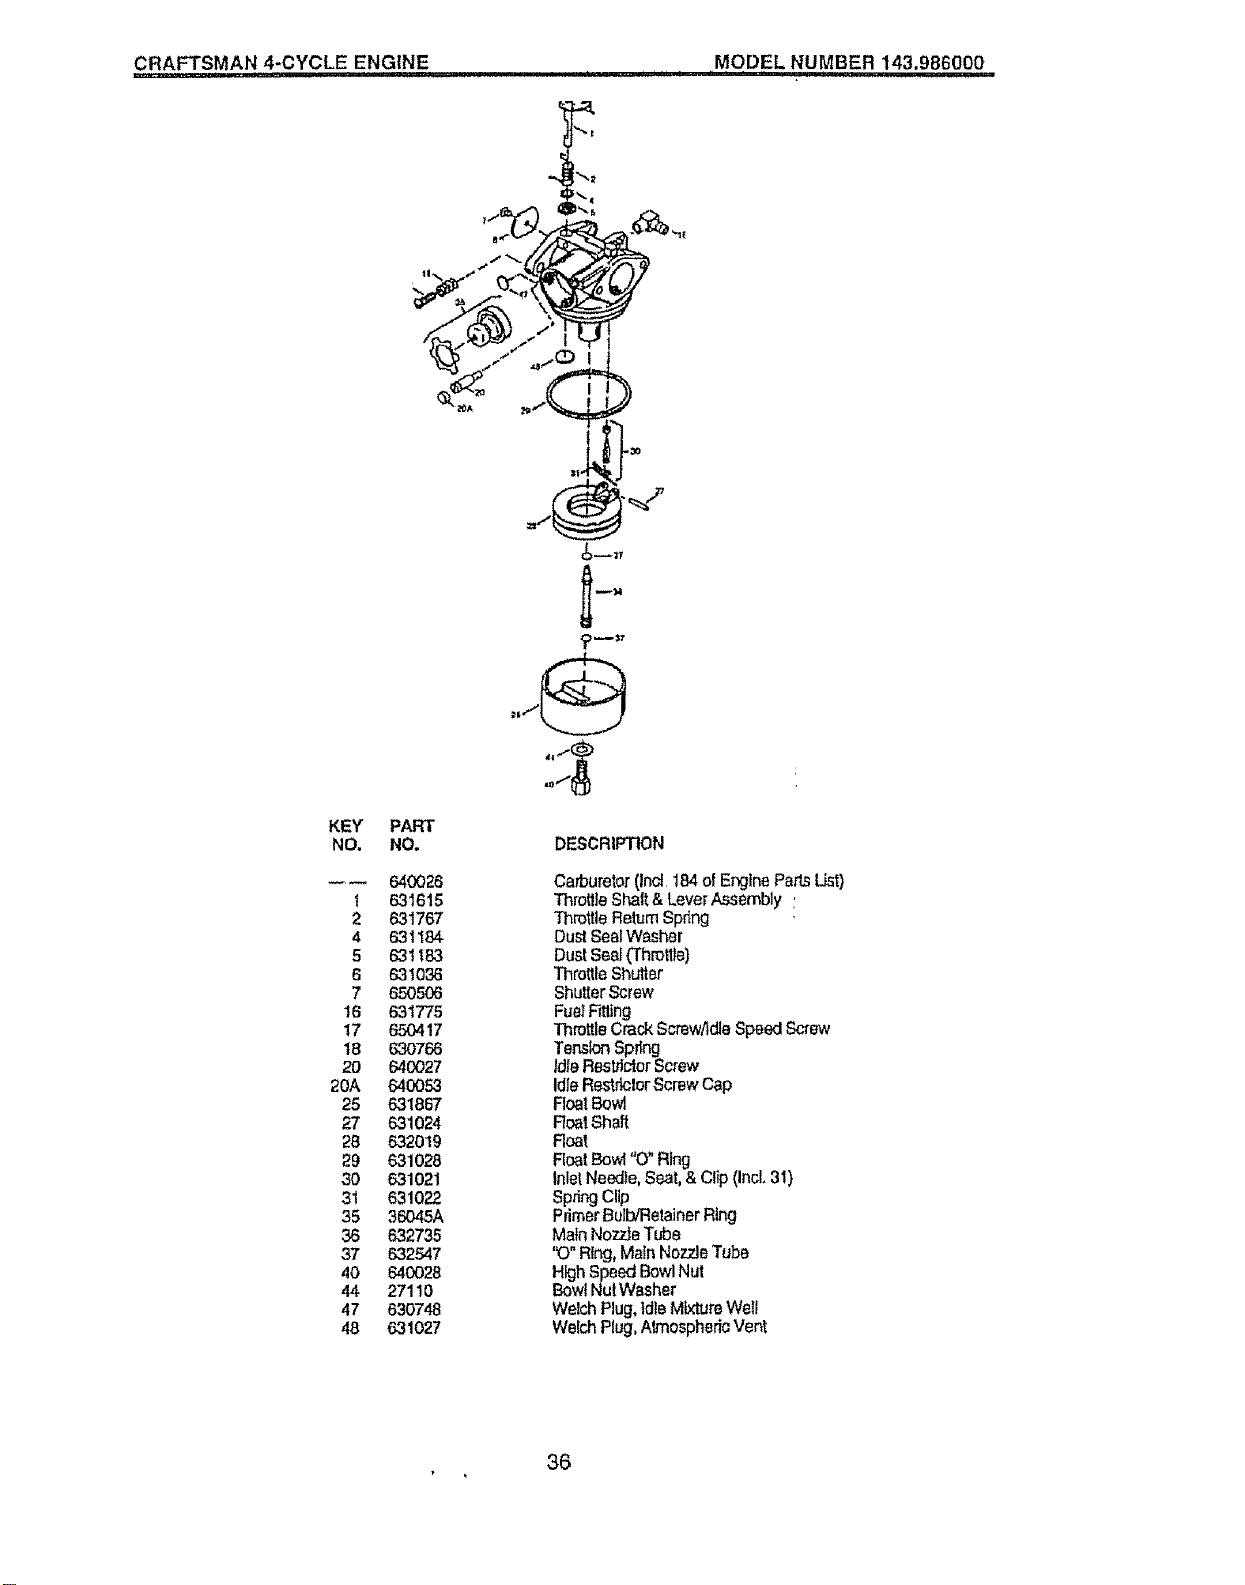
CRAFTSMAN 4-CYCLE ENGINE MODEL NUMBER 143.986000
........ i i i i
KEY PART
NO. NO,
--- 640026
1 631615
2 631767
4 631184
5 631183
6 631036
7 650506
16 631775
17 650417
18 63O766
2O 640027
20A 640053
25 631867
27 631024
28 632019
29 631028
30 631021
31 631022
35 36045A
36 632735
37 632547
40 640028
44 27110
47 630748
48 631027
DESCRIPTION
Carburetor (Incl 184of EnginePa_ List)
Tt_rott]eShalt& Lever Assembly :
Throttle Return Spring
DustSealWasher
DustSea_(Throt_)
Throttle Shutter
ShutterScrew
FuelFitting
ThrottleCrack Screw/idle SpeedScrew
Ten,IonSpr_ng
Idle Restdc_orScrew
IdleRestrtcler Screw Cap
FloatBowl
RoarShaft
Roar
RoarBowl "O_Ring
InletNeedle, Seat,& Clip (Inel 31)
SpringClip
PrimerBulb!RetainerRing
Math Nozde Tube
"(3"Ring, MainNozzle Tube
High Speed Bowl Nut
Bowl NutWasher
Welch Plug, IdleMixture Wetl
Welch Rug, AtmosphericVent
36
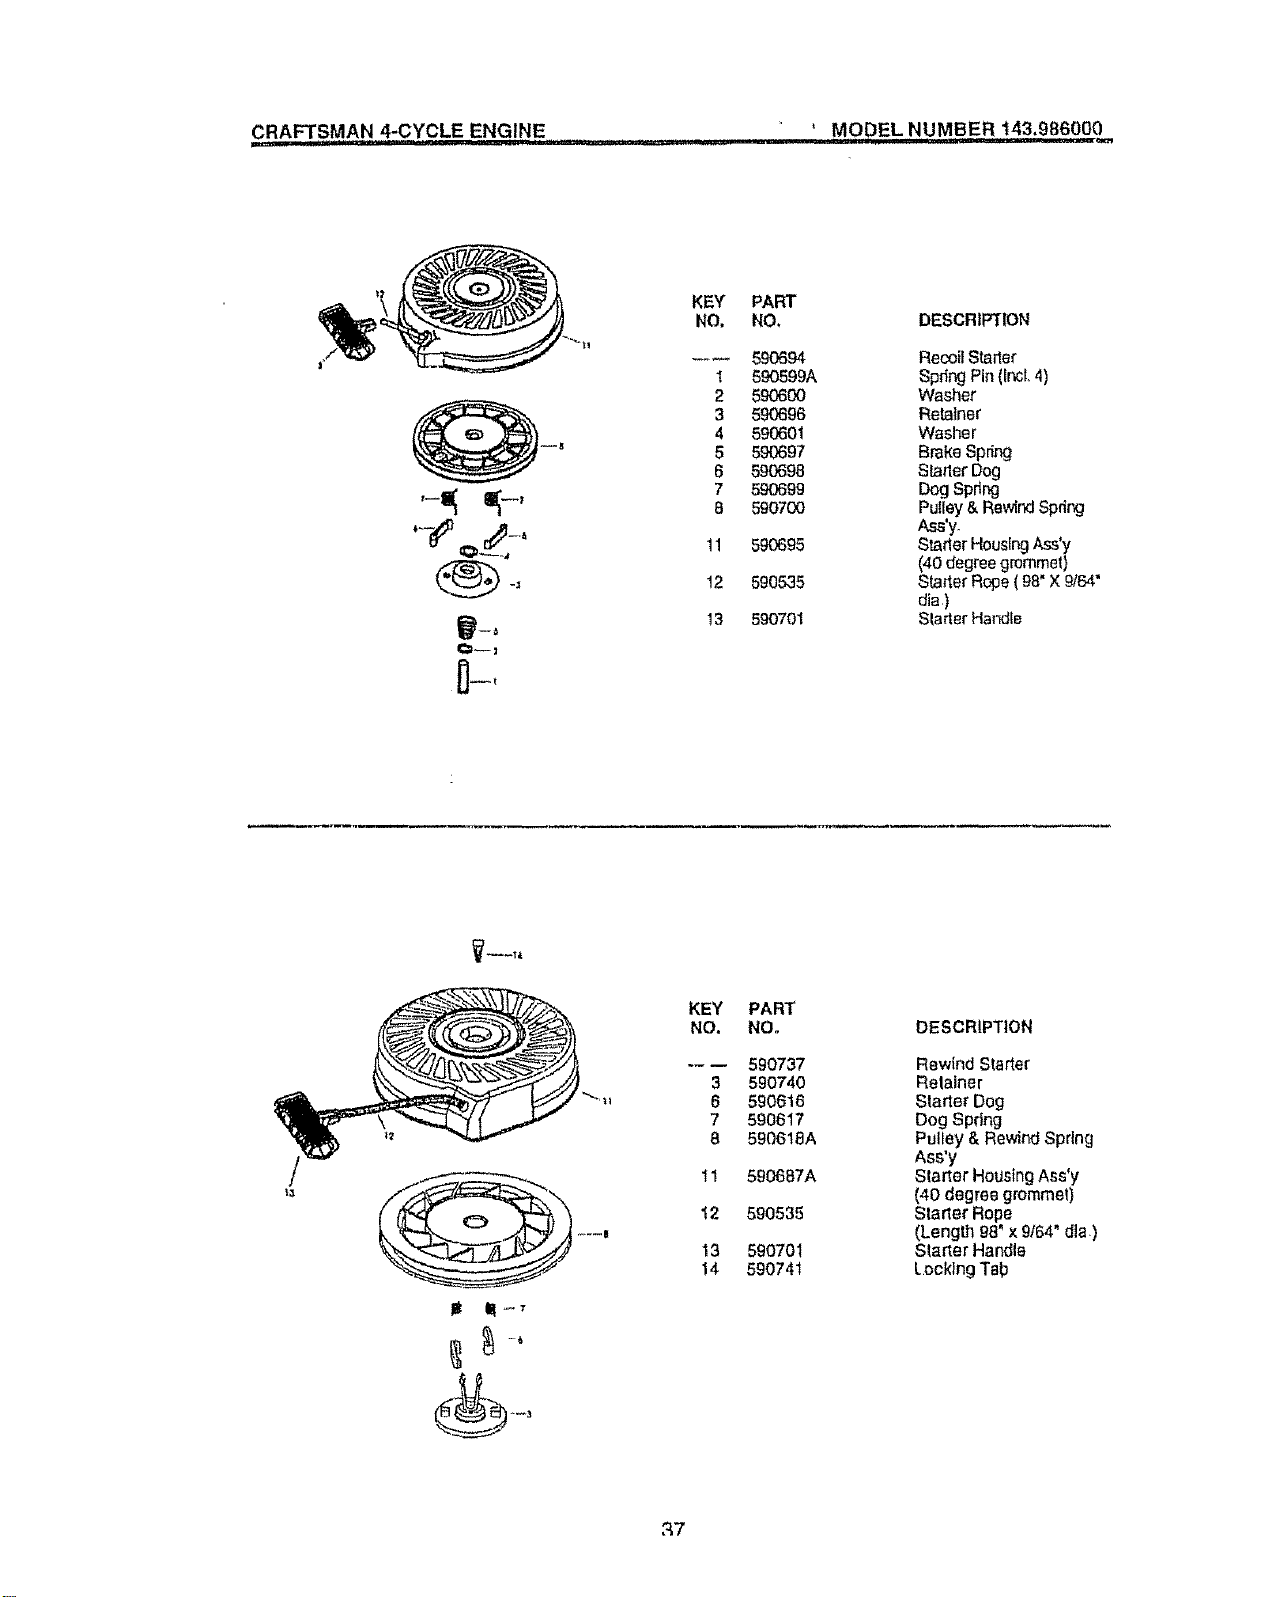
CRAFTSMAN 4-CYCLE ENGINE ' MODEL NUMBER I43.986000=,,,
--J_
KEY
NO.
1
2
3
4
5
6
7
8
11
12
13
PART
NO.
59O694
590599A
59O6OO
590696
590601
59O697
590698
590699
590700
590695
590535
590701
DESCRIPTION
Recoil Starter
Spdng Pin (rncL4)
Washer
Retainer
Washer
Brake Spring
Slarter Dog
Dog Spring
Pulley & RewindSpring
Ass'y.
Stader HousfngAss'y
(40 degree grommet)
Starlet Rope (98" X 9/64"
die)
Slarter HajjiS8
V--_t4
j lIt_7
KEY
NO.
3
6
7
8
11
12
13
14
PART
NOo
590737
590740
590616
590617
590619A
5906_7A
590535
590701
590741
DESCRIPTION
Rewind Starter
Retainer
Starter Dog
Dog Spring
Pulley & Rewind Spring
Ass'y
Starter Housing Ass'y
(40 degree grommet)
Starter Rope
(Length 98" × 9164"dial)
Starter Handle
Locking Tab
_7

38

"4'Ct

For the repair or replacement parts you need
delivered directly to your home
Call 7 am - 7 pro, 7 days a week
1-800-366-PART
(1-800-366-7278)
Para ordenar plezas con entrega a
domicilio - 1-800-659-7084
For in-house major brand rel_air service
Call 24 hours a day, 7 days a week ,
1-800-4-REPAIR
(1-800..473-7274)
Para pedir servtcto de reparacl6n a
domicilio -- 1-800-676-5811
For the location of a Sears Parts and
Repair Center in your area
Call 24 hours a day, 7 days a week
1-800-488-1222
For information on purchasing a Sears
Maintenance Agreement or to inquire
about an existing Agreement
Call 9 am - 5 pm, Monday-Saturday
1-800-827-6655
When requesting service or ordering
parts, always provide the following
information:
• Product Type ° Part Number
° Model Number * Part Description
Americas Repair Specialtsts
165489 05.18.98 VB Printed in U.S.A.