t

CONTENTS
A NOTE TO YOU
SPECIAL TALENTS
OVEN SAFETY
GETTING TO KNOW YOUR AEROTECHTM OVEN
Location of Features _ Accessories
USING YOUR OVEN
Setting the Clock 8
Oven Modes 10
OptfleveF 13
Accessories 14
Oven Operation 16
User Select Options 23
Cooking Charts 25
CARE AND CLEANING
Cleaning YourOven 32
Self Cleaning Mode 33
TroubleShooting 35
WARRANTY
For USA and Canada 38
For New Zealand _ Australia 40
Proof of Purchase 40
CUSTOMER CARE 41

A IVOTE TO YOU
THANK YOU FOR BUYING A FISHER 8 PAYKEL APPLIANCE!
Thankyou for purchasing a Fisher _ Payket oven. This User Guide wilt explain how to operate and maintain your new
appliance properly and safely. Please read the whole guide carefully before starting to use your oven.
IMPORTANT
It is important that the User Guideshould be retained with the appliance for future reference. Should the appliance
be sold or transferred to another owner, always ensure that the User Guideis left with the appliance in order that the
new owner can familiarize themselves with the appliance and the relevant warnings.

SPECIAL TALENTS
OPTILEVEL TM
Allows you to choose the optimum shelf position. With thirteen different positions
available OptitevetTM gives you the ultimate in cooking flexibility.
oerOY_©N TM
Dynamic true convection gives an even air temperature throughout the entire oven
providing you with excellent results every time.
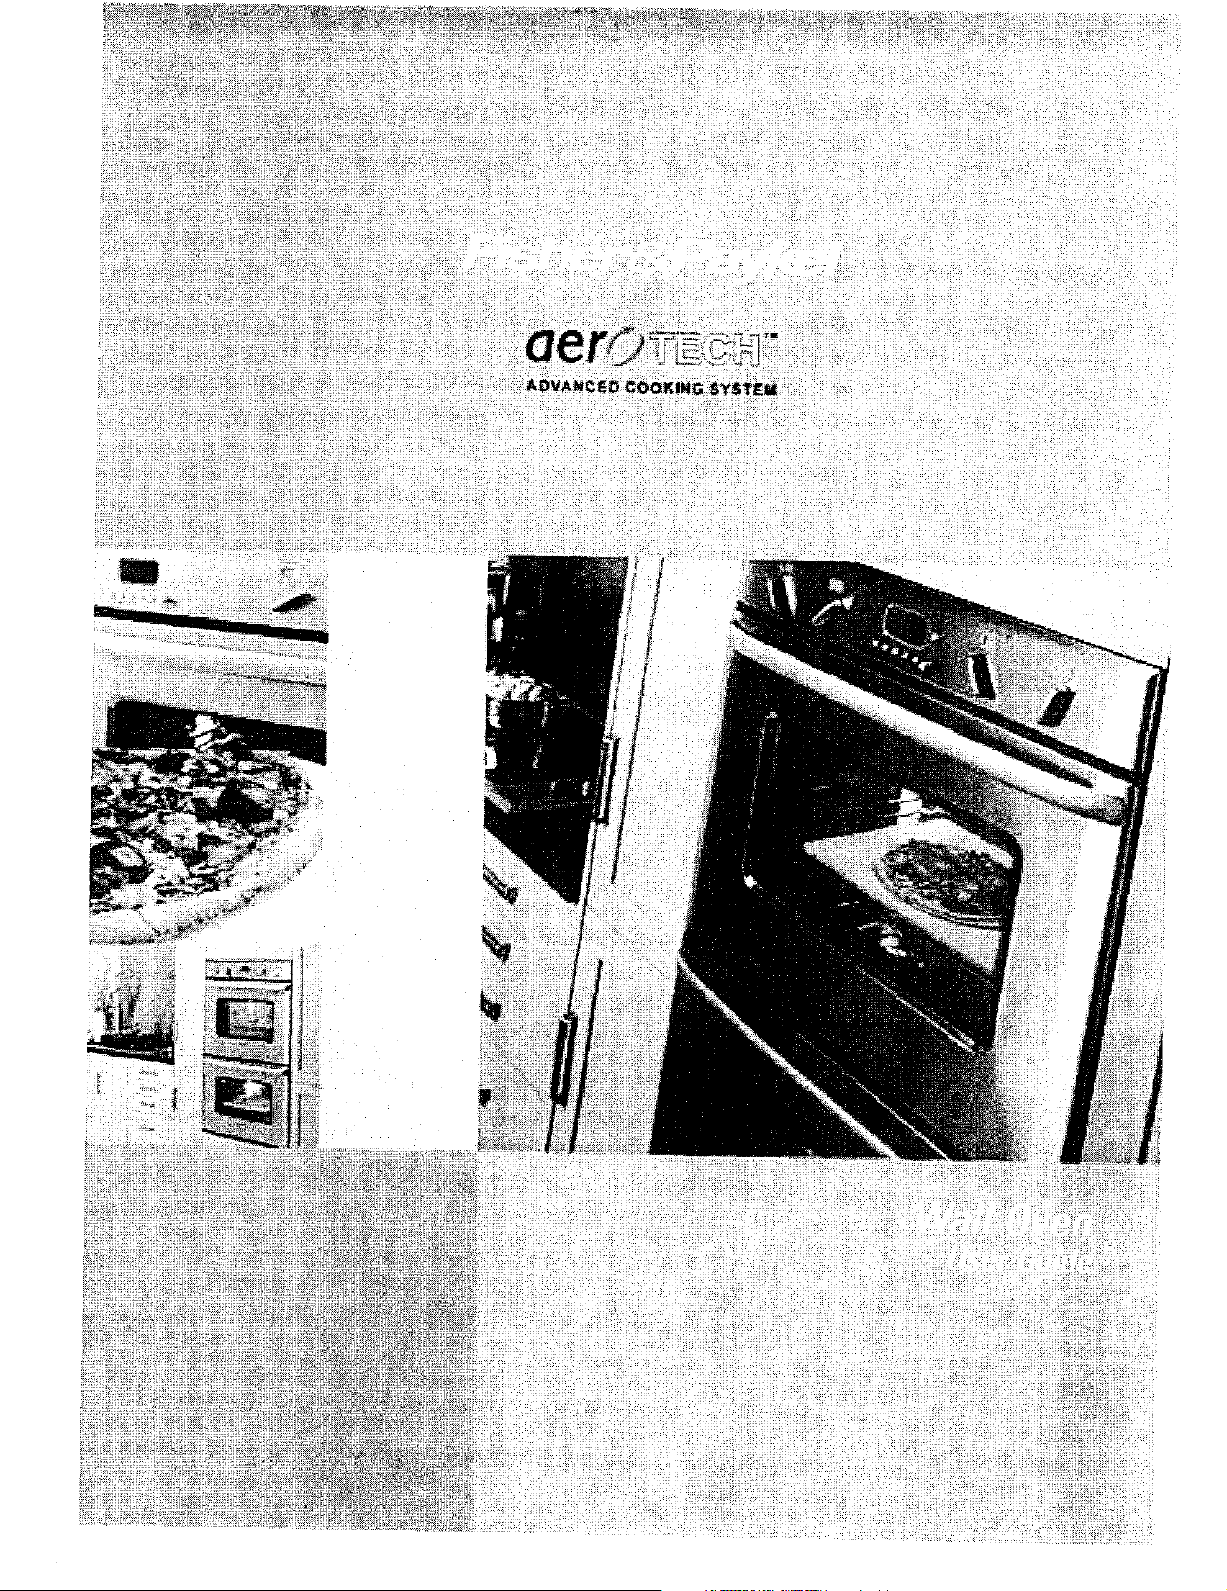
BLUE DIAMOND TM PORCELAIN INTERIOR
Three halogen lights and Blue Diamond_ porcelain enamel teamed with crisp contours
and refined elegance make this oven a pleasure to use.
DIALTRONIC TM
Preciseelectronics teamed with individual displays and a familiar dial gives you
simplicity in control.

OVEN SAFETY
YOURSAFETYIS IMPORTANTTOUS
Thisguidecontainssafetystatementsunderwarningsymbols. Pleasepayspecialattentionto these symbolsandfollow instructions.
WARNING
THIS SYMBOL ALERTS YOU TO HAZARDS SUCH AS FIRE, ELECTRICAL SHOCK, OR OTHER INJURIES.
IT ALSO WARNS YOU OF THINGS THAT MAY CAUSE DAMAGE TO YOUR OVEN.
IMPORTANT SAFETY INSTRUCTIONS
A
[Hot SurfaceI
WARNING!
Accessiblepartswill becomehot when inuse.
Toavoidburnsandscaldschildrenshouldbe kept away.
WARNING
1_ o reduce the risk of fire, electrical shock, injury to persons, or damage when using the oven, follow basic precautions
including the following:
GENERA L
Readall the instructionsbeforeusingthe oven. Usethe ovenonlyfor itsintendedpurposeas describedintheseinstructions.
Install yourovenin accordancewith the providedinstallationinstructions.Besureyourapplianceis properlyinstalledandgroundedby
a qualifiedtechnician.
Do not useyourovenfor warmingorheatingthe room. Personscouldbeburnedor injuredora fire couldstart.
Do not leavechildrenalone. Childrenshouldnot be leftaloneor unattendedinthe areawherethe ovenis inuse. Theyshouldneverbe
allowedto sit or standonanypart of the appliance.
Wear appropriateapparel. Donot wear loosefitting or hanginggarmentswhen usingthe oven. Theycouldigniteor melt if theytouch
an elementor hot surfaceor you couldbe burned.
Use onlydry ovenmitts or potholders.Moist or damppotholderson hot surfacescouldresultin burnsfrom steam. Do not let
potholderstouchhot orheatingelements. Donot usea towel or a bulkyclothfor a potholder.It couldcatchfire.
Do not storeflammablematerialsonor nearthe oven. Theycouldcreateanexplosionand/orfire hazard.
Do not usewater on greasefires. Smotherthe fire/flamesor usea multipurposedrychemicalorfoam-typeextinguisher.
Do not repairor replaceanypart of the ovenunlessspecificallyrecommendedinthis manual.All otherservicingshouldbe referredto
a qualifiedtechnician.
Donot storethingschildrenmightwant abovethe oven. Childrencouldbe burnedorinjuredwhileclimbingonit.
Donot operatethe ovenif it is damagedor not workingproperly.
If youreceiveadamagedproduct,contactyourdealeror installerimmediately.Donot installor usea damagedappliance.
Childrenor personswith adisabilitythat maylimit theirability to usethe applianceshouldhavea competentpersoninstruct them in its
use.Thispersonshouldbesatisfiedthat theycanthen usethe appliancewithout dangerto themselvesor theirsurroundings.
WHEN USING THE OVEN
Donot touchheatingelementsorinteriorsurfacesof the oven, Heatingelementsmaybe hot eventhoughthey
aredarkincolor. Interiorsurfacesof an ovenbecomehot enoughto causeburns. Duringandafterusedo not
touchorlet clothingor otherflammablematerialscontactheatingelementsor interiorsurfacesof the oven
untilthey havehadsufficienttime to cool. Othersurfacesof the oven,suchasthe ovenvent openingand the
ovendoorandwindowcouldalsobecomehot enoughto causeburns.
Alwayspositionovenshelvesin the desiredlocationwhile ovenis cool, If a shelf mustbe removedwhilethe
ovenis hot do not let the potholdercontacthot heatingelementsin the ovenor the baseof the oven.
Usecarewhen openingthe ovendoor. Let hot airor steamescapebeforeremovingor replacingfood.
Donot heat unopenedfood containers.Theycanbuild up pressurethat maycausethe containerto burstand
resultininjury.
Alwayskeepovenventducts unobstructed.
Useonlycookwareapprovedfor ovenuse. Followthe cookwaremanufacturersinstructions.
Disconnectthe electricalsupplybeforeservicingthe oven.
CARE AND CLEANING
Smallamountsof harmfulchemicalsaregivenoff inthe self-cleaningcyclefrom insulationandfood
decomposition.Significantexposureto thesesubstancescancausecancerorreproductiveharm. Ventingwith
a hoodoropenwindowandwipingout excessfood spillspriorto self-cleaningcan minimizeexposure.
Do not useovencleaners. No commercialovencleaner,ovenlinerorprotectivecoatingof anykindshouldbe
usedin oraroundany part ofthe oven.
Beforeself cleaningthe oven,removethe three-piecebroilingsystem,anycookwareandthe ovenshelves.Do
not useyourovento cleanmiscellaneousparts.
Do notcleanthe door orcavityseals(gaskets)or useany ovencleaningproductsonthe seals. Theyareessential
for a good sealandefficientoperationof the oven.
Careshouldbe takennot to rub,damageor movethe seals.
Do not usea steamcleanerto cleanyouroven,
Cleanonlypartsrecommendedin thisUserGuide.
Formoreinformation,seeCareandCleaning,page32.
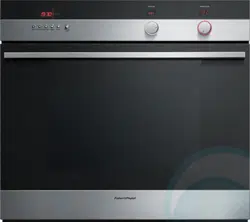
LOCATION OF FEATURES
LOCATION OF FEATURES
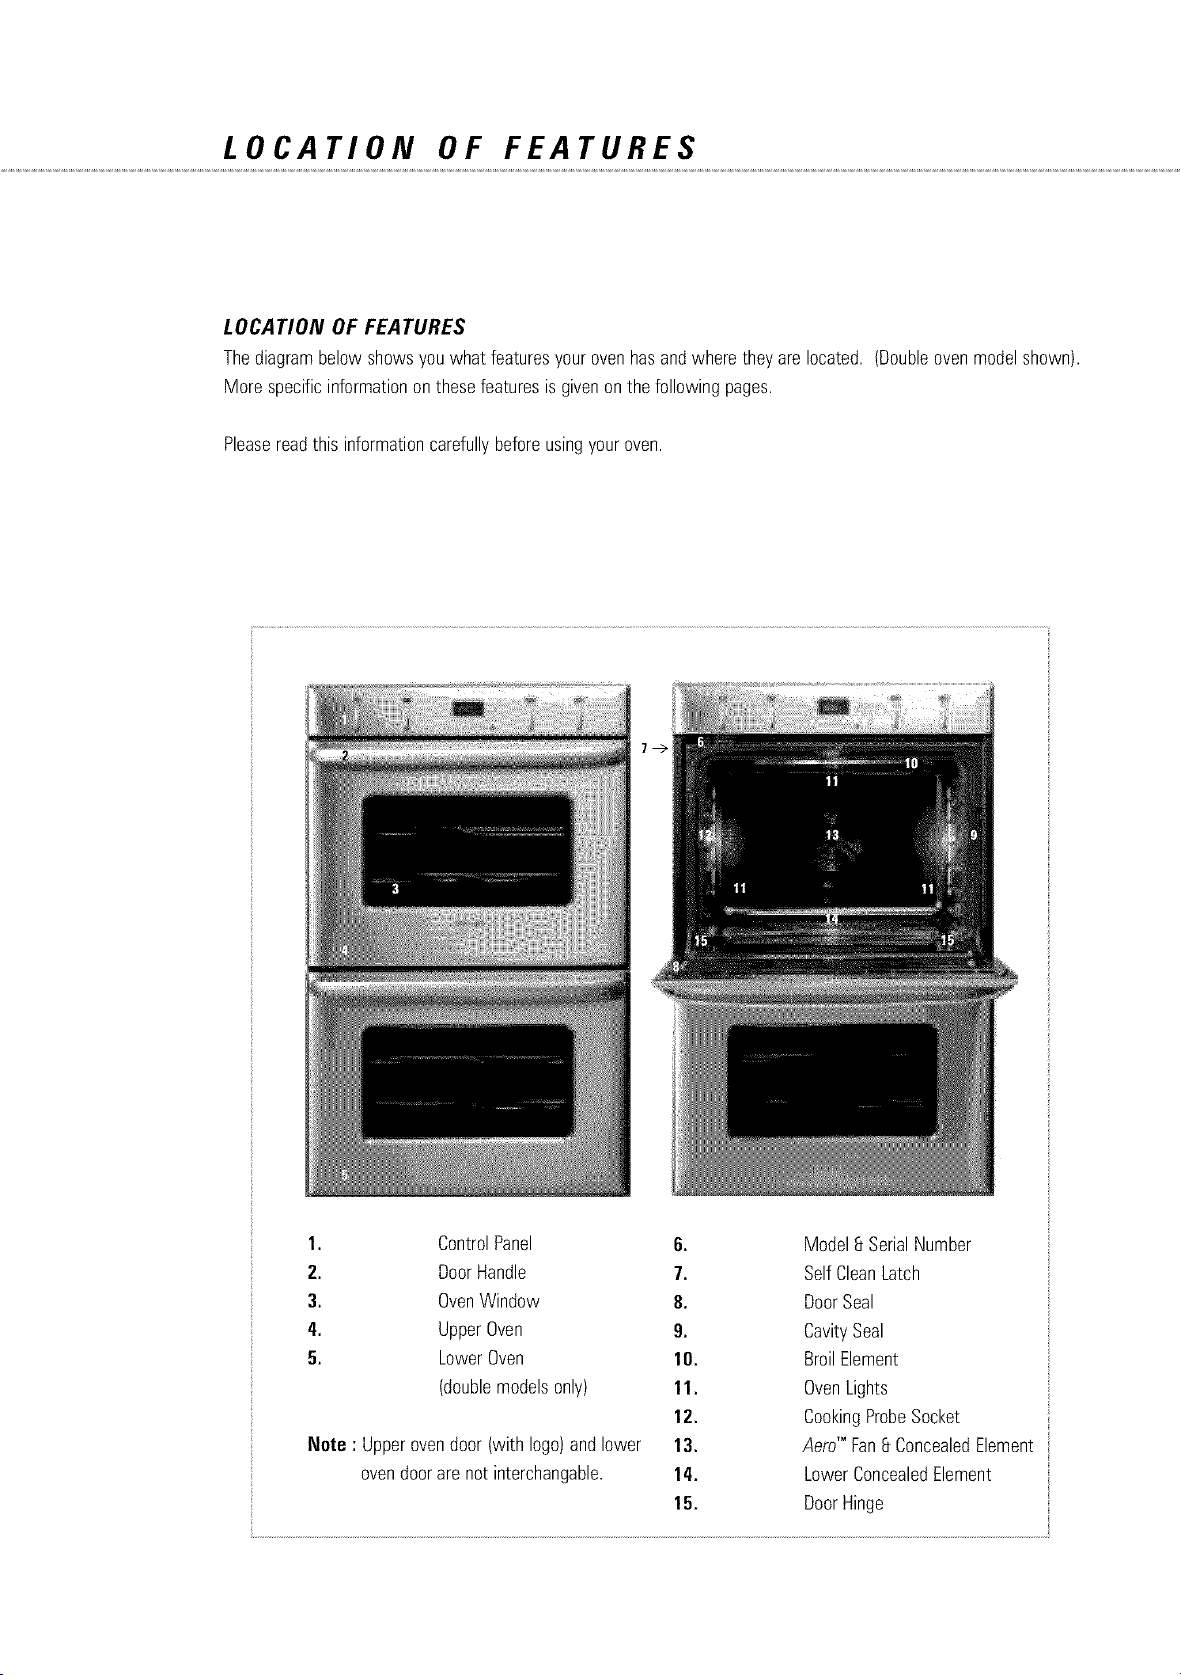
Thediagrambelow showsyouwhat featuresyourovenhasandwhere theyarelocated. (Doubleovenmodelshown).
More specificinformationonthesefeaturesis givenonthe followingpages.
Pleasereadthis informationcarefullybeforeusingyouroven.
I. ControlPanel
2. DoorHandle
3. OvenWindow
4. UpperOven
5. LowerOven
(doublemodelsonly)
Note : Upperovendoor (withlogo)andlower
ovendoorarenot interchangable,
6. Model8 SerialNumber
7. SelfCleanLatch
8. DoorSeal
9. CavitySeal
10. BroilElement
1I. OvenLights
12. CookingProbeSocket
13. AeroTM Fan8 ConcealedElement
14. LowerConcealedElement
15. DoorHinge
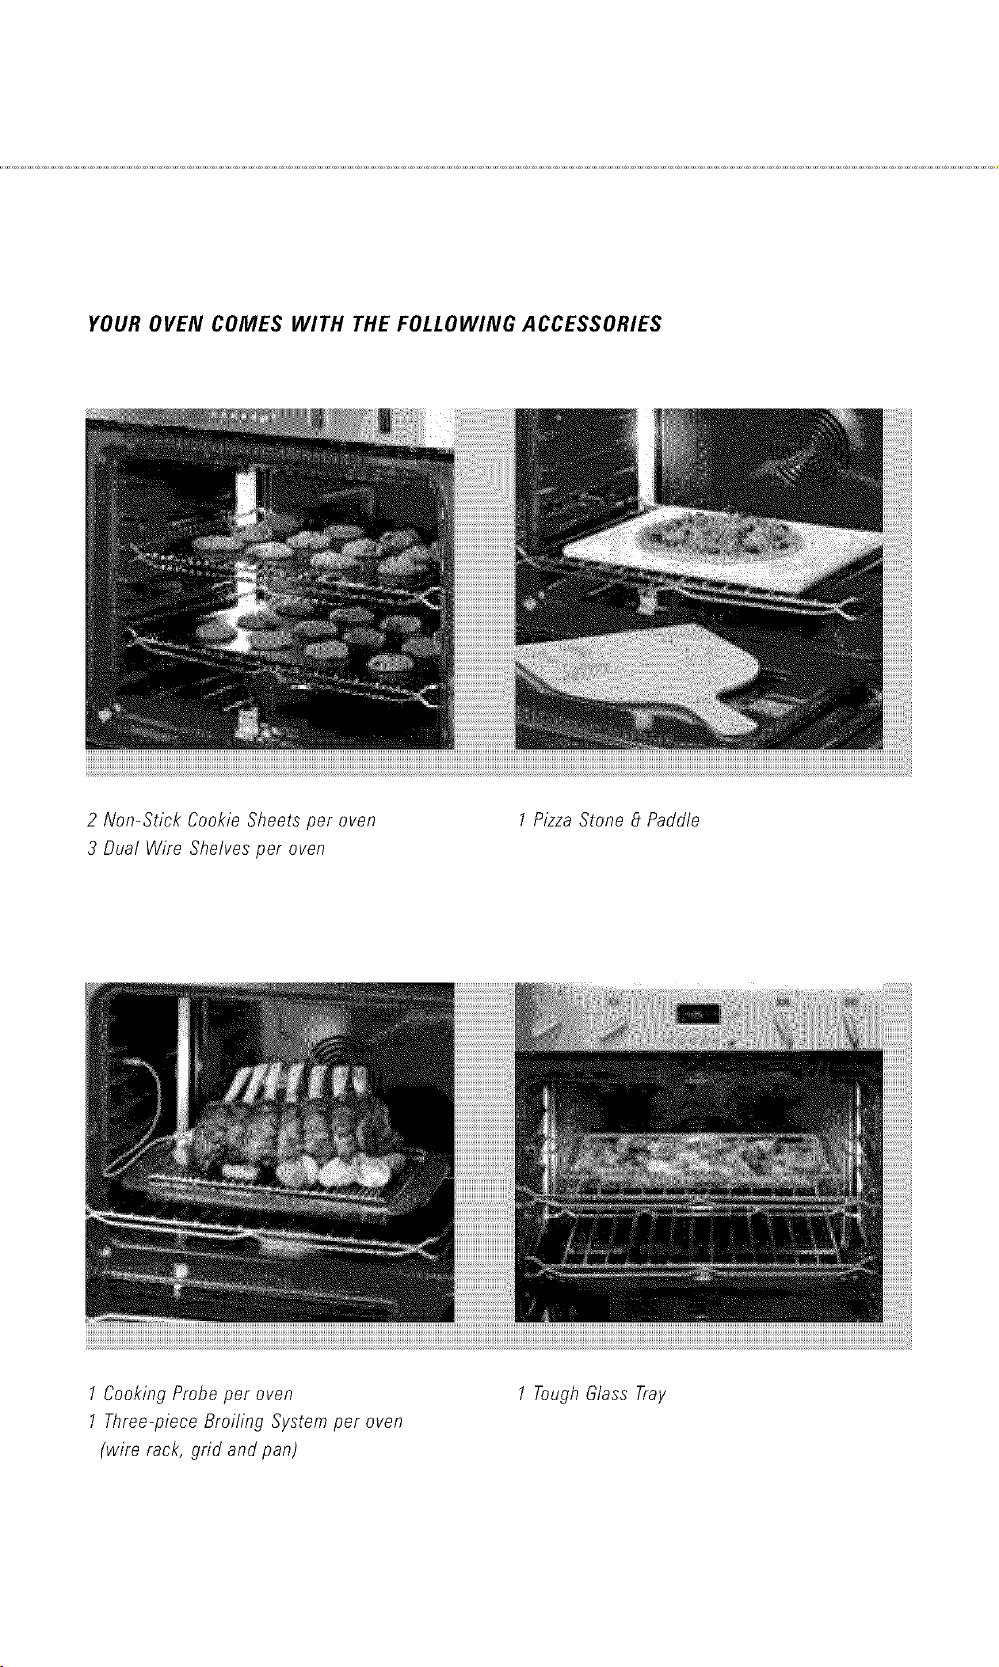
YOUR OVEN COMES WITH THE FOLLOWING ACCESSORIES
2 Non-Stick CookieSheets per oven
3 Buat Wire Shelvesper oven
1PizzaStone B Paddle
1 Cooking Probe per oven
1 Three-piece Broiling System per oven
(wire rack, grid and pan)
1 ToughGlass Tray
SETTING THE CLOCK
Beforeyou beginusingyourAeroTechrMoven, pleasereadthe followingsectionsto familiarizeyourselfwith
its features.
BEFORE YOU FIRST USE YOUR OVEN
As your oven is connectedto a power supplyfor the first time, a tone will soundand the clock displaywill light up
momentarily.Theclockdisplaywill show,,,M12:00'andthe colon ( : ) will flash. Next,setthe clock.
CLOCK MUST BE SET BEFORE OVEN CAN BE OPERATED
SETTING THE CLOCK
Thisclockhasadefault12 hourdisplay."_M12:00'will be shownwhenthe ovenhasbeenturnedonat the wall and the
colonwill flash. While the colonisflashingrotatethe SETTINGSELECTORuntil the correcttime of dayis showing. Press
CLOCKto adoptthe time you haveset or wait 8 secondsandthe settingwill beautomaticallyadopted. Referto the
UserSelectOptionson page23 for instructionson how to changethe clockto display24 hourtime.
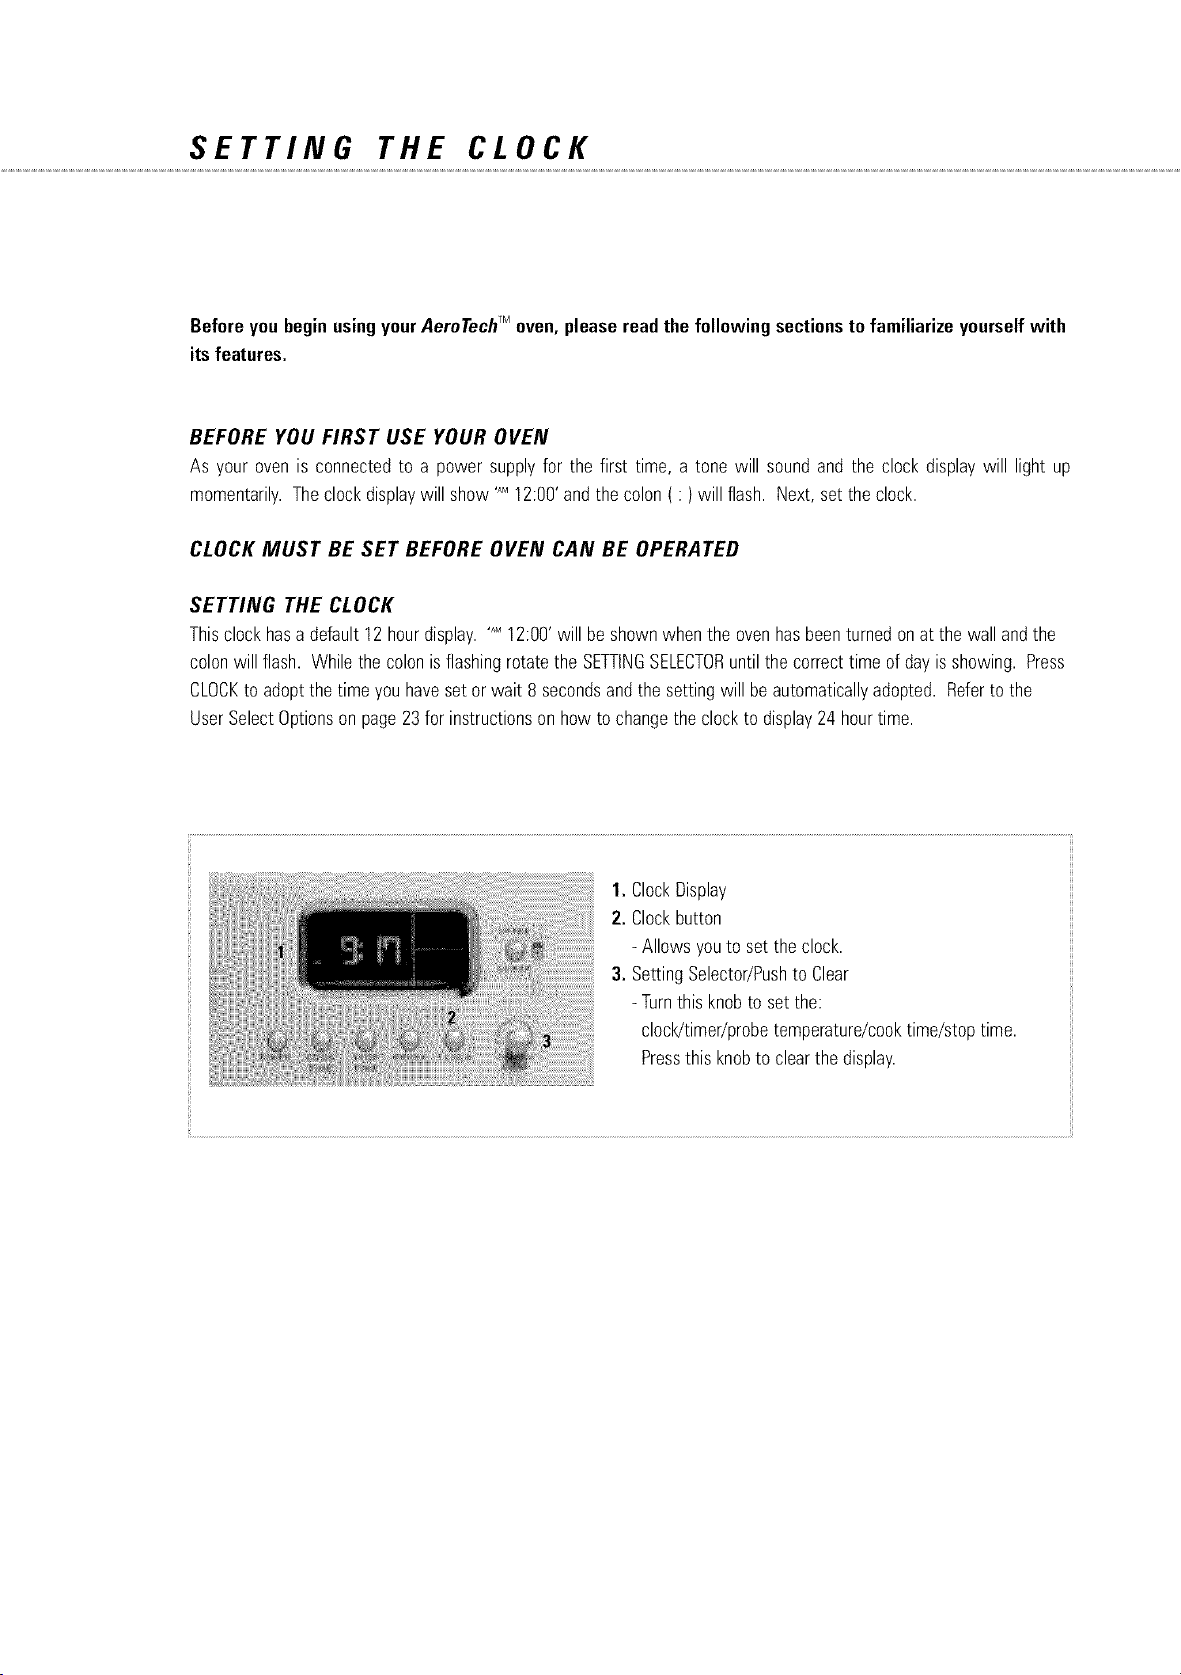
I. ClockDisplay
2. Clockbutton
- Allowsyouto setthe clock.
3. SettingSelector/Pushto Clear
- Turnthis knobto set the:
clocWtimeriprobetemperature/cooktime/stoptime.
Pressthis knobto clearthe display.
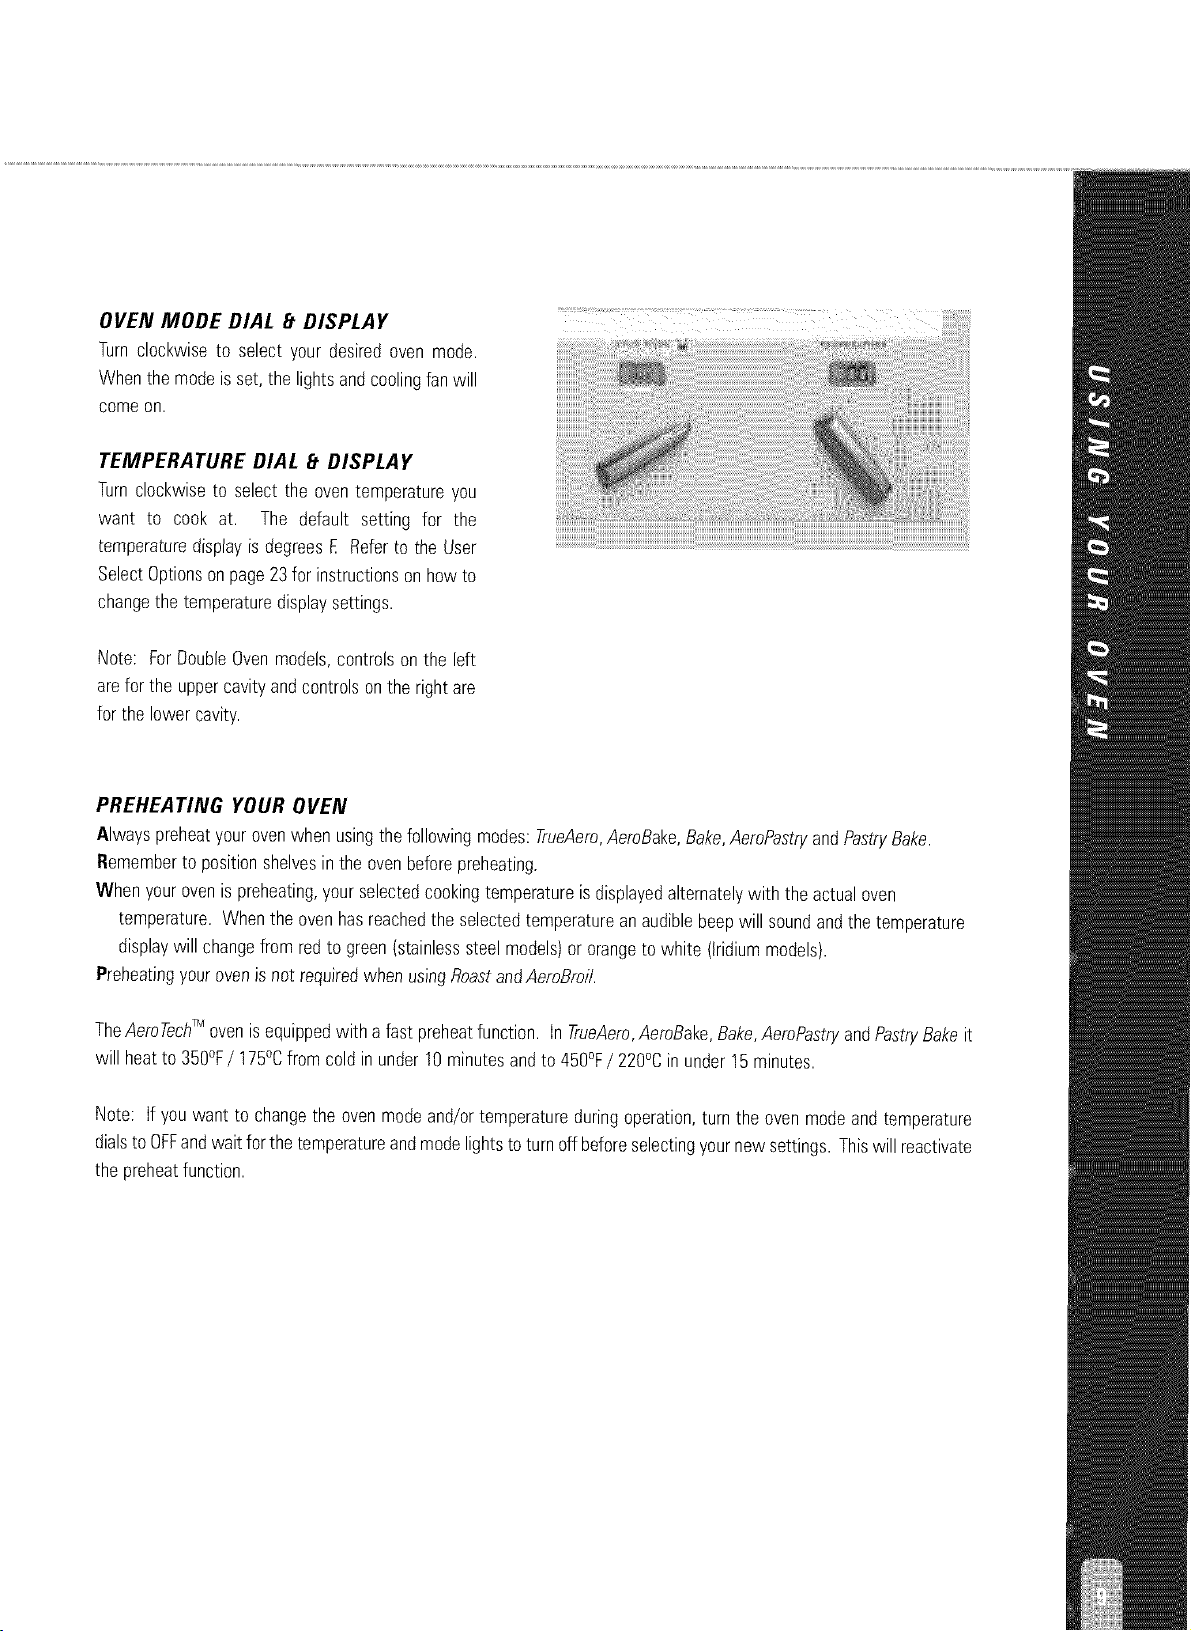
OVEN MODE DIAL [t DISPLAY
Turnclockwiseto select your desiredoven mode.
Whenthe modeis set,the lightsandcoolingfan will
comeon.
TEMPERATURE DIAL EtDISPLAY
Turnclockwiseto select the oventemperatureyou
want to cook at. The default setting for the
temperaturedisplayis degreesR Referto the User
SelectOptionsonpage23for instructionsonhowto
changethe temperaturedisplaysettings.
Note: ForDoubleOvenmodels,controlsonthe left
arefor the uppercavity andcontrolsonthe right are
for the lowercavity.
PREHEATING YOUR OVEN
Alwayspreheatyourovenwhen usingthe followingmodes:TrueAero,AeroBake,Bake,AeroPastryandPastryBake.
Rememberto positionshelvesin the ovenbeforepreheating.
When your ovenis preheating,yourselectedcookingtemperatureis displayedalternatelywith the actualoven
temperature.Whenthe ovenhasreachedthe selectedtemperatureanaudiblebeepwill soundandthe temperature
displaywill changefrom redto green(stainlesssteel models)or orangeto white (Iridiummodels).
Preheatingyourevenis not requiredwhen usingRoastandAeroBroi/.
TheAeroTechTM oven is equippedwith a fast preheatfunction. In TrueAero,AeroBake,Bake,AeroPastryand PastryBakeit
will heatto 350%/175°C fromcold in under10 minutesand to 450%/220°C in under15minutes.
Note: If you want to changethe ovenmodeand/ortemperatureduringoperation,turn the ovenmodeandtemperature
dialsto OFFandwaitfor the temperatureandmodelightsto turn offbeforeselectingyournewsettings. Thiswill reactivate
the preheatfunction.

0 VEN MODES
iNTRODUCTiON TO aerOY_©N'_M: FISHER _t PAYKEL'S DYNAMIC TRUE CONVECTION SYSTEM
SUPERIOR PERFORMANCE
Fisher_ PaykelAeroTech_Misan enhancedconvectioncookingsystem. Air is drawnthroughspiralintakesat the centerof the
rearcoverandpushedoutaroundthe ovencavityin a dynamicturbulentmotion. Thesoft contoursof the interiorpromoteseven
airflowthroughoutthe entireovenprovidingthe idealenvironmentfor multi-shelfcooking.
Thelargecavityprovidesampleusablespace,whichis illuminatedby threeinteriorhalogenfloodlights.Visualfeedbackof
cookingprogressis instant. Activeventingincorporatesafan andsmokeeliminatorto removeodorswhen required.
OVEN MODES
YourFisher_ PaykelAeroTechTMovenhas9 cookingmodesplusWarmandSelfClean.Thesemodesusedifferentcombinationsof
elementsandthe convectionfan to giveyoumaximumflexibilitywhencooking.
Themodesareexplainedin the followingpages. Whichelementsare beingusedandthe natureof the ovenenvironmentis
also described.
YR_derO
derEj_
Bake
Pastry Bake
Serf Clean
Warm
Roast
Broil
Maxi Broil
aerO_R_iL
_u_aer@
ae r© BA_
BAKE
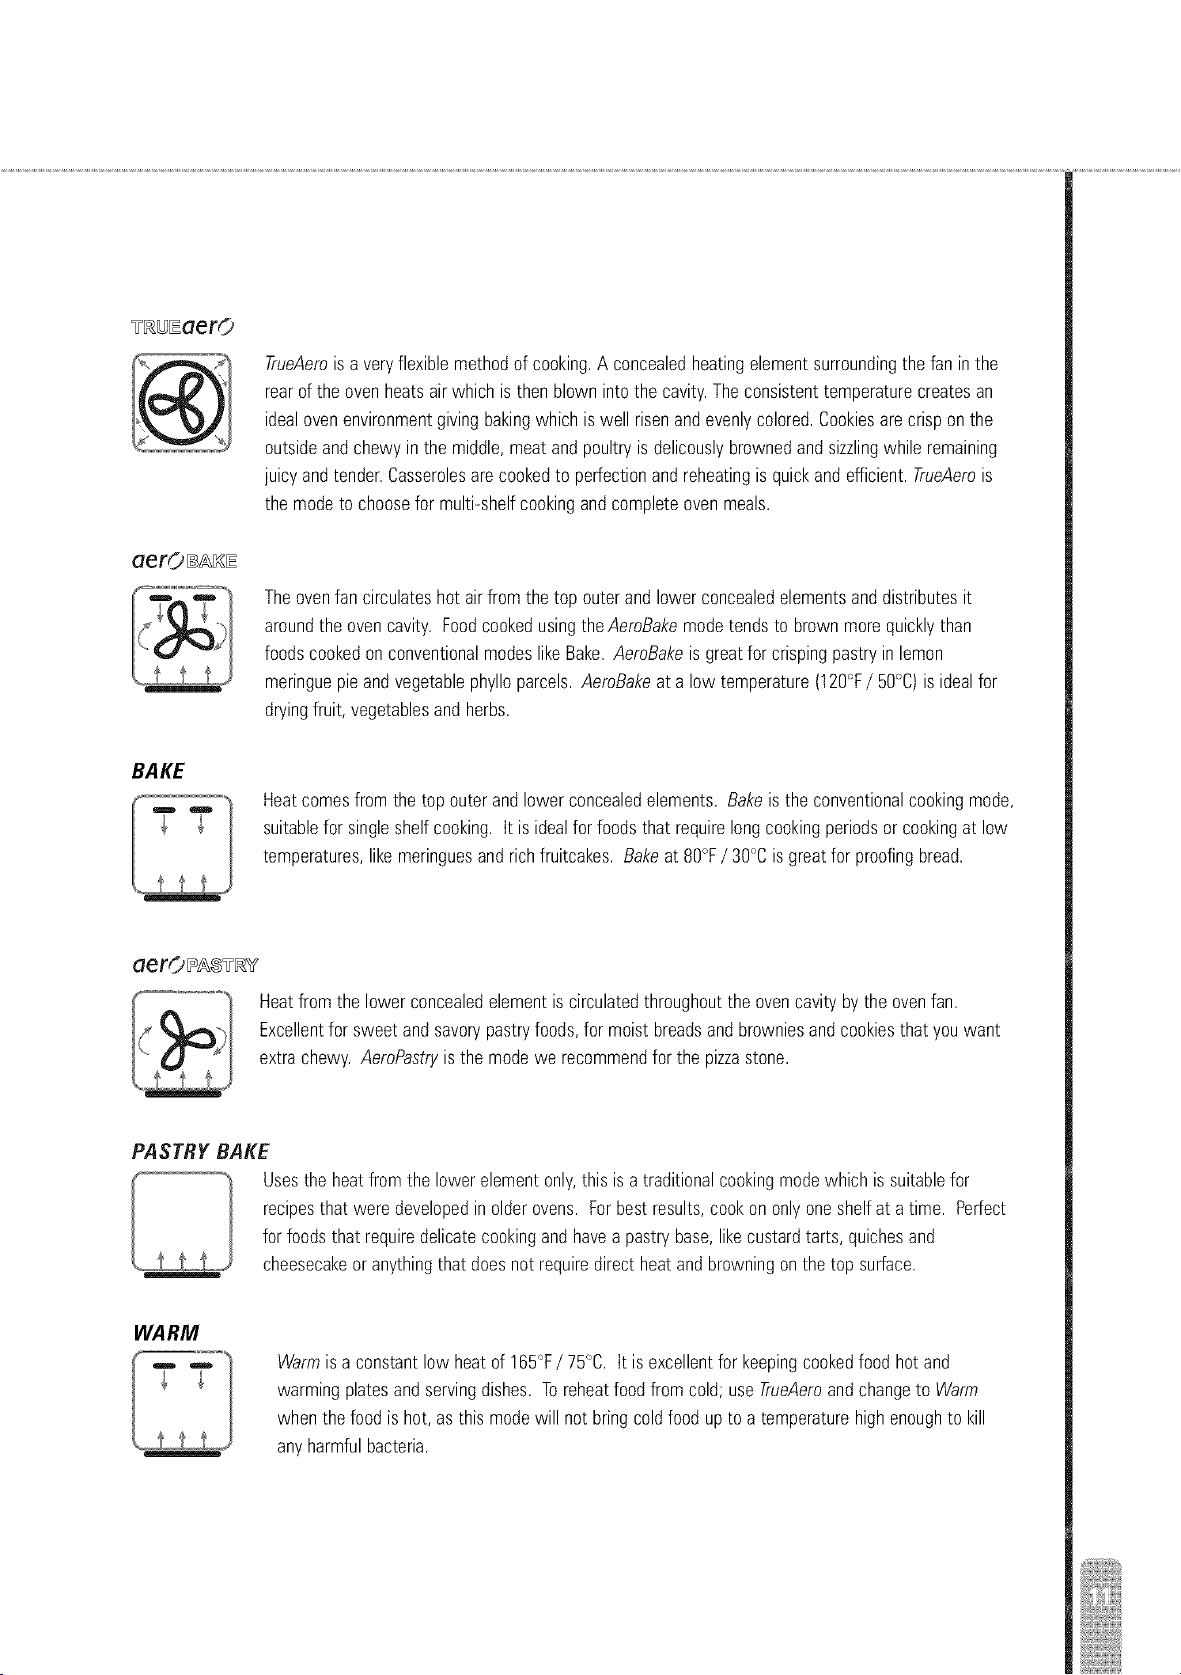
TrueAemis averyflexiblemethodof cooking.A concealedheatingelementsurroundingthe fan inthe
rearof the ovenheatsair whichis then blowninto the cavity.Theconsistenttemperaturecreatesan
idealovenenvironmentgivingbakingwhich is well risenandevenlycolored.Cookiesarecrisponthe
outsideandchewy in the middle,meatand poultryis delicouslybrownedandsizzlingwhile remaining
juicyandtender.Casserolesarecookedto pedectionandreheatingis quickandefficient.TrueAerois
the modeto choosefor multi-shelfcookingandcompleteovenmeals.
Theovenfan circulateshot airfromthe top outerandlowerconcealedelementsand distributesit
aroundthe ovencavity. FoodcookedusingtheAeroBakemodetendsto brownmorequicklythan
foodscookedonconventionalmodeslike Bake.AeroBakeis greatfor crispingpastryin lemon
meringuepieandvegetablephylloparcels.AeroBakeat a low temperature(120°F/50°C) is idealfor
dryingfruit, vegetablesandherbs.
Heatcomesfromthe top outer and lowerconcealedelements.Bakeis the conventionalcookingmode,
suitablefor singleshelfcooking. It is idealfor foods that requirelongcookingperiodsor cookingat low
temperatures,like meringuesandrichfruitcakes.Bakeat 80°F/ 30°Cis greatfor proofingbread.
aerO PAsTAY
Heatfromthe lower concealedelementis circulatedthroughoutthe ovencavitybythe ovenfan.
Excellentfor sweet and savorypastryfoods,for moist breadsandbrowniesandcookiesthat youwant
extrachewy. AeroPastryis the modewe recommendfor the pizzastone.
PASTRY BAKE
Usesthe heatfromthe lowerelementonly,this isa traditionalcookingmodewhichis suitablefor
recipesthat were developedin olderovens. Forbestresults,cookon onlyoneshelfat a time. Perfect
for foodsthat requiredelicatecookingand havea pastrybase,likecustardtarts, quichesand
cheesecakeor anythingthat doesnot requiredirectheatandbrowningonthe top surface.
WARM
Warmis aconstantlow heatof 165%/75°C. It is excellentfor keepingcookedfood hotand
warmingplatesandservingdishes. Toreheatfood fromcold;use TrueAeroandchangeto Warm
whenthe foodis hot,as this modewill not bringcoldfood up to a temperaturehighenoughto kill
any harmfulbacteria.
0 VEN MODES
ROAST
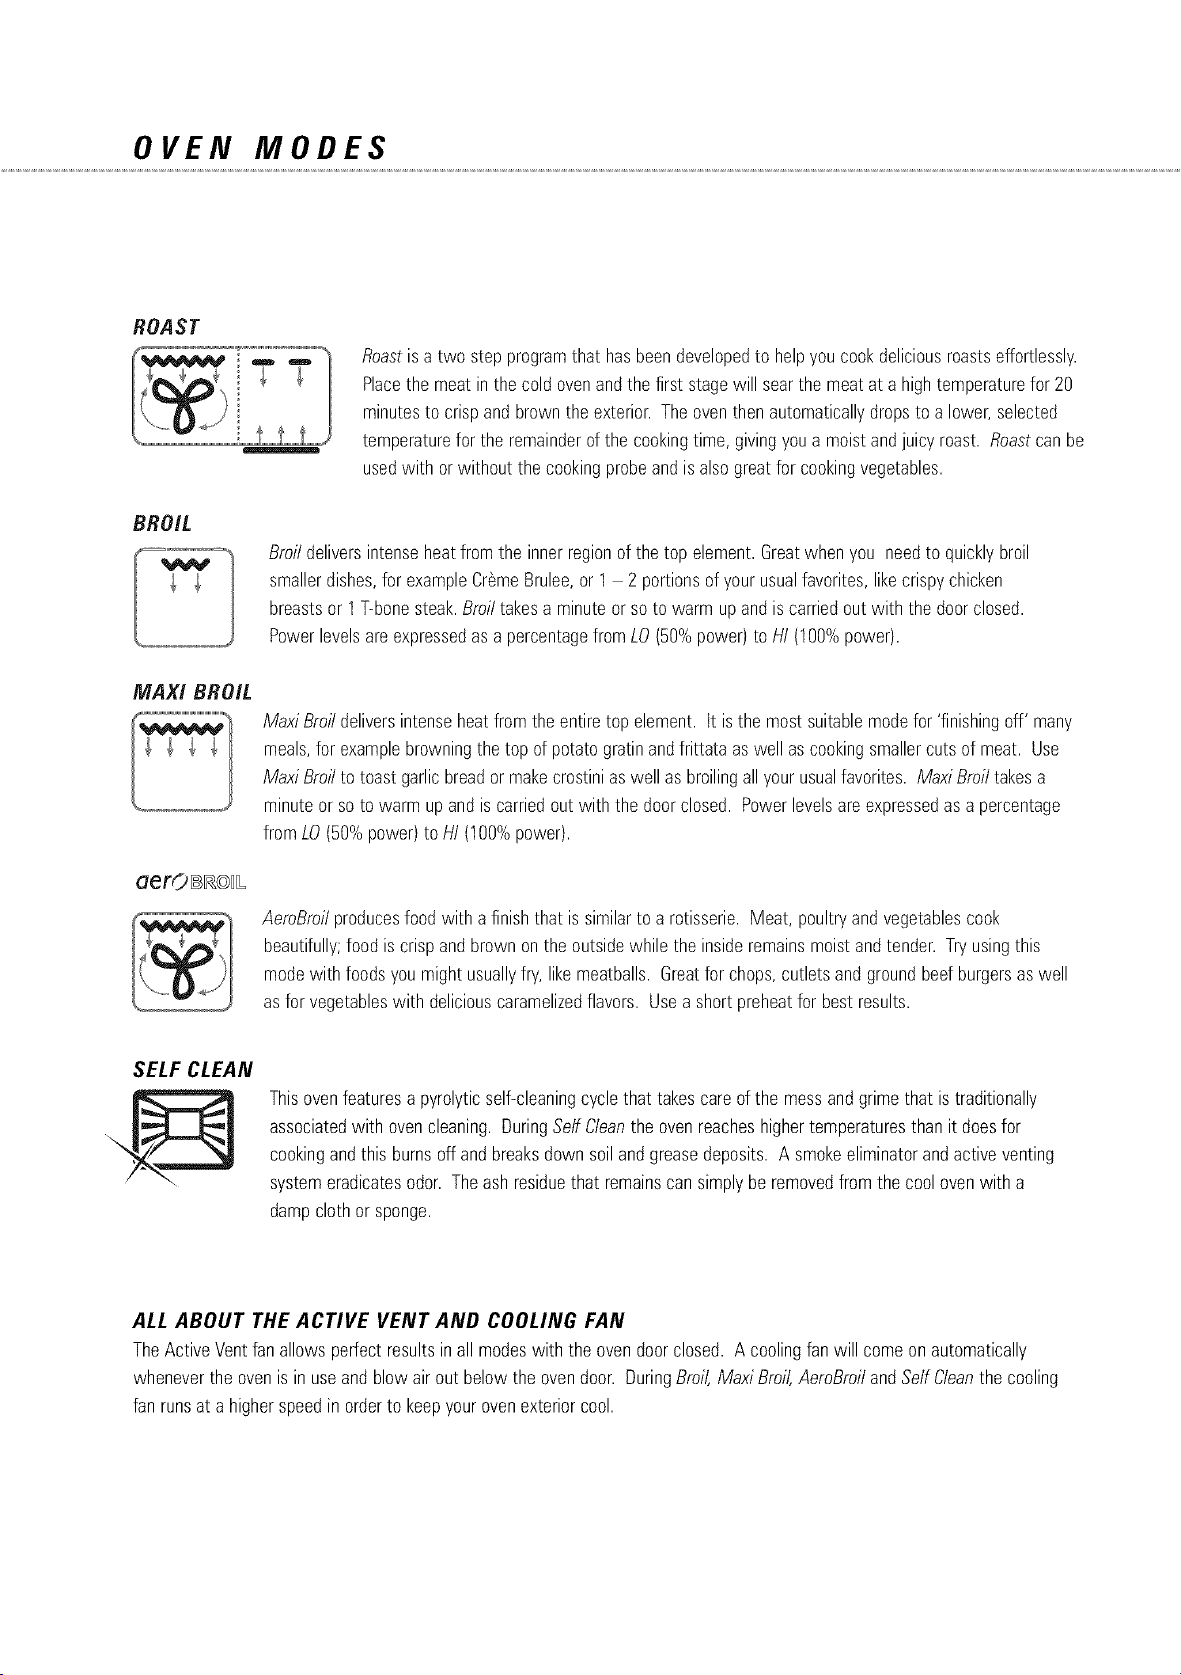
Roastis a two stepprogramthat hasbeendevelopedto helpyou cookdeliciousroastseffortlessly.
Placethe meatinthe cold ovenandthe first stagewill searthe meatat a hightemperaturefor 20
minutesto crispand brownthe exterior. Theoventhenautomaticallydropsto a lower,selected
temperaturefor the remainderof the cookingtime, givingyoua moistandjuicyroast. Roastcan be
usedwith orwithout the cookingprobeandis also greatfor cookingvegetables.
BROIL
Broildeliversintenseheatfromthe innerregionof the top element.Greatwhenyou needto quicklybroil
smallerdishes,for exampleCr6meBrulee,or 1 - 2 portionsof yourusualfavorites,likecrispychicken
breastsor 11--bonesteak.Broiltakesa minuteorso to warmupandis carriedout with the doorclosed.
Powerlevelsareexpressedas a percentagefromLO (50%power}to HI (I 00%power}.
aerO_©iL
Max/Broil deliversintenseheatfromthe entiretop element, it isthe most suitablemodefor 'finishingoff' many
meals,for examplebrowningthe top of potatogratinandfrittata aswell ascookingsmallercutsof meat. Use
MaxiBroilto toast garlicbreadormakecrostinias well as broilingallyour usualfavorites. Maxi Broil takesa
minuteor so to warm up andis carriedout with the doorclosed. Powerlevelsareexpressedasa percentage
fromLO(50%power}to HI (100%power}.
AeroBroilproducesfoodwith afinishthat is similarto arotisserie. Meat, poultryandvegetablescook
beautifully;food is crispandbrownonthe outsidewhile the insideremainsmoistandtender.Tryusingthis
modewith foodsyoumightusuallyfry, likemeatballs.Greatfor chops,cutlets and groundbeefburgersas well
as for vegetableswith deliciouscaramelizedflavors. Use a shortpreheatfor bestresults.
SELF CLEAN
Thisovenfeaturesa pyrolyticself-cleaningcyclethat takescareof the messand grimethat is traditionally
associatedwith ovencleaning. DuringSerfCleanthe ovenreacheshighertemperaturesthan it doesfor
cookingandthis burnsoff and breaksdownsoil andgreasedeposits. A smokeeliminatorandactive venting
systemeradicatesodor. Theash residuethat remainscan simplyberemovedfromthe cool ovenwith a
dampclothor sponge.
ALL ABOUT THE ACTIVE VENT AND COOLING FAN
TheActiveVentfanallowsperfectresultsinall modeswiththe ovendoorclosed. A coolingfan will comeonautomatically
wheneverthe ovenis in useandblow airout belowthe ovendoor. DuringBroil,Maxi Broil,AeroBroilandSerfCleanthe cooling
fan runsat a higherspeedin orderto keepyourovenexteriorcool.
OPTILEVEL TM
OPTILEVEL _
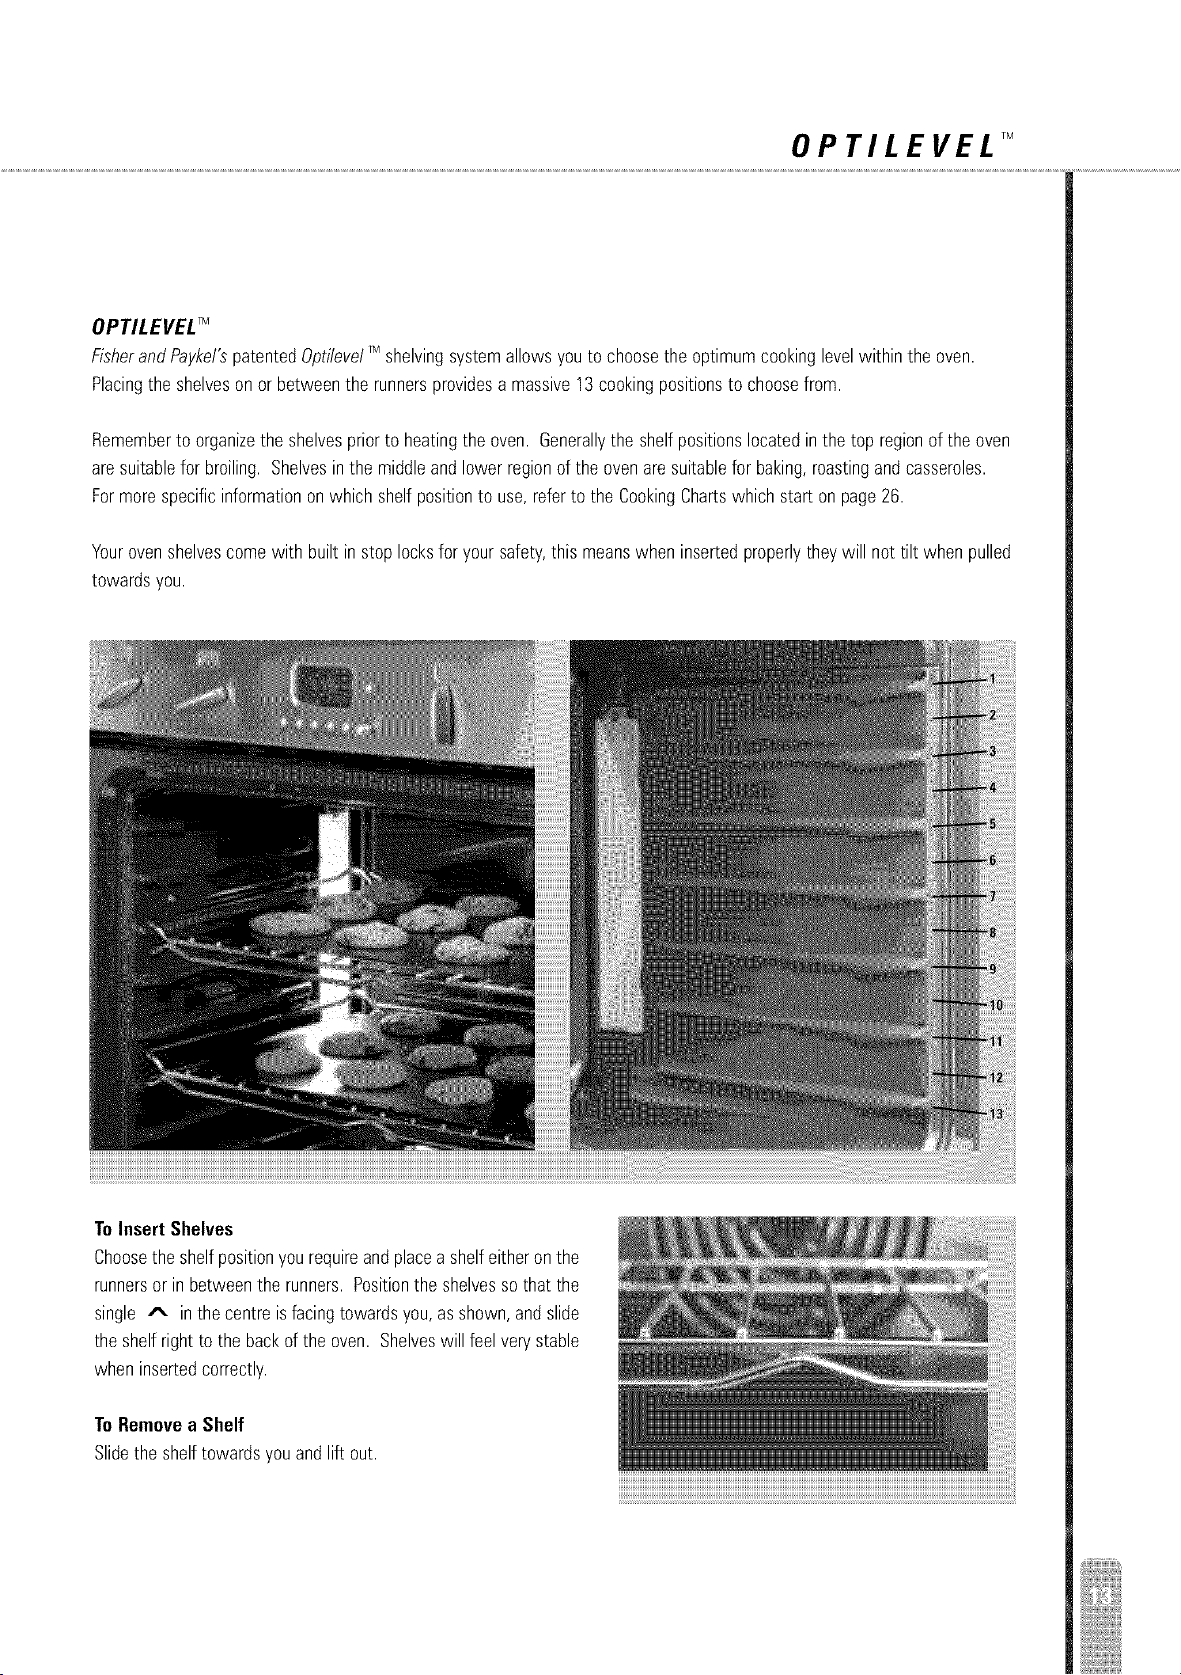
FisherandPaykefspatentedOptitevetrMshelvingsystemallowsyouto choosethe optimumcookinglevelwithinthe oven.
Placingthe shelveson orbetweenthe runnersprovidesa massive13cookingpositionsto choosefrom.
Rememberto organizethe shelvesprior to heatingthe oven. Generallythe shelf positionslocatedin the top regionof the oven
aresuitablefor broiling. Shelvesinthe middleand lower regionof the ovenare suitablefor baking,roastingandcasseroles.
Formorespecificinformationonwhich shelfpositionto use,referto the CookingChartswhich start on page26.
Yourovenshelvescomewith built instop locksfor yoursafety,this meanswhen insertedproperlythey will not tilt when pulled
towardsyou.
ToInsert Shelves
Choosethe shelfpositionyourequireandplacea shelfeitheronthe
runnersor in betweenthe runners.Positionthe shelvesso that the
single A inthe centreisfacingtowardsyou,as shown,andslide
the shelfright to the backof the oven. Shelveswill feel very stable
wheninsertedcorrectly.
ToRemovea Shelf
Slidethe shelftowardsyou andlift out.
ACCESSORIES
BROILING SYSTEM
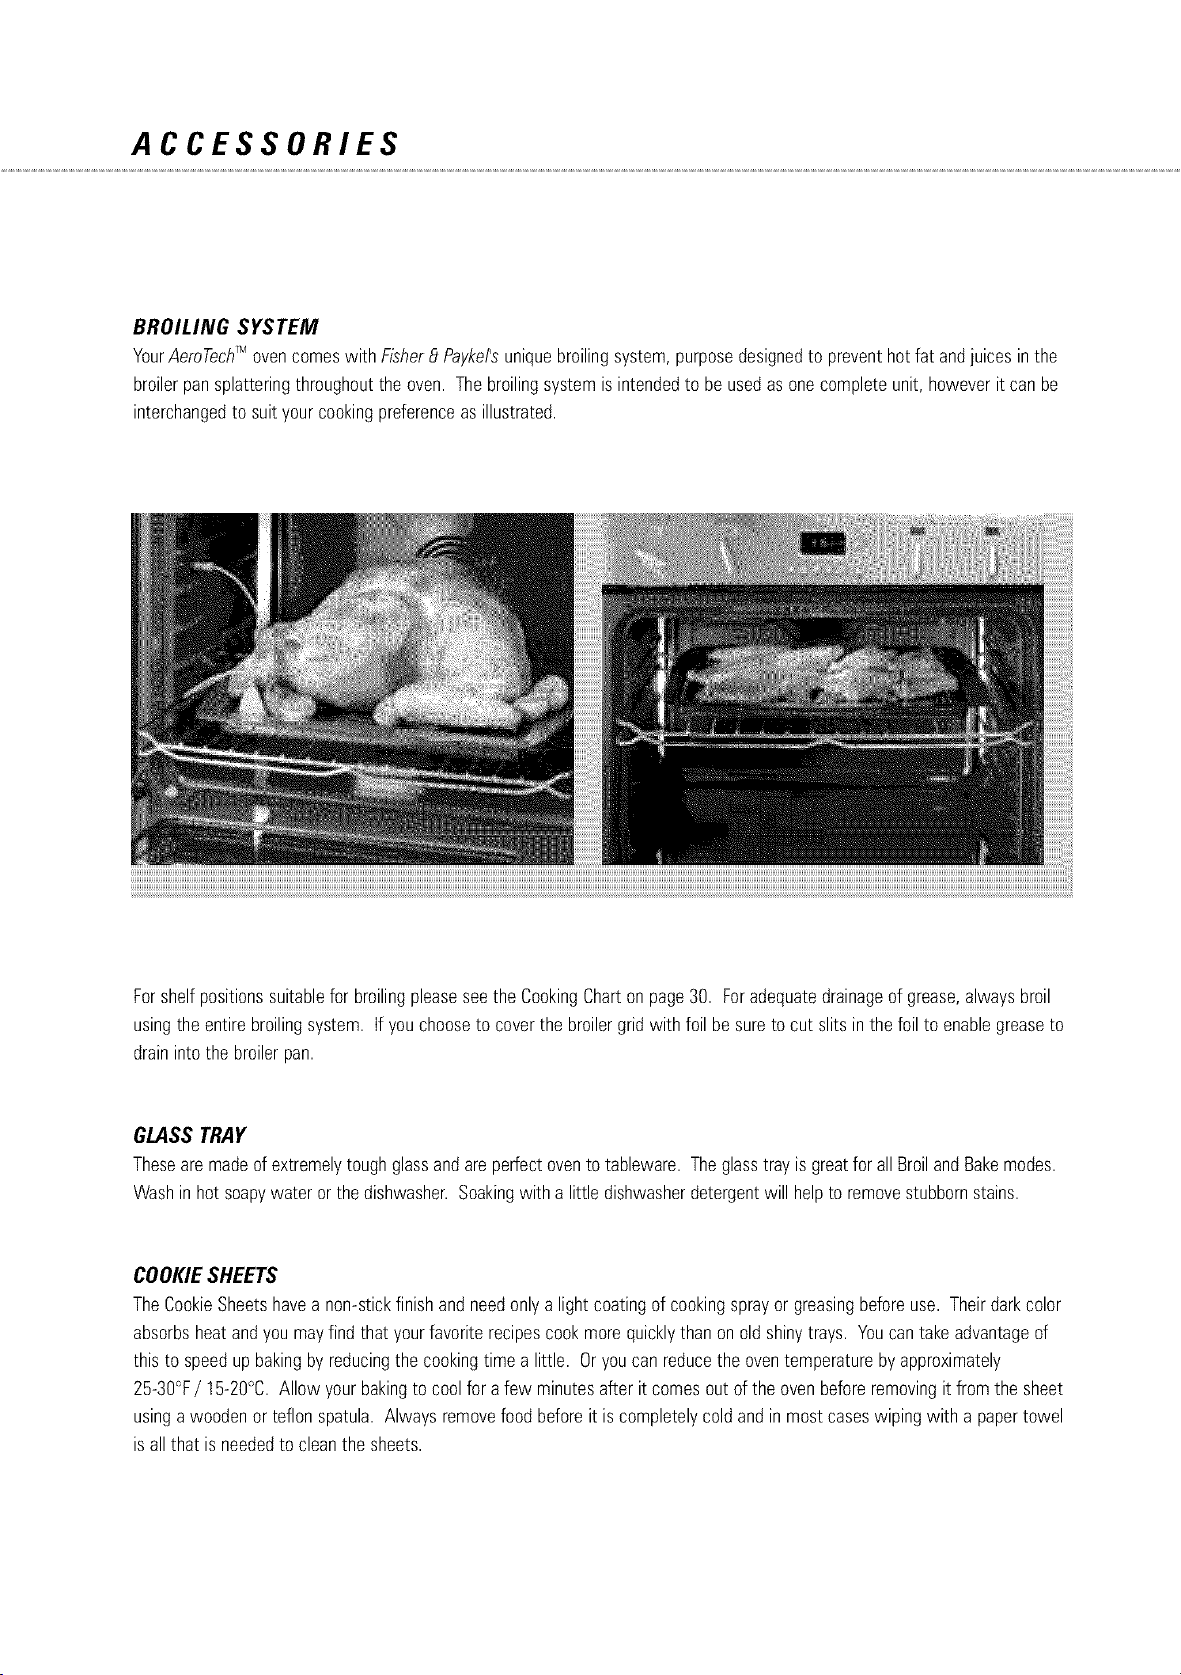
YourAeroTechrMovencomeswith Fisher_ Payket'suniquebroilingsystem,purposedesignedto preventhot fat andjuices in the
broilerpansplatteringthroughoutthe oven. Thebroilingsystemis intendedto be usedas onecompleteunit, howeverit can be
interchangedto suityourcookingpreferenceas illustrated.
Forshelfpositionssuitablefor broilingpleaseseethe CookingCharton page30. Foradequatedrainageof grease,alwaysbroil
usingthe entirebroilingsystem. If youchooseto coverthe broilergridwith foil besureto cut slits inthe foil to enablegreaseto
drainintothe broilerpan.
GLASS TRAY
Theseare madeof extremelytoughglassandareperfectovento tableware. Theglasstrayis greatfor all Broiland Bakemodes.
Washin hot soapywateror the dishwasher.Soakingwith a little dishwasherdetergentwill helpto removestubbornstains.
COOKIE SHEETS
TheCookieSheetshavea non-stickfinishandneedonlya lightcoatingof cookingsprayor greasingbeforeuse. Theirdarkcolor
absorbsheat andyou mayfind that yourfavoriterecipescookmorequicklythanon oldshinytrays. Youcantakeadvantageof
this to speedupbakingby reducingthe cookingtime a little. Oryoucan reducethe oventemperatureby approximately
25-3g°F/ 15-20°C.Allow yourbakingto cool for afew minutesafter it comesout of the ovenbeforeremovingit fromthe sheet
usinga woodenor teflonspatula. Alwaysremovefoodbeforeit is completelycoldandin mostcaseswipingwith a papertowel
is allthat is neededto cleanthe sheets.
PIZZA STONE AND PADDLE
YourPizzaStonewill allow youto cooka pizzaas goodas a boughtonewith a crispybasebut at the sametime a toppingthat is
moist anddoesn'tdry out. Whenyoufirst get yourPizzaStonewipe it with a dampcloth (nodetergent).Itthen needsto be
conditionedby heatingin the ovenfor 1 hourat 4OO°F/ 2OO°ConAeroPastry.If you donot useyourPizzaStonefor anylength
of time it may needto beconditionedagain.
Donot washyourPizzaStoneas it will absorbwaterandcrackon heating.
Usingthe PizzaStoneis agreatway to cookbought,readymadepizzasas well as homemadeones. If cookingfrozenpizza,
allowto defrostcompletelybeforeplacingonthe hot PizzaStone.
OVEN OPERATION
USING THE DOUBLE OVEN
Selectwhichovenyouwant by usingthe appropriateovenmodeandtemperaturedials. Pushingthe OVENCAVITYselector
buttonletsyoutogglebetweenthe cavities,for exampleifyouaresettingAutomatic/ Delayedstart programs,
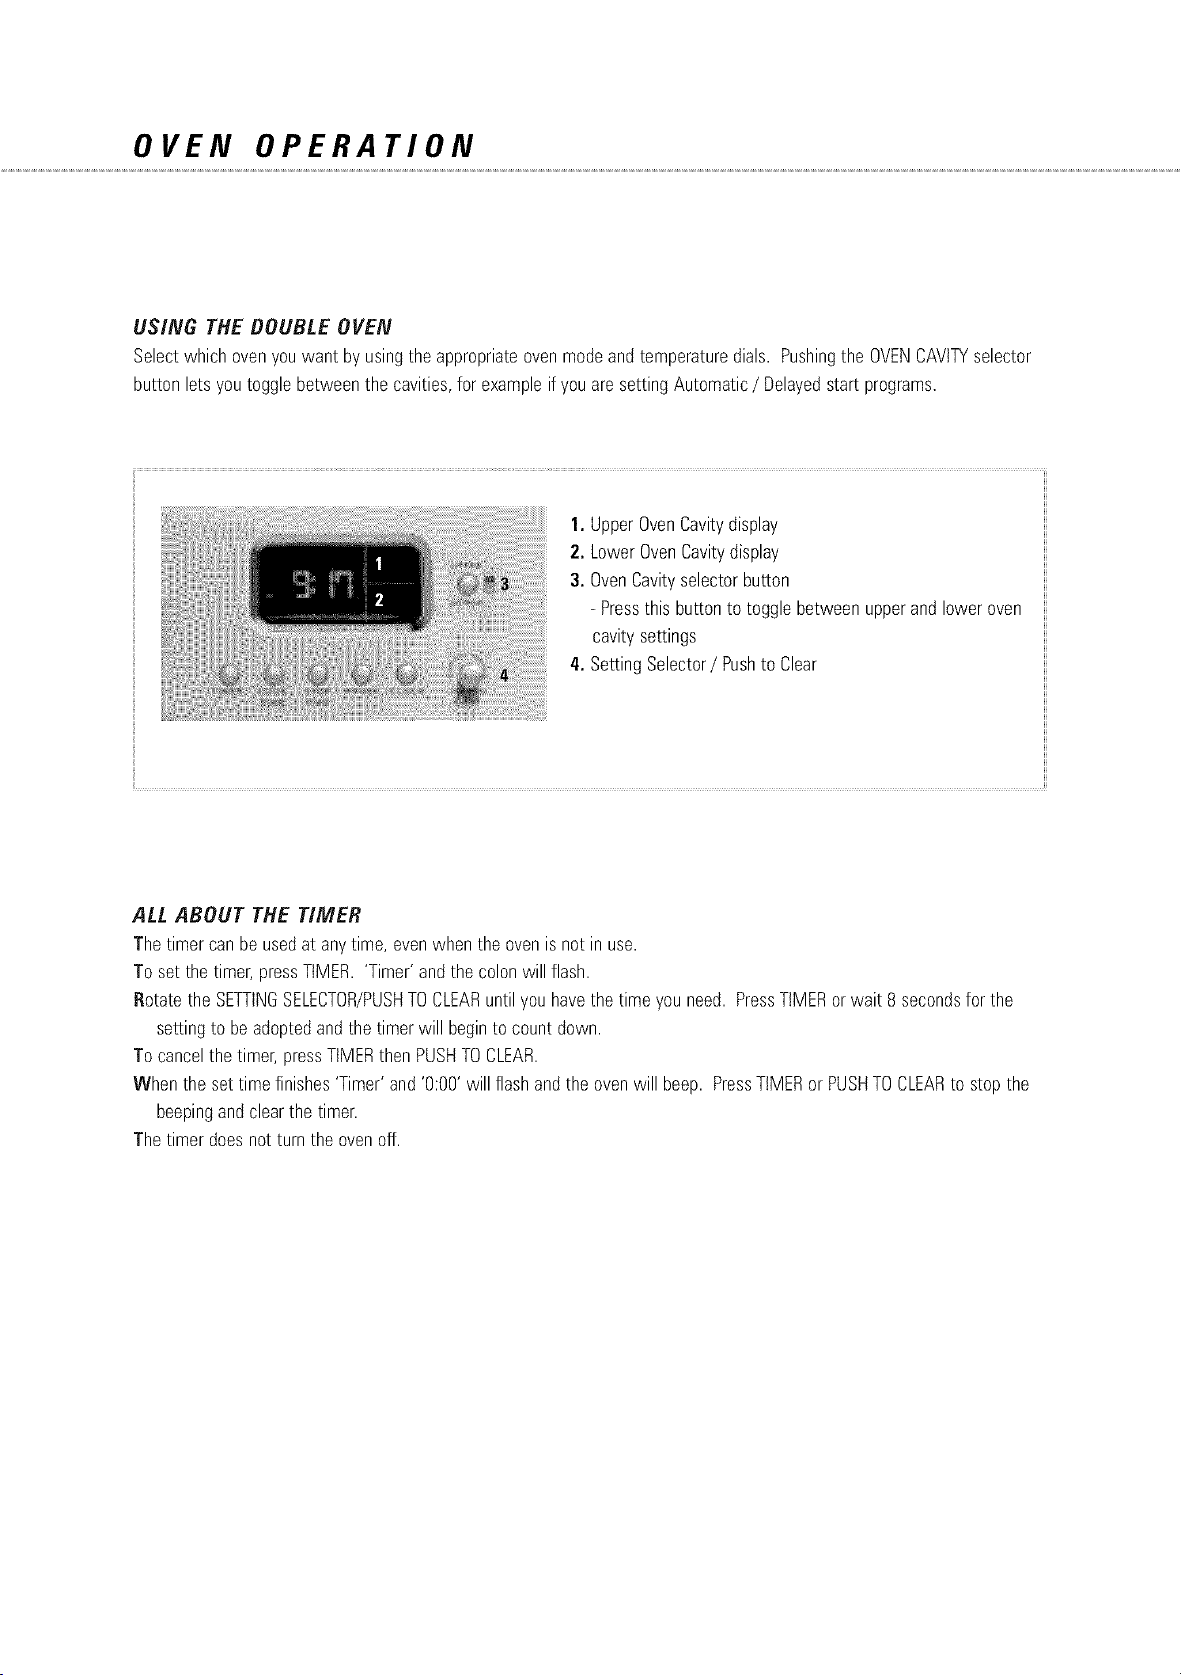
I. UpperOvenCavitydisplay
2. LowerOvenCavitydisplay
3. OvenCavityselectorbutton
- Pressthis buttonto togglebetweenupperandloweroven
cavitysettings
4. SettingSelector/Pushto Clear
ALL ABOUT THE TIMER
Tile timer can be usedat anytime, evenwhenthe ovenis not in use.
To setthe timer,pressTIMER.'Timer'andthe colonwill flash.
Rotatethe SETTINGSELECTOR/PUSHTOCLEARuntilyouhavethe time youneed. PressTIMERorwait 8 secondsfor the
settingto beadoptedandthe timerwill beginto countdown.
To cancelthe timer,pressTIMERthen PUSHTOCLEAR.
When the set time finishes'Timer'and'0:00' will flash andthe ovenwill beep. PressTIMERor PUSHTOCLEARto stopthe
beepingandclearthe timer.
The timer doesnot turn the ovenoff.
AUTOMATIC / DELAYED TIME COOKING
Automaticanddelayedtimecookingwill turnthe ovenonandoff at times youhaveset. Thisis helpfulwhen youarepreparing
mealsin advance.
To Set Automatic / Delayed Time Cooking
Checkthat the clockshowsthe correcttime.
Choosethe upperor lowercavity(fordoubleovensonly)
Selectthe ovenmodeandtemperature.
Decidehow longthe foodwill take to cook,allowingtimefor preheatingif necessary.
Pressthe COOKTIMEbuttonandturn the SETTINGSELECTORto selectthis time. Youdo notneedto seta StartTime.
Pressthe STOPTIMEbuttonandturnthe SETTINGSELECTORto selectthe time youwant the ovento turn off. The StopTime
mustbeset beforethe CookTimesettingsareautomaticallyadoptedi.e.within 8 secondsof settingthe CookTime,
otherwisethe CookTimewill start andyou will haveto cancelthe settings(seebelow)andstart over.
If thereis time to wait beforecookingstarts,'Delay'and'Auto' will show in the displayalongwiththe currenttime. Theoven
modeandtemperaturedisplayswill dim.
Theovenmodeandtemperaturedialswill stillfunctionas in manualoperation;youcanalter thesepriorto or duringcooking,or
you canmanuallyturn the ovenoff beforethe set CookTimehaselapsed.
Duringcooking,'Auto'andthe remainingcooktime will beshownin the clockdisplay.
Whenthe CookTimeis finishedthe ovenwill beepandturn off. Thetemperatureandovenmodedisplayswill dim
and'CookTime'and 'Auto' will flash inthe clockdisplay.
Turnthe ovenmodeandtemperaturedialsto OFFandafter 8 secondsthe ovenwill returnto manualoperation.
To Set Automatic "Stop" Cooking
Theovencanbe set to stopautomaticallyat any time duringnormaluseor at the time youturn it on. Rememberto checkthat
the clockshowsthe correcttime andselectthe upperor lowercavityina doubleoven.
Selectthe ovenmodeandtemperature.
Pressthe STOPTIMEbuttonandturnthe SETTINGSELECTORto selectthe time youwant the ovento turn off.
Autowill showinthe clockdisplayandthe remaining'CookTime'will countdown.
Whenthe 'CookTime'is finishedthe ovenwill 'beep'andturn off. Theovenmodeand temperaturedisplayswill dim.
Turnthe ovenmodeandtemperaturedialsto OFFandafter 8 secondsthe ovenwill returnto manualoperation.
To Cancel Automatic / Delayed Time
Turnthe temperatureandmodedialsto OFF.After 8 secondsthe clockdisplaywill revertto the time of dayandthe ovenwill
returnto manualoperation.
WARNING
Foodsafety is an important considerationwhen usingdelayedcookingmodes.
Toavoidpotentialspoilingof food andsickness,take the following steps:
Avoidusingfoodsthat will spoilwhilewaitingfor the cookingcycleto begin. Typicalfoodsto avoidincludethose containing
eggsanddairyproducts,creamsoups,cookedanduncookedmeats,poultryandfish.
If cookingwill not beginimmediately,placeonlyvery cold or frozenfood in the oven. Most unfrozenfoods shouldneverstandin
the ovenfor morethantwo hoursbeforecookingbegins.
Donot allowfoodsto remaininthe ovenfor morethanonehouraftercompletionof the cookingcycle.
OVEN OPERATION
ALL ABOUT THE COOKING PROBE
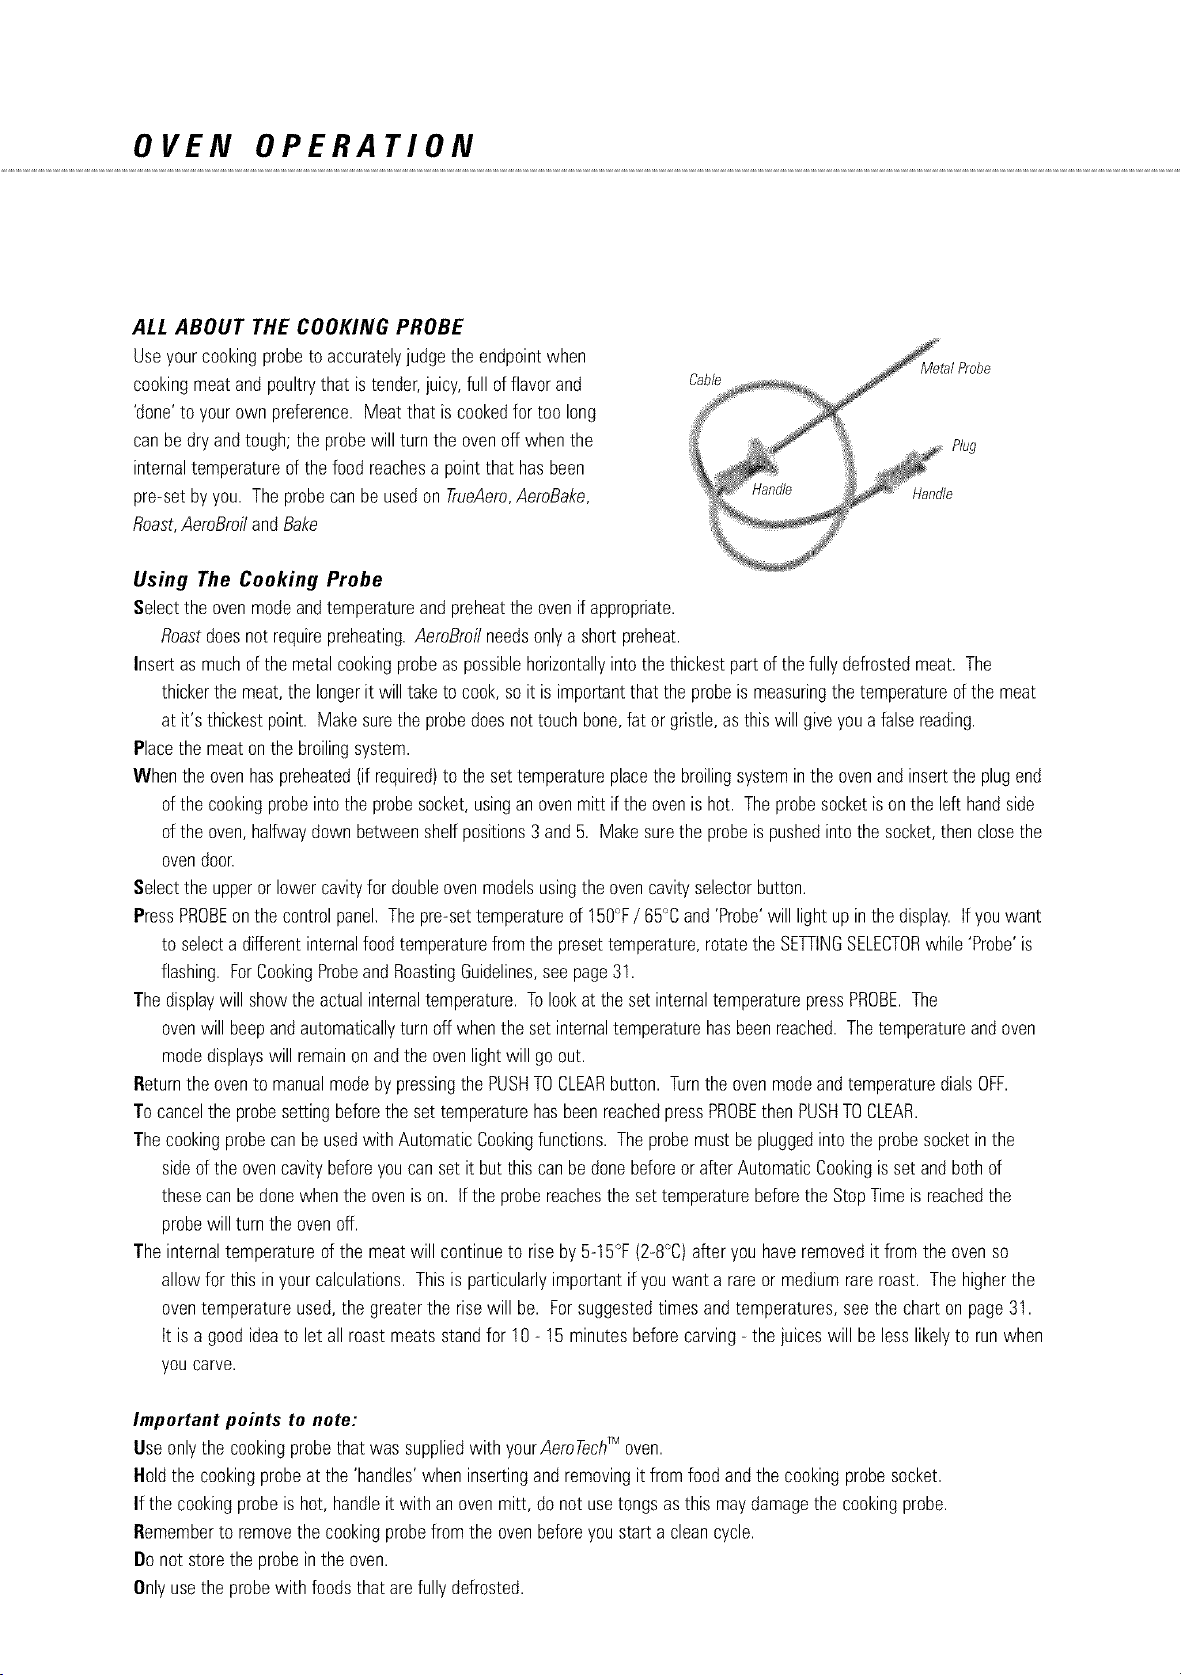
Useyourcookingprobeto accuratelyjudgethe endpointwhen
cookingmeatandpoultrythat is tender,juicy,full of flavorand
'done'to yourown preference.Meatthat is cookedfor too long
can be dry andtough; the probewill turn the ovenoff whenthe
internaltemperatureof the foodreachesa pointthat has been
pre-setby you. Theprobecanbe usedon TrueAero,AeroBake,
Roast,AeroBroitandBake
Cable
Plug
Handle
Using The Cooking Probe
Selectthe ovenmodeandtemperatureandpreheattheovenif appropriate.
Roastdoesnot requirepreheating.AeroBroitneedsonlya shortpreheat.
Insertas muchof the metalcookingprobeas possiblehorizontallyintothe thickestpartof the fully defrostedmeat. The
thickerthe meat,the longerit will taketo cook,so it is importantthatthe probeis measuringthe temperatureof the meat
at it's thickestpoint. Makesurethe probedoesnottouchbone,fat or gristle,as this will giveyoua falsereading.
Placethe meatonthe broilingsystem.
When the ovenhaspreheated(if required)to the settemperatureplacethe broilingsystemin the ovenand insertthe plugend
of the cookingprobeinto the probesocket,usinganovenmitt if the ovenis hot. Theprobesocketis onthe left handside
of the oven,halfwaydownbetweenshelfpositions3 and 5. Makesurethe probeis pushedinto the socket,thenclosethe
ovendoon
Selectthe upperorlowercavityfor doubleovenmodelsusingthe ovencavityselectorbutton.
PressPROBEon the controlpanel. Thepre-settemperatureof 150°F/ 65°Cand'Probe'will light upinthe display.If youwant
to selecta differentinternalfoodtemperaturefromthe presettemperature,rotatethe SETTINGSELECTORwhile 'Probe'is
flashing. ForCookingProbeandRoastingGuidelines,seepage31.
The displaywill showthe actualinternaltemperature.Tolookat the set internaltemperaturepressPROBE.The
ovenwill beepandautomaticallyturnoff whenthe set internaltemperaturehasbeenreached.Thetemperatureandoven
modedisplayswill remainonandthe ovenlight will go out.
Returnthe ovento manualmodeby pressingthe PUSHTOCLEARbutton. Turnthe ovenmodeandtemperaturedialsOFF.
To cancelthe probesettingbeforethe settemperaturehasbeenreachedpressPROBEthen PUSHTOCLEAR.
Thecookingprobecanbe usedwith AutomaticCookingfunctions. Theprobemustbe pluggedinto the probesocketinthe
sideof the ovencavitybeforeyoucan setit but thiscan bedonebeforeorafterAutomaticCookingis set and bothof
thesecanbedonewhenthe ovenis on. If the probereachesthe set temperaturebeforethe StopTimeis reachedthe
probewill turn the ovenoff.
The internaltemperatureof the meatwill continueto riseby 5-15°F(2-8°C)afteryou haveremovedit fromthe oven so
allow for this inyourcalculations.Thisis particularlyimportantif you wanta rareor mediumrareroast. The higherthe
oventemperatureused,the greaterthe risewill be. Forsuggestedtimesandtemperatures,see the charton page31.
It is agoodideato let all roastmeatsstandfor 10- 15 minutesbeforecarving- the juiceswill be less likelyto run when
you carve.
Important points to note:
TM
Useonlythe cookingprobethatwas suppliedwith yourAeraTech oven.
Holdthe cookingprobeat the 'handles'wheninsertingand removingit from food and the cookingprobesocket.
If the cookingprobeis hot,handleit with an ovenmitt, do not usetongsas this maydamagethe cookingprobe.
Rememberto removethe cookingprobefromthe ovenbeforeyoustart a cleancycle.
Do not storethe probein the oven.
Onlyusethe probewith foodsthatarefullydefrosted.
ROASTING
YourAeroTechrMovenis equippedto handlea varietyof roasts- from a succulentlegof lambto a standingribroastandof
course,the Thanksgivingturkey.
ROAST
Tomakethe perfect roasteasier,Fisher_ PaykethavedevelopedRoast. Thismodeprovidesyouwith the ability to effortlessly
cookdeliciousroastswith or withoutthe cookingprobe.
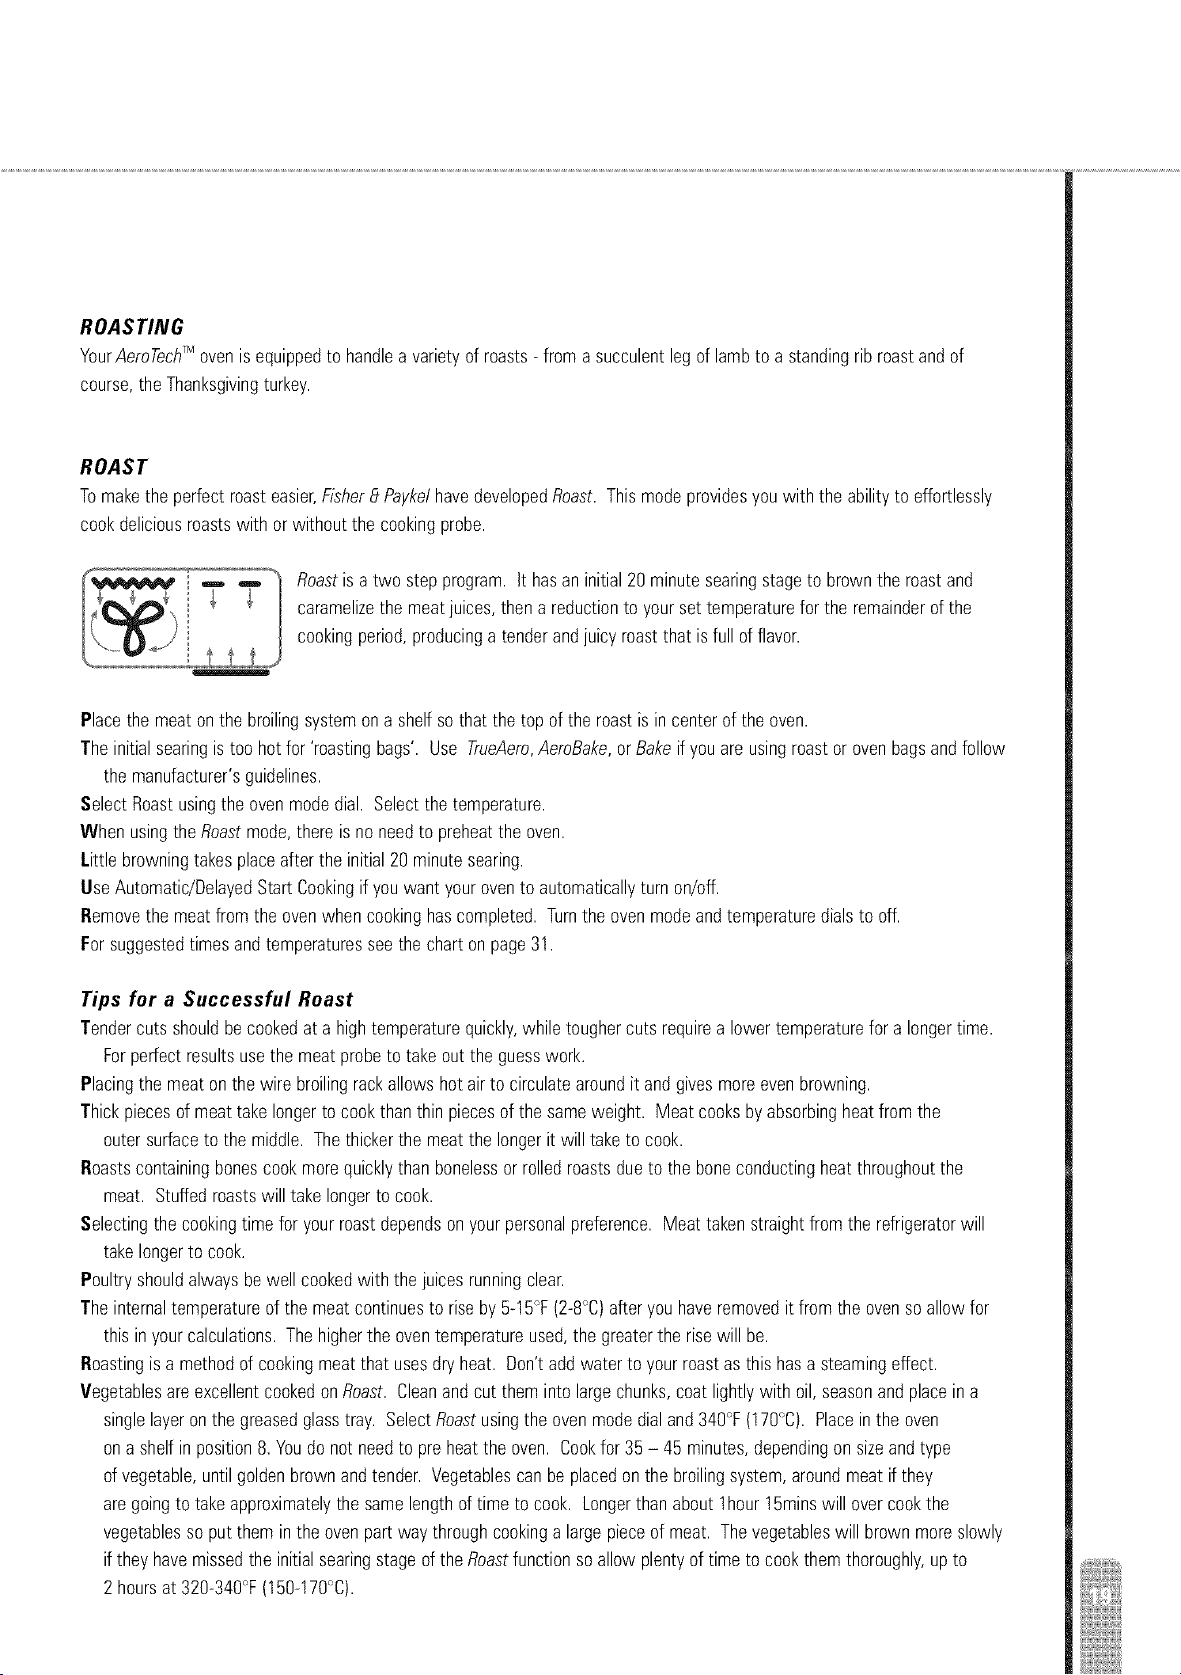
Roastis a two stepprogram.It hasaninitial20 minutesearingstageto brownthe roastand
caramelizethe meatjuices,thena reductionto yourset temperaturefor the remainderof the
cookingperiod,producinga tenderandjuicy roastthat is full of flavor.
Placethe meat onthe broilingsystemon a shelfso that the top of the roast is in center of the oven.
The initialsearingis too hotfor 'roastingbags'. Use TrueAero,AeroBake,or Bakeif youare usingroastor ovenbagsandfollow
the manufacturer'sguidelines.
SelectRoastusingthe ovenmodedial. Selectthe temperature.
When usingthe Roastmode,thereis no needto preheatthe oven.
Little browningtakesplaceafterthe initial 20minutesearing.
UseAutomatic/DelayedStart Cookingif youwant yourovento automaticallyturn on/off.
Removethe meatfrom the ovenwhen cookinghascompleted. Turnthe ovenmodeandtemperaturedialsto off.
Forsuggestedtimes and temperaturesseethe chartonpage31.
Tips for a Successful Roast
Tendercuts shouldbecookedat a hightemperaturequickly,while toughercuts requirea lowertemperaturefor a longertime.
Forperfectresultsusethe meatprobeto takeout the guesswork.
Placingthe meatonthe wire broilingrackallowshotairto circulatearoundit and givesmoreevenbrowning.
Thickpiecesof meat takelongerto cook thanthin piecesof the sameweight. Meatcooksby absorbingheatfromthe
outersurfaceto the middle.Thethickerthe meatthe longerit will taketo cook.
Roastscontainingbonescookmorequicklythanbonelessor rolledroastsdue to the boneconductingheatthroughoutthe
meat. Stuffedroastswill takelongerto cook.
Selectingthe cookingtime for yourroastdependsonyourpersonalpreference.Meat takenstraightfromthe refrigeratorwill
takelongerto cook.
Poultryshouldalwaysbewell cookedwith the juicesrunningclear.
The internaltemperatureof the meat continuesto riseby 5-15°F(2-8°C)afteryou haveremovedit fromthe ovenso allowfor
this in yourcalculations.Thehigherthe oventemperatureused,the greaterthe risewill be.
Roastingis a methodof cookingmeat that usesdry heat. Don'taddwaterto yourroastasthis hasa steamingeffect.
Vegetablesare excellentcookedonRoast. Cleanand cut them into largechunks,coatlightlywith oil, seasonandplaceina
singlelayeronthe greasedglasstray. SelectRoastusingthe ovenmodedialand34g°F(t71:1°C).Placein the oven
onashelfin position8.Youdo not needto preheatthe oven. Cookfor 35 - 45 minutes,dependingon sizeandtype
of vegetable,untilgoldenbrownandtender.Vegetablescanbe placedonthe broilingsystem,aroundmeatif they
aregoingto takeapproximatelythe samelengthof time to cook. Longerthan aboutI hour15minswill overcookthe
vegetablesso put them in the ovenpart way throughcookinga largepieceof meat. Thevegetableswill brownmoreslowly
if theyhavemissedthe initialsearingstageof theRoastfunctionsoallow plentyof timeto cookthemthoroughly,upto
2 hoursat 3%-34g°F(151:1-17g°c).

OVEN OPERATION
BROILING
YourAeroTechrMovengivesachoiceof MaxiBroil,BroilandAeroBroit.Formanymeatsbroilingis consideredto be a healthier
alternativeto frying. Broilingis alsoa greatway to cookvegetables.Broilingis a relativelyquickmethodof cookingfoods
producingsuperiorflavor. Carryout all broilingwith the ovendoorcompletelyclosed. Thepowerlevelcanbe regulated,it is
expressedas a percentagefromLO(50%power)- HI (100%power). We recommendusingHI to broilbut lowertemperatures
workwell toe.
MAXl BROIL AND BROIL
Forbestresultsallowthe broilerto warm upfor a minuteor two beforeputtingfood inthe oven.
Placethefood on top of the broilingrack,grid andpan.
Selectthe shelfposition-seethe BroilingChartonpage30for suggestedshelfpositions,times andtemperatures.
Oncethe broilerhas preheated,placefood inthe oven.
Usethe minutetimer to time the broilingprocessif desired.
Useovenmittsto removethe panas it will be hot.
Broilingis suitedto foodsyou mightwant to toast, brown or crisp.
All broilingis carriedout with the ovendoorclosed.
AEROBROIL
WhenusingAeroBroitwe recommenda shortpreheat(about5 minutes)but this is not essential. Theupper
elementsareusedandthe hot air is circulatedaroundthe ovenby the ovenfan situatedat the rearof the oven
cavity. Placethe food on top of the broilingrack,gridandpan. Selectthe shelfpositionyou want to broil at - see
the BroilingChartonpage30for suggestedshelfpositions,times andtemperatures.AeroBroitis suitablefor foods
that youmightnormallypanfry, barbecueorrotisserie,andfor largercuts of meat.
WARNING
When usingBroil or AeroBroiltake care in opening the dooras there may be steamand use
oven mitts to handlethe hot pan.
Tips for Successful Broiling
We recommendusingthe broilingsystemprovidedwith yeurAeroTechrMoven.This hasbeenspecificallydesignedto
reducesplatterandsmoke. Useonlyalternativeglassorceramicdishesandpansthat canwithstandthe hightemperature
of the broiler.
Bastingleanmeat,fishor chickenwith a marinadeorjuiceswhile broilingwill addflavorandmoisture.
If turningmeathalfwaythroughthe cookingtime, usetongsor aspatula. Avoidpiercingmeat with a knife or fork as this will
allowjuicesto escapemakingthe meat less moist.
To makecleaningyourbroilingdisheseasier,spraythe rack,gridandinsideof the panwith a light coatingof non-stickcooking
spraybeforeuseandsoakthemin warmwateranddetergentbeforewashingthem ina dishwasheror byhand.
Positionthe ovenshelvesbeforeyouturnthe ovenon.
All broilingis carriedoutwith the ovendoorclosed.
BAKING
TheAemTechrMAdvancedConvectionCookingSystem
Convectionmeansmovingair;andconvectioncookingisa technologythatis well establishedin bakeriesandcommercialkitchens.
TheFisherandPayketAemTechrMovenincorporatesan advancedconvectionsystemwhereaconcealedelementinthe rearof the
ovenheatsairthat isthencirculatedevenlyaroundthe ovencavity. CookingwithAemTechrMis substantiallydifferentto cookingin
aconventionaloven. InAemrMmodesmovingairbrownsandcrispsthe outersurfacesoffood, cooking10-20%fasterandat
temperatures25-50°F(5-10°C)lowerthannormallyrecommendedfor mostrecipes.Browningisveryeven,eliminatingthe need
to moveorturnfoodandallowingyouto cookseveraltraysoffood at the sametime,savingtime andenergy.Bakedfoodslike
souffles,puffpastryandangelfoodcakewill alsohaveagreatervolumeandlightertexturethanif cookedina conventionaloven.
Theinsideof meatstaysjuicyandtender,while the outsidebecomesdeliciouslycrispandfull offlavor.
Tips for Successful Baking
Readyour reciperightthroughandassemblethe ingredientsandequipmentonthe counterbeforeyou start bakingto avoid
lastminutepanics.
Organizethe ovenshelveswhile the ovenis cold. If youare not surewhich shelfpositionto use,a generalrule is to placethe
food sothat the top surfaceof the foodis as nearto the center of the ovenas possible.
Setyour ovento preheatwhileyouare gettingready. Manybakeditemsdon't liketo be kept waitingfor the ovento reachthe
desiredtemperature.
Usebakingpaperto linecaketinsandyou'lleliminatethe needfor greasing.Dothis beforeyoustart mixing.
Measureingredientsaccurately.
Whencakemaking,youringredients(includingeggs)shouldbeat roomtemperature.Whencreamingbutterandsugarthe
buttershouldbe soft but not liquid. Creambutterandsugaruntiltheybecomepalein colorandthe mixturelookslight and
aerated. 'Fold'flour inverygentlyusinga largemetalspoonanda cut andfold actionuntilingredientsare just combined.
Pourthe mixtureinto preparedpansand thentap the pangentlyonthe benchto releaseany largeair bubbles.
For maximumvolumewhenwhiskingeggwhites,makesurebowl andbeatersarescrupulouslycleanand freefrom grease.
Whenbaking,makesurethe caketins do not toucheachother or the sidesof the oven- staggertins acrossshelvesif
necessaryanduseTrueAerofor multi shelfcooking. Donot openthe oven dooruntilat least 3/4throughthe suggested
cookingtime.
Lighttexturedcakesarecookedif the centerspringsbackwhen pressedgentlywith yourfinger,the edgeshaveshrunkaway
fromthe panslightlyandtheyareattractivelybrowned.Densercakesarecookedwhena thin skewerpushedcarefullyto the
bottomof the pan in the thickestpart of the cake,comesoutwithout uncookedmixonit. If thereis uncookedmixtureon
the skewer,returnthe caketo the ovenfor a little longer.
Bakingpansthatare madeof dark,dullmetalsare recommendedinapplianceswith a concealedlower elementlikethe
AeroTechrMoven. Theyabsorbheatandoftencookandbrownfood fasterthan reflective,shinyaluminumpansandsheets.
Bearthis in mind in caseyouneedto lowerthe cookingtime and/ortemperatureof yourfavoriterecipes. Neverput a shiny
sheetorovenlineronthe floorof the ovenasthis coulddamagethe porcelainenamel.
Usethe cookiesheetsprovidedwith youroven. Theyhavebeen customdesignedand performextremelywell. Theyarenon-
stickandneedonlya light coatingof cookingspray,or greasingbeforeuse. Rememberthat you may needto bakefor a
shortertime thanon oldershinysheets. Goodaircirculationis necessaryfor bestresults;spacecookiesevenlyoverthe
sheetsandmakethemallthe samesizeandthicknessso they cookevenly. Use TrueAeroto cookonseveralshelvesat the
sametime. Whenit comesoutof the ovenallow bakingto settlefor afew minutesbeforetransferringit to a coolingrack.
It is mucheasierto dothis beforeit is completelycold. Wipeyour non-stickcookiesheetswith a papertowel and store.
Pansmaybenefitfrom beingdriedinthe coolingoven.

OVEN OPERATION
MULTI SHELF COOKING
Multi shelfcookingis very successfulusingthe TrueAeromode. Fisher_ Payket'sAeroTechrMsystemallowsyouto bakeseveral
differentfoodssimultaneouslyon differentlevelsgivingyouincreasedflexibility- as well as savingtime. TrueAerois well suited
to batchbakingof cookies,biscuits,scones,andmuffinsaswell ascompleteovenmeals. Seethe BakingCharton page26 for
suggestedtimes,temperaturesandshelfpositionsfor multirackcooking.
DEHYDRATING / DEFROSTING
YeurAeroTechrMovencanbe usedto dehydrateor defrostfoodsat low temperatureinthe TrueAeromode.
Tips for Dehydrating
To obtaina highqualitydried product,selectonlyunblemished,maturefruit.
Washfruit thoroughlyandpat dry, peelif desired.Unpeeledfruit will take longerto dry. Removestones,stemsor pipsif
necessary.Placefruit ona cookiesheetona shelfinthe oven.
To dehydratefoods,we recommendusingTrueAeroorAeroBakeat a temperatureof 120%/ 50°C.
Tips for Defrosting
Todefrostfoodsselectthe TrueAeromodeanda temperatureof 120_T/5O_C.Selectthe shelfposition(s)and placefood that is
to bedefrostedinanovensafedishin the centerof the ovenshelf.
Llsethe minutetimerif desiredto time the defrostingprocess.Timetakento defrostwill dependonthe sizeandweightof the
item beingdefrosted-it paysto checkit regularly.
TIPS FOR PROOFING BREAD
YourAeroTechrMovenprovidesan idealsealedenvironmentto proofbread.
SelectBakeand80°F/ 30°C.
CONTROL PANEL LOCK
Lockingthe controlsdisablesallthe buttonsand dialswhich canbe usefulwhen cleaningovensurfacesor preventingaccidental
bumpsand unauthorizeduse. Thecontrolpanelcanonlybe lockedwhenthe ovenis off.
PressPUSHTOCLEARandholddown for 5 secondsto lockthe controls.
Repeatto unlock.
USER SELECT OPTIONS
ALL ABOUT USER SELECT MODE
UserSelectmodeallowsyou to configuresomeof the settingsdisplayedonyourAeroTech_Movencontrolpanel. Theseinclude
settingthe SabbathMode,displayingthe temperaturein degreesFahrenheit('T) or degreesCelsius{'_'C),ShortAlert on the
timerandautomaticcookingfunctions,12or 24 hourclockdisplay,hidingthe clockdisplayandchangingthe languageusedin
the displays.Youcanalso resetthe ovento the defaultsettingsusingthe UserSelectmode.
Hew to Enter User Select Mode
Toenterthe UserSelectmode,be surethat the ovenmodeandtemperaturedialsareoff andthat noAutomatic/DelayedStart
programsareoperatingandthat the clockis displayingthe correcttime of day. Pressthe TIMERthen the CLOCKbuttonsand
holddown togetheruntilthe oven'beeps'(abouttwo seconds).Theleft handovenmodedisplaywill show 'UserSelect'.
SABBATH MODE
Thismodeis speciallydesignedfor religiousfaithsthat observea 'no work' requirementonthe Sabbath.
When Your Oven is in Sabbath Mode
Clock,temperatureandovenmodedisplayswill bedisabled.
No toneswill sound.
No errormessagesortemperaturechangeswill bedisplayed,howevertemperaturecan be adjusted.
Thecavitylightsareon.
How To Set Sabbath Mode
Enterthe UserSelectmodeandturnthe ovenmodedialclockwiseuntil 'SabMode'appearsin the display.
Selectthe lengthof timeyou wishto stay inSabbathMode byturningthe SETTINGSELECTOR.Themaximumis 99 hours
in 1 hoursteps. Selecta temperature.Bakeis the onlyovenmodeavailablein SabbathMode.
Tostart SabbathMode,pressPUSHTOCLEAR.Theovenmodedisplaywill show'Sab Mode'with no backlight.The
temperaturedisplaywill show'---'; temperaturescanbe adjustedbut the displaywill not change.
in DoubleOvenmodels,differenttemperaturescanbe selectedfor upperandlower cavitiesby usingtheirtemperature
dials. Theovenmodedialfor the lower ovenmustbeturnedto TrueAeroto activatethe oven,althoughit will operateinBake.
Theovencanbeturnedoff at anytime duringSabbathModebyturningthe ovenmodeand temperaturedialsto the OFFposition,
but the ovenwill not revertto regularoperationuntilthe settime haselapsed.
When the set time haselapsedthe ovenwill revertto regularoperation.
Youcan exit SabbathModeat anytime by pressingthe PUSHTOCLEARbuttonandholdingit downfor 5 seconds.
How to Change from Fahrenheit (°F) to Celsius (°C) Temperature Display
Enterthe UserSelectmodeandturnthe ovenmodedialclockwiseuntil 'TempScale'appearsinthe display.
PressPUSHTOCLEARto selecteither 'C' or 'F' in the clockdisplay.
Selecting%' will convertthe numbersshownin the temperaturedisplayto degreesCelciuswhile selecting'F' will
showthe oventemperaturein degreesFarenheit
Chooseyour preferredoptionandpressthe CLOCKbuttonto activate.
USER SELECT OPTIONS
SHORT ALERT
Bydefaultsetting,ShortAlert isoff andthe audiblebeepwill soundcontinuouslyat the endof automaticcookingfunctionsuntil
cancelledby pressingthe PUSHTOCLEARbutton.
When Short Alert is On
Anaudiblebeepwill sound5 timesat the endof automaticcookingfunctionsandwhenthe timerfinishes. After 5 beeps,the
alert will stop,then repeatevery5 minutesuntilcancelledby pressingthe PUSHTOCLEARbutton.
The clockdisplaywill flashcontinuouslyuntilcancelled.
How to Activate Short Alert
Enterthe UserSelectmodeandturn the ovenmodedialclockwiseuntil'ShortAlert' appearsin the display.
PressPUSHTOCLEARto selecteither'ON' or 'OFF'in the clock display.
Chooseyourpreferredoptionandpressthe CLOCKbuttonto activate.
HOW TO CHANGE FROM 12 HOUR TO 24 HOUR TIME DISPLAY
Enterthe UserSelectmodeandturn the ovenmodedialclockwiseuntil'TimeMode' appearsin the display.
PressPUSHTOCLEARto selecteither'12H'or '24H'inthe clockdisplay.
Chooseyourpreferredoptionandpressthe CLOCKbuttonto activate.
HOW TO H/DE THE TIME IN THE CLOCK DISPLAY
Enterthe UserSelectmodeandturn the ovenmodedialclockwiseuntil'ShowClock'appearsin the display.
PressPUSHTOCLEARto selecteither'ON' or 'OFF'in the clock display.
Selecting'ON'will showthe time and'OFF'will hidethe time inthe clockdisplay.All otherfunctions,suchasTimer,will continue
to beshownas normalin the clockdisplaywhen the time is hidden.
Chooseyourpreferredoptionandpressthe CLOCKbuttonto activate.
HOW TO CHANGE THE LANGUAGE
Enterthe UserSelectmodeandturn the ovenmodedialclockwiseuntil'LangUSA'appearsinthe display.
PressPUSHTOCLEARto select'US'for AmericanEnglish,'EN'for English,'FR'for French,or 'ES'for Spanish.
Chooseyourpreferredoptionandpressthe CLOCKbuttonto activate.
HOW TO RESET THE OVEN
Thiswill resettheTemperatureScale,ShortAlert,TimeModeandShowClockto their defaultsettings.
SabbathModeandLanguagesettingswill remainunaffected.
Enterthe UserSelectmodeandturn the ovenmodedialclockwiseuntil'Reset'appearsin the display.
PressPUSHTOCLEARto select'OFF'in the clockdisplay,resettingthe ovento default settings.
Pressthe CLOCKbuttonto exit UserSelectMode.
COOKING CHARTS
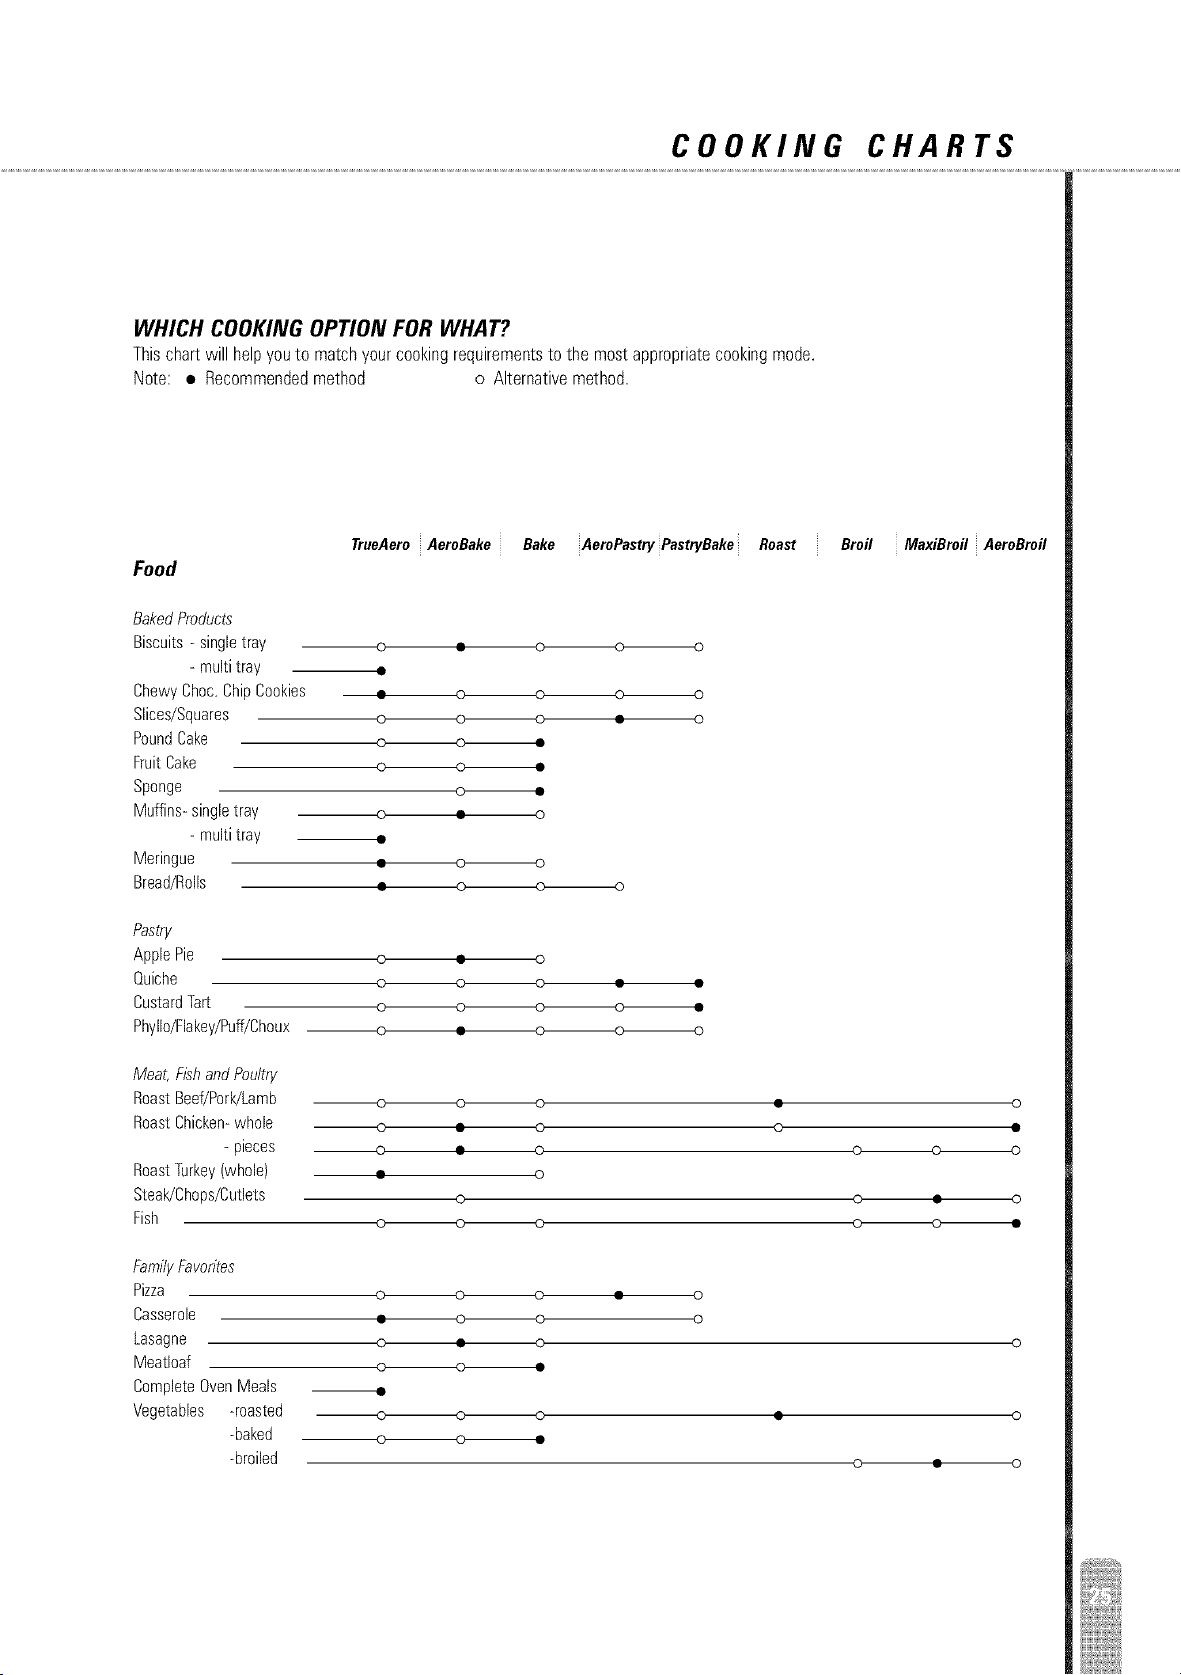
WHICH COOKING OPTION FOR WHAT?
Thischart will help youto match your cookingrequirementsto the most appropriatecooking mode.
Note: • Recommendedmethod o Alternative method.
Food
TrueAero AeroBake Bake AeroPastry PastryBake Roast
Broil MaxiBroil AeroBroil
BakedProducts
Biscuits- singletray
- multi tray
ChewyChoc.ChipCookies
Slices/Squares
PoundCake
FruitCake
Sponge
Muffins-singletray
- multi tray
Meringue
Bread/Rolls
_D
• 0
0-----------0
© • 0
• 0-------------0
Pastry
ApplePie
Quiche
CustardTarL
Phyllo/Flakey/Puff/Choux
0 • 0
c_ _
---0 •
Meat, Fbh andPoultry
RoastBeef/Pork/Lamb
RoastChicken-whole
- pieces
RoastTurkey(whole)
Steak/Chops/Cutlets
Fish
---0 • 0
--4:) • 0
• 0
0
0
o_
o • o
FamilyFavorites
Pizza
Casserole
Lasagne
Meatloaf
CompleteOvenMeals
Vegetables -roasted
-baked
-broiled
0 • 0
--Q
• o
©
• 0
0 • 0

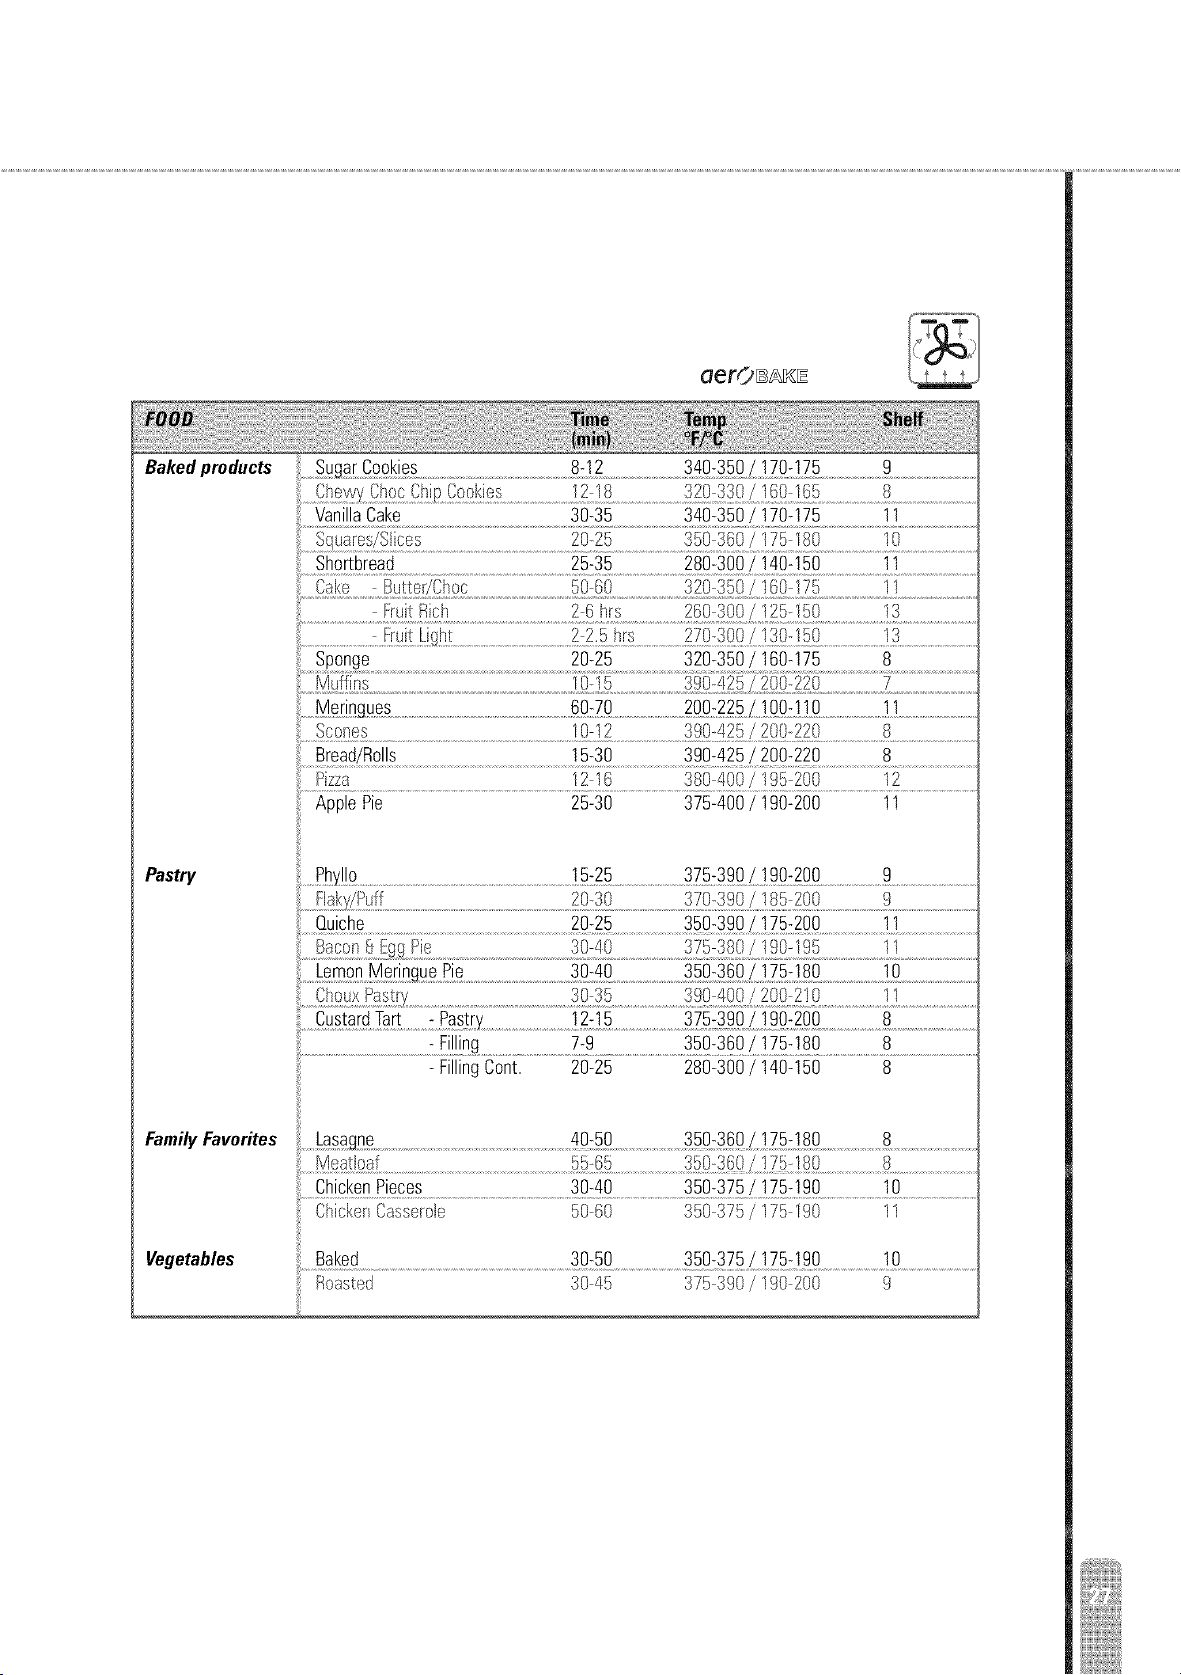
COOKING CHARTS
_Eaer©
Baked products
@:4o !2
............S_u£ ,s_!! c_......................................................................................._:_0 ...........................................s:!!!/:_!6!!_ .....................................s............................................................
Slqortbread.........................................22:30....................3007310_! 507155.................8..............................
..............................................ru!_{£.................................................................................................................4Q!#.............................................................................................
Muffins 10-15 390-410/200-210 8 %10
Scones !2:!5
Pastry
Ph_!!o ! 5:25 37 ! %:20g g
20-30 350-375/175-190 10
Chou×%stry _!:_4!_ ...................................10.....................................................
.... 14:16 375:390/190:200 11
: F,i!ling Z..............................................................._:360 L!75-_80 .........................................................................................................................................
- FillingCont. 20-30 310-330/ 155-165 11
FamilyFavorites ..............................................................................................................@:@......................................350:375/!Z5:!% ...................................!0........................................................
Meatloaf
Ch#!!#nBeces, 5[3:60 350375Z!Z5:!90 !0 .....................................
hickon Casserole 55 70 340375/170 190 10
Vegetables ............Bakec!...........................................................................................30@ ................................350:375/!75:_% ............................10..........................................
Roasl d 30 45 3753%/190 200 9
MULTI SHELF COOKING
Formultishelfcookingrememberto select TrueAero.
Multi shelfrecommendationsare listedafter the singleshelf recommendations.
aerO_
Bakedproducts
Pastry
FamilyFavorites
Vegetables
VanillaCake 30-35 340-350/ 170-175 11
......._! / [!cs.......................................................................................20:%..................................................................................!,0..............................................
.......Shonb!ead.....................................................................................................%:35.........................................280-300/!4q:!50............................................................................................
...................................................................................................................b(s..............................................................................................................
...........!!&![_? !0:! ............................................................g!/:422!!o:22o...................................................7..................................................................
.......Soon%..................................................................................................................!0 !7...............................................................................S.................................................
Bread/Rolls 15-30 390-425/ 200-220 8
.......!z_a......................................................................................................!2 ..................................3So ]%2Qo..............................]2..................................
ApplePie 25-30 375-400/ 1go-2go 11
PI)_!!Q...........................................................................................................................!5:25........................................375:390/!90:200 ...................................9................................................
Ja!_:,//_I!.............................................................................................................20:30..........................................2(,_0......................................_..............................................
......Ou!phe........................................................................................................................20:25.........................................75:2C_0.................................................................................
...... ...................................................................................._O{q..........................................0!9>......................................]!..............................................
........... ..............................................................3o:40................................................................................!o.............................................
.....q_!ouxs!t'/...............................................................................:%: ........................gO_!_;o,/2g!!:2]_........................],]........................
............................................................: F!lli%..................................................7:9..........................................35[]:360/ ..............................8.........................................
- FillingCont. 20-25 280-300/ 140-150 8
....!:a_a_ne 4o:5q
.......M_a!!oat........................................................................................................!_5:65...............................................................................8................................................
....... ......................................................................................30-([0.....................................35(31375/!75 19(]..............................!()........................................
Chicken Casserole 50 (50 350 375/175 190 1I
Roasted 30 45 375390/ 1gO200 9
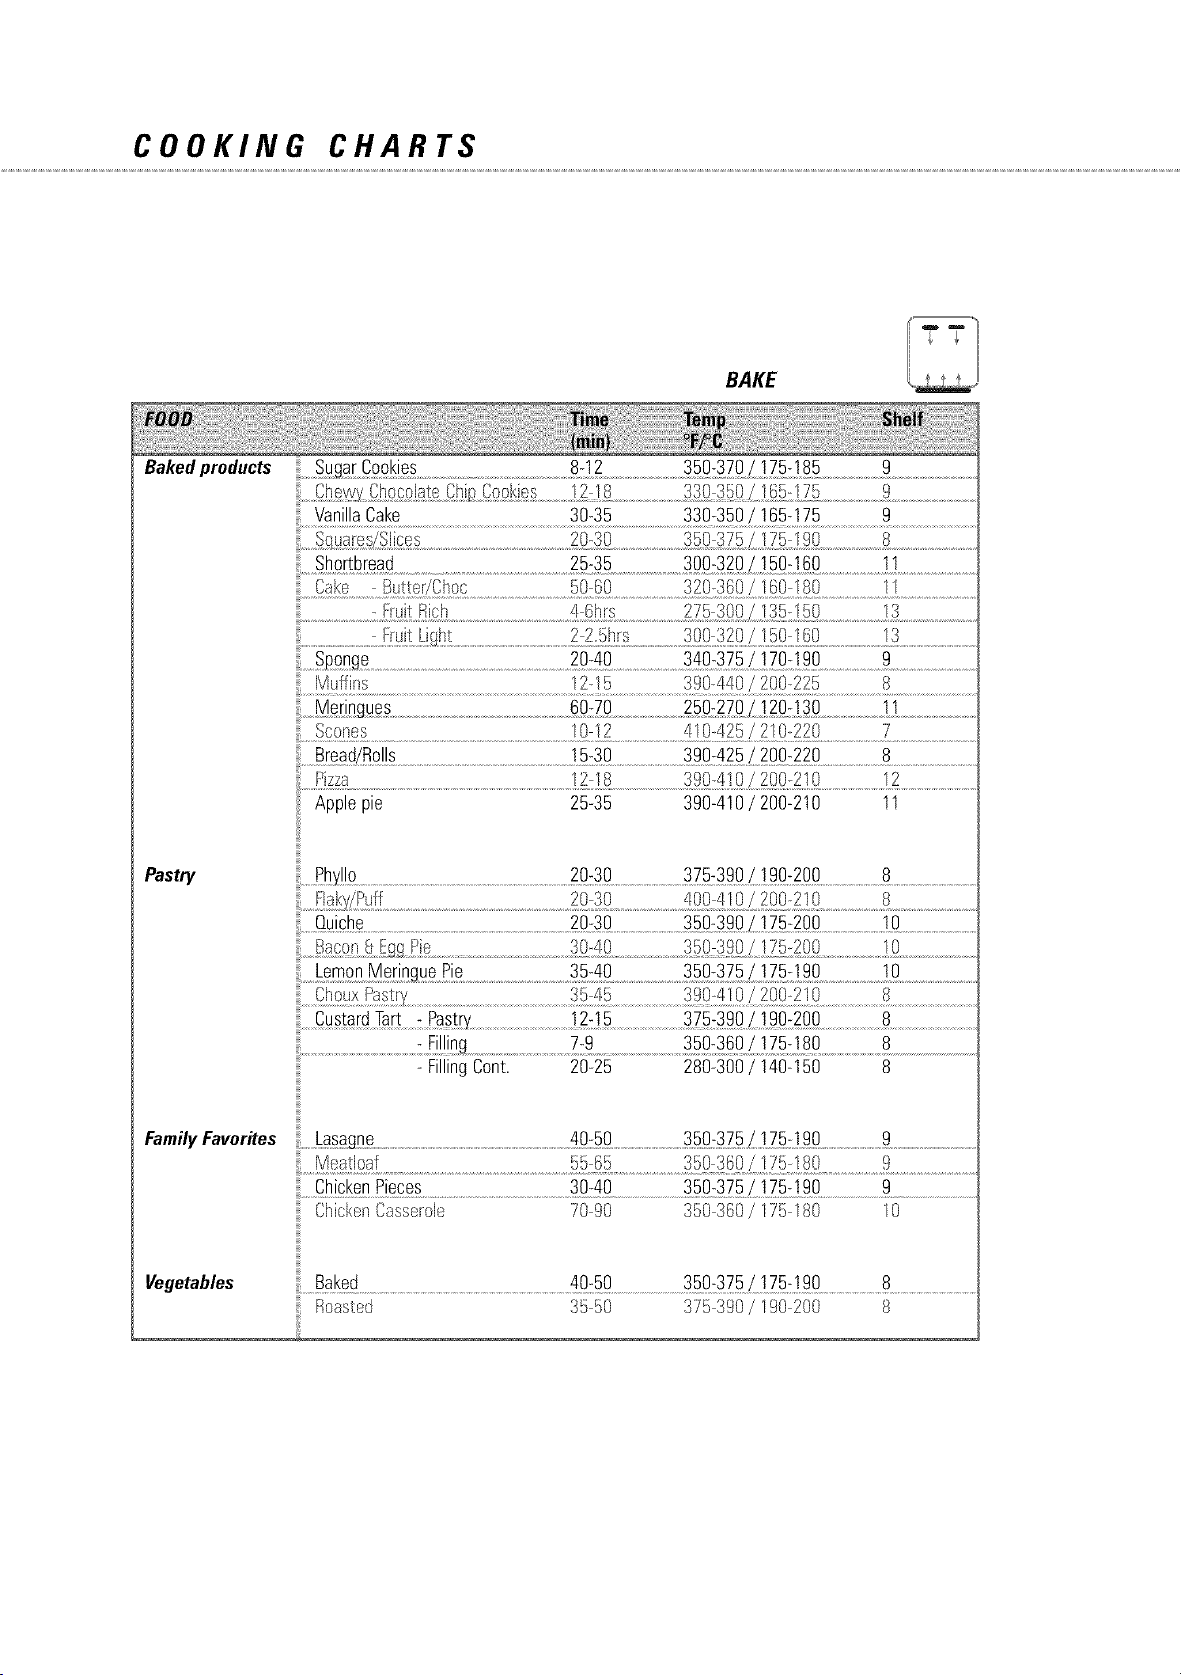
COOKING CHARTS
Baked products
BAKE
_!_:0 {_OSZ/!! s
.......Sho@r@ad...............................................................................................25-35.....................................................800 ....................................!]................................................
.............Ca!S:.......................Bu_er/Cbt_...........................................................................................................................................!!..............................................
.............................................................................................................................................................5Q......................................!_......................................................
...................................................................................................................28S_rs.................................................................................!s.............................................
Muffins 1215 390440 / 200225 8
.......M_i_g_ ........................................................................................................_:Z_..........................................._:_ZQ ..................................._!..............................................
.......S_o-_,_..................................................................................................................10 ...........................................0-220......................................l..................................................
.........Bread{Ro!!s......................................................................................................!5:30..........................................89D<425_ 200:220....................................8..................................................
Applepie 25-35 390-410/ 200-210 11
Pastry
Family Favorites
Vegetables
Pby!!_ _0:30......................................................................._..................................................
Q_i@g 20:30........................................350:39_L_Z5-20_.................................._ .........................................
CustardTart - Pastr_.........................................................12:15..........................................375:_9_L]g0:z@ ...................................8.................................................
Z:9 350@_(_Z5 180 ..............................................8.......................................
- FillingCont. 20-25 280-300/ 140-150 8
a#agnA 40-5_ _50-375Z !,75-]90
...............................................................................................................,6!i ............................................!/!r! .....................................9.................................................
ChickenPieces 30-40 350-375/ 175-190 9
ChbkenCasseroJ 70 90 350 360/175 I80 10
Baked 40-50 350-375/175-190 8
.......Roasted 35 50 375 390/ 190200 8

Baked products
oerOPA$YRY
12-15 320-330/160-165 9
Shortbread 20-25 270-280/ 130-140 9
Pizza 15 20 440475/225250 I0
Pastry
LemonMer=gueP,e15-20 340-360/1_0-I_0=
Baked products
PASTRY BAKE
10-15 320-330/ 160-165 9
Pastry
Pizza
I5 20 440 475/ 225250 8
Lemon Meringue Pie 15-20 340-360/170-180 8

COOKING CHARTS
BEEF
MAXI BROIL It BROIL .......
LAMB
PORK
CHICKEN
SAUSAGES
FISH
BEEF
iiiiiiii
iiiiiiii
iiiiiiii
iiiiiiii
iiiiiiii
iiiiiiii
iiiiiiii
iiiiiiii
iiiiiiii
iiiiiiii
M_atballs
10-15
I2 15
- Well done 20 25
Hi
Hi
Bacon 4-7 Hi 3
iiiiiiii
iiii
15-30 Hi
10-15 Hi 4
Fillets 8I 2 Hi 4
Wholo I5 20 Fii 4
aerO_O_L
LAMB
PORK
CHICKEN
........................................_ 8_a_......................................................................!_:_g........................................_g_:_40/898:2g_.................._.........................
Bacon 10 15 425 440/ 220 225 3
Whole 30_35min 340_360/ 170_180 9
30 50 350 375/ 175190 7
SAUSAGES ...............................................................................................................................................................!{]:!5..............................................................................!I.............................
FISH Fillets 8 12 Hi 4
Whole 1520 Hi 4
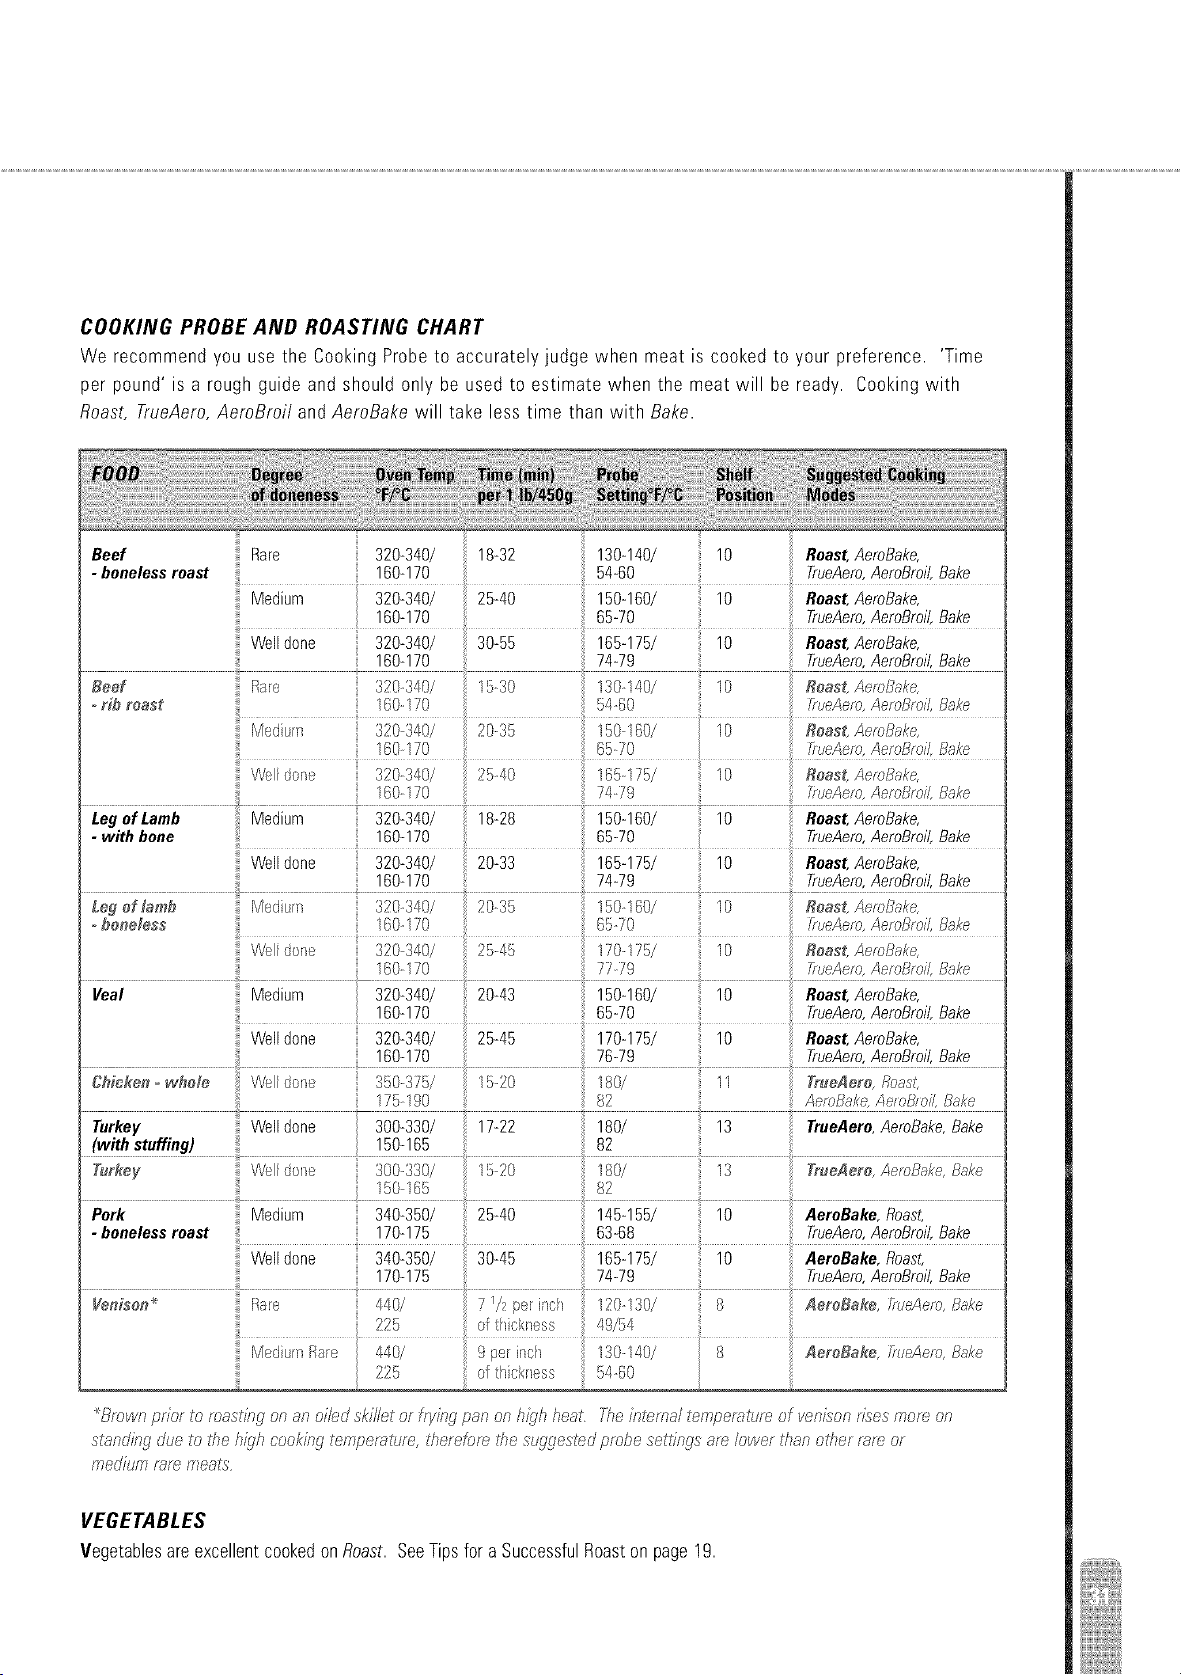
COOKING PROBE AND ROASTING CHART
We recommend you use the Cooking Probe to accurately judge when meat is cooked to your preference. 'Time
per pound' is a rough guide and should only be used to estimate when the meat will be ready. Cookingwith
Roast, TrueAero,AeroBroit andAeroBake will take less time than with Bake.
Beef
- boneless roast
Beef
orib roast
Rare
Medium
Welldone
Bare
Medium
320-340/
160-170
320-340/
160-170
320-340/
180-170
320340/
30-55 165-175/ 10 Roast,AeroBake,
74-79 TrueAero,AeroBroil,Bake
15-30 13O-140/ 1O Roast, AeroB;_ke,
5480 £,ueAem,AemBmiI,Bake
20-35 150-180/ 10 Raast, AemBake,
160110 65-70 TrueAero,AeroBro4Bake
Welldone 320_340/ 25-40 165q 75/ I0 Reas{ AemBake,
160-170 7479 ffaeAem,4eroBroi/,Bake
Leg oiLamb : Medium 320:340/ i8:28 i50:i60/ iO Roast,AeroBake,
- with bone 160-170 65-70 TrueAero,AeroBroil,Bake
We[[done 320-340/ 20-33 165-175/ 10 Roast, AeroBake,
160-170 74-79 TrueAero,AeroBroil,Bake
Leg of lamb Medium 320-340/ 20-35 150160/ 10 Roast, Ae/oBake,
oboneless 160-170 65-70 f,ueAem,AeroBro4Hake
\!,/elidone 320340/ 2545 1701/5/ I0 Runs{ AemBMe,
I60q 70 7779 _aeAem,/_eroBroi/,Bake
7
Veal Medium 320-340/ 20-43 150-160/ 10 Roast, AeroBake,
160-170 65-70 TrueAero,AeroBroil,Bake
Welldone 320-340/ 25-45 170-175/ 10 Roast, AeroBake,
160-170 76-79 TrueAero,AeroBroil,Bake
ii
C#icker_ow_ele Welldone 350_375/ 15-0 180/ 1I gr#eAere, Roast,
175 I90 8 ' /4emBake,ZemBmi/,Bake
Turkey Welldone 300-330/ 17-22 180/ 13 TrueAero,AeroBake,Bake
(with stuffing) _ 150-165 82
Turkey Wel[done 300-330/ 1520 180/ I3 ZrueAere, iLemBake,Bake
150185 82
Pork Medium 340-350/ 25-40 145-155/ 10 AeroBake,Roast,
- bonelessroast ..... 170-175 63-68 TrueAero,AeroBroil,Bake
Welldone 340-350/ 30-45 165-175/ 10 AeroBake,Roast,
170-175 74-79 TrueAero,AeroBroi/,Bake
Venison_ Bare 440/ 7//2 per inch 120-130/ 8 4ereBake, IruaAero,Bake
225 of thickness 49/54
Mad}urnBare 440/ 9 per }nch 130-140/ 8 AeraBake, fruMem, Bake
225 of thiekrass 5460
....Brownpriorto mastk_gonanoiledskilletor tryingpan onh{ghheat. i_heintoma/temperatureof venisonn{_esmornon
standbgdueto the hkjh cookbgtemperature,therM_mthe suggestedpmbe settingsam/owe_thano£he_mm or
mediummm mea_s.
VEGETABLES
Vegetablesare excellentcookedonRoast. SeeTipsfor a SuccessfulRoaston page 19.
CLEANING
Please read the following section to make sure that the correct cleaning is carried out to maintain your ovens appearance. Your
oven has been produced using several different finishes, due to this please follow the recommended cleaning instructions to
avoid permanent damage.
WARNING
_-_ To avoid electrical shock or burns, make sure that all oven controls are turned off. Only clean your
oven when it is cool. Do not use harsh / abrasive cleaning agents, waxes, pumice cleaners, polishes
or commercial oven cleaners to clean your oven.
CLEANING THE CONTROL PANEL, OVEN DOOR AND HANDLE
it maybeusefulto lockthe ovencontrolspriorto cleaning- seeControlPanelLockon page22 for details
BrushedStainlessSteel canbecleanedwith a commercialstainlesssteelcleaner,see'Warning'below,orwiped with a clean
dampclothanddriedwith a lintfree cloth Regularuseof a stainlesssteelcleanerwill reducefingerprintsandother marks Do
not useabrasivecleanersonstainlesssteel,as theywill permanentlydamagethe surface
iridium (Matt StainlessSteel}Thiseasycleansurfacerequiresonlya milddishwashdetergentandwarmwater. Rinseandthen
drywith a lint free cloth. Donot useabrasivecleanersoniridiumas they will permanentlydamagethe surface.
WARNING
[_ if you chooseto use a commercialstainlesssteel cleaner, please read the label to make sure it does
net containchlorinecompoundsas these are corrosiveand maydamagethe appearance of youroven.
Clean the stainlesssteel surfaceswith the grain,in a horizontalmotion.
CLEANING THE DOOR GLASS
Cleanthe exteriorglasssurfacewith a mild solutionof detergentandwarmwater. Usea glasscleanerto removeany smearsor
fingerprints.Drythe glassusinga soft lint free cloth. Theinteriorovendoorglasswill becleanedduringthe SeffCleancycle.
CLEANING THE PORCELAIN ENAMELLED SURFACES
Tile oveninteriorandinnerdoorlinersarefinishedin porcelainenamelandare cleanedduringthe SelfCleancycle.
WARNING
DO NOT USE ANY OVEN CLEANERS, OVEN CLEANING PRODUCTS OR
ABRASIVES ON THE PORCELAIN ENAMEL
Always remove excess grease and any soil from the interior of the oven and door before commencing
the Self Clean mode. Do not clean the door or cavity seals (gaskets} or use any oven cleaning
products on the seals. They are essential for a good seal and the efficient operation of the oven and
care should be taken not to rub, damage or move the seals.
CLEANING THE BROiLiNG SYSTEM AND OVEN SHELVES
Thebroilingsystemand ovenshelvescan becleanedusinga solutionof detergentandhot water, tf particularlysoiled,soakin a
sinkof hot soapywater to makecleaningeasier. Removeovenshelvesbeforestartinga 'SeffClean'. tf the ovenshelvesare left
inthe ovenduringSeffCleanmode,theywill permanentlydiscolor.
SELF CLEAN MODE
ALL ABOUT THE SELF CLEAN MODE
Thisovenfeaturesa pyrolyticSetfCteancyclethattakescareof the messandgrimethat is traditionallyassociatedwith ovencleaning.
DuringSerfC/eanthe ovenreacheshighertemperaturesthanit doesfor cookingandthis burnsoff and breaksdownsoiland grease
deposits. A smokeeliminatorandactiveventingsystemeradicatesodor. Theashresiduethat remainscansimplybe removedfrom the
coolovenwith a dampclothor sponge.A Self Clean cycle normallytakes about 3 hours. Onlyone caviltyin a doubleovencan
SeffC/eanat a time. When onecavity is in SeffC/eanmodethe othercavitycannotbeusedfor cooking.
Note : Duringinitialoperation,includingthe SeffC/eancycle,it is normalto experienceunpleasantodors. Thiswill diminishwith use.
Heat,odorsandsmallflame-upsare normalduringthe cleaningcycle. Theextentof thesewill dependonthe amountof soil buildupin
the oven. If youexperiencea persistentflare-ups,turnthe ovenoffandallow it to cool,removethe food soilandthen restartthe Serf
C/eancycle.
Important Safety Instructions
Wipe up anylargefood spills orgreasedepositswith papertowels inorderto decreasesmokeand odors.
Smallamountsof harmfulchemicalsaregivenoff inthe SeffC/eancyclefrom insulationandfood decomposition.Significant
exposureto thesesubstancescancausecanceror reproductiveharm. Ventingwith anextractorhoodoropenwindowandwiping
outexcessfood spillspriorto a SeffC/eancan minimizeexposure.
De not useovencleaners.No commercialovencleaner,ovenlinerorprotectivecoatingof anykindshouldbe usedinoraroundany
partof the oven.
BeforestartingaSeffC/eancycle, removethe three-piecebroilingsystem,anycookwareandthe ovenshelves. Donot useyouroven
to cleanmiscellaneousparts.
De notcleanthe door orcavityseal,or useanyovencleaningproductsonthe doorseal. It is essentialto the efficientoperationof the
ovenandcare shouldbetakennotto rub,damageor movethe seal.
Cleanonlypartsrecommendedin thisUserGuide.
Using the Self Clean Mode
Selectthe SetfCteanmodebyturningthe ovenmodedial. 'Self Clean'will appearinthe display.
Selectthe maximumtemperatureusingthe temperaturedial, 'go0' will appearin the displayandthis will changeto i whenthe
cycle begins.
In the clockdisplay'DoorLock'and 'Clean'will showandthe time remainingwill countdown.
Foryour safetythe doorlockwill automaticallyactivateoncethe cleanmodeandtemperaturehasbeenselected.
At the end of the SeffC/eancycle,the doorwill unlockandthe 'DoorLock'displaywill disappear.'Clean'andthe '0.00' will flashinthe
clockdisplayand'CleanEnd'in the modedisplayuntilthe ovenis returnedto manualoperation- Todothis turnthe ovenmodeand
temperaturedialsto the OFFposition.
To cancelthe Se/fC/eanmodebeforeit hasfinished,turnthe ovenmodeandtemperaturedialsto the OFFposition. 'CleanCool'will
appearinthe ovenmodedisplayandthe doorwill remainlockeduntilthe ovenhascooledto a safetemperature.Donot turn the
power to the applianceoff as the fans are necessaryto coolthe oven. If the ovenis coolor belowthe safetemperature
it will returnto normaloperationandthe clockdisplaywill showthe time of day.
At the completionof the self-cleancycle,youwill noticegreyash depositedinsidethe oven. Theamountof ash inthe ovenis
dependenton the amountof soilpresentin the ovenbeforeit was cleaned. Whenthe ovenis completelycooled,the bulkof
the ash is easilyremovedwith a smallbrushor drycloth, thenwipe out the ovenwith acleandampclothanddrywith a clean
lint-freecloth.
Note : Pleasecheckthe ovendooranddoorglassarecompletelycold beforewipingupanyash.
SELF CLEAN MODE
Short Self Clean Cycle
A shorterSelfCleancyclecan beselectedif the ovenis onlylightlysoiled.
Selectthe SeffCleanmodebyturningthe ovenmodedial. 'Self Clean'will appearinthe display.
Selectthe maximumtemperatureusingthe temperaturedial.
While '000' is showninthe display,pressthe COOKTIMEbutton. 'CookTime','Auto'andthe colonwill flash.
Rotatethe SETTINGSELECTORto reducethe time, this canbeanywherebetween2and3 hours.
Pressthe COOKTiME buttonagainor wait 8 secondsto adoptthe settingand start the SeffCleancycle. Theclock displaywill showthe
time remaining.
Double Oven Models
Onlyonecavitycan bein the SelfCleanmodeat a time. While onecavityis in SelfCleanmodethe othercavitycannotbeused.
Self Cleaning - Delayed Start
YourAeroTechTM ovencanbe set to SelfCleanat yourconvenience.
Checkthe clockshowsthe correcttime of day.
Selectthe SeffCleanmodebyturningthe ovenmodedial,'SelfClean'will appearin the display.
Selectthe maximumtemperatureusingthe temperaturedial.
While '000' is showninthe display,pessthe STOPTIMEbutton.
Set the time youwant the ovento finish the SeffCleancycleby rotatingthe SETtNGSELECTOR.tf there is time to wait beforethe
SeffCleancyclestarts'DelayClean'will appearin the clockdisplay
When the ovenstartsto SeffClean'Clean'and'DoorLock'will appearinthe displayandthe time remainingwill count down.
TROUBLE SHOOTING
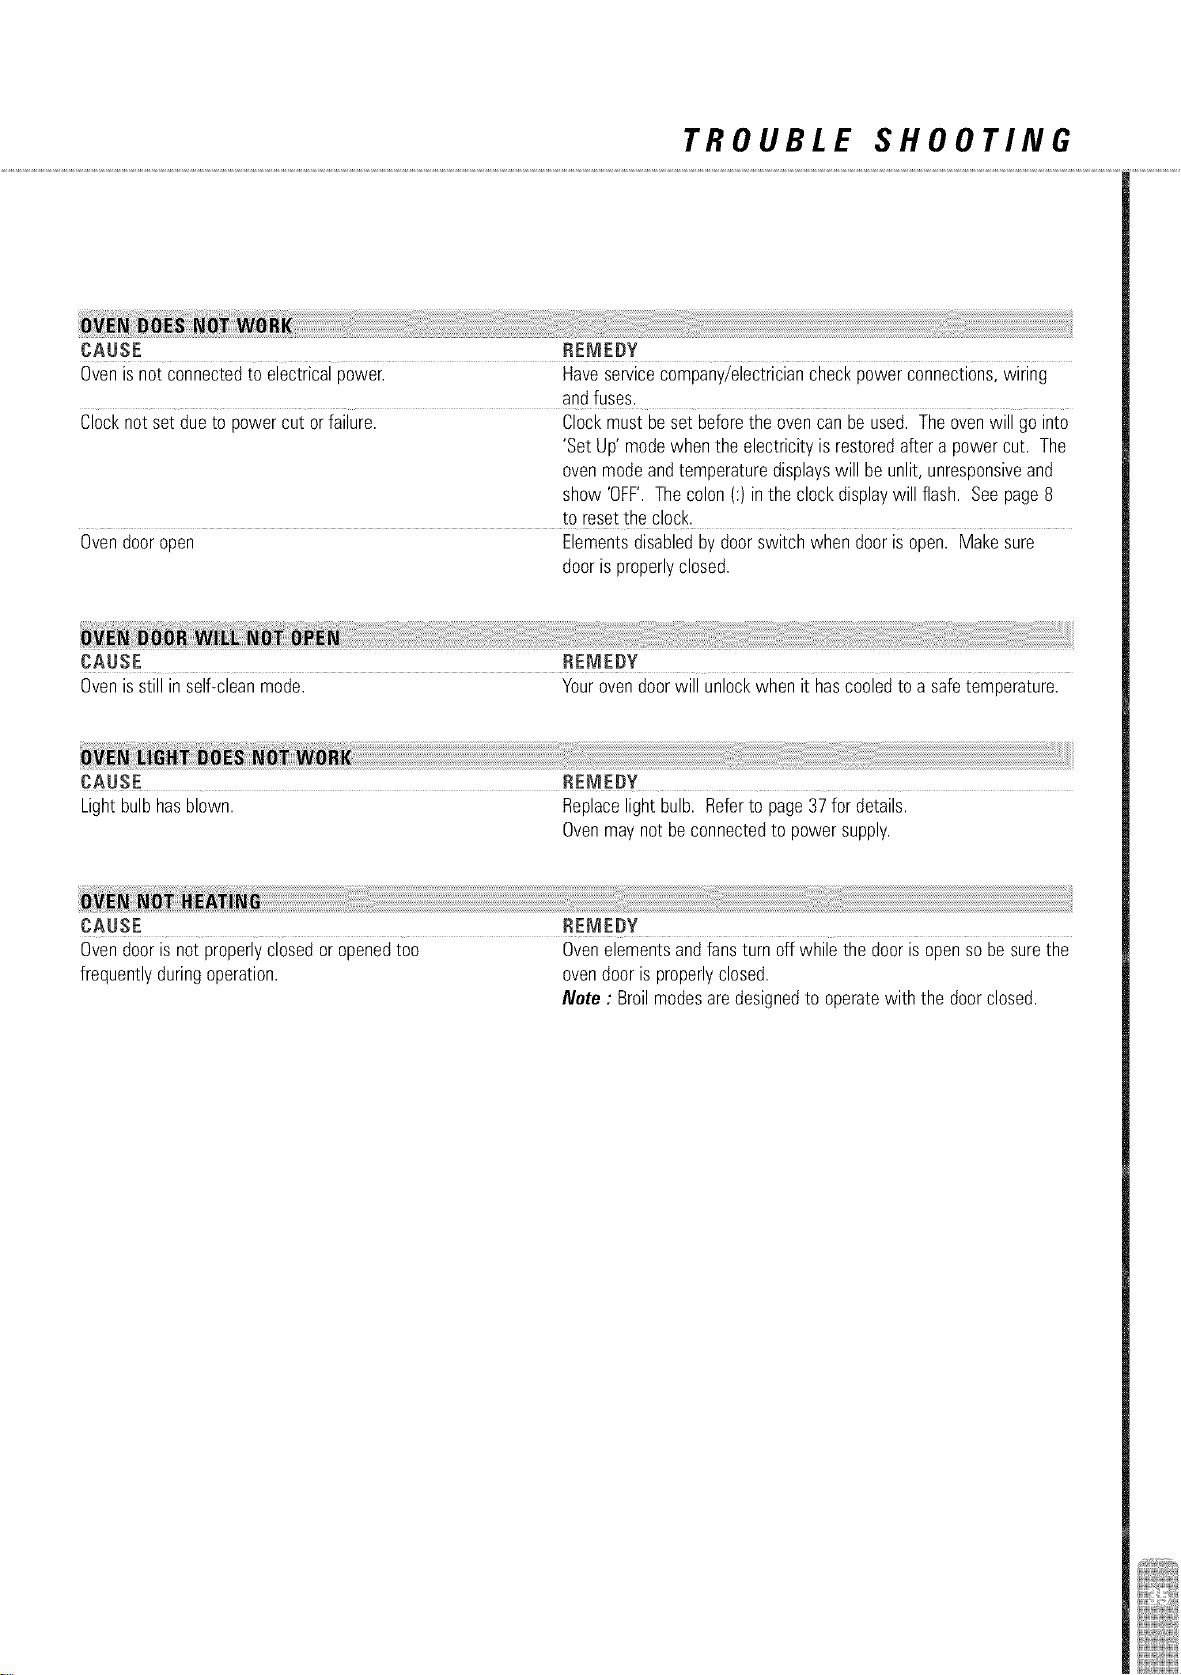
CAUSE REMEDY
Oven is not connected to electrical power. Have service company/electrician check power connections, wiring
and fuses.
Clock not set due to power cut or failure. Clock must be set before the oven can be used. The oven will go into
'Set Up' mode when the electricity is restored after a power cut. The
oven mode and temperature displays will be unlit, unresponsive and
show 'OFF'. The colon (:) in the clock display will flash. See page 8
to reset the clock.
Oven door open Elements disabled by door switch when door is open. Make sure
door is properly closed.
CAUSE REMEDY
Ovenis still in self-cleanmode. Yourovendoorwill unlockwhen it hascooledto a safetemperature.
CAUSE REMEDY
Lightbulbhasblown. Replacelight bulb. Referto page37for details.
Ovenmaynot beconnectedto power supply.
CAUSE REMEBY
Ovendooris not properlyclosedor openedtoo Ovenelementsandfansturn off while the dooris openso be surethe
frequentlyduringoperation, ovendooris properlyclosed.
Note : Broilmodesare designedto operatewith the doorclosed.
TROUBLE SHOOTING
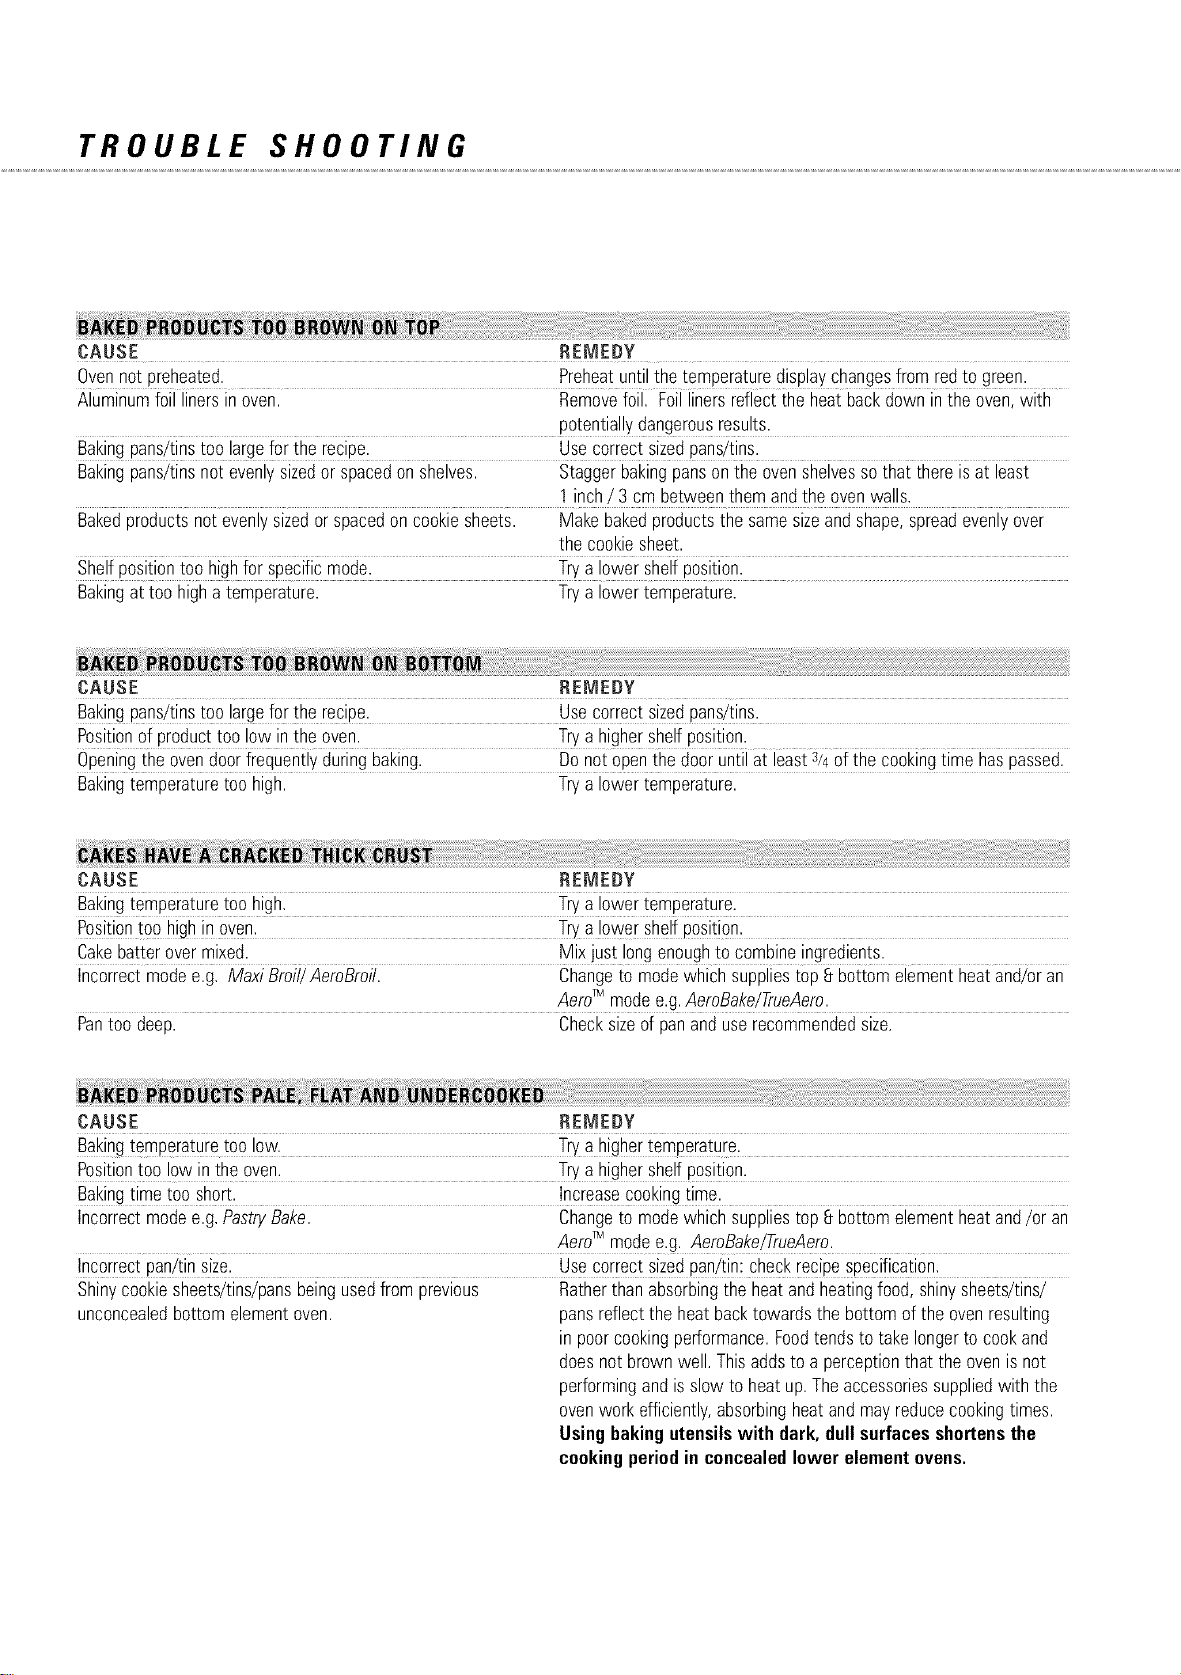
CAUSE REMEDY
Ovennot preheated. Preheatuntilthe temperaturedisplaychangesfrom redto green.
Aluminumfoil linersinoven. Removefoil, Foillinersreflectthe heatbackdown inthe oven,with
potentiallydangerousresults.
Bakingpans/tinstoo largefor the recipe. Usecorrectsizedpans/tins.
Bakingpans/tinsnot evenlysizedor spacedonshelves. Staggerbakingpanson the ovenshelvesso that thereis at least
1 inch/ 3 cm betweenthemandthe ovenwalls.
Bakedproductsnot evenlysizedor spacedon cookiesheets. Makebakedproductsthe samesizeand shape,spreadevenlyover
the cookiesheet.
Shelfpositiontoo highfor specificmode, Trya lower shelfposition,
Bakingat too highatemperature. Trya lowertemperature,
CAUSE REMEDY
Bakingpans/tinstoo largefor the recipe. Usecorrectsizedpans/tins.
Positionof producttoo low inthe oven. Trya highershelfposition.
Openingthe ovendoorfrequentlyduringbaking. Do not openthe door untilat least 3/4of the cookingtime haspassed.
Bakingtemperaturetoo high. Trya lowertemperature.
CAUSE REMEDY
Bakingtemperaturetoo high, Trya lowertemperature.
Positiontoo highin9yen: Trya !owersh#!fposition:
Cakebatterover mixed. Mix just longenoughto combineingredients.
Incorrectmodee.g, MaxiBroit/AeroBro#. Changeto modewhich suppliestop 8 bottomelementheatand/oran
AerorMmodee.g.AeroBake/TrueAero.
Pantoo deep. Checksizeof pananduserecommendedsize.
CAUSE REMEDY
Bakingtemperaturetoo low. Trya highertemperature.
Positiontoo low inthe oven. Trya highershelfposition.
Bakingtimetoo short. Increasecookingtime.
Incorrectmodee.g,PastryBake. Changeto modewhich suppliestop 8 bottomelementheatand/or an
Aero TM modee.g. AeroBake/TrueAero.
Incorrectpan/tinsize. Usecorrectsizedpan/tin:checkrecipespecification,
Shinycookiesheets/tins/pansbeingusedfromprevious Ratherthan absorbingthe heatandheatingfood,shinysheets/tins/
unconcealedbottom elementoven. pansreflectthe heat backtowardsthe bottom of the ovenresulting
in poorcookingperformance.Foodtends to take longerto cookand
doesnot brownwell. Thisaddsto a perceptionthat the ovenis not
performingandis slow to heatup. Theaccessoriessuppliedwith the
ovenworkefficiently,absorbingheatandmayreducecookingtimes.
Usingbakingutensilswith dark, dull surfacesshortensthe
cookingperiodin concealedlower elementovens.
CAUSE REJVlEDY
Bakingtemperaturetoolow. Tryahighertemperature.
Openingthedoortooearlyinbaking. Donotopenthedooruntilatleast3/4ofthecookingtimehaspassed:
asuddenburstofcoldaircanmakecakessinkinthemiddle.
Bakingtimetooshort. Increasecookingtime.
Proportionsofingredientsincorrect. Checkrecipe.
CAUSE REMEDY
Shelfpositiontoolow. Tryahighershelfposition,
Temperaturetoolow. Tryahighertemperature.
Bakingtinthewrongsize. Usepan/tinsizestipulatedinrecipe.Bakingtimevariesnotonlywith
oventemperatureandbakingutensilmaterialbutalsobyutensilsize.
Incorrectmodee.g.PastryBake. Tiy changingto anAeror_model Aero_ modesspeedupcookingand
distributeheat moreevenly;theyalso increasethe rateof browning.
FAULT CODES
If afault occurs,the ovenwill 'beep'everysecondanda faultcodewill appearinthe clockdisplayas a letter'F' with a numberafter it.
Dependingonthe natureof the fault, it may be possibleto clearthe displayby pressingthe PUSHTOCLEARbutton. If the faultcode
andcontinuous'beep'cannotbeclearedthisway, notedown the faultcodeandswitchthe ovenoff at the mainpowersupply. In either
event,pleasecallyourFisherBPayketAuthorizedServiceCenterandadvisethem of the fault code. This informationwill help them to
resolvethe problem. If youhaveanyquestionsaboutoperatingthe product,pleasecontact our FisherB PayketCustomerCareCenter.
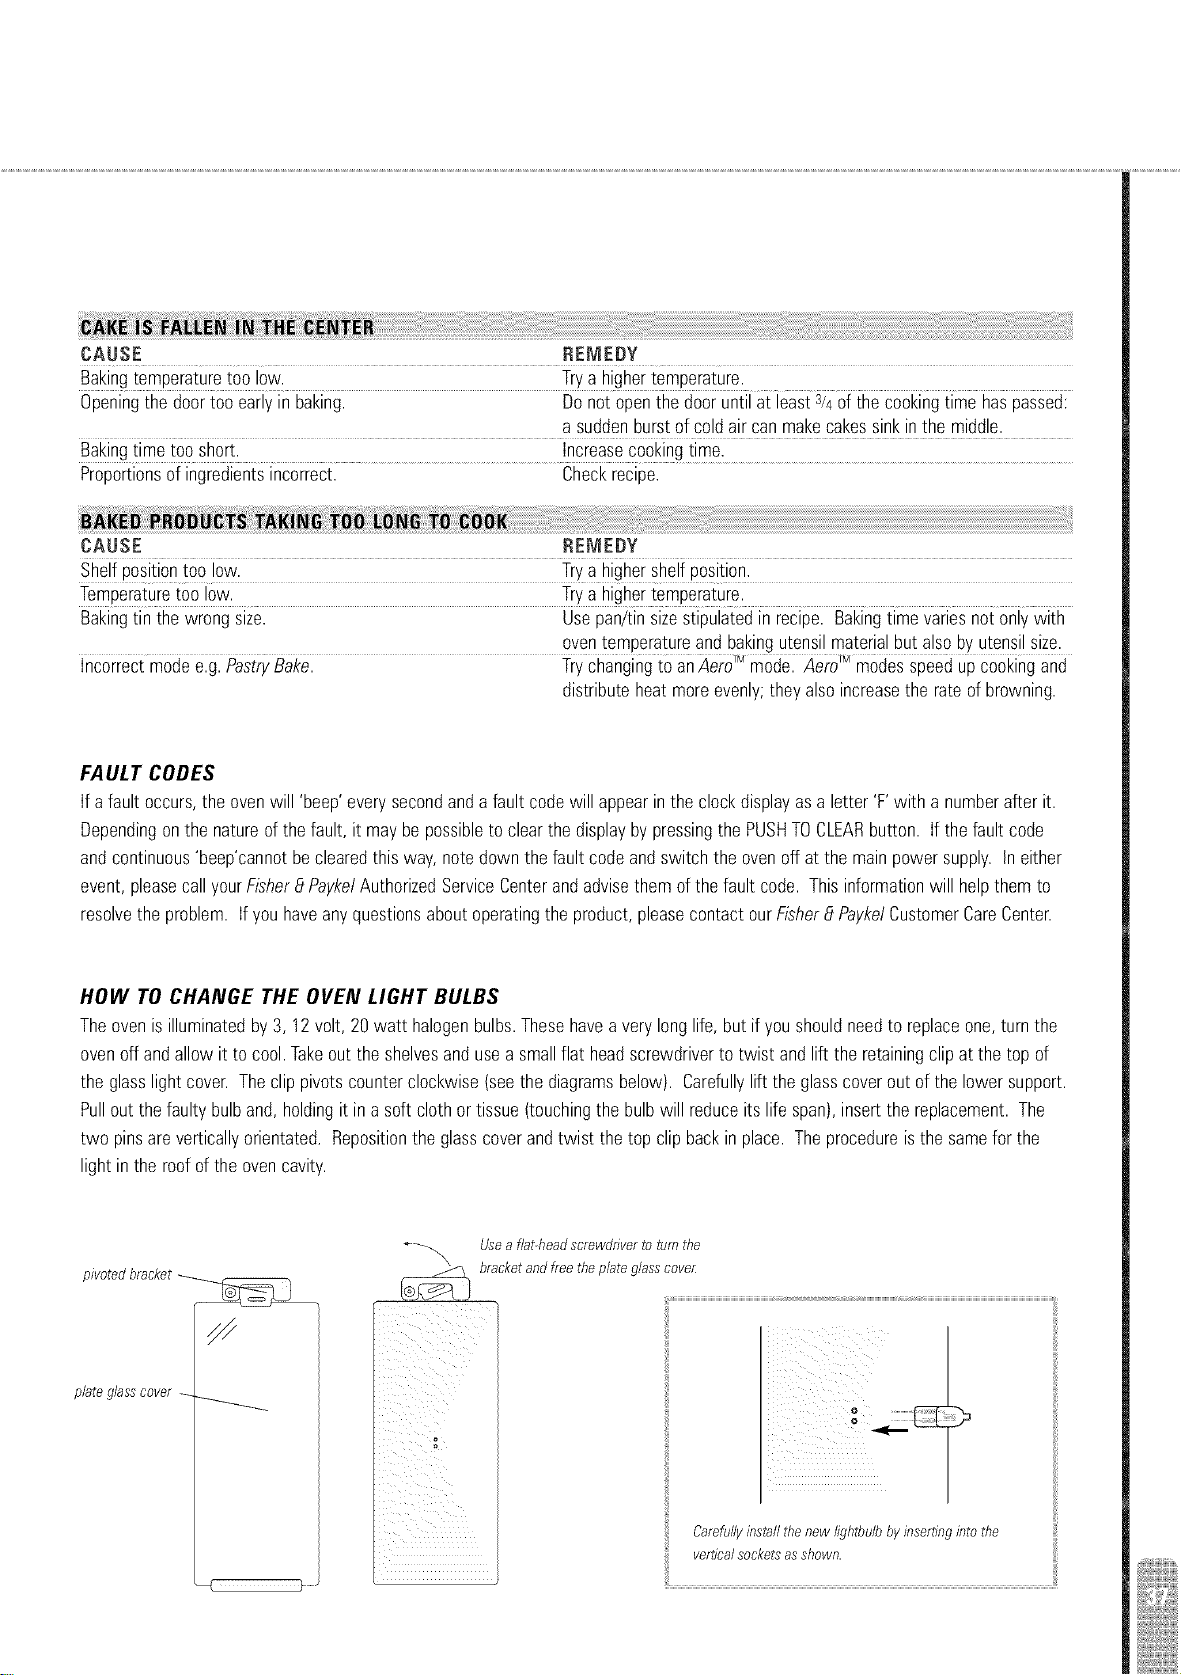
HOW TO CHANGE THE OVEN LIGHT BULBS
Theoven is illuminatedby 3, 12volt, 20watt halogenbulbs.Thesehavea verylonglife,but if you shouldneedto replaceone,turnthe
ovenoff andallow it to cool.Takeout the shelvesandusea smallflat headscrewdriverto twist andlift the retainingclip at the top of
the glasslight cover. Theclip pivotscounterclockwise(seethe diagramsbelow}. Carefullylift the glasscoverout of the lower support.
Pullout the faultybulb and,holdingit in a soft clothortissue (touchingthe bulbwill reduceits life span},insertthe replacement.The
two pinsareverticallyorientated. Repositionthe glasscoverandtwist the top clip backin place. Theprocedureisthe samefor the
light in the roofof the ovencavity.
plateglasscover
} ...........
_ se a flat-headscrewdriverto turn the
bracketand free the plate glasscover
ill
i i
i iii
Carefullyinstallthe new/ightbu/b byinsertingintothe
verticalsocketsasshown.
LIMITED WARRANTY FOR USA AND CANADA
Whenyoupurchaseany new Fisher8 PaykelwhitewareProductfor personalor consumeruseyouautomaticallyreceiveatwo year
LimitedWarrantycoveringpartsandlaborfor servicingwithinthe 48 mainlandUnitedStates,Hawaii,Washington,D.CandCanada.In
Alaskathe LimitedWarrantyis the sameexceptthat youmust payto shipthe Productto the serviceshopor the servicetechnician's
travelto your home. Productsfor usein Canadamust be purchasedthroughthe Canadiandistributionchannelto ensureregulatory
compliance.
If the Productis installedina motorvehicle,boat orsimilarmobilefacility,youreceivethe sametwo yearLimitedWarranty,but you
must bringthe vehicle,boat or mobilefacilitycontainingthe Productto the serviceshopat yourexpenseor paythe servicetechnician's
travelto the locationof the Product.
FISHER _t PAYKEL UNDERTAKES TO:
Repairwithout cost to the ownereitherfor materialor laboranypart of the Product,the serialnumberof whichappearsonthe Product,
whichis foundto bedefective. In Alaska,you mustpayto shipthe Productto the serviceshoporfor the servicetechnician'stravelto
yourhome. If the Productis installedina motorvehicle,boator similarmobilefacility,youmust bringit to the serviceshopat your
expenseor payfor the servicetechnician'stravelto the locationof the Product. Ifwe are unableto repaira defectivepartof the
Productafter a reasonablenumberof attempts,at ouroptionwe mayreplacethe part or the Product,or we mayprovideyou afull
refundof the purchasepriceof the Product(not includinginstallationorother charges).
Thiswarrantyextendsto the originalpurchaserandanysucceedingowner of the Productfor productspurchasedfor ordinarysingle-
familyhomeuse.
All serviceunderthisLimitedWarrantyshallbe providedby Fisher8 Paykelor its AuthorizedServiceAgentduringnormalbusiness
hours.
HOW LONG DOES THIS LIMITED WARRANTY LAST?
Ourliabilityunderthis LimitedWarrantyexpiresTWOYEARSfrom the date of purchaseof the Productbythe first consumer.
Ourliabilityunderanyimpliedwarranties,includingthe impliedwarrantyof merchantability(anunwrittenwarrantythat the Productis fit
for ordinaryuse)alsoexpiresONEYEAR(orsuchlongerperiodas requiredby applicablelaw)from the dateof purchaseof the Product
by the first consumer. Somestatesdo not allow limitationson how longan impliedwarrantylasts,so thislimit onimpliedwarranties
maynot applyto you.
THIS WARRANTY DOES NOT COVER:
A. Servicecallsthatare not relatedto anydefectinthe Product.Thecost of a servicecall will bechargedif the problemis notfound
to bea defectof the Product. Forexample:
1. Correctfaulty installationof the Product.
2. Instructyou howto usethe Product.
3. Replacehousefuses, resetcircuit breakers,correcthousewiringor plumbing,or replacelight bulbs.
4. Correctfault(s)causedby the user.
5. Changethe set-upof the Product.
6. Unauthorizedmodificationsof the Product.
7. Noiseor vibrationthat is considerednormal,for example,fan sounds,ventingnoisesor userwarningbeeps.
8. Correctingdamagecausedby pests,for example,rodents,insectsetc.
B. Defects caused by factors other than:
1. Normal domestic use or
2. Use in accordance with the Product's User Guide.
C. Defects to the Product caused by accident, neglect, misuses, fire, flood or Act of God.
D. The cost of repairs carried out by non-authorized repairers or the cost of correcting such unauthorized repairs.
E. Travel Fees and associated charges incurred when the product is installed in a location with limited or restricted access. (I.e. airplane
flights, ferry charges, isolated geographic areas).
F. Normal recommended maintenance as set forth in the Product's User Guide.
If you haveaninstallationproblemcontactyourdealeror installer.Youareresponsiblefor providingadequateelectrical,exhaustingand
otherconnectionfacilities.
We are not responsible for consequential or incidental damages (the cost of repairing or replacing other property damaged if the
Product is defective or any of your expenses caused if the Product is defective). Some states do not allow the exclusion or
limitation of incidental or consequential damages, so the above limitation or exclusion may not apply to you.
HOW TO GET SERVICE
Please read your User Guide. If you then have any questions about operating the Product, need the name of your local Fisher 8 Paykel
Authorized Service Agent, or believe the Product is defective and wish service under this Limited Warranty, please contact your dealer or
call us at:
TOLL FREE 1-888-9-FNP-USA (1-888-9-367-872) Canadaalso or contact us through our web site: www.usa.fisherpaykel.com
Youmaybe requiredto providereasonableproofof the date of purchaseof the Productbeforethe Productwill beservicedunderthis
LimitedWarranty.
COMMERCIAL USE
If youareusingthe Productina commercialsetting(anyuseotherthana singlefamilydwelling),we agreeto repairor replace,without
cost to youfor partsonly,anydefectiveparts,the serialnumberof whichappearsonthe Product.Ourliabilityfor theserepairsexpires
ONEYEARfromthe dateof originalpurchase.
At ouroptionwe mayreplacethe part orthe Product,orwe mayprovideyouafull refundof the purchasepriceof the Product(not
includinginstallationor othercharges). Allserviceunderthis LimitedWarrantyshallbeprovidedby Fisher8 Paykelor its Authorized
ServiceAgentduringnormalbusinesshours.
NO OTHER WARRANTIES
ThisLimitedWarrantyis the completeandexclusiveagreementbetweenyouand usregardinganydefect inthe Product.Noneof our
employees(orourAuthorizedServiceAgents) is authorizedto makeanyadditionor modificationto this LimitedWarranty.
WARRANTOR: FISHER _t PAYKEL APPLIANCES, INC.
If you needfurtherhelpconcerningthis LimitedWarranty,pleasecall usat the abovenumber,orwrite to:
Fisher8 PaykelAppliances,Inc.
27 Hubble,Irvine,CA92618
This LimitedWarranty givesyou specific legalrights, and you may also haveother rights which vary from state to state.

WARRANTY FOR NEW ZEALAND It AUSTRALIA
Whenyoupurchaseany new Fisher8 PaykelProductyouautomaticallyreceivea two yearManufacturer'sWarrantycoveringpartsand
labourfor servicingwithinNew Zealand,Australia,UnitedKingdomandIreland.
FISHER [:t PAYKEL UNDERTAKES TO
Repairor,at its option,replacewithout cost to the ownereitherfor materialor labouranypart of the Product,the serialnumberof which
appearsonthe Product,whichisfound to bedefectivewithinTWO YEARSof the date of purchase.
THIS WARRANTY DOES NOT COVER
A. Servicecallsthat arenot relatedto anydefect inthe Product.Thecost of a servicecall will be chargedif the problemis notfound
to bea Productfault.
Forexample:
1. Correctthe installationof the Product
2. Instructyouhow to usethe Product.
3. Replacehousefusesor correcthousewiring or plumbing.
4. Correctingfault(s)causedby the user.
B. Defectscausedbyfactorsotherthan:
I. Normaldomesticuseor
2. Use inaccordancewith the ProductsUserGuide.
C. Defectsto the Productcausedbyaccident,neglect,misuseor Act of God.
D. Thecost of repairscarriedout bynomauthorisedrepairersor the cost of correctingsuchunauthorisedrepairs.
E. Normalrecommendedmaintenanceas set out in the ProductsUserGuide.
SERVICEUNDERTHISMANUFACTURER'SWARRANTYMUST BEPROVIDEDBY FISHER,_ PAYKEL.SUCHSERVICESHALL
BEPROVIDEDDURINGNORMALBUSINESSHOURS. THIS WARRANTYCERTIFICATESHOULDBESHOWN WHEN
MAKINGANY CLAIM.
Note: This Warranty is an extra benefit and does not affect your/egat rights.
PROOF OF PURCHASE
Proofof originalpurchasedateis requiredto obtainserviceunder
warranty. Attachyoursalesreceiptorcancelledcheckhere.
Writedownthe model,serialnumberandpurchaseinformation
below.
PRODUCT DETAILS
FISHER_ PAYKELLTD
Model/SerialNo.
Dateof Purchase
Purchaser
Dealer
Address
Please keep this User Guide in a safe place.
Do not return to Fisher [t PaykeL
CUSTOMER CARE
Beforeyoucallfor serviceorassistance,checkthe thingsyoucan doyourself. Referto thisUserGuideandcheck...
I.
2.
Yourproductis correctlyinstalled.
Youare familiarwith its normaloperation.
If aftercheckingthesepointsyou stillneedassistance,pleasereferto the contactdetailslistedbelow.
If youdo callor write, pleaseprovide:name,address,modelnumber,serialnumber,dateof purchaseanda completedescriptionof the
problem.Thisinformationis neededin orderto betterrespondto yourrequestfor assistance.
In the USAff yeu need assistance...
Foryour localFisher_ PayketAuthorizedServiceAgent,pleasecall or write
Toll Free:1 8889 FNPUSA(I 888 9 367872)
PostalAddress: Fisher 8 PaykelAppliances Inc., 27 Hubble, Irvine, CA92618
or contactusthroughourwebsiteat www.usa.fisherpaykel.com
In Canadaff youneed assistance...
Callthe Fisher_ PayketCustomerCareCenterandtalkwith oneof ourCustomerCareConsultants,
Toll Free:1 877744 7400
In New Zealand ff youneed assistance...
CallyourFisher_ Payketretailerwho is trainedto provideinformationon yourproduct,or if we can be of anyfurther help,pleasecontact
ourCustomerCareCentre,
TollFree:0800FPCAREor 0800 37 2273
PostalAddress:POBox58550,Greenmount,Auckland.
If youneed service...
Fisher_ Paykethasa networkof independentFisher_ PayketAUTHORISEDSERVICECENTRESwhosefully trainedtechnicianscancarry
out anyservicenecessaryonyourproduct.Yourdealeror ourCustomerCareCentrecan recommendanAUTHORISEDSERVICECENTRE
in yourarea.
In Australiaff youneed assistance...
Callthe Fisher_ PaykelCustomerCareCentreandtalkto oneof our consultants.
TollFree:t300 650 590fromanywherewithinAustralia
PostalAddress: POBox798Cleveland,QLD4163.
If youneed service...
Fisher_ PayketAustraliaPtyLtd hasa networkof independentFisher_ PayketAUTHORISEDSERVICECENTRESwhosefully trained
technicianscancarryout anyservicenecessaryon yourproduct.YourStateOfficeor ourCustomerCareCentrecan recommendan
AUTHORISEDSERVICECENTREin yourarea.

CopyrightReserved © Fisher_ Payke12003.
Theproductspecifications_nth_sbookletapplyto the spec_ftcproductsandmodelsdescnbedat the dateof _ssue.
Underourpohcyof continuousproduct_mprovement,thesespec_%ahonsmaychangeat anyttme.
Youshouldthereforecheckw_thyourDealerto ensureths bookletcorrectlydescnbesthe productcurrentlyavailable.
USA Fisher_ PaykelAuthorizedServiceAgent, 1 888 9 FNP USA (1 888 9 367 872)
www. usa. fisherpaykel, com
Dateof Issue July 2003 PartNo.545619C