Loading ...
Use & Care _ ®
Guide
APPLY FOR THE FOLLOWING MODELS:
NWR2061Q, NWR2601G, NWR0061Q, NWR0001G,
NWR20601 D, NWROO01D
Nominal Technical Specifications
Nominal Current 6,0 A
Frecuency 60 Hz
Voltage 1t 0- t27V-
Manufactured by Industries Acros Whirlpool S.A. de C.V.
Antigua carretera a Rome km 9
Col. Milagro
Apodaca N.L.
Mexico, 66600
Phone (01-81) 83 29 21 O0
To reduce the risk of fire, electrical shock, or
injury when using your refrigerator, follow
these basic precautions:
-Read eli instructions before using the refrigerator.
-Child entrapment and suffocation are not problems of the past. Junked or abandoned refrigerators are
still dangerous ... even if they wi{l "just sit in the garage a few days".
-If you are getting rid d your old refrigerator, do it safely.
-Never allow children to operate, play with or crawl inside the refrigerator.
-Never clean refrigerator parts with flammable fluids. The fumes can create a fire hazard or explosion.
-We suggest to remove the door or thigh it with a resistant cord.
• FOR YOUR SAFETY,
-DO NOT STORE OR USE GASOLINE OR OTHER FLAMMABLE VAPORS AND LiQUiDS tN THE
VICINITY OF THIS OR ANY OTHER APPLIANCE. THE FUMES CAN CREATE A FIRE HAZARD OR
EXPLOSION.
-IF THE ELECTRICAL CORD tS DAMAGED, OUR SERVICE DEPARTMENT OR A QUALIFIED
ELECTRICIAN SHOULD CHANGE IT.
-SAVE THESE INSTRUCTIONS-
Electrical shock hazard
The refrigerator must be properly grounded.
Do not modify the electrical cord
Do not use an extension cord with this appliance, consult with a
qualify technician any doubts about the proper grounding of this
appliance.
If your wall outlet is not proper one have a qualify technician install it.
Not complying with the above precautions may result in high risk
of injury and even death
• Do not use the refrigerator in an area where the room temperature will fall below 13 °C
(55 °F).
• Keep the refrigerator out of the weather, r ._-.
i
Connect the refrigerator only to the proper kind of outlet, with the correct \_/
electrical supply and grounding, t/_[yt _,_ ,_,
Do not load the refrigerator with food before it has time to get properly , _ _/v-,,_ _ _ _,j ,,
cold.
Use the refrigerator only for the uses described in this manual ......... i
Properly maintain the refrigerator.
Be sure the refrigerator is not used by anyone unable to operate it properly.
• The refrigerator is only for domestic use.
Before connecting the new refrigerator follow these steps:
1. Remove all packing material and the wood bases.
2. Install your refrigerator under the following conditions:
• Allow 7,5 cm (3 inches) between overhead cabinets and
refrigerator top.
• Allow at least 5 cm (2 inches) between the refrigerator
condenser on the back and the wall.
• Allow 1,25 cm (I/2") on each side of the refrigerator for ease
of installation.
• If the hinge side of the refrigerator is to be against the wall, you might want to leave extra
space so the door can be opened wider.
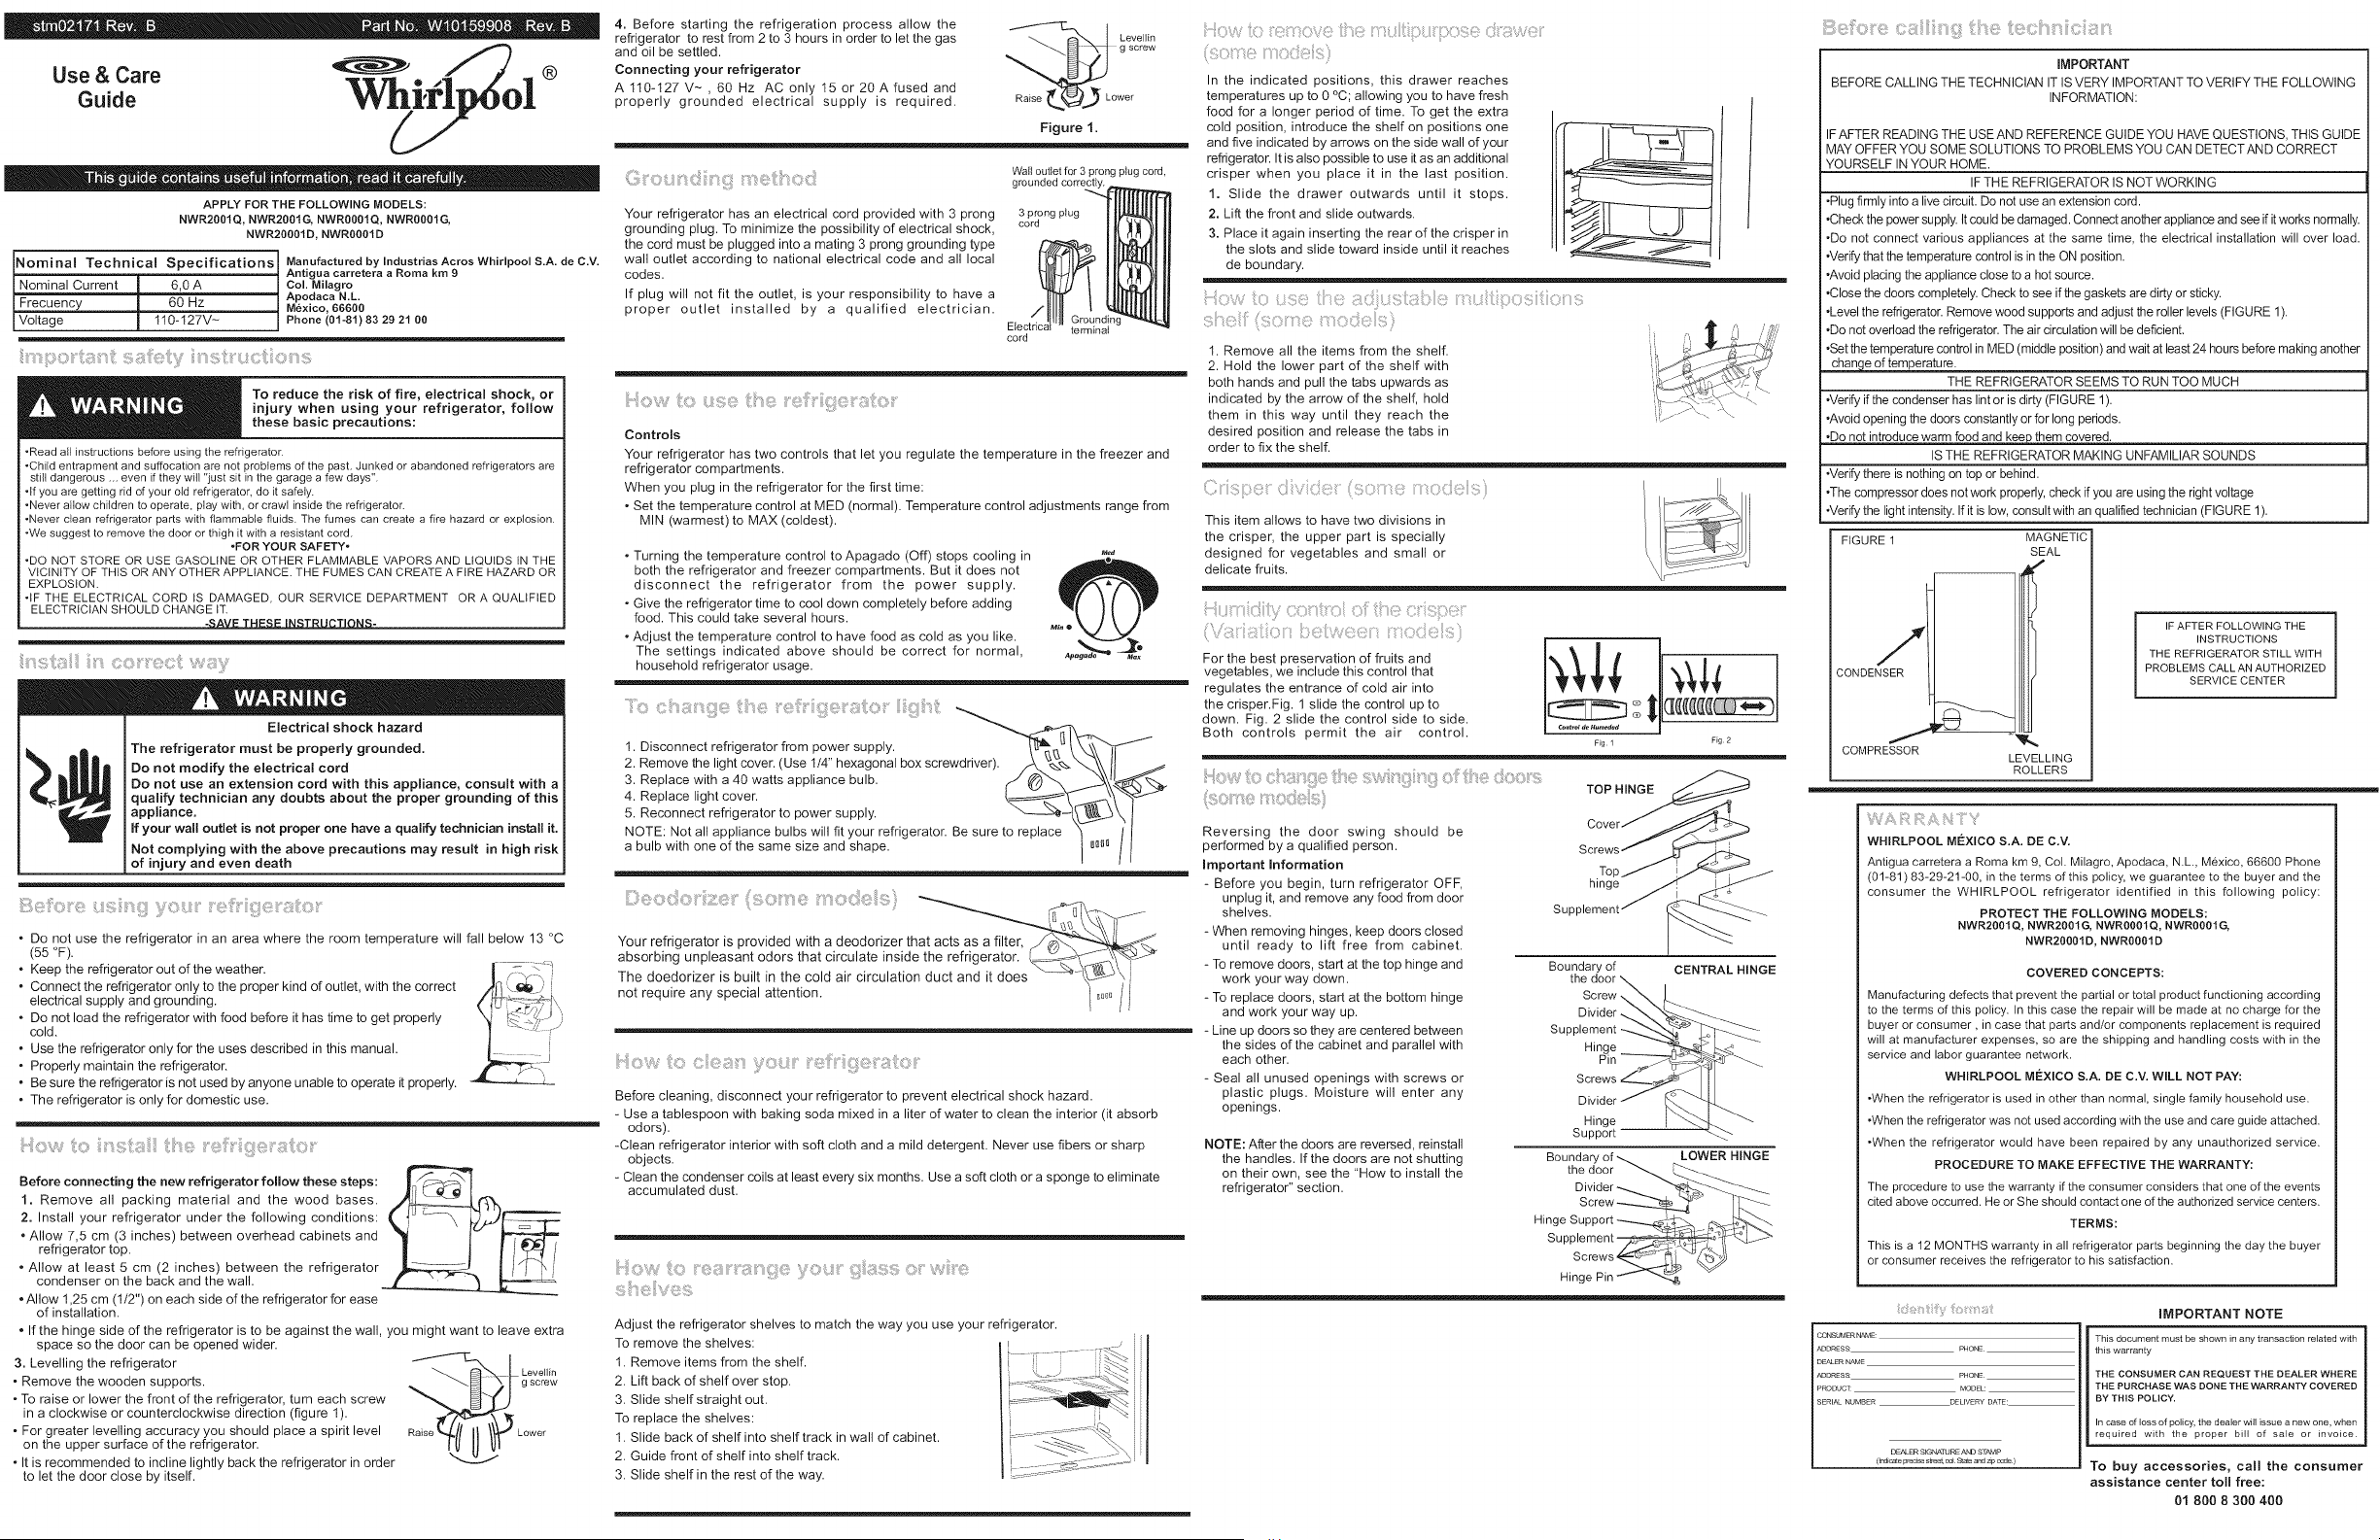
3. Levelling the refrigerator
• Remove the wooden supports.
• To raise or lower the front of the refrigerator, turn each screw
in a clockwise or counterclockwise direction (figure I).
• For greater levelling accuracy you should place a spirit level
on the upper surface of the refrigerator.
• It is recommended to incline lightly back the refrigerator in order
to let the door close by itself.
_ Levellin
g screw
Raise _U _'_ L ....
4. Before starting the refrigeration process allow the
refrigerator to rest from 2 to 3 hours in order to let the gas
and oil be settled.
Connecting your refrigerator
At10-127V-, 60 Hz AC only 15 or 20Afused and
properly grounded electrical supply is required.
_.,._ _%ee'_
_Lower
Figure 1.
Walt outlet for 3 prong ping cord,
grounded correctly.
Your refrigerator has an electrical cord provided with 3 prong
grounding plug. To minimize the possibility of electrical shock,
the cord must be plugged into a mating 3 prong grounding type
wall outlet according to national electrical code and all local
codes.
If plug will not fit the outlet, is your responsibility to have a
proper outlet installed by a qualified electrician.
3 prong plug
cord
terminal
cord
Controls
Your refrigerator has two controls that let you regulate the temperature in the freezer and
refrigerator compartments.
When you plug in the refrigerator for the first time:
• Set the temperature control at MED (normal). Temperature control adjustments range from
MIN (warmest) to MAX (coldest).
• Turning the temperature control to Apagado (Off) stops cooling in M,,
both the refrigerator and freezer compartments. But it does not
disconnect the refrigerator from the power supply.
• Give the refrigerator time to cool down completely before adding
food. This could take several hours.
• Adjust the temperature control to have food as cold as you like.
The settings indicated above should be correct for normal,
household refrigerator usage.
....1.Disconnect refrigerator1:_ : : } ::: : :::]::frompower supply. _ _'_'_" _'_1] /
2. Remove the light cover. (Use I/4" hexagonal box screwdriver). A _._- _.\\ l! -
3. Replace with a 40 watts appliance bulb. ........ _"_ "_\tl_
4. Replace light cover. I_",_- _f \\_C_._
5. Reconnect refrigerator to power supply. "_---_-\_', I
NOTE: Not all appliance bulbs will fit your refrigerator. Be sure to replace "_ _, / I
a bulb with one of the same size and shape. I [!°_[t //
Your refrigerator is provided with a deodorizer th
absorbing unpleasant odors that circulate inside the refrigerator__{\_ -_1_
The doedorizer is built in the cold air circulatio_es .... _--'_ !
not require any special attention. I .... / i
Before cleaning, disconnect your refrigerator to prevent electrical shock hazard.
- Use a tablespoon with baking soda mixed in a liter of water to clean the interior (it absorb
odors).
-Clean refrigerator interior with soft cloth and a mild detergent. Never use fibers or sharp
objects.
- Clean the condenser coils at least every six months. Use a soft cloth or a sponge to eliminate
accumulated dust.
!i_!ii;_ii!iii(!i!!!iiV(!:!!!!!ii_;
Adjust the refrigerator shelves to match the way you use your refrigerator.
To remove the shelves:
1. Remove items from the shelf.
2. Lift back of shelf over stop.
3. Slide shelf straight out.
To replace the shelves:
1. Slide back of shelf into shelf track in wall of cabinet.
2. Guide front of shelf into shelf track.
3. Slide shelf in the rest of the way.
Ci
In the indicated positions, this drawer reaches
temperatures up to 0 °C; allowing you to have fresh
food for a longer period of time. To get the extra
cold position, introduce the shelf on positions one
and five indicated by arrows on the side wall of your
refrigerator. It is also possible to use it as an additional
crisper when you place it in the last position.
1. Slide the drawer outwards until it stops.
2. Lift the front and slide outwards.
3. Place it again inserting the rear of the crisper in
the slots and slide toward inside until it reaches
de boundary.
:::::;
1. Remove all the items from the shelf.
2. Hold the lower part of the shelf with
both hands and pull the tabs upwards as
indicated by the arrow of the shelf, hold
them in this way until they reach the
desired position and release the tabs in
order to fix the shelf.
This item allows to have two divisions in
the crisper, the upper part is specially
designed for vegetables and small or
delicate fruits.
For the best preservation of fruits and
vegetables, we include this control that
regulates the entrance of cold air into
the crisper.Fig. 1 slide the control up to
down. Fig. 2 slide the control side to side.
Both controls permit the air control.
Fig 1 Fig 2
;::i::
Reversing the door swing should be
performed by a qualified person.
Important Information
- Before you begin, turn refrigerator OFF,
unplug it, and remove any food from door
shelves.
- When removing hinges, keep doors closed
until ready to lift free from cabinet.
- To remove doors, start at the top hinge and
work your way down.
- To replace doors, start at the bottom hinge
and work your way up.
- Line up doors so they are centered between
the sides of the cabinet and parallel with
each other.
- Seal all unused openings with screws or
plastic plugs. Moisture will enter any
openings.
NOTE: After the doors are reversed, reinstall
the handles. If the doors are not shutting
on their own, see the "How to install the
refrigerator" section.
TOP H_
Cover_
screT::
hinge
Supplement _ __
Boundary of CENTRAL HINGE
the
Screw \
Divider
Supplement
Hinge
Pin
Screws
Divider
Hinge
Support
Boundary of _ LOWER HINGE
the door _ _....._
Divider
HingeSupport--
Supplement
screws< '
Hinge Pin _ --_-,_
IMPORTANT
BEFORE CALLING THE TECHNICIAN IT IS VERY IMPORTANT TO VERIFY THE FOLLOWING
INFORMATION:
IFAFTER READING THE USEAND REFERENCE GUIDE YOU HAVE QUESTIONS, THIS GUIDE
MAY OFFER YOU SOME SOLUTIONS TO PROBLEMS YOU CAN DETECTAND CORRECT
YOURSELF INYOUR HOME.
IF THE REFRIGERATOR IS NOT WORKING
•Plugfirmly into a live circuit. Do not use an extension cord.
•Check the power supply.It could be damaged. Connect another appliance and see if itworks normally.
•Do not connect various appliances at the same time, the electrical installation will over load.
•Verify that the temperature control is in the ON position.
•Avoid placing the appliance close to a hot source.
•Close the doors completely. Check to see ifthe gaskets are dirty or sticky.
•Level the refrigerator. Remove wood supports and adjust the roller levels (FIGURE 1).
•Do not overload the refrigerator. The air circulation will be deficient.
•Setthe temperature controlin MED (middle position) andwait atleast 24 hours beforemaking another
_e of temperature.
THE REFRIGERATOR SEEMS TO RUN TOO MUCH
•Verify ifthe condenser has lint or is dirty (FIGURE 1).
•Avoid opening the doors constantly or for long periods.
•Do not introduce warm food and _ them covered.
IS THE REFRIGERATOR MAKING UNFAMILIAR SOUNDS
•Verify there is nothing ontop or behind.
•The compressor does not work properly, check ifyou are using the right voltage
•Verify the light intensity. If itis low, consult with an qualified technician (FIGURE 1).
FIGURE 1
CONDENSER r_
COMPRESSOR
MAGNETIC
SEAL
iI
IF AFTER FOLLOWING THE
INSTRUCTIONS
THE REFRIGERATOR STILL WITH
PROBLEMS CALL AN AUTHORIZED
SERVICE CENTER
LEVELLING
ROLLERS
WHIRLPOOL Mr_XICO S.A. DE C.V.
Antigua carretera a Rome km 9, Col. Milagro, Apodaca, N.L., Mexico, 66600 Phone
(01-81) 83-29-21-00, in the terms of this policy, we guarantee to the buyer and the
consumer the WHIRLPOOL refrigerator identified in this following policy:
PROTECT THE FOLLOWING MODELS:
NWR2001Q, NWR2601G, NWROOO1Q, NWR0001G,
NWR20001D, NWROOOl D
COVERED CONCEPTS:
Manufacturing defects that prevent the partial or total product functioning according
to the terms of this policy. In this case the repair will be made at no charge for the
buyer or consumer, in case that parts and/or components replacement is required
will at manufacturer expenses, so are the shipping and handling costs with in the
service and labor guarantee network.
WHIRLPOOL MEXICO S,A, DE C,V, WILL NOT PAY:
,When the refrigerator is used in other than normal, single family household use.
,When the refrigerator was not used according with the use and care guide attached.
,When the refrigerator would have been repaired by any unauthorized service.
PROCEDURE TO MAKE EFFECTIVE THE WARRANTY:
The procedure to use the warranty if the consumer considers that one of the events
cited above occurred. He or She should contact one of the authorized service centers.
TERMS:
This is a 12 MONTHS warranty in all refrigerator parts beginning the day the buyer
or consumer receives the refrigerator to his satisfaction.
CONSUMER NAME:
ADDRESS:
DEALER NAME
ADDRESS:
pRODUCT _
SERIAL NUMBER
PHONE
PHONE
MODEL:
DELIVERY DATE:
DEN_ £3R S]GNATURE AND S]?_MP
(]ndicat epred_ s_ue_ o_f St_u and z# cede)
IMPORTANT NOTE
This document must be shown irl any transaction related with
this warranty
THE CONSUMER CAN REQUEST THE DEALER WHERE
THE PURCHASE WAS DONE THE WARRANTY COVERED
BY THIS POLICY.
In case of loss of policy, the dealer will issue a new one, when
required with the proper bill of sale or invoice.
To buy accessories, cal! the consumer
assistance center toll free:
Ol 800 8 300 400