ORDER #10480903
Top Freezer Refrigerator
Use & Care Guide
CONSUMER INFORMATION LINE
L TOLL FREE
1-800-843-0304
_8n8
Aitay_mmt Comp,_
Contents
MstalMtion
Electrical Requirements .................... 2
Model Identification ....................... 3
Setting Controls ............................ 4
Refrigerator Features ........................ 5
lnstafling and Using Specific Features ......... 6
Adjustable Cantilever Shelves ............... 6
Deli Fresh Chiller ......................... 6
Utility Rack .............................. 7
Crispers .................................. 7
Egg Storage .............................. 7
Adjustable Door Buckets ................... 7
Door Shelves ............................. 8
Tal_ Package Retainer ...................... 8
Huggers ................................. 8
Dairy Storage ............................. 8
Food Storage Containers ................... 9
Butter Dish ............................... 9
Freezer Features
Free-O'-Fr0stT= °........................... 9
Ice Cube Trays ............................ 9
Ice Service Rack .......................... 9
Automatic Icemaker ....................... !0
Freezer Door Shelves ...................... 10
Reversible Freezer Storage Rack ............ 10
Adjustable Cantilever Shelves ............... 1()
Other Features
Decorator Doors ........................... 10
Norma! Operating Sounds .................... 1i
Care and Cleaning
Exterior ................................. 12
Adhesives .............................. 12
Interior .................................. 12
Dairy Storage Door ...................... 12
Second Serving Containers ............... 12
Shelf Removal .......................... !2
Door Shelves ........................... 12
Crisper Drawer and Shelf Removal ........ 13
Odor Removal .......................... 14
Door Gaskets ........................... 14
Mechanical ............................... 14
Condenser Coil .......................... 14
Light Bulbs ............................. 14
Energy Tips ................................ 15
Vacation Tips ............................... 25
Before Calting For Service .................... 26
Amana Warranty ............................ 18
Warranty Exclusions
Temperatures ............................. 18
Removing/Reversing Doors ................. 18
Amana Asute TM Extended Service Pman......... 20
Amana Consumer Information Line ............ 20
Electrical
Requirements
RECOGNIZETHiS SYMBOL
AS A SAFETY PRECAUTION
WARNING
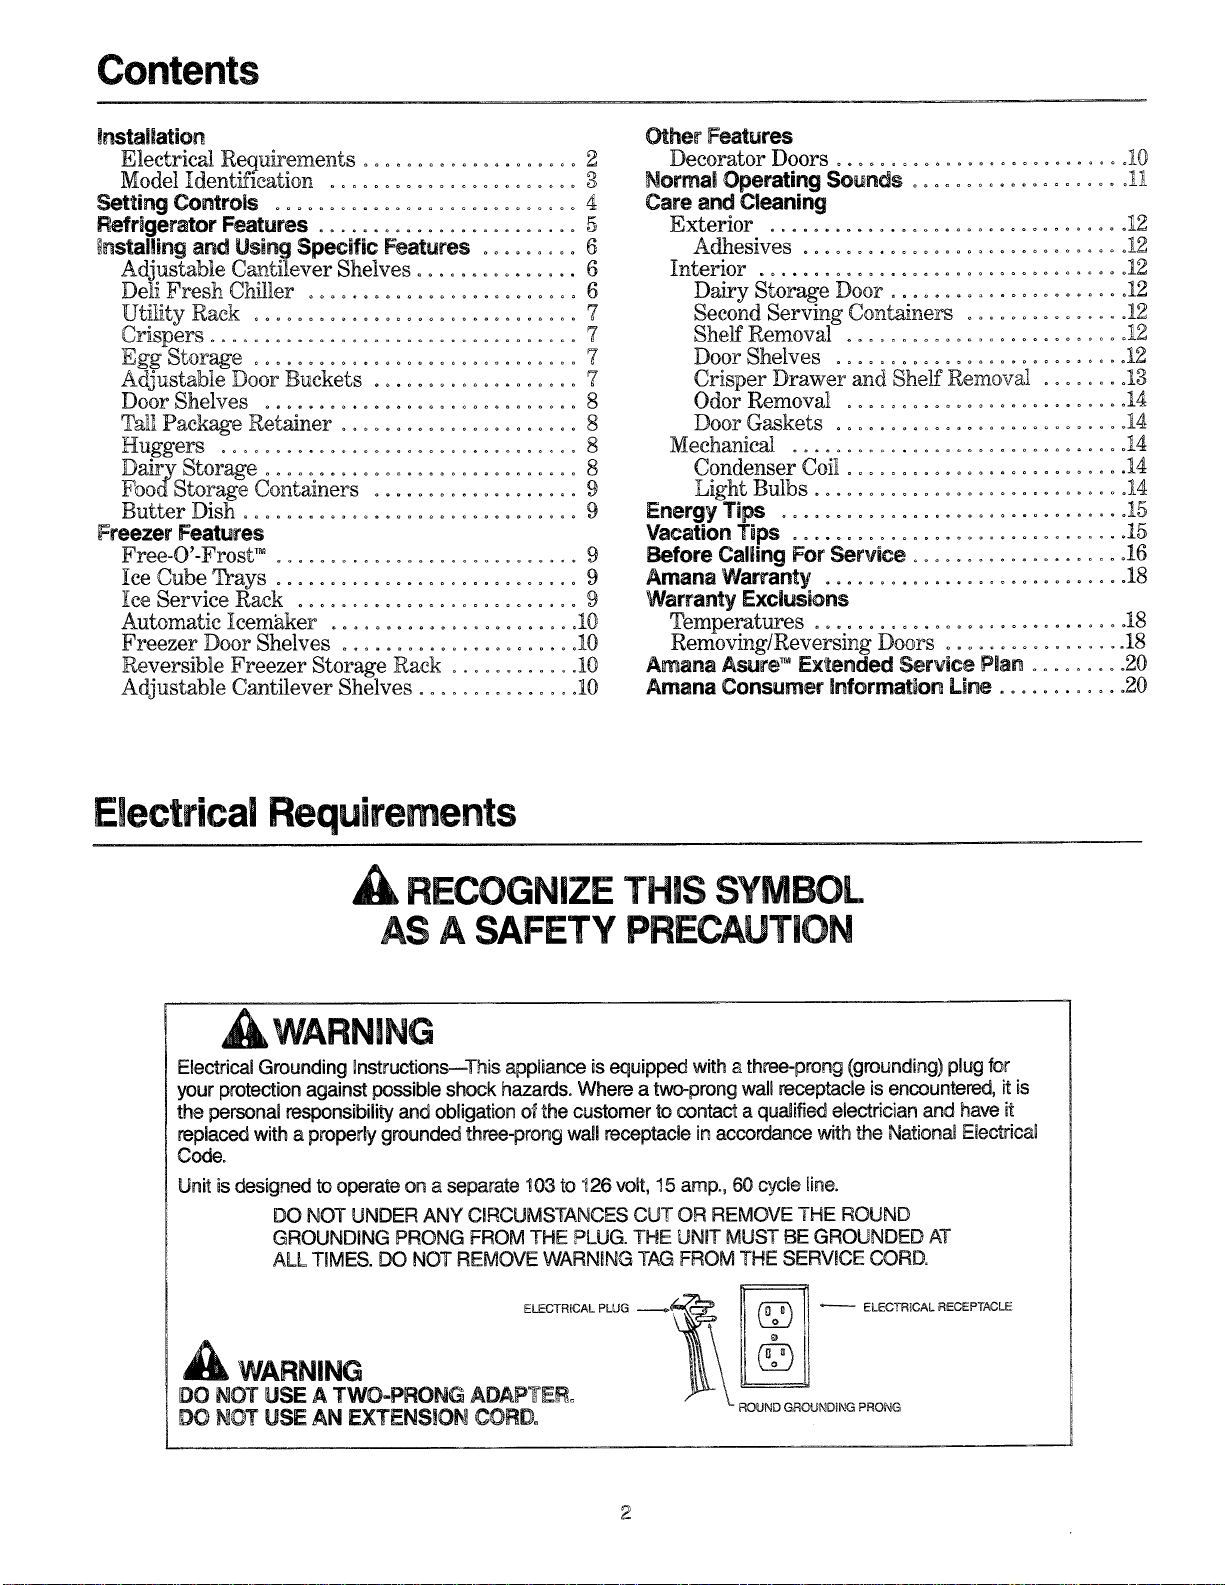
Electrical Grounding lnstructions_This appliance is equipped with a three-prong (grounding) plug for
your protection against possible shock hazards. Where a two-prong wall receptacle is encountered, it is
the personalresponsibility and obligation of the customer to contact a quaJifiedelectrician and have it
replaced with a propertygrounded three-prong waft receptacle inaccordance with the National Electrical
Code.
Unit is designed to operateon a separate !03 to 126 volt,!5 amp., 60 cycle line.
DO NOT UNDER ANY CIRCUMSTANCES CUT OF{REMOVE THE ROUND
GROUNDING PRONG FROM THE PLUG. THE UNiT MUST BE GROUNDED AT
ALL TIMES. DO NOT REMOVE WARNING TAG FROM THE SERVICE CORD.
ELECTRICAL PLUG __ It (_ t[ _ ELECTRICAL RECEPTACLE
WARNING
DO NOT USE A TWO-PRONG ADAPTEFL
DO NOT USE AN EXTENSION CORD_ ROUNDGROUNDINGPRONG
2
AmanaTopFreezer Refrigerator
Thank you for buying an Amana refri_geraton Your sathfaction with this new product is very important to us.
This Use and Care Guide will help you understand how your refrigerator operates...and how to get the most
benefit from the_features you selected.
Please road tt_ _Use and Care Guide thoroughly.
Complete the Re_tration Card in the _mcket with this guide and return to Amana's Product Registration
Department promptly. If your registration card is misshlg, call 1-8(g)-843-0304.
If you believe something is ,operating incorrectly, please read the "Beforo You Call for Service Section," on
_oages 16-17. If you still have questions, please call us at 1-8(D843-_04. (Weekdays, during normal business
An_y time you call or write us _._ your re_ratol; have the following information readily available. It
is located on a m_.meplate, found m the upper left-hand front corner of the reYrigerator section. "I_e a moment
to f'_ in the information so you have it handy!
Serial No.
Model No.
Manufacturing No ....
Please also record:
Date of purchase:
Selling dealer:
Dealer address:
Keep a copy of your sales receipt for future reference, in case warranty service is"required.
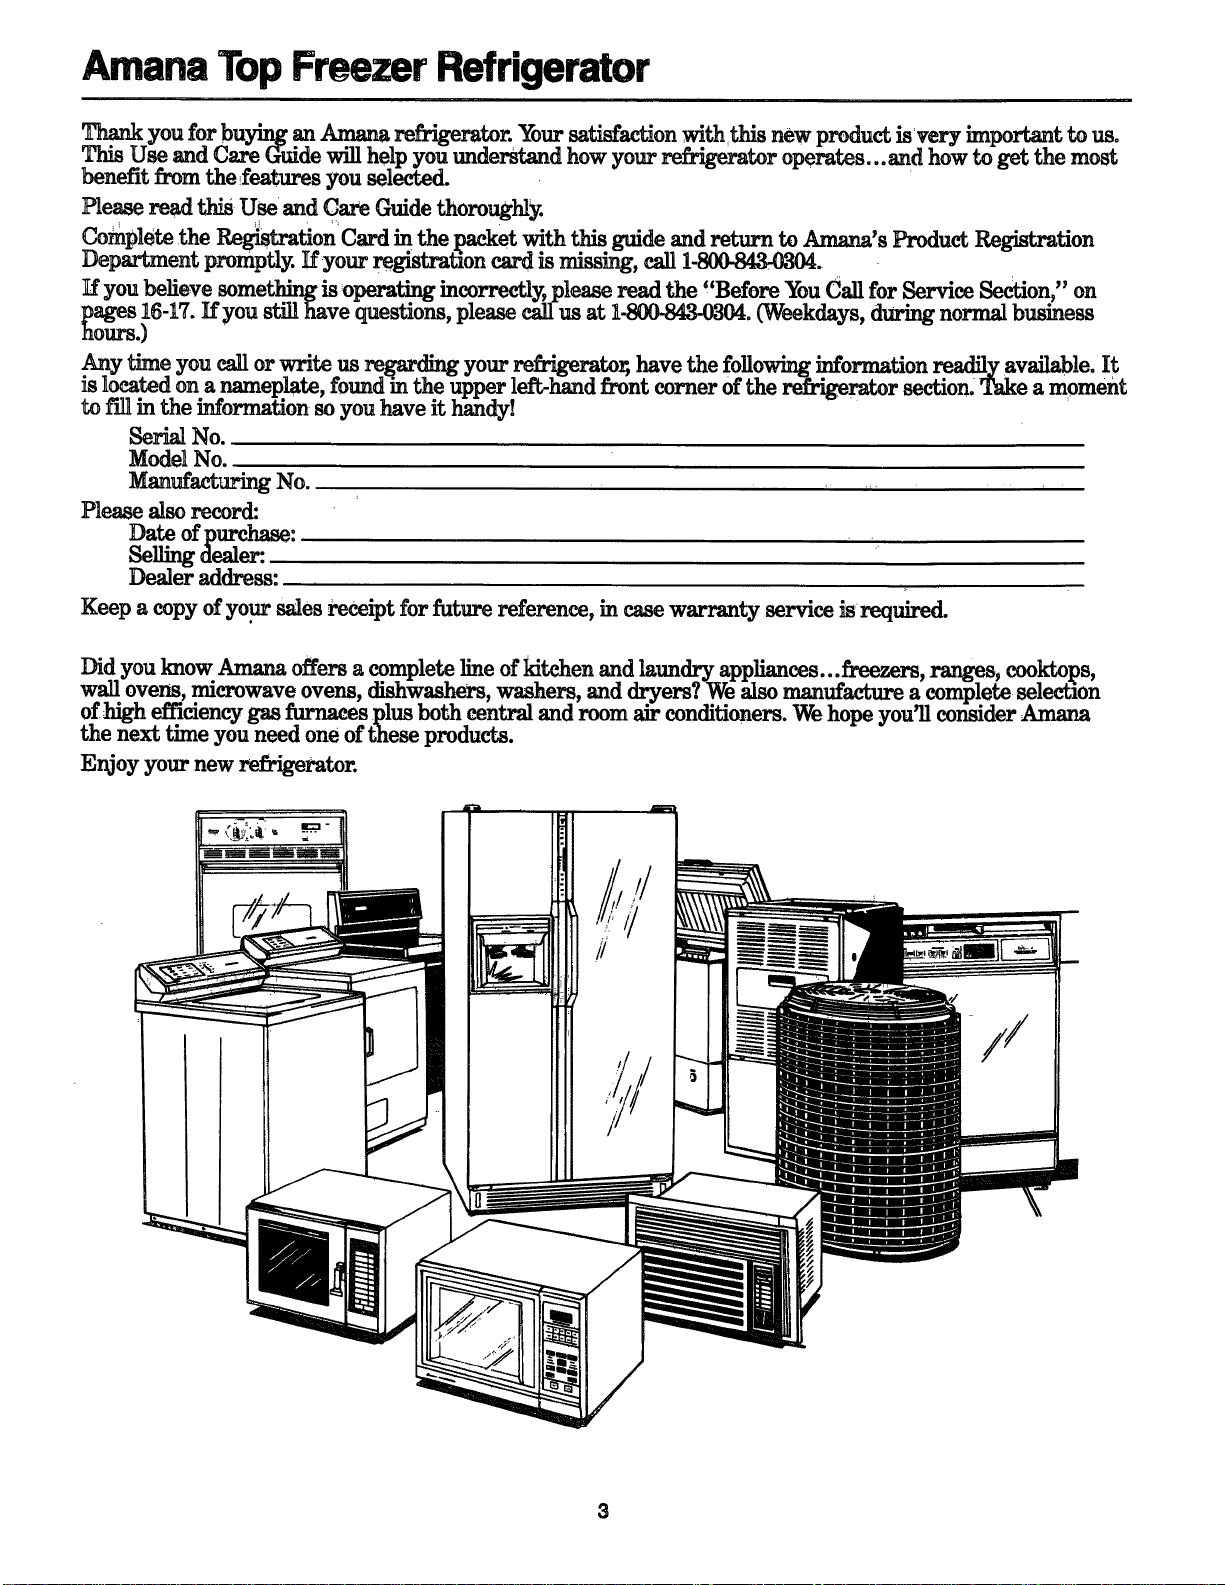
Did you know Amana offers a complete line of kitchen and laundry appliances...freezers, rav_es, cooktoI_s,
wall. ovens, microwave ovens, dishwashers, washers, and dryers? We also manufacture a complete selection
of high efficiency gas furnaces plus both central and room air conditioners. We hope you'll consider Amana
the next time you need one of these products.
Enjoy your new refrigerator.
3
Setting The Controls
Temp-Assure" thermostatic control
This control, located on center divider between
freezer and refrigerator sections, operates
independently of freezer control. A hidden
thermostatic sensor measures refrigerator air
temperature constantly, and automatically lets
in more cold air if temperature rises as little as
I_°F (.8° C) from setting.
Refrigerator and freezer controls
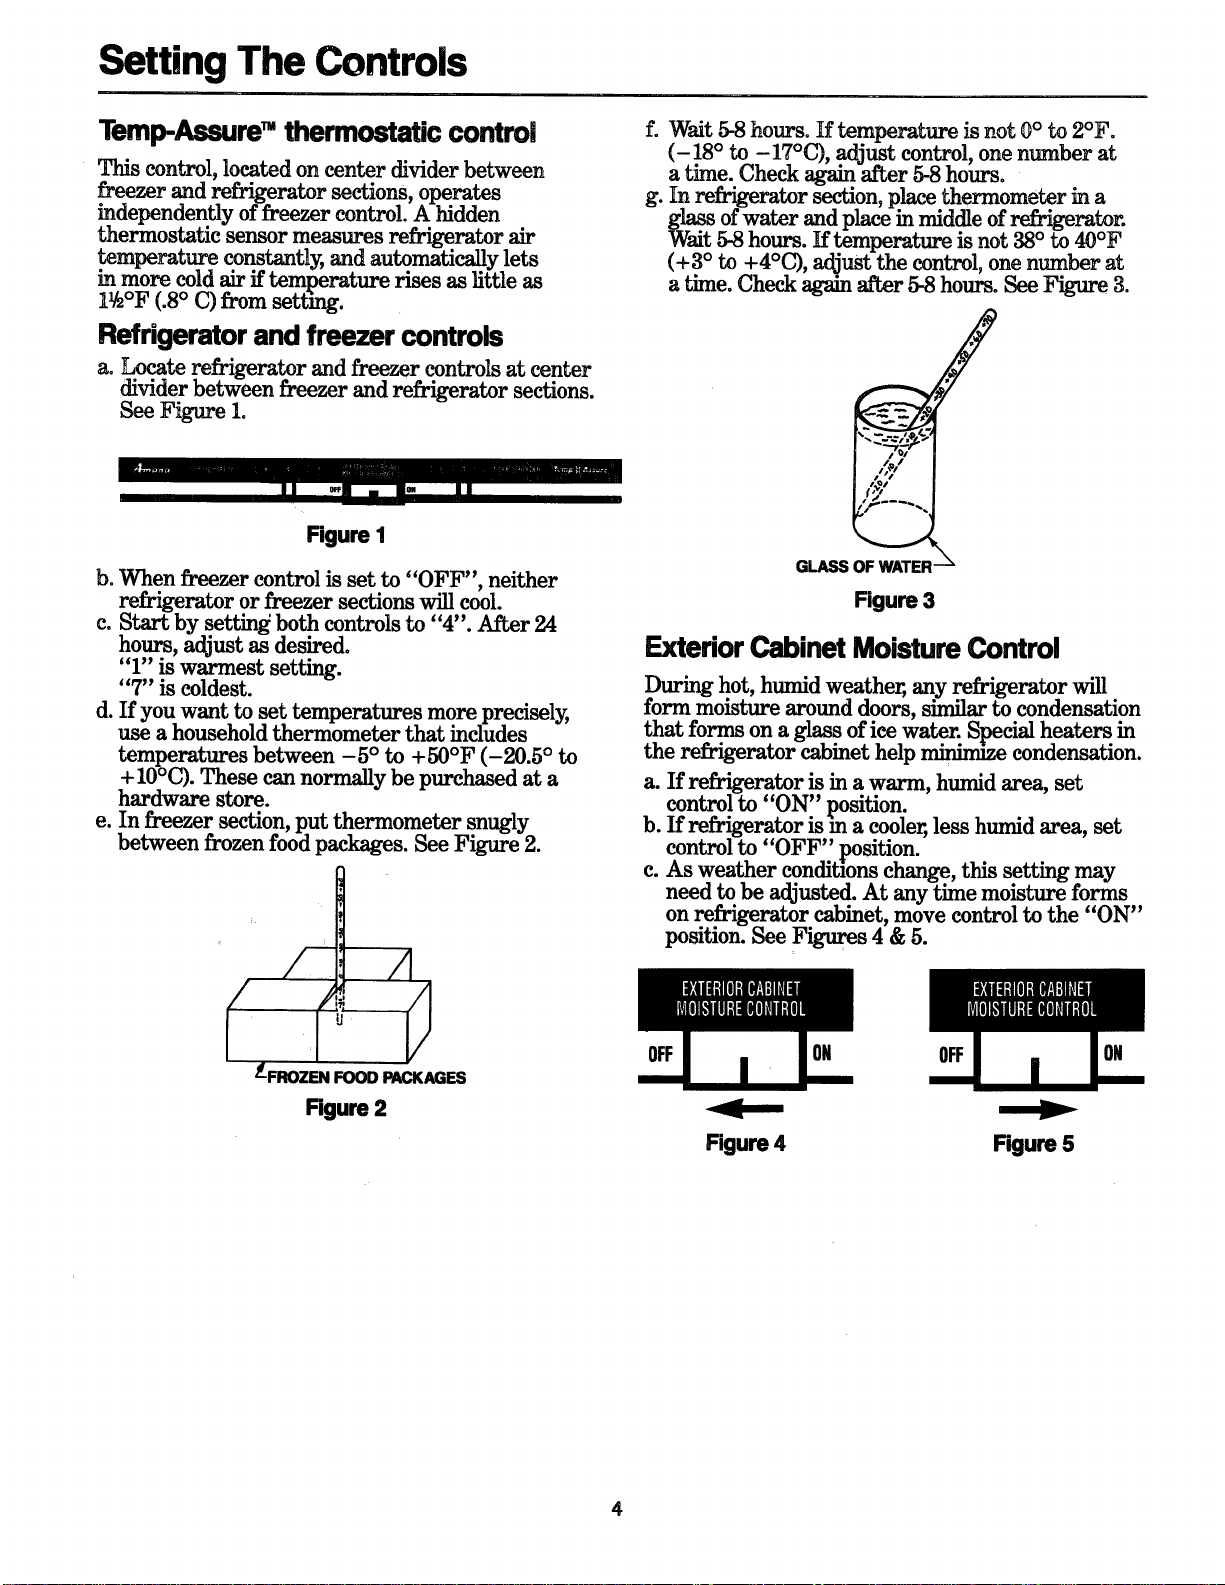
a. Locate _refrigerator and freezer controls at center
divider betv_een freezer and refrigerator sections.
See Figure 1.
Figure I
b. When freezer control is set to "OFF", neither
refrigerator or freezer sections will cool.
c. Start by setting beth controls to "4". After 24
hours, adjust as desired.
'T' is warmest setting.
"7" is coldest.
d. If you want to set temperatures more precisely,
use a household thermometer that includes
temperatures between -5 ° to +50°F (-20.5 ° to
+ 10°C). These can normally be purchased at a
hardware store.
e. In freezer section, put thermometer snugly
between frozen food packages. See Figure 2.
/ / ,'1
FROZEN FOOD PACKAGES
F_um2
f. Wait 5-8 hours. If temperature is not 0° to 2°F.
(-18 ° to -17°C), adjust control, one number at
a time. Check again after 5-8 hours.
g. In refrigerator section, place thermometer in a
glass of water and place in middle of refrigerator.
Wait 5-8 hours. If temperature is not 38° to 40°F
(+3 ° to +4°C), adjust the control, one number at
a time. Check again after 5-8 hours. See Figure 3.
/
7_ r
GLASS OF WATER --_
F_um3
Exterior Cabinet Moisture Control
During hot, humid weather, any refrigerator will
form moisture around doors, similar to condensation
that forms on a glass of ice water. Special heaters in
the refrigerator cabinet help _ condensation.
a. If refri4,_erator is in a warm, humid area, set
control to "ON" position.
b. If refrigerator isin a cooler, less humid area, set
control to "OFF" position.
c. As weather conditions change, this setting may
need to be adjusted. At any time moisture forms
on refrigerator cabinet, move control to the "ON"
position. See Figures 4 & 5.
OFF ON OFF ON
Figure 4 Figure 5

Refrigerator Features
Adjuatab}eCantileverFreezer
Shelf (SomeModels)
Color Coordinated
Top Hinge Cover
(Some Modele)
Refrigerated Deft Chiller
Controls{SomeMode}s)*
Glass Top Refrigerated
_)e0DChiRler,
Adjustable Glass Refrigerator
Shelves(SomeModeBs)
Adjustable Humidity Controls"
(Some Models)
Glass Top
Controlled Crispers
(SomeModels)
Reversible Freezer Rack
(Some ModeLs)
Removable Shelves
(SomeModek,)
DadryStorage
Food StorageContainers
(SomeModels)
Adjustable Hugger
(someModels)
Adjustable Door Shelves
(SomeModels)
Tall Package Retainer
{SomeModels)
Condenser Coil (Behind Toe Grille) Toe Grille Bottle Rack (Some Models)
iMPORTANT NOTE:
*FEATURES MAY VARYFROM MODEL TO MODEL. YOUR REFRIGERATOR MAY NOT HAVE ALL OF THE FEATURES SHOWN.
Figure 6
Installing and Using Specific Features
Refrigerator
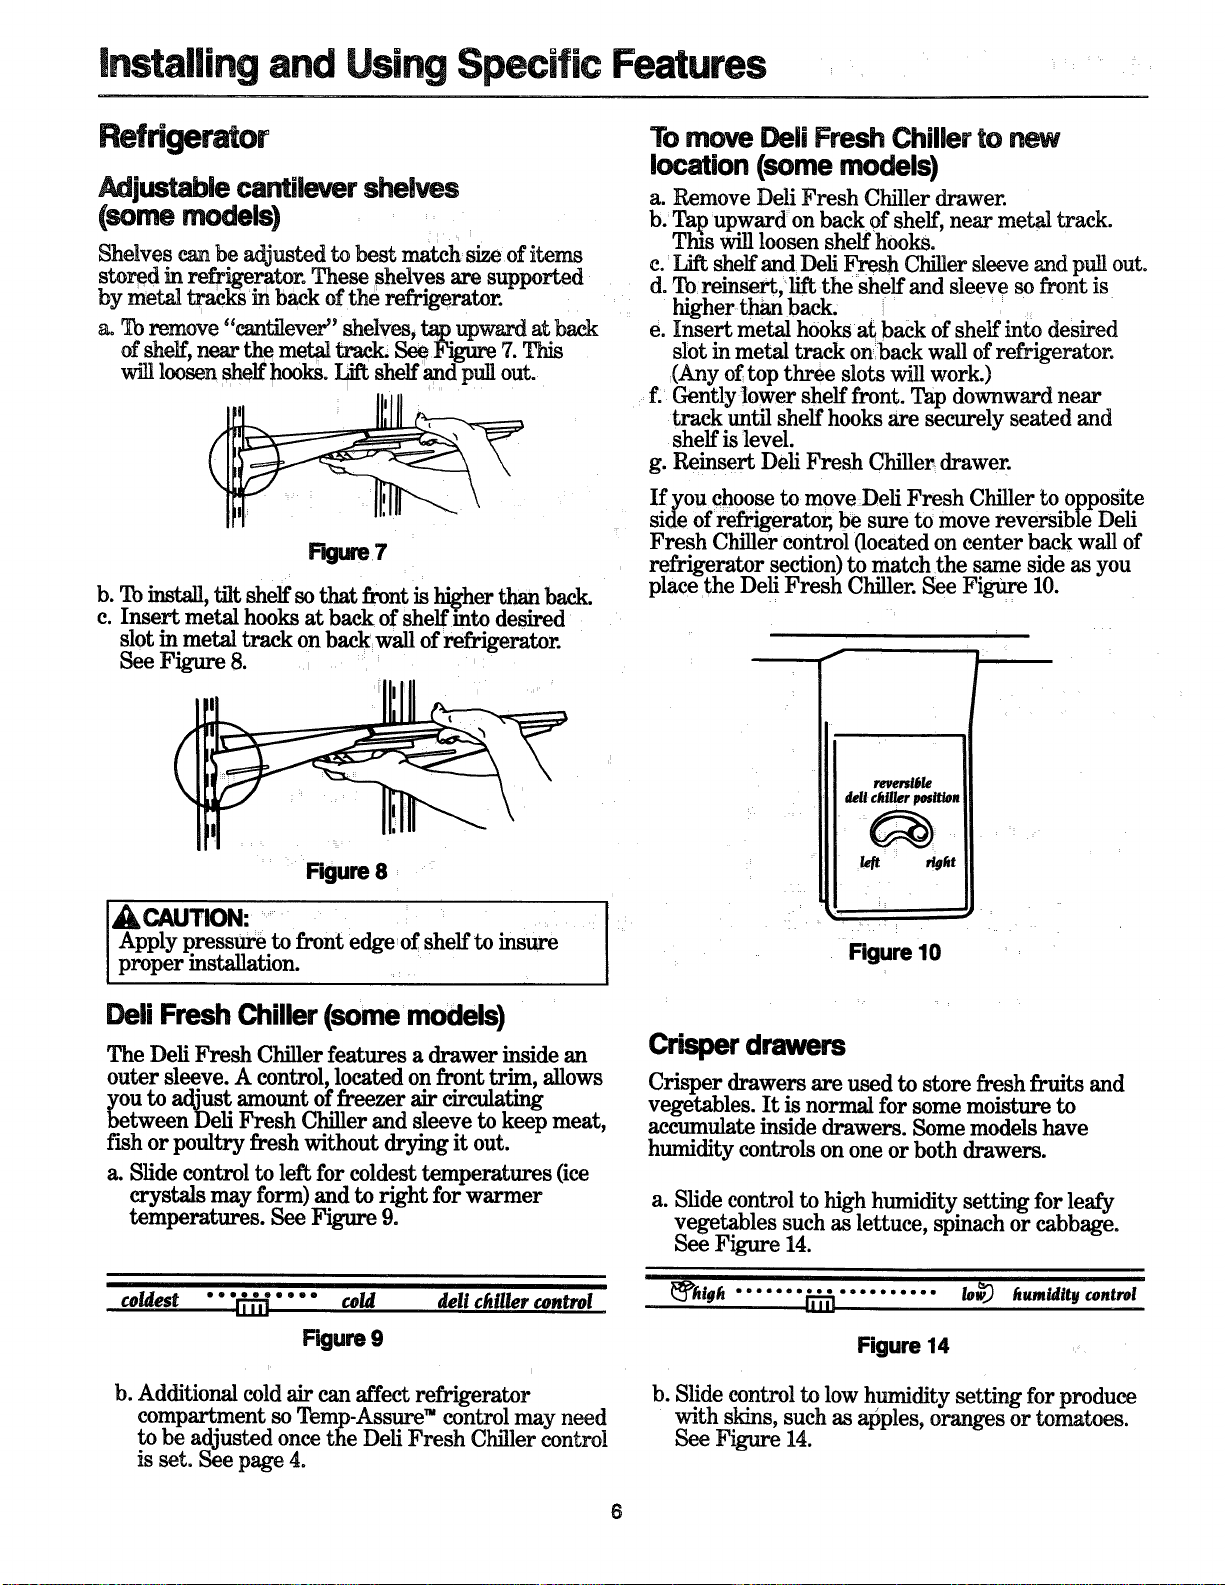
Adjustablecantilevershelves
(some models)
Shelves can be adjusted to best match size of items
stored in reffigeraten These shelves are supported
by metal tracVs in back of the refrigerator.
a. To remove "can_ever" shelves, t_ upward at
of shelf, near the metal track. See _ 7. This
w_ loosen shelf hooks. _ shelf and pull out.
Figure 7
b. To install, tilt shelf so that front is _her than back.
c. Insert metal hooks at back of shelf into desired
slot in metal track on back wall of refrigerator.
See Figure 8.
Rgure 8
_CAUTION: ......:
Apply pressure to front edge of shelf to insure
proper installation. ....
Dell Fresh Chiller (some models)
The Deli Fresh Chiller features a drawer inside an
outer sleeve. A control, located on front trim, allows
you to adjust amount of freezer air circulating
between Dell Fresh Chiller and sleeve to keep meat,
fish or poultry fresh without drying it out.
a. Slide control to left for coldest temperatures (ice
crystals may form) and to right for warmer
temperatures. See Figure 9.
Figure 9
dell ddller control
b. Additional cold air can affect refrigerator
compartment so Temp-Assure TM control may need
to be adjusted once the Dell Fresh Chiller control
is set. See page 4.
To move Deii Fresh Chiller to new
location (some models)
a. Remove Deli Fresh Chiller drawer.
b. Ta]_ upward on back of shelf, near metal track.
This w_l loosen shelf hooks.
c. Lift shelf and Deli Fresh Chiller sleeve and pull out.
d. To reinsert,lift the shelf and sleeve so front is
higher than back.
e. Insert metal hooks at back of shelf into desired
slot in metal track on:back wall of refrigerator.
(Any of top three slots will work.)
f. Gently lower shelf front. Tap downward near
track until shelf hooks are securely seated and
shelf is level.
g. Reinsert Deli Fresh Chiller drawer.
If you choose to move Deli Fresh Chiller to opposite
side of refrigerator, be sure to move reversible Deli
Fresh Chiller control (located on center back wall of
refrigerator section) to match the same side as you
place the Deli Fresh Chiller. See Figure 10.
reversible
dd! _gler r_s_.
: !
Figure 10
Crisper drawers
Crisper drawers are used to stere fresh fruits and
vegetables. It is normal for some moisture to
accumulate inside drawers. Some models have
humidity controls on one or both drawers.
a. Slide control to high humidity setting for leafy
vegetables such as lettuce, spinach or cabbage.
See Figure 14.
_hig_ .................... io3 humidity control
I_
Figure 14
b. Slide control to low humidity setting for produce
with skins, such as apples, oranges or tomatoes.
See Figure 14.
installing and Using Specific Features (Cont,)
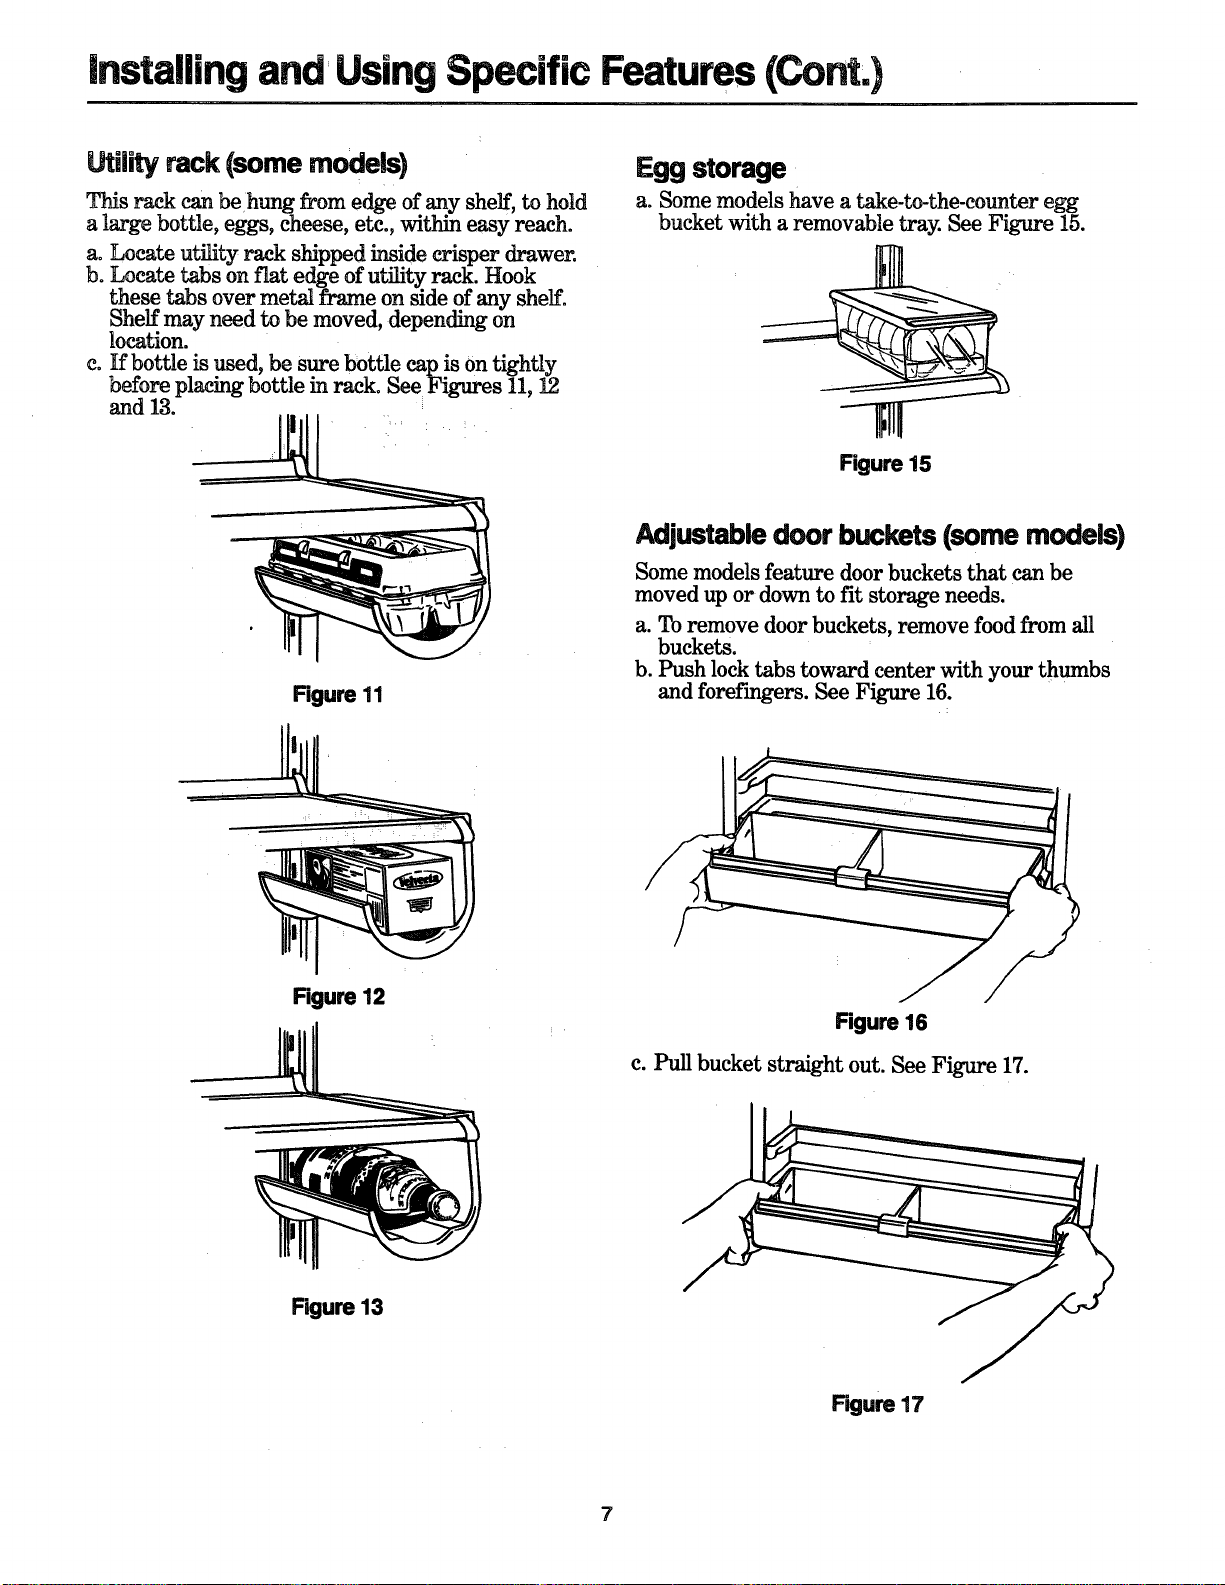
Utility rack {somemodels)
This rack can be hung from edge of any shelf, to hold
a large bottle, eggs, cheese, etc., within easy reach.
a. Locate utility rack shipped inside crisper drawer.
b. Locate tabs on flat edge of ut_ty rack. Hook
these tabs over metal frame on side of any shelf.
Shelf may need to be moved, depending on
location.
c. If bottle is used, be sure _ttle cap is on tightly
before placing bottle in rack. See Figures 11, 12
and 13.
Figure 11
Eggstorage
a. Some models have a take-to-the-counter egg
bucket with a removable tray. See Figure 15.
Figure 15
Adjustabledoor buckets (some models)
Some models feature door buckets that can be
moved up or down to fit storage needs.
a. To remove door buckets, remove food from all
buckets.
b. Push lock tabs toward center with your thumbs
and forefingers. See Figure 16.
Figure 12
Figure 13
! •
Figure 16
c. Pull bucket straight out. See Figure 17.
Figure 17
7
Installing and Using Specific Features (Cont°)
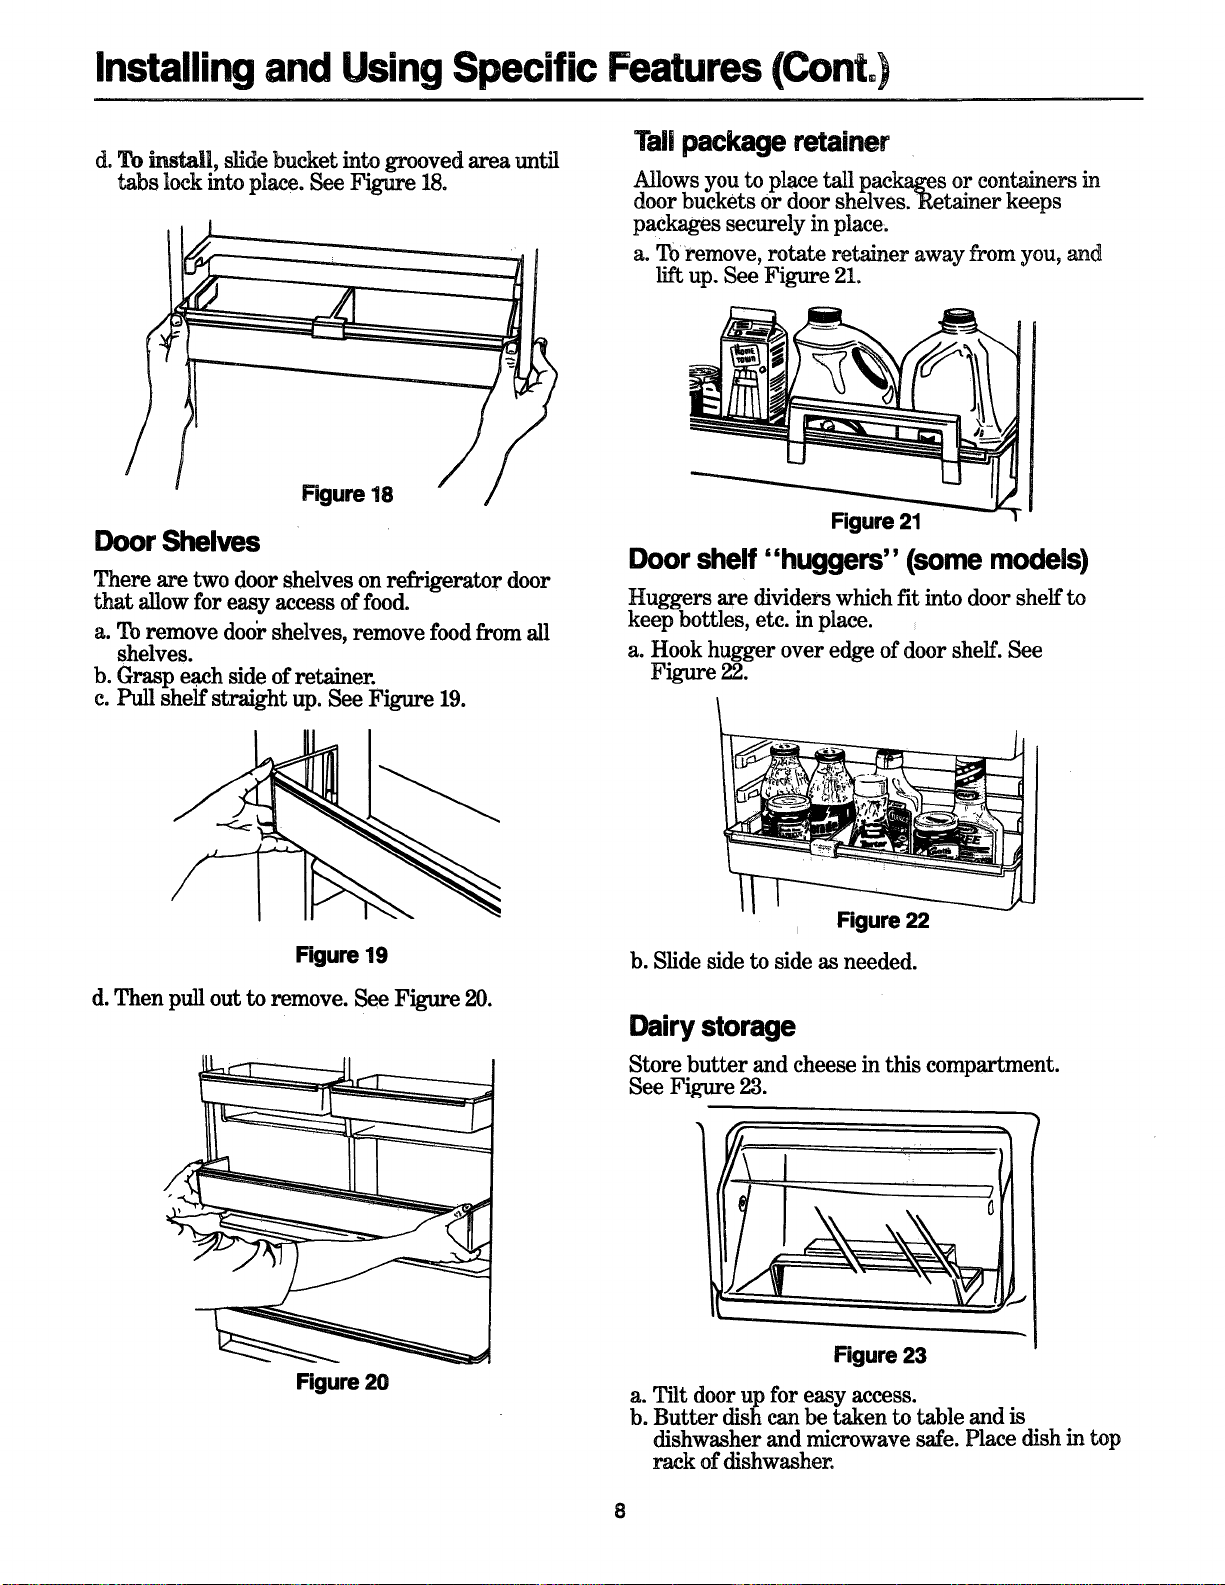
d. To install, slide bucket into grooved area until
tabs lock into place. See Figure 18.
Door Shelves
There are two door shelves on refrigerator door
that allow for easy access of food.
a. To remove door shelves, remove food from all
shelves.
b. Grasp each side of retainer.
c. Pull shelf straight up. See Figure 19.
Taftpackage retainer
Allows you to place tall packages or containers in
door buckets or door shelves. Retainer keeps
packages securely in place.
a. To remove, rotate retainer away from you, and
lift up. See Figure 21.
Figure 21
Door shelf "huggers" (some rnodels)
Huggers are dividers which fit into door shelf to
keep bottles, etc. in place.
a. Hook hugger over edge of door shelf. See
Figure 22.
Rgure 19
d. Then pull out to remove. See Figure 20.
Rgure 20
Figure 22
b. Slide side to side as needed.
Dairy storage
Store butter and cheese in this compartment.
See Figure 23.
a.
Figure 23
a. Tilt door up for easy access.
b. Butter dish can be taken to table and is
dishwasher and microwave safe. Place dish in top
rack of dishwasher.
installing and Using Specific Features (Cont.)
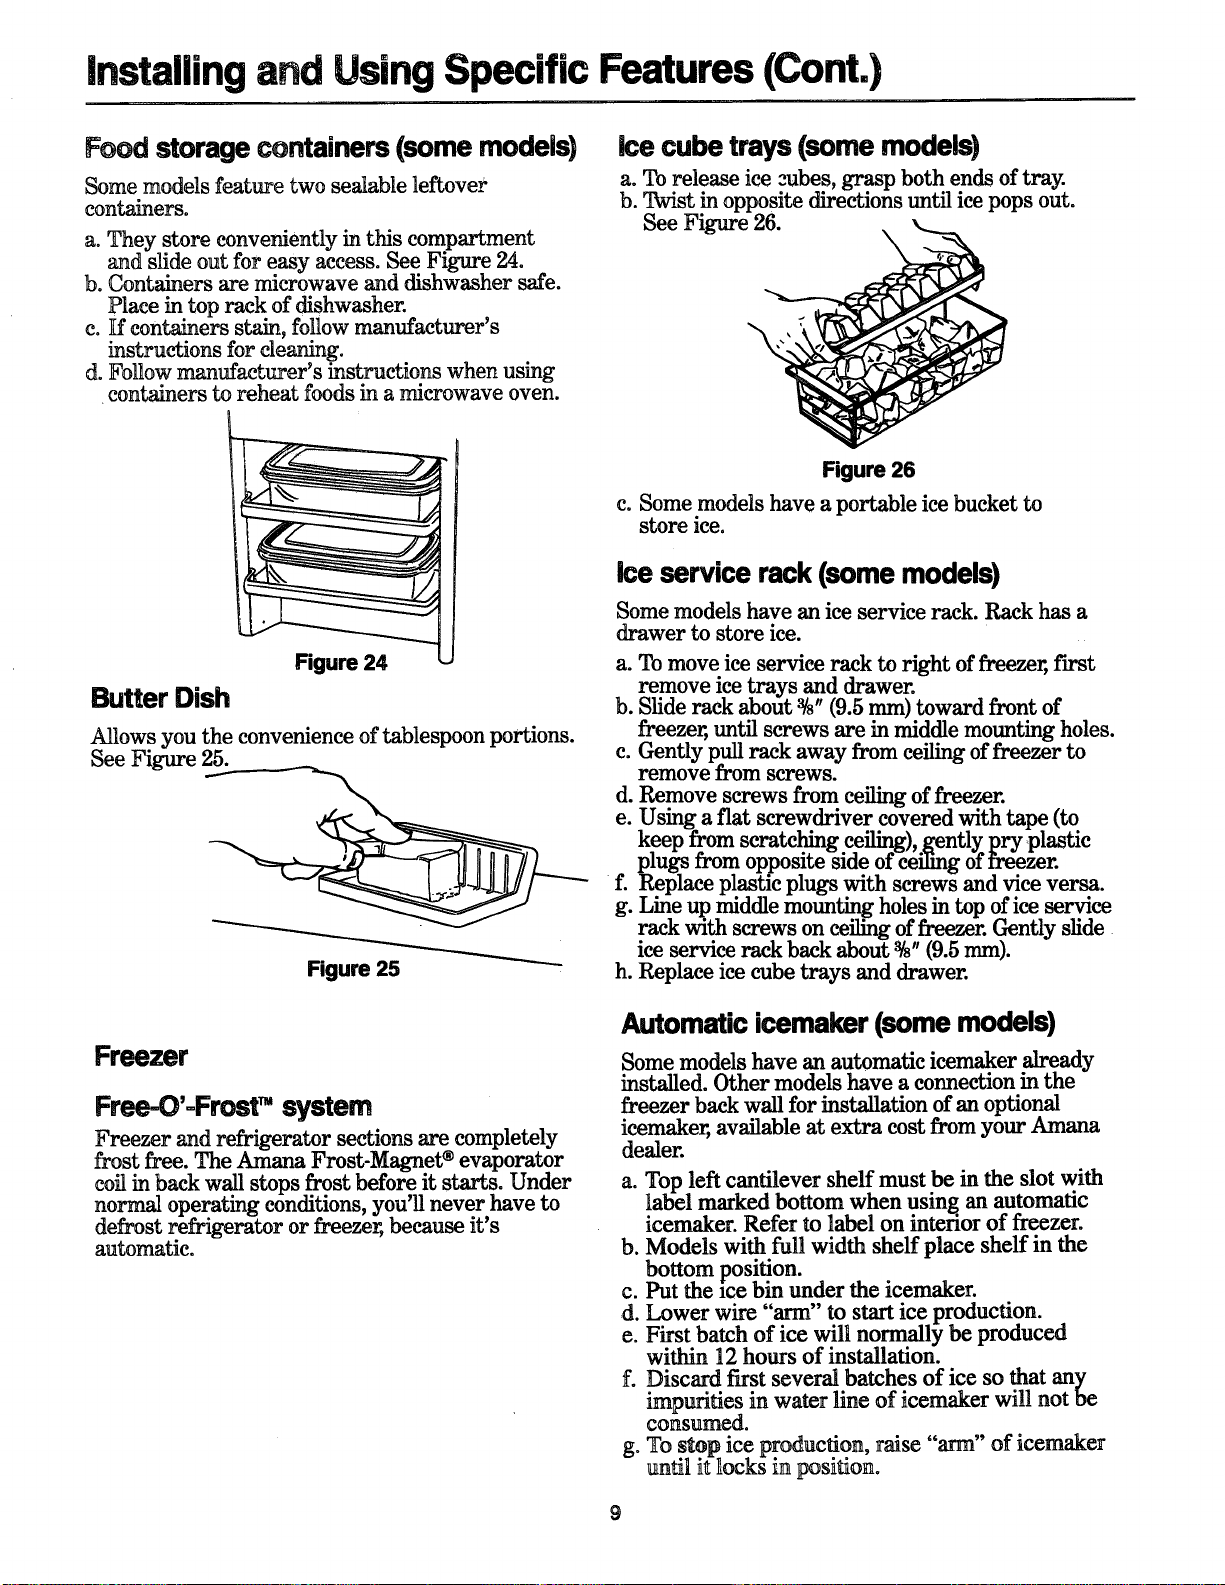
Food storage containers (some models)
Some models feature two sealable leftover
containers.
a. They store conveniently in this compartment
and slide out for easy access. See Figure 24.
b. Containers are microwave and dishwasher safe.
Place in top rack of dishwasher.
e. If containers st'An, follow manufacturer's
instructions for cleaning.
d. Follow manufacturer's instructions when using
containers to reheat foods in a microwave oven.
ice cube trays (some models)
a. To release ice cubes, grasp both ends of tray.
b. Twist in opposite directions until ice pops out.
See Figure 26.
Butter Dish
Allows you the convenience of tablespoon portions.
See Figure 25.
Figure 25
Freezer
Free-O'-Frosf" system
Freezer and refrigerator sections are completely
frost free. The Amana Frost-Magnet ®evaporator
coil in back wall stops frost before it starts. Under
normal operating conditions, you'll never have to
defrost refrigerator or freezer, because it's
automatic.
Figure 26
c. Some models have a portable ice bucket to
store ice.
Ice service rack (some models)
Some models have an ice service rack. Rack has a
drawer to store ice.
a. To move ice service rack to right of freezer, first
remove ice _trays and drawer.
b. Slide rack about %" (9.5 ram) toward front of
freezer, until screws are in middle mounting holes.
c. Gently pull rack away from ceiling of freezer to
remove from screws.
d. Remove screws from ceiling of freezer.
e. Using a flat screwdriver covered with tape (to
keep from scratching ceiling), gently pry plastic
plugs from opposite side of cei_g of freezer.
f. Replace plastic plugs with screws and vice versa.
g. Line up middle mounting holes in top of ice service
rack with screws on ceiling of freezer. Gently slide
ice service rack back about %" (9.5 ram).
h. Replace ice cube trays and drawer.
Automatic icemaker (some models)
Some models have an automatic icemaker already
installed. Other models have a connection in the
freezer back wall for installation of an optional
icemaker, available at extra cost from your Amana
dealer.
a. Top left cantilever shelf must be in the slot with
label marked bottom when using an automatic
icemaker. Refer to label on interior of freezer.
b. Models with full width shelf place shelf in the
bottom position.
c. Put the ice bin under the icemaker.
d. Lower wire "arm" to start ice production.
e. First batch of ice will normally be produced
within 12 hours of installation.
f. Discard first several batches of ice so that an),
impurities in water line of icemaker wil! not be
consumed.
g. To stop ice productior_, raise "arm" of icemaker
until it ]locks in positdor_.
9
Installing and Using Specific Features (Cont°)
Freezer door shelves
There are two full-width door shelves located on
freezer door for convement storage.
a. Shelves can be removed for easy cleaning. To
remove, follow directions in step A-C on page 8.
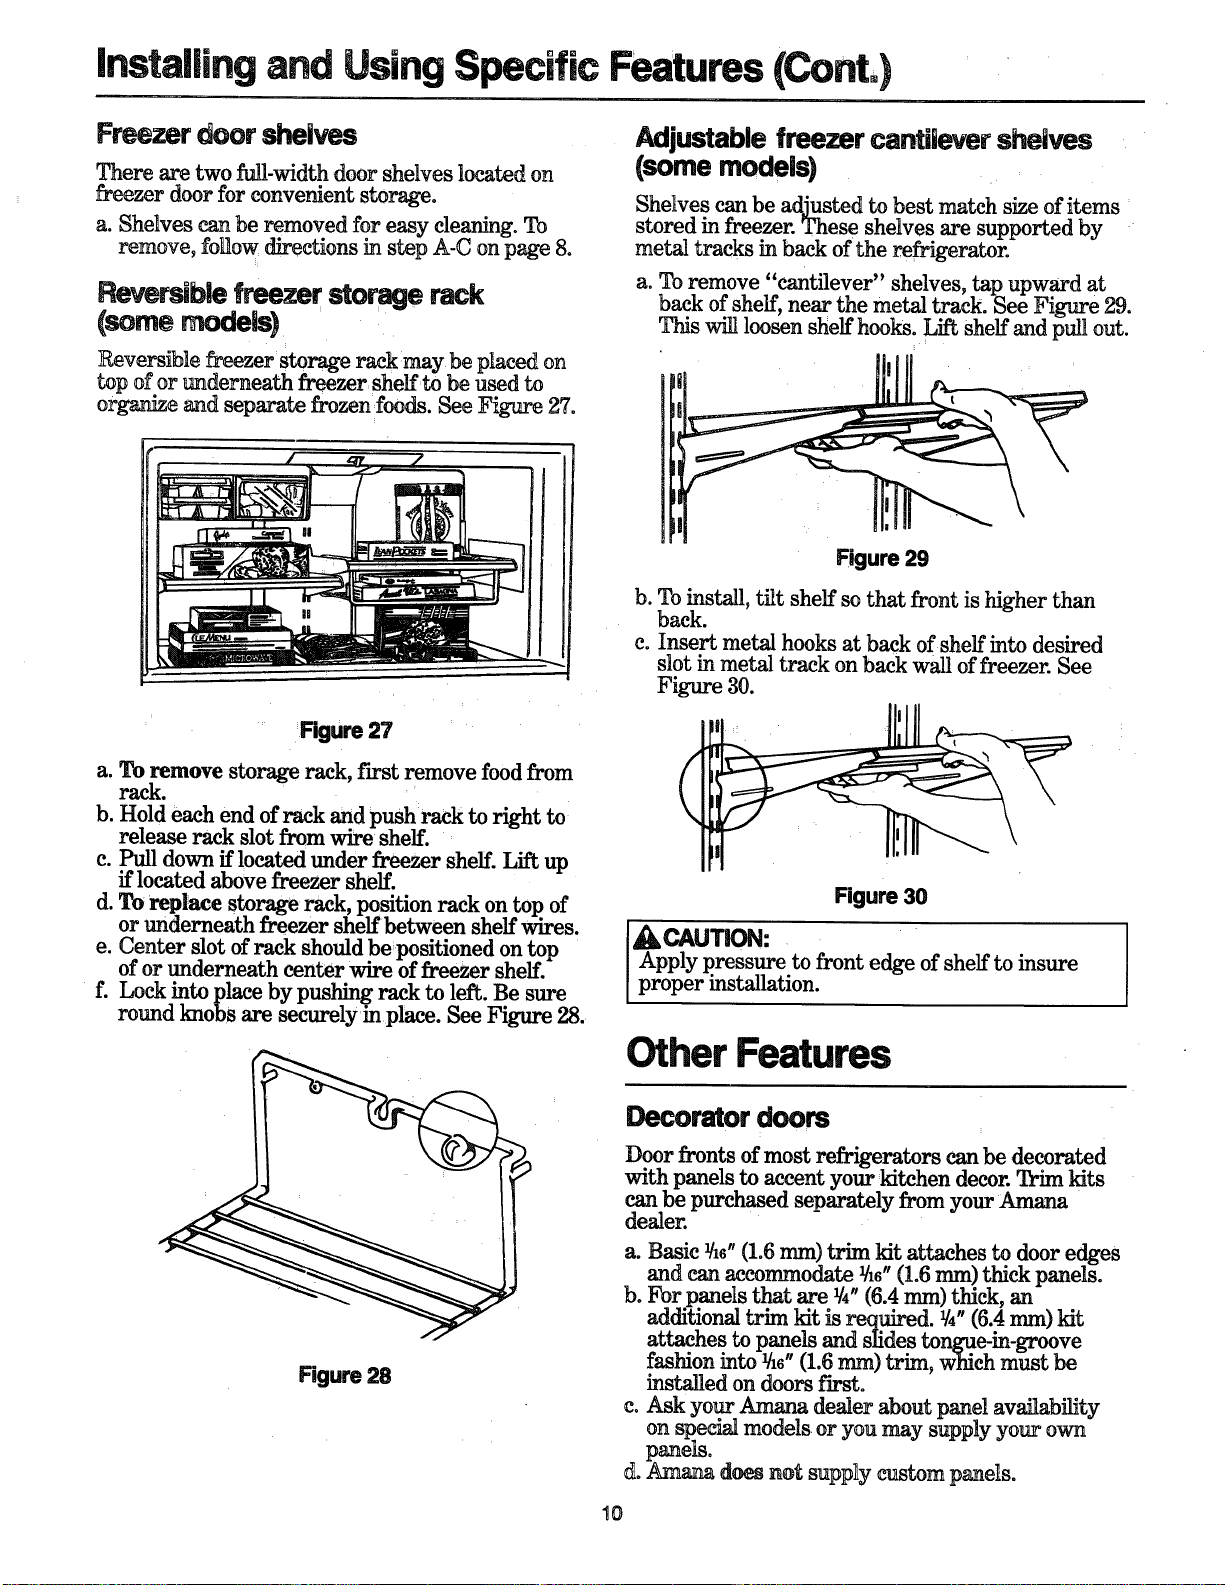
Revereiblefreezer storage rack
(some models)
Reversible freezer storage rack may be placed on
top of or underneath freezer= shelf=to be used to
organize and separate frozen :foods. See Figure 27.
Adjustable freezer cantilever shelves
(somemodels)
Shelves can be adjusted to best match size of items
stored in freezer. These shelves are supported by
metal tracks in back of the refrigerator.
a. To remove "cantilever" shelves, tap upward at
back of shelf, near the metal track. See Figure 29.
This will loosen shelf hooks. Lift shelf and pull out.
Figure 27
a. To remove storage rack, first remove food from
rack.
b. Hold each end of rack and pushrack to right to
release rack slot from wire shelf.
c. Pull down if located under freezer shelf. Lift up
if located above freezer shelf.
d. To replace storage rack, position rack on top of
or underneath freezer shelf between shelf wires.
e. Center slot of rack should be positioned on top
of or underneath center wire of freezer shelf.
f. Lock into place by pushing rack to left. Be sure
round knobs are securelyin place. See Figure 28.
Figure 28
Figure 29
b. To install, tilt shelf so that front is higher than
back.
c. Insert metal hooks at back of shelf into desired
slot in metal track on back wall of freezer. See
Figure 30.
Figure 30
_CAUTION:
Apply pressure to front edge of shelf to insure
proper installation.
Other Features
Decorator doors
Door fronts of most refrigerators can be decorated
with panels to accent your kitchen decor. Trim kits
can be purchased separately from your ,annana
dealer.
a. Basic Y16"(1.6 mm) trim kit attaches to door edges
and can accommodate ¥16"(1.6 mm) thick panels.
b. For panels that are ¥4" (6.4 ram) thick, an
additional trim kit is required. ¥4" (6.4 ram) kit
attaches to panels and slides tongue-in-groove
fashion into ¥16"(1.6 ram) trim, which must be
installedon doors first.
c. Ask your Amana dealer about panel availability
on spedal models, or you may supply your own
panels.
d. Amana de¢_ not supply custom panels.
10
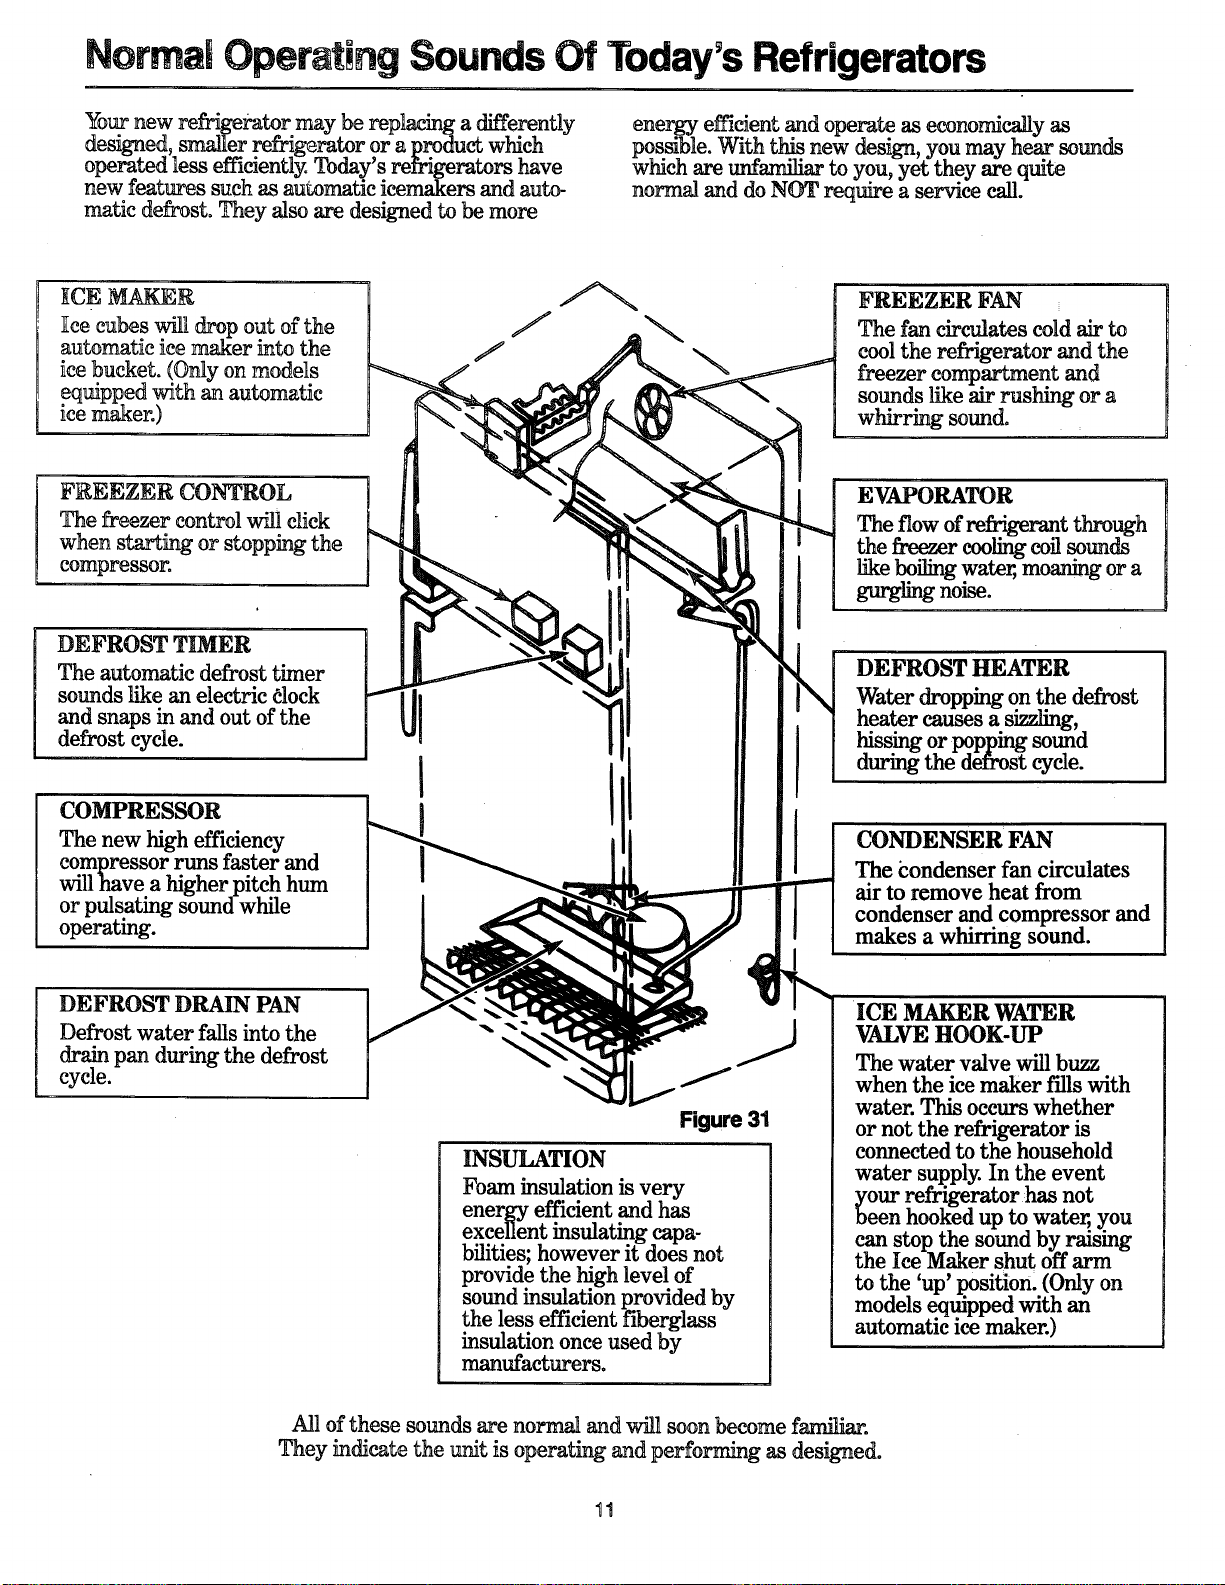
Normal Operating Sounds Of Today's Refrigerators
Your new refrigerator may be repladng a differently
designed, smaller refri'gerator or a product which
operated less efficiently. Today's refrigerators have
new features such as automatic icemakers and auto-
matic defrost. They also are designed to be more
energy effident and operate as economScally as
possible. With this new design, you may hear sounds
which are unfamiliar to you, yet they are quite
normal and do NOT reqmre a service call.
ICE MAKER
Icecubeswilldropoutofthe
automatic ice maker into the
ice bucket. (Only on models
equipped with an au_matic
ice maker.)
FREEZER CONTROL
The freezer control will click
when starting or stopping the
compressor.
DEFROST TIMER
The automatic defrost timer
soundslike an electric _lock
and snapsinand outofthe
defrostcycle.
COMPRESSOR
The new high efficiency
compressor runs faster and
will have a higher pitch hum
or pulsating sound while
operating.
DEFROST DRAIN PAN
Defrostwaterfallsintothe
drainpan duringthedefrost
cycle.
J
I
Figure 31
INSULATION
Foam insulation is very
energy efficient and has
excellent insulating capa-
bilities; however it does not
provide the high level of
sound insulation provided by
the less efficient fiberglass
insulation once used by
manufacturers.
FREEZER FAN
The fan circulates cold air to
cool the refrigerator and the
freezer compartment and
sounds like air rushing or a
whirring sound.
EVAPORATOR
The flow of refrigerant through
the freezer cooling coil sounds
l£keboiling water, moaning or a
gurgling noise.
DEFROST HEATER
Water dropping on the defrost
heater causes a sizzling,
hissing or popping sound
during the defrost cycle.
CONDENSER FAN
The i:ondenser fan circulates
air to remove heat from
condenser and compressor and
makes a whirring sound.
ICE MAKER WATER
VALVE HOOK-UP
The water valve will buzz
when the ice maker fills with
water. This occurs whether
or not the refrigerator is
connected to the household
water supply. In the event
_our refrigerator has not
een hooked up to water, you
can stop the sound by raising
the Ice Maker shut off arm
to the 'up' position. (Only on
models equipped with an
automatic ice maker.)
All of these sounds are normal and will soon become familiar.
They indicate the unit is operating and performing as designed.
Care and Cleaning Of Your Refrigerator
Exterior
a. Wash refrigerator cabinet with warm, soapy
water as needed.
b. Do net use:
Concentrated liquid dishwashing detergent
(Dilute with warm water before using.)
Abrasive cleanerssuch as COMET, AJAX, etc.
Solvents
Metal scouring pads
These can cause surfaces to scratch, crack and
discolor.
Adhesives
a. % remove glue from stickers, labels and
strapping tape, dab non-abrasive toothpaste over
adhesive.
b. Rub adhesive with fingers and rinse.
Interior
_CAUTION: '-
TOAVOID ELECTRICAL SHOCK: Unplug
power cord or open household circuit breaker
to refrigerator before replacing a burned out
light bulb or before cleaning. After cleaning or
changing light bulb, reconnect power.
a. Wash with warm, soapy water.
b. Rinse and dry.
c. Do not use abrasive heavy-duty powders such as
AJAX or COMET.
d. Avoid metal or abrasive cleaning pads.
e. Do not use concentrated liquid detergent. These
cleaners may cause scratching, cracking or
discoloration.
f. Butter dish, and "second serving" leftover
containers can be washed in top rack of an
automatic dishwasher. Other parts should be
hand washed.
Dairy storage door
a. Lift door up.
b. Place foref'mgers on either side of door near the
hinge where the dairydoor and refrigeratorliner
connect.
c.Flex ins_ghtly.
d. Pull out.
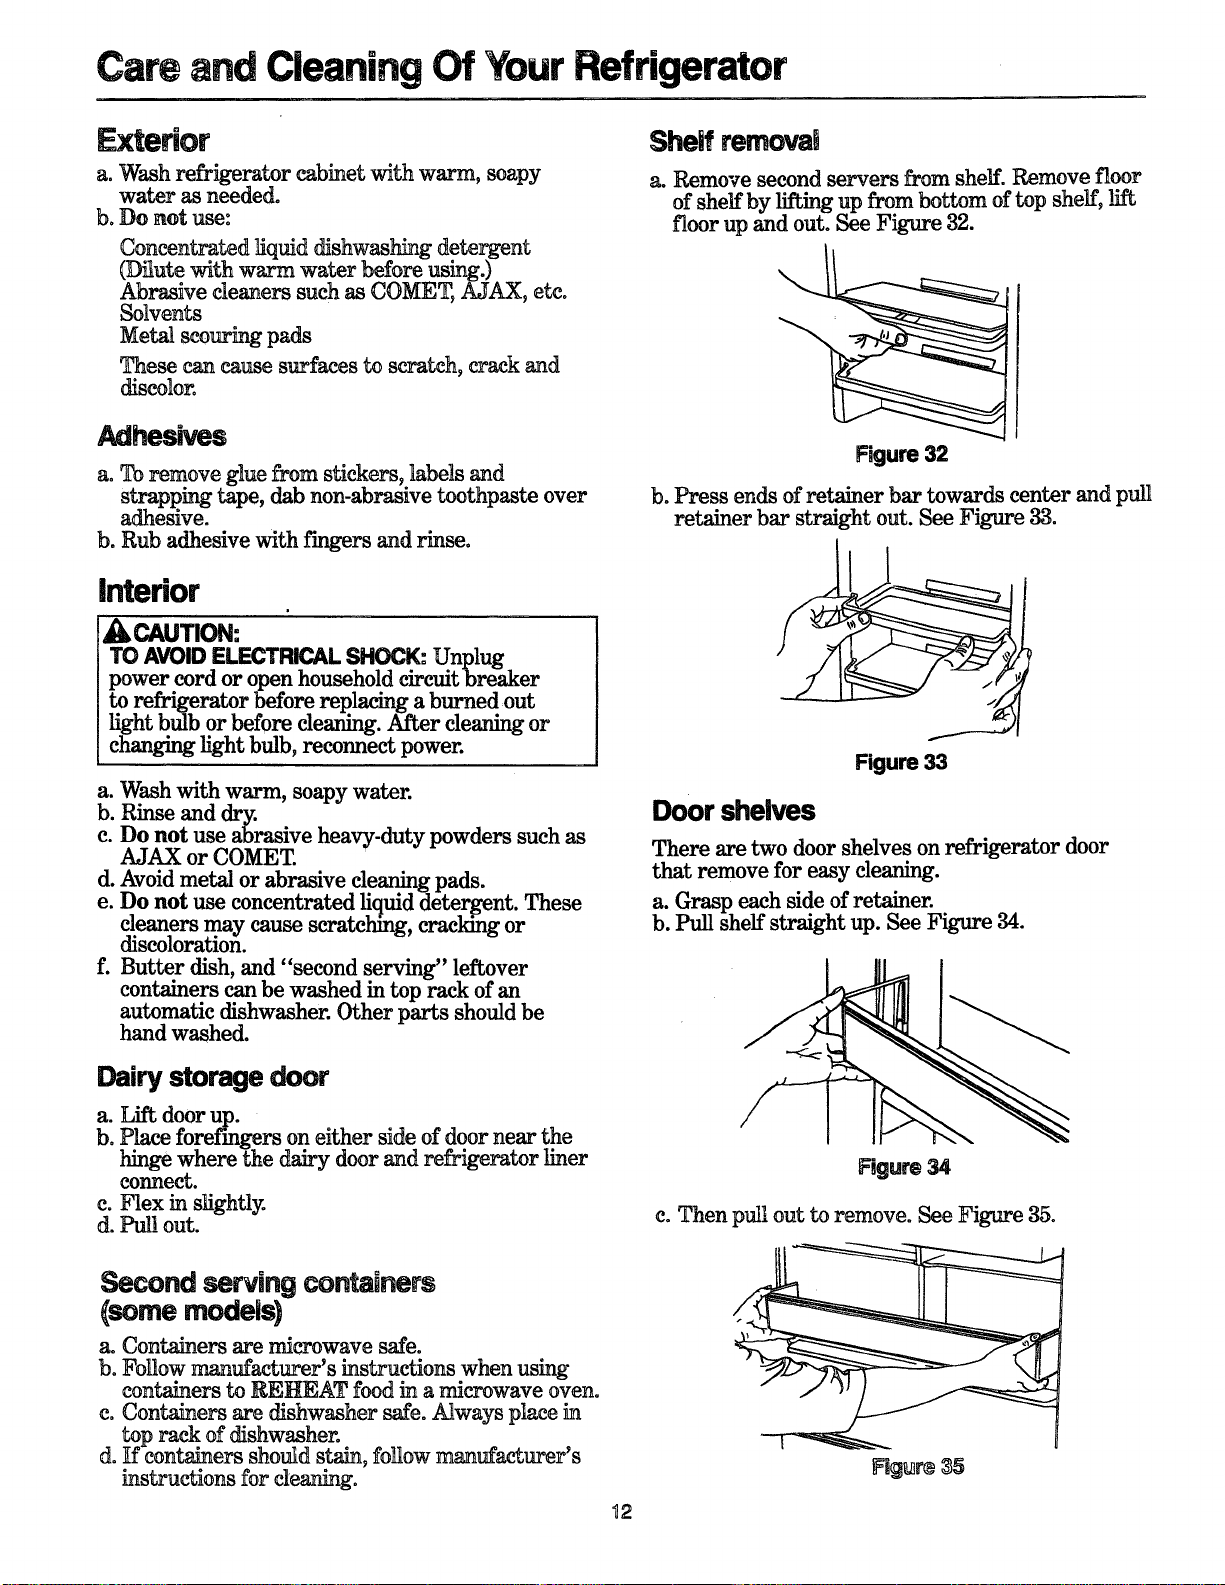
Shelf removam
a. Remove second servers from shelf. Remove floor
of shelf by lifting up from bottom of top shelf, lift
floor up and out. See Figure 32.
Figure 32
b. Press ends of retainer bar towards center and pull
retainer bar straight out. See Figure 33.
Figure 33
Doorshelves
There are two door shelves on refrigerator door
that remove for easy cleaning.
a. Grasp each side of retainer.
b. Pull shelf straight up. See Figure 34.
Figure 34
c. Then pull out to remove. See Figure 35.
Second serving containers
(some models)
a. Containers are microwave safe.
b. Follow manufacturer's instructions when using
containers to REHEAT food in a microwave oven.
c.Containersare dishwasher safe.Always placein
top rack ofdishwashen
d.Ifcontainersshouldstain,followmanufacturer's
instructions for cleaning.
12
Care and Cleaning Of Your Refrigerator (Cont.)
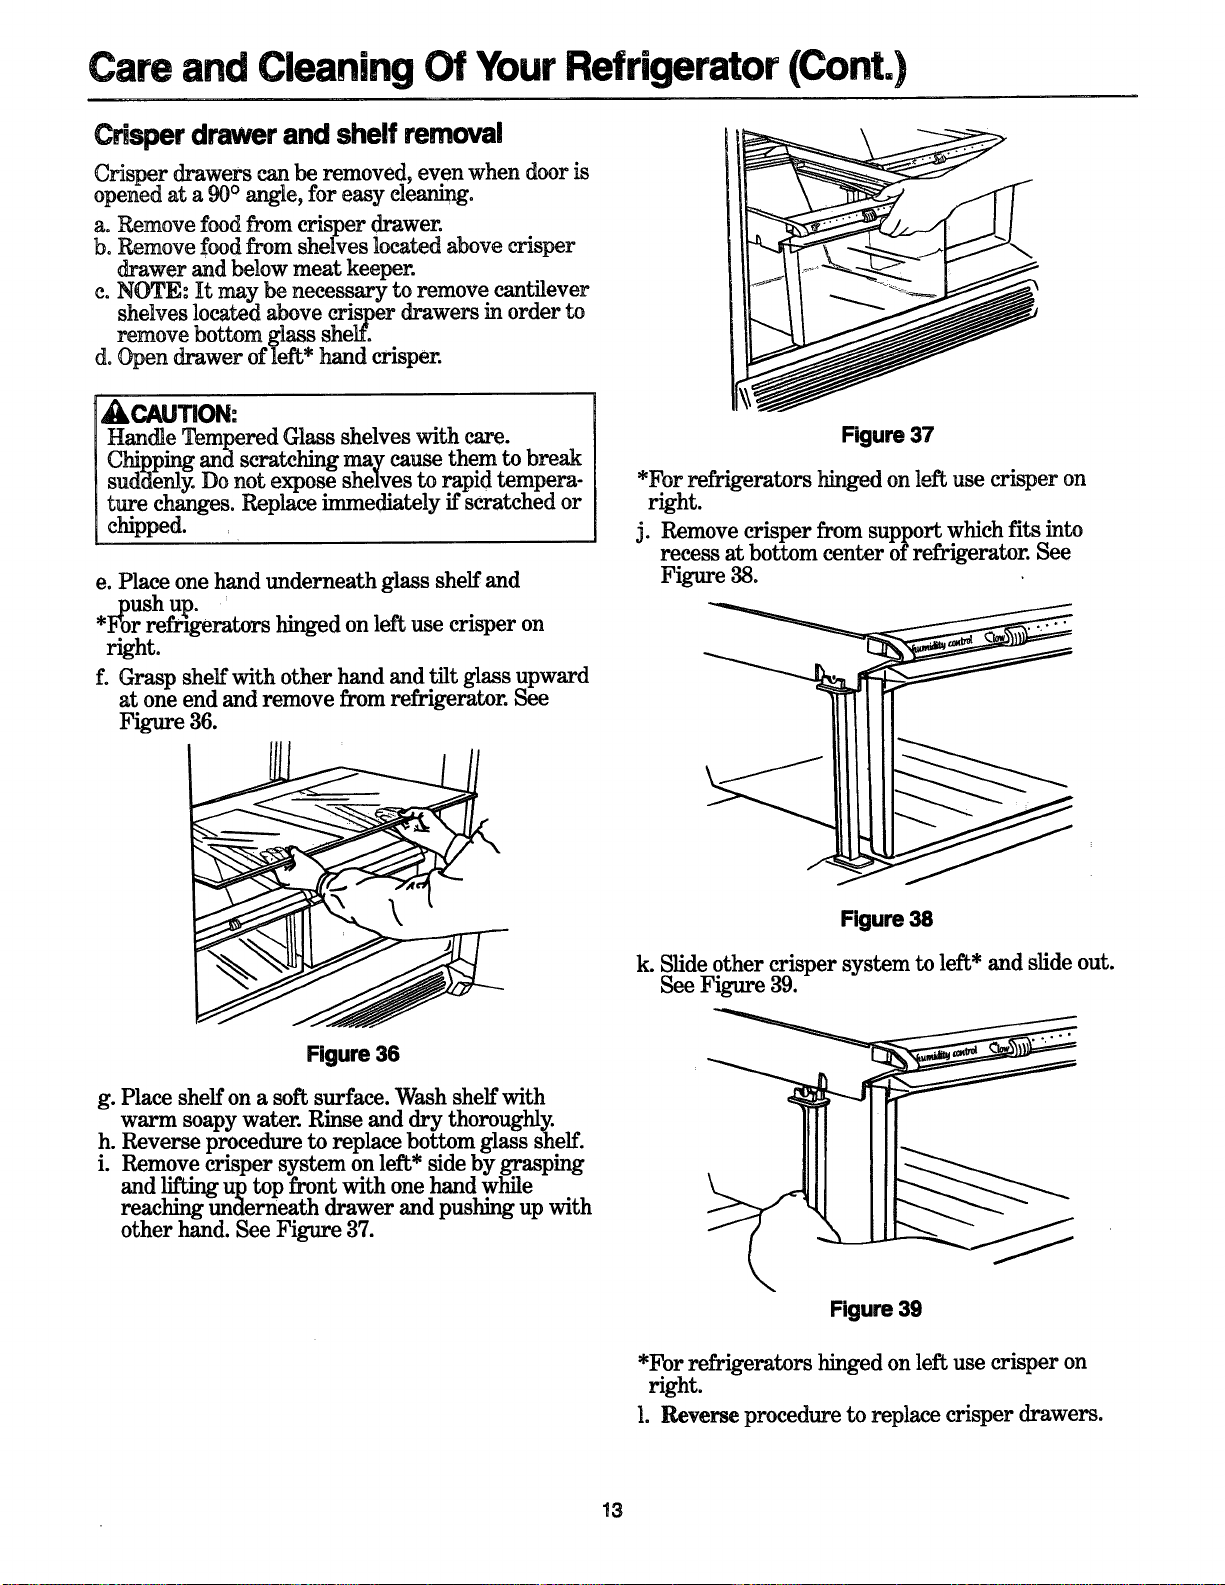
Crisperdrawer and shelf removal
Crisper drawers can be removed, even when door is
opened at a 90 ° angle, for easy cleaning.
a. Remove food from crisper drawer.
b. Remove food from shelves located above crisper
drawer and below meat keeper.
c. NOTE: It may be necessary to remove cantilever
shelves located above crisper drawers in order to
remove bottom glass shelf.
d. Open drawer of left* hand crisper.
_,CAUTION:
Handle Tempered Glass shelves with care.
Ch'pping and scratching may cause them to break
sudaenly. Do not expose shelves to rapid tempera-
ture changes. Replace immediately if scratched or
chipped.
e. Place one hand underneath glass shelf and
push up.
*For refrigerators hinged on left use crisper on
right.
f. Grasp shelf with other hand and tilt glass upward
at one end and remove from refrigerator. See
Figure 36.
Figure 37
*For refrigerators hinged on left use crisper on
right.
j. Remove crisper from support which fits into
recess at bottom center of refrigerator. See
Figure 38.
Figure 38
k. Slide other crisper system to left* and slide out.
See Figure 39.
Figure 36
g. Place shelf on a soft surface. Wash shelf with
warm soapy water. Rinse and dry thoroughly.
h. Reverse procedure to replace bottom glass shelf.
• ,
1. Remove crisper system on left side by grasping
and lifting up top front with one hand while
reaching underneath drawer and pushing up with
other hand. See Figure 37.
Figure 39
*For refrigerators hinged on left use crisper on
right.
1. Reverse procedure to replace crisper drawers.
13
Care and Cleaning Of Your Refrigerator (Cont.)
Odor removal
a. Disconnect electrical power plug.
b. Remove all food.
e. Thoroughly wash inside of unit, including all
shelves, drawers, accessories and gaskets, with a
mb_ure of 4 tablespoons of baking soda dissolved
in a quart of warm water. Pay special attention to
any corners, crevices or grooves into which odor-
causing liqulds may have seeped.
d. Dry thoroughly.
e. Return foodto refrigerator; washing off all
bottles, jars and containers before placing them
into refrigerator and freezer.
f. Plug in refrigerator. Wait 24 hours before
checking to see if odor has been eliminated. If
odor is still present, please call the Amana
Consumer Information Line toll free
(1-800-843-0304) for additional cleaning methods.
[ or
a. Clean refrigerator and freezer gaskets at least
twice a year with a mild detergent diluted in
water.
b. Do not clean with cleaners which contain
ammonia or chlorine bleach.
c. Rinse and dry. ll
d. _Apply a light film of petroleum je y to gaskets to
help keep them soft and pliable.
Mechanical
Condenser coil
It is important to clean condenser coil of an_y
refrigerator every three months. Dust and lint will:
• reduce cooling performance.
• cause refrigerator to waste energy.
• shorten life of the compressor and other
components.
a. Grasp toe grille at each end. Pull forward to
remove. Seepage 5 for location of coil.
b. Use a long h_dIed bottle;- brush and a vacuum
cleaner hose nozzle to remove dust and lint from
condenser coil at bottom of refrigerator. A special
brush can be purchased from your Amana dealer
-- part no. R1930-4.
c. Snap toe grille into place.
d. Additional cleaning may be done if refrigerator
is pulled away from wall. Run a vacuum-brush
across condenser fan outlet grille on lower back
of refrigerator.
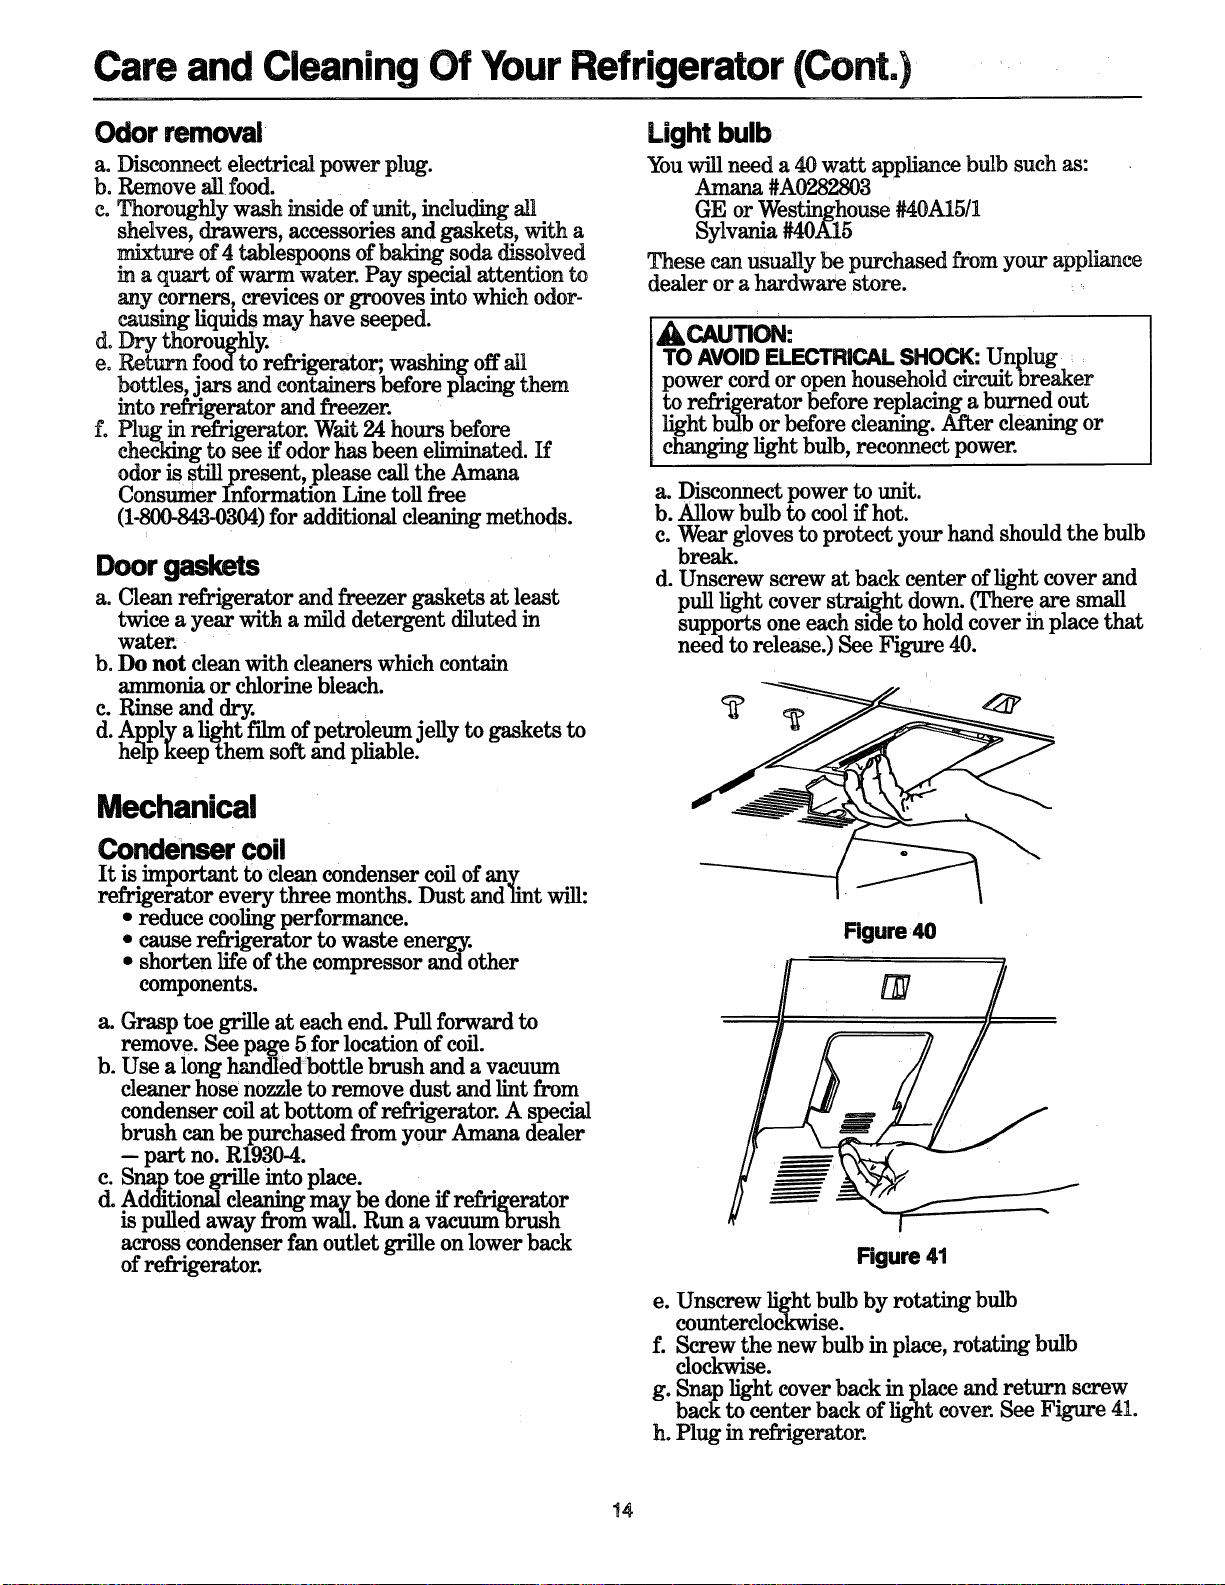
Light bulb
You will need a 40 watt appliance bulb such as:
Amana #A02222_3
GE or Westinghouse #40A15/1
Sylvania #40A15
These can usually be purchased from your appliance
dealer or a hardware store.
_CAUTION:
TO AVOID ELECTRICAL SHOCK: Unplug
power cord or open household circuit breaker
to refrigerator before replacing a burned out
light bulb or before cleaning. After cleaning or
changing light bulb, reconnect power.
a. Disconnect power to unit.
b. Allow bulb to cool if hot.
c. Wear gloves to protect your hand should the bulb
break.
d. Unscrew screw at back center of light cover and
pull light cover straight down. (There are small
supports one each side to hold cover in place that
need to release.) See Figure 40.
Figure 40
Figure 41
e. Unscrew light bulb by rotating bulb
counterclockwise.
f. Screw the new bulb in place, rotating bulb
clockwise.
g. Snap light cover back in place and return screw
back to center back of light cover. See Figure 41.
h. Plug in refrigerator.
!4
Energy Tips
Your Amana refrigerator is designed to be one of
the most energy efficient refrigerators available.
You can help reduce energy use by following these
suggestions:
a. Set freezer, refrigerator and meat keeper controls
so compartments are no colder than necessary.
See page 4 for details.
b. Your refrigerator will use less energy if freezer
section is I_ept full. A full freezer helps maintain
frozen temperatures when door is opened.
c= Keep door gaskets clean and lightly lubricated
with petroleum jelly. Replace worn door gaskets.
If door gaskets become dirty and worn,
Vacation Tips
cold air can leak out and cause refrigerator to use
more energy.
d. Block heat and sunlight. In_t_ your refrigerator
away from heat sources and direct sunlight.
e. Clean condenser coil. A dirty condenser will cause
refrigerator to use more energ_ See instructions
on page 14 for cleaning instructions.
f. Use the Cabinet Moisture Control when humidity
is hi_'gh.This control regulates a heater which
reddces condensation during periods of high
humidity. In periods of low humidity this control
can be set to "Off" position. See page 4.
a. Remove perishable foods from refrigerator.
b. If you have an icemaker, shut it off. Move wire
"arm" to upper position. Turn water supply to
refrigerator off at saddle valve (valve controlling
water supply to refrigerator).
c. If leaving for an extended period --
, empty refrigerator
unplug, it
clean it
• prop door open, so air can circulate inside
15
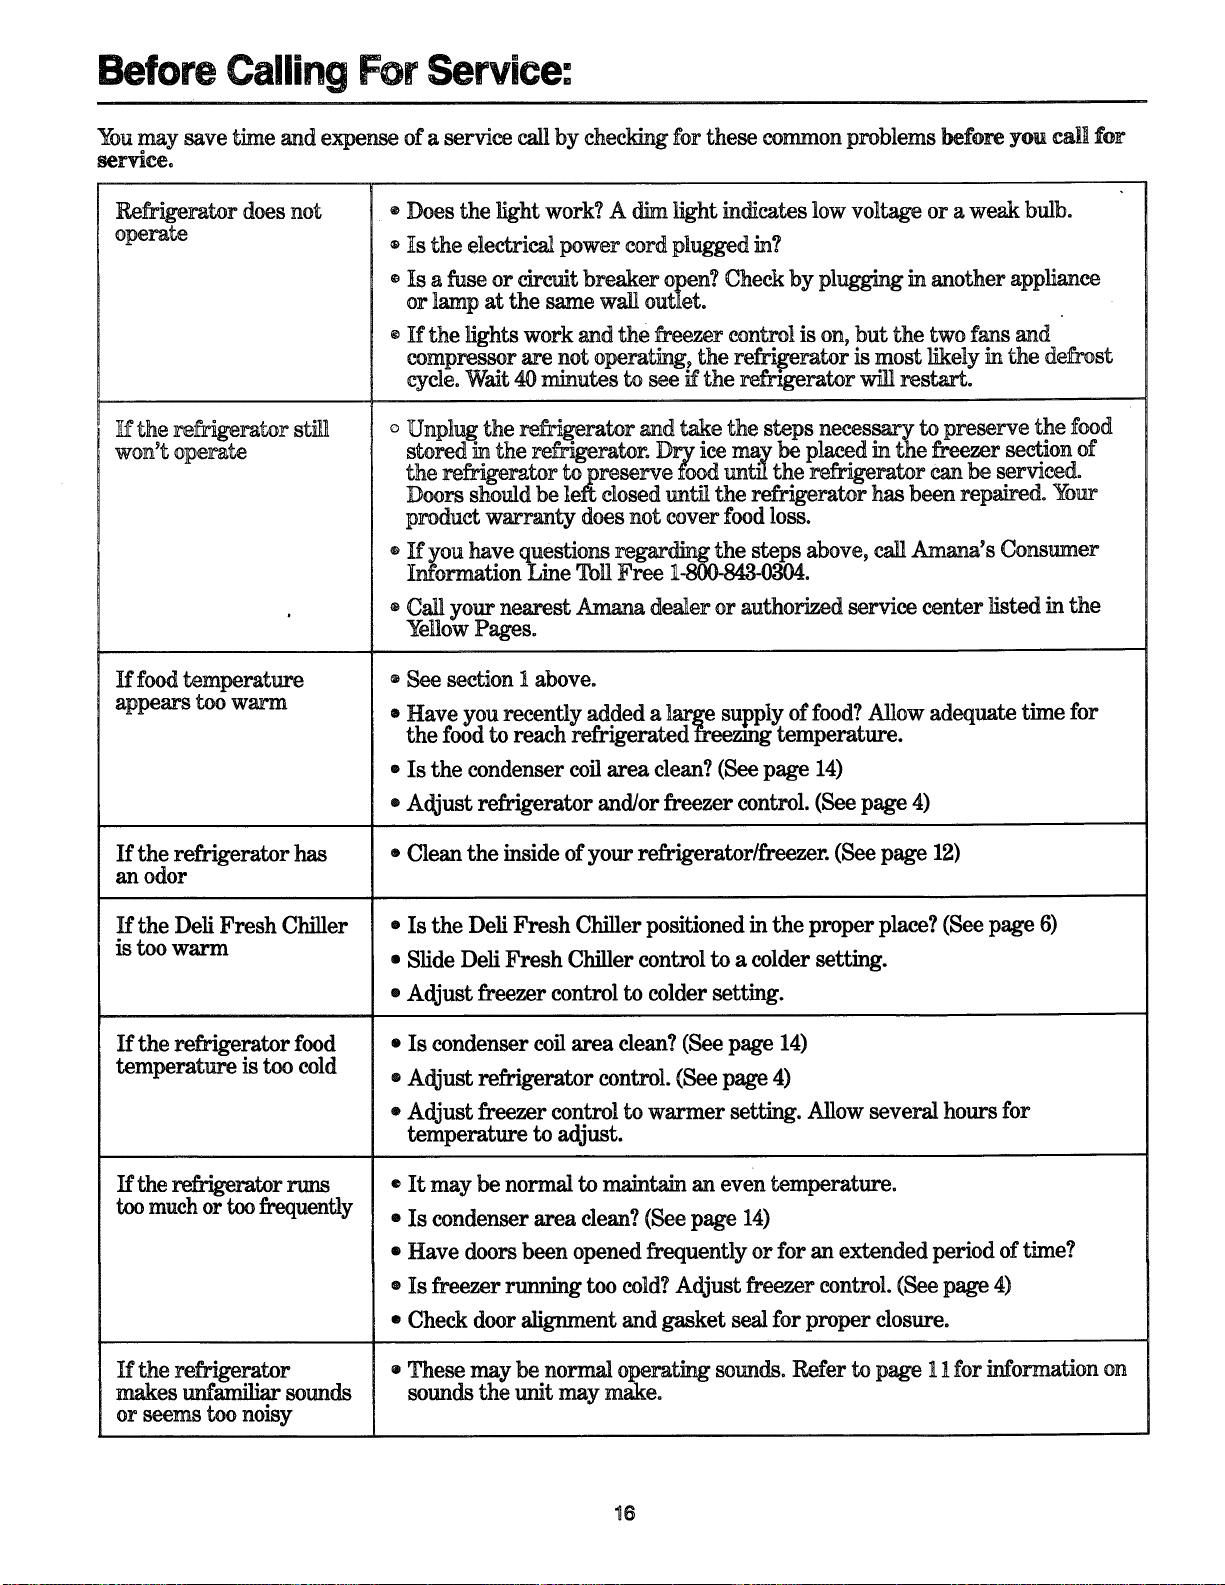
Before Calling For Service:
You may save time and expense of a service c_ by checking for these common problems before you call for
service.
Refrigerator does not
operate ®
If the refr_gera_:_r still
won't operate
If food temperature
appears too warm
If the refrigerator has
an odor
If the Deli Fresh Chiller
is too warm
If the refrigerator food
temperature is too cold
If the refrigerator runs
too much or too frequently
If the refrigerator
makes unfamiliar sounds
or seems too noisy
Does the light work? A dim light indicates low voltage or a weak bulb.
ts the electrical power cord plugged in?
Is a fuse or drcult breaker open? Check by plugging in another apphance
or lamp at the same wall outlet.
If the lights work and the freezer control is on, but the two fans and
compressor are not operating, the refrigerator is most likely in the defrost
cycle. Walt 40 minutes to see ff the refrigerator win restart.
o Unplug the refrigerator and take the steps necessary to preserve the f_d
stored in the refrigerator. Dry ice may be placed in the freezer section of"
the refrigerator to preserve food until the refrigerator can be serviced.
Doors should be left closed until the refrigerator has been repaired. Your
product warranty does not cover food loss.
If you have questions regarding the steps above, call Amana's Consumer
Information Line Toll Free b8004_4}304.
Call your nearest Amana dealer or authorized service center listed in the
Yellow Pages.
See section 1 above.
• Have you recently added a large supply of food? Allow adequate time for
the food to reach i_efrigerated freez_g temperature.
• Is the condenser coil area clean? (See page 14)
• Adjust refrigerator and/or freezer control. (See page 4)
• Clean the inside of your refrigerator/freezer. (See page 12)
• Is the Deli Fresh Chiller positioned in the proper place? (See page 6)
• Slide Dell Fresh Chiller control to a colder setting.
• Adjust freezer control to colder setting.
• Is condenser coil area clean? (See page 14)
• Adjust refrigerator control. (See page 4)
• Adjust freezer control to warmer setting. Allow several hours for
temperature to adjust.
®It may be normal to mahtah an even temperature.
• Is condenser area clean? (See page 14)
• Have doors been opened frequently or for an extended period of time?
® Is freezer running too cold? Adjust freezer control. (See page 4)
• Check door alignment and gasket seal for proper closure.
• These may be normal operating sounds. Refer to page 11 for information on
sounds the unit may make.
16
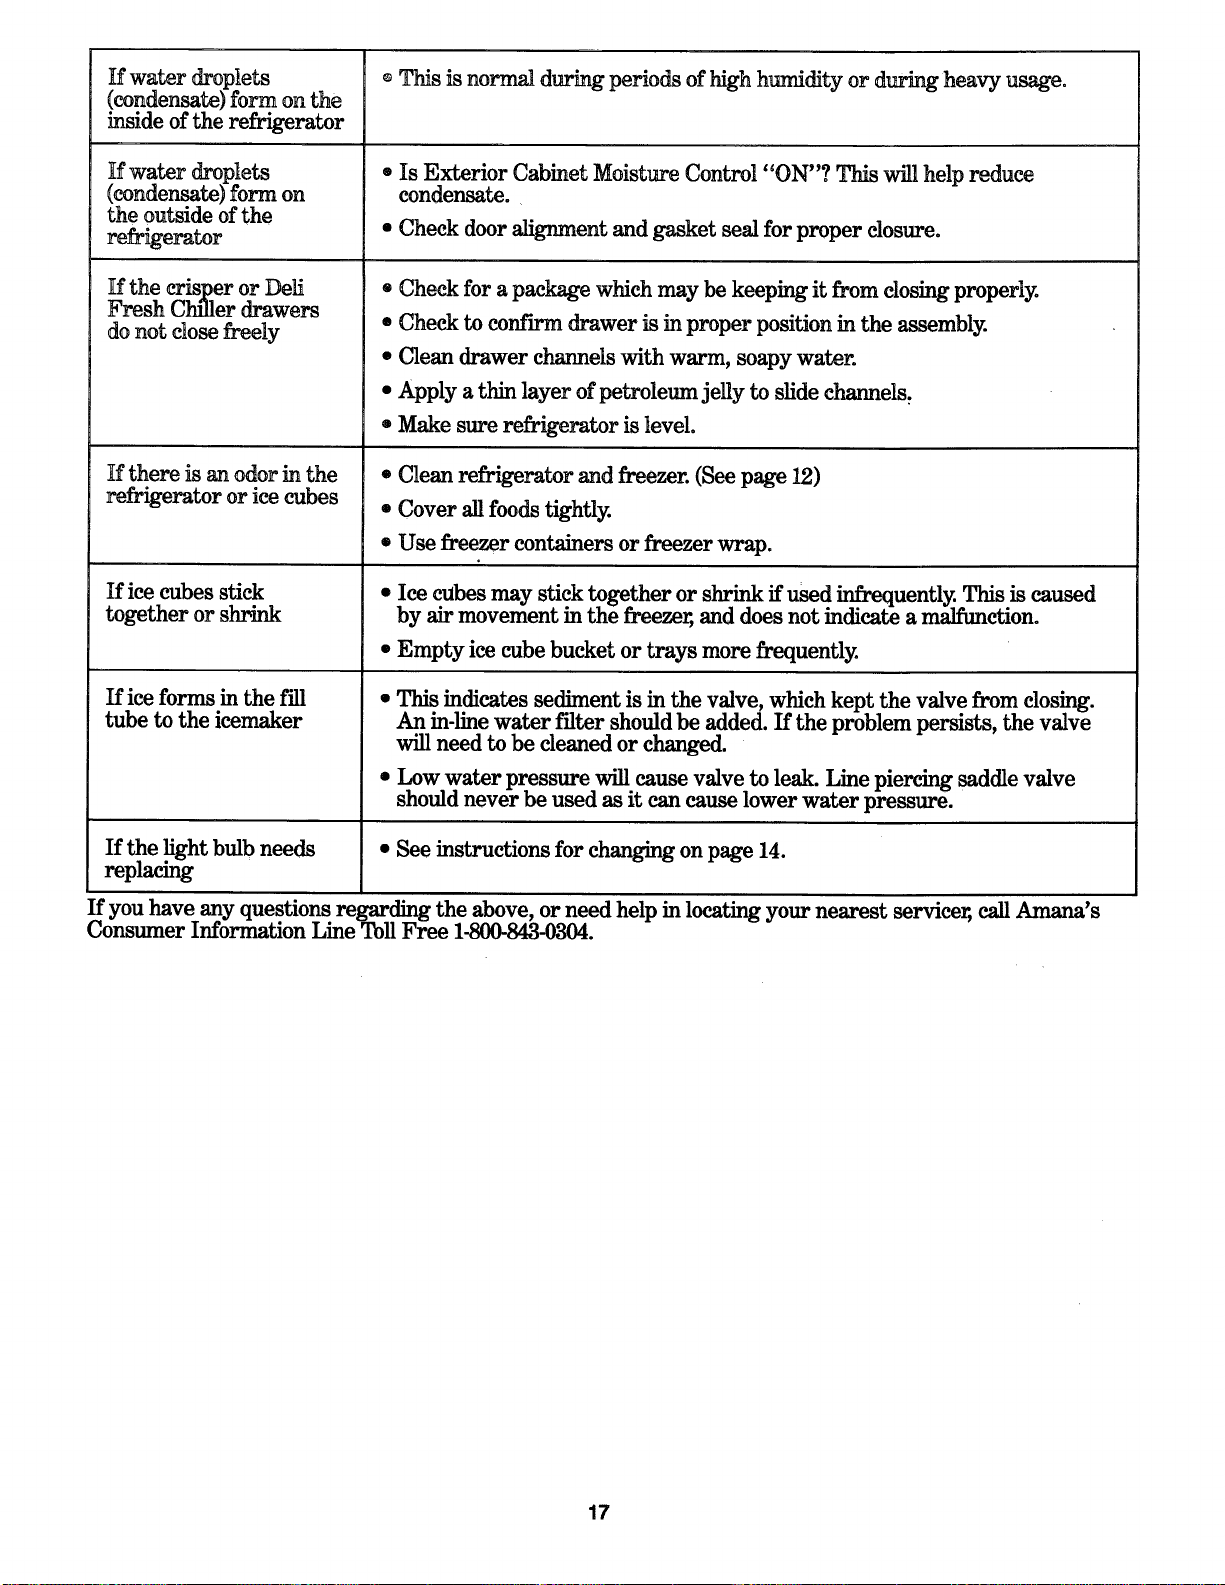
If water droplets
(condensate)form onthe
inside of the refrigerator
If water droplets .
(condensate) form on
the outside of the
refrigerator
If the crisper or Deli
Fresh Chffier drawers
do not close freely
Q
®
If there is an odor in the *
refrigerator or ice cubes
@
@
If ice cubes stick
together or shy-ink
O
If ice forms in the fill *
tube to the icemaker
Q
If the light bulb needs
replacing
This is normal during periods of high humidity or during heavy usage.
Is Exterior Cabinet Moisture Control "ON"? This will help reduce
condensate.
Check door alignment and gasket seal for proper closure.
Check for apackage which may be keeping it from dosing properly.
Check to conf'mn drawer is in proper position In the assembly.
Clean drawer channels with warm, soapy water.
Apply a thin layer of petroleum jelly to slide channels.
Make sure refrigerator is level.
Clean refrigerator and freezer. (See page 12)
Cover all foods tightly.
Use freezer containers or freezer wrap.
ce cubes may stick together or shrink if used infrequentl:_ This is caused
y air movement in the freezer, and does not Indicate a malfunction.
Empty ice cube bucket or trays more frequently.
This indicates sediment is in the valve, which kept the valve from closing.
An in-line water filter should be added. If the problem persists, the valve
will need to be cleaned or changed.
Low water pressure will cause valve to leak. Line piercing saddle valve
should never be used as it can cause lower water pressure.
See instructions for changing on page 14.
If you have any questions regarding the above, or need help in locating your nearest servicer, call Amana's
Consumer Information Line Toll Free 1-800-843-0304.
17
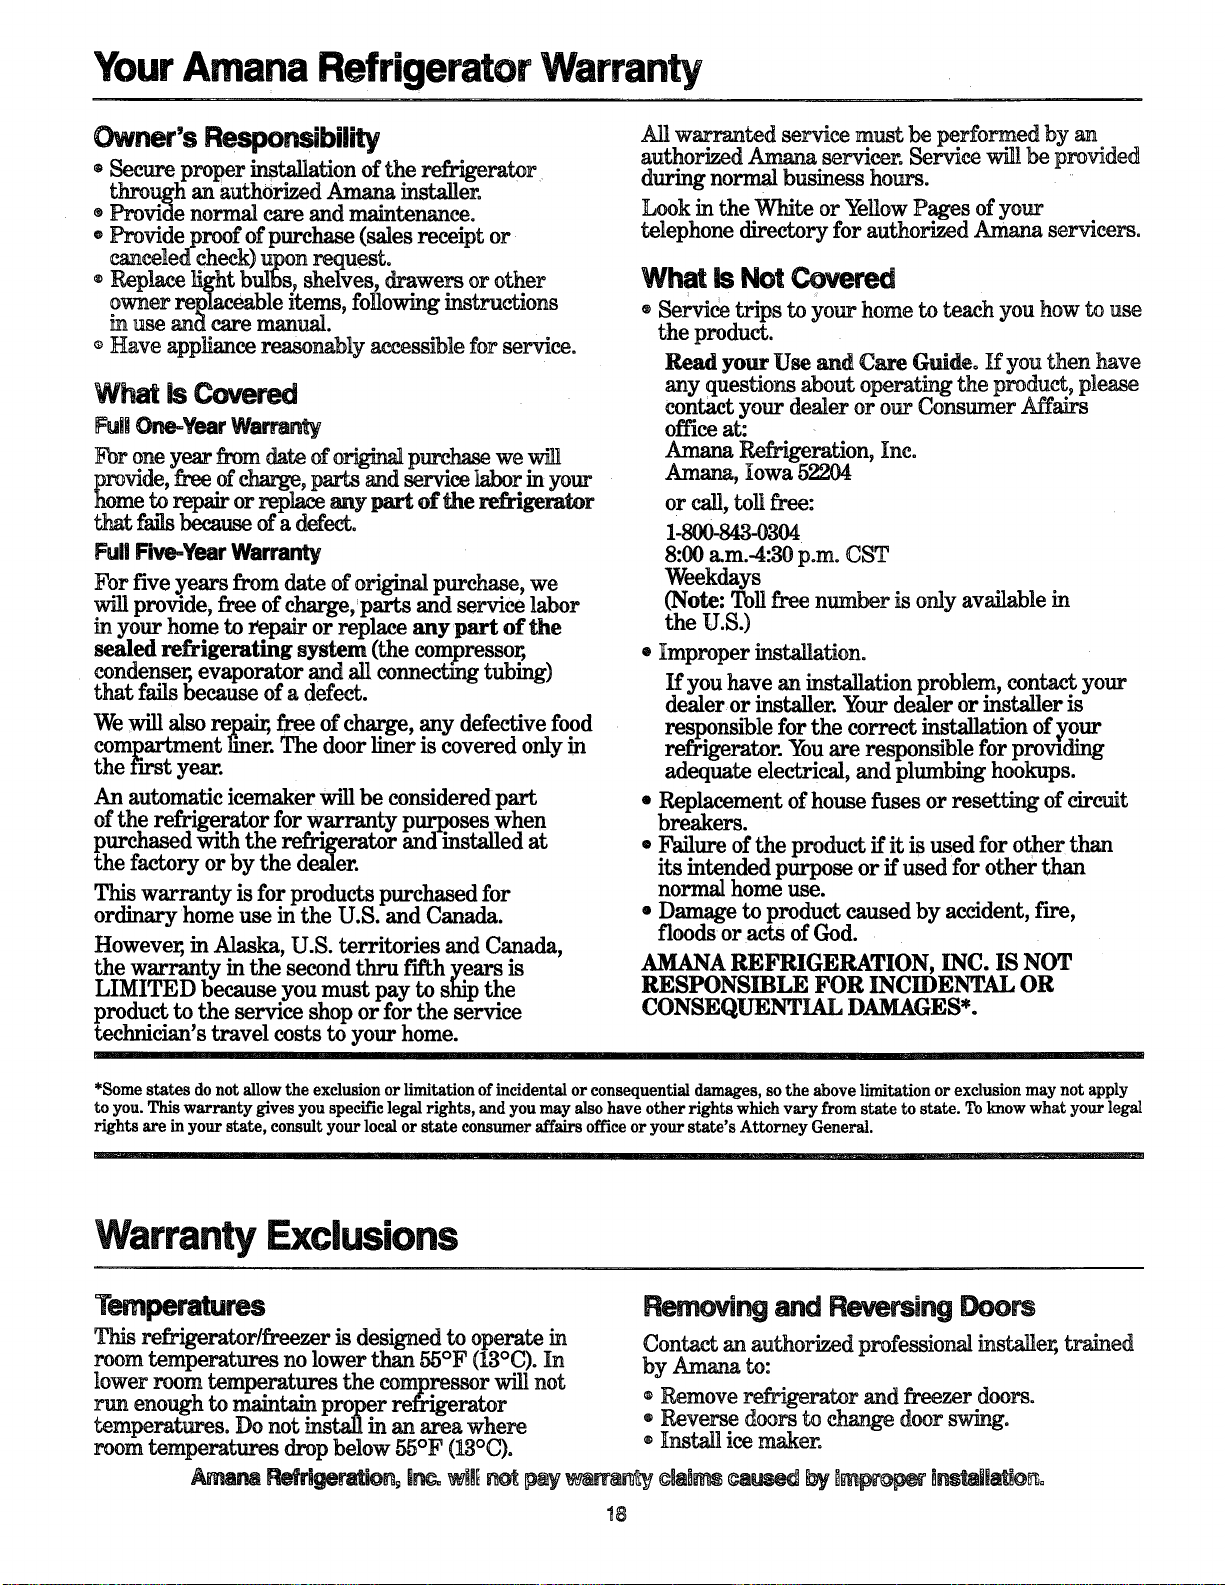
Your Amana Refrigerator Warranty
Owner's Responsibility
Secure proper installation of the refrigerator
through an authorized Amana installer.
®Provide normal care and maintenance.
o Provide proof of purchase (sales receipt or
canceledcheck)upon request.
® Replacelightbulbs,shelves,drawersorother
owner replaceable items, following instructions
inuseand caremanual.
Have appliance reasonably accessible for service.
What is Covered
Full One-Year Warranty
For one year from date of origh_ purchase we will
provide, free of charge, parts and service labor in your
home to repair or replace any part of the refrigerator
that fails because of a defect.
Full Five-Year Warranty
For five years from date of original purchase, we
will provide, free of charge, parts and service labor
in your home to _palr or replace anypart of the
sealed refrigerating system(the compressor,
condenser, evaporator and all connecting tubing)
that fails because of a defect.
We will also repair, free of charge, any defective food
compartment liner. The door liner is covered only in
the first year.
An automatic icemaker will be considered part
of the re flyigerator for warranty purposes when
purchased _vith the refrigerator and installed at
the factory or by the dealer.
This warranty is for products purchased for
ordinary home use in the U.S. and Canada.
However, in Alaska, U.S. territories and Canada,
the warranty in the second thru fifth y e__ is
LIMITED because you must pay to ship the
product to the service shop or for the service
technician's travel costs to your home.
All warranted service must be performed by an
authorized Amana servicer. Service wil! be provided
during normal business hours.
Look in the White or Yellow Pages of your
telephone directory for authorized Amana servicers.
What is Not Covered
®Service trips to your home to teach you how to use
the product.
Read your Use and Care Guide. If you then have
any questions about operating the product, please
contact your dealer or our Consumer Affairs
office at:
Amana Refrigeration, Inc.
Amana, Iowa 52204
or call, toll free:
1-80o_A3-0304
8:00am.-4:30p.m.CST
Weekdays
(Note:Tollfreenumber isonlyavailablein
theU.S.)
* Improperi_stallation.
Ifyou havean installationproblem,contactyour
dealerorinstaller.Your dealerorinstalleris
responsibleforthecorrectinstallationof_rour
refrigerator.You areresponsibleforprowding
adequateelectrical,and plumbinghookups.
* Replacementofhousefusesorresettingofcircuit
breakers.
* Failureoftheproductifitisusedforotherthan
itsintendedpurposeorifusedforotherthan
normalhome use.
®Damage to product caused by accident, fn-e,
floods or ac_ of God.
AMANA REFRIGERATION, INC. IS NOT
RESPONSIBLE FOR INCIDENTAL OR
CONSEQUENTIAL DAMAGES*.
*Some states do not allow the exclusion or limitation of incidental or consequential damages, so the above limitation or exclusion may not apply
to you. This warranty gives you specific legal rights, and you may also have other rights which vary from state to state. To know what your legal
rights are in your state, consult your local or state consumer affairs office or your state's Attorney General.
Warranty Exclusions
Temperatures
This refrigerator/freezer is designed to operate in
room temperatures no lower than 55°F (13°C). In
lower room temperatures the compressor will not
run enough to maintain proper ref_gerator
temperatures. Do not in_stal!in an area where
room temperatures drop below 55°F (13°C).
Removing and ReversingDoors
Contactan authorizedprofessionalinstaller,trained
by Amana to:
Remove refrigerator and freezer doors.
o Reverse doorstochange doorswing.
®Install icemaker.
18
EXTENDED SERVICE PLAN
Rest assured against
unexpected repair billst
EXTENDED SERVICE PLAN
Amana ispleased to offer longer-term service protectionon your newAmana
refrigerator.The Amana Asure Extended Service Plan isspecially designed to
supplement the strongwarranty described above. Itcombines withthis standard
warranty to providebudget-protectingcoverage onyour refrigeratorfor upto
five full years, covering parts, labor and travel charges.
Your participating Amana dealer has details.Or contact us:
Amana Refrigeration, Inc.
Customer Service Department
Amana, IA 52204
CONSUMER INFORMATION LINE
L TOLL FREE
1-800-843-0304
Part No. 10480903
Printed in U.S.A.
_JmQna
A _ Company
© Amana Refrigeration, Mc.
Amana, _owa52204