F
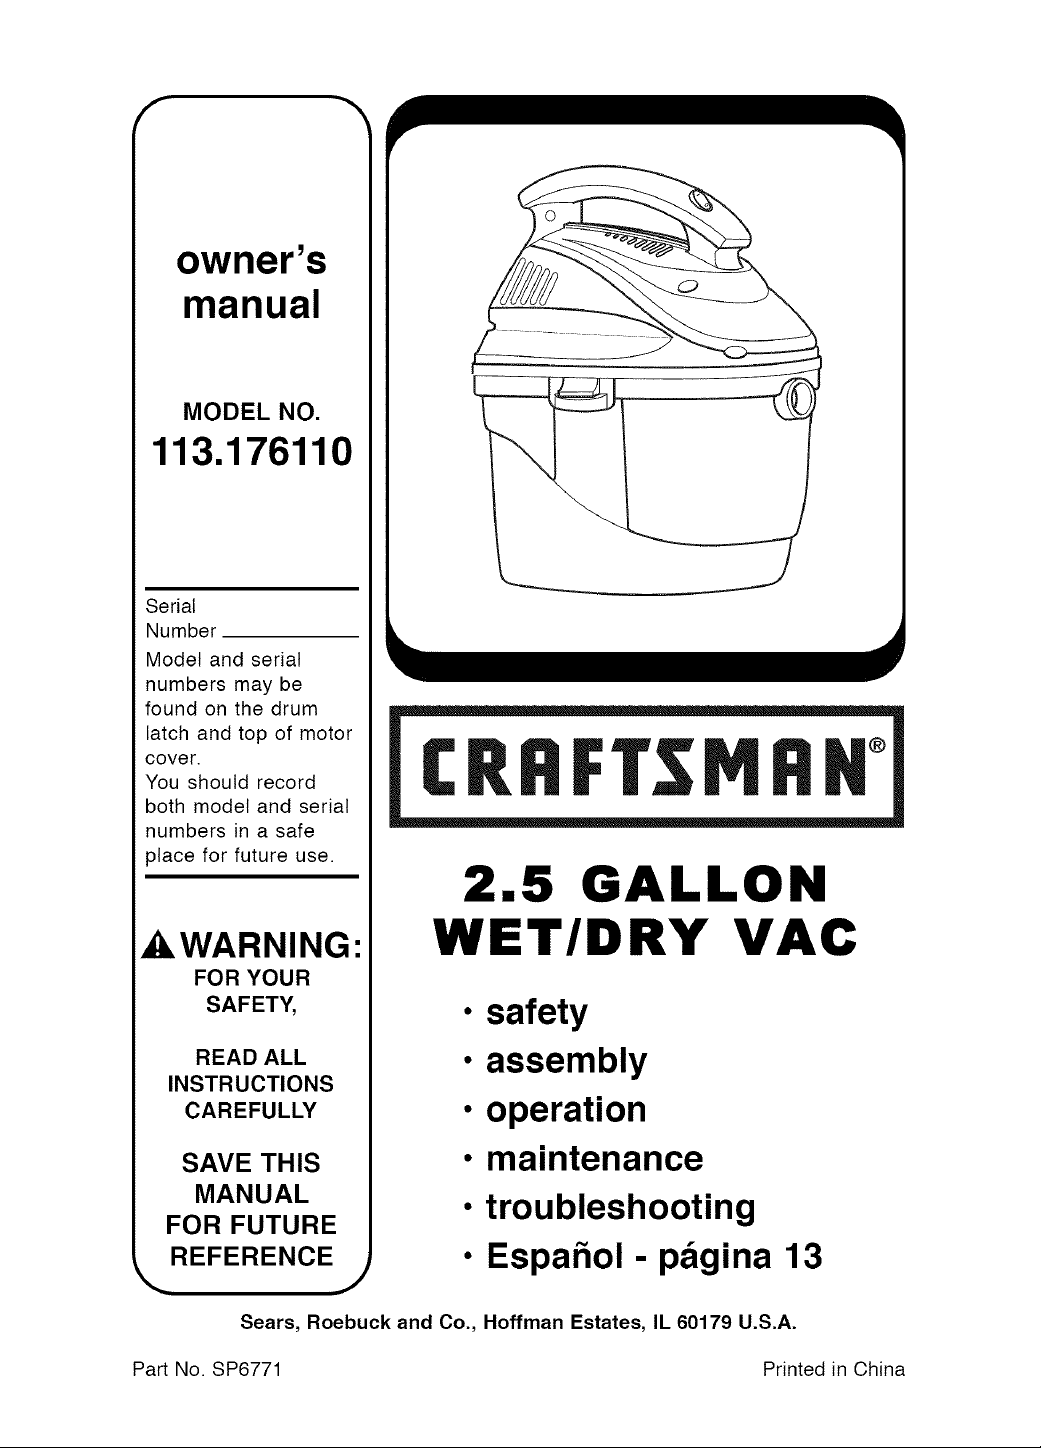
owner's
manual
MODEL NO.
113.176110
Serial
Number
Model and serial
numbers may be
found on the drum
latch and top of motor
cover.
You should record
both model and serial
numbers in a safe
place for future use.
AWARNING"
FOR YOUR
SAFETY,
READ ALL
INSTRUCTIONS
CAREFULLY
SAVE THIS
MANUAL
FOR FUTURE
REFERENCE
J
CRRFrSMRX
2.5 GALLON
WET/DRY VAC
• safety
• assembly
• operation
• maintenance
• troubleshooting
• Espahol- pagina 13
Sears, Roebuck and Co., Hoffman Estates, IL 60179 U.S.A.
Part No. SP6771 Printed in China
Warranty
Craftsman One Year Full Warranty
If this Craftsman product fails due to a defect in material or workmanship
within one year from the date of purchase, return it to any Sears store or
other Craftsman outlet in the United States for free replacement.
This warranty applies for only 90 days from the date of purchase if this
product is ever used for commercial or rental purposes.
This warranty does not include bags or filters, which are expendable
parts that can wear out from normal use within the warranty period.
This warranty gives you specific legal rights, and you may also have
other rights, which vary, from state to state.
Sears, Roebuck and Co., Hoffman Estates, IL 60179
IMPORTANT SAFETY INSTRUCTIONS
Safety is a combination of common sense,
staying alert, and knowing how your
Wet/Dry Vacuum cleaner ("Vac") works.
Safety Signal Words
DANGER: Indicates a hazardous
situation which, if not avoided, will result
in death or serious injury.
WARNING: Indicates a hazardous
situation which, if not avoided, could
result in death or serious injury.
Ak CAUTION: Indicates a hazardous
situation which, if not avoided, could
result in minor or moderate injury.
When using your Vac, always follow basic
safety precautions including the following:
A, WARNING
- To reduce the risk of fire, electric
shock, or injury:
• Read and understand this manual and
all labels on the Vac before operating.
• Use only as described in this manual.
• Do not leave Vac running while
unattended - you may fail to notice
important signs indicating abnormal
operation such as loss of suction,
debris/liquid exiting exhaust, or
abnormal motor noises. Immediately
stop using Vac if you notice these
signs.
• Do not leave Vac when plugged in.
Unplug from outlet when not in use and
before servicing.
• Sparks inside the motor can ignite
flammable vapors or dust. To reduce
the risk of fire or explosion, do not use
near combustible liquids, gases, or
dusts, such as gasoline or other fuels,
lighter fluid, cleaners, oil-based paints,
natural gas, coal dust, magnesium
dust, grain dust, aluminum dust, or gun
powder.
• Do not vacuum anything that is burning
or smoking, such as cigarettes,
matches, or hot ashes.
• Do not vacuum drywall dust, cold
fireplace ash, or other fine dusts,
which may pass through the filter bag
and be exhausted back into the air.
• To reduce the risk of inhaling toxic
vapors, do not vacuum or use near
toxic or hazardous materials.
• To reduce the risk of electric shock,
do not expose to rain or allow liquid to
enter motor compartment. Store
indoors.
• Do not allow to be used as a toy.
Close attention is necessary when
used by or near children.

• Donotusewithatornfilterorwithout
thefilterinstalledexceptwhen
vacuumingliquidsasdescribedinthis
manual.Drydebrisingestedbythe
impellermaydamagethemotororbe
exhaustedintotheair.
• TurnoffVacbeforeunplugging.
• Toreducetheriskofinjuryfrom
accidentalstarting,unplugpowercord
beforechangingorcleaningfilter.
• Donotunplugbypullingoncord.To
unplug,grasptheplug,notthecord.
• Donotusewithdamagedcord,plugor
otherparts.IfyourVacisnotworking
asit should,hasmissingparts,has
beendropped,damaged,leftoutdoors,
ordroppedintowater,callcustomer
service.
• Donotpullorcarrybycord,usecord
ashandle,closeadooroncord,orpull
cordaroundsharpedgesorcorners.
Keepcordawayfromheatedsurfaces.
• Donothandleplug,switch,ortheVac
withwethands.
• Connectonlytoa properlygrounded
outlet.Seegroundinginstructions.
• Useonlyextensioncordsthatarerated
foroutdooruseandhaveagrounding
conductor.Extensioncordsinpoor
conditionortoosmallinwiresizecan
posefireandshockhazards.
Toreducetheriskofthesehazards,
besurethecordisingoodcondition
andthatliquiddoesnotcontactthe
connection.Donotuseanextension
cordwithconductorssmallerthan
16gauge(AWG)insize.Toreduce
powerloss,usea 14gaugeextension
cordif25to50ftlongand12gauge
for50ftorlonger.
• Donotputanyobjectintoventilation
openings.Donotvacuumwithany
ventilationopeningsblocked;keepfree
ofdust,lint,hairoranythingthatmay
reduceairflow.
• Keephair,looseclothing,fingers,and
allpartsofbodyawayfromopenings
andmovingparts.
• Toreducetheriskoffalls,useextra
carewhencleaningonstairs.
• Toreducetheriskofpersonalinjuryor
damagetoVac,useonlyCraftsman
recommendedaccessories.
• Whenusingasablower:
- Directairdischargeonlyatworkarea.
- Donotdirectairatbystanders.
- Keepchildrenawaywhenblowing.
- Donotuseblowerforanyjobexcept
blowingdirtanddebris.
- Donotuseasasprayer.
- Wearsafetyeyewear.
• Toreducetheriskofeyeinjury,wear
safetyeyewear.Theoperationofany
utilityVacorblowercanresultin
foreignobjectsbeingblownintothe
eyes,whichcanresultinsevereeye
damage.
CAUTION:
• Toreducetheriskofhearingdamage,
wearearprotectorswhenusingfor
extendedtimeorinanoisyarea.
• Fordustyoperations,weardustmask.
• Staticshocksarecommonwhenthe
relativehumidityoftheairislow.
VacuumingfinedebriswithyourVac
candepositstaticchargeonthehose
orVac.Toreducethefrequencyof
staticshocksinyourhomeorwhen
usingthisVac,addmoisturetotheair
withahumidifier.
Observethefollowingwarningsthat
appearonthemotorhousingofyourVac:
WARNING:
• For your own safety, read and
understand owner's manual.
• Do not run unattended.
• Do not pick up hot ashes, coals,
toxic, flammable or other hazardous
materials.
• Do not use around explosive liquids
or vapors.
WARNING: To reduce the risk of
electric shock - do not expose to rain -
store indoors.
SAVE THIS MANUAL
Grounding Instructions
This appliance must be grounded. If it
should malfunction or break down,
grounding provides a path of least
resistance for electric current to reduce
the risk of electric shock. This appliance
is equipped with a cord having an
equipment-grounding conductor and
grounding plug. The plug must be
inserted into an appropriate outlet that is
properly installed and grounded in
accordance with all local codes and
ordinances.
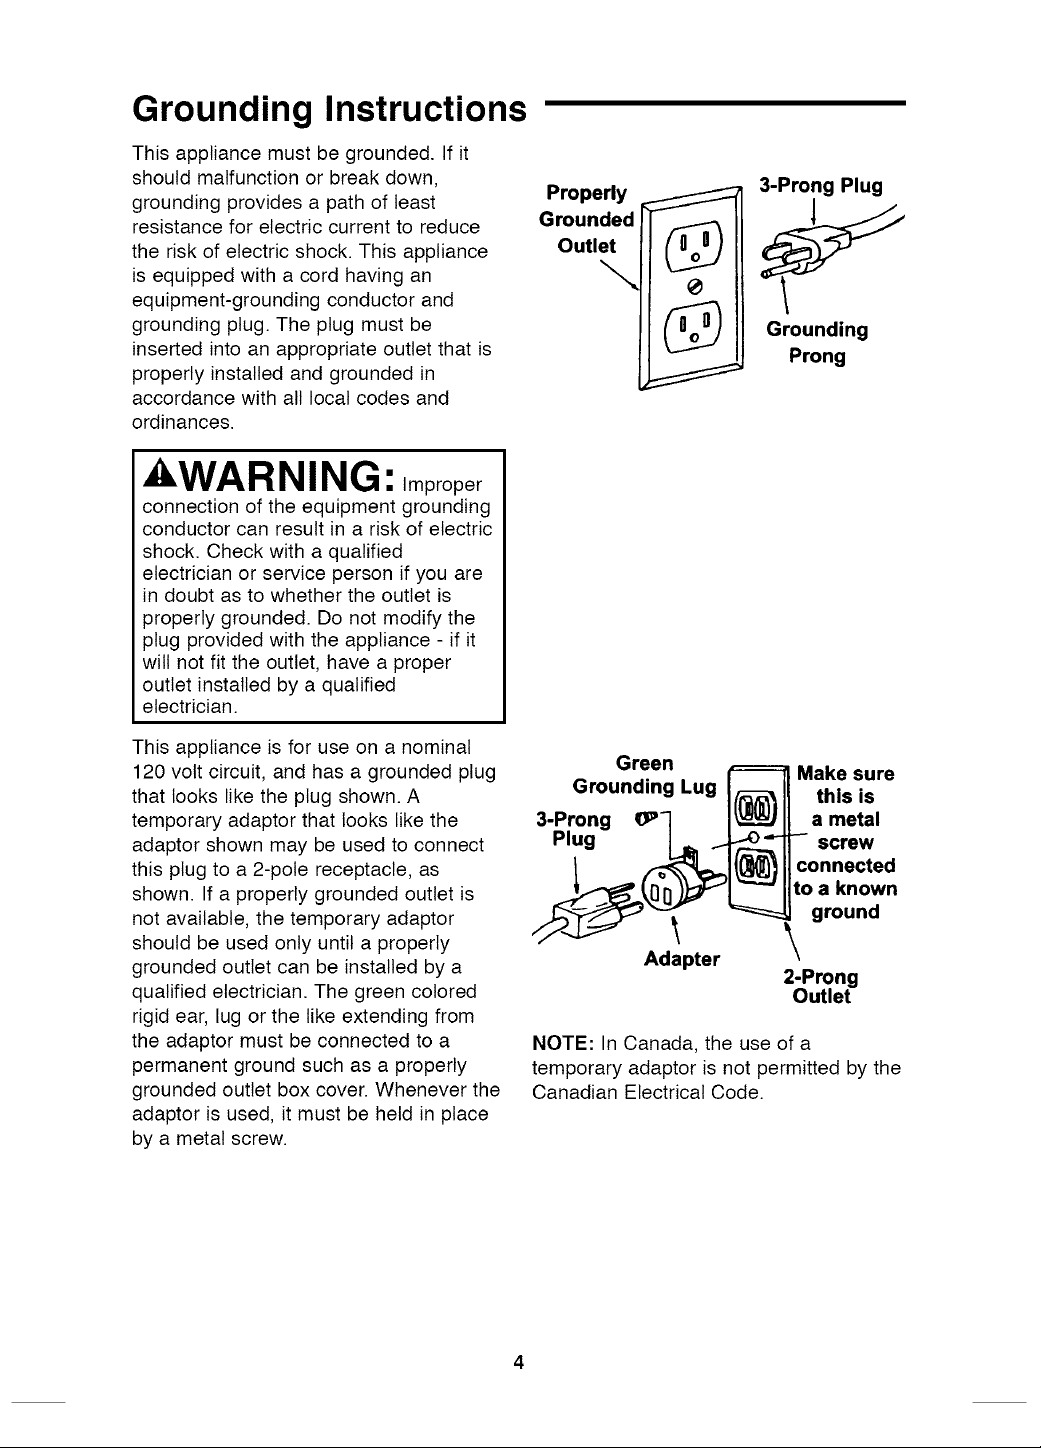
Properly 3-Prong Plug
Grounded
Outlet
Gr;u:d_ng
&WARNING: ,mproper
connection of the equipment grounding
conductor can result in a risk of electric
shock. Check with a qualified
electrician or service person if you are
in doubt as to whether the outlet is
properly grounded. Do not modify the
plug provided with the appliance - if it
will not fit the outlet, have a proper
outlet installed by a qualified
electrician.
This appliance is for use on a nominal
120 volt circuit, and has a grounded plug
that looks like the plug shown. A
temporary adaptor that looks like the
adaptor shown may be used to connect
this plug to a 2-pole receptacle, as
shown. If a properly grounded outlet is
not available, the temporary adaptor
should be used only until a properly
grounded outlet can be installed by a
qualified electrician. The green colored
rigid ear, lug or the like extending from
the adaptor must be connected to a
permanent ground such as a properly
grounded outlet box cover. Whenever the
adaptor is used, it must be held in place
by a metal screw.
Green Make sure
Grounding Lug this is
3-Prong O_° a metal
Plug screw
connected
:to a known
ground
Adapter
2-Prong
Outlet
NOTE: In Canada, the use of a
temporary adaptor is not permitted by the
Canadian Electrical Code.
Introduction
This Wet/Dry Vac is intended for
household use only. It may be used for
light vacuuming of wet or dry media and
may also be used as a blower. The light
weight design allows usage for most
small household vacuuming chores.
Familiarize yourself with the following
product features and read the entire
owner's manual for specific usage of
your new Wet/Dry Vac.
Table of Contents
Item Page
Warranty ......................... 2
Important Safety Instructions ......... 2
Grounding Instructions .............. 4
Introduction ...................... 5
Assembly ........................ 5
Carton Contents ................. 5
Vac Assembly ................... 6
Hose Storage ................... 6
Operation ........................ 7
Vacuuming Dry Materials .......... 8
Item Page
Vacuuming Liquids ............... 8
Emptying the Drum ............... 9
Blowing Feature ................. 9
Maintenance ..................... 10
Filter Cleaning ................. 10
Filter Removal and Replacement... 10
Cleaning and Disinfecting
the Wet/Dry Vac ............... 11
Storage ....................... 11
Troubleshooting .................. 11
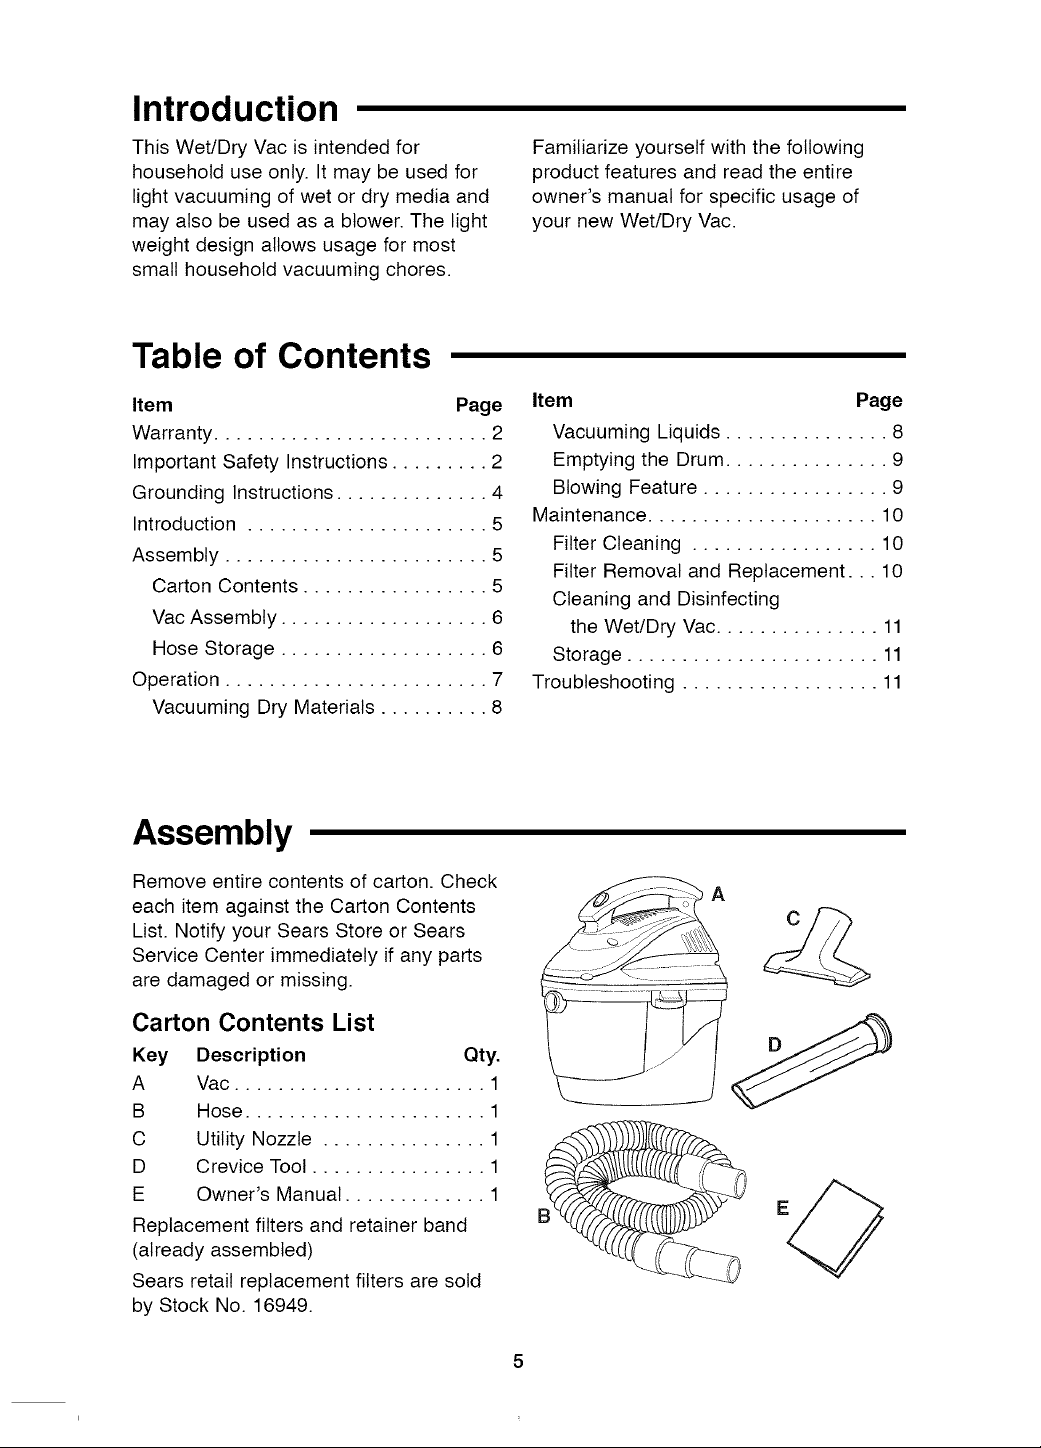
Assembly
Remove entire contents of carton. Check
each item against the Carton Contents
List. Notify your Sears Store or Sears
Service Center immediately if any parts
are damaged or missing.
Carton Contents List
Key Description Qty.
A Vac ....................... 1
B Hose ...................... 1
C Utility Nozzle ............... 1
D Crevice Tool ................ 1
E Owner's Manual ............. 1
Replacement filters and retainer band
(already assembled)
Sears retail replacement filters are sold
by Stock No. 16949.
A
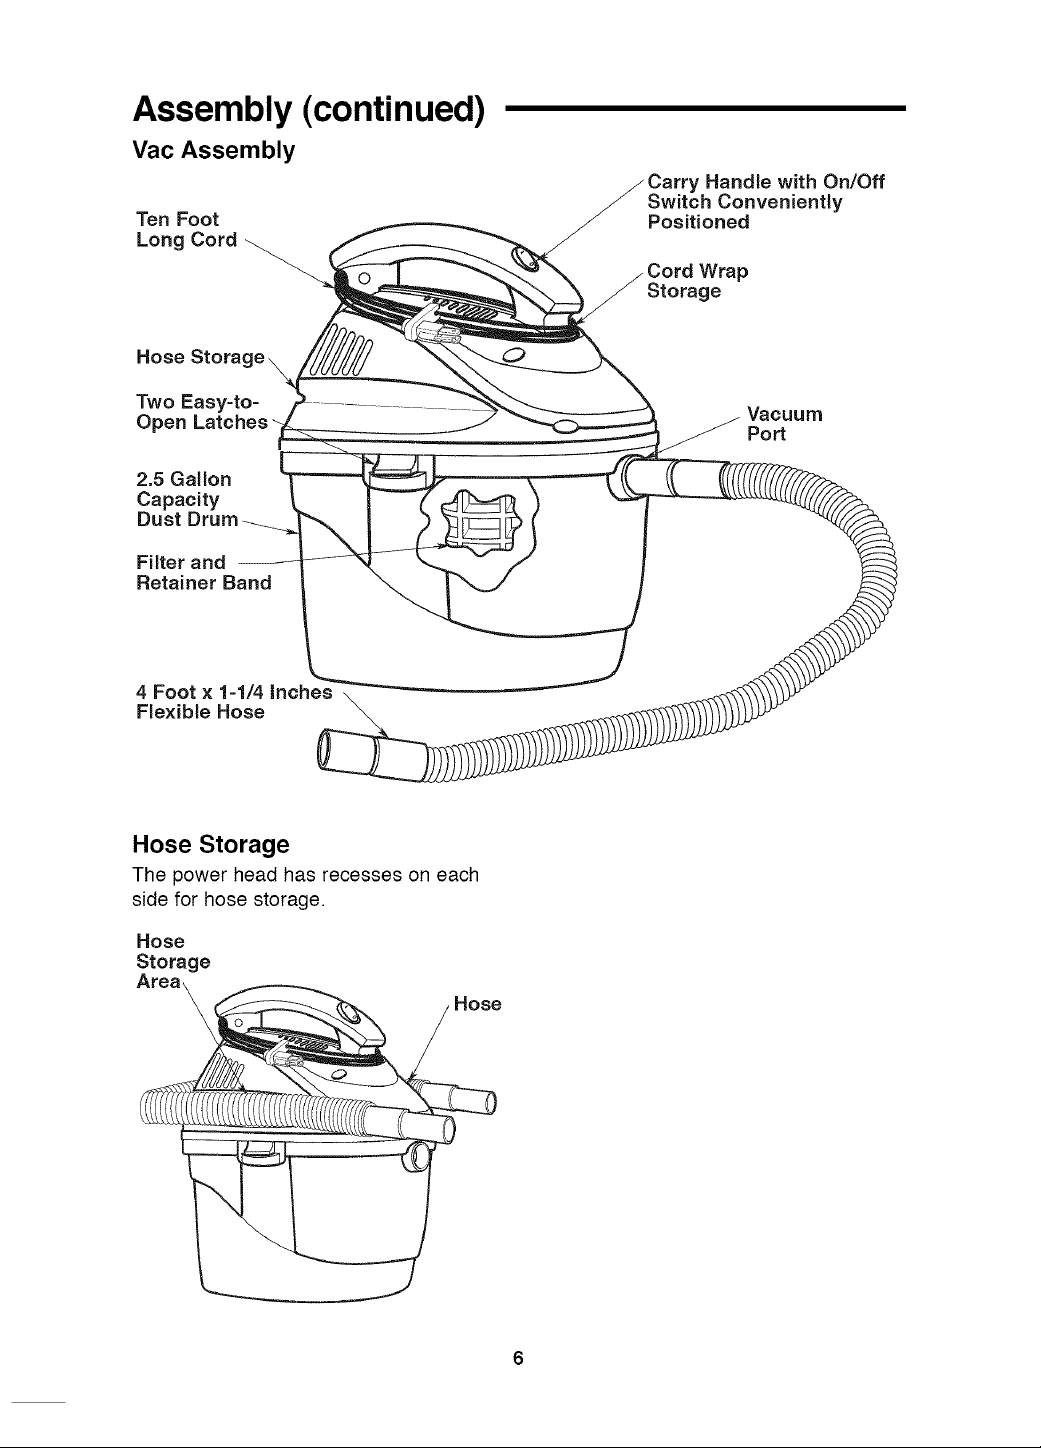
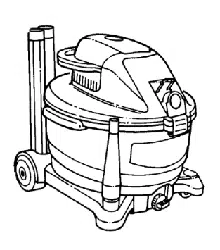
Assembly (continued)
Vac Assembly
Ten Foot
Long Cord
Hose Stora¢
Two Easy-to-
Open Latches-
2.5 Gallon
Capacity
Dust
Filter and
Retainer Band
4 Foot × 1-1/4 inches
Flexible Hose
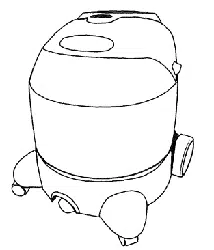
Hose Storage
The power head has recesses on each
side for hose storage.
Hose
Storage
Area_ / Hose
Handle with On/Off
Switch Conveniently
Positioned
P
Storage
Port
Operation
_, WARNING: To reduce the risk of fire, explosion, or damage to Vac:
• Do not leave Vac running while unattended - you may fail to notice important signs
indicating abnormal operation such as loss of suction, debris/liquid exiting
exhaust, or abnormal motor noises. Immediately stop using Vac if you notice
these signs.
• Do not leave Vac plugged-in when not in use.
• Do not continue running when float has cut off suction.
• Do not operate Vac in areas with flammable gases, vapors or explosive dust in the
air. Sparks inside the motor can ignite airborne flammables. Flammable gases
and vapors include: lighter fluid, solvent-type cleaners, oil-based paints, gasoline,
alcohol, or aerosol sprays. Flammable dusts include: coal, magnesium,
aluminum, grain, or gun powder.
• Do not vacuum up explosive dusts, flammable liquids, or hot ashes.
• Do not use Vac as a sprayer.
WARNING: To reduce the risk of electric shock or injury:
• Do not expose to rain or allow liquid to enter motor compartment. Store indoors.
• Do not handle plug, switch, or Vac with wet hands.
• Do not service Vac while it is plugged-in. If your Vac is not working as it should,
has missing parts, has been dropped, damaged, left outdoors, or dropped into
water, return it to an independent service center or call customer service.
• When using an extension cord, use only outdoor-rated cords that are in good
condition. Do not allow the connection to come into contact with liquid.
• Do not vacuum toxic materials to reduce the risk of inhaling the vapors or dust.
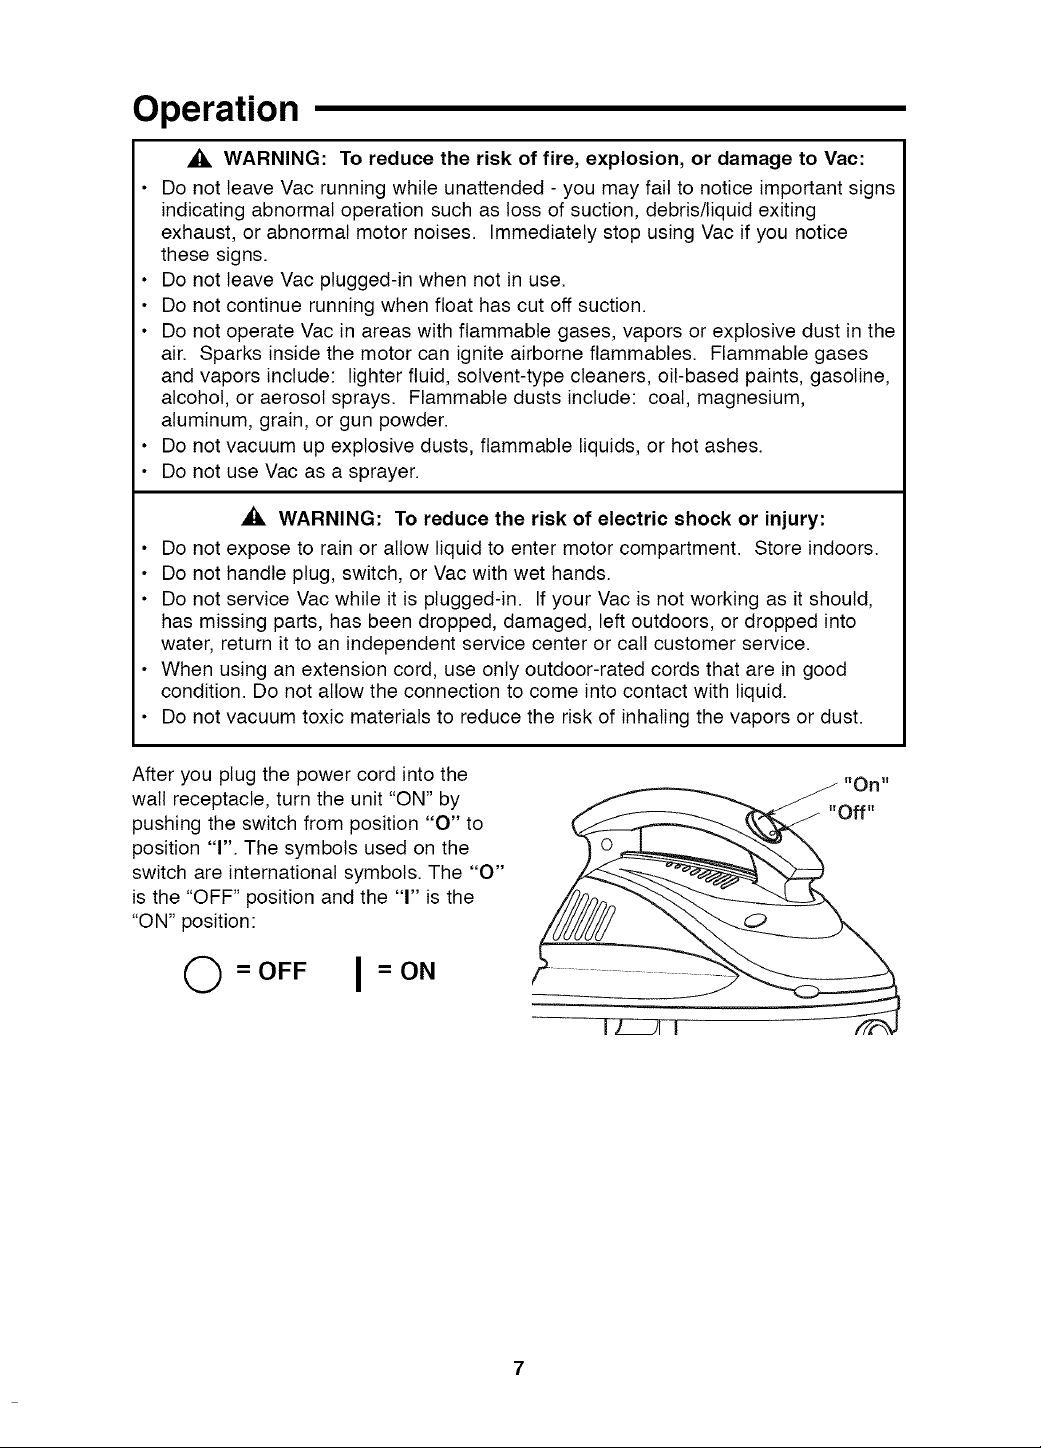
After you plug the power cord into the
wall receptacle, turn the unit "ON" by
pushing the switch from position "O" to
position "r'. The symbols used on the
switch are international symbols. The "O"
is the "OFF" position and the "r' is the
"ON" position:
= OFF I= ON
Operation (continued)
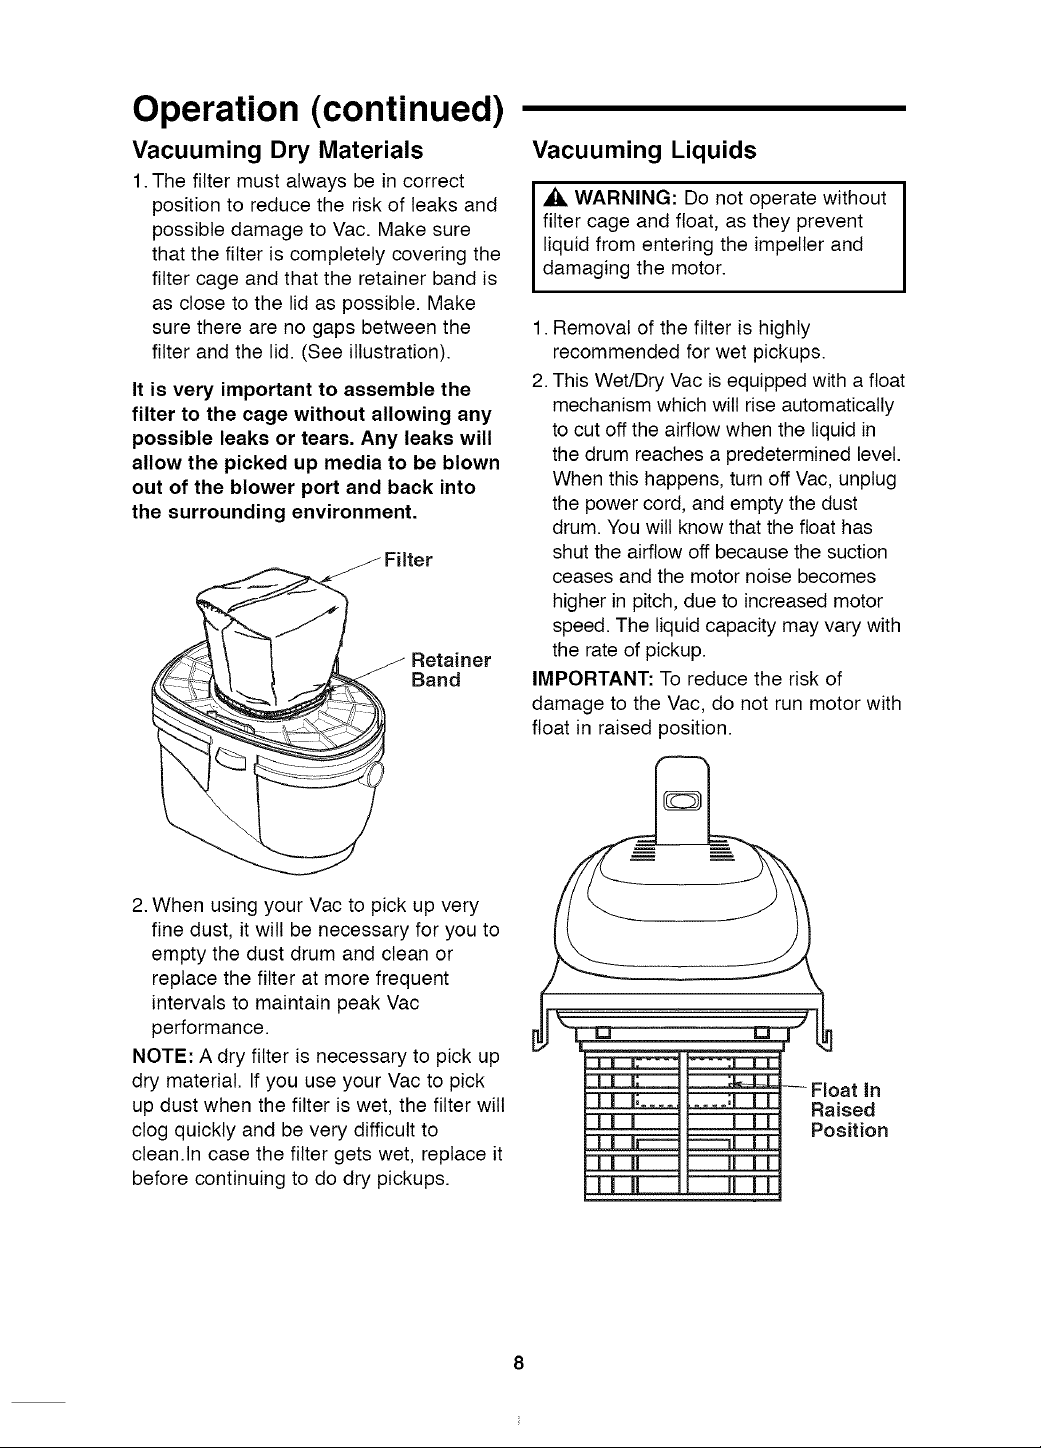
Vacuuming Dry Materials
1. The filter must always be in correct
position to reduce the risk of leaks and
possible damage to Vac. Make sure
that the filter is completely covering the
filter cage and that the retainer band is
as close to the lid as possible. Make
sure there are no gaps between the
filter and the lid. (See illustration).
It is very important to assemble the
filter to the cage without allowing any
possible leaks or tears. Any leaks will
allow the picked up media to be blown
out of the blower port and back into
the surrounding environment.
Retainer
Band
Vacuuming Liquids
WARNING: Do not operate without
filter cage and float, as they prevent
liquid from entering the impeller and
damaging the motor.
1. Removal of the filter is highly
recommended for wet pickups.
2. This Wet/Dry Vac is equipped with a float
mechanism which will rise automatically
to cut off the airflow when the liquid in
the drum reaches a predetermined level.
When this happens, turn off Vac, unplug
the power cord, and empty the dust
drum. You will know that the float has
shut the airflow off because the suction
ceases and the motor noise becomes
higher in pitch, due to increased motor
speed. The liquid capacity may vary with
the rate of pickup.
IMPORTANT: To reduce the risk of
damage to the Vac, do not run motor with
float in raised position.
2. When using your Vac to pick up very
fine dust, it wilt be necessary for you to
empty the dust drum and clean or
replace the filter at more frequent
intervals to maintain peak Vac
performance.
NOTE: A dry filter is necessary to pick up
dry material. If you use your Vac to pick
up dust when the filter is wet, the filter wilt
clog quickly and be very difficult to
clean.In case the filter gets wet, replace it
before continuing to do dry pickups.
Float in
Raised
Position

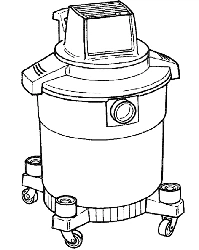
Operation (continued)
Emptying the Drum
_ WARNING: To reduce the risk of
injury from accidental starting, unplug
power cord before emptying the drum.
1. Remove the power head assembly of
the Wet/Dry Vac by pulling outward on
the latches located on each side of the
Vac. Lift off the power head assembly.
2. Dump the drum contents into the
proper waste disposal container.
Power Head
Latch (2)
\
Blowing Feature
Your Vac features a blowing port. It can
blow sawdust and other debris. Follow
the steps below to use your Vac as a
blower.
WARNING: Always wear safety
eyewear complying with ANSI Z87.1
(or in Canada CSA Z94.3) when using
as a blower.
_ WARNING: To reduce the risk of
injury to bystanders, keep them clear
of blowing debris.
Ak CAUTION: Wear a dust mask if
blowing creates dust which might be
nha ed.
,_, CAUTION: To reduce the risk of
hearing damage, wear ear protectors
when using the Vac/Blower for
extended time or in a noisy area.
I
I
1. Locate blowing port of your Vac.
2. Insert one end of the hose into the
blowing port.
3. Turn Vac "ON" and you are ready to
use your Vac as a blower.
NOTE: If you need additional length at
the end of the hose, extension wands are
available at Sears retail stores or
www.sears.com as Stock No. 17849.
Maintenance
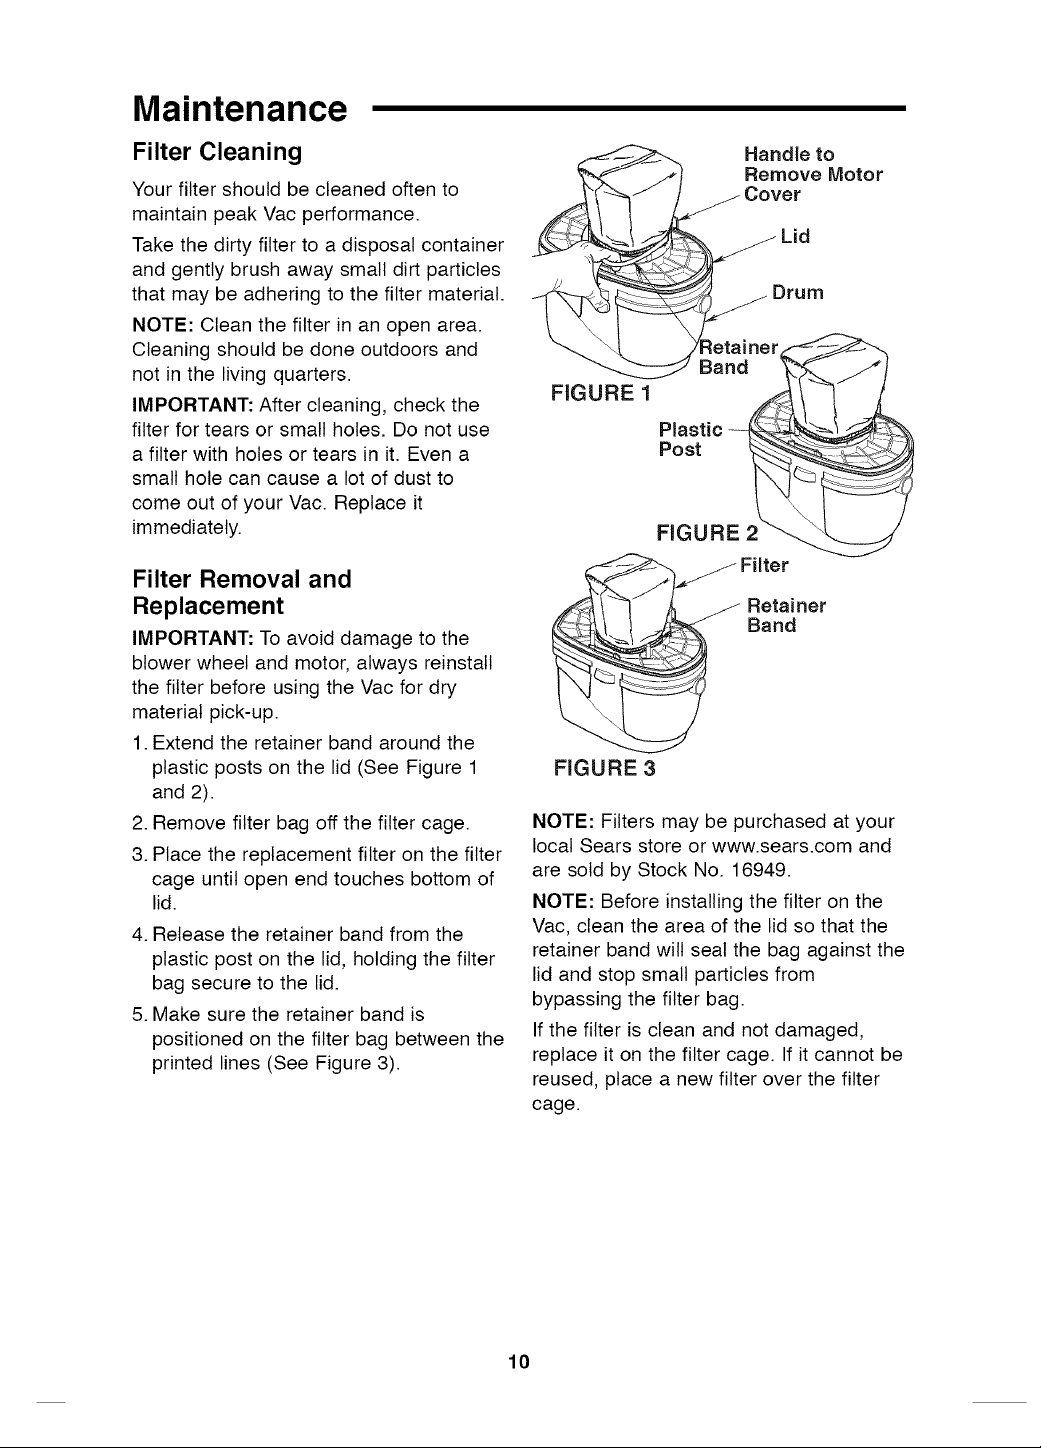
Filter Cleaning
Your filter should be cleaned often to
maintain peak Vac performance.
Take the dirty filter to a disposal container
and gently brush away small dirt particles
that may be adhering to the filter material.
NOTE: Clean the filter in an open area.
Cleaning should be done outdoors and
not in the living quarters.
IMPORTANT: After cleaning, check the
filter for tears or small holes. Do not use
a filter with holes or tears in it. Even a
small hole can cause a lot of dust to
come out of your Vac. Replace it
immediately.
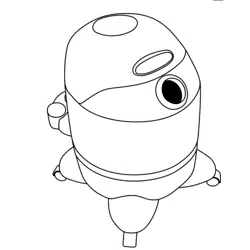
Filter Removal and
Replacement
IMPORTANT: To avoid damage to the
blower wheel and motor, always reinstall
the filter before using the Vac for dry
material pick-up.
1. Extend the retainer band around the
plastic posts on the lid (See Figure 1
and 2).
2. Remove filter bag off the filter cage.
3. Place the replacement filter on the filter
cage until open end touches bottom of
lid.
4. Release the retainer band from the
plastic post on the lid, holding the filter
bag secure to the lid.
5. Make sure the retainer band is
positioned on the filter bag between the
printed lines (See Figure 3).
FIGURE 1
Handle to
Remove Motor
Cover
Lid
Drum
Plastic
Post
FIGURE 2
Fitter
FIGURE 3
NOTE: Filters may be purchased at your
local Sears store or www.sears.com and
are sold by Stock No. 16949.
NOTE: Before installing the filter on the
Vac, clean the area of the lid so that the
retainer band wilt seal the bag against the
lid and stop small particles from
bypassing the filter bag.
If the filter is clean and not damaged,
replace it on the filter cage. If it cannot be
reused, place a new filter over the filter
cage.
10
Maintenance (continued)
Cleaning and Disinfecting the
Wet/Dry Vac
To keep your Wet/Dry Vac looking its
best, clean the outside with a cloth
dampened with warm water and mild
soap.
To clean the drum:
1. Dump debris out.
2. Wash drum thoroughly with warm water
and mild soap.
3. Wipe out with dry cloth.
Before prolonged storage or as needed
(i.e., waste water pick up) the drum
should be disinfected.
3. Empty drum after 20 minutes. Rinse
with water until bleach smell is gone.
Allow drum to dry completely before
sealing the motor on the drum.
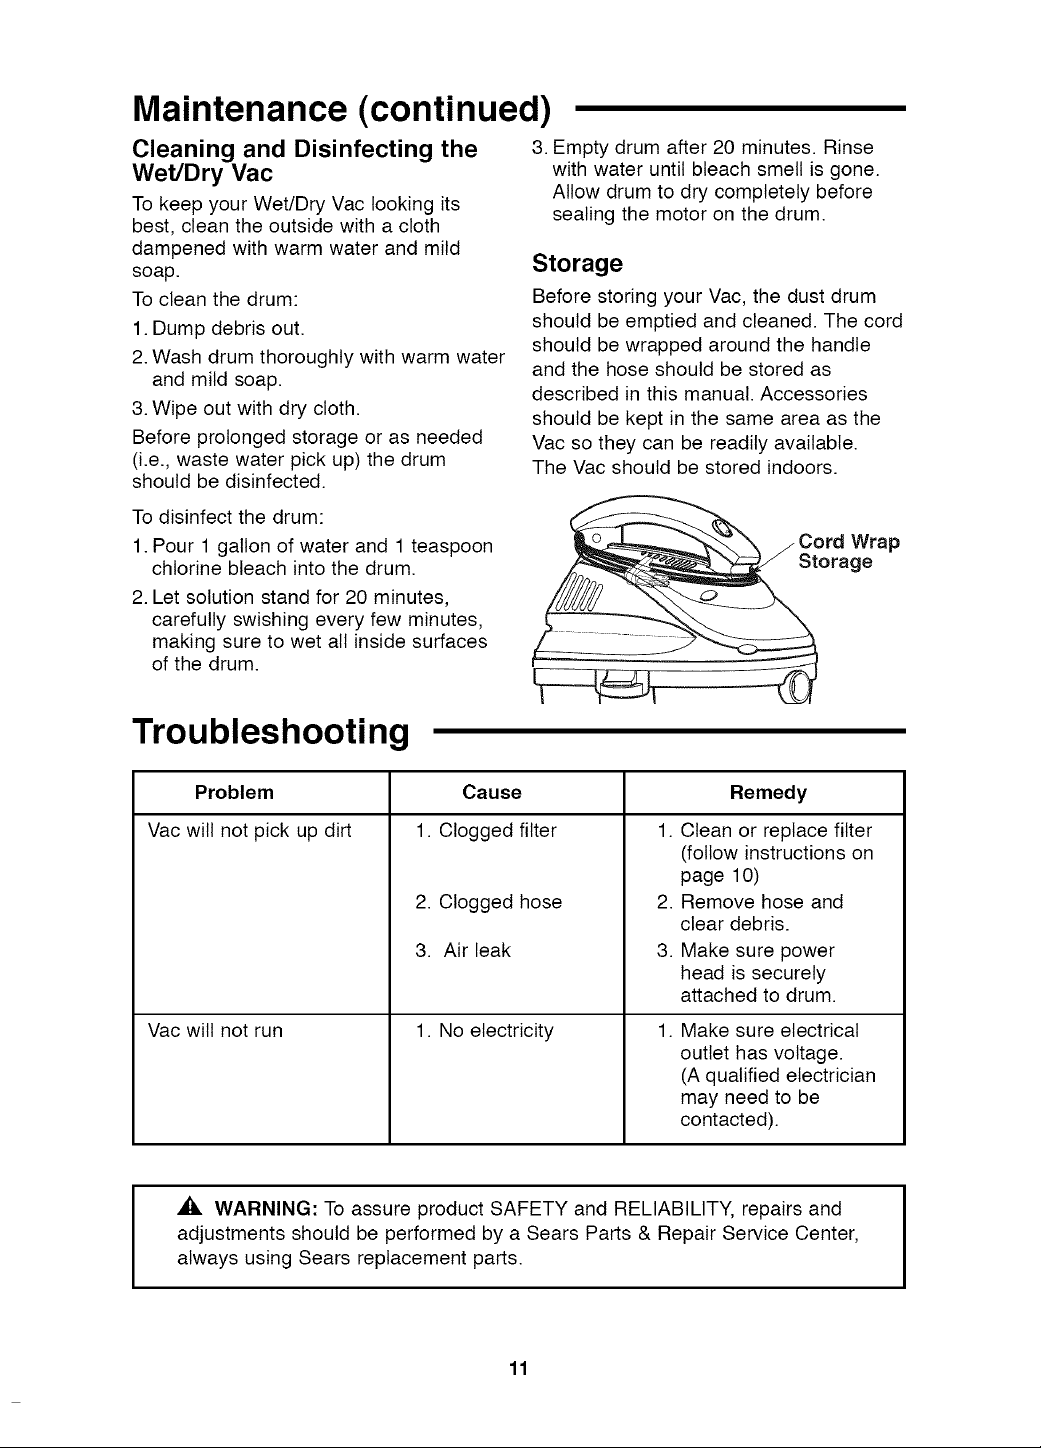
Storage
Before storing your Vac, the dust drum
should be emptied and cleaned. The cord
should be wrapped around the handle
and the hose should be stored as
described in this manual. Accessories
should be kept in the same area as the
Vac so they can be readily available.
The Vac should be stored indoors.
To disinfect the drum:
1. Pour 1 gallon of water and 1 teaspoon
chlorine bleach into the drum.
2. Let solution stand for 20 minutes,
carefully swishing every few minutes,
making sure to wet all inside surfaces
of the drum.
Cord Wrap
Storage
Troubleshooting
Problem Cause Remedy
Vac will not pick up dirt 1. Clogged filter 1.
Vac will not run
2. Clogged hose
3. Air beak
1. No electricity
2.
3.
1.
Clean or replace filter
(follow instructions on
page 10)
Remove hose and
clear debris.
Make sure power
head is securely
attached to drum.
Make sure electrical
outlet has voltage.
(A qualified electrician
may need to be
contacted).
WARNING: To assure product SAFETY and RELIABILITY, repairs and
adjustments should be performed by a Sears Parts & Repair Service Center,
always using Sears replacement parts.
11

Notes
12

f
manual
del usuari0
NO. DEMODELO
113.176110
N_mero
de serie
Los n_meros de modelo
y de serie se pueden
encontrar en el pestillo del
tambor yen la partede
arriba de la cubierta del
motor.
Usted debeanotar los
nQmerostanto de modelo
como de serie en un lugar
seguro para usofuturo.
_ADVERTENCIA:
PARA SU
SEGURIDAD
LEADETENIDAIVIENTE
TODASLAS
INSTRUCCIONES
GUARDEESTE
MANUAL
PARAREFERENCIA
FUTURA
J
CRRFrSMRN °
ASPIRADORA PARA
MOJADO/SECO
DE 2.5 GALONES
• seguridad
• ensamblaje
• funcionamiento
• mantenimiento
• piezasde repuesto
Sears, Roebuck and Co., Hoffman Estates, IL 60179 U.S.A.
No. de piezaSP6771 Impresoen China
Garantia
r
-- GarantiacompletaCraftsmande unafio
Si este productoCraftsmanfalla debidoa un defecto de materialo de fabricaci6ndentrodel plazo
de unafio a partir de lafecha de compra,devu_lvaloa cualquiertienda Sears, CentrodeServicio
Sears u otropuntodeventa Craftsmanpara que sea reparadogratuitamente(o reemplazadosi la
reparaci6nresulta imposible).
Estagarantiase aplicasolamentedurante90 dias a partir de la fecha de compra,si este producto
se utilizaalgunavez para fines comercialeso dealquiler.
Esta garantia no incluye las bolsas ni los filtros, que son piezas perecederasque se pueden
desgastarporcausadel uso normaldentrodel periodo degarantia.
Estagarantialeconfierea ustedderechoslegalesespecificosy es posiblequeustedtengatambi_n
otrosderechosque varian de un estadoa otro.
Sears, Roebuckand Co., Hoffman Estates,IL 60179
INSTRUCCIONESDESEGURIDADIMPORTANTES
La seguridad es una combinaci6n de sentido comt_n,
permaneceralertay saber c6mo funciona la
aspiradora paramojado/seco ("la aspiradora").
Palabrasde serialde seguridad
_, PELIGRO:indicauna situaci6n peligrosa que, si
no se evita, causardla muerte o lesiones graves
_, ADVERTENCIA:indica una situaci6n peligrosa
que, si no se evita, podria causarla muerte o lesiones
graves
,_, PRECAUCION:indica una situaci6n peligrosa que,
si no se evita, pudiera causar lesiones leveso
moderadas.
Cuandoutilice la aspiradorapara mojado/seco, siga
siempre las precaucionesb_sicas de seguridad,
incluyendo las siguientes:
• , ADVERTENCIA
- Para reducir el riesgo de incendio, sacudidas
el_ctricas o lesiones:
• Leay entiendaeste manualdel usuario y todas las
etiquetas que est_ncolocadas en la aspiradora
antes de utilizarla.
• Utilicela aspiradora _nicamentede la maneraque
se describe en este manual.
• No deje la aspiradora en marcha mientras est_
desatendida.Usted podria no notar se_ales
importantes que indiquen un funcionamiento
anormal, tal como p_rdida de succi6n, residuos o
liquido que salen por el escapeo ruidos anormales
del motor. Dejede usar la aspiradorainmediata-
mentesi observa estas se_ales.
• No abandonela aspiradora cuando est_enchufada.
DesenchQfeladel tomacorriente cuandono la est_
utilizandoy antesde realizarservicio de revisi6n.
• Laschispas que se producen en el interior del
motor pueden incendiarlos vapores infiamables
o el polvo. Para reducirel riesgode incendio o
explosi6n: No usela aspiradoracerca de liquidos,
gases combustibles, o polvos explosivos como
gasolina u otros combustibles, liquido encendedor,
limpiadores, pinturas a basede aceite,gas natural,
polvo de carb6n, polvo de magnesio, polvo de
granos de cereal, polvo de aluminio o p61vora.
• No recoja con la aspiradora nadaque est_ ardiendo
o humeando, como cigarrillos, f6sforos o cenizas
calientes.
• No recoja con la aspiradora polvo de pared de tipo
seco ni cenizafria de chimenea u otros polvos
finos. Estosmateriales puedenpasar por la bolsa
del filtro y ser expulsadosde vuelta al aire.
• Para reducir el riesgo deinhalarvapores t6xicos,
no recojacon la aspiradora materialest6xicos o
peligrosos ni la use cercade dichos materiales.
• Para reducir el riesgo dedescargasel_ctricas, no
exponga la aspiradora a la Iluvia ni deje queentren
liquidos en el compartimiento del motor. Guardela
aspiradoraen un lugar interior.
• No permita que la aspiradorase utilice como un
juguete. Se necesitaprestar m_xima atenci6n
cuando sea utilizadapor niSoso cercade _stos.
• No use la aspiradoracon un filtro desgarrado o sin
tener el filtro instalado, excepto cuando recoja con
ella liquidos de la manera que se describe eneste
manual. Los residuos secos absorbidos por el
impulsor podrian da_ar el motor o ser expulsados
de vuelta al aire.
14
• Apague la aspiradoraantes de desenchufarla.
• Para reducir el riesgo delesiones debidas a un
arranqueaccidental, desenchufeel cordon de
energia antesde cambiar o limpiar el filtro.
• No desenchufela aspiradoratirando del cordon. Para
desenchufarla,agarreel enchufe y no el cordon.
• No use la aspiradoracon el cordon daSado,el en-
chufe daSadou otras piezasdaSadas.Si la aspira-
dora no funciona como debe, lefaltan piezas,se ha
caido, ha sido daSada,se hadejadoa la intemperie
o se ha caido al agua, Ilamea servicio al cliente.
• No tire de laaspiradora usando el cordon ni la Ileve
por el cordon, ni use el cordon como asa,ni cierre
una puerta sobre el cordon, ni tire del cordon
alrededor de bordes o esquinas afilados. No pase la
aspiradoraen marcha sobre el cordon. Mantengael
cordon alejadode las superficies calientes.
• No maneje el enchufe,el interruptor o la aspiradora
con las manosmojadas.
• Conectela aspiradora solamente aun toma-
corriente conectado a tierra adecuadamente.
Consultelas instrucciones de conexiOna tierra.
• UtiliceQnicamentecordones de extension que
tengan capacidadnominal para uso a la intemperie.
Los cordonesde extension que est_nen malas
condiciones o tengan un tama_o de alambre
demasiado peque_opuedencrear peligros de
incendioy descargasel_ctricas.
• Para reducir el riesgo deestos peligros, asegQrese
de que el cordon est_en buenas condiciones y que
el liquido no entre en contacto con la conexiOn.No
utilice un cordon de extensionque tenga
conductores con un diAmetro menor al calibre 16
(AWG).Para reducir la p_rdida depotencia, utilice
un cordon de extension de calibre 14 si la Iongitud
es de 25 a 50 pies, y de calibre 12 si la Iongitudes
de 50 pies o mAs.
• No ponga ningQn objetoen las aberturas de
ventilaciOn.No recoja nada con la aspiradora
cuando cualquierade las aberturas de ventilaciOn
est_ bloqueada;mantengadichas aberturas fibres
de polvo, pelusa,pelo o cualquier cosaque pueda
reducir el flujo de aire.
• Mantengael pelo, la ropa holgada, los dedosy
todas las partes del cuerpo alejados de las
aberturas y de las piezasmOviles.
• Para reducir el riesgo decaidas,tenga cuidado
adicional al limpiar en escaleras.
• Para reducir el riesgo delesiones corporales o
da_os a la aspiradora,utilice t_nicamente
accesorios recomendadospor Craftsman.
• Cuandoutilice la aspiradoracomo soplador:
Dirija la descargade aire solamentehacia el Area
de trabajo.
No dirija el aire hacia laspersonas que est_n
presentes.
Mantengaalejados a los ni_os durante la
operaciOnde soplado.
No utilice el soplador para trabajos que no sean
soplar suciedady residuos.
No usela aspiradora como rociador.
Use protecciOnocular de seguridad.
• Parareducirel riesgode lesionesen los ojos, use
protecciOnocular de seguridad.La utilizaciOnde cual-
quieraspiradorautilitariao sopladorutilitario puede
hacerquese soplen objetosextra_oshacialos ojos,
Io cual puedecausar da_os gravesen los ojos.
PRECAUCION:
• Para reducir el riesgo de daSos a la audiciOn, use
protectores de oidos cuando utilice la aspiradora
durante muchas horas seguidas o cuando la
emplee en un Area ruidosa.
• Para operacionesque generan polvo, use una
mascara antipolvo.
• Las descargasde estAticason comunes cuando
la humedad relativadel aire es baja.Si recoge
residuos finos con la aspiradora, se puede
depositar carga estAticaen la manguerao en la
aspiradora.El mejor remediopara reducir la
frecuenciade las descargasde estAtica en su casa
o cuando use estaaspiradora es aSadirhumedadal
aire con un humidificador.
Sigalas siguientes advertenciasque aparecenen la
caja del motor de la aspiradora.
_. ADVERTENCIA:
• Para su propia seguridad, lea y entienda el
manualdel operador.
• No tenga en marcha la aspiradora desatendida.
• No recoja cenizas calientes, carbon caliente,
materiales tOxicos ni infiamables ni otros
materiales peligrosos.
• No use la aspiradora alrededor de liquidos o
vapores explosivos.
,_ ADVERTENCIA:Para reducir el riesgo de I
sacudidas el_ctricas, no exponga la aspiradora a la
I
Iluvia y almac_nela en interiores.
GUARDEESTEMANUAL
15
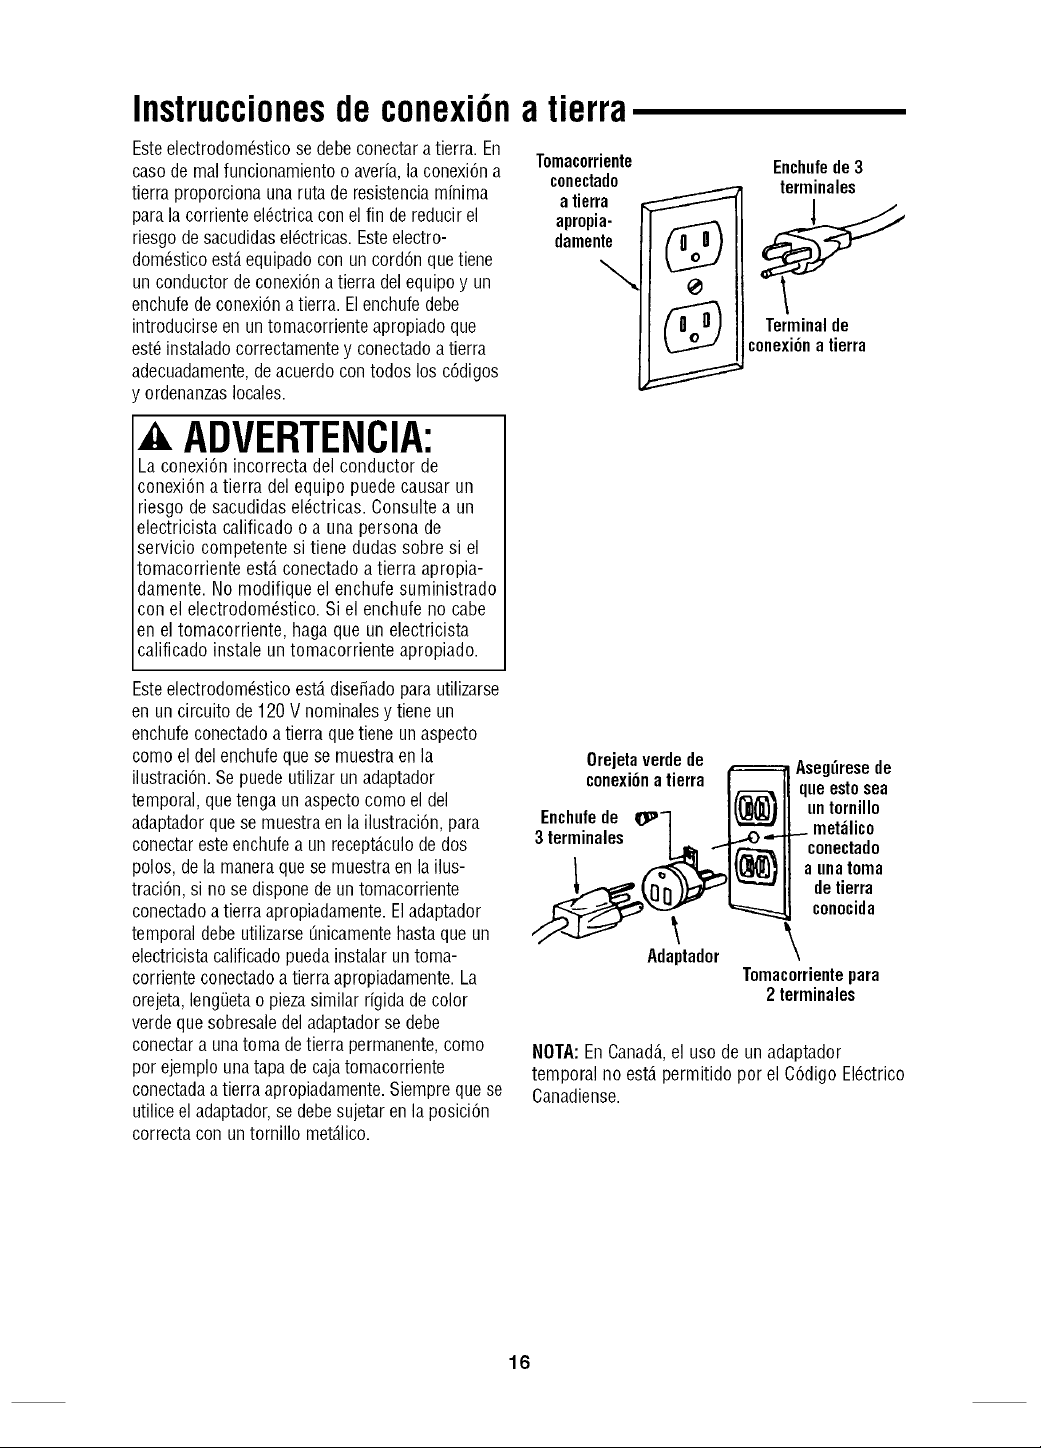
Instruccionesdeconexi6n
Esteelectrodom6sticose debeconectaratierra. En
casode realfuncionamientoo averia,la conexi6na
tierraproporcionaunarutade resistenciaminima
parala corrienteel6ctricaconel fin de reducirel
riesgode sacudidasel6ctricas.Esteelectro-
dom6sticoest,.equipadocon uncord6nquetiene
un conductordeconexi6natierra delequipoy un
enchufede conexi6natierra. Elenchufedebe
introducirseenuntomacorrienteapropiadoque
est6instaladocorrectamentey conectadoatierra
adecuadamente,deacuerdocontodos losc6digos
y ordenanzaslocales.
A, ADVERTENCIA:
Laconexi6nincorrectadel conductor de
conexi6na tierra delequipopuedecausarun
riesgo de sacudidasel6ctricas.Consultea un
electricista calificadoo a unapersonade
servicio competentesi tiene dudassobresi el
tomacorrienteest,. conectadoa tierra apropia-
damente.No modifiqueel enchufesuministrado
con el electrodom6stico.Si el enchufeno cabe
en eltomacorriente,hagaque un electricista
calificadoinstale un tomacorrienteapropiado.
Este electrodom6stico est,. dise_ado para utilizarse
en un circuito de 120 V nominales y tiene un
enchufe conectado a tierra que tiene un aspecto
como el del enchufe que se muestra en la
ilustraci6n. Se puede utilizar un adaptador
temporal, que tenga un aspecto como el del
adaptador que se muestra en la ilustraci6n, para
conectar este enchufe a un recept_.culo de dos
polos, de la manera que se muestra en la ilus-
traci6n, si no se dispone de un tomacorriente
conectado a tierra apropiadamente. Eladaptador
temporal debe utilizarse Onicamente hasta que un
electricista calificado pueda instalar un toma-
corriente conectado a tierra apropiadamente. La
orejeta, lengOetao pieza similar rigida de color
verde que sobresale del adaptador se debe
conectar a una toma de tierra permanente, como
por ejemplo una tapa de caja tomacorriente
conectada a tierra apropiadamente. Siempre que se
utilice el adaptador, se debe sujetar en la posici6n
correcta con un tornillo met_.lico.
a tierra
Tomacorriente
conectado
a tierra
apropia-
damente
Enchufede3
terminales
conexi6na tierra
Orejetaverdede
conexi6na tierra
Enchufede O_-
3 terminales
Adaptador
Aseg_resede
queestosea
.n tornillo
met;ilico
conectado
a oua toma
detierra
conocida
\
Tomacorrientepara
2 terminales
NOTA:EnCanad&el usode unadaptador
temporalno est,.permitido por el C6digoEI6ctrico
Canadiense.
16
Introducci6n
Esta aspiradora est,. dise_ada para uso dom6stico
solamente. Se puede utilizar para la recogida ligera
de medios mojados o secos y tambi6n puede
utilizarse como soplador. El dise_o liviano permite
la utilizaci6n para realizar la mayorfa de las tareas
dom6sticas de aspiraci6n peque_as.
Familiarfceseconlassiguientescaracteristicasdel
productoy leatodo el manualdel usuariopara
obtenerinstruccionessobrela utilizaci6nespecifica
desu nuevaaspiradoraparamojado/seco.
indice
Articulo P;igina
Garantfa.............................. 14
Instruccionesde seguridadimportantes ..... 14
Instruccionesde conexi6na tierra ......... 16
Introducci6n .......................... 17
Ensamblaje............................. 22
Contenidode lacajade cart6n ............ 22
Ensamblajede laaspiradora.............. 25
AImacenamientodela manguera......... 18
Funcionamiento........................ 19
Recogidade materialessecos
conlaaspiradora ..................... 29
Articulo P;igina
Recogidade Ifquidosconlaaspiradora...... 30
Vaciadodeltambor de laaspiradora ...... 30
Dispositivodesoplado .................. 30
Mantenimiento........................... 31
Limpiezadelfiltro ...................... 31
Remoci6ny reemplazodel filtro .......... 31
Limpiezay desinfecci6nde laaspiradora
paramojado/seco .................... 32
AImacenamiento........................ 32
Localizaci6ny resoluci6nde problemas ..... 23
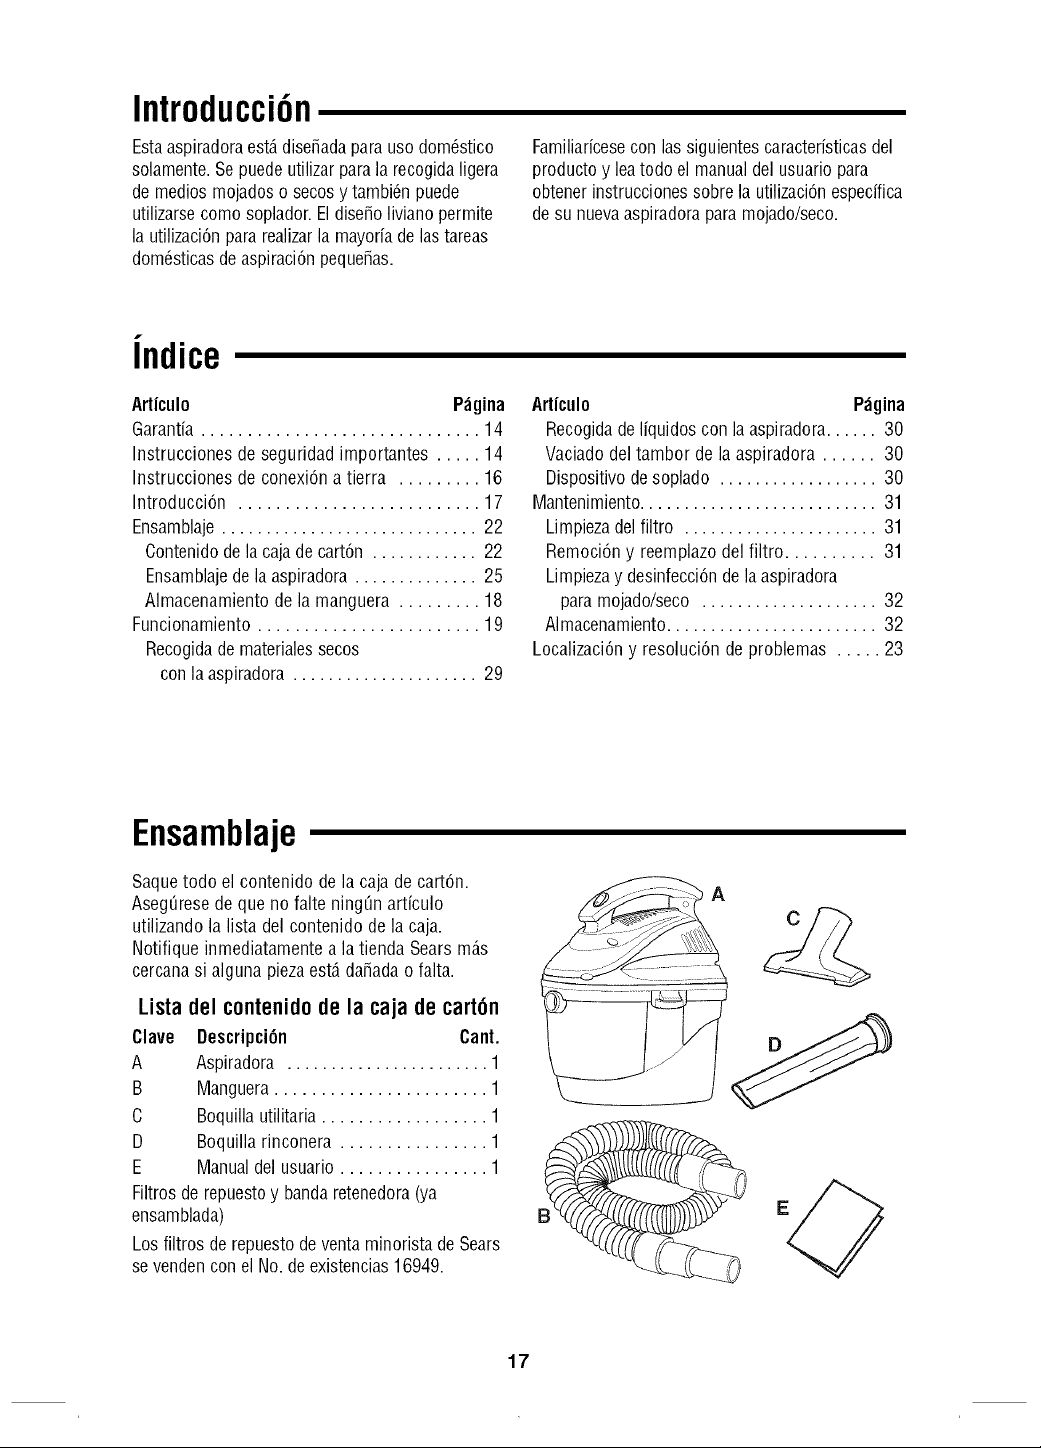
Ensamblaje
Saque todo el contenido de la caja de cart6n.
Aseg0rese de que no falte ning0n artfculo
utilizando la lista del contenido de la caja.
Notifique inmediatamente a la tienda Sears m_.s
cercana si alguna pieza est,. da_ada o falta.
Listadel contenidode la caja de carton
Clave Descripci6n Cant.
A Aspiradora ....................... 1
B Manguera ....................... 1
C Boquilla utilitaria .................. 1
D BoquiNa rinconera ................ 1
E Manual del usuario ................ 1
Filtros de repuesto y banda retenedora (ya
ensamblada)
Los filtros de repuesto de venta minorista de Sears
se venden con el No. de existencias 16949.
A
17
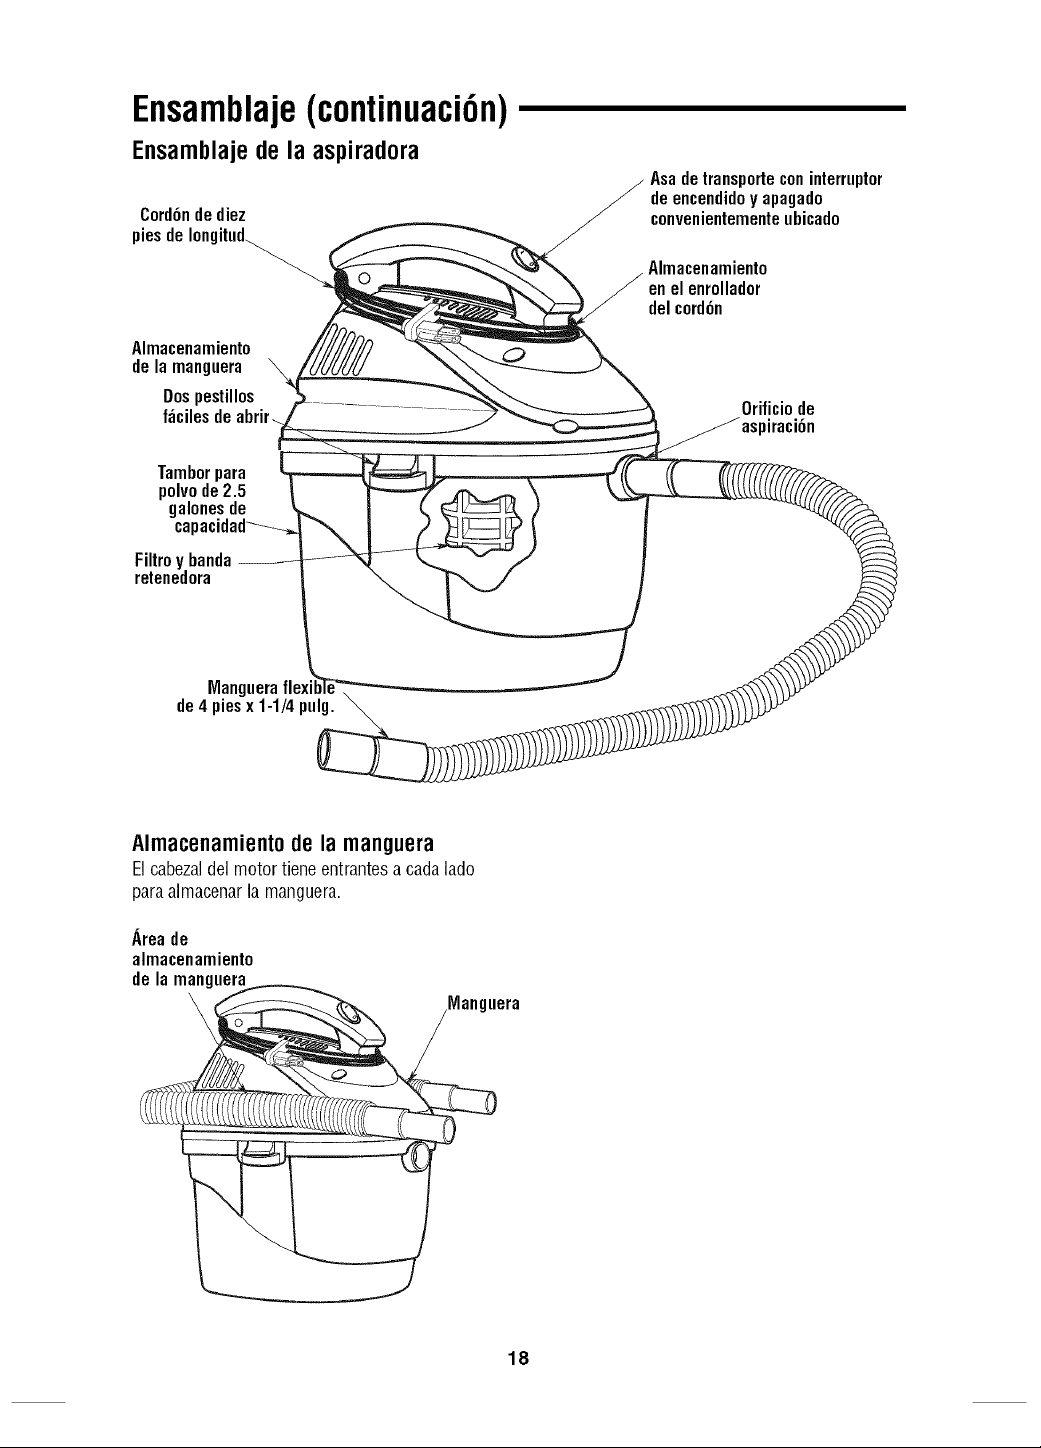
Ensamblaje(continuaci6n)
Ensamblajede la aspiradora
Cord6nde diez
piesde
Almacenamiento
delamanguera
Dospestillos
f_cilesdeabrir_
Tamborpara
polvode2.5
galonesde
cap
Filtroy banda
retenedora
Asadetransporteconinterruptor
deencendidoy apagado
convenientementeubicado
en el enrollador
del cord6n
Orificiode
,iraci6n
Manguera
de4 piesx 1-1/4pulg.
Almacenamientode la manguera
Elcabezaldelmotortieneentrantesa cadalado
paraaimacenarla manguera.
Areade
almacenamiento
de la manguera
Manguera
18
Funcionamiento
ADVERTENCIA:Parareducir el riesgode incendio,explosiono dafiosa la aspiradora:
• No deje la aspiradoraen marcha mientras est_desatendida. Ustedpodria no notar se_alesimportantes que
indiquen un funcionamiento anormal,tal como p_rdida de succiOn,residuos o liquido que salen por el
escape o ruidos anormales del motor. Dejede usar la aspiradorainmediatamentesi observa estas se_ales.
• No deje la aspiradoraenchufadacuando no se est_utilizando.
• No contint_eusando la aspiradoracuando el flotador hayacortado la succiOn.
• No utilice la aspiradoraen _reascon gases inflamables,vapores inflamables o polvo explosivo en el aire.
Laschispas generadasdentro del motor pueden incendiar los materialesinflamablessuspendidos en el aire.
Los gasesinflamables y los vapores inflamables incluyen: liquido encendedor,limpiadores tipo solvente,
pinturas a basede aceite, gasolina,alcohol o rociadores tipo aerosol. Los polvos inflamables incluyen:
polvo de carbon, polvo de magnesio, polvo de aluminio, polvo de grano de cerealo pOlvora.
• No recojacon la aspiradorapolvos explosivos, liquidos inflamablesni cenizascalientes.
• No use la aspiradora como un rociador.
,_ ADVERTENCIA:Para reducirel riesgo de descargasel_ctricaso lesiones:
• No exponga la aspiradora a la Iluvia ni dejeque entreliquido en el compartimiento del motor. Almacenela
aspiradoraen un lugar interior.
• No manejeel enchufe,el interruptor o la aspiradoracon las manos mojadas.
• No haga servicio de ajustesy reparacionesde la aspiradoramientras est_enchufada.Si la aspiradorano estA
funcionando como deberia,le faltan piezas,se ha caido, estAda_ada,se hadejadoa la intemperieo se ha
caido al agua,devu_lvalaa un centro de servicio independienteo Ilamea servicio al cliente.
• Cuandoutilice un cordon de extension, utilice t_nicamentecordones con capacidadnominal para uso a la
intemperie que est_nen buenas condiciones. No deje que la conexiOnentre en contacto con liquido.
• No recojacon la aspiradora materialestOxicos,parareducir el riesgode inhalar los vapores o el polvo.
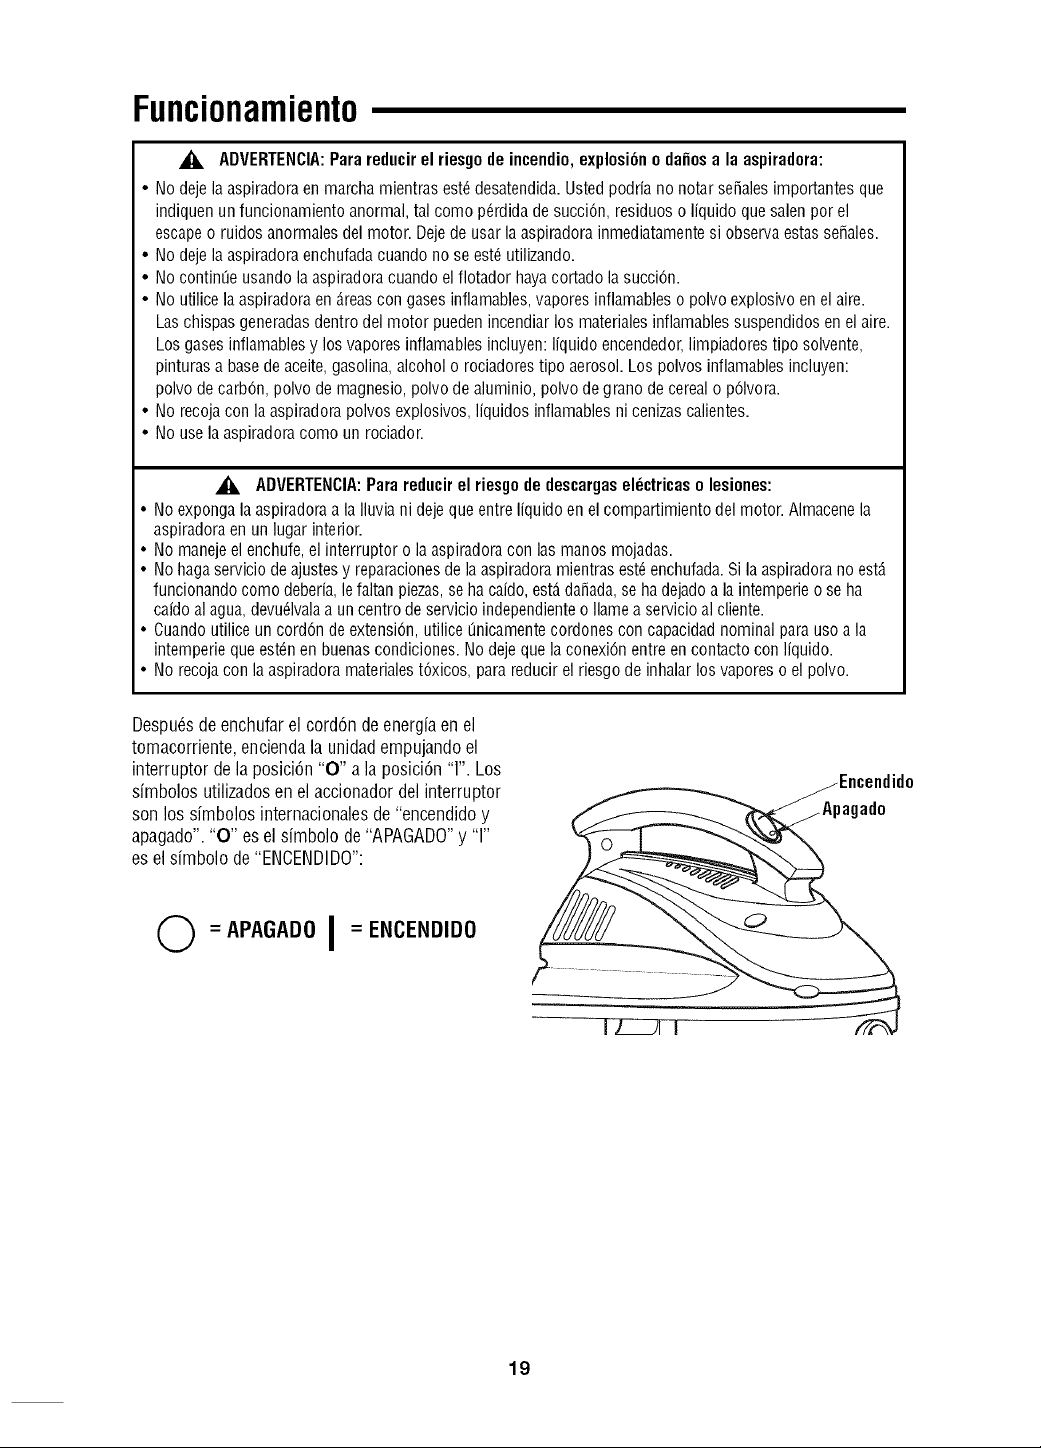
DespuOsdeenchufarel cord6ndeenergiaenel
tomacorriente,enciendala unidadempujandoel
interruptorde laposici6n"O" a laposici6n"1".Los
simbolosutilizadosen el accionadordel interruptor
sonlos simbolosinternacionalesde "encendidoy
apagado"."O" esel simbolode"APAGADO"y "1"
esel simbolode "ENCENDIDO":
Q =APAGADO I =ENCENDIDO
_Encendido
19
Funcionamiento(continuaci6n)
Recogidade materiales secoscon Recogidade liquidoscon la aspiradora
la aspiradora
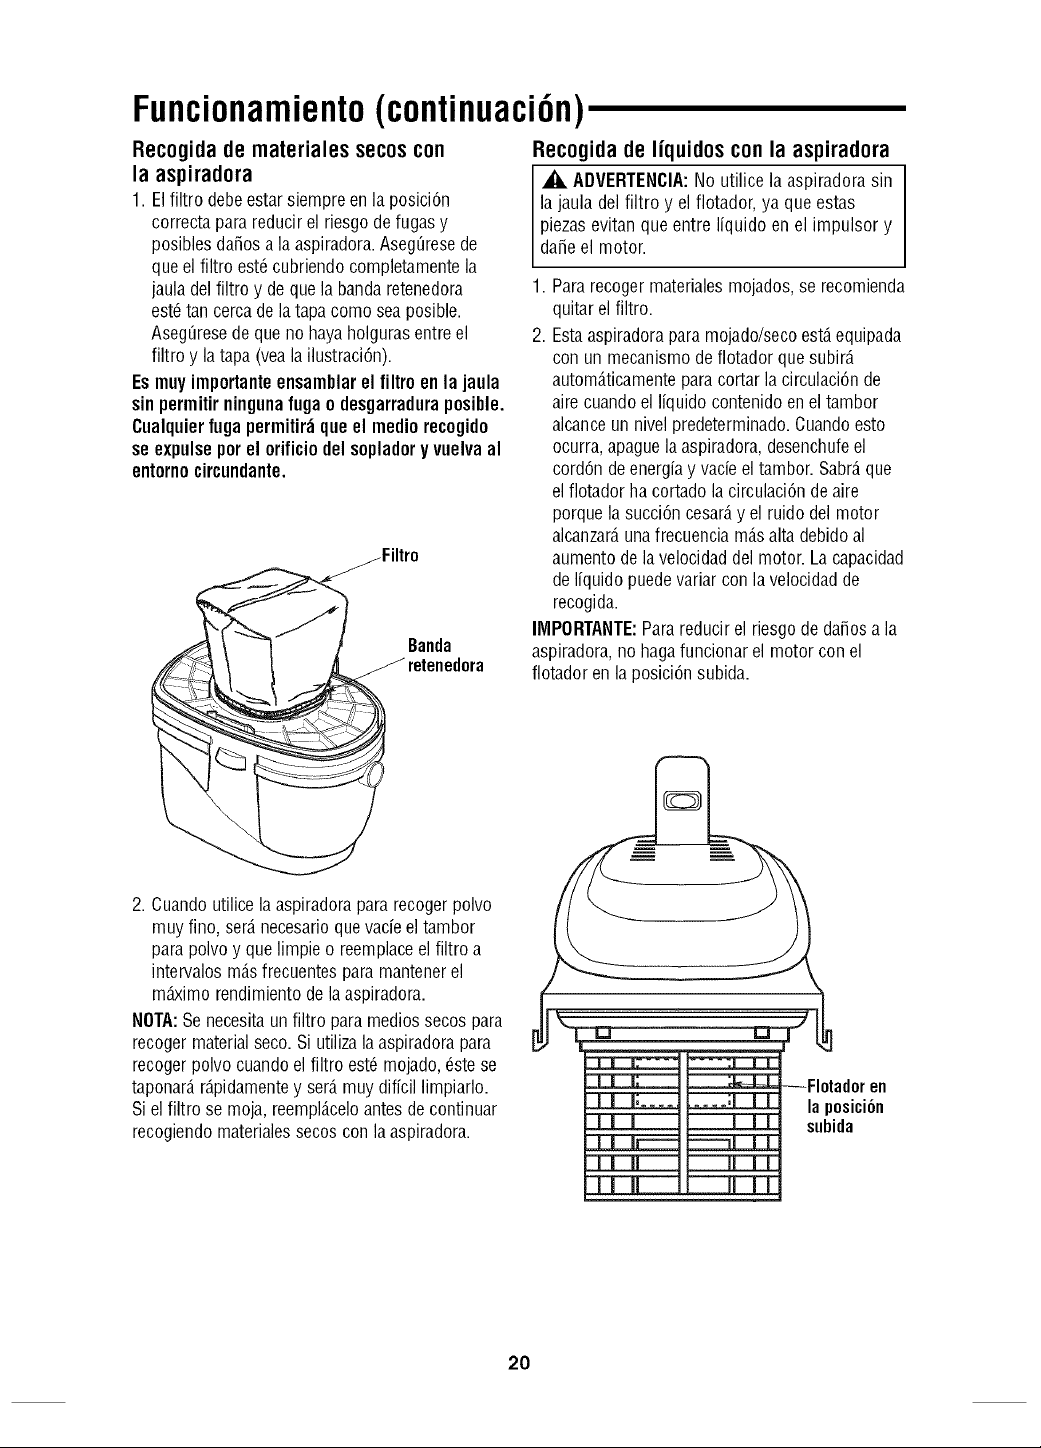
1. Elfiltro debeestarsiempreen la posici6n
correctaparareducirel riesgodefugasy
posiblesda_osa laaspiradora.Aseg0resede
queelfiltro est6cubriendocompletamentela
jauladel filtro y de quela bandaretenedora
est6tancercade latapacomo seaposible.
Aseg0resede queno hayaholgurasentreel
filtro y latapa (veala ilustraci6n).
Esmuy importanteensamblarelfiltroenla jaula
sinpermitirningunafugao desgarraduraposible.
Cualquierfugapermitir;_queel mediorecogido
seexpulseporel orificiodelsopladory vuelvaal
entornocircundante.
Banda
A ADVERTENCIA:No utilice laaspiradorasin
lajaula del filtro y elfiotador,ya que estas
piezasevitan queentre Ifquidoen el impulsor y
da_eel motor.
1. Pararecogermaterialesmojados,se recomienda
quitarelfiltro.
2. Estaaspiradoraparamojado/secoest,.equipada
conun mecanismodeflotadorquesubir_.
autom_.ticamenteparacortarla circulaci6nde
airecuandoel Ifquidocontenidoen el tambor
alcanceunnivelpredeterminado.Cuandoesto
ocurra,apaguelaaspiradora,desenchufeel
cord6nde energfay vacieel tambor.Sabr_.que
elfiotador hacortadolacirculaci6ndeaire
porquela succi6ncesar_,y el ruido del motor
alcanzar_,unafrecuenciam_.saltadebidoal
aumentodelavelocidaddel motor.Lacapacidad
deIfquidopuedevariarconla velocidadde
recogida.
IMPORTANTE:Parareducirel riesgodeda_osa la
aspiradora,no hagafuncionarel motor conel
flotadorenla posici6nsubida.
2. Cuandoutilicela aspiradorapararecogerpolvo
muyfino, ser_.necesarioquevacfeel tambor
parapolvoy quelimpieo reemplaceelfiltro a
intervalosm_.sfrecuentesparamantenerel
m_ximorendimientode la aspiradora.
NOTA:Senecesitaunfiltro paramediossecospara
recogermaterialseco.Si utilizala aspiradorapara
recogerpolvocuandoel filtro est6mojado,6stese
taponar_,r_.pidamentey ser_.muydiffcillimpiarlo.
Siel filtro se moja,reempl_.celoantesdecontinuar
recogiendomaterialessecos conlaaspiradora.
laposici6n
subida
2O
Funcionamiento(continuaci6n)
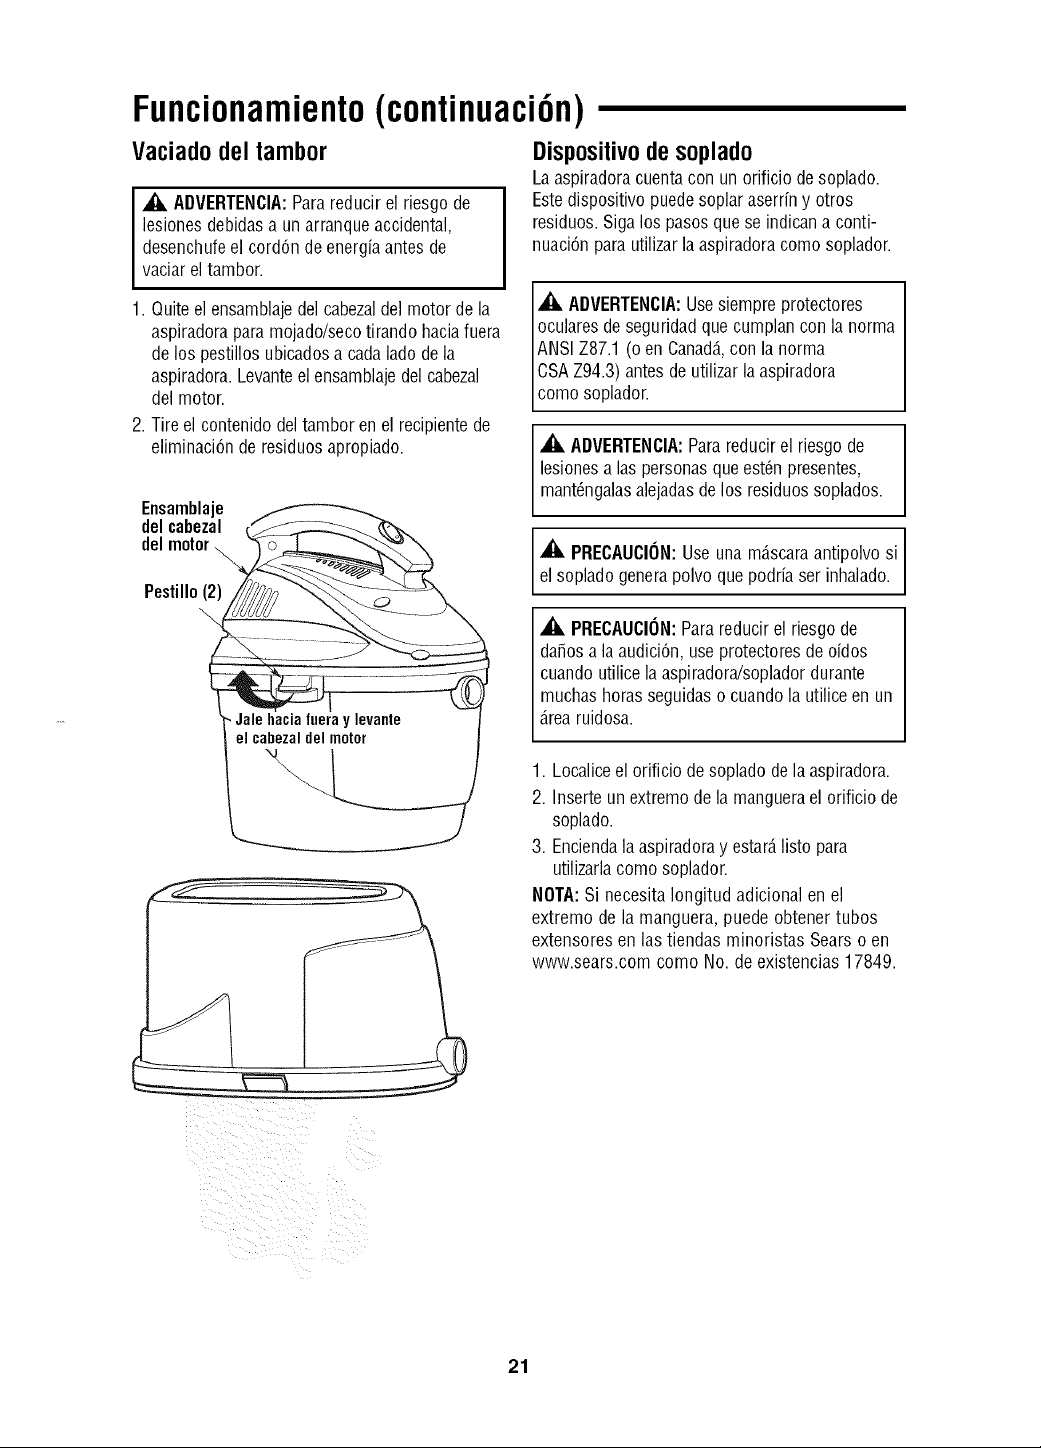
Vaciadodel tambor
,_ ADVERTENCIA:Parareducirel riesgode
lesionesdebidasa unarranqueaccidental,
desenchufeel cord6n deenergiaantesde
vaciarel tambor.
1. Quiteel ensamblajedel cabezaldel motorde la
aspiradoraparamojado/secotirandohaciafuera
delos pestillosubicadosa cadaladode la
aspiradora.Levanteel ensamblajedel cabezal
del motor.
2. Tire el contenidodeltambor enel recipientede
eliminaci6nderesiduosapropiado.
Dispositivo de soplado
Laaspiradoracuentaconun orificiodesoplado.
Estedispositivopuedesoplaraserriny otros
residuos.Sigalos pasosquese indicana conti-
nuaci6nparautilizarla aspiradoracomo soplador.
_, ADVERTENCIA:Usesiempreprotectores
ocularesdeseguridadquecumplanconla norma
ANSIZ87.1(o enCanad&con la norma
CSAZ94.3)antesde utilizarlaaspiradora
como sopador.
_, ADVERTENCIA:Parareducirel riesgode
lesionesalas personasqueest6npresentes,
mant6ngalasalejadasdelos residuossoplados.
_, PRECAUCION:Useunam_.scaraantipolvosi
el sopladogenerapolvoquepodriaserinhalado.
_, PRECAUCION:Parareducirel riesgode
da_osa la audici6n,useprotectoresdeoidos
cuandoutilicelaaspiradora/sopladordurante
muchashorasseguidaso cuandola utiliceen un
Arearuidosa.
1. Localiceel orificiodesopladodela aspiradora.
2. Inserteunextremode lamangueraelorificio de
soplado.
3. Enciendala aspiradoray estar_,listo para
utilizarlacomosoplador.
NOTA:Si necesitaIongitud adicionalen el
extremodela manguera,puedeobtenertubos
extensoresen lastiendasminoristas Searso en
www.sears.comcomo No. de existencias17849.
21
Mantenimiento
Limpiezadel filtro
Elfiltro se debelimpiar a menudoparamantener
un rendimiento6ptimodela aspiradora.
Lleveelfiltro sucio a un recipientededesechoy
quitesuavementeconun cepillolasparticulasde
suciedadpeque_asquepuedanestaradhiriCndose
al materialdelfiltro.
NOTA:Limpieelfiltro en un_.reaabierta.La
limpiezase deberealizarenelexteriory noen
_.reasinterioresdevivienda.
IMPORTANTE:DespuCsdelimpiar elfiltro,
compruebesi 6stetienedesgarraduraso agujeros
peque_os.Nouse un filtro quetengaagujeroso
desgarraduras.Inclusoun agujeropeque_opuede
hacerquesalgamuchopolvodelaaspiradora.
C_.mbieloinmediatamente.
Remoci6ny reemplazodel filtro
IMPORTANTE:Paraevitarda_arla ruedadel
soplador,reinstalesiempreel filtro antesde utilizar
laaspiradorapararecogermaterialseco.
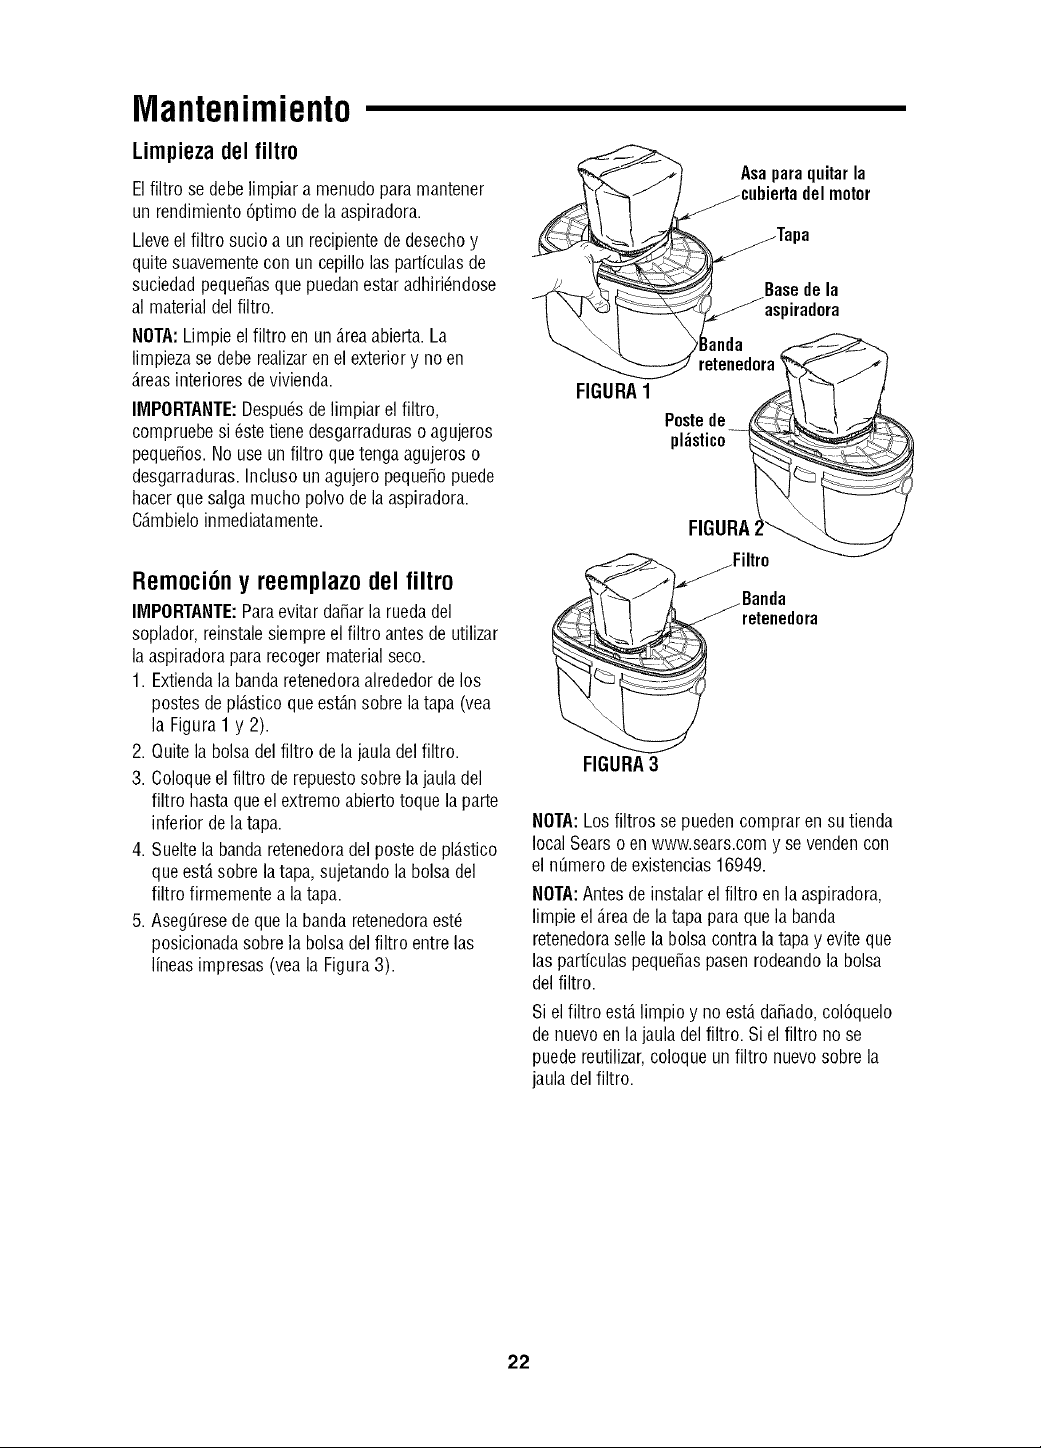
1. Extiendala bandaretenedoraalrededordelos
postesdepl_.sticoqueest_.nsobrelatapa (vea
la Figura1 y 2).
2. Quitela bolsadel filtro delajaula delfiltro.
3. Coloqueel filtro derepuestosobrela jauladel
filtro hastaqueel extremoabiertotoquelaparte
inferiorde latapa.
4. Sueltela bandaretenedoradel postedepl_.stico
queest,.sobrelatapa,sujetandola bolsadel
filtro firmementea latapa.
5. AsegQresedequela bandaretenedoraest6
posicionadasobrela bolsadel filtro entrelas
lineasimpresas(veala Figura3).
Asaparaquitarla
delmotor
FIGURA1
FIGURA
Basedela
flradora
_landa .
retenedora
FIGURA
_Filtro
_Banda
retenedora
NOTA:Losfiltrosse puedencomprarensu tienda
localSearso en www.sears.comy sevendenCOn
el n_merodeexistencias16949.
NOTA:Antesdeinstalarelfiltro en laaspiradora,
limpieel_.readelatapa paraquela banda
retenedoraselle labolsacontralatapay eviteque
lasparticulaspeque_aspasenrodeandola bolsa
del filtro.
Siel filtro est,.limpio y no est,.da_ado,colCquelo
denuevoenlajauladel filtro. Si elfiltro nose
puedereutilizar,coloqueunfiltro nuevosobrela
jauladel filtro.
22
Mantenimiento(continuaci6n)
Limpiezay desinfecci6nde la
aspiradorapara mojado/seco
Paramantenerel mejoraspectoposible de la
aspiradoraparamojado/seco,limpie su exterior
con unpaso humedecidoconaguatempladay
un jab6nsuave.
Paralimpiar eltambor:
1. Vacfelos residuosdel tambor.
2. Lavea fondoel tambor conagua templaday
un jab6nsuave.
3. Limpie el tamborcon un paso seco.
Antesde unalmacenamientoprolongadoo seg0n
seanecesario(por ejemplo,si se recogenaguas
residuales),se debe desinfectarel tambor.
Paradesinfectarel tambor:
1. Eche1 gal6n deaguay 1 cucharaditade
blanqueadorde cloro en eltambor.
2. Dejeque lasoluci6n reposedurante20
minutosy agitelacuidadosamentecadapocos
minutos, asegur_.ndosede mojartodas las
superficiesinterioresdel tambor.
3. Vacfeel tambor despu6sde20 minutos.
Enju_.guelocon aguahasta queel olor a
blanqueadordesaparezca.Dejeque el tambor
se sequecompletamenteantesde sellarel
motor sobre eltambor.
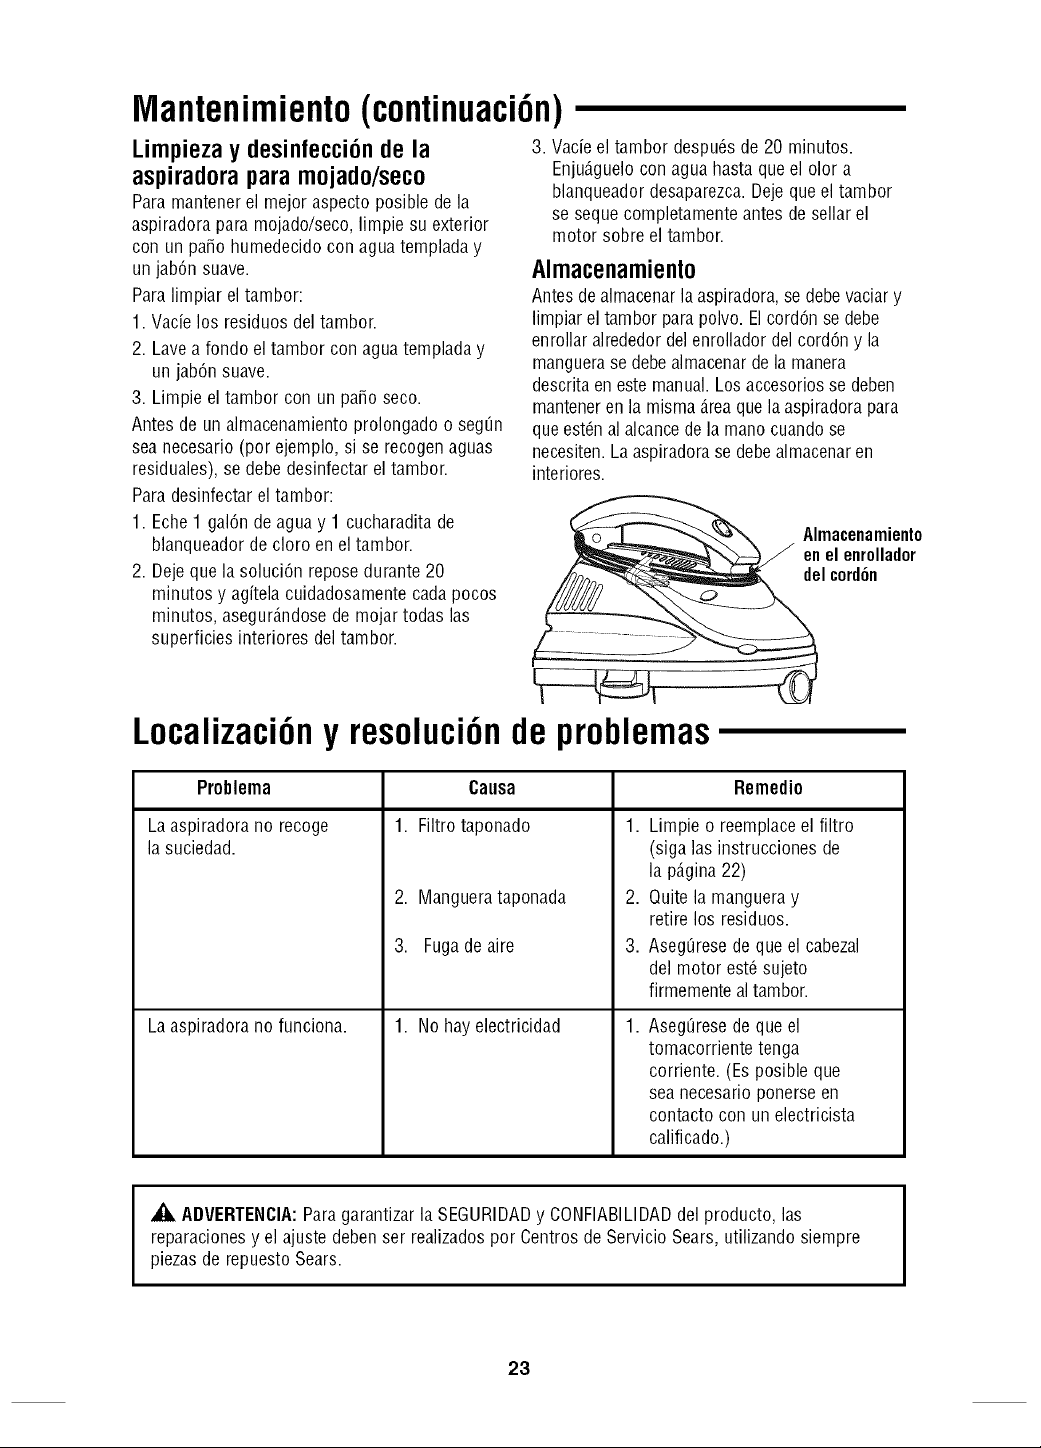
Almacenamiento
Antesdealmacenar]aaspiradora,se debevaciary
limpiarel tamborparapolvo.Elcord6n sedebe
enrollaralrededordelenrolladordelcord6ny la
manguerase debealmacenarde la manera
descritaenestemanual.Los accesoriosse deben
mantenerenla misma_.reaquelaaspiradorapara
queest6nal alcancedela manocuandose
necesiten.La aspiradorase debealmacenaren
interiores.
Localizaci6ny resoluci6nde problemas
Almacenamiento
J en el enrollador
del cord6n
Problema
Laaspiradorano recoge
la suciedad.
Laaspiradorano funciona.
Causa Remedio
1. Filtro taponado 1.
2. Manguerataponada
3. Fugade aire
1. Nohay electricidad
2,
3.
1,
Limpie o reemplaceel filtro
(siga lasinstrucciones de
la p_.gina22)
Quitela mangueray
retirelos residuos.
Aseg0resedeque el cabezal
del motor est6sujeto
firmementealtambor.
Aseg0resedeque el
tomacorrientetenga
corriente.(Esposibleque
seanecesarioponerseen
contactocon unelectricista
calificado.)
_. ADVERTENCIA: Para garantizar la SEGURIDAD y CONFIABILIDAD del producto, las
reparaciones y el ajuste deben ser realizados por Centros de Servicio Sears, utilizando siempre
piezas de repuesto Sears.
23

Your Home
For expert troubleshooting and home solutions advice:
manage home
www.managemyhome.com
For repair - in your home - of all major brand appliances,
lawn and garden equipment, or heating and cooling systems,
no matter who made it, no matter who sold it!
For the replacement parts, accessories and
owner's manuals that you need to do-it-yourself.
For Sears professional installation of home appliances
and items like garage door openers and water heaters.
1-800-4-MY-HOME ®
(1-800-469-4663)
www.sears.corn
Call anytime, day or night
(U.S.A. and Canada)
www.sears.ca
Our Home
For repair of carry-in items like vacuums, lawn equipment,
and electronics, call anytime for the locations of the nearest
Sears Parts & Repair Service Center
1-800-488-1222 (U.S.A.) 1-800-469-4663 (Canada)
www.sears.com www.sears.ca
To purchase a protection agreement on a product serviced by Sears:
1-800-827-6655 (U.S.A.)
1-800-361-6665 (Canada)
Para pedir servicio de reparaci6n a
domicilio, y para ordenar piezas:
1-888-SU-HOGAR ®
(1-888-784-6427)
Au Canada pourserviceen franoais:
1-800-LE-FOYER Mc
(1-800-533-6937)
www.sears.ca
_c_Sears Brands, LLC
® Registered Trademark / TMTrademark / sMService Mark of Sears Brands, LLC
® Marca Registrada / TMMarca de Fabrica / sMMarca de Servicio de Sears Brands, LLC
Mc Marque de commerce / MoMarque d_pos_e de Sears Brands, LLC
Part No. SP6771 Form No. SP6771 Printed in China 06/10