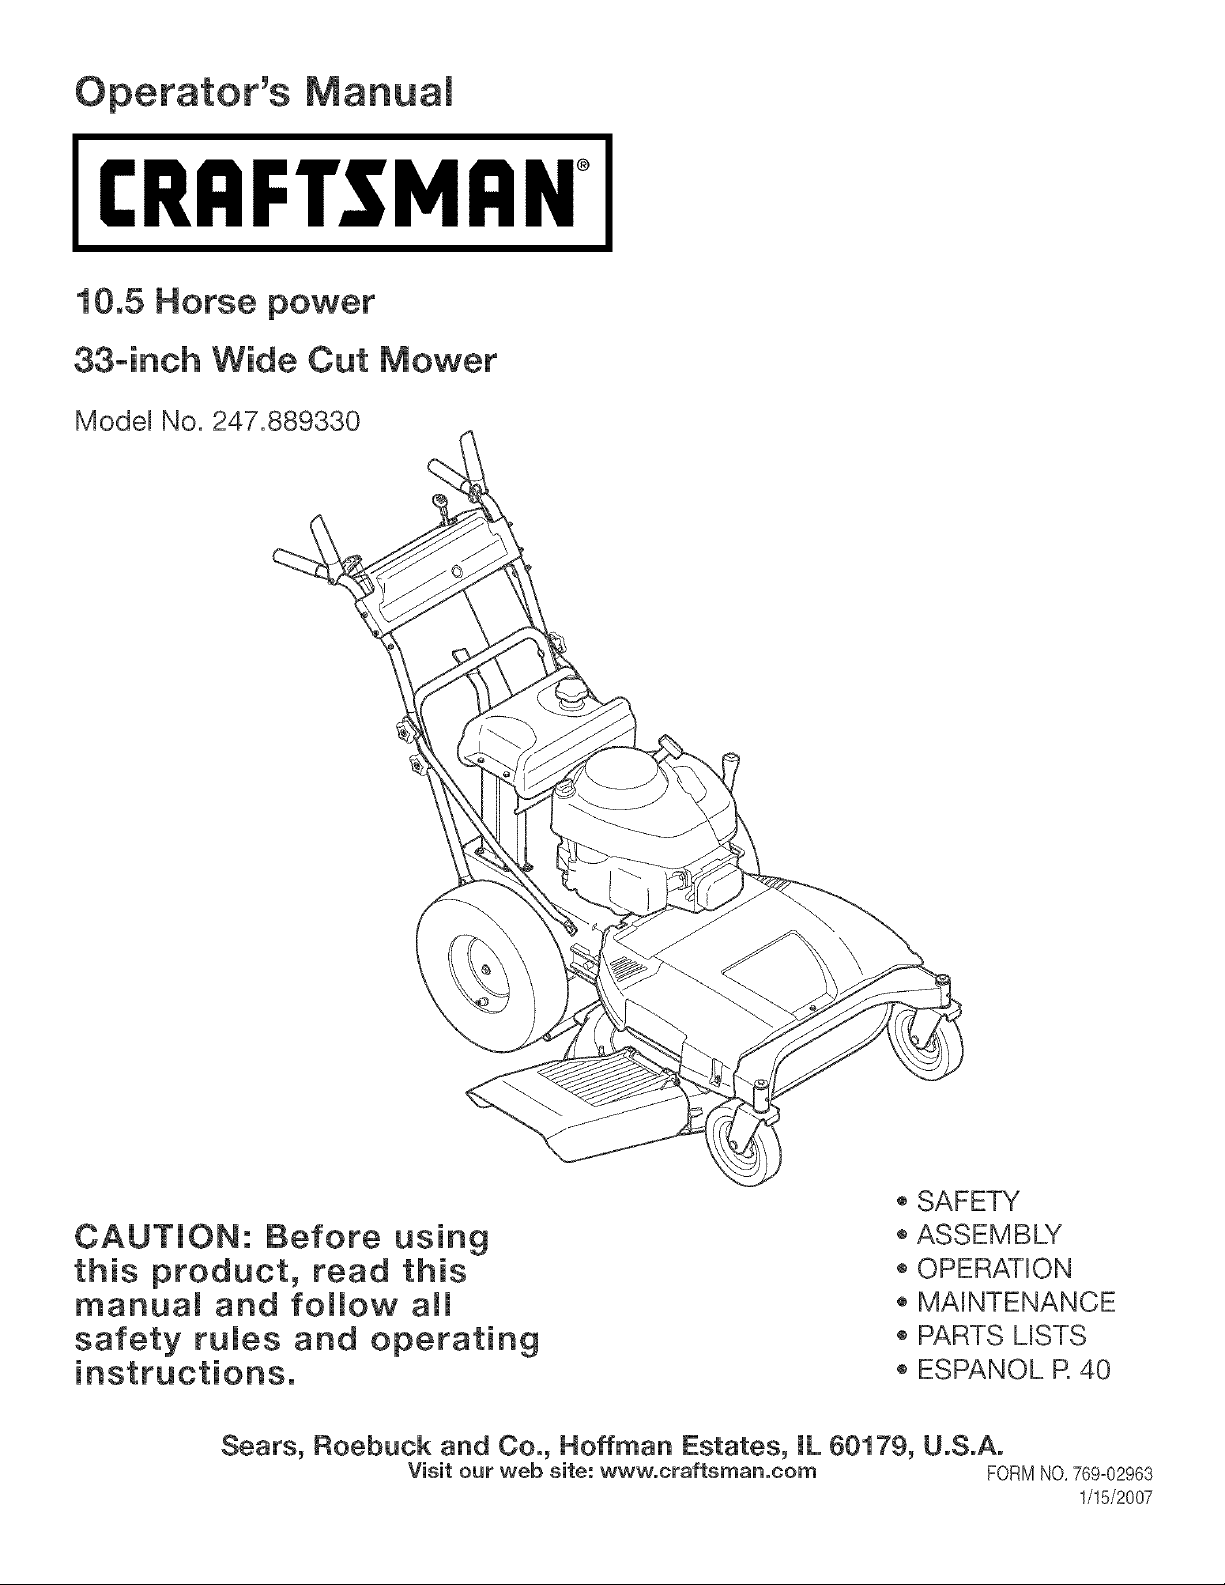
Operator's Manuam
CRAFTSMAN°
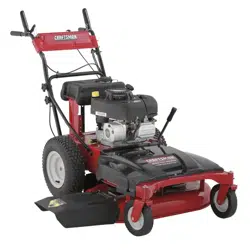
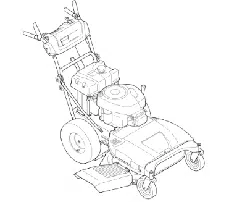
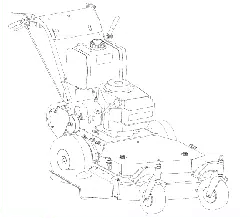
10.5 Horse power
33-inch Wide Cut Mower
Model No. 247.889330
CAUTION: Before using
this product, read this
manual and follow aim
safety fumes and operating
o SAFETY
ASSEMBLY
OPERATION
MAINTENANCE
PARTS LISTS
ESPANOL R 40
Sears, Roebuck and Co., Hoffman Estates, IL 60179, U.S.A.
Visit our web site: www.craftsman.com FORMNO,769-02963
1/15/2007
Craftsman TwoYear Limited Warranty
If thisCraftsmanproductfailsdueto adefect inmaterialorworkmanshipwithintwoyearsfromthe dateof purchase,returnit to any Searsstore,
SearsServiceCenter,orotherCraftsmanoutletinthe UnitedStatesforfree repair,
Thiswarrantydoesnot include:
Expendableitemswhichcanwearout fromnormaluse withinthe warrantyperiod,suchas rotarymowerblades,bladeadapters,belts,air
cleaners,andsparkplug,
, Repairsnecessarybecauseof operatorabuseor negligence,includingbentcrankshaftsandthe failureto operateor maintainthe equip_
mentaccordingto all suppliedinstructions,
Thiswarrantyappliesforonly 90 daysif this productis everusedfor commercialor rentalpurposes,
This warrantyappliesonly whilethisproductis usedin the UnitedStates,
This warrantygivesyouspecific legal rights,andyou mayalsohaveotherrightswhichvaryfromstateto state,
Sears, Roebuck and Co., Hoffman Estates, [L 60179
Repair Protection Agreements
Congratulationson makinga smart purchase,YournewCraftsman®
productis designedand manufacturedfor yearsof dependableopera=
fion,But likeallproducts,it mayrequirerepairfromtimeto time,That's
whenhavinga RepairProtectionAgreementcansaveyoumoneyand
aggravation,Here'swhat'sincludedin the Agreement:
• Expertservice byour 12,000professionalrepairspecialists
= Unlimitedserviceand nochargefor partsand laboronall covered
repairs
= Productreplacementif yourcoveredproductcan't befixed
• Discountof 10%fromregularpriceof serviceand service=related
partsnotcoveredby theagreement;also,10%off regularpriceof
preventivemaintenancecheck
• Fasthelp by phone- phonesupportfroma Searstechnicianon
productsrequiringin=homerepair,plusconvenientrepair
scheduling
Purchasea RepairProtectionAgreementnow and protectyourself
fromunexpectedhassleandexpense,
Onceyou purchasethe Agreement,a simplephonecall is allthat it
takesforyou to scheduleservice,Youcancall anytimedayor night,or
schedulea serviceappointmentonline,
Searshasover 12,000professionalrepairspecialists,who have
accessto over4,5 millionqualitypartsandaccessories,That'sthe
kindof professionalismyoucan countonto help prolongthe life of
yournew purchaseforyearsto come,PurchaseyourRepairProtection
Agreementtoday!
Some [imitations and exclusions apply. For prices and additional
informationca[[ 1-800-827-6655.
Sears Installation Service
ForSearsprofessionalinstallationof homeappliances,garagedoor
openers,water heaters,and othermaiorhomeitems,in the U,S,A,call
1-800-4-MY-HOME®
HorsePower: 10,5
EngineOil: SAE30
Fuel: UnleadedGasoline
SparkPlug: Champion®RC12YC
Engine: Briggs& StrattonPowerBuiltTM
© SearsBrands,LLC
Mode[Number
Serial Number
Dateof Purchase
Recordthe modelnumber,serialnumber,
anddateof purchaseabove,

Thissymbolpointsoutimportantsafetyinstructions
which,ifnotfollowed,couldendangerthepersonal
safetyand/orpropertyofyourselfandothers,Read
andfollowallinstructionsinthismanualbefore
attemptingtooperatethismachine,Failuretocomplywiththese
instructionsmayresultinpersonaliniury,Whenyouseethissymbol,
HEEDITSWARNING!
YourResponsibility:Restricttheuseofthispowermachineto
personswhoread,understand,andfollowthewarningsandinstruc-
tionsinthismanualandonthemachine,
Thismachinewasbuilttobeoperatedaccordingtotherulesfor
safeoperationinthismanual,Aswithanytypeofpowerequipment,
carelessnessorerroronthepartoftheoperatorcanresultinserious
iniury,Thismachineiscapableofamputatinghandsandfeetand
throwingobiects,Failuretoobservethefollowingsafetyinstructions
couldresultinseriousiniuryordeath,
EngineExhaust,someofitsconstituents,andcertainvehicle
componentscontainoremitchemicalsknowntoStateofCaliforniato
causecancerandbirthdefectsorotherreproductiveharm,
Tragicaccidentscan occurifoperatoris notalert to presenceof children.Chil-
dren areoften attractedto mowerandmowingactivity.They do notunderstand
thedangers.Neverassumethat childrenwillremainwhereyou last sawthem.
o Keepchildrenoutof the mowingareaand underwatchfulcareof a
responsibleadult otherthanthe operator.
o Be alert andturn mower off if a child entersthe area.
o Beforeandwhile movingbackwards,look behindand downfor small
children.
o Useextremecare whenapproachingblind corners, doorways,shrubs,
trees, orother objectsthat may obscureyour vision of a childwho may
run into the mower.
o Keepchildrenawayfrom hotor runningengines.They can suffer burns
from a hot muffler.
o Neverallowchildrenunder 14years oldto operatea power mower.
Children14years old and overshouldreadand understandoperation
instructionsand safetyrulesin this manualandshouldbe trained and
supervisedbya parent.
GENERAL OPERATmON
Readthis operator'smanualcarefullyin its entiretybeforeattempting
to assemblethis machine.Read,understand,and followall instructions
on the machineand inthe manual(s)beforeoperation.Be completely
familiarwith the controls andthe properuseof this machinebefore
operatingit. Keepthis manualin a safeplaceforfuture and regular
referenceandfor orderingreplacementparts.
o Thismachineis a precision pieceof powerequipment,not a plaything.
Therefore,exerciseextremecaution at alltimes.Your unit has been
designedto performonejob: to mow grass.Do not use it for any other
purpose.
o Neverallowchildrenunder 14years oldto operatethis machine.
Children14years old and overshouldreadand understandthe instruc-
tions inthis manualand shouldbe trainedand supervisedby a parent.
Only responsibleindividualswho are familiarwith these rulesof safe
operationshould be allowedto usethis machine.
o Thoroughlyinspectthe areawherethe equipmentis to be used. Remove
all stones, sticks,wire,bones, toys andotherforeignobjectswhichcould
be trippedover or pickedup and thrownby the blade.Thrownobjects
can causeseriouspersonalinjury.Plan your mowingpatternto avoid
dischargeof materialtoward roads,sidewalks,bystandersandthe like.
Also, avoiddischargingmaterialagainsta wall orobstructionwhich may
causedischargedmaterialto ricochetbacktowardthe operator.
To helpavoidbladecontactor a thrownobjectinjury,stay inoperator
zone behindhandlesandkeepchildren,bystanders,helpers,and petsat
least 75 feetfrom mowerwhile it is in operation.Stop machineif anyone
entersarea.
o Alwayswearsafetyglassesor safetygoggles duringoperationandwhile
performingan adjustmentor repairto protectyour eyes.Thrown objects
which ricochetcan causeserious injury to the eyes.
o Wearsturdy,rough-soledwork shoesandclose-fittingslacksandshirts.
Shirts andpantsthat coverthe arms and legs andsteel-toedshoes
are recommended.Neveroperatethis machinein barefeet, sandals,
slippery or light weight(e.g.canvas) shoes.
,, Donot put handsor feet near rotatingpartsor undercutting deck.
Contactwith bladecan amputatehandsandfeet.
o A missingor damageddischargecovercan causebladecontact or
thrown objectinjuries.
o Manyinjuriesoccuras a result ofthe mowerbeingpulledoverthe foot
duringa fall caused byslipping or tripping. Do not hold on to the mowerif
you are falling; releasethe handleimmediately.
o Neverpull the mowerbacktowardyou whileyou are walking.If you must
back the mowerawayfrom a wall or obstructionfirstlook down and
behindto avoidtripping andthen followthese steps:
a. Step backfrom mowerto fully extendyourarms.
b. Be sureyou arewell balancedwithsure footing.
c. Pull backslowly,no morethan half waytowardsyou.
d. Repeatthesestepsas needed.
o Donot operatethe mowerwhile underthe influenceof alcoholor drugs.
o Donot engagethe self-propelledmechanismon units so equippedwhile
startingengine.
o The blade controlhandleis a safetydevice.Neverattemptto bypassits
operation.Doingso makesthe safetydevice inoperativeandmayresult
in personalinjurythrough contactwiththe rotatingblade. The blade
control handlemustoperateeasily in bothdirectionsandautomatically
returnto the disengagedpositionwhen released.
o Neveroperatethe mowerinwet grass.Alwaysbe sureof yourfooting. A
slip andfall can causeseriouspersonalinjury. Ifyou feel you are losing
your footing,releasethe bladecontrol handle immediatelyandthe blade
will stop rotatingwithinthree seconds.
Mowonly in daylightorgood artificial light. Walk, neverrun.
o Stopthe blade whencrossing graveldrives,walks or roads.
Iftheequipmentshouldstarttovibrateabnormally,stoptheengineand
checkimmediatelyforthecause.Vibrationisgenerallyawarningof
trouble.
o Shuttheengineoffandwaituntilthebladecomestoacompletestop
beforeremovingthegrasscatcheroruncloggingthechute.
Thecuttingbladecontinuestorotateforafewsecondsaftertheengine
isshutoff.Neverplaceanypartofthebodyinthebladeareauntilyou
aresurethebladehasstoppedrotating.
o Neveroperatemowerwithoutpropertrailshield,dischargecover,grass
catcher,bladecontrolhandle,orothersafetyprotectivedevicesinplace
andworking.Neveroperatemowerwithdamagedsafetydevices.Failure
todosocanresultinpersonalinjury.
o Mufflerandenginebecomehotandcancauseaburn.Donottouch.
o Onlyusepartsandaccessoriesmadeforthismachinebymanufacturer.
Failuretodosocanresultinpersonalinjury.
o Ifsituationsoccurwhicharenotcoveredinthismanual,usecareand
goodjudgment.ContactyourSearsServiceCenterforassistance.
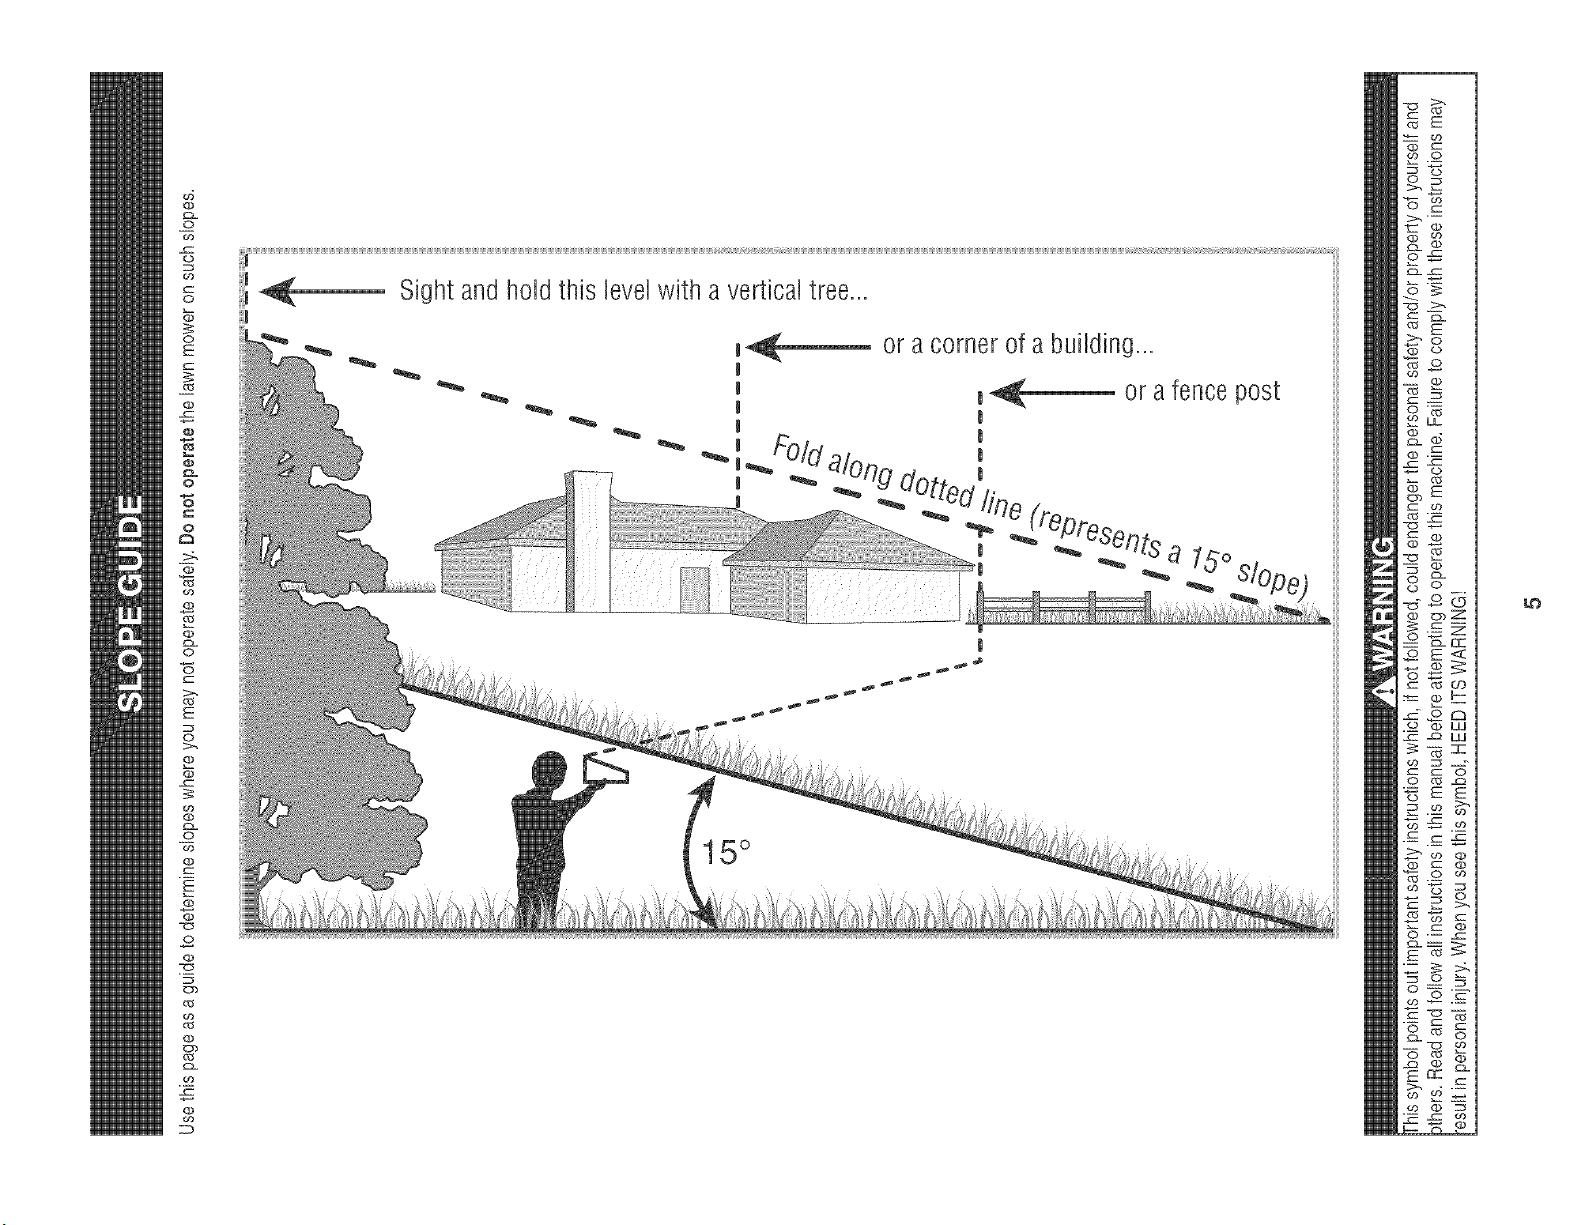
SLOPE OPERATION
Slopesarea majorfactor relatedto slipandfall accidentswhichcan resultin
severeinjury'.Operationon slopesrequiresextracaution.Ifyou feel uneasyon
a slope,do notmow it.For yoursafety,usethe slope gaugeincludedas part
of this manualto measureslopesbeforeoperatingthis unit on a slopedor hilly
area.Ifthe slopeis greaterthan 15 degrees,do not mowit.
Do:
o Mow acrossthe faceof slopes;never up anddown.Exerciseextreme
cautionwhen changingdirectionon slopes.
o Watchfor holes,ruts, rocks,hiddenobjects,or bumpswhichcan cause
youto slip or trip.Tall grasscan hideobstacles.
o Alwaysbe sureof your footing.A slip andfall cancauseseriouspersonal
injury.If you feel you are losingyour balance,releasethe bladecontrol
handleimmediately,and thebladewill stop rotatingwithin 3 seconds.
Do Not:
o Donot mowneardrop-offs, ditchesor embankments,where you could
loseyour footing or balance.
o Donot mowslopesgreaterthan 15 degreesas shownonthe
slopegauge.
o Donot mowonwet grass. Unstablefooting couldcauseslipping.
SERVICE
Safe Handling Of Gasoline:
o Toavoidpersonalinjury or propertydamage use extremecarein
handlinggasoline.Gasolineis extremelyflammableandthe vaporsare
explosive.Serious personalinjurycan occurwhen gasoline is spilledon
yourselfor yourclotheswhichcan ignite.
o Washyourskin andchangeclothesimmediately.
o Useonly an approvedgasolinecontainer.
o Neverfill containersinside avehicle or ona truck or trailer bedwith a
plastic liner.Alwaysplace containerson the groundawayfrom your
vehicle beforefilling.
o Removegas-poweredequipmentfromthetruck or trailer and refuel it on
theground. If this is not possible,then refuelsuch equipmenton a trailer
witha portablecontainer,ratherthan from a gasolinedispensernozzle.
o Keepthe nozzle incontactwith the rimof the fueltank or container
openingat all times until fueling is complete.Donot usea nozzle
lock-opendevice.
o Extinguishall cigarettes,cigars, pipesandother sources
of ignition.
o Neverfuel machineindoorsbecauseflammablevapors will accumulate
inthe area.
o Neverremovegas cap or addfuel while engine is hotor running.
Allowengineto cool at least two minutesbefore refueling.
o Neveroverfill fuel tank. Filltank to nomorethan _ inchbelow bottom
of filler neckto providefor fuel expansion.
o Replacegasolinecap and tightensecurely.
o Ifgasoline is spilled, wipeit offthe engineandequipment.Moveunit
to anotherarea.Wait 5 minutesbeforestarting engine.
o Neverstorethe machineorfuel container near an openflame, spark
or pilot light as on a waterheater,spaceheater,furnace,clothesdryer,
or other gas appliances.
o To reducefire hazard,keepmowerfree of grass,leaves,or other
debris build-up.Clean up oil or fuel spillageand removeany fuel
soakeddebris.
o Allowa mowerto cool at least 5 minutes beforestoring.
General Service:
o Neverrun an engine indoorsor ina poorlyventilatedarea.Engine
exhaustcontainscarbon monoxide,an odorlessand deadlygas.
o Beforecleaning, repairing,or inspecting,makecertainthe bladeand
all movingparts havestopped.Disconnectthe sparkplug wire and
ground againsttheengine to preventunintendedstarting.
o Checkthe blade andengine mountingboltsat frequentintervals
for propertightness.Also,visually inspectbladefor damage(e.g.,
bent, cracked,worn)Replacebladewith the original equipment
manufacture's(O.E.M.)bladeonly, listedin this manual.Use of parts
which do not meetthe originalequipmentspecificationsmayleadto
improperperformanceand compromisesafetyE"
o Mowerbladesare sharp andcan cut. Wrapthe bladeorwear gloves,
and use extra cautionwhen servicingthem.
o Keepall nuts,bolts,andscrewstightto be sure the equipmentis in
safeworkingcondition.
o Nevertamperwith safetydevices.Checktheir proper
operationregularly.
o After strikinga foreignobject, stopthe engine,disconnectthe spark
plug wireand groundagainstthe engine.Thoroughlyinspectthe
mowerfor any damage.Repairthe damagebeforestarting and
operatingthe mower.
o Neverattemptto makea wheelor cutting heightadjustmentwhilethe
engineis running.
o Grasscatchercomponents,dischargecover,andtrailshieldare
subjectto wear anddamagewhichcould exposemovingparts or
allowobjectsto bethrown.For safetyprotection,frequentlycheck
componentsand replaceimmediatelywithoriginal equipment
manufacturer's(O.E.M.)partsonly, listedin this manual."Use of parts
which do not meetthe originalequipmentspecificationsmayleadto
improperperformanceand compromisesafetyE"
o Donot changethe enginegovernorsettingor overspeedthe engine.
The governorcontrolsthe maximumsafeoperatingspeedof the
engine.
o Maintainor replacesafetylabels,as necessary.
o Observeproper disposallawsand regulations.Improperdisposalof
fluids and materialscan harmthe environment.
4
o
8_
E
0
S
0_
0
E
T_
=s
o
O9
cd
09
cd
g_
Sight and how this levelwith a vertical tree...
15°

This page left intentionallyblank.
6

WARNING
This symbol pointsout important safety instructions
which, if not followed, could endanger the personal
safety and/or property of yourself and others. Read and
follow all instructions in this manual before attempting
to operate this machine. Failure to comply with these
instructions may result in personal injury. When you see
this symbol HEED ITS WARNING!
Your ResponsibiJity
Restrictthe use of this power machine to persons who
read, understand, and follow the warningsand instruc-
tions in this manualand on the machine.
7
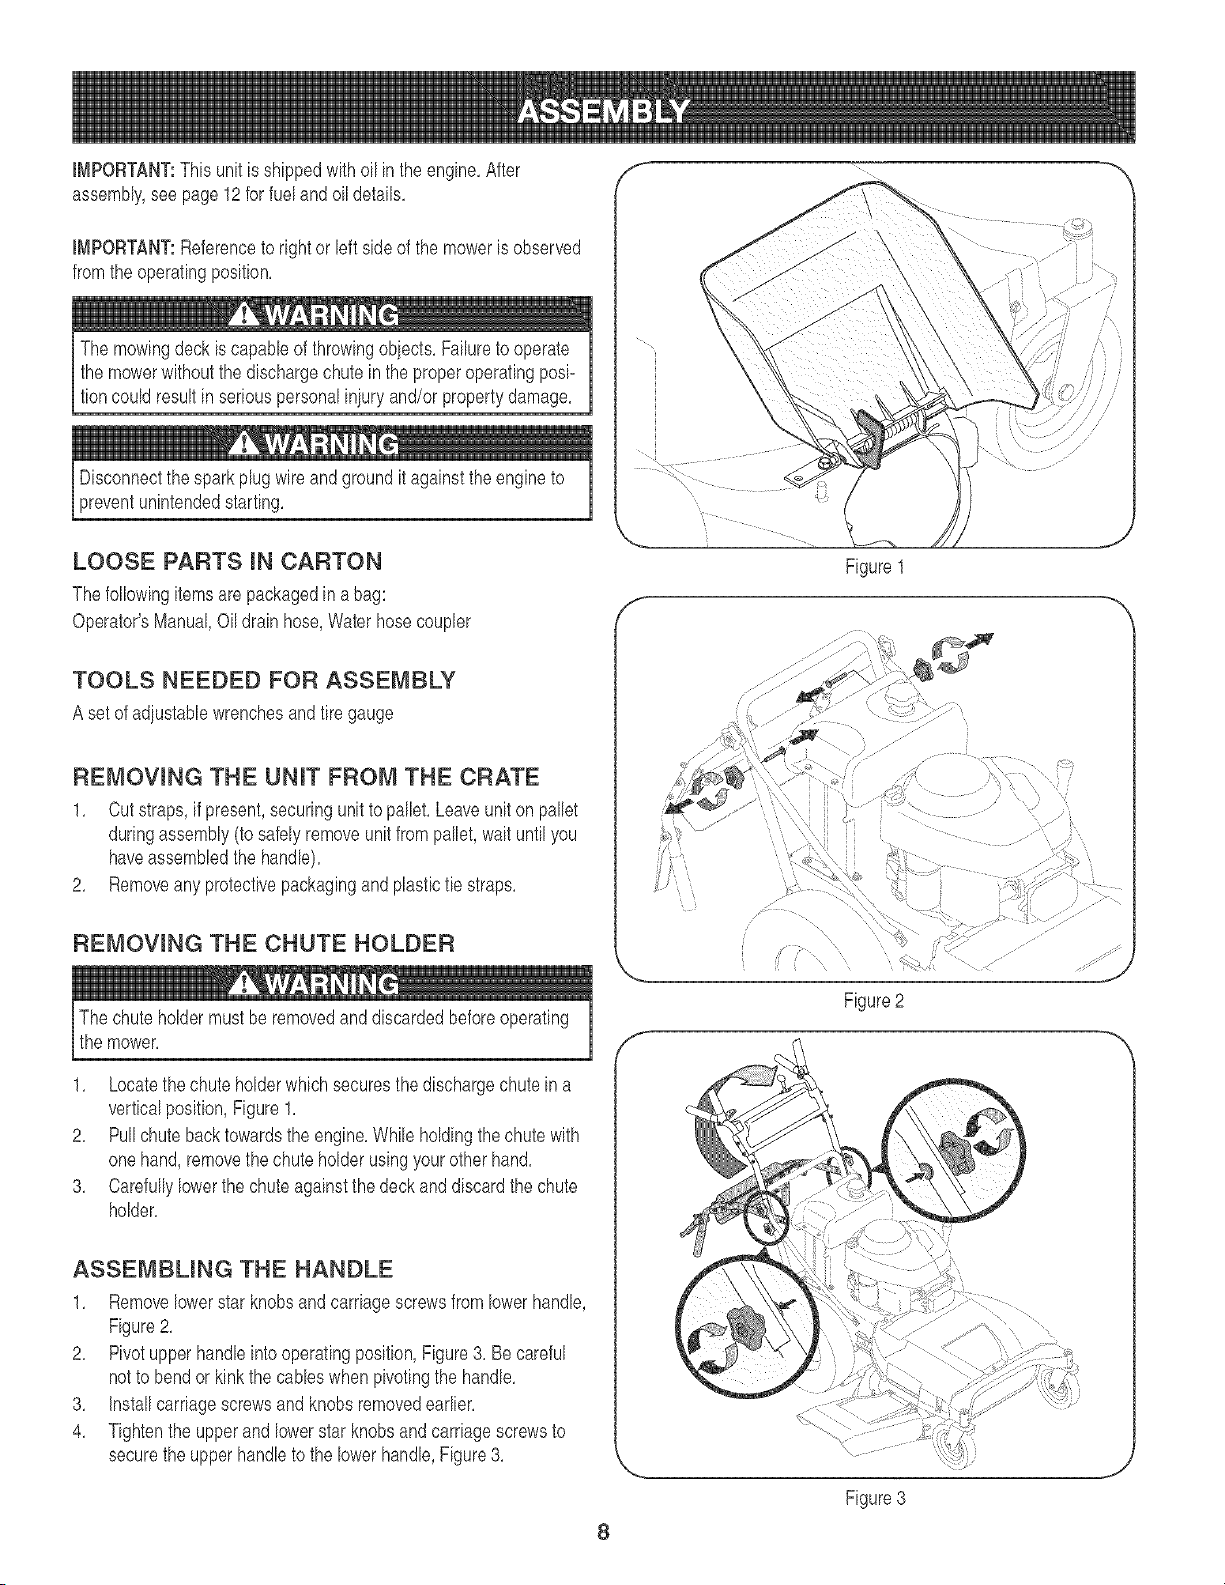
IMPORTANT:This unitis shippedwithoil inthe engine,After
assembly,see page 12for fuel and oil details,
IMPORTANT:Referenceto rightor left sideof the moweris observed
fromtheoperatingposition,
The mowingdeck is capableof throwingobiects,Failureto operate
the mowerwithoutthe dischargechute in the properoperatingposi-
tioncould resultin seriouspersonaliniuryand/or propertydamage,
Disconnectthe sparkplug wireand groundit againsttheengineto
preventunintendedstarting,
LOOSE PARTS mNCARTON
Thefollowingitemsarepackagedin a bag:
Operator'sManual,Oildrainhose,Waterhosecoupler
TOOLS NEEDED FOR ASSEMBLY
A setof adiustablewrenchesand tiregauge
REMOVmNG THE UNmT FROM THE CRATE
1, Cut straps,if present,securingunitto pallet, Leaveuniton pallet
duringassembly(to safelyremoveunitfrompallet,waituntilyou
haveassembledthe handle),
2, Removeany protectivepackagingandplastictie straps,
REMOVING THE CHUTE HOLDER
The chute holdermustbe removedand discardedbeforeoperating
the mower,
1, Locatethe chuteholderwhichsecuresthe dischargechutein a
verticalposition,Figure1,
2, Pull chute backtowardsthe engine,Whileholdingthe chute with
onehand,removethe chuteholderusingyourotherhand,
3, Carefullylowerthe chuteagainstthe deckanddiscardthe chute
holder,
ASSEMBLING THE HANDLE
1, Removelowerstar knobsand carriagescrewsfrom lowerhandle,
Figure2,
2, Pivotupper handleintooperatingposition,Figure3, Be careful
notto bendor kink the canes whenpivotingthe handle,
3, Installcarriagescrewsandknobsremovedearlier,
4, Tightenthe upperandlowerstar knobsandcarriagescrewsto
securethe upperhandleto the lowerhandle,Figure3,
f
f
8
Figure1
Figure2
Figure3
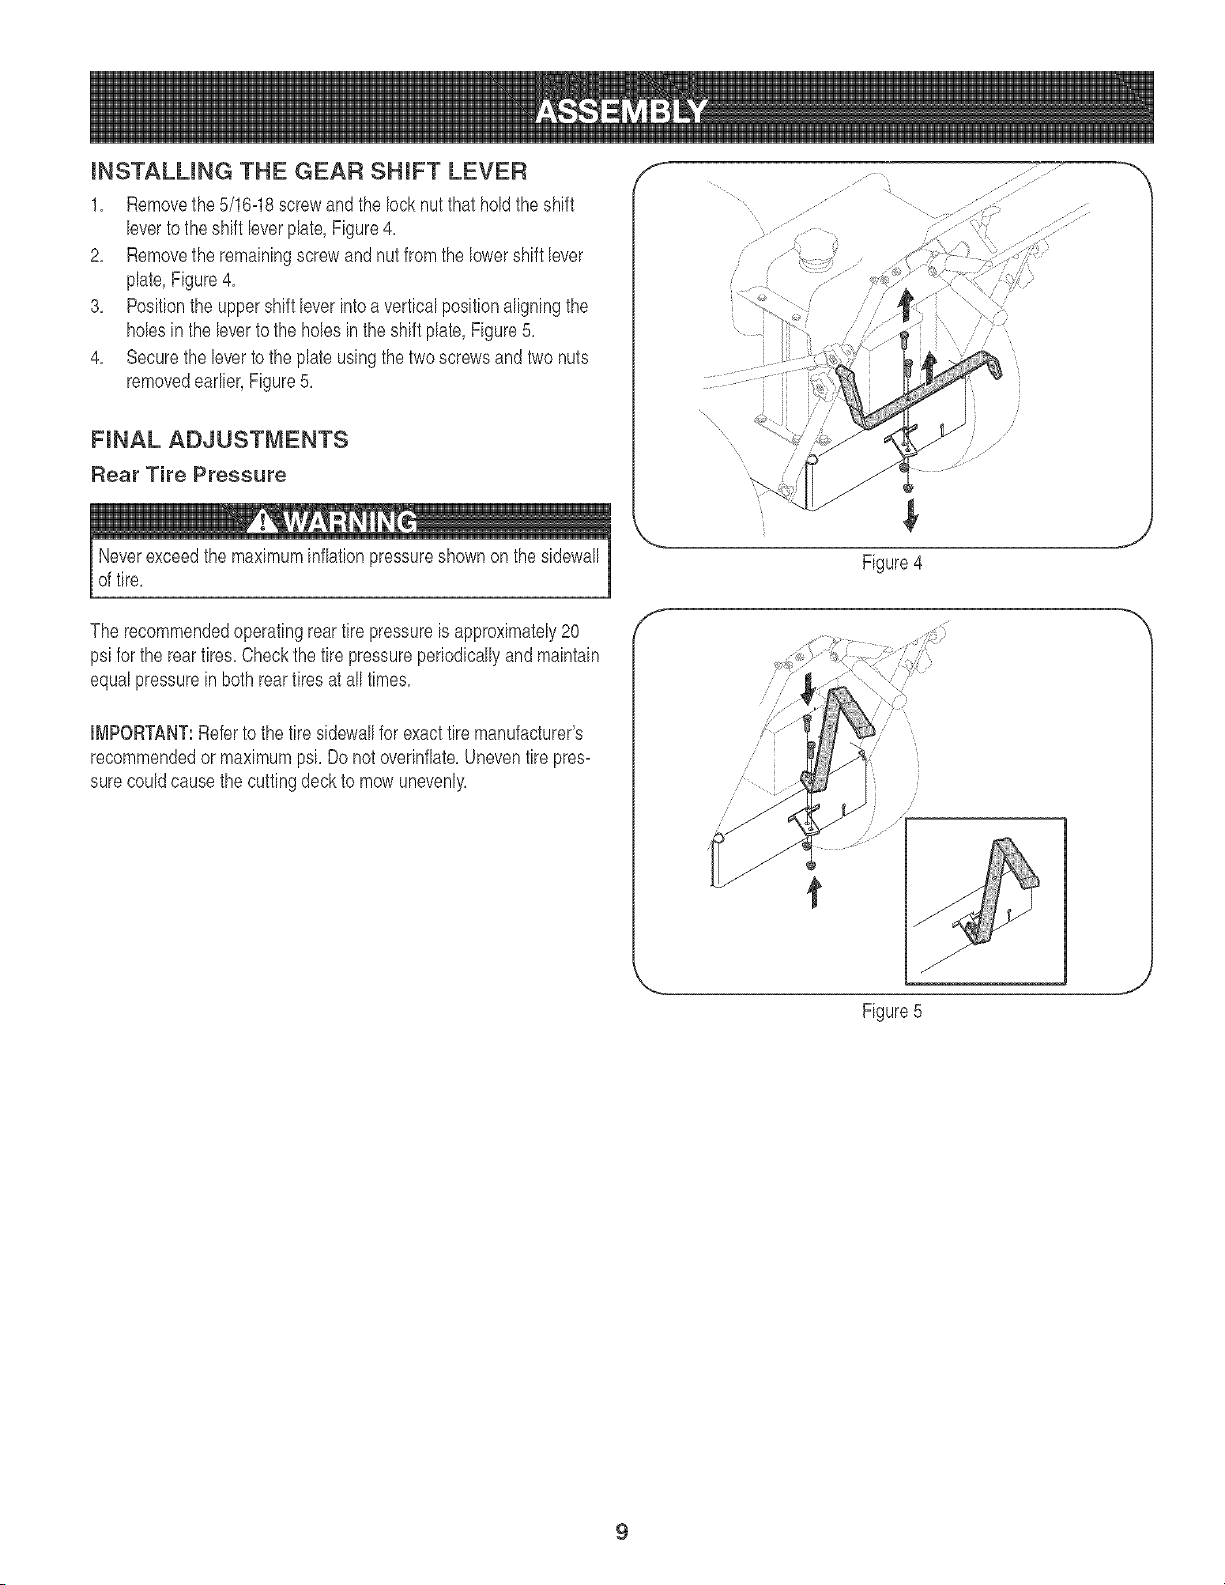
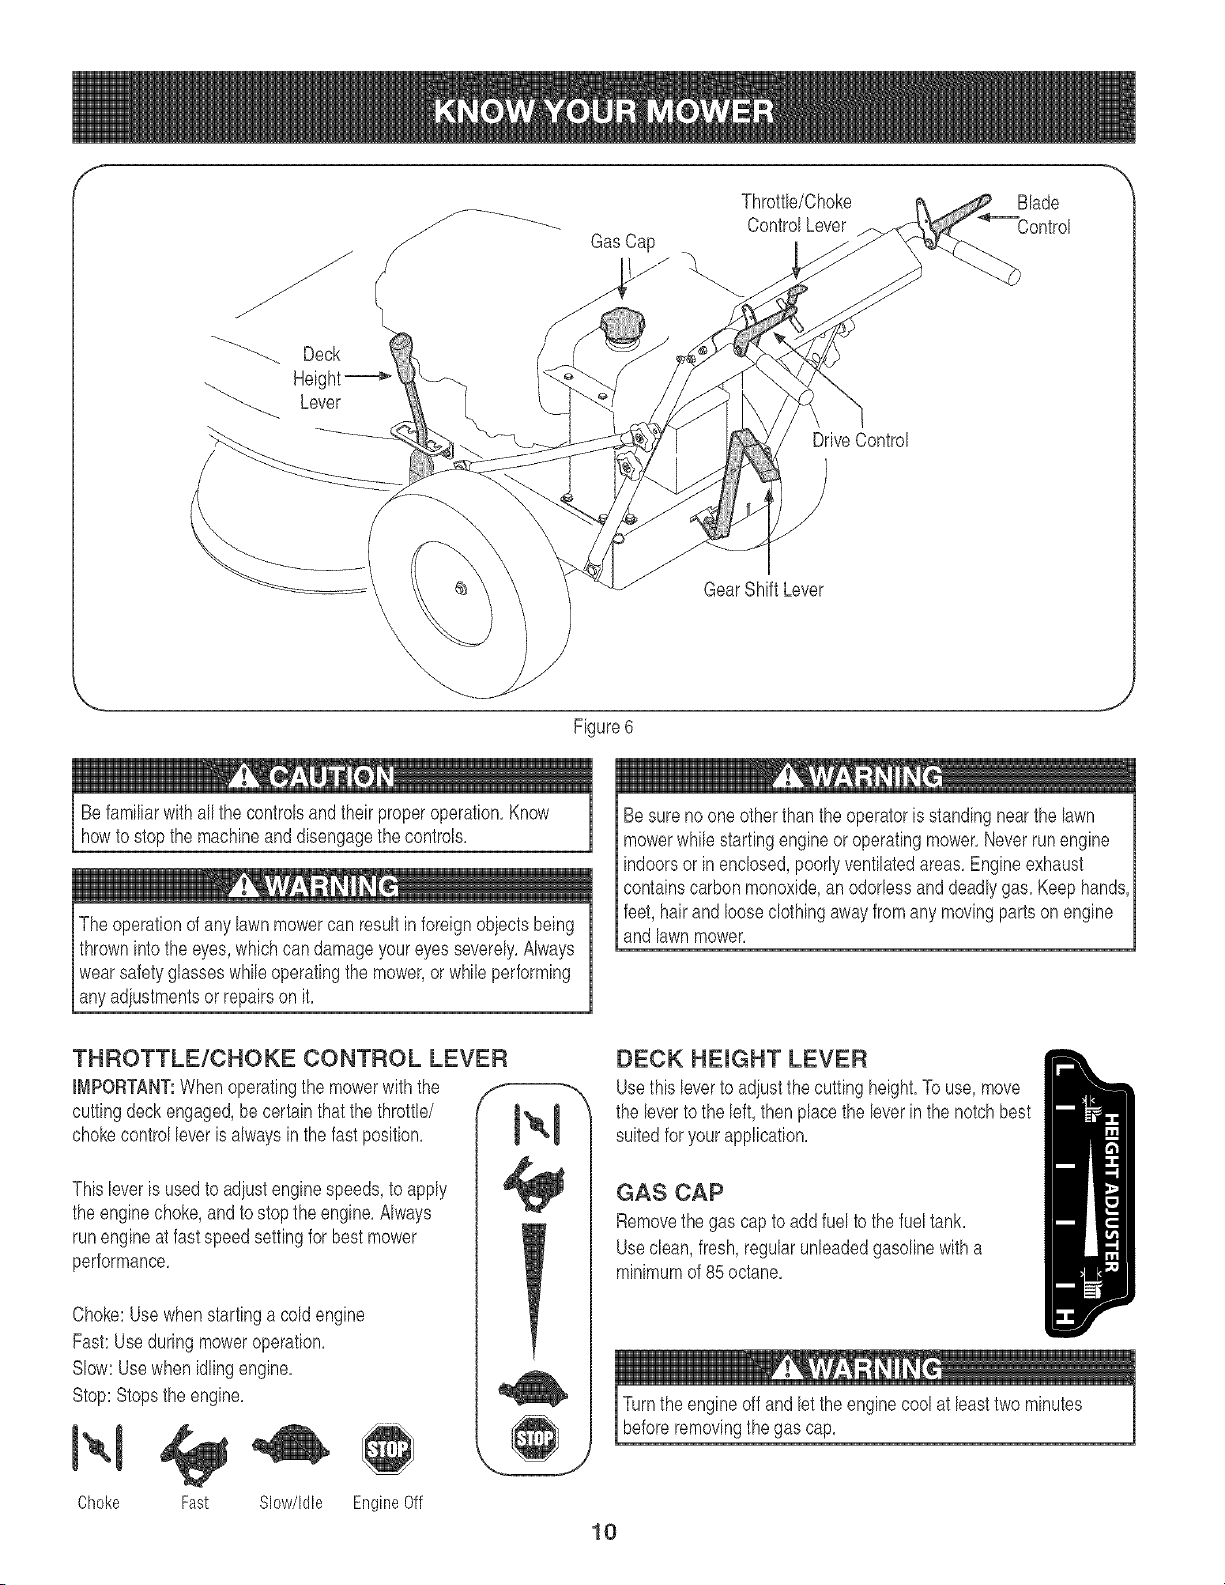
mNSTALLmNG THE GEAR SHIFT LEVER
1, Removethe 5/16=18screwand the locknutthat holdthe shift
leverto theshift leverplate, Figure4,
2, Removethe remainingscrewandnutfrom the lowershift lever
plate,Figure4,
3, Positionthe uppershift leverintoa verticalpositionaligningthe
holesin the leverto the holes inthe shift plate,Figure5,
4, Securethe leverto the plateusingthe twoscrewsandtwo nuts
removedearlier,Figure5,
FINAL ADJUSTMENTS
Rear Tire Pressure
Neverexceedthe maximuminflationpressureshown on the sidewall
of tire,
The recommendedoperatingreartire pressureis approximately20
psi forthe reartires,Checkthe tire pressureperiodicallyandmaintain
equalpressurein bothrear tires at alltimes,
IMPORTANT:Referto the tire sidewallfor exacttire manufacturer's
recommendedor maximumpsi, Do not overinfiate,Uneventire pres=
surecouldcausethecuttingdeckto mowunevenly,
f
Figure4
_f ""X
/ /
// //
,.. j
Figure5
9
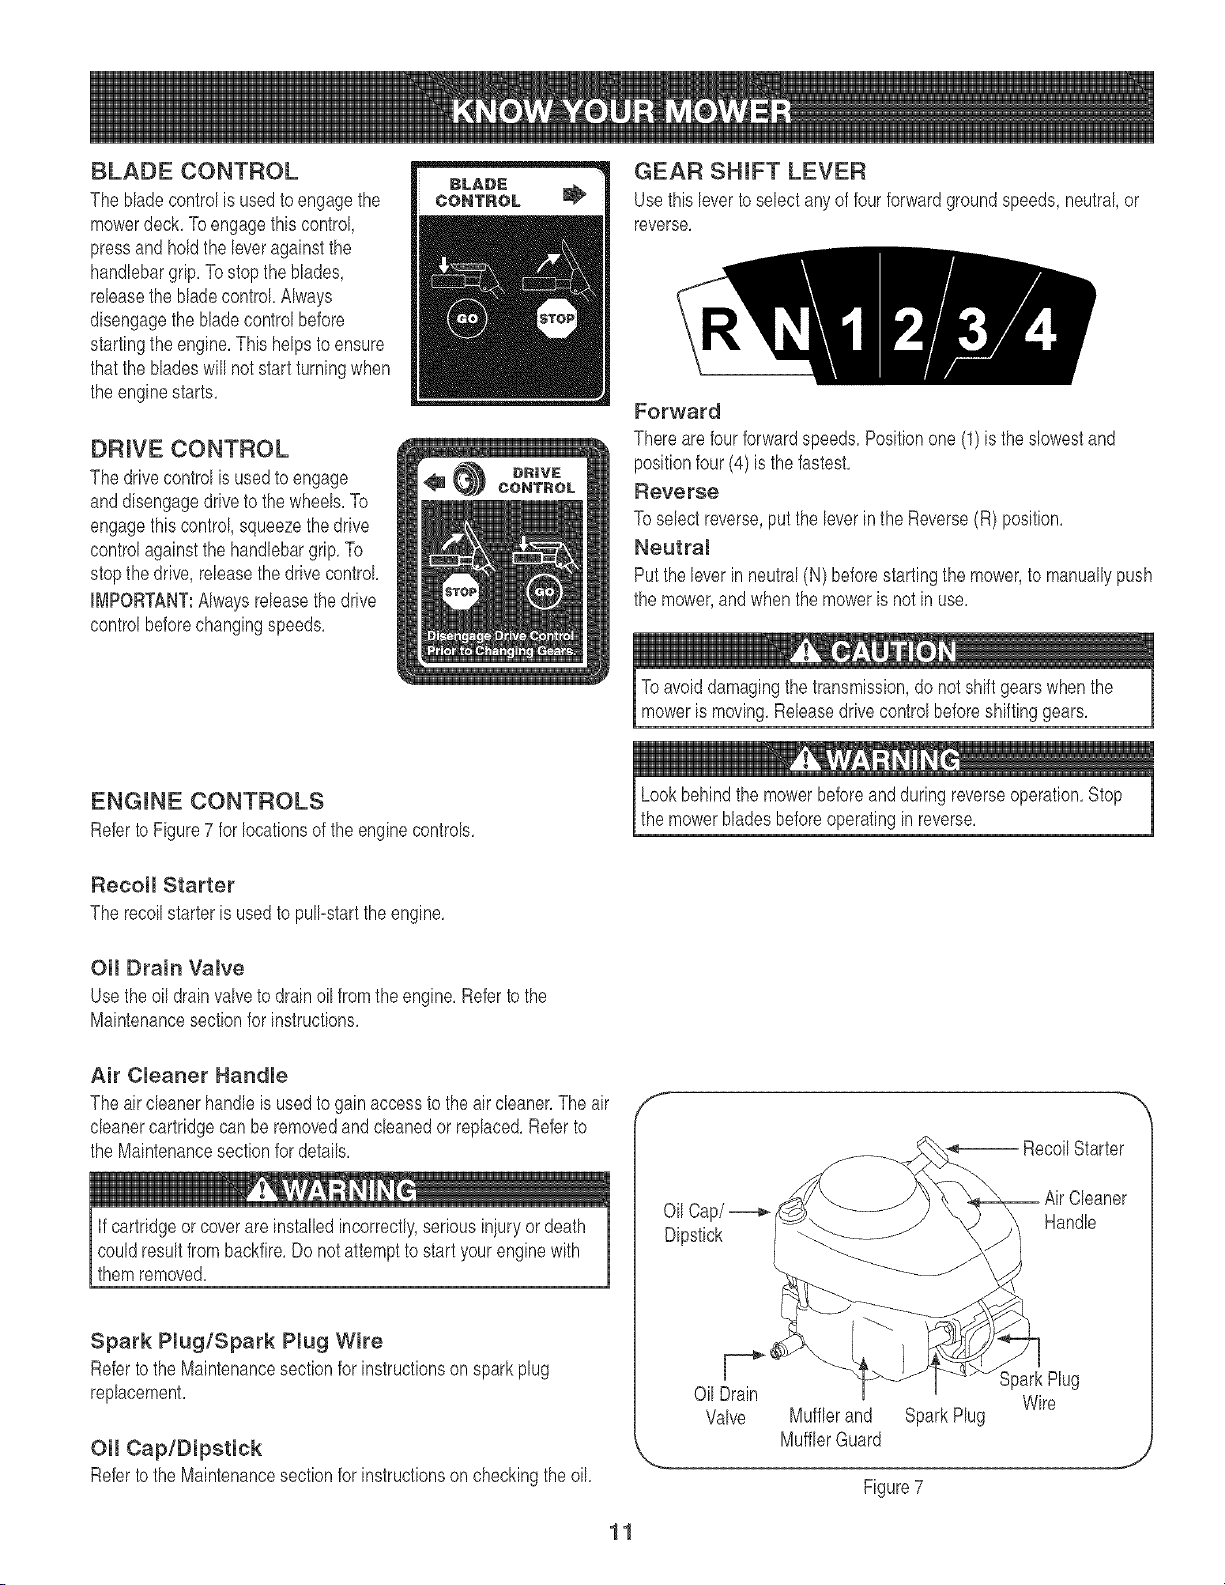
GasCap
Throttb/Choke
ControlLever
DriveControl
Blade
Control
/-
J
GearShiftLever
Figure6
Befamiliarwithall the controlsand theirproperoperation,Know
howto stopthe machineanddisengagethe controls,
The operationof any lawnmowercan result in foreignobiectsbeing
thrownintothe eyes,which candamageyoureyesseverely,Always
wearsafety glasseswhileoperatingthe mower,orwhileperforming
any adiustmentsor repairson it,
Be sureno one otherthan the operatoris standingnearthe lawn
mowerwhilestartingengineoroperatingmower,Neverrun engine
indoorsor in enclosed,poorlyventilatedareas,Engineexhaust
containscarbonmonoxide,an odorlessand deadlygas,Keephands,
feet, hairand looseclothing awayfromany movingpartson engine
and lawnmower,
THROTTLE/CHOKE CONTROL LEVER
IMPORTANT:When operatingthe mowerwith the
cuttingdeck engaged,becertainthatthe throttle/
chokecontrolleveris alwaysin the fast position,
Thisleveris usedto adiustenginespeeds,to apply
the enginechoke,andto stopthe engine,Always
runengineat fast speedsettingfor best mower
performance,
Choke:Usewhenstartinga coldengine
Fast:Useduringmoweroperation,
Slow:Usewhen idlingengine,
Stop:Stopsthe engine,
Choke Fast Slow/Idle Engine Off
DECK HEIGHT LEVER
Usethis leverto adiustthecutting height,To use, move
the leverto the left, thenplacethe leverin the notchbest
suitedforyour application,
GAS CAP
Removethe gas capto addfuel to the fueltank,
Useclean,fresh,regularunleadedgasolinewitha
minimumof 85 octane,
Turnthe engineoff andlet the enginecoolat bast two minutes
beforeremovingthe gas cap,
10
BLADE CONTROL
The bladecontrolis usedto engagethe
mowerdeck,Toengagethiscontrol,
pressand holdthe leveragainstthe
handlebargrip,Tostopthe blades,
releasethe bladecontrol,Always
disengagethe blade controlbefore
startingthe engine,This helpsto ensure
thatthe bladeswill not start turningwhen
the enginestarts,
DRIVE CONTROL
The drivecontrolis usedto engage
anddisengagedriveto thewheels,To
engagethiscontrol,squeezethedrive
controlagainstthe handlebargrip,To
stopthedrive, releasethe drivecontrol
IMPORTANT:Alwaysreleasethe drive
controlbeforechangingspeeds,
GEAR SHIFT LEVER
Usethis leverto select anyof fourforwardgroundspeeds,neutral,or
reverse,
Forward
Thereare four forwardspeeds,Positionone (1)is the slowestand
positionfour (4) is thefastest,
Reverse
To selectreverse,put the leverin the Reverse(R) position,
Neutral
Putthe leverin neutral(N) beforestartingthe mower,to manuallypush
the mower,and whenthe moweris not in use,
Toavoiddamagingthe transmission,donot shiftgears whenthe
moweris moving,Releasedrivecontrolbeforeshiftinggears,
ENGmNE CONTROLS
Referto Figure7 for locationsof the enginecontrols,
Recoil Starter
The recoilstarter is usedto pull=startthe engine,
Oil Drain Vamve
Usethe oil drain valveto drainoilfromthe engine,Refer to the
Maintenancesectionfor instructions,
Air Cleaner Handme
The air cleanerhandle is usedto gainaccessto the aircleaner,The air
cleanercartridgecan be removedand cleanedor replaced,Referto
the Maintenancesectionfor details,
Ifcartridgeor coverareinstalledincorrectly,seriousiniuryor death
could resultfrom backfire,Donot attemptto start yourenginewith
themremoved,
Spark Plug/Spark Plug Wire
Referto the Maintenancesectionfor instructionson sparkplug
replacement,
Oil Cap/Dipstick
Referto the Maintenancesectionfor instructionson checkingthe oil,
11
Lookbehindthe mowerbeforeandduringreverseoperation,Stop
the mowerbladesbeforeoperatingin reverse,
RecoilStarter
Oil Cap/_ Handle
Dipstick
Oil Drain
Valve Mufflerand SparkPlug
MufflerGuard
SparkPlug
Wire
Figure7
J
The operationof any lawnmowercan result in foreignobiectsbeing
thrownintothe eyes,which candamageyoureyesseverely,Always
wearsafety glasseswhileoperatingthe mower,orwhileperforming
any adiustmentsor repairson it,
Useextremecarewhenhandlinggasoline,Gasolineis extremely
flammableandthe vaporsare explosive,Neverfuel machineindoors
orwhilethe engineis hotor running,Extinguishcigarettes,cigars,
pipes,andothersourcesof ignition,
GAS AND OIL FILL°UP
Gas Fill
acidsduringstorage,Acidic gas candamagethefuel systemof an
enginewhilein storage,
To avoidengine problems,the fuel systemshouldbeemptiedbefore
storagefor 30 daysor longer,Drainthe gastank, startthe engine
andbt it rununtil thefuel linesandcarburetorareempty,Use
freshfuel next season,See STORAGEInstructionsfor additional
information,
ge mayoccur,
IMPORTANT:The moweris shippedwithoutgas in thefuel tank,
• Neverfill the fueltank completely,Fill the tank to nomorethan
1/2=inchbelowbottomof fillerneckto providespace forfuel
expansion,
• Alwaysuseclean, fresh,unbadedgradeautomotivegasoline,
Fill thefuel tank outdoorsand usea funnelor spout to prevent
spilling,Makesurethat the containerfrom which you pourthe
gasolineis cleanand free fromrustorotherforeignparticles,
Makesureto wipe off any spilledfuelbeforestartingtheengine,
• At the endof thejob, emptythe fueltank if the moweris not
goingto beusedfor 30 daysor longer,Storegasolineina cban
containerand keepthe cap in placeon the container,See STOR=
AGEinstructionsforadditionalinformation,
Besureno one otherthanthe operatoris standingnearthe lawn I
mowerwhile startingengineor operatingmower,Neverrunengine l
indoorsor in enclosed,poorlyventilatedareas,Engineexhaust
containscarbonmonoxide,anodorbss anddeadlygas, Keephands,I
feet,hair,andlooseclothingawayfrom anymovingparts
Oil Fill
IMPORTANT:The moweris shippedwith motoroil in the engine;
however,you MUSTcheckthe oil levelbeforeoperating,Oil shouldbe
changedonce afterthefirst twohoursof operationandevery25hours
of operationthereafter,Use thegradeof engineoil specifiedinthe
Maintenancesection,
1, Removethe oilfill cap/dipstickfromthe oil fill tube,
2, Checkthatthe levelof oil is upto the FULLmarkon the dipstick,
Ifneeded,pouroil slowlyintothe oilfill tubeuntila FULLoil level
is achieved,
3, Replacethe oilfill cap/dipstick,
STARTmNG THE MOWER
1, Rebase all controlsonthe mowerto preventwheelsor blades
fromrotating,
2, Movegear shift leverto neutral(N) position,
3, Movethe throttb/chokecontrolleverfully upwardtochoke setting
I_1 to starta cold engineorto fast(rabbit)setting_11 to starta
warmengine,
4, Tostart engine usingrecoilstarter:
a, Standon bft side (asviewedfrom behind handbbars)of ma-
chine,Besureyour feetaresafelyawayfrom the underside
of the mowerdeckandall mowercontrolsare released,
b, Graspstarterrope handb and pull slowlyuntil ropepulls
slightlyharder,Let roperewindslowly,Then pullropewitha
rapid,full arm stroke,Letropereturnslowly,If engine failsto
start after threepulls,repeatinstructions(try settingthrottle
at fast setting),
c, Whenenginestarts,operateinfast throttlesetting_1_
(movethrottle/chokecontrol bver fromchokesettingto fast
setting),
Lookbehindthe mowerbeforeandduringreverseoperation,Stop
the mowerbladesbeforeoperatingin reverse,
Ifyou strikea foreignobiect,stop the engine,Removewirefromthe
sparkplug,thoroughlyinspectmowerforany damage,and repair
damagebeforerestartingand operating,Extensivevibrationof
mowerduringoperationis anindicationof damage,The unitshould
bepromptlyinspectedand repaired,
12
Lookbehindthe mowerbeforeand during reverseoperation.Stop
the mowerbladesbeforeoperatingin reverse.
USmNG THE MOWER
IMPORTANT:Alwaysreleasethe drivecontrolbeforechanging
speeds.Referto "Knowyour Mower"sectionfor mowercontroldetails.
Besure lawnis char of stones,sticks,wire,orother obiectswhich
coulddamagelawnmowerorengine.Suchobiectscouldbeaccidently
thrownby the mowerin anydirectionand causeseriouspersonaliniury
to the operatorand others.Forbest results,do notcutwetgrassand
nevercut off morethanone=thirdof the total bngth of the grass.
1. Oncethe engineis running,slowlysqueezethe drivecontrol
againstthe upperhandleto propelthe unit.To activatethe cutting
blades,squeezethe bladecontrolagainstthe upperhandle.
2. Tochangegears,releasethe drivecontrol bver and movethe
gearshiftleverto the desiredsetting.Whenfirst practicingwith
the mower,put the leverin No.1 position.Sebct forwardspeeds
accordingto mowingconditionsand terrain.Useslowerspeeds
on roughterrainor whengrassis heavyor thick.The forward
speedcanbe increasedon smoothterrainor if the grasscoveris
light.Mow thewheelsto stopcompbtely beforeshiftingfromone
speedintoanother.
iMPORTANT:Beawarethat whenengagingthe drivecontrolleverwith
the gearshift bver in 3rdor 4thgear,the powerand torquegenerated
maycausethe unitto lurchforward.To avoidthis,slowlysqueezethe
drivecontrolleveragainstthe upperhandb.
3. Tostopthe blades,rebase the bladecontrol.To stopthe drive
controlto the wheels,releasethedrive control.
STOPPING THE MOWER
1. Releasebladeand drivecontrolto stop wheelsand deck blades.
2. Movethrottle/chokecontrolleverdownto slow(turtb)
position.Wheneverpossible,graduallyreduceenginespeed
beforestoppingengine.
3. Movethrottle/chokecontrolbver all the waydownto stop
position.
4. Disconnectspark plug wirefromsparkplugandgroundagainst
the engine.
MOVmNG THE MOWER WITHOUT
ENGmNE POWER
The mowercan be manuallypushedor pulledby placingthe gearshift
leverintoN (neutral)positionandpressingthedrivecontrolagainstthe
handlebargrip.
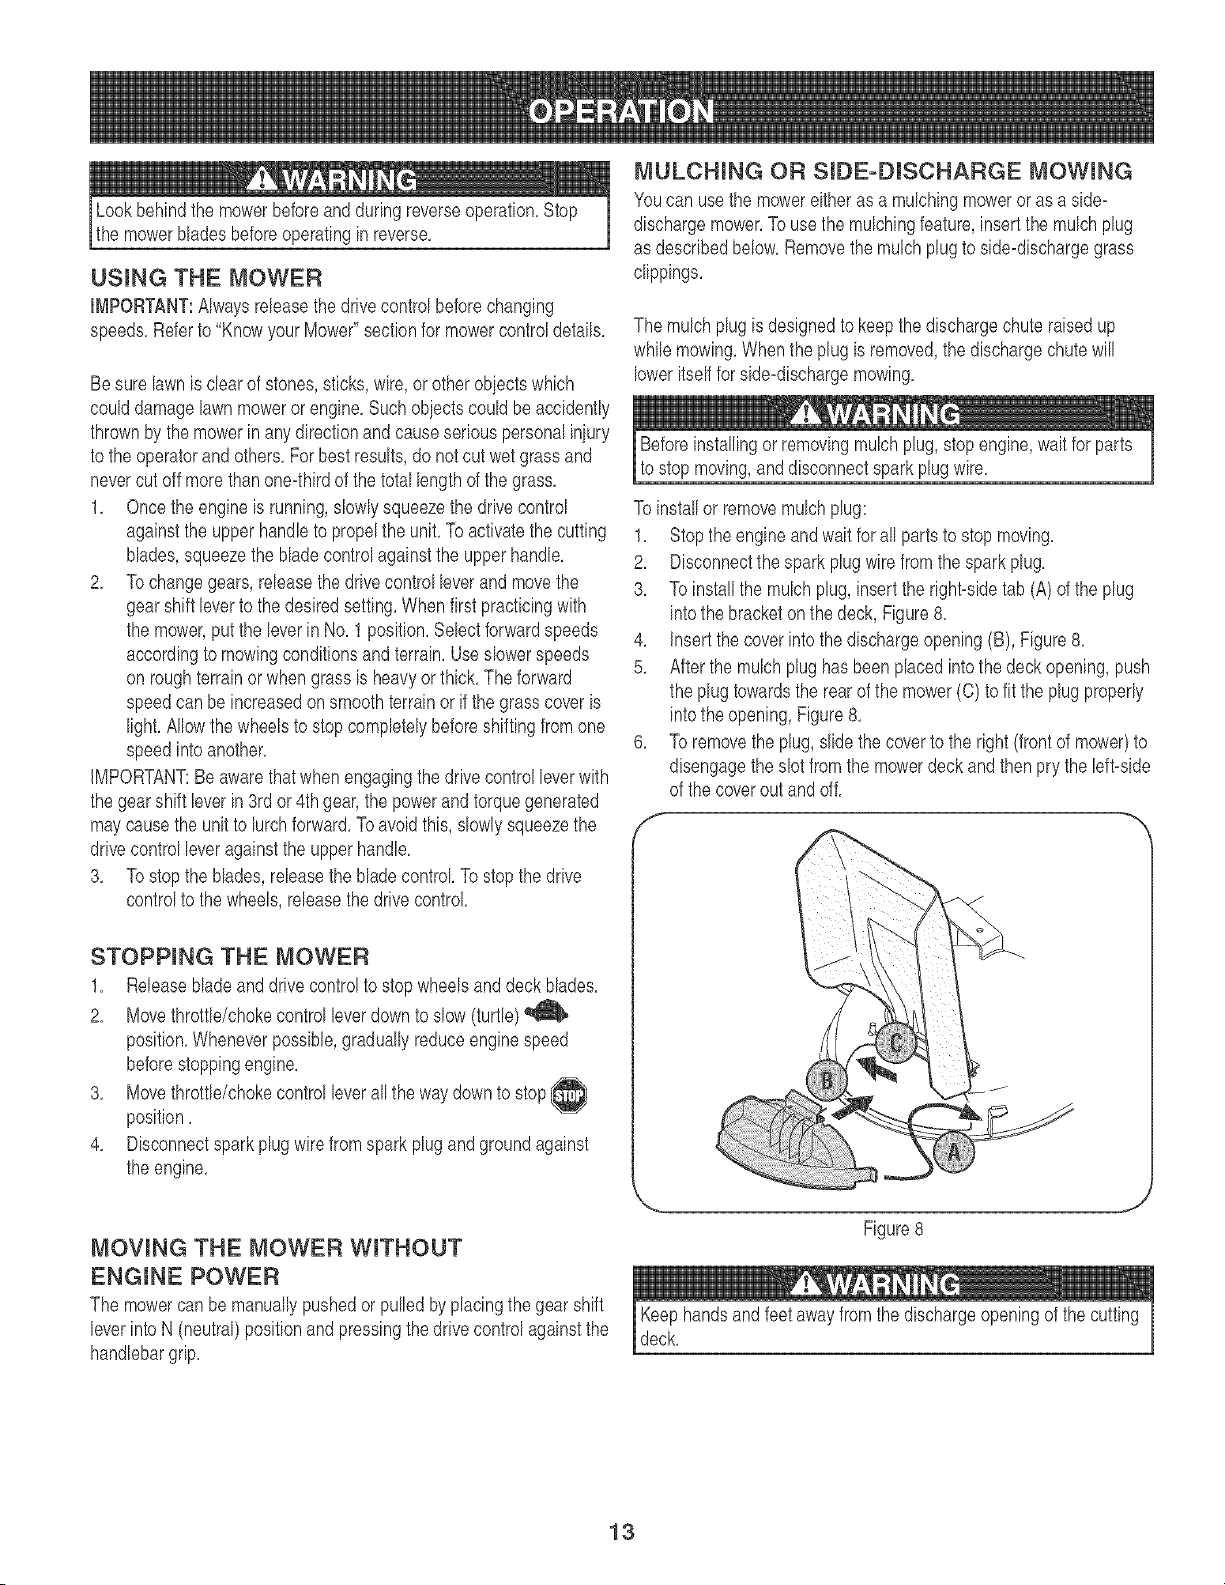
MULCHING OR SmDE-DISCHARGE MOWmNG
Youcan usethe mowereitheras a mulchingmoweror as a side=
dischargemower.To usethe mulchingfeature,insert the mulchplug
as describedbelow.Removethe mulchplugto side=dischargegrass
clippings.
The mulchplug is designedto keepthe dischargechuteraisedup
while mowing.Whenthe plug is removed,thedischargechutewill
loweritselffor side=dischargemowing.
Beforeinstallingor removingmulchplug,stopengine,waitfor parts
to stopmoving,anddisconnectsparkplug wire.
To installor removemulch plug:
1. Stopthe engine andwait for all partsto stop moving.
2. Disconnectthespark plugwirefrom the sparkplug.
3. To installthe mulch plug,insertthe right=sidetab (A) of the plug
into the bracketon the deck, Figure8.
4. Insertthe cover intothe dischargeopening(B), Figure8.
5. After the mulchplughas been placedintothedeckopening,push
the plug towardsthe rearof the mower(C) to fit the plug properly
into the opening,Figure8.
6. To removethe plug,slidethe coverto the right(frontof mower)to
disengagethe slotfromthe mowerdeck and then prythe left=side
of the coverout and off.
f
Figure8
Keephandsand feetawayfromthedischargeopeningof thecutting
deck.
13
Alwaysstop engine,disconnectspark plug,and ground against
enginebeforeperforminganytypeof maintenanceon the mower,
GENERAL RECOMMENDATmONS
Alwaysobservesafetyruleswhen performingany typeof
maintenanceon the mower,
• Thewarrantyon this lawnmowerdoesnot coveritemsthat have
beensubiectedto operatorabuseor negligence,To receivefull
valuefrom warranty,operatormust maintainthe lawnmoweras
instructedin thismanual
• Changingof engine-governedspeedwill voidenginewarranty,
• Alladiustmentsshouldbe checkedat leastonceeach season,
, Periodicallycheckall fastenersand makesurethey are tight,
2,
3,
f Electrode
ENGmNE MAINTENANCE
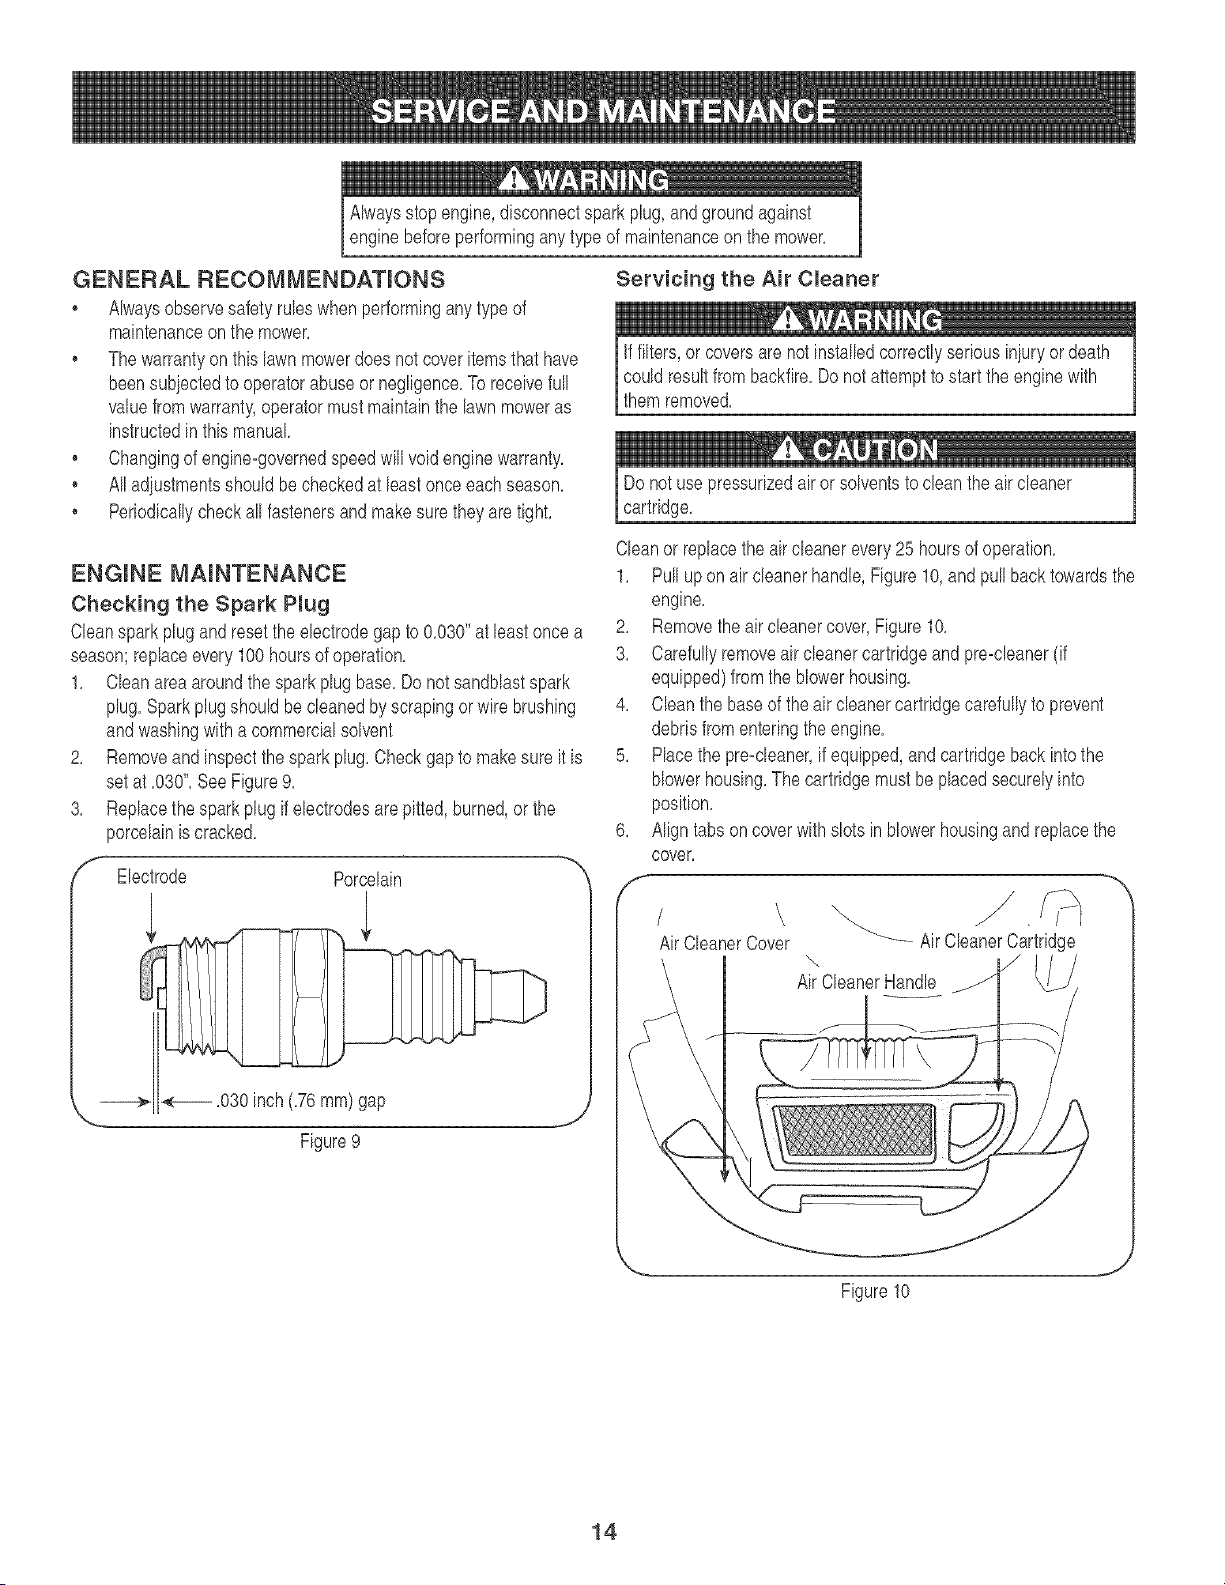
Checking the Spark Plug
Cleansparkplug and reset the electrodegap to 0,030"at least oncea
season;replaceevery 100hoursof operation,
1, Cleanareaaroundthe spark plug base,Do notsandblastspark
plug,Sparkplugshouldbe cleanedby scrapingorwire brushing
andwashingwith a commercialsolvent
Removeand inspectthe sparkplug,Checkgapto makesure it is
setat ,030",SeeFigure9,
Replacethe spark plug if electrodesare pitted,burned,or the
porcelainis cracked,
Porcelain
Servicing the Air Cleaner
If filters,or coversare notinstalledcorrectlyseriousiniuryor death
could resultfrom backfire,Do not attemptto startthe enginewith
themremoved,
Do not usepressurizedair or solventsto cleanthe aircleaner
cartridge,
Cleanor replacethe aircleanerevery25 hoursof operation,
1, Pull up on air cleanerhandle,Figure10,and pull backtowardsthe
engine,
2, Removethe aircleanercover,Figure10,
3, Carefullyremoveair cleanercartridgeand pre-cleaner(if
equipped)fromthe blowerhousing,
4, Cleanthe baseof the aircleanercartridgecarefullyto prevent
debrisfrom enteringthe engine,
5, Placethe pre-cleaner,if equipped,and cartridgeback intothe
blowerhousing,The carNdgemustbe placedsecurelyinto
position,
6, Align tabs on cover with slotsin blowerhousingand replacethe
cover,
f-
AirCleanerCover
_-Air Cleaner Cartridge
\
AirCleanerHandle
Figure10
J
14
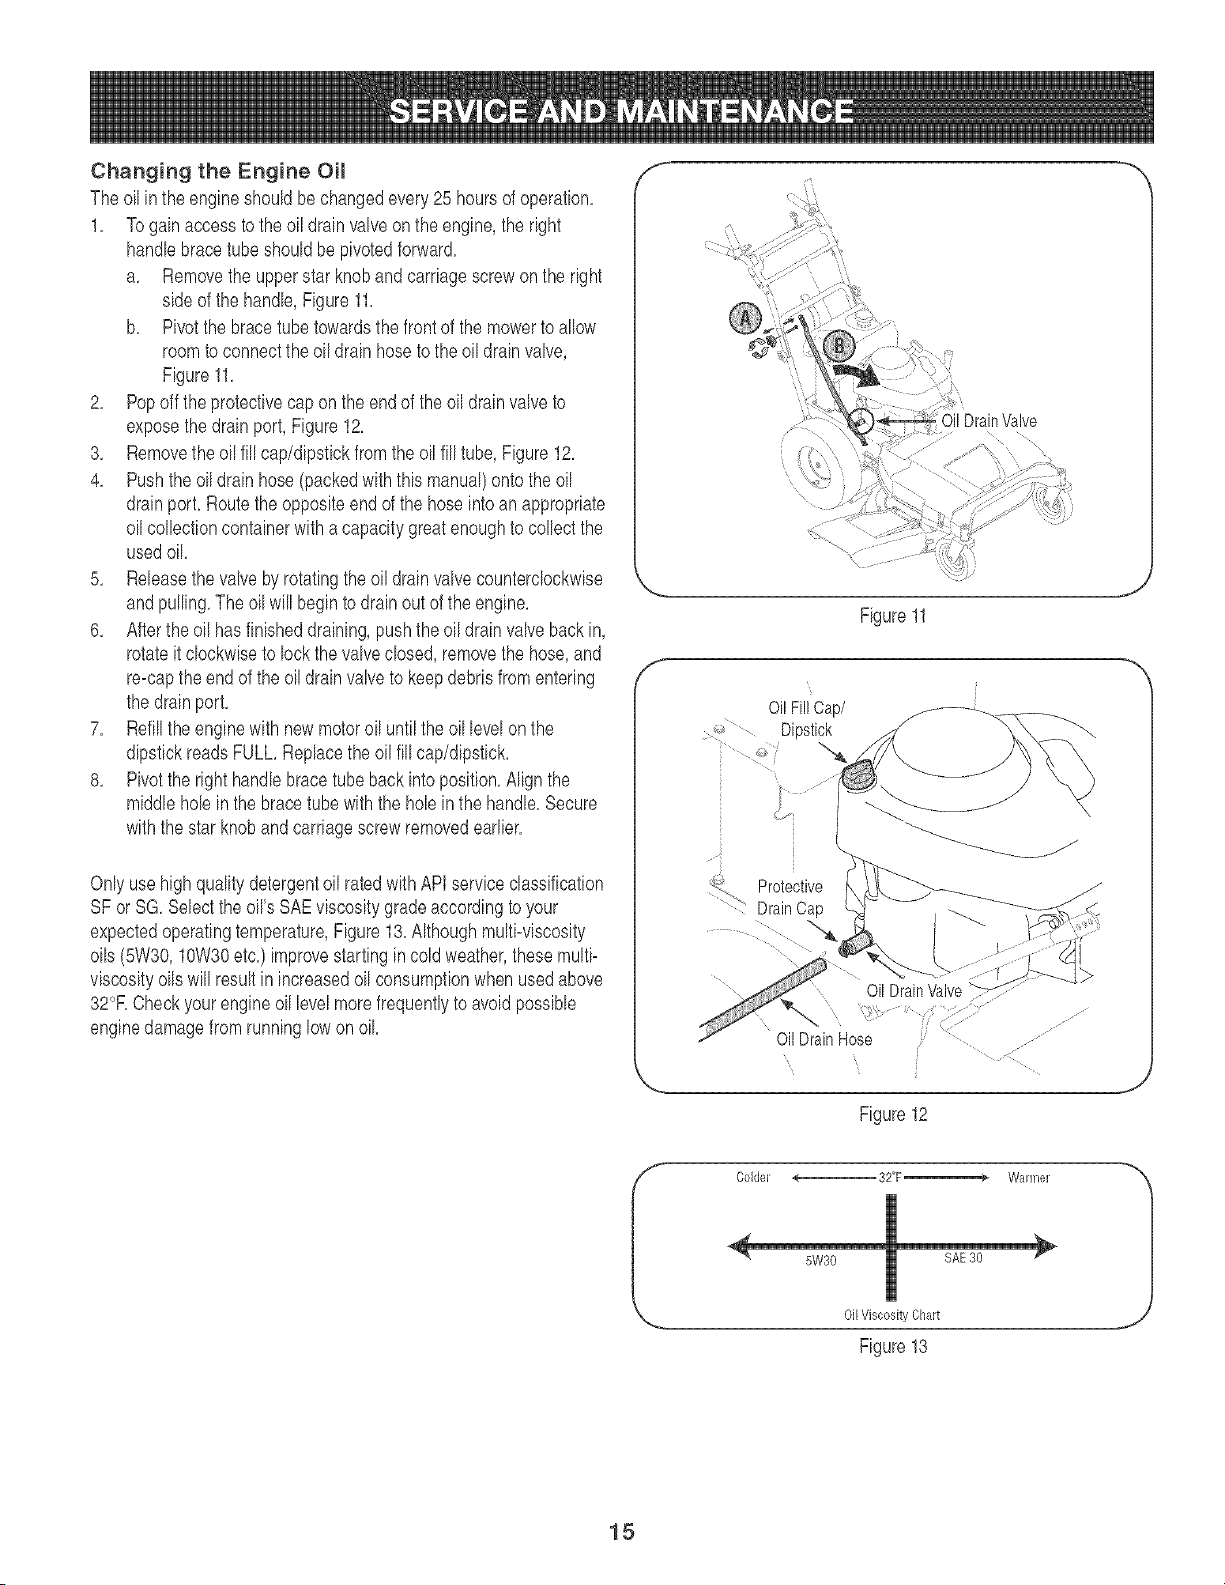
Changing the Engine Oim
The oil in the engineshouldbe changedevery25 hoursof operation,
1, Togainaccessto the oil drainvalveonthe engine,the right
handlebracetubeshouldbe pivotedforward,
a, Removethe upperstarknoband carriagescrewon the right
sideof the handle,Figure11,
b, Pivotthe bracetubetowardsthe frontof the mowerto allow
roomto connectthe oil drainhoseto theoil drain valve,
Figure11,
2, Pop off the protectivecap onthe end of the oil drainvalve to
exposethedrain port, Figure12,
3, Removethe oil fill cap/dipstickfromthe oil fill tube, Figure12,
4, Pushthe oil drain hose(packedwiththismanual)onto theoil
drainport,Routethe oppositeendof the hose intoanappropriate
oilcollectioncontainerwith a capacitygreatenoughto collectthe
usedoil,
5, Releasethe valvebyrotatingthe oil drainvalvecounterclockwise
andpulling,The oilwill begin to drainoutof the engine,
6, Afterthe oil hasfinisheddraining,pushthe oil drainvalvebackin,
rotateit clockwiseto lockthe valveclosed,removethe hose,and
re-capthe endof the oildrainvalveto keepdebrisfromentering
the drainport,
7, Refillthe enginewith newmotoroil untilthe oil levelonthe
dipstickreadsFULL,Replacethe oil fill cap/dipstick,
8, Pivotthe right handlebracetubeback into position,Alignthe
middlehole in the bracetubewiththe holein the handle,Secure
withthe star knobandcarriagescrewremovedearlier,
Onlyuse highqualitydetergentoil ratedwithAPIserviceclassification
SF or SG, Selectthe oil'sSAEviscositygradeaccordingtoyour
expectedoperatingtemperature,Figure13,Althoughmulti-viscosity
oils (5W30,10W30etc,) improvestartingin coldweather,thesemulti-
viscosityoilswill resultin increasedoilconsumptionwhenusedabove
32°RCheckyourengineoil levelmorefrequentlyto avoid possible
enginedamagefrom runninglowon oil
f
f
DrainValve
"\\
Figure11
Protective
DrainCaD
OilDrainHose
J
Figure12
J
J
f
Colder _ 2°F Warmer
SAE30
Oil Viscosit, Chart
Figure 13
1
15
Beforeperforminganytypeof maintenanceonthe machine,waitfor
all partsto stop movingand disconnectthe sparkplugwire,Failure
to follow this instructioncould resultin personaliniuryor property
damage,
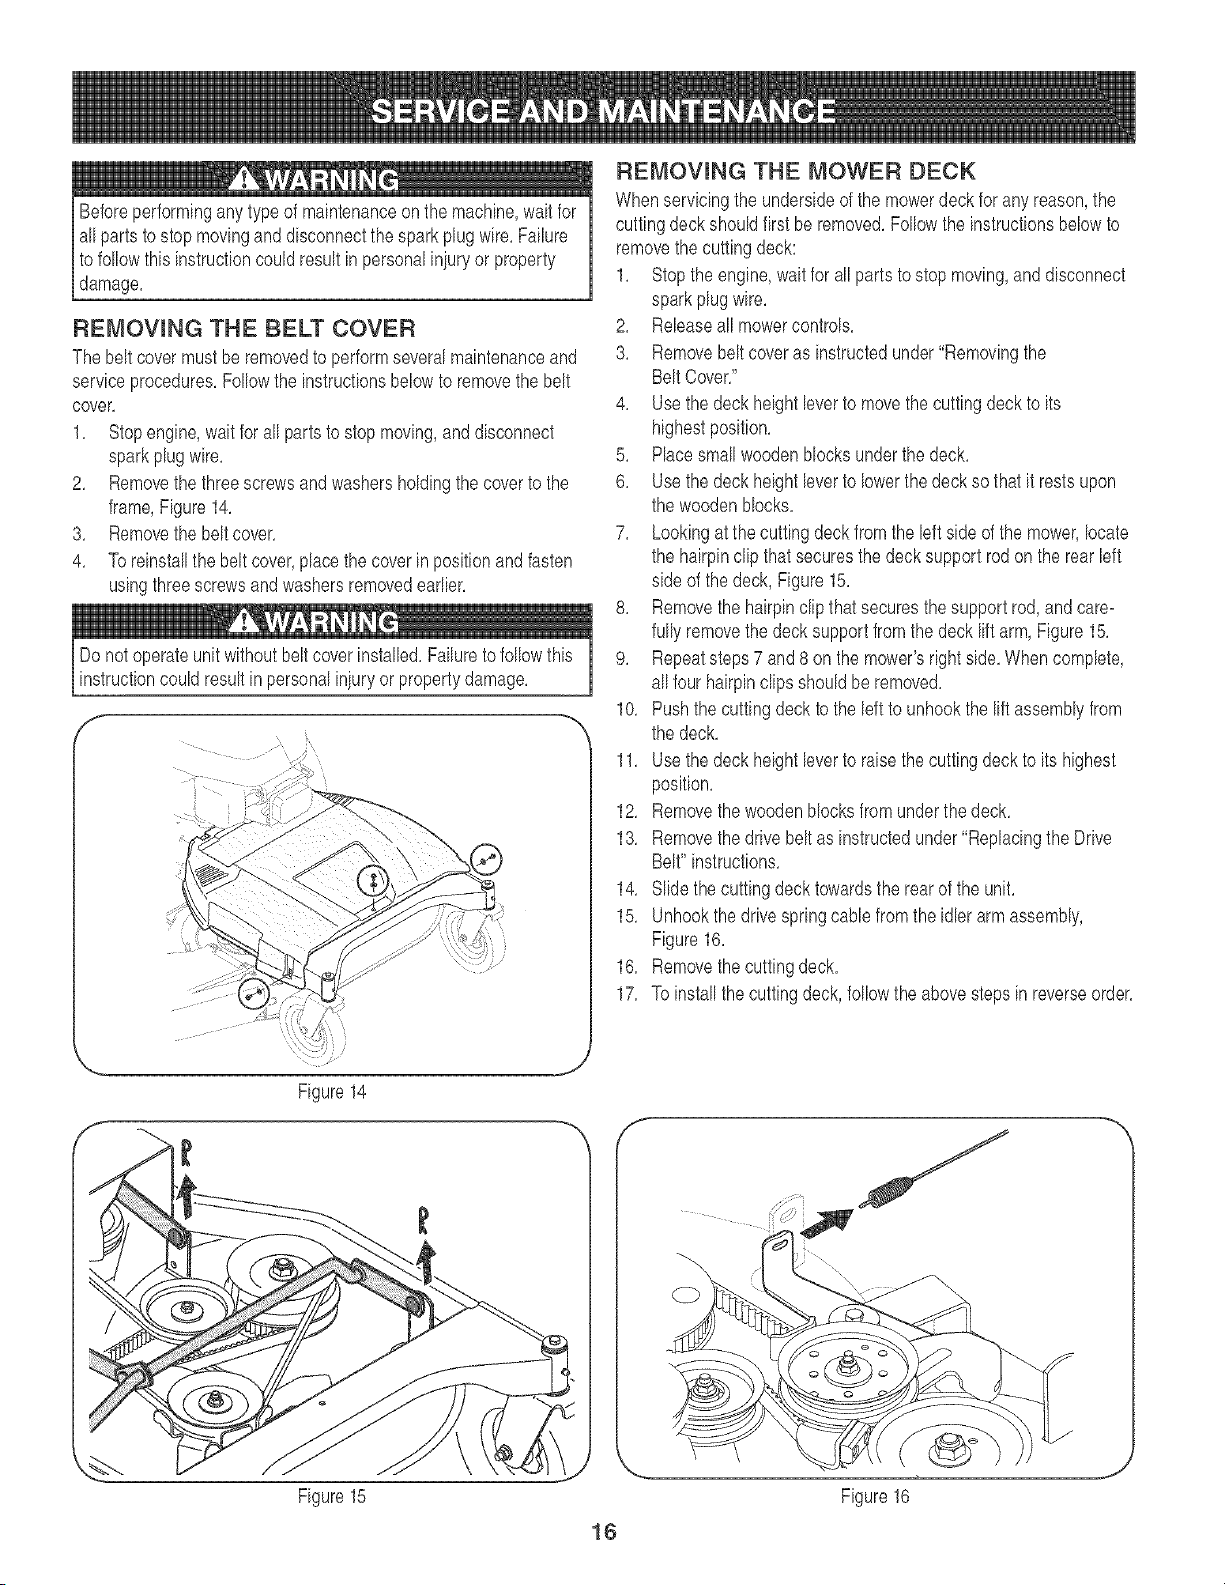
REMOVING THE BELT COVER
Thebelt covermustbe removedto performseveralmaintenanceand
serviceprocedures,Followthe instructionsbelowto removethe belt
cover,
1, Stopengine,wait for all partsto stopmoving,and disconnect
sparkplugwire,
2, Removethe threescrewsand washersholdingthe coverto the
frame,Figure14,
3, Removethe belt cover,
4, Toreinstallthe beltcover,placethe coverinpositionandfasten
usingthreescrewsandwashersremovedearlier,
Donot operateunit withoutbeltcoverinstalled,Failuretofollowthis
instructioncouldresultin personaliniuryor propertydamage,
I
i
/
Figure14
REMOVING THE MOWER DECK
Whenservicingthe undersideof the mowerdeck forany reason,the
cuttingdeck shouldfirst be removed,Followthe instructionsbelowto
removethe cuttingdeck:
1, Stoptheengine,waitfor allpartsto stop moving,and disconnect
sparkplugwire,
2, Releaseall mowercontrols,
3, Removebelt coveras instructedunder"'Removingthe
BeltCover,"
4, Usethe deckheightleverto movethe cuttingdeckto its
highestposition,
5, Placesmall woodenblocksunderthe deck,
6, Usethe deckheightleverto lowerthe deckso that it restsupon
the woodenblocks,
7, Lookingat thecuttingdeckfromthe left side of the mower,locate
the hairpinclip thatsecuresthe decksupportrodon the rear left
side of the deck,Figure15,
8, Removethe hairpinclip that securesthe supportrod, and care-
fully removethe deck supportfrom thedeck liftarm,Figure15,
9, Repeatsteps7 and8 onthe mower'srightside,When complete,
all four hairpinclips shouldbe removed,
10, Pushthe cuttingdeck to the left to unhookthe lift assemblyfrom
the deck,
11, Usethe deckheightleverto raisethe cuttingdeckto its highest
position,
12, Removethe woodenblocksfrom underthe deck,
13, Removethe drivebelt as instructedunder"Replacingthe Drive
Belt"instructions,
14, Slidethe cuttingdeck towardsthe rearof the unit,
15, Unhookthe drivespringcane fromthe idler armassembly,
Figure16,
16, Removethe cuttingdeck,
17, To installthe cuttingdeck,followthe abovestepsin reverseorder,
Figure15
16
Figure16
Beforeperforminganytypeofmaintenanceonthemachine,waitfor
allpartstostopmovinganddisconnectthesparkplugwire,Failure
tofollowthisinstructioncouldresultinpersonaliniuryorproperty
damage,
LUBRICATmON
Pivot Points & Linkage
Lubricateall thephzotpointsonthe drivesystemand lift linkageat
bast oncea season,or 25 hoursof operation,with lightoil,
Rear Wheels
The rearwheelsshouldbe removedfromthe axles oncea season,
Lubricatethe axlesandthe rims wellwithanall=purposegreasebefore
reinstallingthem,
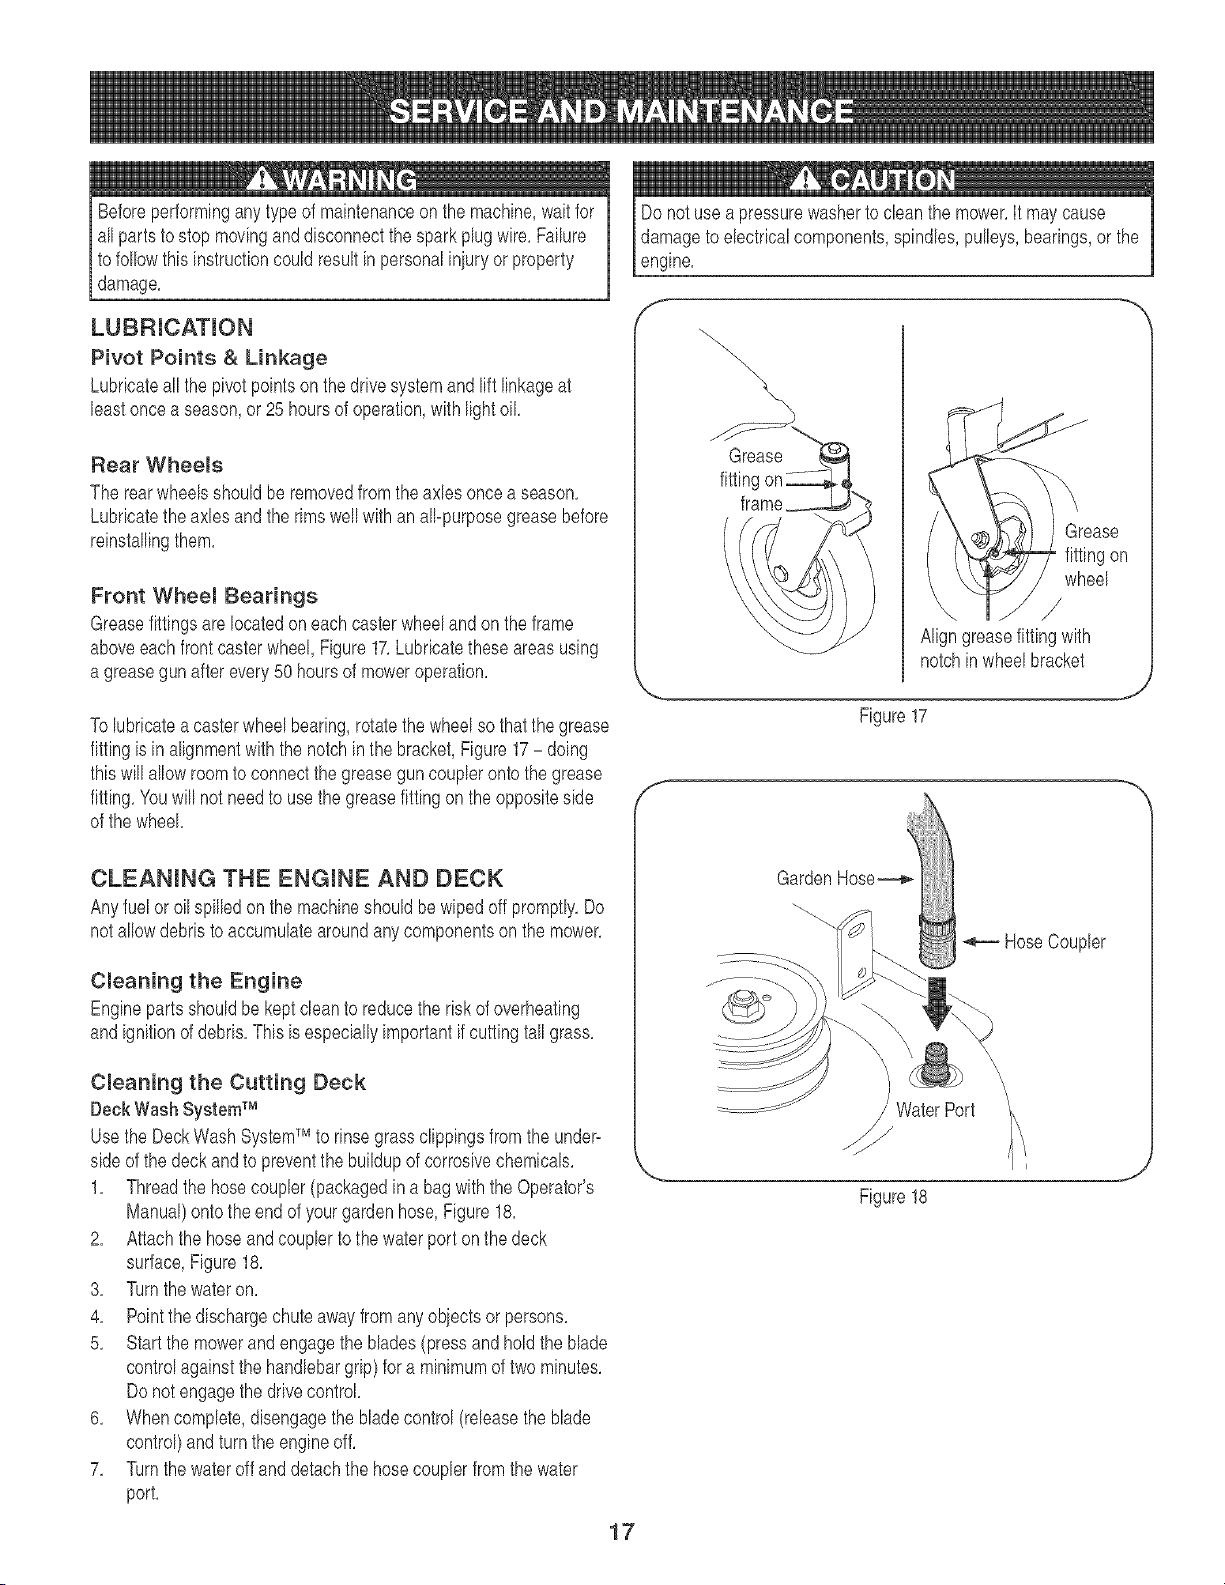
Front Wheel Bearings
Greasefittings are locatedon eachcasterwheelandonthe frame
aboveeach frontcasterwheel, Figure17,Lubricatetheseareasusing
a greasegun after every 50 hoursof moweroperation,
To lubricatea casterwheelbearing,rotate thewheelso thatthe grease
fittingis in alignmentwith the notchinthe bracket,Figure17- doing
thiswill allowroomto connectthe greaseguncoupbr onto thegrease
fitting,Youwill not needto usethe greasefittingon theoppositeside
of the wheel,
CLEANmNG THE ENGmNE AND DECK
Anyfuel oroil spilledon the machineshouldbewipedoff promptly,Do
not allowdebristo accumulatearoundanycomponentsonthe mower,
Cmeaning the Engine
Enginepartsshouldbe kept cleanto reducethe riskof overheating
andignitionof debris,Thisis especiallyimportantif cuttingtall grass,
Cleaning the Cutting Deck
Deck Wash SystemTM
Usethe DeckWash SystemTM to rinsegrassclippingsfrom the under-
sideof thedeckandto preventthe buildupof corrosivechemicab,
1, Threadthe hosecoupbr (packagedina bagwiththe Operator's
Manual)ontothe end of your gardenhose,Figure18,
2, Attachthe hoseandcoupbr to the waterport onthe deck
surface,Figure18,
3, Turnthe wateron,
4, Pointthedischargechuteaway fromanyobiectsor persons,
5, Start the mowerandengagethe blades(pressand hold the blade
controlagainstthe handlebargrip) for a minimumof two minutes,
Do notengagethe drivecontrol,
6, Whencomplete,disengagethe bladecontrol(releasethe blade
control)andturnthe engineoff,
7, Turnthe wateroff anddetachthe hosecoupbr fromthe water
port,
17
Do not usea pressurewasherto cban the mower,it maycause
damageto ebctrbal components,spindles,pulleys,bearings,or the
engine,
\
\
\
Grease
fittingon
wheel
/
Figure17
Aligngreasefittingwith
notchin wheelbracket
J
f
GardenHosei_
HoseCoupler
\
/
WaterPort
Figure18
J
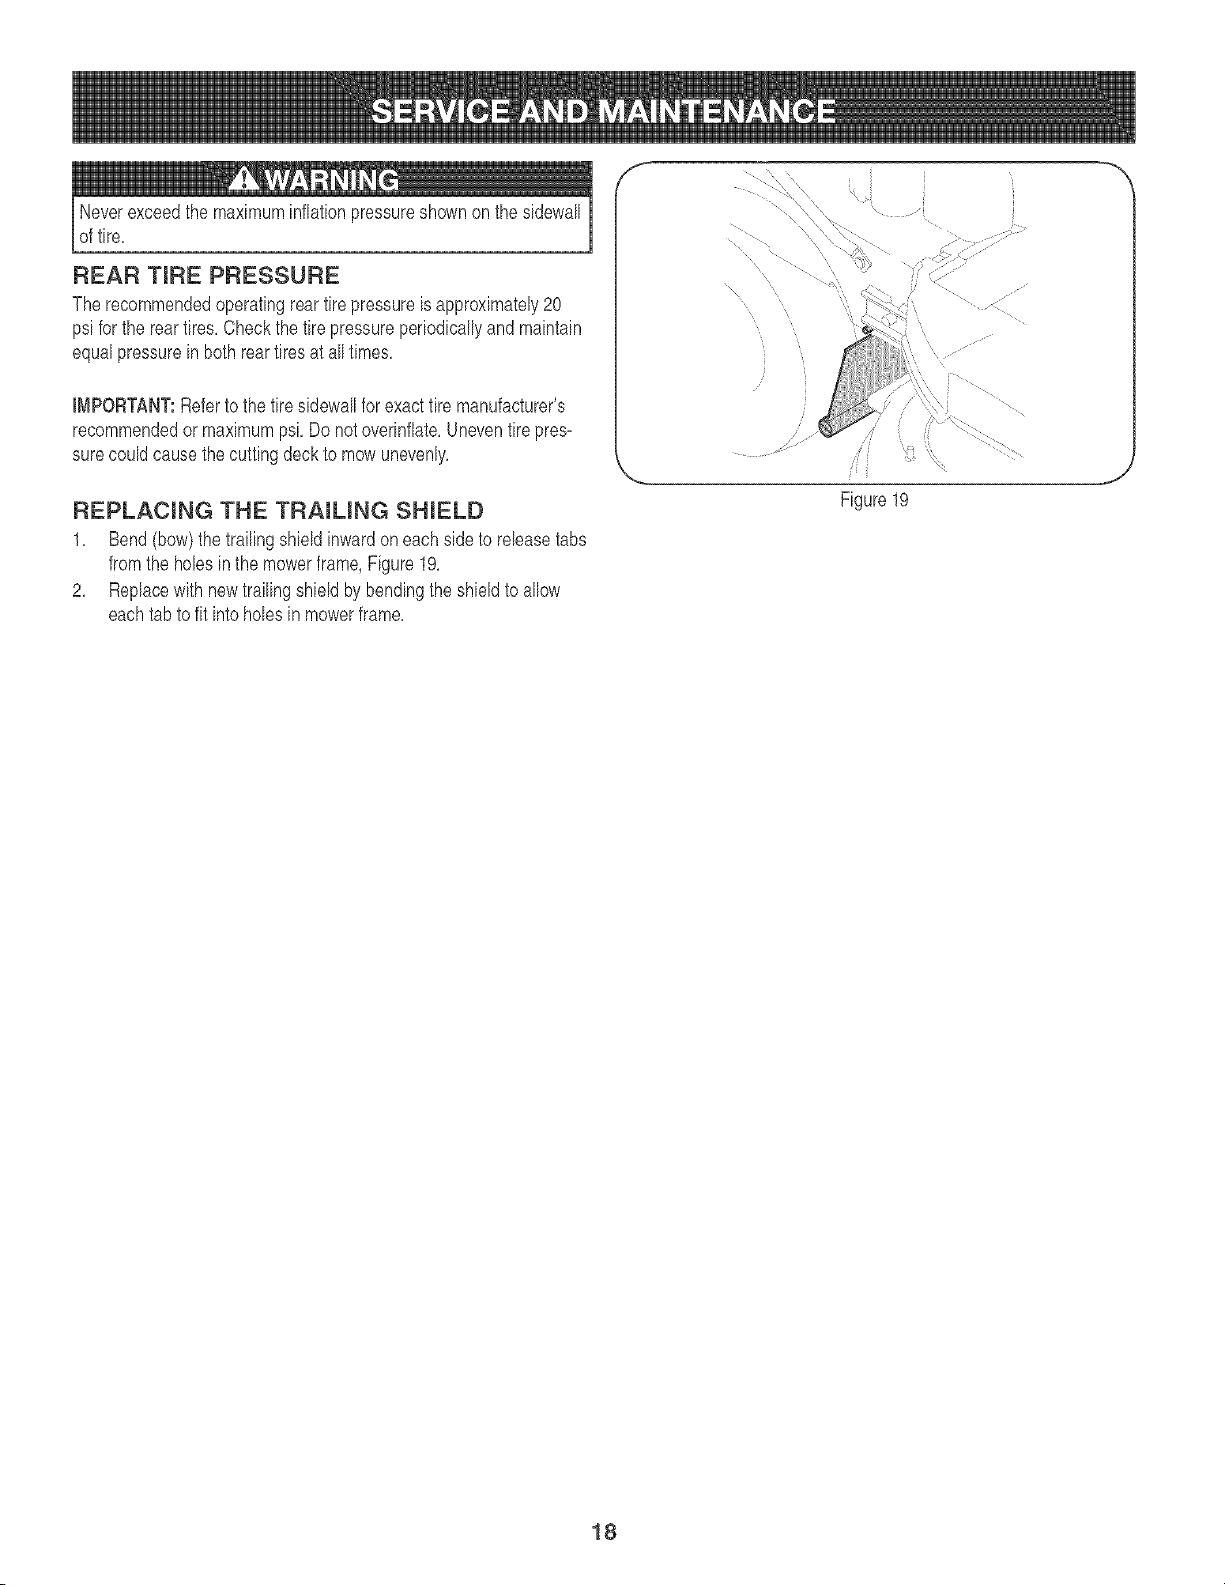
Neverexceedthe maximuminflationpressureshownon the sidewall
of tire,
REAR TmRE PRESSURE
Therecommendedoperatingreartire pressureis approximately20
psi for the reartires,Checkthe tire pressureperiodicallyand maintain
equalpressurein bothrear tiresat all times,
IMPORTANT:Referto the tiresidewallfor exacttire manufacturer's
recommendedor maximumpsi, Do notoverinflate,Uneventire pres-
surecouldcausethecuttingdeckto mowunevenly,
REPLACmNG THE TRAIUNG SHIELD
1, Bend (bow)thetrailingshieldinwardoneachside to releasetabs
fromthe holesinthe mowerframe,Figure19,
2, Replacewith newtrailingshieldby bendingthe shieldto allow
eachtab to fit intoholes in mowerframe,
,f ....... i _ -'X
. _ ,_ i_ i
\'\
\
/
/f
iii 4:•
: ! _J
Figure19
18
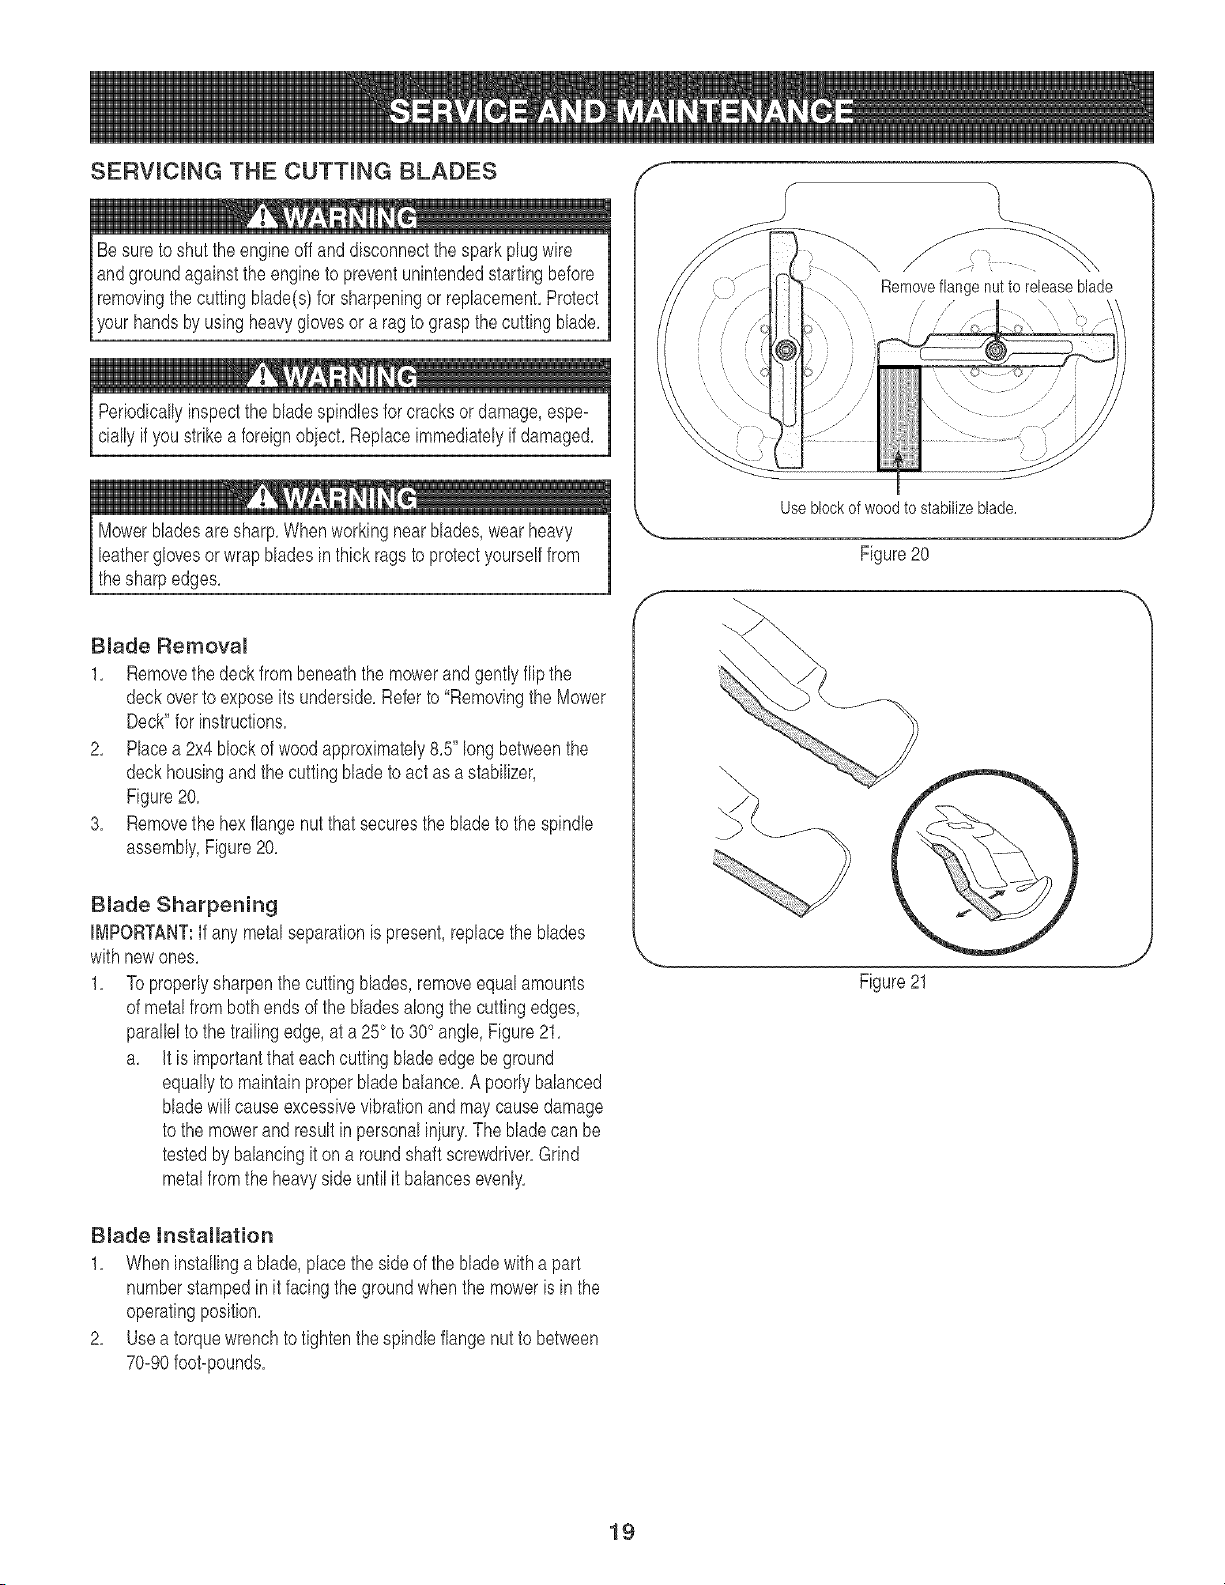
SERVmCmNGTHE CUTTmNGBLADES
Be sureto shutthe engineoff anddisconnectthe spark plug wire
andgroundagainstthe engineto preventunintendedstartingbefore
removingthe cuttingblade(s)for sharpeningor replacement,Protect
your handsby usingheavyglovesor a ragto graspthecutting blade,
Periodicallyinspectthe bladespindlesfor cracksor damage,espe=
ciallyif youstrikea foreignobiect,Replaceimmediatelyif damaged,
Mowerbladesare sharp,Whenworkingnearblades,wearheavy
leatherglovesor wrapbladesin thick ragsto protectyourselffrom
thesharpedges,
Blade Removal
1, Removethe deckfrombeneaththe mowerandgentlyflip the
deckoverto exposeits underside,Refer to "Removingthe Mower
Deck"for instructions,
2, Placea 2x4block of woodapproximately8,5" long betweenthe
deckhousingand the cuttingbladeto act as a stabilizer,
Figure20,
3, Removethe hexflangenutthat securestheblade to the spindle
assembly,Figure20,
Bmade Sharpening
IMPORTANT:Ifany metal separationis present,replacethe blades
withnewones,
1, Toproperlysharpenthe cutting blades,removeequalamounts
of metalfrom bothends of the bladesalong the cuttingedges,
parallelto the trailingedge,at a 25° to 30° angle,Figure21,
a, It is importantthateachcuttingbladeedgebeground
equallyto maintainproperblade balance,A poorlybalanced
bladewill causeexcessivevibrationand maycausedamage
to the mowerandresultin personaliniury,Thebladecan be
testedby balancingit on a roundshaft screwdriver,Grind
metalfromthe heavyside untilit balancesevenly,
Blade Installation
1, Wheninstallinga blade,placethe sideof the bladewitha part
numberstampedin it facingthegroundwhenthe moweris in the
operatingposition,
2, Use a torquewrenchto tightenthe spindleflangenutto between
70=90foot=pounds,
f
f
Removeflangenutto releaseblade
\
Useblockof wood to stabilizeblade.
Figure20
\
\
\
Figure21
-m
J
J
19
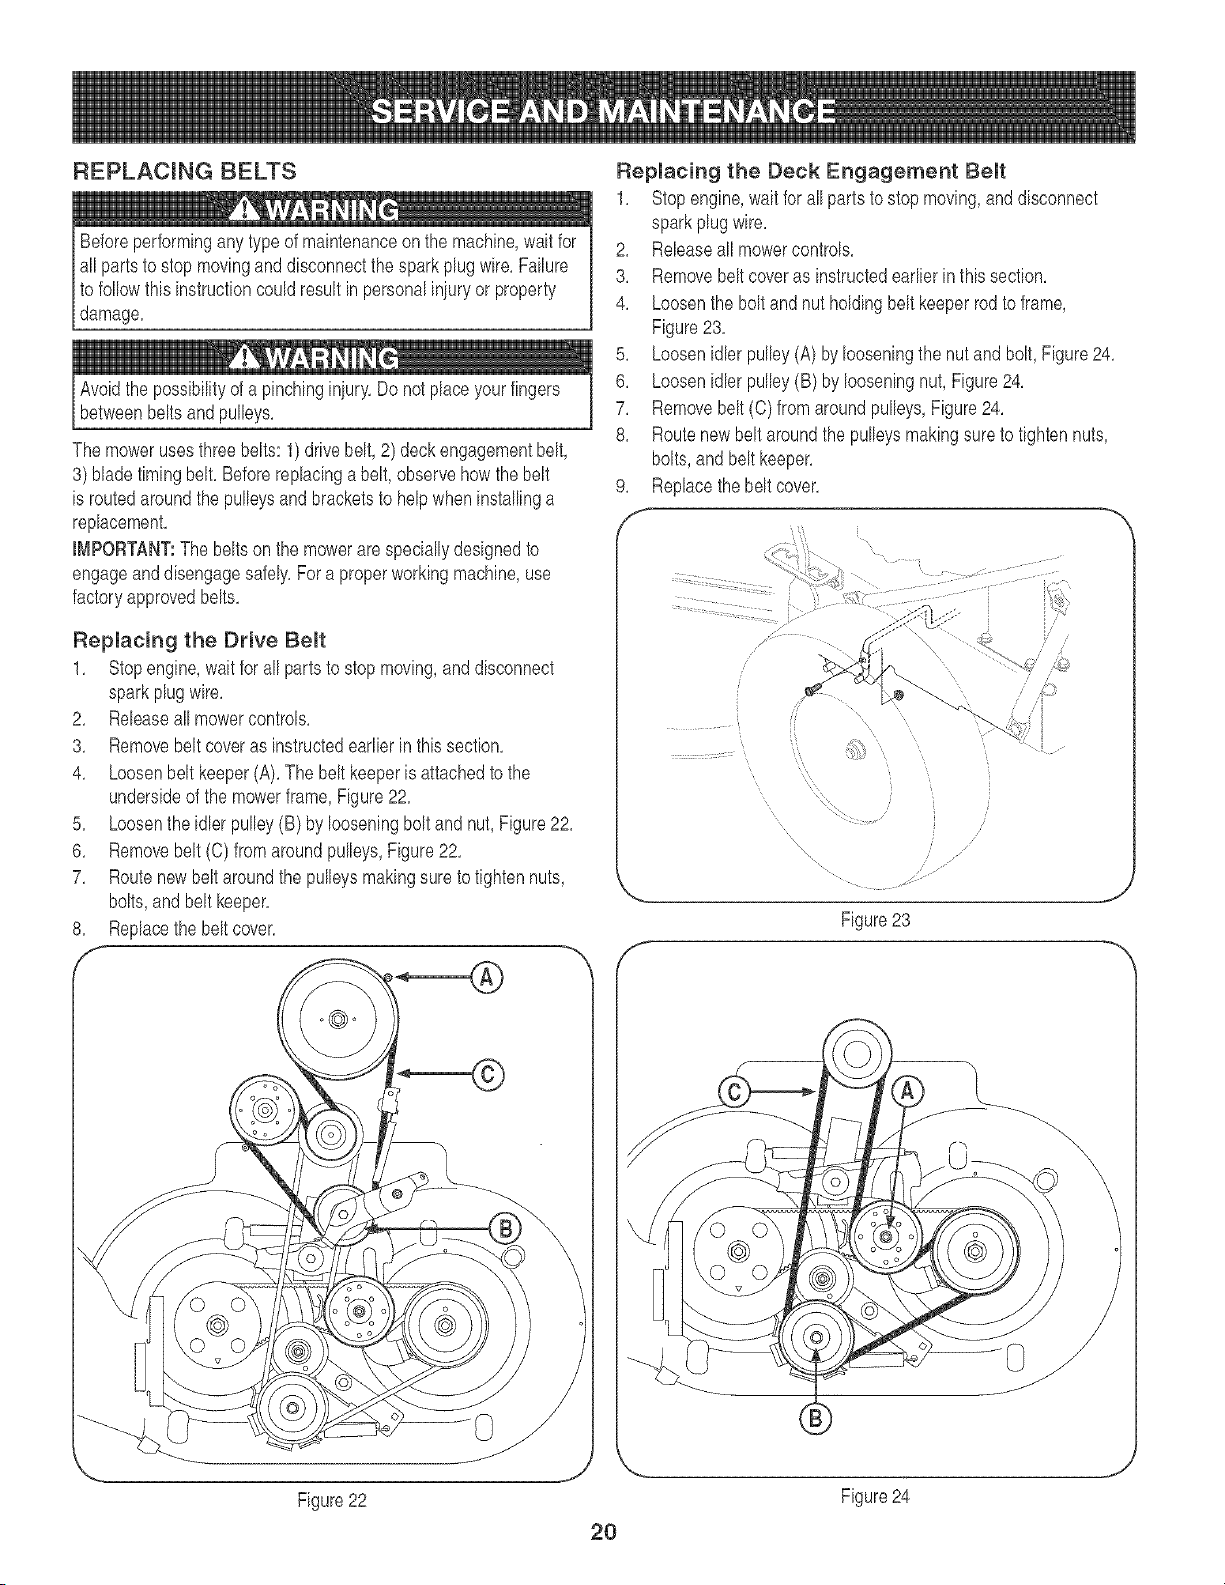
REPLACmNGBELTS
between beltsandpulleys.
Themoweruses threebelts: 1) drivebelt,2) deckengagementbelt,
3) bladetimingbelt.Beforereplacinga belt, observehowthe belt
is routedaroundthe pulleysand bracketsto helpwheninstallinga
replacement.
IMPORTANT:The beltsonthe mowerarespeciallydesignedto
engageanddisengagesafely.Fora properworkingmachine,use
factoryapprovedbelts.
Replacing the Drive Belt
1. Stopengine,wait for all partsto stopmoving,and disconnect
sparkplugwire.
2. Releaseall mowercontrols.
3. Removebeltcoveras instructedearlierin thissection.
4. Loosenbelt keeper(A).The belt keeperis attachedto the
undersideof the mowerframe,Figure22.
5. Loosenthe idlerpulley(B) by looseningbolt andnut,Figure22.
6. Removebelt (C)from aroundpulleys,Figure22.
7. Routenew beltaroundthe pulleysmakingsure to tightennuts,
bolts,and belt keeper.
8. Replacethe belt cover.
Replacing the Deck Engagement Belt
1. Stopengine,wait for allpartsto stop moving,and disconnect
sparkplugwire.
2. Releaseall mowercontrols.
3. Removebelt coveras instructedearlier in this section.
4. Loosenthe boltand nut holdingbelt keeperrodto frame,
Figure23.
5. Loosenidler pulley(A)by looseningthe nut and bolt, Figure24.
6. Loosenidler pulley(B)by looseningnut, Figure24.
7. Removebelt (C) from aroundpulleys,Figure24.
8. Routenewbelt aroundthe pulleysmakingsureto tighten nuts,
bolts,and beltkeeper.
9. Replacethe beltcover.
\
0
Figure22
Figure24
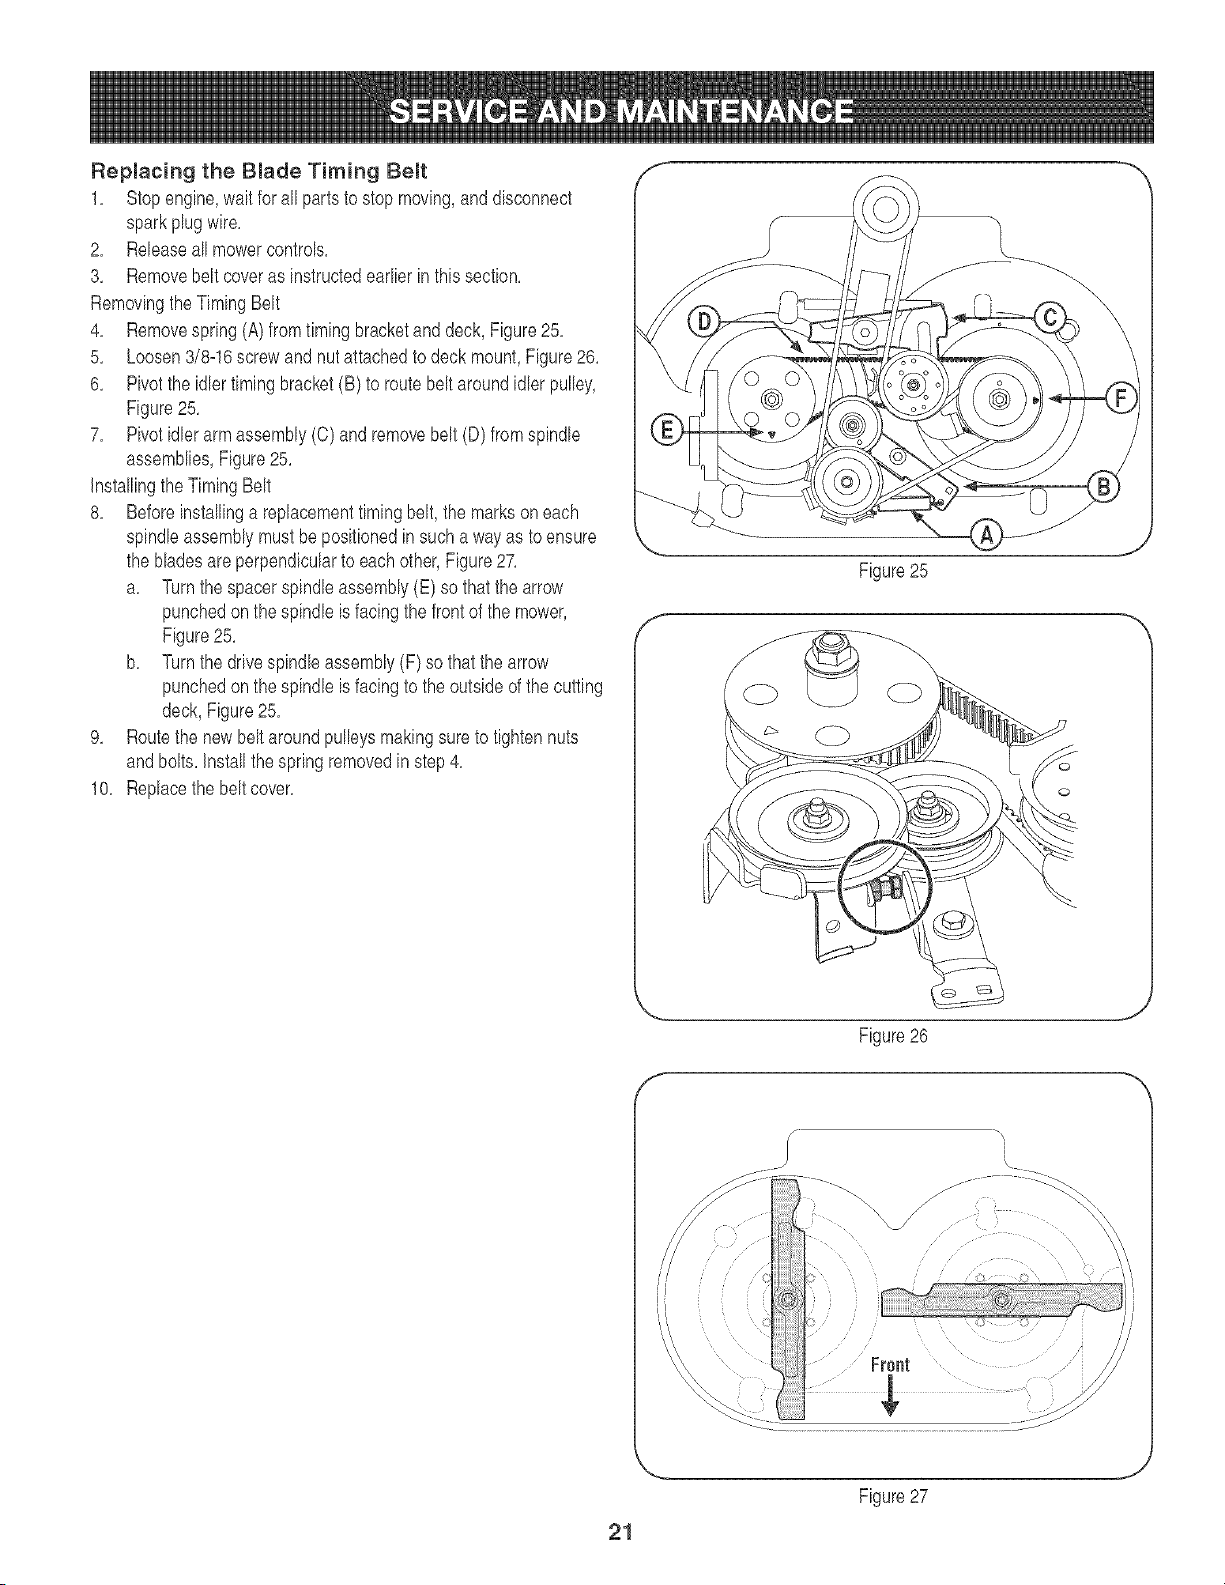
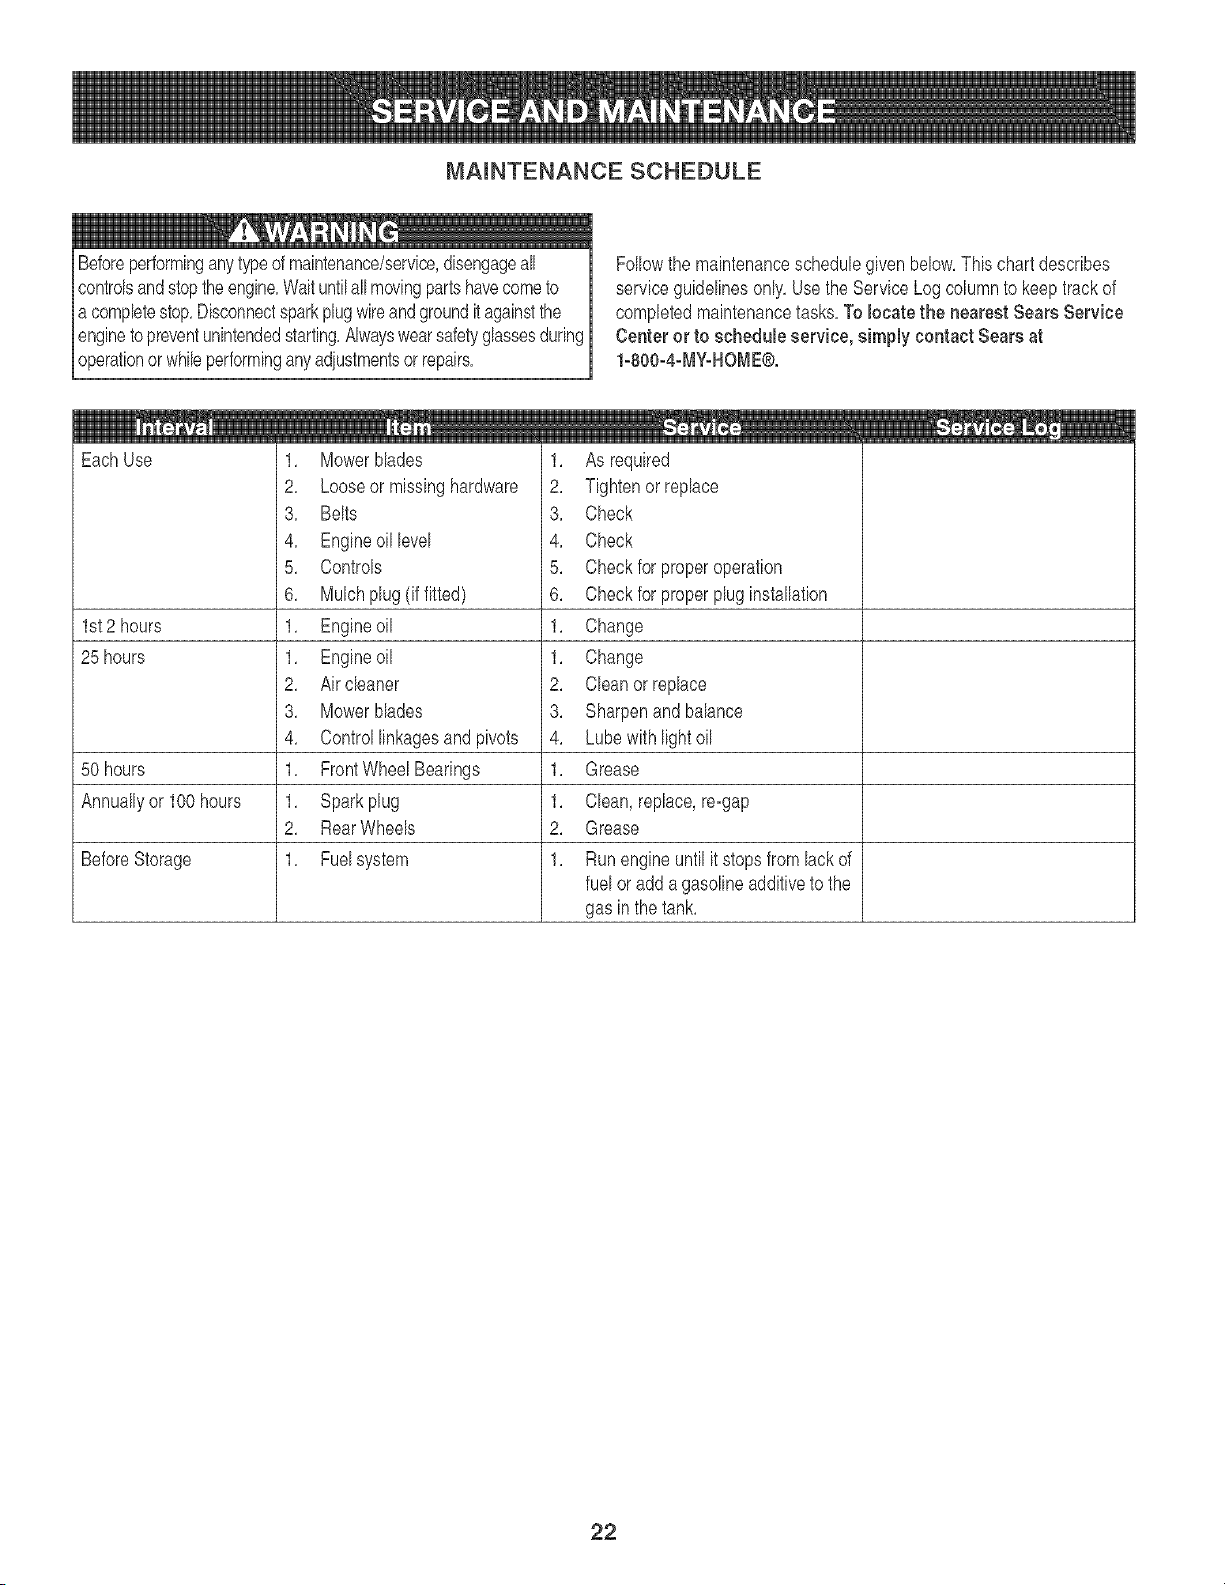
Replacing the BmadeTiming Belt
1, Stopengine,waitforallpartstostopmoving,anddisconnect
sparkplugwire,
2, Releaseallmowercontrols,
3, Removebeltcoverasinstructedearlierinthissection,
RemovingtheTimingBelt
4, Removespring(A)fromtimingbracketanddeck,Figure25,
5, Loosen3/8q6screwandnutattachedtodeckmount,Figure26,
6, Pivottheidlertimingbracket(B)toroutebeltaroundidlerpulley,
Figure25,
7, Pivotidlerarmassembly(C)andremovebelt(D)fromspindle
assemblies,Figure25,
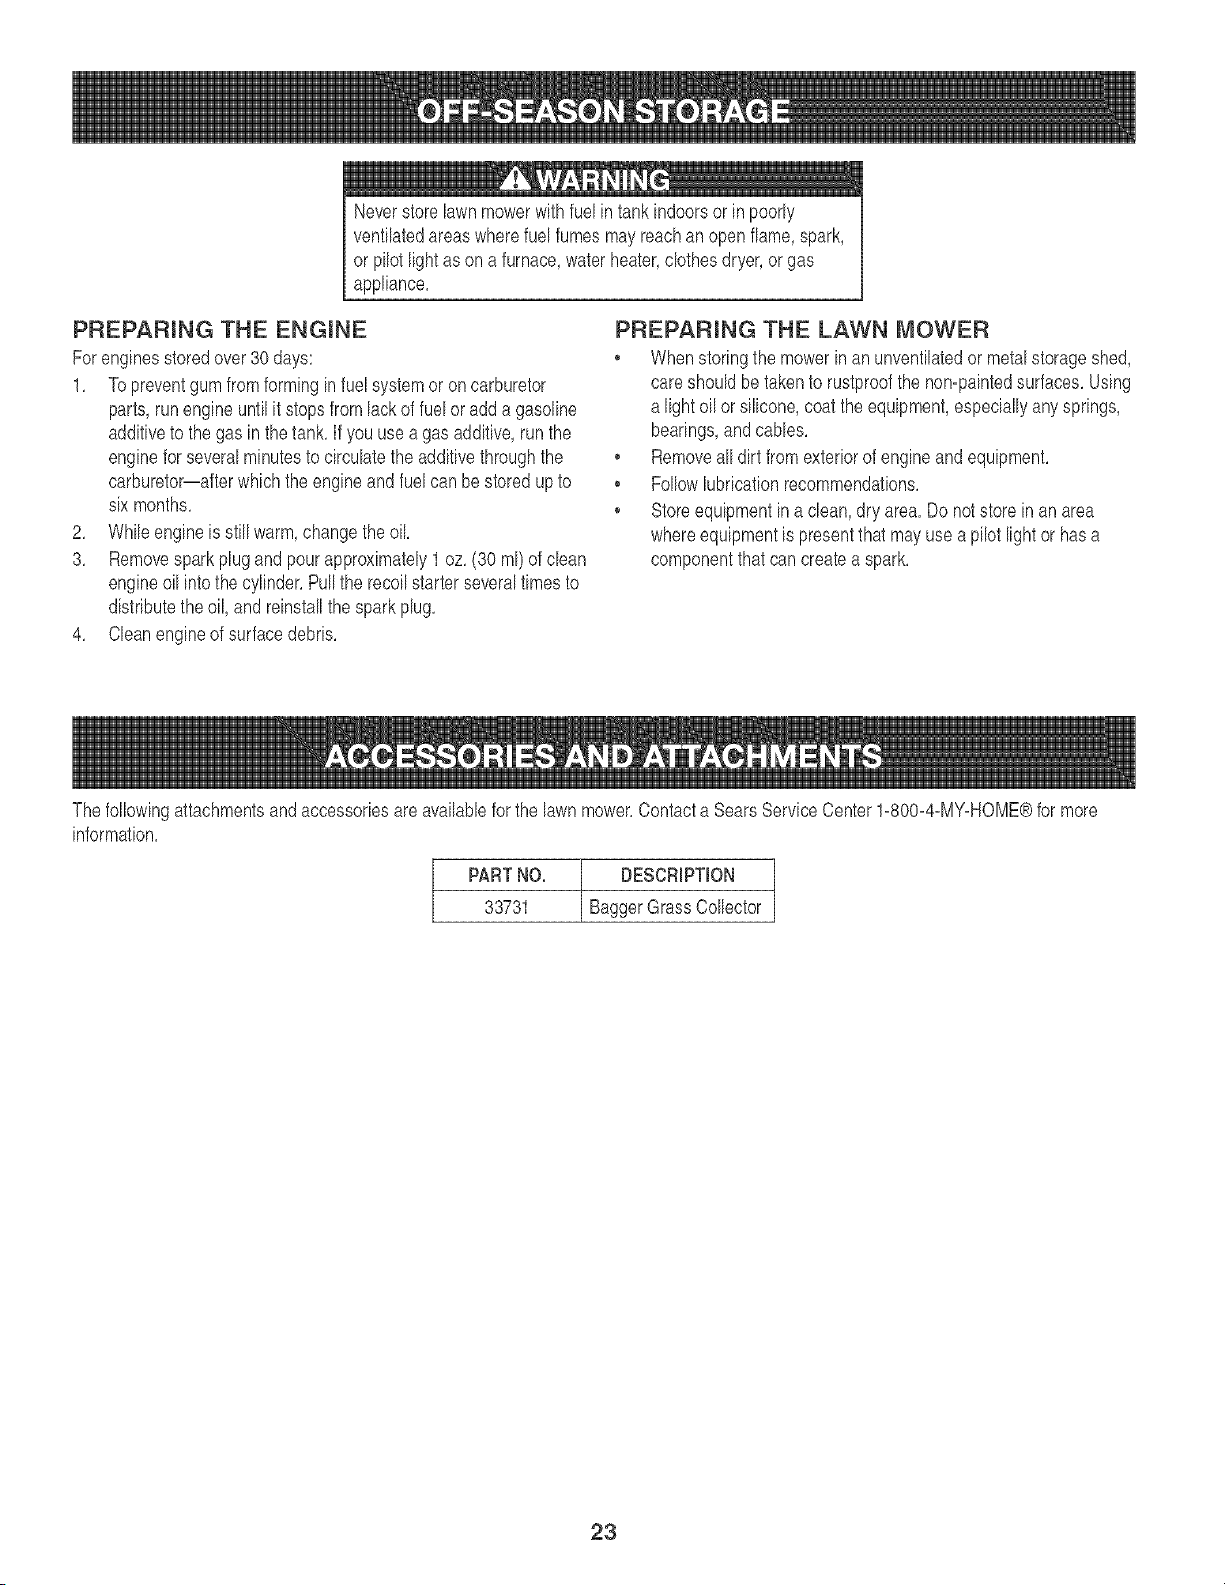
InstallingtheTimingBelt
8, Beforeinstallingareplacementtimingbelt,themarksoneach
spindleassemblymustbepositionedinsuchawayastoensure
thebladesareperpendiculartoeachother,Figure27,
a, Turnthespacerspindleassembly(E)sothatthearrow
punchedonthespindleisfacingthefrontofthemower,
Figure25,
b, Turnthedrivespindleassembly(F)sothatthearrow
punchedonthespindleisfacingtotheoutsideofthecutting
deck,Figure25,
9, Routethenewbeltaroundpulleysmakingsuretotightennuts
andbolts,Installthespringremovedinstep4,
10,Replacethebeltcover,
_f
Figure25
21
f
Figure26
Figure27
J
J
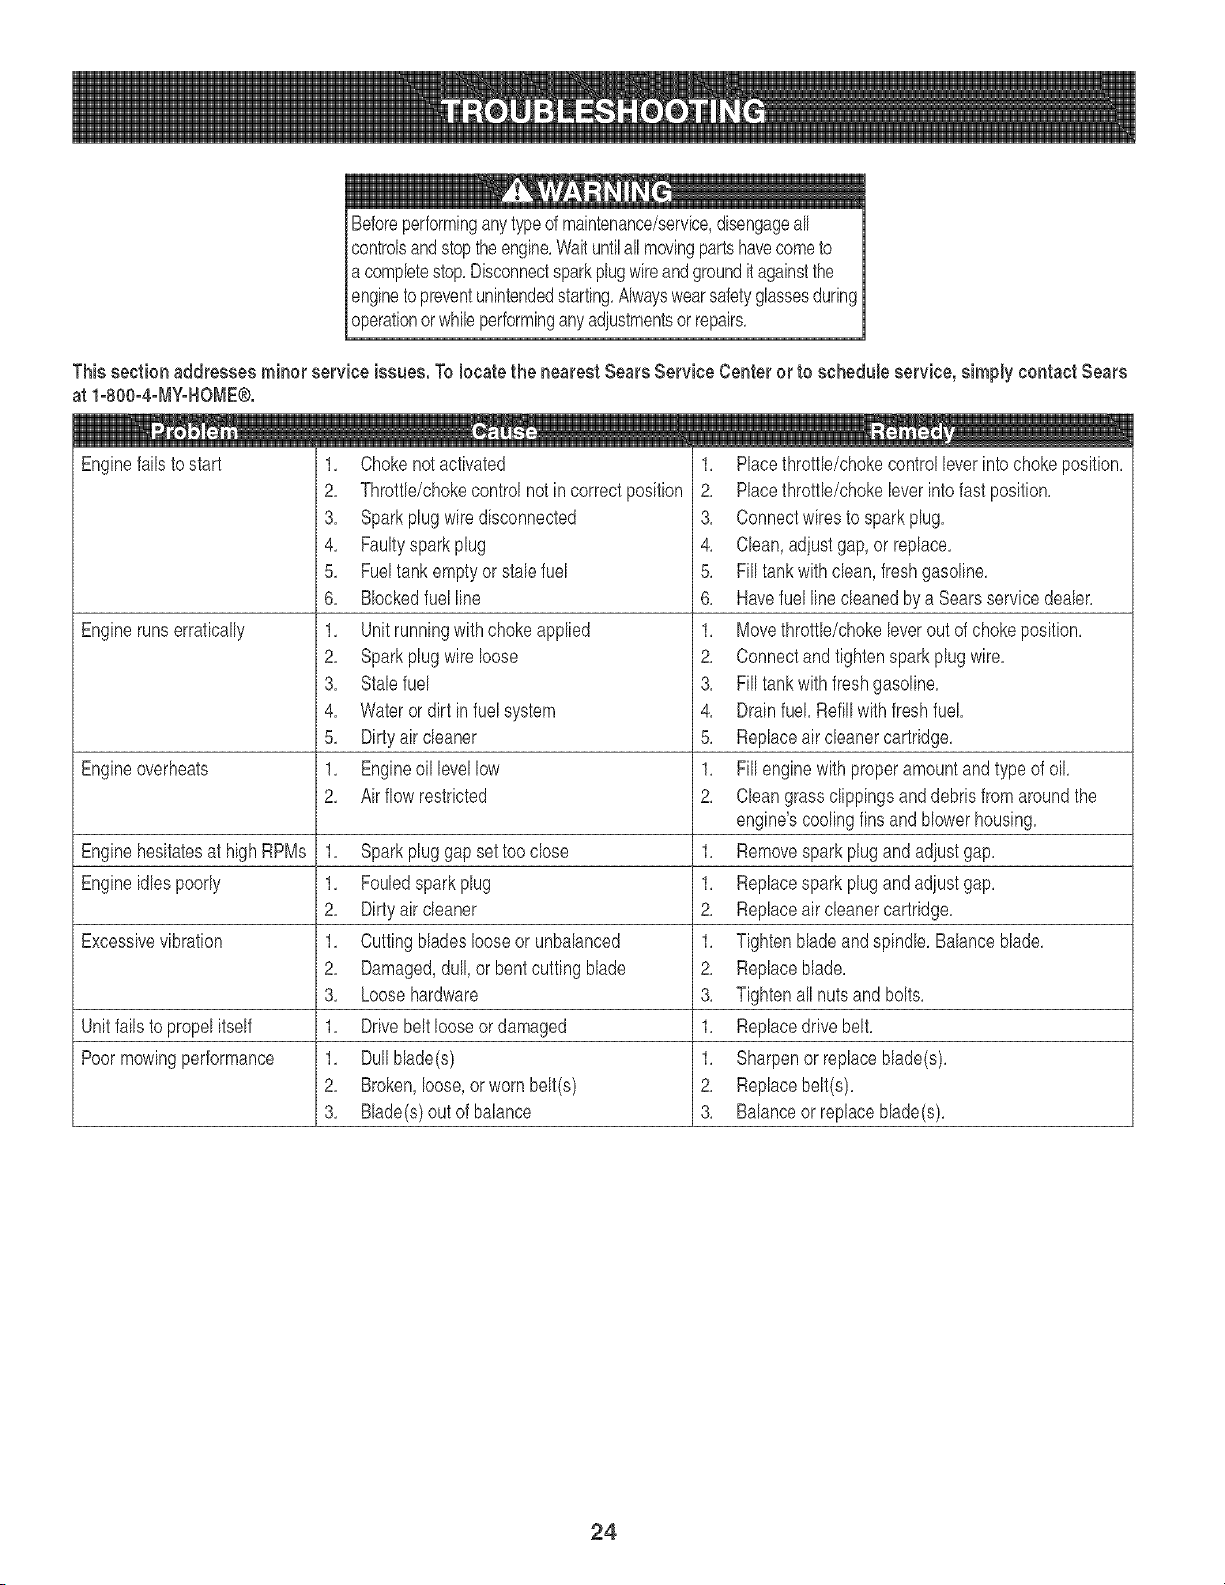
MAINTENANCE SCHEDULE
Beforeperforminganytypeof maintenance/service,disengageall 1
controlsand stoptheengine,Waituntilall movingpartshavecometo
acompletestop,Disconnectsparkplugwireandgroundit againstthe
enginetopreventunintendedstarting,Alwayswearsafetyglassesduring1
operationor whileperforminganyadiustmentsor repairs, J
Followthe maintenanceschedulegiven below,This chart describes
serviceguidelinesonly,Use the ServiceLogcolumnto keeptrackof
completedmaintenancetasks,To locate the nearest Sears Service
Center or to schedule service, simply contact Sears at
loS00o4oMYoHOME®.
EachUse
1st2 hours
25 hours
50 hours
Annuallyor 100 hours
BeforeStorage
1, Mowerblades
2, Looseor missinghardware
3, Belts
4, Engineoil level
5, Controls
6, Mulchplug(if fitted)
1, Engineoil
1, Engineoil
2, Air cleaner
3, Mowerblades
4, Controllinkagesand pivots
1, FrontWheeIBearings
1, Sparkplug
2, RearWheels
1, Fuelsystem
1, As required
2, Tightenorreplace
3, Check
4, Check
5, Checkfor properoperation
6, Checkfor properplug installation
1, Change
1, Change
2, Cleanorreplace
3, Sharpenand balance
4, Lube with lightoil
1, Grease
1, Clean, replace,re=gap
2, Grease
1, Run engineuntil it stopsfrom lack of
fuel or add a gasolineadditiveto the
gas in thetank,
22
Neverstorelawnmowerwith fuel intankindoorsor in poorly
ventilatedareaswherefuel fumesmayreachan openflame,spark,
or pilot lightas on a furnace,water heater,clothesdryer,or gas
appliance,
PREPARING THE ENGmNE
Forenginesstoredover30 days:
1, Topreventgumfromforming in fuel systemor oncarburetor
parts,run engine untilit stopsfromlackof fuel oradda gasoline
additiveto thegas in the tank,If youuse a gasadditive,runthe
enginefor severalminutesto circulatethe additivethroughthe
carburetor--afterwhichthe engineand fuel canbe storedupto
six months,
2, Whileengineis still warm,changetheoil
3, Removespark plug and pour approximately1oz,(30 ml) of clean
engineoil intothe cylinder,Pullthe recoilstarterseveraltimesto
distributetheoil, and reinstallthe sparkplug,
4, Cleanengineof surfacedebris,
PREPARING THE LAWN MOWER
Whenstoringthe mowerinan unventilatedor metalstorageshed,
careshouldbetakento rustproofthe non-paintedsurfaces,Using
a lightoil or silicone,coatthe equipment,especiallyany springs,
bearings,and canes,
• Removeall dirt from exteriorof engineandequipment,
, Followlubricationrecommendations,
, Storeequipmentin a clean,dry area,Do notstoreinan area
whereequipmentis presentthat mayuse a pilot light or has a
componentthatcan createa spark,
Thefollowingattachmentsandaccessoriesare availablefor the lawnmower,Contacta SearsServiceCenter1-800-4-MY-HOME®for more
information,
PARTNO. _ DESCRIPTION
33731 TBaggerGrassCollector
23
Beforeperforminganytypeof maintenance/service,disengageall
controlsandstoptheengine,Waituntilallmovingpartshavecometo
a completestop,Disconnectsparkplugwireandgrounditagainstthe
Iengineto preventunintendedstarting,Alwayswearsafetyglassesduring
_operationor whib performinganyadiustmentsorrepairs,
This section addresses minor service issues.To locate the nearest Sears Service Center or to schedule service, simply contact Sears
at loSO0o4oMYoHOME®.
Enginefailsto start
Enginerunserratically
1, Chokenotactivated
2, Throttle/chokecontrolnotin correctposition
8, Sparkplug wiredisconnected
4, Faultyspark plug
5, Fueltank emptyor stale fuel
6, Blockedfuelline
1, Unit runningwith choke applied
2, Sparkplug wireloose
8, Stabfuel
4, Wateror dirt in fuelsystem
5, Dirtyair cleaner
1, Engineoil levellow
2, Air flow restricted
1,
2,
3,
4,
5,
6,
1,
2,
3,
4,
5,
1,
2,
Engineoverheats
Enginehesitatesat high RPMs 1, Sparkpluggapsettoo close 1,
Engineidles poorly 1, Fouledsparkplug 1,
2, Dirtyair cleaner 2,
Excessivevibration 1, Cuttingbladeslooseor unbalanced 1,
2, Damaged,dull,or bentcutting blade 2,
3, Loosehardware 3,
Unitfailsto propel itself 1, Drivebelt looseor damaged 1,
Poormowingperformance 1, Dullblade(s) 1,
2, Broken,loose,orworn belt(s) 2,
3, Blade(s)out of balance 3,
Placethrottle/chokecontrol leverintochokeposition,
Placethrottle/chokeleverinto fast position,
Connectwiresto sparkplug,
Clean,adiustgap,or replace,
Fill tankwith clean, freshgasoline,
Havefuel line cleanedby a Searsservicedealer,
Movethrottle/chokeleveroutof chokeposition,
Connectand tightensparkplug wire,
Fill tankwith fresh gasoline,
Drainfuel, Refillwith fresh fuel
Replaceair cleanercartridge,
Fill enginewith properamountand type of oil
Cleangrass clippingsand debrisfromaroundthe
engine'scoolingfins and blowerhousing,
Removesparkplugandadiustgap,
Replacesparkplugandadiustgap,
Replaceair cleanercartridge,
Tightenbladeandspindle,Balanceblade,
Replaceblade,
Tightenallnutsandbolts,
Replacedrive belt,
Sharpenor replaceblade(s),
Replacebelt(s),
Balanceor replaceblade(s),
24

25
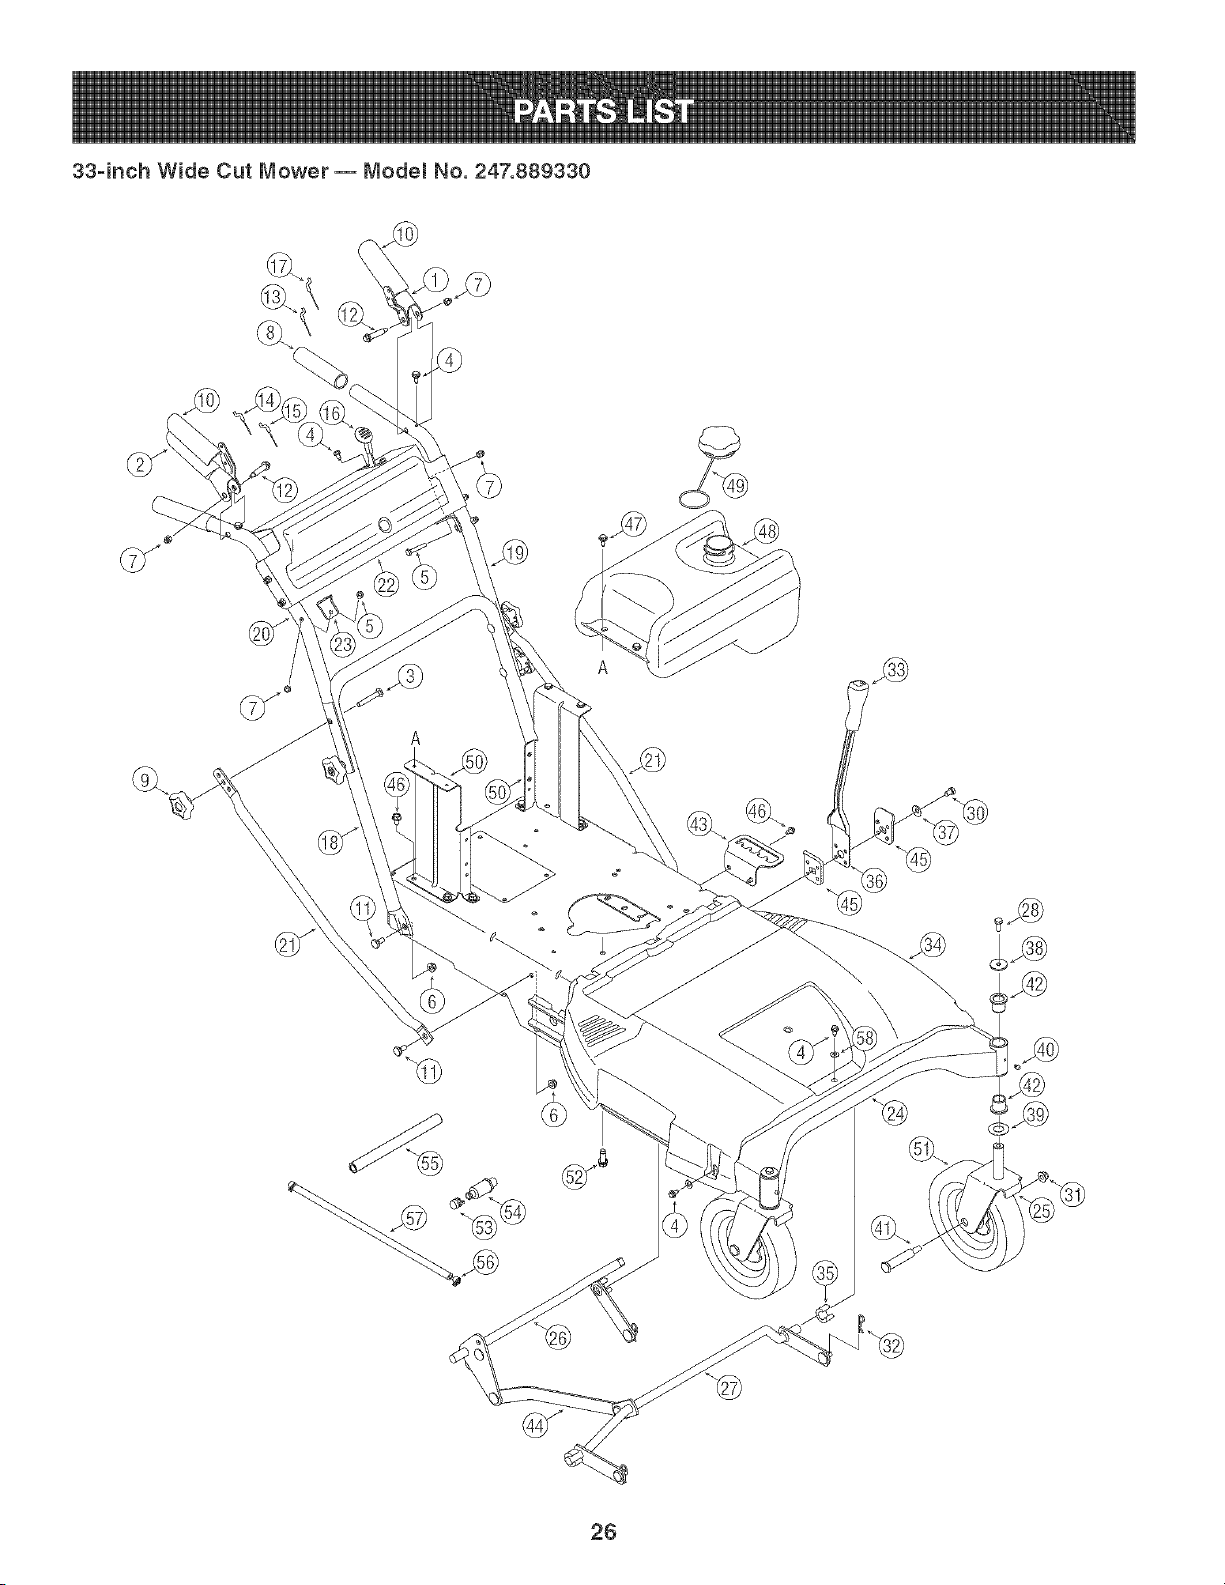
33-inch Wide Cut Mower- Modem No. 247.889330
26

33qnch Wide Cut Mower -- Modem No. 247.889330
1 68_02277
2 68_02278
3 710-0449
4 710-0599
5 710-0606
6 712-04063
7 712-0442
8 720-0274
9 720-04072
10 731-0473
11 738-0140
12 738-1226
13 746-04343
14 746-04344
15 746-04346
16 746-04355
17 746-04361
18 749-04330
19 749-04331
20 749-04332
21 749-04333
22 78_01449
23 78_01490
78_01491
24 68_02255
25 68_02263
26 68_02264
27 68_02265
28 710-0627
LeverAssembly:LH
LeverAssembly:RH
Screw,Carriage:5/16-18x 2,25"
Screw,TT: 1/4-20x 0,500"
Screw,HH Cap: 1/4-20x 1,50"
Nut, FlangeLock:5/16-18
Nut, LockCap: 1/4-20
Grip: 1,0"ID x 5,0" Lg
Star Knob5/16-18
HandleGrip
Screw,Shoulder:,435"x ,178-5/16
Screw,Shoulder:,375"x 1,355"x 1/4-20
CaNe,ClutchWheel
Cable,Brake,Transmission:RH
CaNe,ClutchDeck
CaNe,Throttle/Choke:38"x 1,1"Ext
Cable,Brake,Transmission:LH
LowerHandle
UpperHandle:LH
UpperHandle:RH
BraceTube
HandlePanel
CaNeMountBracket:RH
CaNeMountBracket:LH
FrameAssembly
CasterWheelBracketAssembly
DeckLift Assembly:RR
DeckLift Assembly:Front
Screw,HH Cap:5/16-24x ,750"
29 710-04187 Screw,HL: 1/4-15x ,50'
30 710-04312 Screw,HH Cap:5/16-18x ,50"
31 712-04065 Nut,FlangeLock:3/8-16
32 714-0145 Click Pin:,092" x 1,64"
33 720-0311 HandleGrip 1/2"
34 731-05684 BeltCover33"WideCut Mower
35 731-05791 SnapSpacer:,63" IDx ,75" LG
36 732-04418 DeckHeightLever
37 736-0242 Washer,Bell: ,340"x ,872"x ,060"
38 736-0343 Washer,Flat: ,330"x 125" x ,120"
39 736-0351 Washer,Flat: ,760"IDx 1,50"OD
40 737-3000 LubeFitting:3/16:LNC#70
41 738-04216A Bolt,Shoulder:,625"x 2,515"x 3/8-16
42 741-0860A FlangeBearing:,760"x ,941"x 1,0"
43 787-01496 HeightAdiustmentBracket
44 787-01510 LinkPivotBracket
45 787-01521 LeverPivot Bracket
46 710-0604A Screw,TT: 5/16-18x ,625"
47 738-1225 Screw,Shoulder:,3175"x ,188"x 1/4-20
48 751-10480 FuelTank,2 GaL
49 751-10514 FuelCap
50 787-01507 FuelTank MountingBracket
51 634-04343 WheelCaster8" x 1,75"
52 710-1315 Screw,TT: 3/8-16x 1,25"
53 751-3142 Oil DrainCap
54 751-3140 Oil Drain
55 751-3141 Oil DrainHose
56 726-0205 HoseClamp
57 751-10349 FuelHose
58 736-0463 Washer,Flat: ,25x ,63x ,0515
27
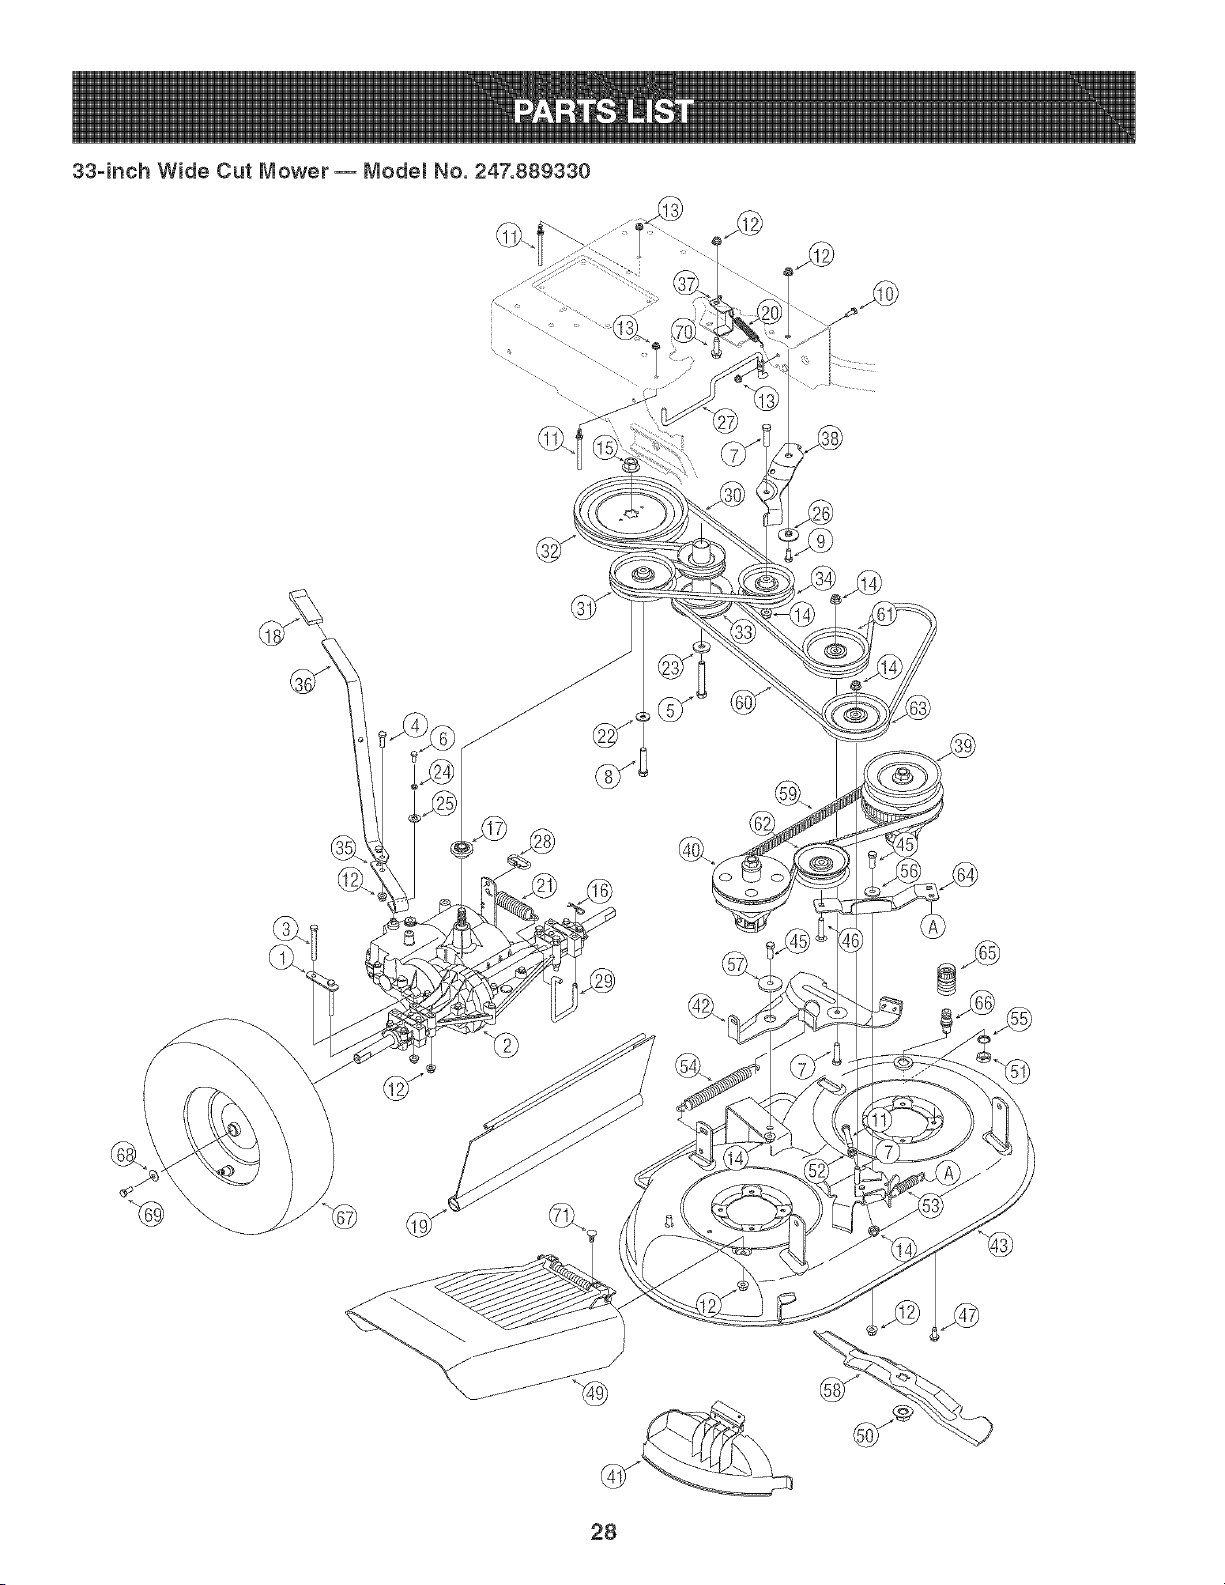
33-inch Wide Cut Mower- Modem No. 247.889330
®
@
J
28

33qnch Wide Cut Mower -- Modem No. 247.889330
1 17840 TransaxleBracketMount
2 618-04452 Transmission4-Speed
3 710-0176 Screw,HH Cap: 5/16-18x 2,75"
4 710-0376 Screw,HH Cap: 5/16-18x 1,00"
5 710-04377 Screw,HH Cap: 7/16-20x 2,75"
6 710-0513 Screw,HH Cap: 1/4-28x ,625"
7 710-0520 Screw,HH Cap: 3/8-16x 1,50"
8 710-1878 Screw,HH Cap: 3/8-16x 1,75"
9 710-3008 Screw,HH Cap: 5/16-18x ,75"
10 710-3015 Screw,HH Cap: 1/4-20x ,75"
11 711-1000 Belt Keeper
12 712-04063 Nut, FlangeLock:5/16-18
13 712-04064 Nut, FlangeLock: 1/4-20
14 712-04065 Nut, FlangeLock:3/8-16
15 712-0700 Nut, Range:9/16-18
16 714-0145 HairpinClip: 092" x 1,64"Long
17 718-0758A PulleyHub
18 720-0142 Grip
19 731-05766 TrailingShield
20 732-04409 ExtensionSpring
21 732-04443 ExtensionSpring
22 736-0105 Washer,Spring:,401"x ,870"x ,083"
23 736-0322 Washer,Flat: 450"x 1,250"x ,164"
24 736-0329 Washer,Lock: 1/4"
25 738-04256 Washer,Flat: ,39"x ,87"x ,06"
26 738-04188 Spacer,Shoulder:,50" x ,1475"
27 747-04635 Belt KeeperRod
28 747-04673 LoopLinkCoupling
29 747-04678 TransMountRod
30 754-04145 Belt,V Type
31 756-04129 IdlerPulley:4,25" Dia,
32 756-04258 FlatSheave7,75"
33 756-04260 EnginePulley3,20" x 4,35"Dia,
34 756-04280 IdlerPulley3,50"Dia,
35 787-01469 ShiftRod,Lower
36 787-01470 ShiftRod,Upper
37 787-01473 BeltKeeper
38 787-01523 WheelDriveidlerBracket
39 818-04438 DriveSpindleAssembly
40 818-04439 SpacerSpindleAssembly
41 931-04011 MulchPlug
42 687-02251 IdlerArmAssembly
43 887-02254 DeckAssembly33-inch
44 710-0451 Bolt,Carriage:5/16-18x ,75"
45 710-0514 Screw,HH Cap:3/8-16x 1,00"
46 710-3106A Screw,Carriage:3/8-16x 1,75"
47 710q260A Screw,LD:5/16-18x ,750"
48 710-3184 Screw,HH Cap:3/8-16x 2,00"
49 631-04244 Chute DeflectorAssembly
50 712-0417A Nut,Flange:5/8-18
51 712-0641 Nut,Hex
52 712-3017 Nut,Hex 3/8-16
53 732-04406 ExtensionSpring:TimingBelt Tension
54 732-04411 ExtensionSpring:Deck Brake
55 736-0760 Washer,Lock
56 738-0347 Spacer,Shoulder:,625"x ,169"
57 738-04162A Spacer,Shoulder:,884"x ,190"
58 742-04154 Blade:17,9"
59 754-04138 Belt,Timing
60 754-04139 Belt,V Type
81 756-04129 IdlerPulley4,25"
82 756-04280 IdlerPulley3,50"
63 756-0616 IdlerPulleyV-Type5,0"
64 787-01440 IdlerTiming Bracket
65 721-04041 Water NozzleAdapter
66 737-04003C Water Nozzle
67 634-04285 Wheel 16x 4 x 8
88 738-0242 Washer,Bell: ,340"x ,872"x ,060"
89 710-0827 Screw,HH Cap:5/16-24x ,75"
70 710-1315 Screw,TT: 3/8-16x 1,25"
71 710-1236 Screw,Carriage:5/16-18x 1,00"
29
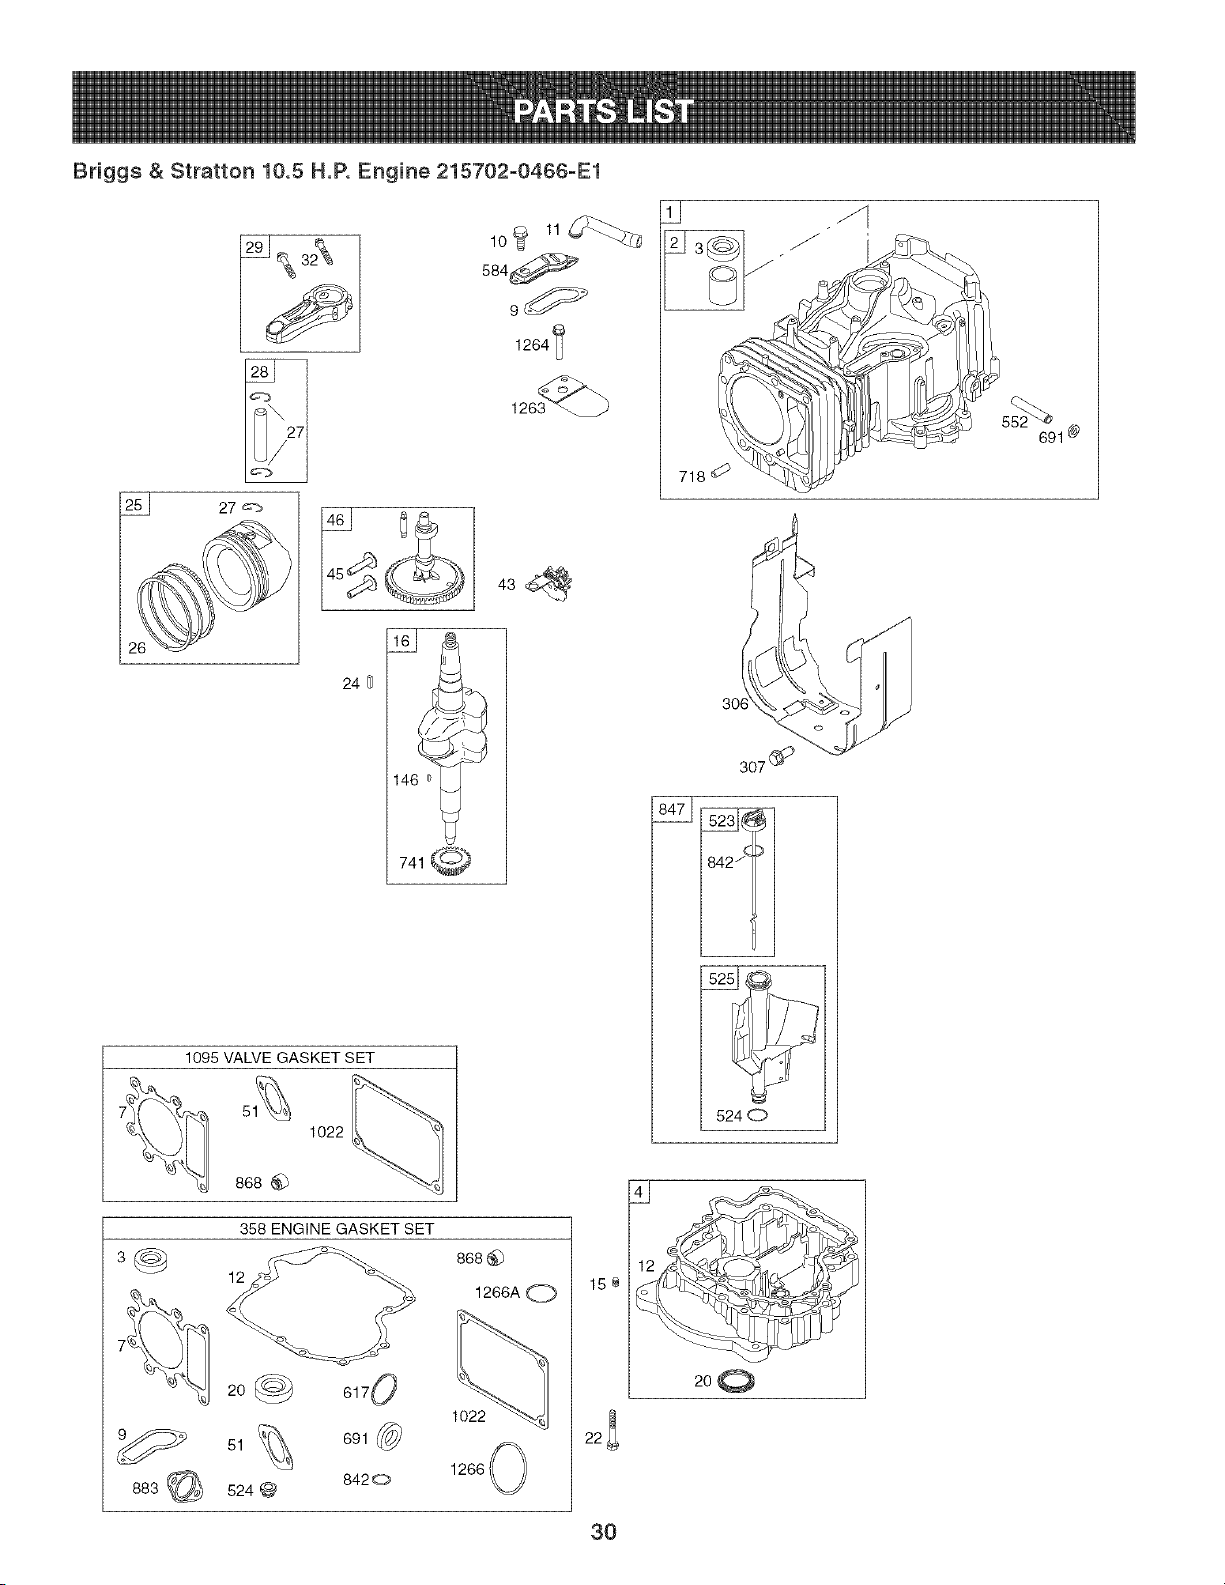
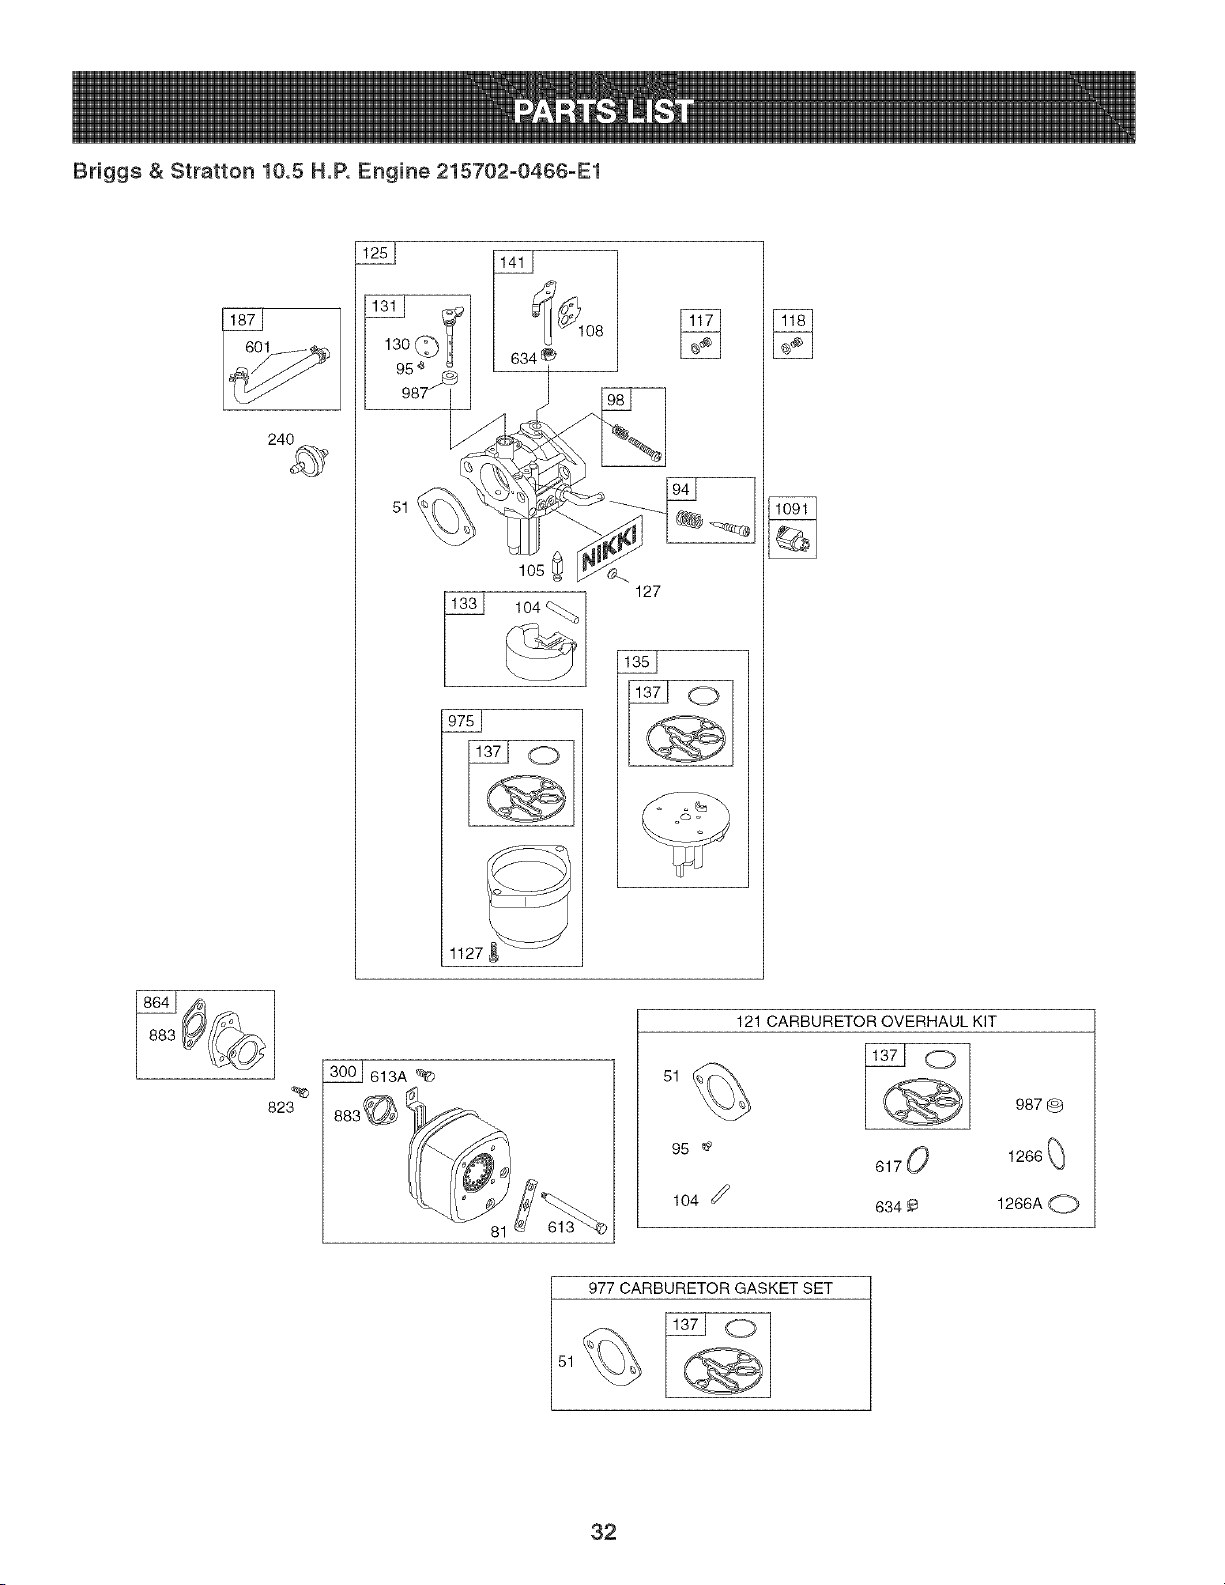
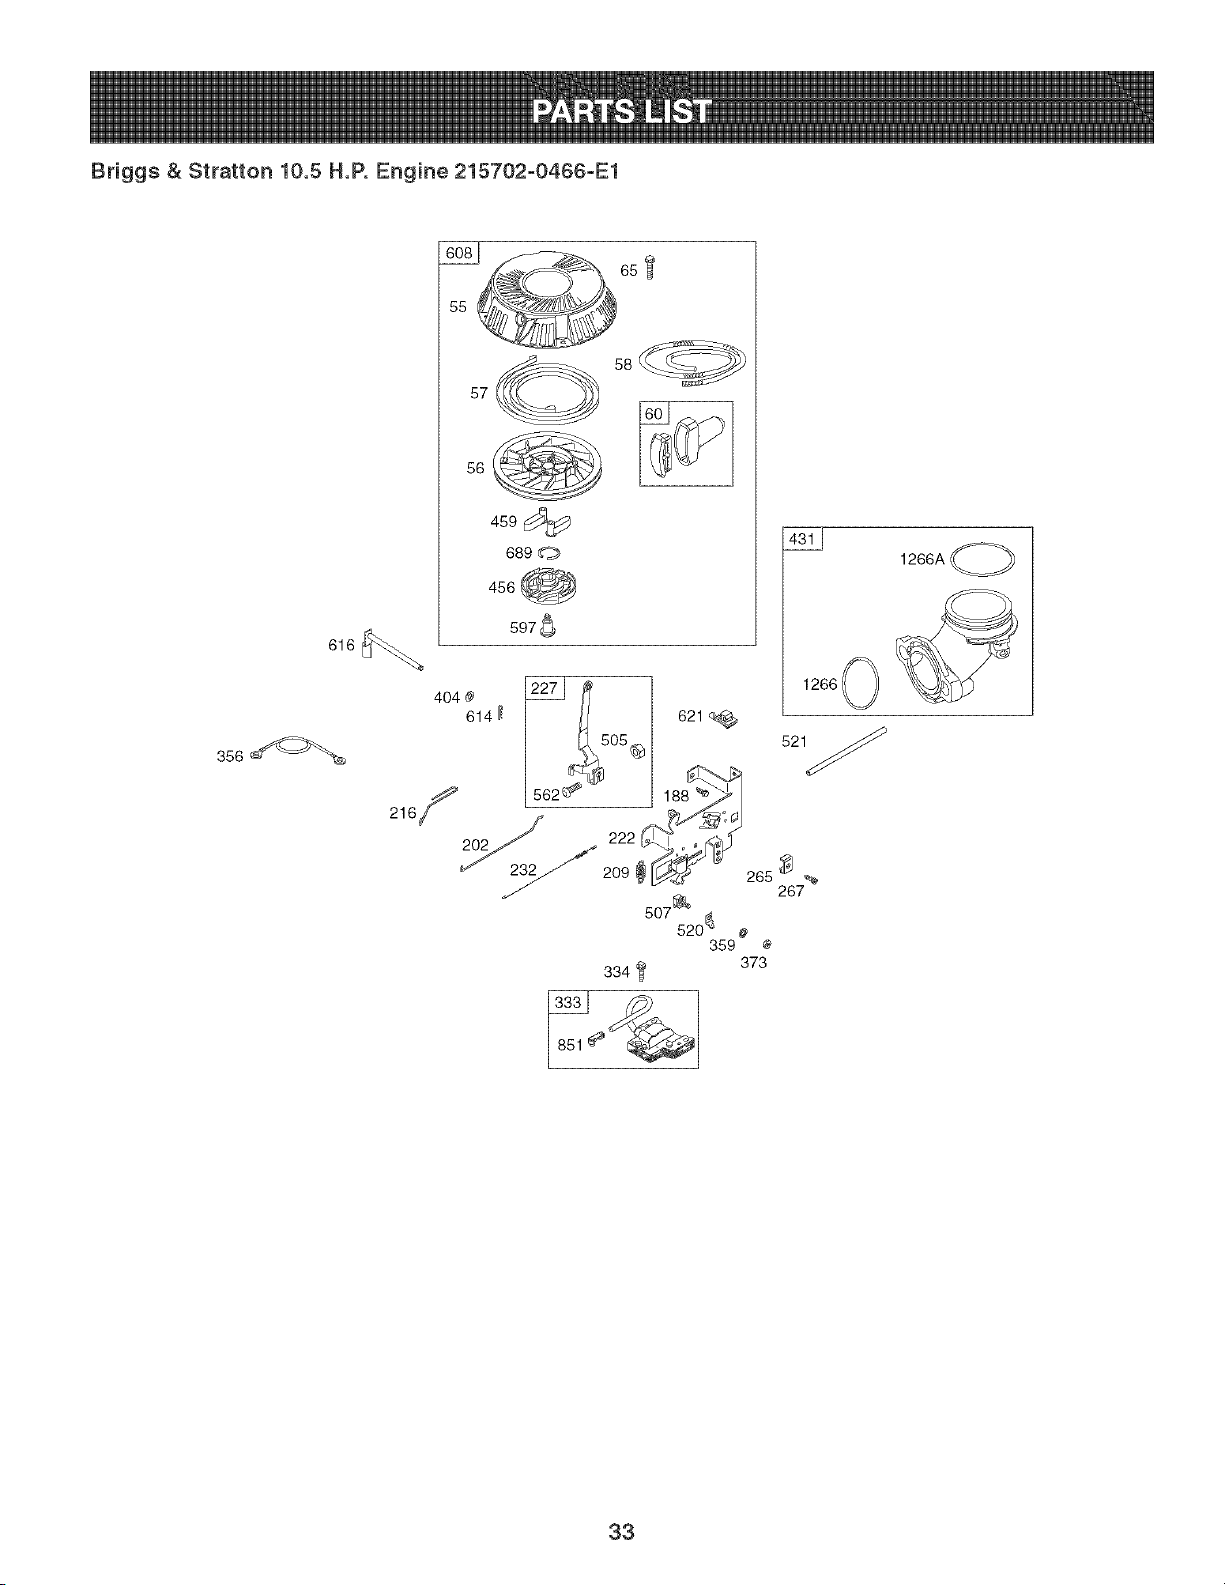
Briggs & Stratton 10.5 H.P. Engine 215702-0466-E1
2_ 27
38
883
24
741
1095 VALVE GASKET SET
868 _ 1022
358 ENGINE GASKET SET
12
20_ 6170
51 691 (_
8420
524
1022
1266
lO_11_
584_
9_
1264 1
868
1266A (_ 15 e
22_
3O
5240
2oO
Briggs & Stratton 10.5 H.P. Engine 215702-0466-E1
sl
883
1O22
1034
_3_
1022
914
1023
37A _ 1070
78A"_
1005
363 # 455_
238 ®
@
35
6170
11036 EMISSIONS LABEL
13J 4_¢_
3_
S
54_b
654
53
305A
643
445%
968
1044_
1058 OPERATOR'S MANUAL ]
I 1330REPAIRMANUALI
I 46SHORTBLOCK I
11329REPLACEMENT ENGINE I
sos
31
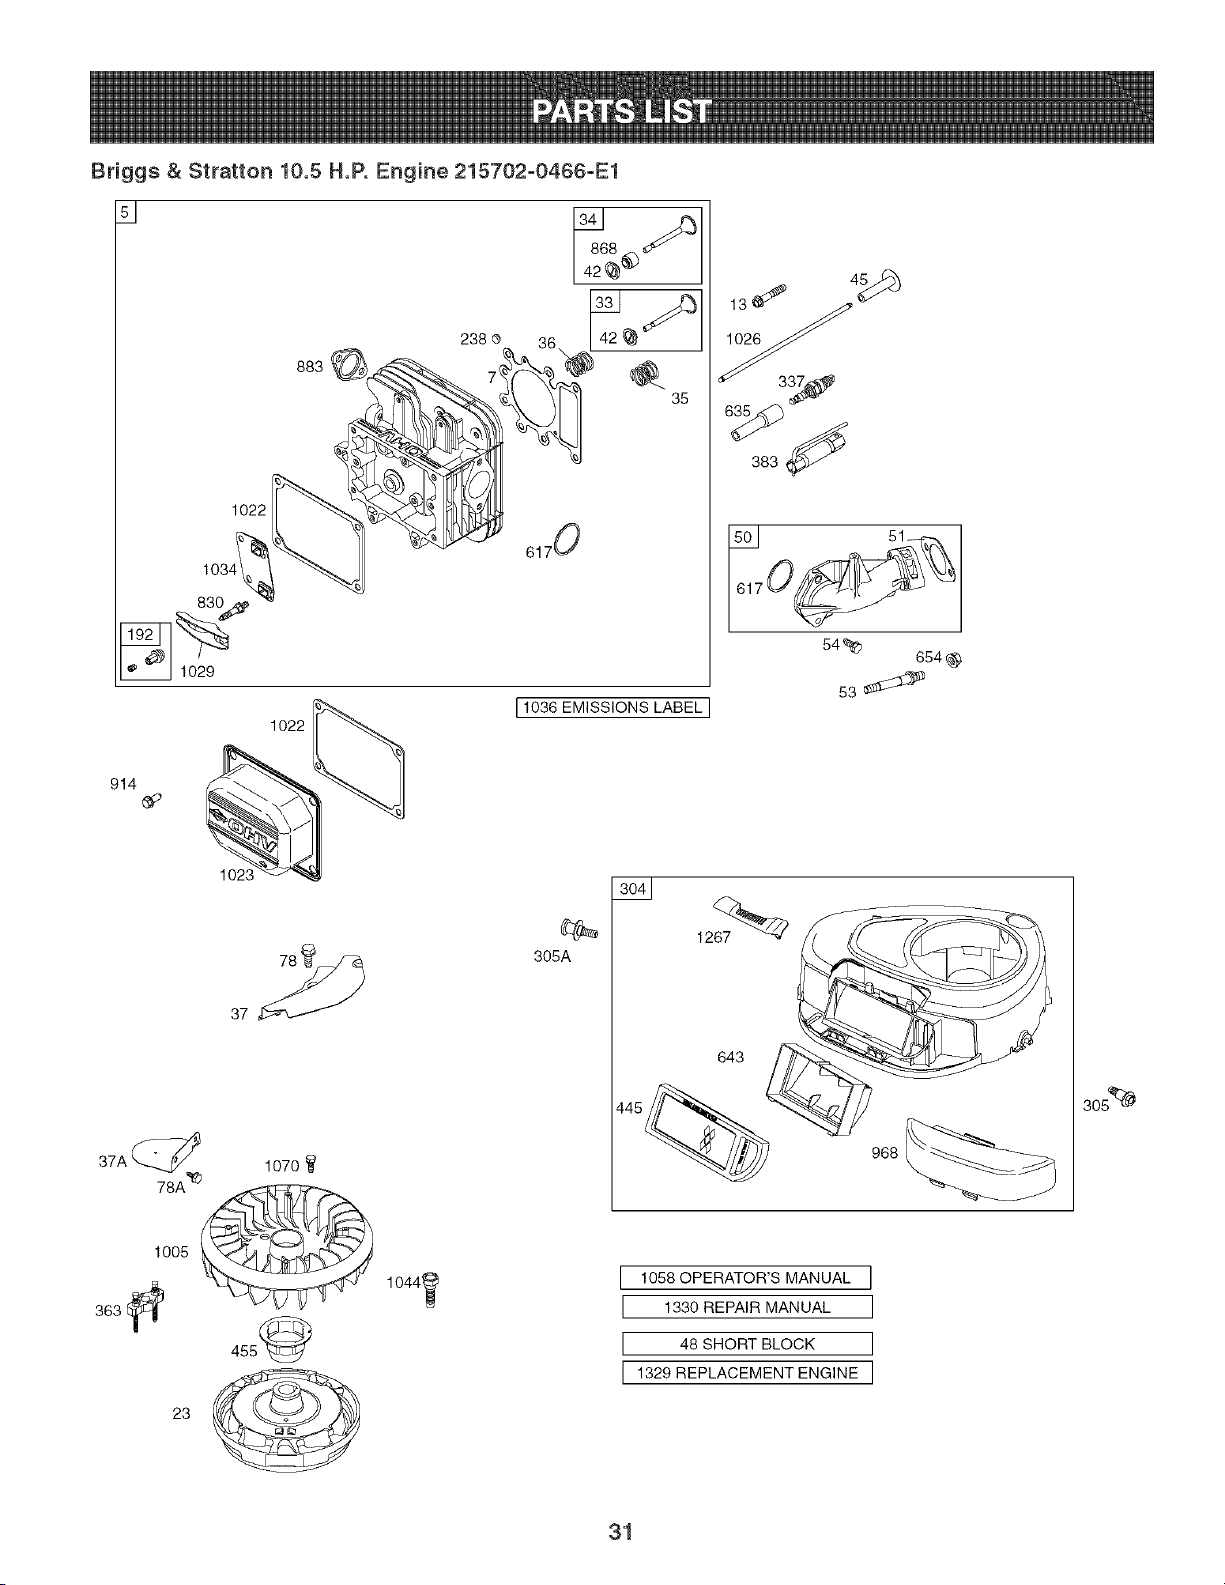
Briggs & Stratton 10.5 H.P. Engine 215702-0466-E1
240
105
127
o
1127
o
823
613A _b
883
81
51
95
104 ,_
121 CARBURETOR OVERHAUL KIT
987 @
6170 1266_
634 _ 1266A O
977 CARBURETOR GASKET SET
32
Briggs & Stratton 10.5 H.P. Engine 215702-0466-E1
356
57 @ 58
4s9_
689 _,_
456 _
597
,o,o _
614_ / _l 621'_
1266_
#
267
507_
520 #
359
373
334 _
1266A
33

Briggs & Stratton 10.5 H.P. Engine 215702-0466-E1
1 BS-699045
2 BS-399265
3 BS-391086s °
4 BS-697106
5 BS-697396
7 B%273280s °+
9 BS-697109
10 BS-697157
11 BS-697113
12 BS-697110 °
13 BS-690360
15 BS-691680
16 BS-698382
20 BS-791892 °
22 BS-692125
23 BS-693555
24 BS-222698s
25 BS-698767
BS-698769
26 BS-698375
BS-698377
27 BS-698469
28 BS-697099
29 BS-791633
32 BS-791118
33 BS-695760
34 BS-695761
35 BS-691279
36 BS-691279
37 BS-697352
37A BS-697626
42 BS-499586
43 BS-691968
45 BS-690564
46 BS-790400
48 B%697740
50 BS-697361
51 BS-692137 °®:_÷
53 BS-690227
54 BS-691148
55 BS-695130
56 BS-695129
57 BS-695131
58 BS-695132
60 BS-494212
65 BS-697725
78 BS-691003
CylinderAssembly
Kit-Bushing/Seal(MagnetoSide)
Seal-Oil(MagnetoSide)
Sump-Engine
Head-Cylinder
Gasket-CylinderHead
Gasket-Breather
Screw(BreatherAssembly)
Tube-Breather
Gasket-Crankcase
Screw(CylinderHead)
Plug-OilDrain
Crankshaft
Seal-Oil(PTOSide)
Screw(CrankcaseCover)
Flywheel
Key-Flywheel
PistonAssembly(Standard)
PistonAssembly(,020"Oversize)
RingSet-Piston(Standard)
RingSet-Piston(,020"Oversize)
Lock-PistonPin
Pin-Piston(Standard)
Rod-Connecting(Standard)
Screw(ConnectingRod)
Valve-Exhaust
Valveqntake
Spring-Valve(Intake)
Spring-Valve(Exhaust)
Guard-Flywheel
Guard-Flywheel
Keeper-Valve
Slinger-Governor/Oil
Tappet-Valve
Camshaft
ShortBlock
Manifold-Intake
Gasketqntake
Stud(Carburetor)
Screw(intakeManifold)
Housing-RewindStarter
Pulley-Starter
Spring-RewindStarter
Rope-Starter
Grip-StarterRope
Screw(RewindStarter)
Screw(FlywheelGuard)
78A
81
94
95
98
104
105
108
117
118
121
125
127
130
131
133
135
137
141
146
187
188
192
202
209
216
222
227
232
238
240
265
267
300
304
305
305A
306
307
333
334
337
356
358
363
373
34
BS-690364
BS-691178
BS-695425
BS-690718
BS-695408
BS-694918
BS-696136
BS-698773
BS-699897
BS-699898
BS-698787
BS-791178
BS-690727
BS-698774
BS-698776
BS-694914
BS-698780
BS-698781
BS-698778
BS-691639
BS-791805
BS-691693
BS-691986
BS-691841
BS-792602
BS-691840
BS-694042
BS-691374
BS-691842
BS-691843
BS-394358s
BS-691024
BS-690804
BS-697048
BS-698473
BS-697102
BS-793376
BS-697359
BS-691003
BS-492341
BS-691061
BS-491055s
BS-398808
BS-697151
BS-19203
BS-691612
io
io
Screw(FlywheelGuard)
Lock-MufflerScrew
KitqdleMixture
Screw(ThrottleValve)
Kit-IdleSpeed
Pin-FloatHinge
Valve-FloatNeedle
Valve-Choke
Jet-Main(Standard)
Jet-Main(HighAltitude)
Kit-CarburetorOverhaul
Carburetor
Plug-Welch
Valve-Throttle
Kit-ThrottleShaft
Float-Carburetor
Tube-FuelTransfer
Gasket-FloatBowl
Kit-ChokeShaft
Key-Timing
Line-Fuel(Cut to RequiredLength)
Screw(ControlBracket)
Adjuster-RockerArm
Link-MechanicalGovernor
Spring-Governor
Link-Choke
Bracket-Control
ControlLever-Governor
Spring-GovernorLink
Cap-Valve
Filter-Fuel
Chmp-Casing
Screw(CasingClamp)
Muffler
Housing-Blower
Screw(BlowerHousing)
Screw(BlowerHousing)
Shield-Cylinder
Screw(CylinderShield)
Armature-Magneto
Screw(ArmatureMagneto)
SparkPlug
Wire-Stop
GasketSet-Engine
FlywheelPuller
Nut(GroundTerminal)

Briggs & Stratton 10.5 H.R Engine 215702-0466-E1
383 BS-89838s Wrench-SparkPlug
404 BS-691691 Washer(GovernorCrank)
431 BS-697122 Elbow-Intake
445 BS-698413 Filter-AirCleanerCartridge
455 BS-695113 Cup-Flywheel
456 BS-695128 Plate-PawIFriction
459 BS-281505s PawI-Ratchet
505 BS-691251 Nut(GovernorControlLever)
520 BS-691084 Terminal-Ground
521 BS-690581 Shield-Cable
523 BS-699908 Dipstick
524 BS-691032 ' Seal-DipstickTube
525 BS-697184 Tube-Dipstick
552 BS-697144 Bushing-GovernorLever
562 BS-691119 Bolt(GovernorControlLever)
584 BS-697112 Cover_BreatherPassage
597 BS-691696 Screw(PawlFrictionPlate)
601 BS-791850 Clamp-Rose
608 BS-695058 Starter-Rewind
613 BS-691416 Screw(Muffler)
613A BS-691678 Screw(Muffler)
614 BS-691620 Pin-Cotter
616 BS-692012 Crank-Governor
617 BS-692138 '_ 0 RingSeal (intake Manifold)
621 BS-692310 Switch-Stop
634 BS-698779 ® Spring/SealAssembly
635 BS-691909 Boot-SparkPlug
643 BS-697155 Retainer-AirFilter
654 BS-690958 Nut(Carburetor)
691 BS-692407 o Seal-GovernorShaft
718 BS-690959 Pin-Locating
741 BS-697128 Gear-Timing
823 BS-698941 Screw(MufflerAdapter)
830 BS-691095 Stud(RockerArm)
842 BS-691031 ' Seal-ORing(DipstickTube)
847 BS-790442 Dipstick/TubeAssembly
851 BS-692424 Terminal-SparkPlug
864 BS-697346 Adapter-Muffler
868 BS-690968 °+ Seal-Valve
883 BS-692236 ' Gasket-Exhaust
914 BS-691108 Screw(RockerCover)
968 BS-697420 Cover_AirCleaner
975 BS-698783 Bowl-Float
977 BS-790032 Set-CarburetorGasket
987 BS-698777 ®' Seal-ThrottleShaft
1005 BS-699044 Fan-Flywheel
1022 BS-272475s
1023 BS-791079
1026 BS-697394
BS-697395
1029 BS-691751
1034 BS-690822
1036
1044 BS-698139
1058 BS-MS3787
1070 BS-690372
1091 BS-691333
1095 BS-691581
1263 BS-697124
1264 BS-697104
1266 BS-691917
1266A BS-697123
1267 BS-697419
1329 BS-215702-
0015
1330 BS-272147
Gasket-RockerCover
Cover_Rocker
Rod=Push(intake)
Rod=Push(Exhaust)
Arm-Rocker
Guide=PushRod
Label-Emissions(Availablefroman
AuthorizedBriggs& StrattonService
Dealer)
Screw(Flywheel)
Operator'sManual
Screw(FlywheelFan)
Cap-Limiter
GasketSet-Valve
Reed=Breather
Screw(BreatherReed)
0 RingSeal (intakeElbow)
0 RingSeal (intakeElbow)
Latch-BlowerRousing
ReplacementEngine
RepairManual
IncludedinEngineGasketSet, Key.No. 358
(bIncludedinCarburetorOverhaulKit, Key.No. 121
Includedin CarburetorGasketSet,Key.No.977
+ Includedin ValveGasketSet,Key.No.1095
35
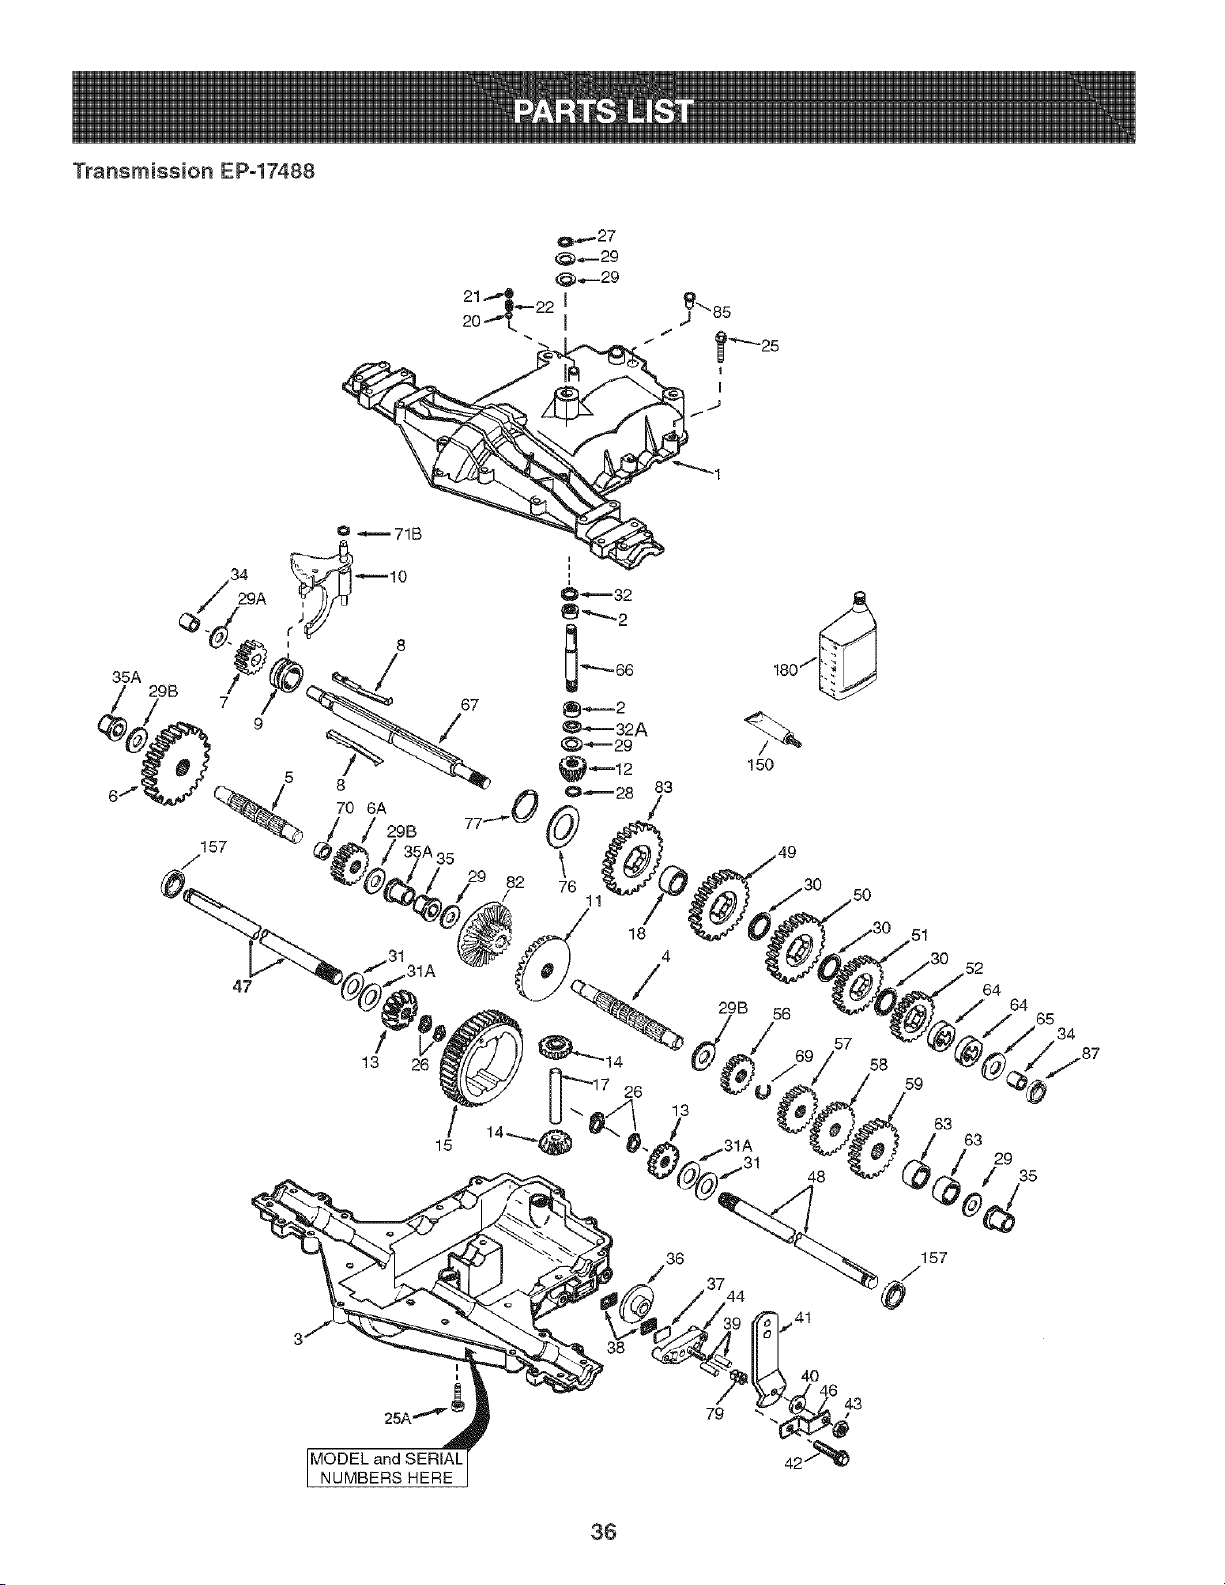
Transmission EP-17488
35A
157
8
70 6A
29B
67
/
47
3
/
13
31A
15
MODEL and SERIAL
NUMBERS HERE
18
4
_17 26 13
/
36
/
29B 56
57
58
59
63
31A
52
64
64
63
65
34
29
35
36

Transmission EP-17488
1 TC_772147 TransaxleCover 1
2 TC-780086A NeedleBearing(1/2"long) 2
3 TC-770128A TransaxleCase 1
4 TC-776395 Countershaft 1
5 TC_776409 OutputShaft 1
6 TC_778364 SpurGear(38%PM/SER) 1
6A TC-778369 SpurGear(15%PM/SER) 1
7 TC-778330 SpurGear(11%PM/SER) 1
8 TC_792180A ShiftKeySet (Qty,2) 2
9 TC-784352 ShiftCollar 1
10 TC-784378 ShiftRod & ForkAssembly 1
11 TC-778334 BevelGear (30%PM) 1
12 TC-778309 InputBevelPinion(13%PM) 1
13 TC_778368 BevelGear 13T(Incl,ref, 13 & 14) 1
CompleteSetof 4_gears
14 TC-778368 BevelGear 13T(Inckref, 13 & 14) 1
CompleteSetof 4_gears
15 TC-778370 RingGear (43T) 1
17 TC-786188 DrivePin 1
18 TC-786102 Spacer(1,130"x ,695") 1
20 TC-792077A Ball(StainlessSteel5/16"dia,) 1
21 TC-792211 Screw,3/8q6 x 3/8' 1
22 TC-792079 Spring 1
25 TC-792073A Screw,1/4-20x lq/4" 17
25A TC-792177 Screw,1/4-20x 1-3/8" 2
26 TC-792125 RetainingRing-packageof 2 4
27 TC-792035 RetainingRing 1
28 TC-788040 RetainingRing 1
29 TC-780072 Washer,627"ID ,031" 5
29A TC-780160 ThrustWasher(,563" ID x ,031") 1
29B TC-780051 ThrustWasher(,762"ID X ,031") 3
30 TC-780108 ShiftWasher(Cupped) 3
31 TC-780001 Washer,750"ID,56" 2
31A TC-780195 Washer,750"ID,062 2
32 TC-788083 Oil Seal5/8" 1
32A T0-792001 0 Ring(,823"OD) 1
34 TC-780194 Bushing(,563") 2
35 TC-780193 FlangedBushing(,625"ID) 2
35A TC-780197 FlangedBushing(,751"ID) 2
36 TC-790075 BrakeDisk 1
37 TC-790007 BrakePad Plate 1
38 TC-799021A BrakePad (pkg,of 2) 2
39 TC_786026 DowelPin ,3125"x ,750" 2
40 TC-792076A Washer,312"ID ,059" 1
41 TC-790104 BrakeLever 1
42 TC-792177 Screw1/4-20x 1-3/8" 1
43 TC-792075 LockNut 5/16-24 1
44 TC-790025 BrakePadHolder 1
46 TC-786086 Bracket 1
47 TC-775146 Axle(10,719"long) (Incl,26) 1
48 TC-775147 Axle(15,312"long) (Inck26) 1
49 TC-778338 SpurGear (27%PM/IC) 1
50 TC-778342 SpurGear (22%PM/IC) 1
51 TC-778313 SpurGear (19%PM/IC) 1
52 TC-778350 SpurGear (16%PM/IC) 1
56 TC-778337 SpurGear (13%PM/SER) 1
57 TC-778341 SpurGear (18%PM/SER) 1
58 TC-778351 SpurGear (21%PM/SER) 1
59 TC-778349 SpurGear (24%PM/SER) 1
63 TC_786071 CountershaftSpacerlq/8" x 3/8" 2
64 TC-786072 BrakeShaftSpacer1-3/8"x 3/8" 2
65 TC-780189 Washer,563" ID,062 1
66 TC-776472 InputShaft 1
67 TC-776396 BrakeShaft 1
69 TC-792170 RetainingRing(,75"x ,042") 1
70 TC-786187 Spacer(,890") 1
71B TC-788092 O-Ring 1
76 TC_780090 FlatWasher(1,128"ID x ,058") 1
77 TC-788078A RetainingRing(1,125"x ,050") 1
79 TC-792144 Spring 1
82 TC-778333 Bevel(30T) & SpurGear 1
83 TC-778338 SpurGear (27%PM/IC) 1
85 TC-792154 Oil Fill Plug 1
87 TC-788089A Oil Seal 9/16"ID 1
150 TC-788093A LiquidGasketRTVSilicon 1
157 TC-788088A Oil Seal 3/4" ID 2
180 TC-730229B GearOil 80W90(32oz,) 1
37
(This page applicable in the U.S.A. and Canada only.)
Sears, Roebuck and Co., U.S.A. (Sears}, the California Air Resources Board (OAF{B)
and the United States EnvironmentaJ Protection Agency (U.S. EPA)
Emission Control System Warranty Statement (Owner's Defect Warranty Rights and Obligations)
EMISSIONCONTROLWARRANTYCOVERAGEISAPPLICABLETO CERT!- YEAR 1997AND LATERENGINESWHICHARE PURCHASEDAND USED
FlED ENGINESPURCHASEDIN CALIFORNIAIN 1995ANDTHEREAF- ELSEWHEREINTHE UNITEDSTATES(ANDAFTERJANUARY1,2001 IN
TER,WHICHARE USEDIN CALIFORNIA,ANDTOCERTIFIEDMODEL CANADA).
California and United States Emission Control Defects Warranty Statement
The CaliforniaAir ResourcesBoard(CARB),U.S.EPAandSearsare pleased enginefor the periodsof time listedbelow,providedtherehas beenno abuse,
to explainthe EmissionControlSystemWarrantyon your modelyear2000 and neglector impropermaintenanceof your smalloff-roadengine.Youremis-
latersmalloff-roadengine(SORE).In California,newsmall off-roadengines sion controlsystemincludespartssuch as thecarburetor,air cleaner,ignition
mustbe designed,builtand equippedto meettheState'sstringentanti-smog system,mufflerand catalyticconverter.Also includedmay be connectorsand
standards.Elsewhereinthe UnitedStates,newnon-road,spark-ignition otheremissionrelatedassemblies.Wherea warrantableconditionexists,Sears
enginescertifiedfor modelyear 1997and latermustmeetsimilar standardsset will repairyour smalloff-roadengine at no cost to you includingdiagnosis,parts
forth bythe U.S.EPA.Sears mustwarranttheemissioncontrol systemonyour and labor.
Sears Emission Control Defects Warranty Coverage
Smalloff-roadenginesarewarrantedrelativeto emissioncontrol partsdefects part onyour engineis defective,the part will be repairedor replacedbySears.
fora period of oneyear,subjectto provisionsset forth below.Ifany covered
Owner's Warranty Responsibilities
Asthe smalloff-roadengineowner,you are responsiblefor theperformanceof provedmodifications.Youare responsiblefor presentingyour smalloff-road
therequiredmaintenancelistedinyour Operatingand MaintenanceInstruc- engineto anAuthorizedSearsService Dealeras soonas a problemexists.The
tions.Searsrecommendsthatyou retainall your receiptscoveringmaintenance undisputedwarrantyrepairsshouldbe completedina reasonableamountof
on yoursmall off-roadengine,butSearscannot denywarrantysolelyforthe time,not to exceed30 days.Ifyou haveany questionsregardingyourwarranty'
lackof receiptsor for yourfailureto ensurethe performanceof all scheduled rightsand responsibilities,you shouldcontacta SearsServiceRepresentative
maintenance.Asthe smalloff-roadengineowner,you shouldhoweverbe at 1--800--469--4663.Theemissionwarrantyis a defectswarranty.Defectsare
awarethat Sears maydenyyou warrantycoverageif your smalloff-roadengine judgedon normalengineperformance.The warrantyis not relatedto an in-use
ora part hasfailed dueto abuse,neglect,impropermaintenanceor unap- emissiontest.
Sears Emission Control Defects Warranty Provisions
Thefollowingare specificprovisionsrelativeto your EmissionControlDefectsWarrantyCoverage.It is in additionto the Searsenginewarrantyfor non-regulated
enginesfoundin theOperatingandMaintenanceInstructions.
1. WarrantedParts 3. NoCharge
Coverageunderthis warrantyextendsonly to the parts listed below(the Repairor replacementof any WarrantedPartwill beperformedat no
emissioncontrol systemsparts)to the extentthese parts werepresenton chargeto the owner,includingdiagnosticlabor whichleads to the
theengine purchased, determinationthata WarrantedPartis defective,if the diagnosticworkis
a. FuelMeteringSystem performedat an AuthorizedSears ServiceDealer.For emissionswarranty
oColdstart enrichmentsystem servicecontact your nearestAuthorizedSearsService Dealeras listed in
oCarburetorand internal parts the "YellowPages"under"Engines,Gasoline,""GasolineEngines,""Lawn
oFuelPump Mowers,"or similarcategory.
b. Air InductionSystem 4. Claimsand CoverageExclusions
oAir cleaner Warrantyclaimsshall be filed in accordancewiththe provisionsofthe
oIntakemanifold Sears EngineWarrantyPolicy.Warrantycoverageshall be excludedfor
c. IgnitionSystem failures of WarrantedPartswhichare not originalSears parts or because
of abuse,neglector impropermaintenanceas setforth in theSears
oSparkplug(s) EngineWarrantyPolicy.Searsis not liable to coverfailuresof Warranted
oMagnetoignitionsystem Partscausedby the useof add-on, non-original,or modifiedparts.
d. CatalystSystem 5. Maintenance
oCatalyticconverter Any WarrantedPartwhich is notscheduledfor replacementas required
oExhaustmanifold maintenanceor which is scheduledonly for regularinspectionto the effect
oAir injectionsystemor pulsevalve of repair or replaceas necessary"shall be warrantedas to defectsfor the
e. MiscellaneousItemsUsed inAboveSystems warrantyperiod.Any WarrantedPartwhich is scheduledfor replacement
oVacuum,temperature,position,timesensitivevalves
as requiredmaintenanceshallbe warrantedasto defectsonly for the
andswitches periodof time upto the first scheduledreplacementforthat part. Any
• Connectorsand assemblies replacementpart that is equivalentin performanceand durabilitymay
2. Lengthof Coverage be usedin theperformanceof any maintenanceor repairs.The owneris
Searswarrantsto the initialownerand eachsubsequentpurchaserthat responsibleforthe performanceof all requiredmaintenance,as definedin
theWarrantedParts shall befree from defectsin materialsandworkman- the SearsOperatingandMaintenanceInstructions.
ship whichcausedthe failureof the WarrantedPartsfor a periodof one 6. ConsequentialCoverage
yearfrom the datethe engineis deliveredto a retailpurchaser. Coveragehereundershallextend to the failure of any engine components
caused bythe failure of anyWarrantedPart still underwarranty.
Inthe USAand Canada,a 24 hour hotline, 1-800-469-4663,has a menuof pre-recordedmessagesofferingyou engine maintenanceinformation.
38
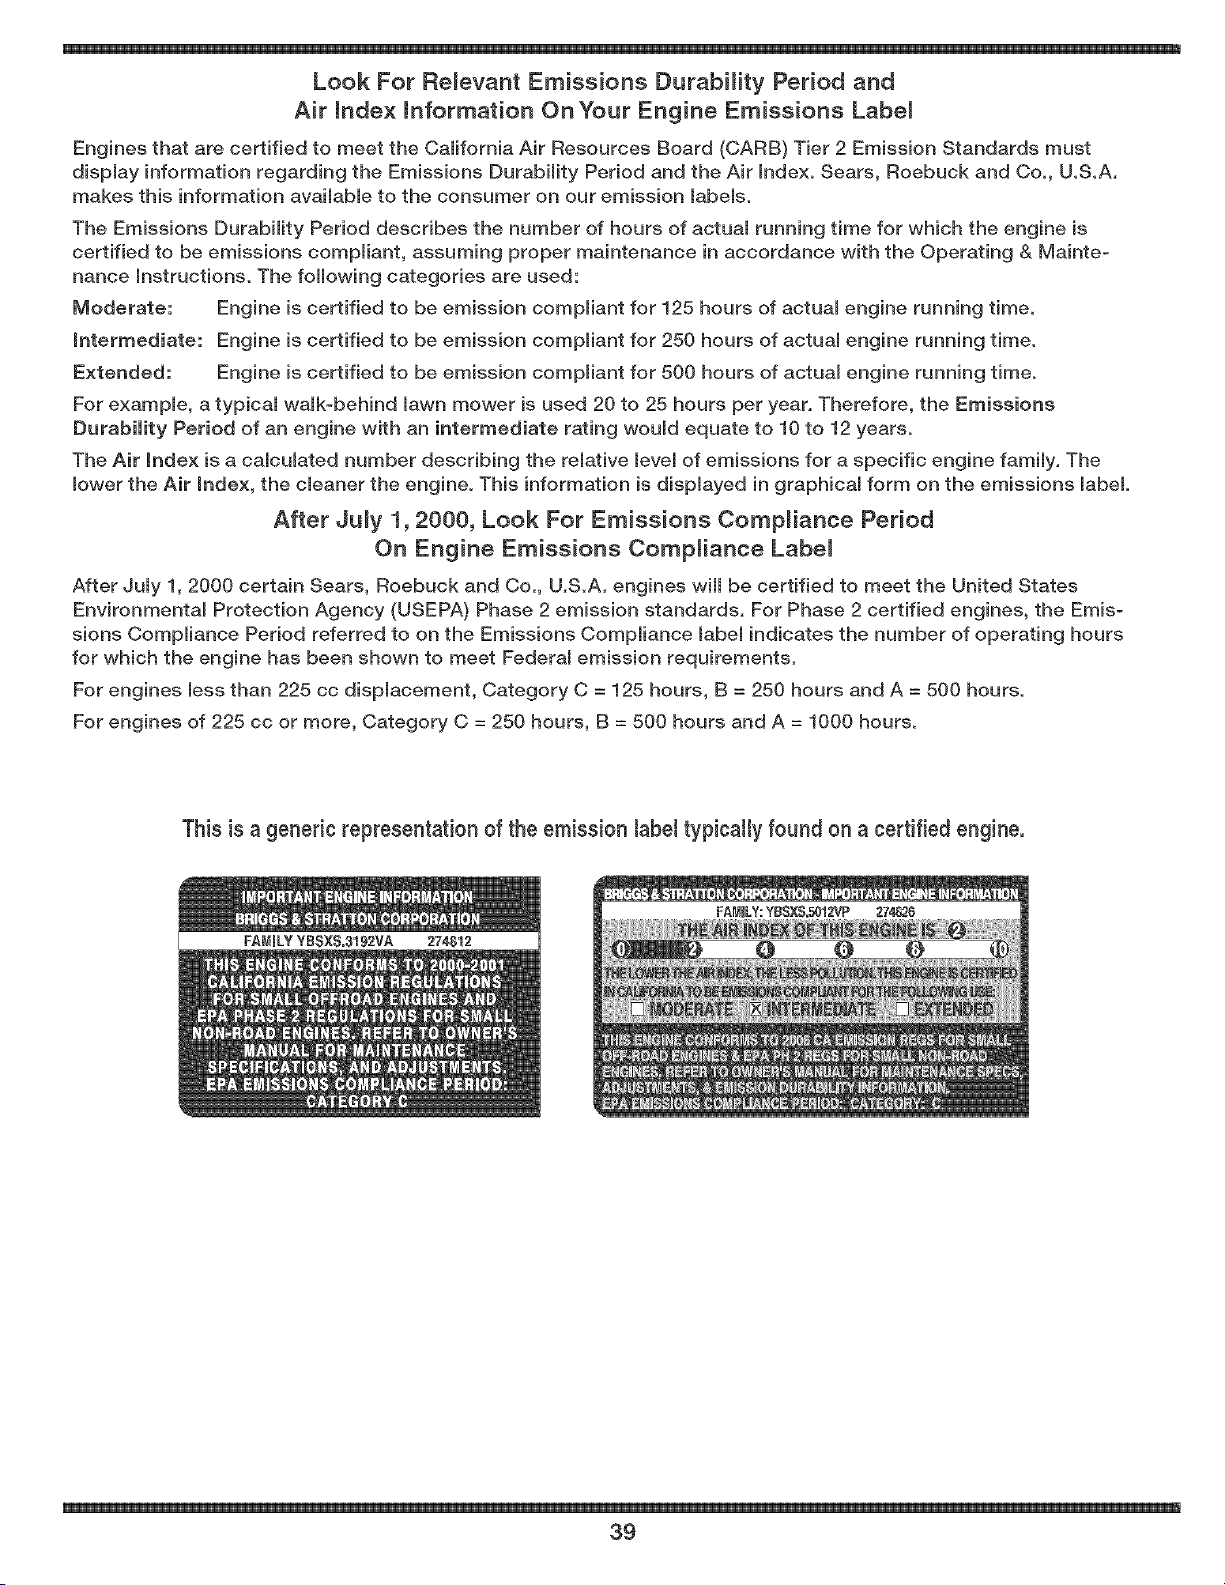
Look For Relevant Emissions E)urabHity Period and
Air hde× mnformation On Your Engine Emissions Labe_
Engines that are certified to meet the California Air Resources Board (CARB) Tier 2 Emission Standards must
display information regarding the Emissions Durability Period and the Air index. Sears, Roebuck and Co., U.S.A.
makes this information available to the consumer on our emission labels.
The Emissions Durability Period describes the number of hours of actual running time for which the engine is
certified to be emissions compliant, assuming proper maintenance in accordance with the Operating & Mainte-
nance Instructions. The following categories are used:
Moderate: Engine is certified to be emission compliant for 125 hours of actual engine running time.
Intermediate: Engine is certified to be emission compliant for 250 hours of actual engine running time.
Extended: Engine is certified to be emission compliant for 500 hours of actual engine running time.
For example, a typical walk-behind lawn mower is used 20 to 25 hours per year. Therefore, the Emissions
Durability Period of an engine with an intermediate rating would equate to 10 to 12 years.
The Air Index is a calculated number describing the relative level of emissions for a specific engine family. The
lower the Air Index, the cleaner the engine. This information is displayed in graphical form on the emissions label.
After Ju_y 1,2000, Look For Emissions Compliance Period
On Engine Emissions Compliance Labe_
After July 1, 2000 certain Sears, Roebuck and Co., U.SoA. engines will be certified to meet the United States
Environmental Protection Agency (USEPA) Phase 2 emission standards. For Phase 2 certified engines, the Emis-
sions Compliance Period referred to on the Emissions Compliance label indicates the number of operating hours
for which the engine has been shown to meet Federal emission requirements.
For engines less than 225 cc displacement, Category C = 125 hours, B = 250 hours and A = 500 hours.
For engines of 225 cc or more, Category C = 250 hours, B = 500 hours and A = 1000 hours.
This is a generic representation of the emission label typically found on a certified engine.
39
Servicio y Mantenimiento ............................................... 51
AImacenamiento fuera de temporada ............................ 60
Aditamentos y Accesorios .............................................. 60
Soluci6n de problemas ................................................... 61
NQmero de servicio ............................... Cubierta posterior
Garantia de dos a_os de Craftsman
SiesteproductoCraftsmanfalla debidoa un defectoen losmateriabso la manode obra dentrode losdos ahosde lafechadecompra,sirvase
devolverloacualqubr tbnda Sears,Centrode servicioSears,u otropuntedeventaCraftsmanen los EstadosUnidospara su reparaci6nsin
cargo.
Estagarantiano cubre:
Arficulosde duraci6nlimitadaque puedendesgastarsebaiocondicionesnormabsdeuso duranteel perfodode garanfia,tabs como
cuchillasde cortadorarotativas,adaptadoresparaeuchillas,correas,filtrosde air& y buiiasdeeneendido.
Las reparacionesrequeridasdebidoa abusoo negligeneiadel operador,incluiyendoabolladurasdel cigqeRaly no operaro mantenerel
equipode acuerdocon las instrueeionessuministradas.
Estagarantfas61otendr_validezdurante90 dias si este productose utilizaen cualqubr mementoparafines comerciabs o de alquiler.
Estagaranfias61otendr_validezmientrasel productose utiliceen los EstadosUnidos.
Estagaranfiale otorgaderechoslegalesespedfieos,pero ustedpodrfagozarde otros dereehosen raz6nde su lugarde residencia.
Sears, Roebuck and Co., Hoffman Estates, IL 60179
Acuerdos de proteccion sobre reparaciones
Felicitacionespor haberrealizadouna adquisbi6ninteligente.El
productoCraftsman@queha adquiridoestAdiseRadoy fabrbado
parabrindarmuchosares de funcionambntoconfiable.Perocomo
todoslos productosa vecespuederequerirde reparaciones.Es en
ese mementocuandoeldisponerde unAcuerdode protecci6npara
reparacionesle puedeahorrardineroy
probbmas.El Acuerdoincluye:
• Servicioexpertoprestadopernuestros12.000especialistasen
reparacionesprofesionabs
Servicioilimitadosincargo paralas piezasy la manode obraen
todaslasreparacionescubiertas
Reemplazodelproductosi no es posibb repararel producto
cubierto
Descuentode 10% sobreelprecionormaldelservieioy de las
piezasrelacionadascon el mismoqueno estencubiertaspor el
aeuerdo;adem_s,10%de descuentosobreel precionormalde la
verifieaci6nde mantenimientoprevenfivo
Ayudar@idaportelefono- asisteneiatelef6nieaa cargode un
t@nicode Searsparalos productosque requierenreparaci6n
Caballosde fuerza:10.5
a domicilio,adem_sde unaconvenbnteprogramaci6nde la
reparaci6n
Adquieraahora un aeuerdode proteeci6nparareparacionesy
proteiasede problemasy gastosinesperados.
Unavez adquiridoel aeuerdo,puedeprogramarel serviciocon
tan s61orealizarunaIlamadatelef6niea.PuedeIlamaren eualquier
momentodel diao de la noche,o programarun servieioen linea.
Searsdisponede m_sde 12.000espeeialistasen reparaeiones
profesionabsque tienenaceesoa m_sde4.5 millonesde piezas
y aeeesoriosde grancalidad.Estees el tipode profesionalismoen
elque puedeeonfiarpara que le ayudea prolongarlavida Otildel
productorecientementeadquiridodurantemuchosaRos.iAdquiera
hoysu aeuerdode protecci6nparareparaciones!
Seaplican determinadas limitaciones y exclusiones. Paraobtener
prec_ose informaci6n adicional llameal 1o800o827o6655.
Sewicio de instalaci6n de Sears
Parainstalaci6ndeartefactosdom6sticos,dispositivosde aperturade
portonesde garage,cabntadoresdeagua,y otrosarficulosdel hogar
perprofesionabsde Sears,en los EstadosUnidosIlameal
1-800-4-MY-HOME@
Aceitedel motor:
Combusfibb:
Buiia:
Motor:
@SearsBrands,LLC
SAE30
Gasolinasin plomo
Champion@RC12YC
Briggs& StrattonPowerBuiltTM
Ntimero de modelo
Ntimero de serie
Fechadecompra
Registreel nOmerode modelo,nOmerodeseriey fechade compra
mAsarriba.
40
La presenciade este s[mboloindicaquese trata de
instruccionesimportantesde seguridadque sedeben
respetarpara evitar poneren peligro su seguddad
personaly/o materialy la de otras personas.Leay siga
todas lasinstruccionesde estemanualantes de porter
en funcionamientoesta maquina.Si no respetaestas instruccionespodffa
provocarlesionespersonales.Cuandoyeaestesimbolo, [presteatenci6na
la advertencia!
Su responsabiHdad:Restr[niael usode estam_qu[namotor[zada
alas personasque lean,comprendany respetenlas advertenc[ase
instrucdonesqueaparecenen estemanualyen la mAqu[na,
Esta maquinafueconstruidaparaser operadade acuerdocon las reglas
de seguridadcontenidasen estemanual.AI igual quecon cualquiertipo
de equipomotorizado,un descuido o error por partedel operadorpuede
producir lesionesgraves.Esta maquinaes capazde amputarmanosy pies
y dearrojar objetoscon gran fuerza. Deno respetarlas instruccionesde
seguridadsiguientesse puedenproducirlesionesgraveso la muerte.
El escapedel motorde esteproducto,algunosde suscomponentesy
algunoscomponentesdel vehiculocontieneno liberansustanciasquimicas
que el estadode Californiaconsideraque puedenproducircancer,defectos
de nacimientou otros problemasreproductivos.
Nmt OS
Puedenocurriraccidentestragicossi el operadorno estaatentoa la presencia
de ni[_os.PorIogenerala los ni_oslesatraenlascortadorasy laactividadde
cortarel cesped.Noentiendenlosriesgosnilos peligrosNuncaasumaquelos
ni_ospermaneceranenel mismolugardondelosvio porLiltimavez
o Mantengaa los ni_osfueradel Areade trabajoy bajoestrictavigilanciade
un adultoresponsableadernasdel operador.
o Estealertay apaguelapodadorasi un nifioingresaal Area.
o Antesde moversehaciaarrasy mientrasIoestehaciendo,mirehacia
arrasycuide queno hayani[_os.
o Tengaextremaprecauci6ncuandose aproximea esquinasciegas,
entradasde puertas,arbolesu otrosobjetosquepuedanobstaculizarlela
vistade un ni_oquepudiesecorrerhaciala cortadora.
o Mantengaa los ni_osalejadosde losmotoresen marchao calientes.
Puedensufrirquemadurascon un silenciadorcaliente.
o Nuncapermitaque niF_osmenoresde 14ariesoperenestamaquina Los
ni_osmayoresde 14 ariesdebenleery entenderlas instruccionesde
operaci6ny reglasde seguridadcontenidasen estemanual,y debenser
entrenadosy supervisadosper suspadres.
FUNC[ONAM[ENTO GENERAL
Leacuidadosamentetodaslasinstruccionescontenidasen este manual
antesde intentarmontarlamaquina.Lea,comprenday respetetodaslas
instruccionesquefiguranen la maquinayen el o los manualesantesde
hacerlafuncionar.Antesde operaresteequipo,familiar[cesetotalmente
con loscontrolesy el usocorrectodel mismo.Guardeestemanualenun
lugarseguroparaconsultasfuturasy periodicas,as[ comopara solicitar
repuestos.
Esta maquinaesun equipode precision,no unjuguete.PorIotanto,tenga
muchocuidadoentodo momento.Esta unidadrue diseffadapararealizar
unatarea:cortarelcesped.Nola utiliceparaningOnotrofin.
o Nopermitanuncaque losniSosmenoresde 14ariesutilicenesta
maquina.Los niRosmayoresde 14altos debenleery entenderlas
instruccionesde operacioncontenidasen estemanual,y debenser
entrenadosy supervisadosper suspadres.$61ose debepermitirusar
estamaquinaa individuosresponsablesy familiarizadoscon sus reglas
de seguridad.
o Reviseminuciosamenteel Areaderidese utilizarael equipo.Retiretodas
laspiedras,palos,Ilantas,huesos,juguetesy otros objetosextraRosque
podr[anhacertropezary caero ser recogidosy arrojadospor laacci6n
de lascuchillas.Losobjetosarrojadospor lamAquinapuedenproducir
lesionesgraves.Planifiqueelpatr6nde cortedel cespedque ha de seguir
paraevitarla descargade materialhacialoscaminos,las veredas,los
observadores,etc. Eviteademasdescargarmaterialcontralas paredes
y obstruccionesquepodr[anprovocarqueel materialdescargadorebote
contrael operador.
o Paraayudara evitarelcontactocon lacuchillao unalesi6nper un objeto
arrojado,mantengaseen lazonadel operadordetrasde lasmanijasy
mantengaa los nffios,observadores,ayudantesy mascotasapartadosal
41
menos25 metrosde lacortadoramientrasestaen operaci6n.Detengala
maquinasi alguienentraen lazona.
o Paraprotegerselosojos,utilicesiempregafaso lentesdeseguridad
mientrasoperala maquinao mientraslaajustao repara.Losobjetos
arrojadosquerebotanpuedenproducirlesionesocularesgraves.
o Utilicezapatosde trabajoresistentes,de suela fuerte,y pantalonesy
camisasajustados.Se recomiendavestircamisay pantalonparacubrir
brazosy piernasy usarzapatoscon punterade acero.Nuncaopereesta
maquinadescalzo,con sandalias,zapatosresbalososo livianos(perej.
de lena).
o Nopongalasmanoso los piescercade las piezasrotatoriasnidebajo
de laplataformadecorte. Elcontactocon lascuchillaspuedeproducirla
amputaci6nde manosy pies.
o Unacubiertade descargafaltanteo da[_adapuedeprovocarel contacto
con la cuchillao lesionesperobjetosarrojados.
o Muchaslesionesocurrencomoresultadode pasarla cortadorasobre
los piesduranteunacaidaprovocadaalpatinarseo tropezarse.No
se sostengadela cortadorasi seestacayendo,sueltela manija
inmediatamente.
o Nuncatire lacortadorahacia ustedmientrascamina.Sideberetroceder
con la podadoraparaevitarunaparedu obstaculo,mireprimeroabajoy
atras paraevitartropezarsey luegosigaestospasos:
a. Retrocedade la podadorahastaestirarcompletamentesus brazos.
b.AsegSresequeestabienequilibradoy bien parado.
c.Tire lentamentehaciaatras,nomasaliade la mitadde ladistanciaentre
ustedy lacortadora.
d. Repitaestos pasossegSnseanecesario.
o Noopereesta cortadorabajolosefectosdel alcoholo lasdrogas.
o Noengancheel mecanismoautopropulsadoen lasunidadesequipadas
mientrasarrancael motor.
o La manijade controlde la cuchillaes un dispositivode seguridad.
Nuncaintenteevitarsufuncionamiento.Dehacerlonofuncionarianlos
dispositivosde seguridady podrianproducirselesionespersonalespor
el contactoconlascuchillasrotatorias.La manijade controlde la cuchilla
debefuncionarbienen ambasdireccionesy regresarautomaticamentea
la posiciondesconectadacuandose lasuelta.
o Nuncaopere lacortadorasobrecespedh8medo.Siempreest6segurode
su equilibrio. Sitropiezay cae puedelesionarsegravemente.Sisiente
que pierdeel equilibrio,suelteinmediatamentela manijade controlde la
cuchillay la cuchilladejarade rotarentres segundos.
Corteel cespedsolamentecon luzde d[ao con unabuenaluzartificial.
Camine,nuncacorra.
o Detengalacuchillacuandocrucesendas,senderoso caminosde grava.
o Si la mAquinacomenzaraavibrar de maneraanormal,detengaelmotor
y busqueinmediatamentelacausa.La vibraci6nperIo generales una
advertenciade algOnproblema.
o Apagueelmotory esperehastaquelacuchillasedetenga
completamenteantesde retirarel colectorde c6spedo de desbloquearel
canal.La cuchillacontinOarotandopor unoscuantossegundosdespues
queelmotorsehaapagado.Nuncacoloqueningunapartedelcuerpoen
elAreadelacuchillahastaqueesteseguroquelacuchillahadejadode
girar.
o Nuncaoperelacortadorasinotienecolocadosyfuncionandoelescudo
posteriorapropiado,lacubiertadedescarga,elcolectordecesped,
lamanijadecontroldelacuchillayotrosdispositivosdeseguridady
protecci6n.Nunca@erelacortadorasilosdispositivosdeseguridad
estandaF_ados.SinoIohace,puedenproducirselesionespersonales.
o Elsilenciadoryelmotorsecalientanypuedencausarquemaduras.No
lostoque.
o Utilicesolamentepiezasyaccesoriosoriginalesdefabrica.SinoIohace,
puedenproducirselesionespersonales.
o Sisepresentansituacionesquenoestanprevistasenestemanual,sea
cuidadosoyuseelsentidocomOn.Contacteconsucentrodeservicio
Searsparaobtenerayuda.
FUNCIONAMIENTO EN PENDIENTES
Las pendientesson un factorimportanteen losaccidentesocasionadospor
derrapesy ca[dasy puedenproducirlesionesgraves.La operaci6nen pendientes
requieremuchaprecauci6n.Si nosesienteseguroen una pendiente,no realice
elcorte.Parasusegurida&use el indicadorde pendientesquese incluyecomo
partede estemanualparamedirla pendienteantesde operarla unidaden una
zonainclinada.Sila pendientesuperalos 15 grados,no realiceelcorte.
HagaIo siguiente:
o Corteelcespedde la pendienteen sentidotransversal,nuncahaciaarriba
y abajo.Tengasumocuidadoalcambiarde direcci6nen unapendiente.
o Est6atentoa losagujeros,surcos,rocas,objetosocultoso bultosque
puedanprovocarquese resbaleo se tropiece.Elcespedalto puede
ocultarobstaculos.
o Siempreest6 segurode queestabien afirmado.Si tropiezay cae
puedelesionarsegravemente.Sisientequepier@el equilibrio,suelte
inmediatamentela manijade controlde la cuchillay lacuchilladejarade
rotaren 3 segundos.
NohagaIo siguiente:
o Nocorte elc6spedcercade hundimientos,zanjas oterraplenes,podr[a
perderelequilibrio.
o Nocorte elc6speden pendientesmayoresde 15gradoscomose muestra
en el indicadorde pendiente.
o Nocorte elc6spedhOmedo.Si noestafirmementeparado,puede
resbalarse.
SERVIClO
Mane]o seguro de la gasolina:
o ParaevitarlesionespersonalesodaRosmaterialessea sumamente
cuidadosoal manipularla gasolina.La gasolinaes sumamenteinflamable
y susvaporespuedencausarexplosiones.Si se derramagasolinaencima
o sobrela ropase puedelesionargravementeya quese puedeincendiar.
o Lavesela pielycambiesede ropade inmediato.
o Utilices61olos recipientesparagasolinaautorizados.
o NuncaIlenelosrecipientesen el interiorde un veh[culoo cami6no caja
de remolquecon recubrimientosplasticos.Antesde Ilenarlos,coloque
siemprelosrecipientesen elsueloy lejosdel vehiculo.
o Retireel equipoa gasolinadel cami6no remolquey II@eloen elsuelo.Si
estono esposible,Ileneelequipoen unremolquecon contenedorportatil,
en vezde desdeunaboquilladispensadorade gasolina.
o Mantengala boquilla en contactocon elbordedel dep6sitode
combustibleo con la aberturadel recipienteen todo momento,hasta
terminarde cargar.No utiliceun dispositivopara abrir/cerrarla boquilla.
o Apaguetodosloscigarrillos,cigarros,pipasy otrasfuentesde
combustion.
o Nuncacarguecombustibleen lamaquinaen interioresporquelos vapores
infiamablespodr[anacumularseen el Area.
o Nuncasaquelatapa de la gasolinaniagreguecombustiblemientrasel
motorestacalienteo en marcha. Permitaqueel motorse enfr[epor Io
menosdos minutosantesde volvera cargarcombustible.
o NuncaIleneen excesoel depositode combustible.Lleneel tanquea no
masde _Jzpulgadapordebajode la basedel cuellodel tap6nde carga,
para permitirla expansi6ndel combustible.
o Vuelvaa colocarlatapa de lagasolinay ajOstelabien.
o Limpiela gasolinaquese puedahaberderramadosobreel motoroel
equipo.Trasladela maquinaa otrazona.Espere5 minutosantesde
encenderel motor.
o Nuncaalmacenelamb,quinao el recipientede combustibleen un
espaciocerradodon@ hayafuego,chispasoaparatosconpilotocomo
por ejemplo,calentadoresdeagua,calefactores,hornos,secadoresde
ropau otrosaparatosa gas.
o Parareducirel riesgode incendiomantengalamaquinalimpia
de pasto,hojasy de acumulaci6nde otrosescombros.Limpie
los derramesde aceiteo combustibley saquetodos los residuos
embebidosde combustible.
o Permitaquelamaquinase enfr[epor Iomenos5 minutosantesde
almacenarla.
Servicio general:
o Nuncaenciendael motoren espacioscerradoso en unazonacon poca
ventilaci6n.Elescapedel motorcontienemon6xidodecarbono,ungas
inodoroy letak
o Antesde limpiar,repararo inspeccionarla maquina,compruebe
que lacuchillay todaslaspartes quese muevense hallandetenido.
Desconecteel cablede la buj[ay p6ngalohaciendomasacontrael
motorpara evitarquese enciendaaccidentalmente.
o Reviselospernosde montajede lacuchillay del motora intervalos
frecuentespara verificarqueestenbien apretados.Inspeccione
ademasvisualmentelacuchillaen buscade dafios(abolladuras,
desgaste,roturas,etc).Reemplacela cuchillaLinicamentecon equipo
originaldelfabricante(OEM)listadoen este manual,iEI usode piezas
que nocumplenconlasespecificacionesdelequipooriginalpodria
tenercomoresultadoun rendimientoincorrectoy ademasponeren
riesgola seguridad!.
o Lascuchillasde lascortadorasson muyafiladasy podriancortarlo.
Envuelvala cuchillao utiliceguantesy extremelasprecauciones
cuandoefect8emantenimiento.
o Mantengatodoslospernos,tuercasy tornillosbienajustadospara
asegurarsede que lamaquinaseencuentraen condicionessegurasde
operaci6n.
o Nuncaintentealterarlosdispositivosde seguridad.Controle
peri6dicamentequefuncionencorrectamente.
o Despuesde golpearalgSnobjetoextraRo,detengael motor,
desconecteelcable de la bujiay col6quelohaciendomasacontrael
motor.Inspeccioneminuciosamentela maquinaparadeterminarsiesta
daflada.RepareeldaRoantesde encenderlay operarla.
o Nuncaintenteajustaruna ruedao la alturade corte mientrasel motor
estaen marcha.
o Loscomponentesdel colectorde c6sped,lacubiertadedescargay el
escudoposterior,estansujetosa desgastey da_iosquepodrian@jar
expuestaslaspiezasm6vileso permitirquese arrojenobjetos.Para
protegersuseguridad,verifiquefrecuentementetodos loscomponentes
y reemplacelosinmediatamentesolocon piezasdelosfabricantes
del equipooriginal,listadosenestemanual,iEI uso de piezasque
no cumplenconlasespecificacionesdel equipooriginalpodriatener
como resultadoun rendimientoincorrectoy ademasporteren riesgola
seguridadk
o Nocambielaconfiguraciondel reguladordel motorni excedala
velocidaddel mismo.Elreguladorcontrolala velocidadmaximasegura
de funcionamientodel motor.
o Mantengao reemplacelasetiquetasdeseguridad,segLinsea
necesario.
o Respetelas leyesy normasaplicablespara disponeradecuadamente
de losdesechos.La disposici6ninapropiadade liquidoso materiales
puededa_iarel medioambiente.
42
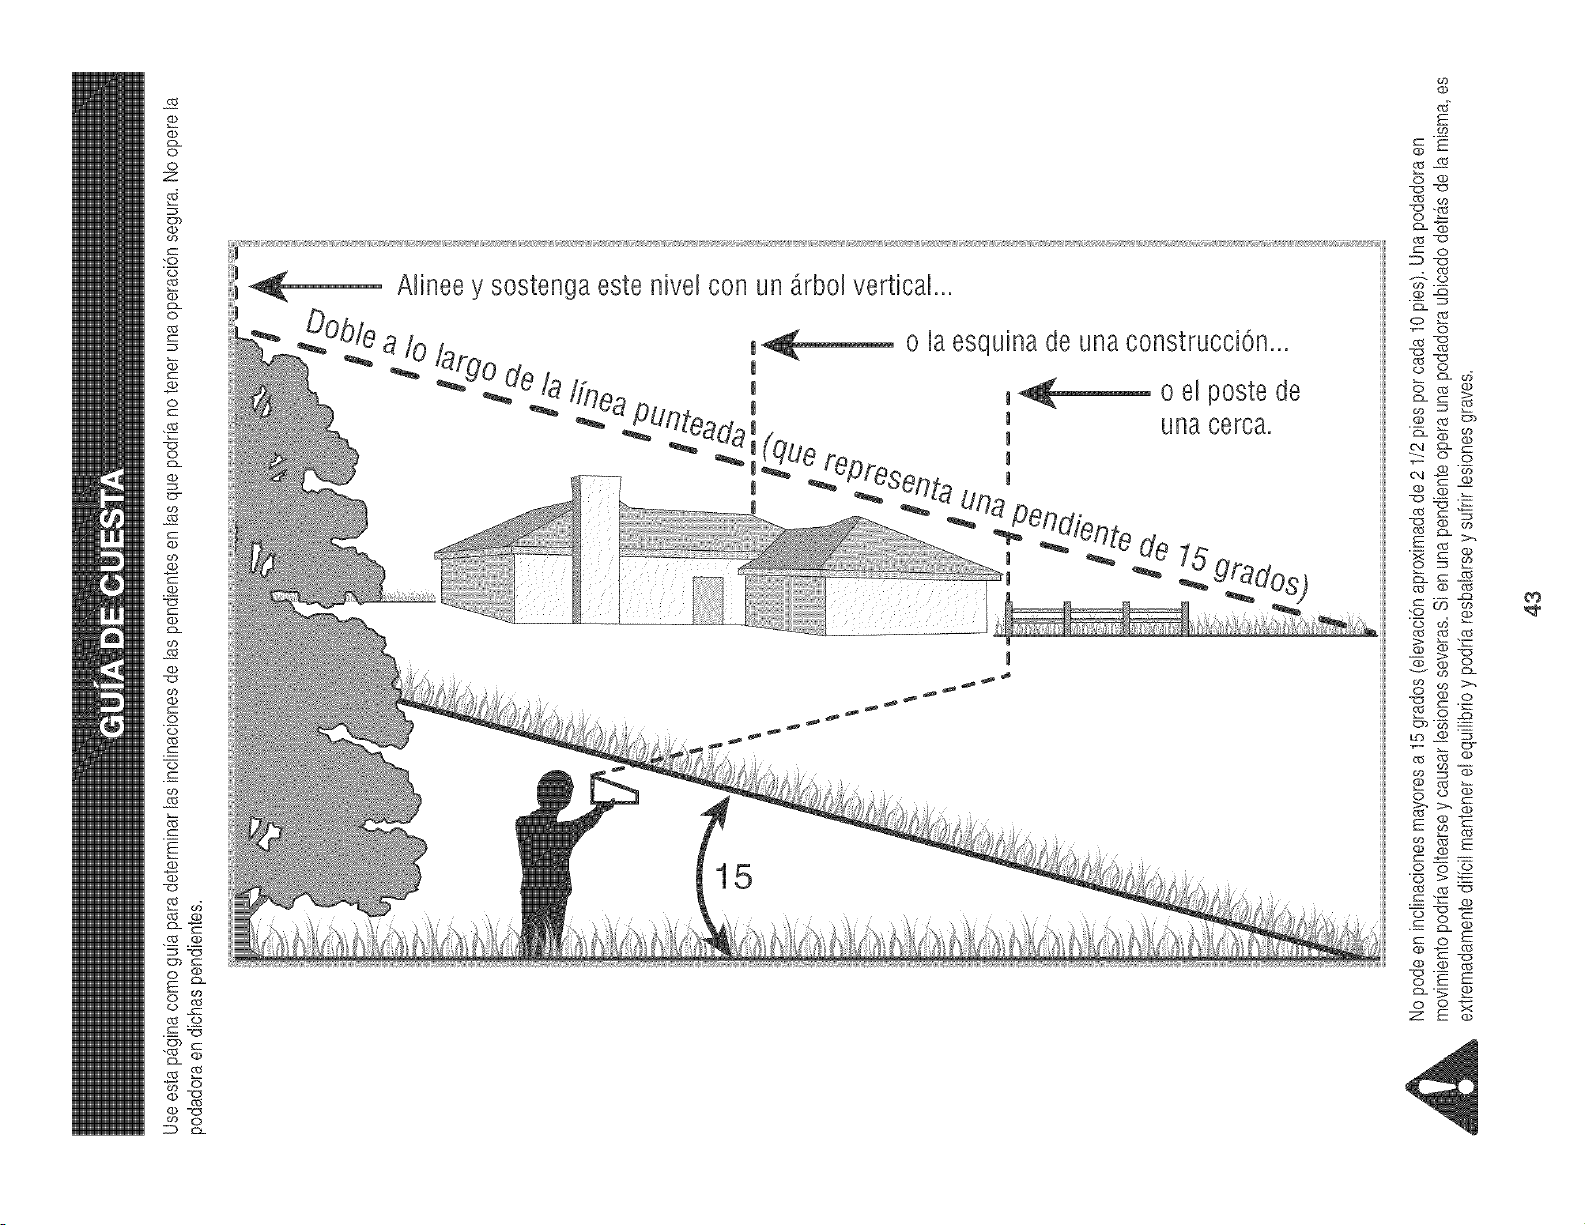
(1)
_2L
©
©
z
E;b
(])
©
b_
©
_25
©
c_
_25
I:D
_25
o3
ed
c_
E
CI)
T25
_ d
.--_ .2
2x
_N
2D _
AHneey sostengaeste nJvelcon un _rbol vertical...
a_.toiarg Odo ia _ o la esquinade unaconstrucci6n...
/rhea PUntea j _,_------ o el poste de
"_ _ _' _ unacerca.
|
E
5E
© el)
_ _25
CI) -_
o _
o
09
_. N
_N
--- _
_d _J
© ©
_,---
C__'_
o3
_J
_25
E
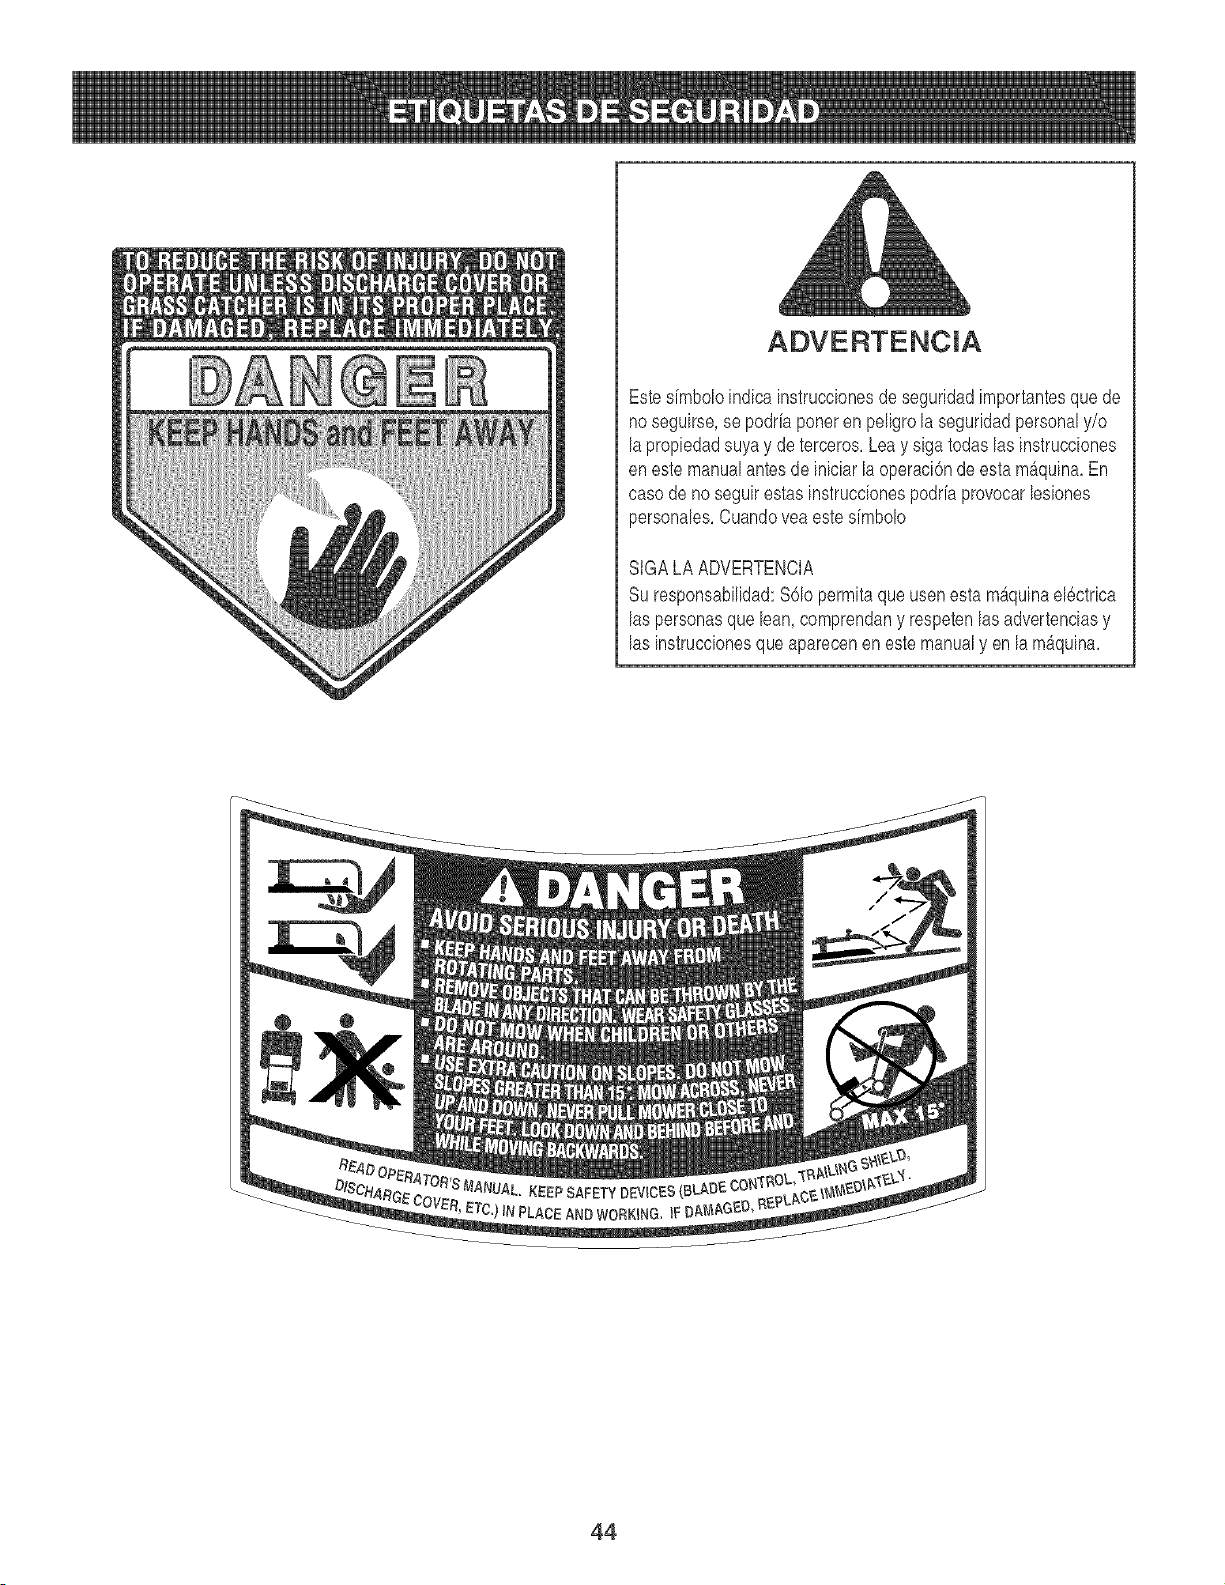
Estes[mbolo[nd[ca[nstrucc[onesdesegur[dad[mportantesquede
noseguirse,se podrh poneren peligrolaseguridadpersonaly/o
laprop[edadsuyay de terceros,Leay s[gatodas las [nstrucc[ones
enestemanualantes de [n[c[arla operac[6nde esta mAqu[na,En
casodeno segu[restas [nstrucc[onespodriaprovocarles[ones
personales,Cuandovea estes[mbolo
StGALA ADVERTENCIA
Suresponsab[l[dad:S61operm[taque usenesta mAqu[naelectr[ca
las personasque lean,comprendany respetenlasadvertenc[asy
las [nstrucc[onesqueaparecenen este manualyen la mAqu[na,
44
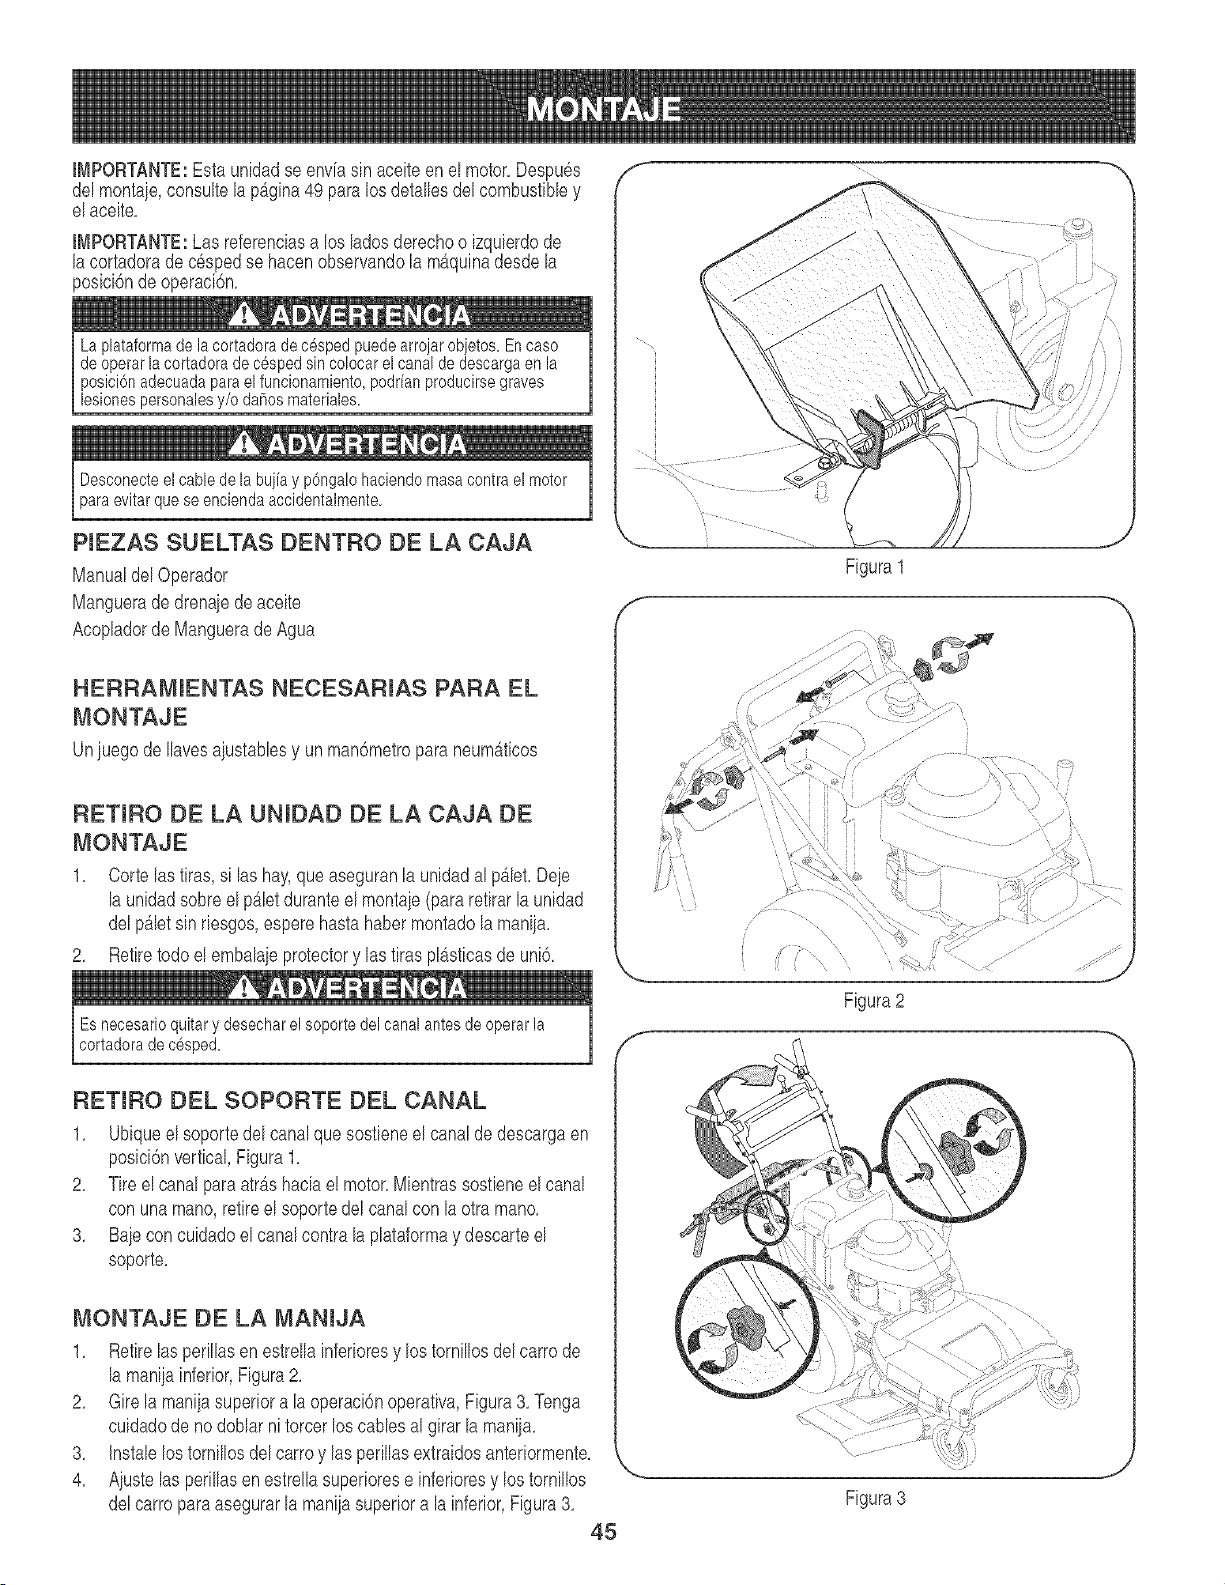
I[_tPORTANTE:Estaunidadse enviasin aceiteen elmotor,Despues
delmontaje,consultela pAgina49 paralos detallesdelcombustibley
el aceite.
IMPORTANTE:Las referenciasa los ladosderechoo [zquierdode
lacortadorade cespedse hacenobservandola m_quinadesdela
posici6ndeoperac[6n,
La plataformade la cortadorade c6sped puedearrojarobjetos. Encaso
de operarla cortadorade c6sped sincolocar el canalde descargaen la
posici6nadecuadaparael funcionamiento,podr[anproducirsegraves
lesionespersonalesy/o daRosmateriales.
Desconecteel cable de la buj[ay pdngalohaciendomasacontra el motor
para evitarquese enciendaaccidentalmente.
PIEZAS SUELTAS DENTRO DE LA CAJA
Manualdel Operador
Manguerade drenaiedeace[te
Acopladorde Manguerade Agua
HERRAMIENTAS NECESARIAS PARA EL
MONTAJE
Un]uegode Ilavesa]ustablesy un man6metropara neum_iticos
RETIRO DE LA UNIDAD DE LA CAJA DE
MONTAJE
1, Corte lastiras, s[ las hay,queaseguranla un[dadal pb_let,Deje
la unidadsobreel p_iletduranteel montaje(pararetirarla unidad
delpAletsin r[esgos,esperehasta habermontadola man[ja,
2, Retiretodo elembalajeprotectory las tiras pl_isticasde uni&
Esnecesarioquitary desecharel soporte del canal antesde operarla
cortadora de c6sped.
f
f
F[gura1
:,:;:_.............
F[gura2
RETIRO OEL SOPORTE OEL CANAL
1, Ub[queel soportedel canalque sostieneel canaldedescargaen
pos[ci6nvertical,F[gura1,
2, Tireel canalpara atris hac[ael motor,Mientrassostieneelcanal
con una mano,retireel soportedel canalcon la otra mano,
3, Baje concuidadoel canalcontralaplataformay descarteel
soporte,
MONTAJE DE LA MANIJA
1, Retirelas perillasen estrellainferioresy lostornillosdelcarro de
la manilainferior,F[gura2,
2, Gire la manijasuperiora la operaci6noperativa,F[gura3,Tenga
cuidadode no doblar n[torcerloscables al girar la manija,
3, Instalelostornillosdel carroy las perillasextraidosanteriormente,
4, Aiustelas perillasen estrellasuperiorese [nferioresy los tornillos
delcarropara asegurarla maniiasuperiora la inferior,F[gura3,
45
F[gura3
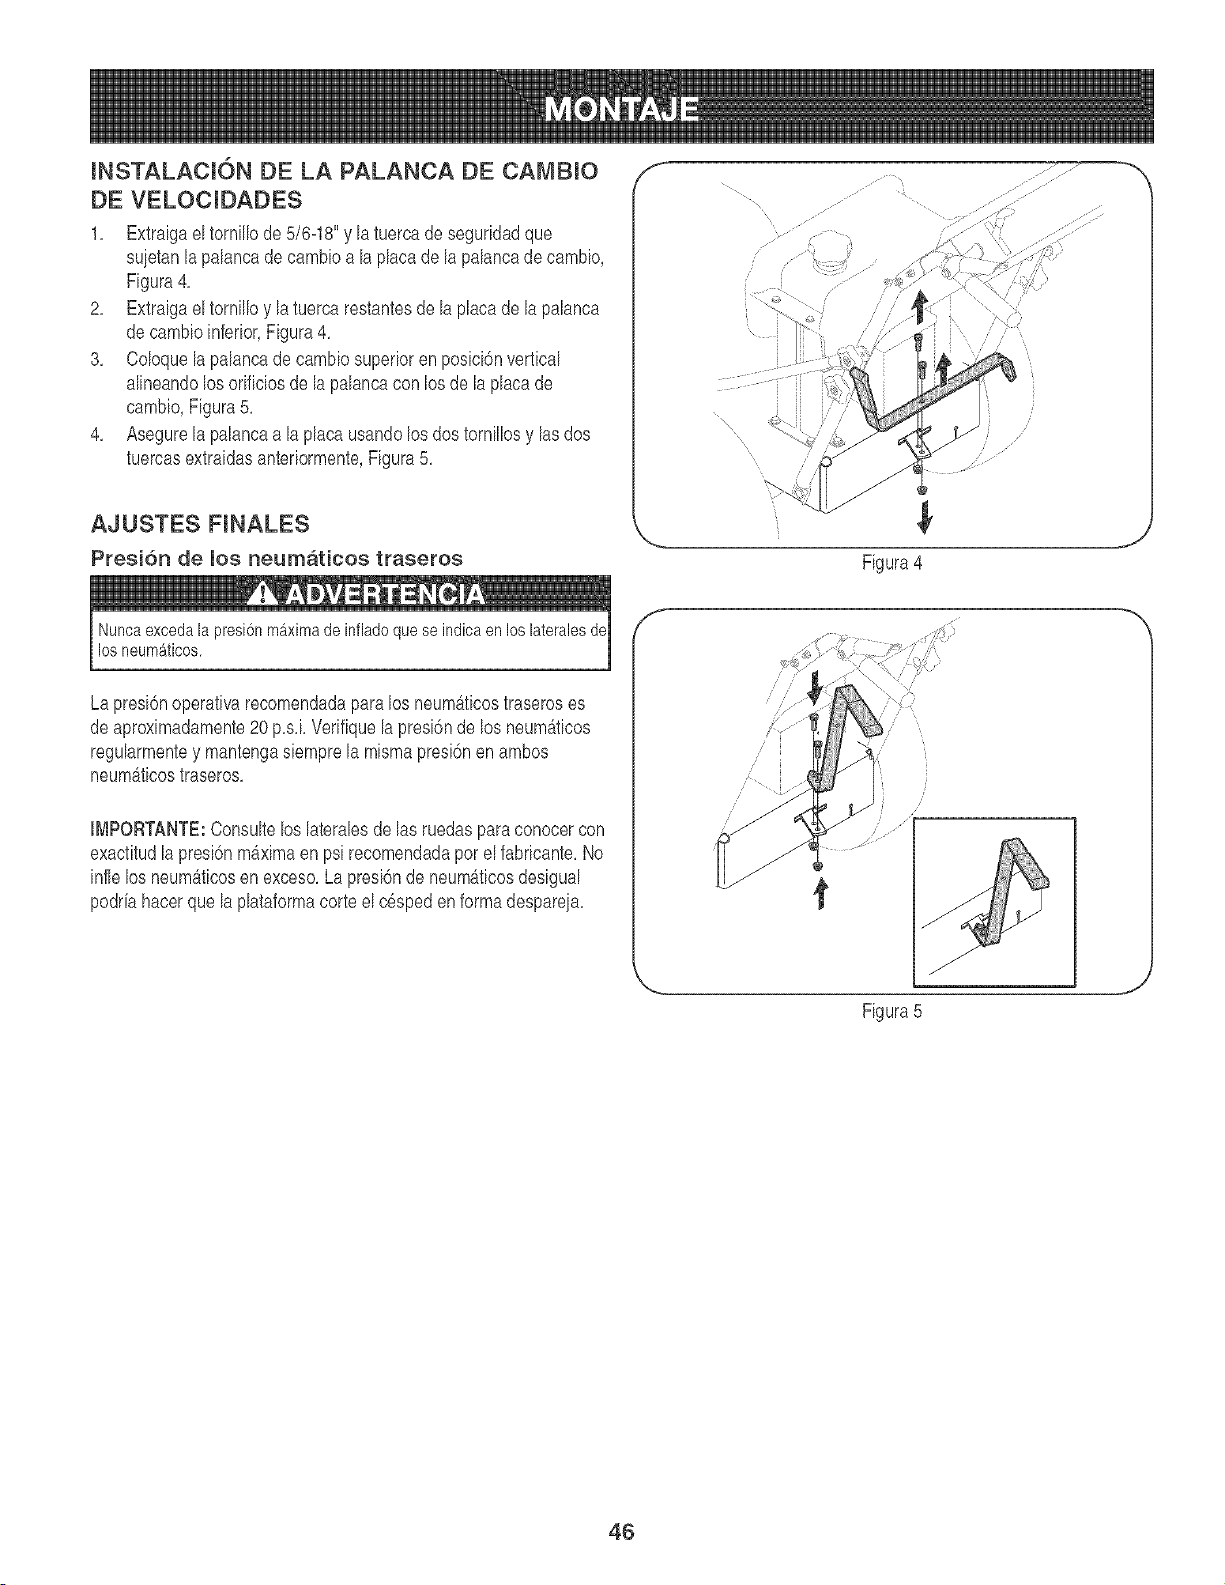
mNSTALACI6N DE LA PALANCA DE CAMBIO
DE VELOCmDADES
1, Extraigael tornillode 5/6-18"y latuercadeseguridadque
suietanlapalancade cambioa la placade lapalancade cambio,
Figura4,
2, Extraigael tornilloy latuercarestantesde laplacade la palanca
decambioinferior,Figura4,
3, Coloquela palancade cambiosuperiorenposici6nvertical
alineandolos orificiosde la palancacon losde la placade
cambio,Figura5,
4, Asegurela palancaa la placa usandolos dostornillosy lasdos
tuercasextraidasanteriormente,Figura5,
AJUSTES FINALES
Presidn de los neumaticos traseros
Nuncaexceda la presi6nmaximade infladoque se indicaen loslateralesd6
los neumaticos.
Lapresi6noperatk,'arecomendadaparalos neum&ticostraseroses
deaproximadamente20 p,s,i,Verifiquela presi6nde los neum_ticos
regularmentey mantengasiemprela mismapresi6nen ambos
neum_ticostraseros,
IMPORTANTE:Consultelos lateralesde las ruedaspara conocercon
exacfitudla presi6nma'ximaen psi recomendadapor el fabricante,No
infle losneum_ticosenexceso,Lapresi6nde neum_ticosdesigual
podriahacerque la plataformacorte el c6speden forma despareia,
f
Figura4
/
J
/
/' i /
Figura5
J
J
46
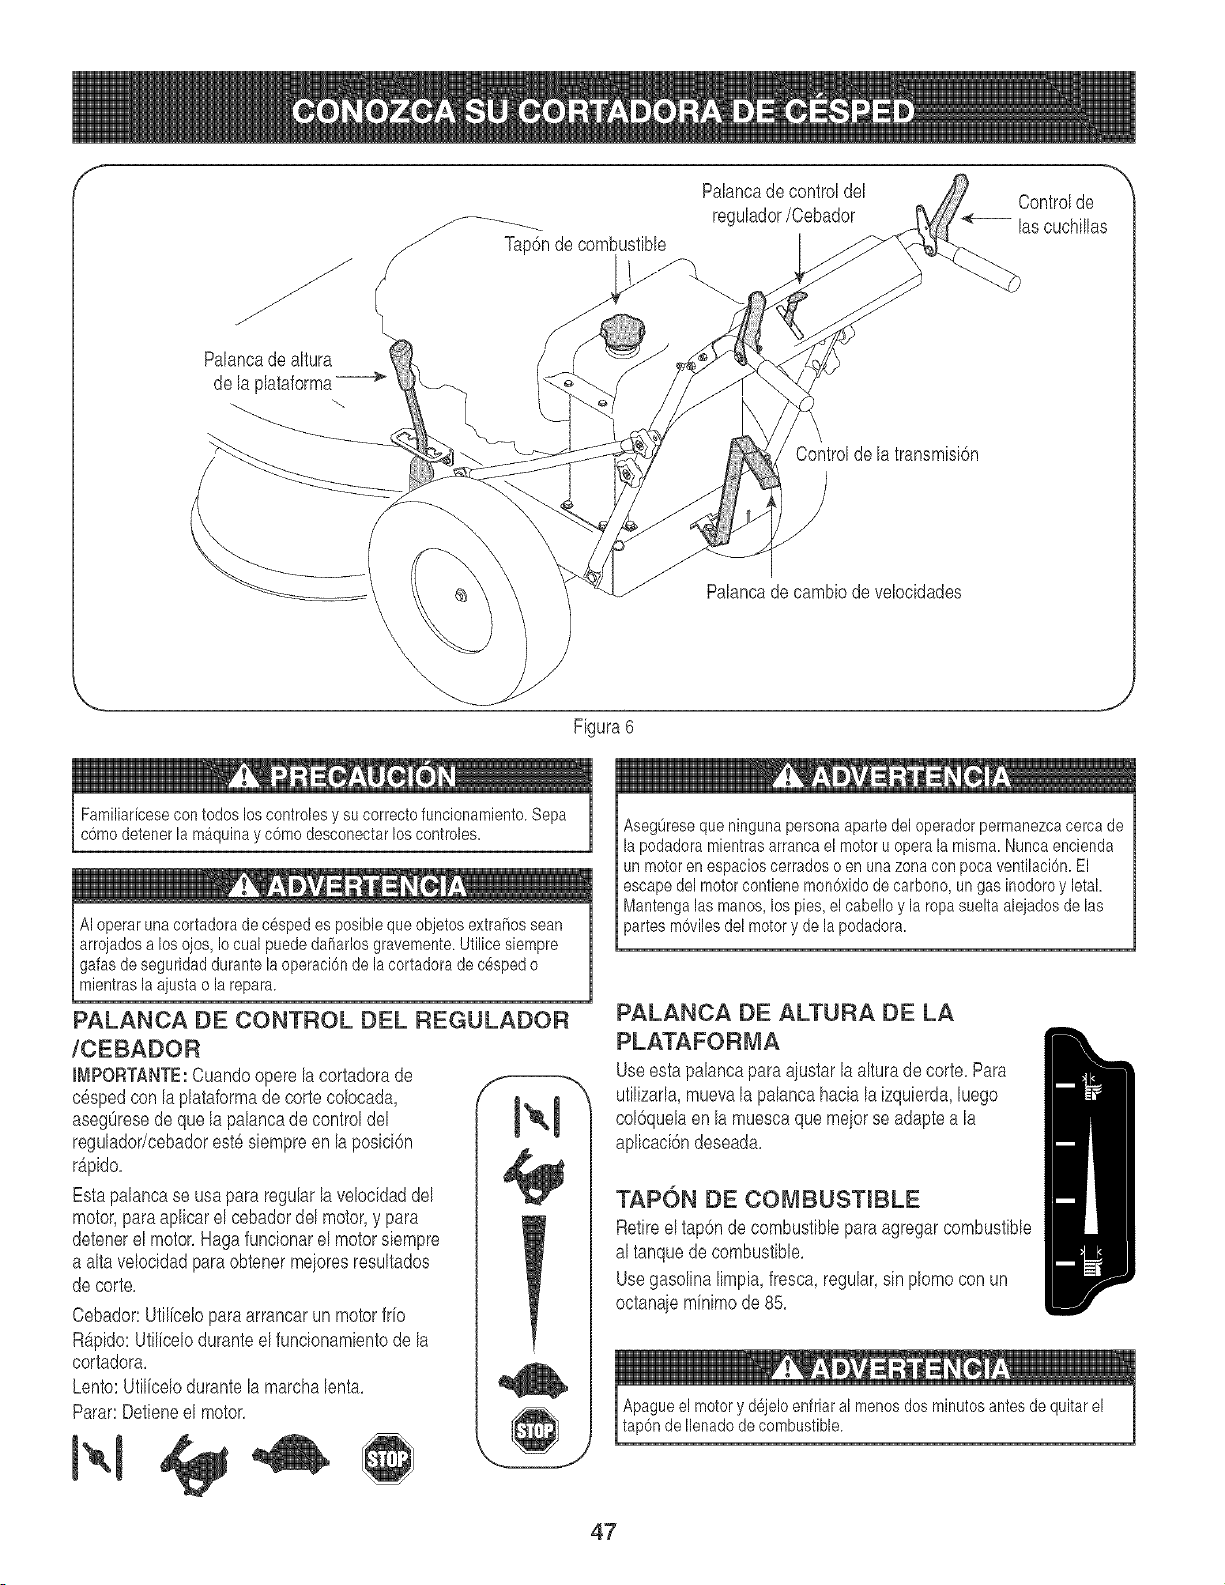
f
Palancade altura
de la plataforma--
,_-_ap6n decombustible
Palancade controldel
regulador/Cebador
Controlde
lascuchillas
Controlde latransmisi6n
Palancade cambiode velocidades
\
\
Figura6
FamiliaHcesecon todos los controlesy su correctofuncionamiento.Sepa
como detenerla maquinay c6mo desconectarlos controles.
AI operar unacortadorade cespedes posiblequeobjetos extra_ossean
arrojadosa los ojos, Iocual puededafiarlosgravemente.Utilice siempre
gafasde seguridaddurantelaoperaci6nde la cortadorade c6spedo
mientrasla ajustao larepara.
PALANCA DE CONTROL DEL REGULADOR
/CEBADOR
IMPORTANTE:Cuandooperelacortadorade
cespedcon la plataformade cortecolocada, l,_ m
asegOresedequela palancade controldel
!
regulador/cebadorest6siempreen la posici6n
r_pido,
Estapalancase usapara regularla velocidaddel
motor,para aplicarel cebadordel motor,y para
detenerel motor,Hagafuncionarel motorsiempre
a altavelocidadparaobtenermeioresresultados
decorte,
Cebador:Ufiliceloparaarrancarunmotorfifo
R_pido:Utiliceloduranteel funcionamientode la
cortadora,
Lento:Utilicelodurantela marchalenta,
Parar:Detieneel motor,
AsegOreseque ningunapersonaaparte del operadorpermanezcacerca de
la podadoramientrasarrancael motoru opera la misma.Nuncaencienda
un motoren espacioscerradoso en unazonacon pocaventilaci6n.El
escape del motorcontienemon6xidode carbono,un gas inodoroy letal.
Mantengalasmanos, los pies,el cabelloy la ropasueltaalejadosde las
partesmoviles del motory de la podadora.
PALANCA DE ALTURA DE LA
PLATAFORMA
Useestapalancapara aiustar la alturadecorte, Para
utilizarla,muevala palancahaciala izquierda,luego
col6quelaen la muescaque meiorseadaptea la
aplicaci6ndeseada,
TAPON DE COMBUSTIBLE
Retireeltap6nde combustibleparaagregarcombustible
al tanquede combustible,
Usegasolinalimpia,fresca,regular,sin plomocon un
octanaieminimode 85,
Apagueel motory d_jeloenfriar al menosdos minutesantesde quitar el
tap6nde Ilenadode combustible.
47
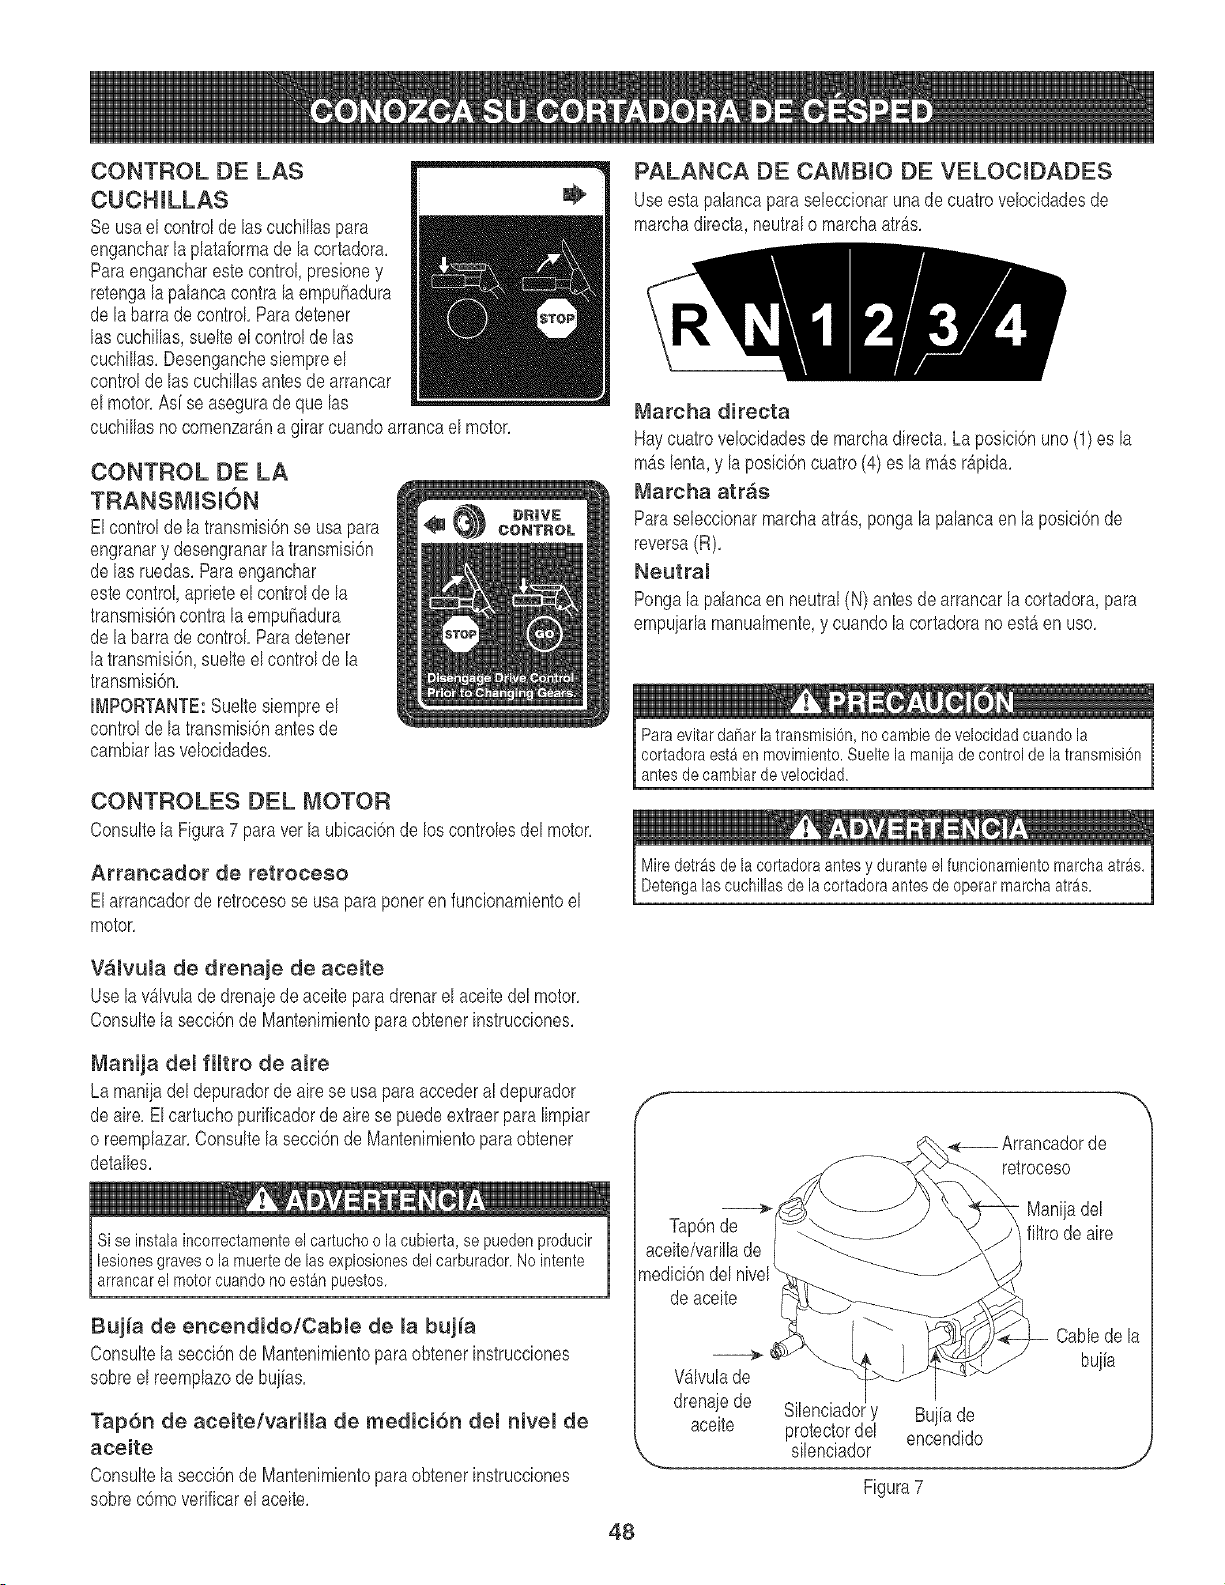
CONTROL DE LAS
CUCHILLAS
Seusa el controlde las cuchillaspara
engancharla plataformade lacortadora.
Paraenganchareste control,presioney
retengala palancacontra la empufladura
de labarrade control Paradetener
las cuchillas,suelteel controlde las
cuchillas.Desenganchesiempreel
controlde lascuchillasantesdearrancar
el motor.Asi se asegurade que las
cuchillasno comenzarAna girarcuandoarrancael motor.
CONTROL DE LA
TRANSMISI6N
Elcontroldela transmisi6nse usapara
engranary desengranarla transmisi6n
de lasruedas.Para enganchar
estecontrol,aprieteelcontrolde la
transmisi6ncontra la empufladura
de labarrade control Paradetener
latransmisi6n,suelteelcontrolde la
transmisi6n.
INPORTANTE:Sueltesiempreel
controlde latransmisi6nantesde
cambiarlasvelocidades.
CONTROLES DEL MOTOR
Consultela Figura7 para ver laubicaci6nde los controlesdel motor.
Arrarloador de retrooeeo
Elarrancadorde retrocesose usapara poneren funcionamientoel
motor,
PALANCA DE CAMBIO DE VELOCIDADES
Useestapahnca paraseleccionarunade cuatrovelocidadesde
marchadirecta,neutralo marchaarras.
Marcha directa
Haycuatrovelocidadesde marchadirecta.La posicbn uno(1) es la
mAslenta,y laposici6ncuatro(4)es lamAsrapid&
Marcha atr_s
Paraseleccionarmarchaatr_s,pongalapalancaen laposici6nde
reversa(R).
Neutral
Pongalapalancaen neutral(N) antesde arrancarla cortadora,para
empuiadamanualmente,y cuandolacortadoranoest_en uso.
Para evitardafiar latransmisbn, no cambie de velocidadcuandola
cortadoraesta en movimiento.Sueltela manijade controlde latransmision
antesde cambiarde velocidad.
Miredetras de la cortadoraantesy duranteel funcionamientomarchaatras.
Detengalas cuchillasde lacortadoraantesde operarmarchaatras.
Valvula de drenaje de aceite
Uselav&lvulade drenaiede aceite paradrenarel aceitedel motor.
Consultela secci6nde Mantenimientoparaobtenerinstrucciones.
Manija del filtro de aire
La maniiadel depuradorde aire se usapara accederal depurador
deaire. El cartuchopurificadorde aire se puedeextraerparalimpiar
o reemplazar.Consultela secci6nde Mantenimientopara obtener
detalles.
Si se instala incorrectamenteel cartuchoo la cubierta,se puedenproducir
lesionesgraveso la muerte de las explosionesdel carburador.No intente
arrancarel motorcuandono estan puestos.
Buj_a de encendido/Cable de la buj_a
Consultela secci6nde Mantenimientoparaobtenerinstrucciones
sobreel reemplazode buiias.
Tap6n de aceiteivarilla de medici6n del nivel de
aceite
Consultela secci6nde Mantenimientoparaobtenerinstrucciones
sobrec6moverificarelaceite.
de
retroceso
--_ Manijadel
Tap6nde filtrodeaire
aceite/varillade
medici6ndel nivel
de aceite
Wlvula de
drenajede
aceite
Silenciado¢y Buiiade
protectordel encendido
silenciador
Figura7
CaMede la
buiia
J
48
AI operaruna cortadorade cespedes posiblequeobietosextrahos
sean arroiadosa los oios,Iocual puededaharlosgravemente,Utilbe
sbmpre galas de segur[daddurantela operac[6nde lacortadorade
c6spedombntras la ajustao la repara,
Asegtiresequeningunapersonaapartedeloperadorpermanezcacercade la
podadoramientrasarrancael motoruoperalamisma.Nuncaenciendaunmotol
en espacioscerrsdoso en unazonaconpocaventilaci6n.Elescapedel motor
contienemon6xidode carbono,un gasinodoroy letal.Mantengalasmanos,los
pies,el cabelloy lavestimentasueltaalejadosde laspiezasm6viles.
Tengasumocuidadoal man[pularla gasolina,Lagasolinaes suma-
mente[nflamabley sus vaporespuedencausarexplos[ones,Nunca 1
carguecombustibleen la mAquinaen un espac[ocerradoo cuandoell
motorest_calbnte oen march&@ague cigarrillos,cigarros,pipasYl
otrasfuentesde combustbn, j
LLENADO DE GASOUNA Y ACEITE
Lienado de gasolina
Loscombustiblescon mezclade alcohol(quese Ilamangasohol,
oque ut[lizanetanolo metanol)puedenatraerhumedad,Ioque
conducea la separaci6ny formaci6nde_cidosduranteelalmace-
nambnto,El gasaddbo puededaharel s[stemade combustble del
motormbntras la m_c[uinaest_ almacenada,
Paraevitarprobbmascon el motor,se debevaciarelsistemade
combustibbantesdealmacenarla m_quinadurante30dias o m_s,
Vacb el tanquede nafta,enciendael motory deielofuncionarhasta
que las lineasde combustibley el carburadorest6nvacios,La
siguientetemporadausecombustiblefresco,Consultelas Instruc-
cionesdeALMACENAMIENTOsi desea informaci6nadicional,
No usenuncaproductosde limpiezapara motoreso carburadores
en el dep6sitode combustible,sepuedenocasionardahosperma-
nentes,
IMPORTANTE:Lacortadorade@spedse entregasincombustibleen
eltanque,
NuncaIleneel tanquede combustblecompletamente,Lleneel
tanquea no m&sde 1/2pulgadapordeba]ode la base delcuello
de Ilenadodejandoespacioparaladilataci6ndelcombustbb,
Sbmpre use gasolinaparaautomotoressin plomo,limpiay
nueva,Lleneel tanquede combustibb al a[re Ibre y useun em-
budoo pbo paraev[tarderramar,AsegOresede queel rec[piente
desdeel cual vbrte lagasolinaest6 limp[oy no est6 oxidadon[
contam[nadocon otras parficulasextrahas,AsegOresede I[mpbr
el combusfibbquese hayaderramadoantes de arrancarel
motor,
, AIfinalizarel trabaio,vacb el tanquede combusfibb s[ la
cortadorade c6spednoser_ usadadurantelos sigubntes30
diaso m_s,AImacenela gasolinaen un recipbnte limp[oy
mantengael recipientebien tapado,Consultelas[nstruccionesde
ALMACENAMIENTOs[ desea[nformaci6nadbionaL
Uenado de aceite
I[_tPORTANTE:La cortadorade cespedse entregacon aceiteen el
motor,no obstante,usted DEBEverificarel nivelde aceiteantesde
operarla,El aceitedebe cambiarsedespuesde las primerasdos horas
de operaci6ny cada25 horasde operaci6ndeah[ enm_s, Utiliceel
tipo de aceite de motorespecificadoen lasecci6nMantenimiento,
1, Retire el tap6nde Ilenadode aceite/la varilladenivelde aceite
del tubode Ilenado,
2, Controb que el niveldeaceiteIleguehasta la marca FULL(lleno)
de lavarilladel niveldelaceite,S[es necesar[o,vbrta aceite
lentamenteen el tubode Ilenadohastaqueel niveldeaceite
alcancea Ileno,
3, Vuelvaacolocareltap6nde Ilenadode aceite/ varilladel nivel
del aceite,
ENCENDIDO DE LA CORTADORA DE CO:SPED
1, Sueltetodosloscontrobs de la cortadorapara impedirque las
ruedaso las cuchillasroten,
2, Muevala palancade camb[ode velocidada la posici6nneutral(N),
3, Mueva la palancede control del regulador/cebadortotalmente
haciaarribaala£osici nN cebadorparaarrancarunmotorlrio
o a la posici6n-'_"r@ido paraarrancarunmotorcaiiente,
4, Para arrancarel motorusandoel arrancadorde retroceso:
a, Pb,rese del lado izquierdo(mirandodesde atr_sde las
barrasde control) de la m_quina,AsegOresede tenerlos
piesbien leiosde lapartede abaiode la plataformade la
cortadoray que todos los controlesde la cortadoraestb.n
desenganchados,
b, Tomecon firmezala maniiade sogadelarrancadory tire
bntamentehastaquela sogaquedeunpocomb,s tirante,
Deieque la soga seenrolle lentamente,Luegotire de la
sogacon un golpe r@idoy continuode todo elbrazo,
Deieque la soga seenrolle lentamente,Si elmotornoha
arrancadodespuesde tres [ntentos,repitalas instrucciones
(intenteponerel reguladoren la posici6nr@ido),
c, Cuandoel motorarranque,hb,galofuncionaren la posici6n
de reguladorr@ida'_t(mueva la palancade controldel
regulador/cebadorde la posici6ncebadorala posici6n
rapido),
Miredetrasde lacortadoraantesy duranteelfuncionamientomarchaatras.
Detengalascuchillas de la cortadoraantesde operarmarchaatras.
Si golpea un objeto extra_o,detengael motor.Retireelcable de la bujia,
inspeccionedetenidamentela cortadorapara verque no tengadatios,y
repareel da[io antesde volvera encendery opersr. El excesode vibracion
de la cortadoradurantela operaciones una indicaci6nde da[_o.Se debe
inspeccionary repararla unidad Ioantes posible.
49
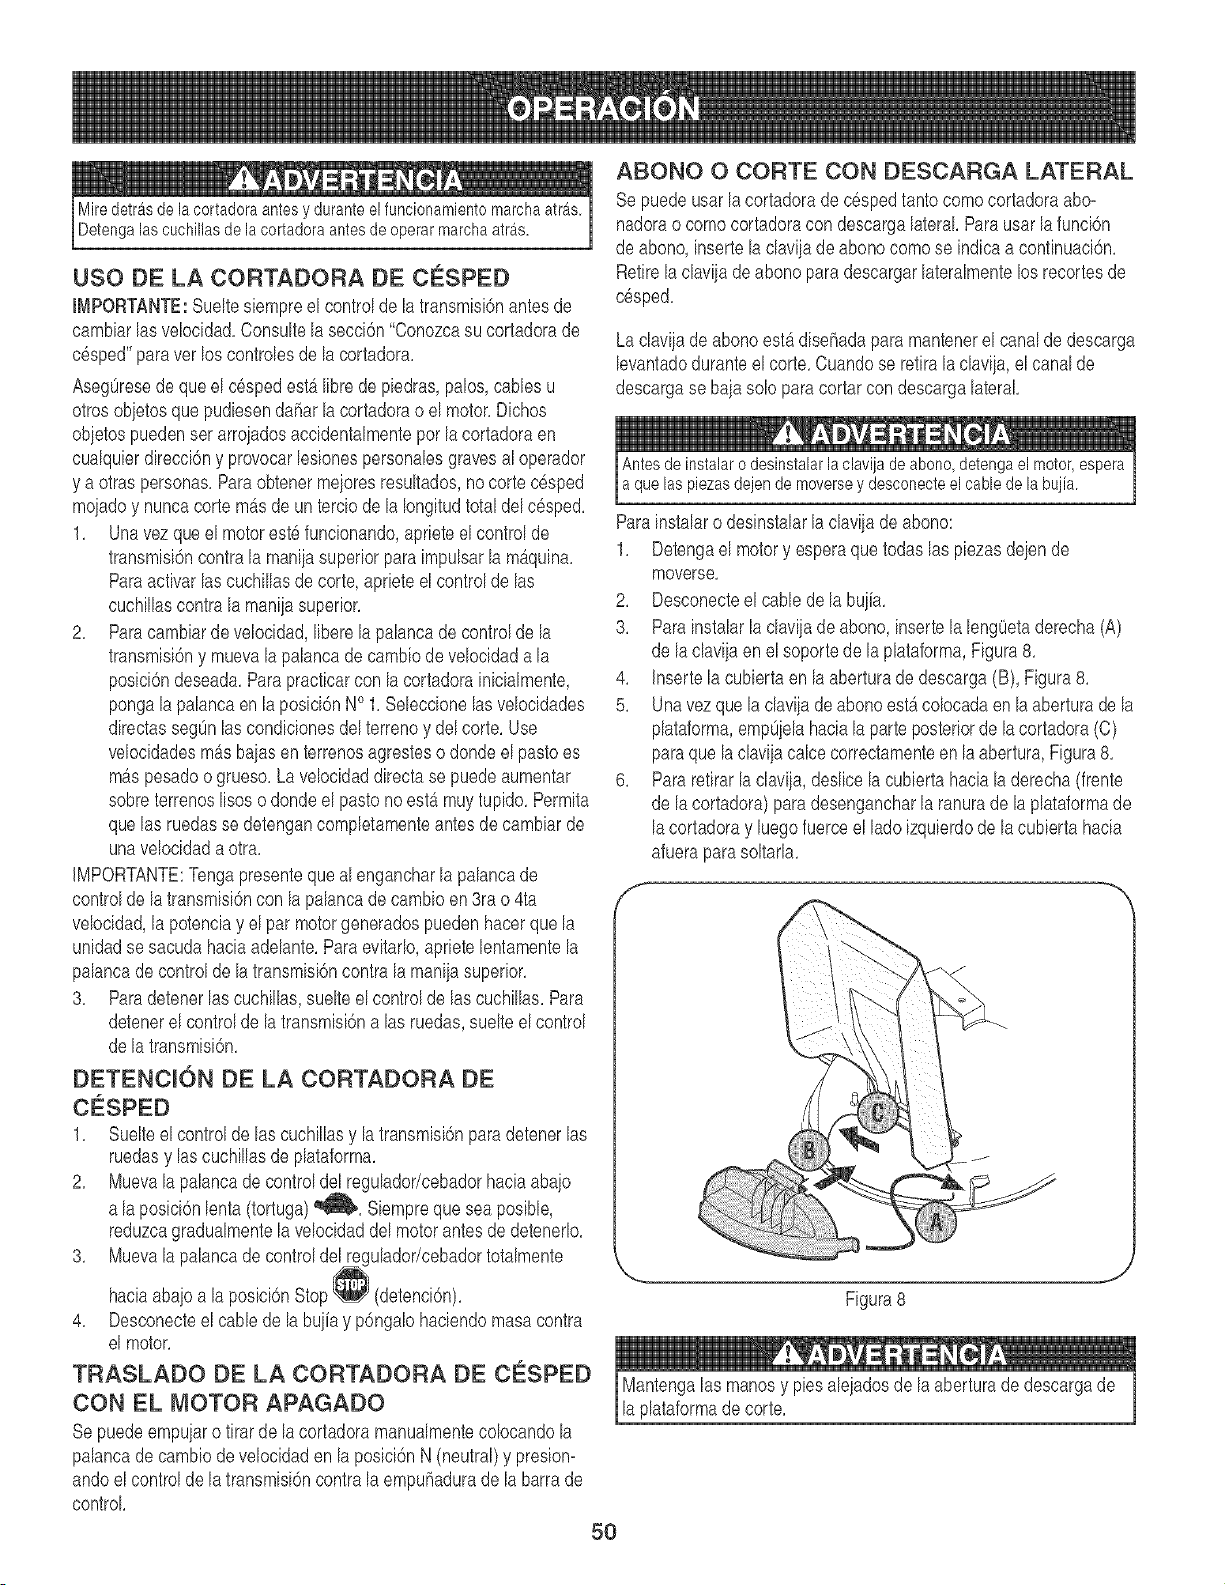
Miredetrasde lacortadora antesy durante el funcionamientomarchaatras.
Detengalas cuchillasde la cortadoraantesde operarmarchaatras.
USO DE LA CORTADORA DE CE_SPED
IMPORTANTE:Sueltesiempreel controlde latransmisi6nantesde
cambiarlasvelocidad,Consultela secci6n"Conozcasu cortadorade
c6sped"paraver los controlesde lacortadora,
AsegOresedequeel cespedest_libredepie@as,palos,cablesu
otrosobietosque pudiesendahar la cortadorao el motor,Dichos
obietospuedenserarroiadosaccidentalmenteporlacortadoraen
cualquierdirecci6ny provocarlesionespersonalesgravesal operador
y a otras personas,Paraobtenermeioresresultados,nocortecesped
mojadoy nuncacortem_sde unterciodela Iongitudtotaldelc6sped,
1, Unavezqueel motorestefuncionando,aprieteel controlde
transmisi6ncontrala maniiasuperiorparaimpulsarla m4quina,
Paraactivarlas cuchillasde corte, aprieteel controlde las
cuchillascontra la manijasuperior,
2, Paracambiarde velocidad,libere la palancadecontrolde la
transmisi6ny muevala palancadecambiode velocidada la
posici6ndeseada,Para practicarcon lacortadorainicialmente,
pongalapalancaen la posici6nNO1,Seleccionelasvelocidades
directassegOnlas condicionesdel terrenoy del corte, Use
velocidadesm_sbajasen terrenosagresteso dondeelpastoes
m_spesadoo grueso,La velocidaddirecta se puedeaumentar
sobreterrenoslisoso dondeel pastonoestb,muy tupido,Permita
quelas ruedasse detengancompletamenteantesde cambiarde
unavelocidada otra,
IMPORTANTE:Tengapresentequeal engancharlapalancade
controlde latransmisi6ncon lapalancade cambioen 3ra o 4ta
velocidad,la potenciay el parmotorgeneradospuedenhacerque la
unidadse sacudahaciaadelante,Para evitado,aprietelentamentela
pahnca de controlde la transmisi6ncontrala maniiasuperior,
3, Paradetenerlascuchillas,suelteel controlde lascuchillas,Para
detenerel controlde la transmisi6nalas ruedas,suelteelcontrol
dela transmisi6n,
DETENCI6N DE LA CORTADORA DE
CE_SPED
1, Suelteelcontrolde las cuchillasy la transmisi6nparadetenerlas
ruedasy las cuchillasde plataforma,
2, Muevala palancadecontroldel reguladodcebadorhaciaabaio
a laposici6nlenta (tortuga)'_, Siemprequesea posible,
reduzcagradualmentela velocidaddel motorantesde detenerlo,
3, Muevala palancadecontroldel regulador/cebadortotalmente
haciaabajoa la posici6nStop_ (detenci6n),
4, Desconecteel cablede labuiiay p6ngalohadendo masa contra
el motor,
TRASLADO DE LA OORTADORA BE C¢:SPED
CON EL MOTOR APAGADO
Sepuedeempuiaro tirar de la cortadoramanualmentecolocandola
palancade cambiode velocidaden la posici6nN (neutral)y presion-
andoelcontrolde latransmisi6ncontra la empuhadurade la barra de
control
ABONO O CORTE CON DESCARGA LATERAL
Sepuedeusar la cortadorade c6spedtantocomocortadoraabo-
nadorao como cortadoracon descargalateral,Parausarla funci6n
de abono,insertela claviiade abonocomose indicaa continuad6n,
Retirelaclaviiadeabonoparadescargarlateralmentelos recortesde
c6sped,
Laclaviiadeabonoest_disehadapara mantenerel canalde descarga
levantadoduranteel corte,Cuandose retiralaclaviia,el canalde
descargase baiasolo paracortarcon descargalateral,
Antes de instalaro desinstalarla clavijade abono,detengael motor,espera
a quelas piezasdejen de moversey desconecteel cablede labujia.
Parainstalaro desinstalarla claviiade abono:
1, Detengael motory esperaque todaslas piezasdeiende
moverse,
2, Desconecteel cablede la bui[a,
3, Parainstalarla claviiade abono,insertela leng0etaderecha(A)
de laclaviiaenel soportede laplataforma,Figura8,
4, Insertela cubiertaen la aberturade descarga(B), Figura8,
5, Unavezquela daviiade abonoest_colocadaen la aberturade la
plataforma,emp0jelahacialaparteposteriorde la cortadora(C)
paraquelaclaviiacalcecorrectamenteenla abertura,Figura8,
6, Pararetirarladaviia, @slice la cubiertahaciala derecha(frente
de lacortadora)paradesengancharla ranurade la plataformade
lacortadoray luegofuerce el lado izquierdode la cubierta hacia
afuerapara soltarla,
Figura8
Mantengalas manosy piesaleiadosde la aberturadedescargade
laplataformade corte,
5O
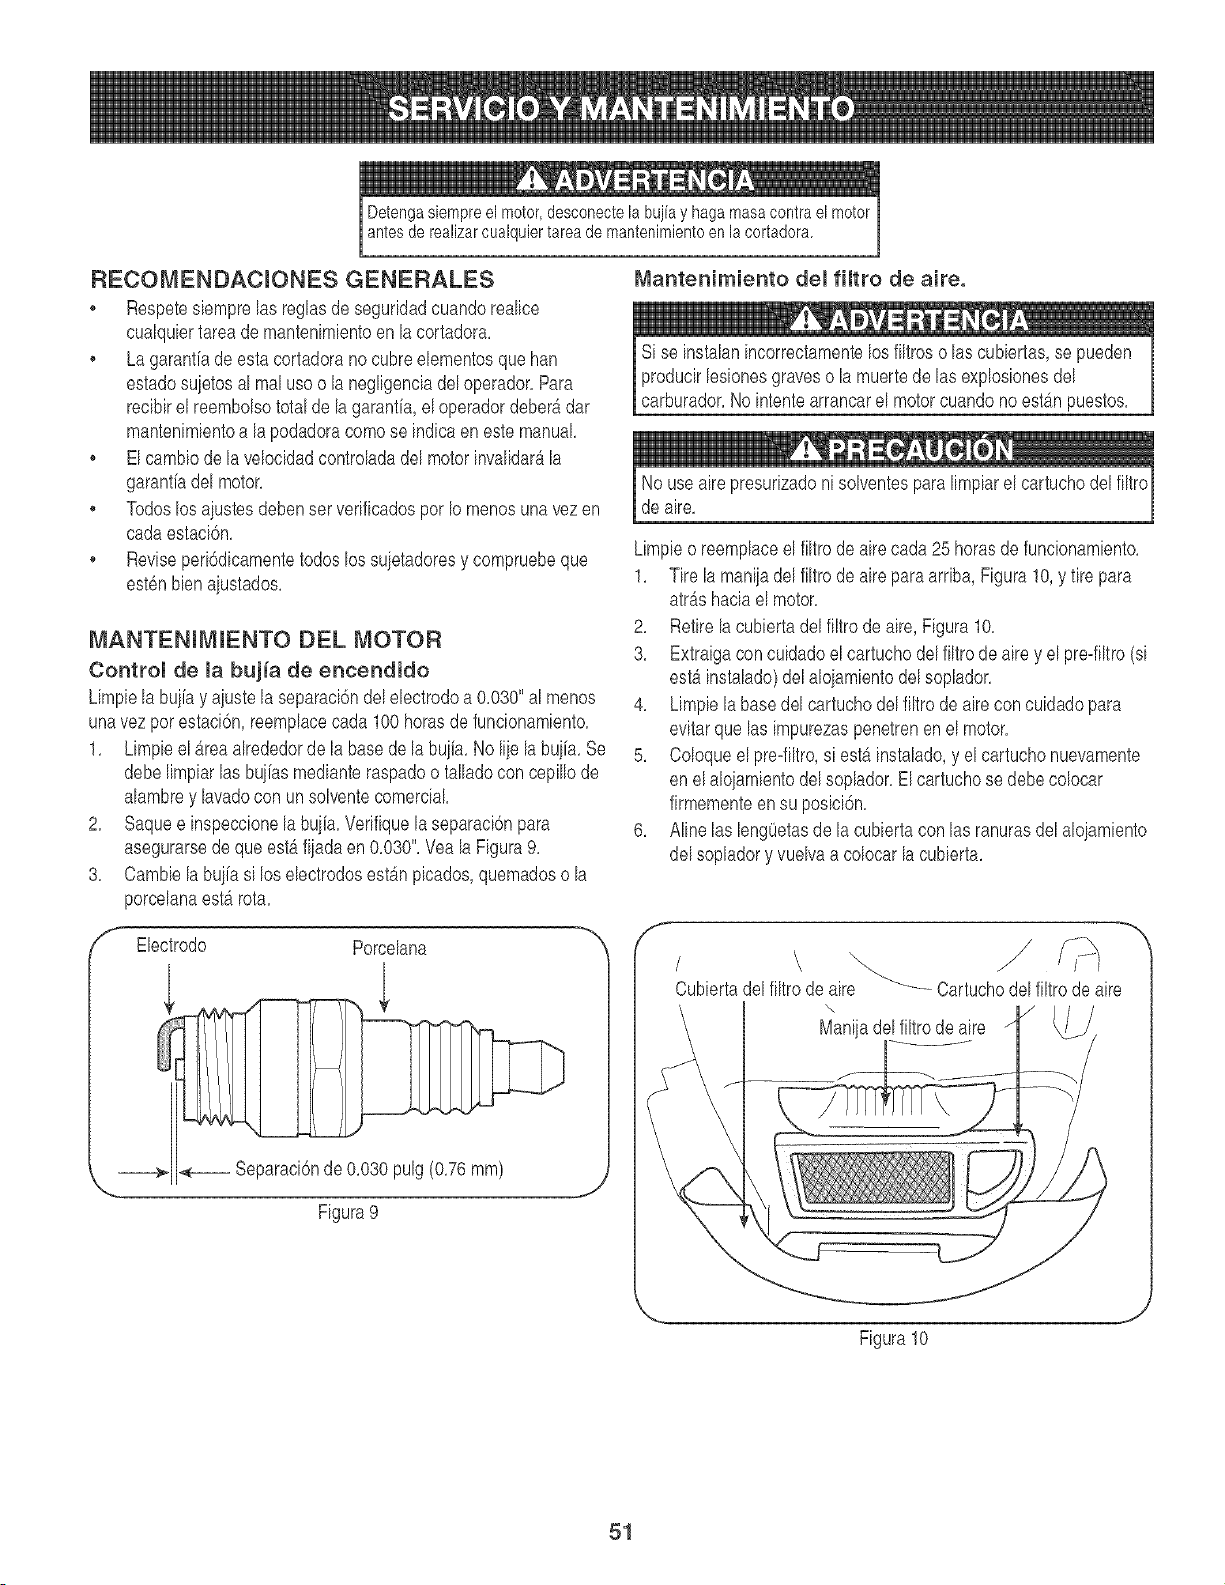
Detengasiempreel motor,desconectela bujfay haga masacontrael motor
antes de realizarcualquiertareade mantenimientoen la cortadora.
RECOMENDACmONES GENERALES
Respetesbmpre las reglasde seguridadcuandorealice
cualqubr tareademantenimbntoenla cortadora,
• Lagaranfiadeestacortadoranocubreelementosque han
estadosuietosal real usoo la negligenciadeloperador,Para
reciNrel reembolsototal de la garanfia,el operadordeberb,dar
mantenimbntoa la podadoracomose indicaenestemanual,
• Elcambiode la velocidadcontroladadel motor invalidarAla
garanth del motor,
• Todoslosaiustesdebenser verificadospor Io menosunavezen
cadaestaci6n,
• Reviseperi6dbamentetodos los suietadoresy compruebeque
estenbienaiustados,
MANTENmMIENTO DEL MOTOR
Controm de la buj_a de encendido
Limpb la buiiay aiuste la separaci6ndelebctrodo a 0,030"al menos
unavezporestaci6n,reemplacecada 100horasde funcionambnto,
1, Limpb el b,rea alrededorde la base dela buiia,No liie labuiia, Se
debelimpiarhs bujiasmedianteraspadoo talladocon cepillode
alambrey lavadocon unsolventecomerciaL
2, Saquee inspeccionela bujia,Verifiquelaseparaci6npara
asegurarsede que esta fijadaen0,030",Veala Figura9,
3, Cambb la buiia si losebctrodos est_n picados,quemadoso la
porcelanaestb.rota,
f_" Ebctrodo Porcelana
_, <--_ Separaci6nde 0,030pulg (0,76mm)
Figura9
Mantenimiento dem fimtro de aire.
Si se instalanincorrectamentelosfiltroso las cubbrtas, se pueden
producirlesionesgraveso la muertede las explosionesdel
carburador,Nointentearranearel motorcuandono est_n puestos,
No use airepresurizadoni solventespara limpiarel cartuchodel filtro
de aire,
Limpieo reemplaceel filtrode aire cada25 horasde funcionambnto,
1, Tire la maniiadel filtrode aireparaarriba, Figura10,y tire para
atr_shaeiael motor,
2, Retire la cubiertadel filtro de aire, Figura10,
3, Extraigacon cuidadoel cartuehodel filtro de aire y el pre-filtro(si
est_ instalado)del aloiamientodel soplador,
4, Limpiela basedel cartuchodelfiltrodeairecon cuidadopara
evitarquelas impurezaspenetrenen el motor,
5, Coloqueelpre-filtro,si est_ instalado,y el cartuchonuevamente
en elaloiamientodel soplador,El cartuchose debecolocar
firmementeensu posiei6n,
6, Aline las bngOetasde la eubiertacon las ranurasdel aloiamiento
del sopladory vuelvaa coloearla eubierta,
Cubiertadelfiltrode aire Cartuchodelfiltrode aire
\
Maniiadel filtro de aire
Figura10
51
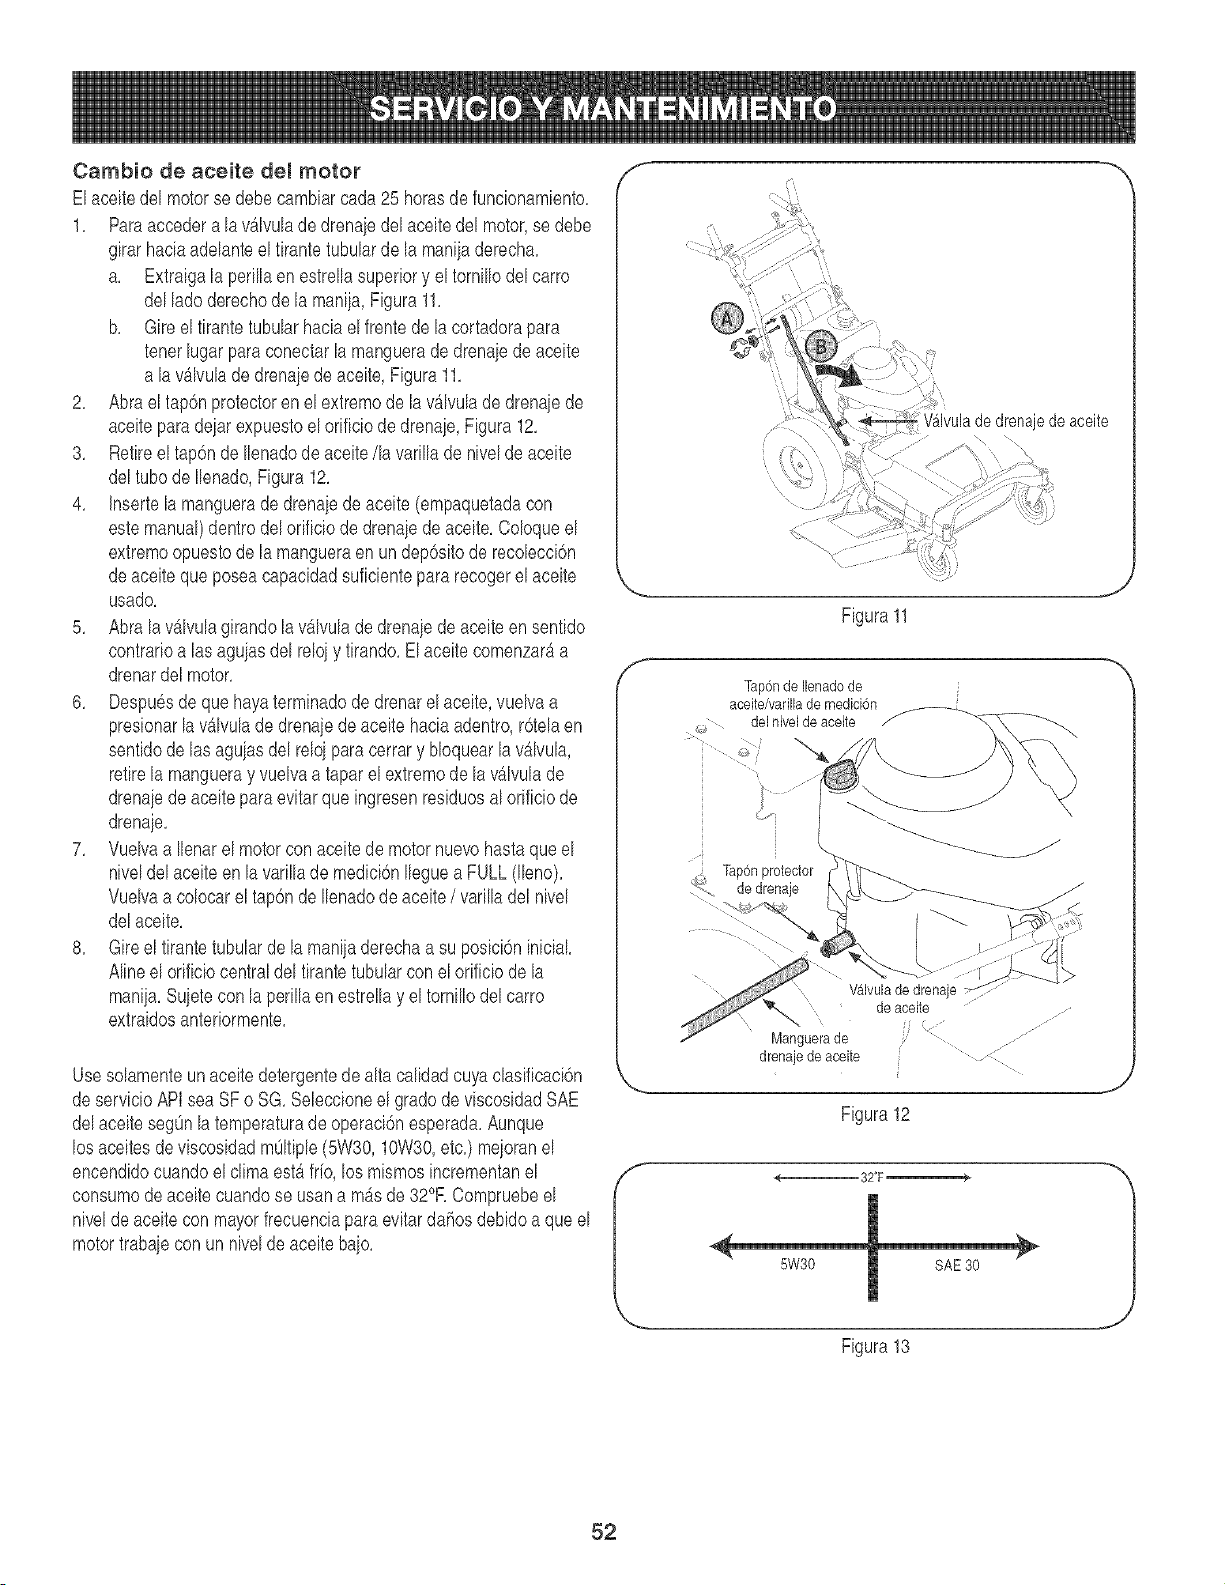
Cambio de aceite del motor
Elaceitedel motorse debe cambiarcada25 horasde funcionamiento,
1, Paraaccedera la vAIvulade drenaiedel aceitedel motor,se debe
girarhaciaadelanteel firante tubularde la maniiaderecha,
a, Extraigala perillaen estrellasuperiory el tornillodel carro
delladoderechode la manija,Figura11,
b, Gire el firante tubularhaciael frentede lacortadorapara
tenerlugar paraconectarlamanguerade drenaiede aceite
a lavb,lvulade drenaiede aceite,Figura11,
2, Abra el tap6nprotectoren el extremode la vAIvulade drenajede
aceiteparadeiarexpuestoel orificiode drenaie,Figura12,
3, Retireel tap6nde Ilenadode aceite/la varillade nivelde aceite
deltubo de Ilenado,Figura12,
4, Insertela mangueradedrenaiedeaceite(empaquetadacon
estemanual)dentrodelorifido de drenaiede aceite,Coloqueel
extremoopuestode la mangueraen un dep6sitode recobccbn
deaceitequeposeacapacidadsuficientepararecogerel aceite
usado,
5, Abra la vAIvulagirandola vAIvulade drenaiede aceiteen sentido
contrarioalas aguiasdelrelojy firando,El aceite comenzarAa
drenardelmotor,
6, Despu6sde que hayaterminadode drenarel aceite,vuelvaa
presionarla vAIvulade drena}ede aceite haciaadentro,r6telaen
sentidode lasaguiasdel relojparacerrary bloquearlavAIvula,
retirela mangueray vuelvaa tapar el extremode la vAIvulade
drenaiedeaceiteparaevitarque ingresenresiduosal orificiode
drenaje,
7, Vuelvaa Ilenarel motorcon aceitede motornuevohastaqueel
niveldel aceite en la varillade medici6nIleguea FULL(Ibno),
Vuelvaa colocarel tap6ndeIlenadode aceite/ varilladel nivel
delaceite,
8, Gire el tirantetubularde la maniiaderechaa su posici6ninicial,
Alineel orificiocentraldeltirantetubularconel orificiodela
manija,Suietecon la perillaen estrellay el tornillodel carro
extraidosanteriormente,
Usesolamenteunaceitedetergentede alta calidadcuya clasificaci6n
deservicioAPIsea SF o SG,Seleccioneel gradode viscosidadSAE
delaceitesegOnlatemperaturadeoperaci6nesperada,Aunque
los aceitesde viscosidadmOItipb(5W30,10W30,etc,) meioranel
encendidocuandoel climaest_ fifo, los mismosincrementanel
consumode aceitecuandose usana mAsde32°R Compruebeel
nivelde aceite con mayorfrecuenciapara evitardahosdebidoa queel
motortrabaiecon unnivelde aceite baio,
f
Valvuladedrenajedeaceite
Figura1!
f -m
Tap6nde Ilenadode
aceite/varillade medici6n
delnivelde aceite
Tap6nprotector
de drenaje
Manguerade
drenajede aceite
deaceite
Figura12
Figura13
52
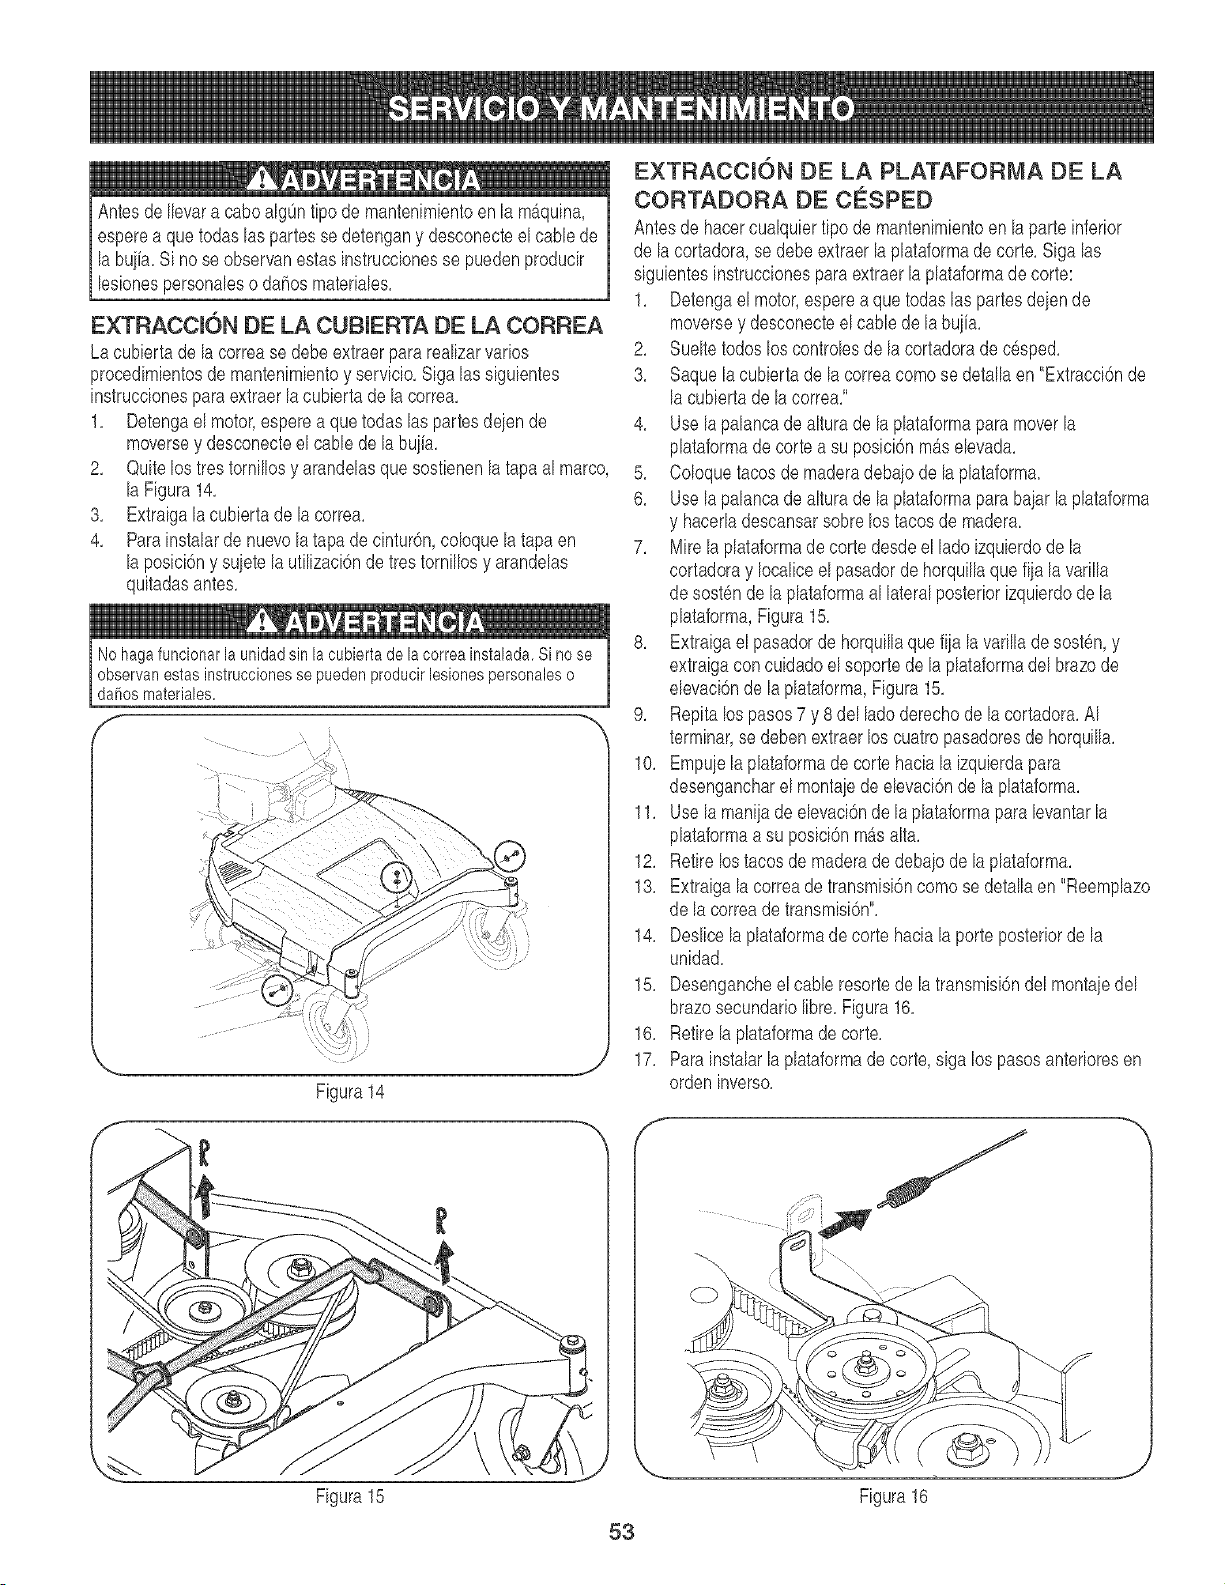
AntesdeIlevara caboalgOntipode mantenimientoen la mAquina,
esperea que todas laspartesse detengany desconecteel cablede
labuiia. Si no se observanestasinstruccionesse puedenproducir
lesionespersonaleso dahosmateriales.
EXTRACCKSN DE LA CUBIERTA DE LA CORREA
Lacubiertade la correase debeextraerpararealizarvarios
procedimientosde mantenimientoy servicio. Sigalas siguientes
instruccionesparaextraerlacubiertade lacorrea.
1. Detengael motor,esperea quetodaslas partesdeien de
moversey desconecteelcable de la buiia.
2. Quitelos tres tornillosy arandelasquesosfienenla tapa almarco,
la Figura14.
3. Extraigala cubierta de la correa.
4. Parainstalarde nuevolatapade cintur6n,coloquela tapaen
la posici6ny suietela utilizaci6nde trestornillosy arandelas
quitadasantes.
Nohagafuncionar la unidadsin la cubiertade la correa instalada.Sino se
observan estas instruccionesse puedenproducirlesionespersonaleso
daF_osmateriales.
f
Figura14
EXTRACCI6N DE LA PLATAFORMA DE LA
CORTADORA DE CESPED
Antesdehacercualquierfipo de mantenimientoen la parteinferior
de lacortadora,se debeextraerla plataformadecorte. Siga las
siguientesinstruccionesparaextraer la plataformade corte:
1. Detengael motor,esperea que todaslas partesdeiende
moversey desconecteel cablede la buiia.
2. Sueltetodosloscontrolesde la cortadorade cesped.
3. Saque la cubiertade la correacomosedetallaen "Extracci6nde
la cubiertade lacorrea."
4. Use la palancade alturade laplataformaparamoverla
plataformade corte a su posici6nm_.selevada.
5. Coloquetacosde maderadebajo de la plataforma.
6. Use la palancade alturade laplataformaparabaiarlaplataforma
y hacerladescansarsobrelostacos demadera.
7. Mire laplataformade cortedesdeel lado izquierdode la
cortadoray Iocaliceel pasadorde horquillaque fija la varilla
de sostende la plataformaal lateralposteriorizquierdode la
plataforma,Figura15.
8. Extraigael pasadorde horquillaque ilia la varilladesost6n,y
extraigacon cuidadoel soportede laplataformadel brazode
elevaci6nde laplataforma,Figura15.
9. Repita los pasos7 y 8 del lado derechode la cortadora.AI
terminar,se debenextraerlos cuatropasadoresde horquilla.
10. Empujelaplataformadecortehaciala izquierdapara
desengancharel montajede elevaci6nde la plataforma.
11. Use la maniiadeelevaci6nde laplataformapara levantarla
plataformaa su posici6nm_salta.
12. Retire lostacosde maderade debaiode la plataforma.
13. Extraiga la correadetransmisi6ncomose detallaen "Reemplazo
de la correade transmisi6n".
14. Deslicelaplataformadecortehacia la porte posteriorde la
unidad.
15. Desengancheel cable resortede latransmisi6ndel montajedel
brazosecundariolibre. Figura16.
16. Retire la plataformade corte.
17. Para instalarla plataformade corte,siga los )asos anterioresen
ordeninverso.
Figura15
53
Figura16
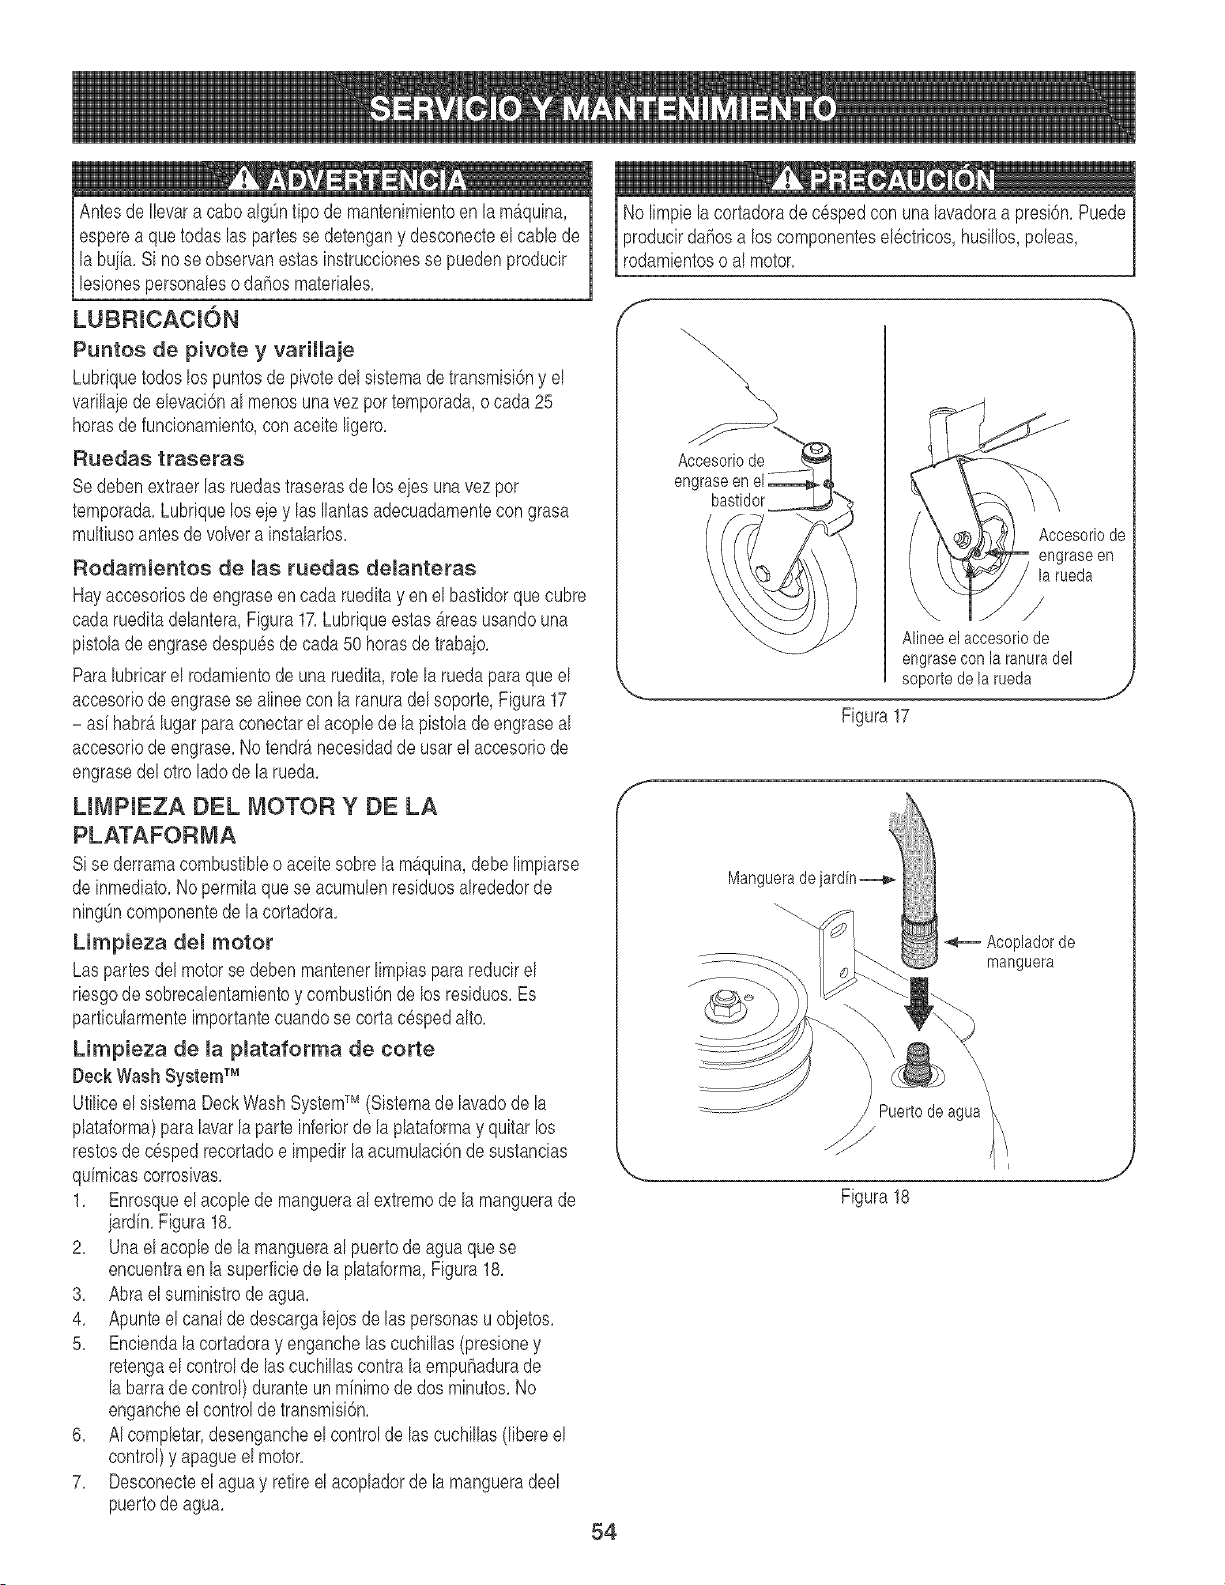
AntesdeIlevaracaboalgOntipodemantenimientoenlamAquina,
espereaquetodaslaspartessedetenganydesconecteelcanede
labuiia.S[noseobservanestas[nstruccionessepuedenproducir
lesionespersonalesodahosmateriales.
LUBRICACION
Puntos de pivote y varillaje
Lubr[quetodoslos puntosde p[votedel s[stemadetransm[s[6ny el
varillaiede elevaci6nal menosunavez por temporada,o cada 25
horasde funcionamiento,conaceite ligero.
Ruedas traseras
Sedebenextraerlas ruedastraserasde los e]esunavezpor
temporada.Lubriqueloseje y las Ilantasadecuadamentecon grasa
mult[usoantesde volvera [nstalarlos.
RodamJentos de Jas ruedas deJanteras
Hayaccesor[osde engraseen cadarued[tayen el basfidorquecubre
cadarueditadelantera,Figura17.Lubr[queestas Areasusandouna
p[stolade engrasedespu6sde cada50 horasde trabajo.
Paralubr[carel rodam[entode una ruedita,rotela ruedaparaqueel
accesor[odeengrasese alineecon laranuradelsoporte,Figura17
- as[habrAlugarparaconectarel acoplede la p[stolade engraseal
accesor[odeengrase.Notendr_necesidadde usarel accesor[ode
engrasedel otro ladodela rued&
UMPIEZA DEL MOTOR Y DE LA
PLATAFORMA
si se derramacombustibleo aceitesobrela m_quina,debe limpiarse
de [nmediato.No permitaquese acumulenresiduosalrededorde
n[ngOncomponentede la cortadora.
Limpieza deJ motor
Las partesdel motorsedebenmantenerlimp[aspara reduc[rel
riesgode sobrecalentamientoy combusti6nde losresiduos.Es
part[cularmente[mportantecuandose cortacespedalto.
Limpieza de Ja pJataforma de corte
Deck Wash SystemTM
Ufil[ceels[stemaDeckWash SystemTM (S[stemade lavadode la
plataforma)paralavarla parte inferiorde la plataformay quitarlos
restosde c6spedrecortadoe [mped[rla acumulac[6nde sustanc[as
qdmicas corrosivas.
1. Enrosqueel acoplede mangueraalextremode la manguerade
iardin.Figura18.
2. Unael acoplede la mangueraal puertodeaguaquese
encuentraen la superfic[ede la plataforma,Figura18.
3. Abra elsumin[strode agua.
4. Apunteel canaldedescargaleiosde las personasu obietos.
5. Enciendala cortadoray enganchehs cuchillas(presioney
retengael controlde lascuch[llascontralaempuRadurade
la barradecontrol)duranteun m[nimode dos minutos.No
engancheel controlde transm[s[6n.
6. AIcompletar,desengancheel controlde hs cuchilhs (libereel
control)y @agueel motor.
7. Desconecteel aguay retireelacopladorde lamangueradeel
puertode agua.
No I[mpiela cortadorade cespedcon unalavadoraa presi6n.Puede
producirdahosa los componentesel6ctricos,husillos,poleas,
rodam[entoso al motor.
X
Accesoriode
engraseen
la rueda
/
Alineeelaccesoriode
engraseconlaranuradel
soportedelarueda
Figura17
Mangueradejard[n_,_
Acopladorde
manguera
\
\
/ Puertode
agua
/
Figura18
54
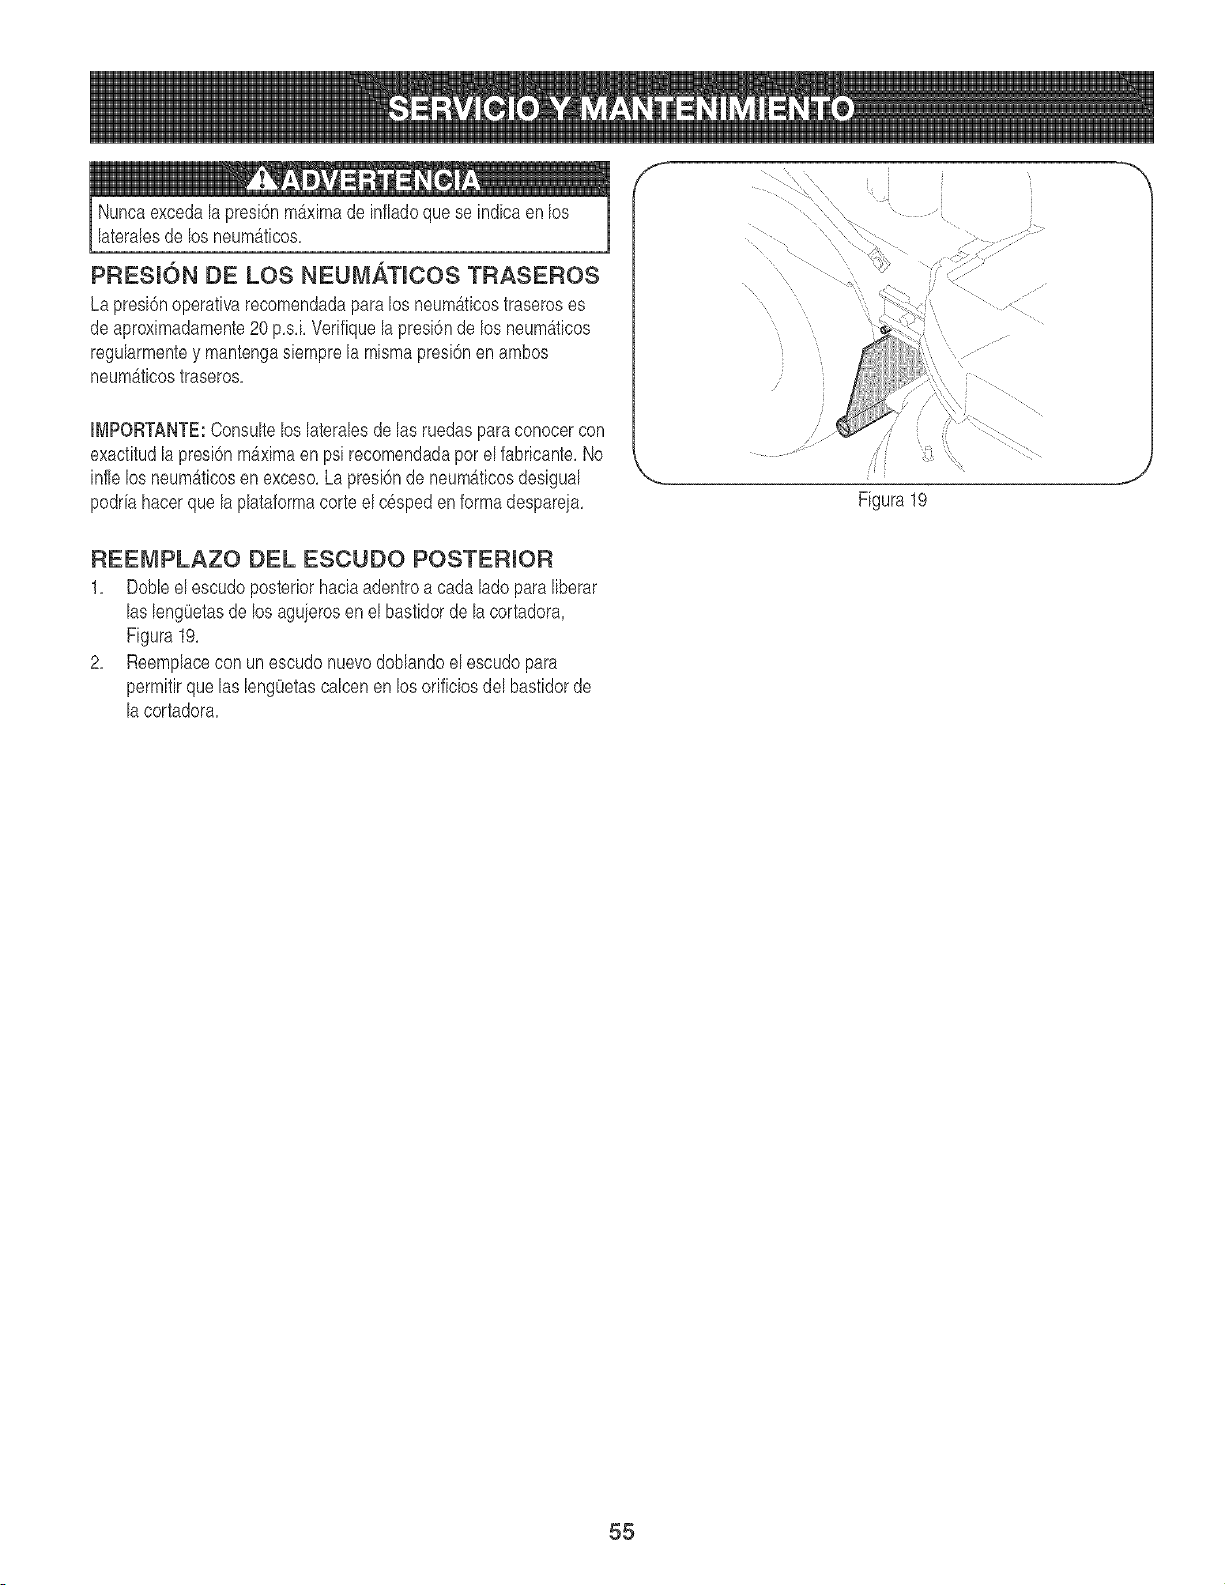
Nuncaexcedalapresi6nmaximade infladoquese indicaen los
lateralesde losneumAticos,
PRESION DE LOS NEUMATmCOS TRASEROS
Lapresi6noperativarecomendadaparalos neum&ticostraseroses
deaproximadamente20 p,s,LVerifiquela presi6nde los neumaticos
regularmentey mantengasiemprela mismapresi6nen ambos
neumAticostraseros,
IMPORTANTE:Consultelos lateralesde las ruedaspara conocercon
exactitudla presi6nmb,xima en psi recomendadapor el fabricante,No
infle losneum_ticosenexceso,Lapresi6nde neum&ticosdesigual
podriahacerque la plataformacorte el c6speden forma despareia,
f
......J•
Figura19
J
REEMPLAZO DEL ESCUDO POSTERIOR
1, Dobleelescudoposteriorhaciaadentroa cada ladoparaliberar
las leng(]etasde losaguierosen elbastidorde lacortadora,
Figura19,
2, Reemplacecon unescudonuevodoblandoel escudopara
permitirquelas lengOetascalcenen losorificiosdel basfidorde
la cortadora,
55
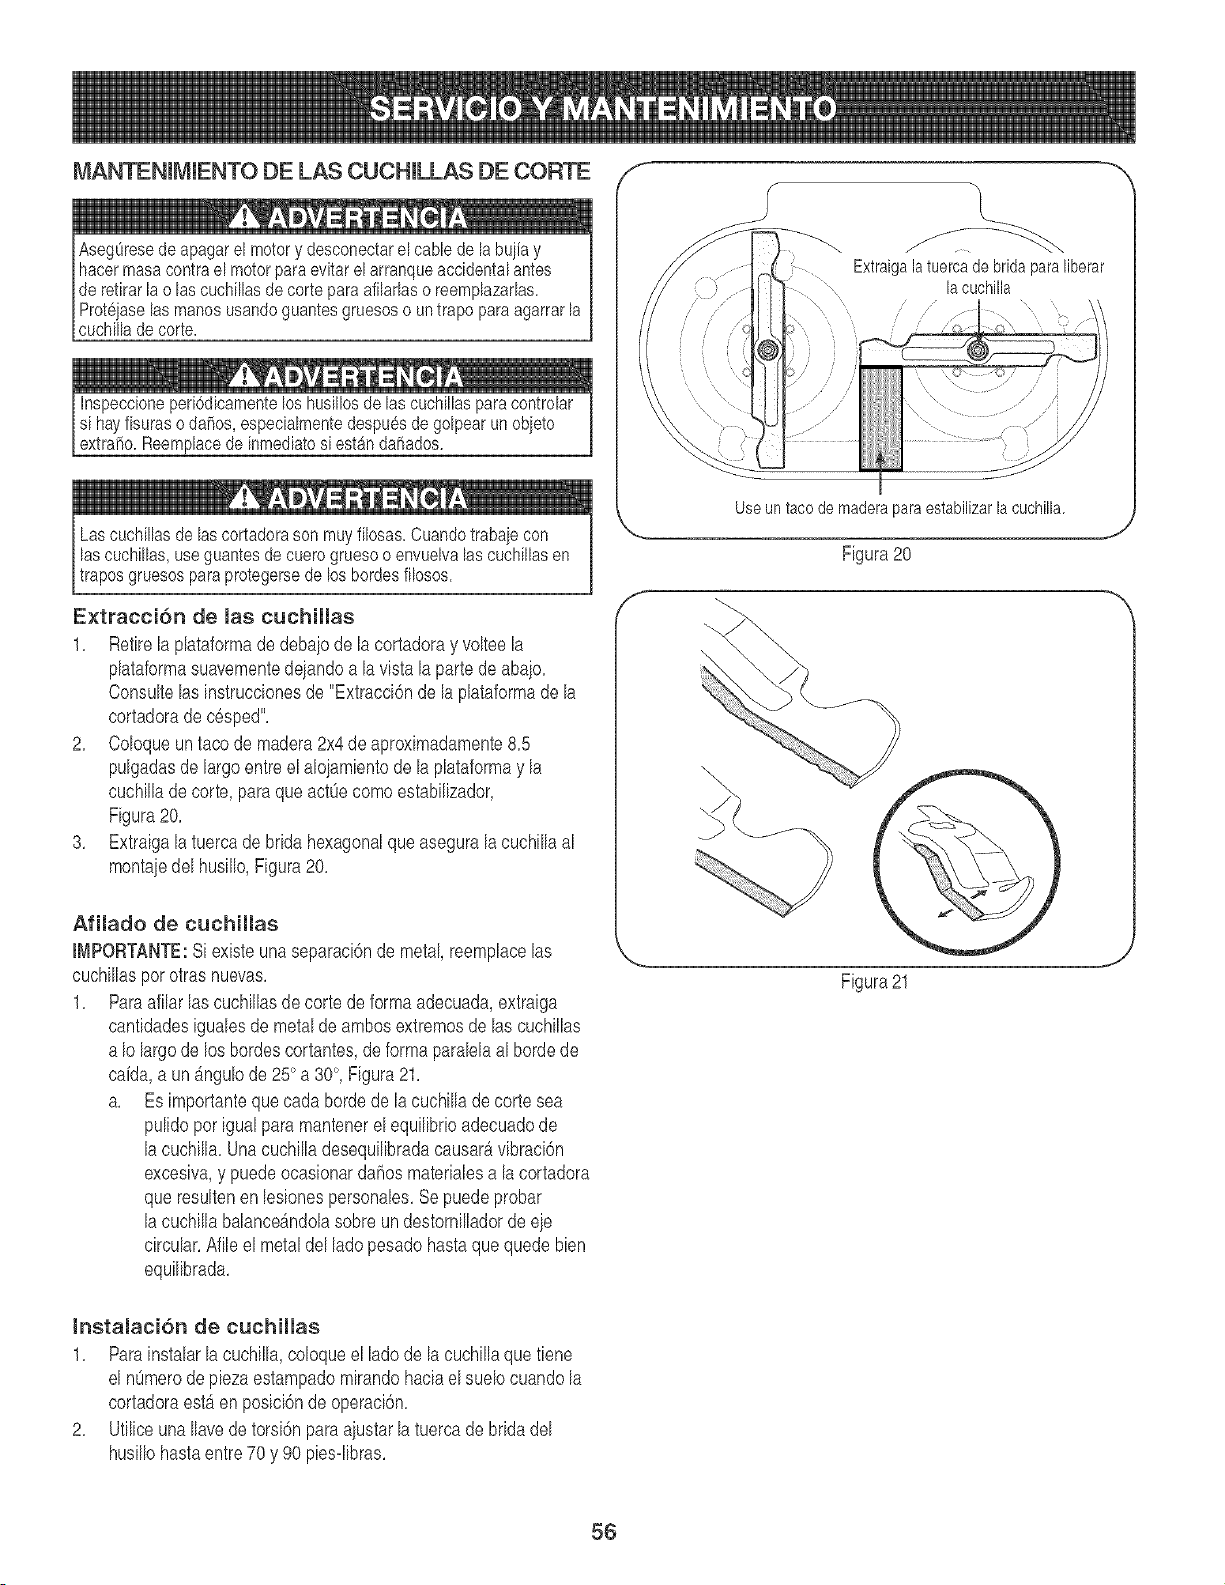
MANTENJMJENTODELAS CUCHJLLAS DE CORTE
de retirar la o las cuchillas de corte para afilarlas o reemplazarlas.
Proteiase lasmanos usandoguantes gruesos o un trapo paraagarrar la
cuchilla de corte.
Inspeccione peri6dicamente los husillos de las cuchillas para controlar
si hay fisuras o da_os, especialmente despues de golpear un obieto
extra_o. Reemplacede inmediato si estan da_ados.
Las cuchillas de lascortadora son muy filosas. Ouando trabaie con
las cuchillas, use guantes de cuero grueso o envuelva las cuchillas en
trapos gruesos para protegerse de los bordes filosos.
Extraccion de Jas cuchiJJas
1, Retirela plataformade debaio de la cortadoray volteela
plataformasuavementedeiandoa la vista laparte de abaio,
Consultelas instrucdonesde "Extracd6nde laplataformade la
cortadorade c6sped",
2, Coloqueun taco de madera2x4de aproximadamente8,5
pulgadasde largo entreel aloiamientode la plataformay la
cuchilladecorte, paraque act@ comeestabilizador,
Figura20,
3, Extraigala tuerca de bridahexagonalque aseguralacuchillaal
montaiedel husillo,Figura20,
Afilado de cuchiJJas
JMPORTANTE:Siexisteunaseparaci6nde metal,reemplacelas
cuchillaspor otras nuevas,
1, Paraafilar lascuchillasde corte de forma adecuada,extraiga
cantidadesigualesde metalde ambosextremosde las cuchillas
a Io largode los bordescortantes,de forma paralelaal bordede
caida,a un_ngulode25° a 30°, Figura21,
a, Es importantequecada bordede la cuchillade corte sea
pulidoporigualparamantenerel equilibrioadecuadode
lacuchilla,Unacuchilladesequilibradacausarb_vibraci6n
excesiva,y puedeocasionardahosmaterialesa la cortadora
queresultenenlesionespersonales,Sepuedeprobar
lacuchillabalance_ndohsobreundestornilladorde eje
circular,Afileel metaldel ladopesadohastaque quede bien
equilibrada,
Extraigalatuercade brida)araliberar
lacuchilla
// jr
Useun taco de maderaparaestabilizarlacuchilla.
Figura 20
Figura21
JnstaJaci6n de cuchiJJas
1, Para instalarla cuchilla,coloqueel ladode la cuchillaque fiene
el n0merode piezaestampadomirandohaciael suelocuandola
cortadoraest_en posici6ndeoperaci6n,
2, UtiliceunaIlavedetorsi6nparaaiustarlatuercade bridadel
husillohastaentre70 y 90 piesdibras,
56
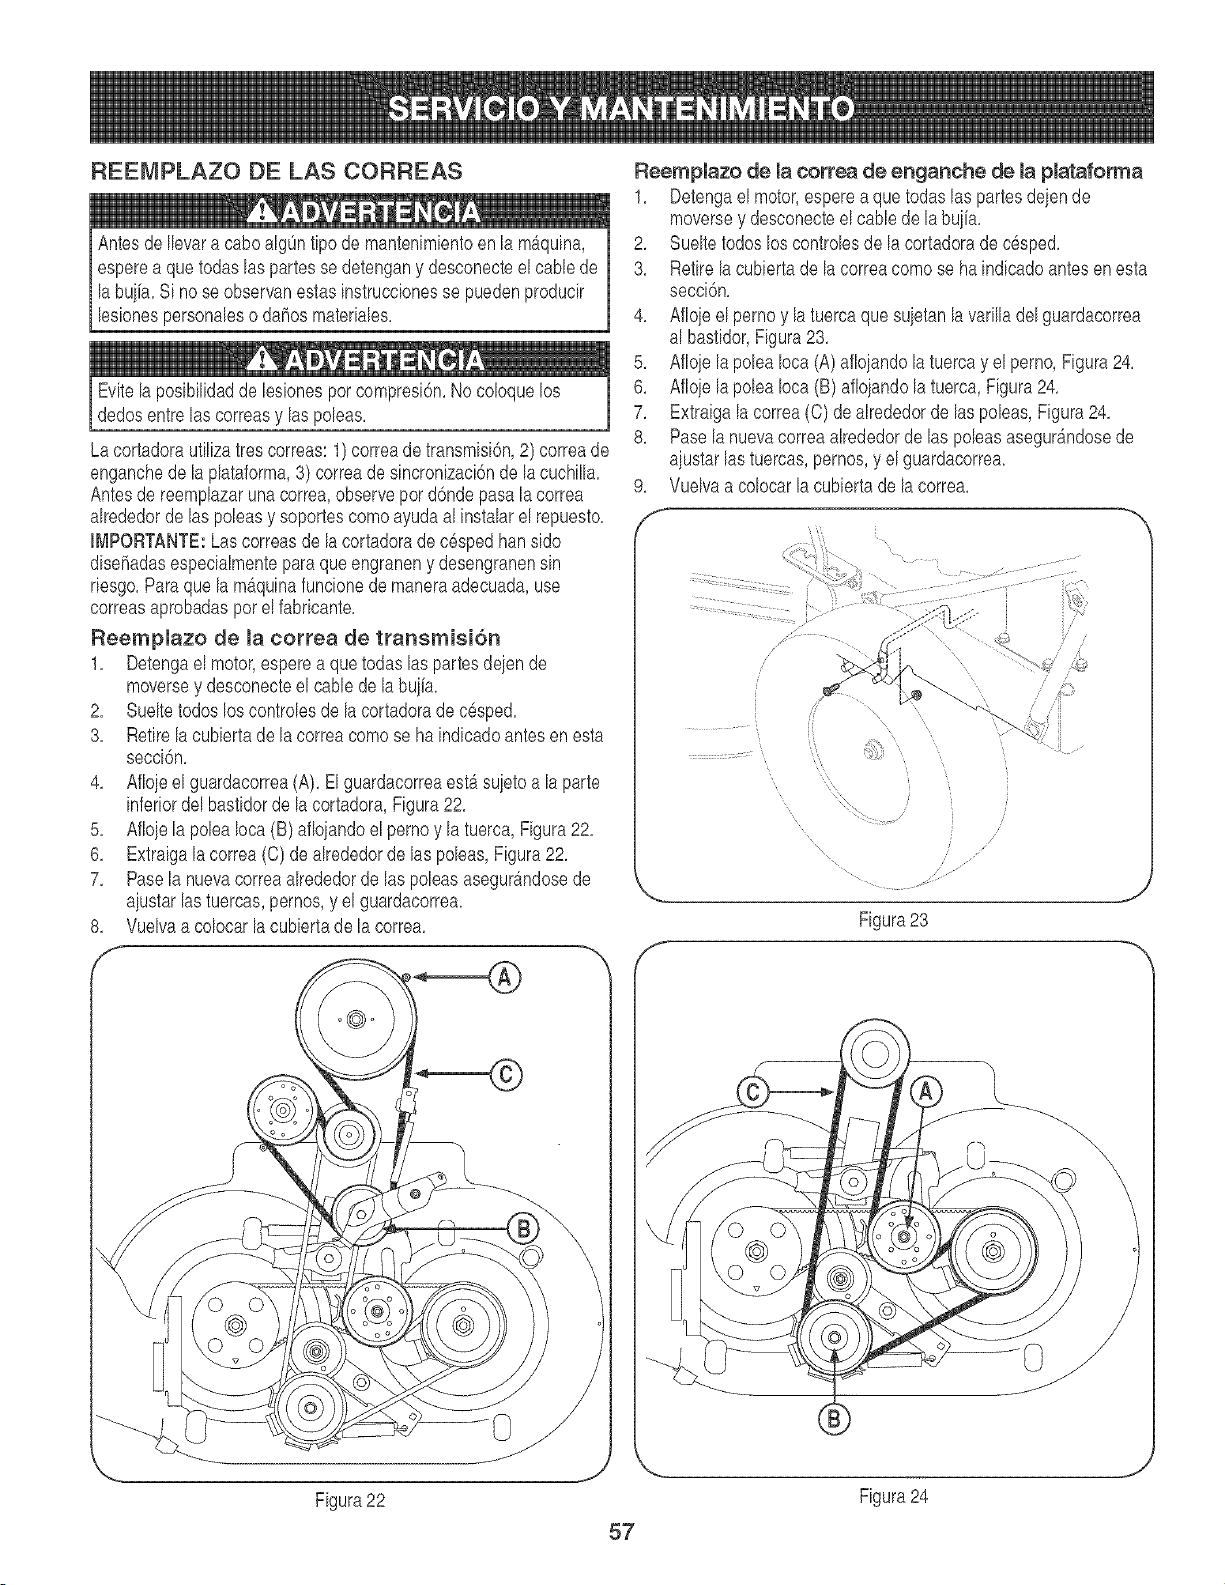
REE[V]PLAZODE LAS CORREAS
AntesdeIlevara caboalgOntipode mantenimientoen lamb,quina,
esperea que todas laspartesse detengany desconecteel cane de
labuiia. Si no se observanestasinstruccionesse puedenproducir
lesionespersonaleso dahosmateriales.
Evitela posibilidadde lesionesporcompresi6n.No coloquelos
dedosentre lascorreasy laspoleas.
Lacortadorautilizatrescorreas:1) correadetransmisi6n,2) correade
enganchede la plataforma,3) correadesincronizaci6nde la cuchilla.
Antesde reemplazarunacorrea,observepor d6nde pasala correa
alrededorde las poleasy soportescomoayudaal instalarel repuesto.
IMPORTANTE:Lascorreasde la cortadorade cespedhan sido
disehadasespecialmenteparaque engraneny desengranensin
riesgo.Paraque lamb,quinafuncionede maneraadecuada,use
correasaprobadasporel fabricante.
Reemplazo de la correa de transmisi6n
1. Detengael motor,esperea quetodaslas partesdeien de
moversey desconecteelcable de la buiia.
2. Sueltetodos los controlesde la cortadorade c6sped.
3. Retirela cubiertade la correacomose ha indicadoantesen esta
secci6n.
4. Aflojeel guardacorrea(A). ElguardacorreaestAsujetoa la parte
inferiordel bastidorde la cortadora,Figura22.
5. Afloiela poleaIoca(B)afloiandoel pernoy la tuerca,Figura22.
6. Extraigala correa (C)de alrededorde las poleas,Figura22.
7. Pasela nuevacorreaalrededorde las poleasasegurAndosede
aiustarlas tuercas,pernos,y el guardacorrea.
8. Vuelvaa colocarla cubiertade la corre&
Reempmazo de la correa de enganche de la plataforma
1. Detengael motor,esperea que todaslas partesdeiende
moversey desconecteel cane de labuiia.
2. Sueltetodosloscontrolesde la cortadorade c6sped.
3. Retire la cubiertade la correacomose ha indicadoantes en esta
secci6n.
4. Afloieel pernoy latuercaquesuietanlavarilladel guardacorrea
al bastidor,Figura23.
5. Afloiela poleaIoca(A)afloiandola tuercay el perno,Figura24.
6. Afloiela poleaIoca(B) aflojandola tuerca,Figura24.
7. Extraiga la correa(C) de alrededorde las poleas,Figura24.
8. Pasela nuevacorreaalrededorde las poleasasegurAndosede
aiustarlastuercas,pernos,y el guardacorrea.
9. Vuelvaacolocarlacubiertade lacorrea.
i !
J
Figura23
\
Figura22
57
Figura24
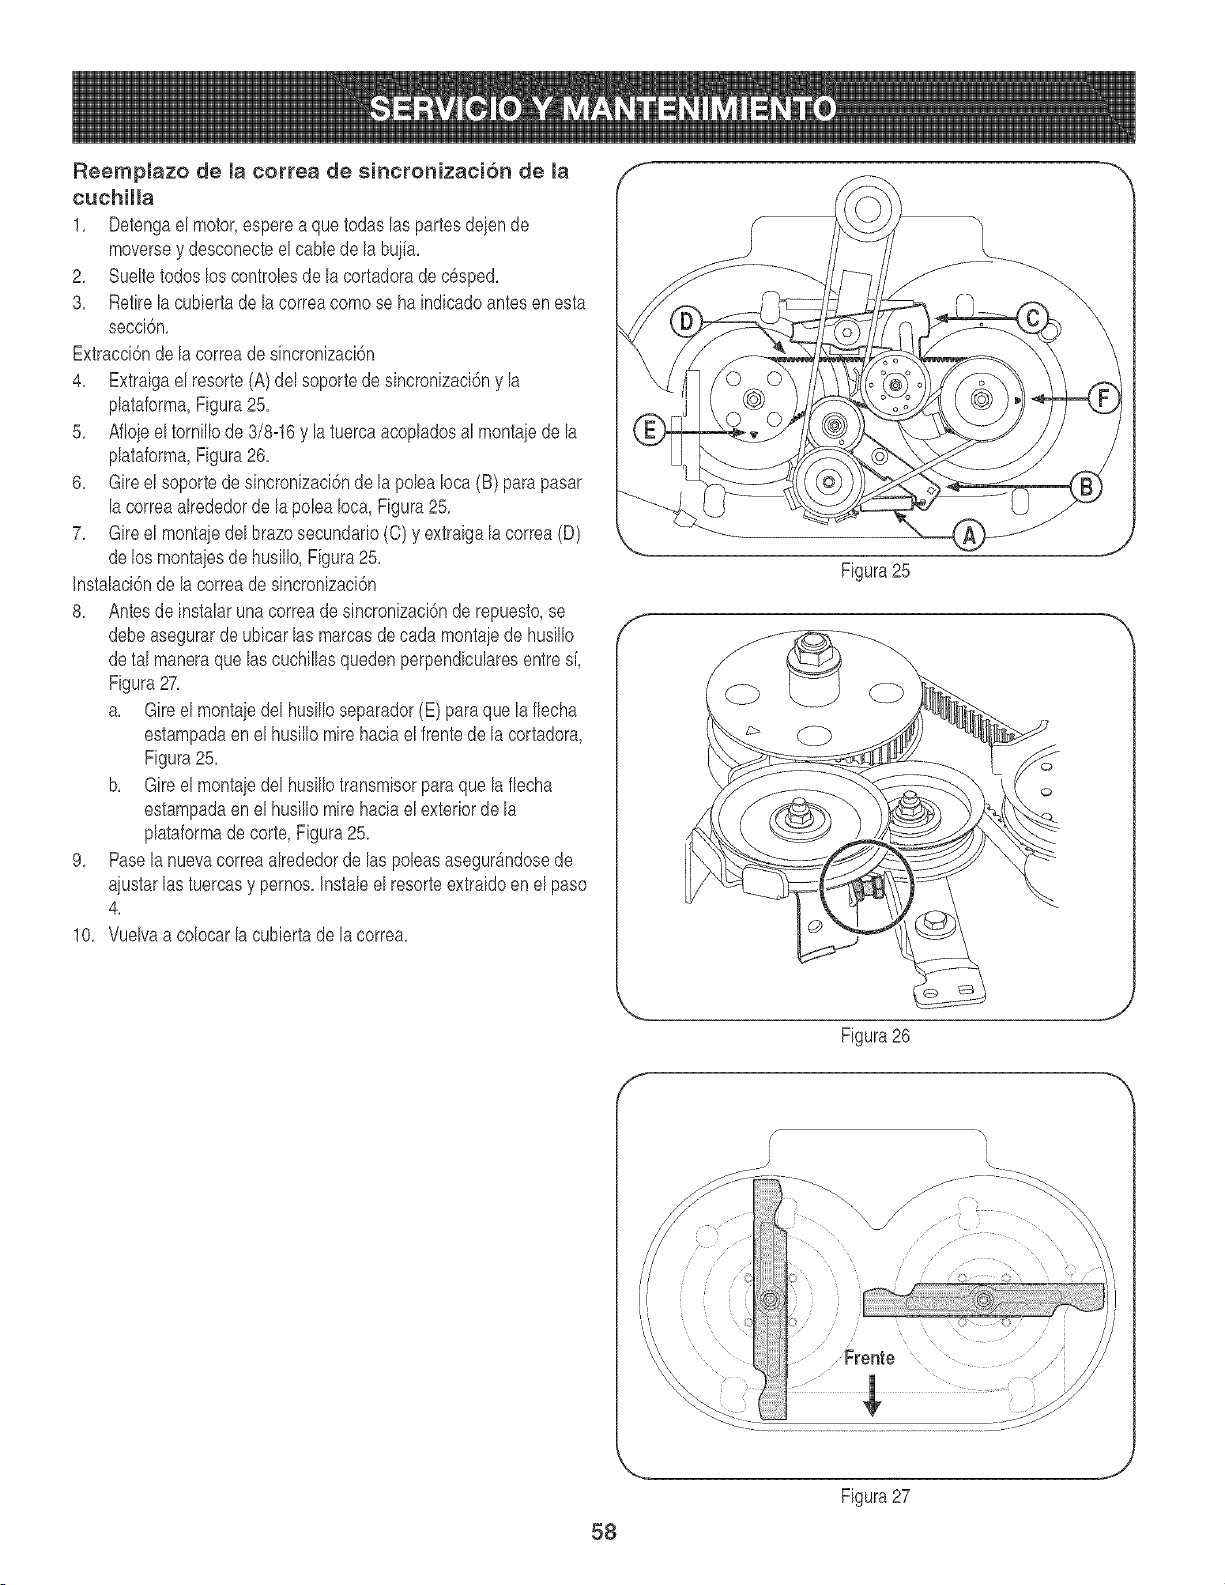
Reempiazode ia correa de sincronizacion de ia
cuchilia
1, Detengael motor,espereaquetodaslas partesdeien de
moversey desconecteelcane de la buiia,
2, Sueltetodoslos controlesde la cortadorade cesped,
3, Retirela eubiertade la correaeomose ha indieadoantesen esta
secci6n,
Extraeci6nde lacorreade sincronizaci6n
4, Extraigael resorte(A) del soportede sincronizaci6ny la
plataforma,Figura25,
5, Afloieeltornillode 3/8-16y la tuercaacopladosal montaiede la
plataforma,Figura26,
6, Gire el soportede sincronizaci6ndela poleaIoca(B) parapasar
la correaalrededorde la polea Ioca,Figura25,
7, Gire el montajedel brazosecundario(C) y extraigalacorrea(D)
delos montaiesde husillo,Figura25,
Instalaci6nde la correadesincronizaci6n
8, Antesde instalaruna correade sincronizaci6nderepuesto,se
debeasegurarde ubicarlas marcasde cada montaiede husillo
detal maneraque lascuchillasquedenperpendicularesentresi
Figura27,
a, Gire el montaiedel husilloseparador(E) para que la fiecha
estampadaen elhusillomire haciael frentede la cortadora
Figura25,
b, Gire el montajedel husillotransmisorpara que la flecha
estampadaen elhusillomire haciael exteriorde la
plataformadecorte, Figura25,
9, Pasela nuevacorreaalrededorde las poleasasegur_.ndosede
aiustarlas tuercasy pernos,Instaleel resorteextraidoenel paso
4,
10, Vuelvaa colocarla cubiertade la correa,
f
Figura25
58
Figura26
f --,,
\
Frente
Figura27
PROGRAMA DE MANTEN(MIENTO
Antesde realizarcualquiertipo de mantenimientoo servicio,desenganchetodos
loscontrolesy detengaelmotor.Esperea quesedetengancompletamente
todaslaspiezasm6viles,Desconecteelcablede labuj(ay pongalohaciendo
masacontrael motorpara evitarquese enciendaaccidentalmente.Utilice
siempreanteojosde seguridaddurantelaoperaci6no mientrasrealizaajusteso
reparaciones.
Sigael cronogramade mantenimientoque se presentaacontinuaci6n,
EstatabIas61odescribepautasdeservicio,UfiIice)acoIumnaRegistro
de Servicioparahacere)seguimientode )astareas de mantenimiento
compIetadas,Para ubicar o( Contro do Sorvicio Soars m_s corcano
o paraprogramar un sorvicio, simp(omontecomuniquoso con
Soars a( te(_fono 1-800-4-MY-HOME®
Cadauso 1,
2,
3,
4,
5,
6,
1,
2,
3,
4,
5,
Cuchillasde la cortadora
Piezassueltaso faltantes
Correas
Nivelde aceitedel motor
ControIes
CIavijade abono (si est_
instaIada)
Aceitede)motor
Aceitedelmotor
Filtrode aire
Cuchillasde la cortadora
Varillaiesy pivotesdecontrol
Rodamientosde )asruedas
deIanteras
Buiiadeencendido
Ruedastraseras
Sistemade combustible
6,
lras 2 horas 1, 1,
25 horas 1, 1,
2, 2,
3, 3,
4, 4,
50 horas 1, 1,
SegOnnecesidad
Aiustaro reemplazar
Verificar
Verificar
Verificare)funcionamientocorrecto
Verificar)acorrectainstaIaci6nde
laclaviia
Cambiar
Cambiar
Limpiaro reempIazar
AfiIary baIancear
Lubricarconaceite)igero
Engrasar
Anualmenteo cada 100 1, 1, Limpiar,reemplazar,regular
horas 2, 2, Engrasar
Antesde almacenar 1, 1, Hacerfuncionarel motorhastaque
se detengapor faItade combustible
o agregaraditivoparagasoIinaa )a
quese encuentraen el tanque,
59
Nuncaalmacenela cortadorade cespedcon combustibleen el tanqueen
un espaciocerradoo en areascon pocaventilaci6n,dondelosgasesdel
combustiblepuedanalcanzarel fuego,chispas o unaluz pilotocomola que
tienen algunos hornos,calentadoresde agua,secadoresde ropa o algQn
otro dispositivoa gas.
PREPARACI6N DEL MOTOR
Paramotoresalmacenadosdurantem4sde30 dias:
1. Paraevitar que se formegomaen el sistemade combustibleo en
las piezasdel carburador,hagafuncionarel motorhastaquese
detengapor falta de combustibleo agregueadifivoparagasolina
al combustibledel tanque. Si utiliza un aditivopara gasolina,
hagafuncionarel motordurantevarios minutosparaque el
adifivocirculeporel carburador--despuesde estoelmotory el
combustiblese puedenalmacenarduranteunmAximode seis
meses.
2. Cambieel aceite mientrasel motor estb,todaviacaliente.
3. Extraigala buiia de encendidoy viertaenel cilindro
aproximadamente1 onza(30 ml)de aceitepara motor limpio.
Tirevarias vecesdel arrancadorde retrocesopara distribuirel
aceitey reinstalela buiia.
4. Limpieel motorde desechossuperficiales.
PREPARACI6N DE LA CORTADORA DE
CESPED
Cuandoalmacenela cortadorade c6speden un galp6nmetb,lico,
tengaespecialcuidadode realizarleun tratamientoantioxidante
alas superficiesno pintadas.Cubraelequipocon unacapa de
aceitelivianoo silicona,especialmentelos resortes,loscoiinetes
y loscables.
• Eliminetodoel polvodel exteriordel motory del equipo.
• Sigalas recomendaci6ndelubricaci6n.
. Almaceneelequipoen unlugarlimpioy seco.No Ioalmacene
enun lugardondese encuentrenequiposque usanpilotode
encendidoo con componentesque puedengenerarchispas.
Puedeobtenerlossiguientesaditamentosy accesoriosparasu cortadorade c6sped.P6ngaseencontactocon u Centrode servicioSearsen el
teldono 1=800=4=MY-HOME®param_,sinformaci6n.
No. de PIEZA DESCRIPCION
33731 Colectorde c6spedcon
sistemadeembolsado
6O
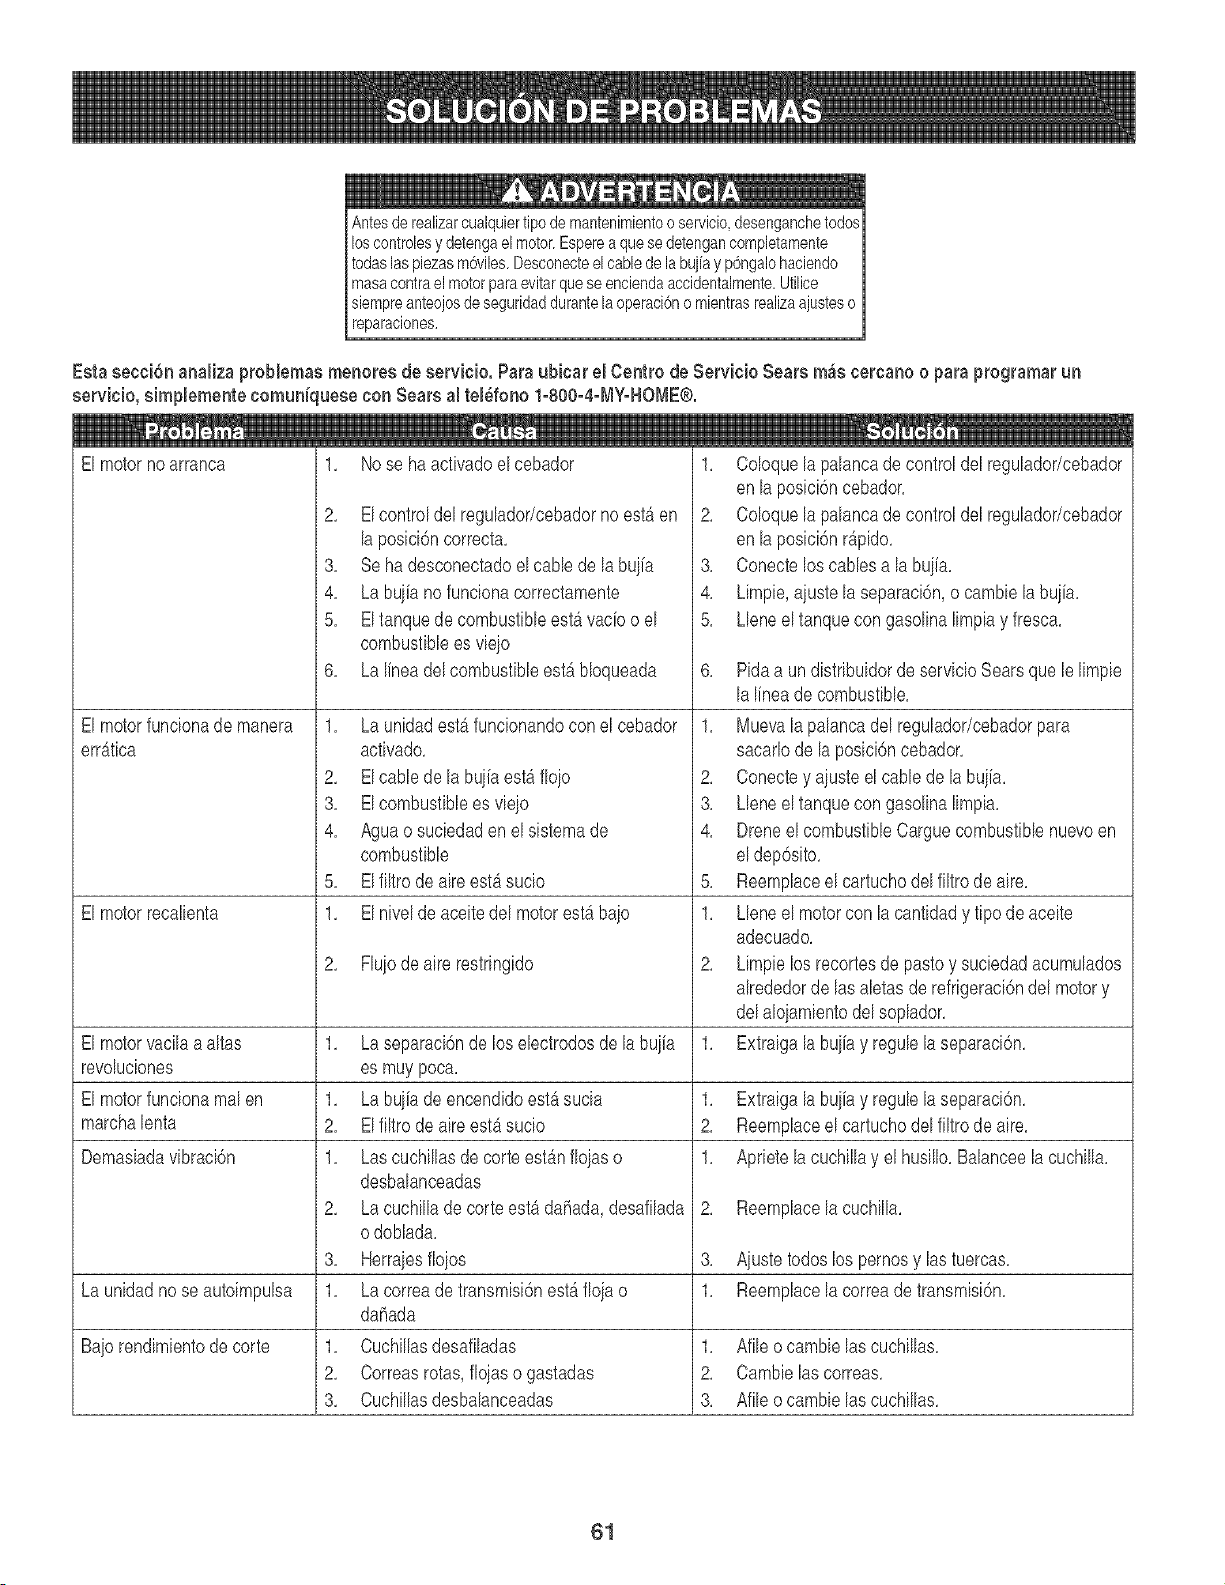
Antesde realizarcualquiertipode mantenimientooservicio,desenganchetodos
loscontrolesy detengael motor.Espereaquesedetengancompletamente
todaslaspiezasm@iles.Desconecteelcablede labujfay p6ngalohaciendo
masacontrael motorparaevitarqueseenciendaaccidentalmente.Utilice
siempreanteojosde seguridaddurantela operaci6no mientrasrealizaajusteso
[reparacones.
Esta secci6n analiza probbmas menoresde servbio. Paraubbar el Centro de Servbio Sears m_s cercano o para programar un
servbio, simplemente comuniquese con Sears al tel_fono 1-800-4-MYoHOME®.
El motornoarranca
El motorfuncionade manera
emitba
El motorrecalienta
1.
2.
3.
4.
5.
6.
1.
2.
3.
4.
5.
1.
2.
Nose ha activadoel cebador
Elcontroldel regulador/cebadornoest_en
laposici6ncorrecta.
Sehadesconectadoel cablede la buiia
La buih no funcionacorrectamente
Eltanquede combustibleest_ vaciooel
combusfibbes vieio
La lineadelcombustibleest_ bloqueada
La unidadest_ funcionandoconel cebador
activado.
Elcablede la buih esbi flojo
Elcombustiblees vieio
Aguao sucbdaden el sistemade
combustible
Elfiltrode aireest_isucio
Elnivelde aceitedel motorest_ baio
Fluiode aire restringido
""L'2t_ lwI_ [o]_j
1. Coloquela palancade control delregulador/cebador
enla posici6ncebador.
2. Coloquela palancade control delregulador/cebador
enla posici6nr@ido.
3. Conectelos cablesa labuiia.
4. Limpie,aiuste la separaci6n,o cambb la buih.
5. Lleneel tanquecon gasolinalimpiay fresca.
El motorvacilaa altas
revoluciones
El motorfuncionamalen Extraigala buiiay regub la separaci6n.
marchalenta Reemplaceel cartuchodelfiltrodeaire.
Demasiadavibraci6n Aprietela cuchillay el husillo.Balanceelacuchilla.
1.
1.
2.
1.
2.
3.
1.
1.
2.
3.
Laseparac[6nde losebctrodos de labuiia
es muy poca.
La buih de encend[doesbi sucia
Elfiltrode aireesbisuc[o
Lascuchillasdecorteest_nflojaso
desbalanceadas
Lacuchillade corteest_dahada,desafilada
odoblada.
Herraiesfloios
Lacorreade transmisi6nest_ fioia o
dahada
Cuchillasdesafiladas
Correasrotas,flqas o gastadas
Cuchillasdesbalanceadas
6, Pidaa un distribuidorde servicioSearsque le limpie
lalineade combustible,
1, Muevala palancadel regulador/cebadorpara
sacarlodela posbi6n cebador,
2, Conectey aiusteel cablede la buiia,
3, Lleneeltanque con gasolinalimpia,
4, Dreneel combustibb Carguecombustiblenuevoen
eldep6sito.
5. Reemplaceel cartuchodel filtro de aire.
1. Lleneel motorcon lacantidady fipode aceite
adecuado.
2. Limpb losrecortesde pasto y sucbdadacumulados
alrededorde lasabtas de refrigeraci6ndel motory
delalojamientodel soplador,
Extraigala buiiay regulela separaci6n,
Reemplacela cuchilla.
1.
1.
2.
1.
2.
3.
1.
1.
2.
3.
A]ustetodos los pernosy lastuercas,
La unidadnose autoimpulsa Reemplacela correade transmisi6n,
Baiorendimientode corte Afileo cambielas cuchillas,
Cambielascorreas,
Afileo cambielas cuchillas,
61
(Esta p4gina se aplica s61oen EE.UU. y Canadb,).
Sears, Roebuck and Coo, U.SoAo(Sears}, el Consejo de Recursos AmbientaBes de California (CARB)
y la Agencia de Protecci6n Ambientam de los Estados Unidos (ERA}
Declaraci6n de garantia demsisterna de controm de emisiones (derecbos y obmigaciones de la garantia de defectos dempropi-
etario}
LA COBERTURADE LA GARANTfADE CONTROLDE EMISiONESES
APLICABLEA LOSMOTORESCERTIFICADOSCOMPRADOSENCALIFOR-
NIAEN 1995Y POSTERIORMENTE,QUE SE UTILIZANENCALIFORNIA,
Deetaraci6n de garantia sobre defectos en el controt
ElConsejode RecursosAmbientalesde California(CARB),laEPA(Agencia
de Protecci6nAmbientalde los EE.UU.)y Searstienen el gustode explicarla
garantiadel sistemade control de emisionespara motoresdel afio 2000y para
elfuturo con relaciona motorespequeSostodo terreno(SORE).En California,
los nuevosmotorespequeF_ostodo terrenodebenestar disefiados,construidos
y equipadosparacumplircon las rigurosasnormasanti-smogdelestado.En
el restode losEstadosUnidos,losmotoresnuevostodoterrenode encendido
perchispacertificadosparael afio 1997debencumplirestandaressimilares
establecidospor la EPA.Searsdebegarantizarel sistemade control de emis-
Y PARALOS MODELOSCERTIFICADOSDELANO 1997YPOSTERIORES,
QUESE COMPRENY UTILICENEN CUALQUIERPARTEDE LOSESTADOS
UNIDOS(Y A PARTIRDEL 1 DEENERODE2001 ENCANADa,).
de emieiones para California y los Eetados Unidos
Jonesde su motorpara losperiodosde tiempo enumeradosa continuaci6n,
siemprequeno hayaabuso,negligenciao mantenimientoindebidode su
motortodoterrenopequeF_o.Su sistemade controlde emisionespuedeincluir
piezastales comoel carburador,el filtrode aire, elsistemade encendido,el
silenciadory elconversorcatalitico.Tambi6npuedeincluirconectoresy otras
unidadesrelacionadascon las emisiones.Dondeexistaunacondici6ncubierta
potla garantia,Searsrepararasu pequefiomotortodo terrenosin costoalguno
incluyendodiagn6stico,piezasy manede obra
Cobertura de Bagarantla Sears para defectos en et control de emisiones
Los motorestodo tenenopequd_osestangarantizadosen Io relativealcontrol a lasdisposicionesque se indiquena continuaci6n.Siuna partede su motor
de emisionesparadefectosenpiezasduranteun per[odode dos a[ios,sujeto cubiertapot la garantiaesdefectuosa,Sears repararao sustituiradicha parte.
ResponsabiHdadee del propietario en remaci6n con la garantma
Comepropietariodel motortodo terrenopequeF_o,Ud.es responsablede la
realizaci6ndel mantenimientorequeridoquese incluyeen las instrucciones
de operaciony mantenimiento.Sears recomiendaquese conserventodoslos
recibosrelativosal mantenimientode su motortodoterrenopequefio,pore
no pude denegarlagarantiasimplementeporla faltade losmismos,o por su
incumplimientodel mantenimientoprogramado.Comopropietariodel motor
pequeSotodoterrenodebesaberque, sin embargo,Sears lepuedenegar
lacoberturade lagaranfiasi su motortodoterrenopequefioo una piezadel
mismohanfalladodebidoa abuso,negligencia,mantenimientoindebidoo
a modificacionesno aprobadas.Ud.es responsablede presentarsu motor
todoterrenopeque[ioa un distribuidorde serviciosSearsautorizadotan pronto
comeaparezcaun problema.Lasreparacionesde la garanfiasinconflicto
debencompletarseen un plazode tiempo razonable,no superiora 30 dias. Si
tienealguna preguntarespectoa sus derechosy responsabilidadesreferen-
tes a la garantia,debe contactarcon un representantede serviciosSearsal
1--800--469--4663.La garantiade emisioneses unagarantiaper defectos.Los
defectossejuzgan de acuerdocon elfuncionamientonormalde un motor.La
garantia no esta relacionadacon unapruebade emisionesen uso.
Disposiciones de magarantia Sears para defectos en el control de emisiones
Las siguientesson disposicionesespedficas relacionadascon la coberturade la garantiaparadefectosen el controlde emisiones.Esun afiadidoa la garantiade
motorSearsparamotoresno reguladosque seencuentraen lasinstruccionesde funcionamientoy mantenimiento.
1. Piezascon garantia
La coberturade estagarantiase extiende0nicamentealas piezas
que aparecena continuaci6n(las partesde los sistemasde control de
emisiones),siemprequedichaspiezasestuvieranya en el motoren el
momentode su compra.
a. Sistemade medici6n de combustible
oSistemade enriquecimientopara arranqueen fr[o
oCarburadory partesintemas
oBombade combustible
b. Sistemade inducci6nde aire
oFiltrode aire
oColectorde admisi6n
c. Sistemade encendido
oBuj[a(s)de encendido
oSistemade encendidomagneto
d. Sistemadelcatalizador
oConvertidorcatalitico
oColectorde escape
oSistemade inyecci6nde aireo valvula de impulses
e. Elementosvariadosusadosen los sistemasanteriores
oValvulasde vado, sensiblesa temperatura,posici6ny tiempo
e intenuptores
• Conectoresy montajes
2. Alcancede la cobertura
Searsgarantiza alposeedorinicialy a los compradoressubsiguientes
que laspiezas con garantiano tendrandefectos en materialesnimano
de obra que provoquenla falla de las mismasduranteun per[ode de
dos aSosa partirde la fecha en queel motorse entregaa un comprador
particular.
3. Sincargo
La reparaci6no reemplazodecualquierpartecon garantia se realizara
sin cargo alguno parael poseedor,incluyendotareasde diagnosticoque
permitandeterminarsi una parte con garantiaes defectuosa,siempreque
dicho diagn6sticose realiceen un distribuidorde serviciosSearsautoriza-
do. Parael servicio de lagarantia de emisiones,contacteal distribuidorde
serviciosSears autorizadomas cercanoincluidoen las'P_.ginasamarillas"
en lascategorias"Motores,gasolina","Motoresde gasolina","Podadoras
de c6sped",o similares.
4. Reclamacionesy exclusionesa la cobertura
Las reclamacionesde lagaranfia debenenviarsede acuerdocon las
disposicionesde la politica de garantia para motoresSears.La cobertura
de la garantiaexcluiradefectosen piezascon garant[aque no seanpartes
originalesSears,o abuso,negligenciao mantenimientoincorrecto,tal y
como se estableceen lapolitica de garantiapara motoresSears. Searsno
es responsablede lasfallas en piezascon garant[aprovocadasperel use
de partesaF_adidas,que no sean originaleso que se hayanmodificado.
5. Mantenimiento
Cualquierpartecon garantiaque no este programadapara set reem-
plazadacomomantenimientorequerido,o que solo deba inspeccionarse
regularmenteal efectode "inspeccioneo reemplaceseg0n sea necesario",
estaragarantizadacontra defectosduranteel per[odede la garantia.Todas
las piezas garantizadasqueest6n programadaspara su reemplazopara
cumplir con los requisitesde mantenimientoestarangarantizadass61o
por el periodoanterior al primerreemplazoprogramadopara dicha pieza.
Cualquierpieza de recambioquesea equivalenteen funcionamientoy
durabilidadpuedeusarsepararealizarmantenimientoo reparaciones.El
propietarioes responsablede realizartodo el mantenimientorequerido,tal
y como sedefine en lasinstruccionesde funcionamientoy mantenimiento
Sears
6. Coberturaindirecta
Perla presente,la coberturase extiendea lafalla de cualquiercomponente
de motorprovocadaper lafalla de unapiezacon garantia queeste todav[a
en per[ododegarant[a.
En los EstadosUnidosy Canadahay unalinea de atenci6nde24 horas,1-800-469u4663,quecuentacon un men0con mensajespre-grabadosquecontienen
informaci6npara el mantenimientode motores.
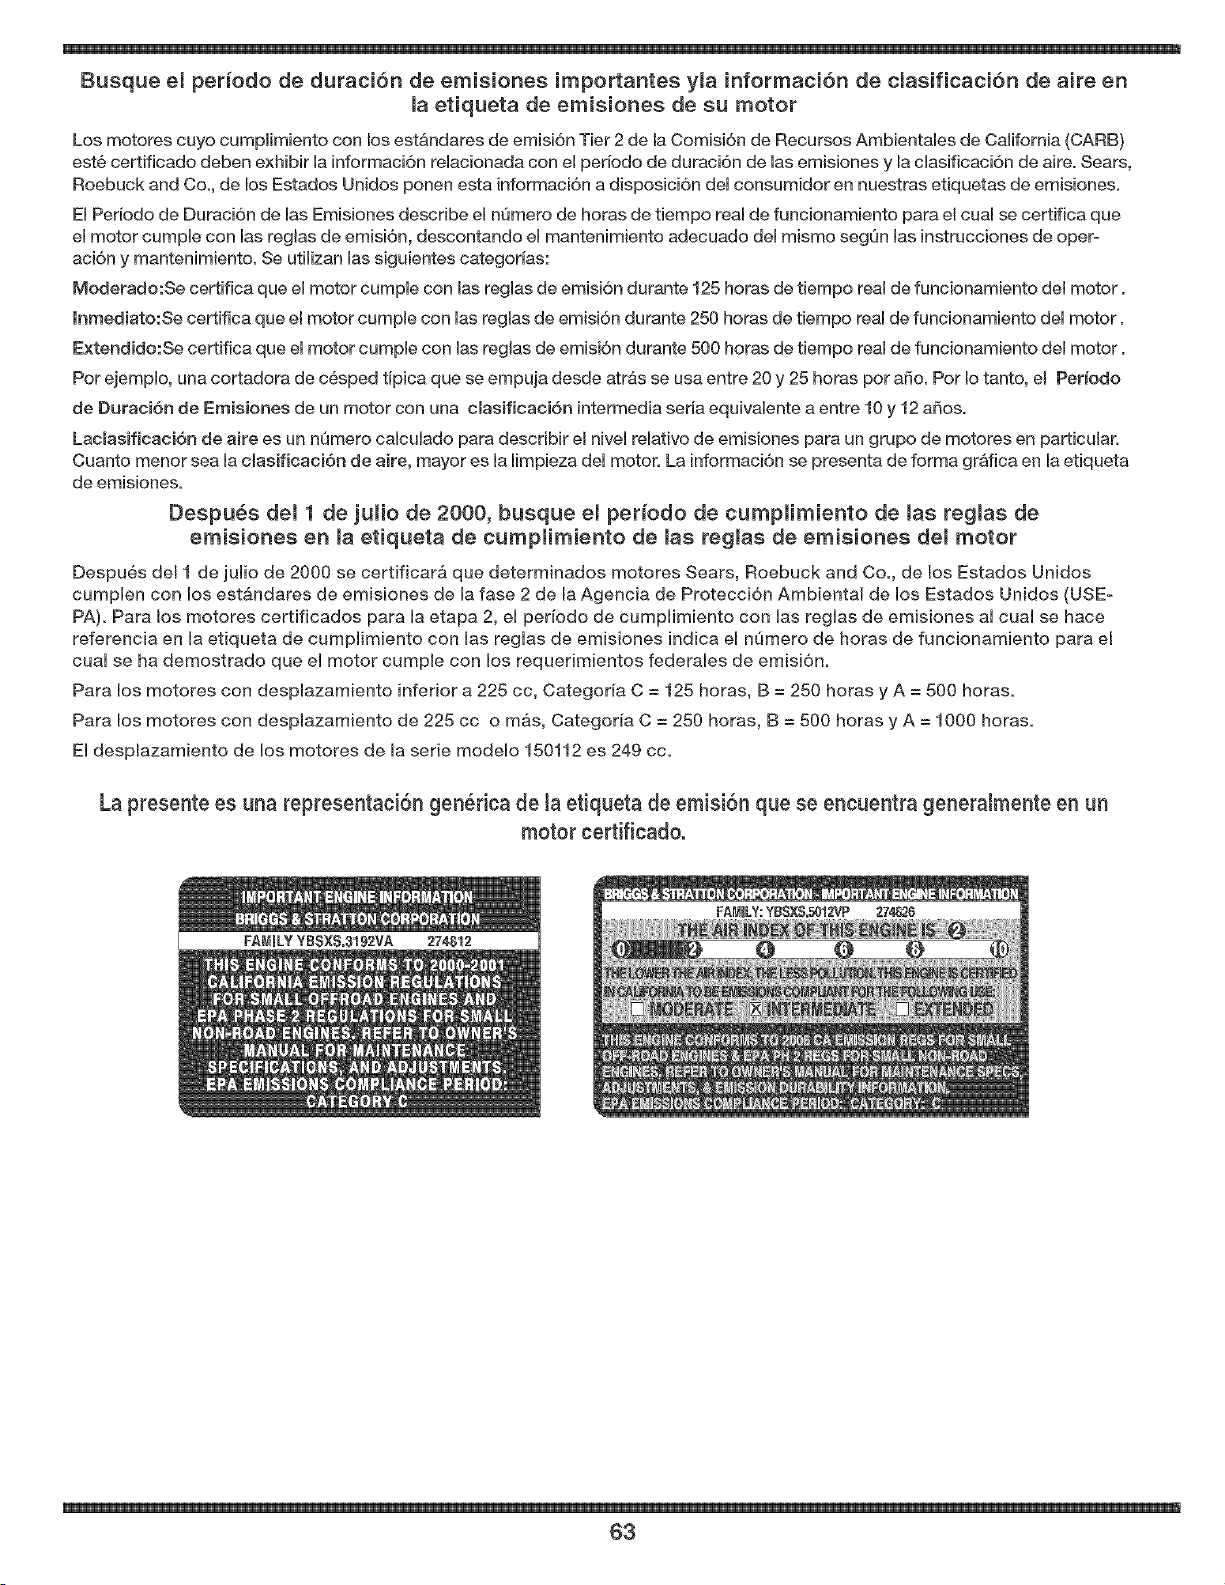
Busque el periodo de duraci6n de emisiones importantes yla informacion de cmasificacion de aire en
la etiqueta de emisiones de su motor
Los motores cuyo cumplimiento con los est&ndares de emisi6n Tier 2 de la Comisi6n de Recursos Ambientales de California (CARB)
est6 certificado deben exhibir la informaci6n relacionada con el periodo de duraci6n de las emisiones y la clasificaci6n de aire. Sears,
Roebuck and Co., de los Estados Unidos ponen esta informaci6n a disposbi6n del consumidor en nuestras etiquetas de emisiones.
El Periodo de Duraci6n de las Emisiones describe el n[imero de horas de tiempo real de funcionamiento para el cual se certifica que
el motor cumple con las reglas de emisi6n, descontando el mantenimbnto adecuado del mismo segQn las instrucciones de oper-
aci6n y mantenimiento. Se utilizan las siguientes categorias:
Moderado:Se certifica que el motor cumple con las reglas de emisi6n durante 125 horas de tiempo real de funcionamiento del motor.
lnmediato:Se certifica que el motor cumpJe con las reglas de emisi6n durante 250 horas de tiempo real de funcionamiento del motor.
Extendido:Se certifica que el motor cump{e con las reglas de emisi6n durante 500 horas de tiempo real de funcionamiento del motor.
Por ejemplo, una cortadora de c_sped tipica que se empuja desde atr&s se usa entre 20 y 25 horas por aSo. Pot Io tanto, el Pedodo
de Duraci_Sn de Emisiones de un motor con una clasificac{6n intermedia seria equivalente a entre 10 y 12 a_os.
Lacmasificaci6n de aire es un nQmero calculado para describir el nivel relativo de emisiones para un grupo de motores en particular.
Cuanto menor sea la c{asificaci6n de aire, mayor es la limpieza del motor. La informaci6n se presenta de forma gr&fica en la etiqueta
de emisiones.
Despues dem 1 de juHo de 2000, busque el periodo de cumpHmiento de masregmas de
emisiones en la etiqueta de cumpiimiento de las regmas de emisiones dem motor
Despu6s del 1 de juiio de 2000 se certificar& que determinados motores Sears, Roebuck and Co., de los Estados Unidos
cumplen con los estb.ndares de emisiones de la fase 2 de la Agencia de Proteccidn Ambiental de los Estados Unidos (USED
PA). Para los motores certificados para la etapa 2, el periodo de cumplimiento con las reglas de emisiones al cual se hace
referencia en la etiqueta de cumplimiento con las reglas de emisiones indica el nQmero de horas de funcionamiento para el
cual se ha demostrado que el motor cumpJe con los requerimientos federales de emisi6n.
Para los motores con desplazamiento inferior a 225 cc, Categoria C = 125 horas, B = 250 horas y A = 500 horas.
Para los motores con desplazamiento de 225 cc o m&s, Categoria C = 250 horas, B = 500 horas y A = 1000 horas.
El desplazamiento de los motores de la serie modelo 150112 es 249 cc.
La presente es una representaciSn gen_rica de la etiqueta de emisiSn que se encuentra generalmente en un
motor certificado.
63

Your Home
For repair - in your home - of all major brand appliances,
lawn and garden equipment, or heating and cooling systems,
no matter who made it, no matter who sold it!
For the replacement parts, accessories and
owner's manuals that you need to do-it-yourself.
For Sears professional installation of home appliances
and items like garage door openers and water heaters.
1-800-4-MY-HOME ® (1-800-469-4663)
Call anytime, day or night (U.S.A. and Canada)
www.sears.com www.sears.ca
For expert home solutions advice: www.managemyhome.com
Our Home
For repair of carry-in items like vacuums, lawn equipment,
and electronics, call or go on-line for the location of your nearest
Sears Parts & Repair Service Center
1-800-488-1222 (U.S.A./ 1-800-469-4663 (Canada/
Call anytime, day or night
www.sears.com www.sears.ca
To purchase a protection agreement on a product serviced by Sears:
1-800-827-6655 (U.S.A.) 1-800-361-6665 (Canada)
Para pedir servicio de reparaci6n Au Canada pour service en fran_ais:
a domicilio, y para ordenar piezas: 1-800-LE-FOYER Mc
1-888-SU-HOGAR ® (1-800-533-6937)
(1-888-784-6427) www.sears.ca
,Se- //rs
® Registered Trademark / Trademark / sM Service Mark of Sears Brands, LLC
T_,T
® Marca Registrada / ' Marca de F_brica / sM Marca de Servicio de Sears Brands, LLC
MC _,ID
Marque de commerce / _ Marque d_pos_e de Sears Brands, LLC © Sears Brands, LLC