Use _ Care Guide
Electric Cooktop
ectrol_
Finding Information
MAKEA RECORDFORFUTUREUSE
Brand
Purchase Date
Model Number
Serial Number
QUESTIONS?
• • • • • • • • • • • • • • • • • • • • • •
For toll-free telephone support in the U.S. and Canada:
1-877-4ELECTROLUX (1-877-435-3287)
For online support and internet product information:
www.electrolux.com
@2003 Electrolux Home Products, lnc,
Post Office Box 212378, Augusta, Georgia 30917, USA
An rights reserved. Printed in the USA
Finding Information
TABLEOFCONTENTS
Finding Information ...........................................2
Makea Recordfor Futureuse ..........................2
Questions?........................................................2
Safety...................................................................4
ImportantSafetyInstructions..............................4
Setting SurfaceControls...................................7
AbouttheCeramicGlassCooktop......................7
AbouttheRadiantSurfaceElements..................7
LocationsoftheRadiantSurfaceElements.........8
SurfaceCookingSettings...................................8
OperatingtheSingleSurfaceRadiantElements. 9
OperatingtheDualSurfaceRadiantElements..10
OperatingtheBridgeSurfaceRadiantElement.11
HotSurfaceIndicatorLights..............................11
SurfaceCookingutensils..................................12
Usingthe Griddle.............................................12
GeneralCare& Cleaning..................................13
Care& CleaningTable....................................13
CooktopCleaningandMaintenance................14
CleaningRecommendationsforthe
CeramicGlassCooktop..............................14-15
Care&Cleaningof StainlessSteel...................15
Solutionsto CommonProblems.....................16
EntireCooktopDoesNotOperate....................16
SurfaceElementDoesNotHeat......................16
SurfaceElementTooHotor NotHotEnough... 16
FoodNotHeatingEvenly................................17
ScratchesorAbrasionsonCeramic
GlassCooktopSurface....................................17
MetalMarksonCeramicGlass
CooktopSurface..............................................17
BrownStreaksandSpecksonCeramicGlass
CooktopSurface..............................................17
Areasof DiscolorationonCeramic
GlassCooktopSurface....................................18
Notes..................................................................19
WarrantyInformation .......................................20

Safety
iMPORTANTSAFETY iNSTRUCTiONS
Please read all safety instructions before using your new Electrolux cooktop.
• Remove all tape and packaging wrap before using the appliance. Destroy the
carton and plastic bags after unpacking the appliance. Never allow children to play
with packaging material.
° Proper Installation. Be sure your appliance is properly installed and grounded by
a qualified technician in accordance with the National Electrical Code No. 70 -
latest edition in the United States, or CSA C22.1, Part 1 in Canada, and local code
requirements. Install only per installation instructions provided in the literature package
for this appliance.
Ask your dealer to recommend a qualified technician and an authorized repair service Know
how to disconnect the electrical power to the appliance at the circuit breaker or fuse box in
case of an emergency.
• User Servicing. Do not repair or replace any part of the appliance unless specifically
recommended in the manuals. All other servicing should be done only by a qualified
technician to reduce the risk of personal injury and damage to the appliance.
° Never modify or alter the construction ofan appliance such as removal of panels, wire
covers or any other permanent part of the appliance.
• Storage on Appliance. Flammable materials should not be stored near surface units.
This includes paper, plastic and cloth items, such as cookbooks, plasticware and towels, as
well as flammable liquids. Do not store explosives, such as aerosol cans, on or near the
appliance. Flammable materials may explode and result in fire or property damage.
• Do not leave children alone. Children should not be left alone or unattended in the
area where an appliance is in use. They should never be allowed to sitor stand on any part
of the appliance
Safety
• DO NOT TOUCH SURFACE UNITS OR AREAS NEAR THESE UNITS. Surface units may
be hot even though they are dark in color Areas near surface units may become hot
enough to cause burns. During and after use, do not touch, or let clothing or other
flammable materials touch these areas until they have had sufficient time to cool. Among
these areas are the cooktop and areas facing the cooktop.
• Wear Proper Apparel. Loose-fitting or hanging garments should never be worn
while using the appliance. Do not let clothing or other flammable materials contact hot
surfaces.
• Do Not Use Water or Flour on Grease Fires. Smother the fire with a pan lid, or use
baking soda, a dry chemical or foam-type extinguisher.
• When heating fat or grease, watch it closely. Fat or grease may catch fire if allowed to
become too hot.
• Use Only Dry Pot holders. Moist or damp pot holders on hot surfaces may result in
burns from steam. Do not let the pot holders touch hot surface units Do not use a towel or
other bulky cloth instead of a pot holder.
• Do Not Heat Unopened Food Containers. Buildup of pressure may cause the container
to burst and result in injury.
IMPORTANT. Do not attempt to operate the cooktop during a power failure. If the power
fails, always turn off the cooktop. If the cooktop is notturned off and the power resumes, the
cooktop will begin to operate again Food left unattended could catch fire or spoil.
IMPORTANT SAFETY INSTRUCTIONS FOR USING YOUR COOKTOP
• Knowwhich knob controls each surface unit.
• Clean the appliance regularly to keep all parts free of grease that could catch fire.
Exhaust fan ventilation hoods and gtease filters shou Id be kept clean Do not allow grease to
accumulate on hood or filter. Greasy deposits in the fan could catch fire When flaming food
under the hood, turn fan on Refer to hood manufacturer's instructions for cleaning.
• Use Proper Pan Size This appliance is equipped with one or more surface units of different
sizes. Select utensils having flat bottoms large enough to cover the surface unit. The use of
undersized utensils will expose a portion of the surface heating unitto direct contact and may
result in ignition of clothing Proper relationship of utensil to element will also improve
efficiency
Safety
• Utensil Handles Should Be Turned Inward and Not Extend Over Adjacent Surface
Units To reduce the risk of burns, ignition of flammable materials, and spillage due to
unintentional contact with the utensil.
° Never Leave Surface Units Unattended. Boilovers cause smoking and greasy spillovers
that may ignite, or a pan that has boiled dry may melt.
• Protective Liners. Do not use aluminum foil to line any part of the appliance. Only use
aluminum foil as recommended for baking if used as a cover placed on the food. Any other use
of protective liners or aluminum foil may result in a risk of electric shock or fire or short circuit.
• Glazed Cooking Utensils. Only certain types of glass, glass/ceramic, ceramic,
earthenware, or other glazed utensils are suitable for range top service without breaking due
to the sudden change in temperature. Check the manufacturer's recommendations for
cooktop use.
• Do Not Use Decorative Surface Element Covers. if an element is accidentally turned on,
the decorative cover will become hot and possibly melt Burns willoccur if the hot covers are
touched. Damage may also be done to the appliance.
• Ventilating hood. The ventilating hood above your cooking surface should be cleaned
frequently, so the grease from cooking vapors does not accumulate on the hood or filter.
FOR CERAMIC-GLASS COOKTOP ONLY
• Do Not Clean or Operate a Broken Cooktop. If cooktop should break, cleaning solutions
and spillovers may penetrate the broken cooktop and create a risk of electric shock. Contact
a qualified technician immediately.
• CleanCooktopwithCaution. lfawetspongeorclothisusedtowipespillsonahotcooking
area, be careful to avoid a steam burn. Some cleaners can produce harmful fumes if applied
to a hot surface.
• Do Not Place Hot Cookware on Cold Cooktop Glass. This could cause glass to break.
• Do not slide pan across the cooktop surface. They may scratch the cooktop surface
• Do Not Let Pans Boil Dry. This may cause permanent damage in the form of breakage,
fusion, or marking that can affect the ceramic-glass cooktop. (This type of damage is not
covered by yourwarranty).

Setting Surface Controls
ABOUTTHECERAMICGLASSCOOKTOP
The ceramic cooktop has radiant surface elements located below the
surface of the glass. The design of the ceramic cooktop outlines the
area of the surface element underneath. Make sure the diameter of the
pan matches the diameter of the element outline on the cooktop (See
Figure).
Heat is transferred up through the surface of the cooktop to the
cookware. Only flat-bottom cookware should be used. The type and
size of cookware, the number of surface elements in use and their
settings, are all factors that will affect the amount of heat that will
spread to areas beyond the surface elements. The areas surrounding
the elements may become hot enough to cause burns.
CooktopAppearance
Cooktop radiantareasthat heat
ABOUTTHERADIANTSURFACEELEMENTS
The element temperature rises gradually and evenly. As the temperature rises, the element
will glow red. To maintain the selected setting, the element will cycle on and off. The heating
element retains enough heat to provide a uniform and consistent heat during the off cycle.
For efficient cooking, turn off the element several minutes before cooking is complete. This
will allow residual heat to complete the cooking process.
Setting Surface Controls
._oc_y.so_j,._su.%_c._.%_.,_._._ js..
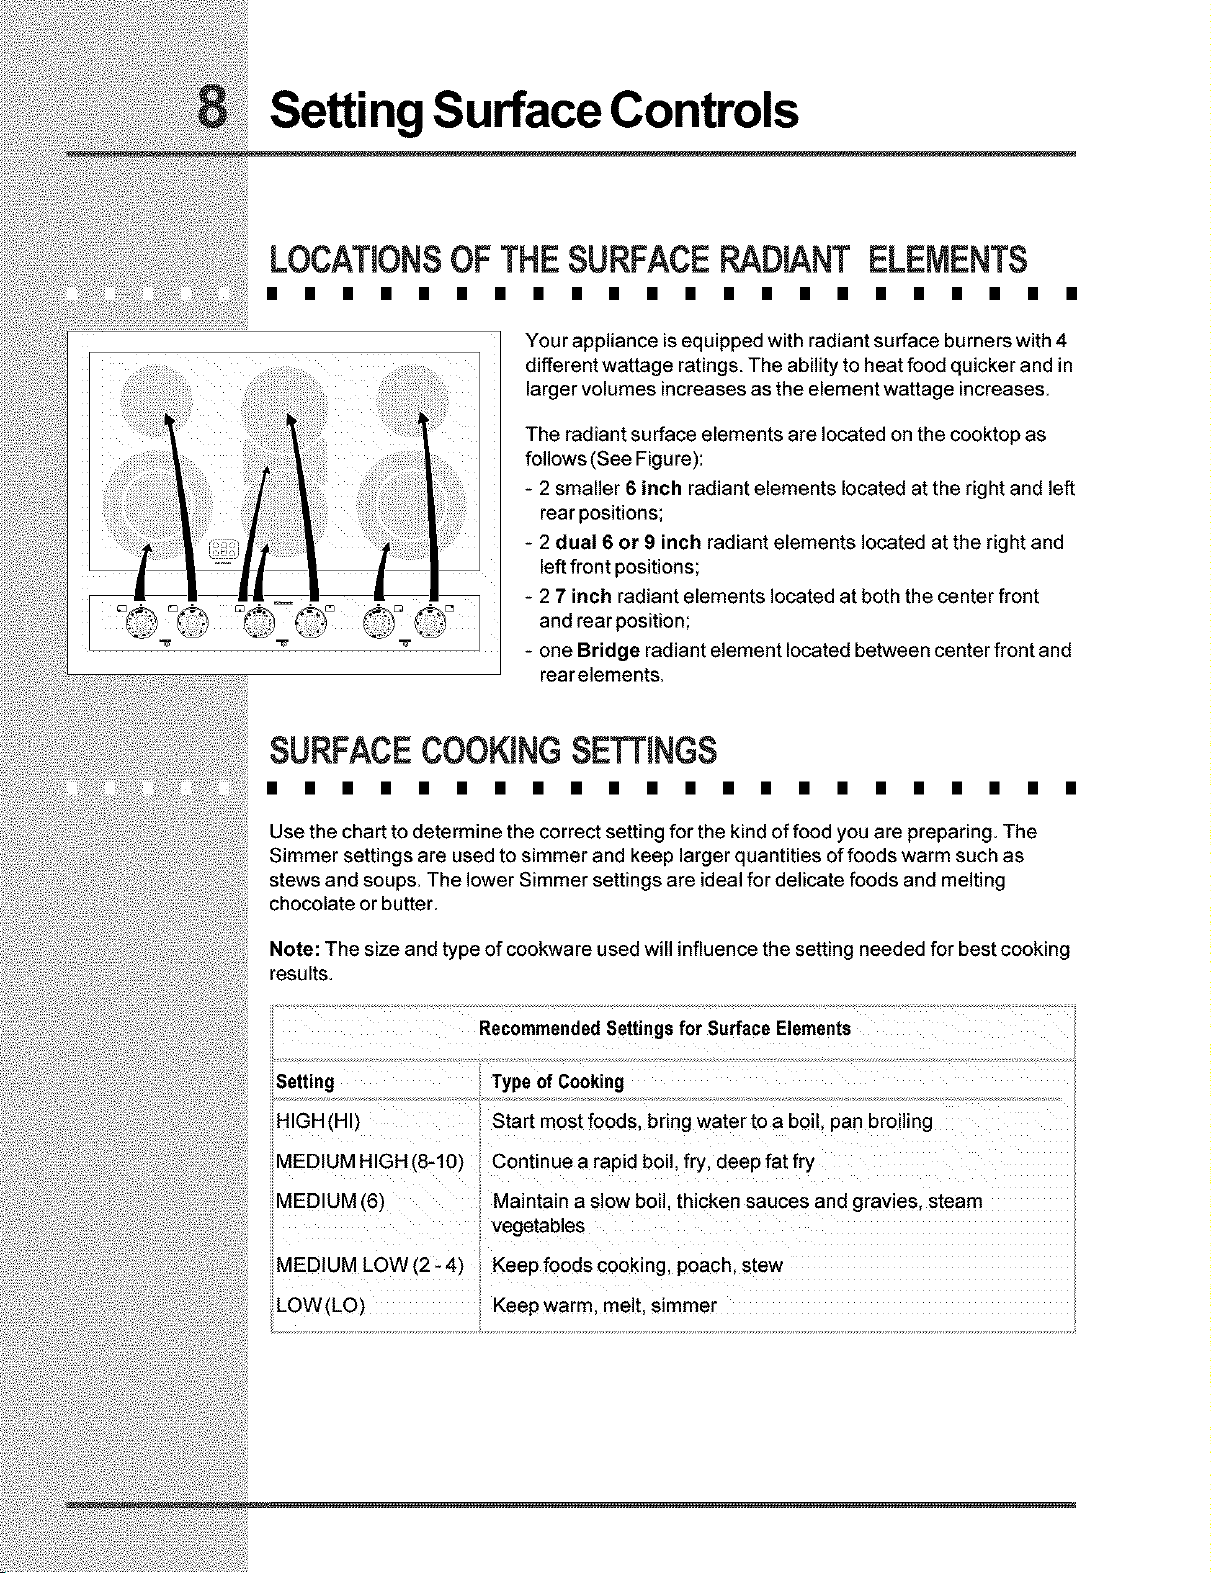
Your appliance is equipped with radiant surface burners with 4
different wattage ratings, The ability to heat food quicker and in
larger volumes increases as the element wattage increases,
The radiant surface elements are located on the cooktop as
follows(See Figure):
- 2 smaller 6 inch radiant elements located at the right and left
rear positions;
- 2 dual 6 or 9 inch radiant elements located at the right and
_; fi_°nhPr°d::_: ements ocated at both the center front
_3 • [] • L. • -- . [] • [] • []
= and rear position
i _L _ "_ "_" - one Bridge radiant element located between center front and
rearelements,
.coo.,,.?
Use the chart to determine the correct setting for the kind of food you are preparing, The
Simmer settings are used to simmer and keep larger quantities of foods warm such as
stews and soups, The lower Simmer settings are ideal for delicate foods and melting
chocolate or butter,
Note: The size and type of cookware used will influence the setting needed for best cooking
results,
RecommendedSettingsfor Surface Elements
Setting Type of Cooking
HIGH (HI) Start most foods bring water to a boll pan brolhng
MEDIUM HIGH (8-10) Continue a rapid boil, fry, deep fat fry
MEDIUM (6) Maintain a slow boll thicken sauces and gravies steam
vegetables
MEDIUM LOW (2- 4) Keep foods cooking, poach, stew
LOW(LO) Keepwarm melt simmer
Setting Surface Controls
OPERATINGTHESINGLESURFACERADIANTELEMENTS
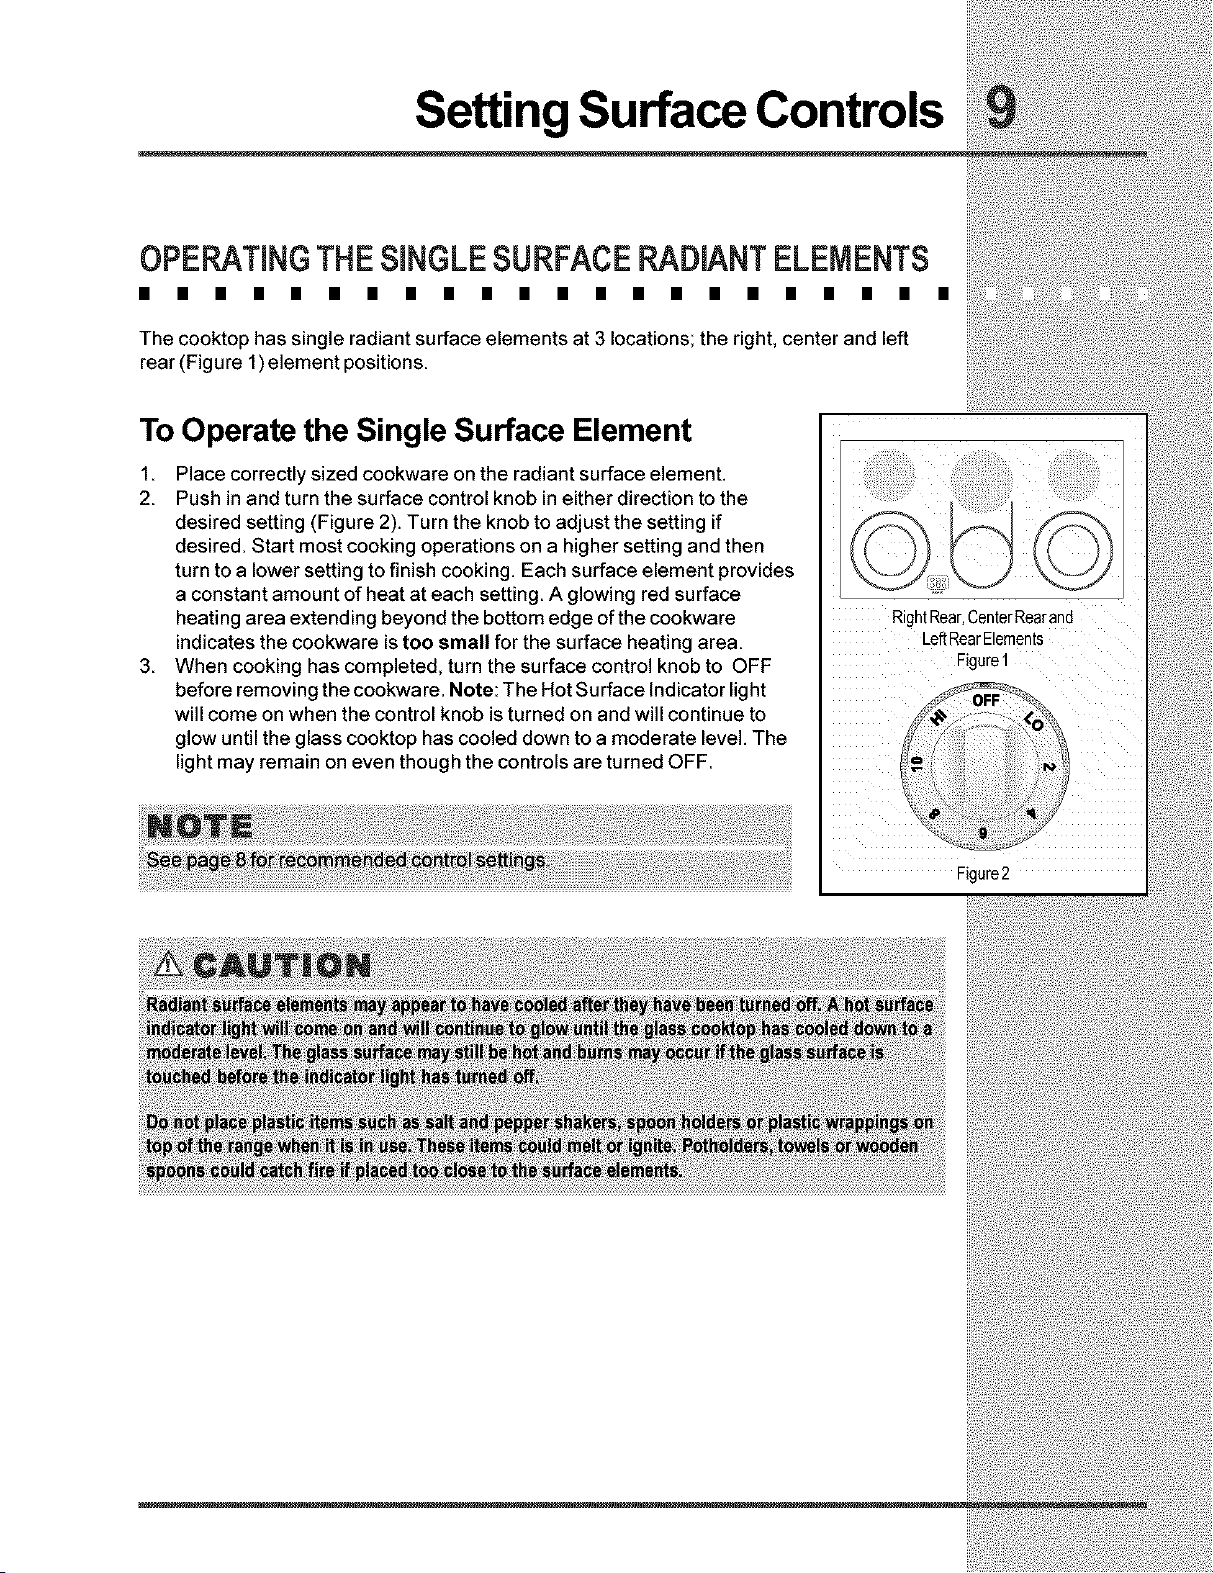
The cooktop has single radiant surface elements at 3 locations; the right, center and left
rear (Figure 1)element positions.
To Operate the Single Surface Element
1 Place correctly sized cookware on the radiant surface element.
2. Push in and turn the surface control knob in either direction to the
desired setting (Figure 2). Turn the knob to adjust the setting if
desired. Start most cooking operations on a higher setting and then
turn to a lower setting to finish cooking. Each surface element provides
a constant amount of heat at each setting. A glowing red surface
heating area extending beyond the bottom edge of the cookware
indicates the cookware is too small for the surface heating area.
3. When cooking has completed, turn the surface control knob to OFF
before removing the cookware. Note: The Hot Surface Indicator light
will come on when the control knob is turned on and will continue to
glow until the glass cooktop has cooled down to a moderate level. The
light may remain on even though the controls are turned OFF.
RightRear,CenterRearand
LeftRearElements
Figure1
Figure2
Setting Surface Controls
OPERATINGTHE DUALSURFACERADIANTELEMENTS
• • • • • • • • • • • • • • • • • • • • •
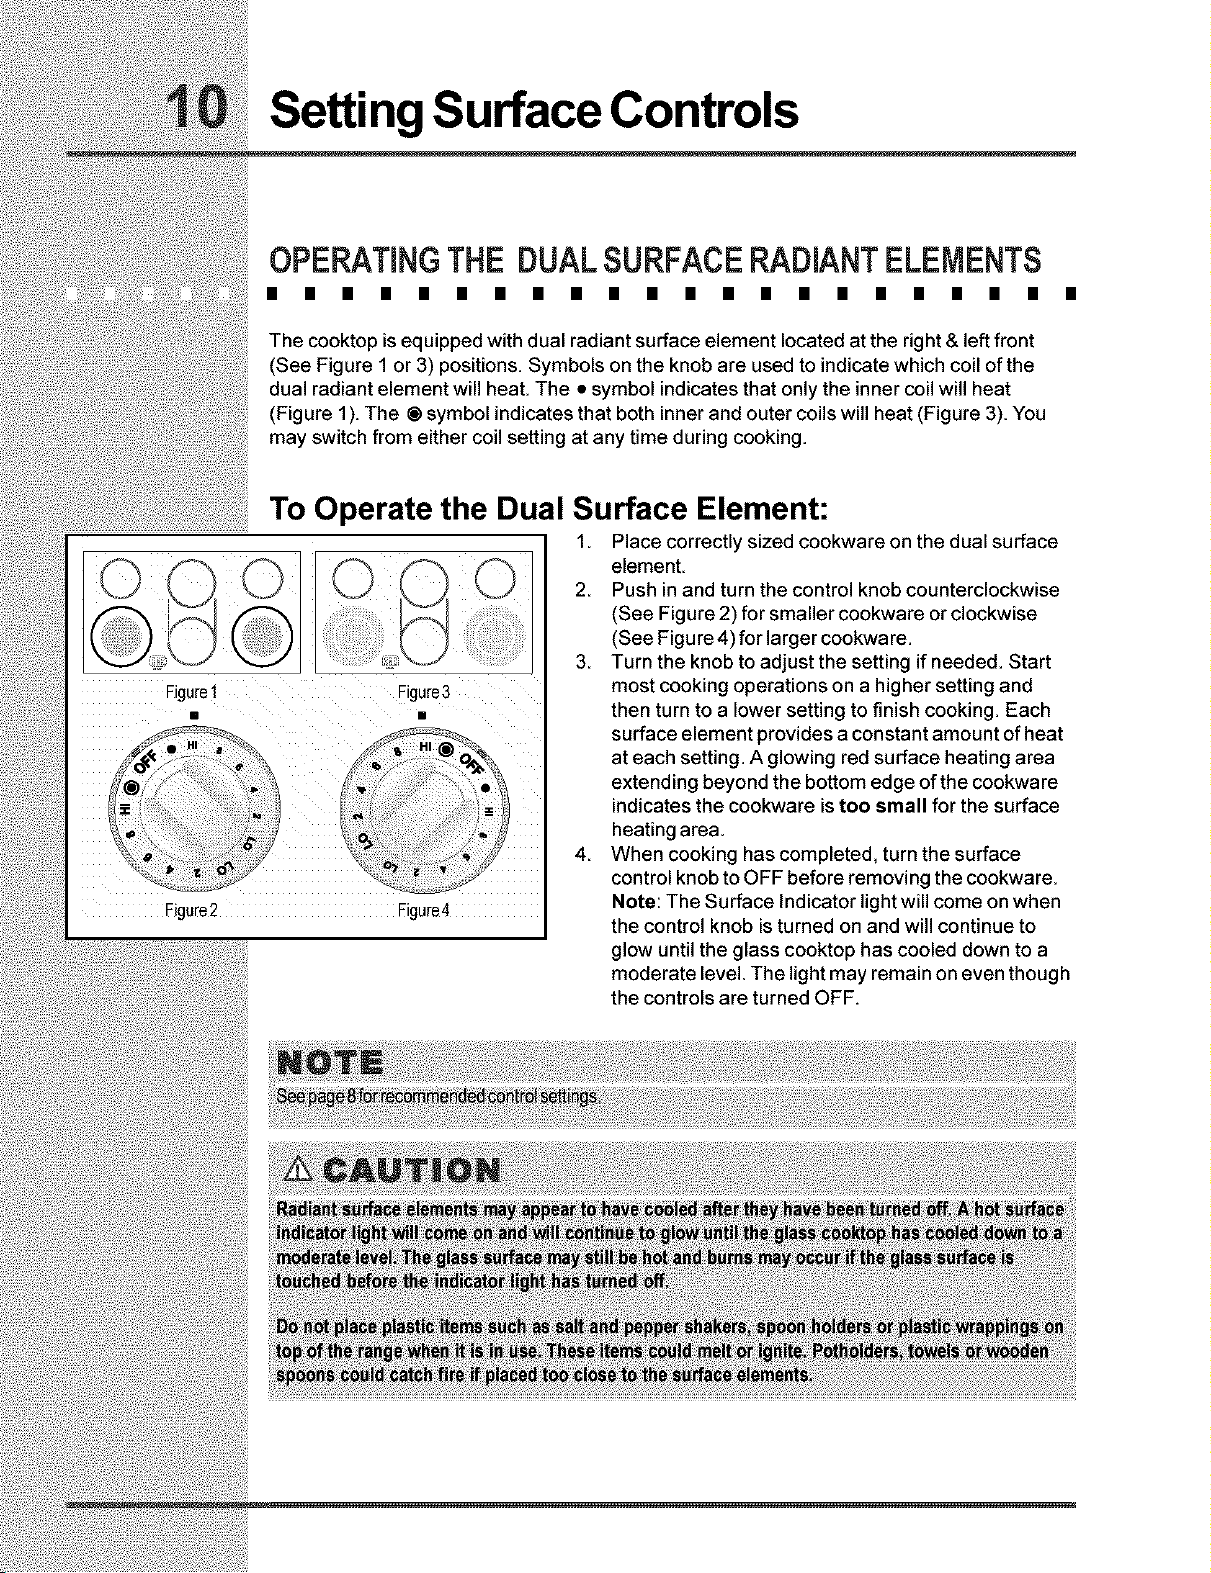
The cooktop is equipped with dual radiant surface element located at the right & left front
(See Figure 1 or 3) positions. Symbols on the knob are used to indicate which coil of the
dual radiant element will heat. The • symbol indicates that only the inner ceil will heat
(Figure 1). The ® symbol indicates that both inner and outer coils will heat (Figure 3). You
may switch from either coil setting at any time during cooking.
To Operate the Dual Surface Element:
1 Place correctly sized cookware on the dual surface
Figure1
I
Figure2 Figure4
Figure3
I
element
2 Push in and turn the control knob counterclockwise
(See Figure 2) for smaller cookware or clockwise
(See Figu re 4) for larger cookwa re.
3. Turn the knob to adjust the setting if needed. Start
most cooking operations on a higher setting and
then turn to a lower setting to finish cooking. Each
surface element provides a constant amount of heat
at each setting. A glowing red surface heating area
extending beyond the bottom edge of the cookware
indicates the cookware is too small for the surface
heating area.
4. When cooking has completed, turn the surface
control knob to OFF before removing the cookware.
Note: The Surface Indicator light will come on when
the control knob is turned on and will continue to
glow until the glass cooktop has cooled down to a
moderate level. The light may remain on even though
the controls are turned OFF.

Setting Surface Controls
OPERATINGTHE BRIDGESURFACE RADIANTELEMENT
The cooktop is equipped with a "Bridge" surface element located at the center front and
middle positions• The Bridge can be used when cooking with rectangular (like a griddle) or
oval shaped cookware• The element will maintain an even temperature setting across both
portions of the Bridge• If needed for normal cookware, the Bridge element can work like a
single element without the Bridge.
Bridge element operation symbols are located on the Bridge element control knob• These
symbols indicate the direction to turn the control knob when operating the Bridge element.
The symbol _ indicates that only the single portion of the Bridge element will heat (see
Figues 1 and 2). The symbol _ indicates that both the single and Bridge portions of the
element will heat together (see Figures 3 and 4). You may switch from either of these
settings at any time during cooking with the Bridge element•
To Operate the Bridge Surface Element:
1. Place correctly sized cookware on the dual surface element•
2. Push in and turn the control knob counterclockwise (see Figure
2) to heat the portion of the Bridge element for normal shaped
cookware or clockwise (see Figure 4) for larger or rectangular
shaped cookware.
3. Turn the knob to adjust the setting if needed• Start most Figure1
cooking operations on a higher setting and then turn to a lower
setting to finish cooking• Each surface element provides a
constant amount of heat at each setting• A glowing red surface
heating area extending beyond the bottom edge of the
cookware indicates the cookware is too small. Please note
that not all cookware will fit the Bridge element correctly.
4. When cooking has completed, turn the surface control knob to
OFF before removing the cookware. Note: The Surface
Indicator light will come on when the control knob is turned on
and will continue to glow until the glass cooktop has cooled
down to a moderate level• The light may remain on even though
the controls are turned OFF.
The BRIDGE element may also be used in combination with the
center rear single element (see Figure 5). Because these element have 2 different controls,
one element can be used to cook while the other element may be used to keep food warm•
Figure3
Figure2
Figure5 Figure4
HOTSURFACEiNDiCATORLIGHTS
This model have indicator lights located on the ceramic glass cooktop that glows as soon as
the glass begins to warm up. When heating units is turned off, itwill continue to glow as long
as the glass remains warm enough to cause burns•
Setting Surface Controls
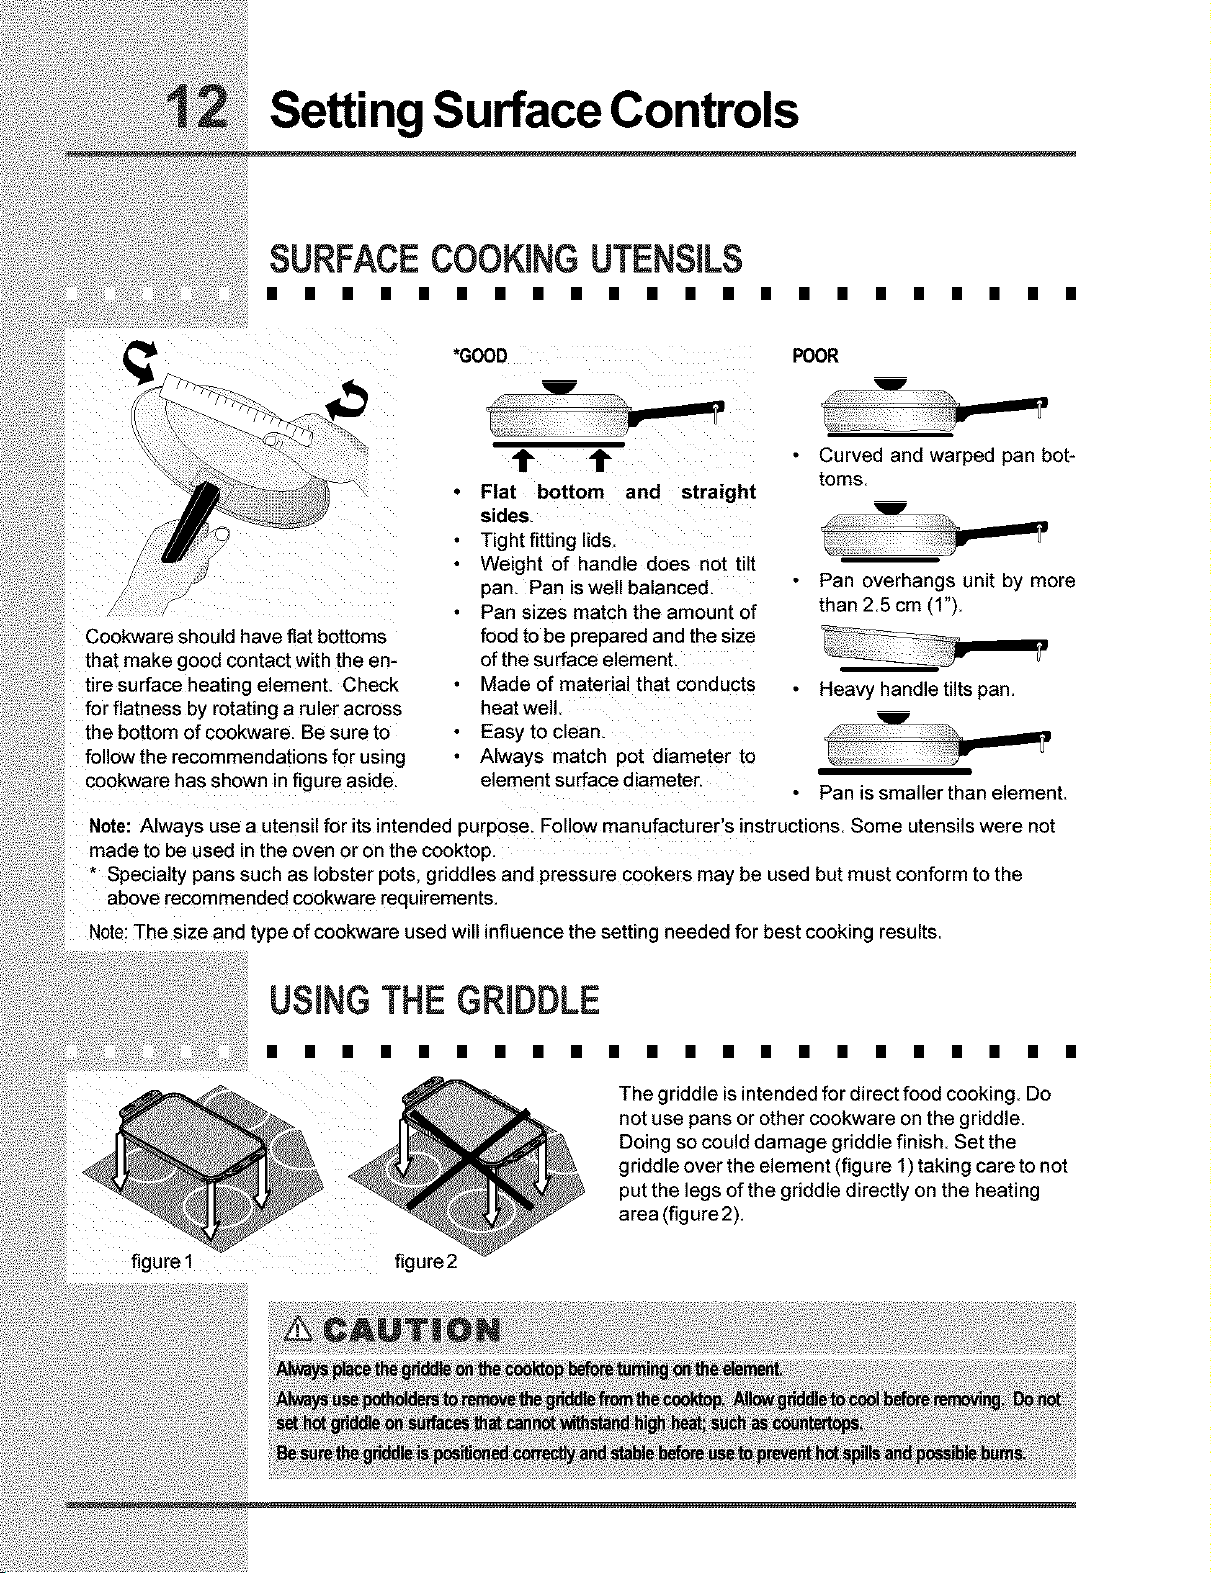
SURFACECOOKINGUTENSILS
Cookware should have flat bottoms
that make good contact with the en-
tire surface heating element. Check
for flatness by rotating a ruler across
the bottom of cookware. Be sure to
follow the recommendations for using
cookware has shown in figure aside.
POOR
u
• Flat bottom and straight
sides.
Tight fitting lids.
Weight of handle does not tilt
pan. Pan iswell balanced.
Pan sizes match the amount of
food to be prepared and the size
of the surface element.
Made of material that conducts
heat well
Easy to clean.
Always match pot diameter to
element surface diameter.
Curved and warped pan bot-
toms.
u
m
Pan overhangs unit by more
than 2.5 cm (1").
Heavy handle tilts pan.
I
--t
Pan is smaller than element.
Note: Always use a utensil for its intended purpose. Follow manufacturer's instructions. Some utensils were not
made to be used in the oven or on the cooktop.
* Specialty pans such as lobster pots, griddles and pressure cookers may be used but must conform to the
above recommended cookware requirements
Note:The size and type of cookware used will influence the setting needed for best cooking results.
USINGTHEGRIDDLE
IllI
figure1 figure2
IllllllllllllllllI
The griddle is intended for direct food cooking Do
not use pans or other cookware on the griddle.
Doing so could damage griddle finish. Set the
griddle over the element (figure 1) taking care to not
put the legs of the griddle directly on the heating
area (figure2).
General Care & Cleaning
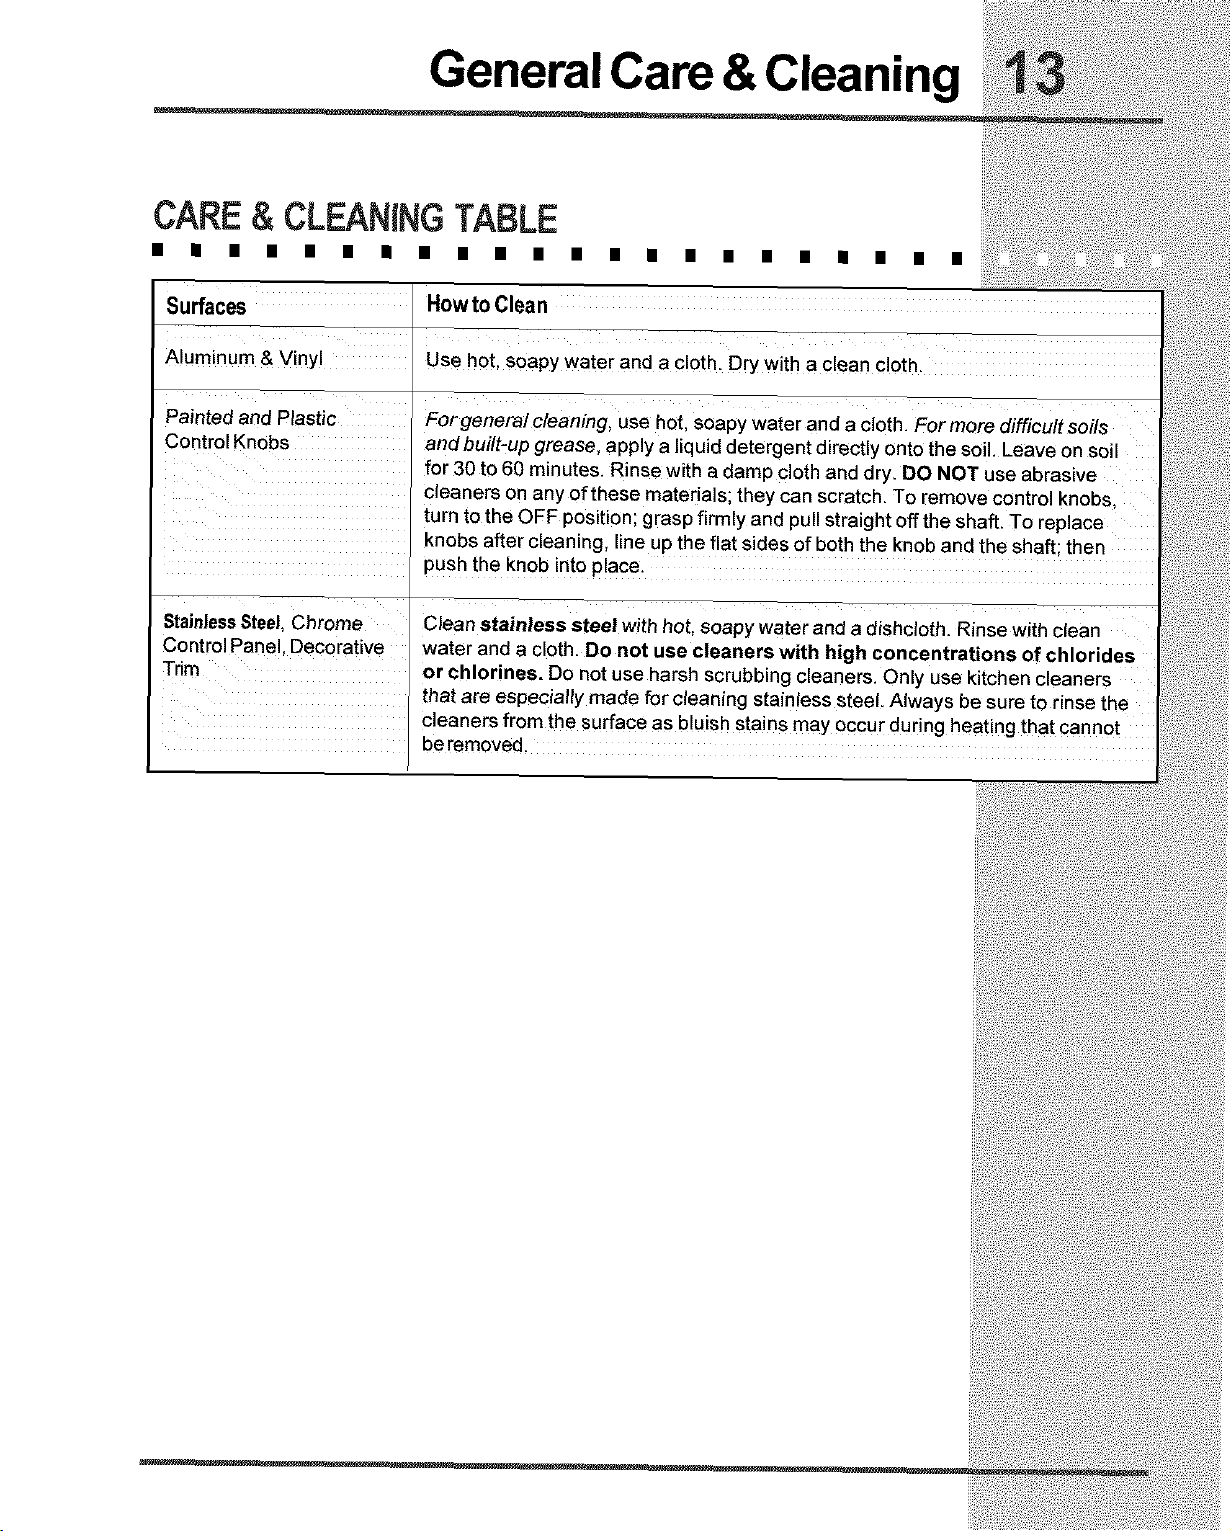
CARE& CLEANINGTABLE
• IN • • II • IN • • • • • • U • • • • II • II •
Control Knobs
Surfaces Howto Clean
Aluminum & Vinyl Use hot, soapy water and a cloth. Dry with a clean cloth.
Painted and Plastic For genera/ cleaning, use hot, soapy water and a cloth. For more difficult soils
andbuilt-up grease, apply a liquid detergent directly onto the soil. Leave on soil
for 30 to 60 minutes. Rinse with a damp cloth and dry. DO NOT use abrasive
cleaners on any of these materials; they can scratch. To remove control knobs,
turn to the OFF position; grasp firmly and pull straight off the shaft. To replace
knobs after c_eaning, _ineup the _at sides of both the knob and the shaft; ther_
push the knob into place.
StainlessSteel, Chrome
Control Panel, Decorative
Trim
Clean stainless steel with hot, soapy water and a dishcloth. Rinse with clean
water and a cloth. Do not use cleaners with high concentrations of chlorides
or chlorines. Do not use harsh scrubbing cleaners. Only use kitchen cleaners
that are especially made for cleaning stainless steel. Always be sure to rinse the
cleaners from the surface as bluish stains may occur during heating that cannot
beremoved.
General Care & Cleaning
COOKTOPCLEANINGANDMAINTENANCE
• • • • • • • • • • • • • • • • • • • • • •
Prior to using your cooktop for the first time, apply the recommended Cleaning Creme to the
ceramic surface. A sample of that cleaning creme is supplied with your appliance and it is
available in store. Clean and buff with a paper towel. This will make cleaning easier when soiled
from cooking. The special cooktop cleaning cream leaves a protective finish on the glass to help
prevent scratches and abrasions.
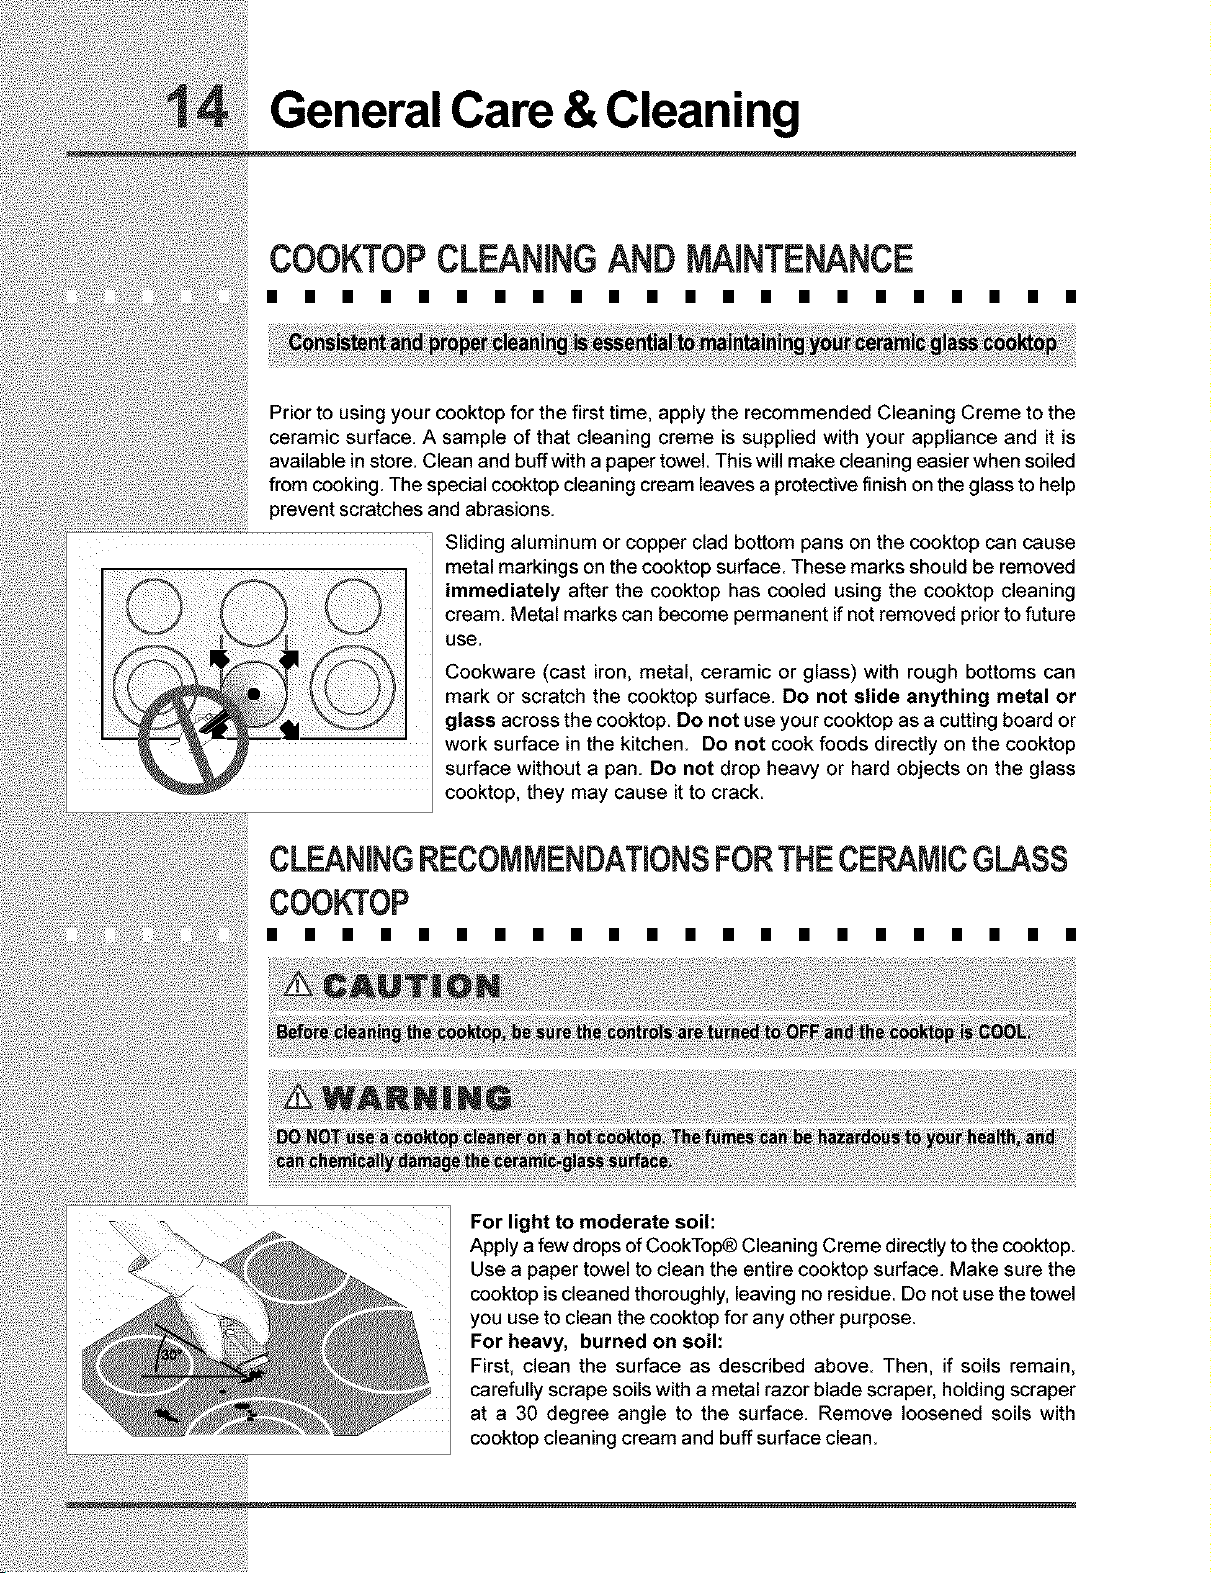
Sliding aluminum or copper clad bottom pans on the cooktop can cause
metal markings on the cooktop surface. These marks should be removed
immediately after the cooktop has cooled using the cooktop cleaning
cream. Metal marks can become permanent if not removed prior to future
use.
Cookware (cast iron, metal, ceramic or glass) with rough bottoms can
mark or scratch the cooktop surface. Do not slide anything metal or
glass across the cooktop. Do not use your cooktop as a cutting board or
work surface in the kitchen. Do not cook foods directly on the cooktop
surface without a pan. Do not drop heavy or hard objects on the glass
cooktop, they may cause it to crack.
CLEANINGRECOMMENDATIONSFORTHECERAMICGLASS
COOKTOP
For light to moderate soil:
Apply a few drops of CookTop® Cleaning Creme directly to the cooktop
Use a paper towel to clean the entire cooktop surface. Make sure the
cooktop is cleaned thoroughly, leaving no residue. Do not use the towel
you use to clean the cooktop for any other purpose.
For heavy, burned on soil:
First, clean the surface as described above. Then, if soils remain,
carefully scrape soils with a metal razor blade scraper, holding scraper
at a 30 degree angle to the surface. Remove loosened soils with
cooktop cleaning cream and buff surface clean.
General Care & Cleaning
CLEANINGRECOMMENDATIONSFORTHECERAMICGLASS
COOKTOP(CONTINUED)
Plastic or foods with a high sugar content:
These types of soils need be removed immediately if spilled or melted onto the ceramic cooktop
surface Permanent damage (such as pitting of the cooktop surface) may occur if not removed
immediately After turning the surface elements OFF, use a razor blade scraper or a metal
spatula with a mitt and scrape the soil from the hot surface (as illustrated on previous page).
Allow the cooktop to cool, and use the same method for heavy or burned on soils
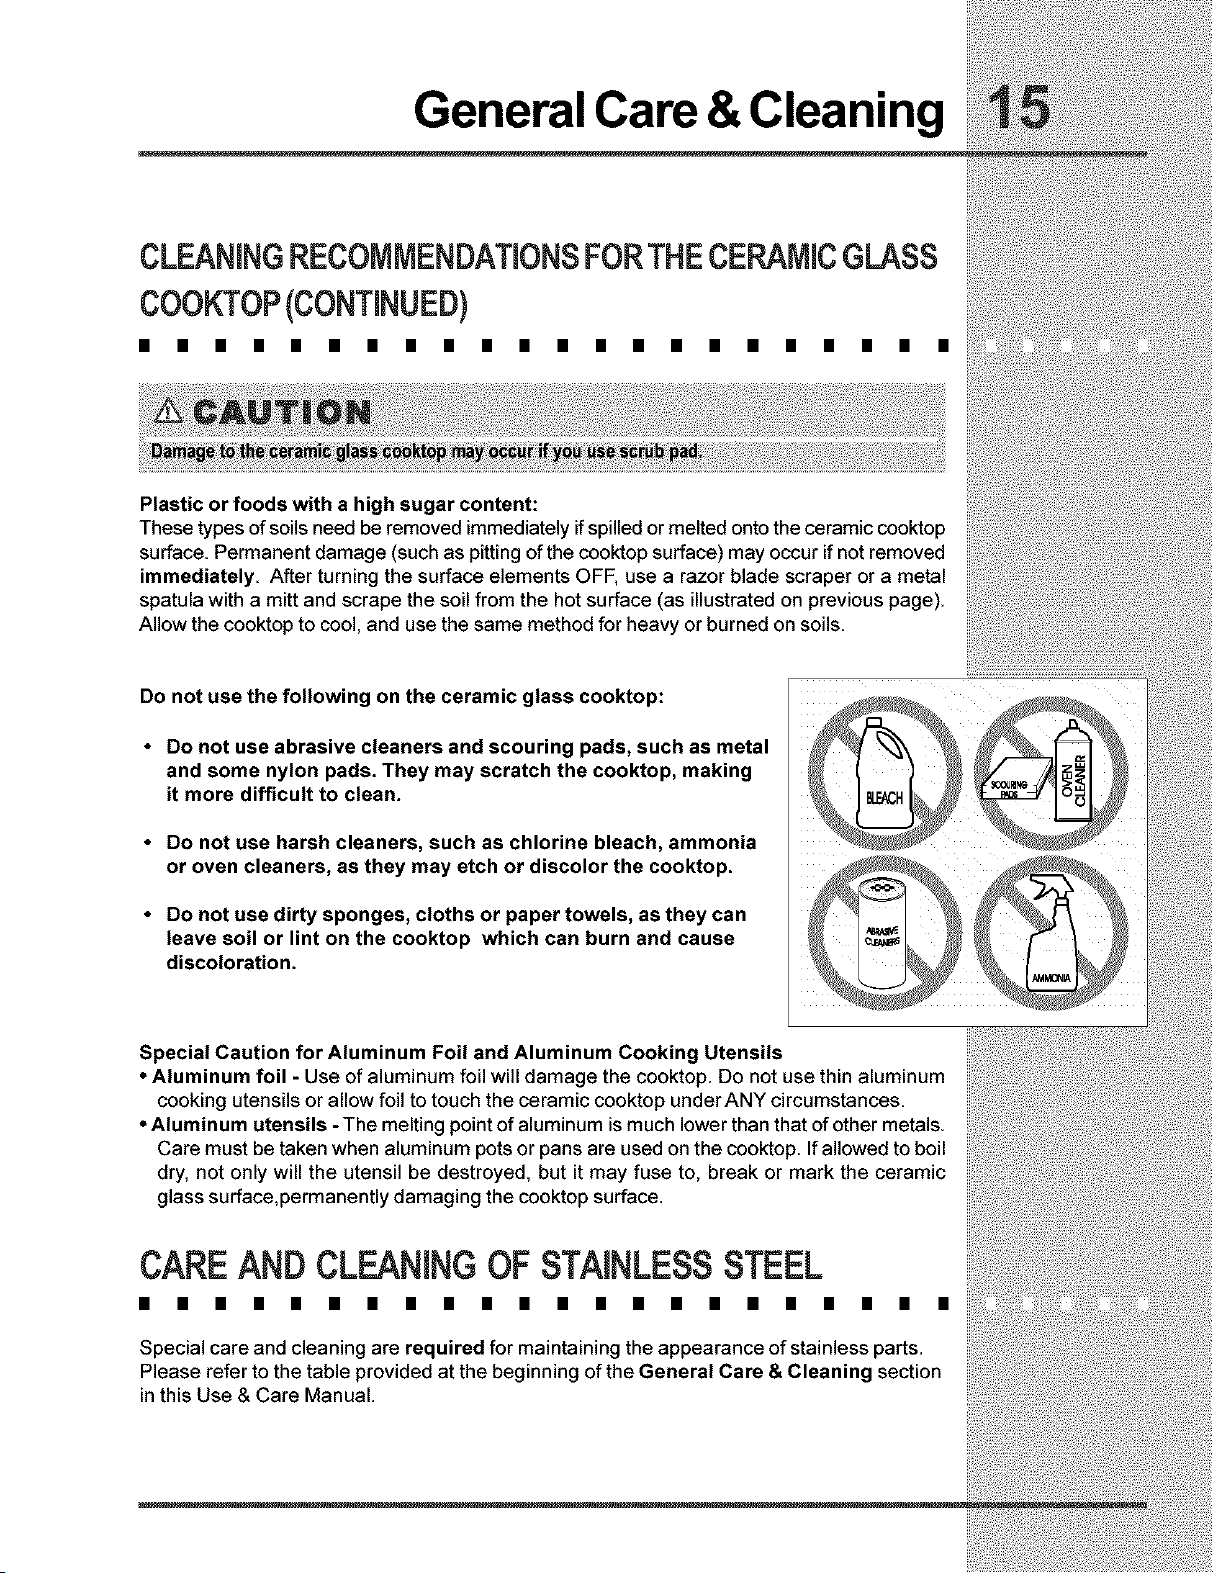
Do not use the following on the ceramic glass cooktop:
• Do not use abrasive cleaners and scouring pads, such as metal
and some nylon pads. They may scratch the cooktop, making
it more difficult to clean.
• Do not use harsh cleaners, such as chlorine bleach, ammonia
or oven cleaners, as they may etch or discolor the cooktop.
• Do not use dirty sponges, cloths or paper towels, as they can
leave soil or lint on the cooktop which can burn and cause
discoloration.
Special Caution for Aluminum Foil and Aluminum Cooking Utensils
• Aluminum foil - Use of aluminum foil will damage the cooktop Do not use thin aluminum
cooking utensils or allow foil to touch the ceramic cooktop underANY circumstances
• Aluminum utensils - The melting point of aluminum is much lower than that of other metals.
Care must be taken when aluminum pots or pans are used on the cooktop If allowed to boil
dry, not only will the utensil be destroyed, but it may fuse to, break or mark the ceramic
glass surface,permanently damaging the cooktop surface.
CAREANDCLEANINGOFSTAINLESSSTEEL
Special care and cleaning are required for maintaining the appearance of stainless parts.
Please refer to the table provided at the beginning of the General Care & Cleaning section
inthis Use & Care Manual.
Solutions to Common Problems
ENTIRECOOKTOPDOESNOTOPERATE
House fuse has blown or circuit breaker has tripped Check/reset breaker or replace
fuse. If the problem is a circuit overload, have this situation corrected by a qualified
electrician.
Service wiring not complete Contact installation agent or dealer.
Power outage. Check house lights to be sure Call local electric company.
SURFACEELEMENTDOESNOTNEAT
No power to appliance. Check/reset breaker or replace fuse If the problem is a circuit
overload, or improper connection of the armored cable supplied with the appliance,
have this situation corrected by a qualified electrician.
Too low heat setting. Turn control to a slightly higher setting until element comes on
Incorrect control is on. Be sure to use correct control for the element to be used.
SURFACEELEMENTTOOHOTORNOTHOTENOUGH
Incorrect control setting. Raise or lower setting until proper amount of heat is
obtained. Dial markings are an indicator of relative heat settings and will vary slightly.
Lightweight or warped pans being used Use only flat, evenly balanced, medium or
heavyweight cookware.
Voltage is incorrect Be sure appliance is properly connected to the specified power
source.
Use only flat bottom, evenly balanced, medium or heavyweight cookware Pans having
a flat bottom heat better than warped pans. Cookware material affects heating. Heavy
and medium weight pans heat evenly. Because lightweight pans heat unevenly, foods
may burn easily.
Solutions to Common Problems
FOODNOTHEATINGEVENLY
• • • • • • • • • • • • • • • • • • • • •
• impropercookware.Selectflat-bottomedcookware ofa propersizetofitelement
• Incorrect control setting. Raise or lower setting until proper amount of heat is
obtained
SCRATCHESORABRASIONSONCERAMICGLASS
COOKTOPSURFACE
• Coarse particles (such as salt or sand) are between cooktop and utensil Be sure
cooktop surface and bottom of utensils are clean before use. Small scratches do not
affect cooking and will become less visible with use.
• Cleaning materials not recommended for glass ceramic cooktop have been used. See
Ceramic-Glass Cooktop section in this Owner's Guide.
• Cookware with rough bottom has been used Use flat-bottomed, smooth utensils. See
Selecting Surface Cooking Utensils in this Owner's Guide.
METALMARKSONCERAMICGLASSCOOKTOPSURFACE
• Sliding or scraping of metal utensils on cooktop surface Do not slide metal utensils on
ceoktop surface. Use a mildly abrasive cleanser to remove marks.
BROWNSTREAKSANDSPECKSONCERAMICGLASS
COOKTOPSURFACE
• Boilovers have cooked onto surface. Use razor blade scraper to remove soil. See
instructions under General Care & Cleaning.
• Cleaning materials not recemmended for ceramic-glass ceoktop have been used Use
recommended cleaners and cleaning method. See Ceramic-Glass Cooktop section in
this Owner's Guide.
Solutions to Common Problems
AREASOFDiSCOLORATiONONCERAMICGLASS
COOKTOPSURFACE
Mineral deposits from water and food Wet surface with water and sprinkle on a
cooktop cleaning creme. Scrub with a clean damp paper towel until the stain
disappears. Wipe remaining paste away, then apply a small amount of cooktop
cleaning creme and polish with a clean paper towel. Use cookware with clean, dry
bottoms. See Ceramic-Glass Cooktop section in this Owner's Guide.

Notes
Warranty Information
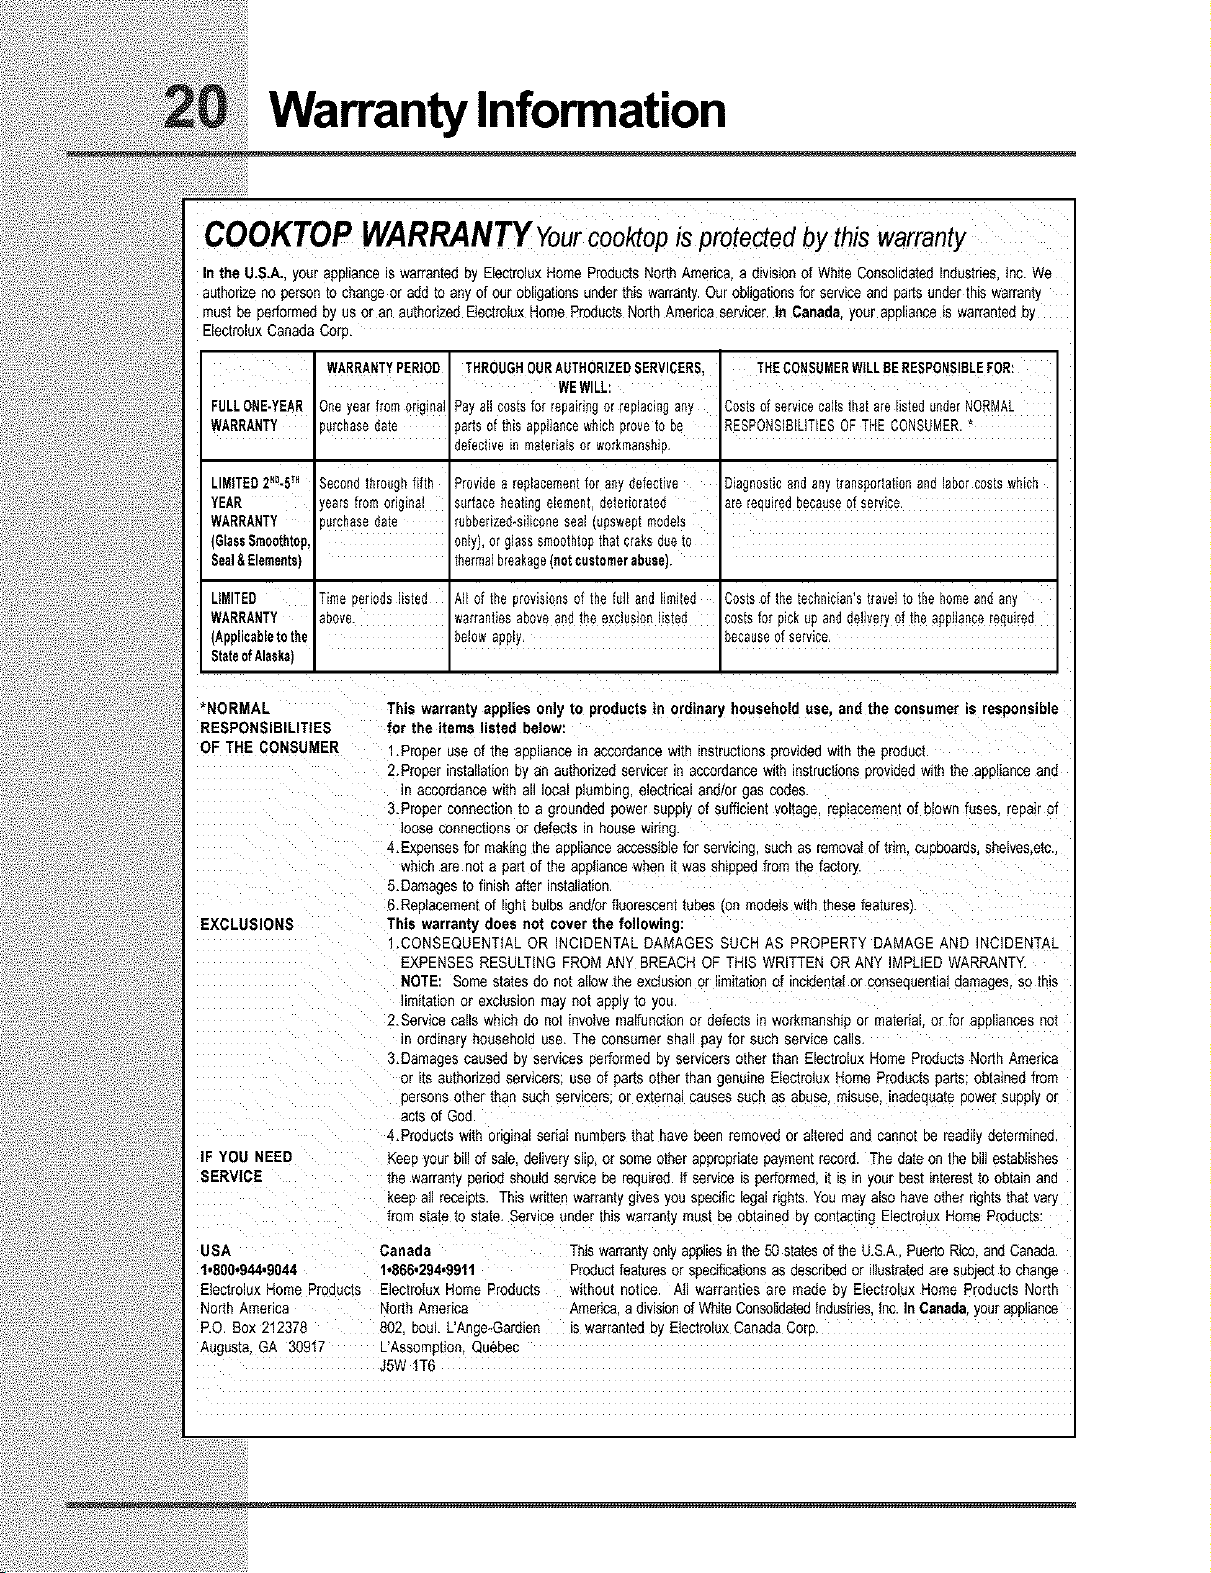
COOKTOPWARRANTYYourcooktop Is protected by this warranty"
In the U.S.A. your appuanceis warrantee oy Eidctroiux Home Products North America a alvlslon of White ConsolidatedIndustries.tnc We
aumorlzeno aerson[o changeor add to any of our obligationsunder this warranty.Our obligationsfor service and Dartsunaer mls warranty
must be cerformed o_ us or an authorized EtectrotuxHome ProductsNorth America servicer, tn Canada, your apt ianceis warrantee [.,
Electrelux Canada CorD.
WARRANTYPERIOD THROUGHOURAUTHORIZEDSERVICERS, THECONSUMERW&LBERESPONSIBLEFOR:
WEWILL:
FULLONE-YEAR One yearfromorigina Payall costsfor repairingor replacingany %sts of servicecalls that ere listedunderNORMAL
WARRANTY _urchasedate partsof this appliancewhichproveto be RESPONSIalLmESOFTHE CONSUMER.*
defectivein materialsor workmanship,
LIMITED2"u-5TH Secondthroughfifth Providee replacementfor anydefective Diagnosticendany transportationandlaborcostswhich
YEAR
WARRANTY
(GlassSmoothtop,
Seal&Elements)
years fromoriginal surfaceheatingelement,deteriorated are requiredbecauseof service.
_urchasedate rubberized-siliconeseal (upsweptmodels
only),or glasssmoothtspthatcrakedueto
thermalbreakage(notcustomerabuse)
LIMITED Time periodslisted All of the provisionsof the full and limited %sts of the technician'stravelto the homeandany
WARRANTY above, warrantiesaboveandthe exclusionlisted ;osts for pick up anddeliveryof the appliancerequired
(Applieebleto the belowapply _ecauseof service.
Stste0fAlsska)
*NORMAL This warranty applies only to products in ordinary household use and the consumer is responsible
RESPONSIBILITIES for the items listed below:
OF THE CONSUMER
EXCLUSIONS
IF YOU NEED
SERVICE
1.Properuse of the aoDilancein accereancewireinstructionsarovided with the product.
2.ProPer installation Dy an authorized servicer in accordance with instructions DrovIoeoWl[nthe aeoliance and
n aecorQancewKn a iocel plamDing electrical ann/or gas codes¸
3.Proper connection [o a grounded powersupply of sufficient voltage, replacement of blown fuses, reeaMof
oose Connectionsor defects _ hokise wiring.
4,Exoenses for makingme appliance accessiblefor servicing such as removaiof trim cuoboards,shelves,etc.
tmlcn are no[ a oar[ of the aoollance when it was shipped from thefactory
&Damages to finish after installation.
6.Reelacemem of gnt bulbs and/or fluorescent tubes 3n models with these features'
This warranty does not cover the following:
I,CONSEQUENTIAL OR NC DENTAL DAMAGES SUCH AS PROPERTY DAMAGE AND NCIDENTAL
EXPENSES RESULTING FROMANY BREACH OF THIS WRITTEN OR ANY MPLIED WARRANTY,
NOTE: Some states do not allow the exclusion or limitationof Inc_aemator consequentialoamages,so tnls
imitation or exclusion may not apply to you
2.Service calls which do not involve malfunction or defects in worKmansmpor material or for ace ances no[
n ordinary nousenolo use, The consumer shal pa! for such service caus,
&Damages causeo by services performed by serwcers omer than Electrolux home Products North America
or Its authorized servicers: use of oarts other thor genuine Etectrolux Home Products oars: obtained from
oersens omer [nan sucn servicers: or external causes such as abuse, misuse. _naaeqaa[epower supply or
acts of God
4,Products with odglnal serial numbers that have been removedor altered and cannot he read , determined
Keep your bill of sate aellverysup or some omer apploprlate paymem recur& The date on the bill establishes
[ne warrant] Derloasnolea servicebe reouired,tf service is performec i[ _s_r your best interestto obtain and
KeeDall rece=o[s This writtenwarrantygives you specific legal rights. Youmay a_sonaveother rights that vary
from state to state, Service unoer fnls warrant: must De ootalne(l ByCon[aoengElectrotux Home Products:
USA Canada Thiswarrantyonly applies in the 50 states of the U,S.A PuertoRico, _ndCanada
1,800*944,9044 1°866,294,9911 Productfeaturesor specificationsas describedor illustratedare suoject to change
Eiectrolux Home Products Eiectrolux Home Products wdhout nobce AII warrantiesare made by Electrolux Home Products North
North America North America Amedca a division of WhiteConsolidatedtnd_lsffiesinc. In Canada your appliance
P.O. Box 212378 802. bouL L'Ange-Gardien is warranted b. Etectrolux Canada Curt
Augusta, GA 30917 L'Assomption, Quebec
JhW 1T6

