- 1 -
0099002387-2
LEVEL 2 EV WALL CHARGER
SEV1600HW, SEV1600P1450,
SEV1600P650
INSTALLATION AND USER GUIDE
E115376

- 2 -
CONTENTS
IMPORTANT SAFETY INSTRUCTIONS .......................................................... 2
GETTING STARTED................................................................................................ 3
FEATURES ................................................................................................................. 4
IN THE BOX .............................................................................................................. 5
TOOLS NEEDED FOR INSTALLATION .......................................................... 6
INSTRUCTIONS PERTAINING TO A RISK OF ELECTRIC SHOCK ..... 7
INSTALLATION INSTRUCTIONS ..................................................................... 8
OPERATING INSTRUCTIONS .......................................................................... 16
TROUBLESHOOTING ........................................................................................... 17
SPECIFICATIONS ................................................................................................. 18
MAINTENANCE INSTRUCTIONS ................................................................... 18
WARRANTY ............................................................................................................ 19
IMPORTANT SAFETY INSTRUCTIONS
SAVE THESE INSTRUCTIONS
WARNING – When using electric products, basic precautions should
always be followed, including the following. This manual contains important
instructions for models SEV1600HW, SEV1600P1450, and SEV1600P650 that
must be followed during installation, operation, and maintenance of the unit.
1. SAVE THESE INSTRUCTIONS – This manual contains important
safety and operating instructions.
2. Read all the instructions before using this product.
3. This device should be supervised when used around children.
4. Do not put fingers into the electric vehicle connector.
5. Do not use this product if the flexible power cord or EV cable is
frayed, has broken insulation, or any other signs of damage.
6. Do not use this product if the enclosure or the EV connector are
broken, cracked, open or show any other indication of damage.
7. Do not operate charger at temperatures above 122°F/50°C.
8. For safe installation use 6 AWG, 90°C rated copper wire.

- 3 -
9. Do not operate charger if it has received a sharp blow, been
dropped, or otherwise damaged in any way; take it to a qualified
service person.
10. Do not disassemble charger; employ a qualified service person when
service or repair is required. Incorrect reassembly may result in a risk
of electric shock or fire.
11. Use the charger only for charging compatible EV vehicles.
12. Changes or modifications not expressly approved by Schumacher
Electric Corporation could void the user’s authority to operate this
device.
13. NOTE: This equipment has been tested and found to comply with
the limits for a Class B digital device, pursuant to part 15 of the FCC
Rules. These limits are designed to provide reasonable protection
against harmful interference in a residential installation. This
equipment generates, uses, and can radiate radio frequency energy
and, if not installed and used in accordance with the instructions,
may cause harmful interference to radio communications. However,
there is no guarantee that interference will not occur in a particular
installation. If this equipment does cause harmful interference to
radio or television reception, which can be determined by turning
the equipment o and on, the user is encouraged to try to correct
the interference by one or more of the following measures:
a) Reorient or relocate the receiving antenna.
b) Increase the separation between the equipment and receiver.
c) Connect the equipment into an outlet on a circuit dierent
from that to which the receiver is connected.
d) Consult the dealer or an experienced radio/TV technician for
help.
GETTING STARTED
Before installing or operating the Schumacher Level
2 EV Wall Charger, use the QR code on the right to
access the most up-to-date installation and operating
instructions, product information, and more.
DOWNLOAD THE APP
Download the SchuPower
TM
app to monitor your EV
charging status or track your vehicle’s charging history.
Follow the QR code for a link to the app.
- 4 -
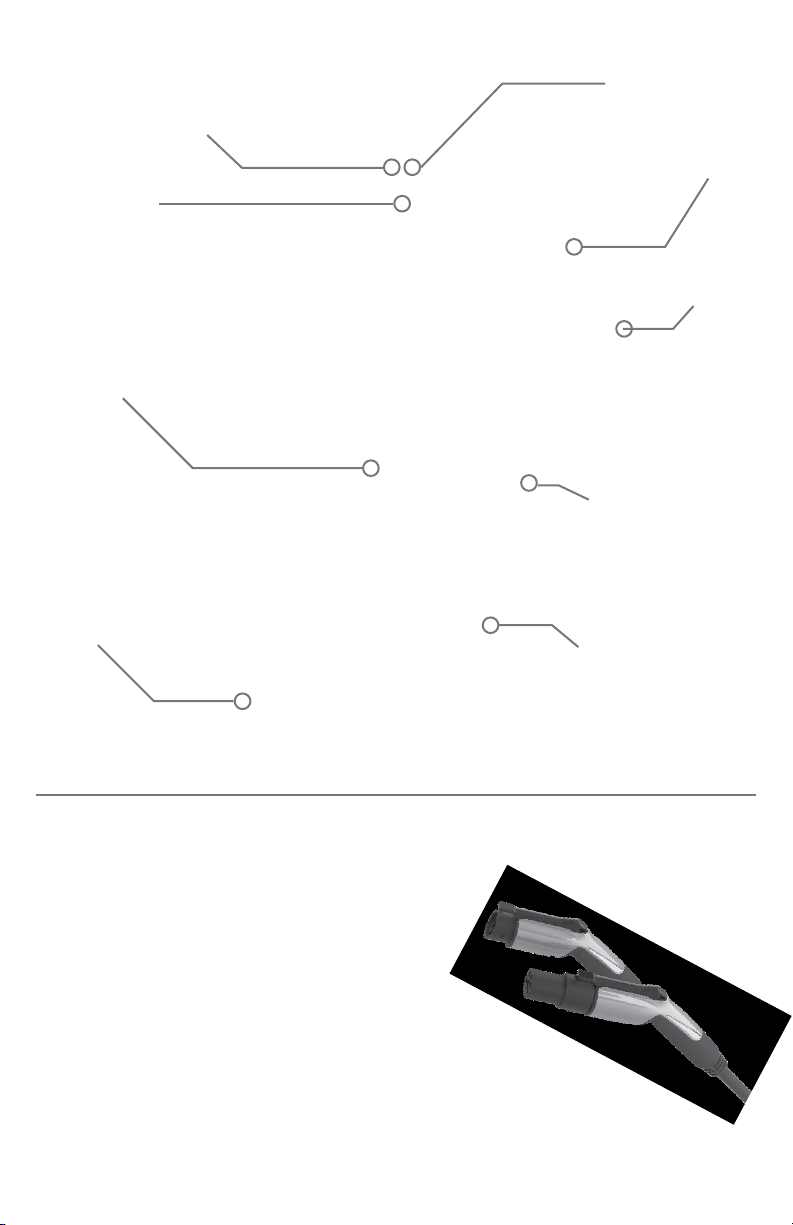
Interchangeable
Dock
Durable, raintight
Housing
Charging
Status LED
Power LED
Wi-Fi® LED
Flexible Cable
Management
Bluetooth®
Switch
Lockable, Ergonomic
Charging Gun
Charging
Gun LED
25-Foot Cable
Low Profile
Design
SAE-J1772
Connector
Tesla
Adapter
Also Available *
*Tesla, Inc. is an independently owned and operated company. This product is not manufactured, approved, or
endorsed by Tesla, Inc.
FEATURES

- 5 -
IN THE BOX
Please check to ensure all parts are included. If any parts are missing,
please return to retailer or contact Schumacher Electric at 1-800-621-5485.
1. Charging station
2. Output cable with EV connector
3. Cord with NEMA 14-50 plug (model SEV1600P1450 only)
4. Cord with NEMA 6-50 plug (model SEV1600P650 only)
5. Mounting Template
6. Cable cradle
7. Two 5.5 mm (.22 in.) x 50 mm (2 in.) lag screws for wall mounting
8. Two 4 mm (.16 in.) x 16 mm (.63 in.) self-tapping screws to attach the
cable cradle
1
2
5
6
3
4
7
8
- 6 -
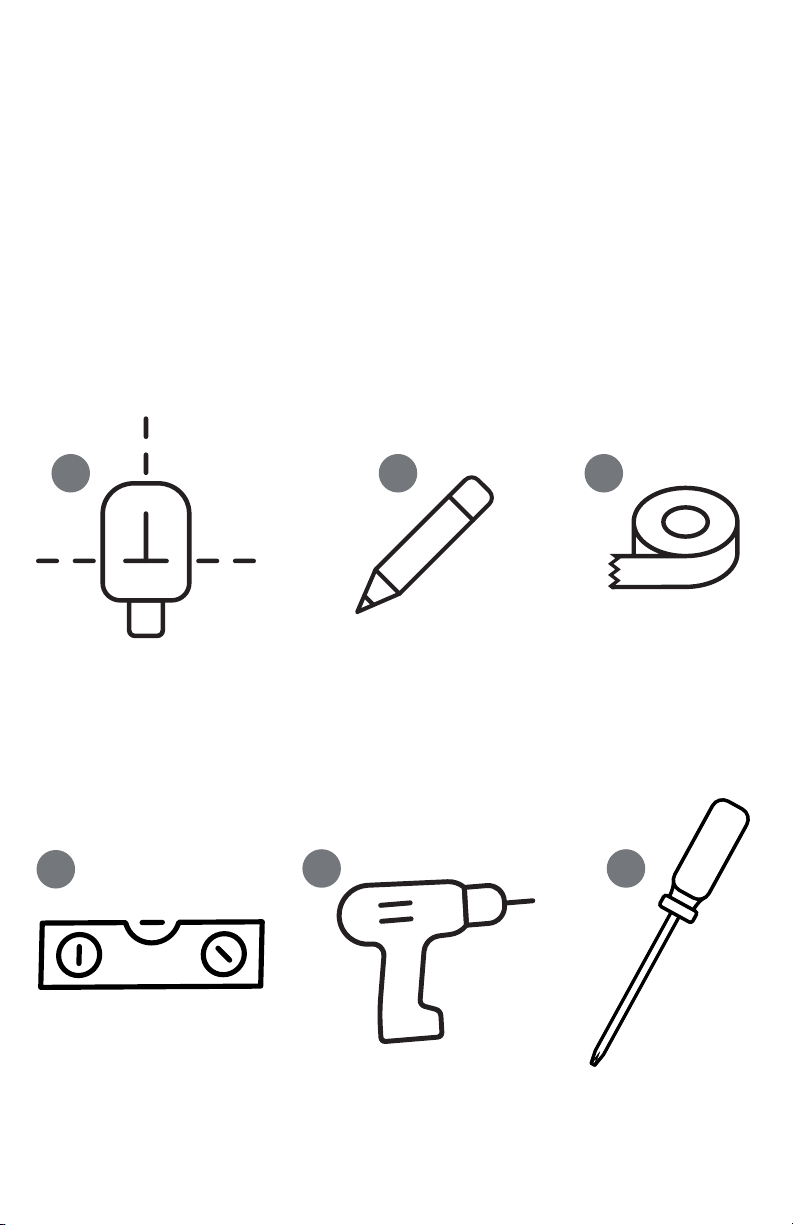
TOOLS NEEDED FOR INSTALLATION
YOU WILL NEED THE FOLLOWING TO COMPLETE INSTALLATION OF
THE SCHUMACHER EV2 WALL CHARGER.
1. Stud finder
2. Pencil
3. Tape
4. Level
5. Drill
6. Phillips head screwdriver
1 2
5 6
3
4

- 7 -
INSTRUCTIONS PERTAINING TO A RISK OF
ELECTRIC SHOCK
For a permanently connected product: MODEL
SEV1600HW ONLY
GROUNDING INSTRUCTIONS
This product must be connected to a grounded, metal, permanent
wiring system, or an equipment-grounding conductor must be run with
the circuit conductors and connected to the equipment grounding
terminal or lead on the product.
For a grounded, cord connected product MODELS
SEV1600P1450 AND SEV1600P650 ONLY
GROUNDING INSTRUCTIONS
This product must be grounded. If it should malfunction or break
down, grounding provides a path of least resistance for electric current
to reduce the risk of electric shock. This product is equipped with
a cord having an equipment grounding conductor and a grounding
plug. The plug must be plugged into an appropriate outlet that is
properly installed and grounded in accordance with all local codes and
ordinances.
WARNING – Improper connection of the equipment-grounding
conductor is able to result in a risk of electric shock. Check with a
qualified electrician or serviceman if you are in doubt as to whether the
product is properly grounded. Do not modify the plug provided with the
product – if it will not fit the outlet, have a proper outlet installed by a
qualified electrician.
- 8 -
INSTALLATION INSTRUCTIONS
CAUTION: The Schumacher Level 2 EV Wall Charger
must be installed by a licensed electrician. Any
changes to the wall charger’s electrical settings (page
13) must be made by a licensed electrician.
CHOOSING A LOCATION
1. This device shall be mounted at a sucient height from grade such
that the height of the storage means for the coupling device is
located between 600 mm (24 inches) and 1.2 m (4 feet) from grade.
2. Before starting the installation, choose a general mounting location
for the unit. The unit may be installed indoors or outdoors. Ensure
that the unit is within easy reach of where the hardwired circuit will
be installed by a licensed electrician or where there is an existing
NEMA 14-50 or NEMA 6-50 outlet. The cord or wiring leading into
the charging station should have some slack. The mounting location
should also allow the output cable with EV connector to have some
slack while in use.
3. Using a stud finder, locate a stud within the general mounting
location identified in the previous step. Use a pencil to mark the
location of the stud.
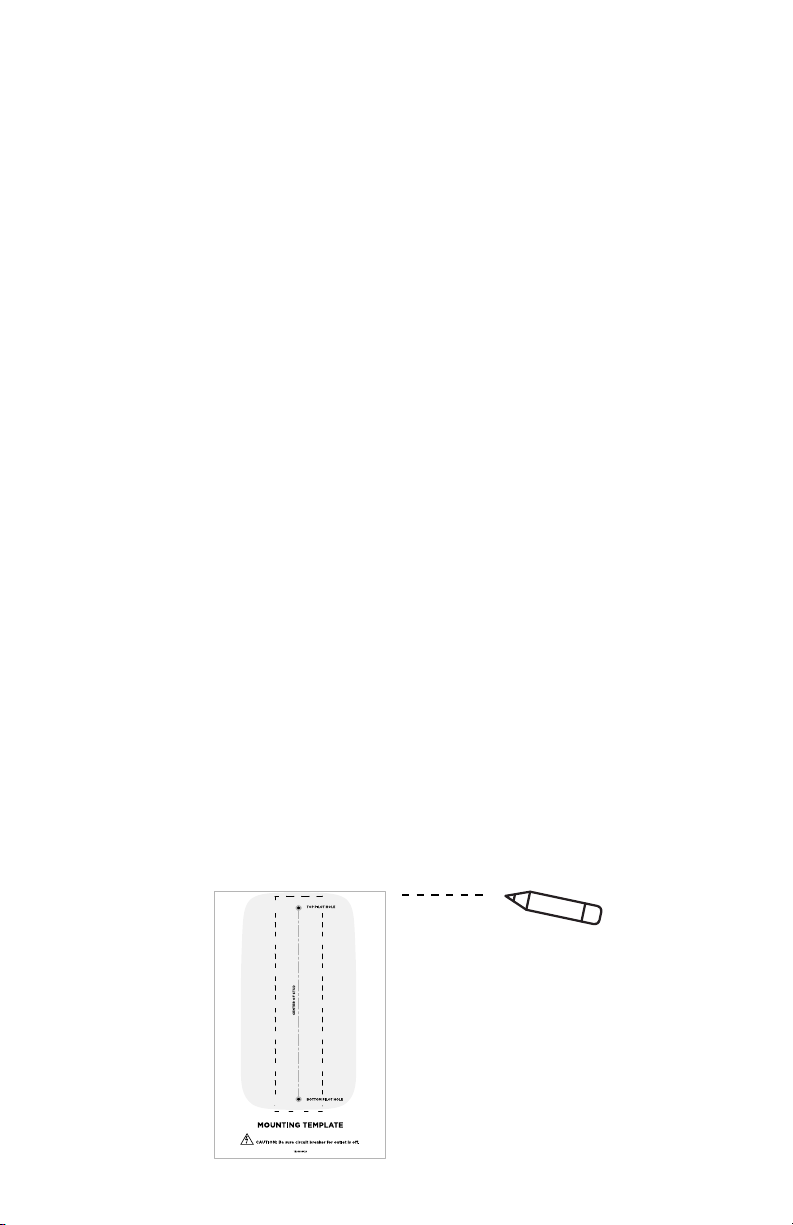
4. Next, use a level and a pencil to mark a line to designate the top of
the charging station when installation is complete. This is usually
about 50 inches above the finished floor. Use tape to attach the
mounting template so that the top edge of the template lines up
with the pencil line you just made.
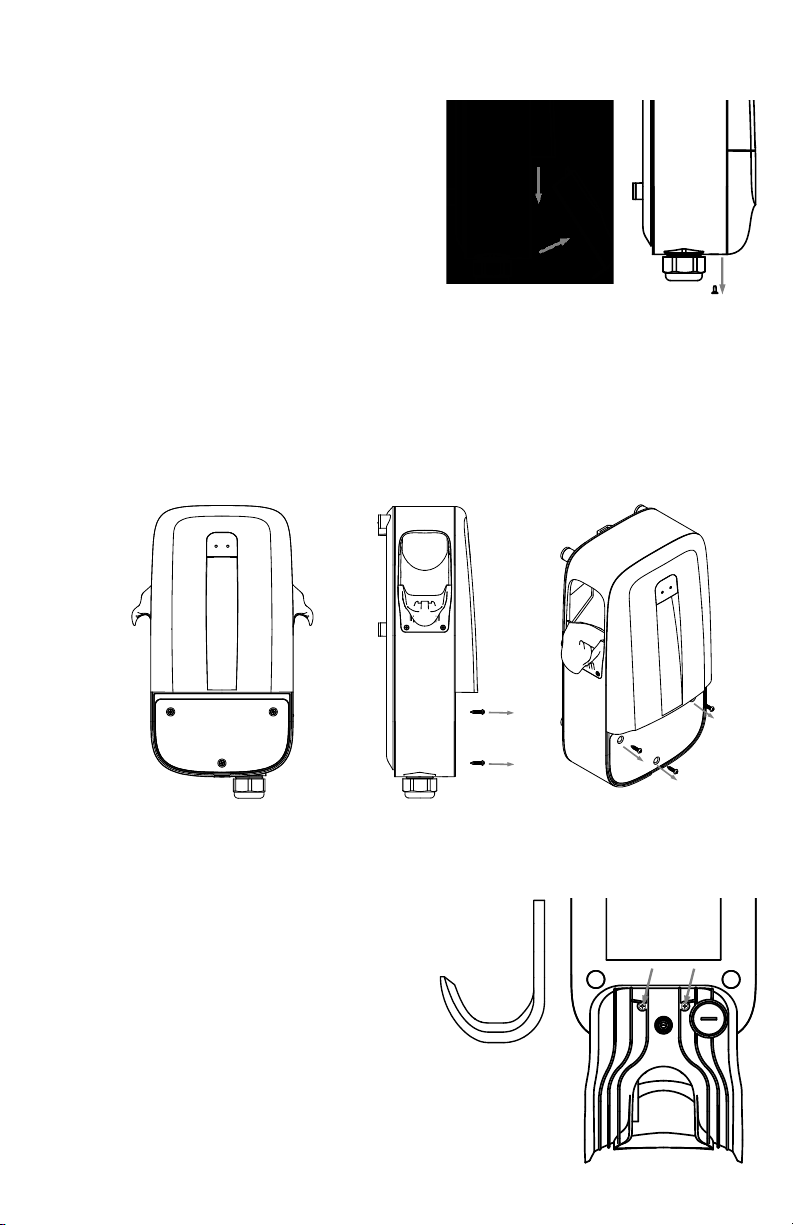
Wiring
access panel
- 9 -
2. Remove the wiring access panel located underneath the lower front
cover by unscrewing three M4 screws from the front of the charging
station. Set the screws aside for reassembly. Lift o the wiring
access panel and set aside for reassembly.
3. Turn over the charging station before
installing the cable cradle. Align
the cable cradle’s screw holes with
the screw holes on the back of the
charging station. Use the two 4 mm
x 16 mm screws to attach the cable
cradle.
Note: If desired, the cable cradle may
be mounted to the wall separate
from the unit. Be sure to mount the
cable cradle securely to a stud or use
heavy-duty drywall anchors.
ASSEMBLING THE CHARGING STATION
1. Lay the charging station on a flat
surface and remove the lower
front cover. Unscrew the single M4
screw at the bottom of the unit.
Set the screw aside for reassembly.
Then, slide the cover down and lift
to disengage the tabs at the top of
the front cover. Set aside the lower
front cover for reassembly.
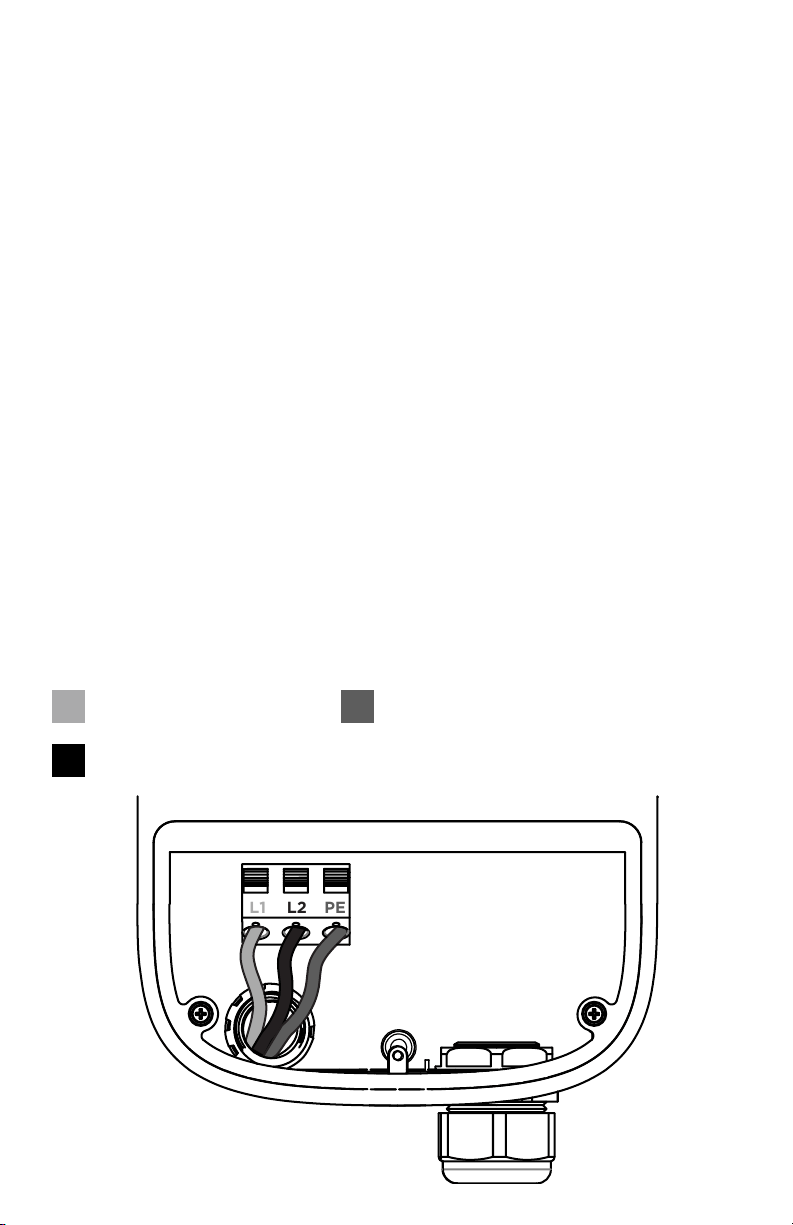
L1 L2 PE
- 10 -
HARDWIRING THE POWER SUPPLY PERMANENTLY TO
THE CHARGING STATION (MODEL SEV1600HW ONLY)
Turn o the power to circuit before installation. Do not restore power
until installation is complete. Failure to do so could result in injury or
death.
1. When installing a hardwired circuit, Schumacher Electric
recommends that the AC input uses a conduit into the rear opening
of the charging station.
2. Turn o the power to the circuit before mounting the charging
station.
3. Feed the conduit and wires through the back of the charging station,
removing the back head plug. Feed the cables through the back of
the charging station until the silver conductors are no longer visible.
Note: If installing the charging station outdoors and using the back
opening to route the conduit, apply liquid sealant or a gasket and
nut around the rear opening to prevent water ingress.
4. Inside the wiring access panel, there are two terminal blocks.
Securely insert wires into the left-hand terminal block as indicated
by the wiring diagram below.
L1 - Red Wire
L2 - Black Wire
PE - Green Wire
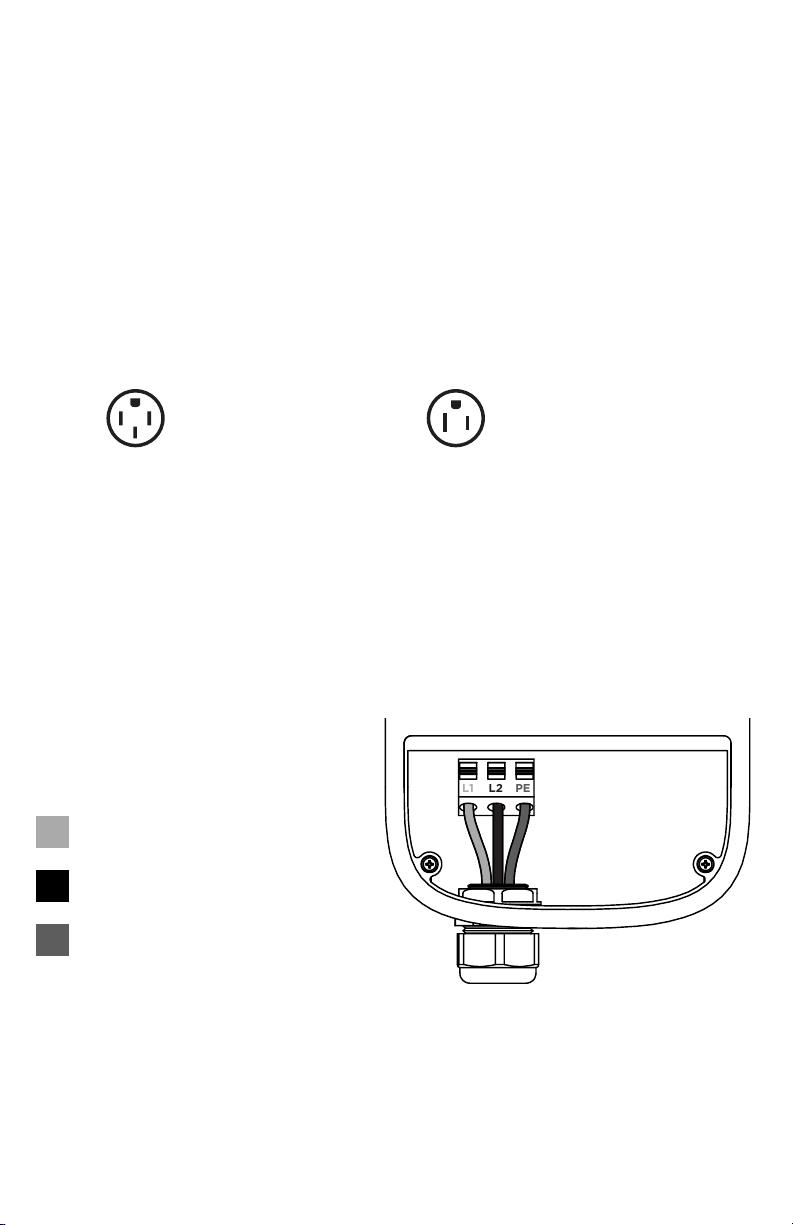
NEMA 14-50
Model SEV1600P1450
NEMA 6-50
Model SEV1600P650
L1 L2 PE
- 11 -
ATTACHING THE CORD AND PLUG TO THE CHARGING
STATION (MODELS SEV1600P1450 AND SEV1600P650 ONLY)
1. Ensure that you have an existing NEMA outlet that matches the
model you are installing. Alternatively, a licensed electrician may
install a NEMA outlet that corresponds with the specifications of
your model. Model SEV1600P650 has a NEMA 6-50 plug and model
SEV1600P1450 has a NEMA 14-50 plug. In addition, Schumacher
Electric recommends that a licensed electrician confirms that any
new or existing outlet complies with all local electrical codes and has
a designated circuit breaker compatible with the specifications and
requirements of the EV wall charger. See the sections Final Steps
and Specifications for more information. for more information.
CONNECTING THE OUTPUT CABLE TO THE CHARGING
STATION
1. The output cable should have five wires visible at the end opposite
the EV connector. Insert the wires through the right-hand opening
on the bottom of the charging station.
2. Route the cord through the left-hand opening on the bottom of the
charging station.
3. Inside the wiring access panel, there are two terminal blocks.
Securely insert wires into the left-hand terminal block as indicated
by the wiring diagram below.
4. Feed the cord up into the charging station and secure by screwing
the outer plastic nut to the threaded ring. The threaded ring must be
securely tightened
L1 - Red Wire
L2 - Black Wire
PE - Green Wire

L1
L2
PE
CP
LED
- 12 -
3. Insert the two-pin plug (orange and blue wires) into the connector
to the left of the right terminal block.
4. Feed the output cable up into the charging station and secure by
screwing the outer plastic nut to the threaded ring. The threaded
ring must be securely tightened.
MOUNTING THE CHARGING STATION TO THE WALL
1. Using a drill fitted with a 5.5 mm or 7/32 inch drill bit, drill two pilot
holes into the stud where indicated by the mounting template.
2. Drive the 5.5 mm x 50 mm lag screw without a rubber washer into
the top pilot hole, leaving the head of the screw 6-7 mm above the
wall surface.
2. Insert the wires into the appropriate connectors in the right terminal
block as illustrated in the wiring diagram below.
L1 - Red Wire
L2 - Black Wire
PE - Green and
Yellow Wire
CP - Blue Wire
LED - Orange Wire

- 13 -
3. Lift the charging station and then use the notch on the back of the
unit to hang the unit from the screw axed to the stud.
4. Align the charging station’s lower mounting hole with the lower pilot
hole you drilled in step 1. Drive the 5.5 mm x 50 mm lag screw with
the rubber washer through the lower mounting hole and into the
pilot hole. Tighten until the charging station is secure.
- 14 -
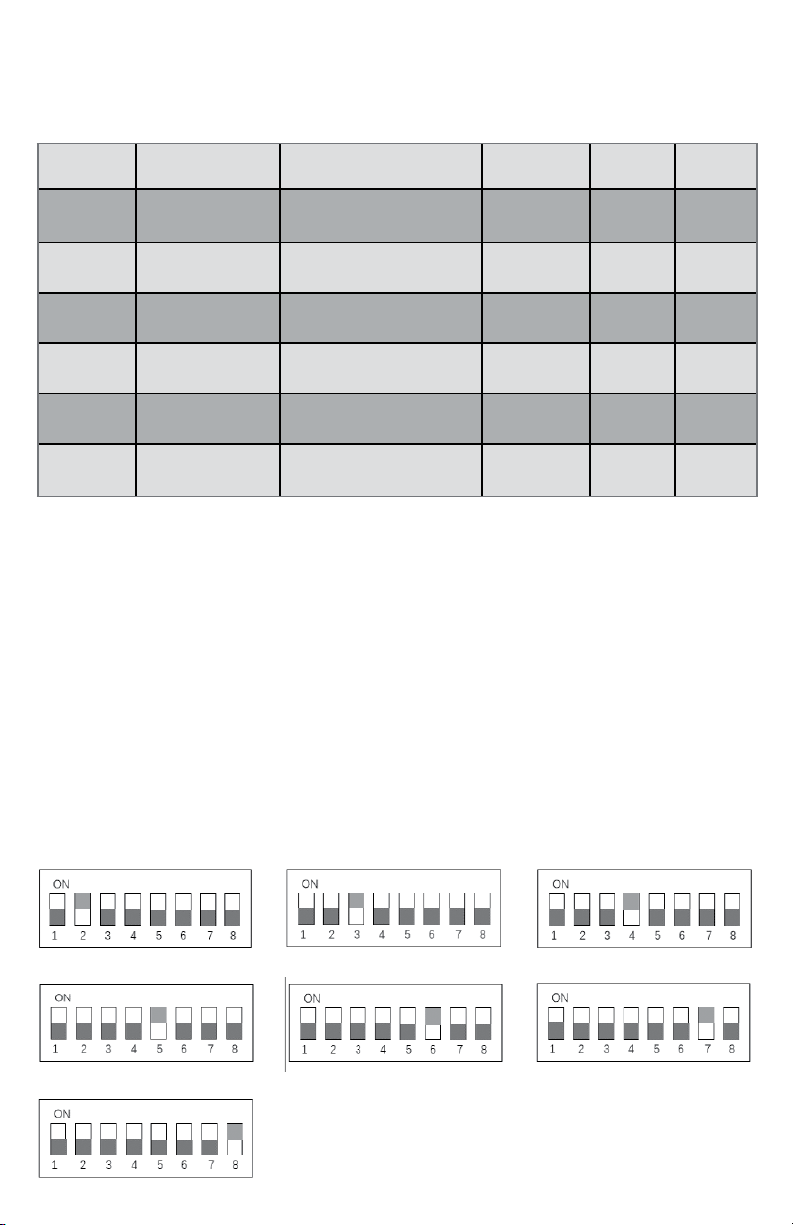
1. Before starting, the licensed electrician should consult all applicable
codes for breaker and wire sizing requirements. Set the amperage of
the unit according to the connected dedicated breaker associated
with the hardwired connection or NEMA outlet. Using the table above,
determine the voltage and amperage of the installation. Then, set
the unit’s DIP switch following the diagram below that corresponds
with the dedicated breaker’s voltage and amperage and the model’s
requirements.
20A 3.8kW 208V/240V 16A Y Y
30A 5.8kW 208V/240V 24A Y Y
40A 7.7kW 208V/240V 32A Y Y
50A 9.6kW 208V/240V 40A Y Y
60A 11.5kW 208V/240V 48A Y N
70A 12.0kW 208V/240V 50A Y N
80A 12.0kW 208V/240V 50A Y N
Dedicated
Breaker Kilowatts Voltage Amperage Hardwired Plug
30A BREAKER 240V 24A
50A BREAKER 240V 40A
70A BREAKER 240V 50A**
20A BREAKER 240V 16A 40A BREAKER 240V 32A*
Factory setting
60A BREAKER 240V 48A**
80A BREAKER 240V 50A**
FINAL STEPS
* All models’ default current settings are set to 32A.
**Models SEV1600P1450 and SEV1600P650 should
not use a current setting greater than 40A.
For models SEV1600HW, SEV1600P1450, and SEV1600P650, the
following steps must be completed by a licensed electrician.
- 15 -
2. A licensed electrician should set the amperage of the unit according
to the connected dedicated breaker associated with the hardwired
connection or NEMA outlet. Using the table on the previous page,
determine the voltage and amperage of the installation. Then, set the
unit’s DIP switch following the diagram below that corresponds with the
dedicated breaker’s voltage and amperage.
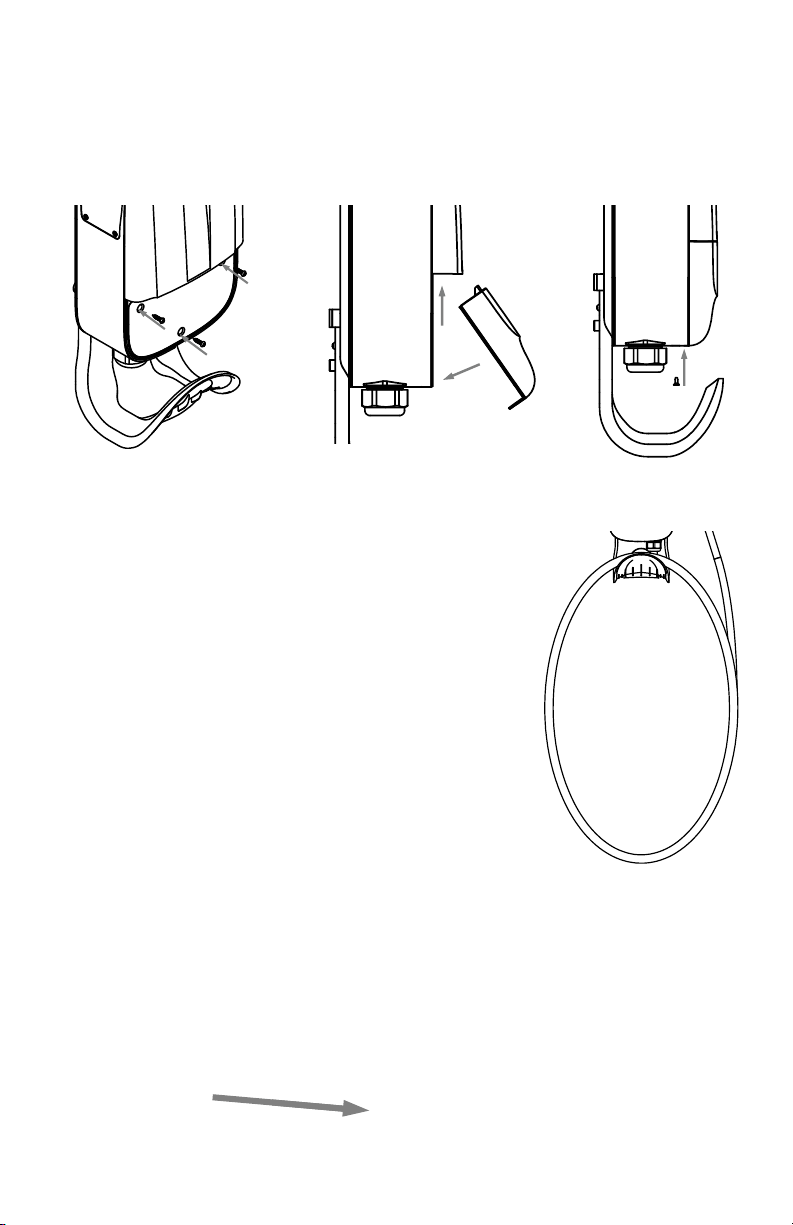
3. Reattach the wiring access panel you set aside
previously. Position the wiring access panel on
the charging station and secure it with three
of the M4 screws you removed earlier. Next,
reattach the lower front cover. Insert the tabs
into the slots on the front of the charging
station and slide the cover up and in place.
Secure the lower front cover at the bottom of
the charging station with the last M4 screw.
4. Coil the output cable into the cable cradle
and insert the EV connector into the dock on
either side of the charging station.
5. Turn the power back on at the circuit breaker if your charging
station was hardwired (SEV1600HW). For models SEV1600P1450
and SEV1600P650, plug the unit into the corresponding live NEMA
outlet. If correctly installed, the Power LED will illuminate a steady
green.

- 16 -
OPERATING INSTRUCTIONS
1. Check to make sure the wall charger’s Power LED is illuminated a
steady, solid green color.
2. Remove charging gun from the wall charger’s dock.
3. Connect the charging gun to your vehicle’s charging port.
Note: The charging gun is fitted with a universal SAE-J1772
connector that will fit most electric vehicles. Tesla vehicles will
require an adapter.
4. Charging begins automatically. Your electric vehicle will control the
charging progress.
5. When charging has stopped, remove the charging gun from your
vehicle’s charging port and return it to the wall charger’s dock.
6. Make sure the output cable is neatly stored in the cable cradle.
7. To monitor your EV charging status or track your vehicle’s charging
history, use the wall charger’s Wi-Fi/Bluetooth connection and the
SchuPower
TM
app. Simply download the SchuPower
TM
app and follow
the app’s instructions.
8. Warning: Do not tamper with the charger or its components.
LED BEHAVIORS
• Power LED (green) solid: Power is connected to the wall charger.
• Charging Gun LED (green) fade in/out: Charging is in progress.
• Charging Gun LED (green) solid: Connected to vehicle. The charging
process is complete, paused, or in scheduled charging mode.
• Charging Status LED (blue) solid: The wall charger is powered on and
in standby mode.
• Charging Status LED (green) fade in/out: Charging is in progress.
• Charging Status LED (cyan) flashing: The charging process is
complete or in scheduled charging mode.
• Charging Status LED (red) flashing: Error. Refer to the
troubleshooting guide for guidance.
• Wi-Fi LED (blue) solid: The wall charger is connected to the saved
Wi-Fi network.
• Wi-Fi LED (blue) flashing: The wall charger’s Wi-Fi connection needs
to be configured. This can be completed through the SchuPower
TM
app.
• Wi-Fi LED (blue) o: The wall charger cannot connect to the saved
Wi-Fi network.
- 17 -
TROUBLESHOOTING
LED Behavior Problem Solution
Power LED o No AC power
Check the breaker and, for models
SEV1600P1450 and SEV1600P650,
make sure the plug is fully inserted.
Have a licensed electrician connect
the charging station to AC power.
Charging Status LED
flashes red two (2)
times
Leakage
Re-power the unit by turning the circuit
breaker o and on again for model
SEV1600HW. For models SEV1600P1450
and SEV1600P650, unplug the charging
station and then plug it back in. If the
fault still exists, please consult a licensed
electrician for help or contact our
support service.
Charging Status LED
flashes red three (3)
times
Overvoltage
Unplug the charging gun and then
reinsert it into your vehicle’s charging
port. If the fault still exists, please
consult a licensed electrician to
check the AC supply.
Charging Status LED
flashes red four (4)
times
Undervoltage
Unplug the charging gun and then
reinsert it into your vehicle’s charging
port. If the fault still exists, please
consult a licensed electrician to
check the AC supply.
Charging Status LED
flashes red five (5)
times
Overcurrent
Unplug the charging gun and then
reinsert it into your vehicle’s charging
port.
Charging Status LED
flashes red six (6)
times
Over
temperature
Unplug the charging gun and then
reinsert it into your vehicle’s charging
port. If the fault still exists, unplug
the charging gun and allow the unit
to cool down before attempting to
charge again.
Charging Status LED
flashes red seven (7)
times
Ground fault
Unplug the charging gun and then
reinsert it into your vehicle’s charging
port. If the fault still exists, please
consult a licensed electrician to
check the ground connection.
Charging Status LED
flashes red eight (8)
times
Relay fault
Unplug the charging gun and then
reinsert it into your vehicle’s charging
port. If the fault still exists, contact
our support service.
Charging Status LED
flashes red nine (9)
times
Meter chip
fault
Unplug the charging gun and then
reinsert it into your vehicle’s charging
port. If the fault still exists, contact
our support service.

- 18 -
SPECIFICATIONS
In/Out Voltage ...................................................................... 208V/240V AC, 60Hz
SEV1600HW Rated Current................................................................................. 50A
SEV1600P1450 Rated Current............................................................................ 40A
SEV1600P650 Rated Current.............................................................................. 40A
SEV1600HW Rated Output Power ............................................................. 12.0kW
SEV1600P1450 Rated Output Power .......................................................... 9.6kW
SEV1600P650 Rated Output Power ........................................................... 9.6kW
Configurable Current ........................................................... 16/24/32/40/48/50A
Configurable Power .................................................. 3.8/5.8/7.7/9.6/11.5/12.0kW
Operating Temperatures .................................... -22°F to 122°F/-30°C to 50°C
Plug Type ........................................ NEMA 6-50P (model SEV1600P650 only)
and NEMA 14-50P (model SEV1600P1450 only)
Cable Length ....................................................................................................... 25 feet
Charging Connector ........................................................... SAE-J1772 (Universal)
Installation Type ............................................................................... Indoor/Outdoor
IP Rating ................................................................................................ IP66 enclosure
Weather Resistance .............................................................................. 3R/Raintight
Warranty ............................................................................................. 3-Year Warranty
MAINTENANCE INSTRUCTIONS
Occasionally cleaning the case of the wall charger with a soft cloth will
keep the finish shiny and help prevent corrosion.

- 19 -
THREE-YEAR LIMITED WARRANTY
(Schumacher Electric Corporation Product)
Go to schumacherelectric.com to register your product online.
THIS LIMITED WARRANTY GIVES YOU SPECIFIC LEGAL RIGHTS AND
YOU MAY ALSO HAVE OTHER RIGHTS, WHICH VARY FROM STATE
TO STATE. WE WARRANT THAT DURING THE WARRANTY PERIOD,
THE PRODUCT WILL BE FREE FROM DEFECTS IN MATERIALS AND
WORKMANSHIP. WE LIMIT THE DURATION AND REMEDIES OF
ALL IMPLIED WARRANTIES, INCLUDING WITHOUT LIMITATION
THE WARRANTIES OF MERCHANTABILITY AND FITNESS FOR
A PARTICULAR PURPOSE TO THE DURATION OF THIS EXPRESS
LIMITED WARRANTY. SOME STATES DO NOT ALLOW LIMITATIONS
ON HOW LONG AN IMPLIED WARRANTY LASTS, SO THE ABOVE
LIMITATION MAY NOT APPLY TO YOU. OUR RESPONSIBILITY FOR
DEFECTIVE GOODS IS LIMITED TO REPAIR OR REPLACEMENT AS
DESCRIBED BELOW IN THIS WARRANTY STATEMENT.
WHO MAY USE THIS WARRANTY? Schumacher Electric Corporation
located at address 14200 FAA Blvd., Fort Worth, TX 76155
(“Schumacher” or “we”) extends this limited warranty only to the
consumer who originally purchased the product from an authorized
retailer in the United States, its territories, or Canada (“you”). It does
not extend to any subsequent owner or other transferee of the product,
including but not limited to anyone that purchases the product after it is
resold by an unauthorized retailer or reseller.
WHAT DOES THIS WARRANTY COVER? This limited warranty covers
defects in materials and workmanship of the product under normal use
and care for the Warranty Period as defined below.
WHAT DOES THIS WARRANTY NOT COVER? This limited warranty
does not cover any damage due to: (a) transportation; (b) storage; (c)
improper use; (d) failure to follow the product instructions or to perform
any preventive maintenance; (e) modifications; (f) unauthorized repair;
(g) normal wear and tear; (h) improper installation; (i) external causes
such as accidents, abuse, theft, weather, natural disasters, or other
actions or events beyond our reasonable control; (j) use of after-market
or other accessories with the product not manufactured by Schumacher
or approved for use with this product; (k) use of this product for
commercial purposes. We reserve the right to revise the design of future
products without assuming any obligation to modify or replace any
previously manufactured product.

- 20 -
WHAT IS THE PERIOD OF COVERAGE? This limited warranty starts
on the date of your purchase and lasts for three years (the “Warranty
Period”). The Warranty Period is not extended if we repair or replace the
product. We may change the availability of this limited warranty at our
discretion, but any changes will not be retroactive.
WHAT ARE YOUR REMEDIES UNDER THIS WARRANTY? With respect
to any defective product during the Warranty Period, we will, in our
sole discretion, repair or replace such product (or the defective part).
The repair or replacement will be free of charge; however, you are
responsible for prepaying the shipping charges.
HOW DO YOU OBTAIN WARRANTY SERVICE? It is your obligation to
forward the unit, along with proof of purchase and shipping charges
prepaid, to Schumacher or its authorized representatives for repair or
replacement to occur.
For detailed information on warranty repairs or returns visit 365rma.com.
LIMITATION OF LIABILITY: THE REMEDIES DESCRIBED ABOVE
ARE YOUR SOLE AND EXCLUSIVE REMEDIES AND OUR ENTIRE
LIABILITY FOR ANY BREACH OF THIS LIMITED WARRANTY. OUR
LIABILITY SHALL UNDER NO CIRCUMSTANCES EXCEED THE
ACTUAL AMOUNT PAID BY YOU FOR THE DEFECTIVE PRODUCT,
NOR SHALL WE UNDER ANY CIRCUMSTANCES BE LIABLE FOR ANY
CONSEQUENTIAL, INCIDENTAL, SPECIAL OR PUNITIVE DAMAGES
OR LOSSES, WHETHER DIRECT OR INDIRECT. SOME STATES DO
NOT ALLOW THE EXCLUSION OR LIMITATION OF INCIDENTAL OR
CONSEQUENTIAL DAMAGES, SO THIS LIMITATION OR EXCLUSION
MAY NOT APPLY TO YOU.
Visit schumacherelectric.com for replacement parts.
Our dedication to providing the best technology and products is an
ongoing commitment. Engineering and design improvements are
continually being added to our product line and may change the
product appearance and/or specifications at any time.
All images displayed in this manual are unique, for illustration purposes
only, and are not intended to represent or reproduce any copyrighted
material or images.

- 21 -
SCHUMACHER ELECTRIC CORPORATION
14200 FAA BLVD.
FORT WORTH, TX 76155
1-800-621-5485
SCHUMACHERELECTRIC.COM
The Schumacher logo is a registered trademark of Schumacher Electric Corporation.