4
se _ Care Guide
f__,_i/t_/n D o u b/e W _11 0 v e n
318 200 938 (0501)Rev, A
MAKEA RECORDFOBIIFUTUREUSE
m [] m [] [] m [] m [] m [] [] m [] [] m [] [] [] m m []
Brand
Purchase Date
ModeU Number
Serial Number
m [] m [] [] m [] m [] m [] [] m [] [] m [] [] [] m m []
For toll-free tebphone support in the U.S. and Canada:
1o877-4ELECTROLUX (1-877-435-3287)
For on-line support and internet product information:
www.emectrolux°com
2004 Electrolux Home Products, inc.
Post Office Box 212378, Augusta, Georgia 30917, USA
All rights reserved. Printed in the USA
Finding Information ...........................................2
Makea Recordfor Futureuse ..........................2
Questions?........................................................2
Safety ................................................................4-6
ImportantSafety'Instructions..............................4
FeatureOverview ................................................7
YourWallOven.................................................7
Getting Started ................................................8-9
OvenVentLocation...........................................8
InstallingOvenRackSupports...........................8
RemovingandReplacingOvenRacks..............8
ArrangingOvenRacks......................................9
AirCirculationintheOven.................................9
Setting oven controls .................................10-10
Centre!PadsFunctions...................................10
SettingtheClock...............................................11
SettingContinuousBake
or 12hoursEnergySaving.............................12
SettingtheKitchenTimer.................................13
SettingOvenLockoutFeature.........................14
SettingTemperatureDisplay............................15
SettingSibnt ControlOperation.......................16
Cooking hstructione ..................................17-33
Preheating......................................................17
Baking.............................................................18
BakingProblems.............................................19
ConvectionBaking.....................................20-21
ConvectionRoasting.......................................22
SettingConvectionConvert.............................23
SettingDelayedBakeor
DelayedConvectionBake...............................24
SettingTimedBakeor
TimedConvectionBake...................................25
SettingDelayedTimedBakeor
DelayedTimedConvectionBake...............26-27
SettingtheKeepWarmFeature..................28-29
Broi%g.......................................................30-31
SabbathFeature(foruseonthe
JewishSabbath& Holidays).......................32-33
Care & C_eaning...........................................34-39
UsingtheSelhCleanFeature...........................34
StartingSeI?CleaningCycle.......................35-36
GeneralCleaning............................................37
CareandCleaningof StainlessSteel...............38
ToRemoveandReplaceOvenDoor..............38
SpecialDoorCareInstructions........................38
ToRemovethe "HiddenBake
Element"Cover...............................................39
OvenLight ......................................................39
Adjusting OvenTemperature...........................40
Solutions to Common Problems ................41-43
OvenCorttrolsBeepsandDisplays"F"Cede, 41
Installation.......................................................41
EntireOvenDoesNotOperate...................41-42
OvenLightDoesNotOperate.........................42
Self-CleanCycJeDoesNetWork.....................42
OvenSmokesExcessivelyDuringBroiling......42
SoilNotCompletelyRemovedAfter
Sel?CleaningCycleIsCompleted....................43
PoorBakingResults........................................43
FlamesInsideOvenOrSmokeFromVent....... 43
Warranty Information .......................................44
IIIM ANTS£FE IIINS U ONS
[] [] [] [] [] [] [] [] [] [] [] [] [] [] [] [] [] []
Please read aUUsafety instructions before using your new ElectroUux wall oven,
[] [] [] []
o Remove aH tape and packaging wrap before using the appliance. Destroy the
carton and plastic bags after unpacking the appliance. Never allow children to play
with packaging material, Do not remove the wiring label and other literature attached to the
back of the wall oven, Do not remove model/serial number plate,
Proper installation--Be sure your appJiance is properly installed and grounded by a
quaJified electrician or installer in accordance with the NationaJ Electrical Code
ANSm/NFPA No. 70 (U.S.A.) or CSA C22.1, PART 1 (Canada)--latest editions and toca!
code requirements. Install only per installation instructions provided in the literature
package for this appliance,
Ask your dealer to recommend a qualified technician and an authorized repair service, Know how
to disconnect the electrical power to the appliance at the circuit breaker or fuse box in case of
an emergency,
EJectronic controllers can be damaged by cold temperatures. When
you use your appliance for the first time, or if it has not been used for a long period of
time, make sure that it has been exposed to a temperature above 0°C/32°F for at teast
3 hours before connecting it to the power suppJy.
User Servicing--Do not repair or reptace any part of the appliance unless specifically
recommended in the manuaJs. All other servicing should be done only by a qualified
technician to reduce the risk of personal injury and damage to the appliance,
o Never modify or alter the construction of the appliance by removing panets, wire
covers, or any other part of the product.
Remove the oven door from any unused appliance if it is to be stored or discarded,
Stepping, leaning, sitting or pulling down on the door of this appliance
can result in serious injuries and may also cause damage to the appliance. Do not allow
children to climb or play around the appliance,
Storage in or on Appliance--Flammable materials should not be stored in an oven.
This includes paper, plastic and cloth items, such as cookbooks, plasticware and towels, as
well as flammable liquids, Do not store explosives, such as aerosol cans, in or near the
appliance,
Do not use the oven for storage.
Do not store items of interest to children in the cabinets above an
appliance. Children climbing on the oven can be seriously injured.
_To reducetheriskoftippingoftheappliance,Theappliancemustbe
securedbyproperlyinstallthemountingbrackets,Tocheckif bracketsareinstalledproperly
opentheovendoorandverifythatthemountingbracketsareengagedseeinstallation
instructions,
o Donot JeavechildrenaJone--Childrenshouldnot be leftaJoneor unattendedin
theareawherean appJianceis in use.Theyshouldneverbeallowedto sitorstandon
anypartoftheappliance,
o DONOTTOUCHmNTERmOROVENELEMENTSORmNTERmORSURFACESOFTHEWALL
OVENUNTmLTHEYHAVECOOLED.Theovenheatingelementsmaybehoteventhoughthe
elementsaredarkincolor,Areasneartheelementsmaybecomehotenoughtocauseburns,
Duringandafteruse,donottouch,orletclothingorotherflammablematerialstouchthese
areasuntiltheyhavehadsufficienttimeto cool,Amongtheseareasaretheovenvent
openings,thesurfacesneartheseopenings,ovendoorandwindow,
o WearProperApparel--Loose-fittingor hanginggarmentsshouJdneverbe worn
whileusing theappliance.Donotletclothingor otherflammablematerialscontacthot
surfaces,
Neveruseyour appJiancefor warmingor heatingtheroom.
o DoNot UseWateror FJouron GreaseFires--Smotherthe fire with apantid,or use
bakingsoda,adry chemica!or foam-typeextinguisher.
o Whenheatingfator grease,watchit ctosely.Fatorgreasemaycatchfireif allowedto
becometoohot,
o UseOnJyDryPotholders--Moistor damppotholderson hot surfacesmayresultin
burns from steam. Do not let the pot holders touch the hot heating elements, Do not use a
towel or other bulky cloth instead of a pot holder
Do Not Heat Unopened Food Containers--Build-up of pressure may cause the
container to burst and resutt in injury.
IMPORTANTINSTRUCTIONSFORUSINGYOUROVEN
Use Care When Opening an Oven Door--Stand to the side of the appliance when opening
the door of a hot oven, Let hot air or steam escape before you remove or replace food in the
oven,
o Keep Oven Vent Ducts Unobstructed. The wall oven is vented at the upper control panel or
at the center trim depending of the model, Touching the surfaces in this area when the wall
oven is operating may cause severe burns, Also, do not place plastic or heat-sensitive items
near the oven vent, These items could melt or ignite,
Placement of Oven Racks. Always place oven racks in desired location while oven is cool,
Remove all utensils from the rack before removing rack, If rack must be moved while oven is
hot, use extreme caution, Use pot holders and grasp the rack with both hands to reposition,
Do not let pot holders contact the hot oven element or interior of the oven,
o Do not use the broiter pan without its insert. The broiler pan and insert allow dripping fat
to drain and be kept away from the high heat of the broiler,
IIIM ANTS£FE IIINS U ONS
[] [] [] [] [] [] [] [] [] [] [] [] [] [] [] [] [] [] [] [] [] []
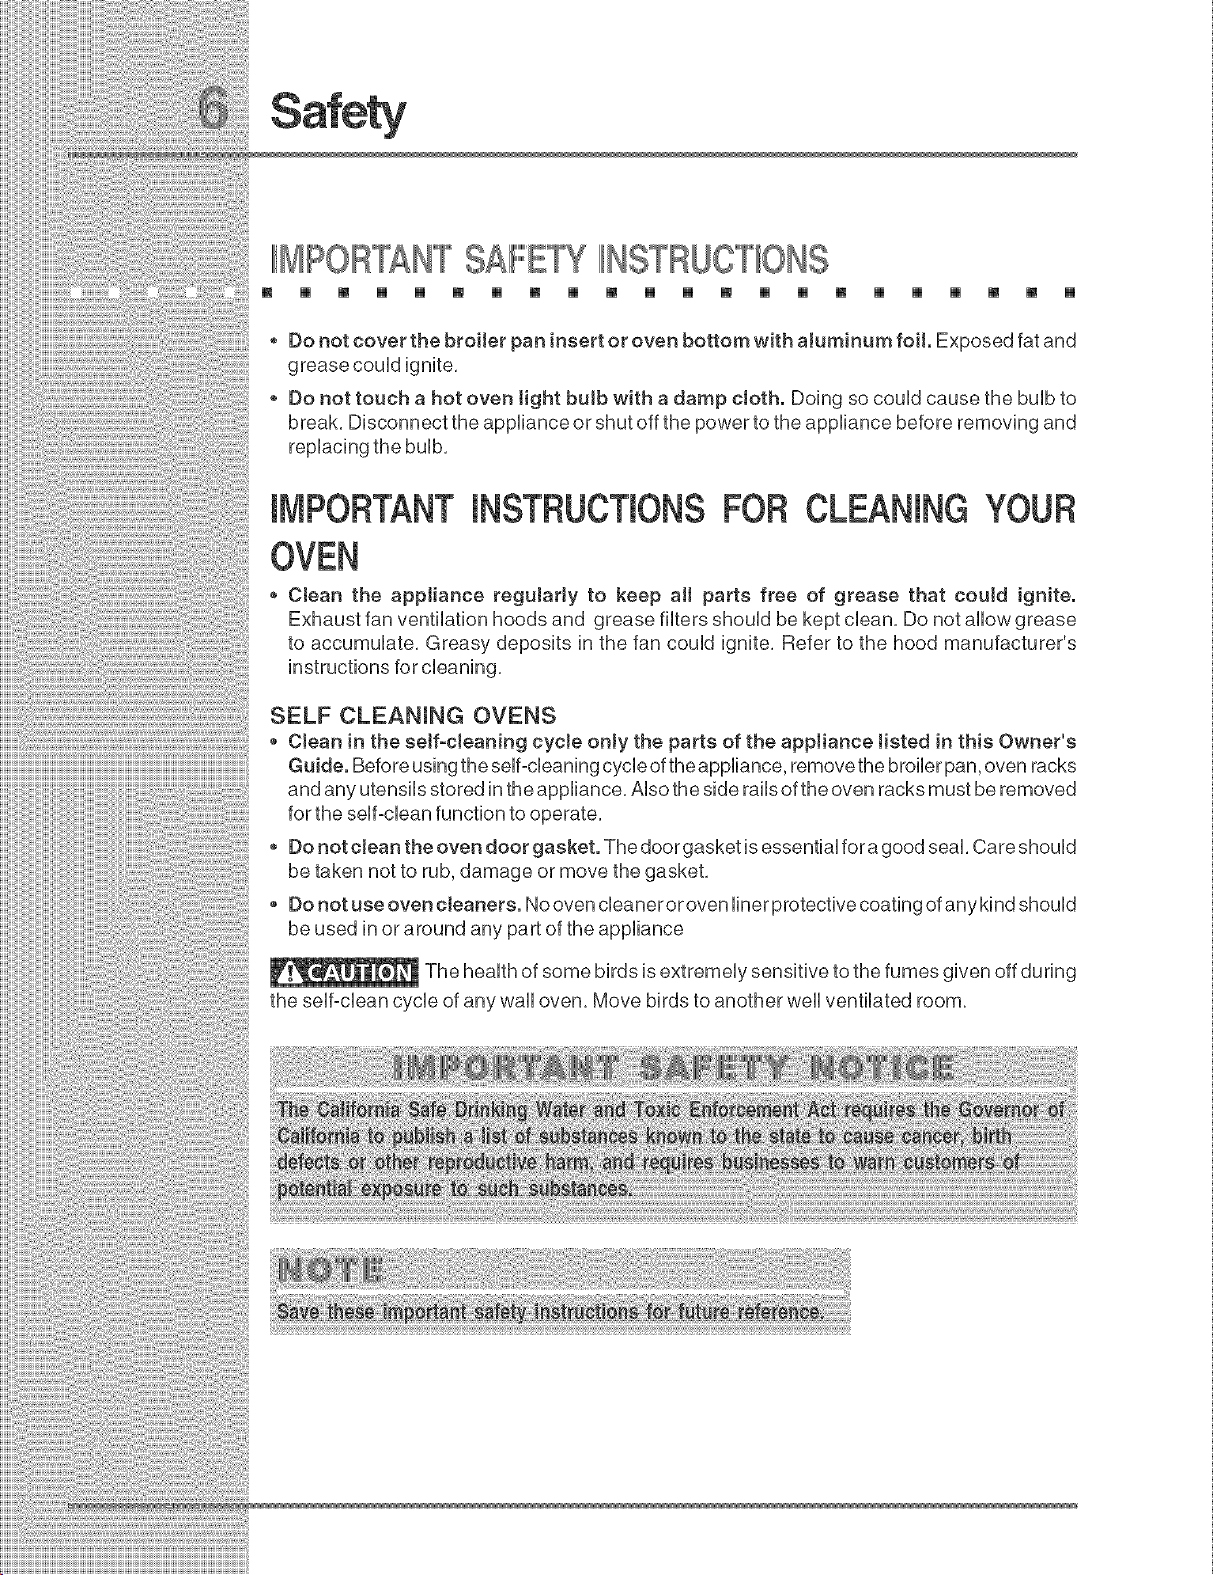
* Do not cover the broiler pan insert or oven bottom with aluminum foil. Exposed fat and
grease could ignite,
Do not touch a hot oven light buJb with a damp cloth. Doing so could cause the bulb to
break, Disconnect the appliance or shut off the power to the appliance before removing and
replacing the bulb,
iMPORTANTINSTRUCTNONSFORCLEANINGYOUR
Ctean the appliance regulaHy to keep aH parts free of grease that could ignite.
Exhaust fan ventilation hoods and grease filters should be kept clean, Do not allow grease
to accumulate, Greasy deposits in the fan could ignite, Refer to the hood manufacturer's
SELF CLEANmNG OVENS
Clean in the self-cleaning cycJe onJy the parts of the appliance Jisted in this Owner's
Guide. Before using the self°cleaning cycle of the appliance, remove the broiler pan, oven racks
and any utensils stored in the appliance, Also the side rails of the oven racks must be removed
for the self-clean function to operate,
Do not clean the oven door gasket. The door gasket is essential for a good seal, Care should
be taken not to rub, damage or move the gasket,
Do not use oven cleaners. No oven cleaner or oven liner protective coating of any kind should
be used in or around any part of the appliance
The health of some birds is extremely sensitive to the fumes given off during
the self°clean cycle of any wall oven, Move birds to another well ventilated room,
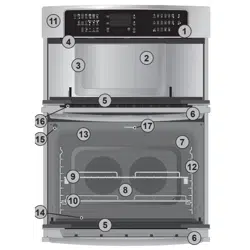
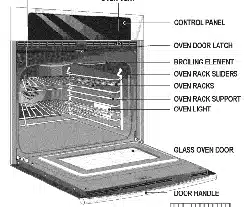
Peal:ure uverview
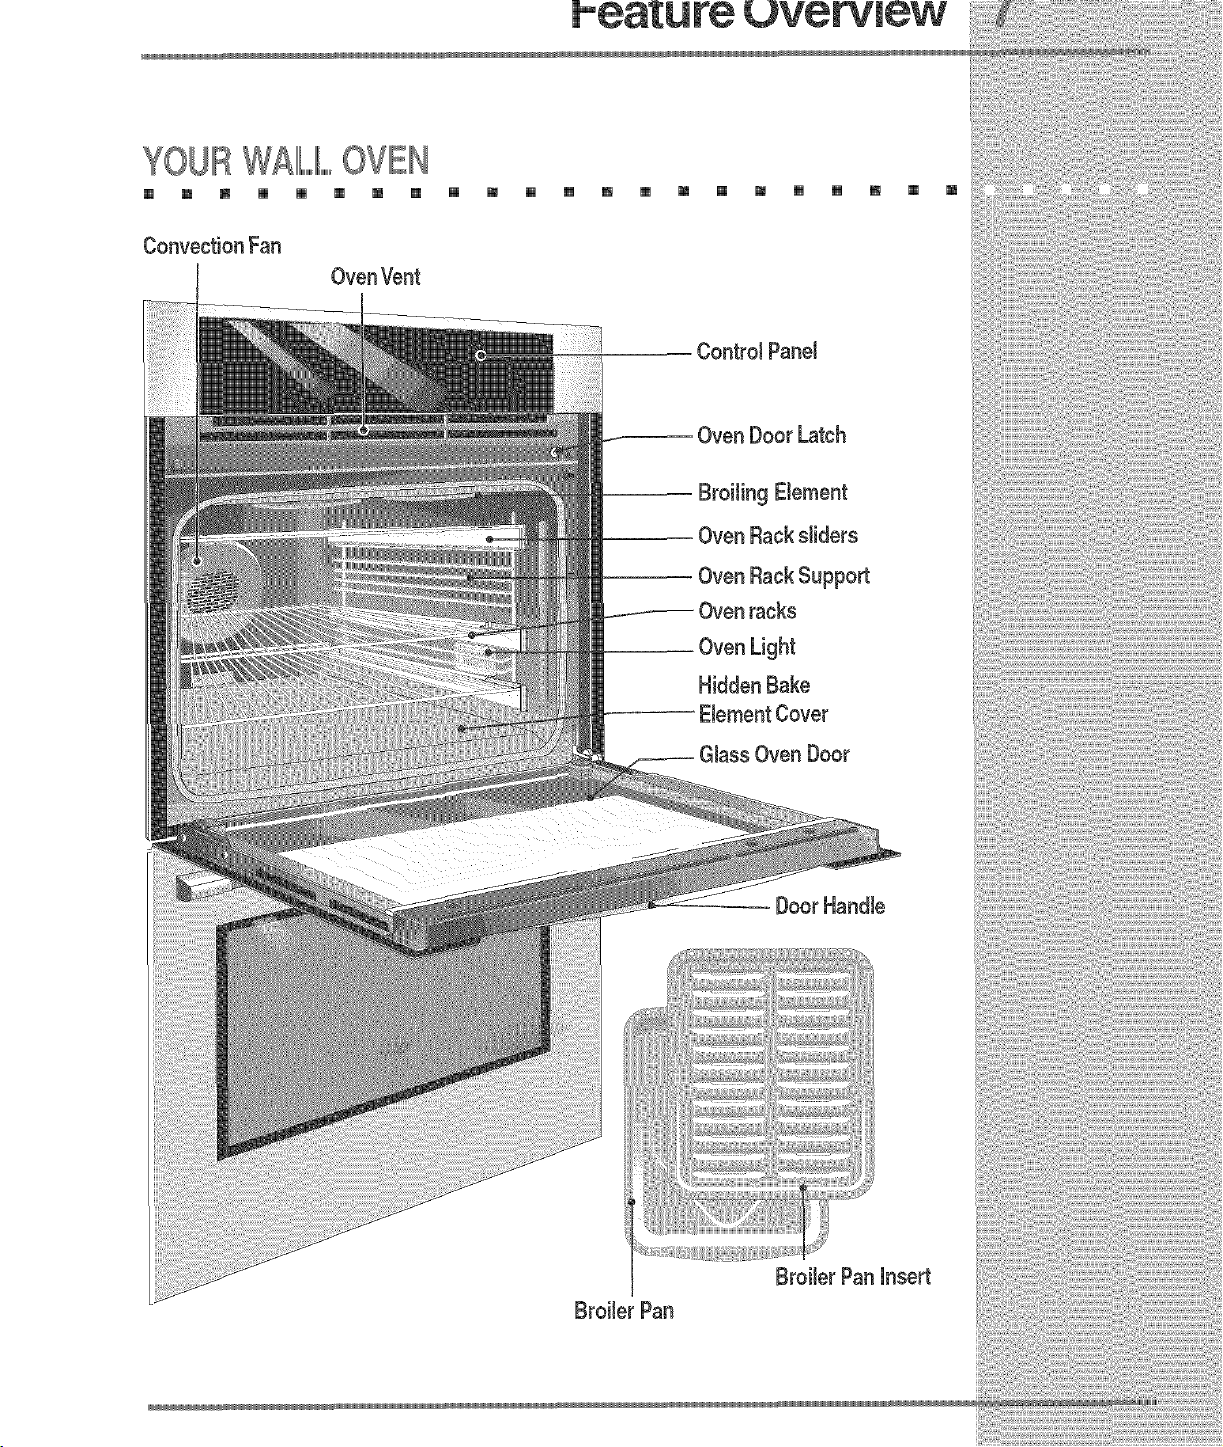
YOURW£11LIILOVEN
[] m m [] [] [] m [] [] m [] [] m [] m [] m [] [] m [] m
Convection Fan
Oven Door Latch

BEIFO $E ING OVENCON OIIIL,,,S
[] [] [] [] [] [] [] [] [] [] [] [] [] [] [] [] [] [] [] [] [] []
Oven Vent Location
The oven is vented under
upper controJ panel for
between the doors for the
lower oven. When the oven
is on, warm air is released
through the vent. This
venting is necessary for
proper air circulation in the
oven and good baking
results.
Oven Vent _,
Oven Vent
NnstallingOven Rack Supports
ALWA YS /#/STALL OVEN RACK
SUPPORT BEFORE TURNING ON
THE OVEN (WHEN THE OVEN iS
COOL).
To install oven rack support, insert
the support tabs in the hobs located
on the oven inside side as shown
below. To remove the oven rack
support for a self-clean cycle, pull up
the support to disengage the tabs
from the oven. if the rack supports are
not removed, the self-clean cycle
won't start. Always remove the left
side support first.
Removing and Replacing Oven
Racks AL WAYS ARRANGE OVEN
RACKS WHEN THE OVEN IS COOL
(PRIOR TO OPERA TING THE OVEN).
Always use oven mitts when using the
oven,
To remove an oven rack, pull the rack
forward. Lift up the rack off the oven rack
slider. To install an oven rack, locate
the two pinholes in the small plates at
the front corners of the rack. Place the
rack on the side sliders and drop the pin
hobs over the pins on the sliders.
Instalbd on sliders
To remove from
sliders
To place on sliders
Pull oven rack forward and lift it
up off the oven rack slider.
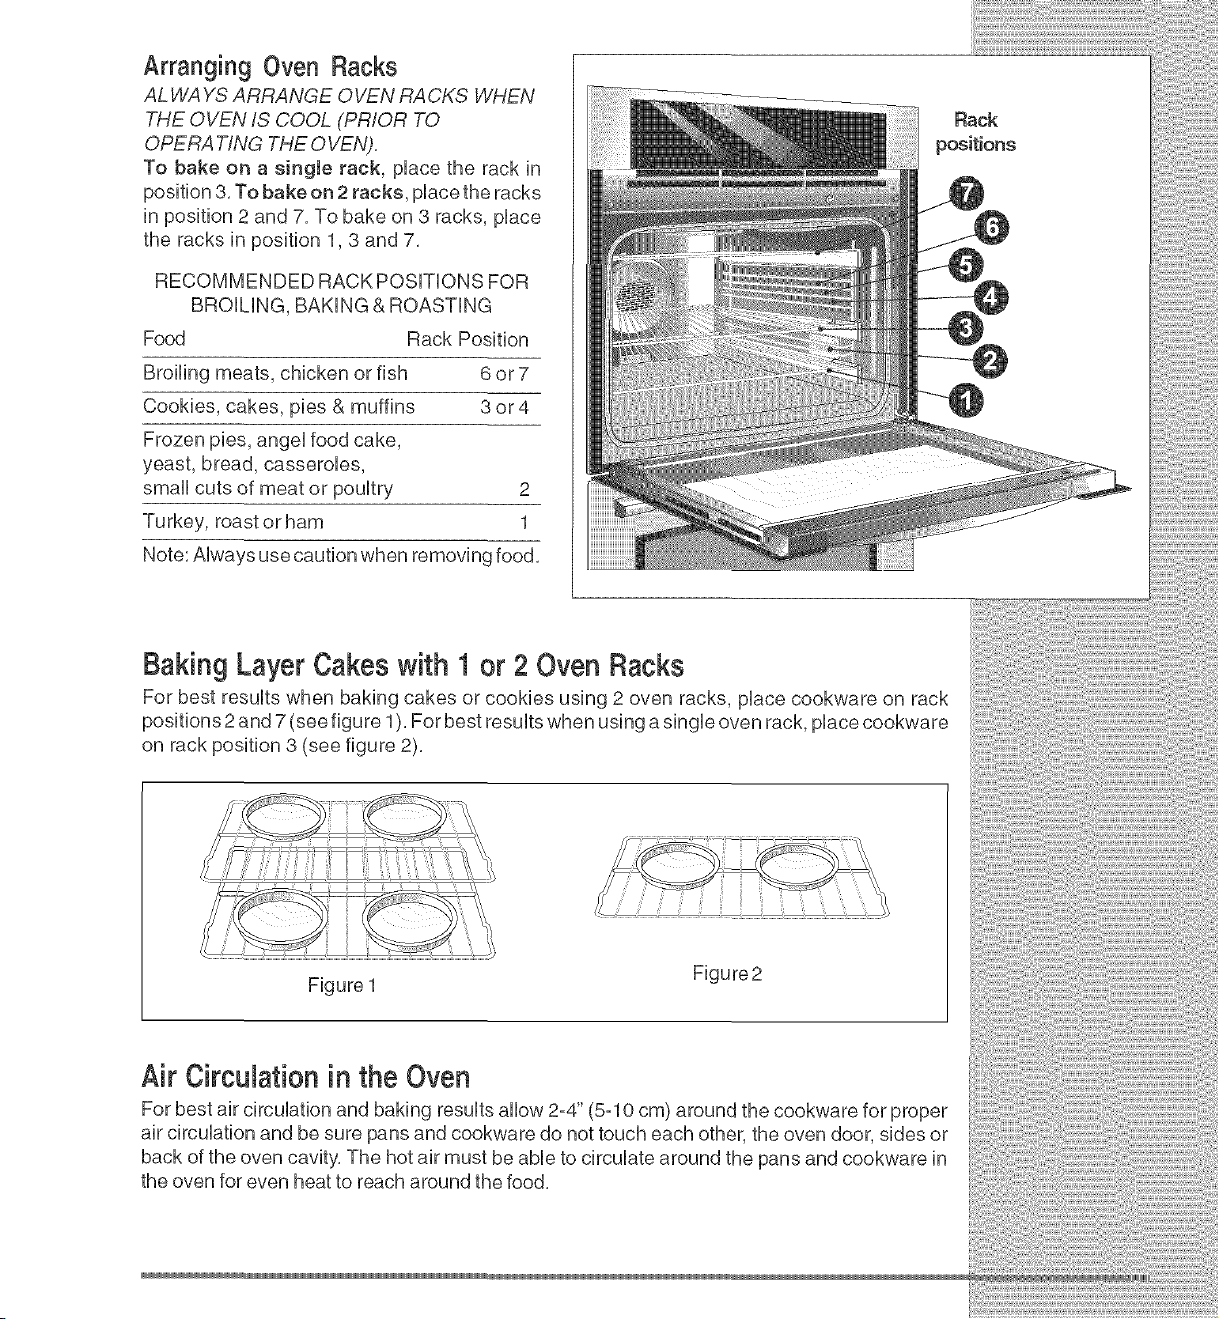
Arranging Oven Racks
AL WAYS ARRANGE OVEN RACKS WHEN
THE OVEN IS COOL (PRIOR TO
OPERA TING THE OVEN).
To bake on a eingJe rack, pUacethe rack in
position 3. To bake on 2 racks, pUacethe racks
in position 2 and 7. To bake on 3 racks, pUace
the racks in position 1,3 and 7.
RECOMMENDED RACK POSBONS FOR
BROiLiNG, BAKING & ROASTING
Food Rack Position
Broiling meats, chicken or fish 6 or 7
Cookies, cakes, pies & muffins 3 or4
Frozen pies, angeUfood cake,
yeast, bread, casserobs,
small cuts of meat or pouUtry 2
Turkey, roast orham 1
Note: AUwaysuse caution when removing food.
o
Baking Layer Cakes with 1 or 2 Oven Racks
For best results when baking cakes or cookies using 2 oven racks, place cookware on rack
positions 2 and 7 (see figure 1). For best results when using a single oven rack, place cookware
on rack position 3 (see figure 2).
Figure 1
Figure2
Air Circulation in the Oven
For best air circulation and baking results allow 2=4" (5=10 cm) around the cookware for proper
air circulation and be sure pans and cookware do not touch each other, the oven door, sides or
back of the oven cavity, The hot air must be able to circulate around the pans and cookware in
the oven for even heat to reach around the food,
CON OIIIL,,,,,PADIFUNCT ONS
[] [] [] [] [] [] [] [] [] [] [] [] [] [] [] [] [] [] [] [] [] []
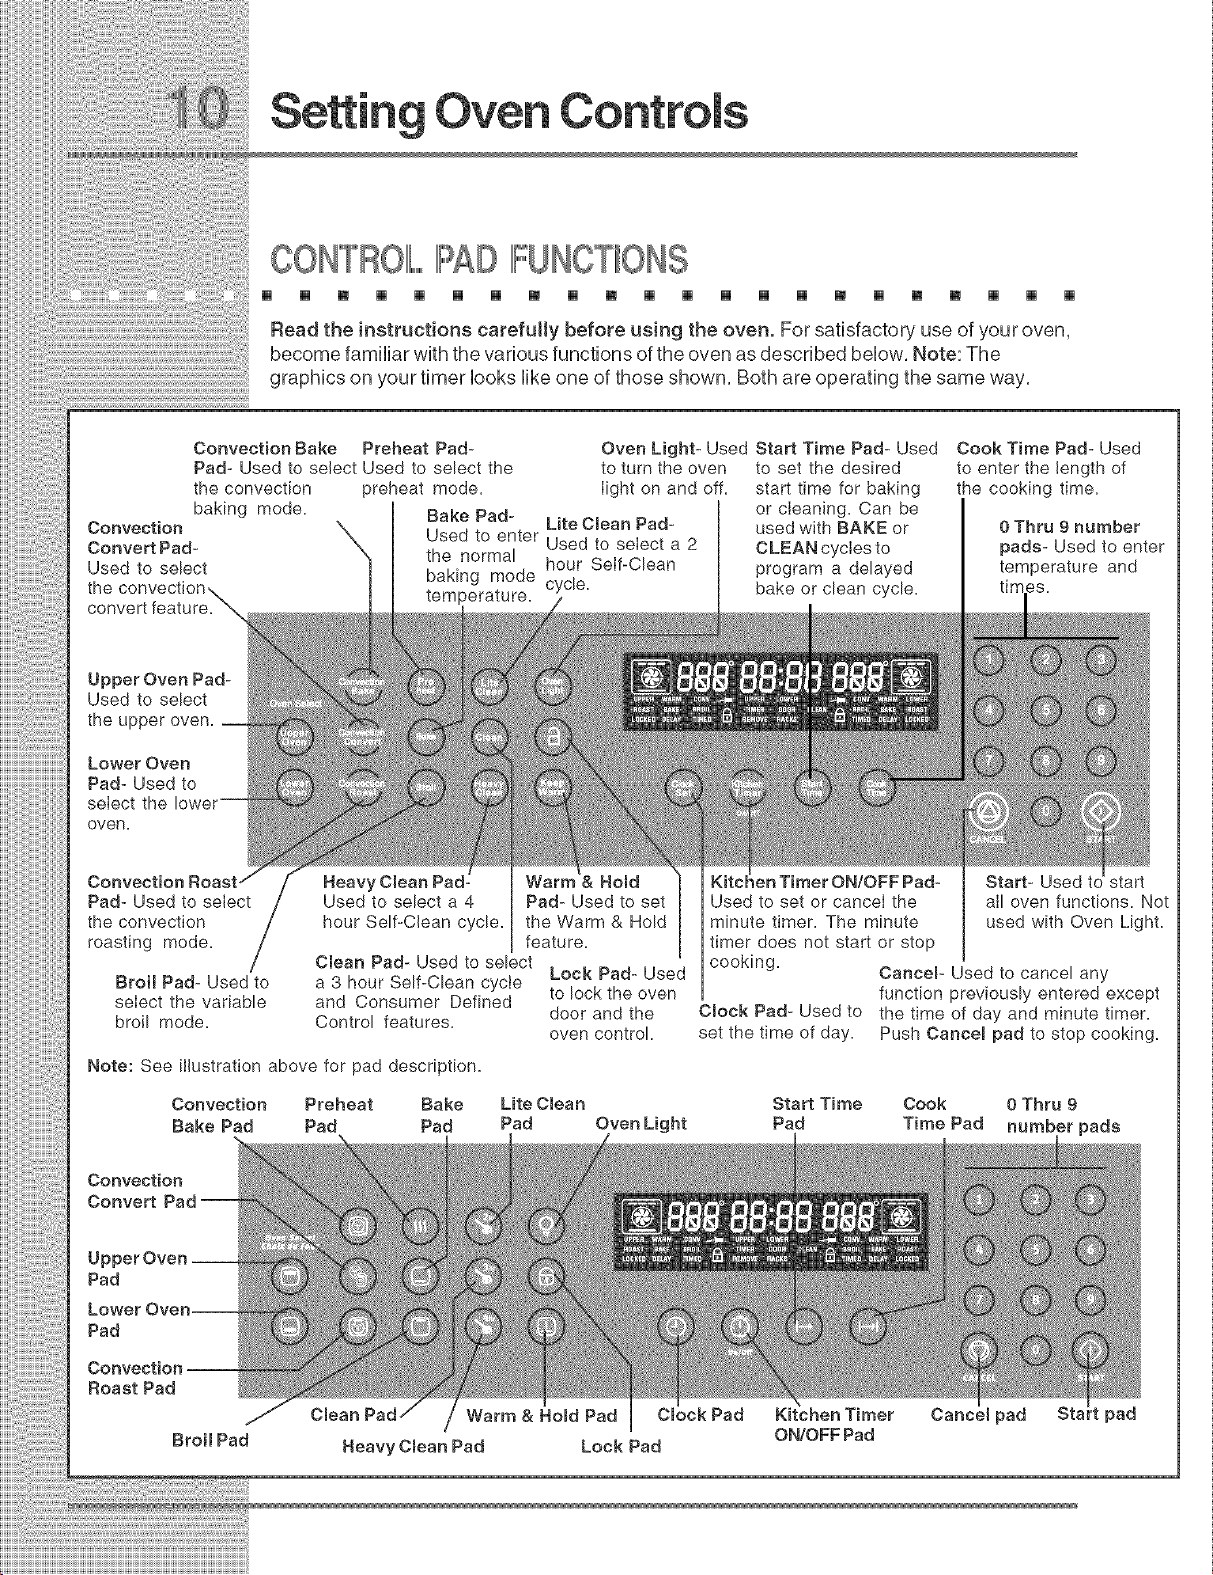
Read the instructions carefully before using the oven. For satisfactory use of your oven,
become familiar with the various functions of the oven as described below. Note: The
graphics on your timer looks like one of those shown. Both are operating the same way.
Convection Bake
Pad- Used to select Used to select the
the convection
baking mode.
Convection
Convert Pad-
Used to select
Upper Oven Pad-
Used to select
the upper oven.
Lower Oven
Pad- Used to
select the
oven.
Pad- Used to select
the convection
roasting mode. /
Broil Pad- Used to
select the variable
broil mode.
Preheat Pad- Oven Light- Used Start Time Pad- Used Cook Time Pad- Used
to turn the oven to set the desired to enter the length of
preheat mode. Iight on and off. start time for baking the cooking time.
or cleaning. Can be
Bake Pad- Lite Cmean Pad- used with BAKE or
Used to enter Used to select a 2 CLEANcycIesto
the normal hour Self-Clean program a delayed
baking mode cycle, bake or clean cycle.
temperature.
& Ho_d
Used to select a 4 Pad- Used to set
hour Self-Clean cycle, the Warm & Hold
feature.
Clean Pad- Used to select
a 3 hour Self-Clean cycle Lock Pad- Used
and Consumer Defined to lock the oven
Control features, door and the
oven control.
Bake Lite C_ean
Pad Pad Oven Light
Note: See illustration above for pad description.
Convection Preheat
Bake Pad Pad
_enTimer ON/OFF Pad-
Used to set or cancel the
minute timer. The minute
timer does not start or stop
cooking.
Cmock Pad- Used to
set the time of day.
0 Thru 9 number
pads- Used to enter
temperature and
Start- Used
alI oven functions. Not
used with Oven Light.
Cancer Used to cancel any
function previously entered except
the time of day and minute timer.
Push Cancem pad to stop cooking.
Start Time Cook 0 Thru 9
Pad Time Pad number pads
Convection
Convert
Pad
Pad
Roast Pad
Broil Pad
Cmean Warm & Herod Pad Cmock Pad
/
Heavy Cmean Pad Lock Pad
Kitchen Timer
ON/OFF Pad
Cance_ pad Sta pad
Oven
9E ING THE ClIILOGK
[] [] [] [] [] [] [] [] [] [] [] [] [] [] [] [] [] [] [] [] [] []
The (_W) or (,Q) pad is used to set the clock. The clock may be set for 12 or 24 hour time of
day operation. The clock is preset at the factory for the 12 hour operation. When the wall
oven is first plugged in or when the power supply to the wall oven has been interrupted, the
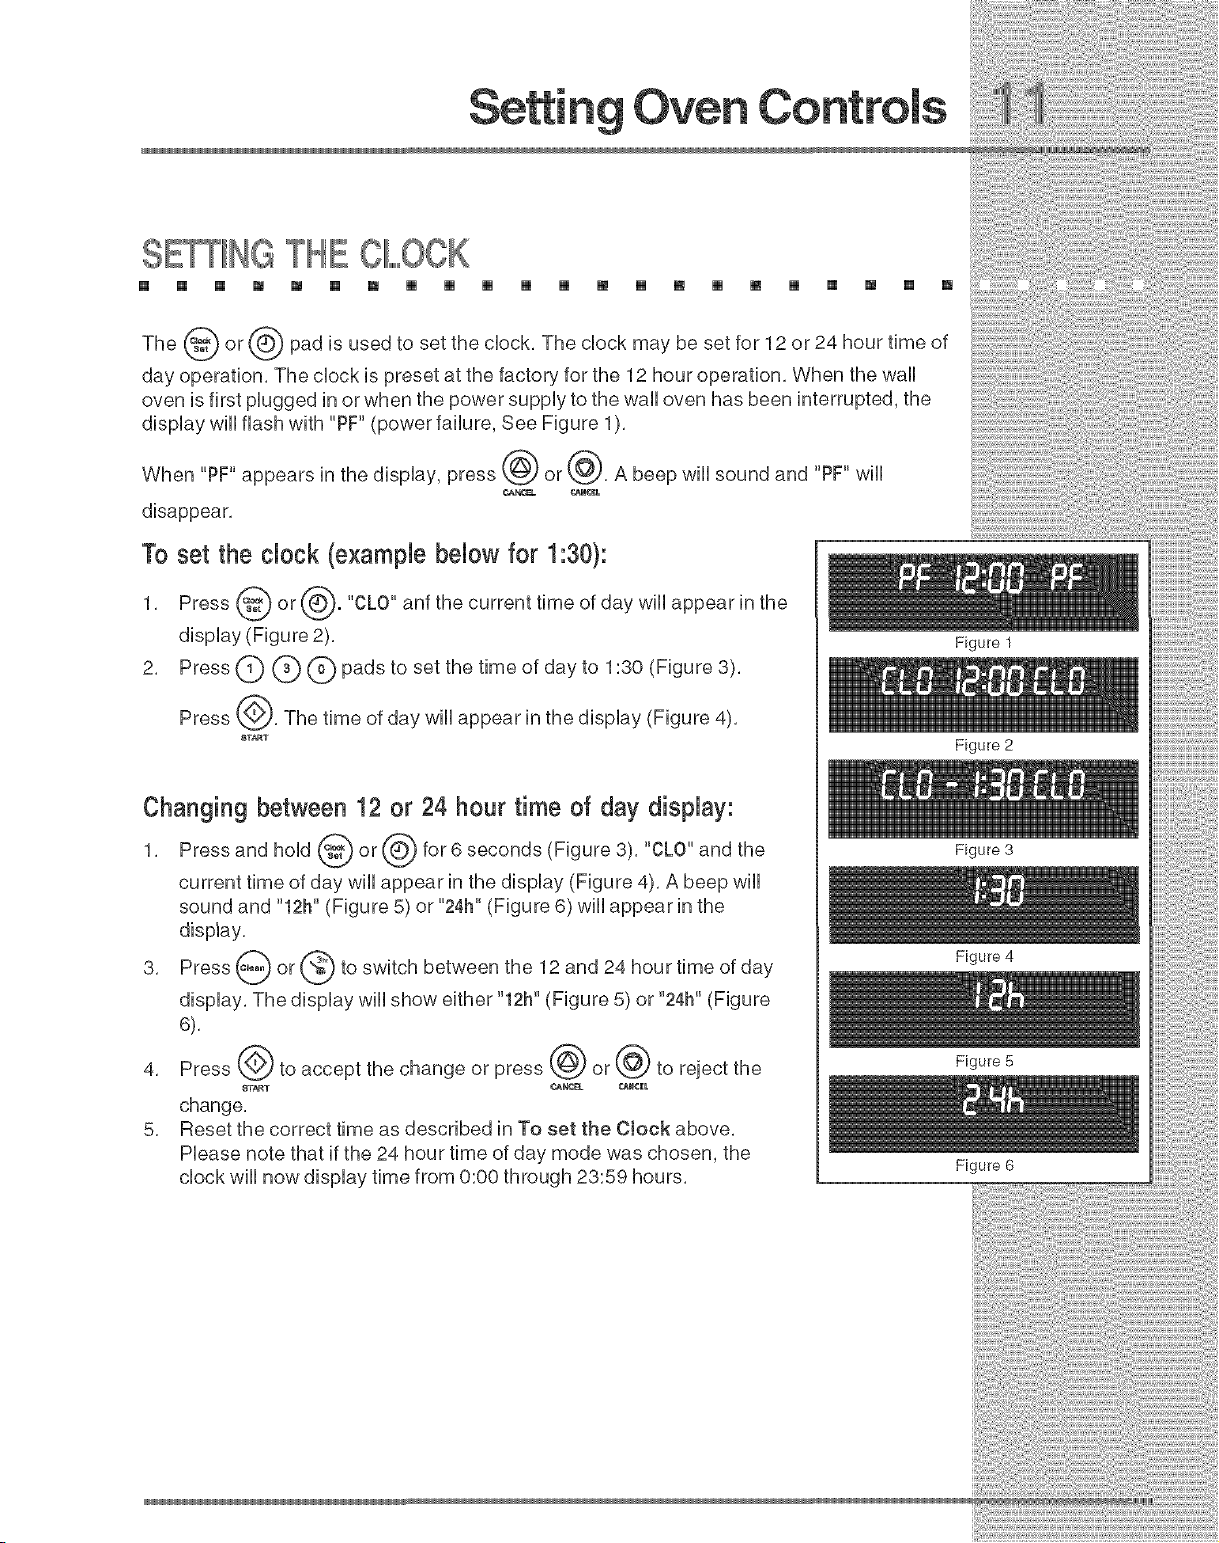
display wiii flash with "PF" (power failure, See Figure 1).
When "PF" appears in the display, press @ or @. A beep will sound and "PF" will
CA_Y4S_L _NCEB
disappear.
To set the clock (example below for 1:30):
1. Press @ or @. "CLO" anf the current time of day wHi appear in the
display (Figure 2).
2. Press (_ (_ (_) pads to set the time of day to 1:30 <Figure 3>.
Press @. The time of day wHiappear in the dispiay (Figure 4).
8TA_T
Changing between 12 or 24 hour time of day display:
1. Pressandhond or(6}for6seconds<Figure31."CLO"andthe
current time of day wili appear in the dispiay (Figure 4). A beep wili
sound and "12h" (Figure 5) or "24h" (Figure 6) wili appear in the
display.
3. Press _ or @ to switch between the 12 and 24 hour time of
day
dispiay. The dispiay wili show either "12h" (Figure 5) or "24h" (Figure
6).
4. Press @ to accept the change or press @ or @ to reject the
change.
5. Reset the correct time as described in To set the Clock above.
Piease note that if the 24 hour time of day mode was chosen, the
chock wili now dispiay time from 0:00 through 23:59 hours.
Figure 1
Figure 2
Figure 3
Figure 4
Figure 5
Figure 6
:i::ii:ii:ii:ii:ii:ii:ii:ii:ii:ii:ii:ii:ii:ii:ii:ii:ii:ii:
SE IIINGOONTIIINUOUSBAKE OR 12 HOUR
ENERGY SAVIIING
[] [] [] [] [] [] [] [] [] [] [] [] [] [] [] [] [] [] []
Figure 1
Figure 2
Figure 3
Figure 4
[] []
G@
The _"°°
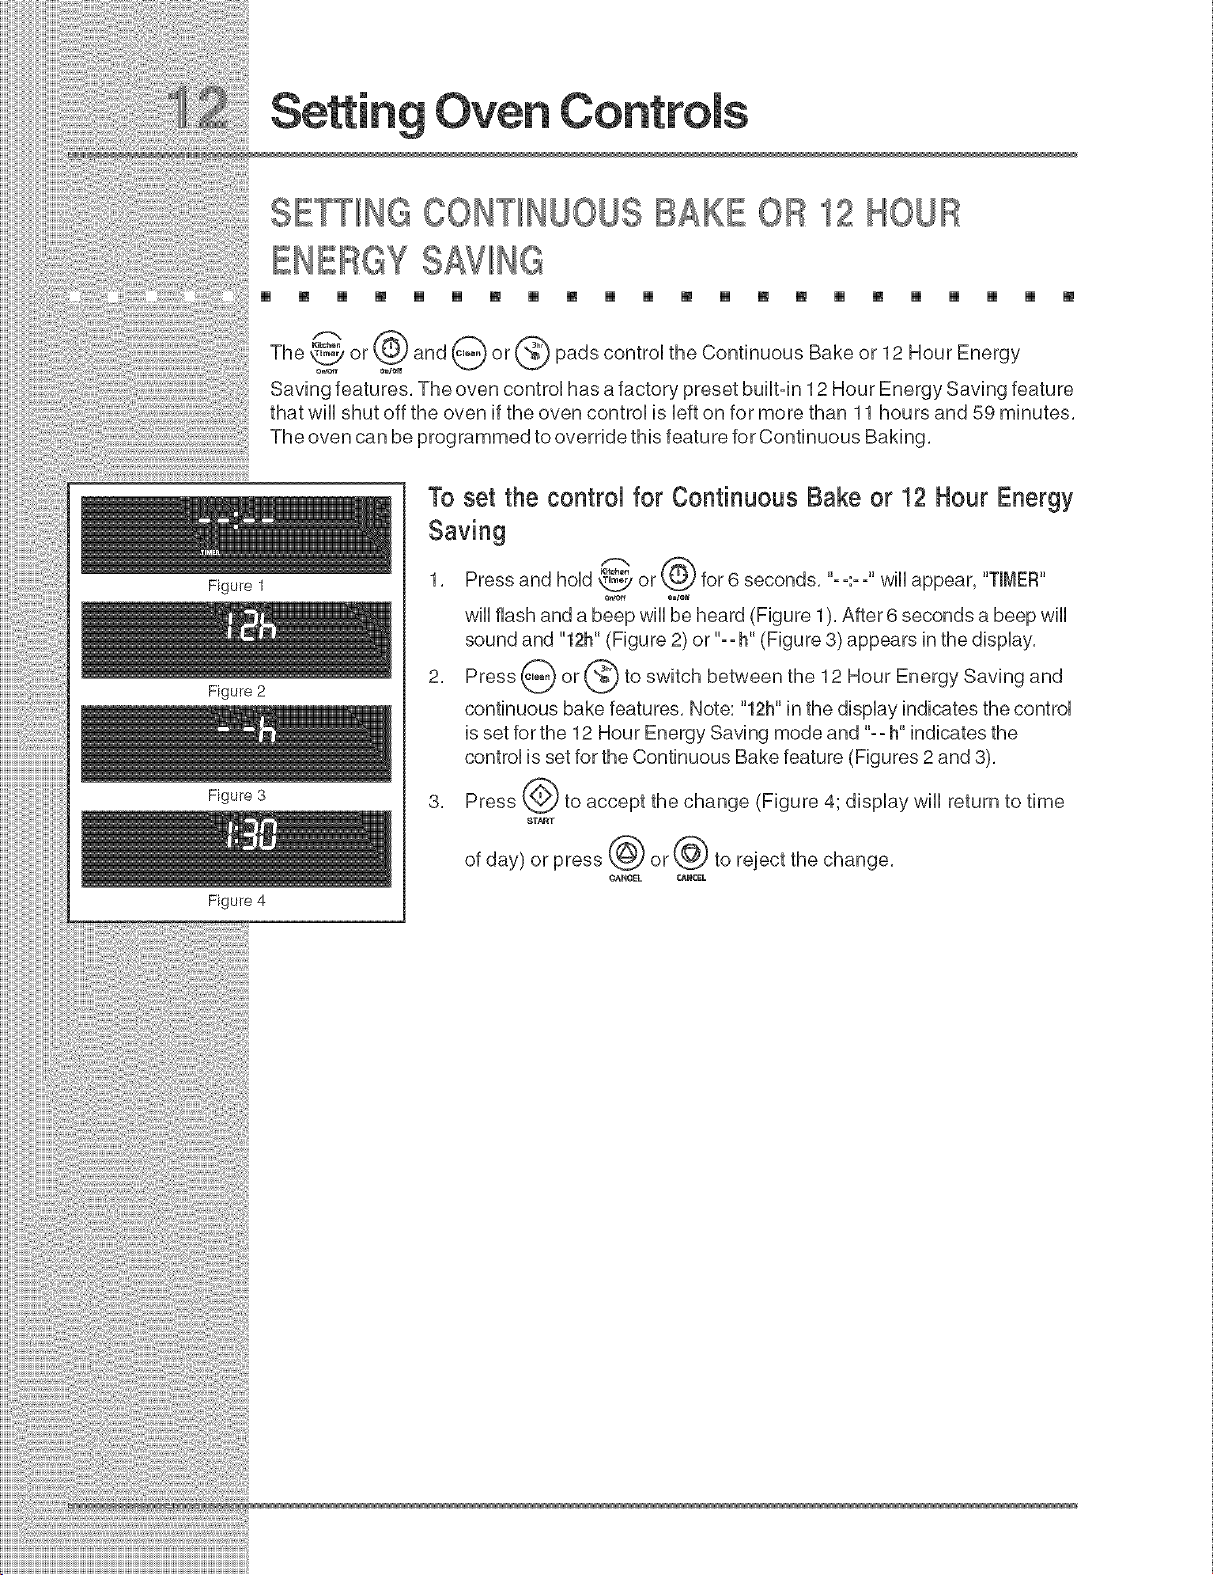
or and or pads control the Continuous Bake or 12 Hour Energy
Saving features. The oven control has a factory preset builtoin 12 Hour Energy Saving feature
that will shut off the oven if the oven control is left on for more than 11 hours and 59 minutes.
The oven can be programmed to override this feature for Continuous Baking.
To set the control for Continuous Bake or 12 Hour Energy
Saving
1. Press and hoUd_L_Yor for 6 seconds. 'oo.oo wHUappear, "TINEF_"
o_ o_le_
will flash and a beep will be heard (Figure 1). After 6 seconds a beep will
sound and "12h" (Figure 2) or "==h" (Figure 3) appears in the display.
2. Press _ or _ to switch between the 12 Hour Energy Saving and
continuous bake features. Note: "12h" in the display indicates the control
is set for the 12 Hour Energy Saving mode and "==h" indicates the
control is set for the Continuous Bake feature (Figures 2 and 3).
3. Press _._ to accept the change (Figure 4; display will return to time
of day) or press _ or_.} to reject the change.
m [] [] [] [] [] [] [] [] [] [] [] [] [] [] [] [] [] [] [] [] []
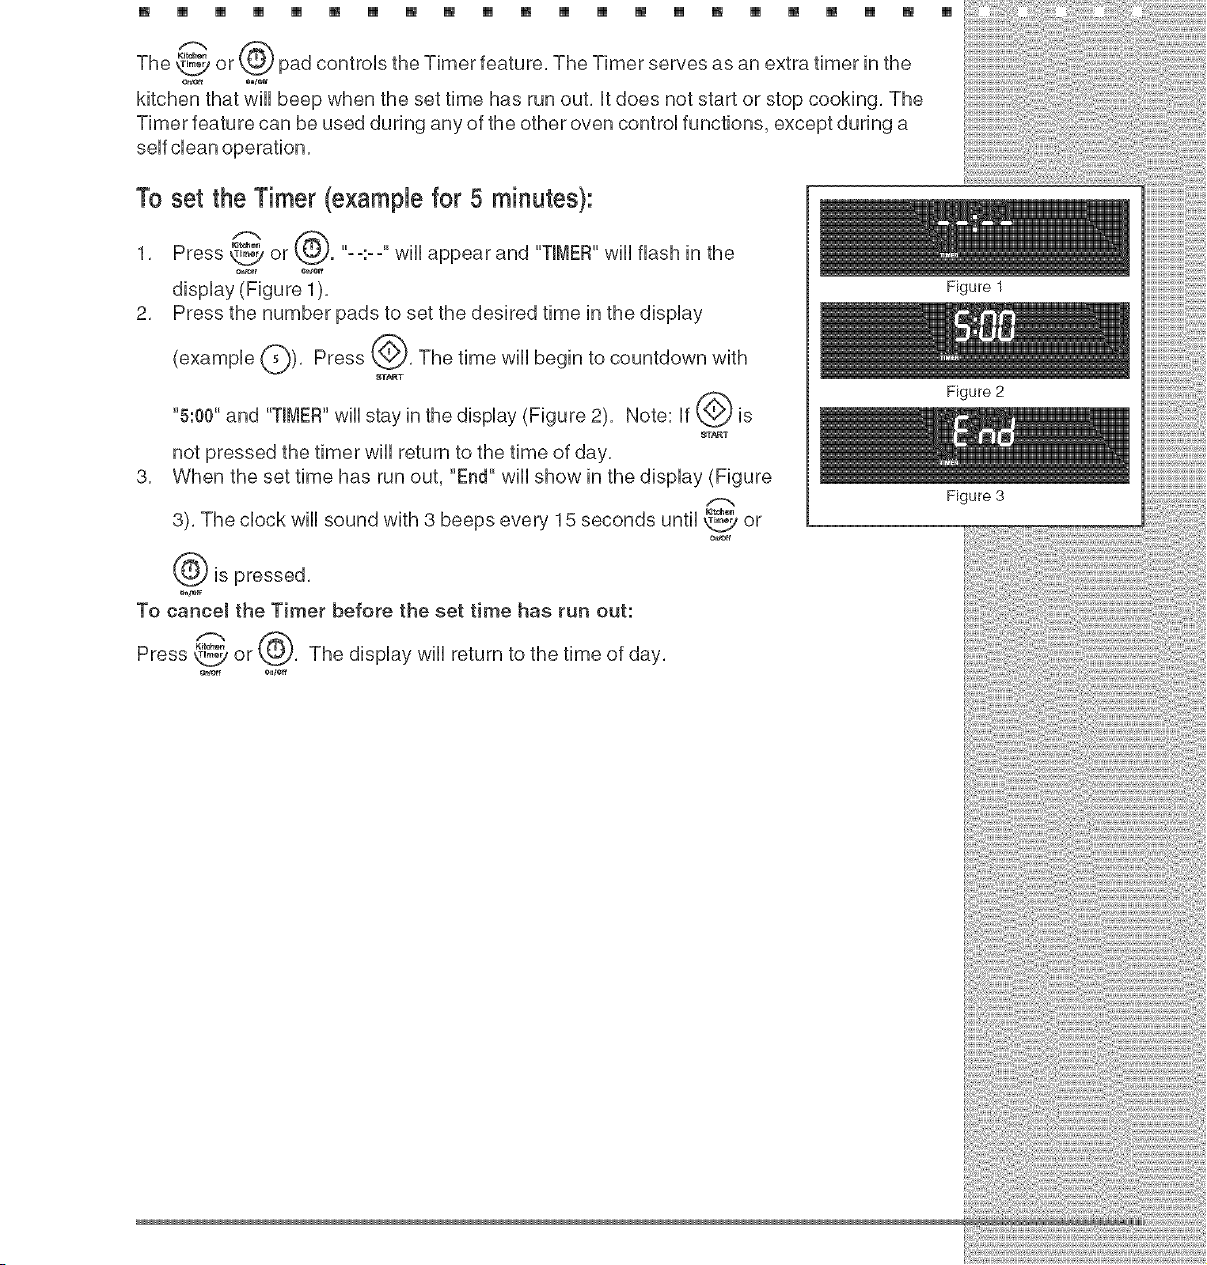
pad controls_'_°° the Timer feature, The Timer serves as an extra timer in the
The _ or
kitchen that wHUbeep when the set time has run out, Utdoes not start or stop cooking, The
Timer feature can be used during any of the other oven controUfunctions, except during a
To set the Timer (example for 5 minutes):
1, Press _ or k_. "o-:- o"wHUappear and "TIMER"wHUflash in the
dispUay(Figure 1),
2, Press the number pads to set the desired time in the dispUay
(exampUe Q), Press ___, The time wHUbegin to countdown with
8T_T
"5:00" and "TIMER"wHUstay in the dispUay(Figure 2), Note: If _ is
_T_T
not pressed the timer will return to the time of day,
3, When the set time has run out, "End" will show in the display (Figure
3), The clock will sound with 3 beeps ever}, 15 seconds until _ or
er_-ff
is pressed,
To cancel the Timer before the set time has run out:
Press _ or , The display will return to the time of day,
OtCeff *_,t*tf
Figure 1
Figure 2
Figure 3
$E IHG OVEN LOCKOUTIIFEATU
[] [] [] [] [] [] [] [] [] [] [] [] [] [] [] [] [] [] [] [] []
Figure 1
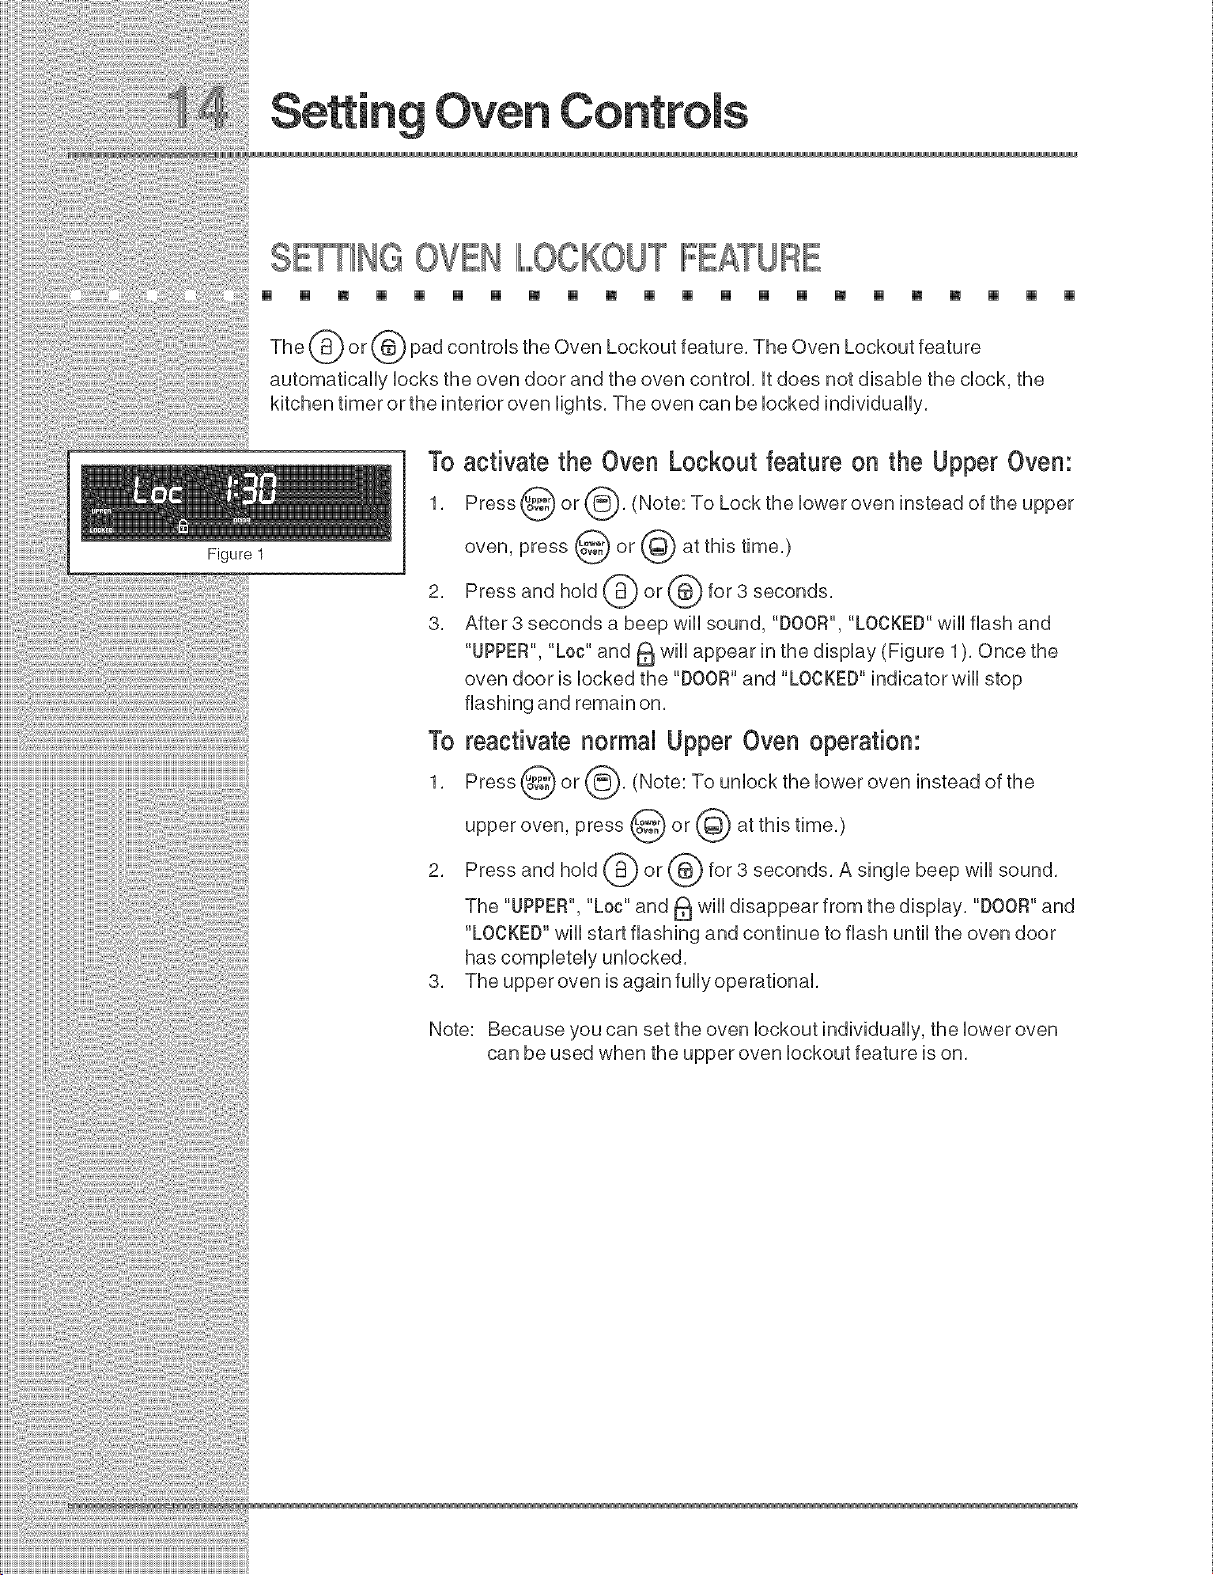
The (_) or (_@,)pad controls the Oven Lockout feature, The Oven Lockout feature
automatically locks the oven door and the oven control, it does not disable the clock, the
kitchen timer or the interior oven lights, The oven can be locked individually,
To activate the Oven Lockout feature on the Upper Oven:
1, Press @ or @, (Note: To Lock the lower oven instead of the upper
oven, press @ or @ at this time,)
2, Press and hold @ or @ for 3 seconds,
3, After 3 seconds a beep will sound, "DOOR", "LOCKED"will flash and
"UPPER", "Loc" and _ will appear in the display (Figure 1), Once the
oven door is locked the "DOOR" and "LOCKED" indicator will stop
To reactivate normal Upper Oven operation:
1, Press @ or @, (Note: To unlock the lower oven instead of the
upper oven, press @ or @ at this time,)
2, Press and hold @ or @ for 3 seconds, A single beep will sound,
The "UPPER", "Loc" and _ will disappear from the display, "DOOR"and
"LOCKED" will start flashing and continue to flash until the oven door
3, The upper oven is again fullyoperational,
Note: Because you can set the oven lockout individually, the lower oven
can be used when the upper oven lockout feature is on,
Oven
SE_NG TEMPERATUREDIIISPIII,,,,,,,,,,AY-IIFA EN IF
OB CEIILSIUS::
[] [] [] [] [] [] [] [] [] [] [] [] [] [] [] [] [] [] [] [] []
The--___o9or© and--_or--_padscontro,theFahrenheitorOe,siustemperaturedisp,ay
modes, The oven control can be programmed to display temperatures in Fahrenheit or
Celsius, The oven has been preset at the factory to display in Fahrenheit,
Note: Both ovens will be changed at the same time,
1"ochange dispmayfrom Fahrenheit to Cemsiusor Cemsius
to Fahrenheit:
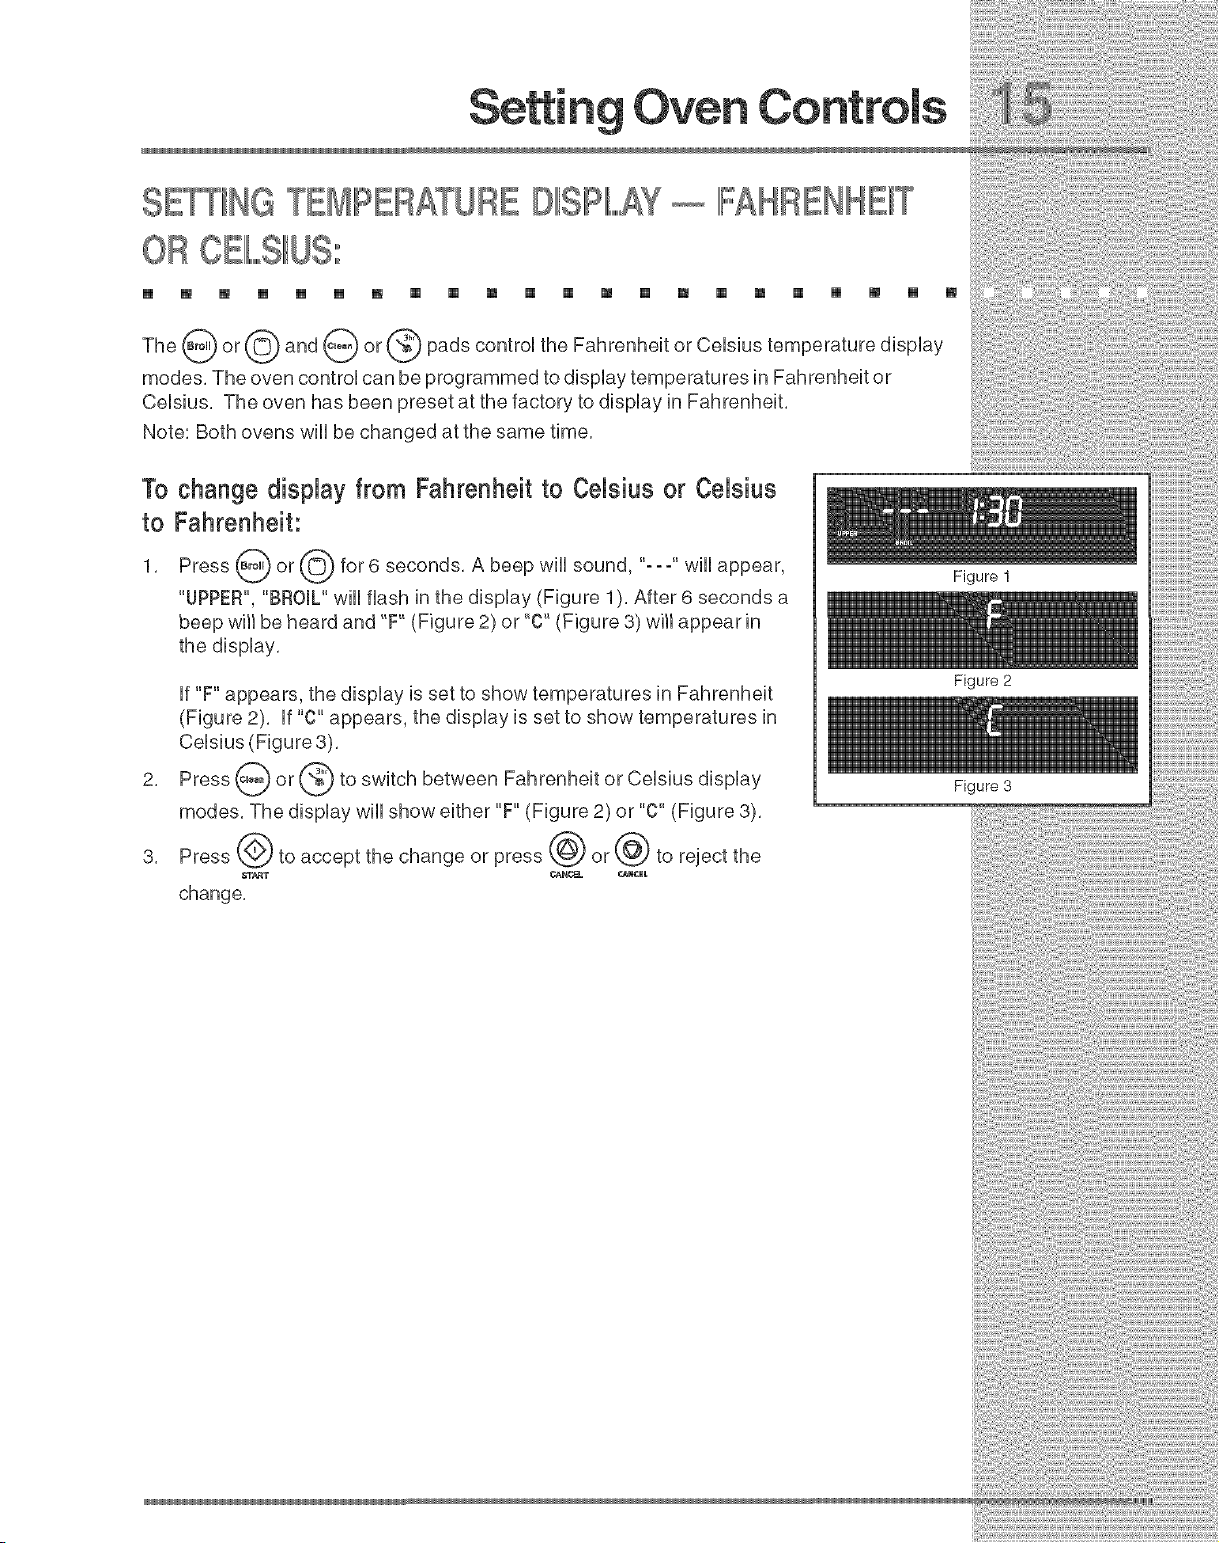
1, Press @ or @ for 6 seconds, A beep wiii sound, "-- -" wiii
appear,
"UPPER", "BROIL" will flash in the display (Figure 1 ), After 6 seconds a
beep will be heard and "F" (Figure 2) or "C" (Figure 3) will appear in
the display,
if "F" appears, the display is set to show temperatures in Fahrenheit
(Figure 2), if "C" appears, the display is set to show temperatures in
Celsius (Figure 3),
Press _ or @ to switch between Fahrenheit or Celsius
display
modes, The display wiii show either "F" (Figure 2) or "C" (Figure 3),
Press @ to accept the change or press @ or @ to reject the
change,
Figure 1
Figure 2
Figure 3
SE_ING S_IIIF,,,,,,,,,,ENTCON OL OIIP ATION
[] [] [] [] [] [] [] [] [] [] [] [] [] [] [] [] [] [] [] [] [] []
Figure 1
Figure 2
Figure 3
The pads control the Silent Control operation feature, The Silent
Control operation feature allows the oven control to be operated without sounds or beeps
whenever necessary, if desired the control can be programmed for silent operation and later
returned to operating with all the normal sounds and beeps,
To change control from normal sound operation to silent
control operation"
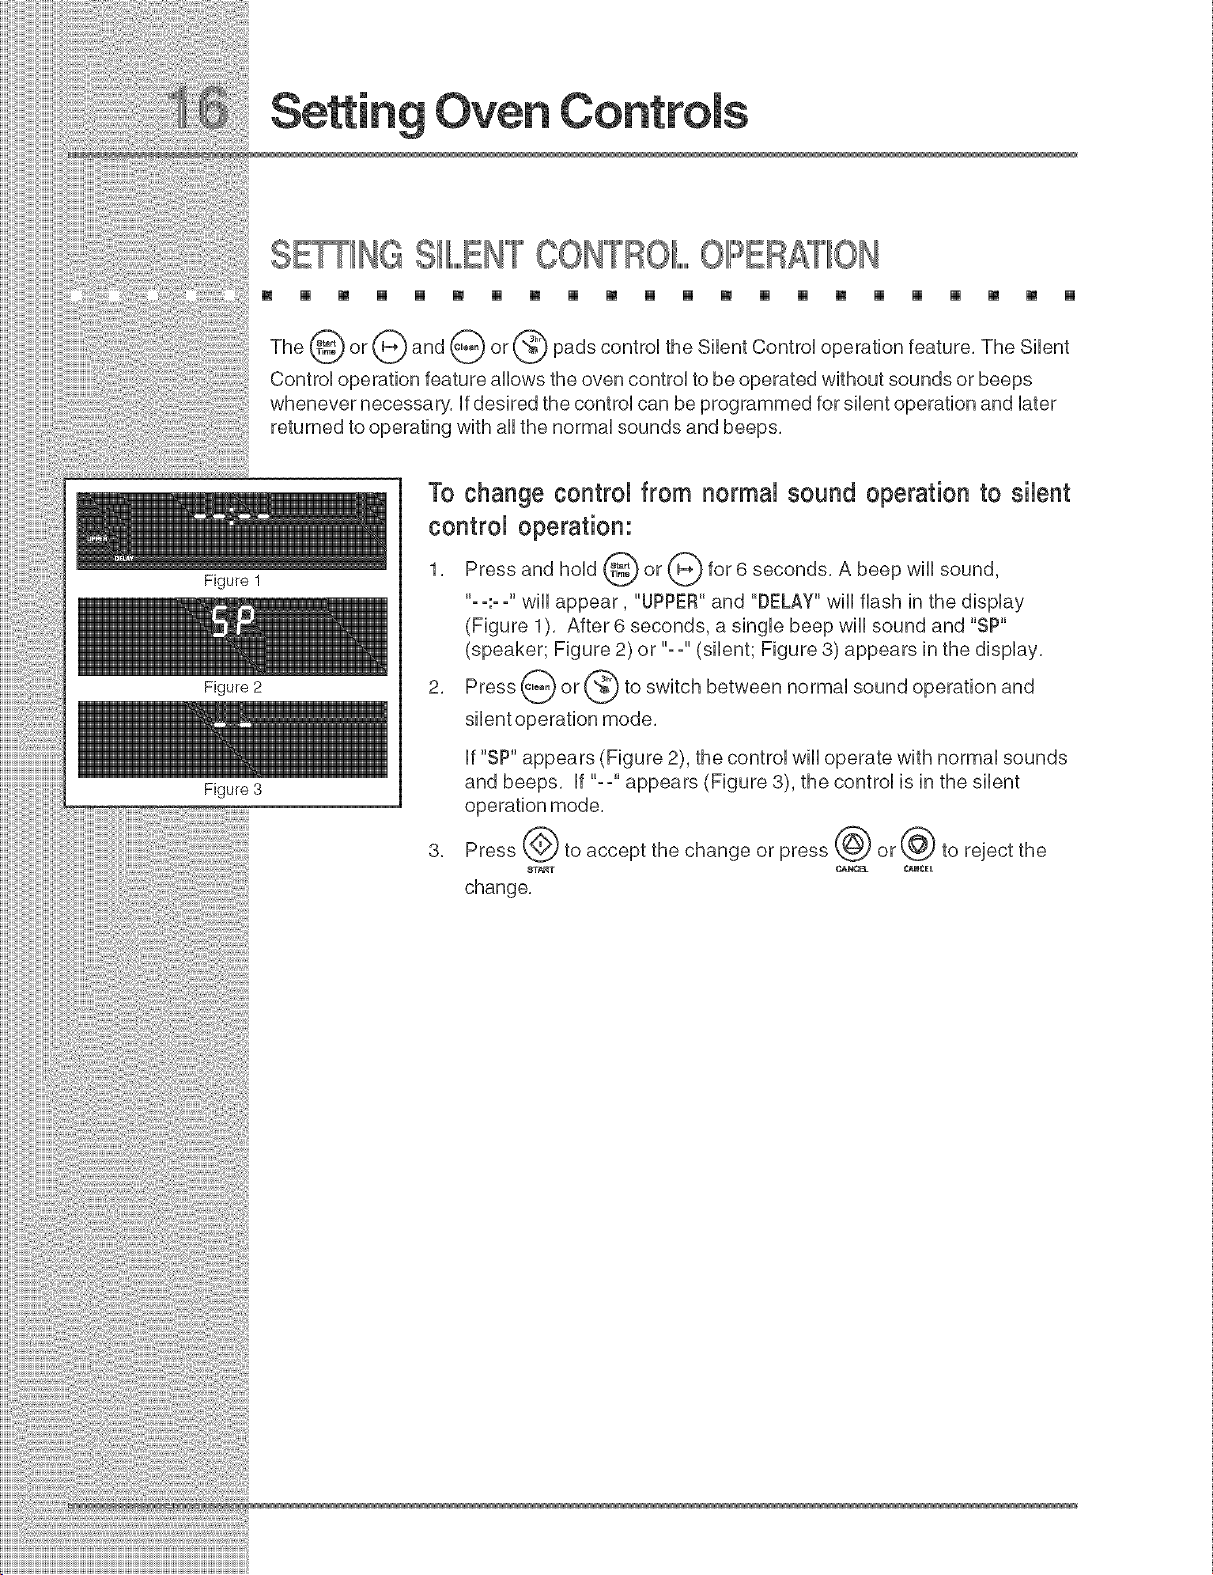
1, Press and hold @ or @ for 6 seconds, A beep will
sound,
"- -:- -" wiii appear, "UPPER"and "DELAY" wiii flash in the display
(Figure 1), After 6 seconds, a single beep will sound and "SP"
(speaker; Figure 2) or "--" (silent; Figure 3) appears in the display,
2, Press _ or_ to switch between normal sound operation and
if "SP" appears (Figure 2), the control wiii operate with normal sounds
and beeps, if "--" appears (Figure 8), the control is in the silent
operation mode,
_oss@_o_cco_t,hochromoo__oss@o_@_o_oioct,ho
change,
m [] [] [] [] [] [] [] [] [] [] [] [] [] [] [] [] [] [] [] [] []
_1_) pad controUsthe Preheat feature. The Preheat feature wHUbring the
or
oven
up
to temperature and then indicate when to pUacethe food in the oven. Use this feature when
recipes call for preheating. Preheating is not necessary when roasting or cooking
casseroles. The oven can be programmed to preheat at any temperature between 170°F to
550°F (77°C to 288°C).
To set the Preheattemperature on the Upper Oven for 350°F:
1. Arrangethe interioroven racks.
2. Press _) or _-_. (Note: To use the bwer oven instead of the
upper
oven, press _ or (_) at this time.)
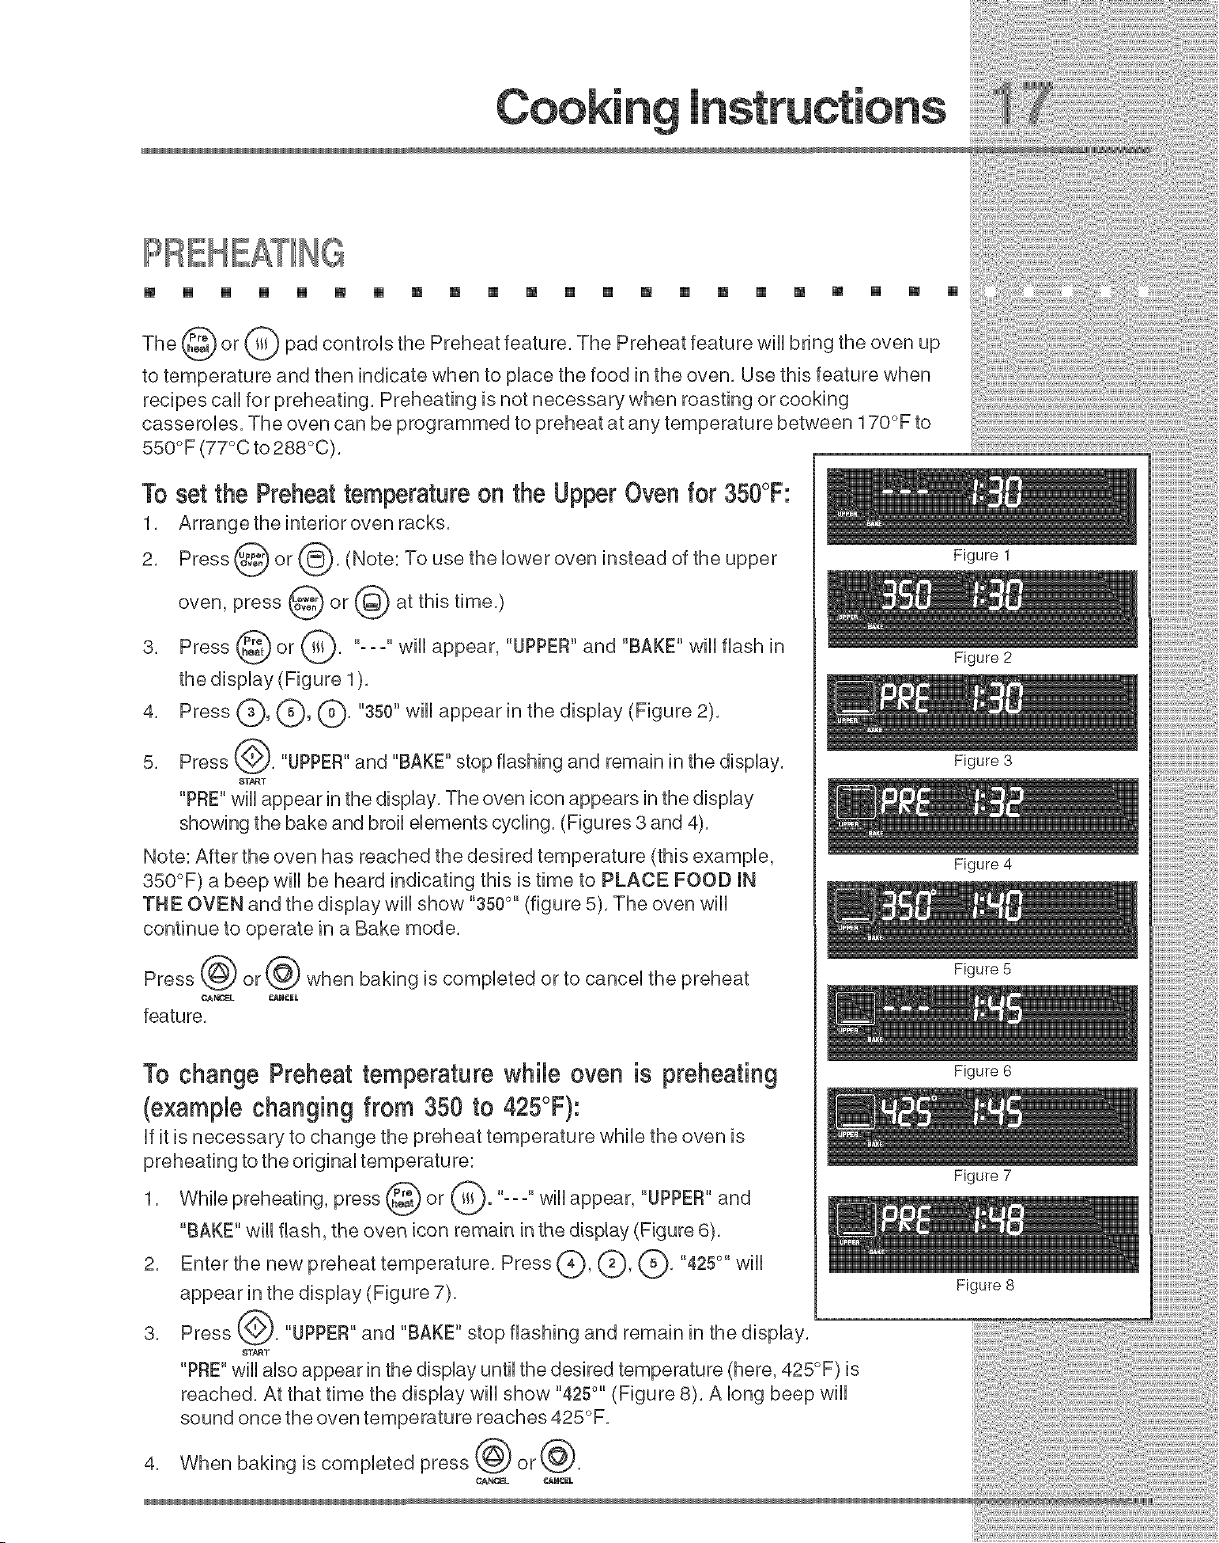
3. Press _ or _. "---" wHUappear, "UPPER"and "BAKE" wHUflash in
the dispUay (Figure 1).
4. Press C), (_, (_' "350" wHUappear in the display (Figure 2).
5. Press _,'). "UPPER"and "BAKE" stop flashing and remain in the dispUay.
8T_T
"PRE"wHUappear in the dispUay.The oven icon appears in the dispUay
showing the bake and broil elements cycling. (Figures 3 and 4).
Note: After the oven has reached the desired temperature (this example,
350°F) a beep will be heard indicating this is time to PLACE FOOD IN
THE OVEN and the display will show "350°" (figure 5). The oven will
continue to operate in a Bake mode.
Press @ or @ when baking is completed or to cancel the preheat
feature.
To change Preheat temperature while oven is preheating
(example changing from 350 to 425°F}:
If it is necessary to change the preheat temperature while the oven is
preheating to the original temperatu re:
1. While preheating, press I ). ''o. o"will appear, "UPPER"and
"BAKE" will flash, the oven icon remain in the display (Figure 6).
2. Enter the new preheat temperature. Press (?), (_, Q. "4250`'will
appear in the display (Figure 7).
3. Press (.,_. "UPPER"and "BAKE" stop flashing and remain in the display.
_T_T
"PRE"will also appear in the display until the desired temperature (here, 425°F) is
reached. At that time the display will show "4250``(Figure 8). A long beep will
sound once the oven temperature reaches 425°F.
4. When baking is completed press _ or_.
GA_OEL O_NCEL
Figure 1
Figure 2
Figure 3
Figure 4
Figure S
Figure 6
Figure 7
Figure 8
[] [] [] [] [] [] [] [] [] [] [] [] [] [] [] [] [] [] [] [] [] []
Figure 1
Figure 2
Figure 3
Figure 4
Figure 5
The _) or (Q) pad controls normal baking, if preheating is necessary, refer to the Preheat
Feature for instructions, The oven can be programmed to bake at any temperature from 170 °
F to 550 ° F (77°C to 288°C),
To set the Bake Temperature to 350°F on the Upper Oven:
1, Arrange interior oven racks and place food in oven,
2, Press @ or @, (Note: To use the lower oven instead of the upper
oven, press @ or @ at this time,)
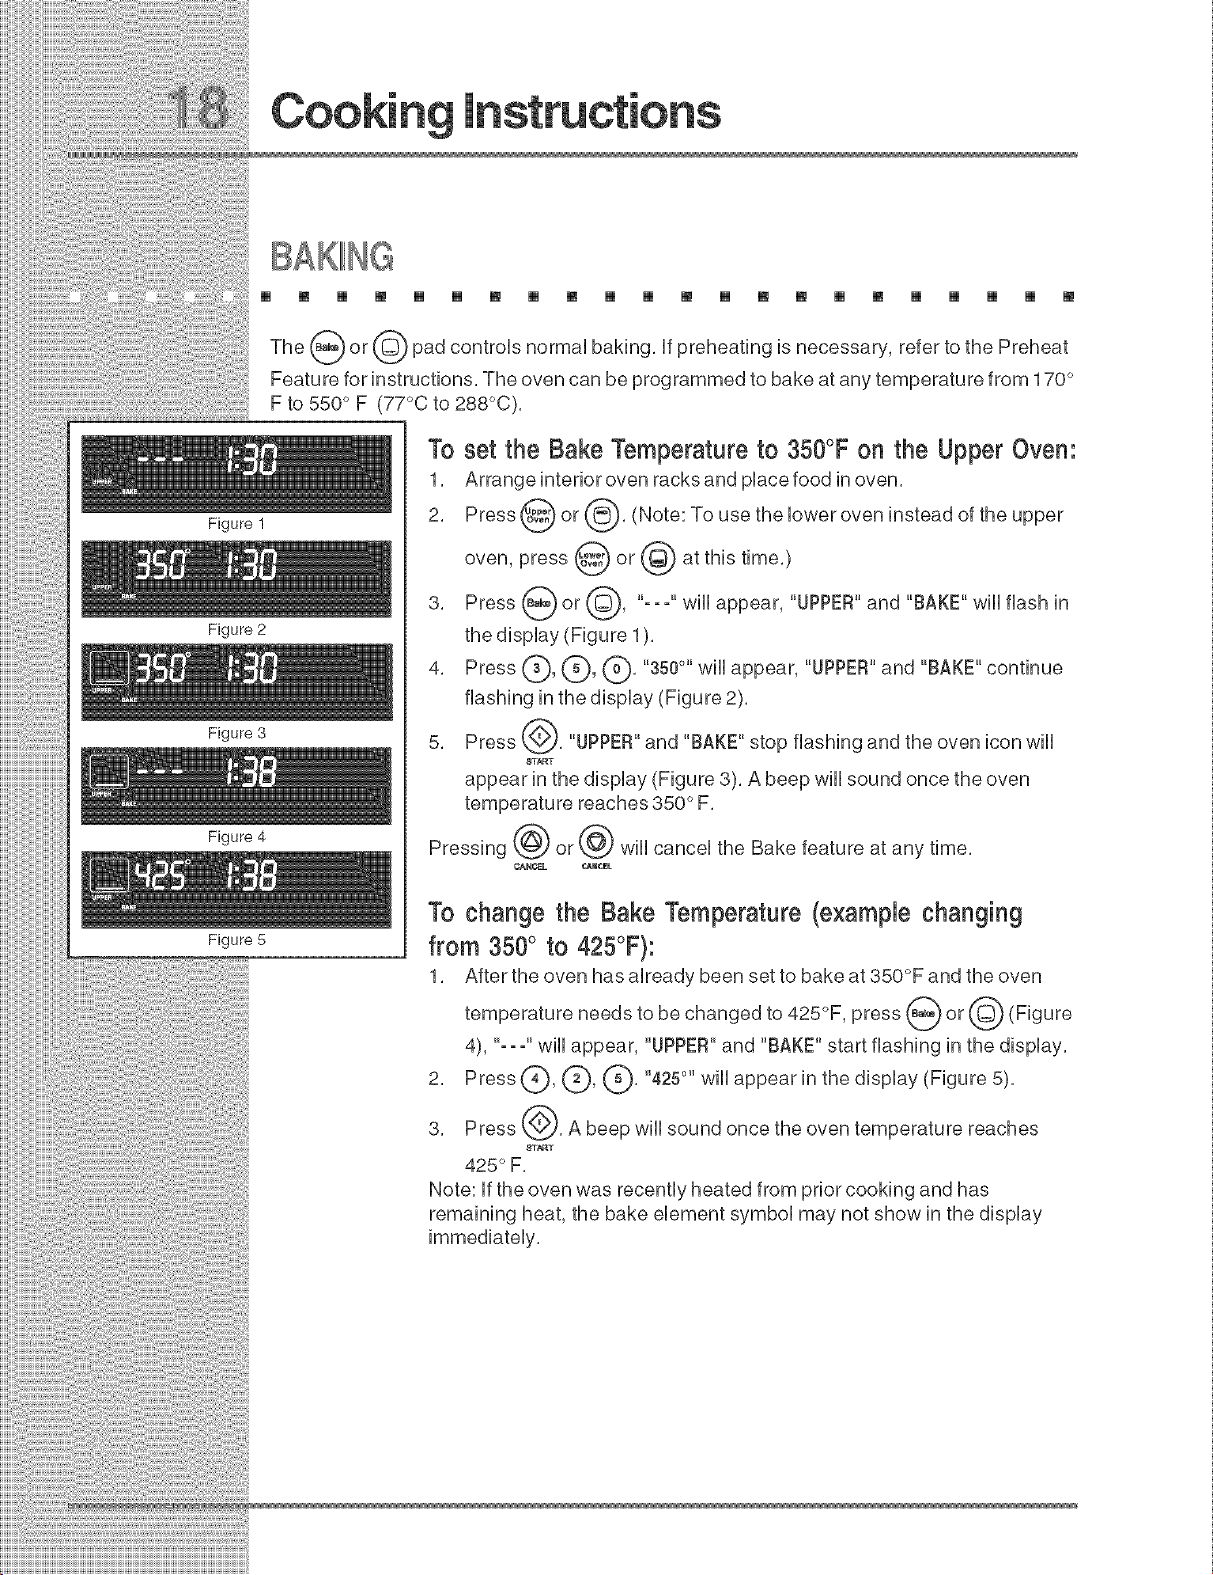
3, Press _ or @, "-- -" wiii appear, "UPPER"and "BAKE" wiii flash in
the display (Figure 1),
4, Press (_, (_, (_), "350°" wiii appear, "UPPER"and "BAKE" continue
flashing in the display (Figure 2),
5, Press @, "UPPER"and "BAKE" stop flashing and the oven icon will
8T_T
appear in the display (Figure 3), A beep will sound once the oven
temperature reaches 850 ° F,
Pressing @ or @ will cancel the Bake feature at any time,
¢AN_ CAR¢_L
To change the Bake Temperature (example changing
from 350° to 425°F):
1, After the oven has already been set to bake at 350°F and the oven
temperature needs to be changed to 425°F, press _ or @ (Figure
4), "- - -" will appear, "UPPER"and "BAKE" start flashing in the display,
2, Press (_, C), (_' "425°" will appear in the
display (Figure 5),
3, Press @, A beep will sound once the oven temperature reaches
8T_T
425 ° F,
Note: if the oven was recently heated from prior cooking and has
remaining heat, the bake element symbol may not show in the display
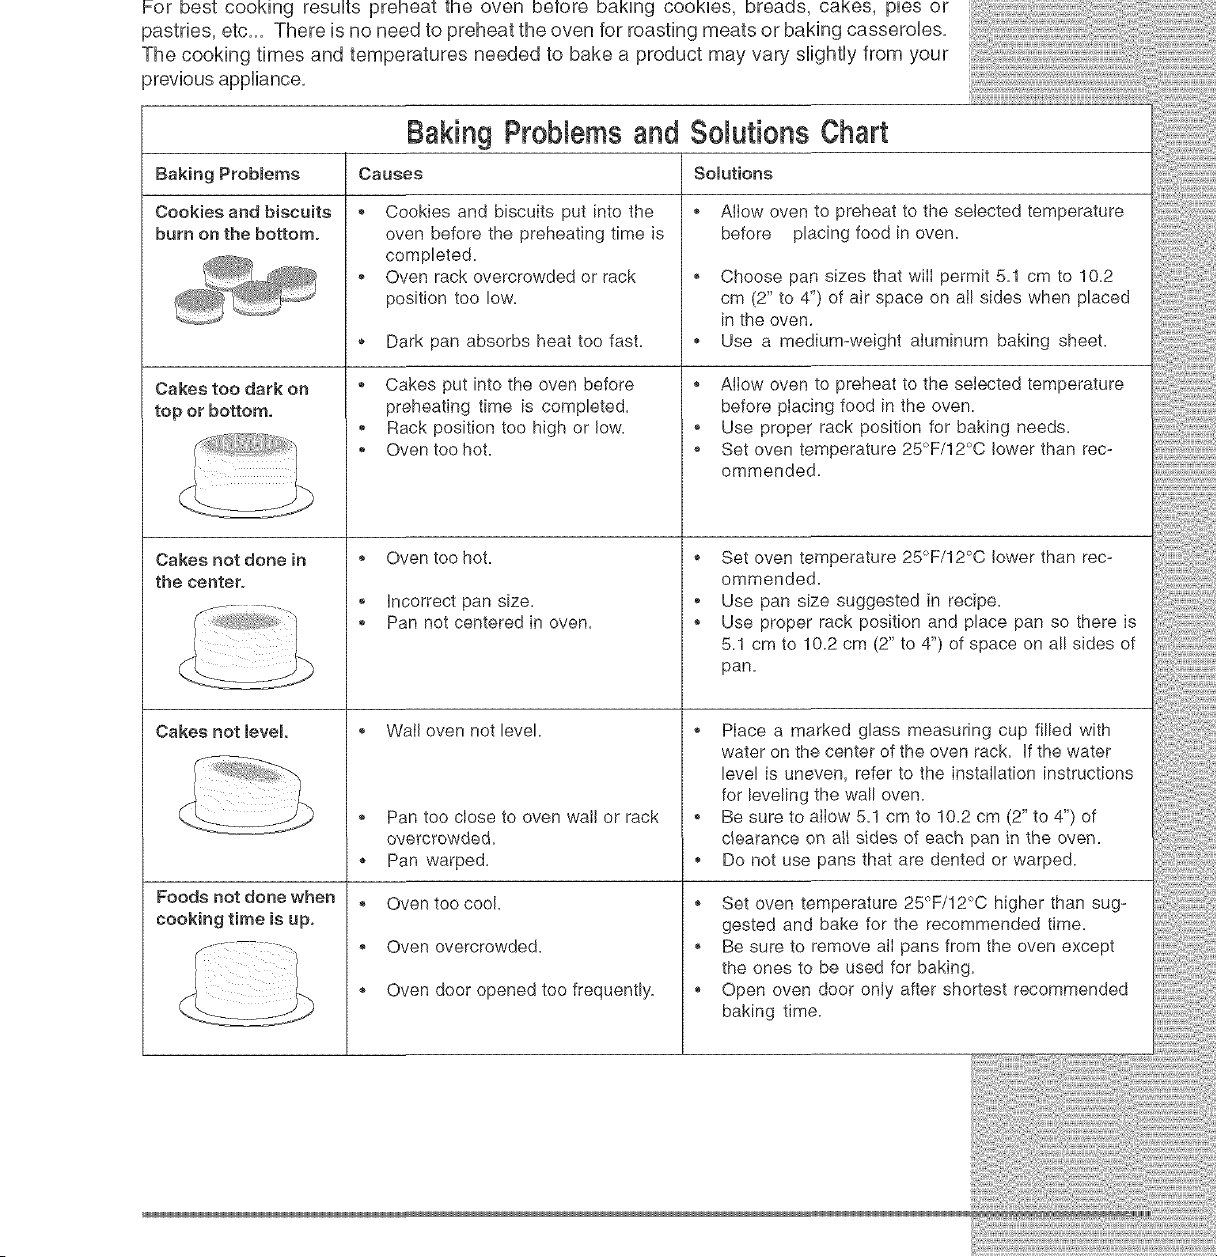
Forbestcookingresultspreheattheovenbetorebakingcookies,breads,cakes,piesor
pastries,etc,,,Thereisnoneedtopreheattheovenforroastingmeatsorbakingcasseroles,
Thecookingtimesandtemperaturesneededto bakea productmayvaryslightlyfromyour
previousappliance,
Baking Probmems
Cookies and biscuits
burn on the bottom°
Cakes too dark on
top or bottom,
Cakes not done in
the center°
Cakes not level
Foods not done when
cooking time is up.
Causes
®
Baking Probbms and Somutions Chart
Somutions
Cookies and biscuits put into the
oven before the preheating time is
completed.
Oven rack overcrowded or rack
position too low.
,, Dark pan absorbs heat too fast.
_, Cakes put into the oven before
preheating time is completed.
,, Rack position too high or low.
,, Oven too hot.
_, Oven too hot.
,, incorrect pan size.
_, Pan not centered in oven.
_, Wail oven not level.
_, Pan too close to oven wail or rack
overcrowded.
,, Pan warped.
, Oven too cool.
,, Oven overcrowded.
_, Oven door opened too frequently.
_, Allow oven to preheat to the selected temperature
before placing food in oven.
,, Choose pan sizes that wilI permit 5.1 cm to 10.2
cm (2" to 4") of air space on all sides when placed
in the oven,
,, Use a medium-weight aluminum baking sheet.
_, Allow oven to preheat to the selected temperature
before placing food in the oven.
,, Use proper rack position for baking needs.
,, Set oven temperature 25°F/12°C lower than rec-
ommended.
_, Set oven temperature 25°F/12°C lower than rec-
ommended.
,, Use pan size suggested in recipe.
_, Use proper rack position and place pan so there is
5.1 cm to 10.2 cm (2" to 4") of space on all sides of
pan.
_, Place a marked glass measuring cup filled with
water on the center of the oven rack. if the water
level is uneven, refer to the installation instructions
for leveling the wall oven.
_, Be sure to allow 5.1 cm to 10.2 cm (2" to 4") of
c_earance on a_Isides of each pan in the oven.
,, Do not use pans that are dented or warped.
_, Set oven temperature 25°F/12°C higher than sug-
gested and bake for the recommended time.
,, Be sure to remove alI pans from the oven except
the ones to be used for baking.
_, Open oven door only after shortest recommended
baking time.

CONVECTIONBAKING
[] [] [] [] [] [] [] [] [] [] [] [] [] [] [] [] [] [] [] [] [] []
Benefits of Convection Bake:
--Some foods cook up to 30% faster, saving time and
energy.
--Multiple rack baking.
--No special pans or bakeware needed.
Foodefor CONVECTION BAKE pad
*Decrease normam cook time by:
Frozen foods, pies .................. 15-25 %
pastries and pizza
Refrigerator biscuits ............... 15-30 %
Rolls & Breads ........................ 20-25%
Fresh Pies/Pastries ................ 10-20 %
Begin with the maximum reduction in cook times and
adjust as needed.
*Recommended reduction in cook times based on
brands of food items tested. Cook times may vary with
your specific brand of food item.
The convection oven uses a fan located in the rear wall of the
oven to circulate heated air around the food to be cooked, The
controlled air flow pattern quickly seals the food surface
retaining the natural juices and fiavour, This method of cooking
enables you to obtain the best culinary results when baking,
thawing, dehydrating and roasting foods,
Convection notes:
1, Batch cooking is more convenient with better results,
2, Defrosting is quicker in convection mode when compared to
regular radiant cooking,
3, Remember to use tested recipes with times adjusted for
convection baking/roasting when using the convection mode,
Times may be reduced by as much as 30% when using the
convection feature,
Setting Convection Bake
The _"
or pad controls the Convection Bake feature, Use the Convection Bake
feature when cooking speed is desired, The oven can be programmed for Convection baking
at any temperature between 170 ° F (77 ° C) to 550 ° F (288 ° C),
Convection baking uses a fan to circulate the oven's heat evenly and continuously within the
oven, This improved heat distribution allows for fast, even cooking and browning results, it
also gives better baking results when using 2 or 3 racks at the same time, Breads and
pastries brown more evenly, Most foods cooked in a standard oven will cook faster and
more evenly with Convection Bake,
General Convection Bake instructions
1, When using Convection Bake, decrease your normal cooking times as shown aside,
Adjust the cook time for desired doneness as needed, Time reductions will vary
depending on the amount and type of food to be cooked, Biscuits should be baked on
pans with no sides or very low sides to allow heated air to circulate around the food,
Food baked on pans with a dark finish will cook faster,
2, Preheating is not necessary when cooking casseroles with Convection Bake,
3, When using Convection Bake with a single rack, place oven rack in position 3, if
cooking on 2 racks, place the oven racks in positions 2 and 7, And to cook on 3 racks,
place the oven racks in positions 1,3 and 7,
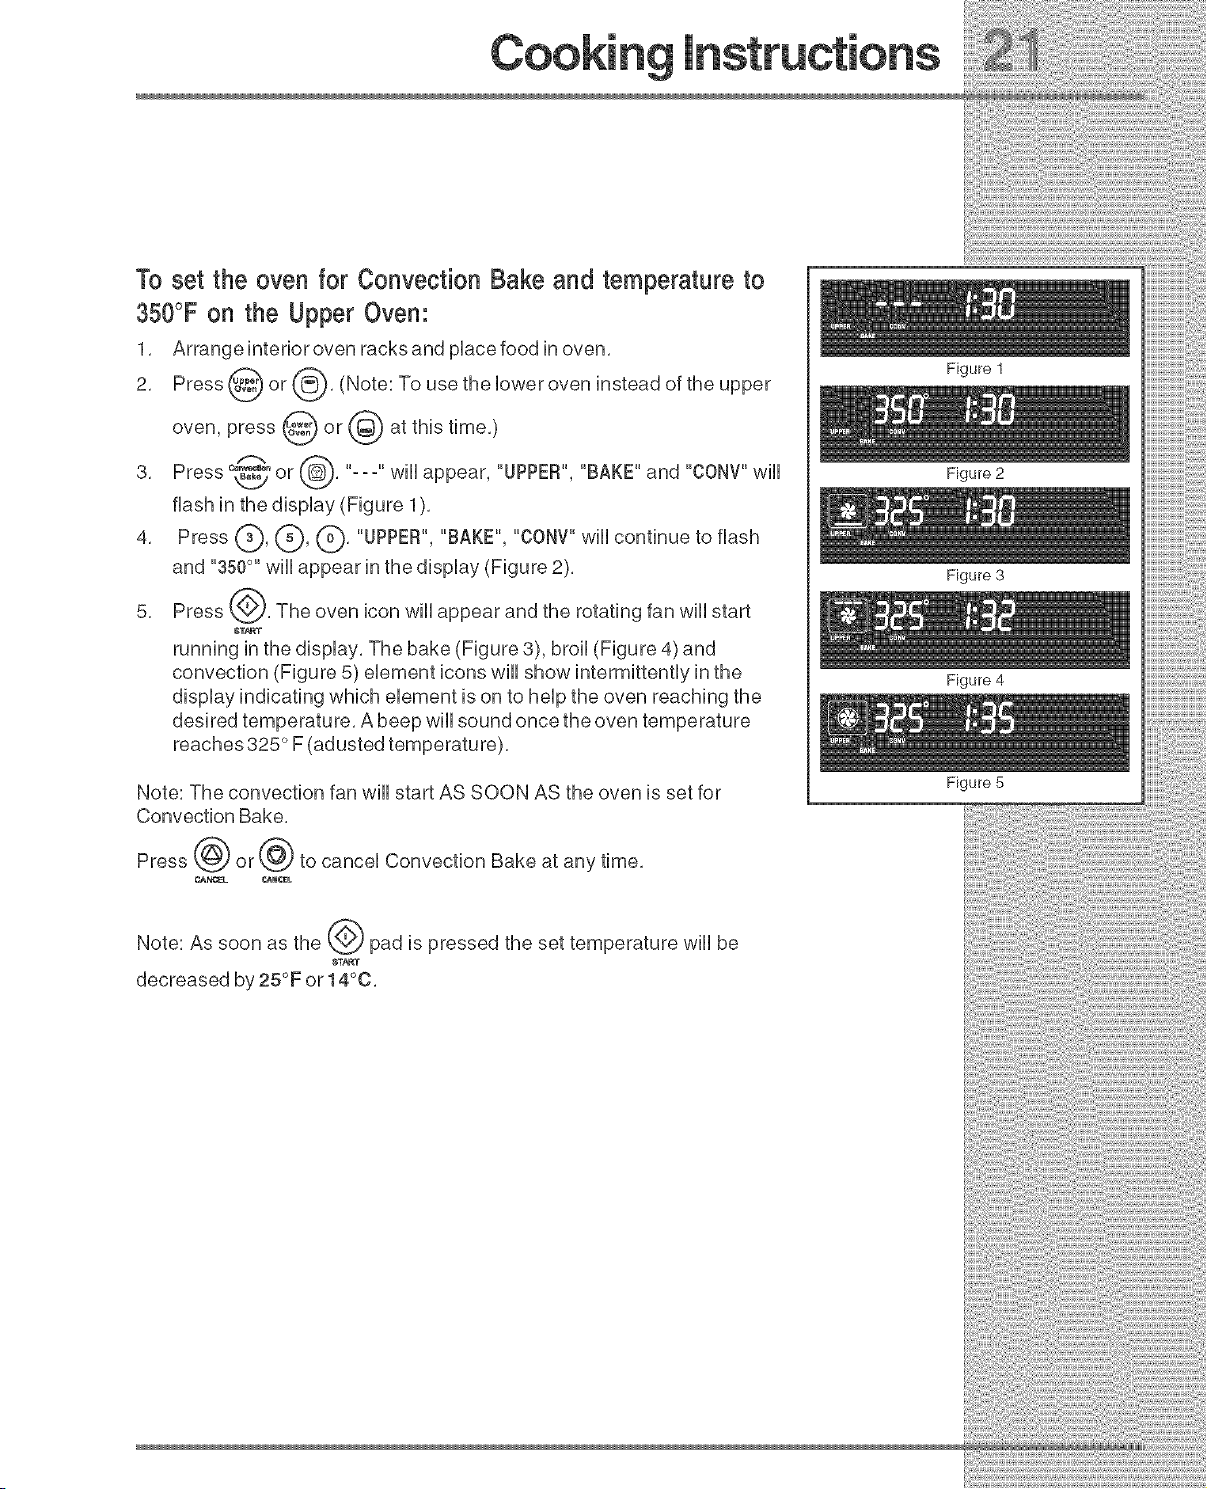
To set the oven for Convection Bake and temperature to
350°F on the Upper Oven:
1, Arrange interior oven racks and pUacefood in oven,
2, Press _ or 8' (Note: To use the Uoweroven instead of the
upper
oven, press @ or (_ at this time,)
3, Press _ or , "---" wHUappear, "UPPER", "BAKE" and "CONV"wHU
flash in the dispUay (Figure 1),
4, Press (_, (_), (_, "UPPER", "BAKE", "CONV"wHUcontinue to flash
and "350°'' wHUappear in the dispUay (Figure 2),
5, Press ___, The oven icon wHUappear and the rotating fan wHUstart
8T_T
running in the dispUay,The bake (Figure 3), broil (Figure 4) and
convection (Figure 5) eUement icons wHUshow intermittentUy in the
dispUay indicating which element is on to help the oven reaching the
desired temperature, A beep will sound once the oven temperature
reaches 325 ° F (adusted temperature),
Note: The convection fan will start AS SOON AS the oven is set for
Convection Bake,
Press @ or@ to cancel Convection Bake at any time,
Note: As soon as the (_ pad is pressed the set temperature will be
$T_T
decreased by 25°F or 14°0,
Figure 1
Figure 2
Figure 3
Figure 4
Figure 5

CONVECTIONROASTING
m [] [] [] [] [] [] [] [] [] [] [] [] [] [] [] [] [] [] [] [] []
Roasting
Rack
Broiler Pan
Figure 1
Figure2
Figure3
Figure4
When preparing meats for convection roasting, use the broiler pan and insert
along with the roasting rack, The broiler pan wiii catch grease spills and the
insert will help prevent spatters, The roasting rack will allow the heat to
circulate around the meat,
To prevent food from contacting the broil element and to
prevent grease spattering, DO NOT use the roasting rack when broiling,
1, Place oven rack on bottom rack position,
2, Place the insert in the broiler pan, The roasting rack fits on the insert
allowing the heated ai rci rculate under the food for even cooking and helps
to increase browning on the underside, Make sure the roasting rack is
securely seated on the insert in the broiler pan, DO NOT use the broiler
pan without the insert or cover the broiler pan insert with aluminum foil,
3, Position food (fat side up) on the roasting rack,
4, Place the broiler pan on the oven rack,
Note: Always pull the rack out to the stop position before removing food,
NOTE: For best convection roasting results, use the broiler pan,broiler pan
insert and roasting rack,
Setting Convection Roast
The _ or pad controls the Convection Roast feature, The oven can be programmed
to Convection Roast at any temperature between 170°F (77°C) to 550°F (288°C) (The
example below is for 350°F),
Figure 5
To Setthe Upper Ovento Convection Roast and Temperature
to 350°F:
1, Arrange interior oven racks and pUacefood in oven,
2, Press @ or @, (Note: To use the bwer oven instead of the upper
oven, press @ or @ at this time,)
3, Press _ or_, --- will appearand UPPER, ROAST and "CONV"will
flash in the display ( Figure 1),
4, Press C:)' (_' (_' "350°" wiii appear in the display (Figure 2),
5, Press @, "UPPER","ROAST"and "CONV"will stop flashing and the oven
ST_T
icon wiii appear in the display, The bake (Figure 3) and broil (Figu re4) and
convection (Figure 5) element icons will show intermittentlyin the display
indicating which element is on, A beep wiii sound when the desired
temperatu re is reached,
6, Press @ or @ to cancel convection roast at any time,
,oo,roc,,oos,Ii,i
iiii{i_t{i_ili}_il
SE_NG CONV T_ONCONVERTATU
[] _ ,, [] [] [] _ [] _ _ [] _ _ [] , [] _ [] [] _ [] _
m oso y oo oon,,ooton
baking. When set properly this feature is designed to display the actual converted (reduced)
temperature in display,
•
Convect on Convert may ONLY be used w th a Bake T reed Bake or a De ay Start (De°
ayed T med Bake) sett ng When used w th a T med Bake or a De ayed T reed Bake sett ng
the Convection Convert feature will display a "OF' for check food when the bake time is
approximately 75% complete. At this time the oven control will sound 3 long beeps at regular
intervals (if the cook time is programmed to a duration greater than 19 minutes) until baking
s f n shed When the bake t me has compete y f n shed the contro w l d sp ay End and
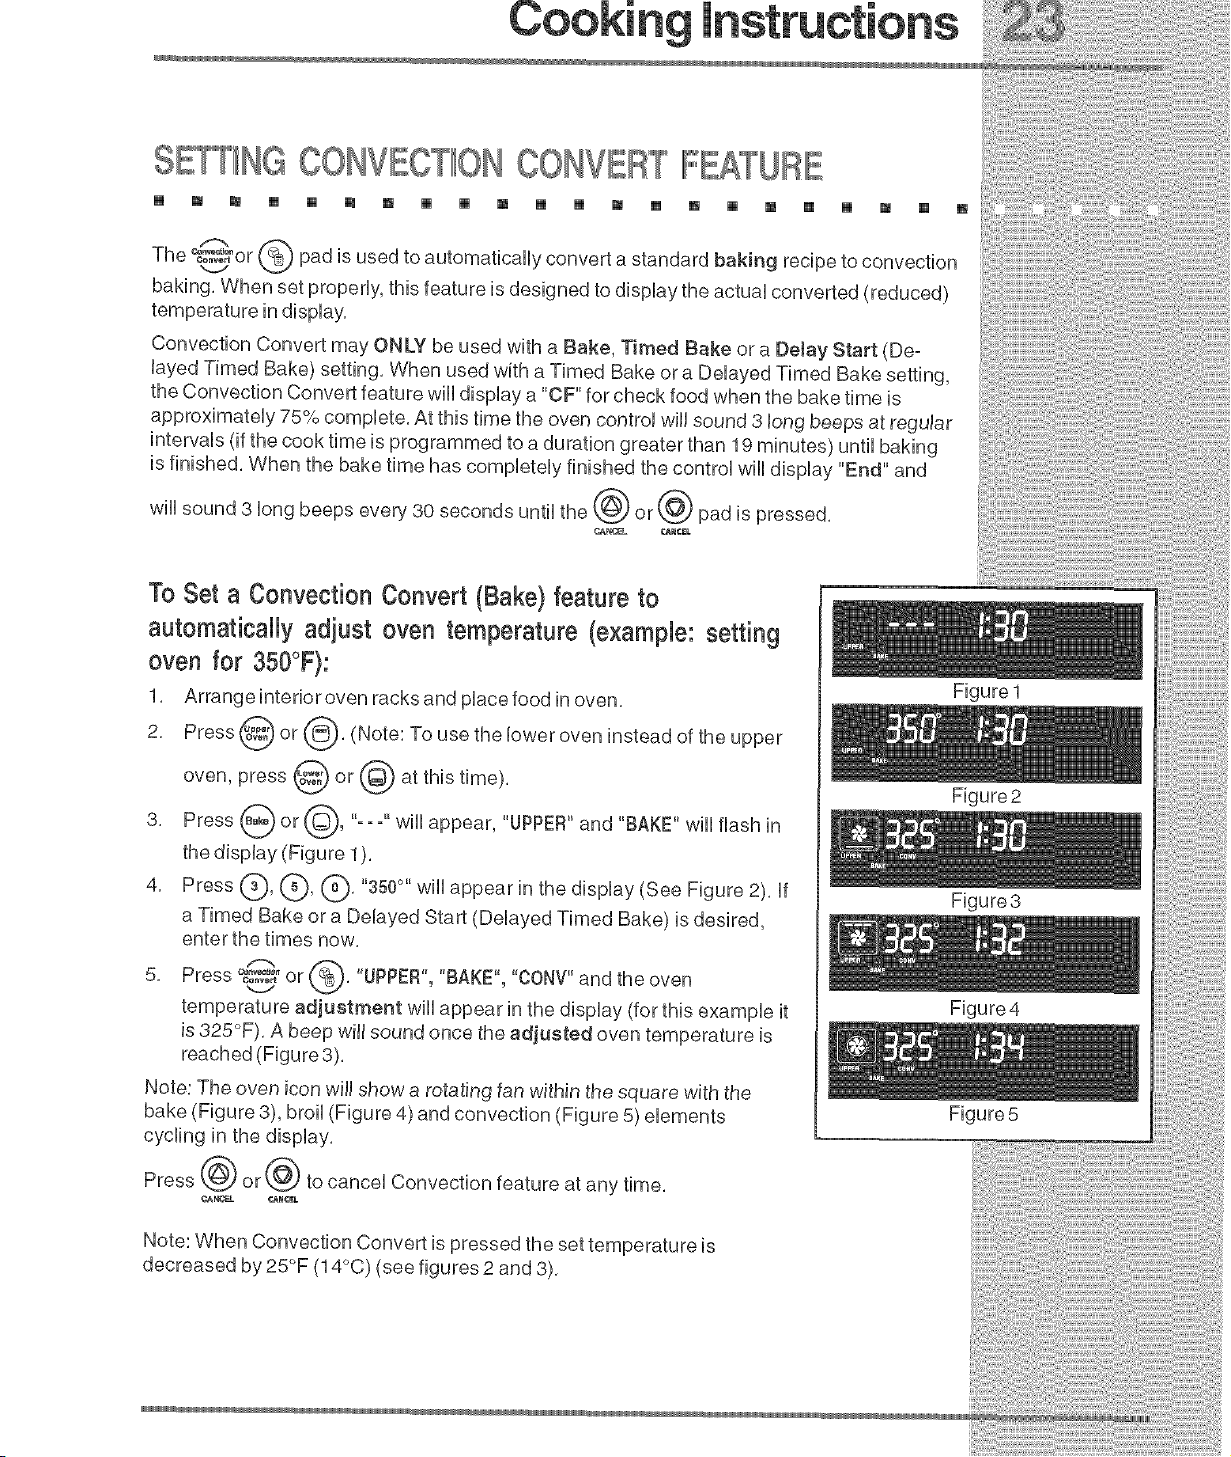
To Set a Convection Convert (Bake) feature to
automatically adiust oven temperature (example: setting
oven for 350°F):
1. Arrange interior oven racks and place food in oven,
2. Press @ or @, (Note: To use the lower oven instead of the
upper
oven, press @ or @ at this time).
3, Press _ or @0 "-- -" wEE[appear, "UPPER"and "BAKE" wile flash [n
the display (Figure 1).
4. Press (_), (_, @, "350°" will appear in the display (See Figure 2t, If
a Timed Bake or a Delayed Start (Delayed Timed Bake) is desired,
enter the times now.
_- ®
5..... o..... or . "UPPER","BAKE", "CONV"and the oven
v
temperature adjustment will appear in the display (for this example it
is 325°F). A beep will sound once the adjusted oven temperature is
reached (Figure 3).
Note: The oven icon will show a rotating fan within the square with the
bake (Figure 3), broil (Figure 4) and convection (Figure 5) elements
cycling in the display.
Press ('@ or _') to cancel Convection feature at any time.
¢AKtC_L #.t_NCEL
Figure 1
Figure2
Figure3
Figure4
Figure 5
_!_!il;@!i!iii!ii!i!i!i_!ii!i_!ii!i_!ii!iii
@ilili_!!!i_ii!!iiii!iii!i!!i!iiiiiiil
Note: When Convection Convert is pressed the set temperature is
decreased by 25°F (14°C) (see figures 2 and 3).
S 'NHGBELAY BAKEORBE Y OOHVEOTION
BAKEORBELAY OONVEOTIOHROAST
[] [] [] [] [] [] [] [] [] [] [] [] [] [] [] [] [] [] [] [] []
Figure 1
Figure 2
Figure 3
Figure 4
Figure 5
Figure 6
_° @ or @ and @)pads control the TimedThe (_ or ,_t/or ,_ and @(@or
Bake feature, The automatic timer of the Delayed Bake feature will turn the oven on at the
time you select in advance, NOTE: if your clock is set for normal 12 hour display mode the
Delayed Time Bake feature can never be set to start more than 12 hours in advance,
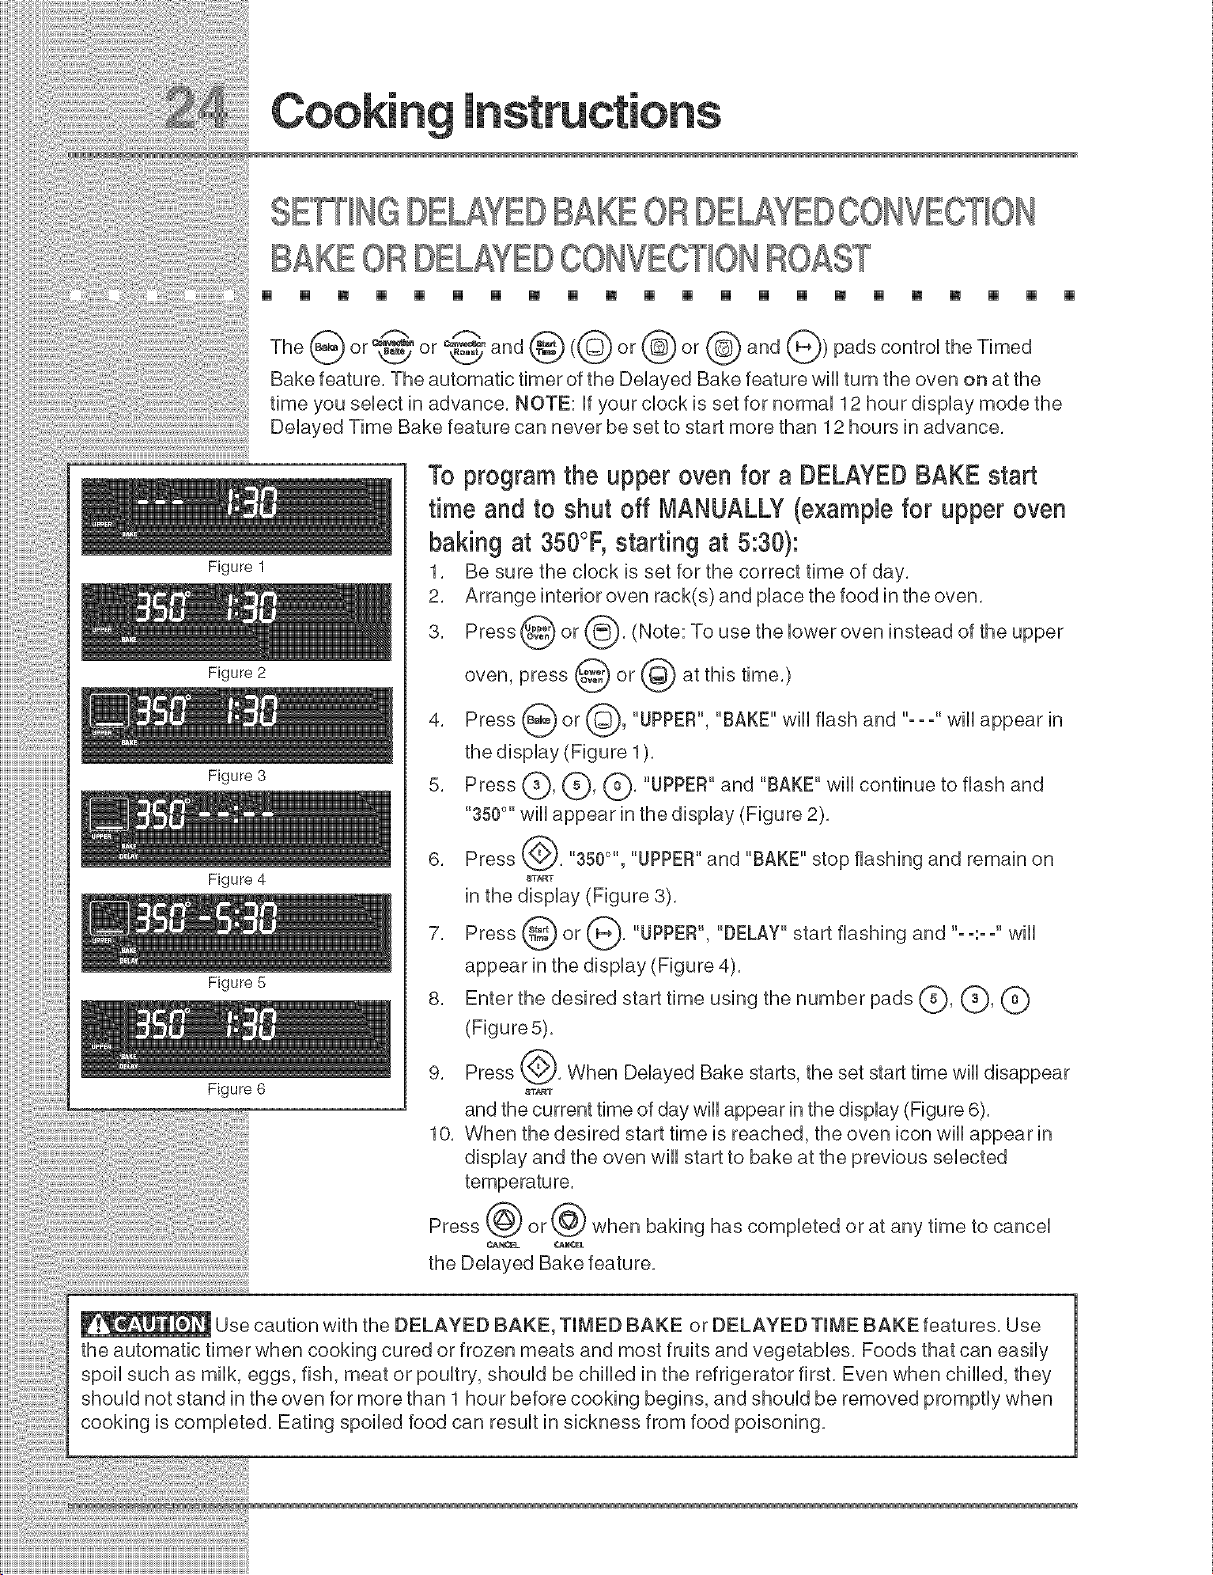
To program the upper oven for a DELAYEDBAKE start
time and to shut off MANUALLY (example for upper oven
baking at 350°F, starting at 5:30):
1. Be sure the clock is set for the correct time of day.
2. Arrange interior oven rack(s) and place the food in the oven.
3. Press @ or @. (Note: To use the lower oven instead of the
upper
oven, press @ or @ at this time.)
4. Press _ or @, "UPPER", "BAKE" wiii flash and "==="wiii appear in
the display (Figure 1).
5. Press ___a_'__L-_'(_' "UPPER" and "BAKE" wiii continue to flash and
"350°" will appear in the display (Figure 2).
6. Press @. "350°'', "UPPER"and "BAKE" stop flashing and remain on
8T_T
in the display (Figure 3).
7. Press @ or _'_}. "UPPER", "DELAY" start flashing and "--:--" will
appear in the display (Figure 4).
8. Enter the desired start time using the number pads k_, G, (_')
(Figure 5).
9. Press @. When Delayed Bake starts, the set start time will disappear
8T_T
and the current time of day will appear in the display (Figure 6).
10. When the desired start time is reached, the oven icon will appear in
display and the oven will start to bake at the previous selected
Press @ or @ when baking has completed or at any time to cancel
the Delayed Bake feature.
Use caution with the DELAYED BAKE, TIMED BAKE or DELAYED TIME BAKE features. Use
the automatic timer when cooking cured or frozen meats and most fruits and vegetables. Foods that can easily
spoil such as milk, eggs, fish, meat or poultry, should be chilled in the refrigerator first. Even when chilled, they
should not stand in the oven for more than 1 hour before cooking begins, and should be removed promptly when
cooking is completed. Eating spoiled food can result in sickness from food poisoning.
SETTINGTIMERBAKE ORTIMERCONVECTIONBAKE
ORTIMERCONVECTIONROAST
m [] [] [] [] [] [] [] [] [] [] [] [] [] [] [] [] [] [] [] [] []
TheGoor °8°and@<©or@or@and@>padscontro,theT,med
Bake feature, The automatic timer of the Timed Bake feature wHUturn the oven OFF after
cooking for the desired amount of time you seUectin advance,
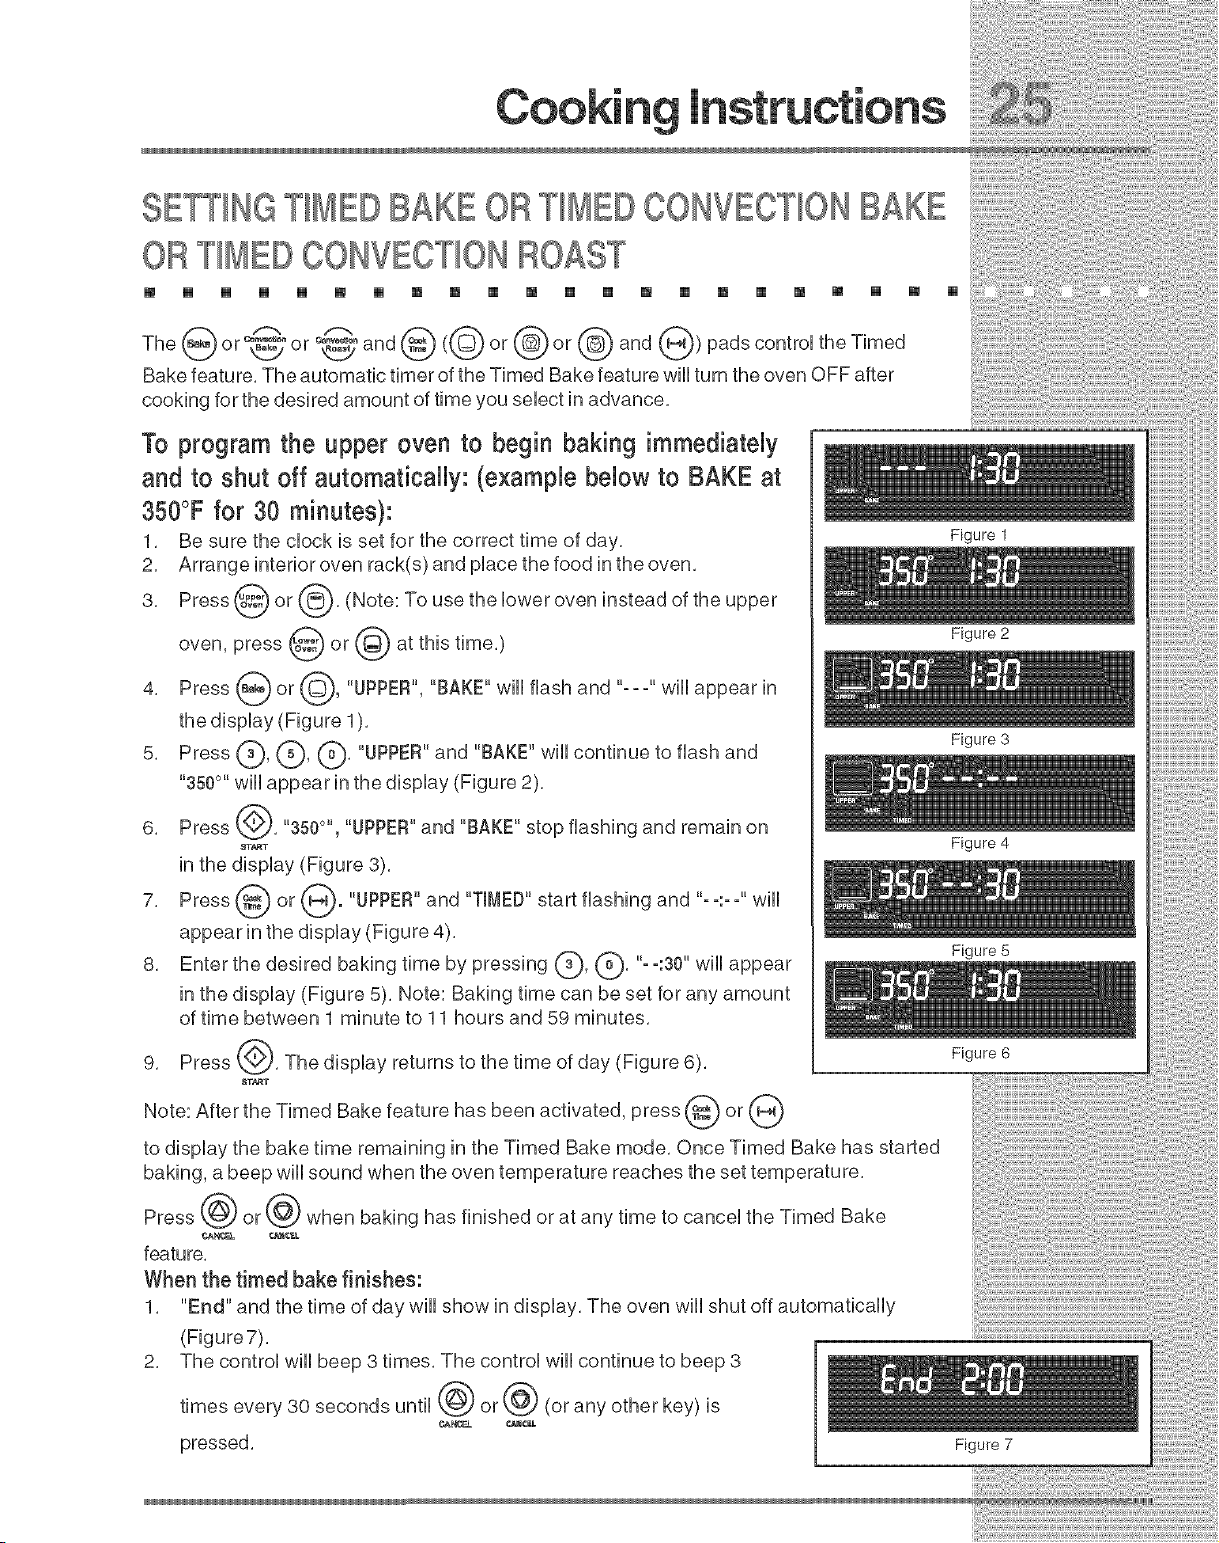
To program the upper oven to begin baking immediately
and to shut off automatically: (example below to BAKE at
350°F for 30 minutes}:
1, Be sure the dock is set for the correct time of day,
2, Arrange interior oven rack(s) and pUacethe food in the oven,
3, Press @ or (_, (Note: To use the Uower oven instead of the
upper
oven, press @ or (_ at this time,)
4. Press _ or @, "UPPER", "BAKE" will flash and "---" will appear in
the display (Figure 1).
5, Press (_, L_, (_, "UPPER"and "BAKE" will continue to flash and
"350°" will appear in the display (Figure 2),
6, Press _, "350°'', "UPPER"and "BAKE" stop flashing and remain on
8TA_T
in the display (Figure 3),
7, Press _ or _. "UPPER" and "TIMED" start flashing and .....--.-- will
appear in the display (Figure 4),
8, Enter the desired baking time by pressing (_), (Q, "-°:30" will
appear
in the display (Figure 5), Note: Baking time can be set for any amount
of time between 1 minute to 11 hours and 59 minutes,
9, Press (_), The display returns to the time of day (Figure 6),
_TA_T
Note: After the Timed Bake feature has been activated, press @ or (_
to display the bake time remaining in the Timed Bake mode, Once Timed Bake has started
baking, a beep will sound when the oven temperature reaches the set temperature,
Press @ or @ when baking has finished or at any time to cancel the Timed Bake
feature,
When the timed bake finishes:
1, "End" and the time of day will show in display, The oven will shut off automatically
(Figure7),
2, The control will beep 3 times, The control will continue to beep 3
times every 30 seconds until _ or @ (or any other key) is
pressed,
Figure 1
Figure 2
Figure 3
Figure 4
Figure 5
Figure 6
Figure 7
SET[_NGDE_YD T_MEDBAKE OB DE_YED T_MD
CONVECT_OHBAKE OB DE_¥D T_MD CONVECT_OHBOAST
m [] [] [] [] [] [] [] [] [] [] [] [] [] [] [] [] [] [] [] [] []
Figure 1
Figure 2
Figure 3
Figure 4
Figure 5
@ ,-.@ @@ @ @@ ®
_r,v_4i_l @an_a_n
The or 'LCY or ',titS' and ( or or , and ) pads control the
Delayed Time Bake feature, The automatic timer of the Delayed Time Bake will turn the
oven on and off at the time you select in advance, NOTE: if your clock is set for normal 12
hour display mode the Delayed Time Bake feature can never be set to start more than 12
hours in advance,
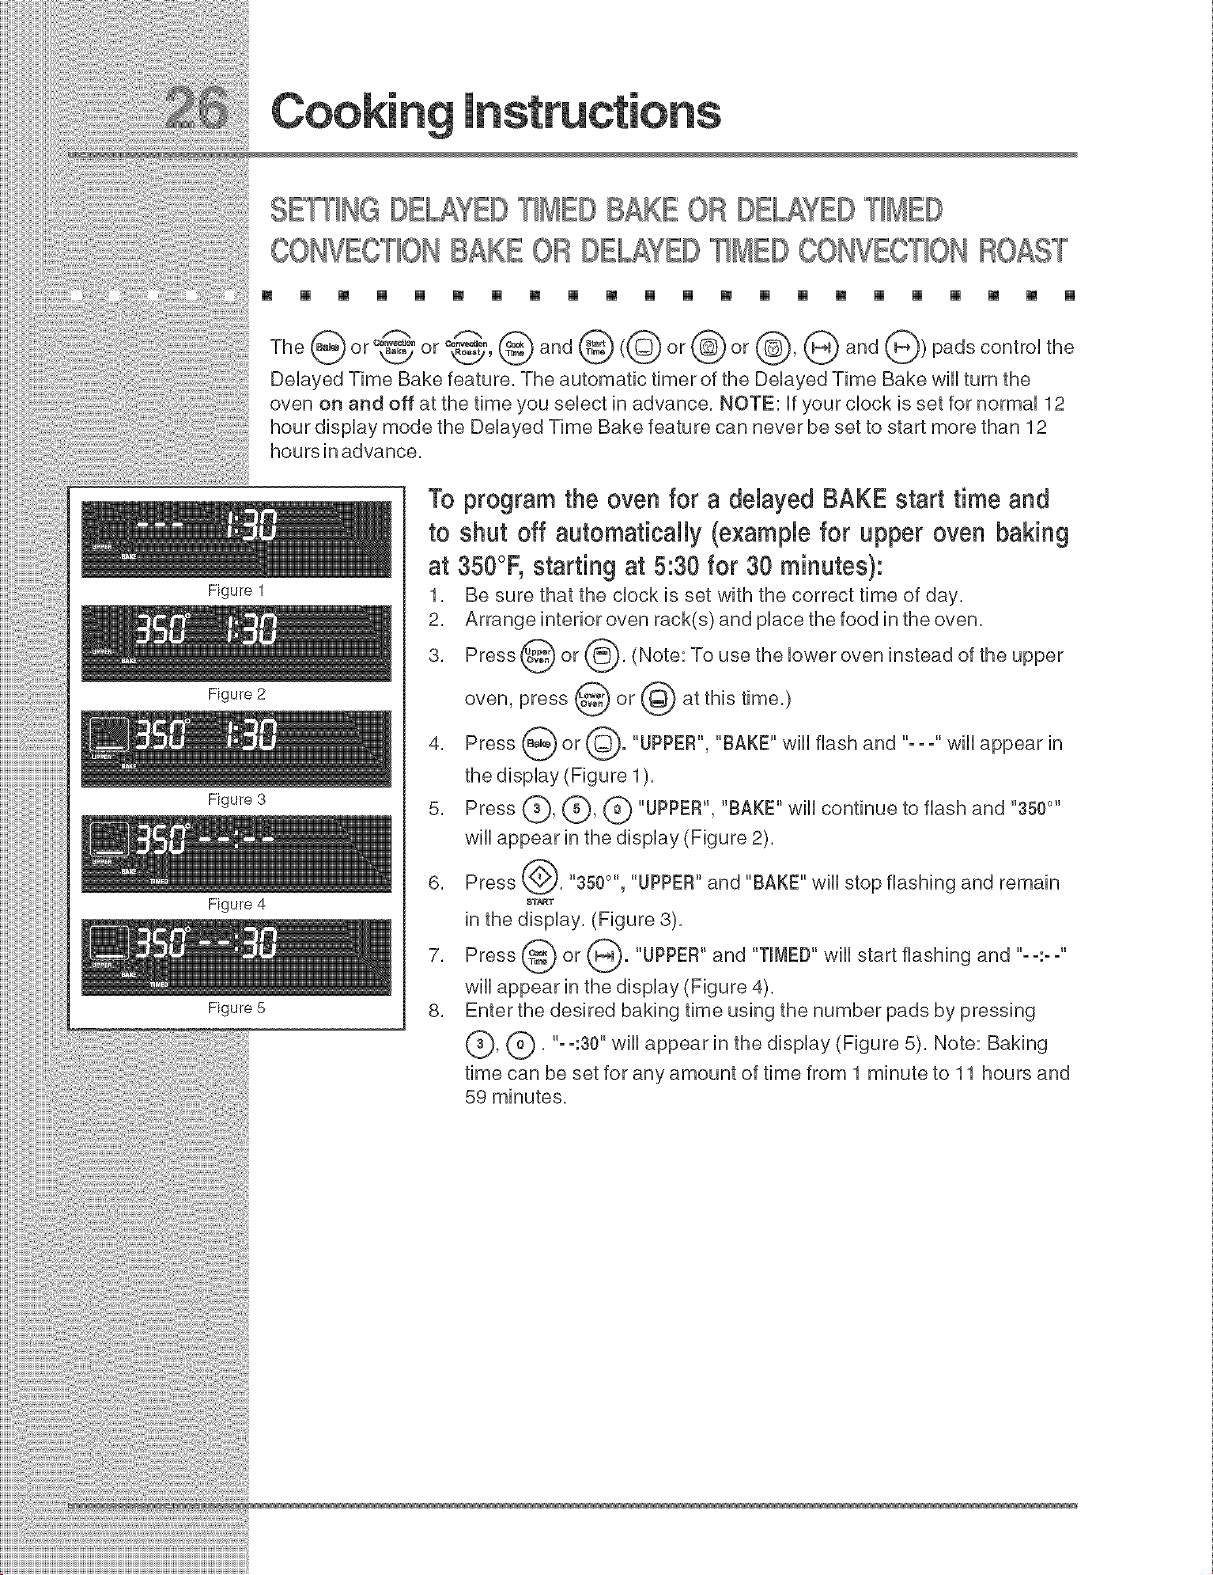
To program the oven for a delayed BAKE start time and
to shut off automatically (example for upper oven baking
at 350°F, starting at 5:30 for 30 minutes):
1, Be sure that the clock is set with the correct time of day,
2, Arrange interior oven rack(s) and place the food in the oven,
3, Press @ or @, (Note: To use the lower oven instead of the
upper
oven, press @ or @ at this time,)
4, Press @ or @. "UPPER", "BAKE" wiii flash and "---" wiii appear in
the display (Figure 1),
5, Press (_), (_), (_ "UPPER", "BAKE" will continue to flash and "3500`'
will appear in the display (Figure 2),
6, Press @, "350°", "UPPER"and "BAKE" will stop flashing and remain
$T_T
in the display, (Figure 3),
7, Press @ or @. "UPPER" and "TIMED"will start flashing and "--:--"
will appear in the display (Figure 4),
8, Enter the desired baking time using the number pads by pressing
(_, (_), "- °:30" will appear in the display (Figure 5), Note: Baking
time can be set for any amount of time from 1 minute to 11 hours and
59 minutes.
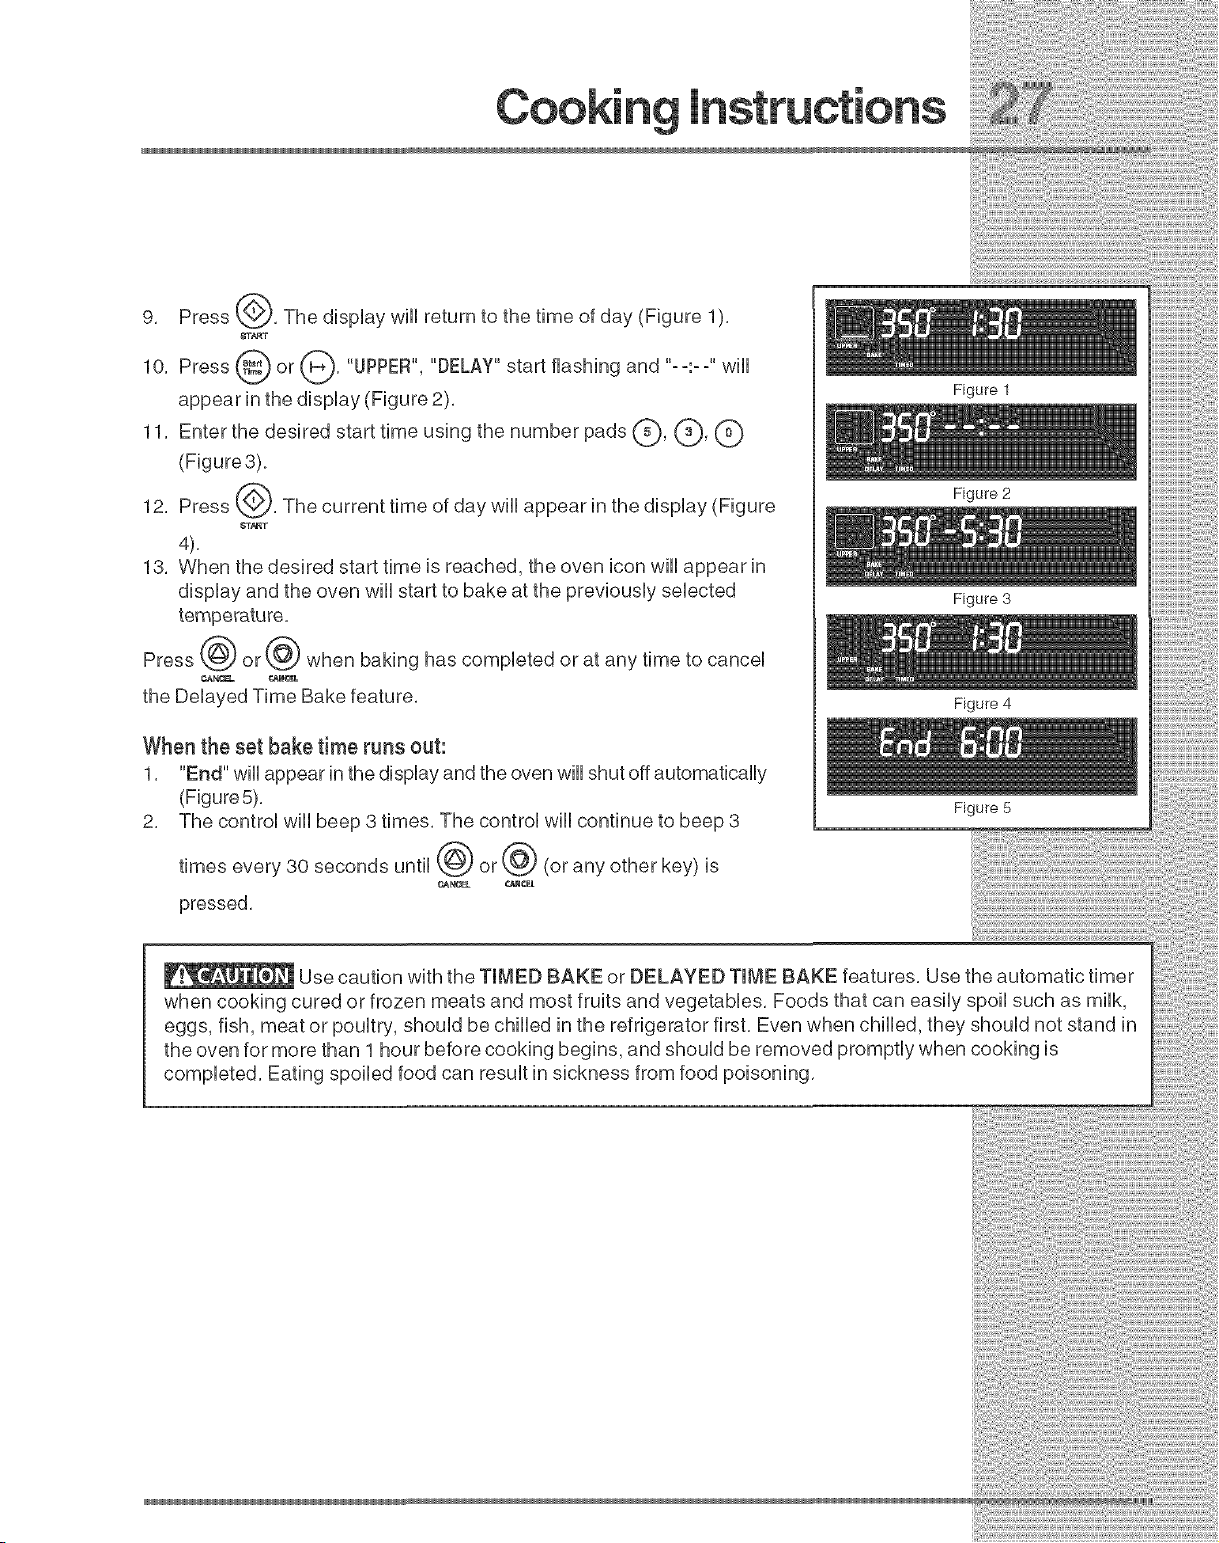
9. Press_. ThedispUaywHnreturntothetimeofday(Figure1).
8T_T
10. Press _ or _. "UPPER", "DELAY" start flashing and .....--.-- wHU
appear in the dispUay (Figure 2).
11. Enter the desired start time using the number pads (_, (_, G
(Figure3),
12. Press _,_. The current time of day wHUappear in the dispUay (Figure
_F_T
4).
13. When the desired start time is reached, the oven icon wHUappear in
dispUayand the even wHUstart to bake at the previousUy seUected
Press @ or @ when baking has compUeted or at any time to canceU
¢,AN¢!_. ¢._NCEL
the DeUayed Time Bake feature,
When the set bake time runs out:
1. "End" wHUappear in the dispUayand the oven will shut off automatically
(Figure 5).
2. The control will beep 3 times. The control will continue to beep 3
times every 30 seconds until _ or _ (or any other key) is
pressed.
Figure 1
Figure 2
Figure 3
Figure 4
Figure 5
Use caution with the TIMED BAKE or DELAYED TIME BAKE features. Use the automatic timer
when cooking cured or frozen meats and most fruits and vegetables. Foods that can easily spoil such as milk,
eggs, fish, meat or poultry, should be chilled in the refrigerator first. Even when chilled, they should not stand in
the oven for more than 1 hour before cooking begins, and should be removed promptly when cooking is
completed. Eating spoiled food can result in sickness from food poisoning,
SE THE K lIPWARM IIFEATU
[] [] [] [] [] [] [] [] [] [] [] [] [] [] [] [] [] [] [] [] [] []
Figure 1
The _St_ or ((_) pad turns ON the Keep Warm feature and wiii maintain
an oven
temperature of 170°F (77°C), The Keep Warm Hold feature will keep oven baked foods warm
for serving up to 8 hours after cooking has finished, The Warm & Hold feature will
automatically turn OFF after 3 hours, The Keep Warm feature may be used without any
other cooking operations or can be used after cooking has finished using BAKE,
CONVECTION BAKE, CONVECTION ROAST,
The Keep Warm feature may be used with TIMED BAKE if you wish to have the Keep Warm
feature turn ON automatically when cooking has finished, The Timed Bake feature requires
you to set the amount of cooking time, With this information the control can calculate the
time when cooking will complete and can then start the Keep Warm feature automatically,
Figure 2
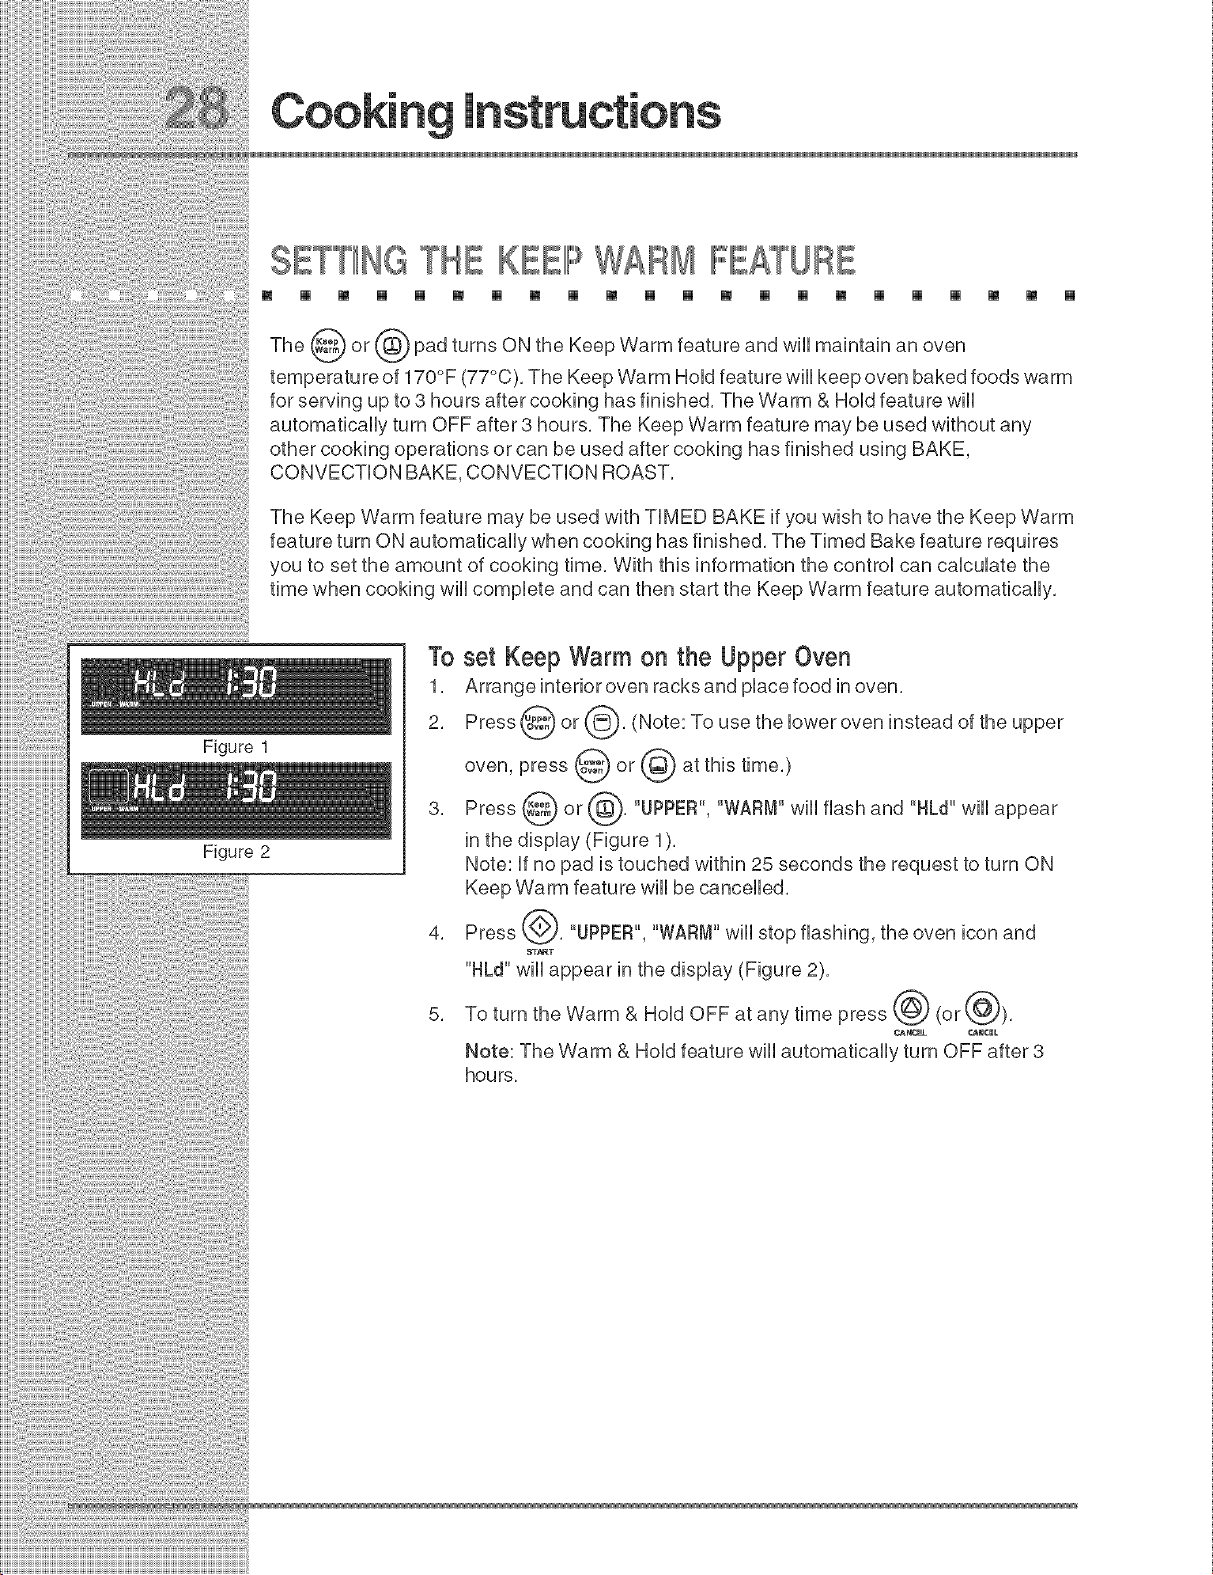
To set Keep Warm on the Upper Oven
1, Arrange interior oven racks and place food in oven,
2, Press @ or @, (Note: To use the lower oven instead of the
upper
oven, press @ or @ at this time,)
3, Press _ or @, "UPPER", "WARM" wiii flash and "HLd" wiii appear
in the display (Figure 1),
Note: if no pad is touched within 25 seconds the request to turn ON
Keep Warm feature will be cancelled,
4, Press @, "UPPER", "WARM" wiii stop flashing, the oven icon and
"HLd" will appear in the display (Figure 2),
5, To turn the Warm & Hold OFF at any time press @ (or @),
Mote: The Warm & Hold feature will automatically turn OFF after 3
hours,
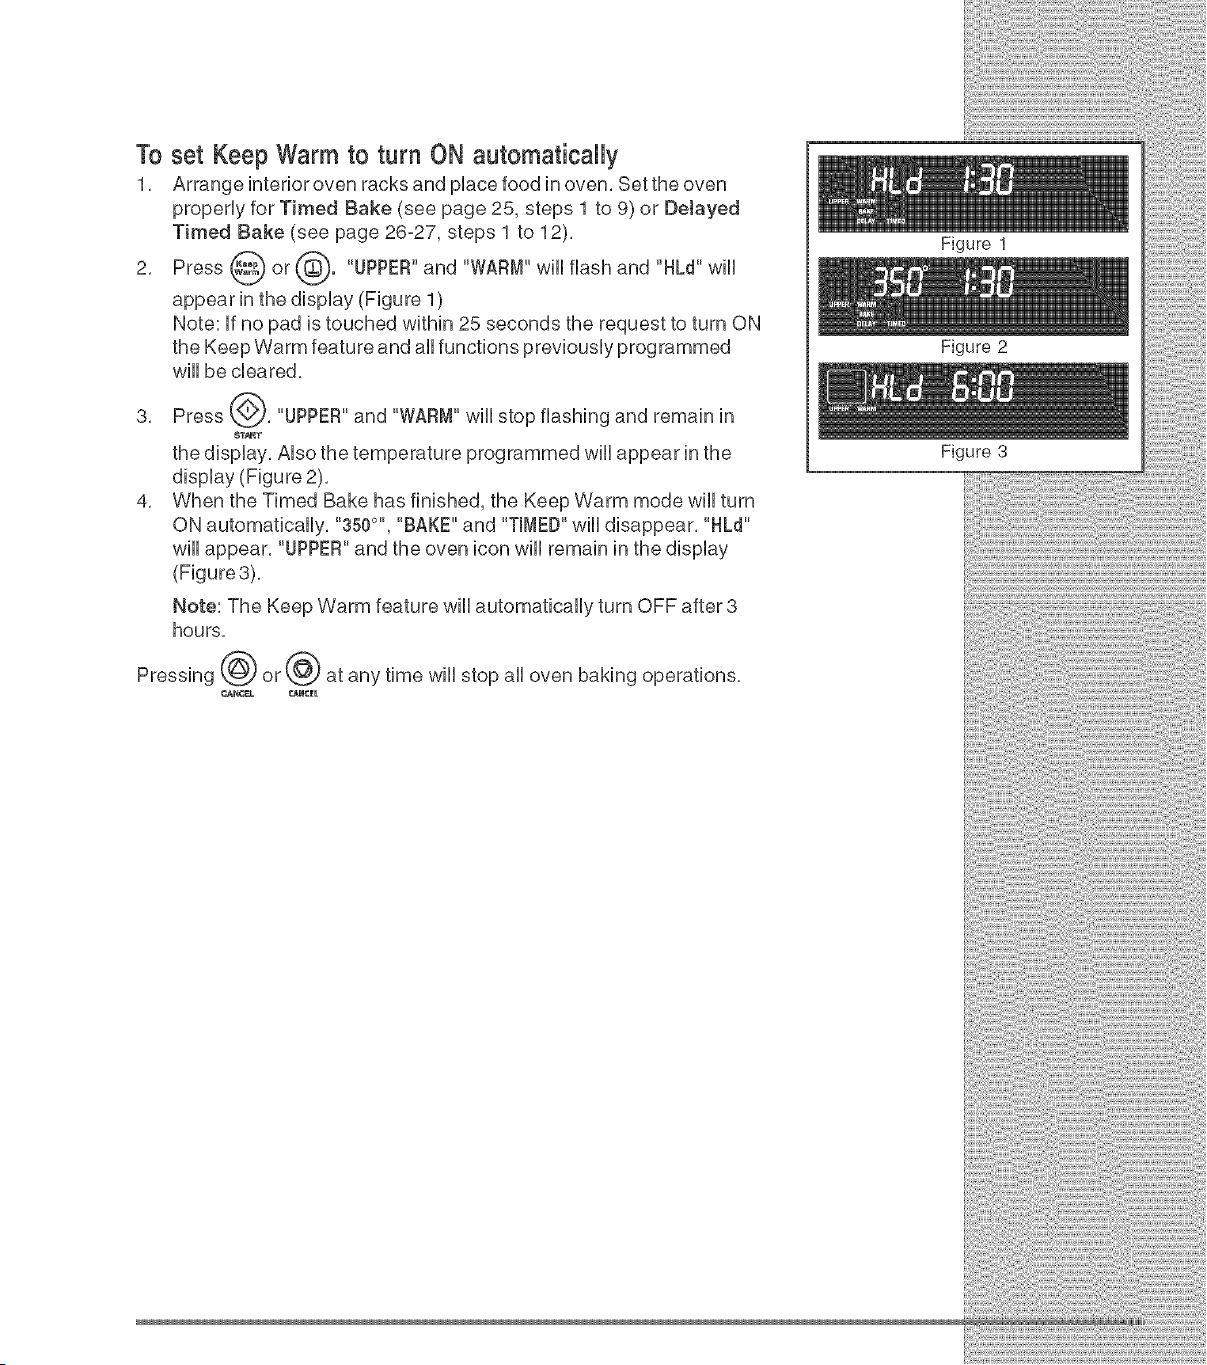
To set Keep Warm to turn ON automatically
1, Arrange interior oven racks and pUacefood in oven, Bet the oven
properUy for Timed Bake (see page 25, steps 1 to 9) or Delayed
Timed Bake (see page 26-27, steps 1 to 12),
2, Press _ or _"). "UPPER"and "WARM" wiUUflash and "HLd" wiUU
appear in the dispUay (Figure 1)
Note: Ufno pad is touched within 25 seconds the request to turn ON
the Keep Warm feature and aUUfunctions previousUy programmed
wHUbe cleared,
3, Press (_), "UPPER"and "WARM" wHUstop flashing and remain in
_T_T
the dispUay, AUsothe temperature programmed wiUUappear in the
display (Figure 2),
4, When the Timed Bake has finished, the Keep Warm mode will turn
ON automatically, "350°", "BAKE" and "TIMED"will disappear, "HLd"
will appear, "UPPER"and the oven icon will remain
(Figure3),
Note: The Keep Warm feature will automatically turn OFF after 3
hours,
Pressing @ or @ at any time will stop all oven baking operations,
Figure 1
Figure 2
Figure 3
[] [] [] [] [] [] [] [] [] [] [] [] [] [] [] [] [] [] [] [] [] []
Position
insert
\,
\
Broiler Pan
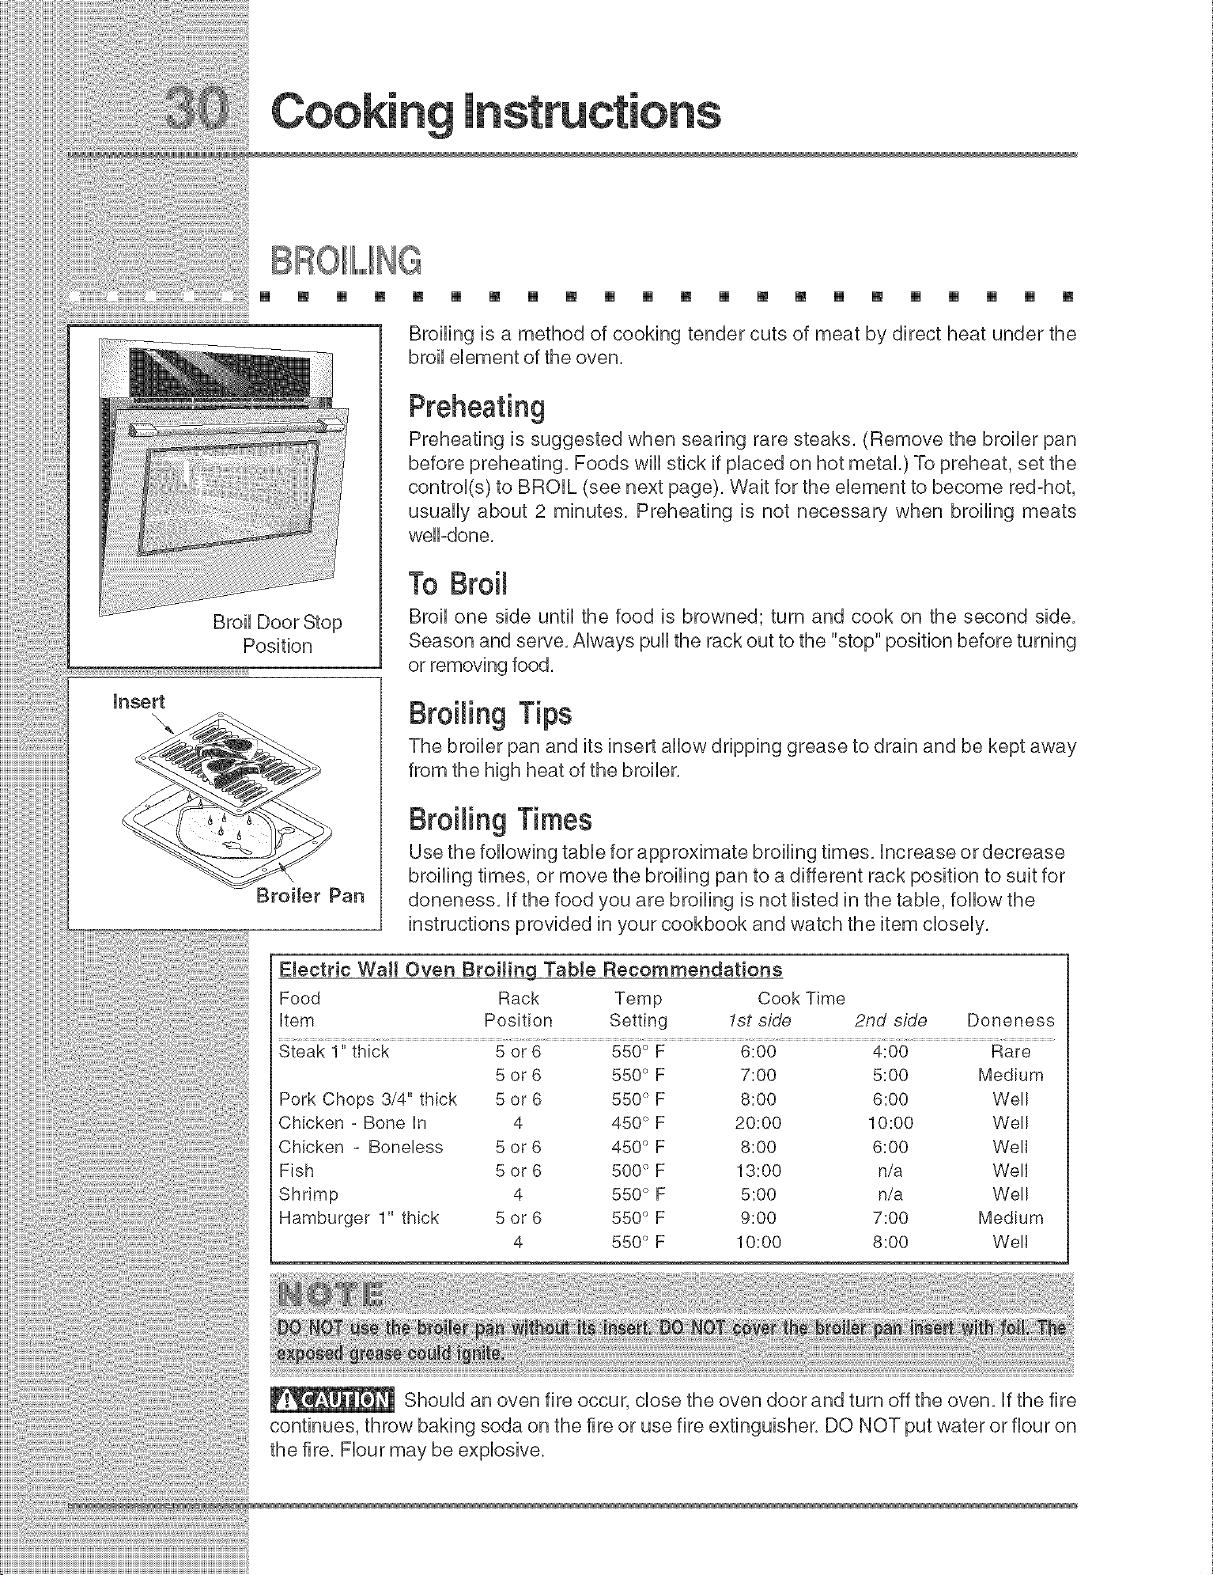
Broiling is a method of cooking tender cuts of meat by direct heat under the
broil element of the oven.
Preheating
Preheating is suggested when searing rare steaks. (Remove the broiler pan
before preheating. Foods will stick if placed on hot metal.) To preheat, set the
control(s) to BROIL (see next page). Wait for the element to become red-hot,
usually about 2 minutes. Preheating is not necessary when broiling meats
well-done.
To Broil
Broil one side until the food is browned; turn and cook on the second side.
Season and serve. Always pull the rack out to the "stop" position before turning
or removing food.
Broiling Tips
The broiler pan and its insert allow dripping grease to drain and be kept away
from the high heat of the broiler.
Broiling Times
Use the following table for approximate broiling times, increase or decrease
broiling times, or move the broiling pan to a different rack position to suit for
aloneness, if the food you are broiling is not listed in the table, follow the
instructions provided in your cookbook and watch the item closely.
Etectric Wall Oven Broiting TabJe Recommendations
Food Rack Temp Cook Time
item Position Setting 1st side 2nd side Doneness
Steak 1" thick 5 or 6 550 ° F 6:00 4:00 Rare
5 or 6 550 ° F 7:00 5:00 Medium
Pork Chops 3/4" thick 5 or 6 550 ° F 8:00 6:00 Well
Chicken - Bone in 4 450°F 20:00 10:00 Well
Chicken - Boneless 5 or 6 450 ° F 8:00 6:00 Well
Fish 5 or 6 500 ° F 13:00 n/a Well
Shrimp 4 550 ° F 5:00 n/a Well
Hamburger 1" thick 5 or 6 550 ° F 9:00 7:00 Medium
4 550 ° F 10:00 8:00 Well
Should an oven fire occur, close the oven door and turn off the oven, if the fire
continues, throw baking soda on the fire or use fire extinguisher, DO NOT put water or flour on
the fire, Flour may be explosive,
Setting Broil
The _ or_'_ pad controls the Broil feature, When broiling, heat radiates downward from
the oven broiler for even coverage, The Broil feature temperature may be set between 400°F
and 550°F (205°C and 288°C),
The broil pan and broil pan insert used together allow dripping grease to drain and be kept
away from the high heat of the oven broiler, DO NOT use the broil pan without the insert
(See previous page), DO NOT cover the broil pan insert with foit. The exposed grease
could ignite,
Should an oven fire occur, leave the oven door closed and turn off the oven, if
the fire continues, throw baking soda on the fire or use a fire extinguisher, DO NOT put
water or flour on the fire, Flour may be explosive and water can cause a grease fire to
spread and cause personal injury,
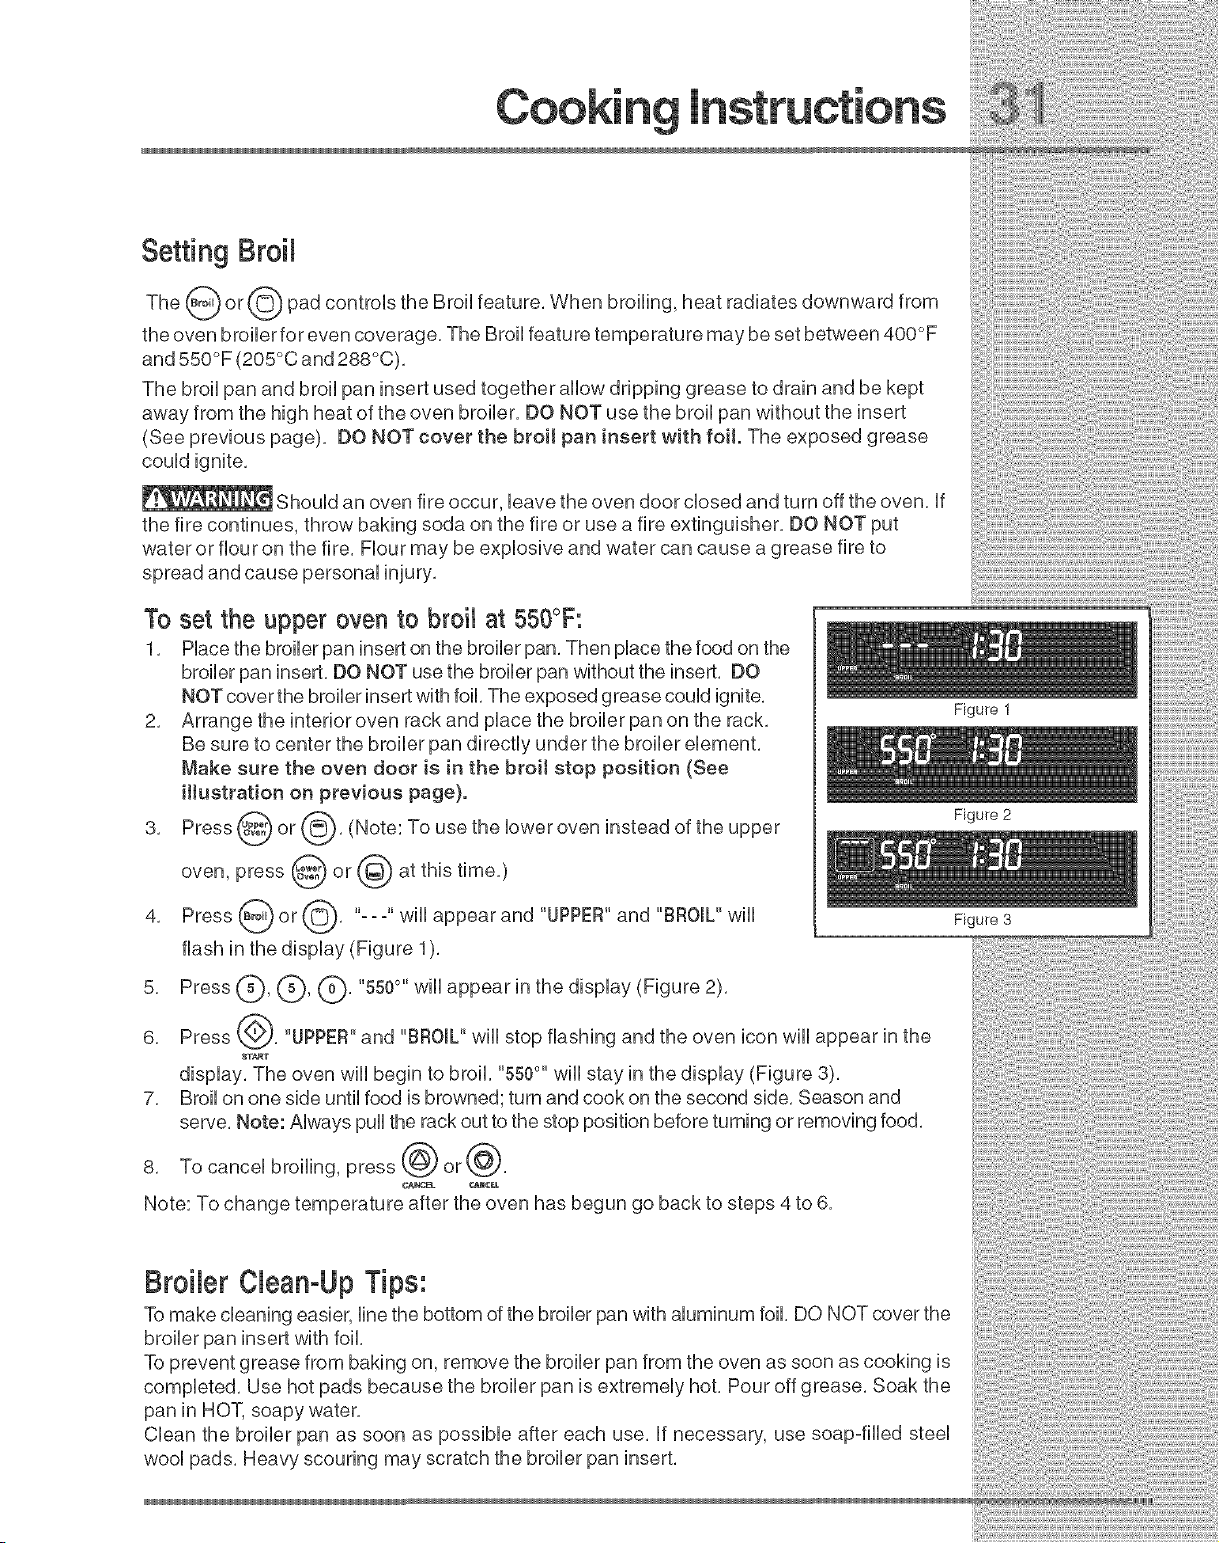
To set the upper oven to broil at 550°F:
1, Place the broiler pan insert on the broiler pan, Then place the food on the
broiler pan insert, DO NOT use the broiler pan without the insert, DO
NOT cover the broiler insert with foil, The exposed grease could ignite,
2, Arrange the interior oven rack and place the broiler pan on the rack,
Be sure to center the broiler pan directly under the broiler element,
Make sure the oven door is in the broil stop position (See
illustration on previous page).
3, Press @ or _'_}, (Note: To use the lower oven instead of the
upper
oven, press @ or @ at this time,)
4, Press _ or {_0-_, "-- o''wiii appear and "UPPER"and "BROIL" wiii
flash in the display (Figure 1),
5, Press C)' (_)' C)' "550°" wH,appear in the display (Figure 2>,
6, Press {@, "UPPER"and "BROIL" will stop flashing and the oven icon will appear in the
8T_,RT
display, The oven will begin to broil, "550°" will stay in the display (Figure 3),
7, Broil on one side until food is browned; turn and cook on the second side, Season and
serve, Note: Always pull the rack out to the stop position before turning or removing food,
8, To cancel broiling, press @ or @,
A
Note: To change temperature after the oven has begun go back to steps 4 to 6,
Figure 1
Figure 2
Figure 3
:i::ii:ii:ii:ii:ii:ii:ii:ii:ii:ii:ii:ii:ii:ii:ii:ii:ii:ii:
Broibr CbanoUp Tips:
To make cleaning easier, line the bottom of the broiler pan with aluminum foil, DO NOT cover the
broiler pan insert with foil,
To prevent grease from baking on, remove the broiler pan from the oven as soon as cooking is
completed, Use hot pads because the broiler pan is extremely hot, Pour off grease, Soak the
pan in HOT, soapy water,
Clean the broiler pan as soon as possible after each use, if necessary, use soap-filled steel
wool pads, Heavy scouring may scratch the broiler pan insert,
SABBATH FEATURE(IFORUSE ON THE JEWlIISH
SABBATH& HOLIDAYS}
[] [] [] [] [] [] [] [] [] [] [] [] [] [] [] [] [] [] [] [] [] []
The or and or padsareusedtosettheSabbathfeature,TheSabbath
may only be used with the (_ or @ pad, The oven temperature may be set higher
feature
or lower after setting the Sabbath feature (the oven temperature adjustment feature should
be used only during Jewish Holidays), however the display will not visibly show or provide
any audible tones indicating whether the change occurred correctly, Once the oven is
properly set using Bake with the Sabbath feature active, the oven will remain continuously
ON until cancelled, This will override the factory preset 12-Hour Energy Saving feature,
if the oven light wiii be needed during the Sabbath, press @ or @ before activating the
Sabbath feature, Once the oven light is turned ON and the Sabbath feature is active, the
oven light wiii remain ON until the Sabbath feature is turned OFF, if the oven light needs to
be OFF, be sure to turn the oven light OFF before activating the Sabbath feature,
Figure 1
Figure 2
Figure 3
IMPORTANT NOTES: it is not advised to attempt to activate any other program feature
other than BAKE while the Sabbath feature is active, ONLY the following key pads will
function after setting the Sabbath feature; (_ to (_, @ or @, @ or @, (_) or @,
& @ or@, ALL OTHER KEYPADS will not function once the Sabbath feature is
ST_T CANCEL _NCE_
properly activated,
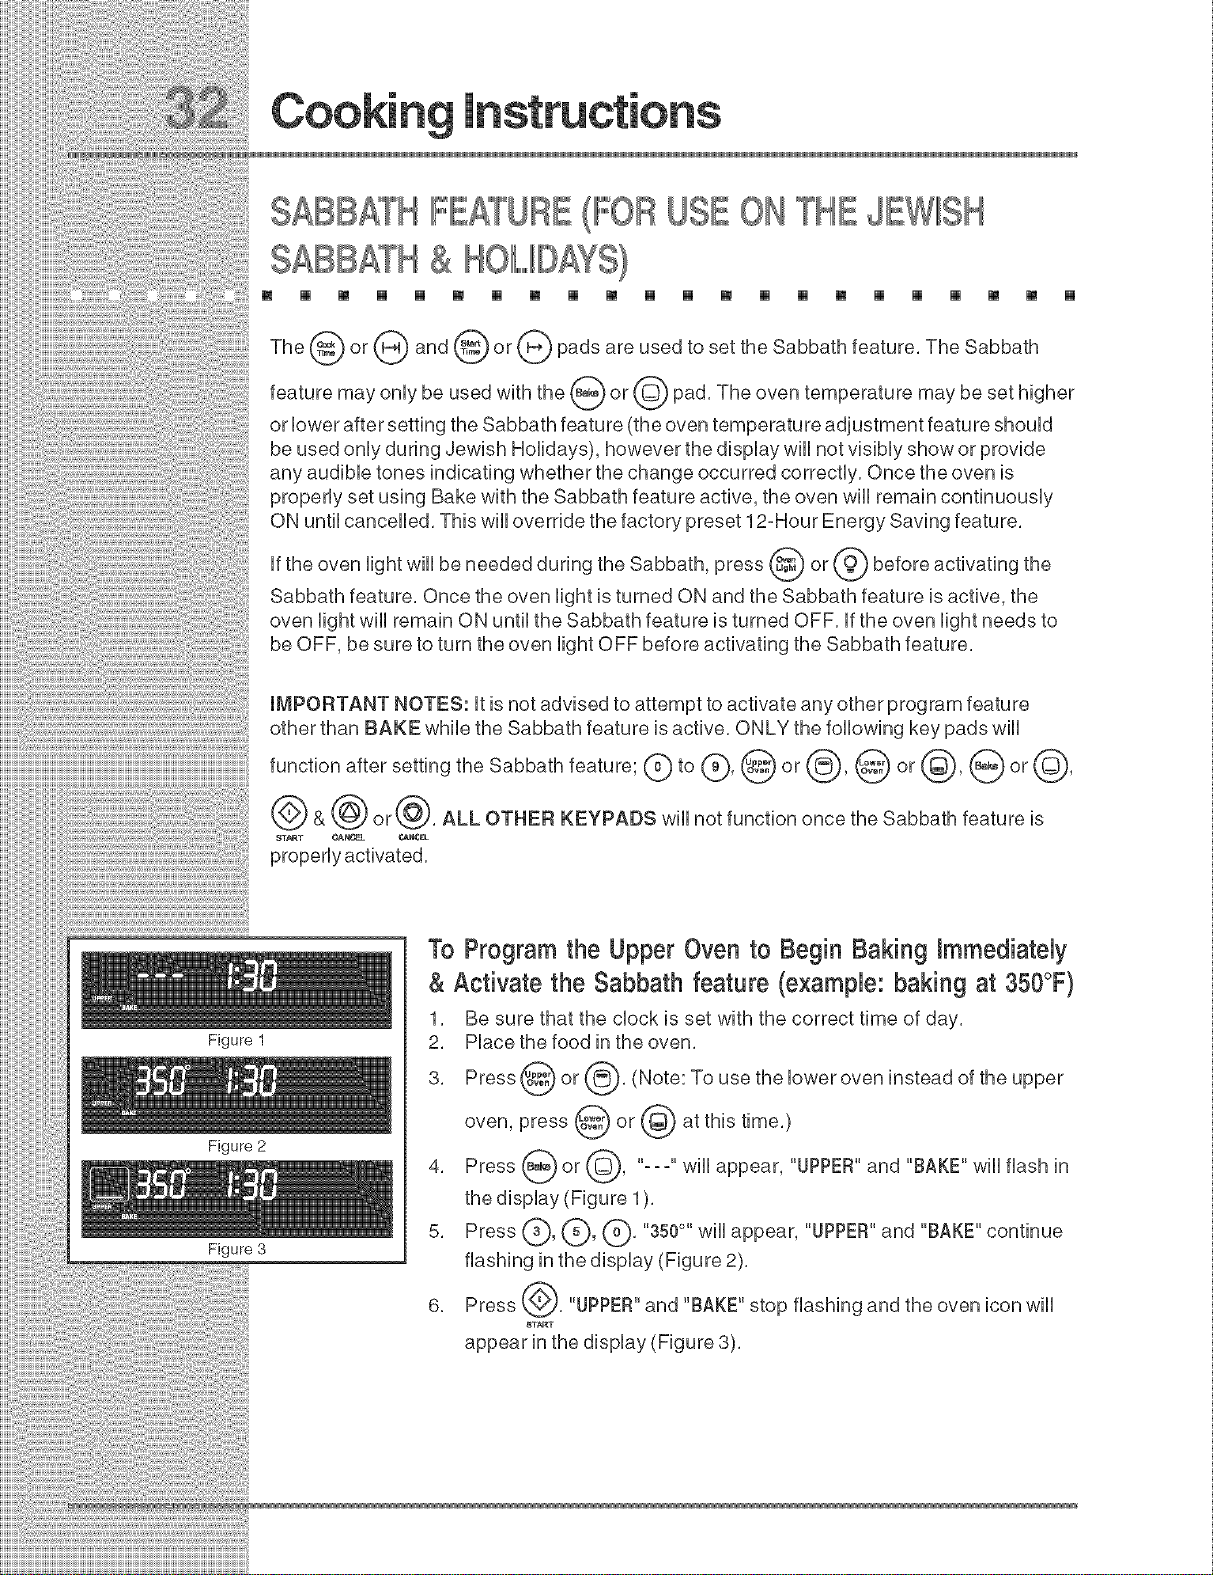
To Program the Upper Oven to Begin Baking Nmmediately
& Activate the Sabbath feature (example: baking at 350°F)
1, Be sure that the clock is set with the correct time of day,
2, Place the food in the oven,
3, Press @ or @, (Note: To use the lower oven instead of the
upper
oven, press @ or @ at this time,)
4, Press B__ or @, "-- -" wiii appear, "UPPER"and "BAKE" wiii flash in
the display (Figure 1),
5, Press _._, (_, k_, "350°" will appear, "UPPER"and "BAKE" continue
flashing in the display (Figure 2),
6, Press @, "UPPER"and "BAKE" stop flashing and the oven icon will
START
appear in the display (Figure 3),
7, HfyoudesiretosettheovencontroHforaTimedBakeor Delayed
TimedBakedo soatthistime,Hfnot,skipthisstepandcontinueto
step8, RefertotheTimedBake(seepage25,compHetesteps7°9)/
Delayed Timed Bake (see pages 26o27,compHete steps 7o12)
section for compHete instructions, Remember the oven wHHshut down
after using Timed Bake or DeJay Timed Bake and therefore may
onHybe used once during the Sabbath/Jewish Holidays, The
maximum Delayed Timed Bake time is 11 hours & 59 minutes,
8, The oven wHHturn ON and begin heating,
9, Press and hold both the @ (or (_) and @ (or (_) pads for at
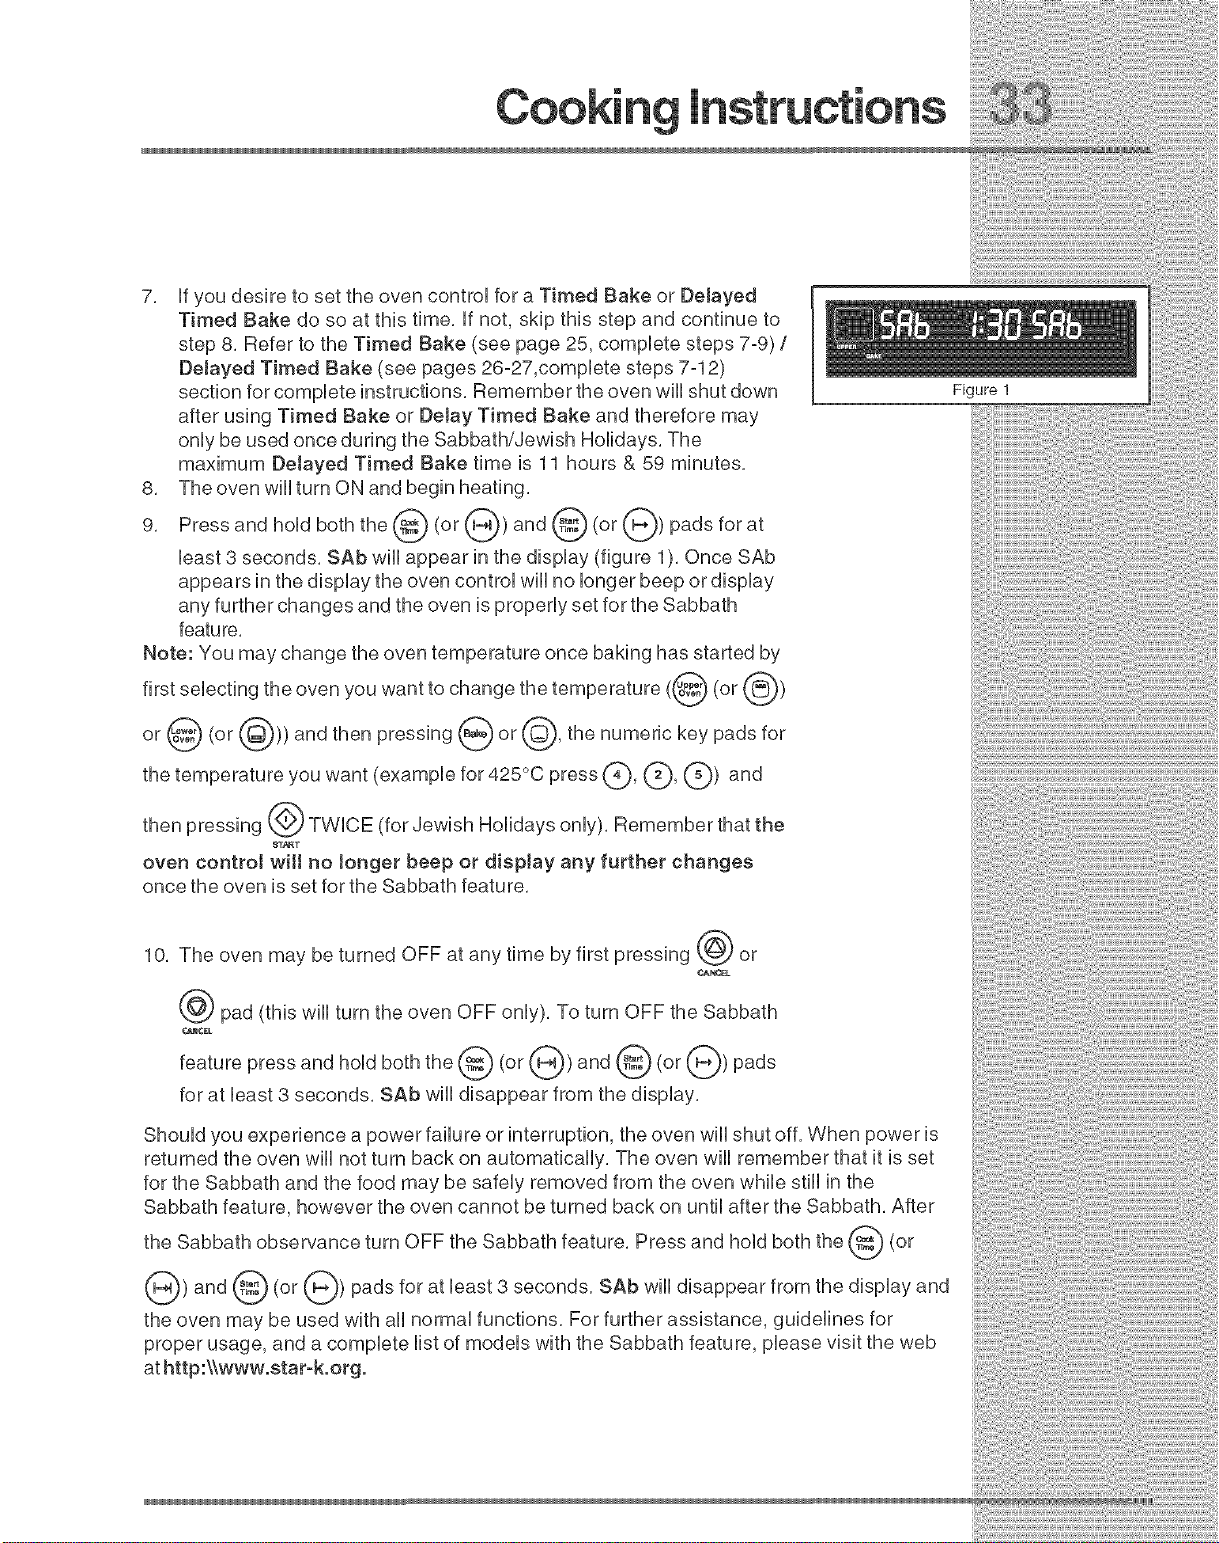
Heast3 seconds, SAb wiHHappear in the display (figure 1), Once SAb
appears in the dispHay the oven controH wiHHno Hongerbeep or dispHay
any further changes and the oven is properHy set for the Sabbath
featu re,
Note: You may change the oven temperature once baking has started by
seHectingthe oven you want to change the temperature (@ (or @)
first
or @ (or (_)))and then pressing @or@, the numeric key pads
for
the temperature you want (exampHe for 425°C press C)' (_' (_)) and
then pressing @ TWHCE (for Jewish HoHidays onHy), Remember that the
oven control wilt no Jonger beep or display any further changes
once the oven is set for the Sabbath feature,
10, The oven may be turned OFF at any time by first pressing @ or
CANCEL
pad (this will turn the oven OFF only), To turn OFF the Sabbath
_¢EL
feature press and hold both the @ (or @) and @ (or @) pads
for at least 3 seconds, SAb will disappear from the display,
ShouHdyou experience a power faiHureor interruption, the oven wiHHshut off, When power is
returned the oven wiHHnot turn back on automaticaHHy,The oven wiHHremember that it is set
for the Sabbath and the food may be safeHy removed from the oven whiHe still in the
Sabbath feature, however the oven cannot be turned back on untiHafter the Sabbath, After
the Sabbath observance turn OFF the Sabbath feature, Press and hold both the @ (or
@) and @ (or @) pads for at Heast3 seconds, BAh wiHHdisappear from the dispHayand
the oven may be used with aHHnormaHfunctions, For further assistance, guideHines for
proper usage, and a compHete Histof modeHs with the Sabbath feature, pHeasevisit the web
at http:\Xwww,star-k,org,
Figure !
Care &
USIIN@THE IIIL,,,,,F'sCIIIL,,,,£ANIIFEATU
[] [] [] [] [] [] [] [] [] [] [] [] [] [] [] []
Adhere to the FommowingCmeaningPrecautions:
[] [] [] [] [] []
Allow the oven to cool before cleaning,
Wear rubber gloves when cleaning any exterior parts of the oven manually,
During the selfocleaning cycle, the outside of the wall oven can become very hot
to the touch, DO NOT leave a small children unattended near the appliance,
Before cleaning any part of the oven, be sure the oven is turned off or else push CANCEL pad,
Wait until the oven is cook
The health of some birds is extremely sensitive to the fumes given off during the
selfoclean cycle of any wall oven, Move birds to another well ventilated room,
DO NOT use oven cleaners or oven protective coatings in or around any part of the selfocleaning
oven, DO NOT clean the oven door gasket, The gasket on the oven door is essential for a good
seal, Care should be taken not to rub, damage or move the gasket, DO NOT use any cleaning
materials on the gasket, Doing so could damage it, DO NOT use aluminum foil to line the oven
bottom, This may affect cooking or foil could melt and damage the oven surface,
A selfocleaning oven cleans itself with high temperatures (well above cooking temperatures)
which eliminate soil completely or reduce it to a fine powdered ash you can whisk away with
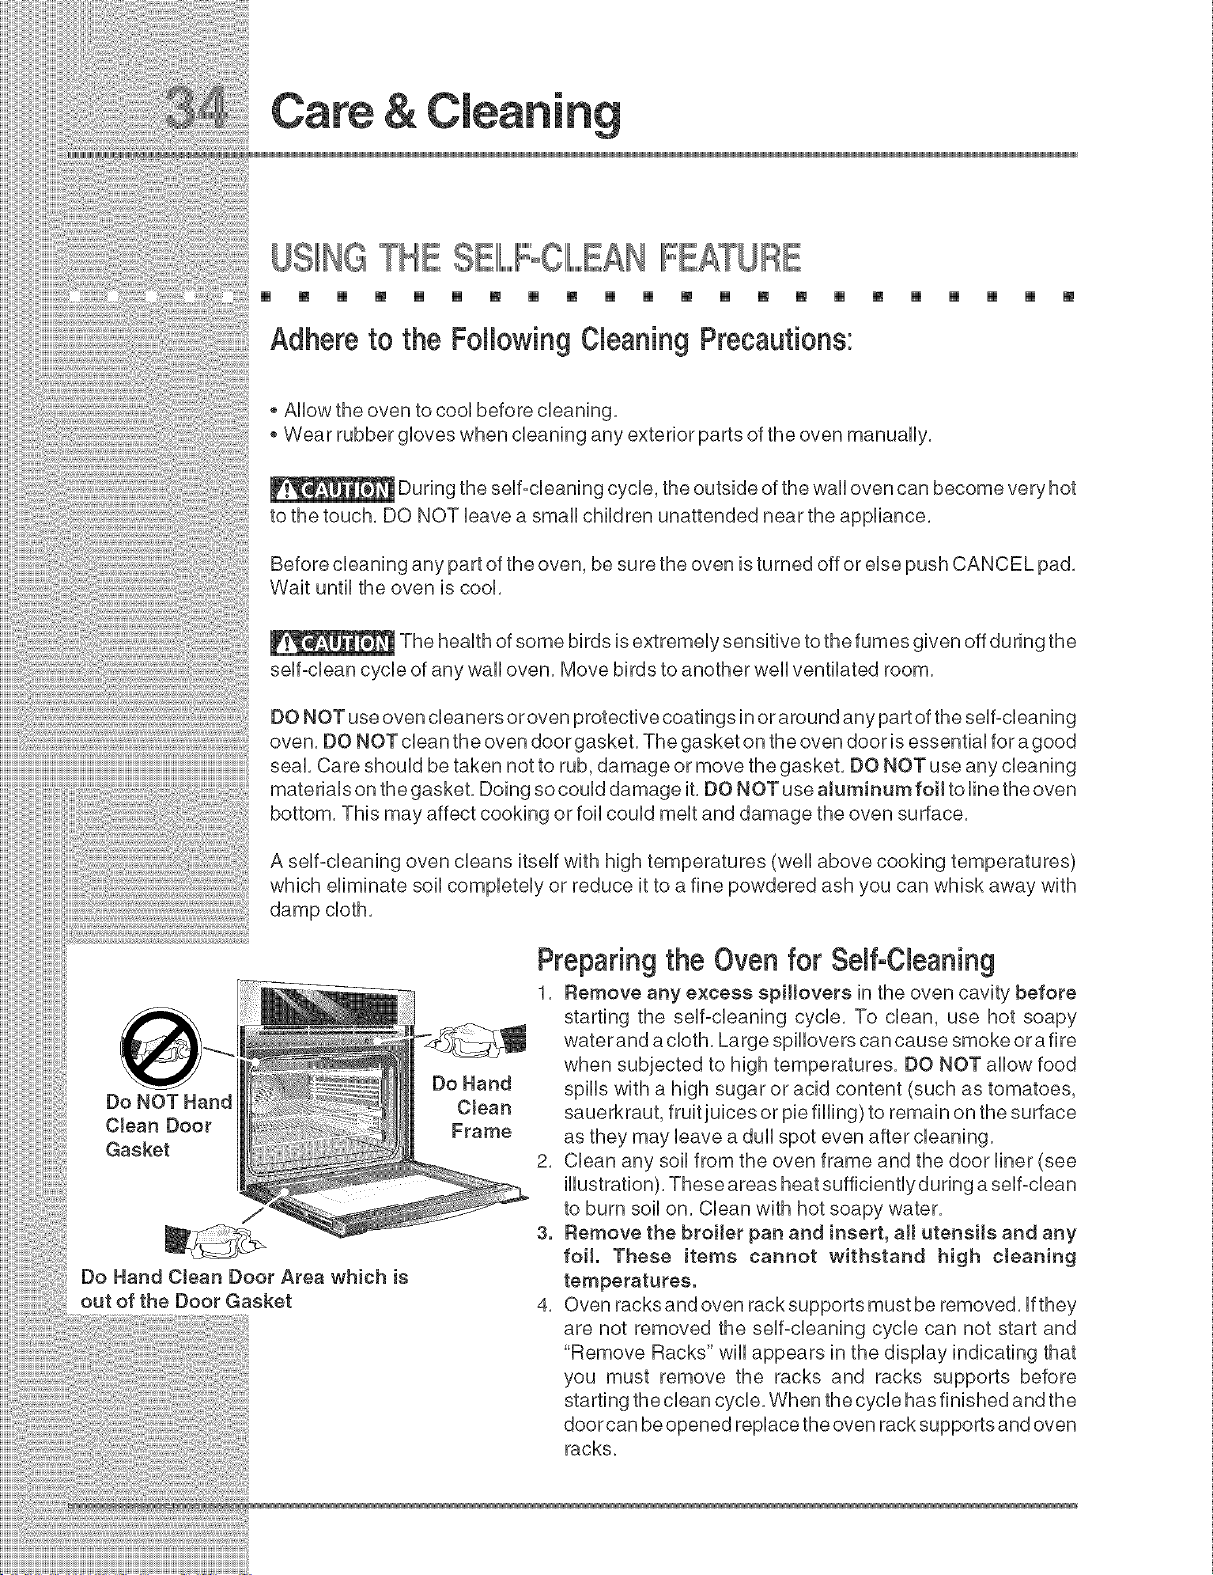
Do Hand CJean Door Area which is
out of the Door Gasket
Do Hand
C Jean
Frame
Preparing the Oven for SelfoCbaning
1, Remove any excess spiltovers in the oven cavity before
starting the selfocleaning cycle, To clean, use hot soapy
water and a cloth, Large spillovers can cause smoke or a fire
when subjected to high temperatures, DO NOT allow food
spills with a high sugar or acid content (such as tomatoes,
sauerkraut, fruit juices or pie filling) to remain on the surface
as they may leave a dull spot even after cleaning,
2, Clean any soil from the oven frame and the door liner (see
illustration), These areas heat sufficientlyduring a selfoclean
to burn soil on, Clean with hot soapy water,
3. Remove the broiler pan and insert, aH utensils and any
foil. These items cannot withstand high cteaning
temperatures.
4, Oven racks and even rack supports must be removed, if they
are not removed the selfocleaning cycle can not start and
"Remove Racks" will appears in the display indicating that
you must remove the racks and racks supports before
starting the clean cycle, When the cycle has finished and the
door can be opened replace the oven rack supports and oven
racks,
nlmt_
STARTINGSBIL,,,,,FOlIIL,,,£AHCYClIIL,,,,£
[] [] [] [] [] [] [] [] [] [] [] [] [] [] [] [] [] [] [] [] [] []
The@<or@),@<or@)and@(or@)padcontro,stheSe,f-C,ean,ngfeature,,f
you are planning to use the oven immediately after a self°clean cycle remember to allow
time for the oven to cool down and the oven door to unlock. This normally takes about one
hour. A 3 hours self-clean cycle will actually take about 4 hours to complete.
use a @ or@ (2 hours)cycle for ,,ght soHs, a @ or @(3
is recommend to
average soils, and a @ or @ (4 hours) cycle for heavy soits (to
hours) cycle
for
assure satisfactory results).
During the self-cleaning cycle, the outside of the appliance can become very
hot to the touch. DO NOT leave small children unattended near the appliance; they may be
burned if they touch the hot oven door surfaces.
DO NOT force the oven door open. This can damage the automatic door
locking system. Use care when opening the oven door after the self-cleaning cycle. Stand to
the side of the oven when opening the door to allow hot air or steam to escape. The oven
may still be VERY HOT.
To start an immediate upper oven Self-Cbaning cycle or
to set a delay start time of 4:30 o'clock and shut off
automatically (example provided is a default 3 hour Self-
Clean cycle}
1. Be sure the clock is set with the correct time of day, the oven is
empty and the oven door is closed.
2. Press @') or @. (Note: To use the lower oven instead of the upper
oven, press @ or @ at this time.)
@ @,' ...... CLn"
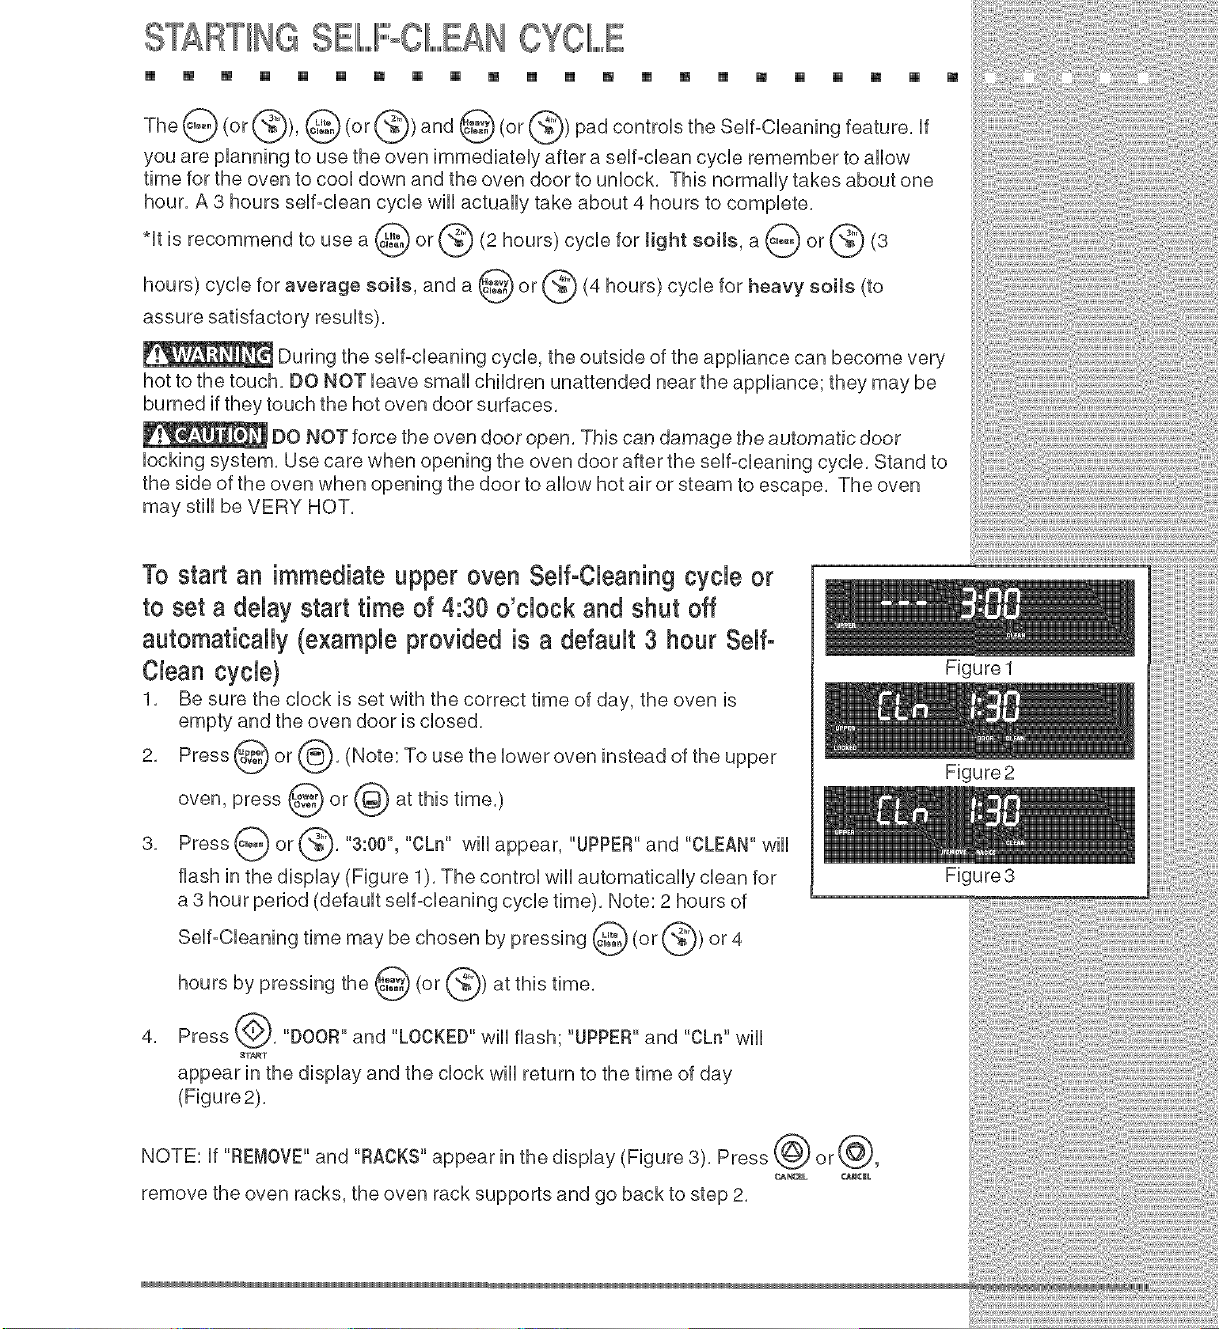
3. Press or 3.00, will appear, "UPPER"and "CLEAN" wiii
flash in the display (Figure 1). The control will automatically clean for
a 3 hour period (default self-cleaning cycle time). Note: 2 hours of
SeUf-CUeaningtimemay be chosen by pressing@ (or@)or 4
Hoursby pressingthe@ (or@) atthistime,
4. Press @. "DOOR" and "LOCKED"wHUflash; "UPPER"and "CLn" wHU
8T_T
appear in the dispUay and the dock wHUreturn to the time of day
(Figure2),
NOTE: if "REMOVE"and "RACKS" appear in the display (Figure 3). Press @ or@,
_k_EL _M¢|L
remove the oven racks, the oven rack supports and go back to step 2,
FigureI
Figure2
Figure3
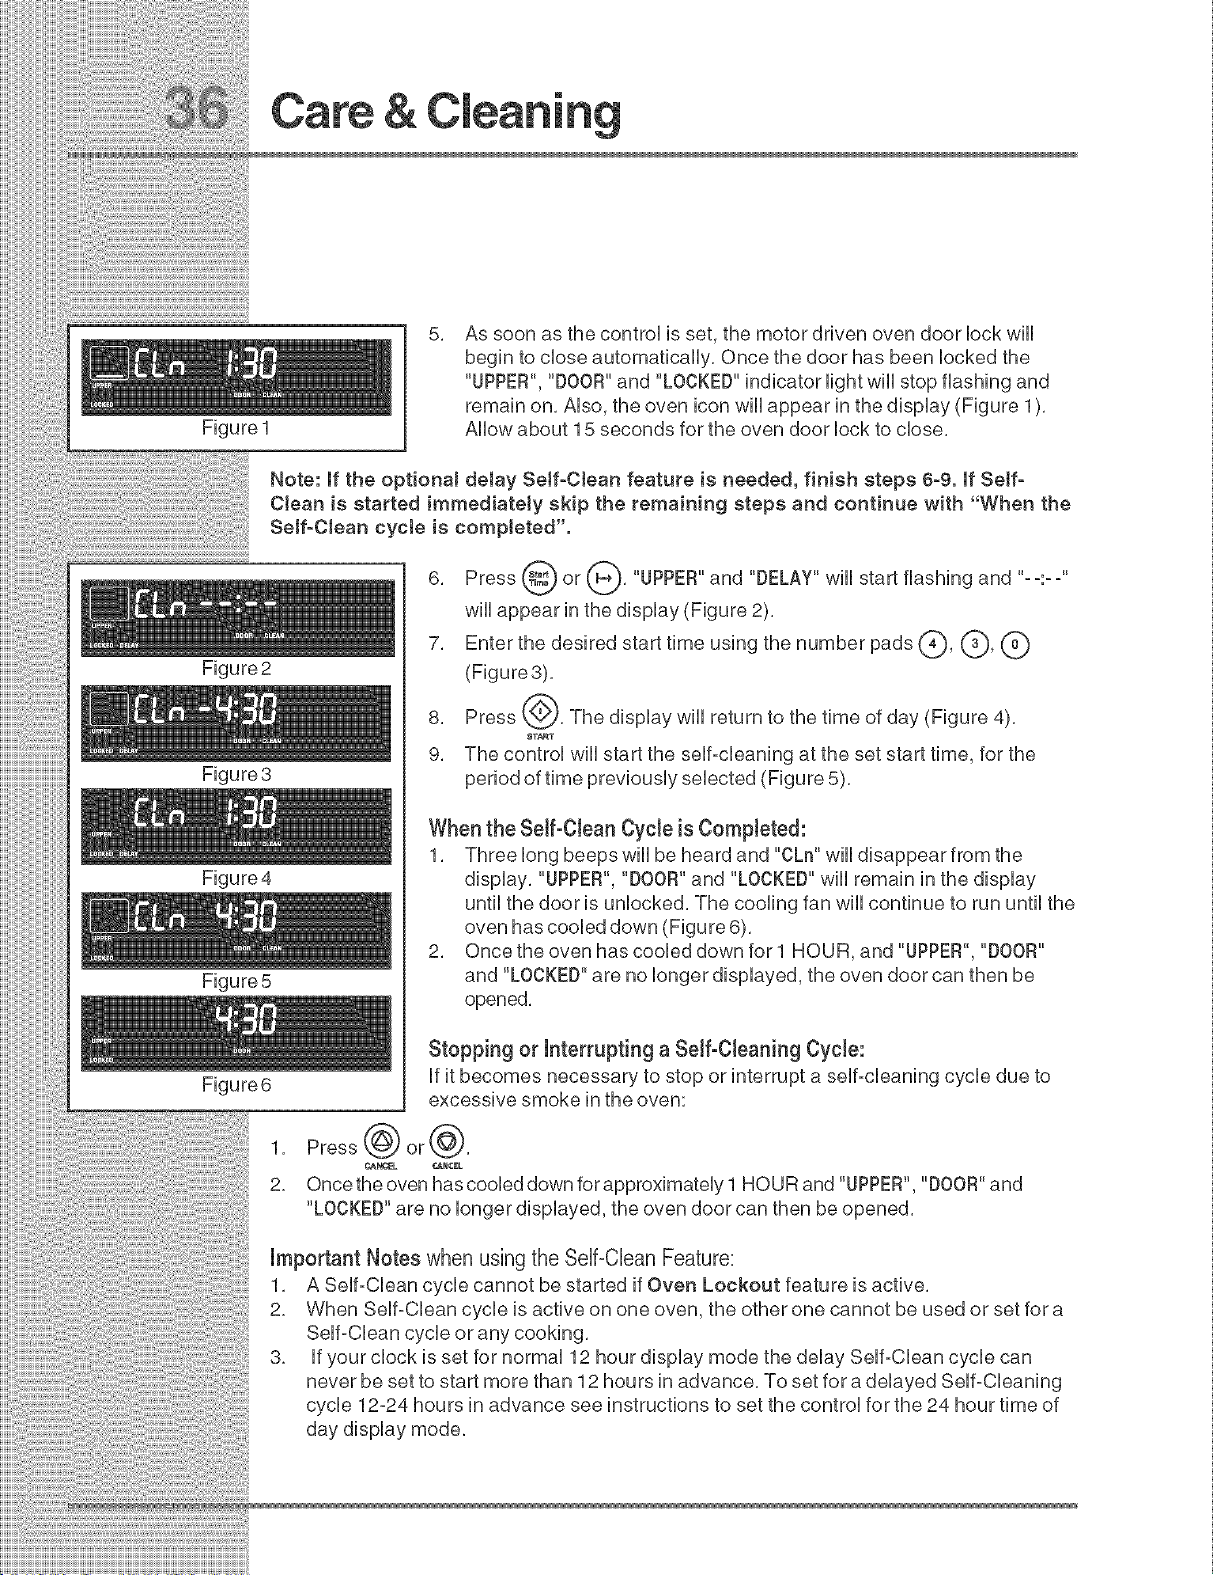
Figure1
Care &
As soon as the control is set, the motor driven oven door lock will
begin to close automatically, Once the door has been locked the
"UPPER", "DOOR"and "LOCKED"indicator light wiii stop flashing and
remain on, Also, the oven icon will appear in the display (Figure 1),
Allow about 15 seconds for the oven door lock to close,
Note: if the optionaJ delay SeJf-CJean feature is needed, finish steps 6-9. if Setf-
CJean is started immediateJy skip the remaining steps and continue with "When the
SeJf-CJean cycle is completed".
Figure2
Figure3
Figure4
Figure 5
Figure6
A
6, Press (_ or _*), "UPPER"and "DELAY" wiii start flashing and "--:--"
will appear in the display (Figure 2),
7, Enter the desired start time using the number pads(_, (_, (_)
(Figure3),
8, Press {@, The display will return to the time of day (Figure 4),
8T_T
9, The control will start the self-cleaning at the set start time, for the
period of time previously selected (Figure 5),
When the Self-Cban Cycle is Compbted:
1, Three long beeps will be heard and "CLn" will disappear from the
display, "UPPER", "DOOR"and "LOCKED" will remain in the display
until the door is unlocked, The cooling fan will continue to run until the
oven has cooled down (Figure 6),
2, Once the oven has cooled down for l HOUR, and"UPPER", "DOOR"
and "LOCKED" are no longer displayed, the oven door can then be
opened,
1,
2_
Stopping or interruptinga Seif-Cbaning Cycb:
if it becomes necessary to stop or interrupt a self=cleaning cycle due to
excessive smoke in the oven:
Press@or@,
_N_t_L _NCEL
Once the oven has cooled down for approximately 1 HOUR and "UPPER", "DOOR"and
"LOCKED"are no longer displayed, the oven door can then be opened,
important Notes when using the Self=Clean Feature:
1, A Self=Clean cycle cannot be started if Oven Lockout feature is active,
2, When Self=Clean cycle is active on one oven, the other one cannot be used or set for a
Self=Clean cycle or any cooking,
3, if your clock is set for normal 12 hour display mode the delay Self=Clean cycle can
never be set to start more than 12 hours in advance, To set for a delayed Self=Cleaning
cycle 12=24 hours in advance see instructions to set the control for the 24 hour time of
day display mode,
i ii iiiii iiiii ilili iii!i iii!iiiiiiii!i!i
Care o
GENERALOlIIL.......EAHING .. [] [] [] []
[] [] [] [] [] [] [] [] [] [] [] [] [] [] [] [] [] :
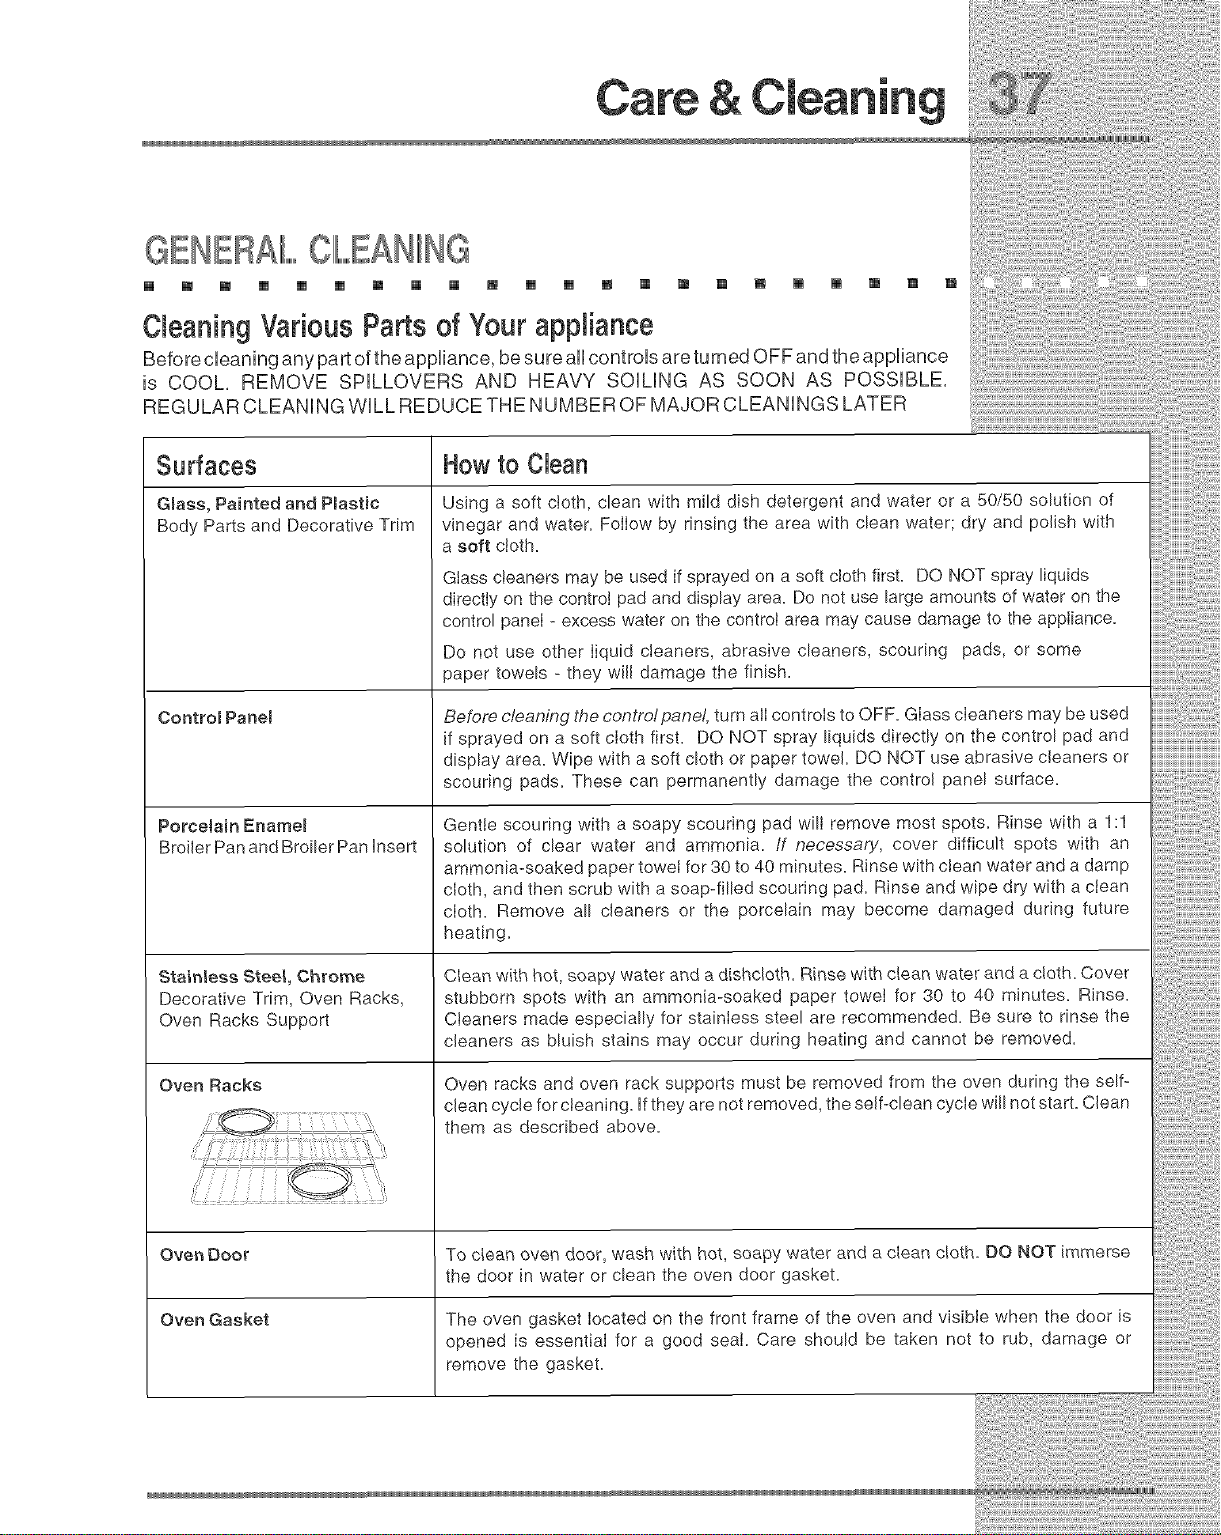
Cleaning Various Parts of Your appliance
Seforec ean nganypartoftheapp ance besureallcontrolsareturnedOFFandtheappliance
s COOL REMOVE SPLLOVERS AND HEAVY SOLNG AS SOON AS POSSIBLE,
R EG U LA R C L EA N IN G W Ihh R ED U C E TH E N U M SE R 0 F M Ad 0 R C L EA N IN G S LAT E R
Surfaces How to Clean
Gmass, Painted and Pmaetic Using a soft cloth, clean with mild dish detergent and water or a 50/50 solution of
Body Parts and Decorative Trim vinegar and water. FolIow by rinsing the area with clean water; dry and polish with
a soft cloth.
Glass cleaners may be used if sprayed on a soft cloth first. DO NOT spray liquids
directly on the control pad and display area. Do not use large amounts of water on the
control paneI- excess water on the controI area may cause damage to the appliance.
Do not use other liquid cleaners, abrasive cleaners, scouring pads, or some
paper towels - they will damage the finish.
Control Panem
Porcelain Enamem
Broiler Pan and Broiler Pan insert
Stainless Steel, Chrome
Decorative Trim, Oven Racks,
Oven Racks Support
Oven Racks
Before c/eaning the contro!pane!, turn alI controIs to OFF. GIass cIeaners may be used
if sprayed on a soft cloth first. DO NOT spray liquids directly on the control pad and
display area. Wipe with a soft cloth or paper towel. DO NOT use abrasive cleaners or
scouring pads. These can permanently damage the control panel surface.
Gentle scouring with a soapy scouring pad wilI remove most spots. Rinse with a 1:1
solution of clear water and ammonia, if necessary, cover difficult spots with an
ammonia-soaked paper towei for 30 to 40 minutes. Rinse with clean water and a damp
cloth, and then scrub with a soap-filled scouring pad. Rinse and wipe dry with a ciean
cloth. Remove all cleaners or the porcelain may become damaged during future
heating.
CIear_ with hot, soapy water and a dishcloth. Rinse with ctean water and a cloth. Cover
stubborn spots with an ammonia-soaked paper towei for 30 to 40 minutes. Rinse.
Cieaners made especially for stainless steel are recommended. Be sure to rinse the
cleaners as bluish stains may occur during heating and cannot be removed.
Oven racks and oven rack supports must be removed from the oven during the self-
clean cycle for cleaning, if they are not removed, the self-clean cycle will not start. Clean
them as described above.
Oven 0oo_ To c_ean oven door, wash with hot, soapy water and a clean cloth. O0 NOT immerse
the door in water or clean the oven door gasket.
Oven Gasket The oven gasket located on the front frame of the oven and visible when the door is
opened is essential for a good seal. Care should be taken not to rub, damage or
remove the gasket.
Care &
CAREAND CIIL,,,,,EANINGOIFSTAINLESSEEIIIF..........
m [] [] [] [] [] [] [] [] [] [] [] [] [] [] [] [] [] [] [] [] []
SpeciaUcare and cUeaning are required for maintaining the appearance of stainUess parts,
PUeaserefer to the tame provided at the beginning of the General Care & CJeaning section
in this Use & Care Manual
TOREMOVEANDREIPLACEOVENBOOR
[] [] [] [] [] [] [] [] [] [] [] [] [] [] [] [] [] [] [] [] [] []
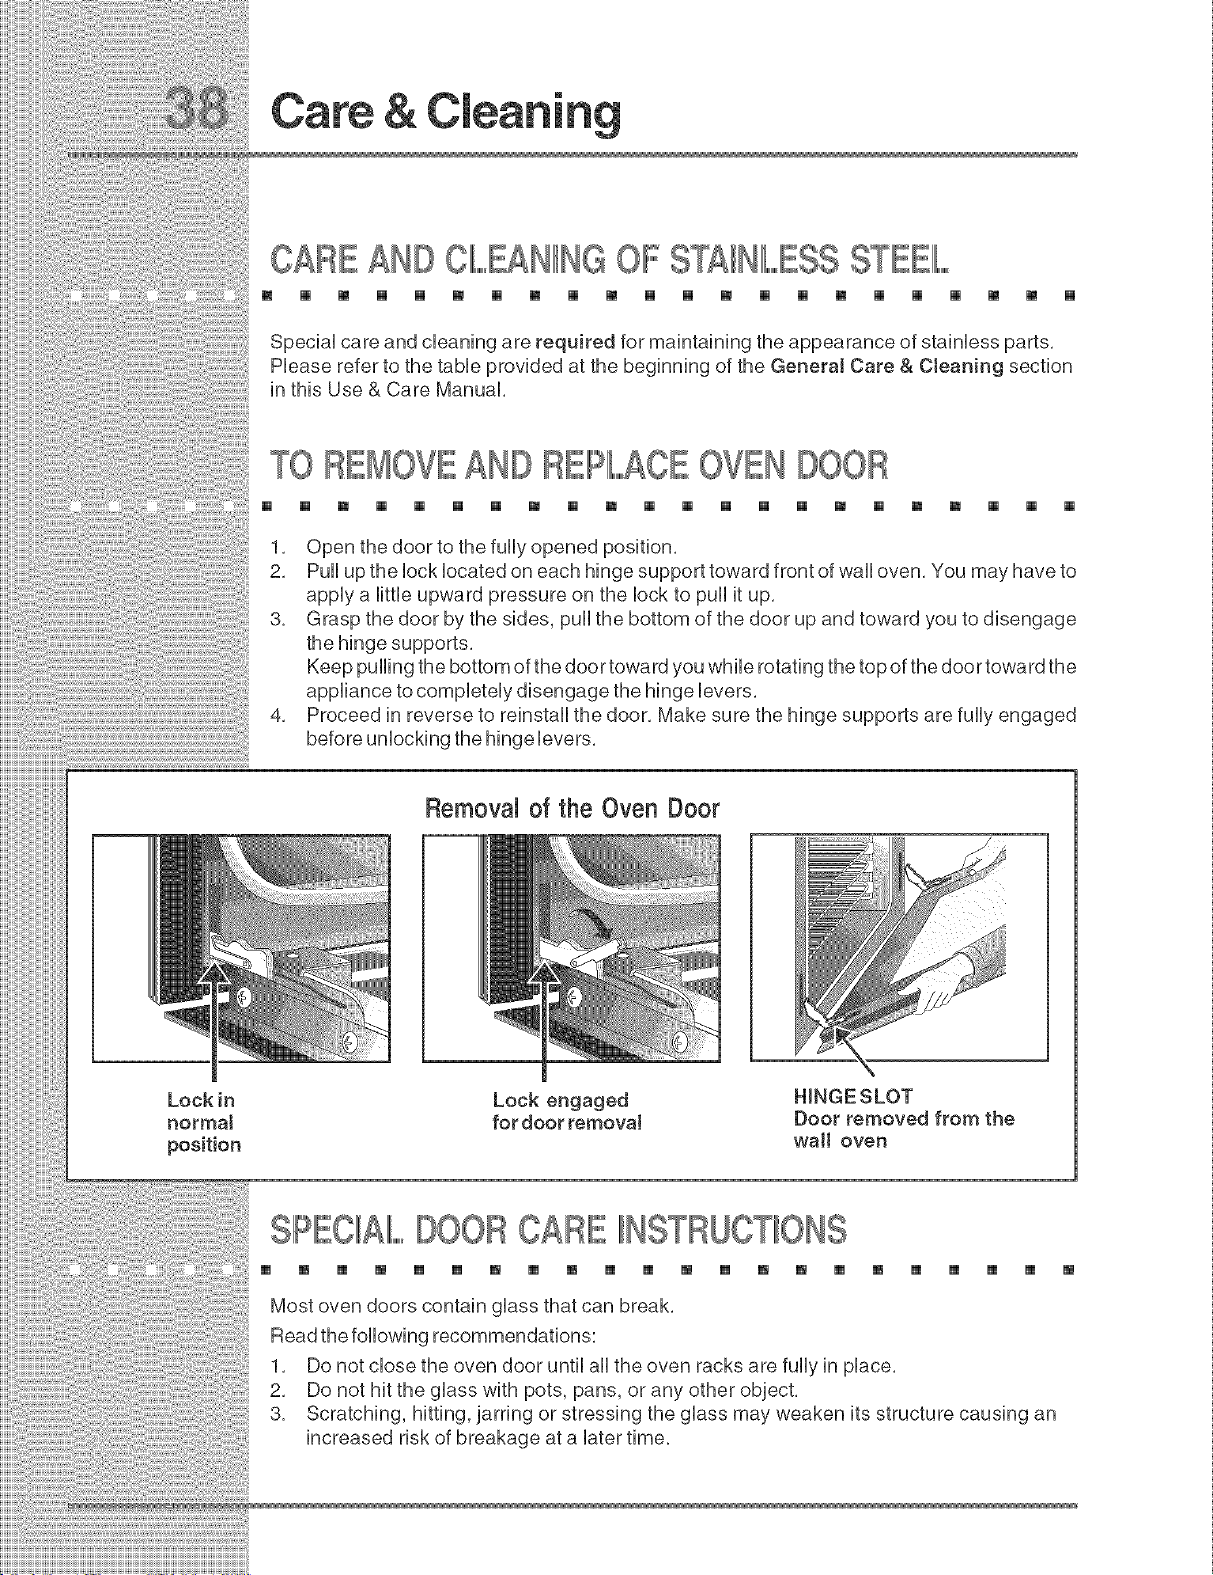
1, Open the door to the fully opened position,
2, Pull up the lock located on each hinge support toward front of wall oven, You may have to
apply a little upward pressure on the lock to pull it up,
3, Grasp the door by the sides, pull the bottom of the door up and toward you to disengage
the hinge supports,
Keep pulling the bottom of the door toward you while rotating the top of the door toward the
appliance to completely disengage the hinge levers,
4, Proceed in reverse to reinstall the door, Make sure the hinge supports are fully engaged
before unlocking the hinge levers,
Lock in
normal
position
Removal of the Oven Door
Lock engaged
for door removal
HmNGESLOT
Door removed from the
wall oven
SPECIIIAIIL,,,,,DOORCARE IIINS U _ONS
[] [] [] [] [] [] [] [] [] [] [] [] [] [] [] [] [] [] [] [] []
Most oven doors contain glass that can break,
Read the following recommendations:
1, Do not close the oven door until all the oven racks are fully in place,
2, Do not hit the glass with pots, pans, or any other object,
3, Scratching, hitting, jarring or stressing the glass may weaken its structure causing an
increased risk of breakage at a later time,
TOREMOVETHE'°H DDEHBAKEEII,,,,,,,,,,EMEHTCOVER
[] m [] [] [] [] B [] [] [] [] [] [] [] [] [] [] [] [] [] [] []
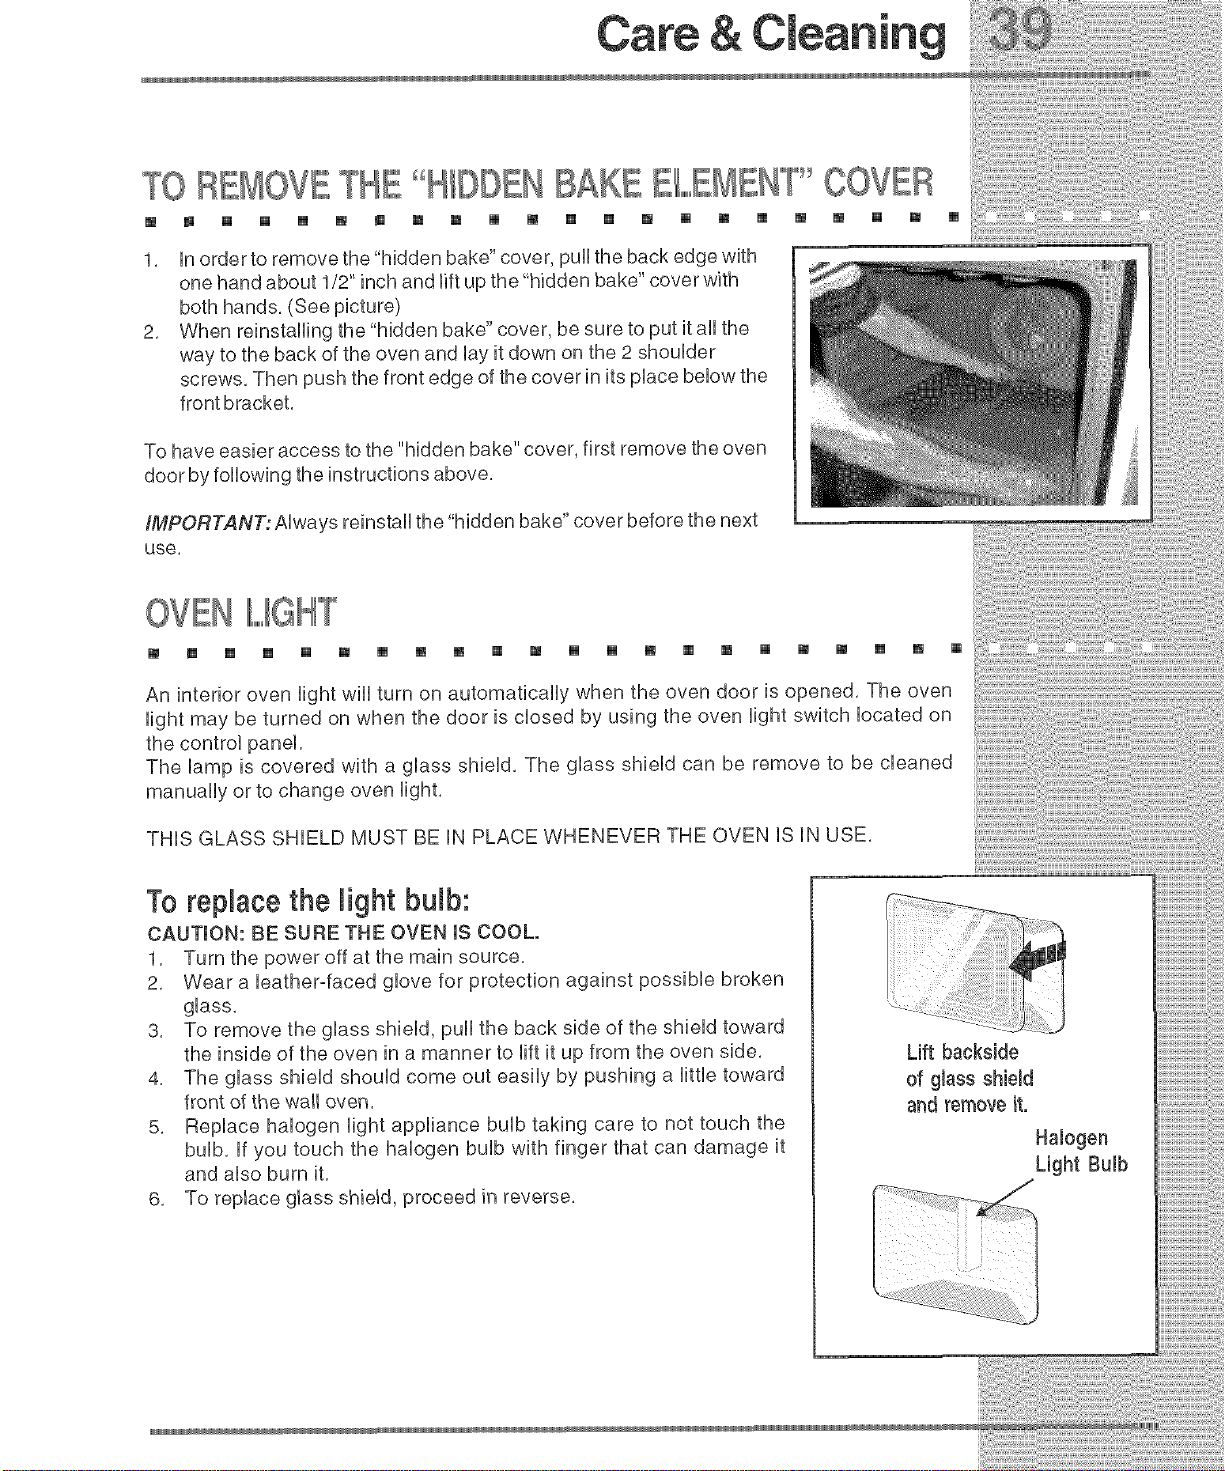
1. in order to remove the"hidden bake" cover, pull the back edge with
one hand about 1/2" inch and lift up the "hidden bake" cover with
both hands. (See picture)
2. When reinstalling the "hidden bake" cover, be sure to put it all the
way to the back of the oven and by it down on the 2 shoulder
screws. Then push the front edge of the cover in its place benow the
front bracket.
To have easier access to the "hidden bake" cover, first remove the oven
door by following the instructions above.
IMPORTANT: Always reinstall the hidden bake cover before the next
use,
OVEN
[] B [] [] [] [] [] [] [] [] [] [] [] [] [] [] [] [] [] [] [] []
An interior oven light wiii turn on automatically when the oven door is opened, The oven
light may be turned on when the door is closed by using the oven light switch located on
the control panel,
The lamp is covered with a glass shield, The glass shield can be remove to be cleaned
manually or to change oven light,
THiS GLASS SHIELD MUST BE iN PLACE WHENEVER THE OVEN iS iN USE,
To replace the light bulb:
CAUTION: BE SURE THE OVEN IS COOL.
1. Turn the power off at the main source.
2. Wear a bather-faced glove for protection against possible broken
glass.
3. To remove the glass shield, pull the back side of the shield toward
the inside of the oven in a manner to lift it up from the oven side.
4. The glass shield should come out easily by pushing a little toward
front of the wall oven.
5. Replace halogen light appliance bulb taking care to not touch the
bulb. if you touch the halogen bulb with finger that can damage it
and also burn it.
6. To replace glass shield, proceed in reverse.
Lift backside
of glass shiemd
and remove it.
Halogen
Light Bulb

Oven Temperature
[] [] m [] [] [] [] m [] m [] [] [] [] [] m [] m m [] [] []
Figure 1
Figure 2
Figure 3
The temperature in the oven has been preset at the factory, When first using the oven, be
sure to follow recipe times and temperatures, if you think the oven is too hot or too cool, the
temperature in the oven can be adjusted, Before adjusting, test a recipe by using a
temperature setting that is higher or lower than the recommended temperature,
The baking results should help you to decide how much of an adjustment is needed,
To adjust the upper oven temperature:
1, Press @ or (_, (Note: To adjust the lower oven instead of the
upper oven, press @ or @ at this time,)
2, Press and hold _ or @ for 6 seconds, The preset adjustment
number will appear and "UPPER"will flash in the display (Figure 1),
3, To increase the temperature use the number pads to enter the desired
change, (Example 30°F) (_ (_) (Figure 2), The temperature may be
increased as much as 35°F (19°C), To decrease the temperature use
the number pads to enter the desired change, (Example -30°F) (_
C) and then press _ or _ (Figure 3), The temperature may be
decreased as much as 35°F (19°C),
4, Press (_) to accept the temperature change and the display will
_T_T
return to the time of day, Press @ or@ to reject the change if
_K_EL _NCEL
necessary,
tO
OVEN COHTBOL BEEPS £ND D SPLAYS"F CODE
m [] [] [] [] [] [] [] [] [] [] [] [] [] [] [] [] [] [] [] [] []
Electronic control has detected a fault condition, Push CANCEL pad to clear the
display and stop the display from beeping, Try to set a cooing function, if a fault
reoccurs, record the fault number, push the CANCEL pad and contact an authorized
servicer,
[] [] [] [] [] [] [] [] [] [] [] [] [] [] [] [] [] [] [] [] [] []
o Place oven rack in center of oven, Place a level on the oven rack, Contact installing
agent if rack and cabinet cutout flooring are not level,
Kitchen cabinet misalignment may make oven appear to be not level, Be sure cabinets
are square and level, Contact cabinet maker to correct problem,
ENTIIIREOVEN DOES NOT OIIP A
[] [] [] [] [] [] [] [] [] [] [] [] [] [] [] [] [] [] [] [] [] []
When the oven is first plugged in, or when the power supply to the oven has been
interrupted, the display wiii flash, The oven cannot be programmed until the clock is
set,
Be sure electrical cord is securely connected into the electrical junction box,
Cord/plug is not installed and/or connected, Cord is not supplied with oven, Contact
your dealer, installing agent or authorized servicer,
Service wiring not compbte, Contact your dealer, installing agent or authorized
servicer,
Power outage, Check house lights to be sure, Call your local electric company,
o Short in cord/plug, Replace cord/plug,
to Common
Controls are not set properly, See instructions to set the controls,
House fuse has blown or circuit breaker has tripped immediately following installation,
House fuse may not be fully engaged, Check fuse and screw or engage circuit breaker
securely,
OVENIII,,,,,,,,,,IIIIGHTDOESNOTWORK
[] [] [] [] [] [] [] [] [] [] [] [] [] [] [] [] [] [] [] [] []
• Burned-out or loose bulb, Follow the instructions under Oven Light to replace or
tighten the bulb.
Mmt_ _
IILF ClIII,,,,,,,,,,EANINGCYClIIF,,,,,,,,,,EDOESNOTWORK
[] m [] m [] [] m [] m [] [] m [] m m [] m [] []
o Make sure the oven door is closed,
o Controls not set properly, Follow steps under"Using the Self-Clean Feature",
[] []
OVENSMOKESEXOESSIVEIll,,,,,,,,,Y©UR NGBROIllL,,,,,IIING
[] [] [] [] [] [] [] [] [] [] [] [] [] [] [] [] [] [] [] [] [] []
Oven door is closed. Door should be open during broiling.
Meat too close to the broiler element. Reposition the rack to provide more clearance
between the meat and the broiler. Preheat broil element for quick searing operation.
Meat not properly prepared. Remove excess fat from meat. Cut remaining fatty edges
to prevent curling, but do not cut into the lean.
Broiler pan insert on broiler pan wrong side-up. Grease does not drain into broiler pan.
Always place the broiler pan insert on the broiler pan with the ribs up and the slots
down to allow grease to drip into the pan.
Broiler pan used without broiler pan insert or broiler pan insert cover with aluminum foil.
DO NOT use the broiler pan without the broiler pan insert or cover the broiler pan insert
with aluminum foil.
Oven needs to be cleaned. Grease has built up on oven surfaces. Regular cleaning is
necessary when broiling frequently. Grease or food spatters cause excessive smoking.
to
SOL, NOTCOMPIL EIIIL,,,YREMOVEDA_::**_""'_""EBSEIll,,,,,,,,,,F'_
OLEANI[INGCYCLE1119COMPIL
m [] [] [] [] [] [] [] [] [] [] [] [] [] [] [] [] [] [] [] [] []
o Failure to clean bottom, front, top of oven, frame of oven or door area outside oven seal,
These areas are not in the self-cleaning area, but get hot enough to burn on residue,
Clean these areas before the self-cleaning cycle is started, Burned on residue can be
cleaned with a stiff nylon brush and water or a nylon scrubber, Be careful not to
damage the oven gasket,
, Excessive spillovers in oven, Set the self-clean cycle for Iongercleaning time,
IIPOOBBAKIIINGR UIIL,
[] [] [] [] [] [] [] [] [] [] [] [] [] [] [] [] [] [] [] [] [] []
o Many factors affect baking results, See Baking for hints, causes and corrections, See
Adjusting Oven Temperature.
IIFIIIf,,,,,,,,,,£MESIIINSDEOVENORSMOKEFROMVENT
[] [] [] [] [] [] [] [] [] [] [] [] [] [] [] [] [] [] [] [] [] []
o Excessive spillovers in oven, This is normal, especially for high oven temperatures, pie
spillovers orfor large amounts of grease on bottom of oven, Wipe up excessive
spillovers,
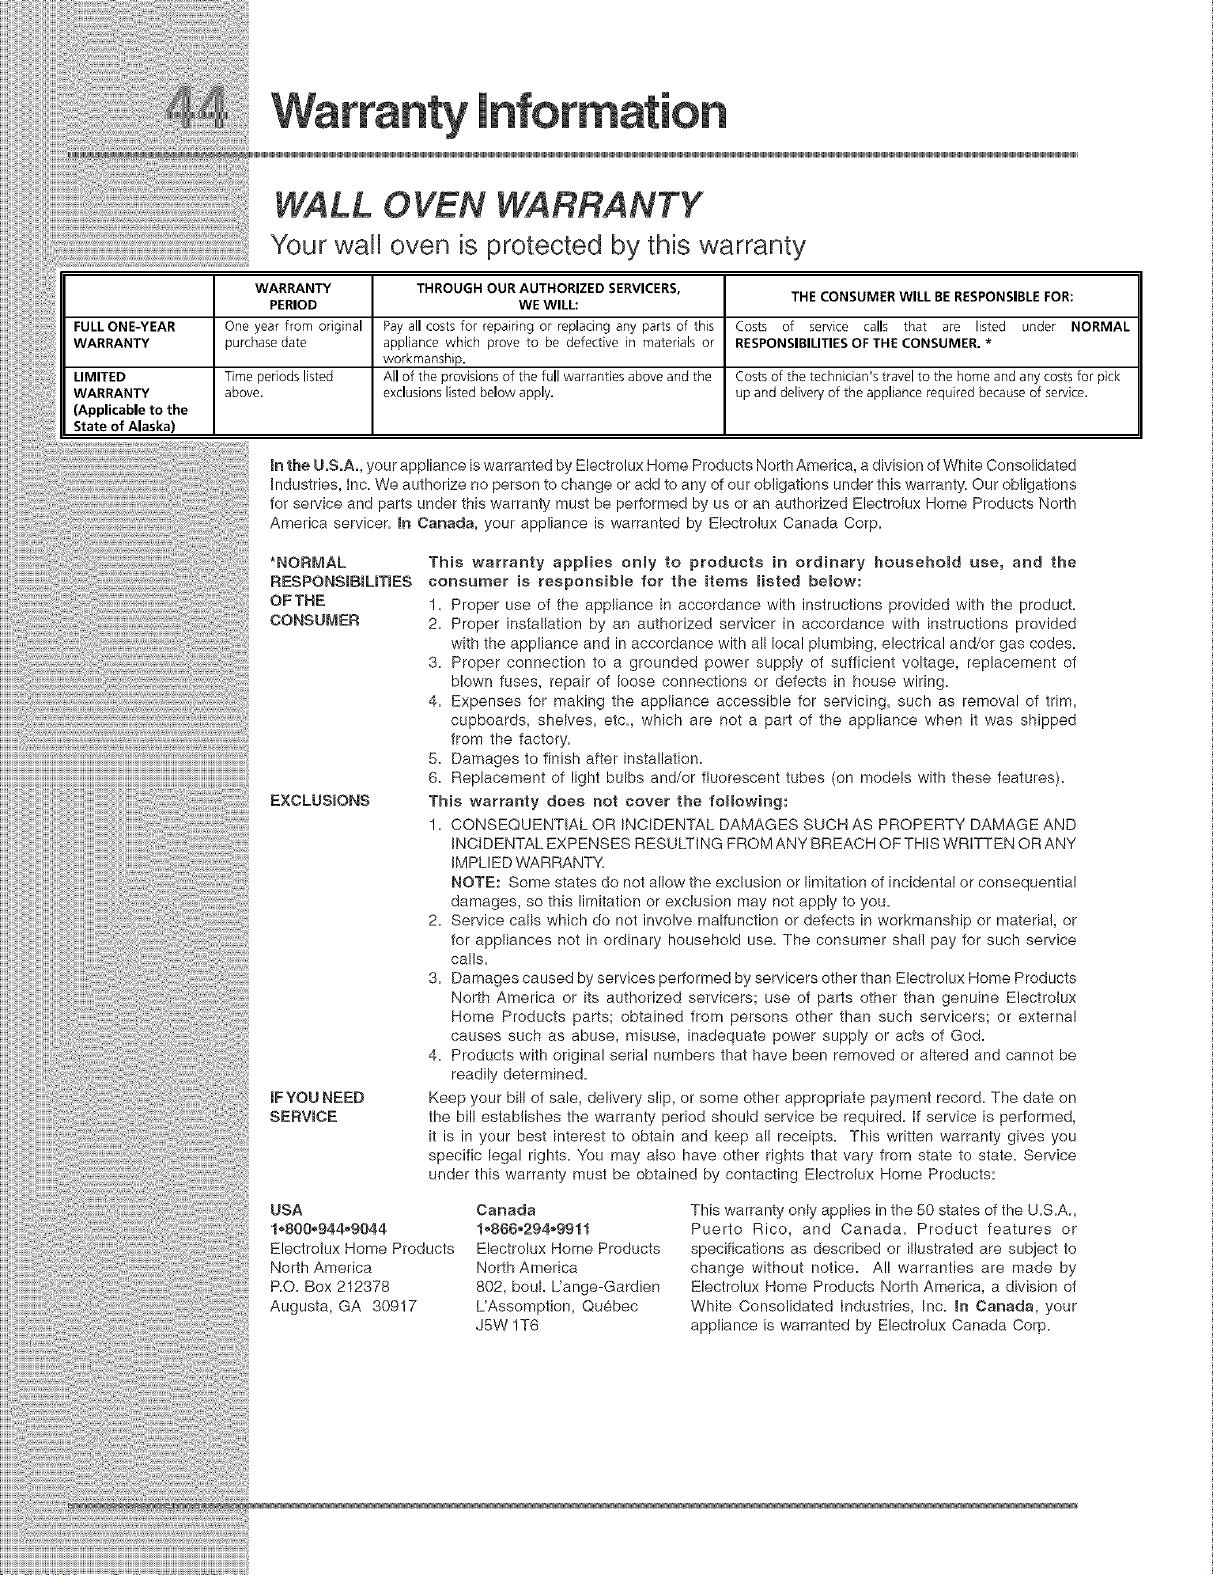
WALL 0 VEN WARRANTY
Your wall oven is protected by this warranty
WARRANTY THROUGH OUR AUTHORIZED SERVICERS, THE CONSUMER WILL BE RESPONSIBLE FOR:
PERIOD WE WILL:
FULL ONE-YEAR One year from original Pay all costs for repairing or replacing any parts of this Costs of service calls that are listed under NORMAL
WARRANTY purchase date appliance which prove to be defective in materials or RESPONSIBILITIES OF THE CONSUMER. *
workmanship.
LIMITED Time periods listed All of the provisions of the full warranties above and the Costs of the technician's travel to the home and any costs for pick
WARRANTY above, exclusions listed below apply, up and delivery of the appliance required because of service.
(Applicable to the
State of Alaska)
In the U.S.A., your appliance is warranted by Electrolux Home Products North America, a division of White Consolidated
Industries, Inc. We authorize no person to change or add to any of our obligations under this warranty. Our obligations
for service and parts under this warranty must be performed by us or an authorized Electrolux Home Products North
America servicer. In Canada, your appliance is warranted by Electrolux Canada Corp.
*NORMAL
RESPONSIBILmES
OFTHE
CONSUMER
EXCLUSIONS
IFYOU NEED
SERVICE
This warranty applies only to products in ordinary household use, and the
consumer is responsible for the items listed below:
1. Proper use of the appliance in accordance with instructions provided with the product.
2. Proper installation by an authorized servicer in accordance with instructions provided
with the appliance and in accordance with all local plumbing, electrical and/or gas codes.
3. Proper connection to a grounded power supply of sufficient voltage, replacement of
blown fuses, repair of loose connections or defects in house wiring.
4. Expenses for making the appliance accessible for servicing, such as removal of trim,
cupboards, shelves, etc. which are not a part of the appliance when it was shipped
from the factory.
8. Damages to finish after installation.
8. Replacement of light bulbs and/or fluorescent tubes (on models with these features).
This warranty does not cover the following:
1. CONSEQUENTIAL OR INCIDENTAL DAMAGES SUCH AS PROPERTY DAMAGE AND
INCIDENTAL EXPENSES RESULTING PROM ANY BREACH OF THIS WRITTEN OR ANY
IMPLIED WARRANTY.
NOTE: Some states do not allow the exclusion or limitation of incidental or consequential
damages, so this limitation or exclusion may not apply to you.
2. Service calls which do not involve malfunction or defects in workmanship or materia!, or
for appliances not in ordinary household use. The consumer shall pay for such service
calls.
3. Damages caused by services performed by servicers other than Electrolux Home Products
North America or its authorized servicers; use of parts other than genuine Electrotux
Home Products parts; obtained from persons other than such servicers; or external
causes such as abuse, misuse, inadequate power supply or acts of God.
4. Products with original serial numbers that have been removed or altered and cannot be
readily determined.
Keep your bill of sale, delivery slip, or some other appropriate payment record. The date on
the bill establishes the warranty period should service be required. If service is performed,
it is in your best interest to obtain and keep all receipts. This written warranty gives you
specific legal rights. You may also have other rights that vary from state to state. Service
under this warranty must be obtained by contacting Electrolux Home Products:
USA
1.800_944_9044
Electrolux Home Products
North America
RO. Box 212378
Augusta, GA 30917
Canada
1_888_294_9911
Electrolux Home Products
North America
802, bouk Uange-Gardien
L'Assomption, Quebec
J5W 1T8
This warranty only applies in the 50 states of the U.S.A.
Puerto Rico, and Canada. Product features or
specifications as described or illustrated are subject to
change without notice. All warranties are made by
Electrolux Home Products North America, a division of
White Consolidated Industries, Inc. mnCanada, your
appliance is warranted by Electrolux Canada Corp.