KitchenAJd ®
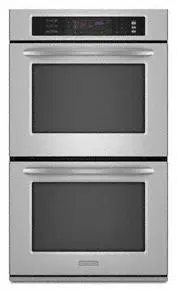
BUILT-INELECIRICCONVECTION SINGLE
AND DOUBLEOVENS
Use & Care Guide
In the U.S.A, for questions about features, operation, pa_formance, parts, accessories or service, call: 1-800-422-1230
In Canada, for product-related questions call 1-800-461-5681, for parts, accessories, installation and service call: 1-800-8074777 or
visit our website at...
www.kitchenaid.com or www.kitchenaid.com/canada
Table of Contents .......................................................................................................... 2
Models KEBC107 KEBC177 KEBC208 KEBC278 KEBS107 KEBS147 KEB8177 KEBS207
KEBS206 KEBS247 KEBS2T/ KEBS278 YK]EBS107 YIKEBS177 YIKEB$_08
,I,161852B

i1,, , , m,,, ,,,,,. ,i,i
TABLE OF CONTENTS
OVEN SAFETY .................................................................. 3
PARTS AND FEATURES .................................................. 5
ELECTRONIC OVEN CONTROL ..................................... 6
St_ .,o..o. * ..._..o,_ ............ *.......,o...* ............ *............ ,H..o.*...--...Hu...*,6
LowerOvenCancel/ Off,
UpperOvenCancel/ Offand CancelOff....................................6
Clock............................................................................................6
F_mtmhett;mdCeLqtus.................................................................7
ContndLock.........................,..............,..............,..............,..........7
OvenTemperatureControl..........................................................8
SabbathMode..............................................................................8
OVEN USE ........................................................................... 9
AluminumFoil...............................................................................9
PositioningRacksandBakeware................................................9
Bakeware....................................................................................10
MeetThermometer.....................................................................10
OvenVent(s)...............................................................................10
BakingandRoasting..................................................................11
ConvectionBaking.....................................................................11
ConvectionRoasting..................................................................12
Maxiand EconoBroiling............................................................12
ConvectionBroiling....................................................................13
ConvectFullMeal ......................................................................14
ConvectionTemperatureConversion........................................15
Dehydrating................................................................................ 16
ProofingBreed...........................................................................16
TemperatureProbe....................................................................17
Tin'rodCooking......................................................................:....18
OVEN CARE. .................................................................... 19
S_-OeaninoCyOe....................................................................19
c_r_g ......................................................................................20
o.m Ughts................................................................................21
OvenDoor..................................................................................21
TROUBLESHOOTING .................................................. 22
ASSISTANCE OR SERVICE ............................................. 23
IntheU.S.A................................................................................23
In Canada...................................................................................23
WARRANTY ...................................................................... 24
2
OVEN SAFEI
Your safety end the safety of others are very Important.
We have provided many important safety messages in this manual and on your appliance, Always read and obey all
safety messages,
This isthe safety alert symbol.
This symbol alerts you to potential hazards that can killor hurt you and others.
All safety messages will follow the safety alert symbol and either the word "DANGER" or
=WARNING." These words mean:
You can be killed or seriously Injured if you don't
Immediately follow instructions.
You can be killed or seriously injured if you don't
follow Instructions.
All safety messages willtell you what the potential hazard is, tell you how to reduce the chance of injury, and tell you
what can happen ifthe instructionsare not followed.
IMPORTANT SAFETY INSTRUCTIONS
WARNING: To reduce the risk of fire, electrical
shock, injury to persons, or damage when using the
oven, follow basic precautions, including the following:
• Proper Installation - Be sure the oven is propedy
installed and grounded by a qualified technician.
• Never Use the Oven for Warming or Heating the
Room.
• Do Not Leave Children Alone - Children should not
be left alone or unattended in area where oven is in
use. They should never be allowed to sit or stand
on any part of the oven.
• Wear Proper Apparel - Loose-fitting or hanging
garments should never be wom while using the oven.
• User Servicing - Do not repair or replace any part of
the oven unless specifically recommended in the
manual. All other servicing should be referred to a
qualified technician.
• Storage in Oven - Flammable materials should not
be stored in an oven.
• Do Not Use Water on Grease Fires - Smother fire or
flame or use dry chemical or foam-type extinguisher.
• Use Only Dry Potholders - Moist or damp potholders
on hot surfaces may result in bums from steam. Do
not let potholder touch hot heating elements. Do not
use a towel or other bulky cloth.
• Use Care When Opening Door - Let hot air or steam
escape before removing or replacing food.
• Do Not Heat Unopened Food Containers - Build-up
of pressure may cause container to burst and result
in injury.
• Keep Oven Vent Ducts Unobstructed.
• Placement of Oven Racks - Always place oven recks
in desired location while oven is cool. If rack must be
moved while oven is hot, do not let potholder contact
hot heating element in oven.
• DO NOT TOUCH HEATING ELEMENTS OR
INTERIOR SURFACES OF OVEN - Heating
elements may be hot even though they are dark in
color. Interior surfaces of an oven become hot
enough to cause bums. Dudng and after use, do
not touch, or let clothing or other flammable materials
contact heating elements or interior surfaces of oven
until they have had sufficient time to cool. Other
surfaces of the oven may become hot enough to
cause bums - among these surfaces are oven vent
openings and surfaces near these openings, oven
doors, and windows of oven doors.
SAVE THESE INSTRUCTIONS
3
IMPORTANT SAFETY INSTRUCTIONS
For serf-deaning ovens:
• Do Not Clean Door Gasket - The door gasket is
essential for a good seal. Care should be taken not
to rub, damage, or move the gasket.
• Do Not Use Oven Cleaners - No commercial oven
cleaner or oven liner protective coating of any kind
should be used in or around any part of the oven.
• Clean Only Parts Listed in Manual.
• Before Self-Cleaning the Oven - Remove broiler pan
and other utensils.
SAVE THESE INSTRUCTIONS
The Califomia Safe Ddnking Water and Toxic Enforcement Act requires the Governor of Califomia to publish a list
of substances known to the State of California to cause cancer, birth defects, or other reproductive harm, and
Cequires businesses to warn of potential exposure to such substances.
WARNING: Thisproduct contains a chemical known to the State of California to cause cancer, birth defects, or
other reproductive harm.
This appliance can cause low-level exposure to some of the substances listed, including benzene, formaldehyde,
carbon monoxide, and toluene,
4
i
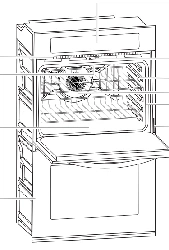
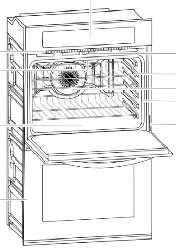
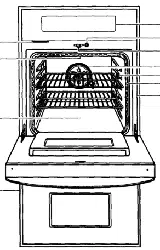
PARTSAND FEATURES
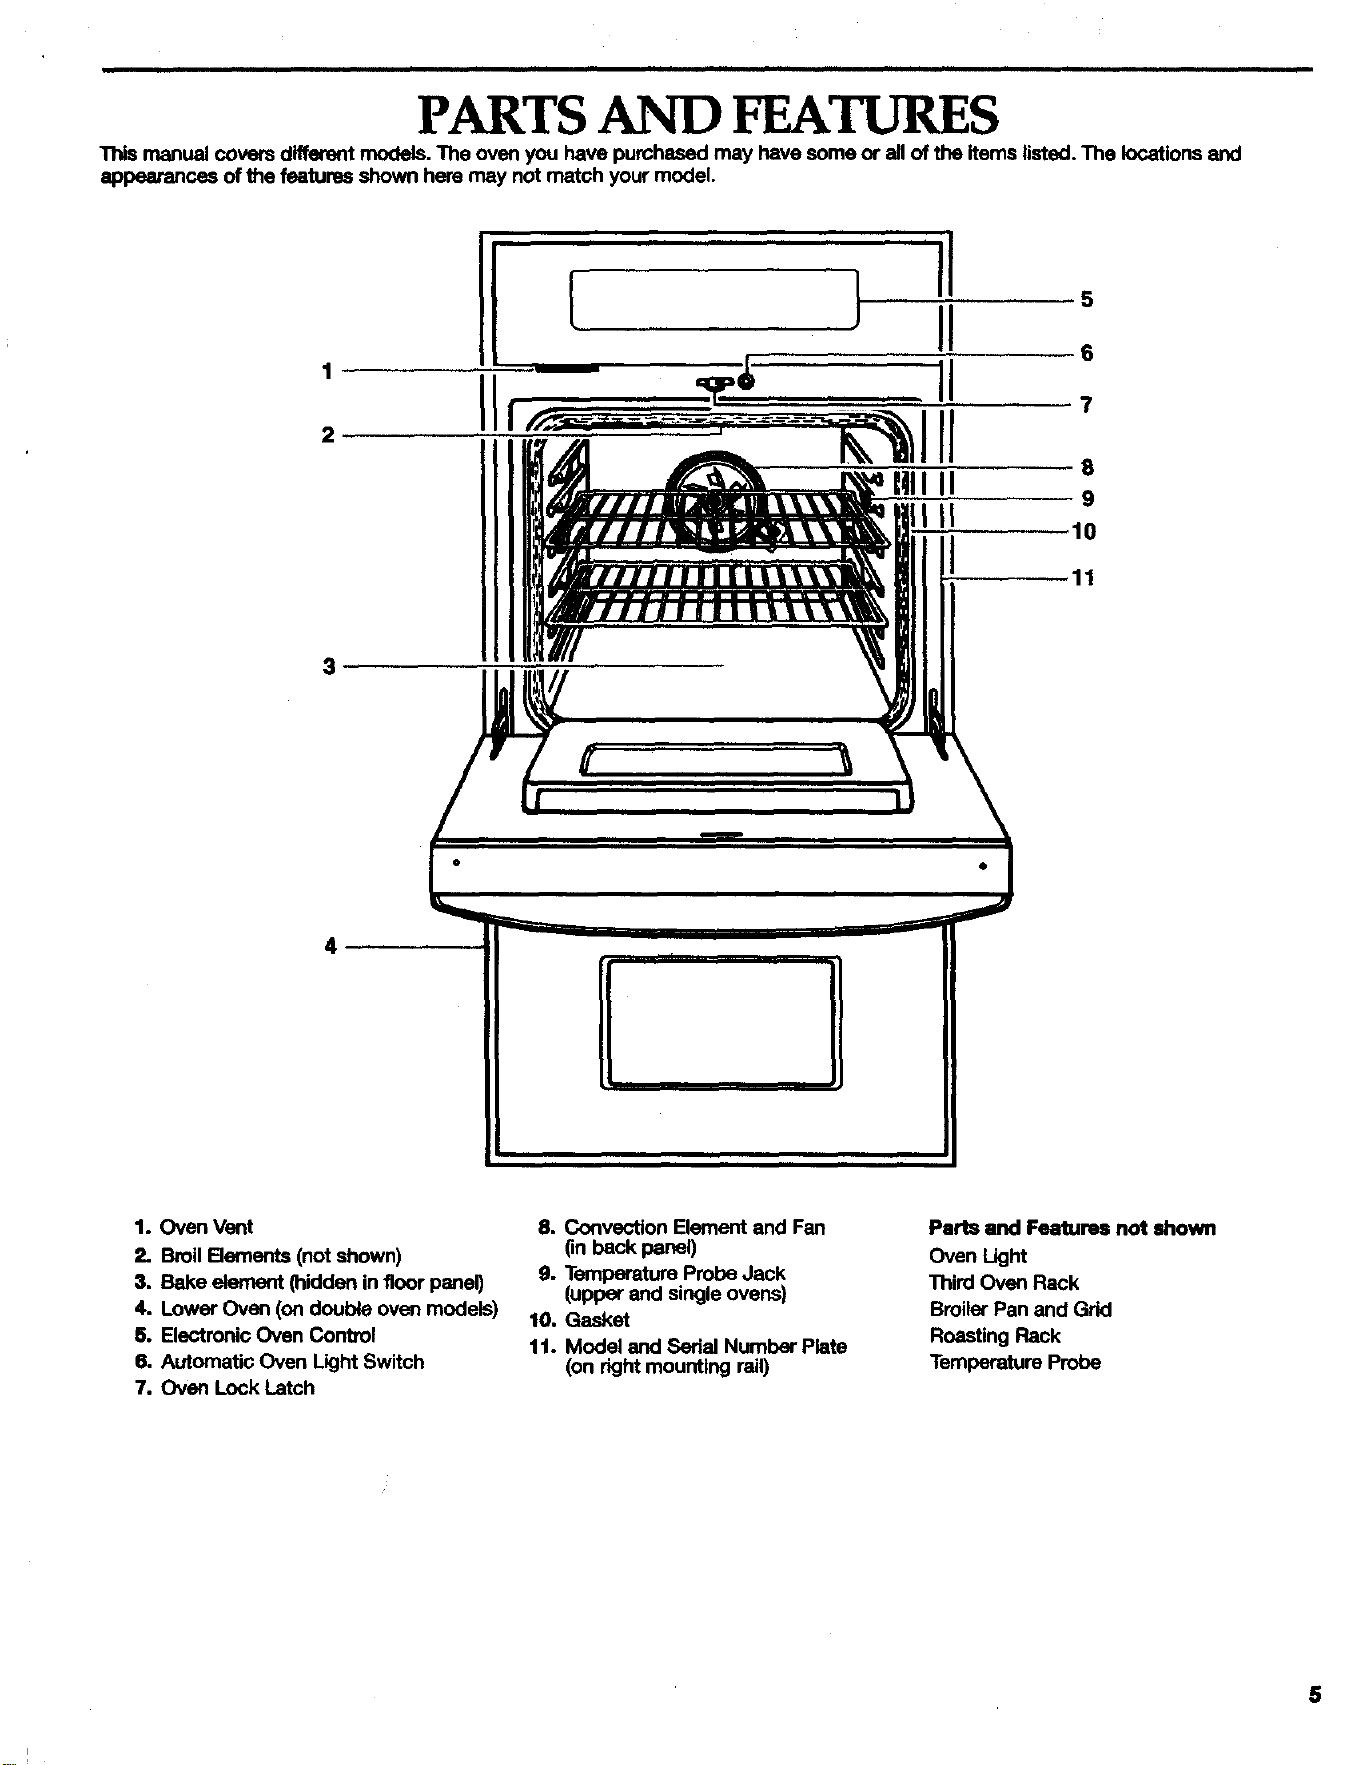
Thismanualcoversdifferent models.The ovenyou havepurchasedmay havesomeor all oftheitemslisted. The locationsand
appeerence_ofthe featuresshownhemmay not matchyourmodel.
1
2
11
3
4
1. OvenVent
2. BroilBements (notshown)
3. Bakeelement(hiddeninfloor penal)
4. LowerOven (ondoubleoven models)
5. ElectronicOven Control
6. AutomaticOven LightSwitch
7. Oven Lock Latch
8. Convection Element and Fen
(in back panel)
9. Temperature Probe Jack
(upper and single ovens)
10, Gasket
11. Model and Serial Numbar Plste
(on right mounting rail)
Parts and Features not shown
Oven Light
Third Oven Rack
Broiler Pan and Grid
Roasting Rack
Temperature Probe
5
ELECTRONIC OVEN CONTROL
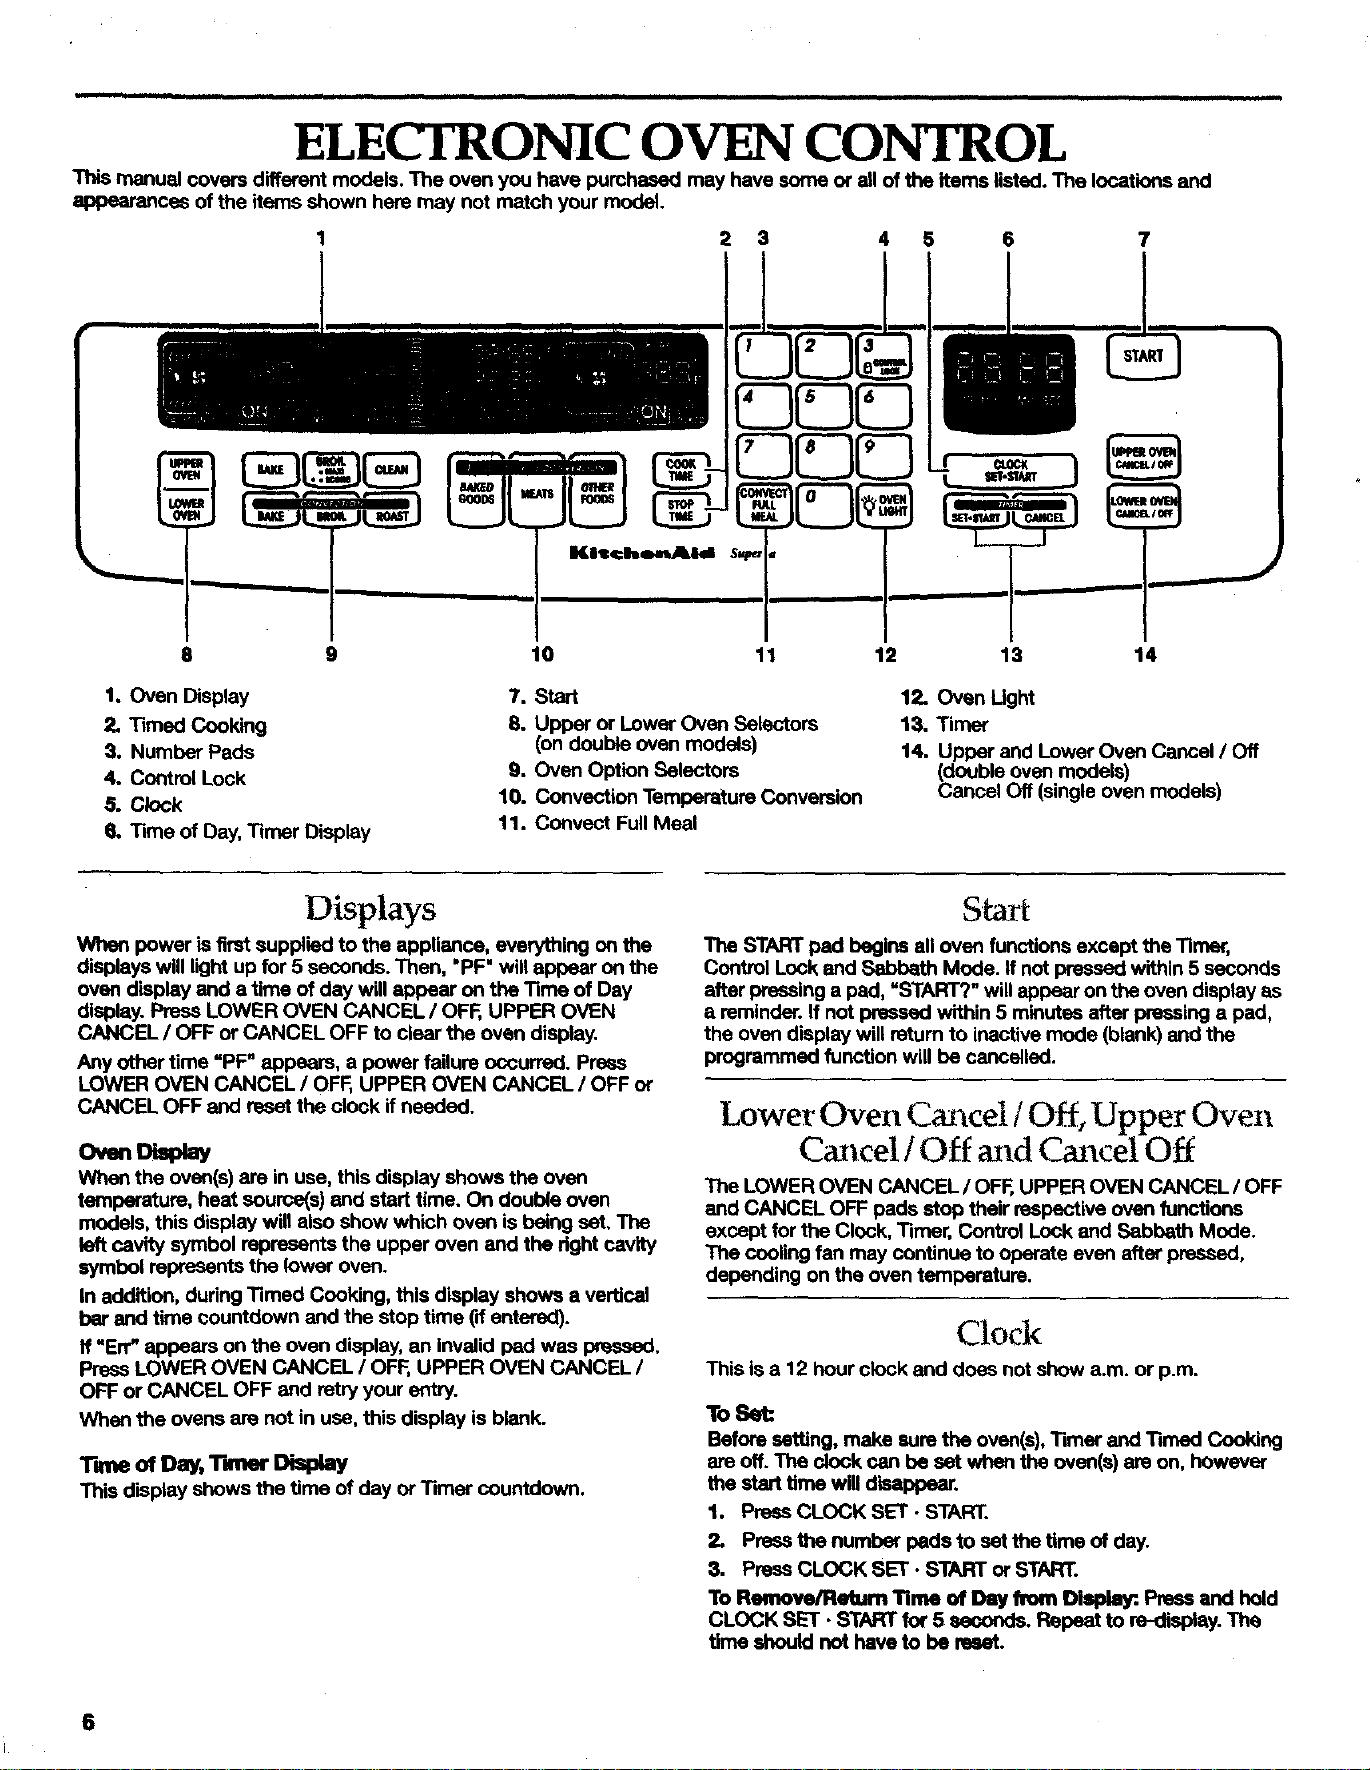
manualcoversdifferentmodels.The ovenyouhave pumhesedmay havesomeor all ofthe itemslisted.The locationsand
appearancesofthe itemsshownheremay not matchyourmodel.
1 2 3 4 5 6 7
9
1. OvenDisplay
2. Timed Cooking
3. NumberPads
4. ControlLock
,5. Clock
6. Tmle ofDay,Timer Display
10 11 12 13 14
7. Start
8. Upper or LowerOven Selectors
(ondoubleovenmodels)
9. Oven OptionSelectors
10. ConvectionTemperatureConversion
11. Cenvect FullMeal
12. Oven Ught
13. Timer
14. Upper and Lower Oven Cancel / Off
(_ouble oven models)
ancel Off (single oven models)
Displays
When power is first supplied to the appliance, everything on the
displays will light up for 5 seconds. Then, "PF" will appear on the
oven display end a time of day will appear on the Time of Day
display. Press LOWER OVEN CANCEL/OFF, UPPER OVEN
CANCEL / OFF or CANCEL OFF to clear the oven display.
Any other time =PF" appears, a power failure occurred. Prses
LOWER OVEN CANCEL / OFF, UPPER OVEN CANCEL / OFF or
CANCEL OFF and reset the clock if needed.
OvenD a ay
When the oven(s) are in use, this display shows the oven
temperature, heat source(s) end start time. On double oven
models, this display will also show which OVen is being set, The
left cavity symbol represents the upper oven and the dght cavity
symbol repr"_--=entsthe lower oven.
In addition, during Timed Cooking, this display shows a vertical
bar and time countdown end the stop time ('dentered).
If =Err= appears on the oven display, an invalid pad was pressed,
Press LOWER OVEN CANCEL / OFF,UPPER OVEN CANCEL /
OFF or CANCEL OFF end retry your entry.
When the ovens are not in use, this display is blank.
Time of Day, "rimer Display
This displayshowsthetime ofdayor Timer countdown.
The STARTpad beginsall ovenfunctions exceptthe Timer,
ControlLockend SabbathMode. ff notpressedwithin5 seconds
after pressinga pad,=START?"willappearontheovendisplayas
a reminder.Ifnot pressedwithin5 minutesafterpressinga pad,
the ovendisplaywillreturnto inactivemode(blank)end the
programmedfunction willbecancelled.
Lower Oven Cancel/Off, Upper Oven
Cancel / Off and Cm cel Off
The LOWER OVEN CANCEL / OF_, UPPER OVEN CANCEL / OFF
end CANCEL OFF pads stop their respective oven functions
except for the Clock, Timer, Control Lock end Sabbath Mode.
The cooling fan may continue to operate even after pressed,
depending on the oven temperature.
Clock
This is a 12 hour clock and does not show a.m. or p.m.
To Set:
Beforesetting, makesuretheoven(s),TimerandTimed Cooking
ere off.The alock cen be set whentheoven(s)m on, howaver
the starttimewilldisappear,
1. PressCLOCK SET- START.
2. Prass_e numberpads to set thetime ofday.
3. PressCLOCKSET. STARTorSTART.
To Remove/Return Time of Day h_m Di_. Pressand hold
CLOCKSET. STARTfor 5 seconds.Repeatto re-display.The
time shouldnotheve to bereset.
6
i

_ones
T_ areaudible_gea{s,indicatingthefol{owing:
()hetone
• V_idpex:lpress
• Oven ispreheated
• Functionhasbeenentered
_ tones
• Invalidpad press
Four tmtes
• End-of-cycle
• Reminder,repeatingeach minuteafterthe and-of-cycletones
Tone Volume
N I
The volume is preset at high, but can be changed to low.
To Change: Prees and hold the number pad "7" for 5 seconds. A
tone will sound and =Snd Lo" will appear on the oven display for
3 seconds. Repeat to change back to "Snd Hi".
All Tones (double oven models)
All of the above tones are preset on, but can be turned off.
To "rum Off/On: Press end held STOP TIME for 5 seconds. A
tone will sound and "Snd OFF" will appear on the oven display
for 3 seconds. Repeat to change beck to =Snd On".
ii L
Pad Press Tones (single oven models)
imll i i
The singletonessignalinga validpad pressarepreseton, but
canbe turnedoff.
To Turn Off/On: Press and hold STOP TIME for 5 seconds. A
tone will sound and "Snd oFF" will appear on the oven display for
3 seconds. Repeat to change back to "Snd on".
End-of-Cycleand ReminderTones
The Timer and Timed Cooking end-of-cycle and reminder tones
are preset on, but can be tumed off. However, on double oven
medals, if all tones have been turned off, the and-of-cycle and
reminder tones cannot be independently turned on.
To Turn Tones Off/On: Press and hold COOK TIME until a tone
sounds and "EOC OFF =appears on the display. Repeat to turn
beck on. "EOC On" will appear on the display.
Rerninder Tones Only
The Timer and Timed Cooking reminder tones are preset on, but
can be turned off. However, on double oven models, if ell tones
have been turned off, the reminder tones cannot be
independently tumed on.
To Turn Tones Off/On: Press and hold TIMER SET. START until
a tone sounds and "nAg OFF" appears on the display. Repeat to
turn beck on. "nAg On" will appear on the display.
Fahrenheit and Celsius
The temperatureispresetinFahrenheit,howeverit canbe
changedto Celsius.
To Change: Pressand hold BROIL. MAXl- •ECONO for 5
seconds.Atone willsoundand =C" willappearon the displayfor
3 seconds.Repe_t to changebackto Fahrenheit."F" willappear
onthe displayfor 3 seconds.
Whenin Fahrenheit,"°F"followstheoventemperature.
WheninCelsius,only"°" followsthe oventemperature.
_111_er
TheTimercanbe set in minutesand secondsor hoursand
minutesandcountsdownthe settime. It donsnotstartorstop
the oven.
To Set:
1. PressTIMER SET- START.
Pressagainto switchbetweenMIN/SEC and HR/MIN.
Ifno actionistakenafteroneminute,the displaywillreturnto
the timeofday mode.
2. Pressthenumberpadsto set thelength oftime.
3. PressTIMER SET. STARTorSTART.
If notpressedwithin5 seconds,the displaywillreturnto the
timeofday mode and the programmedfunctionwillbe
cancelled.
Whentheset timeends,"END"willappear inthe displayand
ifenabled,and-of-cycle tones willsound,then reminder
toneswillsoundevery minute.
4. PressTIMER CANCELanytimeto canceltheTimeror stop
the remindertones.
*Remember,ifa CancelOff pad is pr-,_ssd,the respective
ovenwilltum off.
The timecan be resetdudngcountdownby repeatingthe
above steps.
Control Lock
The Control Lock shuts down the control panel pads to prevant
unintanded use of the ovan(s). The Control Lock will remain set
after a power failure if set before the power failure.
When the control is locked, only the CLOCK SET- START,TIMER
SET. START,TIMER CANCEL and OVEN LIGHT pads will
function. On single oven models, CANCEL OFF will also function
if pressed for one second.
Before locking, make sure the oven(s), Timer, Timed Cooking and
Sabbath Mode are off. On double ovan models, the Control Lock
can be set if the oven(s) are on. The ovan(s) will automatically turn
off. Press a Cancel/Off pad to clear the display.
The Control Lock is preset unlocked, but can he locked.
To Lock/Unlock Control: Press and hold the number pad 3
CONTROL LOCK until "CONTROL LOCK" and a picture of a lock
appear on the display after about 3 seconds. Repeat to unlock
end remove =CONTROL LOCK" from the display.
7
Oven Temperature ContIol
IMPORTANT:. Do not use a thermometer to measure oven
temperature because opening the oven door end element or
btmler cycling may give incorrect readings.
oven(s) provide accurate temperatures; however, they may
cook faster or slower then your previous oven, so the
temperature calibration can be adjusted. It can be changed in
Fahrenheit or Celsius.
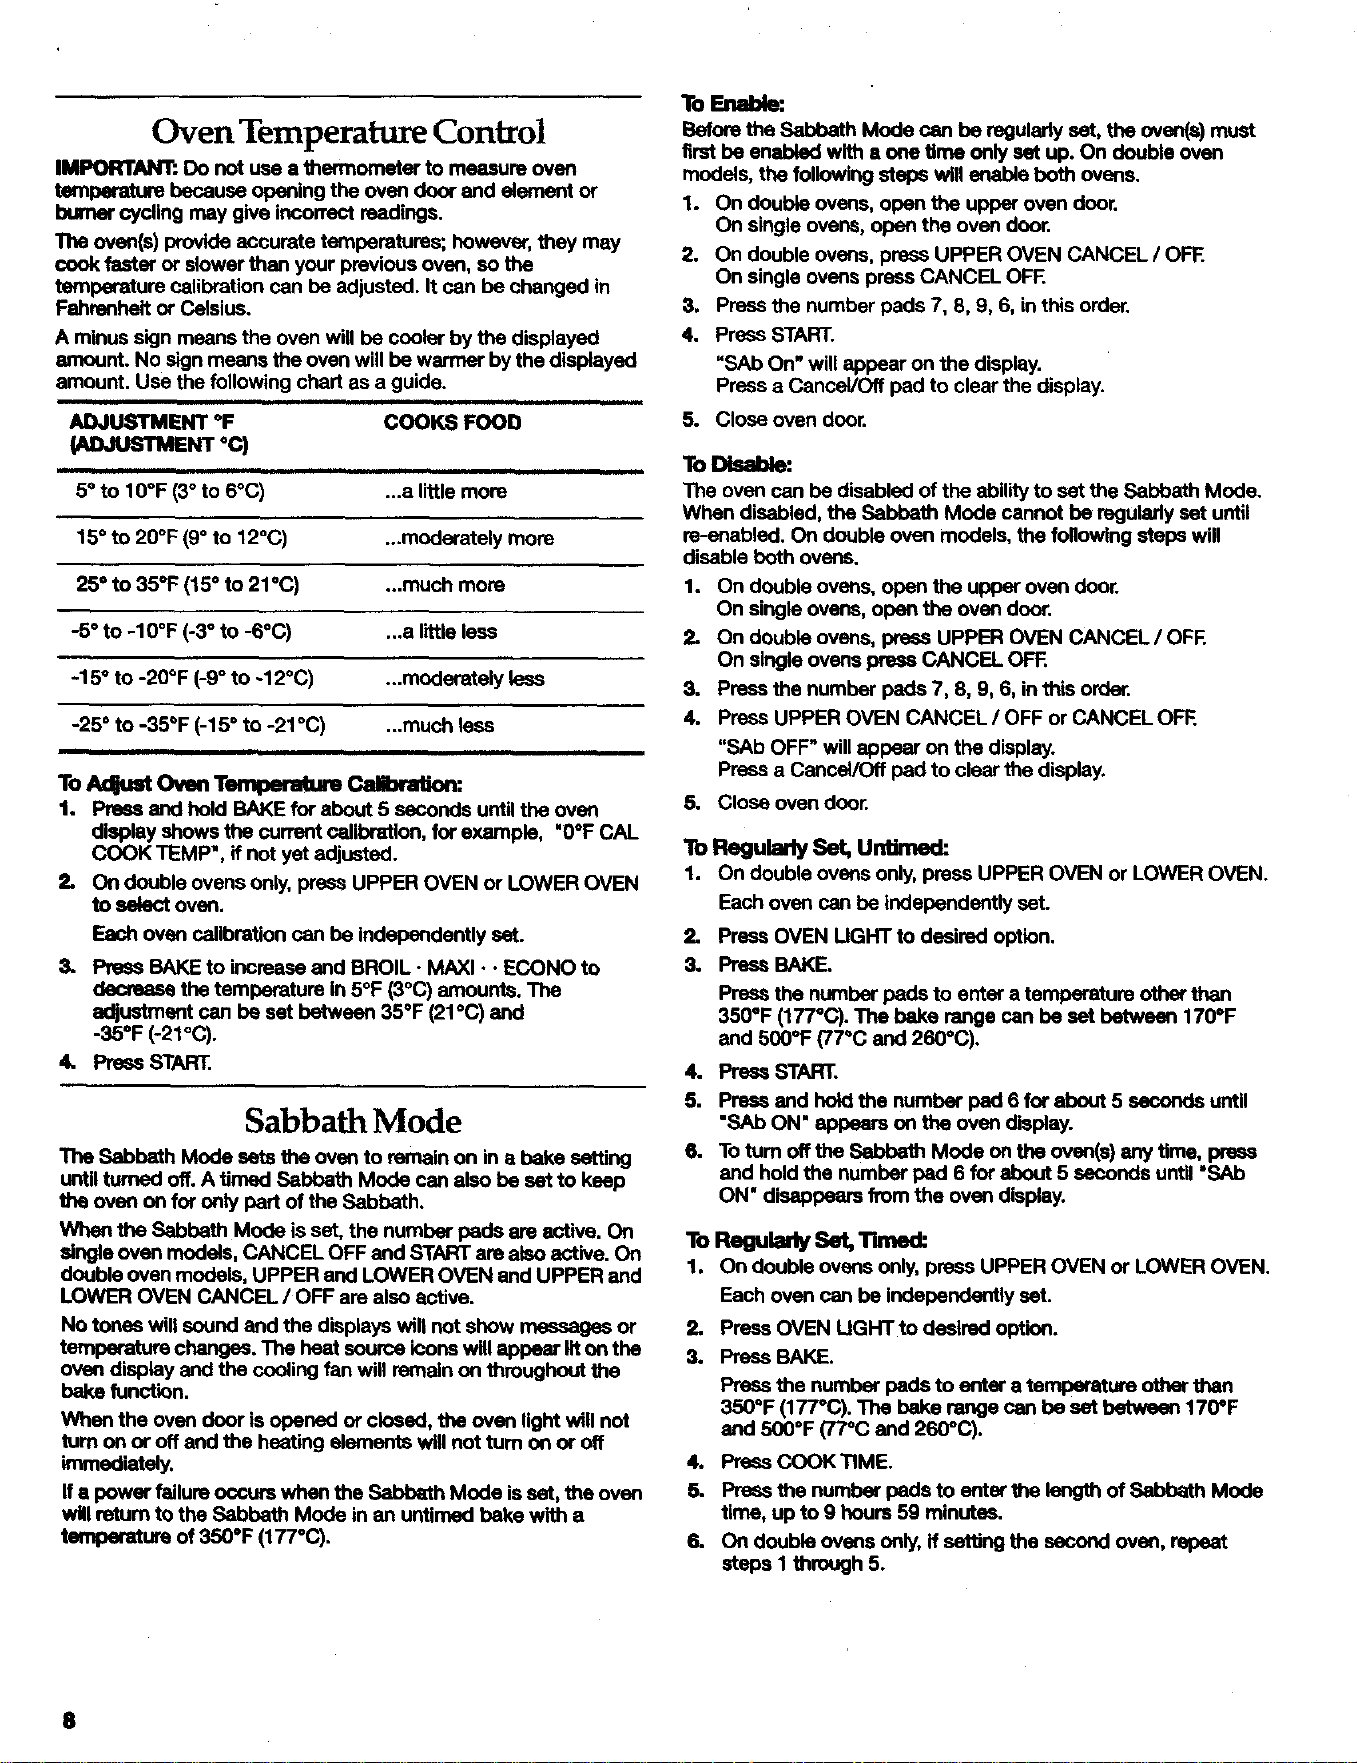
A minus sign means the oven will be cooler by the displayed
amount. No sign means the oven will be warmer by the displayed
amount. Use the following chert as a guide.
ADJUSTMENT °F
(ADJUSTMENT°C)
i
5=to 10°F (3° to 6°C)
COOKS FOOD
ii
...a little more
15" to 20°F (9° to 120C) ...moderately more
25° to 35°F (15° to 21°(3) ...much more
-5° to -10°F (-3° to -6°(3) .,.a little less
-15° to -20°F (-9° to -12°(3) ...moderately less
-25 ° to -35_F (-15 ° to -21°(3) ...much less
To Acqust Oven Temperatum Calibration:
1. Pre6s and hold BAKE for about 5 esconds until the oven
display shows the current calibration, for example, "O°F CAL
COOK TEMP', if not yet adjusted.
2, On double ovens only, press UPPER OVEN or LOWER OVEN
to select oven.
Each oven calibration can be independently set.
3. PressBAKEto increaseend BROIL- MAXI• •ECONO to
decreasethetemperaturein 5°F (3°C) amounts,The
adjustmentcanbe set between350F(21°C) and
-35°F(-21°(3).
4. PressSTART.
Sabbath Mode
The Sabbeth Mode sets the oven to remain on in a bake setting
until turned off. A timed Sabbath Mode can also be set to keep
the oven on for only part of the Sabbath.
When the Sabbath Mode is set, the number pads are active. On
single oven models, CANCEL OFF and START are also active. On
double oven models, UPPER and LOWER OVEN end UPPER and
LOWER OVEN CANCEL / OFF are also active.
No tones will sound and the displays wilt not show messages or
temperature chenges. The heat source k_onswill appear lit on the
oven display and the cooling fan will remain on throughout the
bake function.
Whenthe ovendoorisopenedor closed,the oven lightwillnot
turn on or offand the heatingelements will notturnon or off
knmed_ely.
ffa powerfailure occurswhenthe SabbathMode isset,theoven
willreturnto theSabbathMode in an untimedbakewith a
temperature of 350°F (177°(3).
ToEnable:
Before the Sabbath Mode can be regularly set, the overt(=)must
first be enabled with a one time only set up. On double oven
models, the following steps will enable both ovens.
1. On double ovens, open the upper oven door.
On single ovens, open the oven door.
2. On double ovens, press UPPER OVEN CANCEL / OFE
On single ovens press CANCEL OFF.
3. Press the number pads 7, 8, 9, 6, in this order.
4. Press START.
"SAb On" will appear on the display.
Press a Cancel/Off pad to clear the display.
5. Close oven door.
To Disable:
The oven can be disabled of the ability to set the Sabbath Mode.
When disabled, the Sabbath Mode cannot be regulmly set until
m-enabled. On double oven models, the following steps will
disable both ovens.
1. On double ovens, open the upper oven door.
On single ovens, open the oven door.
On double ovens, press UPPER OVEN CANCEL / OFF.
On single ovens press CANCEL OFE
3. Press the number pads 7, 8, 9, 6, in this order.
4. Press UPPER OVEN CANCEL / OFF or CANCEL O_.
"SAb OFF" will appear on the display.
Press a Cancel/Off pad to clear the display.
5. Close oven door.
ToRegulUsSet,unume
1. On double ovens only, press UPPER OVEN or LOWER OVEN.
Each oven can be independently set.
2. PressOVENUGHT to desiredo_ion.
3. PressBAKE.
4.
5.
6.
Pressthe numberpads to entera temperatureotherthan
350°F (177°C).The bake rangecanbe set between 1700F
and 5000F(77°C and2600C).
Pre_ START.
Press and hold the number pad 6 for about 5 seconds until
"SAb ON" appears on the oven dleplay.
To turn off the Sabbath Mode on the ovan(s) any time, press
and hold the number pad 6 for about 5 seconds until "SAb
ON" disappears from the oven display.
ToRegu dySet,TUne
1. On double ovens only, press UPPER OVEN or LOWER OVEN.
Each oven can be independently set.
2. Press OVEN LIGHTto desired option.
3. Press BAKE.
Press the number pads to enter a temperature other than
350°F (1770C). The bake range can be set botwesn 170=F
and 500°F (77_C and 260"C).
4. Press COOK TIME.
5. Press the number pads to enter the length of Sahbeth Mode
time, up to 9 hours 59 minutes.
6. On double ovens only, if setting the second ovan, repeat
steps I through 5.
8
7, PressSTART.
The starttime, stoptime and verticalbarcountdownwill
appearon thedisplay.
Ondoubleovens,onlytheupperoventimeswillappear.
Whentheupper ovenstop timeisreached,the displaywill
showthe loweroventimes, ifset fora Iongortime thanthe
upperoven.
Press and hold the number pad 6 for about 5 seconds until
"SAb ON" appears on the oven display.
8. Whenthe stop timeisreached,theoven willautomatically
turnoff.
g. To turn off the Sabbath Mode on the oven(s) any time, press
and hold the number pad 6 for about 5 seconds until "SAt)
ON" disappears from the oven display,
Temperature Change
The oven temperature can be changed when the oven(s) are in
the Sabbath Mode. No tones wilt sound and the display will not
change. The heating elements will not turn on or off for a random
time, anywhere from 16 to 24 seconds, after START is pressed. It
may take up to one-half hour for the oven to change temperature.
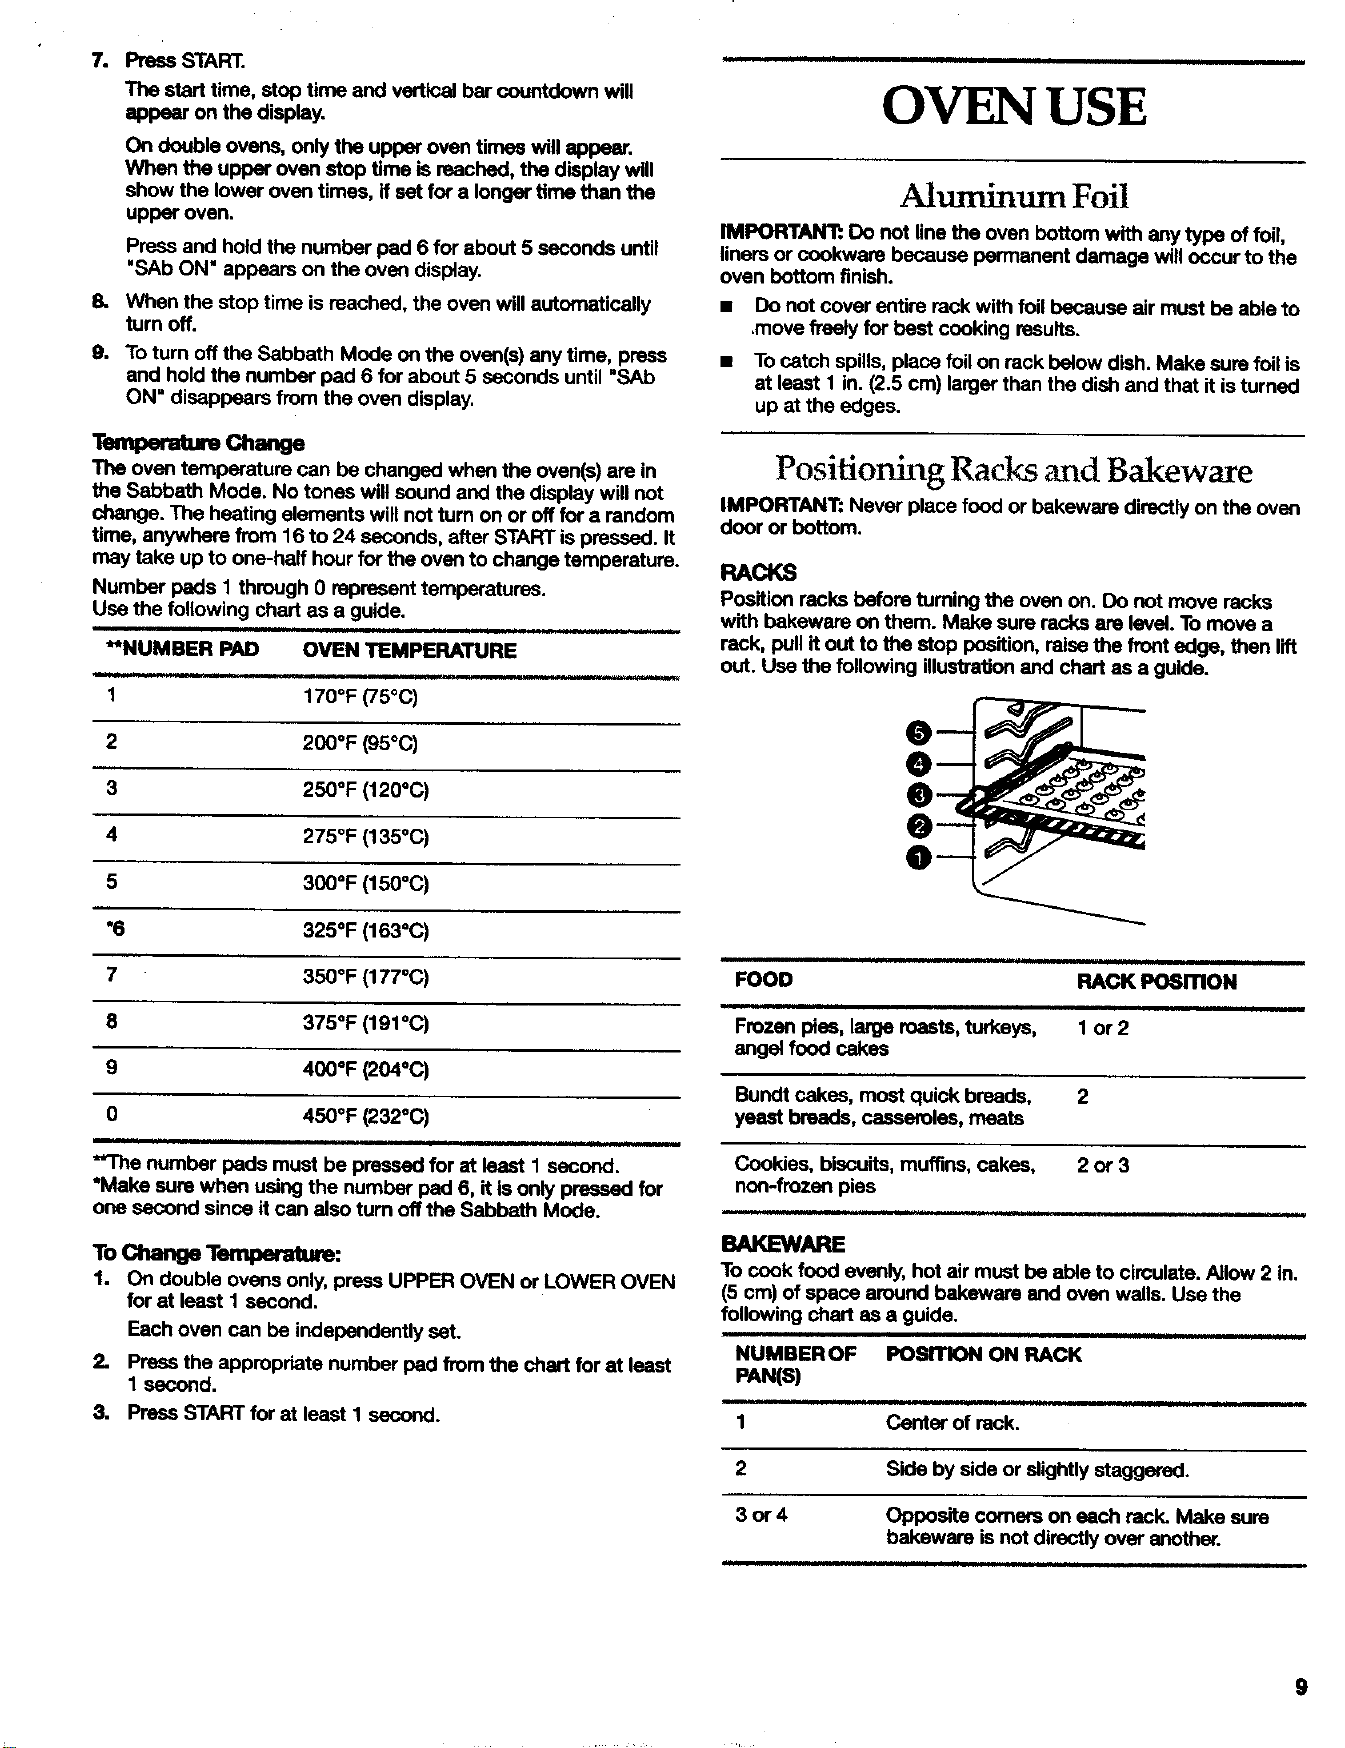
Number pads I through 0 represent temperatures.
Use the following chart as a guide.
i i,i i.
**NUMBER PAD OVEN TEMPERATURE
.=.1 i i
1 170°F (75°C)
2 200°F (95°C)
3 250°F (120°C)
4 2750F (135°C)
5 300°F (150°C)
*6 325°F (163°C)
7 350°F (177"C)
8 375°F (191°C)
9 400°F (204°C)
0 450°F (232oc)
**Thenumber padsmustbe pressedfor st leastI second.
*Make surewhen usingthe numberpad6, itis onlypressedfor
one secondsinceitcan alsoturnoffthe SabbathMode.
TochangeTemperature:
1. On double ovens only, press UPPER OVEN or LOWER OVEN
for at least I second.
Each oven can be independently set.
2. Press the appropriate number pad from the chart for at least
1 second.
3. Press START for at least I second.
OVENUSE
Ahtminum Foil
IMPORTANT: Do not line the oven bottom with any type of foil,
liners or cookwere because permanent damage will occur to the
oven bottom finish.
• Do not coverentirereckwithtoilbecauseair mustbe ableto
,movefreely for bestcookingresults.
• To catch spills, place foil on rack balow dish. Make sure foil is
at least 1 in. (2.5 cm) larger than the dish and that it is turned
up at the edges.
Positioning RacEs and Bakeware
IMPORTANT: Never place food or bakewere directly on the oven
door or bottom.
RACKS
Position racks before tuming the oven on. DO not move racks
with bakewere on them. Make sure racks are level. To move a
rack, pull if out to the stop position, raise the front edge, then lift
out. Use the following illustration and chart as a guide.
i
FOOD RACK PosmoN
Frozenpies,largeroasts,turkeys,
angelfood cakes
1 or2
Bundtcakes,mostquickbreads, 2
yeastbreads,casseroles,meats
Cookies,biscuits,muffins,cakes, 2 or 3
non-frozenpies
BAKEWARE
Tocookfood evenly,hotair mustbe ableto circulate.Allow2 in.
(5 cm) ofspacearoundbakewereandovenwalls.Usethe
followingchart as a guide.
NUMBEROF POSITION ON RACK
PAN(S)
1 Center of rack.
2 Side by side or slightly staggered.
3or4
,H
Opposite comers on each rack. Make sure
bakewere isnot directly over another.
9
Bakeware
The bakewere matedal affects cooking results. Follow
ma_ufaofurer's recommendations and use the bakeware size
recommended in the recipe. Use the following chart as a guide.
BAKEWARE/ RECOMMENDATIONS
RESULTS
i ill i
Light colored • Use temperalure end time
aluminum recommended in recipe.
• Light golden
crusts
• Even browning
Dark aluminum
and other
bakeware with
dark, dull and/or
non-stick finish
• Brown,crisp
crusts
• May reduce baking temperatures
25°F (15°C).
• Use suggested baking time.
• For pies, breads and casseroles, use
temperature recommended In
recipe.
"• Place rack in cerrter of oven.
Insulated cookie
sheets or baking
pans
• Littleorno
bottom
browning
• Place in the bottom third of oven.
• May need to increase baking time.
Stainless steel • May need to increase baking time,
1 Light, golden
crusts
• Uneven
browning
_bl)llewJre • Foltow menufacturer's instructions.
• Crisp crusts
• May reduce baking temperatures
glassware, 25°F (15"C).
coram_e gla_ or
ceramic
• Brown, crisp
crusts
Meat Thermometer
On models without a temperature probe, alweys rebj on a me_
thermometer to determine donensss of meat and poultry.The
internal temperature, not appearance, is what counts. A meat
thermometer is not supplied with this appliance.
• Insert the thermometer into the center of the thickest portion
of the meat or inner thigh or breast of poultry. The tip of the
thermometer should not touch fat, bone or gristle.
• After reading the thermometer once, push it into the meat 1/z
in. (2 cm) more and read again. If the temperature drops,
cook the meat or poultry longer.
• Check pork and poultry in two or three places,
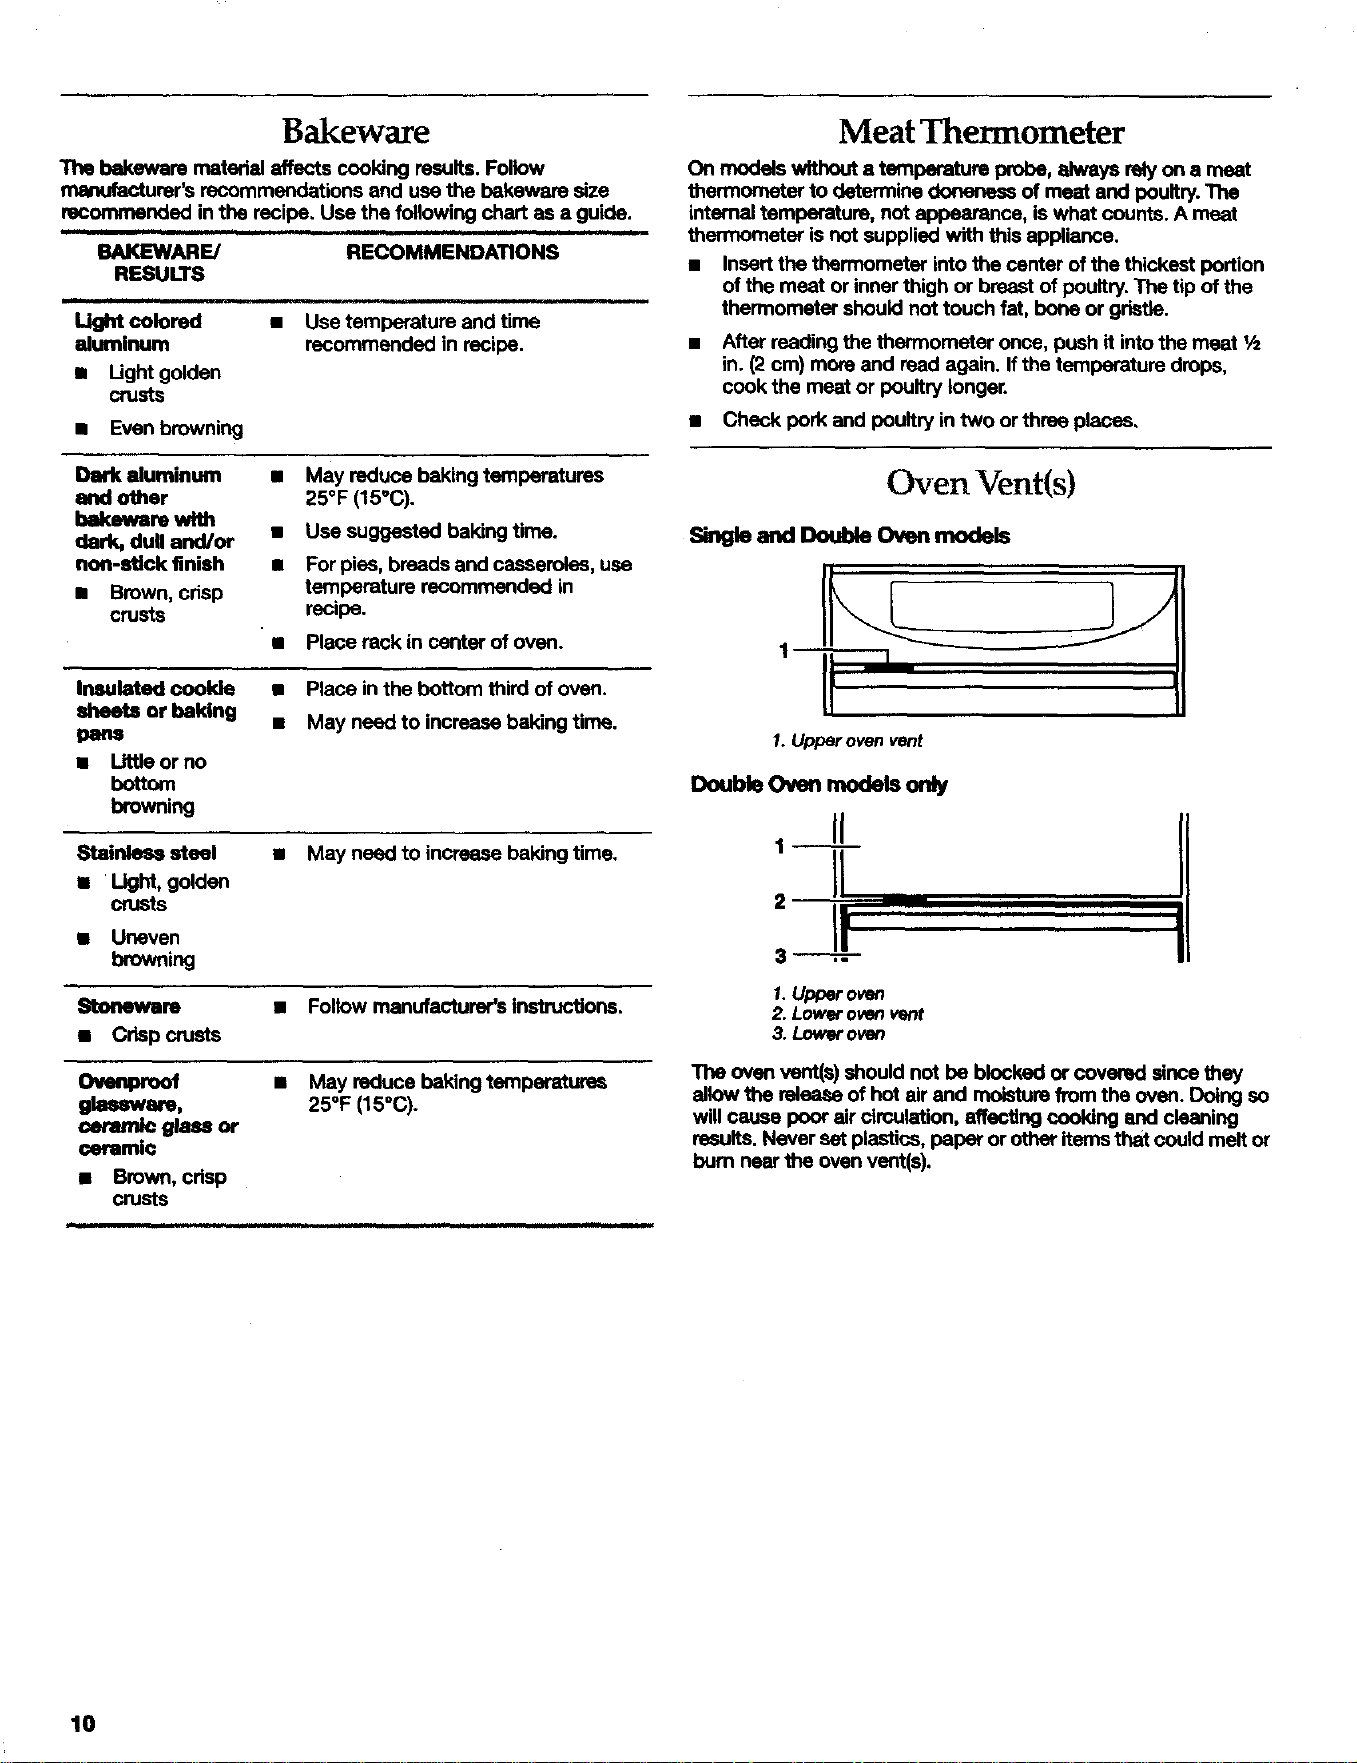
Oven Vent(s)
_ngle aml _ O_a_ m(xlels
1.Upperovenvent
DoubleOven rnodeboNy
1 II
H
' I!
3 ,-
1.Upper owm
2. Lowerovenvent
3. Loweroven
The oven vent(s) should not be blocked or covered since they
silow the rsiease of hot air end moisture from the oven. Doing so
will cause poor air circulation, affecting cooking end cleaning
results. Never set plastics, paper or other items that could melt or
bum near the oven vent(s).
10
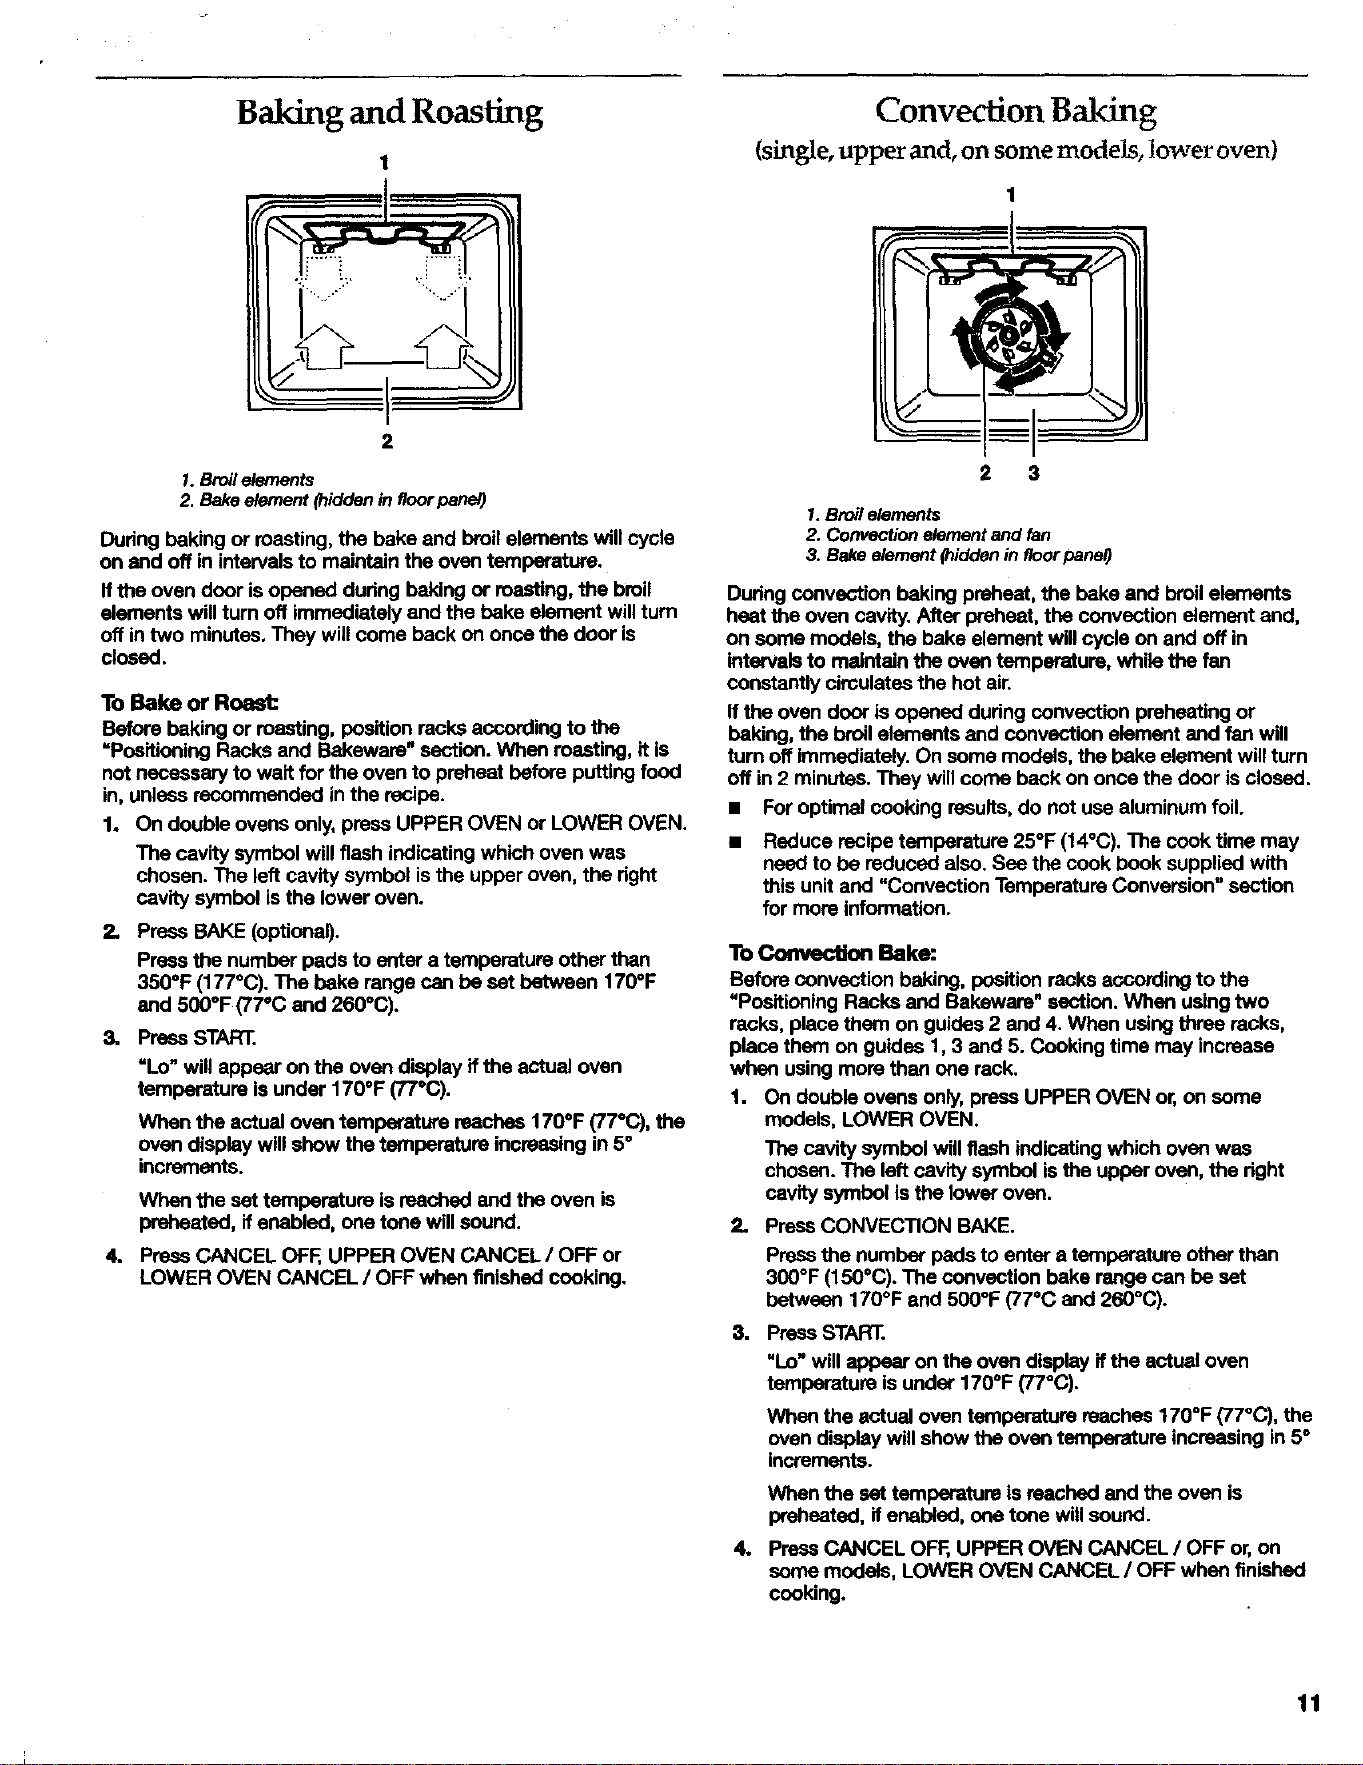
Baking and Roasting
1
2
1. Broil elements
2. Bake element (hidden in floor panel)
Dudng baking or masting, the bake and broil elements will cycle
on and off in intervals to maintain the oven temperature.
If the oven door is opened during baking or roasting, the broil
elements will turn off immediately and the bake element will turn
off in two minutes. They will come back on once the door is
closed.
To Bake or Roast:
Beforebaking or roasting,positionrecksaccordingto the
=PositioningRacksand B_d<eware"section.Whenroasting,itis
notnecessaryto waitforthe ovento preheatbeforeputtingfood
in,unlessrecommendedinthe recipe.
1. Ondoubleovensonly,pressUPPEROVENor LOWEROVEN.
The cavitysymbolwillflashindicatingwhichovenwas
chosen.The leftcavitysymbolisthe upperoven,theright
cavitysymbolisthe loweroven.
2.
Press BAKE (optional).
Press the number pads to e_er a temperature other than
350°F (177°(3). The bake range can be set between 170°F
and 500°F (77°C end 260°(3).
3. Press START.
"Lo"willappearon the ovendisplayIf the actual oven
temperatureisunder170°F (77°C).
When the actual oven temperature reaches 170°F (77°C), the
oven display will show the temperature increasing in 5°
increments.
Whenthe settemperatureisreachedand the ovenis
preheated,ifenabled,one tonewillsound.
4. Press CANCEL OFF, UPPER OVEN CANCEL / OFF or
LOWER OVEN CANCEL / OFF when finished cooking.
Convection Baking
(single, upper and, oft some models, lower oven)
2 3
1. Broil elements
2. Convection element end fan
3. Bake element (hidden in floor panel)
Duringconvectionbakingpreheat,the bake and broilelements
heatthe ovencavity.Afterpreheat,theconvectionelement and,
on somemodels,the bakeelementwillcycleonand offin
intervalsto maintain theoven temperature,whilethe fan
constantlycimulatesthe hot air.
Ifthe ovendoorisopeneddudngconvection preheatingor
baking, the broilelementsend convectionelementand fan will
turn offimmediately.Onsomemodels,thebake elementwillturn
offin 2 minutes.They willcomebackon oncethe doorisclosed.
• Foroptimalcookingresults,do not usealuminumfoil.
Reduce recipe temperature 25°F (14°C). The cook time may
need to be reduced also. Sea the cook book supplied with
this unit and "Convection Temperature Conversion" section
for more information.
To _ Bake:
Before convection baking, po6ition racks according to the
UPositioning Racks end Bakeware" section. When usingtwo
racks, place them on guides 2 end 4. When using three racks,
place them on guides 1,3 end 5. Cooking time may increase
when using more than one rack.
1. On double ovens only, press UPPER OVEN or, on some
models, LOWER OVEN.
The cavity symbol will flash indicating which oven was
chosen. The left cavity symbol is the upper oven, the right
cavity symbol is the tower oven.
2. PressCONVECTION BAKE.
Press the number pads to enter a temperature other than
300°F (150°C). The convection bake range can be set
between 170°F and 500°F (77°C and 260°(3).
3. PressSTART.
"Lo" will appear on the oven display if the actual oven
temperature is under 170°F (77°(3).
When the actual oven temperature reaches 170°F (77°C), the
oven display will show the oven temperature increasing in 5°
increments.
When the set temperature is reached and the oven is
preheated, if enal:ded, one tone will sound.
4. Press CANCEL OFF, UPPER OVEN CANCEL / OFF or, on
some models, LOWER OVEN CANCEL / OFF when finished
cooking.
11
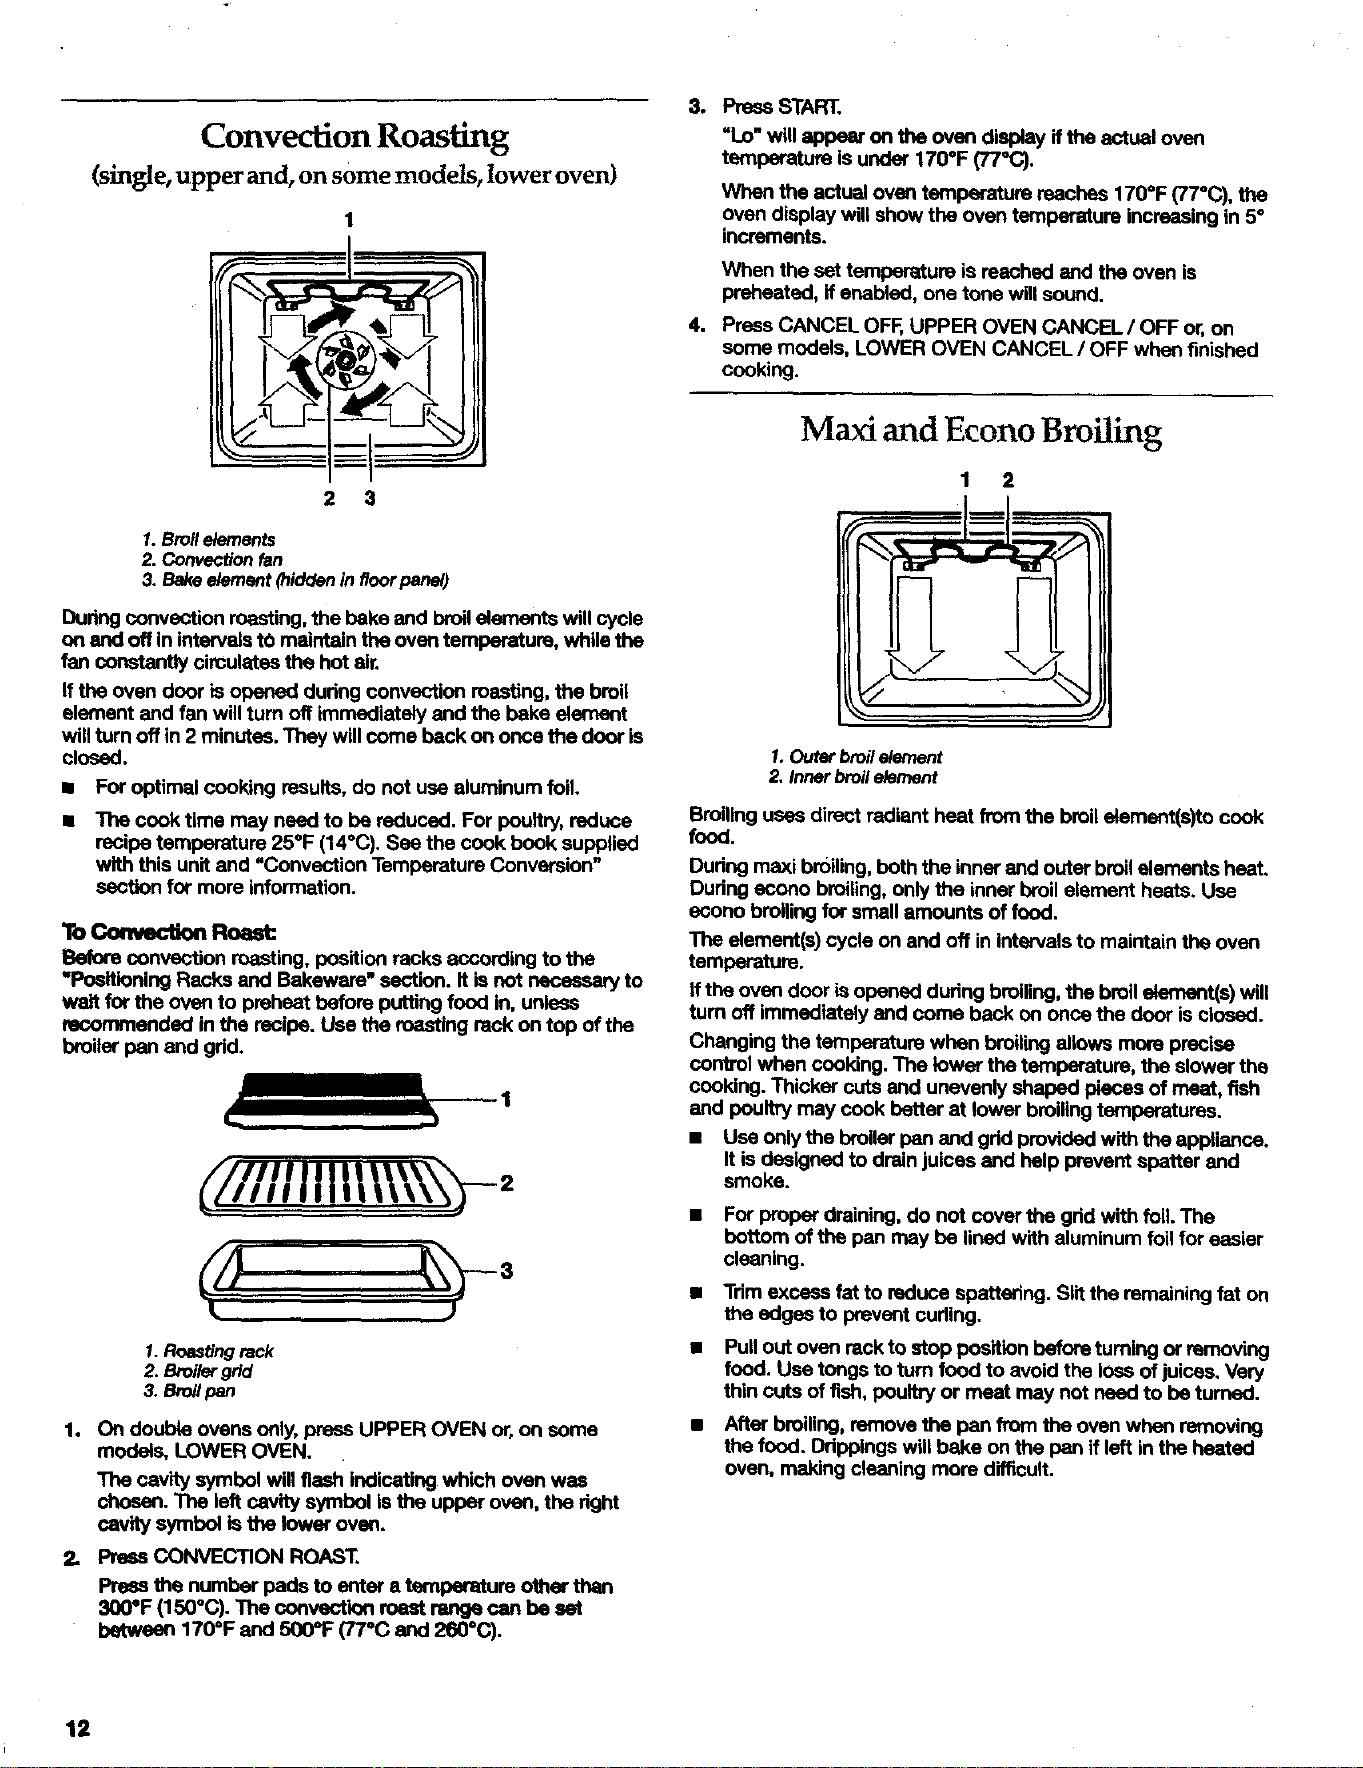
Convection Roasting
(single, upper and, on some models, lower oven)
1
2 3
1. Broil elements
2. Convection fan
3. Bake element {hidden in floor panel)
During convection roasting, the bake end broil elements will cycle
on and off in intervals tO maintain the oven temperature, while the
fan constantly circulates the hot air.
If the oven door is opened during convection masting, the broil
element end fan will turn off immediately end the bake element
will turn off in 2 minutes. They will come back on once the door is
closed.
• For optimal cooking results, do not use aluminum foil.
• The cook time may need to be reduced. For poultry, reduce
recipe temperature 25°F (14°C). See the cook book supplied
with this unit and "Convection Temperature Conversion"
section for more information.
lb ConvecUonRoask
Before convection roasting, position racks according to the
"Positioning Racks and Bakewere" sactlon. It is not necessary to
wait for the oven to preheat before putting food in, unless
recommended in the recipe. Use the roasting rack on top of the
broiler pan end gdd.
//llltl\\ =
1. Roasting rack
2. Broifar grid
3. Broil pen
1. On double ovens only, press UPPER OVEN or, on some
models, LOWER OVEN.
The cavity symbol will flash indicating which oven was
chosen. The left cavity symbol Is the upper oven, the dght
cavity symbol is the lower oven.
Press CONVECTION ROAST,
Press the number pads to enter a temperature other than
300*F (150°0). The sonvectlon roaat renge can be set
between 170°F and 500=F (77"C and 260°C).
4.
PreesSTART.
"Lo"willappearon theoven diSl:dayiftheactualoven
temperatureisunder170°F (77"C).
When the actual oven temperature reaches 1700F (77°C), the
oven display will show the oven temperature increasing in 5°
increments.
When the set temperature is reached end the oven is
preheated, if enabled, one tone will sound.
PressCANCELOFF,UPPER OVENCANCEL/OFF or,on
some models,LOWEROVENCANCEL/ OFF whenfinished
cooking.
Maxi and Econo Broiling
1 2
1. Outer broil element
2. Inner broil element
Broiling uses direct radiant heat from the broil element(s)to cook
fOCal
Dudng maxi broiling, both the inner and outer broilelements heat.
During econo broiling, only the inner broil element heats. Use
esono broiling for small amounts of food.
The element(s) cycle on and off in intervals to maintain the oven
temperature.
If the oven door is opened during broiling, the broilelement(s) will
turn off immediately end coma back on once the door is closed.
Changing the temperaturewhen broiling allows more precise
control when cooking. The lower the temperature, the slower the
cooking. Thicker cuts end unevenly shaped pieces of meat, fish
and poultry may cook better at lower broiling temperatures.
• Use only the broiler nan end grid provided with the appliance.
It is designed to drain juices and help prevent spatter and
smoke.
For proper draining, do not cover the grid with foil. The
bottom of the nan may be lined with aluminum foil for easier
cleaning.
Tdmexcessfat toreducespattering.Slitthe remainingfat on
the edges to preventcuding.
Pull out oven rack to stop position before turning or removing
food. Use tongs to turn food to avoid the Ioes of juices. Very
thin cuts of fish, poultry or meat may not need to be turned.
After broiling, remove the nan from the oven when removing
the food. Drippings will bake on the pan if left in the heated
oven, making cleaning more difficult.
12

lb B¢o_
Before broiling, position rack according to the Broiling Chart.
Poeltlon food on the grid on the broiler pen, then placa It In the
center of the dven rack with the longest side perallai to the door.
It is not necessary to welt for the oven to preheat before puffing
food in, unless recommended in the recipe.
Close the door.
1. On double ovens only, press UPPER OVEN or LOWER OVEN.
The cavity symbol will flesh indicating which oven was
chosen. The left cavity symbol is the upper oven, the right
cavity symbol is the lower oven.
2. Press BROIL. MAXI • • ECONO.
Once for maxi, twice for econo.
Press the number pads to enter a ternparatum other than
500°F (260°C)o The broil range can be set between 170°F and
500°F (770C end 260°C).
3. Press START.
The set oven temperature will appear on the oven display
until the oven isturned off.
4. Press CANCEL OFF, UPPER OVEN CANCEL / OFF or
LOWER OVEN CANCEL / OFF when finished cooking.
BROlUNG CHART
For best results, place food 3 in. (7 cm) or more from the broil
elements, limes ere guidelines only and may need to be adjusted
for individual foods and tastes. Recommended rack positions are
numbered from the bottom (1)to the top (5). For diagram, see the
"Positioning Racks end Bakewere" section.
t i iJ, ii t i ii,uJ ill _ _lJ tl i ,1111111ii i
FOOD RACK TEMP COOK
POSITION TIME
minutes
Calves Liver
½ in. (1.25 cm) thick
4 350 ° F 10-12
(177°C)
Chicken
bone-inpieces
3 500" F 32
(280°C)
FOOD RACK TEMP COOK
POSITION TIME
minutes
i i
Steak
1 in. (2.5 cm) thick
rare 4 500 ° F 16
medium 4 (260_C) 21
well done 4 25
lt,_ in. (4 cm) thick
rare 4 500 ° F 23
medium 4 (260°C) 28
* Place up to 12 patties, equally spaced, on broiler grid.
Convection Broiling
{single, upper and, on some models, lower oven)
1.Broile/ements
2. Fan
During convection broiling, the broil elements will cycle on and off
in intervals to maintain the oven temperature, while the fan
constantly circulates the hot air.
If the oven door isopened during convection broiling, the broil
elements and fen will turn off immediately. They will come back
on once the door is closed.
Fish
½ in. (1.25 cm) thick 3 350° F 20
1 in. (2.5 cm) thick 3 (177°C) 20-22
Frankfurters 4 500 ° F 8
(260°(3)
*Ground meat patties
l/zin. (1.25 cm) thick 1.
medium 5 500 ° F 8-12
(260°C)
To Convec'don Broil:
Before convection broiling, see =Maxi and Econo Broiling"
section for general broiling guidelines. See the cook book
supplied with this unit for more information.
Allow the oven to preheat for 5 minutes. Position food on the grid
on the broiler pan, then place itin the center ofthe oven rack with
the longest side parallel to the door.
Close the door.
Ham slice,
½ in. (1.25 cm) thick 4 500 ° F 10-12
1 in. (2.5 cm) thick 4 (260°C) 20-22 2. Press CONVECTION BROIL
Lamb chops
1 in. (2.5 cm) thick 4 400 ° F 18-20
(204°C) 3. Press START.
Pork chops
1 In. (2.5 cm) thick 4 450 ° F 25-28
(232°C)
On double ovens only, press UPPER OVEN or,on some
models, LOWER OVEN.
The cavity symbol will flash indicating which oven was
chosen. The left cavity symbol is the upper oven, the right
cavity symbol isthe lower oven.
Press the number pads to enter a temperature other than
450°F (232°C). The convection broil range can be set
between 170°F and 500°F (77°C and 260°C).
The setoven temperaturewillappearonthe oven display
untilthe ovenisturned off.
4. Press CANCEL OF_, UPPER OVEN CANCEL/OFF or
LOWER OVEN CANCEL / OFF when finished cooking.
13
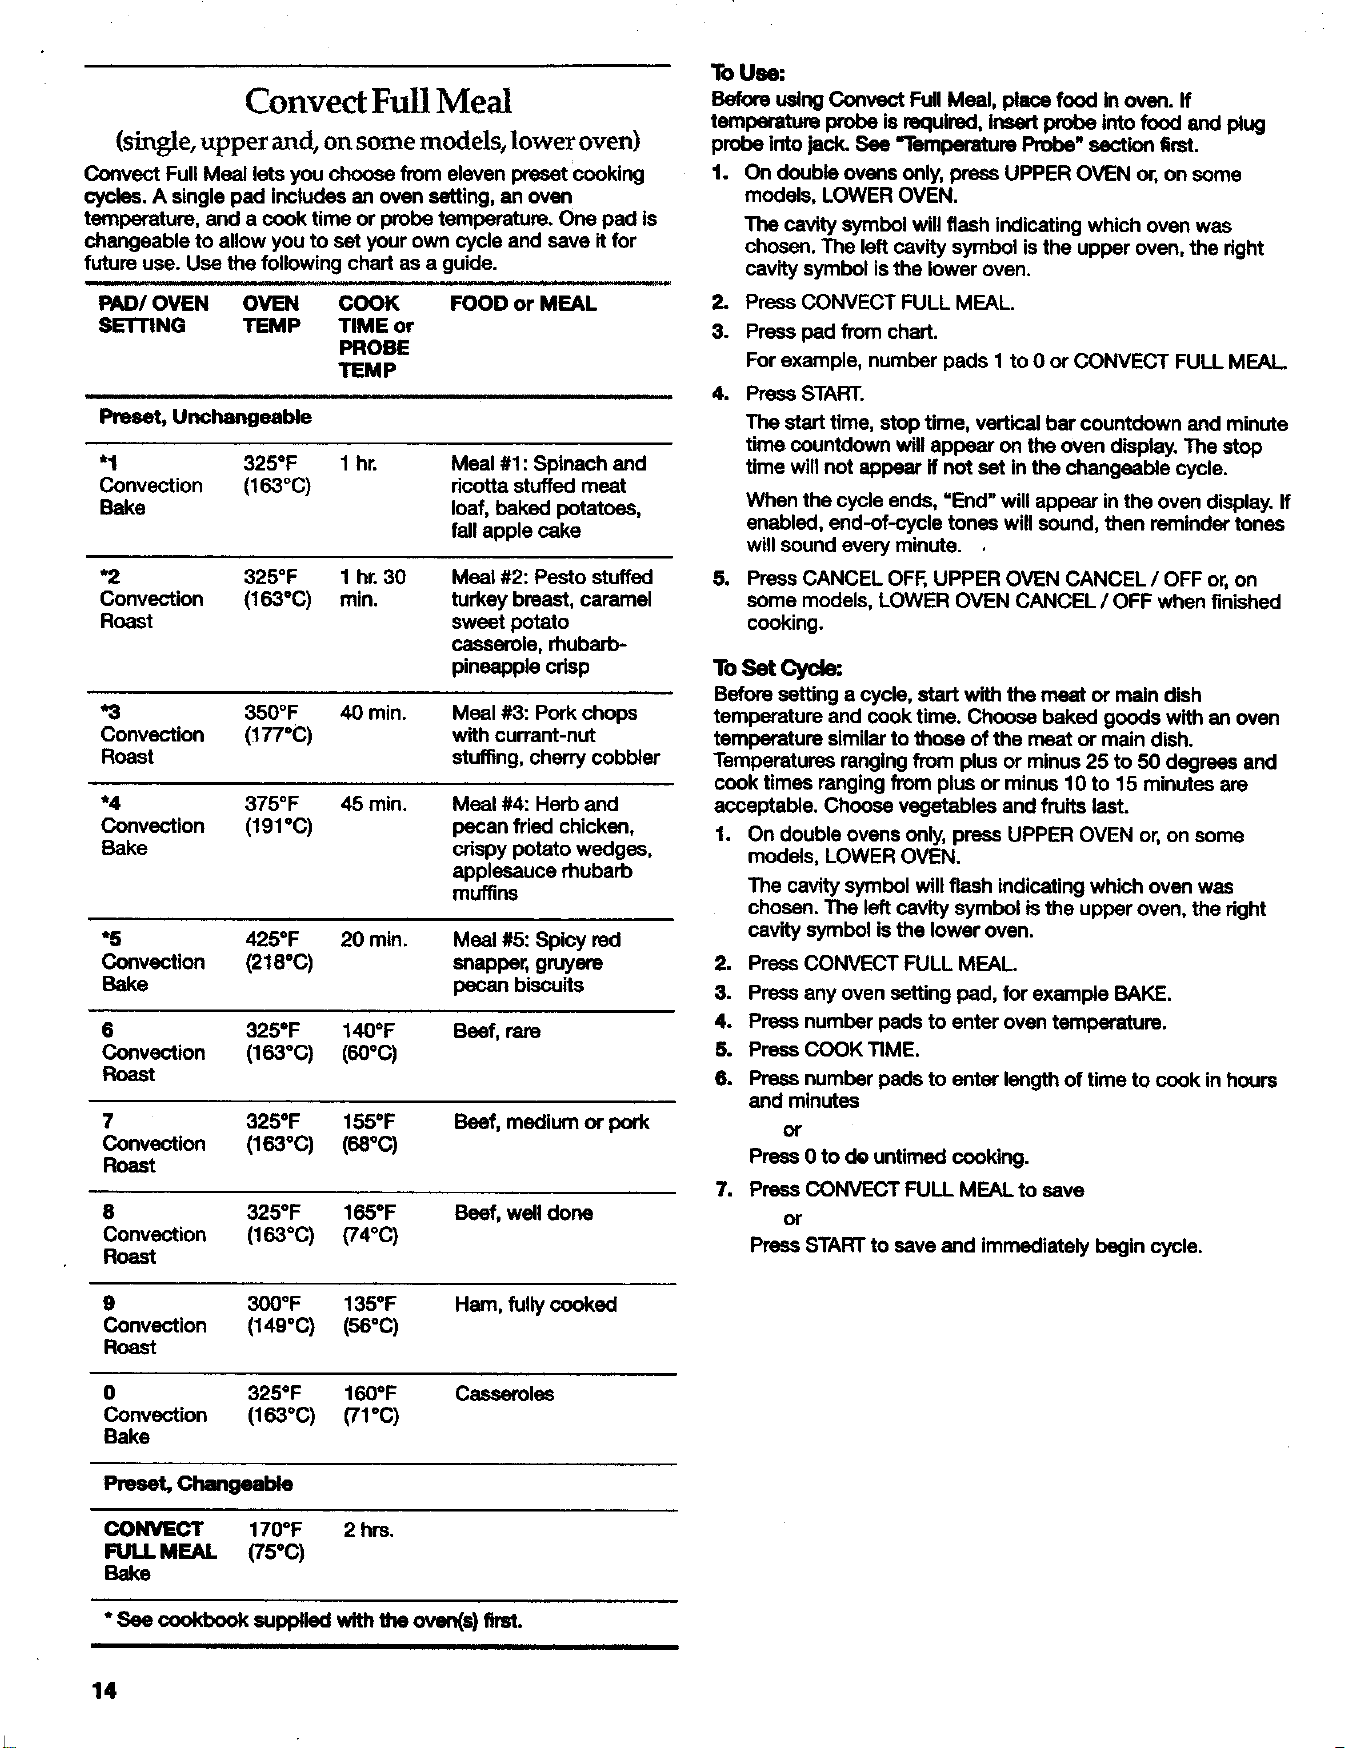
Convect Full Meal
(single, upper and, on some models, lower oven)
Convent Full Meal lets you choose from eleven preset cooking
cycles. A single pad includes an oven setting, an oven
temperature, and a cook time or probe temperature. One pad is
changeable to allow you to set your own cycle and save it for
future use. Use the following chart as a guide.
m i , i
PAD/OVEN OVEN COOK FOOD or MEAL
SE'rnNG TEMP TIME or
PROBE
TEMP
ii i
Unchangeable
"1 325°F 1 hr. Meal #1: Spinach and
Convection (163°(3) ricotta stuffed meat
Bake loaf, baked potatoes,
fall apple cake
*2 325°F 1 hr. 30 Meat #2: Pesto stuffed
Convection (163"(3) rain. turkey breast, caramel
Roast sweet potato
casserole, rhubarb-
pineapple crisp
*3 350°F 40 min. Meal #3: Pork chops
Convection (177°C) with currant-nut
Roast stuffing, cherry cobbler
*4 375°F 45 min. Meal #4: Herb and
Convection (191 °(3) pecan fried chicken,
Bake crispy potato wedges,
applesauce rhubarb
muffins
*5 425°F 20 min. Meal #5: Spicy red
Convection (218=C) snapper, gruyere
Bake pecan biscuits
6 325°F 140°F Beef, rare
Convection (163°(3) (60°C)
Roast
7 325°F 155°F Beef, madjurn or pork
Convection (163°C) (68°C)
Roast
8 325°F 165°F Beef, well done
Convection (163°C) (74°(3)
Roast
9 300°F 135°F Hem, fully cooked
Convection (149"C) (56°C)
Roast
0 325°F 160°F Casseroles
Convection (163°C) (71°C)
Bake
Preset, Changeable
OONVECT 170°F 2 hrs.
FULL MEAL (75°C)
Bake
"See cookbook supplladwiththeovan(e)11mt.
To Use:
Before using Convect Full Meal, place food in oven. If
temperature probe is required, insert probe into food and plug
probe into jack. See "l"emberature Probe" section first.
1. On double ovens only, press UPPER OVEN or, on some
models, LOWER OVEN.
The cavity symbol will flash indicating which oven was
chosen. The left cavity symbol is the upper oven, the right
cavity symbol isthe lower oven.
2. Press CONVECT FULL MEAL.
3. Press pad from chart.
For example, number pads I to 0 or CONVECT FULL MEAL
4. Press START.
The start time, stop time, vertical bar countdown and minute
time countdown wilt appear on the oven display. The stop
time will not appear if not set in the changeable cycle.
When the cycle ends, "End" will appear in the oven display, ff
enabled, end-of-cycle tones will sound, then reminder tones
will sound every minute. .
5. Press CANCEL OFF, UPPER OVEN CANCEL / OFF or, on
some models, LOWER OVEN CANCEL / OFF when finished
cooking.
ToSet Cycle:
Before setting a cycle, start with the meat or main dish
temperature and cook time. Choose baked goods with an oven
temperature similar to those of the meat or main dish.
Temperatures ranging from plus or minus 25 to 50 degrees and
cook times ranging from plus or minus 10 to 15 minutes are
acceptable. Choose vegetables and fruits last.
1. On double ovens only, press UPPER OVEN or, on some
modals, LOWER OVEN.
The cavity symbol will flash indicating which oven was
chosen. The left cavity symbol is the upper oven, the right
cavity symbol is the lower oven.
2. PressCONVECTFULL MEAL.
3. Press any oven setting pad, for example BAKE.
4. Press number pads to enter oven temperature.
5. Press C(X_K TIME.
6. Press number pads to enter length of time to cook in hours
and minutes
or
Press 0 to de untimed cooking.
7. Prass CONVECT FULL MEAL to save
or
Press START to save end immediately begin cycle.
14

Convection Temperature Conversion
(single, upper and, on some models, lower oven)
Convection temperatures and times differ from those of standard
cooking. The oven can automatically reduce standard recipe
temperatures and times for convection cooking.
The conversion may not be exact because foods are grouped in
general categories. To ensure optimal cooking results, the oven
will prompt a food check at the end of a non-delayed cook time.
Use the following chart as a guide.
SETTING
,i
BAKED GOODS
FOODS
Biscuits, Breads: quick end yeast,
Cakes: layer and angel food,
Casseroles: including frozen entr0as
and souffids, Cookies, Fish
MEATS
Baked potatoes, Chicken: whole end
pieces, Meat loaf, Roasts: pork, beef
and ham
"Turkey and large poultry are not
included because their cook time varies.
OTHERFOODS
Convenience foods: french _as,
nuggets, fmh sticks, pizza,
Pies: fruit and custard
lb Use:
Before using Convection Temperature Conversion for BAKED
GOODS and OTHER FOODS, allow the oven to preheat before
placing food in the oven.
1. On double ovens only, press UPPER OVEN or, on some
models, LOWER OVEN.
The cavity symbol will flash indicating which oven was
chosen. The left cavity symbol is the upper oven, the right
cavity symbol isthe lower oven.
2. Press BAKED GOODS, MEATS or OTHER FOODS.
3. Press number pads to enter standard cook temperature.
4. Press number pads to enter standard cook time.
5. Press START.
=CHECK FOOD AT" and the stop time will appear on the oven
display.
When the set temperature is reached and the oven is
preheated, if enabled, one tone will sound.
6. Press CANCEL OFF, UPPER OVEN CANCEL / OFF or, on
some models, LOWER OVEN CANCEL / OFF if food is dons
to taste
or
7. Close door to continue cooking.
3. Press CANCEL OFF, UPPER OVEN CANCEL/OFF or, on
some models, LOWER OVEN CANCEL / OFF or open the
oven door to clear the display and/or stop reminder tones.
ToD ay Star
Food Poisoning Hazard
DO not let food sit In oven more than one hour
before or after cooking.
Doing so can result in food poisoning or
sickness.
Before setting delay start, make sure the clock is set to the
correct time of day. See "Clock" section. Delay start should not
be used for food such as breads and cakes because they may
not bake properly.
1. On double ovens only, press UPPER OVEN or, on some
models, LOWER OVEN.
The cavity symbol will flash indicating which oven was
chosen. The left cavity symbol isthe upper oven, the dght
cavity symbol isthe lower oven.
2. Press BAKED GOODS, MEATS or OTHER FOODS.
3. Press number pads to enter standard cook temperature.
4. Press number pads to enter standard cook time.
5. Press STOP TIME.
6. Press the number pads to enter time of day to atop.
7. Press START.
The start time is automatically calculated and displayed.
"DELAY"and the stop timewillalsoappearon theoven
display.
When the start time is reached, the oven will automatically
turn on. The vertical bar countdown and minute time
countdown will appear on the oven display.
When the stop time is reached, the oven will shut off
automatically and =End" will appear on the oven display.
If enabled, end-of-cycle tones will sound, then reminder
tones will sound every minute.
8. Prese CANCEL OFF, UPPER OVEN CANCEL / OFF or, on
some models, LOWER OVEN CANCEL / OFF or open the
oven door to clear the display and/or stop reminder tones.
15
Dehydrating
(single, upper and, on some models, lower oven)
Dehydrating is a method of food preservation that removes the
water from food. For additional information, refer to a book
wflttan specifically about dehydrating or preserving foods.
Dehydration racks and an oven door stop are required, but not
supplied with this oven. See "Assistance or Service" section to
order.
ToDehydrate:
Before dehydrating, prepare food as recommended in the recipe
and arrange on dehydration reck(s). Position racks according to
the following chart. See =Positioning Racks and Bakeware"
section for diagram of rack positions.
NUMBER OF RACKS RACK PosmoN(S)
Proofing Bread
(single, upper and, on some models, lower oven)
Proofing bread prepares dough for baking by act'rvating the
yeast. Proofing twice is recommended.
To Proofi.
Before first proofing, place dough in a lightly greased bowl and
cover loosely with wax paper coated with shortening. Place on
rank guide two, then place broiler pan on guide one. See
"Positioning Racks and Bakeware" for diagram. Put 2 cups
(500 mL.)of boiling water in broiler pan. Close door.
1. On double ovens only, press UPPER OVEN or, on some
models, LOWER OVEN.
The cavity symbol will flash indicating which oven was
chosen. The left cavity symbol is the upper oven, the right
cavity symbol is the lower oven.
1 3 2.
2 2and4
3.
3 1,3and5
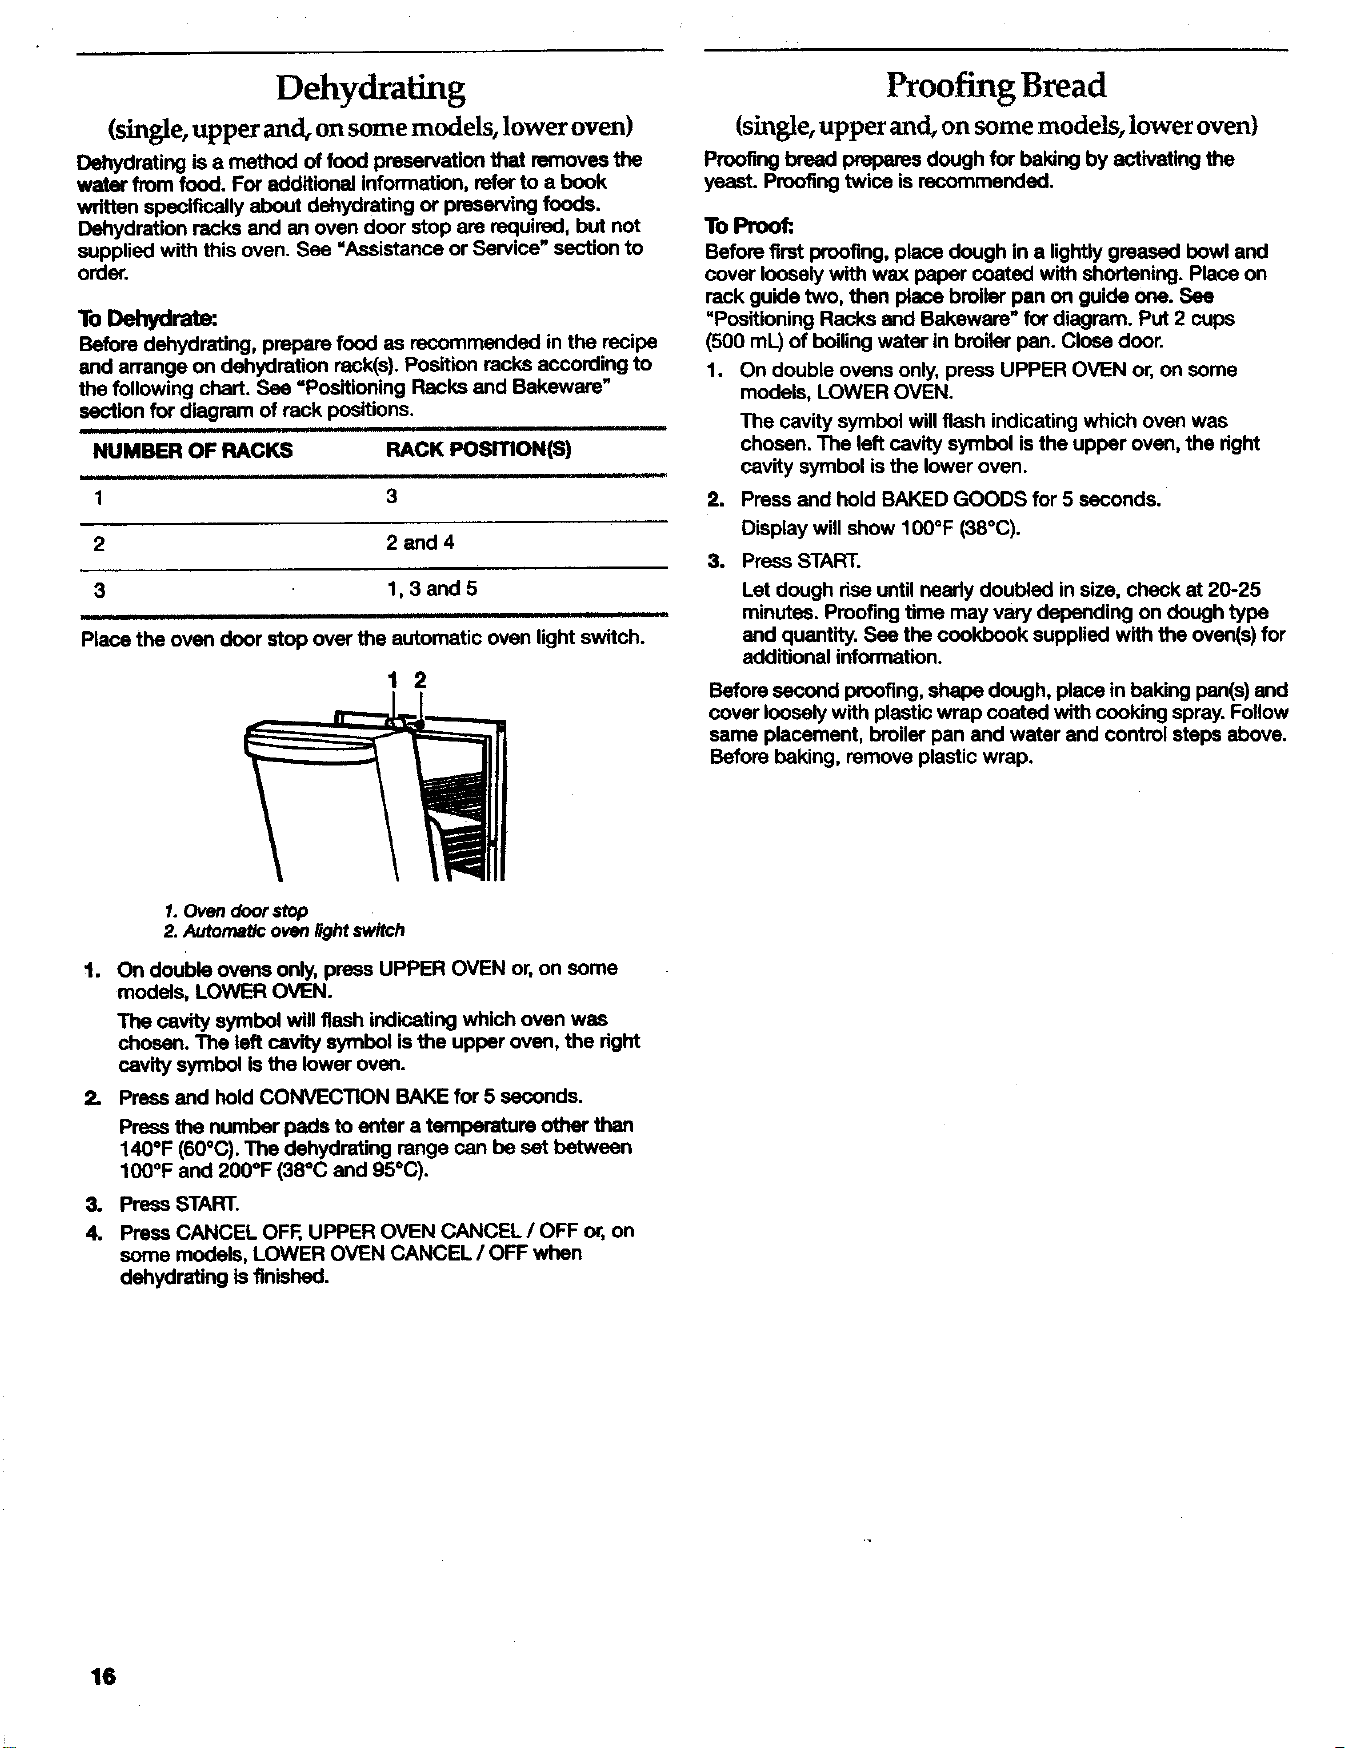
Place the oven door stop over the automatic oven light switch.
1 2
Press and hold BAKED GOODS for 5 seconds.
Display will show 100°F (38°C).
Press START.
Let dough rise until needy doubled in size, check at 20-25
minutes. Proof'ragtime may vary depending on dough type
and quantity. See the cookbook supplied with the oven(s) for
additional information.
Beforesecondproofing,shapedough,place in bakingpan(s)and
coverlooselywithplastic wrapcoated withcookingspray.Follow
sameplacement,broilerpanand waterand controlster_ above.
Beforebaking,removeplasticwrap.
_.Ovendoorstop
2. Autonlat/coven_ht switch
1. On double ovens only, press UPPER OVEN or, on some
models, LOWER OVEN.
The cavity symbol will flash indicating which oven was
chosen. The left cavity symbol is the upper oven, the dght
cavity symbol is the lower oven.
2. Press and held CONVECTION BAKE for 5 seconds.
Press the number pads to enter a temperature other than
140°F (60°C). The dehydrating range can be set between
100°F and 200°F (38°C and 95°C).
3. Press START.
4. Press CANCEL OFF, UPPER OVEN CANCEL / OFF or, on
some models, LOWER OVEN CANCEL / OFF when
dehydrating isfinished.
16
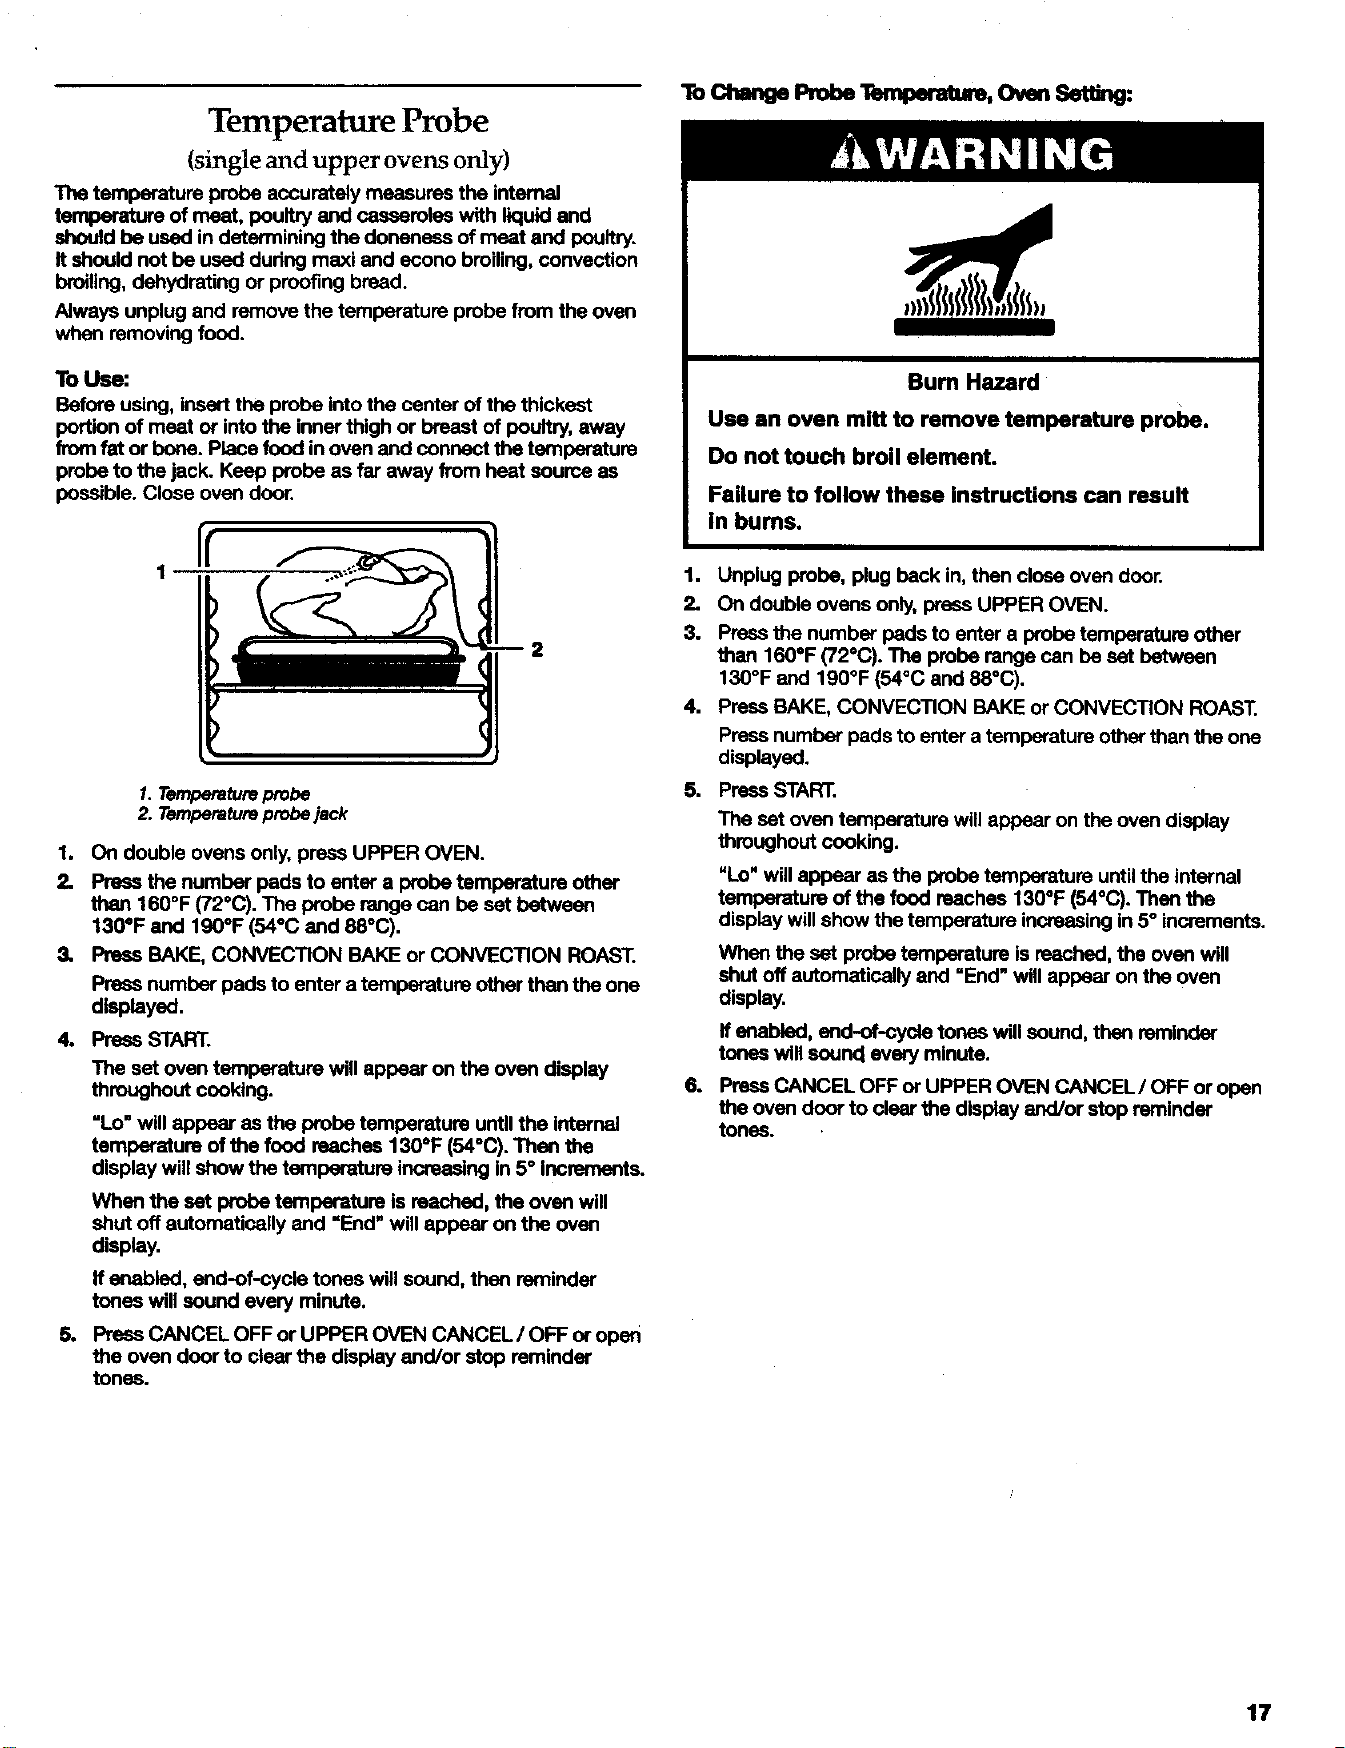
Temperature Probe
(single and upper ovens only)
The temperature probe accurately measures the internal
temperature of meat, poultry and caseamlas with liquid and
should be used in determining the doneneas of meat and poultry.
It should not be used dudng maxi and econo broiling, convection
broiling, dehydrating or proofing bread.
Always unplug and remove the temperature probe from the oven
when removing food.
To Use:
Before using, insert the probe into the center of the thickest
portion of meat or into the inner thigh or breast of poultry, away
from fat or bone. Place food in oven and connect the temperature
probe to the jack. Keep probe as far away from heat source as
possible. Close oven door.
I!
1. Temperature probe
2. Temperature probe jack
1. On double ovens only, press UPPER OVEN.
2. Press the number pads to enter a probe temperature other
than 160°F (72"C). The probe range can be set between
130°F and 190°F (54°C end 88°C).
3, Press BAKE, CONVECTION BAKE or CONVECTION ROAST.
Press number pads to enter a temperature other than the one
displayed.
4. PrassSTART.
The set oven temperature will appear on the oven display
throughout cooking.
"Lo" will appear as the probe temperature until the internal
temperature of the food reaches 130°F (54°C). Then the
display will show the temperature increasing in 5° increments.
When the set probe temperature is reached, the oven will
shut off automatically end =End" will appear on the oven
display.
If enabled, end-of-cycla tones will sound, then remindar
tones will sound every minute.
5. Press CANCEL OFF or UPPER OVEN CANCEL/OFF or open
the oven door to clear the display end/or stop reminder
tunas.
ToChengePrehe OvmSet g.
Bum Hazard
Use an oven mitt to remove temperature probe.
Do not touch broil element.
Failure to follow these Instructions can result
in bums.
1. Unplug probe, plug beck in, then close oven door.
2. On double ovens only, press UPPER OVEN.
3. Press the number pads to enter a probe temperature other
then 1600F (72°C). The probe range can be set between
130°F and 190°F (54°C and 88°(3).
4. Press BAKE, CONVECTION BAKE or CONVECTION ROAST.
Press number pads to enter a temperature other than the one
displayed.
5. Press STAR'E.
6.
The set oven temperature will appear on the oven display
throughout cooking.
NLo" will appear as the probe temperature until the internal
temperature of the food reaches 130°F (540C). Then the
display will show the temperature increasing in 5° increments.
When the set probe temperature is reached, the oven will
shut off automatically and =End" will appear on the oven
display.
ff enabled, end-of-cycla tones will sound, then reminder
tones will sound every minute.
Press CANCEL OFF or UPPER OVEN CANCEL/OFF or open
the oven door to clear the display end/or stop reminder
tones.
17
Tuned Cooking
Food Poisoning Hazard
Do not let food sit In oven more than one hour
before or after cooking.
Doing so can result In food poisoning or
sickness.
Timed Cooking allows the oven(s) to be set to turn on at a certain
time of day, cock for a set length of time, and/or shut off
automatically. Delay start should not be used for food such as
breads and cakes because they may not bake properly.
To Set a Cook "nine:.
1. On double ovens only, press UPPER OVEN or LOWER OVEN.
The cavity symbol will flash indicating which oven was
chosen. The left cavity symbol is the upper oven, the dght
cavity symbol is the lower oven.
3,
4.
5.
6.
Press BAKE, CONVECTION BAKE or CONVECTION ROAST.
Press the number pads to enter a temperature other than the
one displayed.
Press COOK TIME.
Press number pads to enter the length of time to cook.
Press START.
The starttime, stoptime, verticalbarcountdownand minute
timecountdownwillappearon the ovendisplay.
Whenthe stop time isreached,the ovenwillshutoff
automaticallyand =End"will appear onthe ovendisplay.
If enabled, end-of-cycle tones will sound, then reminder
tones will sound every minute.
Press CANCEL OFF, UPPER OVEN CANCEL / OFF or
LOWER OVEN CANCEL / OFF or open the oven door to clear
the display end/or stop reminder tones..
ToSete CookTimeandStopTaee [DelayStart]:
Before setting, make sure the clock is set to the correct time of
day. See "Clock" section.
1. On double ovens only, press UPPER OVEN or LOWER OVEN.
The cavity symbol will flash indicating which oven was
chosen. The left cavity symbol isthe upper oven, the dght
cavity symbol isthe lower oven.
2. Press BAKE, CONVECTION BAKE or CONVECTION ROAST.
Press the number pads to enter a temperature other than the
one displayed.
3. Press COOK TIME.
4. Pressnumberpads toenter thelengthof timeto cook.
5. PressSTOPTIME.
6. Press the number pads to enter time of day to stop.
7. Press START.
The start time is automatically calculated end displayed.
"DELAY" andthe stop timewillalso appear onthe oven
display.
When the start time is reached, the oven will automatically
turn on. The vertical bar countdown end minute time
countdown will appear on the oven display.
When the stop time is reached, the oven will shut off
automatically end _End" will appear on the oven display.
If enabled, end-of-cycle tones will sound, then reminder
tones will sound every minute.
8. Press CANCEL OFF, UPPER OVEN CANCEL / OFF or
LOWER OVEN CANCEL / OFF or open the oven door to clear
the display end/or stop reminder tones.
18
i i.i . .wi,
OVEN
Self-Cleaning Cyde
Bum Hazard
Do not touch the oven during the
Self.leaning cycle.
Keep children away from oven during
Self-Cleenlng cycle.
Do not use commercial oven cleaners In
your oven.
Failure to follow these instructions can result In
bums, or illness from inhaling dangerous fumes.
IMPORTANT: The health of some birds is extremely sensitive to
the fumes given offdudng the Self-Cleaning cycle. Exposure to
the fumes may result in death to certain birds. Always move birds
to another closed and well ventilated room.
Self-clean the oven before it isheavily soiled. Heavy soil results in
longer cleaning and more smoke.
Keep the kitchen well-ventilated during the Serf-Cleaning cycle to
help get dd of heat, odors, end smoke.
Do not block the oven vent(s) dudng the Serf-Cloaning cycle. Air
must be able to move freely. See "Oven Vent(s)" section.
Prepare Ovee:
• Removethe broilerpan,grid,cookwareand bekeware and,
onsomemodels,thetsmparatureprobefromtheoven,
• Remove any foil from the oven because it may burn or melt,
damaging the oven.
Remove oven racks to keep them shiny and easy to slide. If
leaving in, place them on rack positions 2, 3 or 4. For
diagram, see "Positioning Racks and Bakeware". Racks will
discolor and become harder to slide. See "Cleaning" for more
information.
Hand clean inside door edge and the 1½ in. (3.8 cm) area
around the inside oven cavity frame, being careful not to
move or bend the gasket. This area does not get hot enough
during self-cleaning to remove soil. Do not let water, cleaner,
etc. enter slots on door fTame. Use a damp cloth to clean this
area.
Wipe out any loose soil to reduce smoke and avoid damage.
At high temperatures, foods react with porcelain. Staining,
etching, pitting or faint white spots can result. This will not
affect cooking performance.
How the Cycle Works
IMPORTANT:. The heating and cooling of porcelain on steal in the
oven may result in discoloring, loss of gloss, heidine cracks and
popping sounds.
The Self-Cleaning cycle uses very high temperatures, buming soil
to a powdery ash.
The oven is preset for a 3 hour 30 minute clean cycle, however
the time can be changed. Suggested clean times are 2 hours 30
minutes for light soil and between 3 hours 30 minutes to 4 hours
30 minutes for average to heavy soil.
Once the oven has completely cooled, remove ash with a damp
cloth.
The oven lights will not work duringthe Self-Cleaning cycle.
On double oven models, only one oven can self-clean at a
time. Ifone oven Is self-cleaning, the other oven can not be
eat or turned on.
To Self-Clean:
Beforeself-cleaning,make surethedoorisclosedcompletelyor
it willnotlockend the cyclewillnotbegin.
1. Ondoubleovensonly.pressUPPEROVENortOWER OVEN.
The cavitysymbolwillflashindicatingwhichovenwas
chosen.The leftcavity symbolistheupperoven,the right
cavitysymbolisthe lower oven.
2. Press CLEAN.
Press the number pads to set a clean time other than 3 hour
30 minutes. The clean time can be set between 2 hours 30
minutes and 4 hota_ 30 minutes.
3. Press START.
The oven door will automatically lock and =DOOR LOCKED",
the start time and stop time will appear on the oven display.
The door will not unlock until the oven cools.
When the cycle is complete and the oven is cool, "End" will
appear on the oven display and =DOOR LOCKED" will
disappear.
4. Press any pad or open the oven door to clear the oven
display.
19
De y starts f-ou
Before delay starting Self-Clean, make sum the clock is set to the
correct time of day. See "Clock" section. Also, make sure the
door is dosed completely or it will not look and the cycle will not
begin.
1. On double ovens only, press UPPER OVEN or LOWER OVEN.
The cavity symbol will flash indicating which oven was
chosen. The left cavity symbol is the upper oven, the right
cavity symbol is the lower oven.
2.
3.
4.
5.
5.
Press CLEAN.
Pressthenumberpads toset a clean timeotherthen 3 hour
30 minutes.The cleantime canbe set between2 hours30
minutesend 4 hours30 minutes.
Press STOP TIME.
Pressthe numberpads toenterthe timeof dayto stop.
PressSTART.
The start time is automatically calculated and displayed.
The door will automatically lock end "DOOR LOCKED',
"DELAY', and the stop time will also appear on the display.
The door will not unlock until the oven cools.
When the start time is reached, the oven will automatically
turn on.
7,
When the cycle is complete and the oven cools, =End" will
appear on the oven display end "DOOR LOCKED" will
disappear.
Press any pad or open the oven door to clear the oven
display.
To Stop Self-Clean any time:
PressCANCELOFF,UPPEROVENCANCEL/OFF or LOWER
OVENCANCEL/ OFF.ffthe oventemperatureistoo high,the
doorwillremainlooked,Itwillnot unlOCkuntilthe ovencools.
Cleaning
IMPORTANT:. Before cleaning, make sure ell controls are off and
the oven is cool. Always follow label instrucUons on cleaning
products.
Soap, water and a soft cloth or sponge are suggested tint unless
otherwise noted.
STAINLESS STEEL (on some models)
Do not use soap-filled scouring pads, abrasive aleeners, Cook'tap
Polishing Creme, stsel-wool pads, gritty wash cloths or some
paper towels. Damage may occur.
Rub in direction of grain to avoid damaging.
• Stainless Steel Cleaner & Polish (not included):
See "Assistance or Service" ssction to order.
• Liquid detergent or all-purpose cleaner:.
Rinse with clean water end dry with soft, lint-frse cloth.
• Vinegar for hard water spots
OVEN DOOR EXTERIOR
• Glass cleaner end paper towels or non-abrasive plastic
scrubbing pad
i i i i,i i
CONTROL PANEL
Do not use abrasive cleaners, stsel-wool pads, gritty wash cloths
or some paper towels. Damage may occur.
• Glass cleaner and soft cloth or sponge:
Apply glass cleaner to soft cloth or sponge, not directly on
panel.
, ,i
OVEN GAVITY
Do not use commercial oven cleaners.
Food spills should be cleaned when oven cools. At high
temperatures, foods react with porcelain and staining, etching,
pitting or faint white spots can result.
• Serf-Cleaning cycle:
See "Self-Cleaning Cycle" first.
OVEN RACKS
• Self-Cleaning cycle:
See "Seff-Cleening Cycle" first. Racks will disco!or and
become harder to slide. After cleaning, a light coating of
vegetable oil applied to Ule rack guides will help them slide.
• Steel wool pad
2O
i
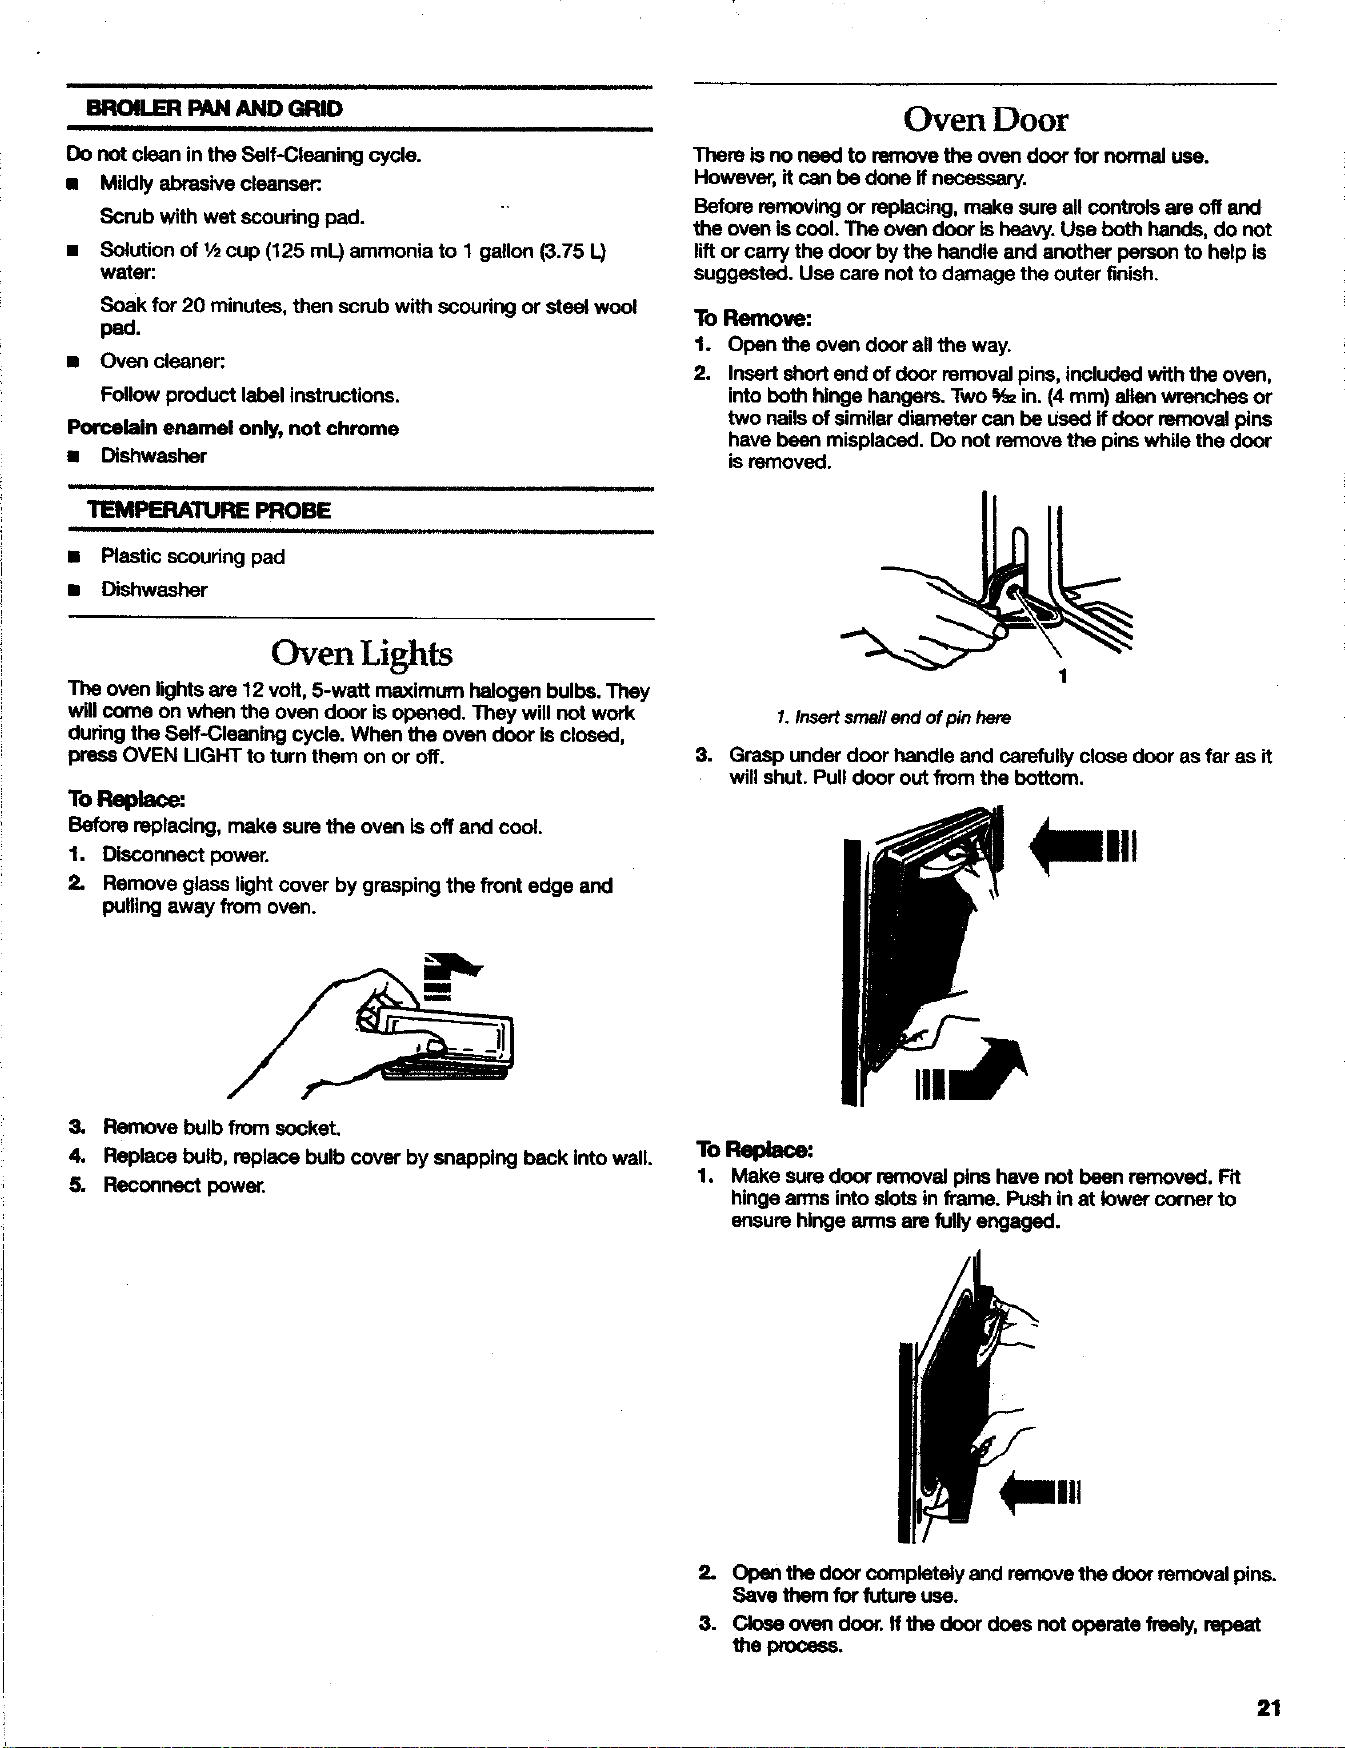
BROILER PAN AND GRID
Do not clean in the Self-Cleaning cycle.
• Mildly abrasive cleanser:.
Scrub with wet scouring pad.
• Solution of 1/2cup (125 mL) ammoni• to 1 gallon (3.75 L)
water:
Soak for 20 minutes, then scrub with scouring or steel wool
pad.
• Oven cleaner:
Follow product label instructions.
Porcelain enamel only, not chrome
• Dishwasher
TEMPERATURE PROBE
• Plasticscouringpad
• Dishwasher
Oven Door
There is no need to remove the oven door for normal use.
However, it can be done ff necessary.
Before removing or replacing, make sure all controls are off and
the oven isoool. The oven door isheavy. Uea both hands, do not
lift or carry the door by the handle and another person to help is
suggested. Use care not to damage the outer finish.
To Remove:
1. Open the oven door all the way.
2. Insert short end of door removal pins, included with the oven,
into both hinge hangers. Two %=in. (4 am) allen wrenches or
two nails of similar diameter can be used if door removal pins
have been misplaced. Do not remove the pins while the door
is removed.
Oven Lights
The oven lights are 12 volt, 5-watt maximum halogen bulbs. They
will come on when the oven door is opened. They will not work
during the Serf-Cleaning cycle. When the oven door is clo_ed,
press OVEN UGHT to turn them on or off.
ToReplace:
Before replacing, make sure the oven is off and cool.
1. Disconnect power.
2. Remove glass light cover by grasping the front edge and
puffing away from oven.
3. Remove bulb from socket.
4. Replace bulb, replace bulb cover by snapping back into wall.
5. Reconnect power.
1
1.Insertsmallend of pinhere
3. Grasp under door handle and carefully close door as far as it
will shut. Pull door out from the bottom.
To
1. Make sure door removal pins have not been removed. Rt
hinge arms into slots in frame. Push in at lower corner to
enSUre hinge arms are fully engaged.
2- Openthedoorcompletelyand removethe doorremovalpins.
Save themfor futureuse.
3. Cloea oven door. ffthe door doas nct operate freely, rapeat
theprocess.
21
Ovencook_g ro_lts notwhat expected
TROUBLESHOOTING
lly the solutions suggeated here flrat in erder to avoid the
cost of an unnecessmy earvice ceil,
Noth g wmopera*
• Has a household fuse been blown or has the circuit
breaker been tripped?
Replace the fuse or reset the circuit.
• Is the appliance wired properly?
See Installation Instructions.
OvenwUinot operate
• is the electronic oven control set correctly?,
See "Electronic Oven Control" section.
• Has a delay start been set?
See "rimed Cooking"section.
• On some models, is the Control Lock set?
See "Control Lock" section.
• On some models, is the Sabbath Mode set?
See =Sabbath Mode" section.
• 011double oven models, isone owm self-cleaning?
Whenone oven isself-cleaningtheotherovencannotbeset
orturnedon,
• On double oven models, has the cmTect oven been
selected?
Choose UPPER OVEN or LOWER OVEN first.
Oven tempe_ture too high or too low
• Does the oven temperature calibration need adjustment?
See "OvenTemperstureControl"section.
= ,. H ,1=, = =_=, ,,=, I,,,.L HL , ,
Display shows messages
Is the display showing =PF", =PF id---27" or "PF Id=30"?
There has been a power failure. Clear the display. See
"Display(s)" section. On some models, reset the clock, if
needed. See =Clock" section.
• Is the display showing a letter followed by a number?
Clear the display. See "Display(s)" section, ff it reappears, call
for service. See "Assistance or Service" section.
m,, ,, i, , .,l, ,
Self-Cleaning cycle will not operab}
Is the oven door open?
Close the oven door all the way,
Has the function been entered?
See =Self-Cleaning Cycle" section.
On some models, has a delay start Self-Clean cycle been
set?
See =Self-Cleaning Cycle" section.
Has a delay start been set?
See ='l-tmed Cooking" section.
On doubis oven modeis, is one oven self-cleaning?
When one oven is serf-cleaning, the other oven cannot be set
to serf-clean.
• istileappliance level?
Leveltheappliance.See theInstallationInstructions.
• Is the IXoper temperature sat?
Double-chenk the recipe in a reliable cookbook.
• Is the proper oven temperature calibration set?
See "OvenTemperatureControl" section.
• Wasthe oven preheated?
See "Bakingand Roasting"section.
l msthe proper bakeware being used?
See "Bakeware" section.
• Are the racks positioned properb/?
See "PositioningRacksand Bakeware"section.
• Is there proper air drculation around bakeware?
See =Positioning Racks and Bakeware" section.
• Is the batter evenly distributed in the pan?
Check to make sure batter is level in the pan.
• Is the proper length of time being used?
Adjust cooking time.
• Has the oven door been opened while cooking?
Oven peekingreleasesovenheat end can resultin longer
cookingtimes.
• Are baked Items too brown on the bottom?
Move rack to higher position in the oven.
• _ pie crust edges browning early?
Use aluminumfoiltocover theedge ofthecrust.
22
ASSISTANCE OR
SERVICE
Before calling for assistance or service, please check
=Troubleshooting." It may save you the cost of a service call. if
you still need help, follow the instructions below.
When calling, please knew the purchase date and the complete
model and serial number of your appliance. This information will
help us to better respond to your request.
nyouneedrep cemeatparts
If you need to order replacement parts, we recommend that you
only use factory specified parts. These factory specified parts will
fit right end work right because they are made with the same
precision used to build every new KITCHENAID" appliance.
To locate factory specified parts in your area, call our Customer
Interaction Center telephone number or your nearest KitchenAid
designated service center.
In the U.S.A.
Call the KitchenAid Customer Interaction Center toll free:
1-800-422-1230.
Our cormultants provide assistance with:
• Fsatures and specifications on our full line of appliances.
• Installation information.
• Accessory end repair parts sales.
• Specialized customer assistance (Spanish speaking, hearing
impaired, limited vision, etc.).
• Referrals to local dealers, repair parts distdbutom, end
service companies. KitchenAid designated service
technicians are trained to fulfill the product warrenty end
provide atter-warranty service, anywhere in the United States.
To locate the KitchenAld designated service company in your
area, you can also look in your telephone directory Yellow
Pages.
Forfurther mldstan_
If you need further assistance, you can write to KitchenAid with
any questions or concerns at:
KltchenAid Brand Home Appliances
Customer Interaction Center
c/o Correspondence Dept.
MD 8020
553 Benson Road
Benton Harbor, MI 49022-2400
Please include a daytime phone number in your correspondence.
Accessories U._A.
To order accessories, call the KitchenAJdCustomer Interaction
Center toll free at 1-800-422-1230; and follow the menu prompts.
Or visit our wel0c,ite at wv_t, kitchelwid.co_ and click on "Shop-
Online', then "Acce_k_xias'.
S_ainleu Steel Cleaner & Poll_
(stainlesssteel models)
Order Part #8171420
eet huon Kn
(includes 3 racks end en oven door stop)
Order Part #4395974A96
In Canada
Forproductrelatedquestions,pleasecallthe KitchenAJdCanada
CustomerInteractionCentertollfree:
•1..800-461-5681 8:30 a.m. - 5:30 p.m.(EST)
Our consultants provideassistance with:
• Featuresand spacificetionsonourfull lineof appliances.
• Referrals to local dealers.
For parts, accessories and service in Canada
Call 1-800-807-6T/7. KitchenAid designated service technicians
are trained to fulfill the product warranty and provide after-
warranty service, anywhere in Canada.
For furl_er assistance
If you need further assistance, you can write to KitchenAid
Canada with any questions or concerns at:
Customer Interaction Center
KitchenAid Canada
1901 Minnesota Court
Mississauga, Ontario L5N 3A7
Please include a daytime phons number in your correspondence.
23
KITCHENAID®COOKTOP,BUILT-INOVENAND RANGEWARRANTY
ONE-YEAR FULL WARRANTY
For one year from the date of purchase, when this appliance is operated and maintained according to instructions attached to or
furnished with the product, KitchanAid will pay for factory specified parts and repair labor costs to correct defects in materials or
workmanship. Service must be provided by a KitohsoAid designated service company.
SECOND THROUGH FIFTH YEAR FULL WARRANTY
On electric ranges and electric cooldops, in the second through fifth years from the date of purchase, KitchonAid will pay for factory
specified parts and repair labor for any electric element to correct defects in materials or workmanship. Service must be provided by a
KitchanAid designated service company.
On gas ranges and gas cooktops, in the second through fifth years from the date of purchase, KitchenAId will pay for factory
specified parts and repair labor for any gas burner to correct defects in materials or workmanship. Service must be provided by a
KttchenAid designated service company.
On ranges and built-in ovens, in the second through fifth years from the date of purchase, KitchenAid will pay for factory specified
parts and repair labor for solid state touch control system to correct defects in materials or workmanship. Service must be provided by
e KitchanAid designated service company.
SIXTH THROUGH TENTH YEAR UMITED WARRANTY
On ranges and built-in ovens only, in the sixth through tenth years from date of purchase, KitchenAJd will pay for factory specified
parts for the porcelain oven cavity/mner door ifthe part rusts through due to defects in materials or workmanship.
KltchenAid wig not pay fort
1. Service calls to correct the Installation of your appliance, to insthJCtyou how to use your appliance, to replace house fuses or
correct house wiring, or to replace owner-accessible light bulbs.
2. Repairs when your appliance is used in other than normal, single-family household use.
3, Pickup and delivery. Your appliance is designed to be repaired in the home.
4. Damage resulting from accident, alteration, misuse, abuse, fire, flood, improper installation, acts of God or use of products not
approved by KltchanAid or KitchenAJd Canada.
5. Repairs to parts or systems resulting from unauthorized modifications made to the appliance.
6. Replacement parts or repair labor costs for units operated outside the United States or Canada.
7. In Canada, travel or transportation expanses for customers who reside in remote areas.
8. Any labor costs during the limited warranty period.
KITCHENAID AND KITCHENAID CANADA SHALL NOT BE LIABLE FOR INCIDENTAL OR CONSEQUENTIAL
DAMAGES.
Somestatesor provincesdo notallowthe exclusionor limitationof tncldantaiorcensequentiai damages,sothisexclusionor limitation
maynotapplytoyou.Thiswarrantygivesyouspecificlegaldghts,and youmay alsohaveotherrightswhichvaw fromstateto stateor
provinceto province.
Outside the 50 United States and Canada, this warranty does not apply. Contact your authorized KitchenAid dealer to
determine if another warranty applies.
If you need service, first see the =Troubleshooting" section of this book. After checking =Troubleshooting," adclitionai help can be found by
checking the "Assistance or Service" section or by ceiling the KitchenAiclCustomer Interaction Cent, 1-8(X)-422-1230 (tcll-ftce), from
anywhore in the U.S.A. In Canada, contact your ICitchonAk:ldesignated service company or call 1-800-807-6777.
5/O0
Keep this book and your sales MIp together for future
reference. You must provide proof of purchase or Installation
date for in-warranty service.
Write down the following information about your appliance to
better help you obtain assistance or service ifyou ever need it.
You will need to know your complete model number and serial
number. You can find this informaifon on the model and serial
number label/plate, located on your appliance as shown in the
=Parts and Features" section.
Dealer name
Address
Phone number
Model number
Serial number
Purdlue date
44b'195=B WOO
0 2000.NIdOl_m_MId. ®Re6klmmd_'=domllddTM"Dlmllme_of10idrml/_l,U.S._ 101dl0lta_Cmm_BelmeeInCamds PrllmdFnU.S.A