
I Use and Care Guide I
Refrigerator
SafetyInstructions........................ 3
Operating Instructions, Tips
Appliance Registration ................................. 2
Energy-Saving Tips ................... 2
Food Storage Suggestio no ............ 7
Ice Dispenser .................................. 4,5
Icemaker ........................................ 4,5
Power Saver Switch .............................. 6
Shelves ....................................................... 8,9
Porta-Bins ....................................... 8
Quick Serve TM System ........................ 9
Quick Store ................................... 9
Storage Drawers ................... 10
Take-out Counter .................................. 8
Temperature Controls .................................. 6
Care and Cleaning
Condenser .......................... 11
Drawers ......................................................... 12
Light Bulb Replacement ............ 13
Shelf Adjustments ................. 12
Water Filter Accessory ............... 13
Problem Solver ........... 16,17
More questions?...call
GEAnswer Center+_800.626.2000
Preparation
Clearances am...................... J4
Location ....................................................... 14
Moving .............................. 13
Rollers/Leveling Legs ................... 14
Vacation ......................................................... 13
Water Supplytolcemaker ............ 14
Installation
Installation .................................................... 15
Adapter Plug ................................. 15
Electrical Requirements .............. 15
Extension Cord .................. 15
Grounding ....................... _5
Consumer Services ........... 19
Model and Serial Numbers ............ 2
Repair Service ................................... 2
Warranty ........................ B ackC over
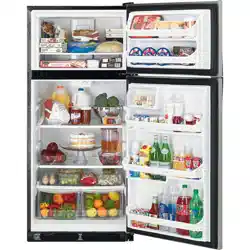
Top.MountNo+Frost22 and25 models
with Ice Dispenser
GE Appliances
HELP US HELP YOU...
Read this book carefully.
It is intended to help you operate
and maintain your new refrigerator
properly•
Keep it handy for answers to your
questions.
If you don't understand something
or need more help, write (include
your phone number):
Consumer Affairs
GE Appliances
Appliance Park
Louisville, KY 40225
Write down the model and
serial numbers.
You'll see them on a label on the
left side, near the top of the fresh
l'ood compartment.
q'hesc numbers are also on the
Consumer Product Ownership
Registralion Card that came with
your refrigerator-o
Before sending in the registration
card, please write these numbers
here:
Model Number
If you received a damaged
refrigerator...
Immediately contact the dealer
(or builder) that sold you the
refrigerator.
Save time and money.
Before you request service...
Check the Problem Solver in the
back of this book. It lists minor
operating problems that you can
correct yourselF.
Serial Number
Use these model and serial numbers
in any correspondence or service
calls concerning your refrigerator.
ENERGY-SAVING TIPS
•Location of your refrigerator- is important. Avoid
locating it next to your range, a heating vent or where
the sun will shine directly on it.
• Close the doors as soon as possible• particularly i n
hot, humid weather.
•Keep Power Saver Switch i n the power sa\cr
position unless moisture forms on the outside o!
the refrigerator.
• Be sure the doors are closed tightly. Before leaving
the house or- retiring for the night, check to be sure the
doors haven't been left open accidentally.
• Keep foods covered to reduce moisture buildup
inside the refligerator.
IF YOU NEED SERVICE
To obtain service, see the
Consumer Services page in the
back of this book.
We're proud of our service a,d
want you to be pleased• If for some
reason you are not happy with the
smwice you receive, here are three
steps to follow for further help.
FIRST• comact the people who
ser\ iccd your appliance. Explain
whx you are not pleased. In most
cases this _ill solve the problem.
NEXT, if you are still not pleased,
write all the details including
_ot rphone number- to:
Manager, Consumer Relations
GE Appliances
Appliance Park
Louisville, KY40225
FINALLY, if your problem is still
not resolved, write:
Major Appliance Consumer
Action Panel
20 North Wacker Drive
Chicago, IL 60606
IMPORTANT SAFETY INSTRUCTIONS
Read all instructions before using this appliance.
A ARNING--When using this appliance,
always exercise basic safety precautions,
including the following:
.Use this appliance only for its intended purpose
as describedin thisUse and CareGuide.
.This refrigerator must be properly installed
in accordance with the Installation Instructions
before it is used. See grounding instructions in
Installation section.
.Never unplug your refrigerator by
-_r_: pulling on the power cord. Always grip
_-" plug firmly and pull straight out from tile
"" outlet.
• Repair or replace immediately all electric
service cords that have become frayed or
otherwise damaged. Do not use a cord that shows
cracks or abrasion damage along its length or at
either the plug or connector end.
, When moving your refrigerator away from the
wail,be careful not to roll over or damage the
powercord.
• Do not allow children to climb, stand or
hang on the shelves in the refrigerator. They
could damage the refrigerator and seriously
injure themselves.
. If your old refrigerator is still around
the house but not in use,,be sure to
remove the doors. This will reduce the
possibility of danger to children.
• After your refrigerator is in operation) do
not touch the cold surfaces in the freezer
compartment particularly when hands are
damp or wet. Skin may adhere to these extremely
cold surfaces.
°If your refrigerator has an automatic icemaker,
avoid contact with the moving parts of the
ejector mechanism'.) or with the heating element
that releases the cubes. Do not place fingers or
hands on tile automatic icemaking mechanism
while the refrigerator is plugged in.
.Don't refreeze frozen foods which have
thawed completely. The United States
Department of Agriculture in Home and Garden
Bulletin No, 69 says:
".. ,You may safely refreeze frozen lbods that have
thawed if they still contain ice crystals or if they are
still cold--below 40°F.
"...Thawed ground meats, poultry or fish that have
any off-odor or off-color should not be refrozen and
should not be eaten. Thawed ice cream should be
discarded. If tile odor or color of any food is poor
or questionable, get rid of it. The food may be
dangerous to eat.
"Even partial thawing and refreezmg reduces the
eating quality of foods, particularly fruits,
vegetables and prepared foods. The eating quality
of red meats is afl'ected less than that of many other
lbods. Use refrozen lbods as soon as possible to
save as much of their eating quality as you can."
.Unplug your refrigerator before cleaning
and making repairs. NOTE: We strongly
recommend that any servicing be
performed by a qualified individual.
.Before replacing a burned-out light bulb,
unplug the refrigerator or turn off power at circuit
breaker or lhse box in order to avoid contact with
a live wire filament. (A burned-out light bulb may
break when being replaced.) NOTE: Turning
control to OFF position does not remove power
to the light circuit.
• Do not store or use gasoline or other flammable
vapors and liquids in the vicinityof this or any
other appliance•
SAVE THESE
INSTRUCTIONS
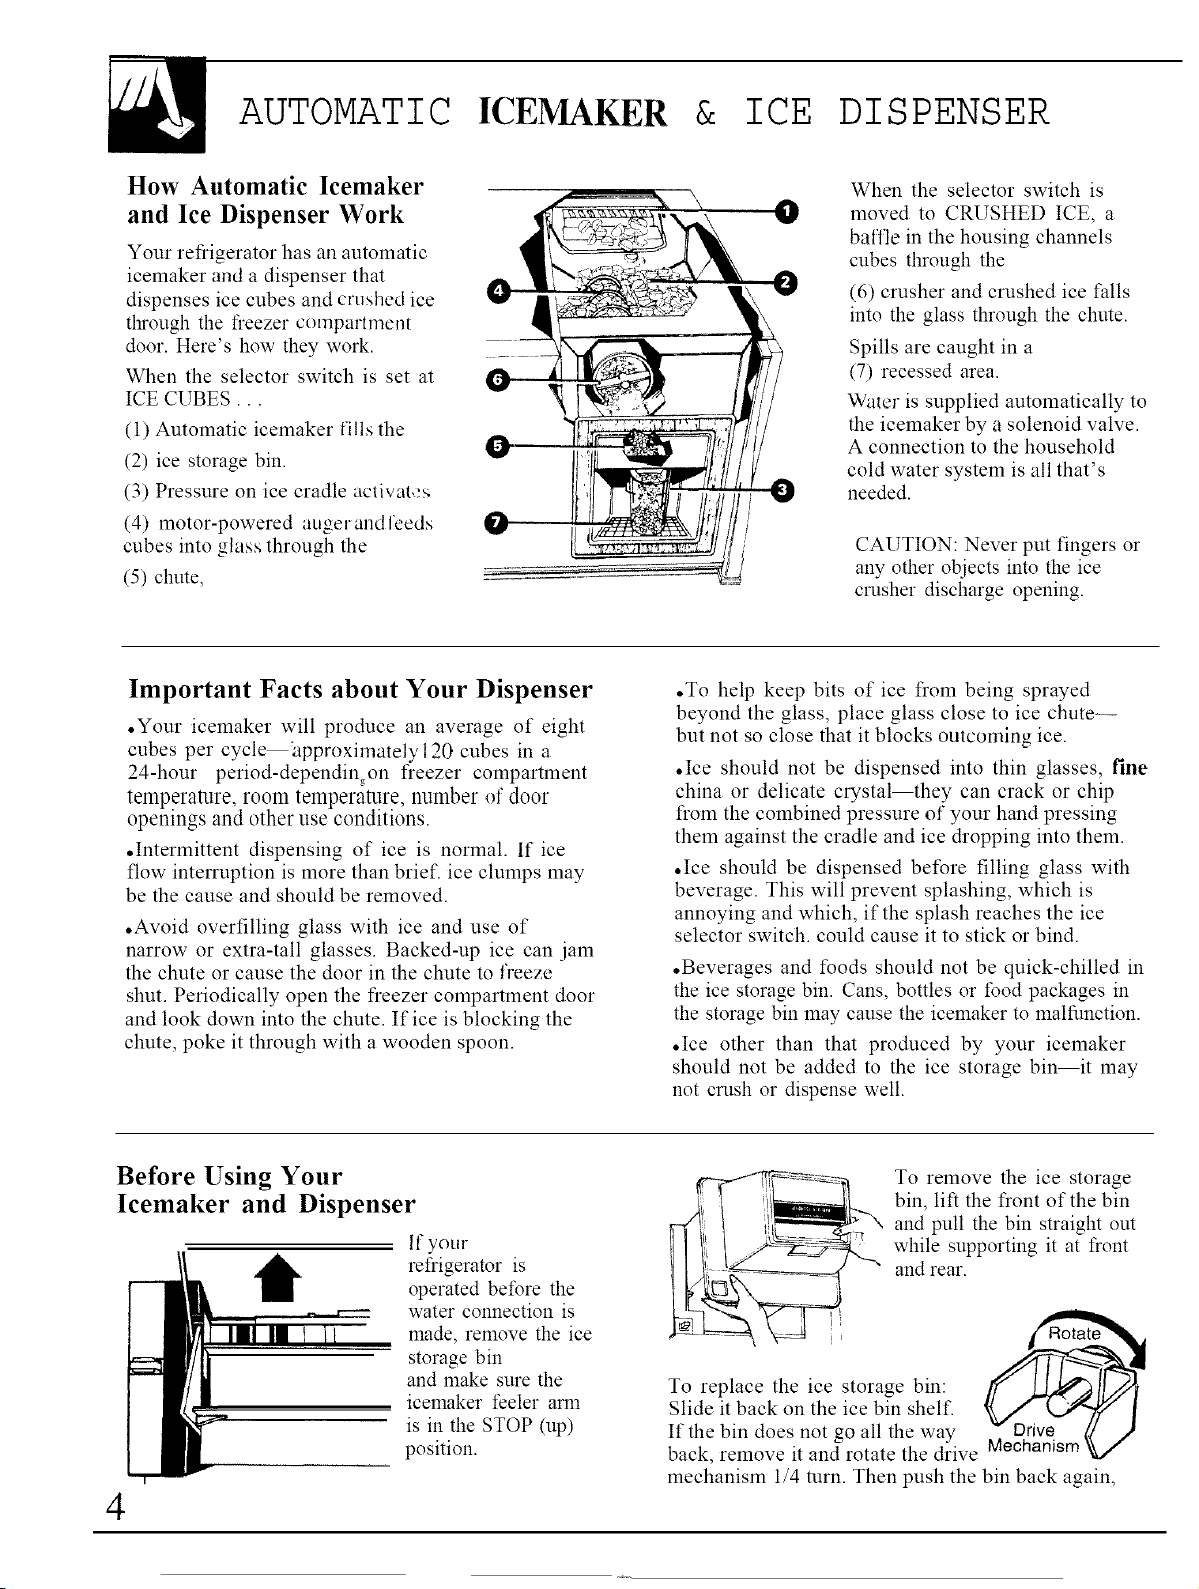
AUTOMATIC ICEMA R & ICE DISPENSER
How Automatic Icemaker
and Ice Dispenser Work
Your refrigerator has an automatic
icemaker and a dispenser that
dispenses ice cubes and crushed ice
through the freezer compartment
door. Here's how they work.
When the selector switch is set at
ICE CUBES...
(1) Automatic icemaker fills the
(2) ice storage bin.
(3) Pressure on ice cradle activates
(4) motor-powered augerandfceds
cubes into glass through the
(5) chine,
When the selector switch is
moved to CRUSHED ICE, a
baffle in the housing channels
cubes through the
(6) crusher and crushed ice falls
into the glass through the chute.
Spills are caught in a
(7) recessed area.
Water is supplied automatically to
the icemaker by a solenoid valve.
A connection to the household
cold water system is all that's
needed.
CAUTION: Never put fingers or
ally other objects into the ice
ClUsher discharge opening.
Important Facts about Your Dispenser
• Your icemaker will produce an average of eight
cubes per cycle approximately t20 cubes in a
24-hour period-dependin on freezer compartment
temperature, room temperature, number of door
openings and other use conditions.
•Intermittent dispensing of ice is normal. If ice
flow interruption is more than brief, ice clumps may
be the cause and should be removed.
• Avoid overfilling glass with ice and use of
narrow or extra-tall glasses. Backed-up ice can jam
the chute or cause the door in the chute to freeze
shut. Periodically open the freezer compartment door
and look down into the chute. If ice is blocking the
chute, poke it through with a wooden spoon.
•To help keep bits of ice from being sprayed
beyond the glass, place glass close to ice chute--
but not so close that it blocks outcoming ice.
• Ice should not be dispensed into thin glasses, fine
china or delicate custal they can crack or chip
from the combined pressure of your hand pressing
them against the cradle and ice dropping into them.
• Ice should be dispensed before filling glass with
beverage. This will prevent splashing, which is
annoying and which, if the splash reaches the ice
selector switch, could cause it to stick or bind.
•Beverages and foods should not be quick-chilled in
the ice storage bin. Cans, bottles or food packages in
tile storage bin may cause tile icemaker to malfunction.
•Ice other than that produced by your icemaker
should not be added to the ice storage bin it may
not Cl-Ushor dispense well.
Before Using Your
Icemaker and Dispenser
If your
refligerator is
operated before the
water connection is
made, remove tile ice
storage bin
and make sure tile
icemaker feeler arm
is in the STOP (up)
position.
4
To remove the ice storage
bin, lift the front of the bin
aim pull the bin straight out
while supporting it at front
and real.
To replace the ice storage bin:
Slide it back on the ice bin shelf.
If the bin does not go all the way
back, remove it and rotate the drive
mechanism 1/4 turn. Then push the bin back again,
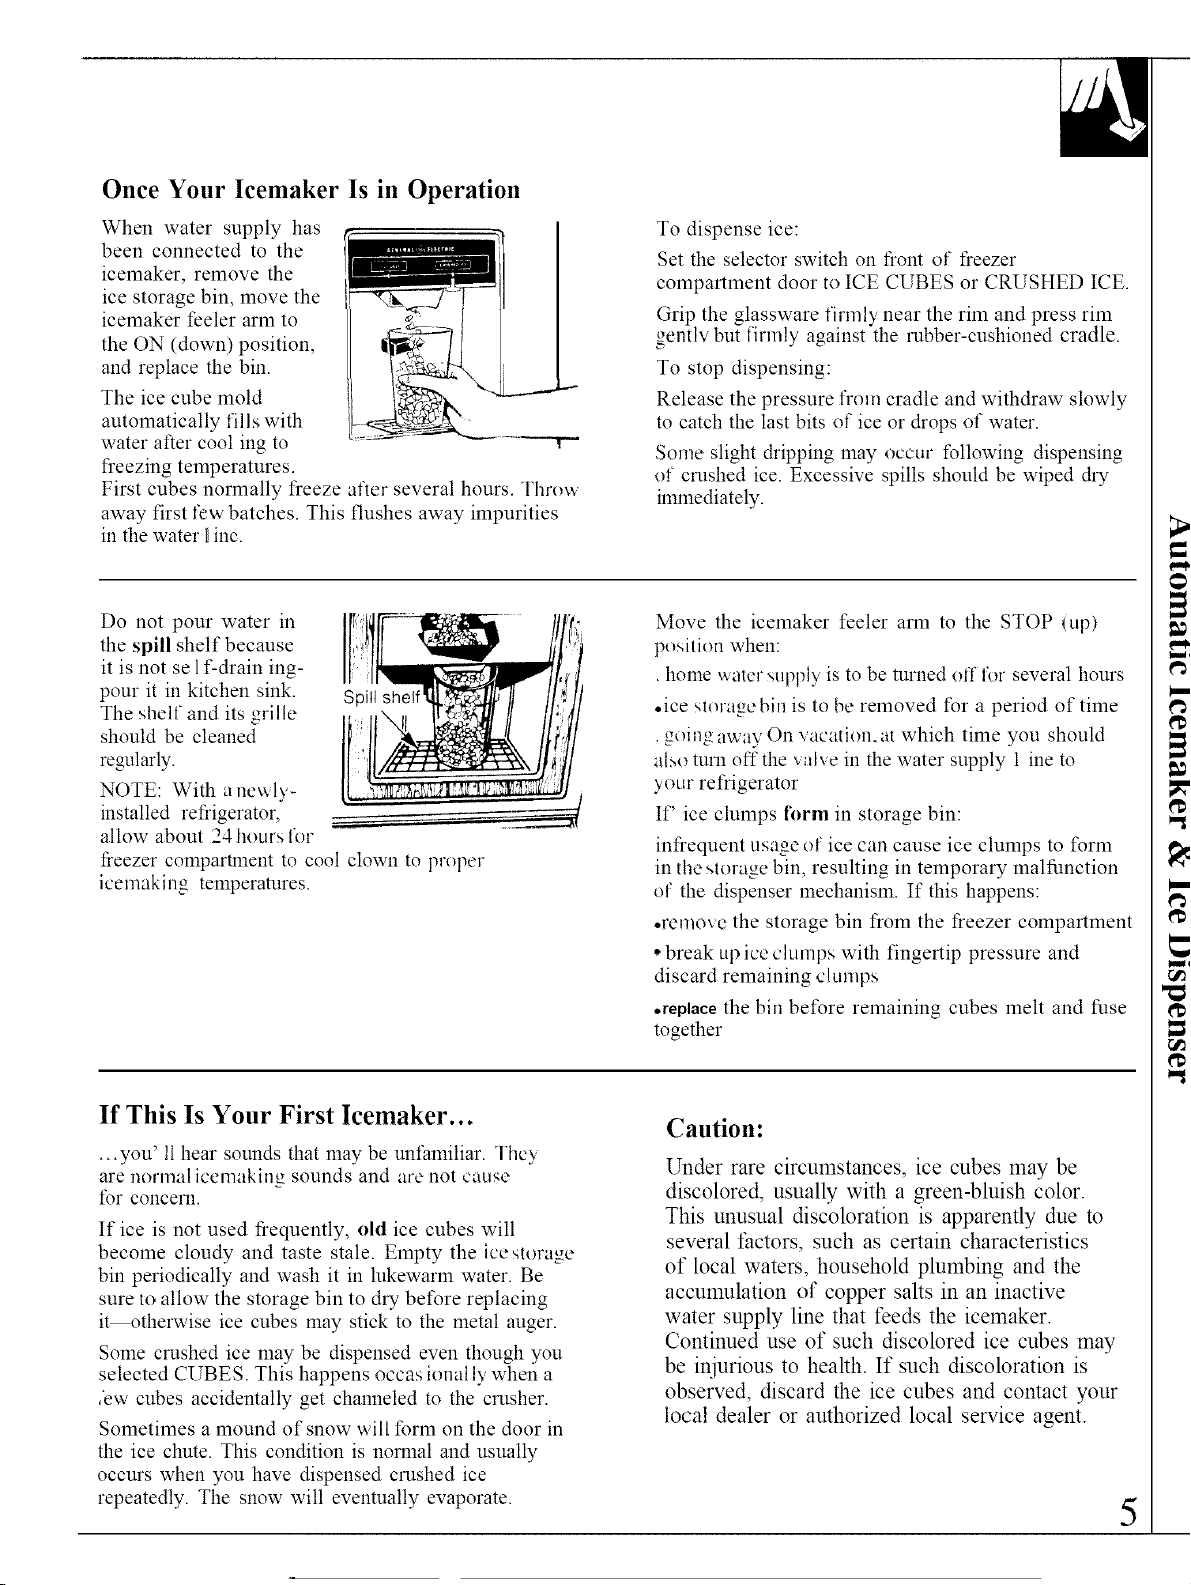
Once Your Icemaker Is in Operation
When water supply has
been connected to the
icemaker, remove the
ice storage bin, move the
icemaker feeler arm to
the ON (down) position,
and replace the bin.
The ice cube mold
automatically fill s with
water after cool ing to !"
freezing temperatures•
First cubes normally freeze after several hours• Throw
away first few batches• This flushes away impurities
in the water [inc.
To dispense ice:
Set the selector switch on t'rom of freezer
compartment door to ICE CUBES or CRUSHED ICE.
Grip the glassware firefly near the rim and press rim
_entlv but firmly against the rubber-cushioned cradle.
To stop dispensing:
Release the pressure floln cradle and withdraw slowly
to catch the last bits of ice or drops of water.
Some slight dripping may occur following dispensing
of crushed ice. Excessive spills should be wiped dry
immediately.
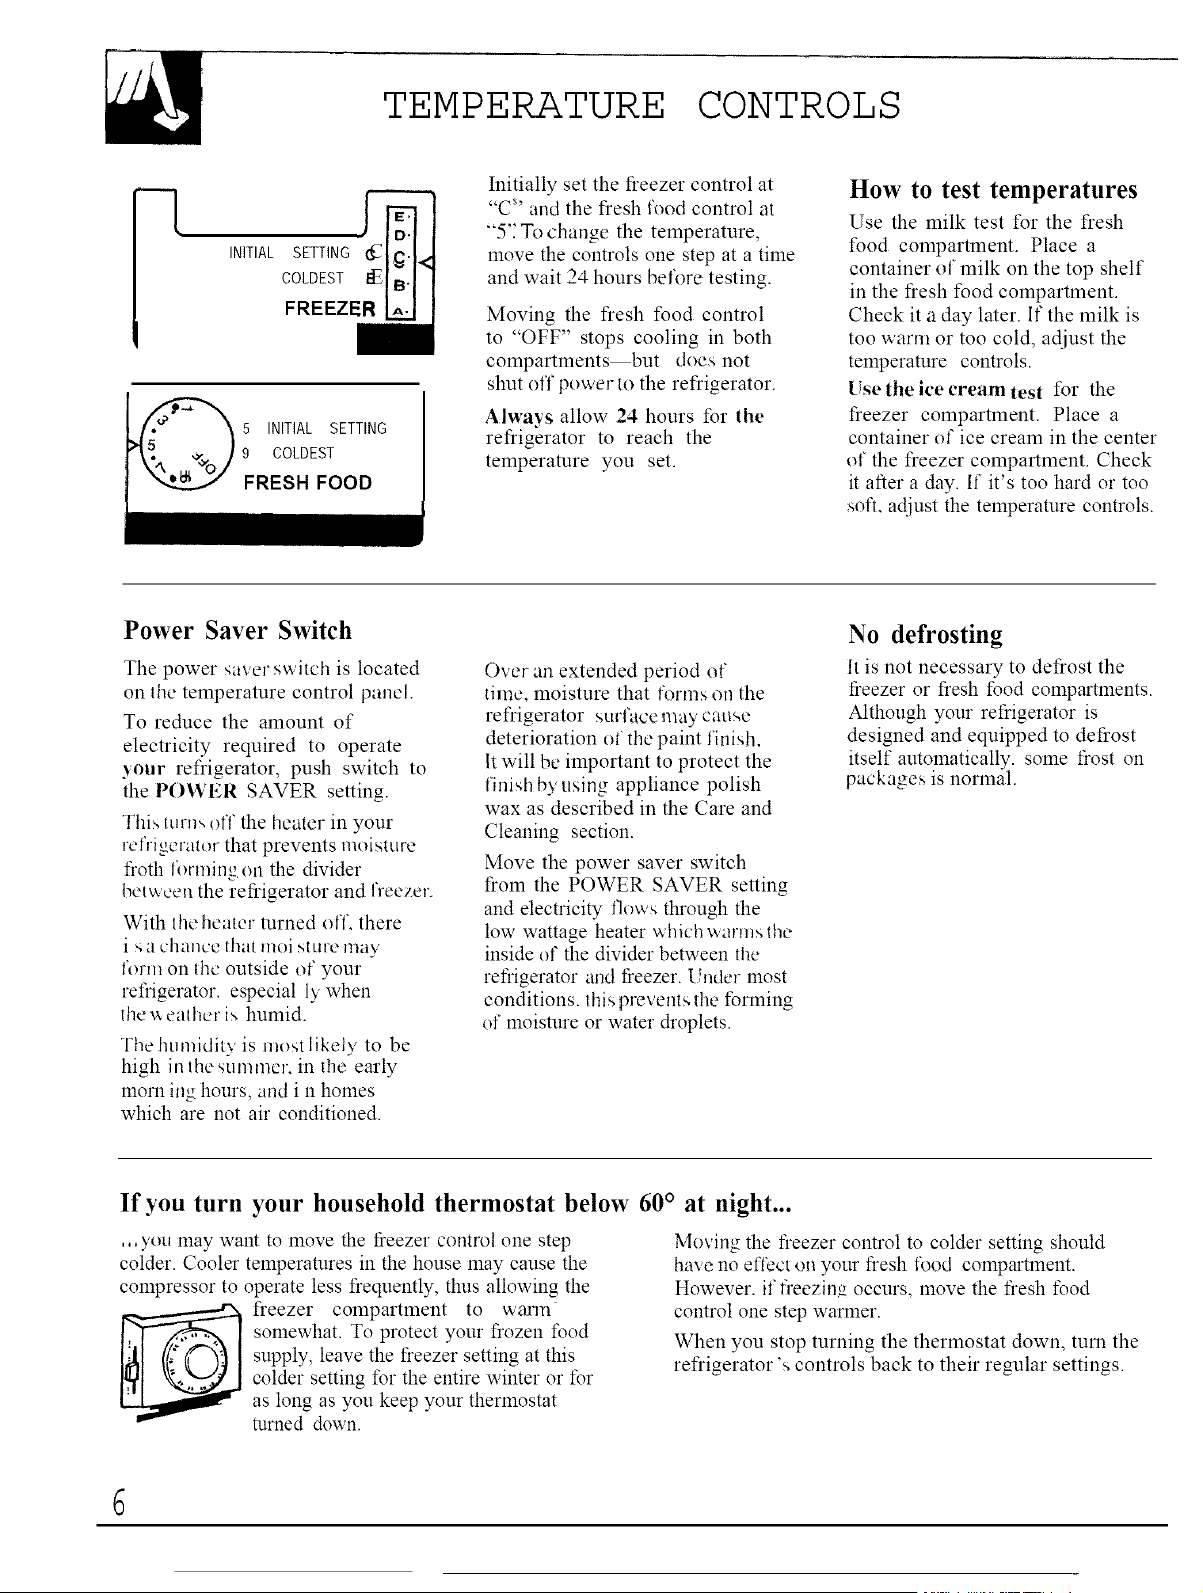
Do not pour water in
the spill shelf because
it is not se If-drain ing-
pour it in kitchen sink• Spill
The shelf and its grille
should be cleaned
regularly.
NOTE: With a newly-
installed refrigerator, -- .......
allow about 24 horns (or
freezer compartment to cool clown to proper
icemaking temperatures.
Move the icemaker feeler arm to the STOP (up)
position when:
•home water supply is to be turned off lk_rseveral hours
•ice storage bii_ is to be removed for a period of time
• going away On vacation, at which time you should
also turn off the val_e in the water supply 1 ine to
your refrigerator
If' ice clumps form in storage bin:
infrequent usage of ice can cause ice clumps to form
in the storage bin, resulting in temporary malfunction
of the dispenser mechanism. If this happens:
°remove the storage bin from the freezer compartment
• break up ice clumps with fingertip pressure and
discard remaining clumps
°replace the bin before remaining cubes melt and fuse
together
If This Is Your First lcemaker...
++.you' 11hear sounds that may be unfamiliar. They
are normal icemaking sounds and are not cause
for concern.
If ice is not used frequently, old ice cubes will
become cloudy and taste stale• Empty the icestorage
bin periodically and wash it in lukewarm water• Be
sure to allow the storage bin to dtT before replacing
i_othm_aqse ice cubes may stick to the metal auger•
Some crushed ice may be dispensed even though you
selected CUBES. This happens occasional ly when a
,'ew cubes accidentally get channeled to the crusher.
Sometimes a mound of snow will form on the door in
the ice chute. This condition is normal and usually
occurs when you have dispensed crushed ice
repeatedly• The snow will eventually evaporate•
Caution:
Under rare circumstances, ice cubes may be
discolored, usually with a green-bluish color.
This unusual discoloration is apparently due to
several factors, such as certain characteristics
of local waters, household plumbing and the
accumulation of copper salts in an inactive
water supply line that feeds the icemaker.
Continued use of such discolored ice cubes may
be injurious to health. If such discoloration is
observed, discard the ice cubes and contact your
local dealer or authorized local service agent.
5
TEMPERATURE CONTROLS
-i
5 INITIAL SETTING
9 COLDEST
FRESH FOOD
Initially set the fleezer control at
"C +'and the flesh food control at
"5'_ To change the temperature,
move the controls one step at a time
and wait 24 hours before testing.
Moving the flesh food control
to "OFF" stops cooling in both
compartments but does not
shut off power to the refligerator.
Always allow 24 hours for the
refligerator to reach the
temperature you set.
How to test temperatures
Use the milk test for the flesh
food compartment. Place a
container of milk on the top shelf
in the flesh food compartment.
Check it a day later. If the milk is
too warm or too cold, adjust the
temperature controls.
Use the ice cream test for the
freezer compartment. Place a
container of ice cream in the center
of the fleezer compartment. Check
it after a day. If it's too hard or too
soft. adjust the temperature controls.
Power Saver Switch
The power saver switch is located
on tile temperature control panel.
To reduce the amount of
electricity required to operate
your refligerator, push switch to
the POWER SAVER setting.
This mrn_ off the heater in your
refrigerator that prevents moisture
fioth formingotl the divider
between the refligerator and freezer.
With Ihe heater turned off. there
i s a chance that moisture may
form on the outside of your
refligerator, especial ly when
the x_emher is humid.
Fhe humidity is most likely to be
high in the sum men in the early
morn ing hours, and i n homes
which are not air conditioned.
Over an extended period of
time, moisture that lk)rms on the
refligerator surfuce n_ay cat>,e
deterioration of the paint finish.
Itwill be important to protect the
finish by' using appliance polish
wax as described in the Care and
Cleaning section.
Move the power saver switch
flom the POWER SAVER setting
aud electricity flows through the
low wattage heater which warms lhe
inside of the divider between tl_e
refligerator and fieezer. Under most
conditions, this prevents tlle forming
of moisture or water &oplets.
No defrosting
It is not necessary to deflost the
freezer or fresh food compartments.
Although your refrigerator is
designed and equipped to defrost
itself autonmtically, some frost on
packages is normal.
If you turn your household thermostat below 60 ° at night...
,,,you nmy waut to move the fieezer control one step
colder. Cooler temperatures in the house may cause the
compressor to operate less fiequently, thus allowing the
fleezer compartment to warm
somewhat. To protect your flozen food
supply, leave the fleezer setting at this
colder setting for the entire winter or for
as long as you keep your thermostat
turned down.
Moving the fleezer control to colder setting should
have no effect on your flesh food compartment.
However. if fleezin._ occurs, move the flesh food
control one step warmer.
When you stop turning the thermostat down, turn the
refligerator "scontrols back to their regular settings.
FOOD STORAGE SUGGESTIONS
Suggested storage times for meat and poultry*
Eating quality DAYS IN MONTHS IN Eatingquality
drops after REFRIGERATORFREEZER drops after
time shown AT 35_'to40_EAT O"'F. time shown
DAYSIN MONTHSIN
REFRIGERATORFREEZER
AT35'to 40F.AT 0 F.
Fresh Meats
Roasts (Beef & Lamb) .3 to 5 6to12
Roasts (Pork & Veal) ..... 3 to 5 4 to8
Steaks (Beef ).... 3 to 5 6to 12
Chops (Lamb) 3to 5 6 to9
Chops (Pork) 3 to 5 3 to4
Ground & Stew Meats .1 to 2 3to4
Variety Meats 1to 2 3 to4
Sausage (Pork).. 1to 2 1to 2
ProcessedMeats
Bacon 7 1
Frankfurters. ..7 1,2
Ham(Whole) 7 t to 2
Ham (Half) 3to 5 1to 2
Ham (Slices) 3 1to 2
LuncheonMeats 3to 5 Freezing
Sausage (Smoked) _. 7 not recoin
Sausage(Dry & Semi-Dry)14 to 21 mended
CookedMeats
CookedMeatsand
Meat Dishes 3 to 4 2to3
Gravy& MeatBroth i to 2 2103
Fresh Poultry
Chicken& Turkey (Whole)1 to 2 12
Chicken (Pieces) 1to2 9
Turkey (Pieces) 1to2 6
Duck& Goose(Whole) 1to2 6
Giblets 1to 2 3
Cooked Poultry
Pieces(Coveredwith Broth)ire 2 6
Pieces (Not Covered) 3 to 4 1
Cooked Poultry Dishes 3to4 4906
FriedChicken 3 to4
(Otherthanfor meats& poultry)FREEZER
Most fruits and vegetables 8-12 months
Lean fish......... 6-8 months
Fattyfish rolls andbreads,
soups, stew, casseroles..... 2-3 months
Cakes,pies. sandwiches,
leftovers (cooked),
_cecream(originalcarton)........... 1monthmax.
"U.S Department of Agriculture
Meats, fish and poultry purchased
from the store vary in quality and
age; consequently, safe storage time
in your refrigerator will vary.
Unfrozen meats, fish
and poultry
• Always remove store wrappings.
• Rewrap in foil, film or wax paper
and refrigerate immediately.
Vegetables
•Use the vegetable drawers--
they've been designed to preserve
the natural moisture and
freshness of produce.
•Covering vegetables with a me i St
towel helps nmintain crispness.
*As a ftulher aid to freshness,
prepackaged vegetables can be
stored in their original wrapping•
Ice Cream
Fine-quality ice cream, with high
creatn conlenl, will normal ly
require sl ighll} Im_er temperatures
than more "'airy" already-packaged
brands with low cream content•
•hw i tt be necessary to e xperiment
to determine the treezer
compartment location and
temperature control _etting to keep
your ice cream at the right serving
temperature.
• The rear of the fleezer
compartment is slighll 3colder than
the front.
Cheese
Wrap well with wax paper or
aluminum foil, or put in a plastic
bag.
oCarel'ully wrap to expel air and
help prevent mold.
• Store prepackaged cheese in its
own wrapping if you wish.
,\"el_ rdt ]miqlte_ dre CO#INUtlf[l.v
h_'ittg dei'doped. Consult the ( oun O'
l_rc,lff_,t Ses'l,icc or your local Utility
Comp(un fi. rhe latest it{ibrmation on
!?u<in_ arid srori#ig fi;odv.
Tips on freezing foods
There are three essential requirements for efficient
home freezing.
1. Initial quality. Freeze only top-quality foods.
Freezing retains quality and flavor: it calmot improve
quality.
2. Speed. The quicker thlits and vegetables are frozen
fter picking, the better the fiozen product will be.
You'll save time, too. with less culling and sorting to do.
3. Proper packaging. LTsefood wraps designed
especially for fieezing.
To freeze meat, fish and poultry, wrap well in
lreezer _. eight foil (or other heavy-duty wrapping
nmterial ), forming it carefldly to the shape of the
contents. This expels air. Fold and crimp ends of the
package to provide a good. lasting seal.
Donq reffeeze meat that has been completely thawed;
meat• whether raw or cooked, can be frozen
succes Lilly only once.
7
TAKE-OUT COUNTER
(on some models)
The Take-out __--
Counter provides
an extra work
surthce right at
the refrigerator.
Frequently used
items stored on the
flesh food door are
readily accessible withom having to open the main
refrigerator door.
Although durable, stain- and scratch-resistant, the
work surface on the Take-out Counter should not be
used as a cutting board. Sharp utensils can damage it.
The Take-ore Counter is also accessible through a lift-
up door on the inside of the flesh food door.
Take-out Counter Porta-Bin
This Porta-Bin has a
special lip that overlaps
the Take-out Counter. It
is not interchaugeable
with the other door
bins. lb remove it, open
the Take-out Counter
door to free the lip.
Inner r r_,
door -4_J:'_:_' • : 7
Take-out Counter Porta-Bin
Raise the inner door and lift
the bin straight up until the
hooks on the bin come out
of the tracks on the door.
When you replace it. make
sure the Take-out Counter
door is open so the lip is
positioned proper] y.
Take-out Counter Porta-Bin
SHELVES
Porta-Bins on the Doors
Adjustable Porta- II 1
Bins on fresh food
and freezer
compartment doors
can easily be carried
from the refrigerator
to the work area. 1
To remove: Lift Porta-Bin straight up until mounting
hooks disengage.
To relocate: Select desired shelf height, engage
Porta-Bin's hooks in slots on the tracks of the door,
and push in and down. Porta-Bin will hook in place.
!
Snuggers are designed
to give you storage
flexibility in Porta-Bins
and on your fresh food
door shelves, items
such as salad dressings,
steak sauces and other
condiments can now be
kept securely against
the door liner to help
prevent tipping, spilling or sliding.
Place index finger and middle finger on either side of
the snugger near the front and simply move it back
and fl_rth to fit your needs.
Adjustable Shelves
Shelves in the fresh food ran 4 'r [] Tilt up
and freezer compartments Lower to iI
are adjustable, enabling lock into i! ,
you to make efficient pl
shelf arrangements to fit ,
your fhmily's food
storage needs.
To remove shelves: Tilt
the shelf up at front, then lift it up and out of tracks on
the rear wall of the refrigerator.
To replace shelves: Select
the desired shelf height. With []
shelf front raised slightly, Engage
engage top lugs in tracks at top lug
rear of cabinet. Then lower
front of shelf until it locks [] Lower
into position. Both wire to lock
and tempered glass shelves into place
are adjusted the same way.

Quick Serve _MSystem (on somemodels)
)/D
I --I
These cooking-serving-storage dishes with durable
lids on an under-the-shelf rack. These dishes can be
removed from and returned to the rack as needed, and
the rack (and the shelf to which it is attached) can be
relocated anywhere in the fresh food compartment.
Dishes and lids are safe for use in microwave ovens,
refiigerators, freezers, and are dishwasher-safe. The
dishes should not be used for cooking high-fat foods
such as bacon and high-sugar foods such as candy and
syrup. The high temperatures of the fat and sugar can
cause bubbles to 1olnl on the inside of the dish.
CAUTION:
Dishes and lids are not designed for use in the
regular men, on the range-top or in the broiler.
Such use can be hazardous.
¢
'x-........
/' \ .
Quick Store Bin (onsomemodels)
This removable tilt-out bin made
of Lexan" polycarbonale resin can
be located on the flesh food or
freezer compartment door. It has
been designed for convenient
storage of those frequently used
items that do not fit easily into a
Porta-Bin or soon-to-be-used items
that require covered storage to
keep from drying ore.
[] Push up
I
_1111
I_Pull forwar,
To open, push the hitch tip and
pull the bin handle li)rvvard,
To avoid damaging flw
refrigerator, make sure the/q n is
ch)sed and latched bcl'ore c!os{ ng
flw refrigerator door,
Quick
To remove the bin, lifl it upand
out of the bin housing.
Bin housirlg "_
To relocate the Quick Store unit,
lil'l the bin housing up and out of
the qots on the door, move it to
the desired new location, and
!ower the hooks on the housing
into file slots on the door. You do
llot have to remove the bin from
the housing when relocating the
Quick Store unit.
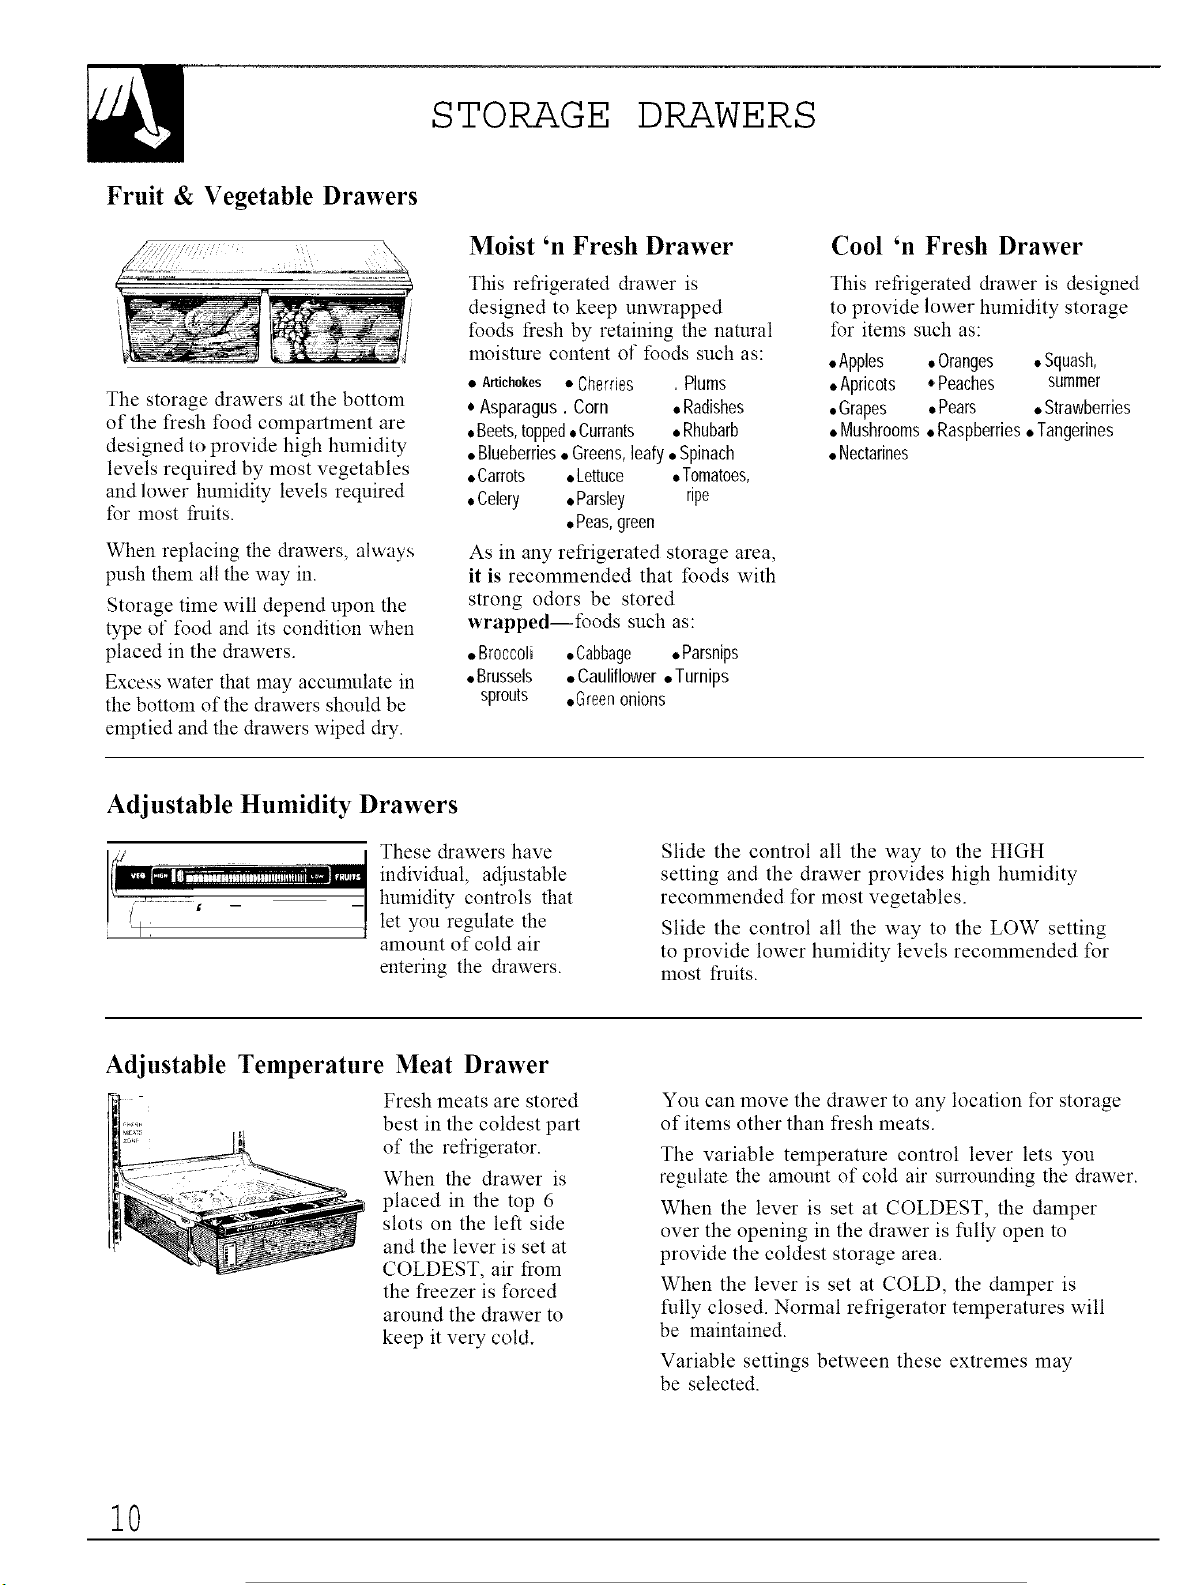
STORAGE DRAWERS
Fruit & Vegetable Drawers
The storage drawers at the bottom
of the fresh food compartment are
designed to provide high humidity
levels required by most vegetables
and lower humidity levels required
for most fiuits.
When replacing the &awers, always
push them all the way in.
Storage time will depend upon the
type of *\_od and its condition when
placed in the drawers.
Excess water that nmy accumulate in
the bottom of the &awers should be
emptied aim the &awers wiped &T.
Moist 'n Fresh Drawer
This refrigerated &awer is
designed to keep unwrapped
foods fresh by retaining the natural
moisture content of foods such as:
• Artichokes • Cherries , Plums
• Asparagus.Corn • Radishes
•Beets,topped•Currants • Rhubarb
• Blueberries•Greens,leafy•Spinach
•Carrots • Lettuce •Tomatoes,
•Celery • Parsley ripe
•Peas,green
As in any refrigerated storage area,
it is recommended that foods with
strong odors be stored
wrapped--foods such as:
,,Broccoli •Cabbage •Parsnips
•Brussels •Cauliflower•Turnips
sprouts •Greenonions
Cool 'n Fresh Drawer
This ret?igerated &awer is designed
to provide lower humidity storage
for items such as:
• Apples • Oranges • Squash,
• Apricots * Peaches summer
• Grapes • Pears • Strawberries
• Mushrooms• Raspberries• Tangerines
• Nectarines
Adjustable Humidity Drawers
These drawers have
individual, adjustable
humidity controls that
let you regulate the
amount of cold air
entering the &awers.
Slide the control all the way to the HIGH
setting and the drawer provides high humidity
recommended for most vegetables.
Slide the control all the way to the LOW setting
to provide lower humidity levels recommended for
most fruits.
Adjustable Temperature Meat Drawer
Fresh meats are stored
best in the coldest part
of the refrigerator.
When the drawer is
placed in the top 6
slots on the left side
and the lever is set at
COLDEST, air from
the freezer is forced
around the drawer to
keep it very cold.
You can move the drawer to any location for storage
of items other than fresh meats.
The variable temperature control lever lets you
regulate the amount of cold air surrounding the drawer.
When the lever is set at COLDEST, the damper
over the opening in the drawer is fully open to
provide the coldest storage area.
When the lever is set at COLD, the damper is
fully closed. Normal refrigerator temperatures will
be nmintained.
Variable settings between these extremes may
be selected.
10
CARE AND CLEANING
Cleaning--Outside
The ice dispenser spill shelf should be wiped dry
immediately to prevent spotting, if excessive spills
occur. Water left on the shelf may leave deposits that
you can remove by soaking them with undiluted
vinegar. You can also use a mixture of one teaspoon
of a non-precipitating water softener (such as Calgon
brand) and water, or one teaspoon of citric acid
powder per pint of hot tap water. Soak until the
deposit disappears or becomes loose enough to rinse
away. Usually 30 minutes of soaking time is adequate.
Avoid using wax on the spill shell' and trim.
The door handles and trim can be cleaned with a
cloth dampened with a solution of mild liquid
dishwashing detergent and water. D_T with a soft
cloth. Don't wax handles or trim.
Keep the finish clean. Wipe with a clean cloth,
lightly dampened with kitchen appliance wax or mild
liquid dishwashing detergent. Dry and polish with a
clean, soft cloth. Do not wipe the refrigerator with a
soiled dishwashing cloth or wet towel. These may
leave a residue that can damage the paint. Do not use
scouring pads, powdered cleaners, bleach, or cleaners
containing bleach, because these products can scratch
and weaken the paint finish.
Protect the paint finish. The finish on the outside of
the refrigerator is a high quality, baked-on paint
finish. With proper care, it wil! stay new-looking and
rust-free fl_r years. Apply a coat of kitchen/appliance
wax when the refrigerator is new, and then at least
twice a year.
Appliance Polish Wax & Cleaner (Cat. No. WR97X0216)
is available from GE Service and Paris stores.
Cleaning--Inside
Clean the inside of' the fresh food and freezer
compartments at least once a year. Unplug refrigerator
before cleaning. If this i_not practical, wring excess
moisture out of sponge or cloth when cleaning around
switches, lights or controls.
Apply an appliance wax/polish to the inside surface
between the doors.
Use warm water and baking soda solution--about a
tablespoon of baking soda to a quart of water. This
both cleans and neutralizes odors. Rinse thoroughly
with water and wipe dry.
Other parts of the refrigerator including door
gaskets, meat and vegetable drawers, ice storage bin
and all plastic parts-can be cleaned the same way.
After cleaning door gaskets, apply a thin layer of
petroleum jelly to the door gaskets at the hinge side.
This helps keep the gaskets from sticking and bending
out of shape. Do not use cleansing powders or other
abrasive cleaners.
To help prevent odors, leave an open box of baking
soda in the rear of the refrigerator, on the top shelf.
Change the box every three months. An open box of
baking soda in the freezer will absorb stale freezer odors.
Do not wash any of your refrigerator's plastic
parts in your automatic dishwasher.
Behind Refrigerator
Care should be taken in moving your refrigerator away
from the wall. All types of floor coverings can be
damaged, particularly cushioned coverings and those
with embossed surfaces
Pull the refrigerator straight out and return it to position
by pushing it straight in. Moving your refrigerator in a
side direction may result in damage to your floor
covering or refrigerator. Refer to the Roller section.
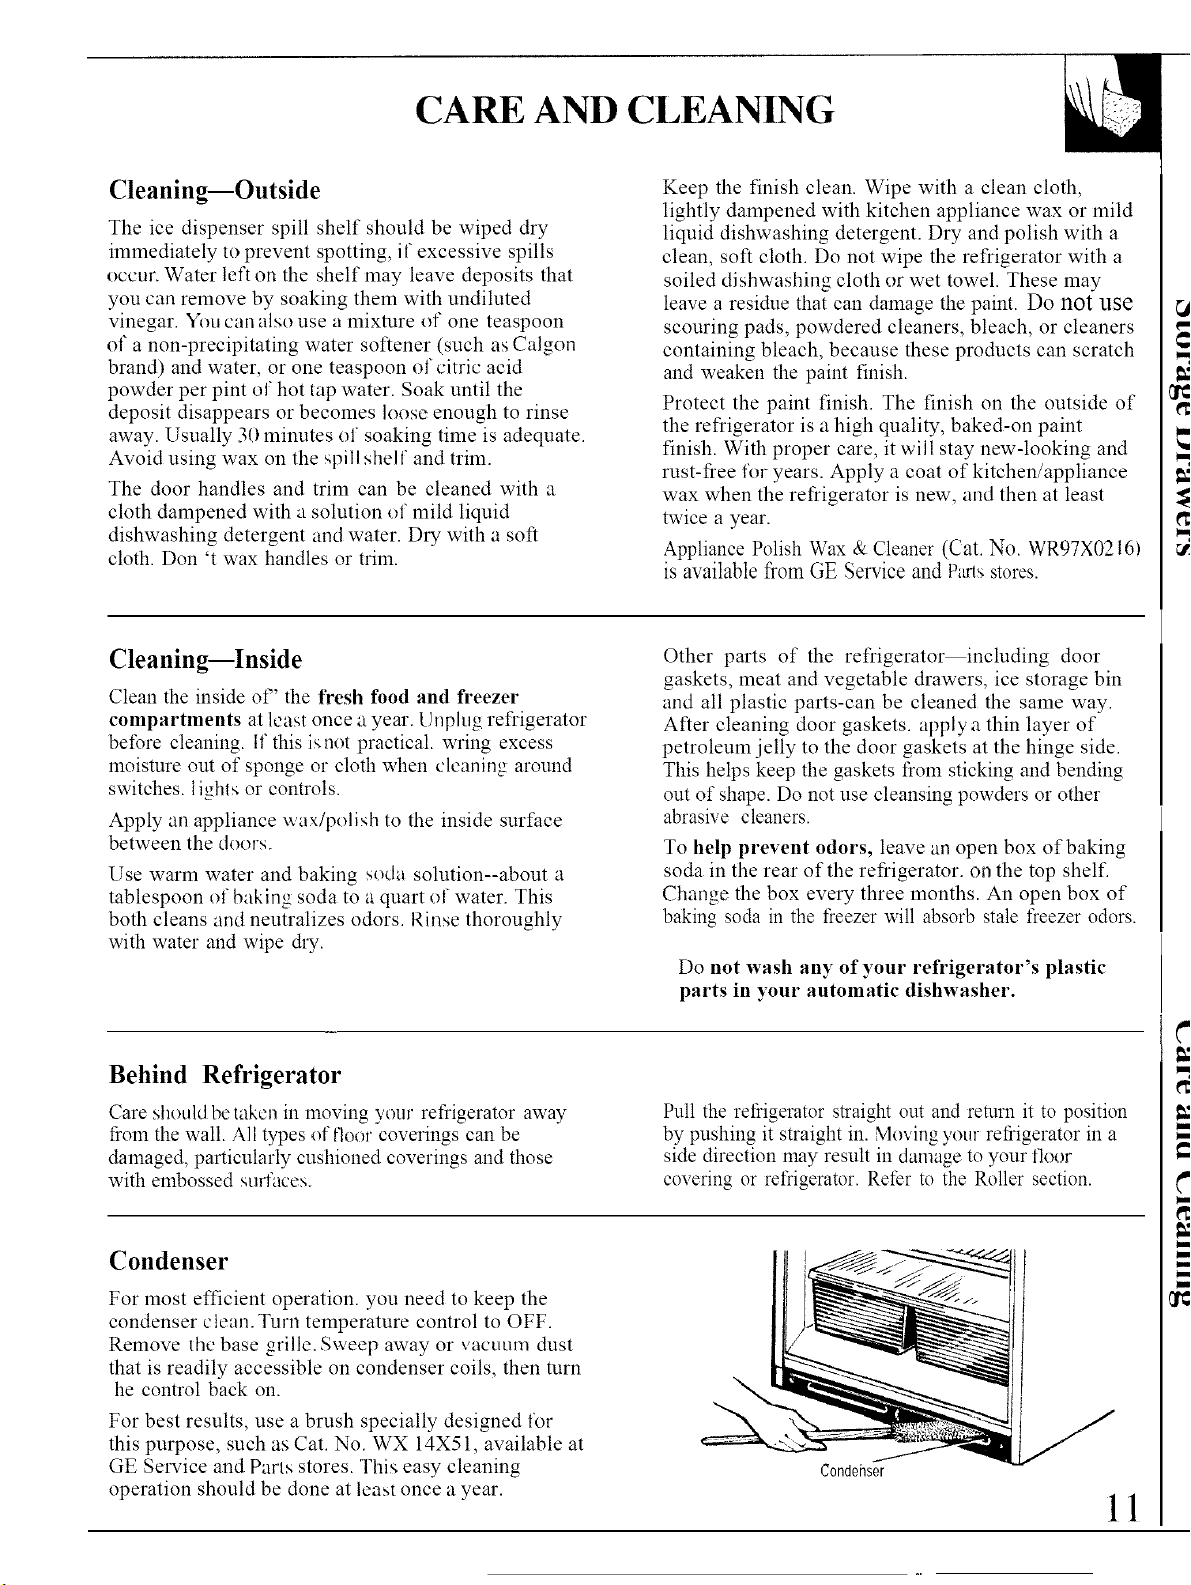
Condenser
For most efficient operation, you need to keep the
condenser cteam Turn temperature control to OFF.
Remove the base grille. Sweep away or vacuum dust
that is readily accessible on condenser coils, then turn
he control back on.
For best results, use a brush specially designed for
this purpose, such as Cat. No. WX 14X51, available at
GE Smwice and Parts stores. This easy cleaning
operation should be done at least once a year.
Condehser
II
CARE AND CLEANING
(continued)
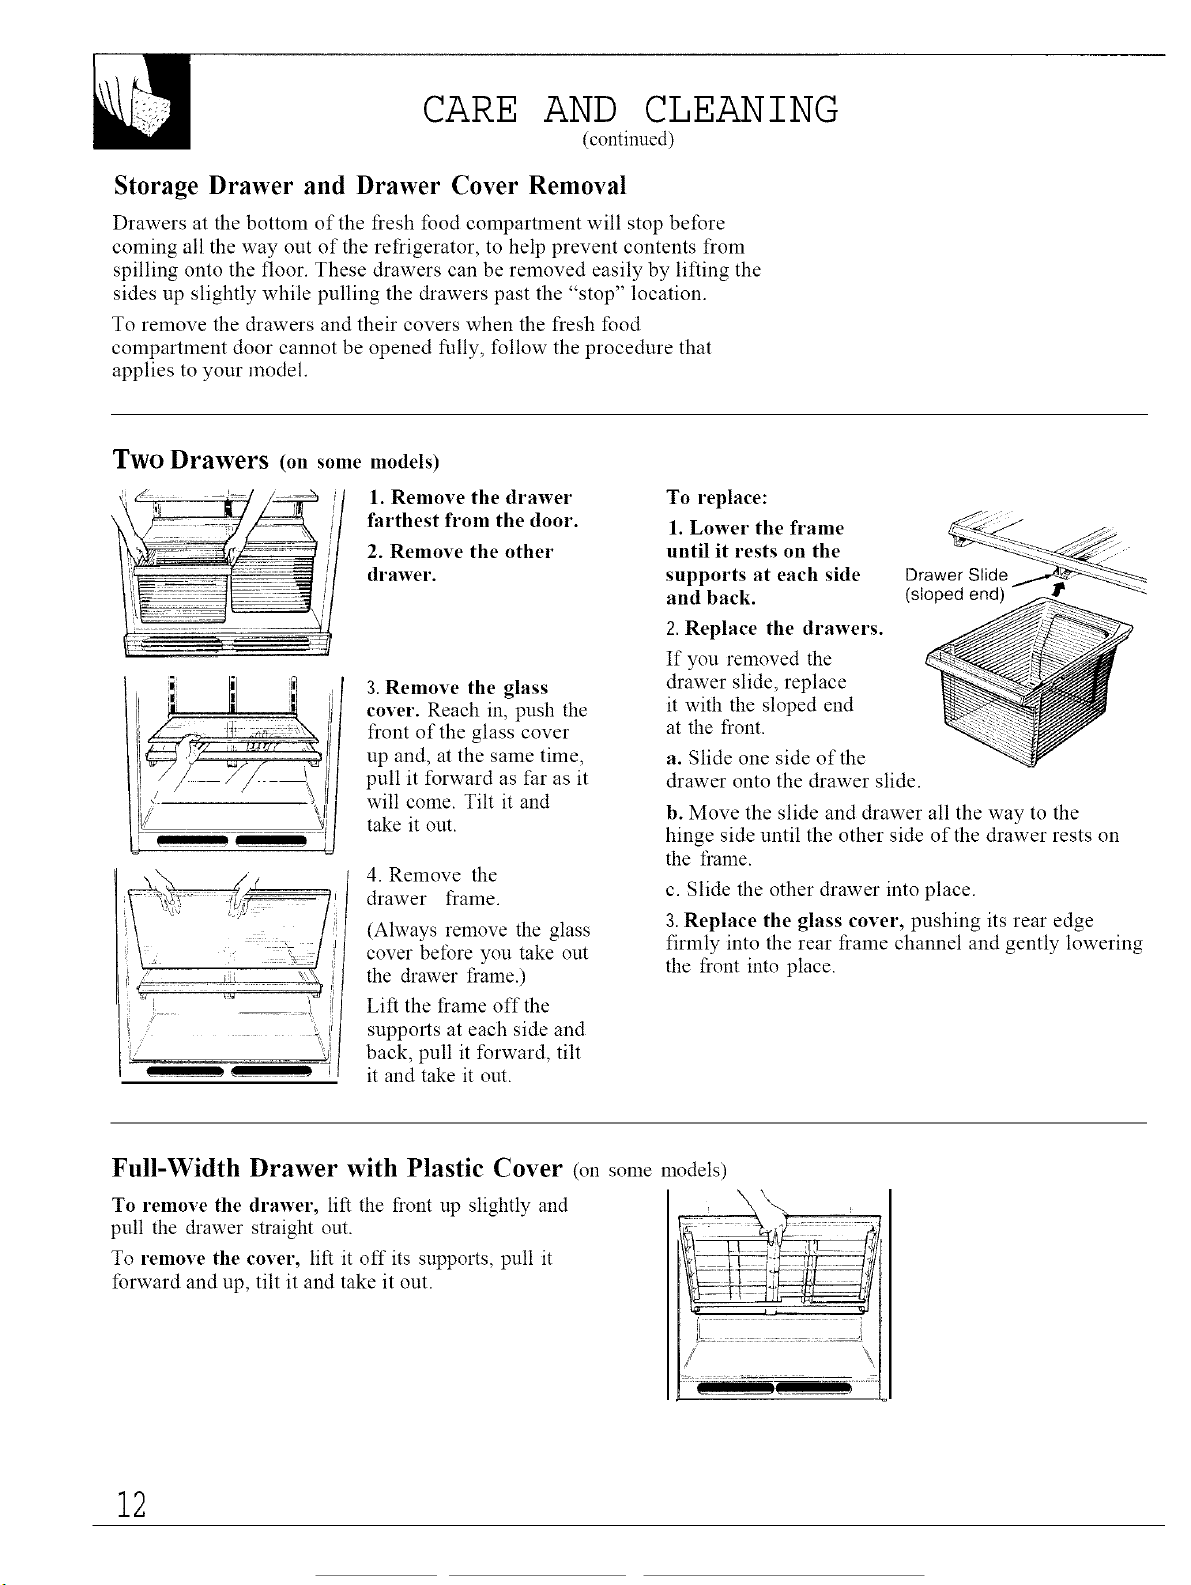
Storage Drawer and Drawer Cover Removal
Drawers at the bottom of the fresh food compartment will stop before
coming all the way out of the refrigerator, to help prevent contents from
spilling onto the floor. These drawers can be removed easily by lifting the
sides up slightly while pulling the drawers past the "stop" location.
To remove the drawers and their covers when the fresh food
compartment door cannot be opened fully, follow the procedure that
applies to your model.
Two Drawers (on somemodels)
1. Remove the drawer
farthest from the door.
2. Remove the other
drawer.
_7...... y_
] ,_
3. Remove the glass
cover. Reach in, push the
front of the glass cover
up and, at the same time,
pull it forward as far as it
will come. Tilt it and
take it out.
4. Remove the
drawer frame.
(Always remove the glass
cover before you take out
the &awer flame.)
Lift the frame off the
supports at each side and
back, pull it forward, tilt
it and take it out.
To replace:
1. Lower the frame
until it rests on the
supports at each side
and back.
Drawer Slide
(sloped end)
2, Replace the drawers.
If you removed the
drawer slide, replace
it with the sloped end
at the front. <:_::_i
a. Slide one side of the
drawer onto the drawer slide.
b. Move the slide and drawer all the way to the
hinge side until the other side of the drawer rests on
the frame.
c. Slide the other drawer into place.
3. Replace the glass cover, pushing its rear edge
firmly into the rear frame channel and gently lowering
the front into place.
Full-Width Drawer with Plastic Cover (on some models)
To remove the drawer, lift the front up slightly and
pull the &awer straight out.
To remove the cover, lift it off its supports, pull it
forward and up, tilt it and take it out.
/ \
12
CARE AND CLEANING
Light Bulb Replacement
A light bulb aud socket are located at the top ol" the
fresh food compartment opposite the temperature
control palM.
Some models also have
a bulband socket in the
upper left corner of the
freezer compartment
behind a flexible
light shield.
To replace either bulb, unplug refrigerator from its
electrical outlet, unscrew bulb when cool, and replace
with similar size bulb.
Water Filter Accessory
Your ice cubes call only be as clean and fresh-tasting as
the water that produces them. That's why it's a good
idea to puri_ your water with a water filter.
Its activated charcoal remove_; must'_, stale odors aim
unpleasant medicinal, metallic tastes. A porous fiber
cartridge catches dirt, rust particles, saud aim silt:
special clTstals reduce deposits of hard scale.
The water filter is an option at extra cost aud is
available from your GE dealer. Speci_ WR97X02 14.
It has complete installation instructions aim installs in
minutes on 1/4" O.D. copper water line.
PREPARATION
Preparing for vacation
For extended vacations or absences, remove food
and shut off power to the refrigerator. Clean the
interior with baking soda solution of one tablespoon
of baking soda to one quart of water. Wipe d_T. To
prevent odors, leave open box of baking soda in
refrigerator. Leave doors open.
For shorter vacations, remove perishable foods and
leave controls at regular settings. However, if room
temperature is expected to drop below 600 _.. follow
same instructions as for extended vacations. Move
icemaker feeler arm to the STOP (up) position and be
sure to shut off water supply to refrigerator.
Preparing to move
Disconnect power cord from wall outlet, remove all
food, and clean and d_T the interior. Secure all loose
items such as grille, shelves and storage pans, by
taping them securely in place to prevent damage.
Be sure refrigerator stays in tq_right position during
actual moving and in van. Refrigerator must be
secured in van to prevent movement. Protect the
outside of the refrigerator with a blanket.
(continued n_,.rtpage)
l;
S
m
p
(
pl

PREPARATION
(contilmed)
Refrigerator Location
Do not install refrigerator where temperature will
go below 60:_F. because it will not run often enough
to maintain propel temperatures.
Do install it on a floor strong enough to support it
fully loaded.
Also _ee Energy-Saving Tips.
Clearances
Allow the following clearances for ease of
installation, proper air circulation and plumbing
and electrical connections:
Side._ ................................. 3/4"
Top....................................... 1"
Back.................................... _"
If refrigerator is to be installed against a wall on the
hinge side. allow 14.:"for door clearance.
Rollers/Leveling Legs
Some models have adjustable
rollers that allow you to move
the refrigerator away from the
wall for cleaning: other models
have adjustable leveling legs.
Rollers or legs should be set so the
relk'igei'ator is firnllypositioned on
file floor and the front i_ raised just
enough that the doors close easily
when opened about halfway.
Turn the two front roller adjusting
screx_ s or four comerlevel i ng legs
clockwise to raise the refrigemlor.
counterclockwise to lower il.
When adjusting rollers or
leveling legs for proper door
closure, we recommend that the
bottom front edge of the cabinet be
approximately 3/4" from the floor_
If your refrigerator has a
base grille, you can turn the
adjusting screws through
openings in the grille.
If you would rather remove the
base grille, grasp the bottom of the
grille and pull il out.
To replace the base grille, line up
the clips on the back of the grille
with the openings in the baseplate
and push the grille folward until it
snaps into place.
Water Supply to Icemaker
If your refrigerator has an icemaker, or if you plan to add an icemaker later,
theicemaker will have to be colmected to a cold water line. A water supply kit
containing copper tubing, shut-off valve, fittings aud instructions is available
at extra cost from your dealer. There should be sufficient tubing for the
ieemaker from the cold water supply to allow you to move the refrigerator om
from the wallseveral feet (approximately 9 feet of 1/4" copper tubing in three
1()" diameter col is).
14
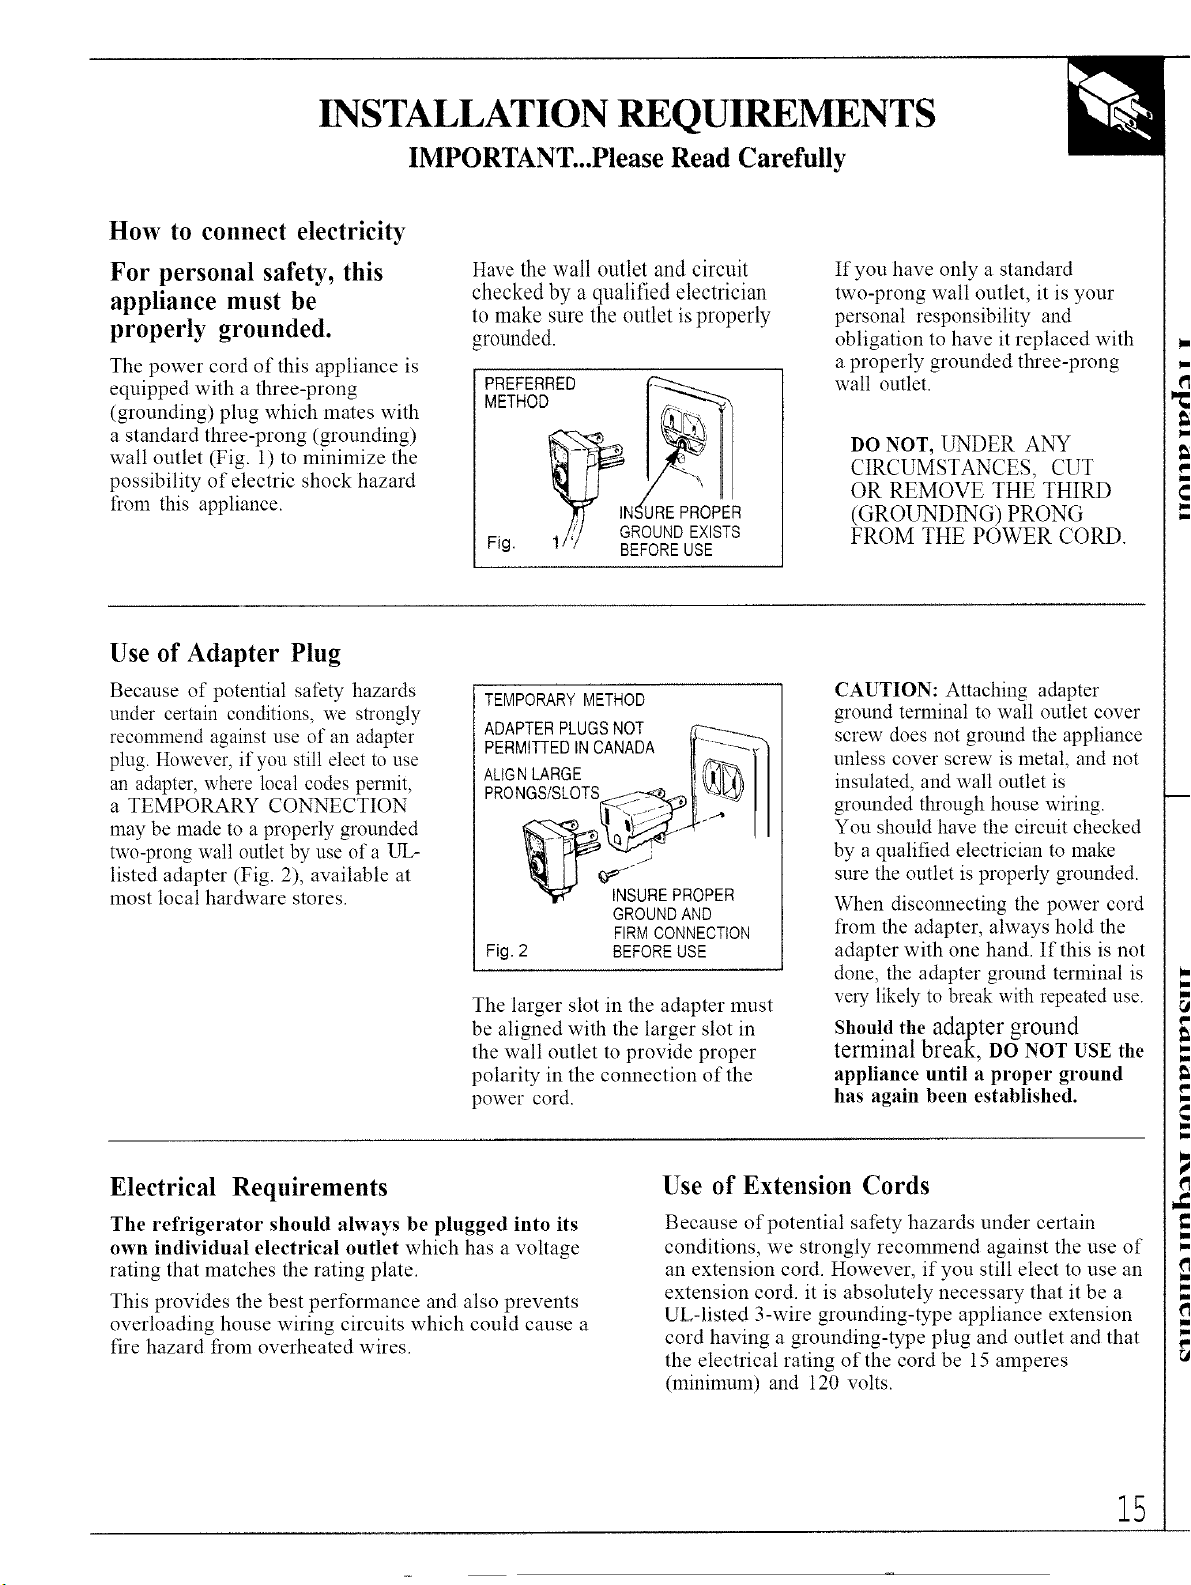
INSTALLATION REQUIREMENTS
IMPORTANT...Please Read Carefully
How to connect electricity
For personal safety, this
appliance must be
properly grounded.
The power cord of this appliance is
equipped with a three-prong
(grounding) plug which mates with
a standard three-prong (grounding)
wall outlet (Fig. 1) to minimize the
possibility of electric shock hazard
from this appliance.
Have the wall outlet and circuit
checked by a qualified electrician
to make sure the outlet is properly
grounded.
PREFERRED
METHOD I _ -""
_. ./,'/ GROUND EXISTS
i-lg. 1/ / BEFORE USE
If you have only a standard
two-prong wall outlet, it is your
personal responsibility aud
obligation to have it replaced with
a properly grounded three-prong
wall outlet.
DO NOT, UNDER ANY
CIRCUMSTANCES, CUT
OR REMOVE THE THIRD
(GROUNDING) PRONG
FROM THE POWER CORD.
Use of Adapter Plug
Because of potential safety hazards
under certain conditions, we strongly
recommend against use of an adapter
plug. However, if you still elect to use
an adapter, where local codes permit,
a TEMPORARY CONNECTION
may be made to a properly grounded
two-prong wall outlet by use of a UL-
listed adapter (Fig. 2), available at
most local hardware stores.
TEMPORARY METHOD
ADAPTERPLUGSNOT _-__
PERMITTEDINCANADA 1[.....
ALIGN LARGE I}_
PRONGS/SLOTS_ __'
INSURE PROPER
GROUND AND
FIRM CONNECTION
Fig. 2 BEFORE USE
The larger slot in the adapter must
be aligned with the larger slot in
the wall outlet to provide proper
polarity in the connection of the
power cord.
CAUTION: Attaching adapter
ground terminal to wall outlet cover
screw does not ground the appliauce
unless cover screw is metal, and not
insulated, and wall outlet is
grounded through house wiring.
You should have the circuit checked
by a qualified electrician to make
sure the outlet is properly grounded.
When discolmecting the power cord
from the adapter, always hold the
adapter with one hand. If this is not
done, the adapter ground terminal is
very likely to break with repeated use.
Should the adapter ground
terminal break, DONOT USE the
appliance until a proper ground
has again been established.
Electrical Requirements
The refrigerator should always be plugged into its
own individual electrical outlet which has a voltage
rating that matches the rating plate.
This provides the best performance and also prevents
overloading house wiring circuits which could cause a
fire hazard from overheated wires.
Use of Extension Cords
Because of potential safety hazards under certain
conditions, we strongly recommend against the use of
an extension cord. However, if you still elect to use an
extension cord. it is absolutely necessary that it be a
UL-listed 3-wire grounding-type appliance extension
cord having a grounding-type plug and outlet and that
the electrical rating of the cord be 15 amperes
(n_ininmm) and 120 volts.
15
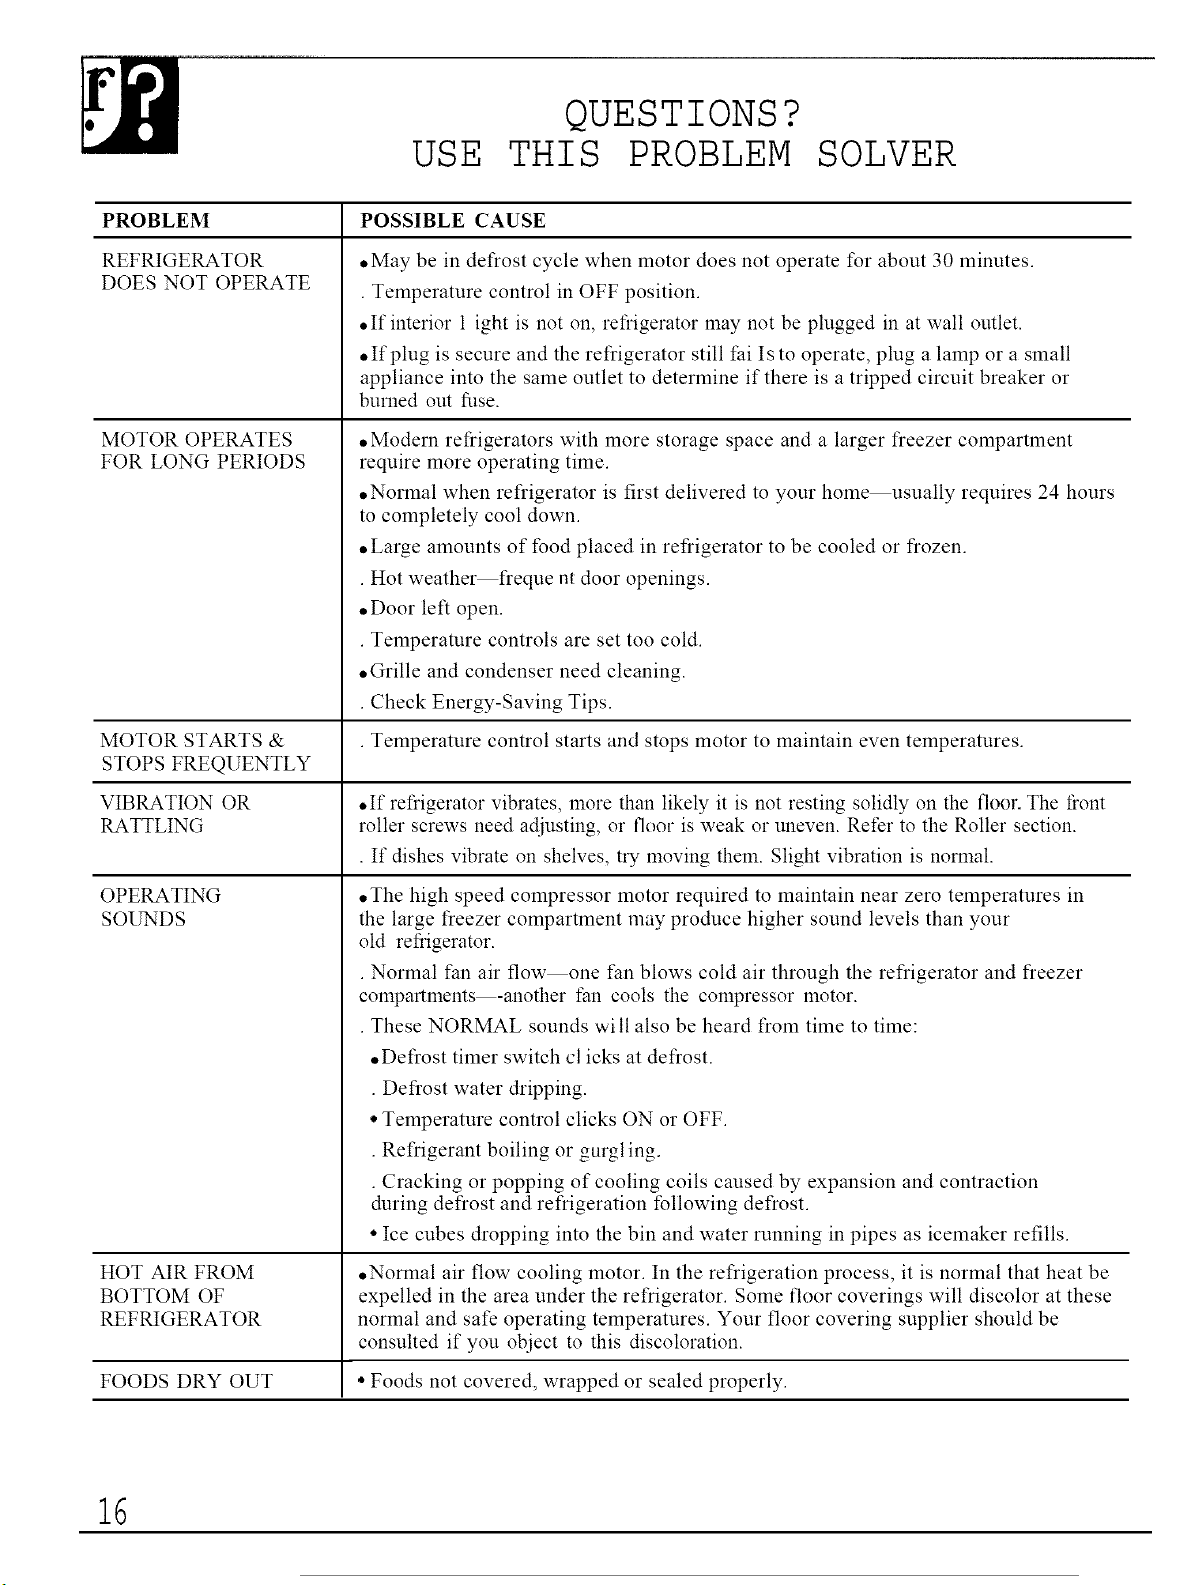
QUESTIONS?
USE THIS PROBLEM SOLVER
PROBLEM
REFRIGERATOR
DOES NOT OPERATE
MOTOR OPERATES
FOR LONG PERIODS
MOTOR STARTS &
STOPS FREQUENTLY
VIBRATION OR
RATTLING
OPERATING
SOUNDS
HOT AIR FROM
BOTTOM OF
REFRIGERATOR
FOODS DRY OUT
POSSIBLE CAUSE
• May be in defrost cycle when motor does not operate for about 30 minutes•
• Temperature control in OFF position•
• If interior 1 ight is not on, refrigerator may not be plugged in at wall outlet•
• If plug is secure and the refligerator still fai Is to operate, plug a lamp or a small
appliance into the same outlet to determine if there is a tripped circuit breaker or
burned om fllse.
• Modern refrigerators with more storage space and a larger freezer compartment
require more operating time.
• Normal when refligerator is first delivered to your home usually requires 24 hours
to completely cool down.
• Large amounts of food placed in refiigerator to be cooled or frozen.
• Hot weather ffeque n! door openings•
• Door left open.
• Temperature controls are set too cold.
• Grille and condenser need cleaning.
• Cheek Energy-Saving Tips.
• Temperature control starts alld stops motor to maintain even temperatures•
,If refligerator vibrates, more than likely it is not resting solidly on the floor. The fiont
roller screws need adjusting, or floor is weak or uneven. Refer to the Roller section.
• If dishes vibrate on shelves, try moving them. Slight vibration is nornml.
• The high speed compressor motor required to maintain near zero temperatures in
the large freezer compartment may produce higher sound levels than your
old refligerator.
• Normal fan air flow one fan blows cold air through the refrigerator and freezer
compartments -another fan cools the compressor motor.
• These NORMAL sounds witl also be heard from time to time:
• Defrost timer switch clicks at defrost.
• Defrost water dripping.
*Temperature control clicks ON or OFF.
•Refrigerant boiling or gurgling.
•Cracking or popping of cooling coils caused by expansion and contraction
during defrost and refrigeration following defrost.
, Ice cubes dropping into the bin and water running in pipes as icemaker refills.
,Normal air flow cooling motor. In the refrigeration process, it is normal that heat be
expelled in the area under the refrigerator. Some floor coverings will discolor at these
normal and safe operating temperatures. Your floor covering supplier should be
consulted if you object to this discoloration.
, Foods not covered, wrapped or sealed properly.
16
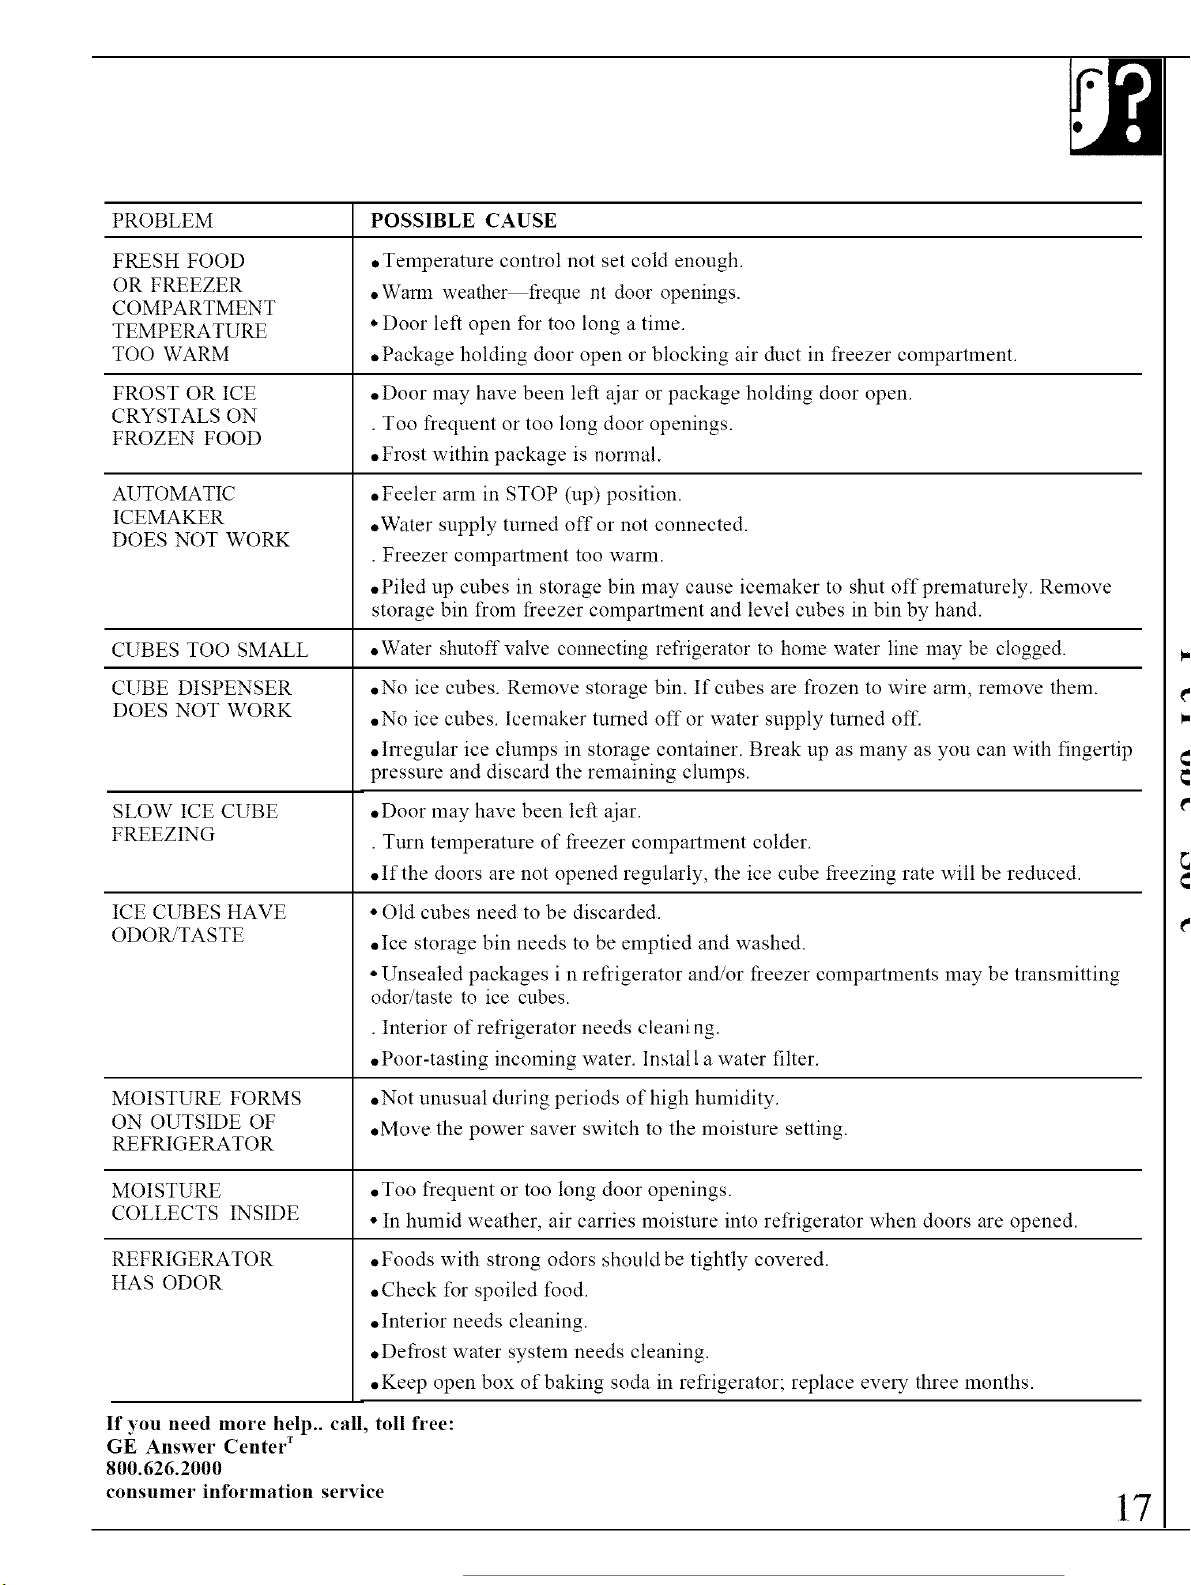
PROBLEM POSSIBLE CAUSE
FRESH FOOD
OR FREEZER
COMPARTMENT
TEMPERATURE
TOO WARM
FROST OR ICE
CRYSTALS ON
FROZEN FOOD
AUTOMATIC
ICEMAKER
DOES NOT WORK
CUBES TOO SMALL
CUBE DISPENSER
DOES NOT WORK
SLOW ICE CUBE
FREEZING
ICE CUBES HAVE
ODOWTASTE
MOISTURE FORMS
ON OUTSIDE OF
REFRIGERATOR
MOISTURE
COLLECTS INSIDE
REFRIGERATOR
HAS ODOR
• Temperature control not set cold enough•
,Warm weather freque nt door openings.
*Door left open for too long a time.
• Package holding door open or blocking air duct in freezer compartment•
• Door may have been left aiar or package holding door open.
•Too frequent or too long door openings•
• Frost within package is normal.
• Feeler arm in STOP (up) position•
,Water supply turned off or not connected•
• Freezer compartment too warm.
• Piled up cubes in storage bin may cause icemaker to shut off prematurely. Remove
storage bin from freezer compartment and level cubes in bin by hand.
,Water shutoff valve connecting refrigerator to home water line may be clogged.
• No ice cubes• Remove storage bin. If cubes are frozen to wire arm, remove them.
• No ice cubes• lcemaker turned off or water supply turned off.
,Irregular ice clumps in storage container• Break up as many as you can with fingertip
pressure and discard the remaining clumps•
• Door may have been left aiar.
• Turn temperature of freezer compartment colder•
• If the doors are not opened regularly, the ice cube freezing rate will be reduced•
, Old cubes need to be discarded•
• Ice storage bin needs to be emptied and washed•
*Unsealed packages i n refrigerator and/or freezer compartments may be transmitting
odor/taste to ice cubes.
•Interior of refrigerator needs c leani ng.
,Poor-tasting incoming water• Install a water filter•
• Not unusual during periods of high humidity•
,Move the power saver switch to the moisture setting.
• Too frequent or too long door openings•
° In humid weather, air carries moisture into refrigerator when doors are opened•
,Foods with strong odors should be tightly covered•
,Check for spoiled food.
,Interior needs cleaning.
• Defrost water system needs cleaning.
,Keep open box of baking soda in refrigerator; replace eve_T three months•
If you need more help., call, toll free:
GE Answer Center T
800.626.2000
consumer information service
17
NOTES
18
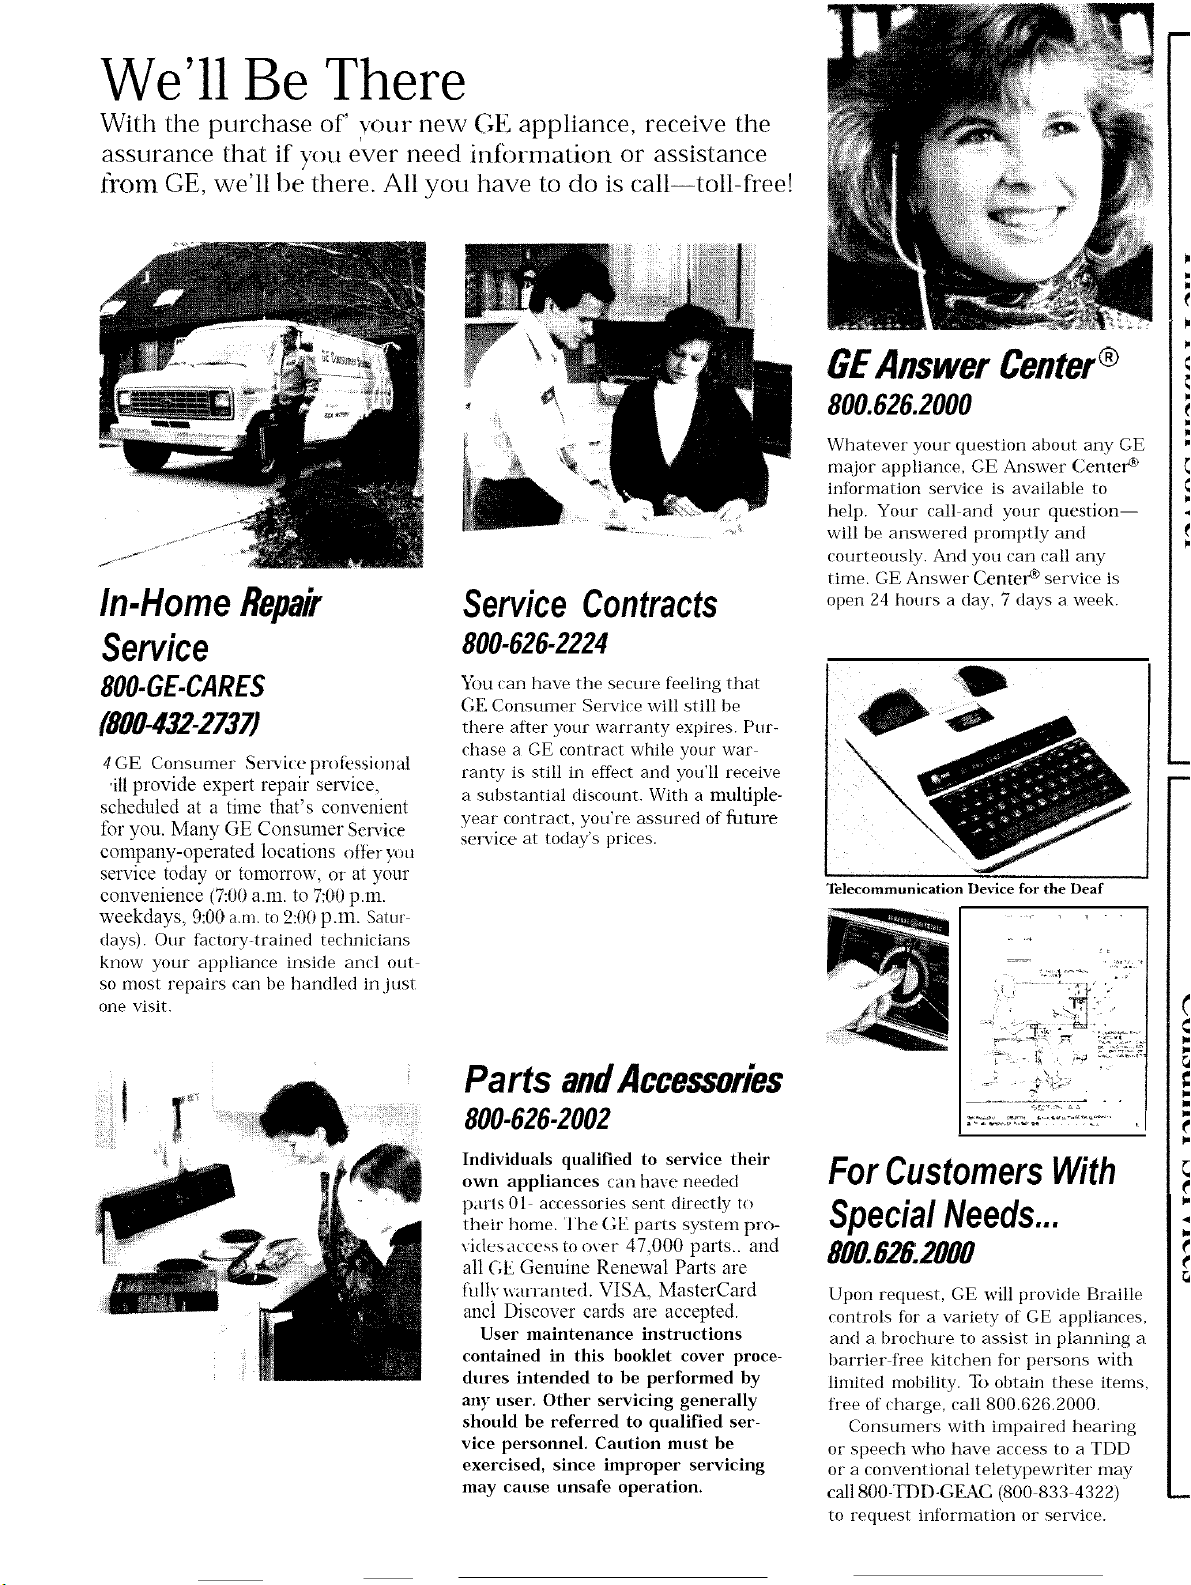
We'll Be There
With the purchase of' vour new GE appliance, receive the
assurance that if you ever need infbrrnation or assistance
from GE, we'll be there. All you have to do is call--toll-free!
/n-HomeRepair
Service
800.GE.CARE$
(800-432-27371
4GE Consumer ServiceproR*ssiomd
'ill provide expert repair service,
scheduled at a time that's convenient
for you. Ma W GE Consumer Service
company-operated locations oiler you
service today or tomorrow, or at your
convenience (7:00a.m. to 7:00 p.m.
weekdays, 9:00 a.m. to 2:00 p.m. Satur
(:lays). Our lactory-trained technicians
know your al)plian(e inside an(1 out
so most rel)airs (an be handled in just
one visit.
ServiceContracts
800-626-2224
"_'_)u(:an have the sectrre feeling that
GE Consumer Service will still be
there alier your warranty expires. Pur-
chase a GE contract while your war
ranty is still in effect and you'll receive
a substantial discount. With a muhiple-
year" (ontra(t, you're assured of furore
service at today's prices.
Parts andAccessories
800-626-2002
Individuals qualified to service their
own appliances can have needed
p_trls 01 accessories sent directly to
their" home. 'lhe (;E parts system pro-
vklcs ac{ess to oxer 47,000 parts., and
all GE Genuine Renewal Parts are
flfllv warranted, VISA, MasterCard
anci Discover cards are accepted.
User maintenance instructions
contained in this booklet cover proce-
dures intended to be performed by
any user. Other servicing generally
should be referred to qualified ser-
vice personnel. Caution must be
exercised, since improper servicing
may cause unsafe operation.
GEAnswerCenter®
800.626.2000
Whatever" your question about any GE
major appliance, GE Answer Center _
inlormation service is available to
hell). Your (all an(t your question--
will be answered proml)tly and
(ourteously. An(t you can (all any
time. GE Answer" Center ®servi( e is
open 24 hours a (lay, 7 days a week.
Telecommunication Device for the Deaf
..... = _ ,<:,.t .
ForCustomersWith
SpecialNeeds...
800.626.2000
Upon request, GE will provi(te Braille
controls for a variety of GE appliances,
and a bro(hure to assist in planning a
barrier free kit(hen fi)r t)ersons with
limited mobility. "1¢)obtain these items,
fl'ee of (barge, (all 800.626.2000.
Consumers with lint)aired hearing
or spee(h who have a((ess to a TDD
or a ( onventional teletyl)ewriter may
call 800-TDD-GEAC (800 833 4322)
to request inlormation or servi(e.
YOUR GE REFRIGERATOR
WARRANTY
Save proof of original purchase date such as your sales slip or cancelled check to establish warranty period.
WHAT IS COVERED LIMITED LIFETIME WARRANTY This warranty is extended to
the original purchaser and any
FULL ONE-YEAR WARRANTY
For one year from date of original
purchase, we will provide, free of
charge, parts and service labor in
your home to repair or replace any
part of the refrigerator that fails
because of a manufacturing
defect.
FULL FIVE-YEAR WARRANTY
For five years from date of original
purchase, we will provide, free of
charge, parts and service labor in
your home to repair or replace any
partof the sealed refrigerating
system (the compressor,
condenser, evaporator and all
connecting tubing) that fails
because of a manufacturing
defect.
For the life of the refrigerator,we will
replace, free of charge, the tinted
see-through Quick Store bin (on
models so equipped) ifthe bin, made
from Lexan_polycarbonate resin
breaks during normal household use.
The bin housing is not included. The
bin can be exchanged at a GE
Appliance Parts Mart, Factory
Service Center, or by writing to the
address below.
succeeding owner for products
purchased for ordinary home use
in the 48 mainland states, Hawaii
and Washington, D.C. In Alaska the
warranty is the same except that it
is LIMITED because you must pay
to ship the product to the service
shop or for the service technician's
travel costs to your home.
All warranty service will be
provided by our Factory Service
Centers or by our authorized
Customer Care' servicers during
normal working hours.
Look in the White or Yellow Pages
of your telephone directory for
GENERAL ELECTRIC COMPANY,
GENERAL ELECTRIC FACTORY
SERVICE, GENERAL ELECTRIC-
HOTPOINT FACTORY SERVICE
or GENERAL ELECTRIC
CUSTOMER CARE' SERVICE
WHAT IS NOT COVERED
* Service trips to your home to
teach you how to use the product.
Read your Use and Care material.
If you then have any questions
about operating the product please
contact your dealer or our
Consumer Affairs office at the
address below, or call, toll free:
GE Answer Center"
800.626.2000
consumer information service
• Improper installation.
If you have an installation problem,
contact your dealer or installer.
You are responsible for providing
adequate electrical, plumbing and
other connecting facilities.
• Replacement of house fuses or
resetting of circuit breakers.
oFailure of the product if it is used
for other than its intended purpose
or used commercially.
Damage to product caused
by accident, fire, floods or acts
of God.
oLoss of food due to spoilage.
WARRANTOR IS NOT
RESPONSIBLE FOR
CONSEQUENTIAL DAMAGES.
Some states do not allow the exclusion or limitation of Incidental or consequential damages, so the above limitation or exclusion
may not apply to you. This warranty gives you specific legal rights, and you may also have other rights which vary from state to state.
To know what your legal rights are in your state, consult your local or state consumer affairs office or your state's Attorney General.
Warrantor: General Electric Company
If further help is needed concerning this warranty, write:
Manager--Consumer Affairs, GE Appliances, Louisville, KY 40225
Thisbook is printed on recycled paper.
• Part No. 162D3928PO02
Pub. No. 49-6686
12-91 CG
Top-Mount No-Frost 22 and 25 models
with Ice Dispenser

