READ CAREFULLY.
KEEP THESE INSTRUCTIONS
.
Installation Built-In Trim Kits
Instructions
JX2027 and JX2030
Read these instructions completely and carefully.
•
IMPORTANT –
Save these instructions for local inspector’s use.
•
IMPORTANT –
Observe all governing codes and ordinances.
• Note to Installer – Be sure to leave these instructions with the
Consumer.
• Note to Consumer – Keep these instructions for future reference.
• For easier installation and personal safety, we recommend that two people
install this microwave oven.
WARNING
— This oven must be plugged into a properly
grounded 3-hole, 120V receptacle as required by the National Electrical Code
or the Canadian Electrical Code.
❒
BEFORE YOU BEGIN
• Do not alter or modify any part of this kit or the oven.
• Unplug the microwave oven before attempting installation of this kit.
• Skill level – Installation of this appliance requires basic mechanical and
electrical skills.
• Completion time – 1-3 hours
• Proper installation is the responsibility of the installer.
• Product failure due to improper installation is not covered under the Warranty.
• This kit is UL/CSA listed for installation alone or over any GE/GE Profile
single electric wall oven. Not for use adjacent to (within 2 feet of) any gas
or electric range, cooktop or oven.
• This kit is for use on models: PEB2060DMBB, PEB2060DMWW,
PEB2060DMCC, PEB2060SMSS, JEB1860DMBB, JEB1860DMWW,
JEB1860DMCC, JEB1860SMSS, PEB206CDNBB, PEB206CSNSS,
PEB206CDNWW, JEB186CDNWW, JEB186CDNBB and JEB186CSNSS.
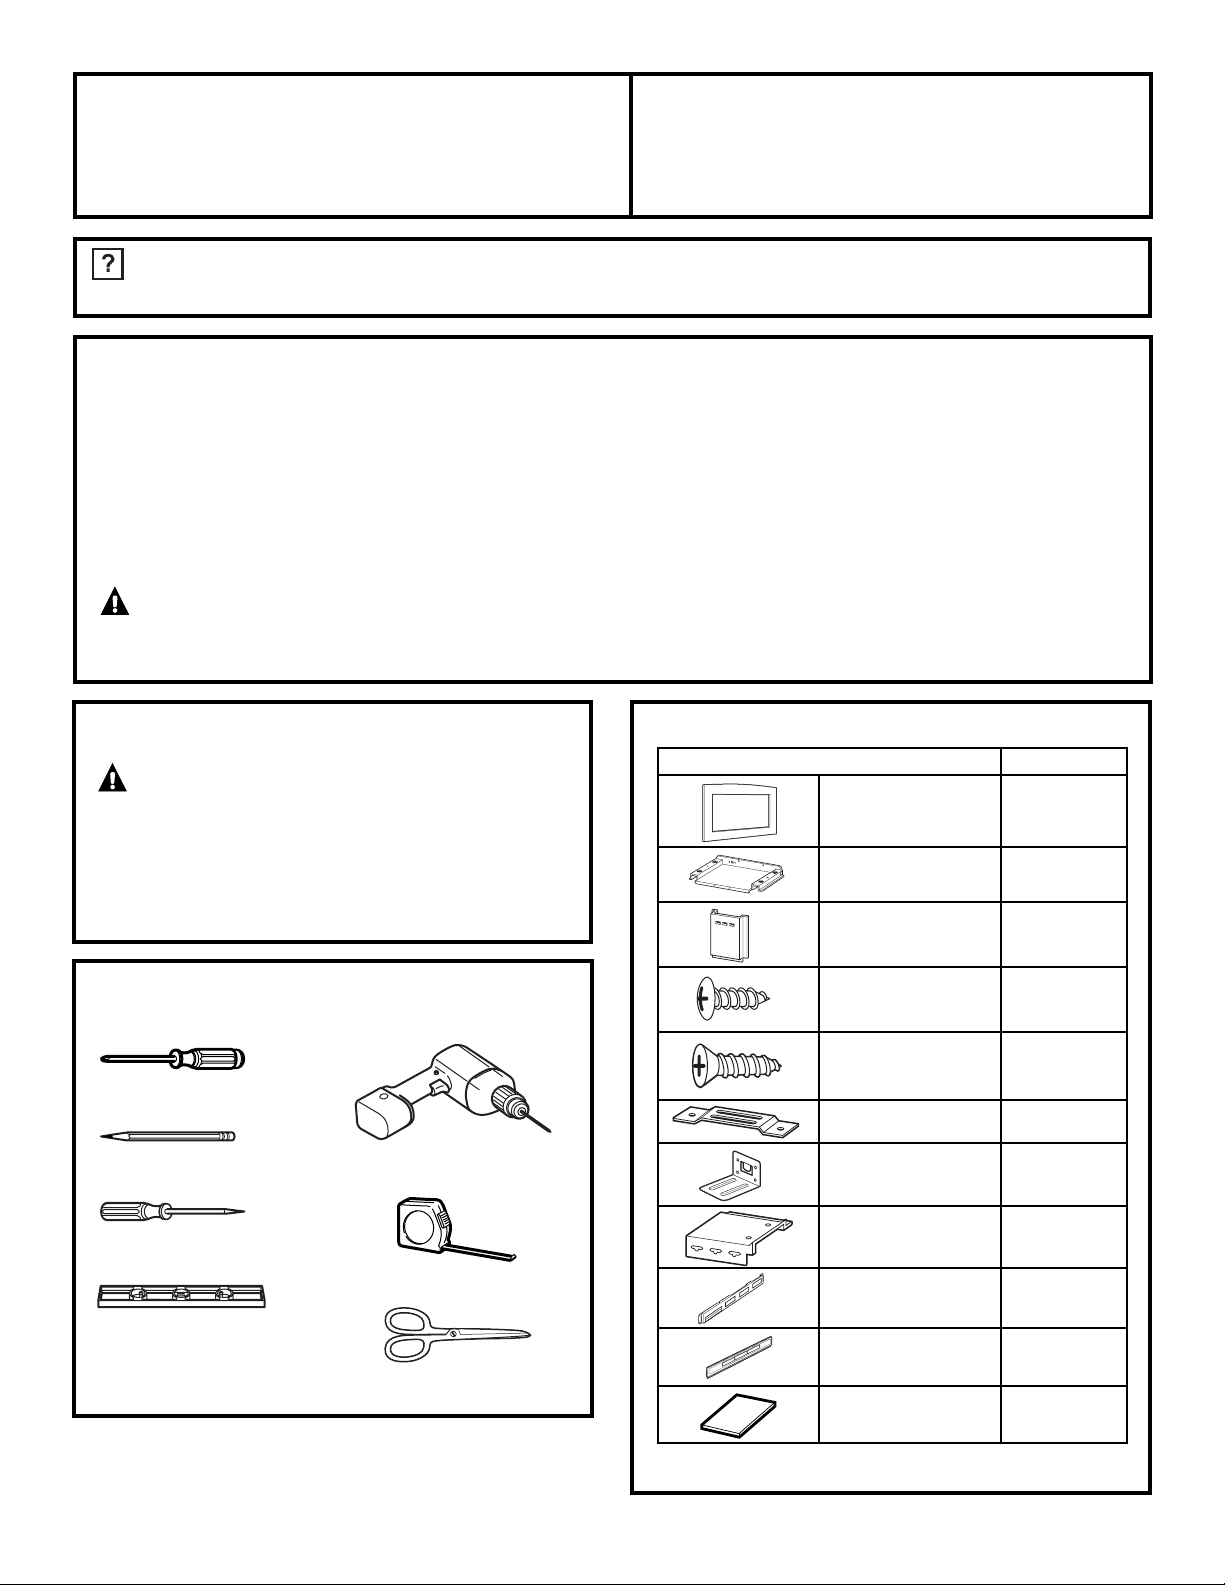
TOOLS YOU WILL NEED
❒ Phillips screwdriver
❒ Pencil
❒ Tape measure
❒ Awl or punch
❒ Drill with
7
⁄64″ bit or #35
FOR YOUR SAFETY:
WARNING –
Before beginning the
installation, switch power off at service panel and lock
the service disconnecting means to prevent power from
being switched on accidentally. When the service
disconnecting means cannot be locked, securely fasten
a prominent warning device, such as a tag, to the
service panel.
❒ Level
❒ Scissors (optional)
1
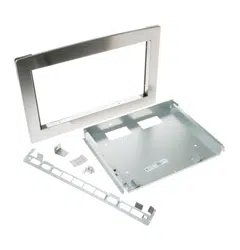
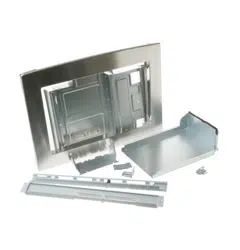
PART QUANTITY
❒
Trim Frame 1
❒ Bottom Duct 1
❒ Side Duct 1
❒ 4 mm x 12 mm 23
Round-Head Screws (21 required
for installation)
❒ 4 mm x 14 mm 6
Flat-Head Screws
(4 required for
installation)
❒ Anti-Tip Brace 1
❒ Anti-Tip Bracket 1
❒ Upper Duct 1
❒ Top Bracket 1
❒ Bottom Bracket 1
❒ Templates 2
PARTS INCLUDED
NOTE: This kit has extra screws to prevent the technician from spending extra
time locating a replacement screw in case they lose one during installation.
Questions? In the U.S., call 800.GE.CARES (800.432.2737) or Visit our Website at: ge.com.
In Canada, call 1.800.561.3344 or Visit our Website at: GEAppliances.ca.
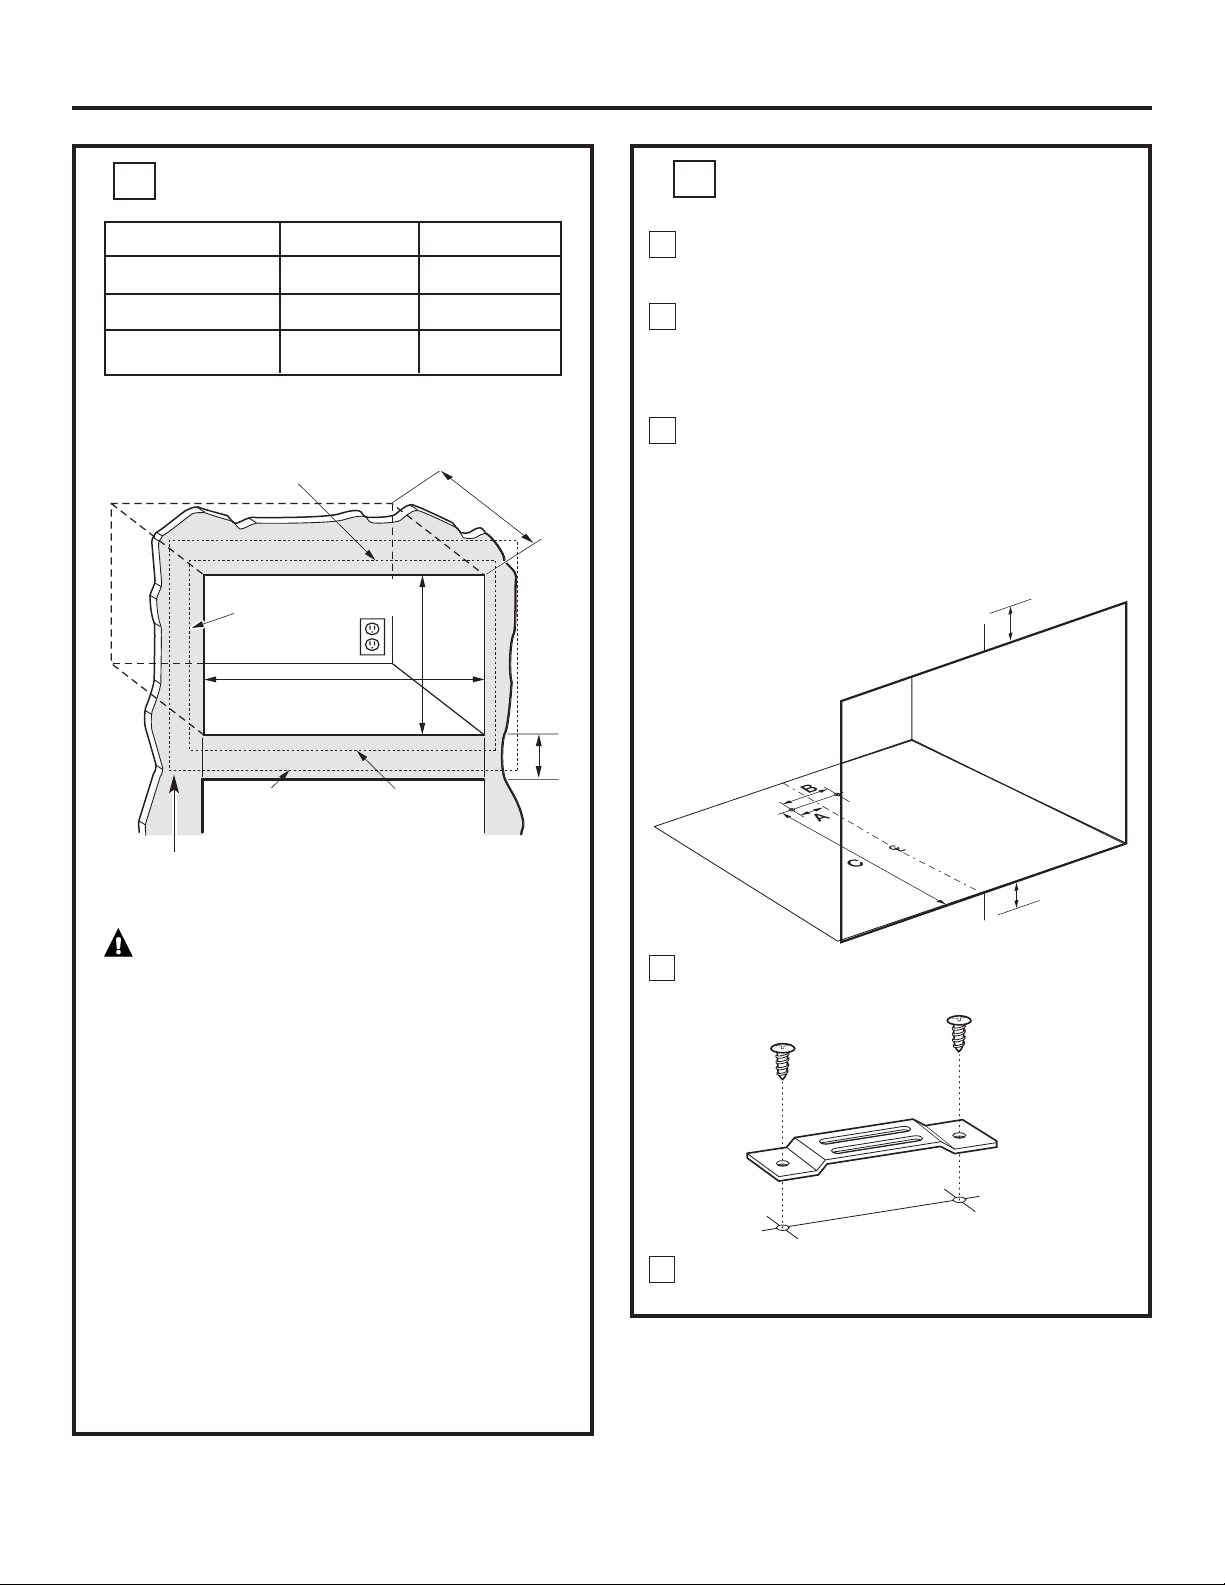
❒
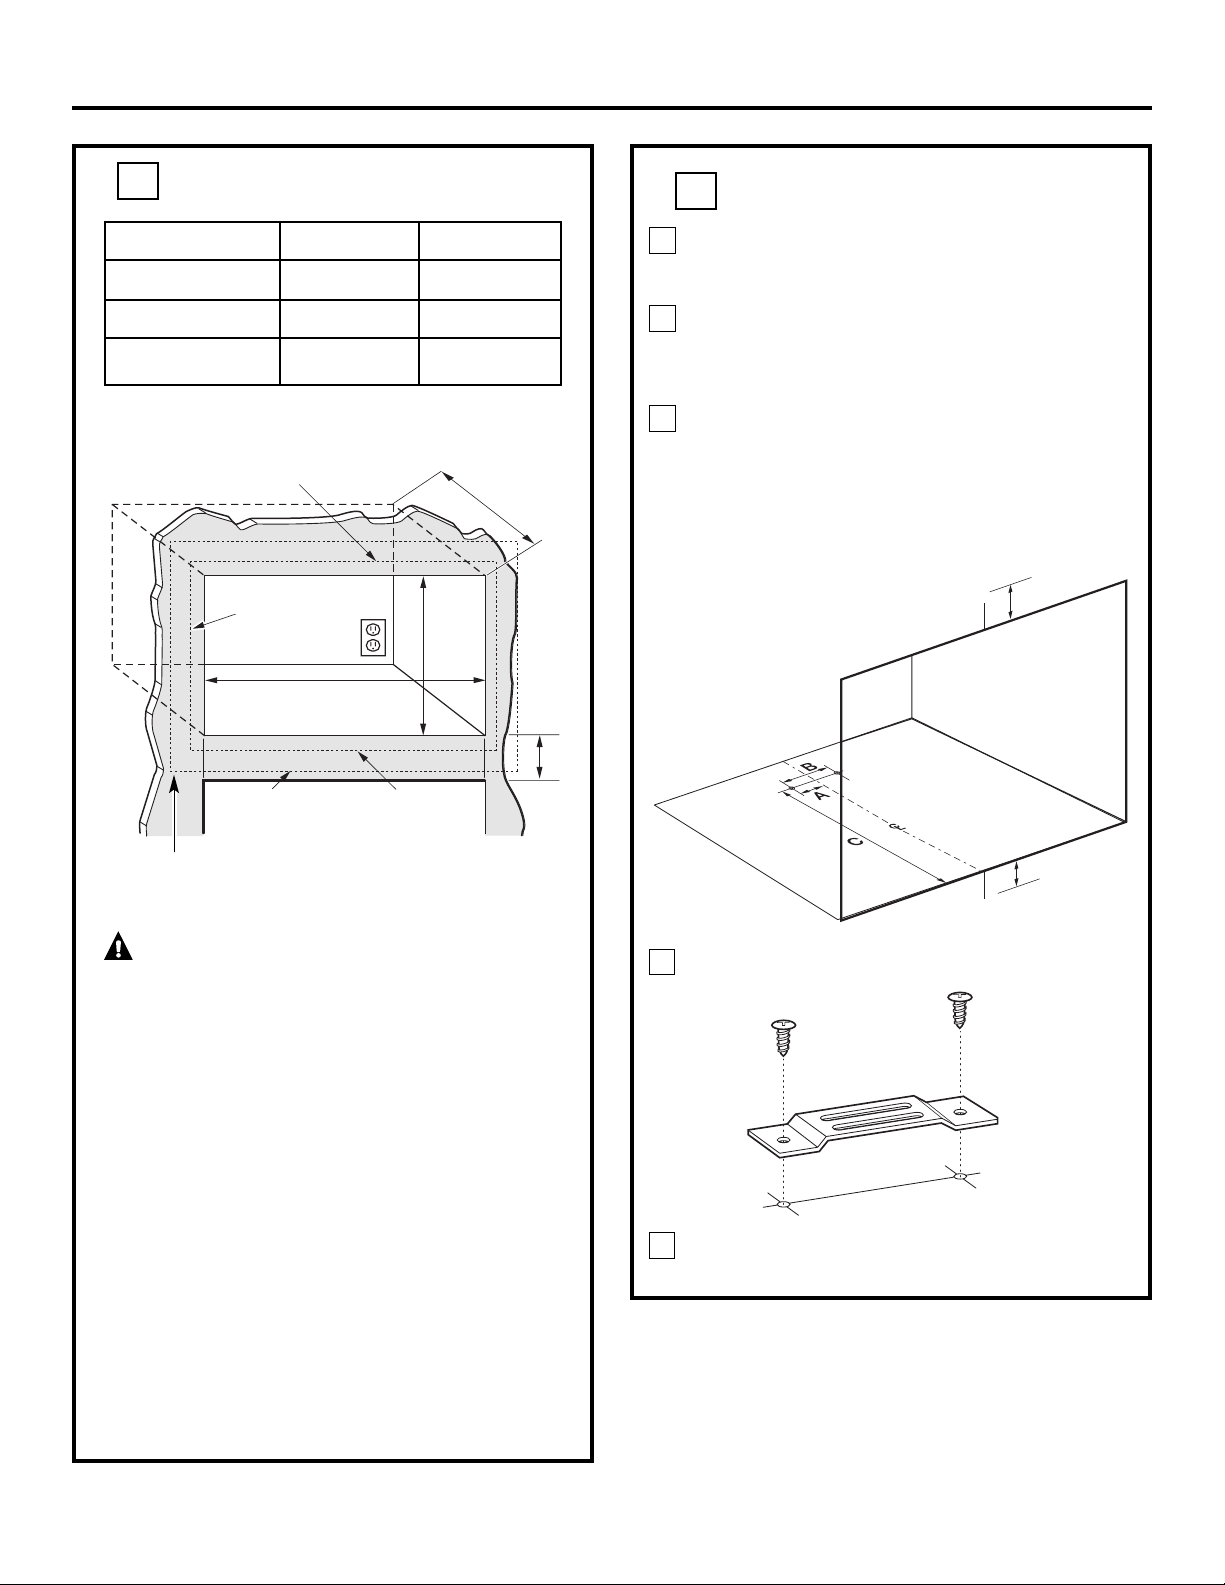
CUTOUT DIMENSIONS
1
2
* Min. depth with receptacle outside cabinet 19
1
⁄2″
Min. depth with receptacle inside cabinet 22″
120 volt-60 Hertz grounded power receptacle
Installation Instructions
Models 27″ 30″
Height 16
3
⁄4″ 16
3
⁄4″
Width 25
1
⁄2″ 25
1
⁄2″
Depth (min.)* 19
1
⁄2″ or 22″ 19
1
⁄2″ or 22″
WARNING — This trim kit uses air flow
from the top, bottom and sides of the trim frame.
Blocking the air flow can cause the microwave to
function improperly and may cause damage to
the microwave.
Allow a 1″ clearance beyond the edge of the trim
frame to provide proper air flow.
On 27″ models, allow 1
1
⁄8″ at the top,
11
⁄16″ on the sides
and 1
1
⁄4″ at the bottom for overlap of the Trim Frame
over the edges of the cutout.
On 30″ models, allow 1
1
⁄8″ at the top, 2
1
⁄16″ on the sides
and 1
1
⁄4″ at the bottom for overlap of the Trim Frame
over the edges of the cutout.
FOR INSTALLATION ABOVE A
BUILT-IN OVEN:
Microwave oven should be installed on a 3/8″ plywood
base and supported by 2x4 or 1x2 equivalent runners
on all sides. Base must be capable of supporting a
minimum of 100 lbs (45.3 kg).
Draw a line on the cutout floor at the center of the
cutout, and extend the line 1/2″ down the face of
the cabinet.
Draw a line on the top front face of the cabinet
at the center of the cutout. The line should extend
1/2″ up the face of the cabinet. This center line will
be used for mounting the top bracket (see step 7).
Fold or cut the front edge of the template, along the
front guide line. Place the template flush along the
front edge of the cutout floor, aligning the center line
of the template with the center line of the cutout
floor. Mark the center positions with an awl or center
punch for the anti-tip brace location as shown.
Drill two holes for the anti-tip brace.
Install the anti-tip brace onto the cutout floor using
two round-head screws.
B
C
D
E
D
D
Round-head
screws (2)
Anti-Tip Brace
❒
INSTALL THE ANTI-TIP BRACE
2
Depth
Height
1
1
⁄4″ Overlap
Width
1
1
⁄8″ Overlap
1″ Clearance
beyond trim frame
(on all sides)
3″ Min.
27″ Models:
11
⁄16″ overlap
30″ Models: 2
1
⁄16″ overlap
A
DIMENSIONS:
A = 1
1
⁄2″
B = 3″
C = 18
3
⁄16″
D = 1/2″
Bottom of trim kit
must be minimum
of 36″ from floor
1′ = 0.3 m
1″ = 2.5 cm
3
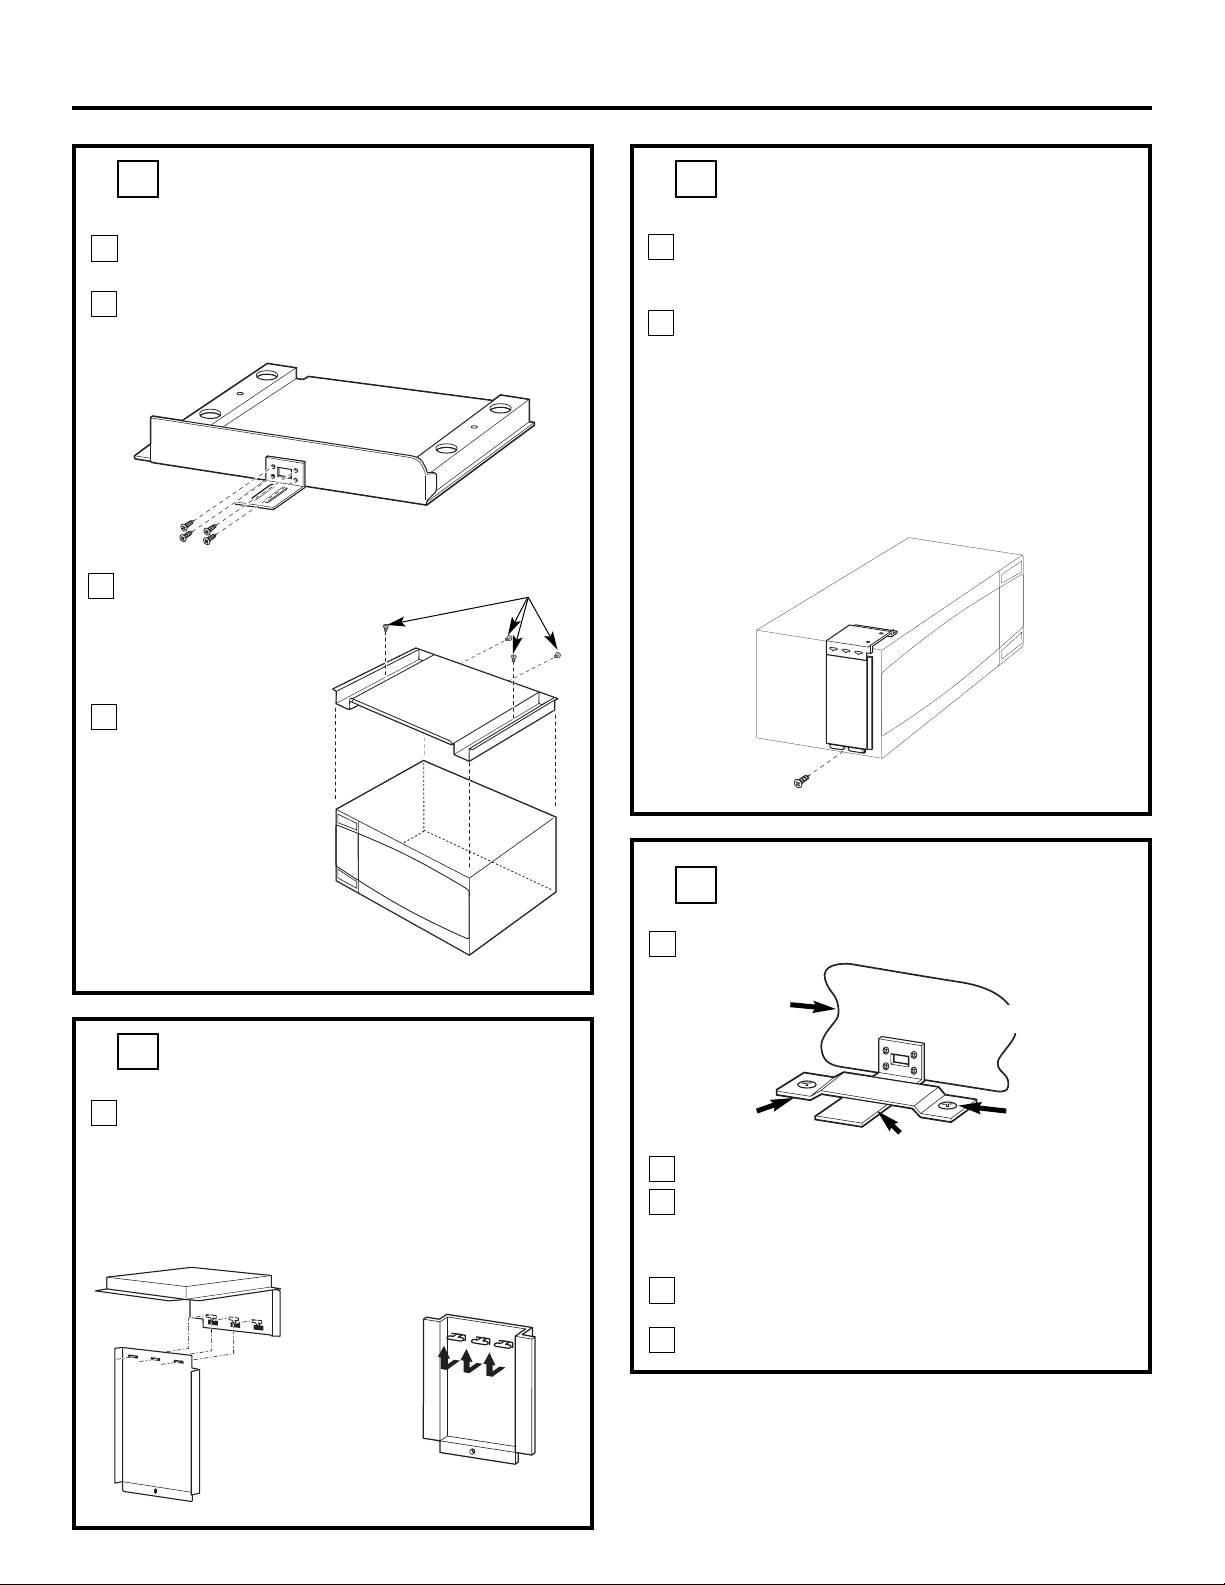
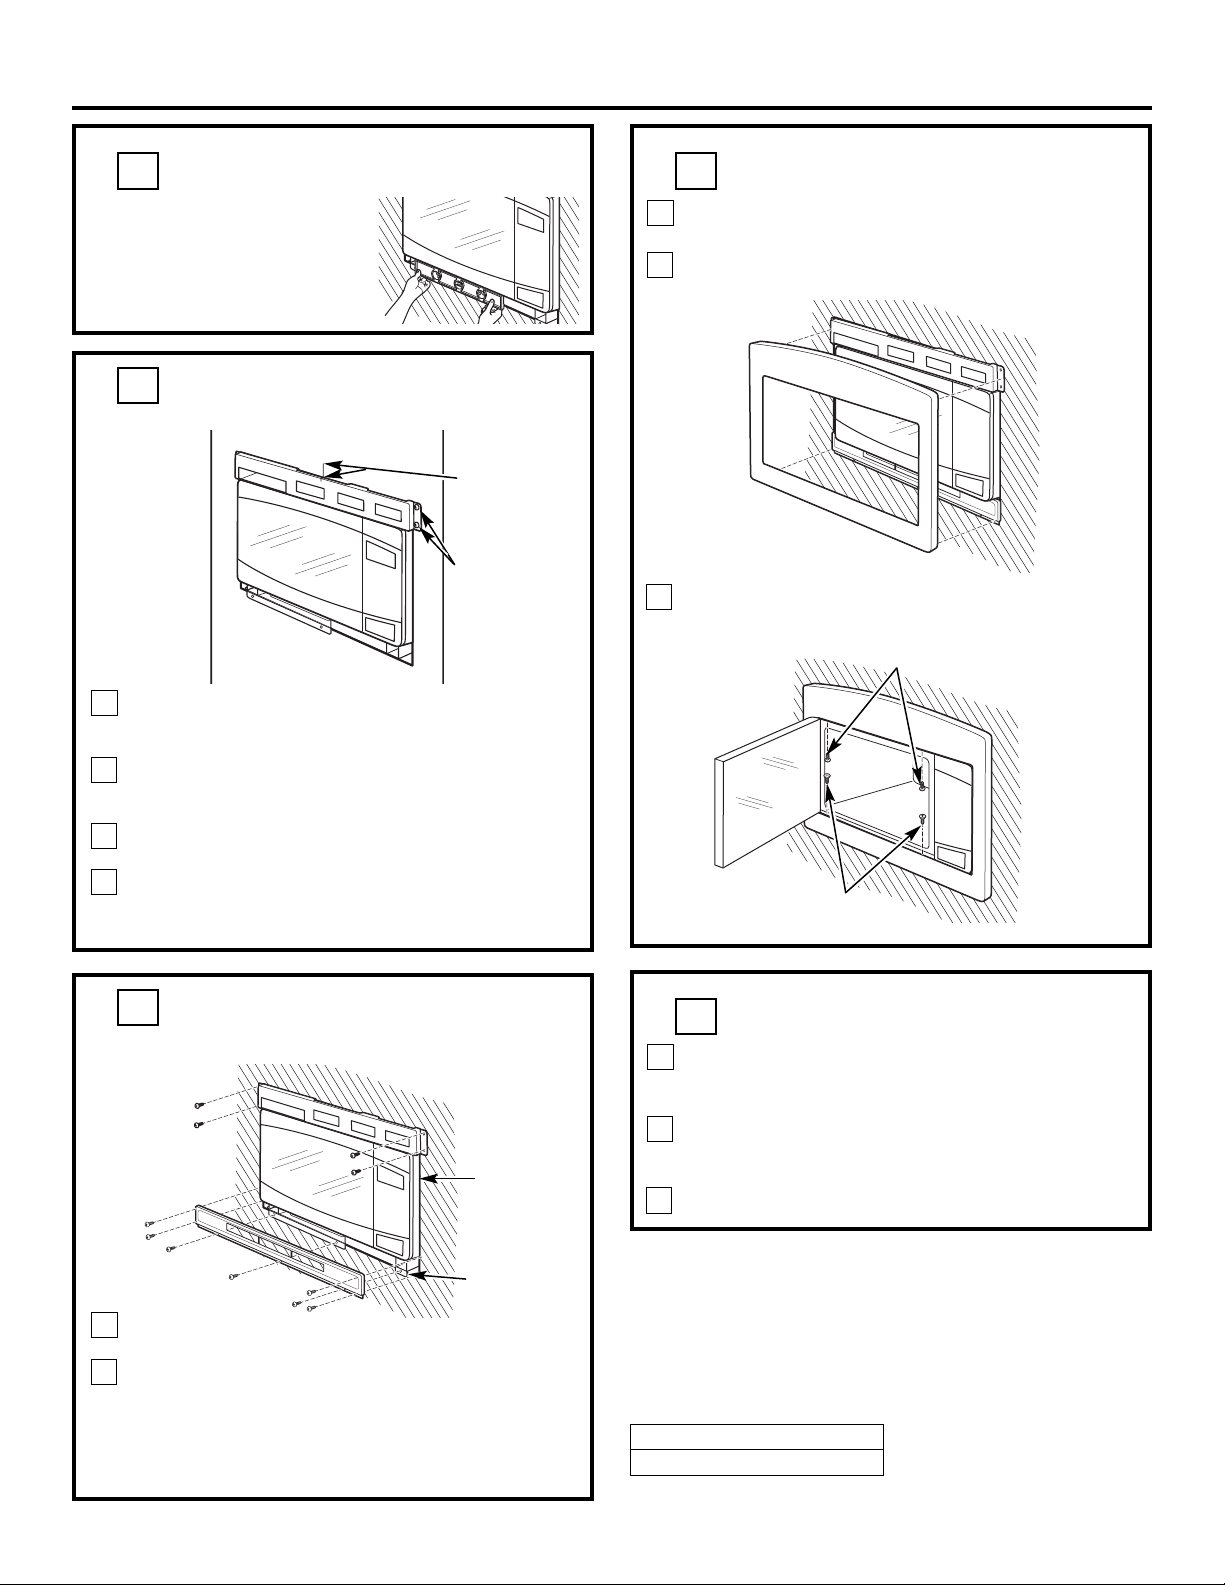
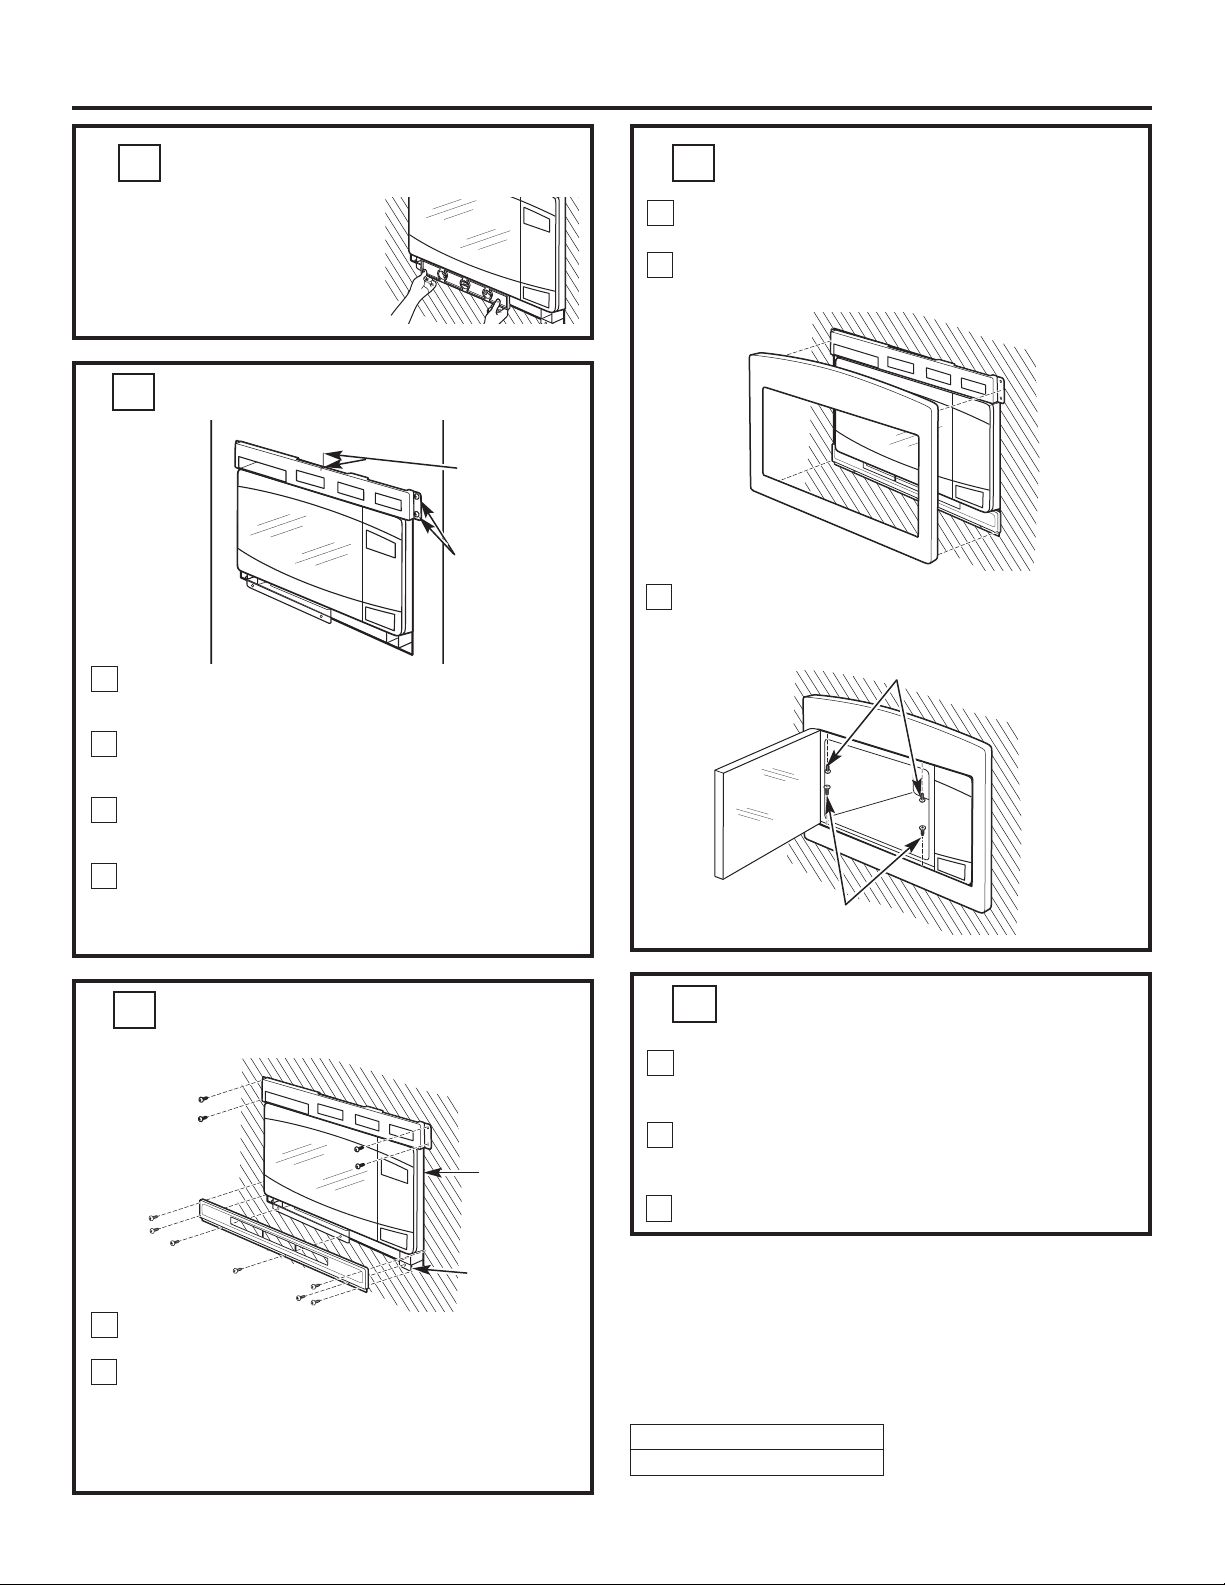
Disconnect the microwave oven before proceeding with the
installation.
Fasten the anti-tip bracket to the bottom duct by using four
round-head screws.
Remove any loose items
inside the microwave oven,
including the turntable
and turntable support.
Carefully turn the
microwave upside down.
Install bottom duct with
four round-head screws
as shown.
A
C
B
D
Front
Rear
Round-Head Screws (4)
Installation Instructions
Set the microwave upright, being careful not to bend the front
flange. Remove the one existing screw from the left side of the
microwave oven.
As indicated on the supplied template (publication
#31-41003-1), fold or cut along the “cut lines” and place the
template on top of the microwave oven. By aligning the
template with the outside edges of the oven, you will see
exactly where to place the upper duct assembly. Peel off the
backing from the double-sided tape. Carefully position the
side duct and upper duct assembly on the microwave
cabinet, aligning with the bottom screw hole. Press down
firmly on the ducts. Fasten the duct assembly to the left
side of the cabinet with the screw removed above.
B
C
Existing Screw (1)
Round-Head Screws
Microwave Oven Upside Down
❒
INSTALL ANTI-TIP BRACKET AND
BOTTOM DUCT
3
❒
INSTALL SIDE DUCT AND UPPER
DUCT
(cont.)
4
A
B
C
Anti-Tip Assembly
Bottom Duct
Round-Head
Screw
Anti-Tip Bracket
Anti-Tip
Brace
D
E
❒
INSTALL MICROWAVE OVEN
INTO CABINET
5
Connect the side duct to the upper duct as shown.
1. Insert projecting tabs of the upper duct into the holes
of the side duct.
2. Bend the tabs up with caution as shown.
NOTE: Remove any oil or dirt on the surface of the microwave
oven before the ducts are attached.
A
(2)
(1)
Upper Duct
Side Duct
3 Tabs
3 Holes
❒
INSTALL SIDE DUCT AND UPPER
DUCT
4
Slide the microwave oven part way into the cabinet opening.
Plug in the microwave oven.
The anti-tip bracket must be flat to the cutout floor to engage
correctly with the anti-tip brace as shown. Carefully slide the
microwave back, making sure the power cord is not mashed
or cut.
Center the microwave oven within the cutout opening and
slide the microwave oven in place, engaging the anti-tip brace.
Ensure the microwave oven is accurately centered
.
Installation Instructions
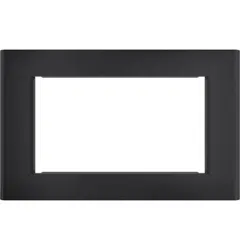
Place the trim frame over the microwave oven with the
curved edge at the top.
Press the trim frame into the opening until all sides snap
into place.
Open the microwave oven door. Secure the trim frame using
four flat-head screws (two on the inside top and two on the
inside bottom).
A
B
C
Your trim kit is now fully installed. Replace the turntable and
turntable support that were removed from the inside
of the microwave oven.
Keep these installation instructions and extra screws for
future reference and need. Do not place them in the
microwave oven.
Replace house fuse or close circuit breaker.
A
B
❒
REPLACE ANY LOOSE ITEMS
10
MFL38268402
49-40552-1
10-07 JR
Printed in China
C
❒
INSTALL THE TRIM FRAME
9
Check the leveling by placing a
level at the front and sides of the
microwave. It may be necessary to
add wood shims under the bottom
duct to level the microwave front to
back or side to side.
❒
CHECK LEVELING
6
Flat-Head
Screws
Flat-Head Screws
❒ INSTALL THE TOP BRACKET
7
Ensure that
Top Bracket
is Level
Align Center
Lines on
Cabinet and
Top Bracket
Mark Screw
Hole Locations
(also on left
side of
bracket)
Place the top bracket flange on top of the upper duct with the
opening of the top bracket lined up with the opening on the
upper duct.
Align the center line marking on the top bracket with the
center line drawn on the top front face of the cabinet at the
center of the cutout.
Ensure the top bracket is level and mark screw hole locations
on the cabinet face.
Drill pilot holes through the side holes in the top bracket.
Secure the top bracket to the cabinet using four round-head
screws (see illustration in step 8).
A
B
C
D
❒❒
INSTALL THE BOTTOM BRACKET AND
SECURE THE TOP BRACKET
8
Round-Head
Screws
Cutout
Opening
Positioning
Flange
Drill pilot holes through the three holes on the front flange of
the bottom duct assembly.
Hold the bottom bracket against the front flange of the bottom
duct assembly, lining up the three holes in the bottom bracket
with the three holes in the bottom duct. Screw in three round-
head screws. Drill pilot holes through the four holes in the
tabs on the sides of the bottom bracket. Screw in four round-
head screws.
A
B

PIÈCE QUANTITÉ
❒ Cadre de finition 1
(ou garniture)
❒ Conduit inférieur 1
❒ Conduit latéral 1
❒ Vis à tête ronde de 23
4 mm x 12 mm
(21 sont nécessaires
à l’installation)
❒ Vis à tête plate de 6
4 mm x 14 mm
(4 sont nécessaires
à l’installation)
❒ Renfort du support 1
antibasculement
❒ Support 1
antibasculement
❒ Conduit supérieur 1
❒ Support supérieur 1
❒ Support inférieur 1
❒ Gabarits 2
PIÈCES COMPRISES
Des questions? Appelez le 1.800.561.3344 ou visitez notre site Web à l’adresse suivante : www.electromenagersge.ca
LISEZ ATTENTIVEMENT CES INSTRUCTIONS ET
CONSERVEZ-LES.
Instructions Ensemble de finition –
d’installation
four encastré
JX2027 et JX2030
❒ AVANT DE COMMENCER
OUTILS NÉCESSAIRES
❒ Tournevis Phillips
❒ Crayon
❒ Ruban à mesurer
❒ Alène ou poinçon
❒ Perceuse avec foret de
7
/64 po ou n° 35
POUR VOTRE SÉCURITÉ :
AVERTISSEMENT –
Avant de commencer
l’installation, coupez le courant au tableau de distribution et
bloquez le disjoncteur pour éviter que le courant ne soit
accidentellement rétabli. Quand il n’est pas possible de bloquer le
disjoncteur, posez un moyen d’avertissement bien visible, comme
une étiquette, sur le tableau de distribution.
❒ Niveau
❒ Ciseaux (facultatifs)
1
REMARQUE : Cet ensemble comprend des vis supplémentaires pour éviter que
le technicien ne perde de temps à chercher une vis de remplacement s’il perdait
l’une d’elles lors de l’installation.
Lisez attentivement toutes ces instructions.
• IMPORTANT – Conservez ces instructions pour l’inspecteur local.
• IMPORTANT – Observez tous les codes et règlements en vigueur.
• Remarque destinée à l’installateur – Veillez à laisser ces instructions
au consommateur.
• Remarque destinée au consommateur – Conservez ces instructions
pour vous y reporter ultérieurement.
• Pour une installation plus facile et votre propre sécurité, nous
recommandons que l’installation de ce four à micro-ondes soit faite par
deux personnes.
AVERTISSEMENT – Ce four doit être branché à une prise à 3
alvéoles de 120 volts correctement mise à la terre, tel qu’exigé par le Code
canadien de l’électricité ou le Code national de l’électricité.
•
N’altérez ou ne modifiez aucune pièce de cet ensemble, ni aucune pièce du four.
• Débranchez le four à micro-ondes avant de commencer l’installation de
cet ensemble.
• Niveau de compétence – L’installation de cet appareil nécessite des
compétences de base en mécanique et en électricité.
• Durée de l’installation – 1 à 3 heures.
• L’installateur est responsable de la qualité de l’installation.
• Une panne du produit due à une mauvaise installation n’est pas couverte
par la garantie.
• Cet ensemble est homologué CSA/UL pour une installation seule ou
combinée avec un four encastré électrique simple GE ou GE Profile. Ce four
à micro-ondes ne peut être installé à moins de 2 pieds d’une cuisinière au
gaz ou électrique, d’une surface de cuisson ou d’un four.
• Cet ensemble doit être utilisé pour les modèles suivants :
PEB2060DMBB,
PEB2060DMWW, PEB2060DMCC, PEB2060SMSS, JEB1860DMBB,
JEB1860DMWW, JEB1860DMCC, JEB1860SMSS, PEB206CDNBB,
PEB206CSNSS, PEB206CDNWW, JEB186CDNWW, JEB186CDNBB
et JEB186CSNSS.
1 pi = 0,3 m
Modèles 27 po 30 po
Hauteur 16
3
⁄4 po 16
3
⁄4 po
Largeur 25
1
⁄2 po 25
1
⁄2 po
Profondeur (min.)* 19
1
⁄2 ou 22 po 19
1
⁄2 ou 22 po
❒
DIMENSIONS DE L’OUVERTURE
1
2
* Prof. min. avec prise à l’extérieur de l’ouverture – 19
1
⁄2 po
Prof. min. avec prise à l’intérieur de l’ouverture – 22 po
Prise mise à la terre de 120 V et 60 Hz
Instructions d’installation
AVERTISSEMENT —Ce cadre de finition
permet à l’air de circuler à partir du haut, du bas et des
côtés. Une obstruction de la circulation de l’air peut entraîner
un mauvais fonctionnement du four à micro-ondes
et l’endommager.
Laissez un espace de 1 po au-delà du bord du cadre de
finition pour permettre à l’air de circuler.
Sur les modèles de 27 po, laissez 1
1
⁄8 po dans la partie
supérieure,
11
⁄16 po sur les côtés et 1
1
⁄4 po dans la partie
inférieure pour permettre le chevauchement du cadre de
finition sur les bords de l’ouverture.
Sur les modèles de 30 po, laissez 1
1
⁄8 po dans la partie
supérieure, 2
1
⁄16 po sur les côtés et 1
1
⁄4 po dans la partie
inférieure pour permettre le chevauchement du cadre de
finition sur les bords de l’ouverture.
INSTALLATION AU-DESSUS D’UN FOUR ENCASTRÉ :
Le four à micro-ondes doit être installé sur une base en
contreplaqué de
3
⁄8 po et être soutenu par des coulisseaux
de 2 x 4 po ou des coulisseaux équivalents de 1 x 2 po sur tous
les côtés. La base doit pouvoir soutenir une charge minimale
de 100 lb (45,3 kg).
Tracez une ligne sur la surface inférieure de l’ouverture, au
centre de celle-ci et en prolongeant la ligne de
1
⁄2 po sur la
partie frontale de l’armoire.
Tracez une ligne sur la partie frontale supérieure de l’armoire
au centre de l’ouverture. La ligne doit se prolonger de
1
⁄2 po
vers le haut sur la partie avant de l’armoire. Cette ligne
centrale sera utilisée pour installer le support supérieur
(reportez-vous à l’étape 7).
Pliez ou découpez le bord avant du gabarit, le long de la
ligne de guidage avant. Placez le gabarit en l’alignant avec
le bord avant de la surface inférieure de l’ouverture et en
alignant la ligne centrale du gabarit avec la ligne centrale de
cette surface inférieure. Marquez les positions centrales de
l’emplacement du renfort du support antibasculement avec
une alène ou un poinçon comme le montre l’illustration.
Percez deux trous pour l’installation du renfort du support
antibasculement.
Installez le renfort du support antibasculement sur la
surface inférieure de l’ouverture avec deux vis à tête ronde.
B
C
D
E
D
D
Vis à tête ronde (2)
Renfort du support
antibasculement
Profondeur
Hauteur
Chevauchement
de 1
1
/4 po
Largeur
Chevauchement de 1
1
/8 po
Espace de 1 po au-delà
du cadre de finition (sur
tous les côtés)
3 po
min.
A
DIMENSIONS :
A = 1
1
⁄2 po
B = 3 po
C = 18
3
⁄16 po
D =
1
⁄2 po
La partie inférieure du
cadre de finition doit être
à au moins 36 po du sol
1 pi = 0,3 m
1 po = 2,5 cm
Modèles de 27 po : Chevauch.
11
/16 po
Modèles de 30 po : Chevauch. 2
1
/16 po
❒ MONTAGE DU RENFORT DU
SUPPORT ANTIBASCULEMENT
2

3
Débranchez le four à micro-ondes avant de passer à
l’installation.
Fixez le support antibasculement au conduit inférieur au
moyen de quatre vis à tête ronde.
Retirez tout article instable
se trouvant à l’intérieur du
four à micro-ondes, y
compris le plateau
tournant et son support.
Retournez soigneusement
le four à micro-ondes.
Fixez le conduit inférieur
avec quatre vis à tête
ronde, comme le montre
l’illustration.
A
C
B
D
Avant
Arrière
Vis à tête ronde (4)
Instructions d’installation
Placez le four à micro-ondes à la verticale en vous assurant
qu’aucune flexion ne s’exerce sur le bord avant. Enlevez la
vis existante du côté gauche du four à micro-ondes.
Comme l’indique le gabarit fourni avec l’ensemble
(publication n° 31-41003-1), pliez ou coupez le gabarit le
long des lignes de coupe et placez le gabarit sur le dessus
du four à micro-ondes. En alignant le gabarit avec les bords
extérieurs du four, vous verrez précisément où le conduit
supérieur doit être installé. Retirez le film protecteur du ruban
double couche. Placez soigneusement les conduits latéral et
supérieur sur le four à micro-ondes en les alignant avec le
trou de vis inférieur. Appuyez fermement sur les conduits.
Fixez les conduits au côté gauche du four en utilisant la vis
retirée précédemment.
B
C
Vis existante (1)
Vis à tête ronde
Four à micro-ondes
renversé
Faites glisser le four à micro-ondes partiellement dans
l’ouverture de l’armoire.
Branchez le four à micro-ondes.
Le support antibasculement doit être parallèle à la surface
inférieure de l’ouverture pour qu’il se loge correctement dans
le renfort du support antibasculement comme il est illustré.
Faites soigneusement glisser le four à micro-ondes dans
l’ouverture en vous assurant que le cordon d’alimentation
n’est ni écrasé ni coupé.
Centrez le four à micro-ondes dans l’ouverture et faites-le
glisser dans sa position en l’engageant dans le renfort du
support antibasculement.
Assurez-vous que le four à micro-ondes est centré avec
précision.
A
B
C
Ensemble de support
antibasculement
Conduit inférieur
Vis à tête ronde
Support antibasculement
Renfort
du support
antibasculement
D
E
Raccordez le conduit latéral au conduit supérieur comme le
montre l’illustration.
1. Insérez les languettes de protection du conduit supérieur
dans les trous du conduit latéral.
2. Repliez soigneusement les languettes comme le montre
l’illustration.
REMARQUE : Enlevez toute trace d’huile ou de saleté sur la
surface du four à micro-ondes avant de raccorder les conduits.
A
(2)
(1)
Conduit supérieur
Conduit latéral
3 languettes
3 trous
❒ MONTAGE DU SUPPORT ANTI-
BASCULEMENT ET DU CONDUIT
INFÉRIEUR
❒ MONTAGE DES CONDUITS LATÉRAL
ET SUPÉRIEUR
❒ MONTAGE DU FOUR À
MICRO-ONDES DANS L’OUVERTURE
❒ MONTAGE DES CONDUITS LATÉRAL ET
SUPÉRIEUR
(SUITE)
3
4
4
5
Instructions d’installation
Placez le cadre de finition sur le four à micro-ondes en
orientant la partie courbée vers le haut.
Enfoncez le cadre de finition dans l’ouverture jusqu’à ce
que tous les côtés s’enclenchent en position.
Ouvrez la porte du four à micro-ondes. Fixez le cadre de
finition avec quatre vis à tête plate (deux à l’intérieur et au
haut et deux à l’intérieur et au bas).
A
B
C
Votre cadre de finition est maintenant installé. Remettez
le plateau tournant et le support du plateau tournant à
l’intérieur du four à micro-ondes.
Conservez les instructions d’installation et les vis
supplémentaires à titre de référence et pour un usage
ultérieur. Ne les placez pas dans le four à micro-ondes.
Remettez le fusible en place ou le disjoncteur en fonction.
A
B
MFL38268402
49-40552-1
10-07 JR
Imprimé en Chine
C
Pour vérifier la mise à niveau, placez
un niveau à l’avant et sur les côtés du
four à micro-ondes. Il se peut que
vous deviez ajouter des cales en bois
en dessous du conduit inférieur pour
mettre le four à micro-ondes à niveau.
Vis à tête plate
Vis à tête plate
Assurez-vous
que le support
supérieur est
de niveau
Alignez les lignes
centrales de
l’armoire et
du support
supérieur
Marquez
l’emplacement
des trous de vis
(sur la partie
gauche du
support
également)
Placez le rebord supérieur du support sur le dessus du
conduit supérieur en alignant l’ouverture du support
supérieur avec l’ouverture du conduit supérieur.
Alignez la ligne centrale du support supérieur avec la ligne
centrale de la partie avant supérieure de l’armoire au centre
de l’ouverture.
Assurez-vous que le support supérieur est de niveau et
marquez l’emplacement des trous de vis sur la partie avant
de l’armoire.
Percez les avant-trous en passant le foret par les trous du
support supérieur. Fixez le support supérieur à l’armoire au
moyen de quatre vis à tête ronde (reportez-vous à
l’illustration de l’étape 8).
A
B
C
D
Vis à tête
ronde
Ouverture
Flasque de
positionnement
Percez des avant-trous en passant le foret dans les trois trous
du bord avant du conduit inférieur.
Maintenez le support inférieur contre le bord avant du
conduit inférieur en alignant les trois trous du support
inférieur avec les trois trous du conduit inférieur. Insérez trois
vis à tête ronde. Percez des avant-trous en passant le foret
dans les quatre trous des languettes sur les côtés du support
inférieur. Insérez quatre vis à tête ronde.
A
B
❒ VÉRIFICATION DU NIVEAU
❒ MONTAGE DU SUPPORT SUPÉRIEUR
❒ MONTAGE DU SUPPORT INF. ET FIXATION
DU SUPPORT SUP.
❒ REMISE EN PLACE DES ARTICLES
MOBILES
6
7
8
10
❒ MONTAGE DU CADRE DE FINITION
9