Loading ...
Pub. No. 49-60043-3
Part No. 197D2521P001
02-06 JR
ZIP75WW–2313617
ZIP75BB–2313618
Printed in the United States
NOTE: While performing installations described in this book,
safety glasses or goggles should be worn.
For Monogram
®
local service in your area, call
1.800.444.1845.
NOTE: Product improvement is a continuing endeavor
at General Electric. Therefore, materials, appearance
and specifications are subject to change without notice.
GE Consumer & Industrial
GE Appliances
General Electric Company
Louisville, KY 40225
ge.com
©2006 GE Company
Installation Instructions
DISCONNECT POWER
TO THE ICE MACHINE
STEP 1
REMOVE HANDLE
AND NAMEPLATE
• Remove the door handle by removing the two top
mounting screws. Set screws aside. Discard handle.
• The Monogram nameplate is held in place with
adhesive. Remove the nameplate.
STEP 2
INSTALL ASSEMBLED PANEL
ONTO THE ICE MACHINE
• Install panel to icemaker with supplied screws,
four on each side.
STEP 6
INSTALL SUPPLIED DOOR
HANDLE (IF USED)
• Install the new supplied handle with original screws.
STEP 7
MARK MOUNTING
SCREW LOCATIONS
• Align and hold the side trim pieces against the
icemaker door and mark screw locations on the sides.
• Drill 1/8″ pilot holes into the door sides of the
icemaker.
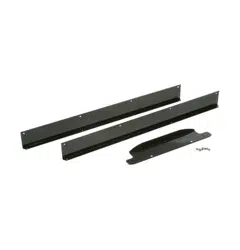
STEP 3
SECURE SIDE TRIM PIECES
TO CUSTOM PANEL
• Lay the custom panel appearance-side-down
on a clean surface.
• Align top and bottom side trim to the custom
panel sides.
• Tape the side trim pieces to the back of the
custom panel.
• Place the panel with trim against the door to be sure
that trim and panel fits the door side to side and top
to bottom. Adjust as needed.
• Mark screw locations and remove trim.
Drill pilot holes.
• Install side trim to the back side of the custom
panel with screws (not supplied). Use flat head
wood screws approximately 1/2″ long.
STEP 5
SECURE CUSTOM HANDLE
TO CUSTOM PANEL.
(SKIP THIS STEP IF
YOU ARE USING THE
SUPPLIED HANDLE)
A custom handle can be installed onto the 3/4″ thick
panel, replacing the supplied handle.
• The custom handle can be installed at the top or side
of the panel.
• Drill pilot holes through the front of the custom panel
to match the chosen handle.
• Secure the handle to the panel with flat head wood
screws.
• Replace original handle screws in the top of the door
frame.
STEP 4