1. The power connection should be applied to the nameplate., the specified power supply should be used, and the specifications of the wires used to connect the circuit should be determined to meet the requirements.
2. The machine must be reliably grounded.
3. It is strictly forbidden to operate the power plug when your hands are wet, and you must unplug the power plug before maintaining and cleaning the machine.
4. The electrical control system voltage is greater than 36V, non-professionals are not allowed to open and touch casually.
5. When the ice machine is out of use, unplug the power plug or cut off the power supply.
The label is a reliable grounding point
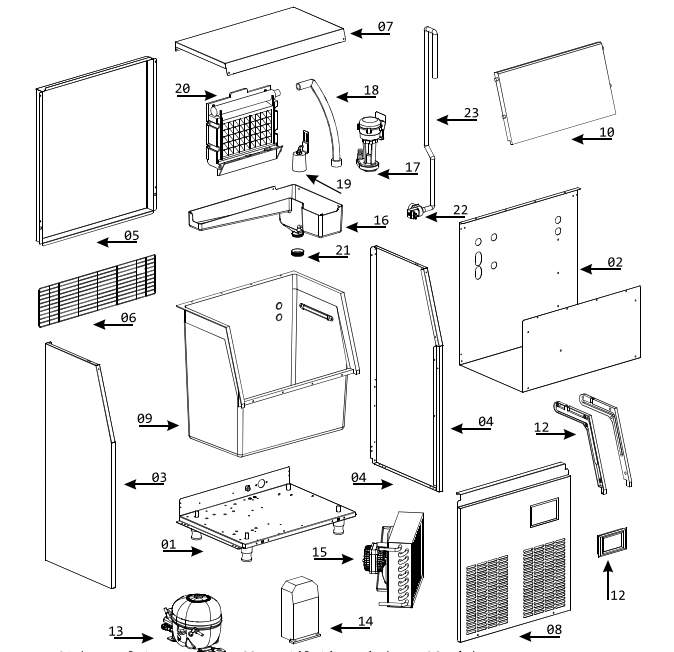
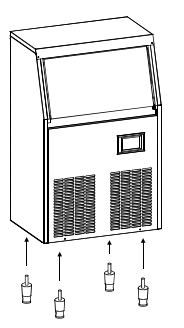
Installation and Placement of Machine Feet
Tilt the machine and install the feet
1. Screw the foot to the bottom of the ice maker. Each foot must be screwed down and tightened.
2. Place the ice maker in a firm and flat position. Adjust the height of the feet to make the ice maker level.
3. The ice maker is not suitable for outdoor use. The normal use environment temperature is between 10°C ~ 38°C, and the water temperature is between 5°C~30°C High temperature will seriously reduce ice production.
4. The ice maker should not be installed in an environment without a drainage system, and it is strictly forbidden to put it alongside high-temperature equipment (such as refrigerators and ovens).
5. The air-cooled ice maker relies on air circulation to dissipate heat. Therefore, it is necessary to reserve a space of more than 20cm in the front and back to facilitate heat dissipation.
Self-contained Machine Installation
1. The ice maker must use sanitary drinking water at room temperature. The water supply pressure should be controlled between 0.l-0.63MPa.
2. The ice maker relies on gravity to drain, so it is necessary to ensure that the drain pipe has sufficient slope and drop.
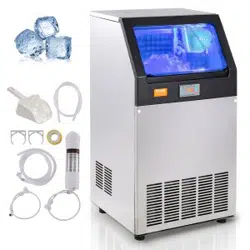
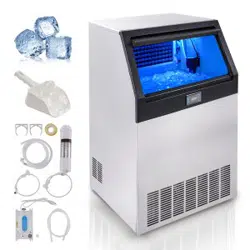
3. The supplied water filter is only suitable for machine testing. The filter is disposable and is replaced regularly according to local water quality.
4. The connector on the filter needs to be removed with a special tool.
This picture is used for water connection of air-cooled machines
1.Drinking water: 1/2" male connector
2.Ice machine water intake: 3/4" external thread nylon connector (white)
3.Ice machine drat water: Bellows (black)
Filter water inlet direction
There is a pump on the right, no pump on the left The direction with protrusions is the direction of water inflow, the direction without protrusions is the direction of water
PE quick connector: 2"/4" internal teeth
PE quick connector: 2"/6" internal teeth
PE quick connector: 2" direct
PE quick connector: 2" elbow
PE quick connector: 2" Tee
6 inch single stage filter
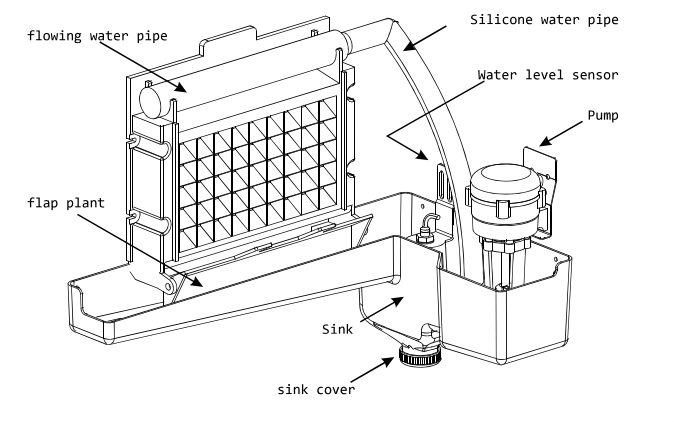
Water tank cleaning
If there is impurity scale in the water, the ice maker will deposit scale inside after a period of use, which will affect the color, quality and taste of the ice. If it is not handled in time, the machine will not work normally.
The serious scale in the water tank will make the pump impeller stuck, resulting in the internal water circulation of the machine. At this time, the power needs to be cut off, and the water pump is taken out for disassembly and cleaning.
The clamp is stretched and locked, the cannula cannot be pulled out
Press and unlock the clamp to pull out the cannula
After the buckle is installed, the cannula can be locked
Maintaining
Please perform maintenance and maintenance according to the requirements of this manual in order to improve the reliability and service life of the ice maker, and avoid the increase in the energy consumption coefficient of ice production while maintaining hygiene.
1. Clean the environment around the ice machine frequently to keep it clean, and do not block the general blinds of the ice machine.
2. The shell can be cleaned with a neutral detergent, and then wiped with a soft cloth and water.
3. The filter element should be checked regularly. Use should follow the instructions and replace on time.
4. The water tank of the ice maker and the ice storage bucket can be directly flushed with a water pipe when the interior is cleaned. Do not use excessive water pressure, do not directly flush the water pump and above the ice tray to prevent the circuit from being drenched.
5.Maintenance of air-cooled ice machine condenser: clean the aircooled condenser once every three months. Use a soft brush or a vacuum cleaner with a brush to brush the condenser fins up and down along the fin direction to avoid damage to the fins and affect the cooling effect. Use a flashlight to check the cleaning effect.
6.Overwintering maintenance: In addition to turning off the water source and power supply, the residual water in the ice maker sink, water inlet pipe and drain line must also be drained.
Water core of water fileter must be regularly replaced
Fin of condenser is very shap, pis be careful during clean
Make sure cut off water and plug off, during cleanning and maintance
Application of drain pump
When the drain pipe of the ice maker is lower than the sewer or too far away, the drain pump can be used to connect.
The drainage pump is fully automatic operation mode. When the wastewater is gathered to a certain height, the pump will be automatically started to drain water.
The user's site environment is different, so the connection pipeline from the drainage pump to the sewer needs to be solved by the user himself.
Best case list
Length of drain pipe > Distance between sewers:a
Drainage height:b > Height of sewer:c There is no need to use a drain pump.
Length of drain pipe:d < Distance between sewers:a
Drain pumps are required.
Drainage height : b> Height of sever : c
Drain pumps are required.
Connnection diagram
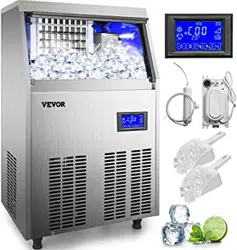
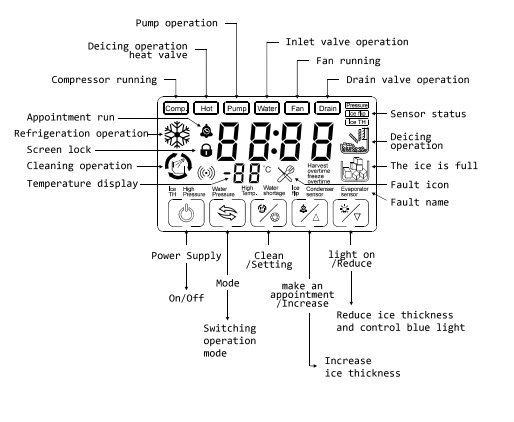
LED Control Panel
1. [Power]
can be used for short-term shutdown operation.
2. [Status]
forced deicing button. Press this key during the ice making process (the ice making lamp is always on), and the program control can immediately change to the ice removal process.
This function is often used for machine maintenance judgment.
3. [Mash]
short press: control the on and off of the blue light, long press for 5 seconds: the program is forced to enter the cleaning process control.
4. [Thick]
During ice making process (the ice making lamp is always on), press this button, and the screen will immediately display a two-digit number, press this button again, the number will increase by +1, and the ice making time will be extended by one minute accordingly.
5. [Thin]
During ice making process (the ice making lamp is always on), press this button, and the screen will immediately display a two-digit number.
Press this button again, the number will decrease by -1,
And the ice making time will be shortened by one minute accordingly.
6. Ice Thickness Parameters-The ice thickness of the ice maker will vary during ice making in different ambient temperatures or different seasons, so users are required to adjust the ice thickness parameters.The parameters should not be adjusted too large, generally within 12-19, which can solve most situations.
7. Adjust the ice thickness-the adjustment of the ice thickness parameter needs to wait until the ice removal is completed before the adjustment effect can be observed.
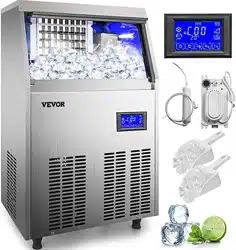
LCD Control Panel
This is a fully automatic ice maker. All programs of SA control panel have been set up in the factory.
Usually, users only need to do some simple operations. Please put the machine in a proper position and connect the power supply.
Some models have red switch on the back or left side, please turn it on. At this time, the SA control panel will light up and the machine will run automatically without any other operation by the user.
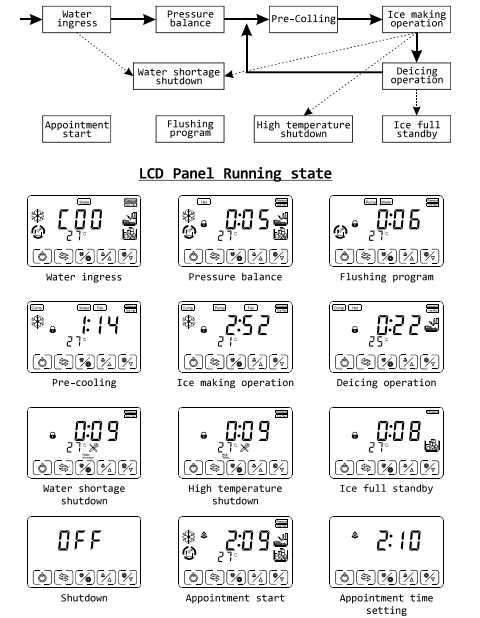
Ice Making Working Process
LCD Panel button Operation
Power supply
1. In the shutdown state, click this button to turn on the ice maker.
2. In the power-on state, click this button to turn off the ice maker.
3. In the setting state, click this button to exit the setting state and save the parameters.
4. In the reservation state, click this button to turn off the ice maker.
5. In the state of appointment time, click this button to make appointment.
6. In the flushing state, click this button to turn off the ice maker.
Mode
1. In the pressure balance state, click this button to enter ice making and pre-cooling.
2. In the ice-making pre-cooling state, click this button to enter ice-making operation.
3. In the ice making operation state, click this button to stop ice making and enter the ice removal operation.
4. In the de-icing state, click this button, if the de-icing version is reset at this time, it will enter the ice precooling.
5. In the de-icing running state, click this button, if the deicing plate is turned over, it will enter the ice full stop.
6. In the reservation time setting state, click this button to close and cancel the time setting.
7. In the flushing state, click this button to enter the power-on and water supply.
Cleaning/Setting
1. In the power-on state, click this button to automatically turn on and enter the flushing running state.
2. When the power is running, in the ice making/de-icing/ice full state, press and hold this button for 3 seconds to enter the flushing state.
Make an Appointement/Increase
1. In the power-on state, click this button to automatically power on and enter the appointment time setting state.
2. In the appointment time setting state, click this button, the time will increase by 10 minutes, and long press this button to increase continuously.
3. In the setting state, click this button, the parameter will increase by 1, long press this button to increase continuously.
Light on/Reduce
1. ln the setting state, click this button, the parameter will decrease by 1, long press this button to decrease continuously.
2. In the reservation time setting state, click this button, the parameter will decrease by 10, and long press will decrease continuously.
3. In the non-setting state, click this button to turn on/off the blue LED lighting.
LCD Panel Functions Operation
A.Appointment time
1. Turn off the mahcine and will display characters as above.
B.Waterway flushing steps
1. Turn off the mahcine and will display characters as above.
2. Press butten . the display will be showed in picture 2,default time is 2 hrs and sparkling.
2. Press the button , the display will be that as showed, system starts to countdown.
3. The machine opens the water inlet valve and starts to feed water. During this process, water will overflow from the sink and wash away floating debris.
4. During this process, the user can unscrew the cap to empty the water in the sink and at the same time empty the sediment.
5. After the flushing program runs for 10 minutes, it switches to the power-on and water-in state. Then began the normal ice making process.
3. Press butten each time, the time will be enlengthed by 10 minutes. Press butten each time, the time will be shorten by 10 minutes. The maximum reservation time is 12 hrs.
6. Water shortage
After rinsing, be sure to check whether the cap has been installed. If the cap is not installed, the machine will report a fault and shut down.
4. Press button , it enter into scheduled boot status,the screen will show the information of time countdown.
C. Adjust the thickness of ice block
1. Wait until the machine is in the ice making state, the screen display interface is as above, and then unlock the screen.
5. After the ice thickness setup is adjusted properly, do not operate the screen again. After a delay of 3 seconds, the program will be automatically saved and transferred to the normal working display.
2. Press butten , the position on the screen that indicates temperature will show "00" sparklingly.
6. When the ice maker is at different ambient temperatures or in different seasons, the ice thickness during ice making will vary. Therefore, the user is required to adjust the ice thickness setting.
3. Press butten , the thickness of ice block will be increased level, the maximum level is 20.
7. The value of the ice thickness level should not be adjusted too big. Generally, it can solve most situations within 4 days.
4. Press butten , the thickness setup of ice bloack will decreased bby 1 letl, the minimum level is 19.
8. The ice thickness Level been adjusted, and the effect of the adjustment can be observed after the de-icing is completed.
General Precautions
1. This appliance is suitable for the catering industry, such as kitchen areas in shops., offices or other workplaces; farms, hotels, motor hotels and residential environments, family hotel environments, catering and similar non-retail applications.
2. Do not store hazardous chemicals such as organic solvents and sprays in the appliance.
3. The machine installation failure must be replaced and repaired by the manufacturer or professionals.
4. When transporting and moving the position, the tilt of the ice machine must not exceed 45 degrees.
5. Please use an independent water source for the ice maker, and check it regularly to prevent low water pressure, fluctuations or clogging of the filter.
6. Do not store any debris in the ice storage room, let alone freeze or ice any food in the ice storage room, and keep the ice shovel clean
7. When opening and closing the plastic door of the ice storage bin, please open and close it gently. Do not hit the door. After taking the ice, please close the sliding door of the ice storage bin.
8. The ice machine should be far away from heat sources, and it is strictly forbidden to use it in high or low temperature environments. Avoid direct sunlight as much as possible to avoid affecting the heat dissipation of the machine
9. For appliances with removable hose assemblies connected to the water source, the new hose assemblies included with the appliance should be used, and old hose assemblies cannot be reused.
10. It is forbidden to directly pour water to rinse the surface of the ice machine, otherwise it may cause short circuit, surge and other faults.
11. After the ice maker has been used for a period of time, if it is left unused for a long time, it should be powered on for 4 to 6 hours every two months.
12. If this appliance needs to be disposed of., it should be disassembled and classified. The metal part and the plastic part can be recycled and processed; the adiabatic foaming agent is a non-flammable combustible material, which must be disassembled according to the local combustible garbage classification and treatment method.
Before Calling Electricity Telephone
If the ice machine is abnormal, it means to confirm the following before calling:
1. Whether the water source of the ice machine is normal and turned on.The method of inspection is to loosen the ice-making water inlet (6 tap) on the back of the machine. When it is loosened to a certain extent, water will leak out. When it leaks for a long time, the water source is normal, otherwise it means there is no water.
2. If the ice machine powered onThe ice machine produced by our company is fully automatic and does not require manual operation, so some models do not have a power switch. Please ask professional personnel to check whether the machine is powered on, and check the socket.
3. The model and number of the ice makerThere is a model nameplate on the front panel of the machine, and a model and number label on the back.
Fault Code
LED Panel
LCD Panel
Fault
Fault
Possible Cause
Solution
E01
Ice Full Switch
1. 5 seconds before power-on, the de-icing plate will disengage more than 3 seconds;
2. The ice removal plate is not reset within 40 seconds after ice removal;
3. The ice removal plate has not been reset for more than 4 minutes during ice making;
1. De-icing plate is missing or misplaced;
2. The polarity of the magnetic induction element is reversed;
3. Abnormal ice full switch;
1. Reset the ice removal plate;
2. Replace the ice removal plate/full ice sensor;
3. Contact after-sales service/visual trouble guidance/confirm the fault point;
E02
Ice making Timeout
10 consecutive ice making times exceed 40 minutes
1. The ambient tenperature is too high;
2. The cooling effect of the condensing system is poor;
3. The cooling fan slows down;
4. Leakage of refrigeration system;
1. Improve environmental ventilation or displacement, or turn on air conditioning;
2. Clean the condenser;
3. Contact after-sales service/seeking guidance/confirm the point of failure;
E03
Deicing Timeout
Overtime deicing failure 3 consecutive deicing times exceed 5 minutes
1. The ice cube setting is too thin;
2. The water tank is insufficient;
3. The ambient temperature is too low;
4. De-icing solenoid valve failure;
1. Check and set the water thickness parameters;
2. Check the water inlet system, or whether the water tank is flooded;
3. Use membrane materials to block the ventilation inlet area proportionally;
4. Contact after-sales/video guidance/confirm the point of failure;
E04
High Temperature Shutdown
High tenperature failure
Condensing temperature exceeds 68 degrees
1. The ambient tenperature is too high;
2. The cooling effect of the condensing system is poor;
3. The cooling fan is damaged;
1. Improve environmental ventilation or displacement, or turn on air conditioning;
2. Clean the condenser;
3. Contact after-sales/confirm the point of failure;
E05
Water Shortage Shutdown
The water intake process does not reach the specified water level for more than 5 minutes
1. No water supply;
2. The water supply pressure is too low;
3. Water tank leaks;
4. The water level sensor fails;
5. Malfunction of the inlet valve;
1. Check the water source or whether the water filter is blocked;
2. Check the water supply pressure or whether the water filter is blocked;
3. Check whether the bottle cap at the bottom of the water tank is tightened and sealed;
4. Contact after-sales/video guidance/confirm the point of failure;
E06
High Pressure Shutdown
The refrigeration system pressure exceeds the upper limit.
1. The condenser tenperature is too high;
2. The refrigeration system is blocked;
3. Pressure switch failure;4. The main control board is abnormal;
1. Improve environmental ventilation or displacement, or turn on air conditioning;
2. Check the condensation heat dissipation system;
3. Contact after-sales/video guidance/confirm the point of failure;
E07
Condensation Probe
Condensing temperature sensor open circuit fault
1. The sensor is damaged;
2. Cable/connector problem;
1. Contact after-sales/video guidance/confirm the point of failure;
E08
Condensing temperature sensor open circuit fault
E09
Evaporation Probe
Evaporation temperature sensor open circuit fault
E10
Evaporation temperature sensor open circuit fault
E11
Poor cooling effect
1. The ring tenperature is too high;
2. Poor dissipation effect of the condensing system;
3. Leakage of refrigeration system;
4. De-icing hot valve failure;
1. Contact after-sales/video guidance/confirm the point of failure;


 The clamp is stretched and locked, the cannula cannot be pulled out
 Press and unlock the clamp to pull out the cannula
 After the buckle is installed, the cannula can be locked
 Water core of water fileter must be regularly replaced


 Connnection diagram
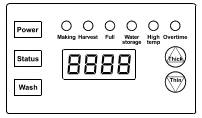
 Power supply
 Mode
Mode Cleaning/Setting
 Make an Appointement/Increase
 Light on/Reduce


 . the display will be showed in picture 2,default time is 2 hrs and sparkling.
 , the display will be that as showed, system starts to countdown.
 each time, the time will be shorten by 10 minutes. The maximum reservation time is 12 hrs.

 , it enter into scheduled boot status,the screen will show the information of time countdown.


 , the thickness setup of ice bloack will decreased bby 1 letl, the minimum level is 19.