GEPpp/iances.com
©
"m
©
Safety Instructions ......... 2-4
Operating Instructions
Clock and Timer .............. 8
Control i,ockout .............. 8
Controls ..................... 5
Convection .............. 12-15
Oven ..................... 6, 7
Probe ................... 10, 14
Proofing .................... 11
Sabbath Feature ............. 21
Self:Cleaning Oven ........ 17, 18
Special Features .......... 19, 20
Thermostat ................. 16
Timed Baking
and Roasting .............. 9, 15
Warming ................... 11
Care and Cleaning
Cleaning Oven Door ......... 23
Control Panel ............... 24
Lift-Off Oven Door ........... 23
Light Bulb .................. 22
Probe ...................... 23
Racks ...................... 24
Removing Packaging Tape ..... 22
Stainless Steel Surfaces ........ 24
Troubleshooting Tips ..... 25-27
Accessories ................. 28
Consumer Support
Consumer Support ........... 32
Warranty ................... 31
Write the model andserial
numbershere:
Model #
Serial #
You can find them on a label
on the flont of the oven behind
the oven door on single oven models,
or the flont of the lower oven behind
the oven door on double oven models.
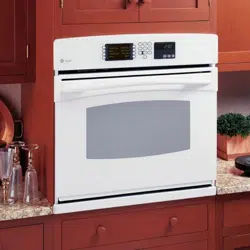
PK916-2 7" Single Wa,ll Oven
PK956-2 7" Double Wall Oven
PT916-30" Single Wall Oven
PT956-30" Double Wall Oven
Printedon
RecycledPaper
49-80599 08-09 Jfl
IMPORTANTSAFETYINFORMATION.
READALLINSTRUCTIONSBEFOREUSING.
ttL '!
For your safety, the information in this manual must be foflowed to minimize the risk of fire
or explosion, electric shock, or to prevent property damage, personal injury, or loss of life.
IMPORTANTSAFETYNOtiCE
The California Safe Drinking Water and Toxic Enforcement Act requires the Governor of California
to publish a list of substances known to the state to cause cancer, birth defects or other reproductive
harm, and requires businesses to warn customers of potential exposure to such substances.
The fiberglass insulation in self-clean ovens gives off a very smafi amount of carbon monoxide during
the cleaning cycle. Exposure can be minimized by venting with an open window or using a ventilation
fan or hood.
2
SAFETYPRECAUtiONS
When using electrical appliances, basic safety precautions should be followed, including the
following:
}} Use this appliance only fbr its intended
purpose as described in this Owner's
Manual.
iii}i}}li_
Be sure your appliance is properly
installed and grounded by a qualified
technician in accordance with the
prox,ided installation instructions.
Do not attempt to repair or replace any
part of your oven unless it is specifically
recommended in this manual. All other
ser_,icing should be referred to a qualified
technician.
iii}i}i
iii}i}}li_
iii}i}}li_
iii}i}}li_
Have the installer show you the location
of the circuit breaker or rise. Mark it for
easy reference.
Befbre perfbrming any ser_;ice, disconnect
the oven power supply at the household
distribution panel by remox,ing the filse
or switching off the circuit breaker.
Do not leave children alone--children
should not be left alone or unattended
in an area where an appliance is in use.
They should never be allowed to sit or
stand on any part of the appliance.
Do not allow anyone to climb, stand
or hang on the door. They could damage
the oven, or cause severe personal in,jury.
_:_Be sure the oven is securely installed
in a cabinet that is firmly attached to the
house structure. Never allow anyone m
climb, sit, stand or hang on the oven door.
}} Never leave the oven door open when you
are not watching the oven.
}} Always keep combustible wall covering,
curtains or drapes a sate distance from
your oven.
}}Always keep dish towels, dishcloths, pot
holders and other linens a s_e distance
flom your oven.
}}Always keep wooden and plastic utensils
and canned fbod a s_e distance away
flom your oven.
}} Teach children not to play with the
controls or any other part of the oven.
}} Large scratches or impacts to glass doors
(:an lead to broken or shattered glass.
}} Do not store flammable materials in
an oven.
iii}i}i
ZiLCAUTION: temsofinterestto
children should not be stored in cabinets
above an oven; children climbing on the
oven to reach items could be seriously
injured.
6EPpp/iances.com
,A I
SAFETYPRECAUTIONS
iiiil}i
Never wear loose-.fitting or han_ng
garments while using the appliance. Be
careful when reaching for items stored in
cabinets over the oven. Flammable material
could be ignited if brought in contact with
hot surfhces or heating elements and may
cause severe burns.
iii}i}i
iii}i}}li_
iii}i}}li_
Use only dry pot holders--moist or damp
pot holders on hot surfaces may result in
bums from smam. Do not let pot holders
much hot heating elements. Do not use
a towel or other bulky cloth.
For your s_ety, never use your appliance
fbr warming or heating the room.
Do not let cooking g,ease or other
flammable materials accumulate in or
near the oven.
}} Do not use water on grease fires.
Never pick tip a flaming pan. Turn
the controls ore
iii}i}i
iii}i}}li_
iii}i}}li_
iii}i}}li_
iii}i}}li_
iii}i}}li_
iii}i}i
iii}i}i
iii}i}i
Flame in the oven can be smothered }}
completely by closing the oven door
and turning the oven off or by using a
}}
multi-purpose dry chemical or fbam-type
fire extinguisher.
Do not touch the heating elements or the
interior surfhce of the oven. These surfhces
}}
may be hot enough to burn even though
they are dark in color. During and after
use, do not touch, or let clothing or other }}
flammable materials contact any interior
area of the oven; allow sutJ{icient time R)r
}}{
cooling first.
Pomntially hot surfaces include oven
vent openings, surfaces near the openings,
crevices around the oven door, the edges
of the _dndow and metal trim parts above
the door.
REMEMBER:The inside surface of the oven
may be hot when the door is opened.
Never place cooking utensils or any other
items on the oven floor. There is a heating
element beneath the oven floor. Placing
items on the oven floor may cause the
oven to overheat, resulting in damage
u) the oven and risk of damage or fire
to cabinets.
iii}i}i
iii}i}}li_
iii}i}}li_
Never lemre,jars or cans of fat drippings in
or near your oven.
Do not store or use combustible materials,
gasoline or other flammable vapors and
liquids in the x,icinity of this or any other
appliance.
Stand away from the oven when opening
the oven door. Hot air or steam which
escapes can cruise burns to hands, face
and/or eyes.
Do not heat unopened fbod containers.
Pressure could build tip and the container
could burst, causing an in.jury.
Keep the oven vent unobstructed.
Keep the oven flee flom grease buildup.
Place the oven rack in the desired position
while the oven is cool. If racks must be
handled when hot, do not let pot holder
contact the heating elements.
When using cooking or roasting bags in the
oven, fbllow the manufhcmrer's directions.
Pulling out the rack to the stop-lock is a
convenience in lifting heaxT foods. It is also
a precaution against burns flom touching
hot surfhces of the door or oven walls.
Do not use the oven to dry newspapers.
R overheated, they can catch on fire.
Do not use the oven for a storage area.
Items stored in an oven can ignite.
Do not leave paper products, cooking
utensils or fbod in the oven when not
in use.
After broiling, always take any broiler
pan out of the oven and clean it. i_eftover
g,ease in a broiler pan can catch fire next
time you use the pan.
Clean only parts listed in this Owner's
Manual.
Do not use aluminum fbil to line
oven bottoms, except as suggested in this
manual. Improper installation of
aluminum foil may result in a risk of
electric shock
or fire.
3
IMPORTANTSAFETYINFORMATION.
READALLINSTRUCTIONSBEFOREUSING.
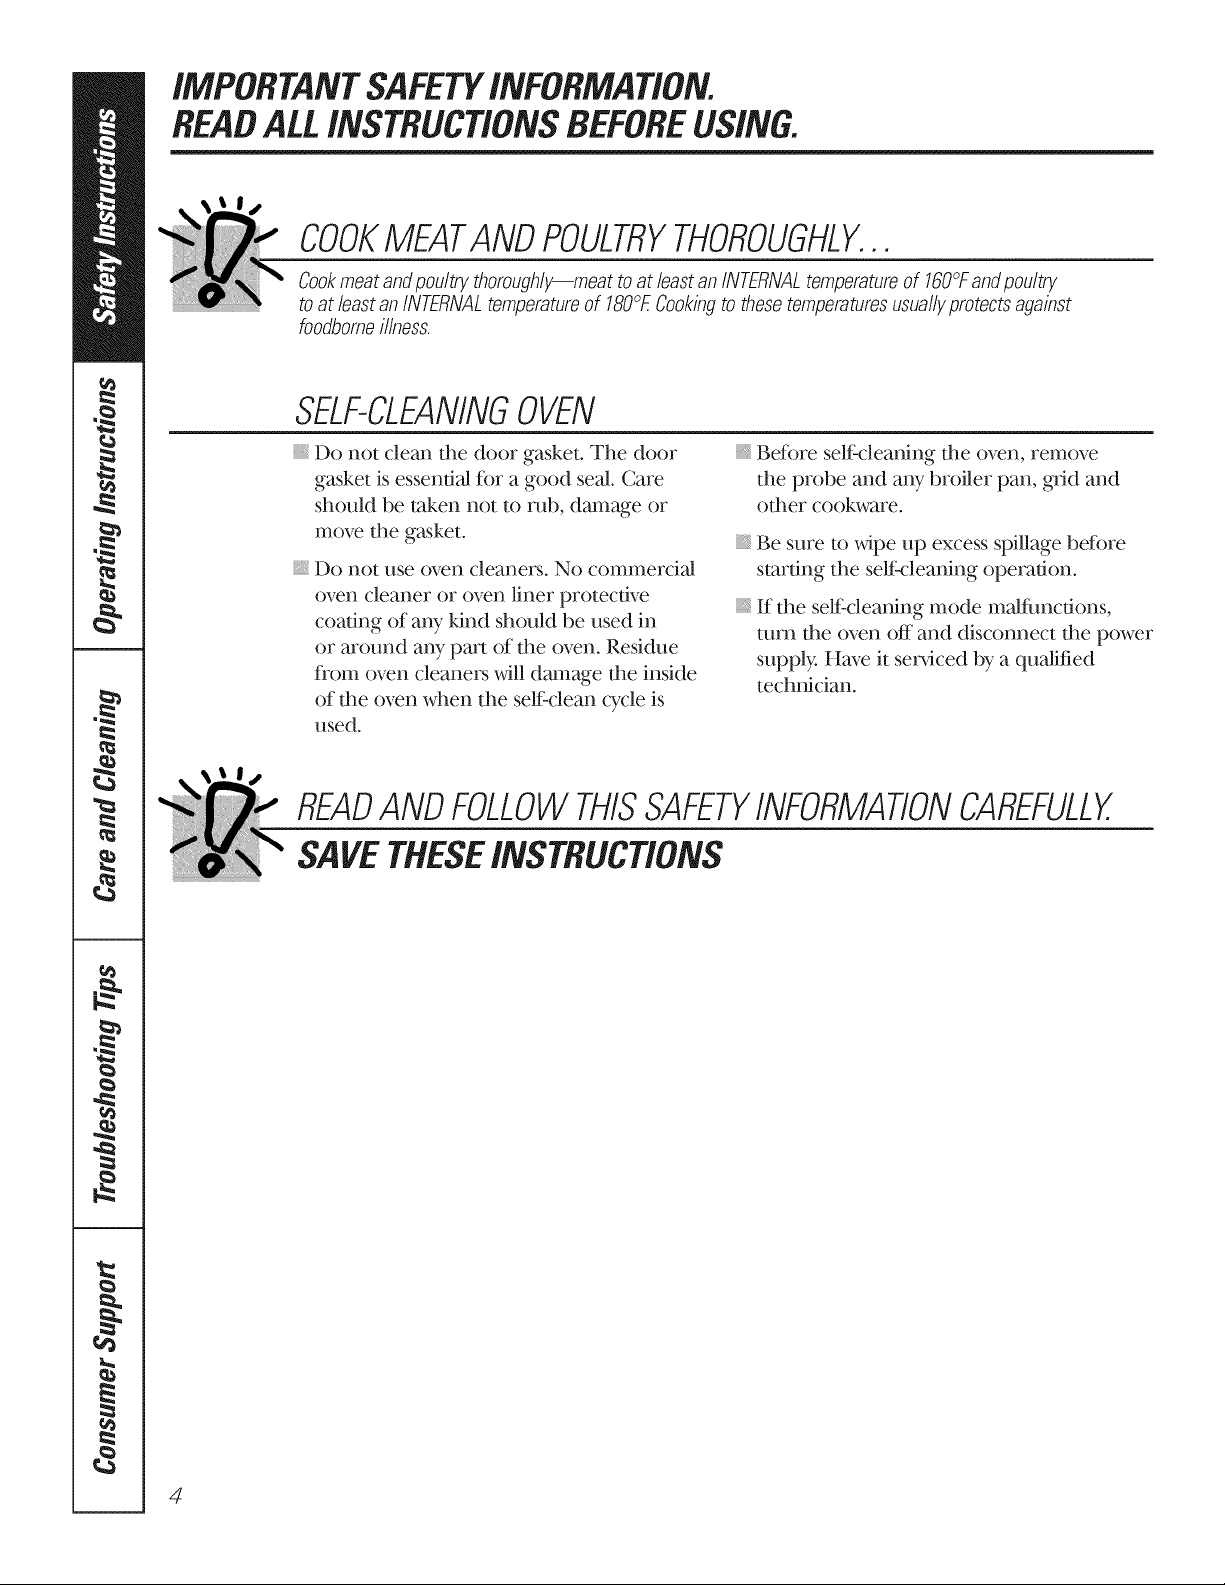
COOKMEATANDPOULTRYTHOROUGHLY...
Cookmeat and poultry thoroughly--meat to at leastan INTERNALtemperatureof 160°Fand poultry
to at least an INTERNALtemperatureof 180°ECookingto these temperaturesusually protectsagainst
foodbomeillness.
SELF-CLEANINGOVEN
_:_Do not clean the door gasket. The door
gasket is essential for a good seal. Care
should be taken not m rob, damage or
move the gasket.
_:_Do not use oven cleaners. No commercial
oven cleaner or oven liner protective
coating of any kind should be used in
or around any part of the oven. Resi&m
flom oven cleaners will damage the inside
of the oven when the self:clean cycle is
used.
}} Before self:cleaning the oven, remove
the probe and any broiler pan, grid and
other cookware.
[} Be sure to wipe up excess spillage before
starting the selfk:leaning operation.
}} If the self:cleaning mode malfimctions,
turn the oven off and disconnect the power
supply. Have it ser_,iced by a qualified
technician.
READANDFOLLOWTHISSAFETYINFORMATIONCAREFULLY.
SAVETHESEINSTRUCTIONS
4
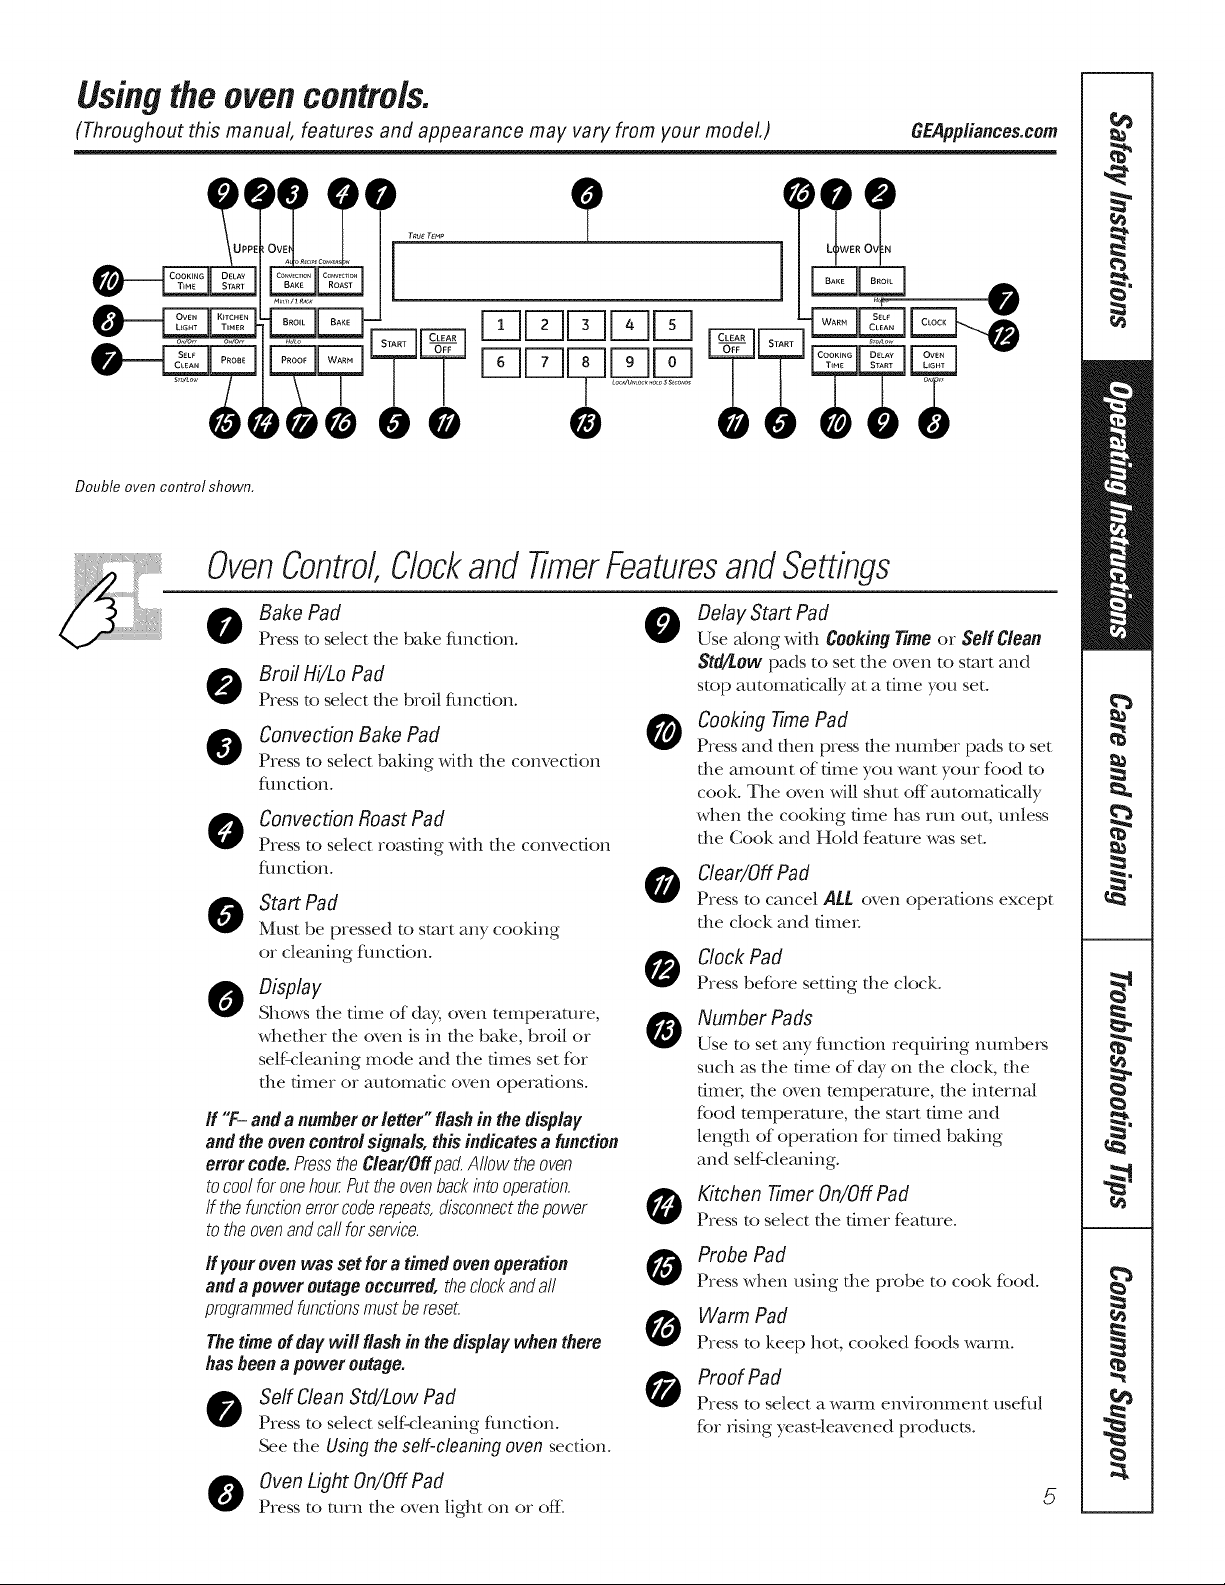
Usingtheovencontrols.
(Throughout this manual, features and appearance may vary from your model,) GEApp/iances.com
" r-qr-qr-qEZ]Fq
Double oven control shown,
OvenControl,Clockand TimerFeaturesand Settings
Bake Pad 0
Press to select die bake fimcdon.
BroilHi/LoPad
Press to select file broil fimcdon.
Convection Bake Pad @
Press to select baking with the convection
flmcfion.
O Convection Roast Pad
Press to select roasting with the convection
flmcdon.
Start Pad
Must be pressed to start any cooking
or cleaning flmcfion.
0 Display
Shows file time of day, oven temperatme,
whefller file oven is in file bake, broil or
selfZcleaning mode and the times set ffw
file timer or automatic oven operations.
If "F- and a numberor letter"flashinthe display
and theeven control signals, thisindicatesa function
errorcode.PresstheC/ear/Offpad,Allow theoven
tocoolforonehourPuttheovenbackintooperation.
If thefunctionerrorcoderepeats,disconnectthepower
to theovenandcarlfor service.
If youroven wasset for a timed ovenoperation
andapower outage occurred, theclockandall
programmedfunctionsmustbe reset.
Thetime of day will flashin the display when there
hasbeena power outage.
Serf Clean Std/Low Pad
Press to select self=cleaning fimcfion.
See the Usingthe self-cleaning oven section.
Delay Start Pad
Use akmg with CookingTimeor Self Clean
Std/Low pads to set the oven to start and
stop automatically at a time you set.
Cooking -time Pad
Press and then press the number pads to set
file amount of time you want your food to
cook. The oven will shut off automatically
when file cooking time has run out, unless
file Cook and Hold feature was set.
0ear/OffPad
Press to cancel ALL oven operations except
the clock and time_:
Clock Pad
Press before setting the clock.
0
0
0
0
0
Number Pads
Use to set any fimcdon requiring numbe_
such as the time of day on the clock, the
fime_; the oven mmperamre, the internal
food temperature, the start time and
length of operation for timed baking
and self cleaning.
Kitchen timer On/Off Pad
Press to select the timer featme.
Probe Pad
Press when using the probe to cook food.
Warm Pad
Press to keep hot, cooked foods warm.
Proof Pad
Press to select a warn1 environment useflfl
for rising yeast-leavened products.
Oven Light On/Off Pad
Press to turn the oven light on or off_
5
Usingtheoven.
Toavoid possible bums
fl
place theracks in the desiredposition before youturn theoven on.
Before you begin,.,
The racks have stop-locks, so that when
placed correctly on die supports, d]ey will
stop before coming completely out, and
will not flit.
When placing and removing cookware,
pull the rack out to the bump on the
rack support.
To remove a rack, pull it toward you, flit
the flont end up and pull it out.
Toreplace, place die end of the rack
(stoi>locks) on the support, flit up
the f]ont and push the rock in.
NOTE"Theovenhas7rackpositions
CAUTlON:Never,lacecooking
utensilsoranyotheritemsontheovenfloorThereis
aheatingelementbeneaththeovenfloorPlacingitems
ontheovenfloormaycausetheoventooverheat,
resultingindamagetotheovenandriskofdamage
orfiretocabinets.
NOTE:A cooling fan may
automatically turn on and off to
cool internal parts, This is normal
and the fan may continue to run
even after the oven is turned off
How to Set the Oven for Baking or Roasting
[_ Press the Bake pad.
[_ Press tlle number pads to set
the desired temperature.
_] Press the Start pad.
Check food for doneness
at minimum flme on recipe.
Cook longer if i]ecessai),:
[_ Press the Clear/Off pad when
cooking is complete.
Rack Position
TypeofFood 27" Oven 30"Oven
Frozenpies Bor C Cor D
(oncookiesheet)
Angelfoodcake A A or B
Bundtor poundcakes A A or B
Biscuits,muffins, Bor C CorU
brownies,cookies,
cupcakes,layer
cakes,pies
Casseroles Bor C Cor D
For27" Ovens: If baking four cake layet_
at the same flme, place two laye,_ on rack
A and two laye_ on rack C.
For30" Ovens: If baldng four cake layet_
at die same flme, place two laye,_ on rack
B and two layers on rack D.
Stagger pans on the rack so one is not
direcdy above the other
Topreheat, set the oven
at the correct temperature, The
control wifl beep when the oven is
preheated and the display wifl show
your set temperature, This may take
approximately 10minutes.
Preheating and Pan Placement
Preheat the oven if die recipe calls for it.
Preheaflng is necessa_y for good results
when baking cakes, cookies, pasu T and
breads.
Baking results will be better if baking
pans are centered in the oven as much
as possible. Pans shoukt not touch each
odler or die walls of the oven. If you
need to use two racks, stagger tlle pans
so one is not directly above the othe_;
and leave approximately 1½" between
pans, fiom the f?ont, back and sides
of the waU.
6
Aluminum Foil
Donot use aluminum foil on the bottom
of the oven
Never entirely cover a rack wid]
aluminum foil. This will disturb the heat
circulaflon and result in poor baking.
A smaller sheet of foil may be used to
catch a spillover by placing it on a lower
rack several inches below the food.
GEApp/iances.com
_2
ii_iiiii
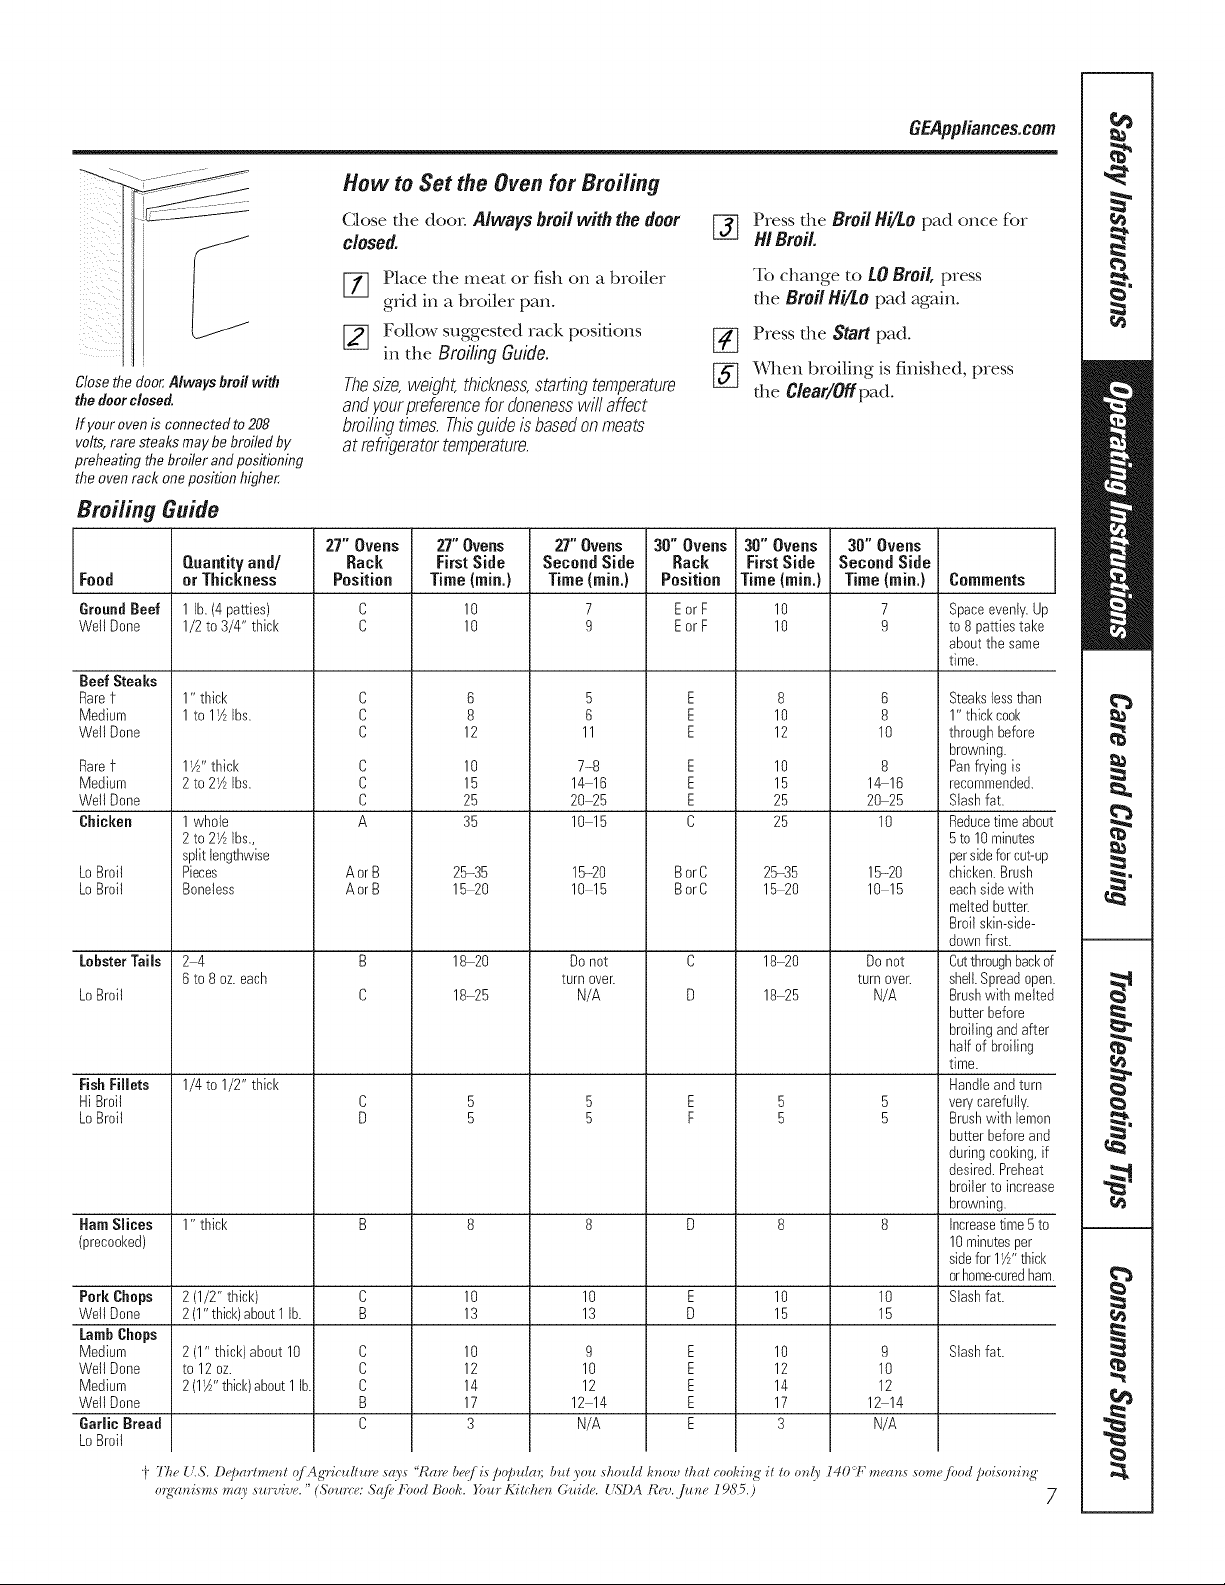
How to Set the Oven for Broiling
Close the doo_: Always broil with the door []
closed.
[77 Place the meat or fish on a broiler
grid in a broiler pan.
[_ Follow suggested rack positions [_
in the Broiling Guide.
Press the Broil Hi/Lo pad once for
MI Broil.
To change to tO Broil, press
the Broil Hi/Lo pad again.
Press the Start pad.
Close the door, Alwaysbroil with
the doorclosed,
If your oven is connected to 208
volts, rare steaks maybe broiled by
preheating the broiler and positioning
the oven rack one position higher,
Broiling Guide
Thesize,weight,thickness,startingtemperature
andyourpreferencefordonenesswill affect
broilingtimes.Thisguideis basedonmeats
at refrigeratortemperature.
[_ When broiling is finished, press
the C/ear/Off pad.
27" Ovens 27" Ovens 27" Ovens 30" Ovens 30" Ovens 30" Ovens
Quantity and/ Rack First Side Second Side Rack First Side Second Side
JFood or Thickness Position Time {rain.) Time{rain.) Position Time{rain.) Time {rain.) Comments
GroundBeef 1 lb.(4 patties) C 10 7 Eor F 10 7 Spaceeveniy.Up
Well Done 1/2 to 3/4" thick C 10 9 Eor F 10 9 to 8 patties take
aboutthe same
time.
Beef Steaks
Rare1-
Medium
Well Done
Rare1-
Medium
Welt Done
Chicken
Lo Broil
Lo Broil
LobsterTails
Lo Broil
FishFillets
Hi Broil
Lo Broil
1" thick
1 to lY2 Ibs.
11A"thick
2 to 2_AIbs.
1 whole
2 to 21AIbs.,
splitlengthwise
Pieces
Boneless
24
6 to 8 oz. each
1/4 to 1/2" thick
C
C
C
C
C
C
A
AorB
AorB
B
C
6
8
12
10
15
25
35
25-35
15 20
18-20
18-25
5
6
11
7-8
14 16
20q5
10 15
15-20
10 15
Do not
turn over.
N/A
E
E
E
E
E
E
C
BorC
BorC
C
U
8
10
12
10
15
25
25
25-35
15 20
18-20
18-25
6
8
10
8
1_16
20 25
10
15-20
10 15
Do not
turn over.
N/A
Ham Slices 1" thick B 8 8 D 8 8
(precooked)
Pork Chops 2 (1/2" thick) C 10 10 E 10 10
Well Done 2 (l" thicl<)about1 lb. B 13 13 D 15 15
Lamb Chops
Medium 2 (1" thick)about 10 C 10 9 E 10 9 Slashfat.
Well Done to 12 oz. C 12 10 E 12 10
Medium 2 (I_A"thicl<)about1 lb. C 14 12 E 14 12
Welt Done B 17 12 14 E 17 12 14
Garlic Bread C 3 N/A E 3 N/A
Lo Broil
Steakstessthan
1" thickcool<
throughbefore
browning.
Panfrying is
recommended.
Slashfat.
Reducetime abou
5 to 10minutes
persidefor cut-up
chicken.Brush
eachside with
melted butter.
Broil skin-side-
down first.
Cutthroughbacko
shell.Spreadoper
Brushwith melte_
butter before
broiling andafter
half of broiling
time.
Handleand turn
verycarefully.
Brushwith lemon
butter before and
duringcooking,if
desired.Preheat
broilerto increaa
browning.
Increasetime 5 to
10 minutesper
sidefor 1_" thick
orhome-curedhat
Slashfat.
')" 77_e U.S'. l)e/)arh_*etzl qf Agric*_fl*m, sa2s "Rat(, be([. is/)o/)_da); b_d .Y(m sko*_ld ktww lkal cookitzg il 1o otzl)_ 140 7; meatzs..... some flood/)oiwtzitzg',
o_g'atzisms ma), s_vive." (5"omre: Sqfb Food Book. Yore Kiick etz (;_dde. US"t)A t_ev../_tze 19(95.) 7

Usingthe clock, timer and controllockout.
..... To Set the Clock
Tiledock..,s_bese__odieco,,ec_
time of day for tile autonm0c oven timing
flmc0ons to work properly: Tile 0me of
Make sure the clock is set day cannot be changed during a timed
to the correct time of flag, baldng or self cleaning cycle.
[77 Press tile Clockpad.
[_] Press tile number pads.
_] Press tile Start pad.
i _i_i__iiii!_ _il_i_i_ii_!_i iiiiiii_i_
ON/OFF
The timer/s a minute timer only.
The timer does not control oven
operations, The maximum setting on
the timer is 9 hours and 59 minutes.
To Set the Timer
%
[]
Press tile KitchenTimerOn/Offpad.
Press die number pads unO1 die
_t[nount of tiIne }_OL, want sho_,vs
in tile display. For example, to set
2 ]louis and 45 minums, press 2, 4
and 5 in that order If you mal<e
a mistake, press the Kitchen Timer
0n/0ff pad and begin again.
_] Press tile Startpad.
AfterpressingtheStartpad,SETdisappears,
thistellsyouthetimeis countingdown,although
thedisplaydoesnotchangeuntil oneminutehas
passed.Secondswifl notbeshownin thedisplay
until thelastminuteis countingdown.
[_ When tile 0Iiler reaches :00,
tile control will beep 3 dines
followed t)y one beep eve_ T
6 seconds unOl tile Kitchen
timer On/Off pad is pressed.
Tile 6-second tone can be canceled by
following die steps in die Special features
of your oven control secdon under Tones
at the End of a -timed Cycle.
To Reset the Timer
If die display is still showing die time
remaining, you may change it by pressing
the KitchenTimerOn/Offpad, then press
the nmnber pads unO1the dine you
want appears in tile display.
If die remaining time is not in die display
(clock, delay start or cooldng time are in
tile display), recall tile remaining time by
pressing tile Kitchen Timer On/Off pad and
then pressing tile number pads to enmr
tile new time you want.
To Cancel the Timer
Press Kitchen timer On/Off pad twice.
_-]:i ii
LOCK/UNLOCK HOLD 3 SECONDS
8
Control Lockout
Yourcontrolwill allowyoutolockoutthe touch
padsso theycannotbe activatedwhenpressed.
NOTE:Ondoubleovenmodels,thisactivates
thisfeatureforbothovens.
To lock/unlock tile controls:
[77 Press tile 9 and 0 pads at tile same
time for 3 seconds, un01 tile display
shows LOC ON.
To unlock tile control, press tile 9
and 0pads at tile same time for
3 seconds, unO1tile display shows
LOCOFF.
When dlis featme is on and die touch
pads are pressed, die conUol will beep
and the display will show LOCON.
NOTES:
Thecontre/lockoutmodeaffectsall touch
pads.No touchpadswifl workwhenthis
featureis activated
_,Theadjustmentwill be retainedinmemory
afterapowerfailure.
Usingthe timed baking and masting features, somemo /sjCEApp,ance .com
On double oven models, you can use timed baking in one oven while using self-clean in the other; you can also use
timed baking in both ovens at the same time,
NOTE:Foods that spoil easily--such as milk, eggs, fish, stuffings, poultry and pork--should not be aflowed to sit for
more than I hour before or after cooking. Room temperature promotes the growth of harmful bacteria, Be sure that
the oven light is off because heat from the bulb will speed harmful bacteria growth,
i i iii ii
ii TJDF;q !I
i i i i
iiiTJDDDFq £
_ F _ii_ _i _ _:_!i i_i__i_i_
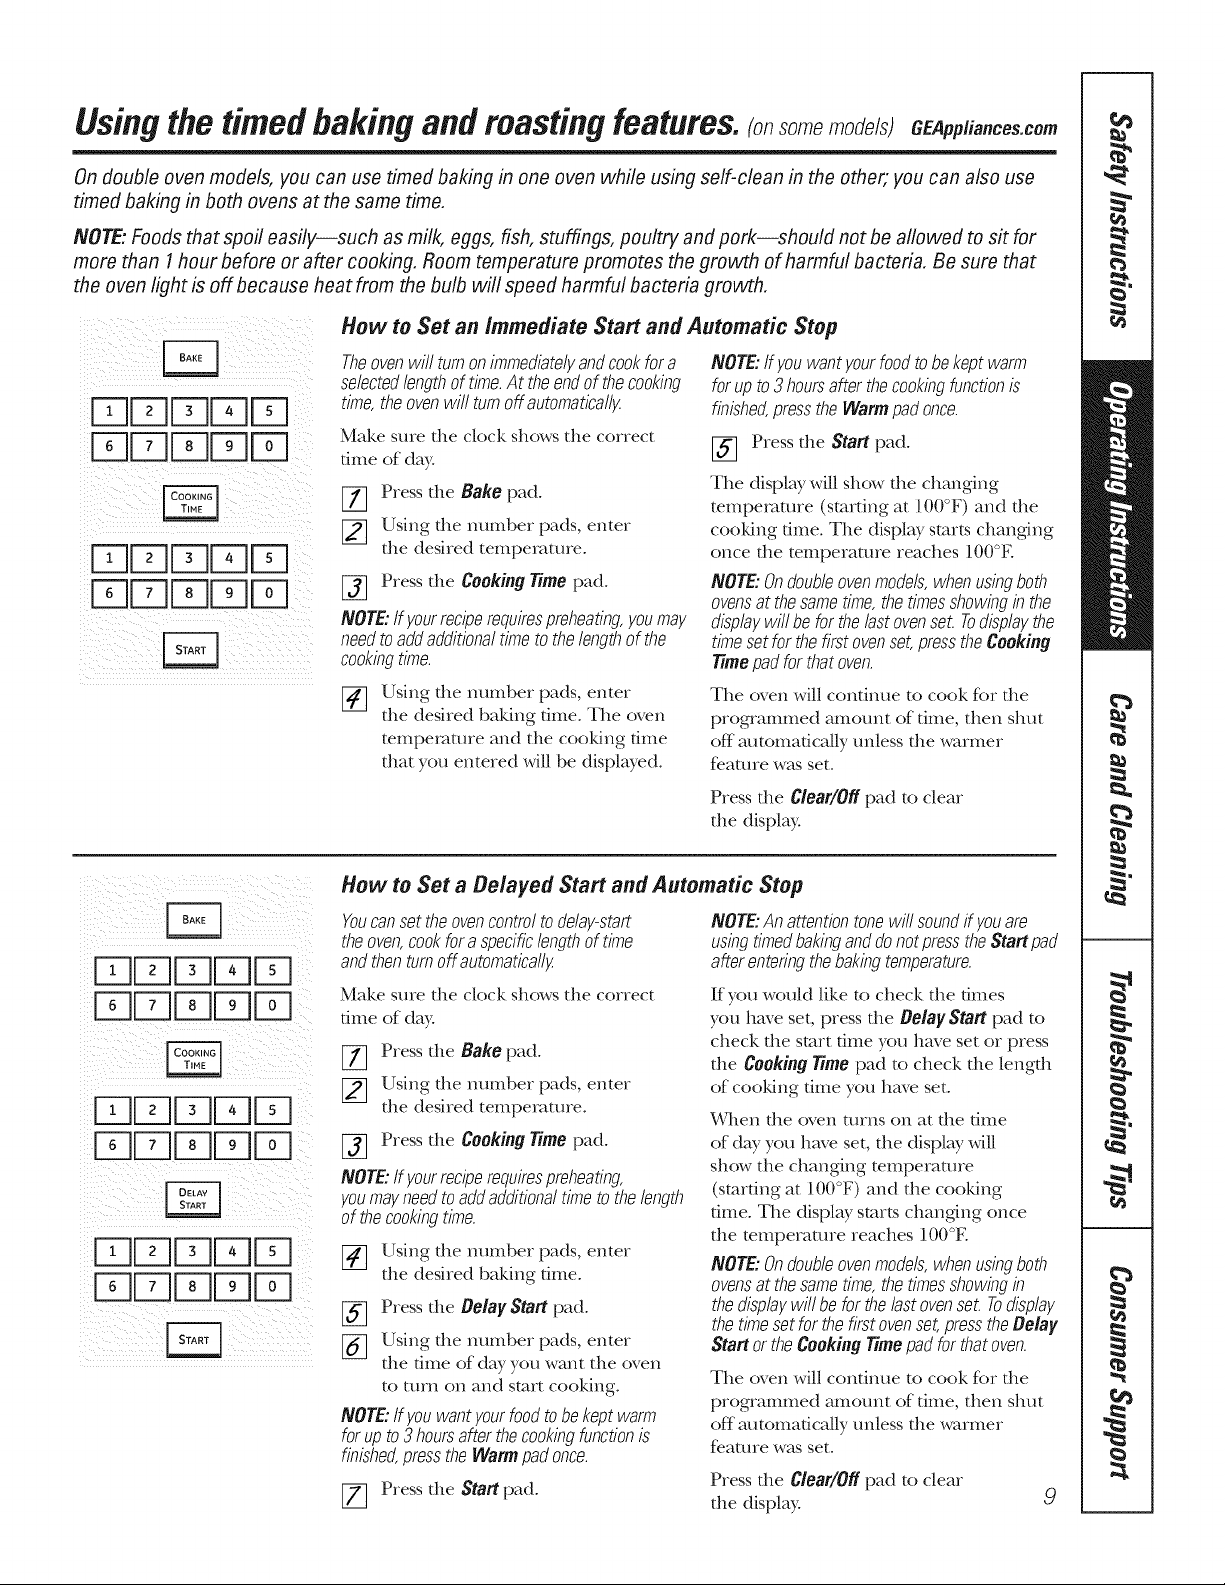
How to Set an immediate Start and Automatic Stop
Theovenwill turnon immediatelyandcookfora
selectedlengthof time.At theendof thecooking
time,theovenwill turnoff automaticall#
Make sure file clock shows the correct
time of day.
[-_ Press the Bake pad.
[_ Using the number pads, enter
the desired temperature.
[_ Press the CookingTime pad.
NOTE:If yourreciperequirespreheating,youmay
needtoaddadditionaltimeto thelengthof the
cookingtime.
FT1
Using the number pads, enter
the desired baking dine. The oven
temperature and the cooMng time
that you entered will be displayed.
NOTE:ff youwantyourfoodtobe keptwarm
for up to3 hoursafterthecookingfunctionis
finished,pressthe Warmpadonce.
[_ Press the Start pad.
The display will show the changing
mmperamre (stuffing at 100°F) and the
cooMng time. The display starts changing
once the temperature reaches 100°E
NOTE:Ondoubleovenmodels,whenusingboth
ovensat thesametime,thetimesshowingin the
displaywill befor thelastovensol Todisplaythe
timesetfor thefirst ovenset,presstheCooking
Timepadfor thatoven.
The oven will condnue to cook fbr file
progqammed amount of time, then shut
off automatically unless the warmer
fe.ature was set.
Press the Clear/Offpad to clear
the display.
_iii)!_ii!_iI _ _ !i_iii_i__!_
!i(5 ii!iliii[-27-]?iiiiii/iiiilli;
How to Set a Delayed Start and Automatic Stop
Youcansettheovencontroltodelay-start
theoven,cookfora specificlengthof time
andthenturnoffautomaticall;_
NOTE:Anattentiontonewill soundif youare
usingtimedbakinganddonotpresstheStart pad
afterenteringthebakingtemperature.
Make sure the clock shows the correct
time of day.
[_ Press the Bake pad.
[_ Using the number pads, enter
the desired temperature.
[-_ Press the CookingTime pad.
NOTE:If Fourreciperequirespreheating,
youmayneedto addadditionaltimeto thelength
of thecookingtime.
[_] Using the number pads, enter
the desired baking time.
[_ Press the Belay Start pad.
[_ Using the number pads, enter
the time of day you want the oven
to mrn on and start cooking.
NOTE:If youwantyourfoodtobe keptwarm
for up to3 hoursafterthecookingfunctionis
finished,pressthe Warmpadonce.
If you would like 1o check file dines
you have set, press file Be/ayStart pad to
check the start time you have set or press
the Cooking Timepad to check tlle length
of cooldng time you have set.
When the oven anns on at the time
of dW you have set, the displ W will
show the changing mmperamre
(stuffing at 100°F) and the cooking
time. The displ W starts changing once
the mmperamre reaches 100°E
NOTE:Ondoubleovenmodels,whenusingboth
ovensat thesametime,thetimesshowingin
thedisplaywill be for thelastovensol Todisplay
the timesetfor thefirst ovenset,presstheBelay
Start or theCooking Timepad for thatoven.
The oven will condnue to cook fbr file
programmed amount of time, then shut
off automatically unless the warmer
feature was set.
Press the Clear/Offpad to clear
the display.
[77 Press the Startpad. 9
Usingthe probe.
For many foods, especially roasts and poultry, internal food temperature is the best test for aloneness.
The temperature probe takes the guesswork out of roasting by cooking foods to the exact doneness you want.
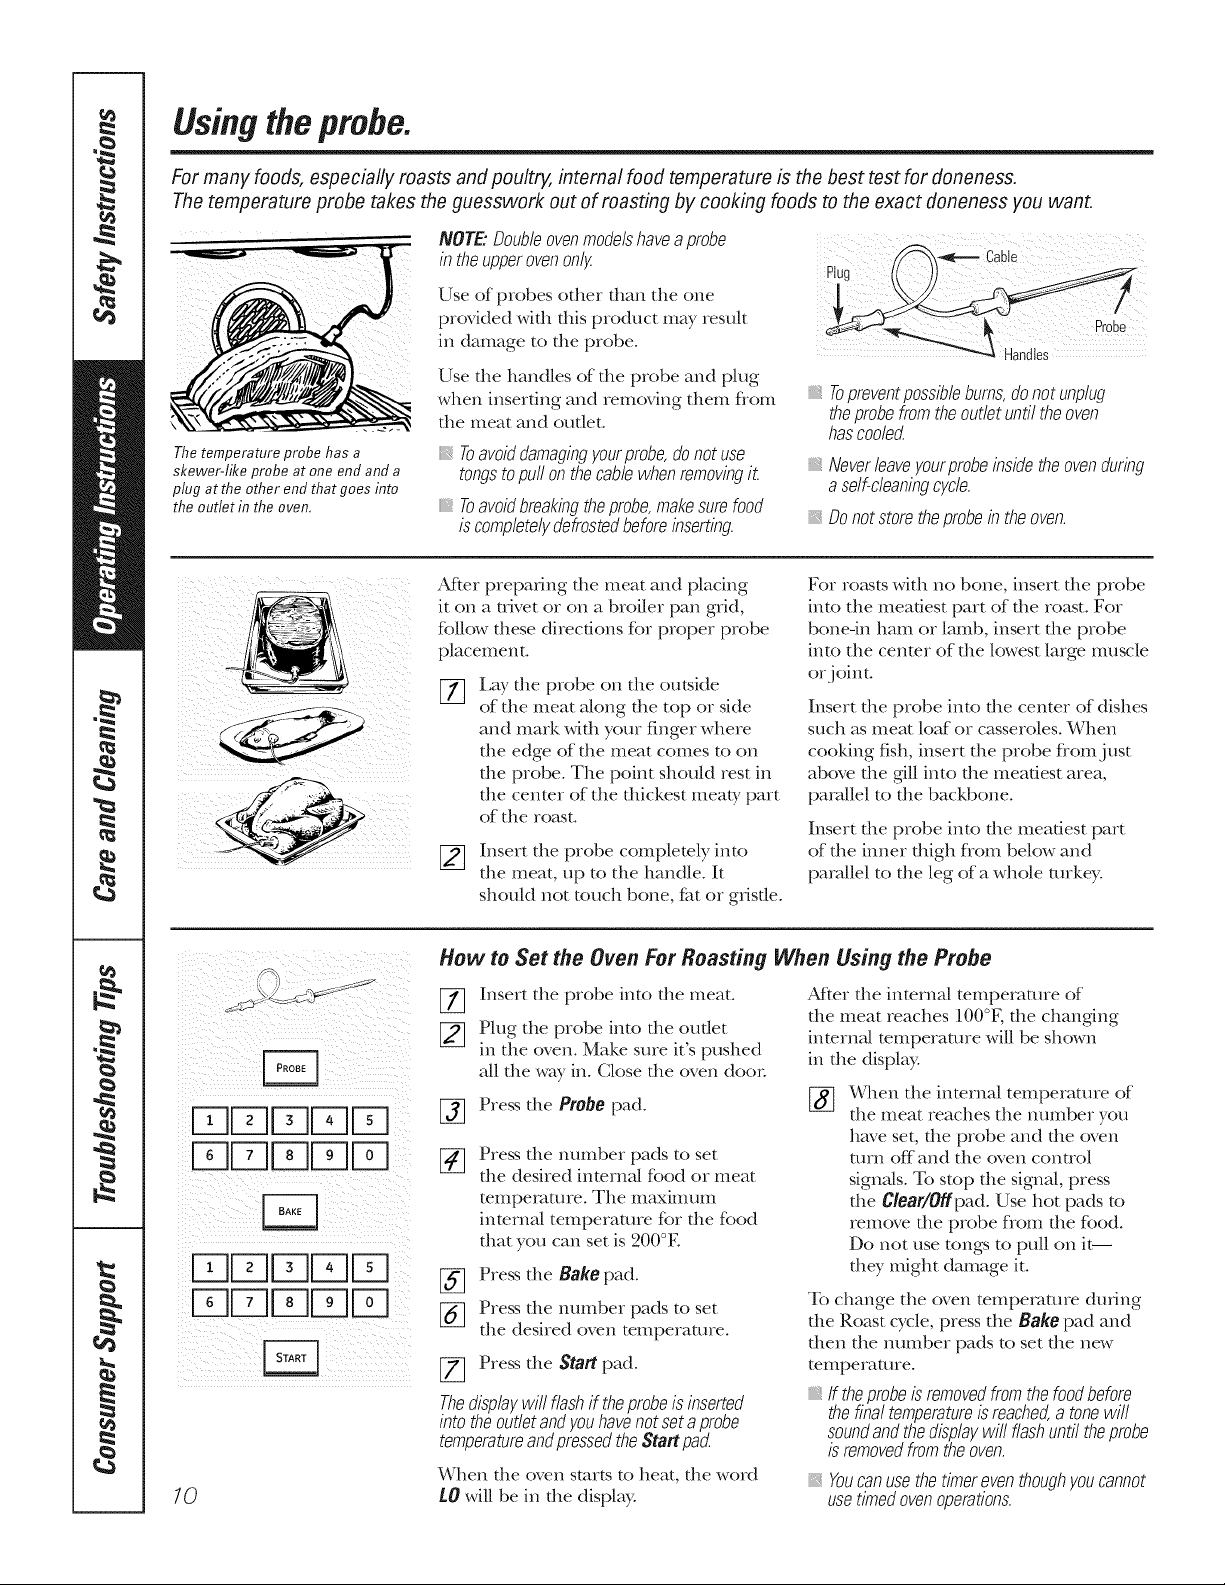
The temperature probe has a
skewer-like probe at one end and a
plug at the other end that goes into
the outlet in the oven,
NOTE."Double ovenmodels havea probe
in the upper ovenonly
Use of probes other than the one
provided with this product may result
in damage to the probe.
Use the handles of the probe and plug
when inserting and removing them flom
the meat and outlet°
Toavoiddamagingyourprobe,donot use
tongstopull on thecablewhenremovingit
Toavoidbreakingtheprobe,makesurefood
is completelydefrostedbeforeinserting.
Cable
Plug (())
_,Topreventpossiblebums,donot unplug
theprobefromtheoutletuntiltheoven
hascoole_
Neverleaveyourprobeinsidetheovenduring
aself-cleaningcycle.
Donot store the probe in the oven.
After preparing file meat and placing
it on a uJvet or on a broiler pan grid,
follow these directions for proper probe
placement°
Lay the probe on the outside
of the meat along the top or side
and mark with your finger where
the edge of the meat comes to on
the probe° The point should rest in
the center of the thickest meaty part
of the roast.
_] Insert the probe completely into
the meat, up to the handle° It
should not touch bone, f_t or gristle°
For ro_ksts with no bone, insert file probe
into the meatiest part of the roast. For
bone-in ham or lamb, insert the probe
into the cenmr of the lowest large muscle
or joint.
Insert file probe into file center of dishes
such as meat loaf or casseroles° When
cooking fish, insert the probe fiom just
above the gill into the meatiest area,
parallel to the backbone.
Insert the probe into the meatiest part
of the inner thigh fiom below and
parallel to the leg of a whole turkey.
How to Set the Oven For Roasting When Using the Probe
%
ii_ _ii i I _i_I _ _ iiii_i i _
i i/i ii !iiiii i ! ii(ii
10
Insert the probe into the meat.
Plug the probe into the outlet
in the oven. Make sme it's pushed
all the way in. Close the oven door
Press the Probe pad.
Press the number pads to set
the desired internal food or meat
mmpemmre. The maximum
inmrnN temperature for the food
that you can set is 200°E
Press the Bake pad.
Press the number pads to set
the desired oven temperature.
Press the Start pad.
Thedisplaywill flashif theprobeis inserted
into theoutletandyouhavenotsetaprobe
temperatureandpressedtheStartpact
When the oven starts to ]teat, the word
LO will be in the display.
After file internM temperature of
file meat reaches 100°K die changing
inmrna/temperature will be shown
in the display.
[_ ¼,qlen the internal temperature of
the meat reaches the mm_ber you
have set, the probe and the oven
turn off and the oven control
signals. To stop the signal, press
the Clear/Offpad. Use hot pads to
remove the probe fiom the food.
Do not use tongs to pull on it--
they might damage it.
To change the oven temperature during
file Roast cycle, press the Bake pad and
then the number pads to set the new
temperature.
If theprobeisremovedfrom thefoodbefore
thefinal temperatureisreached,a tonewill
soundandthedisplaywill flashuntiltheprobe
is removedfromtheoven.
Youcanusethetimereventhoughyoucannot
usetimedovenoperations.
Usingtheproofingandwarming features. CEApplia,ces.com
The proofing feature maintains a warm environment useful for rising yeast-leavened products,
(Available in the upper oven only.)
PROOF
KITCHEN
TIMER
ON/OFF
How to Set the Oven for Proofing
[_] Place the covered dough in the oven
on rack g or C.
NOTE:Forbestresults,coverthedoughwith
a clothor with groasedp/asticwrap(theplastic
mayneedto be anchoredunderneaththe
containerso theovenfanwill notblowit off).
[_ Press the Proof pad _vice.
The display will read PrF (proof)°
The oven inwdor light turns on
and remains on during proofing.
The proofing feature automatically
provides the opdmum temperatme for
the proofing process, and therefore does
not have a temperature adjustment.
[_] When proofing is finished, press
the Clear/Offpad.
Toavoidloweringtheoventemperature
andlengtheningproofingtime,donot
opentheovendoorunnecessarily.
Checkbroadproductsearlytoavoid
over-proofing.
NOTE:
Donot usetheproofingmodefor warming
foodorkeepingfoodhot Theproofingoven
temperatureis nothotenoughto holdfoods
at safetemperaturos.Usethe Warmfeature
to keephot foodwarm.
Proofingwi//notoperatewhenovenis above
125°£"HOT"will showin thedispla;_
[_[] Set the Kitchen 77met fbr
the minimum proof dme.
WARM
How to Set the Oven for Warming
The warm feature keeps cooked foods
warn1 for up to ,1 hou>'s after a timed
fimction is finished, or warm can be
activated to keep hot, cooked foods
wamL This feature is not designed
to reheat cold food.
To use this feature, press the Warmpad
once and then the Startpad.
To activate this feature for use after
Timed galdng or Roasting, press
the Warmpad while programming
the oven and before pressing Start.
ToCrispStale Items
} Place food in low-sided dishes or pans.
}i,For best results, place the food items
in a single layer Do not stuck.
} Leave them uncovered.
Check crispness after 20-30 minutes.
Add time as needed.
IMPORTANTNOTES:
iii}iil;ii:_
iii}i}}ii_
Foodshouldbekepthot in its cookingcontainer
ortransferredtoaheat-safeservingdish.
Formoistfoods,coverthemwith an oven-safe
lidoraluminumfoil.
Friedorcrispfoodsdonot needto becovered,
but canbecometoodryif warmedfortoolong.
Repeatedopeningof thedoorallows thehot
air toescapeandthefoodtocool.
Allow extratimeforthe temperatureinside
theovento stabilizeafter addingitems.
Withlargeloadsit maybenecessaryto cover
someof thecookedfooditems.
Removeserving spoons,etc., before placing
containers in the oven.
Donot useplasticcontainers,lidsorplastic
wrap.
CAUTION:Plasticcontainers,
lidsorplasticwrapwill meltif placodin theoven.
Meltedplasticmaynotberemovableandis not
coveredunderyourwarrant;_
11
Usingtheconvectionoven.
Convection Bake
NOTE."Theconvectionfanwill cycleonandoff
whilecookingtobestdistributehotairin
theoven.
Theconvectionovenfanshutsoff whentheoven
dooris opene_DONOTleavethedooropenfor
longperiodsof timewhileusingconvection
cookingoryoumayshortenthefifeof the
convectionheatingelement
in a convectionoven,a fan circulateshot air
over,underandaroundthe food.
Thiscirculatinghot air is evenlydistributed
throughoutthe ovencavit# As a result,foods
areevenlycookedandbrowne_often in less
time with convectionheal
Idealforevenlybrownedbakedfoodscooked
onmultipleracks.
Goodfor largequantitiesof bakedfoods.
Goodresultswithcookies,biscuits,muffins,
brownies,cupcakes,creampuffs,sweetmils,
angelfoodcakeandbrea_
Tile convection lira circulates the heated
air evenly over and around tile food.
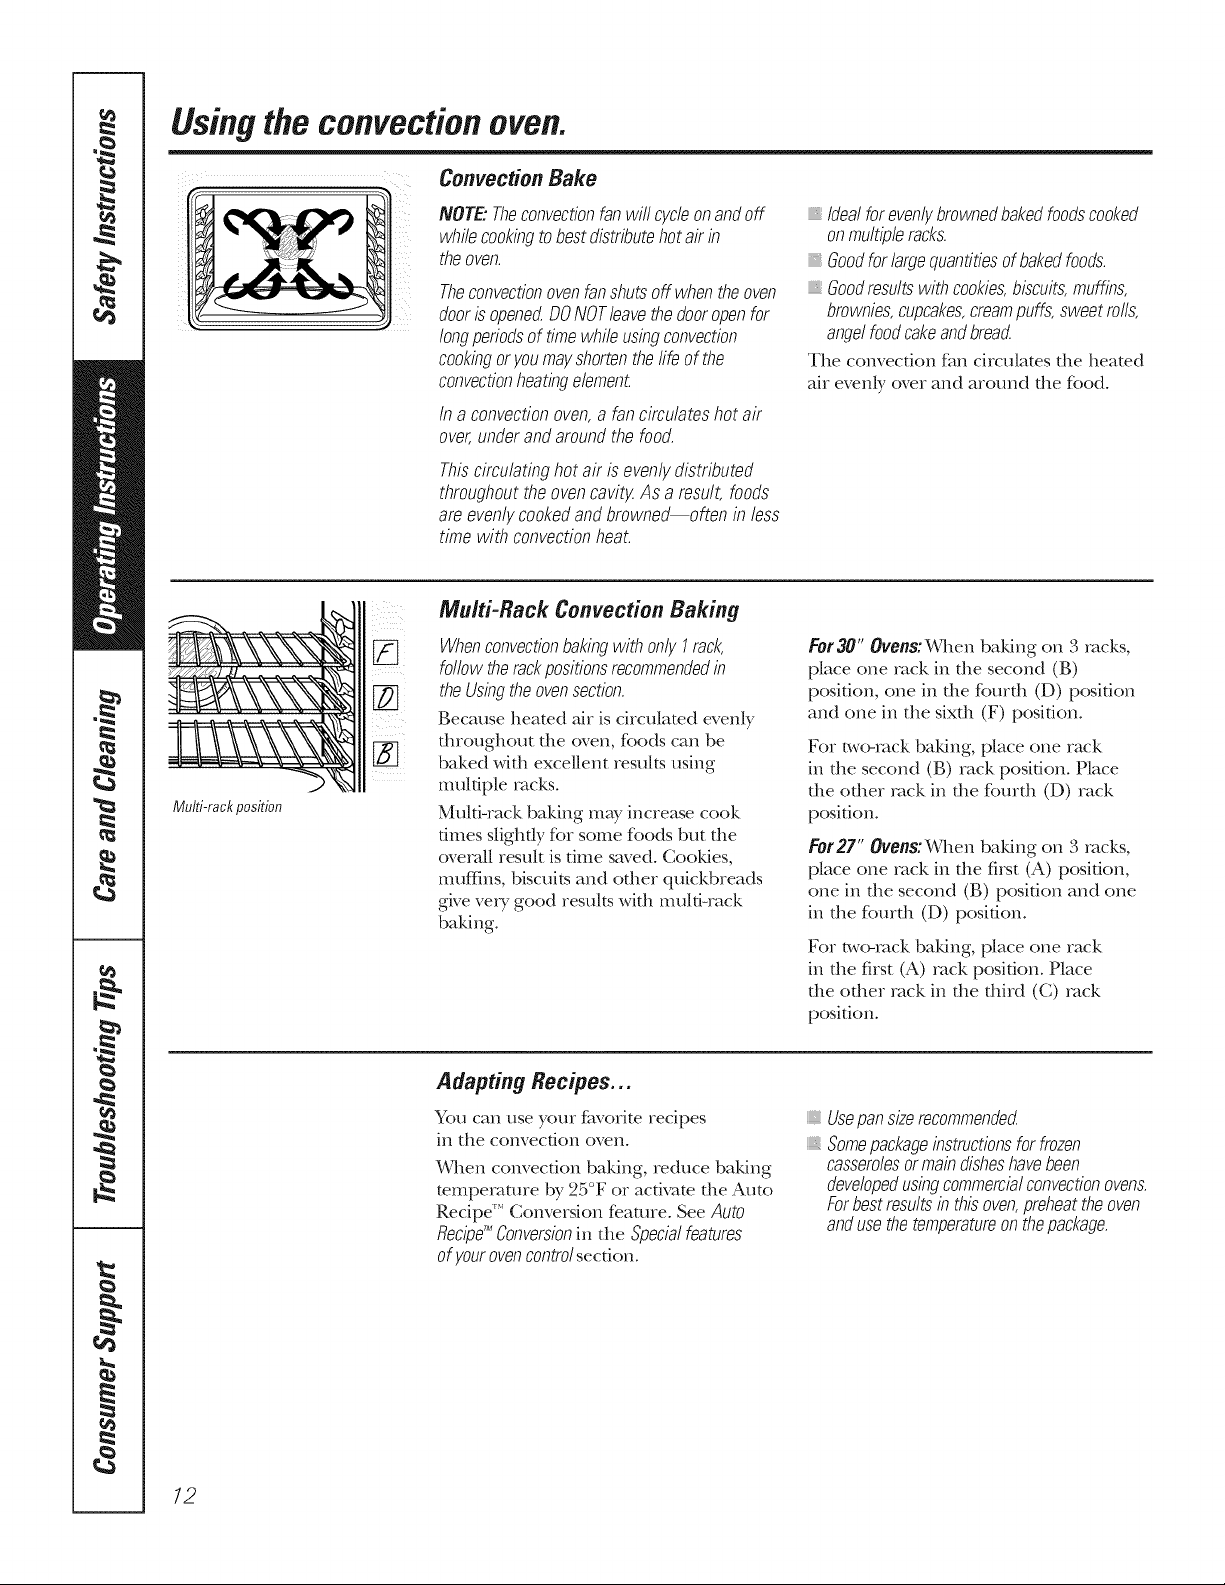
Multi-rackposition
Multi-Rack Convection Baking
[] Whenconvectionbakingwith only I rack,
followtherackpositionsrecommendedin
[_ theUsingtheovensection.
Because heated air is circulated evenly
throughout tile oven, foods can be
baked with excellent results using
multiple racks.
Multi-rack baking may increase cook
times slighdy for some foods but the
overall result is firne saved. CooMes,
IIlttf_ins, biscuits and other quickbreads
gNe vetT good results with multi-rack
baking.
Eer30" Ovens:When baldng on 3 racks,
place one rack in tile second (B)
position, one in tile fourth (D) position
and one in tile sixth (F) position.
For two-tack baking, place one rack
in die second (B) rack position. Place
tile other tack in tile fourth (D) tack
position.
For27" Ovens: When baking on 3 tacks,
place one rack in the first (A) position,
one in the second (B) position and one
in the fourth (D) position.
For two-tack baldng, place one rack
in the first (A) tack position. Place
the adler tack in the third (C) tack
position.
Adapting Recipes...
You can use your f_worite recipes
in tile convection oven.
When convection baking, reduce baking
mmpetaatre by 25°F or acdvam tile Auto
Recipe _'' Conversion feaatre. See Auto
Recipg_ Conversionin tlle Specialfeatures
of your ovencontrol section.
Usepansizemcommende_
Somepackageinstructionsfor frozen
casserolesormaindisheshavebeen
developedusingcommercialconvectionovens.
Forbestresultsinthisoven,preheattheoven
andusethetemperatureonthepackage.
12
GEPpp/iances.com
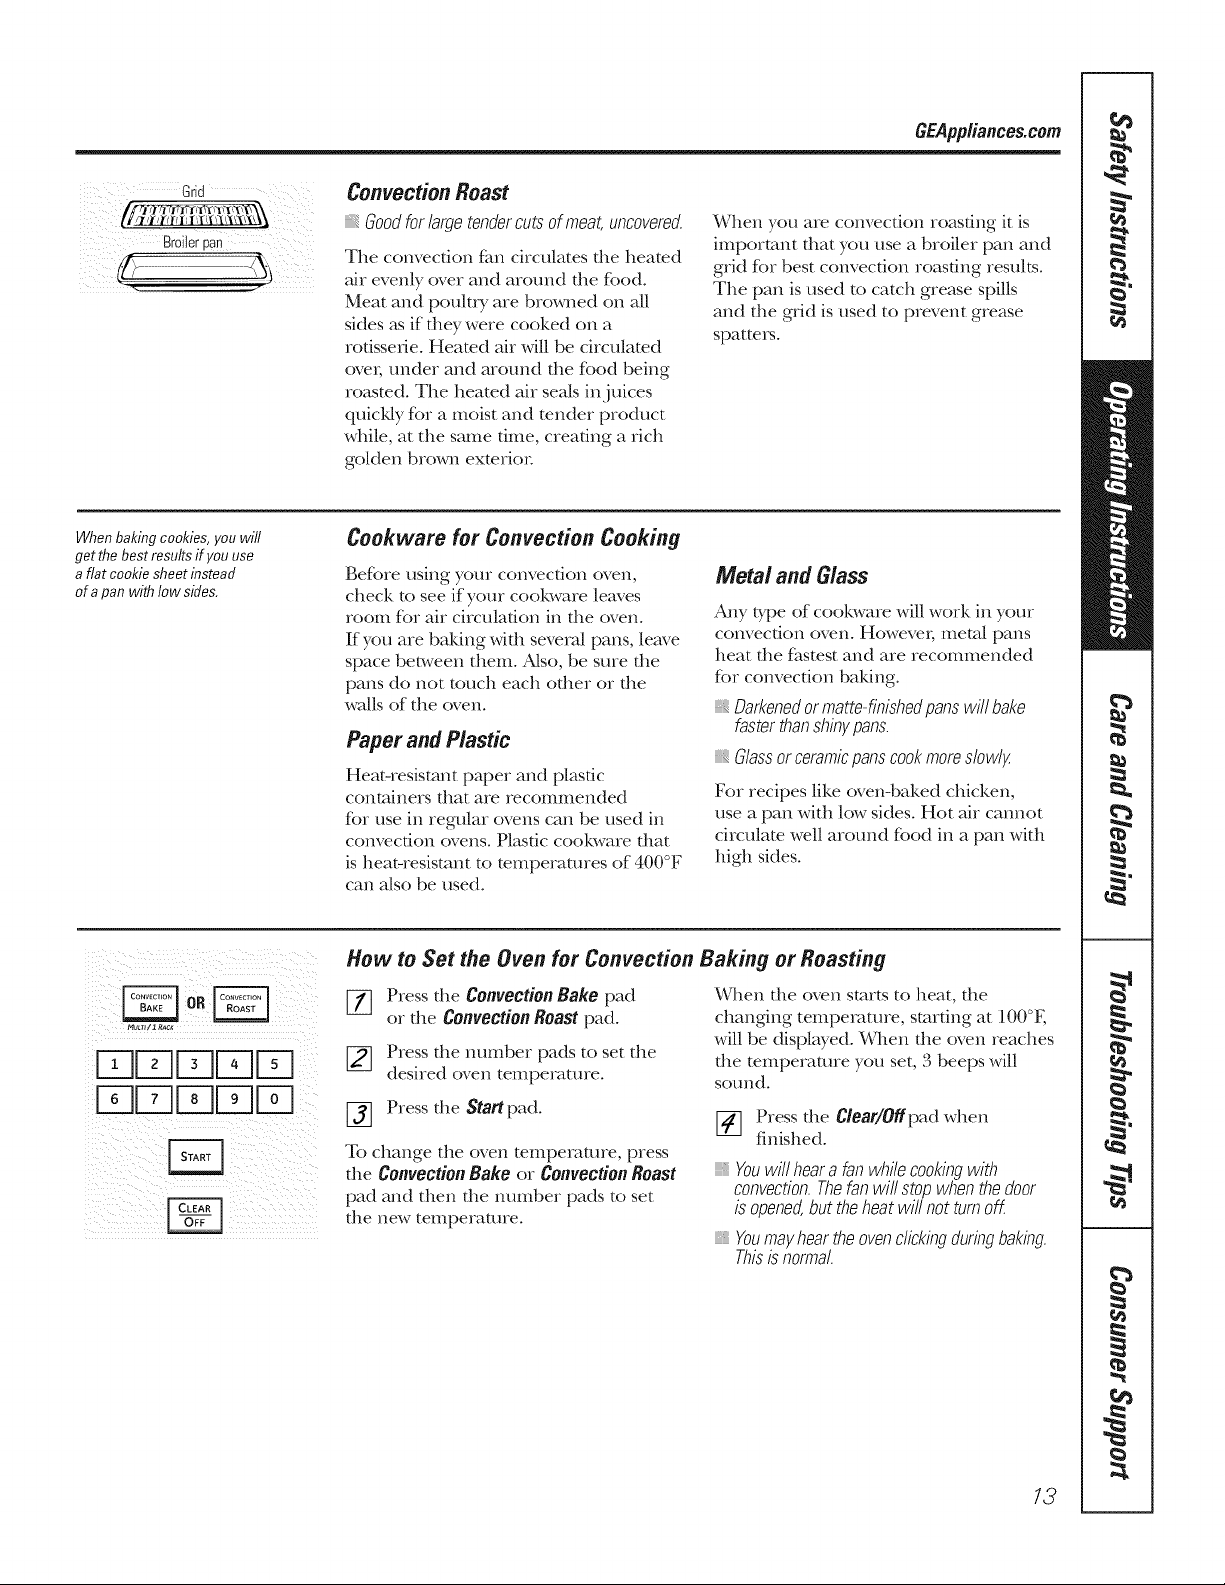
Grid
Convection Roast
Goodfor largetendercutsofmeat,uncovered.
The convection tim circulates die heated
ah evenly over and around file food.
Meat and poultry are browned on all
sides _ksif they were cooked on a
rotisserie. Heated ah will be circulamd
ovei, under and around the food being
roasmd. The heated ah seals inj uices
quicMy for a moist and milder product
while, at the same time, creating a rich
golden brown exmrior
When you are convection roasting it is
important that you use a broiler pail and
grid for best convection roasting results.
The pan is used to catch grease spills
and the grid is used to prevent grease
spatteIs.
Whenbaking cookies, you will
get the best results ff you use
a flat cookie sheet instead
of a pan with low sides.
Cookware for Convection Cooking
Before using your convection oven,
check to see if your cool<ware leaves
room for ah ciIvulafion in the oven.
If you are baking with several pans, leave
space bel_,veen them. Also, be sure the
pans do not touch each other or the
walls of the oven.
Paper and Plastic
Heat-resistant paper and plastic
containers dlat are recommended
for use in regular ovens can be used in
convection ovens. Plasdc cool<ware that
is heat-resistant to mmperatures of 400°F
can a/so be used.
Metal and Glass
Any tTpe of cool<ware will work in your
convection oven. Howevei; Illeta[ pails
heat the fitstest and are recommended
for convection baking.
Darkenedormatte-finishedpanswill bake
fasterthanshinypans.
glassorceramicpanscookmoreslowl;_
For recipes like oven-baked chicken,
use a pan with low sides. Hot ah cannot
ciIvulate well around food in a pail with
high sides.
FqDDr-qD
Dr-qDDD
How to Set the Oven for Convection Baking or Roasting
[_] Press the Convection Bake pad
or the Convection Roast pad.
[_ Press the number pads to set the
desired oven temperature.
[_] Press the Start pad.
To change the oven temperature, press
the Convection Bake or Convection Roast
pad and then the immber pads to set
the new temperature.
When die oven starts to beat, die
changing temperature, smrdng at 100°K
will be displayed. _&,qlenthe oven reaches
the mmperamre you set, 3 beeps will
sound.
_-] Press the Clear/Offpad when
finished.
Youwill hearafan whilecookingwith
convection.Thefanwill stopwhenthedoor
is opened,but theheatwill not turnoff
Youmayheartheovenclickingduringbaking.
Thisis normal.
13
Usingtheconvectionoven.
for best results when masting large
turkeys and masts, we recommend
using the probe included in the
convection oven.
ULdUUf-q
L I, II U]Fq
LdLdULdf-q
b6JL,I [Z]Fq
To change the oven temperature
during the Convection Roast cycle,
press the Convection Roast pad
and then press the number pads
to set the new desired temperature.
14
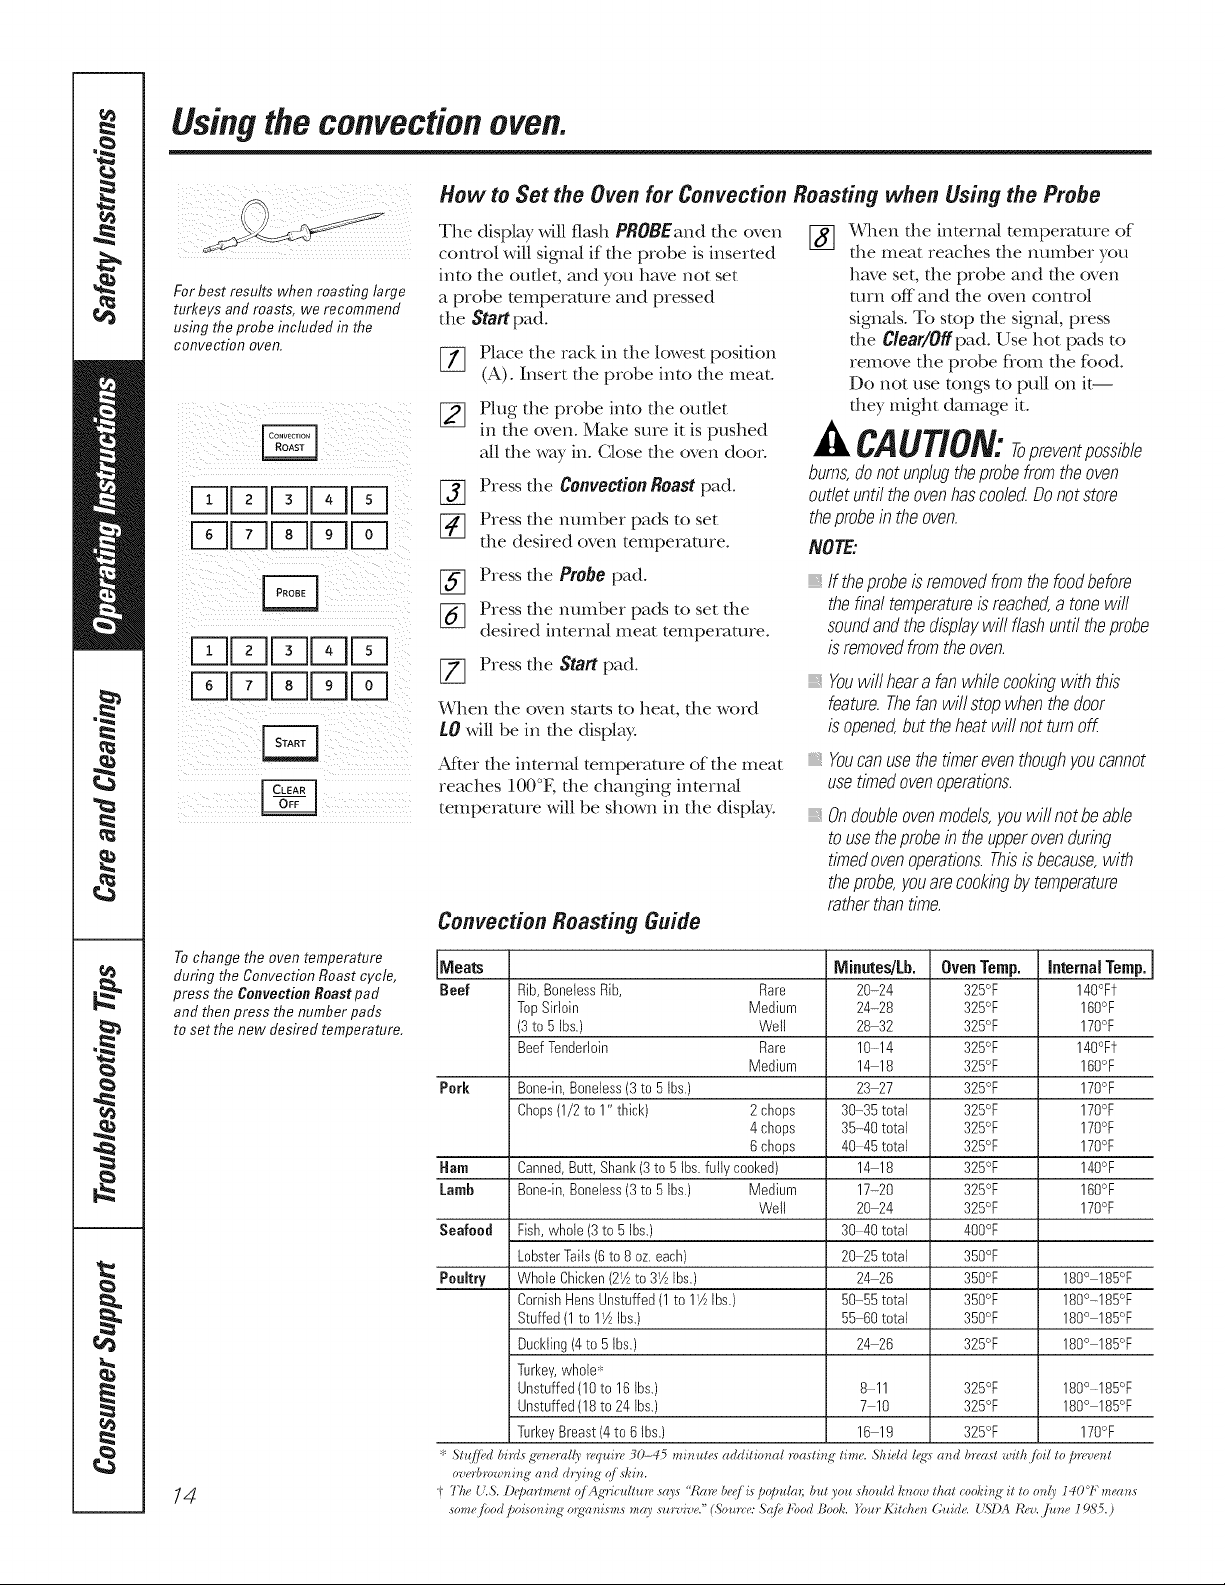
How to Set the Oven for Convection Roasting when Using the Probe
The display will fl_Lsll PROBEand die oven
conuol will signal if file probe is inserted
into file outlet, and you have not set
a p_obe tempe_atme and pressed
the Start pad.
[_ Place the iack in the lowest position
(A). Insert the probe into the meat°
[_ Plug the probe into the oudet
in the oven. Make sure it is pushed
all the way in. Close the oven door°
[_] P_ess the Convection Roast pad.
[_ Press [lie number pads 1o set
the desired oven temperature°
[_ Press the Probe pad.
[_ Press the number pads 1o set tile
desired inten_a| meat temperature.
[77 Press the Start pad.
When the oven starts to heat, the word
tO will be in the display.
After the inten_a[ tempetatme of the meat
reaches 100°K the changing inten_a[
temperatme will be shown in the display°
Convection Roasting Guide
[_] ¼,qlen the intenla/tempe_atme of
the meat ieaches the number you
have set, the probe and the oven
tmn off and file oven conuol
sigma/s. To stop the signal, pxess
the Clear/Offpad. Use hot pads to
,emove the probe flom the food.
Do not use tongs to pull on it--
they might damage it.
CAUTION:Topreventpossible
burns,donotunplugtheprobefromtheoven
outletuntiltheovenhascoole_Donotstore
theprobeinthe oven.
NOTE:
If theprobeisremovedfromthefoodbefore
thefinal temperatureis reached,a tonewill
soundandthedisplaywill flashuntiltheprobe
is removedfromtheoven.
Youwill heara fanwhilecookingwith this
feature.Thefanwill stopwhenthedoor
is opened,but theheatwill not turnoff
Youcanusethetimereventhoughyoucannot
usetimedovenoperations.
Ondoubleovenmodels,youwill notbeable
tousetheprobeintheupperovenduring
timedovenoperations.Thisis because,with
theprobe,youarecookingbytemperature
ratherthantime.
Meats
Beef
Pork
Ham
Lamb
Seafood
Poultry
Rib,BonelessRib, Rare
TopSirloin Medium
(3to 5 Ibs.) Well
BeefTenderloin Rare
Medium
Bone-in,Boneless(3 to 5 Ibs.)
Chops(1/2to 1" thick) 2 chops
4 chops
6 chops
Canned,Butt, Shank(3to 5 Ibs. fully cooked)
Bone-in,Boneless(3 to 5 Ibs.) Medium
Well
Fish,whole(3to 5 Ibs.)
LobsterTails (6 to 8 oz.each)
Whole Chicken(2_Ato 3_AIbs.)
CornishHensUnstuffed(1to I_AIbs.)
Stuffed (1to I_AIbs.)
Duckling(4 to 5 Ibs.)
Turkey,whole_;
Unstuffed(10 to 16 lbs.)
Unstuffed(18 to 24 Ibs.)
TurkeyBreast(4to 6 Ibs.)
Minutes/Lb.
20-24
24-28
28-32
10-14
14 18
23 27
30-35 total
35-40 total
40 45 total
14 18
17-20
20 24
30 40 total
20 25 total
24 26
50-55 total
55-60 total
24 26
8-11
7 10
16 19
Oven Temp.
325°F
325°F
325°F
325°F
325°F
325°F
325°F
325°F
325°F
325°F
325°F
325°F
400°F
350°F
350°F
350°F
350°F
325°F
325°F
325°F
325°F
Internal Temp.
140°FT
160°F
170°F
140°FT
160°F
170°F
170°F
170°F
170°F
140°F
160°F
170°F
180° 185°F
180°-185°F
180° 185°F
180° 185°F
180°-185°F
180° 185°F
170°F
Usingthe timed featuresfor convectioncooking. CEApp.a,cescom
On double oven models, you can use timed baking or roasting in one oven while using self-clean in the other;
you can also use timed baking or roasting in both ovens at the same time,
Youwill hear a fan while cooking with these features, The fan will stop when the door is opened, but the heat will not
turn off
NOTE Foods that spoil easily--such as milk, eggs, fish, stuffings, poultry and pork--should not be stowed to sit
for more than I hour before or after cooking, Room temperature promotes the growth of harmful bacteria, Be sure
that the oven light is off because heat from the bulb will speed harmful bacteria growth,
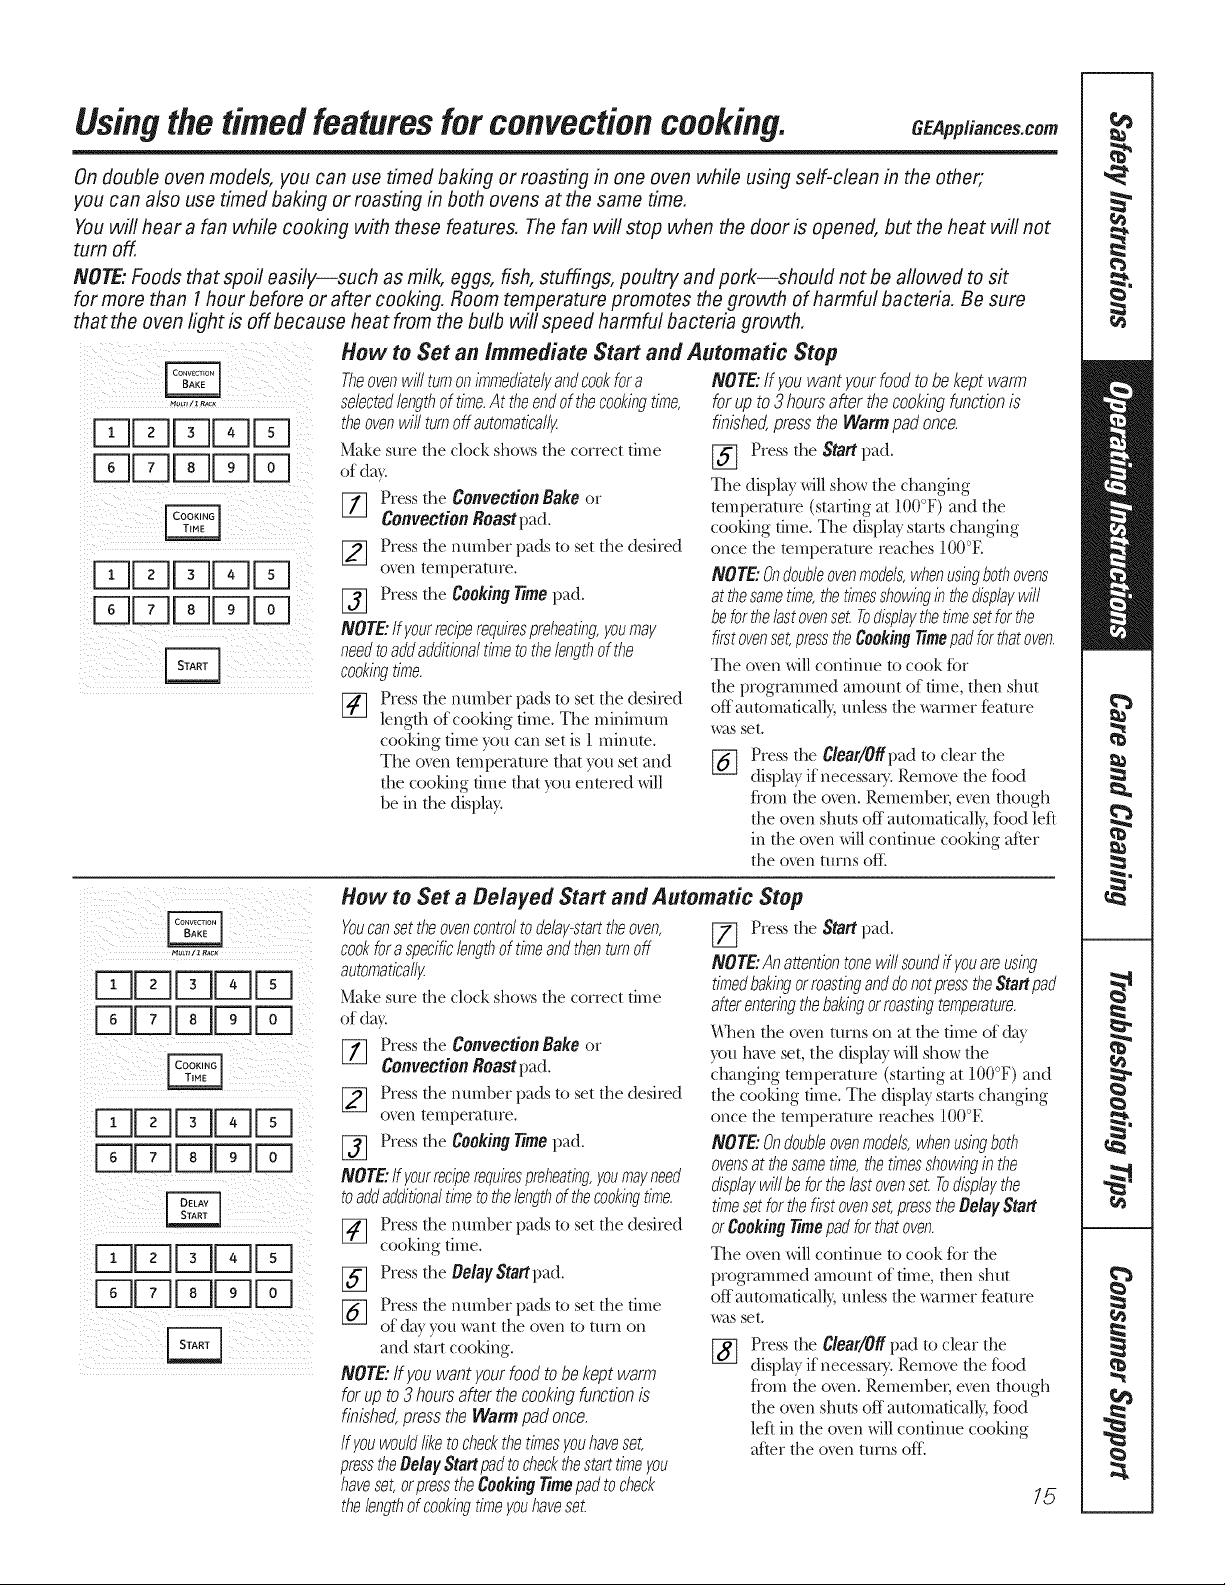
How to Set an Immediate Start and Automatic Stop>eovenwilltumonimmediatelyandcookfora NOTE:lfyouwantyourfoodtobekeptwarm
........... selectedlengthof time.At theendofthecookingtime, forup to3 hoursafterthecookingfunctionis
i ! 7i i(iiiiiii !
theovenwi//turnoffautomatica//y
Make sme the clock sh(m:sthe correct time
of da}:
[77 Press the ConvectionBakeor
ConvectionRoastpad.
[_ Press the numher pads to set the desired
o_n tempecaUue.
[_] Press the CookingTimepad.
NOTE"Ifyourreciperequirespreheatinglieumay
needtoaddadditlenaltimetothelengthofthe
cookingtime.
[_ Press the nmnher pads to set the desired
length of cooking time. The mininmm
cooking time you can set is 1 minum.
The oxen temi)ecamre that you set and
the cooking time that you enmred will
be in the display.
finished,presstheWarmpadonce.
[_ Press the Startpad.
The displaywillshow the changing
mmpecauue (starting at 100°F) and the
cooking time. The displaystarts changing
once the mmpecautre reaches 100°E
NOTE"Ondoubleovenmodels,whenusingbothovens
atthesametime,thetimesshowinginthedisplaywill
beforthelastovenset.Todisplaythetimesetforthe
firstovenset,presstheCookingtimepadforthatoven.
The o_vn willcontinue/o cook R)r
the programmed amount of time, then shut
off automaficall}, unless the p,vttiner fieau/re
,_vtsset.
%
Press the Clear/Offpad to cleat the
display if necessary. Remove the %od
hom the oxen. Remembeh ex_n though
the oxen shuts off atm)maficall), food left
in the oxen will ccmdnue cooking after
the o_n turns off.
How to Set a Be/eyed Start and Automatic Stop
Youcansettheovencontroltodelay-starttheoven,
cookfora specificlengthoftimeandthenturnoff
automatically
Make sure the clock shcm:sthe correct time
of da}:
[_ Press the ConvectionBakeor
ConvectionRoastpad.
Press the number pads to set the desired
o_n mmpetanue.
[_ Press the CookingTimepad.
NOTE"Ifyourreciperequirespreheatingyoumayneed
toaddadditionaltimetothelengthofthecookingtime.
[_] Press the numher pads to set the desired
cooking time.
[_ Press the BelayStart pad.
[_] Press the number pads to set the time
of de} you want the oven to turn on
and s/art cooking.
NOTE:If youwantyourfoodtobe keptwarm
for up to3 hoursafterthecookingfunctionis
finished,pressthe Warmpadonce.
Ifyouwouldliketocheckthetimesyouhaveset,
presstheBelayStartpadtocheckthestarttimeyou
haveset,orpresstheCookingTimepadtocheck
thelengthofcookingtimeyouhaveset.
[77 Press the Start pad.
NOTE"An attentiontonewill soundff youareusing
timedbakingormastinganddonotpresstheStart pad
after enteringthebakingormastingtemperature.
When the o_n turns on at the time of day
you haw set, the display will show the
changing mmpetamre (starting at IO0°F) and
the cooking lime. The display starts changing
once the mmpetautre reaches IO0°E
NOTE"Ondoubleovenmodels,whenusingboth
ovensat thesametime,thetimesshowingin the
displaywill beforthelastovenset. Todisplaythe
timesetfor the first ovenset,pressthe Belay Start
orCooking Timepadfor thatoven.
The ox>n will continue to cook for the
programmed amount of time, then shut
off automadcall}, unless the ,xvtrnler fieau/re
,xvtsset.
Press the Clear/Off pad to cleat the
display if necessa U. Remove the food
hom the oxen. Remember; ex_n though
the oxvn shuts off automaticall}, food
left in the o_n will ccmfinue cooking
after the o_n turns oft_
15

Adjust the oventhermostat--Do it yourself!
Youmay find that your new oven cooks differently than the one it replaced. Use your new oven for a few weeks
to become more familiar with it. If you still think your new oven is too hot or too cold, you can adjust the
thermostat yourself,
Do not use thermometers, such as those found in grocery stores, to check the temperature setting of your oven.
These thermometers may vary 20-40 degrees.
NOTE: This adjustment will only affect baking and roasting temperatures; it does not affect broiling or self-cleaning
temperatures. The adjustment will be retained in memory after a power failure.
FqFqFqFqFq
FqFqSqDFq
ToAdjust the Thermostat
Press the Bake and Broil Hi/to pads f-_
at the same time for 3 seconds undl
the display shows SF.
[]
Press the Bake pad fbr the oven
which you want to use. A l_,vo-digit
number shows in the display°
Press Bake again to alternate
bet_,veen increasing and decreasing
the oven temperature.
The oven temperature can be
adjusted up to (+) 35°F hotter or (-)
35°F cooler Press the number pads
the same way you read them.
For example, to change the oven
mmperamre 15°K press I and 5.
When you have made the
adjustment, press the Startpad to go
back to the time of day display. Use
your oven as you would nomlally:
Thetypeofmargarinewi// affectbakingperformance!
Most recipes for baking have been developed using high-fat products such as butter or margarine (80% fat).
If you decrease the fat, the recipe may not give the same results as with a higher-fat product
Recipe failure can result if cakes, pies, pastries, cookies or candies are made with low-fat spreads. The lower the fat
content of a spread product, the more noticeable these differences become.
Federal standards require products labeled "margarine" to contain at least 80% flit by weight. Low-flit spreads, on die
other band, contain less flit and more water The lfigh-moismre content of these spreads affe.ct the texture and flavor
of baked goods. For best results with your old fl_vo_imrecipes, use margarine, butter or sdck spreads containing at least
70% vegetable oil.
16
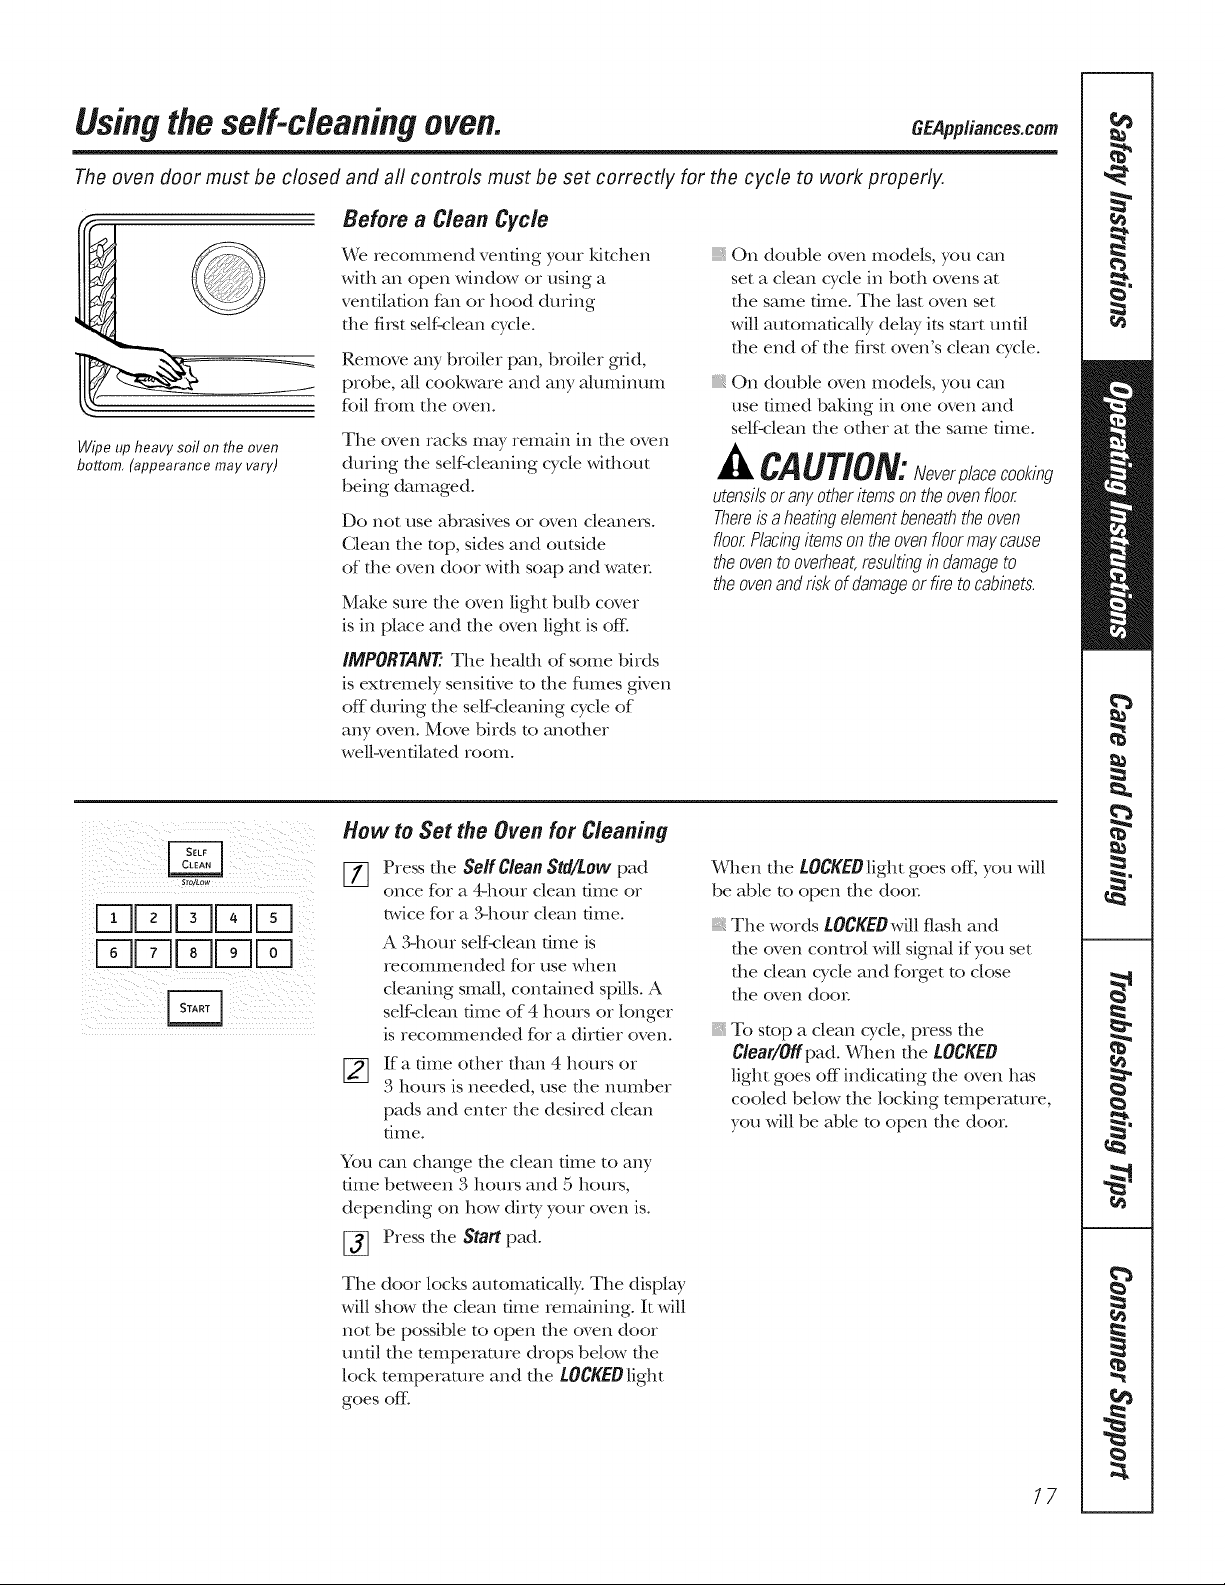
Using the self-cleaning oven. CEApp.a.ce com
The oven door must be c/osefl and a// controls must be set correctly for the cycle to work properly.
Wipe up heavy soil on the oven
bottom, (appearance may vary)
Before a Clean Cycle
We recommend venting your kitchen
with an open window or using a
ventilation tim or hood during
tlle fi_t self clean cycle.
Remove any broiler pan, broiler grid,
probe, all cool<ware and any aluminum
foil flom the oven.
The oven racks may remain in the oven
dininK the self cleaning cycle wifllout
being damaged.
Do no[ use abr_ksives or oven cleaneis.
Clean file top, sides and otKside
of the oven door with soap and water:
Make sme the oven light bulb cover
is in place and the oven light is off
IMPORTANT'. The health of some birds
is extremely sensitive to tlle flmles given
off during the self cleaning cycle of
any oven. Move birds to another
wellwenfilamd room.
iii}iiiiii:_
On double oven models, you can
set a clean cycle in both ovens at
the same time. The last oven set
will automatically delay its start until
tlle end of tlle firs[ (wen's clean cycle.
On double oven models, you can
use timed baking in one oven and
self clean the other at the same time.
CAUTION:Never lacecooking
utensilsor an}/other items on the ovenfloor
Thereis a heating element beneath the oven
floor Placingitems on the ovenfloor ma}/cause
the oven to overheat,resulting in damage to
the ovenand risk of damage or fire to cabinets.
Sm/Low
ii!!E [ E EE]Fq /
iiii_i!i_i_iiI i_iiii _ _:_ii
Hew to Set the Oven for Cleaning
[77 Press the Self Clean Std/tow pad
once for a 4-hour clean dine or
lwice for a ,_hour clean dixie.
A 341our selfk:lean dine is
recommended for use when
cleaning small, contained spills. A
self clean fillle of 4 hours or longer
is recommended for a dirtier oven.
If a time other than 4 hours or
3 hom_ is needed, use the number
pads and enter the desired clean
{ilIle.
You can change the clean time to any
time between 3 hours and 5 hom_,
depending on how dir b, your oven is.
[_ Press file Start pad.
The door locks automatically: The display
will show the clean time remaining. It will
not be possible to open the oven door
until the mmpemmre drops below the
lock temperature and file LOCKEDlight
goes off
When the LOCKEOlight goes off; you will
be able to open the doo_;
iii}iiiiii_The words tOCKEOwill flash and
die oven control will signal if you set
the clean cycle and fbrget to close
the oven door
iii}i}iiii_,
To stop a clean cycle, press die
Clear/OIf pad. _,qlen the LOCKED
light goes oft indicadng file oven has
cooled below die locking temperature,
you will be able to open the door.
17
Usingthe self-cleaning oven.
The oven door must be dosed and aft controls must be set correctly for the cycle to work properly.
iii¸i()) }
Sly/Low
EE]EE]r-qE]EE]¸
iiU-]DE]r-qEE]E i
_ _ _(i_) _ i _ IF I
ii!iE [5 FqC C;E](
How to Belay the Start of Cleaning
[_ Press the Self Clean Std/Low pad
once for a 4-hour clean dine or
twice for a ,_hom clean time.
A 3qlom self:<lean dine is
recommended for use when
cleaning small, contained spills. A
self'clean filIle of 4 hours or longer
is recommended for a dirtier oven.
If a time other than 4 hours or
3 hom_ is needed, use the number
pads and enter the deshed clean
tilIle.
You can change the clean time to any
time between 3 hours and 5 hom_,
depending on how dirt}, your oven is.
[_ Press [lle Delay Start pad.
[_ Using [lie number pads, enter tile
dine of day you want tile clean cycle
to start.
The door locks automadcNly: The display
will show the start time. It will not be
possible to open the (wen door until
the mmperamre drops below the lock
mmpemmre and the LOCKEDlight
goes ore
When the LOCKEDlight goes off, you will
be able to open die doo_:
NOTE:Ondoubleovenmodels,youcanseta
delaycleaninbothovensat thesametime.
Thesecondovensetwill automaticallydelay
thestartof cleaninguntiltheendof thefirst
oven'scleancycle.
Torecallthestart timeof thesecondovenset,
presstheDelay Start padon thecontrolsfor
thesecondoven.
Press the Startpad.
After a Clean Cycle
You may nodce some white ash
in the oven. Wipe it up with a damp
cloth after the oven cools.
If whitespotsremain,removethemwith a
soap-filledsteel-woolpadandrinsethoroughly
witha vinegarandwatermixture.
These deposits are usually a salt residue
that cannot be removed t)y the clean
cycle.
If the oven is not clean after one clean
cycle, repeat the cycle.
}i_You cannot set the oven for cooking
until the oven is cool enough for
the door to unlock.
While die oven is self cleaning, you
can press die Clock pad to display
the dine of day. To reunn to the
clean countdown, press the Self
Clean Std/Lew pad.
}_If the racks become hard to slide, wipe
the rack supports with cooldng oil.
18
Special features of your oven centre/. CEApp.ance .com
Yournew touch pad control has additional features that you may choose to use. The foflowing are the features
and how you may activate them.
The special feature modes can only be activated while the display is showing the time of day. They remain in
the control's memory until the steps are repeated.
When the display shows your choice, press the Start pad. The special features will remain in memory after
a power failure, except for the Sabbath feature, which will have to be reset.
HI/to
12-Hour Shutoff
With this feature, shouldyou forget and leave
the oven on, the control will automatically turn off
the oven after 12hours duringbaking functions
or after 3 hours during a broil function.
If you wish to mrn OFF dlis feature, fbllow
[lle steps below.
[-_ Press the Bake and Broil Hi/to
pads (on double oven models, use
the upper oven controls) at the same
time for 3 seconds, until the display
shows SE
[_ Press the Belay Start pad undl
no shdn (no shutoff) appears in
the display.
[_] Press the Start pad to activate
the no slmtoff and leave the control
set in this special features mode.
NOTE: Ondouble oven models, this activates
this special feature for both ovens.
!iD:D ii!:i
HI/LO
f2-Hour, 24-Hour or Clock Blackout
Yourcontrol is set to use a 12-hourclock.
If you would prefer to have a 24-hour
milimi T dine clock or black out the clock
display, follow the steps below.
Press the Bake and Broil Hi/to
pads (on double oven models, use
the upper oven controls) at the same
time for 3 seconds, until the disphy
shows SE
Press the Clock pad once. The
display will show 12 hr. If tiffs is
the choice you want, press the
Start pad.
Press the Clock pad again [o change
to die 24-hour milim_ 7 dine clock°
The display will show 24 hr. If this
is the choice you want, press the
Start pad.
Press the Clock pad again to black
out die clock display. The display
will show OFF. If this is the choice
you want, press the Start pad.
NOTE: If the clock is in the black-out mode,you
will not be able to usethe Delay Start function.
HI/to
Fahrenheit or Celsius Temperature Selection
Yourovencontrolis set to usetheFahrenheit
temperatureselections,butyoumaychange
thisto usetheCelsiusselections.
Press the Bake and Broil Hi/to
pads (on double oven models, use
the upper oven controls) at the same
time for 3 seconds, until the display
shows SE
[_ Press the Broil Hi/to and Cooking
Time pads again at the same dineo
The display will show C (Celsius)°
[_ Press the Start pad.
NOTE:Ondoubleovenmodels,thenewsetting
will bedisplayedforbothovens.
[_ Press the Broil Hi/to and Cooking
Timepads at the same time. The
display will show F (Faluenheit).
19

Special features of your oven control
i_i_iilI/ i_i_I_ i _ii i i _i
i_IIIi_iiIi_II_ !_i_!iiiiii _iI_I_I
Tones at the End of a Timed Cycle
At the end of a timed cycle,3 short beeps will
sound followed by onebeep every 6 seconds until
the Clear/Off pad is pressed. Thiscontinuous
6-second beep maybe canceled.
To cancel the 6-second beep:
%
Press the Bake and Broil Hi/to
pads (on double oven models use
tile upper oven controls) at tile same
time for 3 seconds, until tile display
showsSE
[]
Press tile Kitchen Timer On/Off
pad. Tile display shows CON BEEP
(contim_ous beep). Press tile Kitchen
timer On/Off pad again. Tile display
shows BEER (This cancels file ()lie
beep every 6 seconds°)
[_ Presstile Start pad.
NOTE:Ondoubleovenmodels,thiscancels
theend-of-cycletoneforbothovens.
Ht/Lo
,£_UTO RECIPE CONVERSION
HULrl/ ! RAC_
Auto Recipe TM Conversion (onsomemodels)
Whenusingconvectionbake,theAutoRecipe'_
Conversionfeaturewill automaticallyconvert
enteredregularbakingtemperaturesto
convectionbakingtemperatures.
Oncethefeatureis activated,thedisplay
will showtheactualconverted(reduced)
temperature.Forexample,if youentera regular
recipetemperatureof 350°Fandpressthe
Startpad,thedisplaywill showCONand
theconvertedtemperatureof325°E
NOTE: Thisfeaturedoes not convertconvection
bake cooking times, only regular baking
temperatures.
Toactivate the feature:
[] Press tile Bake and Broil Hi/to pads
(on double oven models, use tile
upper oven conUols) at file saQle
time K)r 3 seconds, until file display
shows SF.
[]
Press tile Convection Bake pad.
Tile display will show CON OFF.
Press tile Convection Bake pad again.
Tile display will show CON ON
[_] Press tile Start pad.
To deactivate tile realme, repeat steps
1-3 above but press tile Startpad when
CONOFFis in tile display.
20
Usingthe SabbathFeature.
(t)esignedfor useon the Jewish SabbathandHolidays.)(onsomemodels) GEPpp/iances.com
TheSabbathfeaturecan beused for baking/roastingonly. It cannot be used for convection,broiling,self-cleaning or DelayStart
cooking.
NOTE:Theovenlight comes on automatically (on some models)when the door is opened and goes off when the door is closed.
Thebulbmaybe removed.See the OvenLight Replacementsection. On models with a light switch on the controlpanel, the oven
light may be turned on andleft on.
When the display shows D the oven
is set in Sabbath, When the display
shows D C the oven is
baking/roasting,
How to Set for Regular Baking/Roasting
Make sure the dock shows the correct time of day
and the oven is oK
I-_ Press and hold both the Bake and Broil
I/I
Hi/to pads, at the same time, until tile
display shows SE
NOTE:If bake or broil appears in the
display, tile Bake and Broil Hi/to pads
were not touched at the same time.
Touch the Clear/Off pad and begin again.
[_] Tap the Delay Start pad until SAb hAtH
appears in the displa}:
[_] Touch the Start pad and D will appear
in the displa}_
_] Touch the Bake pad. No signal will
be given.
%
%
Using the numl)er pads, enter the desired
tent pentture between 170°F and 550°E
No signal or tentpecature will be given.
Touch the Start pad.
%
Atter a nmdom delay period of
approximately 30 seconds to 1 minute,
D C will appear in the display indicating
that the oven is baking/roasting. If D C
doesn't appear in the displa}, start
again at Step 4.
To adjust the oven/empentture, touch the
Bake pad, enter the new mmpemmre using
the number pads, and touch the Startpad.
NOTE: The Clear/Off and Cooking _me pads are
active during the Sabbath feature.
When the display shows D the oven
is set in Sabbath, When the display
shows D C the oven is
baking/roasting,
How to Set for Timed Baking/Roasting - immediate Start and Automatic Stop
Make sure the dock shows the correct time of day Touch the Bake pad. No signal will
and the oven is off. [77 be gixen.
%
Press m_d hold bO_ the Bake m_d
Broil Hi!to pads, at the same time, until
the display shows Sh'.
NOTE: If bake or broil appears in tile
display, the Bake and BroilHi/to pads
were not touched at the same time.
Touch the Clear/Off pad m_d 1)egin
again.
[_] Tap the Delay Staff pad until SAb bAtH
appears in the displa}_
Touch the Start pad and D will appear
in the displa}_
_ Touch the Cooking 7_me pad.
Touch the number pads to set the
desired length of cooking time between
] minute and 9 hours and 99 minutes.
The cooking time that you enmred will
be displayed.
Touch the Staff pad.
%
%
Using the nmnber pads, enter
the desired tentpecature. No signal
or tentpecature will be given.
Touch the Start pad.
Atter a nmdom delay period of
approximately 30 seconds to 1 minute,
D C will appear in the display indicating
that the oven is baking/roasting. If D C
doesn't appear in the displa}, start
again at Step 7.
To adjust the oven/empenmn'e, touch the
Bake pad, enmr the new mmpecamre using
the number pads and touch the Startp'ad.
When cooking is finished, the dispk g will
change tiom D C to D and 0:00will appear,
indicating that the oven has turned OFFbut is
still set in Sabbath. Remove the cooked toed.
HI/Lo
How to Exit the Sabbath Feature
[_ Touch the C/ear/Offp'ad.
_--_ ff the o_en is cooking, _ait fi)r a nmdom
delay period of approximately 30 seconds
to 1 minute, ,mtil only D is in the displa}_
_] Press and hold both the Bake and Broil
Hi!to pads, at the same time, tmtil the
display shows SE
Tap the Oe/ayStart pad tmtil 12shdn
or no shdn appears in the displa_ 12 shdn
indicates that the oxen will mmmmtically
turn off ;trier ] 2 hours, no shdnindicates
that the oven will not autonmtically
turn ottl
Touch the Start pad.
NOTE: If a power outage occurred while
the oven was in Sabbath, the oven will
automatically turn off and stay off even
when the power returns. The oven control
must be reset.
21
Care and cleaning of the oven.
Be sure electrical power is off and all surfaces are cool before cleaning any part of the oven.
How to Remove Protective ShippingFilm and Packaging Tape
Careflflly grasp a corner of the protective
shipping film wifll your fingers and slowly
peel i[ flom die appliance surfhceo Do
not use any sharp imms to retllove the
film. Remcwe Ml of the film befbre using
[]le appliance for []le firs[ time.
To assure no damage is done to die
finish of die product, die safest way to
remove [lle adhesive flom packaging
tape on new appliances is an application
of a household liquid dishwashing
detergent. Apply with a soft cloth
and allow to soak.
NOTE:Theadhesivemustbe removedfrom
allparts.Itcannotberemovedif it isbakedon.
i
i
i
3½" ,
Maximurrl "
tength
i
, aulu',
i
Glasscover
Oven tight Bulb
NOTE."Theglasscover(onsomemodels)should
beremovedonlywhencold.Wearinglatexgloves
mayofferabettergrip.
Before replacing die bulb, disconnect
elecQJca/power to the oven at the main
fl_se or circuit breaker panel, l,et the
bulb cool complemly before removing it.
For yore safety, do not touch a hot bulb
with a damp cloth. If you do, the bulb
will break.
Toremove:
Turn the glass (;over counterclockwise
1/4 turn undl the tabs of the glass cover
cleat the grooves of the socket° Remove
the bulbo
To replace:
Put in a new 40-watt appliance bulb.
Place the tabs of the glass c(wer into
the gqooves of the socl<et. Turn the glass
cover clockwise 1/4 turn.
NOTE:
A 40-wattapp/iancobulbis smallerthan
a standard40-watthouseholdbulb.
Installandtightenthecoverclockwise.
Reconnectelectrica/powerto theoven.
Forimprovedlightinginsidetheoven,clean
theglasscoverfrequentlyusinga wetcloth.
Thisshouldbe donewhentheovenis
completelycool.
22

GEPpp/iances.com
!
Do not rub or clean the door gasket--
it has an extremely low resistance to
abrasion.
If you notice the gasket becoming worn,
fravedl or damaged in any way or if it has
become displaced on the door, you should
have it replaced.
C/eening the Oven Door
To clean the inside of the door:
Because die area inside die gasket is
cleaned dming the selfLclean cycle, you
do not need to clean dlis by band.
The area outside die gasket and
file door liner can be cleaned with a
soap-filled or plastic scouting pad,
hot waWr and dewrgent. Rinse well
widl a vinegar and water solution.
To dean the outside of the door:
Use soap and water to thoroughly
clean die top, sides and flont of die
oven door Rinse well You may a/so
use a glass cleaner to clean file gl_s
on die outside of die doon Do not let
water drip into die vent openings.
If any stain on the door vent trim is
pexsistent, use a soft abrasive cleaner
and a sponge-scrubber for best results.
Spillage of marinades, fluitj uices,
tomato sauces and basting maerials
containing acids m W cause
disc(_lorafion and should be wiped
up immediatel> When surface is cool,
clean and rinse.
Do not use oven cleaning, cleaning
powde_ or harsh abrasives on the
outside of the door
Slot
Hinge10ck
Pull hinge locks down to unlock
Removal position
Lift-Off Oven Door
The door is very heavy. Be careful when
removing and lifting the door.
Do not lift the door& thehandle.
Toremove the door'.
%
%
Y]
%
Fully open the doon
Pull file hinge locks down toward
the door flame, to the unlocked
posidono A tool, such as a small flat-
blade screwdfiven may be required.
Firefly grasp both sides of the door
at the top.
Close door to the door removal
position (see illustration).
Lift door up and out until the binge
arm is clear of tlle slot.
Toreplacethedoor:
[_ Firefly grasp both sides of the door
at the top.
%
Hinge.
arm
Him
10ck
I
With the Bottom Hingearm
door at the edge
same angle as 0fsi0t
the removal
position, sea the
indentation of
the binge am1
into the bottom
edge of the hinge slot. The notch
in the binge arm must be dilly
seated into the bottom of the slot.
Indentation
Fully open die doon If tlle door
will not flflly open, tlle indentation
is not seated correcdy in tile bottom
edge of the slot.
Push the hinge locks up against
the flont flame of the oven cavity;
to the locked position.
Pushhingelocksup to lock
[_ Close the oven door
Probe
The temperature probe may be cleaned
wkb soap and water or a soal>filled
scouting pad. Cool the mmperamre
probe before cleaning. Scour stubborn
spots with a soaf>filled scouting pad,
rinse and d_>
Donotimmersethetemperatureprobe
in water
Donotstorethe temperatureprobe
in theoven.
23
Care and cleaning of the oven.
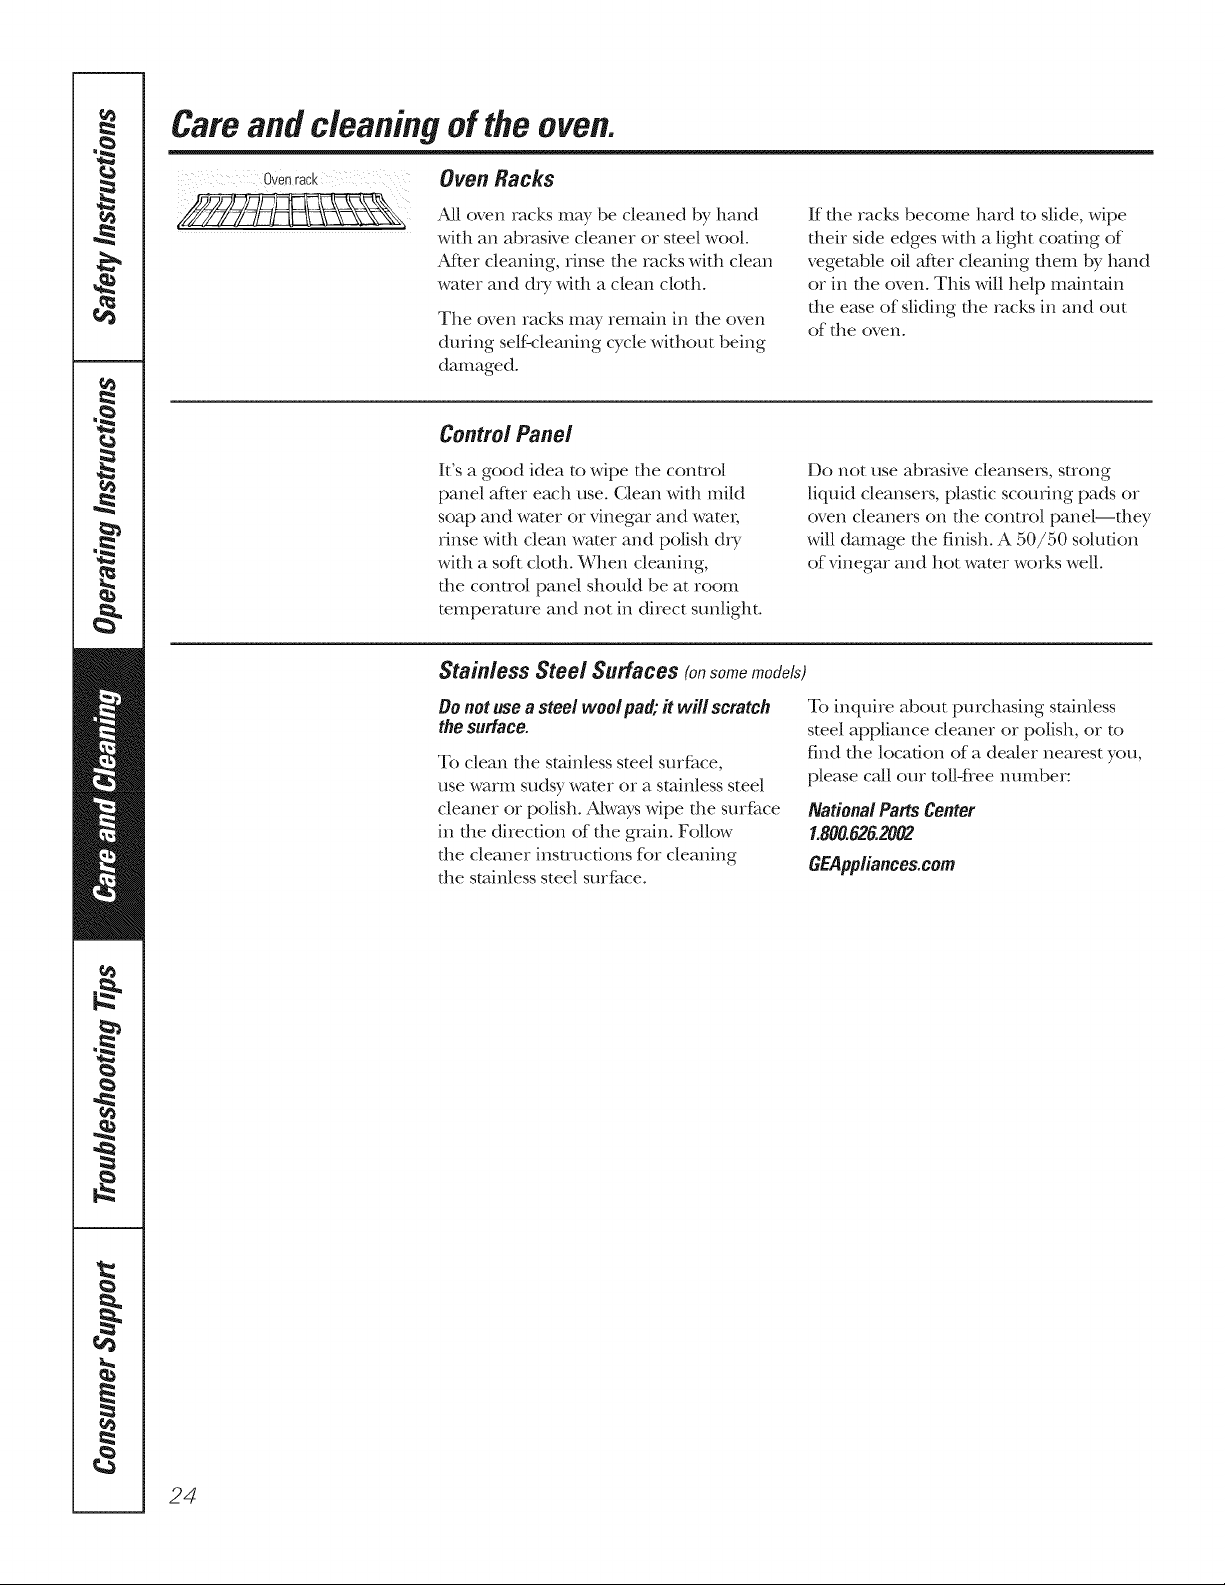
Oven rack( Oven _aoks
All oven racks may be cleaned by hand
with an abrasive cleaner or steel wool.
After cleaning, rinse file racks with clean
water and dry wifll a clean cloth.
The oven racks may remain in file oven
during selfLcleaning cycle without being
damaged.
If file racks become ]mrd to slide, wipe
flleir side edges wifll a light coating of
vegetable oil after cleaning them by hand
or in the oven. This will help maintain
the ease of sliding the racks in and out
of the oven.
Control Panel
It's a good idea to wipe file control
panel after each use. Clean wifll mild
soap and water or vinegar and water;
rinse wkh clean water and polish &T
with a soft doth. When cleaning,
the control panel should be at room
mmperature and not in direct starlight.
Do not use abrasive cleansex_, strong
liquid cleansers, plastic scouting pads or
oven cleaners on the control panel--alley
will damage the finish. A 50/50 sohlfion
of vinegar and hot water works well.
Stainless Steel Surfaces (onsomemodels)
Bo notuse a steel wool pa& # will scratch
thesurface.
To clean die stainless steel surface,
use warm sudsy water or a stainless steel
cleaner or polish. Always wipe the surface
in the direction of the grain. Follow
the cleaner insaucdons fbr cleaning
the stainless steel smface.
To inquire about purchasing stainless
steel appliance cleaner or polish, or to
find the location of a dealer nearest you,
please ca/1 our toll-flee number:
National PartsCenter
1.800.626.2002
GEApp/iances.com
24

BeforeYouCall ForService...
Troubleshooting tips
Save time and money! Review the charts on the following
pages first and you may not need to ca# for service,
GEPppliance&com
Possible Causes What To Do
Control signals after You forgot to enter a bake = Press the Bake pad and desired temperature
entering cooking time temperature or cleaning or the Self Clean Std/tow pad and desired clean time.
or delay start time.
Food does not bake Oven controls improperly set. * See the Using the oven secdon.
or roast properljt Rack position b incorrect • See the Using the oven secdon.
or the rack is not level.
Oven floor not in place. • Replace tile oven floo_:
Oven thermostat needs * See the Adjust the oven thermostat--Do it yourself!
adjustment, sec d on.
Food does not Oven door is open. • Glose the doo_: This model is designed fur closed door
broilproperly broiling only. Always broil with the door closed.
Oven controls improperly set. • Make sure you press the Broil Hi/Lo pad.
Improper rack position • See die Broiling Guide.
being used.
Food being cooked • For best results, use a pan designed for broiling.
in a hot pan. Make sure it is coo/.
Cookware not suited * For best results, use a pan designed fur broiling.
for broiling.
The probe is plugged into • Unplug and remove the probe flom the oven.
the outlet in the oven.
In some areas the power • Preheat the broil element ff_r 10 minutes.
(voltage) may be low.
• Broil fbr the longest period of time recommended
in the Broiling Guide.
Clock and timer A fuse in your home may be • Replace die fuse or reset the circuit breaker:
do not work blown or the circuit breaker
tripped.
Oven controls improperly set. • See the Using the clock, timer and control lockout
see[ion.
Oven light does Light bulb is loose or defective. • Tighten or replace the bulb.
not work
Pad operating light is broken. • (;all for service.
25

BeforeYouCall ForService...
Troubleshooting 77ps
Possible Causes What To Be
"-Oven temperature too Oven thermostat * See d_e Adjust the oven thermostat--Do it yourself!
hot or tOOcold needs adjustment, secdon.
Oven will not work A fuse in your home may * Replace file rise or reset file circuit breaker:
be blown or the circuit
breaker tripped.
Oven controls improperly set. . See the Using the oven secdon.
Oven will not self-clean The oven temperature • Allow file oven to coo| and reset file con/ro|s.
is too high to set a
self-clean operation.
Oven controls improperly set. * See the Using the self-cleaning oven secdon.
The probe is plugged into • Remove the probe fiom the oven.
the outlet in the oven.
"Crackling" or This is the sound of the * This is normal.
"popping" sound metal heating and cooling
during both the cooldng and
cleaning functions.
Excessive smokino Excessive soil. * Press the Clear/Off pad. Open the windows to rid
during clean cycle the room of smoke. Wait undl the LOCKED light goes
off. Wipe up the excess soil and reset the clean cycle.
Oven door will Oven too hot. • Allow the oven to cool below locking temperature.
not open after
a clean cycle
Oven not clean after Oven controls not properly set. = See the Using the self-cleaning oven secdon.
a clean cycle Oven was heavily soiled. = Clean up heavy spillovers behne starting the clean
cycle. Heavily soiled ovens may need to self:clean
again or hn a longer period of time.
"LOCKED"flashes The self-clean cycle has * Close the oven door.
in the display been selected but the
door is not closed.
LOCKED light is on The oven door is locked * Press the Clear/Off pad. Allow the oven to cool.
when you want to cook because the temperature
inside the oven has not
dropped below the
locking temperature.
26
GEPpp/iances.com
Possible Causes What To Do
"F--and a number You have a function = Press the Clear/Offpad. Allow the oven a_ coo/for
or letter" flash error code. one hem: Put the oven back into operation°
in the display If the function code repeats. • Disconnect all power to the oven fbr at least 30
seconds and then reconnect power. If the flmction
error code repeats, call for service.
Oisplaygoes blank A fuse in your home may • Replace the fl_se or reset the circuit breaker
be blown or the circuit
breaker tripped.
The clock is in the • See the Special features of your oven control secdon.
black-out mode.
Oisplay flashes Power failure. • Reset the clock.
Unable to get the Oven control pads were • The Bake and Broil Hi/lo pads (on double oven
display to show "SF" not pressed properly, models, use the upper oven controls) must be
pressed at the same time and held for 3 seconds.
"PROBE" appears This is reminding you to • Enter a probe temperature.
in the display enter a probe temperature
after plugging in the probe.
Power outage, Power outage or surge. • Reset the clock. If the oven was in use, you must reset
clock flashes it by pressing the Clear/Offpad, setting the clock
and resetting any cooking flmcfion.
Steam from the vent When using the convection • This is normal.
feature, it is normal to see
steam coming out of the
oven vent. As the number
of racks or amount of
food being cooked increases,
the amount of visible steam
will increase.
"Burning" or "oily" This is normal in a new oven • To speed the process, set a self clean cycle h_r a
odor emittingfrom and will disappear in time. minimum of 3 hours. See the Using the self-cleaning
the vent oven section.
Strong odor An odor from the insulation • This is temporary.
around the inside of the
oven is normal for the first
few times the oven is used.
Fannoise
A cooling fan or a convection
fan (depending on the
function you are using)
may automatically turn on.
• This is normal° The cooling tim will mrn on
to cool internal parts. It may run fbr up to 1-1/2
hours after the oven is turned of Ii The convection
fan will cycle on and off until the fkmction is over
or the door is opened.
27

Accessories.
Looking For Something More ?
You can find these accessories and many more at GEAppliances.com (U.S.) or
www.GEAppliances.ca (Canada), or carl 800.626.2002 (U.S.) or 800.661.1616
(Canada) (during normal business hours). Have your model number ready.
Grates Surface Burner Heads and Caps Surface Elements and Drip Pans Knobs
Oven Racks Oven Elements
Light Bulbs
Experience these other great products to keep your kitchen looking great!
l_ Ceramic Cooktop _ Ceramic Cooktop _ Stainless Steel
Cleaning Kit: Cleaning Wipes Appliance Polish
Includes cleaner, Wipes
scraper and pad
WXIOX117GCS WXIOX305 WXlOXIO001
Stainless Steel
Appliance
Cleaner
PM10X311
Get the most out of your Broiler Pan! (Not for use with Broiler Drawer models.)
Use your pan and gqid cover to broil hamburgexs, seafood, steal<s, vegetables,
bacon, chops and so much more[ The pan below catches the excess fats and oilso
* Genuine GE Part
* Easy To Clean
* One'Year Warranty ...
Limited time Offe!! Free Shipping!
When you order your broiler pan within 30 days of purchasing your GE cooldng product.
Small Large* XL**
Part # WB48X10055 WB48X10056 WB48X10057
Dimensions 8-3/4"Wx 1-1/4"Hx 13-1/2"D 12-3/4"W x 1-1/4"Hx 15-1/4"D 15-1/2"Wx 1-1/4"Hx 19"D
* Thelarge (standard) broil pan doesnot fit in 20'/24"ranges,
** TheXLpan does not fit in 24" wall ovens, 27"drop-ins or 20"/24"ranges,
Top/ace your order, call 800,626,2002(U,S,),800.661.1616(Canada)or mail this form to:
In the #.$.: GEParts,PO,Box 221027,Memphis, TN38122-102ZIn Canada:GE Parts,1 FactoryLane,Moncton, N,B, E1C9M3
Broiler Pan Order Form
Quantity PartNumber
Model Number
FirstName
Address
City
Phone
Check
Money Order __
Serial Number Brand Date of Purchase
LastName
State Zip Code
E-Mail
Call800.626.2002in the D.$. or800.661.6161in Canadafor current pricing.All credit card orders mustbe called in.
28
Notes.
_k
¢o
w
29
Notes.
,0
,0
3O
GEBuilt-In Electric Oven Warranty.
Aft warranty service provided by our Factory Service Centers, or
an authorized Customer Care _ technician. To schedule service,
visit us on-fine at GEAppfiances.com, or carl 800.GE.CARES
(800.432,2737). Please have serial number and model number
available when calling for service.
Staple your receipt here.
Proof of the original purchase
date is needed to obtain service
under the warranty.
GE Wifl Replace:
One Year
Fromthe date of the
origina!purchase
Any part of the oven which f_tils due to a defect in materials or workmanship.
During this limited one-year warranty, GE will also provide, free of charge, all labor
and in-home service to replace the defective part.
Service trips to your home to teach you how
to use the product.
} Improper installation, delivery or maintenance.
}_Failure of the product if it is abused, misused,
or used for other than the intended purpose
or used commercially.
}_Replacement of house fuses or resetting of circuit
breakers.
}_Damage to the product caused by accident, fire, floods
or acts of God.
Incidental or consequential damage caused by possible
defects with this appliance.
Damage caused after delivery.
Product not accessible to provide required service.
EXCLUSIONOFIMPLIEDWARRANTIES--Yoursole and exclusive remedyisproductrepairasprovidedin thisLimited
Warranty.Anyimpliedwarranties,includingtheimpliedwarranties of merchantability orfitnessforaparticularpurpose,
are limitedtoone yearor theshortestperiodallowedby law.
This warranty is extended to the original purchaser and any succeeding owner for products purchased for
home use within the USA. If the product is located in an area where service by a GEAuthorized Servicer is not
available, you may be responsible for a trip charge or you may be required to bring the product to an Authorized GE
Service location for service. In Alaska, the warranty excludes the cost of shipping or service calls to your home.
Some states do not aflow the exclusion or limitation of incidental or consequential damages. This warranty
gives you specific legal rights, and you may also have other rights which vary from state to state. To know
what your legal rights are, consult your local or state consumer affairs office or your state's Attorney General
Warrantor:General Electric Company.Louisville, KY40225
31
ConsumerSupport.
GEAppliancesWebsite GEApp/iances.com
Have a quesdon or need assistance with your appliance? Try tile GE Appliances Website 24 hours a day,
any day of tile year! For greater convenience and faster service, you can now download Owner's Manuals,
order parts or even schedule service on-line.
ScheduleService ;Eapp/iances.com
Expert GE repair service is only one step away f_om your do(n: Get on-line and schedule your service at
your convenience any day of tile year[ Or call 800.GE.CARES (800.432.2737) dining noiIIIN business hours.
RealLife DesignStudio
GEApp/iances.com
GE supports tile Universal Design concept--products, services, and environments that can be used by
people of all ages, sizes and capabiliOes. _!e recognize tile need to design for a wide range of physical and
mental abili0es and impaimlents. For details of GE's Unive,_al Design applications, including Mtchen
design ideas for people with disabiliOes, check out our Website today. For the hearing impaired, please
ca/1 800.TDD.GEAC (800.833.4322).
ExtendedWarranties
GEApp/iances.com
Purchase a GE extended warranty and learn about special discounts that are mailable while your warranty
is soil in effect. You can purchase it onqine anytime, or call 800.626.2224 during n<mnal business hom_.
(;E Consumer Home Services will still be there aRer your warranty expires.
PartsandAccessories
GEApp/iances.com
Individuals qualified to service their own appliances can have parts or accesscnJes sent directly to their
homes (VISA, MasterCard, and Discover cards are accepted). Order on-line today, 24 hours eve_T day
or by phone at 800.626.2002 during ncmnal business hom_.
Instructions containedin thismanualcoverproceduresto beperformedbyanyuser. Otherservicing generally
should be referredto qualifiedservice personnel.Cautionmustbe exercised,since improper servicing may cause
unsafeoperation.
ContactUs
GEApp/iances.com
If you are not saOsfied widl die service you receive flom (;E, contact us on our Websim widl all die details
including your phone numbe_; or w_Jm to: General Manage_; Custonler Relations
GE Appliances, Appliance Park
Louisville, KY 40225
RegisterYourAppliance
GEApp/iances.com
Register your new appliance on-line--at your convenience! Timely product registraOon will allow for
enhanced conmmnicaOon and prompt service under tile temls of your warranty; should the need arise.
You may Nso mail in tile preprinted registraOon card included in tile packing mate,Jal.
Printed in the United States
GEPpp/iances.com
0
0
Instrucdones de seguridad ........ 2-4
Instrucciones de operad6n
Asado y horneado cronometrado .... 9, 15
Bh)queo de controles ................ 8
Calentanfiento ..................... 11
Controles .......................... 5
Convecd&n ..................... 12-15
Funchmes espedales ............. 19, 20
Homo ........................... 6, 7
Homo autolimpieza ............. 17, 18
i,eudado .......................... 11
Modo Sabbath ..................... 21
Reloj y tempofizador ................. 8
Sonda ......................... 10, 14
Termostato ........................ ] 6
Cuidado y limpieza
C6mo refirar la dnta de empaque ..... 22
iAmpara de luz .................... 22
IJmpieza de la puerta del homo ...... 23
Panel de control ................... 24
Parfillas ........................... 24
Puerta extrafble del homo ........... 23
S()nda ............................ 23
Superficies de acero inoxidable ....... 24
Consejos para resoluci6n
de problemas .................. 25-27
Accesorios ........................ 28
Soporte al consumidor
Garantfa .......................... 31
Soporte al consumidor .............. 32
Escriba los numeros de modelo y
serie aqui:
N ° de modelo
N ° de serie
Puede encontrar esm informacidn
en una efiquem en la parte delantera
del homo, detr_s de la puerto del
homo en los modelos de homo
simple, o en la parte delantera del
homo inferi(m detrfis de la puerto del
homo en los modelos de homo doble.
PK916-Horr_o simp_ de pa:ye(lde 2 7"
PK956-Horr_o dobi_ de pa:ye(lde 27"
P7"916-Horuo simp_ de pa'y_(l de 30"
PT956-Horrzo doble de pa:y_(lde 30"
Impresoenpapel
reciclado
49-80599 08-09 Jfl
/NFORMAC/ONIMPORTANTEBE SEGURIDAD.
tEA TODASI.ASINSTRUCCIONESANTESBEUSAR.
iAOVERTENCIA!
Si no se sigue exactamente la informaciSn de este manual, puede ocurrir un incendio, una
explosi6n o un cortocircuito que podria causar dafios a la propiedad, lesiones personales o la
muerte,
AVISOIMPORTANTEDESEGURIDAD
La Ley de tSxicos y agua potable segura de California (California Safe Drinking Water and Toxic
Enforcement Act) exige al gobemador de California pubficar una lista de las sustancias conocidas
en el estado que causan c#ncer, defectos de nacimiento u otros dafios, y exige alas empresas que
alerten a los clientes sobre la exposiciSn potencial a dichas sustancias,
El aislamiento de fibra de vidrio en los homos de autolimpieza emite una pequefia cantidad de
monSxido de carbono durante el ciclo de limpieza. Puede minimizarse la exposiciSn permifiendo
la ventilaciSn con una ventana abierta o utilizando un ventilador,
2
PRECAUCIONESDESEGURIDAD
Cuando se utilizan aparatos elfictricos, se deben seguir las precauciones de seguridad b#sicas,
incluyendo las siguientes:
Use este aparato dnicamente para los fines
descritos en este Manual del propiemfio.
Aseg_irese de que su aparato sea insmlado
y conecmdo a tierra correctamente por
un t_cnico calificado, de acuerdo con
las instmcciones de instalacidn suministrad_s.
No intente reparar o reemplazar ninguna
parte de su horno a menos clue este manual
lo recomiende de manera espedfica. Todos
los derails servicios de mantenimiento deberfin
defivarse a un tOcnico calificado.
Pida al instalador clue le muestre la ubicacidn
del cortacircuitos o fllsible. Mfirqudo para una
reterencia t_cil.
Antes de realizar cualquier se_a4cio de
mantenimiento, desconecte el suministro de
energia del homo en el panel de distribuddn
dom_sdco quitando el flisible o apagando
el cortacircuitos.
No deje a los nifios sin superdsidn; los nifios
no deben estar solos o sin super_4sidn en
un firea en la clue un aparato estfi en uso.
No se les debe pel_midr sentarse o pamrse
sobre ning_ma de las partes del apamto.
No deje que nadie se suba, se pare o se cuelgue
de la puerta. Podrfan dafiar el homo o suffir
lesiones personales graves.
AsegSrese de que el homo est_ instalado
correctamente en un armario clue est_ bien
sujeto a la estmcmra de la casa. Nunca pe_mim
que alguien se crepe, se siente, se pare o
se cuelg_le de la puerta del homo.
Nunca deje la puerta del homo abierta cuando
no est_ observfindolo.
Siempre mantenga tapices, cordnas o patios
que puec 'tan prenderse fhego a una distancia
segx_ra del homo.
Siempre mantenga los patios de cocina,
repasadores, guantes para cacerolas y todo fipo
de tela a una distancia segura de su homo.
Siempre mantenga los utensilios de madera
y plfisdco, asf como alimentos enlatados, a
una distancia seg_lra de su homo.
Ensefie a los nifios que no debenjugar
con los controles ni con ninguna otra parte
del after%to.
Los rayones o impactos severos sobre
las puertas de _._dfio podrfan romper
o astillar el _._drio.
No gtmrde materiales inflamables en un homo.
PRECAUCION.osart c os
interds para los nifios no deben guardarse en
armanos amba de un homo; ya que los nifios
podrfan suffir lesiones graves al intentar
treparse sobre E1pare alcanzar los objetos.
GEPpp/iances.com
PRECAUCIONESDESEGURIDAD
Nunca use vesdmenta floja o que cuelgue
mientras hace uso del aparato. Tenga cuidado
al intentar alcanzar artfculos guardados en
armanos sobre el homo. i,os materiales
inflamables podrfan encenderse si entmn en
contacto con superficies calientes o elementos
calefhctores y podrfan provocar quemaduras
graves.
Use finicamente guantes pare cacerolas que
estdn secos; los guantes htimedos o mojados
sobre superficies calientes podrfan cmisar
quemaduras debido al vapor. No permita
que los guantes entren en contacto con
los elementos calefhctores calientes. No use
una toalla u otto tipo de tela voluminosa.
Por su seguridad, nunca use su aparato pare
calentar la habitaddn.
: No permita que la grasa de la cocci6n u otros
materiales inflamables se acum_den dentro o
cerca del homo.
No use agua para apagar incendios con
grasa. Nunca tome una cacerola que se estd
quemando. Apague los controles.
i,as llamas en el homo pueden apagarse
por completo al cerrar la puerta del horno
y apagaflo o al utilizar un producto qufmico
mulfiuso seco o un exfintor de fipo espuma.
: No toque los elementos calefhctores ni la
superficie interna del homo. Estas superficies
podrfan estar lo suficientemente calientes como
para quemar afin si estfin oscuras. Durante
el uso y luego de dste, no toque ni pem_ita
que las prendas u otros materiales inflamables
entrenen contacto con ning_n firea interna
del homo; deje que se enfife primero.
ias superficies que pueden estar calientes
incluyen: onficios de venfiladdn del homo,
superficies cercanas a los orificios, gfietas
alrededor de la puerta del homo, los bordes de
la ventana y los fibetes metfilicos sobre la puerta.
RECUERDE"ia superficie interna del homo
puede estar caliente al abrir la puerta.
Nunca coloque utensilios de cocina ni otros
elementos en el piso del horno. Debajo del piso
del homo hay un elemento calefhctol: Si coloca
elementos sobre el piso del homo, dste podrfa
sobrecalentarse y dafiarse al igaial que
los armafios.
: Nunca deje fiascos o latas con grasa de came
asada dentro o cerca de su homo.
: No guarde ni use materiales combustibles,
gasolina u otros lfquidos y vapores inflamables
cerca de este apamto ni ning_n otro.
: Al@se del horno cuando abm la puerta.
E1aire o vapor caliente que sale puede cmisar
quemaduras en las manos, la cam y los ojos.
: No caliente recipientes de alimentos sin abrir.
ia presidn podrfa acumularse y el recipiente
podrfa explotar y provocar una lesidn.
: Mantenga libre la ventilacidn del homo.
: No pe_mita que se ac_mmle grasa en el horno.
: Coloque la parrilla del horno en la posicidn que
desee mientras el homo estd fifo. Si es necesario
manipular las pardllas cuando estfin calientes,
no permita que los guantes pare cacerolas
entrenen contacto con los elementos
calefactores.
: Cuando udlice bolsas pare cocinar o asar en
el homo, siga las indicaciones del fabricante.
: Sacar la parrilla hasta el tope resulta titil
para levantar comidas pesadas. Tambidn
es una precaucidn para edtar quemarse
al tocar las superficies calientes de la puerta
o las paredes del homo.
: No utilice el horno pare secar periddicos.
Si se sobrecalientan, pueden incendiarse.
: No utilice el homo como firea de
ah_acenamiento, i,os elementos almacenados
en un homo pueden incendiarse.
: No deje objetos hechos de papel, utensilios
de cocina o alimentos en el homo mientras
no estd en uso.
: Luego de asar a la parrilla, siempre retire
una asadera del horno y lfmpiela, ia grasa que
quede en una asadem puede incendiarse
la prdxima vez que utilice la bandeja.
l_rnicamente limpie las partes enlistadas en
este Manual del propietario.
: No utilice papel de aluminio pare revestir
la parte inferior del homo, a excepcidn de
lo sugerido en este manual, ia instalad6n
incorrecta del papel de aluminio puede
provocar un riesgo de descarga el&trica
o incendio.
2
/NFORMAC/ONIMPORTANTEDESEGURIDAD.
tEA TODASI.ASINSTRUCCIONESANTESDEUSAR.
CUEZA/AS CAflNESYEl POLIOCOMPI_ETAMENTE...
Cuezala came roja }/de avepor completo. la cameroja a una temperaturaINTEflNAde al menos 160°Fy la de
avea unatemperaturaINTERNAdeal menos 180°£ Lacocci6na estas temperaturasofreceprotecci6ncontra
enfermedadesde transmisi6npot alimentos.
AUTOLIMPIEZADELHORNO
} No limpie el empaque de la puerta.
E1 empaque de la puerta es esencial para
un buen cierre. Debe tenerse cuidado de
no desgastar, daflar o mover el empaque.
::: No udlice limpiadores. NingSn limpiador
comercial para hornos ni ninguna cubierta
protectora para homos debe utilizarse
dentro o alrededor de las partes del homo.
i,os resi&los de los limpiadores de homos
daflaran el inte, rior del homo cuando
se utilice el ciclo de autolimpieza.
}}Antes de la autolimpieza del horn(),
remueva la sonda, cualquier cacerola para
asa_, parrilla y otros utensilios de cocina.
}}Antes de comenzar un ciclo de
autolimpieza, asegSrese de limpiar
con un trapo los derrames.
}} Si el modo de autolimpieza no flmciona
bien, apague el homo y desconecte
el suministro de corriente. Haga que
un t_cnico calificado realice la reparaci6n.
LEAYSIGAESTAINFORMACIONDESEGURIDAD
CUIDADOSAMENTE.
GUARDEESTASINSTRUCC/ONES
4

Uso de los controles de/homo inferior.
(A Io larqo de este manual, las caracterfsticas y apariencia pueden variar con los de su modelo.) GEApp/iances.com
Se muestra el control del homo doble.
Controldelhomo,caracterfsticasy configuracionesdel reloj
(Clock)y del temporizador(Timer)
BoNn Bake (Homeaflo) A
Presione para seleccionar la funcidn horneado.
BoNnBroilHi/Lo(Asara laParrillaAlto/Bajo)
Presione para seleccionar la flmcidn asar a la parrilla.
BoNn Delay Start (Inicio postergado)
Utilicejmm_ con los botones Cooking Timeo Serf
Clean pm;l (-onfigm;n el homo pma que inicie y
sedeteng;l ;mtom_tic;mlente en el momento que
usted programe.
BoNn Convection Bake
(Homeado par convecciSn)
Presidnelo para seleccionar el horneado con
la flmcidn de comeccidn.
BoNn Convection Roast
(Asado par convecciSn)
Presidnelo para seleccionar el asado con
la flmcidn de comeccidn.
BoNnStart(Inicio) 0
Debe presionarse para iniciar cualquier flmcidn
de coccidn o limpiem.
0 Pantalla 0
Muestra la hora del dfa, la temperatma del homo,
si el homo es_ en el motto de horneado, de asar l_
a la parrilla o de autolimt)ie/_ y las horas establecidas
para el temporiz_dor o las operaciones automfiticas
del homo.
$i una "F- y unnumem oletra"parpadeanen la pantalla y/as
so#ales de controlde/homo, esto indica un c6digode error de
la fenci6n.Presioneel bot6nClear/O_ Permitaqueelhomoseenfrfe
duranteunahora.Pongael homonuevamenteen operacibn.Si elcbdigo
de errordela funcibnserepite,desconecteel cabledecorrientede/homo _[_
Ycomunfqueseconel serviciodemarTtenimiaTto.
Si su homofoe configurado para una operaci6ncmnometradade/
homo y se present6ona interrupci6n en el fleido electrico,
el relojVtodaslos funcionesprogramadasdebenrestablecerse
ta flora de/dia parpadear#en la panta/la cuando se flaya
presentadouna interrupci6n en el fluidoelectrico.
BoNn Self Clean Std/Low (Limpieza autom_tica
estbndar/baja ) 0
Presione pare seleccionm la flmcidn de antolimpieza.
Consulte la seccidn Usa del homo autolimpieza. ,_
fO
BoNn OvenLight (Luzdel homo)
Presiorle para erlcerKter o apagar la luz del horno.
BoNn Cooking Time(Tlempode cocci6n)
Presione y luego presione los botones mmldficos
para esmblecei la cantidad de tiempo que desea
cocinar sos alimentos. E1 homo se apag, mi
antom_ticamente cuando se haya agotado
el tiempo de coccidn, a menos que se haYa
configurado la flmcidn "Cook and Hold';
(Cocinar y mantener).
BoNn Clear/Off
Plesione para cancelar TODASlas operaciones
del homo excepto el reh!i y el temporizado_:
BoNn Cbck(Reloj)
Plesione antes de configmar el rel@
Botones num6ricos
Utilice para (Olliigtllal cualquier tklll(i()ll que
necesite nfimeros como la hora del dfa en el tel@
el temporizadoc la temperamra del homo,
la tempemmra interna de la comida, la horn
de inicio v la duracidn de la operacidn pare
el horne_£do cronometrado y la autolimpiem.
BoNn Kitchen _mer On/Off
(Temporizadorde cocina encender/apagar)
Presione pma seleccionar la caracter&tica del
temt) ofiz_ldor
BoNn Probe (Sonda)
Plesione cuando utilice la sonda para cocinar
alimemos a tma tempemmra intema deseada.
BoNn Warm (Calentamiento)
Plesidnelo para mantene_ los alimentos cocidos
calientes.
BoNn Proof (Leudado)
Plesidnelo para selecciona_ un ambiente dl)io dtil
para lexar los pro(hlctOS coi1 lemdura.
5
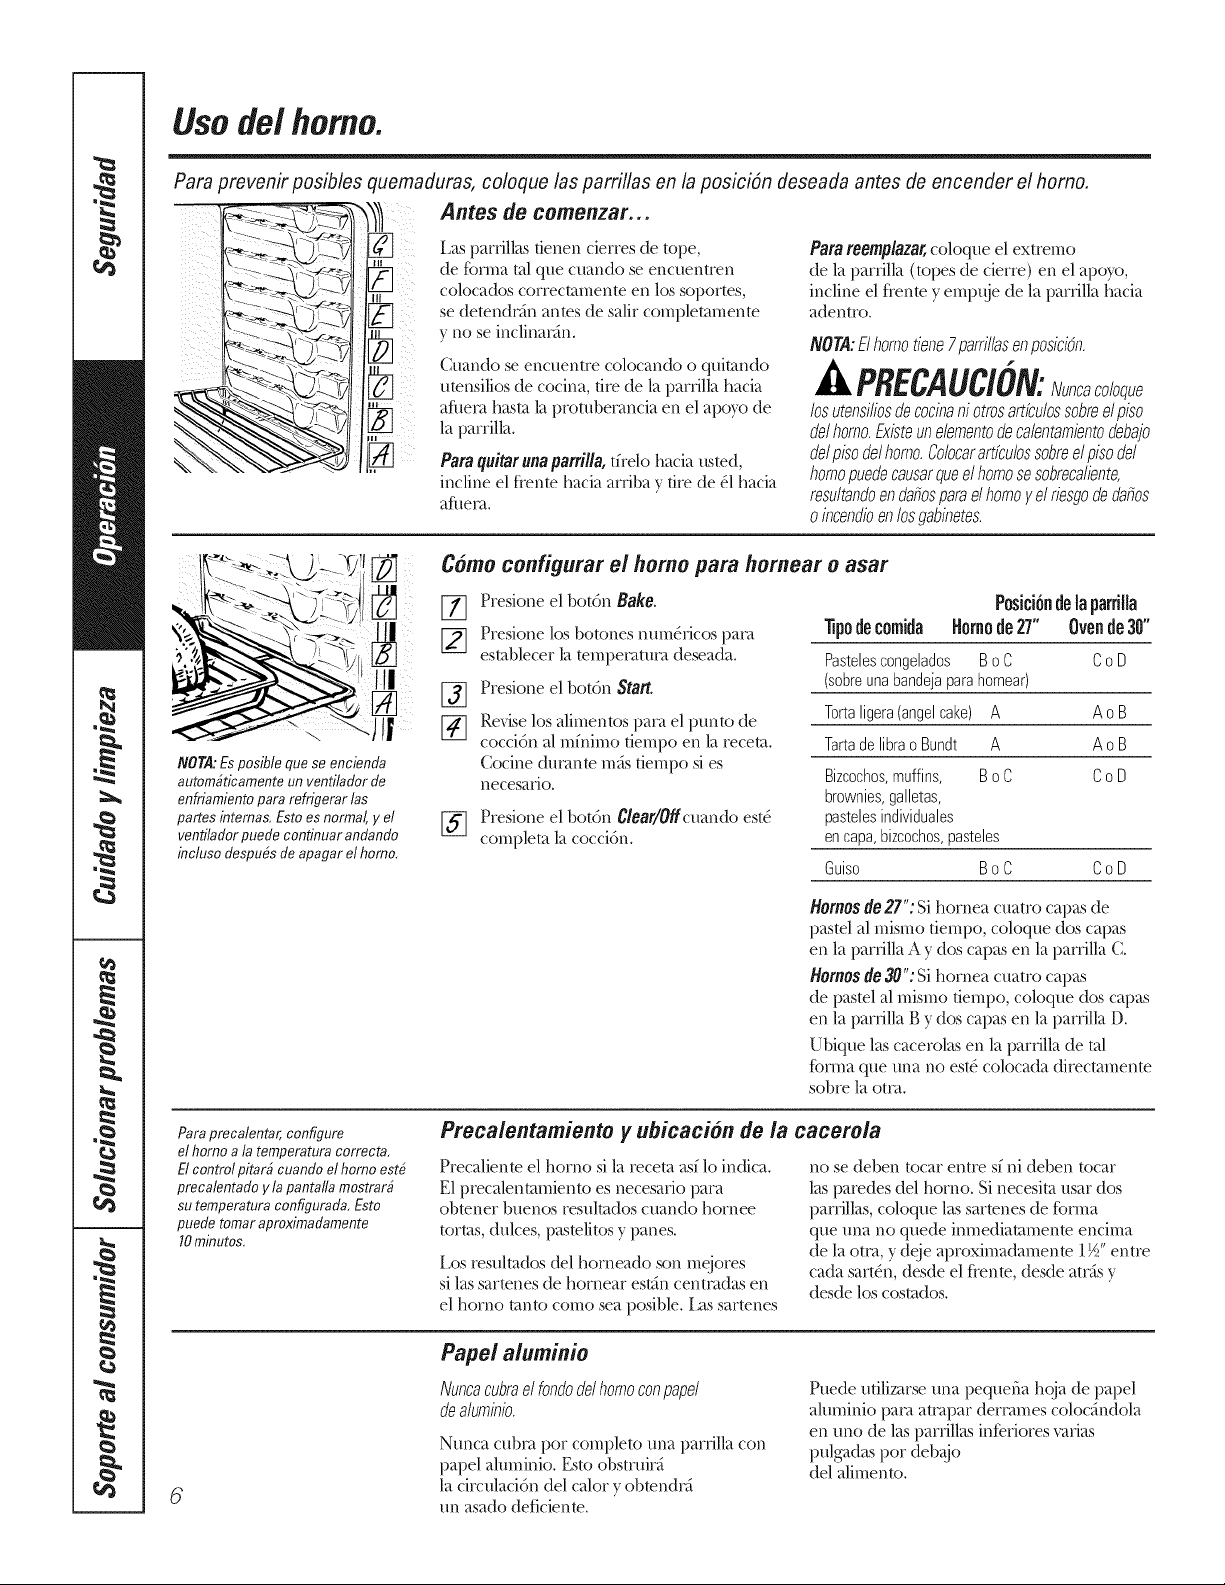
Usode/homo.
Para prevenir posibles quemaduras, coloque /as parrillas en la posici6n deseada antes de encender el horno.
fl
Z H/N
Antes de comenzar. . ,
Las panfillas denen cierres de tope,
de fbnna tal que cuando se encuentren
colocados correctamente en los soi)ortes,
se detend_"An antes de salir completamente
y no se inclinm"An.
Cuando se encuentre colocando o quitando
utensilios de cocina, fire de la par_illa hacia
aflm_>_ has/a la i)rombe_>mcia en el apoyo de
la pmTilla.
Para quitar una parrilla, tflelo hacia usted,
incline el flente hacia arriba y tire de _1hacia
aft/eI_L
Para reemplazat coloque el extremo
de la parrilla (topes de cierre) en el apoy'o,
incline el flente y emp/ge de la pmTilla hacia
adentro.
NOTA:Elhomotiene7parrillasen posiciSn.
losuten$iliosdecocinani otrosartfculossobred pi$o
del homo.Existeun elementodecalentambntodebajo
delpiso delhomo.Colocarartfculossobreel pisodel
homopuedecausarqueel homosesobrecaliente,
resultandoen dafiospara elhomoyel riesgodedams
o incendioen losgabinetes.
NOTA:Es posible que se encienda
autom#ticamente un ventilador de
enfriamientopara refrigerar las
partes intemas, Esto esnormal, y el
ventiladorpuefle continuar anflando
incluso flespu#s de apagar el homo,
Como configurar e/homo pare homear o asar
Presione el bot6n Bake.
[_ Presione los botones nmn_cicos pm'a
establecer la teml)e_'atm'a deseada.
[_ Presione el bot6n Start.
[_ Revise los alimentos paca el punto de
cocci6n al mfnimo tiempo en la receta.
Cocine din'ante m_s tiempo si es
neces;-tFiO.
[_ Presione el bot6n C/ear/Offcu'ando est_
completa la cocci6n.
Posici6ndelaparfitla
"fipodecomida Homode27" Ovende30"
Pastelescongelados Bo C Co D
(sobreunabandejaparahornear)
Tortaligera(angelcake) A Ao B
Tartade librao Bundt A Ao B
Bizc0ch0s,muffins, B0 C C0 D
brownies,galletas,
pastelesindividuales
encapa,bizc0ch0s,pasteles
Guiso Bo C Co D
HOmOSde27": Si hornea cuatro capas de
pastel al mismo fiempo, coloque dos capas
en la par_illa A y (los capas en la par_illa C.
Hornosde 30": Si hornea cuatro capas
de pastel al mismo fiempo, coloque (bs capas
en la partilla g y (los capas en la partilla D.
Ubique las cacerolas en la pmTilla de tal
f_)_na que una no es/4 colocada direc/amente
sobre la ot_'a.
Para precalentar, configure
el homo a la temperatura correcta,
El controlpitarb cuando el homo est#
precalentaflo via pantalla mostrarb
su temperatura configurafla, Esto
puefle tomar aproximaflamente
10minutos.
Precalentamiento y ubicaci6n de la cacerola
Precaliente el homo si la receta asf lo in(tica.
E1 precalentamiento es necesmio para
obtener buenos resultados cuando homee
tortas, dulces, pastelitos y panes.
Los resulmdos del horneado son mejores
si las sartenes de hornear est;_n cent[vtdas en
el homo tanto como sea posible. [_ts sartenes
no se (leben tocar entre sf ni (leben tocar
las paredes del homo. Si necesim usar (los
parrillas, coloque las sarmnes de fonna
que una no quede imne(tiammenm encima
de la ouvt,y deje aproxima(tamenm 1½"entre
cada sart4n, desde el flenm, desde awAsy
desde los cosmdos.
6
Pape/ aluminio
Nuncacubraelfondodelhomoconpapel
dealuminio.
Nunca cub,'a pot completo una parrilla con
papel almnink). Es/o obstruica
la circulaci6n del calory obmn(h'a
un asado (teficienm.
Puede ufilizarse una pequefia h(_a de pal)el
almninio paca auvtpar den'ames coloc_ndola
en uno (te las parrillas inDfiores vmJas
pulgadas por (teb_o
del alimento.
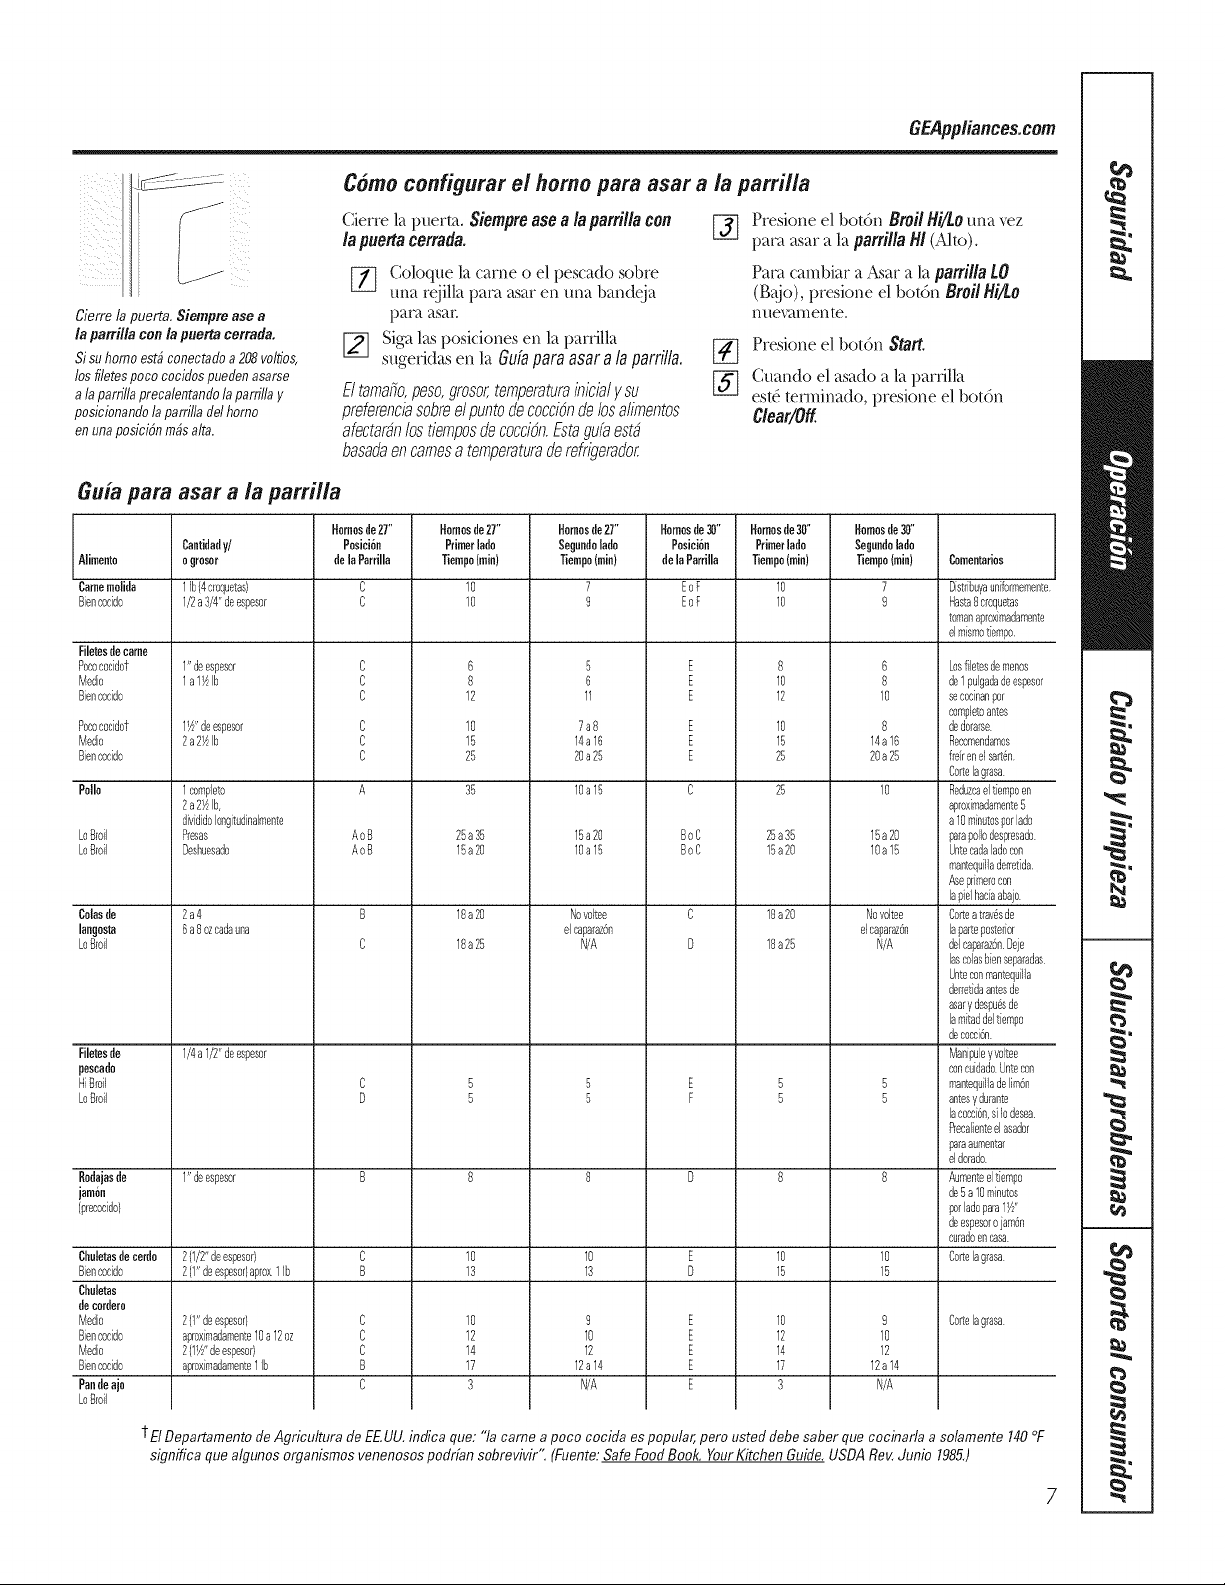
GEPpp/iances.com
/5
Cierre la puerto. $iempmase a
/a parri//a con/a puertocerrada.
Sisuhomoest#conectadoa 208voltios,
los filetespoco cocidospuedenasarse
a laparrillaprecalentandolaparrillaY
posicionandola pardlladel homo
en unaposiciSnm#salto.
C6mo configurar el homo para asar a la parrilla
Cierrel_tpuerto.Siempreasea/a parrilla con
/apuertacerrada.
[_ Coloque la came o el l)escado sobre
una rejilla l)a_t asar en una bandeja
Siga bts posi(iones en la l)_uTilla
sugefid_ts en l_t Guia para asar a la parrilla.
E/tornado,peso,grosor,temperaturainicia/y su
preferencbsobreelpuntodecocci#nde los alimentos
afecta@nlos tiemposdecocci#n.Estagufaesta
basadaen comesa temperaturaderefrigerador
[_ Presione el bot6n Broil Hi!tOuna vez
l)a_ asar a la parrilla HI (Alto).
Pa_'4 cambiar a A,sar a la parrilla tO
(g_jo), presione el bot6n Broil Hi/to
nue_u_ente.
[_ Presione el bot6n Start.
[_ C,4_mdoel _s_Mo_ l_ p_urill_t
est,. termin_Mo, presione el bot6n
C/ear/Off
Guia para asar a la parri/la
Homesde2T' Homosde2T' Hornoode2T' Homesde38" Homoode30" Hornosde30"
Cantidady/ Posioi6n Primerlado Segundolado Posioi6n Primeriado Segundolado
Aiimento ogrosor dela Parrilla Tiempo(min) Tiempo(rain) delaPan'ilia Tiempo(rain) Tiempo(rain) Comentafioo
Camemelida 1]b(4croquetas) C 10 7 EoF 10 7 Distribuyaunformemente
Biencocido 1/2a 3/4"deespesor C 10 9 EoF 10 9 Hasta8 croquetas
romanaproximadamente
elmismotiempo
Filetesdeoame
Poeocoeidot
Medio
Biencocido
%cocoeido$
Medio
Biencoeido
Polio
LoBroil
LoBroil
Colasde
langosta
LoBroil
Filetesde
pesoado
HiBroil
LoBroil
1"deespesor
lal_lb
1½"deespesor
2a2½1b
1compbto
2a2½1b,
dMdidoIongitudinalmente
Presas
Deshuesado
2a4
6a 8 ozcadauna
1/4a1/2"deespesor
C
C
C
C
C
C
AoB
AoB
B
C
6
8
12
lO
15
25
25a35
15a20
18a20
18a25
5
6
11
7a8
14a16
20a25
lOa15
15a20
lOa15
Novoltee
elcaparaz6n
N/A
E
E
E
E
E
E
BoC
BoC
C
D
8
10
12
lO
15
25
25a35
15a20
18a20
18a25
6
8
10
8
14a16
20a25
15a20
lOa15
Novoltee
elcaparaz6n
N/A
Rodajasde 1"deespesor B 8 8 D 8 8
jamon
(precocido)
Chu]etasdeoerdo 2(1/2"deespesor) C 10 10 E 10 10
Biencocido 2(1"deespesor)aprox1Ib B 13 13 D 15 15
Chuletas
decordero
'_.4edio 2(1"deespesor) C 10 9 E 10 9 Cortelagrasa
Biencocido aproximadamente10a 12oz C 12 10 E 12 10
'_.4edio 2(1½"deespesor) C 14 12 E 14 12
Biencoeido aproximadamente1Ib B 17 12a 14 E 17 12a 14
Pandeajo C 3 N/A E 3 N/A
LoBroil
Losfi]etesdemenos
de1pulgadadeespesor
secocinanper
completeantes
dedorarse
Recomendamos
frdrenelsart@
Cortelagrasa
Reduzcaeltiempoen
aproximadamente5
a10minutesperlade
parapoliodespresado
Untecadaladecon
mantequiflade_etida
Aseprimerocon
lapielhaciaabajo
Corteatrav6sde
lapareposterior
delcaparaz6nDeje
lascolasbienseparadas
Unteconmantequifla
derretidaantesde
asarydespu_sde
lamitaddeltiempo
decocci6n
Manipuleyvoltee
concuidadoUntecon
mantequifladelim6n
antesy durante
lacocci@,siIo@sea
Precalienteelasador
paraaumentar
eldorado
Aumenteeltiempo
de5a10minutes
perladepara1½"
deespesorojam6n
curadoencasa
CoRelagrasa
tEl Departamentode Agricultura de EEUU.indica que: "la came a pace cocida espopular,pore ustefl debe saber que cocinada a solamente 140°F
significa que algunos organismos venenosospoflrfan sobrevivir" (Fuente:Safe FoodBook. YourKitchen Guide.USDARev.Junio 1985.)
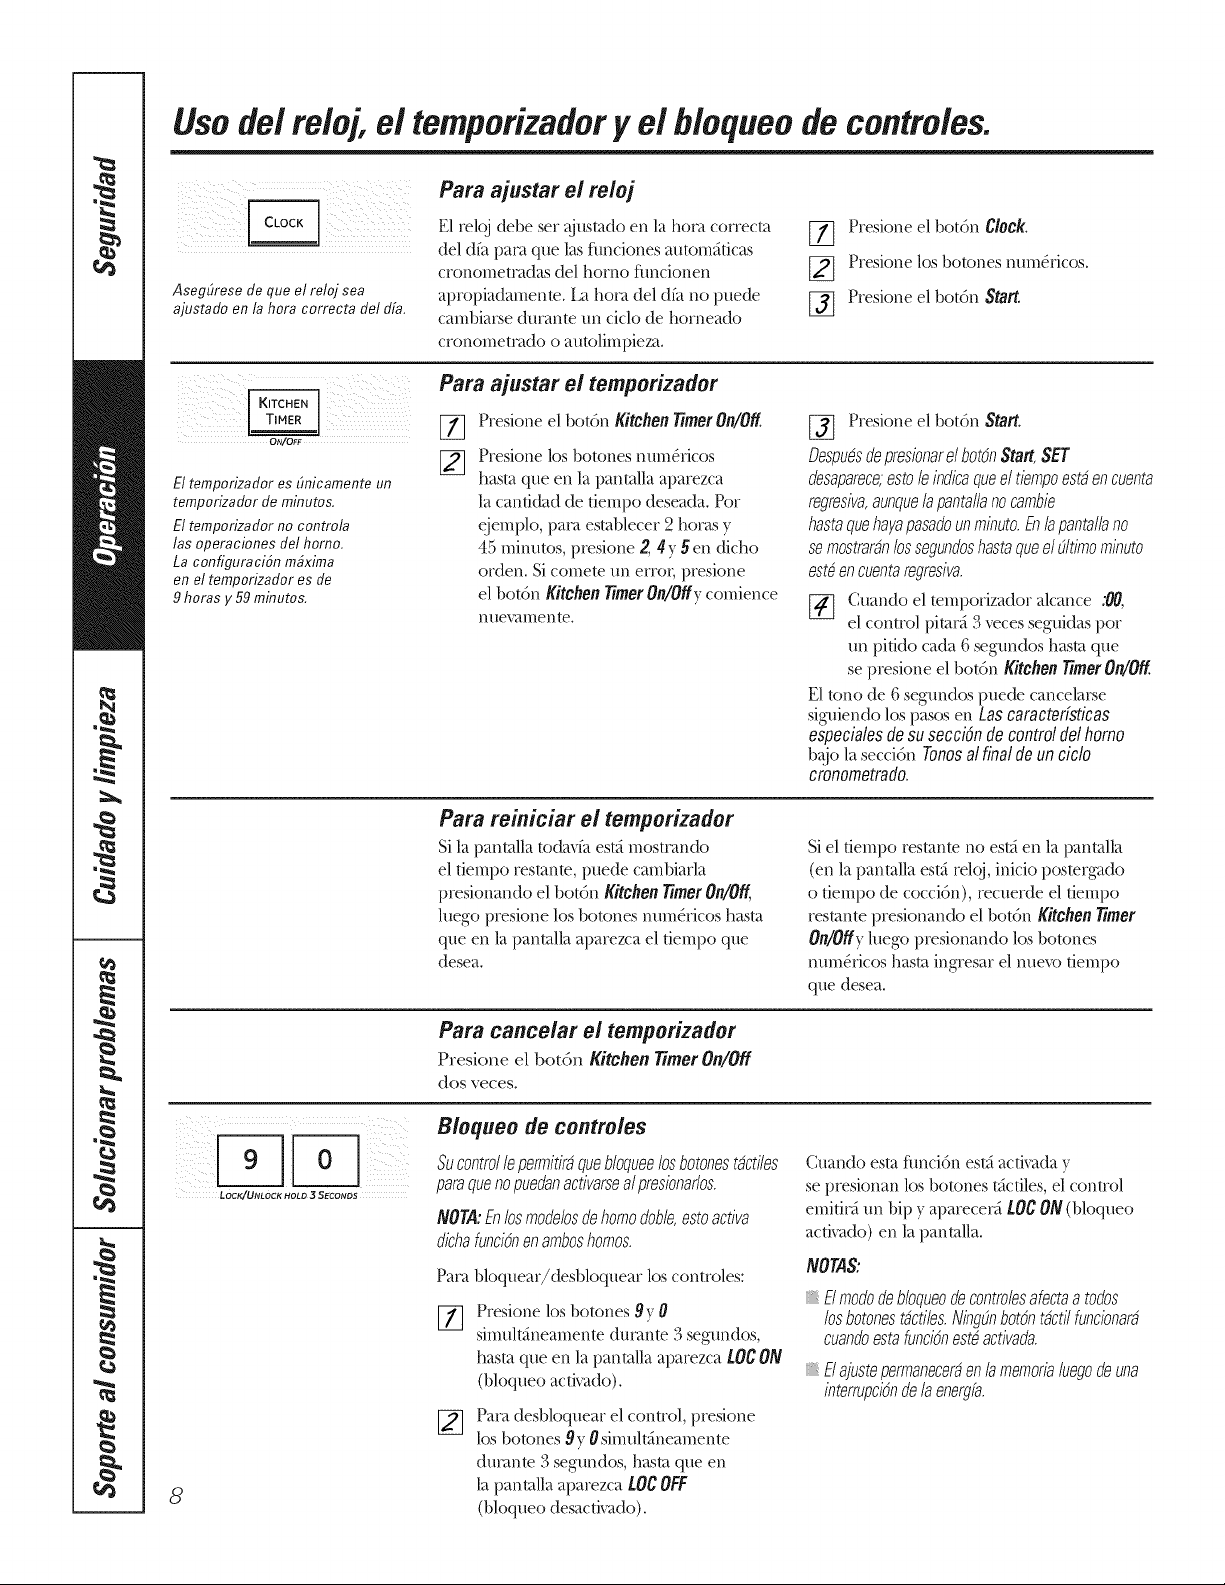
Use de/reloj, el temporizadory el b/oqueode contro/es.
AsegEJresefie que el relo] sea
ajustado en la hora correcta del d[a,
............. Para ajustar el reioj
del (trotpare que las flmciones autom_ticas
cronometmdas del homo fimcionen
apropiadamenm, ia hem del dfa no puede
cambiatse (tumnm un ciclo de hornea(b
cronometmdo o autolimpieza.
[77 Presione el botdn CI0ck.
[_ Presione los botones nmn&icos.
[_ Presione el botdn Start.
ON/OFF
El tempodzador es Emicamente un
tempodzador de minutos.
El tempodzador no controla
las operaciones flel homo,
La configuraciSn mdxima
en el tempodzador es de
9 horas y 59 minutos.
Para ajustar el temporizador
%
Presione el botdn Kitchentimer On/Off
Presione los botones hum&ices
basra queen la pantalla aparezca
la canfidad de tiempo deseada. Per
ejemplo, pare esmblecer 2 hems y
45 minutes, presione 2, 41y 5 en dicho
orden. Si comem un erroI; presione
el botdn Kitchen timer On/Offy comience
nuevamenm.
[_ Presione el botdn Start.
Despuesdepresionarel botchStart, SET
desaparece;estole indicaqueel tiempoestaen cuenta
regresiva,aunquela pantallanocambie
hastaquehayapasadounminuto.Enlapantallano
semostraranlossegundoshastaqueeldtimo minuto
est_encuentaregresiva.
Cuando el tempocizador alcance :00,
[_ el control [)imc_ 3 veces seguidas per
un pitido cada 6 segundos hasm que
se presione el botdn Kitchentimer On/Off
E1/one de 6 segundos puede cancelat_e
siguiendo los pasos en Las caractorfsficas
especiales de su seccidn de control del homo
b@_1_seccidn Tonosal final de un ciclo
cronometrado.
Para reiniciar el temporizador
Si lvtpantalla todavf_ es/>_mostmndo
el tiempo resmnm, imede cambiarla
presionando el botdn Kitchentimer On/Off,
luego presione los botones numS_Jcos hasm
queen la panmlla aparezca el fiempo que
desea.
Si el fiempo resmnte no es/>ien la panmlla
(en la panmlla est>i tel@ inicio pos/er_ado
o tiempo de coccidn), recuerde el fiempo
resmnte presionan(b el bot6n Kitchentimer
On/Off} luego presionando los botones
hum&ices hasm ingresar el nue_t_ tiempo
que desea.
Para cancelar el temporizador
Presione el botdn Kitchen timer On/Off
dos veces.
LOCK/UNLOCK HOLD 3 SECONDS
8
B/oqueo de controles
Sucontrolle permitiraquebloqueelosbotonestactiles
para quenopuedanactivarsealpresionarlos.
NON: Enlosmodelosde homodoble,estoactiva
dichafunci_nenamboshomos.
bloquear/desbloquear los controles:
Presione los botones 9}' 0
simultfineamente (hu>mte 3 segundos,
basra queen la pantalla aparezca LOCON
(bloqueo activado).
Pare desbloquear el control, presione
los botones g y 0 simultfineamente
(tumnte 3 segundos, basra queen
la pantalla aparezca LOC OFF
(bloqueo desactivado).
Cuando esm flmci6n es/>_activada y
se presionan los botones t>_cfiles,el control
emitir_ un bip y aparecec_ tOC ON (bloqueo
activ_do) en la panmlla.
NONE:
Elmododebloqueodecontrolesafectaatodos
losbotonestactiles.Ning(/nbot6ntactilfuncionara
cuandoestafunci6nestdactivada.
Elajustepermaneceraen lamemorialuegode una
interrupci_nde laenerg[a.
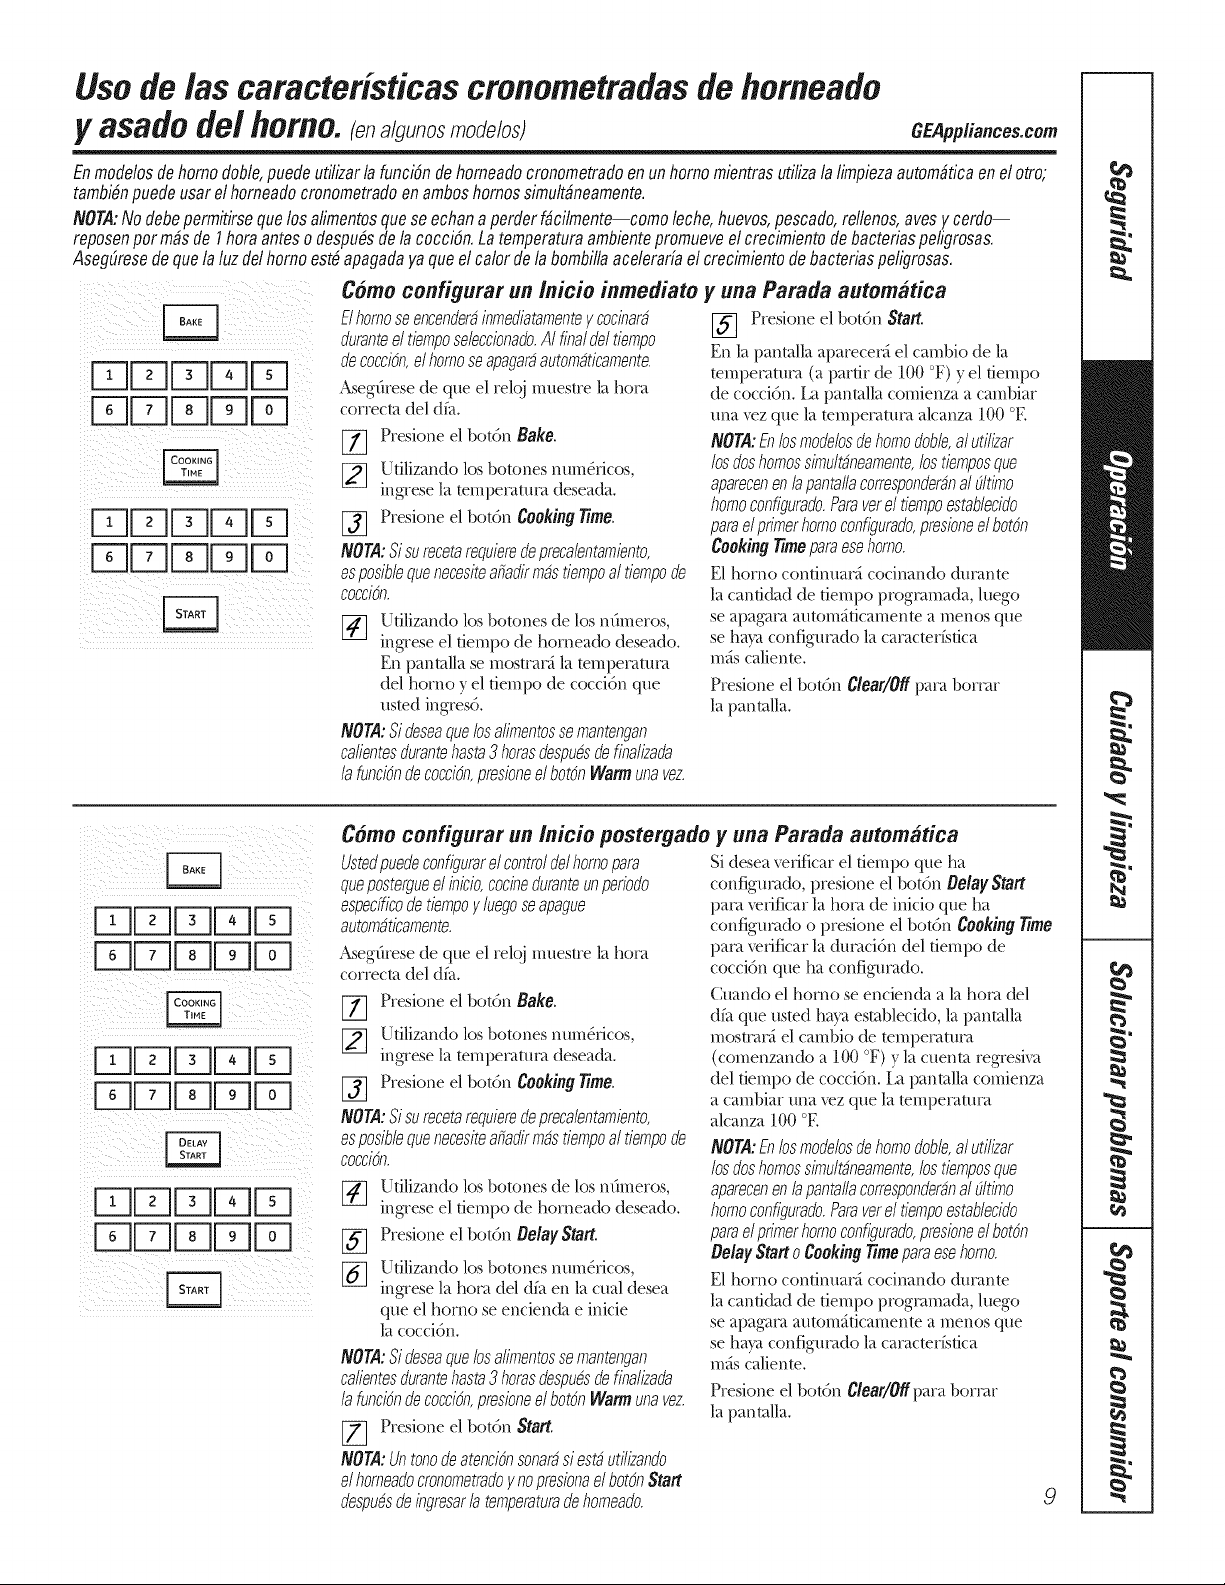
Usode/as caracteristicascmnometradasde homeado
y asadode/homo, a/gu,osmo /osj
GEPpp/iance&com
Enmodelosde homodoble,puedeutilizarla funci4ndehomeadocronometradoenunhomomientrasufilizala limpiezaautom#ficaenelotto;
tambi#npuedeusarelhomeadocronometradoenamboshomossimult#neamente.
NOT4:Nodebepermifirsequelosalimentosqueseechanaperderf#cilmente--comoleche,huevos,pescado,rellenos,ayesy cerdo--
reposenporm4sde I horaanteso despu#sdelacocci4n.Latemperaturaambientepromueveelcrecimientodebacteriaspeligrosas.
Asegd/resedequelaluzdelhomoest#apagadayaqueel calorde la bombillaacelerarfael crecimientodebacteriaspeligrosas.
iiiE-£?] Fq :/
ii _iii
_ / _ii _ _i _ _!i i_i__i_i_
Como configurar un /nicio inmediato
Elhomoseencenderainmediatamentey cocinara
duranteeltiemposeleccionado.AI finalde/fiempo
de cocci#n,el homoseapagaraautomaticamente.
Asegdrese de flue el rek_ muestre la ho_
correcta del dfa.
Presione el botdn Bake.
_] Utilizando los botones num_.ficos,
ingrese la temperature deseada.
[_ Presione el botdn Cooking Time.
• O_A: Si su 2ceta 2qule2 de p2ca/entamlento,
esposiblequenecesiteafiadirmastiempoal tiempode
cocci_n.
[_] Utilizando los botones de los ndmeros,
ingrese el tiempo de horneado deseado.
En panmlla se mostrac_i la temperature
del homo y el tiempo de cocci6n que
usmd ingres6.
NON: Sideseaquelosalimentossemantengan
calientesdurantehasta3 horasdespuesdefinalizada
la funci#nde cocci#n,presioneel botch Warmunavez.
y una Parada automMica
[_ Presione el botdn Start.
En la panmlla aparecev_i el cambio de la
mmpemmm (a partir de 100 °F) y el tiempo
de cocci6n, ia panmlla comienza a cambiar
una _z que la mmpetamm alcanza 100 °E
NON: Enlosmodelosde homodab& al utilizar
losdoshomossimuMneamente,lostiemposque
aparecenen /apanta//acorresponderanal dtimo
homoconfigurado.Paraverel tiempoestablecido
para elprimerhomoconfigurado,presioneelbotch
CookingTimeparaesehomo.
E1 horno continuac4 cocinando din>rote
la cantidad de tiempo progmmada, luego
se apag'ata autom_ticamenm a menos que
se haya configumdo la camcmrfstica
m_s calienm.
Presione el botdn Clear/Offpare bormr
la pantalla.
Como configurar un /nicio postergado
Ustedpuedeconfigurarel controldelhomopara
quepostergueel inicio,cocineduranteunperiodo
especfficode tiempoy luegoseapague
automaticamente.
Asegdrese de que el reko muestre la horn
correcta del dfa.
Z] Presione el botdn Bake.
_] Utilizando los botones num_.ricos,
ingrese la temperature deseada.
[_] Presione el botdn Cooking Time.
NON: Sisurecetarequferedeprecalentamiento,
esposiblequenecesiteafiadirmastiempoal tiempode
cocci5n.
Y]
%
%
Utilizando los botones de los nfimeros,
ingrese el tiempo de horneado deseado.
Presione el botdn Delay Start.
Utilizando los botones num_.ricos,
ingrese la horn del dfa en la cual desea
que el homo se encienda e inicie
la coccidn.
NOTA:Sideseaquelosalimentossemantengan
calientesdurantehasta3horasdespuesdefinalizada
lafunci6ndecocci6n,presioneelbot6nWarmunavez.
[_ Presione el botdn Start.
NOT,d:Untonodeatenci_nsonarasiestautilizando
elhomeadocronometradoynopresionaelbot5nStart
despudsdeingresarlatemperaturadehomeado.
y una Parada automMica
Si desea _fificar el tiempo que ha
configumdo, presione el botdn Delay Start
paca xefificar la horn de inicio que ha
configumdo o presione el botdn Cooking Time
pare xefificar la dumci6n del tiempo de
cocci6n que ha configumdo.
Cuando el homo se encienda a la horn del
dfa que usmd ha}vt esmblecido, la panmlla
mosttac4 el cambio de temi)etatum
(comenzando a 100 °F) y la cuenm regresiva
del fiempo de cocci6n, ia panmlla comienza
a cambiar una _ez que la mmpecamca
alcanza 100 °E
NOTA:Enlosmodelosde homodoble,al utilizar
losdoshomossimultaneamente,lostiemposque
aparecenen lapantallacorresponderanal dtimo
homoconfigurado.Paraverel tiempoestablecido
para elprimerhomoconfigurado,presioneelbotch
Delay Starto CookingTimeparaesehomo.
E1 horno continuacd cocinando dmvmte
la cantidad de tiempo progmmada, luego
se apa£am autom_ticamenm a menos que
se haya configumdo la camcmristica
m_s calienm.
Presione el botdn Clear/Offpara bormr
la pantalla.
9
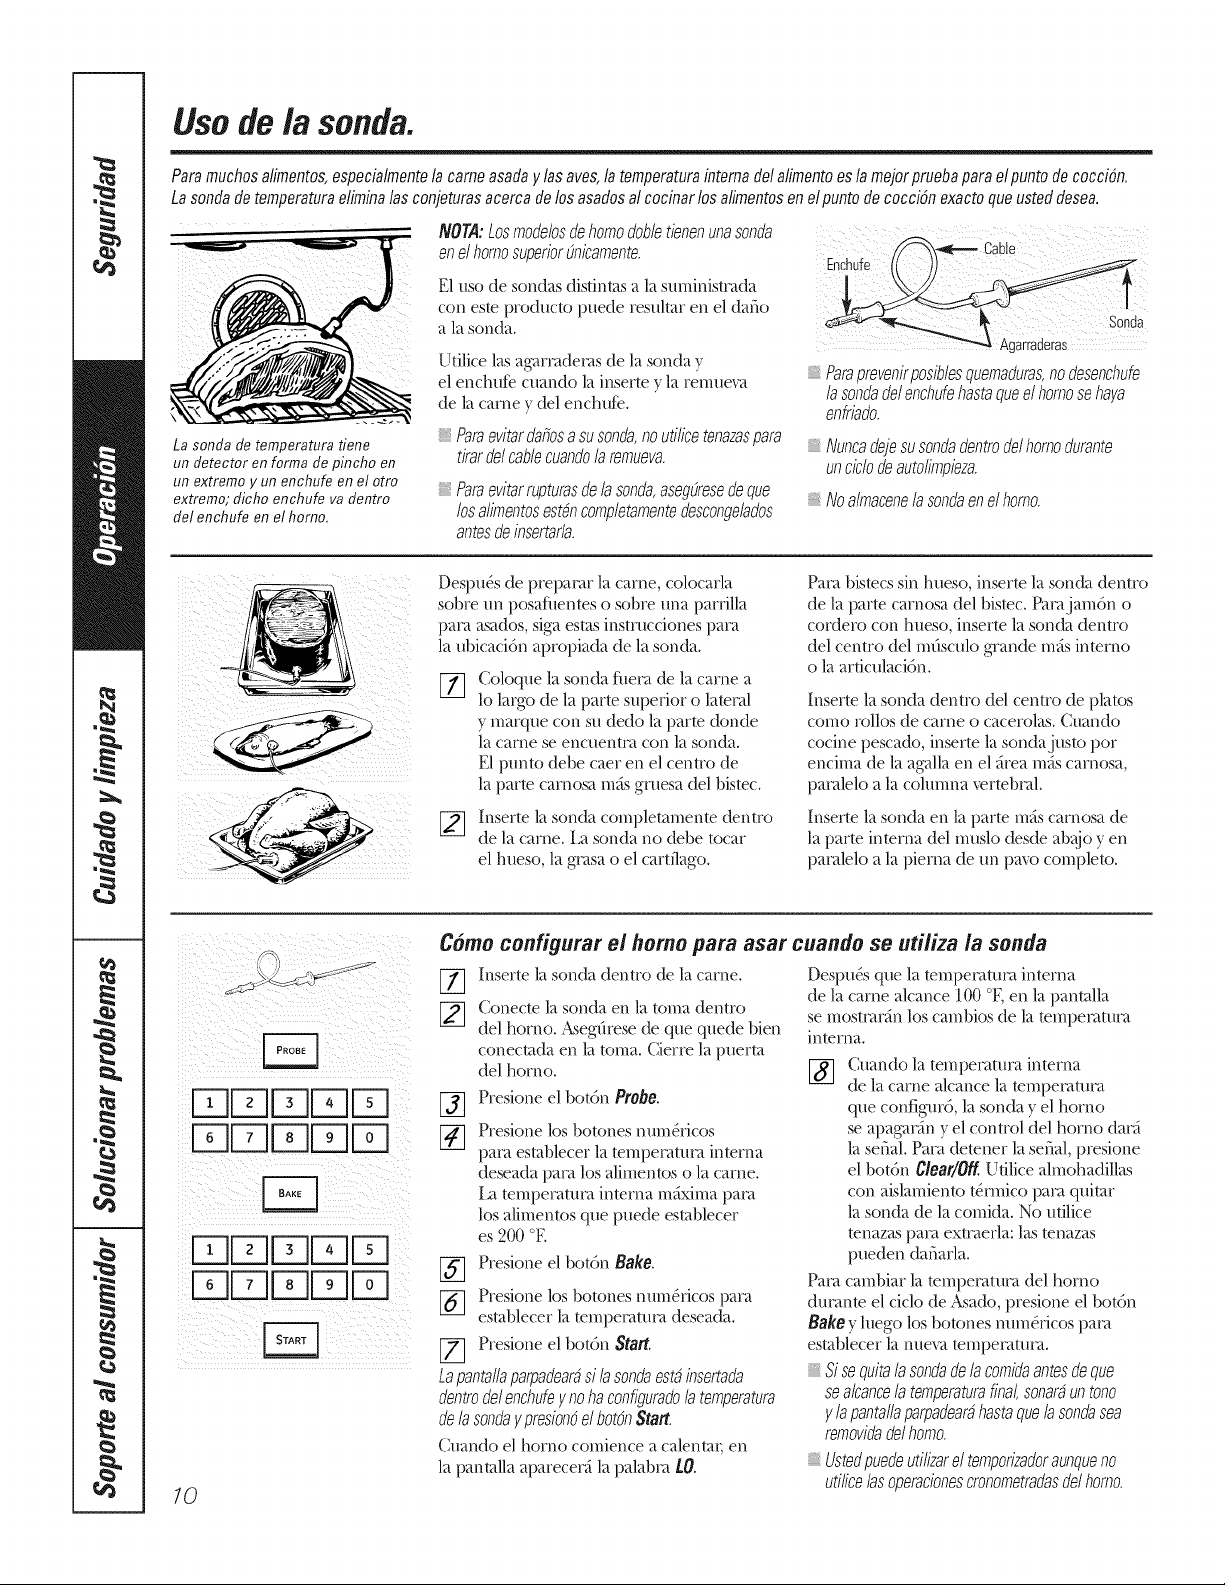
Usode/a sonda.
Paramuchosalimentos,especialmentela came asadaylasaves,la temperaturaintema de/alimentoesla mejorpruebaparaelpunto de cocciSn.
La sondadetemperaturaeliminalas conjeturasacerca de losasadosal cocinarlos alimentosen elpuntodecocciSnexactoqueusteddesea.
La sonda de temperatura tiene
un detector en forma de pincho en
un extremo y un enchufe en el otto
extremo; dicho enchufe va dentro
del enchufe en el homo,
NOTA:Losmodelosdehomodobletienenunasonda
enelhomosuperior(micamente.
E1uso de sondas distintas a la suminiswada
con este producto puede resultar en el dafio
a la sonda.
Utilice las agamtdecas de la sonda y
el enchute cuando la inserte y la remueva
de la came y del enchute.
Paraevitardafiosa susonda,no utilicetenazaspara
tirarde/cablecuandola remueva.
Paraevitarrupturasde lasonda,aseg(/resede que
losalimentosestdncompletamentedesconge/ados
antesdeinsertar/a.
Enchuf,
Sonda
Agarraderas
Paraprevenirposib/esquemaduras,nodesenchufe
lasondade/enchufehastaqueelhomosehava
enfriado.
Nuncadejesusondadentrode/homodurante
unciclodeautolimpieza.
Noa/macenela sondaen e/homo.
Despu& de prepacar la came, colocarla
sobre un posafilenms o sobre una paHilla
paca asados, siga esms instrucciones paca
la ubicaci6n apropiada de la sonda.
Coloque la sonda fi/eca de la came a
lo largo de la parte superior o latecal
y marque con su dedo la parm &rode
la came se encuenwa con la sonda.
E1punto debe caer en el centro de
la parm carnosa m_s gruesa del bismc.
[_ Inserte ]asonda completamente dentro
de la came. La sonda no debe tocar
el hueso, la gcasa o el cartflago.
Paca bistecs sin hueso, inserte la sonda dentro
de la parm carnosa del bismc. Pa_vtjam6n o
cordero con hueso, inserm la sonda dentro
del centro del mdsculo grande mils inmrno
o la ardculaci6n.
Inserte ]a sonda dentro del centro de platos
como rollos de came o cacerolas. Cuando
cocine pescado, inserm la sondajusto pot
encima de la agalla en el firea mils carnosa,
pacalelo a la cohmma _ermbcal.
Inserte la sonda en la parte milscarnosa de
la parte interna del muslo desde ab>!joyen
pacalelo a la pierna de un pavo completo.
Come configurar e/homo para asar cuando se uti/iza /a sonda
10
Inserte la sonda dentro de ]a came.
Conecte ]a sonda en ]a toma dentro
del homo. Asegdresede que quede bien
conectada en la toma. Cierre la puerta
del homo.
%
Presione el bot6n Probe.
Presione los botones num&icos
pa_vtesmblecer ]a tempeI>ttucainterna
deseada pm>tlos alimentos o la came.
[;t tempecatuca interna m(txima paca
los alimentos que puede esmblecer
es 200 °E
[-_ Presione el bot6n Bake.
[_ Presione los botones num&icos paca
establecer la tempecatuca deseada.
[_ Presione el bot6n Start.
Lapanta//aparpadearasi/asondaestainsertada
dentrode/enchufe_/nohaconfiguradolatemperatura
delasonda_/presion#elbotchStart.
Cuando el homo comience a calent;m en
]a pantalla aparecec_ la palabca LO.
Despu& que ]a tempe_vmwainterna
de la came alcance 100 °E en la panmlla
se mostcac_n los cambios de ]a mmpecatuca
interna.
[_ Cuando ]a tempeivttuca interna
de la came alcance la tempecatm'a
que configur6, la sonda y el homo
se apagac&_y el control del homo dac_
la serial.Paca demner la serial, presione
el bot6n Clear/Off.U/ilice ahnohadillas
con aislamiento/_'_nico paca quimr
la sonda de la comkta. No ufilice
tenazas paca exwaerla: las tenazas
pueden dafiarla.
Paca cambiar la mmpecatuca del homo
ducanm el ciclo de Asado, presione el bot6n
Bake y luego los botones num&icos paca
establecer ]a nueva/empecatuca.
Sisequitalasondadelacomidaantesdeque
sealcancela temperaturafinal,sonatauntono
Vlapantallaparpadearahastaquelasondasea
removidade/homo.
Ustedpuedeutilizarel temporizadoraunqueno
utilice/asoperacionescronometradasde/homo.
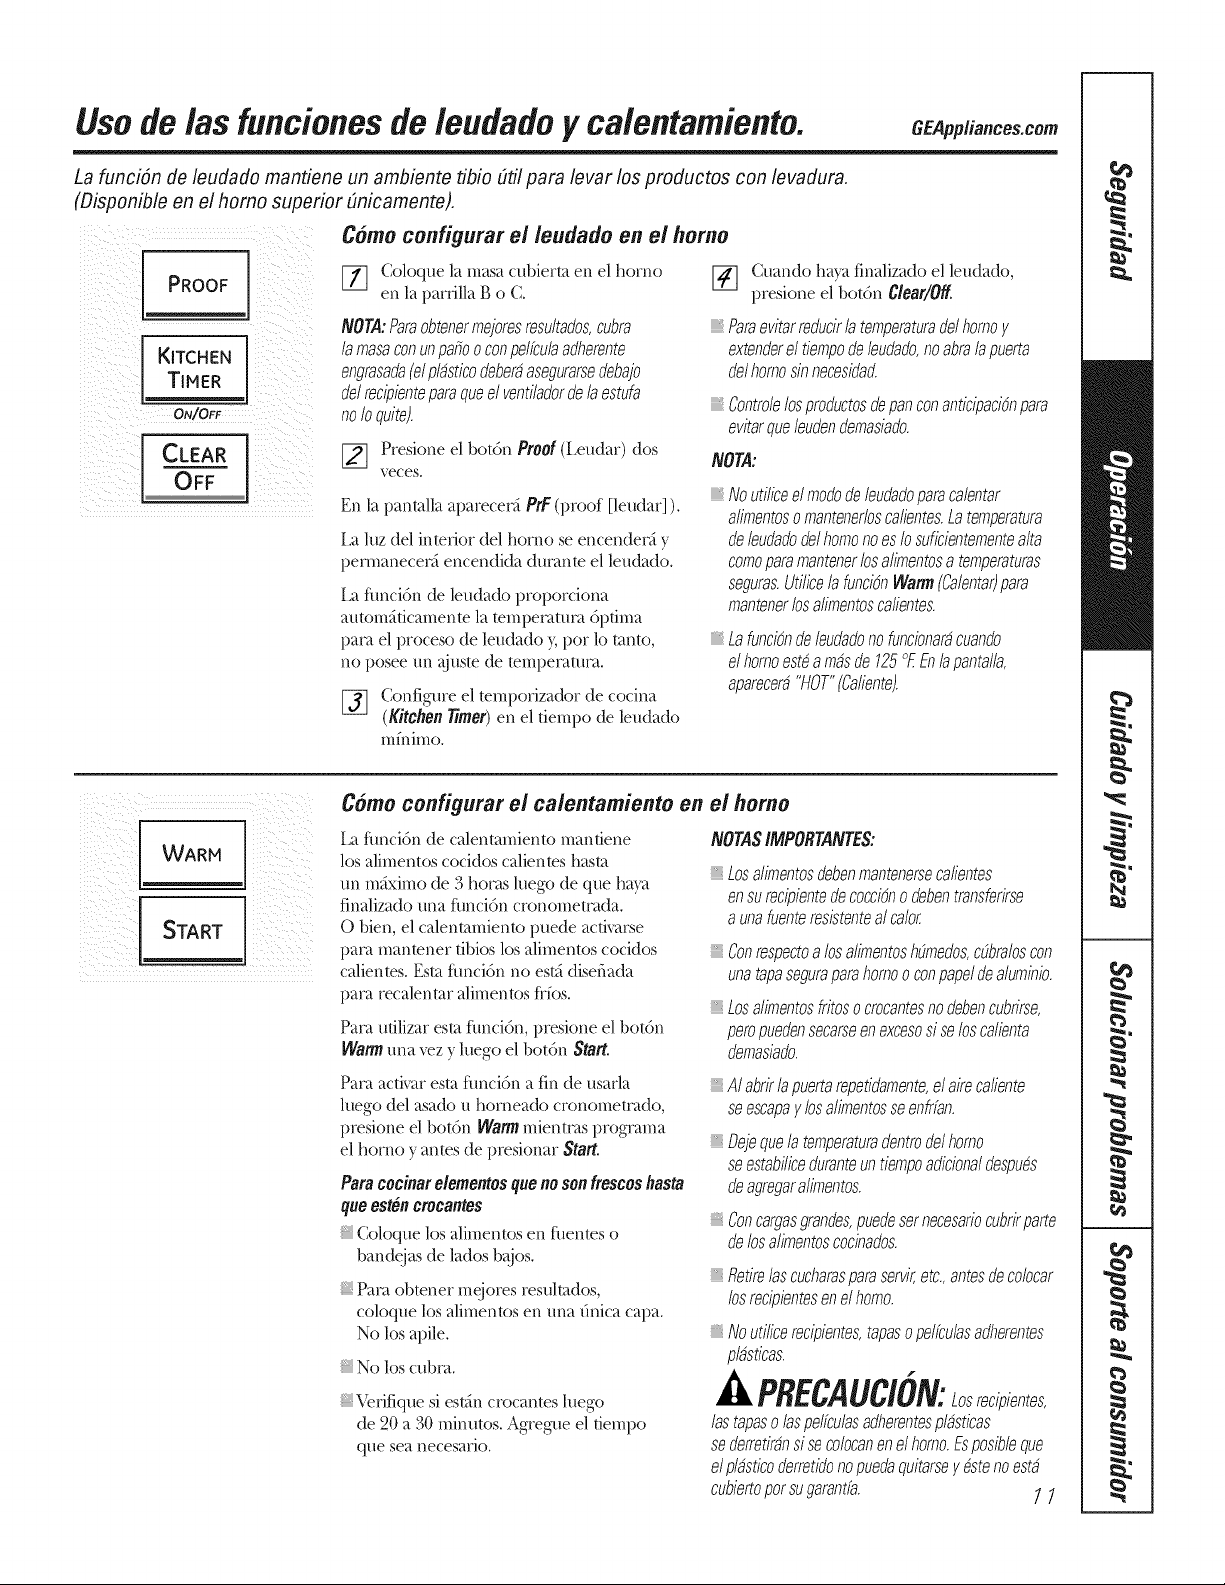
t/so de las funcionesde/eudado y calentamiento. C ap ,,ia,,ce .com
La funci6n de leudado manfiene un ambiente fibio 6til para levar los productos con levadura.
(Disponible en el homo superior 6nicamente).
i ¿¿i_i[ _
i ii i_
PROOF
[ KITCHEN
TIMER
ON/OFF
[ CLEAR
OFF
Como configurar el/eudado en el homo
[77 Coloque la masa cubierta en el homo
en la parfilla B o C
NOTA:Paraobtenermejoresresultados,cubra
la masaconunpatioo conpelfculaadherente
engrasada(elplasticodeberaasegurarsedebajo
de/recipienteparaqueel ventiladorde laestufa
no Ioquite).
[_] Presione el bot6n Proof (Leudar) (los
veces.
En la pantalla aparecec_i PrF (proof [leudar] ).
La luz del interior del homo se encendev_i y
pennanece_"_ encendkta dm_mte el leudado.
i;t flmci6n de leudado proporciona
autom5ficamente la temperature 6prima
i)a_>tel proceso de leudado y, pot lo tanto,
no posee un >Ous/e de temI)e*>m/_vt.
_] Configure el tempofizador de cocina
(Kitchen Timer) en el tiempo de leudado
m/nimo.
[_] Cuando ha)a finalizado el leudado,
presione el bot6n Clear/Off
Paraevitarreducirlatemperaturade/homoY
extenderel tiempodeleudado,noabralapuerta
delhomosinnecesidad.
Contm/e/ospmductosdepanconanticipaci_npara
evitarqueleudendemasiado.
NOTA:
Noutiticeel modode leudadoparacalentar
alimentosomantenerloscalientes.La temperatura
deleudadode/homonoesIo suficientementealta
comoparamantenerlosalimentosa temperaturas
seguras.Utiticela funci_nWarm(Calentar)para
mantenerlos alimentoscalientes.
Lafunci6nde/eudadonofuncionaracuando
elhomoestdamasde125OF.Enlapantalla,
aparecera"HOT"(Ca#ente).
WARM
START
C6mo configurar el calentamiento en el homo
i_t flmci6n de calentamiento mandene
los alimentos cocidos calientes hasta
un mfiximo de 3 ho_>tsluego de que ha)_t
finalizado una fimci6n cronomem_da.
0 bien, el calentamiento puede activa_3e
i)m_t mantener fibios los alimentos cocktos
calientes. Es/a flmci6n no estfi disefiada
pint recalentar alimentos fl-fos.
Paca ufilizar es/a flmci6n, presione el bot6n
Warmuna _z y luego el bot6n Start.
NOTASIMPORTANTES:
Losa/imentosdebenmantenerseca#entes
en surecipientede cocci6no (lebentransferirse
a unafuenteresistentealcalor
Conrespectoa/osa/imentosh(Jmedos,c(Jbra/oscon
unatapaseguraparahomoo conpapeldealuminio.
Losa/imentosfritoso cmcantesno debencubfirse,
peropuedensecarseen excesosi seloscatienta
demasiado.
Paca activar esta flmci6n a fin de usarla
luego del asado u horneado cronometcado,
presione el bot6n Warm mientcas progmma
el homo y antes de presionar Start,
Paracocinar elementosquenoson frescoshasta
queestencrocantes
Coloque los alimentos en fhentes o
bandejas de lados b_oos.
Paca obtener mejores resultados,
coloque k)s alimentos en una finica capa.
No los apile.
No los cubt>L
\._fifique si estfin crocantes luego
de 20 a % nfinutos. Agregue el tiempo
que sea necesafio.
A/abrirlapuertarepetidamente,e/aimca#ente
seescapay/osatimentosseenkfan.
Dejequelatemperaturadentmde/homo
seestabiticeduranteuntiempoadiciona/despuds
deagregaratimentos.
Concargasgrandes,puedesernecesariocubrirpare
de losatimentoscocinados.
Retire/ascucharasparaservketc.,antesdecolocar
losrecipientesenelhomo.
Noutilicerecipientes,tapasopelfculasadherentes
pbsticas.
PRECAUCION:Losre ipientes,
/astapaso/aspeffculasadherentesplasticas
sederretiransi secolocanenel homo.Esposibleque
elplasticoderretidonopuedaquitarsey _steno esta
cubiertopor sugarantfa. I I
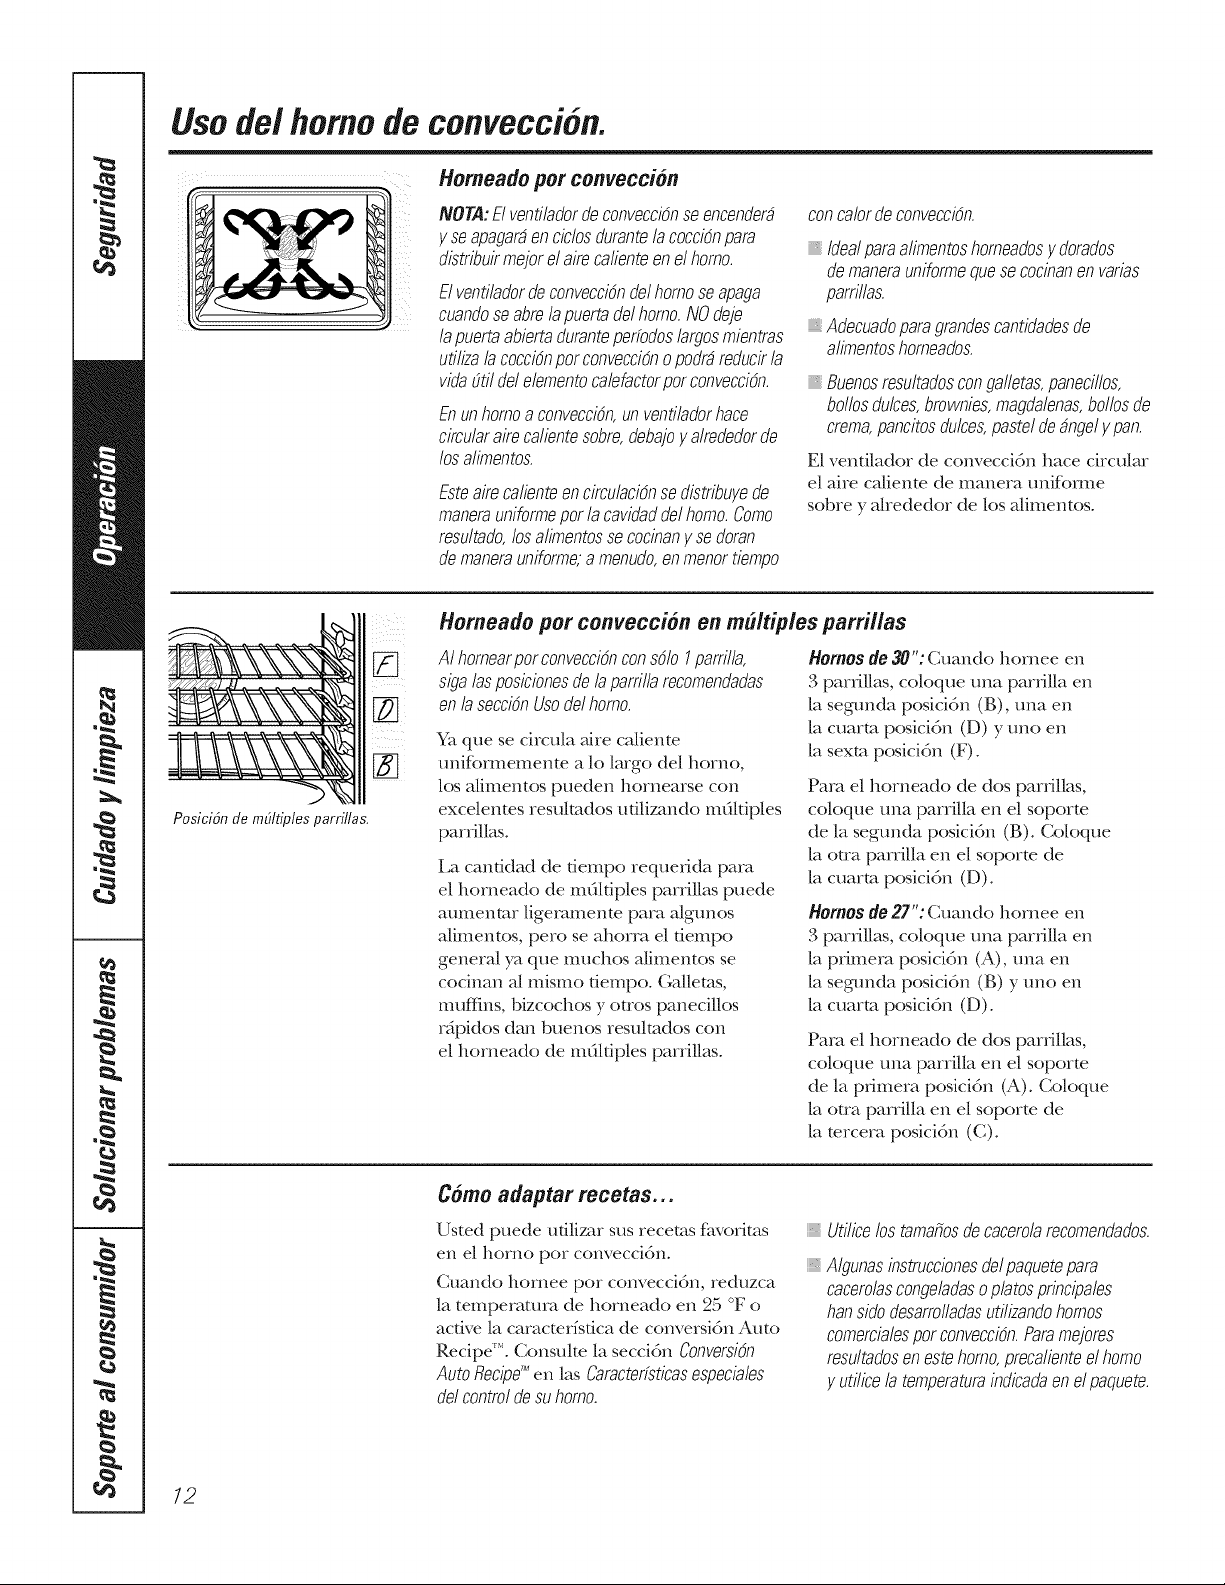
Usode/homo de convecci n.
Homeado pot conveccion
NOTA: El ventilador de convecciOnse encender_
g se apagar_en ciclos durante la cocciOnpare
distribuir meier el aire caliente en el homo.
ElvenfiladordeconvecciOndelhomoseapaga
cuandoseabrelapuertadelhomo.NOdeje
lapuertaabiertaduranteperfodoslargosmientras
utilizela cocciOnperconvecciOnopodrdreducirla
vide_fil delelementocalefactorporconvecciOn.
EnunhomoaconvecciOn,unventiladorhace
circularairecalientesobre,debajoy alrededorde
losalimentos.
EsteaimcalienteencirculaciOnsedistribuyede
manerauniformeper la cavidaddelhomo.Come
resultado,losalimentossecocinany sedoran
demanerauniforme,a menudo,enmenortiempo
con calor de convecciOn.
Idealparealiroentoshomeadosgdorados
demanerauniformequesecocinanen varies
parrillas.
Adecuadoparegrandescantidadesde
aliroentoshomeados.
Buenosresultadoscongafletas,paneci//os,
bellesdulces,brownies,magdalenes,bellesde
creme,pancitos&ices, pasteldedngelgpan.
E1 venfilador de convecci6n hace circular
el aire cafiente de manera tmifbmle
sobre y ahededor de los alimentos.
Posici6n de m61tiples parrillas.
¸
Homeado per convecci6n en m#itiples parrillas
AI homearporconvecciOnconsolo I parrilla,
sigalasposicionesdelaparrillarecomendadas
enlasecciOnUsedelhomo.
Ya que se circula ahe caliente
unifbrmemente a lo largo del homo,
10S a[ilIlentos pueden ]lornearse con
excelentes resulmdos ufilizando mfildples
pardllas.
i,a canddad de dempo requedda pare
el horneado de mOldples parrillas puede
aumenmr ligeramenm pare a/gunos
aUmentos, pete se ahorra el fiempo
general ya que touches a/imentos se
cocinan a/mismo fiempo. (;a/lems,
muffins, bizcochos y ouos panecillos
r_pidos dan buenos resulmdos con
el horneado de mOldples parrillas.
Homes 1to 30" : Cuando hornee en
3 parfillas, coloque una pardlla en
la segm_da posicidn (B), una en
la cuarm posicidn (D) y uno en
la sexm posicidn (F).
Pare el horneado de dos panillas,
coloque una panilia en el soporte
de la segtmda posicidn (B). Coloque
la oua parrilla en el soporm de
la cuarm posicidn (D).
Homos do 27": Cuando hornee en
3 pardllas, coloque una pardlla en
la primem posicidn (A), una en
la segmlda posicidn (B) y uno en
la cuarm posicidn (D).
Pare el horneado de dos panillas,
coloque una parrilla en el soporte
de la pdmera posicidn (A). Coloque
la otra parrilla en el soporm de
la mrcem posicidn (C).
Come adaptar recetas...
Usted puede ufilizar sus recetas fiworitas
en el homo per conveccidn.
Cuando hornee per conveccidn, reduzca
la temperature de horneado en 25 °F o
active la caracmrfsfica de conversidn Auto
Recipe". Consulte la seccidn ConversiOn
Auto Recipg_en las Caracterfsticasespeciales
del control de su homo.
Utificelos tamafiosdecacerolarecomendados.
Algunasinstruccionesdelpaquetepare
cacerolascongeladasoplatesprincipales
hansidedesarrolladasutilizandohomes
comercialesperconvecciOn.Paremejores
resultadosenestehomo,precalienteel homo
y utilicelatemperatureindicadaenelpaquete.
12
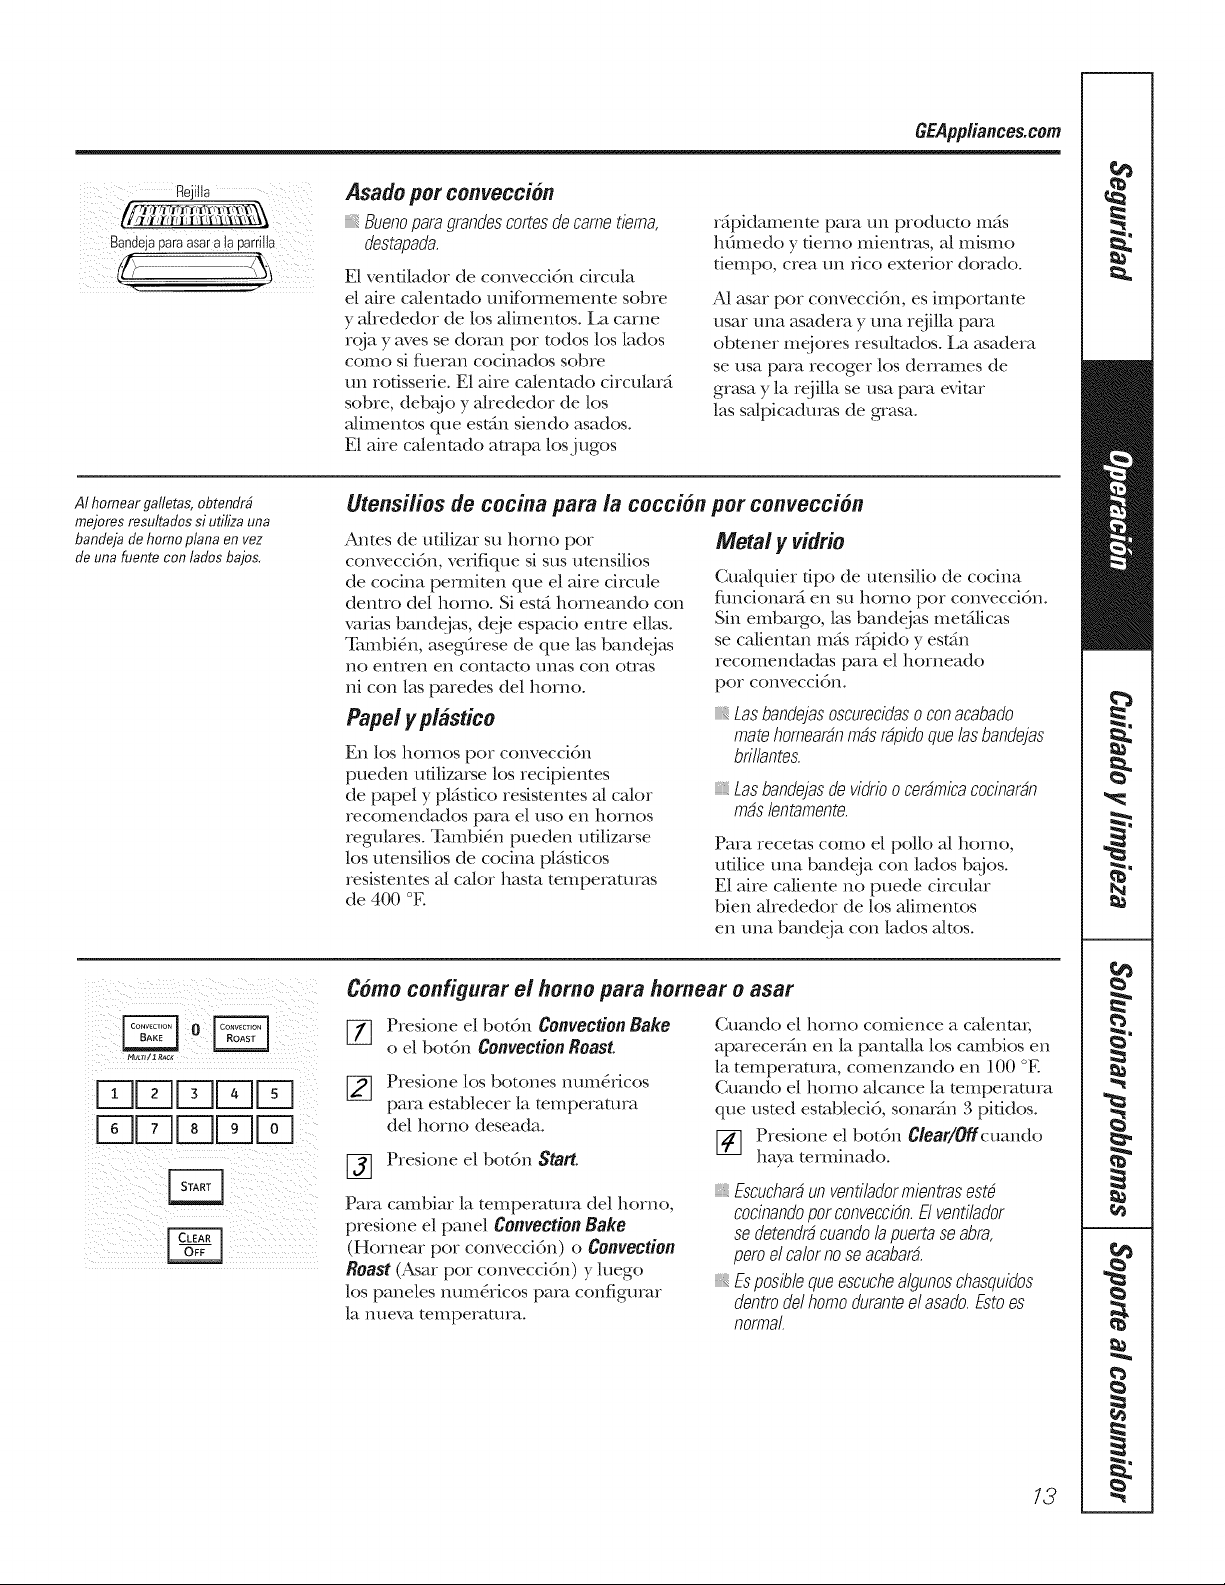
GEPpp/iance&com
Rejilla
r/l_. ......
Bandejaparaasara taparriiia
Asado per conveccion
Buenopara grandescortes de came tiema,
destapada.
E1 vendlador de convecci6n circula
el ahe calenmdo uniff_rmemente sobre
y Mrededor de los Mimentos. La carrie
rQja y ayes se doran per redes los lades
come si flmran cocinados sobre
un rotisserie. E1 aire ca/enmdo circulaM
sobre, deb_io y ahededor de los
aliI_aentos que est_in siendo asados.
E1 aire cMenmdo atrapa los j ugos
r_ipidamente para un producto m_is
hfimedo y tierno mientras, al Hlislno
tiempo, crea un _1co exterior dorado°
A1 asar per conveccidn, es impormnte
usar tma asadera y tma reiilla pare
obmner meiores resulmdos. La asadem
se usa pare recoger los derrames de
gn_sa y la reiilla se usa pare evimr
las sa/picaduras de grasa.
AI homear ga//etas,obtendrb
mejores resultados si utilize una
bandeja de homo plane en vez
de una fuente con lades bajos.
Utensi/ios de cocina para /a coccion
Antes de udlizar su homo per
conveccidn, vedfique si sus umnsilios
de cocina pemflmn que el aire circule
dentro del homo. Si estfi horneando con
varies bandejas, deje espacio entre elias.
• m_bi&L asegmese de que las bandej_ks
no entren en conmcto unas con om_s
ni con las paredes del homo.
Papel y p/astico
En los homes per conveccidn
pueden utilizable los recipientes
tie papel y pkistico resismnms a/ca/or
recolllendados pare el USO ell hornos
regulates. Tambi&_ pueden ufilizarse
los utensilios de cocina plfisdcos
resistentes a/ca/or hasm temperatures
de 400 °K
por conveccion
Meta/ y vidrio
CuMquier ripe de utensilio de cocina
flmcionam en su homo per conveccidn.
Sin embargo, las band@is metfi/icas
se ca/ienmn mils Mpido y est_in
recomendadas pare el horneado
per conveccidn.
Lasbandejasoscurecidasoconacabado
matehomeardnmdsrdpidoque/asbandejas
brillantes.
Lasbandejasdevidrioo cerdmicacocinardn
mdslentamente.
Para recetas come el pollo M homo,
ufilice una bandeia con lades b_jos.
E1 aire calienm no puede circular
bien ahededor de los a/imentos
en una bandeja con lades altos.
HULr,/ 1RACK
K K DDD
K K DK D
Como configurar el homo para hornear o asar
[_ resione el botdn Convection Bake
o el botdn Convection Roast
I-_ Presione los botones hum&ices
para esmblecer la temperamra
del homo deseada.
Presione el botdn Start.
Pare cambiar la tempelatuia del homo,
presione el panel Convection Bake
(Hornear per conveccidn) o Convection
Roast (Asar per conveccidn) y luego
los paneles num&icos pare configumr
la nueva mmpemmm.
Cuando el homo comience a cMenm_;
aparecergn en la panm/la los cambios en
la temperature, comenzando en 100 °E
Cuando el homo a/cance la mmperamm
que usmd estableci6, sonaMn 3 piddos.
_-] Presione el botdn Clear/OClcuando
haya terminado.
Escuchardunventiladormientrasestd
cocinandoporconveccidn.Elventilador
se detendrdcuandolapuertaseabra,
peroelcalornoseacabard.
Esposiblequeescuchealgunoschasquidos
dentrode/homoduranteel asado.Estoes
normal
13
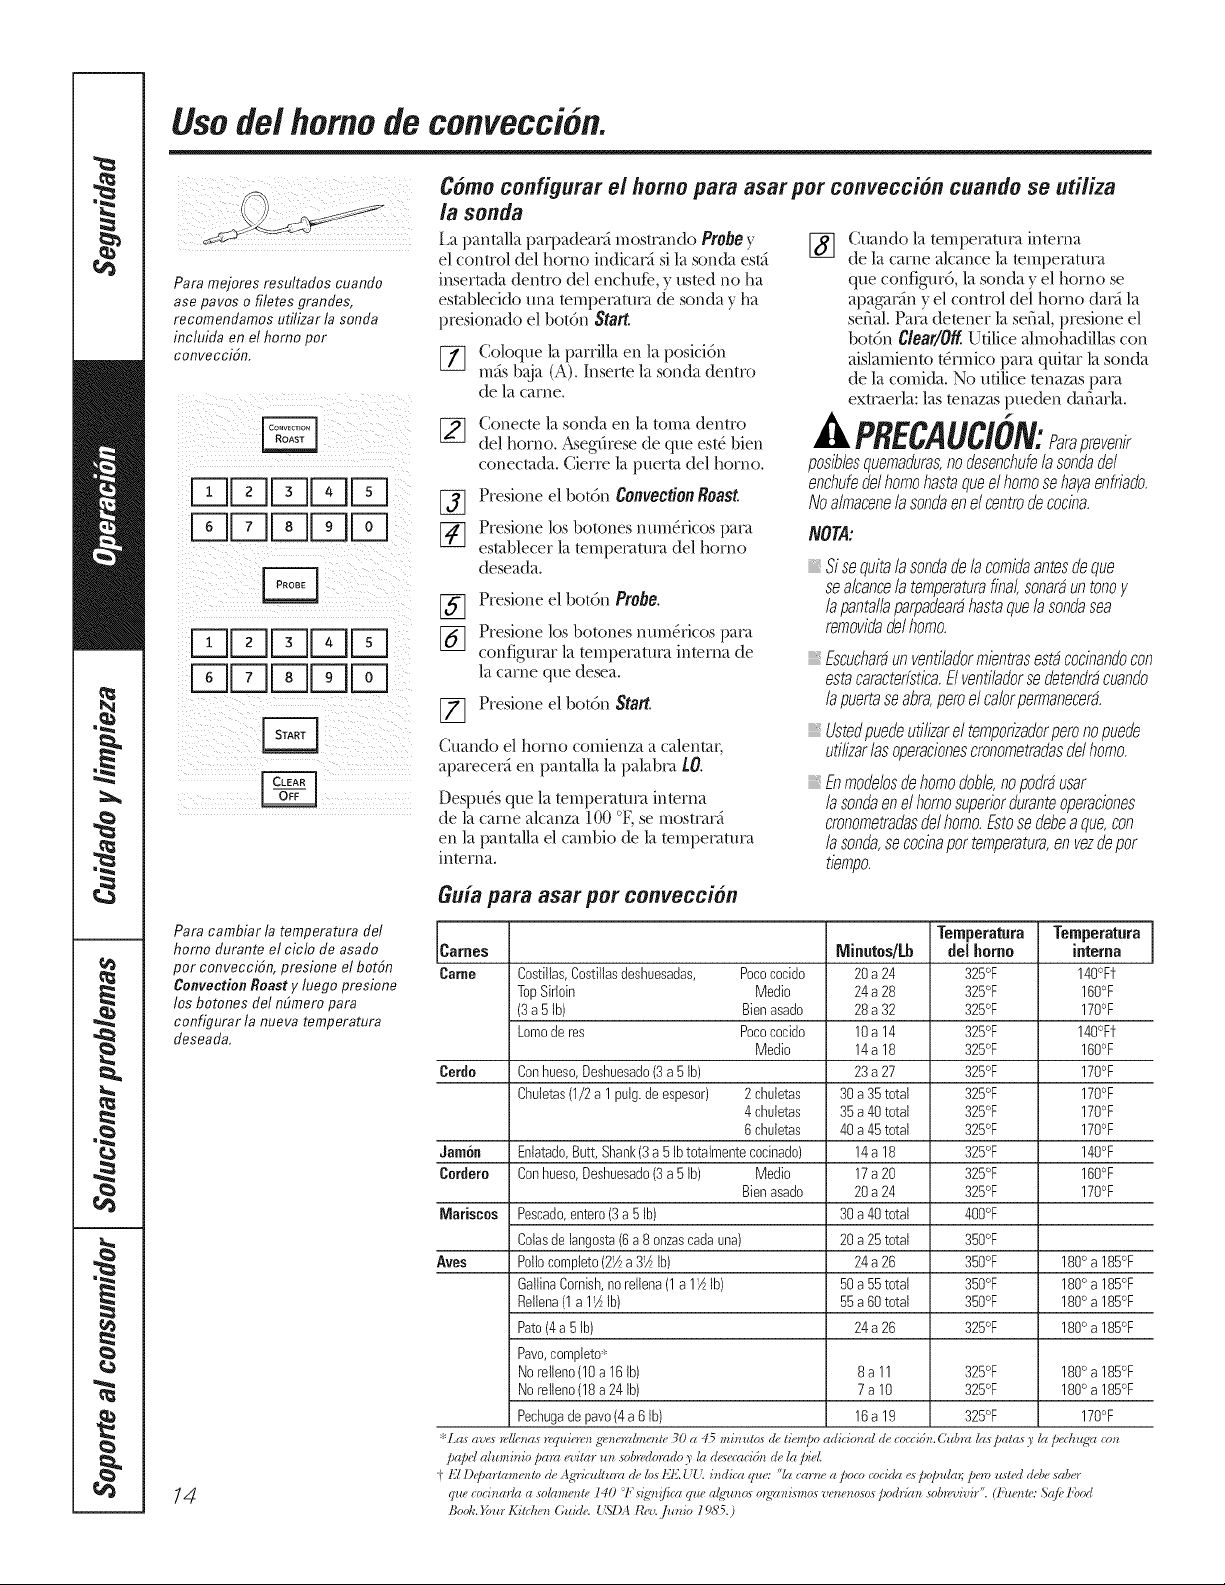
Use de/homo de convecci n.
il i i _ / ii _ iI
Para mejores resultados cuanflo
ase paves o filetes grandes,
recomendamos utilizar la sonda
incluifla en el homo per
convecciCn.
ULdUUJFq
UUUUJD
F:q
Para cambiar la temperatura del
homo flurante el ciclo fie asado
per convecciCn, presione el botCn
Convection Roast y luego presione
los botones de/nElmero para
configurar la nueva temperatura
fleseafla,
14
Como configurar el homo para asar por conveccion cuando se utiliza
la sonda
La pantalla parpadeac,_ mostcando Probe y
el control del homo indicavA si la sonda est_
insertada dentro del enchufe, y usted no ha
estableddo una tempe_ttm_ tie sonda y' ha
presionado el botch Start.
Coloque la parfilla en la posiciCn
ross b_oa (A). [nserte la sonda dentro
de la came.
Conecte la sonda en la toma dentro
del homo. Asegdrese de que es/4 bien
conec/ada. Cierre la puerta del homo.
Presione el bot6n Convection Roast.
_-_ Presione los botones mm]&icos pal>_
es/ablecer la tempe_>mn>_ del homo
deseada.
Presione el bot6n Probe.
Preskme los botones mm]&icos pal>_
configm>u la tempel>mJ_>_ interna de
la came que desea.
_] Presione el bot6n Start
Cuando el homo comienza a calental;
aparecec_ en pantalla la palabca tO.
Despu4s que la tempecatm>( interna
de la came alcanza 100 °K se mosmu'A
en la pantalla el cambio de la tempenmm_
interna.
Guia para asar pot conveccion
[_ uando la tempecatm_( interna
de la came alcance la tempecatuca
que configur6, la sonda y el homo se
apa_ac(in y el control del homo (tac(i la
serial. Pat;( detener la serial, presione el
botch Clear/Off, Ufilice almohadillas con
aislamiento t(_m]ico paca quimr la sonda
de la comi(h. No ufilice tenazas paca
exwaerla: las tenazas pueden (hriarla.
dk PRECIIUC/ON: arapre enir
posiblesquemaduras,nodesenchufela sondadel
enchufedelhomohastaqueelhomosehalloenfriado.
No almacene la sonda en el centre de cocina.
NOTA:
Sisequitalasondadela comidaantesdeque
sealcancelatemperaturafinal,sonorauntonej/
lapantallaparpadearahastaquelasondasea
removidadelhomo.
Escucharaun ventiladormientrasestacocinandocon
estacaracteffstica.Elventiladorse detendracuando
lapuertoseabra,poreelcalorpermanecera.
Ustedpuedeufilizareltemporizadorporenopuede
utilizarlosoperacionescmnometradasdelhomo.
fn modelosdehomodoble,nopedrousar
lasondaenelhomosuperiorduranteoperaciones
cronometradasdelhomo.Estosedebea que,con
lasonda,secocinapertemperatura,envezdeper
tiempo.
j Temperatura Temperatura
Carnes Minutos/Lb de[ home [nterna
Came Costillas,Costillasdeshuesadas, Pocococido 20 a 24 325°F 140°F1-
TopSirloin Medio 24 a 28 325°F 160°F
(3a 5 Ib) Bienasado 28 a 32 325°F 170°F
Lomode res Pocococido 10a 14 325°F 140°F1-
Medio 14a 18 325°F 160°F
Cerflo Conhueso,Deshuesado(3a 5 Ib) 23 a 27 325°F 170°F
Chuletas(1/2a 1 pulg.de espesor) 2 chuletas 30 a 35 total 325°F 170°F
4 chuletas 35 a 40 total 325°F 170°F
6 chuletas 40 a 45 total 325°F 170°F
JamCn Enlatado,Butt,Shank(3a 5 Ibtotalmentecocinado) 14a 18 325°F 140°F
Cordero Conhueso,Deshuesado(3a 5 Ib) Medio 17a 20 325°F 160°F
Bienasado 20 a 24 325°F 170°F
Marisces Pescado,entero(3a 5 Ib) 30 a 40 total 400°F
Colasde langosta(6a 8 onzascodauna) 20 a 25 total 350°F
Aves Poliocompteto(2½a 3_AIb) 24 a 26 350°F 180° a 185°F
GallinaCornish,no reilena(1 a I_AIb) 50a 55 total 350°F 1800a 185°F
Rellena(1a I_AIb) 55a 60 total 350°F 180° a 185°F
Pate(4 a 5 Ib) 24 a 26 325°F 180° a 185°F
Pave,compteto_
Norelleno(10 a 16 lb) 8 a 11 325°F 1800a 185°F
Norelleno(18 a 24 Ib) 7 a 10 325°F 180° a 185°F
Pechugade pave(4a 6 Ib) 16a 19 325°F 170°F
* Lm av_._ _Hlena._ _Wui(w_t g'(,noz_bn_,nte 30 a 45 mbmtos (h, ti_,mpo adiciona[ de cocz:iSn. (htbra/a._/)atas y la twchuqw _z,n
papal alu_ninio /)mzt _vitm un ._ob_,(lora(lz_ ) [a &.:_'caci&t de [a pieL
t l"d Departanu,nlo de Ag'ricultmz_ de 1o._t'_l[ [['. b_di_z_ que "[a ccn'ne a poco _)ci(la _.:_[_o/mlm; ])o_) usted ddw ._aber
qua, cocb_m/a a solame_te 140 'll"S_q'lQfi{Zl qtgg (g(._'l.tTR),'_ O)g'(lT_i_n_O1 *Utq/eTH),'d),'_ t)odl'[(lH sob_vivfl'". (Fuenl,v ,S>{/b t@ul
Booh. _bur Kitchen (hdd< { ',SI)A I{_'*s flmio 19,S'5.)
Use de/as caracteristicas cronometradas
para cocinarper convection. GE4pp/iances.com
Enmodelosde homodoble,puedeutilizarlafuncidndeasadouhomeadocronometradoen unhomomientrasutilizalalimpiezaautombficaen
elotto;tambi#npuedeusarelasadou homeadocronometradoenamboshornossimult#neamente.
Escuchar#unventiladormientrasest#cocinandocon estascaractefisticas.Elventiladorsedetendr#cuandolapuertaseabra,pero elcalorpermanecer#.
NON: Nodebepermitirsequelosalimentosqueseechanaperderbcilmente--comoleche,huevos,pescado,reflenos,avesy cerdo--reposenperm,s
de 1heraanteso despu#sde la cocci6n.Latemperaturaambientepromueveel crecimientodebacteriaspeligrosas.Aseg(Jresede quelaluzdel homoest#
apagadayaqueelcalordelabombillaacelerafiaelcrecimientodebacteriaspeligrosas.
DDDDD
DDDDD
DDDDD
DF]F DD
Come configurar un /nicio inmediato y una Parada atttomatica
Elhomoso oncendorbinmodiatamentey cocinarbduranteel
tiemposoloccionado.AI final c/eltiompode cocci6n,el homo
soapagarbautombticamente.
Aseg@ese de clue el reloi muestre la hera correcta
77 Plesione el botdn ConvectionBake o
Convection Roast.
_2] lesiOlle los botoiles llliiilelicos p_|l_l
establecer la temt)eratura del homo deseada.
[_] Plesione el botdn Cooking Time.
NORA:Sisu feces roquiorodeproca/ontamionto,of pos/b/o
quonocesitoafiadirrobstiompoal tiompode cocci6n.
P1 esione los be[giles 1)tlIIleIiC()S p}t521
configmar el tiempo de coccidn deseado.
E1mfnimo dempo de cocddn que puede
centigram esde ] mhmto. En la p;mtalla
apm ecer_ 1;ltemper;ran ;i del homo que
usted configm e y el dempo de cocddn que
haya ingresado.
NOTA: Si dosoa quo los a/imontos so mantongan
oa/iontos duranto hasta 3 betas deopubs de fina/izada
/a funoi6n de ooooi6n,presiono el botbn Warm una vez.
[_ Presione el botdn Start.
i a pantalla mostrm;i los cambios de temperature
(comem';mdo en ] 00 F) y el tiempo de coccidn.
i ,a pantalla comienza a cambiar tma vez que la
temperature alcam';l 100 E
NON: Enlos modolosdo homodoblo,al utilizarlos dos
homessimult_,neamente,los tiomposquoaparocenon/a
panta//acorrospondorbnal Oltimohomoconfigurado.Para
vetel tiompoestab/ocidopara olprimorhomoconfigurado,
presioneelpanel CookingTime paraesehomo.
E1 homo (ontimmr_ (ocinando dinante la
cantidad de tiempo programada, luego se apa_mi
alltOlilatiCalilellte a illellos qlle se haya COllI]gllmdO
la caracte£stica mils caliente.
Presione el botdn Claar/O_p'ara borrar la
pantalla si es necesario. Retire la comida del
homo. Recuerde, mmque el homo se apague
automfiticamente, los alimentos que se deian
ei1 el horno COlltiBIlal';_lBcocinfin(tose
(tespu_s que el homo se apague.
,lar /1 RACK
kl! II ILsIU-]
b UITI
IP IL ITI
II IUITI
IPlL ITI
LdUL [Z]
Come configurar un /nicio postergado y una Parada automMica
Ustedpuodeconfigurarel controlc/elhomopara quo
posterguoel inicio,cocinoduranteunporiodoospecffico
de tiempog /uegosoapaguoautombticamonte.
Asegdrese de que el reloi muestre la hera correcta
del (ti_.
[7] P_esione el botdn Convection Bake o
ConvectionRoast.
[_] resione los ])otoiles lllli_llelicos pal_l
establecer la temt)eratura del homo deseada.
[_ P_esione el 1)otdn Cooking Time.
NORA:$isu rocotarequiorodeproca/entamiento,
esposib/equo nocesiteafiadirrobstiompoal tiompo
decocci_n.
_--] Plesione los ])otolles 1]lllIleIiCOS p{tlEt
cor@gmar el tiemt)o de coccidr_ deseado.
P_esione el 1)otdn Delay Start.
[_ resione los botones 1]lllIlel'i(os t)_ll_t
establece_ la hora del dfa a la ¢ual desea que
el homo se er_cier@a v colnience a cochlm;
NorA: Si desoaque bs a/imentos oe mantengan
oal/entes durante hasta 3 horas despuds de fina/izada
la funoibn de ooooibn,preoiono el botbn Warm una vez.
Sidosoavorificarel tiompoquoha configurado,prosiono
el botbnDelay Start para vorificarla herade inicb quoha
configuradoo prosionoel botbnCooking Timepara vorificar
la duracibndol tiompodecoccibnquoha configurado.
[_ Presior_e el 1)otdr_ Start.
NOTA:sonarbun tonedeatencibnsi est,,utilizando
el homoadoo el asadocronomotradoy noprosionael botbn
Start dospubsde ingrosarla tomporaturadehorneadoo
asado.
Cuando el homo se encienda a la hera del dfa
que usted hav;_ establecido, la pantalla mostrani el
cambio de temperature (comenz_m(to a 100 F) y
el tiempo de coccidn, i ,apanmlla comienz_ a
cambiar tma vez que la temperature alcance 100 E
NON: Enlos modolosde homodoblo,al utilizarlos
doshomessimultbneamonte,los tiomposquoaparocen
en /apanta//acorrospondorbnal _/timohomoconfigurado.
Paravet el tiompoestab/ecidopara olprimerhomo
configurado,presioneelpanelDelay Start o CookingTime
paraosohomo.
E1 homo comFmwfi cocinando durar_te la
cantidad de tiempo programada, luego se apa_mi
alltOlilatiCalilellte a illellos qlle se haya COllI]gllnido
la caracte£stica mils caliente.
[_ Presione el botdn Claar/O_p'ara borrar la
pantalla si es necesario. Retire la comida del
homo. Recuerde, mmque el homo se apague
automfiticamente, los alimentos que se deian
ei1 el horno COlltiBilal}lB cocinfin(tose
despu_s que el homo se apague.
15
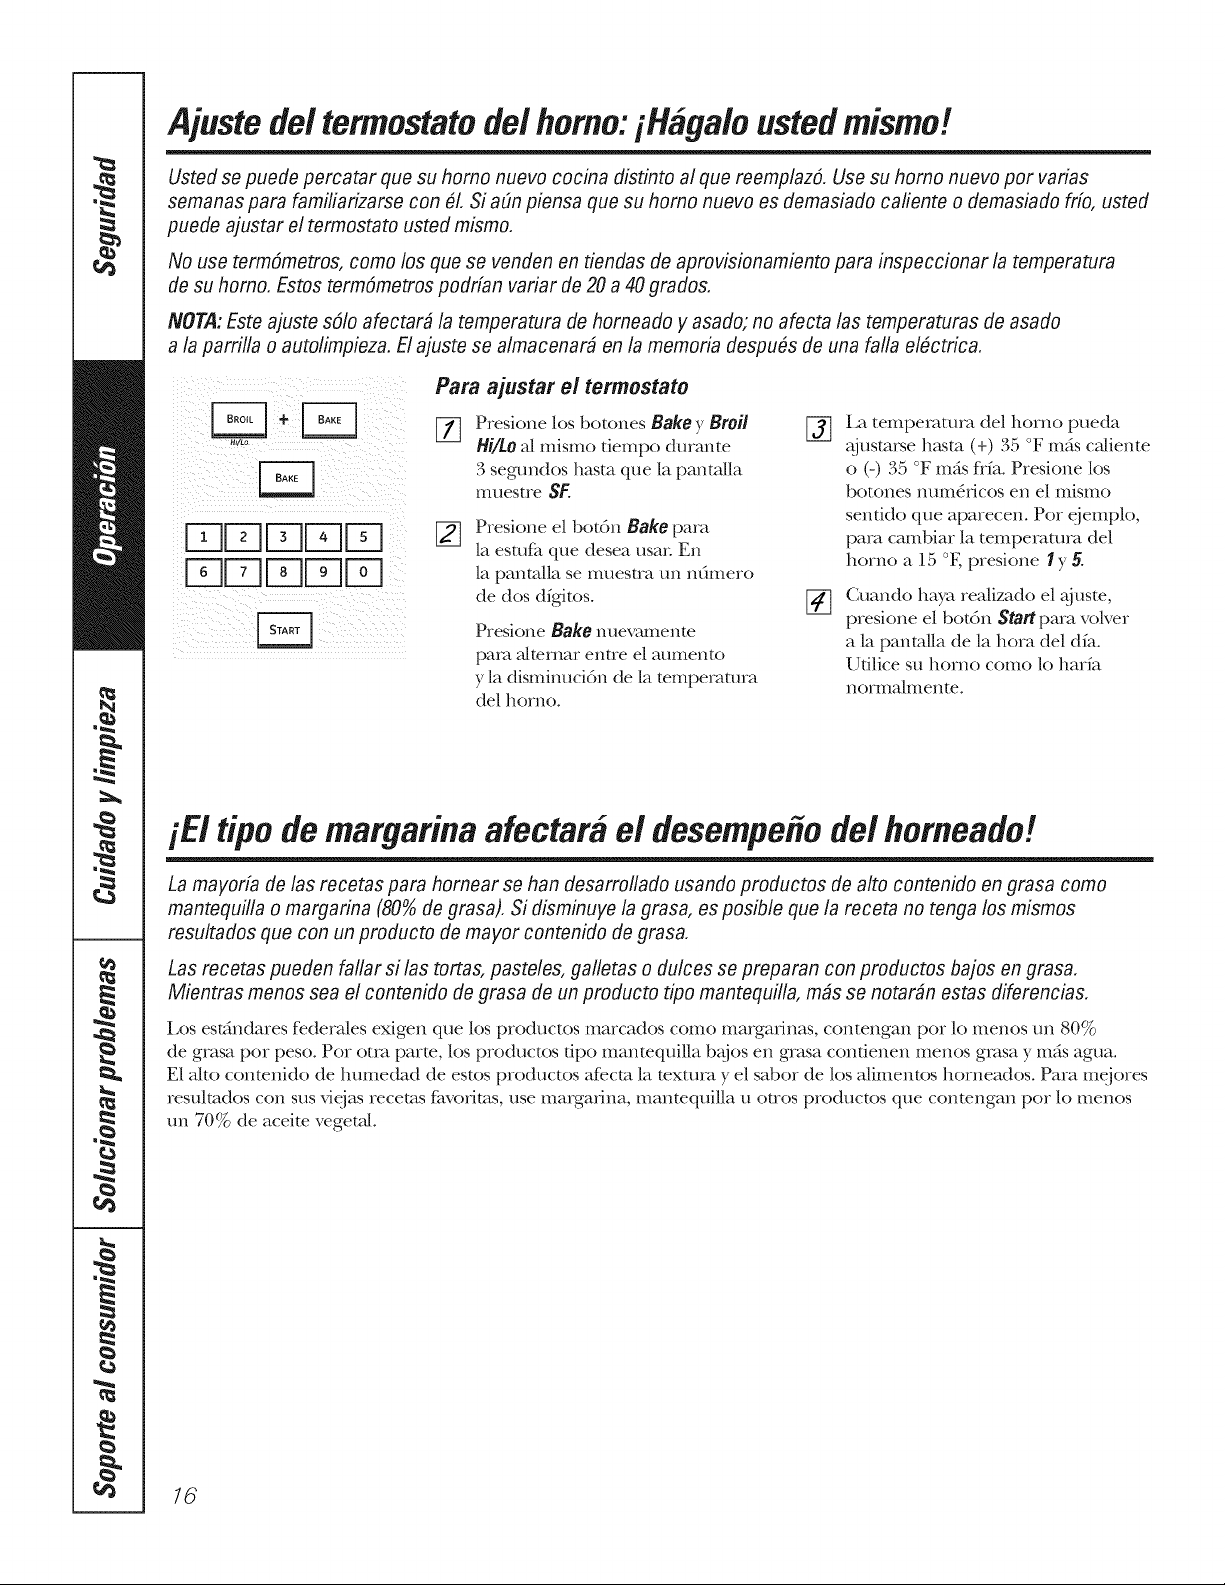
Ajustede/termostatode/homo:iHaga/o ustedmismo!
Usted se puede percatar que su homo nuevo cocina distinto al que reemplazS, Use su homo nuevo por varias
semanas para familiarizarse con #L Si adn piensa que su homo nuevo es demasiado cafiente o demasiado frio, usted
puede ajustar el termostato usted mismo,
No use termSmetros, como los que se venden en fiendas de aprovisionamiento para inspeccionar la temperatura
de su homo, Estos termSmetros podrfan variar de 20 a 40 grados,
NOTIi: Este ajuste sSIo afectar# la temperatura de homeado y asado; no afecta las temperaturas de asado
a la parrilla o autolimpieza. El ajuste se almacenar# en la memoria despufis de una falla elfictrica,
F:q
FqFqKYqFq
FqFqK3K]K3
Para ajustar el termostato
Presione los |)()tones Bake y Broil
Hi/tO al mismo tiempo durante
3 segundos hasm que h panmlla
muestre SK
Presione el bot&n Bake para
la estufa que desea usar En
la panmlla se muestra un rlfimero
de dos dfgitoso
Presione Bake nuevamente
para a/ternar entre el aumento
y la disminuci6n de la temperatura
del homo.
%
La temperamra del homo pueda
@lsmx_e h_ksm (+) 35 °F rods ca/iente
o (-) 35 °F m_is flfa. Presione los
botones num_ficos en el mismo
senfido que aparecen° Pot eiemplo,
pare cambiar la tempemmla del
homo a 15 °E presione I y 5.
Cuando haya rea[izado el _i uste,
presione el bot6n Start para volver
a la panm[la de la hora del dfa.
Ufilice su homo como lo harfa
n oiIIl_-dlIlell[e.
iE! tipo de margarina afectaM el desempe#ode/homeado!
La mayor& de las recetas para homear se han desarrol/ado usando productos de alto contenido en grasa como
mantequilla o margarina (80% de grasa), Si disminuye la grasa, es posible que la receta no tenga los mismos
resultados que con un producto de mayor contenido de grasa,
Los recetas pueden fallar si las tortas, paste&s, galletas o du/ces se preparan con productos bajos en grasa,
Mientras menos sea el contenido de grasa de un producto tipo mantequilla, m#s se notar#n estas diferencias,
Los est_indares federa[es exigen que los productos marcados como ma_gafinas, contengan pot lo menos un 80%
de grasa pot peso. Pot otto parm, los productos fipo manmquilla b_{jos en grasa confienen menos grasa y m_s agua.
E1 ako conmnido de humedad de estos productos afecm la mxmm y el sabot de los a/imentos horneadoso Para mejores
resulmdos con sus vieias recetas f_P_olJt_ts, use mmgafina, manmquilla u otros productos que conmngan pot lo menos
un 70% de aceim vegetal
16
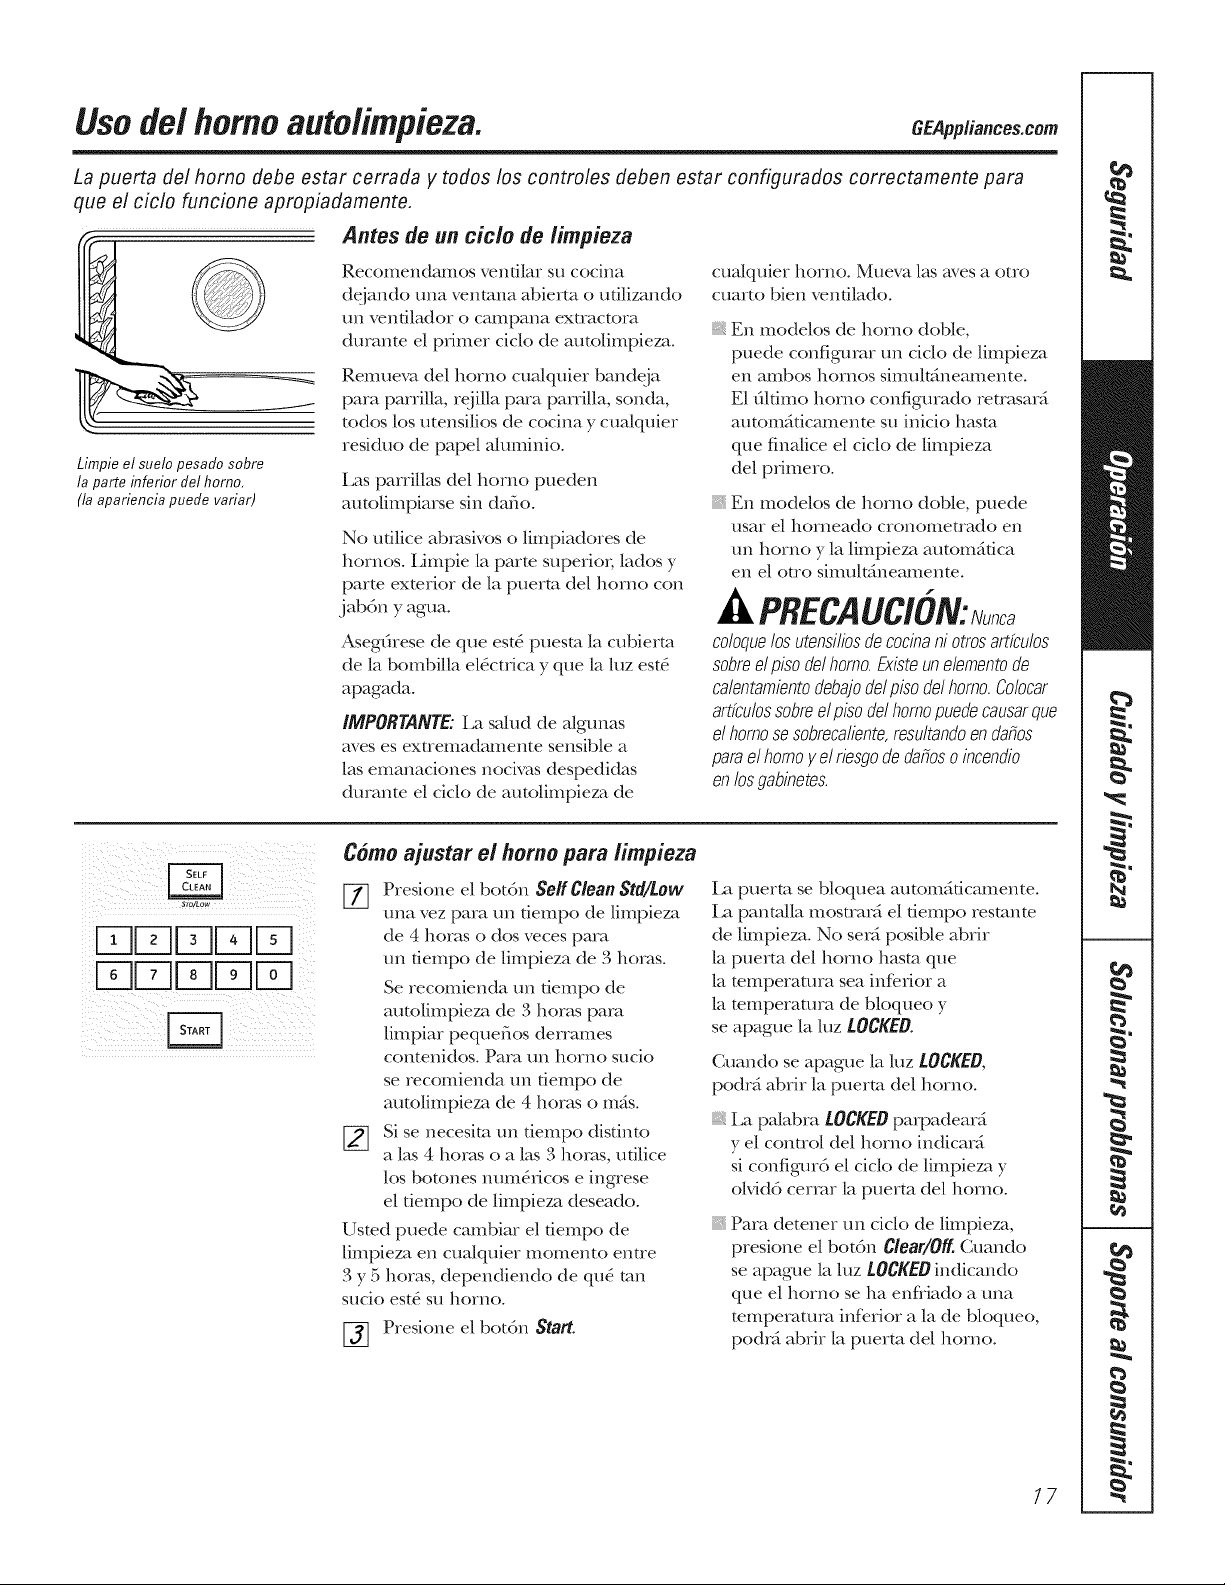
Usode/homo auto/impieza. GEapp/iances.com
La puerta del homo flebe estar cerrada y todos los contro/es deben estar configuraflos correctamente para
que el ciclo funcione apropiadamente.
Limpie el suelo pesaflo sobre
la parte inferior flel homo,
(la apariencia puefle variar)
Antes de un cicio de limpieza
Recomendamos ventilar su cocina
dejando una ventana abierm o ufilizando
un venfilador o campana extractora
dumnm el primer ciclo de autolimpieza.
Remueva del homo cua/quier bandeja
para parrilla, rejilla para parrilla, sonda,
todos los utensilios de cocina y cua/quier
residuo de papel a/uminio.
Las parrilkks del homo pueden
autolimpiarse sin dafio.
No udlice abrasivos o limpiadores de
hornos. Limpie la parm supericn; lados y
parm exmrior de la puerto del homo con
jabdn y agua.
Asegfirese de que est_ puesm la cubierm
de la bombilla el4ctfica y que la luz est4
apagada.
IMPORTANTE: La salud de algunas
ayes es extremadamente sensible a
las emanaciones nocixas despedidas
durante el ciclo de autolimpieza de
cualquier homo. Mueva las ayes a otto
cuarto bien venfiladoo
iii}iiiiii_
En modek_s de homo doble,
puede configumr un ciclo de limpieza
ell atllbos ]loInos sinltllt_tlleatllellteo
E1 6lfimo homo configurado reuasarfi
autom_ificamenm su inicio hasm
que finNice el ciclo de limpieza
del pfimero.
En modelos de homo doble, puede
tlsaI el horneado cronoIIletrado en
un homo y la limpieza autom_ifica
en el otto simult;ineamenm.
PnEcauc/bN: ,
coloquelos utensilios de cocina ni otros artfculos
sobre el piso de/homo. Existe un elemento de
calentamiento debajo del piso del homo. Colocar
artfculossobreel piso del homo puedecausarque
el homo se sobrecaliente,resultandoen dafios
para el homo y el riesgo de dafios o incendio
en los gabinetes.
Como ajustar el homo para iimpieza
[_ Presione el botdn SeffClean Std/Low
una vez pare un dempo de limpieza
de 4 horas o dos veces pare
un fiempo de limpieza de 3 horas.
Se recomienda un fiempo de
autolimpieza de 3 horas pare
limpiar pequefios derrames
contenidos. Pare un homo sucio
se recomienda un fiempo de
autolimpieza de 4 horas o mils.
[_ Si se necesim un tiempo distinto
alas 4 horas o alas 3 horas, ufilice
los botones num_ficos e ingrese
el fiempo de limpieza deseado.
Usmd puede cambiar el delD.po de
limpieza en cualquier momento entre
3 y 5 horas, dependiendo de qu6 mn
sucio est_ su homo.
[_] Presione el botdn Start.
ia puerto se bloquea autom_ificamente.
ia panta/la mostmr_ el fiempo resmnm
de limpieza. No serf posible abrir
la puerto del homo hasm que
la mmperamra sea inferior a
la mmperamra de bloqueo y
se apague la luz LOCKED.
Cuando se apague la luz LOCKEB,
podr_i abrir la puerto del homo.
iii}i}iiii_,
i_a pa/abra LOCKEBpmpadearg
y el conuol del homo indicai5
si configm6 el cido de limpieza y
olvid6 cermr la puerto del homo.
iii}i}iiii_,
Para detener un cido de limpieza,
presione el bot6n Clear/Off Cuando
se apague la luz LOCKEB indicando
que el homo se ha enfliado a una
mmpemmm inferior a la de bloqueo,
podrfi abrir la puerto del homo.
/7
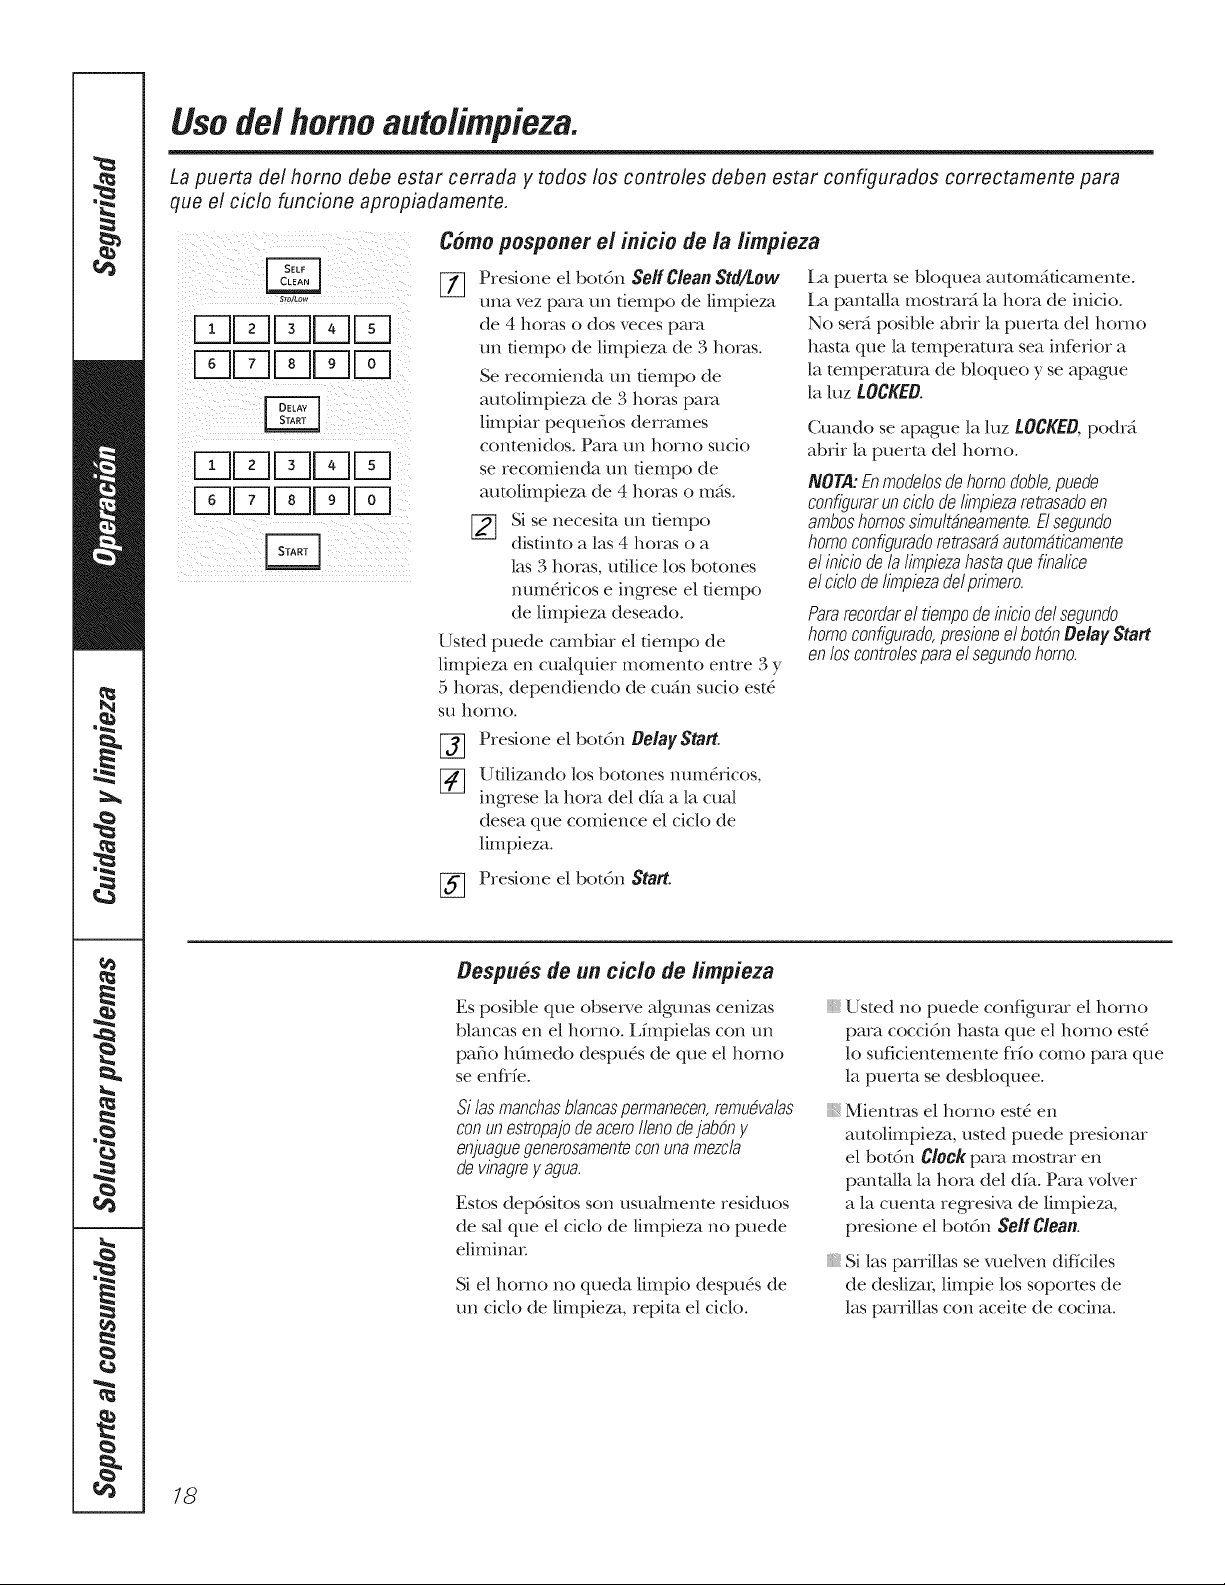
Usode/homo auto/impieza.
La puerta de/homo debe estar cerrada y todos los contro/es deben estar configuraflos correctamente para
que el ciclo funcione apropiadamente.
Como posponer el inicio de /a limpieza
ilDDDDD
! i!i iiiiii ii iii?(i ii i iii!ii i
[_ Presione el bot6n SeffClean Std/Low
una vez para un dempo de lhnpieza
de 4 horas o dos veces para
un fiempo de limpieza de 3 horas.
Se recomienda un fiempo de
autolinlpieza de 3 horas pare
limpiar pequefios derrames
con[enidos. Pala un horrid sucio
se recomienda un fiempo de
autolimpieza de 4 horas o mils.
[_[] Si se necesim un fiempo
disdmo a las 4 hon_s o a
]as 3 horas, ufilice los bo[ones
num_ri€os e in t,nese el fiempo
de limpieza deseado.
Usmd puede cambiar el fiempo de
]impieza en cuMquier mon_en[o enne 3 y
5 horas, dependiendo de cufin sucio est_
su homo.
Presione el botdn Delay Start.
%
Udlizando los bo[ones num_ricos,
mgrese la hora del dfa a la cual
desea que comience el ciclo de
limpieza.
i,a puerto se bloquea autom_ificamente.
La panm/la mostmr_i la hora de inicio.
No serfi posible abrir la puerto del homo
hasm que la mmpemmra sea inferior a
la temperature de bloqueo y se apague
la luz LOCKED.
Cuando se apague la ]uz LOCKED, podrg
abrir la puerto del homo.
NOTA:Enmodelosdehomodome,puede
configurarun ciclode Iimpiezaretrasadoen
amboshomossimultdneamente.Elsegundo
homoconfiguradoretrasardautomdticamente
el iniciodelalimpiezahastaquefinalice
el ciclode Iimpiezadelprimero.
Pararecordarel fiempode iniciodelsegundo
homoconfigurado,presioneel bot5nDelay Start
enloscontrolesparael segundohomo.
[_ Presione el botdn Start.
Despuos de un cicio de iimpieza
Es posible que observe a/gunas cenizas
blancas en el homo. Lfmpielas con un
patio htimedo despu_s de que el homo
se enflfe.
Si/asmanchasblancaspermanecen,remudvalas
conunestropajodeaceroIlenodejab6ng
enjuaguegenerosamenteconunamezcla
devinagregagua.
Estos depdsitos son usualmente residuos
de sal que el ciclo de limpieza no puede
elimina_:
Si el homo no queda limpid despu6s de
un ciclo de limpieza, repim el ciclo.
iii}i}iiii:,
iii}i}}ii_
iii}i}}ii_
Usted no puede configurar el homo
pare coccidn hasm que el homo est#
lo suficien[emenm flfo cored pare que
la puerto se desbloquee.
Mientras el homo est5 en
autolimpieza, usted puede presionar
el bot6n ClOCkpare mostmr en
panm/la la horn del dfa. Para volver
a la cuenm regresiva de limpieza,
presione el bot6n Self Clean.
Si las parrilkks se _a_elven difZciles
de deslizai; limpie los soportes de
las parrillas con aceke de cocina.
18
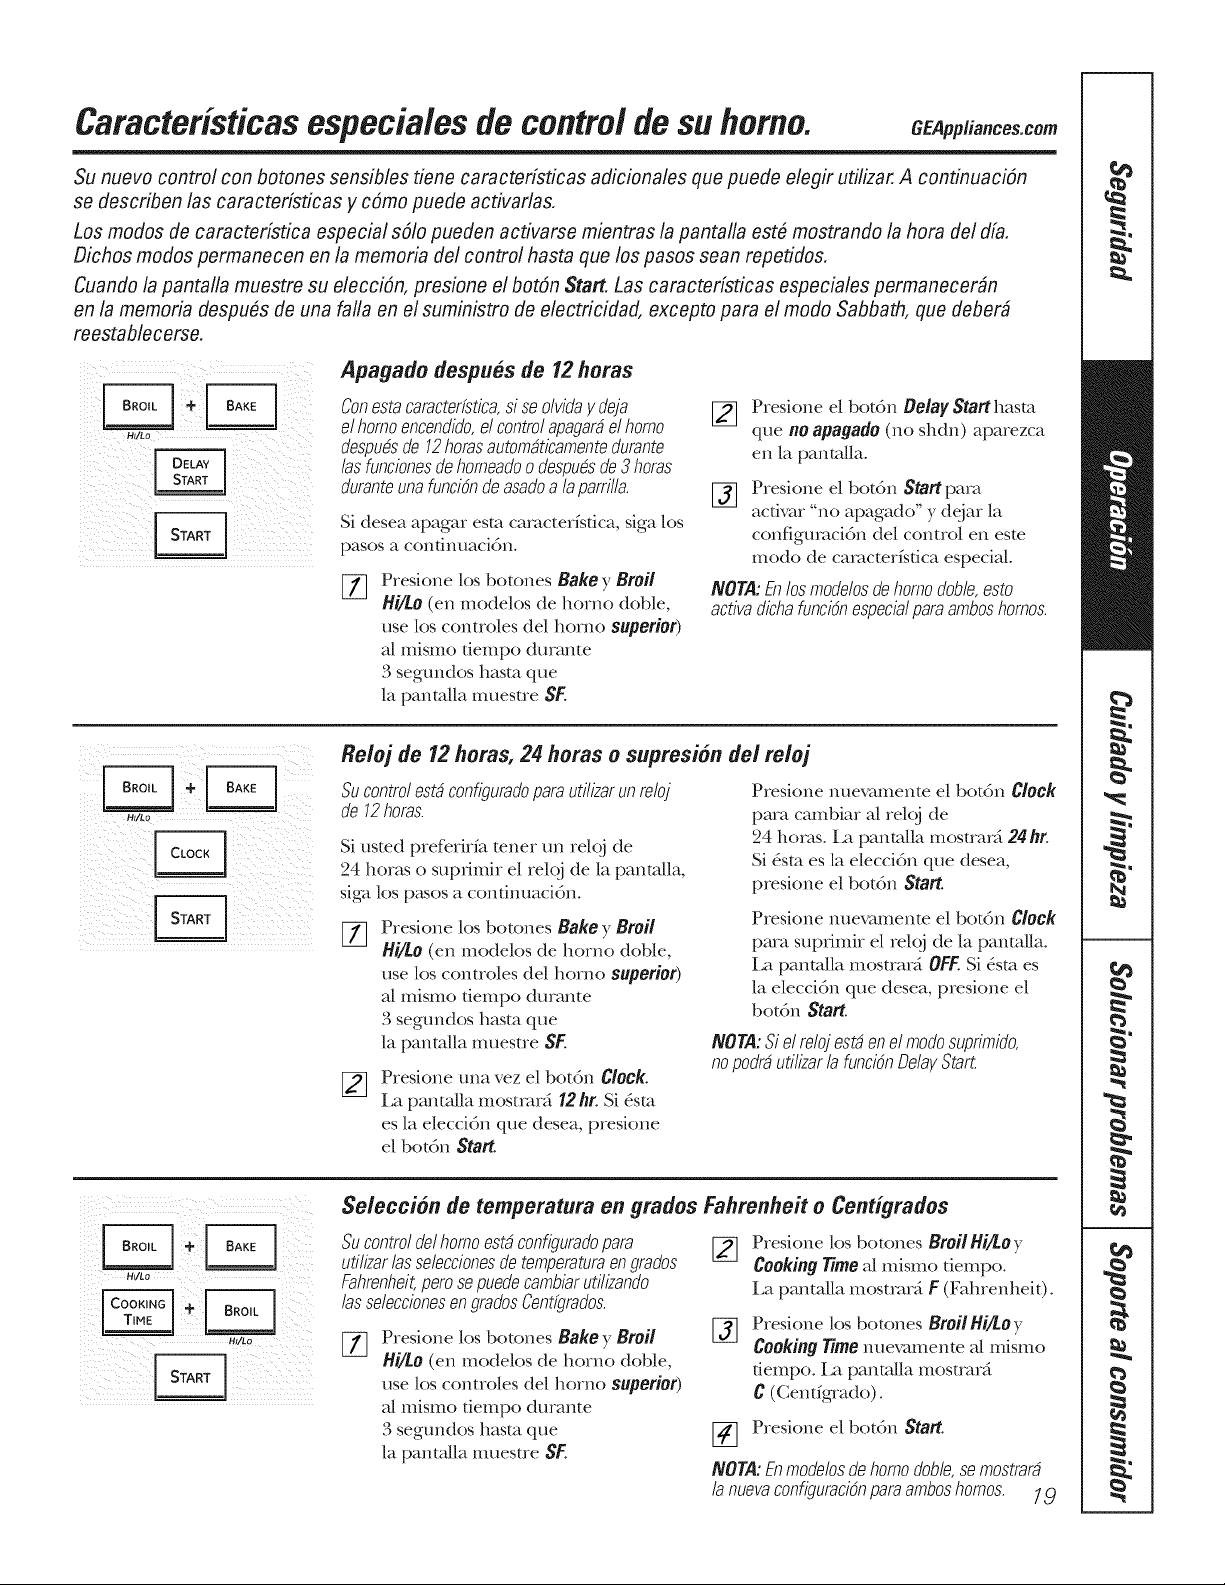
Caracteristicasespecia/es de controlde su homo. CEappliance .com
Su nuevo control con botones sensibles tiene caractedsticas adicionales que puede elegir utilizar. A continuaciSn
se describen /as caracteristicas y cSmo puede activarlas.
Los modes de caractedstica especial sSIo pueden activarse mientras la pantalla estfi mostrando la hera del dia.
Dichos modes permanecen en la memoria del control hasta que los pasos scan repetidos.
Cuando la pantalla muestre su elecci6n, presione el bot6n Start. Las caractedsticas especiales permanecer#n
en la memoria despufis de una falla en el suministro de electricidad, excepto para el mode Sabbath, que deber#
reestablecerse.
HalLo
Apagado despu#s de 12horas
Conestacaracterfstica,si seolvidag deja
elhomoencendido,elcontrolapagardel homo
despudsde 12horasautomdticamentedurante
/asfuncionesdehomeadoo despudsde3horas
duranteunafunci6nde asadoa laparrilla.
Si desea apagar esta caracterfsfica, siga los
pasos a condnuacidn.
%
Presione los botones Bake y Broil
Hi/to (en modelos de horno doble,
use los controles del homo superior)
a[ mismo dempo durante
3 segundos hasm que
la panm/la muesue SF.
[_ Presione el botdn Belay Start hasm
que no apagado(no shdn) aparezca
en la panmlla.
[_ Presione el botdn Start para
acfixar "no apagad(;' y dejar la
configumcidn del control en esm
mode de camcter/sdca especiM.
NOTA: Enlos moddos de homo doble, esto
activa dichafunci_nespecialpara amboshomes.
Ht/Lo
Reioj de 12 horas, 24 horas o supresion de/reioj
Sucontrolestdconfiguradoparautilizarunreloj
de 12horas.
Si usted preferirfa tener un reloj de
24 horas o supfimir el rel(_j de la panm/la,
siga los p_sos a continuacidn.
[_ Presione los botones Bake y Broil
Hi/to (en modelos de horno doble,
use los controles del homo superior)
a/mismo dempo durante
3 segundos hasm que
la panmlla muesue SF.
Presione una vez el botdn Clock.
La panmlla mostrar_i 12 hr. Si &m
es la eleccidn que desea, presione
el botdn Start.
Presione nuevamente el bot6n Clock
pare cambiar a/rel({j de
24 horas, ia pantalla mostmrd 24 hr.
Si _sta es la elecci6n que desea,
presione el bot6n Start.
Presione nuevamente el bot6n Clock
pare supdmir el rel({j de la panmUa.
La pantalla mostrar_ OFF.Si 6sm es
la eleccidn que desea, presione el
bot(m Start.
NOTA:Si el relojestden el modosuprimido,
nopodrdutilizarlafuncidnDelayStart
HffLO
Seleccion de temperatura en grados Fahrenheit o Centigrados
Sucontroldelhomoestdconfiguradopara
utilizar/asseleccionesdetemperaturaengrados
Fahrenheit,peresepuedecambiarutilizando
/asseleccionesengradosCentfgrados.
%
Presione los botones Bake y Broil
Hi/to (en modelos de horno doble,
use los controles del homo superior)
a[ mismo dempo dulante
3 segundos hasm que
la panta/la muesoe SF.
[_ Presione los botones Broil Hi/to y
Cooking Time al mismo dempo.
La panmlla mostrarfi F (Fahrenheit).
%
Presione los botones BroilHi!toy
Cooking Time nuevamente al mismo
fiempo. La panmlla mostrar_i
C (Centfgqado).
[_ Presione el botdn Start.
NOTA:Enmodelosdehomodoble,semostrard
la nuevaconfiguracidnparaamboshomes. 19
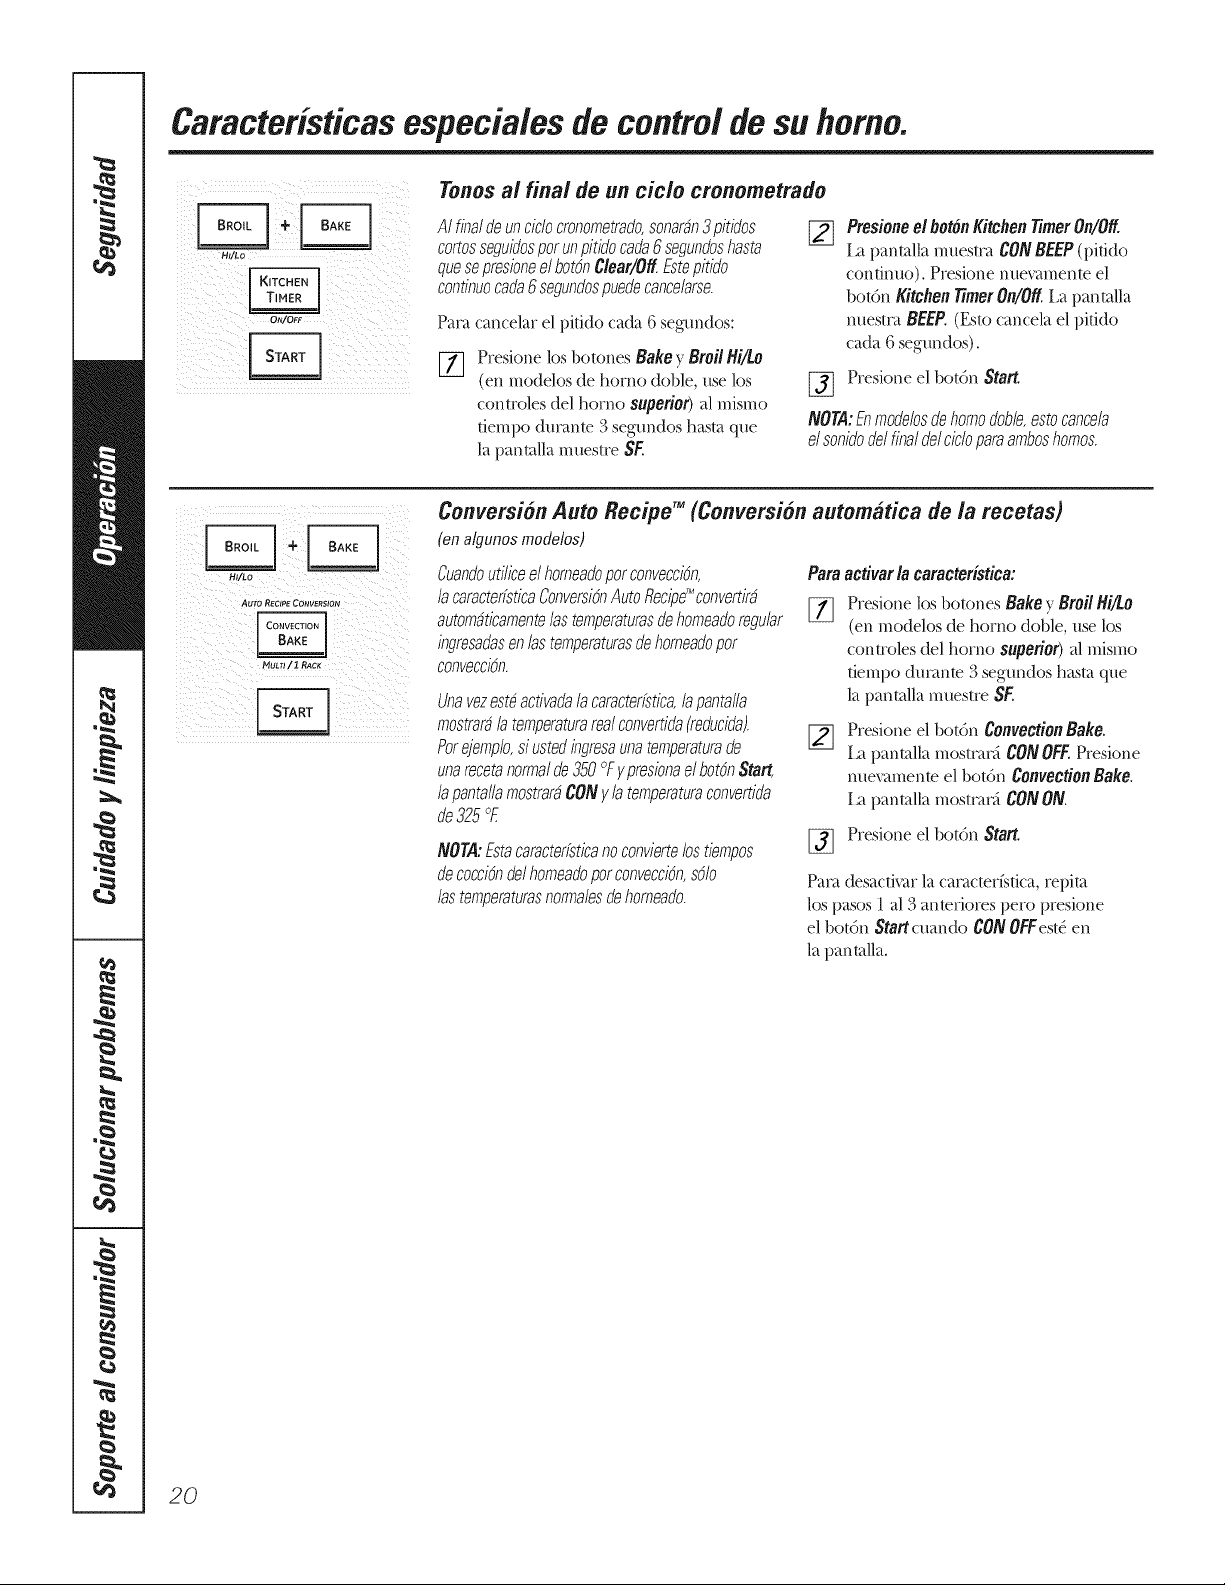
Caracteristicasespecia/es de controlde su homo.
(ii_ii[_i_i_i_I_ !_i[iiiii_i_i__iiii_iii_ _i
i_IIIi_iiIi_II_ !_i_!iiiiii _iI_I_I
Tonosal final de un cicio cronometrado
A/fina/deuncic/ocronometrado,sonaran3 pitidos
cortosseguidosporunpitidocada6segundosbasra
quesepresioneelbot_nC/ear/OffEstepitido
continuocada6segundospuedecancelarse.
Paca cancelar el pitido cada 6 segundos:
%
Presione los botones Bake y BroilHi/io
(en modelos de homo doble, use los
controles del homo superior) al mismo
tiempo din>rote 3 segundos hasta que
la pantalla muestre SE
Presioneel boronKitchen timer On/Off
i_t pantalla muesmt CONBEEP(pitido
confimlo). Presione nuevamente el
bot6n Kitchen Timer On/Off La pantalla
nuestca BEEP.(Esto cancela el pifido
cada 6 segundos).
[_ Presione el bot6n Start.
NOTA:Enmodelosdehomodoble,estocancela
elsonidode/finalde/cicloparaamboshomos.
HI/to
AUTO RECIPE CONVERSIOA
MULti / 1 RaCK
Conversion Auto Recipe TM (Conversi6n automMica de la recetas)
(en algunos modelos)
Cuandoutiliceel homeadoporconvecci6n,
/a caracterfsticaConversiOnAutoRecipe'Mconvertira
automaticamente/astemperaturasde homeadoregu/ar
ingresadasen/astemperaturasdehomeadopor
convecci6n.
Unavezestdactivadalacaracterfstica,lapantalla
mostraralatemperaturarealconvertida(reducida).
Porejemplo,si ustedingresaunatemperaturade
unarecetanormalde 350°FypresionaelbotchStart,
lapantallamostraraCONyla temperaturaconvertida
de 325OF.
NOTA:Estacaracterfsticanoconviertelostiempos
decocci6ndelhomeadoporconvecci6n,s6lo
/astemperaturasnormalesdehomeado.
Para activar la caracteristica:
[_ Presione los botones Bake y BroilBi/Lo
(en modelos de homo doble, use los
controles del homo superior) al mismo
tiempo ducante 3 segundos hasta que
la pantalla muestre SE
%
Presione el bot6n ConvectionBake.
i>t pantalla mostca_viCONOFF.Presione
nuevamente el bot6n ConvectionBake.
i_t pantalla mostca_'dCONON.
Presione el bot6n Start.
Paca desacfivarla cacac/er[sfica, repim
los pasos 1 al 3 anmfiores pero presione
el bot6n Statt cuando CONOFFesl_en
la panmlla.
2O

Uso de/a caracteristica Sabbath.
(Disefiadapara utilizarseen el Sabbathjudfo y dfasfestivos).(en algunosmodelos) GEPpp/iances.com
La caracterisfica Sabbath puede ufilizarse (micamente para horneado/asado. No puede ufilizarse para conveccidn, asado a b parrilla, autolimpiezao Deby
Start
NOTA:La luz flel homo se enciende autom&tJcamente(on algunos moflebs) cuando la puerta es abierta y se apaga cuando la puerta es cerrada. Se puede
quitar /a bombil/a.Consu/te/a secci6n Reemp/azode/a/uz de/homo. Enlos mode/os con un interrupter de/uz en el panel de control,/a/uz de/homo puefie
encenderse y dejarse encendida.
i[i/ !iT( i i [ !(i ii)! i(!i
Cuanflo la pan)alia muestra D
el homo estb configurado en
Sabbath, Cuando la pantalla
muestra D C el homo estb
homeanflo/asanflo,
Come configurar el homeado/asado regular
Aseg&ese de que e/re/oj muestre /a hora correcta
de/dfa y que el homo estbapagado. [_
Presione y mantenga sostenidos los
botones Bake ? Broil Hi_o, al mismo
tiempo, hasta que la pantalla muestre SF. []
NDTA: Si en la pantalla aparece bake o
broil, los botones Bake v, Broil Hi/to no _]
theron presionados al mismo tiempo.
Presione el botdn Clear/Off
y COl)/ience de nI/exo.
_] Presione el bot6n Delay Start hasta que
SAb bAtH aparezca en la pantalla.
[_ resione el botdn Staff}, D apareceni
en la pantalla.
[_ resione el botdn Bake. No se dac, i
ningtma serial.
[i tilizando los botones nmn_ricos,
ingrese la tempecatuc,_ deseada entre
] 70 °F y 550 °E No se dar, i ninguna
serial o tempecatuca.
Presione el 1)otdn Start.
Despuds de tm periodo aleatorio
de espent de aproximadamente
30 segundos a ] minu/o, apareceni en
la pantalla D C indicando que el homo
estfi horneando/asando. Si no aparcce
D C en la pantalla, comience de nucvo
en el Paso 4.
Pare _ius/ar la tcmpenmwa del homo,
presione el botdn Bake,ingrese la nueva
mmpem/um ufilizando los bo/ones
numdricos, y presione el bo/dn Start.
NOTA:I.s botones Clear/Offy &eking time
estfin acfivos dunmtc la caractcrfsfica Sabbath.
Cuanflo la pan)alia muestra D
el homo estb configuraflo en
Sabbath, Cuanflo la pantalla
muestra D C el homo estb
homeanflo/asanflo,
Come configurar un horneado/asado crenometrado: Inicio inmediato
y Parada automMica
Aseg&ese de que e/re/oj muestre ia hora correcta de/
dfa y que el homo estb apagado.
Presione y mantenga sostenidos
los 1)otones Bake y Broil Hi/to, al mismo
tiempo, hasta que la pantalla muestre SF.
NOTA:Si en la pantalla aparece Bake o
Broil, los botones Bake _ Broil Hi/Lo no
flmron presionados al mismo tiempo.
Presione el 1)otdn Clear/Offy comience
de n/lex O.
Presione el botdn Delay Start hasta que
SAb bAtH aparezca en la pantalla.
_] Presione el botdn Staff}, D apareceni
en la pantalla.
_ Presione el 1)otdn Cooking 7_me.
%
%
Presione los 1)ot(mes num_ricos pm-a
configucar el tiempo de cocci6n deseado
entre ] minute y 9 hon_s y 99 minutes.
E1 fiempo de cocci6n que ingres6
aparcceni en la pantalla.
Presione el bo/dn Start.
77 Presione el botdn Bake. No se dani
ninguna serial.
[_ tilizando los botones numdricos,
ingrese la tempecatuca deseada.
No se dac, i ninguna serial o tempecatuca.
Preskme el botdn Start.
%
Despu(_s de un periodo aleatorio
de espent de aproximadamente
30 segundos a ] minu/o, apareceni
en la pantalla D C indicando que
el homo es/fi homeando/asando.
Si no aparcce D Cen la pan/alla,
comience de nuevo en el Paso 7.
Pare _iustar la/cmpenmn-a del herin),
presione el bo/dn Bake, ingrese la nueva
mmpenmn'a ufilizando los bo/ones hum&ices,
y presione el bo/dn Start.
Cuando la coccidn est_ mrminada, la pantalla
cambim;i de D C a D y aparcce,;i 0:00,
indicando que el homo se ha apagado pea)
todavfa estfi configumdo en Sabbath. Rcmueva
la comida cocinada.
HI/LO
Come salir de la caracteristica Sabbath
%
%
Presione el 1)otdn Clear/Off
Si el homo est_i cocinando, espere
dtwante un periodo aleatorio de
aproxima&mmnm 30 segundos a
] mimm), basra que solo D est_ en
la pantalla.
Presione V sostenKa los botones Bake y
Broil Hi/Lo, al mismo tiempo, hasta que
la pan talla muestre S_
Presione el botdn Delay Start hasta que
aparezca en la pantalla f2 shdn o no shdn.
12shdn indica que el homo se apaK, mi
automfificamenm despu_s de ] 2 betas.
no shdn indica que el horn() no
se apaKaF, i m/t(mMticamente.
Presione el botdn Start.
NOTA:Si se prcsentd un cortc en
el smninistro el(_ctrico mientivts el homo
estaba en Sabbath, el borne se apag, mi
atm)mfificamenm y permaneceni apagado
aunque el suministro el_ctrico reg*ese.
E1 control del homo debe set reiniciado.
21
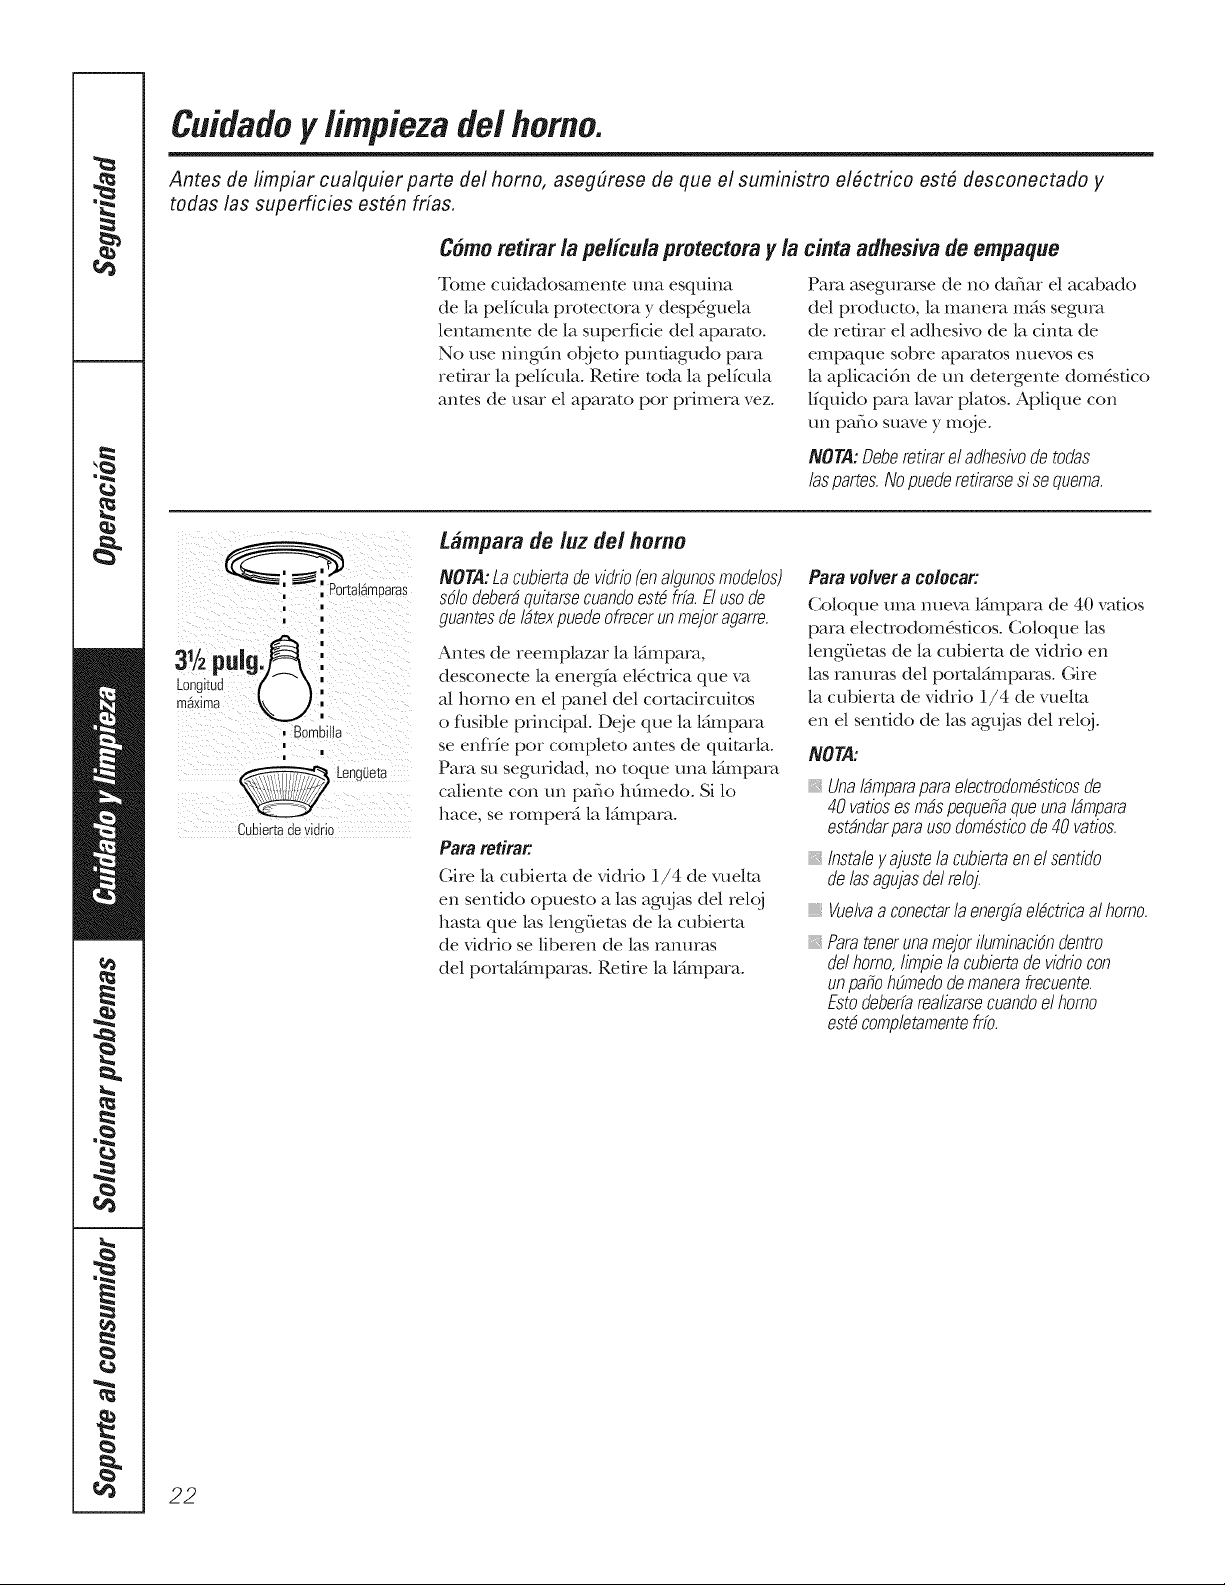
Cuidadoy limpieza de/homo.
Antes de limpiar cualquier parte de/homo, asegdrese de que e/suministro e/#ctrico est# desconectaflo y
todas las superficies est#n fdas.
C6moretirar la pelicula protectora y la
Tome cuidadosamente una esquina
de la pelfcula protectora y despSguela
lentamente de la superficie del aparato.
No use ningdn objeto ptmfiagudo para
refirar la pelfcula. Retire toda la pelfcula
anms de usar el aparato pot primera vez.
cinta adhesiva de empaque
Para asegma,_e de no dafiar el acabado
del producto, la manera rods segma
de refirar el adhesivo de la cinm de
empaque sobre a[)a/a{os ntlevos es
la aplicaci6n de un detergente dora&rico
lfquido para lavar platos. Aplique con
till paf/o suave y moje.
NOTA:Deberetirarel adhesivode todas
/aspartes.Nopuederetirarsesi sequema.
i |
! |
|
Longitud ( _,
mSxima _
, Bomb,.a
i
|
i
_ Lengiteta
Cubierta de vidno
Lampara de luz dei homo
NOTA:Lacubiertade vidrio(enalgunosmodelos)
sdo deberdquitarsecuandoestdfffa.Elusode
guantesdeIdtexpuedeofrecerunmejoragarre.
Anms de reemplazar la ldmpara,
desconecte la ene_gfa el_cuica que va
M homo en el panel del cortacircuitos
o fusible principal. Deje que la l_mpara
se enf}fe pot completo antes de quimrla.
Para su segmidad, no toque una lfimpara
calienm con un pafio hdmedo. Silo
hace, se romperd la l_hnpara.
Para retirar:
Gire la cubierm de vidrio 1/4 de xqmlm
en senddo opuesto alas ag/tjas del relc_j
hasm que las leng{ietas de la cubierm
de vidrio se liberen de 1as ranmas
del portaMmparas. Retire la lfimpma.
Para volver a colocar:
Coloque una nueva l_hnpma de 40 ratios
para elecuodom&dcos. Coloque las
leng{]etas de la cubierm de vid,io en
las ranmas del portaMmparas. (;ire
la cubierm de vidrio 1/4 de wmlm
en el senfido de l_ksagt{j_ksdel relqj.
NOTA:
iiiiiiiiii;_
iii}i}}ii_
iii}i}}_
iii}i}}ii_
UnaIdmparaparaelectrodomdsticosde
40vatiosesrodspequetiaqueunaIdmpara
estdndarparausodomdsticode 40 vafios.
Instaley ajustela cubiertaenel sentido
de/asagujasde/reloj.
Vuelvaaconectarla energfaeldctricaalhomo.
Paratenerunamejoriluminacidndentro
delhomo,limpielacubiertadevidriocon
unpatiohE_medodemanerafrecuente.
Estodeberfarealizarsecuandoelhomo
estdcompletamentefifo.
22
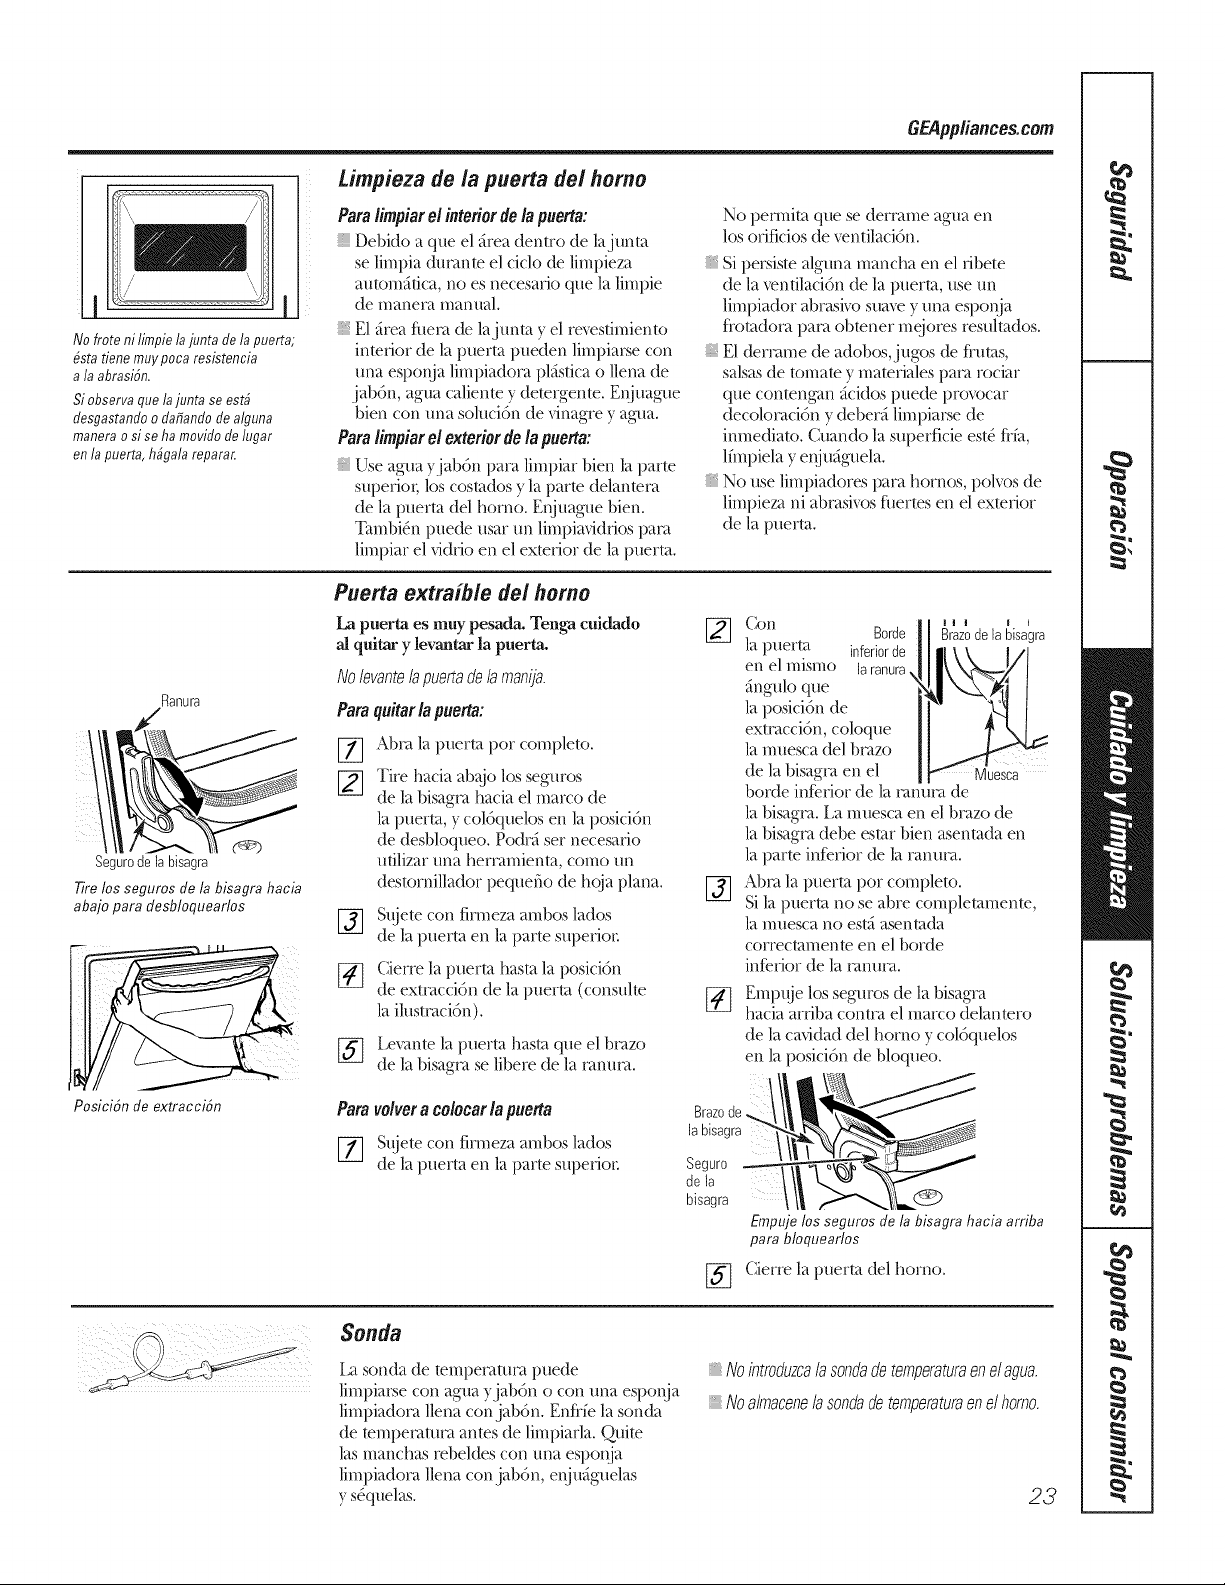
6EPpp/iances.corn
_'i\ /
No frote ni limpiela junta dela puerta;
#statienemuy pocaresistencia
a la abrasion,
Si observa que la junta se esb
flesgastanflo o flafianflo de alguna
manera o si se ha moviflo de lugar
en la puerta, h@ala reparar.
timpieza de/a puerta de/homo
Pare/impier el interior de/e puerte:
Debido a que el firea dentro de lajunm
se limpia (hmmte el ciclo de limpieza
automfifica, no es necesafio que la limpie
de manet_ manual.
E1 _rea fltet_ de lajunm y el rex_sfimiento
interior de la puerta pueden limpiat_e con
una esponja limpiadot_ pl_sfica o llena de
jab6n, agua caliente y detergente. Enjuague
bien con una solucidn de vinagre y agua.
Pare limpierel exteriorde le puerte:
Use agua yjab6n pint limpiar bien la parte
superior; los cosmdos y la parte delante_
de la puerta del horno. EnjuaMm bien.
Tambi_n puede usar un limpia, Mrios pata
limpiar el _ktrio en el exmrior de la puerto.
No pemfita que se dertame agua en
los ofificios de ventilaci6n.
Si pet_is/e alguna mancha en el ribete
de la xenfilacidn de la puerto, use un
limpiador abtasivo suax_ y una esponja
tiomdota pata obmner mejores resulmdos.
E1 dermme de adobos,jugos de fiums,
salsas de tomate y matefiales pata rociar
que conmngan ficidos puede proof)car
decolotaci6n y deber_ limpiat_e de
inmediato. Cuando la superficie es/(" fffa,
lfinpiela y eqjuSguela.
No use limpiadores para hornos, polvos de
limpieza ni abtasivos fl/erms en el exmrior
de la puerto.
Ranura
Segurodelabisagra
Tire los seguros de la bisagra hacia
abajo para desbloquearlos
PosiciSn de extracciSn
Puerta extraib/e de/homo
La puerta es muy pesadaL Tenga cuidado
al quitar y levantar la puerta.
Nolevantelapuertade/_ manija.
Parequiter lepuerte:
%
Abta la puerta por completo.
Tire hacia ab@) los seguros
de la bisagta hacia el marco de
la puerto, y col6quelos en la posici6n
de desbloqueo. Podr_ sex necesario
ufilizar una hert'amienm, como un
des/ornillador pequefio de hc_aplana.
[_ S_getecon finneza ambos lados
de la puerta en la parte superior:
[_ Cierre la puerta hasta la posici6n
de extracci6n de la puerta (consulte
la ilusmtci6n).
[_ Levante la puerta hasta que el bt'azo
de la bisagta se libere de la tanma.
II I ! ICon B0rde Brazedelabisagra
la puerta inferiorde
en el mismo
_ngulo que
la posicidn de
extracci6n, coloque
la muesca del btazo
i
de la bisagta en el Muesca
borde inferior de la tanwa de
la bisagta. La muesca en el btazo de
la bisagta debe esmr bien asenmda en
la parm inferior de la tanwa.
[-_ Abta la puerta por completo.
Si la puerta no se abre completamente,
la muesca no es/_i asenmda
correctamente en el borde
inferior de la tanma.
Emptge los seguros de la bisagta
hacia arfiba conua el marco delantero
de la cavidad del homo y coldquelos
en la posici6n de bloqueo.
Parevolvera colocarlapuerte
[-_ S_getecon finneza ambos lados
de la puerta en la parte superior:
Brazede
labisagra
Seguro
de la
bisagra
%
Empuje los segums de la bisagra hacia arriba
para bloqueados
Cierre la puerta del horno.
Sonda
1_ sonda de tempet'atut'a puede
limpiat_e con agua ).jabdn o con una esponja
limpiadora llena con jabdn. Enfi-fe la sonda
de mmi)e_'auu'a anms de limpiarla. Quire
las manchas tebel(>s con una esponja
limpiadot'a llena conjabdn, enju_guelas
y s_quelas.
Nointroduzcalasondade temperaturaen e/agua.
Noalmacenela sondade temperaturaenel homo.
23
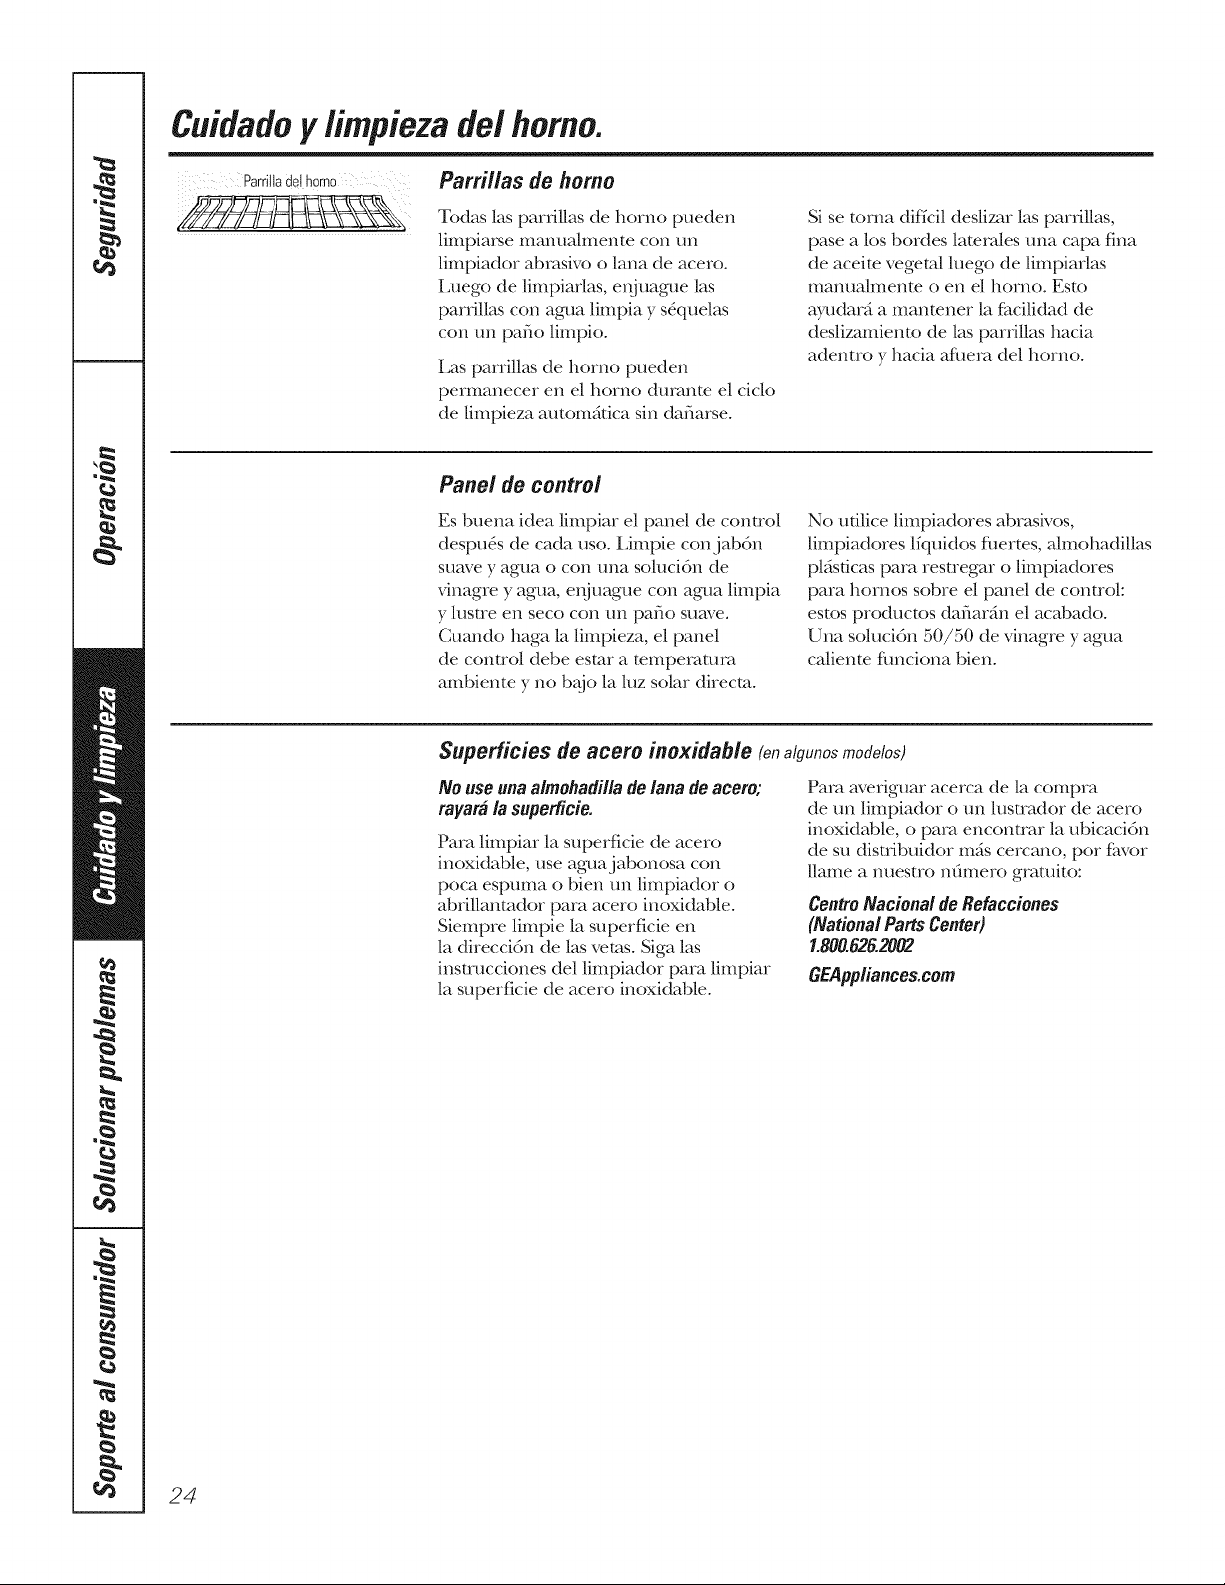
Cuidadoy limpieza de/homo.
Parrilladethomo
Parrillas de homo
Todas las parfillas de homo pueden
limpiai_e manuahnente con un
limpiador abrasive o lana de acero.
i,uego de limpiarlas, eI_iuague las
parfillas con agua limpia y s_quelas
con tm patio limpio.
Las parrilk_s de homo pueden
permanecer ell el homo dmante el ciclo
de limpieza autonlfifica sill dafiarse.
Si se toma diffcil deslizar las panillas,
pase a los bordes lamra|es una capa fina
de aceim vegetal [uego de [impiar[as
manuahnenm o ell e[ homo. Esto
ayudarfi a manmner [a fimilidad de
des[izamiemo de [as parfi[[as hacia
adentro y hacia afimIa de[ hornoo
Panel de control
Es buena idea [impiar el pane[ de comte[
despu& de cada use. iJmpie con jabdn
suave y agua o con una so[ucidn de
vinagre y agua, enjuague con agua [impia
y [usue ell seco con un patio suave.
Cuando haga [a [impieza, e[ pane[
de control debe esmr a mmpelaana
ambiente y no b_io [a [uz solar direcm.
No ud[ice [impiadores abrasives,
[impiadores [fquidos fllertes, a[mohadil[as
p[fisficas paIa restregar o [impiadores
para homes sobre e[ pane[ de control:
es[os productos daflar_in e[ acabado.
U na so[ucidn 50/50 de vinagre y agua
cNienm flmciona bien.
Superficies de acero inoxidable (onalgunosmodelos)
Nouse una almehadilladelana deacem;
rayaMla superficie.
Paia limpiar [a superficie de acero
inoxktab[e, use aguajabonosa con
poca espuma o bien tm [impiador o
abri[[anmdor para acero inoxidab[e.
Siempre [impie [a superficie ell
[a direccidn de [as veins. Nga las
insmmciones del [impiador para [impiar
[a superficie de acero inoxidab[e.
Paia averiguar acerca de [a compra
de un [impiador o un [ustrador de acero
inoxidab[e, o paIa encontrar [a ubicacidn
de su distfibuidor mils cercano, per flwor
[lame a nuestro nfimero gratuito:
CentreNacienalde Refaeciones
(NationalPartsCenter)
1.800.626.2002
GEAppliances.cem
24
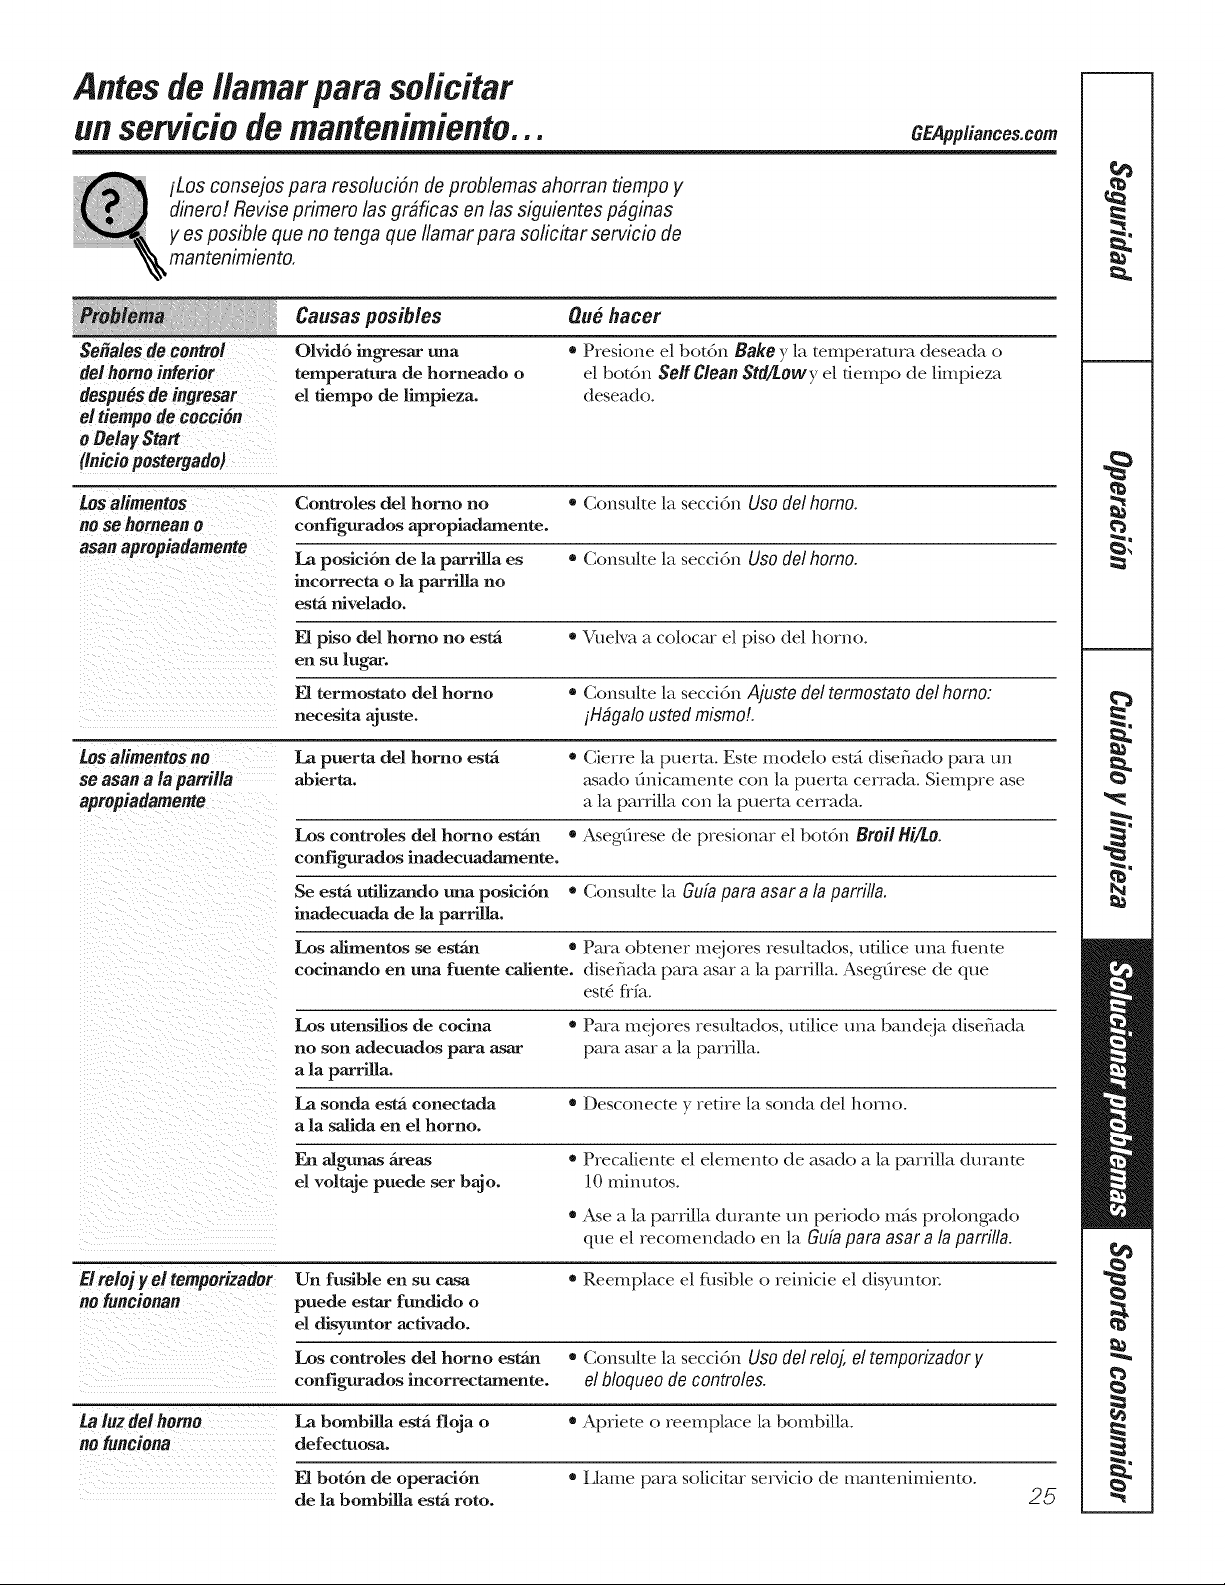
Antes de llamar para so/icitar
un servicio de mantenimiento...
iLos consejos para resoluciSn de problemas ahorran tiempo y
dinero! Revise primero las gr#ficas en las siguientes p@inas
y es posible que no tenga que Ilamar para solicitar servicio de
mantenimiento.
GEPpp/iances.com
Sefialesdecontrol
de/homoinferior
despuesde ingresar
el tiempode coccion
o Belay Start
(Iniciopostergado)
Causas posibles
Olvid6 ingresar una
temperamra de horneado o
el fiempo de lhnpieza.
Qu# hacer
• Presione el bot6n Bake y la temperamra deseada o
el bot6n SerfCleanStd/Lowy el dempo de limpieza
deseado.
LOSalimentos Controles del horno no • Consu|te [a seccidn Use de/homo.
no so homeano configurados apropiadamente.
asan apropiadameate La posici6n de la parrilla es • Consuke la seccidn Use del homo.
incorrecta o la panMla no
estfi nivelado.
E1piso del horno no estfi • Vuelva a cok)car el piso del horno.
en su lugar.
E1 termostato del horno • Consulte |a seccidn Ajuste del termostatodelhomo:
necesita ajuste, iH@alo ustedmismo!.
Losalimentosno La puerta del horno estfi • Cierre la puerto. Este modek) est5 diseflado para un
se asana/a parrii/e abierta. _Lsadofinicamente con la puerto cerrada. Siempre ase
apropiadamente a la parrilla con |a puerto cerrada.
Los controles del horno estfin * Asegdrese de presionar el bot0n BroilHi/Lo.
configurados inadecuadamente.
Se estfi ufilizando una posici6n • Consuke |a Gtlfapara asar a laparrilla.
inadecuada de la pan_lla.
Los alimentos se est£n * Para obtener mejores resu/mdos, ufilice una flmnm
cocinando en una fuente caliente, diseflada para asar a la parfilla. Asegfirese de que
est_ flfa..
Los utensilios de cocina • Para mejores resu/tados, ufilice una bandeja diseflada
no son adecuados para asar para asar a la parfilla.
a la patella.
La sonda estfi conectada • Desconecte y retire la sonda del borne.
a la salida en el borne.
En algunas fireas • Preca/iente el elemento de asado a la parfilla duranm
d voltaje puede ser bajo. 10 minmos.
• Ase a la parrilla durante un periodo rods prolongado
que el recomendado en la Gufa para asor a la parrilla.
E!reioj yel temporizador Un fusible en su casa • Reemplace el fl_sible o reinicie el disyuntor
no funcionan puede estar fundido o
el disTtmtor acfivado.
Los controles del borne estfin • Consulte [a seccidn Use @l role],el temporizador y
configurados incorrectamente, elbloqueode controles.
ta luz de/homo La bombilla estfi floja o • Apriete o reemplace la bombilla.
nofunciona defectuosa.
El botdn de operacidn • lJame para solicitor servicio de manmnimiento.
de la bombilla estfi rote.
25
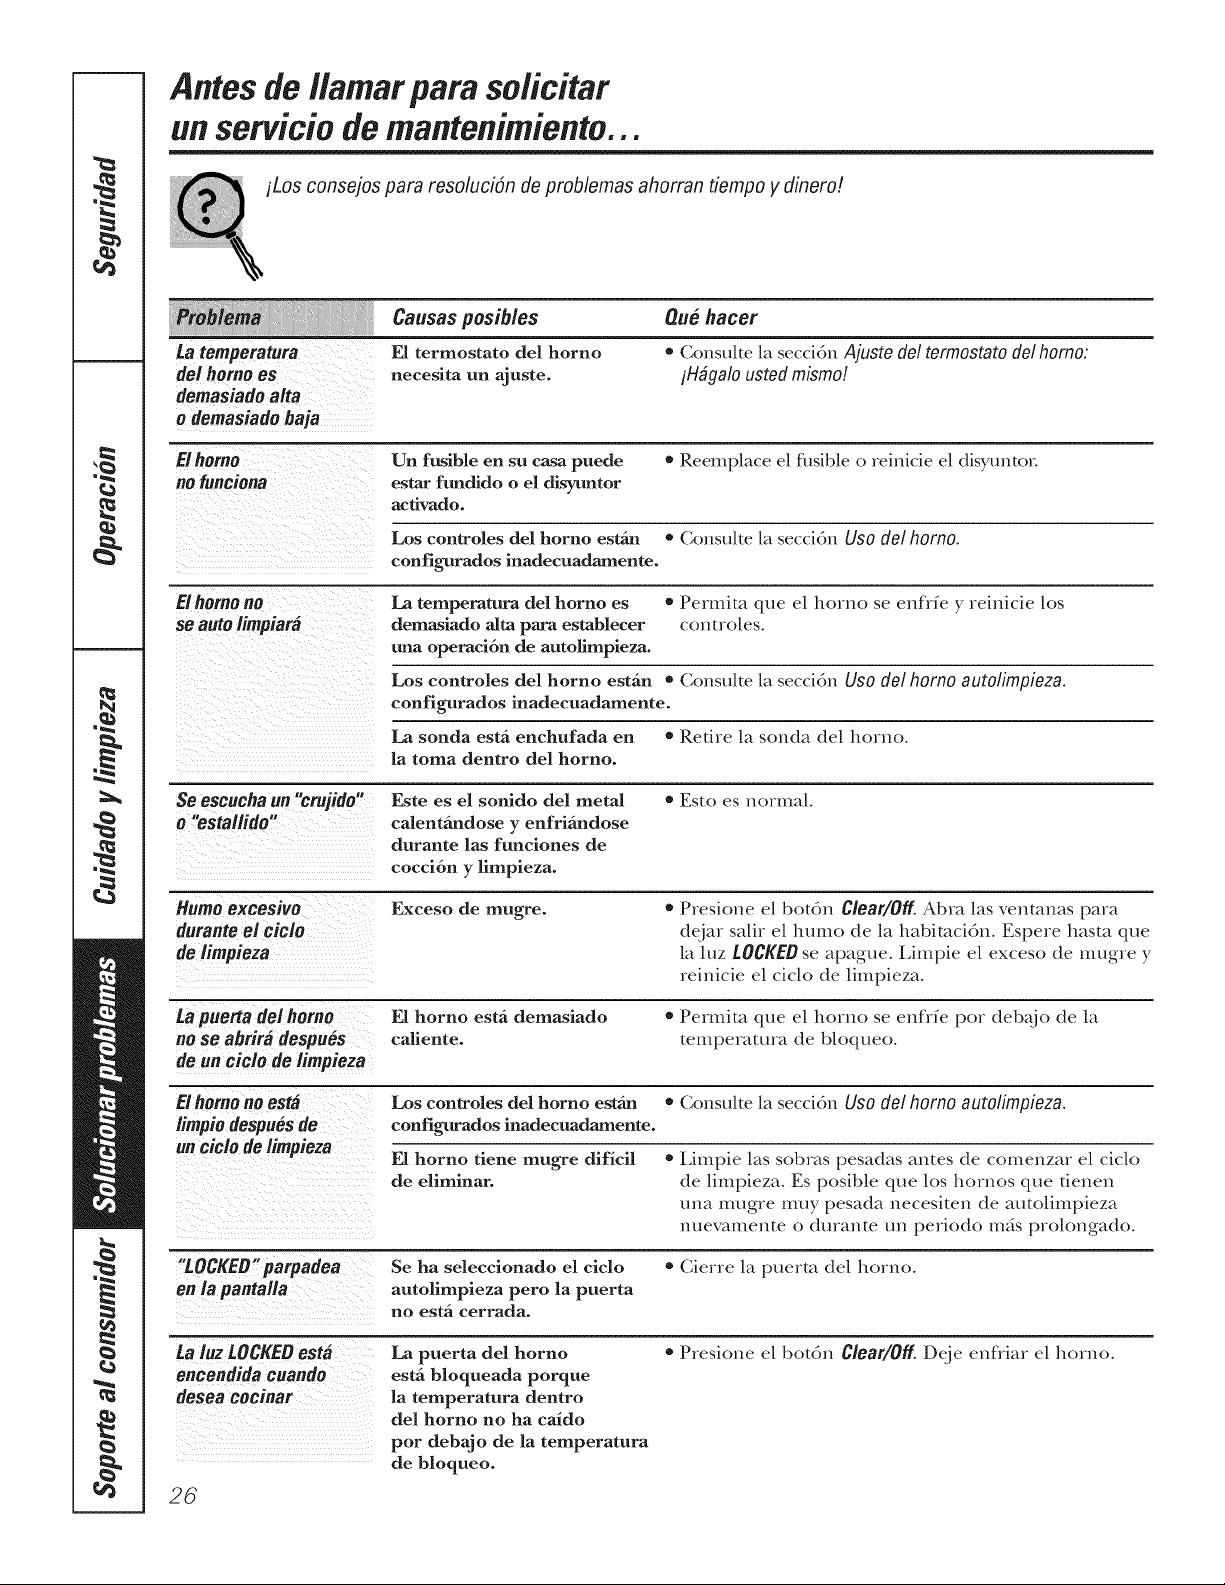
Antes de llamar para solicitar
un servicio de mantenimiento...
iLos consejos para resolucidn de problemas ahorran fiempo y dinero!
ta temperatura
de/homo es
demasiado a/ta
o demasiado baja
Causas posibles
E1 termostato del horno
necesita un ajuste.
QtM hacer
* Consuke ]a secd6n Ajuste del termostatodel homo.
iH@alo ustedmismo!
Un fusible en su casa puede
estar fundido o el disyuntor
acfivado.
• Reemplace el fllsible o reinicie el disyuntor
Los controles del horno esffm • Consulte la secciGn Uso del homo.
configurados inadecuadamente.
El horao no
so auto iimpiara
La temperatura del horno es
demasiado aRa para establecer
una operad6n de autofimpieza.
• Permita que el homo se enfrfe y reinicie los
contYoles.
Los controles del horno estfin * Consulte la secci6n Uso del homo autolimpieza.
configurados inadecuadamente.
La sonda estfi enchufada en
la toma dentro del horno.
• Retire la sonda del homo.
Seescuchaun "crujido"
o "estailido"
Este es el sonido del metal
calentfindose y enfrifindose
durante las funciones de
cocci6n y limpieza.
* Esto es normal.
Humo excesivo
durante el ciclo
de limpieza
Exceso de mugre.
Presione el bot6n Clear/Off. Abra las venmnas para
dejar salir el humo de la habimci6n. Espere hasta que
la luz LOCKEDse apague, i,impie el exceso de mugre y
reinicie el ciclo de limpieza.
La puerta de/homo E1 horno estfi demasiado * Permim que el homo se enflfe poY deb_jo de la
no se abriradespues caliente, temperatma de bloqueo.
de un cicio de iimpieza
Elhorno no esM Los controles del homo esffm * Consu|te |a secci6n USO del homo autolimpieza.
limpio despues de configurados inadecuadamente.
un ciciodelimpieza E1 horno tiene mugre dificil • Limpie |as sobras pesadas antes de comenzm el ciclo
de eliminar, de |impieza. Es posible que los hoYnos que fienen
una mug_e muy pesada necesiten de autolimpieza
nuevamente o durante un periodo m_s prolongado.
"toggED"parpadea Se ha seleccionado el ciclo * Cierre la puerto del hoYno.
en la pantal/a autolimpieza pero la puerta
no estfi cerrada.
La iuz LOCKED esta La puerta del horno * Presione el bot6n Clear/Off. Deje enfliaY el homo.
encendidacuando estfi bloqueada porque
desea cocinar la temperatura dentro
del horno no ha caido
por debajo de la temperatura
de bloqueo.
26
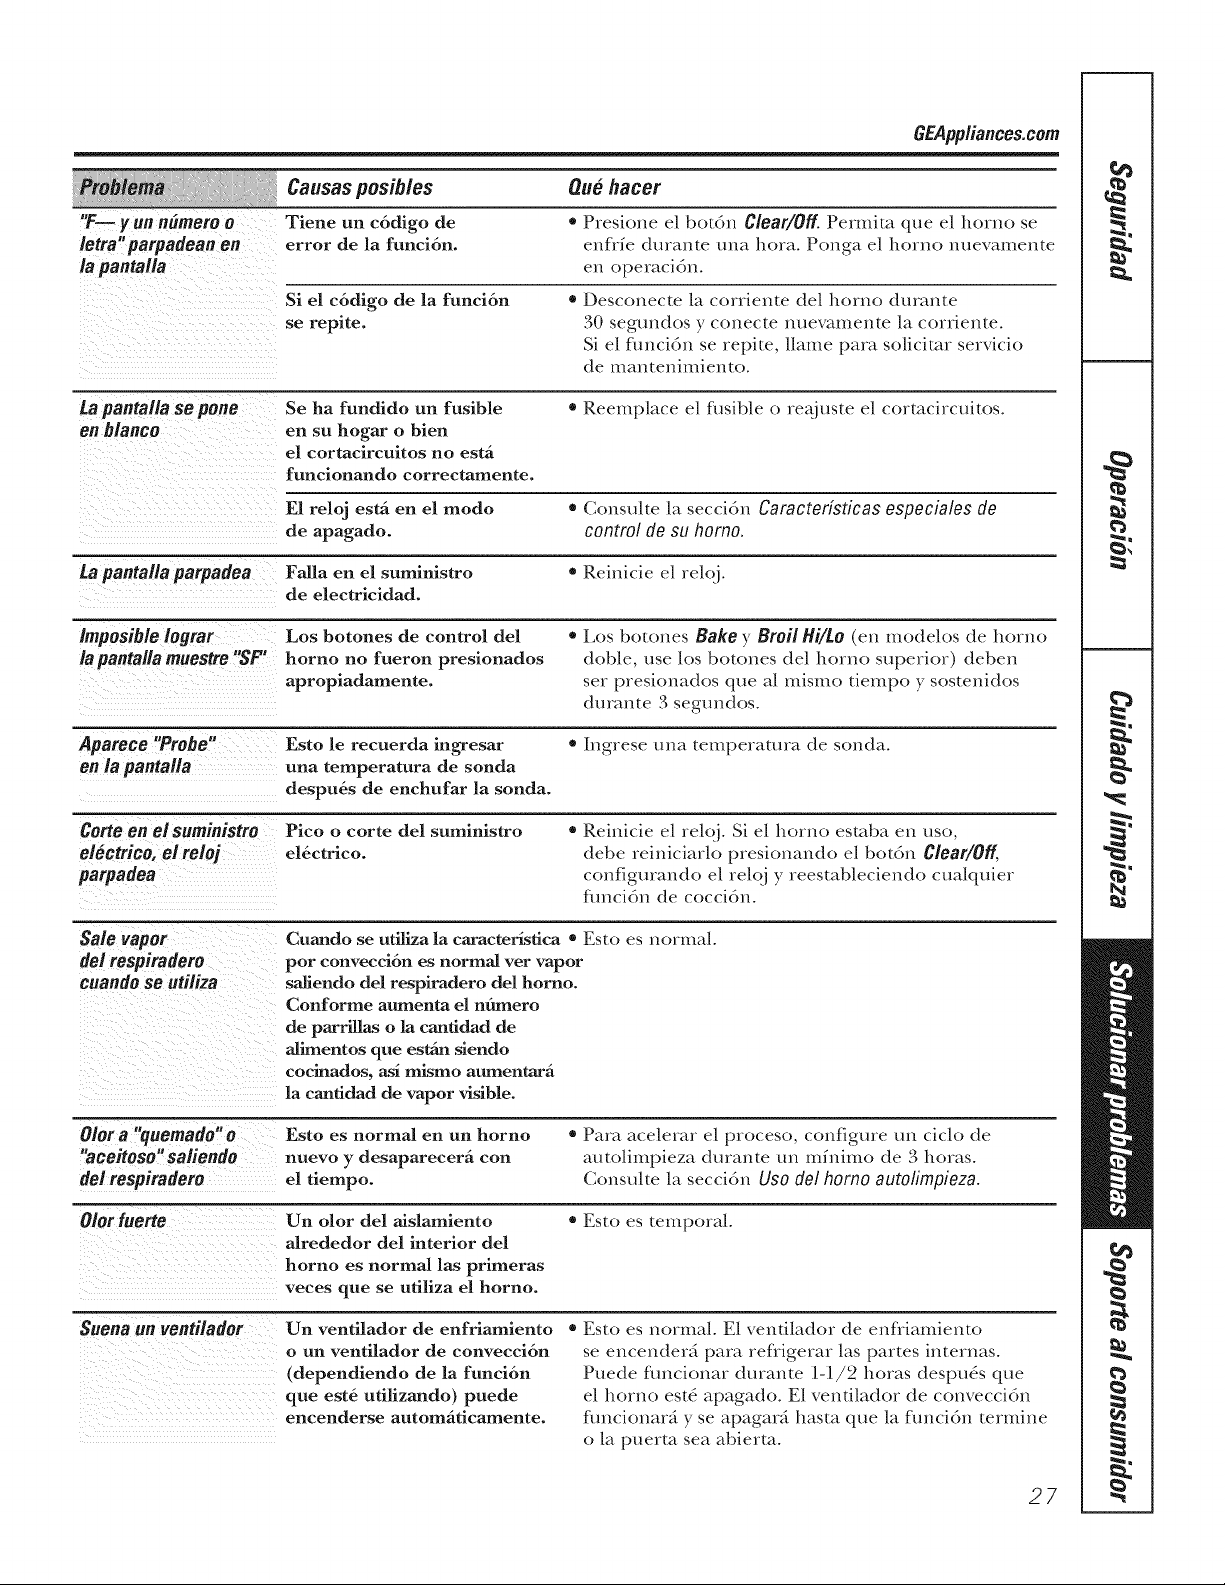
GEPppliances.com
"F_ y un nhmem o
letra"parpadean en
ia pantalla
Causas posibles
Tiene un c6digo de
error de la funci6n.
Que hacer
* Presione el bot6n Clear/Off.Permim que el homo se
enflfe dinante una hera. Ponga el horno nuevamente
en operaci6n.
Si el c6digo de la funci6n
se repite.
* Desconecte la corriente del horno durante
30 segundos y conecte nuevamente la corriente.
Si el fhnci6n se repite, 11ame para solicitor servicio
de mantenimiento.
£apantalla se pone Se ha fundido un fusible * Reemplace el fl_sible o re_j uste el cormcircuitos.
an blanco en su hogar o bien
el cortacircuitos no estfi
funcionando correctamente.
E1 reloj estfi en el mode * Consu/te/a seccidn Caracteristicas especia/es de
de apagado, control de su homo.
La pantalla parpadea Falla en el suministro * Reinicie el reloj.
de electricidad.
Imposible lograr Los botones de control del * Los botones Bake y Broil Hi/Lo (en modelos de homo
lapantallamuestre "SF' horno no fueron presionados doble, use los botones del homo superior) deben
apropiadamente, set presionados que a[ mismo tiempo y sostenidos
durante 3 segm_dos.
Pparece "Probe" Esto le recuerda ingresar * [ngrese una temperatura de sonda.
en 18 pantalla una temperatura de sonda
despu6s de enchufar la sonda.
Corte on el suministro Pico o corte del suministro * Reinicie el relqj. Si el homo esmba en use,
electrico, el reloj el_ctrico, debe reiniciarlo presionando el botdn Clear/Off,
parpadea configurando el reloj y reestableciendo cualquier
flmcidn de coccidn.
Sale vapor
dei respiradero
euandoso utiliza
Cuando se utiliza la caracteristica * Esto es normal.
per convecci6n es normal ver vapor
saliendo del respiradero del horno.
Conforme aumenta el nfimero
de parrillas o la canfidad de
alimentos que estfin siendo
cocinados, asi mismo aumentara
la canfidad de vapor visible.
Olora "quemado'o Esto es normal en un homo * Para acelerar el proceso, configure un cich) de
"aceitoso'saliendo nuevo y desaparecerfi con autolimpieza durante un mhfimo de 3 horas.
del respiradero el tiempo. Consu/te la seccidn USOdel homo autolimpieza.
Olorfuerte Un olor del aislamiento * Esto es temporal.
alrededor del interior del
horno es normal las primeras
veces que se utiliza el borne.
Suenaun ventilador Un ventilador de enfriamiento * Esto es normal. El venfilador de enfliamiento
o un ventilador de convecci6n se encender_ para refligerar las partes internas.
(dependiendo de la funci6n Puede fimcionar durante 1-1/2 betas despubs que
que est6 utilizando) puede el homo est_ apagado. El venfilador de convecci6n
encenderse automfiticamente, flmcionar_ y se apagar_ hasta que la funcidn termine
o la puerto sea abierm.
27
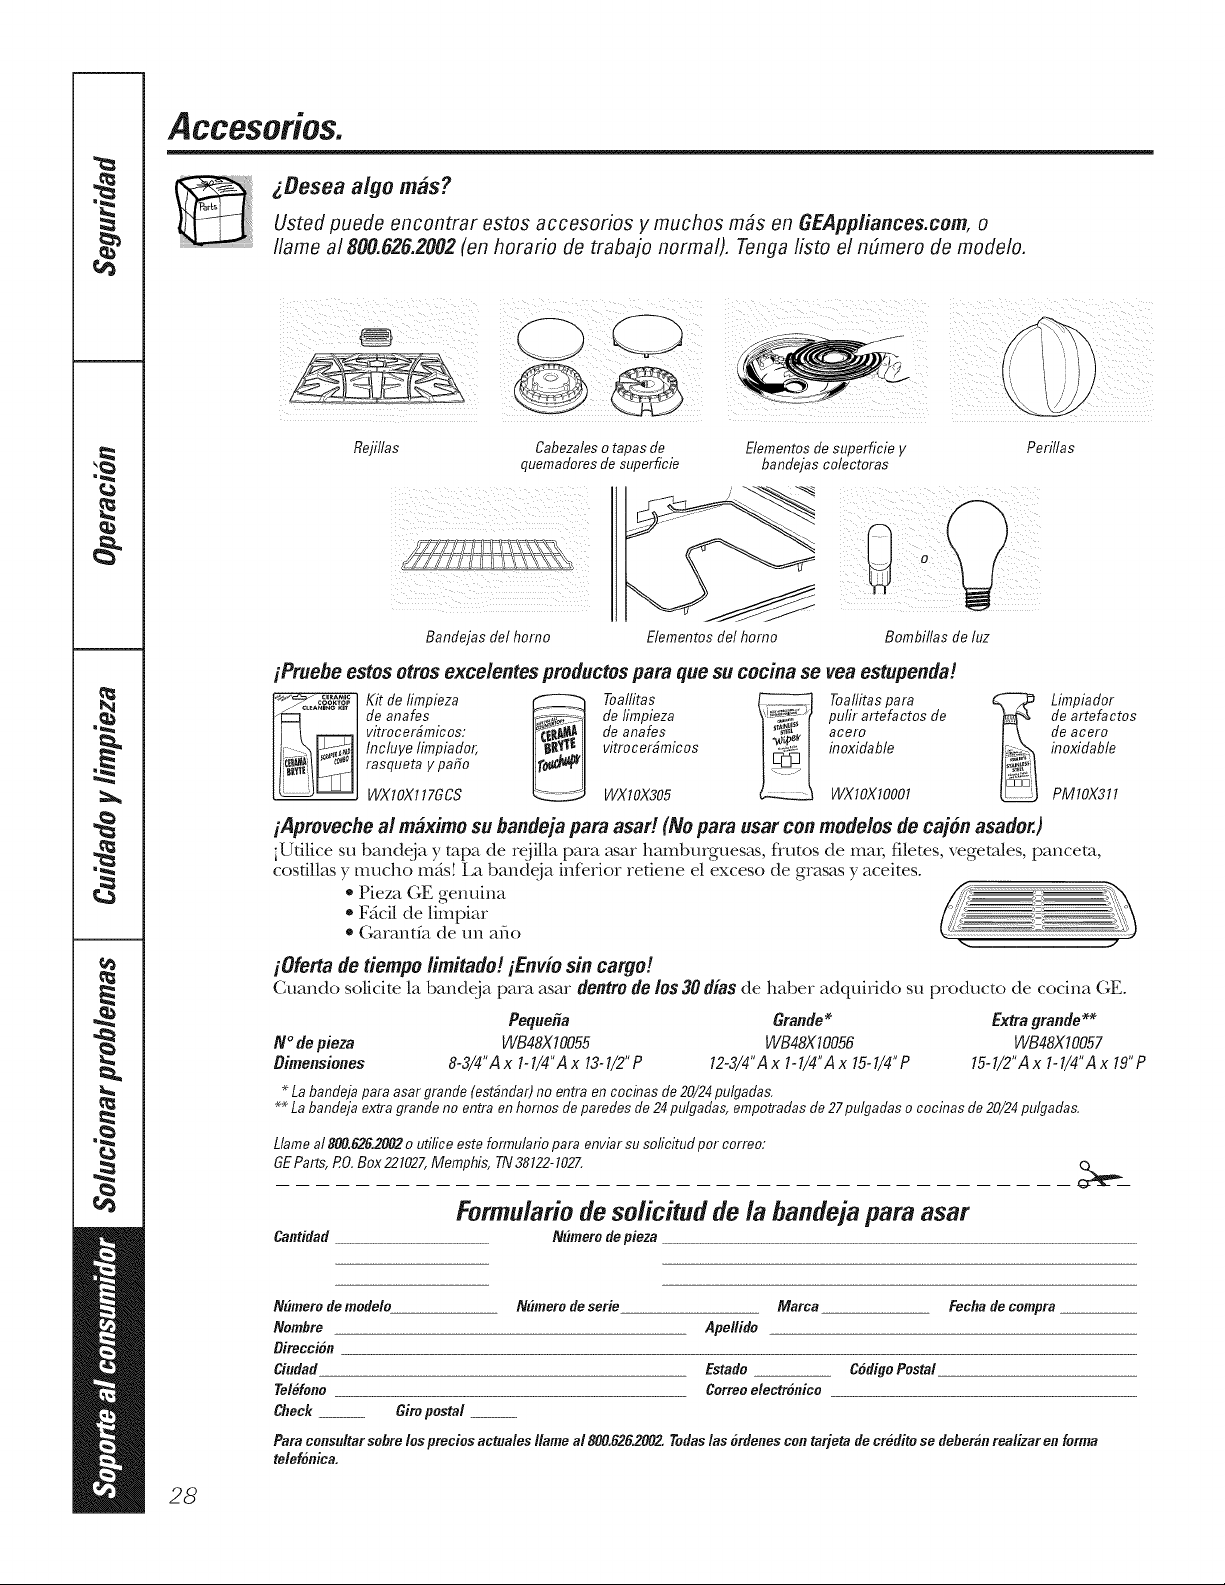
Accesorios.
gBesea a/go mas?
Usted puede encontrar estos accesorios y muchos m_s en GEAppliances.com, o
flame a1800.626.2002 (en horatio de trabajo normal). Tenga listo el ndmero de modelo.
Rejillas Cabezaleso tapas de
quemadores de superficie
Bandejas del homo
E/ementosde superficie y
banflejas colectoras
Elementos c/el horno
Perillas
Bombillas de luz
iPruebe estos otros excelentes pmductos para quesu cocina se yea estupenda!
l_ Kit de limpieza _ Toallitas _ Toallitas para
de anafes de limpieza pulir artefactos de
vitrocer#micos: de anafes acero
lncluye limpiaflor, vitrocer#micos inoxidable
rasqueta y patio
WXlOX117GCS WXlOX305 WXlOXIO001
Limpiaflor
de artefactos
de acero
inoxiflable
PMlOX311
iApmveche ai maximo su flandeja para asar! (No para usar con mode/os de cajon asador.)
;Utilice su bandeia y tapa de reiilla para ;ksar hambmgues_ks, flutos de real filetes, vegetales, panceta,
cosfillas y touche mils! La bandeja inferior retiene el exceso de grasas y aceites.
* Pieza GE genuina
e F_cil de limpiar
* (;arantfa de un afio
iOferta de tiempo limitado! iEnvio sin car.go!
Cuando solicite la bandeja para asar dentro de los 30 dias de haber adfluifido su producto de cocina GE.
Peque#a Grande* Extragrande**
17° depieza WB48X10055 WB48X10056 WB48X10057
Biraensiones 8-3/4"Ax 1-1/4"Ax 13-1/2"P 12-3/4"Ax 1-1/4"Ax 15-1/4"P 15-1/2"Ax 1-1/4"Ax 19"P
* La bandeja para asar grande (est#ndar) no entra en cocinas de 20/24pulgadas.
** La banflela extra granfle no entra en homes tie parefles de 24pulgaflas, empotraflas de 27 pulgaflas o cocinas de 20/24pulgaflas.
L/amea1800.626.2002o uti/ice este fonnulario para enviar su solicitud per correo:
GEParts, RO.Box 221027,Memphis, TN38122-102Z
Cantidad
Formulariode solicitud de la bandeja para asar
N{/merode pieza
N#morode modelo N#merodesorie Marca
Nombre Apellido
Oirecci6a
Ciudad Estado C6diooPostal
Telefono Coffee electr6aico
Check __ Giropostal __
Fechade compra
Para consu/tar sohre los pmcios aotuales Ilame a1800.626.2002. Todas /as 6rdenes con tarjeta de credito so deher#n realizar on forma
to/ofonica.
28
Nota$.
r_
%
29 =
Notas.
Garantia de GE para su homo e/ectrico empotrado.
Todos los servicios de garantia los proporcionan nuestros Centros
de Reparacidn de F#brica o nuestros t#cnicos Customer Care®
autorizados. Para concertar una cita de reparaci6n, visftenos
en Ifnea en GEAppfiances.com, o flame a1800.GE.CARES
(800.432.2737). Cuando flame para soficitar servicio, por favor
tenga a mano el ndmero de serie y el ndmero de modelo.
Pegue aqui su recibo.
Se requiere facilitar prueba
de la fecha de compra original
para obtener un servicio
bajo la garantfa.
Una_o
A partir de la fecha
dela compra original
GE reemp/azara:
Cua/quierpartedel horno que fhlle debido a defectos en los materiales o en la fabIicaci6n.
Durante este garantia limitada de un a#o, GE mmbi_n proporcion_, sin costo a/guno,
toda la mano de obra y los servicios internos para reemplazar partes defectuosas.
Viajes de servicin a su casa para ensefiarle c6mo usar
el producto.
} lnstalaci6n, entrega o mantenimiento inapropiada.
}_Fallas del producto si hay abuso, real uso, o uso para
otros prop6sitos que los propuestos, o uso para fines
comerciales.
}_Reemplazo de fusibles de su casa o reajuste de
interruptores de drcuito.
}_Dafio aLlproducto causado por accidente, fuego,
inundacinnes o actos de Dios.
Dafio incidental o consecuencial causado por posibles
defectos con el aparato.
Dafio causado despu&s de la entrega.
Producto no accesible para facilitar el servicin
requerido.
EXCLUSION DE GARANTJAS/MPLiC/TAS--Su #nico y exc/usivo derecho es la reparaci6n dei pmducto,
tai y como se indica en esta Garantia limitada. Cualquier garantia implicit& incluyendo /as garantias
implicitas de comerciabilidad o adecuaci6n para un fin determinado, estan limitadas a un a#o o el
periodo de tiempo mas breve permitido pot la leF
Esta garantfa se extiende al comprador original y cualquier comprador posterior de productos comprados para
uso residencial dentro des Estados Unidos. Si el producto est# situado en un #rea que no dispone de servicio por
parte de un proveedor de servicio autorizado de GE,podria tener que hacerse cargo de los costes de envio o bien
podria solicit#rsele que Ileve el producto a un centro de servicio de GE autorizado para realizar la reparaciSn. En
Alaska, la garantia excluye el costo de envio o las visitas de servicio a su casa.
Algunos estados no permiten la exclusidn o las limitaciones de dafios incidentales o consecuenciales, Esta garantia
da derechos legales especificos, y usted podda tener otros derechos que variar#n de estado a estado, Para saber
curies son sus derechos legales, consulte a la oficina de asuntos del consumidor local o la oficina del Prucurador
(Attorney General) en su Iocalidad,
Garante: General Electric Company.Louisville, KY#0225
S/
Soportea/ consumidor..
PgginaWebde GEAppliances
GEPpp/iances.com
dTiene alguna pregunta sobre su electrodom_sdco? iPmebe la Digina Web de GE Appliances 24 horns a/
dfa, cualquier dfa del aflo! Para mayor conveniencia y servicio m_s r_pido, ya puede descargar los Manua/es
de los Propiem_ios, pedir piezas o incluso hacer una cim en lfnea para que vengan a rea/izar una
reparaci6n.
Soliciteunareparacidn GEPpp/iances.com
E1servicio de expertos GE estfi a mn s61o un paso de su puerto. ;Entre en lfnea y solicite su reparaci6n
cuando le venga cualquier d/a del aflo! O llame al 800.GE.CARES (800.432.2737) durante horas normales
de oficina.
ilealLifeDesignStudo(Estudodedisefioparalavidareal)
GEPpp/iances.com
(;E apoya el concepto de Disefio Universa/--productos, servicios y ambientes que pueden usar genre de
to&ks 1as edades, tamaflos y capacidades. Reconocemos la necesidad de diseflar para una gran gama de
habilidades y dificulmdes fYsicasy menta/es. Para rods deta/les cobre las aplicaciones de (;E Diseflo Universal,
incluyendo ideas de diseflo para la cocina para pex_onas con discapacidades, mire nuesua pdgina Web hoy
mismo. Para persom_s con dificulmdes auditivas, fl_vor de llmnar a/800.TDD.GEAC (800.833.4322).
garantfasampliadas
GEPpp/iances.com
Compre una garantfa ampliada y obtenga demlles sobre descuentos especiales disponibles mientras su
garantfa estfi aOn acfiva. Puede comprarla en lfnea en cualquier momento, o llamar al 800.626.2224
durante horas normales de oficina. GE Consumer Home Services esmrd adn ahf cuando su garantfa temflne.
Piezasy accesorios
GEPpp/iances.com
Aquellos individuos con la ca/ificaci6n necesaria para reparar sus propios elecuodom4sficos pueden
pedir que se les manden las piez_s o accesorios direcmmente a sus hogares (acepmmos las m_jetas
\qSA, MasterCard y Discover). Haga su pedido en lfnea hoy, 24 horas cada dfa o llamar pot ml4fbno
a/ 800.626.2002 durante hoi_ks normales de oficina.
tas instmccionesdescritaseneste manualcubrenlospmcedimientosa seguir per cualquierusuario. Cualquier
etra reparaciondeberia,per reglageneral,referirse a personalca/ificadoautorizade.Debe ejereerseprecaucion
ya que/as reparacienesincorrectaspuedencausarcondicienesde funcienamientoinseguras.
Pdngaseen contactoconnosotros
GEApp/iances.com
Si no est_isatisfecho con el servicio que recibe de GE, p6ngase en conmcto con nosotros en nuestra pdgina
Web indicando todos los demlles asf como su ndmero de tel_fbno o escrfbanos a:
General Manage_, Customer Relations
GE Appliances, Appliance Park
Louisville, KY40225
Registresu electrodom_stico GEApp/iances.com
iRegistre su nuevo dectrodom6stico en linea---euando usted prefiera! E1 registrar su producto a fiempo le
proporcionar_, si smgiera la necesidad, una mejor comunicacidn y un servicio m_s r_pido b_jo los t_mlinos
de su garantfa. _mlbi&_ puede enviar su mrjem de regisuo preqmpresa que se incluye en el mamria/
de emba/_je.
Impreso en los Estados Unidos