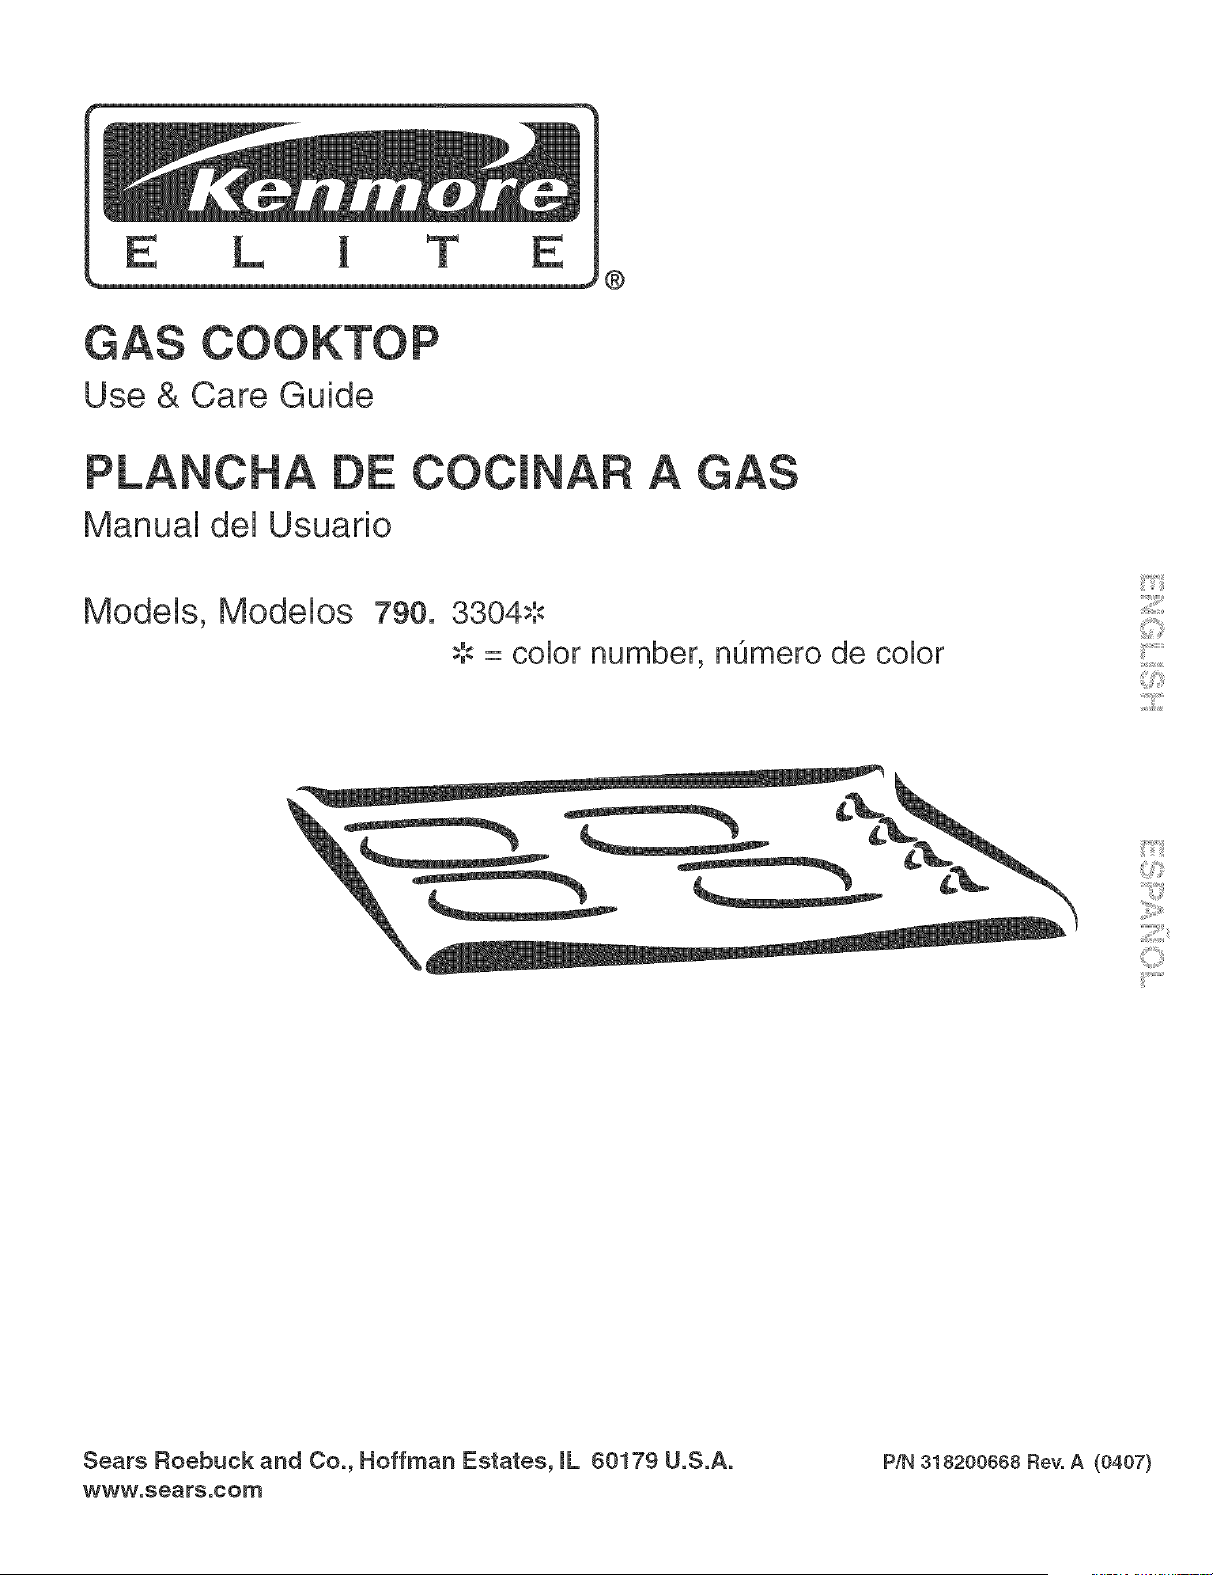
®
Use & Care Guide
Manual del Usuario
Models, Modelos 790. 3304_b"
.,. = color number, numero de color
_iiiii,,J'iiii_
Sears Roebuck and Co., Hoffman Estates, {L 60179 U.S.A.
www°sears°com
P/N 318200668 Rev. A (0407)
Table of Contents
Cooktop Warranty ............................................................. 2
Product Record ................................................................ 2
SeriaUPUateLocation ......................................................... 2
IMPORTANT SAFETY UNSTRUCTUONS ....................... 3-4
Protection Agreements ..................................................... 5
Grounding Unstructions ..................................................... 6
Liquefied PetroUeum (Propane) Gas Conversion ............... 6
Surface Cooking ............................................................... 7
Setting Surface ControUs .............................................. 8-10
GeneraU Care & CUeaning........................................... 11-14
CUeaningVarious Parts of Your Cooktop ..................... 11
Ceramic GUassCooktop CUeaning Unstructions ........... 12
Care & CUeaning of StainUess SteeU(some modeUs).... 12
SeaUed Burner ModeUs ............................................... 13
Before You Call ............................................................... 15
Notes ......................................................................... 16-17
Sears Service ................................................................. 18
Cooktop Warranty
FULL ONE YEAR WARRANTY ON ALL PARTS
For one year from the date of purchase, when installed and operated according to the Installation Instructions and Use &
Care Guide, if any part of this appliance fails due to a defect in material or workmanship, Sears will repair or replace it, at
our option, free of charge.
ADDiTiONAL FOUR-YEAR L_M_TED WARRANTY ON APPLIANCE PARTS
For the second through the fifth year from the date of purchase, when installed and operated according to the
_nstaHation _nstructions and Use & Care Guide, Sears will supply the following appliance parts free of charge if
they fall for the reasons listed below. Customer must pay tabor cost of installation.
o Cooktop glass if it fails due to thermal shock
o Cooktop cooking elements if they are defective
o Rubber seal if it cracks between the cooktop glass and the porcelain edge.
What Sears wilt not cover:
o Failure of the product if it is abused, misused, or used for other than the intended purpose.
o Damage to the cooktop glass caused by the use of cleaners or utensils other than the recommended cleaning cream
and tools.
o Damage to the cooktop glass caused by hardened spills of sugary materials (including starches from vegetables or
pastas) or melted plastic that are not cleaned off according to the directions in the Use & Care Guide.
o Repairs to parts or systems resulting from unauthorized modifications made to the appliance.
If this product is subjected to other than private residential use, all warranty coverage is effective for only 90 days.
WARRANTY SERVICE IS AVAILABLE BY CONTACTING SEARS AT
1-800-4-MY-HOME®.
This warranty gives you specific legal rights, and you may also have other rights which vary from state to state.
Sears, Roebuck and Co., Dept. 817WA, Hoffman Estates, IL 60179
Product Record
In this space below, record the date of purchase, model
and serial number of your product. You will find the model
and serial number printed on the serial plate. This serial
plate is located under the cooktop. See bottom of this
page for the serial plate location.
Model No, 790.
Seria P ate Location
You will find the model and serial number printed on the
serial plate. The serial plate is located under the cooktop.
Please see the illustration for exact location. Remember to
record the serial number for future reference (See Product
Record above).
Serial No.
Date of purchase
Save these instructions and your sales receipt for future
reference.
P_ease carefully read and save these instructions
This Use & Care Manual contains general operating instructions for your appliance and feature information for several
models. Your product may not have all the described features. The graphics shown are representative. The graphics on
your appliance may not look exactly like those shown. Common sense and caution must be practiced when installing,
operating and maintaining any appliance.
2

important Safety instructions
Read aH instructions before using this appliance.
Save these instructions for future reference.
This manuaUcontains important safety symbob and instructions. PUeasepay attention to these symbob and follow aiI
instructions given.
mfthe information in this manua_ is not followed e×actly, a fire or e×p_osion may
result causing property damage, persona_ injury or death.
FOR YOUR SAFETY:
-- Do not store or use gasoline or other flammable vapors and Hquids in the
vicinity of this or any other appliance.
-- WHATTO DO mFYOU SMELL GAS:
* Do not try to Hght any appliance.
* Do not touch any e_ectrica_ switch; do not use any phone in your building.
* mmmediate_y call your gas supplier from a neighbor's phone. Follow the
gas supp_ier's instructions.
* mfyou cannot reach your gas supplier, call the fire department.
-- mnstaHation and service must be performed by a qualified installer, servicer or the gas
suppHer.
o Remove alltape and packaging wrap before using the
cooktop. Destroy the carton and plastic bags after
unpacking the cooktop. N ever allow children to play with
packaging material. Do not remove the model/serial plate
attached to the cooktop.
o Proper installation--Besure your appliance is
property instalJed and grounded by a qualified
technician in accordance with the National Fuel Gas
Code ANSmZ223.1 tateet edition and CAN/CGA El149.2,
and the National Electrical Code ANSm/NFPA No. 70--
tateet edition, and tocaI code requirements. Install and/
or adjust only per installation instructions provided in the
literature package for this cooktop.
Sears Parts & Repair is the recommended repair service
for this appliance. Know how to disconnect the electrical
power to the appliance at the circuit breaker or fuse box in
case of an emergency.
o User Servicing--Do not repair or replace any part of
the appliance unless specifically recommended in the
manua!e. All other servicing should be done only by a
qualified technician to reduce the risk of personal inju B,and
damage to the cooktop.
, Never modify or alter the construction of a cooktop by
removing panels, wire covers, or any other part of the
product.
, Storage on Appliance--Flammable matedaJe shouJd
not be stored on the cooktop, near surface burners.
This includes paper, plastic and cloth items, such as
cookbooks, plasticware and towels, as well as flammable
liquids. Do not store explosives, such as aerosol cans, on
the cooktop. Flammable materials may explode and result
in fire or property damage.
Do not store items of interest to children
in the cabinets above the cooktop.
Do not leavechildrenaJone--Childrenshould not be
teft aJone or unattended in the area where an
appliance is in use. They should never be allowed to sit
or stand on any part of the appliance.
DO NOT TOUCH SURFACE BURNERS, GRATES, OR
AREAS NEAR THESE BURNERS. Surface burners may
be hot even though the flames are not visible. Areas near
surface burners may become hot enough to cause burns.
During and after use, do not touch or let clothing or other
flammable materials touch these areas until they have had
sufficient time to cool. Among these areas are the cooktop
and the surfaces facing the cooktop.
Wear Proper Apparel--Loose-fitting or hanging
garments shoutd never be worn while using the
appliance. Do not let clothing or other flammable
materials contact hot surfaces.
Stepping or leaning on this cooktop can
resuJt in serious injuries and may also cause damage to
the cooktop. Do not allow child ten to climb or play around the
cooktop.
Never use your appliance for warming or
heating the room.
@'}.
important Safety instructions
, Do Not Use Water or Ftour on Grease Fires--Smother
the fire with a pan Hd, or use baking soda, a dry
chemicaJ or foam-type extinguisher.
° When heating fat or grease, watch it cJosely. Fat or
grease may catch fire if allowed to become too hot,
° Use Onty Dry Pothotders--Moist or damp pot holders
on hot surfaces may result in burns from steam. Do not
let the potholders touch the flame or burners, Do not use a
towel or other bulky cloth instead of a pot holder,
° Do Not Heat Unopened Food Containers--Buildup of
pressure may cause container to buret and resuJt in
injury.
* Know which knob controls each surface burner,
Always turn the knob to the LFE position when igniting the
burners, Visually check that the burner has lit, Then adjust
the flame so it does not extend beyond the edge of the
utensil.
Use Proper Flame Size--Adjust flame size
so it does not extend beyond the edge of the utensil. The
use of undersized utensils will expose a portion of the burner
flame to direct contact and may result in ignition of clothing.
Proper relationship of utensil to flame will also improve
efficiency.
Do not use stove top grilts on your seaJed
gas burners, if you use a stove top grill on a sealed gas
burner, it will cause incomplete combustion and can result in
exposure to carbon monoxide levels above allowable cur-
rent standards. This can be hazardous to your health.
Use proper pan size--This appliance is
equipped with one or more surface burners of different sizes.
Select utensils having fiat bottom large enough to cover the
surface burner. The use of undersized utensils will expose a
portion of the surface burner to direct contact and may result
in ignition of clothing. Proper relationship of utensil to the
surface burner will also improve efficiency.
o Clean the appJiance regularJy to keep aH parts free
of grease that couJd catch fire. Exhaust fan ventilation
hoods and grease filters should be kept clean. Do not
allow grease to accumulate on hood or filter. Greasy
deposits in the fan could catch fire. When flaming food
under the hood, turn fan on. Refer to hood
manufacturer's instructions for cleaning.
o Utensil Handtes Should BeTurned Inward from Edges
of Cooktop and Not Extend Over Adjacent Surface
Burners--To reduce the risk of burns, ignition of
flammable materials, and spillage due to unintentional
contact with the utensil, the handle of the utensil should be
positioned so that it is turned inward, and does not extend
over adjacent surface burners.
Never Leave Surface Burners Unattended at High
Heat Settings--Boilovers cause smoking and greasy
spillovers that may ignite, ora pan that has boiled dry may
melt.
Protective Liners--Do not use aluminum foil to line
surface burner pans. Protective liners or aluminum foil
may interfere with heat and air distribution, and
combustion. Damage to the cooktop or personal injury
may result.
Glazed Cooking Utensils--Only certain types of glass,
glass/ceramic, ceramic, earthenware, or other glazed
utensils are suitable for cooktop service without breaking
due to the sudden change in temperature. Check the
manufacturer's recommendations for cooktop use.
Do Not Use Decorative Surface Burner Covers. If a
burner is accidentally turned on, the decorative cover will
become hot and possibly melt, You will not be able to see
that the burner is on, Burns will occur if the hot covers are
touched, Damage may also be done to the cooktop or
burners because the covers may cause overheating, Air
will be blocked from the burner and cause combustion
problems,
GLASS COOKTOPS (some modeJs):
o Do Not Clean or Operate a Broken Cooktop. If cooktop
should break, cleaning solutions and spillovers may
penetrate the broken cooktop and create a risk of electric
shock, Contact a qualified technician immediately,
Ctean Cooktop with Caution. If a wet sponge or cloth is
used to wipe spills on a hot cooking area, be careful to
avoid a steam burn. Some cleaners can produce harmful
fumes if applied to a hot surface.
o Do Not Ptace Hot Cookware on Cold Cooktop Glass.
This could cause glass to break,
o Do not slide pans across the cooktop surface. They
may scratch the cooktop surface,
Do not tet pans boit dry. Pans that boil dry may
permanently damage the cooktop by breaking, fusing to,
or marking it. (This type of damage is not covered by your
warranty).
mMPORTANT SAFETY NOTmCE
The California Safe Drinking Water and Toxic
Enforcement Act requires the Governor of California to
publish a list of substances known to the state to cause
cancer, birth defects or other reproductive harm, and
requires businesses to warn customers of potential
exposure to such substances,

PROTECTmON AGREEMENTS
mnthe U.S.A.
Master Protection Agreements
Congratulations on making a smart purchase, Your new
Kenmore ®product is designed and manufactured for
years of dependable operation, But like all products, it
may require preventive maintenance or repair from time
to time, That's when having a Master Protection
Agreement can save you money and aggravation,
Purchase a Master Protection Agreement now and pro-
tect yourseff from unexpected hassle and expense.
The Master Protection Agreement aUsoheUpsextend the
Hfeof your new product. Here's what's included in the
Agreement:
[_ Expert service by our 12,000 professional repair
specialists
[_ Unlimited service and no charge for parts and
labor on all covered repairs
[Y_ "No-lemon" guarantee - replacement
of your covered product if four or more product
failures occur within tweUve months
[_ Product replacement if your covered product can't
be fixed
[_ AnnuaJ Preventive Maintenance Check at your
[_ request- no extra charge
Fast help by phone - phone support from a Sears
technician on products requiring in-home repair, plus
convenient repair scheduling
[_ Power surge protection against electrical damage
due to power fluctuations
[_ RentaJ reimbursement if repair of your covered
product takes longer than promised
mn Canada
Maintenance Agreements
Your purchase has added value because you can
depend on Sears HomeCentral®for service. With over
2400 Service Technicians and more than a million parts
and accessories, we have the tools, parts, knowledge
and skiffs to ensure our pledge: We Service What We
Sefl.
Your Kenmore®product is designed, manufactured
and tested to provide years of dependable operation, But
like all products, it may require service from time to time,
The Sears Maintenance Agreement offers you an
outstanding service program, affordably priced,
The Sears Maintenance Agreement:
is your way to buy tomorrow's service at today's price
Eliminates repair biffs resulting from normal wear and
tear
Provides phone support from a Sears technician on
products requiring in-home repair
Even if you don't need repairs, provides an annual
Preventive Maintenance Check, at your request, to
ensure that your product is in proper running condition.
Some limitations apply. For more information about
Sears Canada Maintenance Agreements,
call 1-800-381-8885
Once you purchase the Agreement, a simple phone carl
is all that it takes for you to schedule service, You can
carl anytime day or night, or schedule a service
@'},
Sears has over 12,000 professional repair specialists,
who have access to over 4,5 million quality parts and
accessories, That's the kind of professionalism you can
count on to help prolong the life of your new purchase for
years to come, Purchase your Master Protection
Agreement today!
Some limitations and excJueions appJy.
For prices and additionaJ information call
1-800-827-8855.
Sears mnstallation Service
For Sears professional installation of home
appliances, garage door openers, water heaters,
and other major home items, in the U.S.A. carl
1-8OO-4-MY-HOME ®
REV. 030509
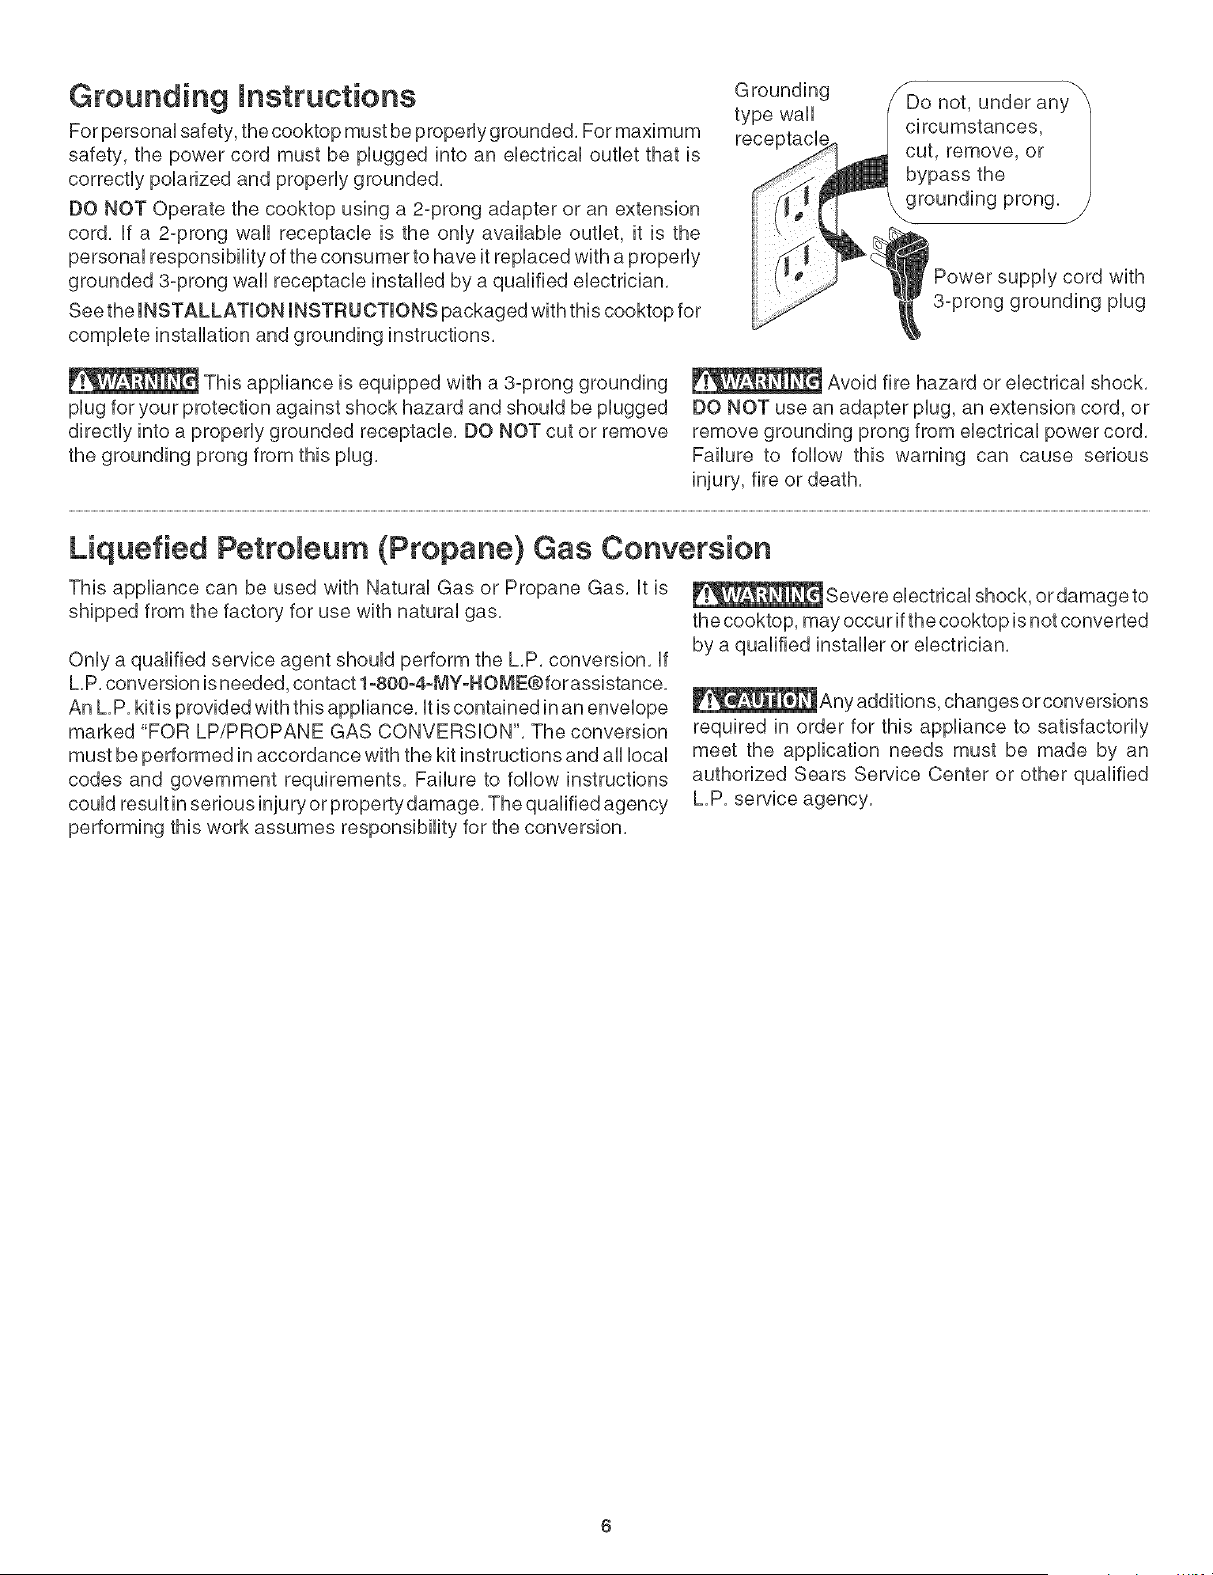
Grounding instructions
For personal safety, the cooktop must be properly grounded, For maximum
safety, the power cord must be plugged into an ebctrbal outbt that is
correctly polarized and properly grounded,
DO NOT Operate the cooktop using a 2°prong adapter or an extension
cord, If a 2°prong wall receptacle is the only available outlet, it is the
personal responsibility of the consumer to have it replaced with a properly
grounded 3°prong wall receptacle installed by a qualified electrician,
See the INSTALLATION INSTRUCTIONS packaged with this cooktop for
complete installation and grounding instructions,
This appliance is equipped with a 3-prong grounding
plug for your protection against shock hazard and should be plugged
directly into a properly grounded receptacle, DO NOT cut or remove
the grounding prong from this plug,
Grounding
type wall
receptacl,
pply cord with
3-prong grounding plug
Avoid fire hazard or electrical shock,
DO NOT use an adapter plug, an extension cord, or
remove grounding prong from electrical power cord,
Failure to follow this warning can cause serious
injury, fire or death,
Liquefied Petroleum (Propane} Gas Conversion
This appliance can be used with Natural Gas or Propane Gas, it is
shipped from the factory for use with natural gas,
Only a qualified service agent should perform the L,P, conversion, if
L,P, conversion is needed, contact 1-800-4-MY-H OME® for assistance,
An L,P, kit is provided with this appliance, it is contained in an envelope
marked "FOR LP/PROPANE GAS CONVERSION", The conversion
must be performed in accordance with the kit instructions and all local
codes and government requirements, Failure to follow instructions
could result in serious injury or property damage, The qualified agency
performing this work assumes responsibility for the conversion,
the cooktop, may occur if the cooktop is not converted
by a qualified installer or electrician,
required in order for this appliance to satisfactorily
meet the application needs must be made by an
authorized Sears Service Center or other qualified
L,P, service agency,
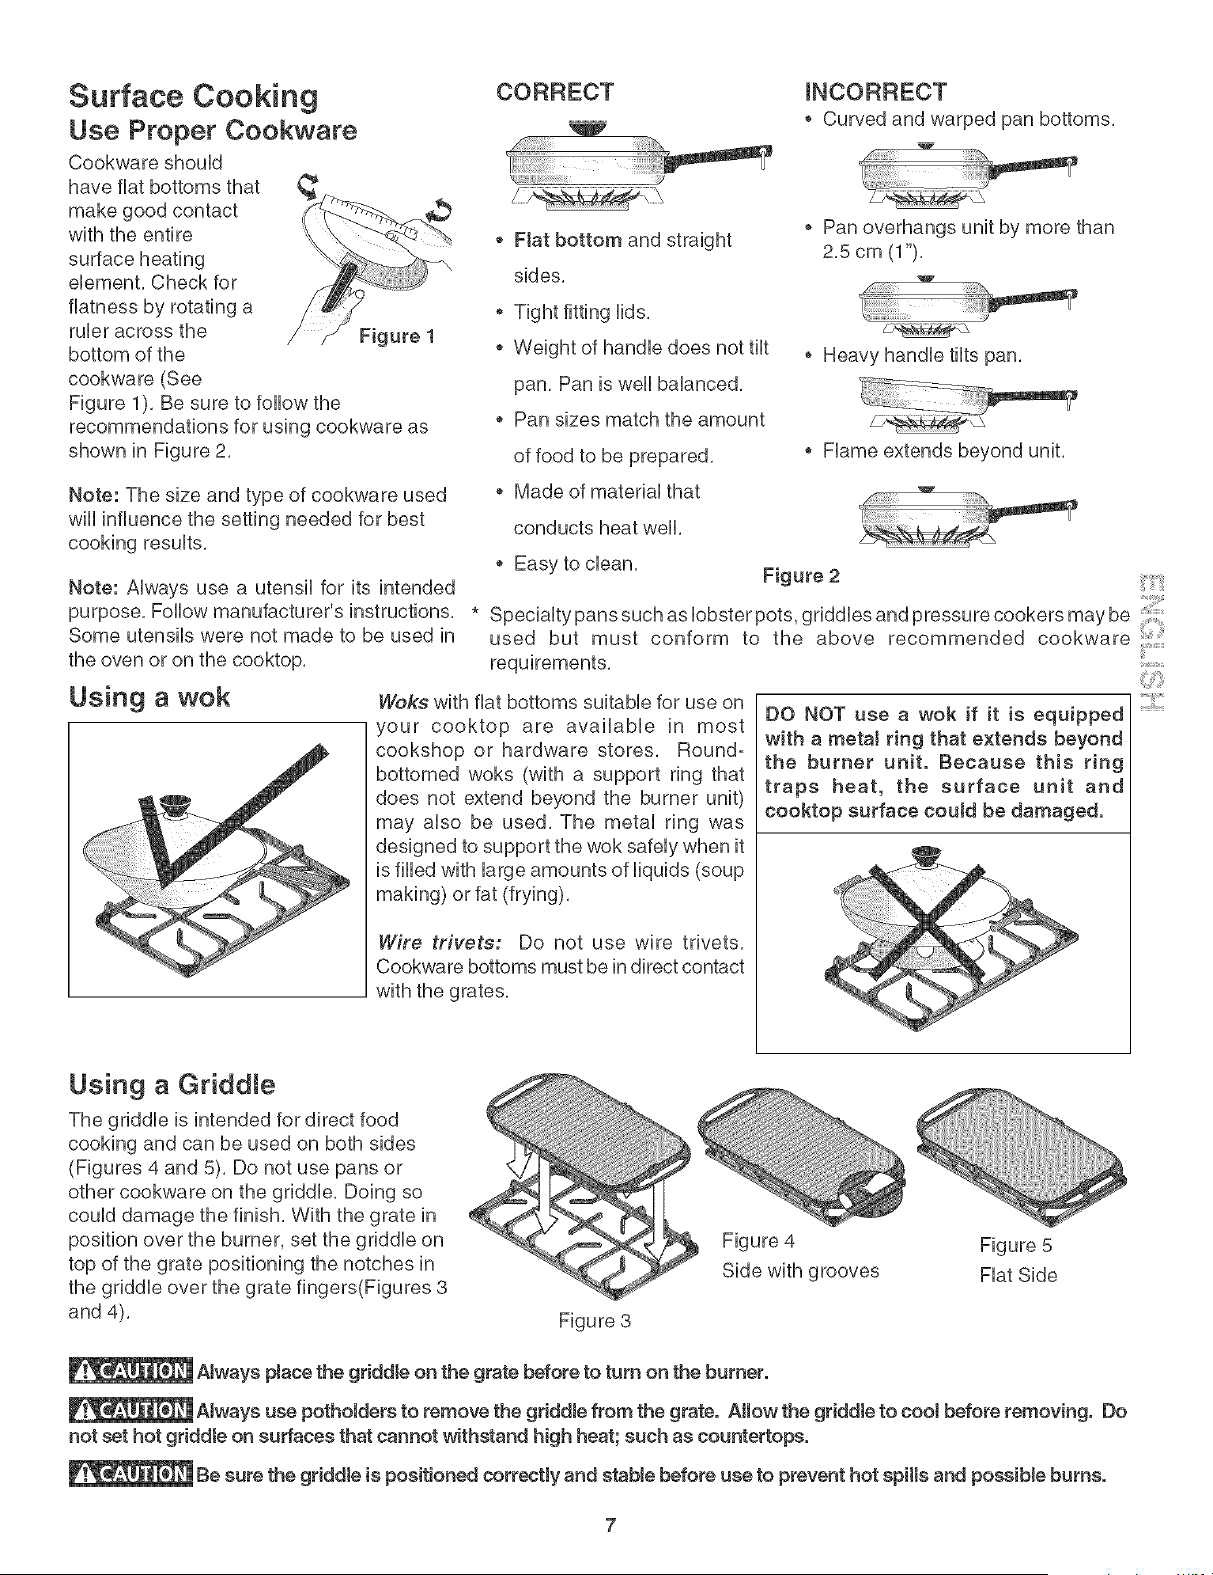
Surface Cooking
Use Proper Cookware
Cookware should
have fiat bottoms that
make good contact
with the entire
surface heating
element, Check for
flatness by rotating a
ruler across the Figure 1
bottom of the
cookware (See
Figure 1), Be sure to follow the
recommendations for using cookware as
shown in Figure 2,
CORRECT
o Fiat bottom and straight
sides,
Tight fitting lids,
Weight of handle does not tilt
pan, Pan is well balanced,
o Pan sizes match the amount
of food to be prepared,
INCORRECT
o Curved and warped pan bottoms,
o Pan overhangs unit by more than
2,5 cm (1"),
o Heavy handle tilts pan,
o Flame extends beyond unit,
Note: The size and type of cookware used
wiii influence the setting needed for best
cooking results,
Note: Always use a utensil for its intended
purpose, Follow manufacturer's instructions,
Some utensils were not made to be used in
the oven or on the cooktop,
Using a wok
Made of material that '_'
conducts heat well,
Easy to clean,
Figure 2
* Specialty pans such as lobster pots, griddles and pressure cookers may be
used but must conform to the above recommended cookware q
Woks with fiat bottoms suitable for use on
your cooktop are available in most
cookshop or hardware stores, Round°
bottomed woks (with a support ring that
does not extend beyond the burner unit)
may also be used, The metal ring was
designed to support the wok safely when it
is filled with large amounts of liquids (soup
making) or fat (frying),
Wire trivets: Do not use wire trivets,
Cookware bottoms must be in direct contact
with the grates,
DO NOT use a wok if it is equipped
with a metal ring that extends beyond
the burner unit. Because this ring
traps heat, the surface unit and
cooktop surface could be damaged.
@'},
Using a Griddle
The griddle is intended for direct food
cooking and can be used on both sides
(Figures 4 and 5), Do not use pans or
other cookware on the griddle, Doing so
could damage the finish, With the grate in
position over the burner, set the griddle on
top of the grate positioning the notches in
the griddle over the grate fingers(Figures 3
and 4),
Figure 3
Figure 4 Figure 5
Side with grooves Fiat Side
Always place the griddle on the grate before to turn on the burner.
Always use potho[ders to remove the griddle from the grate. Allow the griddle to coo[ before removing. Do
not set hot griddle on surfaces that cannot withstand high heat; such as countertops.
Be sure the griddle is positioned correctly and stable before use to prevent hot spills and poseib[e burns.
Setting Surface Controls
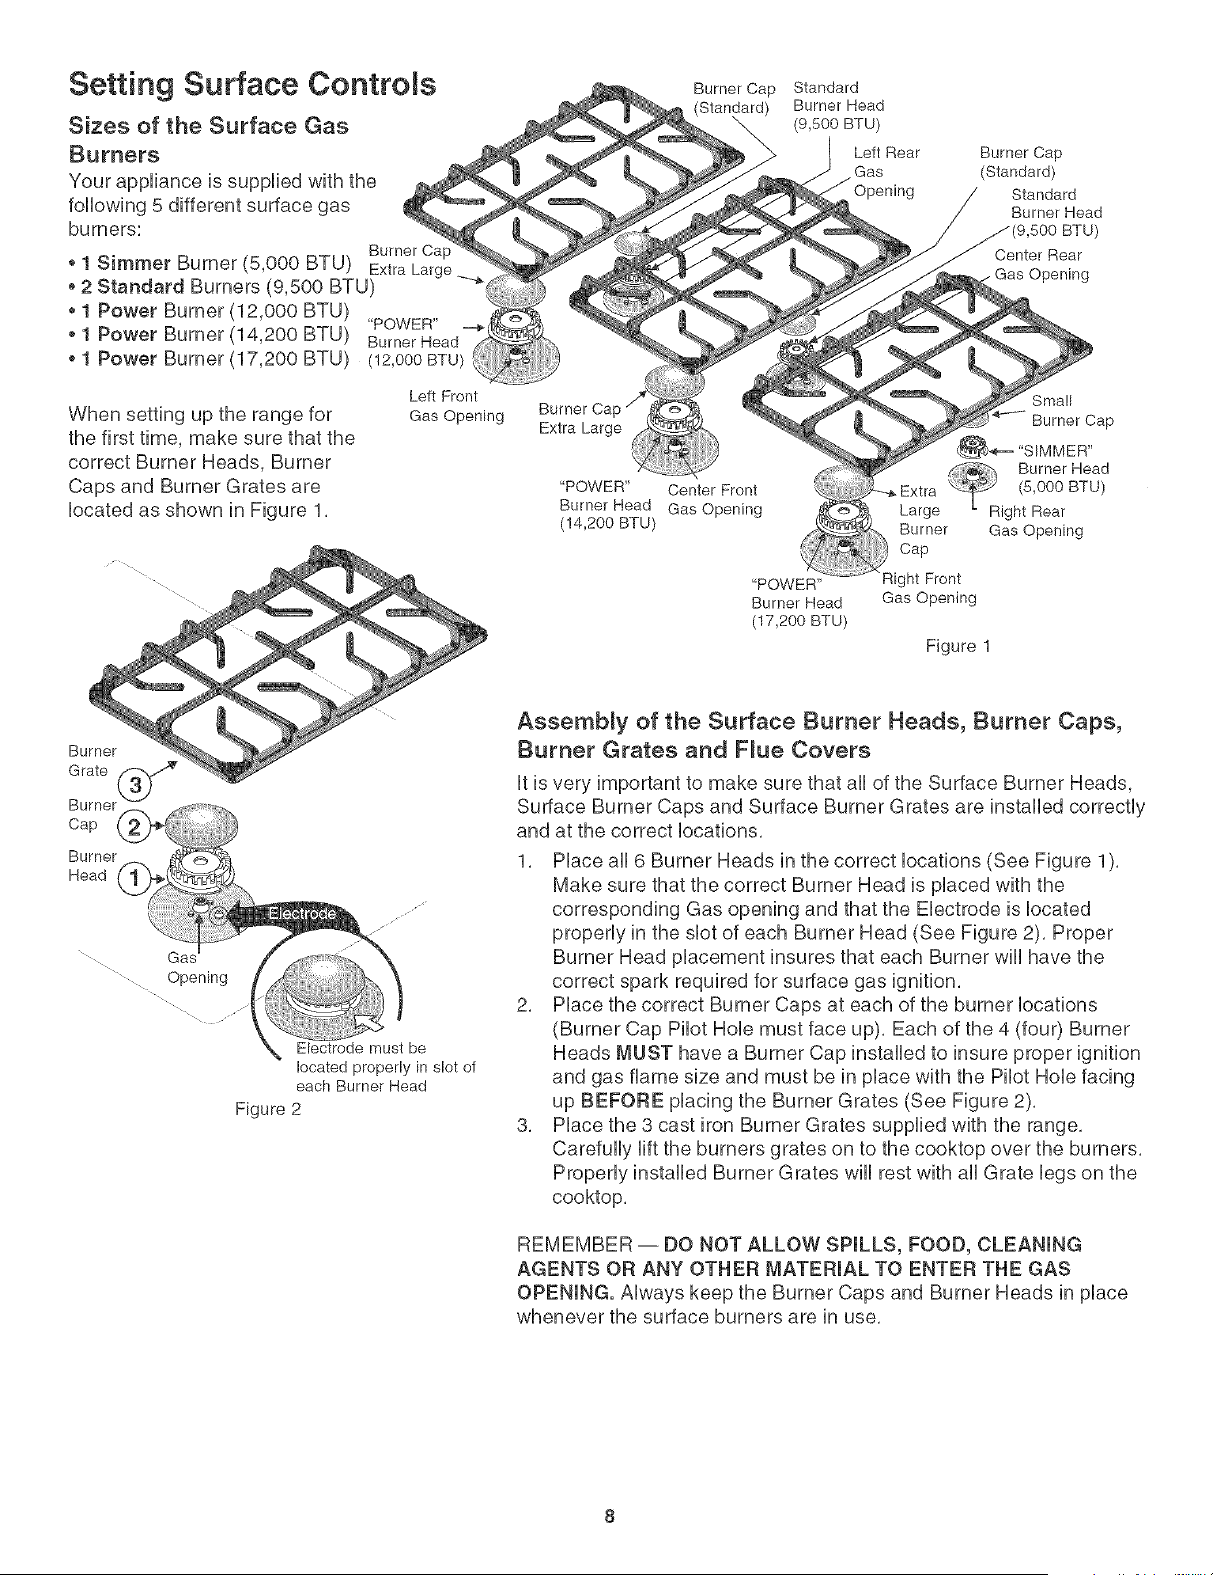
Sizes of the Surface Gas
Burners
Your appfiance is suppfied with the
folio%rig 5 different surface gas
burners:
Burner Ca
o 1 Simmer Burner (5,000 BTU) ExtraLarge
o2 Standard Burners (9,500 BTU)
1 Power Burner (12,000 BTU)
o 1 Power Burner (14,200 BTU) "POWER" ----_l
Burner Head
o 1 Power Burner (17,200 BTU) (12,000BTU)
When setting up the range for
the first time, make sure that the
correct Burner Heads, Burner
Caps and Burner Grates are
Uocated as shown in Figure 1,
Left Front
Gas Opening
Burner Ca
Extra Large
"POWER"
Burner Head
(!4,200 BTU)
Burner Cap
Center Front
Gas Opening
Standard
Burner Head
BTU)
Left Rear
Gas
"Opening
Burner Cap
(Standard)
Standard
Burner Head
Center Rear
Opening
"POWER"
Burner Head
(17,200 BTU)
Small
Burner Cap
"SIMMER"
_ Burner Head
Extra (5,000 BTU)
Large Right Rear
Burner Gas Opening
Cap
jht Front
Gas Opening
Figure 1
Burner
Cap
Burner
Head
Gas
Opening
Electrode must be
located properly in slot of
each Burner Head
Figure 2
Assembly of the Surface Burner Heads, Burner Caps,
Burner Grates and F_ue Covers
utis very important to make sure that aH of the Surface Burner Heads,
Surface Burner Caps and Surface Burner Grates are installed correctUy
and at the correct Uocations,
1, PUaceaH 6 Burner Heads in the correct Uocations (See Figure 1),
Make sure that the correct Burner Head is pUacedwith the
corresponding Gas opening and that the Electrode is located
properly in the slot of each Burner Head (See Figure 2), Proper
Burner Head placement insures that each Burner will have the
correct spark required for surface gas ignition,
2, Place the correct Burner Caps at each of the burner locations
(Burner Cap Pilot Hole must face up), Each of the 4 (four) Burner
Heads MUST have a Burner Cap installed to insure proper ignition
and gas flame size and must be in place with the Pilot Hole facing
up BEFORE placing the Burner Grates (See Figure 2),
3, Place the 3 cast iron Burner Grates supplied with the range,
Carefully lift the burners grates on to the cooktop over the burners,
Properly installed Burner Grates will rest with all Grate legs on the
cooktop,
REMEMBER -- DO NOT ALLOW SPILLS, FOOD, CLEANING
AGENTS OR ANY OTHER MATERIAL TO ENTER THE GAS
OPENING. Always keep the Burner Caps and Burner Heads in place
whenever the surface burners are in use,
Setting Surface Controls
Figure 1
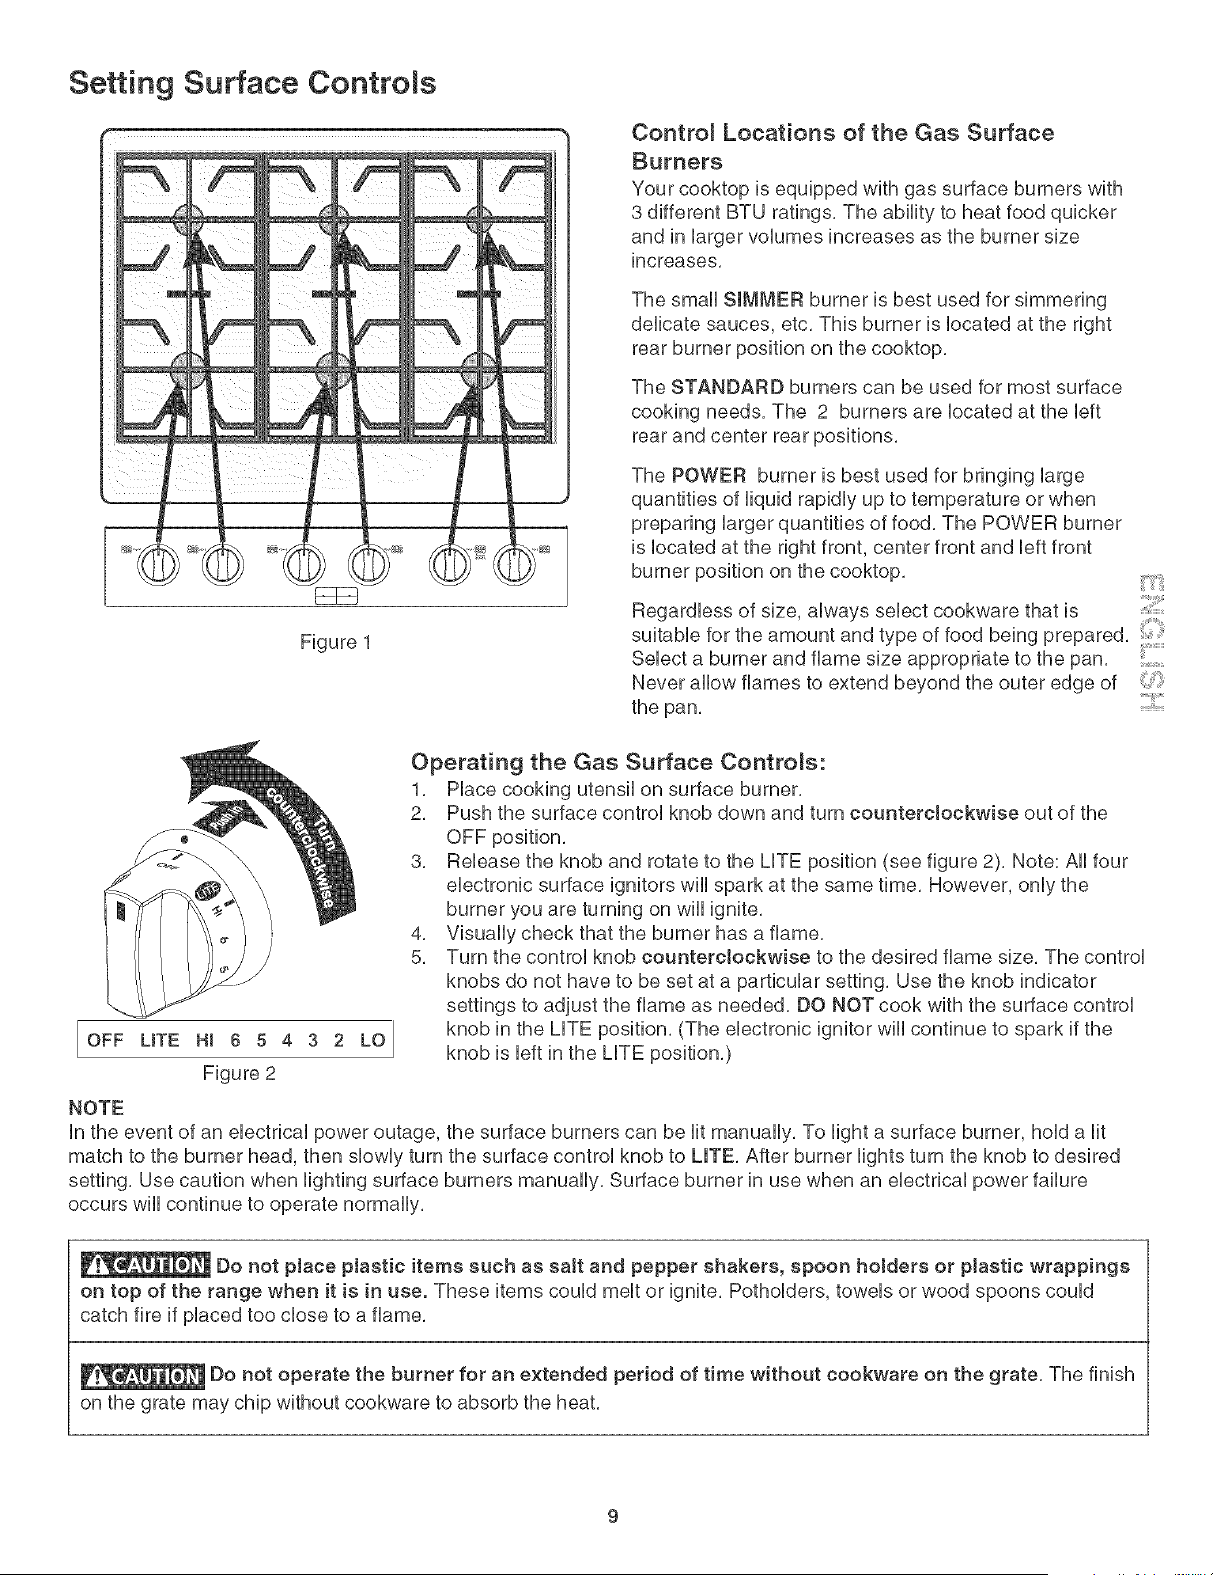
Contro_ Locations of the Gas Surface
Burners
Your cooktop is equipped with gas surface burners with
3 different BTU ratings, The ability to heat food quicker
and in larger volumes increases as the burner size
increases,
The small SIMMER burner is best used for simmering
delicate sauces, etc, This burner is located at the right
rear burner position on the cooktop,
The STANDARD burners can be used for most surface
cooking needs, The 2 burners are located at the left
rear and center rear positions,
The POWER burner is best used for bringing large
quantities of liquid rapidly up to temperature or when
preparing larger quantities of food, The POWER burner
is located at the right front, center front and left front
burner position on the cooktop,
Regardless of size, always select cookware that is
suitable for the amount and type of food being prepared,
Select a burner and flame size appropriate to the pan,
Never allow flames to extend beyond the outer edge of
the pan,
Operating the Gas Surface Controls:
1, Place cooking utensil on surface burner,
2, Push the surface control knob down and turn counterclockwise out of the
OFF UTE HJ 6 5 4 3 2 LO
Figure 2
NOTE
3, Release the knob and rotate to the LITE position (see figure 2), Note: All four
electronic surface ignitors will spark at the same time, However, only the
burner you are turning on will ignite,
4, Visually check that the burner has a flame,
5, Turn the control knob counterclockwise to the desired flame size, The control
knobs do not have to be set at a particular setting, Use the knob indicator
settings to adjust the flame as needed, DO NOT cook with the surface control
knob in the LITE position, (The electronic ignitor will continue to spark if the
knob is left in the LITE position,)
in the event of an electrical power outage, the surface burners can be lit manually, To light a surface burner, hold a lit
match to the burner head, then slowly turn the surface control knob to LITE, After burner lights turn the knob to desired
setting, Use caution when lighting surface burners manually, Surface burner in use when an electrical power failure
occurs will continue to operate normally,
Do not pJace plastic items such as saJt and pepper shakers, spoon holders or plastic wrappings
on top of the range when it is in use, These items could melt or ignite, Potholders, towels or wood spoons could
catch fire if placed too close to a flame,
Do not operate the burner for an extended period of time without cookware on the grate, The finish
on the grate may chip without cookware to absorb the heat,
Setting Surface Controls
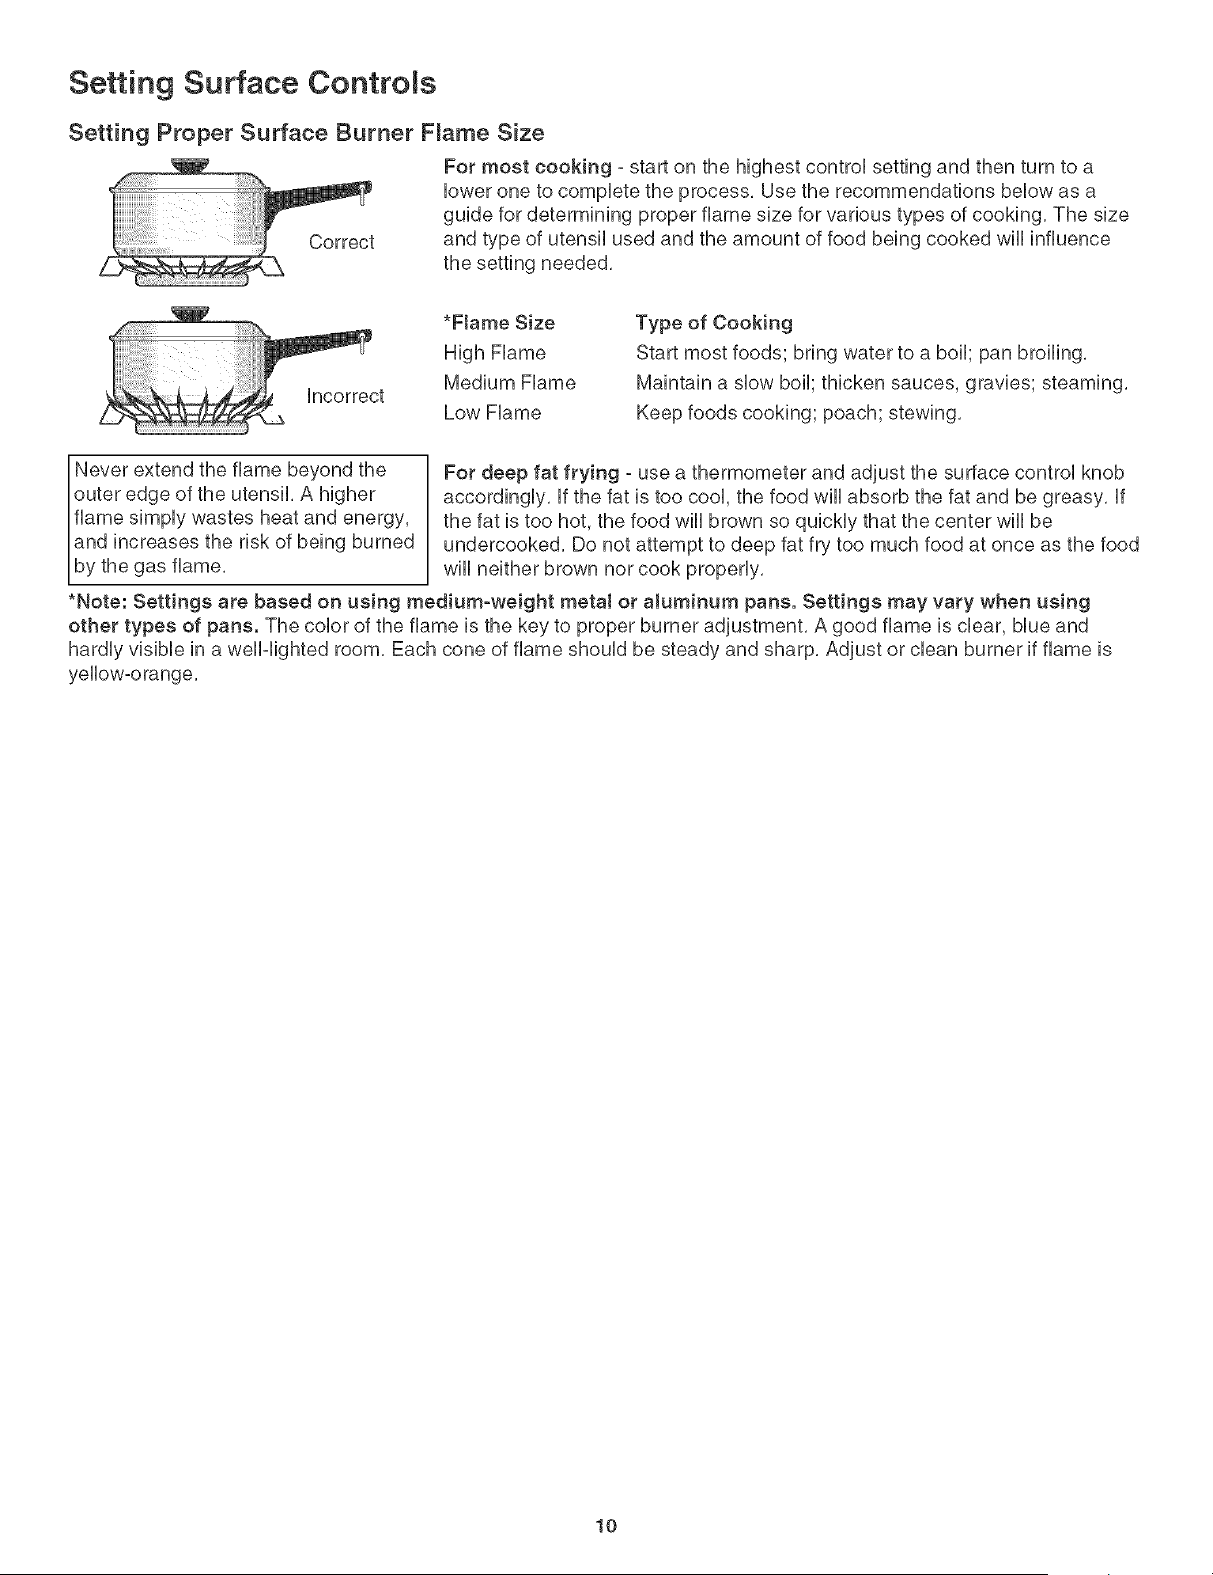
Setting Proper Surface Burner F_ame Size
For most cooking - start on the highest control setting and then turn to a
lower one to compbte the process, Use the recommendations below as a
guide for determining proper flame size for various types of cooking, The size
Correct and type of utensil used and the amount of food being cooked will influence
the setting needed,
incorrect
*Ftame Size
High Flame
Medium Flame
Low Flame
Type of Cooking
Start most foods; bring water to a boil; pan broiling,
Maintain a slow boil; thicken sauces, gravies; steaming,
Keep foods cooking; poach; stewing,
Never extend the flame beyond the
outer edge of the utensil, A higher
flame simply wastes heat and energy,
and increases the risk of being burned
by the gas flame,
For deep fat frying - use a thermometer and adjust the surface control knob
accordingly, if the fat is too cool, the food will absorb the fat and be greasy, if
the fat is too hot, the food will brown so quickly that the center will be
undercooked, Do not attempt to deep fat fry too much food at once as the food
will neither brown nor cook properly,
*Note: Settings are based on using medium-weight metal or aJuminum pans, Settings may vary when using
other types of pans. The color of the flame is the key to proper burner adjustment, A good flame is clear, blue and
hardly visible in a weIMighted room, Each cone of flame should be steady and sharp, Adjust or clean burner if flame is
yellow-orange,
10
Genera Care & C eaning
Cleaning Various Parts of Your Cooktop
Before cleaning any part of the cooktop, be sure all controls are turned OFF and the cooktop is COOL, REMOVE SPILLOVERS
AND HEAVY SOiLiNG AS SOON AS POSSIBLE, REGULAR CLEANINGS NOW WiLL REDUCE THE DiFFiCULTY AND
EXTENT OF A MAJOR CLEANING LATER,
Su#aces How to Clean
AJuminum (Trim Pieces) & Use hot, soapy water and a cloth or paper towel, Dry with a clean cloth,
Vinyl
Painted and Plastic Control Forgeneral cleaning, use hot soapy water and a cloth, Formore difficu/tsoils andbui/t-
Knobs, Body Pieces, and up grease, apply a liquid detergent directly onto the soil, Leave on soil for 30 to 60
DecorativeTdm minutes, Rinse with a damp cloth and dry, DO NOT use abrasive cleaners on any of
these materials; they can scratch or dull the finish,
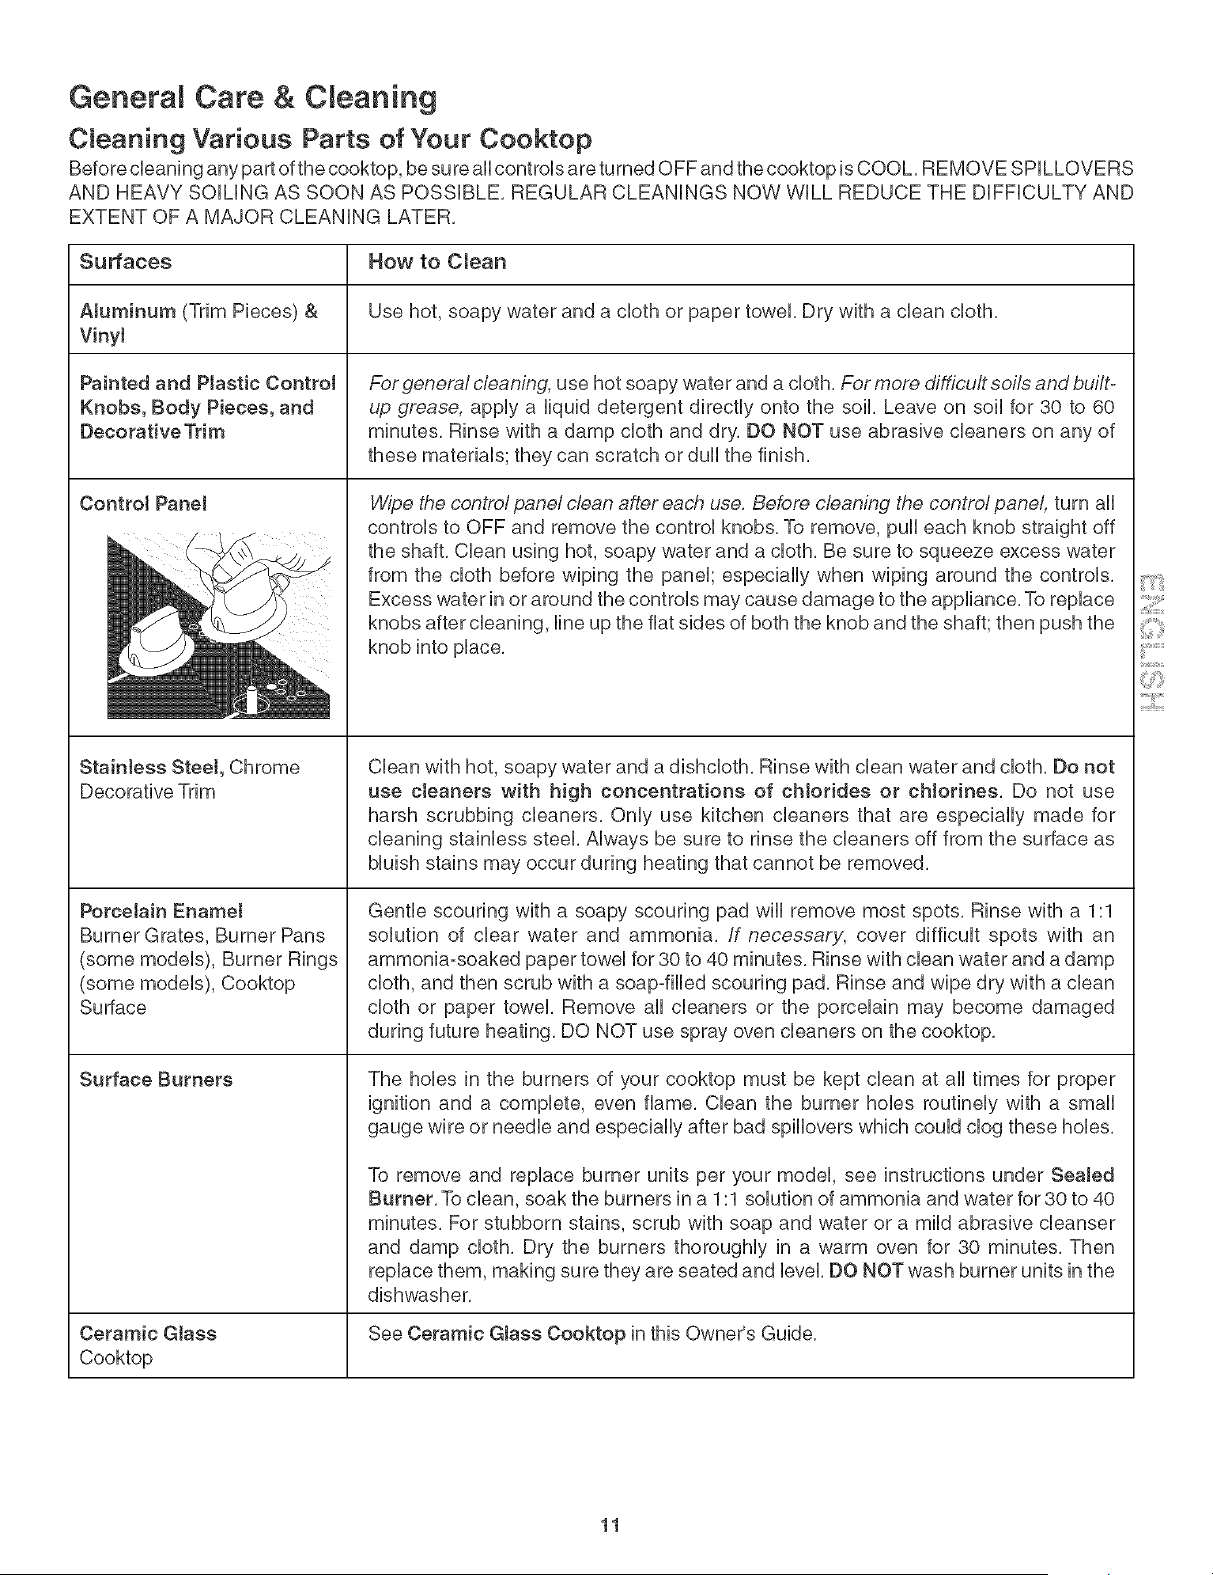
Control Panel
Stainless Steet, Chrome
Decorative Trim
Porcelain Enamet
Burner Grates, Burner Pans
(some models), Burner Rings
(some models), Cooktop
Surface
Surface Burners
Wipe the control panel clean after each use. Before cleaning the control panel, turn all
controls to OFF and remove the control knobs, To remove, pull each knob straight off
the shaft, Clean using hot, soapy water and a cloth, Be sure to squeeze excess water
from the cloth before wiping the panel; especially when wiping around the controls,
Excess water in or around the controls may cause damage to the appliance, To replace
knobs after cleaning, line up the fiat sides of both the knob and the shaft; then push the
knob into place,
Clean with hot, soapy water and a dishcloth, Rinse with clean water and cloth, Do not
use cteaners with high concentrations of chlorides or chlorines, Do not use
harsh scrubbing cbaners, @fly use kitchen cbaners that are especially made for
cleaning stainbss steel, Always be sure to rinse the cleaners off from the surface as
bluish stains may occur during heating that cannot be removed,
Gentle scouring with a soapy scouring pad wiii remove most spots, Rinse with a 1:1
solution of clear water and ammonia, /f necessary, cover difficult spots with an
ammonia-soaked paper towel for 30 to 40 minutes, Rinse with clean water and a damp
cloth, and then scrub with a soap-filled scouring pad, Rinse and wipe dry with a clean
cloth or paper towel, Remove all cleaners or the porcelain may become damaged
during future heating, DO NOT use spray oven cleaners on the cooktop,
The hobs in the burners of your cooktop must be kept clean at all times for proper
ignition and a complete, even flame, Clean the burner hobs routinely with a small
gauge wire or needle and especially after bad spillovers which could clog these hobs,
To remove and replace burner units per your model, see instructions under Sealed
Burner, To clean, soak the burners in a 1:1 solution of ammonia and water for 80 to 40
minutes, For stubborn stains, scrub with soap and water or a mild abrasive cleanser
and damp cloth, Dry the burners thoroughly in a warm oven for 30 minutes, Then
replace them, making sure they are seated and level, DO NOT wash burner units in the
dishwasher,
Ceramic Glass See Ceramic Glass Cooktop in this Owner's Guide,
Cooktop
@'},
11
Genera Care & C eaning
Ceramic Glass Cooktop Cleaning & Maintenance
Consistent and proper cleaning is essential to maintaining your Ceramic glass cooktop
Prior to using your cooktop for the first time, appUythe recommended CookTop® CUeaning Creme (visit www.sears.com
for repUacement cUeaner) to the ceramic surface. CUean and buff with a paper toweUor a 3M ScotchoBdte® BUueMuUti-
Purpose No Scratch Scrub Sponge (see instructions on next page). This wHUmake cUeaning easier when soiled from
cooking. The speciaUcooktop cleaning cream Ueavesa protective finish on the gUassto heUpprevent scratches and
abrasions.
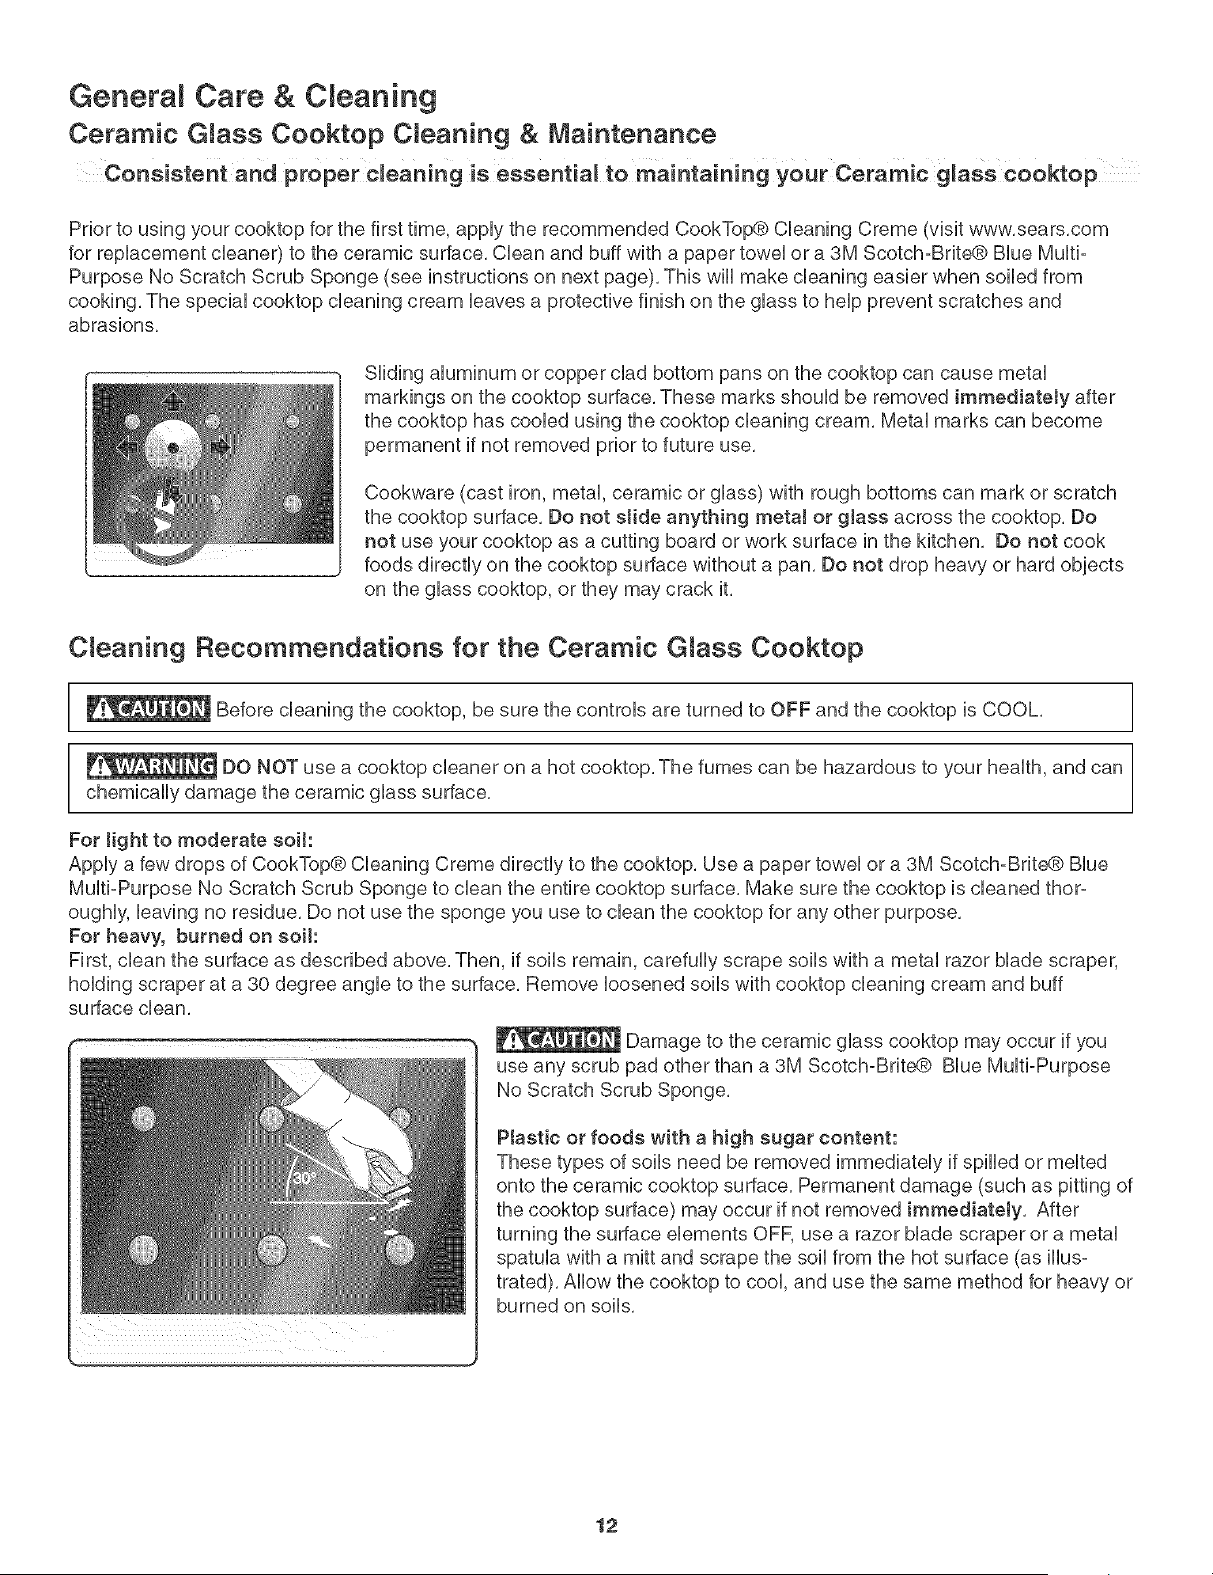
SHding aUuminum or copper dad bottom pans on the cooktop can cause metaU
markings on the cooktop surface. These marks shouUdbe removed immediateJy after
the cooktop has cooUedusing the cooktop cleaning cream. Metal marks can become
permanent if not removed prior to future use.
Cookware (cast iron, metal, ceramic or glass) with rough bottoms can mark or scratch
the cooktop surface, Do not slide anything meta! or gJass across the cooktop, Do
not use your cooktop as a cutting board or work surface in the kitchen, Do not cook
foods directly on the cooktop surface without a pan, Do not drop heavy or hard objects
on the glass cooktop, or they may crack it,
Cleaning Recommendations for the Ceramic Glass Cooktop
Before cleaning the cooktop, be sure the controls are turned to OFF and the cooktop is COOL,
DO NOT use a cooktop cleaner on a hot cooktop, The fumes can be hazardous to your health, and can
chemically damage the ceramic glass surface,
For light to moderate soil:
Apply a few drops of CookTop® Cleaning Creme directly to the cooktop. Use a paper towel or a 3M Scotch-Brite® Blue
Multi-Purpose No Scratch Scrub Sponge to clean the entire cooktop surface. Make sure the cooktop is cleaned thor°
ougHy, leaving no residue. Do not use the sponge you use to clean the cooktop for any other purpose.
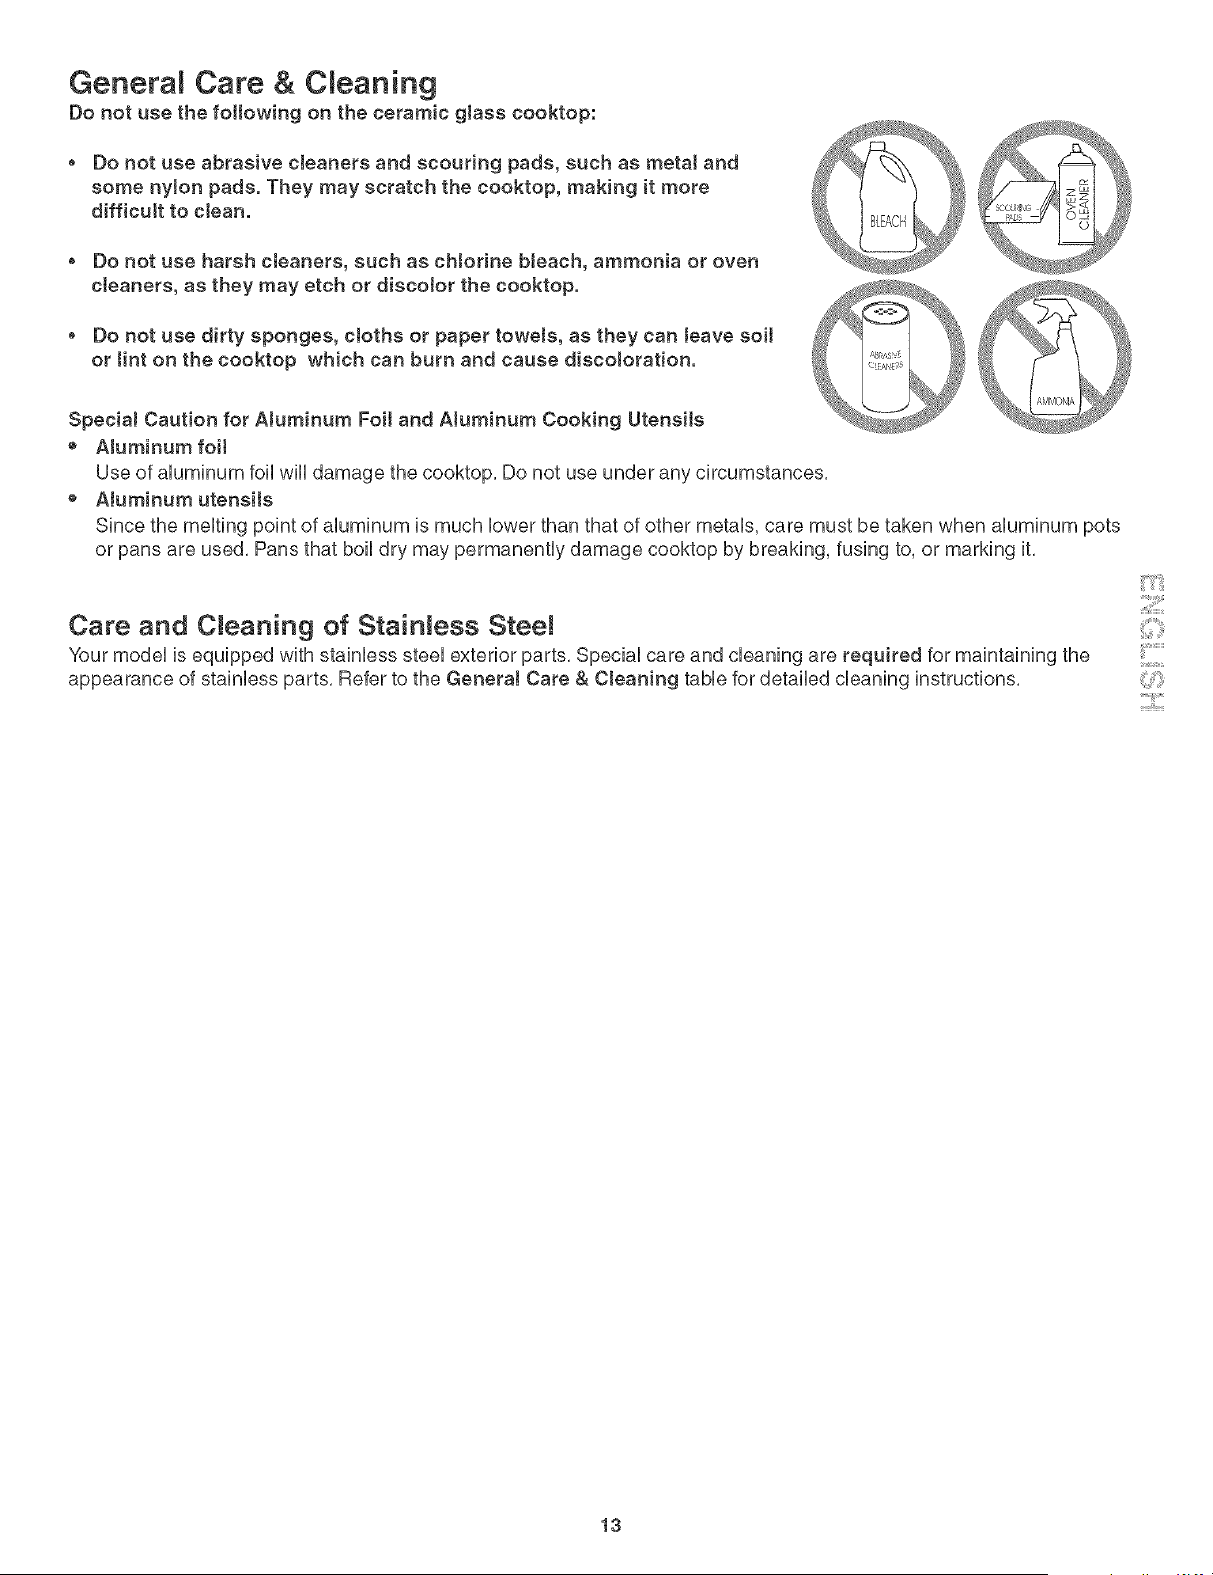
For heavy, burned on soit:
First, clean the surface as described above, Then, if soils remain, carefully scrape soils with a metal razor blade scraper,
holding scraper at a 30 degree angle to the surface, Remove loosened soils with cooktop cleaning cream and buff
surface clean.
- _ Damage to the ceramic glass cooktop may occur if you
use any scrub pad other than a 3M Scotch-Brite® Blue Multi-Purpose
No Scratch Scrub Sponge.
Plastic or foods with a high sugar content:
These types of soils need be removed immediately if spilled or melted
onto the ceramic cooktop surface. Permanent damage (such as pitting of
the cooktop surface) may occur if not removed immediately. After
turning the surface elements OFF, use a razor blade scraper or a metal
spatula with a mitt and scrape the soil from the hot surface (as illus-
trated). Allow the cooktop to cool, and use the same method for heavy or
burned on soils.
12
Genera Care & C eaning
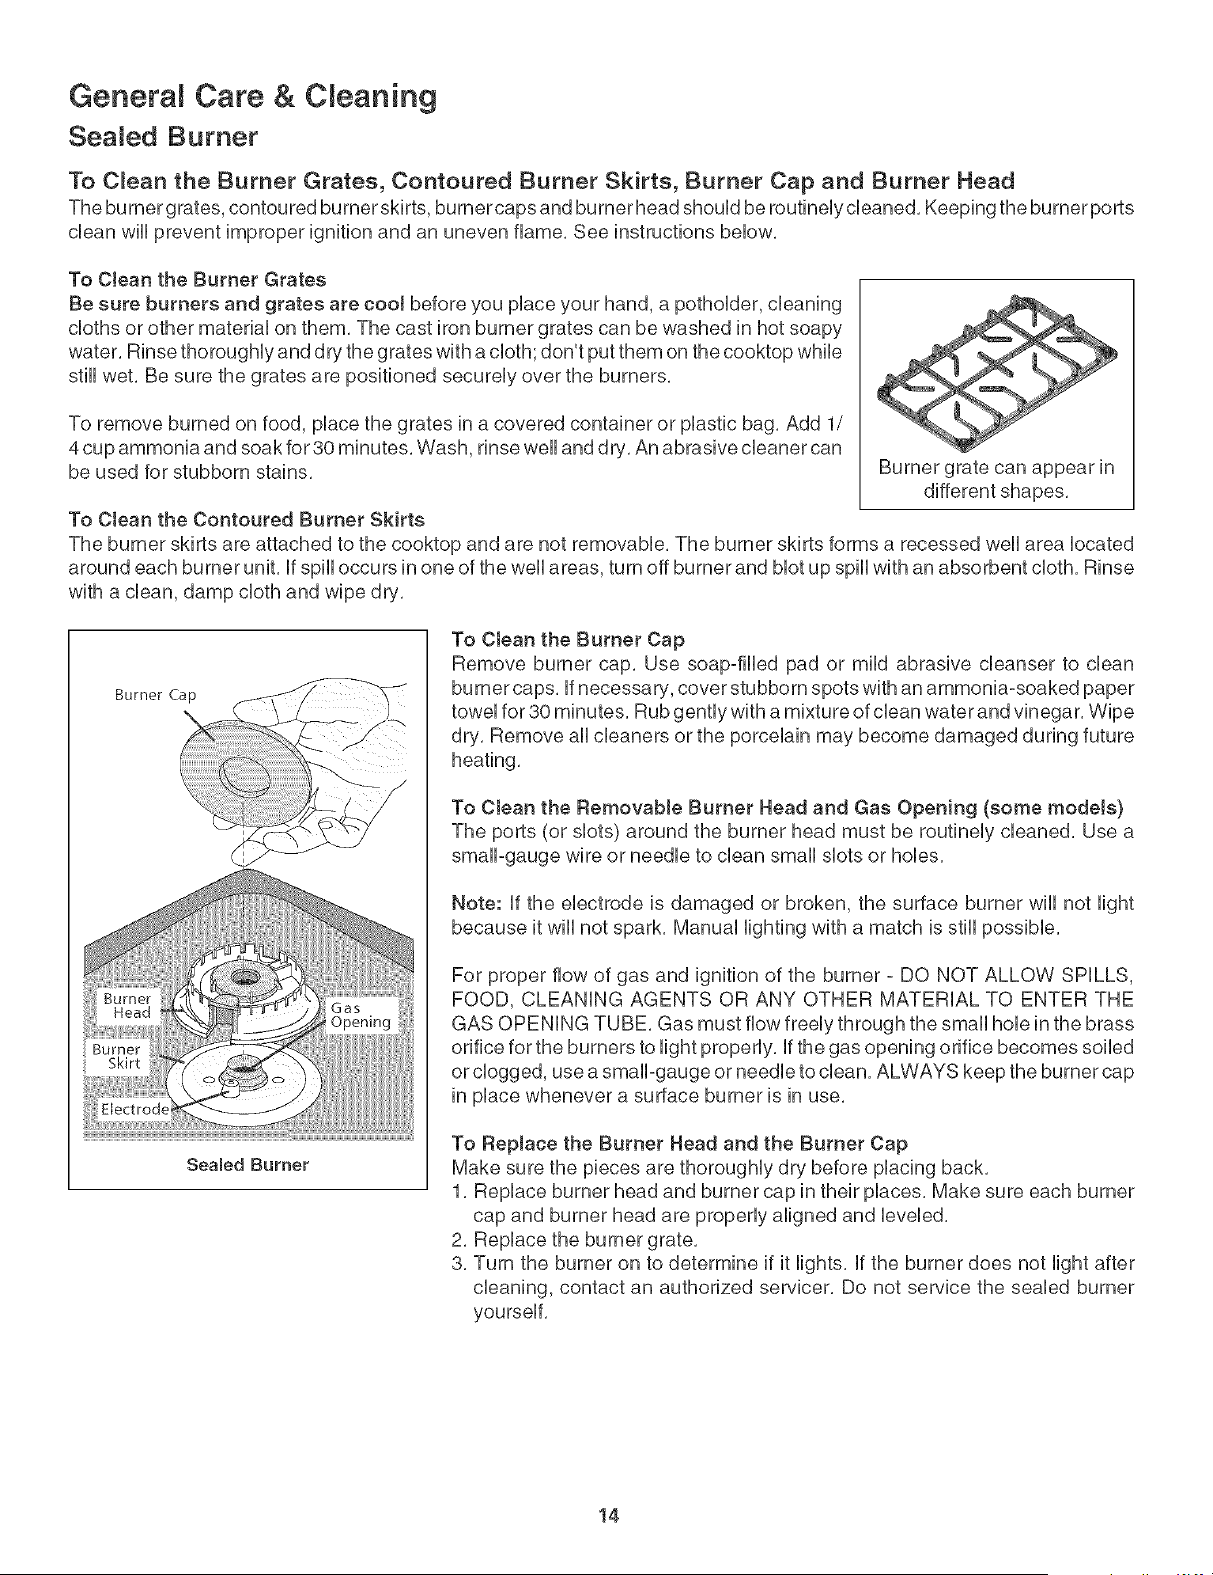
Do not use the following on the ceramic gJass cooktop:
, Do not use abrasive cJeaners and scouring pads, such as metal and
some nyJon pads. They may scratch the cooktop, making it more
difficult to cteam
, Do not use harsh cleaners, such as chJorine bleach, ammonia or oven
cleaners, as they may etch or discolor the cooktop.
. Do not use dirty sponges, cJoths or paper towets, as they can Jeave soit
or tint on the cooktop which can burn and cause discoloration.
Specia{ Caution for Aluminum Foit and Aluminum Cooking Utensits
e Aluminum foil
_c
Use of aluminum foil will damage the cooktop, Do not use under any circumstances,
Atuminum utensits
Since the melting point of aluminum is much lower than that of other metals, care must be taken when aluminum pets
or pans are used, Pans that boil dry may permanently damage cooktop by breaking, fusing to, or marking it,
Care and Cleaning of Stainless Stee!
Your model is equipped with stainless steel exterior parts, Special care and cleaning are required for maintaining the
appearance of stainless parts, Refer to the GeneraJ Care & Cteaning table for detailed cleaning instructions, @'},
13
Genera Care & C eaning
Seaned Burner
To C_ean the Burner Grates, Contoured Burner Skirts, Burner Cap and Burner Head
The burner grates, contoured burner skirts, bumercaps and burnerhead should be routinelycbaned, Keeping the burner ports
dean will prevent improper ignition and an uneven flame, See instructions below,
To CJean the Burner Grates
Be sure burners and grates are cooJ before you place your hand, a potholder, cleaning
cloths or other material on them, The cast iron burner grates can be washed in hot soapy
water, Rinse thoroughly and dry the grates with a cloth; don't put them on the cooktop while
still wet, Be sure the grates are positioned securely over the burners,
To remove burned on food, place the grates in a covered container or plastic bag, Add 1/
4 cup ammonia and soak for 30 minutes, Wash, rinse well and dry, An abrasive cleaner can
be used for stubborn stains,
To Ctean the Contoured Burner Skirts
Burner grate can appear in
different shapes,
The burner skirts are attached to the cooktop and are not removable. The burner skirts forms a recessed well area located
around each burner unit. If spill occurs in one of the well areas, turn off burner and blot up spill with an absorbent cloth. Rinse
with a clean, damp cloth and wipe dry.
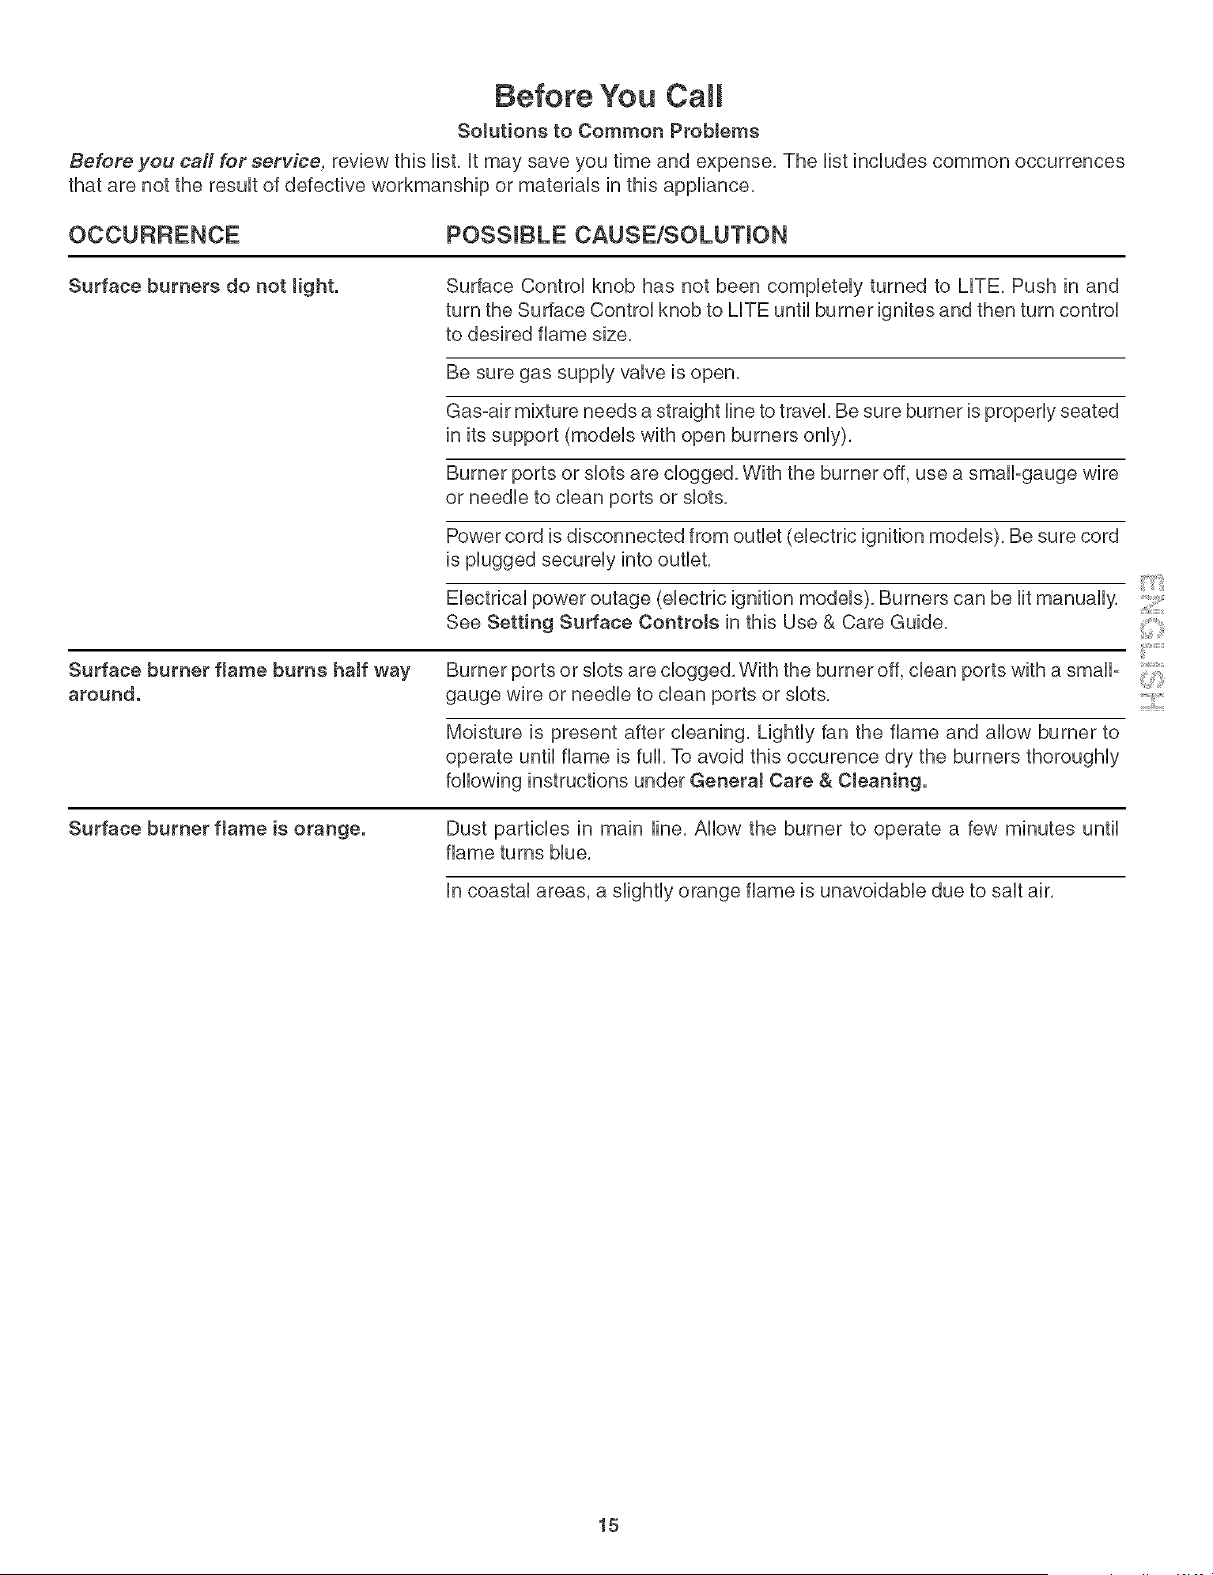
Burner Cap
Seamed Burner
To CJean the Burner Cap
Remove burner cap, Use soap-filbd pad or mild abrasive cleanser to clean
burner caps, If necessary, cover stubborn spots with an ammonia-soaked paper
towel for 30 minutes, Rub gently with a mixture of clean water and vinegar, Wipe
dry, Remove all cleaners or the porcelain may become damaged during future
heating,
To Clean the Removable Burner Head and Gas Opening (some models)
The ports (or slots) around the burner head must be routinely cleaned, Use a
smalPgauge wire or needle to clean small slots or holes,
Note: If the electrode is damaged or broken, the surface burner will not light
because it will not spark. Manual lighting with a match is still possible.
For proper flow of gas and ignition of the burner - DO NOT ALLOW SPILLS,
FOOD, CLEANING AGENTS OR ANY OTHER MATERIAL TO ENTER THE
GAS OPENING TUBE, Gas must flow freely through the small hob in the brass
orifice for the burners to light properly, if the gas opening orifice becomes soiled
or clogged, use a small-gauge or needle to clean, ALWAYS keep the burner cap
in place whenever a surface burner is in use,
To Replace the Burner Head and the Burner Cap
Make sure the pieces are thoroughly dry before placing back,
1, Replace burner head and burner cap in their places, Make sure each burner
cap and burner head are properly aligned and leveled,
2, Replace the burner grate,
3, Turn the burner on to determine if it lights, If the burner does not light after
cleaning, contact an authorized servicer, Do not service the sealed burner
yourself,
14
Before You Call
Solutions to Common Problems
Before you calf for service, review this Hst, it may save you time and expense, The Hst inciudes common occurrences
that are not the resuit of defective workmanship or materiais in this appliance,
OCCURRENCE POSSIBLE CAUSE/SOLUTmON
Surface burners do not light. Surface Controi knob has not been compieteiy turned to LHTE, Push in and
turn the Surface Controi knob to LHTEuntil burner ignites and then turn controi
to desired flame size,
Be sure gas suppiy vaive is open,
Gas-air mixture needs a straight Hneto travel Be sure burner is properiy seated
in its support (modeis with open burners oniy),
Burner ports or shots are dogged, With the burner off, use a smali-gauge wire
or needie to dean ports or shots,
Power cord is disconnected from outiet (eHectnc ignition modeis), Be sure cord
is piugged secureiy into outiet,
Eiectricai power outage (eHectncignition modeis), Burners can be Hitmanualiy,
See Setting Surface Controls in this Use & Care Guide,
Surface burner flame burns haft way
around.
Burner ports or shotsare dogged, With the burner off, dean ports with a smali- :i,,J{
gauge wire or needie to dean ports or shots, .....
Moisture is present after cleaning, Lightly fan the flame and allow burner to
operate until flame is full, To avoid this occurence dry the burners thoroughly
following instructions under GeneraJ Care & Cleaning,
Surface burner flame is orange. Dust particles in main line, Allow the burner to operate a few minutes until
flame turns blue,
in coastal areas, a slightly orange flame is unavoidable due to salt air,
15

Notes
16

Notes
iiiii,,_i!_'ili_,
17

Your Home
IIIIIIIIZ '"'"'"'"'"'"
............... [[[[[[[[[[[[[[[[[[
iiiiiiiiiiiiiii:i For repair-in your home-of all major brand appliances, iiiiiiiiiiiiiiiiii
iiiiiiiiiiiiiil [[[[[[[[[[[[[[[[[[
iiiiiiiiiiiiiii:i Hawn and garden equipment, or heating and cooling systems, iiiiiiiiiiiiiiiiii
iiiiiiiiiiiiiil [[[[[[[[[[[[[[[[[[
iiiiiiiiiiiiiii:i no matter who made it, no matter who sold it! iiiiiiiiiiiiiiiiii
iiiiiiiiiiiiii_ iiiiiiiiiiiiiiiiii
iiiiiiiiiiiiiii:i Forthe replacement parts, accessories and iiiiiiiiiiiiiiiiii
iiiiiiiiiiiiiii:i owner'smanualsthatyou needtodo-lt-yourselL iiiiiiiiiiiiiiiiii
iiiiiiiiiiiiiil [[[[[[[[[[[[[[[[[[
iiiiiiiiiiiiiii:i For Sears professional instaHation of home appliances iiiiiiiiiiiiiiiiii
iiiiiiiiiiiiiil [[[[[[[[[[[[[[[[[[
iiiiiiiiiiiiiii:i and items like garage door openers and water heaters, iiiiiiiiiiiiiiiiii
iiiiiiiiiiiiii_ iiiiiiiiiiiiiiiiii
iiiiiiiiiiiiiii:i lo800o4-MYoHOME ® (1-800o469-4663) iiiiiiiiiiiiiiiiii
iiiiiiiiiiiiiil [[[[[[[[[[[[[[[[[[
iiiiiiiiiiiiiii:i Call anytime, day or night(U.S.A, and Canada) iiiiiiiiiiiiiiiiii
iiiiiiiiiiiiiil [[[[[[[[[[[[[[[[[[
iiiiiiiiiiiiiii:i www.sears.com www.sears.ca iiiiiiiiiiiiiiiiii
iiiiiiiiiiiiiil ..................... [[[[[[[[[[[[[[[[[[
............... HHHHHHHHH
:iiii Our Home iiiiiiiiiiiiiiiiii
For repair of carry-in items like vacuums, lawn equipment, iiiiiiiiiiiiiiiiii
................. and electronics, calHor go on-line for the Hocatlon of your nearest iiiiiiiiiiiiiiiiii
...... IIIIIIIIZ
iiiiiiiiiiiiiii:: Sears Parts & Repair Center. iiiiiiiiiiiiiiii
................ HHHHHHH_
iiiiiiiiiiiiiill 1-800-488-1222 iiiiiiiiiiiiiiii
............... [[[[[[[[[[[[[[[i
iiiiiiiiiiiiiii:i Callanytime, dayornight(U.S.A, only) iiiiiiiiiiiiiiii
................ HHHHHHH_
iiiiiiiiiiiiii!_ www.sears.com iiiiiiiiiiiiiiii
iiiiiiiiiiiiiiiiiiiiiiiiiiiiill................................................... iiiiiiiiiiiiiiii
Para pedir servicio de reparacidn Au Canada pour service en frangais:
a domicilio, y para ordenar p[ezas: 1-800-LE-FOYE_ Me
1-888oSUoHOGAR sM (i-800-533-e937)
..... <1-888-784-6,27t www.soa,s.ca
SM
® Registered Trademark / "TMTrademark / Service Mark of Sears, Roebuck and Co.
® Mama Registrada / TM Mama de Fabrica / sM Mama de Servicio de Sears, Roebuck and Co.
_D
MCMarque de commerce / Marque ddposde de Sears, Roebuck and Co.
© Sears, Roebuck and Co.
Use & Care Guide
P
®
Manual del Usuario
Models, Modelos 790.
3304;',-"
-,- = color number, numero de color
Sears Roebuck and Co., Hoffman Estates, mL 60179 U.S.A.
www.sears.com
P/N 318200668 Rev. A (0407)
Tab a de Materias
Garantia de UapUancha de cocinar .................................... 20
Registro deUproducto ....................................................... 21
Ubicaci6n de UapUacade serie .......................................... 21
UMPORTANTES UNSTRUCCUONESDE SEGURUDAD. 22-24
Acuerdo de protecci6n ..................................................... 25
Unstrucciones para Uapuesta a tierra ................................ 26
Conversi6n al gas propano/Hcuado ................................... 26
Cocinando con UapUanchade cocina ................................ 27
Ajuste de UoscontroUes Superiores .............................. 28-30
Cuidado y Limpieza General ....................................... 31-33
Limpieza de Uasdiferentes partes de UapUancha de
cocinar ........................................................................ 31
Unstrucciones para Hmpiar Uacubierta de vidrio ............ 32
Cuidado y Limpieza de Acero UnoxidaMe ..................... 33
ModeUoscon quemadores sellados ............................. 34
Antes de Ilamar ................................................................ 35
Sen,,icio Sears ................................................................. 38
Garantia de ParriHa de Cocina
UN ANO DE GARANTmA COMPLETA PARA TODAS LAS PIEZAS
Por un aSo, efectivo desde la fecha de compra, y siempre y cuando sea instalada y operada siguiendo la Guia de
Instalaci6n y Uso & Cuidado, Sears reparara, o reemplazar_., de acuerdo a nuestra elecci6n, sin cargo alguno, en caso de
que algOn componente fallara debido a un defecto en el material o en la fabricaci6n de cualquier pieza.
CUATRO ANOS ADICIONALES DE GARANTIA LIMITADA PARA TODAS LAS PIEZAS
iniciando a partir del eegundo y haeta el quinto a_o deede la fecha de compra_ y eiempre y cuando sea inetalado y
operado eiguiendo Ja Gu_a de inetalaci6n y Ueo & Cuidado, Sears proveer_ sin ning_n coeto toe componentee a
continuaci6n enJietadoe y ei eetoe Hegaran a faHar tambi_n pot tae razonee a continuaci6n mencionadae. El
ueuario aeume y acepta cualquier eoeto de inetalaci6n.
o Vidrio cer_.mico de la cubierta si este falla debido a un choque termico.
o Hornillas si estos estuvieran defectuosos.
o Sello de hule si este se Ilegara a romper o desgarrar entre el vidrio y el borde de la cubierta porcelanizada.
Sears no cubre:
o Fallas del producto si este es mal usado, usado para prop6sitos distintos a Io originales o bien si muestra seSas de abuso.
o DaSo en el vidrio de la cubierta causado por el uso de substancias o utensilios limpiadores distintos alas cremas
limpiadoras y herramientas recomendadas apropiadas.
o DaSo en el vidrio de la cubierta causado por derrames endurecidos de materiales azucarados (induyendo almidones de
vegetales o pastas) o plastico derretido que no fuese limpiado de acuerdo con las direcciones e instrucciones
mencionadas en la Guia de Uso & Cuidado.
" Reparaciones a partes o sistemas hechas al electrodom6stico provenientes de modificaciones no autorizadas.
Si el producto es sujeto a un usa distinto al del uso residencial privado, toda cobertura de garantia sera.efectiva por solo 90 dias.
SERVICIOS DE GARANTIA ESTAN DISPONIBLES CONTACTANDO A SEARS AL 1-888-SU-HOGAR _.
Esta garantia le da derechos legales especificos, y usted pudiera tener algunos otros derechos que pudieran variar de
estado a estado.
Sears, Roebuck and Co., Dept. 817WA, Hoffman Estates. IL 601799
Registro Producto
En el espacio a continuaci6n, ingrese la fecha de compra, el
modelo y el nOmero de serie de su producto. Encontrar_. el
modelo y el nOmero de serie impresos en la placa de serie.
Esta placa de serie est,. ubicada sobre la cocina. Yea e_
pie de esta pagina donde se describe la ubicaci6n de la
placa de serie.
No. de Modelo 790.
No. de Serie
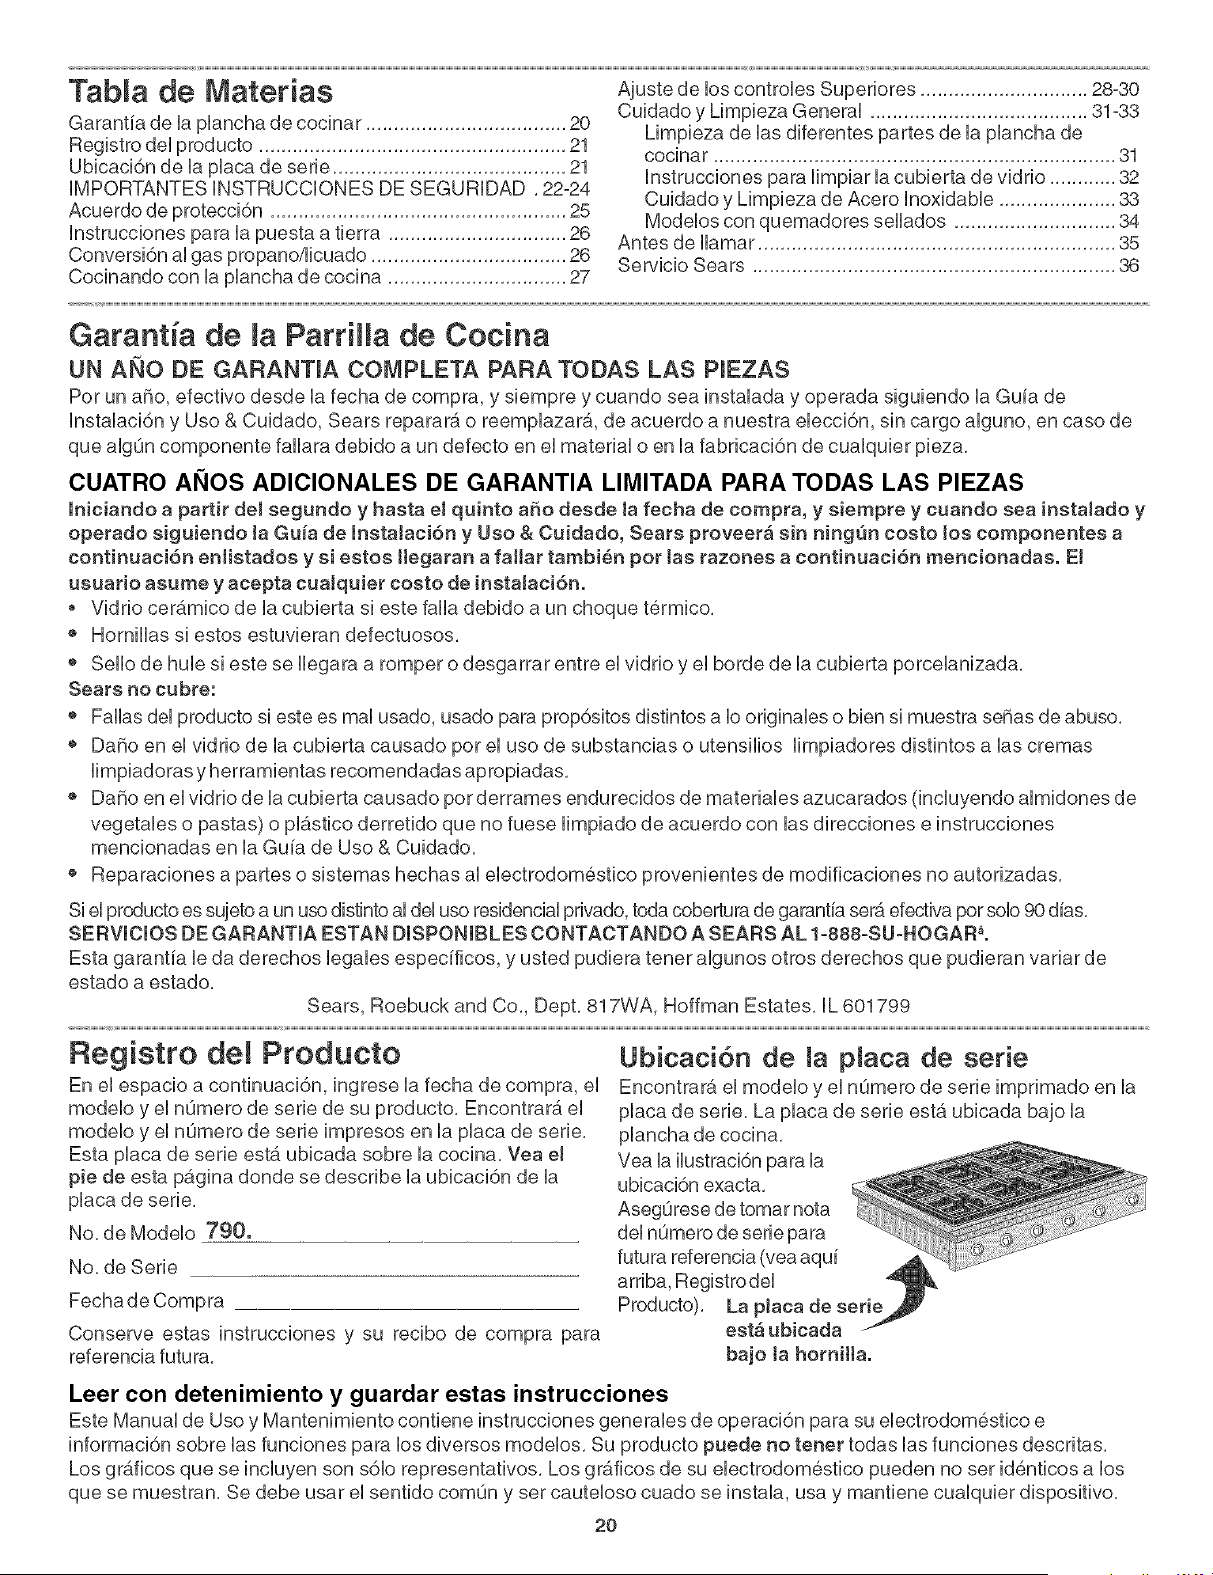
Ubicaci6n de _a p_aca de serie
Encontrara el modelo y el nOmero de serie imprimado en la
placa de serie. La placa de serie est,. ubicada bajo la
plancha de cocina.
Vea la ilustraci6n para la
Fecha de Compra
Conserve estas instrucciones y su recibo de compra para
referencia futura. bajo ta hornilta.
Leer con detenimiento y guardar estas instrucciones
Este Manual de Uso y Mantenimiento contiene instrucciones generales de operaci6n para su electrodom@,stico e
informaci6n sobre las funciones para los diversos modelos. Su producto puede no tenet todas las funciones descritas.
Los gr_.ficos que se induyen son s61o representativos. Los gra.ficos de su electrodomestico pueden no ser id@nticos a los
que se muestran. Se debe usar el sentido comOn y ser cauteloso cuado se instala, usa y mantiene cualquier dispositivo.
2O
lmportantes lnstrucciones de Seguridad
Lea todas _as instrucciones antes de utiHzar e_ aparato
Guarde estas instrucciones Isara futura consu_taciSn
Este manual contiene importantes mensajes de seguridad, Simpre lea y obedezca todo mensaje de seguridad,
!ndica una situaci6n de pe!igro inrninente, !a cual de no ser evitada puede ocasionar heddas !eyes o
da_ios al nroducto solamente,
Si no se sigue e×actamente _a informaci6n que aparece en este manual
puede provocarse un incendio o una e×p_osi6n, con _o que resu_tar_an daSos a _a
propiedad, _esiones persona_es o muerte,
PARA SU SEGURIDAD:
-- No almacene o use gasolina ni otros vapores o _quidos inflamab_es junto a
este aparato emectrodom_stico ni de cua_quier otto.
-- QUE HACER Si HUELE GAS:
* No encienda ningQn aparato e_ectrodom_stico.
* No toque ningQn interruptor em_ctrico; no use ningQn te_fono en su edificio.
* Uamedeinmediatoasuproveedordegasdesde_acasadea_g(_nvecino°Siga_asinstrucciones
que _ed_ e_ proveedor de gas.
* Si usted no puede ponerse en contacto con su proveedor de gas, Hame a_departamento de
bomberos°
-- Tanto _ainsta_aci6n como e_ servicio tienen que quedar a cargo de un insta_ador profesionaL
un t_cnico o e_ proveedor de gas.
o Quite todas las cintas y todo el embalaje antes de usar
ta estufa. Despues de haber desempacado la cubierta,
destruya todo cart6n de embalaje y 1asbolsas pl_sticas
despu_s dedesempacar la estufa. Nunca permita quelos
ni_hosjueguen con el material de embalaje, No retire la placa
del nQmero de serie fijada sobre la estufa,
Servicio pot parte deJ usuario--No repare ni
reemplace ninguna parte deJ aparato a menos que Jos
manuales as_ to recomienden. Solamente un tecnico
calificado puede ocuparse de todos los demas servicios;
asise reducirA el riesgo de bsiones personabs y dedaSar
la estufa,
instalaci6n correcta--AsegQrese que un t_cnico
caJificado conecte e instaJe su aparato correctamente y
de acuerdo con la Qttima edici6n del c6digo nacionaJ
de gas ANSi Z223.1, o en Canad_ CAN/CGA B149.1 y
CAN/CGA B149.2, as_ como _a Q_tima edici6n de_
C6digo Nacionai de E_ectricidad ANSi/NFPA No. 70, o
en Canada, et CSA Norma C22.1, Canadian Electrical
CO DE Part1, as_como de acuerdo con tos requisitos de
tos c6digos toca_es. Instale y/o ajuste su aparato de
acuerdo a las instrucciones impartidas en la literatura
adjunta correspondiente a esta estufa.
o Nunca modifique ni a_tere _a construcci6n de una
estufa quitando _os pane_es, e_revestimiento de tos
a_ambres ni cua_quier parte del producto.
_F__ Esca_ar, apoyarse o sentarse sobre _as
puertas o gavetas de esta estufa puede provocar
tesiones de consideraci6n. Pot otra parte, tambi_n
puede da_arse _a estufa. No permita que los ni_os se
trepen sobre la estufa o jueguen a su alrededor,
Pregunte en su concesionario per un t6cnico calificado y un
sewicio autorizado Sears, Aprenda como desconectar la
estufa del cortacircuito o de la caja de fusibles en caso de
emergencia,
21
lmportantes lnstrucciones de Seguridad
, AJmacenamiento rfentro rfeJ Aparato--No rfeben
almacenarse materiaJes inflamables sobre Ja estufa,
cerca de Jos quemarfores. Esto induye articubs de
papeL pU_.stbo y teUa, tabs como Hbros de cocina,
utensHios de pU#,stico y toaHas, asi come Uiquidos
inflamabbs, No aUmacene expbsivos, tabs como Uatasde
aerosol encima de la estufa, Los materiabs infiamabbs
pueden explotar y causar incendios o da_os a la propiedad,
_.__ No almacene articuJos de interns para
tos niSos rfentro de Jos armarios situarfos pot encima de
ta estufa o en su parte posterior.
o Do not Jeave chHrfren aJone--ChHrfren shoulrf not be
teft aJone or unattenrferf in the area where an appliance
is in use. They should never be allowed to sit or stand on
any part of the appliance,
o NO TOQUE LOS QUEMADORES, LAS PARRILLAS, NI
LAS AREAS CERCANAS A ESTAS. Las parrillas y sus
quemadores podrian estar calientes, aunque no est6n
fulgurantes, Las _.reas cercanas a las parrillas pueden
cabntarse Io suficiente come para causar quemaduras,
Durante y despues de su use, no toque, ni permita que
ningOn tipo de paso o tela infiamabb toquen estas _.reas
hasta que hayan tenido el tiempo necesario de enfriarse,
Entre elias se cuentan en homo de la estufa, las superficies
que se encuentran cara a la estufa,
Pongase Ropa Arfecuarfa--Nunca Heve puesta ropa
sueJta o prenrfas que cuelguen mientras eete usanrfo la
estufa. No deje que su ropa ni otras telas infiamabbs
entrenen contacto con superficies calientes,
V!_ Nunca use se estufa para mantener un
cuarto caHente ni para caJentarlo.
o No vierta agua ni harina sobre fuego provocarfo pot
grasa--Baja las Hamas con la tapa de una oHa, o con
poJvo de hornear, un prorfucto quimico seco o un
extinguirfor a base de espuma,
Cuanrfo caliente manteca o grasa, obe@veta de cerca.
La man-teca o la grasa pueden incendiarse sise calientan
demasiado,
No caJiente envases de comirfa sin antes abriHos--La
presi6n resuttante porfria causar et estaHirfo rfet
envase y provocar quemaduras.
FamiHar_cese con Jas periHas que controJan carla
horniHa, Siempre encienda las hornillas dandobs vueRa
a las perillas hasta Ibgar a la posici6n UTE, Verifique
visualmente sise ha encendido la hornilla, Enseguida,
ajuste la llama para que no rebase los bordes de los
utensilios,
Ajuste Jas Jtamas al tamaSo
arfecuarfo--ajQstelas de manera que no rebasen Jos
bottles de Jos utensilios. Si se usan utensilios de tama_o
demasiado peque_o, una parte de la llama del quemador
quedarA expuesta a contacto directo, con Io cual se podria
correr el riesgo de que se quemara la ropa, La relaci6n
adecuada entre el tamafio del utensilio y el de la llama
mejorar_, asimismo la eficacia al cocinar,
No use parrittas asarforas sobre sus
quemarfores seHarfos. Si usa parrillas asadoras sobre sus
quemadores sellados, la combusti6n ser_. incompbta y
habr_, riesgo de que se produzcan niveles de mon6xido de
carbono per encima de las normas aceptables, Esto
representaria un peligro para su salud,
_.__ UtiJice una sart_n de tamaSo
apropiarfo-- Este aparato esta equipado con quemadores
de diferents tamales, Elija utensilios con las bases
aplanadas y Io suficientemente grandes para cubrir todo el
area del quemador, Utilizar utensilios mas peque_os puede
exponer parte del quemador y ocasionar quemaduras de
las prendas que lleva puesta,
Limpie Ja plancha de cocina regularmente para
mantener todas Jas partes sin grasa que puerfe
encenrferse y causar un incenrfio, La cubierta del
escape de ventilaci6n y los filtros de grasa deben estar
limpios, No permita que la grasa se acumule en la cubierta
o en el filtro, Los dep6sitos grasosos pueden encenderse
y causar un incendio, Cuando caliente comida bajo la
cubierta, encienda el ventilador, Consulte las
instrucciones del fabricante para la limpieza,
Use solamente manopJas o agarrarferas secas aJ asir
utensiHos caiientes--Cuanrfo se Jas pone sobre
superficies caJientes, las manopJas, o las agarraderas
humedas o mojadas pueden causar quemarfuras
resultantes rfel vapor. No deje que dichos protectores
toquen las llamas de los quemadores, AI asir utensilios
calientes, no use toallas ni articulos de tela gruesos en
lugar de una manopla o una agarradera,
Los Mangos de Jos UtensiJios no Deben Querfar
Extenrfirfos Encima de Jos Quemarfores Que se
Encuentran en _aSuperifcie rfeJAparato--Para reducir
el riesgo de quemaduras, ignici6n de materiales
inflamabbs y derrames debido al contacto eventual con el
utensilio, hay que colocar su mange de tal manera que
quede voReado hacia adentro y no sobre Iosquemadores,
22
lmportantes lnstrucciones de Seguridad
, Nunca deja Desatendidoe Joe Quemadores Cuando
Est_n Funcionandoa AJtaTemperatura--LoqueaU hervir
causa humo o desbordamientos de grasa puede provocar
Uaignici6n. Asimismo, una caceroUaque se ha dejado hervir
hasta secarse puede derretirse.
. Revestimientos de Protecci6n--No use hojas o papeUde
aUuminio para proteger Uos pUatHUosrefiectores de Uos
quemadores, ni en eUfondo deUhomo o en cuaUquier otra
parte deUaparato. S6Uodebe usarse este tipo de hojas
siguiendo Uasindicaciones que se dan en la Guia de
Cocina. El uso de cualquier otto revestimiento protector u
hojas de aluminio, puede provocar el riesgo de descargas
el6ctricas o incendio.
o Utensilios de Cocina Vidriados--S61o ciertos tipos de
utensilio de vidrio, vidrio/cer_.mica, cer6.mica, alfareria, u
otros utensilios viddados se pueden usar sobre las
hornillas. Lea las instrucciones del fabdcante para
enterarse de que utensilios de vidrio se pueden usar con
esta estufa.
o No Coloque Coberteras Decorativas Sobre tas
Hornittas. Si accidentalmente se enciende un quemador,
se calentar_, la cobertera y posiblemente se derretir_..
Usted no pod r6.verque se ha encendido el quemador. Si se
tocan las coberteras cuando estan cafientes, se produciran
quemaduras. Asimismo, puede daSarse en homo de la
estufa. Asimismo, se podr_.n daSar la estufa o las horniflas
debido al sobrecalientamiento. El aire se bloquear_, en los
quemadores y causarA problemas de combusti6n.
PARA PLANCHAS DE COCINAR WDRIO
(Atgunos rnodeJos):
o No Jimpie o utiHce una pJancha de cocinar que est_
rota- Si la plancha de cocinar se rompe, los productos de
limpieza o los derrames pueden penetrar en ella y
producir un riesgo de electrocuci6n. Llame a un tecnico
calificado inmediatamente.
Limpie e[ vidrio de [a p[ancha de cocinar con
cuidado- S[ ut[[[za una esponja mojada para [[mp[ar
derrames en una superficie caliente, tenga cuidado de no
quemarse con el vapor. Algunos productos de limpieza
puden producir peligrosas emanaciones sise les usa
sobre areas muy calientes.
o No coloque utensitios de cocina caJientes sobre et vidrio
de ta ptancha de cocinar ann fria. Esto podria causar la
o No deslice utensilios sobre ta superficie de ta cocina.
Podrian rayar la superficie.
. No deje que Jos utensilios hiervan hasta quedarse sin
t_quido. Esto podria causar daSos permanentes como
rupturas, fusiones o diseSo que afecten la cocina de
superficie en vidrio. (Estos tipos de daSos no son cubiertos
por la garantia).
ADVERTENCIA DE SEGURIDAD IMPORTANTE
The California Safe Drinking Water and Toxic Enforcement
Act requires the Governor of California to publish a list of
substances known to the state to cause cancer, birth
defects or other reproductive harm, and requires businesses
to warn customers of potential exposure to such
substances.
23
ACUERDOS DE PROTECCION
En bs EU.
Acuerdoe Maestro de Protecci6n
FeHcitaciones por haber hecho una compra inteHgente, Su
nuevo producto Kenmord _es dise_ado y manufacturado
para muchos a_os de servbio confiabb, Pero como todo
producto, pod ria reque rir mantenimbnto preventivo o
reparaci6n entre tbmpo, Ahi es cuando eUtener un Acuerdo
Maestro de Protecci6n b podria ahorrar dinero y mobstias,
Compre ya un Acuerdo Maestro de Proteccidn y pret_jase
de gastos y frustraciones inesperadas.
EUAcuerdo Maestro de Protecci6n tambi6n ayuda a extender
Uavida de su nuevo producto, Esto es Uoque se incUuye en
eUAcuerdo,
[y_ Servicio Profesional por nuestros 12,000 especialistas
profesionales en reparaci6n.
[_ Servicio iJimitado sin cargo pot piezas y servicio en
toda reparaci6n cubierta
[_ Garant_a de"No-iim6n'- reemplaza su producto
cubierto si ocurren cuatro o m_.s desperfectos dentro de
doce meses,
[_ Reemplazo de Producto si el producto cubierto no
puede ser reparado,
[y_ Verificaci6n de Mantenimiento Preventivo Anua! a su
petici6n sin cargos adicionales,
[y_ Pronta ayuda pot tet_fono- apoyo pot telefono pot un
tecnico de Sears en los productos que requieran
reparaci6n en casa, m_.s la conveniencia de hacer cita
para reparaci6n,
[_ Protecci6n contra picos de energ_a o da_os el6ctricos
causados pot fiuctuaciones en energia,
[_ Reembolso de aJquiter si la reparaci6n de su producto
cubierto toma m_.s tiempo de Io prometido,
Una vez compres el Acuerdo, una simple llamada telef6nica
es todo Io que necesitas para hacer cita para su servicio.
Puedes llamar a cualquier hora, dia o noche o concertar una
cita para servicio via computadora.
En Canada
Acuerdos de Mantenimiento
Su compra tiene valor mayor porque puedes depender de
Sears HomeCentraP para servicio. Con sobre 2,400
Tecnicos de Servicios y m_.s de un mill6n de piezas y
accesorios, tenemos las herramientas, piezas,
conocimiento y destrezas para asegurar nuestro
compromiso: Le damos servicio a Io que vendemos.
Su producto Kenmore_es diseSado y puesto a prueba para
proveer muchos aSos de operaci6n confiable, Pero como
todo producto, podria requerir servicio entre tiempo, El
Acuerdo de Mantenimiento Sears le ofrece un programa de
servicio incomparable a un precio m6dico,
El Acuerdo de Mantenimiento Sears:
Es su manera de comprar servicio para el manana a
precio de hoy
Elimina facturas pot reparaci6n como resultado de uso y
desgaste normal
Provee apoyo via tel6fono de un t6cnico de Sears en
productos que requieran reparaci6n en casa
. Aunque no necesite reparaci6n, provee Verificaci6n de
Mantenimiento Preventivo anual, a su petici6n, para
asegurar que su producto est,. en condiciones apropiadas.
AJgunas Hmitacionee podrian aplicar. Para m_s
informaci6n sobre et Acuerdo de Mantenimiento de
Sears Canada,
ttame aJ1-800-361-6665°
Sears tiene sobre 12,000 especialistas profesionales de
reparaci6n, con acceso a sobre 4.5 millones de piezas y
accesorios de calidad. Esa es la clase de profesionalismo
con la que puedes contar para ayudar a prolongar la vida de
su nueva compra pot muchos a_os. iCompre su Acuerdo
Maestro de Protecci6n hoy!
AIgunae limitaciones y exclueionee podr_an aplicar.
Para precios e informaci6n adicionaJ, Itame aJ 1-800-827-
6655°
Servicio de lnstaJaci6n Sears
Para instalacidn profesiona/ de Sears en enseres del hogar,
abridores de puertas de garaje, calentadores de agua y otros
articulos mayores del hogar, en EU, llame al
1-800-4-MY-HOME®
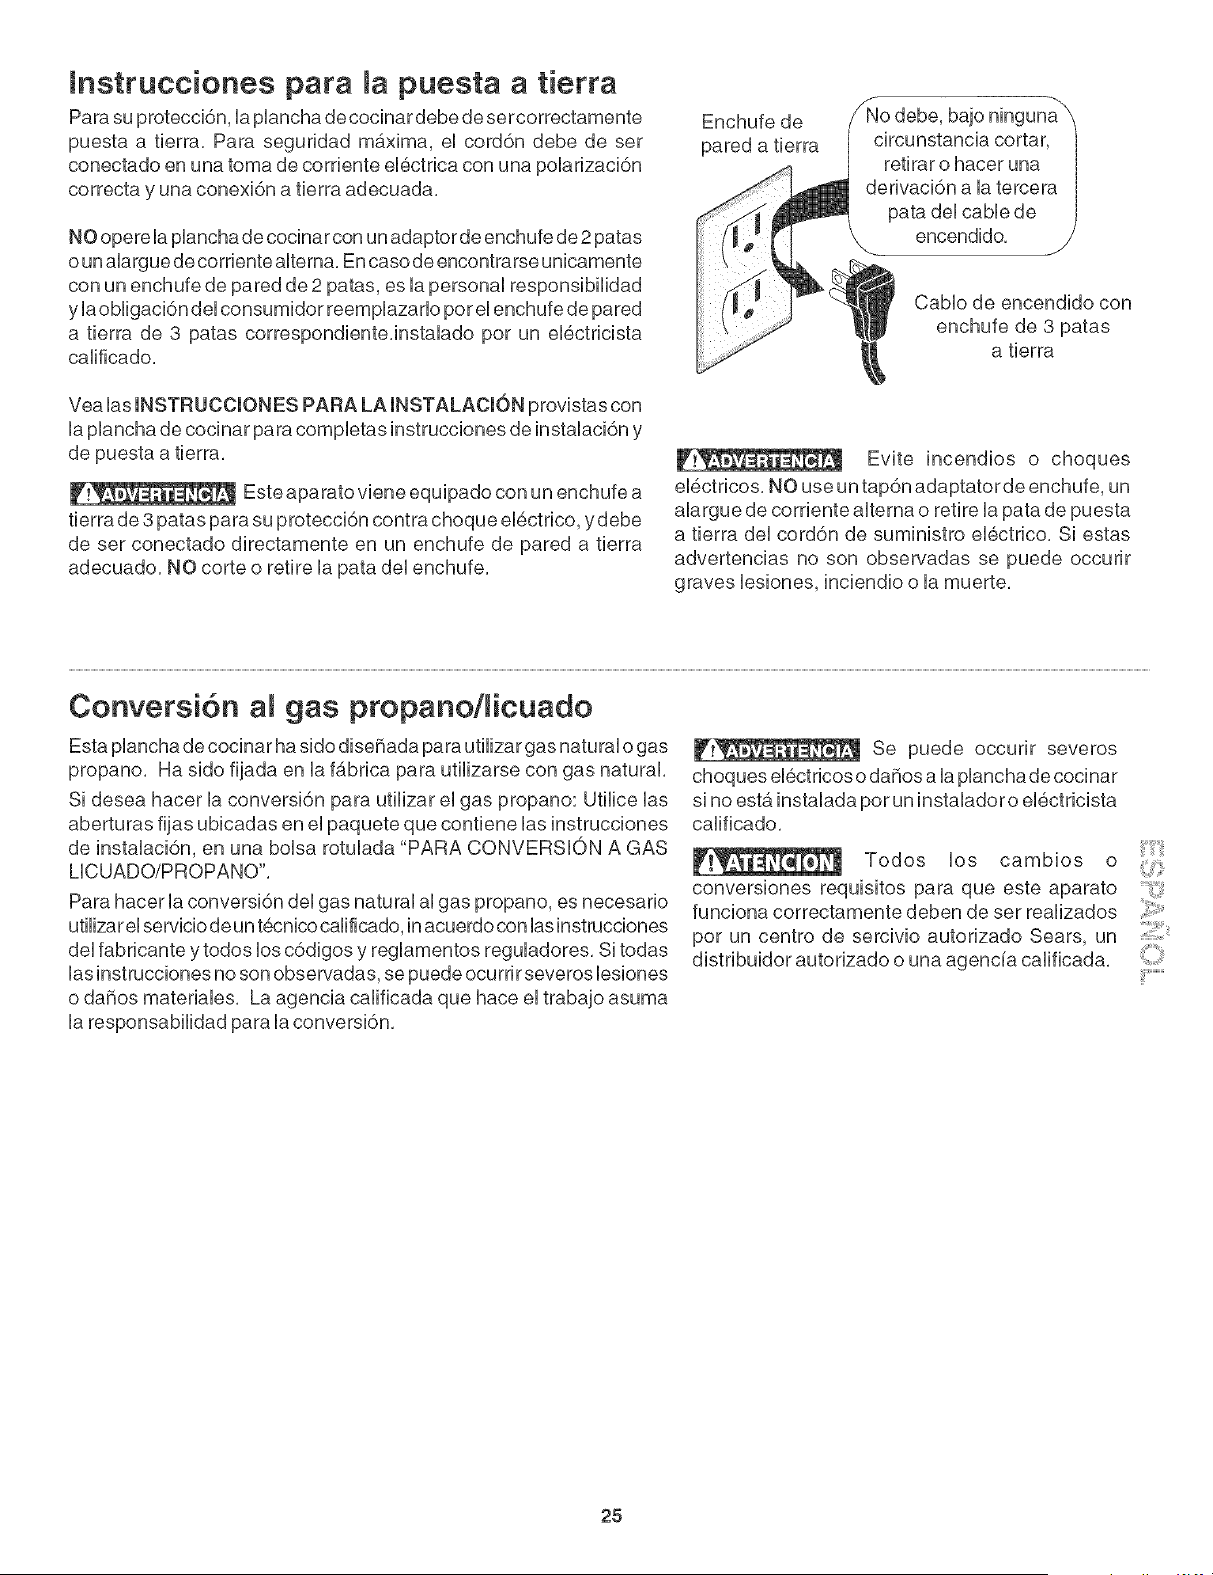
Instrucciones para la puesta a tierra
Para su protecci6n, UapUanchadecocinardebe de sercorrectamente
puesta a tbrra, Para seguridad m&xima, eUcord6n debe de ser
conectado en una toma de corrbnte eU6ctrba con una poUarizaci6n
correcta y una conexi6n a tbrra adecuada,
NO opere UapUanchade cocinar con un adaptor de enchufe de 2 patas
o unaUarguede corrbnte aUterna,En caso de encontrarse unbamente
con un enchufe de pared de 2 patas, es UapersonaU responsibHidad
yUaobHgaci6n del consumidor reemplazarlo por el enchufe de pared
a tierra de 3 patas correspondiente,instalado por un el6ctricista
calificado,
Yea las INSTRUCCIONES PARA LA INSTALACION provistas con
la plancha de cocinar para compbtas instrucciones de instalaci6n y
de puesta a tierra,
Este aparato viene equipado con un enchufe a
tierra de 3 patas para su protecci6n contra choque el6ctrico, ydebe
de ser conectado directamente en un enchufe de pared a tierra
adecuado, NO corte o retire la pata del enchufe,
Enchufe de
pared a tierra
Cablo de encendido con
enchufe de 3 patas
a tierra
Evite incendios o choques
el6ctricos, NO use un tap6n adaptatorde enchufe, un
alargue de corriente alterna o retire la pata de puesta
a tierra del cord6n de suministro electrico, Si estas
advertencias no son observadas se puede occurir
graves lesiones, inciendio o la muerte,
Conversi6n gas propano/ icuado
Esta plancha de cocinar ha sido dise_ada para utilizar gas natural o gas
propano, Ha sido fijada en la f6.brica para utilizarse con gas natural,
Si desea hacer la conversi6n para utilizar el gas propano: Utilice las
aberturas fijas ubicadas en el paquete que contiene las instrucciones
de instalaci6n, en una bolsa rotulada "PARA CONVERSION A GAS
LICUADO/PROPANO',
Para hacer la conversi6n del gas natural al gas propano, es necesario
utilizar el servicio de un t@nico calificado, in acuerdo con las instrucciones
del fabricante y todos los c6digos y reglamentos reguladores, Si todas
las instrucciones no son observadas, se puede ocu rri rseveros bsiones
o da_os materiabs, La agencia calificada que hace el trabajo asuma
la responsabilidad para la conversi6n,
Se puede occurir severos
choques elect ricos o da_os a laplancha de cocinar
si no esta instalada pot un instalador o el6ctricista
calificado,
Todos los cambios o
conversiones requisitos para que este aparato
funciona correctamente deben de set realizados
pot un centro de sercivio autorizado Sears, un
distribuidor autorizado o una agencia calificada,
25
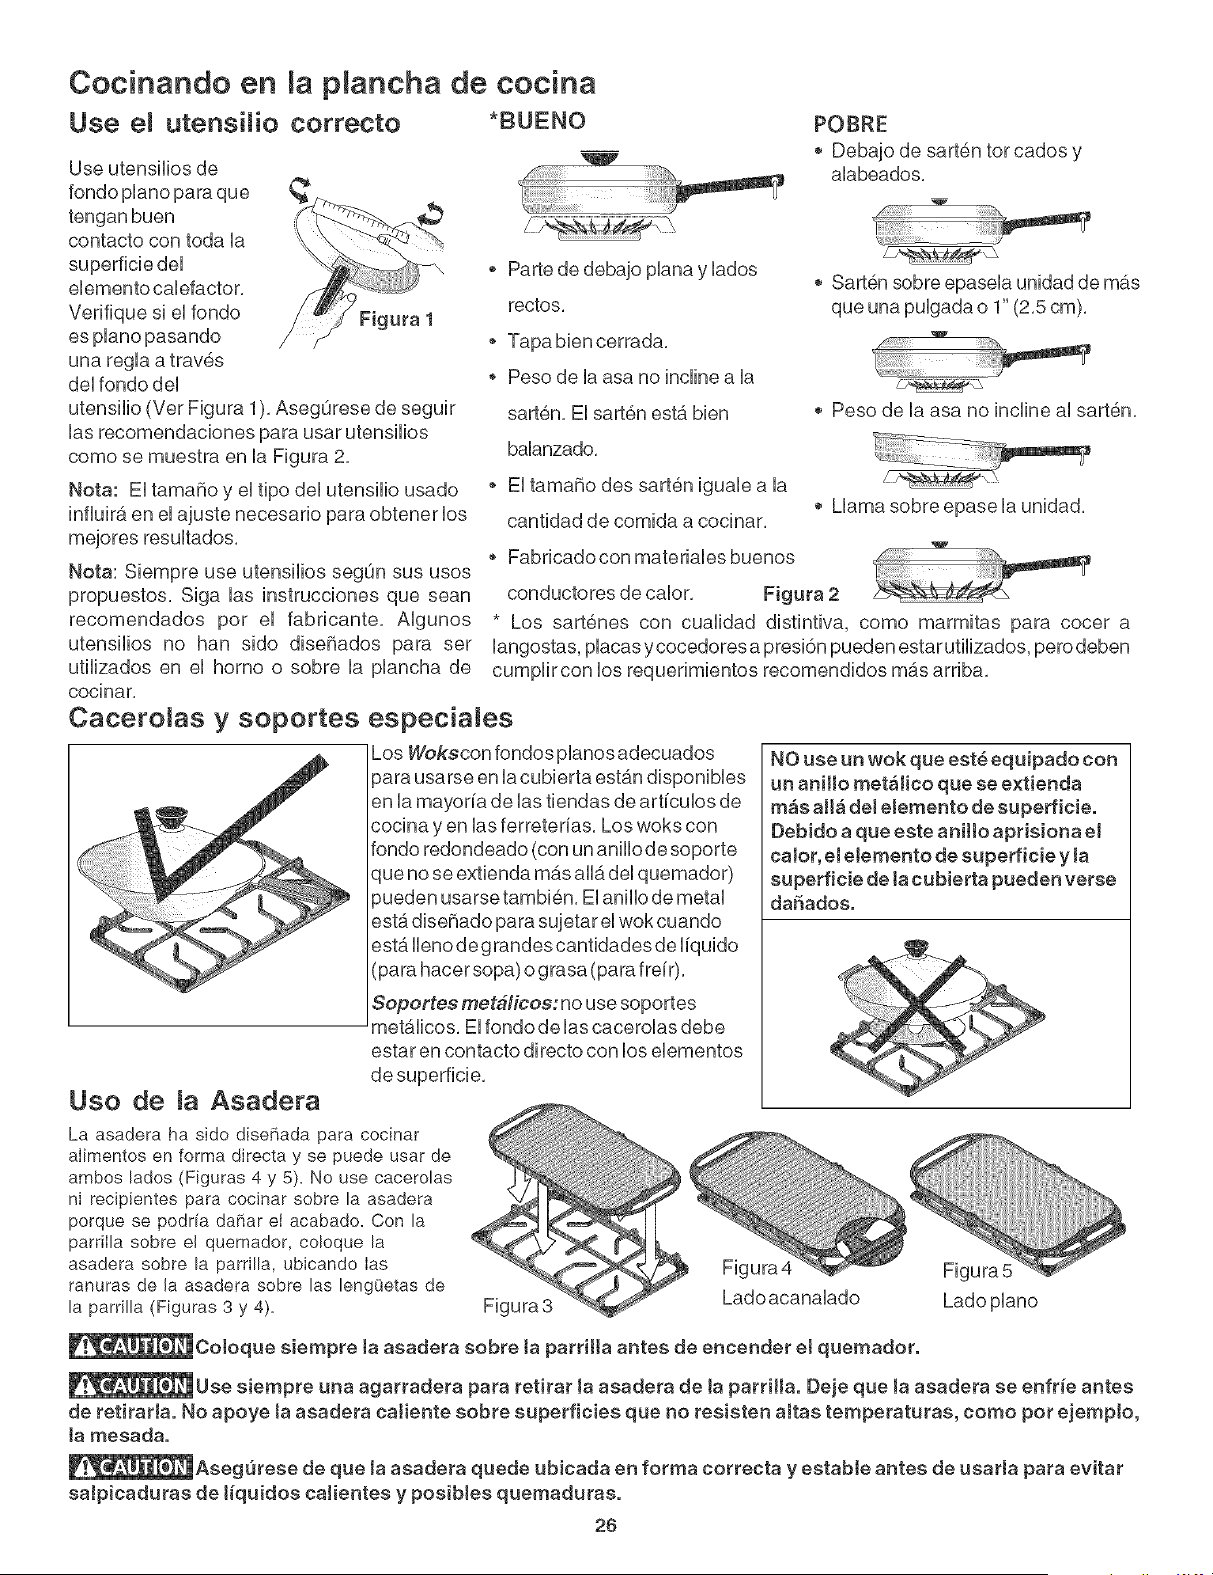
Cocinando en [a p[ancha de cocina
Use el utensi[io correcto *BUENO
Use utensilios de
rondo piano para que
tengan buen
contacto con toda la
elemento calefactor,
Verifique si el rondo Figura 1
es piano pasando
una regla a trav6s
del rondo del
utensilio (Vet Figura 1). AsegOrese de seguir
las recomendaciones para usar utensilios
como se muestra en la Figura 2.
Nota: El tamaffo y el tipo del utensilio usado
influira en el ajuste necesario para obtener los
mejores resultados.
Nota: Siempre use utensilios segOn sus usos
propuestos. Siga las instrucciones que sean
recomendados pot el fabricante. AIgunos
utensilios no han sido diseffados para set
utilizados en el homo o sobre la plancha de
cocinar.
Cacero[as y soportes
o Parte de debajo plana y lados
rectos.
Tapa bien cerrada.
Peso de la asa no incline a la
sarten. Ei sart6n est,. bien
balanzado.
POBRE
• Debajo de sart6n tot cados y
alabeados,
,, Sart6n sobre epasela unidad de mas
que una pulgada o 1" (2.5 cm).
,, Peso de la asa no incline al sart6n.
o El tamaffo des sart6n iguale a la
,, Llama sobre epase la unidad.
cantidad de comida a cocinar.
Fabricado con materiales buenos
conductores de calor. Figura 2
* Los sartenes con cualidad distintiva, como marmitas para cocer a
langostas, placas y cocedores a presi6n pueden estar utilizados, pero deben
cumplircon los requerimientos recomendidos mas arriba.
especiaies
Los Wokscon rondos pianos adecuados
para usarse en la cubierta est_.n disponibles
en la mayoria de las tiendas de articulos de
cocina yen las ferreterias, Los woks con
rondo redondeado (con un anillo de soporte
que no se extienda m_.sall_.del quemador)
est_.ileno degrandes cantidades de liquido
(para hacer sopa) o grasa (para freir).
Soportes metbficos: no use soportes
met_.licos, El fondo de las cacerolas debe
estar en contacto di recto con los elementos
de superficie.
NO use un wok que est_ equipado con
un anH[o met&[ico que se extienda
m_s a[[_ de[ e[emento de supefficie.
Debido a que este ani[[o aprisiona e[
ca[or, e[ e[emento de superficie y [a
superfic[e de [a cubierta pueden verse
daffados.
Uso de la Asadera
La asadera ha sido diseffada para cocinar
alimentos en forma directa y se puede usar de
ambos lados (Figuras 4 y 5). No use cacerolas
ni recipientes para cocinar sobre la asadera
porque se podria da_ar ei acabado. Con la
parriIla sobre el quemador, coloque la
asadera sobre la parrilla, ubicando Ias Figura4
ranuras de la asadera sobre las bngOetas de
la parrilla (Figuras 3 y 4). Figura3 Ladoacanalado
_Co[oque siempre [a asadera sobre [a parri[[a antes de encender e[ quemador.
Figura
Lado piano
_Use siempre una agarradera }sara retirar [a asadera de [a parrH[a. Deje que [a asadera se enfr_e antes
de retirar[a. No apoye [a asadera ca[iente sobre superficies que no resisten a[tas temperaturas, como pot ejemp[o,
[a mesada.
_Asegerese de que [a asadera quede ubicada en forma correcta y estab[e antes de usar[a para evitar
sa[picaduras de [_quidos ca[ientes y posib[es quemaduras.
26
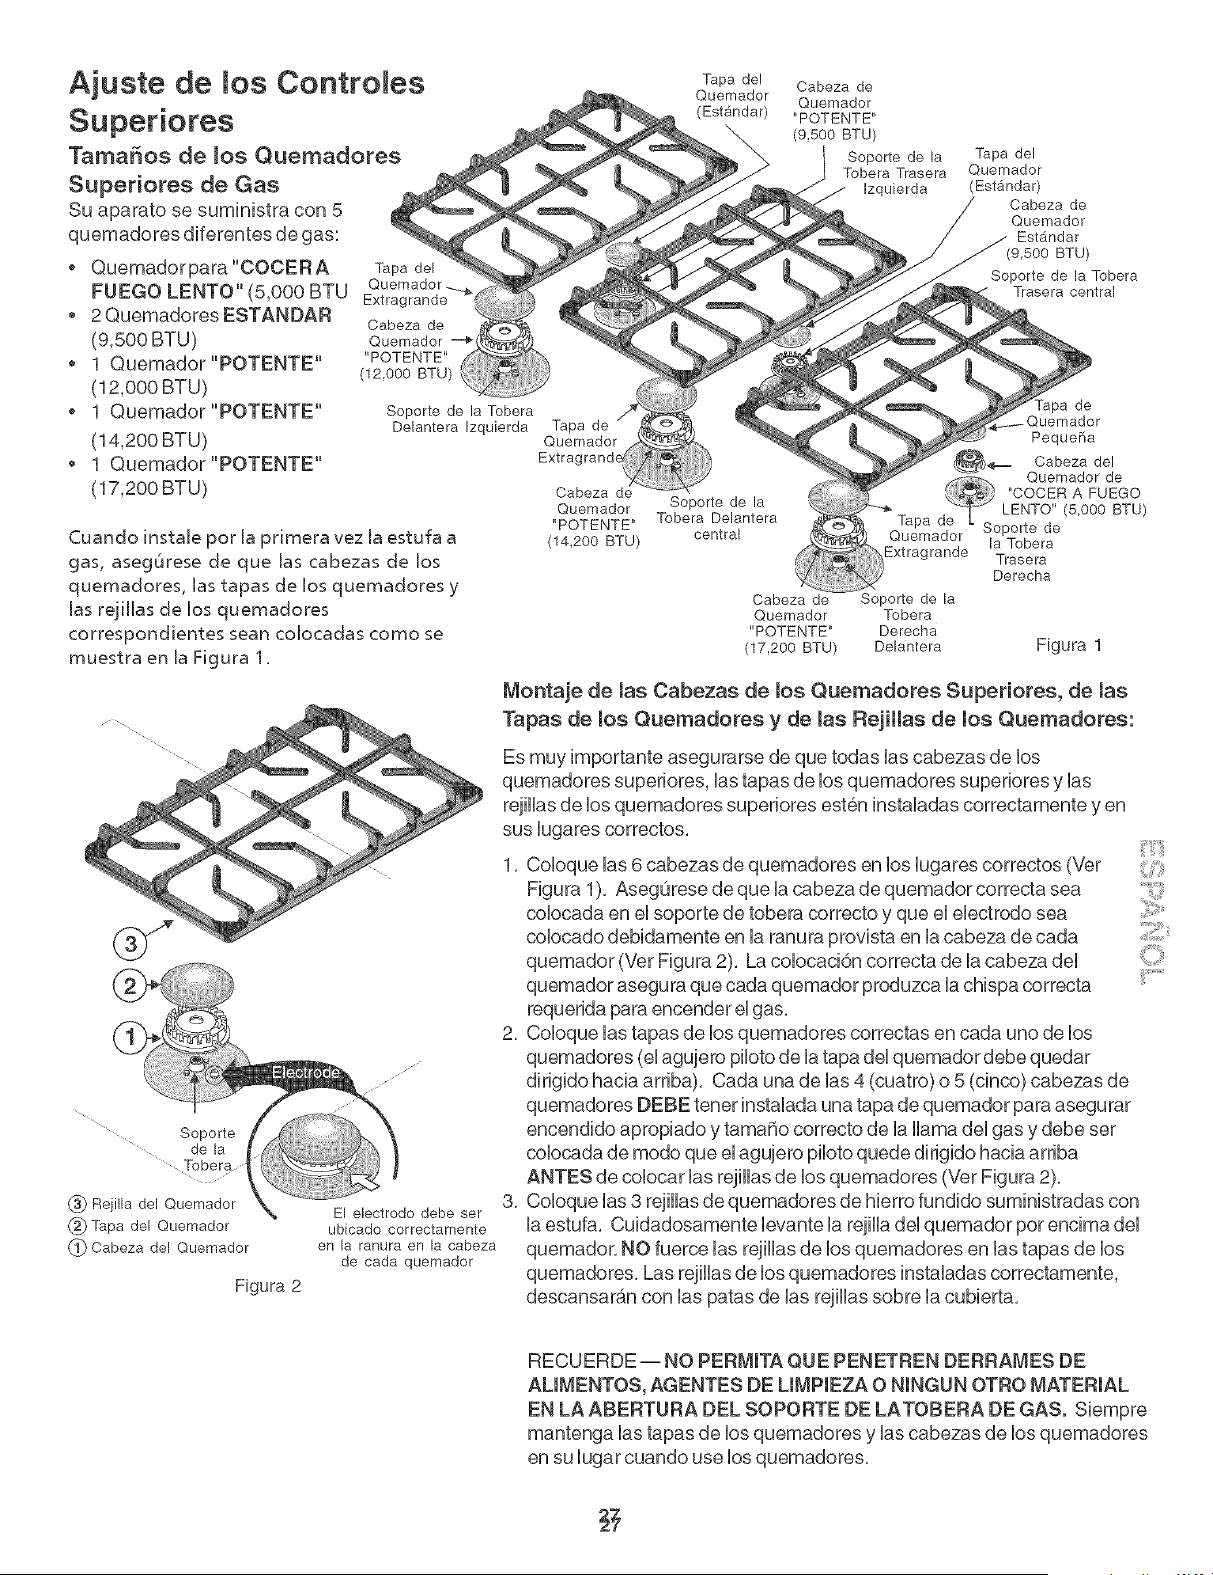
Aiuste de mos Contro es
Superiores
TamaSos de _os Quemadores
Superiores de Gas
Su aparato se suminbtra con 5
quemadores diferentes de gas:
o Quemadorpara"COCERA Tapadel
FUEGO LENTO" (5,000 BTU Quemador....._
Extragrande
2 Quemadores ESTANDAR Cabezade
(9,5OO BTU)
1 Quemador "POTENTE"
(12,000 BTU)
o 1 Quemador"POTENTE"
(14,200 BTU)
, 1 Quemador"POTENTE"
Quemador
"POTENTE"
(12,000 BTU)
Soporte de la Tobera
Delantera Izquierda
(17,200 BTU)
Cuando instale por ]a primera vez la estufa a
gas, asegOrese de que las cabezas de los
quemadores, ]as tapas de los quemadores y
]as rejiHas de los quemadores
correspondientes sean co]ocadas como se
muestra en la Figura 1.
i "':°'
P
(_ Rejllla del Quemador ser
tel Quemador _ ----El electrodo debe
('2_ Tapa del Quemador ubicado correctamente
_ Cabeza del Quemador en la ranura en la cabeza
de cada quemador
Figura 2
Tapa del
Quemador
(EstAndar)
Cabeza de
Quemador
"POTENTE"
(9,500 BTU)
Soporte de la
Tobera Trasera
Izquierda
Tapa del
Quemador
(Estandar)
Cabeza de
Quemador
EstAndar
BTU)
Soporte de la Tobera
Trasera central
Tapa de
Quemador
Extragrande
Cabeza de
Quemador
"POTENTE"
(14,200 BTU)
Soporte de la
Tobera Delantera
central
Cabeza de
Quemador
"POTENTE"
(17,200 BTU)
]-apa de
uemador
Peque_a
_ Cabeza del
Quemador de
"COCER A FUEGO
LENTO" (5,000 BTU)
Tapa d Soporte de
Quemador
la Tobera
Extragrande Trasera
Derecha
Soporte de la
Tobera
Derecha
Delantera Figura 1
Montaje de masCabezas de los Quemadores Superiores, de mas
Tapas de mos Quemadores y de masRejHlas de los Quemadores:
Es muy importante asegurarse de que todas las cabezas de los
quemadores superiores, las tapas de los quemadores superiores y las
rejillas de los quemadores superiores esten instaladas correctamente yen
sus lugares correctos,
1, Coloque las 6 cabezas de quemadores en los lugares correctos (Vet
Figura 1), AsegOrese de que la cabeza de quemador correcta sea
colocada en el soporte de tobera correcto y que el electrodo sea
colocado debidamente en la ranura provista en la cabeza de cada
quemador (Vet Figura 2), La colocaci6n correcta de la cabeza del
quemador asegura que cada quemador produzca la chispa correcta
requerida para encender el gas,
2, Coloque las tapas de los quemadores correctas en cada uno de los
quemadores (el agujero piloto de la tapa del quemador debe quedar
dirigido hacia arriba), Cada una de las 4 (cuatro) o 5 (cinco) cabezas de
quemadores DEBE tenet instalada una tapa de quemador para asegurar
encendido apropiado y tama[io correcto de la llama del gas y debe set
colocada de modo que el agujero piloto quede di rigido hacia arriba
ANTES de colocar las rejillas de los quemadores (Vet Figura 2),
3, Coloque las 3 rejillas de quemadores de hierro fundido suministradas con
la estufa, Cuidadosamente levante la rejilla del quemador pot encima del
quemador, NO fuerce las rejillas de los quemadores en las tapas de los
quemadores, Las rejillas de los quemadores instaladas correctamente,
descansar6.n con las patas de las rejillas sobre la cubierta,
RECUERDE-- NO PERMITA QUE PENETREN DERRAMES DE
ALIMENTOS, AGENTES DE LIMPIEZA O NINGUN OTRO MATERIAL
EN LA ABERTURA DEL SOPORTE DE LATOBERA DE GAS. Siempre
mantenga las tapas de los quemadores y las cabezas de los quemadores
en su lugar cuando use los quemadores,
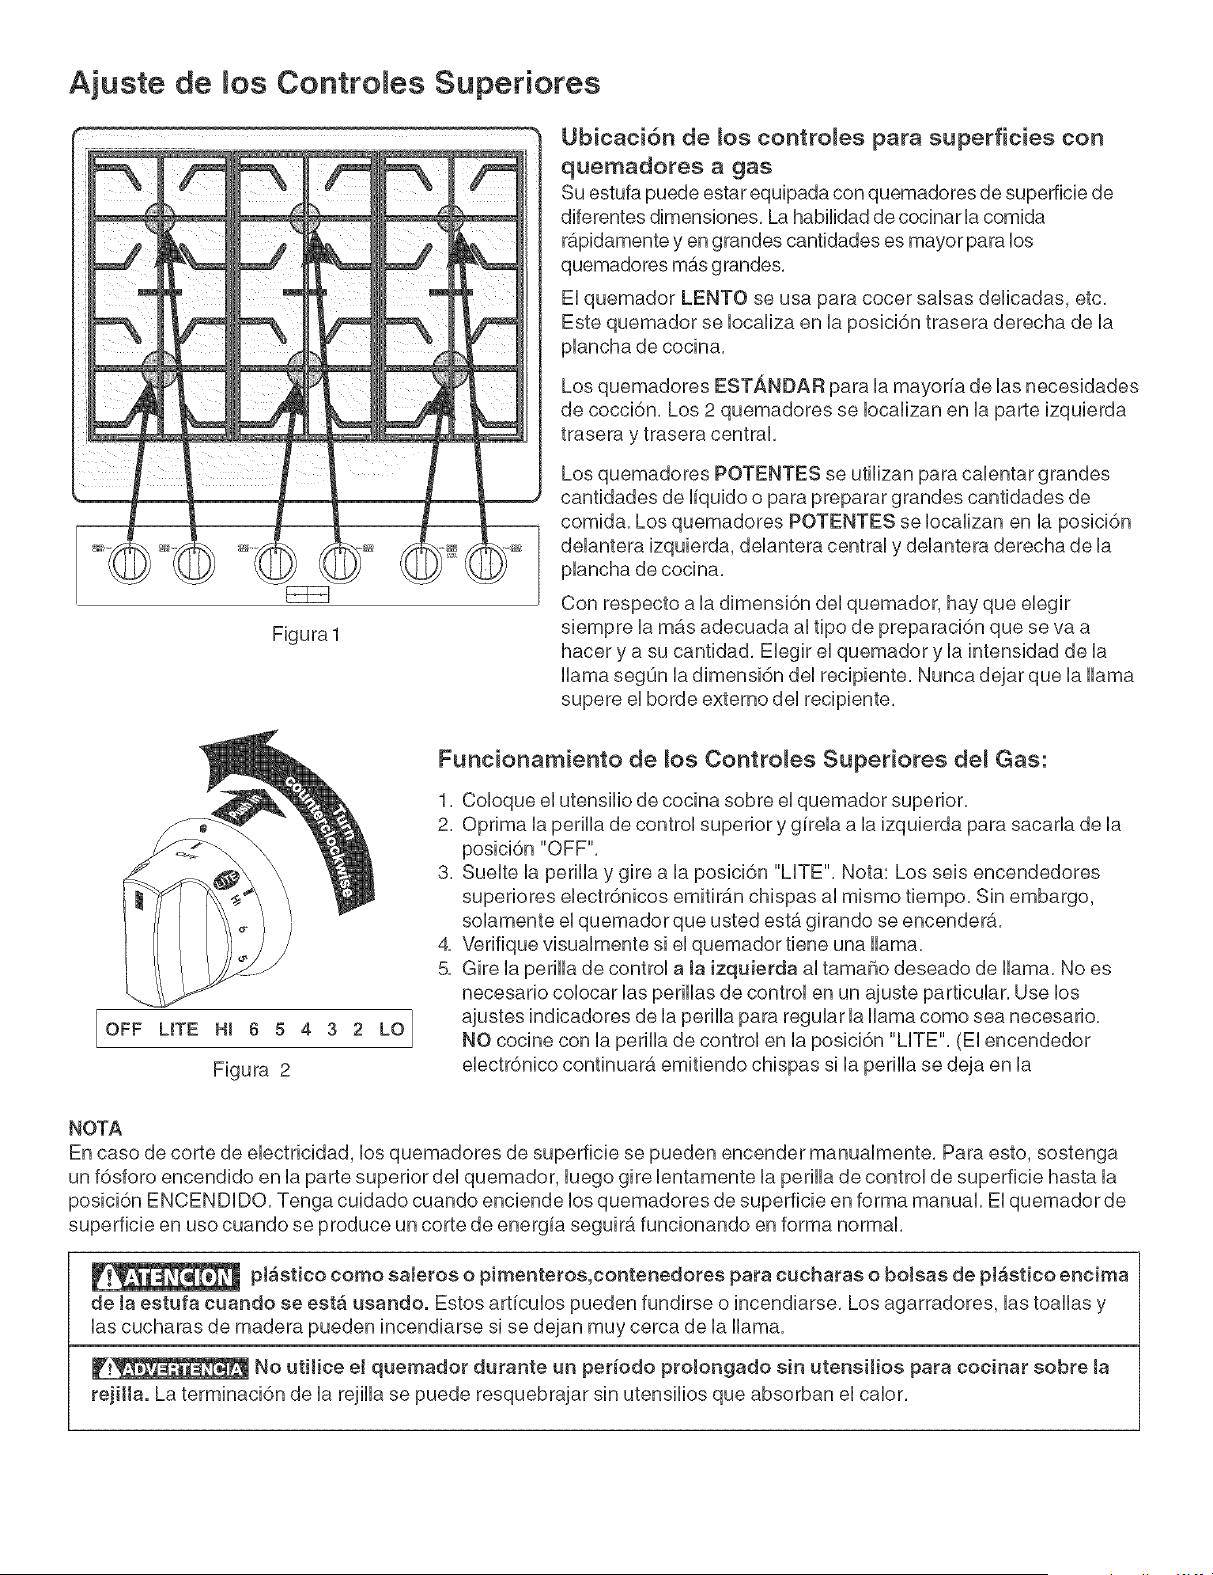
Ajuste de Ros Controles Superiores
Figura 1
Ubicaci6n de _os contro_es para superficies con
quemadores a gas
Su estufa puede estar equipada con quemadores de superficie de
diferentes dimensiones, La habilidad de cocinar la comida
rapidamente yen grandes cantidades es mayor para los
quemadores mas grandes,
El quemador LENTO se usa para cocer salsas delicadas, etc,
Este quemador se Iocaliza en la posici6n trasera derecha de la
plancha de cocina,
Los quemadores ESTANDAR para la mayoria de las necesidades
de cocci6n, Los 2 quemadores se Iocalizan en la parte izquierda
trasera y trasera central,
Los quemadores POTENTES se utilizan para calentar grandes
cantidades de liquido o para preparar grandes cantidades de
comida, Los quemadores POTENTES se Iocalizan en la posici6n
delantera izquierda, delantera central y delantera derecha de la
plancha de cocina,
Con respecto a la dimensi6n del quemador, hay que elegir
siempre la m#.s adecuada al tipo de preparaci6n que se va a
hacer y a su cantidad, Elegir el quemador y la intensidad de la
llama segQn la dimensi6n del recipiente, Nunca dejar que la llama
supere el borde externo del recipiente,
OFF UTE HJ 6 5 4 3 2 LO
Figura 2
Funcionamiento de _os Contro_es Superiores de_ Gas:
1, Coloque el utensilio de cocina sobre el quemador superior,
2, Optima la perilla de control superior y girela a la izquierda para sacarla de la
posici6n "OFF",
3, Suelte la perilla y gire a la posici6n "LITE", Nota: Los seis encendedores
superiores electr6nicos emitirAn chispas al mismo tiempo, Sin embargo,
solamente el quemador que usted esta girando se encendera.,
4, Verifique visualmente si el quemador tiene una llama,
5, Gire la perilla de control a la izquierda al tama_o deseado de llama, No es
necesario colocar las perillas de control en un ajuste particular, Use los
ajustes indicadores de la perilla para regular la llama como sea necesario,
NO cocine con la perilla de control en la posici6n "LITE", (El encendedor
electr6nico continuar_, emitiendo chispas si la perilla se deja en la
NOTA
En caso de corte de electricidad, los quemadores de superficie se pueden encender manualmente, Para esto, sostenga
un f6sforo encendido en la parte superior del quemador, luego gire lentamente la perilla de control de superficie hasta la
posici6n ENCENDIDO, Tenga cuidado cuando enciende los quemadores de superficie en forma manual, El quemador de
superficie en uso cuando se produce un corte de energia seguir_, funcionando en forma normal,
£J_stico como saJeros o pimenteros,contenedores para cucharas o bolsas de pt_stico encima
de Ja estufa cuando se est_ usando. Estos articulos pueden fundirse o incendiarse, Los agarradores, las toallas y
las cucharas de madera pueden incendiarse si se dejan muy cerca de la llama,
No utHice e! quemador durante un £er_odo prolongado sin utensiHos para cocinar sobre ta
rejilta. La terminaci6n de la rejilla se puede resquebrajar sin utensilios que absorban el calor,
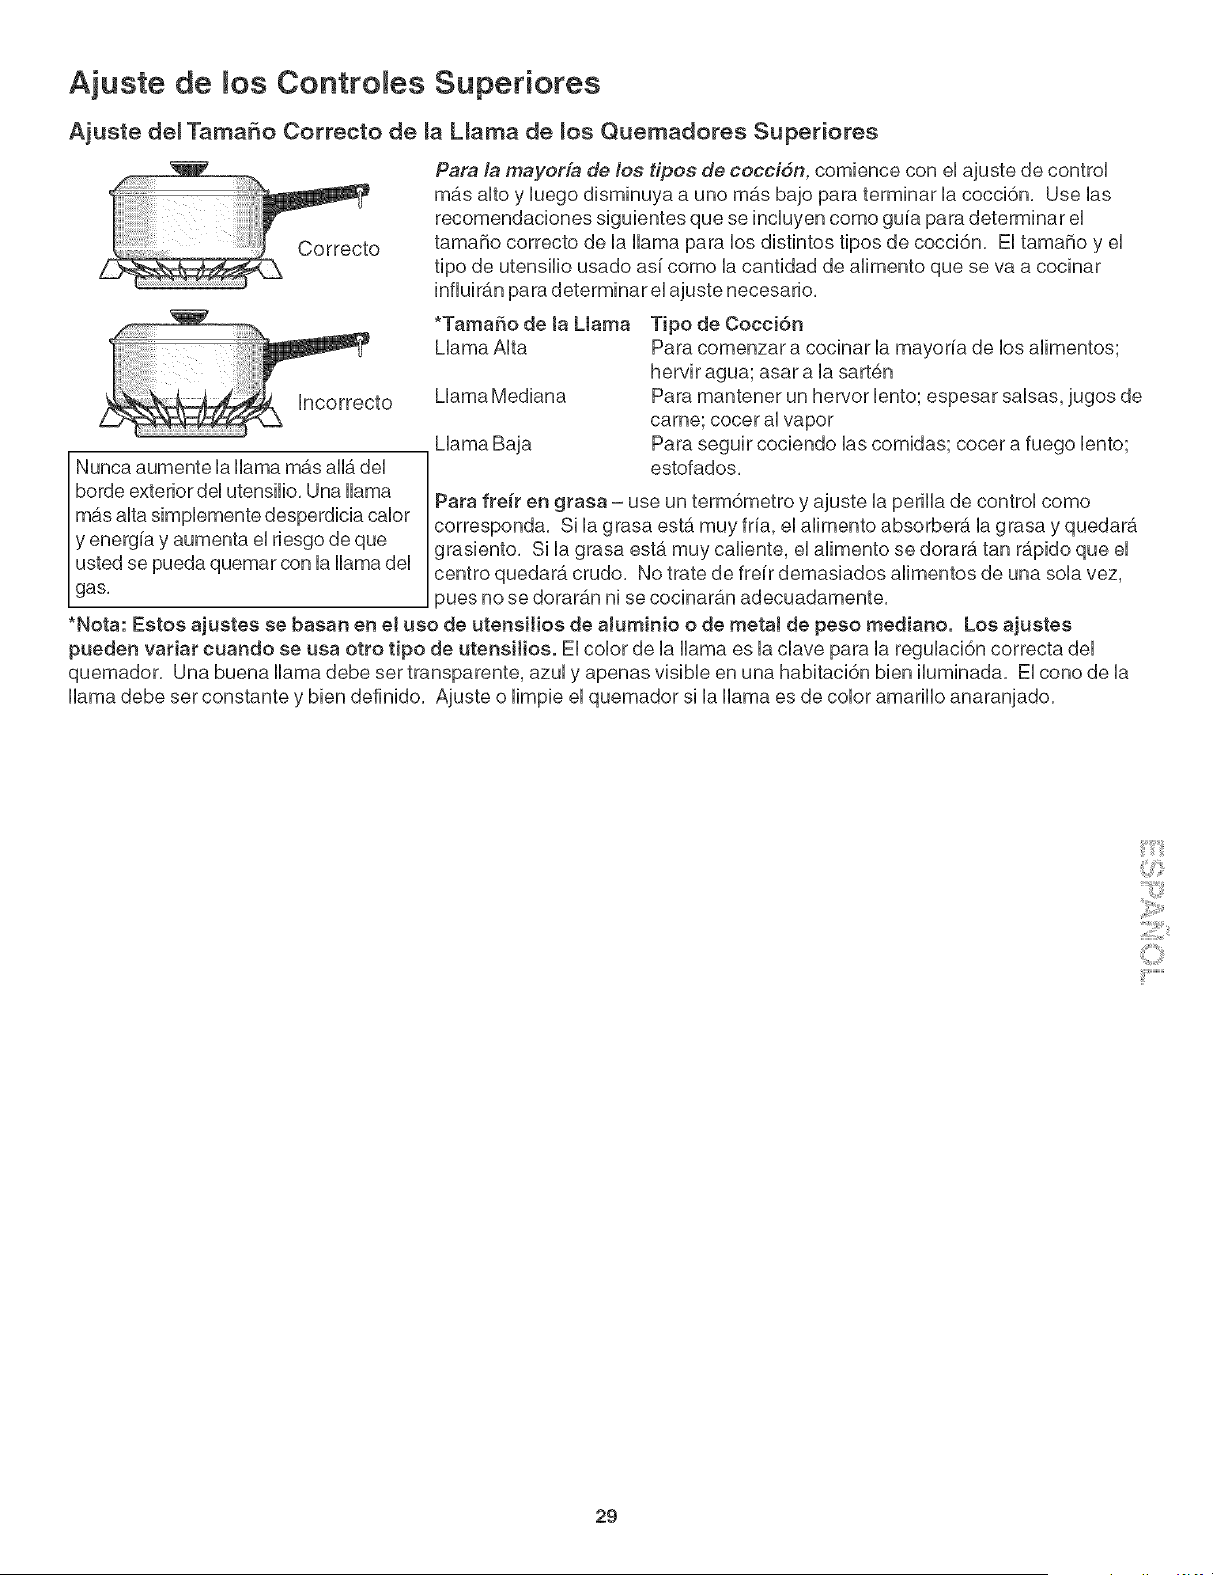
Ajuste de Contro es Supedores
A]uste de_ TamaSo Correcto de _a L_ama de _os Quemadores Superiores
*Tama_o de Ja Llama
Mama AUta
Uama Mediana
Mama Baja
Nunca aumente la Hama mas alia del
borde exterior del utensHio, Una Hama
m_.salta simplemente desperdicia calor
y energia y aumenta el riesgo de que
usted se pueda quemar con la Hamadel
gas,
Para /a mayorfa de ios tipos de cocci6n, comience con el ajuste de control
m_.s alto y luego disminuya a uno m_.s ba]o para terminar la cocci6n, Use las
recomendaciones siguientes que se induyen como guia para determinar el
tamaSo correcto de la llama para los distintos tipos de cocci6n, El tamaSo y el
tipo de utensilio usado asi como la cantidad de alimento que se va a cocinar
infiuira.n para determinar el ajuste necesario,
Tipo de Cocci6n
Para comenzar a cocinar la mayoria de los alimentos;
hervir agua; asar a la sart6n
Para mantener un hewor lento; espesar salsas, jugos de
came; cocer al vapor
Para seguir cociendo las comidas; cocer a fuego lento;
estofados,
Para freir en graea - use un term6metro y ajuste la perilla de control como
corresponda, Si la grasa esta muy fria, el alimento absorber_5,la grasa y quedara.
grasiento, Si la grasa esta muy caliente, el alimento se dorar6, tan r_.pido que el
centro quedar6, crudo, No trate de freir demasiados alimentos de una sola vez,
pues no se doraran ni se cocinaran adecuadamente,
*Nota: Eetoe ajustee ee baean en e! ueo de uteneitioe de aJuminio o de metaJ de peso mediano. Los aiuetee
pueden variar cuando ee usa otto tipo de uteneHioe. El color de la llama es la clave para la regulaci6n correcta del
quemador, Una buena llama debe set transparente, azul y apenas visible en una habitaci6n bien iluminada, El cono de la
llama debe set constante y bien definido, Ajuste o limpie el quemador si la llama es de color amarillo anaranjado,
29
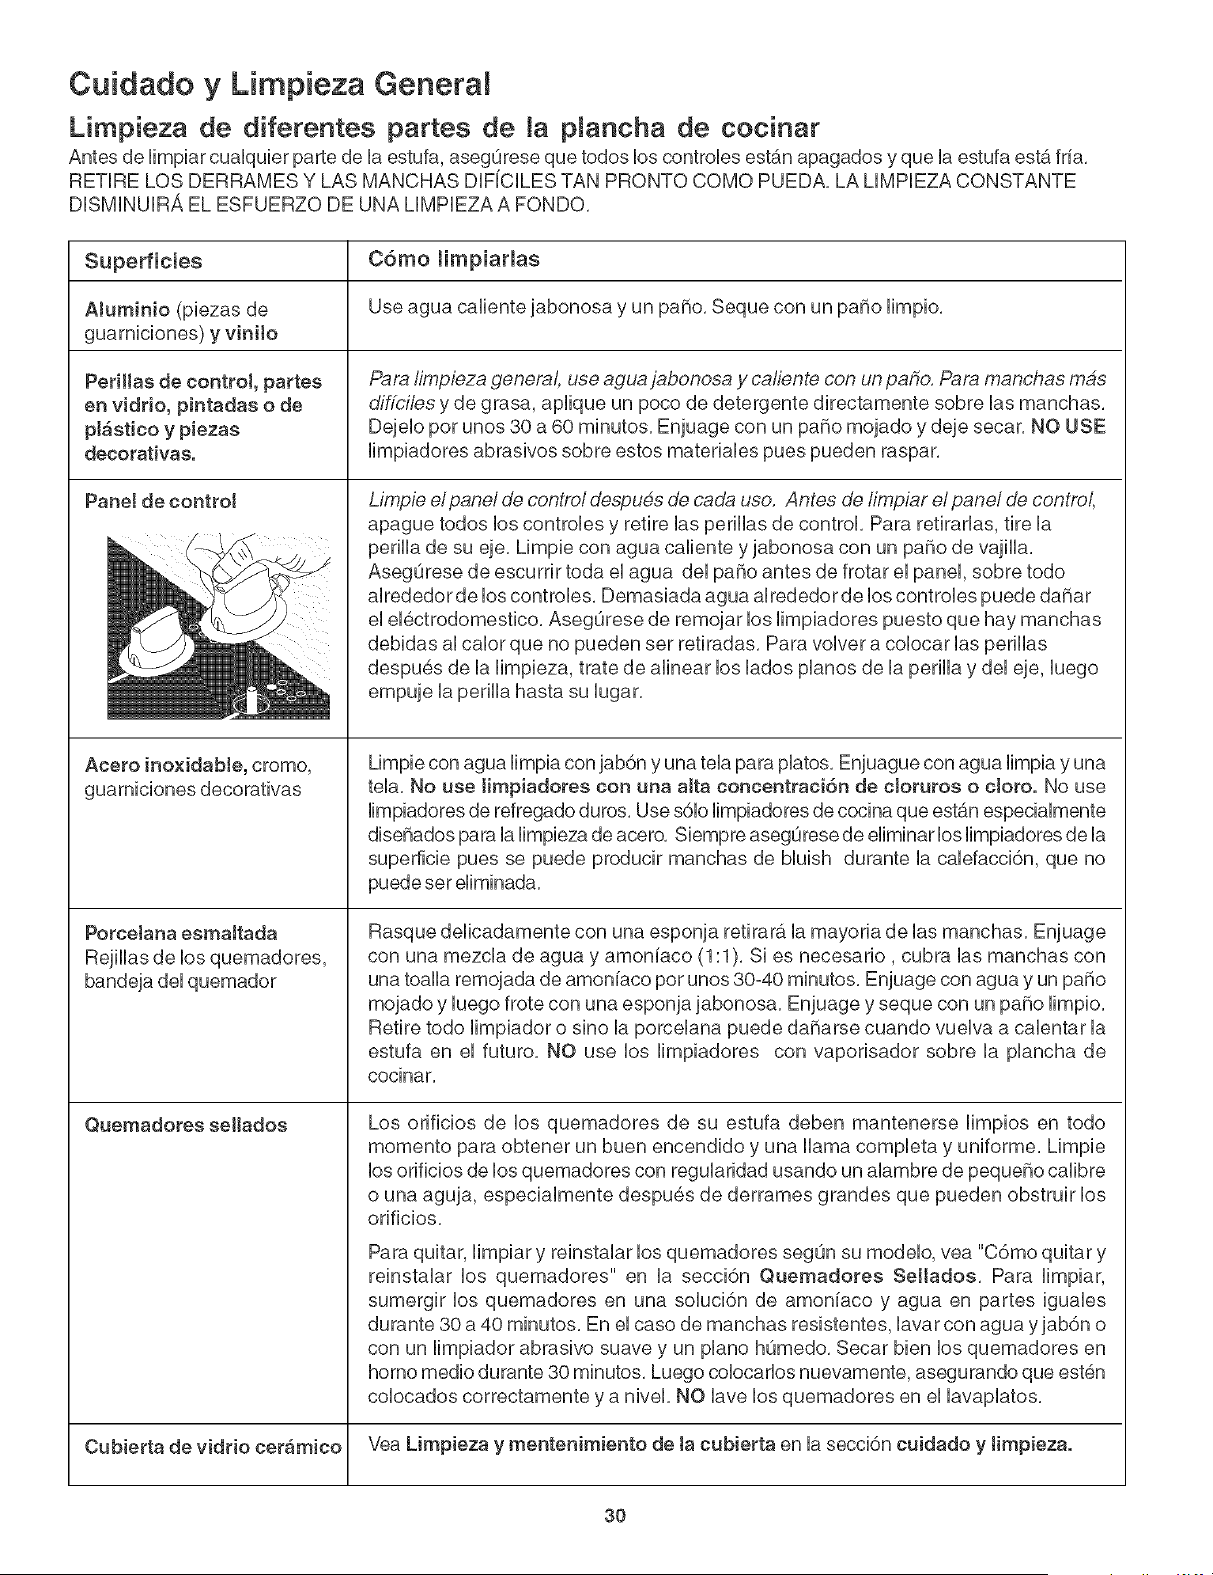
Cuidado y Limpieza Genera
Limpieza de diferentes partes de Ja pJancha de cocinar
Antes de limpiar cualqubr parte de la estufa, asegQrese que todos los controbs est_.n apagados y que la estufa est,. fria,
RETIRE LOS DERRAMES Y LAS MANCHAS DIFiCILES TAN PRONTO COMO PUEDA, LA LIMPEZA CONSTANTE
DISMINUIRA EL ESFUERZO DE UNA LIMPEZA A FONDO,
Superficies Como Hmpiarmas
AJuminio (pbzas de Use agua calbnte jabonosa y un paso, Seque con un pa_o limpio,
guarniciones) y vinilo
PerHlas de control partes Para limpieza general use agua jabonosa y caliente con un paho. Para manchas mas
en vidrio, pintadas o de diffci/es y de grasa, aplique un poco de detergente directamente sobre las manchas,
pl_stico y piezas Dejelo por unos 30 a 60 minutes, Enjuage con un pa_o mojado y deje secar, NO USE
decorativas, limpiadores abrasives sobre estos materiales pues pueden raspar,
Pane! de controJ
Acero inoxidaMe, cromo,
guarniciones decorativas
Porcetana esmaJtada
Rejillas de los quemadores,
Quemadores seltados
Limpie e/pane/de centre/despues de cada uso. Antes de/impiar el panel de control
apague todos los controbs y retire las perillas de control, Para retirarlas, tire la
perilla de su eje, Limpie con agua caliente y jabonosa con un paso de vajilla,
AsegQrese de escurrir toda el agua del paso antes de frotar el panel, sobre todo
alrededor de los controbs, Demasiada agua alrededor de los controbs puede daSar
el el6ctrodomestico, AsegOrese de remojar los limpiadores puesto que hay manchas
debidas al calor que no pueden ser retiradas, Para volver a colocar las perillas
despu6s de la limpieza, trate de alinear los lados planes de la perilla y del eje, luego
empuje la perilla hasta su lugar,
Limpie con agua limpia con jab6n y una tela para plates, Enjuague con agua limpia y una
tela, No use Hmpiadores con una aJta concentraci6n de cioruros o cJoro. No use
limpiadores de refregado duros, Use s61olimpiadores de cocina que est_.nespecialmente
diseSados para la limpieza de acero, Siempre asegOrese de eliminar los limpiadores de la
superficie pues se puede producir manchas de bluish durante la calefacci6n, que no
puede ser eliminada,
Rasque delicadamente con una esponja retirar6, la mayoria de las manchas, Enjuage
con una mezcla de agua y amoniaco (1:1 ), Si es necesario, cubra las manchas con
una toalla remojada de amoniaco pot unos 30°40 minutos, Enjuage con agua y un pa[io
mojado y luego frote con una esponja jabonosa, Enjuage y seque con un paso limpio,
Retire todo limpiador o sino la porcelana puede da_arse cuando vuelva a calentar la
estufa en el futuro, NO use los limpiadores con vaporisador sobre la plancha de
cocinar,
Los orificios de los quemadores de su estufa deben mantenerse limpios en todo
momento para obtener un buen encendido y una llama completa y uniforme, Limpie
los orificios de los quemadores con regularidad usando un alambre de peque_o calibre
o una aguja, especialmente despu6s de derrames grandes que pueden obstruir los
orificios,
Para quitar, limpiar y reinstalar los quemadores segOn su modelo, vea "C6mo quitar y
reinstalar los quemadores" en la secci6n Quemadores SeHados, Para limpiar,
sumergir los quemadores en una soluci6n de amoniaco y agua en partes iguales
durante 30 a 40 minutos, En el caso de manchas resistentes, lavar con agua y jab6n o
con un limpiador abrasivo suave y un piano hQmedo, Secar bien los quemadores en
homo medio durante 30 minutos, Luego colocarlos nuevamente, asegurando que est6n
colocados correctamente y a nivel, NO lave los quemadores en el lavaplatos,
Cubierta de vidrio cer;_mico Vea Limpieza y mentenirniento de ta cubierta en la secci6n cuidado y timpieza.
30
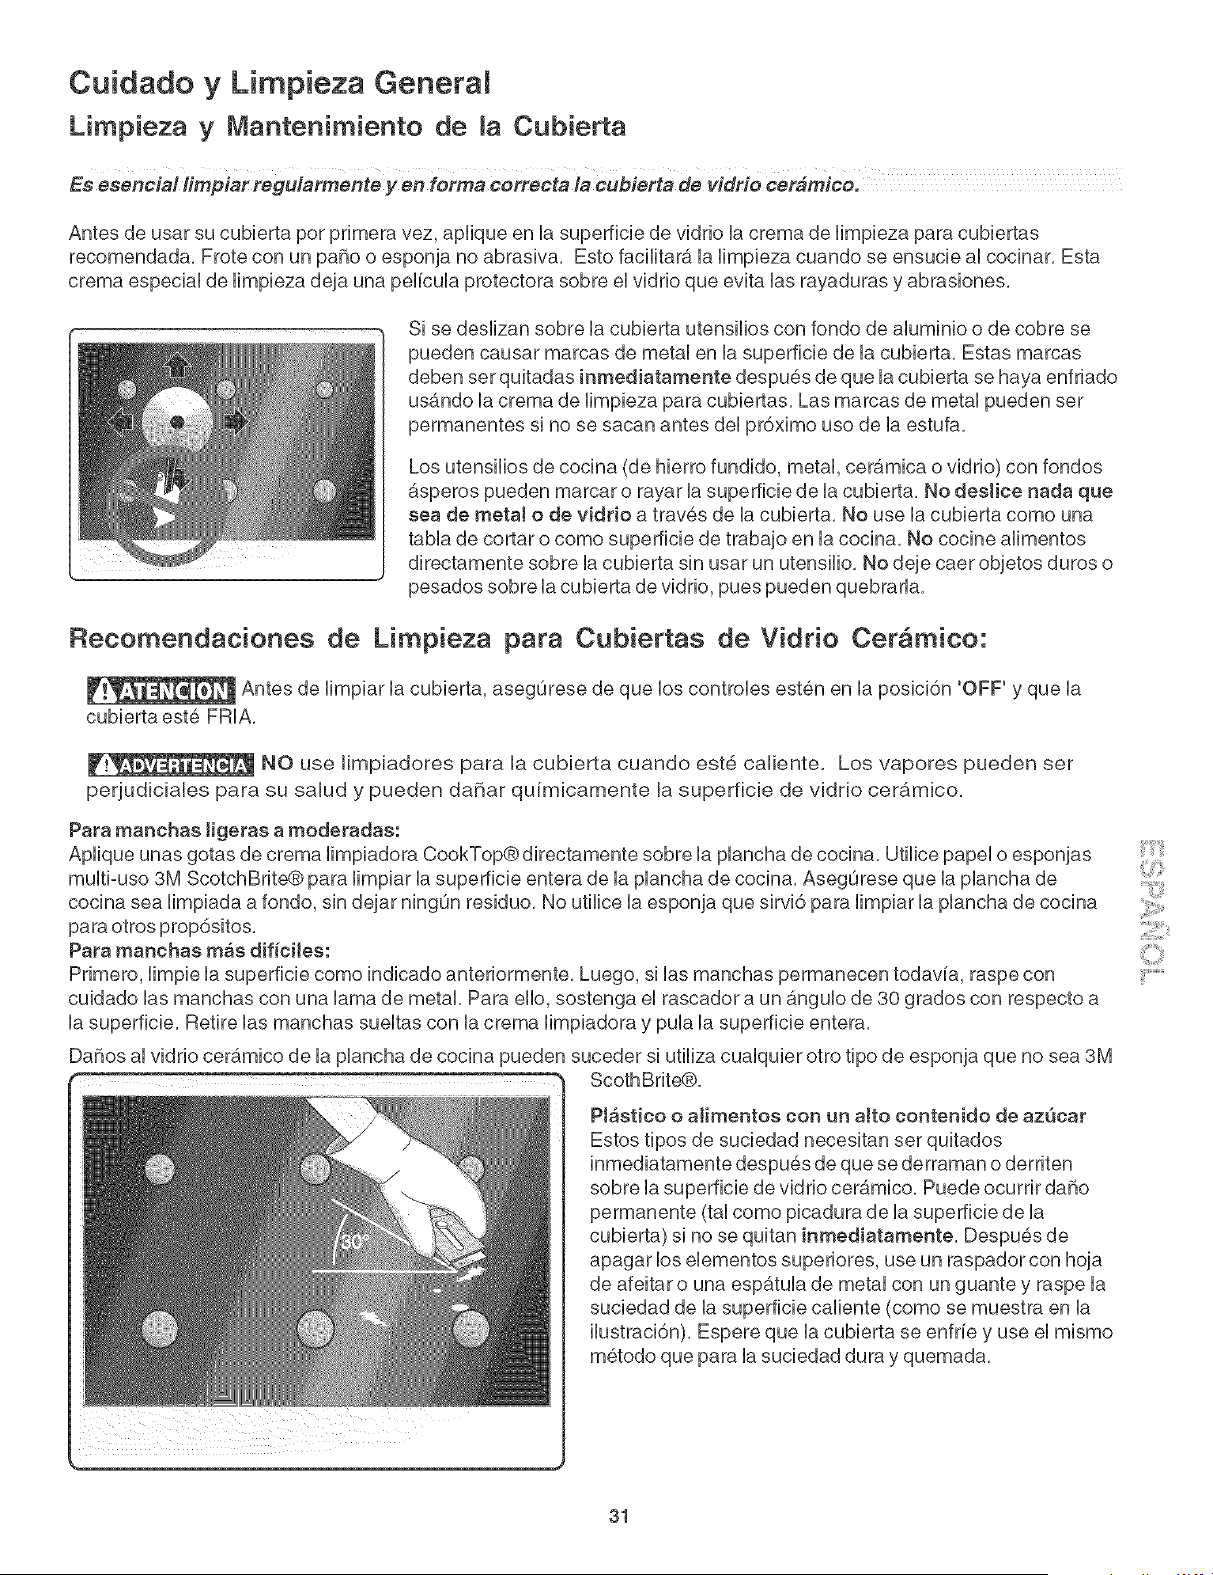
Cuidado y Limpieza General
Limpieza y Mantenimiento de la Cubierta
Antes de usar su cubbrta per primera vez, apHque en Uasuperficb de vidrio Uacrema de Hmpbza para cubbrtas
recomendada, Frote con un pa_o o esponja no abrasiva, Esto facHitara. UaHmpbza cuando se ensucb aUcocinar, Esta
crema especiaU de Hmpbza deja una peUicuUaprotectora sobre eUvidrio que evita Uasrayaduras y abrasiones,
Si se desHzan sobre Uacubbrta utensHios con rondo de aluminio o de cobre se
pueden causar marcas de metal en la superficie de la cubierta, Estas marcas
deben ser quitadas inmediatamente despues de que la cubierta se haya enfriado
usb.ndo la crema de limpieza para cubiertas, Las marcas de metal pueden ser
permanentes si no se sacan antes del pr6ximo use de la estufa,
Los utensilios de cocina (de hierro fundido, metal, cera.mica o vidrio) con rondos
_.speros pueden marcar o rayar la supefficie de la cubierta, No deslice nada que
sea de rnetaJ o de vidrio a trav6s de la cubierta, No use la cubierta come una
tabla de cortar o como superficie de trabajo en la cocina, No cocine alimentos
directamente sobre la cubierta sin usar un utensilio, No deje caer objetos duros o
pesados sobre la cubierta de vidrio, pues pueden quebrarla,
Recomendaciones de Limpieza para Cubiertas de Vidrio Cer mico:
Antes de limpiar la cubierta, aseg0rese de que los controles esten en la posici6n 'OFF' y que la
cubierta este FRIA,
NO use limpiadores para la cubierta cuando este caliente. Los vapores pueden ser
perjudiciales para su salud y pueden daSar quimicamente la superficie de vidrio cer_mico.
Para manchas ligeras a moderadas:
Aplique unas gotas de crema limpiadora CookTop@ directamente sobre la plancha de cocina, Utilice papel o esponjas
multiouso 3M ScotchBrite@ para limpiar la supefficie entera de la plancha de cocina, Aseg0rese que la plancha de
cocina sea limpiada a rondo, sin dejar ning0n residuo, No utilice la esponja que sirvi6 para limpiar la plancha de cocina
para otros prop6sitos,
Para manchas rn_s dif_cHes:
Primero, limpie la superficie come indicado anteriormente, Luego, si las manchas permanecen todavia, raspe con
cuidado las manchas con una lama de metal, Para ello, sostenga el rascador a un _.ngulo de 30 grados con respecto a
la superficie, Retire las manchas sueltas con la crema limpiadora y pula la supefficie entera,
Da¢ios al vidrio cerb,mico de la plancha de cocina pueden suceder si utiliza cualquier otto tipo de esponja que no sea 8M
ScothBrite@,
PJ_stico o aHmentos con un aJto contenido de azQcar
Estos tipos de suciedad necesitan ser quitados
inmediatamente despu6s de que se derraman o derriten
sobre la superficie de vidrio cer_.mico, Puede ocurrir da_o
permanente (tal como picadura de la supefficie de la
cubierta) si no se quitan inmediatamente, Despu6s de
apagar los elementos superiores, use un raspador con hoja
de afeitar o una esp6.tula de metal con un guante y raspe la
suciedad de la superficie caliente (como se muestra en la
ilustraci6n), Espere que la cubierta se enfrie y use el mismo
m6todo que para la suciedad dura y quemada,
31
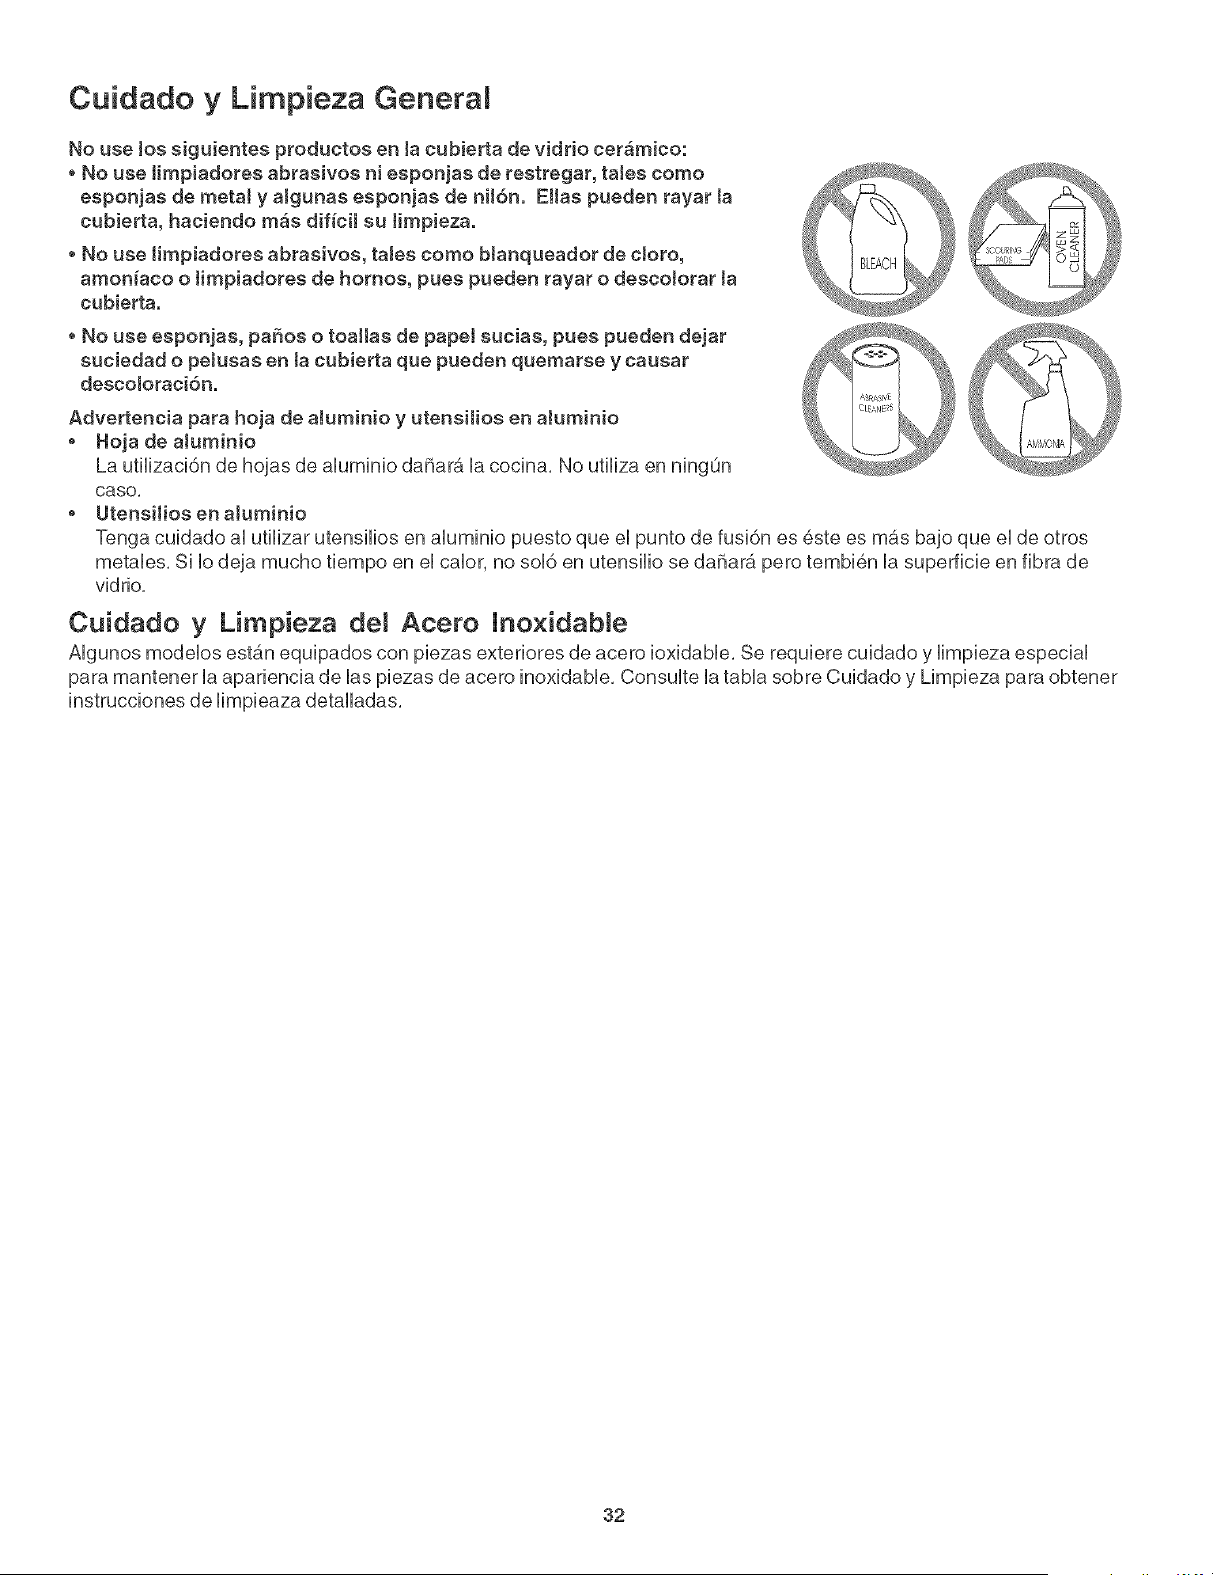
Cuidado y Limpieza Genera
No use Io$ $iguientes productos en Jacubierta de vidrio cer_mico:
* No use Hmpiadore$ abrasivos ni esponjas de restregar, taJes como
esponjas de metal y aigunas esponjas de nil6n. Elias pueden rayar ta
cubierta, haciendo m_s dif_cil su Hmpieza.
* No use limpiadores abrasivos, taJes como blanqueador de cJoro,
amon{aco o limpiadore$ de homos, pue$ pueden rayar o descolorar ta
cubierta.
* No use esponja$, paSos o toaHa$ de papeJ sucia$, pue$ pueden dejar
$uciedad o peJusas en ta cubierta que pueden quemarse y causar
descoloraci6n.
Advertencia para hoja de aJuminio y utensitios en aJuminio
o Hoja de aJuminio
La utilizaci6n de hojas de aluminio dahara, la cocina, No utiliza en ning_n
caso,
UtensiHos en aJuminio
Tenga cuidado al utilizar utensilios en aluminio puesto que el punto de fusi6n es 6.ste es m&s bajo que el de otros
metales, Si Io deja mucho tiempo en el calor, no sol6 en utensilio se da_ara pero tembien la superficie en fibra de
vidrio,
}
Cuidado y Limpieza de! Acero JnoxidabJe
AIgunos modelos est&n equipados con piezas exteriores de acero ioxidable, Se requiere cuidado y limpieza especial
para mantener la apariencia de las piezas de acero inoxidable, Consulte la tabla sobre Cuidado y Limpieza para obtener
instrucciones de limpieaza detalladas,
32
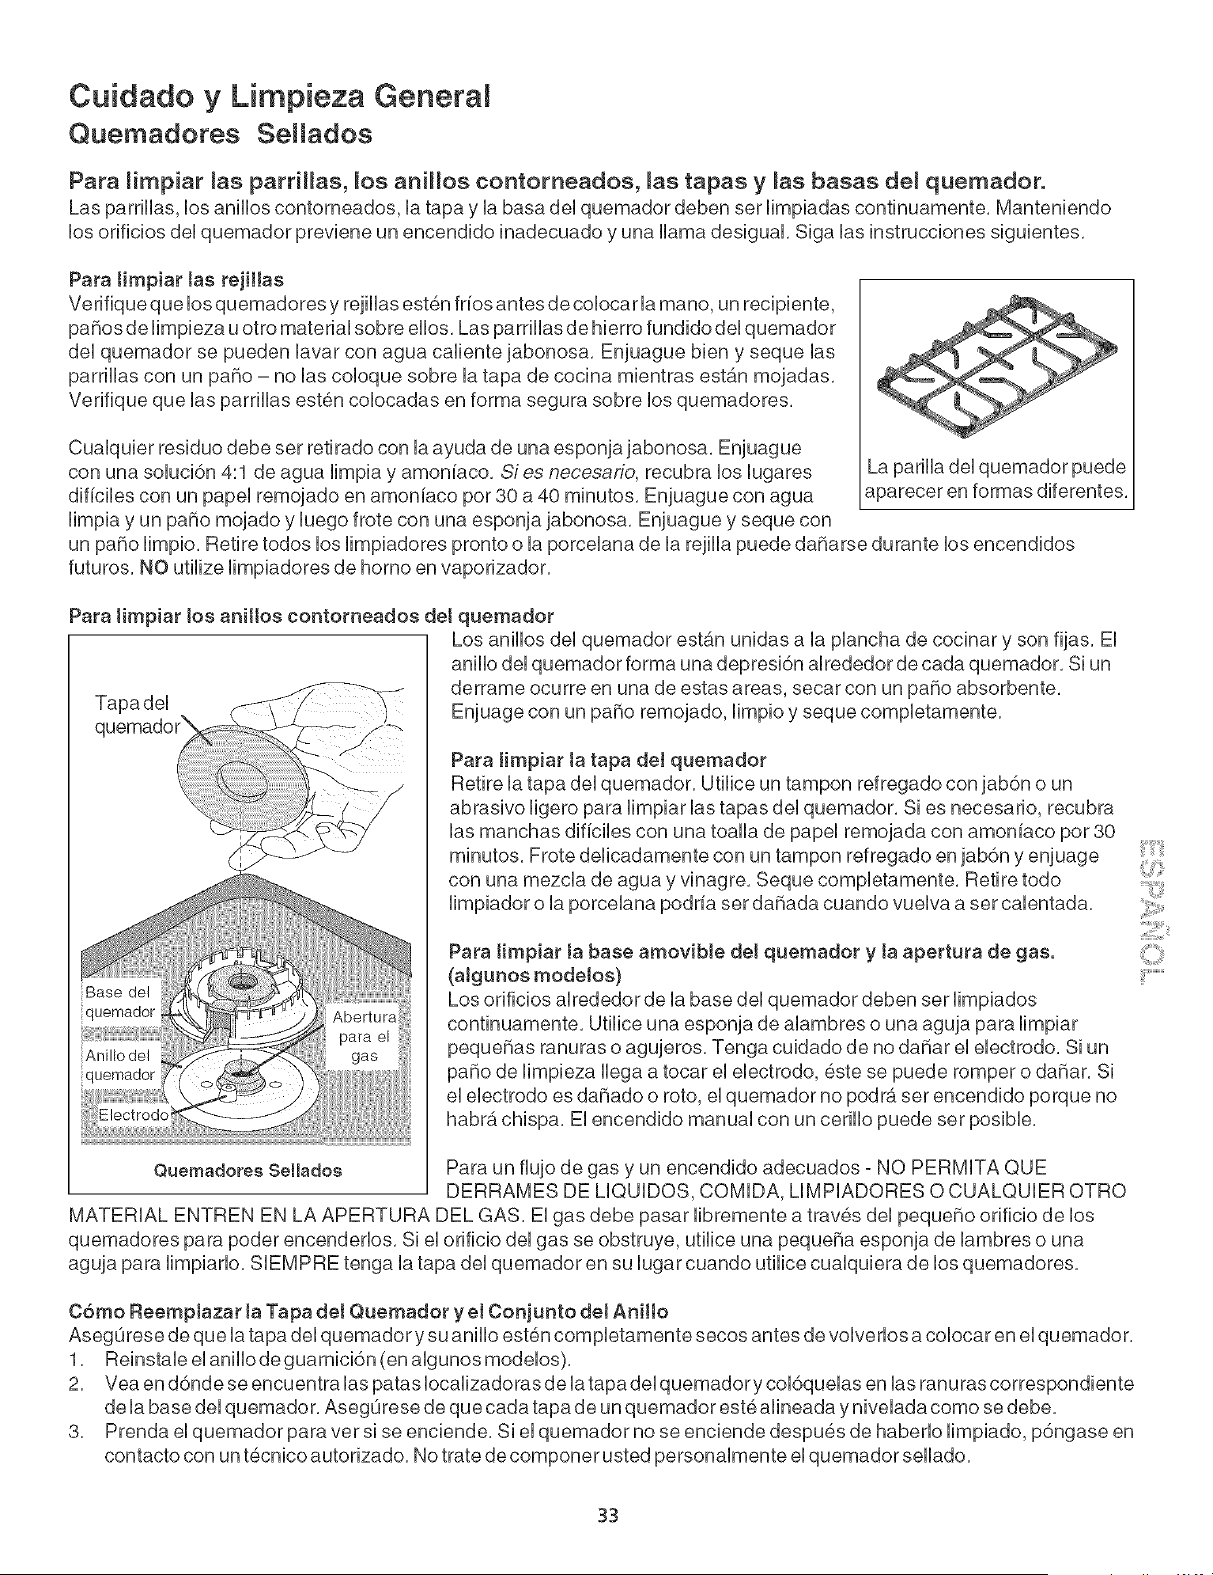
Cuidado y Limpieza Genera[
Quemadores Sei[ados
Para limpiar las parrillas, los anillos contorneados, las tapas y [as basas del quemador°
Las parriUUas,UosaniUUoscontorneados, Uatapa y Uabasa deUquemador deben ser Uimpiadas continuamente, Manteniendo
Uosorificios deUquemador previene un encendido inadecuado y una UUamadesiguak Siga Uasinstrucciones siguientes,
Para timpiar tas rejiHas
Verifique que los quemadores y rejillas est6n frios antes de colocarla mano, un recipiente,
paSos de limpieza u otro material sobre ellos, Las parrillas de hierro fundido del quemador
del quemador se pueden lavar con agua caliente jabonosa, Enjuague bien y seque las
parrillas con un paso - no las coloque sobre la tapa de cocina mientras est_.n mojadas,
Verifique que las parrillas esten coDcadas en forma segura sobre los quemadores,
Cualquier residuo debe ser retirado con la ayuda de una esponja jabonosa, Enjuague
con una soDci6n 4:1 de agua limpia y amoniaco, Sies necesario, recubra los lugares
dificiles con un papel remojado en amoniaco por 30 a 40 minutos, Enjuague con agua
limpia y un paso mojado y luego frote con una esponja jabonosa, Enjuague y seque con
La parilla del quemador puede
aparecer en formas diferentes,
un paso limpio, Retire todos los limpiadores pronto o la porcelana de la rejilla puede daSarse durante los encendidos
futuros, NO utilize limpiadores de homo en vaporizador,
Tapa del
q
Para limpiar tos aniltos contorneados det quemador
Los anillos del quemador est_.n unidas a la plancha de cocinar y son fijas, El
anillo del quemador forma una depresi6n alrededor de cada quemador, Si un
derrame ocurre en una de estas areas, secar con un paso absorbente,
Enjuage con un paso remojado, limpio y seque completamente,
_,Base del
quemador
Anillo del
quemador
Para Hmpiar ta tapa del quemador
Retire la tapa del quemador, Utilice un tampon refregado con jab6n o un
abrasivo ligero para limpiar las tapas del quemador, Si es necesario, recubra
las manchas dificiles con una toalla de papel remojada con amoniaco por 30
minutos, Frote delicadamente con un tampon refregado en jab6n y enjuage
con una mezcla de agua y vinagre, Seque completamente, Retire todo
limpiador o la porcelana podria ser daSada cuando vuelva a ser calentada,
Para timpiar Ja base amovibJe det quemador y ta apertura de gas.
(aJgunos modeJos)
Los orificios alrededor de la base del quemador deben ser limpiados
continuamente, Utilice una esponja de alambres o una aguja para limpiar
pequeSas ranuras o agujeros, Tenga cuidado de no daSar el electrodo, Si un
paso de limpieza Ilega a tocar el electrodo, 6ste se puede romper o daSar, Si
el electrodo es daSado o roto, el quemador no podra ser encendido porque no
habra chispa, El encendido manual con un cerillo puede ser posible,
Quemadores Sellados Para un flujo de gas y un encendido adecuados - NO PERMITA QUE
DERRAMES DE LIQUIDOS, COMIDA, LIMPIADORES O CUALQUIER OTRO
MATERIAL ENTREN EN LA APERTURA DEL GAS, El gas debe pasar libremente a traves del pequeSo orificio de los
quemadores para poder encenderlos, Si el orificio del gas se obstruye, utilice una pequeSa esponja de lambres o una
aguja para limpiarlo, SEMPRE tenga la tapa del quemador en su lugar cuando utilice cualquiera de los quemadores,
C6mo Reemptazar ta Tapa det Quemador y el Conjunto deJ AniHo
AsegQrese de que la tapa del quemador y su anillo est6.n completamente secos antes de volverlos a colocar en el quemador,
1, Reinstale el anillo de guarnici6n (en algunos modelos),
2, Vea en d6nde se encuentra las patas Iocalizadoras de la tapa del quemadory col6quelas en las ranuras correspondiente
de la base del quemador, AsegQrese de que cada tapa de un quemador est6 alineada y nivelada como se debe,
3, Prenda el quemador para ver si se enciende, Si el quemador no se enciende despues de haberlo limpiado, p6ngase en
contacto con un t6cnico autorizado, No trate de componer usted personalmente el quemador sellado,
33
Antes de [[amar
So[uciones a prob[emas comunes
Antes de Ilamara! servicio, revise 6sta ]]sta, Puede ahorrarie tiempo y dinero, Esta ]]sta contiene situaciones comunes que
no son e] resuitado de errores de fabricaci6n o materiales de este artefacto,
PROBLEMA
CAUSA POSIBLE/SOLUCKSN
Los quemadores no encienden.
La periHa de superficie no ha sido compietamente encendida hacia LiTE,
Pulse y gire [a periHa de superficie hasta LiTE hasta que e[ quemador se
encienda y [uego rote hasta obtener [a talla de [a [lama que desea,
AsegOrese que [a v#Jvula de abastecimiento est6 abierta,
La mezcla de gas y aire necesita una linea directa para pasar. AsegOrese de
que el quemador este correctamente colocado en su soporte (s61o en el caso
de los modelos con quemadores abiertos).
Los orificios del quemador estan obstruidos. Con el quemador apagado, limpie
los orificios con una esponja de alambras ou una aguja.
El cable electrico est,. desconectado del toma corriente (modelos con encendido
el6ctrico unicamente). Aseg0rese que el cable est,. conectado adecuadamente
a la toma de corriente.
Interrupci6n de la corriente el6ctrica (modelos con encendido el6,ctrico
unicamante). Los quemadores pueden set encendidos manualmente. Vea
"Programando los controles de superficie" en el Manual del Usuario.
E[ quemador tiene [a mitad de [a
llama.
Los orificios del quemador est_.n obstruidos. Con el quemador apagado, limpie
los orificios utilizando una esponja de alambres o una aguja.
La humedad esta presente despu6s de la limpieza. Sople la llama lentamente
y permita que el quemador funcione hasta que la llama est6 completa. Seque
los quemadores a fondo de acuerdo alas instrucciones de la secci6n
La llama de[ quemador es
anaranjada
Particulas de polvo son la causa mayor. Permita que el quemador funcione
pot unos minutos hasta que la llama se ponga azul.
En las zonas de la costa, una ligera llama anaranjada es la causa del aire
salado.

85

Your Home
IIIIIIIIZ '"'"'"'"'"'"
............... [[[[[[[[[[[[[[[[[[
iiiiiiiiiiiiiii:i For repair-in your home-of all major brand appliances, iiiiiiiiiiiiiiiiii
iiiiiiiiiiiiiil [[[[[[[[[[[[[[[[[[
iiiiiiiiiiiiiii:i Hawn and garden equipment, or heating and cooling systems, iiiiiiiiiiiiiiiiii
iiiiiiiiiiiiiil [[[[[[[[[[[[[[[[[[
iiiiiiiiiiiiiii:i no matter who made it, no matter who sold it! iiiiiiiiiiiiiiiiii
iiiiiiiiiiiiii_ iiiiiiiiiiiiiiiiii
iiiiiiiiiiiiiii:i Forthe replacement parts, accessories and iiiiiiiiiiiiiiiiii
iiiiiiiiiiiiiii:i owner'smanualsthatyou needtodo-lt-yourselL iiiiiiiiiiiiiiiiii
iiiiiiiiiiiiiil [[[[[[[[[[[[[[[[[[
iiiiiiiiiiiiiii:i For Sears professional instaHation of home appliances iiiiiiiiiiiiiiiiii
iiiiiiiiiiiiiil [[[[[[[[[[[[[[[[[[
iiiiiiiiiiiiiii:i and items like garage door openers and water heaters, iiiiiiiiiiiiiiiiii
iiiiiiiiiiiiii_ iiiiiiiiiiiiiiiiii
iiiiiiiiiiiiiii:i lo800o4-MYoHOME ® (1-800o469-4663) iiiiiiiiiiiiiiiiii
iiiiiiiiiiiiiil [[[[[[[[[[[[[[[[[[
iiiiiiiiiiiiiii:i Call anytime, day or night(U.S.A, and Canada) iiiiiiiiiiiiiiiiii
iiiiiiiiiiiiiil [[[[[[[[[[[[[[[[[[
iiiiiiiiiiiiiii:i www.sears.com www.sears.ca iiiiiiiiiiiiiiiiii
iiiiiiiiiiiiiil ..................... [[[[[[[[[[[[[[[[[[
............... HHHHHHHHH
:iiii Our Home iiiiiiiiiiiiiiiiii
For repair of carry-in items like vacuums, lawn equipment, iiiiiiiiiiiiiiiiii
................. and electronics, calHor go on-line for the Hocatlon of your nearest iiiiiiiiiiiiiiiiii
...... IIIIIIIIZ
iiiiiiiiiiiiiii:: Sears Parts & Repair Center. iiiiiiiiiiiiiiii
................ HHHHHHH_
iiiiiiiiiiiiiill 1-800-488-1222 iiiiiiiiiiiiiiii
............... [[[[[[[[[[[[[[[i
iiiiiiiiiiiiiii:i Callanytime, dayornight(U.S.A, only) iiiiiiiiiiiiiiii
................ HHHHHHH_
iiiiiiiiiiiiii!_ www.sears.com iiiiiiiiiiiiiiii
iiiiiiiiiiiiiiiiiiiiiiiiiiiiill................................................... iiiiiiiiiiiiiiii
Para pedir servicio de reparacidn Au Canada pour service en frangais:
a domicilio, y para ordenar p[ezas: 1-800-LE-FOYE_ Me
1-888oSUoHOGAR sM (i-800-533-e937)
..... <1-888-784-6,27t www.soa,s.ca
SM
® Registered Trademark / "TMTrademark / Service Mark of Sears, Roebuck and Co.
® Mama Registrada / TM Mama de Fabrica / sM Mama de Servicio de Sears, Roebuck and Co.
_D
MCMarque de commerce / Marque ddposde de Sears, Roebuck and Co.
© Sears, Roebuck and Co.