Loading ...
Loading ...
Loading ...
English
8
Accessories
WARNING: Since accessories, other than
those offered by CRAFTSMAN, have not been tested
with this product, use of such accessories with this tool
could be hazardous. To reduce the risk of injury, only
CRAFTSMAN recommended accessories should be
used with thisproduct.
Recommended accessories for use with your tool are
available at extra cost from your local dealer or authorized
service center. If you need assistance in locating any
accessory, please contact CRAFTSMAN, call 1-888-331-4569.
MAINTENANCE
WARNING: To reduce the risk of
serious personal injury, turn unit off and remove
the battery pack before making any adjustments
or removing/installing attachments or
accessories. An accidental start-up can causeinjury.
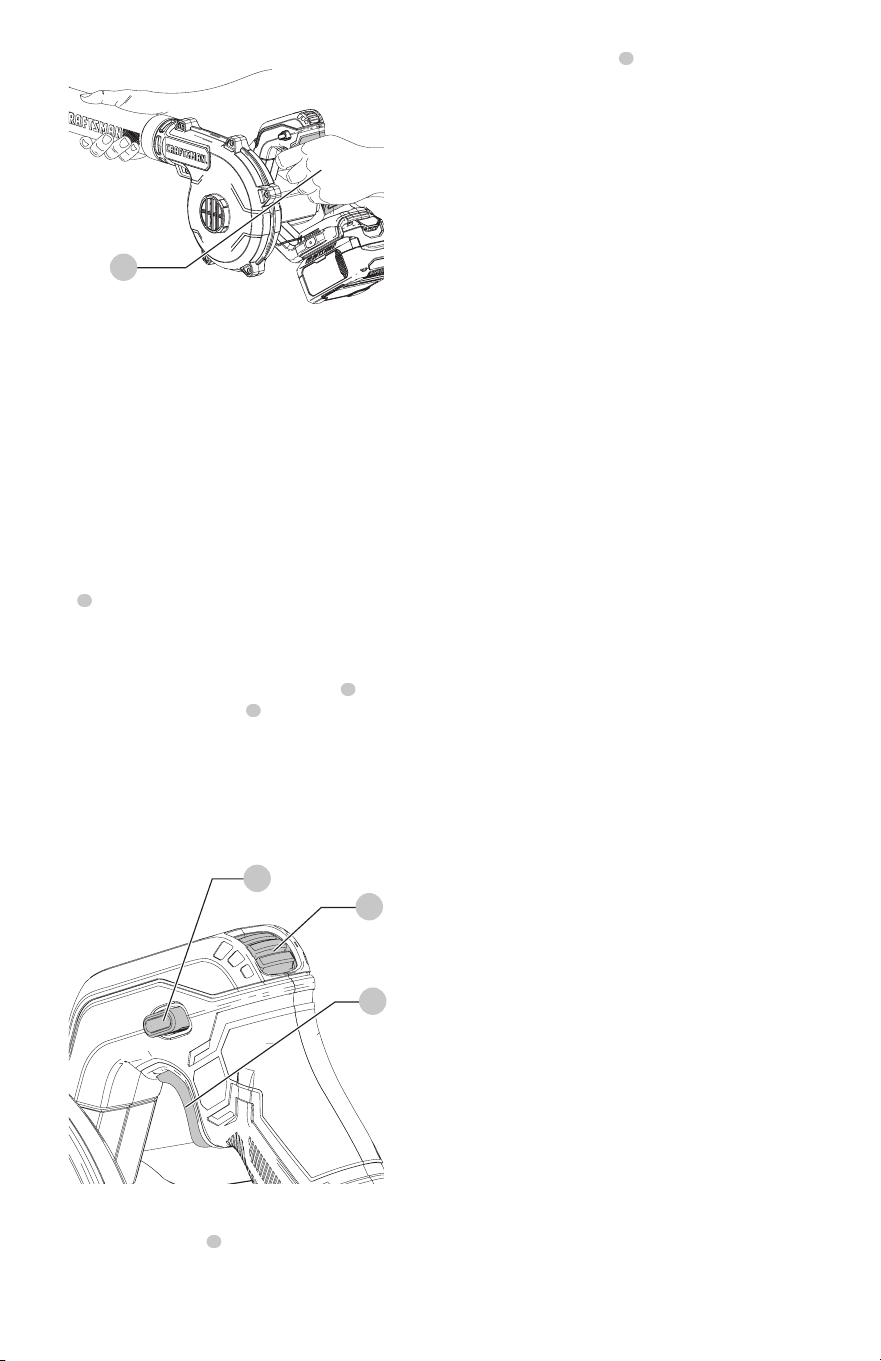
the 3-speed toggle switch
5
up to increase air flow; push it
down to decrease air flow.
Fig.E
13
Switching On (Fig. E, F)
CAUTION: Do not point unit discharge at
self or bystanders.
CAUTION: Always wear safety glasses and
hearing protection. Wear a filter mask if the operation
is dusty. Use of gloves, long pants and substantial
footwear is recommended. Keep long hair and loose
clothing away from openings and moving parts.
To turn the blower on, depress the variable speed trigger
switch
3
. As trigger is pulled from min to max position (or
full off to full on), the airflow from the blower will increase
from min to max. Release the trigger fully to turn the
bloweroff.
To lock the blower on, press the lock-on button
4
with
the variable speed trigger switch
3
depressed. To turn the
blower off when using the lock-on button, pull the trigger
to release the lock. Hold the blower with one hand, as
shown in Figure E, and sweep from side to side with tube
output end several inches above the hard surface. Slowly
advance, keeping the accumulated pile of debris in front
of you.
Fig.F
4
3
5
Speed Selection (Fig. F)
The 3-speed toggle switch
5
sets the maximum airflow
that can be achieved when trigger is fully depressed. Push
Versatrack Variables
1ST_Figure 1ST_Callout 2ND_Callout
G 15 14
Versatrack™ (Fig. G)
WARNING: To reduce the risk of
serious personal injury, turn unit off and remove
the battery pack before making any adjustments
or removing/installing attachments or
accessories. An accidental start-up can causeinjury.
WARNING: To reduce the risk of serious
personal injury, do not use a damaged Versatrack™
hang hook or Versatrack™ Trackwall. A damaged
Versatrack™ hang hook or Versatrack™ Trackwall will
not support the weight of the tool.
WARNING: To reduce the risk of
serious personal injury, ensure the screw holding the
Versatrack™ hang hook is securely tightened.
WARNING: To reduce the risk of serious
personal injury, DO NOT suspend tool overhead
or suspend objects from the hang hook. ONLY
suspend tool on the Versatrack™ Trackwall using the
hanghook.
WARNING: Ensure that the tool weight
does not exceed the maximum rated weight for the
selected Versatrack™ hook.
WARNING: When hanging objects on a
Versatrack™ Trackwall rail, adequately space the tools
in order to not exceed 75 lb (35 kg) per linear foot.
iMPORTAnT: When attaching the Versatrack™ hang
hook, use only the screw that is provided. Be sure to
securely tighten the screw. Versatrack™ accessories
Loading ...
Loading ...
Loading ...