
2
QUICK START GUIDE
BEFORE FIRST USE
1. Remove all packaging materials, read and remove all stickers (except for rating
label, which should remain on unit), and check that all parts and accessories are
accounted for.
2. Wipe interior and exterior with a damp cloth and dry thoroughly before use.
3. Wash accessories with warm, soapy water and dry thoroughly. All accessories
are top rack dishwasher safe.
4. Read instructions and safety information in User Guide.
NOTE: On first use, unit may emit a slight odor, which is normal and will dissipate
with use.
CLEANING AND MAINTENANCE
1. Unplug unit and allow to cool completely before cleaning.
2. Gently wipe down exterior and interior with a damp cloth or paper towel. Never
immerse the Air Fryer+ or its plug in water or any other liquid. The housing of the Air
Fryer+ is NOT dishwasher safe.
3. Wash accessories with a sponge and warm, soapy water. Do not use abrasive
cleaning agents or scouring pads. Accessories are also top rack dishwasher safe.
4. Dry unit and accessories thoroughly and store in a cool, dry place.

3
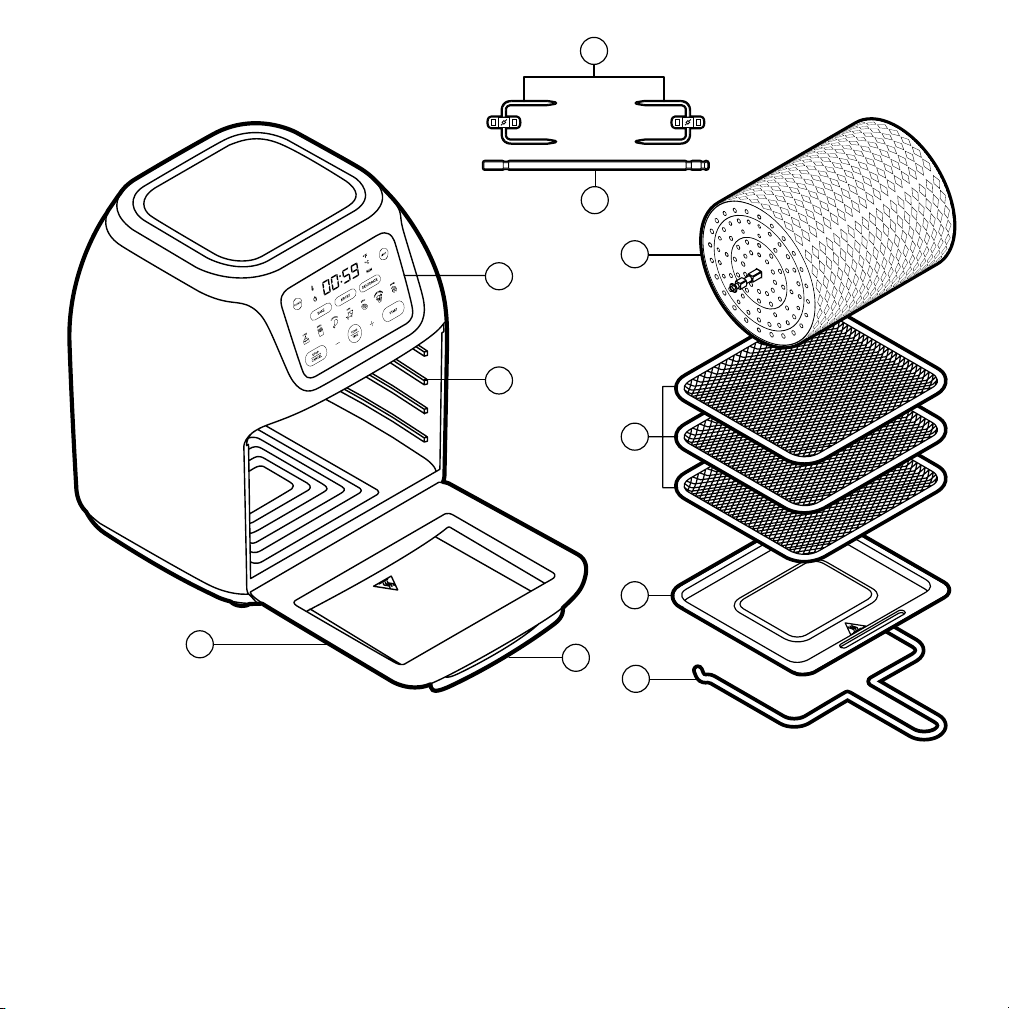
Features and Accessories
1. Capacitive Touch Control Panel
2. Rack Holders
3. Rotisserie Gear (not shown)
4. Rotisserie Holder (not shown)
5. Door with Viewing Window
6. Cool-Touch Handle
7. Spit Forks and Screws (2 of each)
8. Rotisserie Spit
9. Rotating Basket
10. Wire Cooking Racks (3)
11. Removable Drip Tray/Baking Pan
12. Fetch Tool
1
2
5
6
7
8
9
10
11
12
4
Place seasoned food
on rack(s), baking pan,
basket, or spit.
Ensure drip tray is in
bottom of unit
(if not
baking on it).
How to USE AIR FRYER+
STEP
Put food in Air Fryer+
and close door.
STEP 2
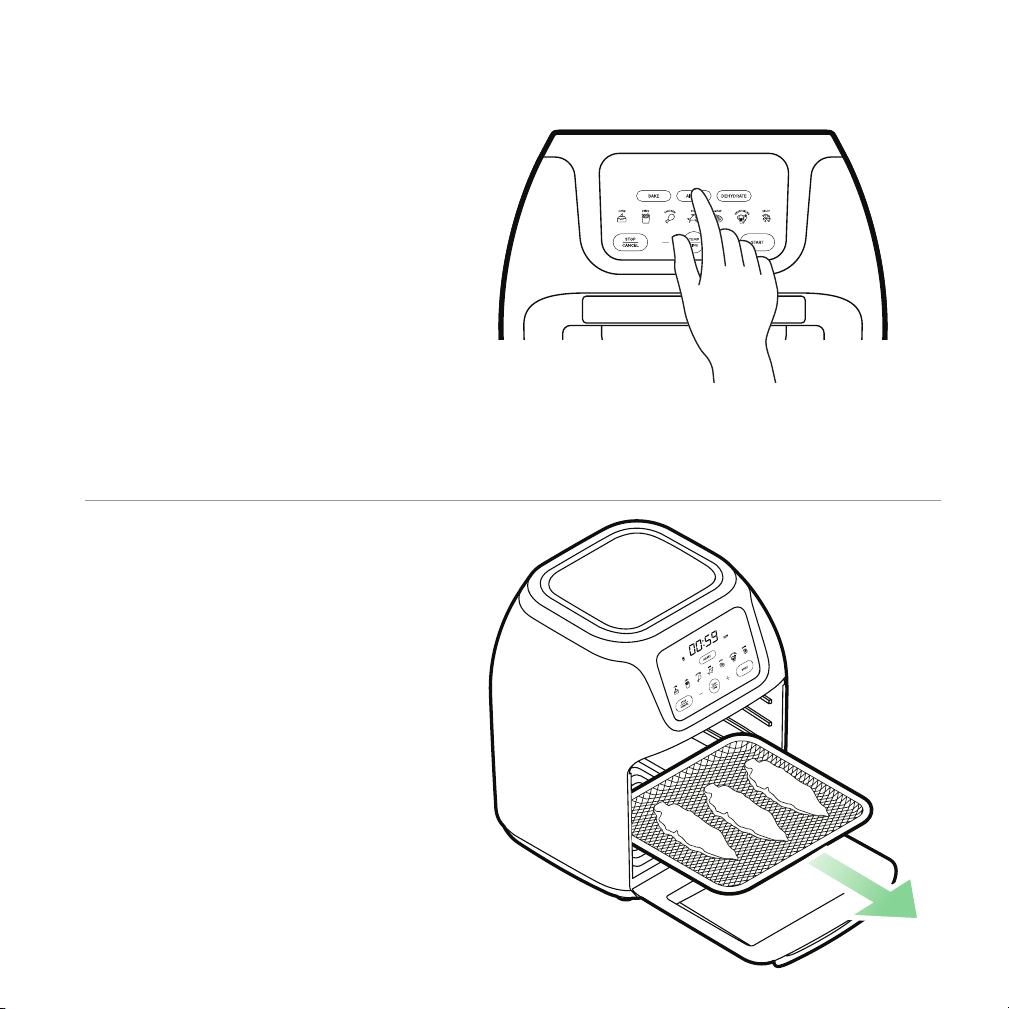
5
When timer ends, carefully
remove food, check for
doneness, serve, and enjoy!
CAUTION: Unit and accessories get
hot during cooking. Use oven mitts
and fetch tool to avoid injury and
place hot items on heat resistant
surface.
STEP 4
Select cooking function:
Bake, Air Fry, or Dehydrate.
To use cooking presets, press
the icon that best matches
what you want to cook.
Otherwise adjust time and
temperature as desired using
TEMP/TIME button and plus
and minus signs.
Press the START button.
STEP 3
(If cooking with the basket or spit,
press Rotate button after START.)

READ ALL INSTRUCTIONS BEFORE USE
For your safety and continued enjoyment of this product, always
read the instruction manual before using.
USER GUIDE
COOKING FORWARD
Welcome!
Whether this is your first Chefman® appliance purchase or you’re already part of
our family, we’re happy to be cooking with you! With your new Multifunctional Air
Fryer+, you can air fry foods to crisp perfection with little to no oil for healthier
eating as well as bake, dehydrate, and even roast foods rotisserie style.
We know you’re excited to get cooking, but please take a few minutes to read
our directions, safety instructions, and warranty information.
From our kitchen to yours,
The Chefman
®
Team

1 Safety Instructions
5 Features
8 Operating Instructions
14 Air Fryer Cooking Tips
15 Troubleshooting FAQs
16 Cleaning and Maintenance
17 Terms and Conditions
19 Warranty
CONTENTS

1
SAFETY INSTRUCTIONS
IMPORTANT SAFEGUARDS
WARNING: When using electrical appliances, basic safety precautions should always be
followed including the following:
1. Read all instructions.
2. Do not touch hot surfaces. Use handles or knobs.
3. To protect against electrical shock, do not immerse cord or plug in water or other liquid.
4. Close supervision is necessary when any appliance is used by or near children.
5. Unplug from outlet when not in use and before cleaning. Allow to cool before putting
on or taking off parts.
6. Do not operate any appliance with a damaged cord or plug or after the appliance
malfunctions or has been damaged in any manner. Return appliance to the nearest
Chefman authorized service facility for examination, repair, or adjustment.
7. The use of accessory attachments not recommended by Chefman may cause injuries.
8. Do not use outdoors.
9. Do not let cord hang over edge of table or counter or touch hot surfaces.
10. Do not place on or near a hot gas or electric burner, or in a heated oven.
11. Extreme caution must be used when moving an appliance containing hot oil or other
hot liquids.
12. Always attach plug to appliance first, then plug cord into the wall outlet. To disconnect,
turn any control to off, then remove plug from wall outlet.
13. Do not use appliance for other than intended use.

2
SAFETY INSTRUCTIONS
IMPORTANT SAFEGUARDS
14. When using this appliance, provide adequate ventilation above and on all sides for air
circulation. Do not allow this appliance to touch curtains, wall coverings, clothing, dish
towels or other flammable materials during use. Do not cover Air Fryer+ and ensure air
vents, located on the back of the fryer, are not covered.
15. This appliance generates heat during use. Proper precautions must be taken to prevent
the risk of burns, fire or other damage to persons or property. Keep hands clear of the
immediate area surrounding the Air Fryer+ during operation and use grips and handles
on the appliance when operating. Do not put hands or other body parts inside the Air
Fryer+ housing while in use or hot.
16. Use caution when opening the Air Fryer+. The inside of the unit and its contents are
very hot. Use tongs or protective gloves to remove food from trays.
17. Do not move the Air Fryer+ while it is in use and/or full of food.
18. Always unplug Air Fryer+ after use.
19. Never place the Air Fryer+ in the dishwasher. This product housing cannot be
immersed in water and is not dishwasher safe.
20. The housing of the Air Fryer+ can be wiped down between uses with a nonabrasive
cleaner.
21. Store Air Fryer+ in a cool, dry place.
22. Never wrap the cord tightly around the appliance during use or storage; this may cause
the wire to fray and break.
SAVE THESE INSTRUCTIONS

3
WARNING: This appliance has a polarized plug (one blade is wider than the other). This
plug is intended to fit into a polarized outlet only one way. If the plug does not fit fully
into the outlet, reverse the plug. If it still does not fit, contact a qualified electrician. Do not
attempt to modify the plug in any way or force it into the outlet. This could result in injury
or electric shock.
SHORT CORD INSTRUCTIONS
A short power supply cord is provided to reduce the hazards of entanglement or tripping
over a longer cord. Longer detachable power-supply cords or extension cords are available
and may be used if care is exercised in their use. If a longer detachable power-supply
extension cord is used:
1. The marked electrical rating of the extension cord should be at least as great as the
electrical rating of the appliance.
2. The cord should be arranged so that it will not drape over the countertop or
tabletop where it can be pulled on by children or tripped over.
SAFETY INSTRUCTIONS
IMPORTANT SAFEGUARDS
4
POWER CORD SAFETY TIPS
1. Never pull or yank on cord or the appliance.
2. To insert plug, grasp it firmly and guide it into outlet.
3. To disconnect appliance, grasp plug and remove it from outlet.
4. Before each use, inspect the power cord for cuts and/or abrasion marks.
If any are found, this indicates that the appliance should be serviced, and
the power cord replaced. Please contact Chefman
®
Support for assistance.
5. Never wrap the cord tightly around the appliance, as this could place
undue stress on the cord where it enters the appliance and cause it to fray and
break.
DO NOT OPERATE APPLIANCE IF THE POWER CORD SHOWS
ANY DAMAGE OR IF APPLIANCE WORKS INTERMITTENTLY
OR STOPS WORKING ENTIRELY.
Do not place the appliance
on a stovetop or any other
heatable surface.
SAFETY INSTRUCTIONS
IMPORTANT SAFEGUARDS
5
1. Capacitive Touch Control Panel
2. Rack Holders
3. Rotisserie Gear (not shown)
4. Rotisserie Holder (not shown)
5. Door with Viewing Window
6. Cool-T
ouch Handle
7. Spit Forks and Screws (2 of each)
8. Rotisserie Spit
9. Rotating Basket
10. Wire Cooking Racks (3)
11. Removable Drip Tray/Baking Pan
12. Fetch Tool
FEATURES
1
2
5
6
7
8
9
10
11
12
6
FEATURES
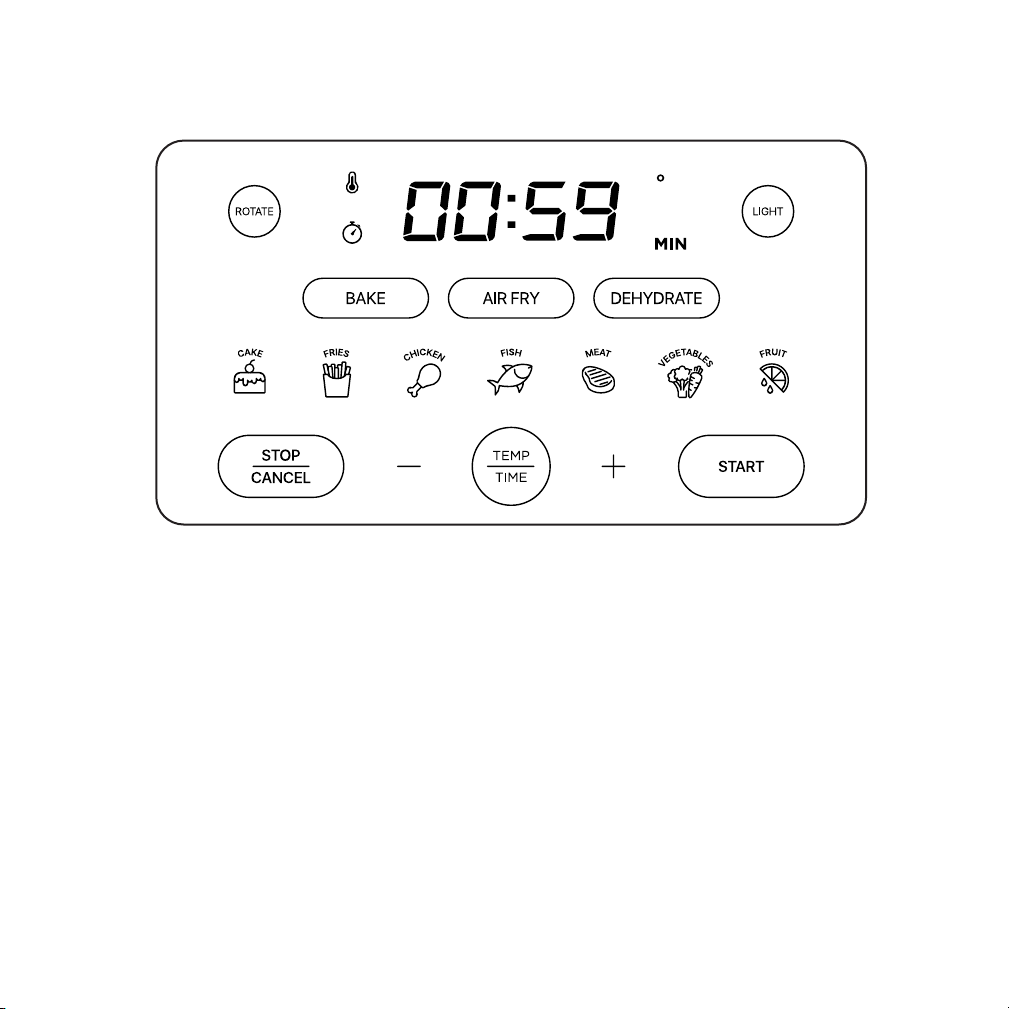
CONTROL PANEL
Rotate – Turns spit and basket
Temperature/Cook Time Display – Automatically alternates between the two
Light – Turns on interior light
Cooking Functions – Bake, Air Fry, Dehydrate
Cooking Presets – Sets suggested time and temperature for favorite foods
(see chart on page 7)
Stop/Cancel – Stops cooking
Minus sign – Subtracts from time and temperature
Temp/Time – Toggles between Temp and Cook Time function to enable setting
Plus sign – Adds to time and temperature
Start – Initiates cooking
F
7
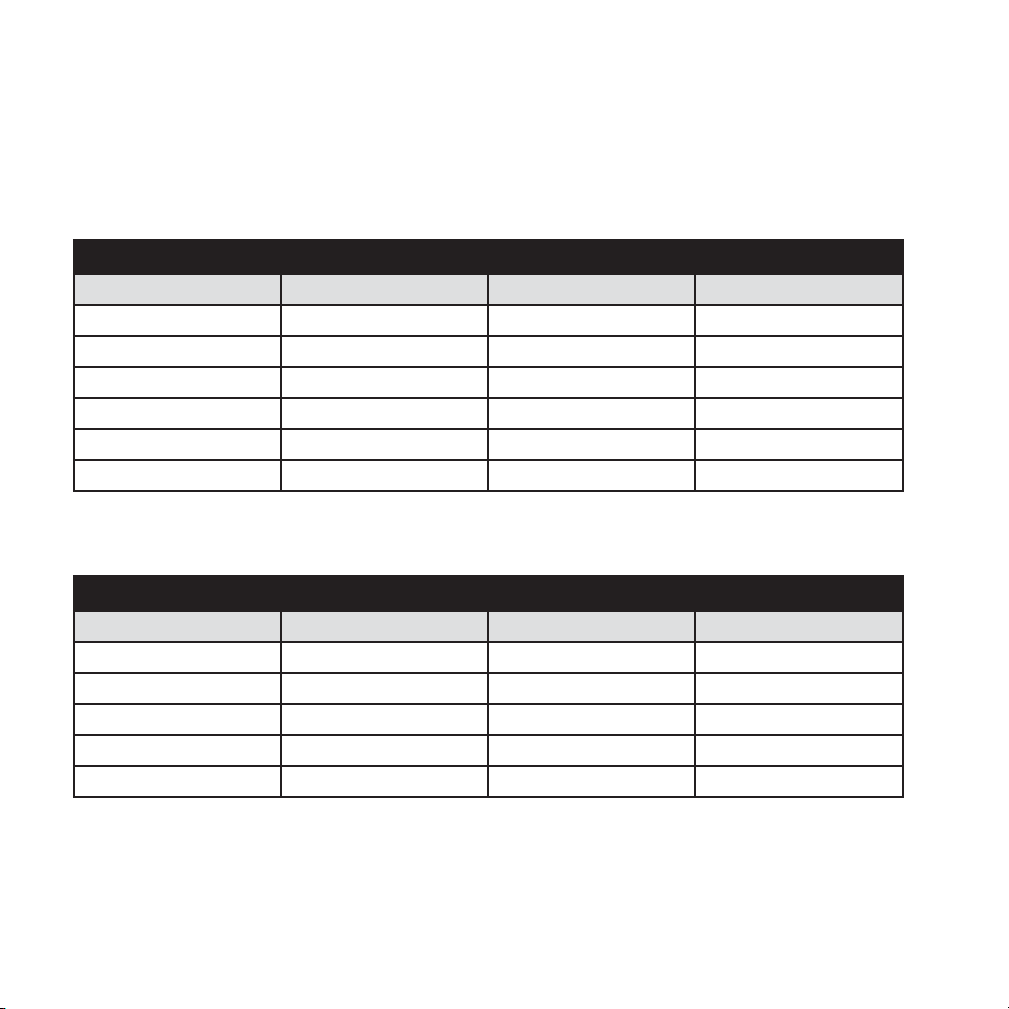
FEATURES
PRESET SETTINGS
NOTE: These are guidelines only; always check foods for doneness according to proper
food safety guidelines.
AIR FRY
Preset Default Time Default Temp Rotate Option
Manual 15 min. 400˚F Yes
Fries 20 min. 400˚F Yes
Chicken 30 min. 375˚F Yes
Fish 10 min. 350˚F Yes
Meat 25 min. 375˚F Ye s
Vegetables 15 min. 350˚F Yes
BAKE
Preset Default Time Default Temp Rotate Option
Manual 30 min. 350˚F Yes
Cake 35 min. 350˚F Yes
Chicken 45 min. 375˚F Ye s
Fish 15 min. 350˚F Yes
Vegetables 25 min. 350˚F Yes
8
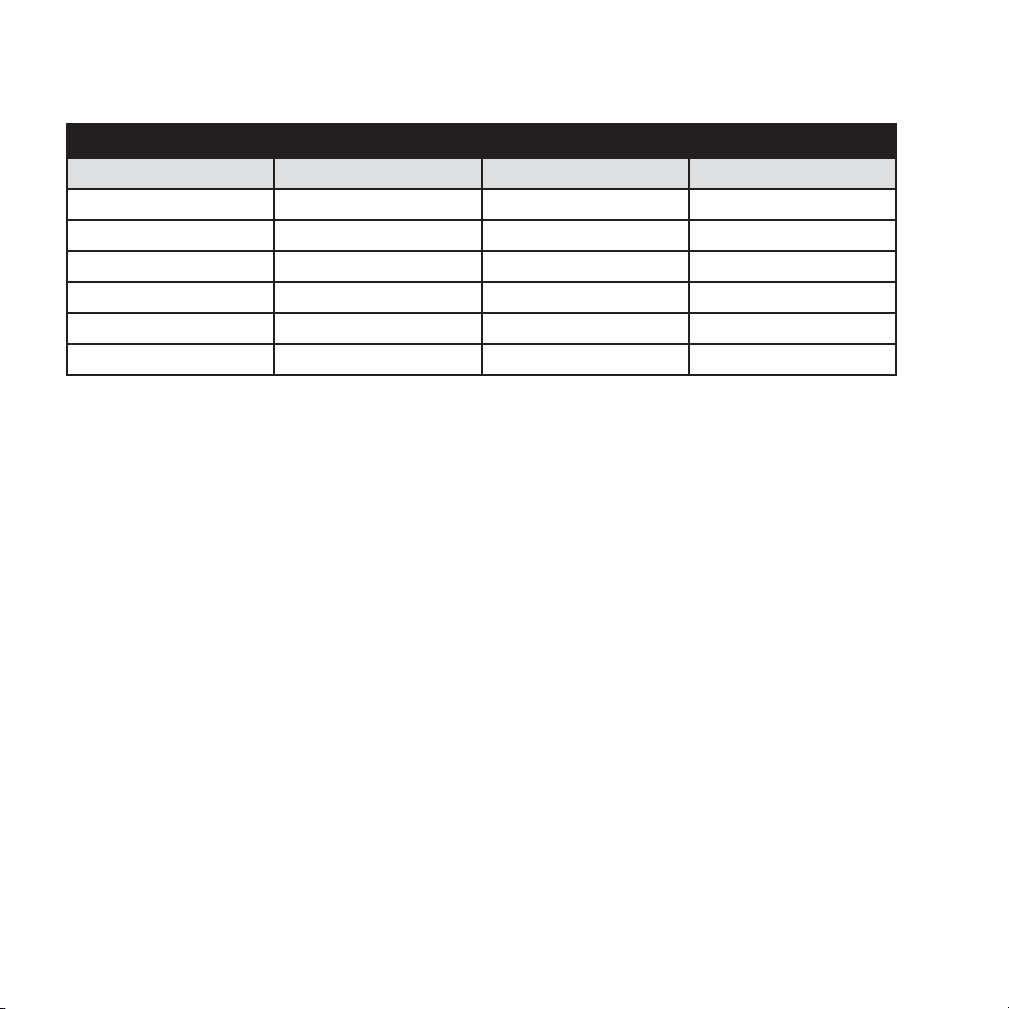
FEATURES
DEHYDRATE*
Preset Default Time Default Temp Rotate Option
Manual 10 hours 165˚F No
Chicken 6 hours 165˚F No
Fish 8 hours 165˚F No
Meat 6 hours 165˚F No
Vegetables 10 hours 125˚F No
Fruit 5 hours 135˚F No
* When dehydrating, follow a trusted recipe and follow food safety guidelines.
NOTE: To change Fahrenheit to Celsius and vice versa: Press and hold the TEMP button
until your desired unit illuminates on the top right part of the control panel. Minutes change
in 1-minute increments and temperature 5-degree increments. To speed through Time or
Temp when setting, press and hold minus or plus sign.
BEFORE FIRST USE
For best results, follow these steps before using your air fryer for the first time.
1. Remove all packaging materials, such as plastic bags and foam inserts.
2. Read and remove all stickers on unit except for rating label on bottom, which should
remain on unit
3. Check to ensure that all parts and accessories are accounted for (see p. 5).
OPERATING INSTRUCTIONS

9
4. Wipe down the interior and exterior with a damp cloth. (Do not use abrasive cleansers or
you could damage finishes.) CAUTION: Do not put the unit in the dishwasher or submerge
in water or any other liquid.
5. Wash the accessories with warm, soapy water and dry thoroughly. Racks and rotisserie
basket may be washed with a bristled brush, but do not use abrasive cleaning agents or
scouring pads. All accessories are top rack dishwasher safe.
6. Read all instructions before using.
NOTE: On first use, unit may emit a slight odor, which is normal and will dissipate with use.
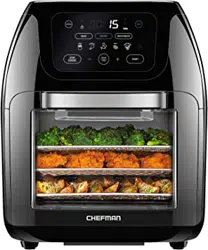
HOW TO COOK IN THE MULTIFUNCTIONAL AIR FRYER+
The Multifunctional Air Fryer+ requires no preheating and cooks faster than a traditional
oven, which means you can enjoy your favorite hot foods in mere minutes. The touch-screen
control panel is intuitive, and customized accessories help guarantee delicious results.
How to Use the Air Fryer+
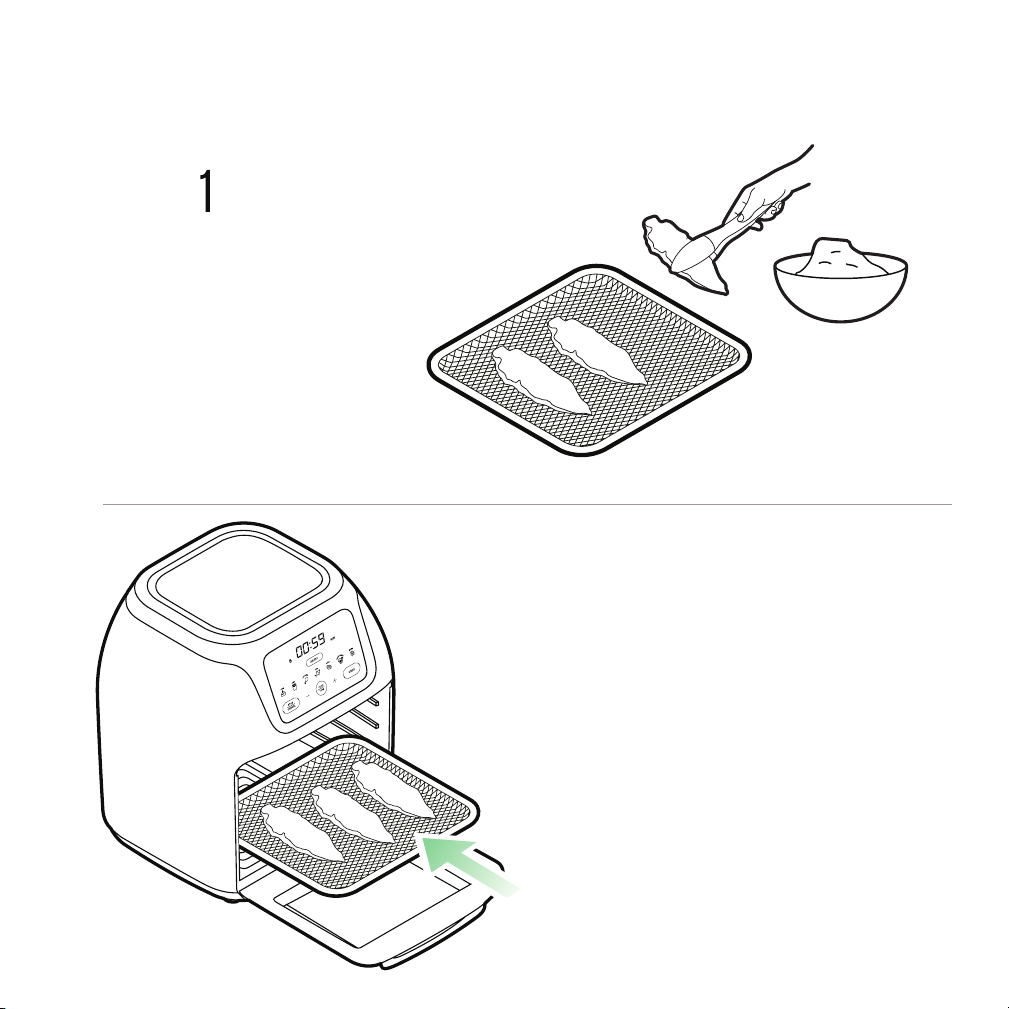
1. Place the Air Fryer+ on a flat surface away from all sources of heat and water and plug
it in.
2. If not using the drip try for baking, position it on the floor of the unit for easy cleaning.
3. Place seasoned food on rack(s), baking pan, basket (see p. 11 for directions) or spit (see
p. 12 for directions).
4. Position rack(s), pan, basket, or spit in oven, and close door.
5. Select cooking function (Bake, Air Fry, or Dehydrate) by pressing function button. The
cooking function will turn blue and food icons will appear below the on the control panel
NOTE: When the unit is first turned on, it defaults to Air Fry function.
OPERATING INSTRUCTIONS

10
OPERATING INSTRUCTIONS
6. If using cooking presets, choose the icon that best matches the food you want to cook
and press that button; the button will turn blue and the programmed temperature and
time will alternate in the control panel. (If desired, you can adjust the preset time and
temperature by pressing the TEMP/TIME button then adjusting the time or temp using
the Minus and Plus buttons.)
NOTE: The time and temperature settings are recommendations; check foods for
doneness according to proper food guidelines before consuming.
If not using presets, adjust the time and temperature as desired.
NOTE: Temperature for Bake and Air Fry ranges from 200°F to 400°F. Time ranges
from 1 minute to 2 hours for Bake and from 1 minute to 1 hour for Air Fry. For Dehydrate,
the time range is 30 minutes to 24 hours, and the temperature range is 95°F to 200°F.
7. Press the START button. The button will turn red, the fan will turn on, and cooking will
begin.
NOTE: During cooking you can check on foods by pressing the Light button on the
control panel and viewing through the door window. You can also open the oven door
to check; the interior light will come on and the Air Fryer+ will pause all functions. Unit
will save time and temp settings so that when door is closed again, cooking will resume
from saved point. You can also press STOP/CANCEL at any time to stop cooking.
8. If cooking with basket or spit (see pp 11 and 12), press Rotate button. NOTE: Rotating
will not occur automatically when using these accessories. The Rotate button will turn
blue when initiated and may be turned off or on at any time during cooking with the
Air Fry or Bake functions.
9. Cook until timer ends. At that point, the unit will beep and automatically turn off. Check
food for doneness according to proper food safety guidelines and cook for more time if
necessary.

11
10. Carefully remove food. Use potholders or oven mitts when removing hot pans, racks, or
trays. If using the spit or rotisserie rack, use the fetch tool in one hand and a potholder
or oven mitt in the other to remove hot basket or spit (see p. 13 for more detailed
directions).
11. Transfer hot pans, racks, or trays to a heat-resistant surface.
12. Use tongs to handle hot foods, then serve and enjoy!
CAUTION: This unit cooks with hot air only; never heat a cooking vessel filled with oil or
any other liquid with this unit as a fire hazard or personal injury could result.
How to Use the Rotisserie Basket (Max: 4 lb.)
Cooking foods in the basket using the Rotate function ensures foods cook up evenly. Though
you can use it for baking, the basket works especially well when air frying small pieces of
foods, such as french fries, chicken wings, and Brussels sprouts. It is not recommended for
dehydrating, and the Rotate function is not available with the Dehydrate function.
1. Ensure drip tray is in bottom of unit.
2. Open door of basket and place seasoned food in it. (For best results, leave room inside
basket; for french fries, use 2 pounds maximum.)
3. Shut basket door and be sure it’s securely closed.
4. Hold the closed basket in your hands so that squared shaft is on the left.
5. Guide the basket into the rotisserie rack position by placing the left shaft into rotisserie
gear located on the left interior wall. Once in place, lift and lay the right shaft on the
rotisserie holder located on the right interior wall.
OPERATING INSTRUCTIONS

12
OPERATING INSTRUCTIONS
6. Close door and proceed with cooking following the directions on p. 9 beginning with
Step 5 and choosing the Air Fry or Bake function. CAUTION: Cooking basket will get
hot during cooking. Use fetch tool and oven mitts and handle with care to avoid injury.
Be sure to place hot basket on a heat-resistant surface to avoid damage.
How to Use the Rotisserie Spit (Max: 4 lb.)
The spit is perfect for roasting a whole chicken to even, crisp perfection and for slowly
cooking whole boneless pieces of meat, such as beef or pork tenderloins. You can also
experiment with roasting a small cauliflower head or a peeled pineapple.
1. Ensure drip tray is in bottom of unit.
2. If using the spit to cook a whole chicken, be sure giblets are removed. Season chicken
as desired and truss tightly. (For best results, be sure the chicken will fit in the oven
with room to rotate; a 3 to 3½ lb. chicken works well.) Run the spit through the bird
lengthwise, starting at the cavity in the back. Carefully slide spit forks onto shaft on
both ends, sinking them deep into the breast meat at one end and the thigh meat at
the other end. Lock forks in place with screws leaving at least 1 inch of free space on
both ends of the rod. The chicken should be secure and should not be able to slide
around on spit.
If using the spit to cook a piece of meat, carefully force the spit lengthwise through
the center of the meat. Carefully slide spit forks onto shaft on both ends, inserting
prongs deeply into meat. Lock forks in place with screws leaving at least 1 inch of free
space on both ends of the rod. The meat should be secure and should not be able to
slide around on spit.
CAUTION: Spit forks are sharp; handle with care.

13
3. Hold the spit, with the meat or chicken secured on it, so that squared shaft is on the left.
4. Guide the spit into the rotisserie position by placing left shaft into rotisserie gear located
on the left interior wall. Once in place, lift and lay the right shaft on the rotisserie holder
located on the right interior wall. Be sure meat or chicken can rotate freely in air fryer.
Close door and proceed with cooking following the directions on p. 9. beginning with
Step 5 and choosing the Bake or Air Fry function,
CAUTION: Spit and basket get hot during cooking. Use fetch tool and oven mitts and
handle with care to avoid injury.
How to Use the Fetch Tool
The fetch tool is handy for removing the hot spit or basket from the Air Fryer+.
1. Hold the fetch tool by its handle with one hand. Have a potholder or oven mitt in or on
other hand.
2. Guide the fetch tool into the unit, positioning prongs below the shafts of the rotisserie
spit or basket.
3. Use the tool to lift the right side of the rotisserie spit. Once it is free, lift the left side.
4. Carefully guide the hot rotisserie spit or basket and food from the Air Fryer+.
5. Transfer it to a heat-resistant surface.
CAUTION: Spit and basket get hot during cooking; use care when removing to avoid
injury.
OPERATING INSTRUCTIONS

14
AIR FRYER COOKING TIPS
• Most prepared foods do not need to be tossed in oil before air frying. Most already
contain oil and other ingredients that enhance browning and crispiness. (Frozen
appetizers and hors d’oeuvres air fry very well.)
• Toss foods you are preparing from scratch, such as french fries, with a little oil, in a
separate bowl, to improve browning and crispiness.
• When making french fries using fresh potatoes, ensure they are completely dry
before cooking in the Air Fryer+. Even the smallest droplets of moisture will
prevent them from getting crispy.
• When air frying battered food, stick to thick, pasty batters. Thin batters, such as
the batters used to make tempura, will run and not set fast enough like they do in a
deep fryer.
• If using multiple wire racks, carefully switch rack positions halfway through the
cooking cycle to ensure the most even results. For dehydrating, switch rack
positions from top to bottom periodically during dehydrating time.
• The Air Fryer+ is great for reheating food. To reheat your food, set the temperature
to 300°F for up to 10 minutes.
• Follow food safety guidelines for doneness. Because food sizes can vary, do not
rely on recipe timing only when cooking food. Check foods for doneness against
current safety guidelines before serving.

15
TROUBLESHOOTING FAQS
Why is there white smoke coming from my unit?
White smoke can be a sign that there’s too much fat in the fryer. Avoid cooking very
fatty foods, such as sausages, in the air fryer, and be sure unit and accessories are clean
before cooking.
CAUTION: Black smoke indicates a more serious problem. In the rare case that you see
black smoke coming from the unit, immediately unplug fryer, contact customer service,
and do not use the fryer until issue is resolved.
Why has my food cooked unevenly?
Two culprits are likely: overcrowding and not switching rack position. Fill basket loosely
with food to let air circulate and switch rack positions at least once during cooking for
more even results. You may also want to carefully flip foods on racks during cooking for
best results.
Why isn’t my food crisp?
Though you can air fry with no added oil, coating foods very lightly with oil (usually just
½ teaspoon per batch for most recipes) helps guarantee crisp results.

16
1. Unplug unit and allow to cool completely before cleaning.
2. Gently wipe down exterior and interior with a damp cloth or paper towel. Never
immerse the Air Fryer+ or its plug in water or any other liquid. The housing of the
Air Fryer+ is NOT dishwasher safe.
3. Wash accessories with a sponge and warm, soapy water. Racks and basket may be
washed with a bristled brush. Do not use abrasive cleaning agents or scouring pads.
Accessories are also top rack dishwasher safe.
4. Dry unit and accessories thoroughly and store in a cool, dry place.
CLEANING AND MAINTENANCE

17
Our products are backed by a limited 1-year warranty. To register, follow the
instructions on the Chefman
®
Warranty Registration page in this User Guide.
We offer a limited 1-year warranty from the date of purchase. This warranty
is void without proof of purchase within the USA, Canada, or Mexico. Service
centers and retail stores do not have the right to alter or change the Terms and
Conditions of this warranty.
WHAT THE WARRANTY COVERS
• Manufacturer Defects
Chefman
®
products are warranted against defects in material and
workmanship for a period of 1 year from the date of purchase when used in
accordance with the Chefman
®
User Guide.
• Qualified Replacements
If your product does not work as it should, we will send you a new one. If the
product is no longer available, we will replace it with one that is comparable.
TERMS AND CONDITIONS
Limited Warranty

18
THIS WARRANTY DOES NOT COVER
• Misuse - Damage that occurs from neglectful or improper use of products;
damage that occurs as a result of usage with incompatible voltage. See
Safety Instructions for information on proper use.
• Poor Maintenance - General lack of proper care. See Cleaning and
Maintenance for information on proper maintenance.
• Commercial Use - Damage that occurs from commercial use.
• Altered Products - Damage that occurs from alterations or modifications by
any entity other than Chefman
®
; removal of rating label.
• Catastrophic Events - Damage that occurs from fire, floods, or natural
disasters.
• Loss of Interest - Claims of loss of interest or enjoyment.
TERMS AND CONDITIONS
Limited Warranty

19
Register your product to add an additional 3 months to your warranty.
What do I Need to Register my Product
•Contact Information
•Model Number
•Proof of Purchase
(online confirmation, receipt, gift receipt)
•Date code
How Do I Register my Product?
We offer two convenient ways to access the Chefman
®
registration form:
1. Visit chefman.com/register.
2. Scan the QR code below to access site:
MADE IN CHINA/FABRIQUE EN CHINE
AC ONLY/ AC SEULEMENT
DATE CODE:
ACCESS CODE:
Model/Modele: RJ25-C
Conveyor toaer
120v~60hz 1800W
CONFORMS TO UL STD. 1026
CERTIFIED TO CSA STD.C22.2 No.64
CAUTION: DO NOT IMMERSE IN WATER
ATTENTION: NE PAS PLONGER DANS L’EAU
WARNING: TO PREVENT ELECTRIC SHOCK,
UNPLUG BEFORE CLEANING
PRÉAVIS: POUR ÉVITER LES CHOCS ÉLECTRIQUES,
DÉBRANCHEZ L’APPAREIL AVANT DE L’UTILISER
READ INSTRUCTIONS BEFORE USING
LISEZ LES INSTRUCTIONS AVANT DE L’UTILISER
HOUSEHOLD USE ONLY
POUR USAGE DOMESTIQUE SEULEMENT
0000000
0000
XXXXXXXX
CHEFMAN
®
WARRANTY REGISTRATION
NOTE: Label depicted here is an exmaple.

20
For product information, visit chefman.com
OTHER LIMITATIONS: ALL WARRANTIES OF ANY KIND WHATSOEVER, EXPRESS, IMPLIED AND
STATUTORY, ARE HEREBY DISCLAIMED. ALL IMPLIED WARRANTIES OF MERCHANTABILITY AND
FITNESS FOR A PARTICULAR PURPOSE ARE HEREBY DISCLAIMED, PROVIDED THAT IF ANY IMPLIED
WARRANTIES OF ANY KIND IS REQUIRED BY ANY JURISDICTION, INCLUDING MERCHANTABILITY
AND FITNESS FOR A PARTICULAR PURPOSE, THE DURATION OF SUCH IMPOSED IMPLIED
WARRANTY IS LIMITED TO ONE (1) YEAR. THIS WARRANTY DOES NOT COVER, AND CHEFMAN
®
SHALL NOT BE LIABLE FOR, INCIDENTAL, INDIRECT, SPECIAL OR CONSEQUENTIAL DAMAGES,
INCLUDING WITHOUT LIMITATION, DAMAGE TO, OR LOSS OF USE OF THE PRODUCT, OR LOST SALES
OR PROFITS OR DELAY OR FAILURE TO PREFORM THIS WARRANTY OBLIGATION. THE REMEDIES
PROVIDED HEREIN ARE THE EXCLUSIVE REMEDIES UNDER THIS WARRANTY, WHETHER BASED ON
CONTRACT, TORT OR OTHERWISE.
This Warranty gives you specific legal rights, and you may also have other rights that vary from state
to state or province to province. Some states or provinces do not allow the exclusions or limitations set
forth in this Warranty, so the above limitations or exclusions may not apply to you depending on the
jurisdiction of purchase.
Chefman
®
is a registered trademark of RJ BRANDS, LLC.
CHEFMAN
®
WARRANTY REGISTRATION

21
®