This ice maker is not designed to keep ice frozen. After each use, remove all
ice cubes, drain the water.
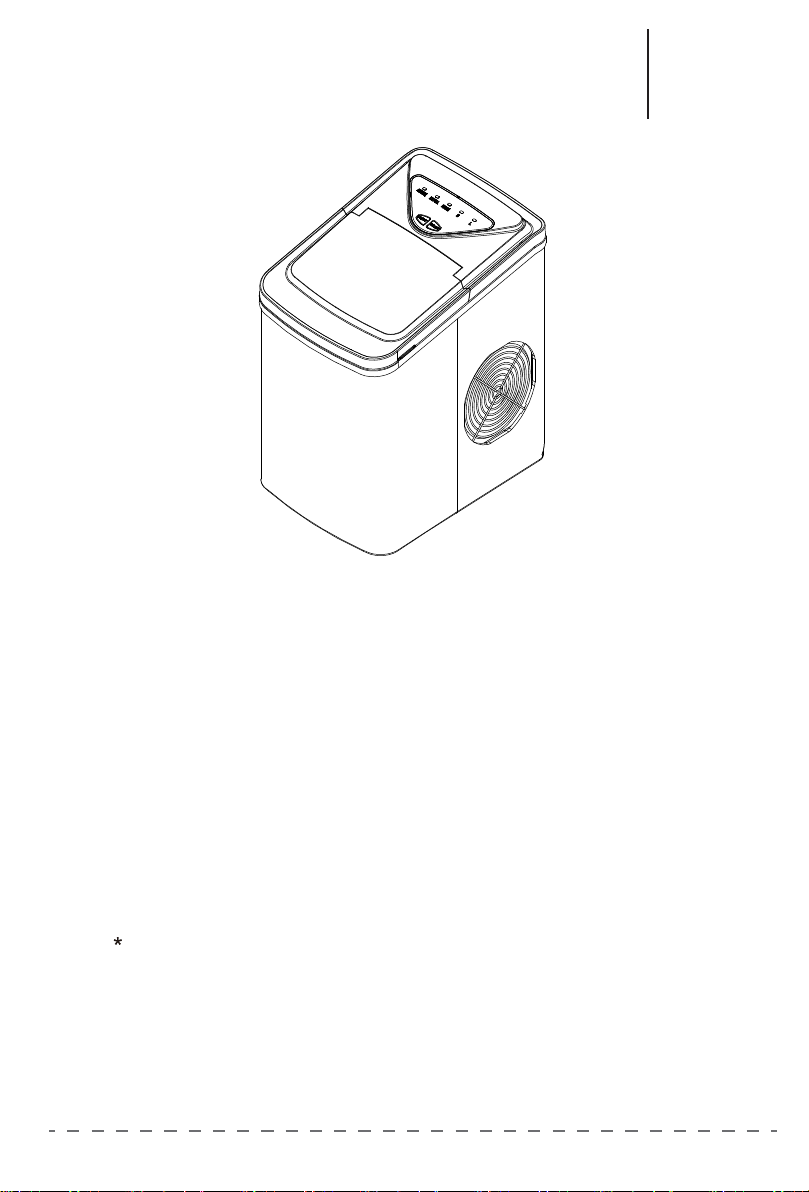
IC E M A K E R
12 KGS
26 L B S
USER MANUAL
HZB-12/SB
TABLE OF CONTENTS
IMPORTANT SAFEGUARDS........................................................
SAFETY INSTRUCTIONS.............................................................
DESCRIPTION OF PARTS............................................................
BEFORE FIRST USE.....................................................................
USE YOUR ICE MAKER................................................................
CARE AND CLEANING..................................................................
TROUBLESHOOTING GUIDE....................................................
1
2
3
4
4
6
6-7
IMPORTANT SAFEGUARDS
When using electrical appliances, basic safety precautions
should always be followed including the following
Read all instructions.
Do not touch hot surfaces. Use handles or knobs.
To protect against electrical hazards, do not immerse cord, plugs, or the
appliance in water or other liquid.
This appliance is not intended for use by persons (including children) with
reduced physical, sensory or mental capabilities or lack of experience and
knowledge, unless they have been given supervision or instruction concerning
the use of the appliance by a person responsible for their safety.
Close supervision is necessary when any appliance is used by or near children.
Children should be supervised to ensure that they do not play with the
appliance.
Unplug from outlet when not in use and before cleaning or servicing.
Do not operate any appliance with a damaged cord or plug or after the appliance
malfunctions, or is dropped or damaged in any manner. Return appliance to the
manufacturer for examination, repair or electrical or mechanical adjustment. All
servicing should be performed by an authorized service representative.
Do not use outdoors.
Do not let cord hang over edge of table or counter, or touch hot surfaces. Do not
let the power cord cross over carpeting or other heat insulators. Do not cover the
cord.
Do not place on or near a hot gas or electric burner, or in a heated oven.
Always attach plug to appliance first, then plug cord into the wall outlet. To
disconnect, turn any control to ‘OFF’, then remove plug from wall outlet.
Do not use appliance for other than intended use.
Do not leave unit unattended while in use.
Plug the Ice Maker into an exclusive grounded 3-prong outlet. No other
appliance should be plugged into the same outlet. Be sure that the plug is fully
inserted into the receptacle.
If the Ice Maker is brought in from outside in wintertime, do not use for a few
hours, allowing the unit to warm up to the room temperature before operating.
Do not clean your Ice Maker with any flammable fluids. The fumes may create a
fire hazard or explosion.
WARNING: Do not touch the Evaporator when the Ice Maker is making ice,
it may burn your skin.
1
DANGER – Risk of fire or explosion. Flammable refrigerant used. Do not use
mechanical devices to defrost ice maker. Do not puncture refrigerant tubing.
DANGER – Risk of fire or explosion. Flammable refrigerant used. To be repaired
only by trained service personnel. Do not puncture refrigerant tubing.
CAUTION – Risk of fire or explosion. Flammable refrigerant used. Consult repair
manual/owner’s guide before attempting to install or service this product. All
safety precautions must be followed.

SAFETY INSTRUCTIONS
This appliance must be plugged into at least a 15 AMP 110-115 VOLT 60 Hz
GROUNDED OUTLET. This appliance must be grounded. It is equipped with a
3-wire cord having a grounding plug. The plug must be plugged into an outlet that
is properly installed and grounded.
Avoid the use of an extension cord because it may overheat and cause a risk of
fire. However, if it is necessary to use an extension cord:
A. Use only 3-wire extension cords with 3-blade grounding plug.
B. The marked rating of an extension cord must be be equal to or greater than the
rating of this appliance.
C. It should be positioned such that it does not drape over the counter or tabletop
where it can be pulled on by children intentionally.
Attempting any maintenance or cleaning:
To minimize the possibility of electric shock, unplug this appliance from the power
suply or disconnect at the household distribution panel by removing the fuse or
switching off the circuit breaker before attempting any maintenance or cleaning.
2
SAVE THESE INSTRUCTIONS
HOUSEHOLD USE ONLY
NOTE:
Pressing the Power ON/OFF button to an off position does
NOT disconnect the appliance from the power supply.
WARNING!
Improper use of grounded wire can result in the risk of electric shock.
Consult a physician if necessary. Do not attempt to defeat this safety
feature by modifying the plug.
CAUTION – Risk of fire or explosion. Dispose of property in accordance with
federal or local regulations. Flammable refrigerant used .
CAUTION – Risk of fire or explosion due to puncture of refrigerant tubing;follow
handling instructions carefully. Flammable refrigerant used.
The ice maker should be installed in accordance with the safety standard for
refrigeration systems, ashrae15. The ice maker shall not be installed in corridors
or hallways of public buildings.
If the unit is with problem need to be maintained, that replacing with like
components and that servicing shall be done by factory authorized service
personnel, so as to minimize the risk of possible ignition due to incorrect parts or
improper service.
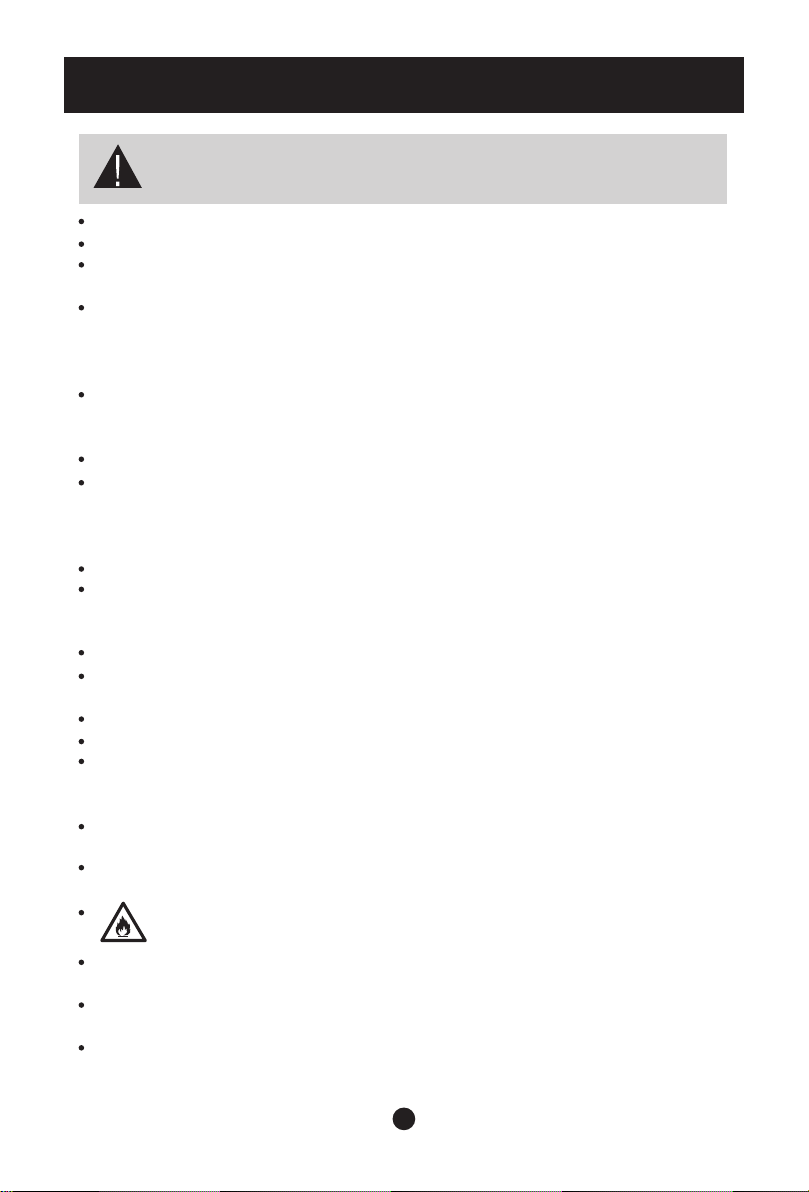
DESCRIPTION OF PARTS
3
General instruction
1. Ice scoop.
2. Ice full sensor
3. Ice basket
4. Top cover with transparent window
5. Air exhausting
6. Water drain cap: at front btm side of the unit.
7.
MAXIMUM WATER LEVEL: ▲
Remove the ice basket, you can see the water level mark.
Position of control panel & function
Control Panel: Easy to use, visible functions touch display setting.
A. Selected ice size di splaying: Small and Large.
B. Power indicator
C. Ice Full indicator
D .Water shortage indicator
E. Button to turn on/off the unit.
F. Button to select ice cube size.

USE YOUR ICE MAKER
Ensure that the Drain Plug underneath the front of the unit is closed and
the Water Tube Screen is in place.
Plug the Ice Maker into the wall outlet and the green power indicator light
will blink (approximately every 5 seconds).
Open the Cover and remove the Ice Basket.
Fill the Water Reservoir. NOTE: Do not fill above the MAX water level
mark at the back of the Water Reservoir.
Replace the Ice Basket and close the Cover.
1.
2.
3.
4.
5.
BEFORE FIRST USE
This portable icemaker uses a fully automatic control system, with an advanced
microcomputer for easy and convenient ice making. Making ice is simple and
fast. Just add water, plug into an outlet, and press the ON button. You can
select one of the two ice cube sizes with the touch of a button. When first
turning on the unit or during icemaking cycles, the compressor will stay idle for
3 minutes, while energizing.
There are warning indicators that alert you to fill water when the reservoir is
empty and to remove ice when the storage basket is full. The icemaker also
has built-in safeguards that can limit accidental damage, automatically shutting
down the system when necessary.
The incline angle of the icemaker cabinet should not exceed 45˚ during
transportation or use. Do not turn the icemaker upside down.
Doing so could cause the compressor or refrigerating system to operate
incorrectly. When the icemaker is moved or transported, please allow time for
the fluids in the compressor to settle. Before using the icemaker for the first
time, please wait 2 hours after the unit has been leveled and positioned in its
proper place.
Please ensure the icemaker is level and on a stable table or platform
to avoid malfunction.
The machine must be placed on a dry and level surface with sufficient
ventilation, far from heat sources such as ovens, heaters and corrosive gases.
Leave an 8-inch clearance on all sides of the icemaker for proper ventilation.
Do not fill the water reservoir with hot water. This may damage the icemaker.
It is best to fill the water reservoir with water of room temperature or lower.
1.
2.
3.
4.
Please read carefully.
4

Press the Power Button and the green indicator light will remain on.
To change between either the small or large ice size, press the Select
Button until the light is lit up beside the desired ice size.
The first ice making cycle will last approximately 8 - 13 minutes
depending on the ice size that is selected. The ice making cycle starts
with water being pumped into the Water Tray situated below the
Evaporator Fingers. Over the next 8 - 13 minutes ice forms on the
Evaporator Fingers. Once this has completed, the Ice Tray will tilt
backwards and the remaining water in the Ice Tray is drained back into the
Water Reservoir. The ice cubes are then dropped from the Evaporator
Fingers and pushed forward into the Ice Basket by the Ice Shovel. The Ice
Tray will automatically move back into position under the Evaporator
Fingers and start the next cycle.
The 'Ice Full' LED light will light up when the ice basket is full and the Ice
Maker will stop the ice making cycle automatically. Gently remove the ice
from the Ice Basket with the Ice Scoop. Once the Ice Basket has been
emptied and the Cover closed, the Ice Maker will restart its ice making
function automatically. IMPORTANT: Wait 3 minutes then press the
Power Button to restart the ice making function.
The ‘Add Water’ LED light will light up when there is no more water in
the Water Reservoir and the ice making cycle will stop automatically. Press
the Power Button once (the Power Button will flash every 5 seconds).
Remove the Ice Basket and add water to the Water Reservoir.
NOTE: Do not fill above the MAX water level mark at the back of the
Water Reservoir. Replace the Ice Basket and close the Cover.
IMPORTANT: Wait 3 minutes then press the Power Button to restart the
ice making function.
When you have finished making ice, transfer the ice to a freezer.
NOTE: The ice will last in the Ice Maker for up to a 18 hour period,
depending on the ambiant temperature. Stop the ice making cycle by
pressing the Power Button. Unplug the unit from the wall outlet.
Open the Cover and allow the Ice Maker to reach room temperature
and follow the directions in the Care and Cleaning section.
6.
7.
8.
9.
10.
5
Stop the Ice Making Cycle by pressing the Power Button and the green LED
light will go out. Unplug the Ice Maker from the wall outlet. Allow the unit
to warm up to room temperature.
If the Water Tray is not in the vertical position behind the Evaporator
Fingers, gently push the Water Tray back so that all water drains into the
Water Reservoir.
Open the Drain Plug to drain out excess water.
Remove the Ice Basket.
Remove the Water Tube Screen and rinse under running water.
Clean the Ice Maker interior with a soft cloth dampened in warm water and
vinegar. Rinse with a clean damp cloth.
Replace the Drain Plug and the Water Tube Screen. Wash the Ice Basket
and Ice Scoop in warm soapy water. Rinse and dry.
Clean the exterior of the Ice Maker with a soft damp cloth. Use a mild
dishwashing soap, if necessary.
IMPORTANT NOTE: Do not clean the Evaporator Fingers.
1.
2.
3.
4.
5.
6.
7.
8.
9.
CARE AND CLEANING
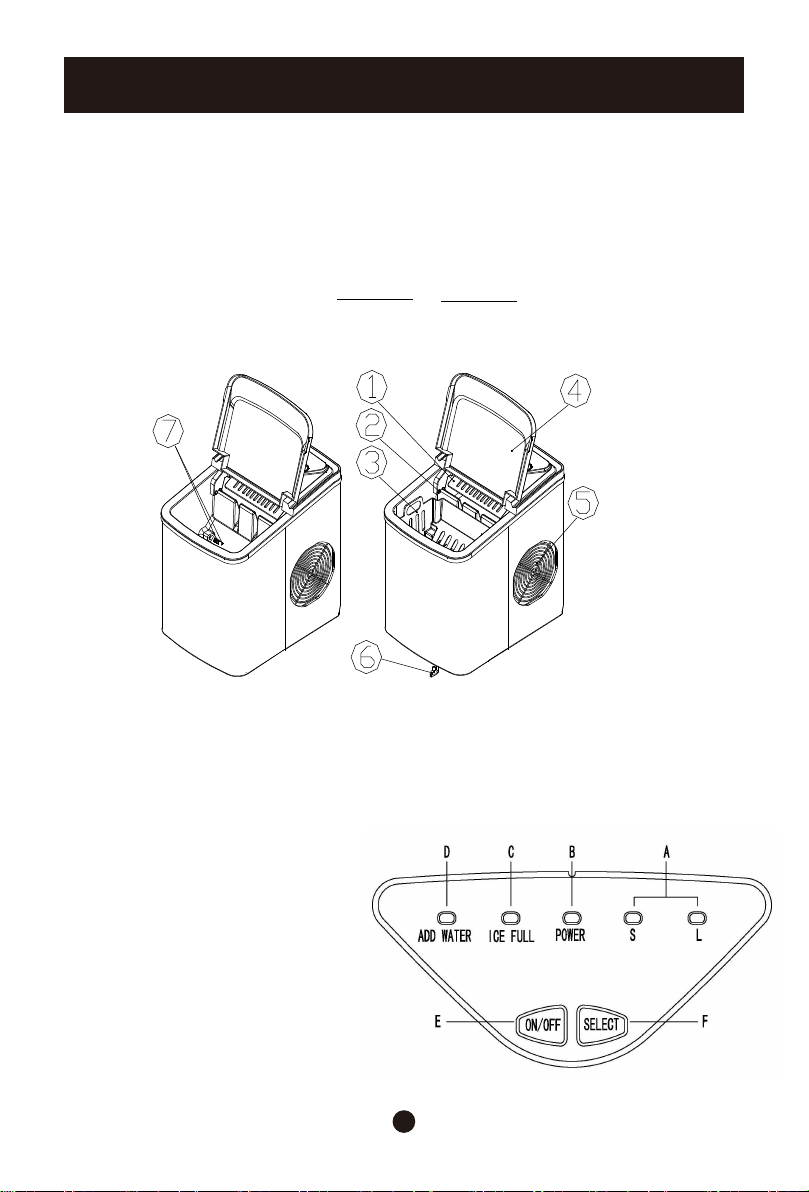
TROUBLESHOOTING GUIDE
PROBLEM POSSIBLE CAUSES SOLUTION
“ADD WATER”
indicator light turns on.
Low water level or lack
of water.
Add water and the
icemaker will operate
automatically.
Check that the plug is
plugged into the electrical
outlet.
Disconnection of plug.There is no indication
on the control panel.
6
“Ice Full” and “Add Water”
indicators light up
simultaneously.
The “Ice Full” indicator
light is on.
The unit does not
operate.
Ice blockage. No ice is
being made.
The icemaking cycle
seems normal but no ice
is produced.
There is refrigerant
leakage. A pipe in the
cooling system is blocked.
Consult a qualified
technician or call
Customer Service.
Making ice takes too
much time.
Turn off the machine.
Start the machine after
the ice block melts. Or
change the size selector
to small ice cubes.
The ice basket is full.
Power is not being
supplied to the unit.
The ambient temperature
or the water temperature
is too high.
Remove ice from the ice
storage basket to make
more.
Plug the unit into a
standard 110/120 Volt,
60 Hertz power source.
Please run the icemaker
in temperatures below
90°F and/or pour colder
water into the water
reservoir.
Electrical Power Surge
or There may be air in
the lines or the lines are
blocked. The water tank
cannot detect water level.
Turn off the icemaker, pull
out the electric plug, fill it
with water if needed,
replace the plug and then
restart the unit. or
Inspect relative parts;
remove the drain cap on
the back of the unit and
drain out a small amount
of water. Replace the
drain cap and attempt to
use the unit again.
or
Check if ice is blocking the
ice pusher. Turn off the
unit; let the ice melt and
restart.
7