
User Manual
Nebula Cosmos Max

01
English
20
Deutsch
36
Español
52
Français
68
Italiano
85
Nederlands
102
Português
119
日本語
135
한국어
151
لعَرَبِية

EN
01
Table of Contents
Safety Instructions 02
What’s Included 04
Overview 04
Getting Started 06
Nebula App 09
Settings 10
Using Nebula Cosmos Max 12
Specifications 15
Troubleshooting 16
Notice 17
Trademarks 19
Warranty 19

EN
02
Safety Instructions
Read all instructions before you use this device. Do not make any changes or create
settings that are not described in this manual. If physical injury, loss of data or damage
is caused by failure to follow instructions, the warranty does not apply.
Setup
•
To reduce the risk of fire and / or electric shock, do not expose the device to rain
or moisture. Objects filled with liquids, such as vases, should not be placed on this
device.
•
Do not place this device on soft surfaces such as tablecloths or carpets, otherwise
the device could be a fire hazard.
•
Do not place this device in areas susceptible to excessive dust and dirt or near any
appliance generating a strong magnetic field.
•
To prevent overheating, do not block or clog the ventilation openings.
•
Never place this device in a confined space. Always leave enough space around
this device for ventilation.
•
Protect this device from overexposure to direct sunlight, heat, large temperature
fluctuations and moisture. Avoid extreme temperatures. The suitable operations
and storage temperature for this device and its accessories is 0°F to 95°F/ 0°C to
35°C.
•
When this device is running for a long period of time, the surface may become hot.
Shut it down immediately and unplug the charger. Resume operation after this
device has cooled down.
•
Always handle this device with care. Avoid touching the lens. Do not allow children
to handle the device without supervision.
•
Never place heavy or sharp objects on this device.
•
To avoid electric shock, do not disassemble.
•
Use attachments or accessories specified by the manufacturer only.
•
Avoid extreme vibrations as they may damage the internal components.
•
Possibly hazardous optical radiation emitted from this product, do not stare at
operating lamp. Maybe harmful to the eyes.
Power Supply
•
Use only the provided power adapter.
•
Power off the device before removing the power supply from the socket.
•
Protect the power cord from being walked on or pinched, particularly at plugs,
convenience receptacles, and the point where they exit from this device.
•
Unplug this device if there are lightning storms or when unused for a long period of time.

EN
03
•
Before you make or change any connections, ensure that all devices are
disconnected from the power outlet.
•
Never touch the power cable or the power connector with wet hands.
Hearing Safety
•
To prevent hearing damage, do not listen for extended periods at high volume. Set
the volume to a safe level.
Charging
•
The charger type is an HKA18019095-6C with output voltage / current of DC
19V/9.47A. The charger should be installed near this product and should be easily
accessible.
•
This charger is for indoor use only.
•
When charging, place this device in an environment that has a normal room
temperature (ranges from 5°C to 25°C/ 41°F to 77°F recommended) and good
ventilation.
•
Due to the enclosure material used, this device must only be connected to a USB
interface of version 2.0 or higher.
Cleaning
•
Use a soft, lint-free cloth. Never use liquid, gaseous or easily flammable cleansers
to clean.
•
Do not use any liquid cleaning agents to clean the lens to avoid damaging the
coating film on the lens.
•
Use lens cleaning paper to clean the lens.
Repairs
•
Do not make any repairs to this device yourself. Only have your device repaired by
an authorized service center.
•
Improper maintenance can result in injuries or damage to this device.
•
Refer all servicing to qualified service personnel.
Caution
•
Possibly hazardous optical radiation emitted from this product, do not stare at
operating lamp. Maybe harmful to the eyes.
EN
04
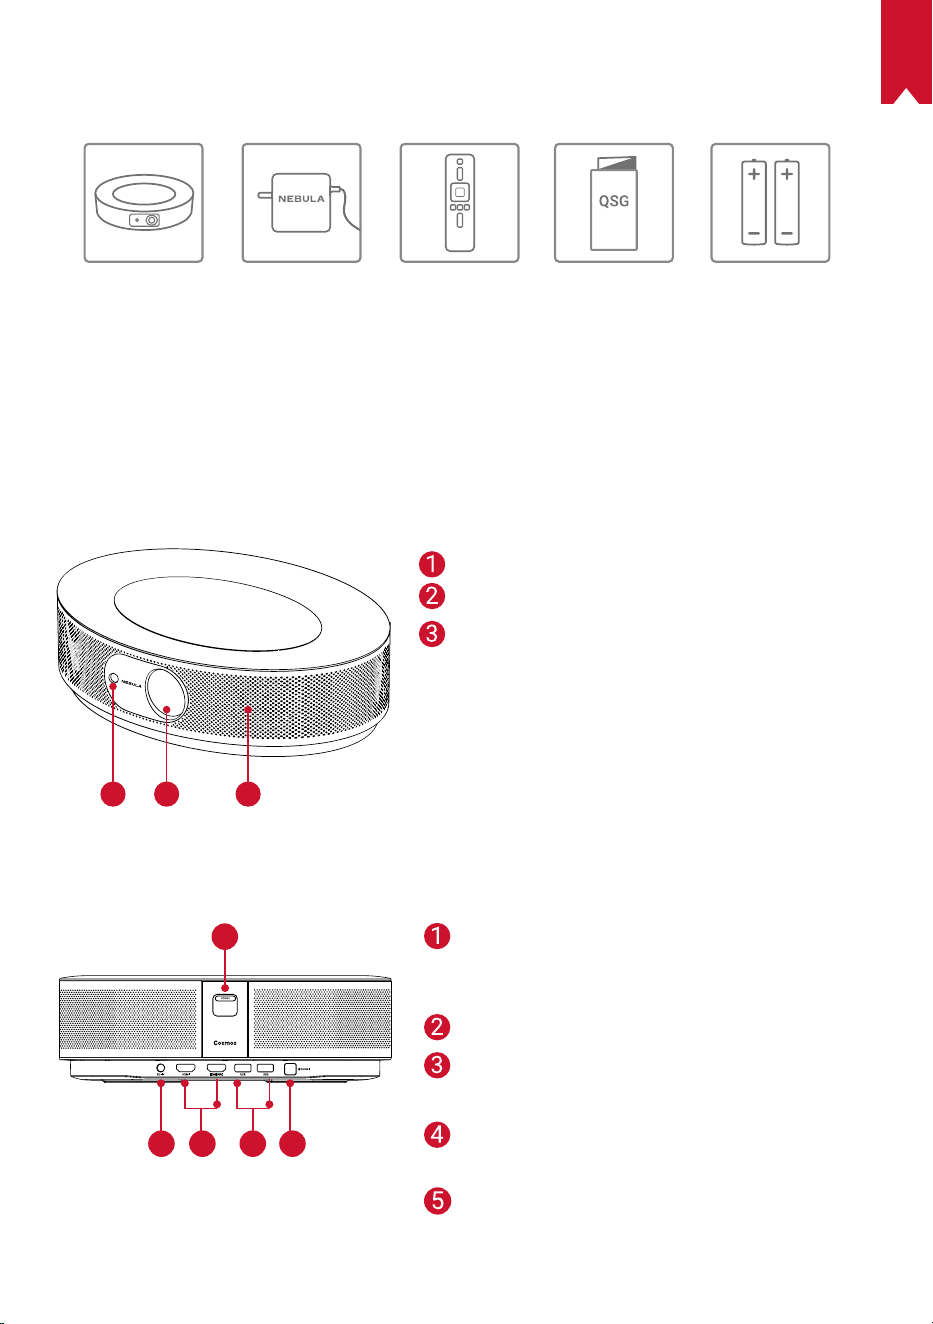
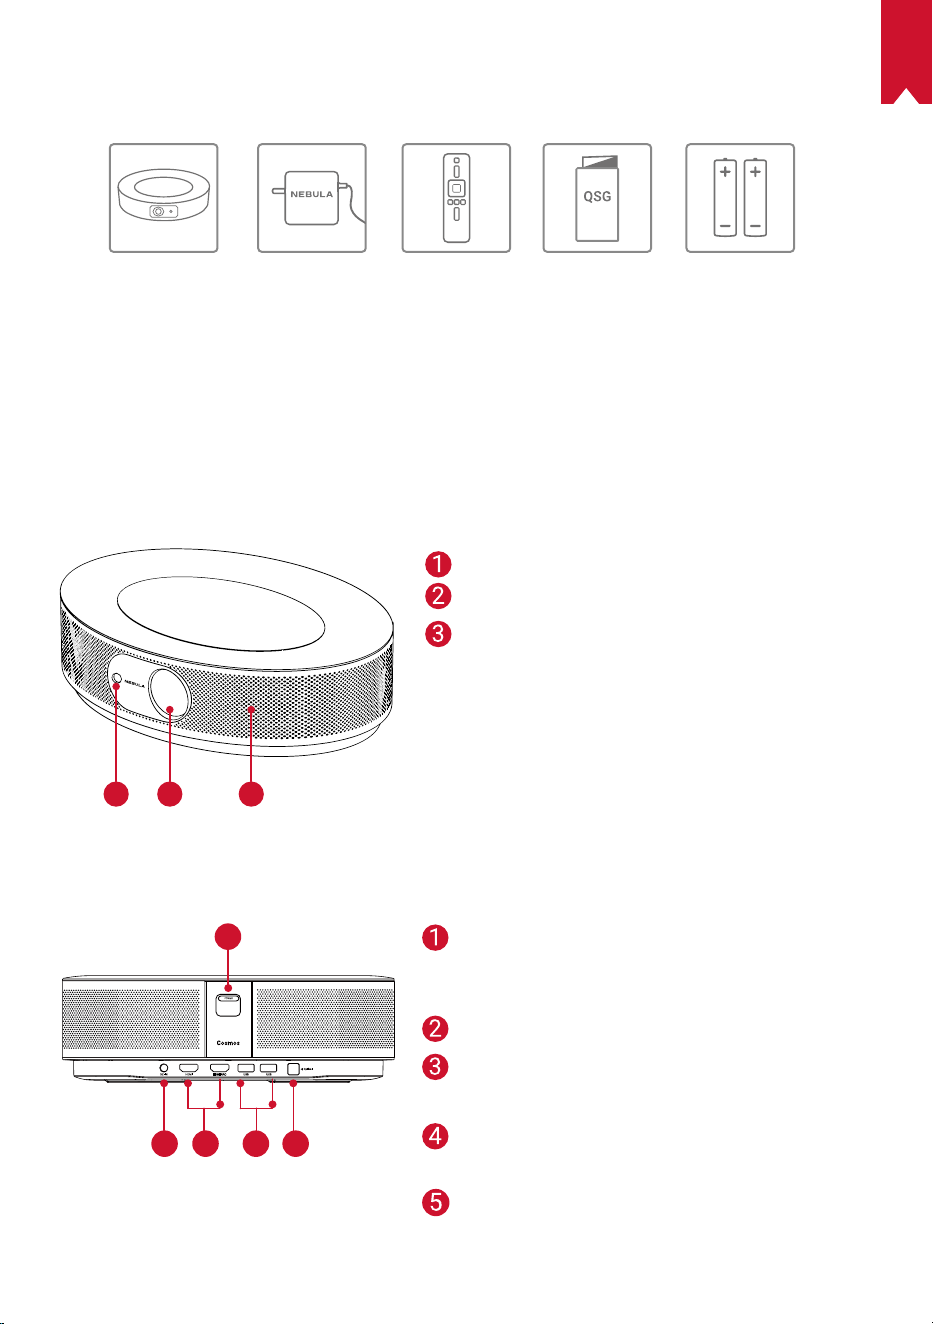
What’s Included
Cosmos Adapter Remote
Control
2 × AAA
Batteries
Quick Start
Guide
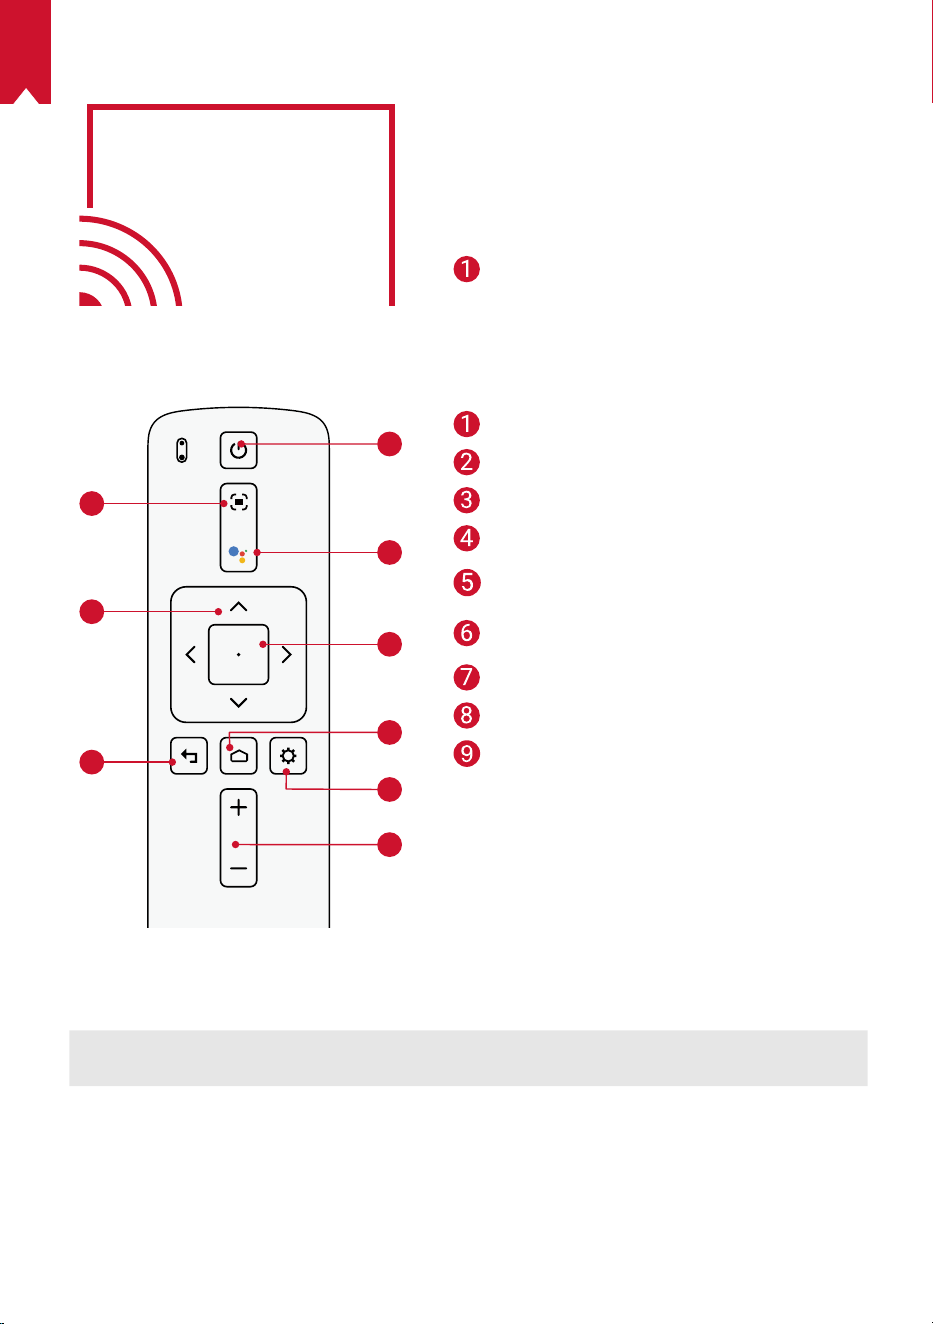
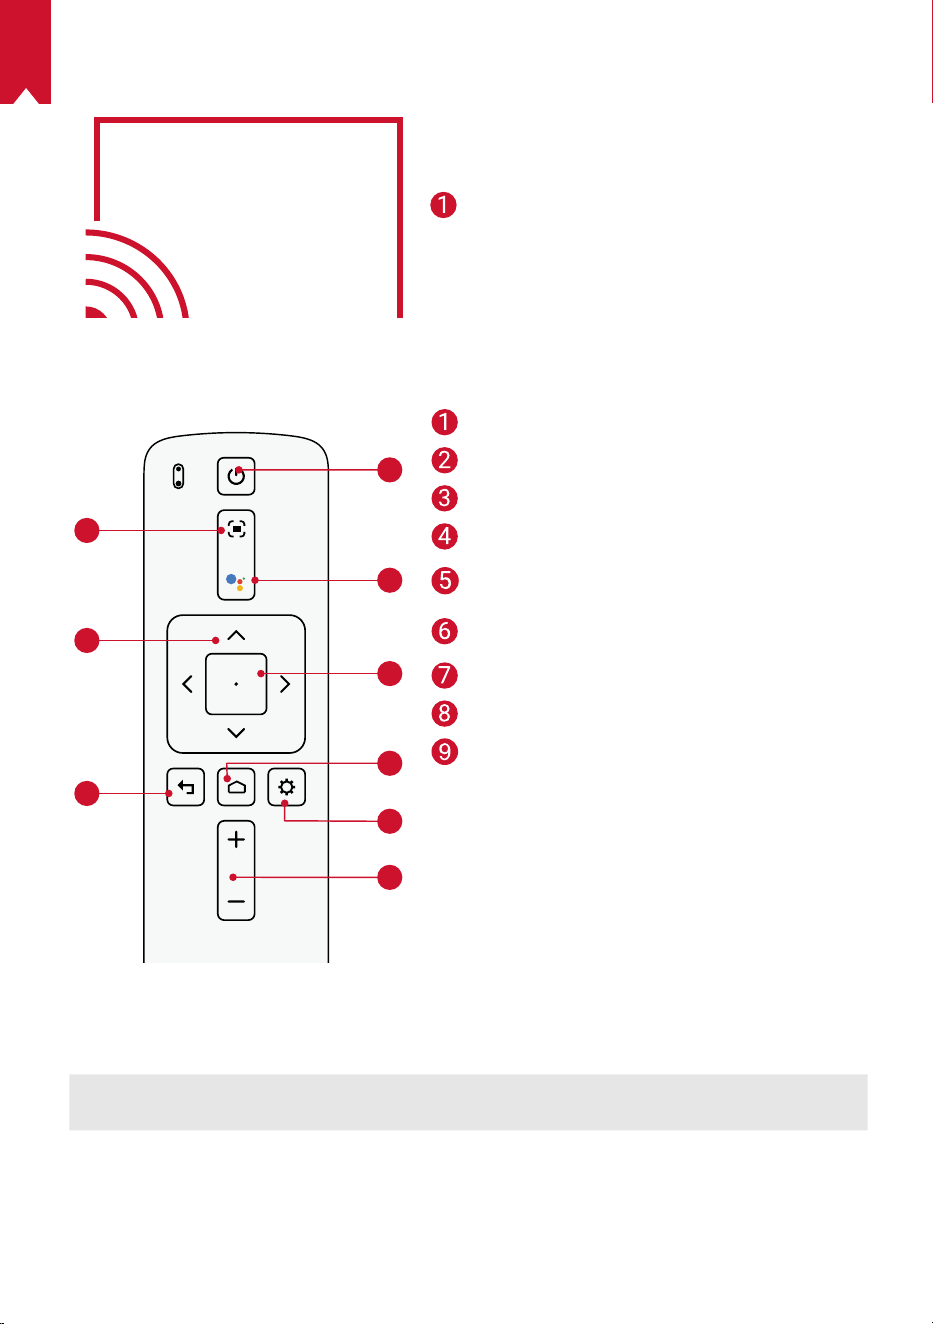
Overview
1.
Front View
1
2 3
2.
Rear View
1
1
2 3 4 5
Camera for Autofocus
Lens
Speaker
Power Button
• Press to power on
• Press and hold to power off
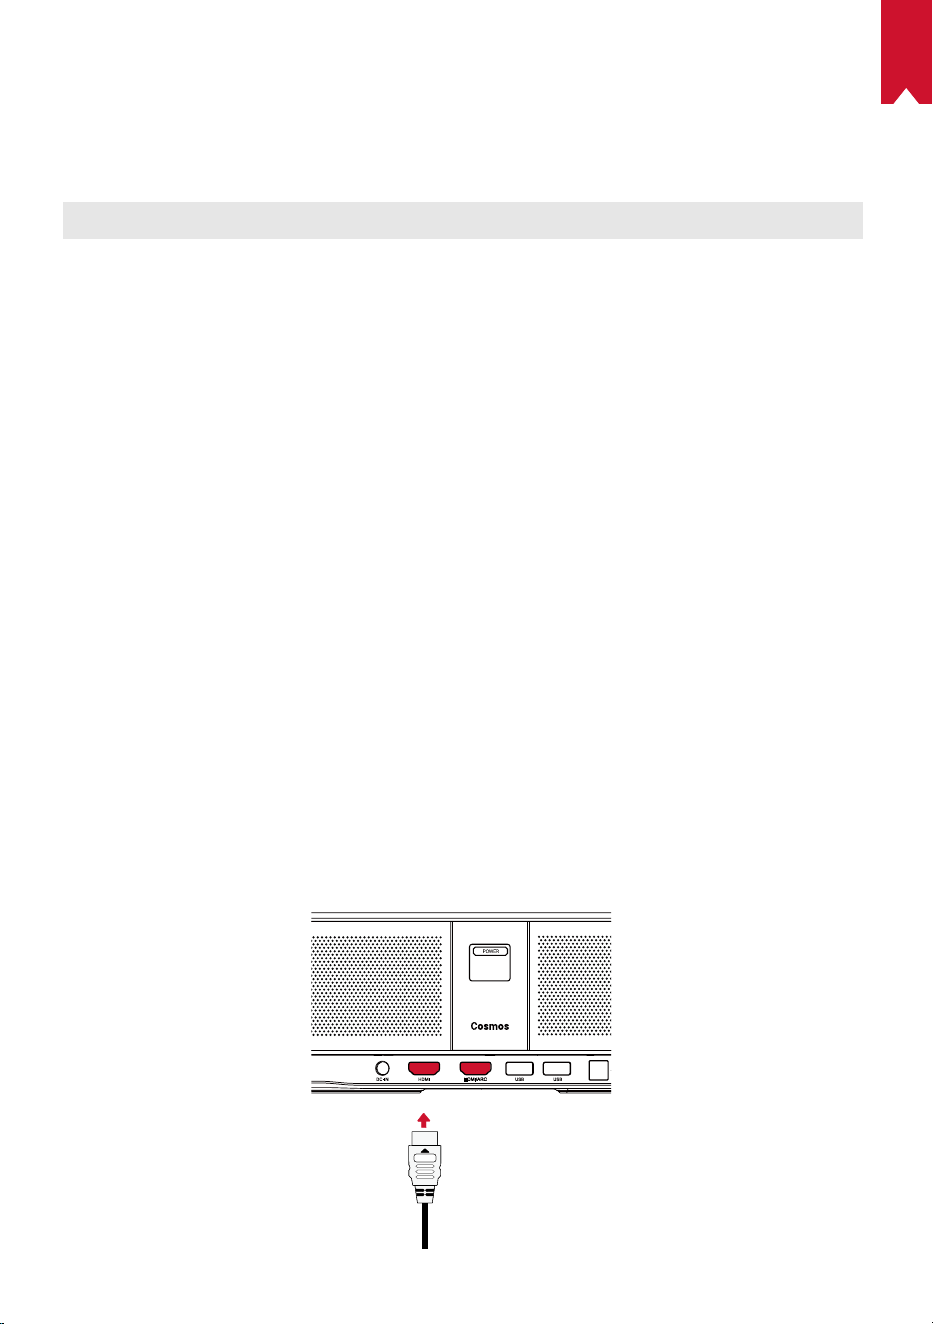
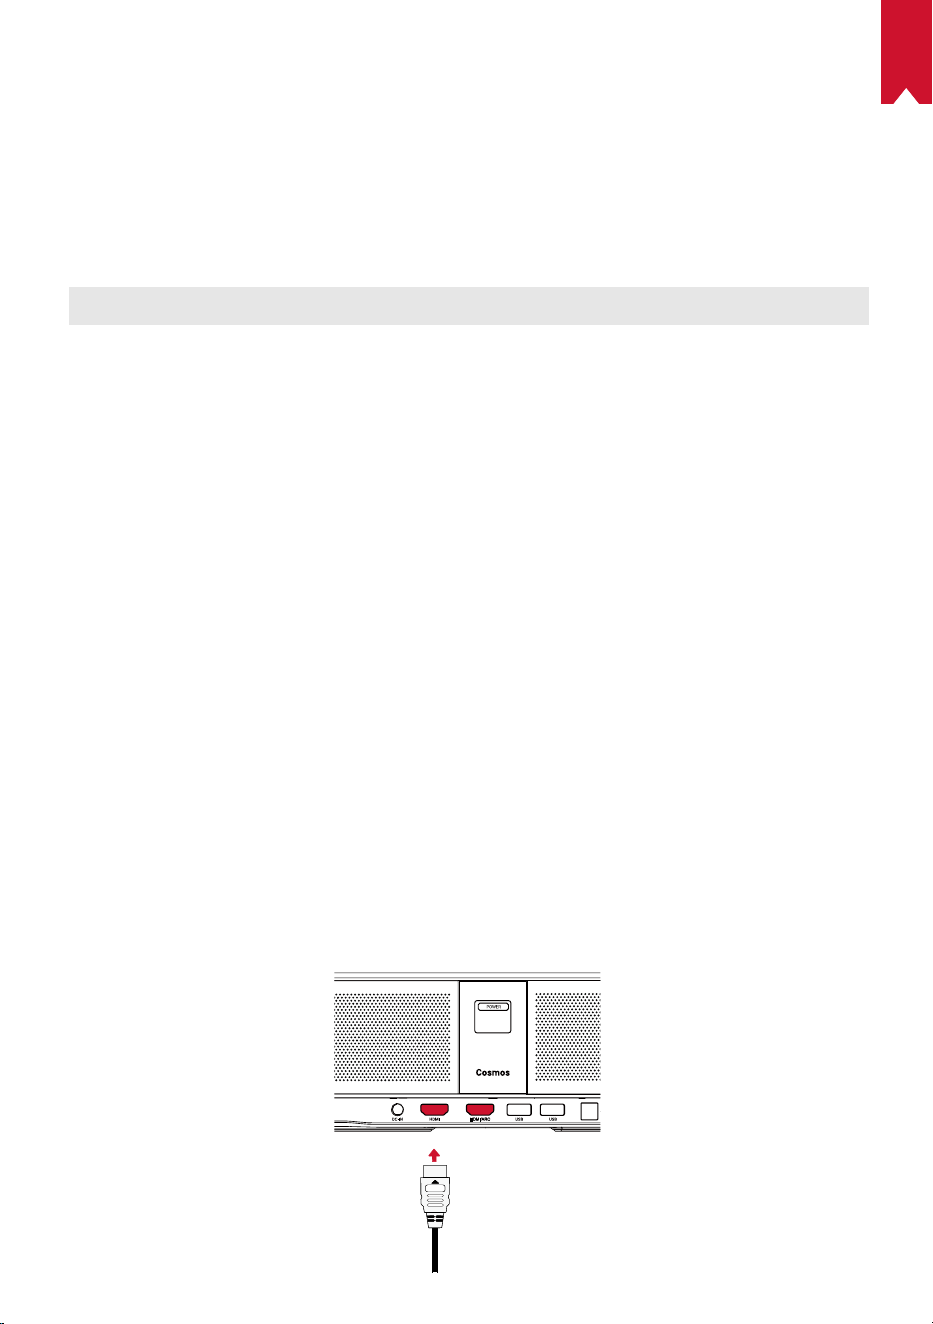
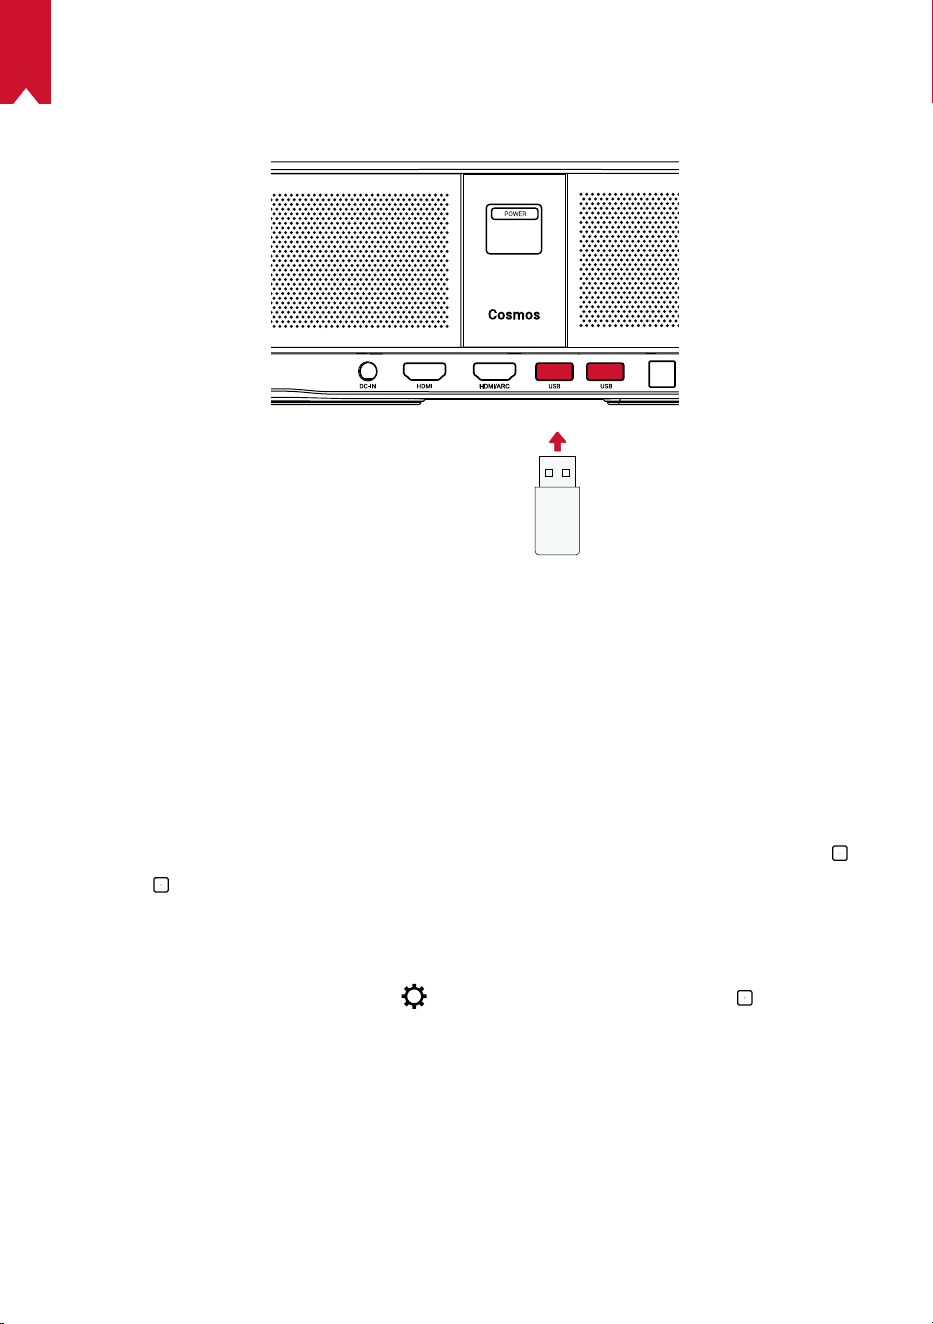
DC Input
HDMI Input Port
• Connect to a playback device
USB-A Port
• Connect to a USB flash drive
Optical Audio Port
• Connect to an audio device using an
optical cable
EN
05
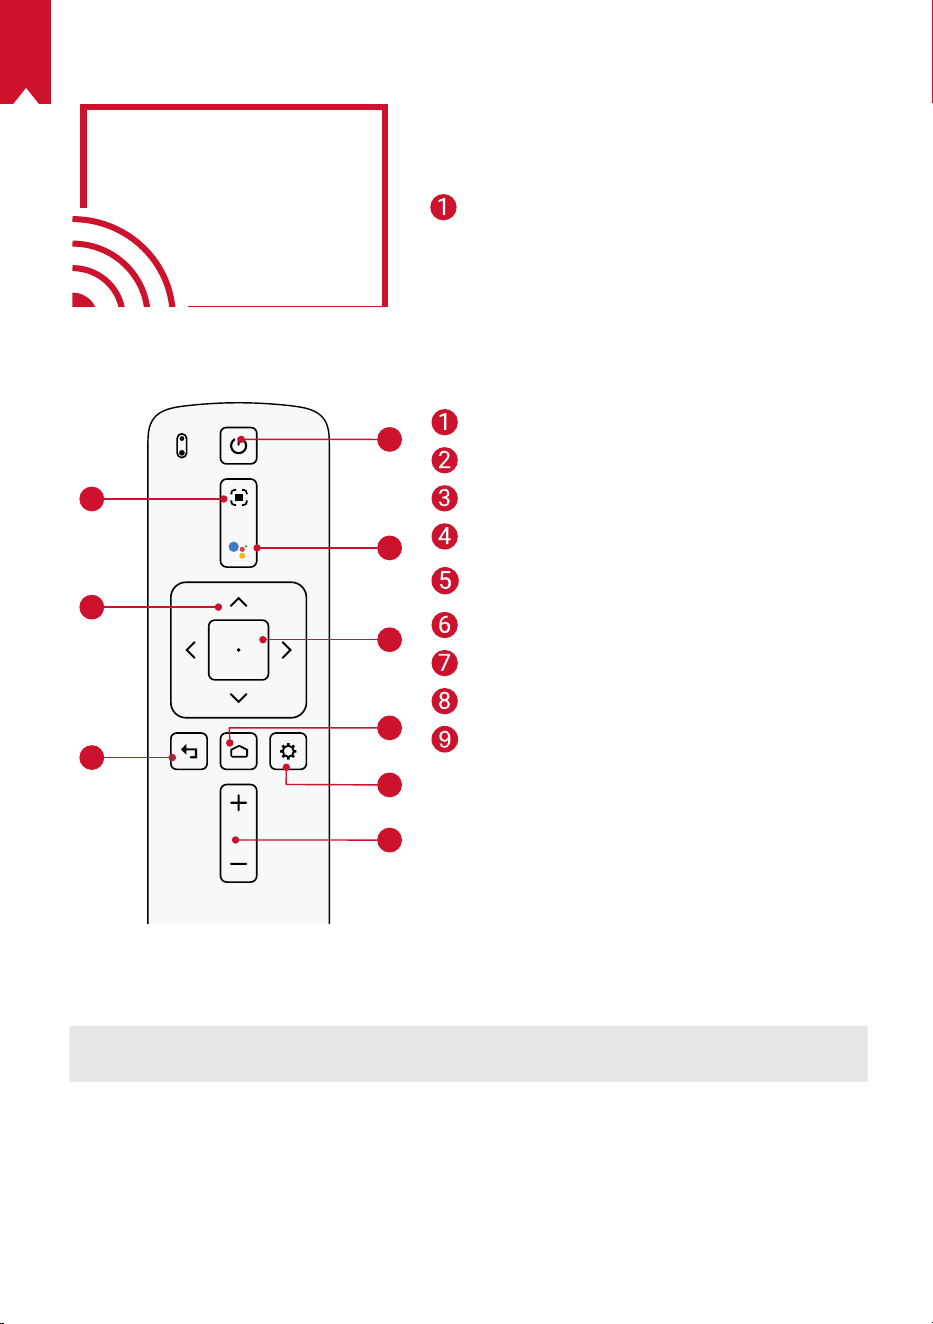
3.
Top View
4.
Bottom View
1
2
3
4
5
6
7
8
9
5.
LED Indicator
LED Status Description
Solid red Operating in projector mode
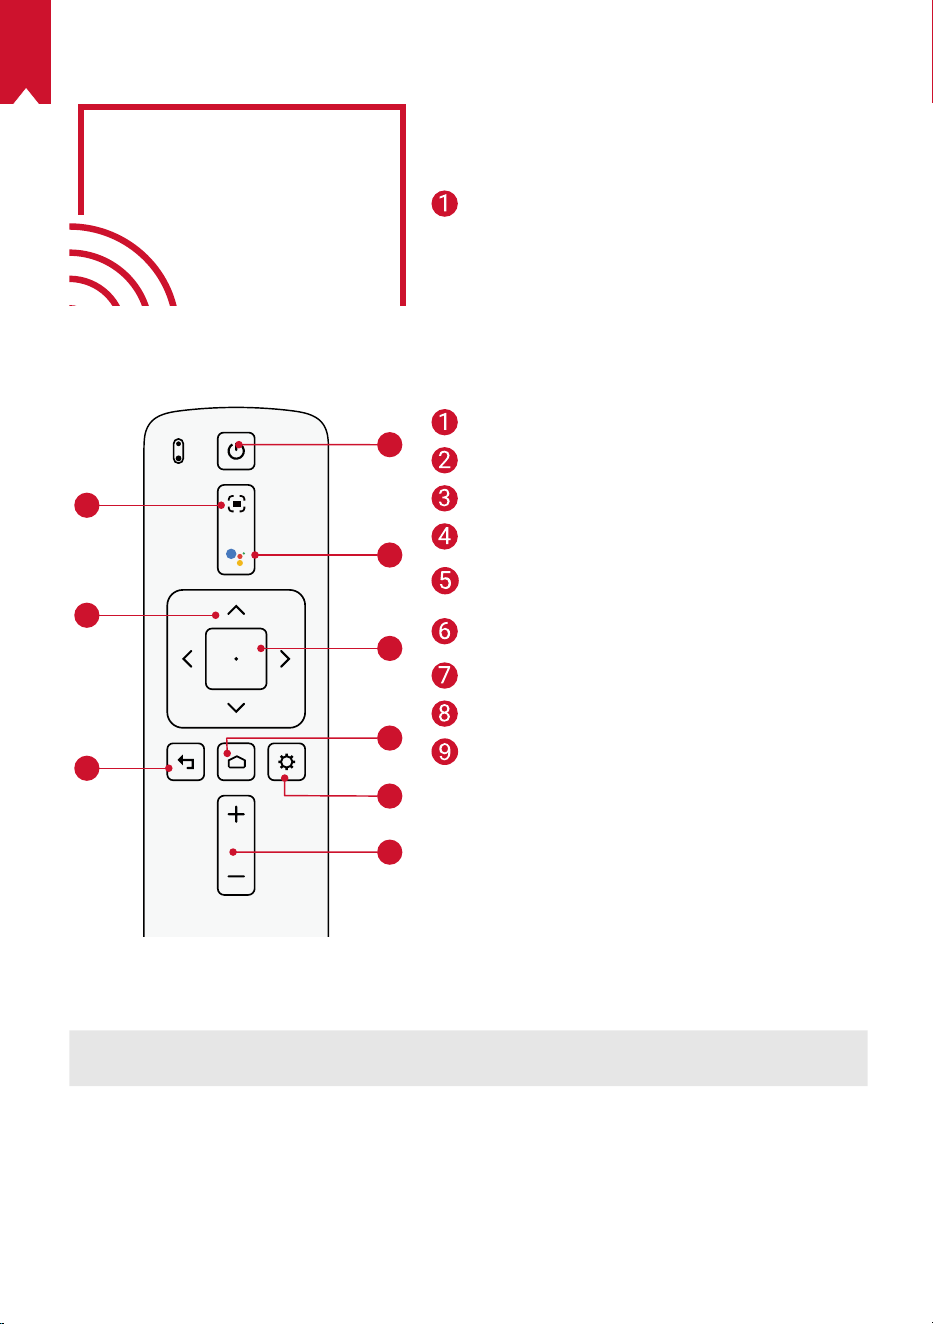
Adjust Focus
Navigation
Back
Power On / Off
Press to activate Google
Assistant
Confirm the selected content
Home
System Settings
Volume Up / Down
Tripod socket
Remote Control: Nebula RC
Model: D0413
EN
06
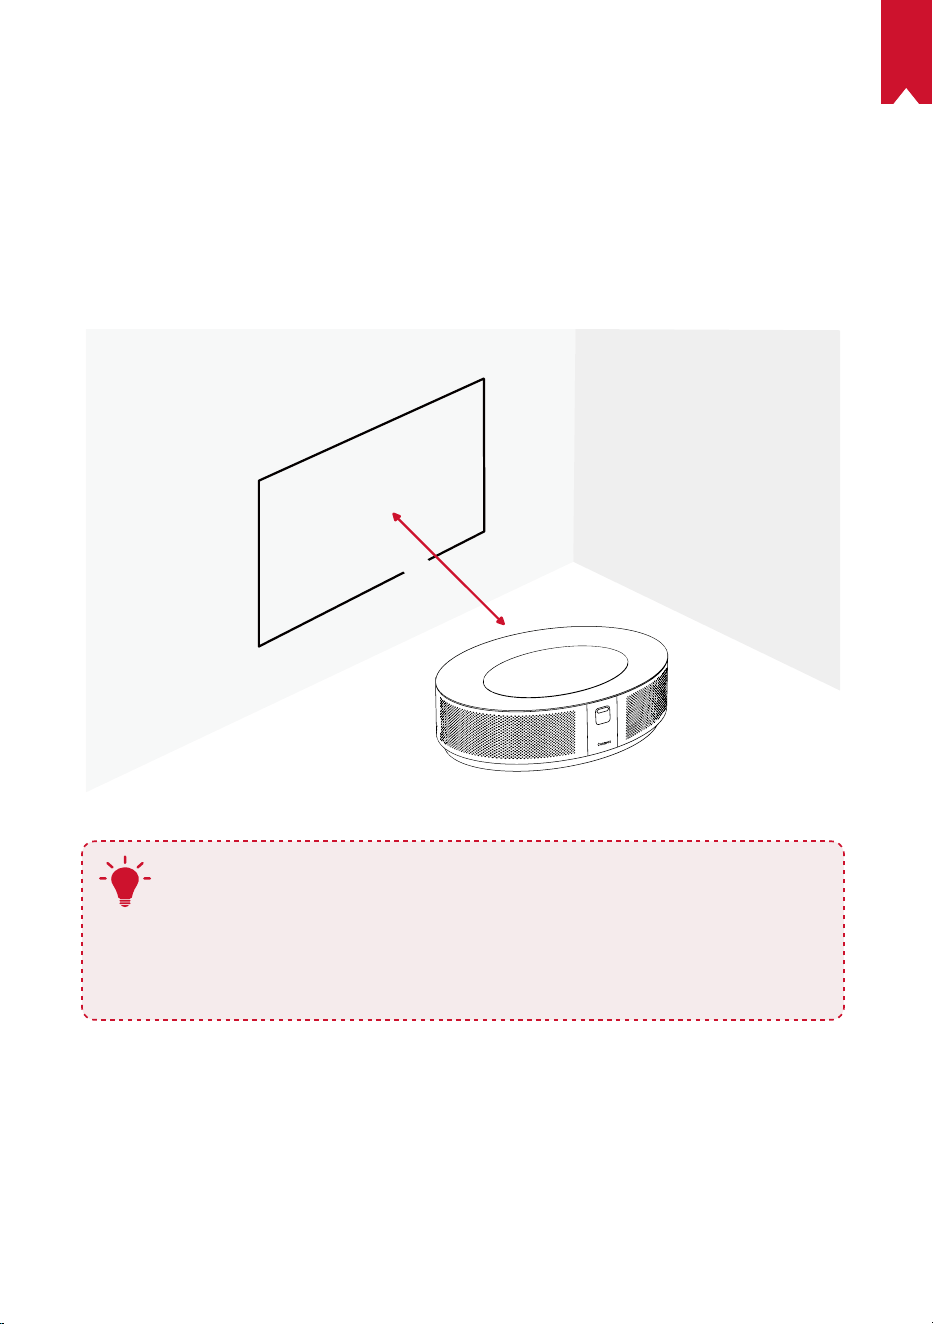
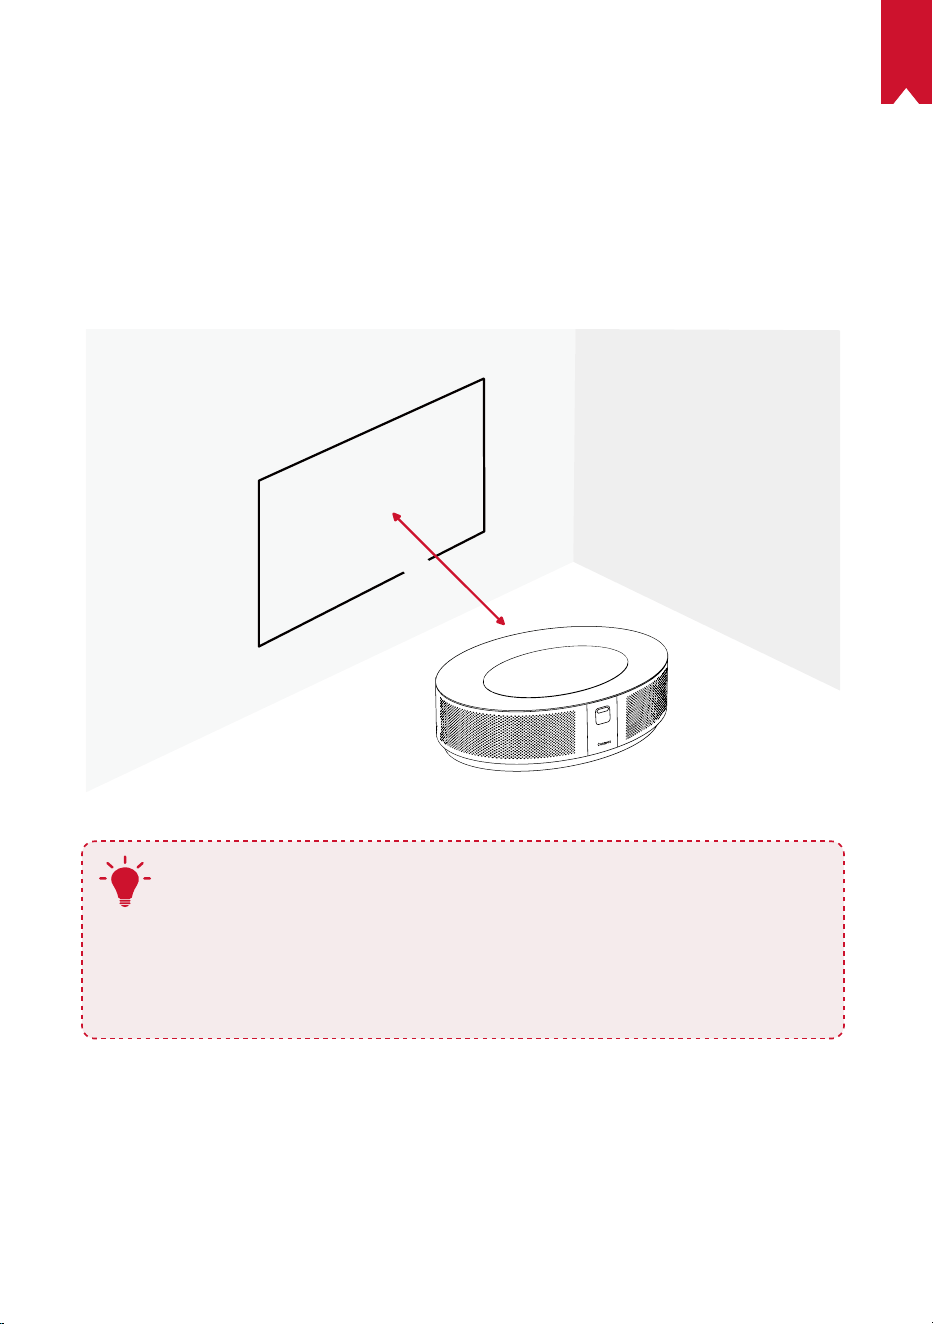
Getting Started
1.
Placement
Place this device on a stable, flat surface, and squarely point it to face the projection
surface. For best results, the projection surface should be white and flat. The distance
between this device and the projection surface must be a minimum of 31 inches (0.8
meters) and a maximum of 157 inches (3.98 meters) to get a projection image from 30
to 150 inches.
31-125 inches
T
•
It is unnecessary to tilt it towards the projection surface. You can
correct the projection image with the built-in keystone correction.
•
The distance between the device and the projection surface
determines the projection image size. For the best result, set the
projector between 63 and 104 inches away.
•
You can also mount your projector on the ceiling.
2.
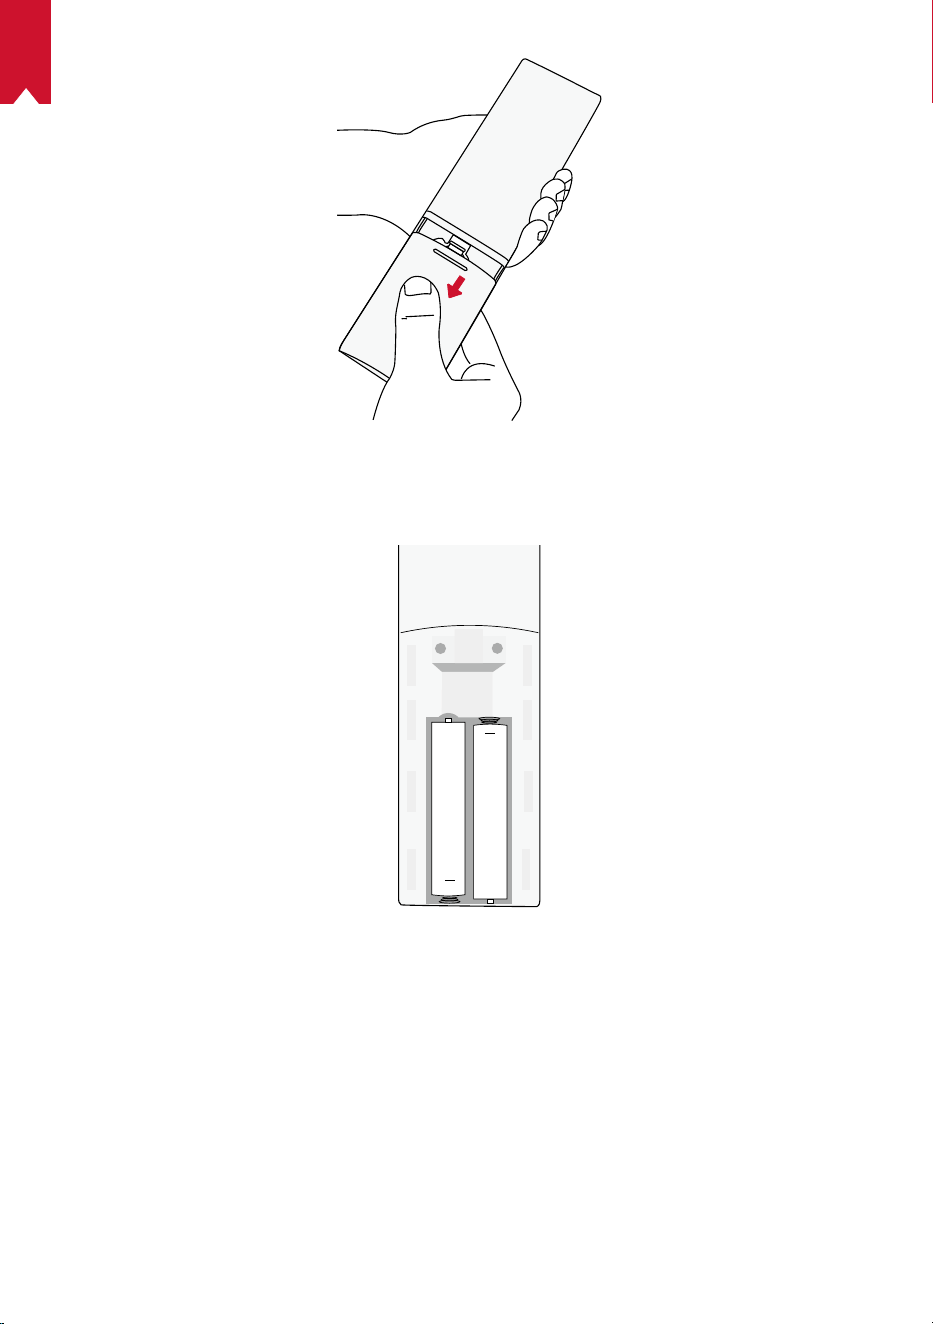
Prepare the Remote Control
The remote control comes with two AAA batteries.
①
For first-time use, slide to open the battery compartment, and install two AAA
batteries.

EN
07
②
To replace the battery, unlock and open the battery compartment, insert a new
battery matching the polarity (+/-) as indicated, and then close and lock the battery
compartment.
+
+
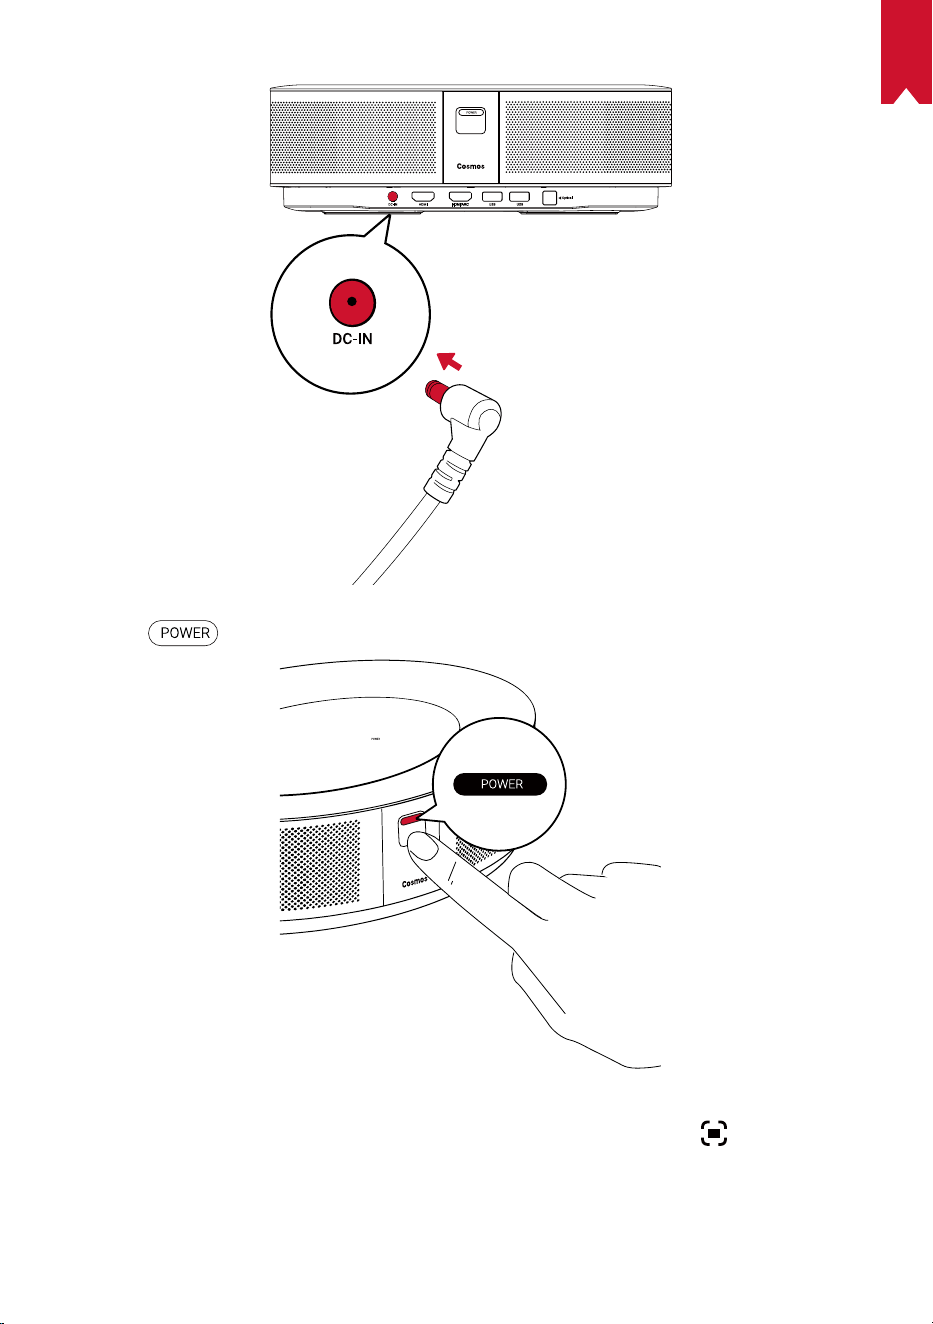
3.
Get Started
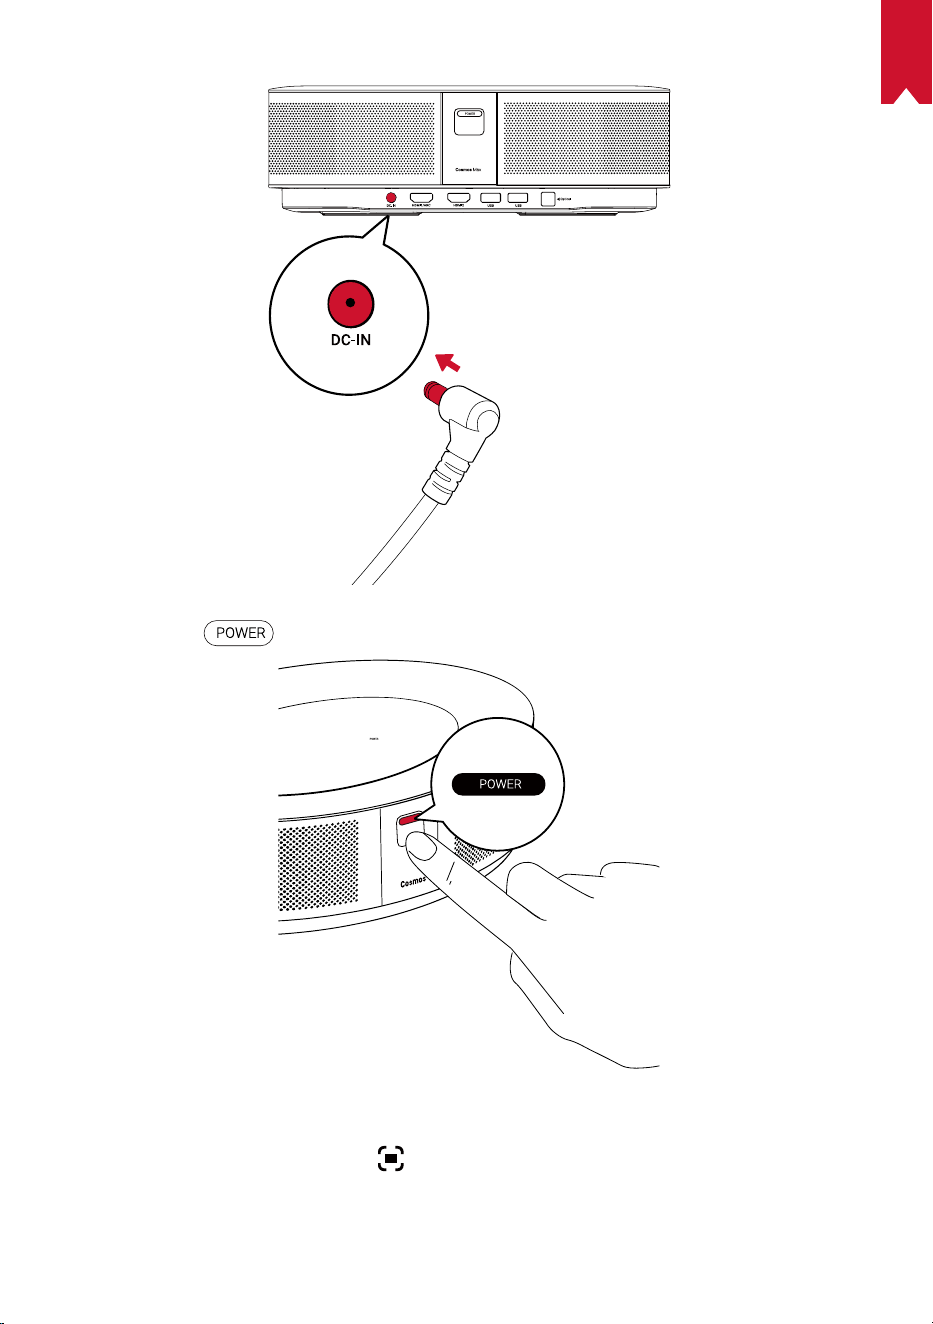
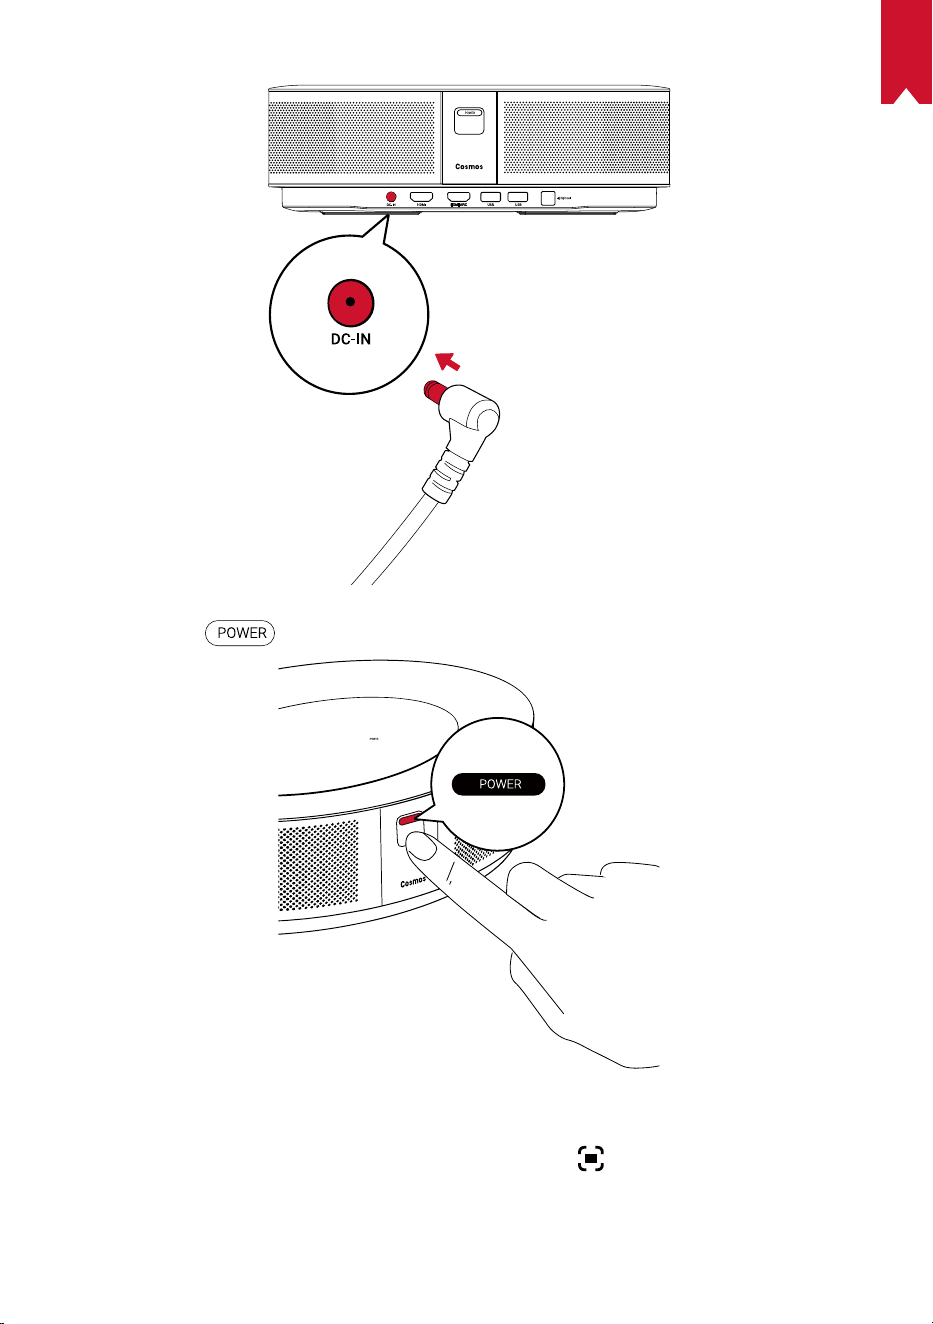
①
Connect Nebula Cosmos Max to a power outlet using the provided power adapter.
EN
08
②
Press
to turn on the projector.
③
Angle the device towards a suitable projection surface or wall.The built-in autofocus
automatically adjusts the protector's image focus. Or you can press
on the remote
control to manually adjust the focus.
④
When using for the first time, follow the on-screen instructions to complete the
basic set-up.

EN
09
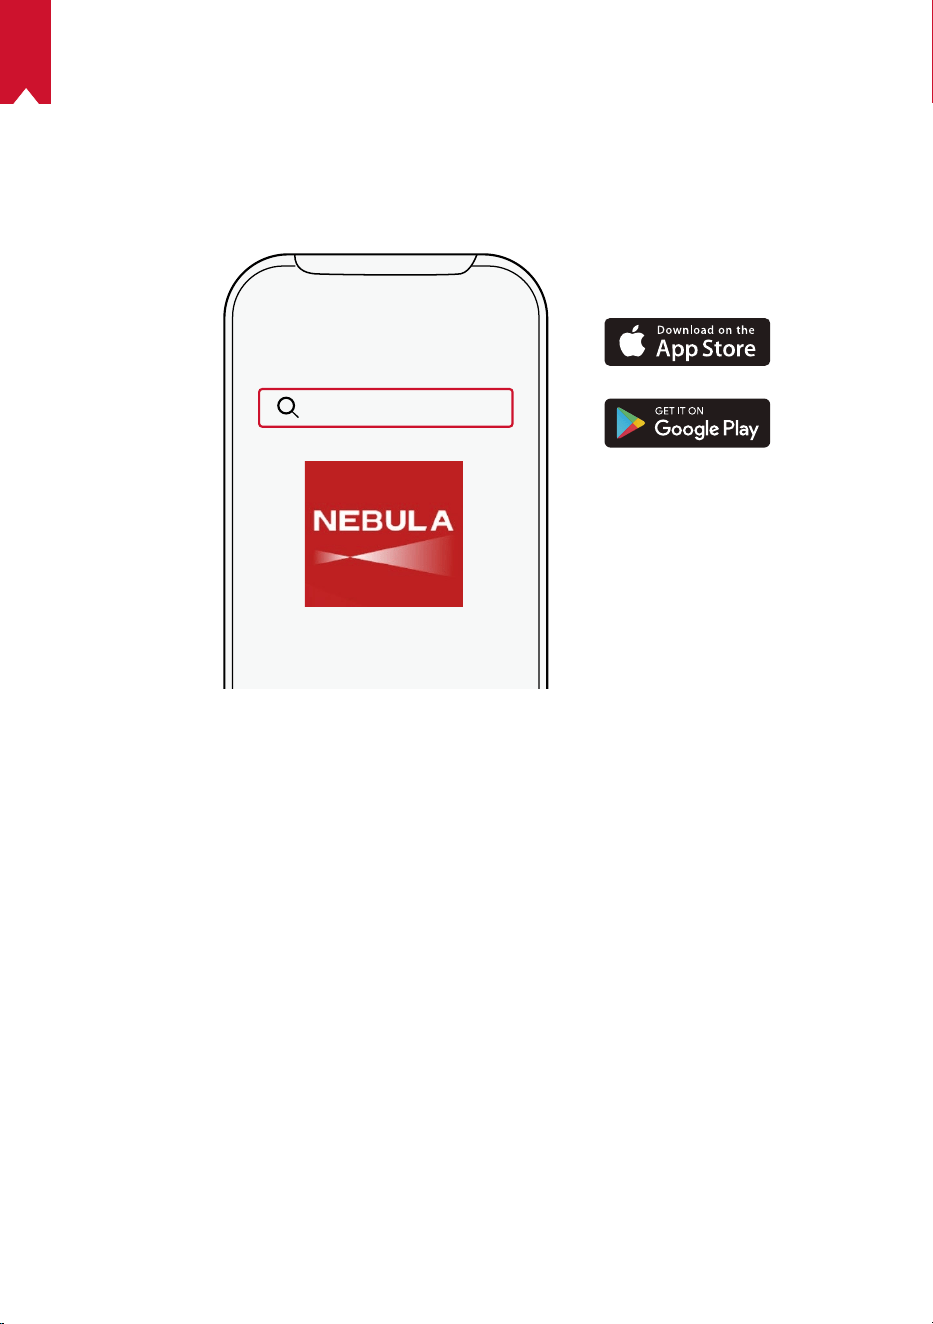
Nebula App
To easily control this device, we recommend downloading When using for the first
time,When using for the first time,
①
Download the Nebula Connect app from the App Store (iOS devices) or Google Play
(Android devices).
Nebula Connect
②
Enable Bluetooth on your smartphone and select [Nebula Cosmos Max ] as the
device to be connected.
③
Open the Nebula Connect app and follow the on-screen instructions to complete
the connection setup.
Powering Nebula Cosmos Max with Android TV™
Follow the on-screen instructions to complete the setup process.
Option 1. Quick setup
Android phone users can follow the instructions to quickly set up Android TV
TM
with
your Android phone.
Option 2. Set up Nebula Cosmos Max
For iOS users, follow the instructions to complete the process.
①
Skip the quick setup process.
②
Connect Nebula Cosmos Max to the network.
③
Sign in with your Google account.
Your Nebula Cosmos Max will be powered by Android TV
TM
after finishing the setup
process.

EN
10
Settings
Go through the setup process when you turn on Nebula Cosmos Max for the first time.
1.
Network
This device can be connected to the Internet via a wireless (Wi-Fi) connection.
①
On the home page, select
> [Network & Internet] and press .
②
Follow the on-screen instructions to complete the network connection.
2.
Audio
Audio format can be changed via the Audio Settings.
①
On the home page, select
> [Audio Settings] and and press .
Auto change digital audio format
Enable or disable automatic digital audio format
change between PCM and RAW
3.
HDMI
Choose HDMI 1/2 as the input source. You can also change CEC settings under this
option.
①
On the home page, select
> [HDMI] and and press .
CEC Settings
Press Enter to change CEC settings
4.
Projector
①
On the home page, select
> [Projector Settings] and press .
[Picture Settings]
Adjust the brightness from 0 to 100%
[Color Temperature]
[
Normal] / [Cool] / [Warm]
[Wall Color]
[White] / [Red] / [Orange] / [Blue] / [Green] / [Cyan] / [Yellow]
/ [Purple]
[Correction correction]
Enable / disable keystone correction.
[Zoom]
[50-100%]
[Autofocus Correction]
Press Enter to Autofocus Correction.
EN
11
[Projector Mode]
[Auto]: Automatically detects whether the projector is inverted.
Automatically switch between these options.
[Front Projection]:
The projector is located in front of the
projection surface.
[Rear Projection]
:
The projector is located behind the
projection surface.
[Inverted Front Projection]:
The projector is hanging from
the ceiling in an upside down position. The image is
rotated by 180 degrees.
[Inverted Rear Projection]:
The projector is hanging
from the ceiling in an upside down position behind the
projection surface. The image is rotated by 180 degrees
and horizontally mirrored.
[Picture Settings]
[Picture Mode]
[Standard] / [Movie] / [Office]
Note: When selecting a different mode, color brightness,
contrast and advanced color settings differ.
[Brightness]
Adjust color brightness between 0 and 100%
[Contrast]
Adjust color contrast between 0 and 100%
Advanced Settings
Adjust color Saturation, Hue, Gain and Gamma
Back to Default
Press Enter to back to the default setting
5. Apps
①
On the home page, select
> [Apps], and press .
②
Select an app and check the current version, open or force stop, check the storage
used, clear data or cache, or enable or disable notifications and permissions.
6. Others
On the home page, select to find more setting options.
[Device Preferences]
[About] Check the device information and firmware update.
[Date & time] Manually set the date and time.

EN
12
[Language] Select the on-screen language.
[Keyboard] Select the keyboard language type.
[Sound] Select the audio output source and sound format.
[Storage] Check the device storage and removable storage.
[Reset] All data from your device’s internal storage will be erased.
[Date & Time]
[Automatic date & time] Enable or disable automatic date and time.
[Set date] Manually set date.
[Set time] Manually set time.
[Set time zone] Set a time zone.
[
Use 24-hour format]
Enable or disable 24-hour format.
EN
13
Using Nebula Cosmos Max
1.
Play from HDMI Playback Devices
Nebula Cosmos Max can be connected to various HDMI playback devices such as
a TV box, TV stick, DVD player, set-top box (STB), gaming consoles or other devices.
Two HDMI devices can be connected to the projector simultaneously to stream video at
4K@60 fps.
To play from HDMI playback devices:
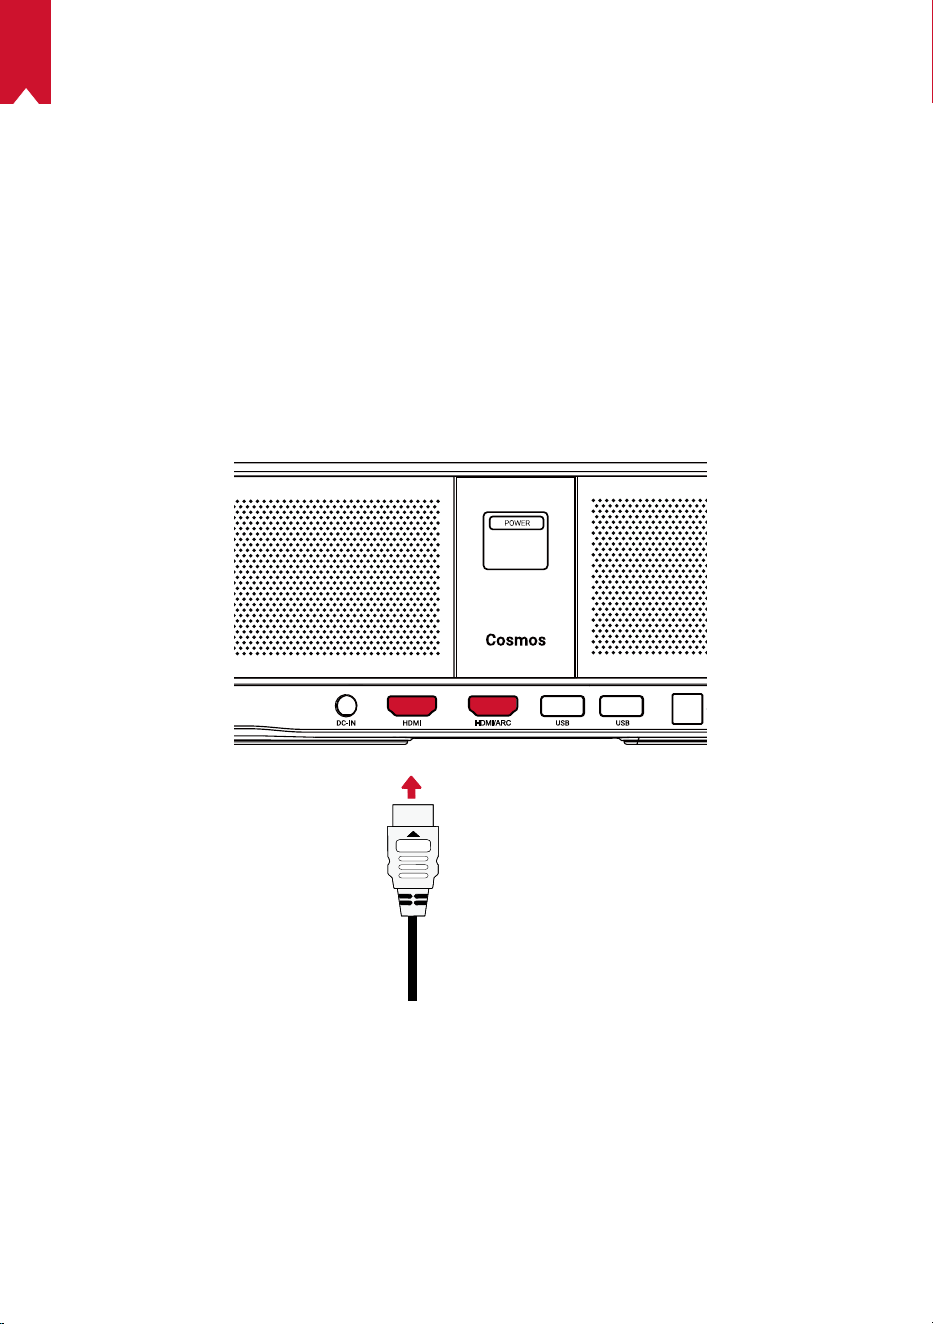
①
Connect Nebula Cosmos Max to an HDMI playback device with an HDMI cable (not
included).
• It will automatically start HDMI playback once connected to an HDMI playback
device.
EN
14
2.
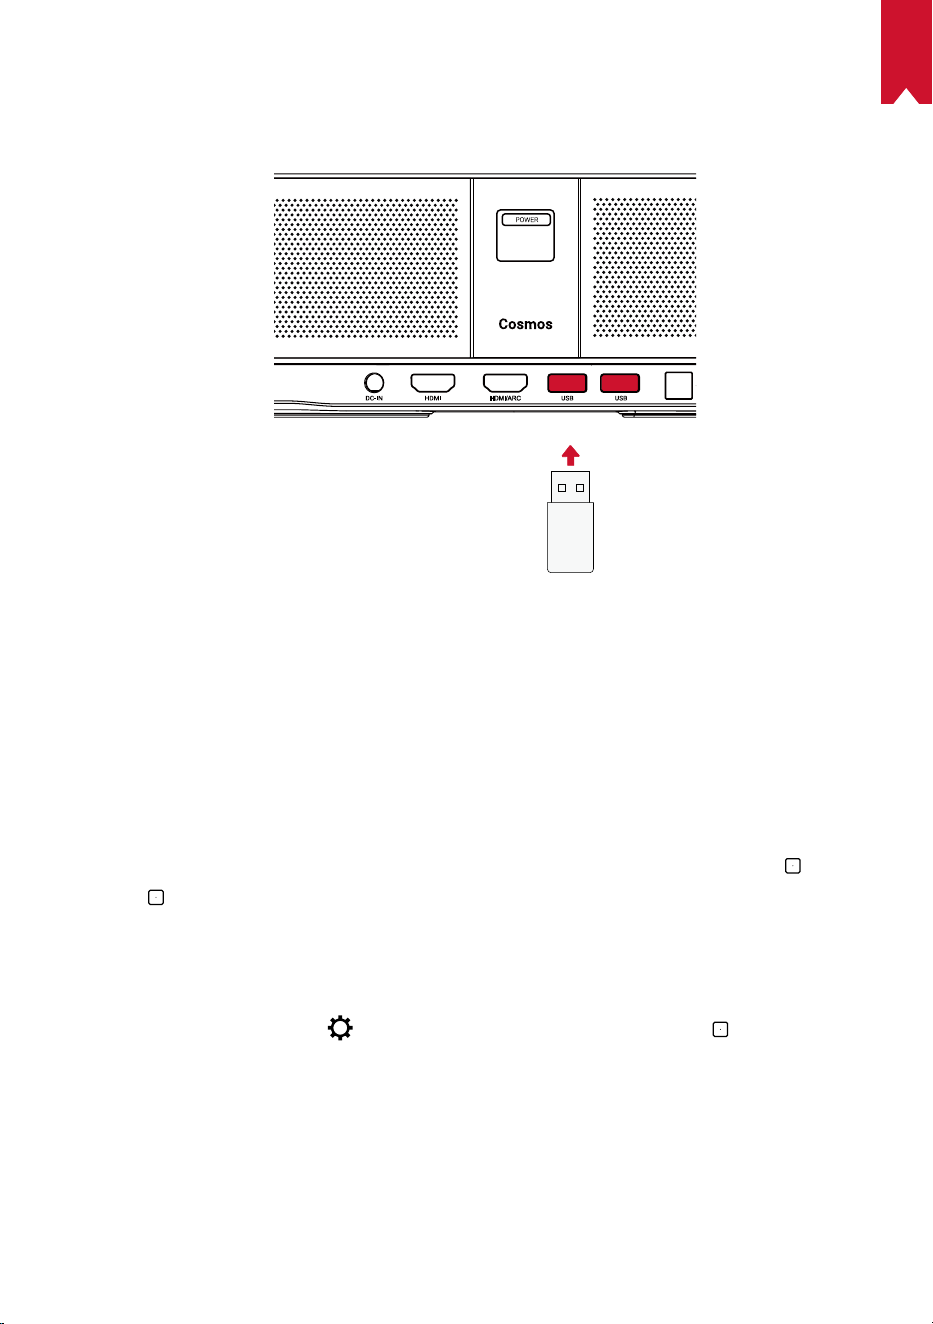
Play from a USB Drive
With Nebula Cosmos Max , you can enjoy music, video, and pictures that are stored on
a USB drive.
To play from a USB drive:
①
Download the ES File Explorer from Google Play.
②
Insert a USB drive into the USB port.
• The USB folder will appear on the ES File Explorer.
③
Select videos or photos from the USB drive that you want to play, and press
.
④
Press
to stop playback.
3.
Connect Bluetooth Accessories
You can connect Bluetooth devices to Nebula Cosmos Max .
①
On the home page, select
> [Remotes & Accessories] and press .
②
Select Add accessories.
• This projector will begin searching for accessories.
③
Pair your projector with the device to be connected.
④
Follow the on-screen instructions to complete the Bluetooth connection.
Note: Before pairing your Bluetooth devices, make sure the remote control and your
projector are in pairing mode.

EN
15
4.
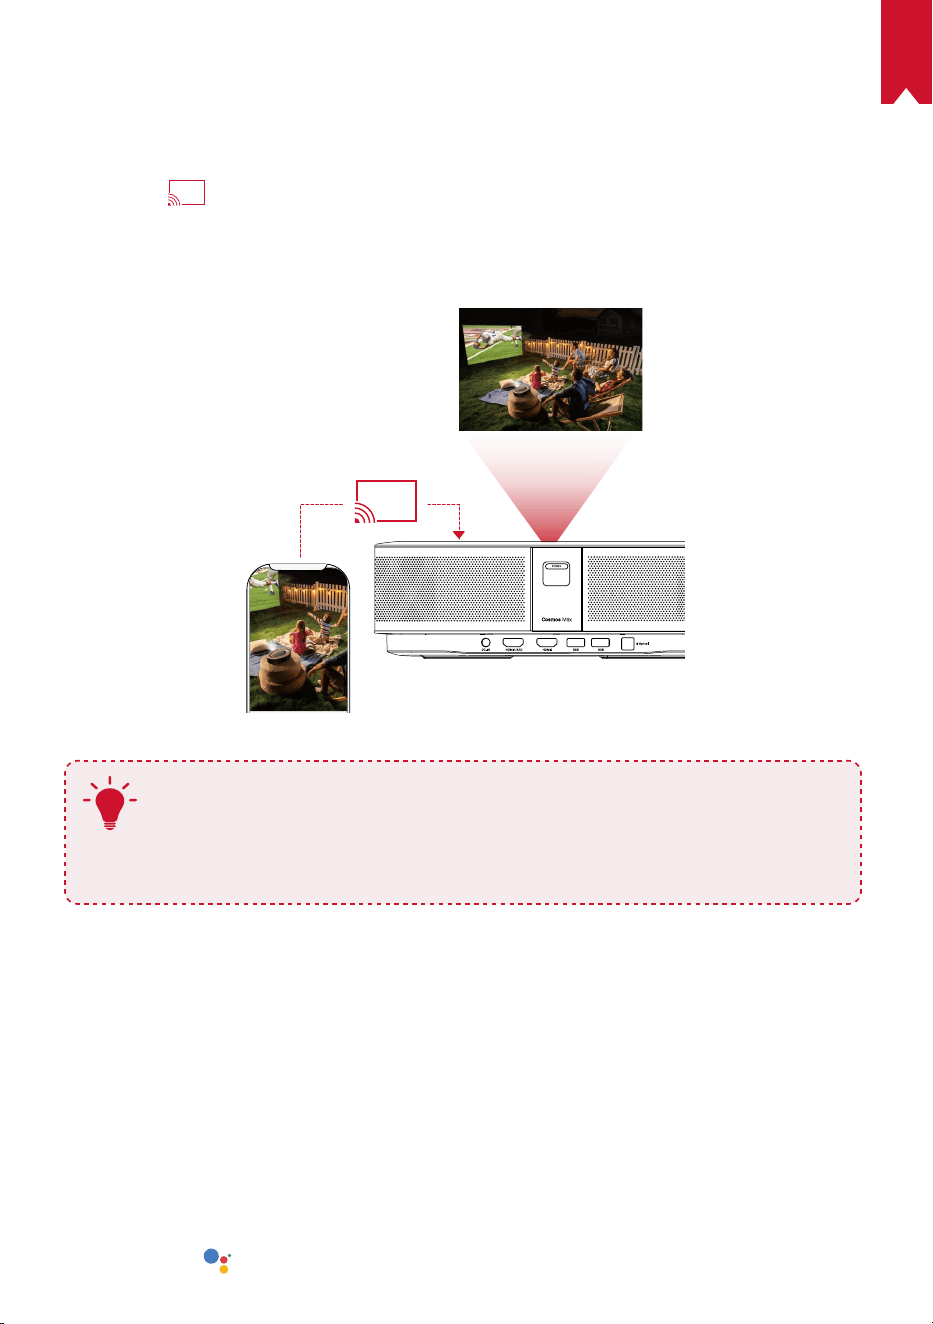
Use Chromecast Built-in
You can wirelessly cast photos, videos, and music from your phone or computer right
to your Nebula Cosmos Max .
①
Play a video clip on your phone and then tap the cast icon
on the video screen.
②
Select the device “D2150” you want to cast to.
• This projector will mirror the screen of the connected phone or computer.
T
• Make sure Nebula Cosmos Max and your phone are connected to the
same wireless network.
• Certain content may be unavailable to be casted due to copyright
restrictions. In this case, you can stream the content via the same app
installed in your Nebula Cosmos Max .
5.
Enjoy Google Features
Nebula Cosmos Max also supports Google features. Once connected to a wireless
network, you can access online services, enjoy movies, music and pictures, and
browse online. Aside from the pre-installed apps, you can also install any other apps
from Google Play, and talk to the Google Assistant to do certain tasks.
To talk to the Google Assistant:
①
Make sure you’ve followed the steps in the section “Connect Bluetooth Accessories”
to connect your remote control to Nebula Cosmos Max . Once connected, the LED
indicator on the remote control turns solid red.
②
Press
on the remote control to talk to the Google Assistant.

EN
16
Specifications
Specifications and design are subject to change without notice.
Power supply: 19V
9.47A
Power consumption: < 180W
Standby power consumption: < 0.5W
Display technology: UHD 3840 × 2160p DLP
Light source: RGB LED
Projection image size: 30-150 inch
Contrast ratio: 1000:1
Throw ratio: 1.2
Throw distance: 0.8m to 3.98m
CPU: Quad-core ARM Cortex-A55
OS: Android TV 9.0
RAM: 2GB DDR
ROM: 16GB eMMC
Speaker drivers: 10W × 4
Wi-Fi: IEEE802.11a/b/g/n/ac Dual Frequency 2.4G/5G
Bluetooth version: V4.2
USB file system: FAT32 / NTFS / exFAT
Recommended ambient: 41°F to 95°F / 5°C to 35°C
Relative humidity: 15% ~ 85% (non-condensing)
Storage temperature and humidity: < 149°F / 65°C, < 90% humidity
Dimensions (H*D): 350 × 250 × 100 mm / 13.8 × 9.8 × 3.9 inch
Weight: 3.3 kg / 118.2 oz
Troubleshooting
EN
17
①
Fail to turn on the projector with the remote control?
• Press
on the projector to turn it on.
• When powered off, you cannot use the remote control to turn it on.
②
The remote control doesn’t work?
• Make sure the battery is already installed in the remote control.
• Replace the batteries.
③
Blurred image?
• Slightly move the projector to engage autofocus.
• Press
to manually adjust the focus.
④
Cannot connect to a Wi-Fi network?
• Refresh the list of available networks and retry.
• Reboot the wireless router or the device and retry.
⑤
How do I update the firmware?
• When a new version is detected you will be asked to reboot and update.
EN
18
Notice
This product complies with the radio interference requirements of the European
Community.
Declaration of Conformity
Hereby, Anker Innovations Limited. declares that this device is in compliance with the
essential requirements and other relevant provisions of Directive 2014/53/EU. For the
Declaration of Conformity, visit the Web site www.SeeNebula.com
RF exposure information (for D2150): The Maximum Permissible Exposure (MPE)
level has been calculated based on a distance of d=20 cm between the device and the
human body. To maintain compliance with RF exposure requirements, use products that
maintain a 20cm distance between the device and human body.
Wifi Operating Frequency Range (for D2150):2412~2472 MHz(2.4G); 5150~5250 MHz,
5725~5850 MHz (5G)
Wifi Max Output Power (for D2150) :19.35 dBm(ERIP for 2.4G);22.09 dBm(ERIP for 5G)
BT Operating Frequency Range (for D2150) : 2402~2480 MHz; BT Max Output Power (for
D2150):9.2 dB(ERIP)
5150~5250 MHz can be used indoors only.
RF warning statement for D0413:
The device has been evaluated to meet general RF exposure requirement. The device
can be used in portable exposure condition without restriction.
Bluetooth Operating Frequency Range(for D0413) 2402~2480MHz; Bluetooth Max
Output Power(for D0413):4.346dBm(EIRP)
Anker Innovations Deutschland GmbH I Georg-Muche-Strasse 3-5, 80807 Munich,
Germany
Anker Technology (UK) Ltd,Suite B I Fairgate House, 205 Kings Road, Tyseley,
Birmingham, B11 2AA, United Kingdom
Your product is designed and manufactured with high quality materials and
components, which can be recycled and reused.
This symbol means the product must not be discarded as household waste,
and should be delivered to an appropriate collection facility for recycling.
Proper disposal and recycling helps protect natural resources, human health
and the environment. For more information on disposal and recycling of this
product, contact your local municipality, disposal service, or the shop where
you bought this product.
EN
19
FCC Notice
This device complies with Part 15 of the FCC Rules. Operation is subject to the
following two conditions: (1) this device may not cause harmful interference, and (2)
this device must accept any interference received, including interference that may
cause undesired operation.
Warning: Changes or modifications not expressly approved by the party responsible
for compliance could void the user's authority to operate the equipment.
Note: This equipment has been tested and found to comply with the limits for a Class
B digital device, pursuant to Part 15 of the FCC Rules. These limits are designed to
provide reasonable protection against harmful interference in a residential installation.
This equipment generates uses and can radiate radio frequency energy and, if not
installed and used in accordance with the instructions, may cause harmful interference
to radio communications. However, there is no guarantee that interference will not
occur in a particular installation. If this equipment does cause harmful interference to
radio or television reception, which can be determined by turning the equipment off
and on, the user is encouraged to try to correct the interference by one or more of the
following measures: (1) Reorient or relocate the receiving antenna. (2) Increase the
separation between the equipment and receiver. (3) Connect the equipment into an
outlet on a circuit different from that to which the receiver is connected. (4) Consult the
dealer or an experienced radio/TV technician for help.
FCC Radiation Exposure Statement:
The device has been evaluated to meet general RF exposure requirements. The device
can be used in fixed/mobile exposure condition. The min separation distance is 20cm.
Notice: Shielded cables
All connections to other computing devices must be made using shielded cables to
maintain compliance with FCC regulations.
The following importer is the responsible party
Company Name: Fantasia Trading LLC
Address: 5350 Ontario Mills Pkwy, Suite 100, Ontario, CA 91764
Telephone:1-800-988-7973
모델명
:D2150
인증번호
: R-C-AIl-D2150
제품명
:
특정소출력
무선기기
(
무선데이터통신시스템용
무선기기
)
제조자및제조국가
: Anker Innovations Limited
제조국
:
중국
CHINA
제조년월
: 2020.05
해당
무선설비는
운용
중
전파혼신
가능성이
있음
.
해당
무선설비는
전파혼신
가능성이
있으므로
인명안전과
관련된
서비스는
할수
없음
.
모델명
:D0413
인증번호
: R-C-AIl-D0413
제품명
:
특정소출력
무선기기
(
무선데이터통신시스템용
무선기기
)
제조자및제조국가
: Anker Innovations Limited
EN
20
제조국
:
중국
CHINA
제조년월
: 2020.05
해당
무선설비는
운용
중
전파혼신
가능성이
있음
.
해당
무선설비는
전파혼신
가능성이
있으므로
인명안전과
관련된
서비스는
할수
없음
.
Trademarks
HDMI, and HDMI logo and High-Definition Multimedia Interface are trademarks or
registered trademarks of HDMI licensing LLC in the United States and other countries.
The Bluetooth® word mark and logos are registered trademarks owned by Bluetooth
SIG, Inc.
Other trademarks and trade names are those of their respective owners.
Manufactured under license from Dolby Laboratories. Dolby, Dolby Audio,Pro Logic,
and the double-D symbol are trademarks of Dolby Laboratories.
Android, Android TV, and Google Assistant
Google, Android, Android TV, Chromecast and other related marks and logos are
trademarks of Google LLC.
Warranty
30-Day Money-Back Guarantee for Any Reason
You may return your undamaged product and packaging within 30 days of purchase to
receive a FULL REFUND for any reason. If the reason for return isn’t quality-related, the
customer must pay for the return shipping..
12-Month Warranty for Quality-Related Issues
Nebula’s products are warrantied to be free from material and workmanship defects
for 12 months from the date of purchase. Within this period, Nebula will provide a
replacement and cover any return shipping costs for products that fail in normal use.
Please Note: Any provided shipping labels must be used within 20 days from the date
they’re issued by Nebula Support.

DE
20
Inhaltsverzeichnis
Sicherheitsinformationen 21
Im Lieferumfang 23
Übersicht 23
Erste Schritte 25
Nebula App 28
Einstellungen 29
Verwenden des Nebula Cosmos Max 31
Technische Daten 34
Fehlerbehebung 35

DE
21
Sicherheitsinformationen
Lesen Sie alle Anweisungen sorgfältig durch, bevor Sie dieses Gerät verwenden.
Nehmen Sie keine Änderungen oder Einstellungen vor, die nicht in diesem Handbuch
beschrieben sind. Wenn Personenschäden, Datenverluste oder Schäden auf eine
Missachtung der Anweisungen zurückzuführen sind, gilt keine Gewährleistung.
Einrichtung
•
Verringern Sie das Brand- und/oder Stromschlagrisiko, indem Sie das Gerät nicht
Regen oder Feuchtigkeit aussetzen. Mit Wasser gefüllte Gegenstände wie Vasen
dürfen nicht auf dem Gerät abgestellt werden.
•
Stellen Sie das Gerät nicht auf weiche Oberflächen wie Tischdecken oder Teppiche,
weil dies eine Brandgefahr darstellen könnte.
•
Platzieren Sie das Gerät nicht in übermäßig staubigen oder schmutzigen
Umgebungen und nicht in der Nähe anderer Geräte, die ein starkes Magnetfeld
erzeugen.
•
Zum Schutz vor Überhitzung dürfen die Belüftungsöffnungen nicht abgedeckt oder
verstopft werden.
•
Verwenden Sie dieses Gerät keinesfalls auf beengtem Raum. Lassen Sie zur
Belüftung stets einen angemessenen Freiraum um das Gerät herum.
•
Schützen Sie das Gerät vor übermäßiger direkter Sonneneinstrahlung, Hitze,
extremen Temperaturschwankungen und Feuchtigkeit. Extreme Temperaturen
meiden. Die Betriebs- und Lagerungstemperatur für dieses Gerät und das Zubehör
sollte zwischen 0°C und 35°C liegen.
•
Bei längerem Betrieb wird die Oberfläche des Geräts heiß. Fahren Sie es umgehend
herunter und trennen Sie das Ladegerät. Wenn das Gerät abgekühlt ist, können Sie
es wieder in Betrieb nehmen.
•
Gehen Sie mit dem Gerät immer vorsichtig um. Vermeiden Sie es, das Objektiv zu
berühren. Lassen Sie Kinder nicht unbeaufsichtigt mit dem Gerät hantieren.
•
Stellen Sie keine schweren oder scharfkantigen Gegenstände auf das Gerät.
•
Nehmen Sie das Gerät nicht auseinander– es besteht die Gefahr von
Stromschlägen.
•
Verwenden Sie nur das durch den Hersteller zugelassene Zubehör.
•
Vermeiden Sie extreme Vibrationen, da sonst interne Komponenten beschädigt
werden könnten.
•
Dieses Produkt gibt möglicherweise gefährliche optische Strahlung ab. Blicken Sie
nicht in die Lampe, wenn diese in Betrieb ist. Kann die Augen schädigen.
Stromversorgung
•
Verwenden Sie ausschließlich das mitgelieferte Netzteil.
•
Schalten Sie das Gerät aus, bevor Sie das Netzteil aus der Steckdose ziehen.
•
Schützen Sie das Netzkabel, damit niemand darauf tritt oder es anderweitig
gequetscht wird, insbesondere an Steckern, an Mehrfachsteckdosen und am
Austrittspunkt des Kabels am Gerät.

DE
22
•
Trennen Sie das Gerät bei Gewittern oder längerer Nichtverwendung vom
Stromnetz.
•
Vor dem Herstellen oder Ändern von Verbindungen stellen Sie bitte sicher, dass alle
Geräte vom Stromnetz getrennt sind.
•
Berühren Sie niemals das Netzkabel oder den Netzanschluss mit feuchten Händen.
Schutz des Gehörs
•
Zur Vermeidung von Gehörschäden nicht über längere Zeiträume bei hoher
Lautstärke verwenden. Stellen Sie die Lautstärke auf einen sicheren Pegel ein.
Ladevorgang
•
Das Ladegerät ist vom Typ HKA18019095-6C mit einer Ausgangsspannung/
Stromstärke von 19V DC/6,32A. Das Ladegerät sollte in der Nähe des Produkts
installiert werden und leicht zugänglich sein.
•
Das Ladegerät darf ausschließlich in Innenbereichen verwendet werden.
•
Stellen Sie das Gerät während des Ladevorgangs in einer Umgebung mit normaler
Raumtemperatur (5–25°C) und angemessener Belüftung auf.
•
Aufgrund des Gehäusematerials darf dieses Gerät nur an eine USB-Schnittstelle
der Version2.0 oder höher angeschlossen werden.
Reinigung
•
Verwenden Sie ein weiches, fusselfreies Tuch. Verwenden Sie keine flüssigen,
gasförmigen oder leicht entflammbaren Reinigungsmittel.
•
Verwenden Sie keine flüssigen Reinigungsmittel zum Reinigen des Objektivs.
Andernfalls könnte die Beschichtung des Objektivs beschädigt werden.
•
Verwenden Sie spezielles Objektiv-Reinigungspapier.
Reparaturen
•
Nehmen Sie keine Reparaturen an diesem Gerät vor. Lassen Sie das Gerät nur
durch ein autorisiertes Servicecenter reparieren.
•
Unsachgemäße Wartung kann zu Personenschäden und zu Schäden an diesem
Gerät führen.
•
Lassen Sie Wartungsarbeiten stets von qualifiziertem Servicepersonal ausführen.
Vorsicht
•
Dieses Gerät kann potenziell schädliche optische Strahlung abgeben.
•
Blicken Sie nicht direkt in den Lichtstrahl. Das helle Licht kann Ihren Augen
schaden.

DE
23
IM LIEFERUMFANG
Cosmos Max Adattatore Fernbedienung 2 x AAA
Batterien
QSG
Übersicht
1.
Vorderseite
1
2 3
2.
Rückseite
1
1
2 3 4 5
Kamera für Auto-Fokus
Objektiv
Lautsprecher
Ein-/Aus-Taste
• Zum Einschalten drücken
• Zum Ausschalten drücken und gedrückt halten
GS-Eingang
HDMI Eingangsanschluss
• Zum Anschließen eines Wiedergabegeräts
USB-A-Anschluss
• Zum Anschließen an ein USB-Speichermedium
Optischer Audioanschluss
• Anschluss an ein Audiogerät über ein
optisches Kabel
DE
24
3.
Oberseite
4.
Unterseite
1
2
3
4
5
6
7
8
9
5.
LED-Anzeige
LED-Status Beschreibung
Leuchtet rot Betrieb im Projektor-Modus
Fokus anzupassen
Navigation
Zurück
Ein- / Ausschalten
Zum Aktivieren von Google
Assistant drücken
Bestätigen Sie den
ausgewählten Inhalt
Home
Systemeinstellungen
Lauter / leiser
Stativgewinde
Fernbedienung: Nebula RC
Modell: D0413

DE
25
Erste Schritte
1.
Platzierung
Stellen Sie das Gerät auf eine stabile, ebene Oberfläche und richten Sie es senkrecht
zur Projektionsfläche aus. Die besten Ergebnisse erzielen Sie mit einer weißen, ebenen
Projektionsfläche. Der Abstand zwischen dem Gerät und der Projektionsfläche muss
mindestens 0,8m und darf höchstens 3,98m betragen. Damit erhalten Sie eine
Bildgröße von ca. 75 bis 300cm.
31-125 inches
T
•
Das Gerät muss nicht in Richtung der Projektionsfläche geneigt
werden. Sie können das Projektionsbild bei Bedarf mit der
integrierten Keystone-Korrektur (Trapezkorrektur) anpassen.
•
Die Bildgröße richtet sich nach dem Abstand zwischen dem Gerät
und der Projektionsfläche. Mit einem Projektorabstand von 160 bis
260cm erzielen Sie das beste Ergebnis.
•
Sie können den Projektor auch an der Decke montieren.
2.
Vorbereiten der Fernbedienung
Die Fernbedienung wird mit zwei AAA-Batterien geliefert.
①
Schieben Sie bei der ersten Verwendung das Batteriefach auf und legen Sie zwei
AAA-Batterien ein.
DE
26
②
Um die Batterie auszutauschen, entriegeln und öffnen Sie das Batteriefach und
legen Sie eine neue Batterie ein. Achten Sie dabei auf die richtige Ausrichtung
der Pole (+/-) entsprechend den Markierungen. Schließen und verriegeln Sie das
Batteriefach anschließend wieder.
+
+
3.
Erste Schritte
①
Schließen Sie den Nebula Cosmos Max über das mitgelieferte Netzteil an die Steckdose
an.
DE
27
②
Drücken Sie
, um den Projektor auszuschalten.
③
Richten Sie das Gerät auf eine geeignete Projektionsfläche oder Wand aus. Die
integrierte Autofokus-Funktion ermöglicht es Ihrem Projektor, automatisch zu
fokussieren. Oder Sie können
auf der Fernbedienung drücken, um den Fokus
manuell einzustellen.
④
Befolgen Sie bei der ersten Verwendung die Bildschirmanweisungen, um die
grundlegende Einrichtung vorzunehmen.

DE
28
Nebula App
Zur leichteren Bedienung des Geräts empfehlen wir Ihnen den Download von Nebula
Connect, einer speziell für Nebula entwickelten App. Mithilfe dieser App können Sie den
Bildschirm als Maus verwenden.
①
Laden Sie die Nebula Connect-App aus dem App Store (iOS-Geräte) oder bei Google
Play (Android) herunter.
Nebula Connect
②
Aktivieren Sie Bluetooth auf Ihrem Smartphone und wählen Sie [Nebula Cosmos
Max ] als zu verbindendes Gerät aus.
③
Öffnen Sie die Nebula Connect-App und befolgen Sie die Bildschirmanweisungen,
um die Verbindungseinrichtung abzuschließen.
Mehr Leistung im Android Nebula Cosmos Max
mit Android-TV™
Befolgen Sie die Bildschirmanweisungen, um den Einrichtungsvorgang abzuschließen.
Option 1. Schnelle Einrichtung
Android-Benutzer können die Bildschirmanweisungen befolgen, um Android TV
TM
mit dem
Android-Telefon schnell einzurichten.
Option 2. Nebula Cosmos Max einrichten
iOS-Benutzer: Befolgen Sie die Anweisungen, um den Vorgang abzuschließen.
①
Überspringen Sie die Schritte zur schnellen Einrichtung.
②
Verbinden Sie den Nebula Cosmos Max mit dem Netzwerk.
③
Melden Sie sich mit Ihrem Google-Konto an.
Nach Abschluss der Einrichtung wird der Nebula Cosmos Max von Android TV
TM
gesteuert.
DE
29
Einstellungen
Nehmen Sie nach dem erstmaligen Einschalten des Nebula Cosmos Max die Einrichtung
vor.
1.
Netzwerk
Sie können mit diesem Gerät über ein WLAN eine Verbindung zum Internet herstellen.
①
Wählen Sie auf der Homepage
> [Netzwerk & Internet] und drücken Sie .
②
Befolgen Sie die Bildschirmanweisungen, um die Verbindung herzustellen.
2.
Audio
Das Audioformat kann über die Audioeinstellungen geändert werden.
①
Wählen Sie auf der Homepage
> [Audioeinstellungen] und drücken Sie .
Digitales Audioformat
automatisch wechseln
Aktivieren oder Deaktivieren des automatischen
digitalen Audioformatwechsels zwischen PCM und
RAW
3.
HDMI
HDMI 1/2 als Eingangsquelle auswählen. Sie können diese Option auch unter den CEC-
Einstellungen ändern.
①
Wählen Sie auf der Homepage
> [HDMI] und drücken Sie .
CEC-Einstellungen
Drücken Sie Enter, um die CEC-Einstellungen zu
ändern
4.
Projektor
①
Wählen Sie auf der Homepage
> [Projektoreinstellungen] aus drücken Sie auf
.
[Helligkeit]
Helligkeit zwischen 0 und 100% auswählen
[Farbtemperatur]
[Normal] / [Kalt] / [Warm]
[Wandfarbe]
[Weiß] / [Rot] / [Orange] / [Blau] / [Grün] / [Cyan] / [Gelb] /
[Violett]
[Keystone-Korrektur]
Keystone-Korrektur (Trapezkorrektur) aktivieren/deaktivieren.
[Zoom]
[50-100%]
[Autom. Fokuskorrektur]
Drücken Sie
Enter
, um die automatische Fokuskorrektur
auszuführen.
DE
30
[Modus „Projektor“]
[Autom]:
Erkennt automatisch, ob der Projektor invertiert ist.
Wechselt automatisch zwischen diesen Optionen.
[Frontprojektion]:
Der Projektor befindet sich vor der
Projektionsfläche.
[Rückprojektion]: Der Projektor befindet sich hinter der
Projektionsfläche.
[Invertierte Frontprojektion]: Der Projektor hängt in
umgedrehter Position von der Decke. Das Bild wird um
180 Grad gedreht.
[Invertierte Rückprojektion]: Der Projektor hängt in
umgedrehter Position und hinter der Projektionsfläche
von der Decke. Das Bild wird um 180 Grad gedreht und
horizontal gespiegelt.
[Bildeinstellungen]
[Bildmodus]
[Standard] / [Film] / [Büro]
Hinweis: Wenn ein anderer Modus gewählt wird, ändern sich
Farbhelligkeit, Kontrast und erweiterte Farbeinstellungen. .
[Helligkeit]
Farbhelligkeit zwischen 0 und 100% einstellen
[Kontrast]
Farbkontrast zwischen 0 und 100% einstellen
Erweiterte Einstellungen
Farbsättigung, Farbton, Verstärkung und Gamma
einstellen
Zurück zur
Standardeinstellung
Drücken Enter, um zur Standardeinstellung
zurückzukehren
5.
Apps
①
Wählen Sie auf der Homepage
> [Apps] aus drücken Sie auf .
②
Wählen Sie eine App aus. Sie können nun die aktuelle Version prüfen, die App
öffnen oder das Beenden erzwingen, den belegten Speicherplatz überprüfen oder
Daten löschen bzw. den Cache leeren oder Benachrichtigungen und Berechtigungen
aktivieren bzw. deaktivieren.
6.
Andere
Wählen Sie auf der Homepage aus, um weitere Einstellungsoptionen zu finden.
[Geräteeinstellungen]
[Info]
Geräteinformationen und Firmware-Aktualisierung anzeigen.
[Datum und Uhrzeit] Datum und Uhrzeit manuell einstellen
[Sprache] Sprache für die Bildschirmanzeige auswählen
DE
31
[Tastatur] Sprache für die Tastatur auswählen
[Ton] Audio-Ausgabequelle und Tonformat auswählen
[Speicher] Gerätespeicher und Wechselspeicher überprüfen
[Reset] Alle Daten aus dem internen Speicher des Geräts löschen
[Datum und Uhrzeit]
[Datum und Uhrzeit
automatisch]
Automatische Datums- und Uhrzeitanzeige aktivieren
oder deaktivieren
[Datum einstellen] Datum manuell festlegen
[Zeiteinstellung] Uhrzeit manuell festlegen
[Zeitzone einstellen] Zeitzone festlegen.
[
24-Stunden-Format verwenden]
24-Stunden-Format aktivieren oder deaktivieren
Verwenden des Nebula Cosmos Max
1.
Abspielen über HDMI-Wiedergabegeräte
Der Nebula Cosmos Max kann an verschiedene HDMI-Wiedergabegeräte
angeschlossen werden, z.B. TV-Box oder -Stick, DVD-Player, Set-Top-Box (STB),
Spielkonsolen oder andere Geräte.Zwei HDMI-Geräte können gleichzeitig an den
Projektor angeschlossen werden, um Video mit 4K@60 fps zu streamen.
Abspielen über HDMI-Wiedergabegeräte:
①
Verbinden Sie den Nebula Cosmos Max über ein HDMI-Kabel (im Lieferumfang
enthalten) mit einem HDMI-Wiedergabegerät.
• Die HDMI-Wiedergabe wird automatisch gestartet, sobald das Gerät an ein HDMI-
Wiedergabegerät angeschlossen wurde.
DE
32
2.
Wiedergabe über ein USB-Laufwerk
Sie können mit dem Nebula Cosmos Max Musik, Videos und Bilder wiedergeben, die
auf einem USB-Laufwerk gespeichert sind.
Wiedergabe über ein USB-Laufwerk:
①
Laden Sie den ES File Explorer von Google Play herunter.
②
Stecken Sie ein USB-Gerät in den USB-Anschluss ein.
• Im ES File Explorer erscheint der USB-Ordner.
③
Wählen Sie Videos oder Fotos vom USB-Gerät aus, die Sie wiedergeben möchten,
und drücken Sie
.
④
Drücken Sie , um die Wiedergabe zu beenden.
3.
Verbinden von Bluetooth-Zubehör
Sie können Bluetooth-Geräte mit Nebula Cosmos Max verbinden.
①
Wählen Sie auf der Homepage
> [Fernbedienungen & Zubehör] und drücken Sie
.
②
Wählen Sie Zubehör hinzufügen.
• Der Projektor sucht nach Zubehör.
③
Koppeln Sie Ihren Projektor mit dem verbindenden Gerät.
④
Befolgen Sie die Bildschirmanweisungen, um die Bluetooth-Verbindung herzustellen.
Hinweis: Bevor Sie Ihre Bluetooth-Geräte koppeln, vergewissern Sie sich, dass sich die
Fernbedienung und Ihr Projektor im Kopplungsmodus befinden.
DE
33
4.
Verwenden von Chromecast Built-in
Sie können Fotos, Videos und Musik von Ihrem Telefon oder Computer direkt auf Ihren
Nebula Cosmos Max übertragen.
①
Spielen Sie einen Videoclip auf Ihrem Telefon ab und tippen Sie auf das Cast-
Symbo
auf dem Videobildschirm.
②
Wählen Sie das Gerät „D2150“ aus, an das übertragen werden soll.
• Dieser Projektor spiegelt den Bildschirm des angeschlossenen Mobiltelefons oder
Computers wider.
T
• Stellen Sie sicher, dass der Nebula Cosmos Max und Ihr Smartphone im
selben WLAN-Netzwerk miteinander verbunden sind.
• Aufgrund urheberrechtlicher Beschränkungen ist Screencast für manche
Inhalte nicht verfügbar. In diesem Fall können Sie diese Inhalte jedoch
über dieselbe, auf Ihrem Nebula Cosmos Max installierte App streamen.
5.
Verwenden von Google-Funktionen
Nebula Cosmos Max unterstützt auch Google-Funktionen. Sobald eine Verbindung
mit einem WLAN-Netzwerk besteht, können Sie auf Online-Services zugreifen, Filme,
Musik und Bilder genießen und im Internet surfen. Neben den vor-installierten Apps
können Sie auch andere Apps von Google Play installieren und mit Google Assistant
sprechen, um bestimmte Aufgaben zu erledigen.
Sprechen mit Google Assistant:
①
Stellen Sie sicher, dass Sie die Schritte in Abschnitt „Verbinden von Bluetooth-
Zubehör” zum Verbinden Ihrer Fernbedienung mit dem Nebula Cosmos Max
durchgeführt haben. Nach der Verbindungsherstellung leuchtet die LED-Anzeige
auf der Fernbedienung rot.
②
Drücken Sie
auf der Fernbedienung, um mit Google Assistant zu sprechen.
DE
34
Technische Daten
Änderungen der technischen Daten und des Designs ohne
Vorankündigung vorbehalten.
Stromversorgung: 19V
9.47A
Stromverbrauch: < 180W
Standby-Leistungsaufnahme: < 0,5W
Display-Technologie: UHD 3840 × 2160p DLP
Lichtquelle: RGB-LED
Projektionsbild-Größe: 30–150Zoll
Kontrastverhältnis: 1000:1
Projektionsverhältnis: 1.2
Projektionsentfernung: 0,8m bis 3,98m
CPU: Quad Core ARM Cortex-A55
Betriebssystem: Android TV 9.0
RAM: 2GB DDR
ROM: 16GB eMMC
Lautsprecher: 10W × 4
WLAN: IEEE802.11a/b/g/n/ac Dualfrequenz 2,4G/5G
Bluetooth-Version: V4.2
USB-Dateisystem: FAT32/NTFS/exFAT
Empfohlene Umgebungstemperatur: 5 °C bis 35 °C
Relative Luftfeuchtigkeit: 15% bis 85% (nicht kondensierend)
Lagertemperatur und Luftfeuchtigkeit: < 65 °C, < 90 % Luftfeuchtigkeit
Maße (H × T): 350 × 250 × 100 mm
Gewicht: 3.3 kg
Fehlerbehebung
①
Der Projektor lässt sich nicht mit der Fernbedienung einschalten?

DE
35
• Halten Sie auf dem Projektor gedrückt, um ihn einzuschalten.
• Wenn er ausgeschaltet ist, können Sie ihn nicht mit der Fernbedienung
einschalten.
②
Die Fernbedienung funktioniert nicht?
• Stellen Sie sicher, dass die Batterien bereits in die Fernbedienung eingelegt
wurden.
• Tauschen Sie die Batterien aus.
③
Unscharfes Bild?
• Bewegen Sie den Projektor etwas, um den Autofokus zu aktivieren.
• Drücken Sie
, um den Fokus manuell einzustellen.
④
Sie können keine WLAN-Verbindung herstellen?
• Aktualisieren Sie die Liste der verfügbaren Netzwerke und versuchen Sie es
erneut.
• Starten Sie den Router oder das Gerät neu und versuchen Sie es erneut.
⑤
Wie aktualisiere ich die Firmware?
• Wenn eine neue Version gefunden wird, werden Sie aufgefordert, einen Neustart
durchzuführen und die Aktualisierung vorzunehmen.

ES
36
Tabla de contenidos
Instrucciones de seguridad 37
Contenido 39
Descripción general 39
Primeros pasos 41
Aplicación Nebula 44
Configuración 45
Uso de NebulaCosmos 47
Especificaciones 50
Solución de problemas 51

ES
37
Instrucciones de seguridad
Lea todas las instrucciones antes de utilizar el dispositivo. No realice cambios ni cree
ajustes que no estén descritos en este manual. En caso de que se produzcan lesiones,
pérdida de datos o daños por no seguir las instrucciones, no se aplicará la garantía.
Configuración
•
Para reducir el riesgo de incendio y/o descarga eléctrica, no exponga el dispositivo
a la lluvia ni a la humedad. No coloque objetos con líquidos, como por ejemplo
jarrones, sobre el dispositivo.
•
No coloque el dispositivo sobre una superficie blanda, como un mantel o una
alfombra; de lo contrario, podría suponer un riesgo de incendio.
•
No coloque el dispositivo en zonas expuestas a un exceso de polvo y suciedad, ni
cerca de cualquier aparato que pueda generar un campo magnético fuerte.
•
Para evitar el sobrecalentamiento, no bloquee ni obstruya las aberturas de
ventilación.
•
No coloque nunca el dispositivo en un espacio confinado. Deje siempre espacio
suficiente alrededor del dispositivo para facilitar la ventilación.
•
Proteja este dispositivo de la sobreexposición a la luz solar directa, el calor, las
grandes fluctuaciones de temperatura y la humedad. No exponga el dispositivo
a temperaturas extremas. La temperatura adecuada de funcionamiento y
almacenamiento de este dispositivo y sus accesorios se sitúa entre 0°C y 35°C.
•
Cuando el dispositivo se utiliza durante un periodo de tiempo prolongado, la
superficie puede calentarse. Apáguelo inmediatamente y desenchufe el cargador.
Reanude el funcionamiento cuando el dispositivo se haya enfriado.
•
Manipule siempre el dispositivo con cuidado. Evite tocar la lente. No permita que
los niños manipulen el dispositivo sin supervisión.
•
No coloque nunca objetos pesados o afilados sobre el dispositivo.
•
Para evitar una descarga eléctrica, no desmonte el dispositivo.
•
Utilice únicamente los accesorios especificados por el fabricante.
•
Evite vibraciones extremas, ya que podrían dañar los componentes internos.
•
Es posible que el dispositivo emita radiación óptica peligrosa. No mire fijamente a
la lámpara en funcionamiento. Puede provocar daños oculares.
Fuente de alimentación
•
Utilice únicamente el adaptador de alimentación suministrado.
•
Apague el dispositivo antes de extraer la fuente de alimentación de la toma de
corriente.
•
Evite pisar o doblar el cable de alimentación y preste especial atención a los
enchufes, ladrones y puntos de salida del dispositivo.

ES
38
•
Desconecte el dispositivo si hay las tormentas eléctricas o cuando no lo vaya a
utilizar durante un periodo de tiempo prolongado.
•
Antes de realizar o cambiar cualquier conexión, asegúrese de que todos los
dispositivos estén desconectados de la toma de corriente.
•
No toque nunca el cable de alimentación ni el conector de alimentación con las
manos mojadas.
Protección auditiva
•
Para evitar daños auditivos, no utilice el producto a un volumen elevado durante
periodos de tiempo prolongados. Ajuste el volumen a un nivel seguro.
Carga
•
El tipo de cargador es HKA18019095-6C con una tensión/corriente de salida de
19VCC/6,32A. El cargador se debe instalar cerca del dispositivo y se debe poder
acceder a él con facilidad.
•
Este cargador es solo para uso en interiores.
•
Durante la carga, coloque el dispositivo en un entorno con una temperatura
ambiente normal (temperatura entre 5°C y 25°C recomendada) y buena
ventilación.
•
Debido al material de la carcasa, el dispositivo solo se debe conectar a una interfaz
USB con la versión 2.0 o superior.
Limpieza
•
Utilice un paño suave y que no deje pelusa. Nunca utilice limpiadores líquidos,
gaseosos o fácilmente inflamables para limpiarlo.
•
No utilice agentes de limpieza líquidos para limpiar la lente, ya que podría dañar el
revestimiento de la lente.
•
Limpie la lente con papel de limpieza para lentes.
Reparaciones
•
No intente reparar el dispositivo usted mismo. El dispositivo se debe reparar
únicamente en un centro de servicio autorizado.
•
Un mantenimiento inadecuado podría causar lesiones o daños en el dispositivo.
•
Delegue todas las tareas de servicio técnico al personal cualificado.
Precaución
•
Es posible que el dispositivo emita radiación óptica peligrosa.
•
No mire directamente al haz en funcionamiento. La luz brillante podría provocar
daños oculares.

ES
39
Contenido
Cosmos Max Adaptador Controle
Remoto
2 x AAA
Baterias
QSG
Descripción general
1.
Vista frontal
1
2 3
2.
Vista posterior
1
1
2 3 4 5
Cámara y enfoque automático
Lente
Altavoz
Botón de encendido
• Pulsar para encender
• Mantener pulsado para apagar
Entrada de CC
Puerto de entrada HDMI
• Conectar a un dispositivo de reproducción
Puerto USB-A
• Conectar a una unidad flash USB
Puerto de audio óptico
• Conectar a un dispositivo de salida de
audio mediante
un cable óptico
ES
40
3. Vista superior
4. Vista inferior
1
2
3
4
5
6
7
8
9
5. Indicador LED
Estado de LED Descripción
Rojo fijo Funciona en modo de proyector
Ajustar enfoque
Navegación
Atrás
Encender/Apagar
Pulsar para activar el Asistente
de Google
Confirmar el contenido
seleccionado
Inicio
Configuración del sistema
Subir/Bajar volumen
Toma para trípode
Mando a distancia: Nebula RC
Modelo: D0413
ES
41
Primeros pasos
1.
Colocación
Coloque el dispositivo sobre una superficie plana y estable, totalmente orientado
hacia la superficie de proyección. Para obtener los mejores resultados, la superficie de
proyección debería ser blanca y plana. La distancia entre el dispositivo y la superficie
de proyección debe ser de 0,8metros como mínimo y 3,98metros como máximo para
obtener una imagen de proyección de entre 30 y 150 pulgadas.
31-125 inches
T
•
No es necesario inclinar el proyector hacia la superficie de
proyección. Puede corregir la imagen proyectada con la función de
corrección trapezoidal integrada.
•
La distancia entre el dispositivo y la superficie de proyección
determina el tamaño de la imagen proyectada. Para obtener el mejor
resultado, coloque el proyector a una distancia de entre 1,6 y 2,6m.
•
También puede instalar el proyector en el techo.
2.
Preparación del mando a distancia
El mando a distancia incluye dos pilas AAA.
①
Antes del primer uso, deslice el compartimento de las pilas para abrirlo e inserte
dos pilas AAA.

ES
42
②
Para sustituir las pilas, desbloquee y abra el compartimento de las pilas, inserte las
pilas nuevas (haciendo coincidir la polaridad [+/-] como se indica) y, a continuación,
cierre y bloquee el compartimento.
+
+
3. Primeros pasos
①
Conecte el proyector NebulaCosmos a la toma de corriente mediante el adaptador
de alimentación incluido.

ES
43
②
Pulse
para encender el proyector.
③
Oriente el dispositivo hacia una pared o superficie de proyección adecuada. La
función de enfoque automático integrada permite que el proyector active el enfoque
automático. También puede pulsar
en el mando a distancia para ajustar el
enfoque manualmente.
④
Cuando utilice el proyector por primera vez, siga las instrucciones que aparecen en
pantalla para completar la configuración básica.

ES
44
Aplicación Nebula
Para controlar fácilmente este dispositivo, le recomendamos que descargue la
aplicación NebulaConnect diseñada para Nebula. Esta aplicación le permite utilizar la
pantalla como si fuera un ratón.
①
Descargue la aplicación NebulaConnect desde AppStore (dispositivos iOS) o
GooglePlay (dispositivos Android).
Nebula Connect
②
Active la conexión Bluetooth en el smartphone y seleccione [NebulaCosmos] como
dispositivo para conectar.
③
Abra la aplicación NebulaConnect y siga las instrucciones que aparecen en pantalla
para completar la configuración de la conexión.
Funcionamiento de NebulaCosmos con Android TV™
Siga las instrucciones en pantalla para completar el proceso de configuración.
Opción 1. Configuración rápida
Los usuarios de teléfonos Android pueden seguir las instrucciones para configurar
rápidamente AndroidTV con el teléfono Android.
Opción 2. Configuración de NebulaCosmos
Los usuarios de iOS deben seguir estas instrucciones para completar el proceso.
①
Omita el proceso de configuración rápida.
②
Conecte el proyector NebulaCosmos a la red.
③
Inicie la sesión con su cuenta de Google.
El proyector NebulaCosmos funcionará mediante AndroidTV tras completar el
proceso de configuración.

ES
45
Configuración
Complete el proceso de configuración cuando encienda por primera vez el proyector
NebulaCosmos.
1.
Red
Es posible conectar el dispositivo a Internet a través de una conexión inalámbrica (Wi-
Fi).
①
En la página de inicio, seleccione
> [Red e Internet] y pulse .
②
Siga las instrucciones que aparecen en pantalla para completar la conexión a la red.
2.
Audio
El formato de audio se puede modificar en Ajustes de sonido.
①
En la página de inicio, seleccione
> [Ajustes de sonido] y pulse .
Cambio automático de formatos
digitales
Active o desactive la función Cambio automático de
formatos digitales entre PCM y RAW.
3.
HDMI
Seleccione HDMI 1/2 como entrada. Esta opción también permite modificar la
configuración de CEC.
①
En la página de inicio, seleccione
> [HDMI] y pulse .
Configuración de CEC
Pulse Intro para modificar la configuración de CEC.
4.
Proyector
①
En la página de inicio, seleccione
> [Configuración del proyector] y pulse .
[Brillo]
Seleccione el brillo entre 0 y 100%.
[Temperatura del color]
[Normal]/[Fría]/[Cálida]
[Color de la pared]
[Blanco]/[Rojo]/[Naranja]/[Azul]/[Verde]/[Cian]/[Amarillo]/
[Morado]
[Corrección trapezoidal]
Active o desactive la corrección trapezoidal.
[Zoom]
[50-100%]
[Corrección enfoque
automático]
Pulse Intro para aplicar la corrección de enfoque automático.

ES
46
[Modo de proyector]
[Automático]:
detecta automáticamente si el proyector
está invertido.
Cambia automáticamente entre estas opciones.
[Proyección frontal]:
el proyector está situado en frente de
la superficie de proyección.
[Proyección posterior]: el proyector está situado detrás
de la superficie de proyección.
[Proyección frontal invertida]:
el proyector está colgando del
techo en posición invertida. La imagen se gira 180 grados.
[Proyección posterior invertida]: el proyector está
colgando del techo en posición invertida detrás de la
superficie de proyección. La imagen se gira 180grados y se
refleja en dirección horizontal.
[Configuración de imagen]
[Modo de imagen]
[Estándar]/[Película]/[Oficina]
Nota: Al seleccionar un modo diferente, los valores de brillo
y contraste del color y de configuración de color avanzada
difieren. .
[Brillo]
Ajuste el brillo del color entre 0 y 100%
[Contraste]
Ajuste el contraste del color entre 0 y 100%
Configuración avanzada
Ajuste los valores de saturación, tono, ganancia y gama
Restablecer valores
predeterminados
Pulse Intro para restablecer los valores predeterminados
5.Aplicaciones
①
En la página de inicio, seleccione
> [Aplicaciones] y pulse .
②
Seleccione una aplicación para comprobar la versión actual, abrirla o forzar el cierre,
comprobar el almacenamiento utilizado, borrar datos, borrar la memoria caché, o
activar y desactivar notificaciones y permisos.
6.Otras configuraciones
En la página de inicio, seleccione para ver más opciones de configuración.
[Preferencias del dispositivo]
[Información]
Permite comprobar la información del dispositivo y la
actualización de firmware.
[Fecha y hora] Defina manualmente la fecha y la hora.
ES
47
[Idioma] Seleccione el idioma de visualización en pantalla.
[Teclado] Seleccione el tipo de idioma del teclado que desea usar.
[Sonido] Seleccione la salida de audio y el formato de sonido.
[Almacenamiento]
Compruebe el almacenamiento del dispositivo y el
almacenamiento extraíble.
[Restablecer]
Se borrarán todos los datos guardados en el
almacenamiento interno del dispositivo.
[Fecha y hora]
[Fecha y hora automática] Active o desactive la fecha y hora automática.
[Definir fecha] Configure manualmente la fecha.
[Definir hora] Configure manualmente la hora.
[Definir zona horaria] Configure la zona horaria.
[
Utilizar formato de 24 horas]
Active o desactive el formato de 24 horas.
Uso de NebulaCosmos
1.
Reproducción desde dispositivos HDMI
NebulaCosmos se puede conectar con varios dispositivos de reproducción HDMI,
como TVBox, TVStick, reproductores de DVD, decodificadores (STB) y videoconsolas,
entre otros.Es posible conectar al proyector dos dispositivosHDMI simultáneamente
para transmitir vídeo 4K a 60fps.
Para reproducir desde dispositivos de reproducción HDMI:
①
Conecte el proyector NebulaCosmos a un dispositivo de reproducción HDMI con un
cable HDMI (no incluido).
• Cuando conecte un dispositivo de reproducción HDMI, la reproducción HDMI se
iniciará automáticamente.
ES
48
2. Reproducción desde una unidad USB
Con NebulaCosmos, puede disfrutar de música, vídeos e imágenes almacenados en
una unidad USB.
Para reproducir desde una unidad USB:
①
Descargue ES File Explorer desde GooglePlay.
②
Inserte la unidad USB en el puerto USB.
• La carpeta USB aparecerá en ES File Explorer.
③
Seleccione los vídeos o las fotos de la unidadUSB que desea reproducir y pulse
.
④
Pulse
para detener la reproducción.
3. Conexión de accesorios Bluetooth
Puede conectar dispositivos Bluetooth a NebulaCosmos.
①
En la página de inicio, seleccione
> [Mandos y accesorios] y pulse .
②
Seleccione Agregar accesorios.
• El proyector iniciará la detección de accesorios.
③
Empareje el proyector con el dispositivo que desea conectar.
④
Siga las instrucciones que aparecen en pantalla para completar la conexión
Bluetooth.
Nota: Antes de emparejar los dispositivos Bluetooth, asegúrese de que el mando a
distancia y el proyector se encuentran en modo de emparejamiento.

ES
49
4. Uso de Chromecast integrado
Puede transmitir fotos, vídeos y música de forma inalámbrica desde un teléfono u
ordenador directamente a NebulaCosmos.
①
Reproduzca un clip de vídeo en su teléfono y pulse el icono de transmisión
en
la pantalla de vídeo.
②
Seleccione el dispositivo “D2150” al que desea transmitir.
• El proyector duplicará la pantalla del teléfono móvil o el ordenador conectado.
T
• Asegúrese de que el dispositivo NebulaCosmos y el teléfono estén
conectados a la misma red inalámbrica.
• Es posible que ciertos contenidos no se puedan transmitir debido a
restricciones de copyright. Cuando esto suceda, puede transmitir los
contenidos mediante la misma aplicación instalada en el proyector
NebulaCosmos.
5. Uso de las funciones de Google
NebulaCosmos también es compatible con las funciones de Google. Una vez que
haya conectado el proyector a una red inalámbrica, podrá acceder a servicios en
línea, disfrutar de películas, música y fotografías, y navegar por Internet. Además de
las aplicaciones preinstaladas, también puede instalar cualquier otra aplicación de
GooglePlay y hablar al Asistente de Google para realizar ciertas tareas.
Para hablar al Asistente de Google:
①
Asegúrese de que ha seguido los pasos indicados en la sección “Conexión de
accesorios Bluetooth” para conectar el mando a distancia con NebulaCosmos. Una
vez conectado, el indicador LED del mando a distancia se iluminará en color rojo fijo.
②
Pulse
en el mando a distancia para hablar al Asistente de Google.
ES
50
Especificaciones
Las especificaciones y el diseño están sujetos a cambios sin previo aviso.
Fuente de alimentación: 19V
9,47A
Consumo de energía: <180W
Consumo de energía en espera: <0,5W
Tecnología de pantalla: UHD 3840 × 2160p DLP
Fuente de luz: LED RGB
Tamaño de la imagen proyectada: 30-150pulgadas
Relación de contraste: 1000:1
Relación de proyección: 1,2
Distancia de proyección: 0,8m a 3,98m
CPU: ARM Cortex-A55 de cuatro núcleos
SO: Android TV 9.0
RAM: DDR de 2GB
ROM: eMMC de 16GB
Diafragmas de altavoz: 4 de 10W
Wi-Fi: IEEE802.11a/b/g/n/ac frecuencia dual 2,4G/5G
Versión de Bluetooth: 4.2
Sistema de archivos USB: FAT32/NTFS/exFAT
Temperatura recomendada: 5°C a 35°C
Humedad relativa: 15%-85% (sin condensación)
Temperatura y humedad de almacenamiento: <65°C, <90% de humedad
Dimensiones (alt. × prof.): 350 × 250 × 100 mm
Peso: 33kg
Solución de problemas
①
¿No puede encender el proyector con el mando a distancia?

ES
51
• Mantenga pulsado en el proyector para encenderlo.
• Cuando el proyector está apagado, no puede usar el mando a distancia para
encenderlo.
②
¿No funciona el mando a distancia?
• Asegúrese de que las pilas están instaladas en el mando a distancia.
• Sustituya las pilas.
③
¿Se ve borrosa la imagen?
• Mueva ligeramente el proyector para activar el enfoque automático.
• Pulse
para ajustar el enfoque manualmente.
④
¿No puede conectarse a una red Wi-Fi?
• Actualice la lista de redes disponibles e inténtelo de nuevo.
• Reinicie el router inalámbrico o el proyector e inténtelo de nuevo.
⑤
¿Cómo se actualiza el firmware?
• Cuando se detecte una nueva versión, se le solicitará que reinicie el dispositivo y
lo actualice.

FR
52
Sommaire
Consignes de sécurité 53
Contenu 55
Présentation 55
Premiers pas 57
Application Nebula 60
Paramètres 61
Utilisation de Nebula Cosmos Max 63
Spécifications 67
Dépannage 68

FR
53
Consignes de sécurité
Veuillez lire toutes les instructions avant d'utiliser cet appareil. N'apportez pas de
modifications et ne procédez pas à des configurations qui ne sont pas décrites dans
ce manuel. Si des dommages corporels, des pertes de données ou des dommages
sont causés par le non-respect des instructions, la garantie ne s'applique pas.
Configuration
•
Pour réduire le risque d'incendie ou d'électrocution, ne pas exposer ce produit à la
pluie ou à l'humidité. Les objets remplis de liquides, tels que des vases, ne doivent
pas être placés sur cet appareil.
•
Ne pas placer l'appareil sur des surfaces souples telles que des nappes ou des
tapis, car cela pourrait constituer un risque d'incendie.
•
Ne pas placer l'appareil dans des zones exposées à la poussière et à la saleté, ou à
proximité de tout appareil générant un fort champ magnétique.
•
Pour éviter une surchauffe, ne pas bloquer ou obstruer les orifices de ventilation.
•
Ne jamais placer cet appareil dans un espace confiné. Toujours laisser
suffisamment d'espace autour de ce dispositif pour la ventilation.
•
Protéger l'appareil contre la lumière directe du soleil, la chaleur, les fluctuations
importantes de température et l'humidité. Éviter les températures extrêmes. La
plage de température idéale pour cet appareil et ses accessoires est entre 0 et
35°C / 0°F et 95°F.
•
Lorsque cet appareil fonctionne pendant une période prolongée, la surface peut
devenir chaude. L'éteindre immédiatement et débrancher le chargeur. Reprendre le
fonctionnement après que l'appareil ait refroidi.
•
Toujours manipuler cet appareil avec soin. Éviter de toucher l'objectif. Ne pas
laisser les enfants manipuler l'appareil sans surveillance.
•
Ne jamais placer d'objets lourds ou coupants sur cet appareil.
•
Pour éviter tout choc électrique, ne pas le démonter.
•
Utiliser uniquement des accessoires ou pièces de rechange spécifiés par le
fabricant.
•
Éviter les vibrations extrêmes, car elles pourraient endommager les composants
internes.
•
Rayonnement optique potentiellement dangereux émis par ce produit, ne pas regarder
directement la lampe lorsqu'elle est en fonctionnement. Peut abîmer les yeux.
Alimentation
•
Utiliser uniquement l'adaptateur fourni.
•
Mettre l'appareil hors tension avant de retirer le bloc d'alimentation de la prise.
•
Protéger le cordon d'alimentation pour éviter que quelqu'un ne marche dessus ou
ne le pince, particulièrement au niveau des fiches, des prises de courant et du point
de sortie de l'appareil.
•
Débrancher l'appareil en cas d'orage ou lorsqu'il n'est pas utilisé pendant une
longue période.

FR
54
•
Avant de réaliser une connexion ou d'en modifier une, s'assurer que tous les
appareils sont débranchés de la prise d'alimentation.
•
Ne jamais toucher le cordon d'alimentation ou le connecteur d'alimentation avec
les mains mouillées.
Protection de l'audition
•
Pour éviter tout dommage auditif, ne pas écouter à un volume élevé pendant une
période prolongée. Régler le volume à un niveau raisonnable.
En charge
•
Le type de chargeur est de type HKA18019095-6C avec une tension/courant de
sortie de 19V C.C./6,32A. Le chargeur doit être installé à proximité de ce produit et
doit être facilement accessible.
•
Ce chargeur est destiné exclusivement à une utilisation en intérieur.
•
Pendant la charge de cet appareil, l'environnement doit être à une température
ambiante normale (de préférence entre 5 et 25°C / 41°F et 77°C) avec une bonne
ventilation.
•
En raison du matériau utilisé pour le boîtier, cet appareil doit être connecté
uniquement à une interface USB version2.0 ou ultérieure.
Nettoyage
•
Utiliser un chiffon doux non pelucheux. Ne jamais utiliser de produits nettoyants
liquides, gazeux ou inflammables pour le nettoyage.
•
Ne pas utiliser d'agents liquides pour le nettoyage de l'objectif, afin de ne pas
endommager le film de protection de l'objectif.
•
Utiliser un chiffon nettoyant pour lentille pour nettoyer la lentille.
Réparations
•
Ne pas réparer cet appareil vous-même. Faire réparer votre appareil par un centre
de service agréé uniquement.
•
Un mauvais entretien peut entraîner des blessures ou endommager l'appareil.
•
Consulter un technicien qualifié pour toute réparation.
Précaution
•
Le rayonnement optique émis par cet appareil est potentiellement dangereux.
•
Ne pas regarder directement le faisceau pendant le fonctionnement. La lumière
vive peut abîmer vos yeux.
FR
55
CONTENU
Cosmos Max Adaptatrice Télécom-
mande
2 x AAA
Batteries
QSG
Présentation
1.
Vue avant
1
2 3
2.
Vue arrière
1
1
2 3 4 5
Caméra pour mise au point automatique
Objectif
Enceinte
Bouton d'alimentation
• Appuyez pour allumer
• Maintenez enfoncé pour éteindre
Entrée CC
Port d'entréeHDMI
• Connecter à un périphérique de lecture
Port USB Type-A
• Connexion à une clé USB
Port audio optique
• Connecter un périphérique audio à l'aide
d'un
câble optique
FR
56
3.
Vue de dessus
4.
Vue de dessous
1
2
3
4
5
6
7
8
9
5.
Voyant LED
État LED Description
Rouge fixe Fonctionnement en mode de projection
Ajuster la mise au point
Navigation
Arrière
Marche/arrêt
Appuyer pour activer l'Assistant
Google
Confirmer le contenu
sélectionné
Accueil
Paramètres du système
Augmenter/diminuer le volume
Attache pour trépied
Télécommande: Télécommande Nebula
Modèle: D0413

FR
57
PREMIERS PAS
1.
Placement
Placer cet appareil sur une surface plane et stable et le diriger directement vers la
surface de projection. Pour de meilleurs résultats, la surface de projection doit être
plane et de couleur blanche. La distance entre cet appareil et la surface de projection
doit être au minimum de 31pouces (0,8mètres) et au maximum de 157pouces
(3,98mètres) pour obtenir une image de projection de 30 à 150pouces.
31-125 inches
T
•
Il n'est pas nécessaire d'incliner l'appareil vers la surface de
projection. L'image de projection peut être ajustée grâce à la
correction de trapèze intégrée.
•
La distance entre l'appareil et la surface de projection détermine la
taille de l'image de projection. Pour un résultat optimal, placez le
projecteur à une distance comprise entre 63 et 104pouces (1,60m
et 2,6m).
•
Vous pouvez monter votre projecteur au plafond
2.
Préparer la télécommande
La télécommande est livrée avec deux piles AAA.
①
Pour la première utilisation, faire glisser pour ouvrir le compartiment à piles et
installer deux piles AAA.

FR
58
②
Pour remplacer les piles, déverrouiller et ouvrir le compartiment à piles, insérer une
nouvelle pile en respectant la polarité (+/-) indiquée, puis fermer et verrouiller le
compartiment à batterie.
+
+
3.
Pour démarrer
①
Brancher Nebula Cosmos Max à la prise de courant à l'aide de l'adaptateur
électrique fourni.
FR
59
②
Appuyer sur
pour allumer le projecteur.
③
Orienter l'appareil vers un mur ou une surface de projection appropriée. La fonction
de mise au point automatique intégrée permet à votre projecteur de régler la mise au
point automatiquement. Ou vous pouvez appuyer sur
sur la télécommande pour
ajuster manuellement la mise au point.
④
Pour la première utilisation, suivre les instructions à l'écran pour effectuer les
réglages de base.
FR
60
Application Nebula
Pour contrôler facilement cet appareil, nous vous recommandons de télécharger
l'application Nebula dédiée, Nebula Connect. Grâce à cette application, vous pouvez
utiliser l'écran comme une souris.
①
Téléchargez l'application Nebula Connect depuis l'App Store (appareils iOS) ou
Google Play (appareils Android).
Nebula Connect
②
Activez le Bluetooth sur le smartphone et sélectionnez [Nebula Cosmos Max ] dans
la liste des périphériques à connecter.
③
Ouvrez l'application Nebula Connect et suivez les instructions à l'écran pour
terminer la configuration de la connexion.
Nebula Cosmos Max alimenté par Android TV™
Suivez les instructions à l'écran pour effectuer le processus de configuration.
Option 1. Configuration rapide
Les utilisateurs de téléphones Android peuvent suivre les instructions pour configurer
rapidement Android TV avec leur téléphone Android.
Option 2. Configurer Nebula Cosmos Max
Pour les utilisateurs iOS, suivez les instructions pour compléter le processus.
①
Ignorez le processus d'installation rapide.
②
Connectez Nebula Capsule II au réseau.
③
Connectez-vous avec votre compte Google.
Une fois le processus de configuration terminé, votre Nebula Cosmos Max sera
alimenté par Android TV.
FR
61
Paramètres
Suivez le processus de configuration lors de la première mise sous tension du Nebula
Cosmos Max .
1.
Réseau
Cet appareil peut être connecté à Internet via une connexion sans fil (Wi-Fi).
①
Sur la page d'accueil, sélectionnez
> [Réseau et Internet] et appuyez sur ).
②
Suivez les instructions à l'écran pour établir la connexion réseau.
2.
Audio
Le format audio peut être modifié via les paramètres audio.
①
Sur la plage d'accueil, sélectionnez
> [Paramètres audio] et appuyez sur .
Changement automatique du
format audio numérique
Activez ou désactivez le changement automatique
de format audio numérique entre PCM et RAW
3.
HDMI
Choisissez HDMI 1/2 comme source d'entrée. Vous pouvez également modifier les
paramètres de la fonctionnalité CEC dans cette option.
①
Sur la page d'accueil, sélectionnez
> [HDMI] et appuyez sur .
Paramètres CEC
Appuyez sur la touche Entrée pour modifier les
paramètres CEC
4.
Projecteur
①
Sur la page d'accueil, sélectionnez
> [Paramètres du projecteur] et appuyez sur
.
[Luminosité]
Choisissez la luminosité entre 0 et 100%.
[Température des
couleurs]
[Normal] / [Froid] / [Chaud]
[Couleur du mur]
[Blanc] / [Rouge] / [Orange] / [Bleu] / [Vert] / [Cyan] /
[Jaune] / [Violet]
[Correction de trapèze]
Activer / désactiver la correction automatique de trapèze.
[Zoom]
[50-100%]
[Correction de la mise au
point automatique]
Appuyez sur la touche Entrée pour lancer la correction
automatique de la mise au point.
FR
62
[Mode projecteur]
[Auto]
: Détecte automatiquement si le projecteur est retourné.
Bascule automatiquement entre les options suivantes.
[Projection avant]
: Le projecteur est situé en face de la
surface de projection.
[Projection arrière]: Le projecteur est situé derrière la
surface de projection.
[Projection avant retournée]: Le projecteur est suspendu
au plafond, à l'envers. L'image est tournée de 180degrés.
[Projection arrière retournée]: Le projecteur est
suspendu au plafond à l'envers, derrière la surface de
projection. L'image est tournée à 180degrés et inversée
horizontalement.
[Paramètres Photo]
[Mode Photo]
[Standard] / [Film] / [Bureau]
Remarque: lors du choix d'un autre mode, la luminosité des
couleurs, le contraste et les paramètres de couleurs avancés
diffèrent. .
[Luminosité]
Choisissez la luminosité des couleurs entre 0 et 100%.
[Contraste]
Choisissez le contraste des couleurs entre 0 et 100%.
Paramètres avancés
Réglez la saturation, la teinte, le gain et le gamma des
couleurs
Restaurer les paramètres
par défaut
Appuyez sur Entrée pour restaurer les paramètres par
défaut
5.
Application
①
Sur la page d'accueil, sélectionnez
> [Application] et appuyez sur .
②
Sélectionnez une application et vérifiez la version actuelle, ouvrez ou forcez l'arrêt,
vérifiez le stockage utilisé, effacez les données ou le cache, ou activez ou désactivez
les notifications et les autorisations.
6.
Autres
Sur la page d'accueil, sélectionnez pour voir plus d'options de configuration.
[Préférences de l'appareil]
[À propos]
Vérifier les informations sur l'appareil et la mise à jour
du firmware.
[Date et heure] Réglage manuel de la date et l'heure.
[Langue] Sélectionner la langue à l'écran.

FR
63
[Clavier]
Sélectionner la langue du clavier que vous souhaitez utiliser.
[Son] Sélectionner la source de sortie audio et le format audio.
[Stockage] Vérifier le stockage de l'appareil et le stockage amovible.
[Réinitialiser]
Toutes les données de la mémoire interne de l'appareil
seront effacées.
[Date et heure]
[Date et heure automatiques] Activer ou désactiver la date et l'heure automatique.
[Régler la date] Définir manuellement la date.
[Régler l'heure] Définir l'heure manuellement.
[Définir le fuseau horaire] Définir un fuseau horaire.
[
Utiliser le format 24heures]
Activer ou désactiver le format 24 heures.
Utilisation de Nebula Cosmos Max
1.
Lecture à partir des dispositifs de lecture HDMI
Nebula Cosmos Max peut être connecté à divers dispositifs de lecture HDMI tels que
Ies récepteurs TV, les clés TV, les lecteurs DVD, les boîtiers décodeurs, les consoles
de jeux ou autres appareils.Deux appareils HDMI peuvent être connectés au projecteur
simultanément pour diffuser des vidéos en 4K@à 60 images par seconde.
Lecture depuis des dispositifs de lecture HDMI
①
Connecte Nebula Cosmos Max à un dispositif de lecture HDMI avec un câble HDMI
(non fourni).
• La lecture via HDMI commence automatiquement lors de la première connexion à
un dispositif de lecture HDMI.
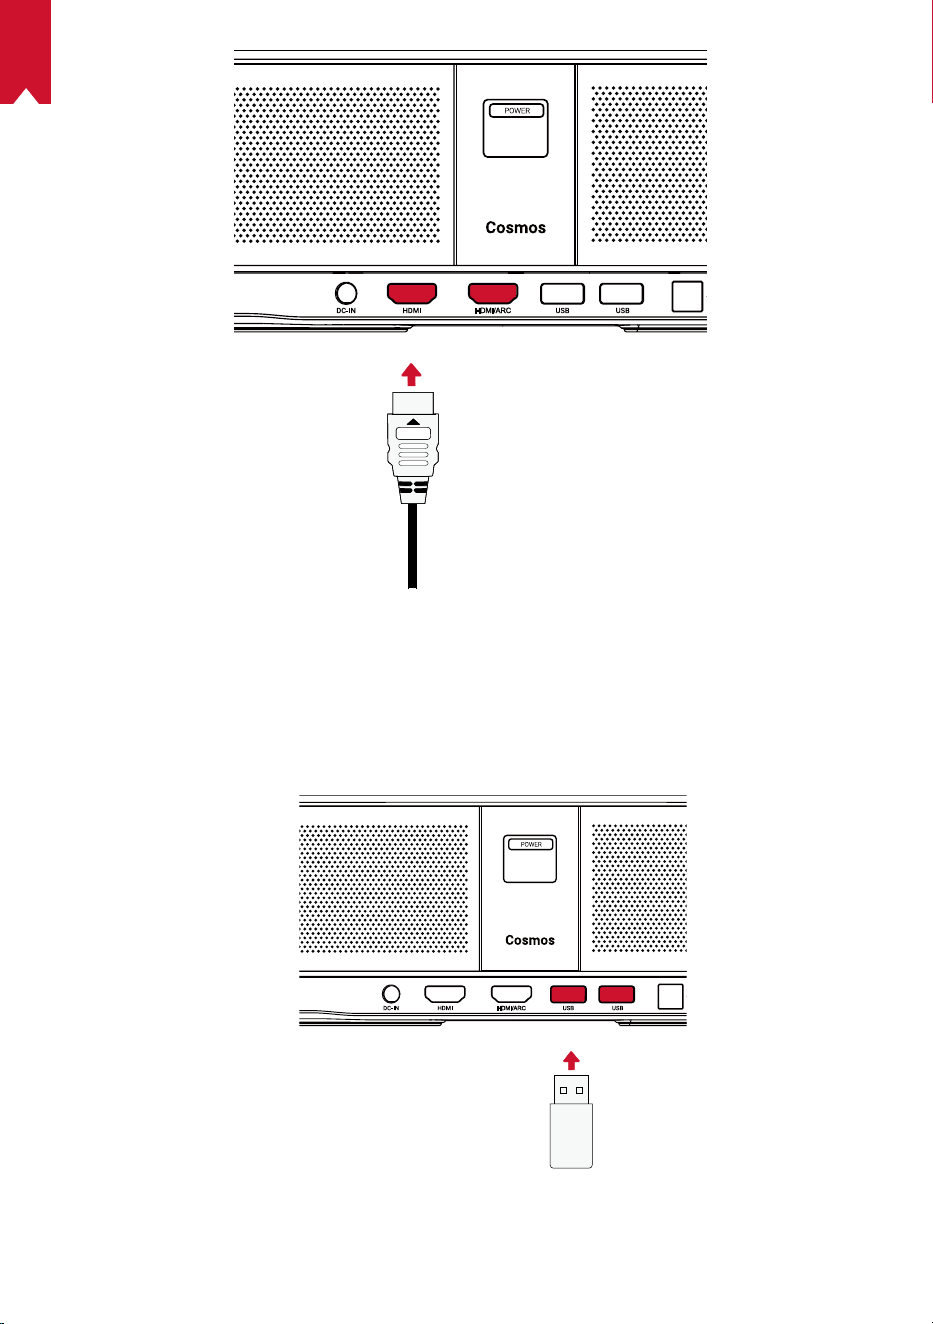
FR
64
2. Lecture à partir d'une clé USB
Avec Nebula Cosmos Max , vous pouvez lire de la musique, des vidéos et des images
stockées sur une clé USB.

FR
65
Lecture à partir d'une clé USB:
①
Téléchargez l'explorateur de fichiers ES à partir de
Google Play.
②
Insérez une clé USB dans le port USB.
• Le dossier USB apparaîtra dans l'explorateur de fichiers ES.
③
Sélectionnez les vidéos ou photos sur la clé USB que vous souhaitez lire, puis
appuyez sur
④
Appuyez sur
pour arrêter la lecture.
3. Connecter des accessoires Bluetooth
Vous pouvez connecter des périphériques Bluetooth à Nebula Cosmos Max .
①
Sur la page d'accueil, sélectionnez
> [Télécommandes et accessoires] et
appuyez sur
.
②
Sélectionnez Ajouter des accessoires.
• Le projecteur commencera à chercher des accessoires.
③
Appairez votre projecteur avec le périphérique à connecter.
④
Suivez les instructions à l'écran pour établir la connexion Bluetooth.
Remarque: Avant d'associer vos périphériques Bluetooth, assurez-vous que la
télécommande et votre projecteur sont en mode appairage.
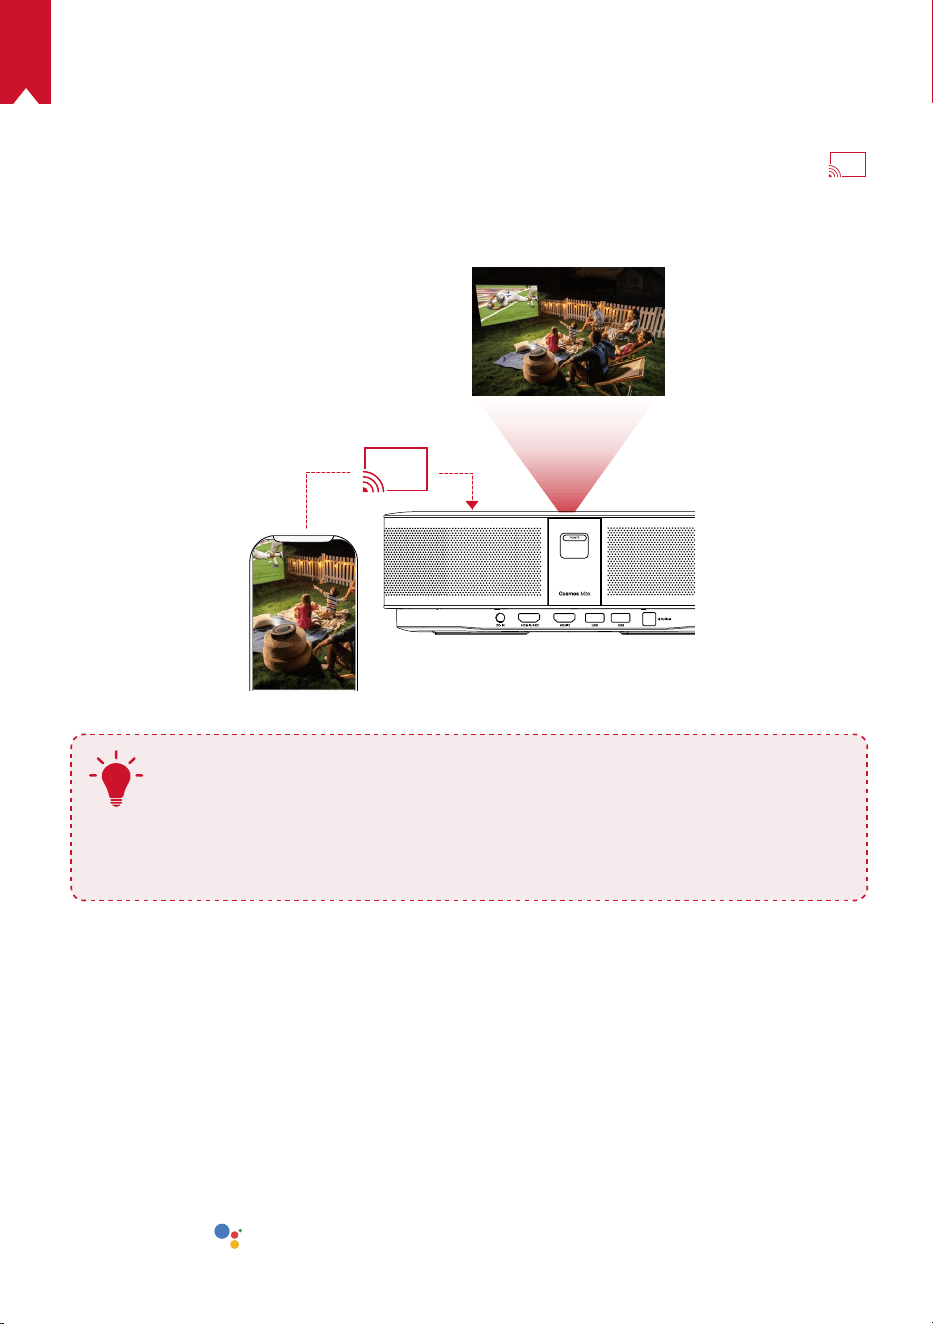
FR
66
4. Utilisé Chromecast intégré
Vous pouvez diffuser sans fil des photos, des vidéos et de la musique depuis votre
téléphone ou votre ordinateur sur votre Nebula Cosmos Max .
①
Lisez un clip vidéo sur votre téléphone, puis appuyez sur l'icône de diffusion
sur l'écran vidéo.
②
Sélectionnez le périphérique «D2150» sur lequel vous souhaitez diffuser.
• Ce projecteur répliquera l'écran du téléphone ou de l'ordinateur connecté.
T
• Veillez à ce que le Nebula Cosmos Max et votre téléphone soient
connectés au même réseau sans fil.
• Il est possible que certains contenus ne puissent pas être diffusés, en
raison de restrictions de droit d'auteur. Dans ce cas, vous pouvez diffuser
ces contenus via la même application installée sur votre Nebula Cosmos
Max .
5. Profitez des fonctionnalités de Google
Nebula Cosmos Max prend également en charge les fonctionnalités Google. Une fois
connecté à un réseau sans fil, vous pouvez accéder aux services en ligne, profiter de
films, de musique et images, ainsi que naviguer sur Internet. Outre les applications
préinstallées, vous pouvez également installer toute autre application à partir de
Google Play, et parler à l'Assistant Google pour effectuer certaines tâches.
Pour parler à l'Assistant Google.
①
Assurez-vous que vous avez suivi les étapes de la section «Connexion d'accessoires
Bluetooth» pour connecter votre télécommande à Nebula Cosmos Max . Une fois
connecté, le voyant de la télécommande devient rouge fixe.
②
Appuyez sur
sur la télécommande pour parler à l'assistant Google.

FR
67
Spécifications
Les spécifications et la conception sont susceptibles d'être modifiées
sans préavis.
Alimentation: 19V
9,47A
Consommation: < 180W
Consommation en veille: < 0,5W
Technologie d'affichage: DLP FHD 3840 × 2160p
Source de lumière: LED RGB
Taille d'image projetée: 30 à 150pouces
Rapport de contraste: 1000:1
Rapport de projection: 1,2
Distance de projection: 0,8m à 3,98m
CPU: Quad-core ARM Cortex-A55
OS: Android TV 9.0
RAM: 2Go DDR
ROM: 16Go eMMC
Enceintes: 4 x 10W
Wi-Fi: IEEE802.11a/b/g/n/c double fréquence 2,4G/5G
Version Bluetooth: V4.2
Système de fichiers USB: FAT32 / NTFS / exFAT
Température ambiante recommandée: de 5°C à 35°C/de 41°F à 95°F
Humidité relative: 15% ~ 85% (sans condensation)
Température et humidité pour le stockage: < 149°F / 65°C, humidité < 90%
Dimensions(H*P): 350 × 250 × 100 mm / 13.8 × 9.8 × 3.9 pouces
Poids: 3.3kg / 118.2oz
Dépannage

FR
68
①
Vous ne parvenez pas à mettre sous tension le projecteur avec la télécommande?
• Appuyez sur
sur le projecteur pour le mettre sous tension.
• Lorsqu'il est éteint, vous ne pouvez pas utiliser la télécommande pour allumer
l'appareil.
②
La télécommande ne fonctionne pas?
• Assurez-vous que les piles sont déjà placées dans la télécommande.
• Remplacez les piles.
③
L'image est floue?
• Déplacez légèrement le projecteur pour activer la mise au point automatique.
• Appuyez sur
pour ajuster la mise au point manuellement.
④
Impossible de se connecter au réseau Wi-Fi?
• Actualisez la liste des réseaux disponibles et réessayez.
• Redémarrez le routeur ou le périphérique sans fil et réessayez.
⑤
Comment mettre à jour le firmware?
• Quand une nouvelle version est détectée, il vous sera demandé de redémarrer et
de mettre à jour.

IT
68
Indice
Informazioni sulla sicurezza 69
Contenuto della confezione 71
Panoramica 71
Per iniziare 73
App Nebula 76
Impostazioni 77
Utilizzo di Nebula Cosmos Max 79
Specifiche 83
Risoluzione dei problemi 84

IT
69
Informazioni sulla sicurezza
Leggere tutte le istruzioni prima di utilizzare il dispositivo. Non apportare modifiche, né
creare impostazioni che non siano descritte nel presente manuale. La garanzia non si
applica in caso di lesioni personali, perdite di dati o danni causati dal mancato rispetto
delle istruzioni.
Configurazione
•
Per ridurre il rischio di incendi o scosse elettriche, non esporre il dispositivo a
pioggia o umidità. Oggetti contenenti liquidi come, ad esempio, vasi, non devono
essere collocati sul dispositivo.
•
Non posizionare il dispositivo su superfici morbide, come tovaglie o tappeti, in
quanto ciò potrebbe provocare un incendio.
•
Non posizionare il dispositivo in aree soggette a polvere e sporco eccessivi o vicino
ad apparecchi che generano un forte campo magnetico.
•
Per evitare il surriscaldamento, non bloccare né ostruire le aperture di aerazione.
•
Non collocare mai il dispositivo in uno spazio ristretto. Lasciare sempre spazio
sufficiente attorno al dispositivo per consentire l’areazione.
•
Proteggere il dispositivo dalla sovraesposizione alla luce diretta del sole, dal calore,
da ampie fluttuazioni di temperatura e dall’umidità. Evitare temperature estreme.
La temperatura di esercizio e di conservazione adatta per questo dispositivo e i
suoi accessori è compresa tra 0°C e 35°C.
•
Quando il dispositivo è in funzione per un periodo di tempo prolungato, la sua
superficie potrebbe riscaldarsi. In tal caso, spegnerlo immediatamente e scollegare
il caricabatterie. Riprendere l’utilizzo solo dopo che il dispositivo si è raffreddato.
•
Maneggiare il dispositivo sempre con cura. Evitare di toccare l’obiettivo. Non
consentire a bambini di maneggiare il dispositivo senza supervisione.
•
Non collocare mai oggetti pesanti o appuntiti sul dispositivo.
•
Per evitare scosse elettriche, non smontare il prodotto.
•
Usare esclusivamente accessori specificati dal produttore.
•
Evitare vibrazioni estreme poiché potrebbero danneggiare le componenti interne.
•
Possibili radiazioni ottiche pericolose emesse da questo prodotto, non fissare la
lampada operatoria in quanto potrebbe essere dannosa per gli occhi.
Alimentazione
•
Utilizzare solo l’adattatore di alimentazione in dotazione.
•
Spegnere il dispositivo prima di rimuovere l’alimentatore dalla presa di corrente.
•
Evitare che il cavo di alimentazione venga calpestato o schiacciato, soprattutto in
prossimità di spine, prese di derivazione e i fori da cui tali spine o prese fuoriescono
fuoriescono.

IT
70
•
Scollegare questo dispositivo in caso di temporali o se rimane inutilizzato per un
lungo periodo di tempo.
•
Prima di effettuare o modificare i collegamenti, assicurarsi che tutti i dispositivi
siano scollegati dalla presa di corrente.
•
Non toccare mai il cavo di alimentazione o il connettore di alimentazione con le
mani bagnate.
Sicurezza acustica
•
Al fine di prevenire danni all’udito, evitare l’ascolto ad alto volume per periodi di
tempo prolungati. Impostare il volume a un livello di sicurezza.
In carica
•
Il caricabatterie è di tipo HKA18019095-6C con tensione/corrente in uscita da 19V
CC/6,32A. Il caricabatterie deve essere installato vicino al prodotto e deve essere
facilmente accessibile.
•
Questo caricabatterie è destinato esclusivamente all’uso in ambienti interni.
•
Durante la ricarica, posizionare il dispositivo in una stanza con temperatura
ambiente normale (variabile da 5°C a 25°C, consigliato) e ben areata.
•
Considerato il materiale utilizzato per l’involucro, il dispositivo deve essere collegato
solo a un’interfaccia USB versione 2.0 o superiore.
Pulizia
•
Utilizzare un panno morbido e privo di lanugine. Per la pulizia del dispositivo, non
utilizzare mai detergenti liquidi, gassosi o facilmente infiammabili.
•
Non utilizzare detergenti liquidi per la pulizia dell’obiettivo onde evitare di
danneggiare la pellicola di rivestimento applicata sull’obiettivo.
•
Utilizzare l’apposita carta per la pulizia dell’obiettivo.
Riparazioni
•
Non effettuare autonomamente riparazioni sul dispositivo. Rivolgersi a un centro di
assistenza autorizzato per la riparazione del dispositivo.
•
Una manutenzione errata può causare lesioni o danni al dispositivo.
•
Affidarsi a personale qualificato per tutti gli interventi di assistenza.
Attenzione
•
Possibili radiazioni ottiche pericolose emesse dal dispositivo.
•
Non fissare il fascio di luce quando il dispositivo è in funzione. La luce intensa
potrebbe danneggiare gli occhi
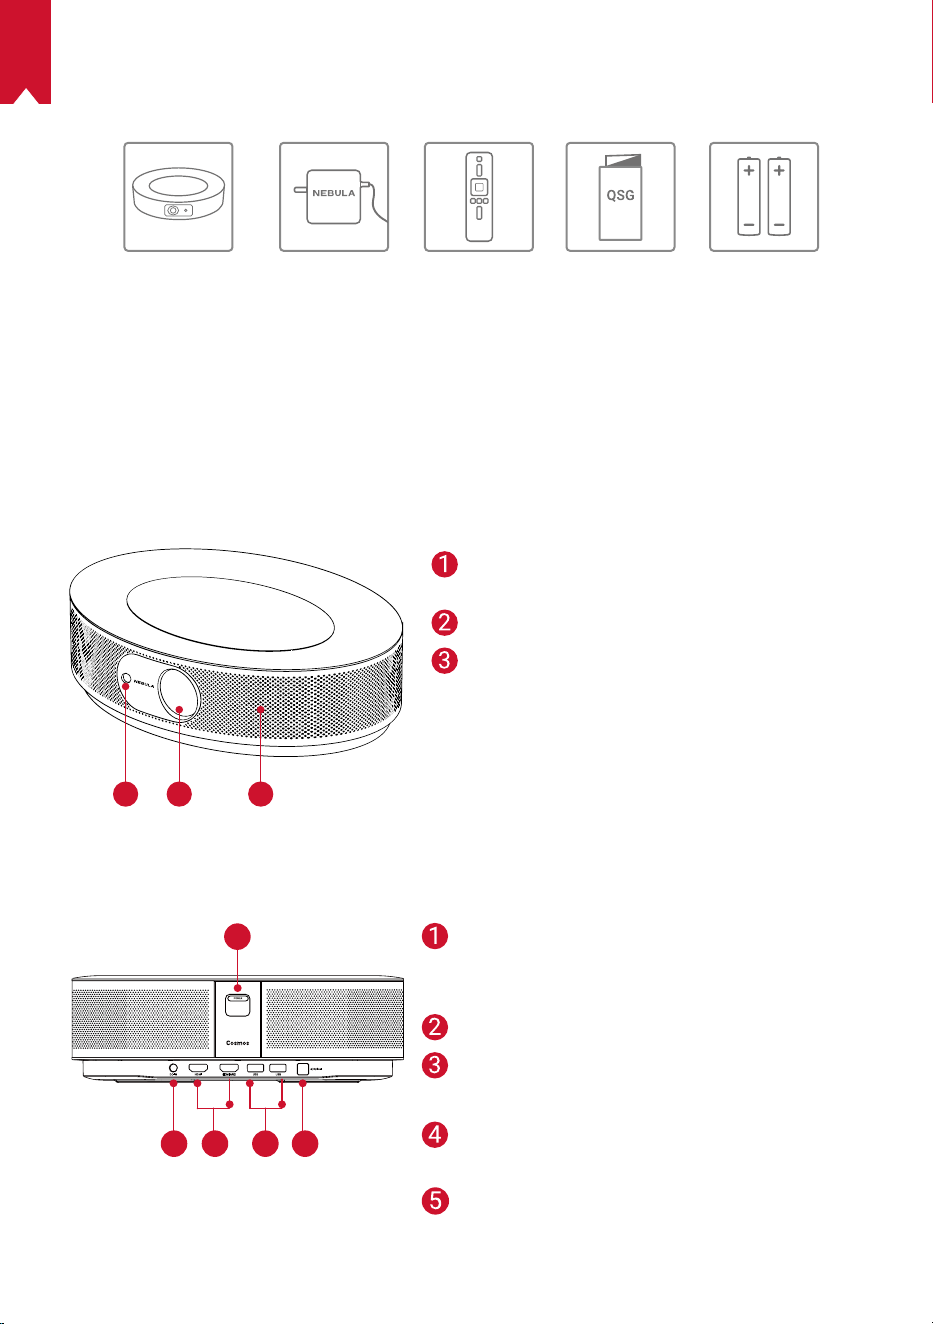
IT
71
CONTENUTO DELLA CONFEZIONE
Cosmos Max Adapter Telecomando 2 x AAA
Batterie
QSG
Panoramica
1.
Vista anteriore
1
2 3
2.
Vista posteriore
1
1
2 3 4 5
Telecamera per la messa a fuoco
automatica
Lente
Altoparlanter
Tasto di accensione
• Premere per accendere il dispositivo
• Tenere premuto per spegnere il dispositivo
Ingresso CC
Porta di ingresso HDMI
• Collegare a un dispositivo di riproduzione
Porta USB-A
• Collegare a un’unità flash USB
Porta audio ottica
• Consente di connettersi a un dispositivo
audio utilizzando un
cavo ottico
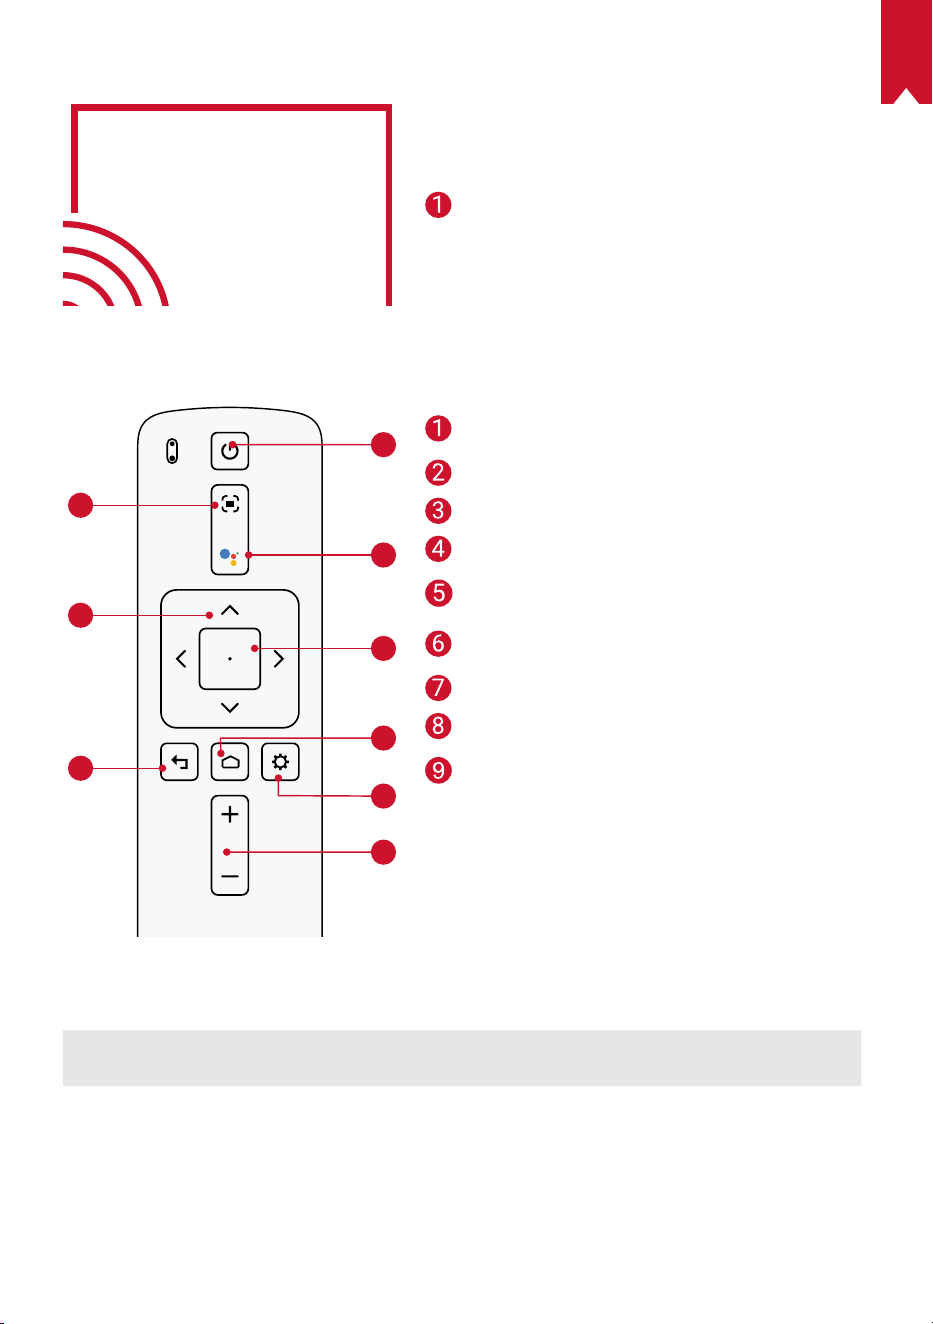
IT
72
3.
Vista dall’alto
4.
Vista dal basso
1
2
3
4
5
6
7
8
9
5.
Indicatore LED
Stato LED Descrizione
Rosso fisso Funzionamento in modalità proiettore
Regolazione della messa a
fuoco
Navigazione
Parte posteriore
Accensione/spegnimento
Premere per attivare l’Assistente
Google
Conferma del contenuto
selezionato
Base di ricarica
Impostazioni di sistema
Aumento/Diminuzione del
volume
Attacco per treppiede
Telecomando: Nebula RC
Modello: D0413
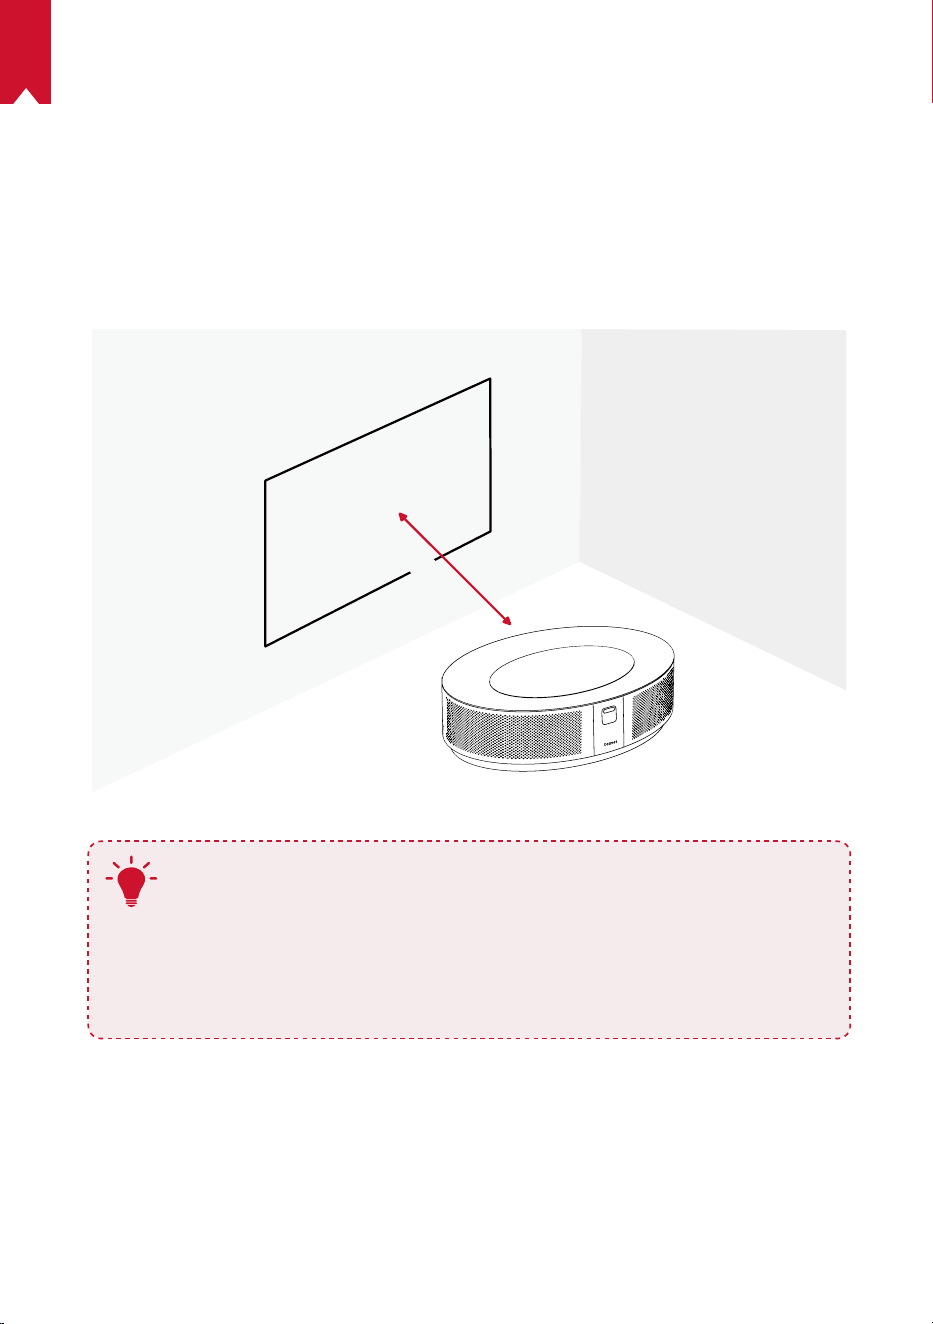
IT
73
Per iniziare
1.
Posizionamento
Posizionare il dispositivo su una superficie piana e stabile, puntandolo esattamente
verso la superficie di proiezione. Per ottenere risultati ottimali, la superficie di
proiezione deve essere bianca e piana. La distanza tra questo dispositivo e la superficie
di proiezione deve essere di minimo 0,8 metri e di massimo 3,98 metri per ottenere
un’immagine di proiezione da 20 a 100 pollici.
31-125 inches
T
•
Non è necessario inclinare il dispositivo verso la superficie di
proiezione. È possibile correggere l’immagine di proiezione usando
la correzione trapezoidale integrata.
•
La distanza tra il dispositivo e la superficie di proiezione determina
le dimensioni dell’immagine di proiezione. Per risultati ottimali,
impostare il proiettore a una distanza compresa tra 160 e 264cm.
•
È inoltre possibile montare il proiettore sul soffitto.
2.
Preparazione del telecomando
Il telecomando è dotato di due batterie AAA.
①
Per il primo utilizzo, aprire il vano batterie facendo scorrere il coperchio, quindi
installare le due batterie AAA.
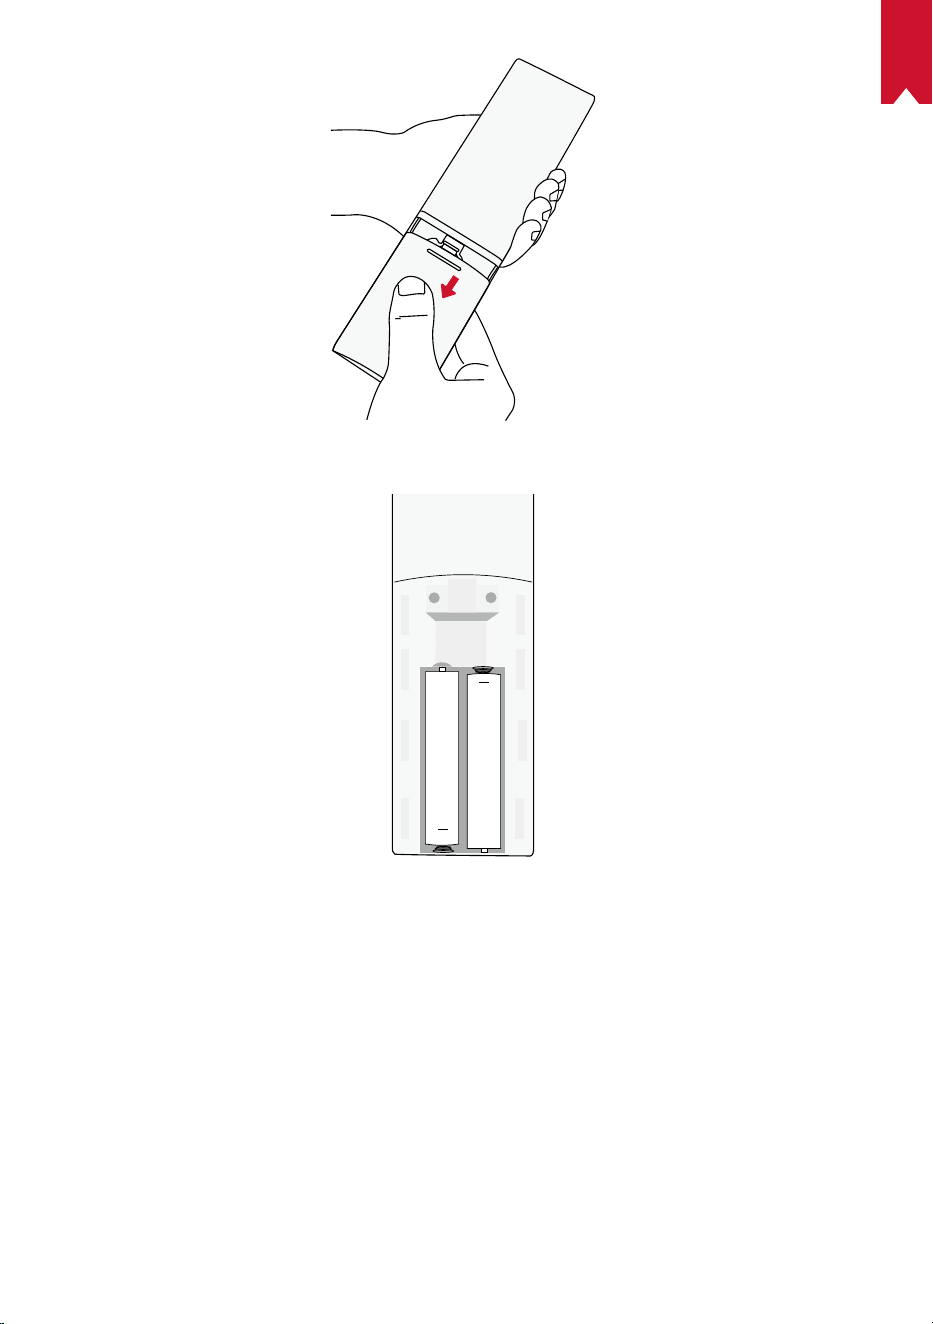
IT
74
②
Per sostituire le batterie, sbloccare e aprire il vano batterie, inserire quelle nuove
facendo corrispondere la polarità (+/-) come indicato, quindi chiudere il coperchio.
+
+
3.
Per iniziare
①
Collegare Nebula Cosmos Max a una presa di corrente utilizzando il l’adattatore di
alimentazione fornito.
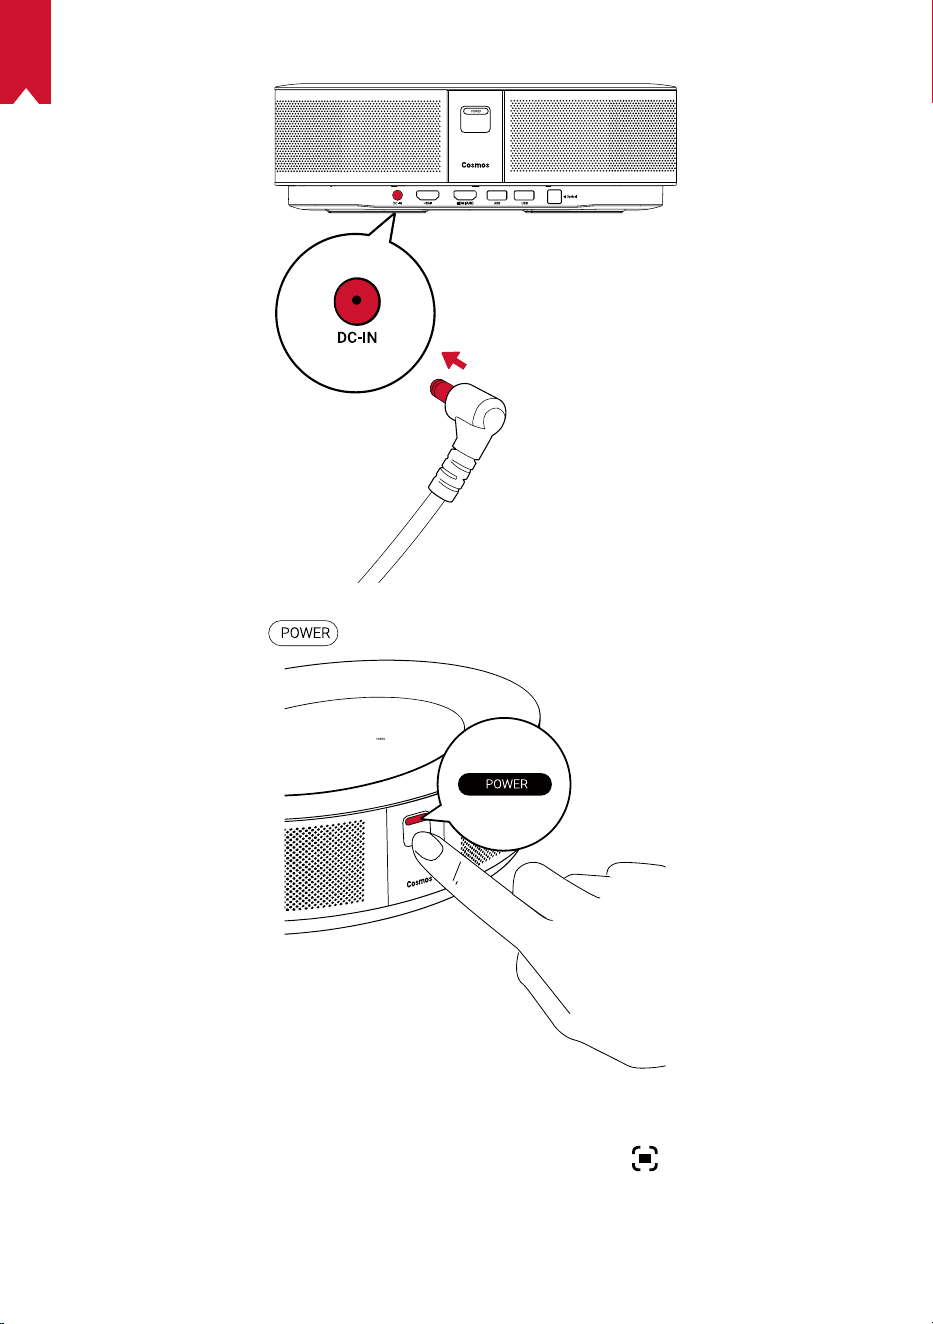
IT
75
②
Premere una volta
per accendere il proiettore.
③
Orientare il dispositivo verso una superficie di proiezione o una parete adatta. La
funzione di messa a fuoco automatica integrata consente al proiettore di attivare la
messa a fuoco automatica. In alternativa, tenere premuto
sul telecomando per
regolare manualmente la messa a fuoco.
④
Per il primo utilizzo, seguire le istruzioni visualizzate sullo schermo per completare
le impostazioni di base.
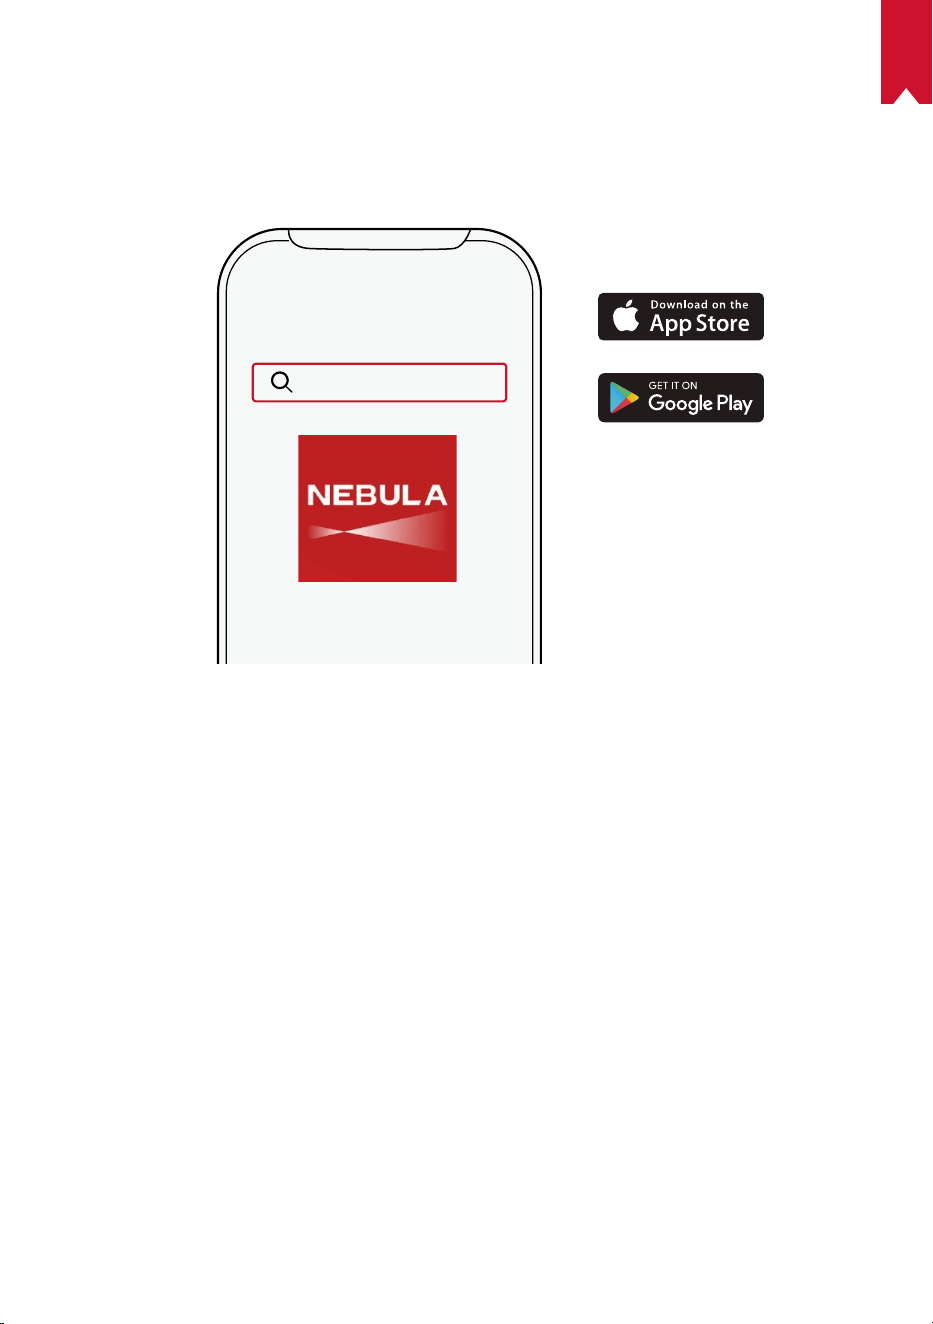
IT
76
App Nebula
Per controllare facilmente il dispositivo, consigliamo di scaricare l’app Nebula dedicata,
Nebula Connect. Tramite l’app è possibile utilizzare lo schermo come mouse.
①
Scaricare l’app Nebula Connect dall’App Store (dispositivi iOS) o da Google Play
(dispositivi Android).
Nebula Connect
②
Abilitare il Bluetooth sullo smartphone e selezionare [Nebula Cosmos Max ] come
dispositivo che si desidera connettere.
③
Aprire l’app Nebula Connect e seguire le istruzioni visualizzate sullo schermo per
completare la configurazione della connessione.
Accensione di Nebula Cosmos Max con Android
TV™
Seguire le istruzioni visualizzate sullo schermo per completare la procedura di
configurazione.
Opzione 1. Configurazione rapida
Gli utenti Android possono seguire le istruzioni per configurare rapidamente Android
TV tramite il proprio telefono Android.
Opzione 2. Installazione di Nebula Cosmos Max
Gli utenti iOS possono seguire le istruzioni per completare la procedura.
①
Saltare la procedura di configurazione rapida.
②
Connettere Nebula Cosmos Max alla rete.
③
Accedere con il proprio account Google.
Nebula Cosmos Max sarà alimentato da Android TV al termine della procedura di
configurazione.
IT
77
Impostazioni
Quando si accende Nebula Cosmos Max per la prima volta, eseguire tutti i passaggi
della procedura di configurazione.
1.
Rete
Il dispositivo può essere connesso a Internet tramite una connessione wireless (Wi-Fi).
①
Nella pagina Home, selezionare
> [Rete e Internet] e premere .
②
Seguire le istruzioni visualizzate sullo schermo per completare la connessione alla
rete.
2.
Audio
Il formato audio può essere modificato tramite le Impostazioni audio.
①
Nella pagina Home, selezionare
> [Impostazioni audio] e premere .
Modifica automatica del formato
audio digitale
Consente di abilitare o disabilitare la modifica
automatica del formato audio digitale tra PCM e
RAW
3.
HDMI
Scegli HDMI 1/2 come origine di input. È anche possibile modificare le impostazioni
CEC con questa opzione.
①
Nella pagina Home, selezionare
> [HDMI] e premere .
Impostazioni CEC
Premere Invio per modificare le impostazioni CEC
4.
Proiettore
①
Nella pagina Home, selezionare
> [Impostazioni proiettore] e premere .
[Luminosità]
Consente di scegliere la luminosità tra 0 e 100%
[Temperatura colore]
[Normale]/[Freddo]/[Caldo]
[Colore parete]
[Bianco]/[Rosso]/[Arancione]/[Blu]/[Verde]/[Ciano]/
[Giallo]/[Viola]
[Correzione trapezoidale]
Consente di attivare/disattivare la correzione immagine
trapezoidale.
[Zoom]
[50-100%]
[Correzione messa a fuoco
automatica]
Premere Invio per eseguire la correzione della messa a fuoco
automatica.
IT
78
[Modalità proiettore]
[Automatica]:
Consente di rilevare automaticamente se il
proiettore è invertito.
Consente di passare automaticamente tra queste opzioni.
[Proiettore frontale]:
il proiettore si trova davanti alla
superficie di proiezione.
[Proiettore posteriore]: il proiettore si trova dietro la
superficie di proiezione.
[Proiettore frontale capovolto]:
il proiettore è appeso al
soffitto in posizione capovolta. L’immagine è ruotata di 180gradi.
[Proiettore posteriore capovolto]:
il proiettore è appeso al
soffitto in posizione capovolta dietro la superficie di proiezione.
L’immagine è ruotata di 180gradi e speculare in orizzontale.
[Impostazioni immagini]
[Modalità immagini]
[Standard]/[Filmati]/[Ufficio]
Nota: quando si seleziona una modalità diversa, la luminosità
del colore, il contrasto e le impostazioni avanzate del colore
differiscono.
[Luminosità]
Consente di regolare la luminosità del colore tra 0 e 100%
[Contrasto]
Consente di regolare il contrasto del colore tra 0 e 100%.
Impostazioni avanzate
Consente di regolare la saturazione, la tonalità, il
guadagno e la gamma del colore
Ritorna alle impostazioni
predefinite
Premere Invio per reimpostare l’impostazione predefinita
5.
Apps
①
Nella pagina Home, selezionare
> [App] e premere .
②
Selezionare un’app e verificare la versione corrente, aprire l’app o forzarne l’arresto,
controllare la quantità di memoria utilizzata, cancellare i dati o la cache, oppure
abilitare/disabilitare notifiche e autorizzazioni.
6.
Altre
Nella pagina Home, selezionare per cercare altre opzioni di impostazione.
[Preferenze del dispositivo]
[Informazioni su]
Consente di controllare le informazioni sul dispositivo e
l’aggiornamento del firmware.
[Data e ora] Consente di impostare manualmente la data e l’ora.
[Lingua]
Consente di selezionare la lingua di visualizzazione
sullo schermo.

IT
79
[Tastiera]
Consente di selezionare il tipo di lingua che si desidera
utilizzare sulla tastiera.
[Audio]
Consente di selezionare l’origine di output e il formato audio.
[Memoria]
Consente di controllare la memoria del dispositivo e la
memoria rimovibile.
[Ripristino]
Tutti i dati nella memoria interna del dispositivo saranno eliminati.
[Data e ora]
[Data e ora automatiche]
Consente di abilitare o disabilitare la data e l’ora automatiche.
[Imposta data] Per impostare manualmente la data.
[Imposta ora] Per impostare manualmente l’ora.
[Imposta fuso orario] Consente di impostare un fuso orario.
[
Usa formato di 24 ore]
Consente di abilitare o disabilitare il formato 24 ore.
Utilizzo di Nebula Cosmos Max
1.
Riproduzione da dispositivi di riproduzione HDMI
Nebula Cosmos Max può essere collegato a vari dispositivi di riproduzione HDMI, ad
esempio TV box, TV stick, lettori DVD, decoder digitali, console per videogiochi o altri
dispositivi.Due dispositivi HDMI possono essere collegati contemporaneamente al
proiettore per lo streaming video in 4K@60fps.
Per eseguire la riproduzione da dispositivi HDMI:
①
Collegare Nebula Cosmos Max a un dispositivo di riproduzione HDMI usando un
cavo HDMI (non in dotazione).
• La riproduzione HDMI si avvia automaticamente non appena il proiettore viene
collegato a un dispositivo di riproduzione HDMI.
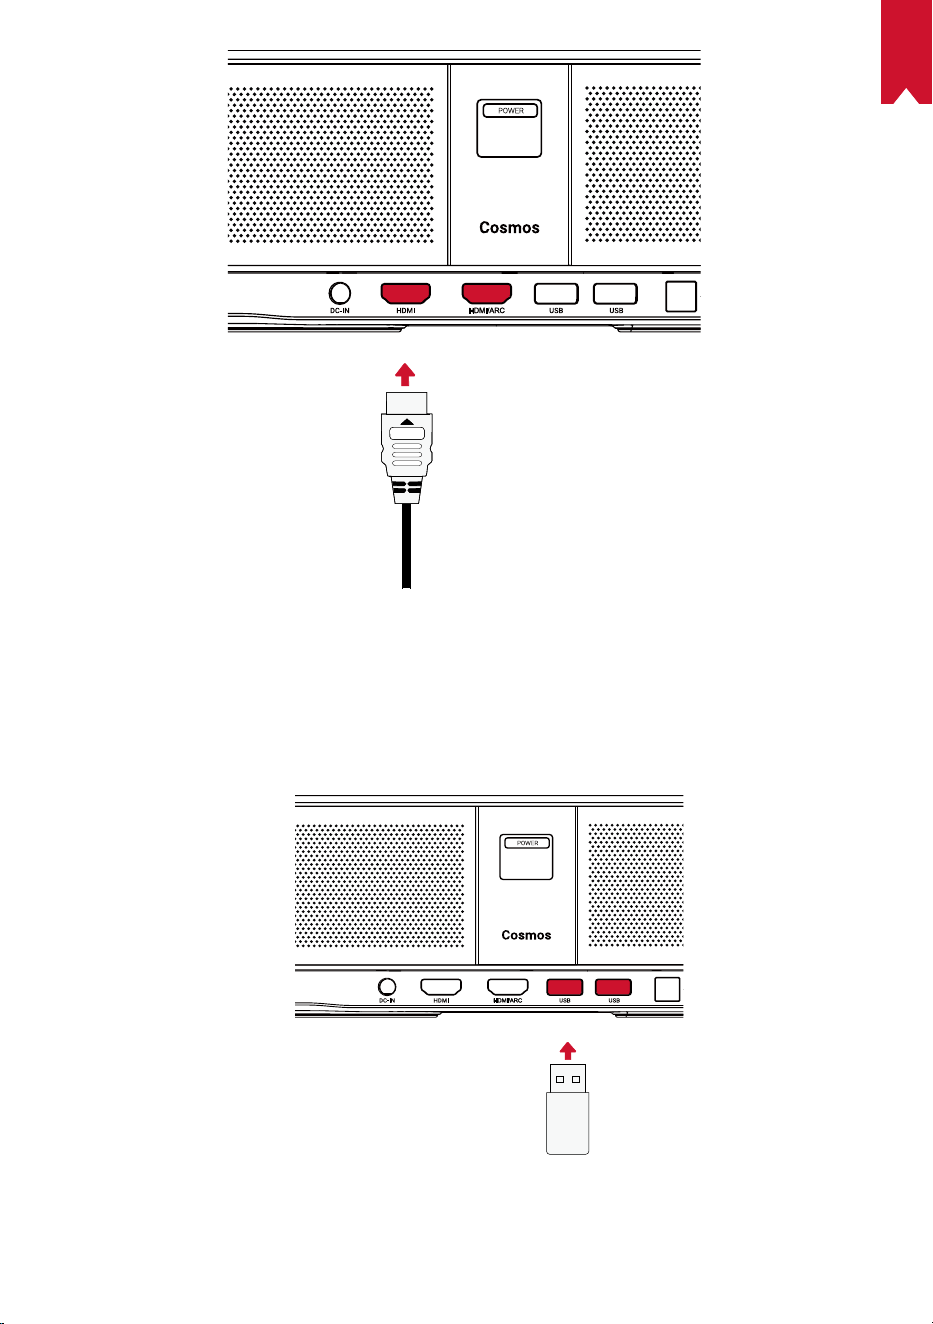
IT
80
2. Riproduzione da un’unità USB
Con Nebula Cosmos Max , è possibile ascoltare musica e guardare foto e video
memorizzati su un’unità USB.
IT
81
Per eseguire la riproduzione da un’unità USB:
①
Scaricare ES File Explorer da Google Play.
②
Inserire un’unità USB nell’apposita porta.
• Verrà visualizzata la cartella USB su ES File Explorer.
③
Selezionare i video o le foto che si desidera riprodurre dall’unità USB, quindi premere
.
④
Premere
per interrompere la riproduzione.
3. Collegamento di accessori Bluetooth
È possibile collegare dispositivi Bluetooth al proiettore Nebula Cosmos Max .
①
Nella pagina Home, selezionare > [Telecomandi e accessori] e premere .
②
Selezionare Aggiungi accessori.
• Il proiettore inizierà a ricercare gli accessori.
③
Associare il proiettore al dispositivo da collegare.
④
Seguire le istruzioni visualizzate sullo schermo per completare la connessione
Bluetooth.
Nota: prima di associare i dispositivi Bluetooth, assicurarsi che il telecomando e il
proiettore si trovino in modalità di associazione.
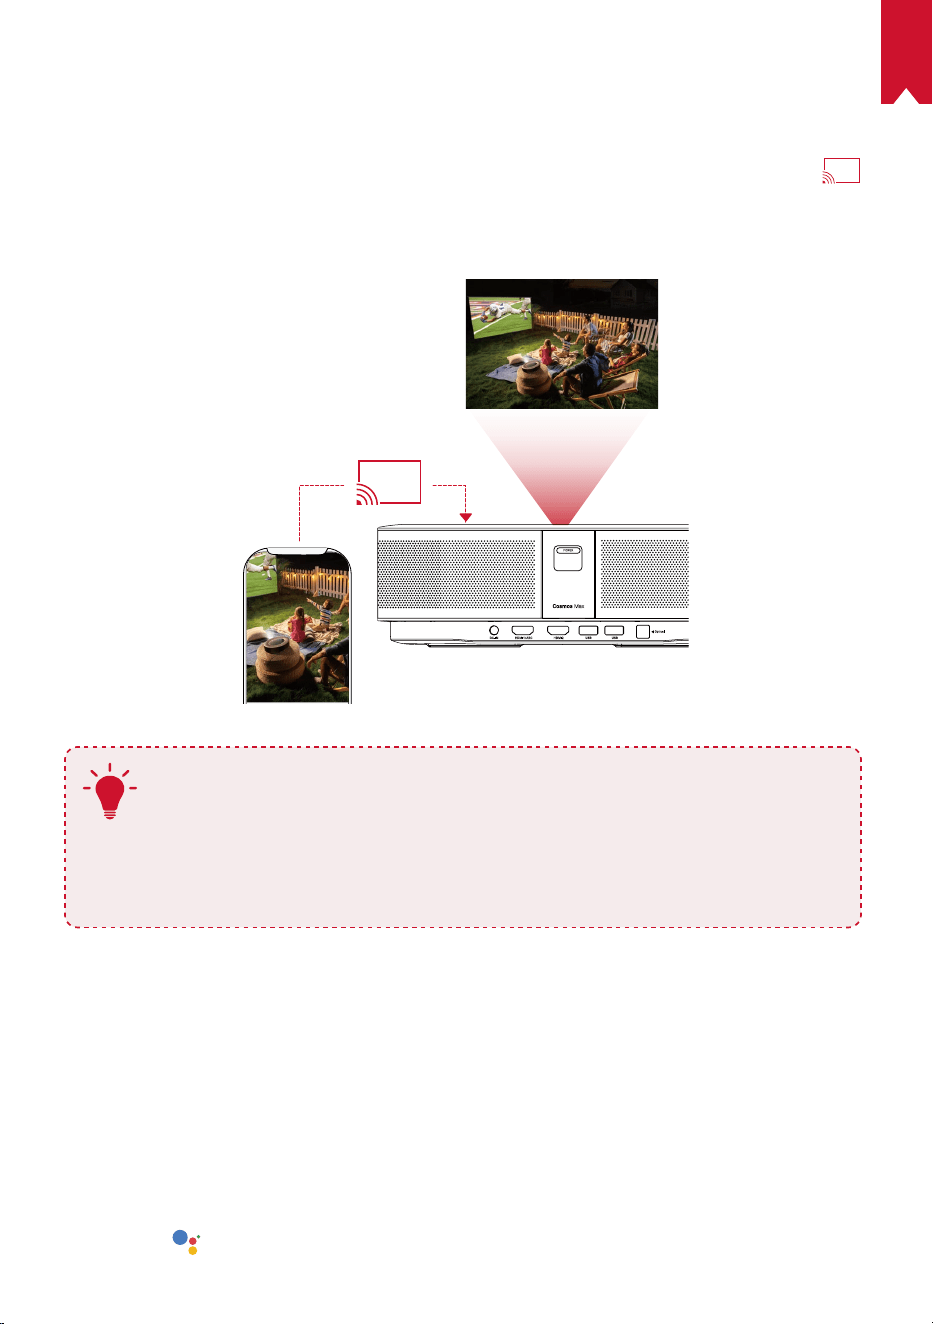
IT
82
4. Utilizzo dell’integrazione Chromecast
È possibile trasmettere foto, video e brani musicali dal telefono o dal computer al
dispositivo Nebula Cosmos Max .
①
Riprodurre una clip video sul telefono e quindi toccare l’icona di trasmissione
sulla schermata video.
②
Selezionare il dispositivo “D2150” sul quale si desidera trasmettere i file.
• Il dispositivo proietterà lo schermo del telefono o del computer collegato.
T
• Accertarsi che Nebula Cosmos Max e il telefono siano entrambi connessi
alla stessa rete wireless.
• Alcuni contenuti potrebbero non essere disponibili per la proiezione
a causa di restrizioni dovute al copyright. In tal caso, sarà possibile
riprodurre i suddetti contenuti in streaming, tramite la stessa app
installata sul dispositivo Nebula Cosmos Max .
5. Utilizzo delle funzionalità Google
Nebula Cosmos Max supporta anche le funzionalità Google. Una volta eseguita la
connessione a una rete wireless, è possibile accedere a servizi online, godersi film,
musica e foto e navigare in Internet. Oltre alle app già installate, l’utente può installare
anche altre app da Google Play e parlare con l’Assistente Google per effettuare certe
attività.
Per parlare con Assistente Google:
①
Assicurarsi di aver seguito i passaggi descritti nella sezione “Collegamento di accessori
Bluetooth” per collegare il telecomando a Nebula Cosmos Max . Una volta eseguito il
collegamento, l’indicatore LED sul telecomando diventerà di color rosso fisso.
②
Premere
sul telecomando per parlare con l’Assistente Google.
IT
83
Specifiche
Le specifiche e il design sono soggetti a modifiche senza preavviso.
Alimentazione: 19V
9,47A
Consumo energetico: <180W
Consumo energetico in standby: <0,5W
Tecnologia display: DLP UHD3840x2160P
Sorgente luminosa: LED RGB
Dimensioni immagine di proiezione: 30-150”
Rapporto di contrasto: 1000:1
Rapporto di proiezione: 1,2
Distanza di proiezione: da 0,8m a 3,98m
CPU: Quad-core ARM Cortex-A55
SO: Android TV 9.0
RAM: DDR da 2GB
ROM: eMMC da 16GB
Driver altoparlante: 10W x 4
Wi-Fi: IEEE802.11a/b/g/n/ac doppia frequenza 2.4G/5G
Versione Bluetooth: V4.2
File system USB: FAT32/NTFS/exFAT
Temperatura ambiente consigliata: da 5°C a 35°C
Umidità relativa: 15%~85% (senza condensa)
Temperatura e umidità di conservazione: < 65°C, < 90% di umidità
Dimensioni (A*P): 350 × 250 × 100mm
Peso: 33kg

IT
84
Risoluzione dei problemi
①
Impossibile accendere il proiettore con il telecomando?
• Tenere premuto
sul proiettore per accenderlo.
• Quando il dispositivo è spento, non è possibile utilizzare il telecomando per
accenderlo.
②
Il telecomando non funziona?
• Assicurarsi che le batterie siano già installate nel telecomando.
• Sostituire le batterie.
③
L’immagine è sfocata?
• Spostare leggermente il proiettore per attivare la messa a fuoco.
• Premere
per regolare manualmente la messa a fuoco.
④
Impossibile connettersi a una rete Wi-Fi?
• Aggiornare l’elenco delle reti disponibili e riprovare.
• Riavviare il router wireless o il dispositivo e riprovare.
⑤
Come si esegue l’aggiornamento del firmware?
• Quando viene rilevata una nuova versione, verrà richiesto di riavviare il dispositivo
e di eseguire l’aggiornamento.

NL
85
Inhoudsopgave
Veiligheidsinstructies 86
Wat zit er in de doos? 88
Overzicht 88
Aan de slag 90
Nebula-app 93
Instellingen 94
De Nebula Cosmos Max gebruiken 96
Specificaties 100
Problemen oplossen 101

NL
86
Veiligheidsinstructies
Lees alle instructies voordat u dit apparaat gebruikt. Breng geen wijzigingen aan
en maak geen instellingen die niet in deze handleiding worden beschreven. Indien
lichamelijk letsel, het verlies van gegevens of schade wordt veroorzaakt door het niet
opvolgen van instructies, is de garantie niet van toepassing.
Instellen
•
Stel het apparaat niet bloot aan regen of vocht om het risico op brand en/of
elektrische schokken te beperken. Plaats geen voorwerpen gevuld met vloeistof,
zoals vazen, op dit apparaat.
•
Plaats dit apparaat niet op zachte oppervlakken zoals tafelkleden of tapijten, omdat
het apparaat in dat geval brandgevaarlijk kan zijn.
•
Plaats dit apparaat niet op plaatsen waar het wordt blootgesteld aan overmatig
stof en vuil of in de buurt van apparaten die een sterk magnetisch veld genereren.
•
Zorg ervoor dat de ventilatieopeningen niet zijn verstopt of geblokkeerd om
oververhitting te voorkomen.
•
Plaats dit apparaat nooit in een afgesloten ruimte. Laat altijd voldoende ruimte vrij
rond dit apparaat voor ventilatie.
•
Bescherm dit apparaat tegen overmatige blootstelling aan direct zonlicht, hitte,
grote temperatuurschommelingen en vocht. Vermijd extreme temperaturen. De
geschikte bedrijfs- en opslagtemperatuur voor dit apparaat en de bijbehorende
accessoires is 0°C tot 35 °C.
•
Als dit apparaat lange tijd in gebruik is, kan het oppervlak heet worden. Schakel
het apparaat in dit geval onmiddellijk uit en trek de stekker van de oplader uit het
stopcontact. U kunt het gebruik hervatten nadat het apparaat is afgekoeld.
•
Ga altijd voorzichtig om met dit apparaat. Raak de lens niet aan. Laat kinderen niet
zonder toezicht gebruik maken van het apparaat.
•
Plaats nooit zware of scherpe voorwerpen op dit apparaat.
•
Niet demonteren om elektrische schokken te voorkomen.
•
Gebruik uitsluitend door de fabrikant gespecificeerde hulpstukken en accessoires.
•
Vermijd extreme trillingen omdat deze de interne onderdelen kunnen beschadigen.
•
Er wordt mogelijk gevaarlijke optische straling uitgezonden door dit apparaat. Staar
niet in een brandende lamp. Dit kan schadelijk zijn voor uw ogen.
Voeding
•
Gebruik alleen de meegeleverde voedingsadapter.
•
Schakel het apparaat uit voordat u de stekker van de voeding uit het stopcontact haalt.
•
Bescherm het netsnoer, zodat er niet overheen kan worden gelopen en het niet
beklemd kan raken, met name bij stekkers, stopcontacten en het punt waar het snoer
uit dit apparaat komt.
•
Haal de stekker van dit apparaat uit het stopcontact bij onweer of wanneer het
apparaat gedurende een langere periode niet wordt gebruikt.

NL
87
•
Zorg er voordat u aansluitingen maakt of wijzigt voor dat alle apparaten zijn
losgekoppeld van het lichtnet.
•
Raak het netsnoer en de voedingsaansluiting nooit met natte handen aan.
Gehoorbescherming
•
Luister niet gedurende langere perioden op een hoog volume om
gehoorbeschadiging te voorkomen. Stel het volume in op een veilig niveau.
Opladen
•
Dit product wordt geleverd met een oplader van het type HKA18019095-6C met een
uitgangsspanning/-stroom van DC 19 V/6,32 A. De oplader moet in de buurt van de
apparatuur worden geïnstalleerd en eenvoudig bereikbaar zijn.
•
Deze oplader is alleen geschikt voor gebruik binnenshuis.
•
Plaats dit apparaat tijdens het opladen in een omgeving met een normale
kamertemperatuur (van 5 °C tot 25 °C) en goede ventilatie.
•
Vanwege het gebruikte behuizingsmateriaal mag dit product alleen worden
aangesloten op opladers met USB 2.0 of hoger.
Reiniging
•
Gebruik een zachte, pluisvrije doek. Gebruik nooit vloeibare, gasvormige of licht
ontvlambare reinigingsmiddelen om het apparaat te reinigen.
•
Gebruik geen vloeibare reinigingsmiddelen om de lens te reinigen om te voorkomen
dat de coating op de lens beschadigd raakt.
•
Gebruik lensreinigingspapier om de lens te reinigen.
Reparaties
•
Voer zelf geen reparaties uit aan dit apparaat. Laat uw apparaat alleen repareren
door een erkend servicecentrum.
•
Onjuist onderhoud kan leiden tot letsel of schade aan dit apparaat.
•
Laat al het onderhoud over aan gekwalificeerd onderhoudspersoneel.
Let op
•
Er wordt mogelijk gevaarlijke optische straling uitgezonden door dit apparaat.
•
Staar niet in de lichtstraal. Het felle licht kan uw ogen beschadigen.

NL
88
WAT ZIT ER IN DE DOOS?
Cosmos Max Adapter Afstands-
bediening
2 x AAA
Batterijen
QSG
Overzicht
1.
Vooraanzicht
1
2 3
2.
Achteraanzicht
1
1
2 3 4 5
Camera voor automatisch scherpstellen
Lens
Luidspreker
Aan/uit-knop
• Druk om in te schakelen
• Houd ingedrukt om uit te schakelen
Voedingsingang
HDMI-ingangspoort
• Sluit aan op een afspeelapparaat
USB-A-poort
• Sluit aan op een USB-stick
Optische audiopoort
• Sluit aan op een audioapparaat met
behulp van een
optische kabel

NL
89
3.
Bovenaanzicht
4.
Onderaanzicht
1
2
3
4
5
6
7
8
9
5.
Led-indicatielampje
Led-status Beschrijving
Brandt rood Gebruik in de projectormodus
Scherpstelling aanpassen
Navigatie
Terug
In-/uitschakelen
Druk om Google Assistent te
activeren
Geselecteerde inhoud
bevestigen
Start
Systeeminstellingen
Volume omhoog / omlaag
Statiefaansluiting
Afstandsbediening: Nebula RC
Model: D0413
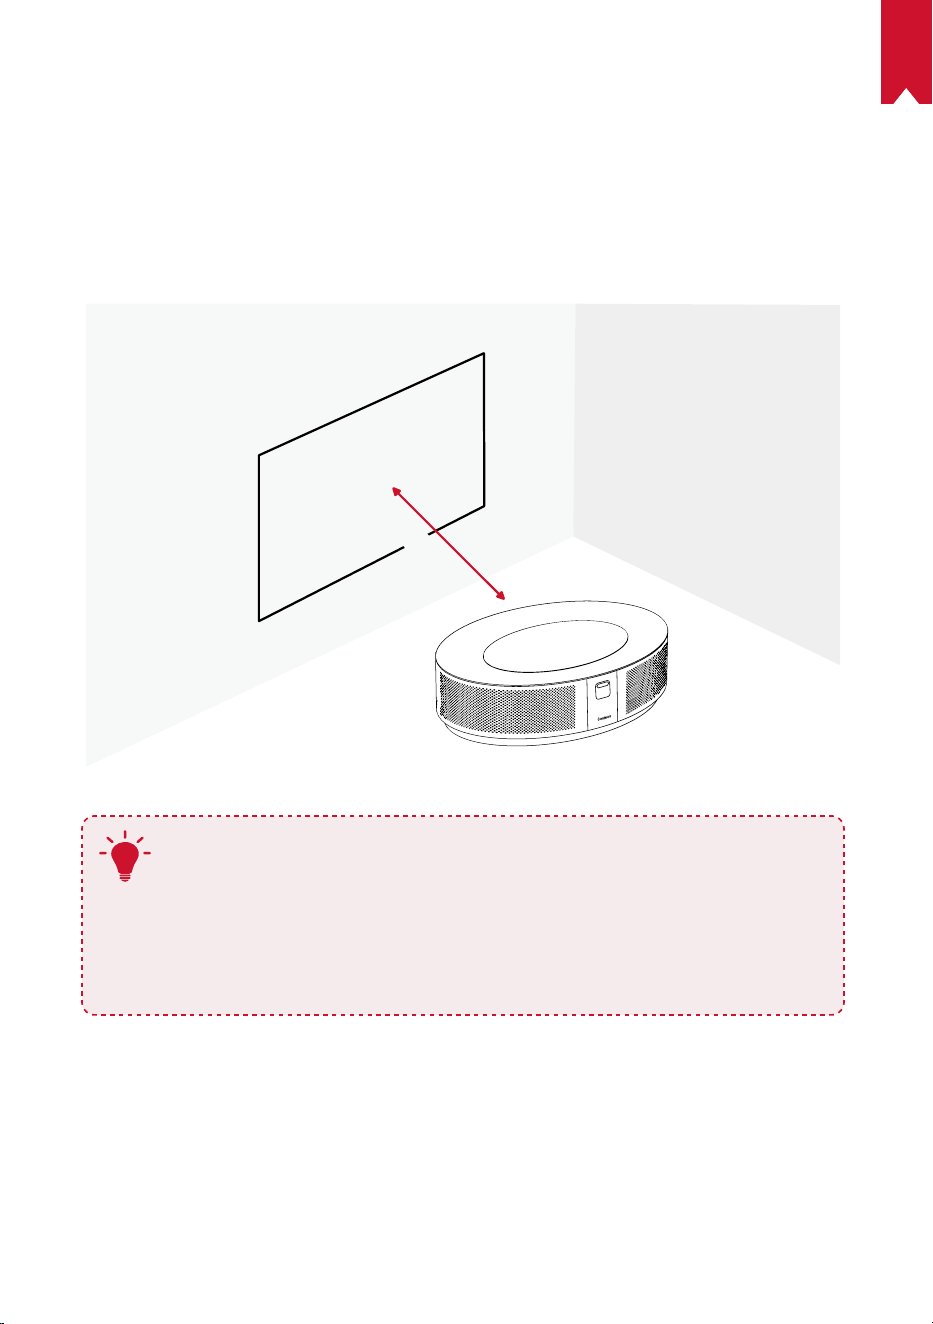
NL
90
AAN DE SLAG
1.
Plaatsing
Plaats dit apparaat op een stabiel, vlak oppervlak en richt het recht op het
projectieoppervlak. Voor de beste resultaten moet het projectieoppervlak wit en vlak
zijn. De afstand tussen dit apparaat en het projectieoppervlak moet minimaal 0,8 meter
en maximaal 3,98 meter bedragen voor een projectiebeeld van 30 tot 150 inches.
31-125 inches
T
•
Het is niet nodig om het apparaat naar het projectieoppervlak te
kantelen. U kunt het projectiebeeld corrigeren met de ingebouwde
trapeziumcorrectie.
•
De afstand tussen het apparaat en het projectieoppervlak bepaalt de
grootte van het projectiebeeld. Voor de beste resultaten plaatst u de
projector op een afstand van 1,6 tot 2,6 meter.
•
U kunt uw projector ook aan het plafond bevestigen.
2.
De afstandsbediening voorbereiden
De afstandsbediening wordt geleverd met twee AAA-batterijen.
①
Als u het apparaat voor het eerst gebruikt, schuif het batterijvak dan open en
installeer twee AAA-batterijen.

NL
91
②
Als u de batterijen wilt vervangen, ontgrendel en open het batterijvak dan, plaats de
nieuwe batterijen in de juiste richting (+/-), zoals aangegeven in het vak, en sluit het
batterijvak.
+
+
3.
Aan de slag
①
Sluit de Nebula Cosmos Max aan op het lichtnet met behulp van de meegeleverde
voedingsadapter.

NL
92
②
Druk op om de projector in te schakelen.
③
Richt het apparaat op een geschikt projectieoppervlak of een geschikte muur. De
ingebouwde automatische scherpstelfunctie stelt uw projector in staat om automatisch
scherpstellen in te schakelen. Als alternatief kunt u op
op de afstandsbediening drukken
om handmatig scherp te stellen.
④
Volg bij het eerste gebruik de instructies op het scherm om het instellen van de
basisinstellingen te voltooien.

NL
93
Nebula-app
We raden aan de speciale Nebula-app, Nebula Connect, te downloaden om dit
apparaat eenvoudig te bedienen. Door deze app te gebruiken kunt u het scherm als
muis gebruiken.
①
Download de Nebula Connect-app uit de App Store (iOS-apparaten) of Google Play
(Android-apparaten).
Nebula Connect
②
Schakel Bluetooth in op uw smartphone en selecteer [Nebula Cosmos Max ] als het
apparaat om verbinding mee te maken.
③
Open de Nebula Connect-app en volg de instructies op het scherm om het instellen
van de verbinding te voltooien.
De Nebula Cosmos Max inschakelen met Android
TV™
Volg de instructies op het scherm om het installatieproces te voltooien.
Optie 1. Snel instellen
Gebruikers van Android-telefoons kunnen de instructies volgen om snel Android TV in
te stellen met uw Android-telefoon.
Optie 2. Nebula Cosmos Max instellen
Voor iOS-gebruikers: volg de instructies om het proces te voltooien.
①
Sla het snelle instelproces over.
②
Verbind de Nebula Cosmos Max met het netwerk.
③
Meld u aan met uw Google-account.
Uw Nebula Cosmos Max wordt na het voltooien van het instelproces aangedreven door
Android TV.
NL
94
Instellingen
Doorloop het instelproces wanneer u de Nebula Cosmos Max voor het eerst inschakelt.
1.
Netwerk
Dit apparaat kan via een draadloze (wifi-)verbinding worden verbonden met het
internet.
①
Selecteer op de startpagina
> [Netwerk en internet] en druk op .
②
Volg de instructies op het scherm om het instellen van de netwerkverbinding te
voltooien.
2.
Audio
De audio-indeling kan worden ingesteld via de Audio-instellingen.
①
Selecteer op de startpagina
> [Audio-instellingen] en druk op .
Digitale audio-indeling
automatisch wijzigen
Schakel het automatisch wijzigen van de digitale
audio-indeling tussen PCM en RAW in of uit
3.
HDMI
Kies HDMI 1/2 als invoerbron. U kunt onder deze optie ook de CEC-instellingen
wijzigen.
①
Selecteer op de startpagina
> [HDMI] en druk op .
CEC-instellingen
Druk op Enter om CEC-instellingen te wijzigen
4.
Projector
①
Selecteer op de startpagina
> [Projectorinstellingen] en druk op .
[Helderheid]
Stel de helderheid in op een niveau tussen 0 en 100%
[Kleurtemperatuur]
[Normaal] / [Koel] / [Warm]
[Muurkleur]
[Wit] / [Rood] / [Oranje] / [Blauw] / [Groen] / [Cyaan] / [Geel]
/ [Paars]
[Trapeziumcorrectie]
Schakel trapeziumcorrectie in of uit
.
[Zoom]
[50-100%]
[Automatische
scherpstelcorrectie]
Druk op
Enter
om automatische scherpstelcorrectie uit te
voeren.
NL
95
[Projectormodus]
[Automatisch]:
Detecteert automatisch of de projector is
omgedraaid.
Schakel automatisch tussen deze opties.
[Projectie voorkant]:
De projector bevindt zich voor het
projectieoppervlak.
[Projectie achterkant]: De projector bevindt zich achter
het projectieoppervlak.
[Omgekeerde projectie voorkant]: De projector hangt
ondersteboven aan het plafond. Het beeld wordt 180
graden gedraaid.
[Omgekeerde projectie achterkant]:
De projector
hangt ondersteboven aan het plafond achter het
projectieoppervlak. Het beeld wordt 180 graden gedraaid en
horizontaal gespiegeld.
[Beeldinstellingen]
[Beeldmodus]
[Standaard] / [Film] / [Kantoor]
Opmerking: Wanneer u een andere modus selecteert,
verschillen de kleurhelderheid, het kleurcontrast en
geavanceerde kleurinstellingen.
[Helderheid]
Stel de kleurhelderheid in op een niveau tussen 0 en 100%
[Contrast]
Stel het kleurcontrast in op een niveau tussen 0 en 100%
Geavanceerde instellingen
Stel de kleurverzadiging, tint, versterking en
gammawaarde in
Standaardwaarden
herstellen
Druk op Enter om de standaardwaarden te herstellen
5.
Apps
①
Selecteer op de startpagina
> [Apps] en druk op .
②
Selecteer een app om de huidige versie te controleren, de app te openen of
geforceerd te stoppen, de gebruikte opslagruimte te controleren, de gegevens of
cache te wissen of meldingen en machtigingen in of uit te schakelen.
6.
Overige
Selecteer op de startpagina voor meer instellingsopties.
[Apparaatvoorkeuren]
[Over] Controleer de apparaatgegevens en werk de firmware bij.
[Datum en tijd] Stel de datum en tijd handmatig in.
[Taal] Selecteer de schermtaal.

NL
96
[Toetsenbord] Selecteer het toetsenbordtaaltype dat u wilt gebruiken.
[Geluid] Selecteer de audio-uitgangsbron en de geluidsindeling.
[Opslag] Controleer de apparaatopslag en verwijderbare opslag.
[Reset]
Alle gegevens uit de interne opslag van uw apparaat
worden gewist.
[Datum en tijd]
[Automatische datum en tijd] Schakel automatische datum en tijd in of uit.
[Datum instellen] Stel de datum handmatig in.
[Tijd instellen] Stel de tijd handmatig in.
[Tijdzone instellen] Stel een tijdzone in.
[
24-uursnotatie gebruiken]
Schakel 24-uursnotatie in of uit.
De Nebula Cosmos Max gebruiken
1.
Afspelen vanaf HDMI-afspeelapparaten
De Nebula Cosmos Max kan worden aangesloten op verschillende HDMI-
afspeelapparaten, waaronder tv-boxes, tv-sticks, dvd-spelers, set-top boxes (STB's),
gameconsoles en andere apparaten.Er kunnen twee HDMI-apparaten tegelijkertijd op
de projector worden aangesloten om video te streamen met 4K@60 fps.
Afspelen vanaf HDMI-afspeelapparaten:
①
Sluit de Nebula Cosmos Max met een HDMI-kabel (niet meegeleverd) aan op een
HDMI-afspeelapparaat.
• De Nebula Cosmos Max start het afspelen via HDMI automatisch zodra deze is
aangesloten op een HDMI-afspeelapparaat.
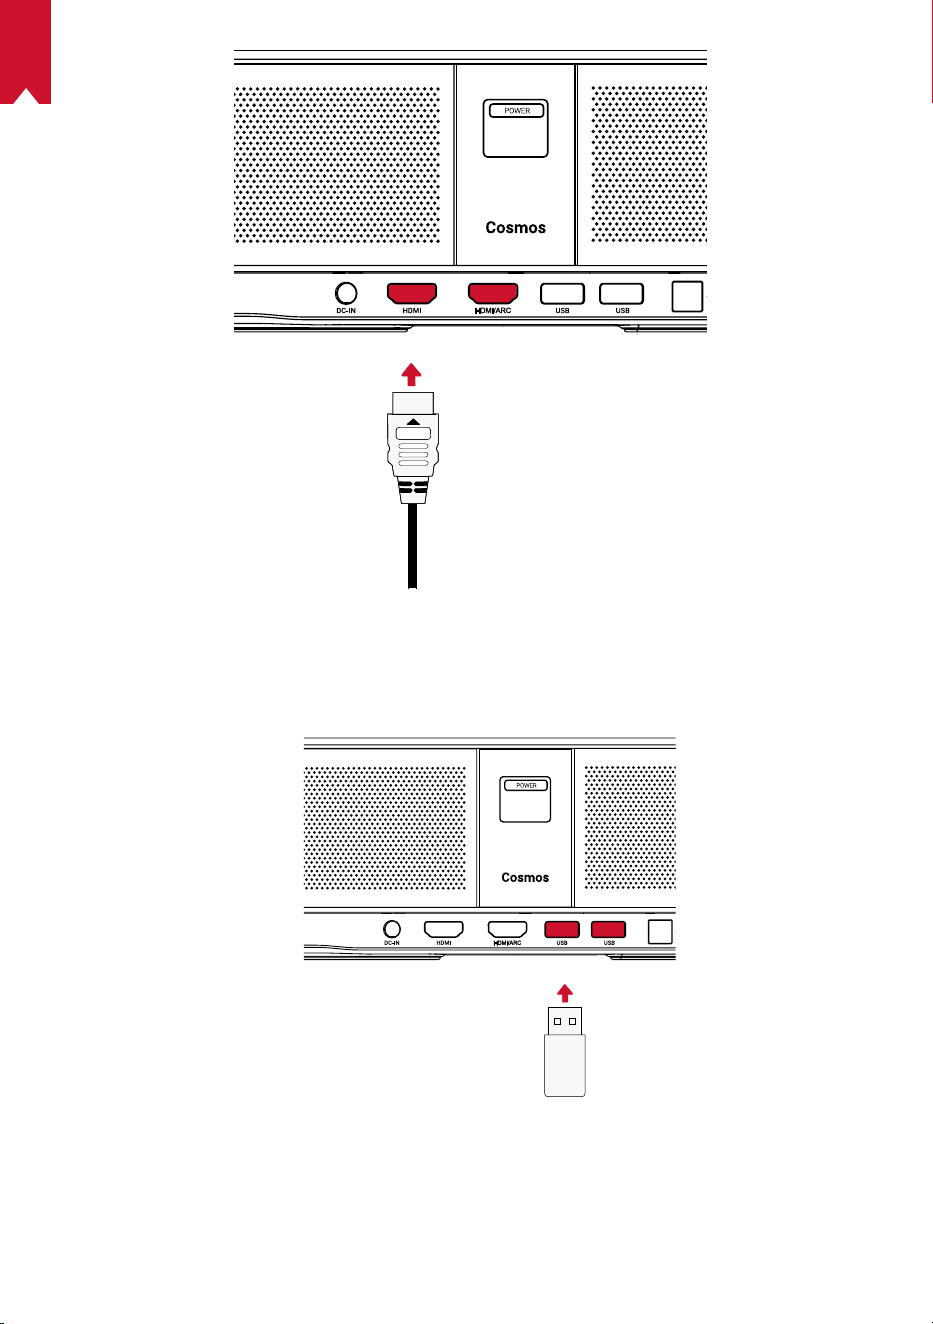
NL
97
2. Afspelen vanaf een USB-stick
U kunt de Nebula Cosmos Max gebruiken om te genieten van muziek, video's en
afbeeldingen die zijn opgeslagen op een USB-stick.

NL
98
Afspelen vanaf een USB-stick:
①
Download ES File Explorer uit Google Play.
②
Steek een USB-stick in de USB-poort.
• De USB-map wordt weergegeven in ES File Explorer.
③
Selecteer video's of foto's die u wilt afspelen van de USB-stick en druk op
④
Druk op
om het afspelen te stoppen.
3. Bluetooth-accessoires verbinden
U kunt Bluetooth-apparaten verbinden met de Nebula Cosmos Max .
①
Selecteer op de startpagina > [Afstandsbedieningen en accessoires] en druk op
.
②
Selecteer Accessoires toevoegen.
• De projector begint met zoeken naar accessoires.
③
Koppel uw projector met het apparaat waarmee u verbinding wilt maken.
④
Volg de instructies op het scherm om het instellen van de Bluetooth-verbinding te
voltooien.
Opmerking: Voordat u uw Bluetooth-apparaten koppelt, moet u ervoor zorgen dat de
afstandsbediening en uw projector zich in de koppelingsmodus bevinden.
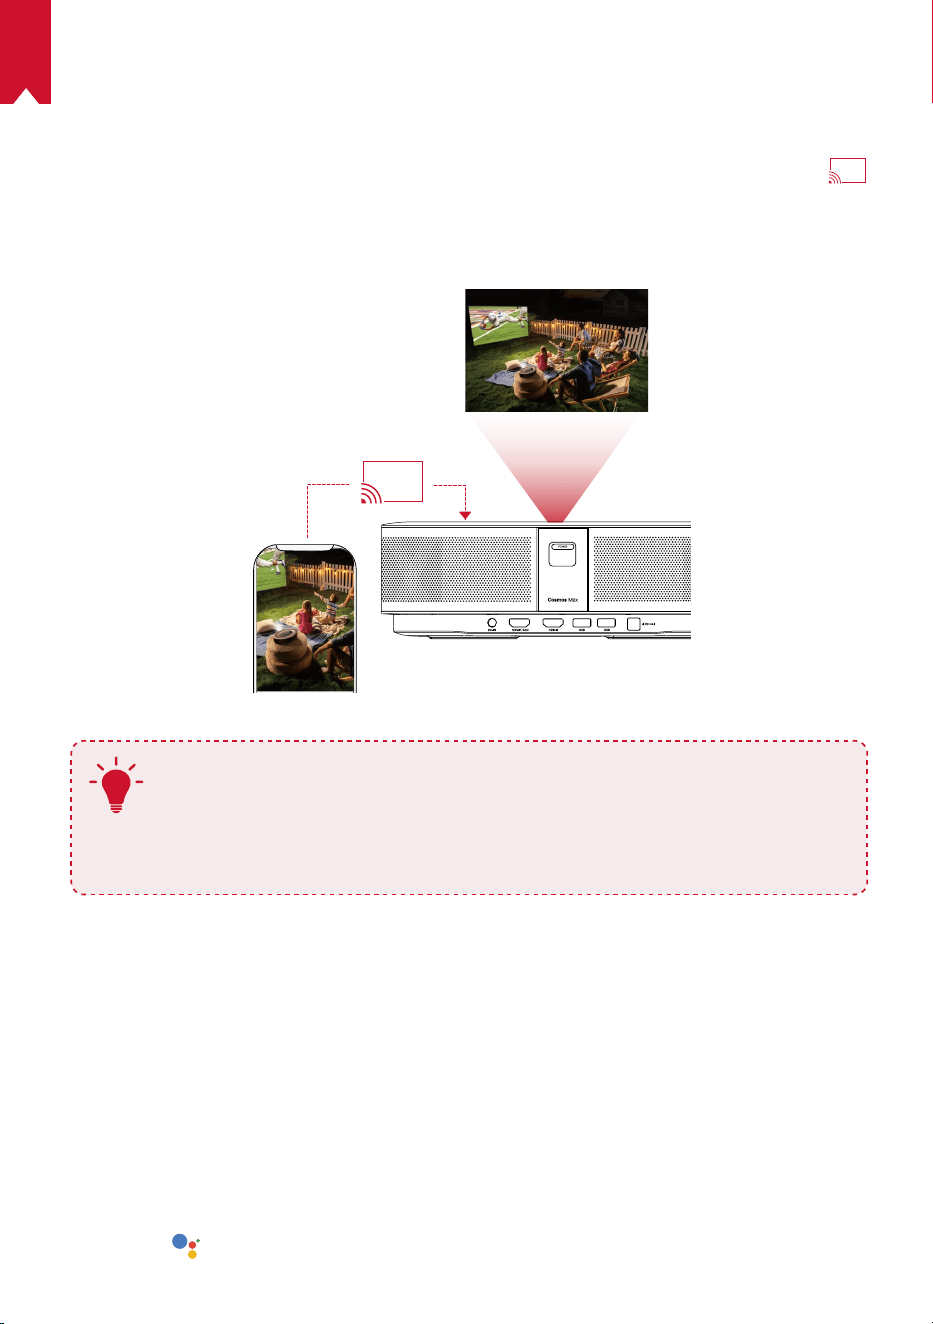
NL
99
4. De ingebouwde Chromecast gebruiken
U kunt foto's, video's en muziek draadloos vanaf uw telefoon of computer rechtstreeks
naar uw Nebula Cosmos Max casten.
①
Speel een videoclip af op uw telefoon en tik vervolgens op het cast-pictogram
op het videoscherm.
②
Selecteer het apparaat 'D2150' als apparaat waarnaar u wilt casten.
• De projector projecteert het scherm van verbonden telefoon of tablet.
T
• Zorg ervoor dat Nebula Cosmos Max en uw telefoon zijn verbonden met
hetzelfde draadloze netwerk.
• Bepaalde inhoud is mogelijk niet beschikbaar om te worden gecast
vanwege copyrightbeperkingen. Als dit het geval is, kunt u deze inhoud
streamen door dezelfde app op uw Nebula Cosmos Max te installeren.
5. Genieten van Google-functies
De Nebula Cosmos Max biedt ook ondersteuning voor Google-functies. Zodra het
apparaat is verbonden met een draadloos netwerk, hebt u toegang tot online services,
kunt u genieten van films, muziek en afbeeldingen en kunt u online browsen. Afgezien
van de vooraf geïnstalleerde apps, kunt u ook andere apps van Google Play installeren
en met Google Assistent praten om bepaalde taken uit te voeren.
Praten met Google Assistent:
①
Zorg ervoor dat u de stappen in de paragraaf 'Bluetooth-accessoires verbinden'
hebt gevolgd om uw afstandsbediening te verbinden met de Nebula Cosmos
Max . Zodra de apparaten zijn verbonden, begint het led-indicatielampje op de
afstandsbediening rood te branden.
②
Druk op
op de afstandsbediening om te praten met Google Assistant.
NL
100
Specificaties
Specificaties en ontwerp kunnen zonder voorafgaande kennisgeving
worden gewijzigd.
Voeding: 19 V
9,47 A
Energieverbruik: < 180 W
Energieverbruik in stand-bymodus: < 0,5 W
Weergavetechnologie: DLP FHD 3840x2160P
Lichtbron: RGB-led
Grootte projectiebeeld: 30-150 inch
Contrastverhouding: 1000:1
Projectieverhouding: 1,2
Projectieafstand: 0,8m tot 3,98m
CPU: Quadcore ARM Cortex-A55
OS: Android TV 9.0
RAM: 2GB DDR
ROM: 16 GB eMMC
Luidsprekerdrivers: 10W × 4
Wifi: IEEE802.11a/b/g/n/ac dubbele frequentie 2,4/5 GHz
Bluetooth-versie: V4.2
USB-bestandssysteem: FAT32 / NTFS / exFAT
Aanbevolen omgevingstemperatuur: 5 °C tot 35 °C
Relatieve vochtigheid: 15% ~ 85% (niet-condenserend)
Opslagtemperatuur en vochtigheid: < 65 °C, < 90% vochtigheid
Afmetingen (H*D): 350 × 250 × 100 mm
Gewicht: 3.3kg
Problemen oplossen
NL
101
①
Lukt het niet om de projector in te schakelen met de afstandsbediening?
• Druk op
op de projector om de projector in te schakelen.
• Als de projector is uitgeschakeld, kunt u de afstandsbediening niet gebruiken om
de projector in te schakelen.
②
Werkt de afstandsbediening niet?
• Zorg ervoor dat de batterij al in de afstandsbediening is geplaatst.
• Vervang de batterijen.
③
Hebt u last van wazig beeld?
• Beweeg de projector een beetje om automatisch scherpstellen in te schakelen.
• Druk op
om de scherpstelling handmatig aan te passen.
④
Kunt u geen verbinding maken met een wifi-netwerk?
• Vernieuw de lijst met beschikbare netwerken en probeer het opnieuw.
• Start de draadloze router of het apparaat opnieuw op en probeer het opnieuw.
⑤
Hoe kan ik de firmware bijwerken?
• Wanneer er een nieuwe versie wordt gedetecteerd, wordt u gevraagd het apparaat
opnieuw op te starten en de firmware bij te werken.

PT
102
Índice
Instruções de segurança 103
Está incluído 105
Descrição geral 105
Começar 107
Aplicação Nebula 110
Definições 111
Utilizar o Nebula Cosmos Max 113
Especificações 117
Resoluções de problemas 118

PT
103
Instruções de segurança
Leia todas as instruções antes de usar este dispositivo. Não faça alterações e não crie
configurações que não estejam descritas neste manual. Se ocorrerem lesões físicas,
perda de dados ou danos devido ao incumprimento das instruções, a garantia não
será aplicável.
Configuração
•
Para reduzir o risco de incêndio e/ou choque elétrico, não exponha o dispositivo à
chuva ou a humidade. Não coloque objetos que contenham líquidos (tais como
vasos) neste dispositivo.
•
Não coloque este dispositivo em superfícies macias (tais como toalhas de mesa
ou tapetes), caso contrário o dispositivo poderá comportar um risco de incêndio.
•
Não coloque este dispositivo em áreas onde possa haver um excesso de poeira
e/ou sujidade, ou próximo de qualquer aparelho que esteja a gerar um campo
magnético forte.
•
Para evitar o sobreaquecimento, não bloqueie ou obstrua as aberturas de
ventilação.
•
Nunca coloque este dispositivo num espaço confinado. Deixe sempre espaço
suficiente ao redor deste dispositivo para a ventilação.
•
Proteja este dispositivo da exposição excessiva à luz solar direta, a calor, a
grandes flutuações de temperatura e a humidade. Evite temperaturas extremas. A
temperatura adequada de operação e armazenamento para este dispositivo e os
seus acessórios é de 0 °C a 35 °C.
•
Quando este dispositivo permanece em funcionamento por um longo período
de tempo, a superfície pode ficar quente. Desligue-o imediatamente e desligue o
carregador. Retome a operação depois deste dispositivo ter arrefecido.
•
Manuseie este dispositivo sempre com cuidado. Evite tocar na lente. Não permita
que crianças manuseiem o dispositivo sem supervisão.
•
Nunca coloque objetos pesados ou afiados neste dispositivo.
•
Para evitar choques elétricos, não desmonte o dispositivo.
•
Use somente anexos ou acessórios especificados pelo fabricante.
•
Evite vibrações extremas, pois estas podem danificar os componentes internos.
•
Possível radiação ótica emitida por este dispositivo. Não olhe diretamente para a
lâmpada em funcionamento. Poderá ser prejudicial aos olhos.
Fonte de alimentação
•
Utilize apenas o transformador fornecido.
•
Desligue o dispositivo antes de retirar a fonte de alimentação da tomada.
•
Proteja o cabo de alimentação para não ser pisado ou entalado, particularmente
na zona das fichas, tomadas e no ponto onde o cabo sai deste dispositivo.

PT
104
•
Desligue este dispositivo durante a ocorrência de trovoadas ou quando não for
utilizado durante um período prolongado.
•
Antes de efetuar ou alterar quaisquer ligações, certifique-se de que todos os
dispositivos estão desligados da tomada elétrica.
•
Nunca toque no cabo de alimentação ou no conetor de alimentação com as mãos
molhadas.
Segurança auditiva
•
Para evitar lesões auditivas, não ouça durante longos períodos de tempo com o
volume alto. Coloque o volume a um nível seguro.
Carregamento
•
O tipo de carregador é um HKA18019095-6C, com uma tensão de saída / corrente
direta de 19 V/6,32 A. O carregador deve ser instalado perto deste produto e deve
ser de fácil acesso.
•
Este carregador é somente para uso interno.
•
Ao carregar, coloque este dispositivo num ambiente que tenha uma temperatura
ambiente normal (entre 5 °C e 25 °C) e uma boa ventilação.
•
Devido ao material usado no invólucro, este dispositivo só deve ser ligado a uma
interface USB 2.0 ou superior.
Limpeza
•
Utilize um pano macio que não largue fiapos. Nunca use agentes de limpeza
líquidos, gasosos ou facilmente inflamáveis para fazer a limpeza.
•
Não use agentes de limpeza líquidos para limpar a lente, para evitar danificar a
película de revestimento da própria.
•
Use papel de limpeza de lentes para limpar a lente.
Reparações
•
Não faça reparações neste dispositivo por conta própria. O dispositivo só deve ser
reparado num centro de assistência autorizado.
•
A manutenção inadequada pode causar ferimentos ou danos a este dispositivo.
•
Se necessitar de assistência, consulte um técnico especializado.
Atenção
•
Este dispositivo pode emitir radiação ótica perigosa.
•
Não olhe para o feixe em funcionamento. A luz brilhante pode causar lesões nos
olhos.
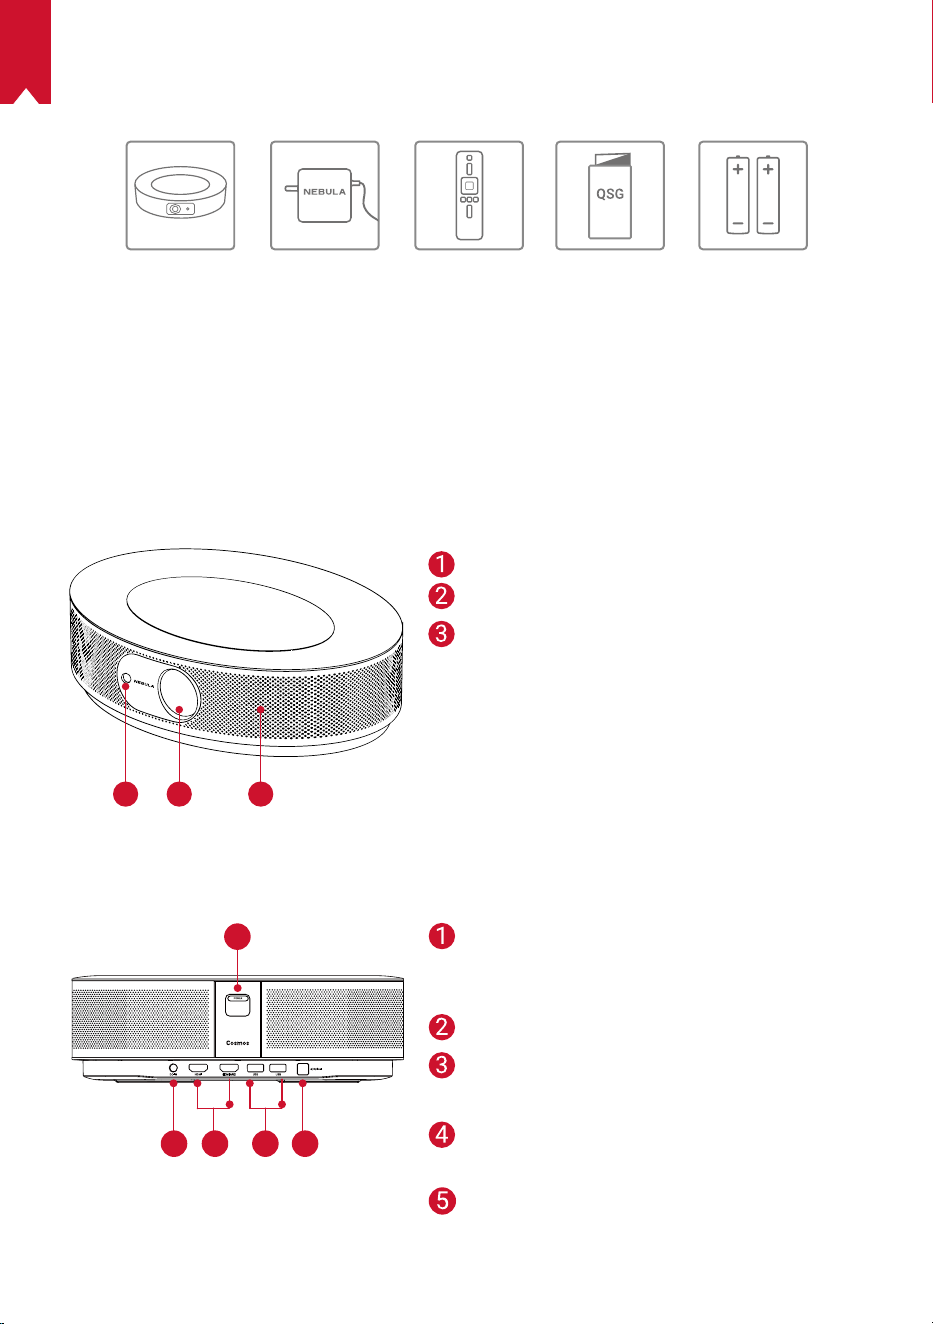
PT
105
ESTÁ INCLUÍDO
Cosmos Max Adaptador Controle
Remoto
2 x AAA
Baterias
QSG
Descrição geral
1.
Vista frontal
1
2 3
2.
Vista traseira
1
1
2 3 4 5
Câmara para a Focagem automática
Lente
Altifalante
Botão para ligar/desligar
• Premir para ligar
• Premir continuamente para desligar
Entrada de CC
Porta de entrada HDMI
• Ligue a um dispositivo de reprodução
Porta USB-A
• Ligue a uma unidade USB
Porta de áudio ótico
• Ligar a um dispositivo de áudio com um
cabo ótico
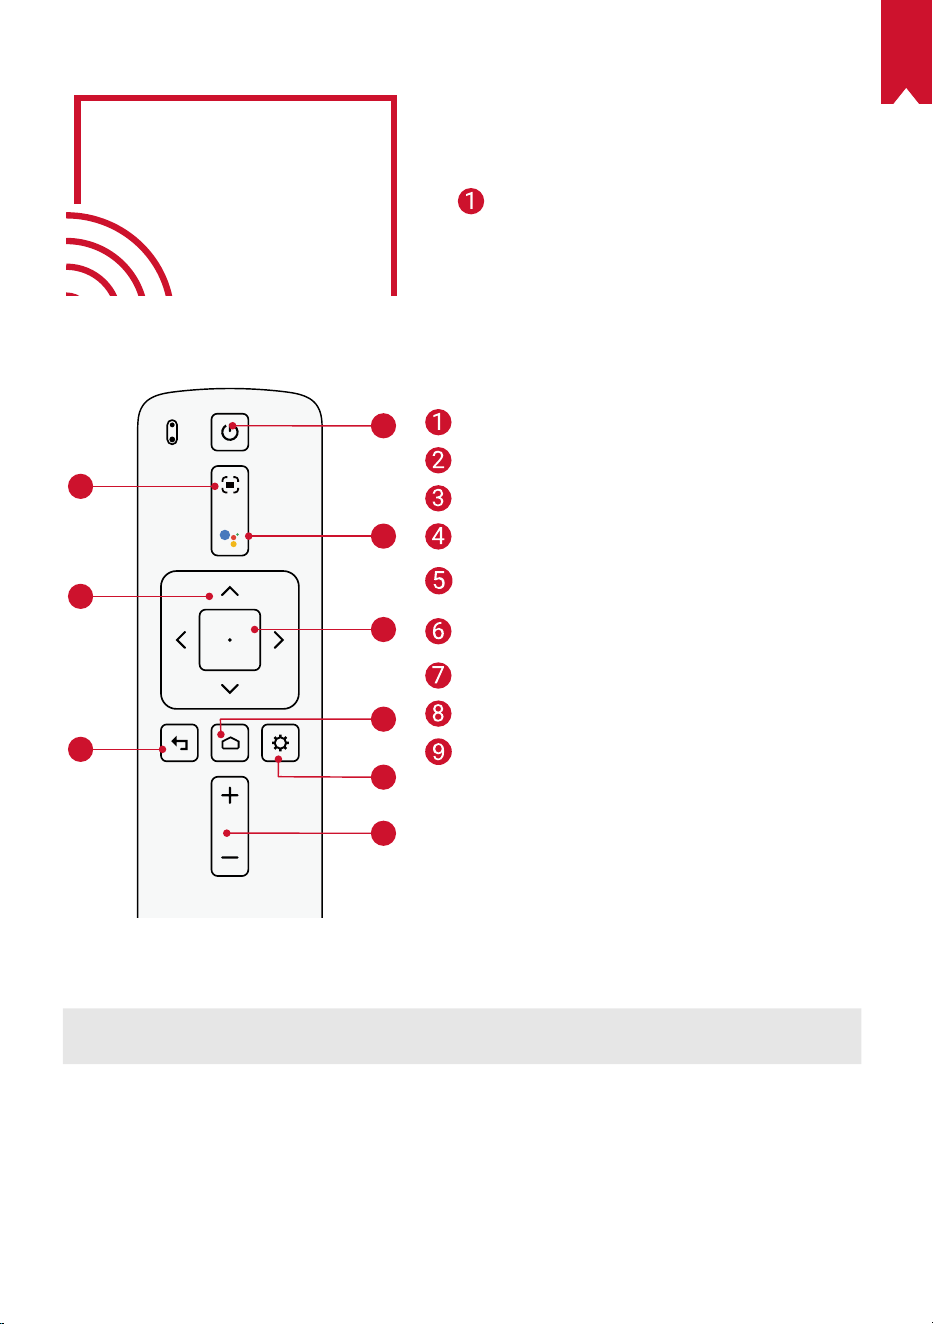
PT
106
Botão para ligar/desligar
• Premir para ligar
• Premir continuamente para desligar
Entrada de CC
Porta de entrada HDMI
• Ligue a um dispositivo de reprodução
Porta USB-A
• Ligue a uma unidade USB
Porta de áudio ótico
• Ligar a um dispositivo de áudio com um
cabo ótico
3. Vista superior
4. Vista inferior
1
2
3
4
5
6
7
8
9
5. Indicador LED
Estado do LED Descrição
Vermelho sólido A funcionar no modo de projetor
Ajustar a focagem
Navegação
Voltar
Ligar/desligar
Premir para ativar o Google
Assistente
Confirmar o conteúdo
selecionado
Página inicial
Definições do sistema
Aumentar/Diminuir volume
Ficha para tripé
Telecomando: Nebula RC
Modelo: D0413

PT
107
COMEÇAR
1.
Localização
Coloque este dispositivo numa superfície estável e plana, e aponte-o diretamente para
a superfície de projeção. Para obter os melhores resultados, a superfície de projeção
deve ser branca e plana. A distância entre este dispositivo e a superfície de projeção
deve ter um mínimo de 0,8 metros e um máximo de 3,98 metros para obter uma
imagem entre 30 e 150 polegadas.
31-125 inches
T
•
Não é necessário incliná-lo em direção à superfície de projeção.
Pode corrigir a imagem de projeção com a correção trapezoidal
integrada.
•
A distância entre o dispositivo e a superfície de projeção determina
o tamanho da imagem de projeção. Para obter o melhor resultado,
defina o projetor entre 1,6 e 2,6 metros de distância
•
Também pode instalar o seu projetor no teto.
2.
Preparar o Telecomando
O telecomando é fornecido com duas pilhas AAA.
①
Na primeira utilização, deslize para abrir o compartimento das pilhas e coloque
duas pilhas AAA.

PT
108
②
Para substituir as pilhas, destranque e abra o compartimento das pilhas, insira as
novas pilhas, correspondendo a polaridade (+/-) indicada e, em seguida, feche e
tranque o compartimento das pilhas.
+
+
3. Começar
①
Ligue o Nebula Cosmos Max à tomada elétrica utilizando o adaptador de
alimentação fornecido.
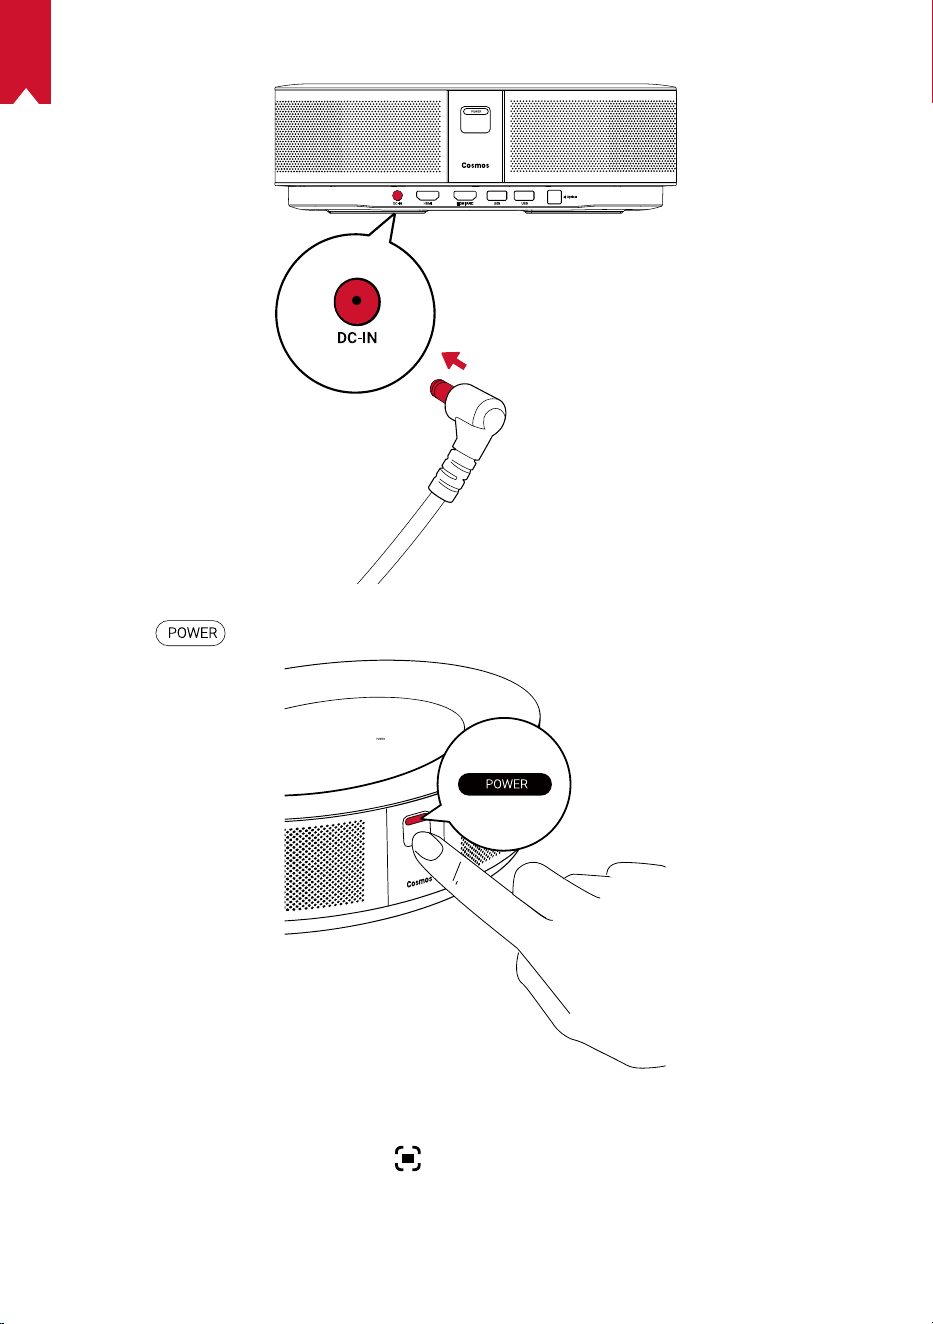
PT
109
②
Prima
para ligar o projetor.
③
Incline o dispositivo em direção a uma superfície ou parede de projeção adequada.
A função de focagem automática permite que o seu projetor efetue a focagem
automática. Ou poderá premir
no telecomando para ajustar manualmente a
focagem.
④
Na primeira utilização, siga as instruções no ecrã para concluir a configuração
básica.
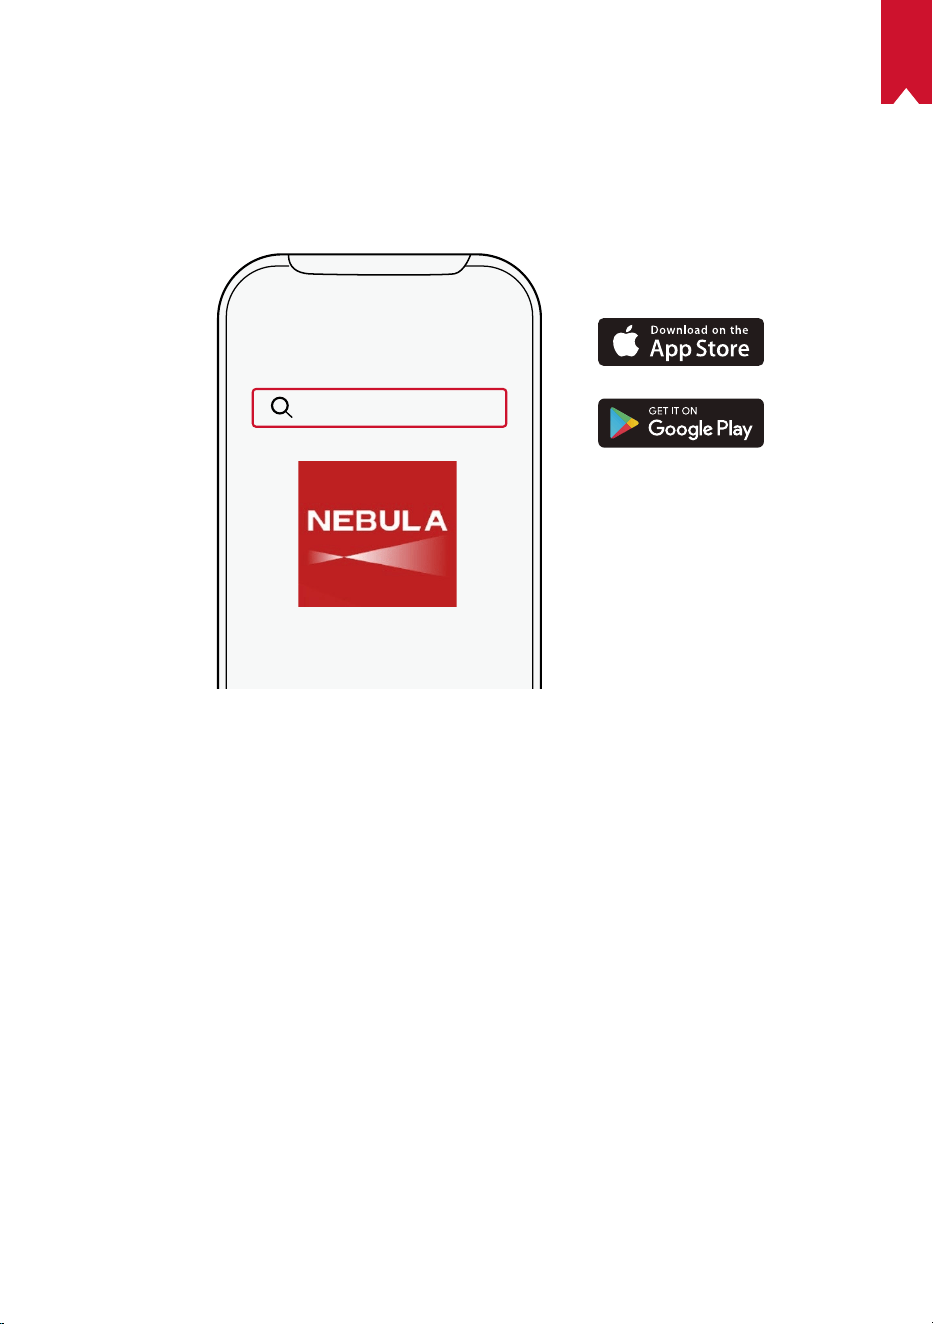
PT
110
Aplicação Nebula
Para controlar facilmente este dispositivo, recomendamos a transferência da
aplicação Nebula dedicada, a Nebula Connect. Com esta aplicação, pode usar o ecrã
como um rato.
①
Transferir a aplicação Nebula Connect a partir da App Store (dispositivos iOS) ou da
Google Play (dispositivos Android).
Nebula Connect
②
Ative o Bluetooth no seu smartphone e selecione [Nebula Cosmos Max ] como o
dispositivo a ligar.
③
Abra a aplicação Nebula Connect e siga as instruções no ecrã para concluir a
configuração da ligação.
Ligar o Nebula Cosmos Max com uma Android
TV™
Siga as instruções apresentadas no ecrã para concluir o processo de configuração.
Opção 1. Configuração rápida
Os utilizadores de telemóveis Android podem seguir as instruções para configurar
rapidamente o Android TV com o seu telemóvel Android.
Opção 2. Configurar o Nebula Cosmos Max
Se for um utilizador do iOS, siga as instruções para concluir o processo.
①
Ignore o processo de configuração rápida.
②
Ligue o Nebula Cosmos Max à rede.
③
Inicie sessão com a sua conta Google.
O seu Nebula Cosmos Max será ligado através da Android TV após concluir o processo
de configuração.

PT
111
Definições
Efetue o processo de configuração quando ligar o Nebula Cosmos Max pela primeira
vez.
1.
Rede
Este dispositivo pode ser ligado à internet através de uma ligação sem fios (Wi-Fi).
①
Na página inicial, selecione
> [Rede & Internet] e prima .
②
Siga as instruções apresentadas no ecrã para concluir a ligação à internet.
2.
Áudio
O formato de áudio pode ser alterado através das Definições de áudio.
①
Na página inicial, selecione
> [Definições de áudio] e prima .
Alterar automaticamente o
formato de áudio digital
Ative ou desative a alteração automática do
formato de áudio digital entre PCM e RAW.
3.
HDMI
Selecione HDMI 1/2 como a fonte de entrada. Também pode alterar as definições de
CEC nesta opção.
①
Na página inicial, selecione
> [HDMI] e prima .
Definições de CEC
Prima Enter para alterar as definições de CEC
4.
Projetor
①
Na página inicial, selecione
> [Definições do projetor] e prima .
[Luminosidade]
Selecione a luminosidade entre 0 e 100%
[Temperatura da cor]
[Normal] / [Frio] / [Quente]
[Cor da parede]
[Branco] / [Vermelho] / [Laranja] / [Azul] / [Verde] / [Azul-
ciano] / [Amarelo] / [Roxo]
[Correção trapezóide]
Ative/desative a correção trapezóide automática.
[Zoom]
[50-100%]
[Correção automática de
focagem]
Prima
Enter
para executar a correção automática de
focagem.
PT
112
[Modo de projetor]
[Auto]: deteta automaticamente se o projetor está invertido.
Alterne automaticamente entre estas opções.
[Projeção frontal]:
o projetor encontra-se em frente à
superfície de projeção.
[Projeção traseira]:
o projetor encontra-se atrás da
superfície de projeção.
[Projeção frontal invertida]:
o projetor encontra-se
pendurado no teto e numa posição invertida. A imagem é
rodada 180 graus.
[Projeção traseira invertida]:
o projetor encontra-se
pendurado no teto, numa posição invertida e atrás da
superfície de projeção. A imagem é rodada 180 graus e
espelhada horizontalmente.
[Definições de imagem]
[Modo de imagem]
[Normal] / [Filme] / [Escritório]
Nota: quando seleciona um modo diferente, as definições da
luminosidade da cor, do contraste e da cor avançadas são
diferentes.
[Luminosidade]
Ajuste a luminosidade da cor entre 0 e 100%
[Contraste]
Ajuste o contraste da cor entre 0 e 100%
Definições avançadas
Ajuste a Saturação, a Tonalidade, o Ganho e a Gama
Voltar à predefinição
Prima em Enter para voltar à predefinição
5.
Aplicações
①
Na página inicial, selecione
> [Aplicações], e prima .
②
Selecione uma aplicação e verifique a versão atual, abra ou force a paragem,
verifique a memória utilizada, limpe os dados ou a cache, ou ative ou desative as
notificações e permissões.
6.Outros
No menu inicial, selecione para ver mais opções de Definições.
PT
113
[Preferências do dispositivo]
[Sobre]
Consulte as informações do dispositivo e a atualização
de firmware.
[Data e Hora] Configure manualmente a data e a hora.
[Idioma] Selecione o idioma apresentado no ecrã.
[Teclado] Selecione o tipo de idioma do teclado que pretende utilizar.
[Áudio] Selecione a fonte de saída de áudio e o formato do áudio.
[Memória] Verifique a memória do dispositivo e a memória amovível.
[Reposição]
Todos os dados da memória interna do dispositivo serão
apagados.
[Data e Hora]
[Data e Hora automáticas] Ative ou desative a data e a hora automáticas.
[Configurar a data] Configure manualmente a data.
[Configurar a hora] Configure manualmente a hora.
[Configurar o fuso horário] Defina um fuso horário.
[
Utilizar o formato de 24 horas]
Ative ou desative o formato de 24 horas.
Utilizar o Nebula Cosmos Max
1.
Reproduzir a partir de Dispositivos de reprodução por HDMI
O Nebula Cosmos Max pode ser ligado a vários dispositivos de reprodução por
HDMI como uma TV Box, um Stick de TV, uma set-top box (STB), consolas de jogos
ou outros dispositivos.Dois dispositivos HDMI podem ser ligados ao projetor em
simultâneo para transmitir vídeo de 4K@60 fps.
Para reproduzir a partir de dispositivos de reprodução HDMI:
①
Ligue o Nebula Cosmos Max a um dispositivo de reprodução por HDMI com um
cabo HDMI (não incluído).
• A reprodução HDMI será automaticamente iniciada logo que um dispositivo de
reprodução HDMI for ligado.
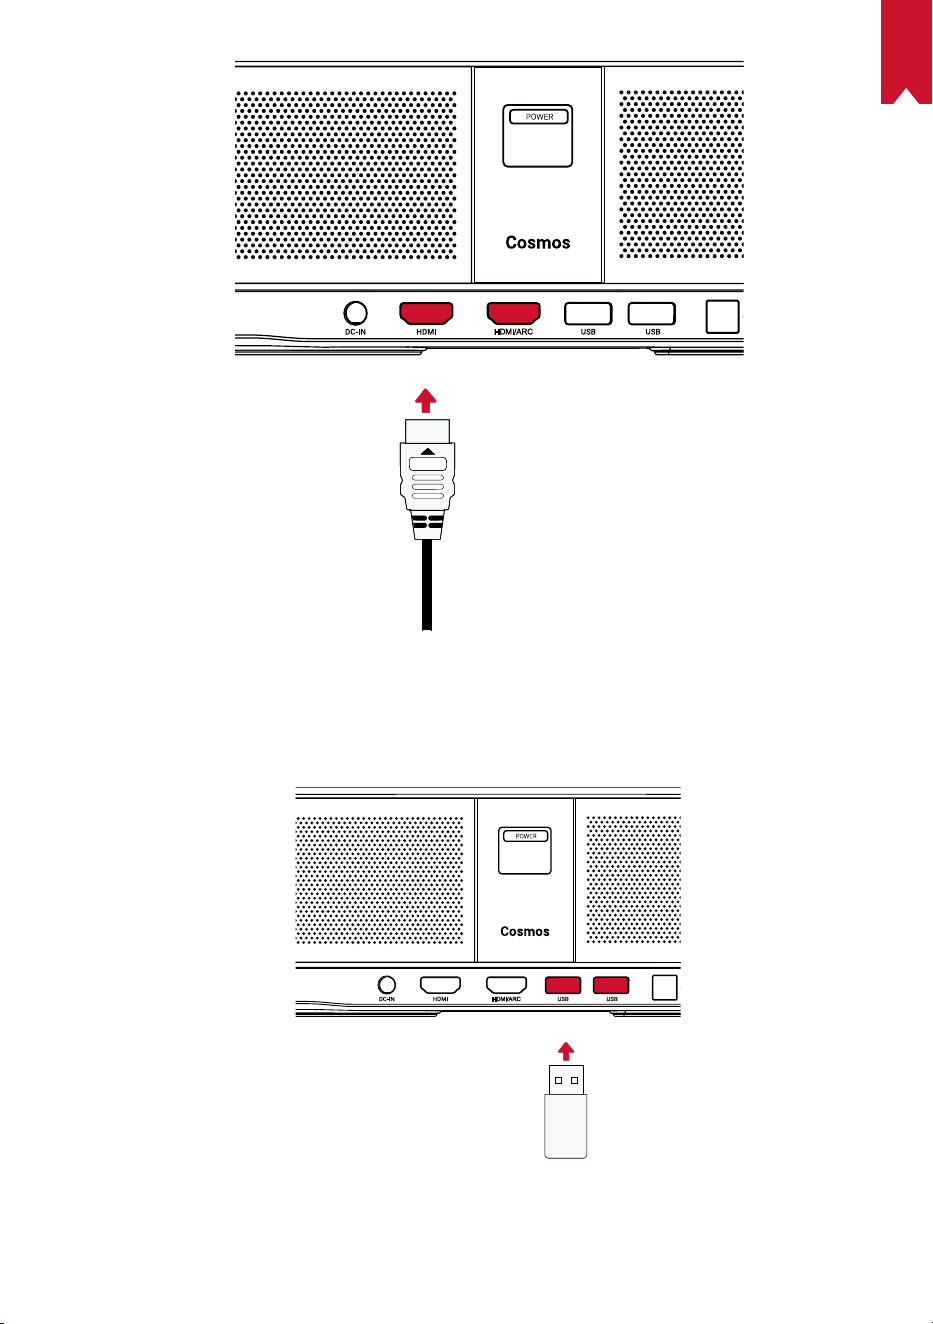
PT
114
2. Reproduzir a partir de uma unidade USB
Com o Nebula Cosmos Max , pode desfrutar de música, vídeos e imagens que estão
guardadas numa unidade USB.
PT
115
Para reproduzir a partir de uma unidade USB:
①
Transfira o ES File Explorer através do Google Play.
②
Insira uma unidade USB na porta USB.
• A pasta USB vai aparecer no ES File Explorer.
③
Selecione os vídeos ou fotografias da unidade USB que pretende reproduzir e prima
④
Prima
para parar a reprodução.
3. Ligar acessórios por Bluetooth
Pode ligar dispositivos por Bluetooth ao Nebula Cosmos Max .
①
Na página inicial, selecione
> [Telecomandos & Acessórios] e prima .
②
Selecione Adicionar acessórios.
• Este projetor irá começar a procurar os acessórios.
③
Emparelhe o projetor com o dispositivo que quer ligar.
④
Siga as instruções apresentadas no ecrã para concluir a ligação por Bluetooth.
Nota: Antes de emparelhar os seus dispositivos por Bluetooth, certifique-se de que o
telecomando e o seu projetor se encontram no modo de emparelhamento.
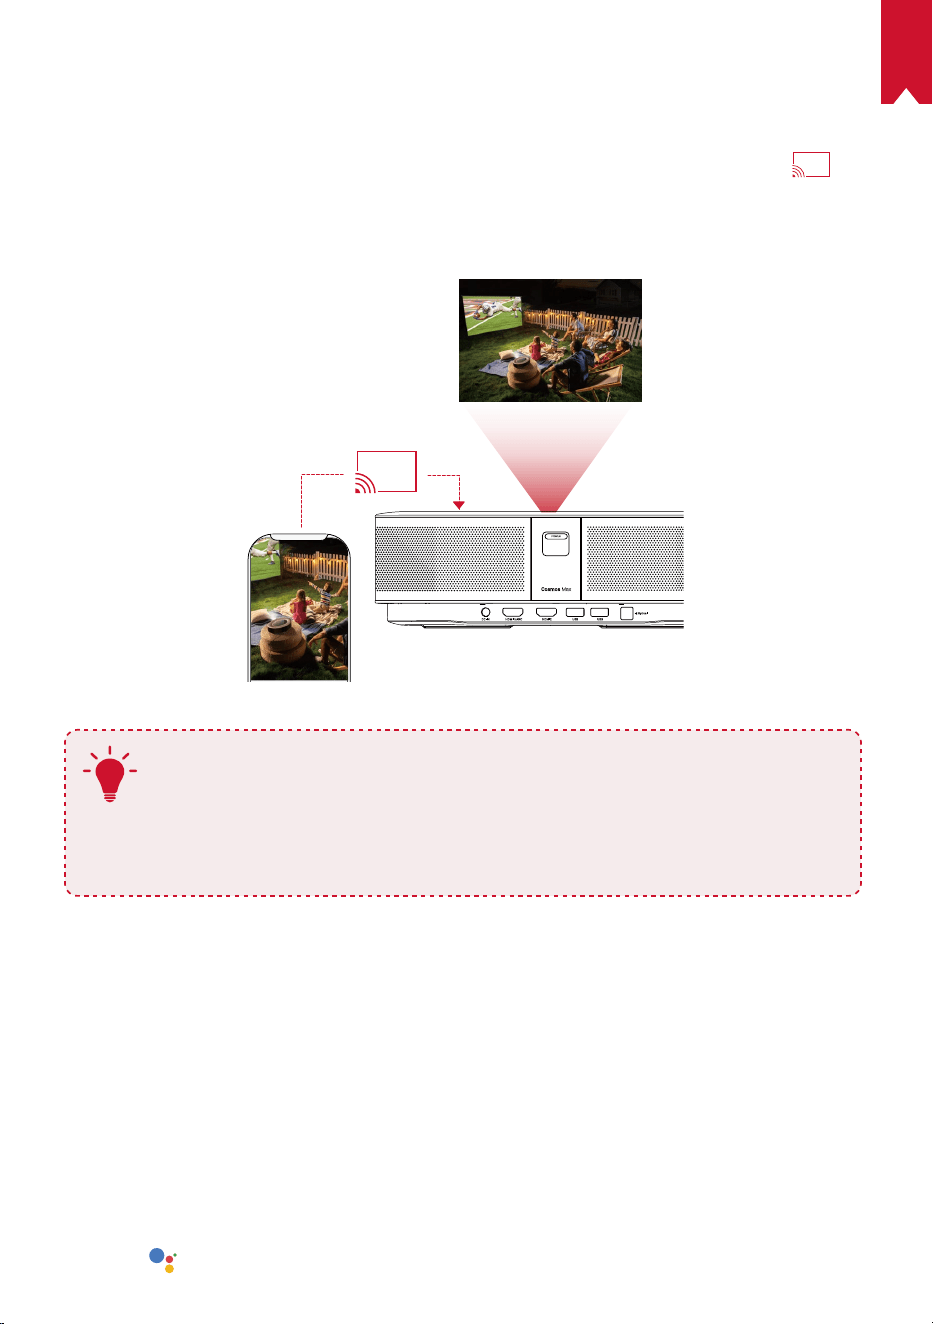
PT
116
4. Utilizar o Chromecast incorporado
Pode projetar sem fios fotografias, vídeos e música do seu telemóvel ou computador
diretamente para o seu Nebula Cosmos Max .
①
Reproduza um videoclipe no seu telemóvel e toque no ícone para projetar
no
ecrã do vídeo.
②
Selecione o dispositivo “D2150” para o qual deseja transmitir.
• Este projetor irá projetar o ecrã do telemóvel ou computador ligado.
T
• Certifique-se de que o Nebula Cosmos Max e o seu telefone estão
ligados à mesma rede sem fios.
• Certo conteúdo poderá não estar disponível para projeção devido a
restrições de direitos de autor. Neste caso, pode transmitir o conteúdo
através da mesma aplicação instalada no seu Nebula Cosmos Max .
5. Desfrute das Funcionalidades da Google
O Nebula Cosmos Max também suporta funcionalidades da Google. Uma vez ligado a
uma rede sem fios, pode aceder a serviços online, ver filmes e imagens, ouvir músicas
e navegar online. Para além das aplica pré-instaladas, também pode instalar quaisquer
outras aplicações da Google Play, e falar com o Google Assistente para executar
determinadas tarefas.
Para falar com o Assistente do Google:
①
Certifique-se de que seguiu os passos na secção “Ligar acessórios por Bluetooth”
para ligar o telecomando ao Nebula Cosmos Max . Uma vez ligado, o indicador LED
no telecomando fica vermelho estático.
②
Prima
no telecomando para falar com o Google Assistente.
PT
117
Especificações
As especificações e a conceção estão sujeitas a alteração sem aviso prévio.
Fonte de alimentação: 19V
9,47A
Consumo de energia: < 180W
Consumo de energia no modo de espera: < 0,5W
Tecnologia do ecrã: DLP UHD3840x2160P
Fonte de luz: LED RGB
Tamanho da imagem de projeção: 30-150 polegadas
Relação de contraste: 1000:1
Relação de projeção: 1.2
Distância de projeção: 0,8m a 3,98m
CPU: Quad-core ARM Cortex-A55
Sistema operativo: Android TV 9.0
RAM: 2 GB DDR
ROM: 16 GB eMMC
Drivers das colunas: 10W × 4
Wi-Fi: IEEE802.11a/b/g/n/ac 2,4G/5G com Dupla Frequência
Versão do Bluetooth: V4.2
Sistema de ficheiros USB: FAT32 / NTFS / exFAT
Ambiente recomendado: 41°F a 95°F / 5°C a 35°C
Humidade relativa: 15% ~ 85% (sem condensação)
Temperatura de armazenamento e humidade: 65°C, < 90% de humidade
Dimensões (A*P) 350 × 250 × 100 mm
Peso: 3,3 kg/118,2 oz
Resolução de problemas
①
Não consegue ligar o projetor com o telecomando?

PT
118
• Prima o botão no projetor para o ligar.
• Se não estiver ligado, não conseguirá utilizar o telecomando para ligá-lo.
②
O telecomando não funciona?
• Certifique-se de que as pilhas estão instaladas no telecomando.
• Substitua as pilhas.
③
Imagem desfocada?
• Mova ligeiramente o projetor para acionar a focagem automática.
• Prima o botão
para ajustar manualmente a focagem.
④
Não consegue estabelecer ligação a uma rede Wi-Fi?
• Atualize a lista de redes disponíveis e tente novamente.
• Reinicie o router sem fios ou o dispositivo e tente novamente.
⑤
Como posso atualizar o firmware?
• Quando uma nova versão é detetada, o sistema pede para reiniciar e atualizar.

JP
119
目次
安全にご使用いただくために
120
パッケージ内容
122
概要
122
はじめに
124
Nebula Connect アプリ
127
設定
128
Nebula Cosmos Max を使用する
130
製品の仕様
133
トラブルシューティング
134

JP
120
安全にご使用いただくために
本製品を使用する前に、すべての指示をお読みください。 このマニュアルで説明さ
れていない変更または設定は行わないでください。
指示に従わなかったことが原因
で怪我、データの損失、破損が発生しても、保証の対象になりません。
セットアップ
• 火災および / または感電のリスクを軽減するため、本製品を雨や湿気にさらさな
いでください。 花びんなど液体の入った物を本製品の上に置かないでください。
• 火災が発生する危険があるため、本製品をテーブルクロスやカーペットなどの上
で使用しないでください。
• 本製品をほこりや汚れが付きやすい場所や、強い磁場を発生する機器の近くに置
かないでください。
• 過熱を防ぐため、換気を妨げたり換気口をふさいだりしないでください。
• 本製品は決して狭いスペースに置かないでください。 本製品の周囲に換気のため
のスペースを常に十分に確保してください。
• 本製品が直射日光、熱、急激な温度変化、湿気に過度にさらさないよう、保護し
てください。 極端な温度を避けてください。 本製品とアクセサリの適正な動作
温度および保管温度は 0 ~ 35° C です。
• 本製品を長時間使用していると、表面が高温になる場合があります。 その際は直
ちにシャットダウンし、電源アダプタをはずしてください。 本製品の温度が下が
ったことを確認して、使用を再開してください。
• 本製品の取り扱いには常に注意が必要です。 レンズに触れないでください。 本製
品を大人による監視なしにお子様だけで使用することがないようにしてください。
• 本製品の上に重い物や尖った物を置かないでください。
• 感電を防ぐため、分解しないでください。
• 弊社指定の付属品およびアクセサリのみを使用してください。
• 内部の部品を損傷する恐れがあるため、激しい振動を避けてください。
• 本製品からの強い光が危険な場合があるためご注意ください。動作時の光線をの
ぞき込まないでください。 まぶしい光により目を傷めるおそれがあります。
電源
• 付属の電源アダプタ以外は使用しないでください。
• コンセントから電源ケーブルを取り外す前に本製品の電源をオフにしてください。
• 特にプラグやコンセント付近、出入力ポート部分で、ケーブルが踏まれたり挟ま
ったりしないようにご注意ください。
• 雷の発生時や長期間使用しない場合は、本製品のプラグを抜いてください。
• 本製品を電源に接続する際には、本製品とケーブルの接続を行ったうえで、電源
アダプタをコンセントに差し込んでください。
• 電源ケーブルや電源アダプタに濡れた手で触れないようにしてください。

JP
121
再生時の安全性
• 聴覚の損傷を防ぐため、長時間、大音量で聴かないように注意してください。 音
量は適切なレベルに設定してください。
充電
• 電源アダプタのタイプは
HKA18019095-6C
、出力電圧 / 電流はDC 19V / 9.47Aです。
電源アダプタは本製品の近くに置いて、すぐ利用できるようにしてください。
• この電源アダプタは屋内使用専用です。
• 本製品を使用する際は、風通しのよい標準室温 (5~ 25° C) の場所に置いてください。
• 本製品は USB 2.0 以降にのみ接続できます。
クリーニング
• 糸くずの出ない柔らかい布を使用してください。 クリーニングに液体、気体、可
燃性の洗浄剤を使用しないでください。
• レンズのコーティング膜の損傷を防ぐため、いかなるレンズクリーニング用洗浄
液も使用しないでください。
• レンズのクリーニングにはクリーニングペーパーを使用してください。
修理
• 本製品のいかなる修理もお客様ご自身ではなさらないでください。
• メンテナンスが不適切な場合は、怪我をしたり、本製品が損傷したりするおそれ
があります。
注意
• 動作時の光線をのぞき込まないでください。 まぶしい光により目を傷めるおそれ
があります。
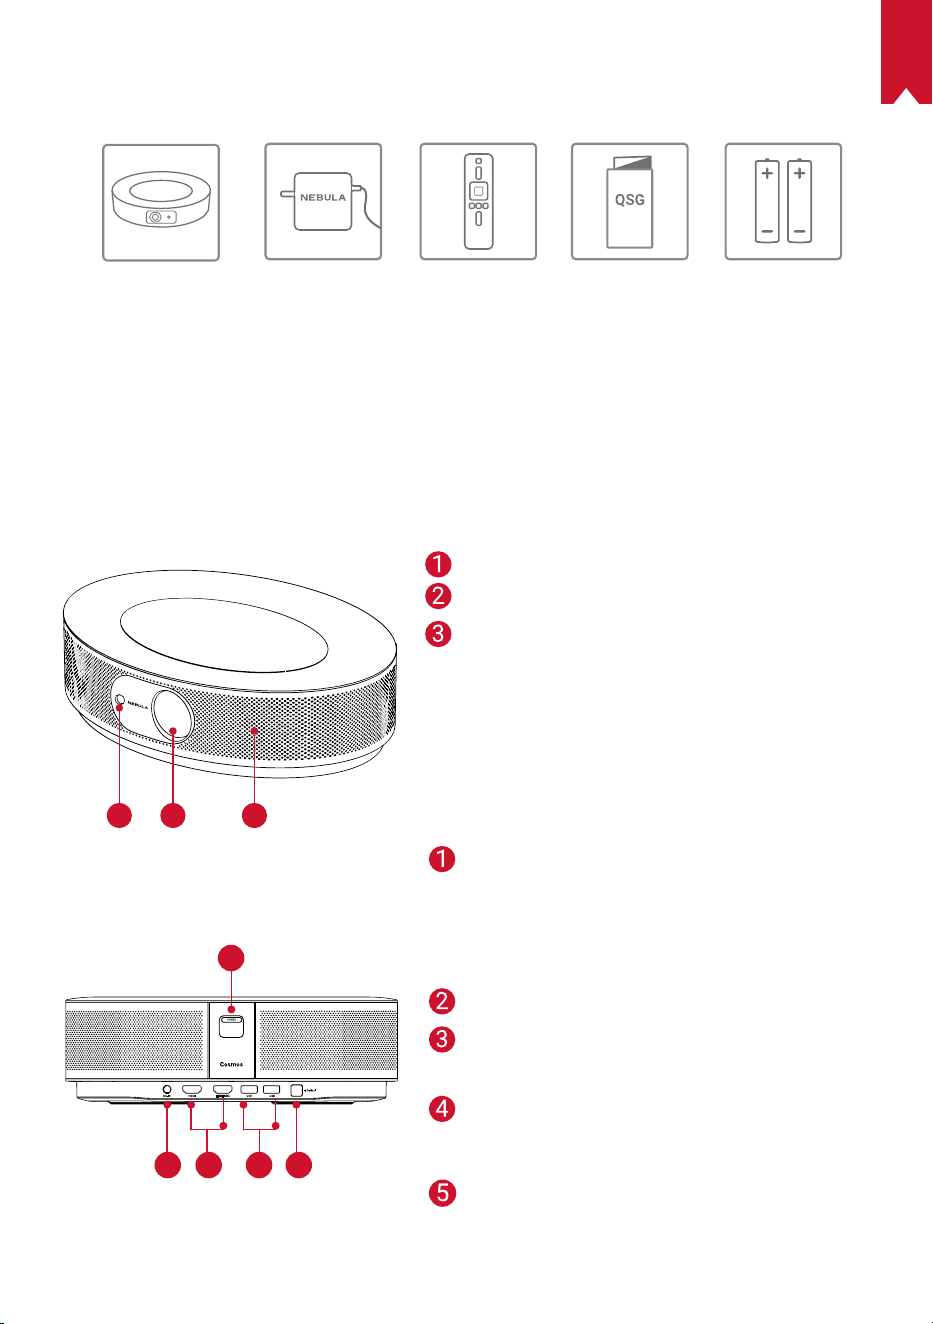
JP
122
パッケージ内容
Cosmos Max
本体
電源アダプタ リモコン
単4形電池
x 2
クイックスタ
ートガイド
概要
1.
正面図
1
2 3
2.
背面図
1
1
2 3 4 5
オートフォーカス用カメラ
レンズ
スピーカー
電源ボタン
• このボタンを押すと、電源がオン
になります
• このボタンを長押しすると、電源
がオフになります
DC ジャック
HDMI 入力ポート
• HDMI 再生機器に接続します
USB-A ポート
• USB フラッシュドライブに接続し
ます
光デジタル出力端子
• 光デジタル音声ケーブルを使用し
て、
オーディオ機器に接続します

JP
123
3.
底面図
4.
リモコン
1
2
3
4
5
6
7
8
9
5.
LED インジケーター
LED ステータス 説明
赤色で点灯 プロジェクターモードで動作中
焦点調整
ナビゲーションボタン
戻る
電源のオン / オフ
Google アシスタント呼び出し
決定
ホーム
システム設定
音量アップ / ダウン
三脚用ソケット
リモコン:Nebula RC
モデル:D0413
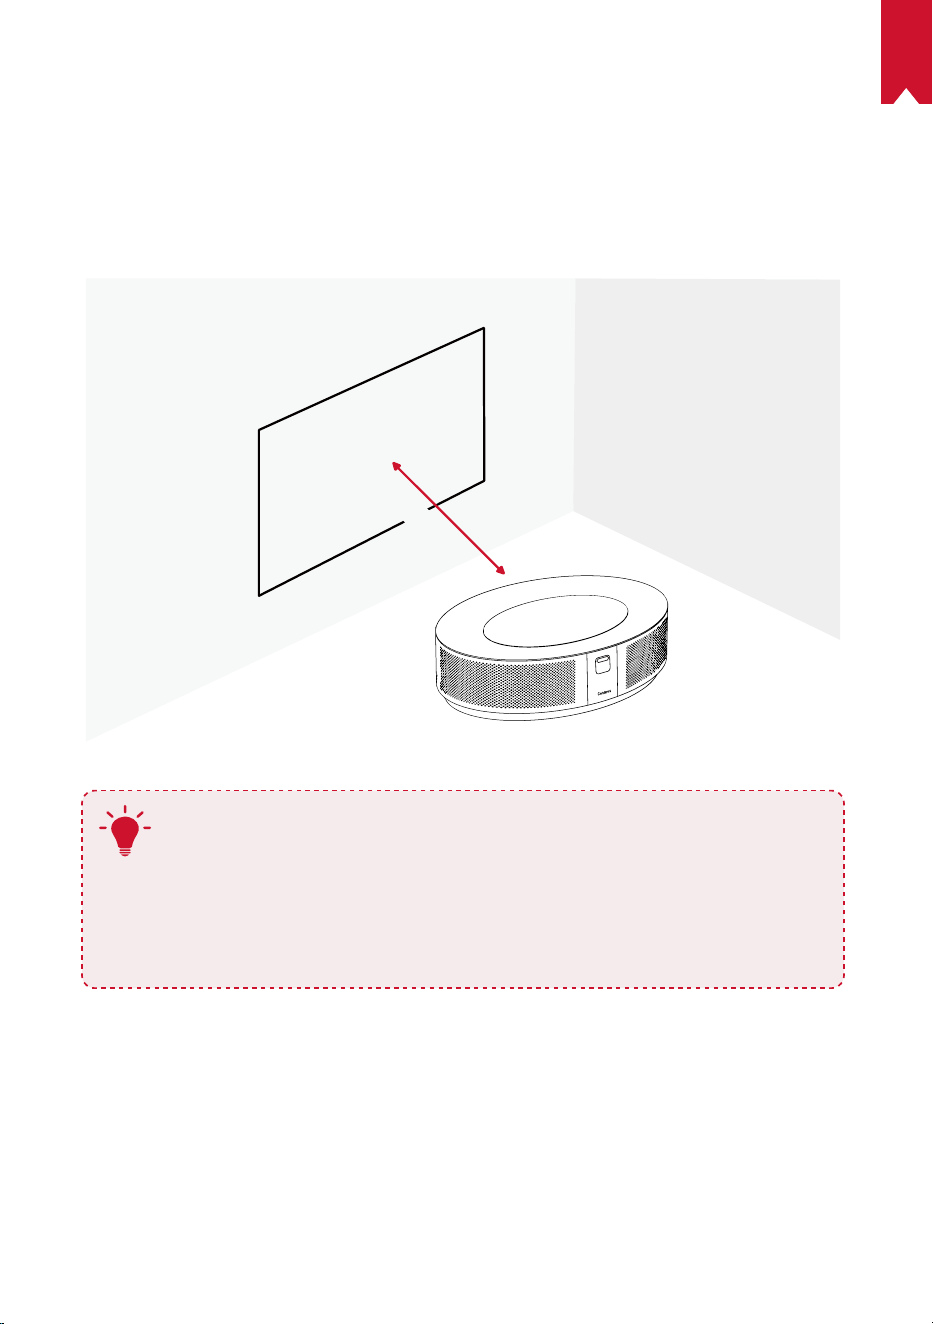
JP
124
はじめに
1.
配置
本製品を安定した平らな面に置いて、投影面にまっすぐに向けます。 投影面が白く
て平らな場合に、最もきれいに映ります。 本製品と投影面との間は、0.58 ~ 3.98m
ほど距離をとる必要があります。これにより、30 ~ 150 インチでの投影が可能です。
31-125 inches
T
• 本製品を投影面に向けて傾ける必要はありません。 自動台形補正
機能を使用して、投影画像を補正できます。
• 投影画像の大きさは、本製品と投影面との距離によって決まりま
す。 最もきれいに映像を映すには、本製品と投影面の距離を 1.6 ~
3.98m の範囲にしてください。
• 本製品はマウント ( 別売り ) を使用して、天井に取り付けることも
できます。
2.
リモコンの準備
リモコンには単 4 形電池が 2 本付属しています。
① 初めて使用する場合は、電池ケースを下にスライドして開き、単 4 形電池を 2 本
入れます。
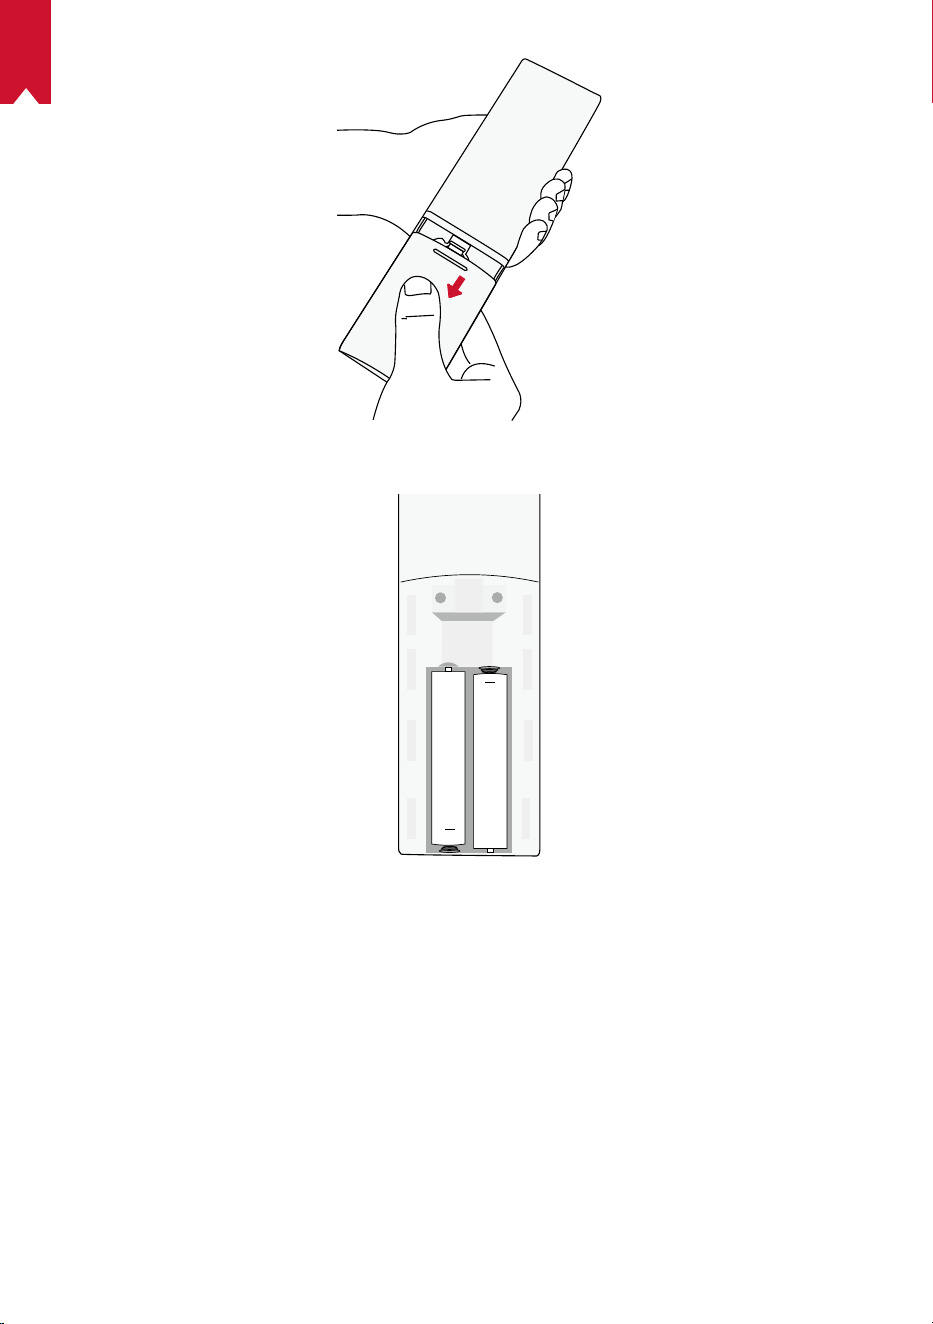
JP
125
② 電池を交換するときには、プラスとマイナスのマーク ( + / - ) に合わせて新しい電
池を挿入し、電池ケースを閉じます。
+
+
3.
はじめに
① 付属の電源ケーブル / アダプタを使用して、本製品をコンセントに接続します。

JP
126
② を押して、プロジェクターの電源をオンにします。
③ 本製品を適切な投影面または壁に向けます。 オートフォーカス機能により、本製
品は自動で焦点の調整ができます。 リモコンの
を押して、手動で焦点を調整す
ることもできます。
④ 初めて使用する際は、画面の指示に従って基本設定を完了させてください。

JP
127
Nebula Connect アプリ
本製品の操作にあたっては、Nebula Connect アプリをダウンロードすることをおす
すめします。 このアプリでは、スマートフォンを使用して本製品を操作できます。
① App Store (iOS 機器の場合 ) または Google Play (Android 機器の場合 ) から
Nebula Connect アプリをダウンロードします。
Nebula Connect
② スマートフォンで Bluetooth を有効にし、接続先デバイスとして [Nebula
Cosmos Max ] を選択します。
③ Nebula Connect アプリを開き、画面の指示に従って、接続の設定を完了します。
本製品で Android TV
TM
を使用する
画面の指示に従って、初回セットアップを完了させてください。
オプション 1. クイックセットアップ
Android 機器ユーザーは、画面の指示に従って Android スマートフォンから
Android TV を簡単にセットアップできます。
オプション 2. 本製品でのセットアップ
iOS 機器ユーザーの場合、画面の指示に従って、初回セットアップを完了します。
① クイックセットアップをスキップします。
② 本製品を Wi-Fi ネットワークに接続します。
③ Google アカウントでサインインします。
セットアップが完了すると、本製品で Android TV を使用することができます。
JP
128
設定
Nebula Cosmos Max を初めて起動するときは、初回セットアップを完了させてくだ
さい。
1.
Wi-Fi ネットワーク
本製品は、ワイヤレス (Wi-Fi) 接続を使用してインターネットに接続できます。
① ホーム画面から
> [ ネットワークとインターネット ] を選択し、 を押します。
② 画面の指示に従って、ネットワーク接続を完了させます。
2.
Sound
オーディオ形式は、[Sound] で変更できます。
① ホーム画面から
> [Sound] を選択し、 を押します。
Auto change digital audio
format
デジタルオーディオ形式 (PCM / RAW) の自動変更
を有効化または無効化します
3.
HDMI
入力ソースとして HDMI 1/2 を選択します。 この入力方式では、CEC 設定を変更す
ることもできます。
① ホーム画面から
> [HDMI] を選択し、 を押します。
CEC Settings
決定ボタンを押して、CEC 設定を変更します。
4.
プロジェクター設定
① ホーム画面から > [ プロジェクター設定 ] を選択し、 を押します。
[輝度]
輝度を 0 ~ 100% で調整します。
[ 色温度 ]
[ 標準 ] / [ 寒色 ] / [ 暖色 ]
[ 壁の色 ]
[白] / [赤] / [オレンジ ] / [青 ] / [緑] / [シアン] / [黄] / [紫]
[Keystone Correction]
キーストーン補正を有効または無効にします。
[zoom]
[50-100%]
[ オートフォーカス ]
決定ボタンを押して、オートフォーカスを実行します。
JP
129
[ プロジェクターモード ]
[Auto]:本製品の設置状況を自動的に検出します。
投影方式を自動的に切り替えます。
[ 前面への投影 ]:プロジェクターが投影面の前にある設
定です。
[ リア ( 背面 ) への投影 ]:プロジェクターが投影面の背
後にある設定です。
[ 天井への設置 / 前面への投影 ]:プロジェクターが天井
から逆さまに吊り下がっている設定です。 画像が 180°
回転します。
[ 天井への設置 / リア ( 背面 ) への投影 ]:プロジェクタ
ーが投影面の背後で天井から逆さまに吊り下がっている
設定です。 画像が 180°回転し、左右が反転します。
[ 写真の設定 ]
[ 写真モード ]
[ 標準 ] / [ 映画 ] / [ オフィス ]
注:選択したモードによって、色の明度、コントラスト、詳
細設定が異なります。
[ 明度 ]
色の明度を 0 ~ 100% の間で調節します
[ コントラスト ]
色のコントラストを 0 ~ 100% の間で調節します
詳細設定
色の彩度、色相、ゲイン、ガンマを調節します
デフォルトに戻す
デフォルトの設定に戻すには、Enter を押します
5.
APP
① ホーム画面から > [ アプリ ] を選択し、 を押します。
② アプリを選択し、現在のバージョンの確認、アプリの起動または強制停止、使用
ストレージの確認、データまたはキャッシュのクリア、通知および権限の有効化
または無効化を行います。
6.
その他
ホーム画面から を選択し、その他の設定オプションを表示します。
[ デバイス設定 ]
[ 端末情報 ] 本製品の情報とファームウェアの更新を確認できます。
[ 日付と時刻 ] 日付と時間を手動で設定します。
[言語] 画面に表示される言語を選択します。
[ キーボード ] 本製品で使用するキーボードの設定を行います。
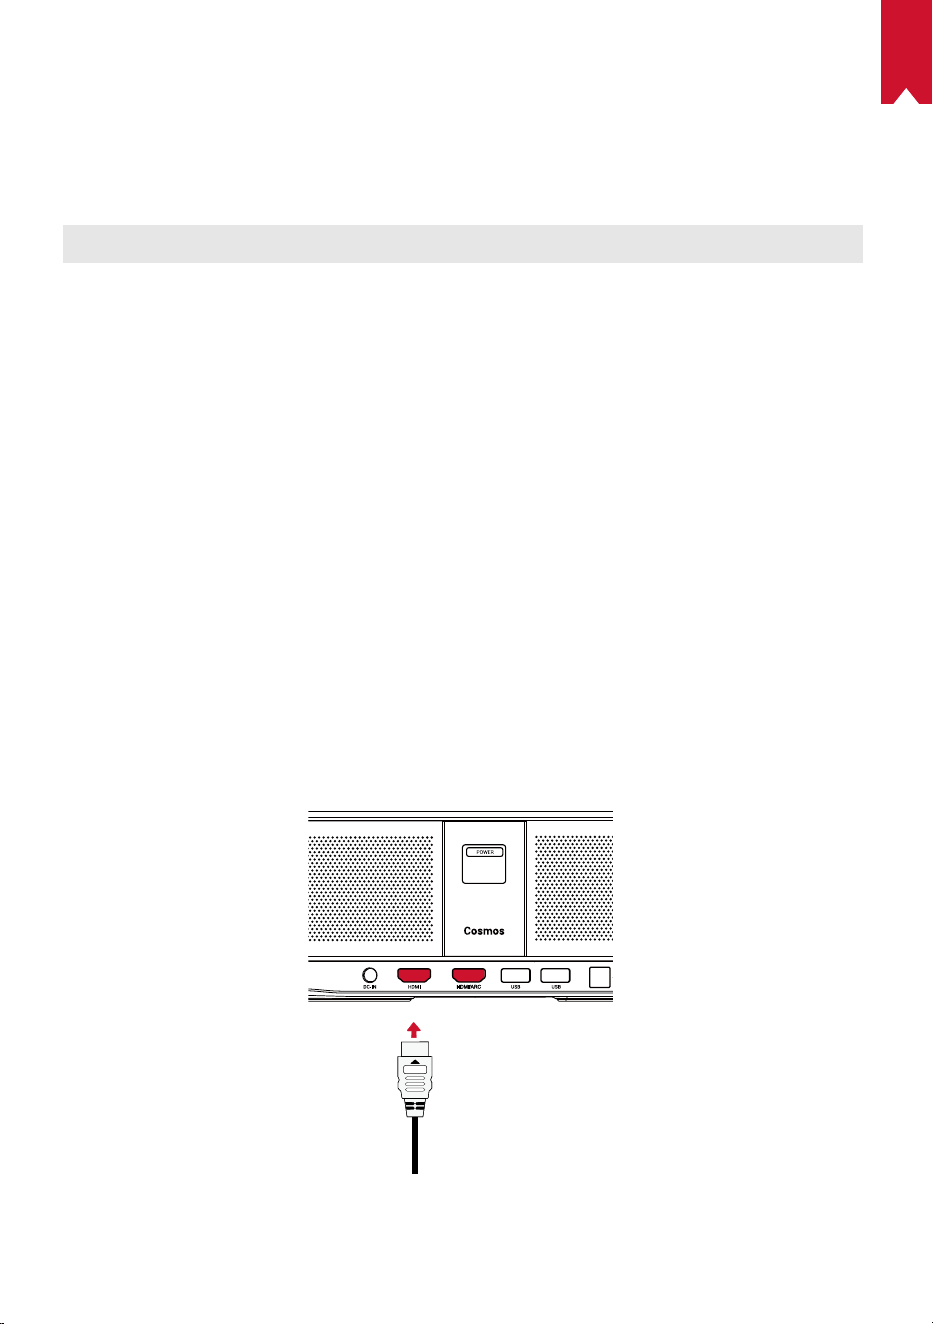
JP
130
[ サウンド ]
オーディオの出力ソースとサウンドフォーマットを選
択します。
[ ストレージ ]
本体の内部ストレージとリムーバブルストレージを確
認します。
[ リセット ] 本体の内部ストレージの全データを消去します。
[ 日付と時刻 ]
[ 日付と時刻の自動設定 ] 日付と時刻の自動設定を有効 / 無効にします。
[ 日付の設定 ] 日付を手動で設定します。
[ 時刻の設定 ] 時刻を手動で設定します。
[ タイムゾーンの設定 ] タイムゾーンを設定します。
[
24 時間表示の使用 ]
24 時間表示を有効 / 無効にします。
Nebula Cosmos Max を使用する
1.
HDMI 再生機器からの再生
本製品は、TVボックス、TVスティック、DVDプレーヤー、セットトップボックス (STB)、
ゲームコンソールなど、さまざまな HDMI 再生機器に接続することができます。
HDMI 再生機器から映像を再生するには:
① HDMI ケーブル ( 別売り ) を使用して、本製品を HDMI 再生機器に接続します。
• HDMI 再生機器に初めて接続する場合、HDMI 再生を自動的に開始します。
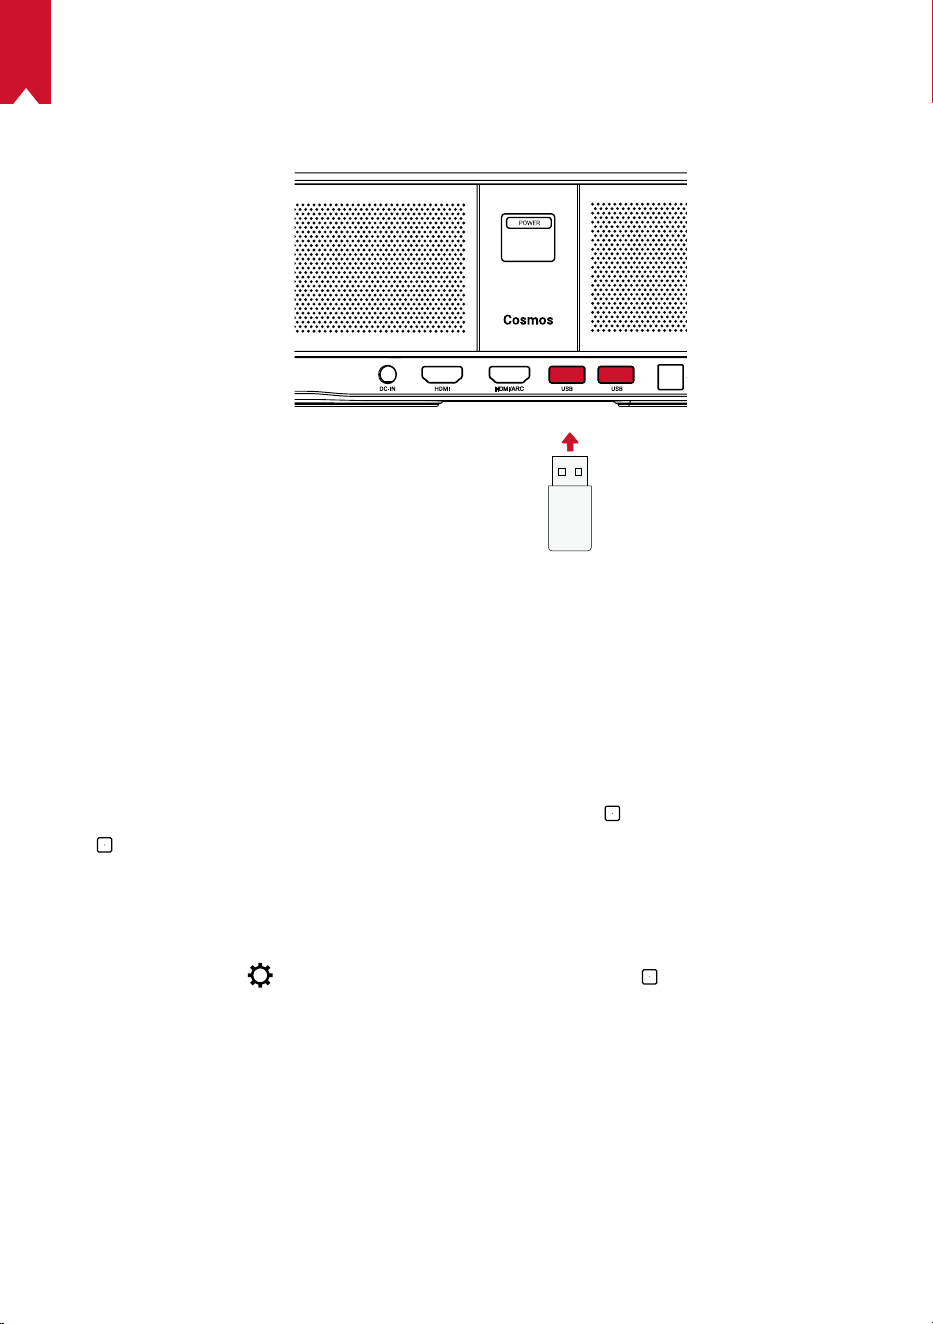
JP
131
2.
USB ドライブから再生する
本製品では、USB ドライブに保存されている音楽、ビデオ、画像を再生することが
できます。
USB ドライブから再生するには:
① Google Play から「ES File Explorer」をダウンロードします。
② USB ポートに USB ドライブを挿入します。
• USB フォルダが ES File Explorer に表示されます。
③ USB ドライブから再生したいビデオ / 写真を選択し、
を押します。
④
を押すと、再生が停止します。
3.
Bluetooth アクセサリを接続する
Bluetooth 機器を本製品に接続できます。
① ホーム画面から
> [ リモコンとアクセサリ ] を選択し、 を押します。
② [ アクセサリを追加 ] を選択します。
• 本製品がアクセサリの検索を開始します。
③ 接続する機器と本製品をペアリングします。
④ 画面の指示に従って、Bluetooth 接続を完了します。
注:Bluetooth 機器をペアリングする前に、リモコンと本体がペアリングモードであ
ることを確認してください。
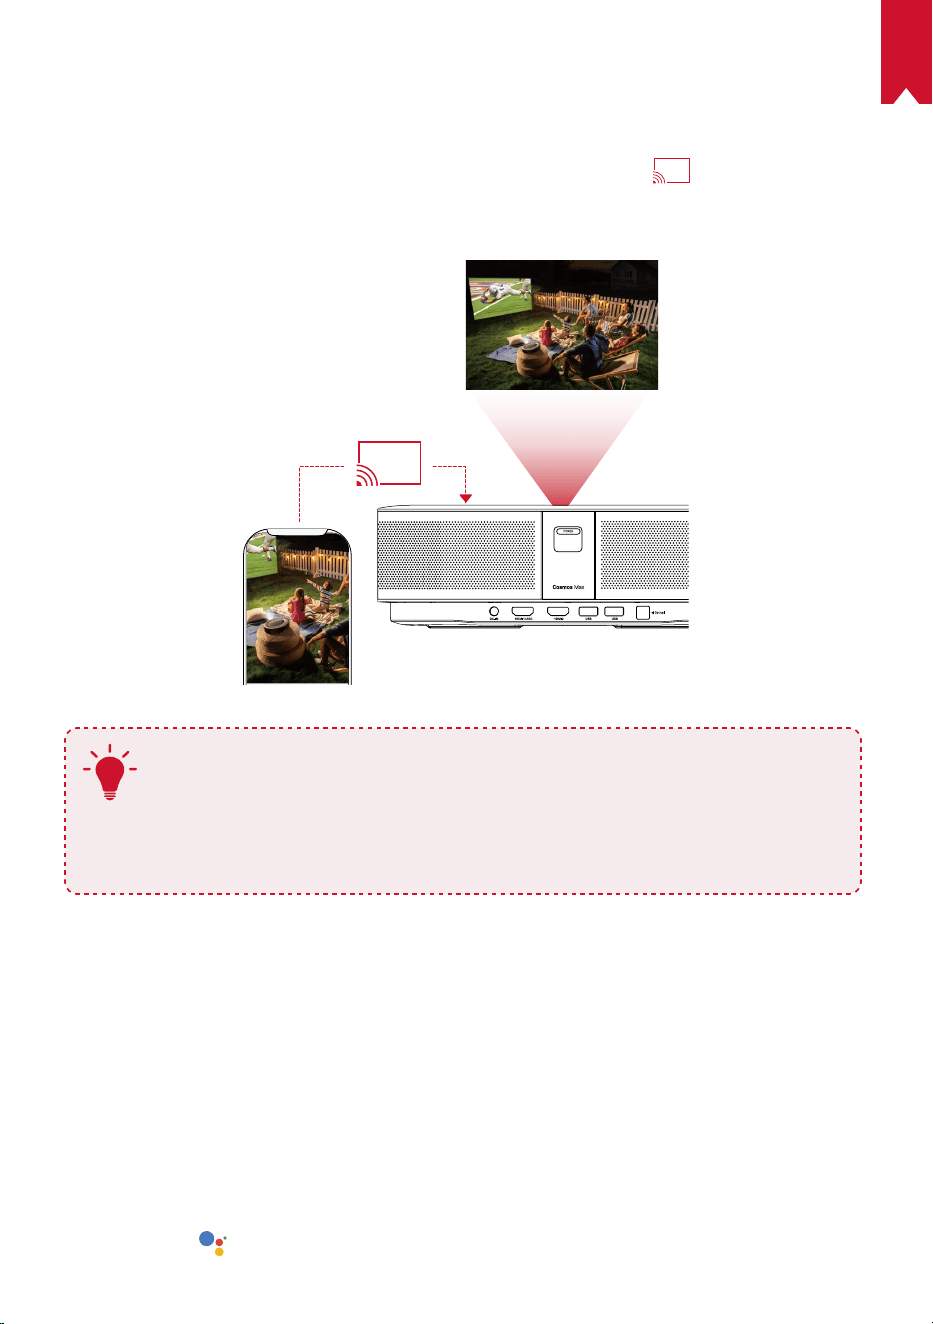
JP
132
4.
Chromecast
TM
Built-in を使用する
スマートフォン / コンピューターから直接、本製品に写真、ビデオ、音楽をワイヤレ
スでキャスト ( 送信 ) できます。
①
お使いのスマートフォンで映像を再生し、画面のキャストアイコン
をタップします。
② キャスト先のデバイス「D2150」を選択します。
• 本製品にスマートフォン / コンピューターの画面がミラーリングされます。
T
• ミラーリングを使用する際は、本製品とお使いのスマートフォン / コン
ピュータを同じ Wi-Fi ネットワークに接続してください。
• コンテンツによっては、著作権上の制限により、スクリーンキャスト
を利用できない場合があります。 その場合は、本製品にインストール
されている同じアプリで、該当するコンテンツを再生できます。
5.
Google 機能を使用する
本製品は Google アシスタント機能をサポートしています。 ワイヤレス (Wi-Fi) 接続
を使用すると、オンラインサービスにアクセスしたり、映画、音楽、写真を表示ま
たは再生して楽しんだり、オンラインでブラウズできます。 事前にインストールさ
れているアプリとは別に、Google Play から好きなアプリをインストールしたり、
Google アシスタントに話しかけてタスクを実行したりすることもできます。
Google アシスタントを利用するには:
① 「Bluetooth アクセサリを接続する」のセクションの手順に従って、リモコンを
本製品に接続します。 本製品に接続されると、リモコンの LED インジケーター
が赤色で点灯します。
② リモコンの
を押して、Google アシスタントに話しかけます。
JP
133
仕様
本製品の仕様およびデザインは予告なく変更されることがあります。
電源:19V
9.47A
消費電力:180W 未満
スタンバイ時消費電力:0.5W 未満
表示技術:DLP FHD3840 x 2160P
光源:RGB LED
投影画像サイズ:30 ~ 150 インチ
コントラスト比:1000:1
スローレシオ:1.2
投影距離:0.58 m ~ 3.98 m
CPU:クアッドコア ARM Cortex-A55
OS:Android TV 9.0
RAM:2 GB DDR
ROM:16 GB eMMC
スピーカードライバー:10W x 4
Wi-Fi:IEEE802.11a/b/g/n/ac デュアル周波数 2.4GHz/5GHz
Bluetooth 規格:V4.2
USB ファイルシステム:FAT32 / NTFS / exFAT
推奨周囲温度: 41° F ~ 95° F / 5° C ~ 35° C
相対湿度:15 ~ 85% ( 結露なし )
保管温度および湿度:温度 65° C 未満、湿度 90%未満
寸法 ( H × L × W ):約 350 × 248 × 99 mm
重量:3.6 kg
トラブルシューティング
① リモコンで電源をオンにすることができない

JP
134
本体の
を押して、電源をオンにします。
• 電源がオフの場合、リモコンを使用して電源をオンにすることはできません。
② リモコンが機能しない
• リモコンに電池が入っていることを確認してください。
• 電池を交換してください。
③ 画像がぼやけている
• 本製品を少し動かしてオートフォーカスを有効にしてください。
•
を押して、焦点を手動で調整します。
④ Wi-Fi ネットワークに接続できない
• 利用可能なネットワークのリストを更新し、接続をやり直してください。
• ワイヤレスルーターまたは本製品を再起動し、接続をやり直してください。
⑤ ファームウェアを更新するには?
• 新しいバージョンが検出されると、再起動して更新を指示するダイアログが表示
されます。画面の指示に従ってファームウェアを更新してください。
保証内容
最大 24 ヶ月保証 x
ご購入日から 18 ヶ月以内に製品不具合が生じた場合は、弊社カスタマーサポートで
確認後、迅速に同一の製品と交換致します ( ただし、説明書の通りに製品をご使用い
ただいた場合に限ります ) 。また Anker Japan 公式ストアに会員登録をしていただ
くと、保証期間が 24 ヶ月まで延長されます ( 登録無料 ) 。
製品の不具合の場合、返送にかかる送料も弊社が負担致しますが、保証の適用はご
購入いただいた国内のみになります。

KO
135
목차
안전 지침 136
제품 구성 138
개요 138
시작하기 140
Nebula 앱 143
설정 144
Nebula Cosmos Max 사용 146
사양 149
문제 해결 150

KO
136
안전 지침
이 장치를 사용하기 전에 모든 지침을 읽으십시오 . 이 매뉴얼에 기재되지 않은 설정을 임의
로 변경하거나 생성하지 마십시오 . 지침을 준수하지 않아 신체적 상해나 데이터 손실 또는
손상이 발생할 경우 보증이 적용되지 않습니다 .
조립
• 화재나 감전의 위험을 줄이려면 장치를 비 또는 습기에 노출시키지 마십시오 . 화병과 같
이 액체가 담긴 물체를 장치 위에 올려두지 마십시오 .
• 이 장치를 식탁보나 카펫과 같이 부드러운 표면 위에 두지 마십시오 . 화재의 위험이 있습
니다 .
• 먼지나 흙이 과도하게 쌓이기 쉬운 곳이나 강한 자기장을 생성하는 기기 옆에 장치를 두
지 마십시오 .
• 환기구를 막지 마십시오 . 장치가 과열될 수 있습니다 .
• 밀폐된 공간에 장치를 두지 마십시오 . 통풍을 위해 장치 주변에 여유 공간을 충분히 확보
하십시오 .
• 직사광선이나 열 , 급격한 온도차 및 습기에 장치를 오랫동안 노출시키지 마십시오 . 너무
높거나 낮은 온도에 노출시키지 마십시오 . 이 장치와 부속품에 적합한 작동 및 보관 온도
는 0° F ~ 95° F/ 0° C ~ 35° C 입니다 .
• 장치를 장시간 가동할 경우 표면이 가열될 수 있습니다 . 이 경우 즉시 전원을 종료하고 충
전기의 전원을 분리하십시오 . 장치의 온도가 내려가면 작동을 재개하십시오 .
• 장치를 항상 조심히 다루십시오 . 렌즈를 만지지 마십시오 . 어린이가 장치를 만지지 못하
도록 관리 감독하십시오 .
• 장치 위에 무겁거나 날카로운 물체를 올려두지 마십시오 .
• 장치를 분해하지 마십시오 . 감전의 위험이 있습니다 .
• 제조사에서 지정한 부착품이나 부속품만 사용하십시오 .
• 심한 진동을 피하십시오 . 내부 부품이 손상될 수 있습니다 .
• 본 제품에서는 유해한 광학적 방사가 발생할 수 있기 때문에 장치에서 나오는 광선을 응
시하지 마십시오 . 눈에 해로울 수 있습니다 .
전력 공급
• 제공된 전원 어댑터만 사용하십시오 .
• 소켓에서 전원 공급 장치를 제거하기 전에 장치의 전원을 끄십시오 .
• 전원 코드 ( 특히 플러그 , 연장 콘센트 및 장치 연결 부위 ) 를 밟거나 누르지 않도록 조심
하십시오 .
• 번개 / 폭풍 시나 장시간 사용하지 않을 때는 기기의 전원 연결을 해제하십시오 .
• 연결을 설정하거나 변경하기 전에 모든 장치에서 전원 콘센트가 분리되어 있는지 확인하
십시오 .
• 젖은 손으로 전원 케이블이나 전원 커넥터를 만지지 마십시오 .

KO
137
청력 보호
• 높은 볼륨으로 장시간 들을 경우 청력이 손상될 수 있습니다 . 볼륨을 안전한 수준으로 설
정하십시오 .
충전
• 충전기 유형은 출력 전압 / 전류가 DC 19V/2A 인
HKA18019095-6C
입니다 . 충전기는
장치 주변에 설치해야 하며 쉽게 접근할 수 있어야 합니다 .
• 이 충전기는 실내 전용입니다 .
• 충전 시에는 장치를 상온 ( 권장 온도 : 5° C ~ 25° C/41° F ~ 77° F) 에 통풍이 잘 되는 곳에
두십시오 .
• 본 장치는 외장 케이스의 소재 특성상 버전 2.0 이상의 USB 인터페이스에만 연결해야 합
니다 .
세척
• 부드럽고 보푸라기가 없는 천을 사용하십시오 . 세척 시 액체 , 기체 또는 가연성 세제를 사
용하지 마십시오 .
• 렌즈 세척 시 액체 세제를 사용하지 마십시오 . 렌즈의 코팅막이 손상될 수 있습니다 .
• 렌즈 세척 페이퍼로 렌즈를 청소하십시오 .
수리
• 장치를 직접 수리하지 마십시오 . 반드시 공인 서비스 센터에 맡기십시오 .
• 장치를 올바르게 관리하지 않을 경우 상해를 입거나 장치가 손상될 수 있습니다 .
• 모든 정비는 자격을 갖춘 서비스 직원에게 의뢰하십시오 .
주의
• 본 장치에서는 유해한 광학적 방사가 발생할 수 있습니다 .
• 장치에서 나오는 광선을 응시하지 마십시오 . 밝은 빛으로 인해 눈이 손상될 수 있습니다 .

KO
138
제품 구성
Cosmos Max 어댑터 리모콘 2 x AAA
배터리
QSG
개요
1.
정면
1
2 3
2.
후면
1
1
2 3 4 5
자동 포커스용 카메라
렌즈
스피커
전원 버튼
• 버튼을 누르면 전원이 켜짐
• 버튼을 길게 누르면 전원이 꺼짐
DC 입력
HDMI 입력 포트
• 재생 장치에 연결
USB-A 포트
• USB 플래시 드라이브 연결
광 오디오 포트
• 광 케이블을 이용해
오디오 장치에 연결

KO
139
3.
상단
4.
하단
1
2
3
4
5
6
7
8
9
5.
LED 표시등
LED 상태 설명
빨간색 점등 프로젝터 모드에서 작동 중
포커스 조정
탐색
뒤로
전원 켜기 / 끄기
버튼을 눌러서 Google Assistant
활성화
선택한 콘텐츠 확인
홈
시스템 설정
볼륨 높이기 / 줄이기
삼각대 소켓
리모컨 : Nebula RC
모델 : D0413

KO
140
시작하기
1.
배치
장치를 평평한 표면에 올려놓고 투사면을 향하도록 위치를 정확히 맞춥니다 . 최상의 결과를
얻으려면 투사면이 흰색 평면이어야 합니다 . 장치와 투사면 간의 거리는 최소 0.8 미터 (31 인
치 ), 최대 3.98 미터 (157 인치 ) 를 두어야 하며 , 이 경우 투영 이미지의 크기는 30 ~ 150 인
치입니다 .
31-125 inches
T
• 장치를 투사면 쪽으로 기울일 필요는 없습니다 . 내장된 키스톤 보정 기능
을 이용해 투영 이미지를 조정할 수 있습니다 .
• 투영 이미지의 크기는 장치와 투사면 간의 거리에 따라 결정됩니다 . 최상
의 결과를 얻으려면 프로젝터와의 거리를 63 ~ 104 인치로 두십시오 .
• 천장에 프로젝터를 설치할 수도 있습니다 .
2.
리모컨 준비
리모컨에는 AAA 배터리가 포함되어 있습니다 .
① 리모컨을 처음 사용하는 경우 , 배터리함을 밀어서 열고 AAA 배터리 2 개를 끼웁니다 .

KO
141
② 배터리를 교체하려면 배터리함의 잠금을 해제한 후 열어서 새 배터리를 극 (+/-) 에 맞게
삽입한 후 배터리함을 닫고 잠급니다 .
+
+
3.
시작하기
① 제공된 전원 어댑터를 사용하여 Connect Nebula Cosmos Max 를 전원 콘센트에 연결합
니다 .
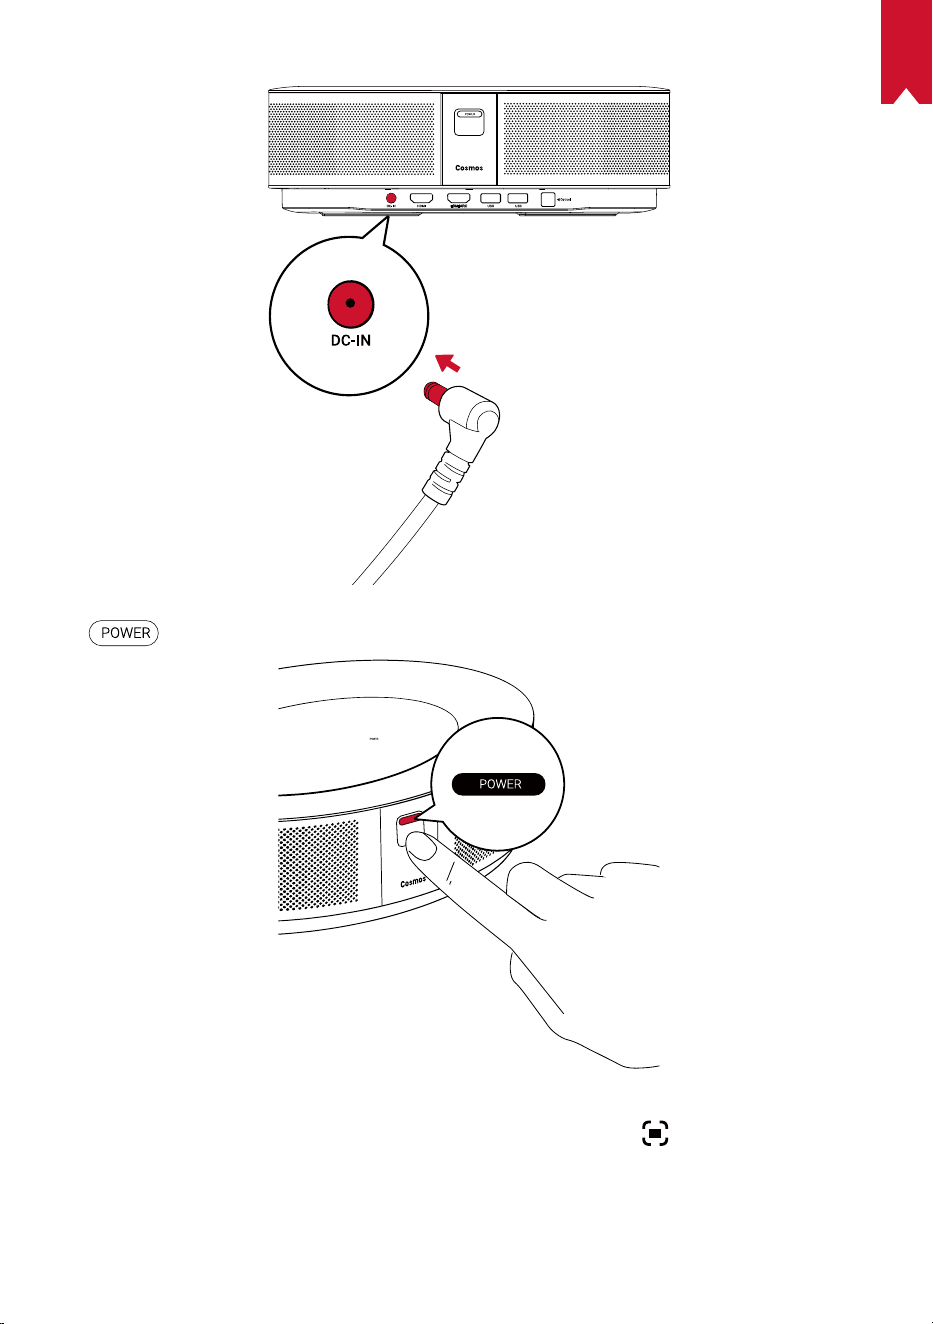
KO
142
② 을 눌러서 프로젝터의 전원을 켭니다 .
③ 투사면 또는 벽을 향해 장치의 각도를 맞춥니다 . 자동 포커스 기능이 내장되어 있어 프로
젝터를 자동 포커스 위치에 맞출 수 있습니다 . 또는 리모컨에서
을 눌러 포커스를 수동
으로 조정할 수도 있습니다 .
④ 처음 사용하는 경우 , 화면의 지침에 따라 기본 설정을 완료합니다 .
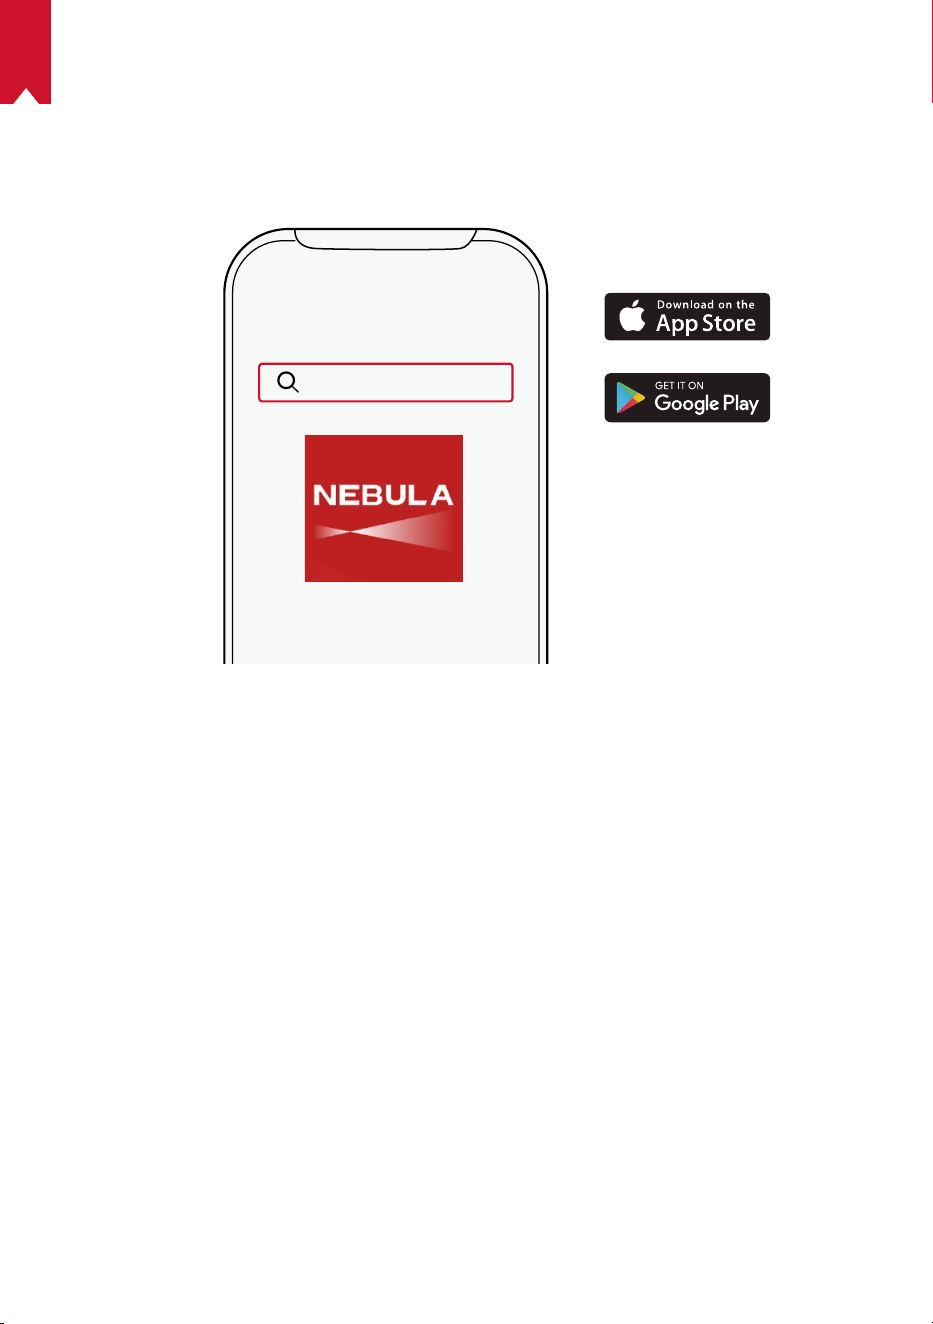
KO
143
Nebula 앱
장치를 간편하게 제어할 수 있도록 Nebula 전용 앱인 Nebula Connect 를 다운로드하는 것
이 좋습니다 . 이 앱을 사용하면 화면을 마우스처럼 사용할 수 있습니다 .
① App Store(iOS 기기 ) 또는 Google Play(Android 기기 ) 에서 Nebula Connect 앱을 다
운로드합니다 .
Nebula Connect
② 스마트폰의 Bluetooth 를 활성화하고 [Nebula Cosmos Max ] 를 선택하여 장치를 연결합
니다 .
③ Nebula Cosmos Max 앱을 열고 화면의 지침에 따라 연결 설정을 완료합니다 .
Android TV ™에서 Nebula Cosmos Max 구동
화면의 지침에 따라 설정 프로세스를 완료합니다 .
옵션 1. 빠른 설정
Android 폰 사용자는 지침에 따라 Android 폰을 이용해 Android TV 를 빠르게 설정할 수 있
습니다 .
옵션 2. Nebula Cosmos Max 설정
iOS 사용자의 경우 , 아래 지침에 따라 프로세스를 완료합니다 .
① 빠른 설정 프로세스를 건너 뜁니다 .
② 네트워크에 Nebula Cosmos Max 를 연결합니다 .
③ Google 계정으로 로그인합니다 .
설정 프로세스가 완료되면 Android TV 에서 Nebula Cosmos Max 가 실행됩니다 .
KO
144
설정
Nebula Cosmos Max 를 처음 실행하면 설정 프로세스가 진행됩니다 .
1.
네트워크
무선 (Wi-Fi) 연결을 통해 장치를 인터넷에 연결할 수 있습니다 .
① 홈페이지에서
> [ 네트워크 및 인터넷 ] 을 선택한 후 를 누릅니다 .
② 화면의 지침에 따라 네트워크 연결을 완료합니다 .
2.
오디오
[ 오디오 설정 ] 을 통해 오디오 포맷을 변경할 수 있습니다 .
① 홈페이지에서
> [ 오디오 설정 ] 을 선택한 후 를 누릅니다 .
디지털 오디오 포맷 자동 변경
PCM 과 RAW 간 디지털 오디오 포맷 자동 변경을 활성
화 또는 비활성화합니다 .
3.
HDMI
입력 소스로 HDMI 1/2 를 선택합니다 . 이 옵션을 이용해 CEC 설정을 변경할 수도 있습니다 .
① 홈페이지에서
> [HDMI] 를 선택한 후 를 누릅니다 .
CEC 설정
Enter 버튼을 눌러서 CEC 설정을 변경합니다 .
4.
프로젝터
① 홈페이지에서 > [ 프로젝터 설정 ] 을 선택한 후 를 누릅니다 .
[밝기]
0 ~ 100% 에서 밝기를 선택합니다 .
[ 색 온도 ]
[ 일반 ] / [ 차갑게 ] / [ 따뜻하게 ]
[ 월 컬러 ]
[ 흰색 ] / [ 빨간색 ] / [ 주황색 ] / [ 파란색 ] / [ 녹색 ] / [ 청녹색 ]
/ [ 노란색 ] / [ 보라색 ]
[ 키스톤 조정 ]
키스톤 조정을 활성화 / 비활성화합니다 .
[줌]
[50-100%]
[ 포커스 자동 조정 ]
Enter
키를 눌러서 포커스 자동 조정을 실행합니다 .
KO
145
[ 프로젝터 모드 ]
[ 자동 ]: 프로젝터의 반전 여부를 자동으로 감지합니다 .
이들 옵션 간에 자동으로 전환이 이루어집니다 .
[ 전면 투영 ]: 프로젝터가 투영 화면 앞에 위치해 있습니다 .
[ 후면 투영 ]: 프로젝터가 투영 화면 뒤에 위치해 있습니다 .
[ 반전된 전면 투영 ]: 프로젝터가 천장에 거꾸로 매달려 있습
니다 . 이미지가 180 도 회전됩니다 .
[ 반전된 후면 투영 ]: 프로젝터가 천장에 투영 화면 뒤로 거꾸
로 매달려 있습니다 . 이미지가 180 도 및 수평 회전됩니다 .
[ 사진 설정 ]
[ 사진 모드 ]
[ 표준 ] / [ 영화 ] / [ 오피스 ]
참고 사항 : 다른 유형의 모드를 선택할 경우 , 색상 밝기와 대비 및
색상 고급 설정이 달라집니다 .
[ 밝기 ]
색상 밝기를 0 ~ 100% 사이로 조정합니다 .
[대비]
색상 대비를 0 ~ 100% 사이로 조정합니다 .
고급 설정
색상의 채도 , 색조 , 게인 및 감마를 조정합니다 .
기본 설정으로 복귀
엔터를 눌러 기본 설정으로 되돌아갑니다 .
5.
앱
① 홈페이지에서 >[ 앱 ] 을 선택한 후 을 누릅니다 .
② 앱을 선택하여 현재 버전을 확인한 후 앱을 열거나 강제 중지하고 사용 중인 저장 용량을
확인하거나 데이터 또는 캐시를 지우거나 알림 및 권한을 활성화 또는 비활성화합니다 .
6.
기타
홈페이지에서 다음을 선택하여 자세한 설정 옵션을 확인합니다 .
[ 장치 기본 설정 ]
[정보]
장치 정보와 펌웨어 업데이트를 확인합니다 .
[ 날짜 및 시간 ]
날짜와 시간을 수동으로 설정합니다 .
[언어]
화면의 언어를 선택합니다 .
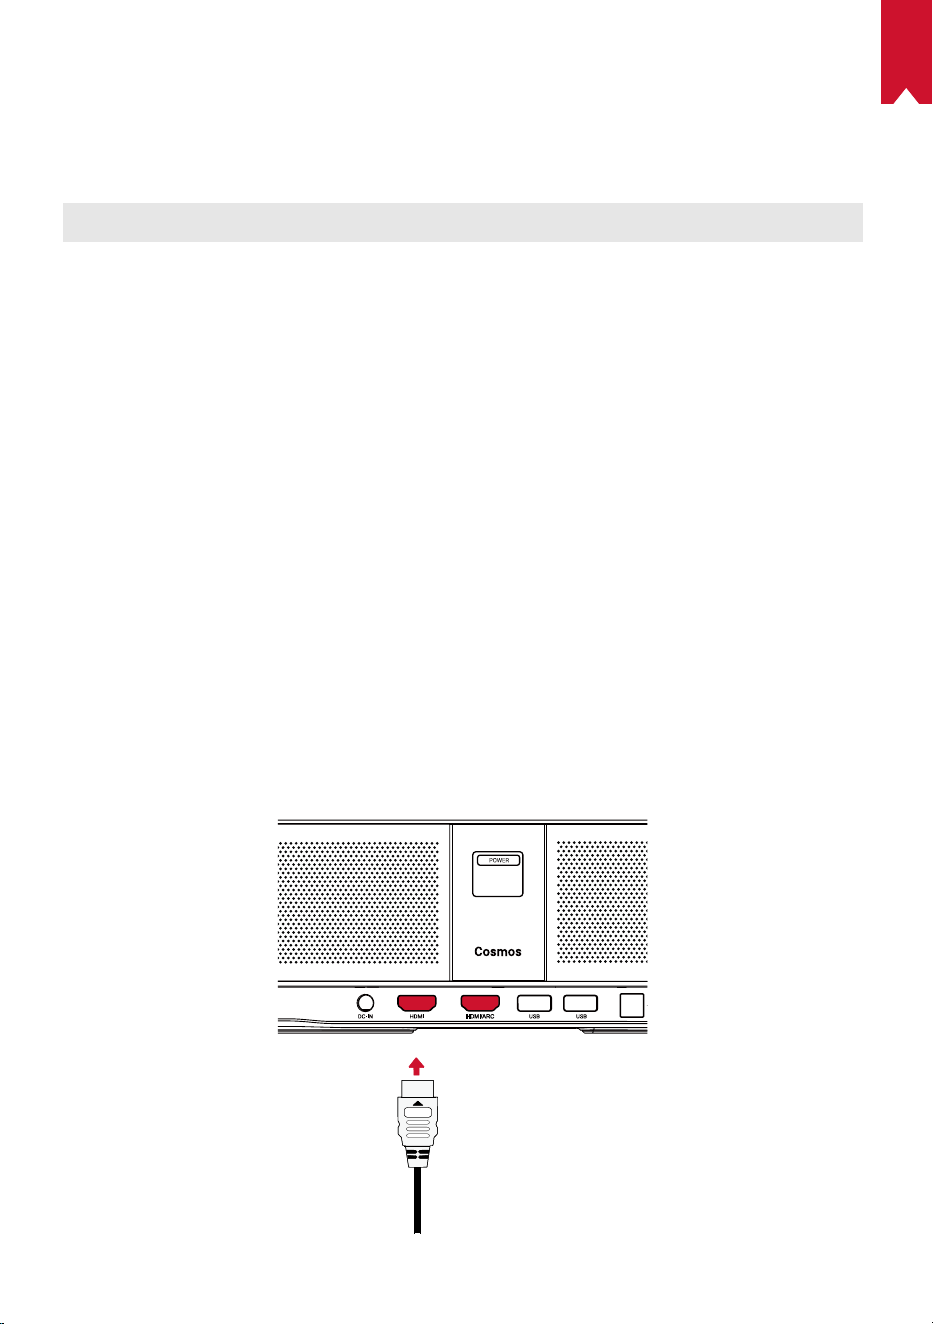
KO
146
[ 키보드 ]
키보드 언어 유형을 선택합니다 .
[ 사운드 ]
오디오 출력 소스와 사운드 형식을 선택합니다 .
[ 스토리지 ]
장치 스토리지와 탈착식 스토리지를 확인합니다 .
[ 재설정 ]
장치 스토리지에 저장된 모든 데이터가 지워집니다 .
[ 날짜 및 시간 ]
[ 자동 날짜 및 시간 ]
날짜 및 시간 자동 설정을 활성화 또는 비활성화합니다 .
[ 날짜 설정 ]
날짜를 수동으로 설정합니다 .
[ 시간 설정 ]
시간을 수동으로 설정합니다 .
[ 시간대 설정 ]
시간대를 설정합니다 .
[
24 시간 형식 사용 ]
24 시간 형식을 활성화 또는 비활성화합니다 .
Nebula Cosmos Max 사용
1.
HDMI 재생 장치에서 재생하기
Nebula Cosmos Max 는 TV 박스 , TV 스틱 , DVD 플레이어 , 셋탑 박스 (STB), 게임 기기 또
는 기타 기기 등 다양한 종류의 HDMI 재생 장치에 연결됩니다 . 두 개의 HDMI 장치를 프로젝
터에 동시에 연결하여 4K@60 fps 의 속도로 동영상을 스트리밍할 수 있습니다 .
HDMI 재생 장치에서 재생하는 방법 :
① HDMI 케이블 ( 미포함 ) 로 Nebula Cosmos Max 를 HDMI 재생 장치에 연결합니다 .
• HDMI 재생 장치에 연결되면 HDMI 재생이 자동으로 실행됩니다 .
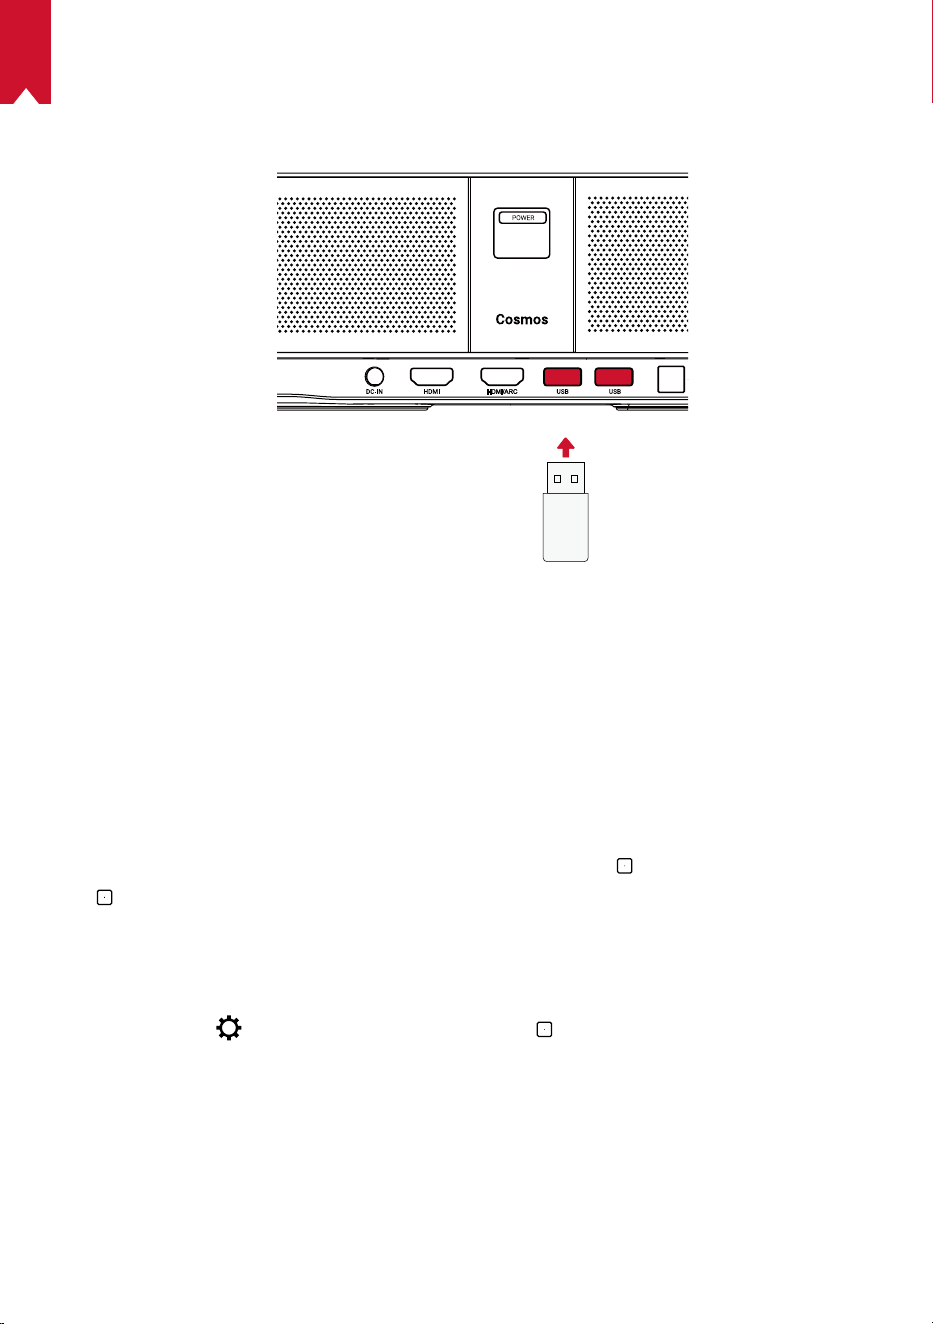
KO
147
2.
USB 드라이브에서 재생하기
Nebula Cosmos Max 에서는 USB 드라이브에 저장된 음악 파일이나 동영상 , 또는 사진을
감상할 수 있습니다 .
USB 드라이브에서 재생하는 방법은 다음과 같습니다 .
① Google Play 에서 ES File Explorer( 파일 탐색기 ) 를 다운로드합니다 .
② USB 드라이브를 USB 포트에 삽입합니다 .
• ES File Explorer 에 USB 폴더가 나타납니다 .
③ USB 드라이브에서 재생하려는 동영상이나 사진을 선택하고
을 누릅니다 .
④
을 눌러 재생을 중지합니다 .
3.
Bluetooth 부속품 연결하기
Nebula Cosmos Max 에 Bluetooth 장치를 연결할 수 있습니다 .
① 홈페이지에서
> [ 원격 및 부속품 ] 을 선택한 후 를 누릅니다 .
② [ 부속품 추가 ] 를 선택합니다 .
• 프로젝터가 부속품 검색을 시작합니다 .
③ 프로젝터를 연결할 장치에 페어링합니다 .
④ 화면의 지침에 따라 Bluetooth 연결을 완료합니다 .
참고 사항 : Bluetooth 장치를 페어링하기에 앞서 먼저 리모컨과 프로젝터가 페어링 모드로
설정되어 있는지 확인합니다 .
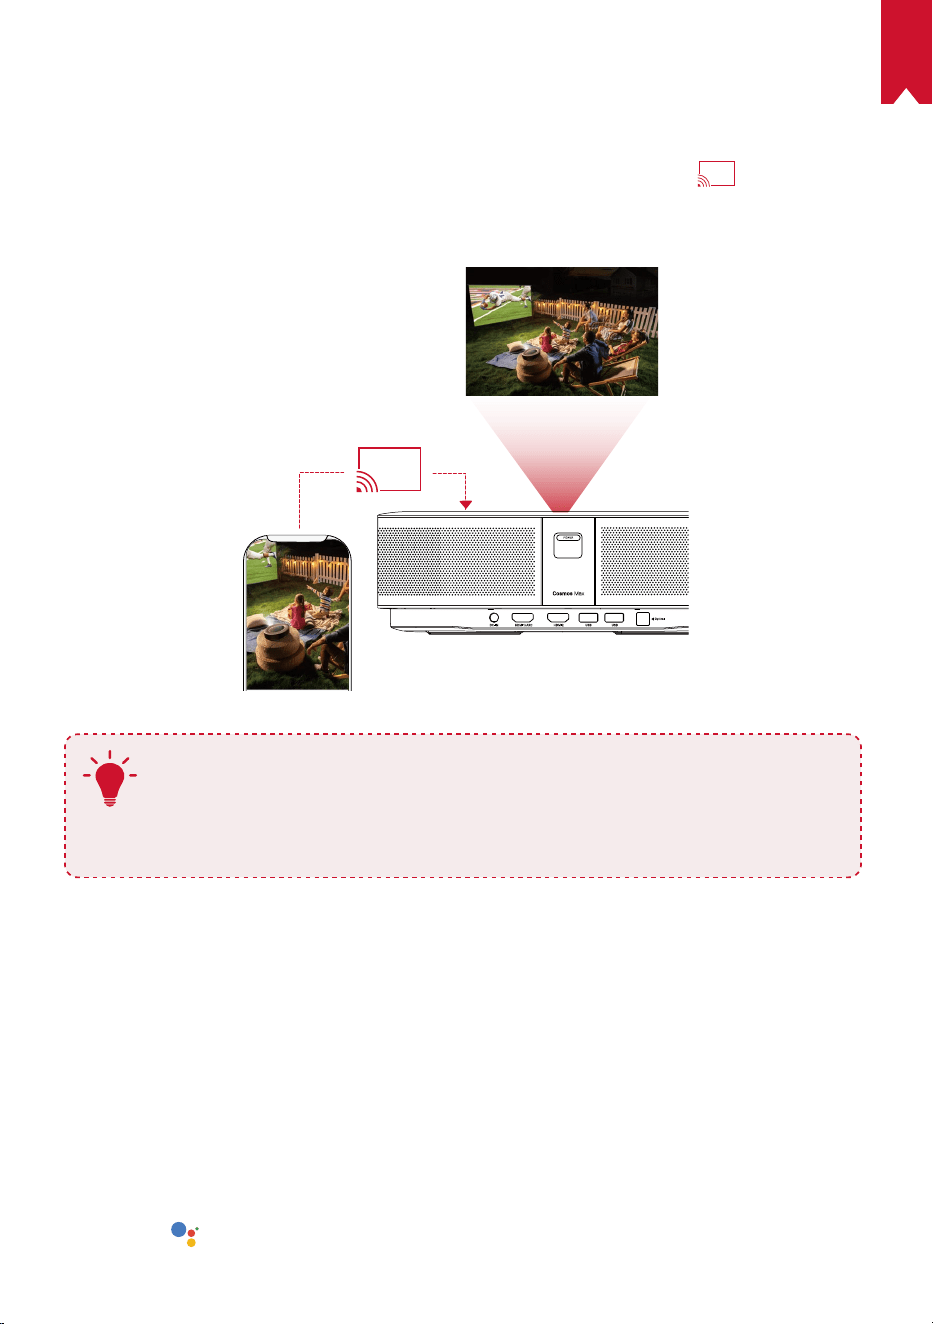
KO
148
4.
내장 크롬캐스트 사용하기
스마트폰이나 컴퓨터에 저장된 사진이나 동영상 또는 음악을 무선으로 Nebula Cosmos Max
에 투사할 수 있습니다 .
① 스마트폰에서 동영상 클립을 재생한 다음 , 동영상 화면의 투사 아이콘
을 누릅니다 .
② 투사하려는 장치로 “D2150”을 선택합니다 .
• 프로젝터가 연결된 스마트폰 또는 컴퓨터의 화면을 미러링합니다 .
T
• Nebula Cosmos Max 와 스마트폰이 같은 무선 네트워크에 연결되어 있는지
확인하십시오 .
• 특정 콘텐츠는 저작권 제한으로 인해 투사가 불가능할 수 있습니다 . 이 경우
Nebula Cosmos Max 에 설치된 같은 앱을 통해 콘텐츠를 스트리밍할 수 있습
니다 .
5.
Google 기능 활용하기
Nebula Cosmos Max 는 Google 기능도 함께 지원합니다 . 무선 네트워크에 연결되면 온라
인 서비스에 액세스할 수 있으며 영화나 음악 , 또는 사진을 감상하거나 인터넷 검색이 가능합
니다 . 사전 설치된 앱과 별도로 Google Play 에서 다른 앱을 설치하여 Google Assistant 에
특정 작업을 수행하도록 지시할 수도 있습니다 .
Google Assistant 와 대화하는 방법은 다음과 같습니다 .
① “Bluetooth 부속품 연결” 섹션의 단계에 따라 Nebula Cosmos Max 에 리모컨이 연결
되었는지 확인합니다 . 일단 연결이 되면 리모컨의 LED 표시등이 짙은 빨간색으로 바뀝니
다.
② 리모컨의
을 눌러서 Google Assistant 에게 말합니다 .

KO
149
사양
사양 및 디자인은 사전 통지 없이 변경될 수 있습니다 .
전력 : 19V
9.47A
소비 전력 : < 180W
대기 소비 전력 : < 0.5W
디스플레이 기술 : DLP UHD3840x2160P
광원 : RGB LED
투영 이미지 크기 : 30~150 인치
명암비 : 1000:1
투사율 : 1.2
투사 거리 : 0.8m ~ 3.98m
CPU: 쿼드 코어 ARM Cortex-A55
운영체제 : Android TV 9.0
RAM: 2GB DDR
ROM: 16GB eMMC
스피커 드라이버 : 10W x 4
와이파이 : IEEE802.11a/b/g/n/ac 듀얼 프리퀀시 2.4G/5G
Bluetooth 버전 : V4.2
USB 파일 시스템 : FAT32 / NTFS / exFAT
권장 환경 : 41° F ~ 95° F/5° C ~ 35° C
상대 습도 : 15% ~ 85%( 비응축식 )
보관 온도 및 습도 : < 149° F/65° C, < 90% 습도
치수 (H*D): 350 × 250 × 100mm / 13.8 × 9.8 × 3.9 인치
무게 : 3.3 kg/118.2 oz
문제 해결
① 리모컨으로 프로젝터의 전원을 켤 수 없으면

KO
150
• 프로젝터에서 을 눌러 전원을 켜십시오 .
• 전원이 꺼져 있는 경우 리모컨을 사용하여 전원을 켤 수 없습니다 .
② 리모컨이 작동하지 않습니다 .
• 리모컨에 배터리가 장착되어 있는지 확인합니다 .
• 배터를 교체합니다 .
③ 이미지가 선명하지 않습니다 .
• 프로젝터를 조금씩 이동시켜 자동 포커스 위치에 맞춥니다 .
•
을 눌러 포커스를 수동으로 조정합니다 .
④ Wi-Fi 네트워크에 연결할 수 없다면
• 사용 가능한 네트워크 목록을 새로 고침한 후 다시 시도하십시오 .
• 무선 공유기 또는 장치를 재부팅한 후 다시 시도하십시오 .
⑥ 펌웨어를 업데이트하고 싶은 경우에는
• 새 버전이 감지되면 재부팅 및 업데이트 요청이 표시됩니다 .

AR
151
تايوتحملا لودج
152 ةمسلاتاداشرإ
154 ةن
ّ
مضملامزاوللا
154 ةماعةرظن
156 مادختساءدب
159 Nebulaقيبطت
160 تادادعا
162 Nebula Cosmos Maxمادختسا
165 تافصاوملا
166 اهحصإوءاطخافاشكتسا

AR
152
ةمسلا تاداشرإ
ةلاحيف.ليلدلااذهيفةحضومريغتادادعإوأتارييغتيأءارجإبمقت.زاهجلااذهمادختسالبقتاداشرالكأرقا
.نامضلاقبطنينلف؛تاداشراعابتامدعببسبررضثودحوأ،تانايبنادقفوأ،ةيدسجةباصإعوقو
دادعا
•يأعضويغبني.ةبوطرلاوأرطمللزاهجلاض
ّ
رعت،ةيئابرهكةمدصثودحوأ/وقيرحبوشنرطخليلقتل
.زاهجلااذهىلع،تايرهزملالثم،لئاوسلابةءولممماسجأ
•.قيرحلارطخلزاهجلاضرعتيدقفإو،داجسلاوأةدئاملاشرافمكةمعانحطسأىلعزاهجلااذهعضت
•.ا
ً
يوقا
ً
يسيطانغم
ً
اجمدلويزاهجيأنمبرقلابوأ،بارتلاو،رابغللةضرعمقطانميفزاهجلااذهعضت
•.اه
ّ
دستوأةيوهتلاتاحتفقلغت،ةدئازلاةنوخسلاعنمل
•.ةيوهتلانامضلزاهجلالوحةيفاكةحاسمنيمأتىلعا
ً
مئادصرحاو.ةق
ّ
يضةحاسميفزاهجلااذها
ً
قلطمعضت
•ةرارحلاتاجردتاب
ّ
لقتوةنوخسلاوةرشابملاسمشلاةعشطرفملاضرعتلانمزاهجلااذهةيامحىلعصرحا
زاهجلااذهلةبسانملانيزختلاوليغشتلاةرارحةجردحوارتت.ىوصقلاةرارحلاتاجردبنجت.ةبوطرلاوةريبكلا
.ةيوئمةجرد35ىلإةيوئمةجرد0/تياهنرهفةجرد95ىلإتياهنرهفةجرد0نيبامهتاقحلمو
•روفلاىلعهليغشتفقوأ،كلذثودحلاحيف.ا
ً
نخاسهحطسحبصيدق،ليوطتقولزاهجلااذهليغشتمتيامدنع
.زاهجلااذهدربينأدعبليغشتلافنأتسا.نحاشلالصفاو
•.مهتبقارمنودنمزاهجلاعملماعتلابلافطلحمست.ةسدعلاسملب
ّ
نجت.ا
ً
مئادرذحبزاهجلالمحا
•.زاهجلااذهىلعةداحلاوأةليقثلاضارغاا
ً
قلطمعضت
•.زاهجلاككفت،ةيئابرهكةمدصلضرعتلاب
ّ
نجتل
•.طقفةع
ّ
نصملاةكرشلااهددحتيتلاتاقحلملاوتاقفرملامدختسا
•.ةيلخادلاتانوكملابررضلاقحلتدقاهنةديدشلاتازازتهابنجت
•نوكيامبر.ليغشتلاحابصميفقدحت،جتنملااذهنما
ً
ثعبنما
ً
رطخيرصبلاعاعشانوكينألمتحملانم
.نيعلابا
ً
رضم
ةقاطلا ردصم
•.قفرملاةقاطلالوحمإمدختست
•.سبقملانمةقاطلاردصمةلازإلبقزاهجلاليغشتفقوأ
•ةطقنلاو،ةيقفاوتلاذخآملاو،سباوقلادنعةصاخ،هيلعصرقلامتينأوأةقاطلاكلسىلعرورملامدعىلعصرحا
.زاهجلااذهنماهدنعجرختيتلا
•.ةليوطةرتفلهمادختسامدعدنعوأةيدعرفصاوعدوجولاحيفزاهجلااذهلصفا
•.ةقاطلاذخأمنعةزهجالكلصفىلعصرحا،اهرييغتوأتيصوتيأءارجإلبق
•.ا
ً
قلطمنيتللبمنيديبةقاطلالصوموأةقاطلالبكسملت

AR
153
عمسلا ةمس
•ىوتسمطبضا.ةيلاعتوصتايوتسمىلعةليوطةينمزتارتفلىقيسوملاىلإعمتست،عمسلابررضلاقاحلإعنمل
.نمآىوتسمىلعتوصلا
نحشلا
•بيكرتبجي.ريبمأ9.47/تلوف19رمتسملارايتلاجارخإرايت/دهجعمHKA18019095-6Cوهنحاشلاعون
.هيلإلوصولالهسيناكميفوجتنملااذهنمبرقلابنحاشلا
•.طقفيلخادلامادختسلممصمنحاشلااذه
•ةجرد25وتاجرد5نيبامحوارتت(ةيسايقلاةفرغلاةرارحةجردبز
ّ
يمتتةئيبيفزاهجلااذهع
َ
ض،نحشلاءانثأ
.ةديجلاةيوهتلابو)اهب
َ
صوملاتياهنرهفةجرد77ىلإتياهنرهفةجرد41/ةيوئم
•.طقفقحرادصإيأوأ2.0رادصانمUSBةهجاوبزاهجلاليصوتبجي،لكيهلايفةمدختسملاداوملاببسب
فيظنتلا
•لاعتشلةلباقلاوأ،ةيزاغلاوأ،ةلئاسلاتافظنملاا
ً
قلطممدختست.ربولانمةيلاخوةمعانشامقةعطقمدختسا
.فيظنتلاضرغلةلوهسب
•.ةسدعلاىلعدوجوملافيلغتلاءاشغبررضلاقاحلإب
ّ
نجتلكلذو،ةسدعلافيظنتلةلئاسفيظنتةداممدختست
•.ةسدعلافيظنتلتاسدعلافيظنتقاروأمدختسا
تاحصا
•.طقفدمتعملاةمدخلازكرمىدلهحصإبمق.كسفنبزاهجلااذهيفتاحيلصتيأءارجإبمقت
•.زاهجلااذهبا
ً
ررضقحلتوأتاباصإبةحيحصلاريغةنايصلاببستتدق
•.ل
ّ
هؤملاةمدخلاقيرفلةنايصلالامعألكلكوأ
ريذحت
•.ةريطخةيرصبتاعاعشإزاهجلااذهنمثعبنتدق
•.كي
َ
نيععطاسلاءوضلايذؤيدقف.ليغشتلاةعشأيفق
ّ
دحت
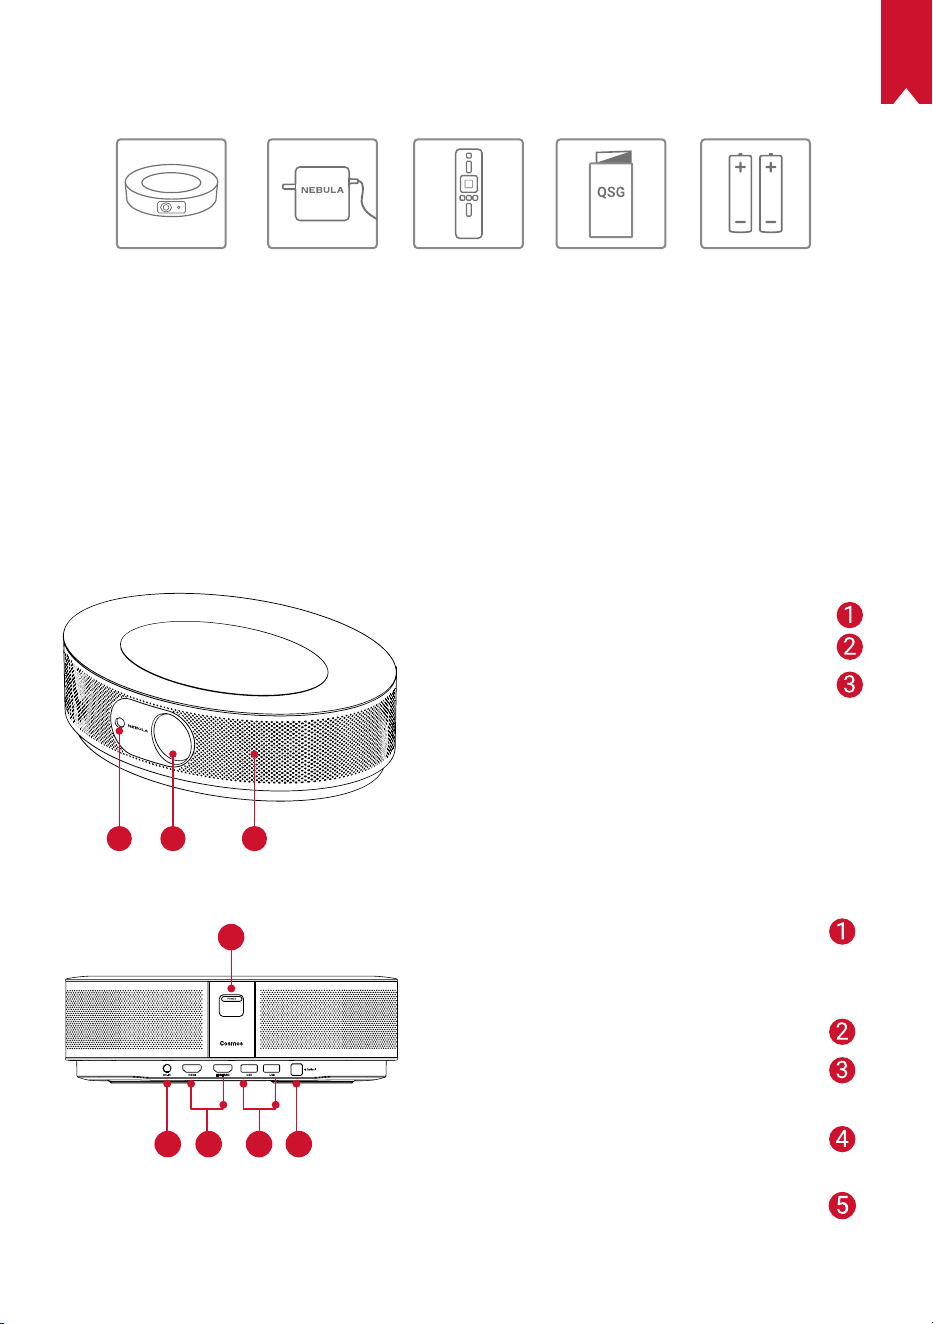
AR
154
ةن
ّ
مضملا مزاوللا
Cosmos Max مشترك كهربائي جهاز التحكم 2 x AAA
البطاريات
QSG
ةماع ةرظن
يماما رظنملا
1
2 3
يفلخلا رظنملا
1
1
2 3 4 5
يئاقلتلازيكرتلابةصاخلااريماكلا
ةسدعلا
توصلاربكم
ليغشتلارز
•ليغشتللطغضا
•ليغشتلافاقيرارمتساعمطغضا
رمتسملارايتلالاخدإ
HDMIلاخدإذفنم
•ليغشتلازاهجبليصوتلا
AعوننمUSBذفنم
•USBشفكرحمبليصوتلا
يرصبلاتوصلاذفنم
•مادختسابتوصزاهجبليصوتلابمق
يرصبلبك
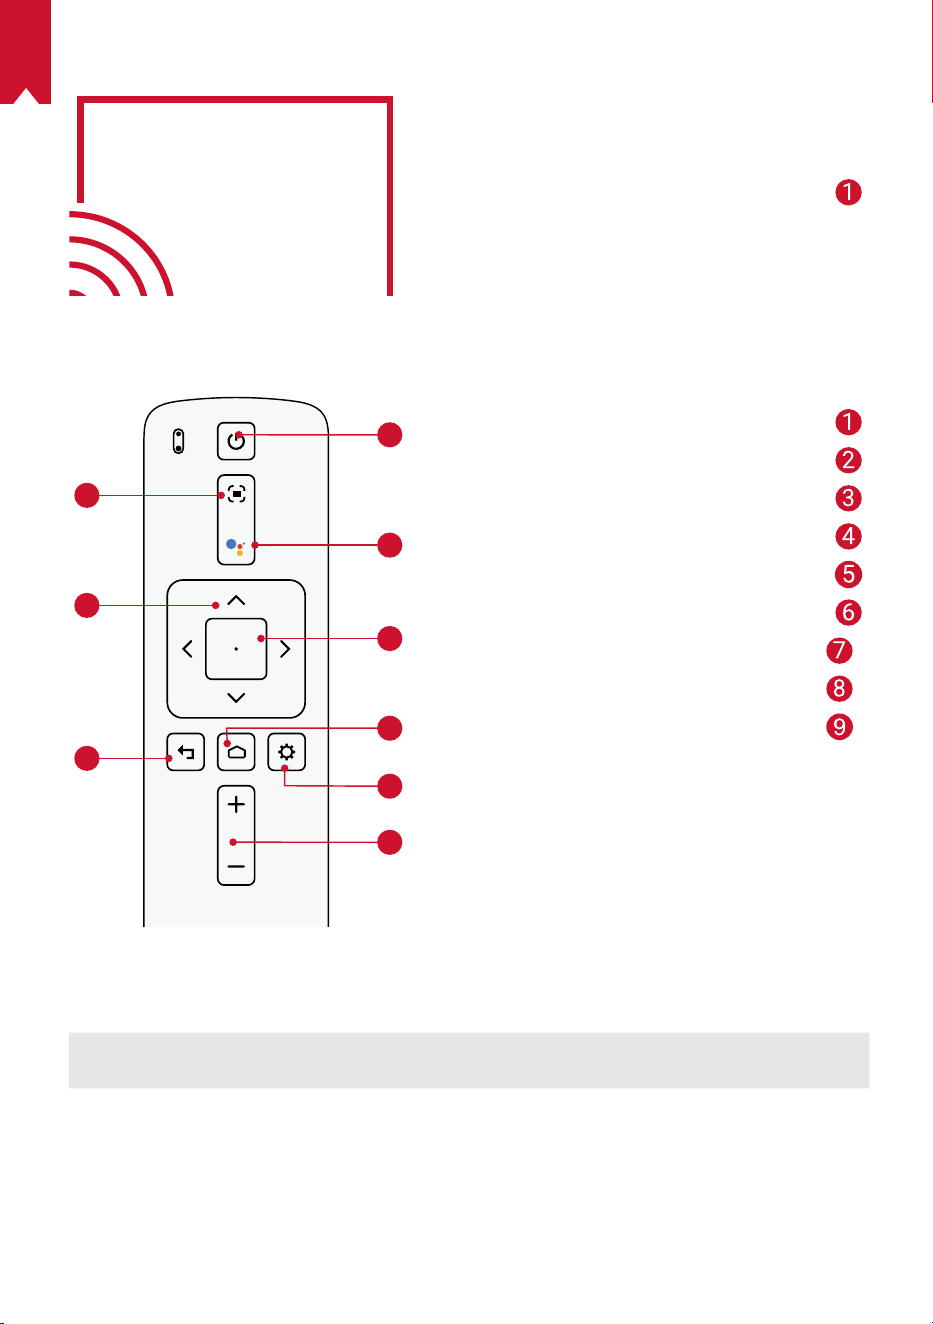
AR
155
يولعلا رظنملا
يلفسلا رظنملا
1
2
3
4
5
6
7
8
9
LED رشؤم
فصولا
LED رشؤم ةلاح
.روتكيجوربلاعضويفليغشتلا تباثرمحأ
زيكرتلاطبض
لقنتلا
ةيفلخلاةهجلا
ليغشتلافاقيإ/ليغشتلل
Googleدعاسمطيشنتلطغضا
ددحملاىوتحملاديكأت
ةيسيئرلا
ماظنلاتادادعإ
هضفخ/توصلاىوتسمعفر
يثثسبقم
Nebula RC:دع
ُ
بنعم
ّ
كحتلازاهج
D0413:ليدوملا
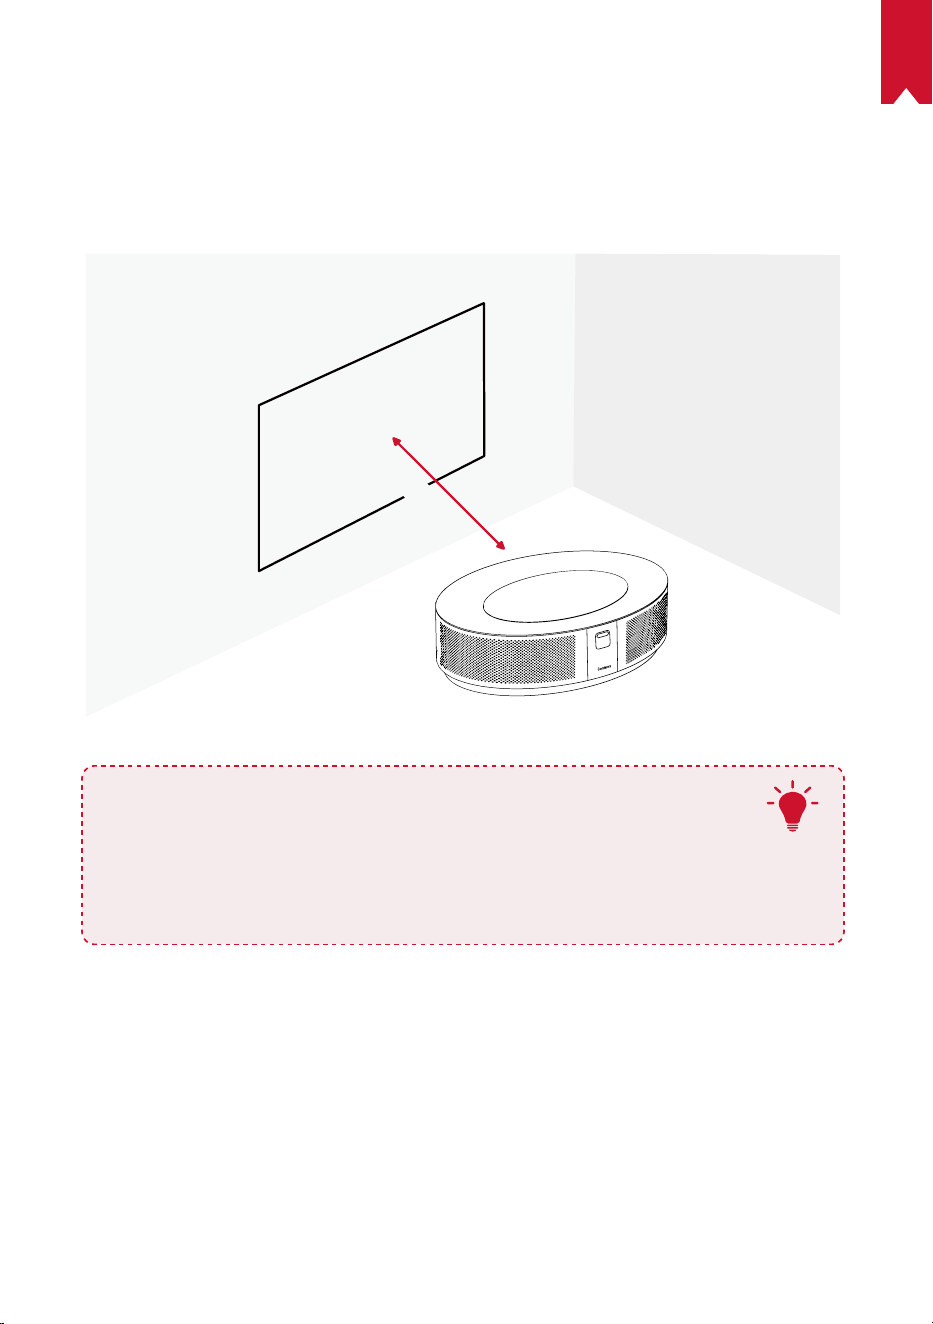
AR
156
مادختسا ءدب
زاهجلا عضو ناكم
نأبجي،جئاتنلالضفأىلعلوصحلل.طاقساحطسةهجاوملةرشابمهعضوح
ّ
طسموتباثحطسىلعزاهجلااذهعض
)رتم0.8(ةصوب31طاقساحطسوزاهجلااذهنيبةفاسملانوكتنأبجي.ا
ً
ح
ّ
طسمونوللاضيبأضرعلاحطسنوكي
.ةصوب150ىلإ30نيبطاقسإةروصىلعلوصحللىصقأدحك)رتم3.98(ةصوب157وىندأدحك
31-125 inches
T
•ةطساوبطقسملاةروصحيحصتكنكمي.طقسملاحطسهاجتابزاهجلاليمتنأا
ً
يرورضسيل
.ةن
ّ
مضملاروحملاحيحصتةزيم
•،ةجيتنلضفأىلعلوصحلل.طقسملاةروصمجحطقسملاحطسوزاهجلانيبةفاسملاد
ّ
دحت
.ةصوب104ىلإ63نيبحوارتتةفاسمدعبىلعروتكيجوربلاطبضا
•.فقسلاىلعروتكيجوربلاتيبثتا
ً
ضيأكنكمي
دع
ُ
ب نع م
ّ
كحتلا زاهج ريضحت
.AAAمجحبنيتيراطببا
ً
د
ّ
وزمدع
ُ
بنعم
ّ
كحتلازاهجيتأي
.AAAعوننمنيتيراطببيكرتبمقو،ةيراطبلاةرجححتفلررم،ةرملومادختسل①

AR
157
،ن
ّ
يبموهامك)-/+(ةيبطقلاعمقفاوتتةديدجةيراطبلخدأ،اهحتفوةيراطبلاةرجحلفقءاغلإبمق،ةيراطبلالادبتس②
.اهلفقأوةيراطبلاةرجحقلغأمث
+
+
مادختسا ءدب
.رفوتملاةقاطلالوحممادختسابةقاطلاجرخمبNebula Cosmos Maxليصوتبمق①
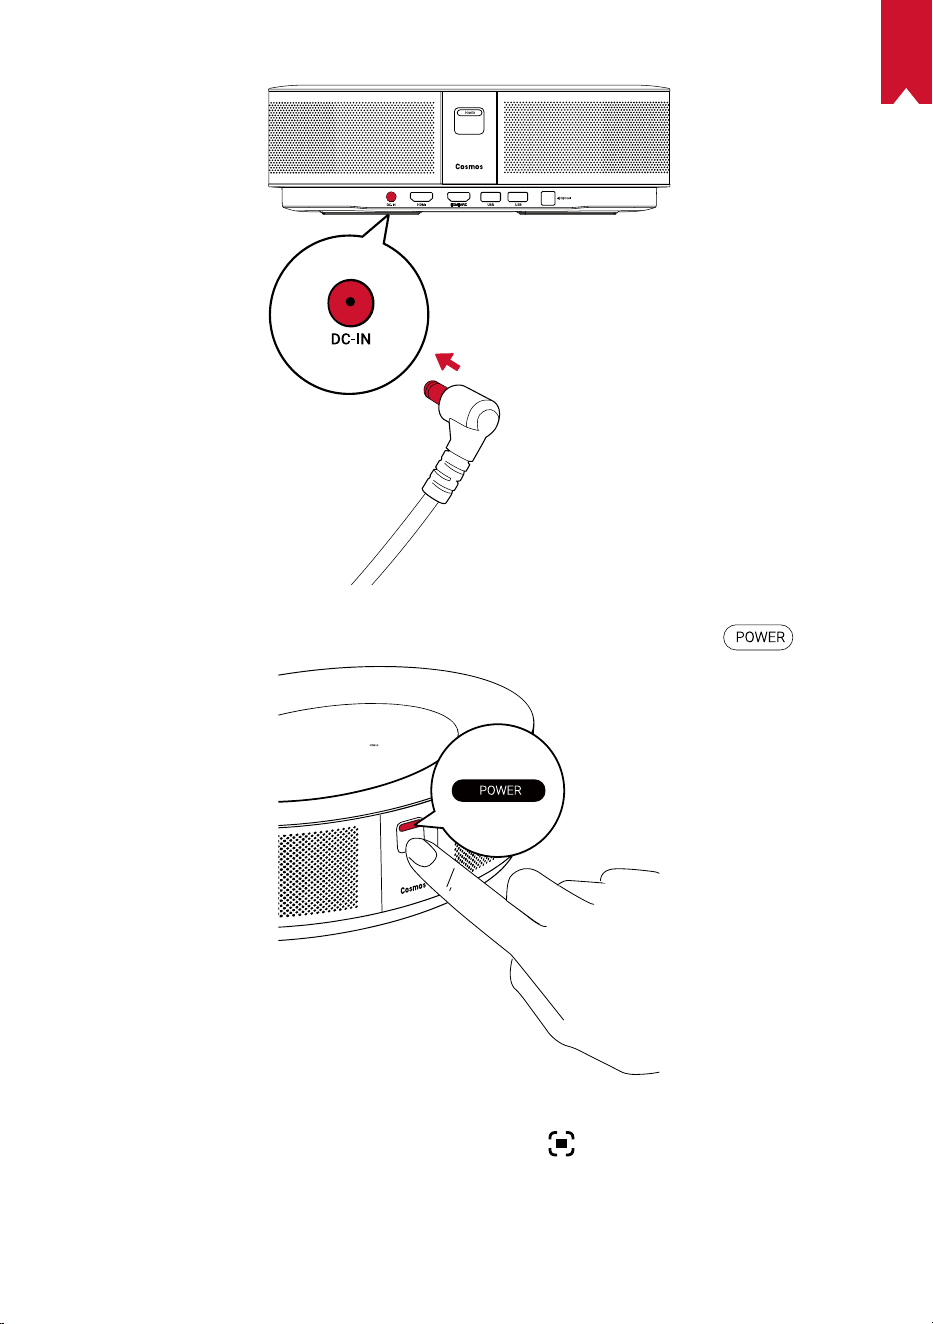
AR
158
.روتكيجوربلاليغشتل طغضا②
طبضليغشتروتكيجوربللةجمدملايئاقلتلازيكرتلاطبضةفيظوحيتت.بسانمطئاحوأطاقسإحطسوحنزاهجلاه
ّ
جو③
.ا
ً
يوديزيكرتلاطبضلدعبنعمكحتلازاهجىلع
ىلعطغضلاكنكميوأ.يئاقلتلازيكرتلا
.يساسادادعالامكةشاشلاىلعرهظتيتلاتاداشراعبتا،ةرملومادختسادنع④

AR
159
Nebula قيبطت
اذهمادختساب.Nebula Connect،صصخملاNebulaقيبطتليزنتبيصون،ةلوهسبزاهجلااذهيفمكحتلل
.سوامكةشاشلامادختساكنكمي،قيبطتلا
Google Playوأ)iOSماظنبلمعتيتلاةزهجل(App StoreنمNebula Connectقيبطتليزنتبمق①
.)Androidماظنبلمعتيتلاةزهجل(
Nebula Connect
.زاهجلاليصوتمتيل]Nebula Cosmos Max[ددحو،يكذلاكفتاهىلعBluetoothنيكمتبمق②
.لاصتادادعإلامكةشاشلاىلعرهظتيتلاتاداشراعبتاوNebula Connectقيبطتلاحتفا③
™Android TV مادختساب Nebula Cosmos Max ليغشت
.دادعاةيلمعلامكةشاشلاىلعرهظتيتلاتاداشراعبتا
عيرسلادادعا1رايخ
.AndroidفتاهمادختسابةعرسبAndroid TVدادعتاداشراعابتاAndroidفتاهيمدختسملنكمي
Nebula Cosmos Maxدادعإ2رايخ
.ةيلمعلالامكتاميلعتلاعبتا،iOSيمدختسمل
.عيرسلادادعاءارجإيطخت①
.ةكبشلابNebula Cosmos Maxل
ّ
صو②
.كبصاخلاGoogleباسحمادختسابلوخدلال
ّ
جس③
.دادعاةيلمعنمءاهتنادعبAndroid TVةطساوبNebula Cosmos Maxليغشتمتيس
AR
160
تادادعا
.ىلواةرمللNebula Cosmos Maxليغشتدنعدادعاةيلمعلمكتسا
ةكبشلا
.)Wi-Fi(يكلسلاصتاربعتنرتنابزاهجلااذهليصوتنكمي
.
ىلعطغضاو]تنرتناو ةكبشلا[ > ددح،ةيسيئرلاةمئاقلايف①
.ةكبشلالاصتالامكةشاشلاىلعرهظتيتلاتاداشراعبتا②
توصلا
.توصلاتادادعإربعتوصلاقيسنترييغتنكمي
.
ىلعطغضاو]توصلا تادادعإ[ > ددح،ةيسيئرلاةمئاقلايف①
PCMنيبهليطعتوأيئاقلتلايمقرلاتوصلاقيسنترييغتنيكمت
RAWو
ا
ً
يئاقلتيمقرلاتوصلاقيسنترييغت
HDMI
.رايخلااذهنمضCECتادادعإرييغتا
ً
ضيأكنكمي.لاخداردصمكHDMI1/2رتخا
.
ىلعطغضاو]HDMI[ > ددح،ةيسيئرلاةحفصلانم①
CECتادادعإرييغتلEnterرزىلعطغضا CECتادادعإ
روتكيجوربلا
. ىلعطغضاو]روتكيجوربلا تادادعإ[ > ددح،ةيسيئرلاةمئاقلانم①
100%و0نيبعوطسلاةجردرتخا ]عوطسلا[
]قماغ[/]حتاف[/]يداع[ ]ناولاةرارحةجرد[
/]يوامس[/]رضخأ[/]قرزأ[/]يلاقترب[/]رمحأ[/]ضيبأ[
]يناوجرأ[/]رفصأ[
]طئاحلانول[
.روحملاحيحصتةزيمليطعت/نيكمتل ]روحملاحيحصت[
]50-100%[ ]ريغصتلا/ريبكتلا[
.يئاقلتلازيكرتلاحيحصتليغشتل
Enterرزىلعطغضا
]يئاقلتلازيكرتلاحيحصت[
AR
161
.سوكعمروتكيجوربلاناكاذإاما
ً
يئاقلتفشتكي:]يئاقلت[
.تارايخلاهذهنيبا
ً
يئاقلتليدبتلا
]روتكيجوربلاعضو[
.طاقساحطسمامأروتكيجوربلاعضودنع:]يماماطاقسا[
.طاقساحطسفلخروتكيجوربلاعضودنع:]يفلخلاطاقسا[
فقسلانمروتكيجوربلاىلدتيامدنع:]سوكعملايماماطاقسا[
.ةجرد180لدعمبةروصلاريودتمتي.بقعىلعا
ً
سأر
فقسلانمروتكيجوربلاىلدتيامدنع:]سوكعملايفلخلاطاقسا[
لدعمبةروصلاريودتمتي.طاقساحطسفلخبقعىلعا
ً
سأر
.ا
ً
يقفأاهسكعوةجرد180
]إعدادات الصورة[
]قياسي[ / ]فيلم[ / ]المكتب[
ملاحظة:عندتحديدوضعمختلف،تختلفدرجةسطوعالألوان،
والتباين،وإعداداتالألوانالمتقدمة.
]وضع الصورة[
اضبطدرجةسطوعاللونبين0و100%
]السطوع[
ضبطدرجةتبايناللونبين0و100%
التباين[
اضبطتشبعاللون،وتدرجه،واكتسابه،وغاما
عدادات متقدمة
اضغطعلىزرEnterللعودةإلىالإعدادالافتراض
العودة إلى الافتراضي
ىرخأ
. ىلعطغضاو،]تاقيبطتلا[ ددح ،ةيسيئرلاةمئاقلايف①
حسماوأمدختسملانيزختلانمققحتوا
ً
يرابجإهفقوأوأهحتفامثيلاحلارادصانمققحتوتاقيبطتلادحأددح②
.اهليطعتوأتانوذاوتاراطخانيكمتبمقوأتقؤملانيزختلاةركاذوأتانايبلا
ىرخأ
.تادادعاتارايخنمديزملاىلعروثعللددح،ةيسيئرلاةحفصلايف
]زاهجلا تيضفت[
.تباثلاجمانربلاثيدحتوزاهجلاتامولعمنمققحت
]لوح[
.ا
ً
يوديتقولاوخيراتلانييعتبمق
]تقولاو خيراتلا[
.ةشاشلاىلعرهظتيتلاةغللاديدحتل
]ةغللا[
.اهمادختساديرتيتلاحيتافملاةحولةغلعونرتخا
]حيتافملا ةحول[

AR
162
.توصلاقيسنتوتوصلاجارخإردصمددح
]توص فلم[
.ةلازللباقلانيزختلاوزاهجلانيزختنمققحت
]نيزختلا[
.زاهجللةيلخادلانيزختلاةدحويفةدوجوملاتانايبلالكوحممتيس
]نييعت ةداعإ[
]تقولاو خيراتلا[
.امهليطعتوأنييئاقلتلاتقولاوخيراتلانيكمتل
]نايئاقلتلا تقولاو خيراتلا[
.ا
ً
يوديخيراتلاطبضل
]خيراتلا طبض[
.ا
ً
يوديتقولاطبضل
]تقولا طبض[
.ةينمزةقطنمددح
]ةينمزلا ةقطنملا ديدحت[
.هليطعتوأةعاس24قيسنتنيكمتل
]ةعاس 24 قيسنت مادختسا
[
Nebula Cosmos Max مادختسا
HDMI ـب ةد
ّ
وزملا ليغشتلا ةزهجأ نم ليغشتلا
TVوأ،TV boxلثمةفلتخملاHDMIـبةد
ّ
وزملاليغشتلاةزهجأبNebula Cosmos Maxزاهجليصوتنكمي
ليصوتنكمي.ىرخأةزهجأوأ،باعلابمكحتلاتادحووأ،)STB(ريفشتلاكفزاهجوأ،DVDلغشموأ،stick
.ةيناثلايفا
ً
راطإ60لكل@وليك4لدعمبويديفلاثبلهسفنتقولايفروتكيجوربلابHDMIنيزاهج
:HDMIـبةد
ّ
وزملاليغشتلاةزهجأنمليغشتلل
.)نمضمريغ(HDMIلبكمادختسابHDMIـبد
ّ
وزمليغشتزاهجبNebula Cosmos Maxليصوتبمق①
•.HDMIـبد
ّ
وزمليغشتزاهجبليصوتلادرجمبا
ً
يئاقلتHDMIليغشتأدبيس
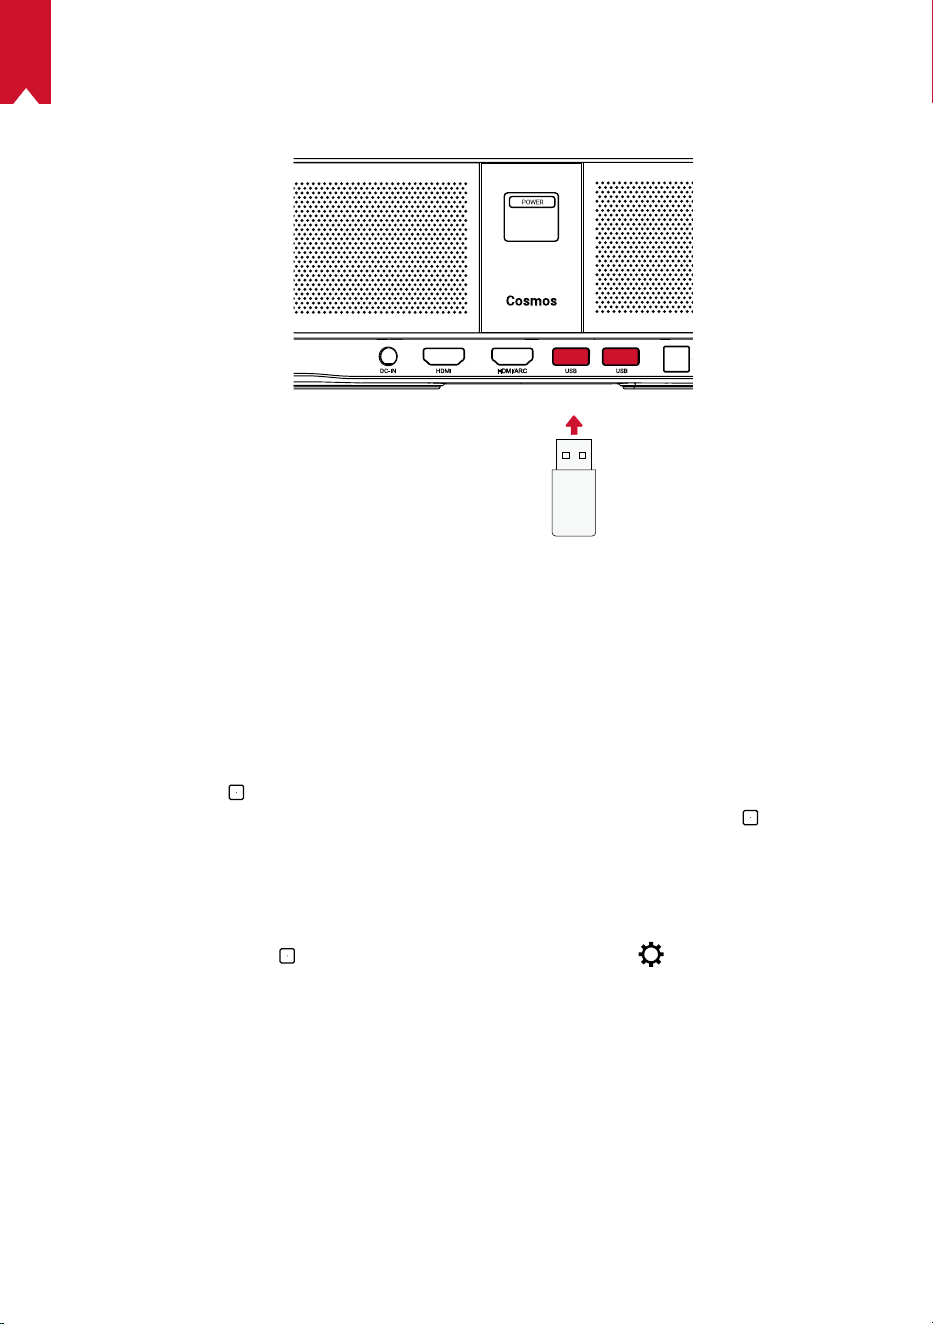
AR
163
USB صارقأ ك
ّ
رحم نم ليغشتلا
ك
ّ
رحمىلعةن
ّ
زخملاروصلاوويديفلاعطاقموىقيسوملابعاتمتساكنكمي،Nebula Cosmos Maxزاهجعم
.USBصارقأ
:USBصارقأك
ّ
رحمنمليغشتلل
.Google PlayنمESFileExplorerليزنتبمق①
.USBذخأميفUSBصارقأك
ّ
رحملخدأ②
•.ESFileExplorerىلعUSBدلجمرهظيس
ىلعطغضامث،هليغشتديرتيذلاUSBصارقأكرحمنمروصلاوأويديفلاعطاقمددح③
.ليغشتلافاقي ىلعطغضا④
Bluetooth تاقحلم ليصوت
.Nebula Cosmos MaxزاهجبBluetoothةزهجأليصوتكنكمي
.
ىلعطغضاو]اهتاقحلمودعبنعمكحتلاةزهجأ[> ددح،ةيسيئرلاةحفصلايف①
.تاقحلمةفاضإددح②
•.تاقحلملانعثحبلايفاذهضرعلازاهجأدبيس
.هليصوتديرتيذلازاهجلابروتكيجوربلانارقإبمق③
.Bluetoothلاصتالامكةشاشلاىلعرهظتيتلاتاداشراعبتا④
يفكبصاخلاروتكيجربلاودع
ُ
بنعم
ّ
كحتلازاهجنأنمدكأت،كبةصاخلاBluetoothةزهجأنارقإلبق:ةظحم
.نارقاعضو
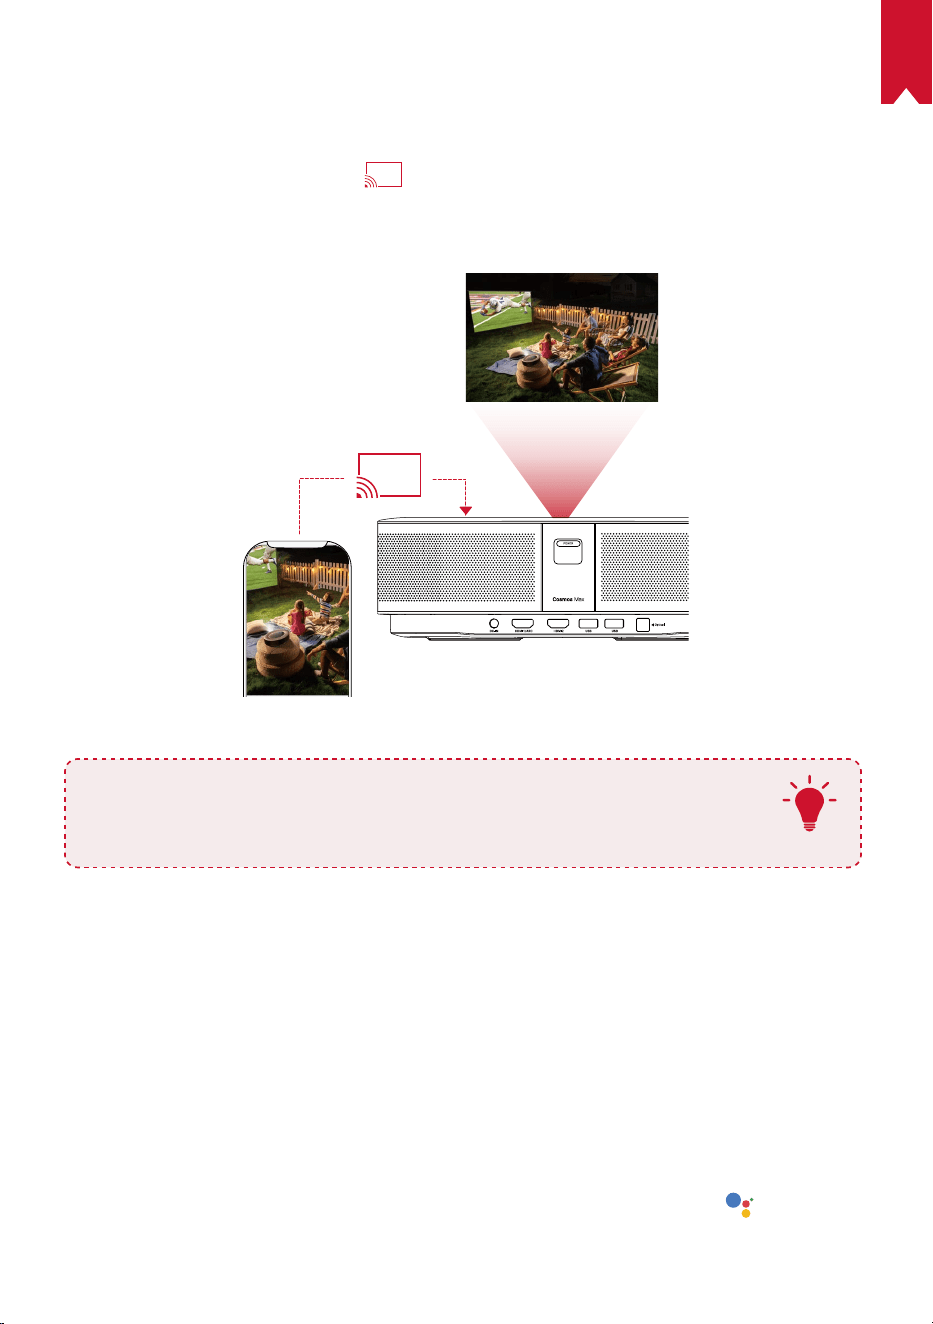
AR
164
جمدملا Chromecast مدختسا
Nebula Cosmosىلإةرشابمرتويبمكلاوأكفتاهنما
ً
يكلسىقيسوملاوويديفلاعطاقموروصلاضرعكنكمي
.Max
.ويديفلاةشاشىلع
ضرعلازمرقوفطغضامث،كفتاهىلعويديفعطقمليغشتبمق①
.هيلعضرعلاديرتيذلا"D2150"زاهجلاددح②
•.لصتملارتويبمكلاوأفتاهلاةشاشاذهروتكيجوبرلاسكعيس
T
•.ةيكلسلاةكبشلاسفنىلعنيلصتمكفتاهوNebula Cosmos Maxنأنمدكأت
•ثبكنكمي،ةلاحلاهذهيف.رشنلاقوقحبةقلعتملادويقلاءا
ّ
رجضرعللتايوتحملاضعبرفوتتدق
.Nebula Cosmos Maxيفتبثملاهسفنقيبطتلاربعىوتحملا
Google تازيمب عتمتسا
ىلإلوصولاكناكمإبحبصي،ةيكلسةكبشبلصتتامدنع.Googleتازيما
ً
ضيأNebula Cosmos Maxمعدي
ةتبثملاتاقيبطتلاىلإةفاضاب.تنرتناربعح
ّ
فصتلاوروصلاوىقيسوملاومفابعاتمتساوتنرتناربعتامدخلا
ماهمذيفنتلGoogleدعاسمىلإثدحتلاوGoogle Playرجتمنمىرخأتاقيبطتيأتيبثتا
ً
ضيأكنكمي،ا
ً
قبسم
.ةنيعم
:Googleدعاسمىلإثدحتلل
زاهجبدعبنعمكحتلازاهجليصوتل"Bluetoothتاقحلمليصوت"مسقيفةحضوملاتاوطخلاعابتانمدكأت①
.رمحانوللاىلإدعبنعمكحتلازاهجيفLEDرشؤملوحتي،لاصتادرجمب.Nebula Cosmos Max
.Googleدعاسمىلإثدحتللدع
ُ
بنعمكحتلازاهجيف
ىلعطغضا②
AR
165
تافصاوملا
.راعشإنودنمرييغتللةضرعميمصتلاوتافصاوملانإ
ريبمأ9.47
تلوف19:ةقاطلاردصم
طاو180<:ةقاطلاكهتسا
طاو0.5<:دادعتساعضويفةقاطلاكهتسا
DLPUHD3840x2160P:ةشاشلاةينقت
)قرزاورضخاورمحانوللا(RGBمعديLEDءوض:يئوضلاردصملا
ةصوب150ىلإ30نم:ضرعلاةروصمجح
1000:1:نيابتلال
ّ
دعم
1,2:طاقسال
ّ
دعم
رتم3.98ىلإرتم0.8:طاقساةفاسم
Cortex-A55ةاونلايعابرعارذ:)CPU(ةيزكرملاةجلاعملاةدحو
AndroidTV9.0:ليغشتلاماظن
DDRتياباجيجRAM(:2(يئاوشعلالوصولاةركاذ
تياباجيج8ةعسROM(:eMMC(طقفةءارقلاةركاذ
4×طاو10:توصلار
ّ
بكمليغشتجمارب
اجيج5/اجيج2.4جودزمددرتWi-Fi:IEEE802.11a/b/g/n/c/acلاصتا
Bluetooth:V4.2رادصإ
USB:FAT32/NTFS/exFATتافلمماظن
ةيوئمةجرد35ىلإ5نم/تياهنرهفةجرد95ىلإ41نم:اهب
َ
صوملاةرارحلا
)فثاكتنودنم(85%ىلإ15%نم:ةيبسنلاةبوطرلا
ةبوطر90%<،ةيوئمةجرد65/تياهنرهفةجرد149<:اهتبوطرونيزختلاةدحوةرارحةجرد
ةصوب3.9 × 9.8 × 13.8/مم100 × 250 × 350:)قمعلا*لوطلا(داعبا
ةصنوأ118.2/مج3.3:نزولا

AR
166
اهحصإو ءاطخا فاشكتسا
؟دعبنعمكحتلازاهجمادختسابروتكيجوربلاليغشتلشفله①
•.هليغشتلروتكيجوربلاىلع
ىلعطغضا
•.هليغشتلدع
ُ
بنعم
ّ
كحتلازاهجمادختساكنكمي،ليغشتلانعا
ً
فقوتمزاهجلانوكيامدنع
؟دع
ُ
بنعم
ّ
كحتلازاهجل
ّ
طعتله②
•.دع
ُ
بنعم
ّ
كحتلازاهجيفا
ً
قبسمةب
ّ
كرمةيراطبلا
ّ
نأنمدكأت
•.تايراطبلالدبتسا
؟ةحضاوريغةروصلاله③
•.يئاقلتلازيكرتلابذجل
ً
يلقروتكيجوربلالقنا
•.ا
ً
يوديزيكرتلاطبضل
ىلعطغضا
؟Wi-Fiةكبشبلاصتاكيلعرذعتيله④
•.ا
ً
ددجمةلواحملادعأوةرفوتملاتاكبشلاةحئثيدحتبمق
•.ةلواحملادعأمثزاهجلاوأيكلسلاه
ّ
جوملاليغشتدعأ
؟ةتباثلاجماربلاثيدحتيننكميفيك⑤
•.ثيدحتلاوليغشتلاةداعإكنمبلط
ُ
يس،ديدجرادصإفاشتكادنع

V01Model:
D2150
©Anker Innovations Limited. All rights reserved. NEBULA
and the NEBULA logo are trademarks of Anker Innovations
Limited, registered in the United States and other countries.
All other trademarks are the property of their respective
owners.
+1 (800) 988 7973 Mo–Fr 9:00–17:00 (PT)
+44 1604 936200 (UK) Mo–So 6:00–14:00 (GMT)
+49 (0) 69 9579 7960 (DE) Mo-Fr 6:00 - 11:00
+81 03 4455 7823 (
日本
)
月
-
金
9:00-17:00
+971 42463266 (Middle East & Africa) Sun-Thu 9:00 - 17:30
(GMT+4)
+971 8000320817 (UAE) Sun-Thu 9:00 - 17:30 (GMT+4)
+966 8008500030 (KSA) Sun-Thu 8:00 - 16:30 (GMT+3)
+965 22069086 (Kuwait) Sun-Thu 8:00 - 16:30 (GMT+3)
+20 8000000826 (Egypt) Sun-Thu 7:00 - 15:30 (GMT+2)
