Owner's Manual
CRRFTSMRH'°
G
42" Mower
CATC E
Model No.
917.248921
• EspaEol, p. 14
• Safety
• Assembly
• Operation
• Maintenance
• Repair Parts
CAUTION:
Read and follow all Safety
Rules and Instructions before
operating this equipment.
For answers to your questions
about this product, Call:
1=800-659-5917
Sears Craftsman Help Line
5 am - 5 pro, Mon- Sat
Sears, Roebuck and Co., Hoffman Estates, IL 60179 U.S.A.
Visit our Craftsman website:www.sears.com/craftsman
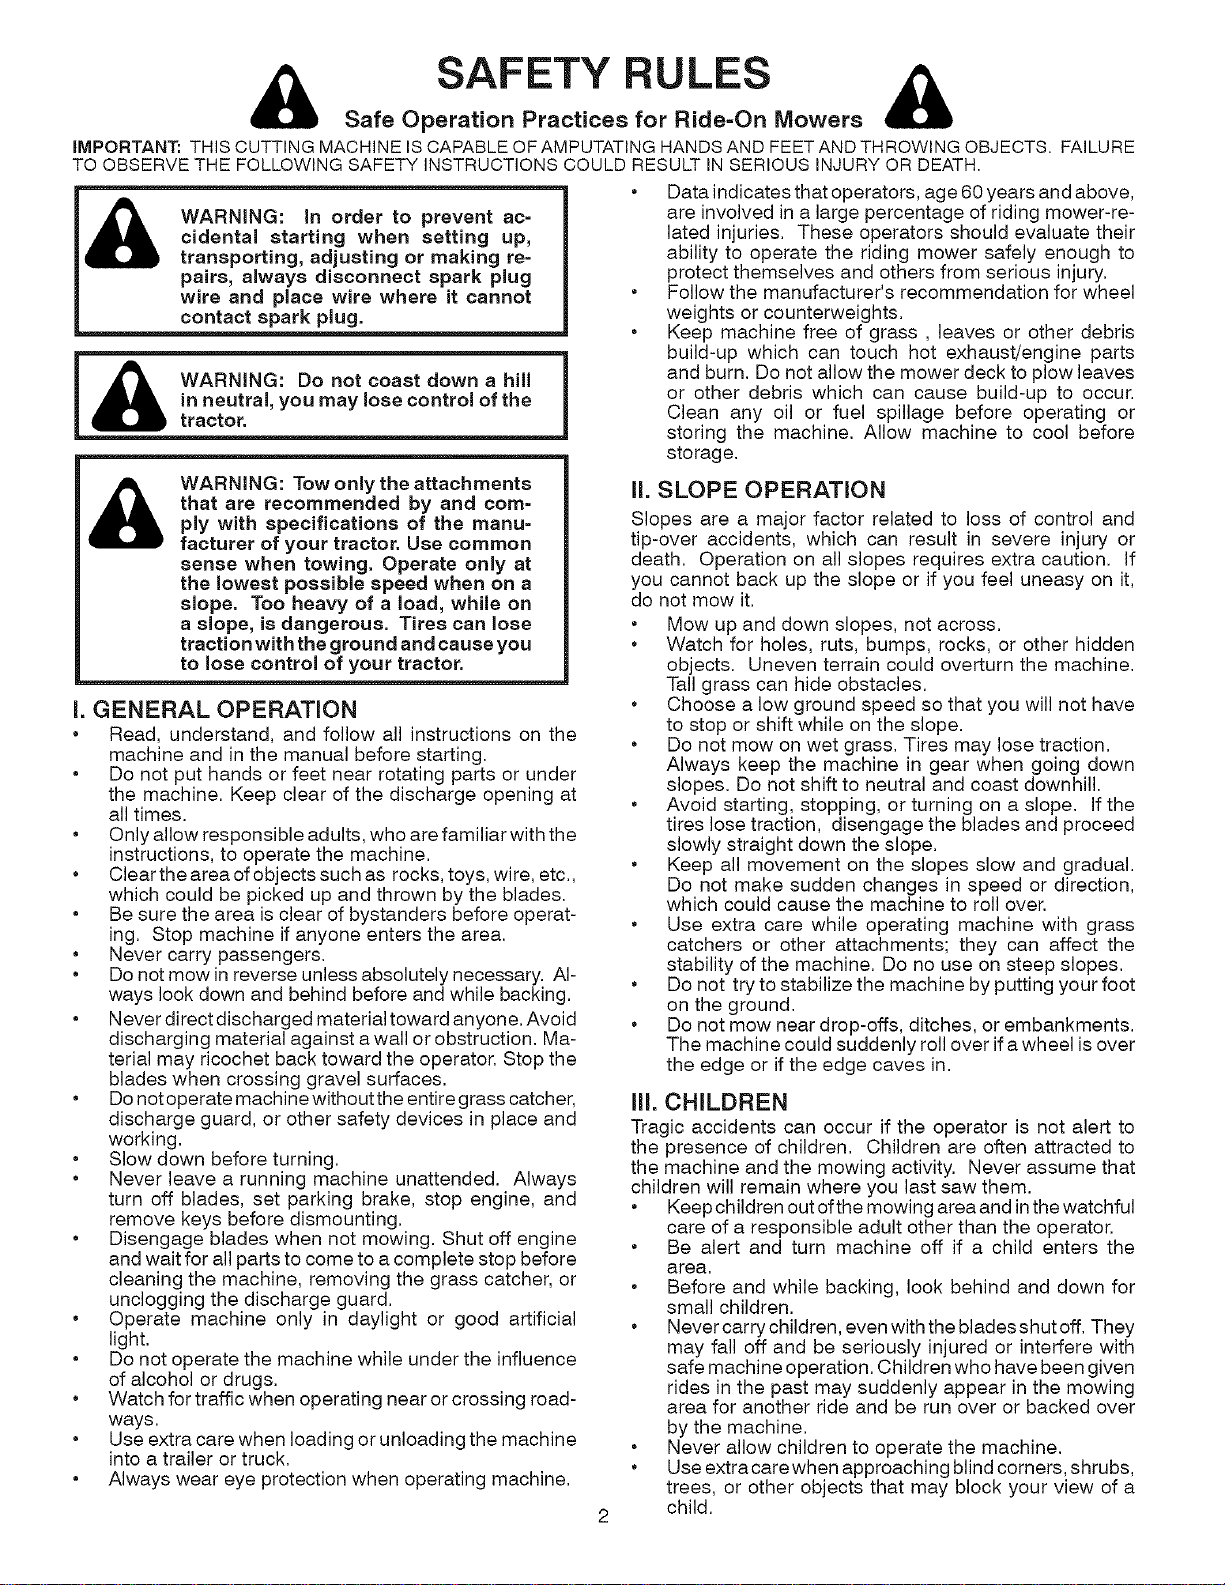
SAFETY RULES
Safe Operation Practices for Ride=On Mowers
IMPORTANT: THIS CUTTING MACHINE IS CAPABLE OFAMPUTATING HANDS AND FEETANDTHROWING OBJECTS. FAILURE
TO OBSERVE THE FOLLOWING SAFETY INSTRUCTIONS COULD RESULT IN SERIOUS INJURY OR DEATH.
WARNING: in order to prevent ac=
cidental starting when setting up,
transporting, adjusting or making re=
pairs, always disconnect spark plug
wire and place wire where it cannot
contact spark plug.
I _1_ WARNING," Do not_coast dow n a bill
_ in neutral_ you may lose control of the
tractor.
WARNING: Tow only the attachments
that are recommended by and corn=
ply with specifications of the manu=
facturer of your tractor. Use common
sense when towing. Operate only at
the lowest possible speed when on a
slope. Too heavy of a load, while on
a slope, is dangerous. Tires can lose
traction with the ground and cause you
to lose control of your tractor.
I. GENERAL OPERATION
• Read, understand, and follow all instructions on the
machine and in the manual before starting.
• Do not put hands or feet near rotating parts or under
the machine. Keep clear of the discharge opening at
all times.
• Only allow responsible adults, who are familiar with the
instructions, to operate the machine.
• Clear the area of objects such as rocks, toys, wire, etc.,
which could be picked up and thrown by the blades.
• Be sure the area is clear of bystanders before operat-
ing. Stop machine if anyone enters the area.
• Never carry passengers.
• Do not mow in reverse unless absolutely necessary. Al-
ways look down and behind before and while backing.
• Never direct discharged material toward anyone. Avoid
discharging material against a wall or obstruction. Ma-
terial may ricochet back toward the operator. Stop the
blades when crossing gravel surfaces.
• Donotoperate machine without the entire grass catcher,
discharge guard, or other safety devices in place and
working.
• Slow down before turning.
• Never leave a running machine unattended. Always
turn off blades, set parking brake, stop engine, and
remove keys before dismounting.
• Disengage blades when not mowing. Shut off engine
and wait for all parts to come to acomplete stop before
cleaning the machine, removing the grass catcher, or
unclogging the discharge guard.
• Operate machine only in daylight or good artificial
light.
• Do not operate the machine while under the influence
of alcohol or drugs.
• Watch for traffic when operating near or crossing road-
ways.
• Use extra care when loading or unloading the machine
into a trailer or truck.
• Always wear eye protection when operating machine.
o
o
Data indicates that operators, age 60 years and above,
are involved in a large percentage of riding mower-re-
lated injuries. These operators should evaluate their
ability to operate the riding mower safely enough to
protect themselves and others from serious injury.
Follow the manufacturer's recommendation for wheel
weights or counterweights.
Keep machine free of grass, leaves or other debris
build-up which can touch hot exhaust/engine parts
and burn. Do not allow the mower deck to plow leaves
or other debris which can cause build-up to occur.
Clean any oil or fuel spillage before operating or
storing the machine. Allow machine to cool before
storage.
il. SLOPE OPERATION
Slopes are a major factor related to loss of control and
tip-over accidents, which can result in severe injury or
death. Operation on all slopes requires extra caution, If
you cannot back up the slope or if you feel uneasy on it,
do not mow it.
• Mow up and down slopes, not across.
• Watch for holes, ruts, bumps, rocks, or other hidden
objects. Uneven terrain could overturn the machine.
Tall grass can hide obstacles,
• Choose a low ground speed so that you will not have
to stop or shift while on the slope.
• Do not mow on wet grass. Tires may lose traction,
Always keep the machine in gear when going down
slopes, Do not shift to neutral and coast downhill.
• Avoid starting, stopping, or turning on a slope. If the
tires lose traction, disengage the blades and proceed
slowly straight down the slope.
• Keep all movement on the slopes slow and gradual.
Do not make sudden changes in speed or direction,
which could cause the machine to roll over.
• Use extra care while operating machine with grass
catchers or other attachments; they can affect the
stability of the machine. Do no use on steep slopes.
• Do not try to stabilize the machine by putting your foot
on the ground.
• Do not mow near drop-offs, ditches, or embankments.
The machine could suddenly roll over if a wheel is over
the edge or if the edge caves in,
ill. CHILDREN
Tragic accidents can occur if the operator is not alert to
the presence of children. Children are often attracted to
the machine and the mowing activity. Never assume that
children will remain where you last saw them.
• Keep children out ofthe mowing area and inthe watchful
care of a responsible adult other than the operator.
• Be alert and turn machine off if a child enters the
area.
• Before and while backing, look behind and down for
small children.
• Never carry children, even withthe blades shut off. They
may fall off and be seriously injured or interfere with
safe machine operation. Children who have been given
rides in the past may suddenly appear in the mowing
area for another ride and be run over or backed over
by the machine.
• Never allow children to operate the machine.
• Use extracare when approaching blind corners, shrubs,
trees, or other objects that may block your view of a
child,
SAFETY RULES
Safe Operation Practices for Ride=On Mowers
iV. TOWING
• Tow only with a machine that has a hitch designed for
towing. Do not attach towed equipment except at the
hitch point.
• Follow the manufacturer's recommendation for weight
limits for towed equipment and towing on slopes.
• Never allow children or others in or on towed equip-
ment.
• On slopes, the weight of the towed equipment may
cause loss of traction and loss of control.
• Travel slowly and allow extra distance to stop,
V. SERVICE
SAFE HANDLING OF GASOMNE
To avoid personal injury or property damage, use extreme
care in handling gasoline. Gasoline is extremely flammable
and the vapors are explosive.
• Extinguish all cigarettes, cigars, pipes, and other
sources of ignition.
• Use only approved gasoline container.
• Never remove gas cap or add fuel with the engine run-
ning. Allow engine to cool before refueling.
• Never fuel the machine indoors.
• Never store the machine or fuel container where there
is an open flame, spark, or pilot light such as on awater
heater or other appliances.
• Never fill containers inside a vehicle or on a truck or
trailer bed with plastic liner. Always place containers
on the ground away from your vehicle when filling.
• Remove gas-powered equipment from thetruck ortrailer
and refuel it on the ground. If this is not possible, then
refuel such equipment with a portable container, rather
than from a gasoline dispenser nozzle.
• Keep the nozzle in contact with the rim of the fuel tank
or container opening atall times until fueling iscomplete.
Do not use a nozzle lock-open device.
• If fuel is spilled on clothing, change clothing immedi-
ately.
• Never overfill fuel tank. Replace gas cap and tighten
securely.
GENERAL SERVICE
• Never operate machine in a closed are.
• Keep all nuts and bolts tight to be sure the equipment
is in safe working condition,
• Never tamper with safety devices, Check their proper
operation regularly.
• Keep machine free of grass, leaves, or other debris
build-up. Clean oil or fuel spillage and remove any fuel-
soaked debris. Allow machine to cool before storing.
• If you strike a foreign object, stop and inspect the
machine. Repair, if necessary, before restarting.
• Never make any adjustments orrepairs with the engine
running.
• Check grass catcher components and the discharge
guard frequently and replace with manufacturer's rec-
ommended parts, when necessary.
• Mower blades are sharp. Wrap the blade or wear
gloves, and use extra caution when servicing them.
• Check brake operation frequently. Adjust and service
as required.
• Maintain or replace safety and instruction labels, as
necessary.
®@@@@
• Be sure the area is clear of bystanders before operat-
ing. Stop machine if anyone enters the area.
• Never carry passengers.
• Do not mow in reverse unless absolutely necessary.
Always look down and behind before and while back-
ing.
• Nevercarry children, even withthe blades shut off. They
may fall off and be seriously injured or interfere with
safe machine operation. Children who have been given
rides in the past may suddenly appear in the mowing
area for another ride and be run over or backed over
by the machine.
• Keepchildren out ofthe mowing areaand inthe watchful
care of a responsible adult other than the operator.
• Be alert and turn machine off if a child enters the
area.
• Before and while backing, look behind and down for
small children,
• Mow up and down slopes (15° Max), not across.
• Be alert and turn machine off if a child enters the
area.
• Choose a low ground speed so that you will not have
to stop or shift while on the slope.
• Avoid starting, stopping, or turning on a slope. If the
tires lose traction, disengage the blades and proceed
slowly straight down the slope.
• Ifmachine stops while going uphill, disengage blades,
shift into reverse and back down slowly.
• Do not turn on slopes unless necessary, and then, turn
slowly and gradually downhill, if possible.
SAVE THESE iNSTRUCTiONS
SAFETY RULES ................................................................... 2-3
CARTON CONTENTS ............................................................. 4
ASSEMBLY ........................................................................... 5-9
OPERATmON .......................................................................... 10
MAINTENANCE ..................................................................... 11
STORAGE .............................................................................. 11
WARRANTY ........................................................................... 11
REPAIR PARTS ................................................................ 12-13
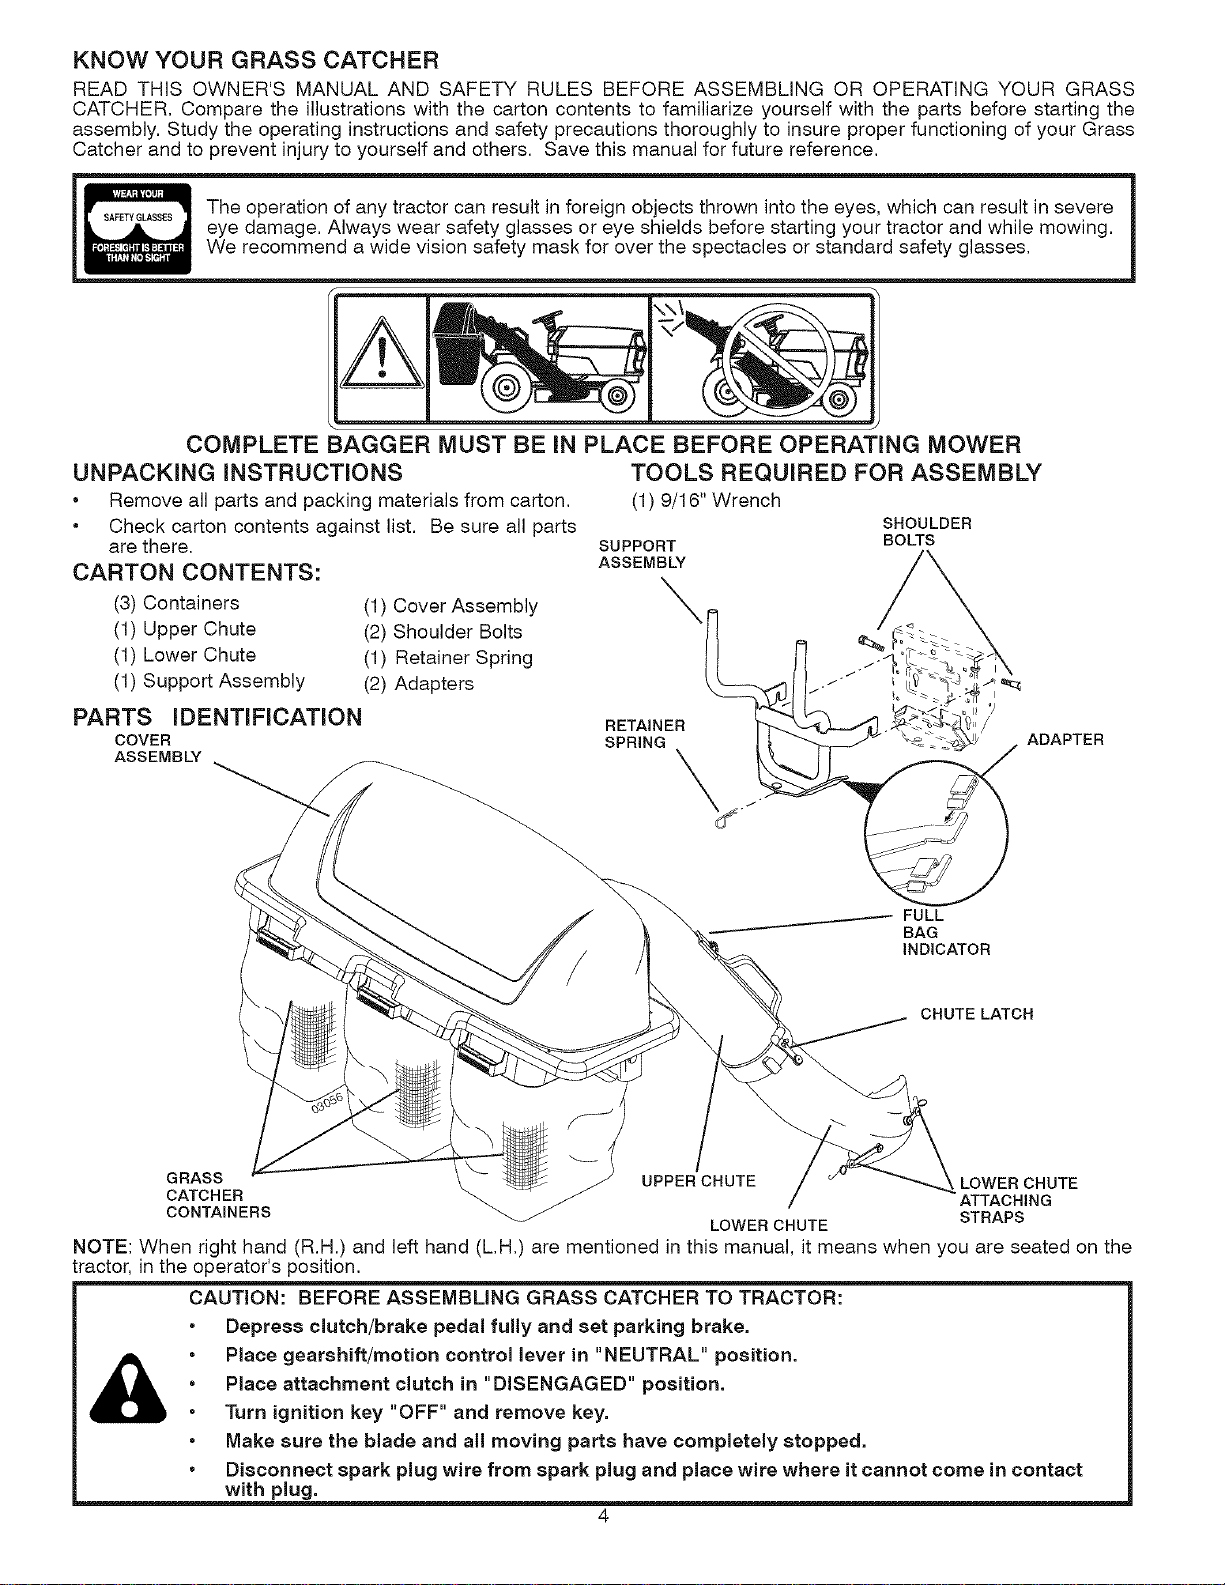
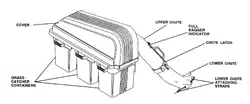
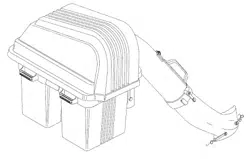
KNOW YOUR GRASS CATCHER
READ THIS OWNER'S MANUAL AND SAFETY RULES BEFORE ASSEMBLING OR OPERATING YOUR GRASS
CATCHER. Compare the illustrations with the carton contents to familiarize yourself with the parts before starting the
assembly. Study the operating instructions and safety precautions thoroughly to insure proper functioning of your Grass
Catcher and to prevent injury to yourself and others. Save this manual for future reference.
The operation of any tractor can result in foreign objects thrown into the eyes, which can result in severe
eye damage. Always wear safety glasses or eye shields before starting your tractor and while mowing.
We recommend a wide vision safety mask for over the spectacles or standard safety glasses.
COMPLETE BAGGER MUST BE iN PLACE BEFORE OPERATING MOWER
UNPACKING iNSTRUCTIONS
• Remove all parts and packing materials from carton.
• Check carton contents against list. Be sure all parts
(1) Cover Assembly
(2) Shoulder Bolts
(1) Retainer Spring
(2) Adapters
are there.
CARTON CONTENTS:
(3) Containers
(1) Upper Chute
(1) Lower Chute
(1) Support Assembly
TOOLS REQUIRED FOR ASSEMBLY
(1) 9/16" Wrench
SHOULDER
SUPPORT BOLTS
ASSEMBLY
\
PARTS iDENTiFiCATiON RETAINER
COVER SPRING
ASSEMBLY
FULL
BAG
INDICATOR
ADAPTER
CHUTE LATCH
GRASS UPPER CHUTE LOWER CHUTE
CATCHER ATTACHING
CONTAINERS STRAPS
LOWER CHUTE
NOTE: When right hand (R.H.) and left hand (L.H.) are mentioned in this manual, it means when you are seated on the
tractor, in the operator's position.
CAUTION: BEFORE ASSEMBLING GRASS CATCHER TO TRACTOR:
Depress clutch/brake pedaJ fully and set parking brake.
Place gearshift/motion control lever in "NEUTRAL" position.
Place attachment cJutch in "DISENGAGED" position.
Turn ignition key "OFF" and remove key.
Make sure the bJade and aJJmoving parts have compJeteJy stopped.
Disconnect spark pJug wire from spark pJug and pJaee wire where it cannot come in contact
with plug.
4
1
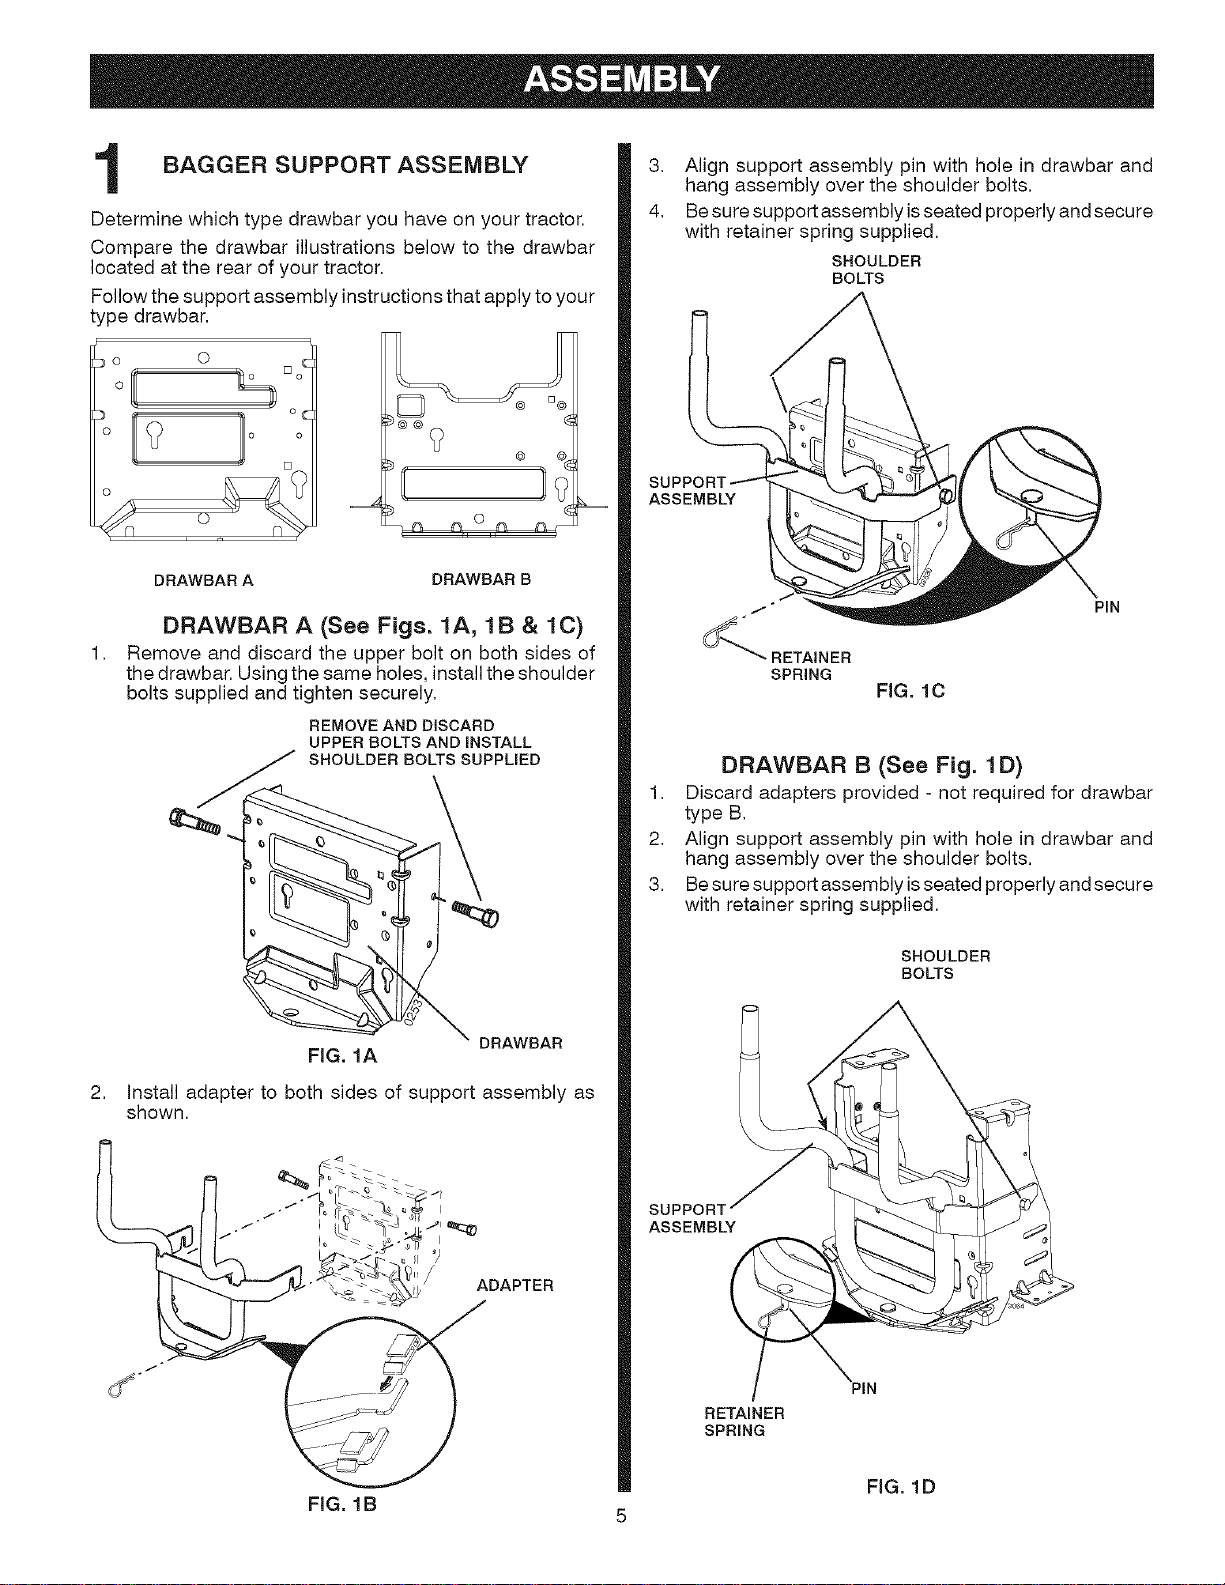
BAGGER SUPPORT ASSEMBLY
Determine which type drawbar you have on your tractor,
Compare the drawbar illustrations below to the drawbar
located at the rear of your tractor,
Follow the support assembly instructions that apply to your
type drawbar,
O
_o
°i
@
r O "
DRAWBAR A DRAWBAR B
1,
DRAWBAR A (See Figs. 1A, 1B & lC)
Remove and discard the upper bolt on both sides of
the drawbar. Using the same holes, install the shoulder
bolts supplied and tighten securely,
REMOVE AND DISCARD
UPPER BOLTS AND INSTALL
SHOULDER BOLTS SUPPLIED
2,
FiG. 1A
DRAWBAR
Install adapter to both sides of support assembly as
shown,
3, Align support assembly pin with hole in drawbar and
hang assembly over the shoulder bolts,
4, Besure support assembly isseated properly and secure
with retainer spring supplied,
SHOULDER
BOLTS
ASSEMBLY
÷
J
_*- RETAINER
SPRING
FIG. lC
PIN
DRAWBAR B (See Fig. 1D)
1. Discard adapters provided - not required for drawbar
type B,
2, Align support assembly pin with hole in drawbar and
hang assembly over the shoulder bolts,
3, Besure support assembly isseated properly and secure
with retainer spring supplied,
SHOULDER
BOLTS
SUPPOR'I"
ASSEMBLY
RETAINER
SPRING
FiG. 1D
FiG. 1B
5
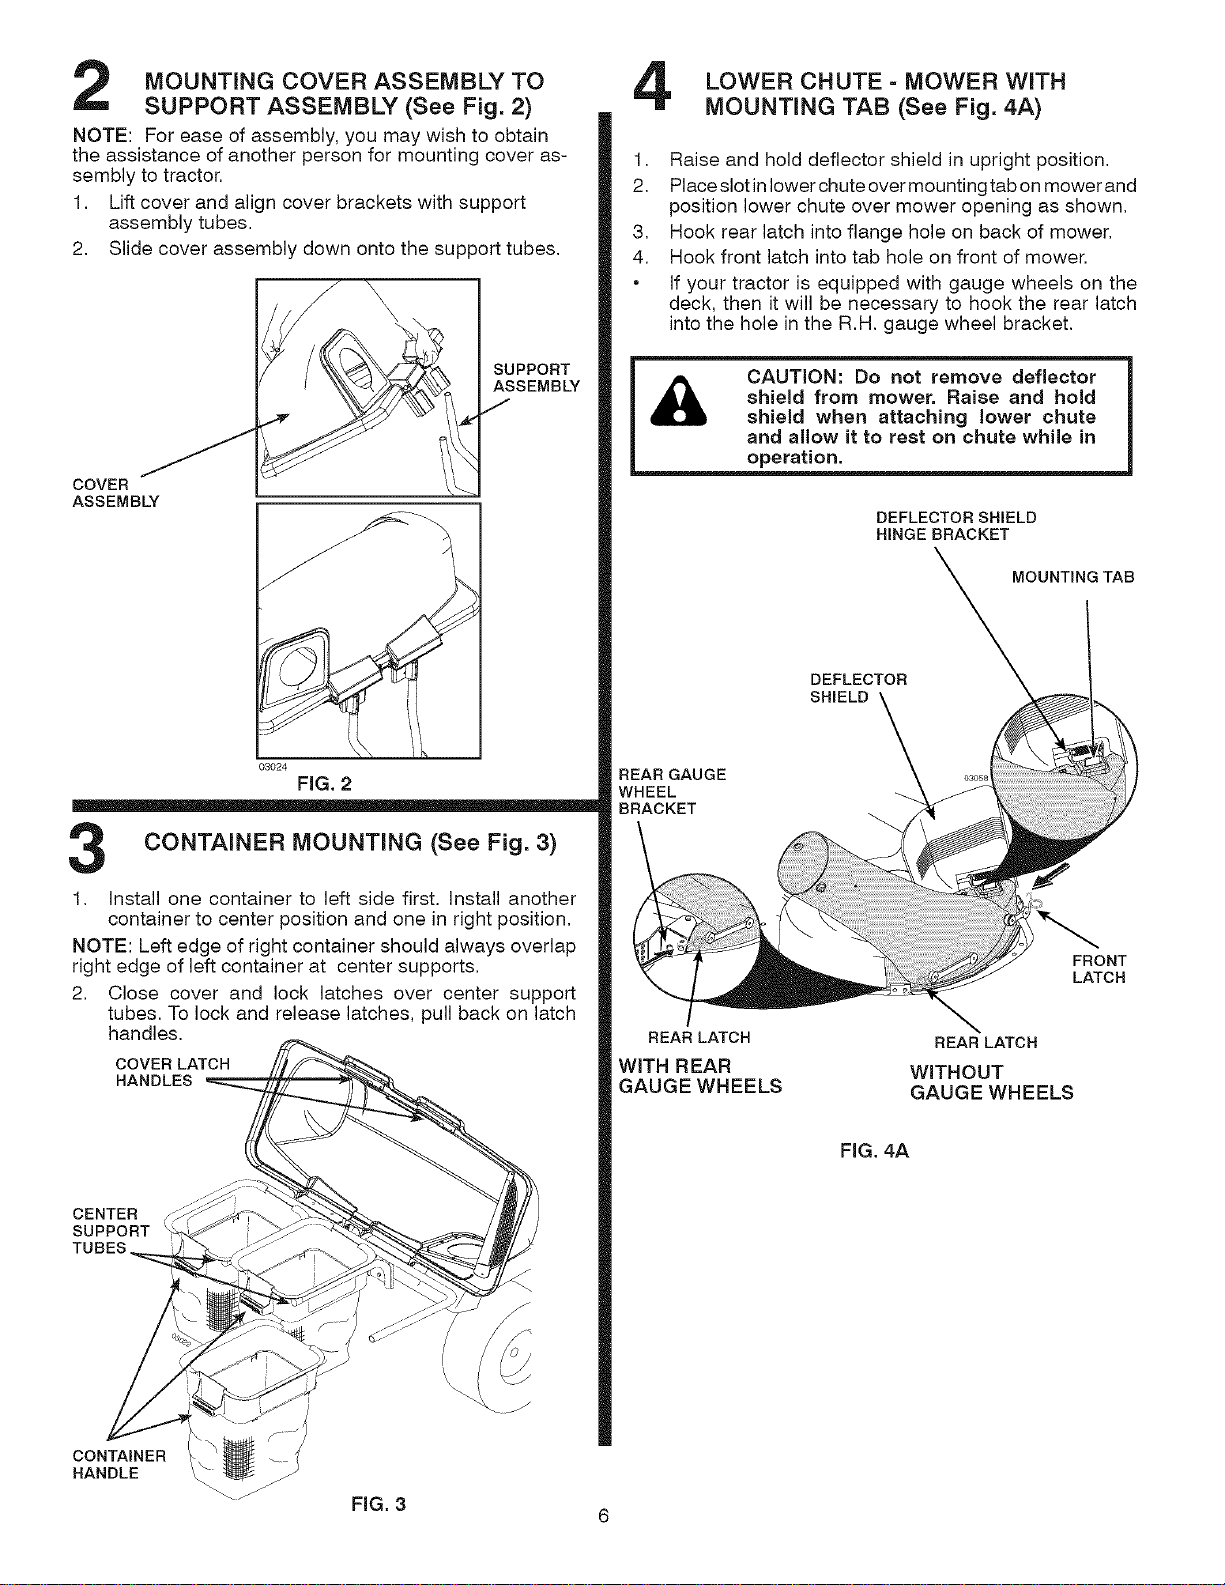
MOUNTING COVER ASSEMBLY TO
SUPPORT ASSEMBLY (See Fig. 2)
NOTE: For ease of assembly, you may wish to obtain
the assistance of another person for mounting cover as-
sembly to tractor.
1. Lift cover and align cover brackets with support
assembly tubes.
2. Slide cover assembly down onto the support tubes.
COVER
ASSEMBLY
SUPPORT
ASSEMBLY
03024
FiG. 2
CONTAINER MOUNTING (See Fig. 3)
1. Install one container to left side first. Install another
container to center position and one in right position.
NOTE: Left edge of right container should always overlap
right edge of left container at center supports.
2. Close cover and lock latches over center support
tubes. To lock and release latches, pull back on latch
handles.
COVER LATCH
HANDLES
CENTER
SUPPORT
TUBES
LOWER CHUTE =MOWER WiTH
MOUNTING TAB (See Fig. 4A)
1. Raise and hold deflector shield in upright position.
2. Place slot inlower chute over mounting tab on mower and
position lower chute over mower opening as shown.
3. Hook rear latch into flange hole on back of mower.
4. Hook front latch into tab hole on front of mower.
• if your tractor is equipped with gauge wheels on the
deck, then it will be necessary to hook the rear latch
into the hole in the R.H. gauge wheel bracket.
CAUTION: Do not remove deflector
shield from mower, Raise and hold
shield when attaching lower chute
and allow it to rest on chute while in
operation.
DEFLECTOR SHIELD
HINGE BRACKET
MOUNTING TAB
DEFLECTOR
SHIELD
REAR GAUGE
WHEEL
BRACKET
FRONT
LATCH
REAR LATCH
WiTH REAR
GAUGE WHEELS
REAR LATCH
WITHOUT
GAUGE WHEELS
FiG. 4A
CONTAINER
HANDLE
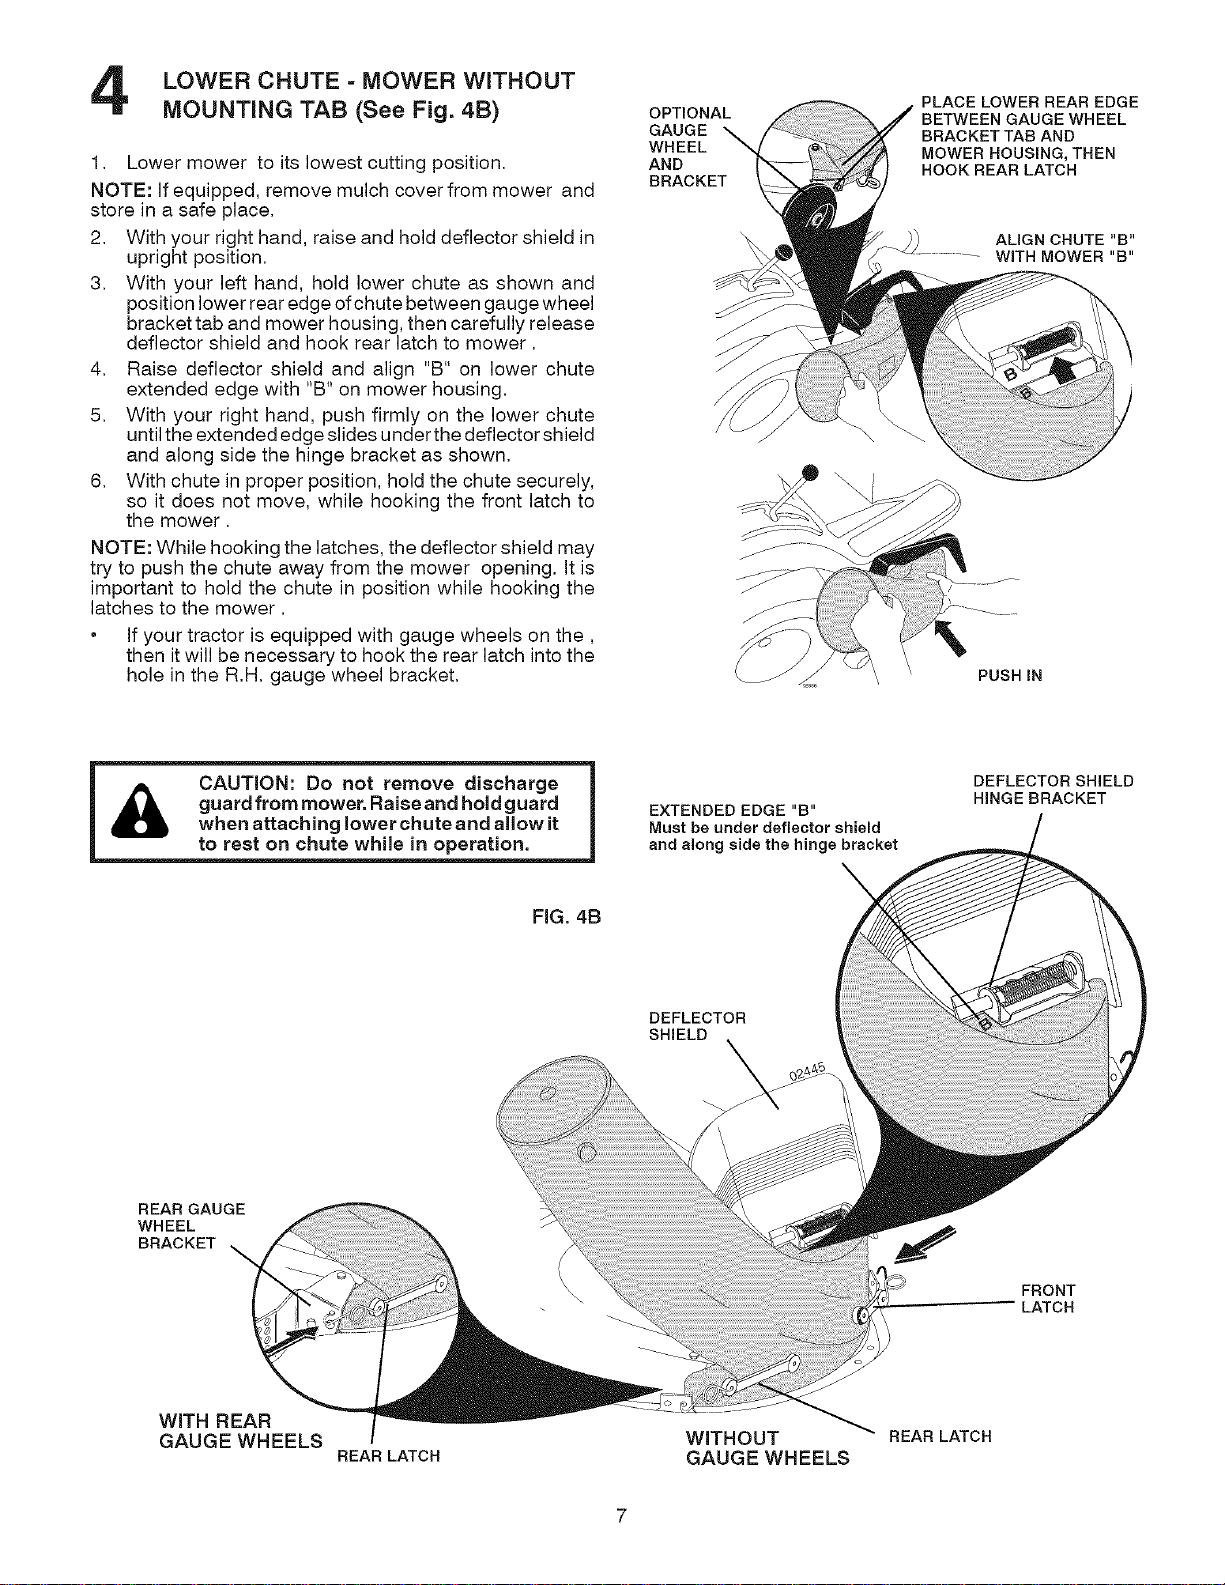
LOWER CHUTE =MOWER WITHOUT
MOUNTING TAB (See Fig. 4B)
1, Lower mower to its lowest cutting position,
NOTE: If equipped, remove mulch cover from mower and
store in a safe place,
2, With your right hand, raise and hold deflector shield in
upright position,
3, With your left hand, hold lower chute as shown and
position lower rear edge ofchute between gauge wheel
bracket tab and mower housing, then carefully release
deflector shield and hook rear latch to mower,
4, Raise deflector shield and align "B" on lower chute
extended edge with "B" on mower housing,
5, With your right hand, push firmly on the lower chute
until the extended edge slides under the deflector shield
and along side the hinge bracket as shown,
6, With chute in proper position, hold the chute securely,
so it does not move, while hooking the front latch to
the mower,
NOTE: While hooking the latches, the deflector shield may
try to push the chute away from the mower opening. It is
important to hold the chute in position while hooking the
latches to the mower,
• If your tractor is equipped with gauge wheels on the,
then it will be necessary to hook the rear latch into the
hole in the R,H, gauge wheel bracket,
OPTIONAL
GAUGE
WHEEL
AND
BRACKET
/
PLACE LOWER REAR EDGE
BETWEEN GAUGE WHEEL
BRACKET TAB AND
MOWER HOUSING, THEN
HOOK REAR LATCH
ALIGN CHUTE "B"
WITH MOWER "B"
PUSHIN
CAUTION: Do not remove discharge
guard from mower, Raise and hold guard
when attaching lower chute and allow it
to rest on chute while in operation.
EXTENDED EDGE "B"
Must be under deflector shield
and along side the hinge bracket
DEFLECTOR SHIELD
HINGE BRACKET
DEFLECTOR
SHIELD
\
REAR GAUGE
WHEEL
BRACKET
/
\\\\\
FRONT
LATCH
WiTH REAR
GAUGE WHEELS
REAR LATCH
WITHOUT REAR LATCH
GAUGE WHEELS
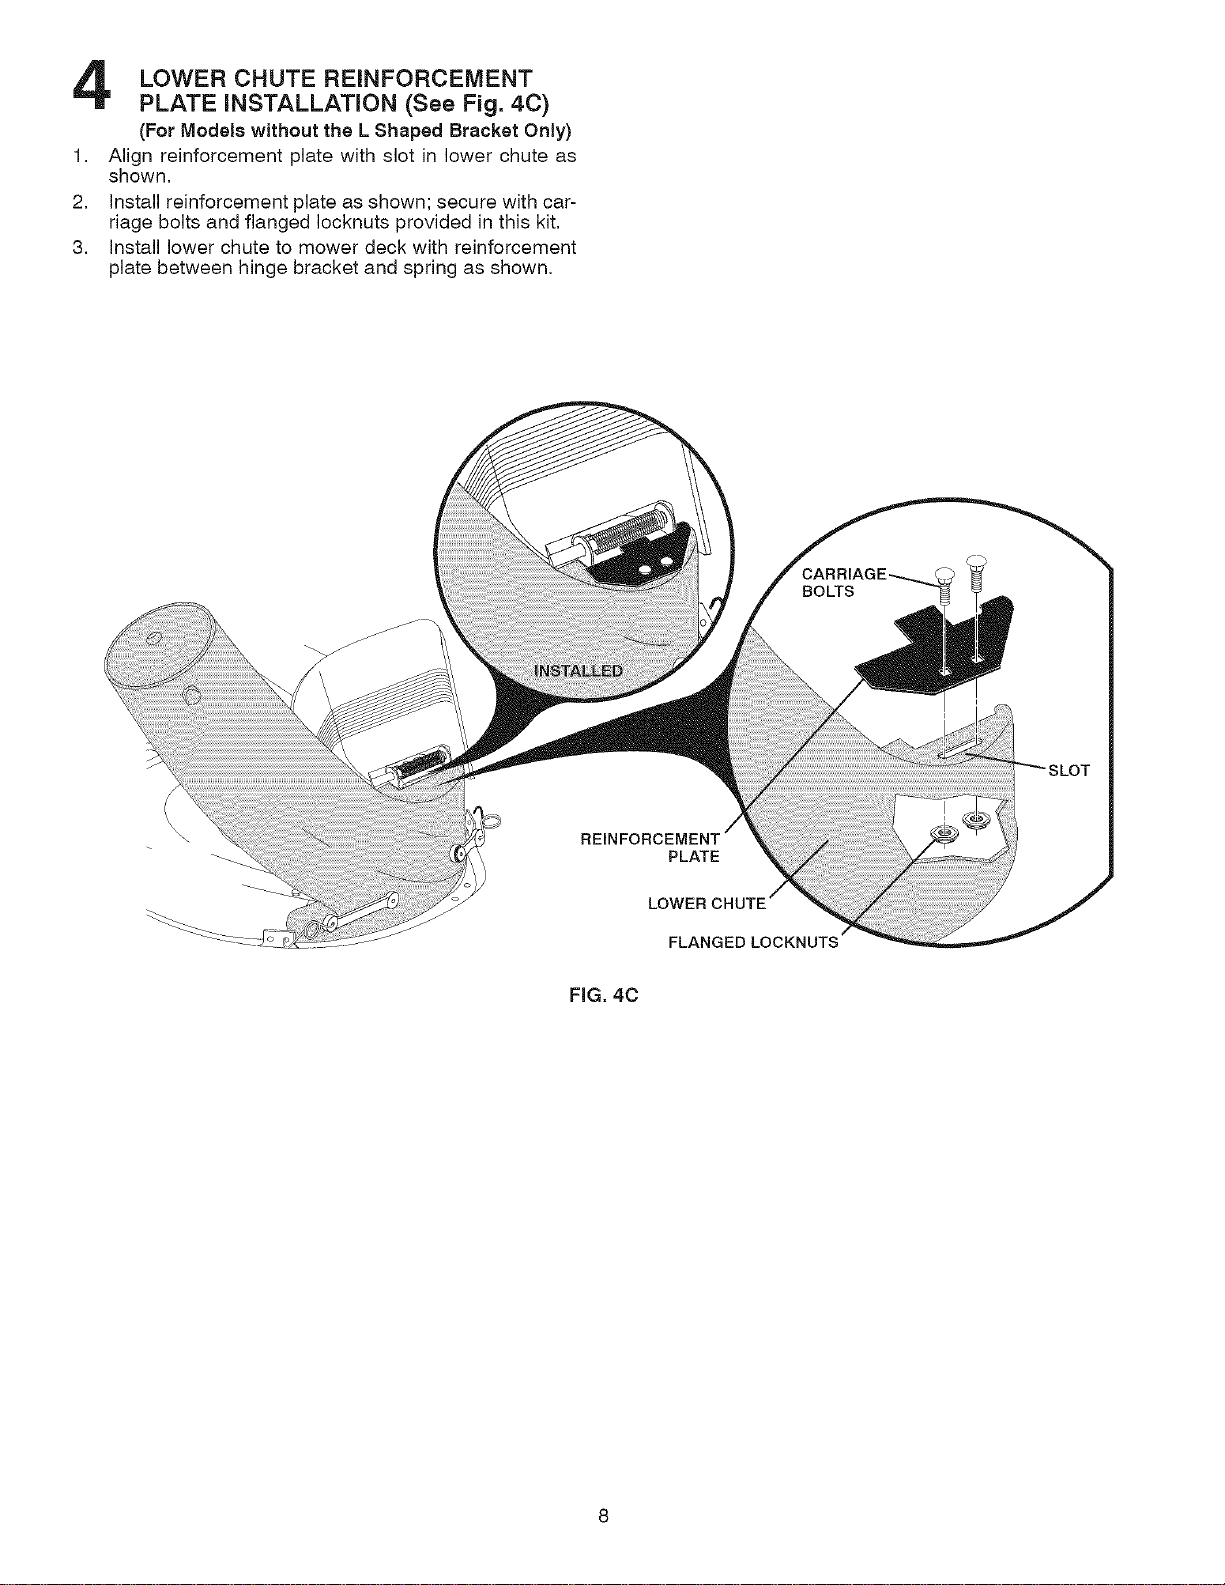
LOWER CHUTE REINFORCEMENT
PLATE iNSTALLATiON (See Fig. 40)
(For Models without the L Shaped Bracket Only)
1, Align reinforcement plate with slot in lower chute as
shown,
2, Install reinforcement plate as shown; secure with car-
riage bolts and flanged Iocknuts provided in this kit.
3, Install lower chute to mower deck with reinforcement
plate between hinge bracket and spring as shown,
BOLTS
REINFORCEMENT
PLATE
LOWER
FLANGED LOCKNUTS
FiG. 40

UPPER CHUTE (See Figs. 5A & 5B)
1. Lower mower to its lowest cutting position,
2. Assemble upper chute by inserting curved end into
hole in back of cover,
NOTE: Handle carefully so as not to damage full bagger
indicator,
3, Push in and turn upper chute until it is in line with lower
chute,
4. Align the bosses on lower chute with alignment slots
on upper chute and slide together,
5, Secure with rubber latch by hooking hole in latch over
latch pin,
UPPER
COVER CHUTE
FULL DAGGER
iNDiCATOR HANDLE
LOWER
CHUTE
FIG. 5A
ALIGNMENT
SLOT
LATCH PiN
RUBBER
LATCH
BOSSES
FIG. 5B
LEVEL MOWER
Be sure mower is properly leveled for best mower
performance, See your tractors owner's manual for
instructions
TIPS FOR iMPROVED BAGGING
OPERATION:
Follow the mower operation instructions in your tractor
owner's manual,
When operating your grass catcher on a lawn where grass
and leaf bagging equipment has not been used, you are
picking up thatch and debris that has accumulated for long
periods of time. The amount collected and the total time
of operation may be greater than you will experience with
regular use of your grass catcher.
• Always run throttle at full speed when bagging.
• Select a gear low enough to give good mower cutting
performance, good quality cut and good bagging
performance.
NOTE: It may be necessary to overlap width of cut to suit
your conditions.
• Ifgrass is extremely tall, itshould be mowed twice. The
first time relatively high, the second time to desired
height.
• Use left hand side of mower for trimming.
• Plastic trash bags can be inserted inside grass catcher
containers for ease of debris disposal. To remove the
plastic trash bags when full:
a. Disengage blades, shift into neutral, engage the
parking brake and stop the engine.
b. Raise seat. Unlatch and raise cover.
c. Remove one container at a time by grasping
container handles and pulling toward the rear, off
of the tube rails.
d. With the container resting on the ground, close
and secure the top of the plastic lawn bag.
e. Tip the container on itsside and slide the filled bag
from the container.
f. Install a new plastic lawn bag with the edges of the
bag draped over upper lip of the container.
g. Repeat for other containers.
h. Reinstall containers making sure right container
overlaps left container at center supports.
j. Close cover and secure latches over center support
tubes.
• Avoid cutting wet grass or in the morning while the dew
is still heavy. Grass clippings collected under these
conditions tend to be sticky and adhere to the walls of
the flow path causing clogging.
• Your bagger is equipped with a full bagger indicator.
Movement of the wheel increases as the bags fill. The
wheel will be spinning fastest just before the bags fill
completely. When the wheel stops, it indicates that the
bags are full and the chutes have become clogged.
NOTE: To help prevent clogging of chutes, check/empty
bags when the wheel is spinning fast. Experience will teach
you the best time to empty the bags.
Care should be taken not to damage the parts and that
the wheel spins freely at the beginning of each use.
• If the grass catcher fails to pick up cut grass or leaves,
it is an indication that clogging has occurred in the
system or that the grass catcher containers are full.
Usually this is indicated by the stopped movement of
the full bagger indicator.
a. Disengage blades, shift into neutral, engage the
parking brake and stop the engine.
- Raise seat. Unlatch and raise cover.
b,
- Slide out containers and dispose of clippings.
- Replace containers, close cover, and latch.
Unlatch chutes and check for clogging.
- Remove all debris in chutes.
C,
- Reassemble and latch chutes
Checkto insure full bagger indicator has not become
clogged.
- The air passage hole must be clear of debris.
Gently insert asmall twig or wireinto passageway
to clear.
CAUTION
• Do not operate mower with grass catcher
partially installed.
• Disengage blades and stop engine before
leaving tractor seat to empty containers,
unclogging chutes, etc.
• Close cover before starting.
• Disengage mower when crossing driveways
or gravel surfaces and other areas where
thrown objects could be a hazard,
• Do not attempt to vacuum up cans or other
potentially hazardous projectiles.
10
GENERAL RECOMMENDATIONS
Always observe safety rules when performing any main-
tenance.
. Before each use check for loose fasteners.
• Clean unit thoroughly after each use.
BLADE CARE
For best results mower blades must be kept sharp. Replace
bent or damaged blades.
• See BLADE CARE instructions in your tractor owner's
manual.
CAUTION: BEFORE PERFORMINGANY
MAINTENANCE, SERVICE OR ADJUST=
MENTS:
• Depress clutch brake pedal fully and
set parking brake.
• Place gearshift/motion control lever in
"NEUTRAL" position.
• Place clutch control in "DISENGAGED"
position.
• Turn ignition key to "OFF" position,
• Make sure blades and aii moving parts
have completely stopped.
• Disconnect spark plug wire(s) from
spark plug(s) and place wire where it
cannot come in contact with plug,
CAUTION: Grass catcher components
are subject to wear, damage and dete-
rioration, which could expose moving
parts or allow objects to be thrown.
Frequently check components and
replace with manufacturer's recommen=
ded parts, when necessary.
STORAGE
When grass catcher is to be stored for a period of time,
clean itthoroughly, remove all dirt, grass, leaves, etc. Store
in a clean, dry place.
CAUTION: Do not leave grass in bag-
ger containers. Empty containers after
each use and before storing. Failure
to do so may result in spontaneous
combustion which could develop into
a fire.
One Year Full Warranty on Craftsman Grass Catcher
When assembled, used and maintained according to the owner's manual instructions, if this grass catcher fails
due to a defect in material or workmanship within one year from the date of purchase, RETURN IT TO ANY
SEARS STORE OR SEARS PARTS & REPAIR CENTER OR OTHER CRAFTSMAN OUTLET IN THE UNITED
STATES FOR FREE REPAIR (or replacement if repair proves impossible).
• This warranty does not include the bagging blades, which are expendable parts.
• This warranty is void if this grass catcher is used for commercial or rental purpose.
. This warranty applies only while this product is used in the United States.
This warranty gives you specific legal rights, and you may also have other rights which vary from state to state.
Sears, Roebuck and Co., Hoffman Estates, IL. 60179
11
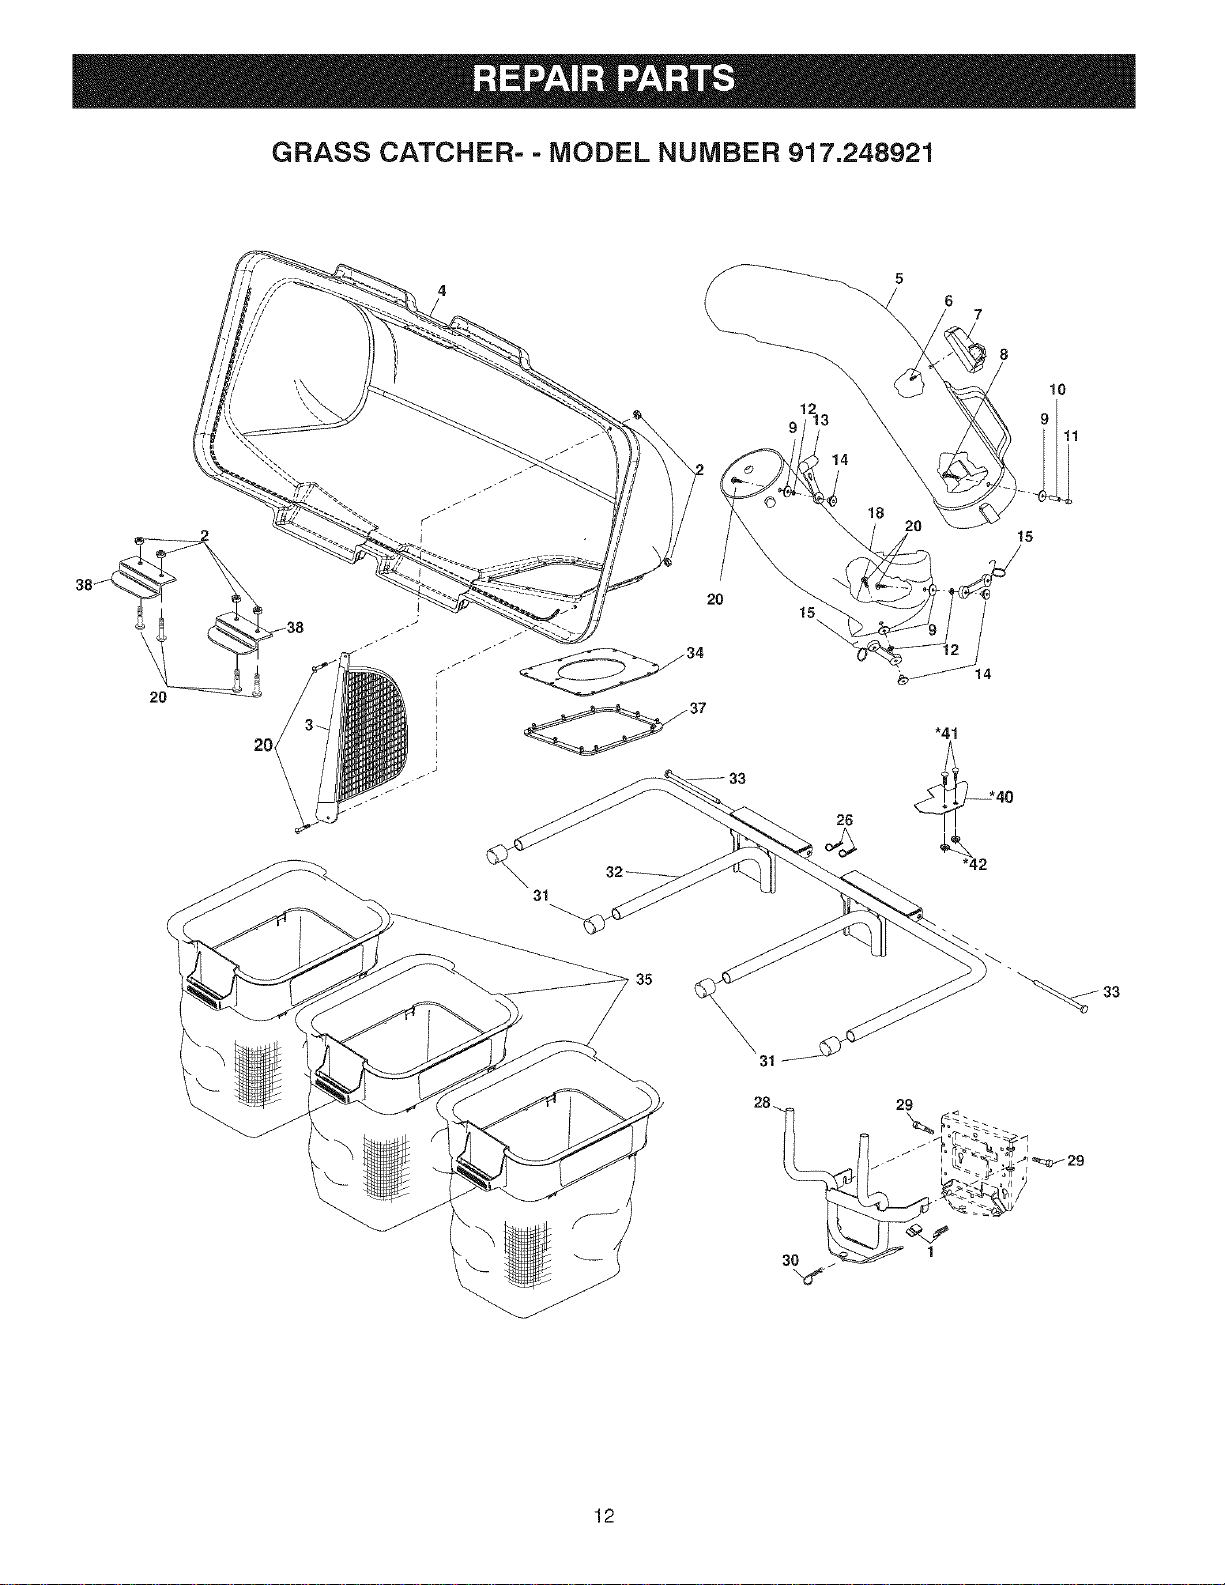
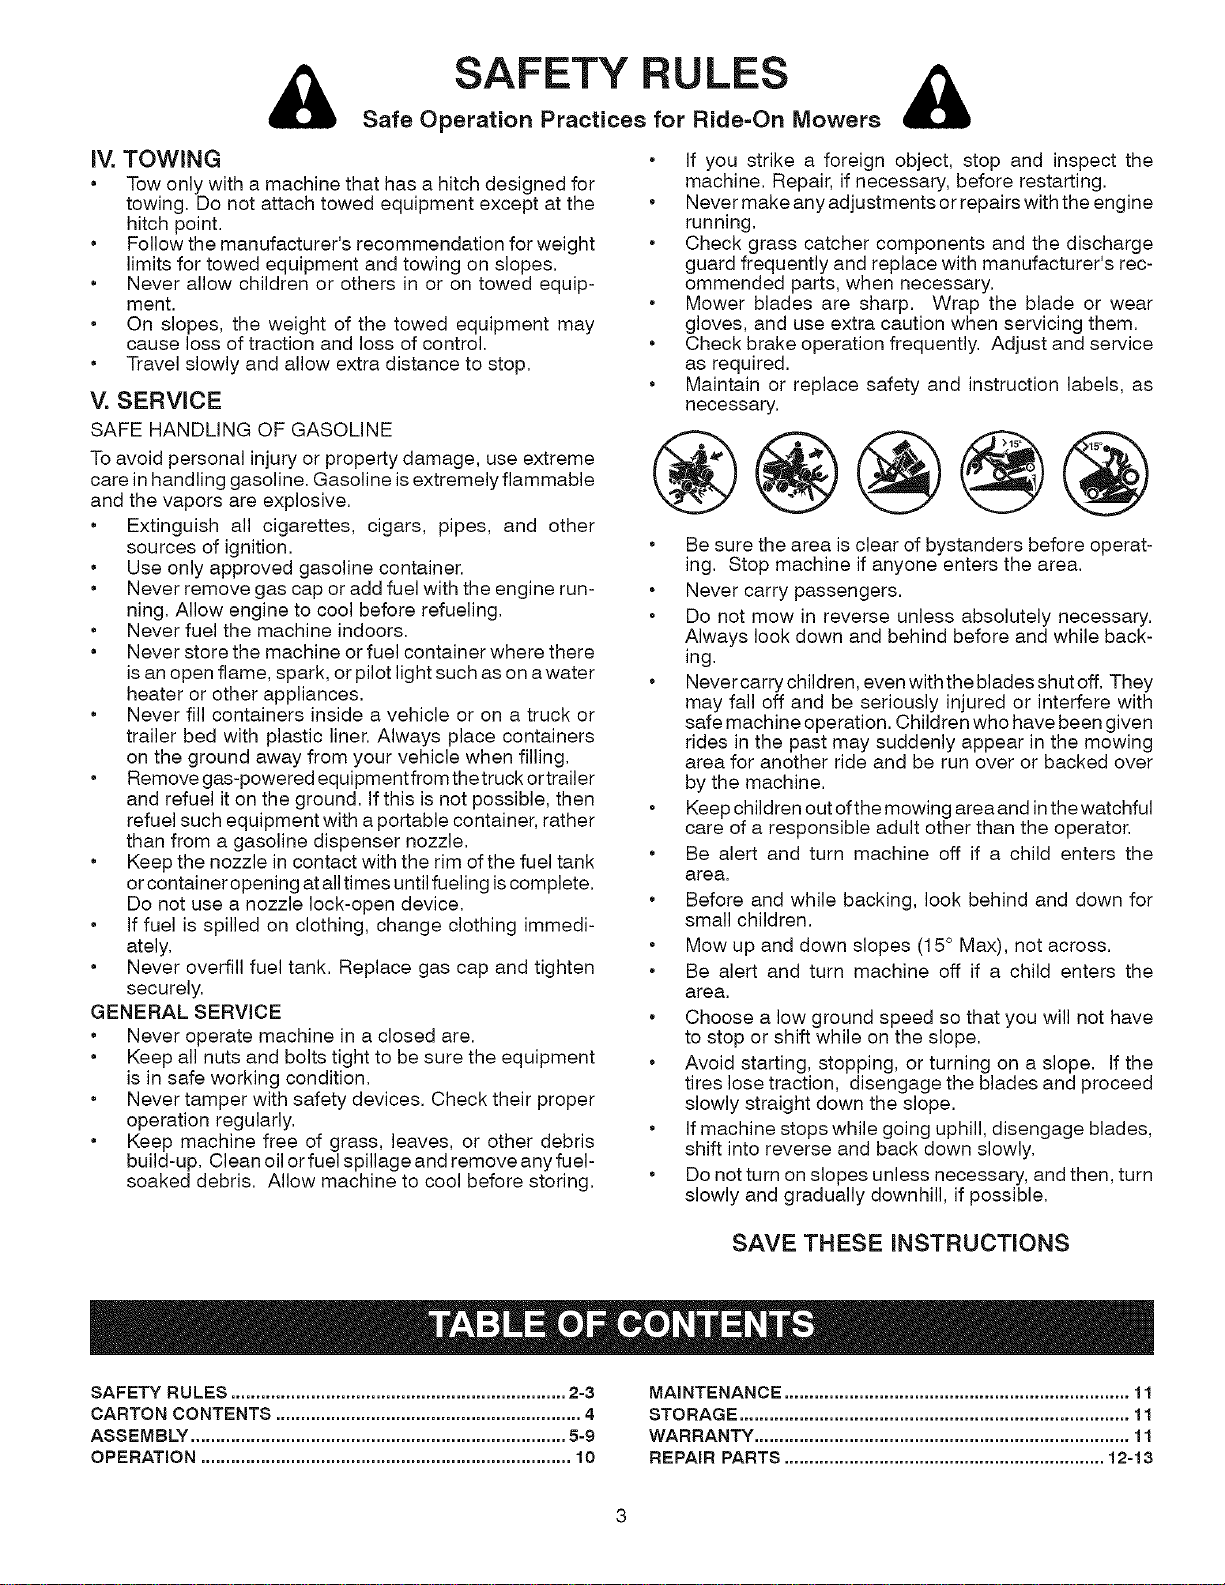
GRASS CATCHER- =MODEL NUMBER 917.248921
2
" 38
!2
9 13
14
33
\
31
26
18
20
6
7
15
10
11
35
31
29
3O
1
12

GRASS CATCHER- - MODEL NUMBER 917.248921
KEY PART DESCRIPTION
NO. NO.
1 401047 Adapter
2 69180 Nut, Crownlock #10-24
3 192709 Screen, Cover
4 193010 Cover Assembly (Includes 34, 37)
5 126840 Chute, Upper
6 18021008 Screw, Special #10-14xl/2
7 130933 Full Bag Indicator
8 87175 Screw, #10-24 x 1-1/8
9 52784 Washer 3/16x3/4x16 Ga,
10 7206J Spacer, Split
11 60867 Nut, Acorn #10-24
12 10071000 Washer, lock
13 109808X Latch, Chute
14 2029J Nut, Weld
15 160793 Latch Assembly, Hook
18 162803 Chute, Lower
20 71081010 Screw #10-24 x 5/8
26 4939M Spring, Retainer
28 198364 Support Assembly
29 188528 Shoulder Bolt, Tapping
30 165898 Spring, Retainer
31 174083 Plug, Tubing End
32 176990 Bagger, Frame
33 192786 Pin, Hinge
34 192550 Gasket, Cover
35 400226 Container, Soft
37 192603 Ring, Cover Gasket
38 130895 Latch Handle, Cover
*40 415405 Plate, Reinforcement
"41 72140406 Bolts, Carriage 1/4
*42 73900400 Locknuts, Hex, Flanged
-- 418094 Owner's Manual
NOTE: All component dimensions given in U,S, inches
1 inch = 25,4 mm
* If your tractor is equipped with the L shaped bracket
these parts are not needed,
13
REGLAS E S I
PELIGRO: ESTA MAQUINA CORTADORA ES CAPAZ DE AMPUTAR LAS MANOSY LOS
PIES Y DE LANZAR OBJETOS, SI NO SE OBSERVAN LAS INSTRUCCIONES DE SEGU-
RIDAD SIGUIENTES SE PUEDEN PRODUCIR LESIONES GRAVES O LA MUERTE,
ADVERTENCIA: Siempre desconecte el
alambre de la bujia y pongalo donde no
_ pueda entrar en contacto con la bujia, parsevJtar el arranque por accJdente, durante
la preparaci6n, el transporte, el ajuste o
cuando se hacen reparaciones.
ADVERTENCIA: No avance cuesta abajo
a punto muerto ya que podria perder el
control del tractor.
ADVERTENCiA: Remolque solamente los
accesorios recomendados y conforrnes
a las caracteristicas indicadas pot el
I& abricante de su tractor. Tenga cuidado y
prudencJa al utJlJzar el tractor. Cuando se
encuentre en un declJve, oper utilJzando
exclusivamente la velocidad mas baja.
En caso de un declive una carga excesJva
podria resultar peligrosa. Los neumatJcos
pueden perder la tracci6n con el suelo y
hacerle perder el control de su tractor.
I. FUNCIONAMIENTO GENERAL
Leer, entender y seguir todas las instrucciones sobre la
mAquina yen el manual antes de empezar.
No poner las manes o los pies cerca de partes giratorias o
debajo de la mAquina, mantener siempre limpia la abertura
de descarga.
Permitir el funcionamiento de la mAquina s61o a adultos que
tengan familiaridad con las instrucciones.
Limpiar el Area de objetos come piedras, juguetes, cables,
etc. que pueden ser recogidos y disparados con las cuchil-
las.
Asegurarse de que el Area este libre de otras personas antes
de joonerla en marcha. Parar la mAquina si alguien entra en
e! area.
Nunca Ilevar pasajeros.
No cortar marcha atras al no ser absolutamente necesario.
Mirar siempre abajo y delante mientras se procede atrAs.
Nunca dirigir el material descargado hacia nadie. Evitar des-
cargar material contra paredes u obstrucciones. El material
podria rebotar hacia el operador. Parar las cuchillas cuando
se pasan superficies de grava.
No hacer funcionar la mAquina sin el captador de hierba
entera, la protecci6n de descarga u otros dispositivos de
seguridad en su lugar yen buenas condiciones.
Ralentizar antes de girar.
Nunca dejar una maquina encendida sin vigilancia. Apagar
siempre las cuchillas, poner el freno de estacionamiento,
parar el motor, y quitar las Ilaves antes de bajar.
Desconectar las cuchillas cuando no se corta. Apagar el
motor y esperar que todas las partes esten completamente
paradas antes de limpiar la maquina, quitar el captador de
hierba, o desatascar la proteccion de descarga.
Hacer funcionar la maquina s61o con la luz del dia o luz
artificial buena.
No hacer funcionar la mAquina estando bajo los efectos de
alcohol o droga.
Poner atenci6n al trAfico cuando se opera cerca de calles o
se cruzan.
Poner la maxima atenci6n al cargar o descargar la maquina
en una caravana o cami6n.
Llevar siempre gafas de protecci6n cuando se hace funcionar
la maquina.
14
Los datos indican que los operadores a partir de los 60 afios
estan afectados por un gran porcentaje de heridas relativas
a la conducci6n del cortacesped. Estos operadores tendrian
que evaluar su habilidad de hacer funcionar el cortacesped
de modo Io bastante seguro para proteger a si mismos y a
otras personas de heridas graves.
Seguir las recomendaciones del fabricante para los pesos
y contrapesos de las ruedas.
Mantener la maquina libre de hierba, hojas u otros es-
combros que pueden tocar el tubo de escape / partes del
motor calientes y quemarse. No permitir que el puente del
cortacesped cargue hojas u otros residuos que pueden
causar acumulaciones. Limpiar toda salpicadura de aceite
o carburante antes de hacer operaciones sobre la mAquina
o guardarla. Dejarla enfriar antes de guardarla.
II. FUNCIONAMIENTO EN PENDIENTES
Las pendientes son el mayor factor de accidentes relativos a la
p@dida de control y vuelco, que pueden causar severas heridas
o muerte. El funcionamiento en pendientes requiere una atenci6n
extra. Si no es posible hacer marcha atras en una pendiente o si
te sientes incomodo, no la cortes.
Cortar hacia arriba y abajo de una pendiente, no de modo
horizontal.
Poner atenciones a los hoyos, las raices, los bultos, las pied ras
u otros objetos escondidos. El terreno irregular puede volcar
la maquina. La hierba alta puede esconder obstaculos.
Escoger una velocidad de marcha baja de modo que no sea
necesario pararse o cambiar estando en una pendiente.
No cortar la hierba mojada. Las ruedas pueden perder trac-
ci6n.
Poner siempre una marcha cuando se esta en pendientes.
No poner en punto muerto e ir cuesta abajo.
Evitar arrancar, pararse o girar en una pendiente. Si las rue-
das pierden tracci6n, desconectar las cuchillas y proceder
despacio cuesta abajo en la pendiente.
Mantener todo los movimientos en las pendientes lentos y
gradual. No hacer cambios repentinos de velocidad o direc-
ci6n, ya que pueden causar el escape de la mAquina.
Poner la maxima atenci6n cuando la maquina funciona con
captadores de hierba u otros dispositivos enganchados;
pueden afectar la estabilidad de la mAquina. No usar en
pendientes empinados.
No intentar estabilizar la maquina poniendo el pie en el ter-
reno.
No cortar cerca de bajadas, cunetas y orillas. Las maquina
puede volcarse improvisamente si una rueda esta en el borde
o se hunde.
lJl.NI_IOS
Si el operador no pone atenci6n a la presencia de los ni_os
pueden ocurrir accidentes trAgicos. Los nir_os a menude estAn
atraidos por la maquina y las actividad de cortar. No dar por
hecho de que los ni_os se queden adonde estaban la 01tima
vez que los vistes.
Mantener los nitros fuera del Area de corte y vigilados por
un adulto responsable que no sea el operador.
Estar alerta y apagar la mAquina si un ni_os entra en el Area.
Antes y durante la marcha atras, mirar adelante y abajo para
ver si hay ni_os peque_os.
Nunca Ilevar nitros, incluso si hay las cuchillas apagadas.
Podrian caer y herirse seriamente o interferir con el funcio-
namiento seguro de la mAquina, los ni_os que se han Ilevado
precedentemente pueden aparecer de pronto en el Area de
corte por otro paseo y ser atropellados o tumbados por la
maquina.
Nunca dejar que los ni_os manipulen la mAquina.
Tener el maximo cuidado cuando se acerca a cantos ciegos,
arbustos, arboles u otros objetos que pueden impedir la vista
de ni_os.
REGLAS DE
IV. REMOLQUE
Remolcar s61o con una mAquina que tenga un gancho dis-
e_ado para remolcar. Enganchar el equipo o remolcar s61o
en el punto dispuesto al efecto.
Seguir las recomendaciones del productor con respecto a
los limites del equipo por remolcar y el remolque en pendi-
entes.
Nunca permitir que nitros u otras personas est6n dentro del
equipo por remolcar.
En pendientes, el peso del equipo remolcado puede causar
la p6rdida de tracci6n y la p6rdida de control.
Viajar despacio y dejar mAs distancia para frenar.
V. SERVIClO
MANIPULACION SEGURA DE LA GASOLINA
Para evitar heridas personales o da_os alas cosas, poner el
mAximo cuidado a la hora de manipular la gasolina. La gasolina
es extremamente inflamable y los vapores son explosivos.
Apagar todos los cigarrillos, cigarros, pipas y otras fuentes
de ignici6n.
Usar s61o contenedores para gasolina aprobados.
Nunca quitar el tap6n de la gasolina o a_adir carburante
con el motor en marcha, dejar enfriar el motor antes del
abastecimiento de la gasolina.
Nunca abastecer la mAquina al interior de un local.
Nunca guardar la mAquina o el contenedor del carburante
donde haya una llama abierta, chispas o una luz piloto come
un calentador de agua u otros dispositivos.
Nunca Ilenar los contenedores al interior de un vehiculo o en
una caravana o cami6n recubiertos con un forro de plastico.
Colocar siempre los contenedores en el terreno lejos del
vehiculo cuando se estA Ilenando.
Quitar el equipo de gas del cami6n o caravana y abastecerlo
en el terreno. Si no es posible, abastecer dicho equipo con
un contenedor portAtil, mAs bien que de un surtidor de gaso-
lina.
Mantener la boquilla a contacto del borde del dep6sito de
carburante o la abertura del contenedor durante toda la
operaci6n de abastecimiento. No utilizar un dispositivo con
boquilla cerrada-abierta.
Si se vierte carburante sobre la ropa, cambiarse la ropa
inmediatamente.
Nunca Ilenar el dep6sito mas de Io debido. Volver a colocar
el tap6n del gas y cerrar de modo firme.
OPERACIONES DE SERVlClO GENERALES
Nunca hacer funcionar la maquina en un Area cerrada.
Mantener todas las tuercas y pernos apretados para asegu-
rarse de que trabaja en condiciones seguras.
Nunca modificar los dispositivos de seguridad. Controlar su
correcto funcionamiento regularmente.
Mantener la mAquina libre de hierba, hojas u otros residuos
acumulados. Limpiar las salpicaduras de aceite o carburante
y quitar cualquier cosa mojada con carburante. Dejar que la
maquina se enfrie antes de guardarla.
Si se golpea un objeto ajeno, hay que pararse e inspeccionar
la maquina. Reparar, si es necesario, antes de volver a poner
en marcha.
Nunca hacer ningOn ajuste o reparaci6n con el motor en
funci6n.
Controlar los componentes del captador de hierba y la pro-
tecci6n de la descarga frecuentemente y sustituir con partes
recomendadas por el fabricante, en su caso.
Las cuchillas del cortacesped son afiladas. Envolver la
cuchilla, ponerse guantes y poner la maxima atenci6n cuando
se hacen operaciones en elias.
Controlar el funcionamiento del freno frecuentemente. Ajustar
y hacer las operaciones de mantenimiento cuando eso sea
necesario.
Mantener y sustituir las etiquetas de seguridad e instrucci6n,
cuando sea necesario.
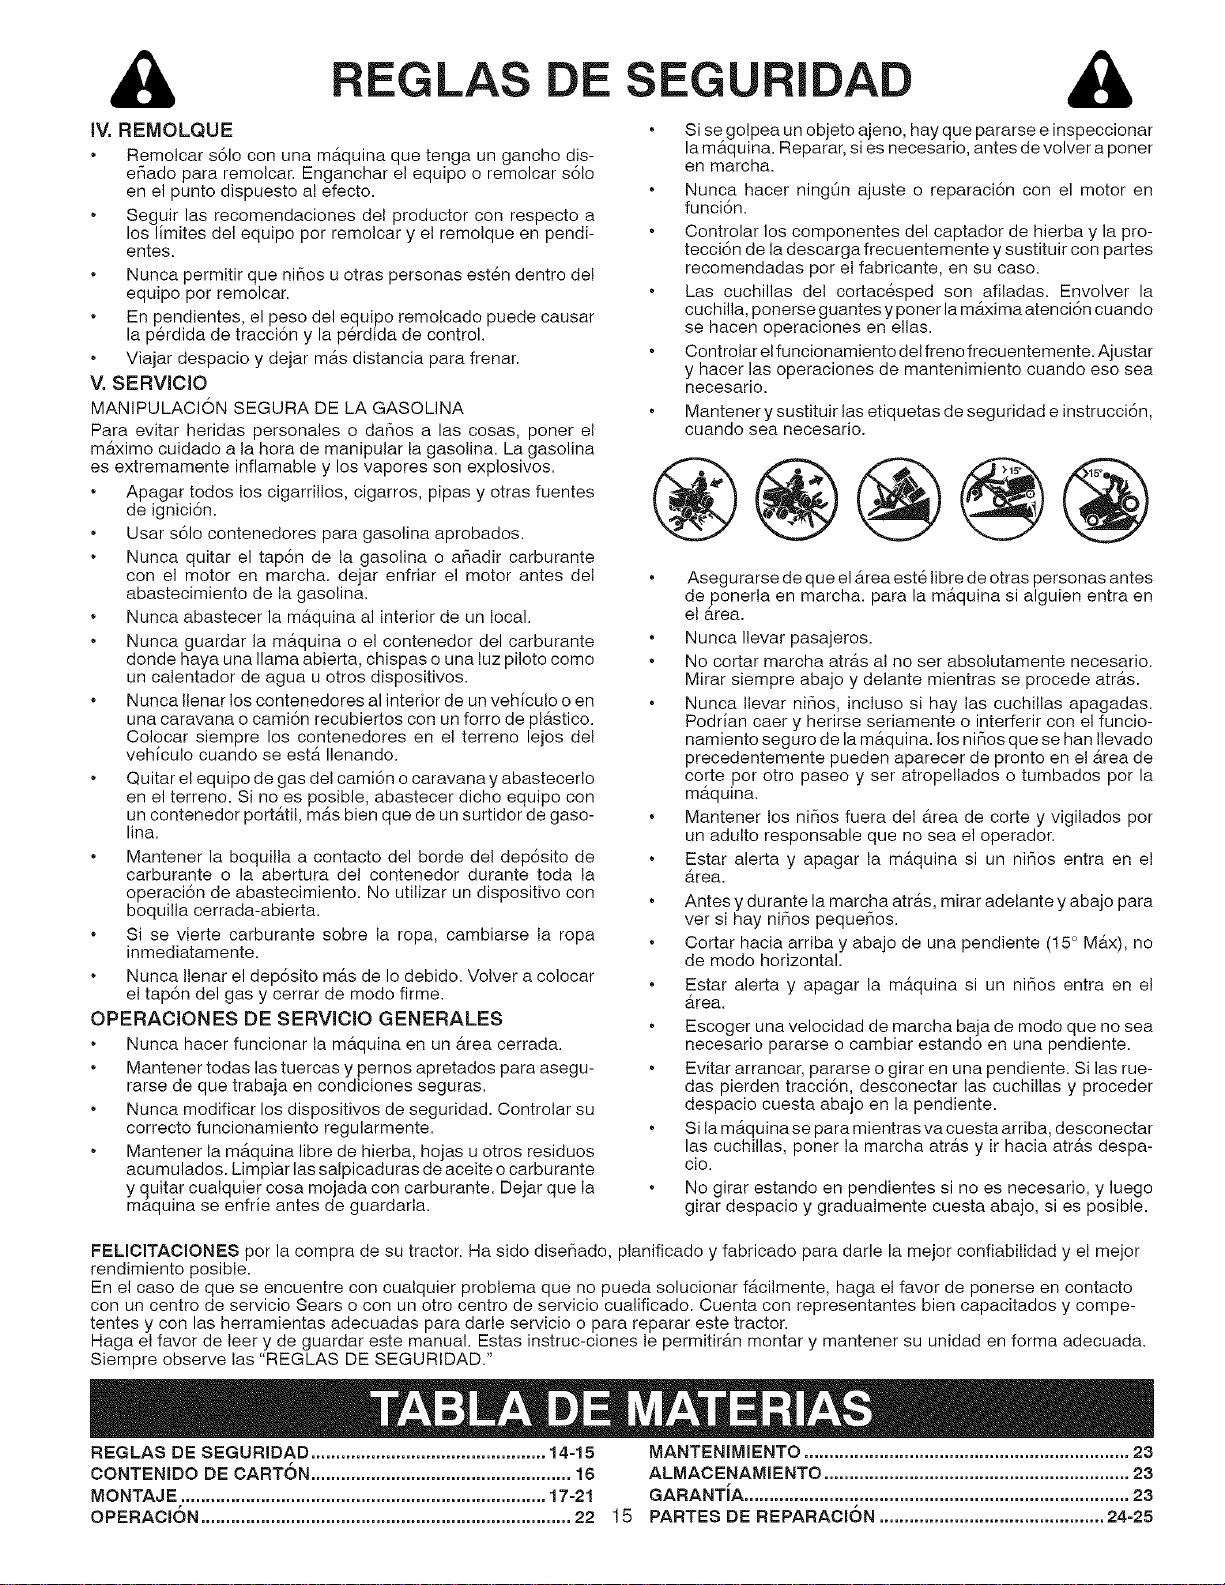
@@@@@
Asegurarse de que el Area est6 libre de otras personas antes
de ponerla en marcha, para la maquina si alguien entra en
el Area.
Nunca Ilevar pasajeros.
No cortar marcha atras al no ser absolutamente necesario.
Mirar siempre abajo y delante mientras se procede atrAs.
Nunca Ilevar ni_os, incluso si hay las cuchillas apagadas.
Podrian caer y herirse seriamente o interferir con elfuncio-
namiento seguro de la maquina, los nitros que se han Ilevado
precedentemente pueden aparecer de pronto en el Area de
corte por otro paseo y ser atropellados o tumbados por la
maquina.
Mantener los nir_os fuera del Area de corte y vigilados por
un adulto responsable que no sea el operador.
Estar alerta y apagar la maquina si un nir_os entra en el
Area.
Antes y durante la marcha atras, mirar adelante y abajo para
ver si hay nir_os peque_os.
Cortar hacia arriba y abajo de una pendiente (15° MAx), no
de modo horizontal.
Estar alerta y apagar la mAquina si un nir_os entra en el
Area.
Escoger una velocidad de marcha baja de modo que no sea
necesario pararse o cambiar estando en una pendiente.
Evitar arrancar, pararse o girar en una pendiente. Si las rue-
das pierden tracci6n, desconectar las cuchillas y proceder
despacio cuesta abajo en la pendiente.
Si la mAquina se para mientras va cuesta arriba, desconectar
las cuchillas, poner la marcha arras y ir hacia atrAs despa-
cio.
No girar estando en pendientes si no es necesario, y luego
girar despacio y gradualmente cuesta abajo, si es posible.
FELICITACIONES por la compra de su tractor. Ha sido disefiado, planificado y fabricado para darle la mejor confiabilidad y el mejor
rendimiento posible.
En el caso de que se encuentre con cualquier problema que no pueda solucionar facilmente, haga el favor de ponerse en contacto
con un centro de servicio Sears o con un otro centro de servicio cualificado. Cuenta con representantes bien capacitados y compe-
tentes y con las herramientas adecuadas para darle servicio o para reparar este tractor.
Haga el favor de leer y de guardar este manual. Estas instruc-ciones le permitirAn montar y mantener su unidad en forma adecuada.
Siempre observe las "REGLAS DE SEGURIDAD."
REGLAS DE SEGURIDAD ............................................... 14-15 MANTENIMIENTO ................................................................. 23
CONTENmDO DE CARTON .................................................... 16 ALMAOENAMIENTO ............................................................. 23
MONTAJE ......................................................................... 17-21 GARANTiA ............................................................................. 23
OPERAOION .......................................................................... 22 15 PARTES DE REPARACION ............................................. 24-25
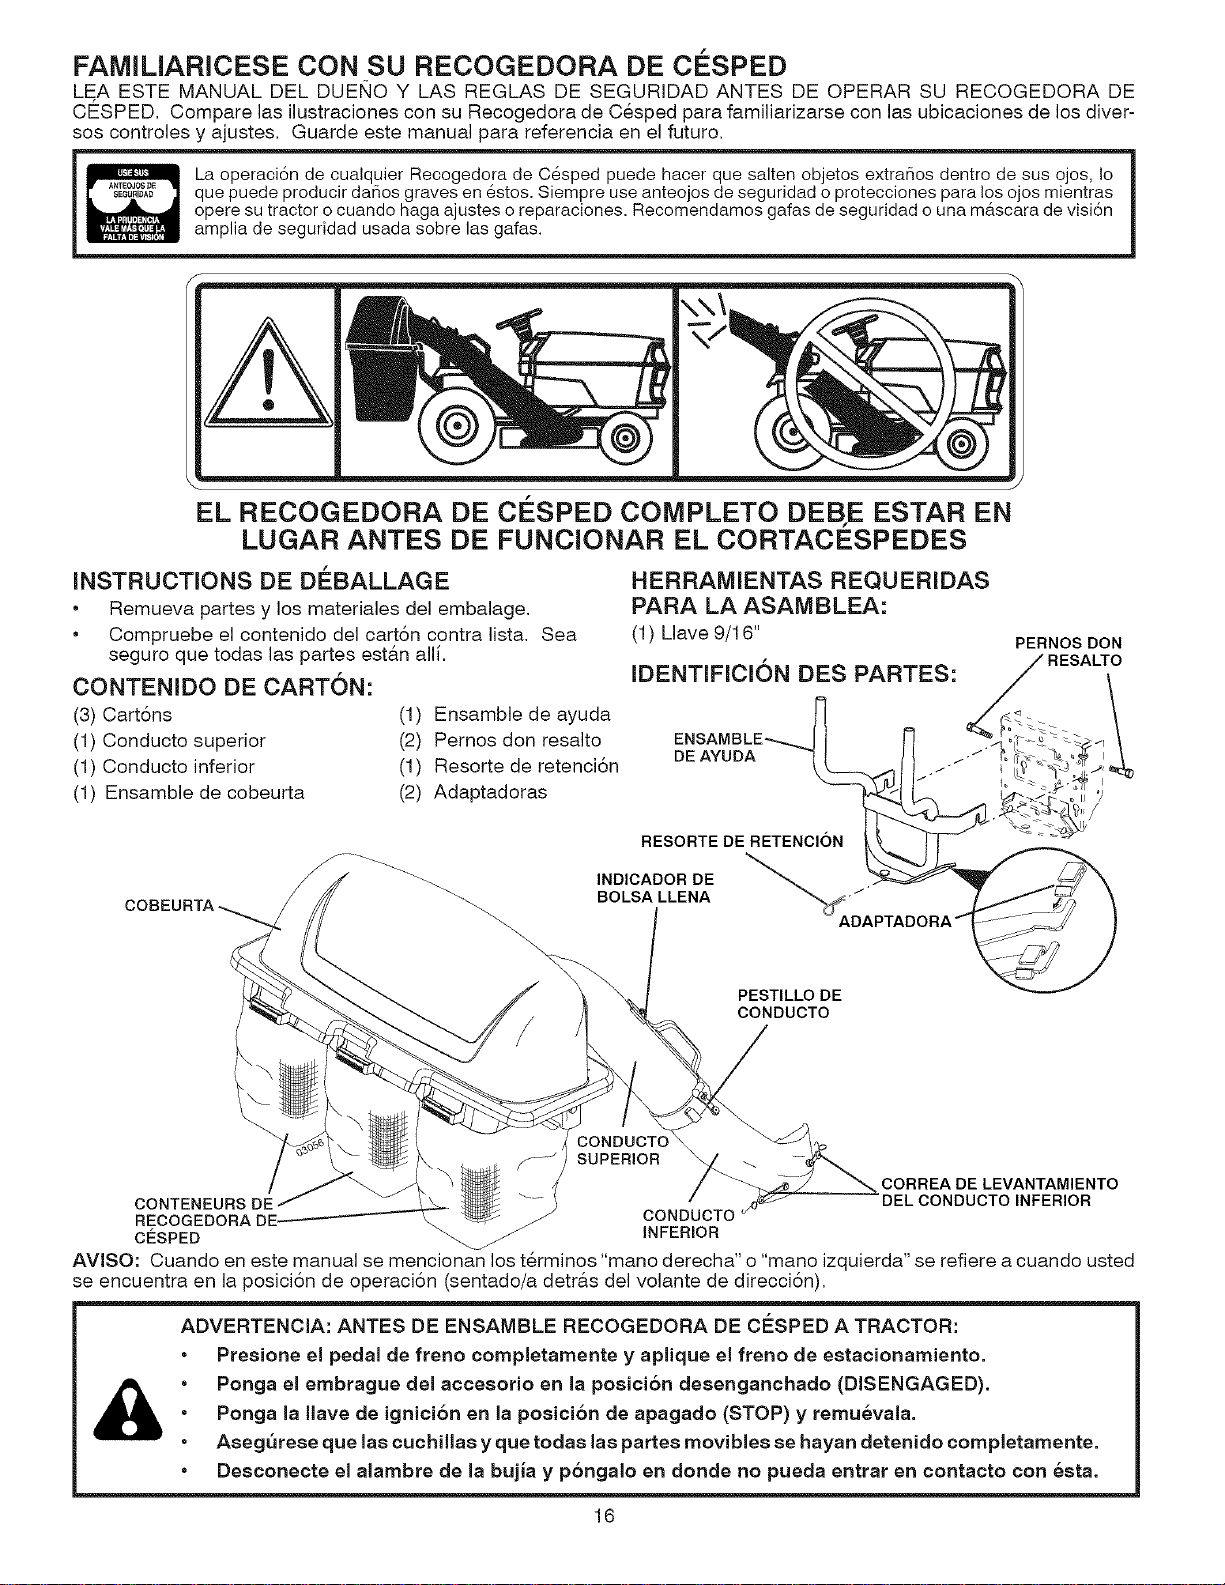
FAMILIARICESE CON SU RECOGEDORA DE ClaSPED
LE,A ESTE MANUAL DEL DUEIC,]OY LAS REGLAS DE SEGURIDAD ANTES DE OPERAR SU RECOGEDORA DE
CESPED. Compare las ilustraciones con su Recogedora de Cesped para familiarizarse con las ubicaciones de los diver-
sos controles y ajustes. Guarde este manual para referencia en el futuro.
La operaci6n de cualquier Recogedora de Cesped puede hacer que salten objetos extrar_os dentro de sus ojos, Io
que puede producir dafios graves en estos. Siempre use anteojos de seguridad o protecciones para los ojos mientras
opere su tractor o cuando haga ajustes o reparaciones. Recomendamos gafas de seguridad ouna mascara de visi6n
amplia de seguridad usada sobre las gafas.
EL RECOGEDORA DE CESPED COMPLETO DEB.E ESTAR EN
LUGAR ANTES DE FUNCIONAR EL CORTACESPEDES
iNSTRUCTiONS DE DI_BALLAGE
• Remueva partes y los materiales del embalage.
• Compruebe el contenido del cart6n contra lista. Sea
seguro que todas las partes est&n alli.
CONTENIDO DE CARTON:
(3) Cart6ns
(1) Conducto superior
(1) Conducto inferior
(1) Ensamble de cobeurta
(1) Ensamble de ayuda
(2) Pernos don resalto
(1) Resorte de retenci6n
(2) Adaptadoras
HERRAMIENTAS REQUERIDAS
PARA LA ASAMBLEA:
(1) Llave 9/1 6"
IDENTIFICl6N DES PARTES:
DEAYUDA
PERNOS DON
RESAkTO
.4
RESORTE DE RETENCION
INDICADOR DE
BOLSA LLENA "_"
PESTILLO DE
CONDUCTO
CONDUCTO
SUPERIOR
CORREA DE LEVANTAMIENTO
CONTENEURS DE DEL CONDUCTO INFERIOR
RECOGEDORA DE- CONDUCTO
CESPED _. INFERIOR
AVlSO: Cuando en este manual se mencionan los terminos "mano derecha" o "mano izquierda" se refiere a cuando usted
se encuentra en la posici6n de operaci6n (sentado/a detr&s del volante de direcci6n),
ADVERTENOIA: ANTES DE ENSAMBLE REOOGEDORA DE ClaSPED A TRACTOR:
•
o
o
o
Presione el pedal de freno completamente y aplique el freno de estacionamiento.
Ponga el embrague del accesorio en la posici6n desenganehado (DISENGAGED).
Ponga la Ilave de ignici6n en la posici6n de apagado (STOP) y remu6vala.
Asegurese que las cuchillas y que todas las partes movibles se hayan detenido completamente.
Desconecte el alambre de la bujia y p6ngalo en donde no pueda entrar en contacto con 6eta.
16
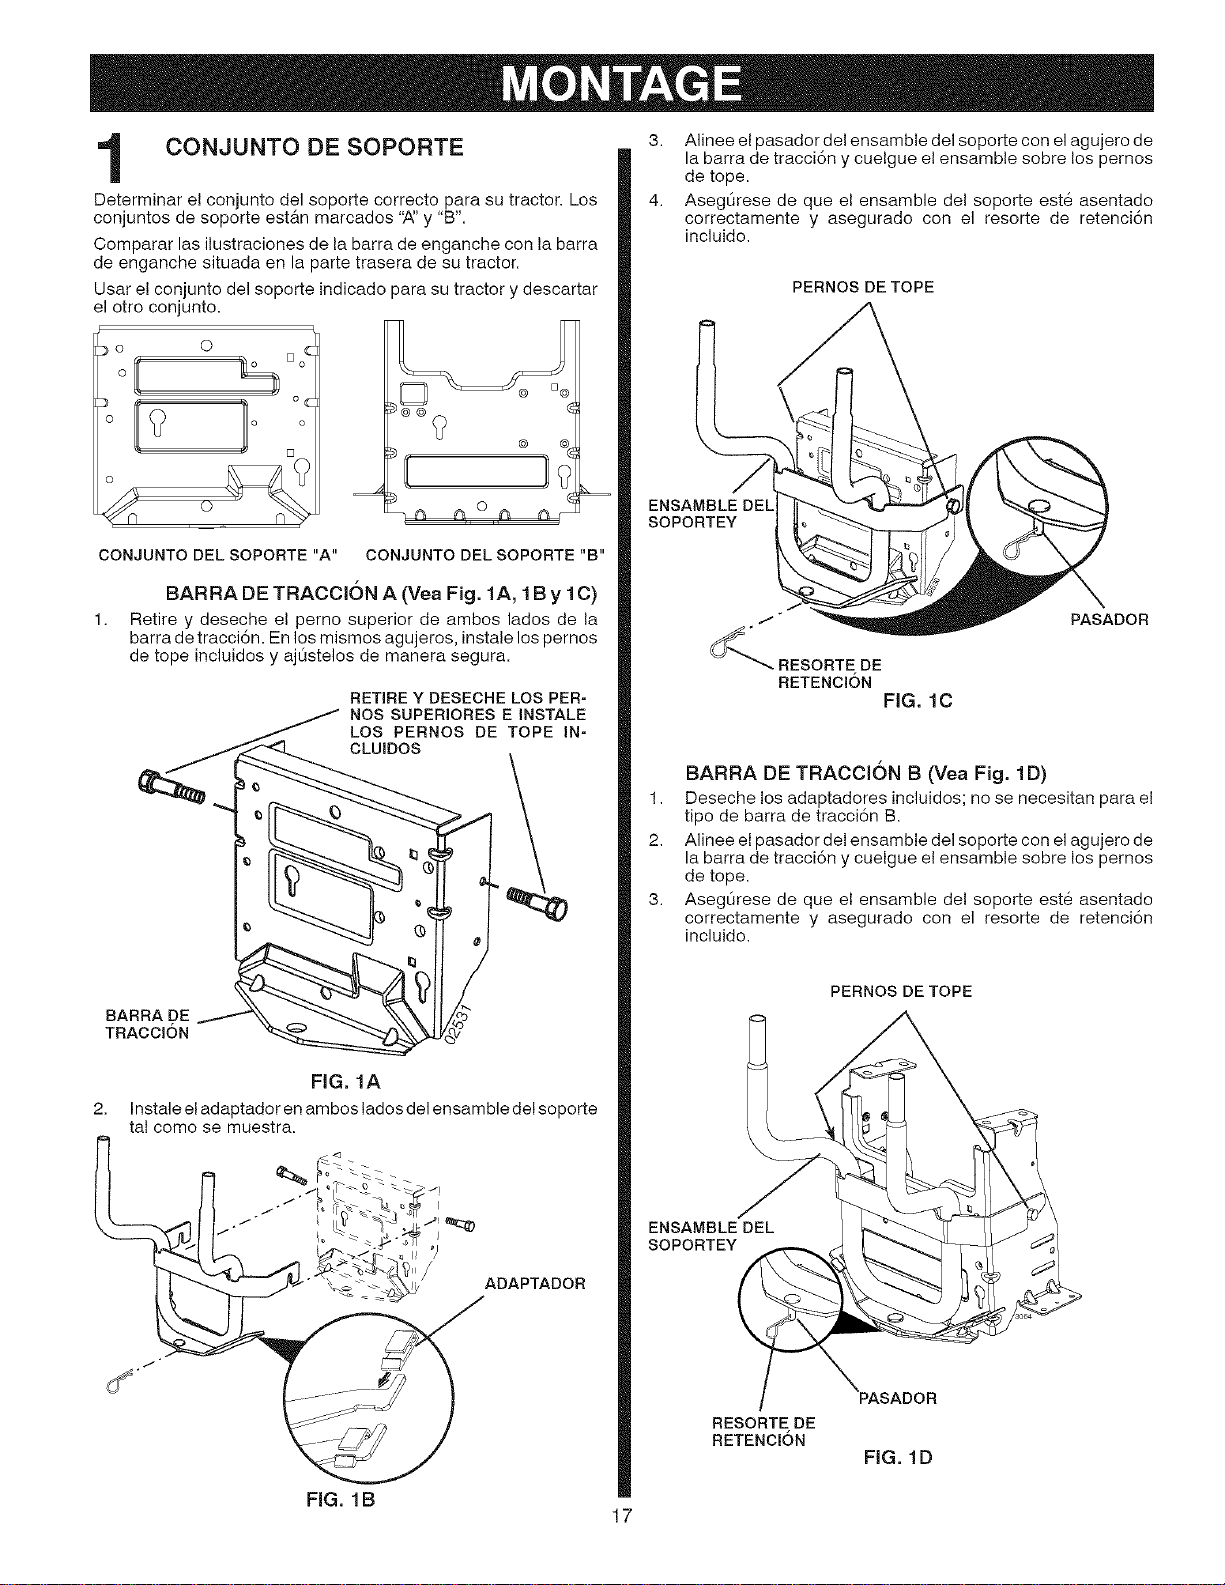
CONJUNTO DE SOPORTE
Determinar el conjunto del soporte correcto para su tractor. Los
conjuntos de soporte est_tn marcados '_' y "B".
Comparar las ilustraciones de la barra de enganche con la barra
de enganche situada en la parte trasera de su tractor.
Usar el conjunto del soporte indicado para su tractor y descartar
el otro conjunto.
:_o 0
oi, ,%
CONJUNTO DELSOPORTE"A" CONJUNTO DELSOPORTE"B"
BARRA DE TRACClON A (Vea Fig. 1A, 1B y 1C)
Retire y deseche el perno superior de ambos lados de la
barra de tracci6n. En los mismos agujeros, instale los pemos
de tope incluidos y ajOstelos de manera segura.
RETIRE Y DESECHE LOS PER-
NOS SUPERIORES E INSTALE
LOS PERNOS DE TOPE IN-
CLUIDOS
RARRA DE
TRACCl6N
FIG. 1A
2. Instale eladaptador en ambos lados del ensamble delsoporte
tal como se muestra.
ADAPTADOR
3. Alinee el pasador del ensamble del soporte con el agujero de
la barra de tracci6n y cuelgue el ensamble sobre los pernos
de tope.
4. Aseg0rese de que el ensamble del soporte este asentado
correctamente y asegurado con el resorte de retenci6n
incluido.
PERNOS DE TOPE
ENSAMBLE DEL
SOPORTEY
PASADOR
BARRA DE TRACClON B (Vea Fig. 1D)
1. Deseche los adaptadores incluidos; no se necesitan para el
tipo de barra de tracci6n B.
2. Alinee el pasador del ensamble del soporte con el agujero de
la barra de tracci6n y cuelgue el ensamble sobre los pernos
de tope.
3. Aseg0rese de que el ensamble del soporte este asentado
correctamente y asegurado con el resorte de retenci6n
incluido.
PERNOS DE TOPE
ENSAMBLE DEL
SOPORTEY
RESORTE DE
RETENCION
FIG. 1D
FIG. 1B
7
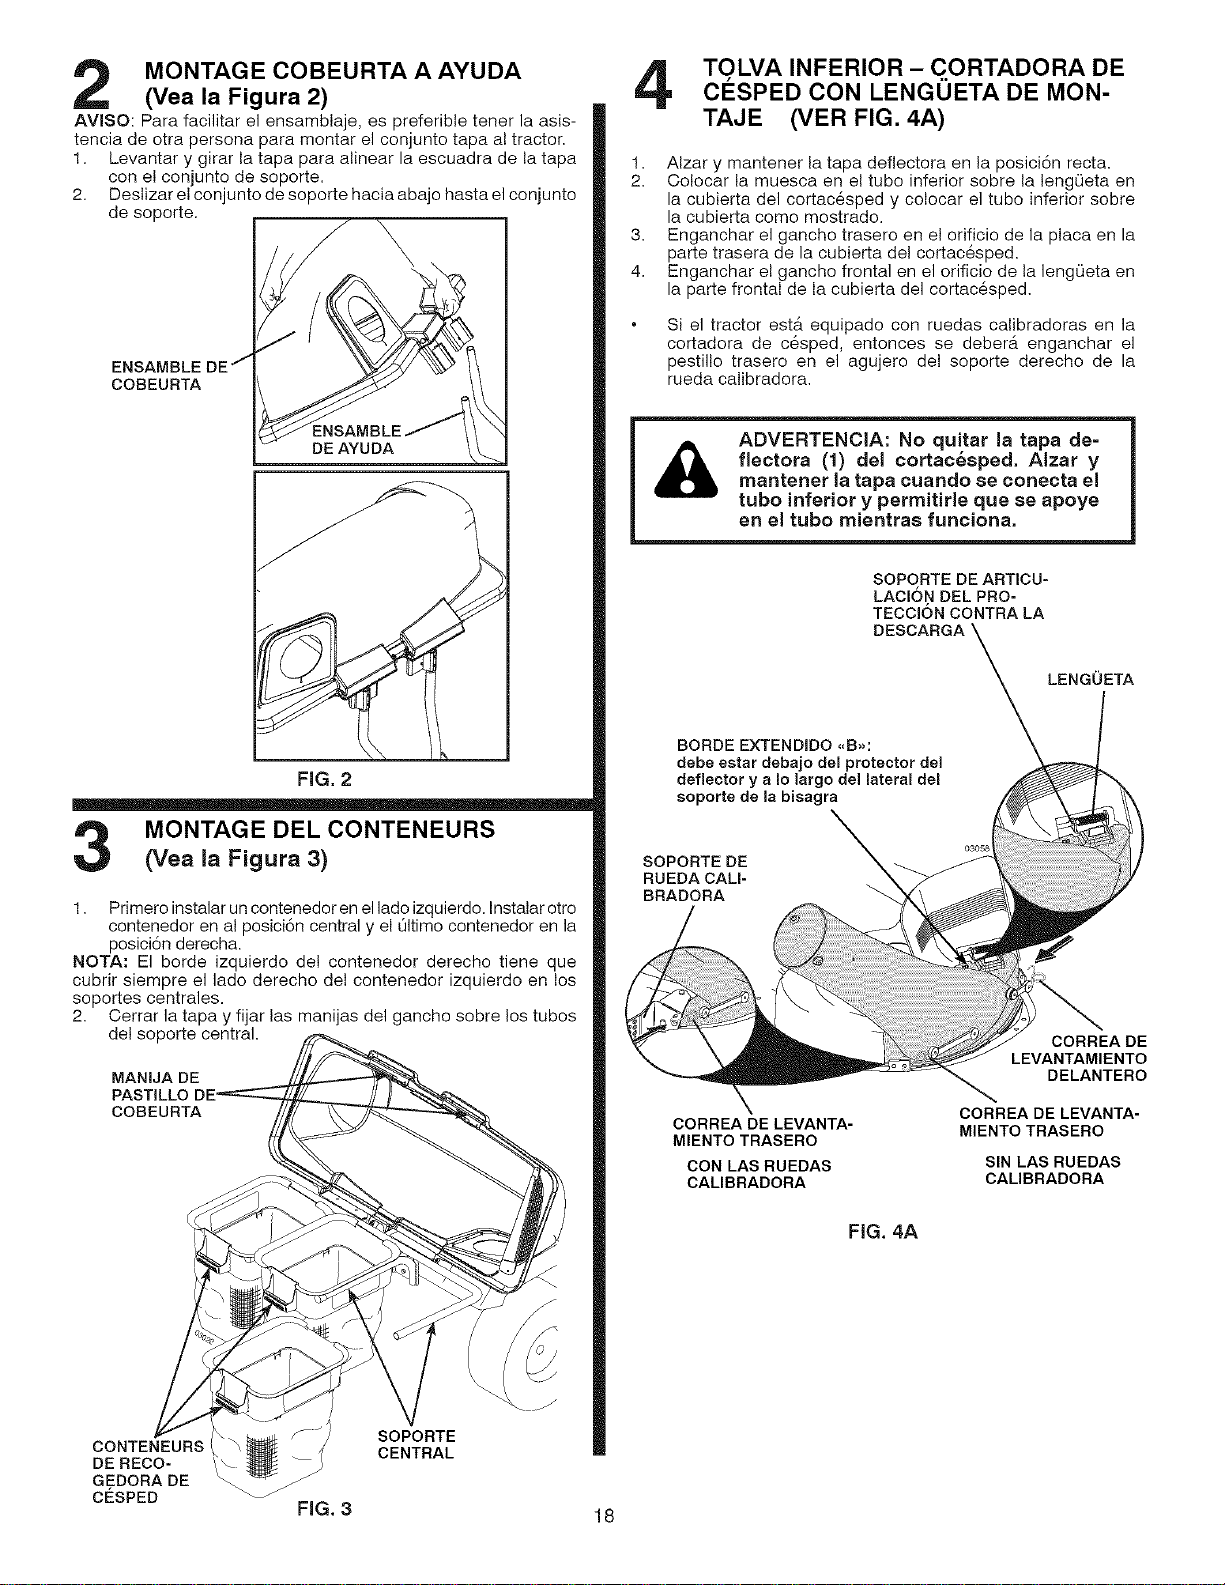
MONTAGE COBEURTA A AYUDA
(Vea la Figura 2)
AVISO: Para facilitar el ensamblaje, es preferible tener la asis-
tencia de otra persona para montar el conjunto tapa al tractor.
1. Levantar y girar la tapa para alinear la escuadra de la tapa
con el conjunto de soporte.
2. Deslizar el conjunto de soporte hacia abajo hasta el conjunto
de soporte. 1
COBEURTA
DE AYUDA
FIG. 2
MONTAGE DEL CONTENEURS
(Vea la Figura 3)
1. Primero instalar un contenedor en el lado izquierdo. Instalar otto
contenedor en al posici6n central y el L_ltimocontenedor en la
posici6n derecha.
NOTA: El borde izquierdo del contenedor derecho tiene que
cubrir siempre el lade derecho del contenedor izquierdo en los
soportes centrales.
2. Cerrar la tapa y fijar las manijas del gancho sobre los tubos
del soporte central.
MANIJA DE
PASTILLO
COBEURTA
CONTENEURS
DERECO-
GEDORA DE
CESPED
FIG. 3
SOPORTE
CENTRAL
18
TO LVA INFERIOR- CORTADORA DECESPED CON LENGUETA DE MON-
TAJE (VER FIG. 4A)
1. Alzar y mantener la tapa deflectora en la posici6n recta.
2. Colocar la muesca en el tubo inferior sobre la lengQeta en
la cubierta del cortacesped y colocar el tubo inferior sobre
la cubierta como mostrado.
3. Enganchar el gancho trasero en el orificio de la placa en la
parte trasera de la cubierta del cortac6sped.
4. Enganchar el gancho frontal en el orificio de la lengQeta en
la parte frontal de la cubierta del cortacesped.
Si el tractor est& equipado con ruedas calibradoras en la
cortadora de c6sped, entonces se deberb, enganchar el
pestil!o trasero en el agujero del soporte derecho de la
rueda calibradora.
ADVERTENCIA: No quitar la tapa de=
flectora (1) del cortac_sped. Alzar y
mantener la tapa cuando se conecta el
tubo inferior y permitirle que se apoye
en el tubo mientras funciona.
SOPORTEDEARTICU-
LAClO N DEE PRO-
TECClON CONTRA LA
LENGUETA
BORDE EXTENDIDO .B_:
debe estar debajo del protector deJ
deflector y a Io Jargo deJ latera! del
soporte de la bisagra
SOPORTE DE
RUEDACALI-
BRADORA
CORREA DE LEVANTA-
MIENTO TRASERO
CON LASRUEDAS
CALIBRADORA
CORREA DE
LEVANTAMIENTO
DELANTERO
CORREA DELEVANTA-
MIENTOTRASERO
SIN LASRUEDAS
CALIBRADORA
FIG. 4A
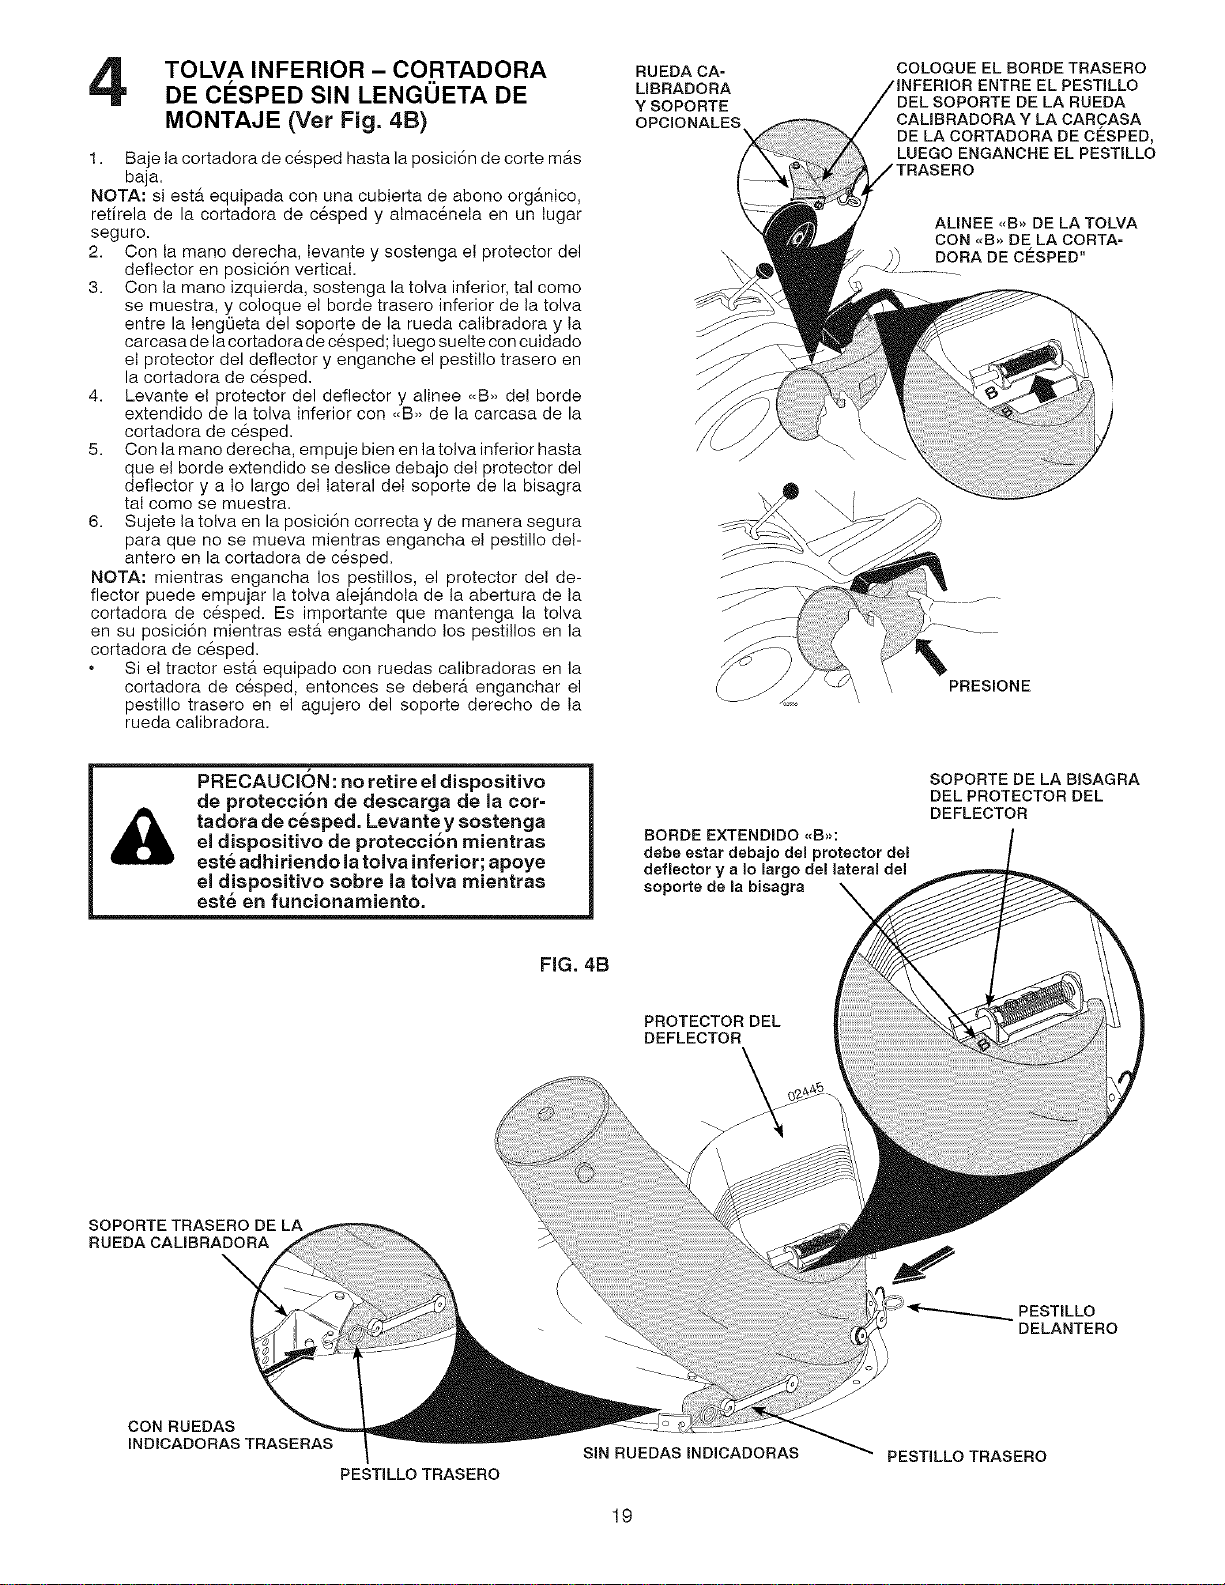
TOLVA INFERIOR - CORTADORA
DE ClaSPED SIN LENGOETA DE
MONTAJE (Vet Fig. 4B)
1. Baje la cortadora de c6sped hasta la posici6n de corte mas
baja.
NOTA: si estb, equipada con una cubierta de abono organico,
retirela de la cortadora de c6sped y almacenela en un lugar
seguro.
2. Con la mano derecha, levante y sostenga el protector del
deflector en posici6n vertical.
3. Con la mano izquierda, sostenga la tolva inferior, tal como
se muestra, y coloque el borde trasero inferior de la tolva
entre la lengQeta del soporte de la rueda calibradora y la
carcasa de la cortadorade c&sped; luego suelte con cuidado
el protector del deflector y enganche el pestillo trasero en
la cortadora de cesped.
4. Levante el protector del deflector y alinee ,,B,_ del borde
extendido de la tolva inferior con -B,_ de la carcasa de la
cortadora de cesped.
5. Con la mano derecha, empuje bien en la tolva inferior hasta
que el borde extendido se deslice debajo del protector del
deflector y a Io largo del lateral del soporte de la bisagra
tal como se muestra.
6. Sujete la tolva en la posici6n correcta y de manera segura
para que no se mueva mientras engancha el pestillo del-
antero en la cortadora de cesped.
NOTA: mientras engancha los pestillos, el protector del de-
flector puede empujar la tolva alejandola de la abertura de la
cortadora de cesped. Es importante que mantenga la tolva
en su posici6n mientras esta enganchando los pestillos en la
cortadora de cesped.
Si el tractor est& equipado con ruedas calibradoras en la
cortadora de cesped, entonces se deber& enganchar el
pestillo trasero en el agujero del soporte derecho de la
rueda calibradora.
RUEDA CA-
LIBRADORA
Y SOPORTE
OPClONALES
/
COLOQUE EL BORDETRASERO
ENTRE EL PESTILLO
DELSOPORTE DE LA RUEDA
CALIBRADORAYLA CAROASA
DELA CORTADORA DECESPED,
LUEGO ENGANCHE EL PESTILLO
ALINEE <_B,_DE LA TOLVA
CON <_B,_DE LA CORTA=
DORA DE C¢:SPED"
PRESIONE
PRECAUCl6N: no retire el dispositivo
de proteccion de descarga de la cor-
tadora de c_eped, Levante y sostenga
el dispositivo de protecci6n mientras
est_ adhiriendo la tolva inferior; apoye
el dispositivo sobre la tolva mientras
est_ en funeionamiento.
BORDE EXTENDIDO ,_B_,:
debe estar debajo del protector del
deflector y a Io largo de! lateral del
soporte de la bisagra
SOPORTEDELA BISAGRA
DEL PROTECTOR DEL
DEFLECTOR
PROTECTOR DEL
DEFLECTOR
\
SOPORTE TRASERO DE LA
RUEDA CALIBRADORA
\
PESTILLO
DELANTERO
CON RUEDAS
INDICADORASTRASERAS
PESTILLO TRASERO
SiN RUEDASINDICADORAS
PESTILLO TRASERO
19
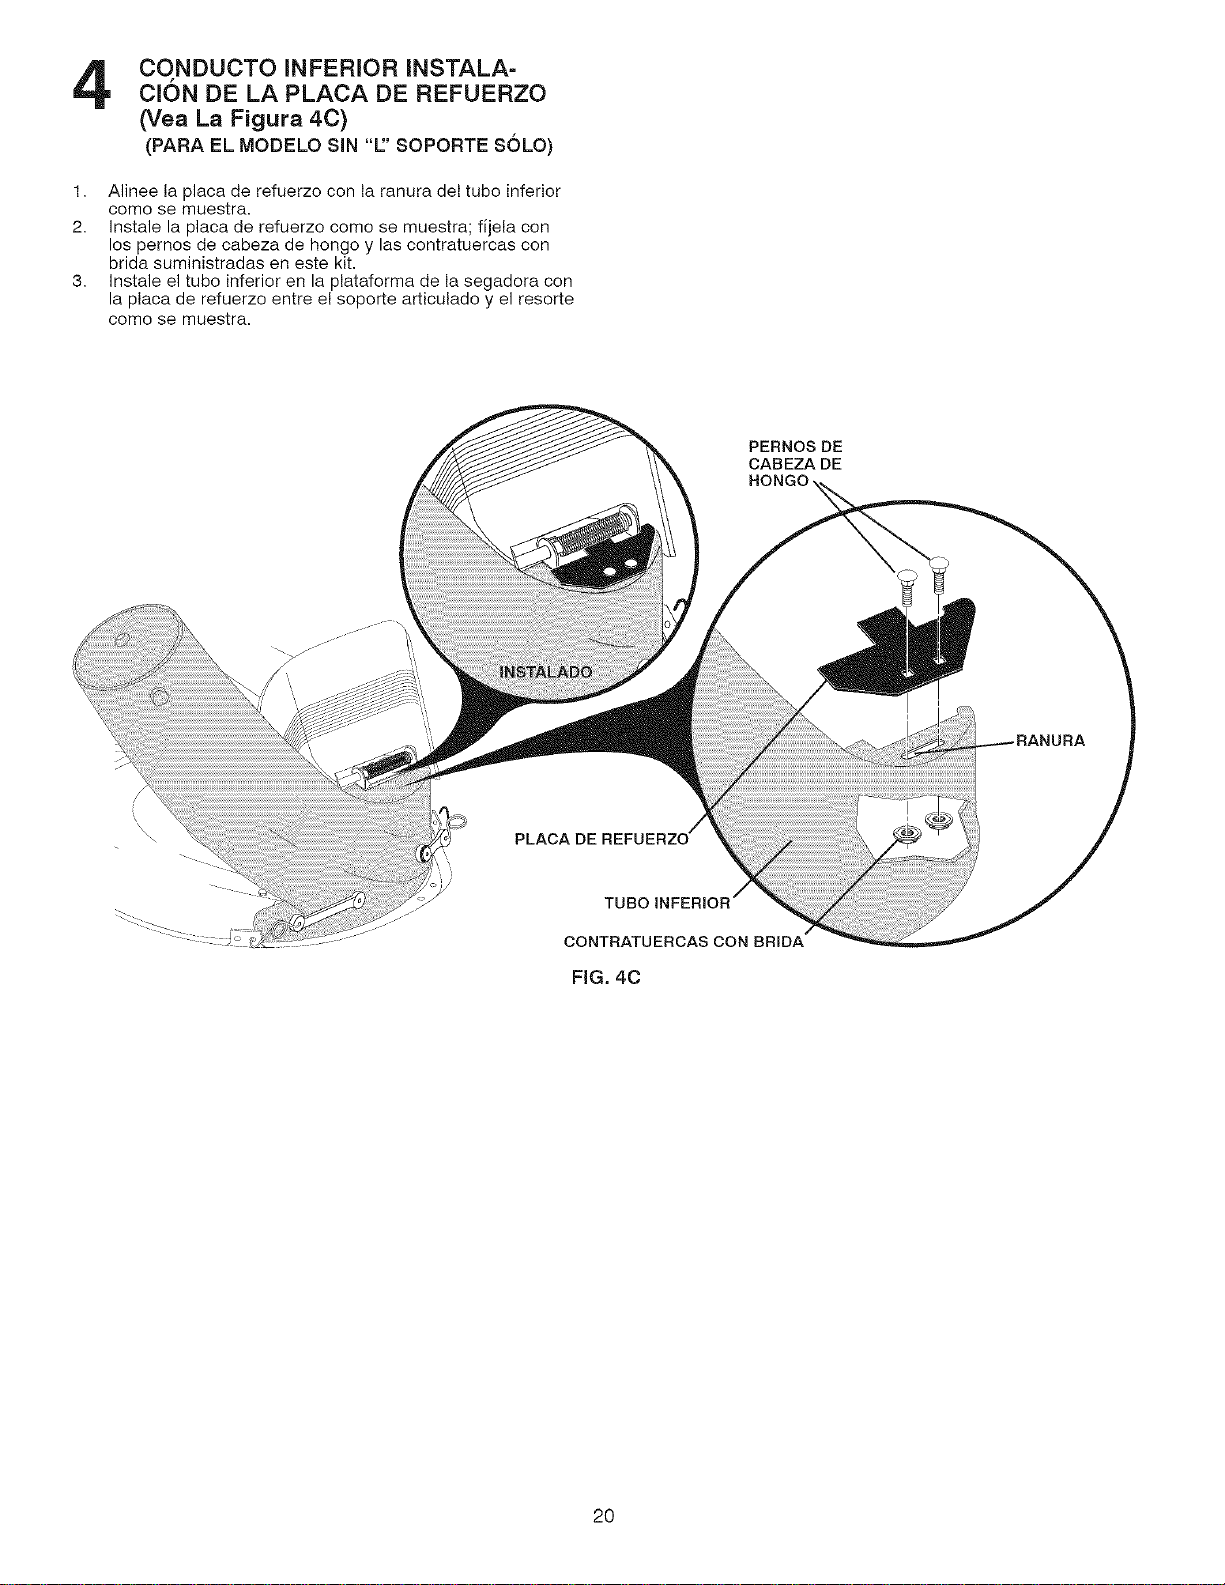
CONDUCTO INFERIOR INSTALA-
Cl6N DE LA PLACA DE REFUERZO
(Vea La Figura 40)
(PARA EL MODELO SIN "1" SOPORTE SOLO)
1. Alinee la placa de refuerzo con la ranura del tubo inferior
como se muestra.
2. Instale la placa de refuerzo come se muestra; fijela con
los pemos de cabeza de hongo y las contratuercas con
brida suministradas en este kit.
3. Instale el tubo inferior en la plataforma de la segadora con
la placa de refuerzo entre el soporte articulado y el resorte
come se muestra.
PERNOS DE
CABEZA DE
TUBO
CONTRATUERCAS CON BRIDA
FiG. 4C
2O
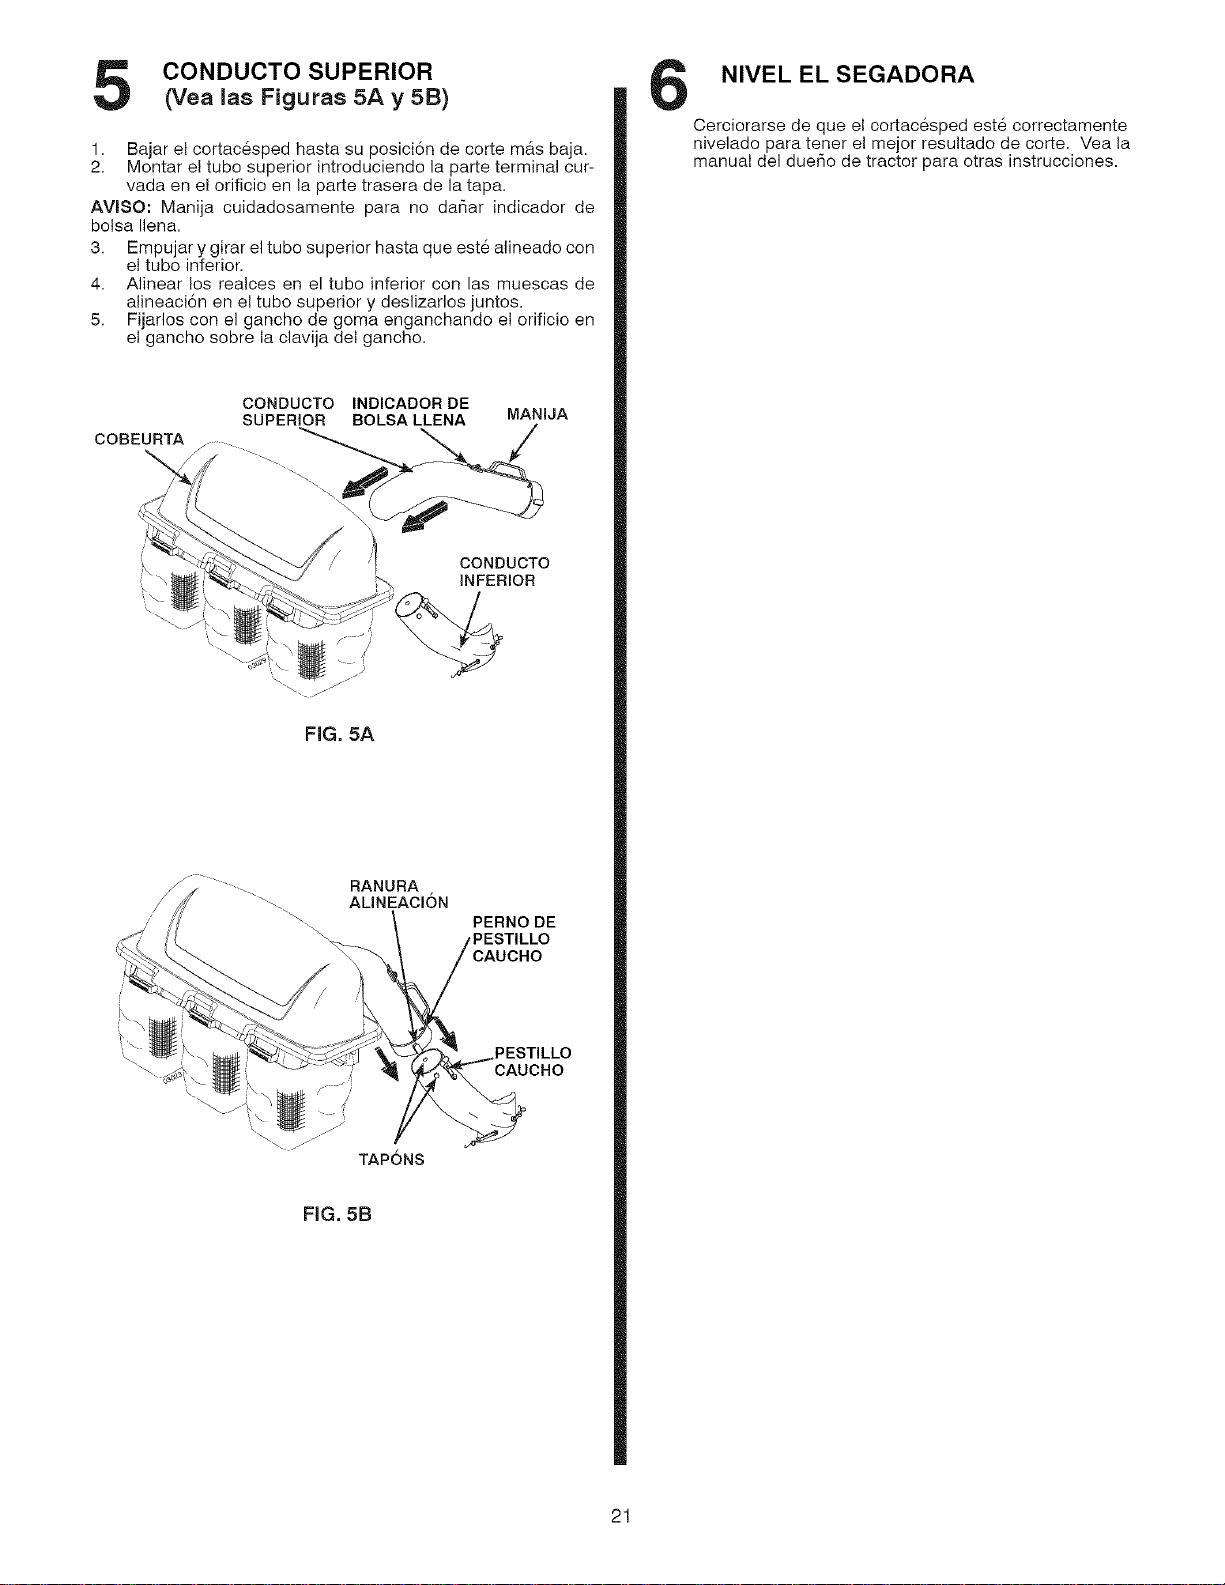
CONDUCTO SUPERIOR
(Vea las Figuras 5A y 5B)
1. Bajar el cortacesped hasta su posici6n de carte mrs baja.
2. Montar el tubo superior introduciendo la parte terminal cur-
vada en e! orificio en la parte trasera de la tapa.
AVmSO: Manija cuidadosamente para no dafiar indicador de
bolsa Ilena.
3. Empujar y girar el tubo superior hasta que este alineado con
el tubo inferior.
4. Alinear los realces en el tubo inferior con las muescas de
alineaci6n en el tubo superior y deslizarlos juntos.
5. Fijarlos con el gancho de goma enganchando el orificio en
el gancho sobre la clavija del gancho.
COBEURTA
\
CONDUCTO INDICADOR DE
SUPERIOR BOLSA LLENA MANIJA
INFERIOR
FIG. 5A
RANURA
ALINEAClON
PERNO DE
PESTILLO
\\
PESTILLO
CAUCHO
TAPONS
FIG. 5B
NIVEL EL SEGADORA
Cerciorarse de que el cortacesped este correctamente
nivelado para tener el mejor resultado de corte. Vea la
manual del duer_o de tractor para otras instrucciones.
21
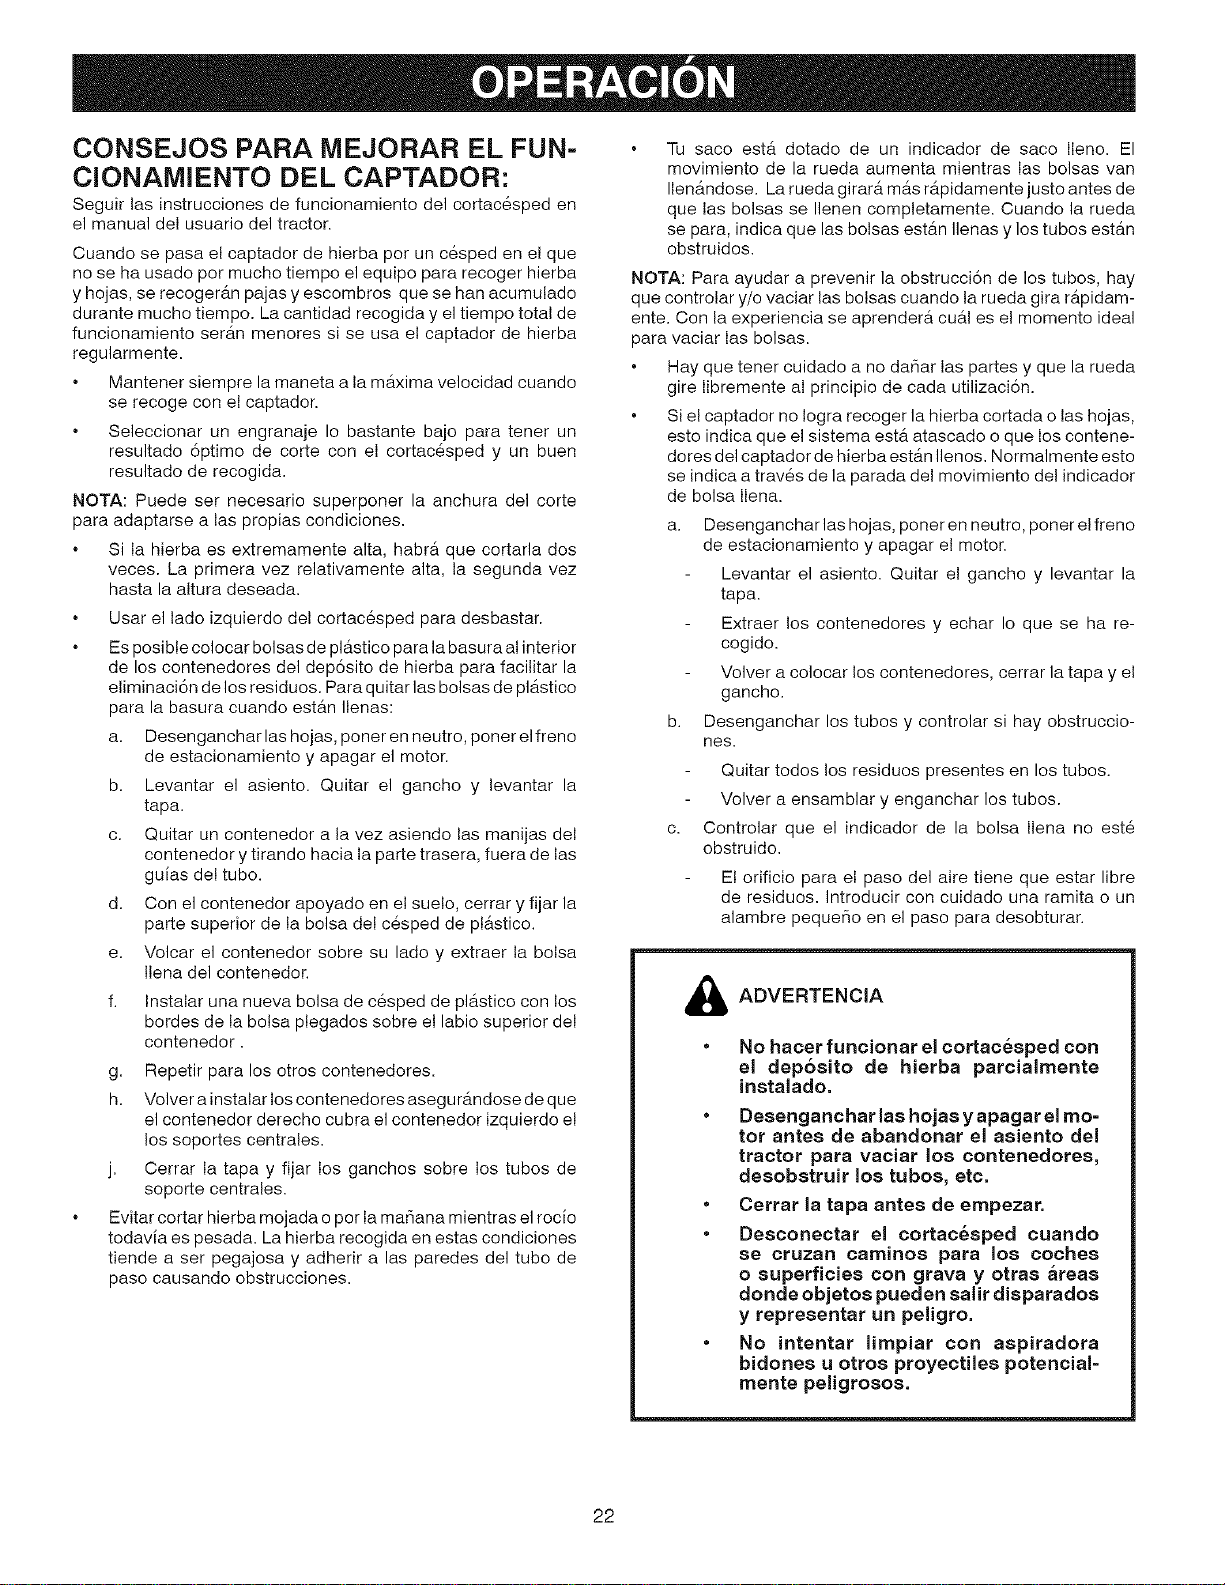
CONSEJOS PARA MEJORAR EL FUN=
CIONAMIENTO DEL CAPTADOR:
Seguir las instrucciones de funcionamiento del cortac_sped en
el manual del usuario del tractor.
Cuando se pasa el captador de hierba por un cesped en e! que
no se ha usado por mucho tiempo el equipo para recoger hierba
y hojas, se recoger_n pajas y escombros que se han acumulado
durante mucho tiempo. La cantidad recogida y el tiempo total de
funcionamiento serb.n menores si se usa el captador de hierba
regularmente.
Mantener siempre la maneta a la m_.xima velocidad cuando
se recoge con el captador.
Seleccionar un engranaje Io bastante bajo para tener un
resultado 6ptimo de corte con el cortacesped y un buen
resultado de recogida.
NOTA: Puede ser necesario superponer la anchura del corte
para adaptarse alas propias condiciones.
Si la hierba es extremamente alta, habra que cortarla dos
veces. La primera vez relativamente alta, la segunda vez
hasta la altura deseada.
Usar el lado izquierdo del cortac6sped para desbastar.
Es posible colocar bolsas de plb_stico para la basura al interior
de los contenedores del dep6sito de hierba para facilitar la
eliminaci6n de los residuos. Para quitar las bolsas de pl_.stico
para la basura cuando est_n Ilenas:
a. Desenganchar las hojas, poner en neutro, poner el freno
de estacionamiento y apagar el motor.
b. Levantar el asiento. Quitar el gancho y levantar la
tapa.
c. Quitar un contenedor a la vez asiendo las manijas del
contenedor y tirando hacia la parte trasera, fuera de las
guias del tubo.
d. Con el contenedor apoyado en el suelo, cerrar y fijar la
parte superior de la bolsa del cesped de pl_stico.
e. Volcar el contenedor sobre su lado y extraer la bolsa
Ilena del contenedor.
f. Instalar una nueva bolsa de c&sped de plb_stico con los
bordes de la bolsa plegados sobre el labio superior del
contenedor.
g. Repetir para los otros contenedores.
h. Volver a instalar los contenedores asegurb_ndose de que
el contenedor derecho cubra el contenedor izquierdo el
los soportes centrales.
j. Cerrar la tapa y fijar los ganchos sobre los tubos de
soporte centrales.
Evitar cortar hierba mojada o por la manana mientras el rocio
todavia es pesada. La hierba recogida en estas condiciones
tiende a ser pegajosa y adherir a las paredes del tubo de
paso causando obstrucciones.
Tu saco estb_ dotado de un indicador de saco Ileno. El
movimiento de la rueda aumenta mientras las bolsas van
Ilenandose. La rueda girara mb_sr_pidamente justo antes de
que las bolsas se Ilenen completamente. Cuando la rueda
se para, indica que las bolsas estb.n Ilenas y los tubos estan
obstruidos.
NOTA: Para ayudar a prevenir la obstrucci6n de los tubos, hay
que controlar y/o vaciar las bolsas cuando la rueda gira r_pidam-
ente. Con la experiencia se aprender_, cu_.l es el momento ideal
para vaciar las bolsas.
Hay que tener cuidado a no da_ar las partes y que la rueda
gire libremente al principio de cada utilizaci6n.
Si el captador no Iogra recoger la hierba cortada o las hojas,
esto indica que el sistema est_ atascado o que los contene-
dores del captador de hierba estan Ilenos. Normalmente esto
se indica a trav&s de la parada del movimiento del indicador
de bolsa Ilena.
a. Desenganchar las hojas, poner en neutro, poner el freno
de estacionamiento y apagar el motor.
Levantar el asiento. Quitar el gancho y levantar la
tapa.
Extraer los contenedores y echar Io que se ha re-
cogido.
Volver a colocar los contenedores, cerrar la tapa y el
gancho.
b. Desenganchar los tubos y controlar si hay obstruccio-
nes.
C.
Quitar todos los residuos presentes en los tubos.
Volver a ensamblar y enganchar los tubos.
Controlar que el indicador de la bolsa Ilena no este
obstruido.
El orificio para el paso del aire tiene que estar libre
de residuos. Introducir con cuidado una ramita o un
alambre pequefio en el paso para desobturar.
_ADVERTENCIA
No hater funcionar el cortac_sped con
el deposito de hierba parcialrnente
instalado,
• Desenganchar las hojas y apagar el mo-
tor antes de abandonar el asiento del
tractor para vaciar los contenedores,
desobstruir los tubos, etc.
• Cerrar la tapa antes de empezar.
• Desconectar el cortac_sped cuando
8e cruzan calTlinos para los coches
o superficies con grava y otras areas
donde objetos pueden salir disparados
y representar un peligro,
• No intentar limpiar con aspiradora
bidones u otros proyectiles potencial=
mente peligrosos.
22
RECOMENDACIONES GENERALES
Cuando se realiza cualquier operaci6n de mantenimiento hay
que seguir siempre las normas de seguridad.
Antesdecualquierusocontrolarquenohayancierressueltos.
Limpiar bien la unidad despues de cada uso.
CUIDADO DE LAS HOJAS
Para un mejor resultado las hojas del cortac6sped han de man-
tenerse afiladas. Sustituir las hojas plegadas o da_adas.
Vease las instrucciones CUIDADO DE LAS HOJAS en el
manual del instrucciones del tractor.
ADVERTENCIA: ANTES DE REALIZAR
CUALQUIER OPERACION DE MANTEN-
IMIENTO, SERVICIO O AJUSTE:
ALMACENAJE
Cuando Ilega la hora de guardar el captador de hierba por un largo
periodo de tiempo, hay que limpiarlo bien, eliminar toda suciedad,
hierba, hojas, etc. Guardarlo en un lugar limpio y seco.
ADVERTENCIA: No dejar hierba en los
contenedores. Vaciar los contenedores
depuse de cada uso antes de guardar=
los. No observar esta regla puede cau=
sat combustion espontanea que puede
desarrollarse en un incendio.
• Presionar el pedal del embrague y freno
hasta el rondo y poner el freno de estacio=
namiento,
• Colocar la palanca de mando del cambio/
movimiento en la position neutra (N).
• Colocar el mando del cambio en la posici6n
"DESACOPLADO".
• Girar a Ilave de encendido en la position
"OFF".
• Asegurarse de que las hojas y todas las
partes de movimiento est6n completamente
paradas.
• Desconectar el cable(s) de la bujia de
encendido y colocar el cable en un lugar
donde no pueda entrar en contacto con la
bujia.
ADVERTENCIA: Los componentes del
captador estan sujetos a desgaste, da=
5os y deterioro, hecho que puede dejar
expuestas las partes en movimiento
o permitir que los objetos salgan dis=
parados, Controlar los componentes
frecuentemente y sustituirlos con las
partes recomendadas pot elfabricante,
cuando sea necesario.
Un de garantia completa para el recolector de cesped artesanal
Cuando el recolector de cesped ya este ensamblado, utilicelo y mantengalo segQn las instrucciones del manual del
usuario; si este recolector presenta fallas debido a un defecto en elmaterial o en la mano de obra dentro del a_o desde
la fecha de compra, DEVUELVALO A CUALQUIER TIENDA SEARS O A CUALQUIER CENTRO DE REPUESTOS
Y REPARACIONES SEARS O A OTRA TIENDA DISTRIBUIDORA ARTESANAL DE LOS ESTADOS UNIDOS PARA
OBTENER UNA REPARACION SIN CARGO (o el reemplazo si la reparaci6n resulta imposible).
• Esta garantia no incluye las cuchillas para bolsas; son piezas de desgaste.
• Esta garanfia quedar& sin efecto si se utiliza el recolector de cesped con fines comerciales o de alquiler.
• Esta garanfia se aplica solo mientras se utilice este producto en los Estados Unidos.
Esta garanfia le otorga derechos legales especificos yes posible que usted tambien goce de otros derechos que
varian segQn el estado.
Sears, Roebuck and Co., Hoffman Estates, IL. 60179
23
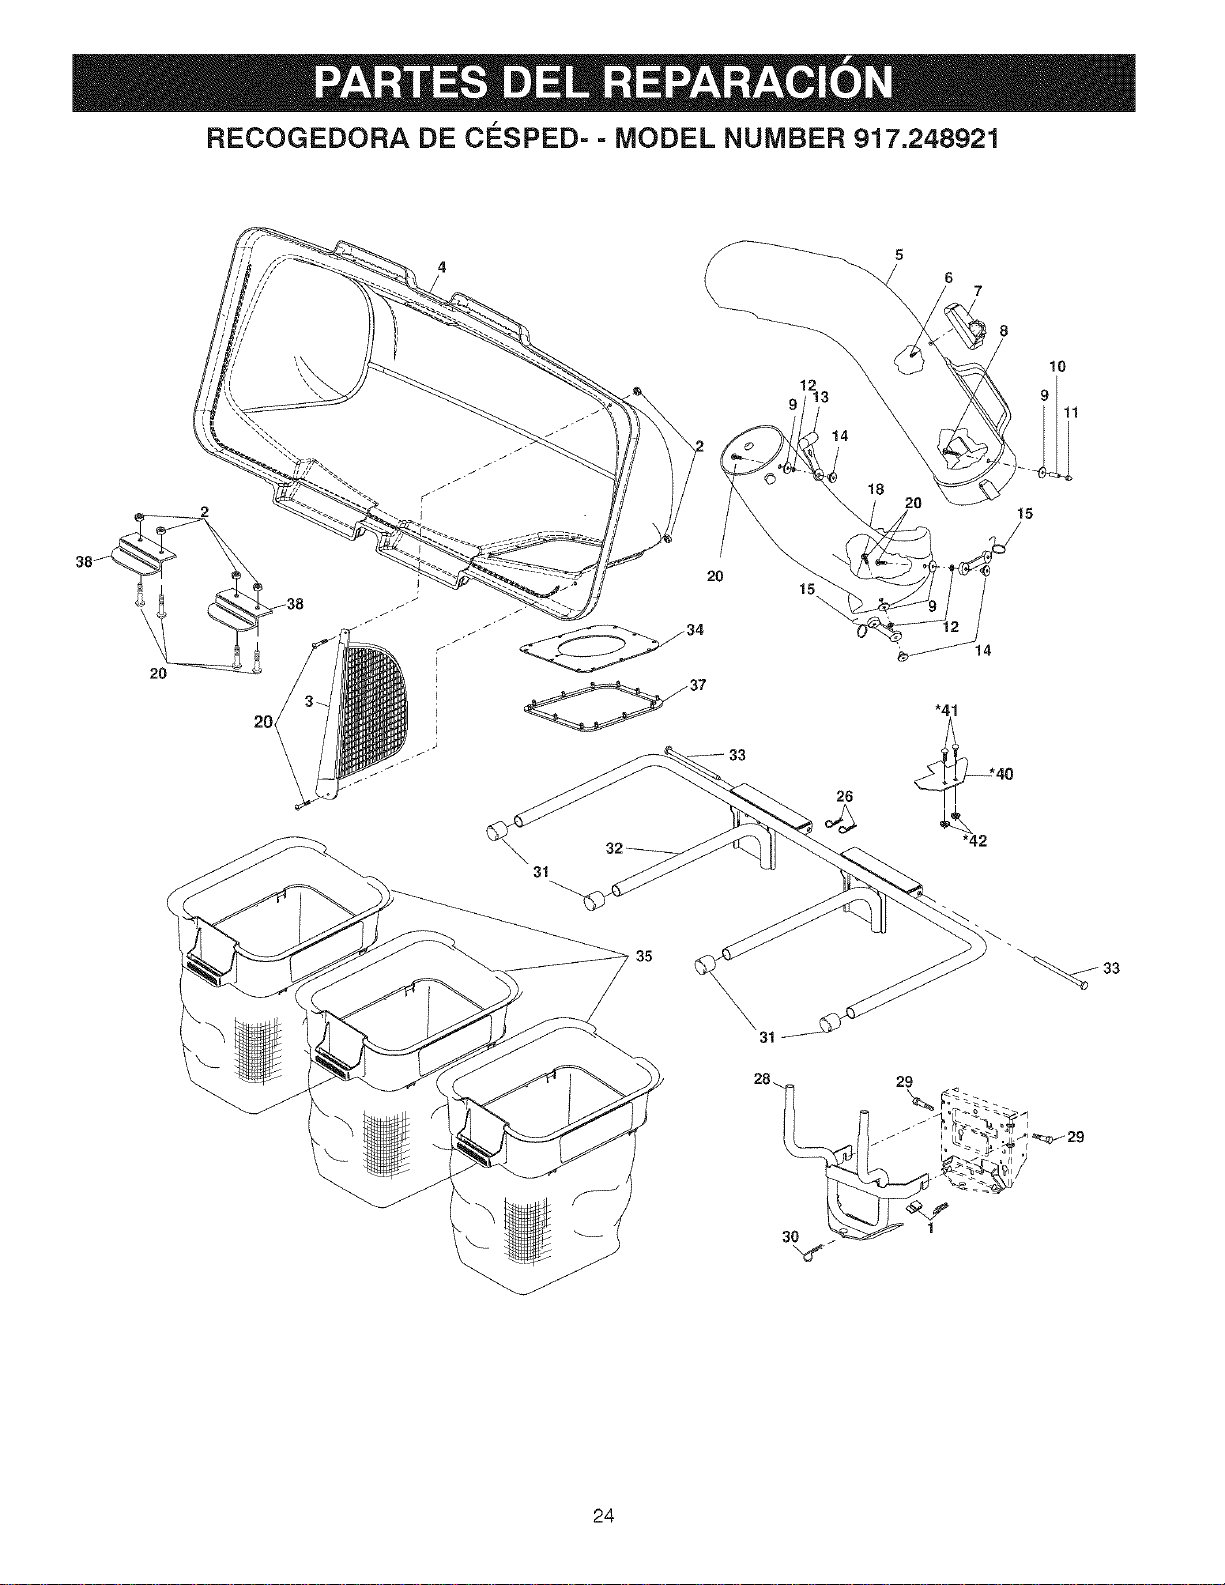
RECOGEDORA DE CESPED= =MODEL NUMBER 917.248921
12
9 !3
!4
18
20
6
7
8
10
11
15
20
31
35
33
31
15
26
30
29
1
24

RECOGEDORA DE C#:SPED= =MODEL NUMBER 917.248921
NO. DE NO. DE
LLAVE PARTE
1 401047
2 69180
3 192709
4 193010
5 126840
6 18021008
7 130933
8 87175
9 52784
10 7206J
11 60867
12 10071000
13 109808X
14 2029J
15 160793
18 162803
20 71081010
26 4939M
28 198364
29 188528
30 165898
31 174083
32 176990
33 192786
34 192550
35 400226
37 192603
38 130895
*40 415405
"41 72140406
*42 73900400
-- 418094
DESCRIPCION
Adaptador
Teurca de seguridad #10-24
Pantalla de cobeurta
Cobeurta (Incluye 34, 37)
Conducto superior
Perno especial #10-14 x 1/2
Indicador de bolsa Ilena
Perno #10-24 x 1-1/8
Arandela 3/16 x 3/4 x 16
Espaciador
Teurca cerrada #10-24
Arandela de seguridad
Pestillo de conducto
Tuerca de soldadura
Correa de levantamiento
Conducto inferior
Perno #10-24 x 5/8
Resorte de vuelta
Soporte de seguridad
Pernos de Tope
Resorte de retencion
Tapas del estremo de la tuberia
Chasis de recogedora de cesped
Perno de articulaci6n
Junta de cobeurta
Conteneur
Selladora de cobeurta
Manija de pastillo de cobeurta
Placa, refuerzo
Pernos, cabeza de hongo 1/4
Contratuercas, hexagonales, conbrida
Manual del dueSo
NOTA: Las dimensiones de todos los componentes
est&n expresadas en pulgadas americanas,
1 pulgada = 25,4 mm
* Si esto tractor es equipado con "L" soporte, entonces
estas partes no set& necesitado,
25

26

27

Find this and aLtyour other product manuats online.
Get answersfrom our team of home experts.
Get a personalized maintenance plan for your home.
Find information and tooLs to help with home projects.
b_oaght to gins by Sears
....................................................... %!iiiiiiii!!!iiiiiiii!iiiiiiii!i!iii_iiiiiiiii_iiiii!i_
YourHome
..........................For repair - in your home - of all major brand appliances, ........................
lawn and garden equipment, or heating and cooling systems,
no matterwho made it, no matterwho sold it!
Forthe replacementparts, accessoriesand
owner's manualsthatyou need todo-it-yourself.
For Sears professional installation of home appliances
and items likegaragedooropenersandwaterheaters.
i-800-4-MY-HOME ®Anytime, dayornight
(1-800-469-4663) (U.S.A. and Canada)
www.sears.com www.sears.ca
Our Home
For repair of carry-in products like vacuums, lawn equipment,
and electronics, call or go on-line for the nearest
Sears Parts and Repair Center.
1-800-488-1222 Anytime, day or night (U.S.A. only)
www.sears,com
iiiiiiiiiiiiiiiiiiiiiiiii¸
ii_iiiiiiiiii#iiiiiii
ii_iiiiiiiiiiiiiiiiiiiiii
ii_iiiiii!ii!!iiiii!!_!i
ii_iiiiiii##iii#
ii_iiiiii###iii
ii_iiiiiiiiiiiiiiiiiiiiii
ii_iiiiii!ii!!iiiii!!_!i
ii_iiiiiii##iii#
ii_iiiiii###iii
ii_iiiiiiiiiiiiiiiiiiiiii
ii_iiiiiii!ii!!iiiiiiiiii
ii_iiiiiii!ii!iiiiiiiiiii
ii_iiiii#iiiiiiiiiiii
ii_iiiiiiiiiiiiiiiiiiiii
iiiiiiiiiii!!ii#iiiii
i#iiiii##ili
#iiiiiii#iiiiill
iiiiiiiii!ii!!imiiiii!
#iiiiiii#iiiiill
iiiiiiiii!ii!!imiiiii!
#iiiiiii#iiiiill
iiiiiiiii!ii!!imiiiii!
#iiiiiii#iiiiill
iiiiiiiii!ii!!imiiiii!
#iiiiiii#iiiiill
iiiiiiiii!ii!!imiiiii!
#iiiiiii#iiiiill
iiiiiiiii!ii!!imiiiii!
#iiiiiii#iiiiill
iiiiiiiii!ii!!imiiiii!
#iiiiiii#iiiiill
iiiiiiiii!ii!!imiiiii!
#iiiiiii#iiiiill
iiiiiiiii!ii!!imiiiii!
#iiiiiii#iiiiill
iiiiiiiii!ii!!imiiiii!
#iiiiiii#iiiiill
iiiiiiiii!ii!!imiiiii!
#iiiiiii#iiiiill
iiiiiiiiiiiiiiiiiiiiiiiiiadomicilio, yparaordenarpiezas:
'::i!!iiiiii!iiii!!iiii!iii,I"888-SU-HOGAR°
_!!i!!!!iii!ii!iiii!!!iiii!!i!!il_ <1_88-784-6427)
'HH,,HHH_,,HH_HHH_,
To purchase a protection agreement (U.S.A.)
or maintenance agreement (Canada) on a product serviced by Sears:
1-800-827-6655 (U.S.A.) 1-800-361-6665 (Canada)
Au Canada pour service en frangais:
1-800-LE-FOYER MC
(1400-533-6937)
www.sears.oa
ii_iiiii!iiii#iiill¸
iiiiiiiiiiiiiiiiiiiiiiii
ii_iiiiiiiiiiiiiiiiiiiii
iiiiiiiiiiiiiiii#_
i_;iiiiii!iiiiiiiiiiiiii
iiiiiiiiiiii#iiiiiii
ii!iiiiiiiiiiiiiii!HiillI
ii iiiiiiiiiiiiii!iiiiiii
ii_iiiii!iiii#iiill_
ii_iiiiiiiiiiiiiiiiiiiiii
ii_iiiiiiiiiiiiiiiiiiiii
iiiiiiiiiiiiiiii#_
i_;iiiiii!iiiiiiiiiiiiii
iiiiiiiiiiii#iiiiiii
ii iiiiiiiiiiiiiii!i iiill
iiii!iiiiiiii_iiiiiiiiiii_
,_i!!iiiiiiiiiiiiiii!!iiiii!_
,,_!_iiiii!!iii!!iiiiiiiii!_iiiiii_
_iiiii!!_!iiiiiiiii!!_iiiiiiiiii_'
© Sears Brands, LLC
TM £M
® Registered Trademark / ' Trademark / - Service Mark of Sears Brands, LLC
TM
® Marca Registrada / Marca de Fabrica / s_,_Marca de Servicio de Sears Brands, LLC
_,_cMarque de commerce / MDMarque deposee de Sears Brands, LLC
418094 Rev, 1 01,09,08 CL PRINTED IN U,S,A,