User Manual Maytag MEDE300VW1 electric dryer
DRYER CARE
Cleaning the Dryer Location
Keep dryer area clear and free from items that would obstruct the flow of combustion and ventilation air.
Cleaning the Lint Screen
Every load cleaning
The lint screen is located in the door opening of the dryer. A screen blocked by lint can increase drying time. Clean the lint screen before each load.
To clean
1. Pull the lint screen straight up. Roll lint off the screen with your fingers. 13o not rinse or wash screen to remove lint. Wet lint is hard to remove.
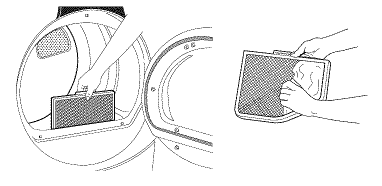
2. Push the lint screen firmly back into place
IMPORTANT:
- Do not run the dryer with the lint screen loose, damaged, blocked, or missing. Doing so can cause overheating and damage to both the dryer and fabrics.
- If lint falls off the screen into the dryer during removal, check the exhaust hood and remove the [int. See "Venting Requirements" in the Installation Instructions.
As needed cleaning
I.aundry detergent and fabric softener residue can build up on the lint screen. This buildup can cause longer drying times for your clothes, or cause the dryer to stop before your load is completely dry. The screen is probably clogged if lint falls off while the screen is in the dryer.
Clean the lint screen with a nylon brush every 6 months, or more frequently, if it becomes clogged due to a residue buildup.
To wash
1. Roll lint off the screen with your fingers
2. Wet both sides of lint screen with hot water.
3. Wet a nylon brush with hot water and liquid detergent. Scrub lint screen with the brush to remove residue buildup
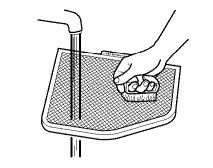
4. Rinse screen with hot water
5. Thoroughly dry lint screen with a clean towel. Replace screen in dryer.
Cleaning the Dryer Interior
To clean dryer drum
1. Make a paste with powdered laundry detergent and very warm water.
2. Apply paste to a soft cloth. OR Apply a liquid, nonflammable household cleaner to the stained area and rub with a soft cloth until all excess dye and stains are removed.
3. Wipe drum thoroughly with a damp cloth.
4. Tumble a load of clean cloths or towels to dry drum.
NOTE: Garments that contain unstable dyes, such as denim blue jeans or brightly colored cotton items, may discolor the dryer interior. These stains are not harmful to your dryer and will not stain future loads of clothes. Dry unstable dye items inside out to avoid transfer of dye.
Removing Accumulated Lint
From Inside the Dryer Cabinet
Lint should be removed every 2 years, or more often, depending on dryer usage. Cleaning should be done by a qualified person.
From the Exhaust Vent
Lint should be removed every 2 years, or more often, depending on dryer usage.
Vacation, Storage, and Moving Care
Install and store your dryer where it will not freeze. Because some water may stay in the hoses, freezing can damage your dryer. If storing or moving your dryer during freezing weathec winterize it.
Non-Use or Vacation Care
Operate your dryer only when you are at home. If you will be on vacation or not using your dryer for an extended period of time, you should:
1. Unplug dryer or disconnect power.
2. Gas models only: Close shutoff valve in gas supply line.
3. Clean lint screen. See "Cleaning the Lint Screen."
4. Turn off the water supply to the dryer. This helps to avoid unintended flooding (due to a water pressure surge) while you are away.
Moving care
For power supply cord-connected dryers:
- Unplug the power supply cord.
- Gas models only: Close shutoff valve in gas supply line.
- Gas models only: Disconnect gas supply line pipe and remove fittings attached to dryer pipe.
- Gas models only: Cap the open fuel supply line.
- Steam models only: Shut off water faucet.
- Steam models only: Disconnect the water inlet hose from faucet, then drain the hose. Transport hose separately.
- Make sure leveling legs are secure in dryer base.
- Use masking tape to secure dryer door.
For direct-wired dryers:
- Disconnect power
- Disconnect wiring.
- Steam models only: Shut off water faucet.
- Steam models only: I)disconnect the water inlet hose from faucet, Transport hose separately.
- Make sure leveling legs are secure in dryer base.
- Use masking tape to secure dryer door.
Reinstalling the dryer
Follow the "Installation Instructions" to locate, level, and connect the dryen
Special Instructions for Steam Models
Water Inlet Hoses
Replace inlet hoses and hose screen after 5 years of use to reduce the risk of hose failure. Periodically inspect and replace inlet hoses if bulges, kinks, cuts, wear, or leaks are found. When replacing your inlet hoses, record the date of replacement.
To winterize dryer
- Unplug dryer or disconnect power
- Gas models only: Close shutoff valve in gas supply line.
- Shut off water faucet.
- Disconnect water inlet hose from faucet and drain.
To use dryer again
- Flush water pipes. Reconnect water inlet hose to faucet. Turn on water faucet.
- Plug in dryer or reconnect power.
- Gas models only: Open shutoff valve in gas supply line.
Changing the Drum Light
The dryer light automatically turns on inside the dryer drum when you open the door.
To change the drum light
- Unplug dryer or disconnect power.
- Open the dryer door. I_ocate the light bulb cover on the back wall of the dryer. Remove the screw located in the lower right corner of the cover. Remove the cover.
- Turn bulb counterclockwise. Replace the bulb with a 10-watt appliance bulb only. Replace the cover and secure with the screw.
- Plug in dryer or reconnect power.
TROUBLESHOOTING
Dryer will not run
- Has a household fuse blown, or has a circuit breaker tripped? Replace the fuse or reset the circuit breaker. If the problem continues, ca[[ an electrician.
- Is the correct power supply available? Electric dryers require 120-volt power supply and gas dryers require 240-volt power supply. Check with a qualified electrician.
- Was a regular fuse used? Use a time-delay fuse.
- Is the dryer door firmly closed?
- Was the Start button firmly pressed? Large loads may require pressing and holding the Start button for seconds.
No heat
-
Has a household fuse blown, or has a circuit breaker tripped? The drum may be turning, but you may not have heat. Replace the fuse or reset the circuit breaker. Electric dryers use 2 household fuses or curcuit breakers. If the problem continues, call an electrician.
- Is the valve open on the gas supply line for gas models?
Unusual sounds
Dryer displaying code message
-
"PF" (power failure), check the following: Was the drying cycle interrupted by a power failure? Depending on the length of the power outage, you may be able to resume the cycle by simply pressing and holding START-PAUSE; otherwise, press POWER-CANCEl_ and then start a new cycle.
- "E" Variable (El, E2, E3) service codes: Ca[[ for service.
Electric Dryer displaying code message
"L2" Diagnostic Code (low or no line voltage condition): The drum will turn, but there may be a problem with your home power supply keeping the dryer's heater from turning on. The dryer will continue to run when this diagnostic code is present. Press any key to clear the code from the display and return to the estimated time remaining.
Try the following:
Check to see if a household fuse has blown or circuit breaker has tripped. Electric dryers use two household fuses or breakers. Replace the fuse or reset the circuit breaker.
Confirm the power cord is properly installed. Refer to "Electrical Connection" for details.
Select a Timed Dry heated cycle, and restart the dryer.
If the message persists, consult a qualified electrician.
"AF" (low airflow condition):
The dryer will continue to run when this diagnostic code is present. Press any key to clear the code from the display and return to the estimated time remaining.
Try the following:
Clean lint screen.
Check to see if the vent run from the dryer to the wall is crushed or kinked.
Confirm the vent run from the dryer to the wall is free of lint and debris.
Confirm the exterior vent exhaust hood is free of lint and debris.
Confirm your vent system falls within the recommended run length and number of elbows for the type of vent you are using. Refer to "Plan Vent System" in the Installation Instructions for details.
Select a Timed Dry heated cycle, and restart the dryer. If the message persists, have your entire home venting run cleaned.