
Operator'sManual
Model No. Description
78OO6O4
$22675
SP22675
NS22675
NSP22675
Manual No. 7104974 (Rev. '-', 11/11/2010)

ThankYou for purchasingthis quafity-buflt Snapper mower. We're pleasedthat you placedyour
confidence in the Snapperbrand. When operatedand maintainedaccordingto the instructions in this
manual, your Snapper mower will provide manyyears of dependableservice.
This manualcontains safety information to makeyou awareof the hazardsand risks associatedwith the
machine and how to avoid them. This machine is designed and intended only for finish cutting of
established lawns and is not intendedfor any other purpose. It is important that you read and understand
these instructions thoroughly before attempting to start or operatethis equipment. Savethese original
instructions for future reference.
Completethe following information on your Snapper purchase.
Date of Purchase
Retailer
Retailer's PhoneNumber
Equipment
Model Number
Serial Number
Engine
Model Type Code
SNAPPERis a trademark of
Briggs & Stratton Power Products Group, LLC
Milwaukee,Wl, USA,
Copyright @ 2010, Briggs & Stratton Corporation
Milwaukee,Wl, USA, All Rights Reserved,

TabJeof Contents
Operation ............................................................ 12
Engine Stop Lever .................................................. 12
Front Wheel Drive System cSelf-Propelled Units) .......................... 12
Stopping the Engine ............................................... 12
Starting the Engine ................................................ 13
Rubs for Safe and Effective Operation ................................. 13
Maintenance ......................................................... 14
Maintenance Chart ................................................ 14
Engine Maintenance ............................................... 15
EngineTipping ................................................... 15
Cleaningthe Mower Housing ........................................ 15
Lubrication ...................................................... 15
Adjusting the Height of Cut .......................................... 15
Adjusting the Drive Cable ........................................... 16
Preparing the Mower for Storage ..................................... 17
Troubleshooting ...................................................... 18
Warranty ........................................................... 19
Battery posts, terminals and relatedaccessories contain
lead and lead compounds, chemicals known to the State of
Californiato cause cancerand birth defects or other
reproductive harm. Wash hands after handling.
Engineexhaust, some of its constituents, and certain
vehicle components contain or emit chemicals known to
the State of California to causecancer or other reproductive
harm.

OperatorSafety
WARNING:This powerful cutting machine is capable of amputating hands and feet and can throw objects
that can cause injury and damage! Failureto comply with the following SAFETYinstructions could result in
serious injury or death to the operator or other persons. The owner of the machine must understand these
instructions and must allow only persons who understand these instructions to operate machine. Each
person operating the machine must be of sound mind and body and must not be under the influence of any
substance,which might impair vision, dexterity,or judgment. If you have any questions pertaining to your
machinewhich your dealer cannot answer to your satisfaction, call or write the Customer Service
Departmentat SNAPPER,McDonough, Georgia 30253. Phone: (1o800-317o783%
Protection for Children
Tragic accidents can occur if the operator is not alert to the
presenceof children. Children are often attracted to the
machineand the mowing activity. Never assume that
children will remain where you last saw them.
1. KEEPchildren out of the mowing area and under the
watchful care of a responsible adult other than the operator.
2. DO NOTallow children in yard when machine is operated
and turn machine OFFif anyone enters the area.
3. DO NOTallow pre-teenagechildren to operate machine.
4. ALLOW only responsible adults & teenagerswith mature
judgment under close adult supervision to operate machine.
5. DO NOTpull mower backwards unless absolutely
necessary.LOOKand SEE behind and down for children,
pets and hazards before and while backing.
6. USEEXTRACAREwhen approaching blind corners
shrubs, trees, or other objects that may obscure visuon.
Slope Operation
1. Slopes are a major factor relatedto slip and fall acci-
dents, which can result in severe injury. All slopes requure
extra caution. If you feel uneasyon a slope, DO NOTmow
it.
2. Mow across slopes, never up-and-down. Exercise
extreme CAUTIONwhen changing directions on slopes. DO
NOTmow steep slopes or other areas where stability or
traction is in doubt. Refer to the Slope Guide at the end of
this manual.
3. Useextra care with grass catchers or other attachments;
these affect the handling and the stability of the machine.
Preparation
1. Read,understand, and follow instructions and warnings
in this manual and on the mower, engine and attachments.
Know the controls and the proper use of the mower before
starting.
2. Only mature, responsible persons shall operate the
machineand only after proper instruction.
3. Data indicatesthat operators age 60 and above,are
involved in a large percentageof mower-related injuries.
Theseoperators should evaluate their ability to operate the
mower safely enough to protect themselves and others
from serious injury.
Preparation
(Continued From Previous Column)
4. Handle fuel with extra care. Fuelsare flammable and
vapors are explosive. Useonly an approved fuel container.
DO NOTremove fuel cap or add fuel with engine running.
Add fuel outdoors only with engine stopped and cool. Clean
spilled fuel and oil from machine. DO NOTsmoke.
5. Checkthe areato be mowed and removeall objects such
as toys, wire, rocks, limbs and other objects that could
cause injury if thrown by blade or interfere with mowing.
Also note the location of holes, stumps, and other possible
hazards.
6. Keeppeople and pets out of the mowing area.
Immediately,STOP Blade,Stop engine and Stop mower if
anyone entersthe area.
7. Checkshields, deflectors, switches, blade controls and
other safety devices frequently for proper operation and
ocation.
8. Make sure all safety decals are clearly legible. Replace if
damaged.
9. Protect yourself when mowing and wear safety glasses, a
dust mask. long pants, and substantial footwear. DO NOT
mow barefooted or with sandals.
10. Know how to STOPbladeand engine quickly in
preparation for emergencies.
11. Use extra care when loading or unloading the machine
into a trailer or truck.
12. Checkgrass catcher components frequently for signs of
wear or deterioration and replaceas neededto prevent
injury from thrown objects going through weak or torn
spots.
Safe Handling of Gasoline
To avoid personal injury or property' damage, use extreme
care in handling gasoline. Gasoline is extremely flammable
and the vapors are explosive.
1. Extinguish all cigarettes, cigars, pipes and other sources
of ignition.
2. Use only an approved fuel container.
3. DO NOTremovefuel cap or add fuel with the engine
running. Allow the engineto cool before refueling.
4. DO NOTrefuel the machine indoors.
5. DO NOTstore the machine or fuel container inside where
there is an open flame, spark or pilot light such as on a
water heater or other appliances.
4 www.snapper.com

OperatorSafety
Safe Handling of Gasoline
(Continued From PreviousPage)
6. DO NOTfill fuel containers inside a vehicle or on a truck
or trailer bed with a plastic liner. Always placethe contain-
ers on the ground away from the vehicle before filling.
7. Remove gasopoweredequipment from the vehicle or
trailer and refuel it on the ground, if this is not possible,
then refuel equipment using a portable container, rather
than a gasoline dispenser nozzle.
8. DO NOTstart gas powered equipment in enclosedvehi-
cles or trailers.
9. Keepthe nozzle in contact with the rim of the fuel tank or
container opening at all times until fueling is complete. DO
NOTuse a nozzle lock-open device
10. If fuel is spilled on clothing, change clothing
immediately.
11. DO NOToverfill a fuel tank. Replacefuel cap and tight-
en securely.
Operation
1. DO NOTput hands or feet near or under rotating parts.
Keepdear of discharge area while engine is running.
2. STOPengine when crossing gravel drives, walks, or
roads, and under any conditions where thrown objects
might be a hazard.
3. Mow only in daylight or good artificial light.
4. DO NOToperate mower while underthe influence of
alcohol or drugs.
5. After striking a foreign object or if mower vibrates
abnormally, STOPthe engine, disconnect and secure spark
plug wire. Inspect the mower for any damageand repair
the damage before starting.
6. DO NOTmow near drop offs, ditches or embankments.
Operator could lose footing or balance.
7. STAYALERTfor holes and other hidden hazards.Tall
grass can hide obstacles. Keep awayfrom ditches,
washouts, culverts, fences and protruding objects.
8. DO NOTmow on wet grass. Always be sure of your
footing. Keepa firm how on the handleand wail never
run. Slipping could causeinjury.
9. ALWAYSstay behind handle when engine (motor) is
running.
10. DO NOTleavethe machinewith the engine running.
STOPBLADEand STOPENGINEbefore leavingthe opera-
tors position for any reason.
11. Before cleaning, repairing or inspecting make certain
engine, blade and all moving parts have STOPPED.
Disconnect and securespark plug wire away from plug to
prevent accidental starting.
12. STOPengine and wait until the blade comes to com-
plete STOP before removing grass bagand/or cleadng
grass.
Operation
(Continued From Previous Column)
13. DO NOToperate mower without the entire grass catch-
er, or guards in place discharge guard, rear guard or other
safety devices in place and working. DO NOT point dis-
charge at people, passing cars, windows or doors.
14. DO NOTdischarge material against a wall or obstruc-
tion. Material may ricochet back towards the operator.
15. Slow down beforeturning.
16. Watch out for traffic when near or crossing roadways.
17. DO NOToperate engine in enclosedareas. Engine
exhaust gasescontain carbon monoxide, a deadly poison.
18. Only use accessoriesapproved by the manufacturer.
See manufacturer's instructions for proper operation and
installation of accessories.
Maintenanceand Storage
1. DO NOTstore mower or fuel container inside where
fumes may reach an open flame, spark or pilot light such as
in a water heater,furnace, clothes dryer or other gas appli-
ance. Allow engine to cool before storing machine in an
enclosure. Store fuel container out of reach of children in a
well ventilated, unoccupied building.
2. Keepmower and engine free of grass, leavesor excess
grease to reduce fire hazardand engine overheating.
3. When draining fuel tank, drain fuel into an approved
container outdoors and away from open flame.
4. Keepall bolts, especially bladebolts, nuts and screws
properly tight. Checkthat all cotter pins are in proper
position.
5. Always provide adequate ventilation when running
engine. Engineexhaust gases contain carbon monoxide, a
deadly poison.
6. Serviceengine and makeadjustments only when engine
s stopped. Removed spark plug wire from spark plug and
secure wire away from spark plug to prevent accidental
starting.
7. DO NOTchange engine governor speed settings or
overspeed engine.
8. Checkgrass bag assembly frequently for wear or
deterioration to avoid thrown objects and exposure to
moving parts. Replacewith new bag if loose seams or tears
are evident. Replaceslider or bag adapter if broken or
cracked.
9. Mower blades are sharp and can cut. Wrap the blades or
wear heavy leather gloves and use CAUTIONwhen handling
them.
10. DO NOTtest for spark by grounding spark plug next to
spark plug hole; spark plug could ignite gas exiting engine.
11. Havemachine serviced by an authorized dealer at least
once a year and havethe dealer install any new safety
devices.
12. Use only genuine replacement parts to assure that
original standards are maintained.
WARNING:Before doing any assembly or main-
tenanceto the mower, remove the wire from the
spark plug.
NOTE:In this instruction book, left and right describe the
location of a part with the operator standing behind the
handle.
Unpacking
The mower was fully assembled at the factory. When the
mower was put in the carton, the handlewas put in the
storage position. To put the handle in the operating position,
follow the steps below.
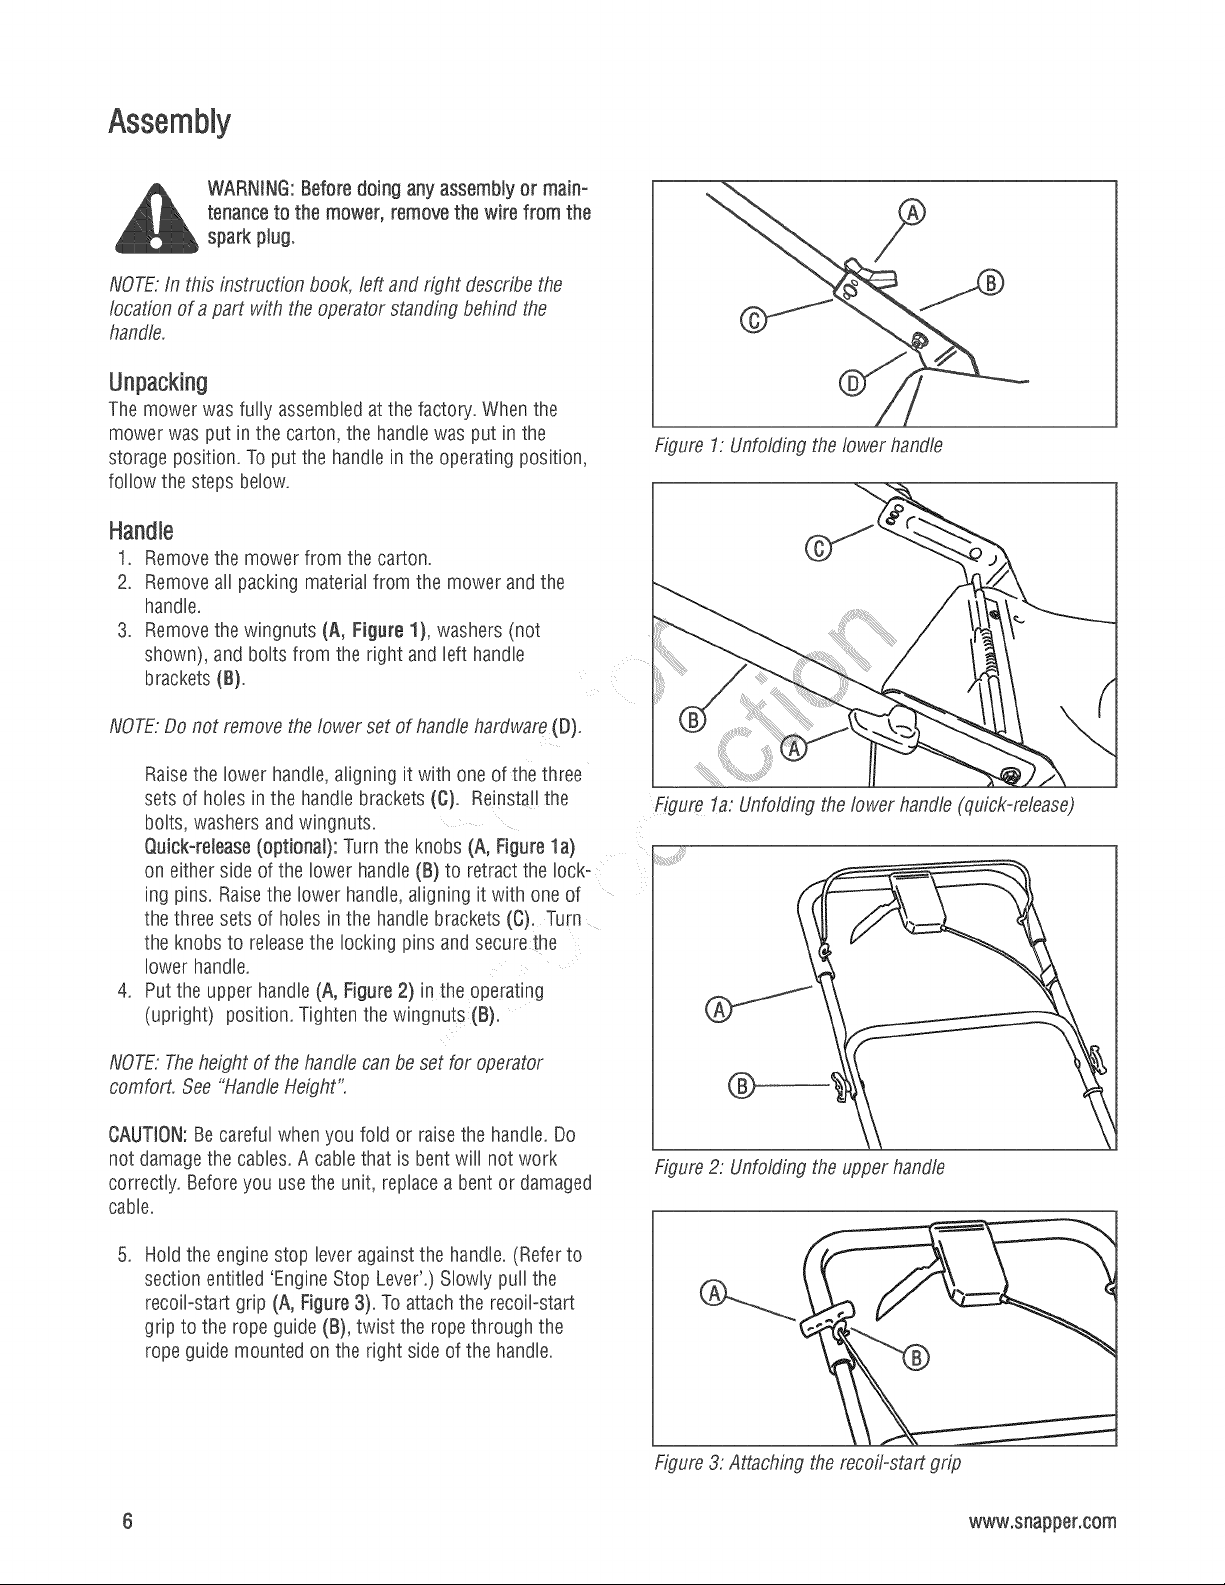
Figure 1: Unfolding the lower handle
Handle
1. Remove the mower from the carton.
2. Remove all packing material from the mower and the
handle.
3. Remove the wingnuts (A, Figure 1), washers (not
shown), and bolts from the right and left handle
brackets (B).
NOTE:Do not remove the lower set of handlehardware (D).
Raisethe lower handle, aligning it with one of the three
sets of holes in the handle brackets (C), Reinstall the
bolts, washers and wingnuts.
Quick-release(optiona0: Turn the knobs (A, Figure la)
.
on either side of the lower handle(B) to retract the lock-
ing pins. Raisethe lower handle, aligning it with one of
the three sets of holes in the handle brackets (C). Turn
the knobs to releasethe locking pins and secure the
lower handle.
Put the upper handle(A, Figure2) in the operating
(upright) position. Tighten the wingnuts (B),
NOTE: Theheight of the handlecan be set for operator
comfort. See "Handle Height".
Figure la: Unfolding the lower handle (quick-release)
CAUTION:Becareful when you fold or raise the handle. Do
not damagethe cables. A cable that is bent will not work
correctly. Before you use the unit, replacea bent or damaged
cane.
Figure 2: Unfolding the upper handle
.
Hold the engine stop lever against the handle. (Referto
section entitled 'Engine Stop Lever'.) Slowly pull the
recoil-start grip (A, Figure 3). To attach the recoil-start
grip to the rope guide (B), twist the rope through the
rope guide mounted on the right side of the handle.
Figure 3: Attaching the recoil-start grip
6 www.snapper.oom

HandleHeight
1. Remove the vangnuts (A, Figure 4), washers (not
shown), and bolts from the right and left handle
brackets (B).
Note: Do not remove the lower set of handle hardware (D).
2. Adjust the handle to a higher or lower height adjustment
hob (C).
3. Reinstall the bolts, washers and wingnuts removed in
Step 1.
HandleHeight (optional quick°release)
1. Turn the knobs (A, Figure 4a) on either side of the lower
handle (B) to retract the locking pins. Align the lower
handle with the desired set of hobs in the handle
brackets (C). Turn the knobs to releasethe locking pins
and secure the lower handle.
Note: Do not remove the lower set of bolts and nuts securing
the lower handle.
Figure 4: Adjusting the handle height
Figure 4: Adjusting the handle height (qu£k-release)

Assemblingthe Grass Bag
Note: On some models, the side mounted discharge deflector
is temporarily attached (for shipping purposes) to the rear of
the mower. Before assembly of the grass bag, remove the
side mounted discharge deflector.
1. Slide the frame assembly (A, Figure 5) into the grass
bag (B)+
Figure 5: Installing the frame assembly
+
,
Make sure the handle (A, Figure 6) is on the outside of
the grass bag.
First, attach the clips (B, Figure 6) to the side of the
frame assembly (C). Next, attach the dips to the top and
bottom of the frame assembly+
Figure 6: Installing the bag clips
8 www.snapper.oom
Mounting the Grass Bag
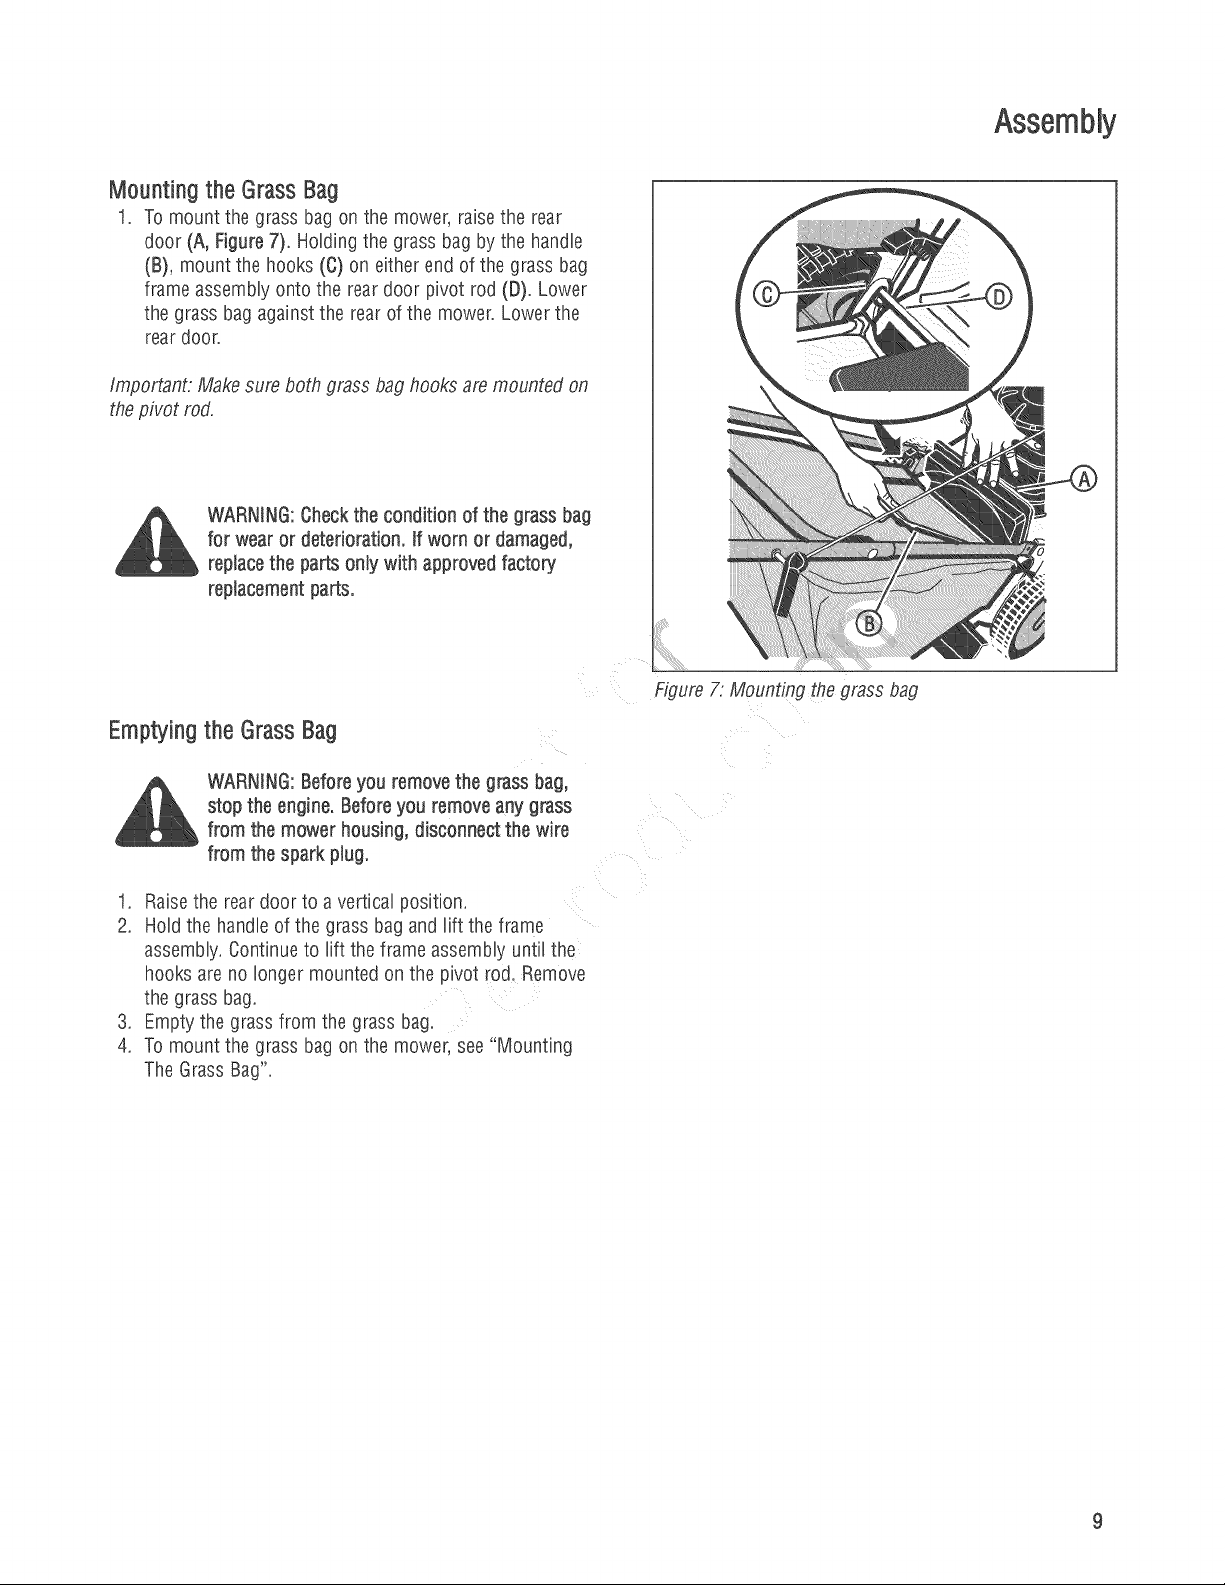
1. To mount the grass bag on the mower, raisethe rear
door (A, Figure 7). Holding the grass bag by the handle
(B), mount the hooks (C) on either end of the grass bag
frame assemNy onto the reardoor pivot rod (D). Lower
the grass bagagainst the rear of the mower. Lower the
rear door.
Important: Make sure both grass bag hooks are mounted on
the pivot rod.
WARNING:Checkthe condition of the grass bag
for wear or deterioration. If worn or damaged,
replacethe parts only with approved factory
replacement parts.
Emptyingthe Grass Bag
WARNING:Before you remove the grass bag,
stop the engine. Before you removeany grass
from the mower housing, disconnect the wire
from the spark plug.
1. Raisethe rear door to a vertical position
2. Hold the handle of the grass bag and lift the frame
assembly. Continueto lift the frame assembly until the
hooks are no longer mounted on the pivot rod. Remove
the grass bag.
3. Empty the grass from the grass bag.
4. To mount the grass bag on the mower, see "Mounting
The Grass Bag".
Figure 7: Mounting rile grass bag
Attachingthe Side Mounted Discharge Deflector
WARNING:To prevent the enginefrom starting,
disconnect the wire from the spark ptug.
For shipping purposes, the side deflector was not installed+
Locatethe side deflector and install as follows+
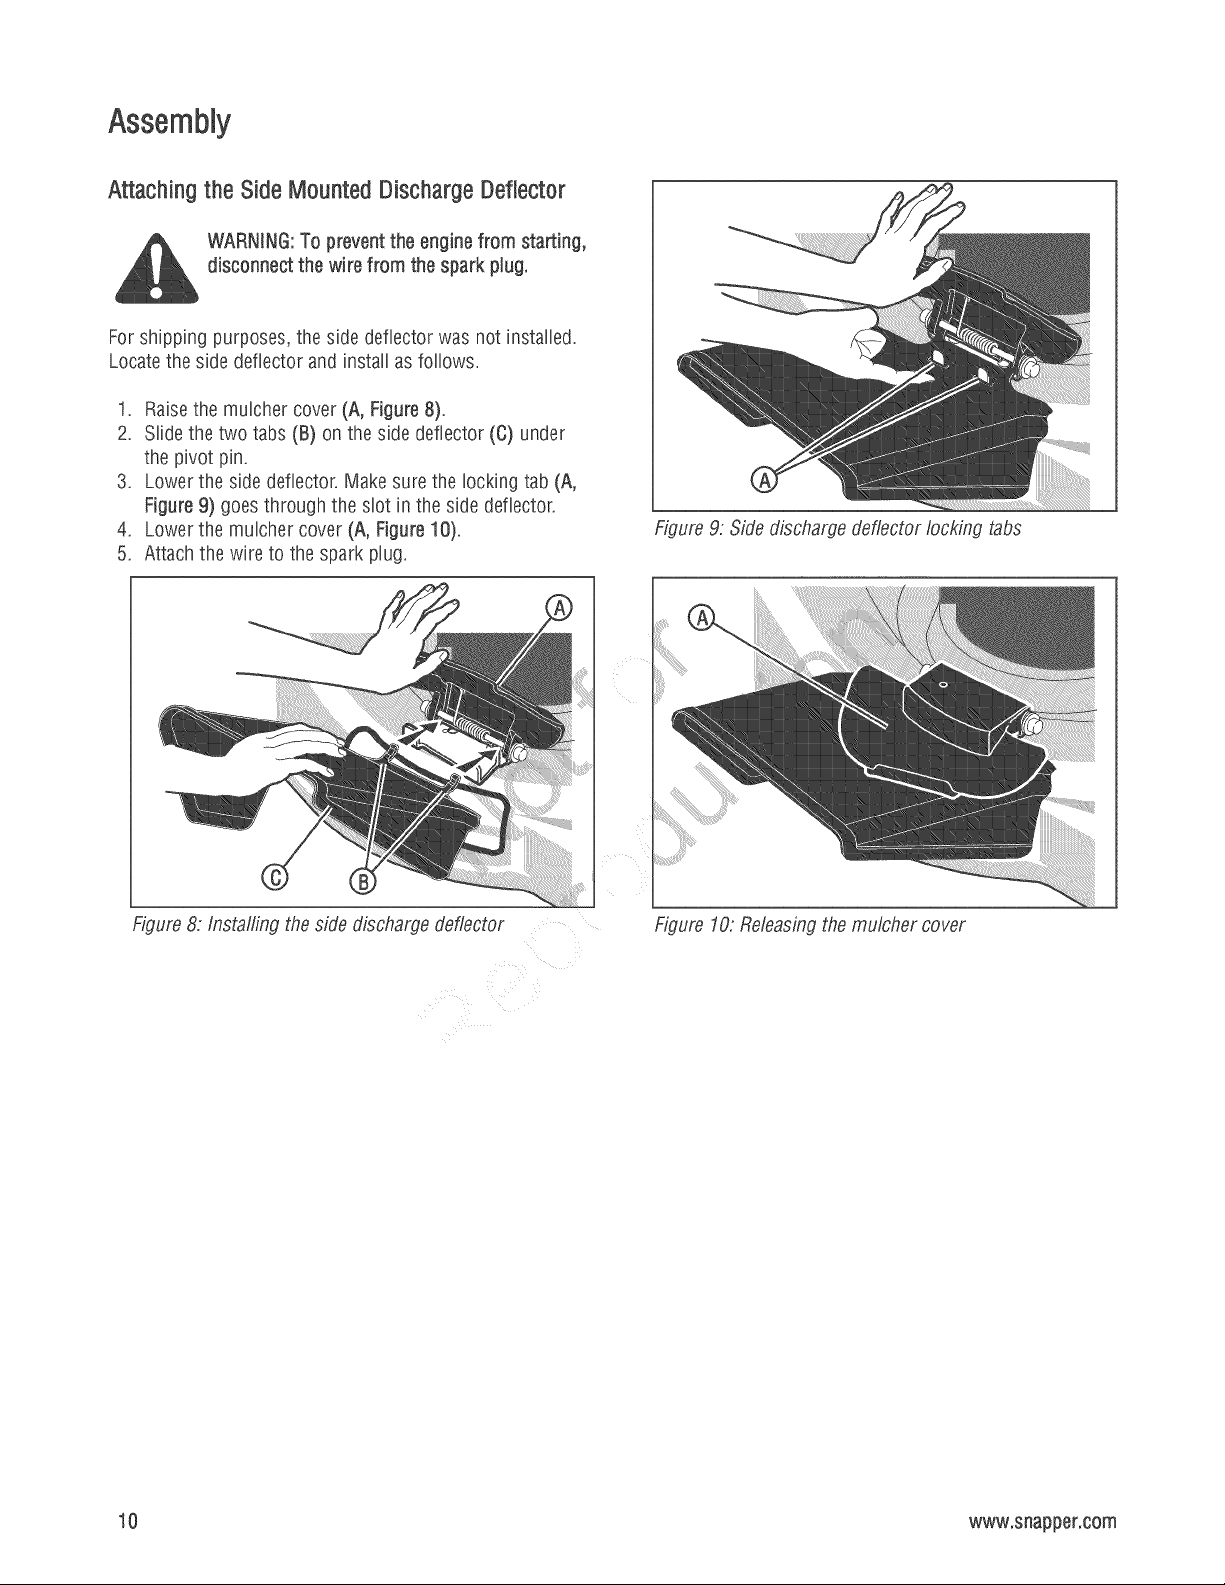
1. Raisethe mulcher cover (A, Figure 8).
2. Slide the two tabs (B) on the side deflector (C) under
the pivot pin.
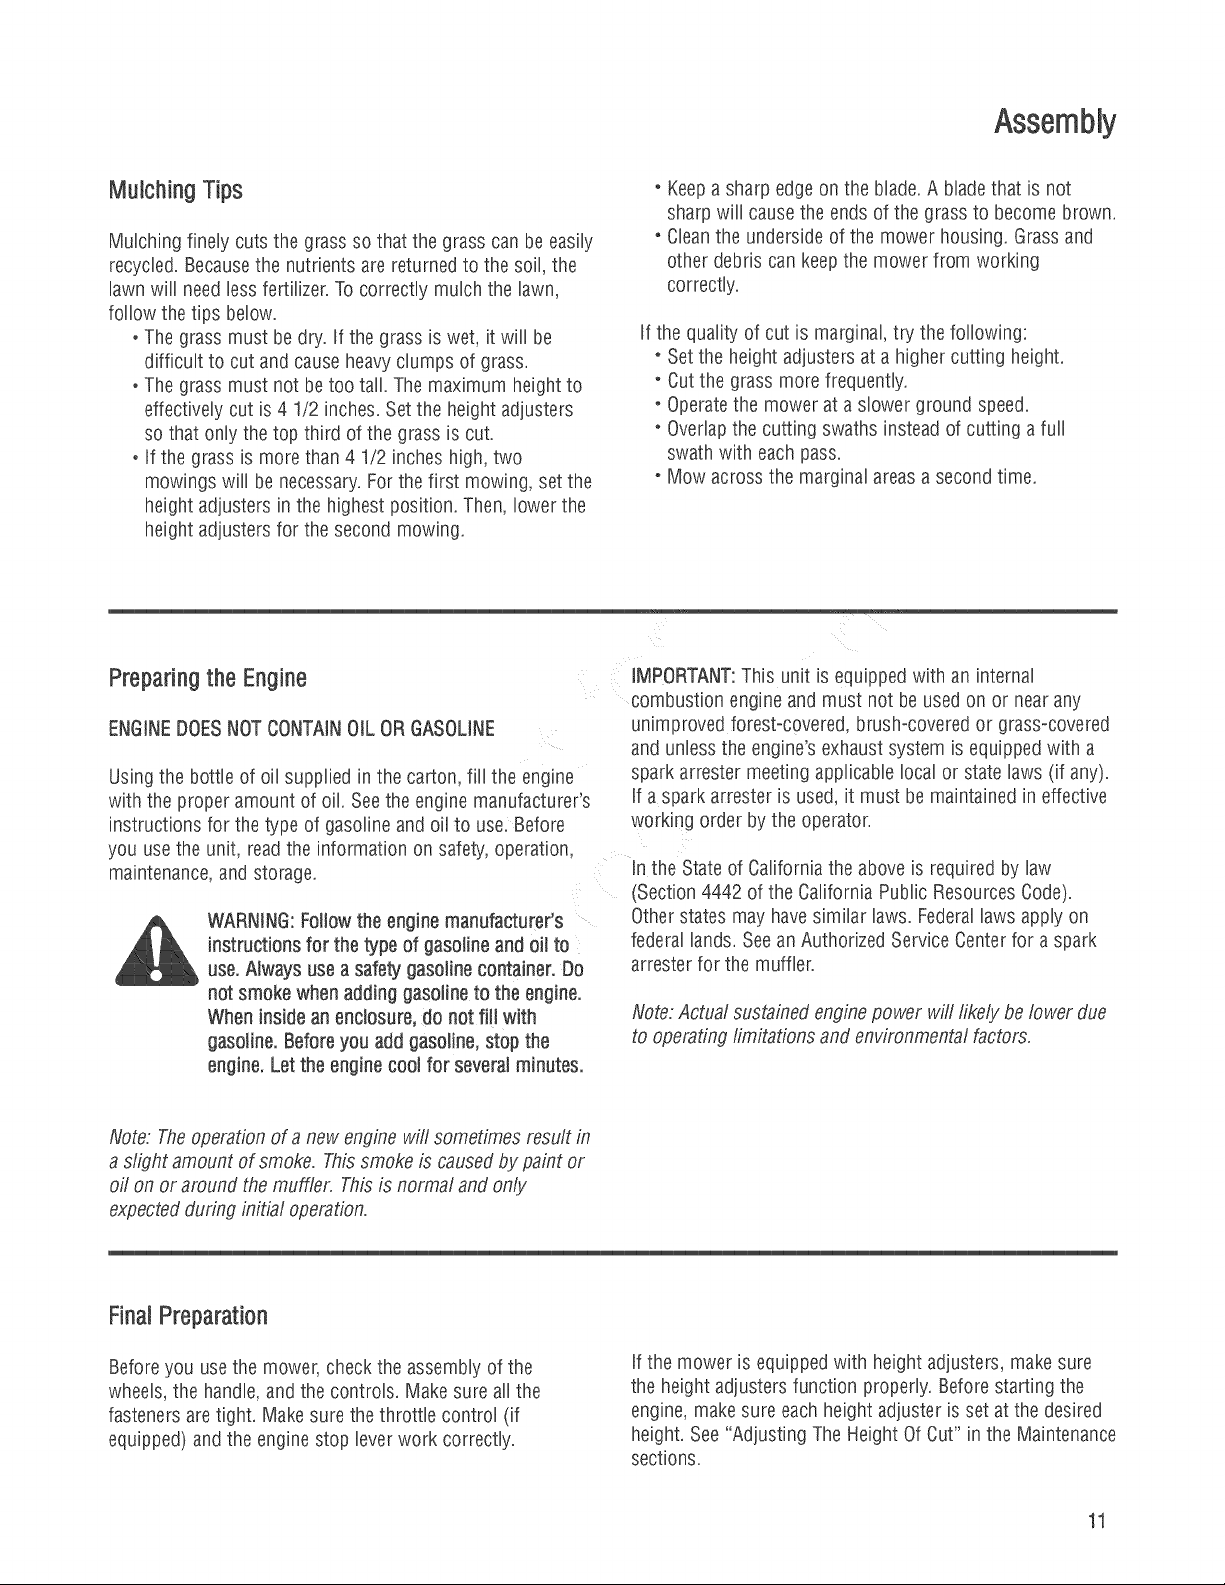
3. Lower the side deflector. Make sure the locking tab (A,
Figure 9) goes through the slot in the side deflector.
4. Lower the mulcher cover (A, Figure 10)+
5. Attach the wire to the spark plug.
Figure 9: Side discharge deflector locking tabs
Figure 8: Installing the side discharge deflector
Figure 10: Releasingthe mulcher cover
10 www.snapper.com
Mulching Tips
Mulching finely cuts the grass so that the grass can be easily
recycled. Becausethe nutrients are returned to the soil, the
lawn will need less fertilizer. To correctly mulch the lawn,
follow the tips below.
oThe grass must be dry. if the grass is wet, it will be
difficult to cut and cause heavyclumps of grass.
oThe grass must not be too tall. The maximum height to
effectively cut is 4 1/2 inches. Set the height adjusters
so that only the top third of the grass is cut.
oif the grass is more than 4 1/2 inches high, two
mowings will be necessary. Forthe first mowing, set the
height adjusters in the highest position. Then, lower the
height adjusters for the second mowing.
oKeep a sharp edge on the blade. A blade that is not
sharp will causethe ends of the grass to become brown.
- Cleanthe underside of the mower housing. Grass and
other debris can keep the mower from working
correctly.
If the quality of cut is marginal, try the following:
oSet the height adjusters at a higher cutting height.
, Cut the grass more frequentty
, Operatethe mower at a slower ground speed.
oOverlapthe cutting swaths instead of cutting a full
swath with each pass.
oMow across the marginal areas a second time.
m
Preparingthe Engine
ENGINEDOESNOTCONTAINOiL OR GASOLINE
Using the bottle of oil supplied in the carton, fill the engine
with the proper amount of oil. Seethe engine manufacturer's
instructions for the type of gasoline and oil to use: Before
you usethe unit, readthe information on safety, operation,
maintenance,and storage.
WARNING:F@ow the engine manufacturer's
instructions for the type of gasoline and oil to
use.Always use a safety gasoline container. Do
not smoke when adding gasoline to the engine.
When inside an enclosure, do not fill with
gasoline. Beforeyou add gasoline, stop the
engine. Let the enginecool for several minutes.
iMPORTANT:This unit is equipped with an internal
combustion engine and must not be used on or nearany
unimproved forest-covered, brush-covered or grass-covered
and unless the engine's exhaust system is equipped with a
spark arrester meeting applicable local or state laws (if any).
if a spark attester is used, it must be maintained in effective
working order by the operator.
Rnthe Stateof Californiathe above is required by law
(Section 4442 of the California Public ResourcesCode).
Other states may have similar laws. Federallaws apply on
federal lands. Seean Authorized Service Centerfor a spark
arrester for the muffler.
Note: Actual sustained enginepower wil/ likely be lower due
to operating limitations and environmental factors.
Note: Theoperation of a new engine wil/ sometimes result in
a s/ight amount of smoke. This smoke is caused by paint or
oil on or around the muffler. This is normal and only
expected during initial operation.
FinalPreparation
Before you use the mower, check the assembly of the
wheels, the handle,and the controls. Makesure all the
fasteners are tight. Make sure the throttle control (if
equipped) and the engine stop lever work correctly.
If the mower is equipped with height adjusters, makesure
the height adjusters function properly. Before starting the
engine, makesure each height adjuster is set at the desired
height Bee"Adjusting The Height Of Cut" in the Maintenance
sections.
11
Operation
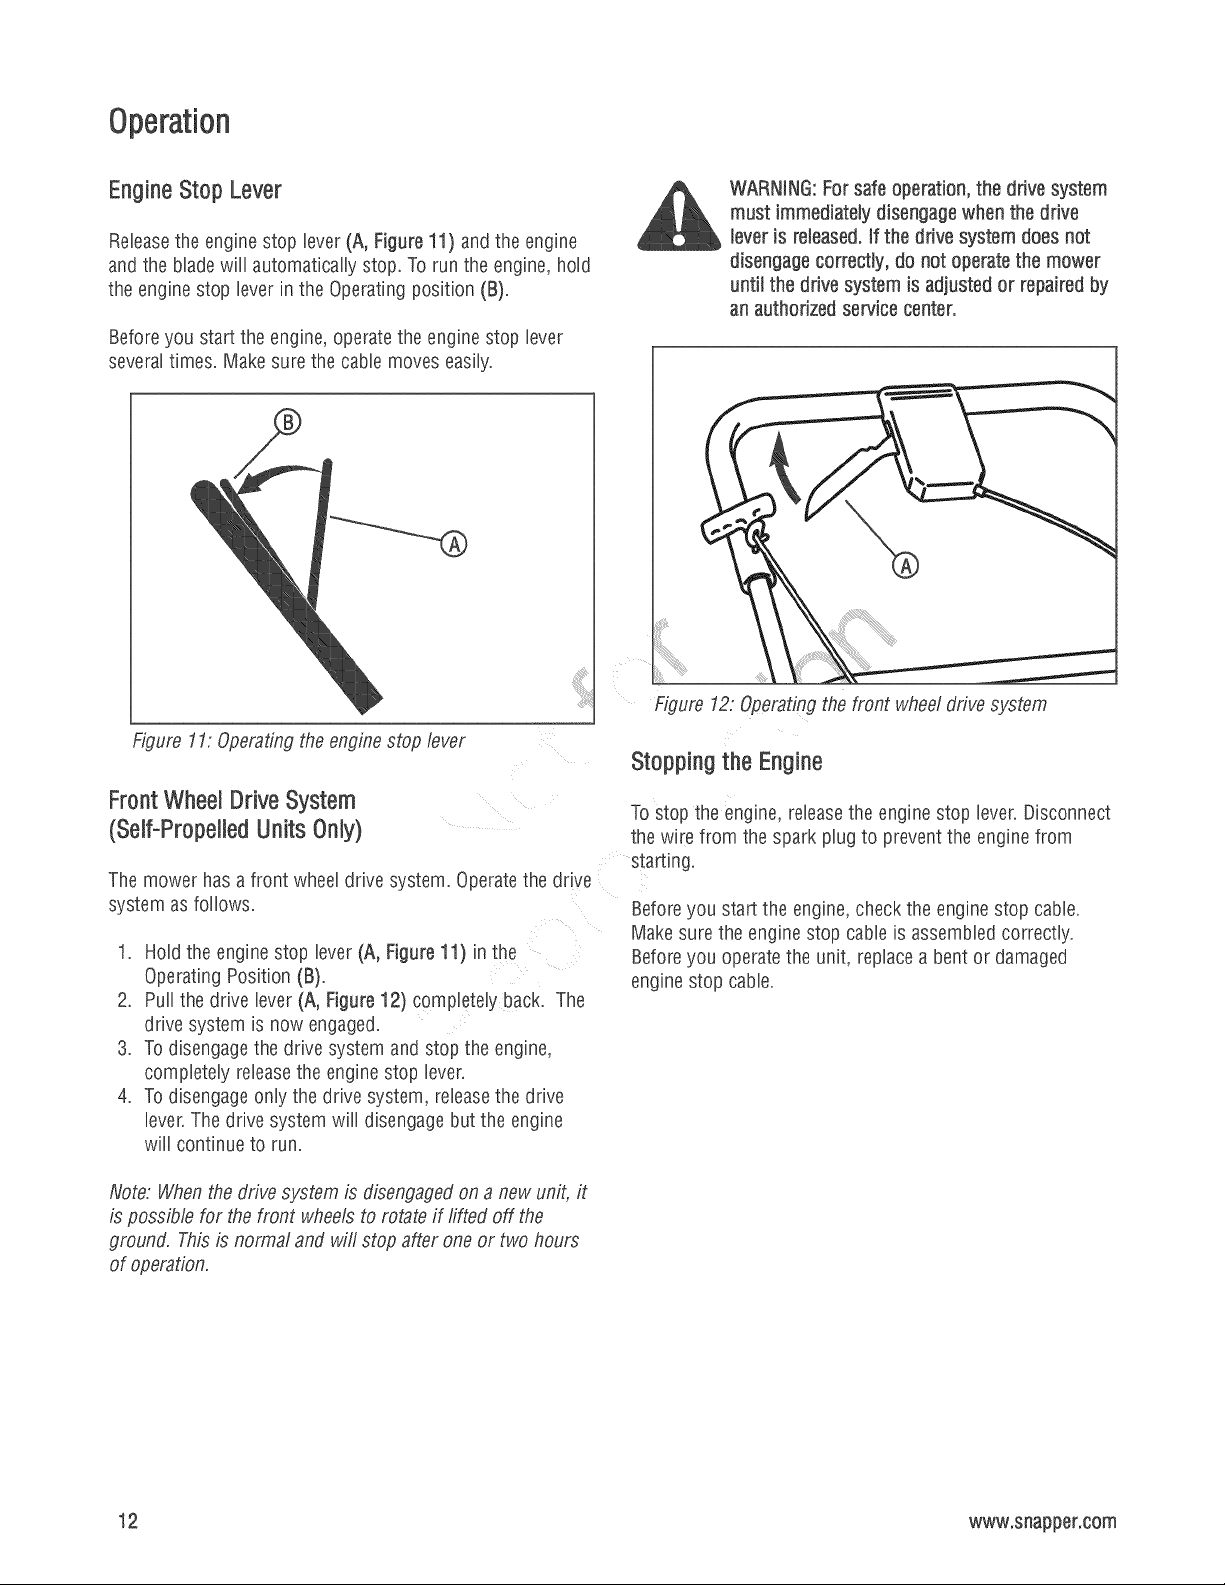
EngineStop Lever
Releasethe engine stop lever (A, Figure 1!) and the engine
and the blade will automatically stop. To run the engine, hold
the engine stop lever in the Operating position (B).
Before you start the engine, operate the engine stop lever
severaltimes. Make sure the cable moves easily.
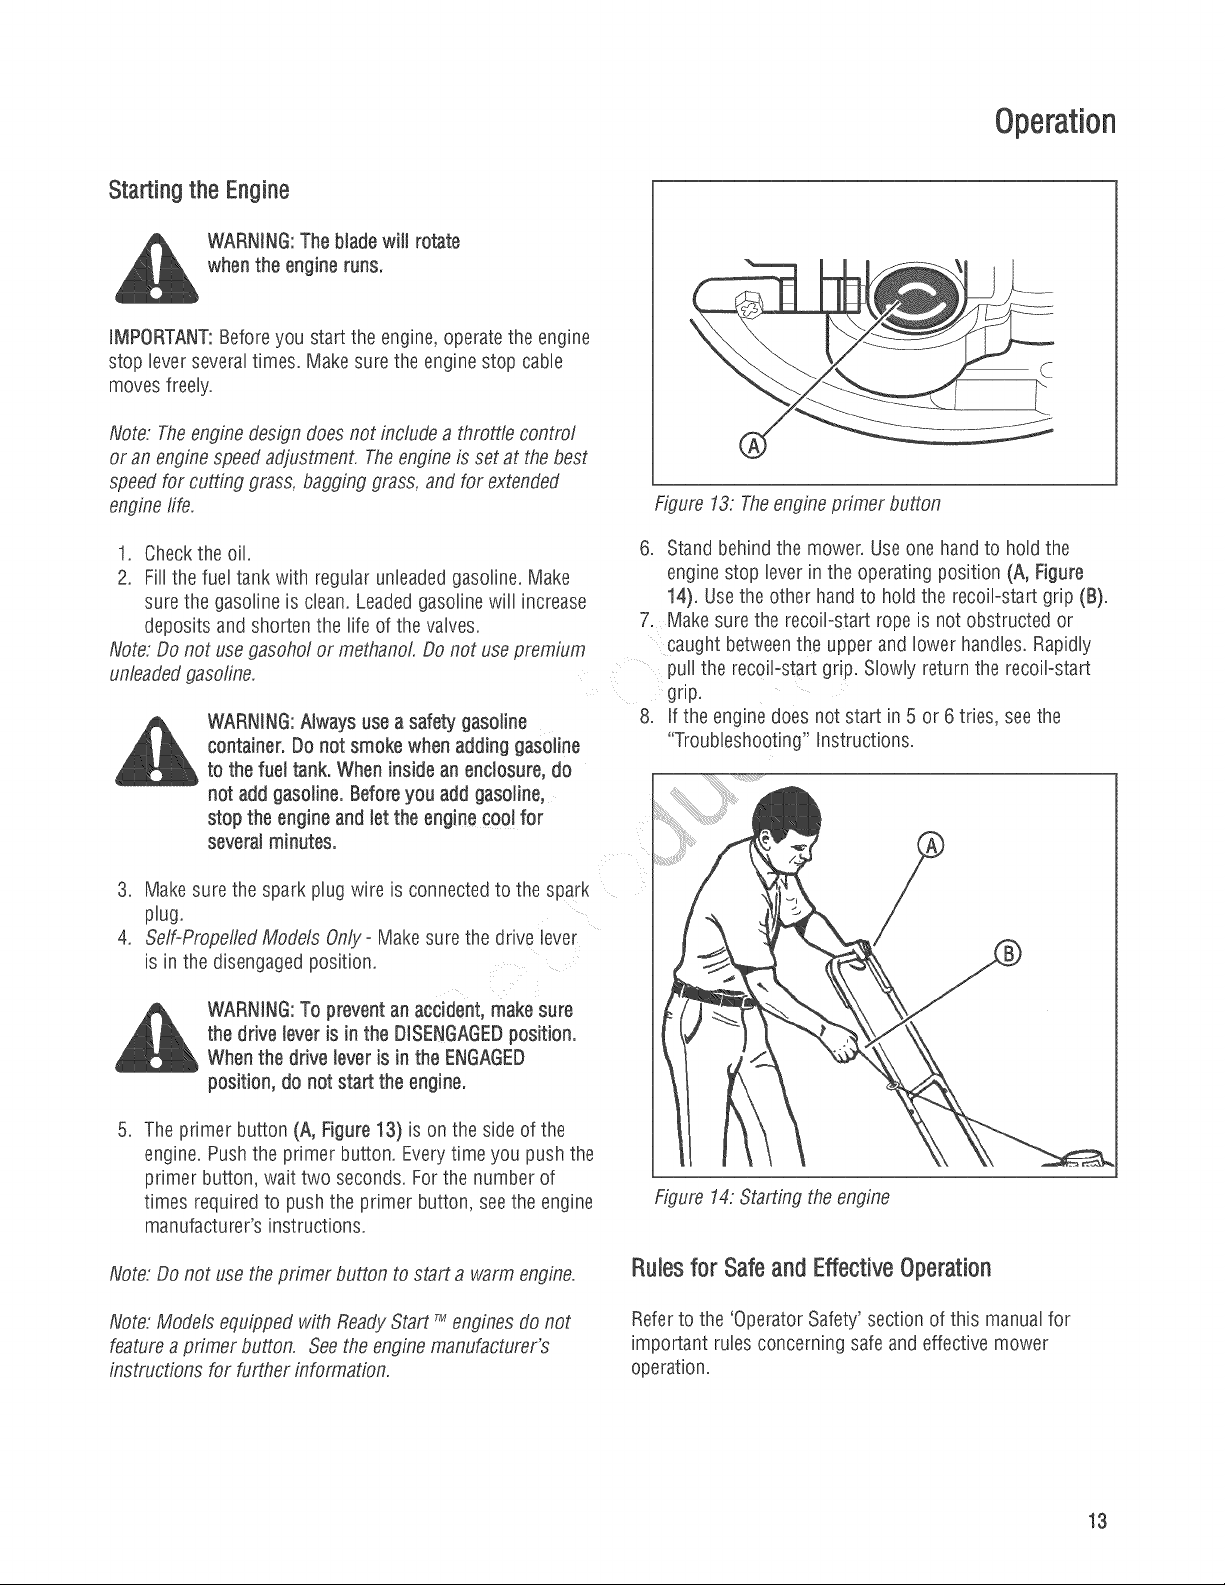
WARNING:For safe operation, the drive system
must immediately disengagewhen the drive
lever is released,tf the drive system does not
disengage correctly, do not operate the mower
untit the drive system is adjusted or repairedby
an authorizedservice center.
Figure 11: Operating the engine stop lever
FrontWheel Drive System
(SelfoPropelledUnits Only)
The mower has a front wheel drive system. Operatethe drive
system as follows.
1. Hold the engine stop lever (A, Figure 11) in the
Operating Position (B).
2. Pull the drive lever (A, Figure 12) completely back. The
drive system is now engaged.
3. To disengagethe drive system and stop the engine,
completely releasethe engine stop lever.
4. To disengage only the drive system, releasethe drive
lever.The drive system will disengage but the engine
will continue to run.
Note: When the drive system is disengaged on a new unit, it
is possible for the front wheels to rotate if lifted off the
ground. This is normal and will stop after one or two hours
of operation.
Figure 12: Operatingthe front wheel drive system
Stopping the Engine
To stop the engine, releasethe engine stop lever. Disconnect
the wire from the spark plug to prevent the engine from
starting.
Before you start the engine, check the engine stop cable.
Make sure the engine stop cable is assembled correctly.
Before you operate the unit, replace a bent or damaged
engine stop cable.
12 www.snapper.com
Operation
Starting the Engine
WARNING:The blade will rotate
when the engine runs.
IMPORTANT:Before you start the engine, operatethe engine
stop lever severaltimes. Make sure the engine stop cable
moves freely.
Note: Theengine design does not include a throttle control
or an enginespeed adjustment. The engine is set at the best
speed for cutting grass, bagging grass, and for extended
engine life.
1. Checkthe oil.
2. Fill the fuel tank with regular unleaded gasoline. Make
sure the gasoline is clean. Leaded gasoline will increase
deposits and shorten the life of the valves.
Note: Do not use gasohol or methanol Do not use premium
unleadedgasoline.
WARNING:Always use a safety gasoline
container. Do not smoke when adding gasoline
to the fuel tank. When inside an enclosure, do
not add gasoline. Beforeyou add gasoline,
stop the engine and let the engine cool for
several minutes.
3. Make sure the spark plug wire is connected to the spark
plug.
4. Self-Propelled Models Only- Makesure the drive lever
is in the disengaged position.
WARNING:To prevent an accident, make sure
the drive lever is in the DISENGAGEDposition.
When the drive tever is in the ENGAGED
position, do not start the engine.
5_
The primer button (A, Figure !3) is on the side of the
engine. Push the primer button. Everytime you push the
primer button, wait two seconds. For the number of
times required to push the primer button, see the engine
manufacturer's instructions.
Note: Do not use the primer button to start a warm engine.
Note: Models equ@pedwith Ready Start 7_engines do not
feature a primer button. Seethe engine manufacturer's
instructions for further information.
Figure 13: Theengine primer button
6. Stand behindthe mower. Use one handto hold the
engine stop lever in the operating position (A, Figure
14). Usethe other handto how the recoibstart grip (B).
7. Make sure the recoil-start rope is not obstructed or
caught betweenthe upper and lower handles. Rapidly
pull the recoil:start grip. Slowly return the recoilostart
grip.
8. If the engine does not start in 5 or 6 tries, seethe
"Troubleshooting" Instructions.
Figure 14: Starting the engine
Rulesfor Safeand Effective Operation
Referto the 'Operator Safety' section of this manual for
important rubs concerning safe and effective mower
operation.
13

Maintenance Chart
Checkengine stop lever
Cleandebris off mower
Every25 Hours or Annually *
Check mower for loose hardware
Every50 Hours or Annually *
Cleanbattery and cables (if equipped)
SeeDealerAnnuallyto
Lubricate mower
Check mower belt
Check mower blades **
Check mower blade stopping time
* Whichever comes first.
**Check blades more often in regions with sandy soils or
high dust conditions.
-- m
,,_!@iii_ii_!i!!i_iiii!!!!_!_i_!_iiiiiiiiii!i!_ii!iiii_ii_i_!!_!_ii!!!!!!_!_ii!!!!iiiiiiiiiiiiiiiiiiii_iiiiiiiiiiiii!i!!!i!_!!!!!!i_!!iii_!!iii_!!iii_!!iii_!!iii_!!iii_!_!_!_!_!_!!!!!!! !!!!!!!!!!_;
First 5 Hours
Changeengineoil
_8 Hours or Daily
Checkengine oil level
Every25 Hours or Annually*
Cleanengine air filter and pre-cleaner (if equipped) **
EWvery50 Hours or Ann--ually*
Changeengineoil
Replaceoil filter (if equipped)
Annually
Replaceair filter
Replacepre-cleaner (if equipped)
Inspect muffler and spark arrester (if equipped)
Replacespark plug
Replacefuel filter _f equipped_
Cleanengine a,r cooling system
Whichever comes first.
_Clean more often n dusty conditions or when airborne
debris uspresent.
14 www.snapper,com
Engine Maintenance
Usethe following maintenancesection to keepyour unit in
good operating condition. All the maintenance information
for the engine is in the "Engine instruction Book". Before you
start the engine, readthis book.
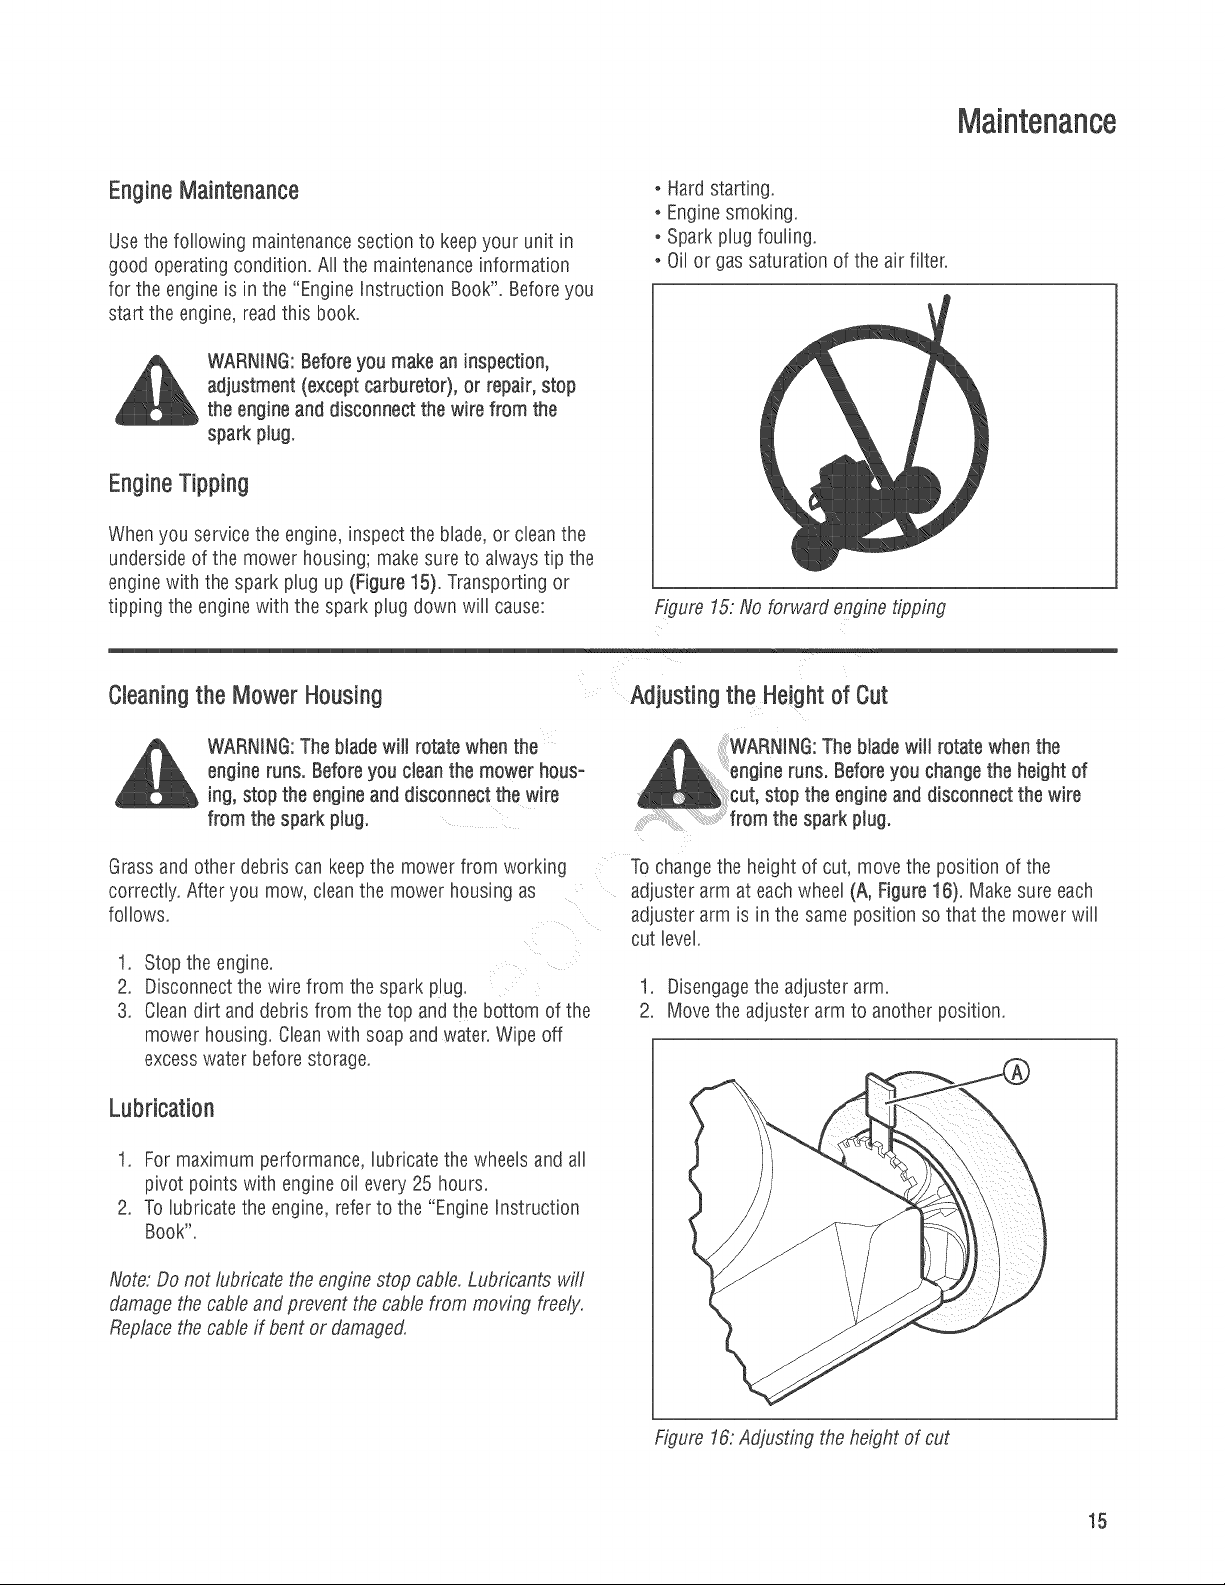
- Hard starting.
° Enginesmoking.
oSpark plug fouling.
° Oil or gas saturation of the air filter.
WARNING:Before you make an inspection,
adjustment (except carburetor), or repair, stop
the engine and disconnect the wire from the
spark plug.
EngineTipping
When you service the engine, inspect the blade, or clean the
underside of the mower housing; make sure to always tip the
engine with the spark plug up (Figure 15). Transporting or
tipping the enginewith the spark plug down will cause:
Figure 15: No forward engine tipping
Cleaningthe Mower Housing
WARNING:The blade wilt rotate when the
engine runs. Beforeyou clean the mower hous-
ing, stop the engine and disconnect the wire
from the spark plug.
Adjusting the Height of Cut
WARNING:The bladewill rotate when the
ine runs. Beforeyou changethe height of
cut, stop the engine and disconnect the wire
from the spark plug.
Grassand other debris can keepthe mower from working
correctly. After you mow, clean the mower housing as
follows.
1. Stop the engine.
2. Disconnect the wire from the spark plug.
3. Cleandirt and debris from the top and the bottom of the
mower housing. Cleanwith soap and water. Wipe off
excesswater before storage.
To change the height of cut, move the position of the
adjuster arm at eachwheel (A, Figure 16}. Make sure each
adjuster arm is in the same position so that the mower will
cut level.
1. Disengagethe adjuster arm.
2. Move the adjuster arm to another position.
Lubrication
1. For maximum performance, lubricate the wheels and all
pivot points with engine oil every 25 hours.
2. To lubricate the engine, referto the "Engine Instruction
Book".
Note: Do not lubricate the engine stop cable. Lubricants will
damage the cable and prevent the cable from moving freely.
Replacethe cable if bent or damaged.
Figure 16: Adjusting the height of cut
15
Adjusting the Drive Cable
(Self-PropelledUnits Only)
WARNING:Before you adjust the drive cable,
rebase the engine stop lever and wait for the
engine to stop.
If the drive system does not engageand disengage correctly,
check the handlefor correct assembly. Make sure that all
parts are in good condition, not broken or bent, and that all
fasteners are tight.
Worn parts and cable stretch will change the performance of
the drive system. When you mow in high or thick grass or
on hills, the drive system can slip. if the drive system is
slipping, adjust as follows or take the mower to an
authorized service center.
iMPORTANT:Before you start the engine, operatethe engine
stop lever severaltimes. Make sure the engine stop cable
moves freely.
Note: Theengine design does not include a throttle control
or an engine speed adjustment. Theengine is set at the best
speed for cutting grass, bagging grass, and for extended
engine life.
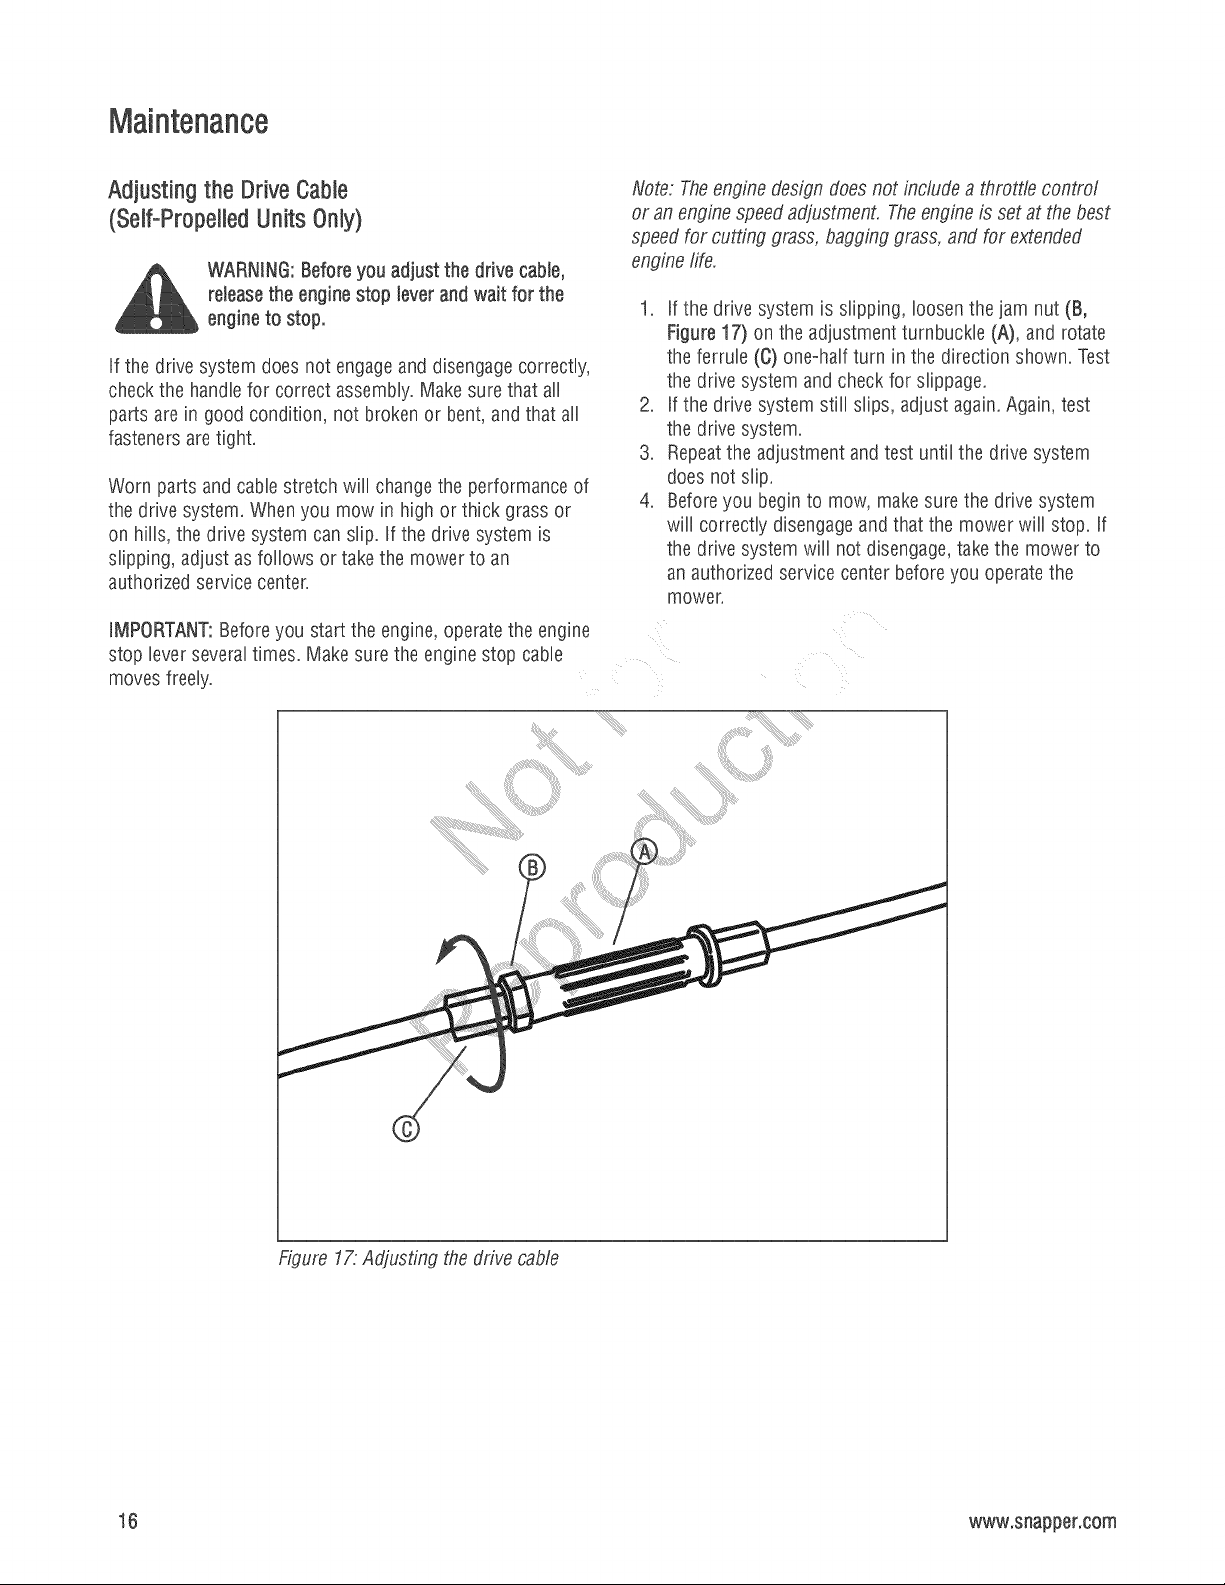
1. If the drive system is slipping, loosen the jam nut (B,
Figure 17) on the adjustment turnbuckle (A), and rotate
the ferrule (C) one-half turn in the direction shown. Test
the drive system and check for slippage.
2. If the drive system still slips, adjust again. Again, test
the drive system.
3. Repeatthe adjustment and test until the drive system
does not slip.
4. Before you beginto mow, make sure the drive system
will correctly disengage and that the mower will stop. Uf
the drive system will not disengage, takethe mower to
an authorized service center before you operatethe
mower.
iiiiiiiiiiiiiiiiiiiii,!_,,_
i,il_
Figure 1£ Adjusting the drive cable
16 www.snapper.com

Preparingthe Mower for Storage
WARNING:Do not remove gasoline while
inside a building, neara fire, or white you
smoke. Gasolinefumes can cause an
explosion or a fire.
1. Drain the fueltank.
2. Let the engine run until it is out of gasoline.
3. Drain the oil from the warm engine. Fill the engine
crankcasewith new oil.
4. Remove the spark plug from the cylinder. Pour one
ounce of oil into the cylinder. Slowly pull the recoil-start
grip so that the oil will protect the cylinder. Install a new
spark plug in the cylinder.
5. Cleanthe dirt and debris from the cylinder cooling fins
and the engine housing.
6. Cleanthe bottom of the mower housing.
7. Make sure the grass bag is empty of grass. Grass
remaining in the bag during storagewill damagethe
bag.
8. Compietdy dean the mower to protect the pant.
9. Fold the handbs (if desired).
CAUTION:Becareful when you fold or raise the handle. Do
not damagethe cables. A cable that is bent will not work
correctly. Before you use the unit, replacea bent or damaged
cane.
10. Put the unit in a building that has good ventilation.
17

Troubleshooting
Theengine will not start.
1. Make sure the fuel tank is filled with dean gasoline. Do not use old gaso%e.
2. On a cold engine, push the primer button (optional on some models). For the number of times required to push the
primer button, seethe engine manufacturer's instructions.
3. Make sure the wire for the spark plug is connected to the spark plug.
4. There is too much gasoline in the engine cylinder. Removeand dry the spark plug. Pull the recoil-start grip severaltimes.
Install the spark plug, Connectthe wire to the spark plug. Start the engine.
5. The engine is difficult to start in heavy or high grass. Move the mower to a clean dry surface.
6. Make sure the engine stop lever is in the operating position.
7. Make sure the fuel valve is in the ON position. Referto the engine manual.
Theengine will not stop.
1. Releasethe engine stop lever.
2. Checkthe enginestop cane. Replace the cane if bent or damaged.
Engine performanceis bad.
1. Checkthe height of cut settings. Raise the height of cut if the grass is high.
2. Checkthe bottom of the blade housing. Cleanthe blade housing of grass and other debris,
3. Checkthe wire to the spark plug. Make sure the wire is connected.
4. Cleanthe engine cooling fins of grass and other debris.
5. Checkthe spark plug gap. Set the spark plug gap at 0.030"
6. Checkthe amount of oil in the engine. Fill with oi if necessary.
7. Checkthe engineair cleaner.Referto the engine manual.
8. The gasoline is bad. Drain and clean the fuel tank. Fifl the fuel tank with clean gasoline.
Excessivevibration.
1. Takethe mower to an Authorized Service Center.
Thegrass will not discharge correctly.
1. Cleanthe bottom of the mower housing.
2. Takethe mower to an Authorized Service Center..
Thegrass is not cut even.
1. Checkthe height adjustment at each wheel. The height adjustment must be the same for each wheel.
2. Takethe mower to an Authorized Service Center.
18 www.snapper.com
BRIGGS& STRATTONPOWERPRODUCTSGROUP,LIL:CIOWNERWAR_NTY POLicY
LIMITEDWARRANTY
Bnggs & Stratton Power Products Group, LLC will repair and/or rephce free of charge, any part(s) of the equipment that is defective in
material or workmanship or both Bnggs & Stratton Corporation will repair and/or rephce, free of charge, any part(s) of the Bnggs and
Stratton engine* (if equipped) that is defective in material or workmanship or both Transportation charges on product submitted for repair
or rephcement under this warranty must be borne by purchaser.This warranty is effective for the time periods and subject to the condi-
tions stated below. For warranty service, find the nearest Authorized Service Dealer using our dealer Iocator at
www.BriggsandStratton.com
There is no other express warranty. Implied warranties indudin# those of merchantability and fitness for a particular purpose, are limited
to one year from purchase or to the extent permitted by law. Liability for incidental or consequential damages are excluded to the extent
exclusion is permitted by law.
Some states or countries do not allow limitations on how long an implied warranty lasts, and some states or countries do not allow the
exclusion or limitation of incidental or consequential damages, so the above limitation and exclusion may not apply to you. This warranty
gives you specific legal rights and you may also haveother rights which vary from state to state or country to country.
WARRANTYPERIOD
Item Consumer Use Commercial Use:
Equipmenl 2 Years 90 Days
Engine* 2 Years 90 Days
Battery 1 Year 1 Year
The warranty period begins on the date of purchase by the first retail consumer or commercial end user, and continues for the period of time
stated above. "Consumer use" means personal residential household use by a retail consumer. "Commercial use" means all other uses,
including use for commercial, income producing or rental purposes. Onceproduct has experienced commercial use, it shall thereafter be
considered as commercial use for purposes of this warranty.
No warranty registration is necessaryto obtain warranty on Briggs & Stratton products. Save your proof of purchase receipt. If you do not
provide proof of the initial purchase date at the time warranty service is requested, the manufacturing date of the product will be used to
determine warranty eligibility.
We welcome warranty repair and apologizeto you for being inconvenienced. Warranty service is available only through servicing dealers
authorized by Briggs & Stratton or BSPPG,LLC.
Most warranty repairs are handled routinely, but sometimes requests for warranty service may not be appropriate. This warranty only covers
defects in materials or workmanship. It does not cover damage caused by improper use or abuse, improper maintenance or repair, normal
wear and tear, or stale or unapprovedfuel.
improper Useand Abuse - The proper, intended use of this product is described in the Operator's Manual. Using the product in a way not
described in the Operator's Manual or using the product after it has been damaged will void your warranty. Warranty is not allowed if the
serial number on the product has been removed or the product has been altered or modified in any way, or if the product has evidenceof
abuse such as impact damage, or water/chemical corrosion damage.
improper Maintenance or Repair - This product must be maintained according to the procedures and schedules provided in the Operator's
Manual, and serviced or repaired using genuine Briggs & Stratton parts. Damagecaused by lack of maintenance or use of non-original parts
is not covered by warranty.
Normal Wear - Like all mechanical devices, your unit is subject to wear even when properly maintained. This warranty does not cover repairs
when normal use has exhausted the life of a part or the equipment. Maintenance and wear items such as filters, belts, cutting blades, and
brake pads (engine brake pads are covered) are not covered by warranty due to wear characteristics alone, unless the cause is due to defects
in material or workmanship.
Stale Fuel - In order to function correctly, this product requires fresh fuel that conforms to the criteria specified in the Operator's Manual.
Damagecaused by stale fuel (carburetor leaks, clogged fuel tubes, sticking valves, etc) is not covered by warranty.
* Applies to Briggs and Stratton engines only, Warranty coverage of non-Briggs and Stratton engines is provided by the engine manufacturer,
19

.....%
20 www.snapper.com
o
L_
o
0
m
O3
/ mower
/ SJOpeS,
never up o_ dow_
_iiiiiiiiiiiiiiiiiiiiiiiiiiiiiiiiiiiii_
10 DEGREES
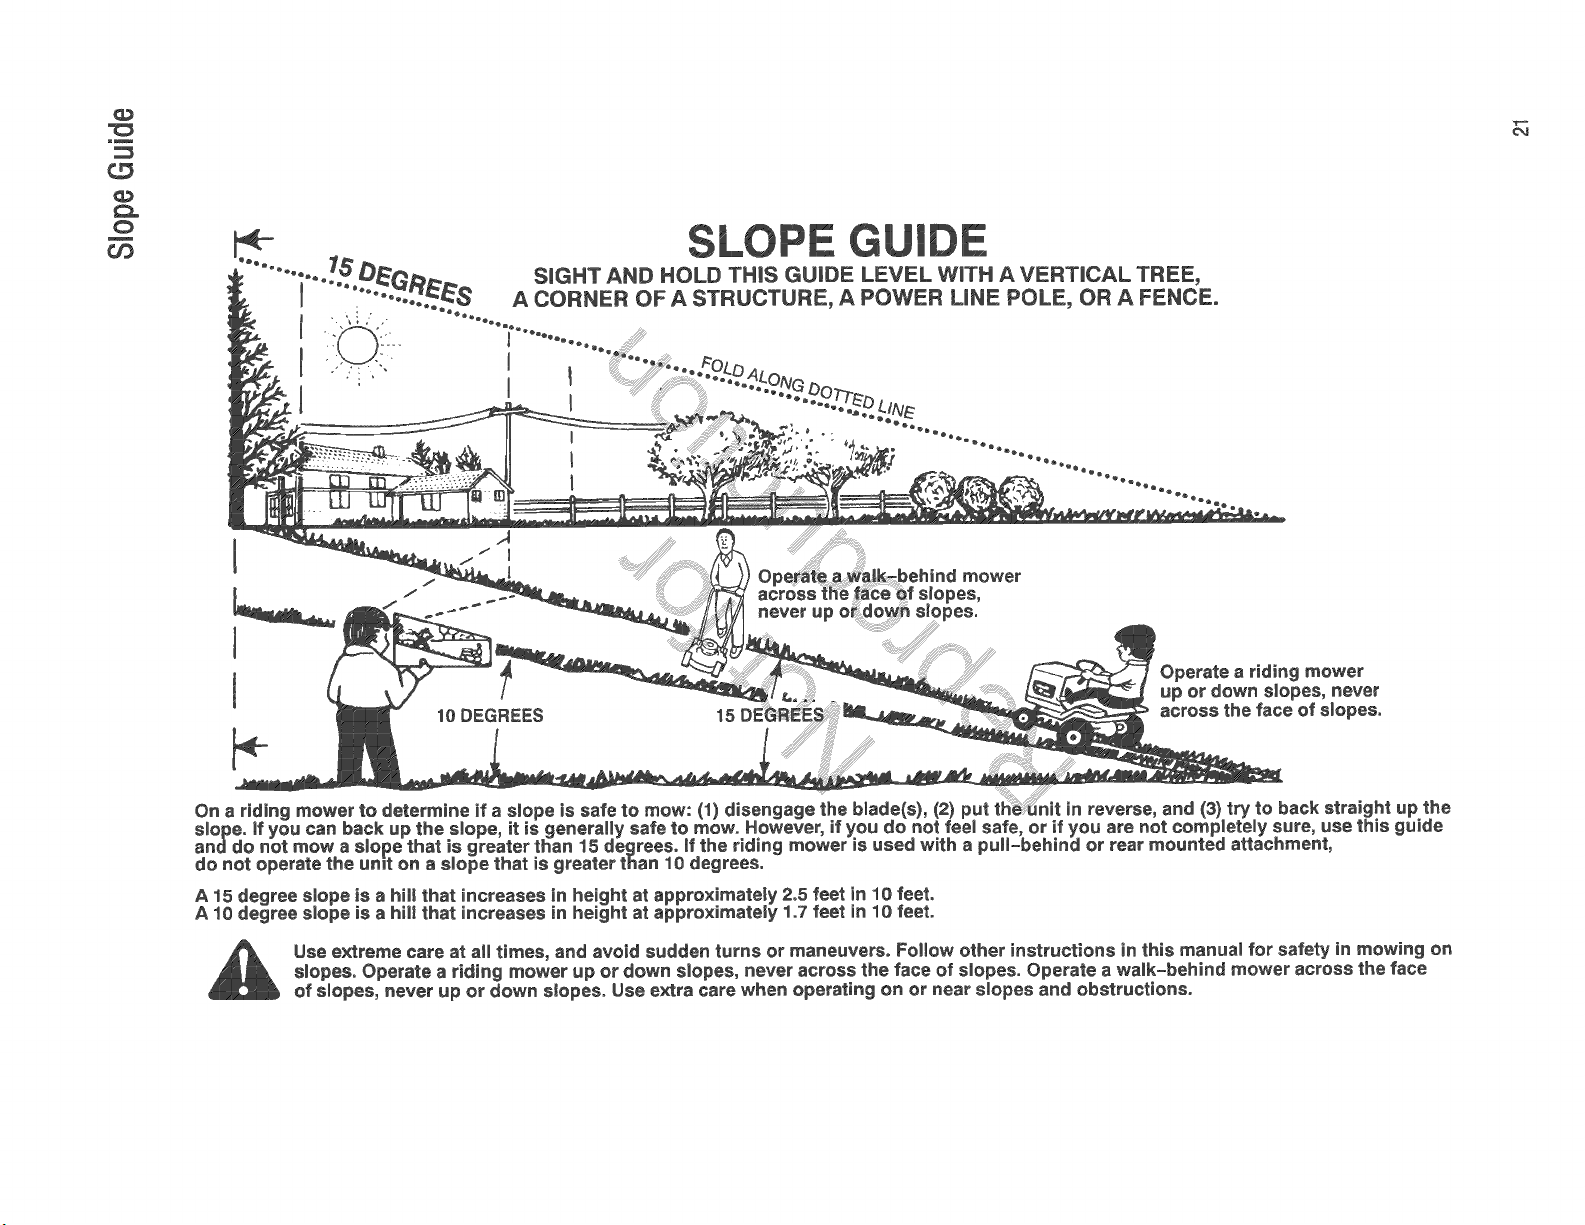
A 15 degree elope is a hill that increasee in height at appro×imatety 2.5 feet in 10 feet.
A t0 degree s)ope )s a hi)) that increases }n height at appro×imatety 1.7 feet in 10 feet.
Use extreme care at all timee, and avoid sudden turns or maneuvers. Follow other instructions in this manual for safety in mewing on
elopes. Operate a riding mower up or down slopes, never across the face of slopes. Operate a walk=behind mower aerose the face
of slopes, never up or down slopes. Use extra care when operating on or near slopes and obstructions.

Product Specifications
Deck Size (in)
Height of Cut (in)
Transmission Type
(Self-PropelledUn@Only)
Ground Speed (mph)
(Self-PropelledUnitsOnly)
Engine Power (fibs)
Engine Displacement (cc)
FuelTank Capacity (qt)
$22675 / SP22675/
NS22675 NSP22675
22 22
1.25 o4 1.25 o4
N/A Single Speed/Gear
NiA
6.75 6.75
190 190
1 1
Common Service Parts
BladeControl Cable (All)
Wheel Drive Cable (SP22675& NSP22675Only)
Cutter Blade (All)
Drive Belt (SP22675& NSP22675Only)
7101395
7101401
7100851
7101193
Engine Power Rating information: The gross power rating for individual gas engine models is labeledin accordance with SAE
(Society of Automotive Engineers) code J1940 (Small EnginePower & Torque Rating Procedure), and rating performance has
been obtained and corrected in accordance with SAE J1995 (Revision 2002-05). Torque values are derived at 3060 RPM;
horsepower values are derived at 3600 RPM. Actual gross engine power will be lower and is affected by, among other things,
ambient operating conditions and engine-to-engine variability. Given both the wide array of products on which engines are
placed and the variety of environmental issues applicable to operating the equipment, the gas engine will not develop the rated
gross power when used in a given piece of power equipment (actual "on-site" or net horsepowe0. This difference is due to a
variety of factors including, but not limited to, accessories (air cleaner,exhaust, charging, cooling, carburetor, fuel pump, etc.),
application limitations, ambient operating conditions (temperature, humidity, altitude), and engine-to-engine variability. Dueto
manufacturing and capacity limitations, Briggs & Stratton may substitute an engine of higher rated power for this Series
engine.
22 www,snapper,com

Manualde/operador
f
DE55.9cm (22')
:Nbde Modelo
Descripci6n
SP22675
NS22675
NSP22675

Gracias por comprar este producto de calidad Snapper. Nos complace que haya puesto su confianza en la marca
Snapper. Cuando se maneja y mantiene de acuerdo a Jasinstrucciones que aparecen en este manual, su producto
Snapper brindar_ muchos aSos de servicio seguro.
Este manual contiene informaciOn sobre la seguridad para que est6 enterado de los peligros y riesgos asociados
con la m_quina y c6mo evitarlos. Esta m_quina est_ dise_ada y destinada solamente para el corte de acabado de
Jos c6spedes establecidos y para ning_]n otro fin. Es importantee que lea detenidamente estas instrucciones antes
de intentar poner en marcha o manejar este equipo. Conserve estas instrucciones originales para consultarlas en ei
futuro.
Llene Nainformaci6n siguiente sobre su compra Snapper.
Fechade compra
Concesionario
NSmero de tel6fono del concesionario
Equipo
Ngde modelo
Ngde
Motor
Modelo Tipo C6digo
SNAPPEResunamarcacomerciaJde
Briggs& StrattonPowerProductsGroup,LLC
Milwaukee,Wl, EEUU.
Copyright© 2010,Brigge& StrattonCorporation
Milwaukee,Wl, EEUU. Todoslos derechosreservados.

Seguridaddeloperador.......................................................... 4
EnsamNaje.................................................................... 6
Desempaque.............................................................. 6
Asidero................................................................... 6
Ajustedelaalturadelasidero(manillar)......................................... 7
BoBadec6sped............................................................ 8
Placaparaelmododetriturado............................................... 10
Deflectordedescargalateral................................................. 10
RecomendacionesacercadeItriturado......................................... 11
C6moprepararelmotor.................................................... 11
Preparaci6nfind .......................................................... 11
Manejo ...................................................................... 12
Pahnca de paradadeI motor ................................................. 12
Sbtema de tracci6n de las ruedas dehnteras (UnNades autopropubadas) ............. 12
Parada deI motor .......................................................... 12
Arranque deI motor ........................................................ 13
Reglas para un manejo seguro y efectivo ....................................... 13
Mantenimbnto ................................................................ 14
TaNa de Mantenimbnto ..................................................... 14
Mantenimiento deJ motor .................................................... 15
Inclinaci6n deI motor ....................................................... 15
Limpieza de ia cubierta de[ cortacesped ....................................... 15
Lubricaci6n .............................................................. 15
Ajuste de la altura de corte .................................................. 15
Ajuste del cane del sistema de tracci6n de as ruedas ............................. 16
Preparaci6n del corta@sped paraalmacenamiento ............................... 17
Soluci6ndeprobbmas ......................................................... 18
Garantia..................................................................... 19
Los bornes, terminales y otros accesoriosrelacionadoscon las
bateriascontienenplomo y compuestosde plomo, productosqui-
micos consideradospor el estado de california como la causade
c_ncer y defectosde nacimiento u otros trastornos del aparato repro°
ductor. I_veselas manosdespu6sde estar en contactocon ellos.
Los gasesde escape del motor, algunos de sus constituyentes
y ciertos componentes del vehiculo contienen o emiten
productos quimicos considerados por el estado de california
como la causa de c_ncer u otros trastornos del aparato
Seguridaddeioperador
ADVERTENCIA:Estapotente m_quina cortac6sped es capazde amputar las manos y los pies y puede arrojar objetos
causando lesiones e incBso la muerte. Si no se respetan las instrucciones de SEGURDAD siguientes tanto eI operador
como otras personas corren peiigro de sufnr lesiones o la muerte. EI propietado de la mAquina debe entender estas
instrucciones y permitir que esta mAquina la manejen Qnbamente hs personas que enfienden estas instrucciones. Toda
persona que maneje esta mAquina debe estar en buenas condMones fisbas y psiqubas y no haber beNdo ni ingeddo
ninguna droga o fArmaco que pueda perjudbar la vM6n, dexteridad o discernimiento. Ante cualquier duda respecto a
su mAquinaque su concesionario no pueda soBcionar para su satisfacci6n, Ihme o escriba al Customer Service
Department, SNAPPER,McDonough, Georgia 30253. Phone: (1-800-317-7833).
Protecci6n para los nifios
Puedenocurrir accidentes de tr@icas consecuencias si el oper-
ador no est_ alerta a la presencia de nifios en el Bgar. Los nifios
son frecuentemente atraNos a la mAquinay a la actividad de corte
de cSsped o hierba. Nunca de por sentado que los nifios per-
manecerAnen el mismo Bgar que usted los vio la Qltimavez.
1. MANTENGAa los nifios fuera de la zona de trabajo y bajo el
cuidado vigilante de un adulto responsaNe, que no sea el oper-
ador.
2. NO permita a bs niffos en e[ jardin mientras [a m_quina est_
funcionando y APAGUEel motor cuando alguien entra a la zona de
trabajo.
3. NOpermita que j6venes menores de edad manejen la mAquina.
4. PERMffA que sohmente personas adultas o adolescentes
responsaNes que demuestren buen criterio manejen esta ......
mAquina, pero bajo supervisi6n de un adulto.
5. NO tire de la mAquina hacia atrAs salvo que sea absoBtamente
necesario. MIRE HACIAATRASy hacia abajo paraasegurarse de
que no hay nifios pequefios, mascotas y objetos peligrosos antes
y mientras retrocede con la m_quina.
6. PRESTEMUCHAATENCIONal acercarsea las curvas sin visibiP
ida& arbustos, Arboles u otros objetos que puedan obstruir la
visi6n.
Manejo en pendientes
1. Las pendientes son un factor importantee relacionado con los
accidentes por p6rdida deslizamiento y caidas, los cuales pueden
ocasionar lesiones graves. Todas hs pendientes requieren actuar
con mucha cauteb. Si se siente inseguro en una pendiente, NO
corte el cSsped o hierba alK
2. Corte el cSsped a Io ancho en las pendientes, nunca hacia arri-
bay hacia abajo. Preste MUCHAATENQON cuando cambie de
direcci6n en hs pendientes. NO corte el cSspeden pendientes
empinadas u otras zonas don@ la estabilidad o tracci6n sea
dudosa. Consulte la Guia para trabajar en pendientes presentadaal
final de este manual
3. Tenga sumo cuidado con los recogedores de hierba y otros
accesorios; estos pueden afectar la maniobrabilidad y la estabili-
dad de la mAquina.
Preparaci6n
1. Lea, comprenda y respete todos los mensajes de advertencia y
hs instrucciones incBidas en la mAquina, el motor y los imple-
mentos. Aprenda la ubicaci6n de todos los mandos y practique
c6mo usados antes de poner en marcha la mAquina.
2. Esta mAquina debe ser manejada por personas adultas y
responsaNes y sohmente despu6s de haber recibido las instruc-
ciones correspondientes.
Preparaci6n
(viene de la columna anterior)
3. Datos registrados indican que los operadores mayores de 60
afios sufren un gran porcentaje de accidentes rehcionados con
cortac6spedes. Estos operadores @ben evaBar su capacidad para
manejar hs mAquinas de cortar c6sped de una manera Io suficien-
temente segura para protegerse ellos mismos y los demAs contra
la posibilidad de sufrir lesiones graves.
4. Maneje el combustible con mucho cuidado. El combustible es
infiamaNe y los vapores son explosivos. Use un recipiente aproba-
do para combustible. NO quite el tap6n del dep6sito de com-
bustiNe ni reposte de combustible mientras el motor estAfuncio-
nando. Llene el dep6sito de combustible al aire libre sohmente
cuando el motor estAapagadoy frio. Limpie los derrames de com-
bustible de la m_quina. NOfume.
5. Inspeccione ei lugar de trabajo y quite todos los objetos tales
como juguetes, alambres, piedras, ramas y otros objetos que
pudieran causar lesiones al ser arrojados por la cuchilla o estorbar
el paso de la m_quina. Tambi@ est6 atento a la ubicaci6n de los
agujeros, tocones y otros riesgos posibles.
6. Mantenga a la personas y mascotas a una distancia segura de
Jam_quina. Si alguien entra a la zona don@ est_ cortando el
c6sped, inmediatamente PARE las cuchillas, APAGUEel motor y
PAREla m_quina.
7. Revisefrecuentemente los protectores, deflectores, conmuta-
dores, mandos de la cuchilla y otros dispositivos de seguridad
para cerciorarse de que est_n correctamente colocados y funcio-
nando bien.
8. Aseg_rese de que todos los r6tulos de seguridad est_n clara-
mente legibles. Reemplacelos que est_n dafiados.
9. Prot6jase cuando corte el c6sped. Use gafas de seguridad, pan-
talones largos y calzado grueso. NO corte el c6sped estando
descalzo o con sandalias.
10. Sepa c6mo PARARla cuchilla y el motor r@idamente en el
caso de emergencias.
11. Tenga mucho cuidado cuando suba o baje la m_quina a un
remolque o cami6n.
12. Revise frecuentemente los componentes del recogedor de
hierba en busca de dafio o deterioro, y reempl_celos segSn sea
necesario para impedir que ocurran lesiones a causa de objetos
arrojados a trav6s de puntos d6biles o desgastados.
Manejoseguro de la gasolina
Para evitar lesiones persondes o dafios fisicos, tenga mucho
cuidado al manipuhr gasolina. La gasolina es extremadamente
infiamaNe y los vapores son explosivos
1. Apague los cigarrillos, cigarros, pipasy otras fuentes de ignici6n.
2. Use solamente un contenedor aprobado para combustible.
3. NOquite la tapa del dep6sito de combustible ni cargue com-
bustible mientras el motor est_ funcionando. Dejeque el motor se
enfde antes de cargar combustible.
4 www.snapper.com
Seguridaddet operador
Manejo seguro de Jagasoina
(viene de la columna anterior)
4. NO cargue combustible con la m_quina puertas adentro.
5. NO guarde la m_quina o el contenedor de combustible dentro
de lugares don@ haya llama expuesta, chispas o luz piloto, tal
como en un calentador de agua u otro antefactoelectrodom6sti-
co. 6. NO Ilene los contenedores de combustible dentro de un
vehiculo o un cami6n o plataforma de remolque con un forro de
pl_stico. Antes de Ilenarlos, coloque siempre los contenedores en
el suelo lejos del vehiculo.
7. Retire el equipo con motor de gasolina del vehiculo o remolque
y reabast6zcalode gasolina en el suelo. En caso de no ser posi-
ble, reabastezcael equipo utilizando un contenedor port_til, en vez
de una boquilla surtidora de gasolina.
8. NO arranque el equipo con motor de gasolina en vehiculos o
remolques cerrados.
9. Mantenga la boquilla en contacto con el reborde del dep6sito o
boca del contenedor de combustible todo el tiempo hasta comple-
tar el repostaje. NO use un dispositivo para bloquear abierta la
boquilla.
10. En caso de derramar combustible en la ropa, c_mbiesela
inmediatamente.
11. NUNCAIleneen exceso el dep6sito de combustible. Coloque
la tapa de combustible y apri6tela firmemente.
Manejo
1. NO ponga las manos o los pies cerca o debajo de las piezas
giratorias. Sitiese lejos del punto de descarga mientras el motor
estAfuncionando.
2. APAGUEel motor cuando cruce calzadasde gravilla, aceras o
caminos, y en cualquier situaci6n don@ exista el riesgo de que
objetos sean arrojados por las cuchillas.
3. Corte el c6sped durante el dia o con buena luz artificial
4. NO manejeel cortac6sped siestA en estado de ebriedado bajo
los efectos de drogas.
5. Despu6s de golpear algin objeto extraio, o si a cortadora
vibra en forma anormal, DETENGAel motor, desconecte el cable
de la bujia y suj6telo. Inspeccione la cortadora para verificar si
hay algin daio, y en caso afirmativo repAreloantes de arrancar
nuevamente.
6. NO corte el cSsped cerca de barrancos, zanjas o terraplenes. El
operador podria perder el equilibrio o apoyo.
7. ESTEALERTAa los hoyos y otros peligros ocultos. La hierba
alta puede ocultar los obstAculos. MantSngasealejado de las zan-
jas, socavones, alcantarillas, vallados y objetos salientes.
8. NO corte el cSsped mojado. Asegirese de tener una buena base
de apoyo. Sujetesefirmemente del manillar y camine, no corra.
Un resbal6n puede causarle lesiones.
9. PermanezcaSIEMPRE detrAsde la manija cuando el motor est8
en marcha.
10. NOdeje la mAquinasin vigilancia mientras el motor est&fun-
cionando. PARELA CUCHILLAy APAGUEEL MOTORantes de
alejarse de la mAquina por cualquier motivo.
11. Antes de Iimpiar, reparar o inspeccionar la mAquina,
asegirese de que el motor, la cuchilla y todas las piezas m6viles
estAnDETENIDAS.Desconecteel cable de la bujia y Atelo lejos de
la bujia para evitar el arranque accidental.
12. APAGUEel motor y espere hasta que la cuchilla est8 PARADA
por completo antes de quitar el recogedor y!o desatascar cSsped.
Manejo
(viene de la columna anterior)
13. NO maneje la cortadora sin que el recogedor de hierba com-
pleto, la protecci6n de descarga, la protecci6n posterior u otros
dispositivos de seguridad, est6n colocados y funcionando correc-
tamente. NOapunte la descarga hacia la gente, autom6viles, ven-
tanas o puertas.
14. NO descargue material contra una pared u obstrucci6n. El
material puede rebotar hacia atr_s, dirigi@dose hacia el operador.
15. Aminore la marcha antes de dar lavuelta.
16. Preste atenci6n al tr_fico cuando est6 cerca de calzadaso vaya
a cruzarlas.
17. NO haga funcionar el motor en recintos cerrados. Los gases
de escape del motor contienen mon6xido de carbono, un veneno
mortal.
18. Utilice inicamente accesorios aprobados por el fabricante. Vea
las instrucciones del fabricante para una correcta operaci6n e
instalaci6n de accesorios.
Mantenimiento y aimacenarniento
1. NO guarde la m_.quinani el bid6n de combustible dentro de un
local don@ los vapores pueden quedar en contacto con llama
expuesta, chispas o llama piloto de un calentador de agua, homo,
secadora de ropa u otros artefactos de gas. Espereque el motor
se enfrie antes de guardar la m_quina en un local cerrado. Guarde
el bid6n de combustible lejos del alcance de los niios en un recin-
to desocupado y bien ventilado.
2. Para reducir el riesgo de provocar un incendio y de calentar en
exceso el motor, mantenga el motor Iibre de hierba, hojas o grasa
sobrante.
3. Cuandovacie el dep6sito de combustible, h_galo a un bid6n
aprobado en un lugar al aire Iibre y lejos de llama expuesta.
4. Mantenga todos los pernos, tuercas y tornillos bien apretados.
Compruebe que todas las chavetas o pasadoreshendidos est6n en
el lugar debido.
5. Suministre siempre una ventilaci6n adecuada cuando haga fun-
cionar el motor en el interior de un recinto. Los gases de escape
contienen mon6xido de carbono, un veneno inodoro y letal.
6. Repareel motor y haga ajustes solamente con el motor parado.
Desconecteel cable de la bujia y Ateloslejos de la bujia para evitar
el arranque accidental.
7. NOcambie los reglajes de velocidad del regulador ni sobrepase
la velocidad del motor.
8. Para evitar que objetos sean arrojados y que las piezas m6viles
queden al descubierto, revise frecuentemente la bolsa del recoge-
dor en busca de deterioro o desgaste. Coloque una bolsa nueva si
las costuras est&ndescosidas o hay evidencia de rasgaduras.
Reemplaceel deslizador o adaptador del recogedor si estA roto o
agrietado.
9. La cuchilla del cortac6sped es filosa y puede cortar. Envuelva la
cuchilla o use guantes de cuero grueso, y tenga PRECAUCIONal
10. NO pruebe en cuanto a chispa conectando a tierra la bujia al
lado del orificio de inserci6n de la bujia, la bujia podria encender el
gas que sale del motor.
11. Solicite un servicio de mantenimiento para la mAquina por
parte de un distribuidor autorizado al menos una vez al aio, y
solicite al distribuidor que instale cualquier nuevo dispositivo de
seguridad.
12. %1o utilice piezas de repuesto genuinas para garantizar que se
mantienen los estAndaresoriginales.
5
ADVERTENCiA:Antesderealizarcualquierensambla-
je o mantenimientoal cortac6sped,desconecteel
cane de labuj[a,
NOTA:En este manual de instrucciones, las indicaciones izquierda y
derecha describen la ubicaciSn de unapieza teniendo el usuario
parado detr4s del asidero.
Desempaque
El contac6spedse ensamN6 completamente en la f_brica. Cuandoel
cortac6sped se coloc6 en la caja de cant6n,el asNero se coloc6 en
la posici6n de almacenamiento. Para colocar el asidero en la posi-
ci6n de operaci6n, siga los siguientes pasos.
Asidero
1. Saqueel contac6spedde la caja de cart6n.
2. Remuevatodo el material de empaque del contac6spedy el
asidero.
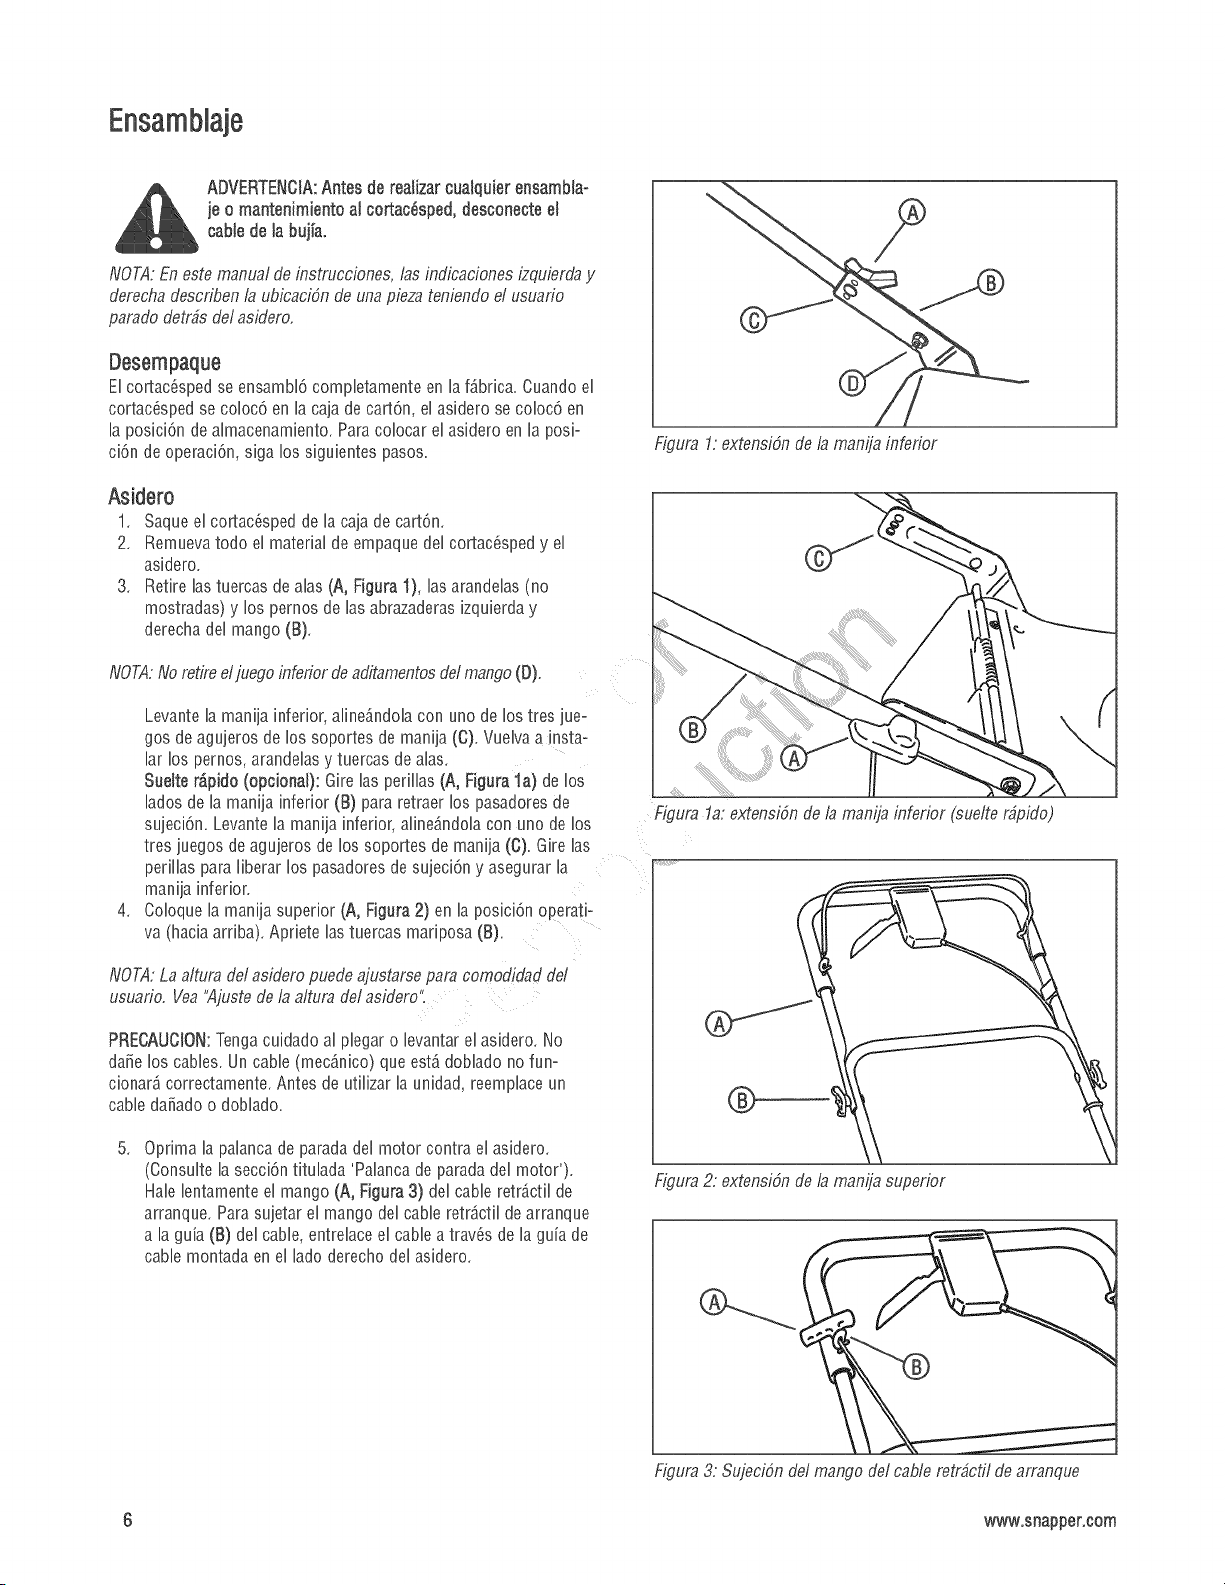
3. Retire las tuercas de alas (A, Figura 1), las arandelas (no
mostradas) y los pernos de las abrazaderasizquierda y
derecha del mango (B).
NOTA:No retire el juego inferior de aditamentosdel mango(D).
.
Levante la manija inferior, aline_ndola con uno de los tres jue-
gos de agujeros de los soportes de manija (C). Vuelva a insta-
lar los pernos, arandelas y tuercas de alas
Suelte rdpido (opcional): Gire las perillas (A, Figura.la) de los
lados de la manija inferior (B) para retraer los pasadoresde
sujeci6n. Levantela manija inferior, aline_ndola con uno de os
tres juegos de agujeros de los soportes de manija (C). Gire as
perillas para liberar los pasadores de suieci6n y asegurar la
manija inferior.
Coloque la manija superior (A, Figura 2) en la posici6n operati-
va (hacia arriba). Apriete las tuercas mariposa (B).
NOTA:La altura del asidero puede ajustarse para comodidad del
usuario. Vea "Ajustede la altura del asidero".
PRECAUCION:Tengacuidado al plegar o levantar el asidero. No
dafie los cables. Un cable (mec_nico) que est_ doNado no fun-
cionar_ correctamente. Antes de utilizar la unidad, reemplace un
cable dafiado o doNado.
5.
Oprima la pdanca de parada del motor contra el asidero.
(Consulte la secci6n titulada 'Palanca de parada del motor').
Hale lentamente el mango (A, Figura 3) del cable retr_ctil de
arranque. Para sujetar el mango del cable retr_ctil de arranque
a la guia (B) del cable, entrelace el cable a trav6s de la guia de
cable montada en el lado derecho del asidero.
Figura 1: extensiSn de la manija inferior
Figura la: extensiDn de la manija inferior (suelte r_pido)
Figura 2: extensiSn de la manija superior
Figura3: SujeciSndel mangodelcableretr4ctildearranque
www.snapper.com
Aitura de la manija
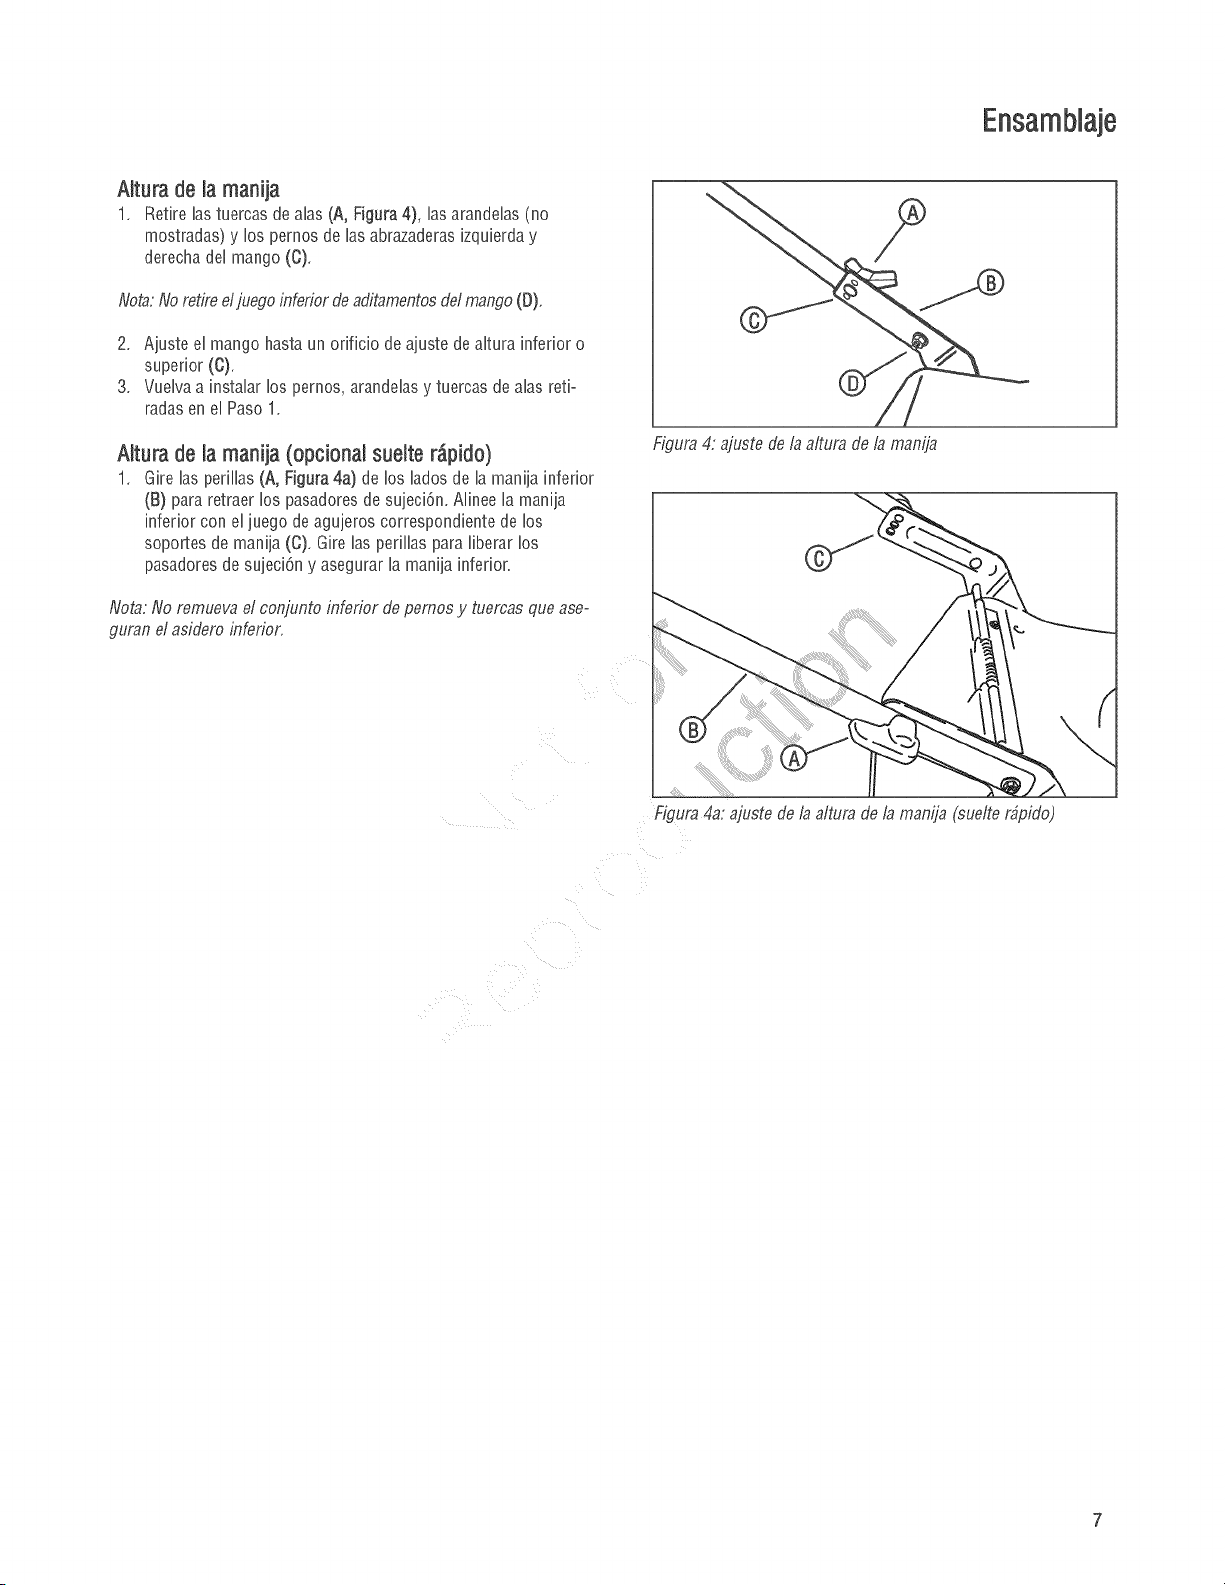
1. Retire las tuercas de alas (A, Figura 4), las arandelas (no
mostradas) y los pernos de las abrazaderasizquierda y
derecha del mango (C).
Nora:No retireeljuego inferior de aditamentosde,/mango(D).
2. Ajusteel mangohastaun orificiode ajustedealturainferioro
superior(C).
3. Vuelvaa instalarlos pernos,arandelasy tuercasde alasreti-
radasenel Paso1.
Aitura de la manija (opcional sueite r£pido)
1. Gire las perillas (A, FJgura4a) de los lados de la manija inferior
(B) para retraer los pasadoresde sujeci6n. Alinee la manija
inferior con el juego de agujeros correspondiente de los
soportes de manija (C). Gire las perillas para Iiberar los
pasadores de sujeci6n y asegurar la manija inferior.
Nora: No remueva el conjunto inferior de pemos y tuemas que ase-
guran el asifiero inferior.
Figura 4: ajuste de la altura de la mamja
Figura 4a: ajuste de la altura de la manija (sueM r#pido)

Ensambiajede la boisade c6sped
(No todos los modelos)
Nora: En algunos modelos, el deflector de descarga de montaje lat-
eral se sujeta de manera temporal (para prop6sitos de envio) a la
parte trasera del cortac4sped. Antes de ensamblar la bolsa de
c6sped, remueva el deflector de descargade montaje lateral
1. Deslice el armaz6n (A, Figura 5) dentro de la bolsa de c6sped
(B).
-@
Figura 5: Instalaci6n del armaz6n
,
,
Verifique que la manija (A, Figura 6) est_ en el lado exterior de
la bolsa de c6sped.
Primero, sujete los ganchos (B, Figura 6) al costado del
armaz6n (C). Luego, sujete los ganchos a la parte superuore
inferior del armaz6n.
Figura 6: Instalaci6n de los ganchos de la bolsa
8 www.snapper.com
Montaje de la bolsa de cdsped (No todos los
modeios)
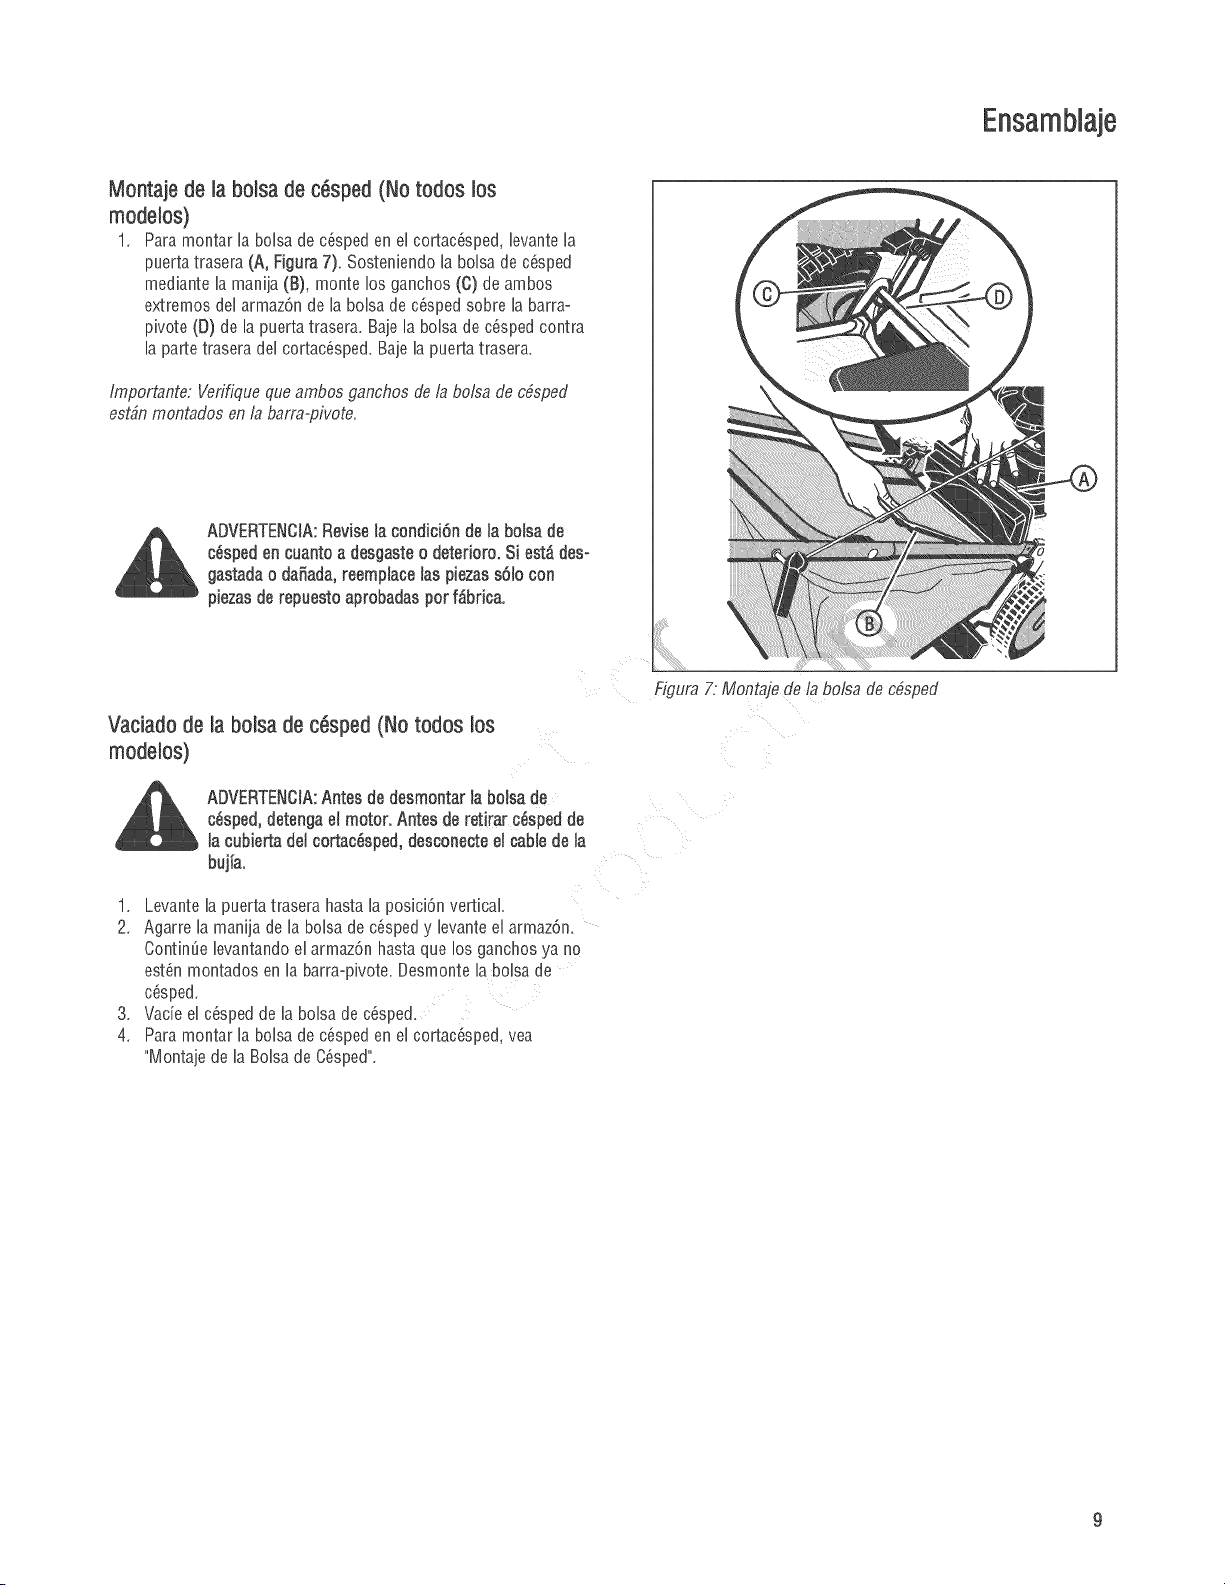
1. Para montar la bolsa de c6sped en el contac6sped,levante la
puerta trasera (A, Figura 7). Sosteniendo la bolsa de c6sped
mediante la manija (B), monte los ganchos (C) de ambos
extremos del armaz6n de la bolsa de c6sped sobre la barra-
pivots (D) de la puerta trasera. Baje la bolsa de c6sped contra
la pantstrasera del cortac6sped. Baje la puentatrasera.
Importante: bgrifique que ambos ganchos de la bolsa de c6sped
est_n montados en la barraopivote.
ADVERTENCIA:Revise ia condid6n de Jabolsa de
c6sped en cuante a dssgaete o deterioro. Si eet_ des-
gastada o daSada, reemplace las piezass61ocon
piezasde repuesto aprobadas por f_.brica.
Vaciadode la bolsa de cdsped (No todos los
modeios)
ADVERTENCIA:Antes de desmontar JaboJsade
c6sped, detengael motor. Antes de retirar c6sped de
la cubierta del cortac6sped, desconecte et cane de la
buj[a,
1. Levante la puerta trasera hasta la posici6n vertical.
2. Agarre la manija de la bolsa de c6sped y levante el armaz6n.
Contin@ levantando el armaz6n hasta que os ganchos ya no
est@ montados en la barra-pivote. Desmonte la bolsa de
c6sped.
3. Vacie el c6sped de la bolsa de c6sped
4. Para montar la bolsa de c6sped en el cortac6sped, vea
"Montaje de la Bolsa de C6sped".
Figura 7: Montaje de ta bo/sa de c#sped
Sujeci6n dendeflector de descargade montaje iatera_
ADVERTENCIA:Para evitar que
el motor arranque, desconecte
el cable de la buj_a,
Para prop6sitos de envio, no se instal6 el deflector lateral. Localice
el deflector lateral e instale de la siguiente manera.
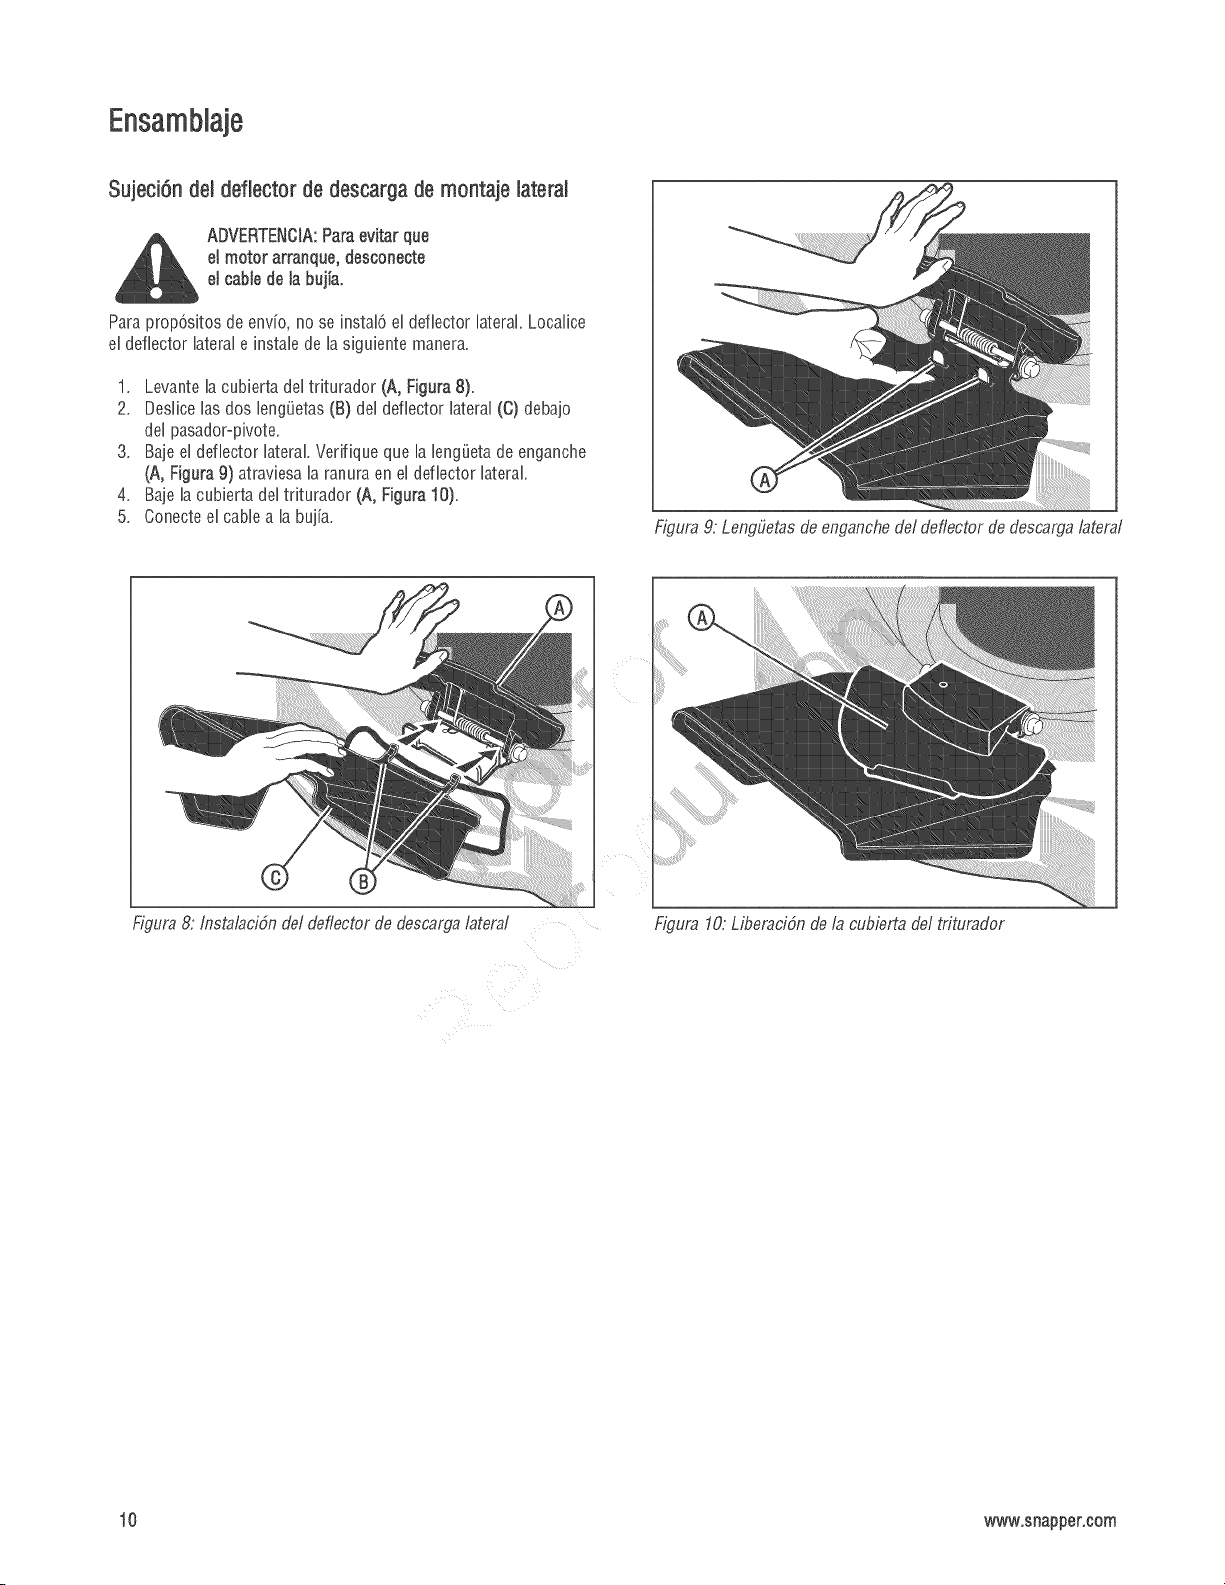
1. Levante la cubierta del triturador (A, Figura 8).
2. Deslice las dos lengietas (B) del deflector lateral (C) debajo
del pasador-pivote.
3. Baje el deflector lateral.Verifique que la lengieta de enganche
(A, Figura 9) atraviesa la ranura en el deflector lateral.
4. Baje la cubierta del triturador (A, Figura 10).
5. Conecte el cable a la bujia.
Figura 9: Lengfietas de enganche de/deflector de descarga lateral
©
Figura 8: Instalaci6n de/deflector de descarga lateral
FJfura 10: Liberaci6n de la cubierta de/triturador
10 www.snapper.com
Recomendacionesacercadei triturado
EItriturador corta en trozos pequefios eI c6sped para que eI c6sped
pueda recMarse fAciimente, Ya que los nutrientes son regresados
aI sueIo, eI c6sped necesRarAmenos ferfiiizante, Paratriturar cor-
rectamente eI c6sped, siga las recomendacionessiguientes,
EI c6sped debe estar seco, Si eI c6sped estA hQmedo, este serA
dificiI de cortar y causarAmasas pesadasde c6sped,
EI c6sped no debe estar demasiado are, La aRura maxima para
Iograr un corte efecfivo es de 4ol/2 puigadas, Fije los ajusta-
dores de aRura de mode que s6Io se corte latercera parte
superior del c6sped,
Si el c6sped tiene una aRura superior a 4ol/2 pulgadas, serAn
necesarias dos operaciones de corte con el cortac6sped, Para
la primera operaci6n de corte con el cortac6sped, fije los ajus-
tadores de aRura en la posici6n mAsaRa, Luego, baje los ajus-
tadores de aRura para la segunda operaci6n de corte con el
cortac6sped,
o Mantenga afilada la cuchilla, Una cuchilla que no estAafilada
provocarA que los extremes del c6sped se vuelvan de color
marr6n,
o Limpie el lade de abajo de la cubierta del cortac6sped, El
c6sped y otros residues pueden evitar que el cortac6sped fun-
clone correctamente,
Si la calidad del corte es secundaria, ensaye Io siguiente:
Fije los ajustadores de altura en una altura de corte mAs alta,
Corte el c6sped mAs frecuentemente,
Maneje el cortac6sped a una velocidad de avance mAs lenta,
Traslapelasfranjas de corte en vez de cortar unafranja com°
pleta con cada pasada,
Corte dos veces el c6sped a trav6s de las areas de margen,
Prepararei motor
ELMOTORNOCONTIENEACEITENIGASOLINA
Utilizando la botella de aceite suministrada en la caja de cart@.
iiene ei motor con ia cantidad de aceiteapropiada. Vea ias instruc-
clones del fabricante del motor para averiguar el tipo de gasolina y
aceite que se debe utilizar, Antes de utilizar la unidad, lea la infor-
maci6n sobre seguridad, operaci6n, mantenimiento y almace-
namiento,
ADVERTENCIA:Sigalasinstruoeionesdelfabdcante
del motor paraaveriguareJtipo degasolinay aeeRe
queeedebeutilizar,Siempreutilieeunrecipientede
seguridadparaJagaeoJina,Nofume mientraese
agregagaeolinaaltanquede combustible.Cuando
se eet_dentrode unlugarcerrado,no Ibnecon
gasoJina,Antesdeagregarlagasolina,detengael
motor.Permitaqueel motorse enfdedurantevaries
minutes.
Nora: La operaciDnde,un motor nuevo algunas vecesprovocarb
una /evecantifiafi de humo, Este humo es causadoper pintura o
ace@ en o alrededor del silenciador, Esto es normal y s41ose
espera durante /a operaciDn iniciaL
IMPORTANTE:Esta unidad estA equipada con un motor de com-
busti6n interna y no debe utilizarse en o cerca de ninguna area de
bosque o cubierta con maleza,a menos que el sistema de escape
del motor est6 equipado con un supresor de chispas que cumpla
las byes locales o estatales aplicables (si existen), Si se utiliza un
supresor de chispas, 6ste debe set mantenido en buen estado de
funcionamiento per parte del operador,
En el Estado de California Io anterior es exigido per ley (Secci6n
4442 del C6digo de Recursos PQblicosde California), Otros estados
podrian tenet byes similares, Las leyes federales se aplican en ter-
ritories federabs, Visite un Centre de Servicio Autorizado para con-
seguir un supresor de chispas para el silenciador,
Nora: Es posible que /a potencia real sostenida del motor sea infedo
or debido a/_nitaciones operafivas y factores del medio ambiente,
Preparaci6nfinal
Antes debe utilizar el cortac6sped, revise las ruedas, el asidero y los
controles, Verifique quetodos los tornillos estAnapretados,
Verifique que el control del acelerador (en case de tenerlo) y la
palanca de parada del motor funcionan correctamente,
Si el cortac6sped estA equipado con ajustadores de altura, verifique
que los ajustadores de altura funcionan apropiadamente, Antes de
arrancar el motor, verifique que cada ajustador de altura estAfijado
en la altura deseada,Yea "Ajuste de la AItura de Corte" en las sec-
clones de Mantenimiento,
11

Palancade paradadel motor
Libere la pahnca de parada del motor (A, Figura 11) y el motor y la
cuchilla se detendr_.nautomAficamente. Para mantener en fun°
cionamiento el motor, sostenga la pdanca de parada del motor en
la posbi6n de operaci6n (B).
Antes de arrancar el motor, accione varias veces la palanca de parao
da del motor. Verifique que el cane se mueve f_cilmente.
Figura 11: Operaci6nde la palanca de parada de,/motor
Sistema de tracci6n (propulsi6n) deiantera
(S61olas unidadesautopropulsadas)
El corta@sped tiene un sistema de tracci6n de las ruedas
delanteras. Manejeel sistema de tracci6n de la siguiente manera.
1. Sostenga la palanca de parada del motor (A, Figura 11) en ia
posici6n de operaci6n (B).
2. Tire de la palanca de tracci6n (A, Figura 12) compbtamente
hacia atrD.s.El sistema de transmisi6n est,.ahora acoplado.
3. Para desactivar el sistema de tracci6n y detener el motor,
libere completamente la palanca de paradadel motor.
4. Para desacoplar s61oel sistema de transmisi6n, libere la
palanca detracci6n. El sistema de tracci6n se desactivara pero
el motor continuara en funcionamiento.
Nora: Cuando el sistema de, tracci6n estb desacfivado en una unidad
nueva, es posibie que /as ruedas de/anterasgiren si se levantan del
suelo. Esto es normal y dejarb de suceder despu6s de una o dos
horas de operaci6n.
ADVERTENCIA:Para una operaci6n segura, el sistema
de tracci6n debe desactivarseinmediatamente cuando
se libera la palancadel sistema de tracci6n. Si el sis-
tema de tracci6n no se desactiva correctamente, no
opere el cortac6sped hasta que el sistema de tracci@
sea ajustado o reparado por un centro de servicio
autodzado.
Figura 12:Operaci@ de! slstema de.traccidn de/as medas
de/anteras
Paradadel motor
Para detener el motor, libere la palancade parada del motor.
Desconecte el cane (el6ctrico) de la bujia para evitar que el motor
arranque
Antes de arrancar el motor, revise el cane (mecanico) de paradadel
motor. Verifique que el cane de paradadel motor estD.ensamblado
correctamente. Antes de operar la unidad, reemplace un cane de
parada de motor, daSado o doblado.
12 www.snapper.com
Encendidodei motor
ADVERTENCIA:La cuchilla girar_ cuando el motor se
ponga en funcionamiento.
IMPORTANTE:Antes de arrancar eI motor, accione varias veces la
palanca de parada deI motor. Verifique que eI cane de parada deI
motor se mueve Ibremente.
Nora: El disefio de/motor no incluye un control de/acelerador o un
ajuste de la velocidad del motor. El motor estb ajustado en la mejor
velocidad para el corte de @sped, para el empacado en bolsa c/el
@sped y para una vifia EItilprolongada c/elmotor.
1. Revise el nivel de aceite.
2. Llene el tanque de combustible con gasolina normal sin
plomo. Verifique que la gasolina est_ limpia. La gasolina con
plomo aumentar_ los depGsitosy acortar_ la vida de las
v_lvulas.
Nota: No utilice gasohol ni metanoL No utilice gasolina premium sin
plomo.
ADVERTENCIA:Siempre utilice un recipbnte de
seguridad para la gaeolina, Nofume mientrae agrsga
gasolina al tanque de combustible. Cuando se eet_
dentro de un lugar cerrado, no agregue gasolina°
Antes de agregar gasolina, detenga el motor y permio
ta que ei motor se enfffe durante ratios minutoe.
3. Verifique que el cane de la bujia est_ conectadoa la bufia
4. S61olos modelos autopropulsados - Verifique que la palanca
del sistema de tracciGn est_ en la posicion desactivada.
ADVERTENCIA:Para evitar un aeeidente, venfique que
ia palancadel eietema de tracciGn eet#.en la posiciGn
DESACTIVADA(DISENGAGED).Cuando la palanca del
eistema de tracciGn est_ en la poebiGn ACTIVADA
(ENGAGED),no arranque el motor.
5,
El bet@ cebador (A, Figura 13) est_ al lade del motor. Oprima
el botGncebador. Cadavez que usted oprima el botGncebador,
espere dos segundos. Para averiguar el nQmero de veces que
se requiere oprimir el bet@ cebador, vea las instrucciones del
fabricante del motor.
Nora: No utilice el botGn cebador para arrancar un motor cafiente.
TM
Nora: Los modelos equipados con motores Ready Start no fienen
botGn cebador. Vea/as instrucciones c/el fabricante c/elmotor para
obtener informaciGnadicionaL
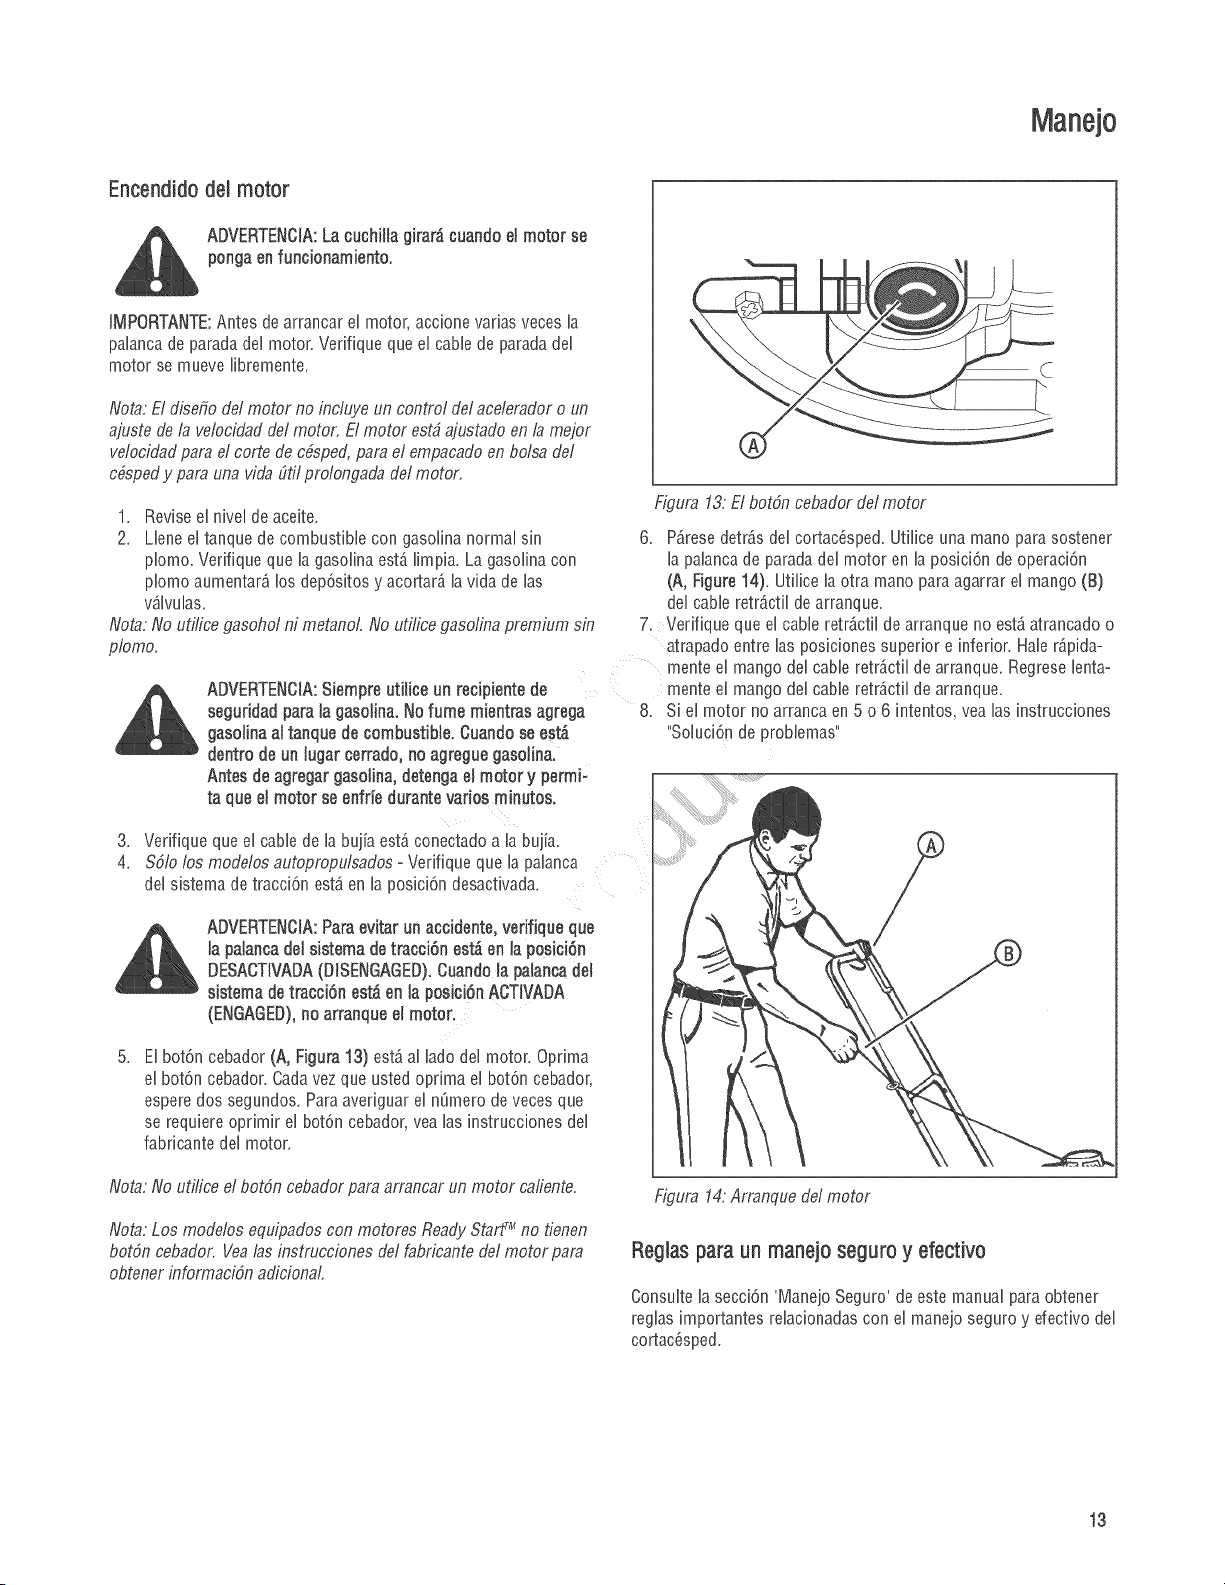
Figura 13. El botGn cebador de/motor
6. %rese detr_s del cortacGsped.Utilice una mano para sostener
la palanca de paradadel motor en la posiciGn de operaciGn
(A, Figure 14). Utilice la otra mano paraagarrar el mango (B)
del cane retr_ctil de arranque.
7. Verifique que el cane retr_.ctilde arranque no est_atrancado o
atrapado entre las posiciones superior e inferior. Hale r@ida-
mente el mango dei cane retr_ctil de arranque. Regreselenta-
mente el mango dei cable retr_.ctilde arranque.
8. Si el motor no arranca en 5 o 6 intentos, yea las instrucciones
"SoluciGnde probbmas"
Figura 14.Arranque de/motor
Reglas para un manejo seguro y efectivo
Consulte la secciGn'Manejo Seguro' de este manual para obtener
reglas importantes relacionadas con el manejo seguro y efectivo del
cortacGsped.
13

Tabla de Mantenimiento
COR SPE#
Oada8 horas o diadamente
Revisar eI paianca de paradadd motor
Limpiar los desechosdeI corta@sped
Oada25 horas o anualmeate *
Revisar corta@sped por si tuviesen piezassueltas
Cada50 horas o anua+mente*
Limpiar la bateriay el cableado (si equipado)
_al distfibuidor cada aHopara
Lubricar el corta@sped
Revisar la correa
Revisar las cuchillas del cortac6sped **
Comprobar el tiempo de detenciOnde las cuchillas de la
segadora
* Lo que ocurra en primer lugar.
**Revise las cuchillas mds a menudo en reglones que
tengan suelosarenosos yen condiciones en las que
exista mucho polvo.
MOTOR
Pdmeras 5 horas
Cambiarel aceite del motor
Cada8 horas o diadam_
Comprobar el nivel de aceitedel motor
Cada25 h
Limpiar el filtro y el depurador de aire del motor
(si equipado) **
Cada50 horas o anuaJmente*
Cambiarel aceite del motor
Sustituir el filtro de aceite(si equipado)
Anualmente
Sustituir el filtro de awe
Sustituir el depurador [si equipado)
Inspeccionar el silenciador y la pantallaantichispas
si equipado;
Sustituir la bujia
Sustituir el filtro de combustible (si equipado)
Limpiar el sistema de refrigeraciOnde aire del motor
* Lo que ocurra en primer lugar
*_En condiciones en las que exista polvo o suciedad en
forma de particulas en suspenslOn_limpiar rods a
menudo.
14 www.snapper.com
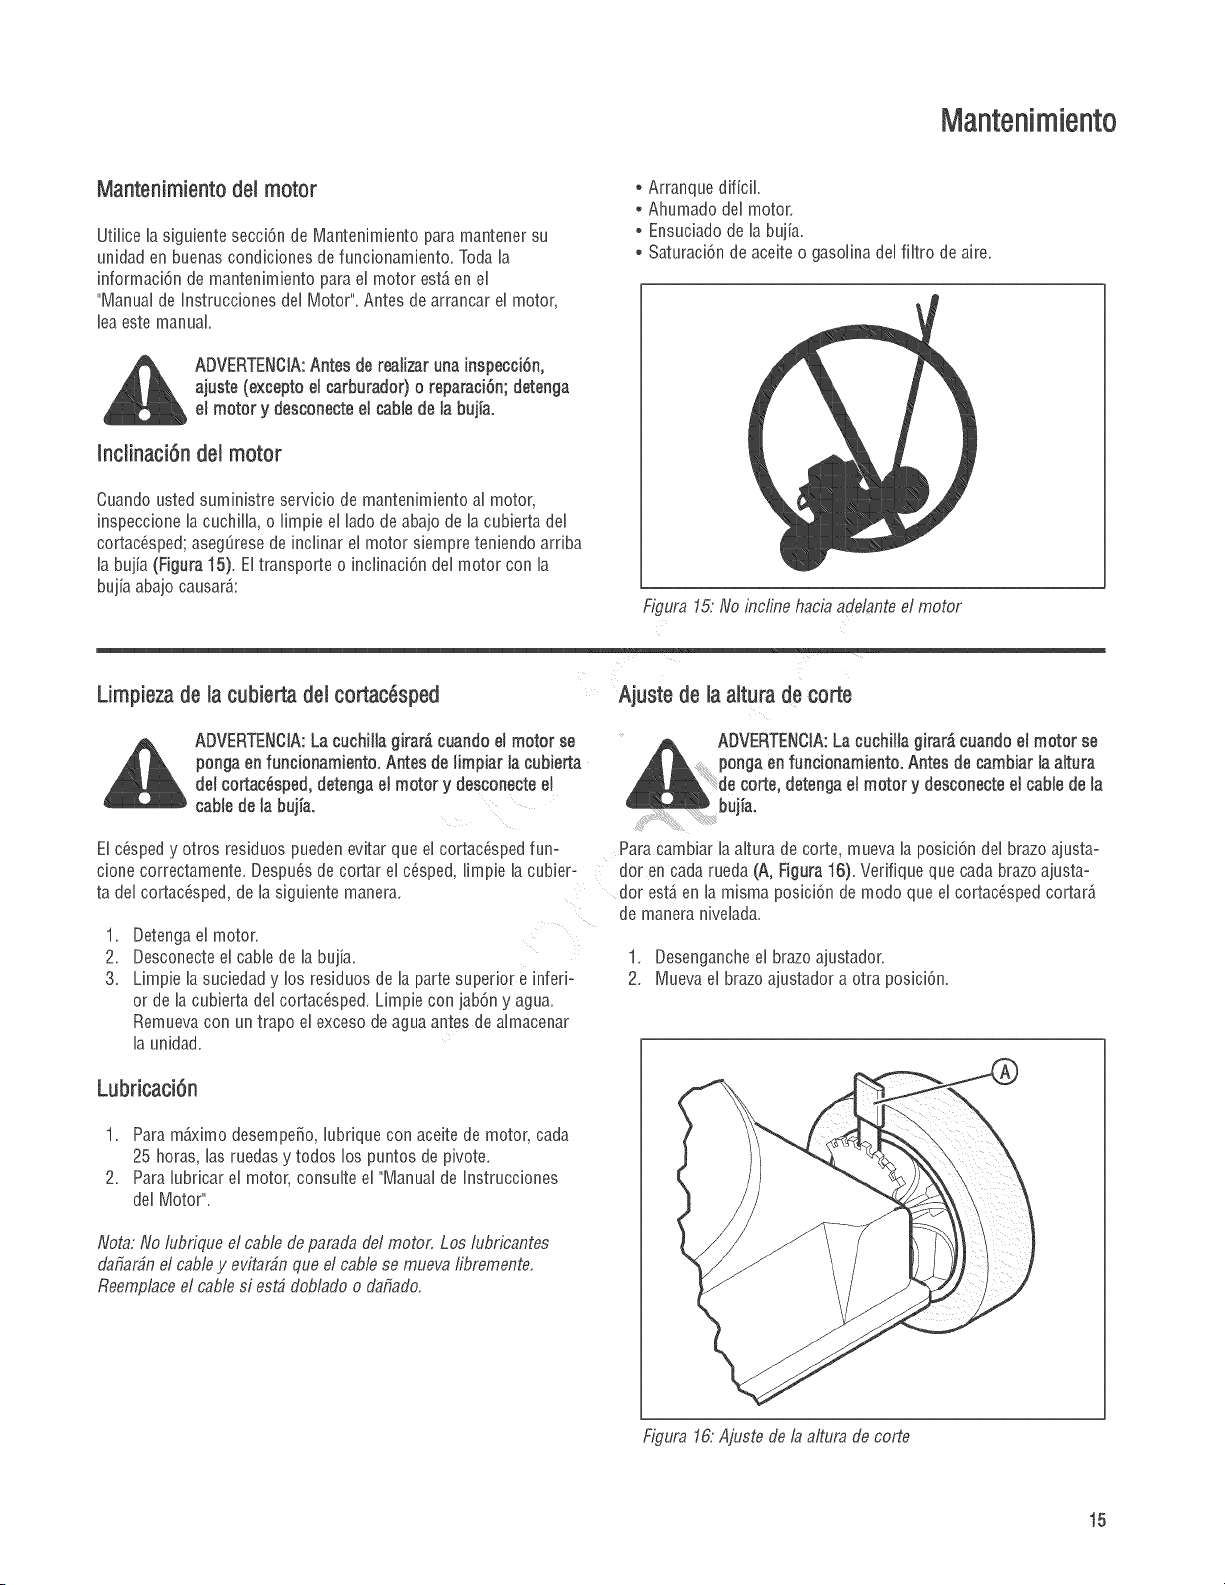
Mantenimiento del motor
Utilice la siguiente secci6n de Mantenimiento para mantener su
unidad en buenas condiciones de funcionamiento. Toda la
informaci6n de mantenimiento para el motor est_ en el
"Manual de Instrucciones del Motor". Antes de arrancar el motor,
lea este manual.
o Arranque dificil.
o Ahumado del motor.
o Ensuciado de la bujia.
o Saturaci6n de aceite o gasolina del filtro de aire.
ADVERTENCIA:Antesde realizarunainspecci6n,
ajuste (exceptoel earburador)o reparaci6n;detenga
el motor y deseonecteelcablede la bujfa,
Inctinaci6n del motor
Cuando usted suministre servicio de mantenimiento al motor,
inspeccione la cuchilla, o limpie el lado de abajo de la cubierta del
cortac6sped; asegSresede inclinar el motor siempre teniendo arriba
la bujia (Figura 15). El transporte o inclinaci6n del motor con la
bujia abajo causar_:
F@ura15: No incline hacia adelante el motor
Limpieza de la cubierta dei cortacdsped
ADVERTENCIA:La eucbilla girard cuando ei motor se
ponga en funcionamiento, Antes de Jimpiar la cubierta
del cortae6sped, detenga el motor y desconecte el
cable de la bujfa,
El @sped y otros residuos pueden evitar que el cortac6sped fun=
clone correctamente. Despu6sde cortar el @sped, limpie la cubier-
ta del corta@sped, de la siguiente manera.
.
2.
3.
Detenga el motor.
Desconecte el cane de la bujia.
Limpie la suciedad y los residuos de la parte superior e nferi-
or de la cubierta del corta@sped. Limpie con jab@ y agua.
Remueva con un trapo el exceso de agua antes de aimacenar
la unidad.
Ajuste de la aitura de corte
ADVERTENCIA:La cucbilla girar_ cuando el motor se
ponga en funcionambnto, Antes de cambiar la altura
detenga el motor y desconecte el cable de la
buj[a,
Para cambiar la altura de corte, mueva la posici6n del brazo ajustao
dot en cada rueda (A, Figura 16). Verifique que cada brazo ajustao
dor est_ en la misma posici6n de modo que el corta@sped cortara
de manera nivelada.
1. [}esengancheel brazoajustador.
2. Mueva el brazo ajustador a otra posici6n.
Lubricaci6n
1. Para m_ximo desempe_o, lubrique con aceite de motor, cada
25 horas, las ruedas y todos los puntos de pivote.
2. Para lubricar el motor, consulte el "Manual de Instrucciones
del Motor".
Nora: No/ubfique el cable de,parada del motor, Los lubricantes
dafiar_n el cabley evitar@ que el cable se mueva /ibremente,
Reemplace el cable si est_ doblado o dafiado,
Figura16:Ajuetede,la a@rade,corte
15
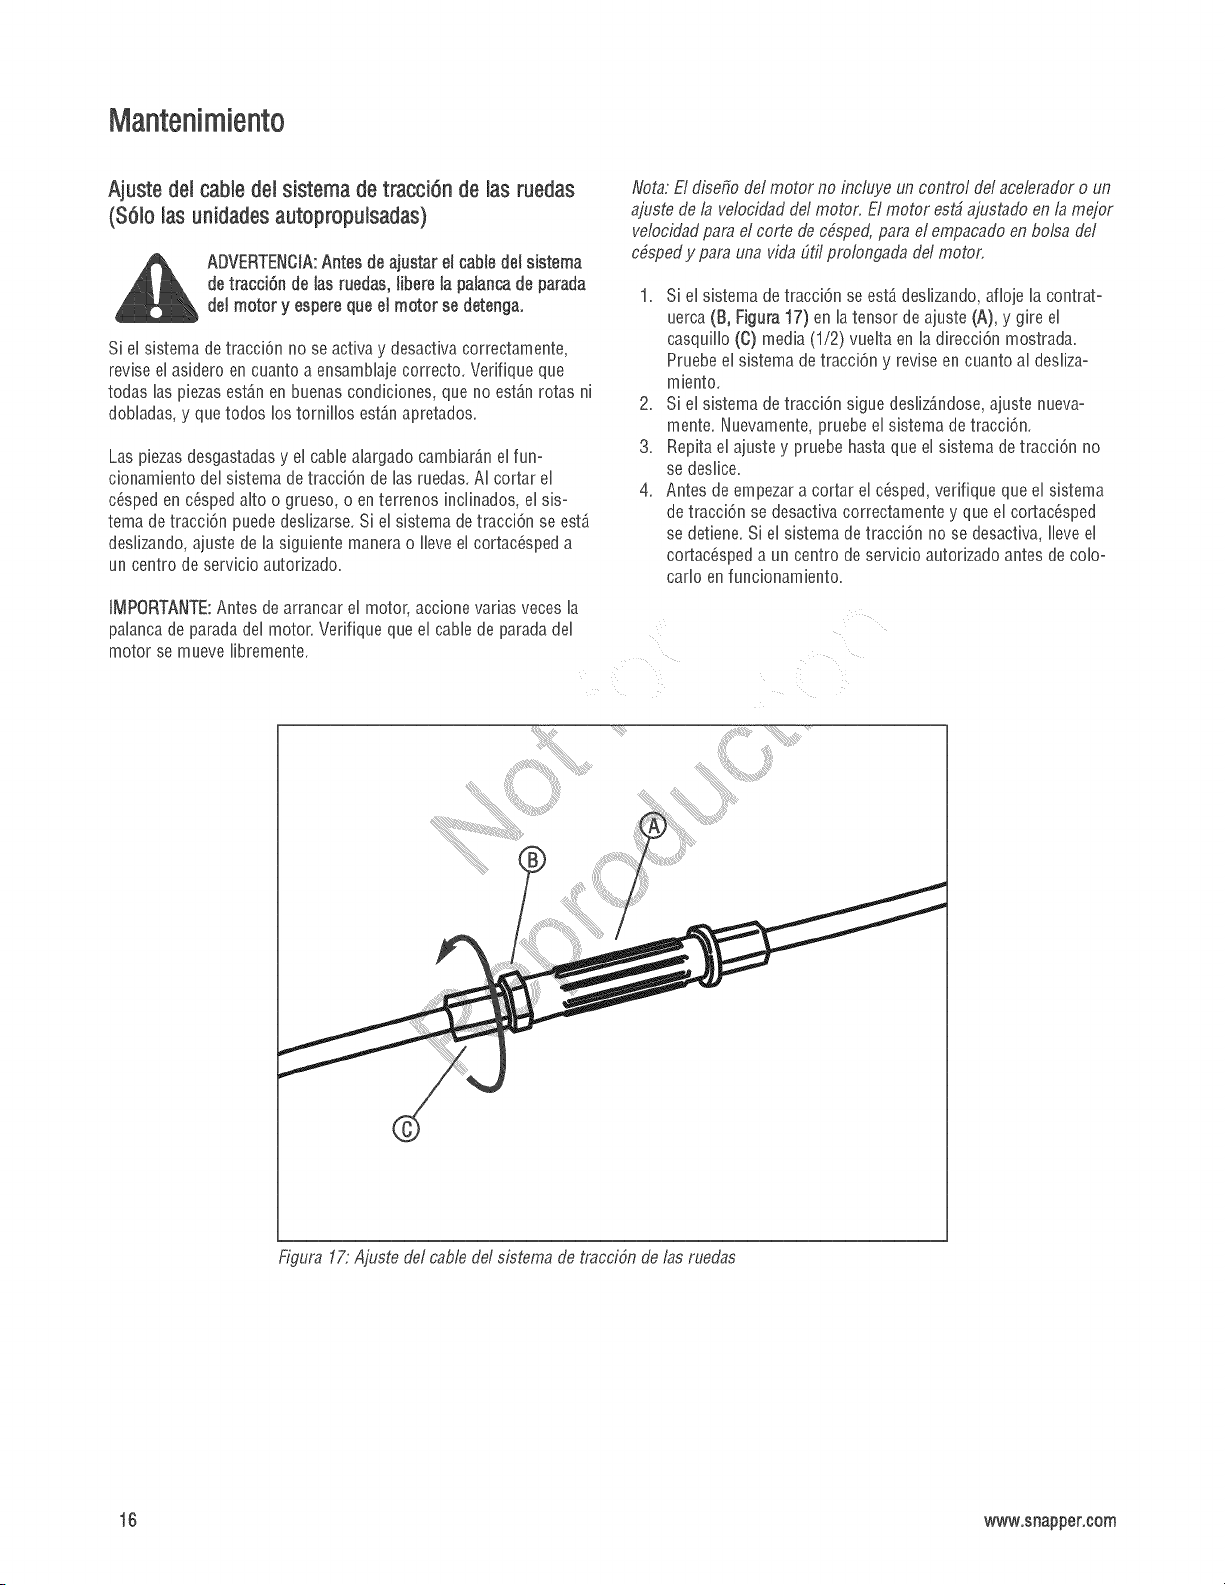
Ajuste dei cabledei sJsternade traccJ6nde las ruedas
(S6nolas unidadesautopropulsadas)
ADVERTENCIA:Antes de ajustar el cable del sistema
de tracci6n de Jasrue@s, libere Japalancade parada
del motor y espere que eJmotor se detenga,
Si el sistema de tracci6n no se acfiva y desacfiva correctamente,
revise el asWeroen cuanto a ensambhje correcto. Vedfique que
todas hs piezas est_n en buenas condMones, que no est_n rotas ni
dobladas, y que todos los tornillos est_n apretados.
Las piezasdesgastadas y el cablealargado camNar_.nel fun-
cionamiento del sistema de tracci6n de hs ruedas.AI cortar el
c6sped en c6sped aRoo grueso, o en terrenos inclinados, el sis-
tema de tracci6n puede deslizarse. Si el sistema de tracci6n se est_
deslizando, ajuste de la siguiente manera o Ileve el cortac6sped a
un centro de servicio autorizado.
IMPORTANTE:Antes de arrancar el motor, accione varias veces la
palanca de parada del motor. Verifique que el cable de parada del
motor se mueve libremente.
Nora: El disefio de/motor no incluye un control de/acelerador o un
ajuste de la velocidad del motor. El motor est# ajustado en la mejor
velocidad para el corte de c6sped,para el empacado en bolsa del
c4sped y para una vida EItilprolongada del motor.
,
,
3.
4.
Si el sistema de tracci6n se est,. deslizando, afioje la contrat-
uerca (B, Figura 17) en latensor de ajuste (A), y gire el
casquillo (C) media (1/2) vueRa en la direcci6n mostrada.
Pruebe el sistema de tracci6n y revise en cuanto al desliza-
miento.
Si el sistema de tracci6n sigue desliz_ndose,ajuste nueva-
mente. Nuevamente, pruebe el sistema de tracci6n.
Repita el ajuste y pruebe hasta que el sistema de tracci6n no
se deslice.
Antes de empezar a cortar el c6sped, verifique que el sistema
de tracci6n se desactiva correctamente y que el contac6sped
se detiene. Si el sistema de tracci6n no se desactiva, lleve el
contac6speda un centro de servicio autorizado antes de colo-
carlo en funcionamiento.
Figura 17:Ajuste del cable del sistema de tracci6n de ins ruedas
16 www.snapper,com

Preparaci6ndei cortac£spedpara almacenamiento
ADVERTENCIA:Noextraigagasoinamientrasseest£
enel interiordeunaedfficaci6n,cercade unallama,o
mientraeuetedfumaoLosvaporeedela gaeo/na
puedencausarunaexplosi6no un incendio.
1. Drene eltanque de combustible.
2. Permita que el motor permanezca enfuncionamiento hasta
que se le agote la gasolina.
3. Drene el aceite del motor caliente. Llene el c_nterdel motor
con aceite nuevo.
4. Remueva la bujia del cilindro. Vienta una onza de aceite dentro
del cilindro. Hale lentamente el mango del cable retr_ctil de
arranque para que el aceite proteja el cilindro. Instale una bujia
nueva en el cilindro.
5. Limpie la suciedad y residuos de las aletas de enfriamiento del
cilindro y de la carcasadel motor.
6. Limpie la pante inferior de la cubierta del contac6sped.
7. Verifique que la bolsa de c6sped est_vach. Elc6sped que per-
manece en la bolsa durante el almacenamiento daiar_ a
bolsa.
8. Limpie completamente el cortac6sped para proteger la pintura.
9. Pliegue el asidero (sise desea).
PRECAUCION:Tengacuidado al plegar o levantar el asidero, No
dale los cables, Un cable (mec_nico) que est_ doblado no fun-
cionar_ correctamente, Antes de utilizar la unidad, reemplace un
cable daiado o doblado,
10. Coloque la unidad en una edificaci6n que tenga buena venti-
laci6n,
17
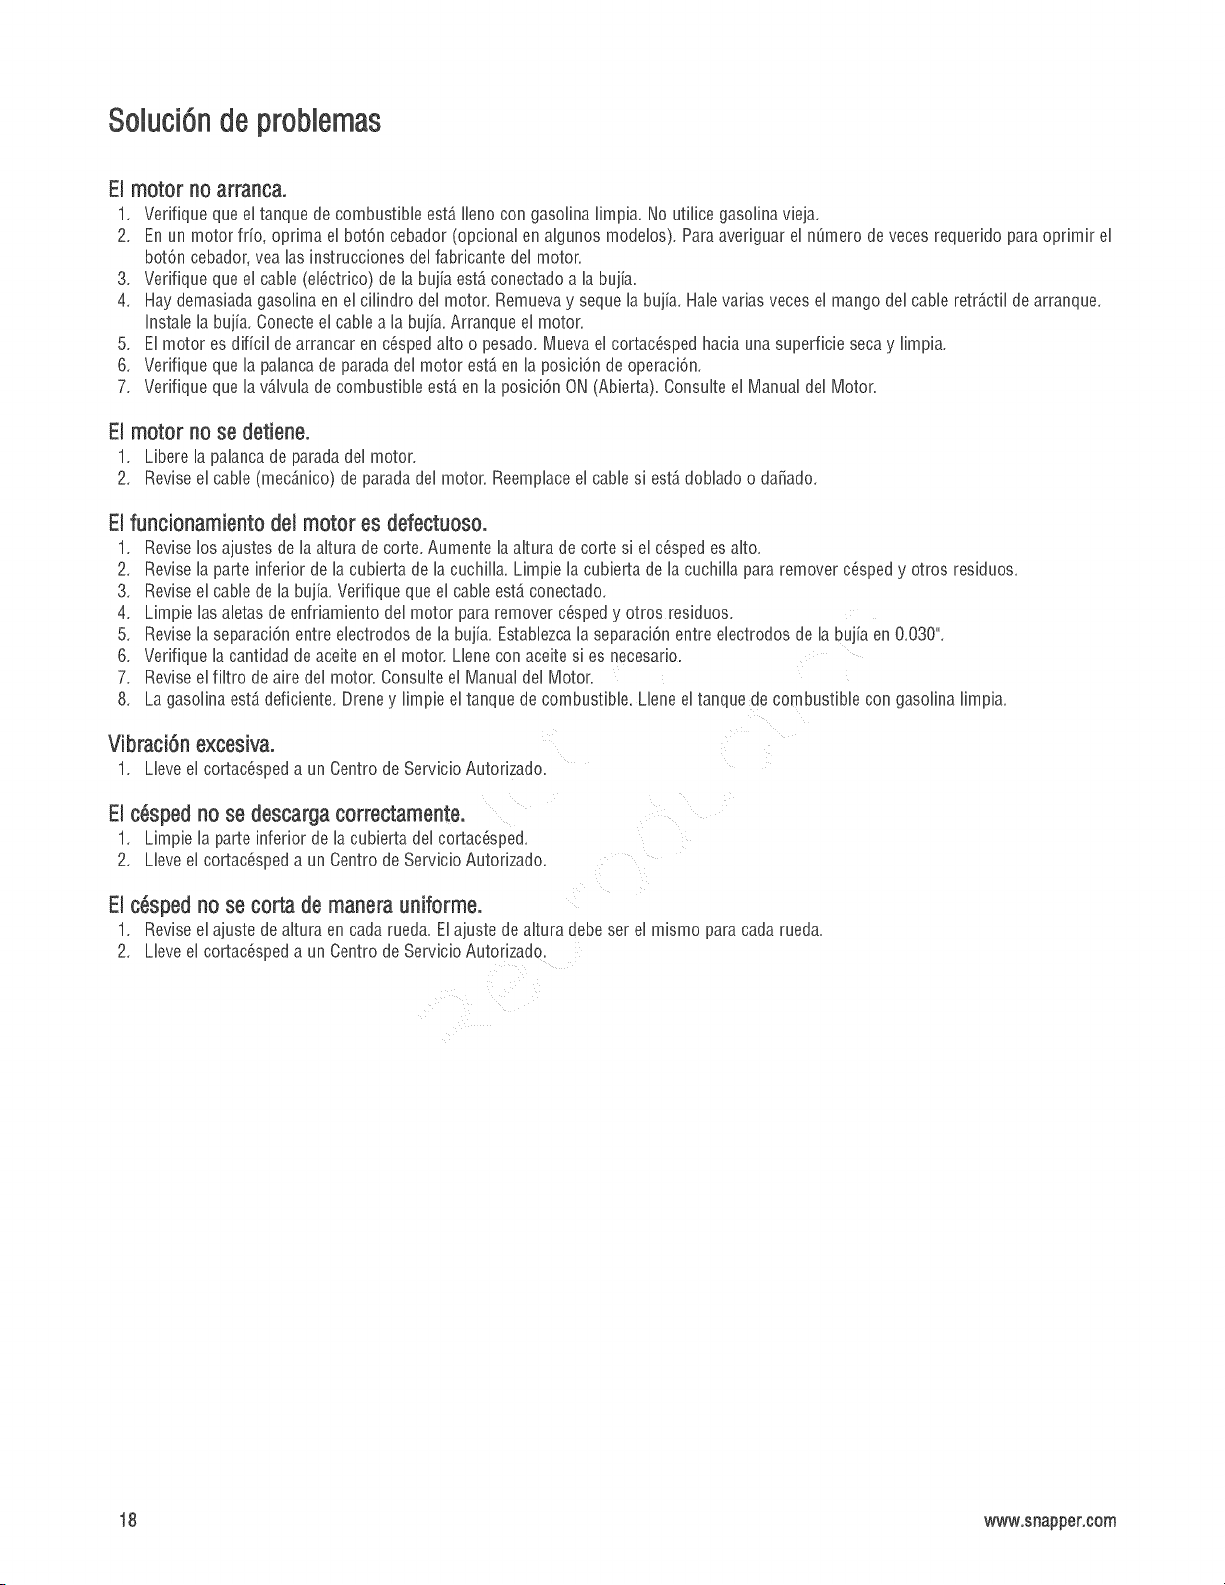
So[uci6ndeprob[emas
E[ motor no arranca.
1. Verifique que el tanque de combustiNe est_ Ileno con gasolina limpia. No utilice gasolina vieja.
2. En un motor frio, oprima el bot6n cebador (opcional en algunos modelos). Para averiguar el n_mero de veces requerido para oprimir el
bot6n cebador,vea las instrucciones del fabricante del motor.
3. Verifique que el cane (el6ctrico) de la bujia est_ conectado a la bujia.
4. Hay demasiadagasolina en el cilindro del motor. Remuevay sequela bujia. Halevarias veces el mango del cable retr_ctil de arranque.
Instale la bujia. Conecte el cable a la bujia. Arranque el motor.
5. El motor es dificil de arrancar en c6spedalto o pesado. Mueva el cortac6sped hacia una superficie seca y limpia.
6. Verifique que la palancade parada del motor est_ en la posici6n de operaci6n.
7. Verifique que la v_lvula de combustible est_ en la posici6n ON (Abierta). Consulte el Manual del Motor.
El motor no se detiene.
1. Libere la palanca de parada del motor.
2. Revise el cable (mec_nico) de parada del motor. Reemplaceel cable si est_ doNado o dafiado.
EI funcionamiento dei motor es defectuoso.
1. Revise los ajustes de la dtura de corte. Aumente la altura de corte si el c6sped es alto.
2. Revise la parte inferior de la cubierta de la cuchilla. Limpie la cubierta de la cuchilla para remover c6sped y otros residuos.
3. Revise el cable de la bujia. Verifique que el cable est_ conectado.
4. Limpie las aletas de enfriamiento del motor para remover c6sped y otros residuos.
5. Revise la separaci6n entre electrodos de la bujia. EstaNezcala separaci6n entre electrodos de [a bujia en 0.030".
6. Verifique la cantidad de aceite en el motor. Llene con aceite si es necesario.
7. Revise el %ro de aire del motor. Consulte el Manual del Motor.
8. La gasolina est_ deficiente. Drene y impie el tanque de combustible. Llene el tanque de combustible con gasolina limpia.
Vibraci6n exeesiva.
1. Lleve el cortac6sped a un Centro de Servicio Autorizado.
El cdsped no se descargacorrectamente.
1. Limpie la parte inferior de la cubierta del cortacesped.
2. Lleve el cortac6sped a un Centro de Servicio Autorizado.
El cdsped no se corta de manerauniforme.
1. Revise el ajuste de dtura en cada rued& El ajuste de altura debe ser el mismo para cada rued&
2. Lleve el cortac6sped a un Centro de Servicio Autorizado.
18 www.snapper.com
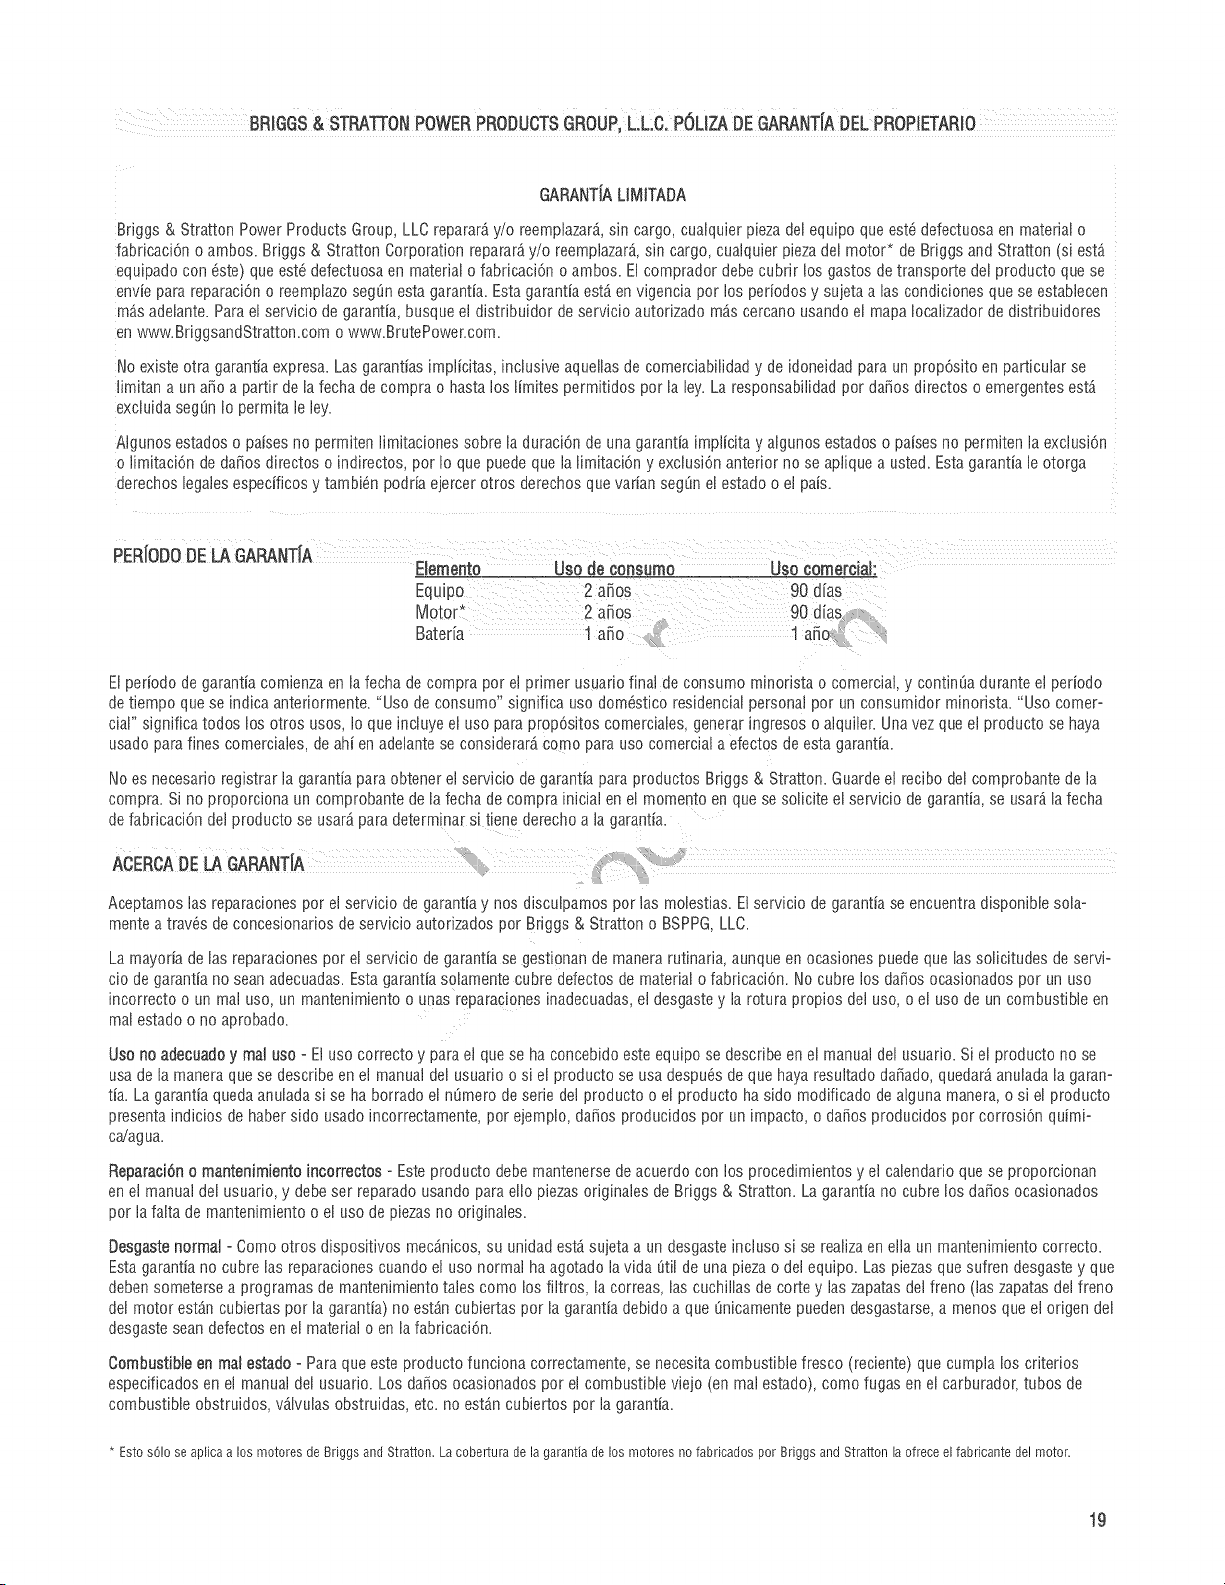
BRIGGS&STRATFONPOWERPRODUOTSGROUP,L.LO.POLIZADEGARANT[ADELPROPIETARJO
GARANTIAUMITADA
Briggs & Stratton Power Products Group, LLC reparar_, y/o memplazar& sir cargo, cualquier pieza del equipo que est6 defectuosa en material o
fabricaci6n o ambos. Briggs & Stratton Corporation reparar_, yio reemplazar& sin cargo, cuaiquier pieza dei motoC de Briggs and Stratton (si est,.
equlpado con 6ste que est6 defectuosa en _naterial o fabricaci6n o ambos. Ei comprador debe cubrir los gastos de transporte del producto que se
envte para 'eparaciOn o _eemplazo segun esta garantia. Esta garantia est,. en vlgencia por los periodos y sujeta a las condiciones que se establecen
m_.sadelante. Para el servicio de garantia. 3usque el distribuidor de servicio autorizado ma.s cercano usando ei mapa Iocalizador de distribuidores
en www.BriggsandStratton.com o www.BrutePower.com.
No existeotra garantiaexpresa Las garantiasimplicitas,inclusive aqueliasde comerciabilidady de idoneidadpara un prop6sito en particular se
limitan a un argoa partir de la fecha de compra o hasta los limites _ermitidos _or la ley. La responsabilidadpor dariosdirectos o emergentesest,.
exciuidasegQn o permita le ley.
Aigunosestados o paisesno permiten imitacionessobre la duraci6nde unagarantia implicita y algunosestadoso paisesno permitenla exciusi6n
o limitaci6n de daiios directos o indirectos por Io que puedeque la limitaci6n y exciusi6nanterior no se apfiquea usted. Esta garantiale otorga
derechoslegalesespecificosy tambi6n podriaeiercerotros derechosque /arian segOnel estado o el pals.
PERIODODELAGARANT[A
Etemento Uso de consumo Uso comercial:
Equipo 2 aSos 90 dias
Motor* 2 aSos 90 dias
Bater[a 1 afro 1 a_o
El periodo de garantia comienza en la fecha de compra por el primer usuario final de consumo minorista o comerciaI, y continOa durante el pedodo
de tiempo que se indica anteriormente. "Uso de consumo" significa uso dom_stico residenciai personal por un consumidor minorista. "Uso comer°
ciai" significa todos los otros usos Io que incluje el uso para propOsitos comerciales general ingresos o alquiler. Una vez que ei producto se haya
usado para fines comerciales, de ahi en adelante se considerar_ como para uso comercial a efectos de esta garantia
No es necesarioregistrar-la garantiaparaobtenerei servicio de garantiaparaproductosBriggs & Stratton.Guardeei recibo dei comprobantede la
compra. Si no proporcionaun comprobantede la fecha de compra inicial en el momentoen quese solicite el servicio de garantia,se usar_ lafecha
de fabricaci6ndel productose usar_ paradeterminarsi tiene derechoa la garantia.
ACERCADE LA GARANT[A
Aceptamoslas reparacionespor el servicio de garantiay nos discuipamospor ias molestias.El servicio degarantiase encuentradisponibiesola-
mentea travds de concesionariosde servicio autorizadospor Briggs & Stratton o BSPPG,LLC.
La mayoriade las reparacionespor el servicio de garantiase gestionande manerarutinaria,aunqueen ocasionespuedeque lassolicitudes de servi-
cio de garantiano seanadecuadas.Estagarantiasolamentecubredefectosde materialo fabricaci6n. No cubrelos dar]osocasionadospor un uso
incorrectoo un mal uso,un mantenimientoo unas reparacionesinadecuadas,ei desgastey la rotura propios dei uso,o ei uso de un combustibleen
mal estadoo no aprobado.
Uso no adecuadoy mal uso - Eluso correcto y parael quese ha concebidoeste equipo se describeen el manual del usuario. Siel productono se
usa de la maneraquese describeen el manualdei usuarioo si el producto se usa despu_sde que hayaresultadodar]ado,quedar_anuladala garan-
tia. La garantiaquedaanuladasi se ha borradoel nQmerode serie del producto o el producto ha sido modificado de alguna manera,o si el producto
presentaindicios de habersido usadoincorrectamente,por ejemplo,da_os producidospor un impacto,o da_osproducidospor corrosi6n quimi-
ca!agua.
Reparaci6no mantenimientoincorrectos - Esteproducto debe mantenersede acuerdo con los procedimientosy el caiendarioquese proporcionan
en eI manualdel usuario,y debeser reparadousandopara eilo piezasoriginalesde Briggs & Stratton.La garantiano cubre los daffosocasionados
por la faita de mantenimientoo eI uso de piezasno originaies.
Desgaste normal - Como otros dispositivos mec_.nicos, su unidad est,. sujeta a un desgaste incluso si se realiza en ella un mantenimiento correcto.
Esta garantia no cubre las reparaciones cuando el uso normal ha agotado la vida Qtil de una pieza o del equipo. Las piezas que sufren desgaste y que
deben someterse a programas de mantenimiento tales como los filtros, la correas, las cuchillas de corte y las zapatas del freno (las zapatas del freno
del motor- est_.n cubiertas por la garantia) no est_.n cubiertas por la garantia debido a que Qnicamente pueden desgastarse, a menos que ei origen dei
desgaste sean defectos en ei material o en la fabricaci6n.
Combustibleen mal estado - Paraque esteproductofunciona correctamente,se necesitacombustiblefresco (reciente)que cumpialos criterios
especificadosen el manualdel usuario. Los darlos ocasionadospor el combustibleviejo (en maI estado),como fugas en ei carburador,tubos de
combustibleobstruidos,v_.ivulasobstruidas, etc. no est_.ncubiertos por lagarantia.
* Esto s61o se aplica a los motores de Briggs and Stratton. La cobertura de la garantia de los motores no fabricados por Briggs and Stratton la ofrece el fabricante de! motor.
19

.....%
2@ www.snappencom
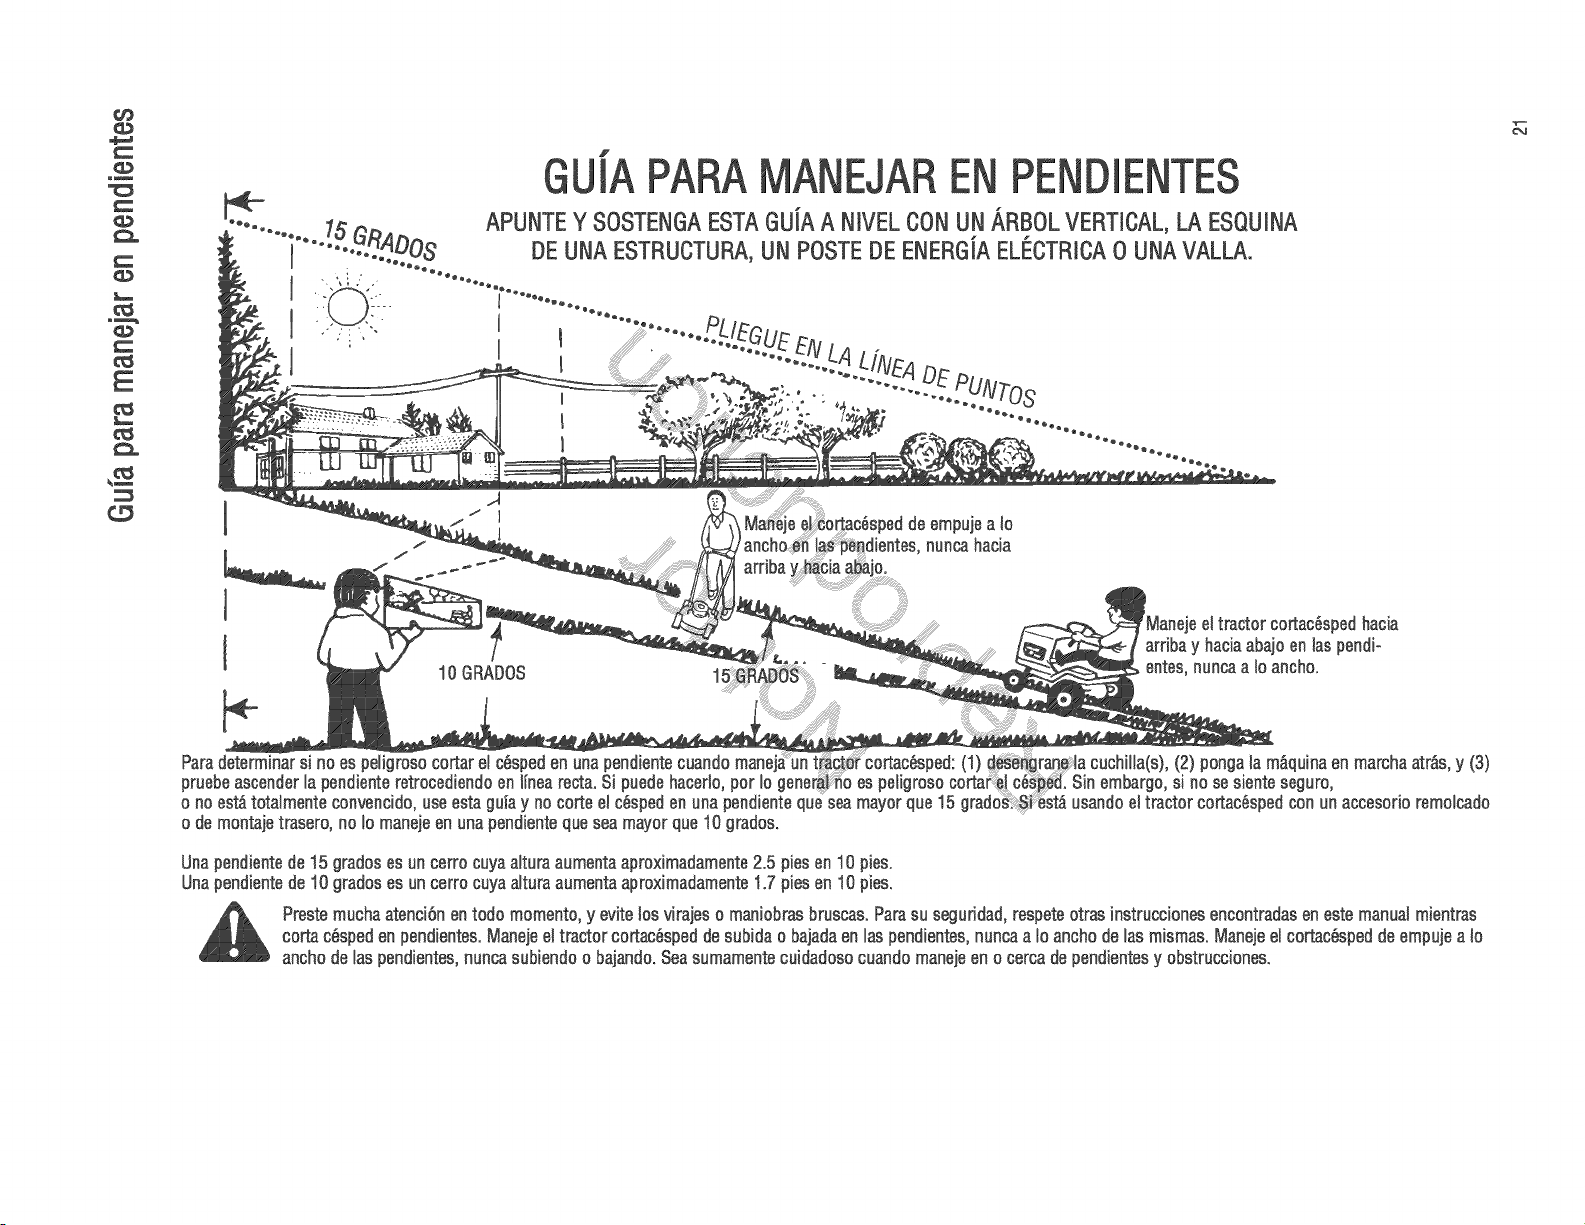
_m
c_
CD
7
GUIA
.... . 15 _ APUNTEY SOSTENGAESTAGUiA A NIVELCONUN_,RBOLVERTICAL,LA ESQUINA
.... I........ _oR.ADOS DE UNAESTRUCTURA,UN POSTEDE ENERGiAELECTRICA0 UNAVALLA.
i ' //-- 1 " °o o
_NL4 LINE4DE PUNTos
I
bacia
arribay baciaabajosn [aspendi-
entes,nuncaa Io ancho.
Para determinar s[ no es peligroso cortar el c_eped en una pendiente cuando mane
pruebe ascender[a pendiente retrocedisndo en t_nearecta. Si puede bacer[o, pot [o es peligroso
o no est_ totaimente convencido, use esta guia y no core e[ c_spsd en una pendiente que sea mayor que 15
o de montaje trasero, no Io maneje en una pendiente que sea mayor que 10 grados.
(1) (2) ponga la m_quina en marcha atr_e, y (3)
Sin embargo, si no se siente seguro,
usando eltractor coAac6sped con un accesorio remoicado
Una pendientede 15 grados es un cerro cuya altura aumenta aproximadamente 2.5 pies en 10 pies.
Una pendiente de 10 gradoe es un cerro cuya a[tura aumenta aproximadamente 1.7 pies en 10 pies.
Preste mucha atenci6n en todo momento, y evite los virajes o man]obras bruscae. Para su segundad, respete otras inetrucciones encontradae en este manual mientrae
corta c_sped en pendientes. M&qejee[ tractor cortac_sped de subida o bajadaen [as pendientes, nunca a Io ancho de }as mismas. Maneje el cortac_sped de empuje a Io
ancho de [as pendientes, nunca eubiendo o bajando. Seasumamente cuidadoso cuando maneje en o cerca de pendientes y obstrucciones.
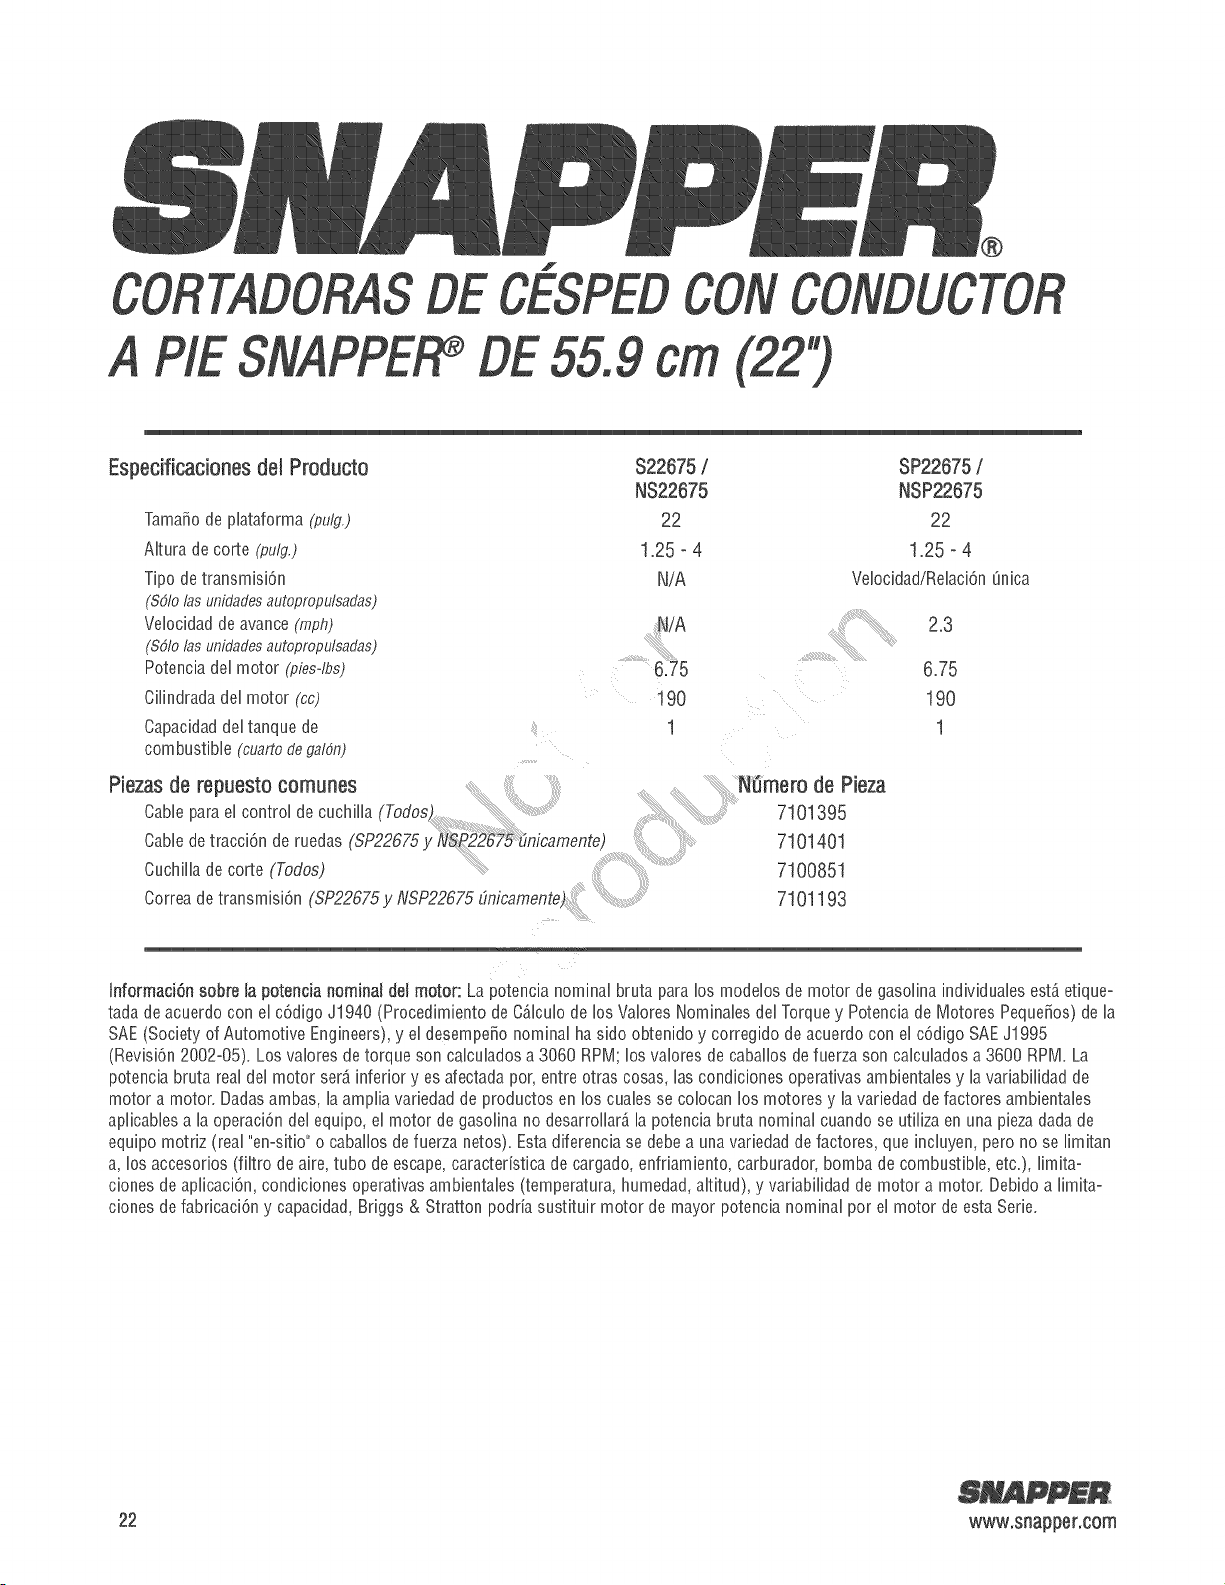
f
DE55.9 cm (22")
Especificacionesdel Producto
S22675/ SP22675/
NS22675 NSP22675
Tamaio de plataforma (puLq.)
22 22
Alturadeconte(pulg.) 125 - 4 125 - 4
Tipo de transmisi6n
(Sdlolasunidadesautoproputsadas)
Velocidad de avance (mp,_)
(Sdlolasunidadesautopropulsadas)
Potencia del motor (pbs-lbs)
NiA VelocidadiRelaci6n inica
N/A 2.3
6.75
Cilindrada del motor (cc)
Capacidaddel tanque de
combustible (cuartode galdn)
190 190
1 1
Piezasde repuestocomunes ...... Nimero de Pieza
Cable para el control de cuchilla (Todos)...................................... .... 7101395
Cable de tracci6n de ruedas (SP22675 yNSP2_75Emicamente) ........ 7101401
Cuchilla de conte(Todos) 7100851
Correa de transmisi6n (SP22675yNSP22675 L'micamente)i 7101193
Informaci6n sobre la potencia nominal del motor: La potencia nominal bruta para los modelos de motor de gasolina individuales est_ etique-
tada de acuerdo con el c6digo J1940 (Procedimiento de CAIculo de los Valores Nominales del Torque y Potencia de Motores Pequeios) de la
SAE (Society of Automotive Engineers), y el desempeio nominal ha sido obtenido y corregido de acuerdo con el c6digo SAEJ1995
(Revisi6n 2002-05). Los valores de torque son calculados a 3060 RPM; los valores de caballos de fuerza son calculados a 3600 RPM. La
potencia bruta real del motor serA inferior y es afectada por, entre otras cosas, las condiciones operativas ambientales y la variabilidad de
motor a motor. Dadas ambas, la amplia variedad de productos en los cuales se colocan los motores y la variedad defactores ambientales
aplicables a la operaci6n del equipo, el motor de gasolina no desarrollarA la potencia bruta nominal cuando se utiliza en una piezadada de
equipo motriz (real "en-sitio" o caballos de fuerza netos). Esta diferencia se debe a una variedad de factores, que incluyen, pero no se Iimitan
a, los accesorios (filtro de aire, tubo de escape, caracteristica de cargado, enfriamiento, carburador, bomba de combustible, etc.), Iimita-
clones de aplicaci6n, condiciones operativas ambientales (temperatura, humedad, altitud), y variabilidad de motor a motor. Debido a Iimita-
clones de fabricaci6n y capacidad, Briggs & Stratton podria sustituir motor de mayor potencia nominal por el motor de esta Serie.
22 wwwosnapperocom