Loading ...
24-48
HRS
CLEANING THE EXHAUST FILTER
PART # 902418001
TROUBLESHOOTING
WARNING:
To reduce the risk of personal injury, unplug vacuum
before servicing. Do not operate cleaner without either the secondary or
final filter in place.
AVAILABLE REPLACEMENT PARTS AND ACCESSORIES SUCH AS BAGS CAN BE FOUND ON
HOOVER.COM
IF APPLIANCE IS NOT WORKING AS IT SHOULD, HAS BEEN DROPPED, DAMAGED, LEFT
OUTDOORS, OR DROPPED INTO WATER, CALL CUSTOMER SERVICE AT 1-800-944-9200 PRIOR
TO CONTINUING USE.
ALWAYS IDENTIFY YOUR CLEANER BY THE COMPLETE MODEL NUMBER. (THE MODEL NUMBER
APPEARS ON THE BOTTOM OF THE CLEANER.)
CAUTION:
Not to be used for
grooming a pet.
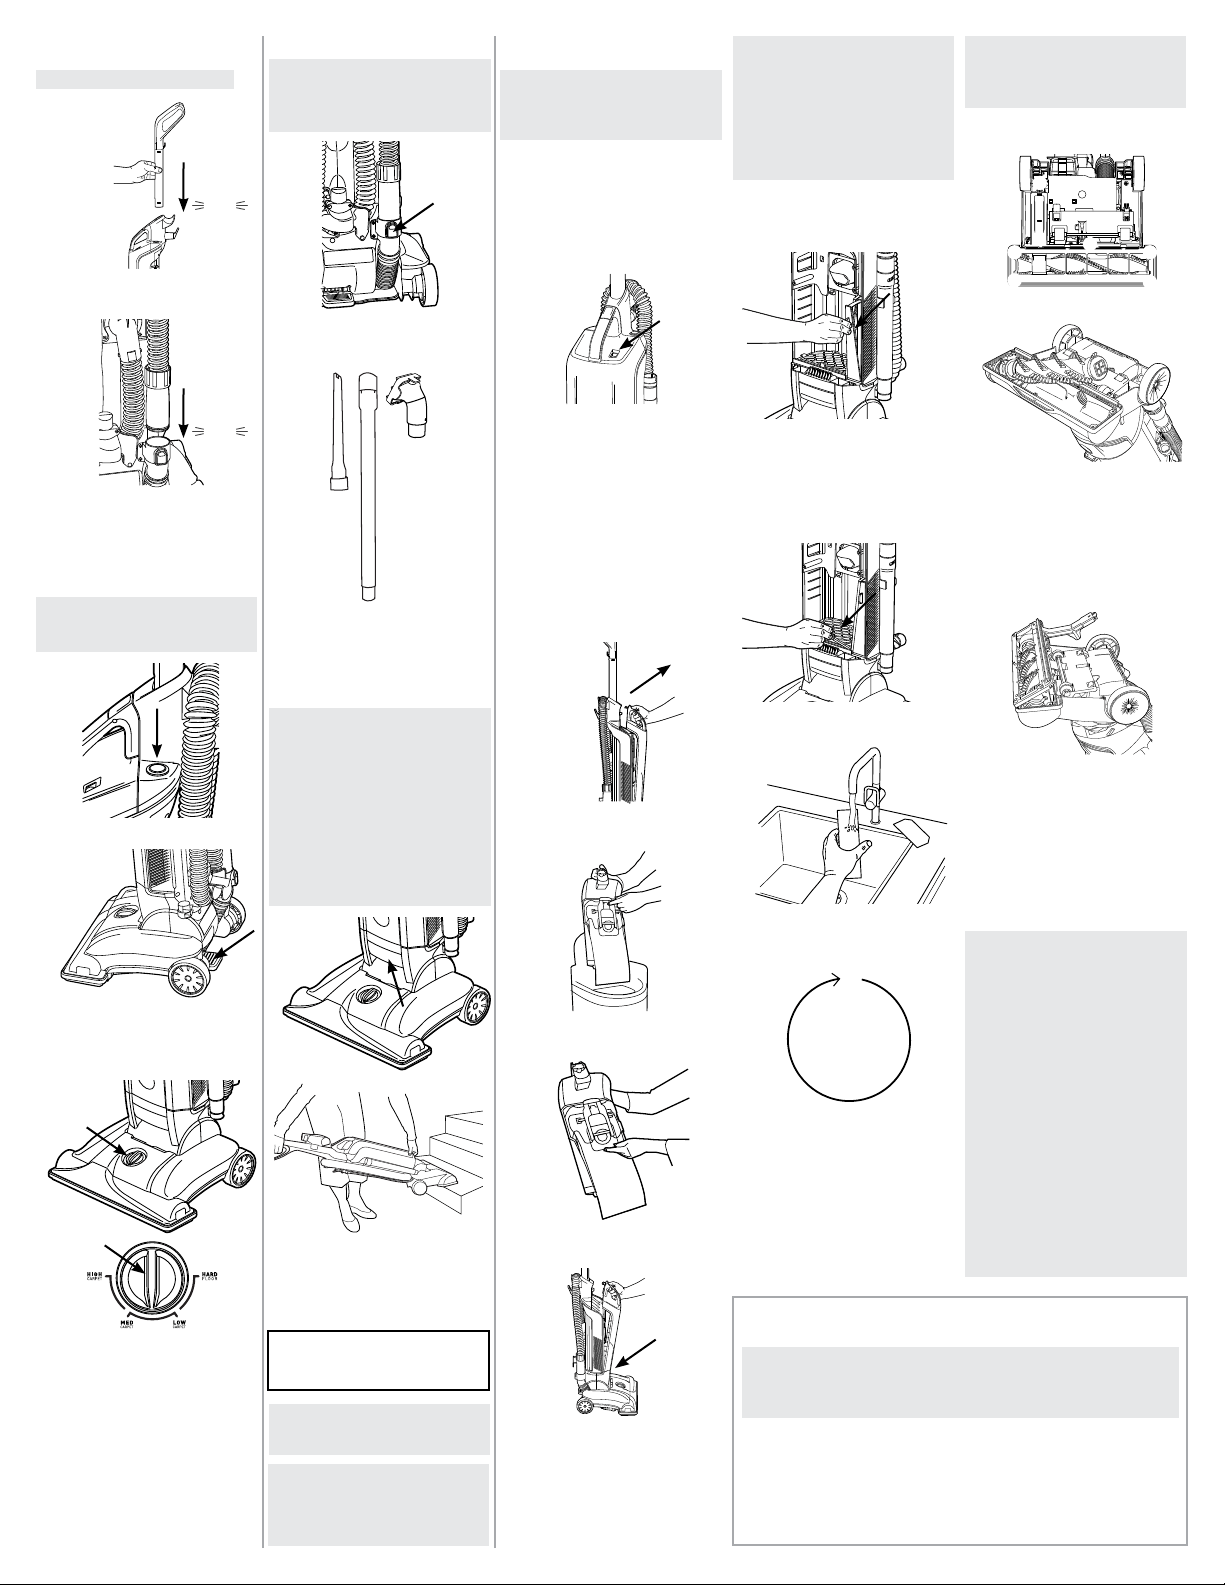
1
Push the handle into the body of the vacuum
until it clicks into place.
Fully assemble product prior to use.
2
Insert hose into hose port. It will click when
secured.
ASSEMBLY
LUBRICATION: The motor is equipped
with bearings which contain sufficient
lubrication for their lifetime. The addition
of lubricant could cause damage. Do not
add lubricant to motor bearings.
1
2
Press the Power Button to turn ON/OFF.
Step on handle release pedal and lean
handle back.
OPERATION
click
click
1
1
To change the filter bag, while pushing the
door release button, pull the handle up and
out.
WARNING:
To reduce the risk of
personal injury, unplug before
cleaning or servicing.
MAINTENANCE
This product contains no serviceable parts.
If appliance is not working as it should, has
been dropped, damaged, left outdoors, or
dropped into water, call customer service at
1.800.944.9200 prior to continuing use.
Place bag door over trash bin and push lever
to drop filter bag into trash bin.
2
2
3
4
5
1
Lift the grill out and pull to remove the
secondary filter.
CLEANING THE SECONDARY FILTER
PART # 902417001
With door and filter bag removed, remove the
exhaust filter by pulling tab on filter holder
and swinging it outward.
3
Slide the new filter bg’s crdbord sleeve
into the bg holder so the lever secures it.
Replace the door by inserting the bottom
first, then swing the top of the bag door in
so it latches.
NOTE: Make sure the filter bag is tucked
securely between the tabs on the bag door.
IMPORTANT: Use only genuine HOOVER® bags
with your vacuum.
4
CAUTION:
Very fine materials,
such as face powder or cornstarch,
may seal the filter bag and may
cause it to burst even though it is
partially full of dirt. When the
cleaner is used to remove material of
this nature, change filter bag often.
Rinse filters with water only until the filter is
clean and the water runs through clear. Gently
squeeze the filter to remove excess water.
Allow filters to air dry for at least 24 hours.
IMPORTANT: The filters must be completely
dry before replacing it. This may take between
24 and 48 hours.
Replace filters.
To replace the brushroll, loop the belt around
the brush roll and push the roll back into
place. Replace the nozzle guard and six
screws.
TIP: Rotate brushroll manually to ensure the
belt is properly installed. Check for obstruc-
tions in the brush roll area and remove any
obstructions. When obstructions are cleared,
resume cleaning as normal.
4
2
1
Pull the brushroll up and out from the
vacuum belt.
NOTE: From here you can install a new
Brushroll.
BELT MAINTENANCE
Remove the 6 screws to remove the nozzle
guard.
Cut o tangled hair and wipe away any debris.
3
CAUTION:
To reduce the risk of
injury from moving parts, unplug
before servicing.
To reduce the chance of system clogs be
sure to clean up large debris from the area
before vacuuming.
CARPET HEIGHT ADJUSTMENT
STAIR CLEANING
1
To adjust height setting, PUSH DOWN and
TURN knob desired height setting.
For maximum cleaning performance,
the following carpet height settings are
recommended:
• Lowest setting (1) : for bare floors
• Low setting (2): for all types of carpet
• Higher settings: for very deep pile carpet,
where easier pushing eort is desired, while
maintaining good cleaning performance.
IMPORTANT: If the vacuum is dicult to push,
push down and turn knob to the next higher
setting.
CAUTION:
To reduce the risk of
injury from moving parts, unplug
before servicing.
USING HOSE AND ATTACHMENTS
1
Make sure the vacuum is upright and press
the hose release button and pull hose end
out.
Remove hose and attach the desired accessory.
The Extension Wand can be added for addi-
tional reach.
2
CAUTION:
Use extra care when
cleaning on stairs. To avoid personal
injury or damage, and to prevent the
cleaner from falling, always place
cleaner at the bottom of the stairs or
on the floor. Do not place cleaner on
stairs or furniture, as it may result in
injury or damage. When using tools,
always ensure handle is in the
upright position.
CORD STORAGE: Wrap the power cord
around the cord hooks for convenient
storage. Attach the plug end to the cord.
The bag check indicator will begin to show
red as the filter bags fills with dirt. There are
three conditions that will cause the indicator to
become completely red.
1. If the bag is full, change the bag.
2. If very fine materials have been picked up,
clogging the bag pores; change the bag.
3. If there is a blockage in the nozzle, hose,
tools or at the bag opening; remove the
blockage.
CHANGING THE FILTER BAG
PART # AH10040
BAG CHECK INDICATOR
1
Lift the vacuum by the stair cleaning handle
and position it on the stairs, cleaning forward
to back. Never leave the vacuum on the stairs
unattended or not when cleaning.
THERMAL PROTECTION
A thermal protector has been designed
into your cleaner to protect it from
overheating. When the thermal protector
activates the cleaner will stop running.
If this happens proceed as follows:
1. Turn cleaner OFF and unplug it from the
electrical outlet.
2. Replace Filter Bag.
3. Inspect and remove blockage along the
dirt path. This blockage may occur at
the: nozzle inlet, hose connector, hose,
bag opening inlet, secondary filter and
final filter.
4. When cleaner is unplugged and motor
cools for 30 minutes, the thermal
protector will deactivate and cleaning
may continue.
If the thermal protector continues to
activate after following the above steps,
your cleaner needs servicing.
➀
➂
➁
➃
➄
➅
Loading ...
Loading ...
Loading ...