Loading ...
Loading ...
Loading ...
ADJUSTING TILT GAGE -- Using
an accurate square, set saw blade at
right angles to table top. Then adjust
the pointer on the tilt gage (D, fig. 2)
to *'0".
ADJUSTING MITER GAGE SCALE
Using an accfirate square, block the
miter gage at the square position. Make
a trial cut on a fairly wide board, then
check this cut with the square. If cut
is accurate, set the pointer on the miter
gage scale (K, fig. 2) to "90". _
ADJUSTING FENCE INDICATORS
_Adjust right-hand fence indlcatoI
(part 135, fig. 4) by positioning fence
T
/
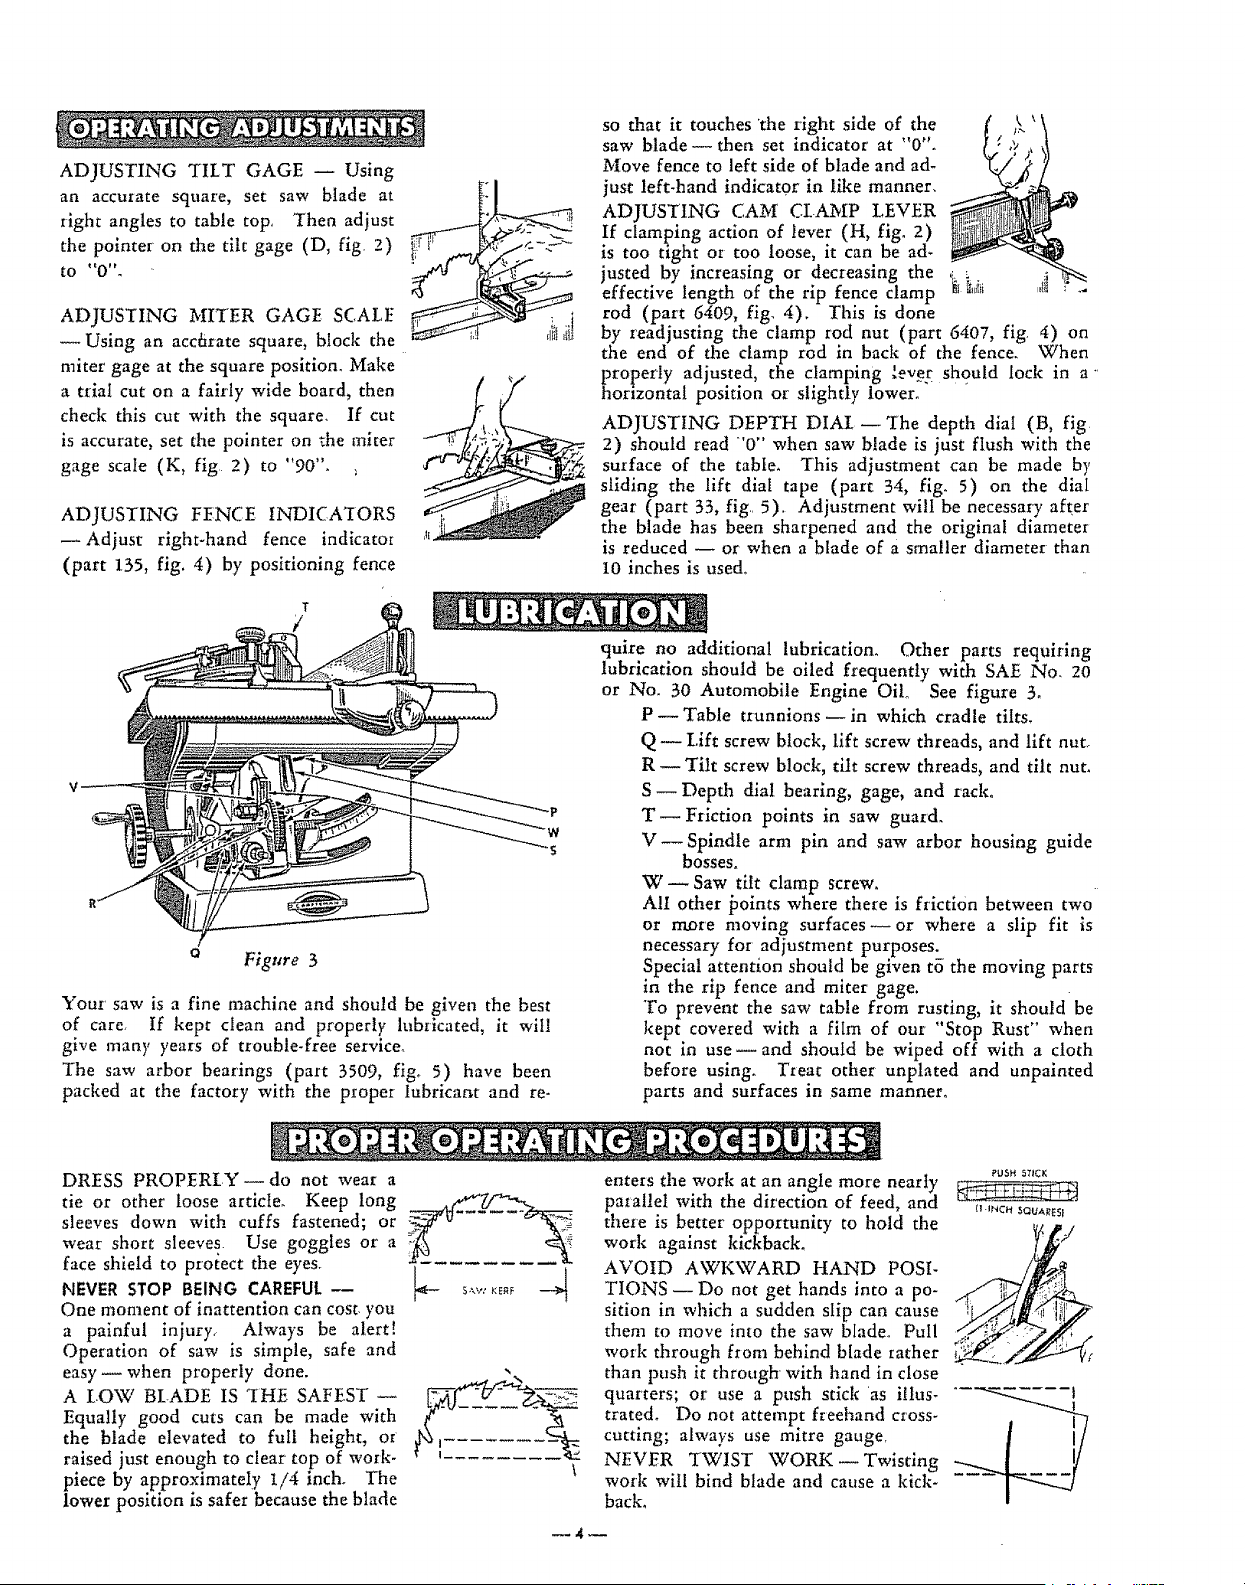
o Figure 3
Your' saw is a fine machine and should be given the best
of care. tf kept clean and properly lubricated, it will
give many years of trouble-free service°
The saw arbor bearings (part 3509, fig° 5) have been
packed at the factory with the proper lubricant and re-
so that it touches 'the right side of the
saw blade--then set indicator at "0".
Move fence to left side of blade and ad-
just left-hand indicator in like manner.
ADJUSTING CAM CLAMP LEVER
If clamping action of lever (H, fig° 2)
is too tight or too loose, it can be ad.
justed by increasing or decreasing the ,_.L
effective length of the rip fence clamp _t_iii ,,Iii _ ..
rod (part 6409, fig. 4). This is done
by readjusting the clamp rod nut (part 6407, fig. 4) on
the end of the clamp rod in back of the fence. When
properly adjusted, the clamping **ever should lock in a"
horizontal position or slightly lower[ "_ "
ADJUSTING DEPTH DIAI. _ _[he depth dial (B, fig
2) should read "0" when saw blade is just flush with the
surface of the table. This adjustment can be made by
sliding the lift dial tape (part 34, fig. 5) on the dial
gear (part 33, fig.. 5). Adjustment will be necessary after
the blade has been sharpened and the original diameter
is reduced -- or when a blade of a smaller diameter than
10 inches is used°
quire no additional lubrication_ Other parts requiring
lubrication should be oiled frequently with SAE No. 20
or No_ 30 Automobile Engine Oilo See figure 3.
P_Table trunnions _in which cradle tilts.
Q _ Lift screw block, lift screw threads, and lift nut_
R _ Tilt screw block, tilt screw threads, and tilt nut.
S _ Depth dial bearing, gage, and rack°
T _ Friction points in saw guard.
V _ Spindle arm pin and saw arbor housing guide
bosses.
W _ Saw titt clamp screw.
A!l other _oints where there is friction between two
or more moving surfaces _ or where a slip fit is
necessary for adjustment purposes.
Special attention should be given t6 the moving parts
in the rip fence and miter' gage.
To prevent the saw table from rusting, it should be
kept covered with a film of our "Stop Rust" when
not in use_ and should be wiped off with a cloth
before using. Treat other unplated and unpainted
parts and surfaces in same manner.
DRESS PROPERLY _ do not wear a
tie or other loose article. Keep long
sleeves down with cuffs fastened; or
wear short sleeves Use goggles or a
face shield to protect the eyes.
NEVER STOP BEING CAREFUL
One moment of inattention can cost, you
a painful injury, Always be alert!
Operation of saw is simple, safe and
easy _ when properly done.
A LOW BLADE IS THE SAFEST
Equally good cuts can be made with
the blade elevated to full height, or
raised just enough to clear top of work-
piece by approximately I/4 inch, The
lower position is safer because the blade
\
enters the work at an angle more nearly
parallel with the direction of feed, and
there is better opportunity to hold the
work against kickback.
AVOID AWKWARD HAND POSI-
TIONS _ Do not get hands into a po-
sition in which a sudden slip can cause
them to move into the saw blade.. Pull
work through from behind blade rather
than push it through with hand in close
quarters; or use a push stick as illus-
tratedo Do not attempt freehand cross-
cutting; always use mitre gauge_
NEVER TWIST _¢/ORK_Twisting
work will bind blade and cause a ldck-
back,
_USH 5i'lCl(
()-INCH SQUA_'[51
Loading ...
Loading ...
Loading ...