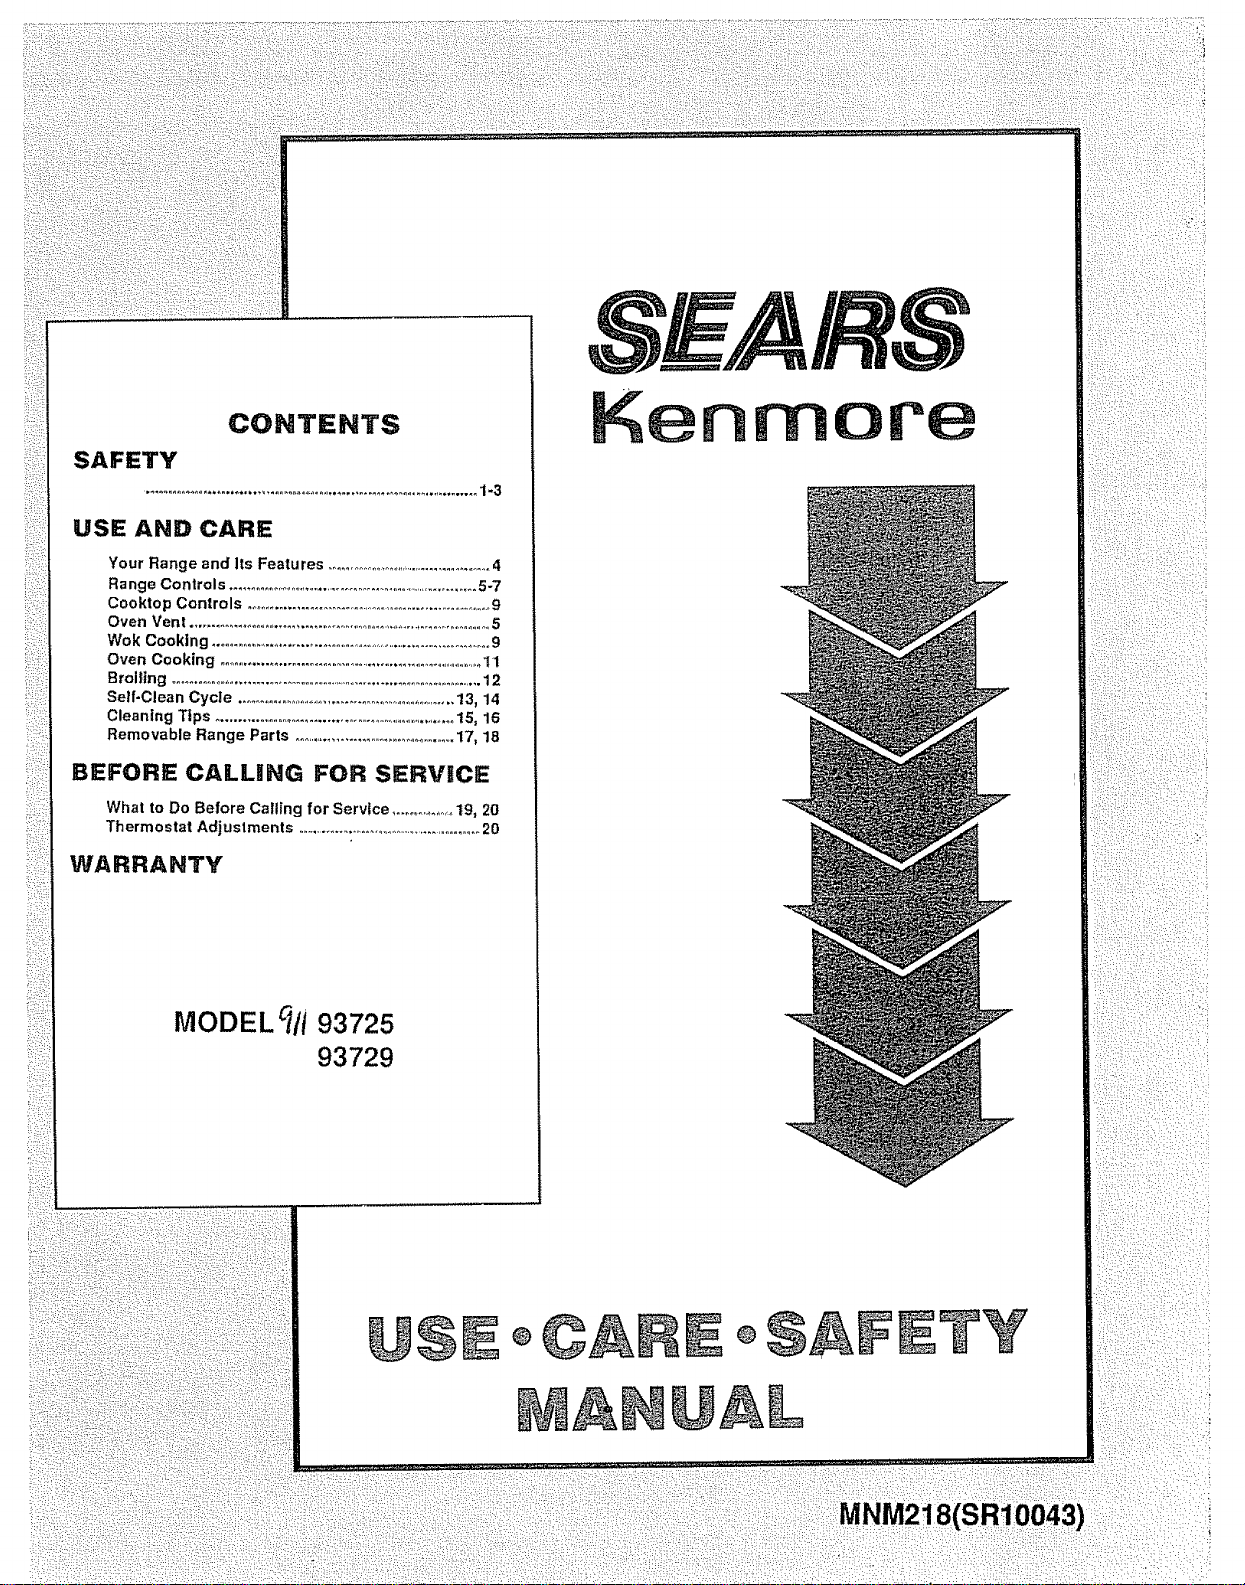
USE AND CARE
BEFORE CALLING FOR SERVICE
WARRANTY
MODEL _1i 93725
93729
:::::::::::::::::::::
Kenm
MNM2
T
TY
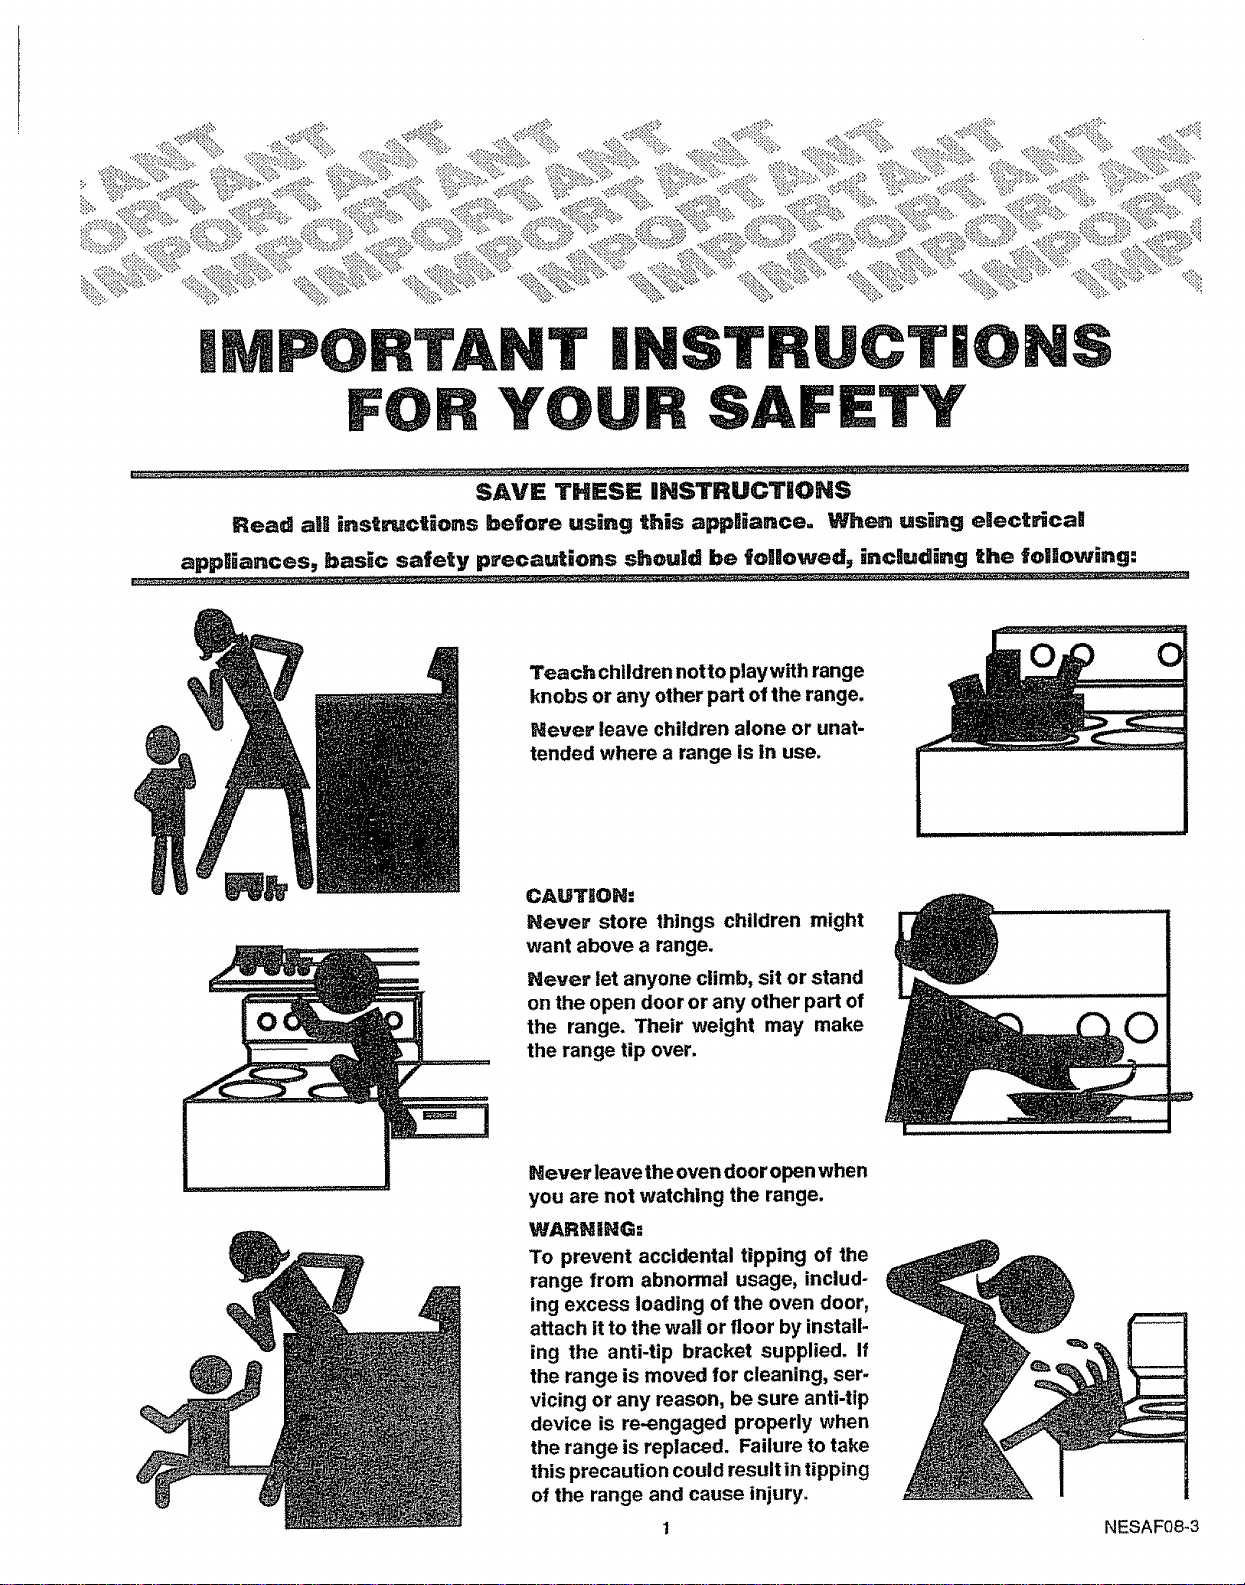
SAVE THESE INSTRUCTIONS
Read all instrJctions before using this appliance. When using enectNca!
appliances, basic safety precautions should be foUowed_ including _he following:
Teach children not to play with range
knobs or any other part of the range.
Never leave children alone or unat-
tended where a range is in use.
CAUTItON:
Never store things children might
want above a range.
Never let anyone climb, sit or stand
on the open door or any other part of
the range. Their weight may make
the range tip over.
Never leave theoven door open when
you are not watching the range.
WARNING:
To prevent accidental tipping of the
range from abnormal usage, includ-
ing excess loading of the oven door,
attach it to the wall or floor by install-
ing the anti-tip bracket supplied. If
the range is moved for cleaning, ser-
vicing or any reason, be sure anti-tip
device is re-engaged properly when
the range is replaced. Failure to take
this precaution could result in tipping
of the range and cause injury.
1 NESAF08_3

Altways keep the range area clear
and free from things that will burn.
CAUTIION:
Hever store things in an oven
or near cooktop elements/
burners. These things may catch
fire and plastic items could melt.
Never use your range for warming
or heating a room. You could be
burned or seriously Injured. Such
misuse could also cause damage to
the range.
Never wear loose clothing when
using your range. Such clothing
could catch fire.
Never use a towel or other bulky cloth
as a potholder. Such cloths could
catch fire on a hot element/burner.
Never let pot handles stick out
over the front of the range. Turn
handles in so that they cannot be
bumped into. Keep the handles
away from other hot surface ele*
merits/burners,
Never leave cooktop elements/
burners unwatched at high heat
settings. Bollovers cause smok-
ing and greasy spillovers could
catch fire.
2 NESAF09-2
Keep this book for later use.
Be sure your range is installed and grounded properly
by a qualified technician.
Aaways use care when touching surface elements,
oven heating elements or inside the oven. Heating
elements could be hot enough to burn you even if they
are dark in color. The oven vent duct and oven door may
also become hot during oven use.
A_er hroiming, always take the broiler pan out of the
oven and clean it. Leftover grease in the broiler pan can
catch on fire next time you use the pan.
Allways use dry potholders when removing pans from
the oven. Moist or damp potholders can cause steam
burns.
A_ways use care when opening oven door. Let hot air
and steam out before moving food.
AIIways follow cleaning instructions in this book_
Agways keep the range clean. Food and grease are
easy to ignite. Clean the oven regularly.
Always keep combustible wall coverlngs, curtains or
drapes a safe distance away from your range. Never
store such items in or on your range.
AHways keep wooden, plastic utensils, or canned food
a safe distance away from your range.
Always keep the appliance area clear and free from
things that will burn, gasoline and other flammable
vapors and liquids.
Always remove the broiler pan and other utensils from
the oven before a self-clean cycle.
C_ear= Or=ltypans llisted in the Mar=uaW.
Amuvays keep dish towels, dish cloths, potholders, and
linens a safe distance away from your range. Never
store such items in or near your range.
Neverheatunopenedfood containers. Pressure buildup
may make container burst and cause injury.
Never leave jars or cans of fat or drippings on or near
the range. Never let grease build up on your range. You
can keep grease fires from starting if you clean up
grease and spills after each range use.
Be sure eye.one in your hon:e knows what to do
it= case of a f_re,
Read ar=d understar=d this infon_at_on NOW!
ShouUd you ever need it, you wiB!not have t_me for
reading.
NeveruSe aluminum foil tel!he oven bottoms. Improper
use of foil could start a fire.
Never block free airflow through the oven vent.
Never try to move a pan of hot fat, especially a deep fat
fryer. Wait until the fat has cooled.
Place oven racks in desired position while oven is cool.
If racks must be handled when hot, do not let potholder
contact hot heating element in oven.
Choose pots and pans with flat bottoms, large enough
to cover the entire cooktop element. This will cut down
the risk of setting potholders or clothing on fire with an
uncovered element and waste less energy,
Only some kinds of glass or ceramic pans can be used
for cooktop cooking. Be sure that the pan you use will
not break when heated on the cooktop elements.
Never try to clean utensils, cookware or removable
parts of your range In the oven during a self-clean cycle.
Never rub, move, or damage the door gasket on self-
cleaning oven. The gasket is essential for a good seal.
Only clean the gasket by soaking it with hydrogen
peroxide, as described in the self-clean section of this
manual.
Illthe self.cllean_r=g mode maifunctier=s, turn off and
disconnect the power supply. Have serviced by a
qualified technician.
Never try to repair or replace any part of the range
unless instructions are given in this book. All other
work should be done by a skilled technician.
Do Not Use Over= C0ear=ers -- No commercial oven
cleaner or oven liner protective coating of any kind
should be used in or around any part of the oven.
Never put removable heating elements in water. Do not
put them in a dishwasher. Do not put them in the self.
clean cycle of your oven.
Never clean cooktop surface when it is hot. Some
cleaners produce noxious fumes and wet cloths could
cause steam bums if used on a hot surface.
OVEN FIIRE
Do not try to move the pan.
1. Close oven door and turn controls off.
2. If fire continues, throw baking soda on the fire.
Never use water on a grease f_re _ ll_ w_H er_lly
spread the flames.
, ,,,,,,
I]MPORTANT SAFB=P# ' NOTliCB
The California Safe Drinking Water and Toxic Enforce-
ment Act requires the Governor of California to publish
a list of substances known to the state to cause birth
defects or other reproductive harm, and requires busi-
nesses to warn customers of potential exposure to
such substances.
3
The fiberglass insulation in self-clean ovens gives off a
very small amount of carbon monoxide during the
cleaning cycle. Exposure can be minimized by venting
with an open window or using a ventilation fan or hood,
NESAF47
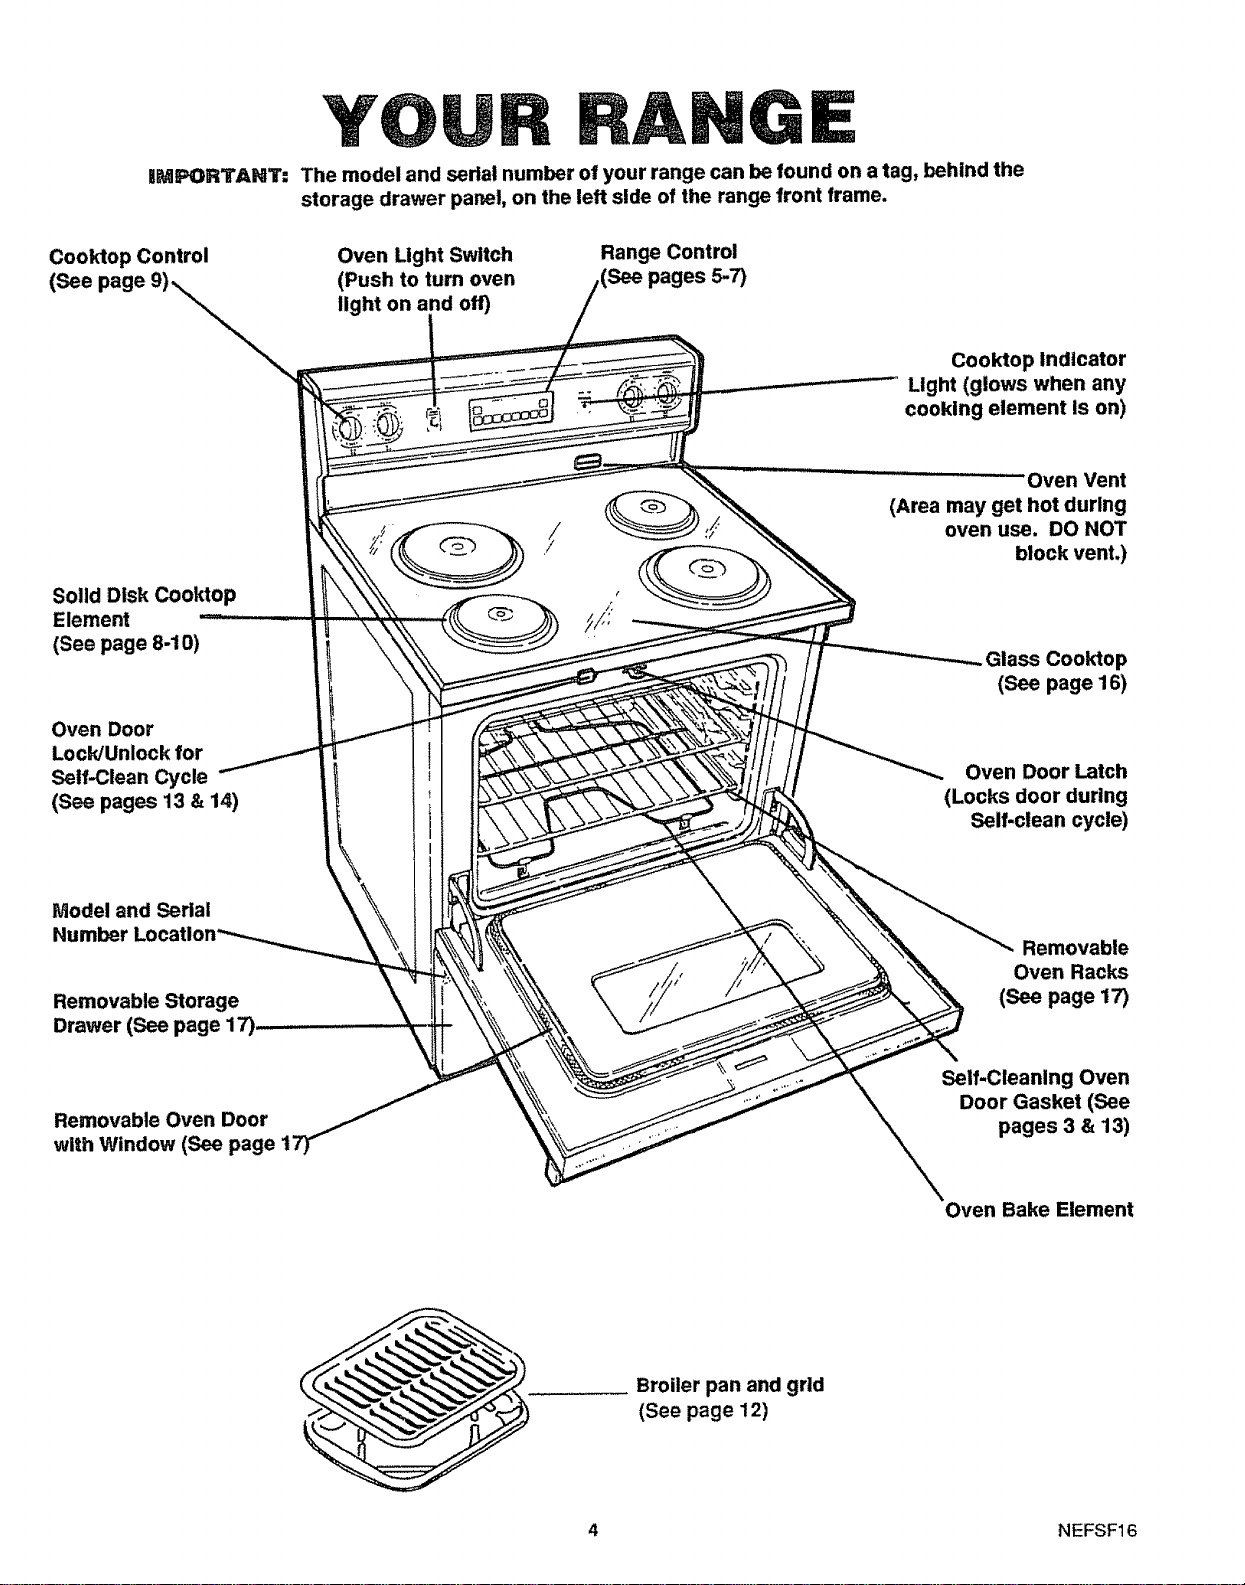
iMPORTANT:
Cooktop Control
(See page
YO
The model and serial number of your range can be found on a tag, behind the
storage drawer panel, on the left side of the range front frame.
Oven Light Switch
(Push to turn oven
light on and off)
Range Control
5-7)
Cooktop Indicator
Light (glows when any
cooking element Is on)
Solid Disk Cooktop
Element
(See page 8-10)
Oven Door
Lock/Unlock for
Self-Clean Cycle
(See pages 13 & 14)
Model and Serial
Nt
Removable Storage
Drawer (See
Removable Oven Door
with Window (See page
/
'Oven Vent
(Area may get hot during
oven use. DO NOT
block vent.)
.Glass Cooktop
(See page 16)
Oven Door Latch
(Locks door during
Self-clean cycle)
Removable
Oven Racks
(See page 17)
Self.Cleaning Oven
Door Gasket (See
pages 3 & 13)
Oven Bake Element
Broiler pan and grid
(See page 12)
4 NEFSF16
..... i,ii
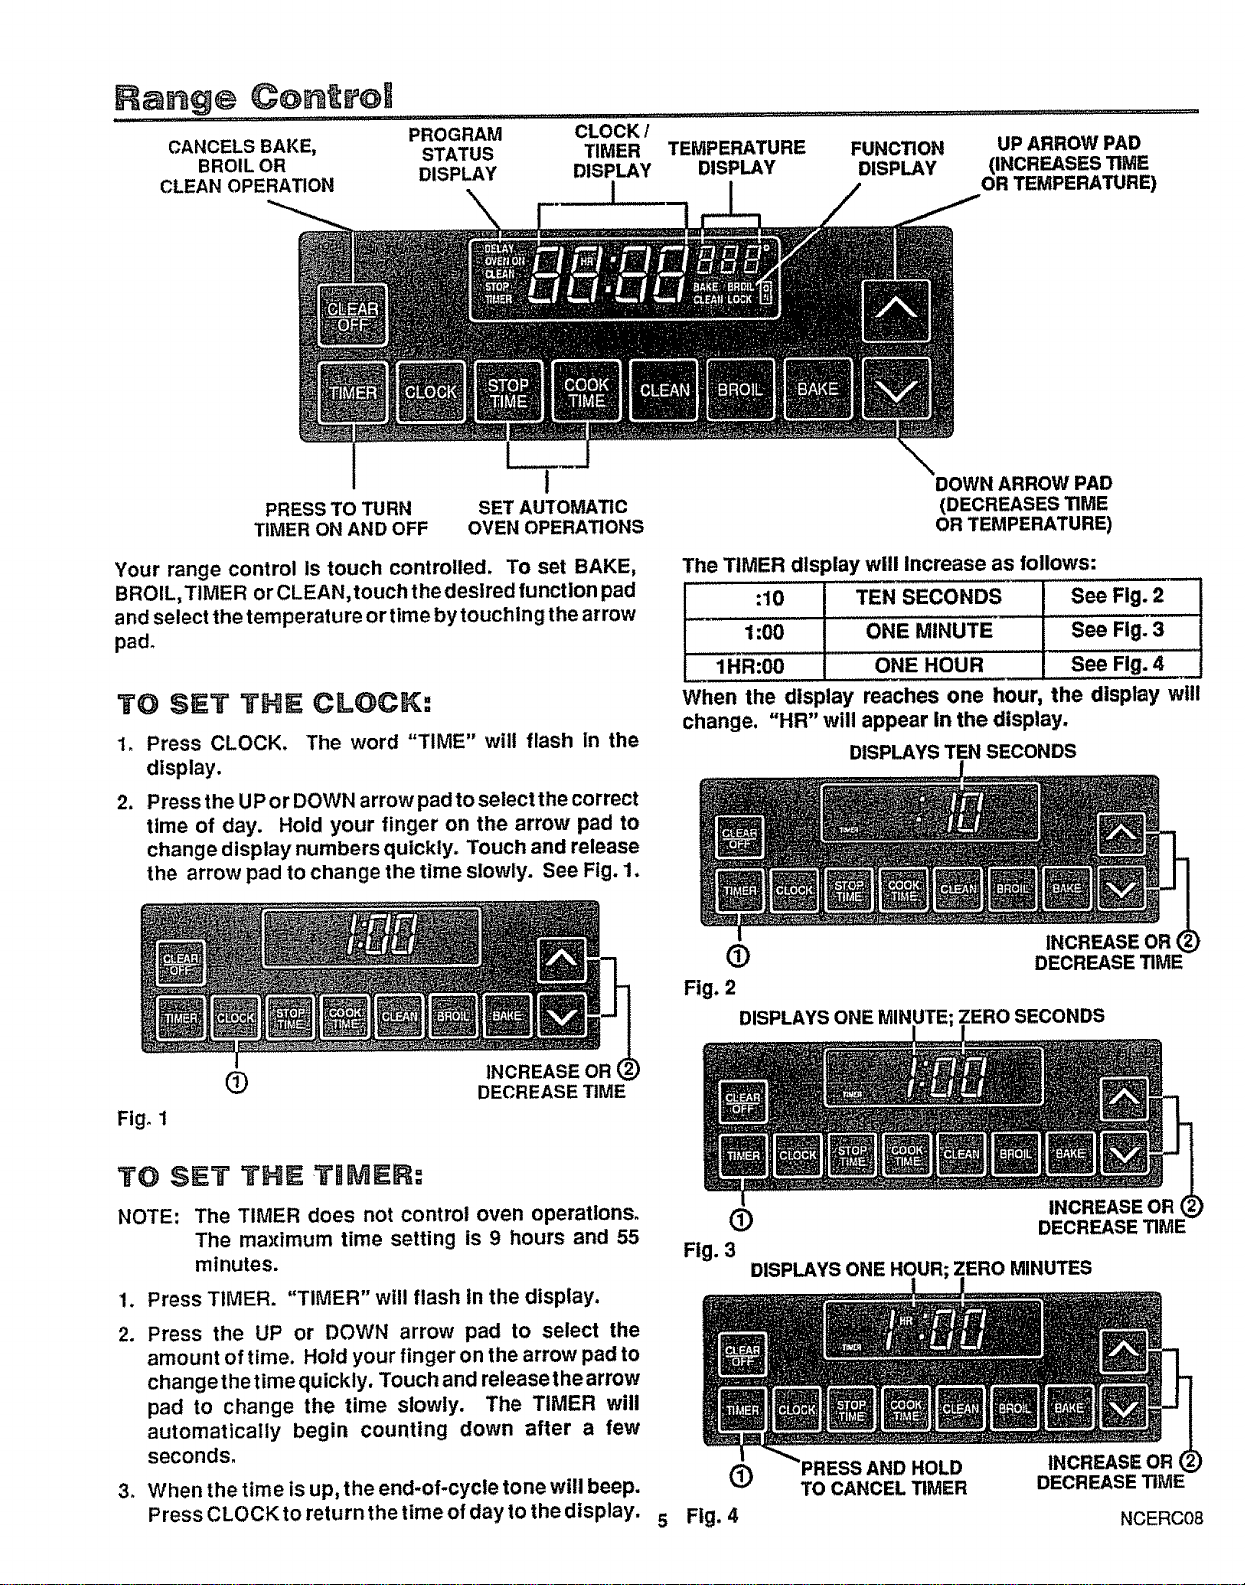
PROGRAM CLOCK /
STATUS TIMER TEMPERATURE FUNCTION UP ARROW PAD
DISPLAY DISPLAY DISPLAY DISPLAY (INCREASES TIME
OR TEMPERATURE)
PRESS TO TURN
TIMER ON AND OFF
1
SET AUTOMATIC
OVEN OPERATIONS
Your range control Is touch controlled. To set BAKE,
BROIL, TIMER or CLEAN, touch the destred function pad
and select the temperature or time bytouching the arrow
pad.
TO SET THE CLOCK:
1, Press CLOCK, The word "TIME" will flash in the
display.
2. Press the UP or DOWN arrow padto select the correct
time of day. Hold your finger on the arrow pad to
change display numbers quickly. Touch and release
the arrow pad to change the time slowly. See Fig. 1.
DOWN ARROW PAD
(DECREASES TIME
OR TEMPERATURE)
The TIMER display will Increase as follows:
:10 TEN SECONDS See Fig. 2
1:00 ONE MINUTE See Fig. 3
1HR:00 ONE HOUR See Fig. 4
When the display reaches one hour, the display will
change. "HR" will appear In the display.
DISPLAYS TEN SECONDS
INCREASE OR
(_) DECREASE TIME
Fig. 2
DISPLAYS ONE MINUTE ZERO SECONDS
Fig° 1
(T) INCREASE OR
DECREASE TIME
TO SET THE TIMER:
NOTE: The TIMER does not control oven operatlonso
The maximum time setting is 9 hours and 55
minutes.
1. Press TIMER. "TIMER" will flash in the display.
2. Press the UP or DOWN arrow pad to select the
amount of time. Hold your finger on the arrow pad to
changethetimequickly. Touch and releasethearrow
pad to change the time slowly. The TIMER will
automatically begin counting down after a few
seconds.
3_ When the time is up, the end-of-cycle tone will beep.
Press CLOCK to return the time of day to the display.
INCREASE OR
(D DECREASETIME
Fig. 3
DISPLAYS ONE HOUR: ZERO MINUTES
HOLD INCREASE OR
(_ TO CANCEL TIMER DECREASE TIME
Fig. 4 NCERC08
TO RESET THE T|MER:
"TIMER" will stop flashing and the TIMER will start
counting down a few seconds after you stop touching
the UP or DOWN arrow. If you pause while selecting the
time and the tlmer activates, press TIMER again and
continue to set the time.
TO CANCEL THE TIMER:
After TIMER begins to count down, press TIMER and
hold TIMER In at least four seconds until "TIMER" quits
flashing and time of day returns to display.
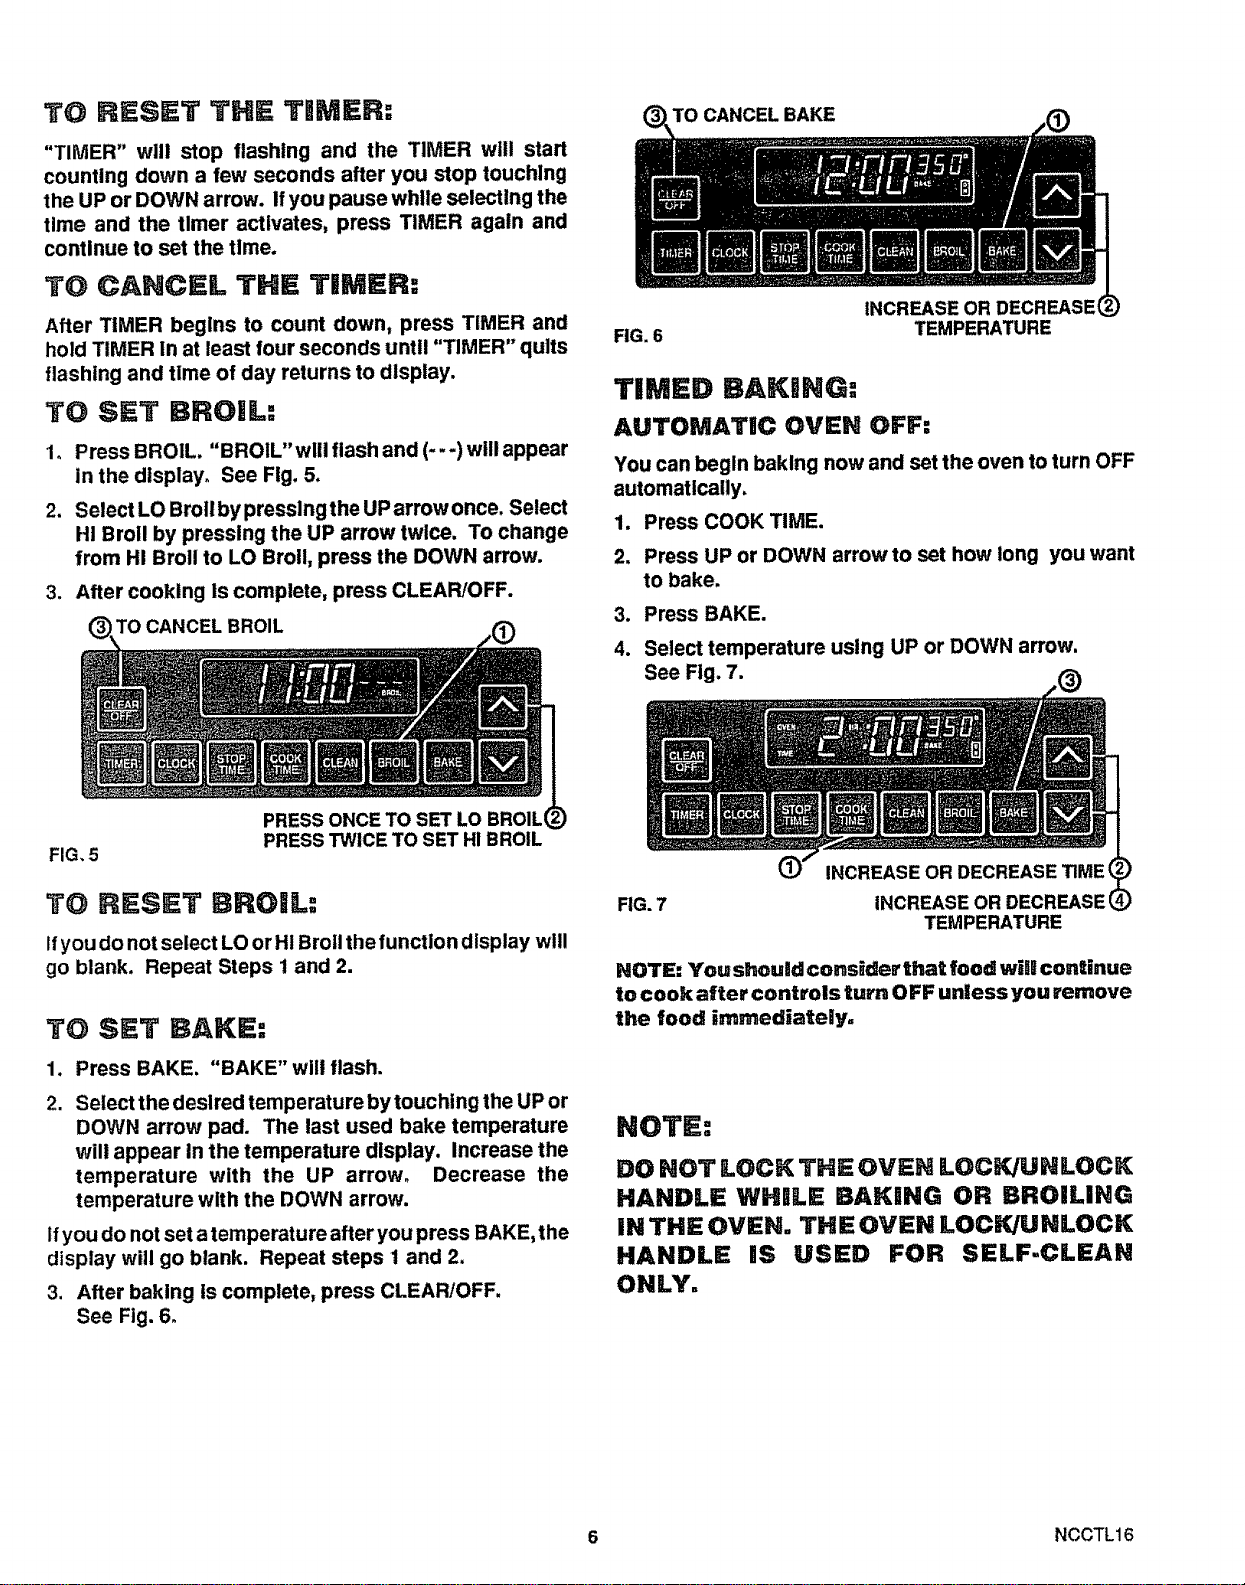
TO SET BROIL:
I,
.
Press BROIL. "BROIL" will flash and (- --) will appear
In the display° See Fig. 5,
Select LO Broil by presslngthe UP arrow once. Select
H! Broll by pressing the UP arrow twice. To change
from HI Broil to LO Broil, press the DOWN arrow.
3. After cooking is complete, press CLEAR/OFF.
(_, TO CANCEL BROIL
bTOCANCEL BAKE
FIG. 6
INCREASE OR DECREASE4
TEMPERATURE
TIMED BAKING:
AUTOMATIC OVEN OFF:
You can begin baking now and set the oven to turn OFF
automatically.
1. Press COOK TIME.
2. Press UP or DOWN arrow to set how long you want
to bake.
3. Press BAKE.
4. Select temperature using UP or DOWN arrow,
See Fig. 7.
FIG, 5
PRESS ONCE TO SET LO BROILq
PRESS TWICE TO SET HI BROIL
TO RESET BROIL:
Ifyou do not select LO or Hi Broil the function display will
go blank. Repeat Steps 1 and 2.
TO SET BAKE:
.
2.
Press BAKE. "BAKE" will flash.
Select the desired temperature by touching the UP or
DOWN arrow pad. The last used bake temperature
will appear In the temperature display. Increase the
temperature with the UP arrow. Decrease the
temperature with the DOWN arrow.
Ifyou do not set a temperature after you press BAKE, the
display will go blank. Repeat steps 1 and 2.
3. After baking Is complete, press CLEAR!OFF,
See Fig. 6o
FIG.7
INCREASE OR DECREASE _ME(
INCREASE OR DECREASE(
TEMPERATURE
NOTE: You should consider that food will continue
to cook after controls turn OFF unless you remove
the food immediately.
NOTE:
DO HOT LOCK THE OVEN LOCK/UNLOCK
HANDLE WHILE BAKING OR BROILING
IN THE OVEN. THE OVEN LOCK/UNLOCK
HANDLE iS USED FOR SELF-CLEAN
ONLY.
6 NCCTL16
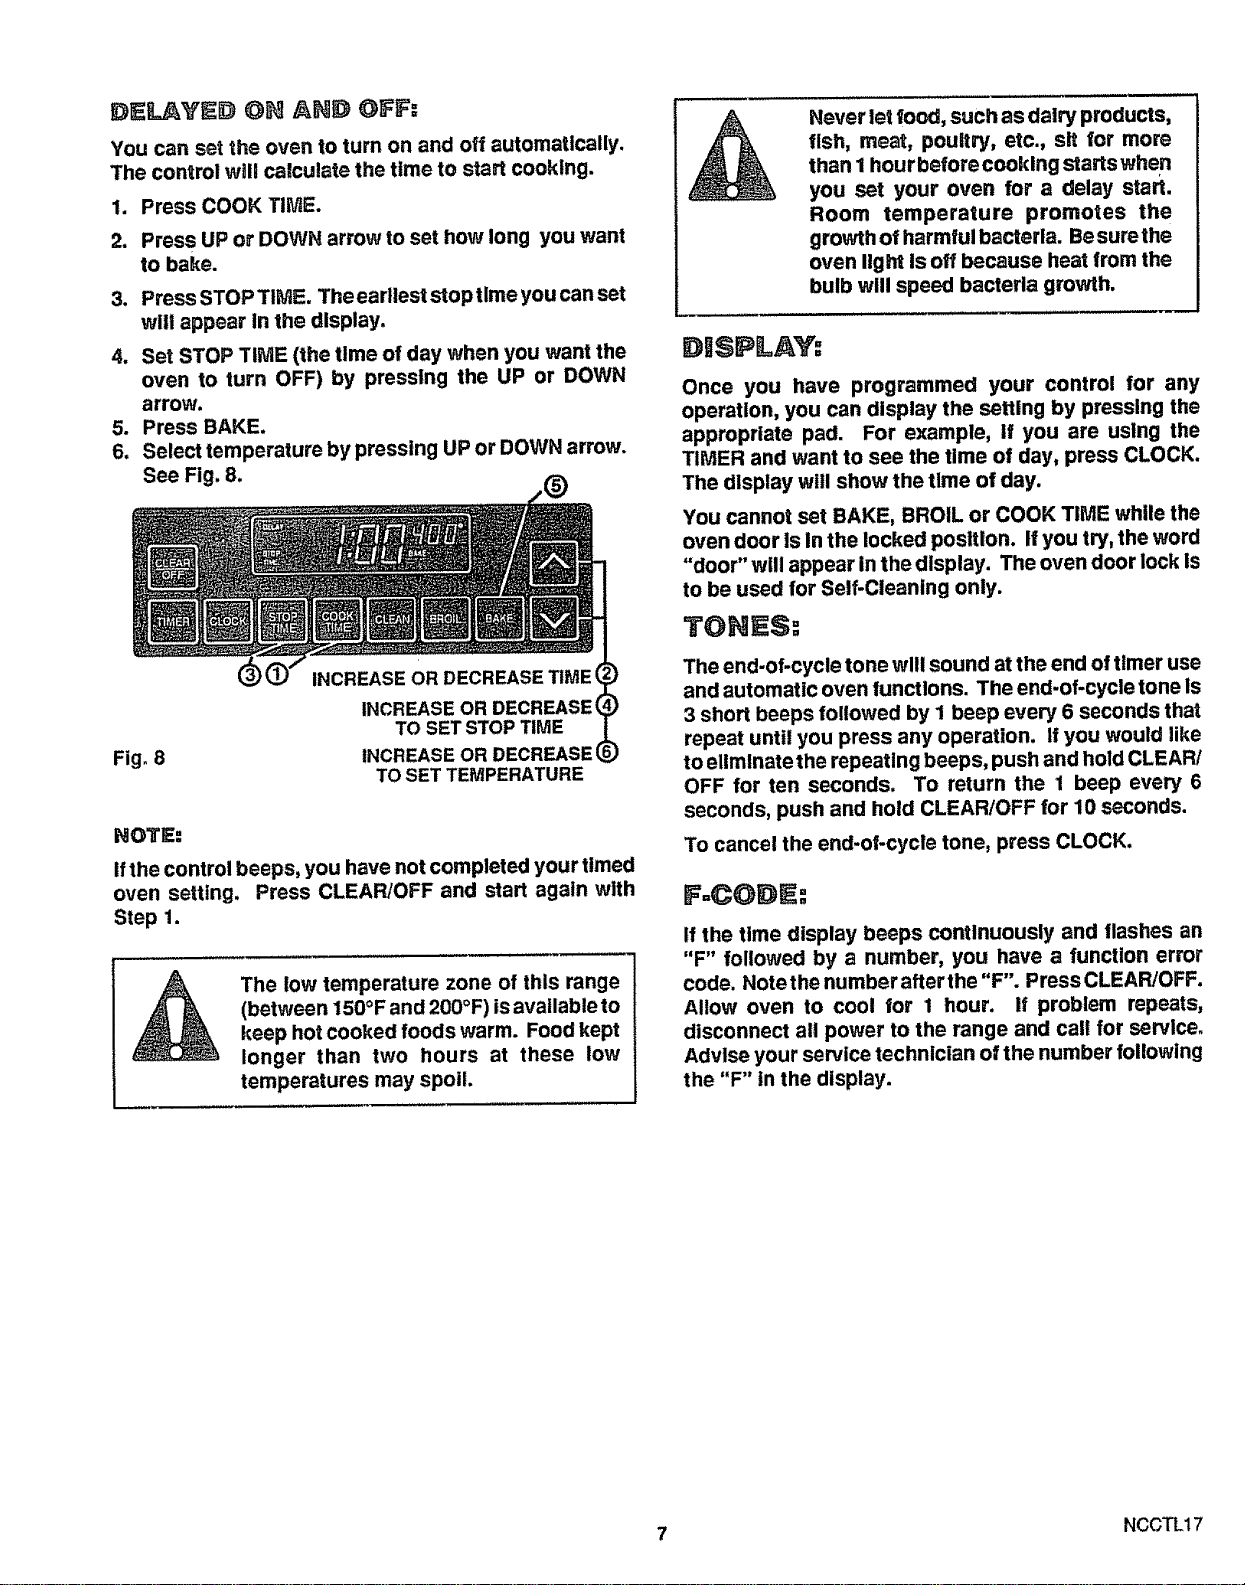
DELf_Y_ 0_ AND OFF:
You can set the oven to turn on and off automatically.
The control wall calculate the time to start cooking.
1. Press COOK TIME.
2. Press UP or DOWN arrow to set how long you want
to bake.
3. Press STOP TIME. Theearllest stop time you can set
will appear In the display.
4. Set STOP TIME (the time of day when you want the
oven to turn OFF) by pressing the UP or DOWN
arrow.
5. Press BAKE.
6. Select temperature by pressing UP or DOWN arrow.
See Fig. 8.
Fig° 8
INCREASE OR DECREASEI
TO SET STOP TIME
INCREASE OR DECREASEq
TOSET TEMPERATURE
NOTE:
ifthe control beeps, you have not completed your timed
oven setting. Press CLEAR/OFF and start again with
Step 1.
The low temperature zone of this range
(between 150°F and 200°F) isavailable to
keep hot cooked foods warm. Food kept
longer than two hours at these low
temperatures may spoil.
Never let 4oo4, such as dairy products,
fish, meat, poultry, etc., sit for more
than I hour before cooking starts when
you set your oven for a delay start.
Room temperature promotes the
growth of harmful bacteria. Besure the
oven light Is off because heat from the
bulb will speed bacteria growth.
DWSPLAY:
Once you have programmed your control for any
operation, you can display the setting by pressing the
appropriate pad. For example, if you are using the
TIMER and want to see the time of day, press CLOCK.
The dlsplay will show the time of day.
You cannot set BAKE, BROIL or COOK TIME while the
oven door Is in the locked position. If you try, the word
"door" will appear In the display. The oven door lock Is
to be used for Self-Cleaning only.
TOH S:
The end-of-cycle tone will sound at the end of timer use
and automatic oven functions. The end-of-cycle tone Is
3 short beeps followed by I beep every 6 seconds that
repeat until you press any operation. If you would like
to eliminate the repeating beeps, push and hold CLEAR/
OFF for ten seconds. To return the 1 beep every 6
seconds, push and hold CLEAR/OFF for 10 seconds.
To cancel the end-of-cycle tone, press CLOCK.
F=CODE:
If the time display beeps continuously and flashes an
"F" followed by a number, you have a function error
code. Note the number after the "F". Press CLEAR/OFF.
Allow oven to cool for t hour. If problem repeats,
disconnect all power to the range and call for servlce_
Advlse your service technician of the number following
the "F" in the display.
7 NCCTL17
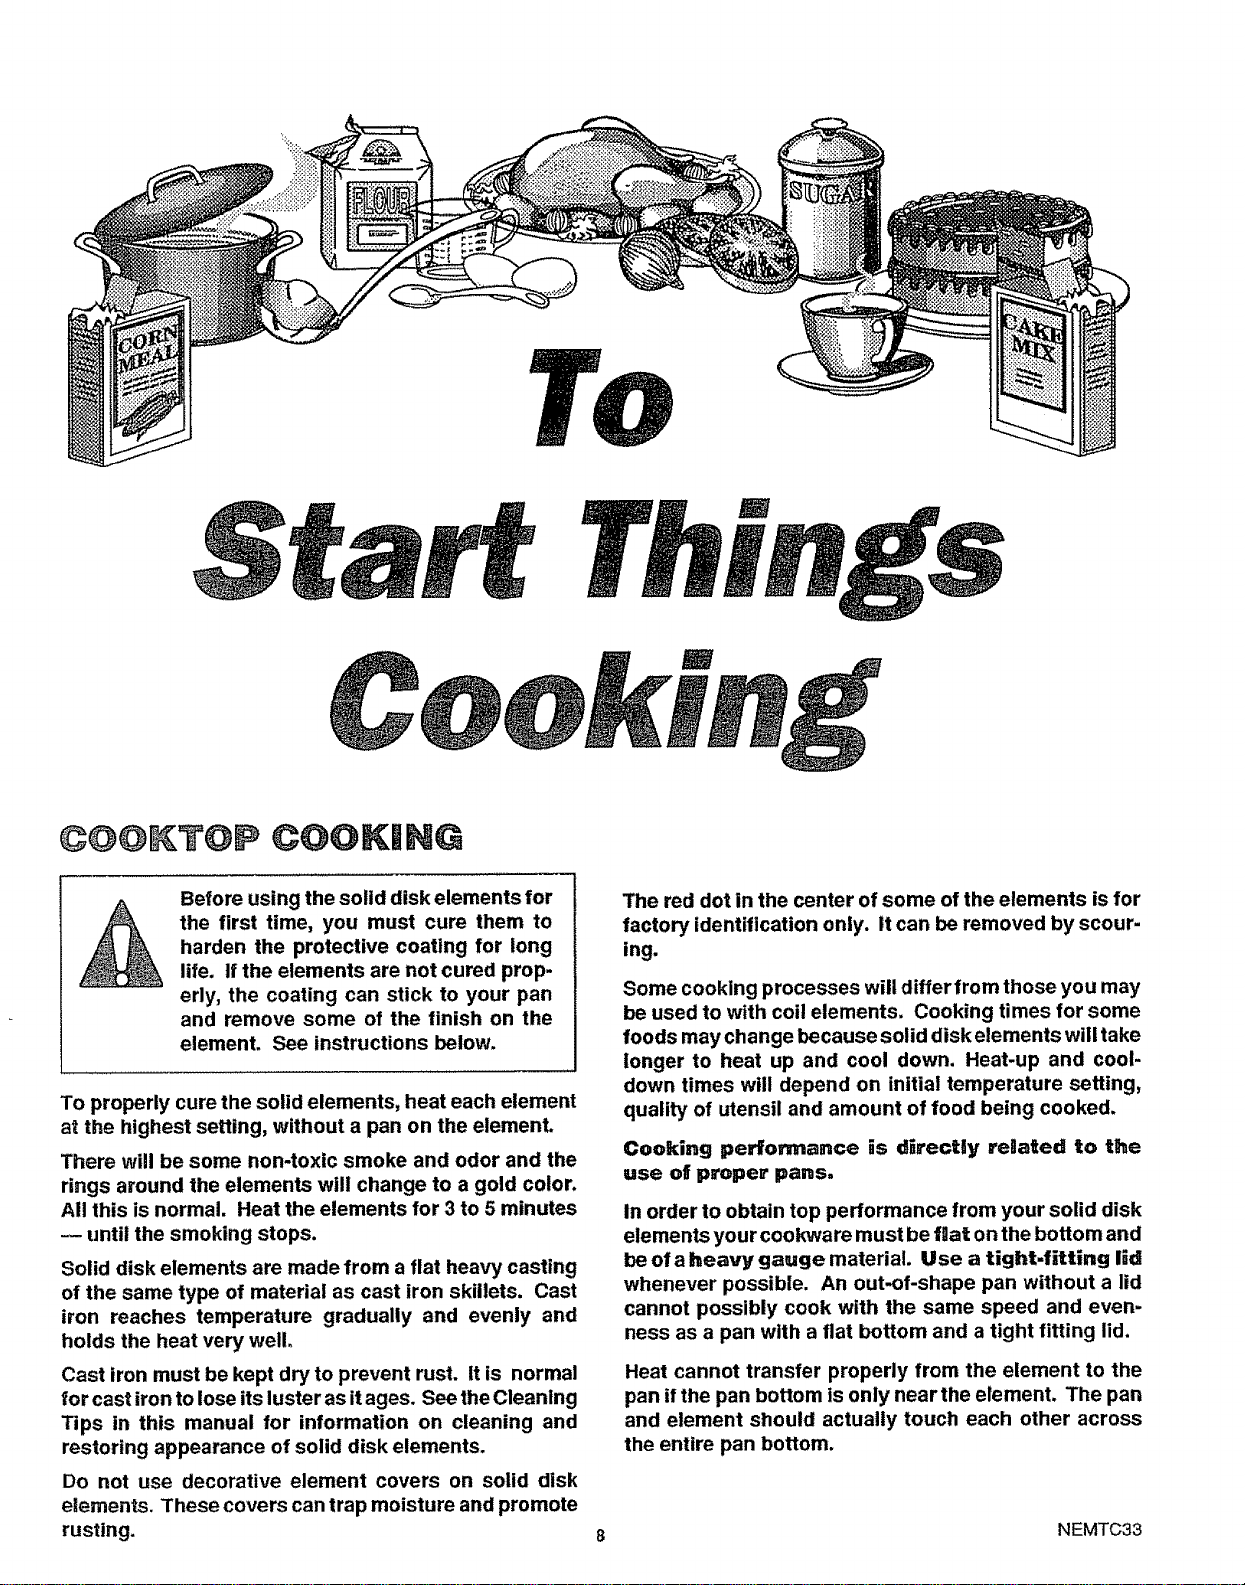
©@@KT@P ©OOK NG
Before using the solid disk elements for
the first time, you must cure them to
harden the protective coating for long
life. If the elements are not cured prop-
erly, the coating can stick to your pan
and remove some of the finish on the
element. See instructions below.
To properly cure the solid elements, heat each element
at the highest setting, without a pan on the element.
There will be some non-toxic smoke and odor and the
rings around the elements will change to a gold color.
All this is normal. Heat the elements for 3 to 5 minutes
-- until the smoking stops.
Solid disk elements are made from a flat heavy casting
of the same type of material as cast iron skillets. Cast
iron reaches temperature gradually and evenly and
holds the heat very well.
Cast iron must be kept dry to prevent rust. it is normal
for cast iron to lose its luster as it ages. See the Cleaning
Tips in this manual for information on cleaning and
restoring appearance of solid disk elements.
Do not use decorative element covers on solid disk
elements. These covers can trap moisture and promote
rusting.
The red dot in the center of some of the elements is for
factory identification only. It can be removed by scour-
ing.
Some cooking processes will differ from those you may
be used to with coil elements. Cooking times for some
foods may change because solid disk elements will take
longer to heat up and cool down. Heat-up and cool-
down times will depend on initial temperature setting,
quality of utensil and amount of food being cooked.
Cooking performance is d_recUy rebated to the
use of proper pans=
In order to obtain top performance from your solid disk
elements your cookware must be fiat on the bottom and
be of a heavy gauge material. Use a tight-fitting lid
whenever possible. An out-of-shape pan without a lid
cannot possibly cook with the same speed and even-
ness as a pan with a flat bottom and a tight fitting lid.
Heat cannot transfer properly from the element to the
pan if the pan bottom is only near the element. The pan
and element should actually touch each other across
the entire pan bottom.
NEMTC33
Many pans have a slight depression in the center of the
pan bottom. Some cookware has circular ridges in the
pan bottom_ Many older pans have become warped
from overheating in the past. None of these pans will
give top performance on any type of electric cooking
element because they do not make contact with the
element across the entire pan bottom.
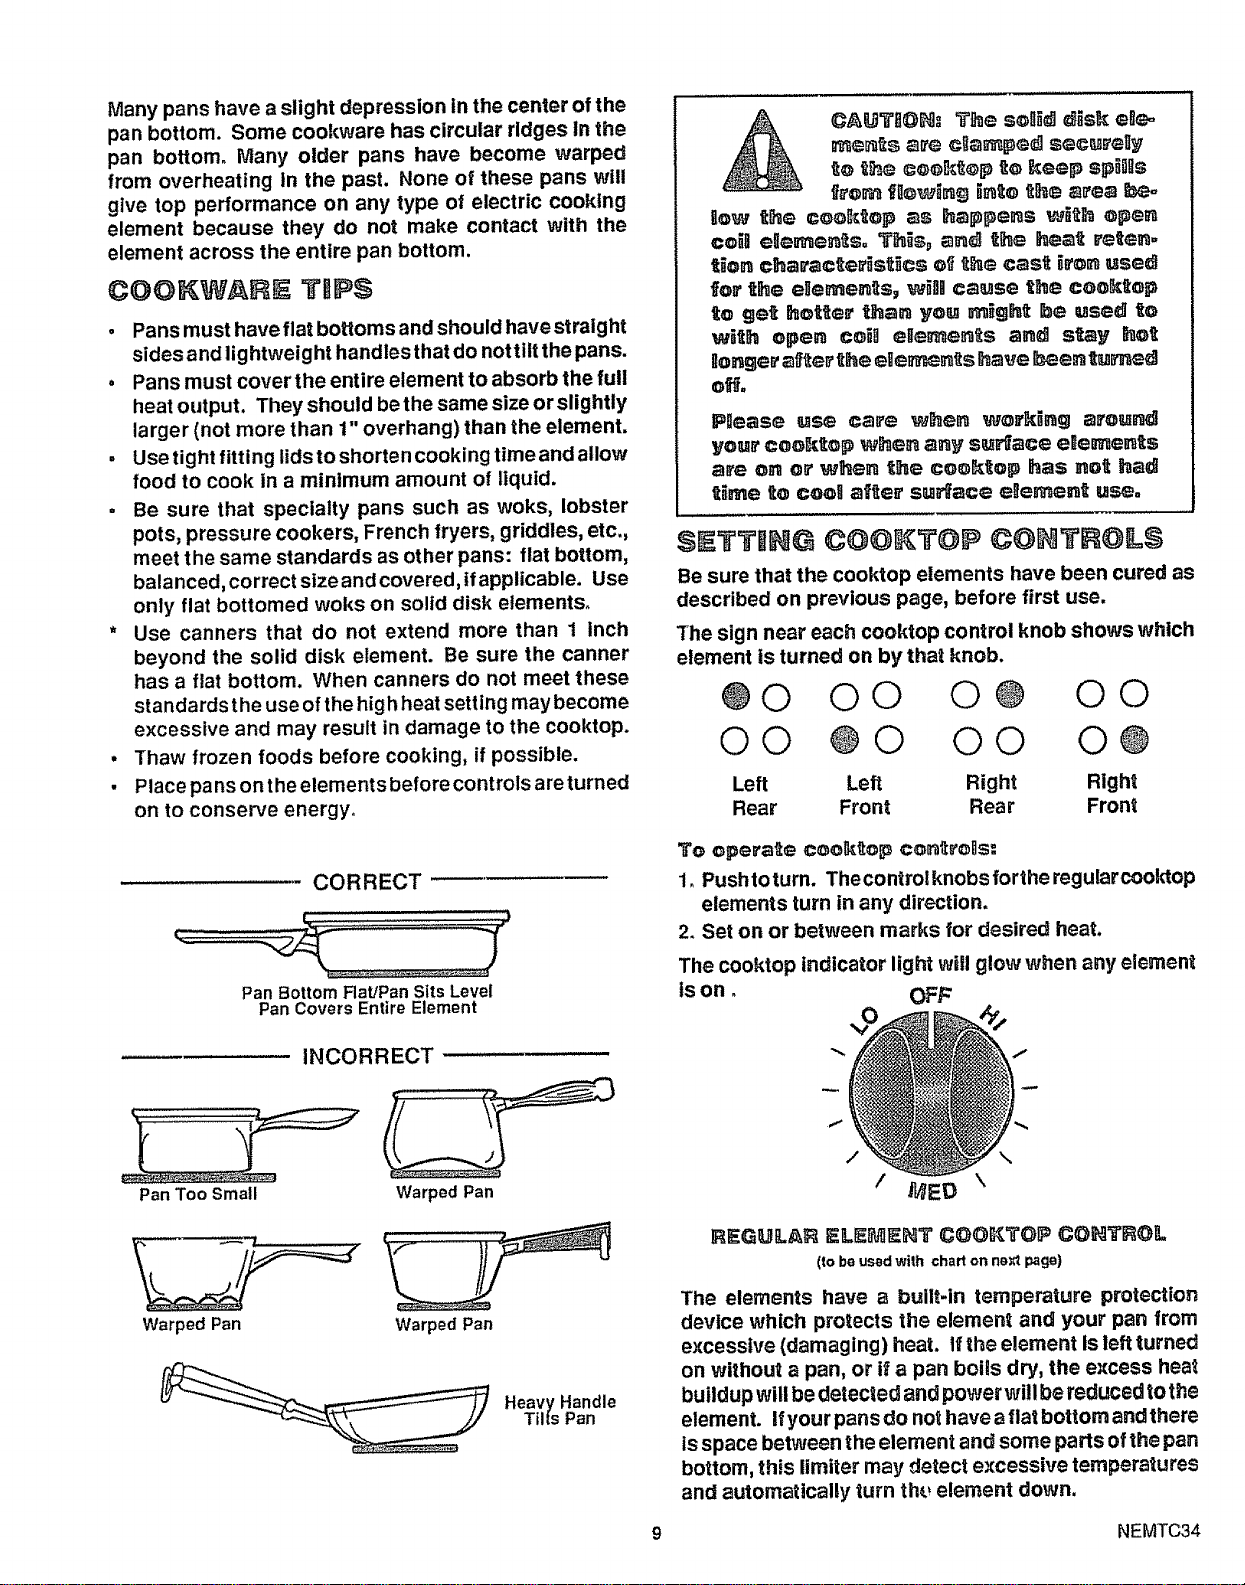
COOKWA E T P$
o Pans must have flat bottoms and should have straight
sides and lightweight handles that do not tiit the pans.
• Pans must cover the entire element to absorb the full
heat output. They should be the same size or slightly
larger (not more than 1" overhang) than the element.
, Use tight fitting lids to shorten cooking time and allow
food to cook in a minimum amount of liquid.
, Be sure that specialty pans such as woks, lobster
pots, pressure cookers, French fryers, griddles, etc,,
meet the same standards as other pans: flat bottom,
balanced, correct size and covered, if applicable. Use
only fiat bottomed woks on solid disk elements°
• Use canners that do not extend more than 1 inch
beyond the solid disk element. Be sure the canner
has a flat bottom. When canners do not meet these
standards the use of the high heat setting may become
excessive and may result in damage to the cooktop.
• Thaw frozen foods before cooking, if possible.
• Place pans on theelements before controls are turned
on to conserve energy,
CORRECT
!
Pan Bottom Flat/Pan Sits Level
Pan Covers Entire Element
P_ease use ca_e when wo_ng aroum_
your coo_lLop who. a.y su_a©e e_e_e._s
are on o_ when the co_h_op has no_ had
t_e te coog a_e_' surface e_emen_ us_.
Be sure that the cooktop elements have been cured as
described on previous page, before first use.
The sign near each cooktop control knob shows which
element is turned on by that knob.
@0 O0 O@ O0
O0 @ 0 O0 O@
Left Left Right Right
Rear Front Rear Fronft
To operate coolk_lp co_ro_s:
1_Pushtotum. Thecontrolknobsfortheregularcooktop
elements turn in any direction.
2. Set on or between marks for desired heat.
The cooktop indicator light will glow when any element
Is on. OFF
INCORRECT
Pan Too Small
Warped Pan
Warped Pan Warped Pan
.o .ono,o
Tills Pan
/
/ MED
\
\
R_G_._,F_ ELI_EHT COOl,TOP CO,TROlL
(_o be used wi_h chart on ns_t page)
The elements have a built-in temperature protection
device which protects the element and your pan from
excessive (damaging) heat. If the element Is left turned
on without a pan, or i_a pan boils dry, the excess heat
buildup will be detected and power will be reduced to the
element. If your pans do not have a flat bottom and there
is space between the element and some parts of the pan
bottom, th_s limiter may detect e_cessive temperatures
and automatically turn th(_element down.
9 NEMTC34
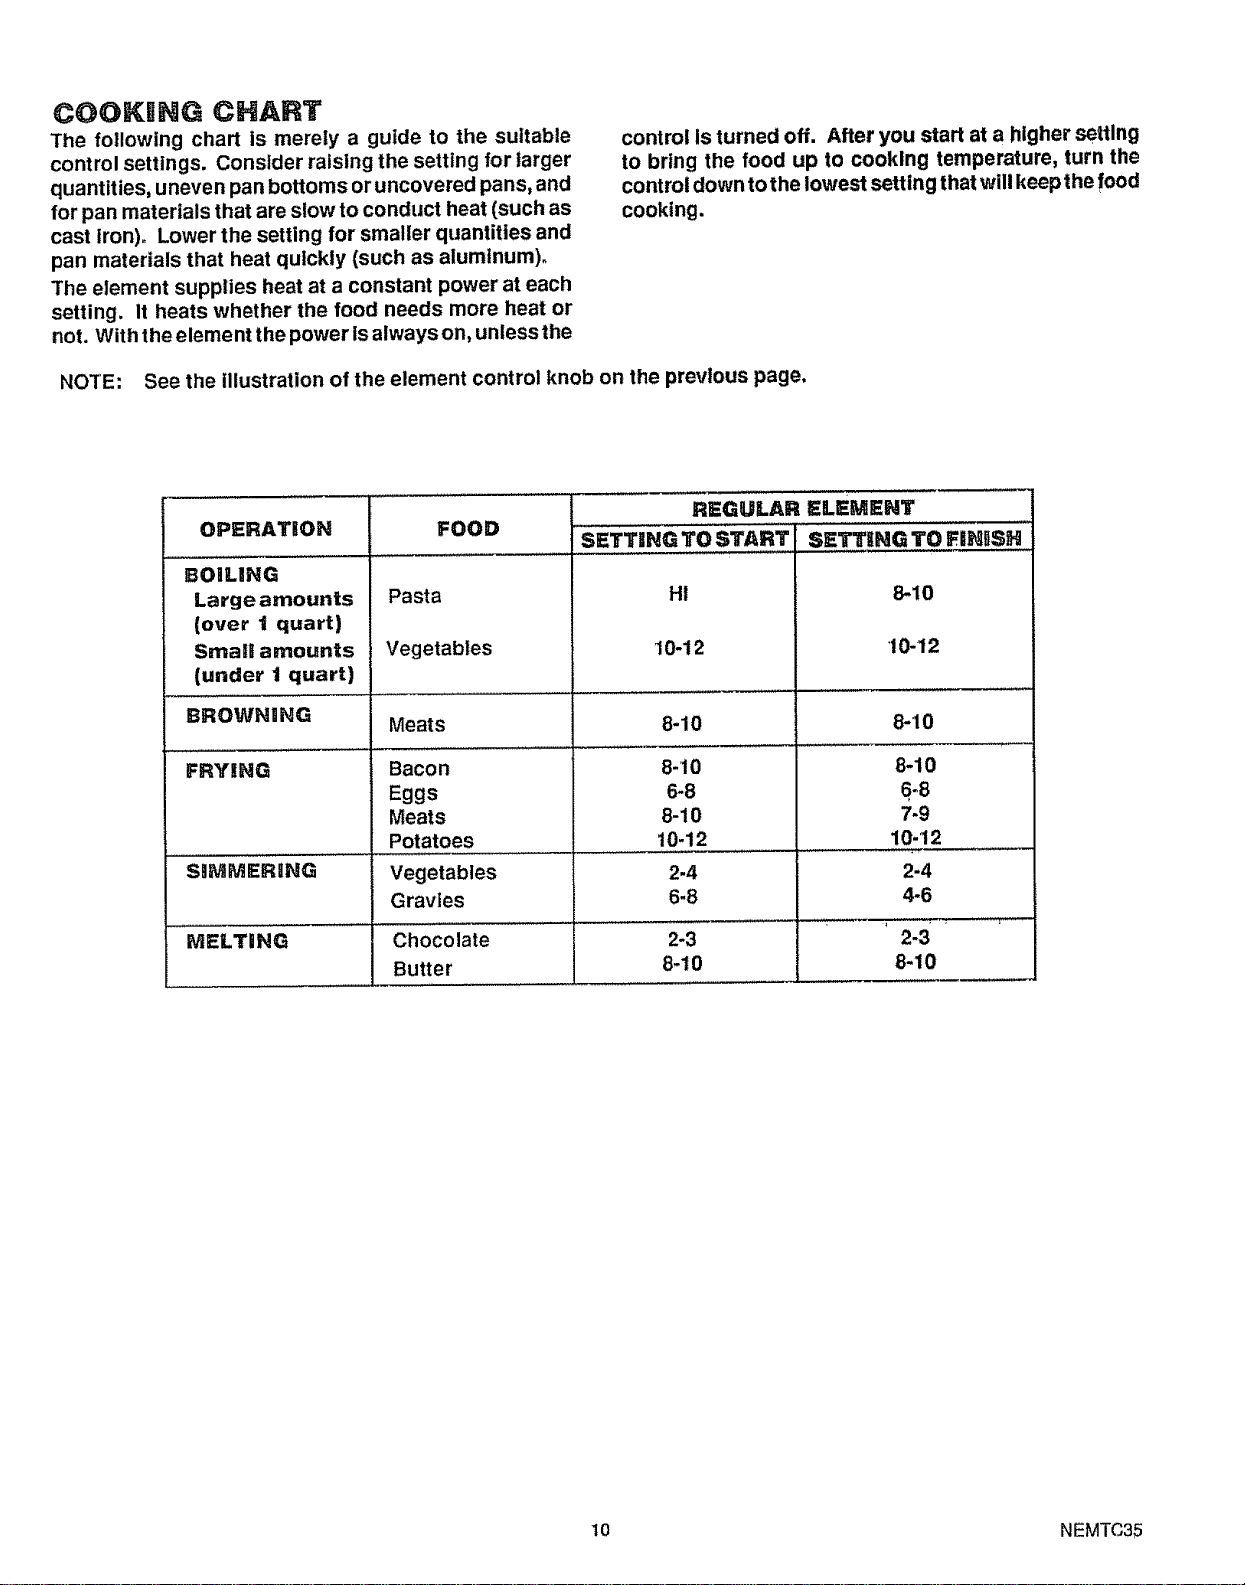
COOKING CHART
The following chart is merely a guide to the suitable
control settings. Consider raising the setting for larger
quantities, uneven pan bottoms or uncovered pans, and
for pan materials that are slow to conduct heat (such as
cast iron)° Lower the setting for smaller quantities and
pan materials that heat quickly (such as aluminum)°
The element supplies heat at a constant power at each
setting, it heats whether the food needs more heat or
not. With the element the power is always on, unless the
control is turned off. After you start at a higher setting
to bring the food up to cooking temperature, turn the
control down to the lowest setting that will keep the food
cooking.
NOTE: See the illustration of the element control knob on the previous page.
OPERATION
BOILING
Large amounts
(over t quart)
SmaJl amounts
(under t quart)
BROWNING
FRYING
FOOD
Pasta
Vegetables
REGULAR ELEMENT
SETTING TO START SETTING TO Fi_HSH
H!
10.12
8-10
8-10
10-12
8-10
8-10
6"8
7_9
10-12
2-4
4-6
Meats
Bacon
Eggs
Meats
Potatoes
Vegetables
Gravies
8-10
6-8
8-10
10-12
2-4
6-8
SiMMERiNG
MELTING Chocolate 2-3 2-3 •
Butter 8-t0 8-10
10 NEMTC35
@Will ©@@I ING
When cooking a food for the first time In your new
oven, use time gBven on recipes as a guide.
Veur new oven has been set correctly at the factory
and is more apt to be accurate than the oven it
replaced.
After you have used your oven for awhile, If you feel
your oven shound be hoUer or cooler, you can adjust
it yourself. See TH_ER_OSTAT ADJUSTMEMTS
In this manual.
T Always follow recipe carefully.
• Measure ingredients properly.
e
a
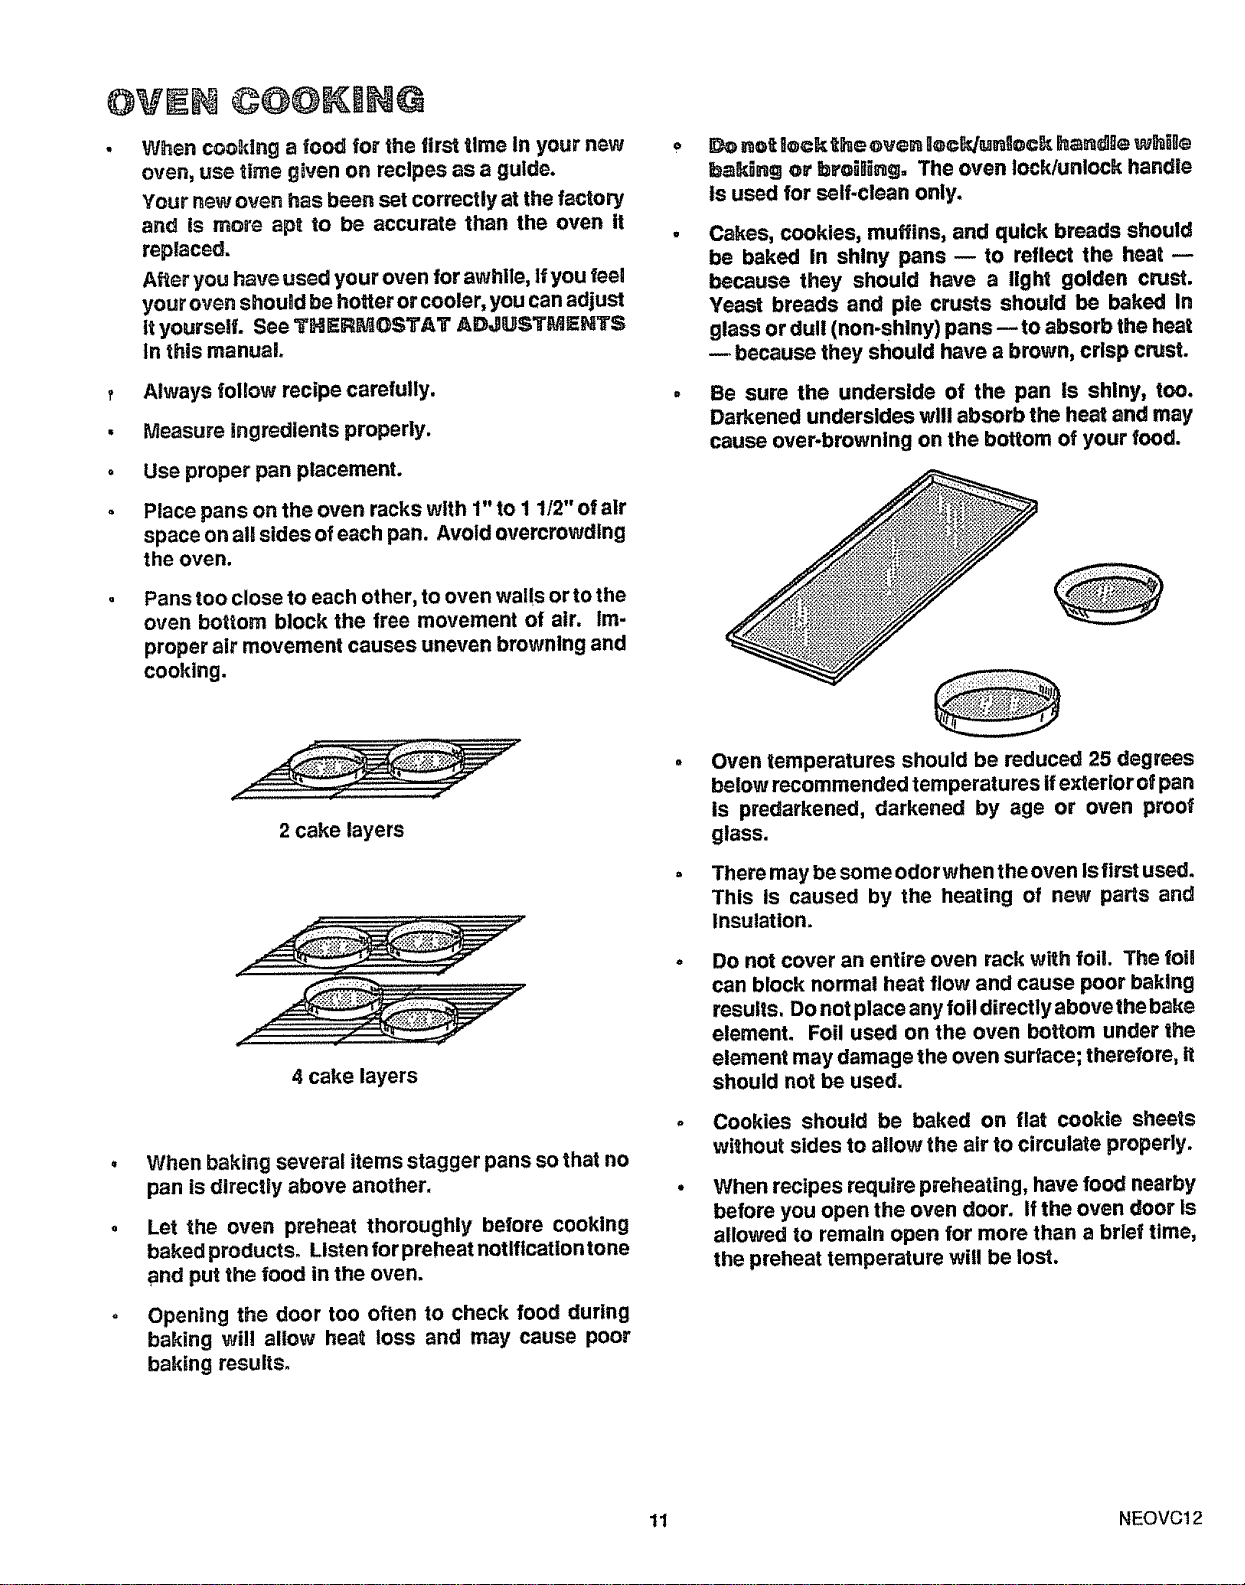
Use proper pan placement.
Place pans on the oven racks with 1"to I 112"of air
space on al sides of each pan. Avoid overcrowding
the oven.
Pans too close to each other, to oven walls or to the
oven bottom block the free movement of air. im-
proper air movement causes uneven browntng and
cooking.
Do not lo©k the even lo©_unlock handle while
ba_dng or broiling, The oven lock/unlock handle
ts used for self-clean only.
Cakes, cookies, muffins, and quick breads should
be baked In shiny pans -- to reflect the heat --
because they should have a light golden crust.
Yeast breads and pie crusts should be baked In
glass or dull (non-shiny) pans--to absorb the heat
m because they should have a brown, crisp crust.
Be sure the underside of the pan is shiny, too.
Darkened undersides will absorb the heat and may
cause over-browning on the bottom of your food.
2 cake layers
4 cake layers
When baking several items stagger pans so that no
pan is directly above another.
Let the oven preheat thoroughly before cooking
baked productso Listen for preheat notiftcatlon tone
and put the food in the oven.
Opening the door too oten to check food during
baking will allow heat loss and may cause poor
baking results°
Oven temperatures should be reduced 25 degrees
below recommended temperatures if e_erlor of pan
is predarkened, darkened by age or oven proof
glass.
There may be some odorwhen the oven Is first used.
This is caused by the heating of new parts and
Insulation.
Do not cover an entire oven rack with foil. The foi
can block normal heat flow and cause poor baking
results. Do not place any foil directly above the bake
element. Foil used on the oven bottom under the
element may damage the oven surface; therefore, it
should not be used,
Cookies should be baked on flat cookie sheets
without sides to allow the air to circulate properly.
When recipes require preheating, have feed nearby
before you open the oven door. If the oven door is
allowed to remain open for more than a brief time,
the preheat temperature will be lost.
11 NEOVC12
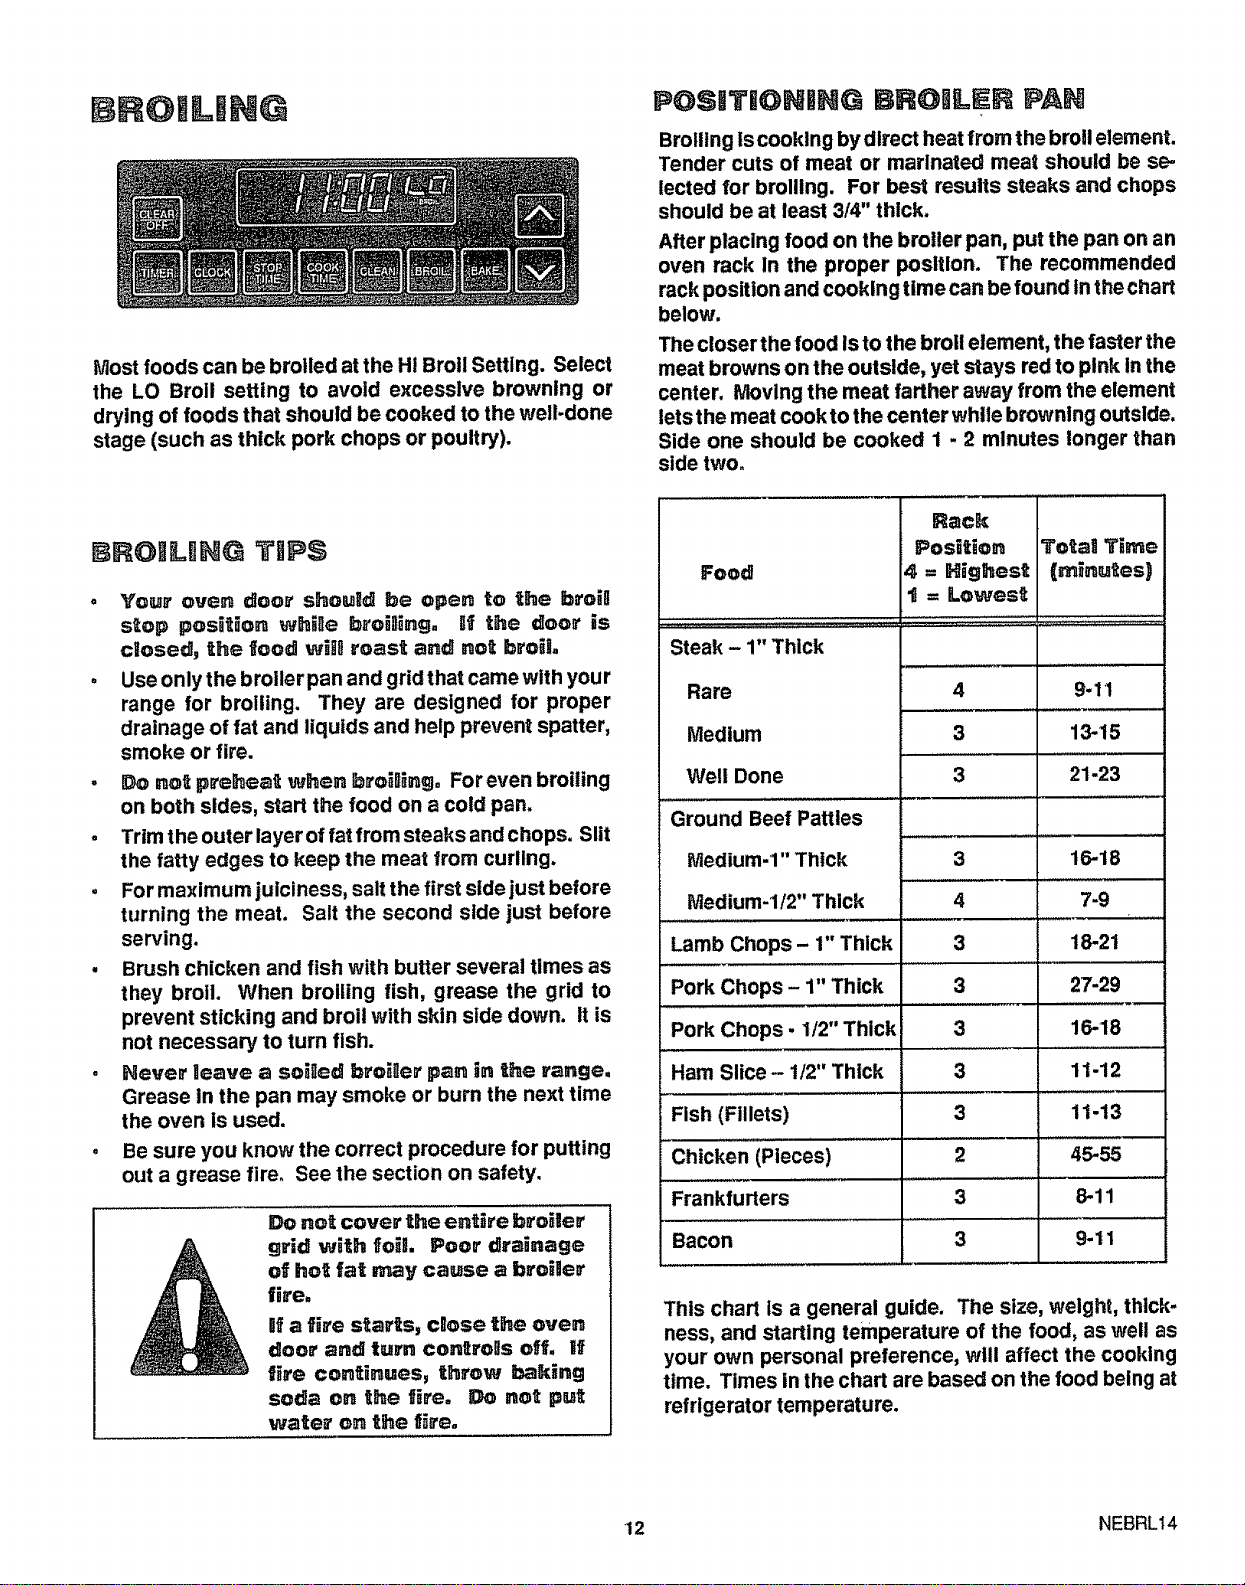
Most foods can be broiled at the H! Broil Setting. Select
the LO Broil setting to avoid excesslve browning or
drying of foods that should be cooked to the well-done
stage (such as thick pork chops or poultry).
BROgLUNG T P$
• Your oven door shouRd be open to the broia
stop position whi_e broODing. Jf the door is
cllosed, the food w_H roast and not broil
, Use only the broiler pan and grid that came with your
range for broiling. They are designed for proper
drainage of fat and liquids and help prevent spatter,
smoke or fire.
. Do not preheat when bro_l;ingo For even broiling
on both sides, start the food on a cold pan.
, Trim the outer layer of fat from steaks and chops. Slit
the fatty edges to keep the meat from curling.
, For maximum juiciness, salt the first side just before
turning the meat. Salt the second slde just before
serving.
• Brush chicken and fish with butter several Umes as
they broil. When broiling fish, grease the grid to
prevent sticking and broil with skin side down. It is
not necessary to turn fish.
. Never leave a soiled b_'oiller pan in the range,
Grease in the pan may smoke or burn the next time
the oven ls used.
Be sure you know the correct procedure for putting
out a grease fire. See the section on safety.
not cover the entire h_'oiler
grid w_th foil, Poor drainage
of hot fat may cause a broiler
fire°
Ill a fire starts, cl!ose the oven
door and turn controUs o_f, If
l_re continues, throw baking
soda on the fire. Do not put
water on the f_re°
PO$11TIONING BROItLER PAN
Broiling is cooking by direct heat from the broil element.
Tender cuts of meat or marinated meat should be se-
lected for broiling. For best results steaks and chops
should be at least 314" thick.
After placing food on the broiler pan, put the pan on an
oven rack In the proper position. The recommended
rack position and cooking time can be found In the chart
below.
The closer the food Isto the broil element, the faster the
meat browns on the outside, yet stays red to pink In the
center. Moving the meat farther away from the element
lets the meat cook to the center while browning outslde.
Side one should be cooked 1 - 2 minutes longer than
side two°
Food
Steak - 1" Thick
Rare
Medium
Well Done
...... ,, ,, ,,,,,_,,,,_,,,_u,,
Ground Beef Patties
iViedium-1" Thick
lVledium-1/2" Thick
Rack
Position
4 = Highest
= Lowest
4
3
3
Lamb Chops - 1" Thick
Pork Chops - 1" Thick
Pork Chops - 1/2" Thick
, ,,,,, ..............
Ham Slice - 1/2" Thick
Fish (Fillets)
Chicken (Pieces)
Frankfurters
Bacon
3
3
3
9-11
13-15
21-23
3 16-18
4 7-9
18-21
27-29
16-18
3
3
2
3
11-12
_,,,,,,,,,,, ,,,,,,,,,_
11-13
45-55
8-11
This chart is a general guide. The size, weight, thick-
ness, and starting temperature of the food, as well as
your own personal preference, will affect the cooking
time. Times in the chart are based on the food being at
refrigerator temperature.
12 NEBRL14
CYCLE
BEFORE A C L AN
1. Removethe broil pan and grid, oven racks, aUutensils
and any foil that may be in the oven. Do not try to
clean utensils or any other objects in the oven during
a self.clean cycle. It_oven racks are le_ in the
range dlu_'_ng a cBean oycne, they win! darken_
nose their Ruster and become hard to sNde. If
you choose to leave the racks In the oven, you can
polish the edges of the racks with steel wool and
apply a small amount of vegetable oil to the rack
edges after the self.clean cycle. This will make the
racks easier to slide.
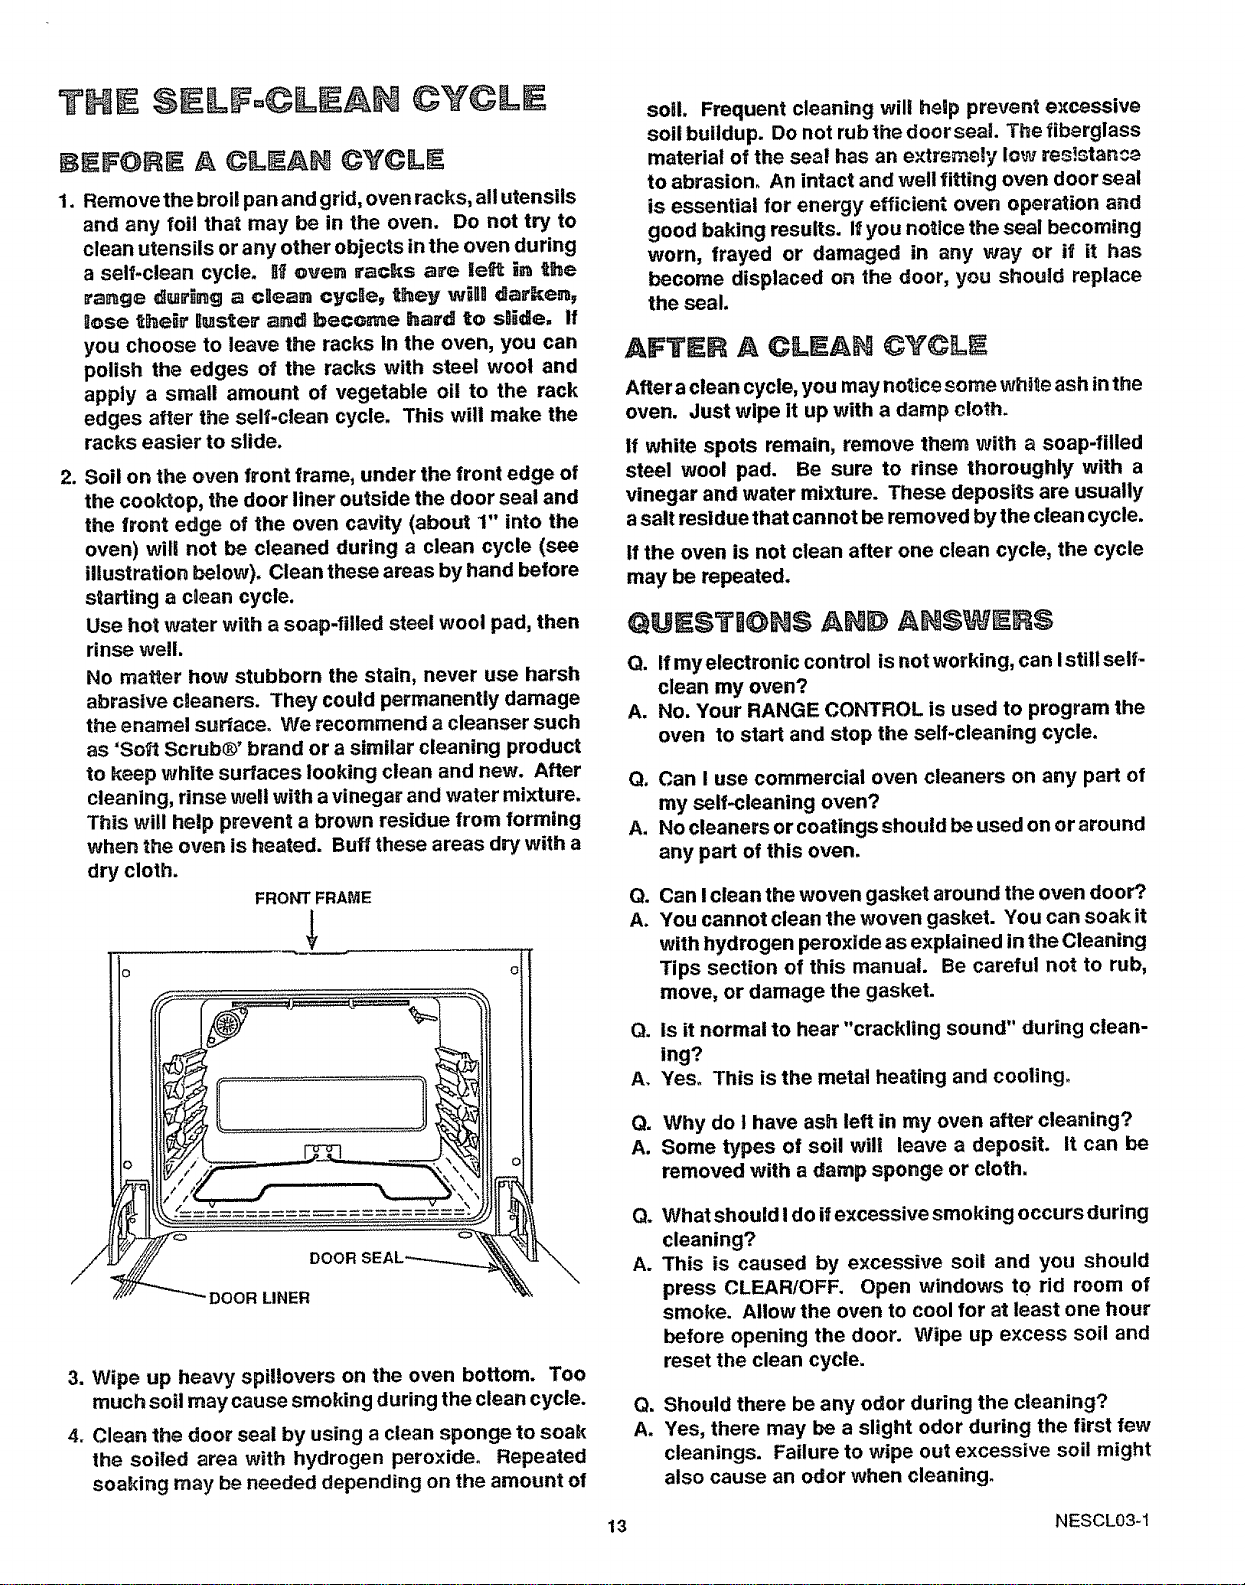
2. Soil on the oven front frame, under the front edge of
the cooktop, the door liner outside the door seal and
the front edge of the oven cavity (about 1" into the
oven) will not be cleaned during a clean cycle (see
illustration below). Clean these areas by hand before
starting a c0ean cycle.
Use hot water with a soap-filled steel wool pad, then
rinse well.
No matter how stubborn the stain, never use harsh
abrasive cneaners. They could permanently damage
the enamel surface° We recommend a cleanser such
as 'So_t Scrub®" brand or a similar cleaning product
to keep white surfaces looking clean and new. After
cleaning, rinse well with a vinegar and water mixture.
This will help prevent a brown residue from forming
when the oven is heated. Buff these areas dry with a
dry cloth.
FRONT FRAME
so,. Frequent cleaning will help prevent excessive
soil buildup. Do not rub the doorseal. The fiberglass
material of the seal has an e×tremely low resL_tance
to abrasion° An intact and well fitting oven door seal
is essential for energy efficient oven operation and
good baking results. If you notice the seal becoming
worn, frayed or damaged in any way or if it has
become displaced on the door, you should replace
the seal.
AFTER A ©YCLE
After a clean cycle, you may notice some whl_e ash inthe
oven. Just wipe it up with a damp cloth.
If white spots remain, remove them with a soap-filled
steel wool pad. Be sure to rinse thoroughly with a
vinegar and water mixture. These deposits are usually
asalt residue that cannot be removed by the clean cycle.
If the oven is not clean after one clean cycle, the cycle
may be repeated.
QUESTIONS AND
Q. Ifmyelectronic control is not working, can Isttllself-
clean my oven?
A. No. Your RANGE CONTROL is used to program the
oven to start and stop the self-cleaning cycle.
Q. Can I use commercial oven cleaners on any part of
my self-cleaning oven?
A. No cleaners or coatings should be used on or around
any part of this oven.
a_
Ao
Can !clean the woven gasket around the oven door?
You cannot clean the woven gasket. You can soak it
with hydrogen peroxide as explained in the Cleaning
Tips section of this manual. Be careful not to rub,
move, or damage the gasket.
Q. is it normal to hear "crackling sound" during clean-
ing?
A. Yes° This is the metal heating and cooling.
Q. Why do I have ash left in my oven after cleaning?
A. Some types of soil will leave a deposit. It can be
removed with a damp sponge or cloth.
DOOR
DOOR LINER
3. Wipe up heavy spil!overs on the oven bottom. Too
much soil may cause smoking during the clean cycle.
4. Clean the door seal by using a clean sponge to soak
the soiled area with hydrogen peroxide. Repeated
soaking may be needed depending on the amount of
a_
A.
Q=
A.
What should Ido ifexcessive smoking occurs during
cleaning?
This is caused by excessive soil and you should
press CLEAR/OFF. Open windows to rid room of
smoke. Allow the oven to cool for at least one hour
before opening the door. Wipe up excess soil and
reset the clean cycle.
Should there be any odor during the cleaning?
Yes, there may be a slight odor during the first few
cleanings. Failure to wipe out excessive soil might
also cause an odor when cleaning.
13 NESCL03-1
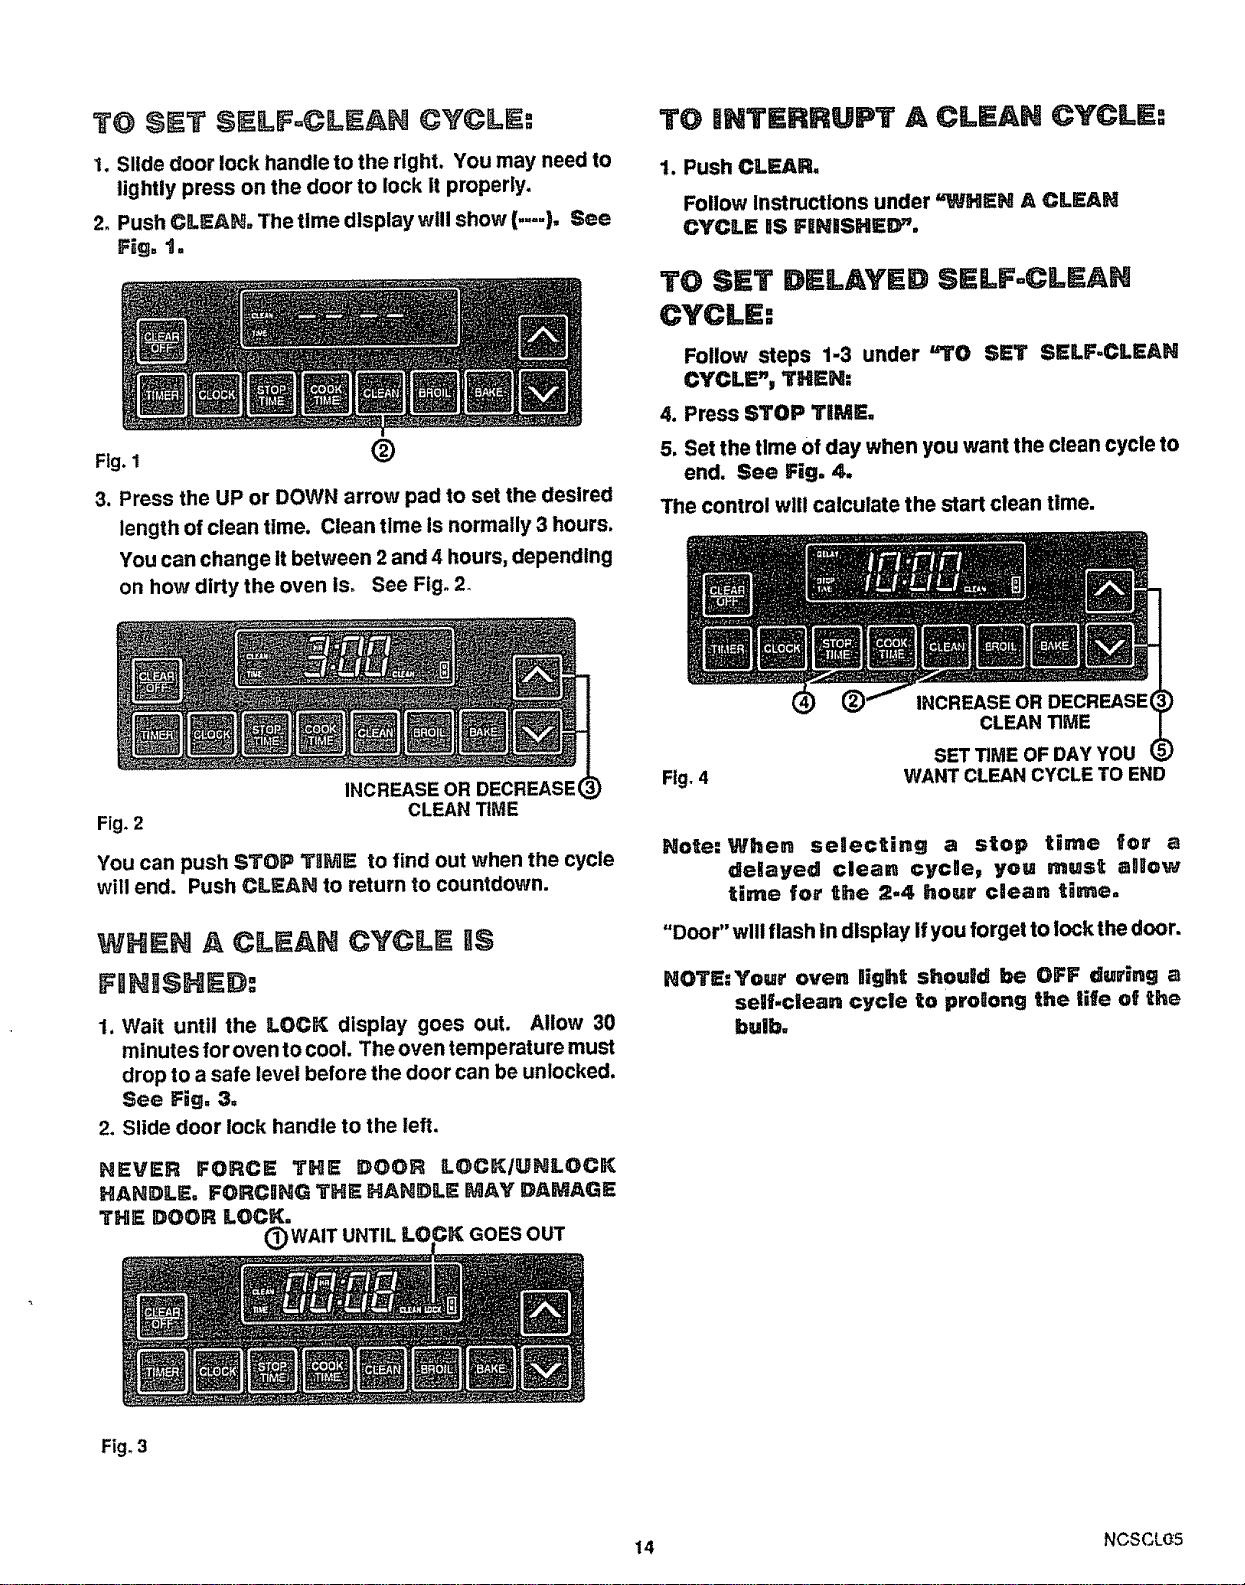
TO SET SELF=CLEAN CYCLE:
I. Slide door lock handle to the right. You may need to
lightly press on the door to lock It properly.
2. Push CLEAN, The time display will show (.... ), See
Fig. t.
@
Fig. 1
3. Press the UP or DOWN arrow pad to set the desired
length of clean time. Clean tlme is normally 3 hours.
You can change it between 2 and 4 hours, depending
on how dirty the oven is° See Fig. 2_
INCREASE OR DECREASE(
Fig_2
You can push STOP THME to find out when the cycle
will end. Push CLEAN to return to countdown.
CLEAN TIME
WHEH A CLEAH CYCLE I$
FllNISHEE):
1. Wait until the LOCK display goes out. Allow 30
minutes for oven to cool. The oven temperature must
drop to a safe level before the door can be unlocked.
See Fig. 3=
2. Slide door lock handle to the left.
HEVER FORCE THE DOOR LOCKIUNLOCIK
HANDLE= FORCING THE HANDLE MAY DAMAGE
THE DOOR LOCK.
(_)WAIT UNTIL LO GOES OUT
TO INTERRUPT A C!i lEAN CYCLI:
1. Push CLEAR.
Follow Instructions under %VHEH A CLEAN
CYCLE IS FiNiSHED".
TO SET DELAYED SELF=CLEAN
CYCLE. =
Follow steps 1-3 under '_l'O SET SELF=CLEAN
CYCLE", THEN:
4. Press STOP TIME,
5. Set the time of day when you want the clean cycle to
end. See Fig, 4,
The control will calculate the start clean time.
Fig. 4
INCREASE OR DECREASE
CLEAN TIME
SET TIME OF DAY YOU
WANT CLEAN CYCLE TO END
Hote:Wlten selecting a stop time for a
delayed clean cycle, you must alllow
time foe' the 2.4 houe. clean t_me.
"Door" will flash tndisplay If you forget to lock the door.
NOTE.'Your oven light should be OFF due.ing a
self.clean cycle to progong the li|e of the
bulb,
Fig. 3
14 NCSCLO5
CLEANING T P$
On the following pages, all removable parts on your
range are shown. Refer to those pages when cleaning
your range.
Warm water, a mild detergent and a soft cloth are safe to
use on all cleanable parts of your range.
Do not use metal scouring pads, except where recom-
mended.
PART
Control panel knobs
CLEANaNG UATERIIALS REMARKS
Detergent, warm water, soft ..............D0 not use abrasive cleaners. Knobs pull off for
cloth easier cleaning.
...... , ,,,,,,,,,,,,,,,
Scouring powder, Heavy Duty The red dot In the center of the element c_.n be
Scotch Brite Scour Pad® or removed with a soap-filled steel wool pa_ The
soap pad, Collo Electrol® dot is used by the element manufactt to
identify the element as having a special safety
feature. The red dot will wear off, but this will
not affect the performance or durability of the
element.
Follow the circular grooves of the elemen
cleaning.
Light Spills--Wipe the element with a powdered
cleaner and a damp cloth.
Heavy Spills--Scrub with a scou ring pad and/or
scouring powder.
Stains--Heavy stains can be removed with 80-
100 grit sand paper.
After cleaning, wipe element with a dam )cioth
and tL,rn element on a medium setting t_ dry.
Finish with vegetable oil or Cotto Electrol®:
Heat element on Medium for 30 second_, then
turn it off. Apply a small amount of salt-free
vegetable oil to a dry cloth or paper to_ and
rub a light coating into the element surface to
improve the appearance of the element and to
prevent the element from rusting. Rub c onto
the element evenly and wipe off excess Heat
element for one minute on Medium to cure.
The matte black surface can be maintai by
treating it periodically with the Collo Electroi®
polish. The solid element dressing is available
through Sears Stores or Sears Service Centers.
To use the polish, use the applicator to pply a
very thin coating to the entire element s _rface.
Turn the element on high for several mln to
bake the polish to the element. When the ele-
ment is cool, rub lightly with a cloth o= paper
towel to remove any excess polish. The dress-
ing restores the color of the element and helps
prevent the element from staining. The element
must be clean before the dressing is applied.
NOTE: This product is not a cleanser it is a
cosmetic polish.
15 NECCH32
CLEANING TraPS
PART
Glass
Oven interior
Oven door gasket
Oven racks
Broiler pan and grid
Chrome trim rings
Black trim rings
CLEANING MATERIALS
Glass cleaner and paper towels
Detergent, warm water and/or
soap-filled steel wool pad. Do
not use oven cleaner In or
around any part of the oven.
Hydrogen peroxide
Detergent, warm water, scouring
pad or soap-filled steel wool pad
Detergent, warm water, soap-
filled scouring pad, plast tcscour-
ing pad, commercial oven cleaner
(pan only)
Hot soapy water
Soft sponge or soft cloth
Detergent or non-abrasive clean-
ers
REMARKS
Remove stubborn soil with paste of baking
soda and water. Do not use abrasive clean-
ers. Rinse thoroughly.
Cleaning Inside the oven need onlybe done
as an optional touch-up between self-clean
cycles. Rinse oven interior thoroughly after
cleaning.
Soak with hydrogen peroxide, using a
sponge. Frequent soaking helps prevent soil
buildup. Do not rub. See self-clean section
for more Information.
Remove from oven to clean. Rinse thoroughly.
Remove SOiled pan from oven to cool. Drain fat
or drippings. Fill pan with warm water. Sprinkle
grid with detergent and cover with damp cloth
or paper towels, t.et pan and grid soak for a few
minutes. Rinse or scour as needed. Dry well.
Grid and pan may be washed in a dishwasher.
Do not use steel wool or abrasives on the
stainless steel trim rings.
Do not use scouring pads. Spillage of mari-
nades, fruit juices, tomato sauces and basting
materials containing acids may cause discol-
oration. Spillovers should be wiped up imme-
diately, with care being taken not to touch any
hot portion of the element. When the surface is
cool, clean and rinse.
16 NECCH33
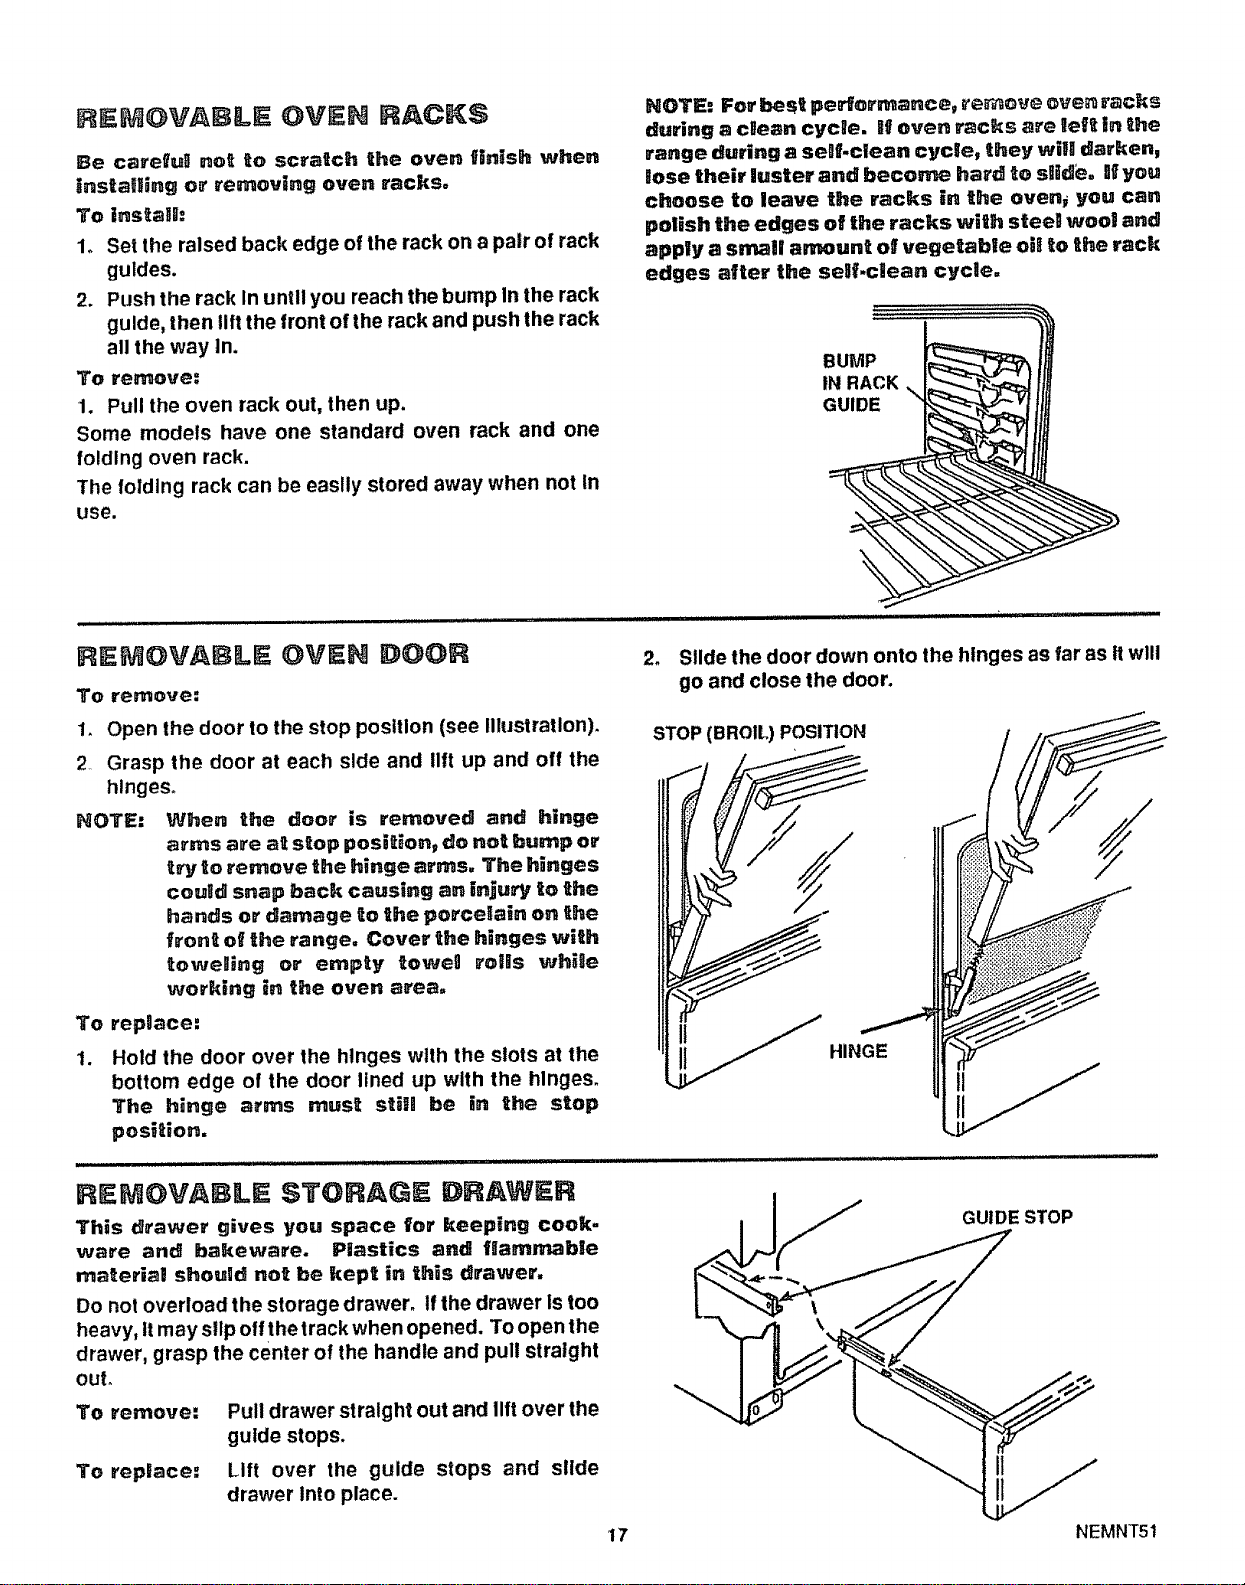
RE;MOVABLE OVEH RACKS
Be carefu_ not to scratch the oven finish when
installing or removing oven racks,
To lnstalh
1o Set the raised back edge of the rack on a pair of rack
guides.
2. Push the rack In until you reach the bump In the rack
guide, then lift the front of the rack and push the rack
all the way In.
To remove=
1. Pull the oven rack out, then up.
Some models have one standard oven rack and one
folding oven rack.
The folding rack can be easily stored away when not In
use.
NOTE: For best performance, _'er_ove oven racks
during a clean cycle, if oven racks are left in the
range during a self.clean cycle, they will darken,
lose their luster and become hard to sgide, Bfyou
choose to leave the racks in the ovens you can
polish the edges of the racks with stee! wool and
apply a small amount of vegetable oil to the rack
edges after the self.clean cycle.
BUMP
tN RACK
GUIDE
REMOVABL = OVEN DOOR
TO remove=
1. Open the door to the stop position (see Illustratlon).
2 Grasp the door at each side and lift up and off the
hlngeso
HOTE= When the door is removed and hinge
arms are at stop position, do not bump or
try to remove the hinge arms, The hinges
could snap back causing an injury to the
hands or damage to the porcelain on the
front of the range. Cover the hinges with
towe_ing or empty rowe0 roils while
working in the oven area,
To repgace;
t. Hold the door over the hinges with the slots at the
bottom edge of the door lined up with the hlngeso
The hinge arms must sUl! be in the stop
position,
2_
go and close the door.
Slide the door down onto the hinges as far as ttwill
STOP (BROIL) POSITION
REMOVABLE STORAGE DRAWER
This drawer gives you space for keeping cook-
ware and bakeware. Plastics and flammable
material shougd not be kept in this drawer.
Do not overload the storage drawer_ If the drawer Is too
heavy, itmay slip off the track when opened. To open the
drawer, grasp the center of the handle and pull straight
out.
To remove= Pull drawer straight out and lift over the
guide stops.
To rep|ace: Ltft over the guide stops and slide
drawer Into place.
17
i IJ GUIDE STOP
of
NEMNT51
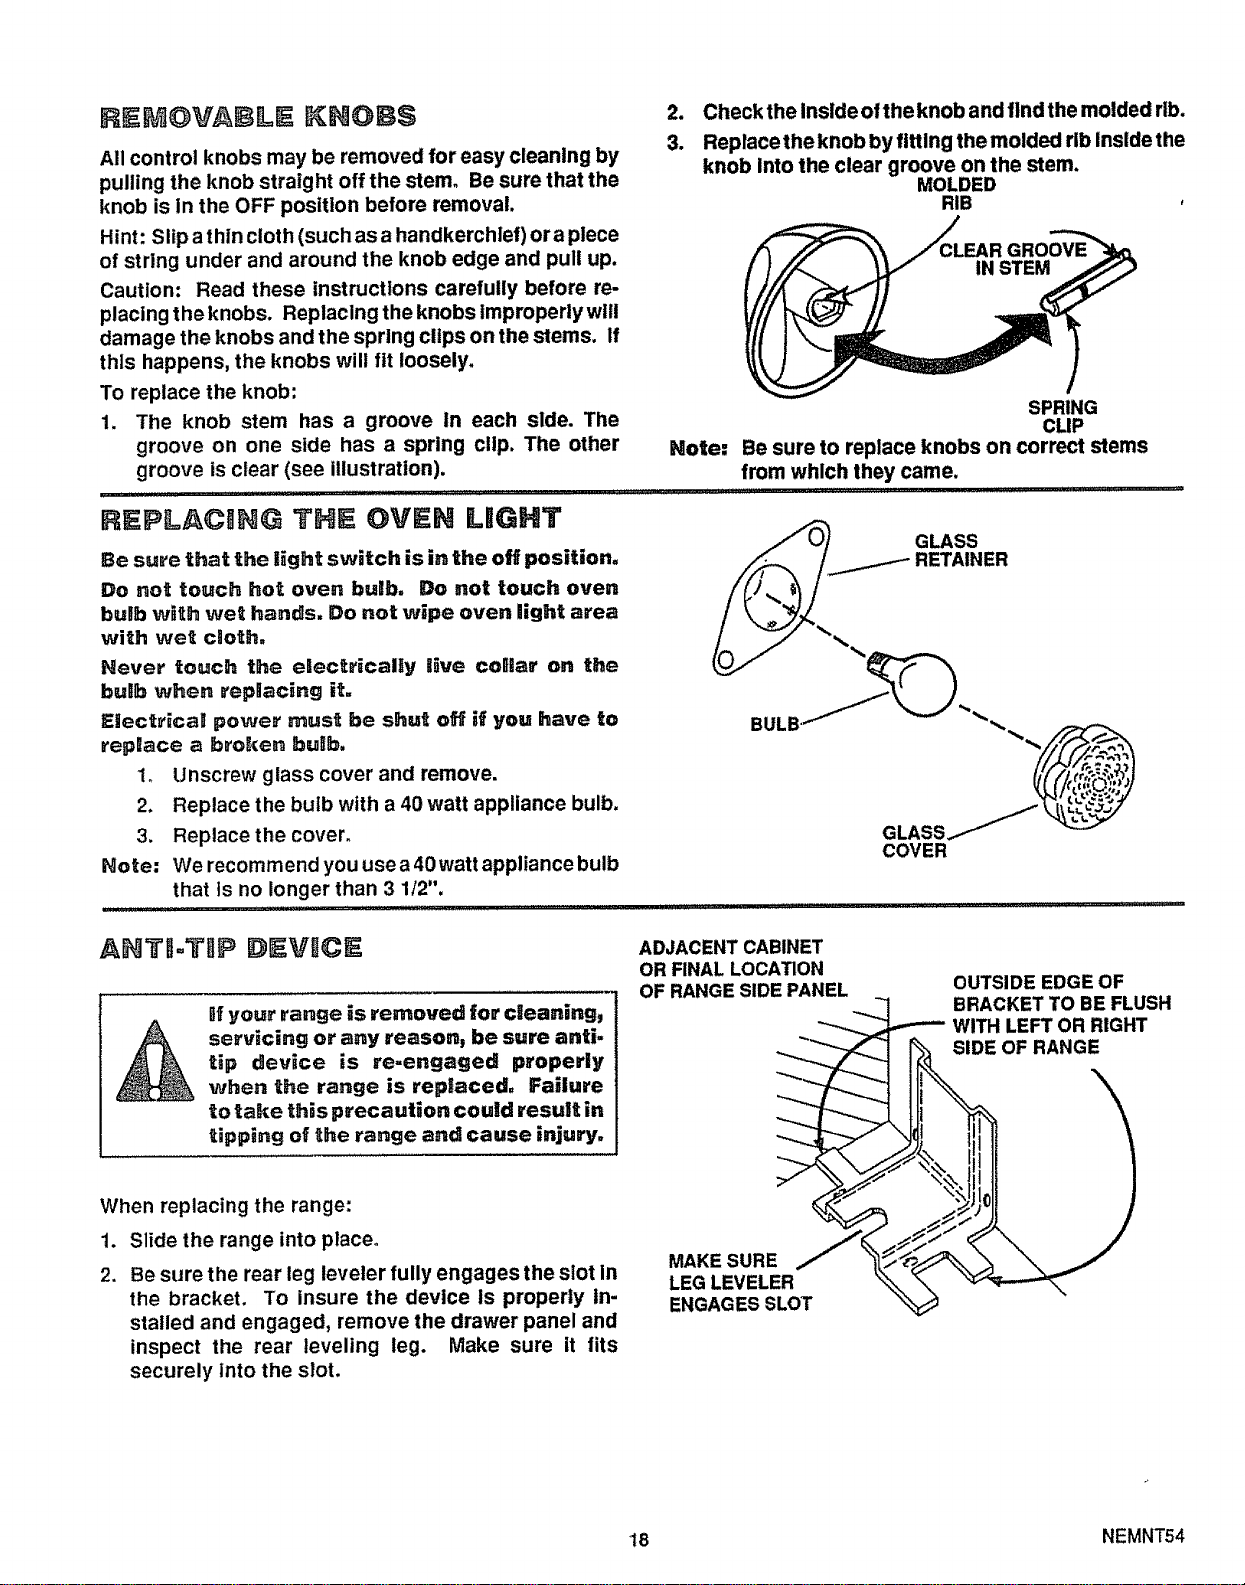
REM@VA LE I N@B$
All control knobs may be removed for easy cleaning by
pulling the knob straight off the stem° Be sure that the
knob is in the OFF position before removal.
Hint: Sllp athin cloth (such as a handkerchief) or a plece
of string under and around the knob edge and pull up.
Caution: Read these instructions carefully before re-
placing the knobs, Replacing the knobs Improperly will
damage the knobs and the spring clips on the stems. If
this happens, the knobs will fit loosely.
To replace the knob:
1. The knob stem has a groove In each side. The
groove on one side has a spring clip. The other
groove is clear (see illustration).
o
3.
Check the Inside ofthe knob and find the molded rib.
Replace the knob by fitting the molded rib Inside the
knob Into the clear groove on the stem.
MOLDED
RIB
Note:
SPRING
CLIP
Be sure to replace knobs on correct stems
from which they came.
REPLACING THE OVEN LIGHT
Be sure that the light switch is in the off position,
Do not touch hot oven bulb, Do not touch oven
buJb with wet hands. Do not wipe oven light area
with wet cloth,
Never touch the electrically live coOIlar on the
bulb when replacing it,
Electrical power must be shut off if you have to
repBace a broken bulb.
1. Unscrew glass cover and remove.
2. Replace the bulb with a 40 watt appliance bulb.
3. Replace the cover.
Note: We recomm end you use a 40 watt appliance bulb
that is no longer than 3 1/2".
....................... i................
GLASS
RETAINER
,,lip ,,IU, J, ,! ,i ,M, .......................
AHTI=TI]P DEVICE
lif your range _s removed for cleaning,
servicing or any reason, be sure anti-
tip device is re-engaged properly
when the range is replaced, Failure
to take this precaution could result in
tipping of _he range and cause injury,
When replacing the range:
1. Slide the range into place.
2. Be sure the rear leg leveler fully engagesthe slot in
the bracket. To insure the device is properly In-
stalled and engaged, remove the drawer panel and
inspect the rear leveling leg. Make sure it fits
securely into the slot.
ADJACENT CABINET
OR FINAL LOCATION
OF RANGESIDE PANEL
MAKE SURE
LEG LEVELER
ENGAGES SLOT
OUTSIDE EDGE OF
BRACKET TO BE FLUSH
•-,-'-- WITH LEFT OR RIGHT
OF RANGE
18 NEMNT54
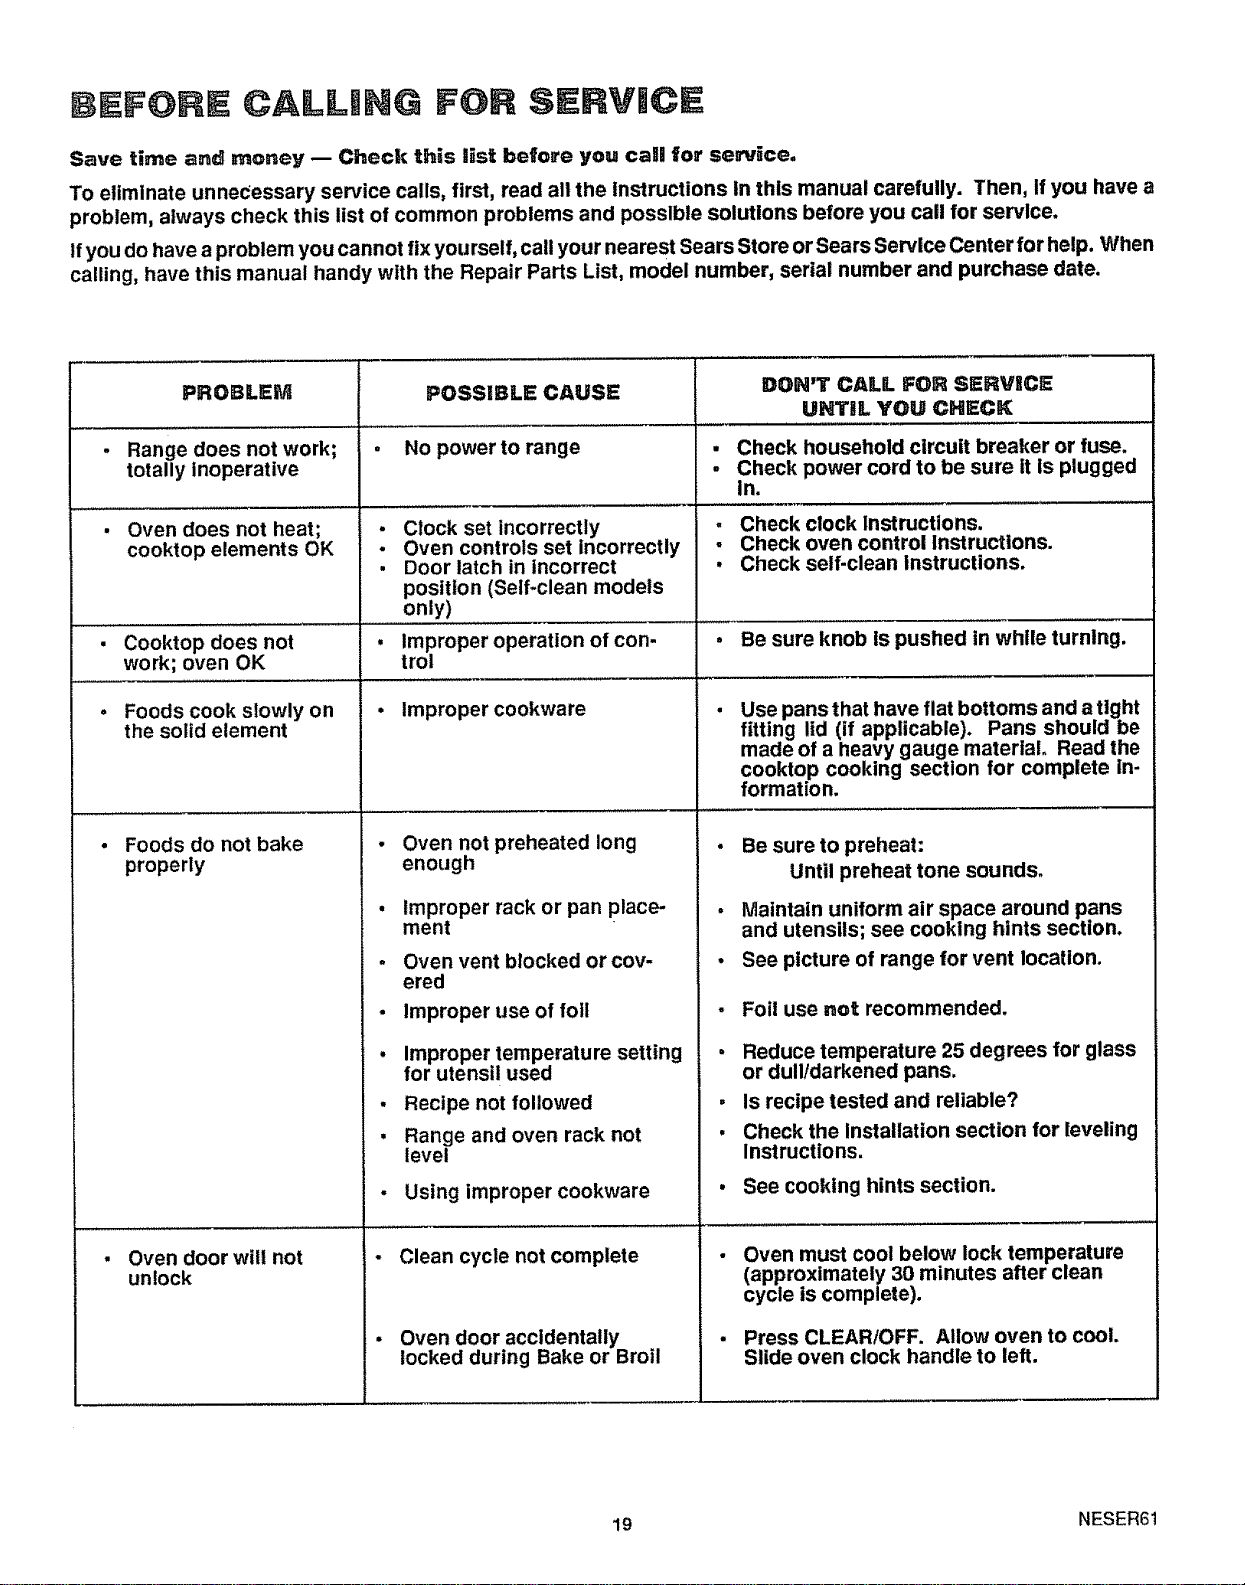
Save time and money -- Check this list before you call for sePJice.
TO eliminate unnecessary service calls, first, read all the instructions in this manual carefully. Then, if you have a
problem, always check this list of common problems and possible solutions before you call for service.
Ifyou do have a problem you cannot fix yourself, call your nearest Sears Store or Sears Service Center for help. When
catling, have this manual handy with the Repair Parts List, model number, serial number and purchase date.
PROBLEM
Range does not work;
totally inoperative
Oven does not heat;
cooktop elements OK
POSSIBLE CAUSE
Foods cook slowly on
the solid element
, No power to range
e
e
m
Crock set incorrectly
Oven controls set incorrectly
Door latch in incorrect
position (Self-clean models
only)
• Cooktop does not • Improper operation of con-
work; oven OK troi
, • Improper cookware
Oven not preheated long
enough
Improper rack or pan place-
ment
Foods do not bake
properly
Oven door will not
unlock
a
o
w
s
Oven vent blocked or cov-
ered
Improper use of loll
Improper temperature setting
for utensil used
Recipe not followed
Range and oven rack not
level
Using improper cookware
Clean cycle not complete
Oven door accidentally
locked during Bake or Broil
DON'T CALL FOR SERVICE
UNTIL YOU CHECK
Check household circuit breaker or fuse.
Check power cord to be sure it is plugged
in.
, Check clock Instructions.
- Check oven control Instructions.
, Check self-clean instructions.
, Be sure knob is pushed in while turning.
• Use pans that have flat bottoms and a tight
fitting lid (if applicable). Pans should be
made of a heavy gauge material Read the
cooktop cooking section for complete in-
formation.
Be sure to preheat:
Until preheat tone sounds.
, Maintain uniform air space around pans
and utensils; see cooking hints section.
• See picture of range for vent location.
m
o
Foil use not recommended.
Reduce temperature 25 degrees for glass
or dull/darkened pans.
, Is recipe tested and reliable?
• Check the Installation section for leveling
Instructions.
• See cooking hints section.
Oven must cool below lock temperature
(approximately 30 minutes after clean
cycle is complete).
Press CLEAR/OFF. Allow oven to cool.
Slide oven clock handle to left.
19 NESER61
BEFORE CALL|NG FOR SERVICI
DON'T CALL FOR SERVICE
POSSIBLE CAUSE UNTIL YOU CHECK
• - Improper rack position •
PROBLEM
Foods do not broil
properly
Oven smokes
Oven or work light
does not work (if
equipped)
Oven does not clean
or poor cleaning re-
suits (self-clean mod-
els only)
Tone does not sound
. Oven preheated
• Improper utensil used
• Oven door closed during
broil
- Improper brollingtime
• Dirty oven
• Broiler pan containing
grease left in oven
Light switch in off position
Light bulb or fluorescent
light starter burned out
• Controls not set properly
• Clean cycle interrupted too
soon
• Oven too dirty
Tone has been altered by
pushing and holding
CLEAR/OFF button
o
a
e
Check broil pan placement. See broiling
section.
Do not preheat when broiling.
Use broiler pan and grid supplied with range.
Open door to broil stop position; see remov-
able oven door section.
. Check broiling chart In broiling section.
• Check for heavy spillover.
° Clean pan and grid after each use.
. Check switch setting; see operating instruc-
tions.
• Check or replace light bulb; see Instruc-
tions.
, If work light does not work after replacing
bulb, replace starter; see Instructions.
• Check self-clean Instructions.
, Heavily soiled ovens require a 3-1/2 hour
clean cycle.
• Heavy spillovers should be removed before
setting clean cycle. Repeat clean cycle.
° Push and hold CLEAR/OFF button to acti-
vate tone.
ADJUSTING OVEN
TEMPERATURE
The temperature in your new range has been set cor-
rectly at the factory, so be sure to follow the recipe
temperatures and cooking times the first few times you
bake in your oven.
Ifyou think the oven should be hotter or cooler, you can
adjust it yourself. To decide how much to change the
temperature, set the oven temperature 25°F higher or
lower than the temperature in your recipe, then bake.
The results of this "test" should give you an idea of how
much the temperature should be changed°
To adjust temperature:
I. Push "BAKE" key.
2. Select a temperature between 500°F and 550°F.
3. Immediately, press "BAKE" again and hold the key
for about 4 seconds. The preset oven adjustment will
appear in the temperature display.
4. The temperature can be adjusted up to (+) 35°F hotter
or (-) 35°F cooler. Use the up or down keys to select.
5. When you have made the adjustment, push CLEAR/
OFF to go back to the time of day. Use your oven as
you would normally.
NOTE:This adjustment will not affect Broi! or
Clean temperatures, it wil! be remem-
bered when power is removed,
2O NESER62

NOTES
J
21

22
f
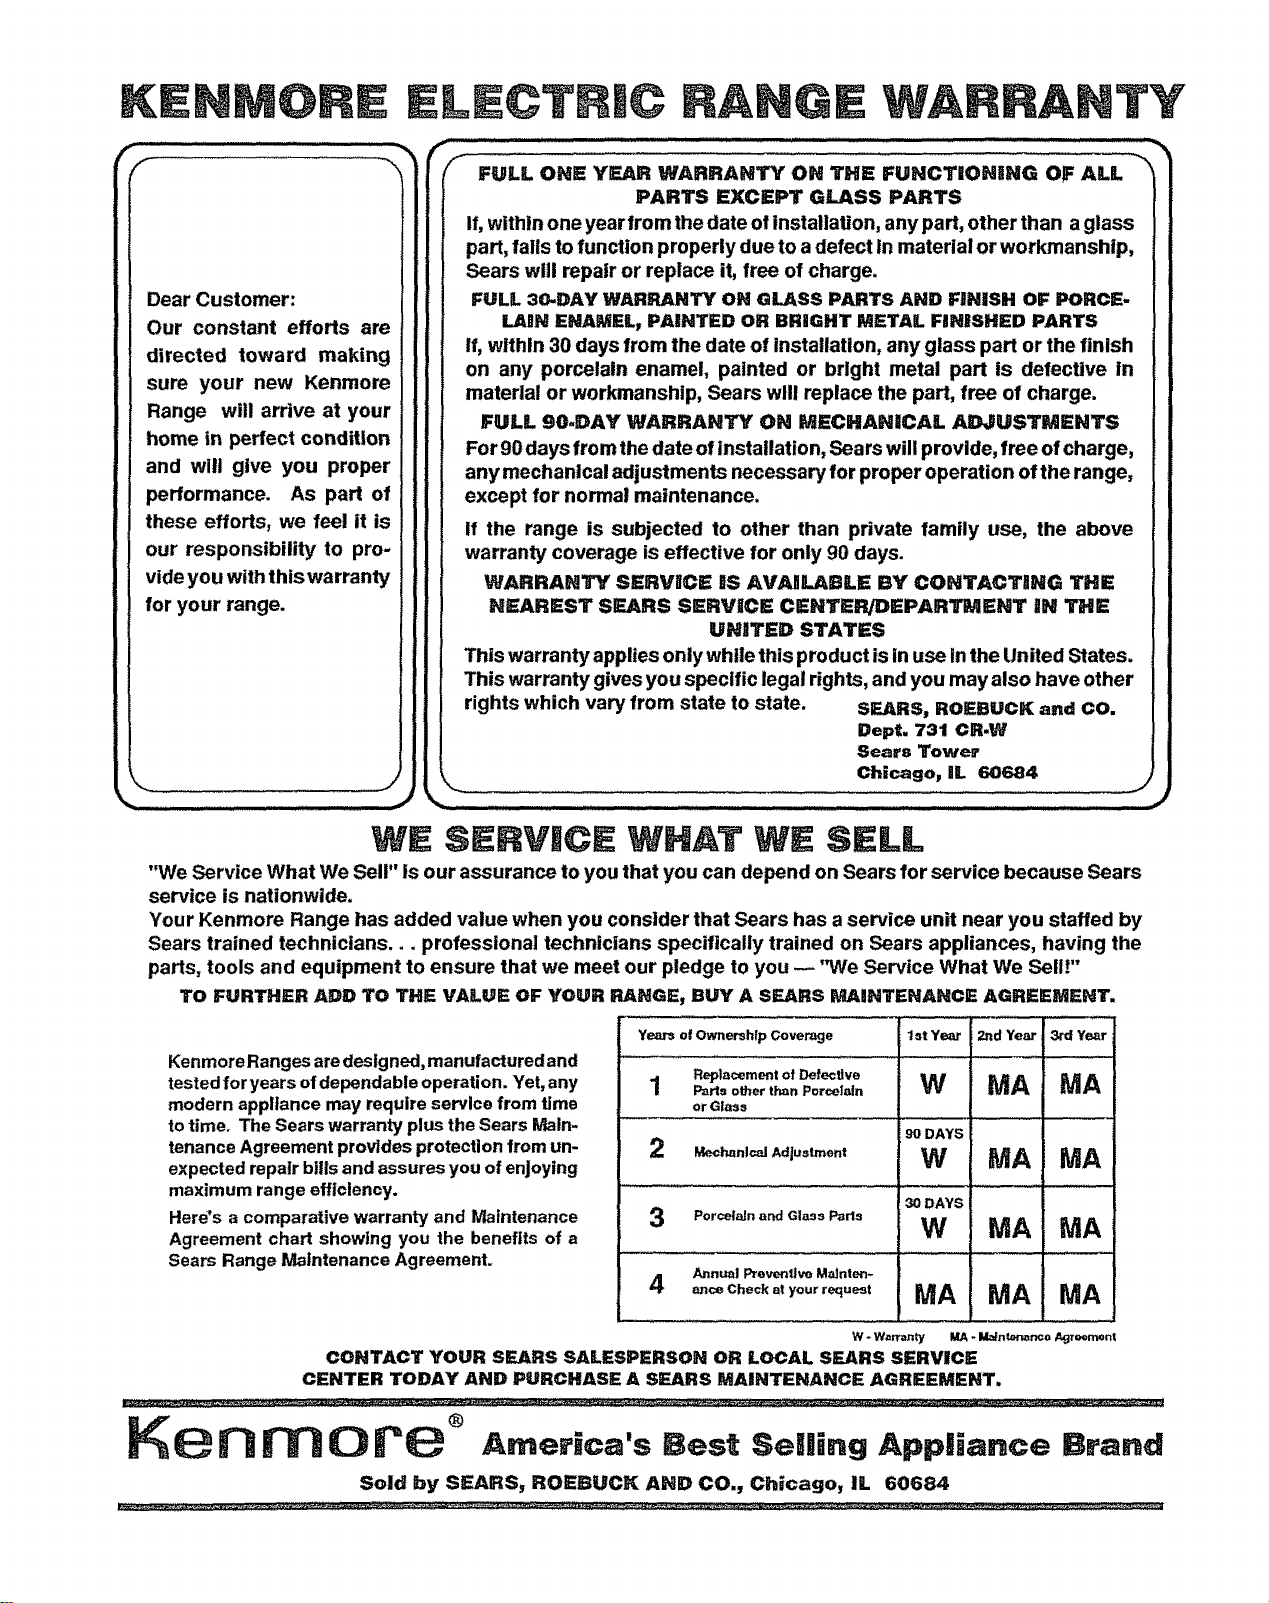
Dear Customer:
Our constant efforts are
directed toward making
sure your new Kenmore
Range will arrive at your
home in peHect condition
and will give you proper
performance. As part of
these efforts, we feel it is
our responsibility to pro-
vide you with this warranty
for your range.
p_
FULL ONE YEAR WARRANlr_ ON THE FUNCTIONING OF ALL
PARTS EXCEPT GLASS PARTS
If, within one year from the date of installation, any part, other than a glass
part, falls to function properly due to a defect in material or workmanship,
Sears will repair or replace it, free of charge.
FULL 30-DAY WARRANTY ON GLASS PARTS AND FINISH OF PORCE-
LAiN ENAMEL, PAINTED OR BRIGHT METAL FiNiSHED PARTS
If, within 30 days from the date of Installation, any glass part or the finish
on any porcelain enamel, painted or bright metal part is defective in
material or workmanship, Sears will replace the part, free of charge.
FULL 90.DAY WARRANTY ON MECHANICAL ADJUSTMENTS
For 90 days from the date of installation, Sears will provide, free of charge,
any mechanical adjustments necessary for proper operation ofthe range,
except for normal maintenance.
If the range is subjected to other than private family use, the above
warranty coverage is effective for only 90 days.
WARRANTY SERVnCE BS AVAILABLE BY CONTACTaNG THE
NEAREST SEARS SERVICE CENTER/DEPARTMENT iN THE
UNnTED STATES
This warranty applies only while this product isin use in the United States.
This warranty gives you specific legal rights, and you may also have other
rights which vary from state to state. SEARS, ROEBUCK and CO.
Dept. 731 CR,W
Sears Tower
Chicagop IL 60684
WE SERVDCE WHAT S LL
"We Service What We Sell" is our assurance to you that you can depend on Sears for service because Sears
service is nationwide.
Your Kenmore Range has added value when you consider that Sears has a service unit near you staffed by
Sears trained technicians.., professional technicians specifically trained on Sears appliances, having the
parts, tools and equipment to ensure that we meet our pledge to you -- "We Service What We Sell!"
TO FURTHER ADD TO THE VALUE OF YOUR RANGE, BUY A SEARS MAINTENANCE AGREEMENT.
Kenmore Ranges are designed, manufactured and
tested for years ofdependable operation. Yet, any
modern appliance may require service from time
to timer The Sears warranty plus the Sears Main-
tenance Agreement provides protection from un-
expected repair bills and assures you of enjoying
maximum range efficiency.
Here's a comparative warranty and Maintenance
Agreement chart showing you the benefits of a
Sears Range Maintenance Agreement.
Yem's of Ownership Coverage 1st Year 2nd Year 3rd Year
I
Replacement of Defective
1 Parts other than Porcelain W IVlA MA
or Glass
! go DAYS
........... , .......... , = ,
30 DAYS
Porcelain and Glass Paris W MA MA
................ _ ........ ,,, ,
Ann_! Prevent|vo M_nt_'_-
4 cho k0tyo , °e= MA MA MA
W - War_nty MA - M_n_nco Ag_o_mont
CONTACT YOUR SEARS SALESPERSON OR LOCAL SEARS SERVICE
CENTER TODAY AND PURCHASE A SEARS MAINTENANCE AGREEMENT.
® America's Best Selling Appliance Brand
Sold by SEARS, ROEBUCK AND CO., Chicago, IL 60684


