
THIS RANGE IS FOR RESIDENTIAL USE ONLY
GAS RANGE
for residential use only
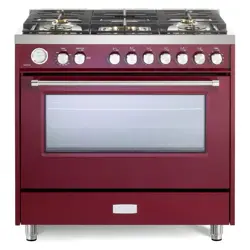
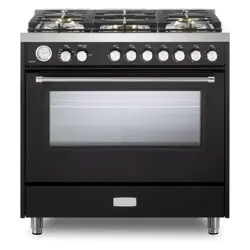
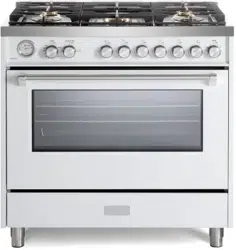
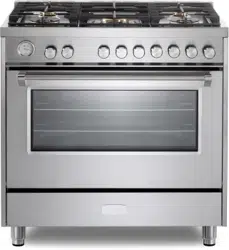
Models: VEFSGG 304 ..
USERS OPERATING INSTRUCTIONS
IMPORTANT - PLEASE READ AND FOLLOW
• Beforebeginning,pleasereadtheseinstructionscompletelyandcarefully.
• Donotremovepermanentlyafxedlabels,warnings,orplatesfromtheproduct.Thismay
voidthewarranty.
• Pleaseobservealllocalandnationalcodesandordinances.
• Pleaseensurethatthisproductisproperlygrounded.
• Theelectricalplugshouldalwaysbeaccessible.
• The installer should leave these instructions with the consumer who should retain
for local inspector’s use and for future reference.
Installationmustconformwithlocalcodesorintheabsenceofcodes,theNationalFuelGas
CodeANSIZ223.1/NFPA54-Iatestedition.Electricalinstallationmustbeinaccordancewith
theNationalElectricalCode,ANSI/NFPA70-latesteditionand/orlocalcodes.
INCANADA:InstallationmustbeinaccordancewiththecurrentCAN/CGA-B149.1National
GasInstallationCodeorCAN/CGA-B149.2,PropaneInstallationCodeand/orlocalcodes.
ElectricalinstallationmustbeinaccordancewiththecurrentCSAC22.1CanadianElectrical
CodesPart1and/orlocalcodes.
INSTALLATIONINMANUFACTURED(MOBILE)HOME:Theinstallationmustconformwith
theManufacturedHomeConstructionandSafetyStandard,Title24CFR,Part3280[formerly
theFederalStandardforMobileHomeConstructionandSafety,Title24,HUD(Part280)]
or,whensuchstandardisnotapplicable,theStandardforManufacturedHomeInstallations,
ANSI/NCSBCSA225.1,orwithlocalcodeswhereapplicable.
INSTALLATIONINRECREATIONALPARKTRAILERS:Theinstallationmustconformwith
stateorothercodesor,intheabsenceofsuchcodes,withtheStandardforRecreationalPark
Trailers,ANSIA119.5.
Installationofanygas-redequipmentshouldbemadebyalicensedplumber.Amanualshut-
offvalvemustbeinstalledinanaccessiblelocationinthegaslineexternaltotheappliance
forthepurposeofturningonorshuttingoffgastotheappliance(InMassachusettssuchshu-
toffdevicesshouldbeapprovedbytheBoardofStateExaminersofPlumbers&GasFitters).
Ifanexternalelectricalsourceisutilized,theappliance,wheninstalled,mustbeelectrically
groundedinaccordancewithlocalcodesor,intheabsenceoflocalcodes,withthenational
ElectricalCode,ANSI/NFPA70.
Some models are supplied with a protective lm on steel and aluminium
parts.Thislmmustberemovedbeforeinstalling/usingtheappliance.
R
2
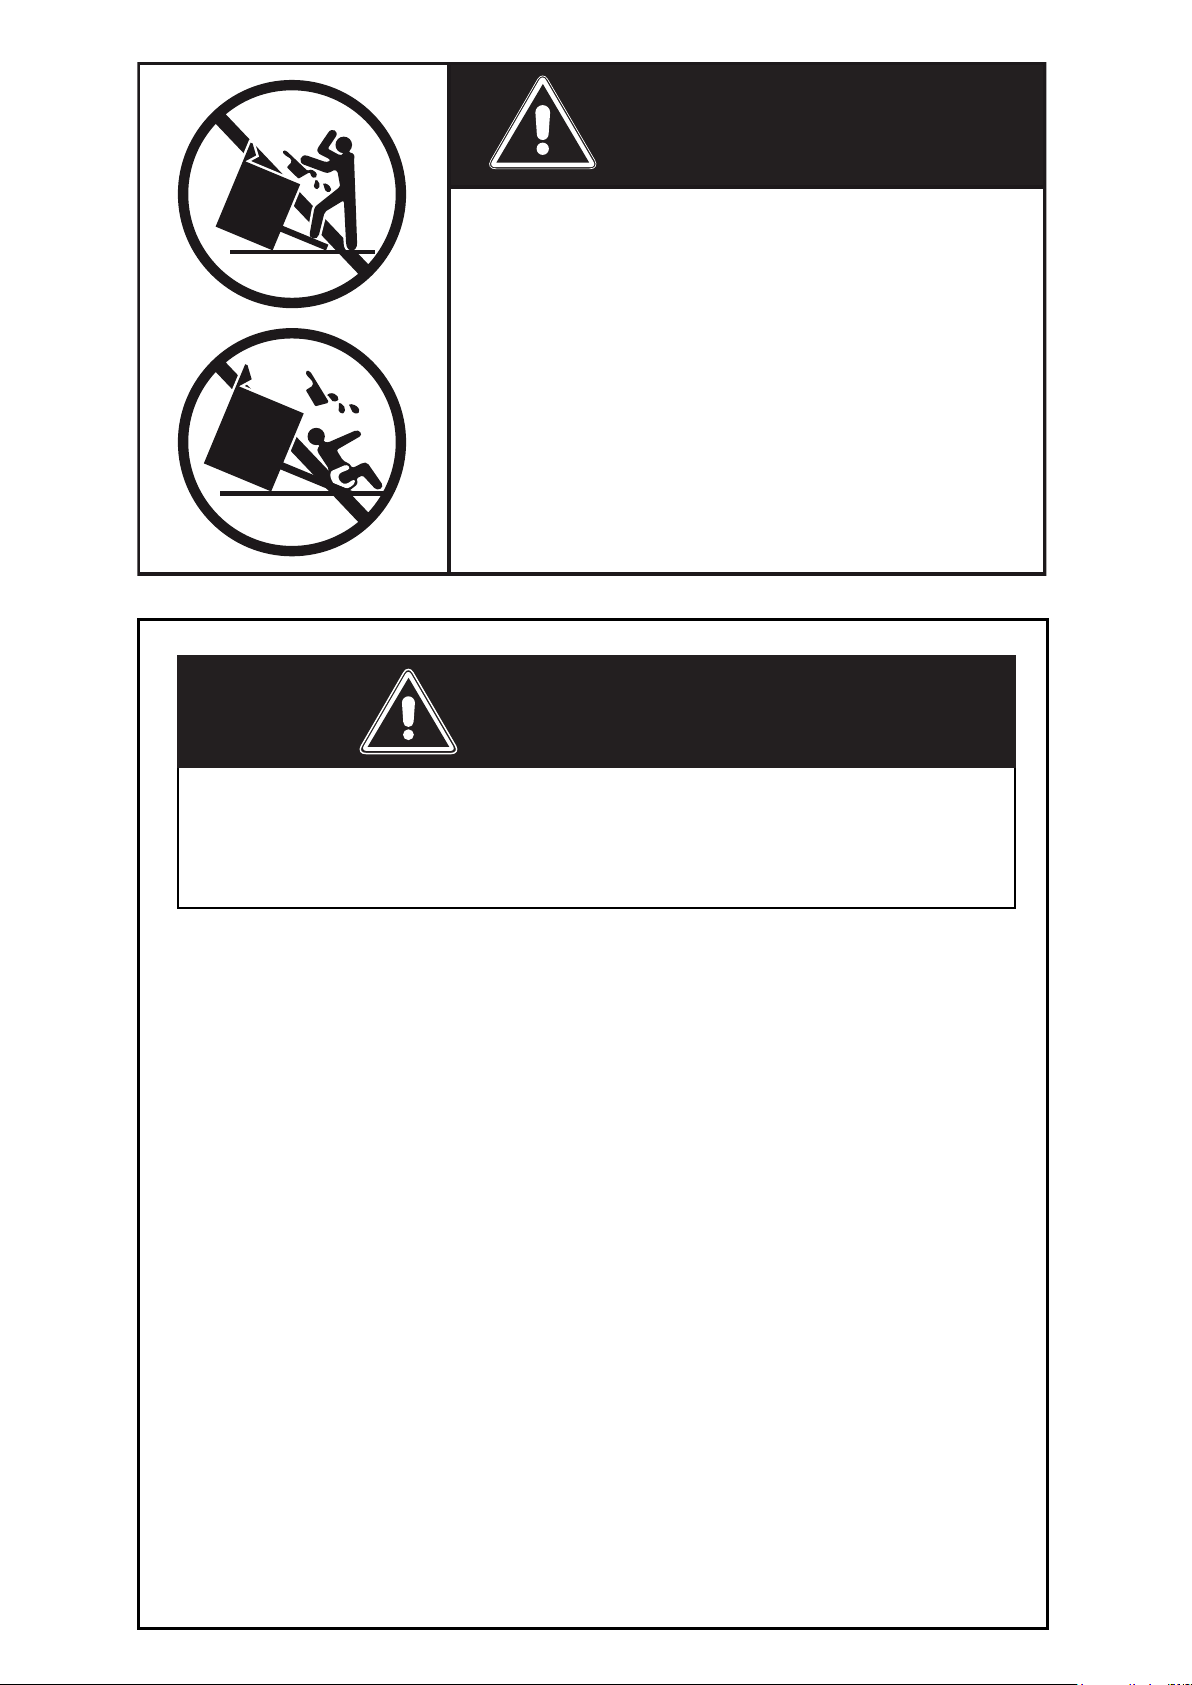
WARNING !
Toreducetheriskoftippingtheappliance,
theappliancemustbesecuredbyproperly
installed anti-tip device packed with the
appliance.
• ALL RANGES CAN TIP
• INJURY TO PERSONS COULD RESULT
• INSTALL ANTI-TIP DEVICE PACKED
WITH RANGE
• SEE INSTALLATION INSTRUCTIONS
– Donotstoreorusegasolineorotherammablevaporsand
liquids in the vicinity of this or any other appliance.
– NEVER use this appliance as a space heater to heat or warm
theroom.Doingsomayresultincarbonmonoxidepoiso-
ningandoverheatingoftheappliance.
– WHAT TO DO IF YOU SMELL GAS:
• Donottrytolightanyappliance.
• Do not touch any electrical switch.
• Donotuseanyphoneinyourbuilding.
• lmmediately call your gas supplier from a neighbor’s
phone.Followthegassupplier’sinstructions.
• lf you cannot reach your gas supplier, call the re de-
partment.
– Installationandservice must be performed by a qualied
installer,serviceagency,orthegassupplier.
Iftheinformationinthismanualisnotfollowedexactly,
areorexplosionmayresultcausingpropertydamage,
personalinjury,ordeath.
WARNING !
3
Thisapplianceisdesignedandmanufacturedsolelyforthecookingofdomestic(household)food
andinnotsuitableforanynonedomesticapplicationandthereforeshouldnotbeusedinacom-
mercialenvironmement.
Theappliancewarrantywillbevoidiftheapplianceisusedwithinanonedomesticenvironmement
i.e.asemicommercial,commercialorcommunalenvironment.
DearCustomer,
Thank you for having purchased and given your preference to our
product.
The safety precautions and recommendations reported below are
for your own safety and that of others. They will also provide a means
by which to make full use of the features offered by your appliance.
Please preserve this booklet carefully. It may be useful in future,
either to yourself or to others in the event that doubts should arise
relating to its operation.
This appliance must be used only for the task it has explicitly been
designed for, that is for cooking foodstuffs. Any other form of usage
is to be considered as inappropriate and therefore dangerous.
The manufacturer declines all responsibility in the event of dama-
ge caused by improper, incorrect or illogical use of the appliance.
TheGovernorofCaliforniaisrequiredtopublishalistofsubstancesknowntothestateofCalifor-
niatocausecancerorreproductiveharmandrequiresbusinessestowarncustomersofpotential
exposurestosuchsubstances.
WARNING!: Gas appliances contain or produce substances which can cause death or serious
illnessandwhichareknowntotheStateofCaliforniatocausecancer,birthdefectsorotherrepro-
ductiveharm.Toreducetheriskfromsubstancesinfuelorfromfuelcombustion,makesurethis
applianceisinstalled,operated,andmaintainedaccordingtothemanufacturer’sinstructions.

4
USER INSTRUCTIONS
GENERAL INFORMATION
1.
WARNING!!
Thisapplianceshallnotbeusedforspaceheating.This
informationisbasedonsafetyconsiderations.
2. Toeliminateriskofburnsorrebyreachingoverheatedsur-
face units, cabinet storage located above the surface units
shouldbeavoided.
3. AlIopeningsinthewallbehindtheapplianceandintheoor
undertheapplianceshallbesealed.
4. Keepapplianceareaclearandfreefromcombustiblemate-
rials,gasoline,andotherammablevapors.
5. Donotobstructtheowofcombustionandventilationair.
6. Disconnecttheelectricalsupplytotheappliancebeforeser-
vicing.
7. Whenremovingapplianceforcleaningand/orservice;
A. Shutoffgasatmainsupply.
B. DisconnectACpowersupply.
C. Disconnectgaslinetotheinletpipe.
D. Carefullyremovetherangebypullingoutward.
CAUTION:Rangeisheavy;usecareinhandling.
8.
Electrical Requirement
Electrical installation should comply with national and local
codes.
9.
Air Supply and Ventilation
Theinstallermustreferstolocal/nationalcodes.
10.
Gas Manifold Pressure
Naturalgas-4.0”W.C.P.
LP/Propane-11.0”W.C.P.
11. Themisuseofovendoor(e.g.stepping,sitting,orleaningon
them)canresultinpotentialhazardsand/orinjuries.
12. Wheninstallingorremovingtherangeforservice,arollinglift
jackshouldbeused.Donotpushagainstanyoftheedgesof
therangeinanattempttoslideitintooroutoftheinstallation.
Pushingorpullingarange(ratherthanusingaliftjack)also
increases the possibility of bending the leg spindles or the
internalcouplingconnectors.
WARNING!!
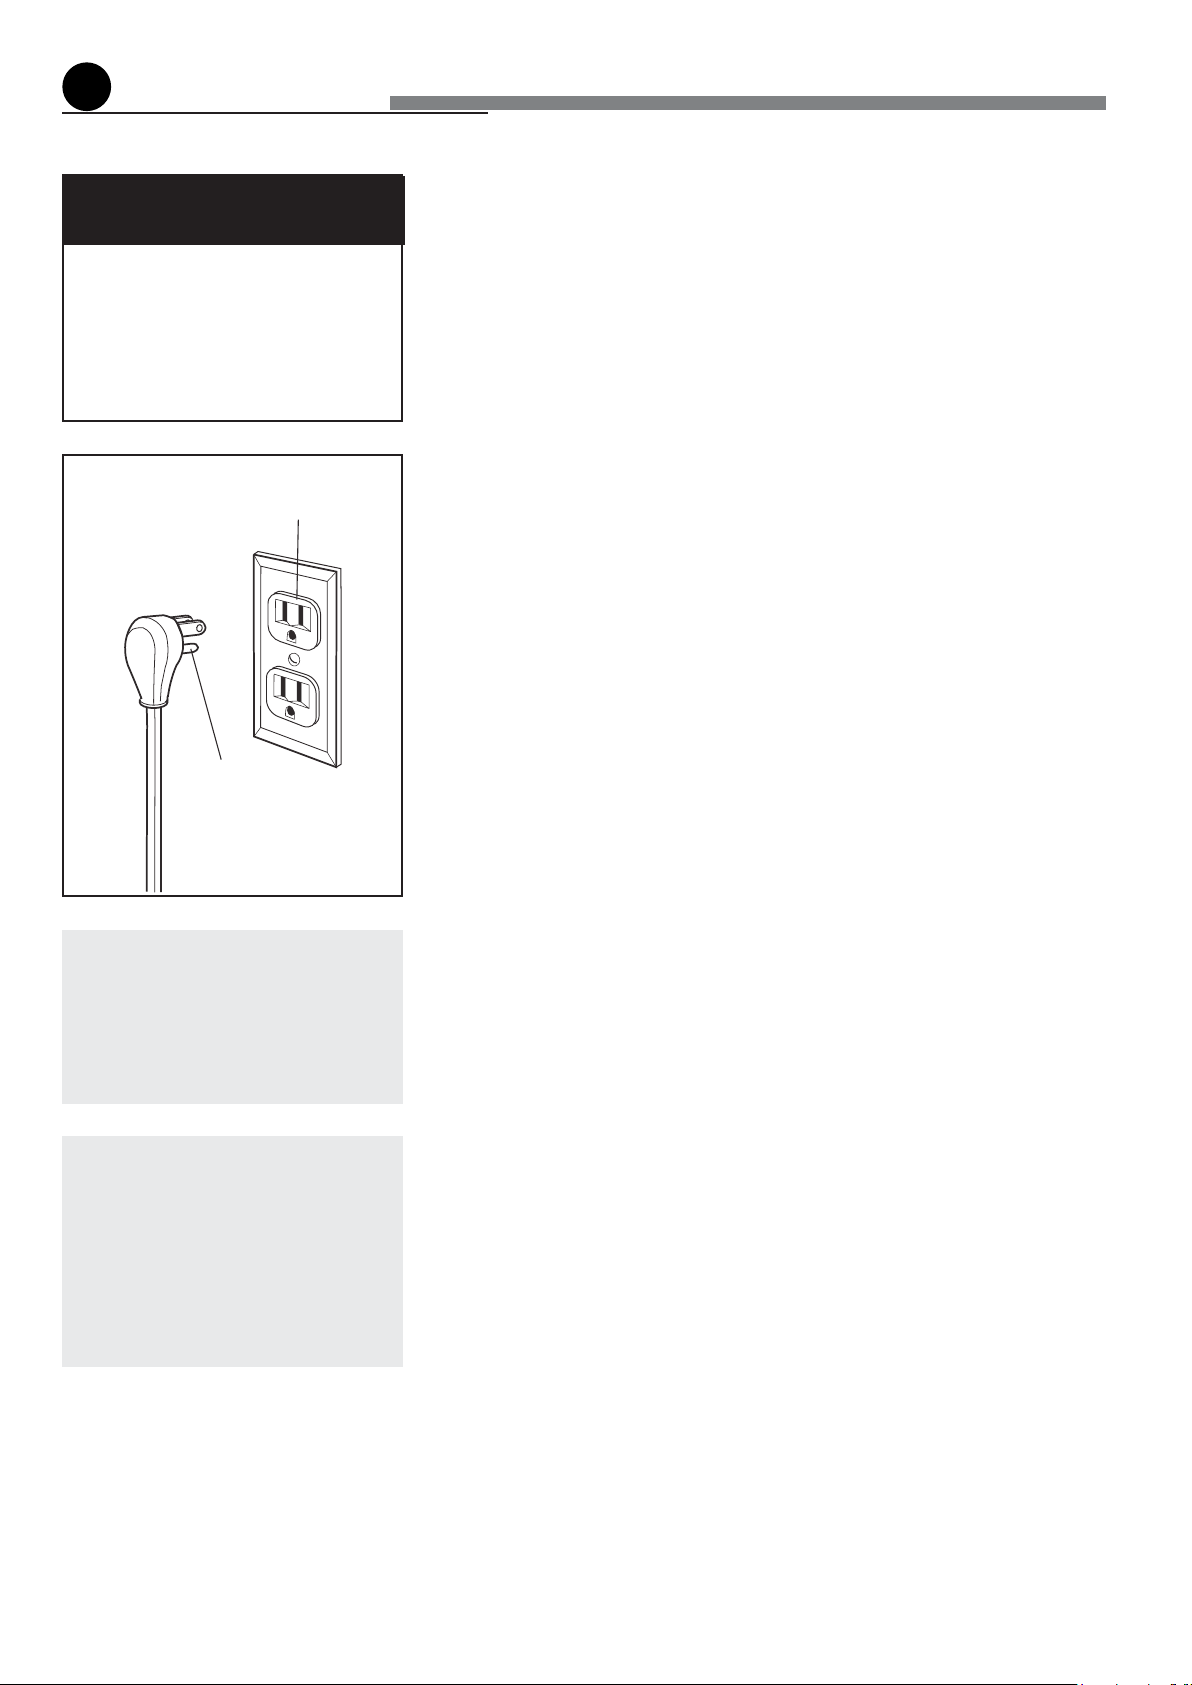
ELECTRICAL GROUNDING INSTRUCTIONS
Therangemustbeelectricallygroundedinaccordancewith
localcodesor,intheabsenceoflocalcodes,withtheNatio-
nalElectricalCode,ANSI/NFPANo.70-latestedition,inCana-
da Canadian Electrical Code.
InstallationshouldbemadebyaIicensedelectrician.
FORPERSONALSAFETY,THISAPPLIANCEMUSTBEPRO-
PERLY GROUNDED.
Ifanexternalelectricalsourceisutilized,theinstallationmustbe
electrically grounded in accordance with local codes or, in the
absenceoflocal codes,withthe nationalElectrical Code,ANSI/
NFPA70.
This appliance is equipped with a three-prong grounding plug
(NEMA 5-15P) for your protection against shock hazard and
shouldbepluggeddirectlyintoaproperlygroundedsocket.
Do not under any circumstances cut or remove the third
(ground)prongfromthepowerplug.
REPLACEMENT PARTS
Onlyauthorizedreplacementpartsmaybeusedinperformingser-
viceontherange.Replacementpartsareavailablefromfactory
authorizedpartsdistributors.Contactthenearestpartsdistributor
inyourarea.

5
IMPORTANT PRECAUTIONS AND RECOMMENDATIONS
Afterhavingunpackedtheappliance,checktoensurethatitisnotdamaged.
Incaseofdoubt,donotuseitandconsultyoursupplieroraprofessionallyqualiedtechnician.
Packingelements(i.e.plasticbags,polystyrenefoam,nails,packingstraps,etc.)shouldnotbeleftaround
withineasyreachofchildren,asthesemaycauseseriousinjuries.Thepackagingmaterialisrecyclable
andismarkedwiththerecyclingsymbol
.
• Donotattempttomodifythetechnicalcharacteristicsoftheapplianceasthismaybecomedangerous
touse.
• Donotcarryoutcleaningormaintenanceoperationsontheappliancewithouthavingpreviouslydi-
sconnecteditfromtheelectricpowersupply.
• Afteruse,ensurethattheknobsarein
OFF
position.
• Donotallowchildrenorotherincapablepeopletousetheappliancewithoutsupervision.
• Duringandafteruseoftherange,certainpartswillbecomeveryhot.Donottouchhotparts.
• Keepchildrenawayfromtherangewhenitisinuse.
• Somemodelsaresuppliedwithaprotectivelmonsteelandaluminiumparts.Thislmmustberemo-
vedbeforeinstalling/usingtheappliance.
• Firerisk!Do notstoreammable materialintheoven andinthe storagecompartment(accessible
throughapivotingpanel).
• Makesurethatelectricalcablesconnectingotherappliancesintheproximityoftherangecannotcome
intocontactwiththehoborbecomeentrappedintheovendoor.
• Donotlinetheovenwallswithaluminiumfoil.Donotplaceshelves,broilerpan,pansorothercooking
utensilsonthebaseoftheovenchamber.
• Themanufacturerdeclinesallliabilityforinjurytopersonsordamagetopropertycausedbyincorrect
orimproperuseoftheappliance.
• Toavoidanypossiblehazard,theappliancemustbeinstalledbyqualiedpersonnelonly.Anyrepairs
byunqualiedpersonsmayresultinelectricshockorshortcircuit.Inordertoavoidpossibleinjuries
toyourbodyortotheappliance,donotattemptanyrepairsbyyourself.Suchworkshouldbecarried
outbyqualiedservicepersonnelonly.
• Dangerofburns!Theovenandcookingaccessoriesmaybecomeveryhotduringoperation.Make
surechildrenarekeptoutofreachandwarnthemaccordingly.Toavoidburnsusekitchenclothesand
gloveswhenhandlinghotpartsorutensils.
• Standawayfromtherangewhenopeningovendoor.Hotairorsteamwhichescapescancauseburns
tohands,face,and/oreyes.
• Nevercleantherangeandtheovenwithahigh-pressuresteamcleaningdevice,asitmayprovokea
shortcircuit.
• Inthecaseofaprolongedpowerfailure:
– thetopburnerscanbeusedwithnorestriction.Inthatcasefollowtheinstructionsinthechapter
“Howtousethetopburners”.
– ovenandbroilburner:DONOTattempttolighttheovenorbroilburnerduringpowerfailure.
• Thisapplianceisintendedforuseinyourhousehold.Neverusetheapplianceforanyotherpurpose!
• Ifyou shoulddecide notto usethis applianceany longer(or decideto substitutean oldermodel),
beforedisposingofit,itisrecommendedthatitbemadeinoperativeinanappropriatemannerinac-
cordancetohealthandenvironmentalprotectionregulations,ensuringinparticularthatallpotentially
hazardouspartsbemadeharmless,especiallyinrelationtochildrenwhocouldplaywitholdapplian-
ces.Removethedoorbeforedisposaltoprevententrapment.
IMPORTANT PRECAUTIONS AND RECOMMENDATIONS FOR USE OF
ELECTRICAL APPLIANCES
Useofanyelectricalapplianceimpliesthenecessitytofollowaseriesoffundamentalrules.
Inparticular:
• Nevertouchtheappliancewithwethandsorfeet.
• Donotoperatetheappliancebarefooted.
• Donotallowchildrenordisabledpeopletousetheappliancewithoutyoursupervision.
Themanufacturercannotbeheldresponsibleforanydamagescausedbyimproper,incorrectorunreaso-
nableuseoftheappliance.
6
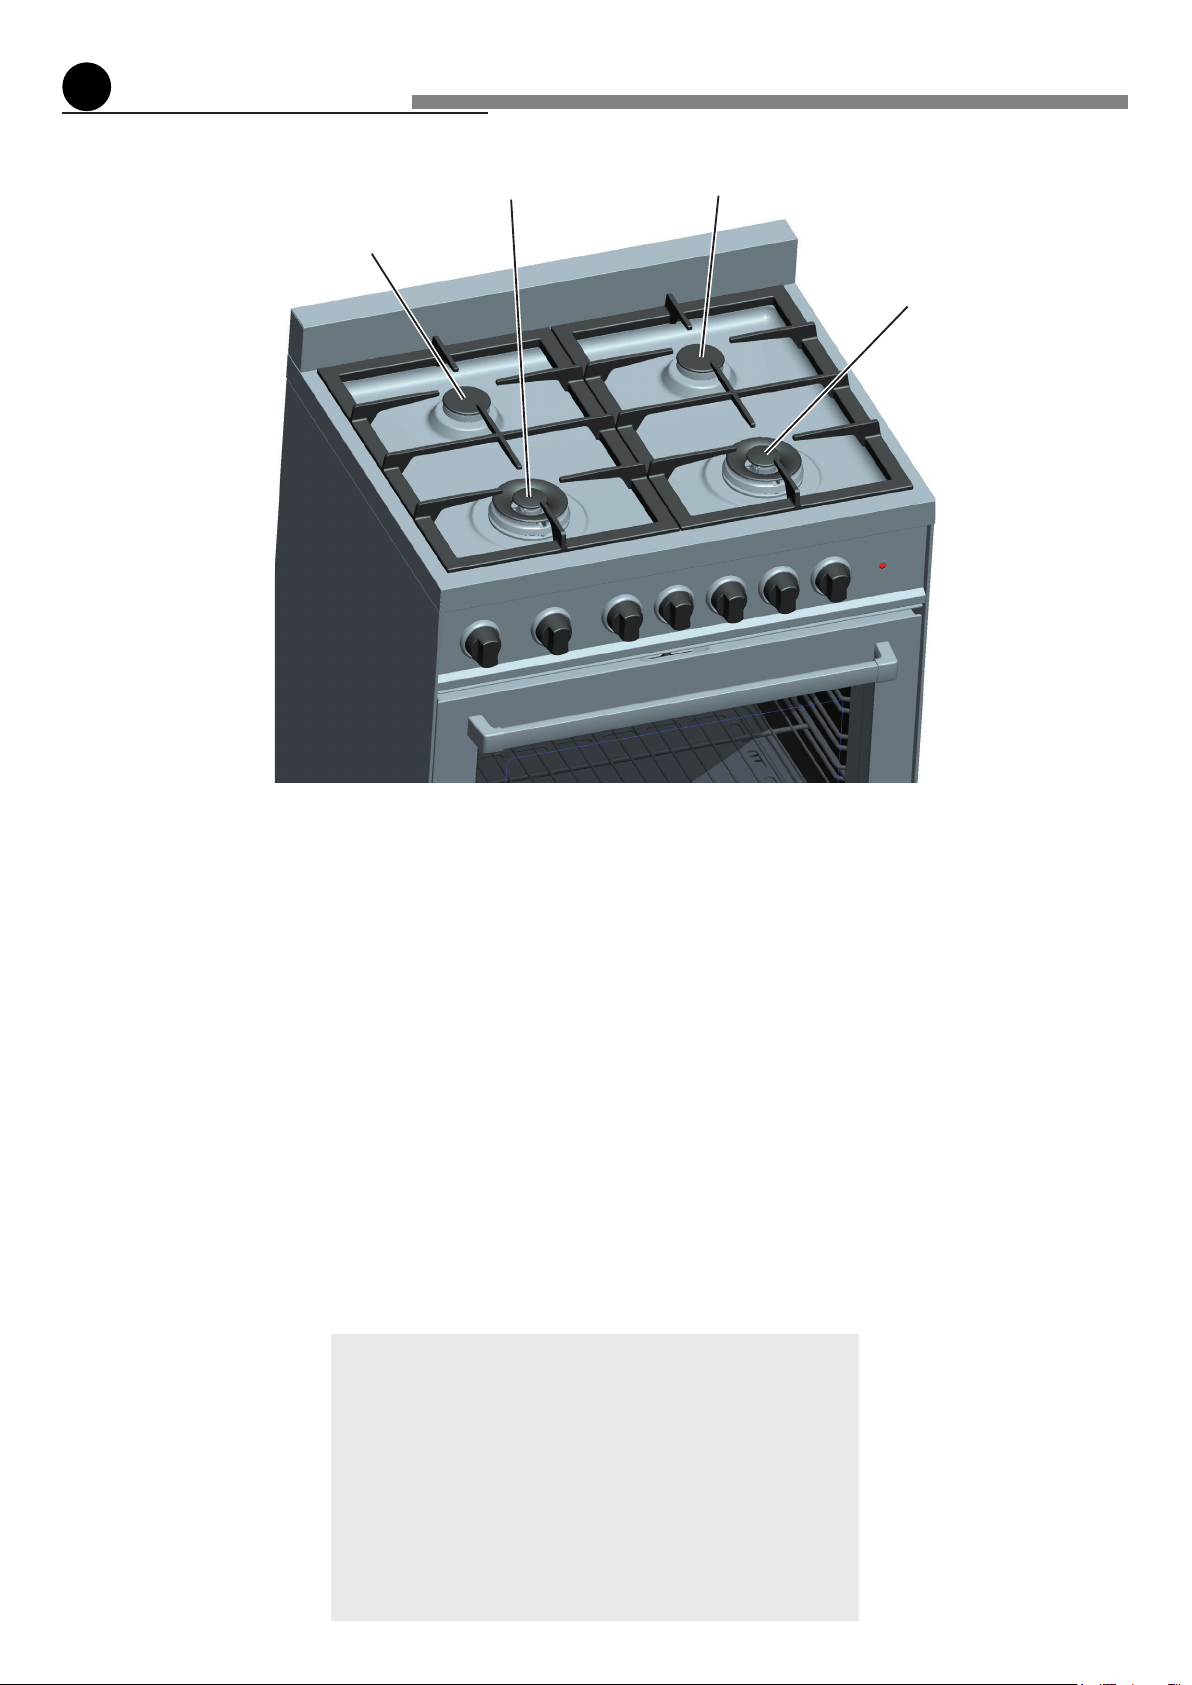
GASBURNERS
1. RearleftSemi-rapidburner(SR)-8000BTU/hr
2. RearrightSemi-rapidburner(SR)-8000BTU/hr
3. FrontrightDualburner(D)-17000BTU/hr
4. FrontleftDualburner(D)-17000BTU/hr
Note:
• Theelectricgas-lightingdeviceisincorporatedintotheknobs.
• Theappliancehasasafetyvalvesystemtted.
Theowofgaswillstopifandwhentheameshouldacciden-
tallygoout.
features
1
CAUTION:
Iftheburnerisaccidentallyextinguished,turnthegas
offatthecontrolknobandwaitatleast1minutebefo-
reattemptingtorelight.
CAUTION:
Gas appliances produce heat and humidity in the en-
vironment in which they are installed.
Ensure that the cooking area is well ventilated fol-
lowingnational/localcodes.
Fig. 1.1
1
4
2
3
7
1
CONTROLS DESCRIPTION
Gascookinghobcontrols:
1. Frontleftburner(4)controlknob
2. Rearleftburner(1)controlknob
3. Rearrightburner(2)controlknob
4. Frontrightburner(3)controlknob
Oven controls:
5. Ovenandbroilburnercontrolknob
6. Ovenlight&fancontrolknob
7. Coolingfanfailurewarninglight
8. 60minutesalarmcontrolknob
When the cooling fan failure warning light is OFF the
coolingfanmotoriscorrectlyoperating.
Operatethecookinghobburners
and the oven or broil as per in-
struction manual.
Whenthecoolingfanfailurewarninglightislitthisindica-
testhemalfunctioningofthecoolingfanmotor.
Youmustnotusetheovenorbroil.
Onlytheburnersofthecooking
hobcanbeused.
Contact Customer Care to arran-
geforservice.
SERVICE
COOLING FAN WARNING LIGHT
WARNING
VERY IMPORTANT NOTICE
Fig. 1.2
6 8 5 1 2 3 4 7
8
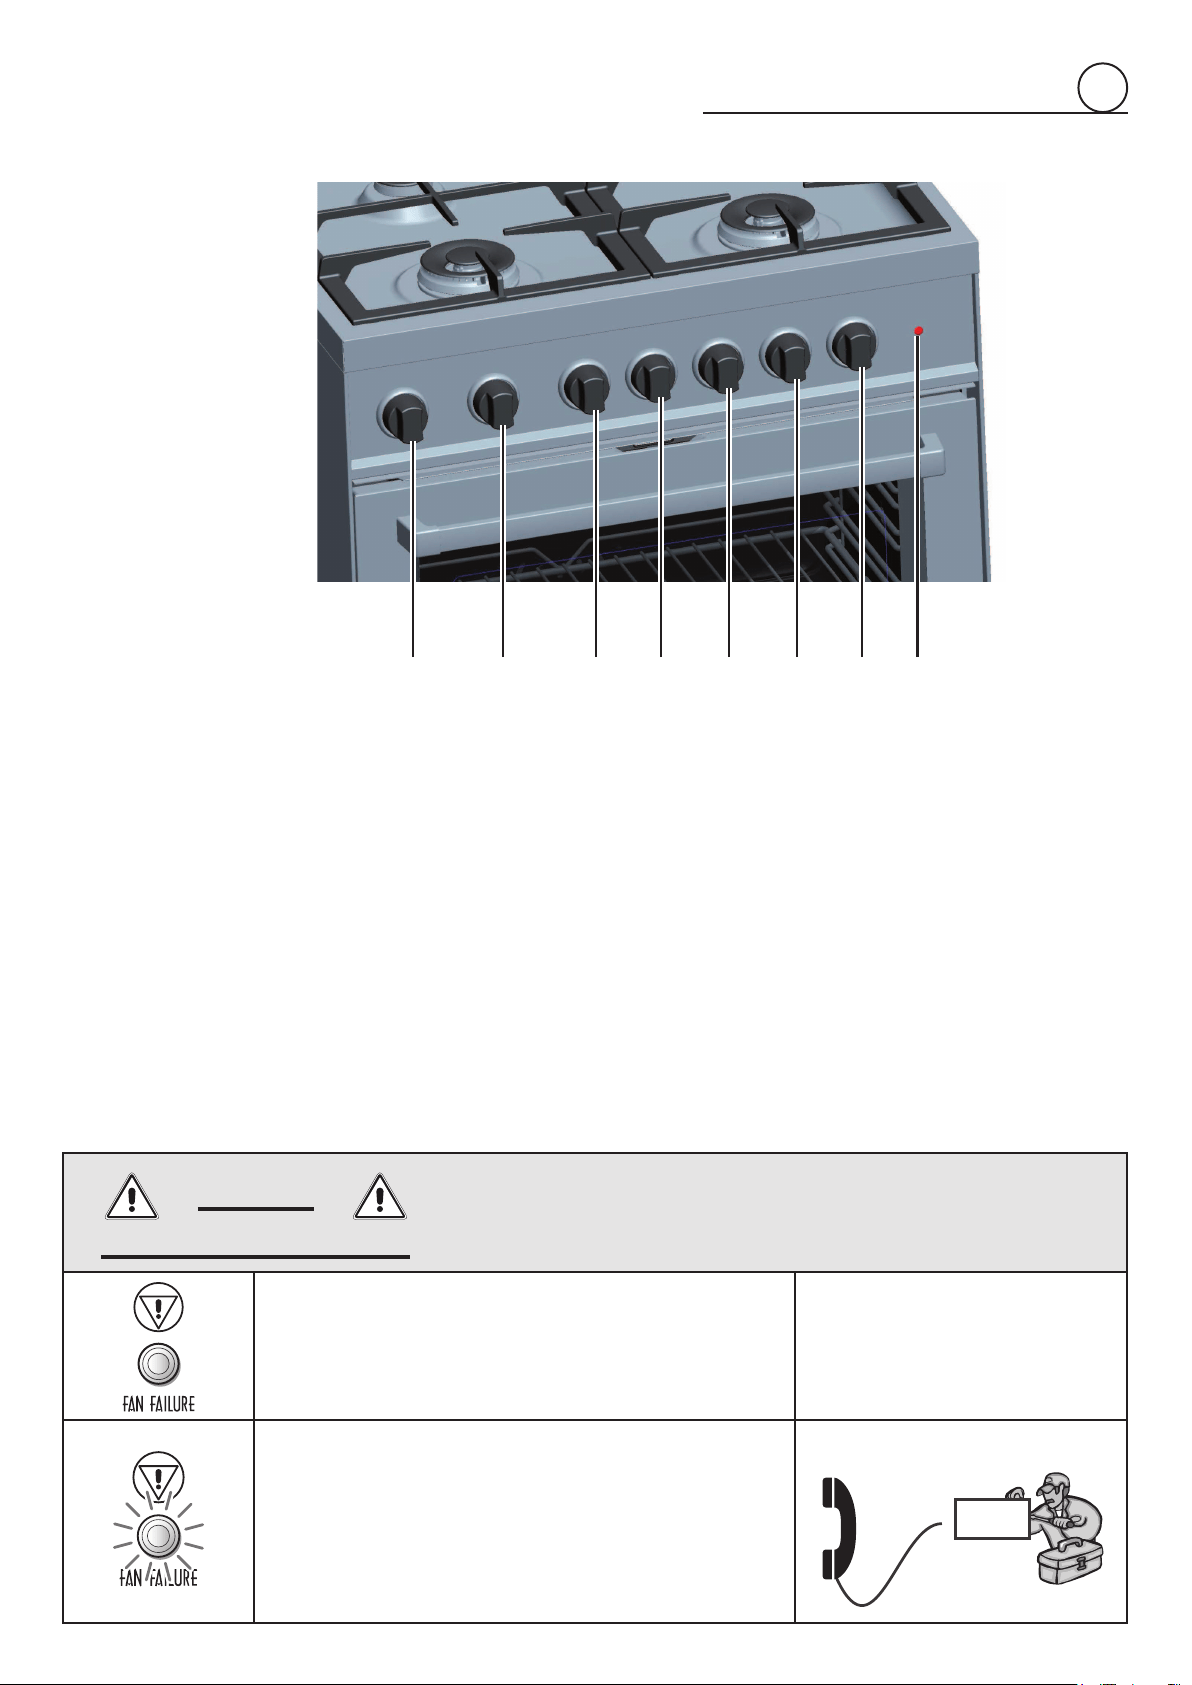
howtousethetopburners
2
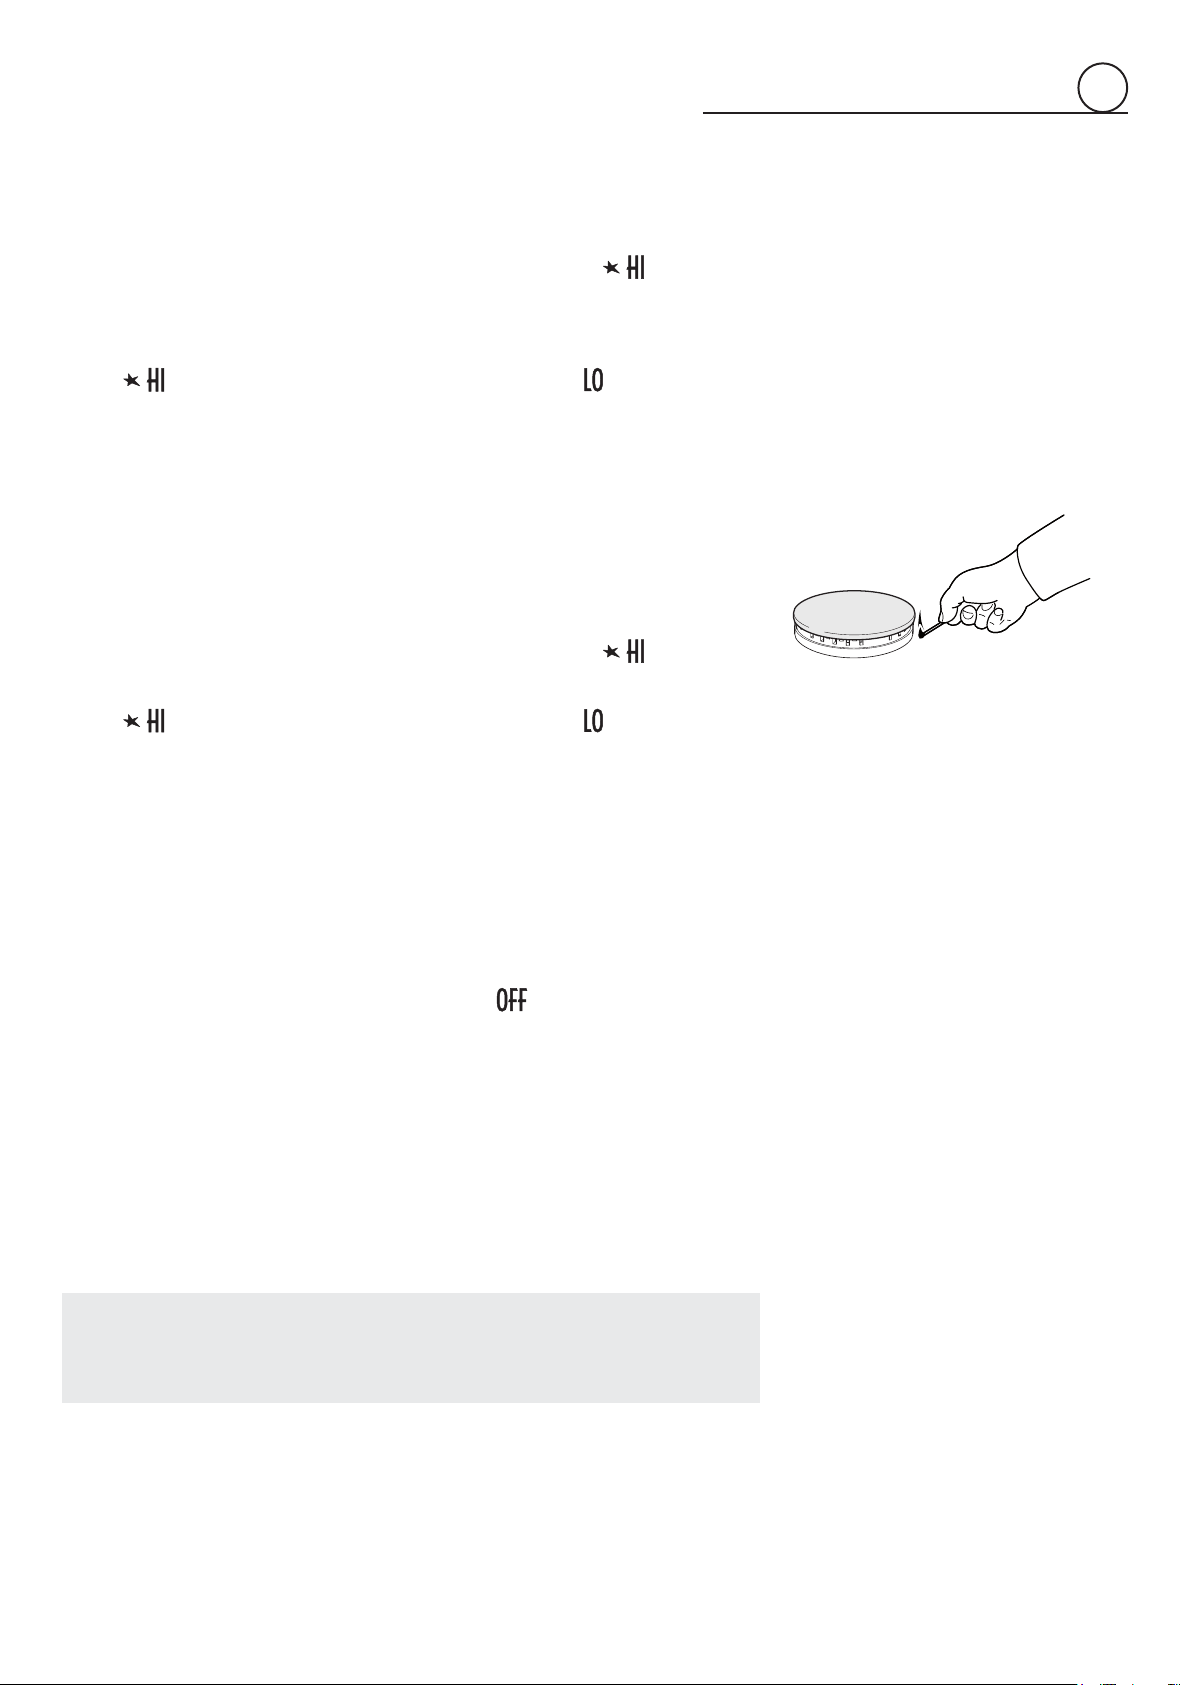
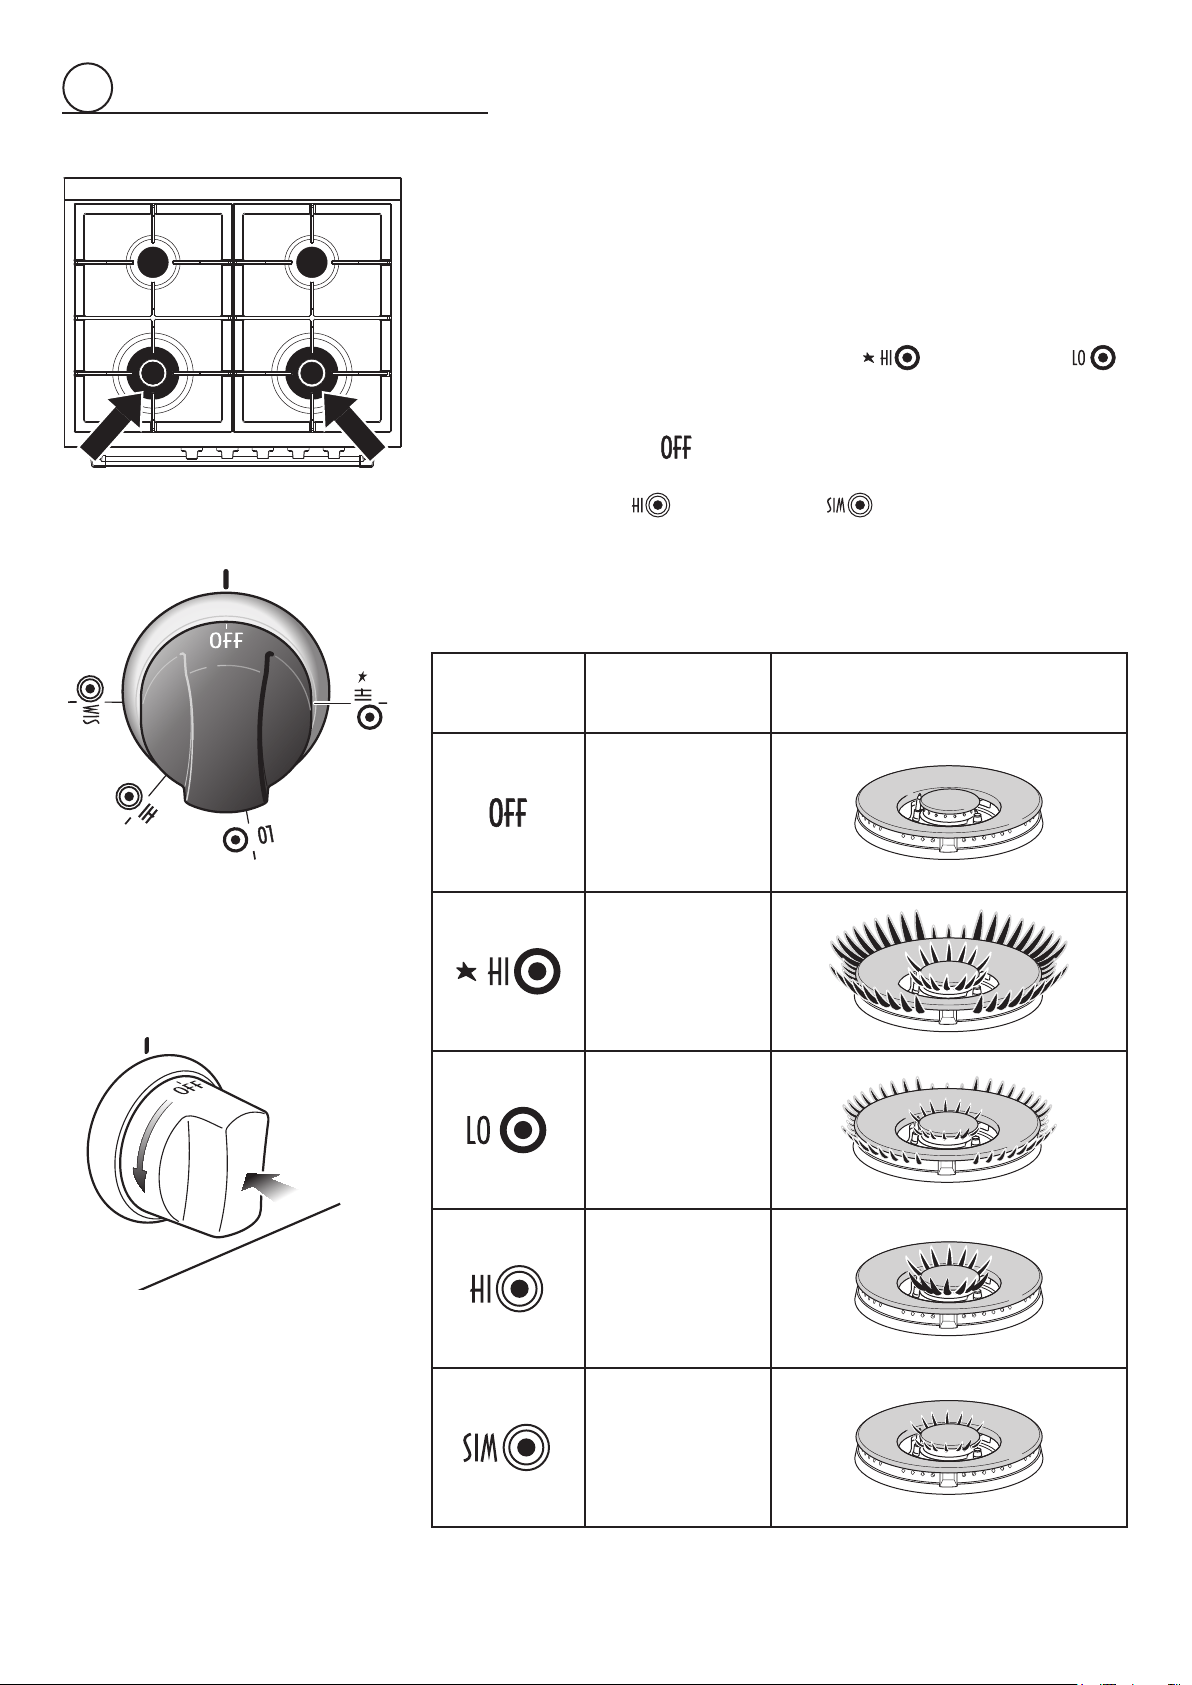
GASBURNERS(Semi-rapid)
Gasow to theburners isadjustedby turningthe knobs (illustratedin g. 2.1)which
controlthevalves.
Turningtheknobsothatthesymbolsprintedonitselfpointtothesymbolprintedonthe
controlpanelachievesthefollowingfunctions:
Knob
position
Function SEMI-RAPIDburners
closed
valve
maximum
rate
minimum
rate
Themaximumaperturepositionpermitsrapidboilingofliquids,whereastheminimum
aperture position allows simmer warming of food or maintaining boiling conditions of
liquids.
Toreducethegasowtominimum,rotatetheknobfurtheranti-clockwisetopointthe
indicatortowardsthe
position(minimumrate).
Otherintermediateoperatingadjustmentscanbeachievedbypositioningtheindicator
betweenthemaximumandminimumaperturepositions,andneverbetweenthemaxi-
mumapertureand
position.
N.B.Whentherangeisnotbeingused,setthegasknobstotheir
positionsandalsoclosethegasshut-offvalveplacedonthemaingas
supply line.
Fig. 2.1
Fig. 2.2
9
2
Caution!
Therangebecomesveryhotduringoperation.
Keep children well out of reach.
LIGHTINGGASBURNERSFITTEDWITHFLAMEFAILURE
SAFETYDEVICE(Semi-rapidburners)
Inordertolighttheburner,youmust:
1. Pushandturntheknobinananti-clockwisedirectionuptothe
position(ma-
ximumrate),pushinandholdtheknobuntiltheamehasbeenlit(g.2.2).
Thesparksproducedbythelightersituatedinsidetherelativeburnerwilllightthe
ame.
Intheeventthatthelocalgassupplyconditionsmakesitdifculttolighttheburner
in
position(maximumrate),tryagainwiththeknobin position(minimum
rate).
2. Waitforabouttensecondsafterthegasburner hasbeenlitbeforelettinggothe
knob(safetydeviceactivationdelay).
3. Adjustthegasvalvetothedesiredposition.
Ifthereisnomainselectricalsupply,theburnerscanbeusedwithnorestriction.
Inthatcase,inordertolighttheburner,youmust:
1. Bringalightedmatchclosetotheburner(aspersidegure)andkeepitinplaceuntil
theburnerhasbeenignited.
2. Pushandturntheknobinananti-clockwisedirectionuptothe
position(ma-
ximumrate),pushinandholdtheknobuntiltheamehasbeenlit(g.2.2).
Intheeventthatthelocalgassupplyconditionsmakesitdifculttolighttheburner
in
position(maximumrate),tryagainwiththeknobin position(minimum
rate).
3. Waitforabouttensecondsafterthegasburner hasbeenlitbeforelettinggothe
knob(safetydeviceactivationdelay).
4. Adjustthegasvalvetothedesiredposition.
Iftheburnerameshouldgooutforsomereason,thesafetyvalvewillautomaticallystop
thegasow.
Tore-lighttheburner, returntheknobtothe closed
position,wait foratleast1
minuteandthenrepeatthelightingprocedure.
Ifyourlocalgassupplymakesitdifculttolighttheburnerwiththeknobsettomaximum,
settheknobtominimumandrepeattheoperation.
10
2
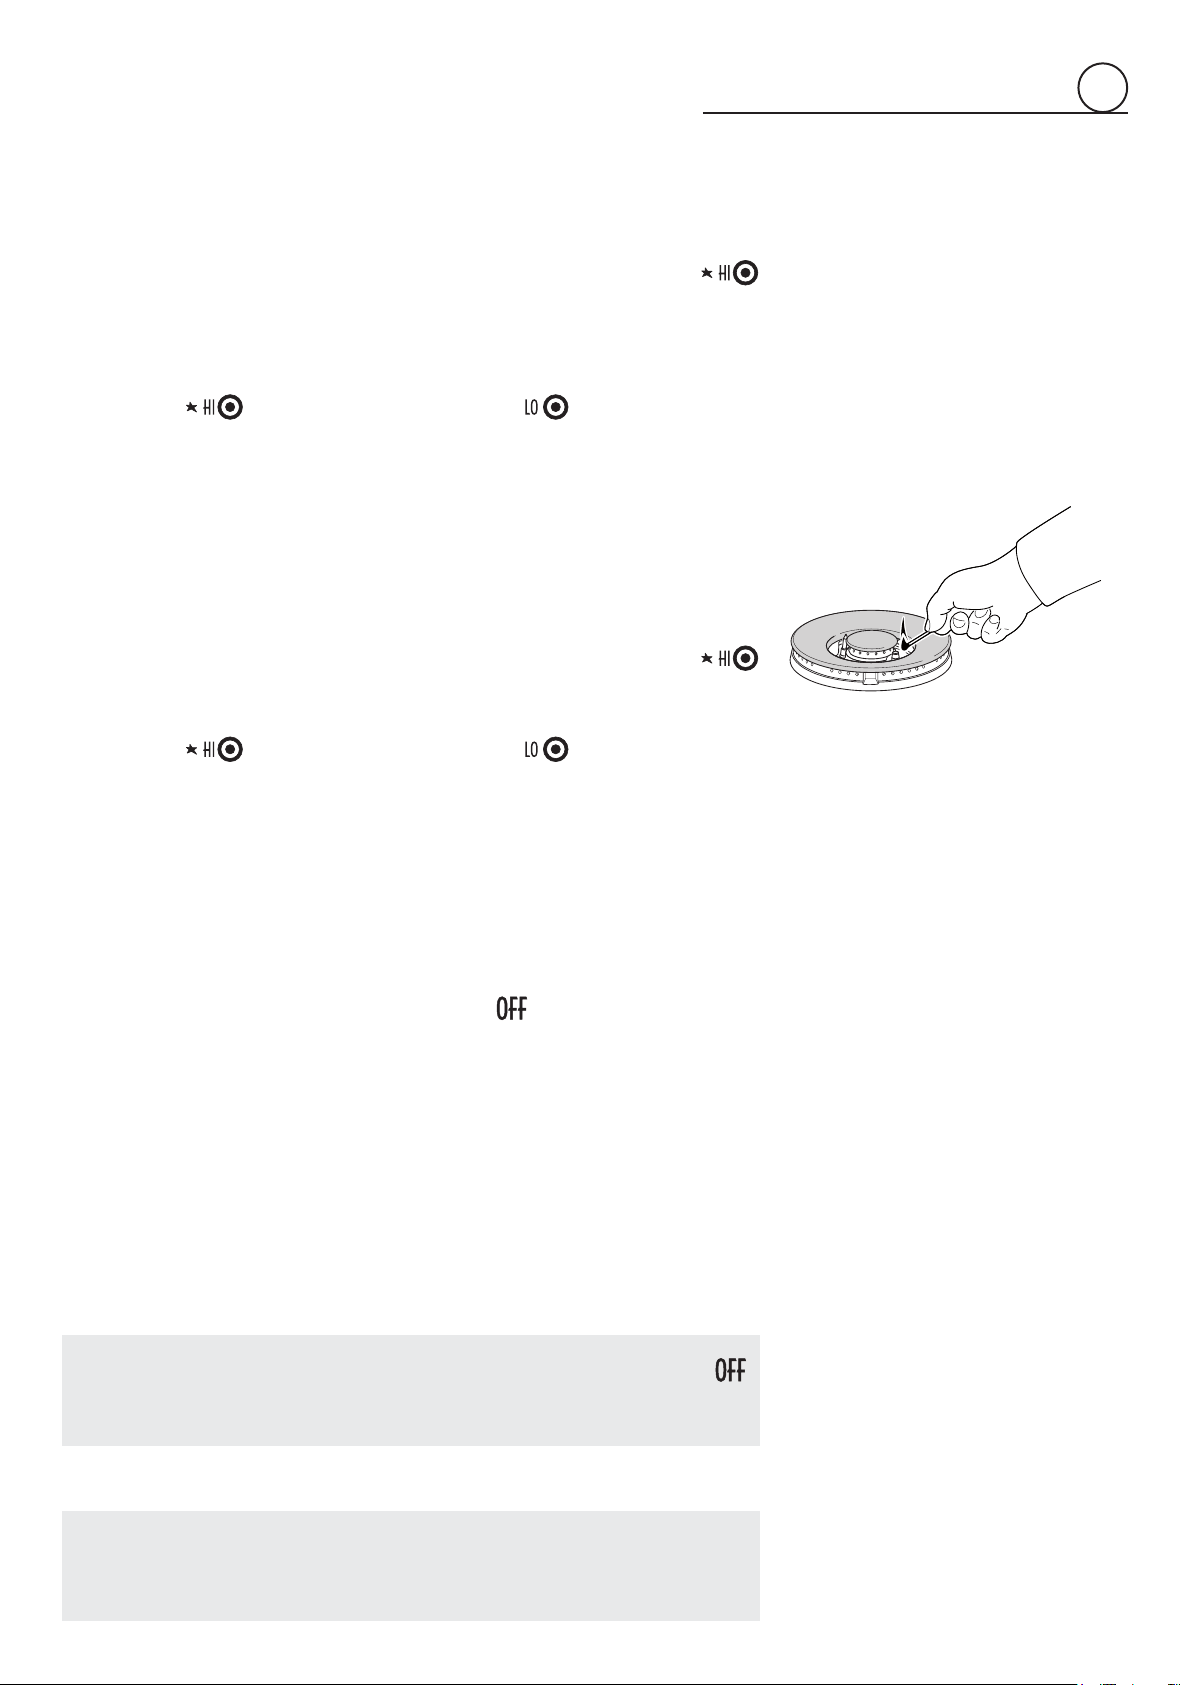
GASBURNERS(Dual)
TheDualBurnerisaveryexibleburnerwhichallowsdifferentregulationsandoptimal
cooking.
Itiscomposedbyoneinnerandoneoutercrown;theameoftheinnercrowncanbe
regulatedseparatelyfromtheamesoftheoutercrown.
TheDualBurnercanbeused:
• As a high-power burner (all ames produced simultaneously by inner and outer
crown)whichcanbeadjustedfromthemaximum( )totheminimum( )
position.
Intermediate operating adjustments can be achieved by positioning the indicator
between the maximum and minimum opening positions, and never between the
maximumopeningand
position.
• Asasmallburner(ameproducedonlybytheinnercrown)whichcanbeadjusted
fromthemaximum(
)totheminimum( )position.
Gasow to theburners isadjustedby turningthe knobs (illustratedin g. 2.3)which
controlthevalves.
Turningtheknobsothatthesymbolsprintedonitselfpointtothesymbolprintedonthe
controlpanelachievesthefollowingfunctions:
Knob
position
Function DUALburners
closed
valve
Maximumrateof
inner+outercrown
(insideandoutside
amesin
simultaneously
atthemaximum)
Minimumrateof
outercrownand
maximumrateof
innercrown
Maximumrate
ofinnercrown
(onlyinnerame
atthemaximum)
Minimumrate
ofinnercrown
(onlyinnerame
attheminimum)
Fig. 2.3
Fig. 2.4
11
2
N.B.Whentherangeisnotbeingused,setthegasknobstotheir
positionsandalsoclosethegasshut-offvalveplacedonthemaingas
supply line.
Caution!
Therangebecomesveryhotduringoperation.
Keep children well out of reach.
LIGHTINGGASBURNERSFITTEDWITHFLAMEFAILURE
SAFETYDEVICE(Dualburners)
Inordertolighttheburner,youmust:
1. Push and turn the knob in an anti-clockwise direction up to the position
(maximumrateofinner+outercrown);pushinandholdtheknobuntiltheamehas
beenlit(g.2.4).
Thesparksproducedbythelightersituatedinsidetherelativeburnerwilllightthe
ame.
Intheeventthatthelocalgassupplyconditionsmakesitdifculttolighttheburner
inposition
,tryagainwiththeknobinposition .
2. Waitforabouttensecondsafterthegasburner hasbeenlitbeforelettinggothe
knob(safetydeviceactivationdelay).
3. Adjustthegasvalvetothedesiredposition.
Ifthereisnomainselectricalsupply,theburnerscanbeusedwithnorestriction.
Inthatcase,inordertolighttheburner,youmust:
1. Bringalightedmatchclosetotheburner(aspersidegure)andkeepitinplaceuntil
theburnerhasbeenignited.
2. Push and turn the knob in an anti-clockwise direction up to the position
(maximumrateofinner+outercrown);pushinandholdtheknobuntiltheamehas
beenlit(g.2.4).
Intheeventthatthelocalgassupplyconditionsmakesitdifculttolighttheburner
inposition
,tryagainwiththeknobinposition .
3. Waitforabouttensecondsafterthegasburner hasbeenlitbeforelettinggothe
knob(safetydeviceactivationdelay).
4. Adjustthegasvalvetothedesiredposition.
Iftheburnerameshouldgooutforsomereason,thesafetyvalvewillautomaticallystop
thegasow.
Tore-lighttheburner, returntheknobtothe closed
position,wait foratleast1
minuteandthenrepeatthelightingprocedure.
Ifyourlocalgassupplymakesitdifculttolighttheburnerwiththeknobsettomaximum,
settheknobtominimumandrepeattheoperation.
12
2
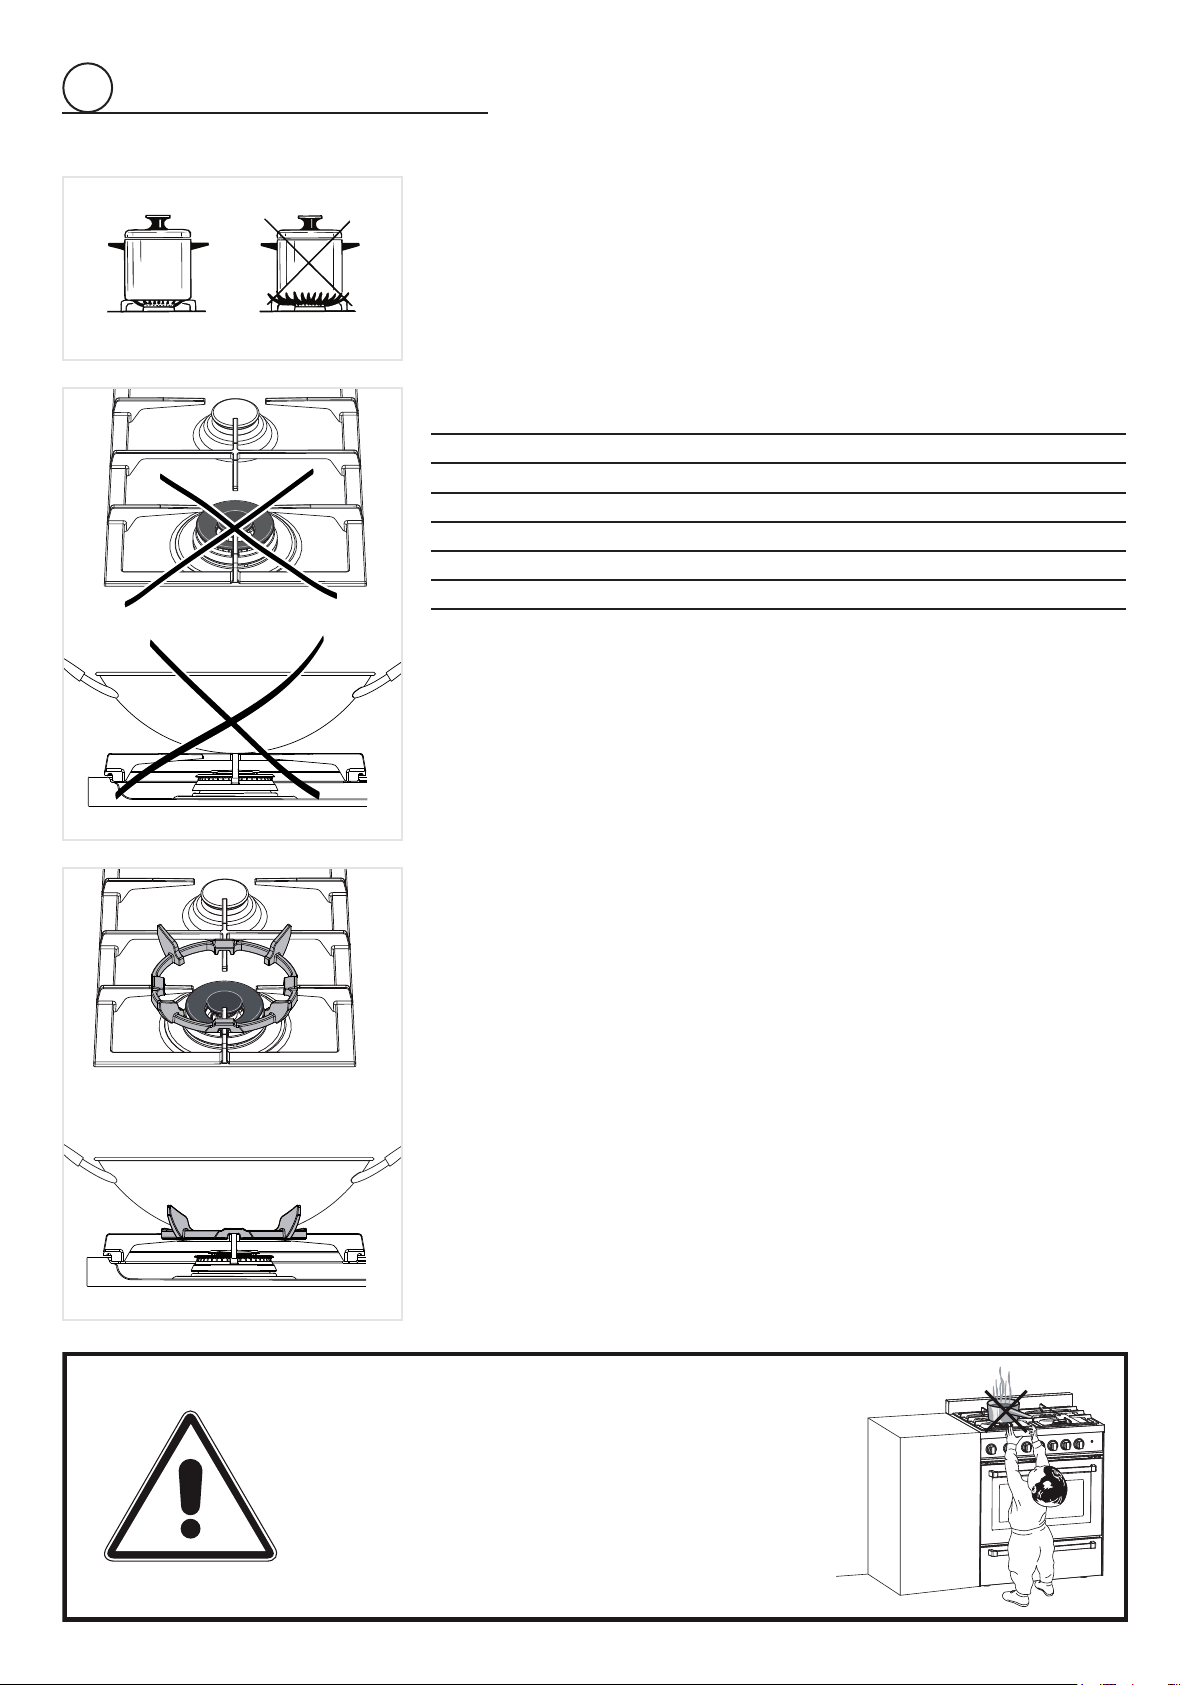
CHOICEOFBURNER(g.2.5)
Thesymbolsorwordingsprintedonthepanelabovethegasknobsindicatethecorre-
spondencebetweentheknobandtheburner.
Themostsuitableburneristobechosenaccordingtothediameterandvolumecapacity
ofthecontainertobewarmed.
Itisimportantthatthediameterofthepotsorpanssuitablymatchtheheatingpotential
oftheburnersinordernottojeopardisetheefciencyoftheburners,bringingabouta
wasteofgasfuel.
Asmalldiameterpotorpanplacedonalargeburnerdoesnotnecessarilymeanthat
boilingconditionsarereachedquicker.
DIAMETERSOFPANSWHICHMAYBEUSEDONTHEHOBBURNERS
BURNER MINIMUM MAX.
Semi-rapid 16cm(6”19/64) 24cm(9”7/16)
Dual 26cm(10”3/16) 28cm(11”1/16)
Wokpansmin36cm(14”3/16)-max40cm(15”3/4)
Donotusepanswithconcaveorconvexbases
CORRECTUSEOFDUALBURNER(Fig.2.6a-2.6b)
Theat-bottomedpansaretobeplaceddirectlyontothepan-support.
WhenusingaWOKyouneedtoplacethesuppliedstandintheburnertoavoidanyfaulty
operationoftheDualburner(Figs.2.6a-2.6b).
IMPORTANT:
Thespecialgrillforwokpans(g.2.6b)MUSTBEPLACEDONLYoverthepan-restfor
theDualburner.
Ensure that the handles of
cookware do not stick out over
the edge of the range, to avoid
them being knocked over by
accident. This also makes it more
difficult for children to reach the
cooking vessels.
WRONG
CORRECT
Fig. 2.5
Fig. 2.6b
Fig. 2.6a
13
3
howtousethegasoven
GENERAL FEATURES
Thegasovenisprovidedwith:
■ Ovenburner,mountedonthelowerpartoftheoven(14000BTU/hr).
■ Broilburner,mountedontheupperpartoftheoven(11000BTU/hr).
■ Fan motor which canbe used in combinationwith the oven burneror separately
(withoutheating).
Itisnotpossibletousethefanmotorincombinationwiththebroilburner:a
safetydeviceswitchesoffthefanmotorwhenthegasoven/broilcontrolknob
isturnedonbroilposition.
■ Lightthatilluminatestheoventoenablevisuallycontrollingthefoodthatiscooking.
OPERATING PRINCIPLES
Heatingandcookingareobtainedinthefollowingways:
a. bynormalconvection
Theheatisproducedbytheovenburner.
b. byforcedconvection
Theheatproducedbytheovenburnerisdistributedthroughouttheovenbythefan.
Thehotairenvelopsthefoodintheoven,provokingacompleteandrapidcooking.
Itispossibletocookseveraldishessimultaneously.
c. byradiation
Theheatisirradiatedbytheinfraredbroilburner.
d. byventilation(thisisnotacookingfunction)
Thefoodisdefrostedbyusingthefanonlywithoutovenburner.
USING THE OVEN FOR THE FIRST TIME
Itisadvisedtofollowtheseinstructions:
■ Furnishtheinterioroftheovenasdescribedatchapter“Cleaningandmaintenance”.
■ Turntheovenontothemaximumtemperature“8” toeliminatepossibletracesof
greasefromtheovenburner.
Thesameoperationshouldbefollowedforbroilburner(knobsetto“BROIL”position).
■ Switchofftheelectricalsupply,lettheovencooldown,thencleantheinteriorofthe
ovenwithclothsoakedinwateranddetergent(neutral)thendrycarefully.
Attention: The range becomes very
hotduringoperation.
Attention: The oven door becomes
veryhotduringoperation.
Keep children away.
WARNING:
Thedoorishot,usethehandle.
NOTE: When the range is not being
used,setthegasknobstotheirOFF
positions and also close the gas
shut-offvalveplacedonthemaingas
supply line.
VERY IMPORTANT
The oven/broil shall be used always
with the oven door closed.
Do not use 1
st
STEP
Broilinglevel2
nd
STEP
Ovencookinglevel3
rd
STEP
Ovencookinglevel4
th
STEP
14
OVENBURNER
Itcarriesoutnormal“ovencooking”.
Thegasowtotheburnerisregulatedbyathermostatwhichallowtomaintaintheoven
temperatureconstant.
Thecontrolofthetemperatureisassuredbyathermostaticprobepositionedinsidethe
oven.
Theprobemustbealwayskeptinitshousing,inacleancondition,asanincorrectposi-
tionorencrustmentmaycauseanalterationinthecontrolofthetemperature.
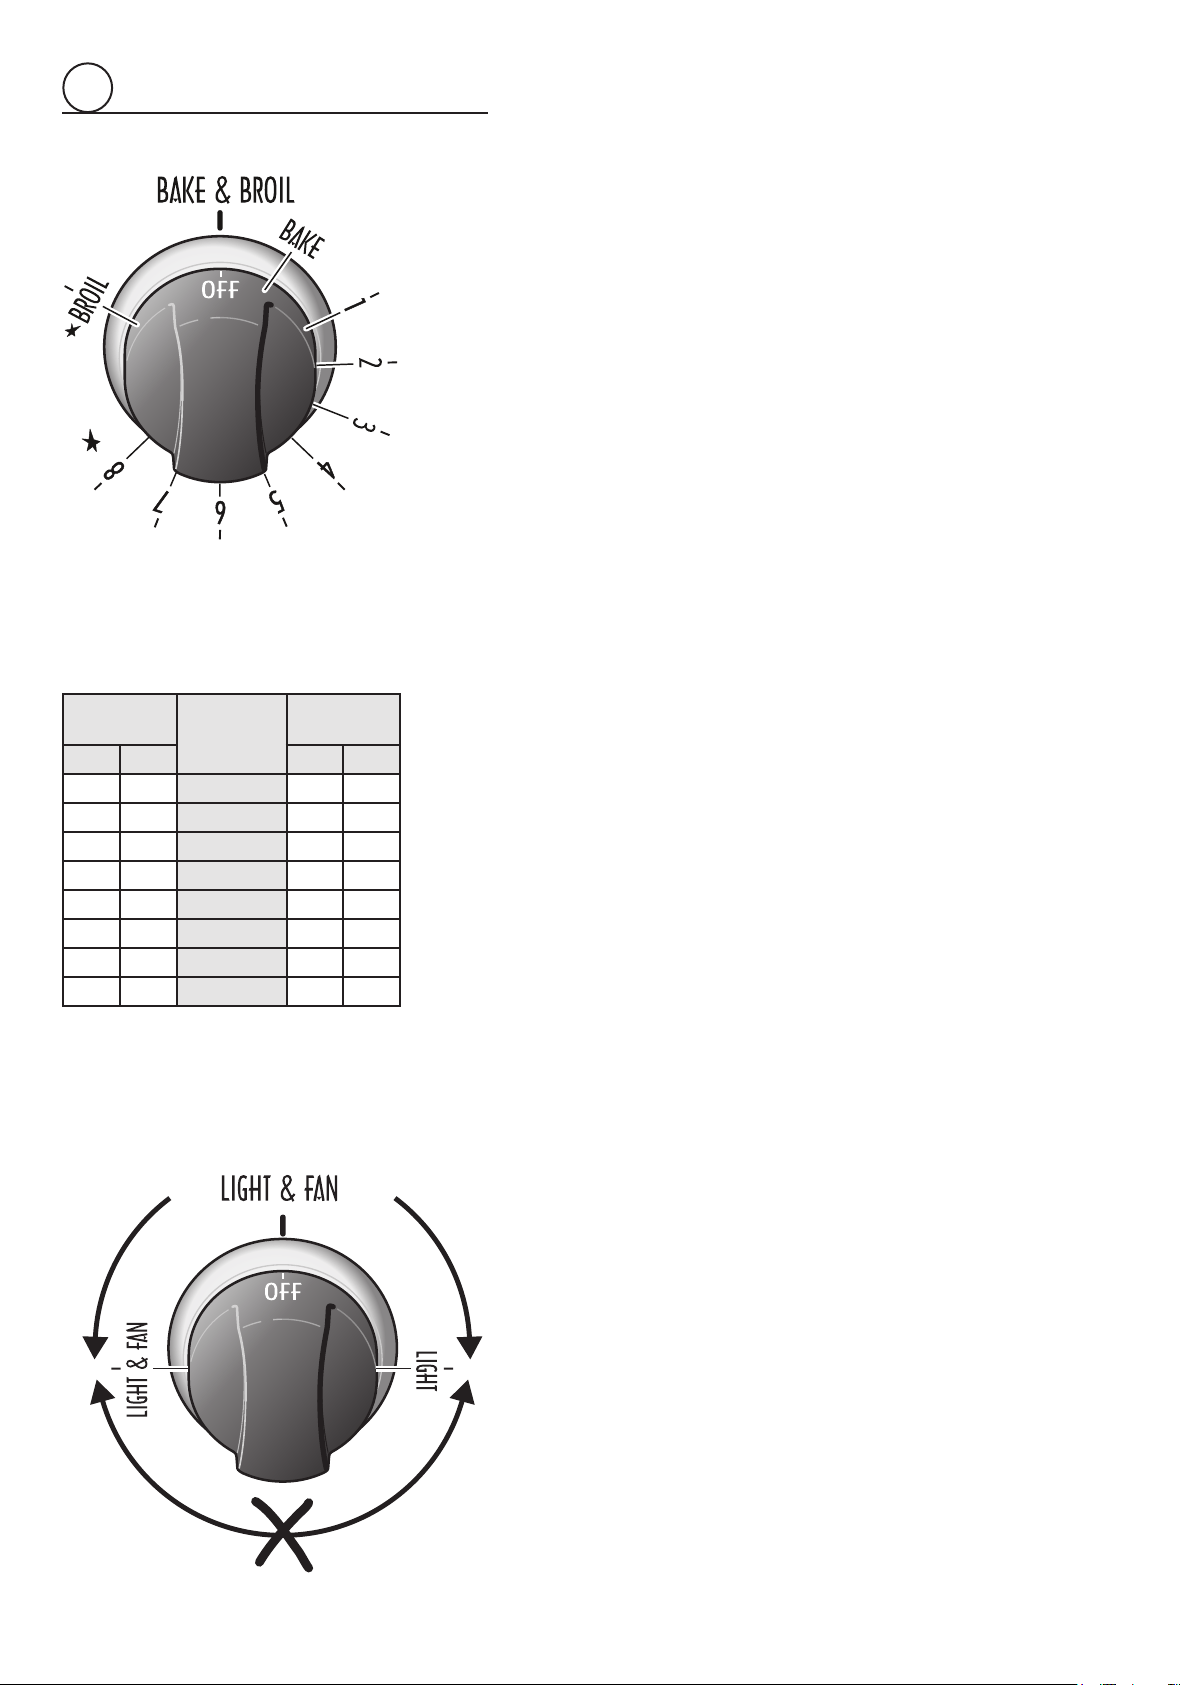
OVEN THERMOSTAT
Thenumbersprintedonthecontrolknob(g.3.1)indicatetheincreasingoventempera-
turevalue(seetemperaturetablenearthecontrolknob).
Leftcolumnofthetemperaturetablereferstoovenburnerusedincombinationwiththe
fanmotorwhilerightcolumnreferstoovenburnerusedinthenormalconvectionmode
(withoutfanmotor).
Toregulatethetemperature,setthechosennumberontothecontrolpanelindicator.
Theposition“BROIL”servesonlytoturnonthebroilburner.
OVEN LIGHT AND FAN MOTOR
Theovenlightandthefanmotorarecontrolledbyaswitchknobonthecontrolpanel
(g.3.2).
Tolightuptheovenlampturntheknobanti-clockwiseto“LIGHT”position.
Tooperatethefanmotorturntheknobclockwiseto“LIGHT & FAN”position.Inthisset-
tingalsotheovenlampislit.
WARNING:Theswitchknobcanbeturnedonlyclockwisefrom“OFF”to“LIGHT & FAN”
positionandanti-clockwisefrom“OFF”to“LIGHT”position.
TheswitchknobDO NOT TURNfrom“LIGHT & FAN”to“LIGHT”position.
DO NOT FORCE.
IMPORTANT NOTE:Thefanmotorcanbeusedincombinationonlywiththeovenbur-
ner.Asafetydeviceswitchesoffthefanmotorwhenthegasoven/broilcontrolknobis
turnedon“BROIL”position.
OK OK
NOT TURN
3
FAN
GAS OVEN
KNOB
SETTING
GAS
OVEN
°F °C °F °C
200 93 1 200 93
240 116 2 245 118
285 141 3 270 132
330 166 4 345 174
375 191 5 380 193
420 215 6 455 235
475 246 7 505 263
530 277 8 555 291
Fig. 3.2
Fig. 3.1
15
3
IGNITIONOFTHEOVENBURNER
Thethermostatallowstheautomaticcontrolofthetemperature.
Thegasdeliverytotheovenburneriscontrolledbyatwowaythermostatictap(ovenand
broilburners)withame-failuredevice.
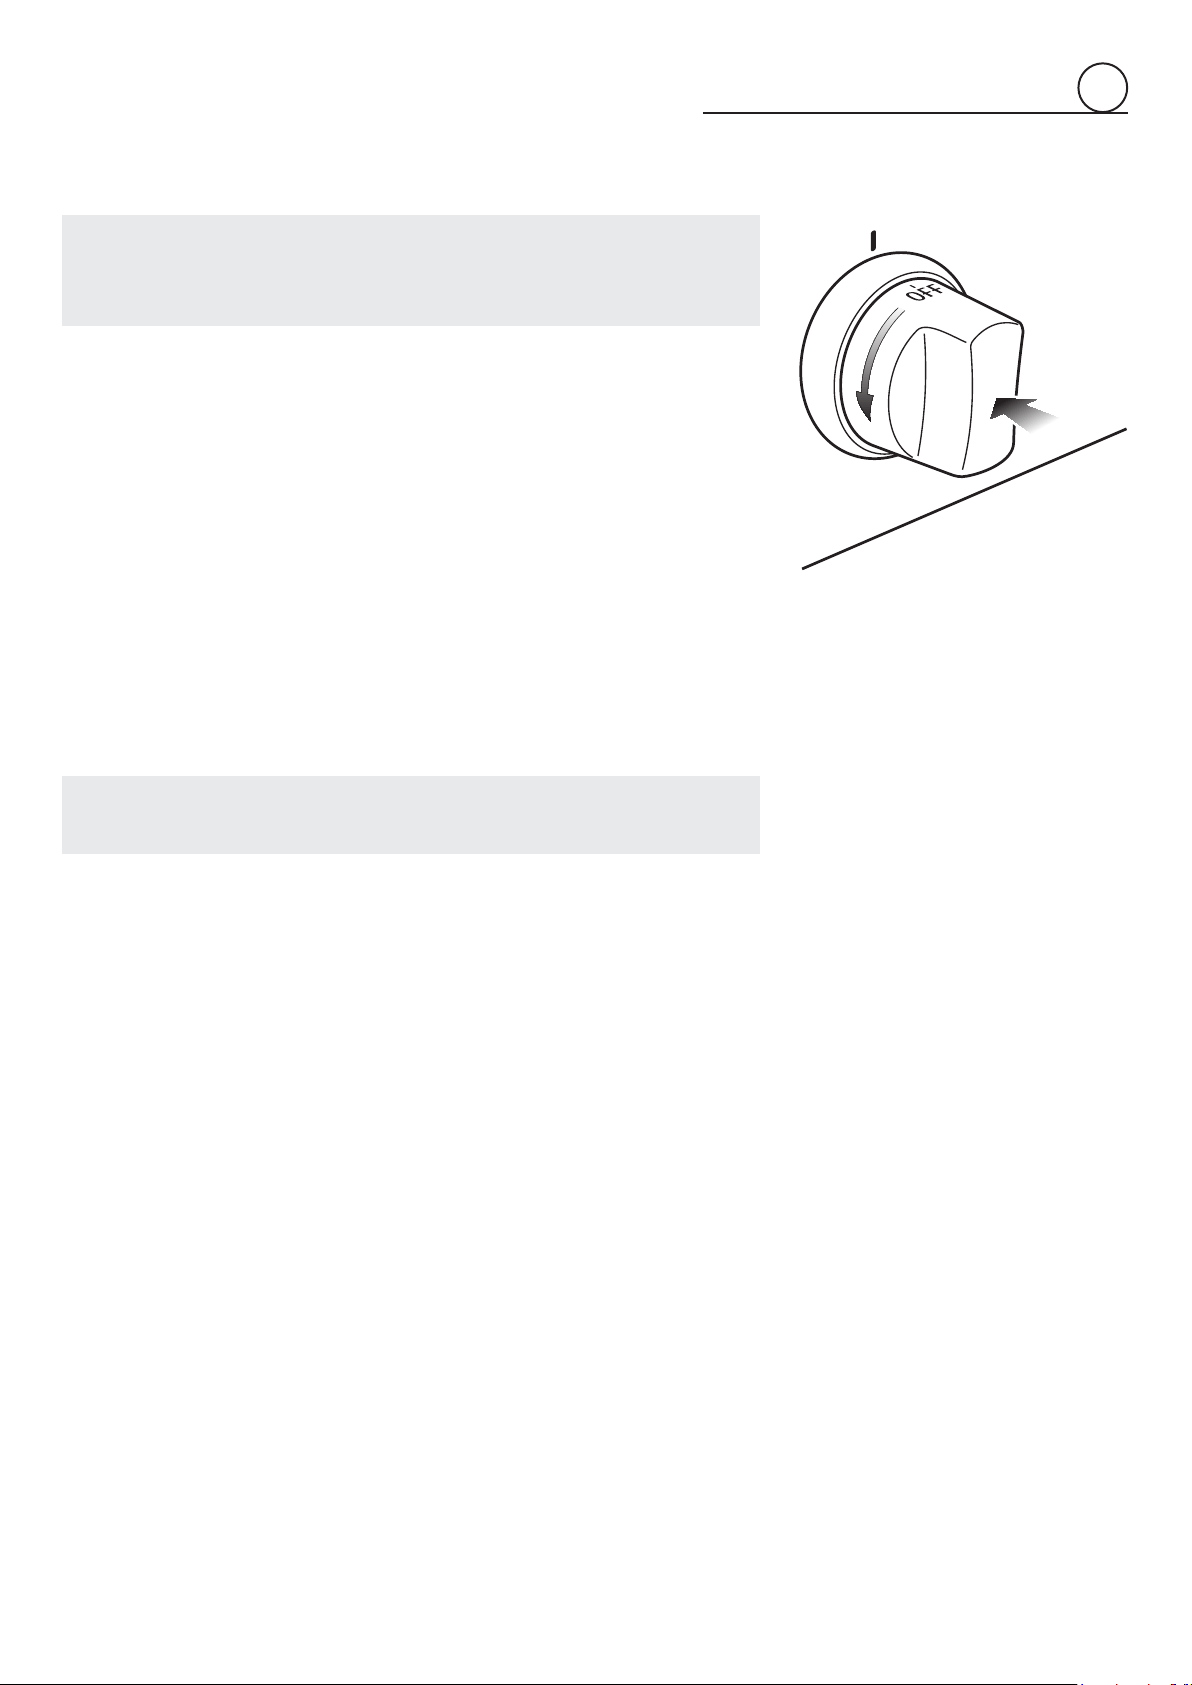
Tolighttheovenburneroperateasfollows:
1. Opentheovendoortoitsfullextent.
WARNING:Riskofexplosion!Theovendoormustbeopenduringthisope-
ration.
2. Press the oven control knob right down and, keeping it pressed, turn counter-
clockwise(g.3.3)tomaxposition“8”.
3. Releasetheknobandchecktheovenburnerhaslit;ifnot,turntheknobclockwise
backto“OFF”andrepeattheprocedurefromstep2.
4. Oncetheovenburnerhaslit,closetheovendoorslowlyandadjusttheburnerac-
cordingtothepowerrequired.
Iftheameextinguishesforanyreason,thesafetyvalvewillautomaticallyshutoffthe
gassupplytotheburner.
Tore-lighttheburner,rstturntheovencontrolknobtoposition“OFF”,wait for at least
1minuteandthenrepeatthelightingprocedure.
TRADITIONALBAKING(OVENBURNERWITHOUTFANMOTOR)
Beforeintroducingthefood,preheattheoventothedesiredtemperature.
Foracorrectpreheatingoperation,itisadvisabletoremovethetrayfromtheovenand
introduceittogetherwiththefood,whentheovenhasreachedthedesiredtemperature.
Checkthecookingtimeandturnofftheoven5minutesbeforethetheoreticaltimeto
recuperatethestoredheat.
Recommended for:
Forfoodswhichrequirethesamecookingtemperaturebothinternallyandexternally,i.e.
roasts,spareribs,meringue,etc.
Important!
■ Duringignitionoftheovenburner,thefanmotorshallbeswitchedoff(light
andfancontrolknobin“OFF”position–Fig.3.2).
■ Donotattempttolighttheovenburnerduringpowerfailure.
Attention:Theovendoorbecomesveryhotduringoperation.
Keep children away.
Fig. 3.3

16
3
CONVECTIONBAKINGWITHVENTILATION(OVENBURNER
WITHFANMOTOR)
AfterlightingtheovenburnerswitchonthefanmotorbyturningtheLIGHT&FANcontrol
knob(g.3.2)on“LIGHT & FAN”position.
Beforeintroducingthefood,preheattheoventothedesiredtemperature.
Foracorrectpreheatingoperation,itisadvisabletoremovethetrayfromtheovenand
introduceittogetherwiththefood,whentheovenhasreachedthedesiredtemperature.
Checkthecookingtimeandturnofftheoven5minutesbeforethetheoreticaltimeto
recuperatethestoredheat.
Itispossibletocookvariousdifferentfoodsatthesametime.Fish,cakesandmeatcan
becookedtogetherwithoutthesmellsandavoursmixing.
Theonlyprecautionsrequiredarethefollowing:
■ Thecookingtemperaturesmustbeascloseaspossiblewithamaximumdifference
of70-80°F(20-25°C)betweenthedifferentfoods.
■ Differentdishesmustbeplacedintheovenatdifferenttimesaccordingtothecoo-
kingtimerequiredforeachone.Thistypeofcookingobviouslyprovidesaconside-
rablesavingontimeandenergy.
Recommended for:
For foods of large volume and quantity which require the same internal and external
degreeofcooking;forex:rolledroasts,turkey,legs,cakes,etc.
DEFROSTINGFROZENFOODS(ONLYFANMOTOR)
Withtheovenburnercontrolknobin“OFF”positionturntheLIGHT&FANcontrolknob
(g.3.2)on“LIGHT & FAN”position.
Onlythe fanandthe ovenlamp switchon.Defrostingtakesplace bythe fan,without
heating.
Recommended for:
Torapidlydefrostfrozenfoods;2.2lbs(1kg)requiresaboutonehour.
Thedefrostingtimesvaryaccordingtothequantityandtypeoffoodstobedefrosted.
17
3
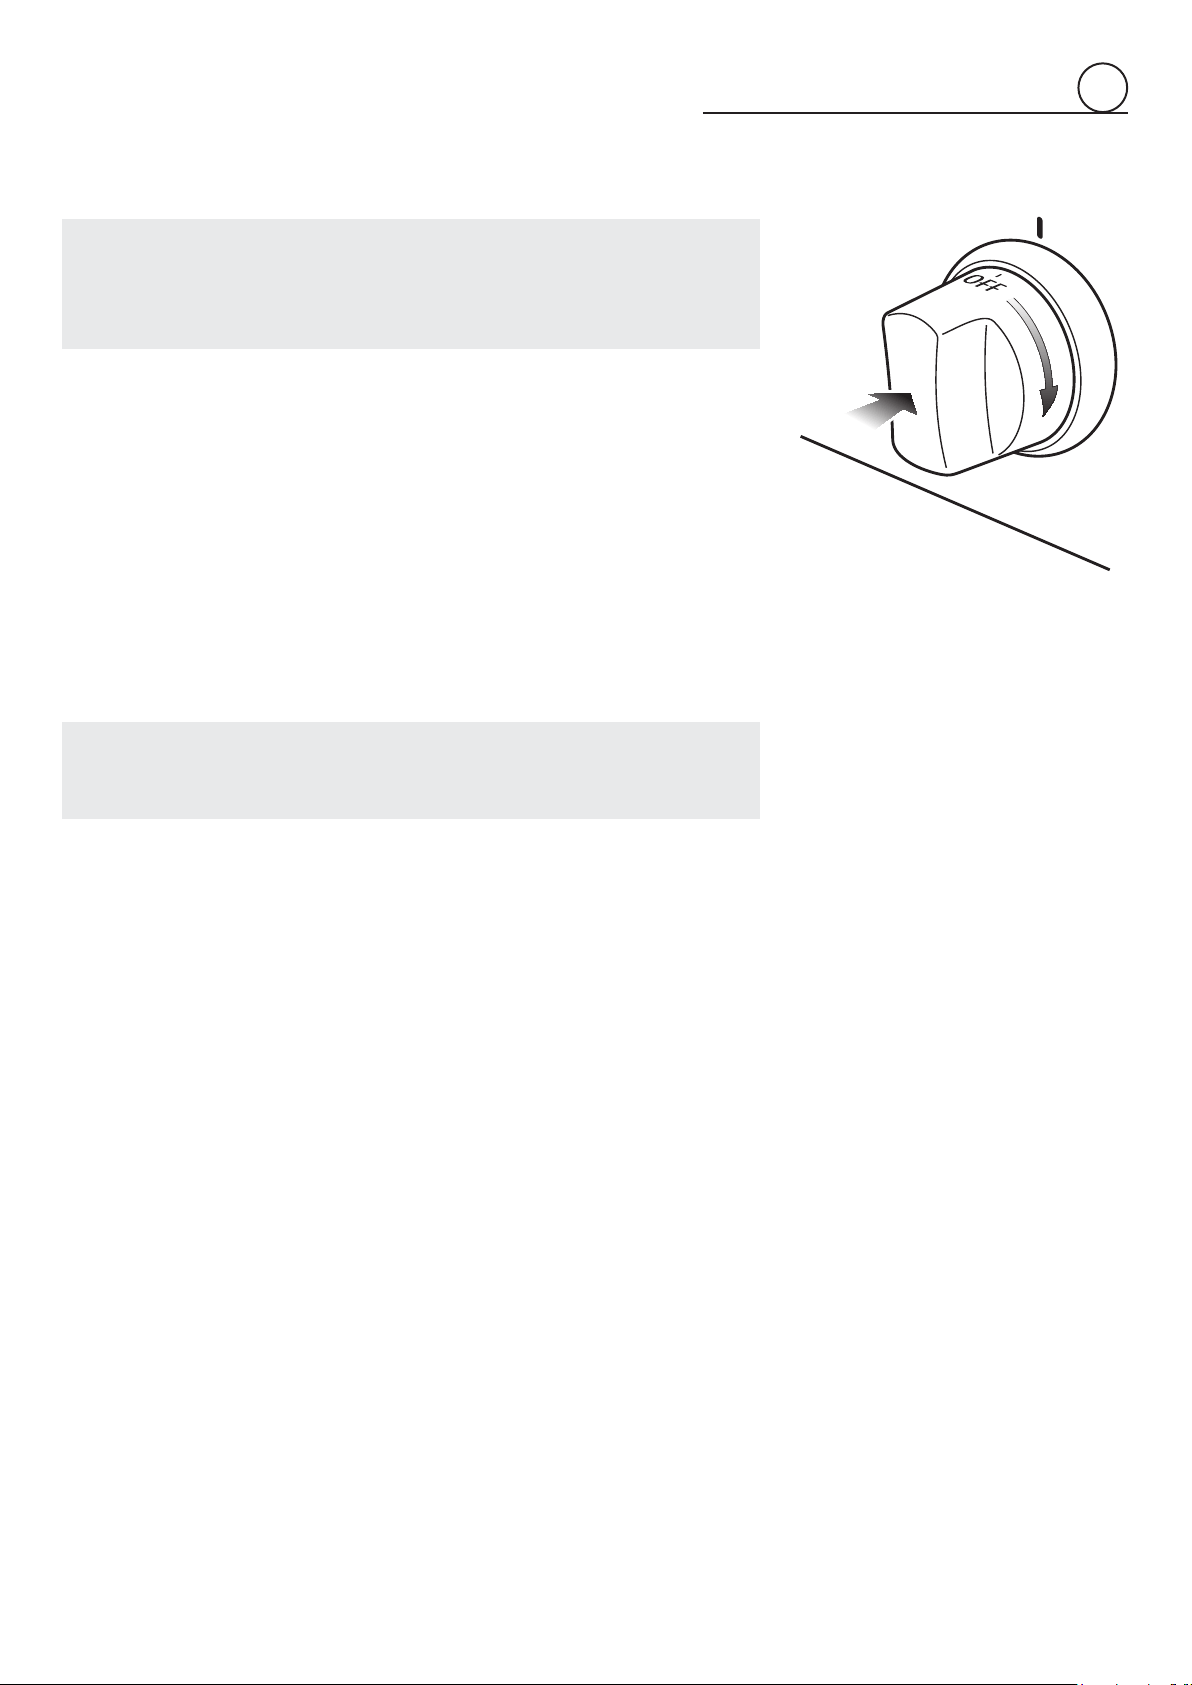
IGNITIONOFTHEBROILBURNER
Thebroilburnergeneratestheinfra-redraysforbroiling.
Tolightthebroilburneroperateasfollow:
1. Opentheovendoortothefullextent.
WARNING:Riskofexplosion!Theovendoormustbeopenduringthisoperation.
2. Presstheovencontrolknobrightdownand,keepingitpressed,turnclockwise(g.
3.4)tothe“BROIL”position.
3. Releasetheknobandcheckthebroilburnerhaslit;ifnot,turntheknobcounter-
clockwisebackto“OFF”andrepeattheprocedurefromstep2.
4. Oncethebroilburnerhaslit,closetheovendoorslowly.
Iftheameextinguishesforanyreason,thesafetyvalvewillautomaticallyshutoffthe
gassupplytotheburner.
Tore-lighttheburner,rstturntheovencontrolknobtoposition“OFF”,wait for at least
1minuteandthenrepeatthelightingprocedure.
Important!
■ Thefanmotorcannotbeusedincombinationwiththebroilburner.
Asafetydeviceswitchesoffthefanmotorwhenthegasoven/broilcontrol
knobisturnedon“BROIL”position.
■ Donotattempttolightthebroilburnerduringpowerfailure.
Doalwaysbroilwithovendoorclosed.
Attention:Theovendoorbecomesveryhotduringoperation.
Keep children away.
Fig. 3.4
18
3
4
th
STEP
Ovencookinglevel
3
rd
STEP
Ovencookinglevel
2
nd
STEP
Broilinglevel
1
st
STEP
Do not use
Itisadvisabletohandlethe
oven accessories using
ovengloves.
WRONG
CORRECT
BROILING
Veryimportant:Thebroilburnermustalwaysbeusedwiththeovendoorclo-
sed.
• Positiontheshelfonthesecondlevelfromthetop(g.3.5).
• Turnonthebroilburner,asexplainedintheprecedingparagraphsandletthe
broilburnerpreheatforabout5minuteswiththedoorclosed.
• Placethefoodtobecookedabovethebroilingpan.
• Introducethebroilingpanintheoven(g.3.6).Thebroilingpanshouldbepla-
cedabovetheshelfanditshouldbecenteredwiththebroilburner(g.3.5).
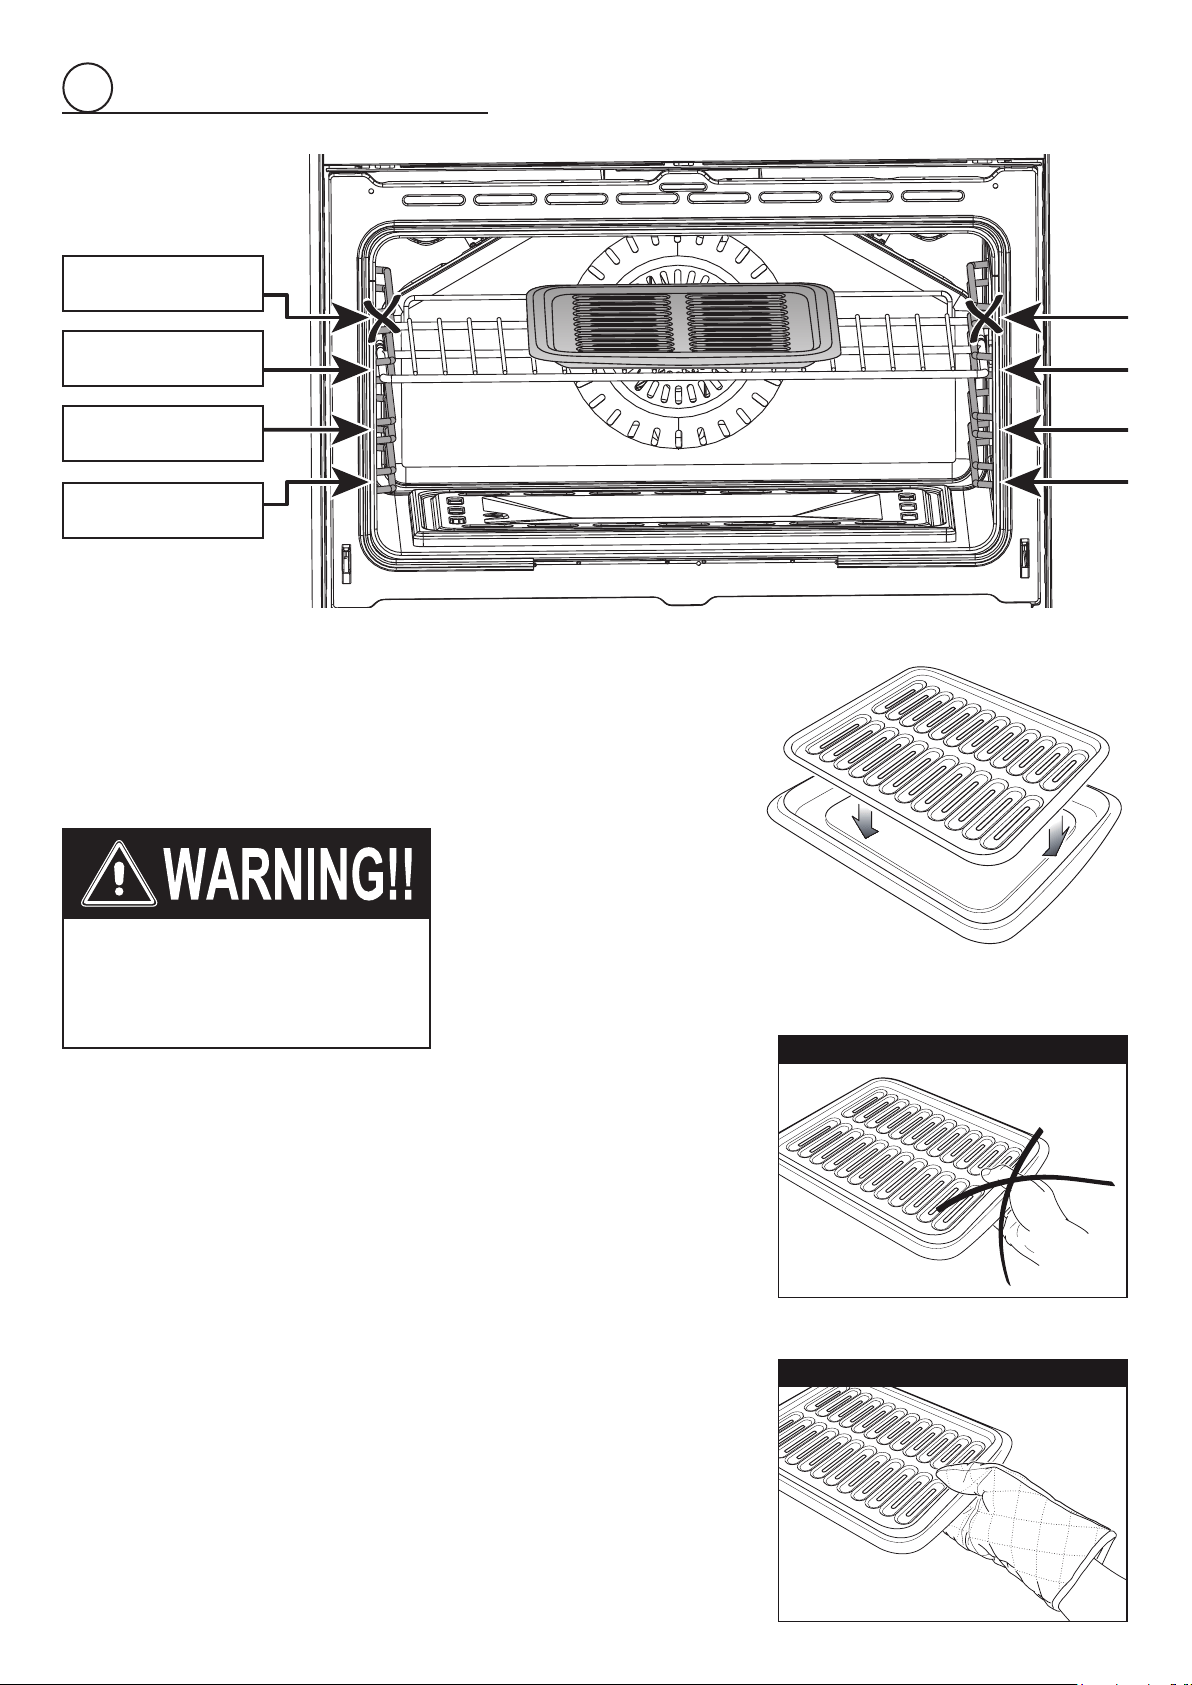
Donotbroilwithoutusingthebroilingpan.
Important:Alwaysusesuitableprotectivegloveswheninserting/removingthe
broilingpan,shelves,pansonothercookingutensilsfromtheoven.
Fig. 3.5
Fig. 3.8
Fig. 3.7
Fig. 3.6
19
Fig. 4.1
4
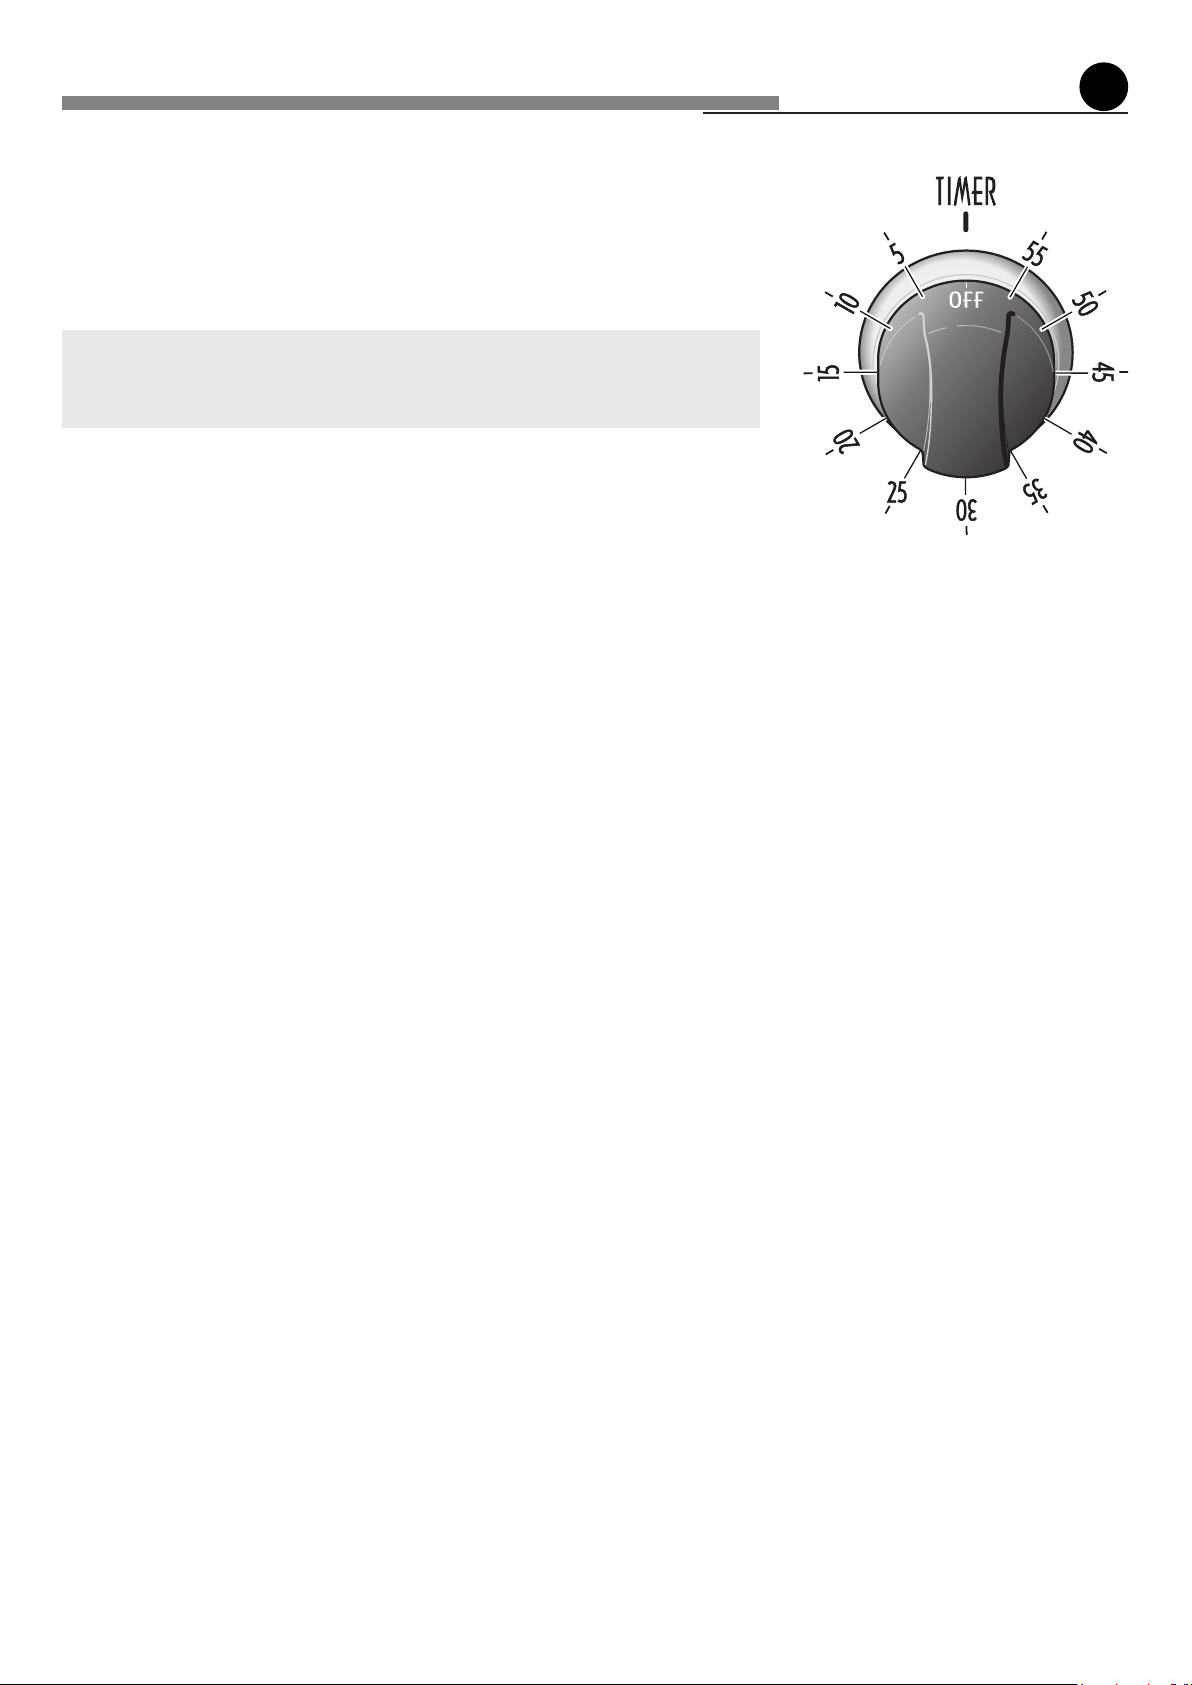
60 minutes alarm
MINUTE COUNTER(g.4.1)
Theminutecounterisatimedacousticwarningdevicewhichcanbesetforamaximum
of60minutes.
Theknob(Fig.4.1)mustberotatedclockwiseasfarasthe60minutepositionandthen
settotherequiredtimebyrotatingitanticlockwise.
IMPORTANT WARNING:
This is only a mechanical timer.
Remembertoturnofftheoven/broilmanually.
20
GENERAL RECOMANDATION
• Important: Before any operation of cleaning and maintenance disconnect the
appliancefromtheelectricalsupply.
• Itisadvisabletocleanwhentheapplianceiscoldandespeciallyforcleaningthe
enamelledparts.
• Avoidleavingalkalineor acidicsubstances (lemon juice,vinegar, etc.)on the
surfaces.
• Avoidusingcleaningproductswithachlorineoracidicbase.
• IMPORTANT:Theuseofsuitableprotectiveclothing/glovesisrecommen-
dedwhencleaningandmaintainingtheappliance.
• WARNING
Whencorrectlyinstalled,yourproductmeetsallsafetyrequirementslaid
downfor this typeof product category. Howeverspecial care shouldbe
taken around the rear or the underneath of the appliance as these areas are
notdesignedorintendedtobetouchedandmaycontainsharporrough
edges,thatmaycauseinjury.
ENAMELLED PARTS
• Alltheenamelledpartsmustbecleanedwithaspongeandsoapywateronlyor
othernon-abrasiveproducts.
Drypreferablywithamicrobreorsoftcloth.
PAINTED PARTS AND SILK-SCREEN PRINTED SURFACES
• Cleanusinganappropriateproduct.Alwaysdrythoroughly.
IMPORTANT: these parts must be cleaned very carefully to avoid scratching and
abrasion.Youareadvisedtouseasoftclothandneutralsoap.
STAINLESS STEEL ELEMENTS
• Stainlesssteelpartsmustberinsedwithwateranddriedwithasoftandclean
cloth.
• Fordifcultdirt,useaspecicnon-abrasiveproductavailablecommerciallyora
littlehotvinegar.
• Note:regularusecouldcausediscolouringaroundtheburners,becauseofthe
highametemperature.
INSIDE OF OVEN
Theovenshouldalwaysbecleanedafterusewhenithascooleddown.
Thecavityshouldbecleanedusingamilddetergentsolutionandwarmwater.
Suitable proprietary chemical cleaners may be used after rst consulting with the
manufacturersrecommendationsandtestingasmallsampleoftheovencavity.
Abrasivecleaningagentsorscouringpads/clothsshouldnotbeusedonthecavity
surface.
NOTE:Themanufacturersofthisappliancewillacceptnoresponsibilityfordamage
causedbychemicalorabrasivecleaning.
Lettheovencooldownandpayspecialattentionnototouchthehotheating
elements inside the oven cavity.
BURNERSANDGRIDS
• Thesepartscanberemovedandcleanedwithappropriateproducts.
• Aftercleaning,theburnersandtheiramedistributorsmustbe welldriedand
correctlyreplaced.
• Itisvery importantto checkthatthe burneramedistributorandthe caphas
beencorrectlypositioned-failuretodosocancauseseriousproblems.
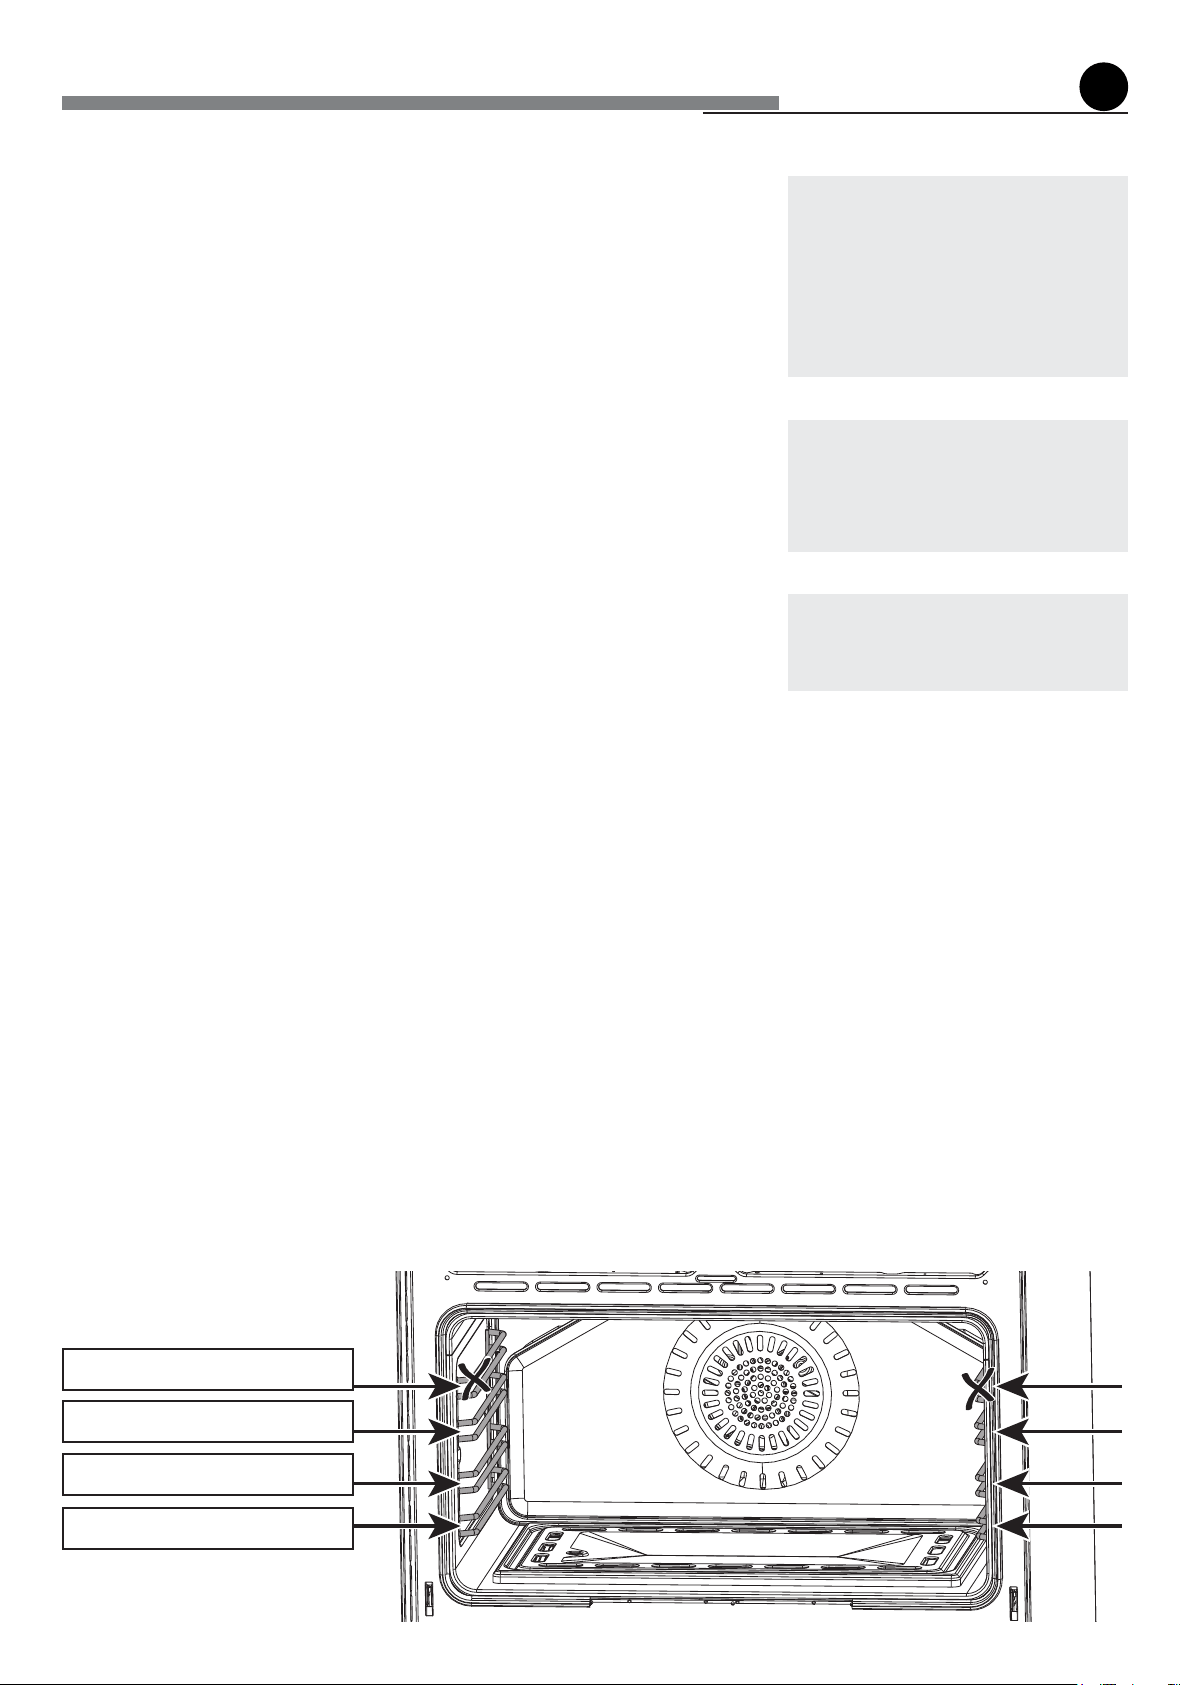
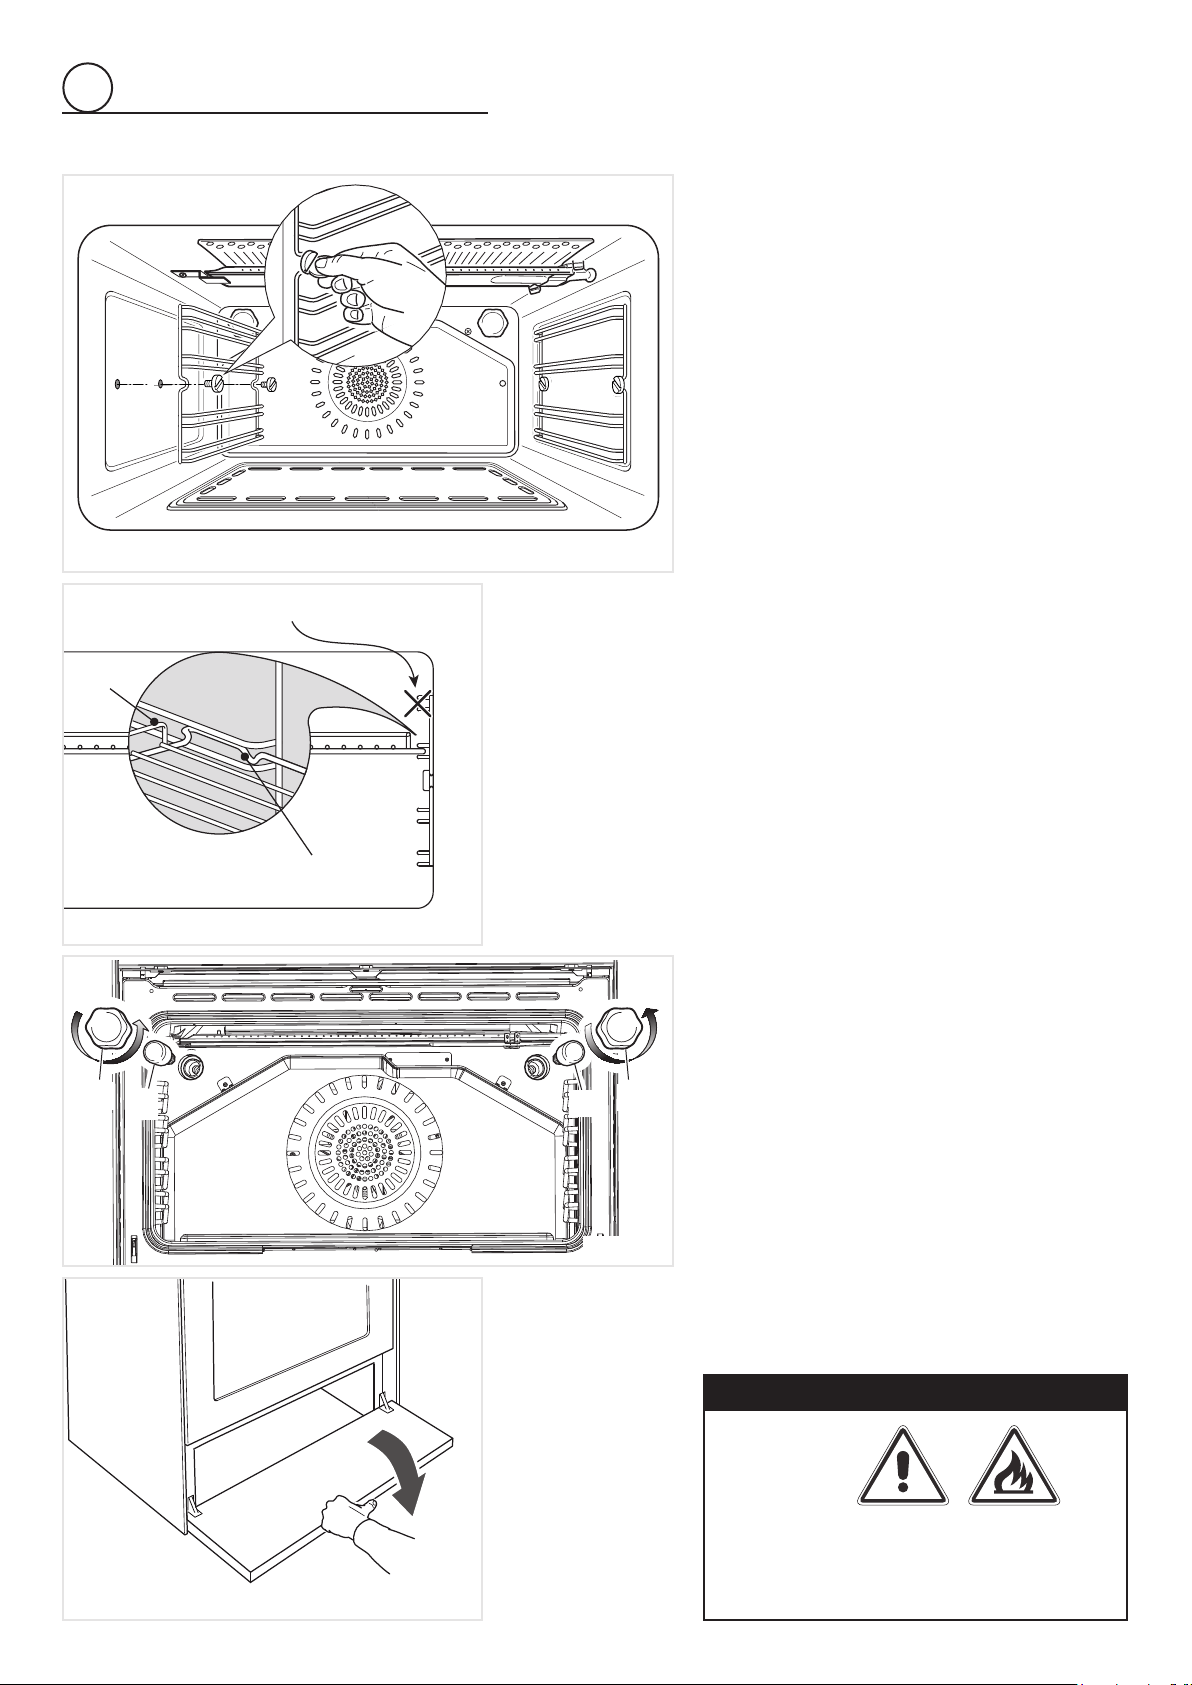
• Checkthattheprobe“T”(gs.5.1,5.3)nexttoeachburnerisalwayscleanto
ensurecorrectoperationofthesafetyvalves.
• Checkthattheelectrode“S”(gs.5.1,5.3)isalwayscleantoensuretrouble-free
sparking.
• Note:Toavoiddamagetotheelectricignitiondonotuseitwhentheburnersare
notinplace.
• Boththeprobeandignitionplugmustbeverycarefullycleaned.
Do not use steam jet clea-
ners because the humidity
could inltrate into the ap-
pliance making it dange-
rous.
Do not use harsh abrasi-
ve cleaners or sharp metal
scrapers to clean the oven
door glass since they can
scratch the surface, which
may result in shattering of
theglass.
WARNING
VERY IMPORTANT
Before any operation of
maintenance
disconnect
the appliance from the
electrical main supply.
cleaningandmaintenance
5
3-prongpolarized
ground-typeoutlet
ground
prong
21
5
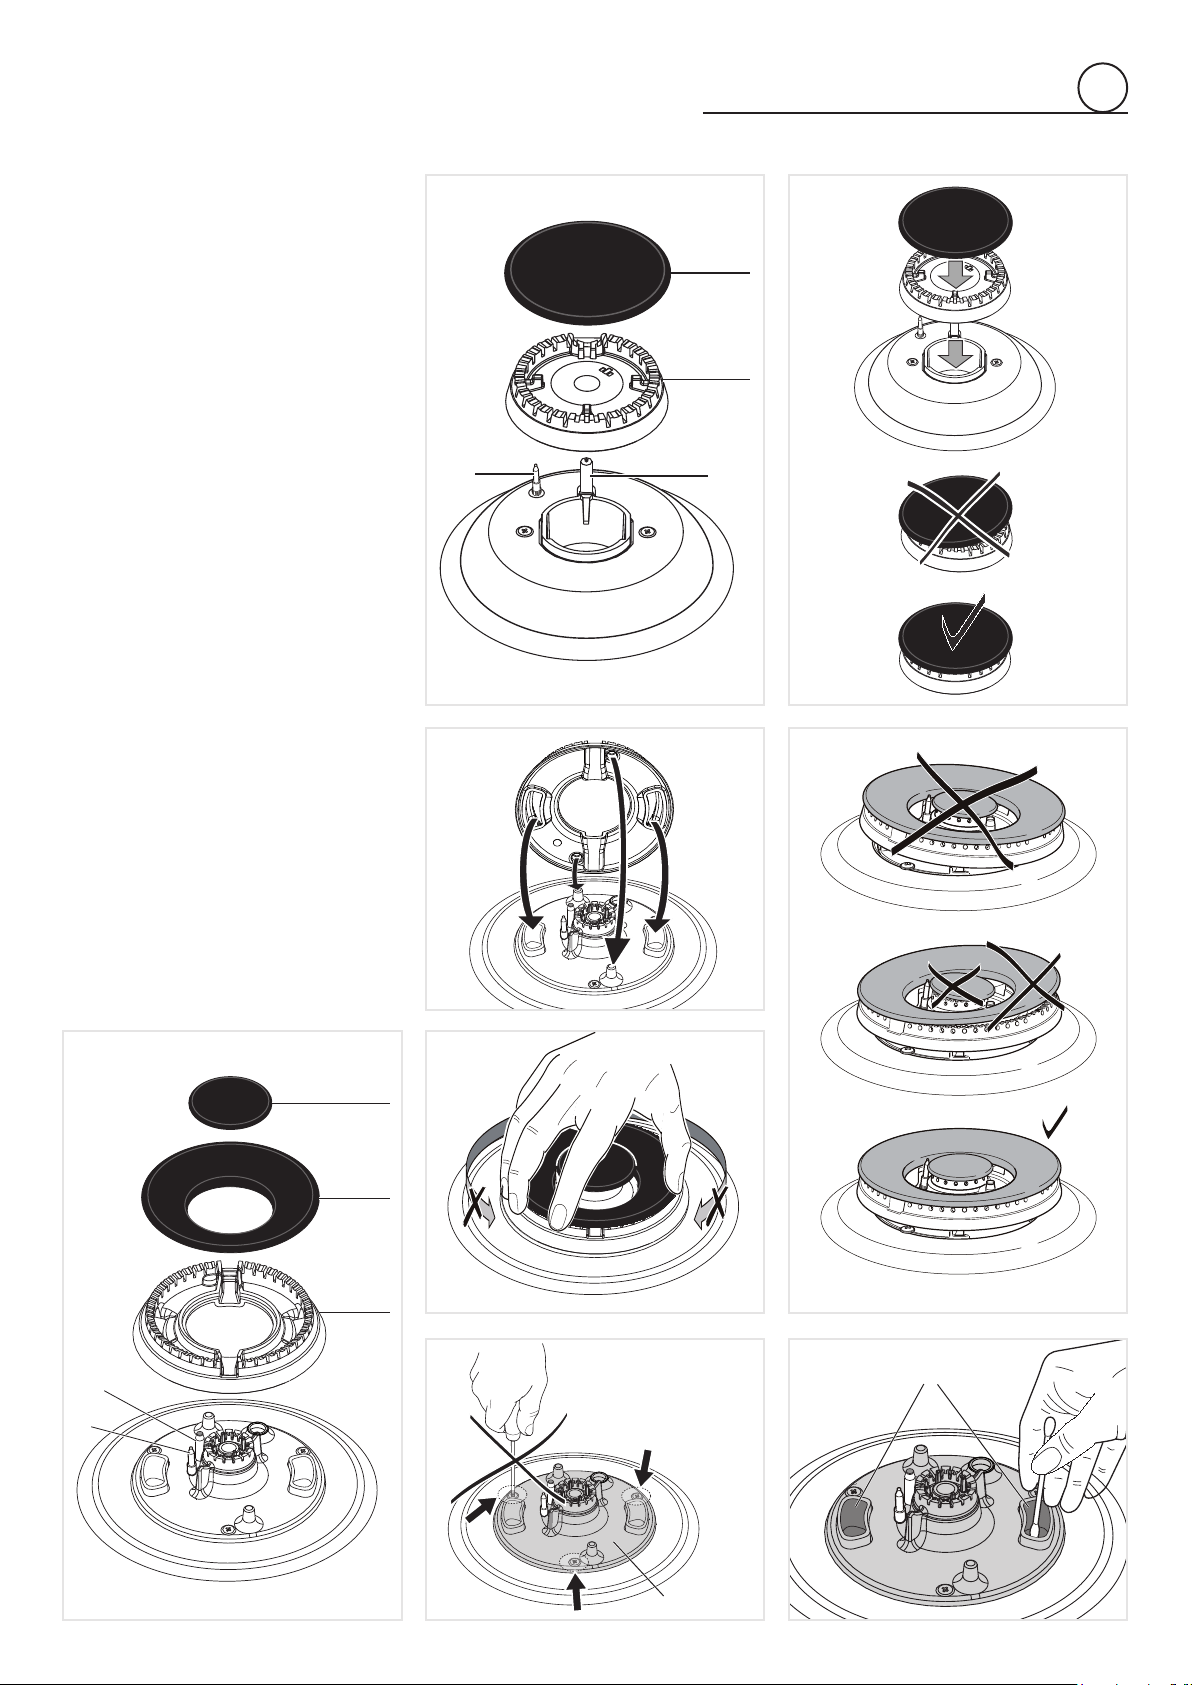
CORRECT POSITION OF THE
SEMI-RAPIDBURNERS
Itisveryimportanttocheckthattheburner
ame spreader “B” and the cap “A” have
beencorrectlypositioned(seegs.5.1and
5.2 ). Failure to do so can cause serious
problems.
CORRECT POSITION OF THE
DUALBURNERS
TheDualburnermustbecorrectlypositio-
ned (see g. 5.3); the ame spreader “E”
mustbettedasshownbythearrows(g.
5.4).Thenpositionthecap“C”andthering
“D”(gs.5.3and5.6).Correctlypositioned
burnershouldnotrotate(g.5.5).
IMPORTANT: NEVER unscrew the bur-
ner inner ame speader xing screws
(g.5.7).Theinnerame spreadercan
beremovedONLYbyanauthorisedser-
viceagent.Damagetotheappliancewill
occur if not observing this condition
and this may result in serious injury
to the user. The manufacturer declines
every responsibility for any inconve-
nienceresultingfromtheinobservance
of this condition.
CLEANINGTHEDUALBURNER
Payspecialattentiontothisburner:thetwo
holes“H”ontheinneramespreader(g.
5.8)mustalwaysbekeptclean.
When cleaning, remove the external a-
mespreader“E”(g.5.3)anduseacotton
bud,toothbrush,orsomeotheritemtocle-
anoutanyincrustationsordirtfromthetwo
holesmarked“H”(Fig.5.8).Thisprocedure
isnecessarytoensuretheburnerfunctions
correctly.
Iftheburnerdoesnotfunctioncorrectly
and it is not possible to clean out any
incrustationsordirtfromthetwoholes,
contact the After-Sales Service.
Fig. 5.6
Fig. 5.4
Fig. 5.3
Fig. 5.2
Fig. 5.1
T
S
B
A
Fig. 5.5
T
S
D
C
Fig. 5.7
Fig. 5.8
H
Inner
amespreader
Fixingscrews
E
22
B
A
B
A
5
Fig. 5.9
Stop notch
Do not use this step
Guard
rail
Fig. 5.10
Fig. 5.12
OVEN SHELF INSTALLATION AND
REMOVAL
• Assemblethewirerackstotheovenwallsusing
the2screws(Fig.5.9).
• Slide in, on the guides, theshelf(g. 5.10). Do
notusetherststepfromthetop.
The shelf must be tted so that the stop notch
(whichstopsitslidingout)andtheguardrailface
theinsideoftheoven.
• Position the broiling pan above the oven shelf
(seepage18).
• Todismantle,operateinreverseorder.
REPLACING THE OVEN LIGHT(g.5.11)
Beforeanymaintenanceisstartedinvolvingelectrical
partsoftheappliance,itmustbedisconnectedfrom
thepowersupply.
• Lettheovencavityandtheheatingelementscool
down.
• Switchofftheelectricalsupply.
• Removetheprotectivecover“A”(g.5.11).
• Unscrewandreplacethebulb“B”withanewone
suitableforhightemperatures(300°C)havingthe
following specications: 120V, 60 Hz, E14 and
samepower(checkwattpowerasstampedinthe
bulbitself)ofthereplacedbulb.
• Rettheprotectivecover.
NOTE: Ovenbulbreplacementisnotcoveredbyyour
warranty.
STORAGE COMPARTMENT
The storage compartment is accessible through the
pivotingpanel(g.5.12).
Fig. 5.11
WARNING !!
Do not store ammable material
intheovenorinthestoragecom-
partment.
23
5
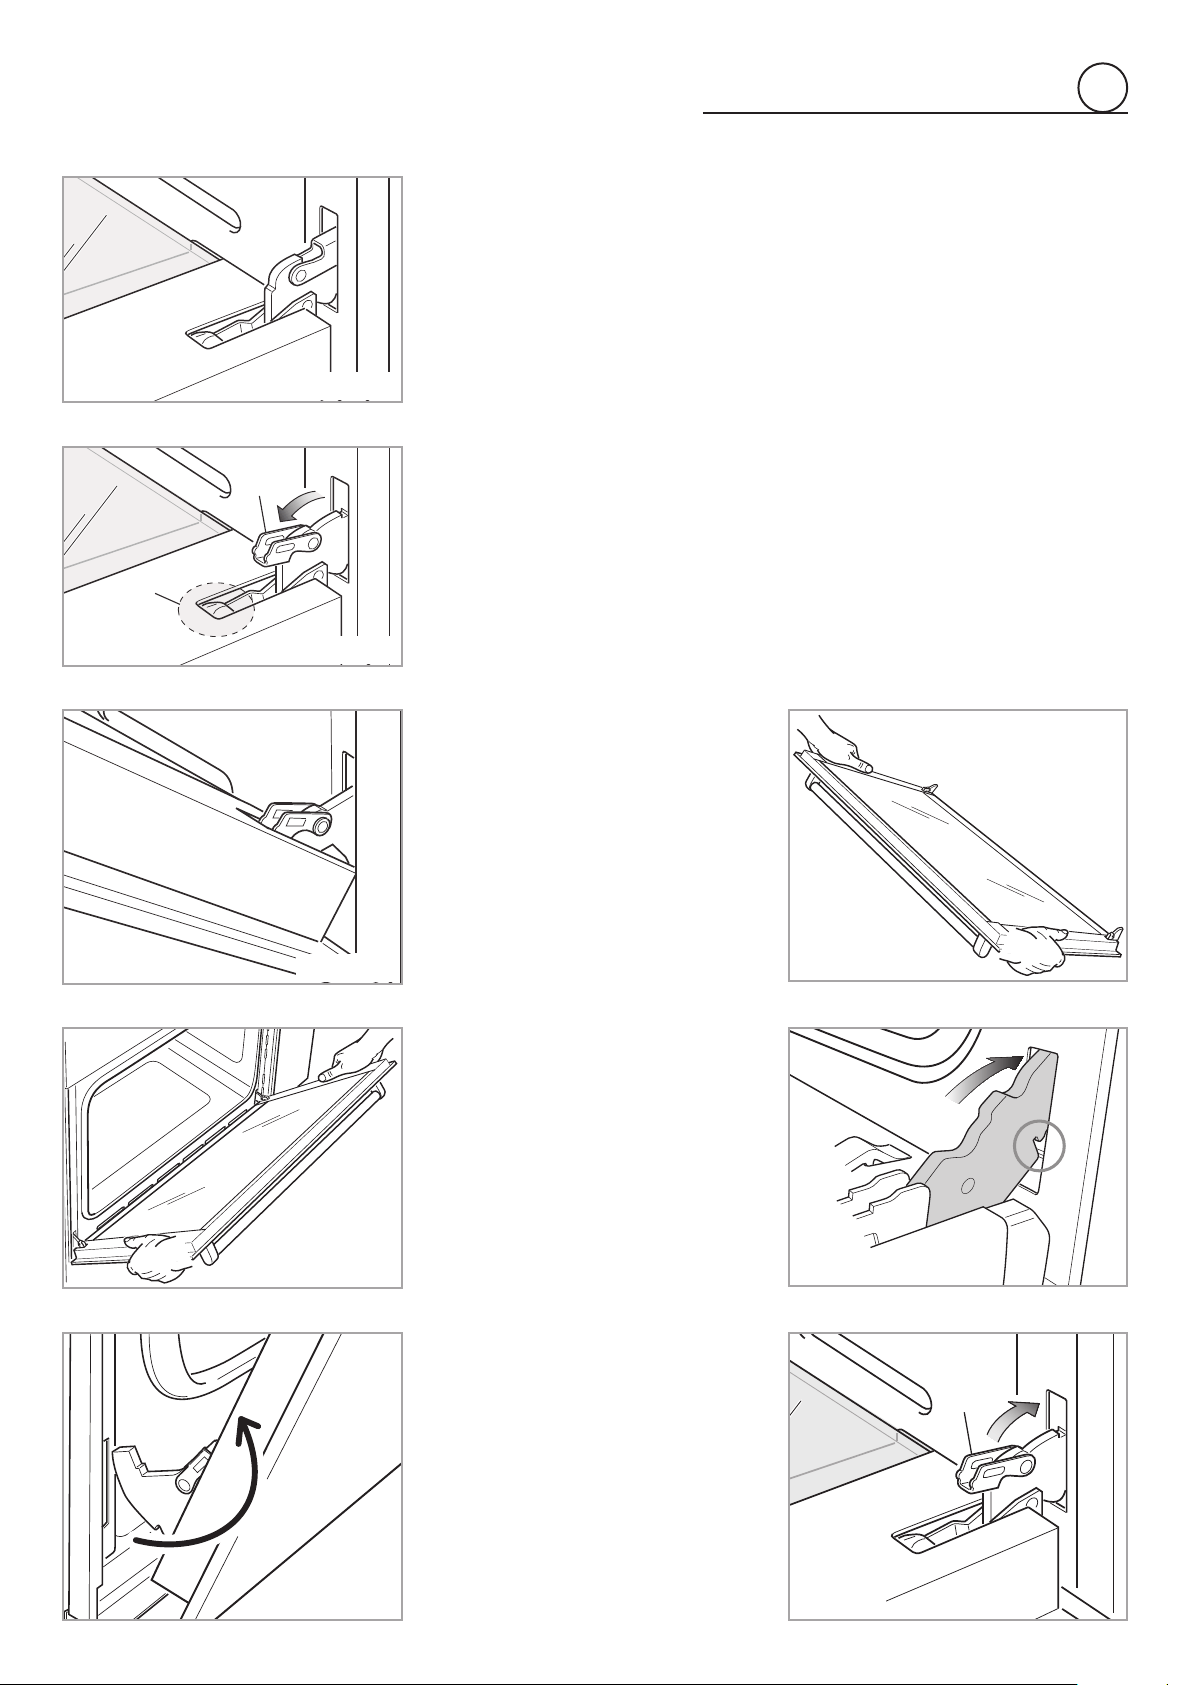
REMOVING THE OVEN DOOR
Theovendoorcaneasilyberemovedasfollows:
• Openthedoortothefullextent(g.5.13a).
• Openthelever“A”completelyontheleftandrighthinges(g.5.13b).
• Holdthedoorasshowning.5.13d.
• Gentlyclosethedooruntilleftandrighthingelevers“A”(g.5.13b)arehooked
topart“B”ofthedoor(g.5.13c)
• Withdrawthehingehooksfromtheirlocationfollowingarrow“C”(g.5.13e).
• Restthedooronasoftsurface.
REFITTING THE OVEN DOOR
• Holdthedoorrmly(g.5.14a).
• Insertthehingetonguesintotheslots,makingsurethatthegroovedropsinto
placeasshownintheg.5.14b.
• Openthedoortoitsfullextent.
• Fullyclosethelevers“A”ontheleftandrighthinges,asshowninthegureg.
5.14c.
• Closethedoorandcheckthatitisproperlyinplace.
B
A
C
Fig. 5.13a
Fig. 5.13b
Fig. 5.13c
Fig. 5.13d
Fig. 5.13e
A
Fig. 5.14a
Fig. 5.14b
Fig. 5.14c

DO’S AND DO NOT’S
• Doalwaysusetheovenwiththedoorclosed.
• Doalwaysbroilwiththedoorclosed.
• Doreadtheuserinstructionscarefullybeforeusingtherangeforrsttime.
• Doallowtheoventoheatforabouttwohours,beforeusingforthersttime,inordertoexpelanysmellfromthenewoveninsula-
tion,withouttheintroductionoffood.
• Docleanyourovenregularly.
• Doremovespillsassoonastheyoccur.
• Doalwaysuseovengloveswhenremovingfoodshelvesandtraysfromtheoven.
• Donotallowchildrenneartherangewheninuse.
• Donotallowfatoroilstobuildupintheovenbase,orovenaccessories.
• Donotplacecookingutensilsorplatesdirectlyontotheovenbase.
• Donotplacehotenamelpartsinwater.Leavethemtocoolrst.
• Donotallowvinegar,coffee,milk,saltwater,lemonortomatojuicetoremainincontactwithenamelparts(i.e.insidetheoven).
• Donotuseabrasivecleanersorpowdersthatwillscratchthesurfaceofthestainlesssteelandtheenamel.
• Donotattempttorepairtheinternalworkingsofyourrange.
• Doremovetheprotectivelmbeforetherstuse.
• Firerisk!Donotstoreammablematerialintheovenandinthestoragecompartment.
• Donotusetheovenwiththeovendooropen.
• Donotusetheoventowarmorheataroom.
FOR YOUR SAFETY
Undernocircumstancesshouldanyexternalcoversberemovedforservicingormaintenanceexceptbysuitablyqualiedpersonnel.
Themanufacturercannotbeheldresponsibleforpossibleinaccuraciesduetoprin-
tingortranscriptionerrorsinthepresentbooklet.
Themanufacturerreservestherighttomakeallmodicationstoitsproductsdee-
mednecessaryformanufactureorcommercialreasonsatanymomentandwithout
priornotice,withoutjeopardisingtheessentialfunctionalandsafetycharacteristics
oftheappliances.
Cod.1104008-ß2