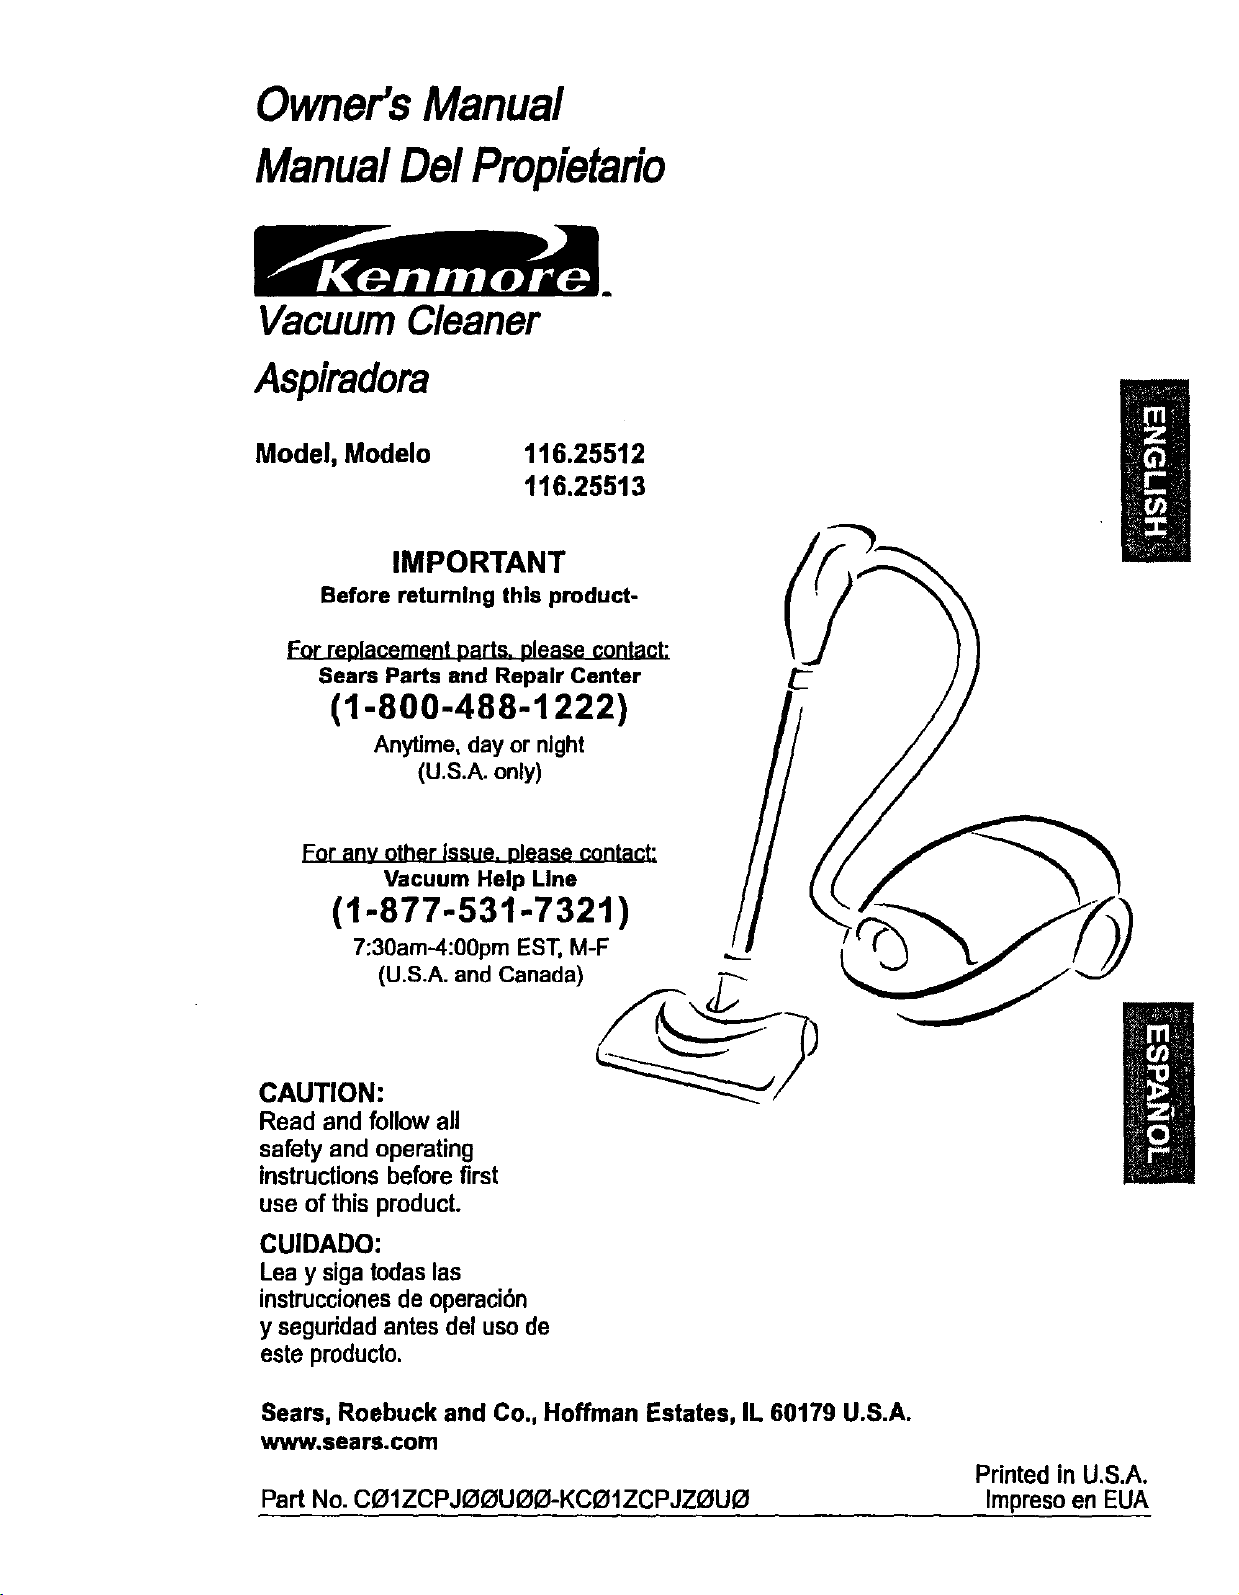
Owner'sManual
ManualDe/Propietafio
Vacuum Cleaner
Aspiradora
Model, Modelo
116.25512
116.25513
IMPORTANT
Before returning this product-
For replacement parts, please contact:
Sears Parts and Repair Center
(1-800-488-1222)
Anytime, day or night
(U.S.A. only)
For any other issue, please contact:
Vacuum Help Line
(1-877-531-732t)
7:30am-4:00pmEST, M-F
(U.S.A.and Canada)
CAUTION:
Read and follow all
safety and operating
instructionsbefore first
use of this product.
CUIDADO:
Lea y sigatodaslas
instruccionesdeoperaci6n
y seguridadantes del usede
este producto.
Sears, Roebuck and Co., Hoffman Estates, IL 60179 U.S.A.
www.sears.com
Printed in U.S.A.
Part No. C131ZCPJOOUOO-KCO1ZCPJZOUO Impresoen EUA
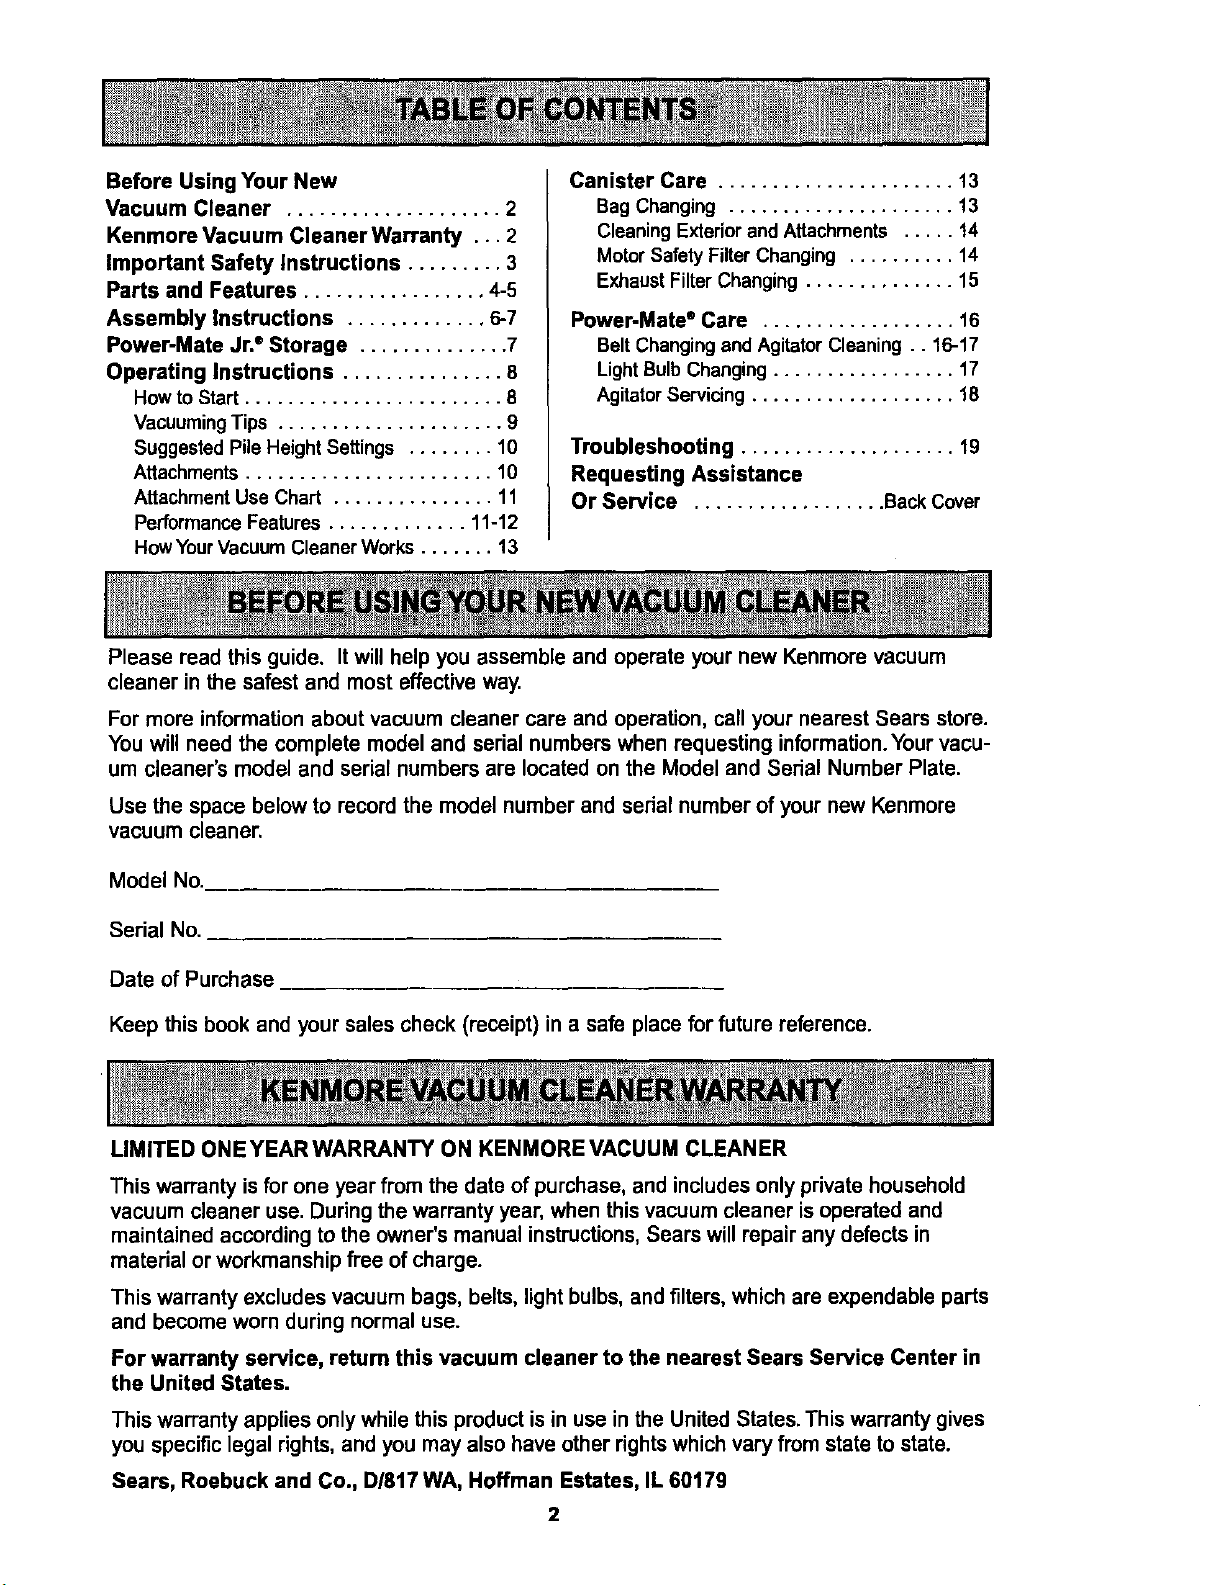
Before Using Your New
Vacuum Cleaner .................... 2
Kenmore Vacuum CleanerWarranty ... 2
Important Safety Instructions ......... 3
Parts and Features ................. 4-5
Assembly Instructions ............. 6-7
Power-Mate Jr.®Storage .............. 7
Operating Instructions ............... 8
How to Start ........................ 8
VacuumingTips ..................... 9
Suggested Pile Height Settings ........ 10
Attachments ....................... 10
Attachment Use Chart ............... 11
PerformanceFeatures ............. 11-12
HowYourVacuum Cleaner Works ....... 13
Canister Care ...................... 13
Bag Changing ..................... 13
CleaningExteriorand Attachments ..... 14
Motor Safety Filter Changing .......... 14
Exhaust Filter Changing .............. 15
Power-Mate" Care .................. 16
Belt Changingand AgitatorCleaning.. 16-17
LightBulbChanging ................. 17
AgitatorServicing ................... 18
Troubleshooting .................... 19
Requesting Assistance
Or Service .................. Back Cover
Please read thisguide. Itwillhelp you assemble and operate your new Kenmorevacuum
cleaner in the safest and most effectiveway.
For more information about vacuum cleaner care and operation, call your nearest Sears store.
You will need the complete model and serial numbers when requesting information. Your vacu-
um cleaner's model and serial numbers are located on the Model and Serial Number Plate.
Use the space below to record the model number and serial number of your new Kenmore
vacuum cleaner.
Model No.
Serial No.
Date of Purchase
Keep this book and yoursales check (receipt) ina safe place for future reference.
LIMITED ONE YEAR WARRANTY ON KENMORE VACUUM CLEANER
This warranty is for one year from the date of purchase, and includes only private household
vacuum cleaner use. During the warranty year, when this vacuum cleaner is operated and
maintained according to the owner's manual instructions, Sears will repair any defects in
material or workmanship free of charge.
This warranty excludes vacuum bags, belts, light bulbs, and filters, which are expendable parts
and become worn during normal use.
For warranty service, return this vacuum cleaner to the nearest Sears Service Center in
the United States.
This warranty applies only while this product is in use in the United States. This warranty gives
you specific legal rights, and you may also have other rights which vary from state to state.
Sears, Roebuck and Co., D/817 WA, Hoffman Estates, IL 60179
Yoursafety is important to us.To reducethe risk offire, electrical shock,
injury to persons or damagewhen using your vacuum cleaner,follow basic
safety precautions including thefollowing:
Read all instructionsin this manual before
assembling or using your vacuum cleaner.
Use your vacuum cleaner only as
described in this manual. Use only with
Sears recommended attachments.
Disconnect electrical supply before
servicingor cleaning out brush area.
Failure to do so could result in electrical
shookor brush suddenly starting.
Do not leave vacuum cleaner when
plugged in. Unplug from outletwhen not in
use and before servicing.
To reduce the dsk of electrical shock - Do
not use outdoors or on wet surfaces.
Do not allow to be used as a toy. Close
attention is necessary when used by or
near children.
Do not use with damaged cord or plug. If
vacuum cleaner is not working as it should,
has been dropped, damaged, left outdoors,
or dropped intowater, return itto a Sears
Service Center.
Do not pull or cam] bycord, use cord as a
handle, close door on cord, or pull cord
around sharp edges or comers. Do not run
vacuum cleaner over cord. Keep cord away
from heated surfaces.
Do not unplug by pullingon cord. To
unplug, grasp the plug, not the cord.
Do not handle plug or vacuum cleaner with
wet hands.
Do not put any objects into openings.
Do not use with any opening blocked; keep
free of dust, lint, hair and anything that may
reduce air flow.
Keep hair, looseclothing, fingers, and all
parts of body away from openings and
moving parts.
SAVE THESE
Turn off all controlsbefore unplugging.
Use extra care when cleaning on stairs. Do
not put on chairs, tables, etc. Keep on
floor.
Do not use vacuum cleaner to pick up
flammable or combustible liquids (gasoline,
cleaning fluids, perfumes, etc.), or use in
areas where they may be present. The
fumes from these substances can create a
fire hazard or explosion.
Do not pick up anything that is buming or
smoking, such as cigarettes, matches, or
hot ashes.
Do not use vacuum cleaner without dust
bag and/or filters in place.
Always change the dust bag after
vacuuming carpet cleaners or freshener,
powders and fine dust. These productsclog
the bag, reduce airflow and can cause the
beg toburst. Failure to change bag could
cause permanent damage to the cleaner.
Do not use the vacuum cleaner to pick up
sharp hard objects, small toys, pins, paper
clips, etc. They may damage the cleaner or
dust bag.
Do not operate vacuum cleaner without the
exhaust filter or exhaust filter door in place
(if applicable).
The hose contains electrical wires. Do not
use when damaged, cut, or punctured.
Replace if cut or worn. Do not pick up
sharp objects.
Always turn off and unplug the vacuum
cleaner before connecting or disconnecting
either hose, Handi-Mate Jr.® (if applicable),
or nozzle.
Hold plug when rewindingonto cordreel.
Do not allow plug to whip when rewinding.
You are responsiblefor making sure that
your vacuum cleaner is not used by anyone
unable to operate itproperly.
INSTRUCTIONS
Proper assembly and safe use of your vacuum cleaner are your responsibilities.
Your vacuum cleaner is intended for Household use. Read this Owner's Manual
carefully for important use and safety information. This guide contains safety
statements under warning and caution symbols.
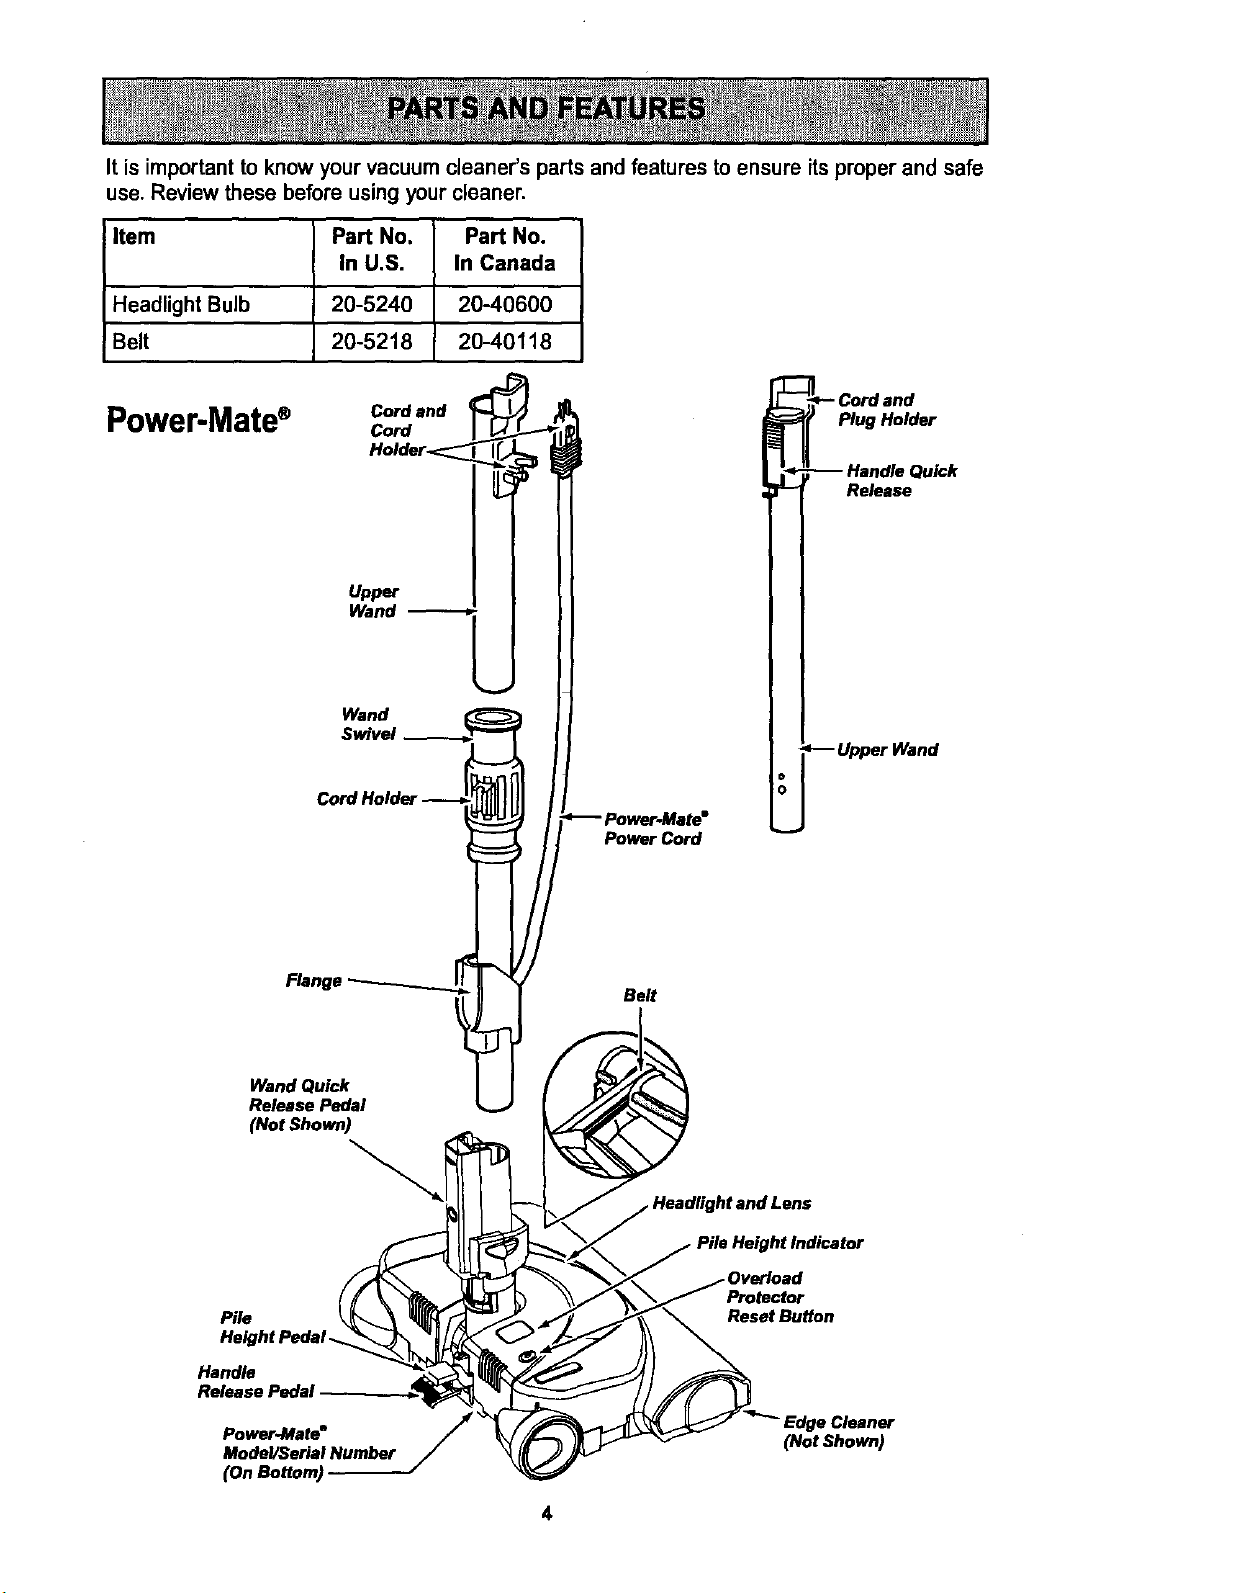
It is important to knowyour vacuum cleaner's parts and features to ensure itsproper and safe
use. Review these before using yourcleaner.
Item Part No. Part No.
In U.S. In Canada
Headlight Bulb 20-5240 20-40600
Belt 20-5218 20-40118
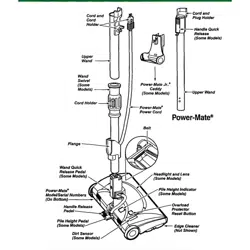
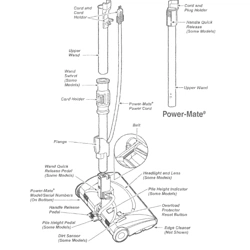
Power-Mate®
Cord and !
Cord
Holder_
Upper
Wand --------_
Wand
Swivel __
Cord Holder
Flange
Power Cord
Belt
_--Cord and
Plug Holder
-- Handle Quick
Release
--Upper Wand
Wand Quick
Release Pedal
(Not Shown)
"....
Pile Height Indicator
Pile
Height Pedal.
Handle
Release Pedal
Power.Mate B
Model/Serial Number
(OnBottom)
Protector
Reset Button
• Cleaner
(Not Shown)
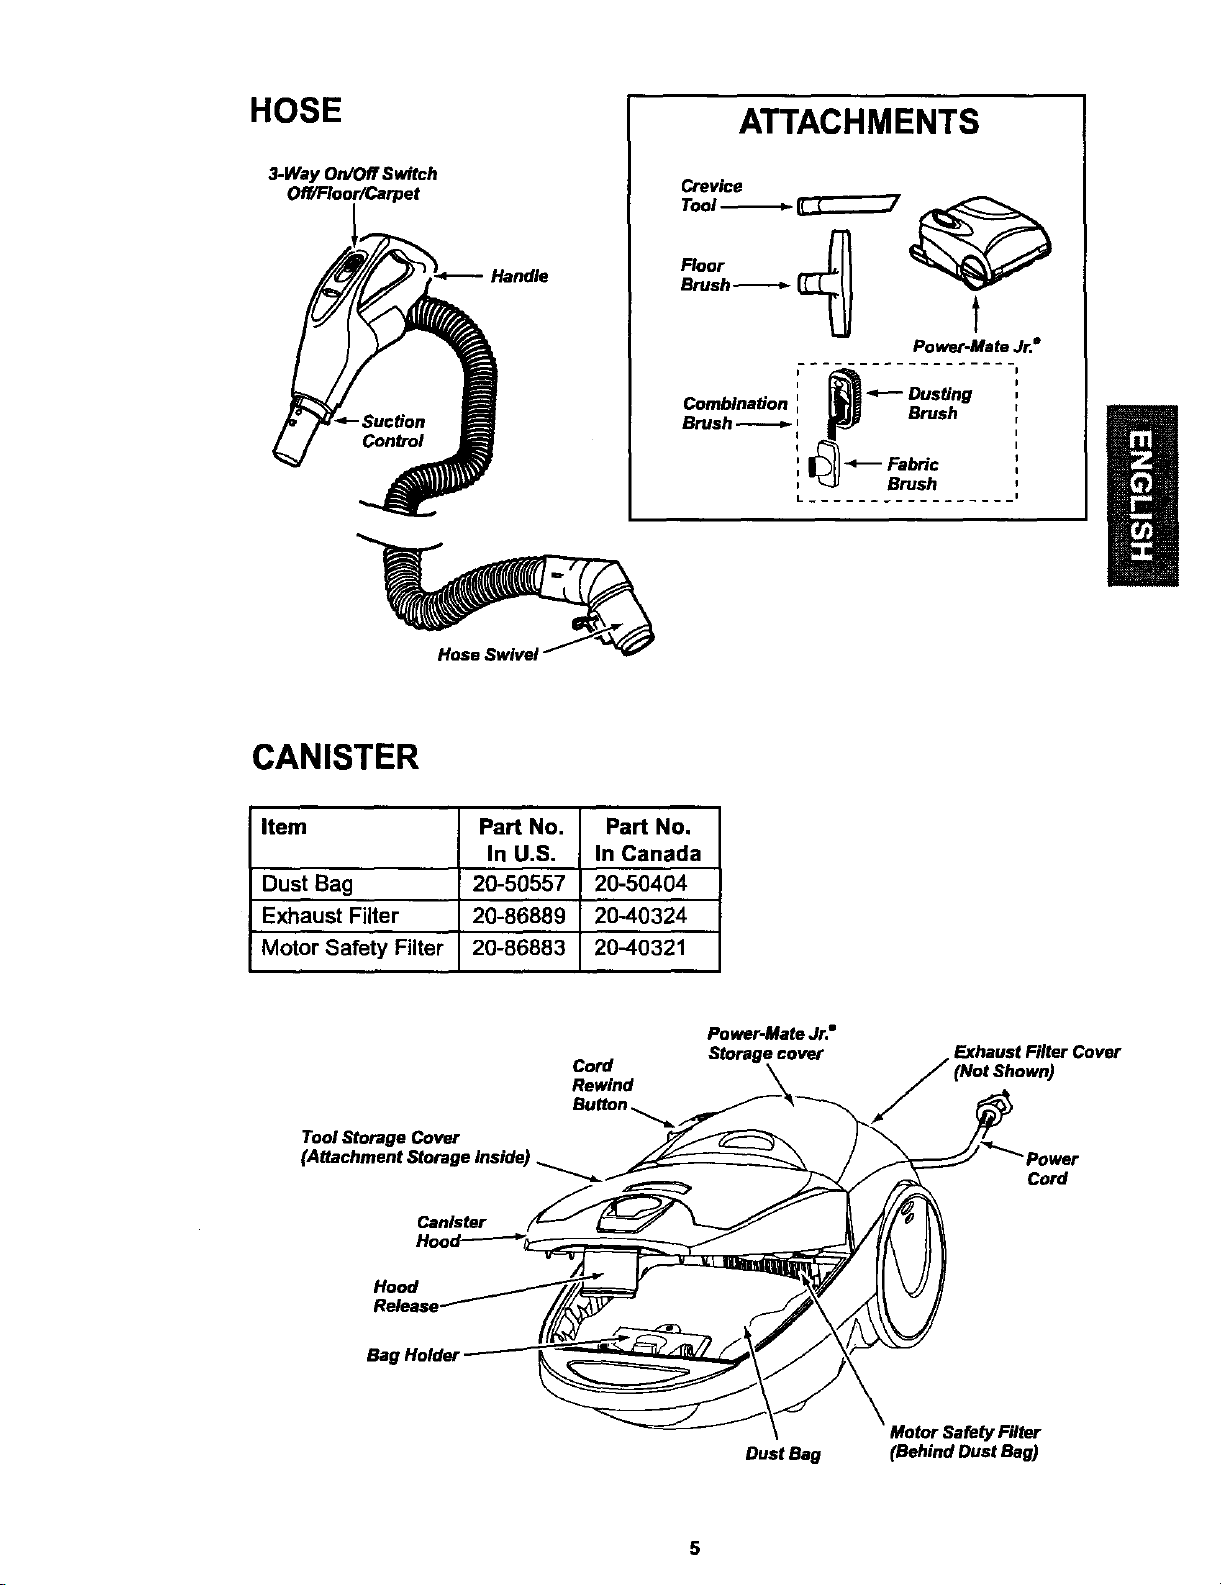
HOSE
3-Way On/Off Switch
Off/Floor/Carpet
Handle
ATTACHMENTS
Crevice
Tool --_ _7
Floor _ "_f*-
Brush _ _
Power-Mate Jr.e
I _ <--- Dusting
Combination : p Brush
Brush _ i
!_Fabric
, _JJ Brush
Hose Swivel
CANISTER
Item
Dust Bag
Exhaust Filter
Motor Safety Filter
Pan No.
In U.S.
20-50557
20-86889
20-86883
Pan No.
In Canada
20-50404
20-40324
20-40321
Tool Storage Cover
(Attachment Storage inside)
Can_ter
Cord
Rewind
Button ._
Power-Mate Jr."
Storage cover
Exhaust Filter Cover
Cord
Hood
Bag HoideJ
Dust Bag
Motor Safety Filter
(Behind Dust Bag)
5
I_ Please pay special attentionto these hazard alert boxes,and follow any instructionsI
given. WARNING statementsalert you tosuch dangers asfire, electricshock,burns
and personal injury. CAUTION statements alert you to such dangers as personalI
njury and/or property damage. J
Electrical Shock Hazard
DO NOT plug into electrical supply
until assembly is complete. Failure
to do so could result in electrical
i shock or injury,
Before assemblingthe vacuum cleaner,
checkthe PACKING LIST onthe coverof
the separate Repair Parts List.Use thislist
to verifythat you have received all the com-
ponents of your new Kenmore vacuum
cleaner.
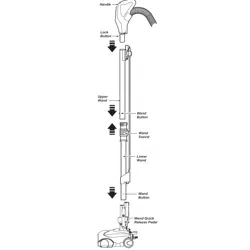
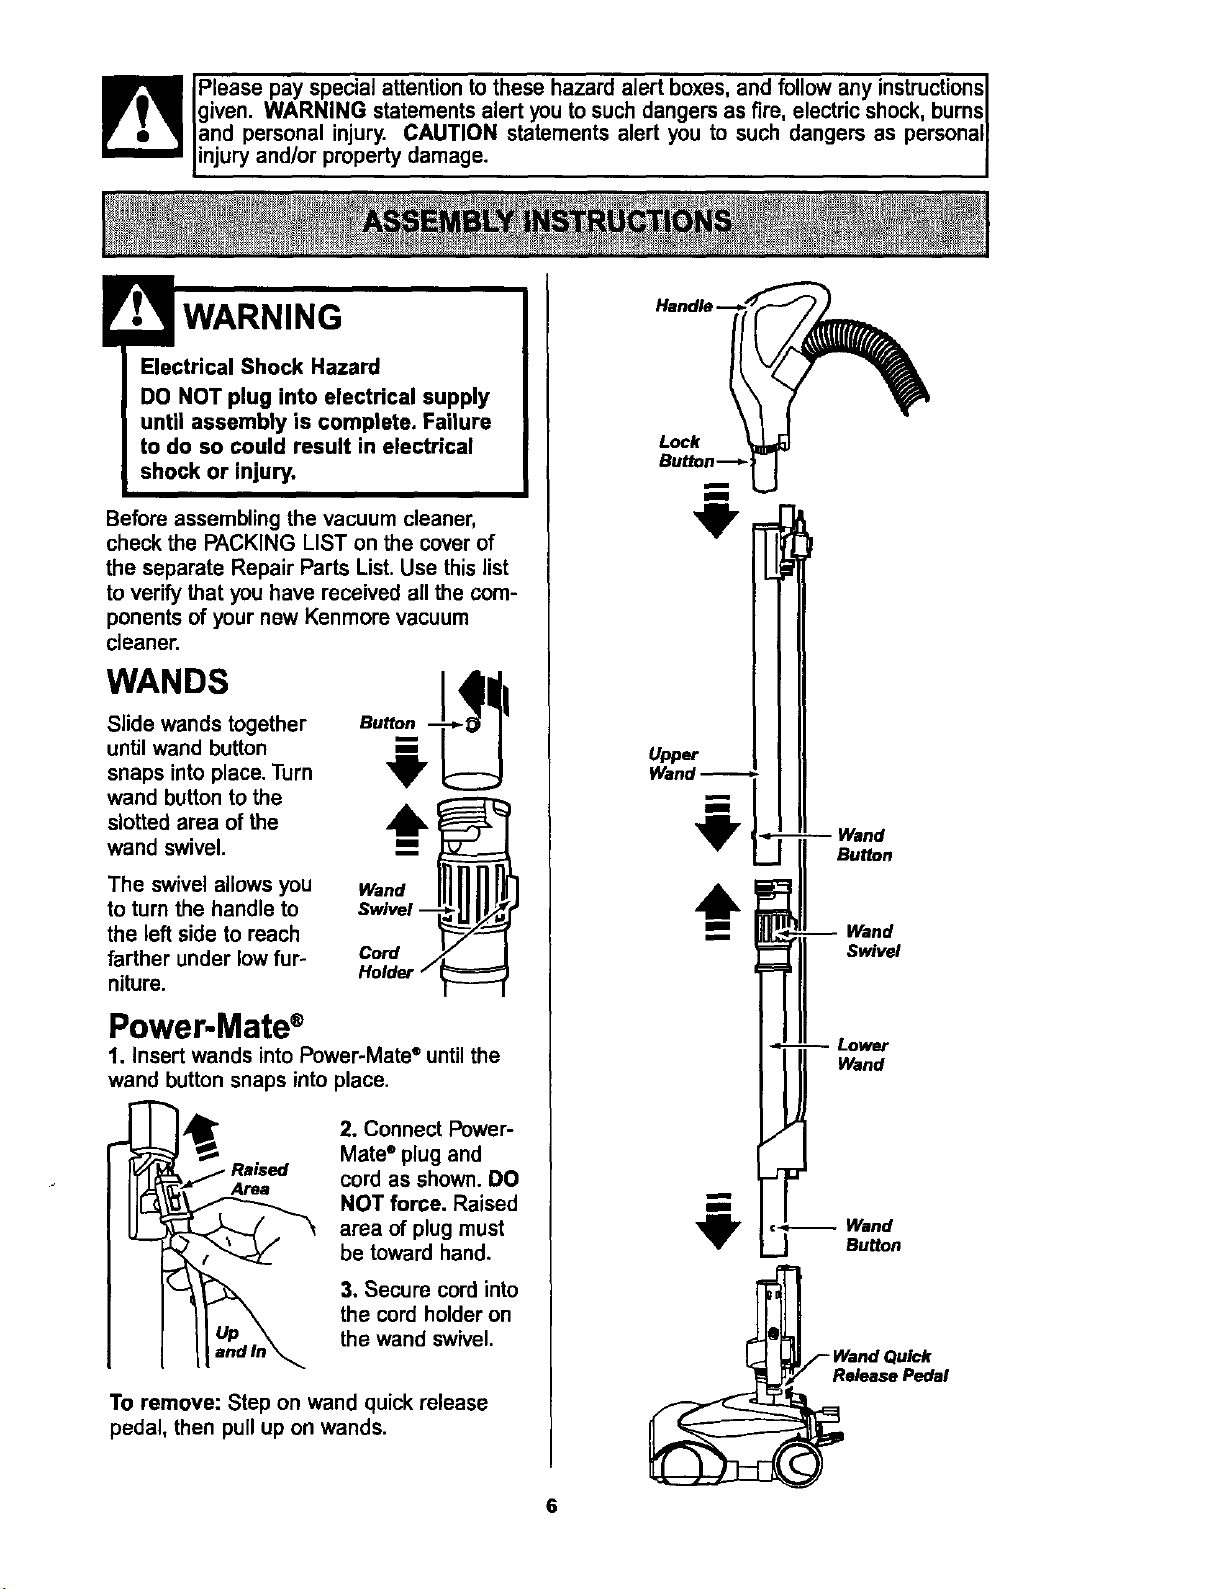
WANDS
Slide wands together
untilwand button
snaps intoplace.Turn
wand buttonto the
slottedarea of the
wand swivel.
The swivel allows you
to turn the handle to
the left side to reach
farther under low fur-
niture.
Power-Mate ®
1. Insert wands into Power-Mate" until the
wand button snaps into place.
Raised
Area
2. Connect Power-
Mate ®plug and
cord as shown. DO
NOT force. Raised
area of plug must
be toward hand.
3. Secure cord into
the cord holder on
the wand swivel.
To remove: Step on wand quickrelease
pedal, then pullup on wands.
6
Lock
Upper
Wand --
_ Button
mm Wand
m
Swivel
Lower
Wand
Wand
Button
_Wand Quick
elease Pedal
CANISTER
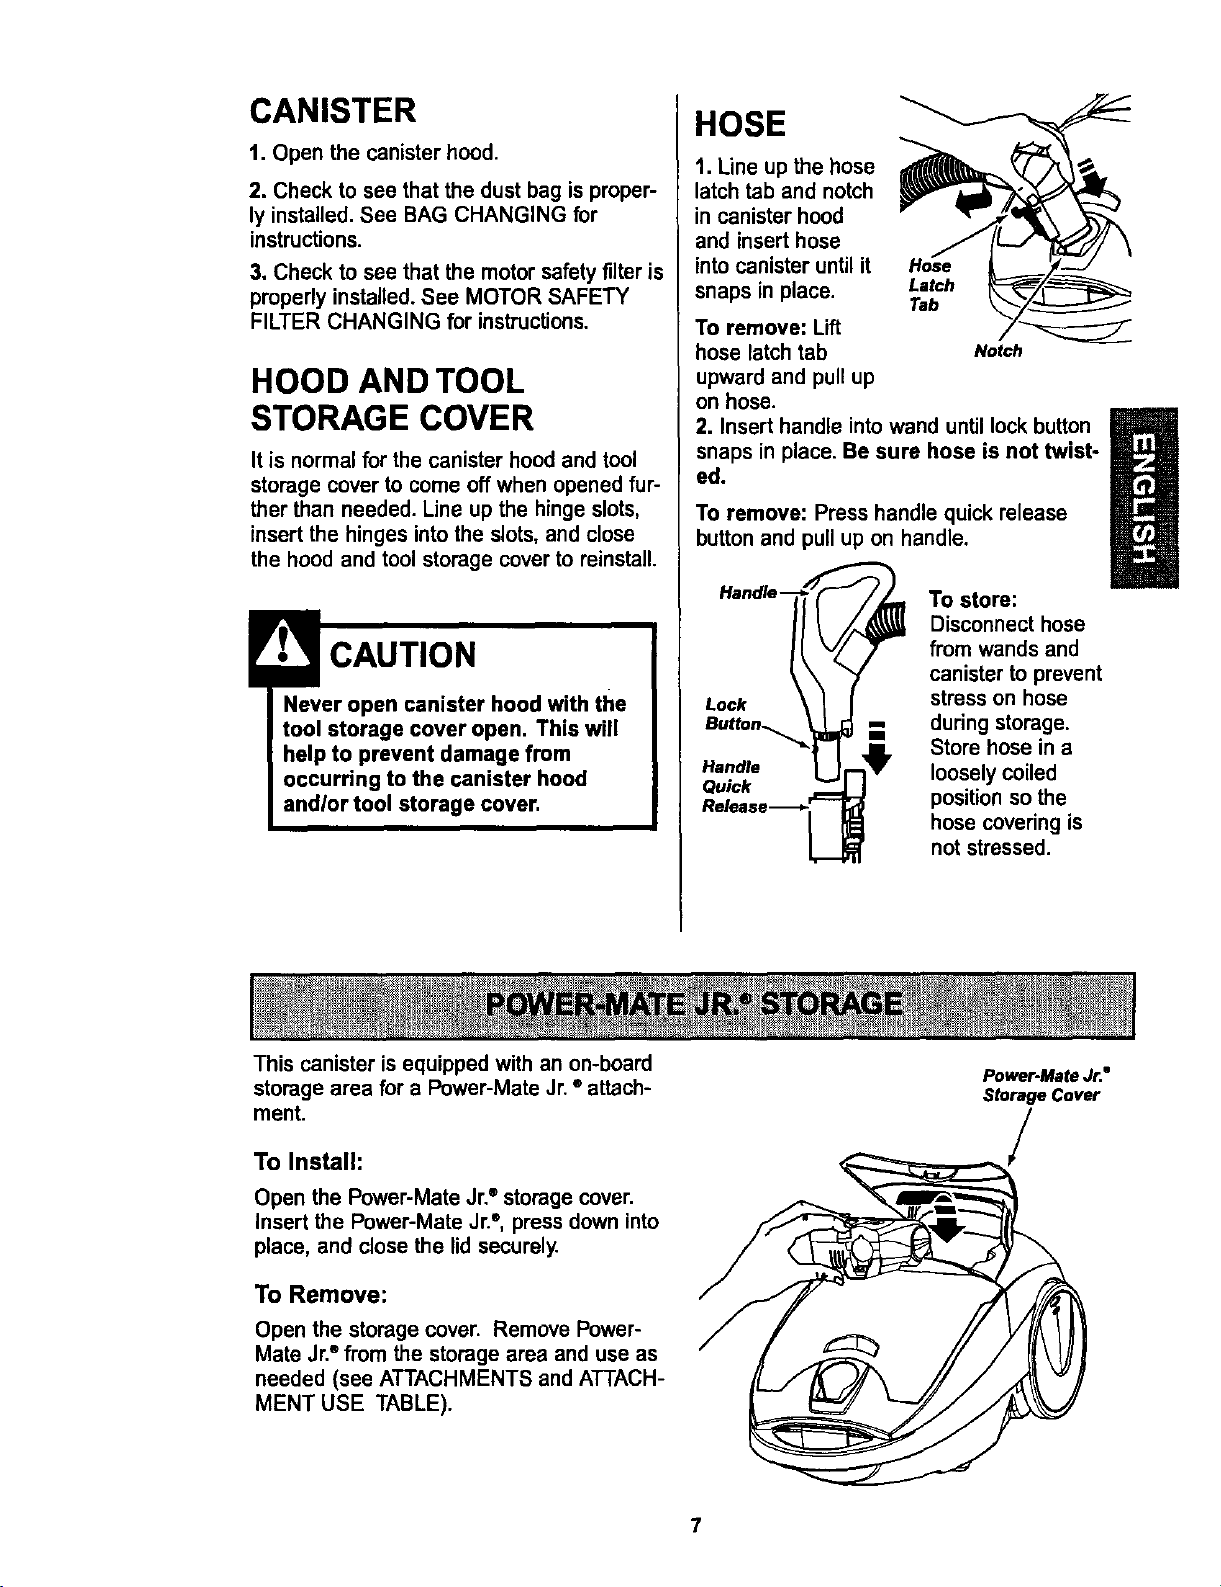
t. Open the canisterhood.
2. Check to see that the dust bag is proper-
ly installed. See BAG CHANGING for
instructions.
3, Check to see that the motor safety filter is
properly installed. See MOTOR SAFETY
FILTER CHANGING for instructions.
HOOD AND TOOL
STORAGE COVER
It is normal for the canister hood and tool
storage cover to come off when opened fur-
ther than needed. Line up the hinge slots,
insert the hinges into the slots, and close
the hood and tool storage cover to reinstall.
CAUTION
Never open canister hood with the
tool storage cover open. This will
help to prevent damage from
occurring to the canister hood
andlor tool storage cover,
HOSE
t. Line up the hose
latch tab and notch
in canister hood
and insert hose
into canister until it
snaps in place. Latch
Tab
To remove: Lift
hose latch tab Notch
upward and pull up
on hose.
2, Insert handle into wand until lock button
snaps in place, Be sure hose is not twist-
ed.
To remove: Press handle quickrelease
buttonand pullup on handle.
Lock
HenCe
Qu_k
To store:
Disconnect hose
from wands and
canister to prevent
stress on hose
_-- during storage.
Store hose in a
loosely coiled
position so the
hose covering is
not stressed.
This canisteris equippedwith an on-board
storagearea for a Power-Mate Jr.®attach-
ment.
To lnstalh
Open the Power-Mate Jr.®storage cover.
Insert the Power-Mate Jr.', press down into
place, and close the lid securely.
To Remove:
Open the storage cover. Remove Power-
Mate Jr." from the storage area and use as
needed (see ATTACHMENTS and ATTACH-
MENT USE TABLE).
Power-Mate Jr."
Storage Cover
/
OPERATING INSTRUCTIONS
Personal Injury and Product Damage
Hazard
• DO NOT plug in if switch is in ON
position. Personal injury or
damage could result.
• The cord moves rapidly when
rewinding. Keep children away
and provide a clear path when
rewinding the cord to prevent
personal injury,
• DO NOT use outlets above
counters. Damage from cord to
items in surrounding area
could occur.
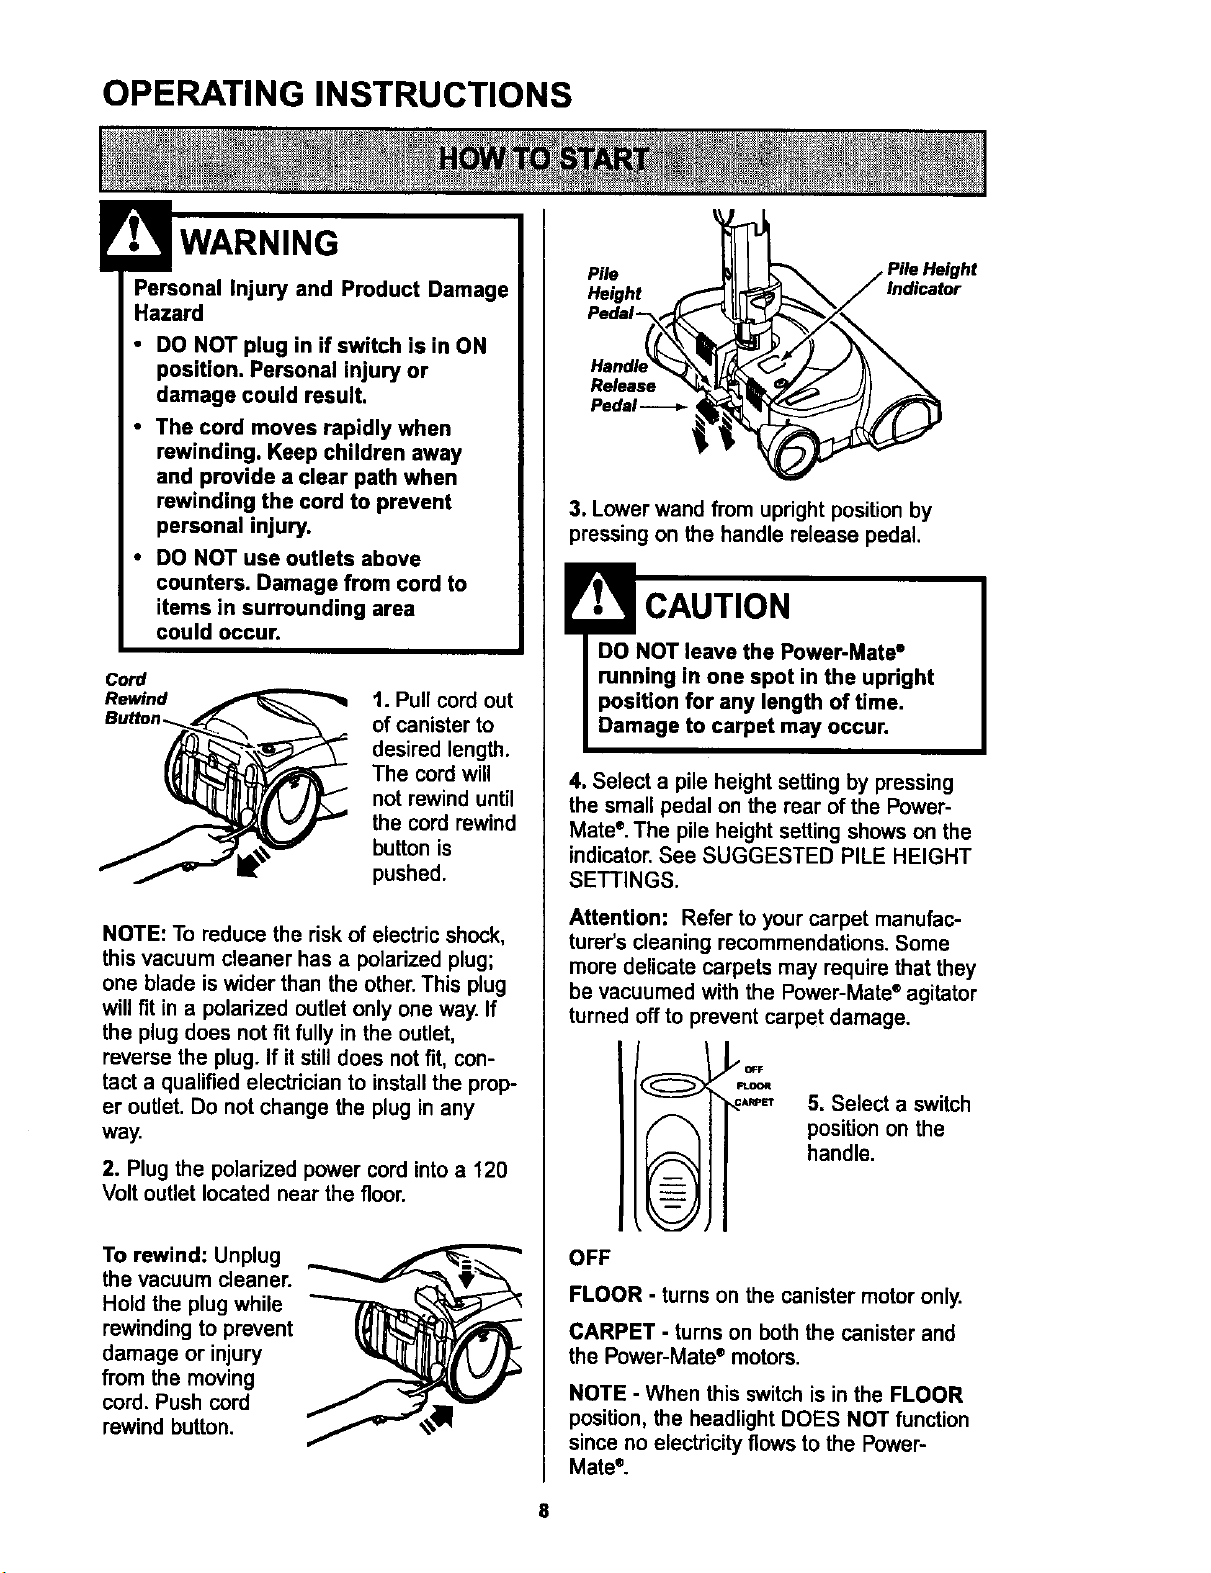
Cord
t Pu,,cordout
of canister to
_ esired length.
The cord will
not rewind until
the cord rewind
button is
pushed.
NOTE: To reduce the risk of electric shock,
this vacuum cleaner has a polarized plug;
one blade is wider than the other. This plug
will fit in a polarized outlet only one way. If
the plug does not fit fully in the outlet,
reverse the plug. If it still does not fit, con-
tact a qualified electrician to install the prop-
er outlet. Do not change the plug in any
way.
2. Plug the polarized power cord into a 120
Volt outlet located near the floor.
To rewind: Unplug
the vacuum cleaner.
Hold the plug while
rewinding to prevent
damage or injury
from the moving
cord. Push cord
rewind button.
Pile
Height
Pedal-*
Indicator
Release
Pedal
3. Lowerwand from uprightposition by
pressing on the handle release pedal.
CAUTION
DO NOT leave the Power-Mate '_
running in one spot in the upright
position for any length of time.
Damage to carpet may occur.
4. Select a pile heightsetting by pressing
the small pedalon the rear of the Power-
Mate®.The pileheight settingshows onthe
indicator.See SUGGESTED PILE HEIGHT
SETTINGS.
Attention: Refer to your carpet manufac-
turer's cleaning recommendations. Some
more delicate carpets may require that they
be vacuumed with the Power-Mate ®agitator
turned off to prevent carpet damage.
L_OF F
FLOOR
_=,,-'_ 5. Select a switch
position on the
handle.
OFF
FLOOR - turns on the canister motor only.
CARPET - turns on both the canister and
the Power-Mate ®motors.
NOTE - When this switch is in the FLOOR
position, the headlight DOES NOT function
since no electricity flows to the Power-
Mate ®.
8
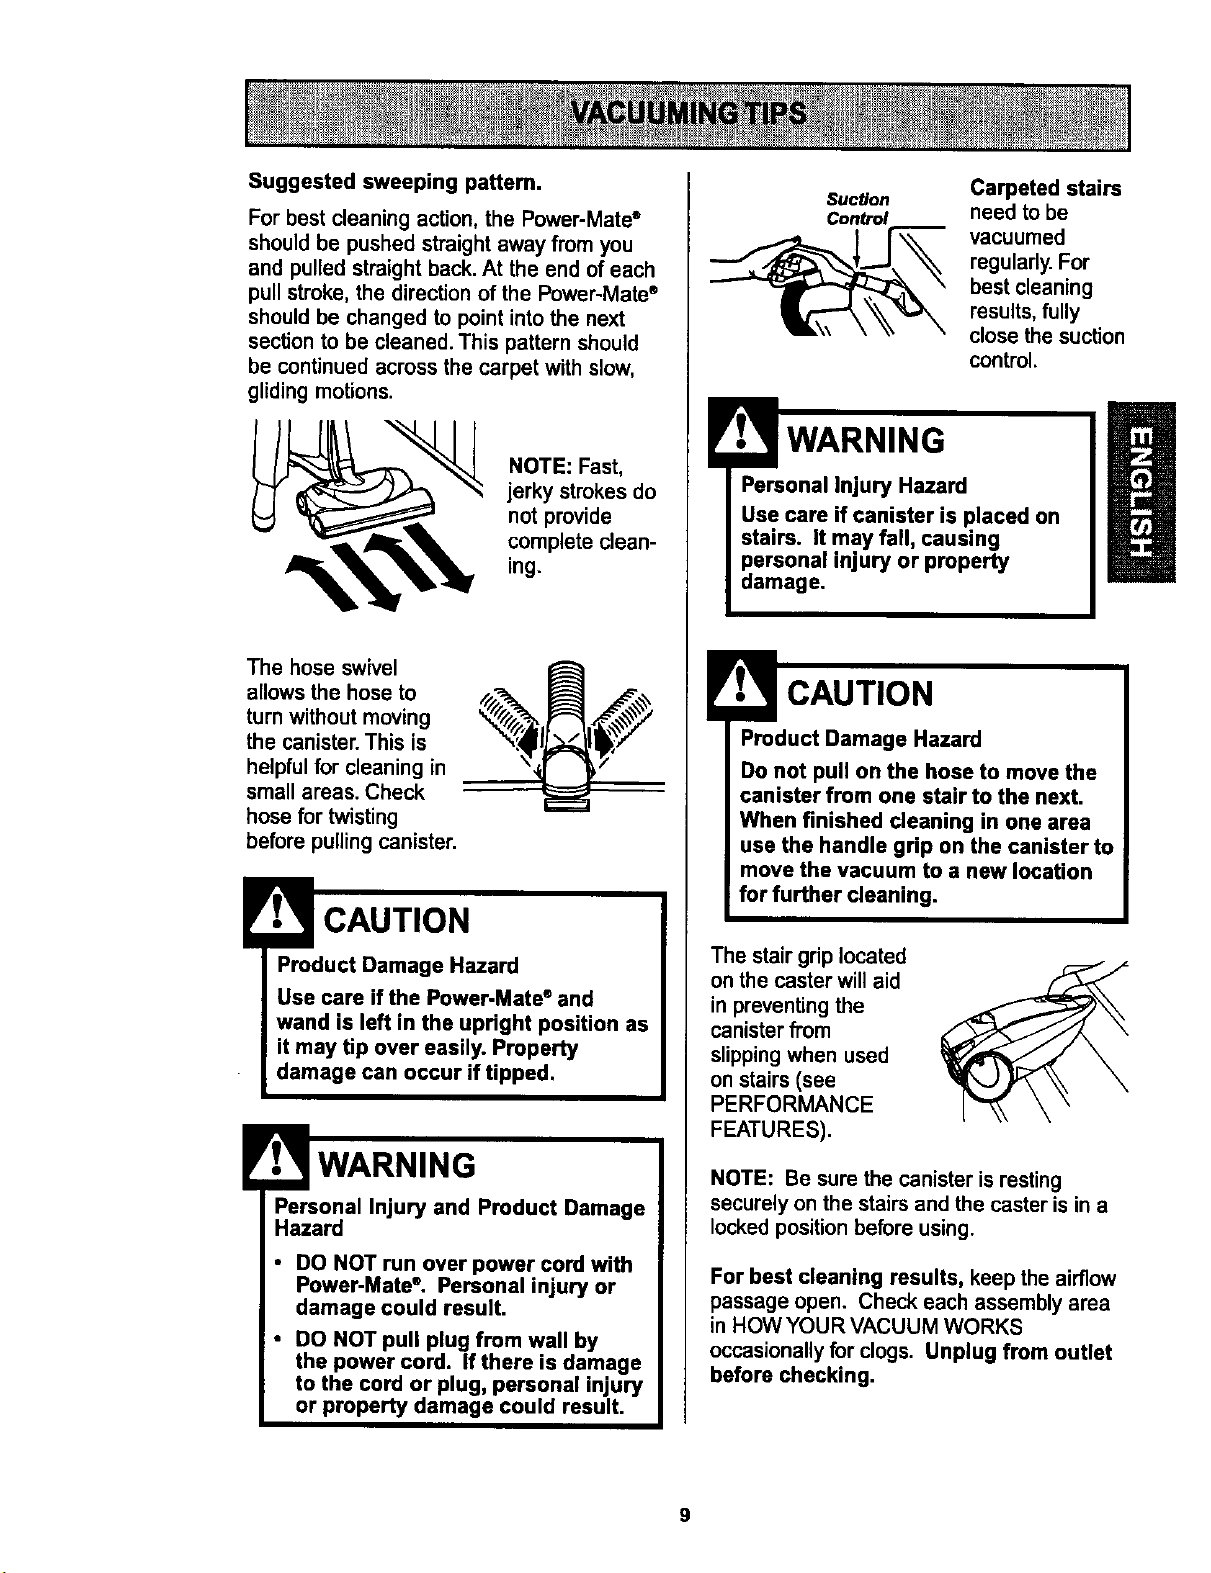
Suggestedsweepingpattem.
For best cleaning action, the Power-Mate"
should be pushed straight away from you
and pulled straight back. At the end of each
pull stroke, the direction of the Power-Mate ®
should be changed to point into the next
section to be cleaned. This pattern should
be continued across the carpet with slow,
gliding motions.
"_ NOTE: Fast,
jerky strokesdo
not provide
complete clean-
ing.
The hose swivel
allows the hose to
turn without moving
the canister. This is
helpful for cleaning in
small areas. Check
hose for twisting
before pulling canister.
Product Damage Hazard
Use care if the Power-Mate ®and
wand is left in the upright position as
it may tip over easily. Property
damage can occur if tipped.
!r.,L WARNING
Personal Injury and Product Damage
Hazard
• DO NOT run over power cord with
Power-Mate'. Personal injury or
damage could result.
• DO NOT pull plug from wall by
the power cord. If there is damage
to the cord or plug, personal injury
or property damage could result.
Suc_on
Control
Carpeted stairs
need to be
vacuumed
regularly. For
best cleaning
results, fully
close the suction
control.
Product Damage Hazard
Do not pull on the hose to move the
canister from one stair to the next.
When finished cleaning in one area
use the handle grip on the canister to
move the vacuum to a new location
for further cleaning.
The stair grip located
on the caster will aid
in preventing the
canister from
slipping when used
on stairs (see
PERFORMANCE
FEATURES).
NOTE: Be sure the canister is resting
securely on the stairs and the caster is in a
locked position before using.
For best cleaning results, keep the airflow
passage open. Check each assembly area
in HOW YOUR VACUUM WORKS
occasionally for clogs. Unplug from outlet
before checking.
9
For best deep down cleaning, use the XLO
setting. However, you may need to raise the
height to make some jobs easier, such as
scatter rugs and some deep pile carpets,
and to prevent the vacuum cleaner from
shutting off. Suggested settings are:
HI - Shag, deep pile, or scatter rugs.
MED - Medium to deep pile.
LO - Low to medium pile.
XLO - Most carpets and bare floors.
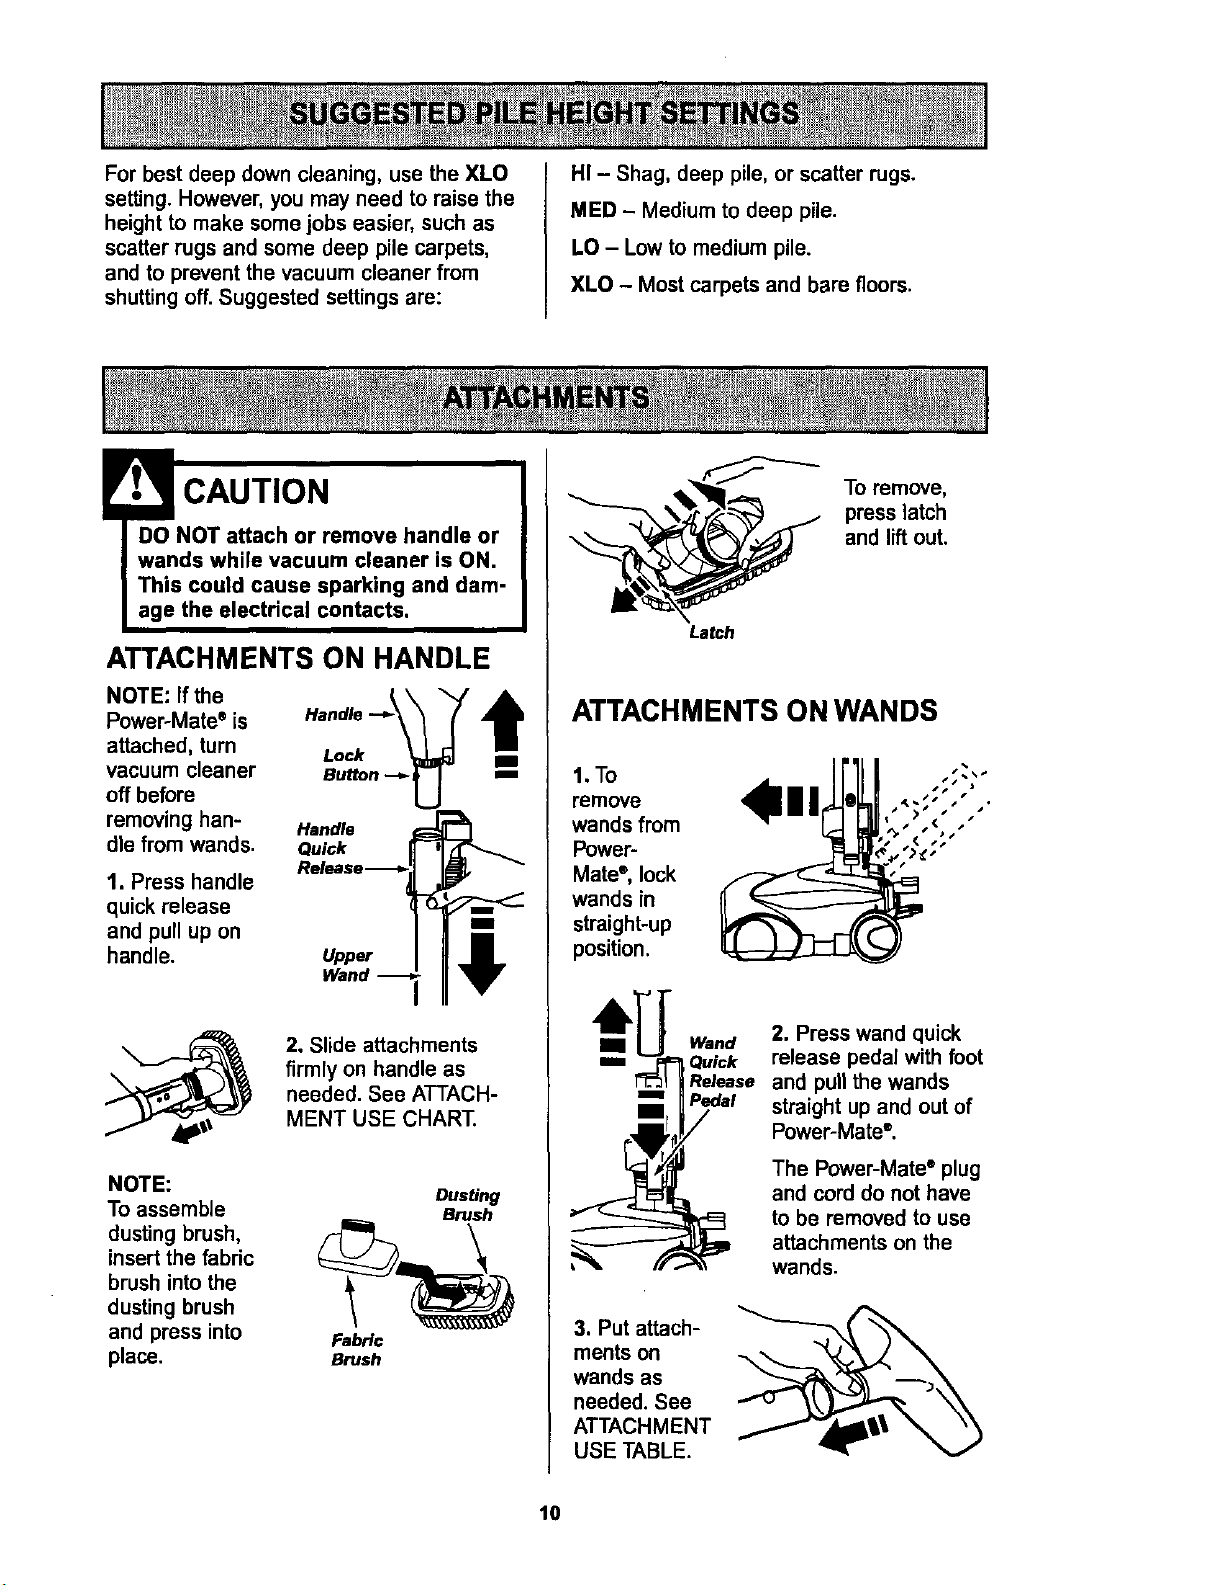
DwaOnCAUTION
NOT attach or remove handle or
ds while vacuum cleaner is ON,
J This could cause sparking and dam-
l age the electrical contacts.
ATTACHMENTS ON HANDLE
NOTE: If the _,\ "-,/
Power-Mate ®is Handle ..-_\ _ (
attached, turn Lock
vacuum cleaner Button .-_-_-]
off before L_.J
removing han- Handle
die from wands, Quick
1. Press handle
quickrelease
and pull up on
handle. Upper
2. Slide attachments
firmly on handle as
needed. See ATTACH-
MENT USE CHART•
NOTE:
Dusting
To assemble Brush
dusting brush, __
insert the fabric
brush into the
dusting brush
and press into Fabric
place. Brush
\
La
ATTACHMENTS ON WANDS
1.To
remove
wands from
Power-
Mate ®, lock
wands in
straight-up
position.
Toremove,
presslatch
and liftout.
Wand
Quick
Release
m Pedal
2. Press wand quick
release pedal with foot
and pull the wands
straight up and out of
Power-Mate'.
The Power-Mate ° plug
and cord do not have
to be removed to use
attachments on the
wands.
3. Put attach- _-----_
merits on -,,
wands as
needed• See
ATTACHMENT
USE TABLE.
10

CLEANING AREA
ATTACHMENT Between Carpeted
Cushions* FloondRugs Walls
l/
pust!n.
Combination 10msn
brush Fabric
brush
Crevice tool
Floor brush I_
Power'Mate®
Handi-Mate Jr.e
(Some Models)*'*
Power-Mate Jr2
_Some Models)***
Furniture*
v'
=/
v'
Bare
Drapes* Stairs Floors
i,'
i/ i/
v'**
v'
i/
*Alwaysdean attachmentsbeforeusingon fabrics, ** 3-way OnlOffswitchshouldbe in FLOOR position.
*** Handi-MateJr..° and Power-MateJr.° attachmentinstructionsare includedwiththe products.
NOTE: When separating wands depress lock button completely before pullingwands apart. If
wand lock button is difficult to depress push the two wands more tightly together to line up
me ock button w th the he e. Depress lock button and then pu I wands apart.
OVERLOAD
PROTECTOR
The Power-Mate ®has
built-in protection
against motor and belt
damage should the
agitator jam. If the
agitator slows down or
stops, the overload
protector shuts off the Power-Mate*. The
canister motor will continue to run.
Overload Protector
Reset Button
To correct problem: Turn off and unplug
vacuum cleaner, remove obstruction, then
press overload protector reset button. A
ball point pen may be required
If the problem persists, have the
vacuum cleaner serviced by a Sears or
other qualified service agent.
WARNING
Personal Injury Hazard
Always unplug the vacuum cleaner
before cleaning the agitator area as
brush may suddenly restart. Failure
to do so can result in personal injury.
11
EDGE CLEANER
Active brush edge
cleaners are on both
sides of the Power-
Mate". Guide either
side of the Power-
Mate ®along base-
boards or next to
furniture to help
remove dirt trapped at
carpet edges.
SUCTION CONTROL
The suction
control allows
you to change
the vacuum
suction for
different fabrics Suction Suction
and carpet
weights, Opening the control decreases
suction for draperies and lightweight rugs,
while closing the control increases suction
for upholsteries and carpets.
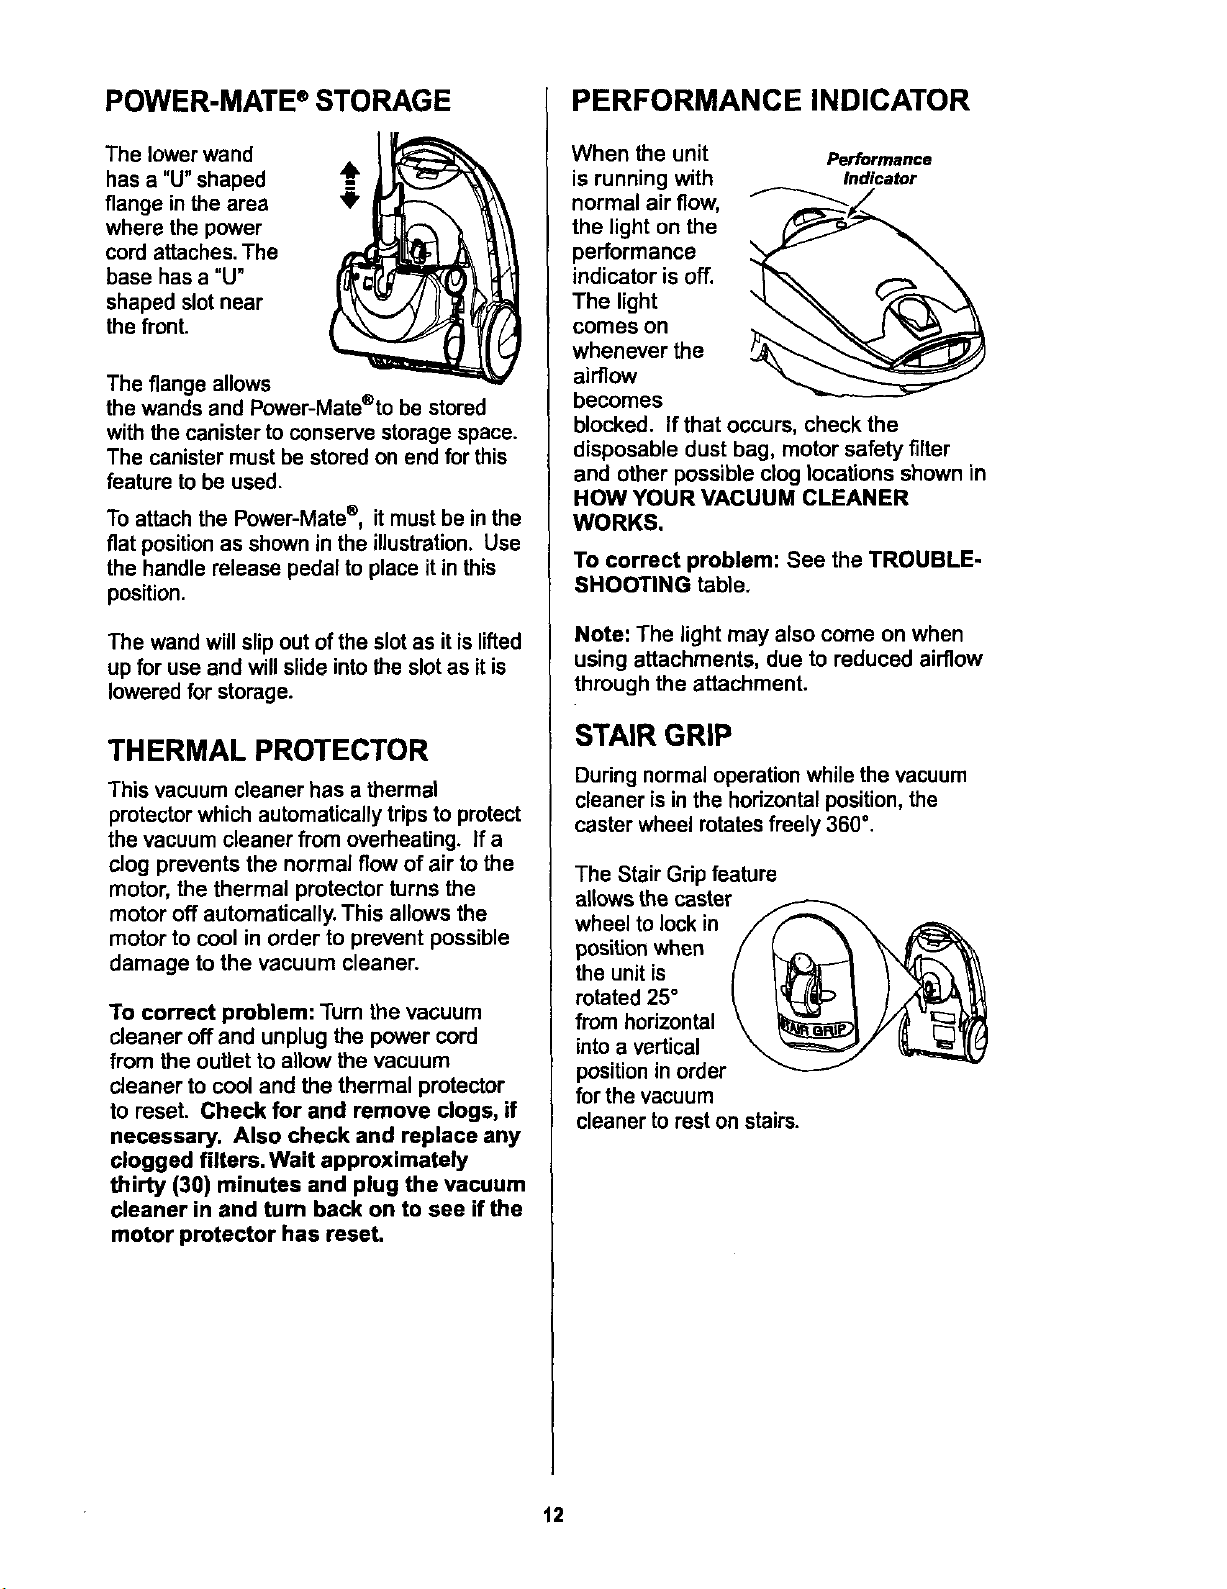
POWER-MATE ®STORAGE
The lower wand
has a "U" shaped =4_
flange in the area '_"
where the power
cord attaches. The
base has a "U"
shaped slot near
the front.
The flange allows
the wands and Power-Mate®to be stored
with the canister to conserve storage space.
The canister must be stored on end for this
feature to be used.
To attach the Power-Mate ®, it must be in the
fiat position as shown in the illustration. Use
the handle release pedal to place it in this
position.
The wand will slip out of the slot as it is lifted
up for use and will slide into the slot as it is
lowered for storage.
THERMAL PROTECTOR
This vacuum cleaner has a thermal
protector which automatically trips to protect
the vacuum cleaner from overheating. If a
clog prevents the normal flow of air to the
motor, the thermal protector turns the
motor off automatically. This allows the
motor to cool in order to prevent possible
damage to the vacuum cleaner.
To correct problem: Turn the vacuum
cleaner off and unplug the power cord
from the outlet to allow the vacuum
cleaner to cool and the thermal protector
to reset. Check for and remove clogs, if
necessary. Also check and replace any
clogged filters. Wait approximately
thirty (30) minutes and plug the vacuum
cleaner in and turn back on to see if the
motor protector has reset.
PERFORMANCE INDICATOR
When the unit Performance
is running with Indicator
normal air flow,
the light on the
performance
indicator is off.
The light
comes on
whenever the
airflow
becomes
blocked. If that occurs, check the
disposable dust bag, motor safety filter
and other possible clog locations shown in
HOW YOUR VACUUM CLEANER
WORKS,
To correct problem: See the TROUBLE-
SHOOTING table.
Note: The light may also come on when
using attachments, due to reduced airflow
through the attachment.
STAIR GRIP
During normal operation while the vacuum
cleaner is in the horizontal position, the
caster wheel rotates freely 360 °.
The Stair Grip feature
allows the caster
wheel to lock in
position when
the unit is
rotated 25 °
from horizontal
into a vertical
position in order
for the vacuum
cleaner to rest on stairs.
t2
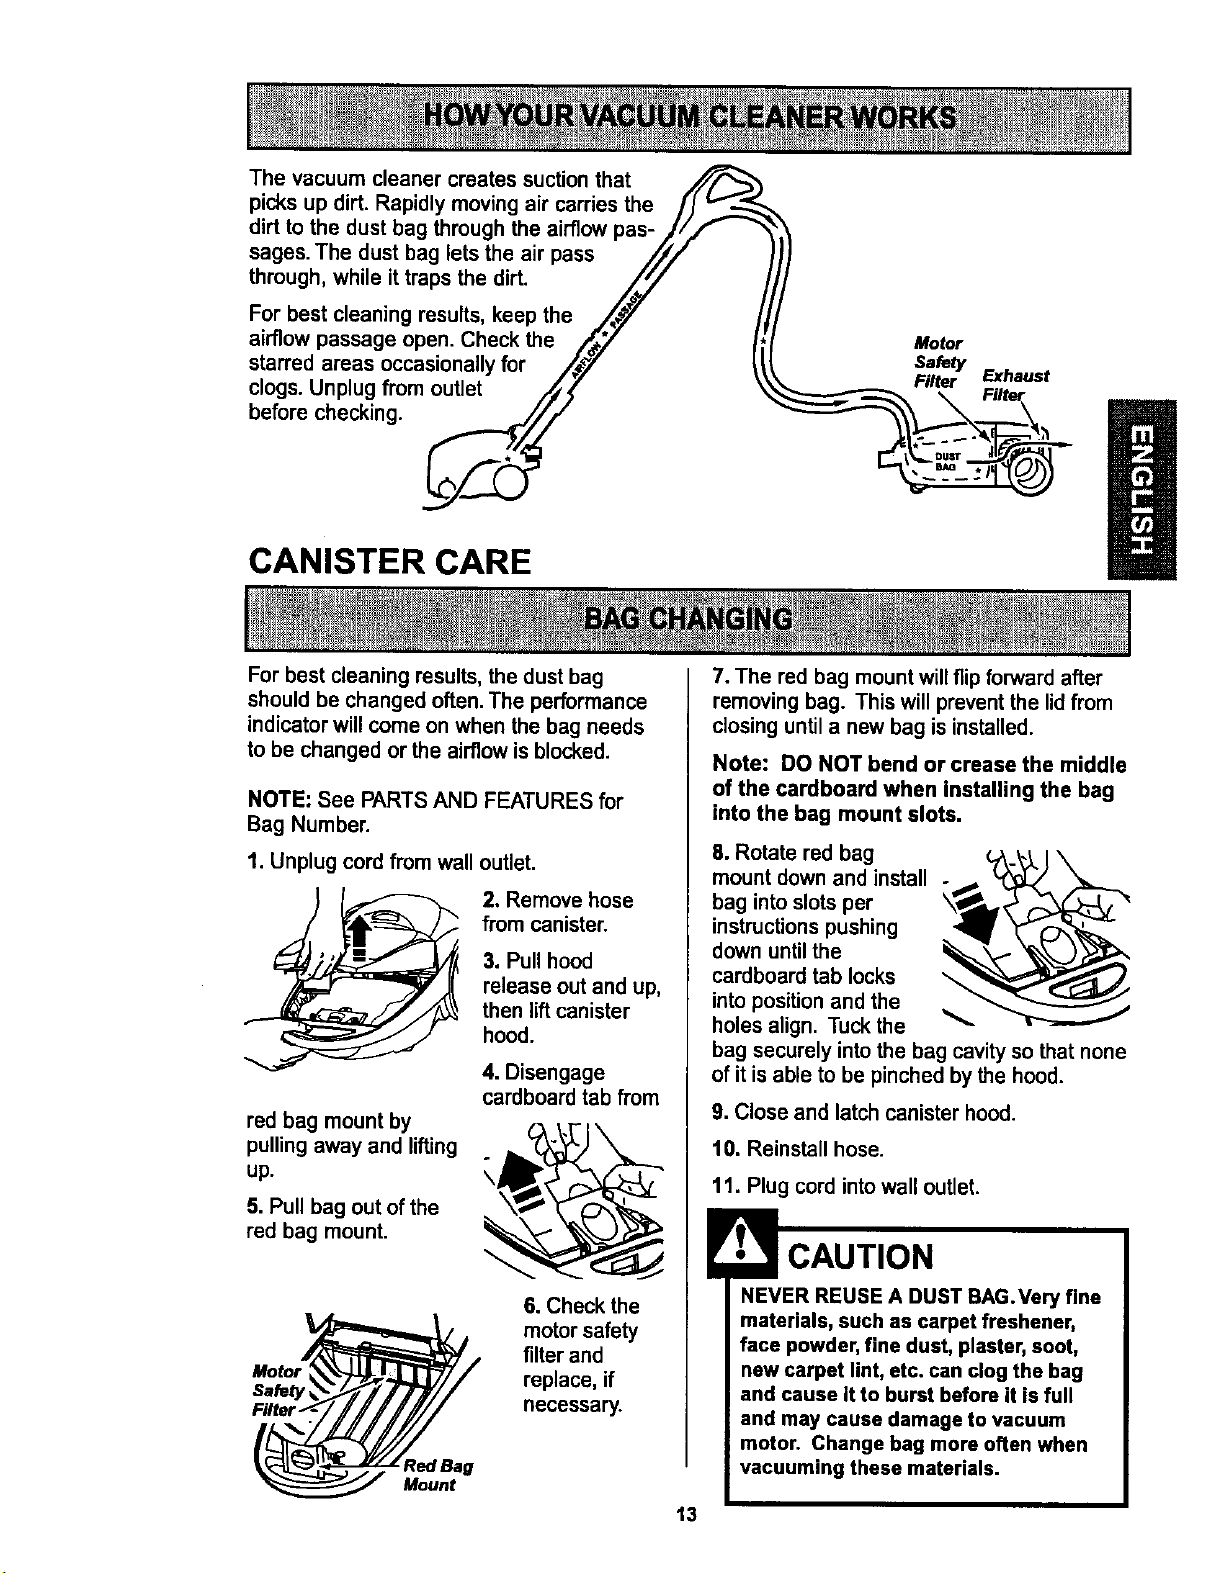
The vacuum cleaner creates suction that
picks up dirt. Rapidly moving air carries the /J
dirt to the dust bag through the airflow pas-/_/_ _'
sages. The dust bag lets the air pass /jr
through, while it traps the dirt. /._
For best cleaning results, keep the .,_'7 /i
airflow passage open. Check the /_y I_
starred areas occasionally for _J/ _
clogs. Unplug from outlet ,,_ ( \
before checking _._
Motor
Safety
Filter Exhaust
%- --:'kW)
CANISTER CARE
Forbest cleaningresults,the dust bag
should be changedoften.The performance
indicatorwill come on when the bag needs
to be changed or the airflowis blocked.
NOTE: See PARTS AND FEATURES for
Bag Number.
1. Unplug cord from wall outlet.
2. Remove hose
from canister.
3. Pullhood
release outand up,
thenliftcanister
hood.
4, Disengage
cardboardtab from
red bag mount by
pulling away and lifting
up.
5. Pull bag out of the
red bag mount.
6. Check the
motor safety
filter and
replace, if
necessary.
Mount
7. The red bag mount will flip forward after
removing bag. This will prevent the lidfrom
closing until a new bag is installed.
Note: DO NOT bend or crease the middle
of the cardboard when installing the bag
into the bag mount slots,
8. Rotate red bag
mount down and install -
bag into slots per
instructions pushing
down until the
cardboard tab locks \
into position and the
holes align. Tuck the
bag securely into the bag cavity so that none
of it is able to be pinched by the hood.
9. Closeand latchcanisterhood.
10. Reinstall hose.
11. Plug cord intowalloutlet.
NEVER REUSE A DUST BAG.Very fine
materials, such as carpet freshener,
face powder, fine dust, plaster, soot,
new carpet lint, etc. can clog the bag
and cause It to burst before it is full
and may cause damage to vacuum
motor. Change bag more often when
vacuuming these materials.
13
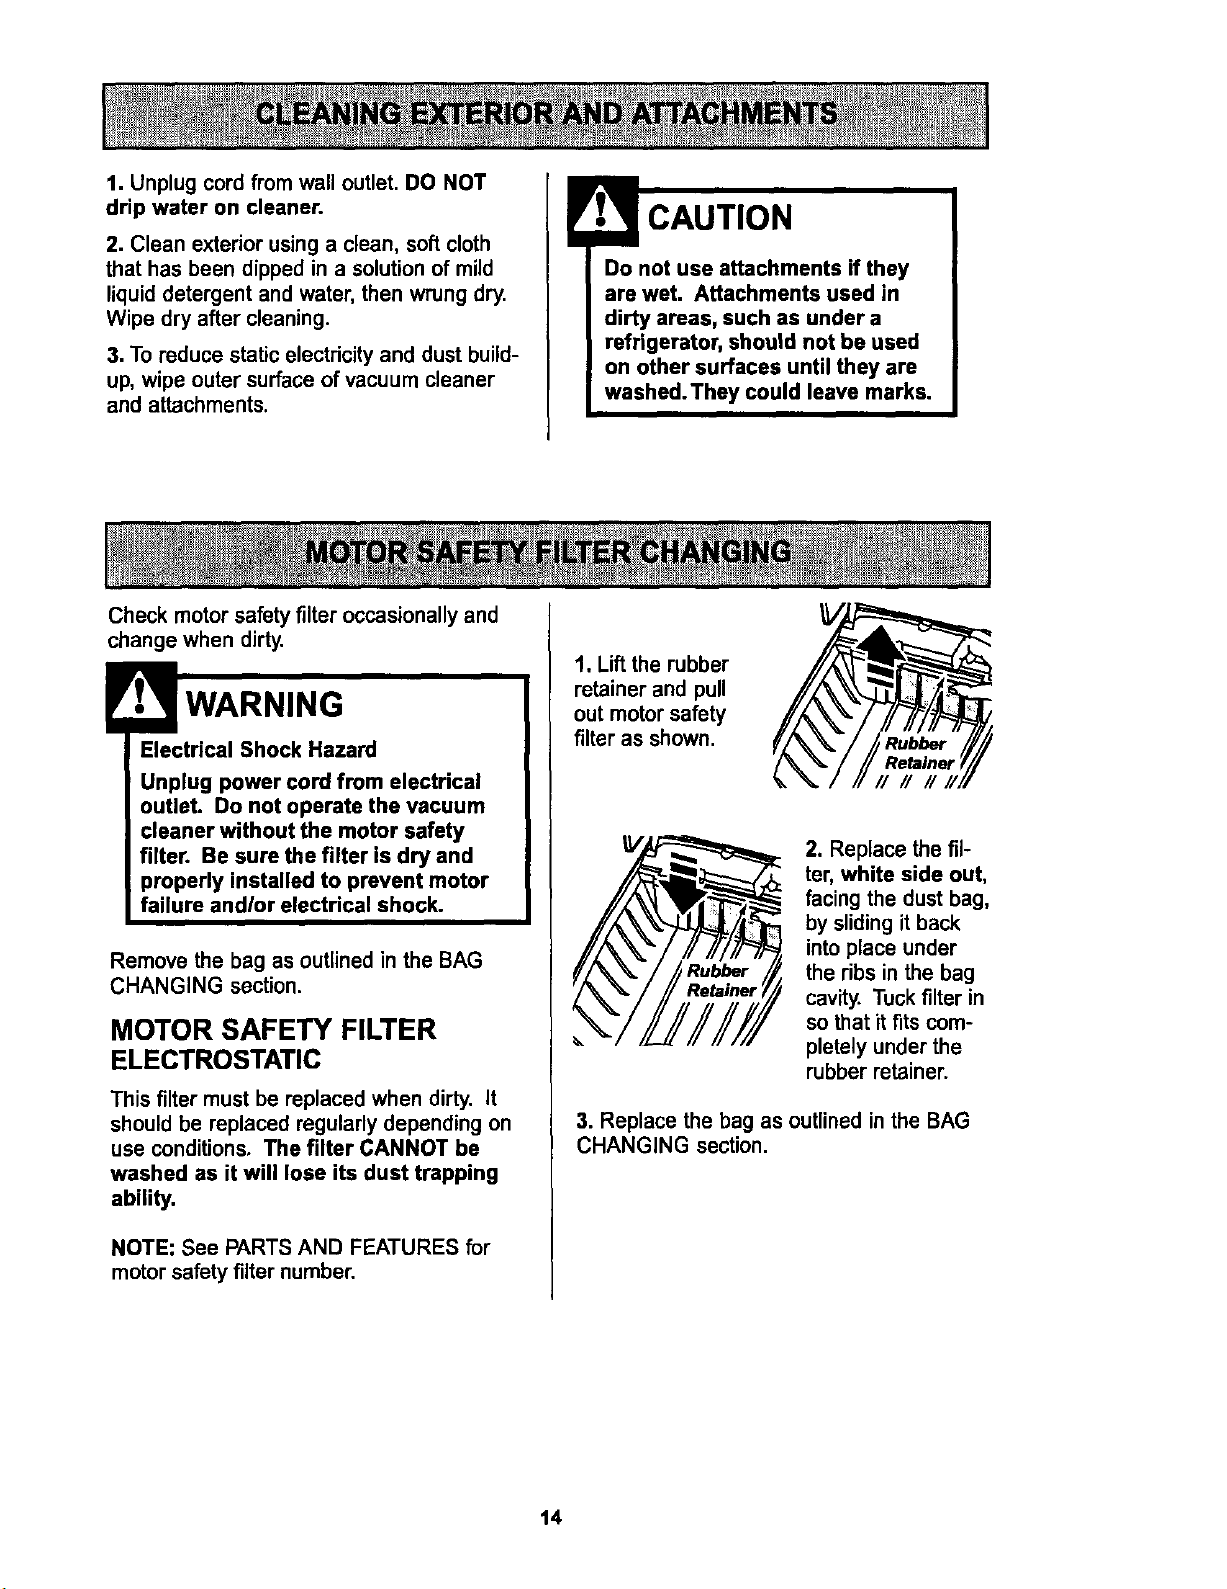
1. Unplug cord from wall outlet. DO NOT
drip water on cleaner.
2. Clean exteriorusinga clean, softcloth
that has been dipped in a solutionof mild
liquiddetergent andwater, then wrung dry.
Wipe dry after cleaning.
3. To reduce static electricity and dust build-
up, wipe outer surfaceof vacuum cleaner
and attachments.
Do not use attachments if they
are wet. Attachments used in
dirty areas, such as under a
refrigerator, should not be used
on other surfaces until they are
washed.They could leave marks.
Check motorsafetyfilter occasionallyand
change when dirty.
Electrical Shock Hazard
Unplug power cord from electrical
outlet. Do not operate the vacuum
cleaner without the motor safety
filter, Be sure the filter is dry and
properly installed to prevent motor
failure and/or electrical shock.
Remove the bag as outlinedin the BAG
CHANGING section.
MOTOR SAFETY FILTER
ELECTROSTATIC
This filter must be replaced when dirty. It
should be replaced regularly depending on
use conditions. The filter CANNOT be
washed as it will lose its dust trapping
ability.
NOTE: See PARTS AND FEATURES for
motor safety filter number.
1. Liftthe rubber
retainer and pull
out motorsafety
filter as shown.
Rubber
Retminer
//////
2. Replace the fil-
ter, white side out,
facing the dust bag,
by sliding it back
into place under
the ribs in the bag
cavity. Tuck filter in
so that it fits com-
pletely under the
rubber retainer.
3. Replace the bag as outlined in the BAG
CHANGING section.
14
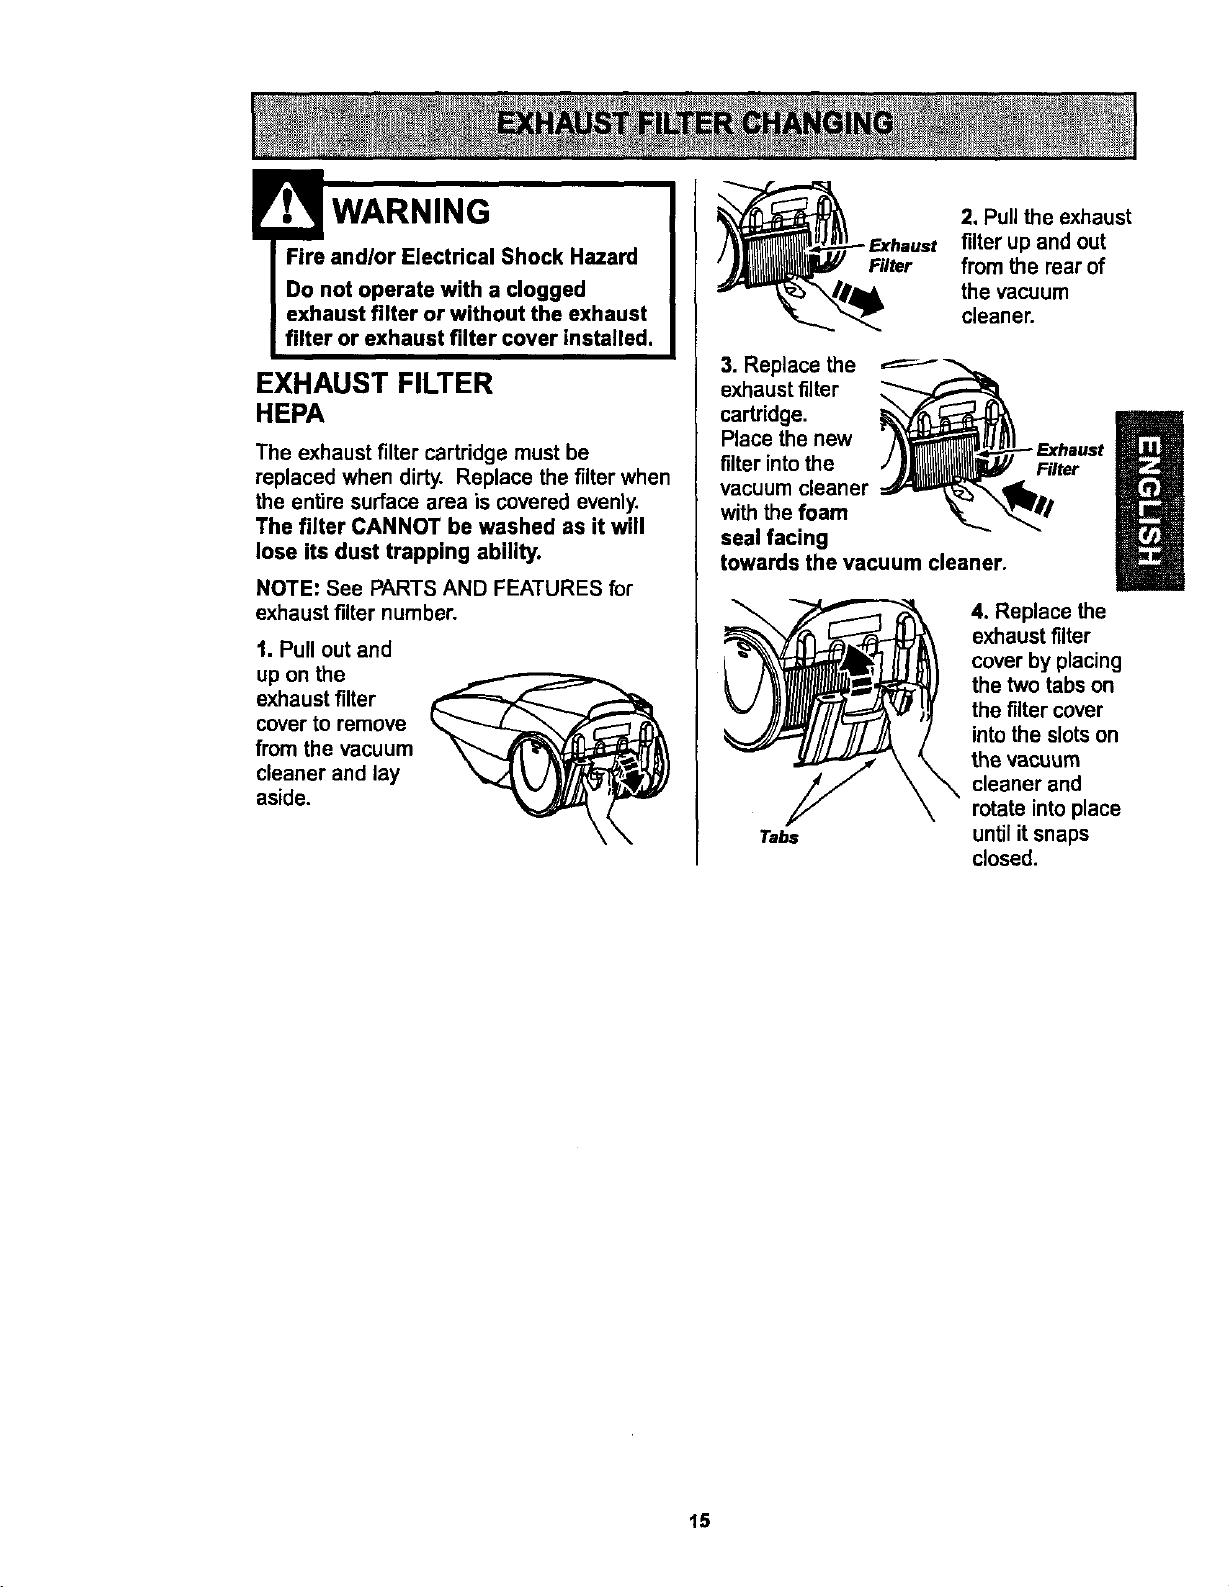
WARNING
Fire andlor Electrical Shock Hazard
Do not operate with a clogged
exhaust filter or without the exhaust
filter or exhaust filter cover installed.
EXHAUST FILTER
HEPA
The exhaust filter cartridge must be
replaced when dirty. Replace the filter when
the entire surface area is covered evenly.
The filter CANNOT be washed as it will
lose its dust trapping ability.
NOTE: See PARTS AND FEATURES for
exhaust filternumber.
t. Pull out and
up on the
exhaust filter
cover to remove
from the vacuum
cleaner and lay
aside.
2. Pull the exhaust
filter up and out
Filter from the rear of
the vacuum
cleaner.
3. Replace the
exhaust filter
cartridge.
Place the new
filter into the
vacuum cleaner
with the foam
seal facing
towards the vacuum cleaner.
Filter
Tabs
4. Replace the
exhaust filter
cover by placing
the two tabs on
the filter cover
into the slots on
the vacuum
cleaner and
rotate into place
until it snaps
closed.
15
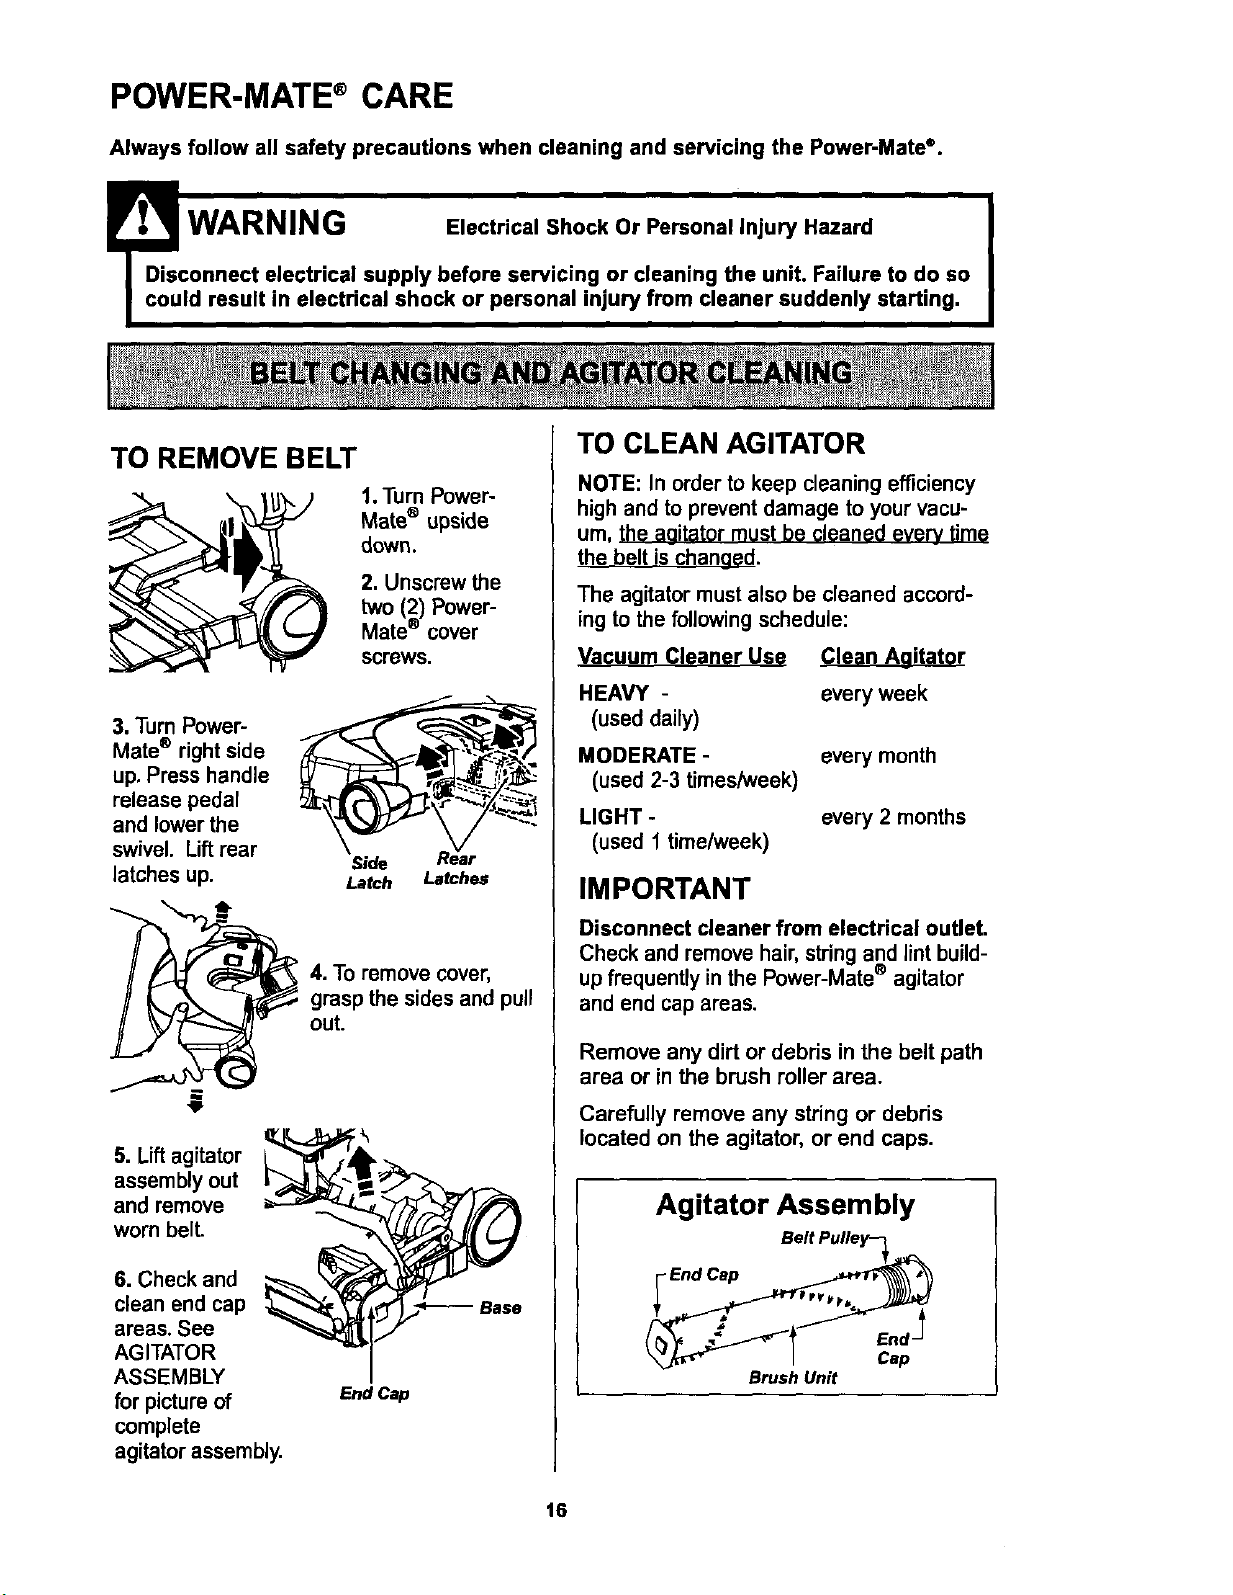
POWER-MATE®CARE
Always follow all safety precautions when cleaning and servicing the Power-Mate".
! 'v, lWARNING Electrical Shock Or Personal Injury Hazard
Disconnect electrical supply before servicing or cleaning the unit. Failure to do so
could result in electrical shock or personal injury from cleaner suddenly starting,
TO REMOVE BELT
1. Turn Power-
Mate ® upside
down.
2. Unscrew the
two (2) Power-
Mate ® cover
screws.
3. Turn Power-
Mate e right side
up, Press handle
release pedal
and lower the
swivel. Lift rear
latches up.
Side
Latch Latches
4. To remove cover,
grasp the sides and pull
out.
5. Lift agitator
assembly out
and remove
worn belt.
6. Check and
clean end cap
areas. See
AGITATOR
ASSEMBLY
for pictureof
complete
agitatorassembly.
End Cap
TO CLEAN AGITATOR
NOTE: In orderto keep cleaning efficiency
highand to preventdamage to yourvacu-
um, the agitatormust be cleaned every_time
the belt ischanged.
The agitatormust also be cleaned accord-
ing to thefollowing schedule:
Vac_uum ClQaner UsQ
HEAVY -
(used daily)
MODERATE -
(used 2-3 times/week)
LIGHT -
(used I time/week)
Clean Agitator
every week
every month
every2months
IMPORTANT
Disconnect cleaner from electrical outlet.
Check and remove hair, string and lint build-
up frequently in the Power-Mate ® agitator
and end cap areas.
Remove any dirt or debris in the belt path
area or in the brush roller area.
Carefully remove any string or debris
located on the agitator, or end caps.
Agitator Assembly
Belt Pulley_
Brush Unit
16
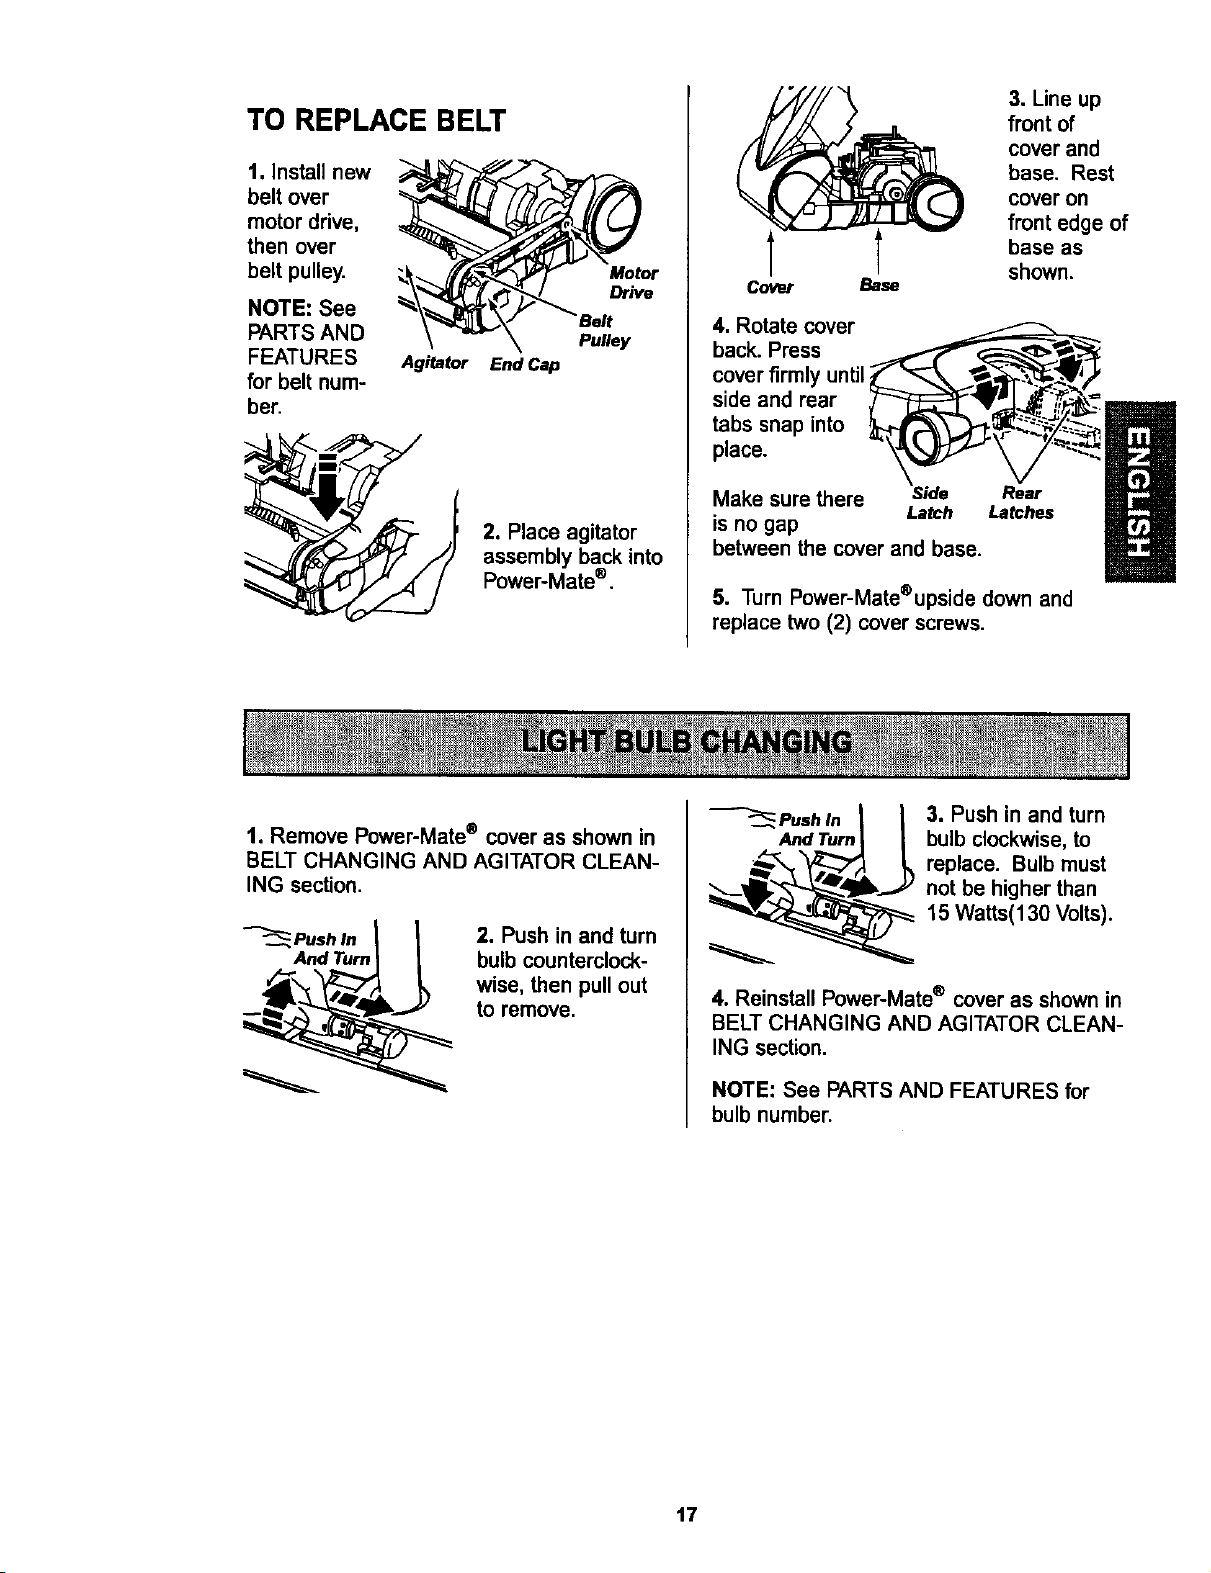
TO REPLACE BELT
1. Installnew
belt over
motor drive,
then over
belt pulley.
NOTE: See
PARTS AND
FEATURES Agitator
for belt num-
ber.
Motor
Drive
Pu//ey
End Cap
2. Place agitator
assembly back into
Power-Mate ®.
Cover
Base
3. Line up
front of
cover and
base. Rest
cover on
front edge of
base as
shown.
4. Rotatecover
back. Press
coverfirmlyuntil
side and rear
tabs snap into
place.
Make sure there Side Rear
is no gap Latch Latches
between the cover and base.
5. TurnPower-Mate®upsidedownand
replacetwo (2) coverscrews.
t. Remove Power-Mate ® cover as shown in
BELT CHANGING AND AGITATOR CLEAN-
ING section.
Push In
And Turn
2. Push in and turn
bulb counterclock-
wise, then pull out
to remove.
Push In
And Turn
3. Push in and turn
bulb clockwise, to
replace. Bulb must
not be higher than
15 Watts(130 Volts).
4. Reinstall Power-Mate ® cover as shown in
BELT CHANGING AND AGITATOR CLEAN-
ING section.
NOTE: See PARTS AND FEATURES for
bulb number.
17
Electrical Shock Or Personal Injury
Hazard
Disconnect electdcal supply before
servicing or cleaning the unit.
Failure to do so could result in elec-
trical shock or personal injury from
cleaner suddenly starting.
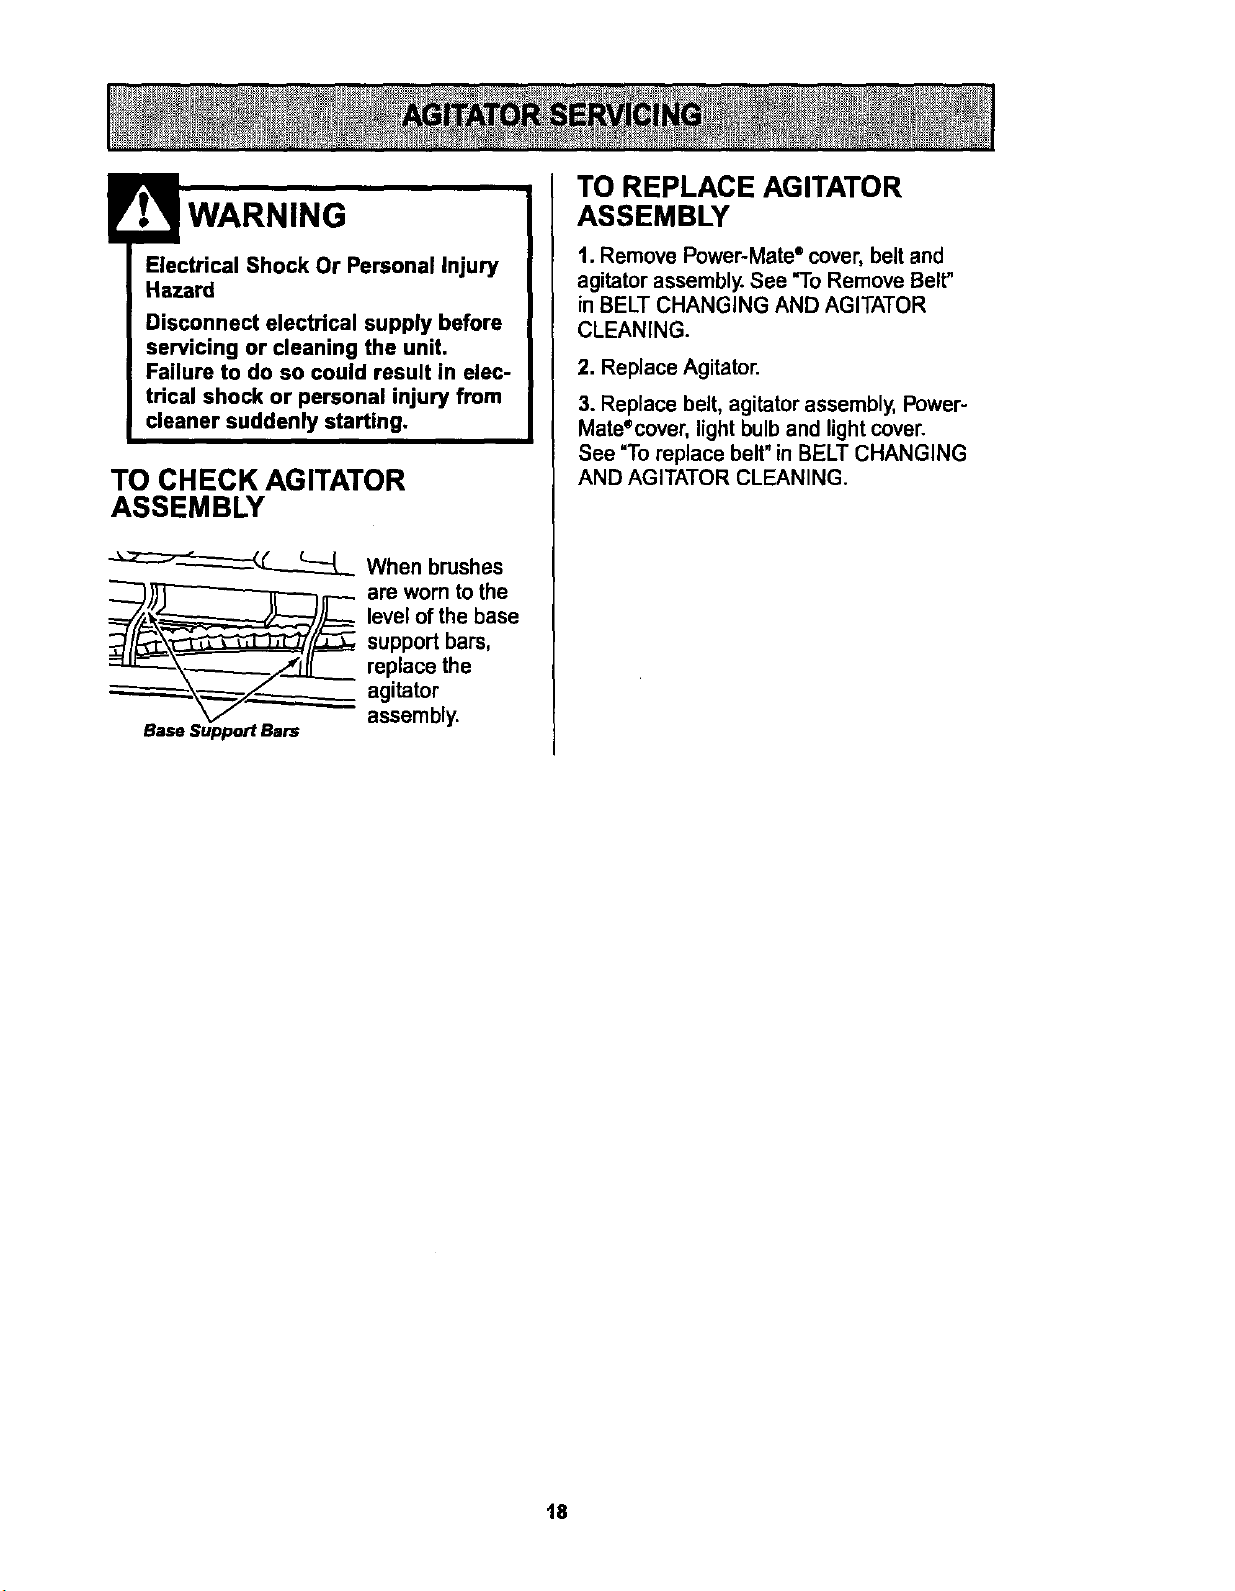
TO CHECK AGITATOR
ASSEMBLY
When brushes
__r_T-_ K---are wern to the
level of the base
support bars,
replace the
agitator
assembly.
Base Support Bars
TO REPLACE AGITATOR
ASSEMBLY
1. Remove Power-Mate ° cover, belt and
agitator assembly. See "To Remove Belt"
in BELT CHANGING AND AGITATOR
CLEANING.
2. Replace Agitator.
3. Replace belt, agitatorassembly, Power-
Mate%over, lightbulb and lightcover.
See "To replace belt"in BELTCHANGING
AND AGITATOR CLEANING.
18
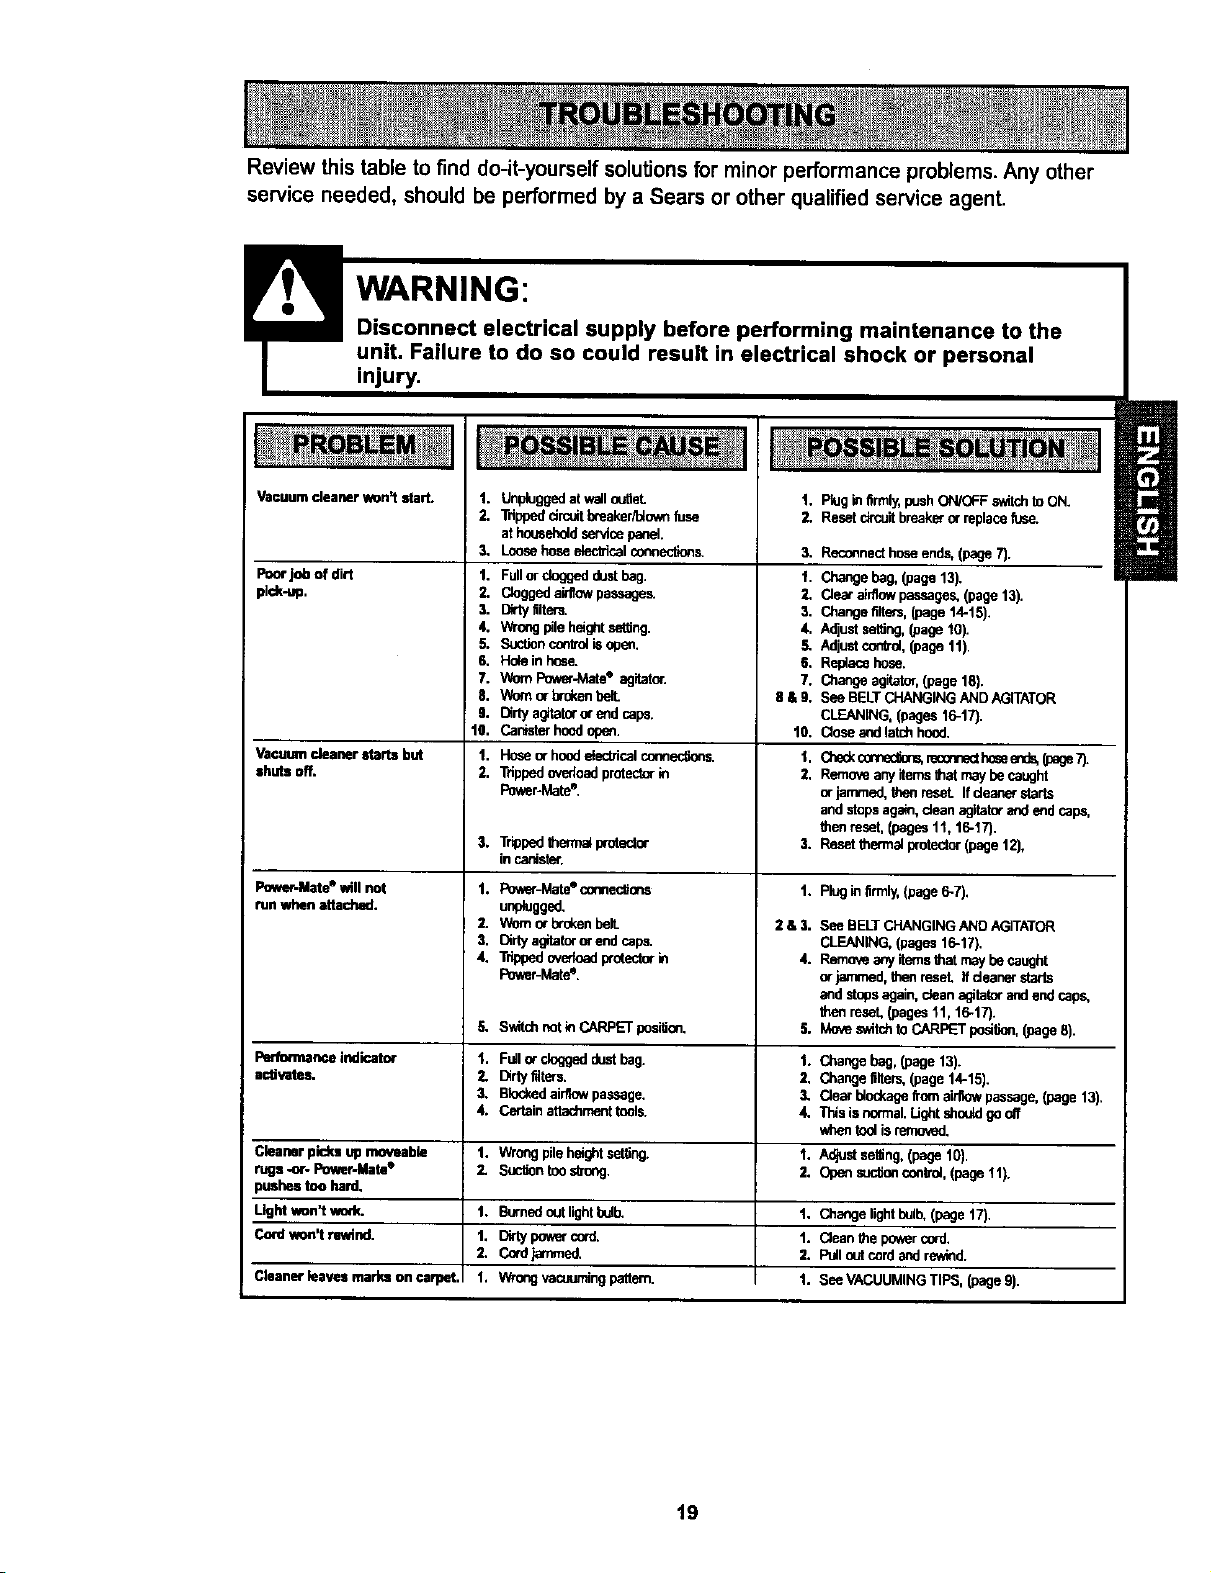
Review thistable to find do-it-yourselfsolutionsfor minorperformanceproblems.Any other
service needed, should be performedby a Sears or other qualifiedservice agent.
WARNING:
Disconnect electrical supply before performing maintenance to the
unit. Failure to do so could result in electrical shock or personal
injury.
Vacuumcleanerwon=tstart. 1.
2,
3,
Poorjob of dirt 1.
pich-up. 2.
Vacuum cleaner starts but
shuts off.
Unpluggedatwalloutlet.
TdppeddrcuitIxeaker/'dolmfuse
at householdservicepanel.
Loosehoseeiec_cel conneotinns.
Fullorcloggeddustbag.
C_aggedair_owpassages.
3. _ itlters.
4. Wrongpileheightsetgag.
5. S_-'tJoncootrotisopen.
6, Heiein hose.
7. WornP_,_r-Motee agitator.
8, Wornor brd_enbell
g. Dirtyagitotoror endcaps.
10, Canisterhoodopen.
1, Hoseor hoodelectricalcomecbens.
2. Trippedovedoadprotectorin
Power-Mate*.
3. Trlppedthermalprotectm
in canister.
Power-Mute° will not 1.
run whenaltached.
2.
3.
4,
5,
Pm/ornianceindicator 1.
aotJvatos. 2.
3.
4.
Cleanerpicksup moveable 1.
rugs-or-Power-Mate* 2.
bushostoo hard,
Lkjht v_n't vmrk. 1.
Card_'t nm_nd. 1.
2.
Cleanerleaves marks on ca_Nt.I 1.
Pov_'-Mate° cennec_ons
unplugged.
Wornor brekenbell
Dirtyagitatororendcabe.
Tripped_f_oed _oteotor in
Powar-Mate'.
t. Rug in firmly,pushON/OFFswitchto ON.
2. Resetcircuitbreakerorreplacefuse.
3, Reconnecthoseends,(page7).
t. Changebeg, (page13).
2. Cleataidtowpassages.(page13).
3. Chaagefiltes, (page14-15).
4. AdjustsotHag,(page10).
5. Adjustcon_ol,(page 11)
6. Replacehose.
7. Changeagitator,(page18).
it & g. See BELTCHANGINGANDAGITATOR
CLEANING,(pages16-17).
10. C_oseandlatchhood.
t.
2,
3.
1.
2&3.
4.
o_ _'n_n_ reo0rr__seen_(puge7).
Removeanyitemsthat maybecaught
orjammed,thenreset. If deane_clarts
andstopsagain,dean agitatorandend caps,
thenreset,(pages11, 16-17).
Resetthenneiprotector(page12),
Pluginfirmly,(page6-7),
See BELTCHANGINGANDAGITATOR
CLEANING,(pages16-17).
Rornoveamyitemsthatmaybecaught
or jammed,then reseL If deanerclarts
and clopsagain,dean agitatorandendcaps,
thenreset,(pages'il, 16-17).
Mo_es_tch toCARPETgedtie_, (pagee).
SwitchnotinCARPETpusi_on. 5.
Fuitor degged dustbeg. 1. Changebag, (page13).
Dirty filters. 2, Changefilters,(page t4-15).
Blockedairflowpassage. 3. Clearblod_agefromairflowpassage,(page13).
Certainattachmenttools. 4. Thisisnormei.Light_ou_d gond
whentoei isremoved.
Wrongpileheightseffing, t. Ao]ustsetting,(page 10).
SuclJontoosbong. 2. Opensucbenconb_ei,(psge11).
Burnedoutlightbulb. 1. Changelightbulb,(page17).
Dirty gewerca_l. 1. Cleanthe gewercoed.
ConJ_mmnd. 2. Pulloutcordandrewind.
Wrongvacuundngpottom. J I. SeeVACUUMINGTIPS. (page9).
19
Antes de usar su aspiradora nueva ..... 1
Garantia de la aspiradora de Kenmore .. 1
Instrucciones importantes de
seguridad ............................ 2
Piezas y caractedsticas ............... 3-4
Instrucciones de
ensamblamiento ................. 5-6
Almacenaje del Power-mate Jr.® ....... 6
Instrucciones de operati6n ........... 7
Paracornenzar ....................... 7
Sugerencias para aspirar ............... 8
Sugerenciassobre el ajustede nivelde
pelodela alfombra .................... 8
Accesorios........................... 9
Uso de los accesodos................. 10
Caracterisf_casde rendimiento ........ 10-11
Funcionamientode su aspimdom ......... 12
Cuidado del recept_culo .............. 12
Cambiode la balsa ................... 12
Limpiezadel exteriory de losaccesorios... 13
Cambiodelfiltro de seguridaddelmotor ... 13
Cambiodelfiltro deescape ............. 14
Cuidado de la Power-Mate ® ............ 15
Carnbiode la correay limpieza
del agitador....................... 15.16
Cambiodela bombilla ................. 16
Cuidadodel agitador .................. 17
Reconocimiento de problemas ......... 18
Informacibn de
assistancia o servicio ..... Poster;orCubierta
favor lea estaguiaquele ayudaraa assemblary operarsu aspiradoranuevade Kenmoreenuna manera
m_sseguray effeclJva.
Paramas informaci6nacercadel cuidadoy operaci6ndeesta aspirador,flamea su tiendaSearsmas cercana.
Cuandoprequnteporinformaci_nustednecisitar_elnt_merocompletodesedey modetode la aspiradoraque
est_ Iocadoen la placade losn6merosdemodeloy serie.
Use elespaciode abajopara registrarelnt_merode modeloy serieparasunueva aspiradoradeKenmoce.
Nt_merodeModelo_
Nt_memde Serie.
Fechade Compra
m
Matengaestelibro y sureciboen ulugar seguropara referenciasfuturas. N
I
Estagarantiaespot unafio desdela fecha de compra,e incluyesolamenteelusodela aspiradoraen hogares
pdvados.Duranteela_ode garantia,cuandolaaspiradoraes operaday mantenidade acuerdoal manualde
instruccionesdeldue_o,Searsreparar_cualquierdefectoen materialesofabdcacibn libredecargo.
GARAN'I1AUMITADADE UN N;IO DE LAASPIRADORAKENMORE
Esta garantiaexcluyelas bo_sasdecoiecci6n,correas,lampadllas,y filtros, las cualessonpartesgastablesque
se detedoran cone!usonormal.
Para el servicio de garantia,rstome esta aspiradora al Centro deServicio Sears m;tscercanoen los
Estados Unidos.
Estagarantia se aplicasolamentemienf_asest_producto estd enusoenlosEstadosUnidos.Estagamntia le
daa ustedderechoslegales esperJficos,y ustedpuedetenertambidnotrosderechosloscualesvadande
estadoa estado.
Sears, Roebuck and Co., 1:)/8'17WA, HoffmanEstates,IL 60179
Suseguridadesmuyimportanteparanosotros.Parareducirelriesgodeincendio,
choqueel_ctrico,lesi6ncorporalo dafiosalutilizarsuaspiradora,actdedeacuerdo
conprecaucionesb_sicasde seguHdad, entre elias:
Lea les instruccioneseneste manualantesde
armaro usar suaspiradora.
Use suaspiradorat_nicamenteen laforma
descritaen este manual.Usa t_nicamentecon
accasoriosrecomendadosporSears.
Desconecte el cord6n el_ctricoantesde
componero limpiarel drea del cepillo.De Io
contrario, el cepillopodrfaarrancarde form
imprevistao podriaproducirseun choque
electrico.
No abandonela aspiradoracuandoestd
conectada. Descondctela cuandono la estd
usandoy antesde dade servicio.
Pars reducirel riesgode choqueel6ctrico,no
use su aspiradoraal aim Ubreni sobre
superficiesmojadas.
No permitaqua sea utilizadacomojuguate.
Se requieretener mayorcuidadocuandosea
ub]izadaen la proximidadde nifioso por
nines.
No use la aspiradorasi elcord6n o el enchufe
estddar_ado.Si la aspiradorano estd
funcionando adecuadamenteosi se ha
dejadocaer, est_ dafiada, se ha dejado
expuestaa la intemperieo se ha dejadocaer
en agua,devu61valaaun Centrode servicio
deSears.
No hale ni transportela espiradora porel
cord6n;no use elcord6n como mango;no
cierrepuertassobreel cord6n; no hale el
cord6nsobrerebordesagudos niesquinas.
No pasela espiradora sobreel cord6n.
Mantengael cord6n alejado desuperficies
calientes.
No desconectela aspiradoratirandodel
cord6nel6ctrico.Para desconectada,hale el
enchufe,no el cord6n.
No toquela aspiradorani el enchufecon las
manosmojadas.
No coloqueobjetosen lasaberturas.
No utilicelaaspiradorasialgunaabertura
astdbloqueada;mantdngalafibrede polvo,
Apague todoslos controles antesde
desenchufar.
Tenga cuidado especial al utilizarla
aspiradora en escalones.No la coloque sobre
sillas,mesas,etc. Mant_ngelaen el piso.
No use Isaspiradorapars aspirarI(quidos
inflamableso combustibles(gasolina,I[quidos
para limpieza,perfumes,etc.)ni la usean
lugaresdondedstos podrfanestarpresentes.
Losvaporesde estassustanciespuedencrear
un peligrode incendioo explosi6n.
No levanteningunacosa qua se est_
qiuemandoo emitiendohumo,como
garrillos,carillos o cenizascalientes.
No use laaspiradora sin tenerinstaladala
bolsaparapolvoy/o losflltros.
Cambia siempre la bolsapara polvodespuds
de aspirarlimpiadoresde alfombraso
desodorantes,talcosy polvosfinos.Estos
productosatescanlabolsa, reducenelflujode
aire y puedencausar que dsta se rompa.Si
no cambiala bolsapodrfaocasionardafio
permanentea laaspiradora.
No use laaspiradorapara levantar objetos
agudos,juguetespeque_os,elfileres,
sujetapapeles,etc.Podrian dar_arla
aspiradorao labolsapara polvo.
No operasin el flltrode escapeni la cubierta
del filtrode escapeinstalados.
La manguera contiene cables el6ctricos.No
la usecuandoestddafiada, cortada, o
perforada.Reemplacesiest_ cortada o
desgestada.No levante objetosafilados.
Siempre apagu_y desconectela aspiradora
antesde conectar o desconectarla manguera,
Handi-MataJr.@ (siaplicabla),o laboquilla.
Sujete el enchufecon la manoal enrollarel
cord6neldctrico. Para desconectada,haleen
enchufe,no elcord6n.
Usted es responsablede asegurarqua su
aspiradorano sea utilizadaporninguna
personaqua nopueda manejada
correctamente.
GUARDE ESTAS INSTRUCClONES
El armado y uso seguro de su aspiradora son su responsabilidad. Esta aspiradora ha sido
disefiada exclusivamente para usedomdstico. La aspiradoradeberd almacenarse en un ugar
seco yen el interior. Lea este Manual del propietario detenidamente, pues contiene
informaci6n importante sobre se_]uddad y uso. Esta quia contiene informaci6n sobre
seguridad debajo desimbolosde aavertiencla cuidado.
2

Esimportanteconocerlaspiezasycaracteds_casdesuaspiradoraparaasegurarsuusoadecuadoyseguro,
Examfnelasantesdeusarsuaspiradora.
Objeto PiezaN°. PiezaN°.
enEUA enCanad&
Bombilladefarol 20-5240 20-40600
Correa 20-5218 20-40118
Suje_dordel
cord6n yel
Tubo
superior----D
Disposidvo
giratorlo
delmanga
Sujetador
delcord6n--.._
Pedal de Ilberaci6n
r_pida del tubo
(No se muestra_._
N_meros de serie del
modelo Power-Mate m
Pedal de selecci6n
de nivel de pelo
de la affombra
Pedal de
liberaci6n
Cord6n el_ctrico
de Power-Mate _
_____ eSUje"ador del
cord6n y el
nchuh)
Power-Mate®
de pelo de la alfombra
sobrecargas
BorOn de
restauraci6n "Reset"
'Limpiador de orillas
(No se muestra)
3
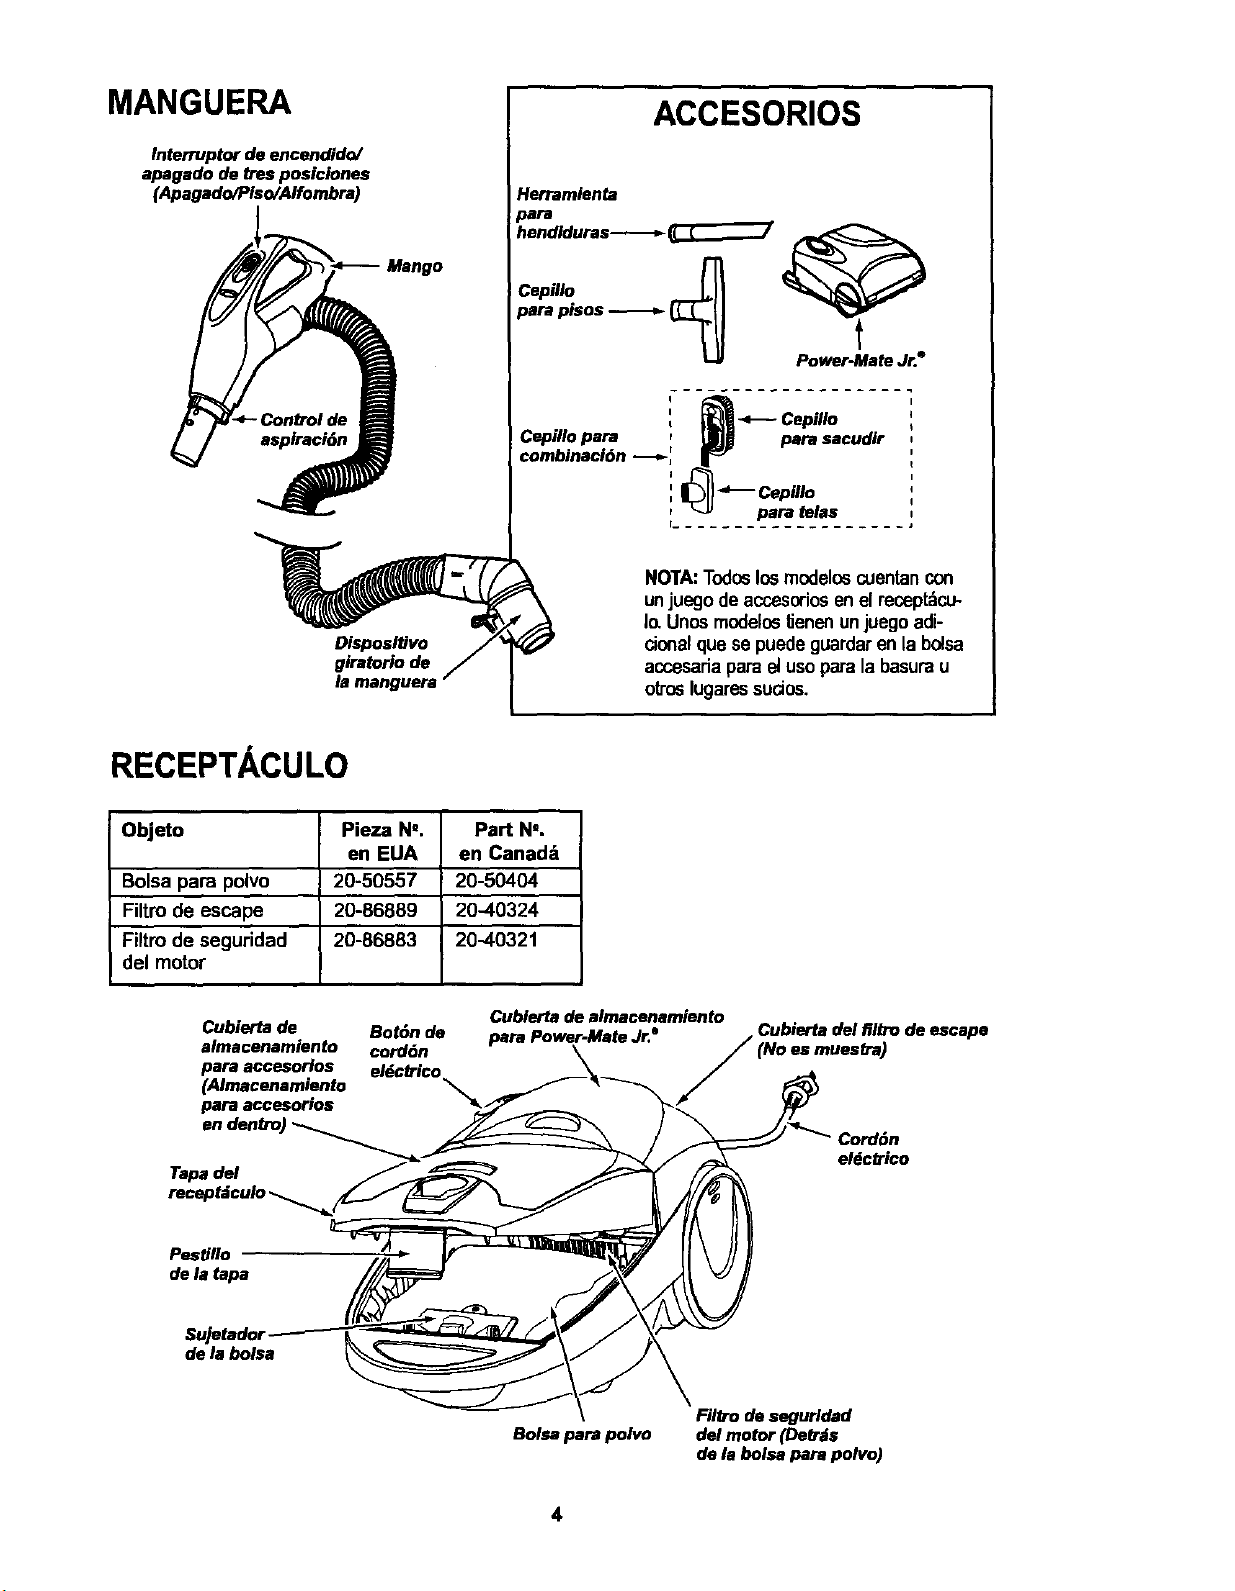
MANGUERA
Interruptor de encendido/
apagado de tres posiciones
(Apagado/Plso/Alfombra)
Mango
ACCESORIOS
Herramienta
_ <--- Cepillo
Cepillo para _ para sacudir
combinaci6n -_ _ _ Cepillo
_.__u para telas ....
Disposltivo
glratoriode
NOTA:Todoslosmodeloscuentancon
unjuegode accesoriosen elreceptdcu-
Io.Unosmodelos _enen unjuegoadi-
cionalque se puedeguardarenla bolsa
accesariapara elusopara labasurau
otroslugaressudos.
RECEPTACULO
Objeto Pieza N,. Part No.
en EUA en Canad_
Bolsa para polVo 20-50557 20-50404
Filtro de escape 20-86889 20-40324
Filtro de seguridad 20-88883 20-40321
del motor
Cubierta de
almacenamiento
para accesorios
(Almacenamiento
para accesorios
Cubierta de almacenamiento
Bot6n de i_ra Power-Mate Jr.e
cord6n
eld,ctrico ..._ .
Cubierta del filtro de escape
Tapa del
receptdculo _..._
Pestlllo
de la tapa
de la bolsa
Bolsapa_po_o
Filtro de segurldad
del motor (Debts
de la bolsa para polvo)
4

Pot'favorpongaespecialatend6na dstosrecuadrosconalertadedesgo.Advertencia:Este
informad6nlealertarddelpeligrodefiJego,choqueselectricos,quemadasylesianes. Cuidado:
Esteinformad6nlealertarade peligmscomolesionesy daSosdepropiedad.
ADVERTENCIA
Peligrode choque eldctdco
No conectela aspiradora hastaqua termine
dearmada.De Io contrario podriacausar
unchoque al_ctdco o lesi6n corporal.
Antesdearmarla aspiradora,chequeela LISTA
DE EMBALAJEen lacubiertaseparadade la Lista
dePartesparaReparaci6n. Useesta listaparaveri-
ficar queha recibidotodaslascompanentesdesu
nuevaaspiradoraKenmore.
TUBOS
Una lostubos
deslizdndoloshasta
que elbot6nquede
fijoen pesid6n. Gireel
bot6ndeltubohada la
zonaranuradadeldis-
positivogiratoriodel
tubo.
EldisposilJvogimtorio
le permitegirarel
mangohada la
izquierdaparalimpiar
mejordebajodelos
mueblesbajos.
B°t6n_---__ _
SuJetad°r _ l
del cord6n "_
POWER-MATE®
1.Introduzcalostubosenla Power-Mate"hastaque
elbotdndel tuboquedefijo enposid6n.
2. Conecteel
enchufey corddnde
la Power-Mate"
elevada comose muestra,
NO LOfuerce. El
dreaelevadadel
enchufefiene que
estarhaciala mano.
3,Assegureel
cordbndentrodel
sujetadordelcord6n
en elgiratoriodela
hac_adentr°_ mango.
Pararetirar: Piseelpedaldeliberad6nrdpidadel
tuboy lJredeltuboshaciaarriba.arriba.
5
Bot6n
de cierre ---_
m
m
-- Botdndel
tubo
4k
m
m
giratorio
del mango
inferior
_!" tubo
bPedalde

RECEPTACULO
1, Abralatapadel recept_culo.
2. Examinela balsaparapolvoesteinstaladocorrec-
tamante.Consultelasinstruccionesdeinstaladdnen
la CAMBIODE LA BOLSA.
3. Examineelfiltrodeseguddaddel motoreste insta-
ladocorrectamante.Consultelas instrucdonesde
instalaci&'len CAMBIODEL FILTRODE SEGURI-
DAD DEL MOTOR.
LA TAPAY LA CUBIERTA
Es normalque latapadel receptdculo se desprenda
al serabiertamdsdeIo necesario.Parecolocarnue-
vamentelatapa, alineelasranuresde labisagra,in-
sL'rtelasy cierrela tapa.
! CUIDADO
Nunca dabe abrir la capuchadel contenedor
estando latapa abierta. As| se evitar6 da_os
a lacapucha del contanador ylo a latapa.
MANNGUERA
1.Alineelapestafiade
sujed6ndela manguera
y la ranuredela cubier-
ta del receptdculoe
introduzcalamanguera
en elrecept_culohasta
que quede fija enposi-
ci6n.
Para retirar: Levanteel
pestillo de la manguere
y tirede lamanguera.
Pestal_,
sujeci6n
dela
manguera
Ranura
Bot6nde
Bot6n de
liberaci6n
r_pida del
2. Introduzcael
mangoen eltubo
hastaque elbot6n
quedeen posici6n.
AsegOresede que la
rnanguerano est6
torcida.
Para retirar: Oprima
m el botbndeliberadbn
rdpidadelmango
paraliberarel mango
y tire del mangohacia
arfiba.
PareGuardar:Paraprevenirlapreci_nde lamangua
mientresse guarda,desunaiamanguadeltubode la
aspiradore. Guardelamaguaan unaposicibn
enrolladayflojamentedetalmaneraquela tapadela
mangua nose estire.
Estd aspiradora esta equipada con almacdn
a bordo para el accesorio POWER- MATE
JR.®.
Para instalar:
Abra la cubierta de almacenaje del Power-
Mate Jr.°. Inserte el Power-Mate Jr.", pre-
si6nelo en su lugar hacia abajo, y cierre la
cubierta con seguridad.
Para quitar:
Abra la eubierta de almacenaje. Levante el
Power-Mate Jr." de su lugar utilicelo como
sea necesario (v6ase ACCESORIOS y
USO DE ACCESORIOS).
Almacenamiento
para Power-Mate Jr.=
INSTRUCClONES DE OPERATION
Peligrode leai6n personaly da6o al
producto
• NO enchufe la aspiradora si el
interruptor est4 en la posici6n ON.
Podda causar lesi6n personal o daRo
al praducta.
• El cordbn el6ctrico se mueve
r_pidamente durante a] anrollamiento.
Mantenga alejados a los niRosy
asagure espacio libra suficiante para
evitar ]asionespersonales alenmllar
el cord6n.
• NO use los anchufes Iocalizados sobre
los mueblae. Los objetos cercanos
podHan resuItar daRados,
Bot6n
del cord6n
1,Tiredel cord6n
parasacadode]
receptdculohasta
tenorlaIongitud
deseada.El cor-
d6nno se enro-
Ilardhastaque
optimaelbot6n
paraenrollado.
NOTA:Pararedudreldesgode choqueeldcf_ico,
estaaspiradoracuentaconuna davijapoladzada,
unodeloscontactosesrodsanchoque elotto.La
clavijas61opuedeintrodudrsedeuna maneraenel
enchufe.Siladavija nocabebienenel enchufe,
invi_rtala.Si at_nno cabe,Ilamea uneleclricista
paraque instaleunenchufecorrecto.Noalterela
davijade ningunamanera.
2. Conecte el cord6nel_ctricopoladzado enun
enchufede 120voltJosque se encuenb'ecercadel
piso.
Paraenrollar: desco-
nectelaaspiradora.
Sujeteelenchufe
mientrasenrollaelcor-
d6nparaimpedirda_o
olesi6n corporalpotel
movimientodelcor-
d_. Oprimael contrd
parabotch elcord6n
el_c_ico conla mano
oconelpie,
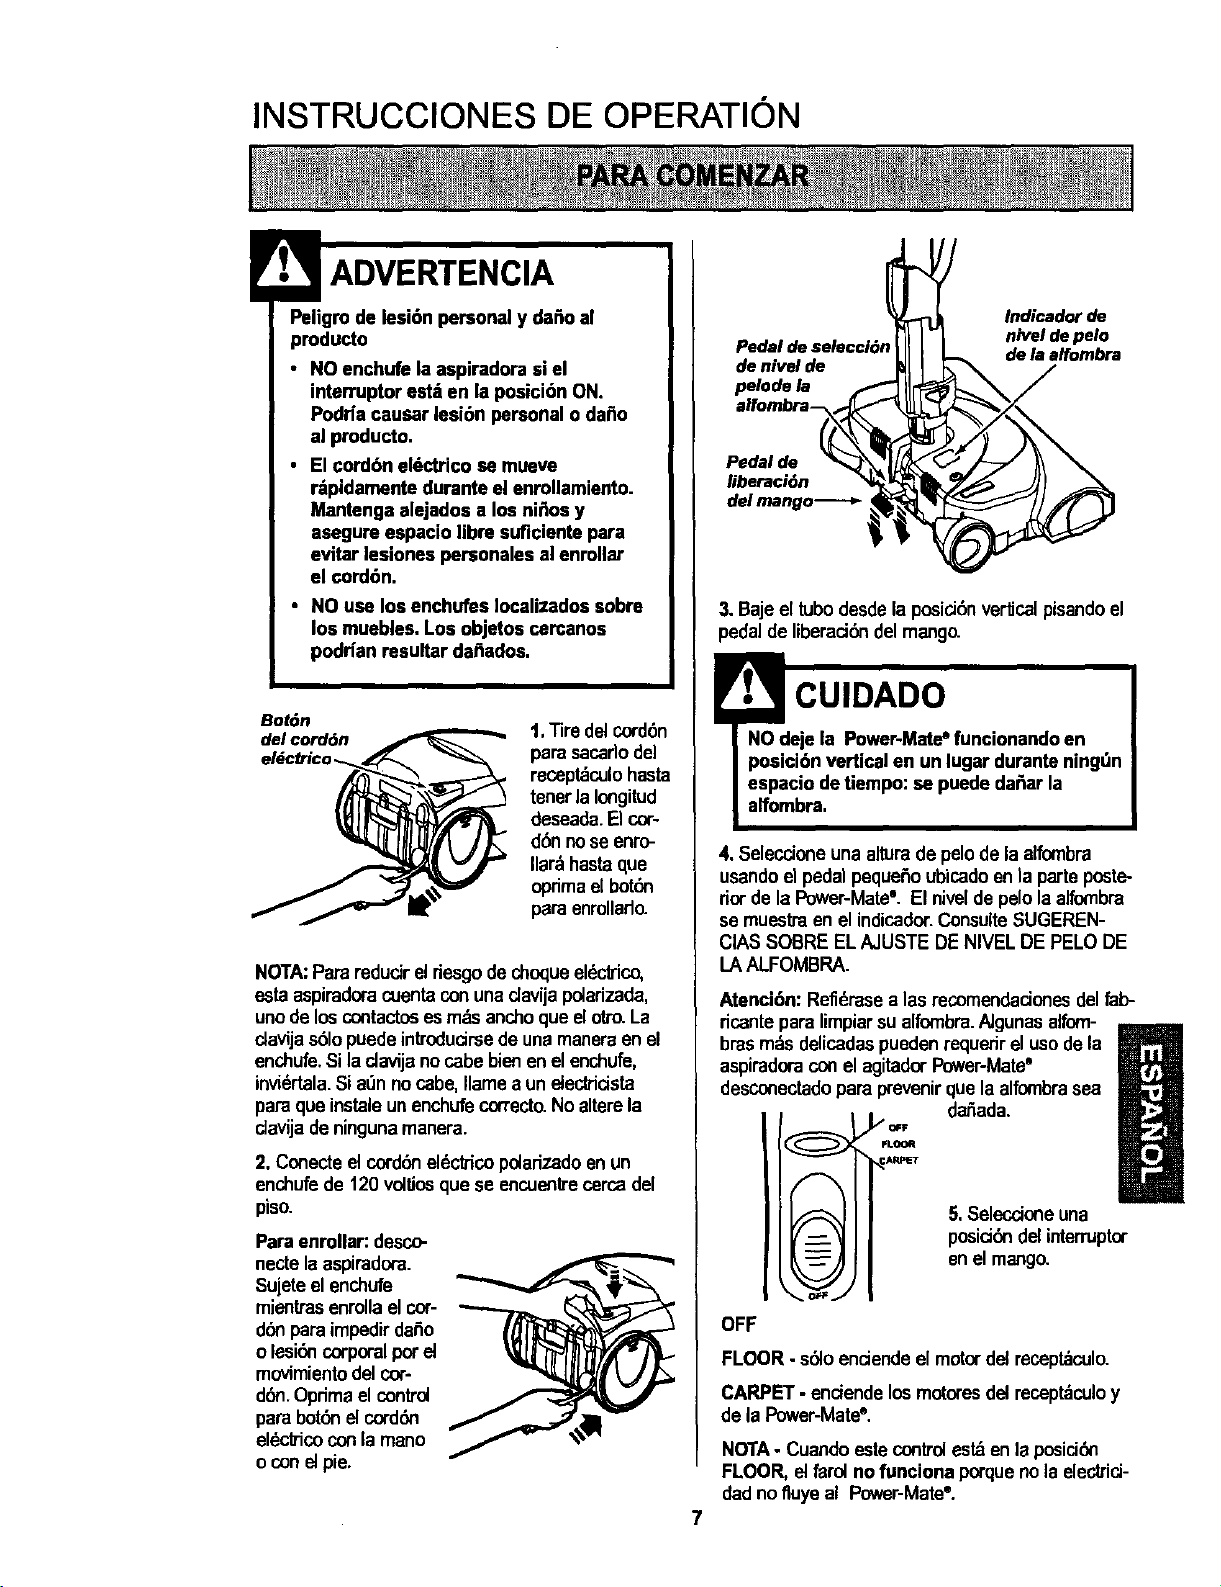
Pedaldeselecci6n_
denivelde HI I
pelode la _,_ _11r4_
alrombra _ lllll"
Iiberaci6n "_ _]_
del mango-_--_ _
/
Indicadorde
niveldepelo
delaalfombra
3. Bajeel tubodesde la posidb'l verlJcalpisandoel
pedal de liberad6n del mango.
p cu,o oo
NOdeje la Power-Mate° funcionandoen
posici6n verticalen un lugar durante ningt_n
espacio detiempo:se puededa6ar la
alfombra.
4. Seleccione una alturade pelode la alfombra
usandoelpedal pequeSoubicadoenla parleposte-
riorde la Power-Mate'. El niveldepelolaalfombra
se muestraen el indicador.ConsulteSUGEREN-
CIASSOBRE ELAJUSTE DENIVELDE PELODE
LA ALFOMBRA.
Atenci6n: Refidrasealas recomendacionesdel lab-
dcante para limpiarsu alfombra,hJgunasalfom-
brasm_sdelicadas puedenrequerirel usodela
aspiradoraconel agitadorPower-Mate"
desconectadopara prevanirquela alfombrasea
I/OFF da_ada.
FLOOR
ARPET
r
OFF
U
5.Selecdone una
posid6n delinterruptor
en el mango.
FLOOR- s61oendende el motorde{recept_culo.
CARPET- enciendelosmotoresdelrecept_culoy
de la Power-Mate'.
NOTA- Cuandoestecontrolestdenla posid6_'_
FLOOR, el farol no funciona porque nola electrid-
dadnofluyeal Power-Mate'.

Eetilodelimpiezasugerido.
Paraobtenerla mejoracci_ delimpiezase reco-
miendaempujarla Power-Mate®en direcci6ndirec-
tamenteopuestaa ustedy jalarlaen linearecta.AI
finalde cadapasadaderegreso,cambiela direc-
ci(_ de laPower-Mate®hacialasiguientesecci6na
limpiar.Contint_eas[a travdsdetodala alfombrade
una maneralentay deslizante.
NOTA:las pasa-
dasr_pidasy jalo-
nadasnoIogran
una limpieza com-
pleta,
El disposi{_vogiratorio
de la manguerapermi-
te que dsta giresinne-
cesidaddemoverel
recept_culo.Estoes
muyOtilpara limpiaren
dreas pequefias.Ase-
gt_resedeque laman-
gueranoest_ torcida
antesdejalarel recept_culo.
Peligm de lesi6n personal y da6o al
producto
Tenga cuidadosi el Power-Mat_®y la
manguera se dejanen posici6n vertical
pues peuden caersef&cilmente.Si se
voltean peude haberda6o de propiedad.
Peligrode lesi6n personal y dar_oal
producto
• No atropelleel cord6n el_=ctricocon la
Power-Mate®. Hay un peligro de
leal6n corporal o unosda_os de
posesiones.
• Notire del cord6n el6ctrico de la pared
para desenchufado. Si hay danosen
el cordbn el6ctrico o el enchufe, hay
un peligro de lesi6n corporal o unos
da6os de posesiones.
Control de
aspiraci6n
Los escalones alfom-
brados requierenlim-
piezaperi6dica.Cierre
pot completoel con_el
de aspiraci6npara
Iogmr losmejores
resultadosdelim-
pieza. Mantengael
pasodeaire abierto
pare Iogrsr los
mejoresresultados
de nmpieza.
ADVERTENCIA
Peligrode lesi6n personal
Tengacuidado si coloca el recept_culo
sobrs escalones. Si se cae, podda causar
lesi6n personal o dai_oa la propiedad.
Peligrode lesi6n personaly da6o al
producto
No jale de la manguera para mover la
aspiradora de un escal6n al
siguiente. Cuando termine de limpiar
una _rea use la manija en la
aspiradora para moverla a otro lugar
para continuar la limpieza,
SOSTE_NPAPA LA
ESCALEPA El sost6n
para la escalera esta
situadoen elcuerpo y
ayudar_a evitarque la
aspiradorase deslice
cuandose est_
utilizadoen las
escaleres(vdase CARACTERISTICAS del
FUNCIONAMIENTO)
NOTA: Asegttrese que la aspiradora est_
descansando con seguridad sobre las
escaleras y el echador est_ en la
posicibn bloqueada antes de usarla,
Examine devezen cuandocadauna delasdreas
de uni6nenFUNCIONAMIENTODESU
ASPIRADORAparaasegurarsede quenoestf_n
bloqueadas.Desconectelaaspirsdora antesde
reviser.
UseelajusteXLO(bajo)psraobtaneriamejorlim-
pieza a fondo.Porotraparte,quiz_sse requieraele-
varel nivelparafacilitarelgunastareas,comopot
ejemplocuandosetratadelapetesy algunaselfom-
brasdepelolargo,y pars impedirque laaspiradora
se apague.Se sugierenlossiguientesajustes:
HI - Pelomuylargoy suelto,tapetes,alfombras
muyacojinadas.
MED - Pelomedianoa largo.
LO - Pelocortoa mediano.
XLO- La mayorfade lasalfombrasy pisos
descubiertos.
CUIDADO
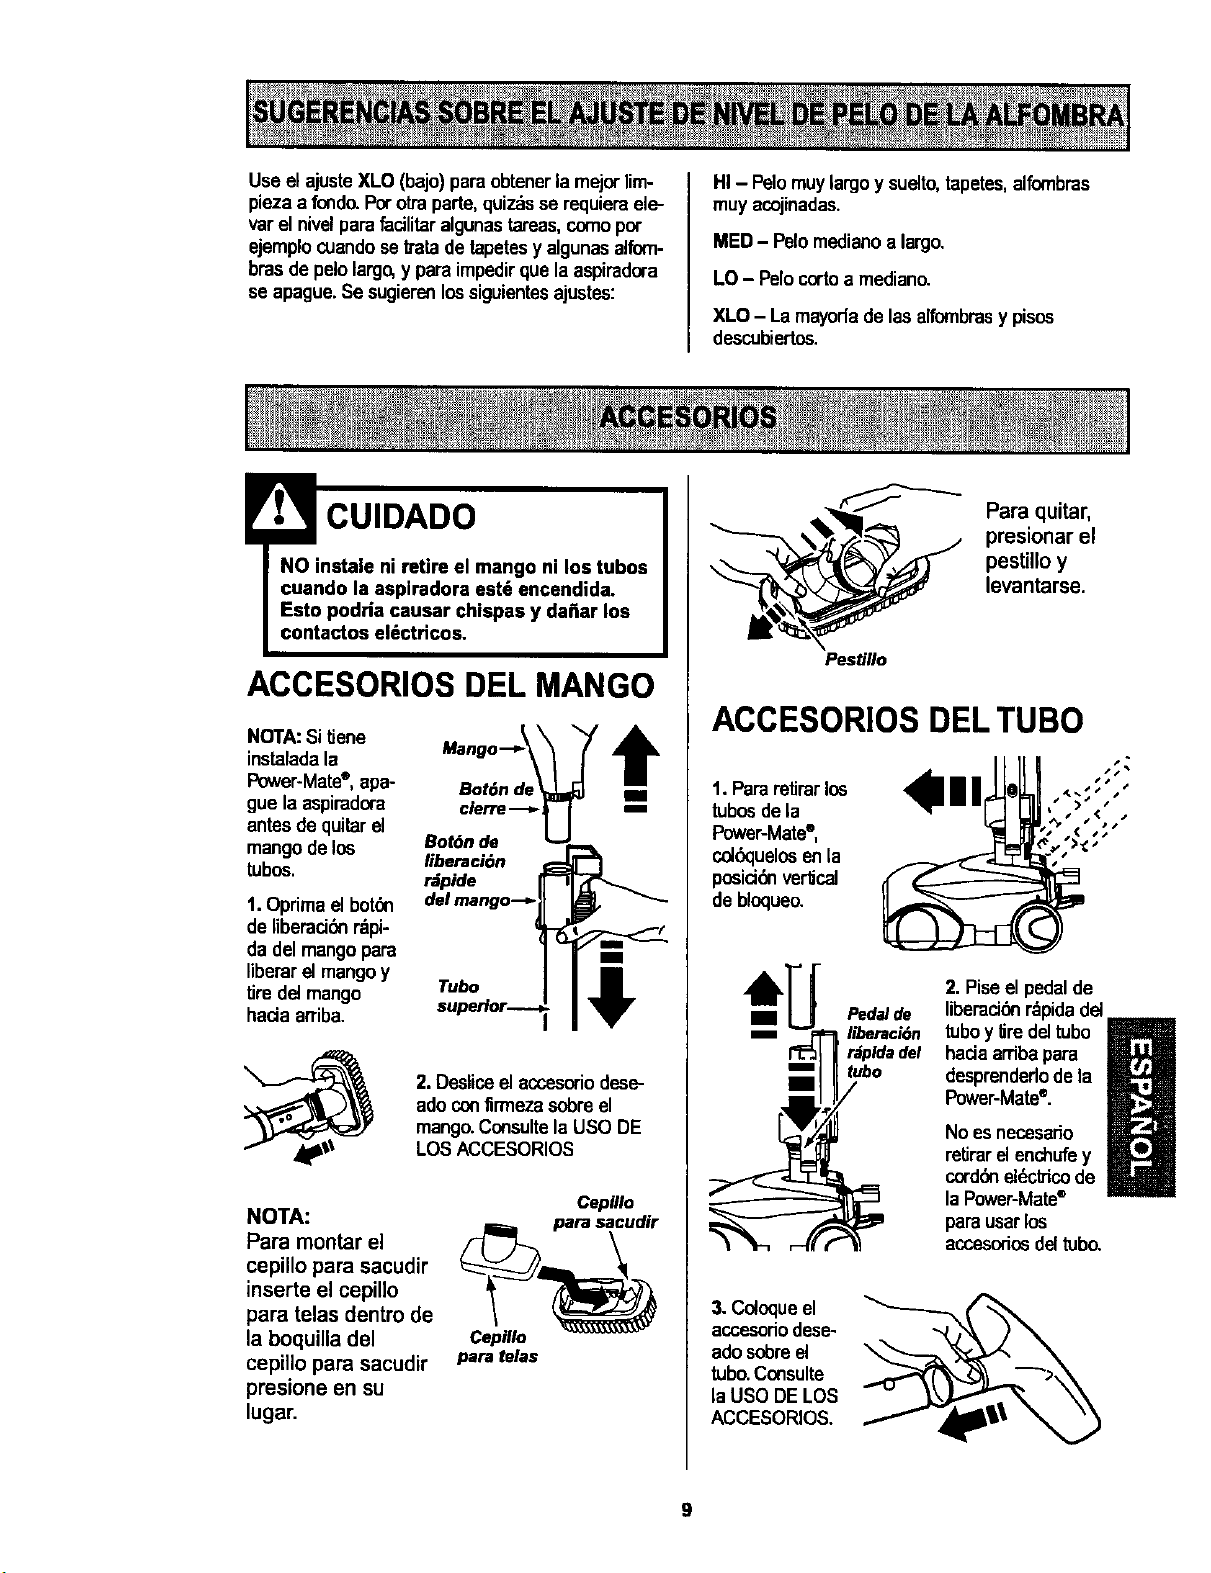
ACCESORIOS DEL MANGO
NOTA: Sitiene A
instaladala
T
Power-Mate®,apa-
i
gue la aspiradora clerre
antesde quitarel
mangode los Bot6nde
tubos, liberaci6n
r_pide
1. Oprimaelbaton delmango.-,_
de liberaci_ r_pi-
da delmangopars
liberarel mangoy
tiredel mango
hada arriba.
m
Tubo
I
2.Desliceel accesoriodose-
adocanfirmeza sobreel
mango.Consultela USO DE
LOSACCESORIOS
NOTA:
Para montar el
cepillo para sacudir
inserte el cepillo
para telas dentro de
la boquilla del
cepillo pars sacudir
presione en su
lugar.
CepUlo
Cepillo
para telas
Para quitar,
_ resionar el
pestillo y
levantarse.
Pes_go
ACCESORIOSDELTUBO
1. Parsretirarlos
tubosdela
Power-Mate°,
cd&:luelosenla
posiddn ve_cal
debloqueo.
Pedalde
liberaci6n
r_pldadel
2. Piseelpedalde
liberacidnrdpidadel
tuboy _re deltubo
hada arribapara
M
desprenderlodela
Power-Mate®.
No esnecesario
retirarel enchufey
cord6neldclz'icode
la Power-Mate®
parsusarlos
accesoriosdeltubo.
3. Coloqueel
accesoriodese-
adosobreel
tubo.Consulte
la USO DELOS
ACCESORIOS.
Cepillopara
Cepilloparasacudir
combinaci6nCepillo ,_
parateas
Herramienta
parahendiduras_
Cepillo para pisos
Power'Mate® _p
Handi-MateJr."
(AJgunos modelos)'*"
Power-MateJr."(AIgunos modelos)*'*
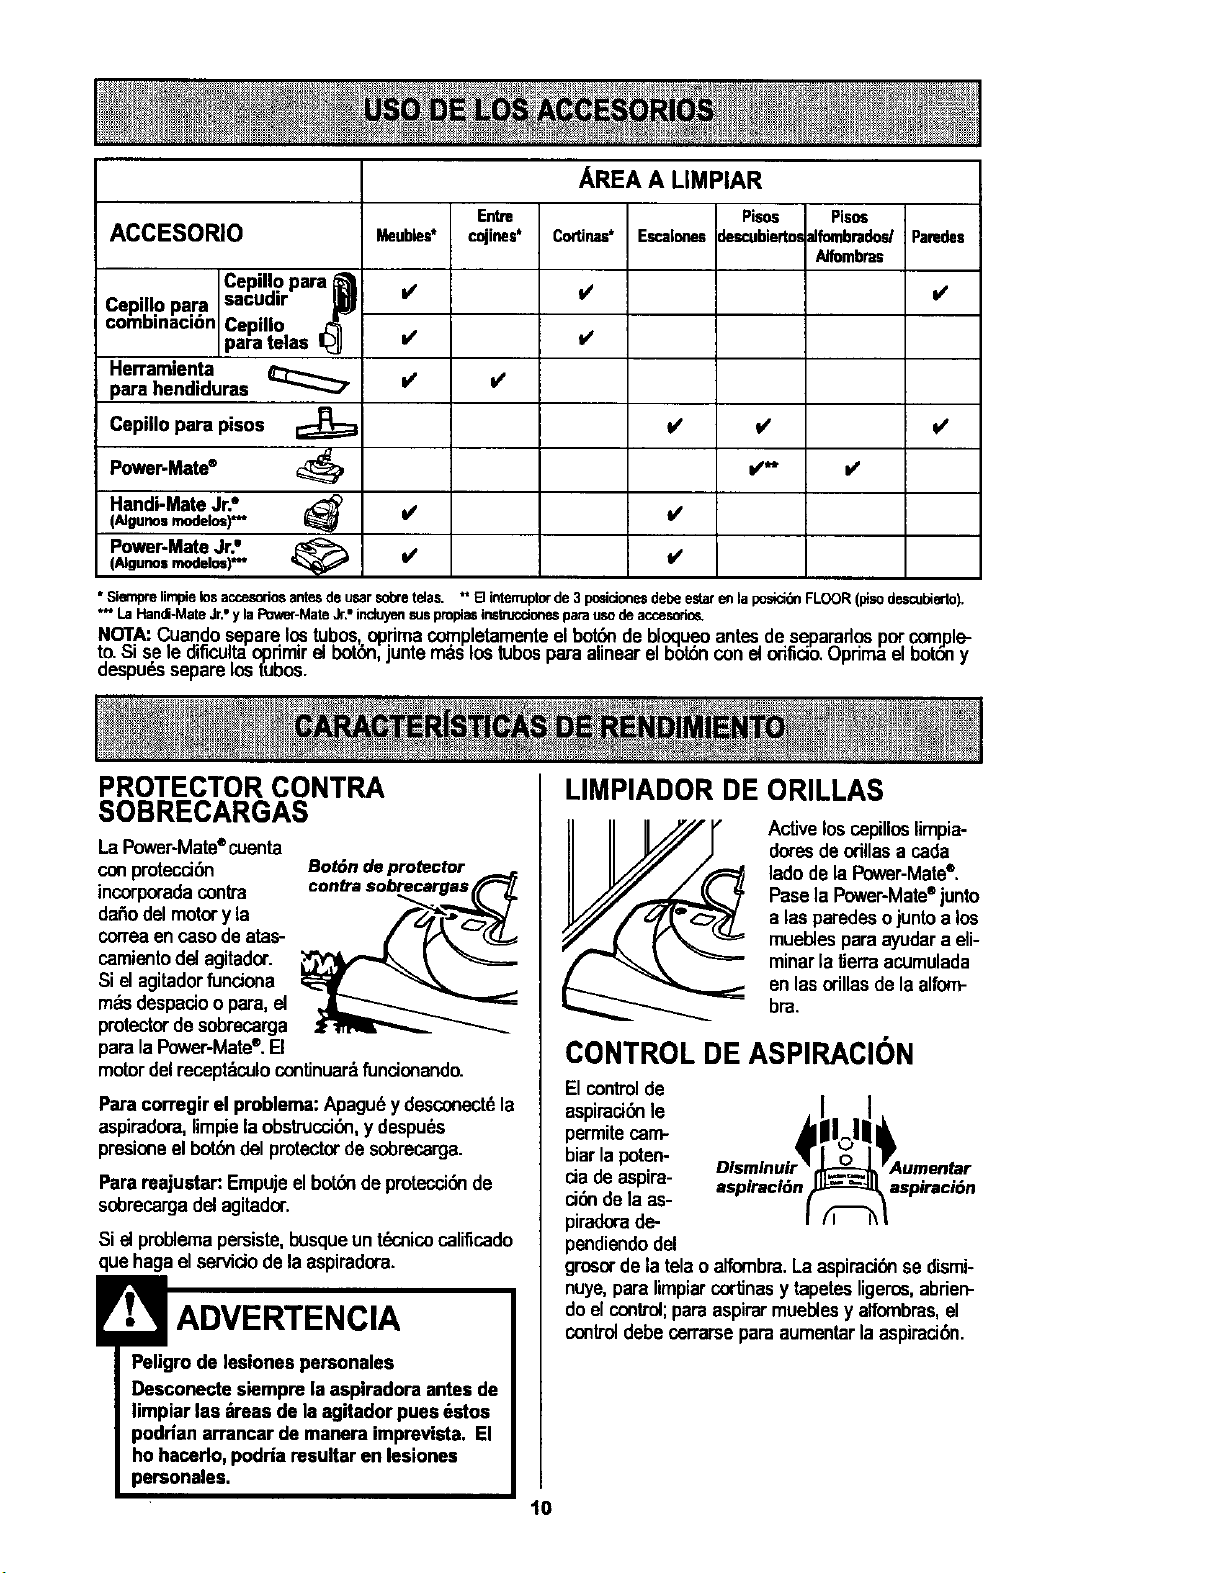
AREA A LIMPIAR
Entre Pisos Pisos
ACCESORIO cojines* EscalonesJescubiertosaJfombrados/Paredes
AJfombras
Meubles*
=/
=/
iS
t/
CorUnas*
t/
v'
t,/
l/
t/
v'**
"Siemprelimpielosaccesormsantesde usarsobretelas. ** [] interruptorde 3 posicionesdebeestarerl la posicidnFLOOR(pisodescubierto).
**' La HandI-MateJr., ylaPower-MateJr."induyensuspropia6insbllcclonesparausodeaccesorio_
NO]'_,:C.uandoseparelostub_ oprim.acomp!etamenteel bot.6ndebl.oqueoantes.deseparadospor.com.,ple-
zo.bi sete ol_cutzaoprlmirelbol6n,junle rodslos ZUDOSpara adnearel oot6ncon etorincio,uprima el borony
despudssepare loslubos.
PROTECTOR CONTRA
SOBRECARGAS
LaPower-Mate®cuenta
conprotecci_
incorporadacontra
da5odelmotory la
correaencasodeatas-
camientodel agitador.
Siel agitadorfunciona
m_sdespacioo para,el
protectorde sobrecarga
paralaPower-Mate®.El
Bot6n deprotector
conb'asobrecargasf/'-'_
motordelreceptdculocontinuardfuncionando.
Paracorregir el problema:Apagudydesconectdla
aspiradora,limpiela obstrucci6n,y despuds
presioneel bot6ndel protectordesobrecarga.
Parareajustar: Empujeelbot6ndepmtecci_ de
sobrecargadelagitador.
Siel problemapersiste,busqueunt6cnicocaliflcado
que hagael servidodela aspiradora.
Peligro de lesiones personales
Desconecte siempre laaspiradora antesde
limpiar las &reas de laagitador pues datos
poddan arrancar de manera irnpreviata. El
ho hacerto,podria resultar en lesiones
personales.
LIMPIADOR DE ORILLAS
ActiveloscepUloslimpia-
doresdeorillas a cada
ladode la Power-Mate®.
Pasela Power-Mate®junto
alas paredesojuntoa los
mueblesparaayudara eli-
minarlalJerraacumulada
en lasorillasdela alfom-bra.
CONTROL DE ASPIRACI(SN
El controlde
aspirad6nle
permitecam-
biar la poten-
ciadeaspira- aspiracl6n aspiraci6n
cidndela as-
piradorade-
pendiendodel
grosorde la telaoalfombra.Laaspiraci6nse dismi-
nuye,paralimpiarcortJnasy tapetesligeros,abrien-
do elcontrol;para aspirarmueblesy alfombras,el
controldebe cerrarseparaaumentarla aspiraci6n.
10
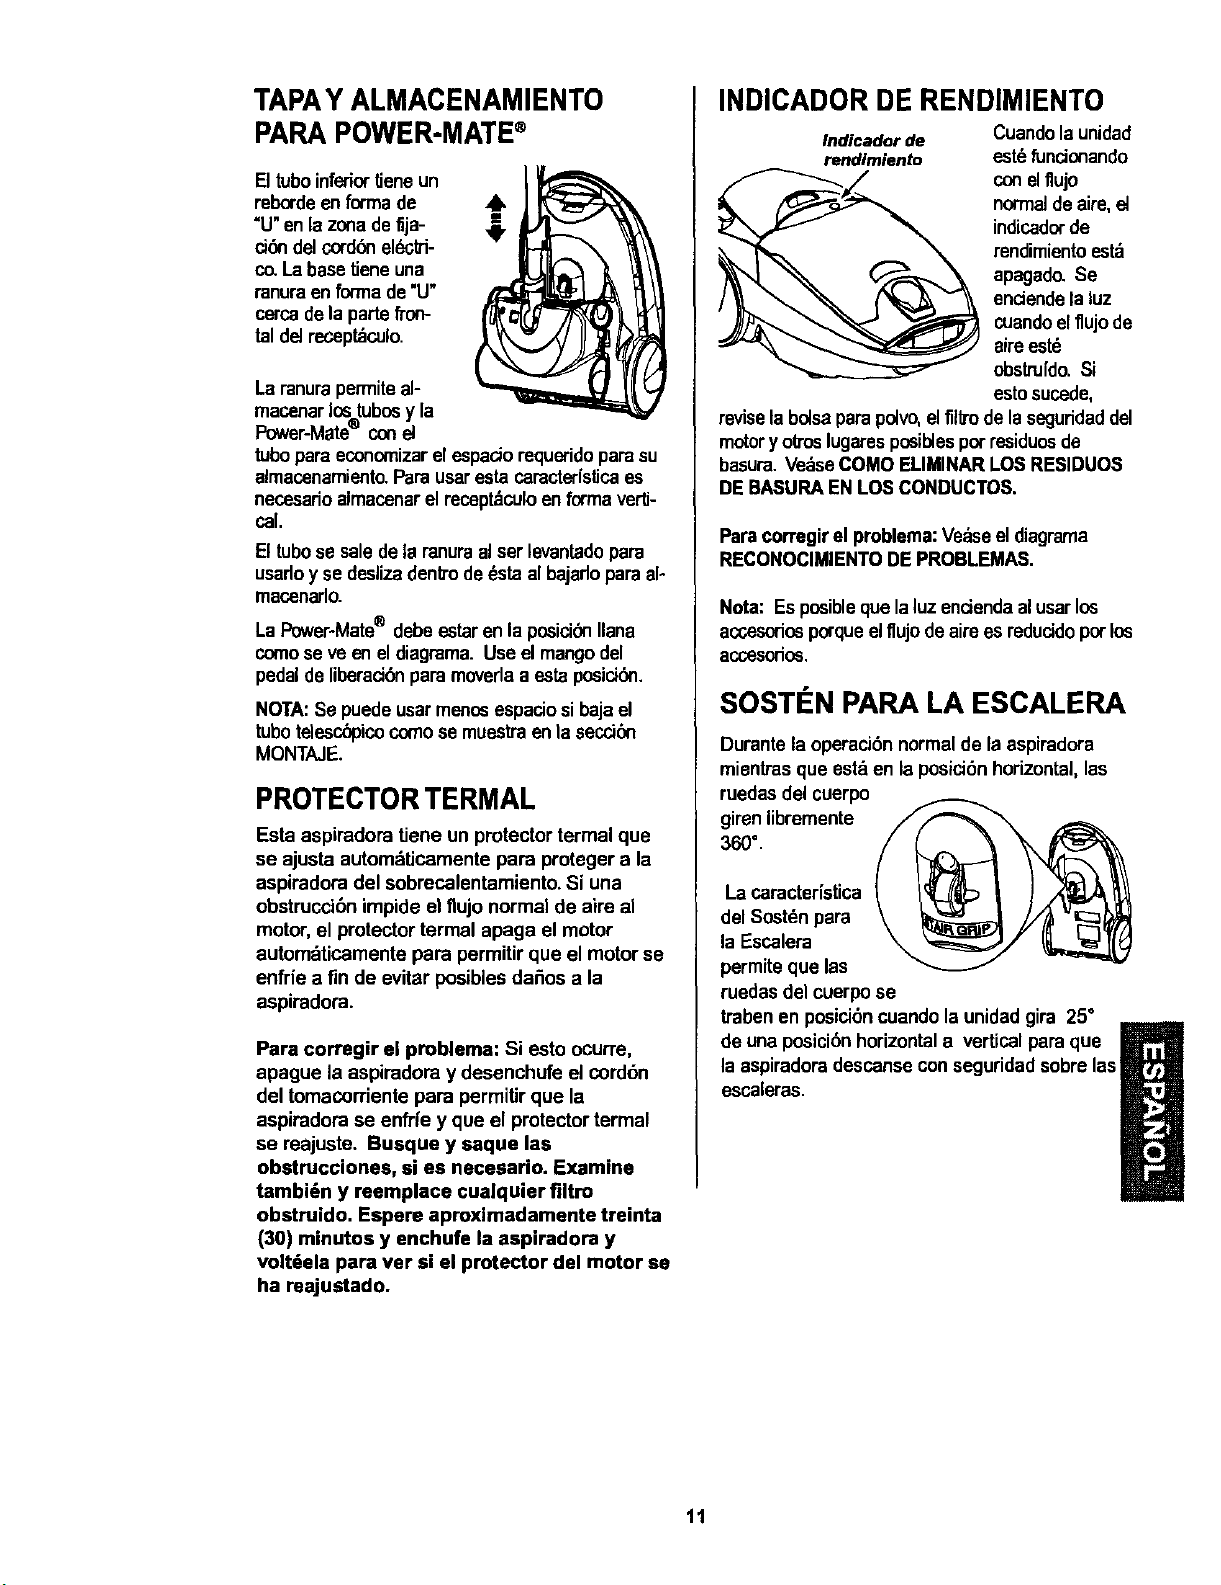
TAPAYALMACENAMIENTO
PARAPOWER-MATE®
Eltuboinferiortieneun
rebordeenforma de
"U"en lazonade fija-
ci6ndelcord6nelL_tri-
co,LabaseUeneuna
ranuraenforrnade"U"
cercadela partefrom
tamde]recep_culo.
La ranurapermiteal-
macenar lostubosy la
Power-Mate® conet
tubopara economizarel espae]orequeddoparasu
elmacenamiento.Parausaresta caracter{sticaes
necesarioalmacenar el recep_culoenforma verti-
cal.
El tubose saledeta ranuraal ser levantadopara
usarloy se deslizadentrode _sta al bajarlopara al-
macenarlo.
La Power-Mate_ debe estar en la posicibnliana
comose ve enel diagrama.Useel mangodel
pedal deliberae]6npara moveda a estaposici_n.
NOTA:Se puedeusarmenosespaciosi baja el
tubotelesc6picocomose muestraenla secci6n
MONTAJE.
PROTECTORTERMAL
Esta aspiradora Uene un protector termal que
se ajusta automdUcamente para protegera la
aspiradora del sobrecalentamiento. Si una
obstruccibnimpide el flujo normal de aire al
motor, el protector termal apaga el motor
automdticamente para permitir que el motorse
enfde a fin de evitar posiblesda_os a la
aspiradora.
Para corregir el problema: Si esto ocurre,
apague la aspiradora y desenchufe el cord6n
del tomacorriente para permitirque la
aspiradora se enfrfe y que el protector termal
se reajuste. Busque y saque las
obstrucciones, si es necesario. Examine
tambi6n y reemplace cualquier filtro
obatruido, Espere aproximadamente treinta
(30) minutos y enchufe la aspiradora y
volbtela para ver si el protector del motor se
ha reajustado.
INDICADOR DE RENDIMIENTO
Indicadorde Cuandolaunidad
rendlmiento est_fundonando
conelflujo
normaldeaim, e]
indicadorde
rendimientoest_
apagado.Se
ene]endelaluz
cuandoelflujo de
aireestd
obstrufdo. Si
esto sucede,
reviselabolsaparapolvo,elfilbodelasegufidaddel
motory ofroslugaresposiblesporresiduos de
basura.Ve=_seCOMO ELIMINARLOSRESlDUOS
DEBASURAEN LOS CONDUCTOS.
Paracorregirel problema:Verse eldiagrama
RECONOCIMIENTODEPROBLEMAS.
Nota: Es posibleque laluzenciendaal usarlos
aosesoriosporque elflujo de aire es reducidopor los
accesorios,
SOST#N PARA LA ESCALERA
Durante la operaci6nnormalde la aspiradora
mientrasque est&en la posici6nhorizontal,las
ruedasdel cuerpo
360°.girenlibremente _
La caracteristica
del Sostdnpara
la Escalera
permiteque las
ruedasdel cuerpo se
trabenen posici6ncuandola unidadgira 25°
de una posici6nhorizontala verticalpara que
la aspiradora descanse conseguridadsobrelas
U
escaleras.
tl
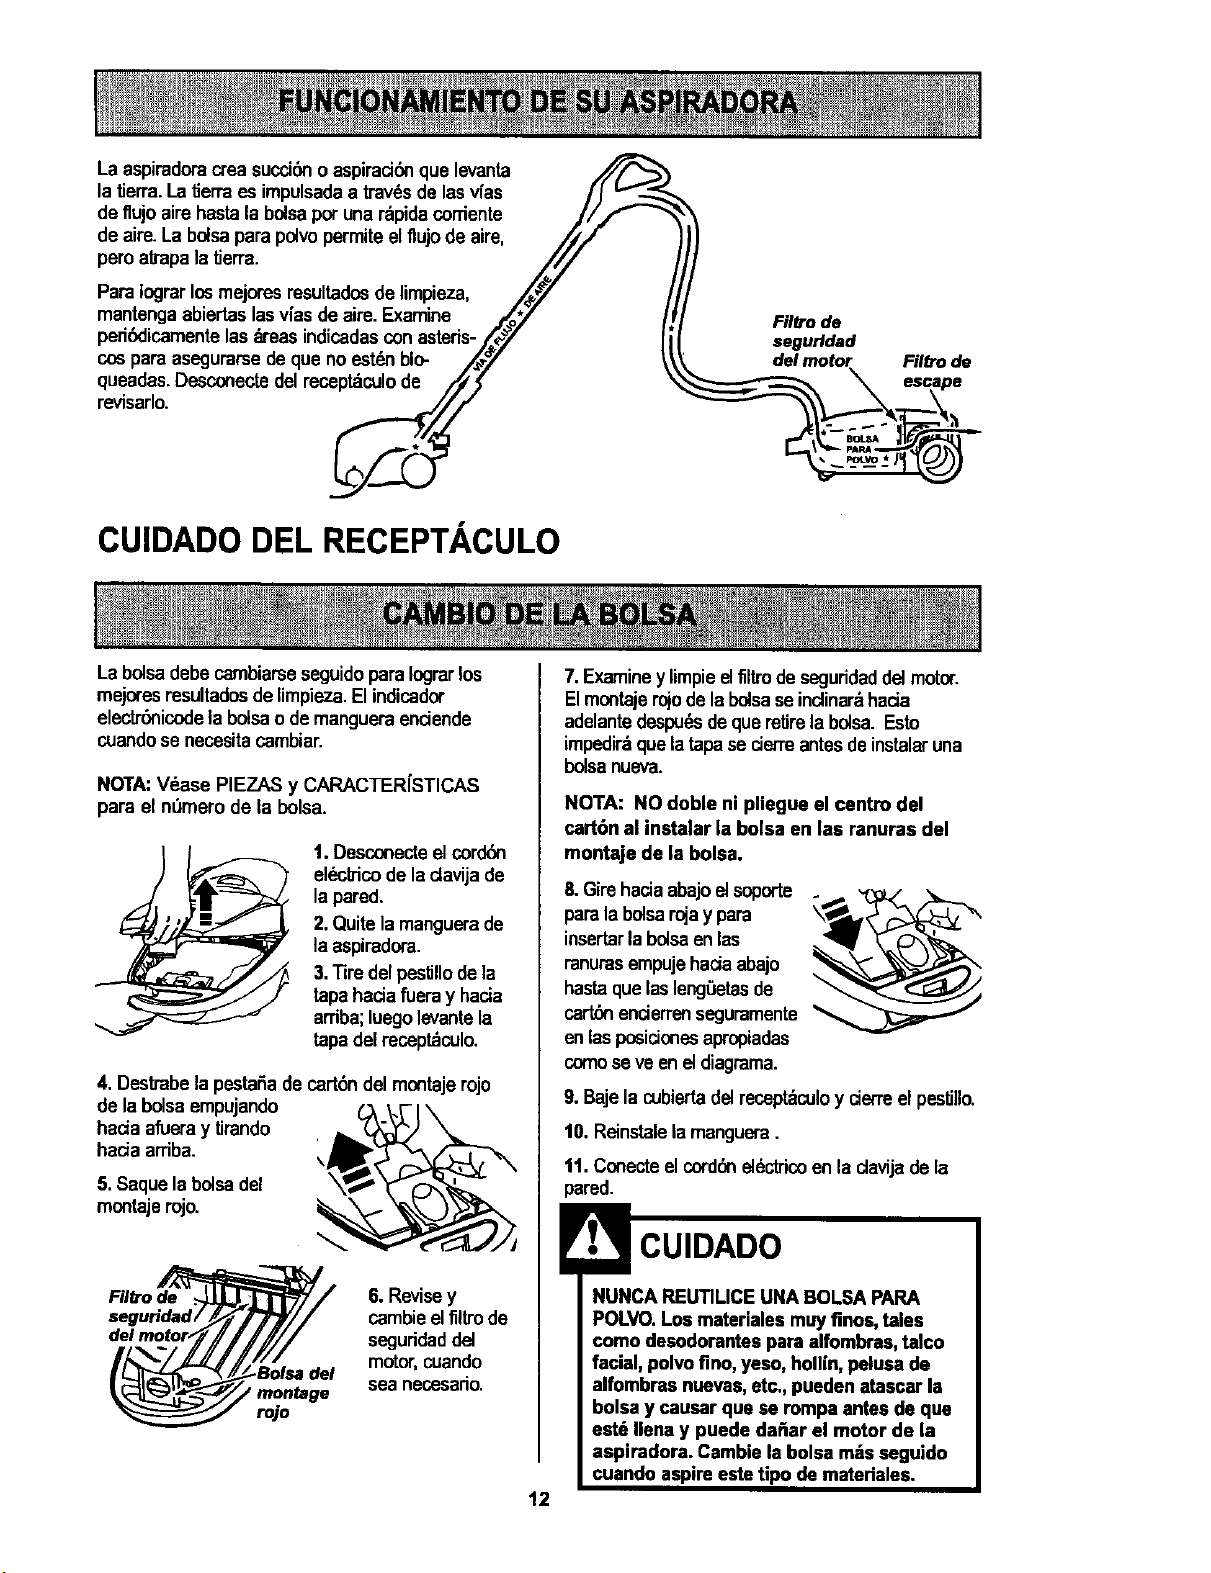
La aspiradoraorea succi6no aspirad6nque levanta
la tierra.Latierra es impulsadaa trav6sde lasvias /J
de flujo aire hastala bolsapot una rdpidacornente //./I_
de aire.La bolsapara polvopermiteelflujode aire, //,/ '
peroab-apalatierra. ///
/
ParaIograr losmejoresresultadosdelimpieza, _/ /
mantengaabiertaslasv{asde aire.Examine ,,_*.J /i
peribdicamentelasdreasindicadasconasteris-._._" Ii
Cos para asegurarse de qua no est_n b,o- _7
queadas. Desconectedelreceptaculode /_5 '_
revisarlo _*S
CUIDADODEL RECEPTACULO
Filtrode
seguHdad
del motor Filtrode
La bolsadebe cambiarseseguidoparaIograrlos
mejoresresultadosdelimpieza.El indicador
electr_icode labolsao demangueraenciende
cuandose necesitacambiar.
NOTA:Vdase PIEZAS y CARACTER[STICAS
para el n_mero de la bolsa.
1. Desconecteelcorddn
el6c_co de laclavijade
la pared.
2. Quitelamanguerade
la aspiradora.
3.Tiredel peslllodela
tapahaciafueray hacia
arTiba;luegolevantela
tapadelrecep_culo.
4. Destrabelapesta6adecart6ndel montajerojo
de labolsaempujando
haciaafueray trando
hada ardba.
5. Saquelabolsadel
ITIOl_ltaja rojo.
Filtro de ._
seguHdad/
montage
rojo
6. Revisey
cambieelfiltrode
seguddaddet
motor,cuando
sea necesado.
12
7.Examiney limpieelfiltro deseguridaddel motor.
Elmontajerojodela bolsaseindinar_hada
adelantedespu6sdequeretirela bolsa. Esto
impedirdquelatapase ciorreantesdeinstalaruna
bolsanueva.
NOTA: NO doble ni pliegue el centro del
cart6n al instalar la bolsa en las ranuras del
montaje de la bolsa.
8.Girehaciaabajoel soporte
parala bolsarojay para
insertarla bolsaenlas
ranurasempujehaciaabajo
hastaquelaslengSetasde
cart_ encierranseguramente
enlasposicionesapropiadas
comose ve enel diagrama.
9. Bajela cubiertadelreceptdculoy cierreel pestillo.
10. Relnstalela manguem.
tl. Conecte elcorddnel6ctdcoen la clavijadela
pared.
NUNCA REUTILICEUNABOLSA PARA
POLVO.Los materiales muy finos, tales
como desodorantes para alfombras,talco
facial, polvo fino, yeso, hollin,pelusa de
alfombras nuevas,etc., pueden atascar la
bolsay causar que se rompa antesde que
est6 Ilena y puede da_ar el motor de la
aspiradora. Cambie la bolsa m=tsseguido
cuando aspireeste tipo de materiales.
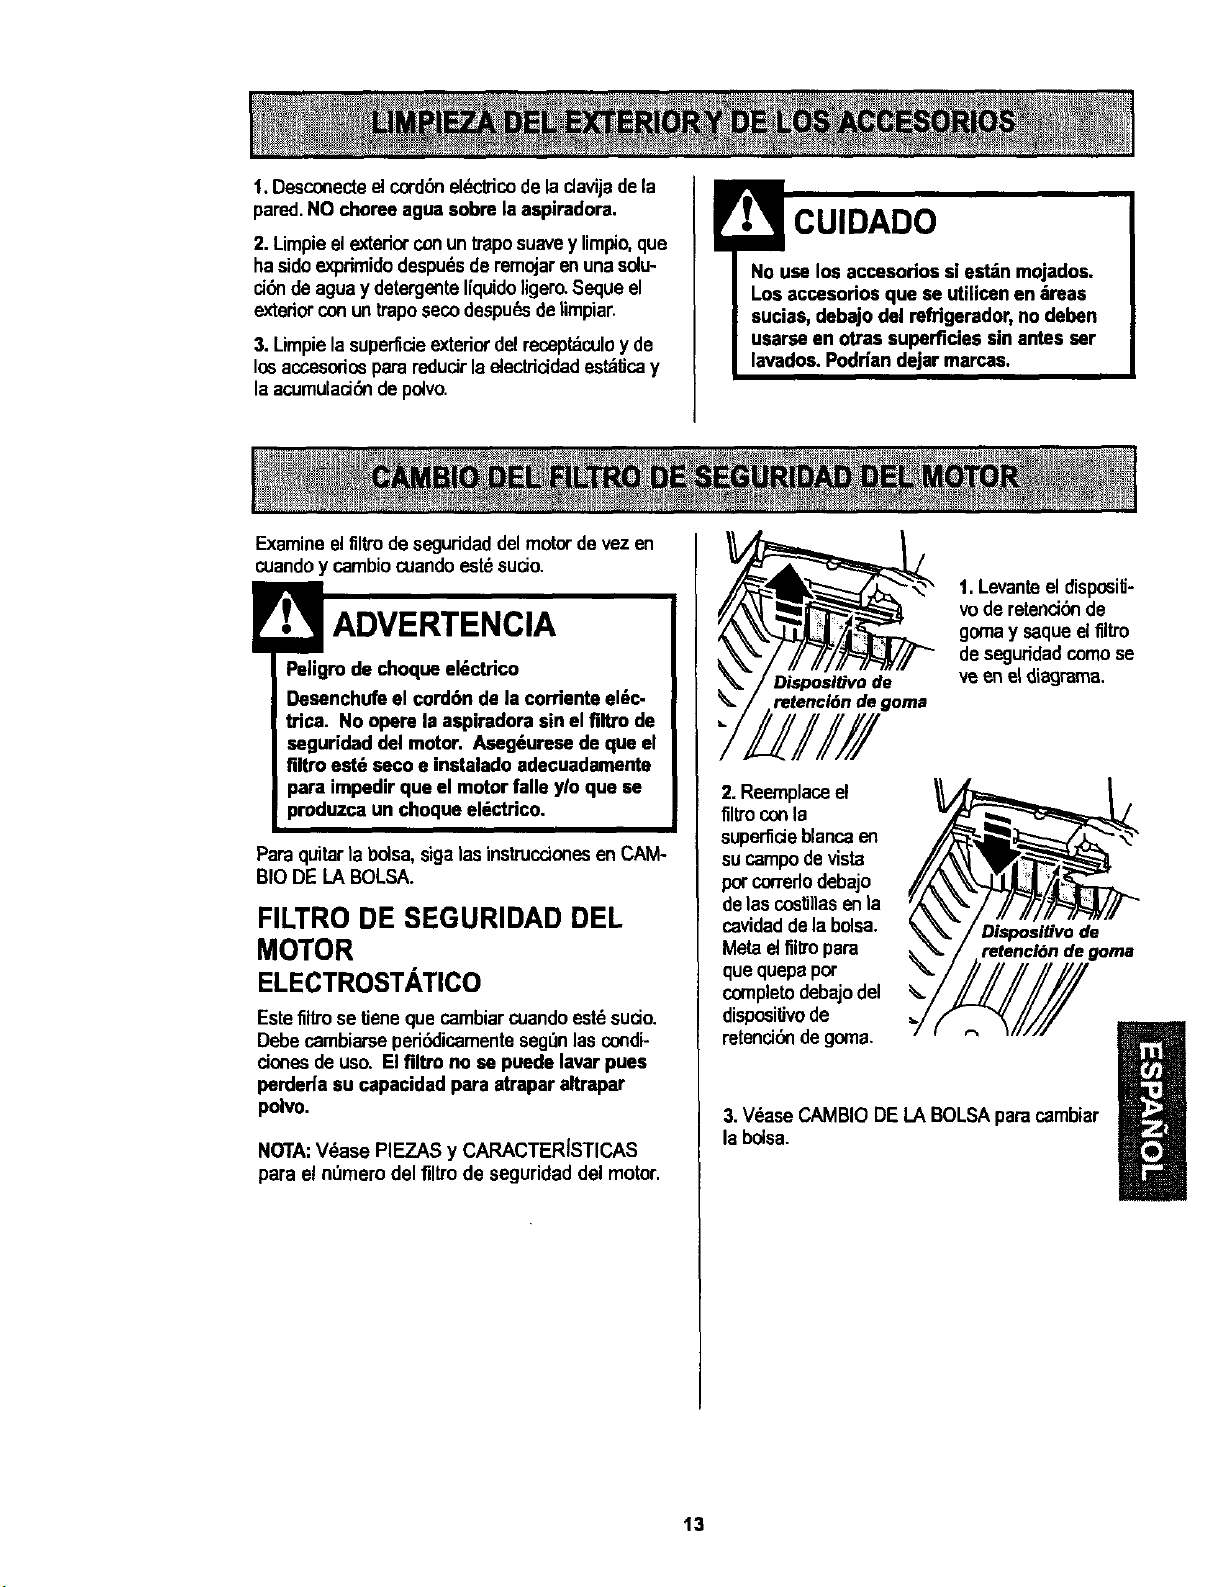
1.Desconectaelcordbneldcitico dela clavijade la
pared.NO choree agua sobre laaspiradora,
2.Limpieelexteriorconuntraposuavey limpio,que
hasidoexprimidodespudsderemojarenuna solu-
ci_nde aguay detergemteIiquidoligero.Sequeel
exteriorconuntraposecodespu_sdelimpiar.
3. Limpielasuperfideexteriordelreceptdculoy de
losaccesofiospararedudrla electfiddad est_Ucay
laacumulaci6n depoivo.
CUIDADO
No use los accesortossi est_n mojados.
Los accesoHosque se utilicenen _reas
sucias, debajo del refrigerador,no deben
usarse en otras superficiessin antesser
lavados. PodHandejar marcas.
Examineelflllrodeseguridaddel motordevez en
cuandoy cambiocuandoest_sucio.
Peligrode choqueePtctrico
Desenchufe el cord6n de la corrienteeldc-
trica. No opere la aspiradora sin el filtro de
seguridad del motor. Aseg6urese de que el
filtro estd seco e instaladoadecuadamente
para impedir que el motor falle ylo que se
produzca un choque el_,ctrico.
Paraquitar labolsa,siga1asinstruccio_esenCAM-
BIO DE LA BOLSA.
FILTRO DE SEGURIDAD DEL
MOTOR
ELECTROSTATICO
Este flltro se Ueneque cambiarcuandoestdsudo.
Debe cambiarseped6dicamentesegfinlas condi-
cionesdeuso. Elfiltro no se puede lavarpues
perderl"asu capecidad para atrapar altrapar
polvo.
NOTA:V_ase PIEZAS y CARACTERISTICAS
para el nDmem del filtrode seguridad del motor.
Disposltivo de
retencldn de goma
1. Levante eldisposiU-
vode retend6nde
gomay saqueelfiltro
de seguridadcomose
ve en eldiagrama.
2.Reemplaceel
filtroconla
superficieblancaen
sucampodevista
p_"correrlodebajo
delascostillasenta
cavidaddelabolsa.
Metaelfiltropapa
quequepapot
completodebajodel
dispositivode
retenci6ndegoma,
Disposltivo de
retencldn de goma
3. V_ase CAMBIODE LABOLSApara cambiar
la bolsa.
13
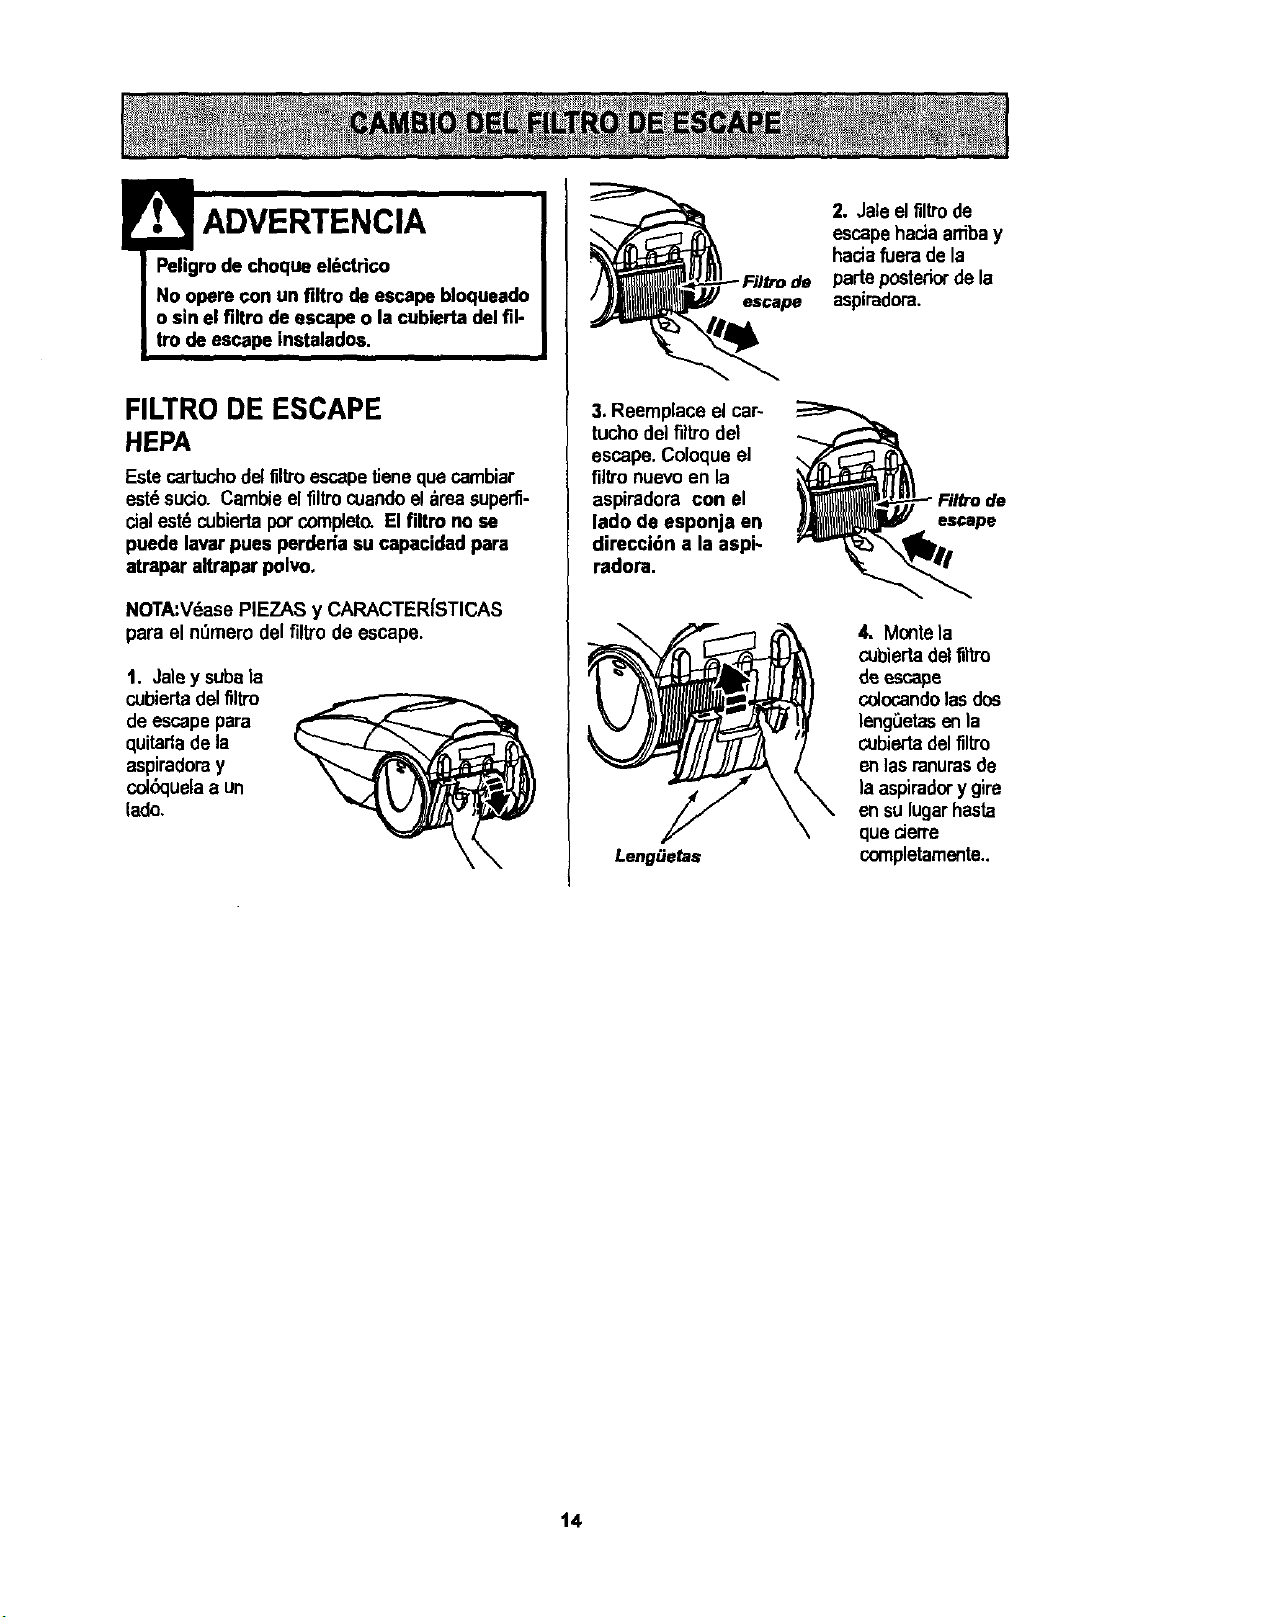
! ADVERTENCIA "
Peligrode choque el_ctrico
No opere con un filtro de escape bloqueado
o sin el filtro de escape o la cubierta delfil-
tro de escape instalados,
i
FILTRO DE ESCAPE
HEPA
Este cartuc,hodel liltroescapetJeneque carnbiar
est6sucio. Cambieel filtrocuandoelarea superfi-
cialestdcubiertapot completo.El filtm no se
puede lavarpues perder|a su capacided para
atrapar altrapar polvo.
NOTA:V6asePIEZAS y CARACTER[STICAS
para el nDmerodel filtrode escape.
1. Jaley subata
cubiertadelfiltro
deescapepara
quitadadela
aspiradoray
col&:luelaa un
lack).
escape
3. Reemplace el car~
tuchodel fil_o del
escape. Coloqueel
fillronuevaen la
aspiradora con el
lado de esponja an
diracci6n a la aspi-
radora.
LengOe_s
2. Jateelflltrode
escapehaciaarribay
hada fuera de Is
parteposteriorde la
aspiradora.
de
escape
4. Montela
cubiertadelfiltm
de escape
oslocandolas dos
lengOetasenla
cubierta delfiltro
enlasranurasde
la aspiradory gire
ensulugarhssta
que derre
cornpletamente..
t4
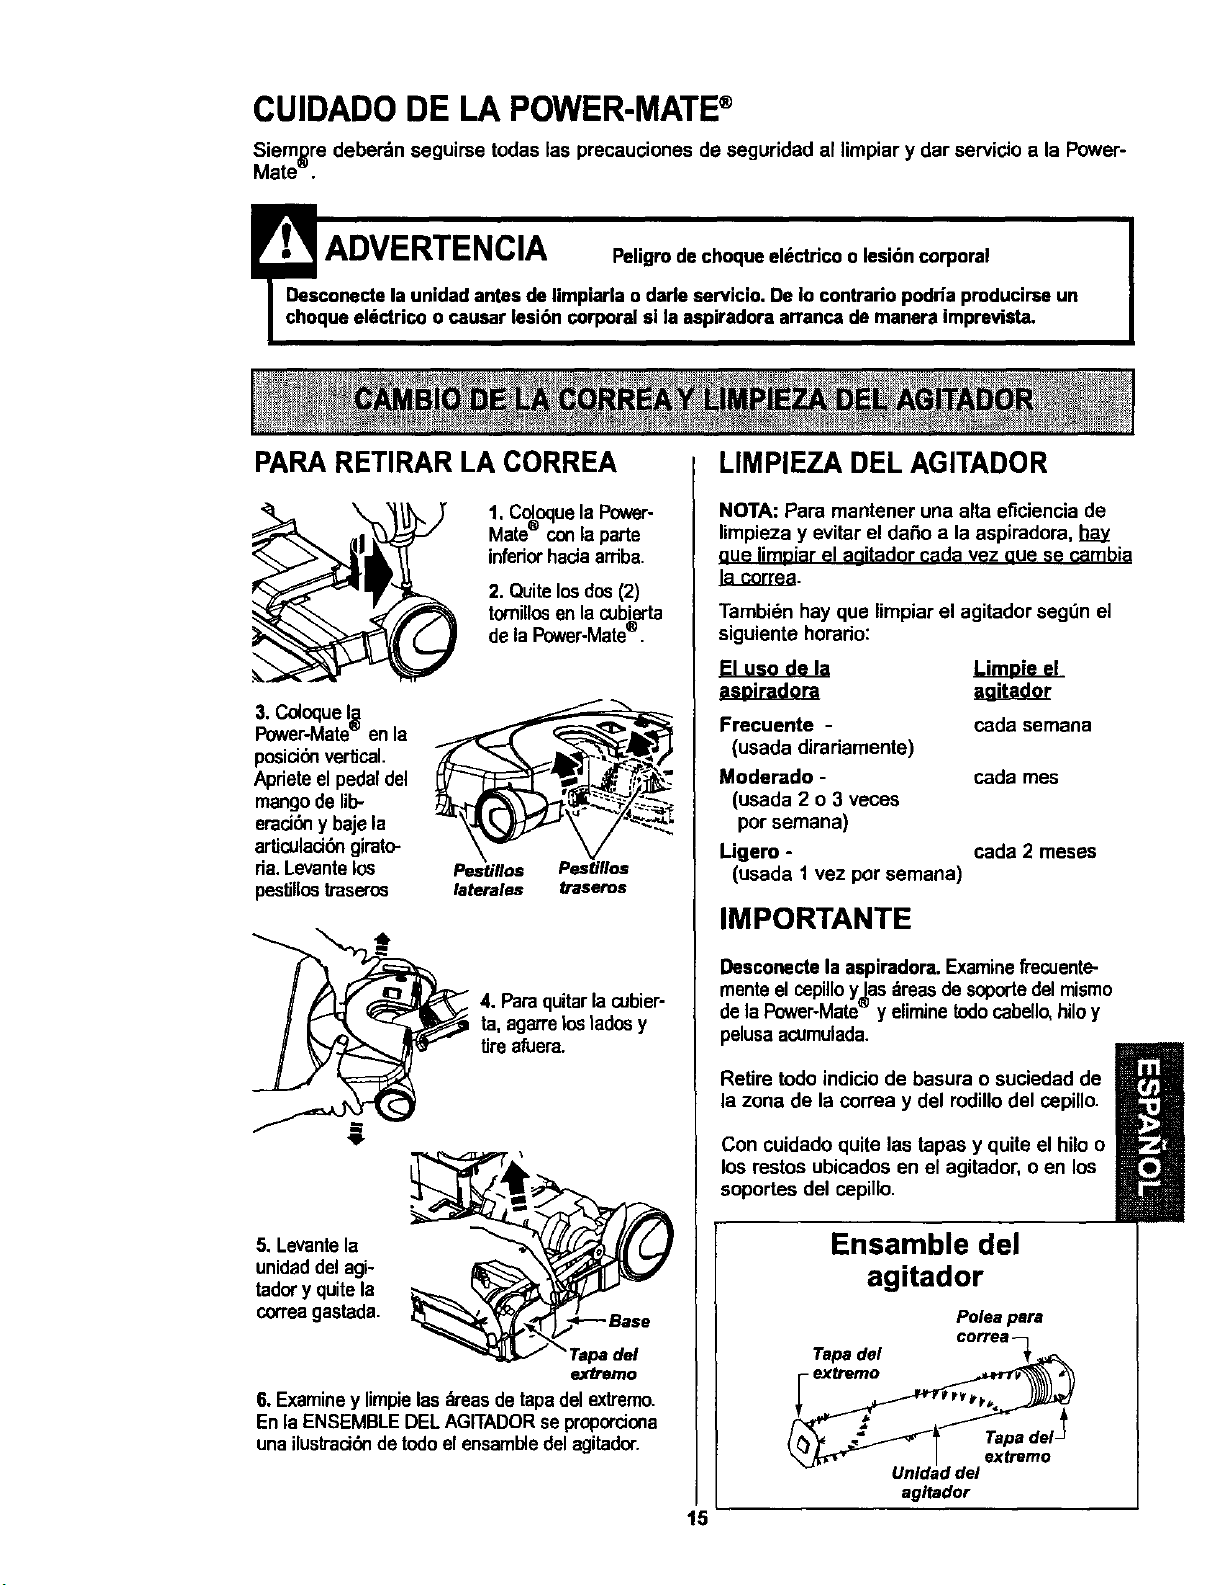
CUIDADODE LA POWER-MATE®
Siem_re deberdn seguirse todas las precauoiones de seguridad al limpiar y dar servido a la Power-
Mate .
!
ADVERTENCIA ,ti rodeohoqueele coclesi6,co ,ora
I De$conectela unidad antes de limpiarla o darleservicio. De Io contrario podda producirseun
I choque eldctricoo causar lesi6n corporalsi la aspiradora arrancade manera imprevista.
PARA RETIRAR LA CORREA
1. Col,oquelaPower-
Mate® conla parte
infed_ hada arriba.
2. Quitelosdos(2)
tomillosan lacubiecta
de laPower-Mate®.
3. ColoqueI_,
Power-Mate'="enla
posid6nvertical.
Aprieteel pedaldel
mango de lib-
emd_ y baje la
articulaci6ngirato-
ria.Levantelos
pestillostraseros
Pestillos Pestillos
laterales traseros
4, Paraquitarla cubier-
ta, agarrelosladosy
tireafuera.
5, Levante la
unidaddel agi-
tadory quitela
correagastada.
6. Examiney limpielasdreasdetapadel extremo.
Enla ENSEMBLEDEL AGITADORse propordona
una ilusb'aci6ndetodoel ensambledel agitador.
LIMPIEZA DEL AGITADOR
NOTA: Para mantener una alta eficiencia de
limpieza y evitar el daSo a la aspiradora, hay
aue limpiar el agitador cada vez aue se cambia
Ja_c,ozr.e,a.
Tambidn hay que limpiarel agitador seg0n el
siguiente her'ano:
El uso de la
as=dr._toj:a agita_dJ_
Frecuente -
(usada dirariamente)
Moderado -
(usada 2 o 3 veces
por semana)
Ligero -
(usada 1 vez por semana)
cada semana
cada mes
cada 2 meses
IMPORTANTE
15
Desconectela aspiradora.Examinefrecuente-
mente el cepilloy_as dreasdesoportedelmismo
de la Power-Mate° y eliminetodocabello,hiloy
pelusaacumulada.
[]
Retire todo indicio de basura o suciedad de I
la zona de la corTeay del rodillodel cepillo.
I
Con cuidado quite las tapas y quite el hilo o
los restos ubicados en el agitador, o en los
aoportes del cepillo.
Ensamble del
agitador
Poleapara
Tapadel ccflea -_p_
agitador
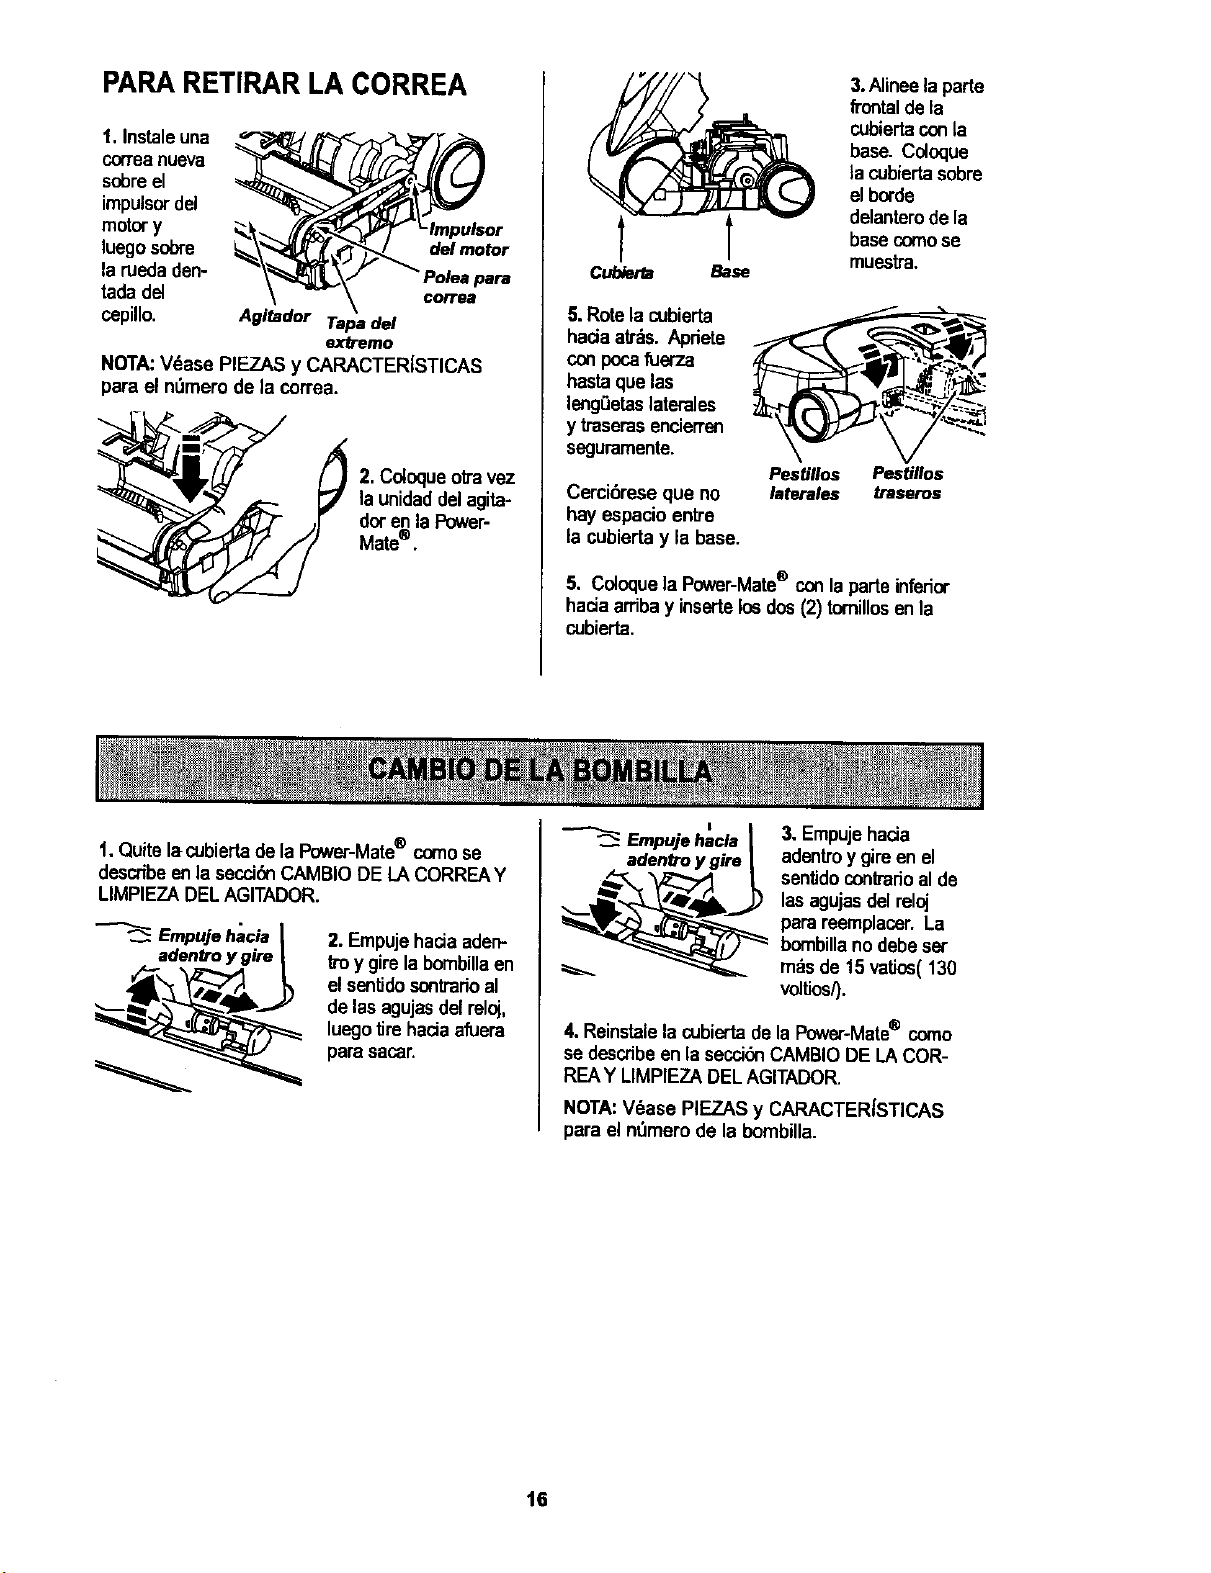
PARA RETIRAR LA CORREA
t. Instaleuna
CQ(Tea nueva
sobreel
impulsordel
motory
It.ego sobre
laruedaden-
tada del
cepillo.
del motor
corrl_8
Agitador Tapa del
extremo
NOTA:Vdase PIEZAS y CARACTER{STICAS
para el nt_merode la correa.
2. Coloqueob'avez
ta unidaddelagita-
doren laPower-
Mate®.
Cubierta Base
3.Alineela I:_rte
frontalde la
cubiertaconla
base. Coloque
_acubiertasobre
el borde
delanterodela
basecomese
muesfra.
5.Rote lacubierta
hada ab'_s.Apriete
conpocafuer7_a
hastaquelos
lengOetaslater'alas
y fraseras encierren
seguramente.
Cerci_rese que no
hay espacioentre
la cubiertay la base.
Pestillos Pestillos
laterales traseros
5. Coloquela Power-Matee conla parte inferior
haciaarribay insertelosdos(2) tornillosenla
cubierta.
1, Quitelacubiertade laPower-Matee comose
describeenla secci6nCAMBIODE LA CORREAY
LIMPIEZADELAGITADOR.
2. Empujehaciaaden-
froy girela bombillaen
elsentidosontrarioel
de lasagujasdel reloj,
luegotire hada afuera
parasacar.
|
Empujehacla
adentroy gire
3. Empujehada
adentroy gireen el
sentidoconb'afioal de
lasagujasdelreloj
para reemplacer.La
bornbillanodebe set
m_s de15 vatios(130
v osO.
4. Reinstalela cubiertade la Power-Mate® como
se describeen lasecci6nCAMBIODE LACOR-
REAY LIMPIEZA DEL AGITADOR.
NOTA: Vdase PIEZAS y CARACTERISTICAS
para el n'3merode la bombilla.
16
Peligrode choqueel6ctdco o lesi6n corpo-
ral
Desconectela unidadantes de limpiarla o
darle servicio. DeIo contrario podrlapro-
ducirse un choque el6ctrico o causar
lesi6n corporal si la aspiradora arrancade
manera imprevista,
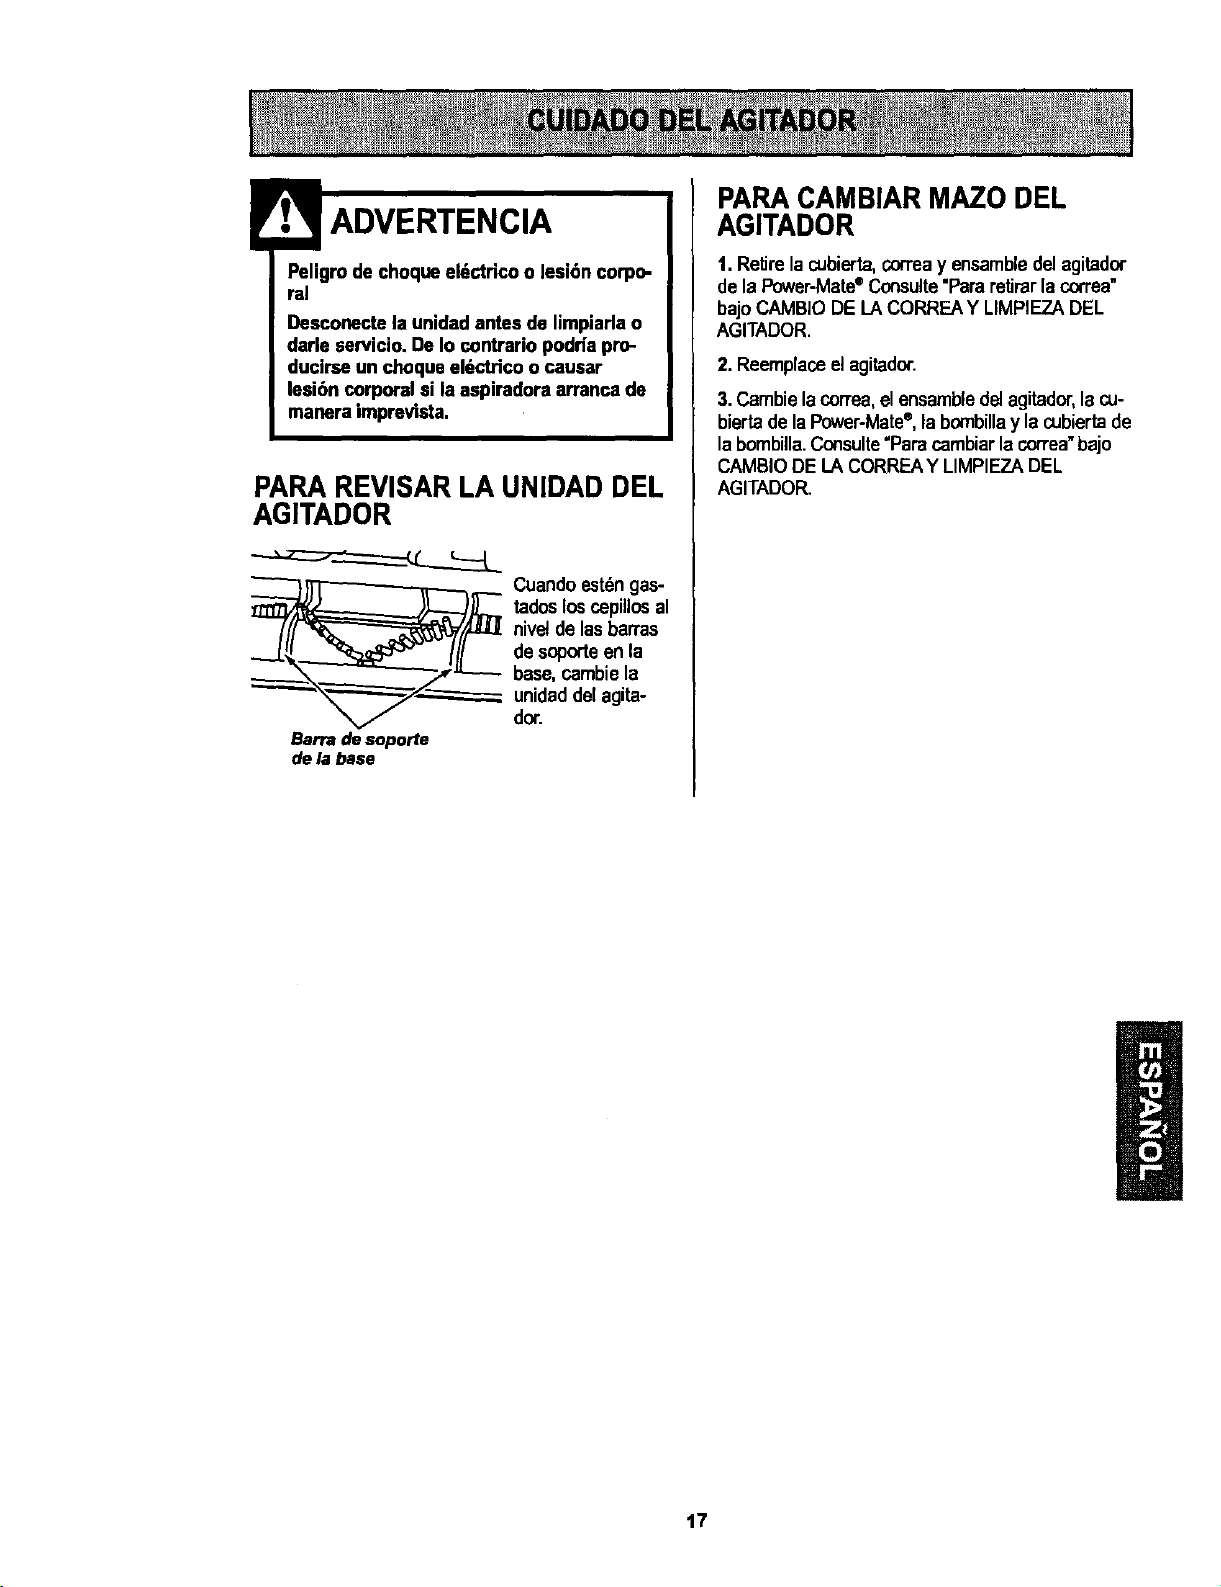
PARA REVISAR LA UNIDAD DEL
AGITADOR
__ Cuandoestdngas-
tadosloscepillosal
nive!de lasbarras
desopodeenla
base,cambiela
unidaddelagita-
dor.
Barradesoporte
de labase
PARA CAMBIAR MAZO DEL
AGITADOR
1. Retirelacubierta,correay ensambledel agitador
de la P_ver-Mate®Consulte"Pararetirarla correa"
bajoCAMBIODELACORREAY LIMPIEZADEL
AGITADOR.
2. Reemplaceel agitador.
3. Cambielacorrea,elensamblede_agitador,la cu-
biertadelaPower-Mate®,labombillay la cubiertade
labombilla.Consulte"Paracambiarlacorrea"bajo
CAMBIODE LACORREAY LIMPIEZADEL
AGITADOR.
17
Reviseesterecuadro para encontrarsoludonesa problemasque puede corregirusted mismo.Cualquierotro
serviciodebe serrealizadoporSEARS u ottoagentede serviciocalificado.
Leupiradom noarranc_
NO Ilsplrll
satlsfactodamente.
Lo ospl_doro ilrrl_Cll,
peru se apaga.
La Power-mate* no funclona
cuande es_i inetalodL
[] Indlcado_e_ect_nlce
de Is bols_ y de la
manguera fundoM
Le asplrodora I_ t_p_s --o-
--o- es d_.ll empuJar•
Power=matee.
La luz no fundona.
[] cordd_ no so mroll&
Lanplradora dejamarcu
etlladfombm.
t.
3.
ESLlides_nectade.
Cortacircuitosb_tadeo _usildequem_lo
on eltablem de servi_ de la residencia.
Co_e:_onesell_bicas de Is manguera
SLII_tas .
t. Boisa pare Ix)Nolens oatescade.
2- Vias de flujode eire _des.
3. FiRmssuoos.
4, Ajuste incormctode nivelde pelode
la alfombra.
S. Controlde aspirac_ abiert_
6. Manguem rata.
7. Agitaderde la Foyer-Mate° desgastado_
8. Correa desgasta_ o mrs.
0. Agitadero tapas del extremode _ste sucios.
10. Tapa del mcepl_cu4oabierta.
1. Cone_donesel_ctdcssde Ismanguem o
de_ tapa.
2. Protectorco_ra sobrecargasde Is
Power-Mate®botade.
3. Protectortermalbotade
enelmce_lo.
1. Cowes de la Power-Mate® desconontadas.
2. Cowea desgastadeo rata.
3. Agitadero tapas del extremosde 6ste sucios.
4. Protectorconlmsdarecargesde la
Fower-Mate° b_tado.
5. El intenuptorno est_ en b posici_ CARPET.
4. Boisapare pol',,olena o stascade.
3. Filtms suci_
3. Vlas de flujodeaire 9tosc_des,
4. Ciertos accesori_s.
'l. Ajusteinc_'_cto derd_ de pelode laalfombra.
3. Aspirack_ de_asiade poterde.
1. _nbHla lundide.
1. Co_ el_ctricosudo.
3. Cordde etascado.
1. Estilode limpk_8 incon_¢_.
1. Conectebien,(]primaselectorde mcendJdc/
apagadoa la posici_ ON.
3. Rest_ el cortacir_ o camb_eel
fusibl_
3. Vuelva e c_lectar los extrenm_de lamanguel'a,
(l_gina 6).
1. Cambiela balsa,(p_gina t2).
2. Limpie _s vfasde flujode aire, (p_gina12).
3. Cambieel tilting,(p_gin_ 13-14).
4. NusZea r_d, _gina _).
S. Ajusied contrd, (p_ina 10).
6, CombieI_ msnguera.
7. _an_e Is agitador,(p,_gnm17).
0.&6` Co.suite CAMBIO DE LA CORREAY LIMPIF-ZA
DELAGITADOR, (p_inas 15-16).
10. Ciem_bienla tal_.
1, Examinelas conexmnesel_J_zs, welva a con-
ectarlos extremosde la manguera,(p;_gina6).
3. Re,re cuaiquie_objetoatoradeo mscad_
kJegorest_tdez_, Si _ aspimderam dem
se ,_elve e apagar,limpieel _gdeder y los
tapas del extremosde _te, luegorestaUez_a.
(p_ginas 10, 15-16).
3. Restabiezcaprotectorretinal, (pagina11).
1.
2&3.
2-
C_necte bien,(pdgins5_).
ConsulteCAMB}ODE LACORREAY LIMPIEZA
DEL AGtTADO_ (l_girms 15-16),
ReSrecualquie_objetoatoradoo mscad_
luego resteUezca.Sila espiraderaerrancadem
se vue_e e opaga', limpieelagitadery los
tapas del e_trerr_ de _ste, iuego i_e_e,z_,
(p_gms 10, 15-16).
Ponga elintermptora la posid_ CARPET,
(pdgina7).
1. Cambie la bolsa,(p_gin_12).
3. Cambie ellil_os, (p_gi_a 13-14)
3. _esUoquee tas vfasde flujodeaire, (p_na 12).
4. Esto esnormal. [] indicadorde_ s_xnomml
cuande
la he_amientaest_quitada.
t. Ajusteel n_, (p_gina9).
3. ._brael conbd de aspiracide,(p_gina10).
1, Cambie la I_rnbifla, (p_ina 16).
1, Limpieel cord_ ek_trico.
2- Tire del cor_ )' despu_s enr_llelo.
t, Cortsu_eSUGERENCIASPARAASPIRAR,
(p_gina8),
18

19

20
Your Home
For repair - in your home - of all major brand appliances,
lawn and garden equipment, or heating and coolingsystems,
no matter who made it, no matter who sold itl
For the replacement parts, accessories and
owner's manuals that you need to do-it-yourself.
For Searsmprofessionalinstallationof home appliances
and items likegarage door openers and water heaters.
1-800-4-MY-HOME ® Anytime, day or night
(1-800-469-.4663) (U.S.A. and Canada)
www.seam.com www.sears.ca
Our Home
For repair of carry-in productslike vacuums, lawn equipment,
and electronics,call or go on-linefor the nearest
Sears Parts and Repair Canter.
1-800-488-1222 Anytime,dayornight(U.S.A.only)
www.sears.com
To purchase a protectionagreement (U.S.A.)
or maintenance agreement (Canada) on a productserviced by Seam:
1-800-827-6655 (U.S.A.) 1-800-361-6665 (Canada)
Para pedirservicio de reparad6n
a domicilio,y para ordenar piezas:
t-888.SU-HOGAR s_
(1-888-784-6427)
Au Canada pourservice en francis:
1.800-LE-FOYER ac
,, Lzars
© Sears, Roebuckand Co.
® Registered Trademark I "r_Trademark/ sa Service Mark ofSeam, Roebuckand Co.
® Marce Reglstrada I'rM Mama de F=ZbrlcaI suMama de SewIdo de Sears, Roebuck and Co.
tic Marque de commerce I MOMarque d&pos6ede Seam, Roebuckand Co.