Loading ...
Loading ...
Loading ...

- 7 -
08/2019
Copyright © 2019, Fast ČR, a.s.
EN
Hand Mixer
User'smanual
■ Prior to using this appliance, please read the user’smanual thoroughly, even in cases,
when one has already familiarised themselves with previous use of similar types of
appliances. Only use the appliance in the manner described in this user’smanual. Keep
this user’smanual in asafe place where it can be easily retrieved for future use.
■ We recommend saving the original cardboard box, packaging material, purchase
receipt and responsibility statement of the vendor or warranty card for at least the
duration of the legal liability for unsatisfactory performance or quality. In the event of
transportation, we recommend that you pack the appliance in the original box from the
manufacturer.
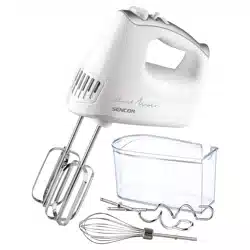
DESCRIPTION OF THE APPLIANCE
A1 Turbo pulse switch
for setting maximum speed
A2 Power and speed setting switch
A3 Button for releasing removable
attachments
A4 Motor unit
A5 Vents
A6 Holes for attaching removable
attachments
A7 Handle
A8 Set of beaters
A9 Set of kneading hooks
A10 Balloon whisk
A11 Removable attachment storage box
BEFORE FIRST USE
1. Remove all packaging materials, including promotional tags and labels from the
appliance and its accessories.
2. Use one hand to hold the storage box A11 and the other to grasp the motor unit A4 by
the handle A7 and take it o the box A11. Take the removable attachments out of the
box A11.
3. Thoroughly wash the storage box A11 and the removable attachments A8, A9, and
A10 that are intended to come into contact with food using warm water and aneutral
kitchen detergent. Then rinse everything with clean water and allow it to dry naturally
or dry it out thoroughly using awiping cloth. No part of this appliance is suitable for
washing in adishwasher.
Attention:
Do not rinse the motor unit A4 and its power cord under water
or submerge it in water.
INTENDED USE OF THE ATTACHMENTS
Attachment type Purpose of use
Beaters A8 Mixing and whipping
– batter dough, mashed potatoes, whipped cream, foam
from egg whites, creams, etc.
Kneading hooks A9 Kneading
– bread dough, fresh dough for pasta, pizza or biscuits,
pu dough, etc.
Balloon whisk A10 Whisking
– whipped cream, foam from egg whites, foam creams,
etc. Do not use it for mixing or kneading dough.
ASSEMBLING AND DISASSEMBLING THE APPLIANCE
■ Before you start assembling or disassembling the appliance, check that the switch A2 is
set to position 0 (o) and that the motor unit A4 is disconnected from the power socket
and that the rotating parts have come to acomplete stop.
■ Select attachment type A8, A9 or A10, that you wish to use and fasten it into the holes
A6 underneath the motor unit A4 (see g. B). The correct procedure must be followed
when inserting the attachments into the holes A6. Otherwise, the attachments could
come loose during operation. Insert the beater or hook with the ring into the left hole
and push it towards the motor unit A4 until it is secured in place. In the same way,
attach the other attachment of the same type into the right hole. Insert the balloon
whisk A10 only into the right hole.
Attention:
Never combine various types of accessories.
■ To remove the attachments, put the appliance into a vertical position and stand it
on an even surface. Press button A3. This will release the attachments from the holes
underneath the motor unit A4, and then it is easy to take them out. Do not use force to
remove the attachments.
Attention:
Button A3 cannot be pressed unless switch A2 is set to position
0 (turned o).
OPERATING THE APPLIANCE
1. Place the food and liquids that you wish to process into asuciently large container.
2. Assemble the appliance according to the instructions in the chapter Assembling and
disassembling the appliance. Unwind the full length of the power cord and connect the
appliance to apower socket.
3. Submerge the attachments into the container with the ingredients, then start the
appliance by setting switch A2 to the required speed level in the range from 1 to 5. To
initially stir in the ingredients, we recommend that you rst set alower speed and then
adjust it as required. For kneading dough, use only speed 1. To prevent the ingredients
from splashing out of the container during operation, keep the attachments
submerged in the container.
Attention:
The maximum continuous operating time of the appliance is
10 minutes. Before using it again, allow the appliance to cool
down for 15 minutes. When kneading heavy, thick doughs,
do not leave the appliance running for more than 5 minutes.
4. Hold down the pulse button A1 to run the appliance at maximum speed. To prevent the
appliance from overheating, do not use this button for longer than 30 seconds.
5. After you have nished using the appliance, set switch A2 to position 0 (o) and
disconnect the power cord from the power socket. Make sure that the rotating parts
have stopped rotating. Put the appliance into avertical position and stand it on an even
surface. Remove all the used attachments and then clean all the used parts according
to the instructions in chapter Cleaning and maintenance.
QUICK GUIDE TO PROCESSING INGREDIENTS
Beaters A8
Type of ingredients
or meals
Amount Processing time Recommended
speed setting
Creams approx.
600 g
approx.5 minutes level 4
Mashed potatoes max. 750 g max. 3.5 minutes level 3-4
Whipped cream max. 500 g max. 5 minutes level 5
Egg whites max. 5 egg
whites
approx. 3 minutes level 5
Batter approx.
600 g
approx. 5 minutes level 3-4
Kneading hooks A9
Type of ingredients
or meals
Amount Processing time Speed setting
Bread dough max. 500 g
of our
2× 5 minutes level 1
Dough for fresh
pasta
max. 300 g
of our
5 minutes level 1
Balloon whisk A10
Type of ingredients
or meals
Amount Processing time Recommended
speed setting
Whipped cream max. 500 g max. 5 minutes level 5
Egg whites max. 5 egg
whites
approx. 3 minutes level 5
Whipped foam approx. 600 g approx. 1 minute level 1
Note:
The above processing times are only areference.
When whipping egg whites, the container and attachments must be
perfectly clean and dry. Even asmall amount of fat may cause the egg
whites not be whipped to the desired snowy consistency.
Whipping cream should be cooled to atemperature of 6 °C prior to being
whipped.
Prior to processing them, allow the ingredients used for making various
doughs to rest at room temperature.
Loading ...