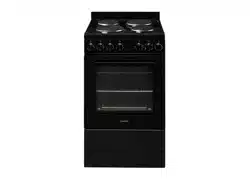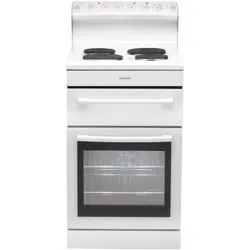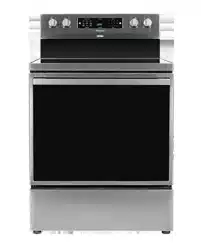

INSTRUCTIONS FOR USE
ELECTRIC RANGE

We thank you for your trust and the purchase of our appliance.
This detailed instruction manual is supplied to make the use of this product easier. The
instructions should allow you to learn about your new appliance as quickly as possible.
Make sure you have received an undamaged appliance. If you do find transport damage,
please contact the seller from which you purchased the appliance, or the regional
warehouse from which it was supplied. The telephone number can be found on the
invoice or on the delivery note.
The appliance has to be connected in compliance with the effective regulations, and it
may only be used in well ventilated areas. Read the instructions before connecting or
using the appliance.
Instructions for use are also available at our website:
http://www.hisense.com
The following symbols are used throughout the manual and they have the following meanings:
INFORMATION!
Information, advice, tip, or recommendation
WARNING!
Warning – general danger

Contents
4Important safety information .................................................................................................
4Tip-Over hazard ........................................................................................................................
4Anti-Tip Bracket ........................................................................................................................
11Appliance description .............................................................................................................
11Rating plate - information about the appliance ........................................................................
12Cooktop ...................................................................................................................................
12Cooking zones ..........................................................................................................................
12Glass ceramic cooking surface .................................................................................................
13Operating the cooktop ..............................................................................................................
15Oven .........................................................................................................................................
15Control unit ...............................................................................................................................
16Using the appliance ..................................................................................................................
16Settings .....................................................................................................................................
20Oven functions ..........................................................................................................................
21Baking .......................................................................................................................................
21Baking tips ................................................................................................................................
22Baking modes ...........................................................................................................................
25Extra functions ..........................................................................................................................
28Child Lock .................................................................................................................................
28Light ..........................................................................................................................................
28Switching off .............................................................................................................................
29Food table .................................................................................................................................
30Cleaning and maintenance ....................................................................................................
30Daily exterior cleaning ...............................................................................................................
30Cleaning control panel ..............................................................................................................
30Cleaning glass cooktop ............................................................................................................
31Light bulb ..................................................................................................................................
31Storage drawer .........................................................................................................................
32Removing and inserting the oven door .....................................................................................
33Potential issues/troubleshoot ................................................................................................
33Troubleshooting table ...............................................................................................................
35Baking problems and tips .........................................................................................................
36Disposal ...................................................................................................................................
3
Important safety information
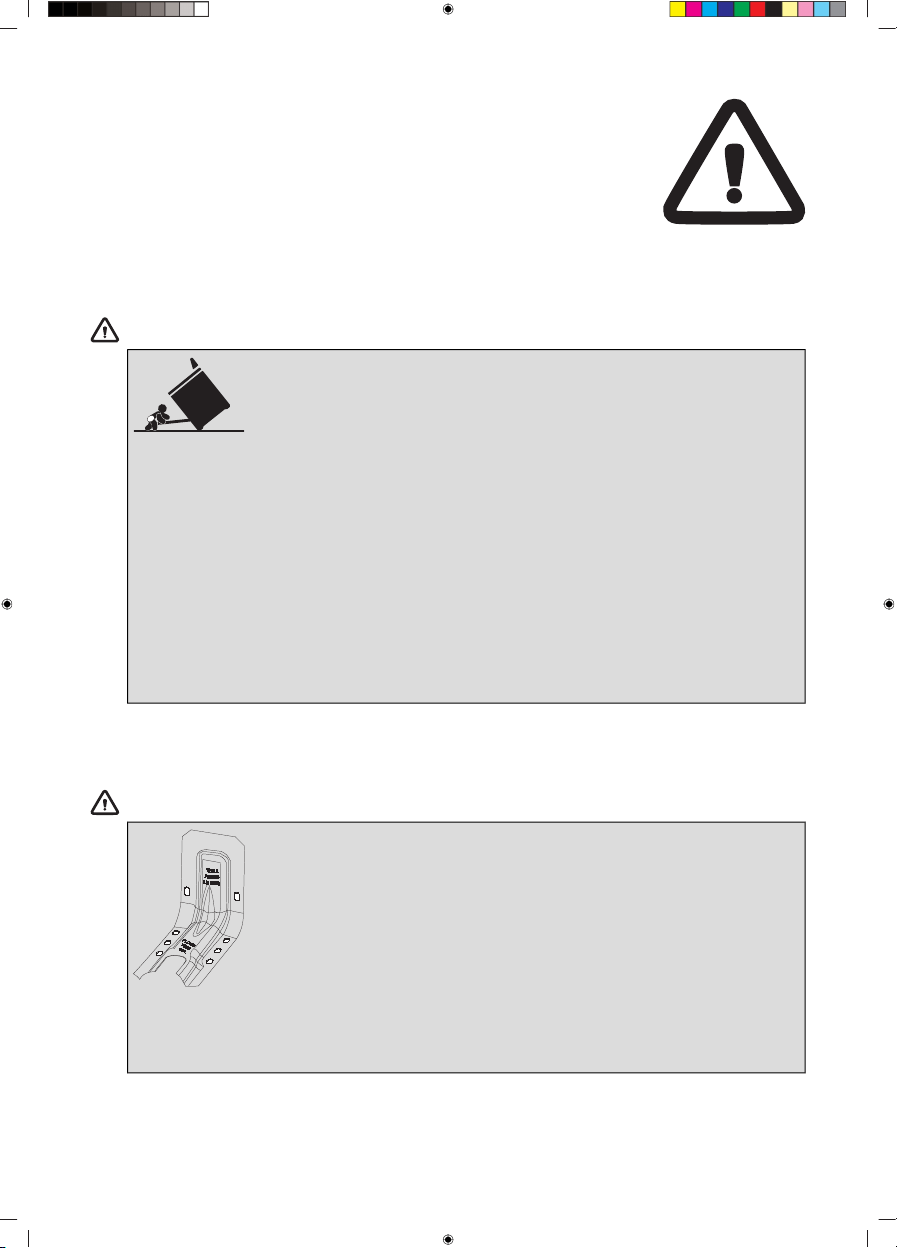
Tip-Over hazard
WARNING!
A. A child or adult can tip the range and
be killed.
B. Verify the anti-tip device has been
properly installed and engaged (See
installation instruction for details).
C. Ensure the anti-tip device is
re-engaged when the range is moved
(See installation instruction for details).
D. Do not operate the range without
the anti-tip device in place and
engaged.
Anti-Tip Bracket
WARNING!
•
To reduce the risk of tipping the
range, the range must be secured
by a properly installed anti-tip
bracket.
•
See installation instructions shipped
with the bracket for complete details
before attempting to install.
4

GENERAL SAFETY INSTRUCTIONS:
WARNING!
NEVER use this appliance as a space heater to heat or
warm the room.
Keep these safety precautions, so they are available for review
by your local inspector.
Make sure your appliance is properly installed and grounded
by a qualified technician.
Never use the appliance for heating a room.
Do not leave children unsupervised. Children should never be
left alone or unsupervised in the appliance's area. Never allow
children to sit or stand on any part of the appliance.
Wear suitable clothing. When using the appliance, do not wear
loose clothing or clothing with hanging parts.
Do not attempt to repair or replace any part of the appliance,
unless this is specifically recommended in the manual. A trained
service technician shall carry out all other servicing or repairs.
Do not use water to extinguish a grease fire. Smother the fire
or flame, or use a dry chemical or foam-type extinguisher.
Use only dry potholders. Moist or damp potholders on hot
surfaces may result in burns from steam. Do not let the
potholders touch hot heating elements. Do not use a towel or
other bulky cloth in place of a potholder.
5

During use of the appliance some condensation could appear
on the control panel. This will not affect functioning of the
appliance.
STORING ITEMS IN OR ON THE APPLIANCE:
Do not store items of interest to children in cabinets above the
cooking range or on the back guard of the cooking range.
Children climbing onto the range to reach items could be
seriously injured.
Do not store any flammable materials or substances in the oven
or near the cooking zones or burners of the appliance.
BOTTOM STORAGE DRAWER SAFETY INSTRUCTIONS:
Do not leave paper products, plastics, canned food, or
combustible materials in the drawer. They may ignite.
Use care when opening the bottom storage drawer.
6

COOKTOP SAFETY INSTRUCTIONS:
Use the proper pan size. This appliance is equipped with one
or more surface units of different sizes. Select cookware with
flat bottoms large enough to cover the burner. The use of
undersized cookware will expose a portion of the heating
element to direct contact and may result in the ignition of
clothing. Proper relationship of cookware to burner will also
improve efficiency.
Never leave the cooking zones unattended at medium or high
heat settings. Foods, especially oily foods, may ignite resulting
in a fire that could spread to surrounding cabinets.
Only certain glass, glass/ceramic, ceramic, earthenware, or
other glazed cookware or utensils are suitable for use on the
cooktop without breaking due to the sudden temperature
change.
Cookware handles should be turned inward and not extend
over adjacent cooking zones. To reduce the risk of burns,
ignition of flammable materials, and spillage due to unintentional
contact with the cookware, the cookware handles should be
positioned so that they are turned inward and that they do not
extend over adjacent cooking zones.
7

OVEN SAFETY INSTRUCTIONS:
Be careful when opening the oven door. Let the hot air or steam
escape before removing or replacing food.
Do not heat unopened food containers. Build-up of pressure
may cause the container to burst, which may result in injury.
Never place cooking utensils, pizza or baking stones, or any
type of foil or liner on the oven floor. These items can trap heat
or melt, resulting in damage to the product and risk of shock,
smoke, or fire.
Do not leave items on the cooktop near the oven vent. Items
may overheat, resulting in a risk of fire or burns.
Always place oven racks in the desired location while the oven
is cool. If you have to move a rack while the oven is hot, do not
let the potholder come into contact with any hot heating element
in the oven.
Never broil with the door open.
Ensure that aluminum foil and meat probes are prevented from
contacting the heating elements (including sheathed type
surface elements).
SELF-CLEANING OVEN SAFETY INSTRUCTIONS:
CAUTION: DO NOT LEAVE FOOD OR COOKING UTENSILS,
ETC., IN THE OVEN DURING THE SELF-CLEANING MODE.
Do not clean the door gasket. The door gasket is essential for
a good seal. Care should be taken not to rub, damage, or move
the gasket.
8

Do not touch oven door surfaces during self-clean operation.
Keep children away from the oven during self-cleaning. Failure
to follow these instructions may cause burns.
Before operating the self-clean cycle, remove pans, shiny metal
oven racks and other utensils from the oven.
Before operating the self-clean cycle, wipe grease and food
soils from the oven. An excessive amount of grease may ignite
causing a fire hazard and smoke damage.
Do not use oven cleaners. No commercial oven cleaner or oven
liner protective coating of any kind should be used in or around
any part of the oven.
Only clean the parts specified in the manual.
IMPORTANT: The health of some birds is extremely sensitive
to the fumes given off during the self-cleaning cycle of any
range. Move birds to another well-ventilated room.
Be careful when handling hot grease container and disposing
hot grease.
GLASS/CERAMIC COOKING BURNERS SAFETY
INSTRUCTIONS:
Do not cook on a broken cooktop. If the cooktop breaks,
cleaning solutions and spillovers may penetrate the broken
cooktop, which in turn results in a risk of electric shock. Contact
a qualified technician immediately.
9

Be careful when cleaning the cooktop. If you use a wet sponge
or cloth to wipe spills on a hot cooking area, be careful to avoid
steam burn. Some cleaners can produce noxious fumes if
applied to a hot surface.
DURING AND AFTER USE DO NOT TOUCH THE COOKING
ZONES OR AREAS NEAR THEM – Cooking zones may be hot
even when they are dark in color. Areas near cooking zones
may become hot enough to cause burns. During and after use,
do not touch, or let clothing or other flammable materials come
into contact with the cooking zones or areas near them, until
they have had sufficient time to cool.
10
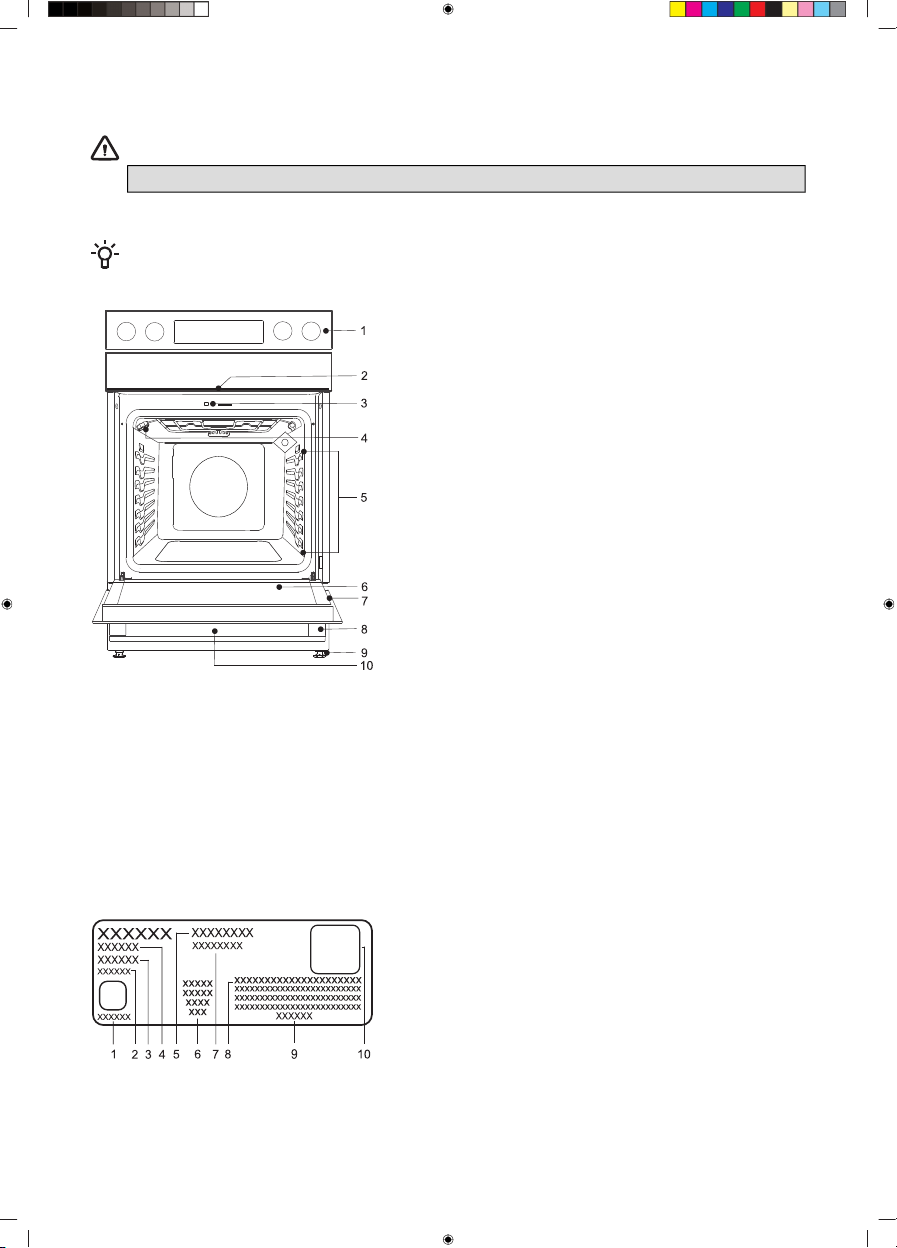
Appliance description
WARNING!
Before use, read the safety instruction first!
INFORMATION!
Throughout this manual, features and appearance may vary from your model.
6 Oven door1 Control unit
7 Rating plate2 Cooktop
8 Door handle3 Door lock with switch
9 Foot4 Light
10 Drawer5 Guides - 7 cooking levels
Rating plate - information about the appliance
The rating plate indicating the basic information about the appliance is located at the edge of the
drawer.
1 UL symbol
2 Serial number
3 Code
4 Model
5 Brand
6 UL standard
7 Technical data
8 AUID number
9 Manufacturer address
10 QR Code
11
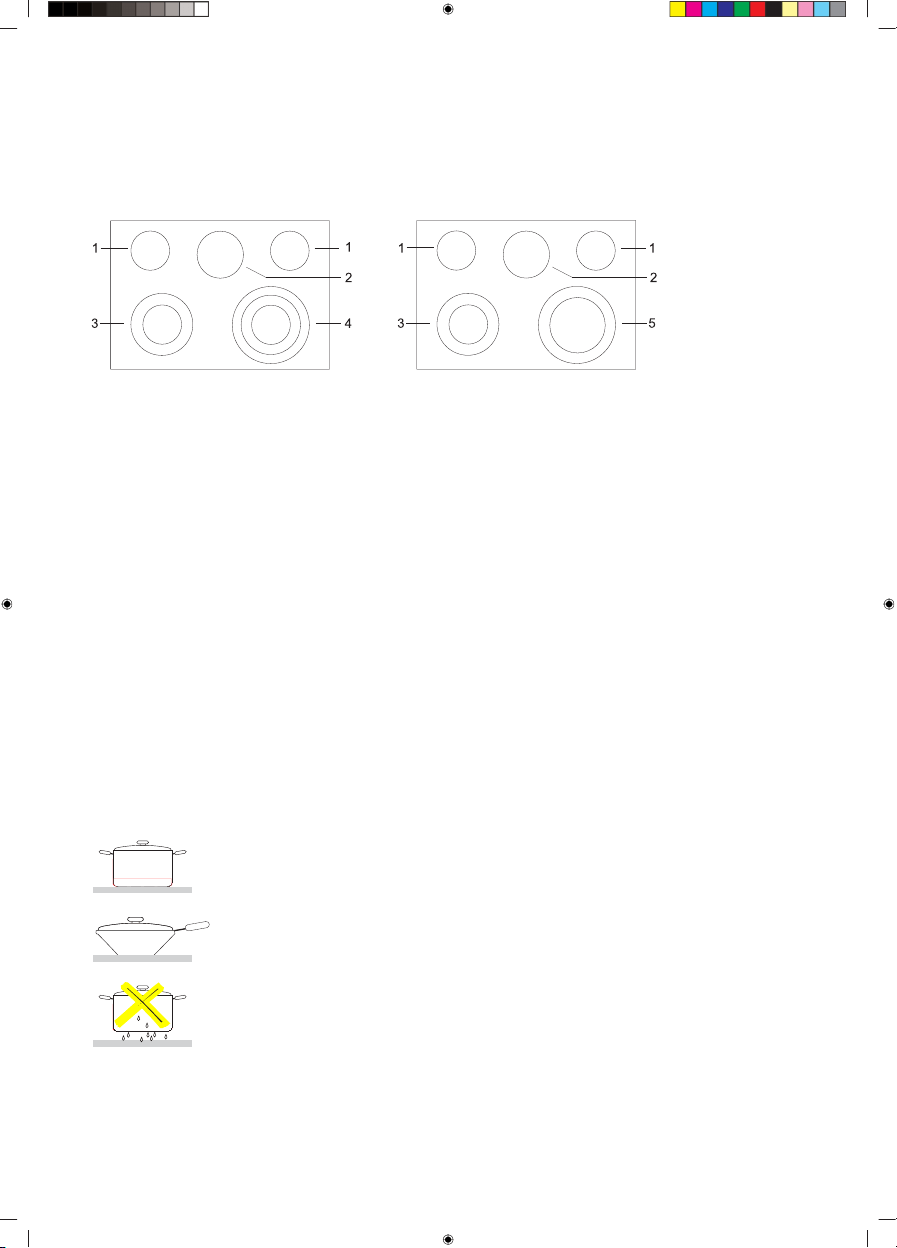
Cooktop
Cooking zones
(depending on the model)
4 Triple-ring cooking zone:1 Cooking zone ø 6'' - 1200 W
2 Cooking zone ø 7'' - 100 W (Warm Zone)
• ø 6'' - 1050 W
3 Double-ring cooking zone:
• ø 8'' - 1950 W
ø 12'' - 3000 W• ø 6'' - 1400 W
• ø 9'' - 3300 W
5 Double-ring cooking zone:
• ø 8'' - 1900 W
• ø 12'' - 3000 W
Glass ceramic cooking surface
• Cooktop surface is made of smooth glass; heaters are placed under the cooking zones.
• Cooking zone temperature rises gradually and evenly. When the temperature is rises, the cooking
zone will glow red.
• The cooking zone will switch on and off to maintain the selected setting. The cooking zone will
retain enough heat to deliver even heat during operation.
• For more efficient cooking, switch off the cooking zone 5 minutes before the end of the cooking
process. The appliance will finish cooking using the remaining heat.
Safety tips for cooking
• Use quality cookware with a flat and stable bottom.
• Only use a flat-bottomed wok.
• Do not place wet cookware in the cooking zone.
• Make sure the pots and pans are placed in the middle of the cooking
zone.
• Pan bottom diameter should be equal to the cooking zone diameter.
• When using special cookware, observe the cookware manufacturer's
instructions.
12
Preventing scratches and stains
• Do not use abrasive cleaners or sponges that could scratch the cooktop.
• Do not use chlorine-based bleach, ammonia, or other cleaners not expressly recommended for
cleaning the glass- ceramic surface.
• Do not use glass cookware as it could scratch the cooktop surface.
• Do not place a wok ring on the cooktop, as it could damage or scratch the cooktop.
• Make sure the cooktop and the pan bottom are always clean.
• Do not slide metal cookware across the cooktop.
• Do not use dirty cloths to clean your cooktop. They will leave behind a layer of dirt that could
cause permanent stains on the cooktop.
Preventing other damage
• Do not place plastic objects, sugar or food with high sugar content onto the cooking zone. If this
happens, immediately clean the cooktop.
• Do not cook food directly on the cooktop.
• Always use suitable cookware.
Operating the cooktop
WARNING!
DANGER OF FIRE: Never leave the area in which the cooktop is used unsupervised.
Always supervise the cooking process. Do not store any items on the cooktop surface.
Failure to observe these instructions could lead to fire, severe injuries, or death.
INFORMATION!
Before using the cooktop, clean the glass-ceramic surface using a damp cloth and some mild
cleaner safe for the cooktop surface. During initial use, a characteristic "New appliance smell"
may appear; it will gradually disappear.
Do not use aggressive cleaners, such as abrasive cleaners that could cause scratches, abrasive
dishwashing sponges, or stain removers.
Use only cleaners safe for cooktop surfaces.
Switching on the cooking zone
Switch on the cooking zones using the knobs on the control panel. A
surface ON indicator light will glow when any surface unit is on. The
symbols indicate the respective cooking zones that the knobs control.
Push the knob inwards and rotate it in any direction to the setting you
want.
Warm Zone function can be operated using control unit.
Dual and Triple Surface units (on some models)
An additional heater ring can be activated for some cooking zones (depending on the model). Push
the knob inwards and rotate it in any direction to the desired position.
13
Hot surface indicator
When on, the indicator light warns that the cooking zone is hot (danger of burns). The hot surface
indicator will remain lit when the cooking zone is switched off until the cooktop cools down to
approximately 150 °F.
WARNING!
Do not touch the cooktop until the cooking zones have fully cooled down.
The surface could still be hot and touching the glass surface before it is sufficiently cool
may result in burns.
After the hot surface indicator light is turned off, immediately clean any spills of food
residue from the cooktop as it will be harder to clean them later on.
If there is a storage cupboard directly above the cooktop, make sure the items stored
there are rarely used and that they can be safely stored in the area exposed to heat. High
temperature can be dangerous to items, such as volatile liquid, cleaners or sprays.
Warm Zone
WARNING!
FOOD POISONING HAZARD: if the food has not been sufficiently cooked the Warm Zone
function can contribute to development of harmful bacteria in the food.
Activate the Warm Zone function by pressing the Warm Zone key. Signs MID and CONFIRM will
start flashing on the display unit. The intensity of the Warm Zone can be adjusted by pressing Warm
Zone. Press once to increase the intensity; HIGH will flash on the display unit. Press twice to decrease
the intensity; LOW will flash on the display unit. Then, Activate the function by pressing
key.
• Placing uncooked or cold food in the Warm Zone could result in foodborne illness.
• For best results, all food should be covered with a lid or aluminium foli.
• When removing food from the Warm Zone, cookware and plates will be hot; use potholders or
oven mitts.
• Always start with hot food.
14
Oven
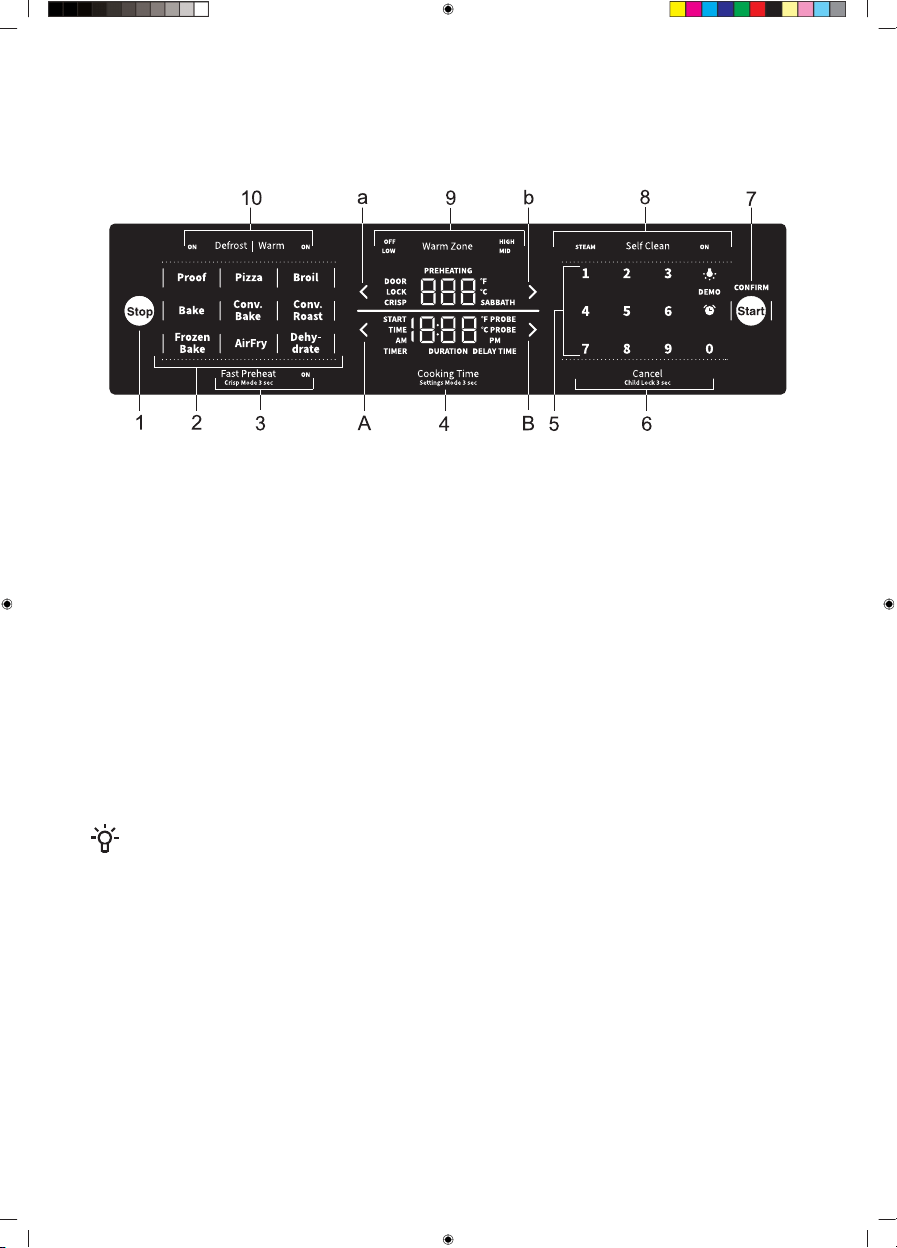
Control unit
6 Cancel/Child Lock1 Stop
7 Start/Confirm2 Baking modes
8 Cleaning- Proof
- Steam Clean- Pizza
- Self Clean- Broil
9 Warm Zone- Bake
10 Defrost/Warm- Convection Bake
Time Settings- Convection Roast
A Decrease time- Frozen Bake
B Increase time- AirFry
Temperature Settings- Dehydrate
a Decrease temperature3 Fast Preheat/Crisp Mode
b Increase temperature4 Cooking Time/Settings Mode
5 Keypad
Touch the keys with a larger area of your fingertip for a better key response. Each time you press a
key, this will be acknowledged by a short acoustic signal.
INFORMATION!
Appliance functions depend on the model.
15
Using the appliance
Switching on for the first time
After connecting your appliance to the power for the first time, or after
an extended power outage, 12:00 will flash on display.
To activate the appliance, briefly press the key.
NOTE!
After powering on the appliance "DOOR LOCK" will be illuminated on the user interface for the
first few seconds. This is the normal initialization process of the door lock. After the "DOOR
LOCK" sign disappears, the appliance is ready to use. Please do not open the door when the
"DOOR LOCK" sign is illuminated.
INFORMATION!
If you do not press any key within 30 seconds and no program is activated, the oven will
automatically switch to standby mode. A clock will appear on the display unit. The appliance can
also be switched to standby mode if a cooking system has been selected, but the oven is not
active.
Settings
Choose settings by pressing the Cooking Time/Settings Mode key and holding it for 3 seconds.
Use the temperature settings keys to scroll through the menu. Confirm any changes by pressing
the
key.
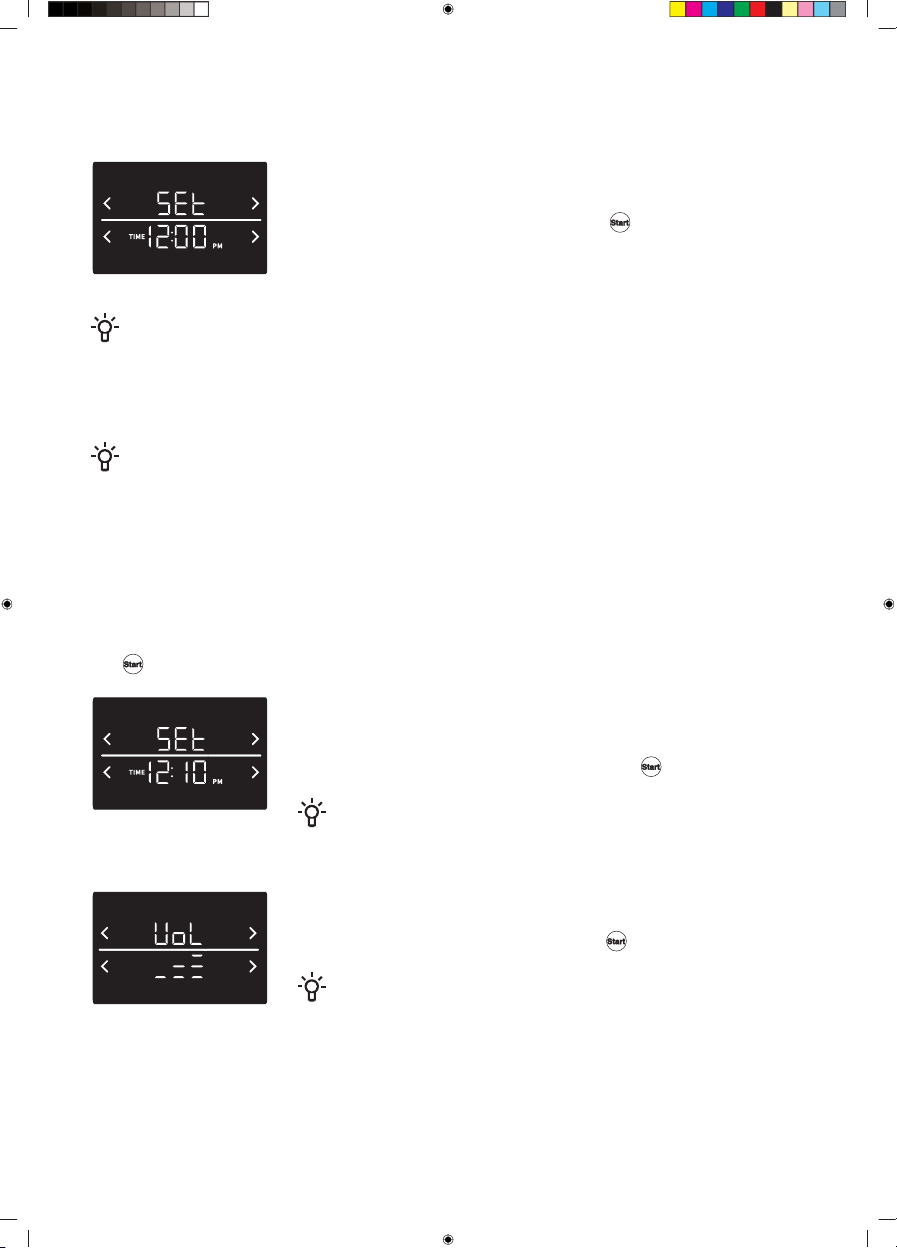
Setting the clock
World Time is always shown on the lower display. The first 2 digits are
hours and the third and fourth digits are minutes. Use the Keypad keys
to set the time. Confirm your selection with the
key.
INFORMATION!
AM/PM is automatically changed when time exceeds 12:00.
Setting the volume
You can choose between three control unit volume levels, and silent
operation. Confirm your selection with the
key.
INFORMATION!
When the silent operation is selected, oFF will appear at the bottom
of the display unit.
16

Control unit brightness
You can choose between three display brightness intensity levels. Confirm
the selection by pressing the key.
Factory settings
This function allows resetting the appliance to factory settings. Fct will
appear on display. Press the temperature increase or decrease key to
choose between rES (for factory defaults) or oFF (for keeping the current
settings). Confirm your selection by pressing .
Temperature unit
Select either degree Fahrenheit (°F) or degrees Celsius (°C). Confirm your
selection with the key.
Auto Fast Preheat
You can set whether Fast Preheat is automatically activated on the
selected function or not, by setting Auto Fast Preheat to either ON or
OFF. Confirm your selection with the key.
Sabbath Mode
Allows keeping the food warm in the oven without having to switch the
oven on or off.
The Sabbath mode function complies with standards set forth by
Star K.
Sabbath Mode function can be activated in the settings menu. When
activated, ON will start flashing. Then, touch the
key and the
SABBATH sign will start flashing as well.
17
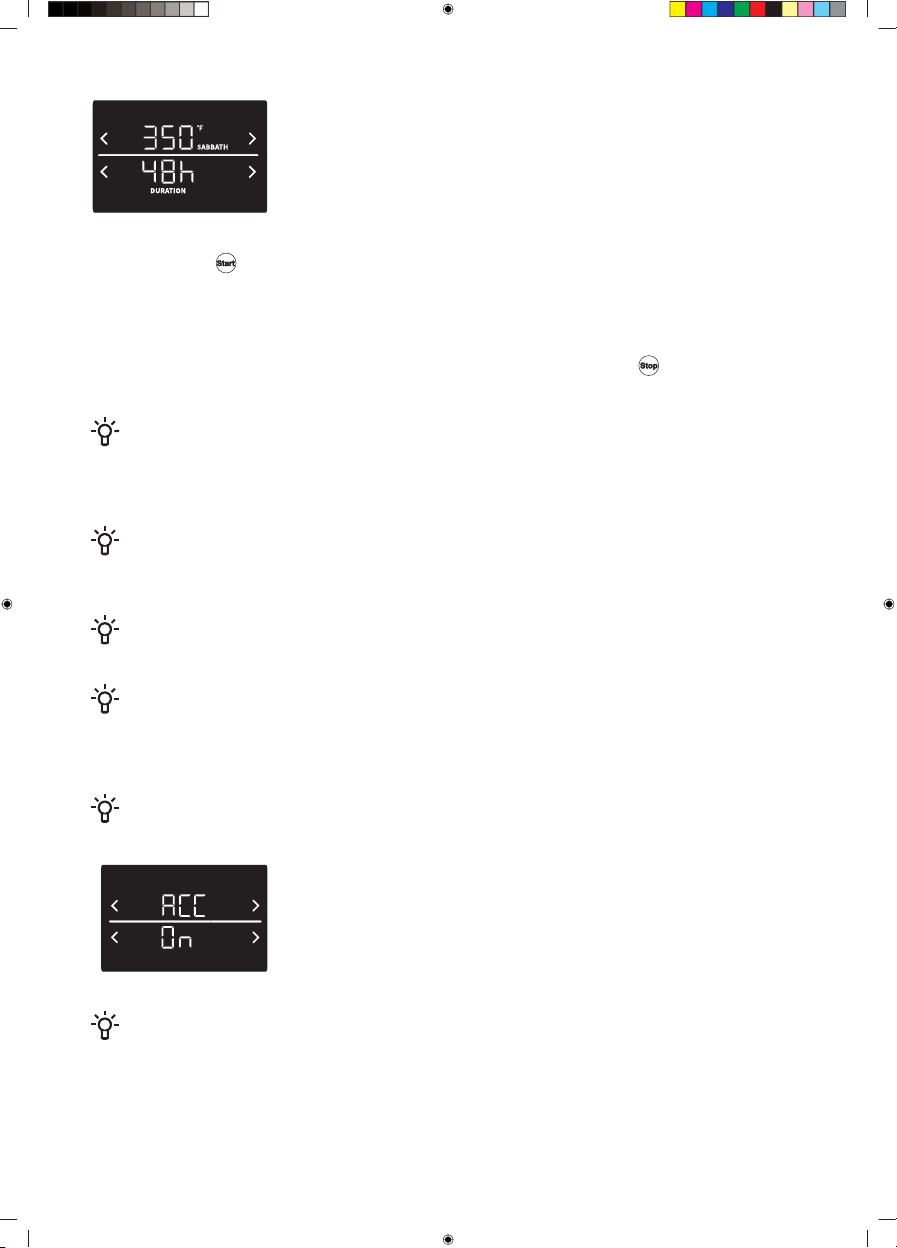
Baking during Sabbath Mode. Set the baking temperature and time.
The default temperature of 350 °F is displayed at the top of the display
unit. You may adjust the temperature in the range from 175 °F to the
maximum possible setting of 425 °F. The default time of 48 hours is
indicated at the bottom of the display unit. You can set it in the range
from 1 hour to 74 hours.
Briefly press the key to start the Sabbath Mode function. The oven starts heating up after 30
seconds.
The Sabbath Mode function is active for 74 hours, after that the function is automatically switched
off.
The Sabbath Mode function can be deactivated at any time by pressing the
key. When the
Sabbath Mode is active, the temperature or time cannot be changed.
INFORMATION!
In the case that during active Sabbath Mode any error is triggered, all the heaters are turned off,
and an error message is displayed on the user interface, but there is no audible tone to indicate
this.
INFORMATION!
Suppose the power failure occurs while in Sabbath Mode ; the appliance will return to Sabbath
Mode without heating. The 74h countdown, will start again from 74h.
INFORMATION!
During active Sabbath Mode, the Child Lock and Warm function function are disabled.
INFORMATION!
When the Sabbath Mode is active, the oven light is off, and it does not switch on when the oven
door is opened.
All sounds are deactivated as well.
INFORMATION!
Only the Bake function is enabled in the Sabbath Mode.
Automatic Convection Conversion
When Automatic Convection Conversion is turned ON, the function will
automatically convert the regular baking temperatures to convection
bake cooking temperatures. This feature may be turned on or off.
NOTE!
Note that this option does not convert convection bake cooking times; it only converts
temperatures.
18
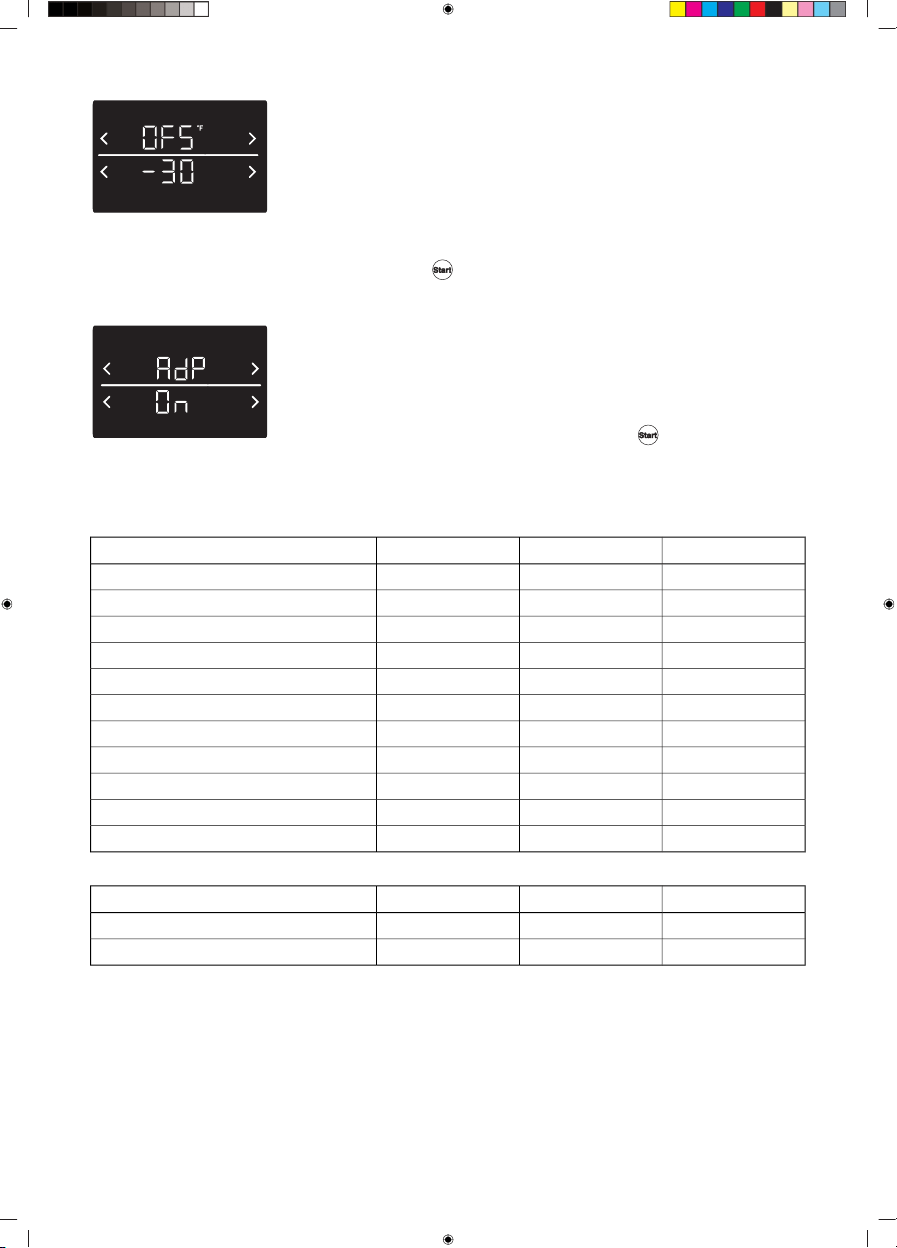
Temperature offset
The temperature in the oven has been calibrated at the factory. When
first using the oven, be sure to follow recipe times and temperatures. If
you think the oven is too hot or too cool, you can adjust the temperature
in the oven. Before correcting, test a recipe by using a temperature setting
that is higher or lower than the recommended temperature. The baking
results should help you decide how much adjustment is needed. The
oven temperature can be changed from -30°F to +30°F. Confirm your
selection with the key.
Adapt Sense
The Adapt Sense (AdP) function will propose the most frequently used
temperature setting when the following systems (Bake , Frozen Bake,
Warm, Convection Bake, Convection Roast, AirFry, Pizza, Dehydrate)
are activated. The factory setting for this function is OFF; you can activate
it is ON and confirms your choice by pressing .
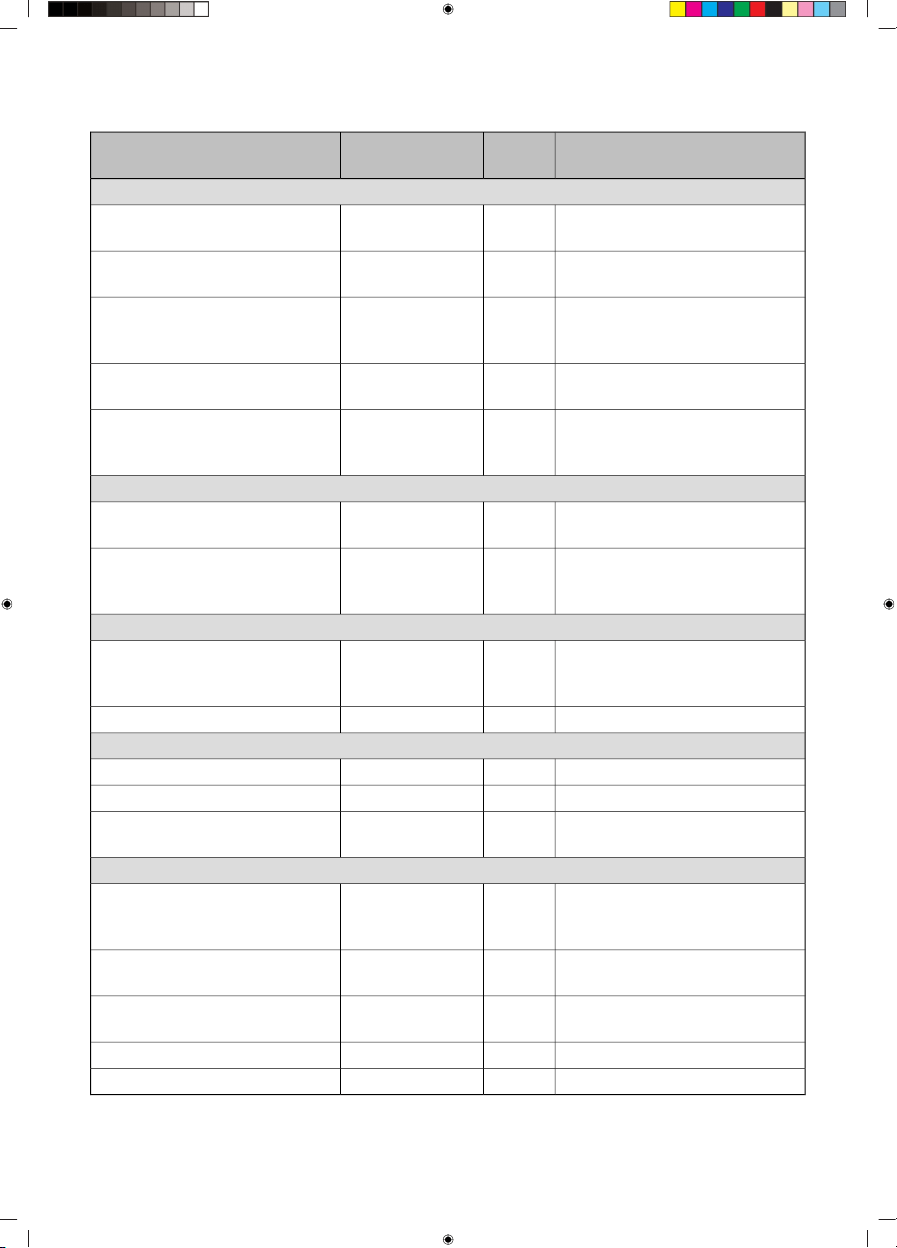
Minimum and maximum settings
All of the programs listed in the table below have minimum and maximum temperature or time settings.
DefaultMaxMinProgram
350 °F550 °F175 °FBake
325 °F480 °F265 °FFrozen Bake
HIHILOBroil
150 °F210 °F140 °FWarm
325 °F550 °F175 °FConvection Bake
325 °F550 °F175 °FConvection Roast
425 °F500 °F300 °FAirFry
100 °F100 °F100 °FProof
425 °F550 °F300 °FPizza
100 °F100 °F100 °FDefrost
150 °F175 °F100 °FDehydrate
Default (h:min)Max (h:min)Min (h:min)Program
3:005:002:00Self Clean
0:300:300:30Steam Clean
19
Oven functions
Oven functions include Baking modes: Proof, Pizza, Broil, Bake, Convection Bake, Convection Roast,
Frozen Bake, AirFry, Dehydrate and some Extra modes: Fast Preheat, Crisp Mode, Self Clean, Steam
Clean, Defrost and Warm. All oven functions are activated in two steps:
1. First, press the key for the selected mode. The indicator around it will light up and the indicator
around
will start to flash.
2.
Then, activate the selected mode by pressing the
key. The indicator around the selected
mode and the indicator around will be lit.
Default temperature will be displayed at the top of the display unit.
You can set the temperature using
or key or keypad.
INFORMATION!
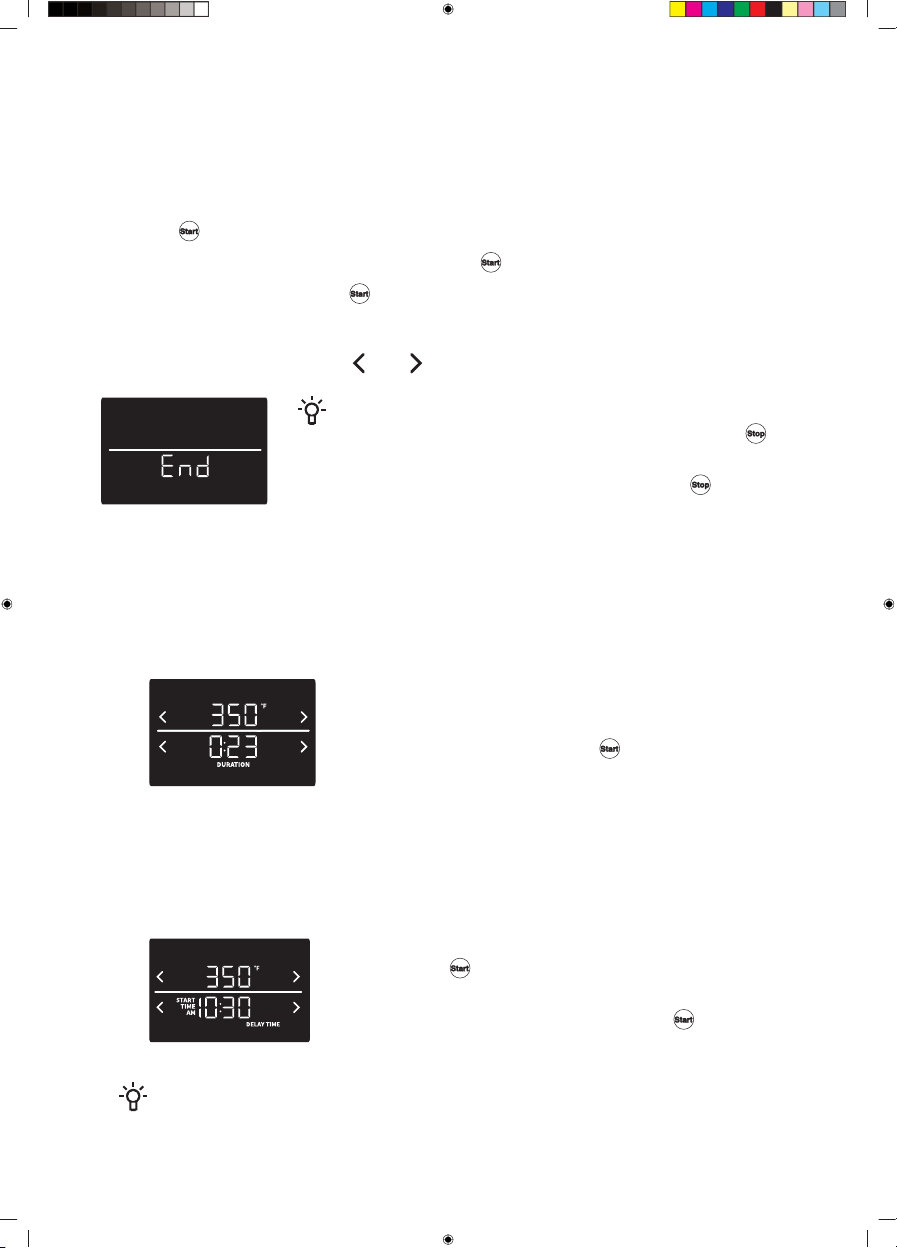
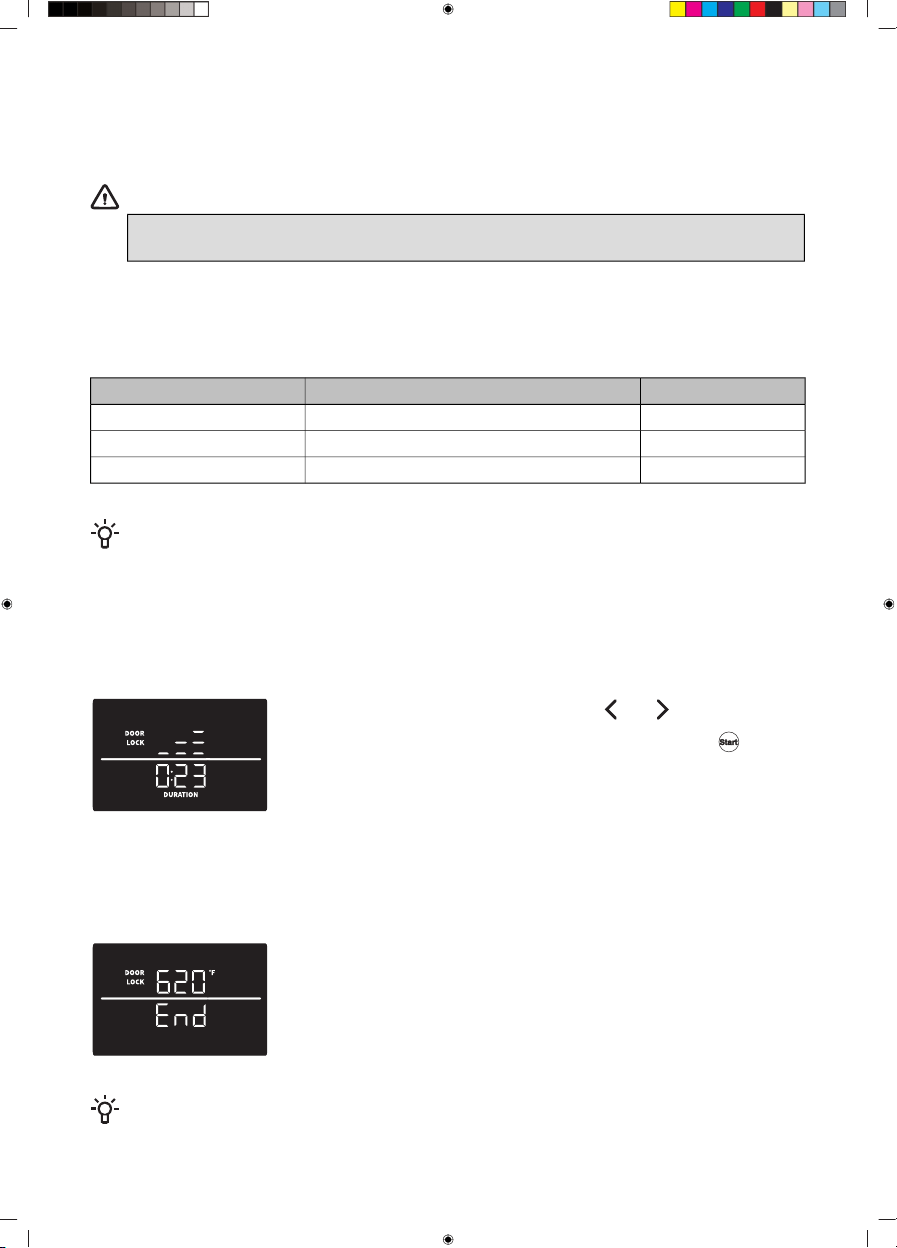
All oven functions can be stopped by briefly pressing the
key.
End will display on the screen. The appliance will automatically go
to a standby state after 5 minutes or if you press again.
Cooking Time
You can set Cooking Time by pressing the Cooking Time key, before you activate the function or
while the function is active.
Cooking Time includes duration and delay. You can set it in the next ways.
1. Duration – set the duration for the selected oven function.
• Position the oven rack(s) and place the food in the oven.
• Select desired baking function.
• Press the Cooking Time key.
•
Set desired duration and touch
or Cooking Time key to
confirm the setting.
• When the set duration expires, the oven function is switched
off.
2. Delay Time – use this option when you wish to activate a function after a certain period of time.
• Position the oven rack(s) and place the food in the oven.
• Select desired baking function.
• Press the Cooking Time twice.
• Set desired delay (start time).
•
Touch the
or Cooking Time to confirm the setting.
• The oven will begin to bake with selected delay.
•
Delay can be deactivated by pressing the
and the oven
will immediately start baking.
INFORMATION!
Duration and delay can be used at the same time. The function will start with a set delay and
when the delay expires. Function will start and the duration will be shown.
20

INFORMATION!
If you want to cancel duration and delay, press Cooking Time and when DURATION or
DELAY TIME signs is blinking; press the Cancel key.
Timer
Set the time by pressing the key. After you set the time press again and the timer will be
confirmed. If you do not confirm the timer it will be automatically confirmed after 10 seconds. When
the time expires, an alarm will sound.
NOTE!
The timer does not start or stop cooking functions. You can use the timer with any of the other
oven functions.
If you want to cancel the timer, press
the key so that the TIMER sign starts to blink and
then press the Cancel key.
Baking
• Remove all unnecessary equipment from the oven during baking.
• If at all possible, do not open the oven during baking.
• Do not place baking dishes, sheets, or trays directly onto the bottom of the oven cavity.
• Always place the baking dishes in the center of the wire rack.
• When cooking larger cuts of meat or pastry with higher water content, a lot of steam will be
generated inside the oven, which in turn may condense on the oven door. This is a normal
phenomen on that will not affect the appliance's operation. After the cooking process, wipe the
door and the door glass dry.
• Place the deep baking tray one level lower to function as a drip tray when using the wire rack.
• When making cakes or pastry, use light-colored baking dishes or molds (biscuits, cupcakes).
• Use dark-colored baking dishes for pies and tarts.
Baking tips
Preheating
When you start, the appliance will be in preheating phase until the set temperature is reached. Some
of the functions have automatically set Fast Preheat. This functioning can be changed in settings.
If you are preheating the oven with the fast preheat function, do not place the food into the oven until
the oven is fully heated. When the appliance reaches set temperature, an audible signal is played,
PREHEATING sign will turn OFF and on the upper display only set temperature will be shown.
You can see the temperature rise on the user interface. Rapid preheating is recommended for delicate
cuts of meat (sirloin), as well as for yeast-leavened and sponge dough.
INFORMATION!
Heating an empty oven consumes a lot of energy. Therefore, we recommend cooking several
dishes in succession, or making several dishes simultaneously.
INFORMATION!
Some baking functions use low temperatures and preheating is not necessary. In this case
PREHEATING will not be shown on display.
21
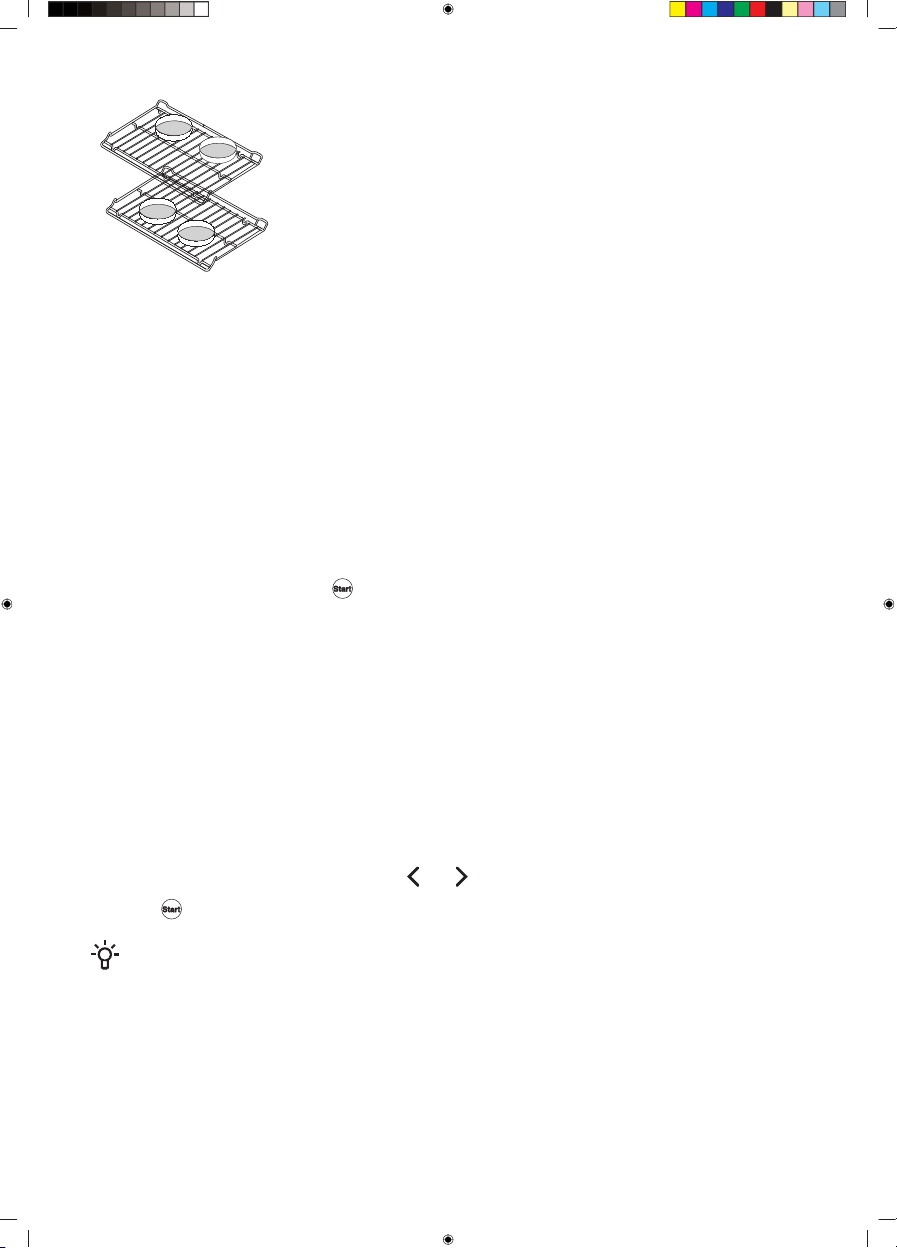
Multi-level baking
• Use the Convection Bake system for baking on multiple levels
simultaneously.
• Recommended baking levels: 3 and 5
• Arrange smaller baking dishes as indicated in the figure. This way,
you will allow adequate room for air circulation around the food,
which in turn allows correct baking.
Baking modes
Bake
This mode is intended for baking food on a single rack. The oven should be preheated when baking
pastry, biscuits, and cakes.
Frozen Bake
This method allows baking frozen food on a single rack in a shorter period of time without pre-heating.
Optimum for pre-baked frozen products (frozen meals, bakery products, croissants, French fries,
chicken nuggets).
Follow the recipe or package directions for frozen products preparation (time, and temperature). Use
the Frozen Bake system for baking.
Press Frozen Bake to activate the function. Set the temperature, baking time and preheating if required.
Confirm the settings by pressing
.
Broil
This mode is intended for baking flat food (toasted bread, open sandwiches, burgers, grill sausages,
steaks, fish, etc.) or for Au gratin.
The top heater uniformly heats the entire surface, baking the food evenly regardless of where it is
under the heater. Recommended baking levels: 6 and 7 You can choose Broil HI and Broil LO.
Broil HI
Use it to grill large amounts of flat-shaped food like toast, open sandwiches, grill sausages, fish,
skewers, etc., cook au gratin and brown the crust.
Broil LO
Use it to prepare flat food, when you want the food to be crunchy.
To activate the function, press Broil. Press
or select the intensity and activate it by
pressing .
INFORMATION!
Recommended temperature is preset.
Regular use:
• Always keep the oven door closed when using the broil function.
Use the wire rack and drip tray or suitable special-purpose equipment.
• Use upper rack levels.
• When the food is close to the upper heating element, spattering grease can cause smoke and
possible ignition of the fat. Therefore, closely monitor the food while you are using the broil function.
22

Convection Bake
Use it to prepare meat, pastry and vegetables on a single or multiple racks simultaneously.
This system combines heaters with a fan, which makes it faster than conventional systems.
Recommended baking levels:
• for single-level baking of flat food (pastry) 4
• for single-level baking of larger cuts (meat): 2 or 3 for multi-level baking: 3 and 5
Convection Roast
The mode is intended for roasting poultry and whole cuts of meat on a single rack under a broiler.
This is a combined system. Hot air is circulated evenly around the food, and the heaters uniformly
radiate heat and contribute to a crunchy crust and juicy core. This system combines heaters with a
fan, which makes it faster than conventional systems.
Recommended baking levels:
• roasting large cuts of meat: 3 or 4
• roasting a single cut of meat: 2 or 3
Equipment used:
• wire rack
• drip pan
AirFry
This cooking method results in a crunchy crust without added fat. This is a healthy version of fast-food
frying, with fewer calories in the cooked food. Suitable for smaller cuts of meat, fish, vegetables, and
frozen products ready for frying (French fries, chicken nuggets).
This is a combined system. The hot air circulates evenly around the food. The heat from the top heater
contributes to a crunchy crust.
Recommended baking levels: 4
Equipment used:
• for better browning of the bottom, we recommend using darker baking dishes
INFORMATION!
For the best result, distribute the food evenly across the entire area of the baking dish or sheet,
and do not cover it.
Proof
This program ensures an optimum proofing process. The controlled temperature will speed up the
proofing process relative to proofing at room temperature.
INFORMATION!
For best results, cover the dough while using the Proof mode.
For optimum proofing, always start the program when the appliance has completely cooled
down.
Do not open the appliance door during the proofing process for better results.
Do not use the Proof mode warm or keep the food hot. Proofing temperature in the oven is not
hot enough to hold foods at safe temperatures.
23

Dehydrate
The Dehydrate mode is intended for drying food so that moisture can evaporate. You can use this
mode for manually dehydrating food at a temperature between 100 and 175 °F. You can dehydrate
fruit, vegetables and herbs.
Pizza
This system is optimal for the fastest, pizza baking on a single rack.
Recommended baking levels: 1 or 2.
Equipment used:
• For better browning of the bottom, we recommend using darker baking sheets.
24
Extra functions
Self Clean
(depending on the model)
WARNING!
Before you start the Self Clean mode, remove all items you may store in your oven as it
will discolor if left inside during the process.
The Self Clean function cleans the oven using high temperature.
Fat residues and other impurities are incinerated during the cleaning process and reduced to ashes.
There are three cleaning intensity levels available, with varying duration of the process:
Program durationCleaning purposeCleaning intensity
2 hoursFor minor impuritiesFast cleaning
3 hoursFor noticeable impuritiesMedium-intensity cleaning
5 hoursFor stubborn and persistent (older) impuritiesIntensive cleaning
INFORMATION!
The more stubborn the soil, the higher the level that should be selected.
Preparing for the Self Clean function:
• Make sure any noticeable oil is wiped up prior to using this function.
• Remove all soil left on glass and food residue from the oven cavity.
• Always start the program when the appliance has cooled down.
Briefly press the Self Clean key and touch
or to set the desired
cleaning intensity. Confirm the settings by pressing on the
symbol.
Lock and program duration will appear on display (the door will be
locked). The default cleaning duration is 3 hours.
Unpleasant odors and smoke can be released and irritant fumes and gases during a program operation.
Therefore, we recommend that you ensure thorough ventilation of the kitchen during the program
process. We advise against staying in the room for a long period of time. Do not let children and pets
near the appliance while using this mode.
When the temperature drops to bellow 400 °F, the appliances will unlock
and go to a stand-by state.
Once the oven cavity has fully cooled down, wipe it with soap and a soft
cloth to remove any residue (e.g. ashes).
INFORMATION!
We recommend using this function once per month.
25
WARNING!
• Do not use cooktop during the Self Clean mode.
• If you try to use the cooktop while the Self Clean mode is in use "Hob" will appear
on upper display and will be toggled with Self Clean intensity sign. If cooktop is not
turned off within one minute, Error 14 is displayed and Self Clean function will stop.
• Remove any cookware from the cooktop area.
• During the cleaning program, the appliance becomes very hot on the outside. Do not
touch the oven door and never hang any combustible objects, such as kitchen cloths
or towels, on the door handle.
• The oven door is locked. Do not try to open it!
• Small animals or pets can be particularly sensitive to any fumes. We recommend
removing them from the kitchen while this function is active, and ventilating the
kitchen thoroughly after the cleaning process.
• As a result of the Self Clean cleaning, the oven cavity and the oven accessories may
discolor and lose their sheen. This does not affect the functionality of the oven or
the accessories/equipment.
• Before cleaning the oven with Self Clean function, remove the oven racks and other
accessories.
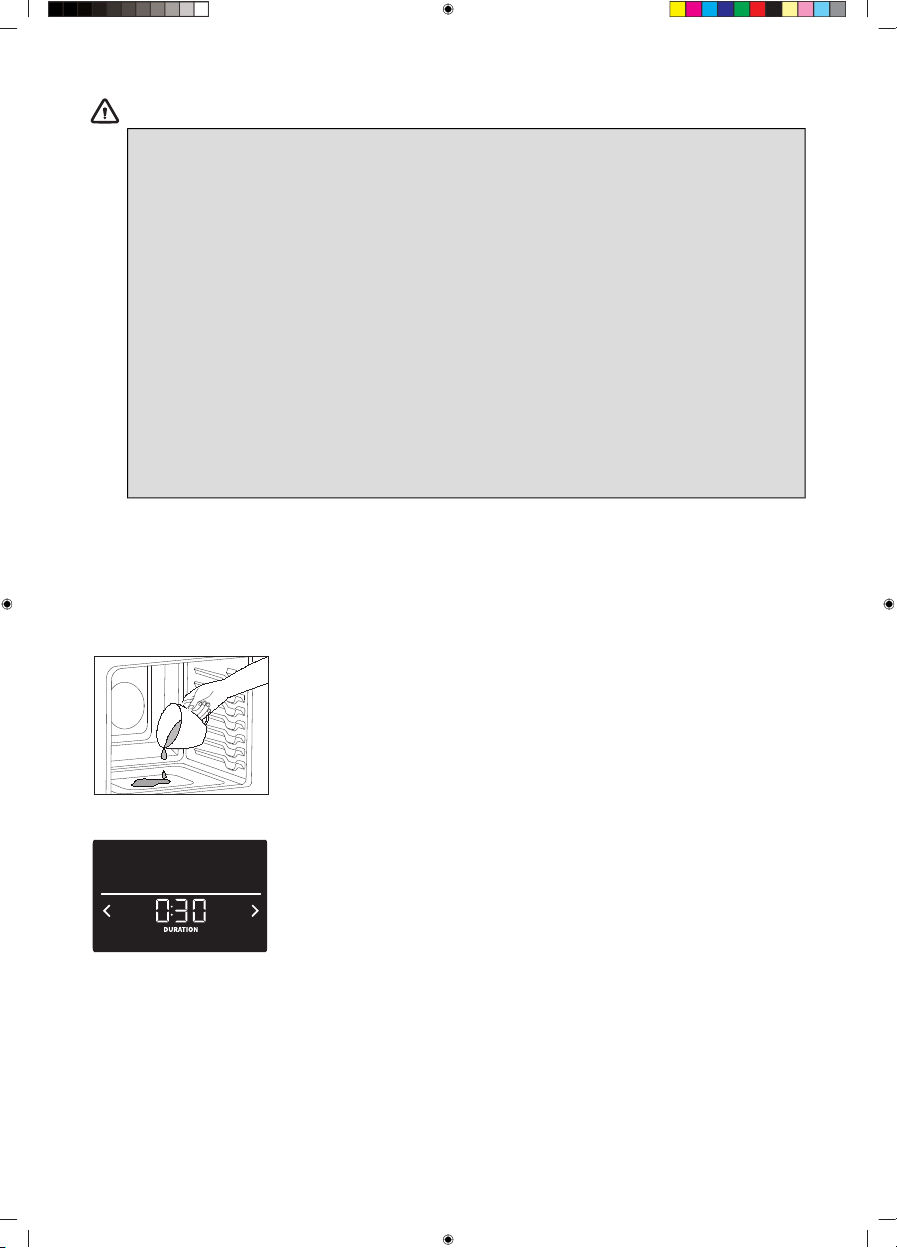
Steam Clean
The Steam Clean function allows easier removal of soils in the oven using steam.
This function is most effective when used regularly.
Before running the Steam Clean program, remove all large chunks of dirt and food residue from the
oven cavity.
Pour a maximum of 1/2 cup of water onto the bottom of the oven.
Activate the Steam Clean function by pressing the Self Clean key twice.
The program takes 30 minutes.
Wipe the appliance dry with a cloth.
Fast Preheat
Use the Fast Preheat function if you wish to heat the oven to the desired temperature as quickly as
possible. The default setting is ON.
26
Press the Fast Preheat key to change the setting before activating the selected cooking function.
You can enable Fast Preheat only for Bake, Convection Bake, Convection Roast, AirFry and Pizza
functions.
The Fast Preheat function uses a convection fan to reach the temperature as quickly as possible, even
if a function that does not use convection is selected.
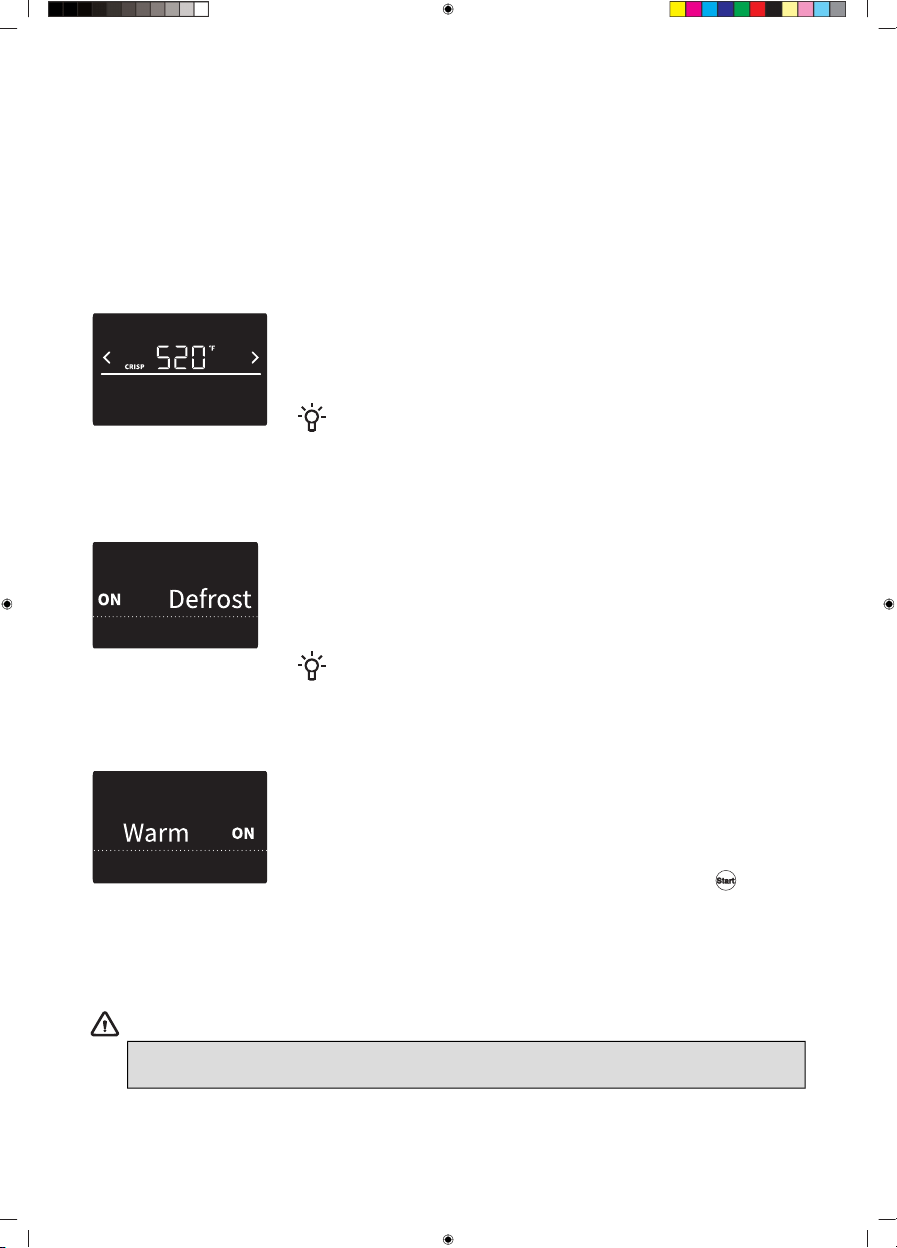
Crisp Mode
This mode is used when you need a crisp exterior, such as breaded food, bread or french fries.
You can enable Crisp mode for Bake, Broil, Convection Bake, Convection Roast, AirFry, Frozen Bake
and Pizza functions.
The Crisp mode can be activated and deactivated with a long press on
Crisp Mode. In the crisping process, it's possible to start, when the set
temperature of the oven is reached. The maximum duration of Crisp
mode operation is 5 minutes.
INFORMATION!
Crisp mode is automatically canceled after 5 minutes. If a set
temperature is above 480°F, the Crisp mode cannot be activated.
Defrost
The Defrost mode is used for automatic controlled defrosting (or thawing)
of frozen food (cakes, pastry, bread and rolls, and deep-frozen fruit). The
temperature is preset, and it cannot be adjusted. Halfway through the
defrost time, the pieces should be turned over, stirred and separated if
they were frozen together.
INFORMATION!
Defrosting time is longer than when defrosting with microwaves.
Warm
This mode allows you to keep cooked food warm. The temperature for
this program can be set from 140 °F to 210 °F, and the Cooking Time
can be set from 0 minutes to 3 hours. Recommended Cooking Time is
30 minutes.
To activate the mode, press the Warm key. Set the temperature and
reheating time and confirm the setting by pressing on the symbol.
• Cover any food with higher water content with a lid of aluminum foil. If you prefer a crunchy crust,
leave the food uncovered.
• Do not use the function for reheating cold food.
WARNING!
FOOD POISONING HAZARD: if the food has not been sufficiently thermally processed,
the Warm function can contribute to development of harmful bacteria in the food.
27

Child Lock
Use the Child Lock function to prevent children from turning on the oven or changing the settings,
either inadvertently or when unsupervised. The function locks the control unit (prevents unwanted
control or changes to the settings). The function also locks the door (at appliance with doorlock).
To activate the Child Lock function, press the Child Lock key and hold it for 3 seconds. The display
unit is locked. The keys will be unresponsive when the Child Lock function is active (a beep will be
heard upon touch, indicating that the module cannot be controlled).
To deactivate the Child Lock function, press the Child Lock key and hold it for 3 seconds. The display
unit is unlocked.
NOTE!
The cooktop can still be used normally when the Child Lock function is active.
In case of the need for emergency shutdown of the heaters, the user can still use the
key
even if the Child Lock is activated.
Light
Activate/deactivate the light by briefly pressing the Light key.
Switching off
Oven functions can be deactivated at any time by pressing the
key.
28
Food table
Additional suggestionsCooking
level
Recommended
baking mode
Type of food
Pork and beef
Use barbecue tongs to turn the
meat after 2/3 of cooking time.
5 or 6Broil LOHamburgers
Use barbecue tongs to turn the
meat after 2/3 of cooking time.
5 or 6Broil LOSteaks & chops
Use barbecue tongs to turn the
meat after 2/3 of the cooking
time.
5 or 6Broil HIBeef steaks
Broil skin side down first.4 or 5Broil LOChicken parts (breasts, wings,
legs, thighs)
We recommend using a broiling
pan.
2 or 3Bake
Convection Bake
Roasts
Convection Roast
Polultry
We recommend using a broiling
pan.
2 or 3Convection Roast
Bake
Whole poultry
We recommend using a broiling
pan
4Convection Roast
AirFry
Chicken parts (breasts, wings,
legs)
Bake
Fish
The larger the fish, the lower the
level and the longer the cooking
time.
5 or 6Broil HIWhole fish
5 or 6Broil LOFish fillet
Baked Goods
3 or 4BakePastry (cookies, biscuits,), cakes
2 or 3BakeAngel food cakes, pies
3 and 5Convection BakePastry (cookies, biscuits, muffins),
cakes - multiple levels
Various
3 or 4Frozen BakeFrozen conventional products
(potatoes, pizza, lasagna, chicken
nuggets, fish fingers, etc.)
Bake
1 or 2PizzaFresh pizza
Bake
If possible, use an air fry baking
tray.
4AirFry
Bake
Potato products
3BakeCasseroles
7Broil HIToast bread, opened sandwiches
29
Cleaning and maintenance
We recommend cleaning the appliance after each use. This will prevent the food that is stuck to the
cooktop from heating up and damaging the glass surface.
Daily exterior cleaning
• Clean the appliance using a damp cloth and a mild detergent, such as dish soap.
• Wipe the appliance dry with a paper towel or a cloth for best results.
• For heaviliy polluted stainless steel surfaces use a stainless steel cleaner. Clean according to the
cleaner instructions. If possible, wipe along direction of the grain.
Cleaning control panel
• To avoid damage to the cooktop controls, do not use steel wool, abrasive cleaners or oven cleaner.
• If you remove knobs during the cleaning of the control panel, be careful not to move the knob
gasket from its assembled place.
• If you move the gasket, you can install it back in the right place by yourself.
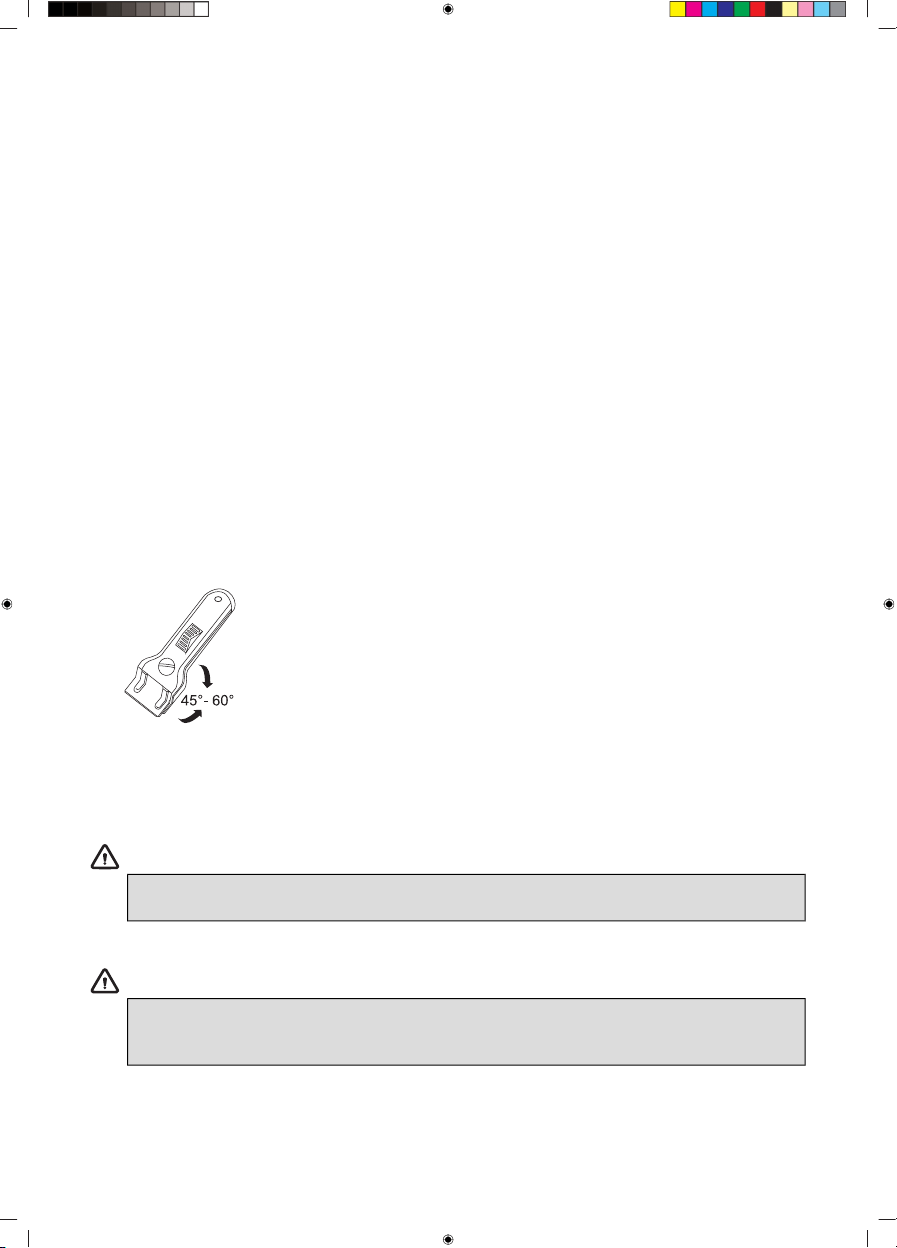
Cleaning glass cooktop
• Immediately remove any food remains, burnt grease, sugar or stubborn stains from the cooktop
using a scraper, even if the cooktop is still hot! Spills of sugar or food with high sugar content can
permanently damage the glass-ceramic surface.
• Hold the scraper (not included) at the correct angle (45° to 60°)
relative to the cooktop. Gently slide the scraper across the glass
surface to remove the dirt. Make sure the plastic handle of the scraper
(in some models) does not come into contact with a hot cooking
zone. Do not press the scraper perpendicularly against the surface.
Be careful not to scratch the cooktop surface with the corners of the
scraper blade. This could result in permanent scratches on the
surface.
• After you have removed the stubborn stains from the glass, use the daily cleaning steps to clean
the burner.
WARNING!
Do not use abrasive cleaning agents because they can cause scratches. Do not use
steelwool, scourers or any type of sharp objects to clean the appliance.
WARNING!
The cooktop could still be very hot from the cooking process. Do not touch the appliance
surface directly. Immediately after the end of the cooking process, you can use protective
gloves or mittens to prevent burns.
30
INFORMATION!
If you notice a crack in the glass top (small), switch the cooktop off immediately, unplug the
range, turn off the (automatic) fuse switch(es) in the fuse switch in the fuse box or, in the event
of a permanent connection, set the switch in the power supply lead to zero. Contact the service
department.
Light bulb
The bulb is consumable, therefore not covered by a warranty. Before replacing the bulb, remove all
accessories from the oven.
Unscrew and remove the cover in
counter-clockwise direction and pull out the
bulb.
INFORMATION!
Take care not to damage the enamel
coating.
Use protection to avoid burning yourself.
For lightbulb replacement, contact our
customer service.
WARNING!
Before replacing the bulb disconnect the cooking range from the power mains.
Only replace the bulb when oven is cool.
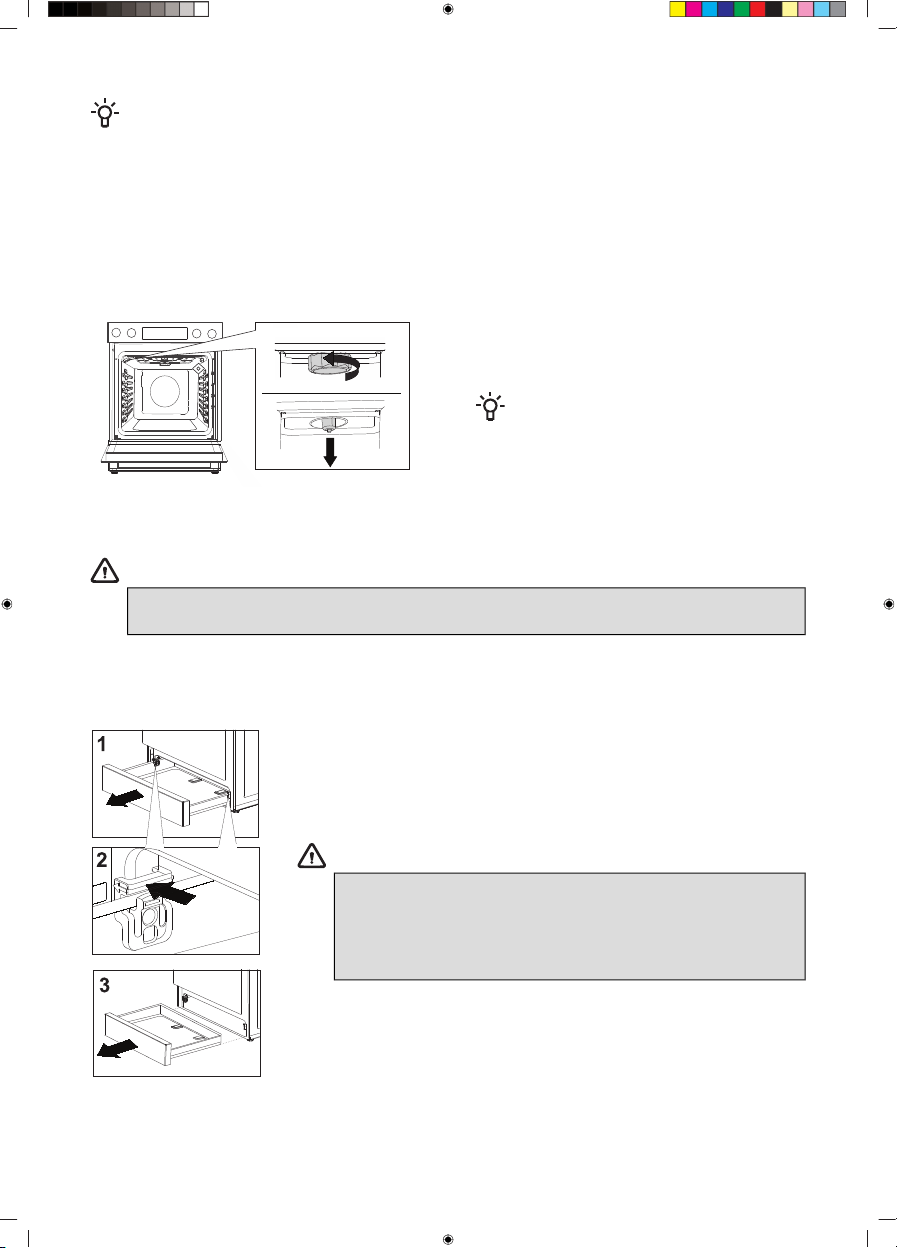
Storage drawer
1 Open the drawer.
2 Simultaneously push the two spacers, one on either side, back in the
direction of the arrow.
3 Completely remove the drawer.
WARNING!
Do not store combustible, explosive, volatile items or items
sensitive to high temperature (such as paper, dish cloths,
plastic bags, cleaners or detergents and spray cans) in the
oven's storage drawer, as they can ignite during operation
the oven and cause a fire.
31
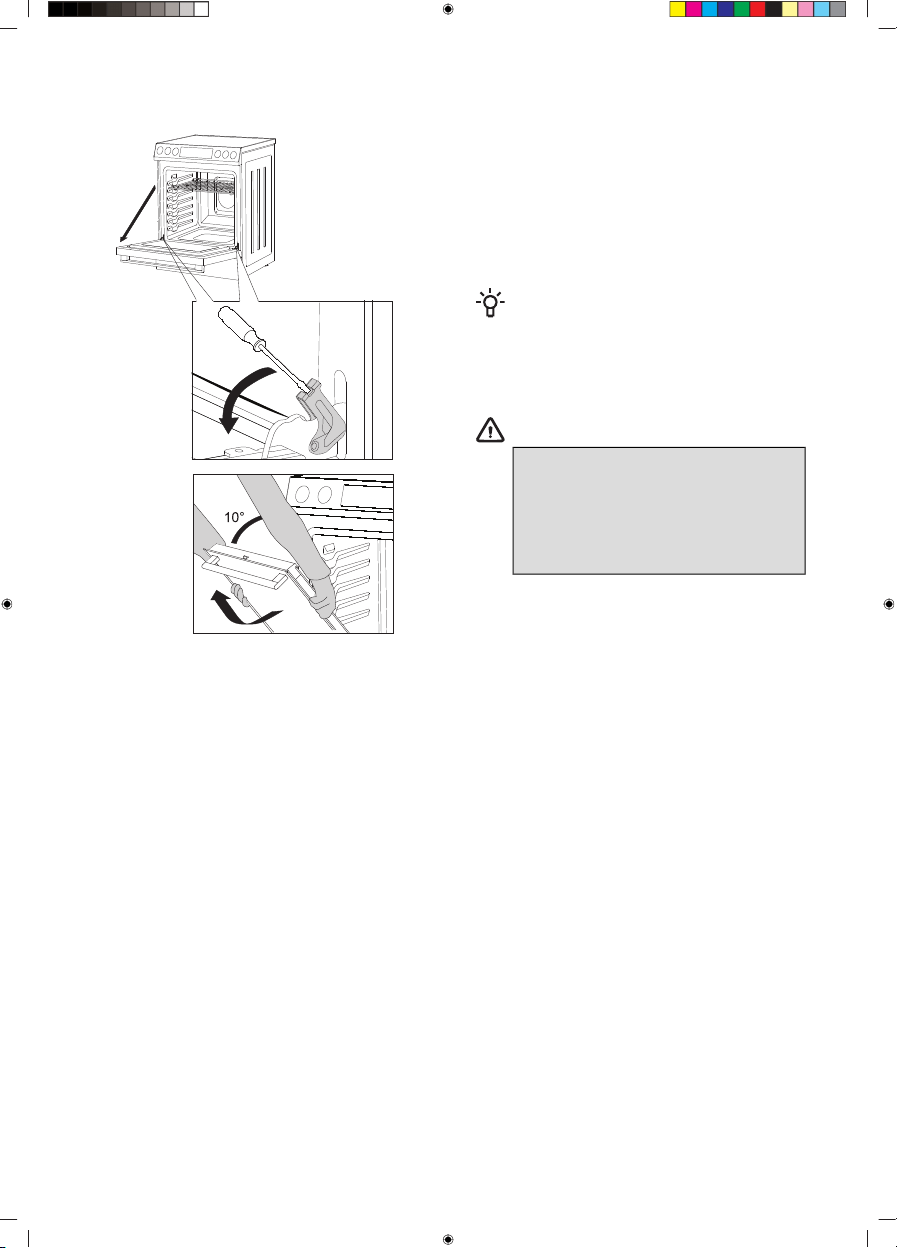
Removing and inserting the oven door
1 First, fully open the door (as far as it will go).
2 Rotate with a screwdriver the two retainers
until the end position.
3 Slowly close the door to a 10-degree angle
(relative to the position of the fully closed door);
then pull the door.
INFORMATION!
To replace the door, follow the reverse
order. If the door does not open or close
properly, make sure the notches on the
hinges are aligned with the hinge beds.
WARNING!
When replacing the door, always
make sure the hinge retainersare
correctly placed in the hinge beds to
prevent sudden closing of the main
hinge, which is connected to a strong
main spring. There is a risk of injury.
32

Potential issues/troubleshoot
Only a service center authorized by the manufacturer during the warranty period may carry out
any repairs.
Before making any repairs, make sure the appliance is disconnected from the power mains by removing
the fuse or disconnecting the power plug from the wall outlet.
Any unauthorized repairs of the appliance may result in electric shock and short circuit hazard; therefore,
do not perform them. Leave such work to an authorized service technician.
In case of minor problems with appliance operation, check this manual to see if you can fix the problem
yourself.
Suppose the appliance is not operating properly or at all due to inappropriate operation or handling.
In that case, a visit from a service technician shall not be free of charge, even during the warranty
period.
Save the instructions for future reference and pass them on to any subsequent owners or users of the
appliance.
Troubleshooting table
SolutionPossible causeDescriptionError
name
Disconnect the cooking range from the
power mains for a few minutes (undo
the fuse or switch off the main switch);
then, reconnect the cooking range to
the power mains. If the problem
persists, contact service.
Temperature sensor on the
appliance might be
malfunctioning.
Oven temperature
sensor failure
Err 001
Disconnect the cooking range from the
power mains for a few minutes (undo
the fuse or switch off the main switch);
then, reconnect the cooking range to
the power mains. If the problem
persists, contact service.
Problem on appliance’s
electronics.
Communication
failure between
user interface and
power board
Err 003
Clean user interface with dry cloth.
Disconnect the cooking range from the
power mains for a few minutes (undo
the fuse or switch off the main switch);
then, reconnect the cooking range to
the power mains. If the problem
persists, contact service.
Failure on touch sensor.Touch sensor
failure on user
interface
Err 004
Check ambient temperature in the
room. Cool down the appliances.
Disconnect the cooking range from the
power mains for a few minutes (undo
the fuse or switch off the main switch);
then, reconnect the cooking range to
the power main. If the problem
persists, contact service.
Ambient temperature is too
high, NTC sensor is
malfunctioning.
Overheating of
user interface
Err 005
33

Table continued from last page
SolutionPossible causeDescriptionError
name
Check position of pots. Pots position
might influence temperature on the
user interface.
Stop Self Clean function, wait until the
door is unlocked and start it again. If
the problem persists, contact service.
Door lock on the appliance
is malfunctioning.
Self Clean door
lock failure
Err 006
Check correct voltage in house
installation. Disconnect the cooking
range from the power mains for a few
minutes (undo the fuse or switch off
the main switch); then, reconnect the
cooking range to the power mains. If
the problem persists, contact service.
Failure of power supply.Failure of power
board relay supply
Err 007
Check ambient temperature in the
room. Cool down the appliances.
Disconnect the cooking range from the
power mains for a few minutes (undo
the fuse or switch off the main switch);
then, reconnect the cooking range to
the power mains. If the problem
persists, contact service.
Ambient temperature is too
high, NTC sensor is
malfunctioning.
Overheating of
power board
Err 008
Turn off any active cooktop heater and
start Self Clean function again.
Cooktop was activated while
the Self Clean function was
active.
Cooktop
activation during
active Self Clean
function
Err 014
Disconnect the cooking range from the
power mains for a few minutes (undo
the fuse or switch off the main switch);
then, reconnect the cooking range to
the power mains. If the problem
persists, contact service.
Failure on electronics.Zero cross failure
on power board
Err 015
34
Baking problems and tips
TipProblem
When is the sponge cake done?
• The crust turns a golden brown.
• The sponge is elastic to touch.
• Pierce the cake at the top with a wooden
toothpick or skewer. When you pull the
toothpick out, there should be no crumbs or
traces of dough on it.
The cake collapsed
• Observe the mixing time.
• Use less liquid.
• Increase temperature and extend baking
time.
The cake is unevenly browned
• When baking on multiple levels
simultaneously, pastry may not be done all
at the same time.
• Remove the baking tray with the pastry that
is done sooner.
The sponge cake has risen in the middle, but not
along the sides
• Only grease the bottom of the baking dish;
do not grease the sides.
Small pastry clumped or stuck together during
baking
• Not enough space between pastries (allow
at least 2 cm).
The pastry is dried out
• Increase temperature and reduce the baking
time.
The bottom is underbaked
• Place the food one rack level lower.
The top side is underbaked
• Place the pastry one rack level higher.
When baking on multiple levels simultaneously,
the cake is not evenly browned
• When baking on multiple levels
simultaneously, pastry may not be done all
at the same time.
• Remove the baking tray with the pastry that
is done sooner.
Cake is stuck to the baking dish or tin
• When the cake cools down, carefully
separate it from the mold by loosening the
edges with a knife.
• Next time, grease the tin more generously,
or sprinkle it with breadcrumbs.
35

Disposal
Our product packaging is made of environmentally friendly materials that
can be recycled, disposed of, or destroyed without any environmental
hazard. To this end, packaging materials are labelled appropriately.
The product's symbol or packaging indicates that the product should
not be treated as normal household waste. Take the product to an
authorized collection centre for waste electric and electronic equipment
processing.
Correct disposal of the product will help prevent any negative effects on
the environment and health of people, which could occur in case of
incorrect product removal. For detailed information on the removal and
processing of the product, please contact the relevant municipal body
in charge of waste management, your waste disposal service, or the
store where you bought the product.
We reserve the right to any changes and errors in the instructions for use.
36

Notes
37
Notes
38

Notes
39
854934-a3DRAFT