FIRST EDITION
23_GG_OH_EN_USC
HORNET
2023 OWNER HANDBOOK
MOPAR.COM/OM
U.S.
OWNERS.MOPAR.CA
CANADA
DOWNLOAD THE MOST UP-TO-DATE OWNER HANDBOOK, RADIO
AND WARRANTY BOOKS
©2022 FCA US LLC. ALL RIGHTS RESERVED. TOUS DROITS RÉSERVÉS. DODGE IS
A REGISTERED TRADEMARK OF FCA US LLC OR FCA CANADA INC., USED UNDER
LICENSE. DODGE EST UNE MARQUE DÉPOSÉE DE FCA US LLC OU FCA CANADA INC.,
UTILISÉE SOUS LE PERMIS. APP STORE IS A REGISTERED TRADEMARK OF APPLE INC.
GOOGLE PLAY STORE IS A REGISTERED TRADEMARK OF GOOGLE.
WARNING: Operating, servicing and maintaining a passenger vehicle or off-highway motor vehicle can expose you to chemicals including engine exhaust, carbon
monoxide, phthalates, and lead, which are known to the State of California to cause cancer and birth defects or other reproductive harm. To minimize exposure, avoid
breathing exhaust, do not idle the engine except as necessary, service your vehicle in a well-ventilated area and wear gloves or wash your hands frequently when
servicing your vehicle. For more information go to www.P65Warnings.ca.gov/passenger-vehicle.
This Owner Handbook illustrates and describes the operation of features and equipment that are either standard or optional on this vehicle. This handbook may also include a description of
features and equipment that are no longer available or were not ordered on this vehicle. Please disregard any features and equipment described in this handbook that are not on this vehicle.
FCA US LLC reserves the right to make changes in design and specications, and/or make additions to or improvements to its products without imposing any obligation upon itself to install
them on products previously manufactured.
With respect to any vehicles sold in Canada, the name FCA US LLC shall be deemed to be deleted and the name FCA Canada Inc. used in substitution therefore.
This Owner Handbook is intended to familiarize you with the important features of your vehicle. Your most up-to-date Owner Handbook, Owner’s Manual, Radio Instruction Manual and Warranty
Booklet can be found by visiting the website on the back cover.
U.S. Residents: If you are the rst registered retail owner of your vehicle, you may obtain a complimentary printed copy of the Warranty Booklet by calling 1-800-423-6343 or by contacting your
dealer. Replacement kits can be purchased by visiting www.techauthority.com.
Canadian Residents: If you are the rst registered retail owner of your vehicle, you may obtain a complimentary printed copy of the Warranty Booklet or purchase a replacement kit by calling
1-800-387-1143 or by contacting your dealer.
FCA US LLC reserves the right to modify the terms or discontinue the Roadside Assistance Program at any time. The Roadside Assistance Program is subject to restrictions and
conditions of use, that are determined solely by FCA US LLC.
ROADSIDE ASSISTANCE
24 HOURS, 7 DAYS A WEEK AT YOUR SERVICE.
CALL 1-800-521-2779 OR VISIT CHRYSLER.RSAHELP.COM (USA)
CALL 1-800-363-4869 OR VISIT FCA.ROADSIDEAID.COM (CANADA)
SERVICES: Flat Tire Service, Out Of Gas/Fuel Delivery, Battery Jump Assistance, Lockout Service and Towing Service
Please see the Customer Assistance chapter in this Owner Handbook for further information.
The driver’s primary responsibility is the safe operation of the vehicle. Driving while distracted can result in loss of vehicle control, resulting in an accident and personal injury. FCA US LLC
strongly recommends that the driver use extreme caution when using any device or feature that may take their attention off the road. Use of any electrical devices, such as cellular telephones,
computers, portable radios, vehicle navigation or other devices, by the driver while the vehicle is moving is dangerous and could lead to a serious accident. Texting while driving is also
dangerous and should never be done while the vehicle is moving. If you nd yourself unable to devote your full attention to vehicle operation, pull off the road to a safe location and stop your
vehicle. Some states or provinces prohibit the use of cellular telephones or texting while driving. It is always the driver’s responsibility to comply with all local laws.
This Owner Handbook has been prepared to help you get acquainted with your new Dodge brand vehicle and to provide a convenient reference source for common questions.
Not all features shown in this handbook may apply to your vehicle. For additional information, visit mopar.com/om (U.S.), owners.mopar.ca (Canada) or your local Dodge brand dealer.
DRIVING AND ALCOHOL
Drunk driving is one of the most frequent causes of accidents. Your driving ability can be seriously impaired with blood alcohol levels far below the legal
minimum. If you are drinking, don’t drive. Ride with a designated non-drinking driver, call a cab, a rideshare, a friend, or use public transportation.
WARNING
Driving after drinking can lead to an accident. Your perceptions are less sharp, your reexes are slower and your judgment is impaired when you have
been drinking. Never drink and then drive.

2
INTRODUCTION
SYMBOLS KEY ...................................................4
CUSTOMER ASSISTANCE ...............................5
FCA US LLC Customer Center......................5
FCA Canada Inc. Customer Center.............5
Mexico.....................................................................5
Puerto Rico And US Virgin Islands..............5
ROADSIDE ASSISTANCE................................5
Customer Assistance For The Hearing
Or Speech Impaired (TDD/TTY) ..................5
Service Contract ................................................5
WARRANTY INFORMATION.........................6
Ordering and Accessing Additional
Owner’s Information ........................................6
Change Of Ownership Or Address .............6
General Information ..........................................6
INTERIOR
INTERIOR OVERVIEW ......................................7
STARTING AND OPERATING ..........................8
Key Fob ...............................................................8
Keyless Enter ‘n Go™ — Passive Entry .....8
Stop/Start System.............................................9
MULTIMEDIA & PHONE CONNECTIVITY ..... 10
Uconnect System ............................................10
Uconnect Settings .......................................... 11
Pair/Delete A Device .....................................12
Apple CarPlay®...................................................12
Android Auto™ ................................................. 12
Uconnect Voice Recognition —
If Equipped .......................................................13
Performance Pages..........................................13
CHARGING & OUTLETS ..................................14
Electrical Power Outlets ..............................14
Wireless Phone Charging ..............................15
USB .....................................................................15
INSTRUMENT CLUSTER.................................. 16
Getting To Know Your Instrument
Cluster...................................................................16
Controlling Your Instrument Cluster
Display ..................................................................17
Warning Lights And Messages.................... 17
Drowsy Driver Detection (DDD) —
If Equipped.........................................................20
Traffic Sign Recognition ...............................20
INTERIOR COMFORT SETTINGS ................... 21
Climate Controls ..............................................21
Automatic Climate Control
Descriptions And Functions ........................21
Automatic Temperature
Control (ATC) ..................................................23
Climate Voice Recognition ..........................23
Front Heated Seats.........................................23
Front Ventilated Seats...................................24
Power Front Seats .......................................... 24
Driver Memory Settings .............................. 24
Head Restraints.................................................25
LIGHTING OPERATION ................................. 26
Headlight Switch ....................................... 26
Automatic High Beams................................. 26
Automatic Headlights .................................. 26
Automatic Headlights With Wipers......... 26
WINDSHIELD WIPERS & WASHERS ............ 26
Windshield Wiper Operation...................... 26
Rain Sensing Wipers ......................................27
CRUISE CONTROL SYSTEMS ........................ 27
Adaptive Cruise Control (ACC) ...............27
GARAGE DOOR OPENER (HOMELINK®) ..... 29
Troubleshooting Tips..................................... 30
PARKING ASSISTANCE .................................30
Parksense Front/Rear Park Assist
System ................................................................ 30
Electric Park Brake (EPB) ........................... 31
EXTERIOR
EXTERIOR OVERVIEW .................................. 33
EXTERIOR CAMERA VIEWS.......................... 34
Back Up Camera ........................................... 34
Surround View Camera System ............... 34
LIFTGATE......................................................... 35
Liftgate Release Button................................ 35
Hands-Free Liftgate....................................... 35
23_GG_OH_EN_USC_t.book Page 2

3
EMERGENCY
SOS AND ASSIST SYSTEM —
IF EQUIPPED....................................................37
JACKING AND TIRE CHANGING —
IF EQUIPPED....................................................39
Preparations For Jacking............................. 39
Accessing the Jack, Tools, Spare Tire,
or Tire Service Kit - If Equipped................ 39
Jacking Instructions ........................................ 41
JUMP STARTING ............................................43
Preparations For Jump Starting ................43
Jump Starting Procedure ............................ 44
REFUELING IN EMERGENCY ........................ 45
IF YOUR ENGINE OVERHEATS ................... 46
FREEING A STUCK VEHICLE ........................47
TOWING A DISABLED VEHICLE.................. 48
Towing In An Emergency............................ 49
SPECIFICATIONS
ENGINE COMPARTMENT OVERVIEW ......... 51
2.0L Engine ....................................................... 51
FLUID CAPACITIES .....................................52
ENGINE FLUIDS AND LUBRICANTS ..........52
CHASSIS FLUIDS AND LUBRICANTS .........53
SERVICING AND MAINTENANCE .................53
Maintenance Plan ............................................ 53
Oil Change Reset ........................................... 54
Engine Break-In Recommendations ........ 54
TRAILER TOWING ....................................... 55
23_GG_OH_EN_USC_t.book Page 3

4 I N T R O D U C T I O N 4 I N T R O D U C T I O N
INTRODUCTION
OWNER’S HANDBOOK INTRODUCTION
Thank you for choosing Dodge. This Owner’s Handbook has been prepared to
help you quickly become acquainted with important features of your vehicle.
It contains most things you will need to operate and maintain your vehicle,
including emergency information.
This handbook also illustrates and describes the operation of certain features
and equipment that come either standard or optional on your vehicle. It may
include a description of features and equipment that your vehicle is not
equipped with. FCA US LLC reserves the right to make changes in design and
specifications and/or make additions to or improvements to its products
without imposing any obligation upon itself to install them on products
previously manufactured.
Mobile App:
To access your complete Owner’s Manual online: www.mopar.com
To order a hard copy of your Owner’s Manual, visit: www.techauthority.com
SYMBOLS KEY
If you do not read the entire Owner’s Manual, you may miss important
information. Observe all Cautions and Warnings.
WARNING!
These statements apply to operating
procedures that could result in a collision,
bodily injury and/or death.
CAUTION!
These statements apply to procedures that
could result in damage to your vehicle.
NOTE:
A suggestion which will improve installation,
operation, and reliability. If not followed, may
result in damage.
TIP:
General ideas/solutions/suggestions on easier
use of the product or functionality.
PAGE REFERENCE
ARROW
Follow this reference for additional information
on a particular feature.
FOOTNOTE
Supplementary and relevant information
pertaining to the topic.
23_GG_OH_EN_USC_t.book Page 4

I N T R O D U C T I O N 5
CUSTOMER ASSISTANCE
FCA US LLC and its authorized dealers are vitally
interested in your satisfaction. We want you to be
happy with our products and services.
Warranty service must be done by an authorized
dealer. We strongly recommend that you take the
vehicle to an authorized dealer for non-warranty
service as well. FCA US LLC's authorized dealers
have the facilities, factory-trained technicians,
special tools, and the latest information to ensure
the vehicle is fixed correctly and in a timely
manner.
If your authorized dealer is unable to resolve the
concern, you may contact an FCA US LLC
Customer Assistance center.
Any communication to an FCA US LLC Customer
Assistance center should include the following
information:
Owner's name and address
Owner's telephone number
(home, mobile, and office)
Authorized dealer name
Vehicle Identification Number (VIN)
Vehicle delivery date and mileage
FCA US LLC C USTOMER C ENTER
P.O. Box 21–8004
Auburn Hills, MI 48321–8004
Phone: (800) 423-6343
FCA C ANADA I NC . C USTOMER C ENTER
P.O. Box 1621
Windsor, Ontario N9A 4H6
Phone: (800) 465-2001 English /
(800) 387-9983 French
M EXICO
Av. Prolongacion Paseo de la Reforma, 1240
Sante Fe C.P. 05109
Mexico, D.F.
In Mexico City: 800-505-1300
P UERTO R ICO A ND US V IRGIN I SLANDS
FCA Caribbean LLC
P.O. Box 191857
San Juan 00919-1857
Phone: (800) 423-6343
Fax: (787) 782-3345
ROADSIDE ASSISTANCE
Phone: (800) 521-2779
Available: 24 Hours, 7 Days A Week
Your vehicle’s VIN number is required to receive
covered services.
Flat Tire Service
Out Of Gas/Fuel Delivery - This service is limited
to two occurrences in a 12-month period. Up to
two gallons of fuel will be provided by a service
provider.
Battery Jump Assistance
Lockout Service
Towing Service
C USTOMER A SSISTANCE F OR T HE H EARING
OR S PEECH I MPAIRED (TDD/TTY)
To assist customers who have hearing difficulties,
FCA US LLC has installed special Telecommu-
nication Devices for the Deaf (TDD) equipment at
its customer centers. Any hearing or speech
impaired customer, who has access to a TDD or a
conventional teletypewriter (TTY) in the United
States, can communicate with FCA US LLC by
dialing 1-800-380-2479.
S ERVICE C ONTRACT
Mopar Vehicle Protection Plans offer valuable
protection against repair costs after your vehicle
warranties have expired. Mopar Vehicle Protection
plans are the ONLY vehicle extended protection
plans authorized, endorsed and backed by FCA US
LLC to provide additional protection beyond your
vehicle's warranty.
FCA US LLC is not responsible for any service
contract you may have purchased from another
manufacturer. If you require service after the FCA
US LLC New Vehicle Limited Warranty expires,
please refer to the contract documents, and
contact the person listed in those documents.
23_GG_OH_EN_USC_t.book Page 5

6 I N T R O D U C T I O N
WARRANTY INFORMATION
Use this QR code to access your
digital experience.
O RDERING AND A CCESSING
A
DDITIONAL O WNER ’S I NFORMATION
To order a hard copy of your Service or Diagnostic
Procedure manuals, visit:
www.techauthority.com (US and Canada).
To access your Owner's Information online, visit
www.mopar.com/om (US) or
www.owners.mopar.ca (Canada).
Or
Call Tech Authority toll free at:
1-800-890-4038 (US)
Owner's Manuals, Radio Manuals and Warranty
Information Books can be ordered through
Archway at:
1-800-387-1143 (Canada)
C HANGE O F O WNERSHIP O R A DDRESS
*If you have purchased this vehicle used or have
changed your address, please provide the
following information and mail to:
FCA US LLC
P.O. Box 21–8008
Auburn Hills, MI 48321–8004
Make sure to include the following:
Date of Sale (mm/dd/yy)
Vehicle Indentification Number (17 Character ID
located on top left of the instrument panel)
Exact Odometer Reading
First and Last Name
Phone Number
Street Address, City, State and Zip Code
Email Address
*Applies to US residents only.
G ENERAL I NFORMATION
The following regulatory statement applies to all
Radio Frequency (RF) devices equipped in this
vehicle:
This device complies with Part 15 of the FCC Rules
and with Innovation, Science and Economic
Development Canada license-exempt RSS
standard(s). Operation is subject to the following
two conditions:
1. This device may not cause harmful
interference, and
2. This device must accept any interference received,
including interference that may cause undesired
operation.
Le présent appareil est conforme aux CNR
d`Innovation, Science and Economic Development
applicables aux appareils radio exempts de licence.
L'exploitation est autorisée aux deux conditions
suivantes:
1. l'appareil ne doit pas produire de brouillage,
et
2. l'utilisateur de l'appareil doit accepter tout
brouillage radioélectrique subi, même si le
brouillage est susceptible d'en compromettre le
fonctionnement.
La operación de este equipo está sujeta a las
siguientes dos condiciones:
1. es posible que este equipo o dispositivo no
cause interferencia perjudicial y
2. este equipo o dispositivo debe aceptar cualquier
interferencia, incluyendo la que pueda causar su
operación no deseada.
NOTE:
Changes or modifications not expressly approved
by the party responsible for compliance could void
the user’s authority to operate the equipment.
23_GG_OH_EN_USC_t.book Page 6
I N T E R I O R 7
INTERIOR
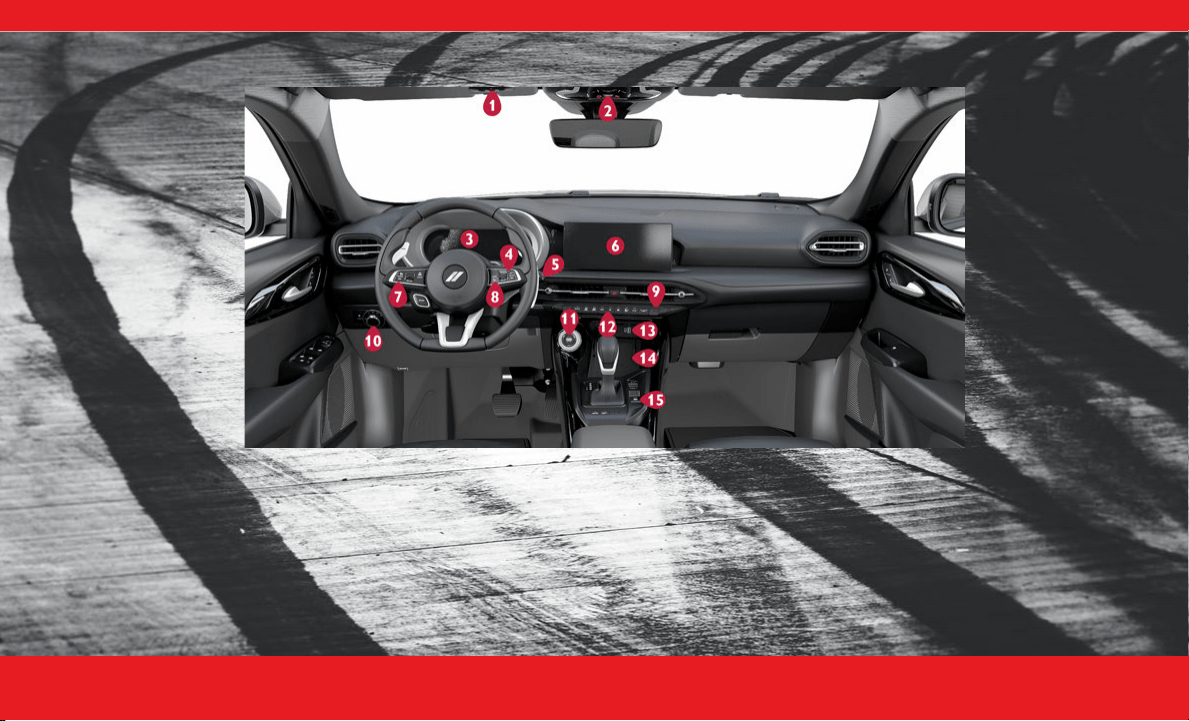
INTERIOR OVERVIEW
1. Garage Door Opener (HomeLink®)
Ú
page 29
2. Assist & SOS Buttons
Ú
page 37
3. Instrument Cluster Display
Ú
page 17
4. Instrument Cluster Control Wheel
Ú
page 17
5. Windshield Wipers and Washers
Ú
page 26
6. Uconnect Radio Screen Display
Ú
page 10
7. Cruise Control Buttons
Ú
page 27
8. Uconnect Voice Command Buttons
Ú
page 13
9. Climate Controls
Ú
page 21
10. Headlight Switch
Ú
page 26
11. Keyless Enter ‘n Go™ Ignition
Ú
page 8
12. Stop/Start Off Switch
Ú
page 9
13. USB/AUX Media Hub
Ú
page 15
14. Wireless Charging Pad
Ú
page 15
15. Electric Parking Brake
Ú
page 31
23_GG_OH_EN_USC_t.book Page 7
8 I N T E R I O R
STARTING AND OPERATING
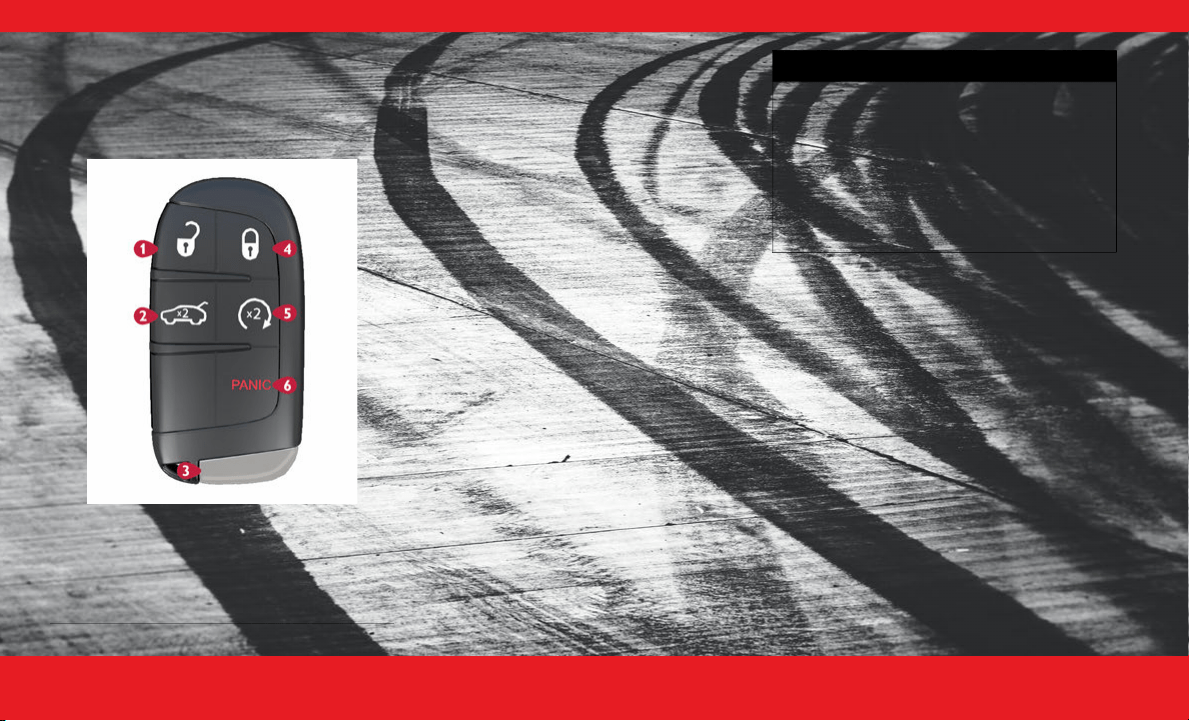
K EY F OB
Your key fob allows you to lock or unlock all doors
and liftgate, as well as activate the Panic Alarm.
To Remove The Emergency Key
You can remove the emergency key by pushing the
release button on the back of the key fob.
To Lock/Unlock The Doors And Liftgate
Push and release the unlock button on the key fob
once to unlock the driver’s door, or push it again to
unlock all doors and the liftgate. If you want to
unlock all the doors with a single push of the unlock
button, you can change this setting within your
Uconnect system. A push of the lock button will
lock all of your doors and liftgate.
Remote Start
Push and release the Remote Start button on the
key fob twice within five seconds.
Some additional features may automatically
activate when using Remote Start:
Your driver ventilated seat feature may turn on.
Your front and rear defrost may turn on.
Your heated steering wheel and driver heated
seat feature may also turn on.
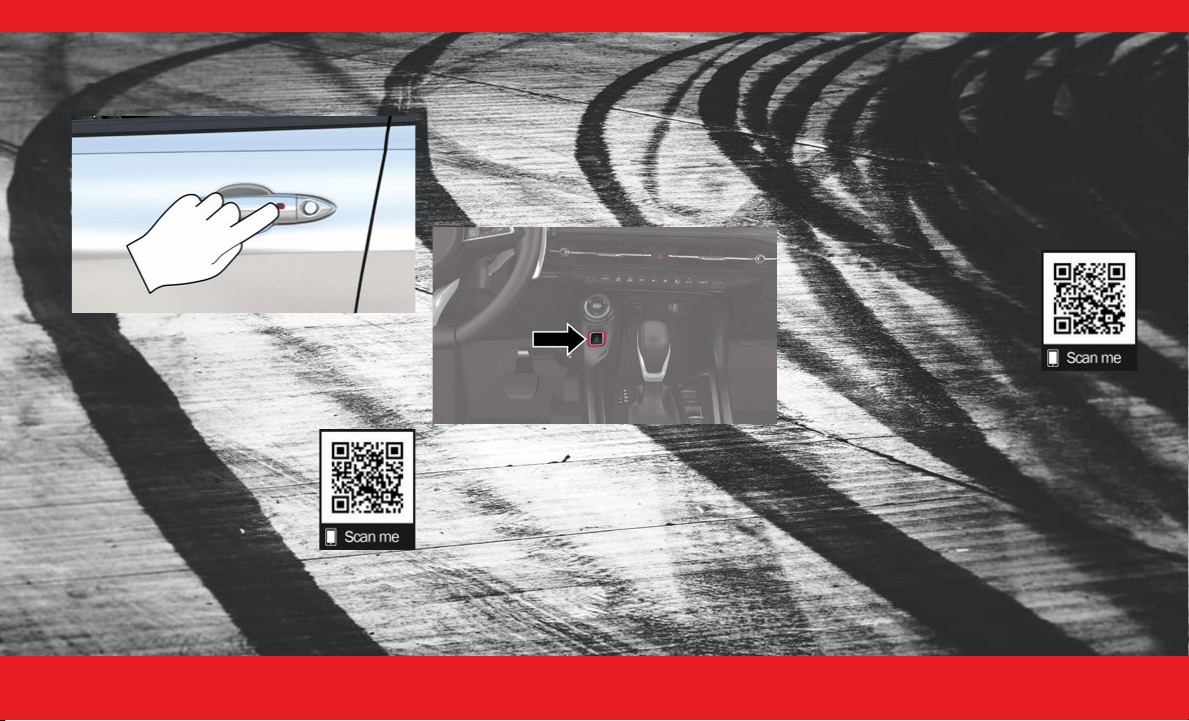
K EYLESS E NTER ‘ N G O ™ — P ASSIVE E NTRY
Keyless Enter ‘n Go™ — Passive Entry allows you to
lock and unlock the vehicle’s door(s) without
having to push the key fob lock or unlock buttons.
To Unlock/Lock The Vehicle’s Doors And
Liftgate
With a valid Passive Entry key fob with you, grab
the handle to unlock the vehicle. The driver's
handle will unlock the driver's door only (unless
otherwise programmed in Uconnect Settings),
whereas the passenger handle will unlock all doors
and the liftgate.
1 — Unlock
2 — Liftgate
3 — Emergency Key
4 — Lock
5 — Remote Start
6 — Panic
WARNING!
Do not start or run an engine in a closed
garage or confined area. Exhaust gas contains
carbon monoxide (CO) which is odorless and
colorless. Carbon monoxide is poisonous and
can cause serious injury or death when inhaled.
Keep key fobs away from children. Operation
of the Remote Start system, windows, door
locks or other controls could cause serious
injury or death.
23_GG_OH_EN_USC_t.book Page 8
I N T E R I O R 9
With a valid Passive Entry key fob on you, push the
Passive Entry lock button on the door handle to
lock the vehicle.
Push The Door Handle Button To Lock
NOTE:
DO NOT grab the door handle when pushing the
lock button. This could unlock the door(s).
Be sure to keep the vehicle key fob with you.
Use this QR code to access your
digital experience.
S TOP /S TART S YSTEM
The Stop/Start function is designed to save fuel
and reduce emissions. The system will stop the
engine automatically during a vehicle stop if the
required conditions are met. Releasing the brake
pedal or shifting out of DRIVE will automatically
restart the engine.
How To Turn Off The Stop/Start System
Did you know you can manually turn off your Stop/
Start system?
Just push the Stop/Start OFF switch (located near
the gear shifter) to turn off this feature. The light on
the switch will illuminate and the “STOP/START
OFF” message will appear in the instrument cluster
display.
NOTE:
The Stop/Start system will reset itself back to the
on position every time the ignition is turned off and
back on.
Use this QR code to access your
digital experience.
23_GG_OH_EN_USC_t.book Page 9
1 0 I N T E R I O R
MULTIMEDIA & PHONE CONNECTIVITY
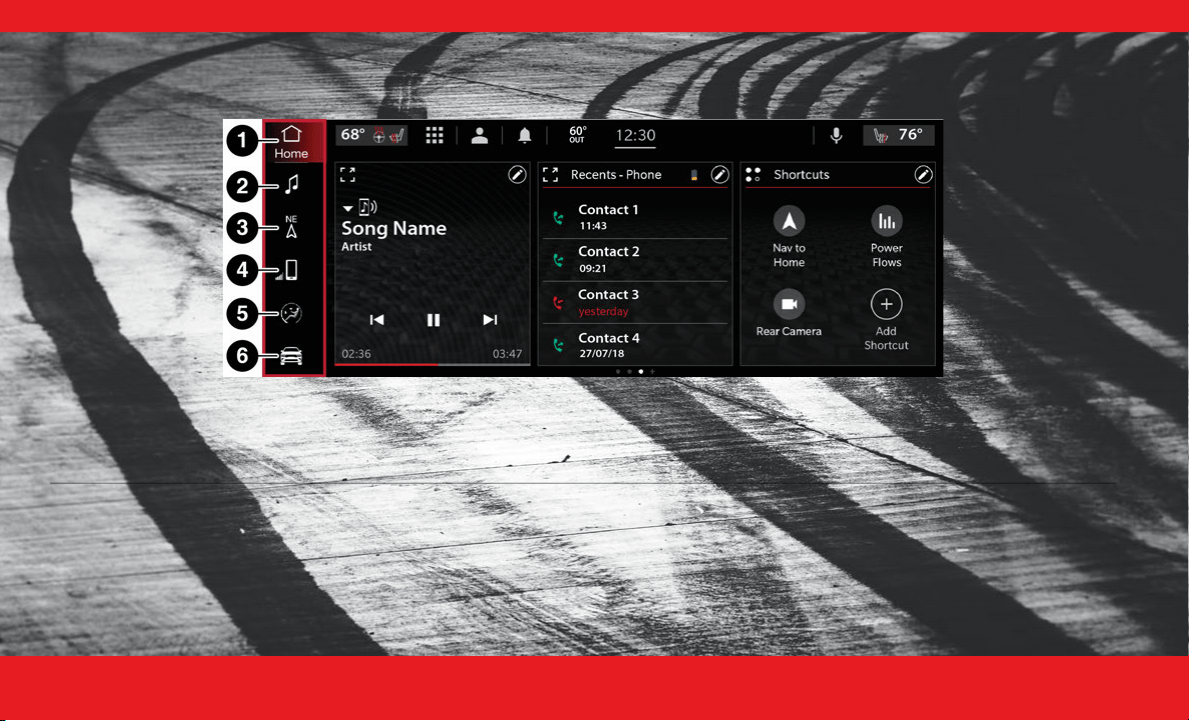
U CONNECT S YSTEM
Uconnect 5/5 NAV With 10.25-inch Display
1 — Home Button 4 — Phone Button
2 — Radio/Media Button 5 — Comfort Button
3 — Navigation Button 6 — Vehicle Button
23_GG_OH_EN_USC_t.book Page 10
I N T E R I O R 11
NOTE:
Uconnect screen images may not reflect the exact
software in your vehicle.
Use this QR code to access your
digital experience.
U CONNECT S ETTINGS
Uconnect 5/5 NAV With 10.25-inch Display
Uconnect Settings
Do you want to change the theme of your radio?
Or what about setting text message pop-up
notifications?
These settings are all customizable, and can be
adjusted to your needs with a press of your
fingertip.
Press the Vehicle button, then press the Settings
button toward the top of your touchscreen to get
started with customizing your settings.
NOTE:
Depending on the vehicle’s options, feature
settings may vary.
My Profile
— Customize features such as “Voice
Options”, “Notification Pop-ups”, and much
more!
Display
— Customize features such as your
display brightness, or even allow navigation
instructions to appear on your instrument
cluster display!
Safety/Driving Assistance
— Would you like to
be able to customize your LaneSense feature?
Within the Safety/Driving Assistance setting,
you can customize both the warning signal and
steering wheel strength for your LaneSense
detection.
Phone/Bluetooth®
— Do you have your phone
paired to your Uconnect system yet? Press the
Phone/Bluetooth® button to begin the phone
pairing process.
Camera
— Pressing the Camera button on the
touchscreen will display settings related to the
vehicle’s cameras. A few of these settings are
“ParkView Backup Camera Delay” and
“Surround View Camera Delay”.
Brakes
— Pressing the Brakes button on the
touchscreen will display settings related to the
vehicle’s brakes. One of these settings is “Auto
Park Brake”.
Seats & Comfort
— The Uconnect system allows
you to adjust your comfort levels for your
heated seats, heated steering wheel, and even
ventilated seats!
Key Off Options
— The Uconnect system gives
you the option to customize what your vehicle
does when it shuts down. One option is
adjusting how long your headlights stay on after
you turn your vehicle off.
Audio
— Did you know you can customize your
vehicle’s audio? Press the Audio button to begin
tuning your vehicle’s audio to your liking.
Notifications
— Within Notifications, you can
customize alerts for notification sound chimes,
new text message alerts, displaying messages
for missed calls, navigation prompt pop-ups,
and more!
Use this QR code to access your
digital experience.
23_GG_OH_EN_USC_t.book Page 11

1 2 I N T E R I O R
P AIR /D ELETE A D EVICE
Did you know pairing your smartphone with your
vehicle is quick and easy?
Pairing your smartphone with your vehicle will
open even more possibilities for your driving
convenience, such as playing music from your
phone or answering calls through your Uconnect
system.
1. Make sure Bluetooth® is enabled on your
mobile phone.
2. With the vehicle in the ACC or ON/RUN position,
press the Phone button on the vehicle’s
touchscreen menu bar.
3. Press “Device Manager”.
4. Select “Add Device”.
5. Follow the prompts on your phone and on the
touchscreen.
Uconnect 5/5 NAV With 10.25-inch Display
Pairing a Phone
Follow these steps to remove your smartphone:
1. Press the Device Manager button on the
touchscreen.
2. Press the Settings gear icon next to the phone or
device you wish to remove.
3. Press “Delete Device”. The device should be
removed.
Use this QR code to access your
digital experience.
A PPLE C AR P LAY ®
To use Apple CarPlay®, follow these steps:
1. Ensure that your iPhone® is unlocked for the
very first connection, then ensure Siri is
enabled in settings.
2. Connect your iPhone® to one of the media USB
ports in your vehicle, or pair your iPhone® with the
system. You have no need to plug your device in if
it is paired with the system.
3. Once the device is connected and recognized, the
Phone icon on the menu bar changes to the Apple
CarPlay® icon.
NOTE:
To use Apple CarPlay®, make sure that cellular data
is turned on, and that you are in an area with
cellular coverage. Your data and cellular coverage
is shown on the left side of the touchscreen within
CarPlay. Data plan rates may apply.
Use this QR code to access your
digital experience.
A NDROID A UTO ™
To use Android Auto™, follow these steps:
1. Download the Android Auto™ app from the
Google Play store.
2. Connect your phone to one of the media USB ports
in your vehicle, or pair your phone with the system.
You have no need to plug your device in if it is
paired with the system.
3. Once the device is connected and recognized, the
Phone icon on the menu bar changes to the Android
Auto™ icon.
NOTE:
To use Android Auto™, make sure you are in an
area with cellular coverage. Android Auto™ may
use cellular data, and your cellular coverage is
shown in the upper right corner of the touchscreen.
Data plan rates may apply.
23_GG_OH_EN_USC_t.book Page 12
I N T E R I O R 13
Use this QR code to access your
digital experience.
U CONNECT V OICE
RECOGNITION — I F E QUIPPED
Introduction
Did you know that your vehicle is capable of voice
commands? This feature is called Voice
Recognition (VR).
Start using Uconnect VR with these helpful quick
tips. They provide the key voice commands and
tips you need to know to control your vehicle’s VR
system.
Basic Voice Commands
The following basic voice commands can be given
at any point while using your Uconnect system.
Push the VR button or, for the
Uconnect 5/5 NAV, say the vehicle’s “Wake Up”
word, “Hey Uconnect”. After the beep, say:
“
Cancel
” to stop a current voice session.
“
Help
” to hear a list of suggested Voice
Commands.
“
Repeat
” to listen to the system prompts again.
Notice the visual cues that inform you of your VR
system’s status on your Uconnect system.
Use this QR code to access your
digital experience.
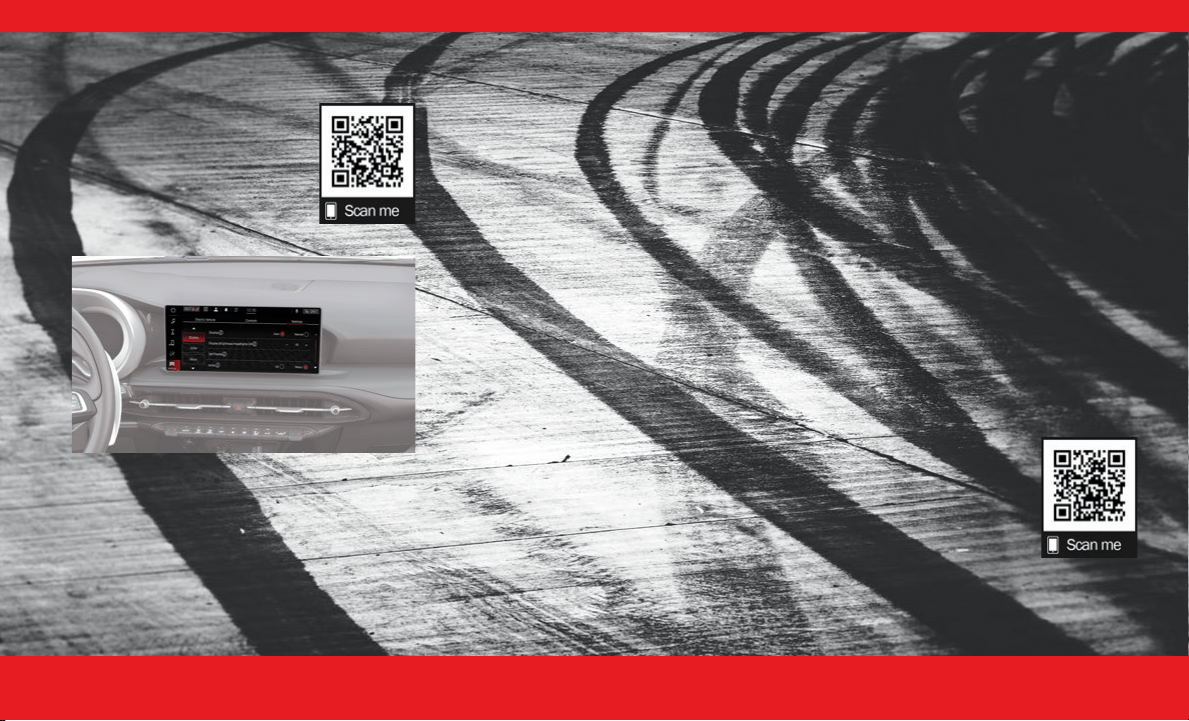
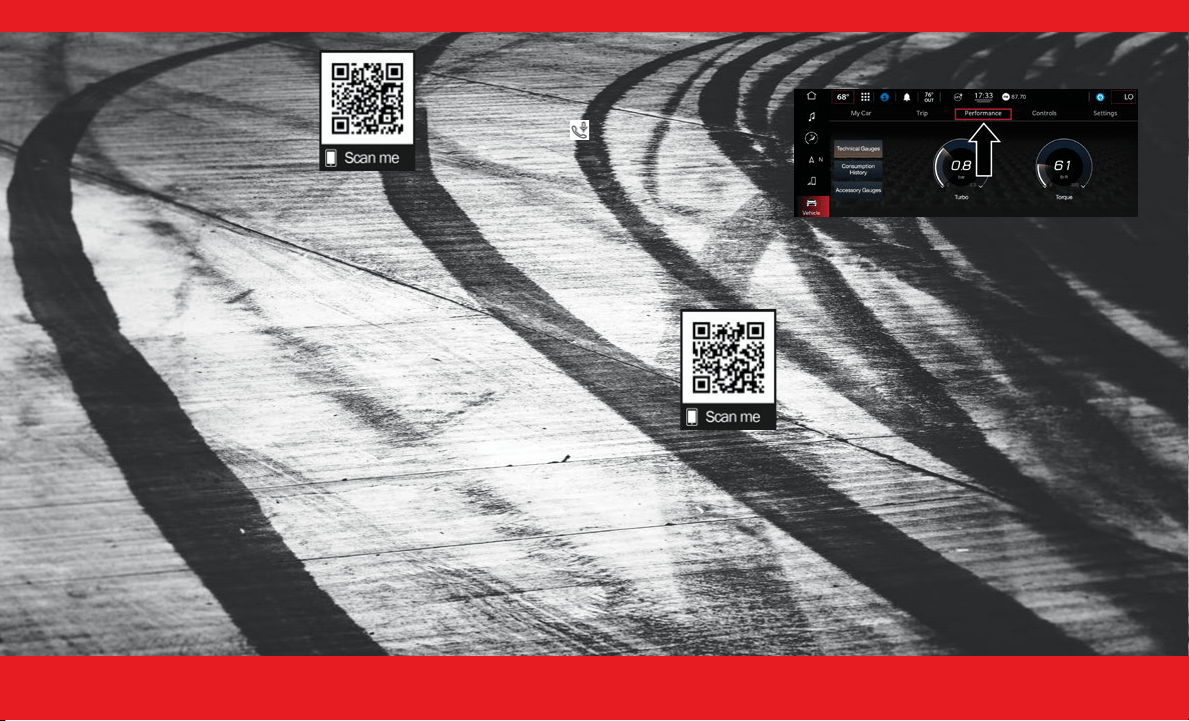
P ERFORMANCE P AGES
Uconnect 5/5 NAV With 10.25-inch Display
Performance Pages
Performance Pages is an application that provides
a display of performance indicators that will help
you gain familiarity with the capabilities of your
vehicle in real time.
To access the Performance Pages:
1. Press the Vehicle or the Apps button on the
touchscreen.
2. Press “Performance”.
3. Press the desired button on the touchscreen to
access that specific option within the Performance
Pages.
23_GG_OH_EN_USC_t.book Page 13

1 4 I N T E R I O R
(Continued)
CHARGING & OUTLETS
E LECTRICAL P OWER O UTLETS
Your vehicle may be equipped with 12 Volt (13
Amp) power outlets that can be used to power
cellular phones, small electronics, and other low
powered electrical accessories.
Your vehicle might have an outlet in any of the
following locations:
On the instrument panel, beneath your Climate
Control buttons
On the trim in the rear cargo area
On the back of the center console
Instrument Panel Power Outlet
Rear Cargo Area Power Outlet
Rear Center Console Power Outlet
NOTE:
Do not connect any of your devices that have a
power rating higher than 180 W to the outlet. Do
not use power adapters that do not fit the outlet
as this may damage it.
Power outlets labeled with a key symbol are
powered when the ignition is in the ON/RUN
position.
WARNING!
To avoid serious injury or death:
Only devices designed for use in this type of
outlet should be inserted into any 12 Volt
outlet.
Do not touch with wet hands.
Close the lid when not in use and while driving
the vehicle.
If this outlet is mishandled, it may cause an
electric shock and failure.
CAUTION!
Power outlets are designed for accessory plugs
only. Do not insert any other object in the power
outlets as this will damage the outlet and blow
the fuse. Improper use of the power outlet can
cause damage not covered by your New Vehicle
Limited Warranty.
Many accessories that can be plugged in draw
power from the vehicle's battery, even when not
in use (i.e., cellular phones, etc.). Eventually, if
plugged in long enough, the vehicle's battery
will discharge sufficiently to degrade battery life
and/or prevent the engine from starting.
23_GG_OH_EN_USC_t.book Page 14
I N T E R I O R 15
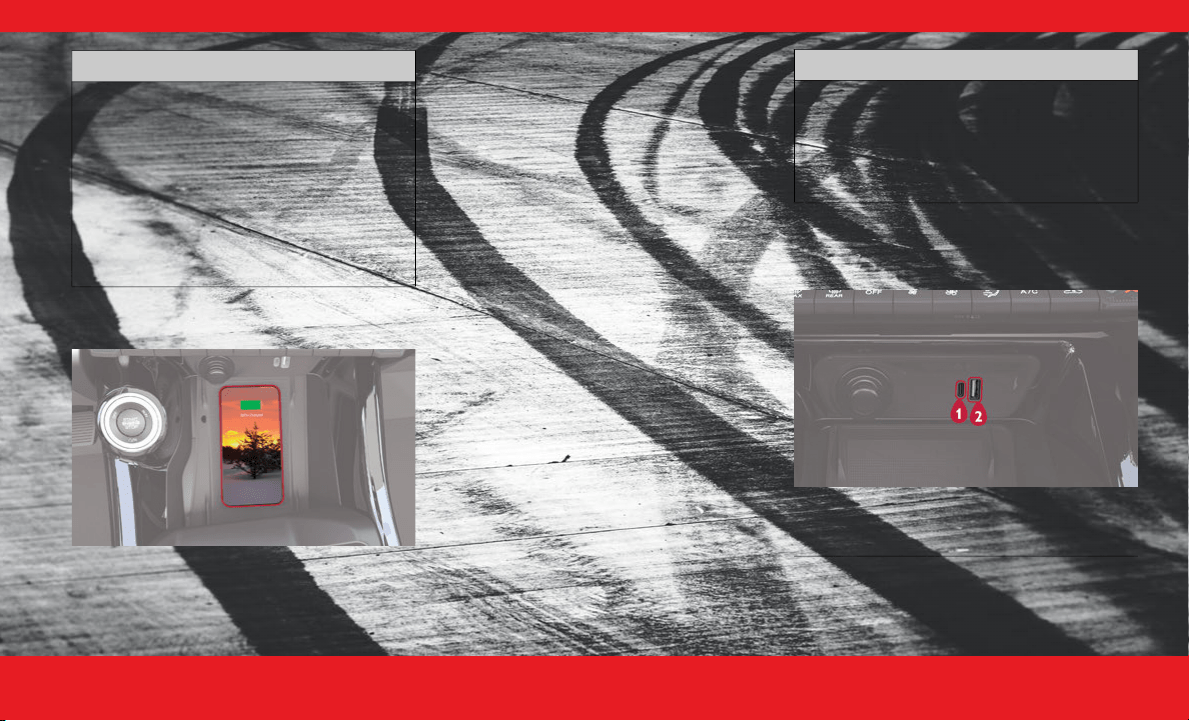
W IRELESS P HONE C HARGING
Did you know your vehicle may be equipped with a
wireless charging pad located below the center
stack, within the storage compartment? It is
designed to easily charge your Qi
®
enabled mobile
phone on the go.
The wireless charging pad may include an anti-slip
mat to hold your mobile phone in place and an
indicator light that indicates your phone is
charging.
Be sure to place your mobile device on the center
of the charging pad, with the display facing
upward, and your device not covering the LED.
LED Indicator Status:
No Light: Charging pad is idle or searching for a
device.
Blue Light: Device is detected, and is charging.
Red Light/Flashing: Internal error, or foreign
object is detected.
Green Light: Device has completed battery
charging (if device is equipped to transmit this
information).
NOTE:
Do not place the key fob on or near the charging
pad.
Using a phone case may interfere with wireless
charging.
USB
Your vehicle may be equipped with four USB ports:
Front USB Ports
Accessories that draw higher power (i.e.,
coolers, vacuum cleaners, lights, etc.), will
discharge the battery even more quickly. Only
use these intermittently and with greater
caution.
After the use of high power draw accessories,
or long periods of the vehicle not being started
(with accessories still plugged in), the vehicle
must be driven a sufficient length of time to
allow the generator to recharge the vehicle's
battery.
CAUTION!
CAUTION!
The key fob should not be placed on the
charging pad or within 6 inches (15 cm) of it.
Doing so can cause excessive heat buildup and
damage to the fob. Placing the fob in close
proximity of the charging pad blocks the fob
from being detected by the vehicle and prevents
the vehicle from starting.
1 — USB Type C
2 — USB Type A
23_GG_OH_EN_USC_t.book Page 15
1 6 I N T E R I O R
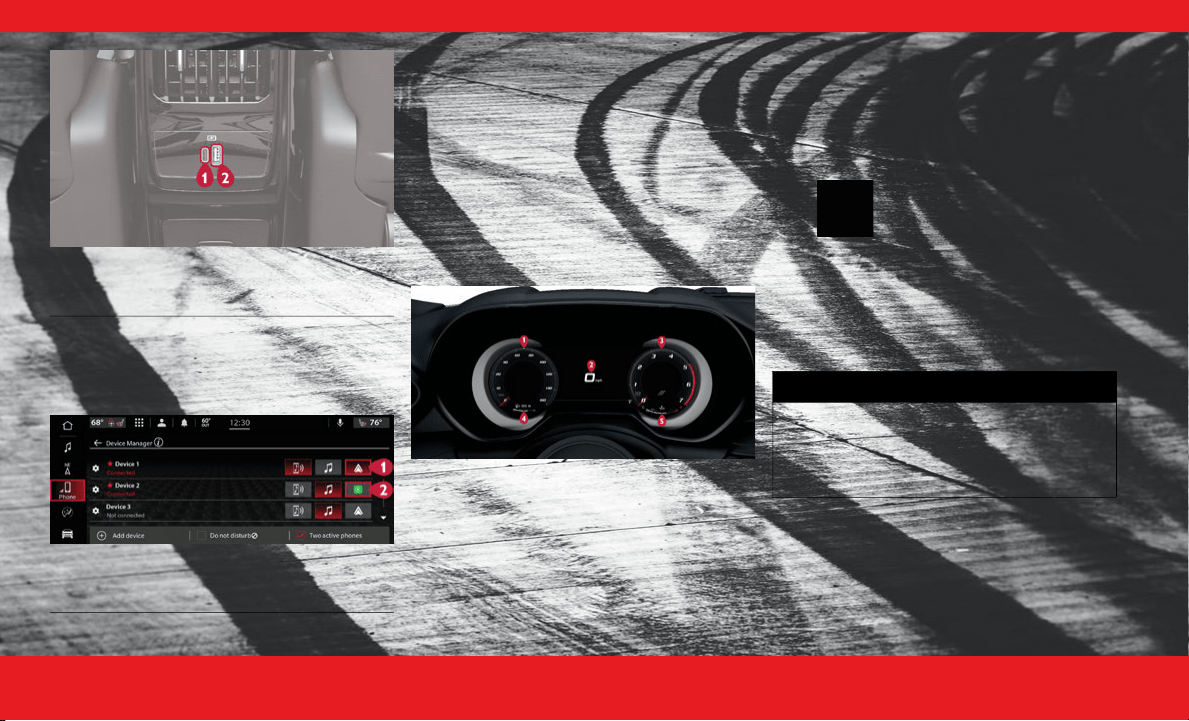
Rear Charge-Only USB Ports
Plugging in a mobile device to a USB port below
the Uconnect screen may activate the Android
Auto™ or Apple CarPlay® features.
Disabling Android Auto™ and Apple CarPlay®
To disable Android Auto™ or Apple CarPlay®,
navigate to “Device Manager” in the “Phone/
Bluetooth®” section of your Uconnect settings. For
further information, refer to “Android Auto™” or
“Apple CarPlay®” in “Multimedia” in your Owner’s
Manual.
For additional information please visit
UconnectPhone.com.
INSTRUMENT CLUSTER
G ETTING T O K NOW Y OUR I NSTRUMENT
CLUSTER
1. Speedometer
Indicates vehicle speed.
2. Instrument Cluster Display
When the appropriate conditions exist, this
display shows the instrument cluster display
messages.
The display always shows one of the main
menu items after ignition is placed on.
3. Tachometer
Indicates the engine speed in revolutions
per minute (RPM x 1000).
4. Fuel Gauge
The gauge shows the level of fuel in the fuel
tank when the Keyless Push Button Ignition
is in the ON/RUN position.
The fuel pump symbol points to
the side of the vehicle where the
fuel door is located.
5. Temperature Gauge
The temperature gauge shows engine cool-
ant temperature. Any reading within the
normal range indicates that the engine
cooling system is operating satisfactorily.
1 — Charge-Only USB Type C
2 — Charge-Only USB Type A
1 — Android Auto™
2 — Apple Carplay®
WARNING!
A hot engine cooling system is dangerous.
You or others could be badly burned by
steam or boiling coolant. It is recommended
to call an authorized dealer for service if your
vehicle overheats.
23_GG_OH_EN_USC_t.book Page 16
I N T E R I O R 17
NOTE:
Depending on your vehicle trim, your instrument
cluster display may vary.
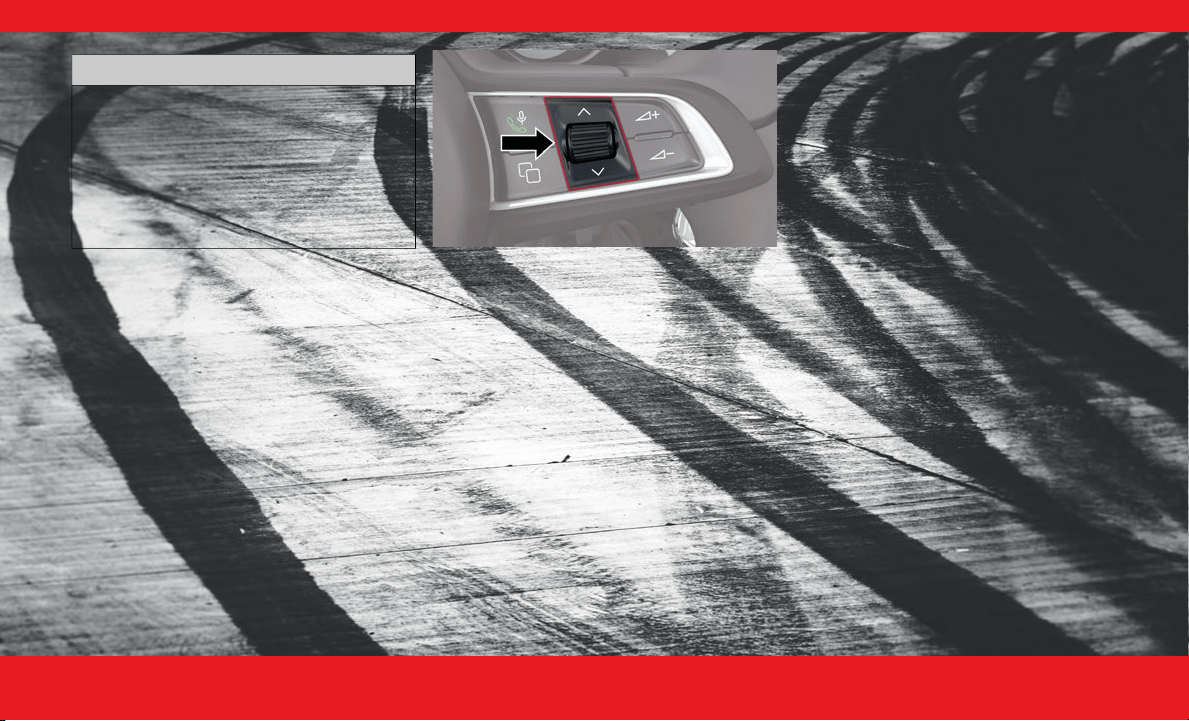
C ONTROLLING Y OUR I NSTRUMENT C LUSTER
D
ISPLAY
The instrument cluster display features a driver
interactive display that is located in the instrument
cluster.
The systems allow the driver to select information
by using the thumbwheel, mounted on the steering
wheel:
Instrument Cluster Display Control Thumbwheel
Thumbwheel
Use the
Thumbwheel
on the right side of the
steering wheel to scroll through the menu options
and submenus in the Instrument Cluster Display.
Thumbwheel Button
Press the
Thumbwheel Button
to select the high-
lighted menu option.
W ARNING L IGHTS A ND M ESSAGES
These symbols are warning/indicator lights that
illuminate to signify various conditions with your
vehicle, ranging from potentially critical faults to
merely informing you that a feature has been
engaged. Some of the symbols are optional and
may or may not show.
NOTE:
For more information about warning lights and
indicators, please see your owners manual.
Warning & Indicator Lights
If any of the
warning lights
illuminate in your
cluster, a condition may need to be corrected or
your vehicle may require service. In these situations
it is recommended that you contact your local
authorized dealer to schedule service.
The
indicator lights
illuminate in your cluster to
indicate a feature is active.
CAUTION!
Driving with a hot engine cooling system
could damage your vehicle. If the
temperature gauge reads “
H
”, pull over and
stop the vehicle. Idle the vehicle with the air
conditioner turned off until the pointer drops
back into the normal range. If the pointer
remains on the “
H
”, turn the engine off
immediately and call an authorized dealer for
service.
23_GG_OH_EN_USC_t.book Page 17

1 8 I N T E R I O R
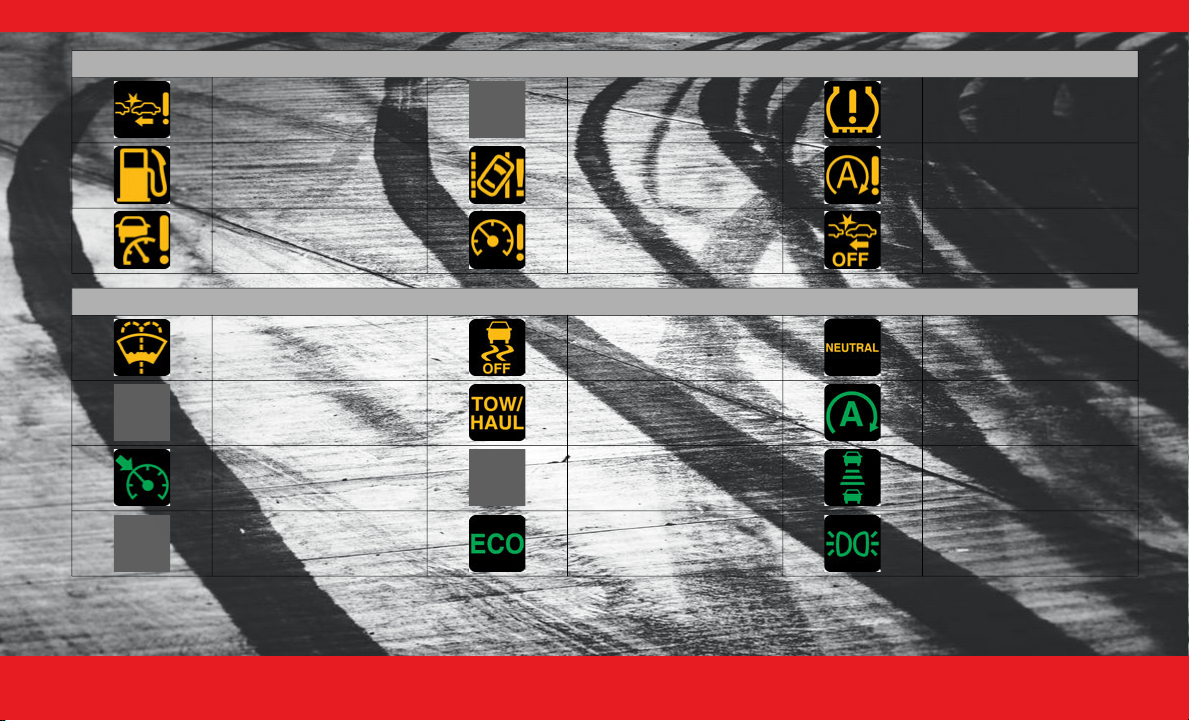
Warning Lights
Air Bag Battery Charge Brake
Electric Power Steering
(EPS) Fault
Electronic Throttle Control
(EPS) Fault
Engine Coolant
Temperature
Oil Pressure Oil Temperature Transmission Temperature
Liftgate Open Door Open Hood Open
Seat Belt Reminder Service AWD
Anti-Lock Brake System
(ABS)
Engine Check/Malfunction Electric Park Brake (EPB)
Electronic Stability Control
(ESC) Active Warning
23_GG_OH_EN_USC_t.book Page 18
I N T E R I O R 19
Service Forward Collision
Warning (FCW)
Vehicle Security
Tire Pressure Monitoring
System (TPMS)
Low Fuel Service LaneSense Service Stop/Start System
Adaptive Cruise Control
(ACC) Fault
Cruise Control Fault
Forward Collision Warning
(FCW) Off
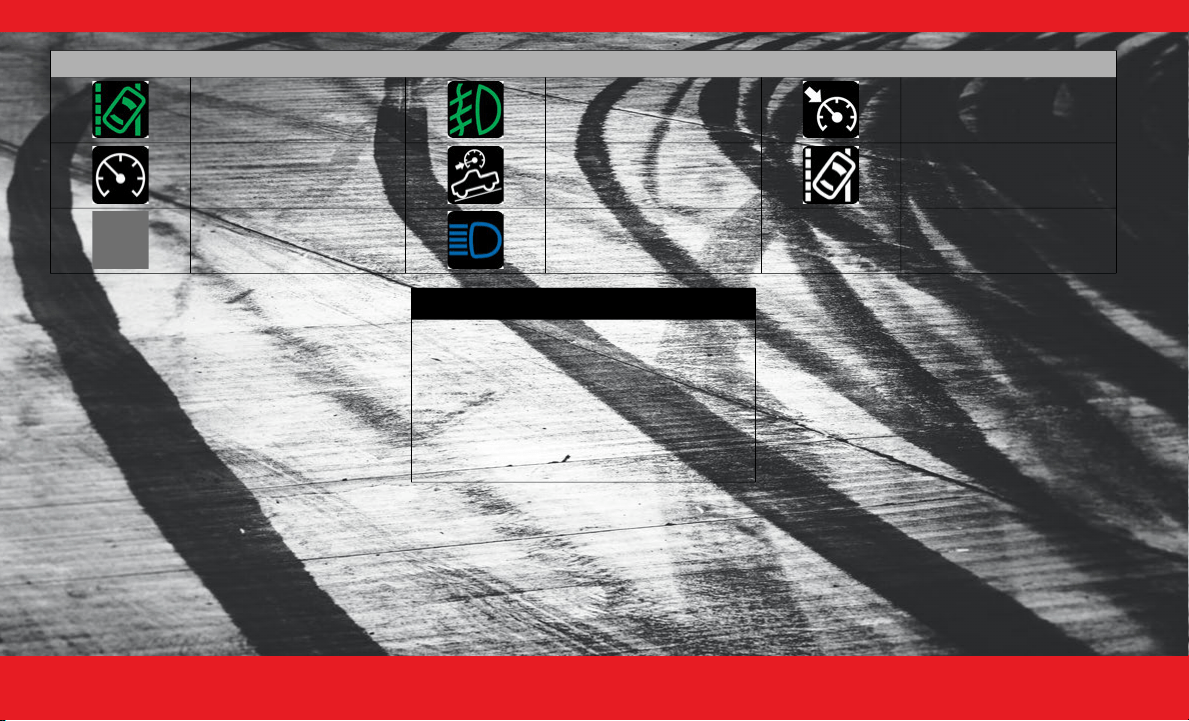
Indicator Lights
Low Washer Fluid
Electronic Stability Control
(ESC) Off
NEUTRAL
Trailer Merge Assist TOW/HAUL Stop/Start Active
Cruise Control Set Turn Signal
Adaptive Cruise Control
(ACC) Set With Target
Adaptive Cruise Control
(ACC) Set With No Target
Detected
ECO Mode Parking/Headlights On
Warning Lights
23_GG_OH_EN_USC_t.book Page 19
2 0 I N T E R I O R
D ROWSY D RIVER D ETECTION (DDD) —
I
F E QUIPPED
DDD detects when the driver is feeling fatigued
and warns the driver with an audible chime and a
DDD graphic will display on the cluster screen,
advising to pull over and take a break.
If the driver
accepts
the suggestion provided by
the system by pressing the thumbwheel on the
steering wheel, the message will disappear from
the display.
If the driver
does not acknowledge
the warning
provided by the system, the message will remain
on the screen for one minute.
DDD can be activated and deactivated through the
Uconnect system.
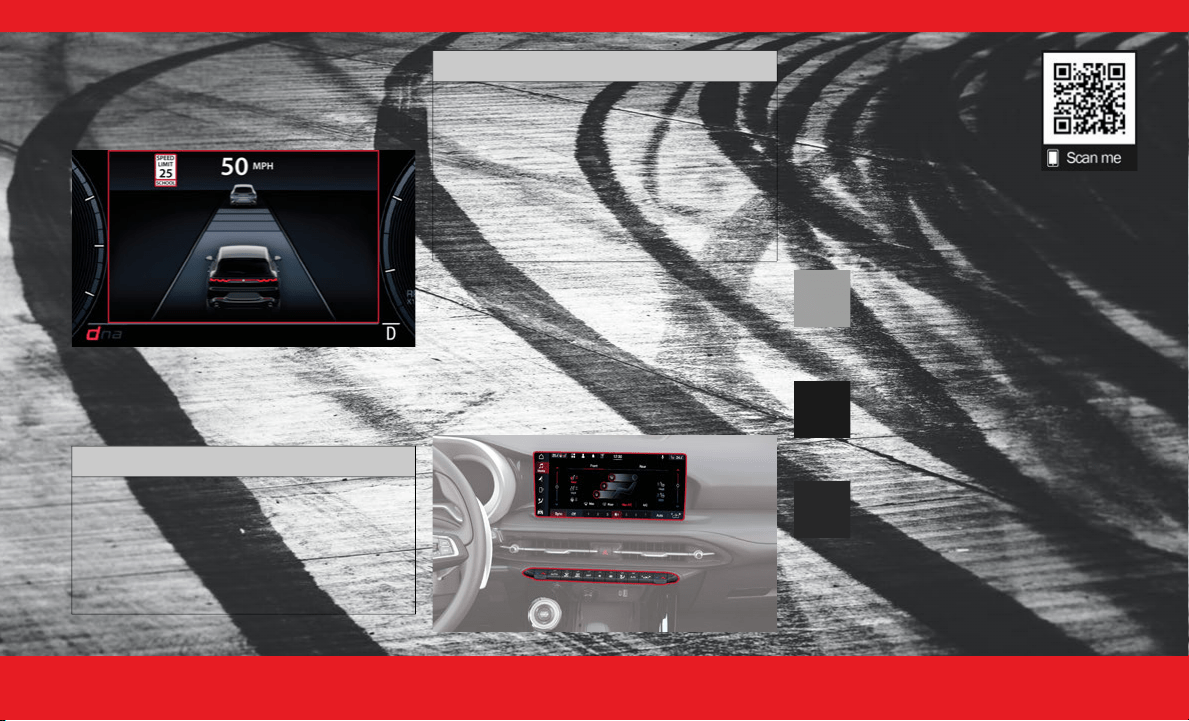
T RAFFIC S IGN R ECOGNITION
Your Traffic Sign Recognition (TSR) system uses a
camera mounted on the windshield, as well as map
data (if your vehicle is equipped with Navigation)
to detect recognizable road signs such as:
Speed limits
School zones
No passing zones
This system may also detect supplemental
information to display such as:
Rain
Snow
Fog
School
Night
Trailer
LaneSense Front Fog Lights Cruise Control Set
Cruise Control Ready Hill Descent Control (HDC) LaneSense
Adaptive Cruise Control
(ACC) Ready
High Beam
Indicator Lights
WARNING!
The DDD system is an aid for driving and
does not relieve the driver of the
responsibility of driving the vehicle. If you
experience fatigue while driving, pull over
safely for a break without waiting for the
DDD warnings. Only return to the road when
you are in the right physical and mental
condition to prevent endangering yourself
and other drivers.
23_GG_OH_EN_USC_t.book Page 20
I N T E R I O R 21
(Continued)
You will see the detected traffic signs in the
instrument cluster display. A combination of signs
can be displayed at one time (e.g. speed limit,
supplemental info, and no passing zone signs),
depending on what information is available.
School Zone Detected
NOTE:
You can enable/disable the TSR system within the
Uconnect system. If road signs are shown on the
instrument cluster display, your system is ON.
INTERIOR COMFORT
SETTINGS
C LIMATE C ONTROLS
The Climate Control system allows you to regulate
the temperature, air flow, and direction of air
circulating throughout the vehicle.
Use this QR code to access your
digital experience.
A UTOMATIC C LIMATE C ONTROL
D
ESCRIPTIONS A ND F UNCTIONS
MAX A/C Button
Press the button on the touchscreen to
set the system to maximum Air
Conditioning (A/C).
A/C Button
Push the button to engage the Air
Conditioning (A/C) system.
Recirculation Button
Push the button to change the system
between Recirculation mode and outside
air mode.
CAUTION!
Functionality may be limited or the system
may not work if the sensor is obstructed.
The system may have limited operation or not
work at all in weather conditions such as heavy
rain, hail, and thick fog. Strong light contrasts
can influence the recognition capability of the
sensor.
The area surrounding the sensor must not be
covered with stickers or any other object.
Do not tamper or perform any operations in
the area of the windshield glass directly
surrounding the sensor.
Clean foreign matters such as bird droppings,
insects, snow or ice on the windshield. Use
specific detergents and clean cloths to avoid
scratching the windshield.
CAUTION!
23_GG_OH_EN_USC_t.book Page 21
2 2 I N T E R I O R
Auto Button
Push the button after setting your
desired temperature and the system will
maintain the set temperature.
MAX Defrost Button
Push the button to direct air to the
windshield and front windows.
Rear Defrost Button
Push the button to turn on the rear
window defroster and heated mirrors.
Driver And Passenger Temperature Controls
SYNC Button
Press the SYNC button on the
touchscreen to synchronize the driver
and front passenger temperature
settings.
Blower Control
Use the small or large blower icon toggle
switches or the blower bar on the
touchscreen to increase or decrease the
amount of air forced through the climate
control system.
Mode Control
Select Mode by pressing one of the Mode
buttons on the touchscreen, or the
faceplate, to change the airflow
distribution mode.
CAUTION!
Failure to follow these cautions can cause
damage to the heating elements:
Use care when washing the inside of the rear
window. Do not use abrasive window cleaners
on the interior surface of the window. Use a
soft cloth and a mild washing solution, wiping
parallel to the heating elements. Labels can be
peeled off after soaking with warm water.
Do not use scrapers, sharp instruments, or
abrasive window cleaners on the interior
surface of the window.
Keep all objects a safe distance from the
window.
Push the driver or passenger’s
side toggle switch upward or
downward, or slide the
temperature bar to adjust the
driver and passenger
temperature settings.
Panel Mode
Bi-Level Mode
Floor Mode
Defrost Mode
Mix Mode
23_GG_OH_EN_USC_t.book Page 22

I N T E R I O R 23
Combine Modes:
Dual Level Combination
Front Defrost and Panel Mode
Tri-Level Combination
Front Defrost, Panel Mode, and Floor Mode
Climate Control OFF Button
Press the button to turn the climate
control system off.
A UTOMATIC T EMPERATURE C ONTROL
(ATC)
Automatic Operation
1. Push the AUTO button on the faceplate or the
AUTO button on the touchscreen.
2. Select the desired temperature using the toggle
switches or the touchscreen. The system then
achieves and automatically maintains that comfort
level.
NOTE:
There will be no need for you to move the
temperature settings for cold or hot vehicles. The
system automatically adjusts the temperature,
mode, and blower speed to provide comfort as
quickly as possible.
Manual Operation Override
Your Climate Control system includes manual
override features. The AUTO symbol in the front
ATC display will turn off when the system is in the
manual mode.
C LIMATE V OICE R ECOGNITION
You can adjust your vehicle’s temperature
hands-free while you’re driving.
Push the VR button on the steering wheel. After the
beep, say one of the following commands:
“
Set driver temperature to
70
degrees
”
“
Set passenger temperature to
70
degrees
”
Did you know:
Voice Recognition for Climate may
only be used to adjust the interior temperature of
your vehicle. Voice Recognition will not work to
adjust the heated seats or steering wheel.
F RONT H EATED S EATS
Press the heated seat button to cycle
through HI, MED, LO, and off settings.
The driver or front passenger can
combine two or three of the
modes described by selecting
them individually on their side of
climate control screen. Combine
modes by pressing each icon on
the touchscreen.
WARNING!
Persons who are unable to feel pain to the skin
because of advanced age, chronic illness,
diabetes, spinal cord injury, medication,
alcohol use, exhaustion or other physical
condition must exercise care when using the
seat heater. It may cause burns even at low
temperatures, especially if used for long
periods of time.
Do not place anything on the seat or seatback
that insulates against heat, such as a blanket or
cushion. This may cause the seat heater to
overheat. Sitting in a seat that has been over-
heated could cause serious burns due to the
increased surface temperature of the seat.
23_GG_OH_EN_USC_t.book Page 23
2 4 I N T E R I O R
F RONT V ENTILATED S EATS
Press the ventilated seat button to cycle
through HI, MED, LO, and off settings.
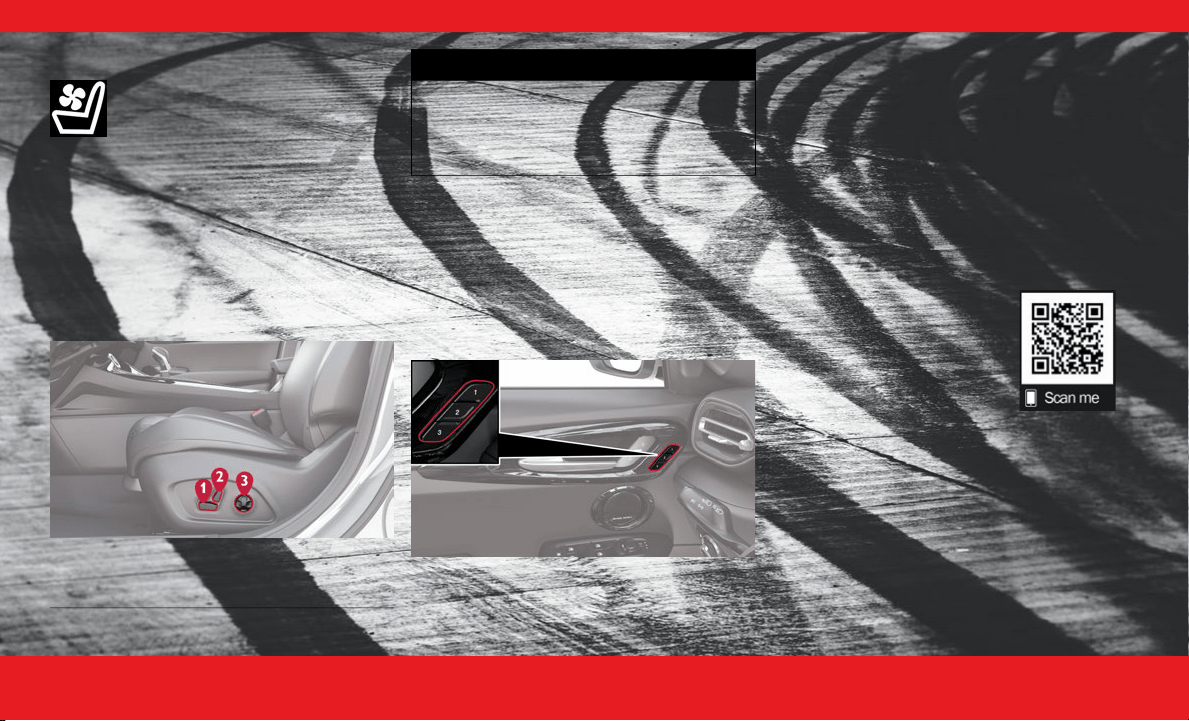
P OWER F RONT S EATS
There are two power seat switches that are used to
control the movement of the seat cushion and the
seatback.
Push the power lumbar switch forward to increase
the lumbar support. Push the switch rearward to
decrease the lumbar support. Pushing upward or
downward on the switch will raise and lower the
position of the support.
D RIVER M EMORY S ETTINGS
This feature allows you to save up to two different
memory profiles for easy recalling through a
memory switch. Each memory profile saves your
desired position settings for the following features:
Driver’s seat
A set of desired radio station presets
To recall the memory settings for driver one or two,
push the desired memory button number (1 or 3).
Programming the Memory Feature
1. Place the ignition in the ON/RUN position (do
not start the engine).
2. Adjust all memory profile settings to desired
preferences (i.e., seat and radio station presets).
3. Push and release the (2) button on the memory
switch, and then push the desired memory profile
button (1 or 3) within five seconds. A beep will
sound to confirm the memory profile has been
successfully stored.
Use this QR code to access your
digital experience.
1 — Power Seat Cushion Switch
2 — Power Seatback Switch
3 — Power Lumbar Switch
WARNING!
Do not ride with the seatback reclined so that
the shoulder belt is no longer resting against
your chest. In a collision you could slide under
the seat belt, which could result in serious
injury or death.
23_GG_OH_EN_USC_t.book Page 24
I N T E R I O R 25
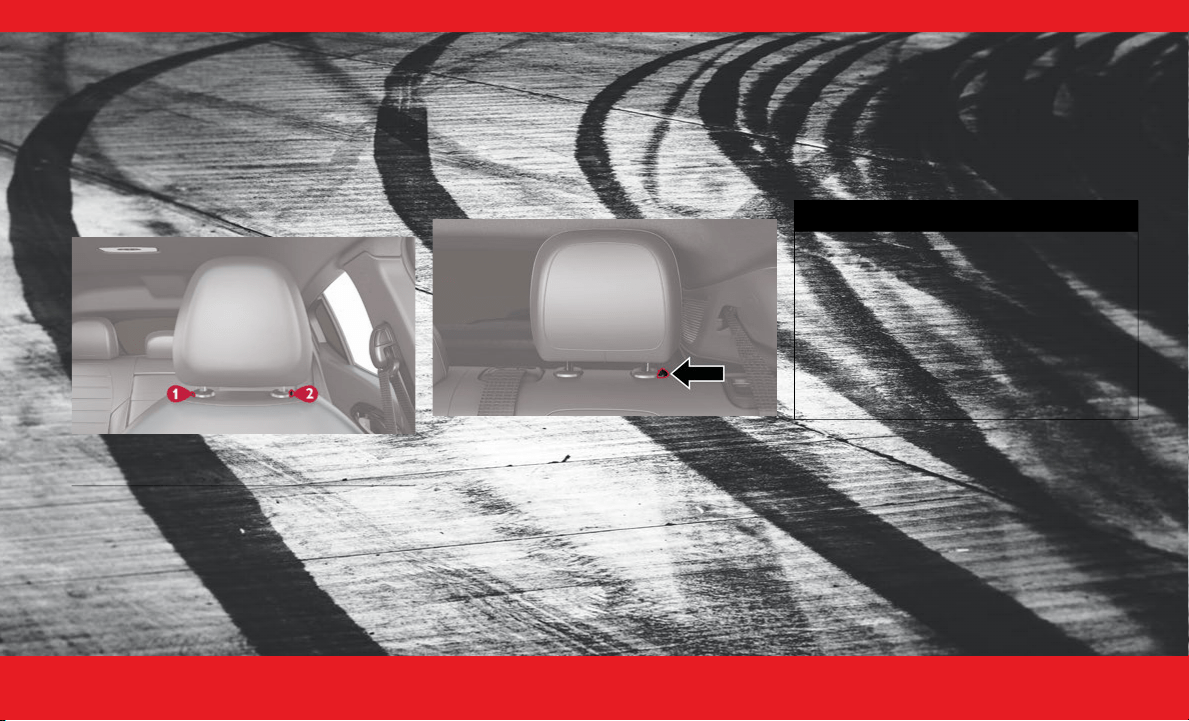
H EAD R ESTRAINTS
Did you know your vehicle is equipped with front
driver and passenger head restraints that can be
adjusted two different ways?
Head restraints are designed to reduce the risk of
injury by restricting head movement in the event of
a rear impact. Head restraints should be adjusted
so that the top of the head restraint is located
above the top of your ear.
To raise the head restraint, pull upward on the
head restraint.
To lower the head restraint, push the adjustment
button, located at the base of the head restraint,
while pushing downward on the head restraint.
Rear Head Restraints
The outboard head restraints can be adjusted up or
down.
Rear Outboard Head Restraint Button
To raise the outboard head restraint, pull upward
on the head restraint. To lower the head restraint,
push the adjustment button, located at the base of
the head restraint, and push downward on the
head restraint.
NOTE:
The rear center head restraint is not adjustable or
removable.
1 — Removal Button
2 — Adjustment Button
WARNING!
All occupants, including the driver, should not
operate a vehicle or sit in a vehicle’s seat until
the head restraints are placed in their proper
positions in order to minimize the risk of neck
injury in the event of a crash.
Head restraints should never be adjusted while
the vehicle is in motion. Driving a vehicle with
the head restraints improperly adjusted or
removed could cause serious injury or death in
the event of a collision.
23_GG_OH_EN_USC_t.book Page 25
2 6 I N T E R I O R
LIGHTING OPERATION
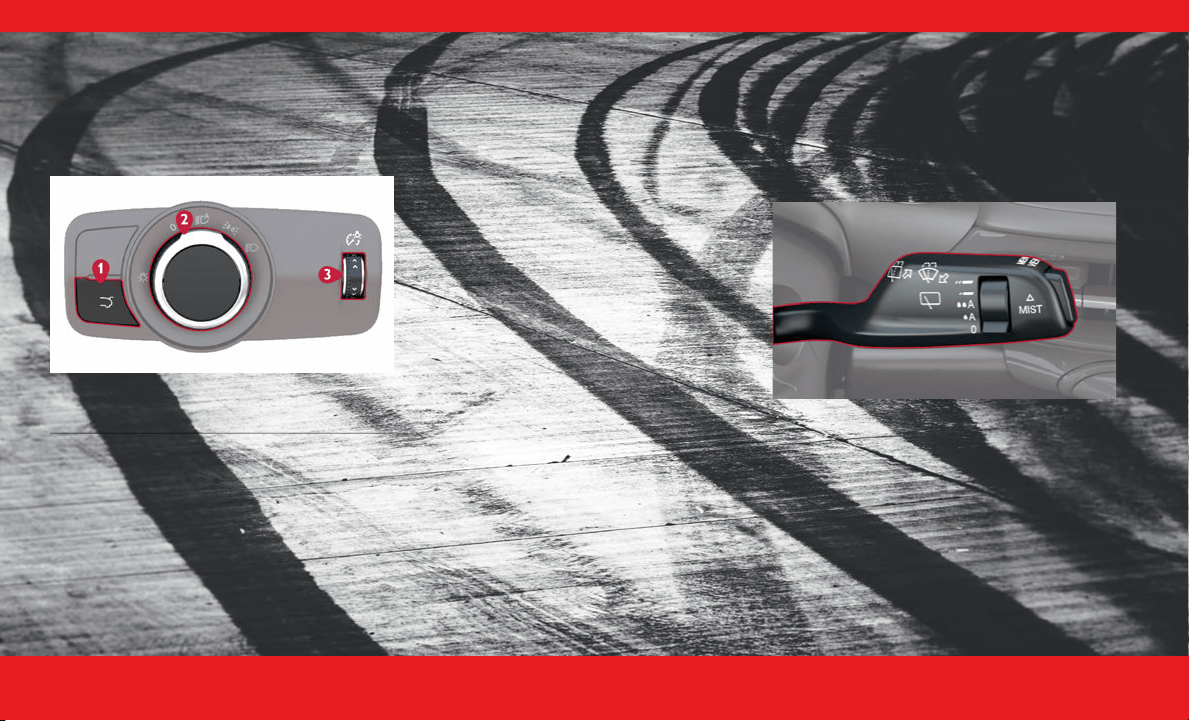
H EADLIGHT S WITCH
The headlight switch is located on the left side of
the instrument panel and is used to control your
lighting.
Rotate the headlight control knob to select one of
the available positions: O (off) position, parking
lights position, headlights position, or AUTO.
A UTOMATIC H IGH B EAMS
Did you know your vehicle can automatically
switch from high beams to low beams until an
approaching vehicle is out of view?
To turn on this feature:
1. Set the headlight switch to the AUTO position.
2. Make sure “Auto Dim High Beams” is set to “ON”
within your Uconnect Settings.
A UTOMATIC H EADLIGHTS
With the engine running, make sure your headlight
control knob is in the AUTO position; your vehicle
will detect how bright it is outside and turn the
headlights on/off as necessary.
A UTOMATIC H EADLIGHTS W ITH W IPERS
You can have your automatic headlights
automatically turn on when the wiper system is on,
provided that your headlights are in AUTO mode
and the engine is running. You can turn this feature
on/off in the Uconnect Settings.
If you have Rain Sensing Wipers, and they are on,
the headlights will automatically turn on after the
wipers complete five wipe cycles within
approximately one minute.
WINDSHIELD WIPERS &
WASHERS
The windshield wiper/washer controls are located
on the windshield wiper/washer lever on the right
side of the steering column. The front wipers are
operated by rotating a switch, located on the end
of the lever.
Windshield Wiper/Washer Lever
W INDSHIELD W IPER O PERATION
Front Wipers
Rotate the switch to the Low Continuous Wiper
Speed position to activate the first (low) level
continuous speed of the windshield wipers in
manual mode.
Rotate the switch to the High Continuous Wiper
Speed position to activate the second (high) level
continuous speed of the windshield wipers in
manual mode.
1 — Power Liftgate Release Button
2 — Rotate Headlight Control
3 — Instrument Panel Dimmer Control
23_GG_OH_EN_USC_t.book Page 26

I N T E R I O R 27
(Continued)
Windshield Washers
To use the washer, pull the windshield wiper lever
toward the steering wheel and hold.
Mist
Push the lever upward to the MIST position and
release for a single wiping cycle.
NOTE:
The mist feature does not activate the washer
pump; therefore, no washer fluid will be sprayed on
the windshield. The washer function must be used
in order to spray the windshield with washer fluid.
R AIN S ENSING W IPERS
This feature senses rain or snowfall on the
windshield and automatically activates the wipers.
Rotate the end of the multifunction lever to the
Low Sensitivity Rain Sensing or High Sensitivity
Rain Sensing position, and tap the lever upwards,
to activate this feature.
NOTE:
The Rain Sensing feature can be turned on and off
using the Uconnect system.
CRUISE CONTROL SYSTEMS
Your vehicle is equipped with the Adaptive Cruise
Control (ACC) system. ACC will adjust the vehicle
speed up to the preset speed to maintain a
distance with the vehicle ahead.
NOTE:
If Active Speed Limiter is enabled, Adaptive Cruise
Control will be unavailable, and vice versa.
A DAPTIVE C RUISE C ONTROL (ACC)
WARNING!
Sudden loss of visibility through the
windshield could lead to a collision. You
might not see other vehicles or other
obstacles. To avoid sudden icing of the
windshield during freezing weather, warm the
windshield with the defroster before and
during windshield washer use.
CAUTION!
Always remove any buildup of snow that
prevents the windshield wiper blades from
returning to the parked position. If the
windshield wiper switch is turned off, and the
blades cannot return to the parked position,
damage to the wiper motor may occur.
WARNING!
Adaptive Cruise Control (ACC) is a conve-
nience system. It is not a substitute for active
driver involvement. It is always the driver’s
responsibility to be attentive of road, traffic,
and weather conditions, vehicle speed,
distance to the vehicle ahead and, most impor-
tantly, brake operation to ensure safe opera-
tion of the vehicle under all road conditions.
Your complete attention is always required
while driving to maintain safe control of your
vehicle. Failure to follow these warnings can
result in a collision and death or serious
personal injury.
The ACC system:
Does not react to pedestrians, oncoming
vehicles, and stationary objects (e.g., a
stopped vehicle in a traffic jam or a
disabled vehicle).
Cannot take street, traffic, and weather
conditions into account, and may be
limited upon adverse sight distance condi-
tions.
Does not always fully recognize complex
driving conditions, which can result in
wrong or missing distance warnings.
23_GG_OH_EN_USC_t.book Page 27
2 8 I N T E R I O R
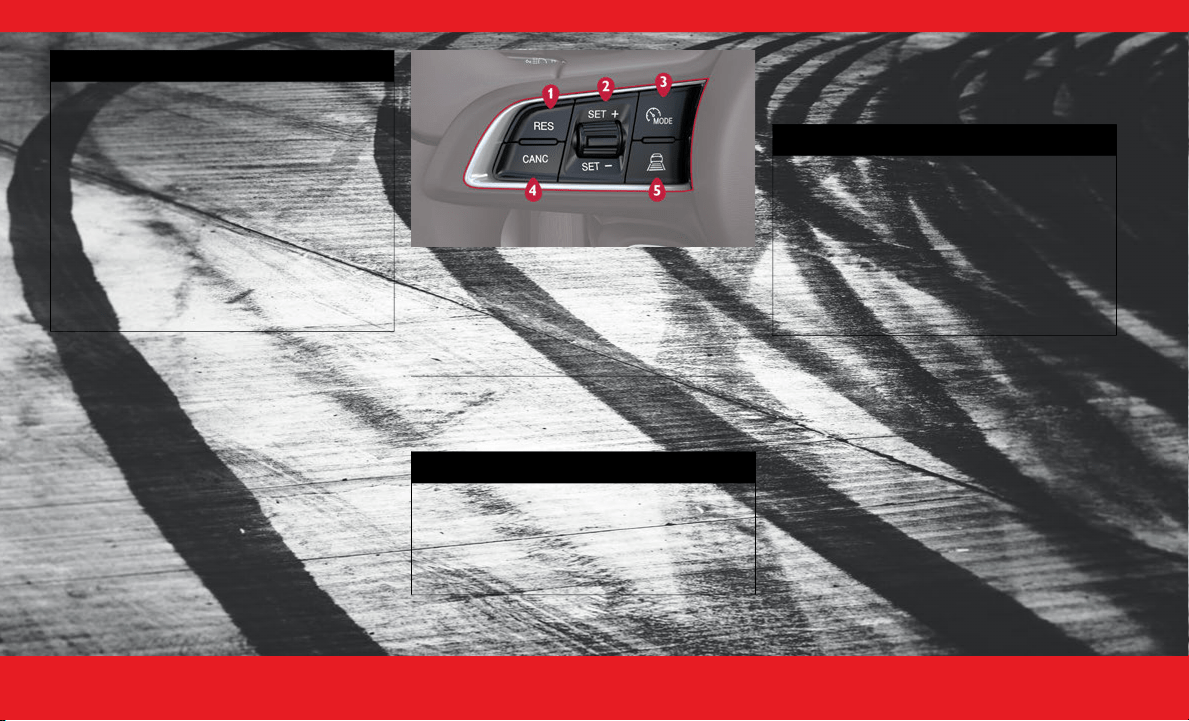
The buttons on the left side of the steering wheel
operate the ACC system.
Adaptive Cruise Control Buttons
To Activate/Deactivate
Push and release the Mode button.
To Set A Desired ACC Speed
When the vehicle has reached the desired
speed, push the SET switch up or down
briefly, then release.
To Deactivate
You can deactivate the ACC by pressing the
Mode button again or placing your vehicle’s
ignition in the OFF position.
To Resume Speed
If ACC was canceled, and there is a set
speed in memory, push the RES (resume)
button.
You should turn the ACC system off:
When driving in fog, heavy rain, heavy snow,
sleet, heavy traffic, and complex driving situa-
tions (i.e., in highway construction zones).
When entering a turn lane or highway
off-ramp; when driving on roads that are
winding, icy, snow-covered, slippery, or have
steep uphill or downhill slopes.
When towing a trailer up or down steep
slopes.
When circumstances do not allow safe driving
at a constant speed.
WARNING!
1 — RES/Resume Button
2 — SET (+/-) Switch
3 — MODE Button
4 — CANC/Cancel Button
5 — Distance Setting Button
WARNING!
Leaving the Adaptive Cruise Control (ACC)
system on when not in use is dangerous. You
could accidentally set the system or cause it
to go faster than you want. You could lose
control and have a collision. Always leave the
system off when you are not using it.
WARNING!
If the Active Speed Limiter is active, the
system will not react to vehicles ahead. In
addition, the proximity warning does not
activate and no alarm will sound even if you
are too close to the vehicle ahead since
neither the presence of the vehicle ahead nor
the vehicle-to-vehicle distance is detected.
Be sure to maintain a safe distance between
your vehicle and the vehicle ahead. Always be
aware which mode is selected.
23_GG_OH_EN_USC_t.book Page 28
I N T E R I O R 29
To Vary The Speed Setting
Once the vehicle speed has been set, you
can increase the speed by pushing the SET
switch upward or decrease the speed by
pushing the SET switch downward.
Setting The Following Distance In ACC
To decrease the distance setting, push the
Distance Setting Button and release. Each
time the button is pushed, the distance
setting increases by one bar (longer). Once
the longest setting is reached, if the button
is pushed again it will be set to the shortest
setting available.
Use this QR code to access your
digital experience.
GARAGE DOOR OPENER
(HOMELINK®)
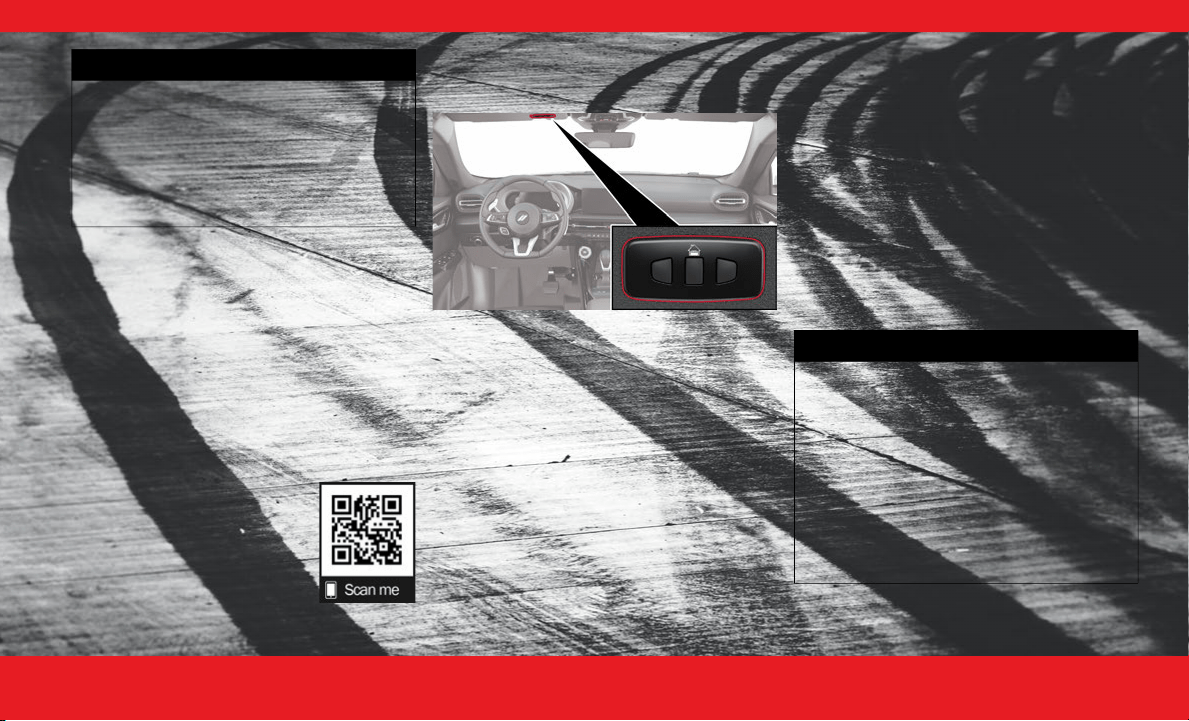
The HomeLink® buttons are located in the over-
head console or sunvisor and contain three
optional HomeLink® channels.
TO ERASE ALL SET CHANNELS:
Push and hold
the two outside HomeLink® buttons for
20 seconds until the indicator flashes above the
buttons.
ROLLING OR NON-ROLLING?
Check your
garage door opener motor in your garage for a
“LEARN” or “TRAIN” button by the hanging
antenna. If you have one of these, you have a
Rolling Code garage door opener.
1. While the car is ON, hold the handheld garage
door transmitter 1-3 inches from the
HomeLink® button you want to program in the
vehicle.
2. Push and hold both the HomeLink® button being
programmed and the button on the garage door
transmitter.
3.
For Non-Rolling Code
garage door openers,
watch for the indicator light to stay illuminated.
For Rolling Code
garage door openers,
watch for the indicator light to go from a
slow blink to blinking rapidly.
4.
For Rolling Code
garage door openers only,
firmly push and release the “LEARN” or “TRAIN”
button on your garage door opener motor in your
garage, then push the HomeLink® button in your
vehicle three times (holding the button for two
seconds each time).
WARNING!
The Resume function should only be used if
traffic and road conditions permit. Resuming
a set speed that is too high or too low for
prevailing traffic and road conditions could
cause the vehicle to accelerate or decelerate
too sharply for safe operation. Failure to
follow these warnings can result in a collision
and death or serious personal injury.
WARNING!
Your motorized door or gate will open and
close while you are programming the universal
transmitter. Do not program the transmitter if
people or pets are in the path of the door or
gate.
Do not run your vehicle in a closed garage or
confined area while programming the trans-
mitter. Exhaust gas from your vehicle contains
carbon monoxide (CO) which is odorless and
colorless. Carbon monoxide is poisonous when
inhaled and can cause you and others to be
severely injured or killed.
23_GG_OH_EN_USC_t.book Page 29

3 0 I N T E R I O R
If you have any problems, or
require additional assistance,
please call toll-free
1-800-355-3515 or visit
HomeLink.com.
NOTE:
If the programming was successful, your garage
door should open and close with your chosen
HomeLink® button.
Use this QR code to access your
digital experience.
T ROUBLESHOOTING T IPS
If you are having trouble programming HomeLink®,
here are some of the most common solutions:
Replace the battery in the garage door opener
hand-held transmitter.
Push the LEARN button on the garage door
opener to complete the training for a rolling
code.
Did you unplug the device for programming and
remember to plug it back in?
If you have any problems, or require additional
assistance, please call toll-free 1-800-355-3515 or
visit HomeLink.com.
PARKING ASSISTANCE
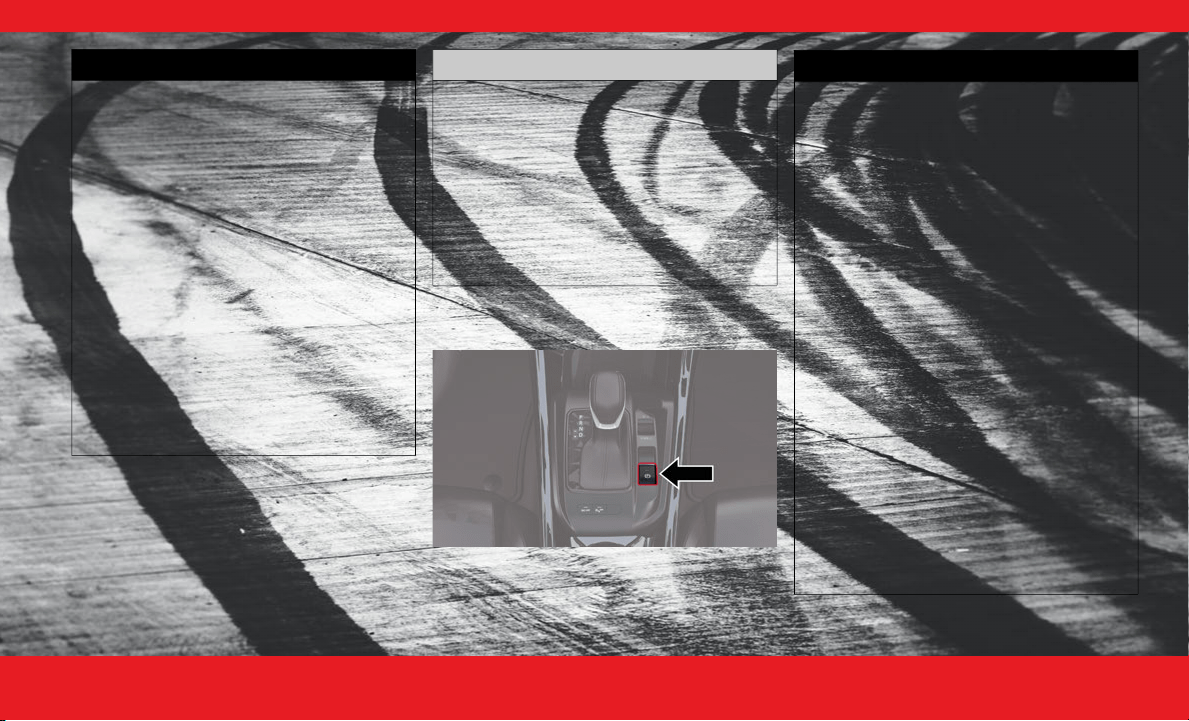
P ARKSENSE F RONT /R EAR P ARK A SSIST
S
YSTEM
Did you know you can enable and disable the
ParkSense system using the ParkSense switch,
located in front of the center console, to the rear of
the gear selector?
Use this QR code to access your
digital experience.
WARNING!
Vehicle exhaust contains carbon monoxide, a
dangerous gas. Do not run your vehicle in the
garage while programming the transmitter.
Exhaust gas can cause serious injury or death.
Your motorized door or gate will open and
close while you are programming the universal
transmitter. Do not program the transmitter if
people, pets or other objects are in the path of
the door or gate. Only use this transmitter with
a garage door opener that has a “stop and
reverse” feature as required by Federal safety
standards. This includes most garage door
opener models manufactured after 1982. Do
not use a garage door opener without these
safety features.
23_GG_OH_EN_USC_t.book Page 30
I N T E R I O R 31
(Continued)
E LECTRIC P ARK B RAKE (EPB)
To apply the parking brake manually, pull up on the
EPB switch. Once the EPB is fully engaged, the
Brake Warning Light on the instrument cluster and
an indicator on the switch will illuminate if the
ignition is in the ON position.
WARNING!
Drivers must be careful when backing up even
when using ParkSense. Always check carefully
behind your vehicle, look behind you, and be
sure to check for pedestrians, animals, other
vehicles, obstructions, and blind spots before
backing up. You are responsible for safety and
must continue to pay attention to your
surroundings. Failure to do so can result in
serious injury or death.
Before using ParkSense, it is strongly recom-
mended that the ball mount and hitch ball
assembly be disconnected from the vehicle
when the vehicle is not used for towing. Failure
to do so can result in injury or damage to vehi-
cles or obstacles because the hitch ball will be
much closer to the obstacle than the rear
fascia when the vehicle sounds the continuous
tone. Also, the sensors could detect the ball
mount and hitch ball assembly, depending on
its size and shape, giving a false indication that
an obstacle is behind the vehicle.
CAUTION!
ParkSense is only a parking aid and it is unable
to recognize every obstacle, including small
obstacles. Parking curbs might be temporarily
detected or not detected at all. Obstacles
located above or below the sensors will not be
detected when they are in close proximity.
The vehicle must be driven slowly when using
ParkSense in order to be able to stop in time
when an obstacle is detected. It is recom-
mended that the driver looks over his/her
shoulder when using ParkSense.
WARNING!
Do not rely on the parking brake to operate
effectively if the rear brakes have been
immersed in water or mud.
Never use the PARK position as a substitute
for the parking brake. Always apply the
parking brake fully when parked to guard
against vehicle movement and possible injury
or damage.
When leaving the vehicle, always remove the
key fob from the ignition and lock your vehicle.
Never leave children alone in a vehicle, or with
access to an unlocked vehicle. Allowing chil-
dren to be in a vehicle unattended is
dangerous for a number of reasons. A child or
others could be seriously or fatally injured.
Children should be warned not to touch the
parking brake, brake pedal or the gear
selector.
Do not leave the key fob in or near the vehicle,
or in a location accessible to children, and do
not leave the ignition of a vehicle equipped
with Keyless Enter ’n Go™ in the ACC or ON/
RUN position. A child could operate power
windows, other controls, or move the vehicle.
Be sure the parking brake is fully disengaged
before driving; failure to do so can lead to
brake failure and a collision.
23_GG_OH_EN_USC_t.book Page 31

3 2 I N T E R I O R
Use this QR code to access your
digital experience.
Always fully apply the parking brake when
leaving your vehicle, or it may roll and cause
damage or injury. Also be certain to leave the
transmission in PARK. Failure to do so may
allow the vehicle to roll and cause damage or
injury.
WARNING!
WARNING!
Driving the vehicle with the parking brake
engaged, or repeated use of the parking
brake to slow the vehicle, may cause serious
damage to the brake system. Be sure the
parking brake is fully disengaged before
driving; failure to do so can lead to brake
failure and a collision.
CAUTION!
If the Brake System Warning Light remains on
with the parking brake released, a brake
system malfunction is indicated. Have the
brake system serviced by an authorized
dealer immediately.
23_GG_OH_EN_USC_t.book Page 32
3 4 E X T E R I O R 3 4 E X T E R I O R
(Continued)
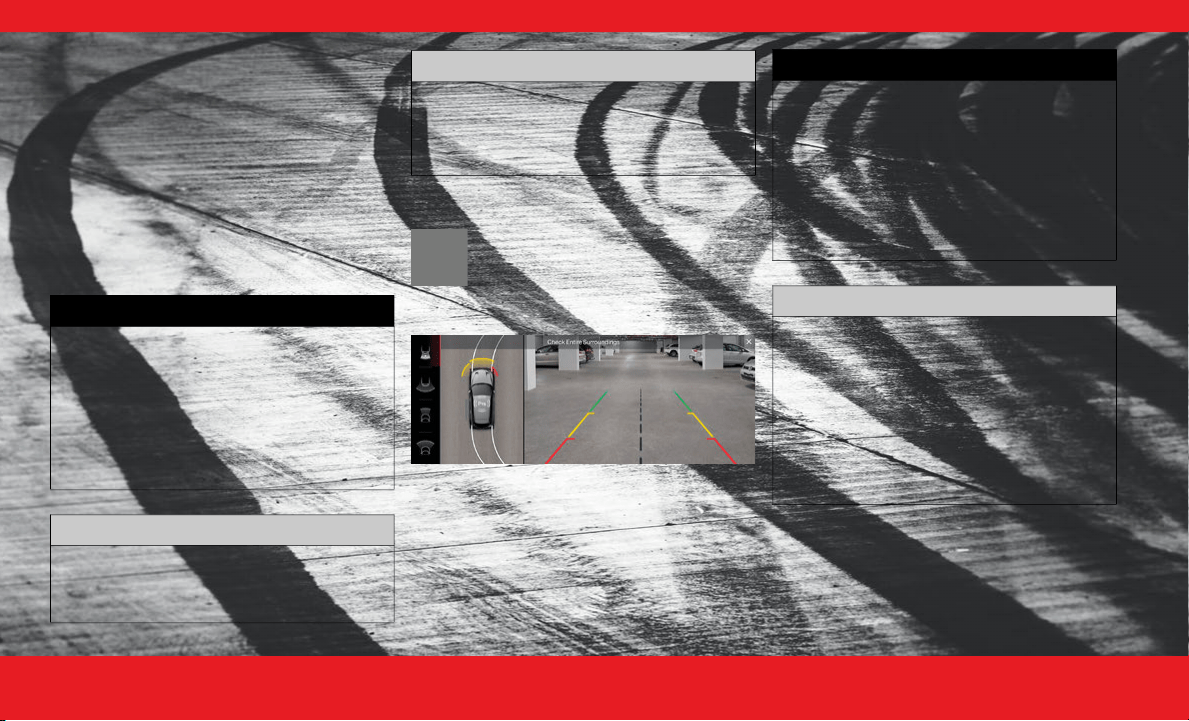
EXTERIOR CAMERA VIEWS
B ACK U P C AMERA
The ParkView Rear Back Up Camera allows you to
see an on-screen image of the rear surroundings of
your vehicle whenever the gear selector is put into
REVERSE.
Manual Activation Of The Rear View Camera:
1. Press the Controls button located on the
bottom of the Uconnect display.
2. Press the Back Up Camera button to turn the Rear
View Camera system on.
S URROUND V IEW C AMERA S YSTEM
Press this button on the touchscreen to
enter the Surround View Camera menu.
When the vehicle is shifted into
REVERSE, the Rear View and Top View is
the default view of the system.
WARNING!
Drivers must be careful when backing up even
when using the ParkView Rear Back Up Camera.
Always check carefully behind your vehicle, and
be sure to check for pedestrians, animals, other
vehicles, obstructions, or blind spots before
backing up. You are responsible for the safety of
your surroundings and must continue to pay
attention while backing up. Failure to do so can
result in serious injury or death.
CAUTION!
To avoid vehicle damage, ParkView should
only be used as a parking aid. The ParkView
camera is unable to view every obstacle or
object in your drive path.
To avoid vehicle damage, the vehicle must be
driven slowly when using ParkView to be able
to stop in time when an obstacle is seen. It is
recommended that the driver look frequently
over his/her shoulder when using ParkView.
CAUTION!
WARNING!
Drivers must be careful when backing up
even when using the Surround View Camera.
Always check carefully behind your vehicle,
and be sure to check for pedestrians, animals,
other vehicles, obstructions, or blind spots
before backing up. You are responsible for
the safety of your surroundings and must
continue to pay attention while backing up.
Failure to do so can result in serious injury or
death.
CAUTION!
To avoid vehicle damage, Surround View
should only be used as a parking aid. The
Surround View camera is unable to view every
obstacle or object in your drive path.
To avoid vehicle damage, the vehicle must be
driven slowly when using Surround View to be
able to stop in time when an obstacle is seen.
It is recommended that the driver look
frequently over his/her shoulder when using
Surround View.
23_GG_OH_EN_USC_t.book Page 34
E X T E R I O R 35
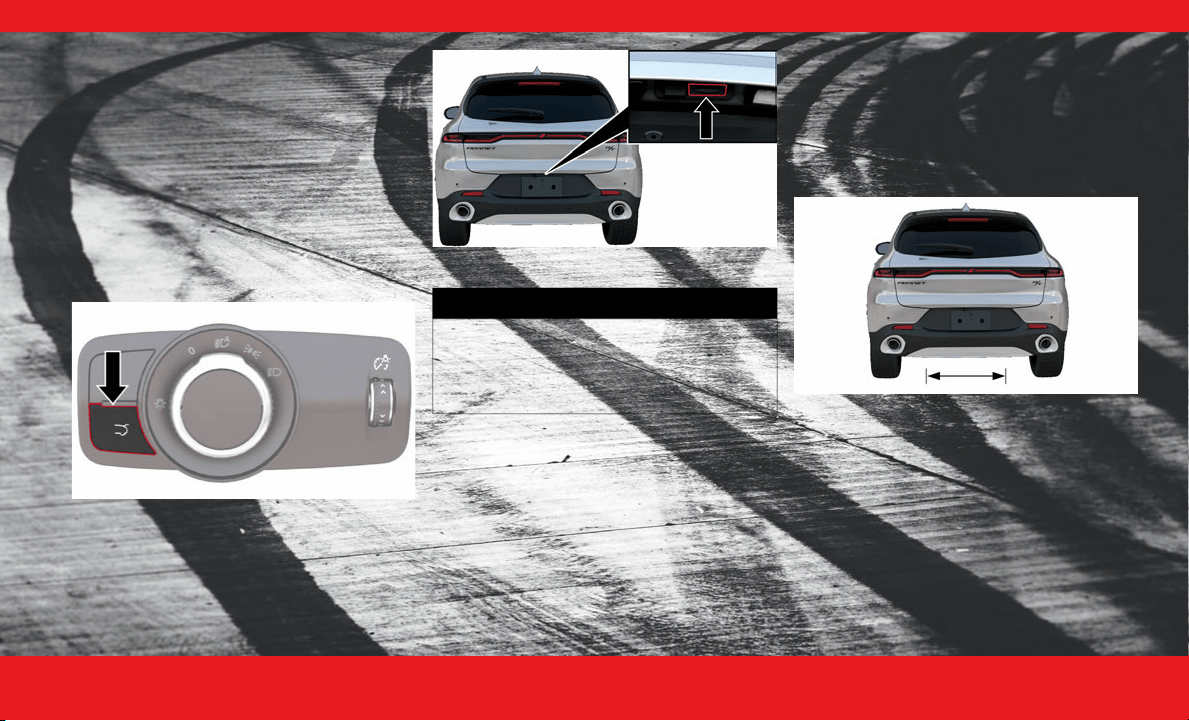
LIFTGATE
L IFTGATE R ELEASE B UTTON
You can open your liftgate in any of the following
ways:
By pushing the liftgate button on your key fob
By pushing the release button on the liftgate
itself
By pushing the release button near the headlight
switch
By kicking under the activation zone on your
Hands-Free liftgate
Headlight Switch Liftgate Button
Liftgate Release Button
H ANDS -F REE L IFTGATE
You can open your Hands-Free Liftgate by kicking
your leg in a straight in and out motion under the
vehicle activation zone that is located below the
rear license plate. Do not move your foot sideways,
or in a sweeping motion, or the sensors may not
detect the request.
Hands-Free Liftgate Activation Zone
If the liftgate is already opened, kicking your leg
under the activation zone will close the liftgate
completely.
WARNING!
Driving with the liftgate open can allow
poisonous exhaust gases into your vehicle.
You and your passengers could be injured by
these fumes. Keep the liftgate closed when
you are operating the vehicle.
23_GG_OH_EN_USC_t.book Page 35

3 6 E X T E R I O R
NOTE:
Opening or closing the Hands-Free Liftgate
requires a valid Passive Entry key fob within 5 ft
(1.5 m) of the door handle, and you must have
the vehicle’s gear selector in the PARK position.
You can turn the Hands-Free Liftgate feature on
or off through the Uconnect system.
If anything obstructs the Hands-Free Liftgate
while it is opening or closing, or if you kick in the
activation zone again, the liftgate will automati-
cally reverse its operation.
WARNING!
Driving with the liftgate open can allow
poisonous exhaust gases into your vehicle.
You and your passengers could be injured by
these fumes. Keep the liftgate closed when
you are operating the vehicle.
If you are required to drive with the liftgate
open, make sure that all windows are closed,
and the climate control blower switch is set at
high speed. Do not use the recirculation mode.
During power operation, personal injury or
cargo damage may occur. Ensure the liftgate
travel path is clear. Make sure the liftgate is
closed and latched before driving away.
Personal injury or cargo damage may occur if
caught in the path of the liftgate. Make sure
the liftgate path is clear before activating the
liftgate.
CAUTION!
The Hands-Free Liftgate can be turned off
manually in the Uconnect system to avoid
unintentional activation.
23_GG_OH_EN_USC_t.book Page 36
E M E R G E N C Y 37
(Continued)
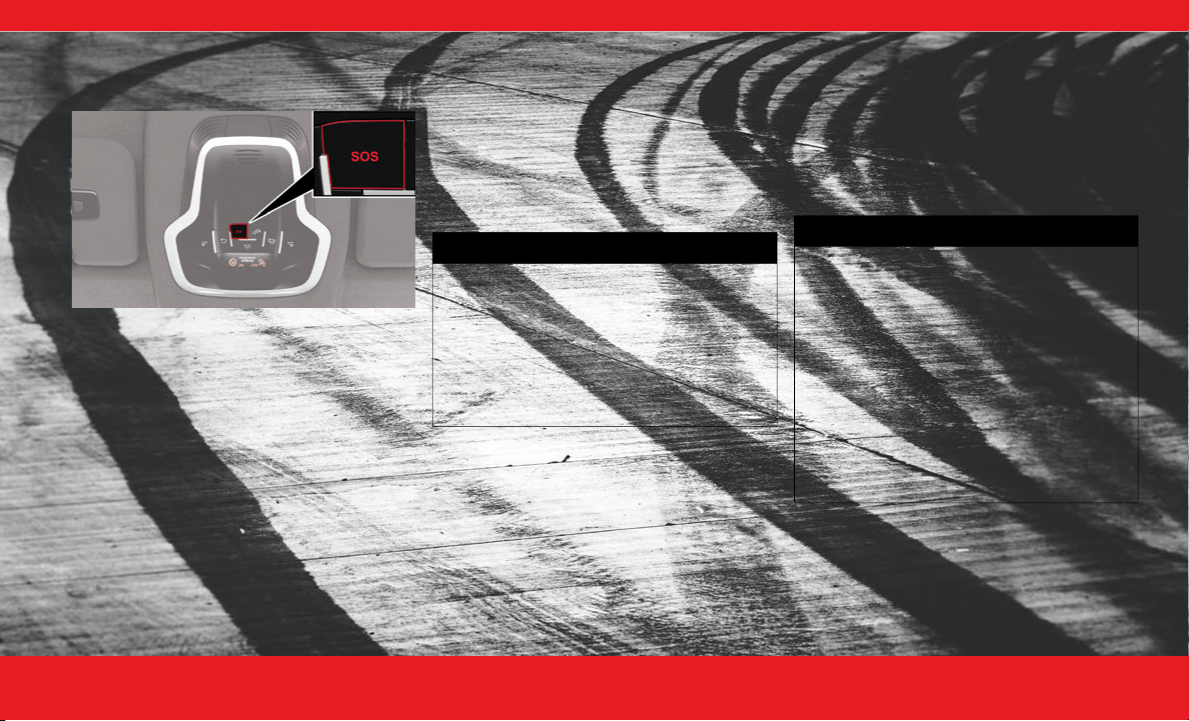
EMERGENCY
SOS AND ASSIST SYSTEM —
IF EQUIPPED
SOS Emergency Call Button
Making an SOS Call
1. Press or hold the SOS Call button on the
overhead console.
NOTE:
In case the SOS Call button is pushed in error, there
will be a 10 second delay before the SOS Call
system initiates a call to a SOS operator. To cancel
the SOS Call connection, push the SOS call button
on the overhead console or press the cancellation
button on the Device Screen. Termination of the
SOS Call will turn off the green LED light on the
overhead console.
2. The LED light located next to the SOS button on the
overhead console will turn green once a connection
to a SOS operator has been made.
3. Once a connection between the vehicle and a SOS
operator is made, the SOS Call system may transmit
the following important vehicle information to a
SOS operator:
Indication that the occupant placed a SOS
Call
The vehicle brand
The last known GPS coordinates of the
vehicle
4. You should be able to speak with the SOS operator
through the vehicle audio system to determine if
additional assistance is needed.
NOTE:
Your vehicle may be transmitting data as
authorized by the subscriber
Ú page 6.
Once a connection is made between the
vehicle’s SOS Call system and the SOS oper-
ator, the SOS operator may be able to open
a voice connection with the vehicle to deter-
mine if additional assistance is needed. Once
the SOS operator opens a voice connection
with the vehicle’s SOS Call system, the oper-
ator should be able to speak with you or
other vehicle occupants and hear sounds
occurring in the vehicle. The vehicle’s SOS
Call system will attempt to remain
connected with the SOS operator until the
SOS operator terminates the connection.
5. The SOS operator may attempt to contact
appropriate emergency responders and provide
them with important vehicle information and GPS
coordinates.
WARNING!
ALWAYS obey traffic laws and pay attention
to the road. ALWAYS drive safely with your
hands on the steering wheel. You have full
responsibility and assume all risks related to
the use of the features and applications in
this vehicle. Only use the features and
applications when it is safe to do so. Failure
to do so may result in an accident involving
serious injury or death.
WARNING!
If anyone in the vehicle could be in danger
(e.g., fire or smoke is visible, dangerous road
conditions or location), do not wait for voice
contact from an Emergency Services Agent.
All occupants should exit the vehicle immedi-
ately and move to a safe location.
Never place anything on or near the vehicle’s
operable network and GPS antennas. You
could prevent operable network and GPS
signal reception, which can prevent your
vehicle from placing an emergency call. An
operable network and GPS signal reception is
required for the SOS Call system to function
properly.
23_GG_OH_EN_USC_t.book Page 37

3 8 E M E R G E N C Y
(Continued)
Automatic SOS — If Equipped
Automatic SOS is a hands-free safety service that
can immediately connect you with help in the event
that your vehicle’s airbags deploy. Please refer to
your provided radio supplement for complete
information.
Making an ASSIST Call
The vehicle is equipped with an on board assist,
which is located within the Uconnect system. The
ASSIST Button is used to automatically connect
you to any one of the following support centers:
Roadside Assistance – If you get a flat tire, or
need a tow, just push the ASSIST button and
you’ll be connected to someone who can help.
Roadside Assistance will know what vehicle
you’re driving and its location. Additional fees
may apply for roadside assistance.
Dodge Connect Customer Care - Total support
for Radio, Phone and NAV issues.
Vehicle Customer Care – Total support for all
other vehicle issues.
NOTE:
The SOS button will only function if you are
connected to an operable LTE (voice/data) or
4G (data) network, which comes as a built in
function. Other Uconnect services will only be
operable if your Dodge Connect service is active
and you are connected to an operable LTE
(voice/data) or 4G (data) network.
For further information, refer to the vehicles
Uconnect Radio Instruction Manual.
The SOS Call system is embedded into the
vehicle’s electrical system. Do not add after-
market electrical equipment to the vehicle’s
electrical system. This may prevent your
vehicle from sending a signal to initiate an
emergency call. To avoid interference that can
cause the SOS Call system to fail, never add
aftermarket equipment (e.g., two-way mobile
radio, CB radio, data recorder, etc.) to your
vehicle’s electrical system or modify the
antennas on your vehicle. IF YOUR VEHICLE
LOSES BATTERY POWER FOR ANY REASON
(INCLUDING DURING OR AFTER AN ACCI-
DENT), THE UCONNECT FEATURES, APPS
AND SERVICES, AMONG OTHERS, WILL NOT
OPERATE.
Modifications to any part of the SOS Call
system could cause the air bag system to fail
when you need it. You could be injured if the
air bag system is not there to help protect you.
WARNING!
Ignoring the overhead console light could
mean you will not have SOS Call services. If the
overhead console light is illuminated, have an
authorized dealer service the SOS Call system
immediately.
WARNING!
The Occupant Restraint Control module turns
on the Air Bag Warning Light on the instru-
ment panel if a malfunction in any part of the
system is detected. If the Air Bag Warning
Light is illuminated, have an authorized dealer
service the Occupant Restraint Control system
immediately.
WARNING!
ALWAYS obey traffic laws and pay attention
to the road. ALWAYS drive safely with your
hands on the steering wheel. You have full
responsibility and assume all risks related to
the use of the features and applications in
this vehicle. Only use the features and
applications when it is safe to do so. Failure
to do so may result in an accident involving
serious injury or death.
WARNING!
23_GG_OH_EN_USC_t.book Page 38
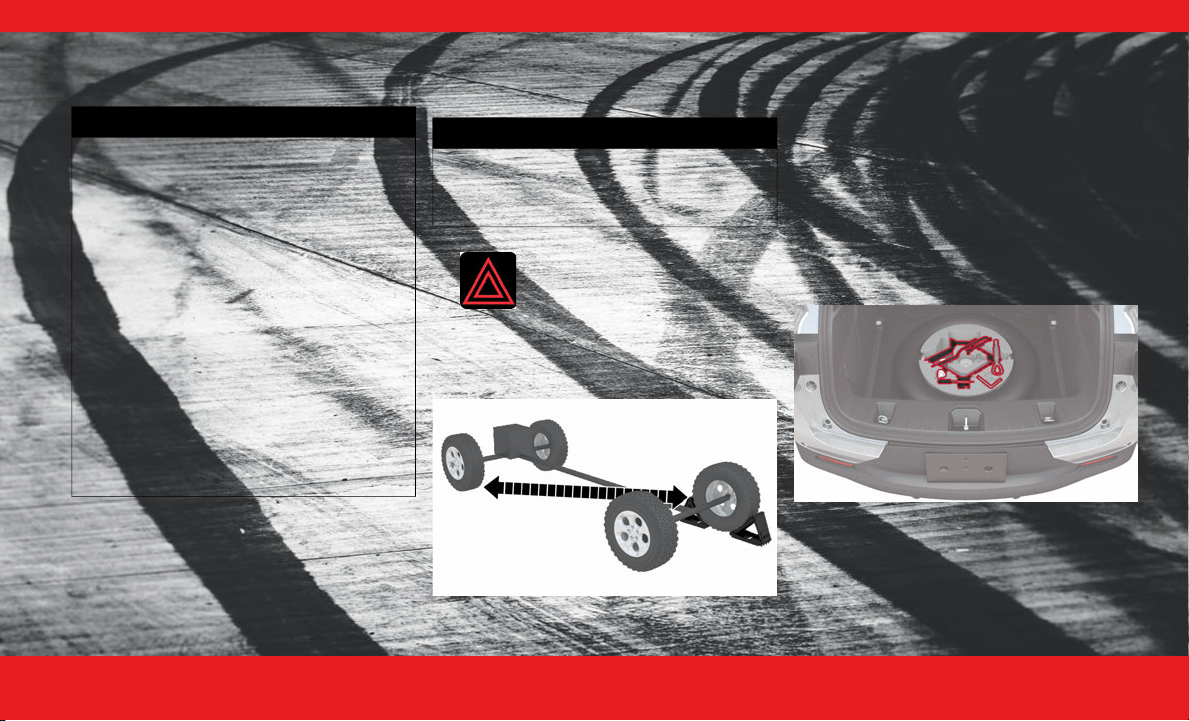
E M E R G E N C Y 39
JACKING AND TIRE
CHANGING — IF EQUIPPED
P REPARATIONS F OR J ACKING
1. Park on a firm, level surface (avoid ice or
slippery areas).
2. Turn on the Hazard Warning Flashers.
3. Apply the parking brake.
4. Place the ignition to the OFF position.
5. Block both the front and rear of the
wheel diagonally opposite of your jacking position.
For example, if the driver’s front wheel is being
changed, block the passenger’s rear wheel.
Wheel Blocked
NOTE:
Passengers should not remain in the vehicle
when the vehicle is being raised or lifted.
Do not attempt to change a tire on the side of
the vehicle close to moving traffic. Pull far
enough off the road to avoid being hit when
operating the jack or changing the wheel.
A CCESSING THE J ACK , T OOLS , S PARE T IRE ,
OR T IRE S ERVICE K IT - I F E QUIPPED
If equipped, the jack, tools and spare tire are
located under the load floor in the rear cargo
compartment.
Jack, Tools And Spare Tire Location
WARNING!
Do not attempt to change a tire on the side of
the vehicle close to moving traffic. Pull far
enough off the road to avoid the danger of
being hit when operating the jack or changing
the wheel.
Being under a jacked-up vehicle is dangerous.
The vehicle could slip off the jack and fall on
you. You could be crushed. Never put any part
of your body under a vehicle that is on a jack.
If you need to get under a raised vehicle, take
it to a service center where it can be raised on
a lift.
Never start or run the engine while the vehicle
is on a jack.
The jack is designed to be used as a tool for
changing tires only. The jack should not be
used to lift the vehicle for service purposes.
The vehicle should be jacked on a firm level
surface only. Avoid ice or slippery areas.
WARNING!
Do not attempt to change a tire on the side of
the vehicle close to moving traffic. Pull far
enough off the road to avoid being hit when
operating the jack or changing the wheel.
23_GG_OH_EN_USC_t.book Page 39
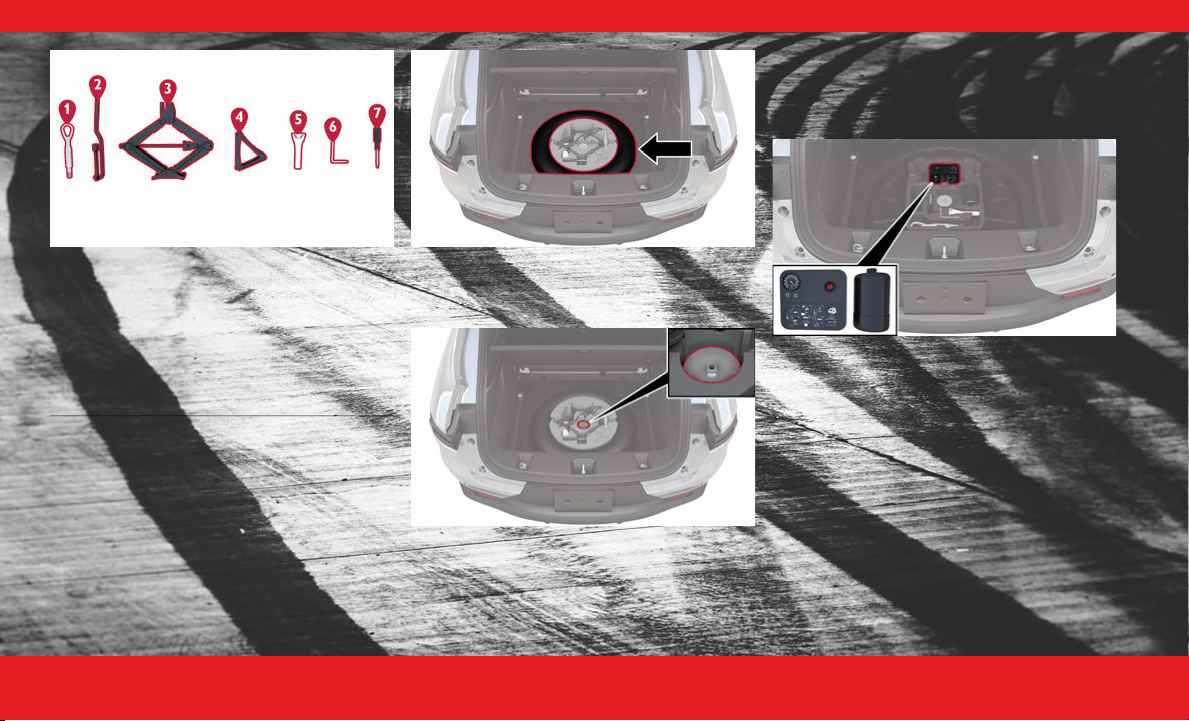
4 0 E M E R G E N C Y
Jack And Tools
To access the jack, tools and spare tire proceed as
follows:
1. Open the liftgate.
2. Locate and lift up on the load floor handle.
Spare Tire
3. Remove the fastener securing the spare tire by
turning it counterclockwise.
Spare Tire Fastener
4. Pull upward to remove the jack and tool tray and
gain access to the spare tire.
Tire Service Kit - If Equipped
If a tire is punctured, you can make an emergency
repair using the Tire Service Kit located beneath
the load floor in the rear cargo area.
Tire Service Kit Storage
The Tire Service Kit includes:
Power Cord.
Sealant cartridge containing the sealing fluid.
Filler tube.
Adhesive label with the writing "Max. 50 mph
(80 km/h)”, to be attached in a position easily
visible to the driver (e.g. on the dashboard) after
repairing the tire.
Air compressor, complete with pressure gauge
and connectors.
An instruction pamphlet for reference and
correct use of the Tire Service Kit, which must be
1 — Tow Eye
2 — Wheel Bolt Wrench
3 — Jack
4 — Wheel Chock
5 — Fuel Funnel
6 — Unlocking Tool (If Equipped)
7 — Screwdriver
23_GG_OH_EN_USC_t.book Page 40
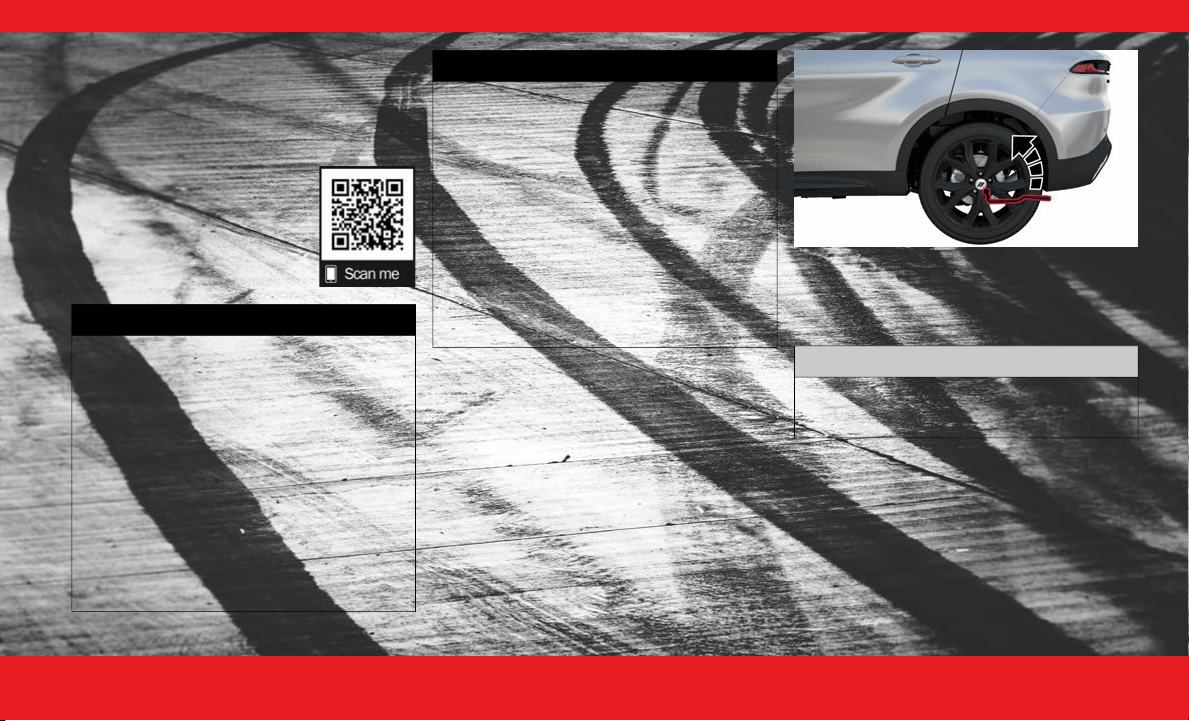
E M E R G E N C Y 41
(Continued)
then given to the personnel dealing with the
sealant-treated tire.
A pair of protective gloves (if equipped).
Adapters for inflating different elements.
J ACKING I NSTRUCTIONS
Use this QR code to access your
digital experience.
1. Remove the jack, wheel bolt wrench and
spare tire.
2. Before raising the vehicle, use the wheel bolt
wrench to loosen, but not remove, the wheel bolts
on the wheel with the flat tire. Turn the wheel bolts
counterclockwise one turn while the wheel is still on
the ground.
Loosening The Wheel Bolts
NOTE:
Placement for the front and rear jack locations are
critical. See the following images for proper jacking
locations.
3. Jack lifting points can be identified by an opening
under an access panel that exposes the steel lifting
flange. Before positioning the jack, remove the
access panel with the provided screwdriver or
similar tool. Place the jack underneath the lifting
area that is closest to the flat tire. Turn the jack
screw clockwise to securely engage the jack saddle
to the lifting area of the sill flange, centering the jack
saddle within the notch of the sill trim.
WARNING!
Carefully follow these tire changing warnings
to help prevent personal injury or damage to
your vehicle:
Always park on a firm, level surface as far from
the edge of the roadway as possible before
raising the vehicle.
Turn on the Hazard Warning Flashers.
Apply the parking brake firmly and set the
transmission in PARK.
Block the wheel diagonally opposite the wheel
to be raised.
Never start or run the engine with the vehicle
on a jack.
Do not let anyone sit in the vehicle when it is
on a jack.
Do not get under the vehicle when it is on a
jack. If you need to get under a raised vehicle,
take it to a service center where it can be
raised on a lift.
Only use the jack in the positions indicated and
for lifting this vehicle during a tire change.
If working on or near a roadway, be extremely
careful of motor traffic.
To assure that spare tires, flat or inflated, are
securely stowed, spares must be stowed with
the valve stem facing the ground.
WARNING!
CAUTION!
Do not attempt to raise the vehicle by jacking
on locations other than those indicated in the
Jacking Instructions for this vehicle.
23_GG_OH_EN_USC_t.book Page 41
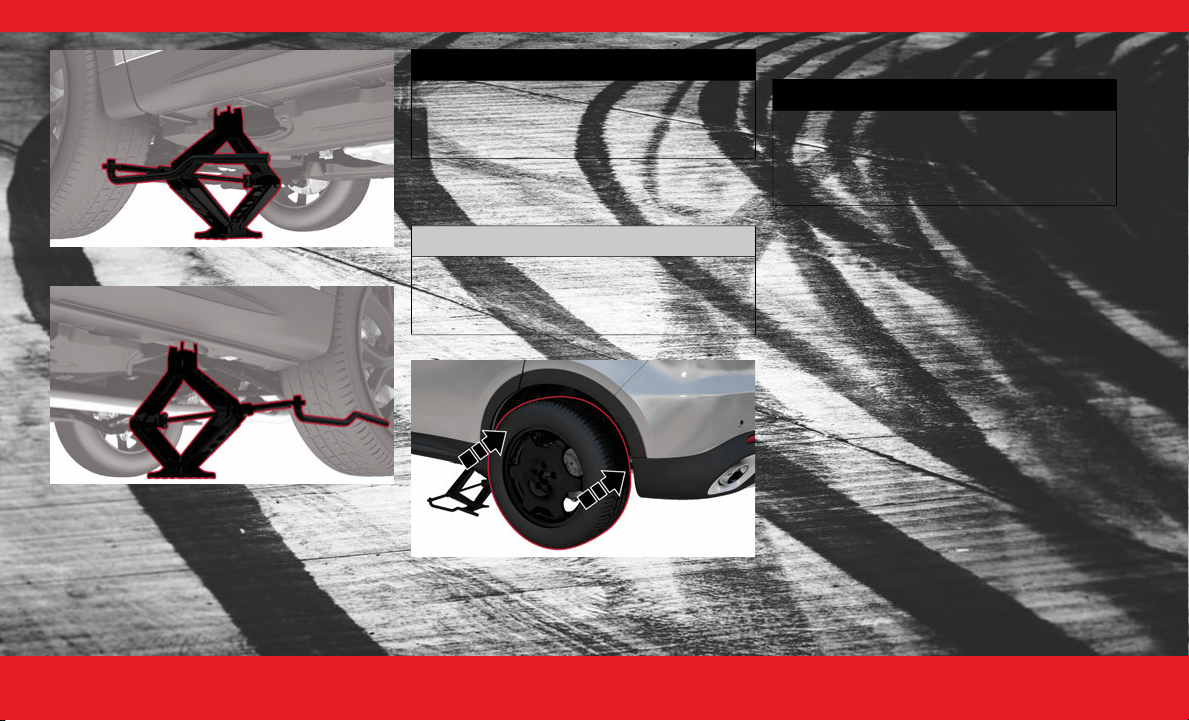
4 2 E M E R G E N C Y
Front Jacking Location
Rear Jacking Location
4. Raise the vehicle just enough to remove the flat tire.
5. Remove the wheel bolts and tire.
6. Mount the spare tire.
Mounting Spare Tire
7. Install and lightly tighten the wheel bolts.
8. Lower the vehicle to the ground by turning the jack
handle counterclockwise.
9. Finish tightening the wheel bolts. Push down on the
wrench while at the end of the handle for increased
leverage. Tighten the wheel bolts in a star pattern
until each wheel bolt has been tightened twice. If in
doubt about the correct tightness, have them
checked with a torque wrench by an authorized
dealer or at a service station.
10. Lower the jack until it is free. Remove the wheel
blocks. Stow the wheel bolt wrench, jack assembly
and wheel blocks in the provided storage. Secure
the assembly using the means provided. Reinstall
the jacking access cover. Release the parking brake
before driving the vehicle.
WARNING!
Raising the vehicle higher than necessary can
make the vehicle less stable. It could slip off
the jack and hurt someone near it. Raise the
vehicle only enough to remove the tire.
CAUTION!
Be sure to mount the spare tire with the valve
stem facing outward. The vehicle could be
damaged if the spare tire is mounted
incorrectly.
WARNING!
To avoid the risk of forcing the vehicle off the
jack, do not tighten the wheel nuts fully until
the vehicle has been lowered. Failure to
follow this warning may result in serious
injury.
23_GG_OH_EN_USC_t.book Page 42
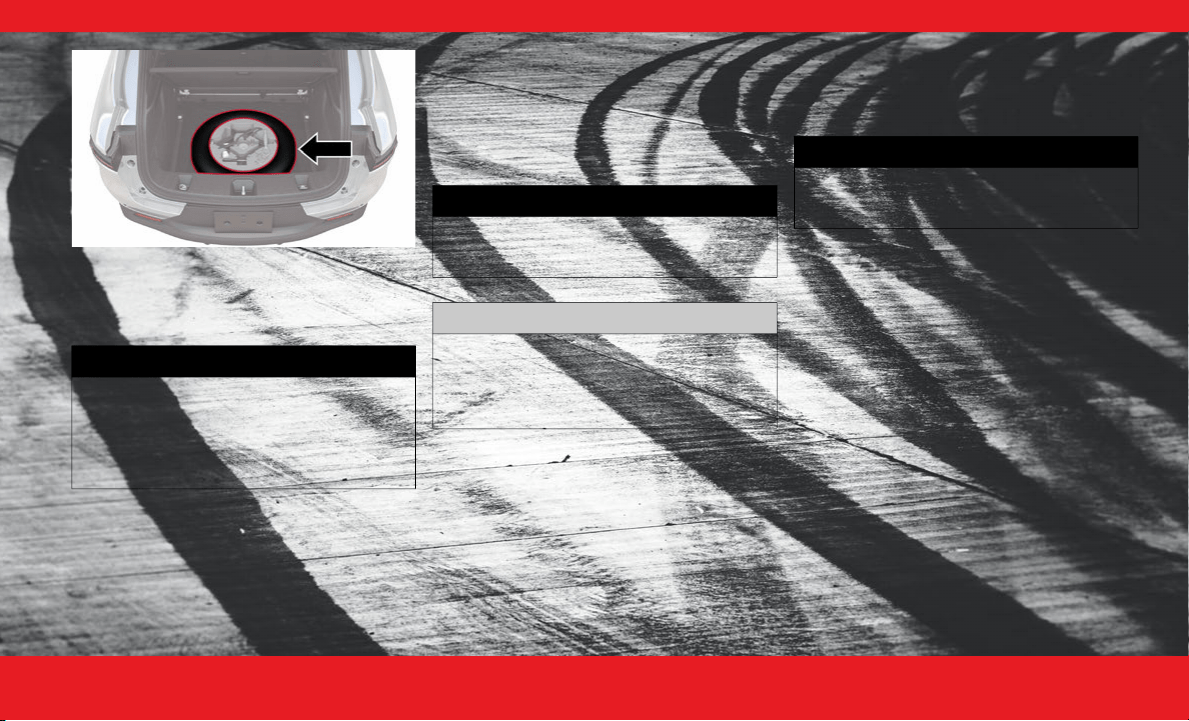
E M E R G E N C Y 43
Damaged Tire Stowage
11. After 25 miles (40 km), check the wheel bolt torque
with a torque wrench to ensure that all wheel bolts
are properly seated against the wheel.
JUMP STARTING
If your vehicle has a discharged battery, it can be
jump started using a set of jumper cables and a
battery in another vehicle, or by using a portable
battery booster pack. Jump starting can be
dangerous if done improperly, so please follow the
procedures in this section carefully.
NOTE:
When using a portable battery booster pack, follow
the manufacturer's operating instructions and
precautions.
P REPARATIONS F OR J UMP S TARTING
The battery in your vehicle is located in the front of
the engine compartment, behind the left headlight
assembly.
See the following steps to prepare for jump
starting:
1. Apply the parking brake, shift the automatic
transmission into PARK (P) and turn the
ignition to OFF.
2. Turn off the heater, radio, and all electrical
accessories.
3. Pull upward and remove the protective cover over
the positive
(+)
battery post.
4. If using another vehicle to jump start the battery,
park the vehicle within the jumper cables reach, set
the parking brake and make sure the ignition is OFF.
WARNING!
A loose tire or jack thrown forward in a
collision or hard stop could endanger the
occupants of the vehicle. Always stow the
jack parts and the spare tire in the places
provided. Have the deflated (flat) tire
repaired or replaced immediately.
WARNING!
Do not attempt jump starting if the battery is
frozen. It could rupture or explode and cause
personal injury.
CAUTION!
Do not use a portable battery booster pack
or any other booster source with a system
voltage greater than 12 Volts or damage to
the battery, starter motor, alternator or
electrical system may occur.
WARNING!
Do not allow vehicles to touch each other as
this could establish a ground connection and
personal injury could result.
23_GG_OH_EN_USC_t.book Page 43

4 4 E M E R G E N C Y
J UMP S TARTING P ROCEDURE
Connecting The Jumper Cables
1. Connect the positive (+)
end of the jumper cable
to the positive
(+) post of the discharged
vehicle.
2. Connect the opposite end of the positive
(+)
jumper cable to the positive
(+)
post of the booster
battery.
3. Connect the negative
(-)
end of the jumper cable to
the negative
(-)
post of the booster battery.
4. Connect the opposite end of the negative
(-)
jumper cable to a good engine ground. A “ground”
is an exposed metallic/unpainted part of the engine,
frame or chassis, such as an accessory bracket or
large bolt. The ground must be away from the
battery and the fuel injection system.
Jump Starting Label
5. Start the engine in the vehicle that has the booster
battery, let the engine idle for a few minutes, and
then start the engine in the vehicle with the
discharged battery.
6. Once the engine is started, follow the disconnecting
procedure.
WARNING!
Do not allow vehicles to touch each other as
this could establish a ground connection and
personal injury could result.
Take care to avoid the radiator cooling fan
whenever the hood is raised. It can start
anytime the ignition switch is ON. You can be
injured by moving fan blades.
Remove any metal jewelry such as rings, watch
bands and bracelets that could make an inad-
vertent electrical contact. You could be seri-
ously injured.
Batteries contain sulfuric acid that can burn
your skin or eyes and generate hydrogen gas
which is flammable and explosive. Keep open
flames or sparks away from the battery.
WARNING!
Failure to follow this jump starting procedure
could result in personal injury or property
damage due to battery explosion.
CAUTION!
Failure to follow these procedures could
result in damage to the charging system of
the booster vehicle or the discharged vehicle.
WARNING!
Do not connect the jumper cable to the
negative
(-)
post of the discharged battery.
The resulting electrical spark could cause the
battery to explode and could result in
personal injury.
23_GG_OH_EN_USC_t.book Page 44
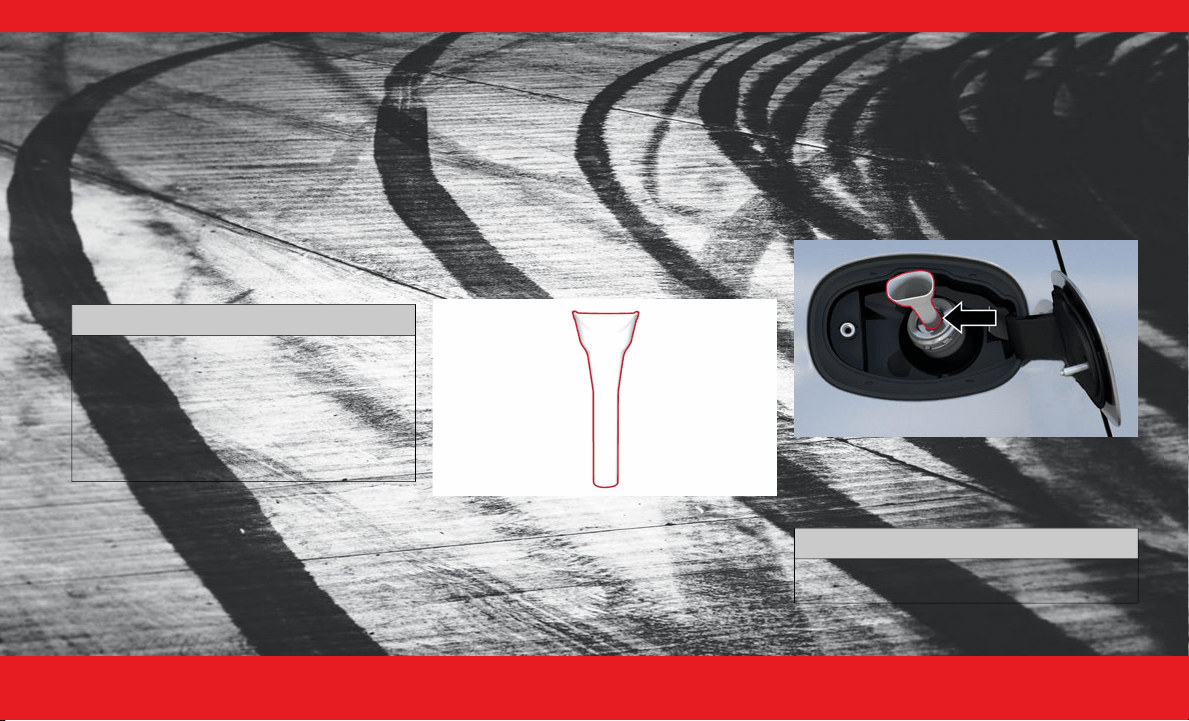
E M E R G E N C Y 45
Disconnecting The Jumper Cables
1. Disconnect the negative (-) end of the jumper
cable from the engine ground of the vehicle
with the discharged battery.
2. Disconnect the opposite end of the negative
(-)
jumper cable from the negative
(-)
post of the
booster battery.
3. Disconnect the positive
(+)
end of the jumper cable
from the positive
(+)
post of the booster battery.
4. Disconnect the opposite end of the positive
(+)
jumper cable from the positive
(+)
post of the
vehicle with the discharged battery, and reinstall
the protective cover.
If frequent jump starting is required to start your
vehicle, you should have the battery and charging
system inspected at an authorized dealer.
REFUELING IN EMERGENCY
The vehicle is equipped with a refueling funnel for
a Capless Fuel System. The refueling funnel is
located under the load floor in the rear cargo area.
If refueling is necessary, while using an approved
gas can, insert the refueling funnel into the filler
neck opening. Take care to open both flappers with
the funnel to avoid spills.
NOTE:
In certain cold conditions, ice may prevent the fuel
door from opening. If this occurs, lightly push on
the outside center of the fuel door to break the ice
buildup. Do not pry on the door.
Fuel Funnel
Emergency Gas Can Refueling
Most gas cans will not open the flapper doors. A
funnel is provided to allow emergency refueling
with a gas can.
See the following steps for refueling:
1. Retrieve funnel from the spare tire storage
area.
2. Insert funnel into same filler pipe opening as the fuel
nozzle.
Inserting Funnel
3. Ensure funnel is inserted fully to hold flapper doors
open.
4. Pour fuel into funnel opening.
CAUTION!
Accessories plugged into the vehicle power
outlets draw power from the vehicle’s battery,
even when not in use (i.e., cellular devices,
etc.). Eventually, if plugged in long enough
without engine operation, the vehicle’s
battery will discharge sufficiently to degrade
battery life and/or prevent the engine from
starting.
CAUTION!
To avoid fuel spillage and overfilling, do not
“top off” the fuel tank after filling.
23_GG_OH_EN_USC_t.book Page 45

4 6 E M E R G E N C Y
5. Remove funnel from filler pipe, clean off prior to
putting back in the spare tire storage area.
IF YOUR ENGINE
OVERHEATS
If the vehicle is overheating, it will need to be
serviced by an authorized dealer.
Potential signs of vehicle overheating:
Temperature gauge is at HOT (H)
Strong smell of coolant
White smoke coming from engine or exhaust
Coolant bottle coolant has bubbles present
In the event it is observed that the temperature
gauge is moving towards or close to the HOT (H)
position, you can reduce the potential for
overheating by taking the appropriate action.
On the highways — slow down.
In city traffic — while stopped, place the trans-
mission in NEUTRAL (N), but do not increase the
engine idle speed while preventing vehicle
motion with the brakes.
If your Air Conditioner (A/C) is on, turn it off.
The A/C system adds heat to the engine cooling
system and turning the A/C off can help remove
this heat.
You can also turn the temperature control to
maximum heat, the mode control to floor and
the blower control to high. This allows the heater
core to act as a supplement to the radiator and
aids in removing heat from the engine cooling
system.
WARNING!
Never have any smoking materials lit in or near
the vehicle when the fuel door is open or the
tank is being filled.
Never add fuel when the engine is running.
This is in violation of most state and federal fire
regulations and may cause the Malfunction
Indicator Light to turn on.
A fire may result if fuel is pumped into a
portable container that is inside of a vehicle.
You could be burned. Always place fuel
containers on the ground while filling.
WARNING!
You or others can be badly burned by hot
engine coolant (antifreeze) or steam from
your radiator. If you see or hear steam coming
from under the hood, do not open the hood
until the radiator has had time to cool. Never
try to open a cooling system pressure cap
when the radiator or coolant bottle is hot.
CAUTION!
Driving with a hot cooling system could damage
your vehicle. If the temperature gauge reads H,
pull over and stop the vehicle. Idle the vehicle
with the air conditioner turned off until the
pointer drops back into the normal range. If the
pointer remains on the H and you hear
continuous chimes, turn the engine off
immediately and call for service.
23_GG_OH_EN_USC_t.book Page 46

E M E R G E N C Y 47
FREEING A STUCK VEHICLE
If your vehicle becomes stuck in mud, sand, or snow,
it can often be moved using a rocking motion.
1. Push the ESC OFF button to turn off the
Electronic Stability Control (ESC) system, before
rocking the vehicle.
2. Turn the steering wheel right and left to clear the
area around the front wheels.
3. Then shift back and forth between DRIVE (D) and
REVERSE (R), while gently pressing the
accelerator.
4. Shifts between DRIVE and REVERSE can only be
achieved at wheel speeds of 5 mph (8 km/h) or
less. Whenever the transmission remains in
NEUTRAL (N) for more than two seconds, you
must press the brake pedal to engage DRIVE or
REVERSE.
5. Use the least amount of accelerator pedal
pressure that will maintain the rocking motion,
without spinning the wheels or racing the engine.
6. Once the vehicle has been freed, push the ESC
OFF button to turn on the ESC system.
WARNING!
Fast spinning tires can be dangerous. Forces
generated by excessive wheel speeds may
cause damage, or even failure, of the axle and
tires. A tire could explode and injure
someone. Do not spin your vehicle's wheels
faster than 30 mph (48 km/h) or for longer
than 30 seconds continuously without
stopping when you are stuck and do not let
anyone near a spinning wheel, no matter
what the speed.
CAUTION!
Racing the engine or spinning the wheels may
lead to transmission overheating and failure.
Allow the engine to idle with the transmission
in NEUTRAL for at least one minute after every
five rocking-motion cycles. This will minimize
overheating and reduce the risk of transmis-
sion failure during prolonged efforts to free a
stuck vehicle.
When “rocking” a stuck vehicle by shifting
between DRIVE and REVERSE, do not spin the
wheels faster than 15 mph (24 km/h), or drive-
train damage may result.
Revving the engine or spinning the wheels too
fast may lead to transmission overheating and
failure. It can also damage the tires. Do not
spin the wheels above 30 mph (48 km/h)
while in gear (no transmission shifting occur-
ring).
23_GG_OH_EN_USC_t.book Page 47

4 8 E M E R G E N C Y
TOWING A DISABLED VEHICLE
This section describes procedures for towing a disabled vehicle using a commercial towing service.
Proper towing or lifting equipment is required to
prevent damage to your vehicle. Use only tow bars
and other equipment designed for this purpose,
following equipment manufacturer’s instructions.
Use of safety chains is mandatory. Attach a tow bar
or other towing devices to main structural
members of the vehicle, not to fascia/bumper or
associated brackets. State and local laws regarding
vehicles under tow must be observed.
NOTE:
You must ensure that the Auto Park Brake
feature is disabled before towing this vehicle to
avoid inadvertent Electric Park Brake engage-
ment. The Auto Park Brake feature is enabled or
disabled via the customer programmable
features in the Uconnect Settings.
Vehicles with a discharged battery, or total elec-
trical failure when the Electric Park Brake (EPB)
is engaged, will need a wheel dolly or jack to
raise the rear wheels off the ground when
moving the vehicle onto a flatbed.
If you must use the accessories (wipers, defrosters,
etc.) while being towed, the ignition must be in the
ON/RUN mode.
Note that the Safehold feature will engage the
Electric Park Brake whenever the driver's door is
opened (if the battery is connected, ignition is ON,
transmission is not in PARK, and brake pedal is
released). If you are towing this vehicle with the
ignition in the ON/RUN mode, you must manually
disable the Electric Park Brake each time the
driver's door is opened by pressing the brake pedal
and then releasing the EPB.
If the vehicle’s battery is discharged, instructions
on shifting the automatic transmission out of PARK
so that the vehicle can be moved
Ú page 49.
TOWING CONDITION
WHEELS OFF THE GROUND ALL-WHEEL DRIVE (AWD)
Flat Tow NONE NOT ALLOWED
Dolly Tow
REAR NOT ALLOWED
FRONT NOT ALLOWED
On Trailer ALL BEST METHOD
When towing your vehicle, always follow applicable state and provincial laws. Contact state and provincial Highway Safety offices for additional
details.
CAUTION!
Do not use sling-type equipment when towing.
Vehicle damage may occur.
When securing the vehicle to a flatbed truck,
do not attach to front or rear suspension
components. Damage to your vehicle may
result from improper towing.
Ensure that the Electric Park Brake is released,
and remains released, while being towed.
Do not use a fascia/bumper mounted
clamp-on tow bar on your vehicle. The fascia/
bumper face bar will be damaged.
23_GG_OH_EN_USC_t.book Page 48
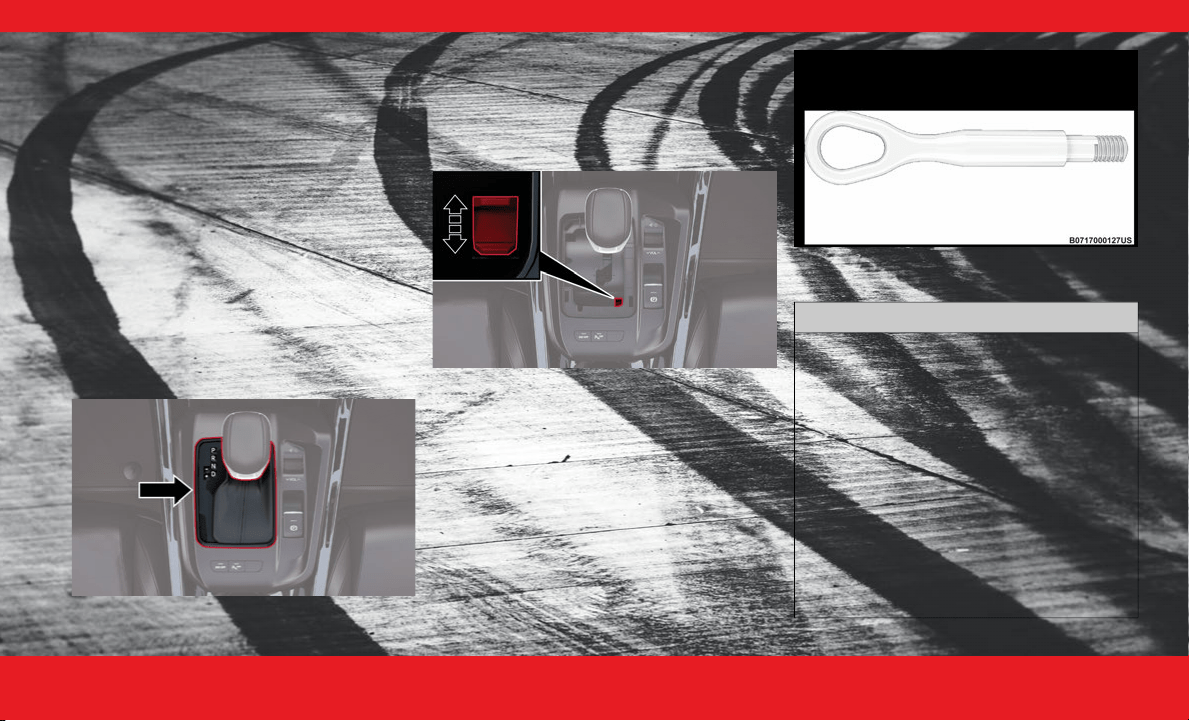
E M E R G E N C Y 49
T OWING I N A N E MERGENCY
Without The Key Fob
Special care must be taken when the vehicle is
towed with the ignition in the OFF mode. The only
approved method of towing without the key fob is
with a flatbed truck. Proper towing equipment is
necessary to prevent damage to the vehicle.
Gear Selector Override
If a malfunction occurs, and the gear selector
cannot be moved out of the PARK position, you
can use the following procedure to temporarily
move the gear selector:
1. First turn the engine OFF.
2. Apply the parking brake.
3. Grab the boot material of the gear selector and pull
up to carefully separate the gear selector bezel and
boot assembly from the center console.
Gear Selector Bezel
4. Press and maintain firm pressure on the brake
pedal.
5. Locate the gear selector override access (at the
right rear corner of the gear selector assembly).
Using a small screwdriver or similar tool, push and
hold the override release lever down.
Gear Selector Override Access Hole
6. Move the gear selector to the NEUTRAL (N)
position.
7. The vehicle may then be started in NEUTRAL.
8. Reinstall the gear selector boot.
Tow Eye Usage
Your vehicle may be equipped with a tow eye that
can be used to move a disabled vehicle.
When using a tow eye, see the following
precautions.
Tow Eye
Tow Eye Usage Precautions
CAUTION!
The tow eye must only be used for roadside
emergencies. Use with an appropriate device
in accordance with highway code (a rigid bar
or rope) to maneuver the vehicle in prepara-
tion for transport via a tow truck.
The tow eye must not be used to move the
vehicle off the road or where there are obsta-
cles.
Do not use the tow eyes for tow truck hookup
or highway towing.
Do not use the tow eye to free a stuck vehicle
Ú page 47.
Damage to your vehicle may occur if these
guidelines are not followed.
23_GG_OH_EN_USC_t.book Page 49
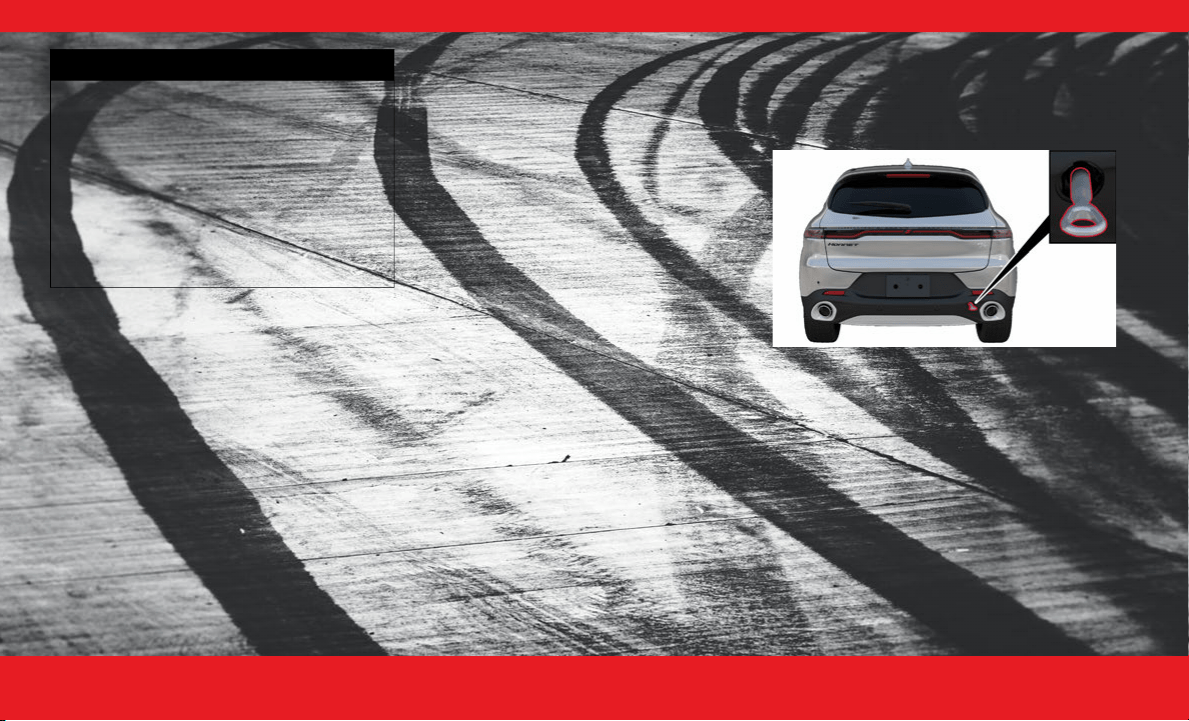
5 0 E M E R G E N C Y
Installing The Tow Eye
The rear tow eye receptacle is located behind a
door on the passenger’s side of the fascia/bumper.
To install the tow eye, open the door using the a
small screwdriver or similar tool. Thread the tow
eye into the receptacle, making sure it is fully
tightened.
The tow eye must be securely seated to the
attaching bracket through the rear fascia/bumper.
If the tow eye is not securely seated to the
attaching bracket, the vehicle should not be
moved.
Rear Tow Eye Installed
WARNING!
Stand clear of vehicles when pulling with tow
eyes.
Do not use a chain with a tow eye. Chains may
break, causing serious injury or death.
Do not use a tow strap with a tow eye. Tow
straps may break or become disengaged,
causing serious injury or death.
Failure to follow proper tow eye usage may
cause components to break resulting in
serious injury or death.
23_GG_OH_EN_USC_t.book Page 50
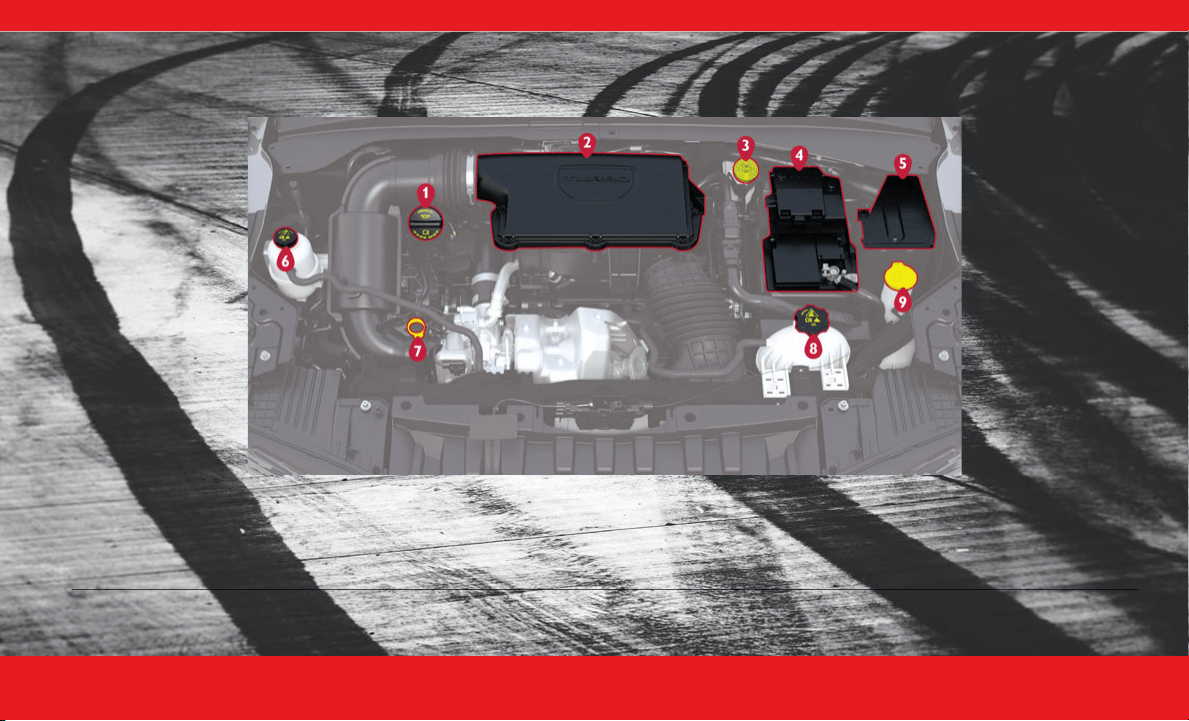
S P E C I F I C A T I O N S 51
SPECIFICATIONS
ENGINE COMPARTMENT OVERVIEW
2.0L E NGINE
1 — Engine Oil Fill 6 — Intercooler Coolant Reservoir Cap
2 — Engine Air Cleaner Filter 7 — Engine Oil Dipstick
3 — Brake Fluid Reservoir Cap 8 — Engine Coolant Pressure Cap
4 — Battery 9 — Washer Fluid Reservoir Cap
5 — Power Distribution Center (Fuses)
23_GG_OH_EN_USC_t.book Page 51

5 2 S P E C I F I C A T I O N S
FLUID CAPACITIES
ENGINE FLUIDS AND LUBRICANTS
We recommend using the following fluids and
lubricants:
US Metric
Fuel (Approximate)
All Engines 13.5 gal 51 L
Engine Oil With Filter
2.0L Engine 5 qt 4.73 L
Cooling System*
2.0L Engine 7 qt 6.6 L
2.0L Low Temp 2.3 qt 2.17 L
* Includes heater and coolant recovery bottle filled to MAX level.
Component Fluid, Lubricant, or Genuine Part
Engine Coolant
We recommend using Mopar® Antifreeze/Coolant 10 Year/150,000 Miles (240,000 Kilometers)
Formula OAT (Organic Additive Technology) meeting the requirements of the manufacturer Material
Standard MS.90032.
Engine Oil - 2.0L Engine
We recommend using Mopar® API SP/GF-6A Certified SAE 5W-30 Full Synthetic Engine Oil which
meets the requirements of the manufacturer Material Standard MS-13340. Equivalent full synthetic
5W-30 API SP engine oil can be used but must have the API Donut trademark.
CAUTION!
Failure to use the recommended API SP/GF-6A or equivalent oil can cause engine damage not covered
by the vehicle warranty.
Fuel Selection - 2.0L Engine 87 Octane (R+M)/2 Method, 0-15% ethanol.
23_GG_OH_EN_USC_t.book Page 52

S P E C I F I C A T I O N S 53
CHASSIS FLUIDS AND LUBRICANTS
We recommend using the following chassis fluid and lubricants:
SERVICING AND
MAINTENANCE
M AINTENANCE P LAN
Your vehicle will remind you that it is time to take
your vehicle in for scheduled maintenance.
At Every Oil Change Interval As Indicated By Oil
Change Indicator System:
Change the oil and filter.
Rotate the tires (Rotate at the first sign of
irregular wear, even if it occurs before the oil
indicator system turns on).
Inspect the battery and clean and tighten
terminals as required.
Inspect the CV/Universal joints.
Inspect the brake pads, shoes, rotors, drums,
and hoses.
Inspect the engine cooling system protection
and hoses.
Inspect the exhaust system.
Inspect the engine air cleaner filter if using in
dusty or off-road conditions; replace the engine
air cleaner filter as necessary.
Component Fluid, Lubricant, or Genuine Part
9-Speed Automatic Transmission –
If Equipped
Use only Mopar® ZF 8 & 9 Speed ATF Automatic Transmission Fluid, or equivalent. Failure to use
the correct fluid may affect the function or performance of your transmission.
Power Transfer Unit (PTU) – If Equipped We recommend using Mopar® Front Axle/PTU Synthetic Axle Lubricant SAE 75W-90 (API GL-5).
Rear Differential (RDM) – If Equipped We recommend using Mopar® Rear Axle/RDM Synthetic Axle Lubricant SAE 75W-90 (API GL-5).
Brake Master Cylinder We recommend using Mopar® DOT 4 (Tutela TOP EVO).
WARNING!
You can be badly injured working on or around
a motor vehicle. Do only service work for
which you have the knowledge and the right
equipment. If you have any doubt about your
ability to perform a service job, take your
vehicle to a competent mechanic.
Failure to properly inspect and maintain your
vehicle could result in a component malfunc-
tion and affect vehicle handling and perfor-
mance. This could cause an accident.
23_GG_OH_EN_USC_t.book Page 53

5 4 S P E C I F I C A T I O N S
O IL C HANGE R ESET
Your vehicle is equipped with an engine oil
change indicator system. The change oil
message will display in the instrument cluster
display for five seconds after a single chime has
sounded, to indicate the next scheduled oil
change. The engine oil change indicator system
is duty cycle based, which means the engine oil
change interval may fluctuate, depending upon
your personal driving style.
Unless reset, this message will continue to
display each time the ignition is cycled to the
ON/RUN position.
To reset the oil change indicator after performing
the scheduled maintenance, refer to the following
procedure:
1. Without pressing the brake pedal, push the
ENGINE START/STOP button and cycle the
ignition to the ON/RUN position (do not start
the engine).
2. Fully press the accelerator pedal, slowly, three
times within ten seconds.
3. Cycle the ignition to the OFF position.
NOTE:
If the indicator message illuminates when you start
the vehicle, the oil change indicator system did not
reset. If necessary, repeat this procedure.
E NGINE B REAK -I N R ECOMMENDATIONS
A long break-in period is not required for the
engine and drivetrain (transmission and axle) in
your vehicle.
Drive moderately during the first 300 miles
(500 km). After the initial 60 miles (100 km),
speeds up to 50 or 55 mph (80 or 90 km/h) are
desirable.
While cruising, brief full-throttle acceleration
within the limits of local traffic laws contributes to
a good break-in. You should avoid wide-open
throttle acceleration in low gear as it can be
detrimental.
The engine oil installed in the engine at the factory
is a high-quality energy conserving type lubricant.
Oil changes should be consistent with anticipated
climate conditions under which vehicle operations
will occur. For the recommended viscosity and
quality grades
Ú page 52.
CAUTION!
Never use Non-Detergent Oil or Straight
Mineral Oil in the engine or damage may
result.
23_GG_OH_EN_USC_t.book Page 54

S P E C I F I C A T I O N S 55
TRAILER TOWING
Trailer Towing Weights (Maximum Trailer Weight Ratings)
Engine/Transmission GCWR Maximum GTW Maximum Trailer TW (See Note)
2.0L / 9 Speed Auto 6,503 lb (2950 kg) 2,000 lb (907 kg) 154 lb (70 kg)
Refer to local laws for maximum trailer towing speeds.
23_GG_OH_EN_USC_t.book Page 55

5 6
INDEX
A
Adaptive Cruise Control (ACC)
(Cruise Control)
................................................27
Adaptive Cruise Control (ACC) b .....................29
Air Conditioning ...............................................21
Android Auto ....................................................12
Android Auto™ b.............................................13
Antifreeze (Engine Coolant) .............................52
Apple CarPlay® b ...........................................12
Automatic Headlights .......................................26
Automatic High Beams ....................................26
Automatic Temperature Control (ATC) .............23
Automatic Transmission
Fluid Type
............................................. 52
,
53
Axle Fluid .........................................................53
B
Back Up Camera ..............................................34
Basic Voice Commands b ...............................13
Brake Fluid ............................................... 52
,
53
C
Camera
............................................................34
Camera, Rear ...................................................34
Camera, Surround View ...................................34
Capacities, Fuel ............................................... 52
Caps, Filler
Oil (Engine) ................................................. 51
Cargo Light ...................................................... 26
Climate Control ............................................... 21
Automatic.................................................... 21
Climate Controls b ......................................... 21
Contract, Service ................................................5
Cooling System
Cooling Capacity
......................................... 52
Selection Of Coolant (Antifreeze) ................ 52
Cruise Control (Speed Control) ........................ 27
Customer Assistance ..........................................5
D
Defroster, Windshield
...................................... 21
Dimmer Control Switch .................................... 26
Disable Vehicle Towing .................................... 48
Driver Memory Settings b .............................. 24
E
Electric Park Brake (EPB) b............................ 32
Electric Parking Brake ..................................... 31
Electrical Power Outlets .................................. 14
Emergency, In Case Of
Freeing Vehicle When Stuck
........................47
Jump Starting ..............................................43
Towing .........................................................48
Engine..............................................................51
Break-In Recommendations ........................54
Coolant (Antifreeze) .....................................52
Fuel Requirements ......................................52
Jump Starting ..............................................43
Oil ................................................................52
Oil Filler Cap ................................................51
Oil Selection ................................................52
Overheating .................................................46
Engine Overview ..............................................51
Exterior Lights ..................................................26
F
Filters
Engine Oil ....................................................52
Fluid Capacities ...............................................52
Fluid, Brake .............................................. 52
,
53
Fog Lights ........................................................26
Freeing A Stuck Vehicle ...................................47
23_GG_OH_EN_USC_t.book Page 56

57
Fuel
Octane Rating
............................................. 52
Requirements ............................................. 52
Tank Capacity .............................................. 52
G
Garage Door Opener (HomeLink®)
.................. 29
Garage Door Opener (HomeLink®) b ............. 30
H
Headlights
On With Wipers
............................................ 26
Switch ......................................................... 26
HomeLink® (Garage Door Opener) .................. 29
How To Turn Off The Stop/Start System b........ 9
I
Instrument Cluster
........................................... 16
Descriptions ................................................ 16
Location And Controls ................................. 17
J
Jack Location ................................................... 39
Jacking Instructions b .................................... 41
Jump Starting .................................................. 43
K
Key Fob
.............................................................. 8
Keyless Enter 'n Go™
Passive Entry
................................................. 8
Keyless Enter ‘n Go™ — Passive Entry b........... 9
Keyless Enter 'n Go™ ......................................... 8
L
Liftgate
............................................................35
Hands-Free ..................................................35
Opening ....................................................... 35
Lights
Cargo ...........................................................26
Exterior ........................................................26
Fog ..............................................................26
Headlights ...................................................26
M
Manual
Service
.......................................................... 6
Media Hub .......................................................15
Memory Seat ...................................................24
Memory Settings ..............................................24
MP3 Control .....................................................15
N
New Vehicle Break-In Period
............................54
O
Oil Change Indicator
Reset
...........................................................54
Oil, Engine ........................................................52
Capacity .......................................................52
Filter ............................................................52
Recommendation ........................................52
Viscosity.......................................................52
Operator Manual
Owner's Manual ............................................. 6
Overheating, Engine .........................................46
P
Pair/Delete A Device b ...................................12
Parking Brake ..................................................31
Parksense Front/Rear Park Assist System b ..30
ParkSense System, Rear ..................................30
Passive Entry ..................................................... 8
Power
Outlet (Auxiliary Electrical Outlet)
.................14
Seats ...........................................................24
23_GG_OH_EN_USC_t.book Page 57

5 8
R
Radio
Settings
.......................................................11
Rain Sensitive Wiper System ...........................27
Rear ParkSense System ..................................30
Remote Starting System .................................... 8
S
Seats
Memory
.......................................................24
Power ..........................................................24
Second Row USB .............................................15
Selection Of Coolant (Antifreeze) .....................52
Service Assistance ............................................. 5
Service Contract ................................................ 5
Service Manuals ................................................ 6
SOS Call ...........................................................37
Speed Control (Cruise Control) ........................27
Steering
Wheel, Voice Recognition ............................13
Stop/Start .......................................................... 9
Surround View Camera ....................................34
T
Temperature Control, Automatic (ATC)
.............23
Towing..............................................................55
Disabled Vehicle ..........................................48
Towing Eyes .....................................................49
Traffic Sign Recognition ...................................20
Trailer Towing ...................................................55
Transfer Case
Fluid
.............................................................53
Transmission
Fluid...................................................... 52
,
53
U
Uconnect
Uconnect Settings
.......................................11
Uconnect Phone ...............................................12
Pair (Link) Uconnect Phone To A
Mobile Phone ..........................................12
Uconnect Settings
Customer Programmable Features ................ 8
Passive Entry Programming ........................... 8
Uconnect Settings b .......................................11
Uconnect System ............................................ 10
Uconnect System b ........................................ 11
USB ................................................................. 15
V
Vehicle Settings
.............................................. 11
Voice Command .............................................. 13
Voice Recognition System (VR) ....................... 13
W
Warning Lights And Messages
........................ 17
Warranty Information .........................................6
Windshield Washers ........................................ 26
Windshield Wipers .......................................... 26
Wipers, Rain Sensitive .................................... 27
Wireless Charging Pad .................................... 15
23_GG_OH_EN_USC_t.book Page 58


WARNING: Operating, servicing and maintaining a passenger vehicle or off-highway motor vehicle can expose you to chemicals including engine exhaust, carbon
monoxide, phthalates, and lead, which are known to the State of California to cause cancer and birth defects or other reproductive harm. To minimize exposure, avoid
breathing exhaust, do not idle the engine except as necessary, service your vehicle in a well-ventilated area and wear gloves or wash your hands frequently when
servicing your vehicle. For more information go to www.P65Warnings.ca.gov/passenger-vehicle.
This Owner Handbook illustrates and describes the operation of features and equipment that are either standard or optional on this vehicle. This handbook may also include a description of
features and equipment that are no longer available or were not ordered on this vehicle. Please disregard any features and equipment described in this handbook that are not on this vehicle.
FCA US LLC reserves the right to make changes in design and specications, and/or make additions to or improvements to its products without imposing any obligation upon itself to install
them on products previously manufactured.
With respect to any vehicles sold in Canada, the name FCA US LLC shall be deemed to be deleted and the name FCA Canada Inc. used in substitution therefore.
This Owner Handbook is intended to familiarize you with the important features of your vehicle. Your most up-to-date Owner Handbook, Owner’s Manual, Radio Instruction Manual and Warranty
Booklet can be found by visiting the website on the back cover.
U.S. Residents: If you are the rst registered retail owner of your vehicle, you may obtain a complimentary printed copy of the Warranty Booklet by calling 1-800-423-6343 or by contacting your
dealer. Replacement kits can be purchased by visiting www.techauthority.com.
Canadian Residents: If you are the rst registered retail owner of your vehicle, you may obtain a complimentary printed copy of the Warranty Booklet or purchase a replacement kit by calling
1-800-387-1143 or by contacting your dealer.
FCA US LLC reserves the right to modify the terms or discontinue the Roadside Assistance Program at any time. The Roadside Assistance Program is subject to restrictions and
conditions of use, that are determined solely by FCA US LLC.
ROADSIDE ASSISTANCE
24 HOURS, 7 DAYS A WEEK AT YOUR SERVICE.
CALL 1-800-521-2779 OR VISIT CHRYSLER.RSAHELP.COM (USA)
CALL 1-800-363-4869 OR VISIT FCA.ROADSIDEAID.COM (CANADA)
SERVICES: Flat Tire Service, Out Of Gas/Fuel Delivery, Battery Jump Assistance, Lockout Service and Towing Service
Please see the Customer Assistance chapter in this Owner Handbook for further information.
The driver’s primary responsibility is the safe operation of the vehicle. Driving while distracted can result in loss of vehicle control, resulting in an accident and personal injury. FCA US LLC
strongly recommends that the driver use extreme caution when using any device or feature that may take their attention off the road. Use of any electrical devices, such as cellular telephones,
computers, portable radios, vehicle navigation or other devices, by the driver while the vehicle is moving is dangerous and could lead to a serious accident. Texting while driving is also
dangerous and should never be done while the vehicle is moving. If you nd yourself unable to devote your full attention to vehicle operation, pull off the road to a safe location and stop your
vehicle. Some states or provinces prohibit the use of cellular telephones or texting while driving. It is always the driver’s responsibility to comply with all local laws.
This Owner Handbook has been prepared to help you get acquainted with your new Dodge brand vehicle and to provide a convenient reference source for common questions.
Not all features shown in this handbook may apply to your vehicle. For additional information, visit mopar.com/om (U.S.), owners.mopar.ca (Canada) or your local Dodge brand dealer.
DRIVING AND ALCOHOL
Drunk driving is one of the most frequent causes of accidents. Your driving ability can be seriously impaired with blood alcohol levels far below the legal
minimum. If you are drinking, don’t drive. Ride with a designated non-drinking driver, call a cab, a rideshare, a friend, or use public transportation.
WARNING
Driving after drinking can lead to an accident. Your perceptions are less sharp, your reexes are slower and your judgment is impaired when you have
been drinking. Never drink and then drive.
FIRST EDITION
23_GG_OH_EN_USC
HORNET
2023 OWNER HANDBOOK
MOPAR.COM/OM
U.S.
OWNERS.MOPAR.CA
CANADA
DOWNLOAD THE MOST UP-TO-DATE OWNER HANDBOOK, RADIO
AND WARRANTY BOOKS
©2022 FCA US LLC. ALL RIGHTS RESERVED. TOUS DROITS RÉSERVÉS. DODGE IS
A REGISTERED TRADEMARK OF FCA US LLC OR FCA CANADA INC., USED UNDER
LICENSE. DODGE EST UNE MARQUE DÉPOSÉE DE FCA US LLC OU FCA CANADA INC.,
UTILISÉE SOUS LE PERMIS. APP STORE IS A REGISTERED TRADEMARK OF APPLE INC.
GOOGLE PLAY STORE IS A REGISTERED TRADEMARK OF GOOGLE.

