Loading ...
Loading ...
Loading ...
ES NL PTDE
PRIMERA
UTILIZACIÓN
El horno se limpia a fondo
con agua y jabón y se
enjuaga cuidadosamente.
Para sacar los armazones
laterales en los hornos con
paredes lisas proceder como
se ilustra en la figura.
Recalentar el horno alre-
dedor de 30 minutos a la
máxima temperatura; serán
así eliminados todos los
residuos grasos ya que po-
drían causar olores desagra-
dables durante la fase de
cocción.
ERSTMALIGE
BENUTZUNG
Der Backofen muss gründ-
lich mit Seifenwasser ge-
säubert werden. Wie auf
der Abbildung dargestellt
vorgehen, um bei den Öfen
mit glatten Wänden die
seitlichen Backbleche her-
auszunehmen.
Den Backofen für etwa 30
Minuten auf Höchsttempe-
ratur aufheizen; auf diese
Weise werden alle fett-
haltigen Bearbeitungsrück-
stände eliminiert, die beim
Backen unangenehme Ge-
rüche verursachen könnten.
EERSTE GEBRUIK
De oven moet grondig wor-
den schoongemaakt met
water en zeep, en zorgvuldig
worden afgespoeld.
Voor
het verwijderen van de zij-
frames in ovens met gladde
wanden dient u te werk te
gaan zoals op de afbeelding
wordt geïllustreerd.
Verwarm de oven ge-
durende ongeveer 30 minu-
ten op de hoogste tempe-
ratuur; zodoende worden
alle achtergebleven vetten
geëlimineerd die onaange-
name geuren zouden kunnen
veroorzaken tijdens het
bereiden van voedsel.
PRIMEIRA
UTILIZAÇÃO
O forno deve ser limpo a
fundo com água e sabão e
depois cuidadosamente se-
cado com um pno. Para tirar
as estruturas laterais nos
fornos com paredes lisas
proceder como ilustrado na
figura.
Aquecer o forno à máxima
temperatura por cerca de 30
minutos; assim serão elimi-
nados todos os resíduos de
gorduras de fabrico que po-
deriam causar cheiros desa-
gradáveis ao cozinhar.
rança antes de proceder a
qualquer operação de lim-
peza do forno tirar sempre a
ficha da tomada de corrente
ou tirar a linha de alimen-
tação do aparelho. Além
disso evite usar substâncias
ácidas ou alcalinas (sumos
de limão, vinagre, etc.).
Evitar a utilização de
produtos à base de cloro,
ácidos ou abrasivos espe-
cialmente para a limpeza
das paredes envernizadas.
moet altijd de stekker uit
het stopcontact worden ge-
haald of moet de voeding
van het apparaat worden
afgekoppeld alvorens de
oven te gaan schoonmaken.
Gebruik bovendien geen
zure of alkaline stoffen (ci-
troensap, azijn, zout, enz.).
Gebruik geen producten op
chloorbasis, of zure of
schurende producten, voor-
al voor het reinigen van
gelakte oppervlakken.
Como precaución de segu-
ridad, antes de proceder con
cualquier operación de lim-
pieza del horno quitar
siempre el enchufe de la
toma de corriente o quitar la
línea de alimentación del
aparato. Además evitar el
uso de sustancias ácidas o
alcalinas (jugos de limón,
vinagre, sal, tomates, etc.).
Evitar el uso de productos a
base de cloro, ácidos o
abrasivos especialmente
para la limpieza de las
paredes barnizadas.
Als Sicherheitsvorkehrung
muss vor jeder Reinigung
des Backofens immer das
Stromnetz abgeschaltet
werden. Zum Reinigen
dürfen keine sauren oder
alkalischen Substanzen ver-
wendet werden (Zitronen-
saft, Essig, Salz, usw.).
Chlorhaltige Produkte, so-
wie Säuren oder Scheuer-
mittel sind ebenfalls zu
vermeiden, dies gilt vor
allem für die Reinigung der
lackierten Wände.
Als veiligheidmaatregel
Como precaução de segu-
7
GB
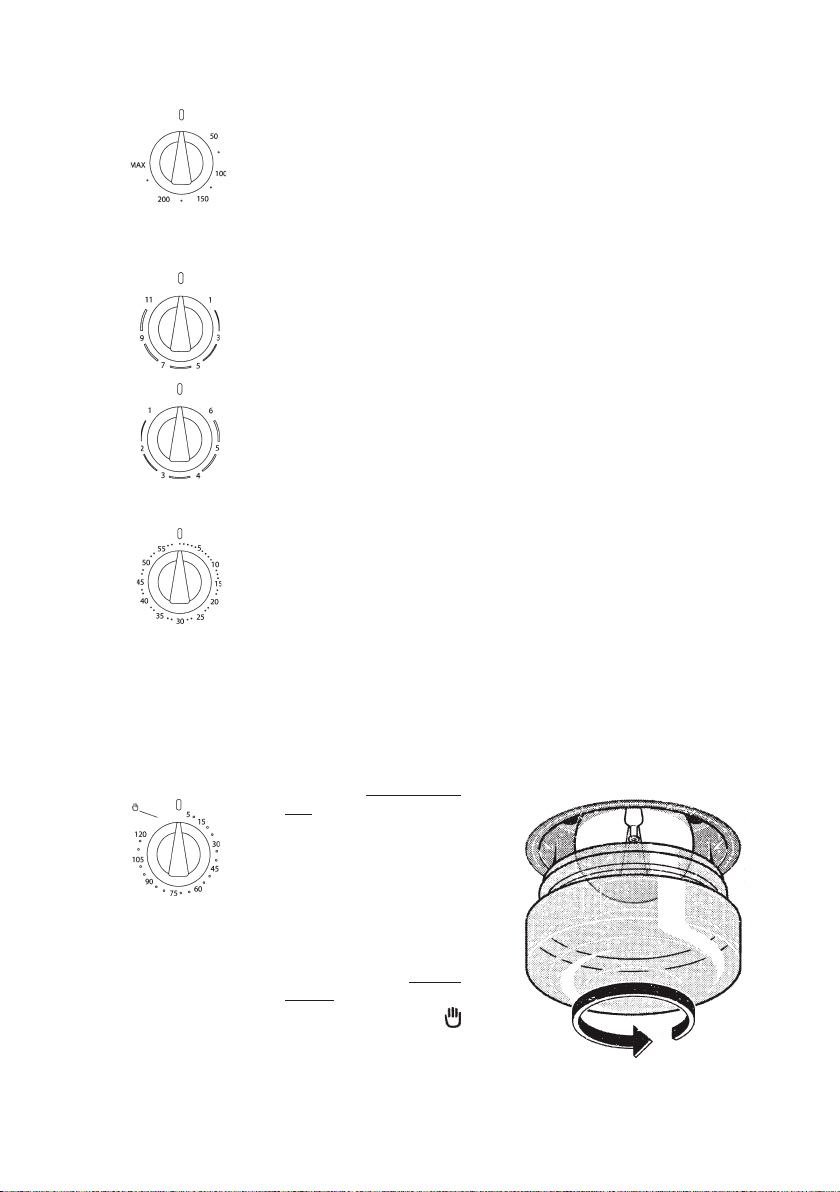
THERMOSTAT
Use the thermostat to set
the cooking temperature
you need. The thermostat
can be adjusted from 50° to
250° C.
0-11 HEAT REGULATOR
0-6 SELECTOR
Use these to adjust the heat
in the cast iron or glass-
ceramic plates. Increase the
setting from 0 to 6 or from
0 to 11 to raise the tempe-
rature.
ALARM TIMER
You can set this timer to
sound a buzzer after 0 to 60
minutes of cooking. First
turn the knob fully clock-
wise, then turn it back to
the desired alarm time.
COOKING TIMER
First, turn the cooking se-
lector to the required cook-
ing function, and the ther-
mostat to the desired cook-
ing temperature.
Then, to set end of cooking
time, turn the cooking timer
to the right and to the
desired time. First turn the
knob fully clockwise, then
turn it back to the desired
alarm time. A buzzer
sounds at the end of the
timed cooking period, and
the oven switches itself off.
To set only the start of
cooking, turn the cooking
timer to the left to the
symbol.
GB
REPLACING THE
OVEN LIGHT
IMPORTANT:
The oven light must have
these precise features:
- to prevent damage, place
a tea cloth in the oven
- unscrew the glass cover of
the light
- unscrew the old light bulb
and replace it with the new
one
- put back the glass cover
and remove the tea cloth
- connect the appliance to
the main electricity supply
a) it must be able to resist
high temperatures (up
to 300
°C)
b) power supply: see V/Hz
indicated on data plate.
c) power 25W.
d) E 14 connection.
Before proceeding,
disconnect the appliance
from the power line to
avoid the possibility of
electric shock.
Loading ...
Loading ...
Loading ...