Loading ...
Loading ...
Loading ...
- 8 -
09/2019
Copyright © 2019, Fast ČR, a.s.
Note:
The above processing times are only areference. To prevent ingredients
from splattering out of the bowl, select an initial speed level of 1 or 2.
Later set ahigher speed based on requirements.
BLENDING
ASSEMBLING THE BLENDER
1. If the blending jar A20 is not seated on the blade assembly A21, put it on and turn
it clockwise to lock it in position.
2. Seat the outer lid A19 on to the blending jar and push it down along its entire
perimeter so that it firmly adheres to the edges of the blending jar. Insert the cap
A18 into hole of the lid A19 so that the tabs along the perimeter of the cap slide into
the grooves in the lid A19. Secure the cap A18 in position by turning it clockwise.
3. Make sure that the appliance is turned off and disconnected from the power socket.
The arm A12 must be tilted down to the horizontal position, the mixing head
shaft A9 must be without attachments A1 to A4 and the stainless steel bowl A7
must be seated in the base unit A8. Take the lid A10 off the arm A12 and place the
assembled blending jar on to the hub A11. Secure the blending jar on the hub by
turning it clockwise. The appliance is equipped with asafety mechanism that will
prevent the blender from starting unless it is correctly secured.
USING THE BLENDER
1. The blender is intended for preparing meals and drinks such as nutritional drinks,
milkshakes, creamy soups, sauces, spreads, fresh baby foods, etc. It is not intended
for juicing fruit and vegetables, preparing potato purée, yeast dough or for
whipping egg whites.
2. Place the prepared ingredients into the blending jar A20 and assemble the blender
according to the instructions in chapter Assembling and disassembling the blender.
Note:
The maximum capacity of the blending jar A20 is 1.5 litres, however,
we do not recommend filling the blending jar with an amount of liquid
greater than 1 litre. Certain liquids increase in volume while blending
and, therefore, are best prepared in smaller batches.
3. Make sure that the appliance is correctly assembled and that the speed control knob
A15 is set to position 0 (stand-by mode). Connect the power cord to apower socket.
4. Set the required speed using the speed control knob. We recommend to first set
the slower speed to allow the ingredients to mix together. Then you can increase
the speed. Another alternative is to directly select ablending mode, which has the
appropriate speed already set. While blending, always use your hand to hold down
the lid from above.
Attention:
The maximum operating time of the blender is 1 minute. Do
not leave the appliance in continuous operation for longer than
indicated above. Then allow the appliance to cool down for 10
minutes.
5. While blending, you may add food or liquids to the blending jar A20 through the
hole in the lid A19 after removing the inner cap A18. Never open the lid A19 during
operation. When processing hot liquids, the inner cap A18 must remain closed.
6. In the event that food is sticking to the blade assembly A21 or the walls of the
blending jar A20, turn the appliance off by turning the speed control knob to
position 0 (stand-by mode) and disconnect it from the power socket. Make sure that
the blade assembly has stopped rotating. Remove the blending jar from the hub.
Open the lid and, using aspatula, clean the blade assembly and the walls of the
blending jar. Put the lid back on and reattach the blender assembly to the multi-
function head. Plug the power cord into apower socket and continue blending.
7. After you have finished using the appliance, set the speed control knob to position 0
(stand-by mode) and disconnect the power cord from the power socket. Check that
the blade assembly A21 has stopped rotating and take the blending jar assembly off
the multi-function head. Use asoft plastic spatula to remove food from the blending
jar.
8. Clean out the individual parts after each use according to the instructions in chapter
Cleaning and maintenance.
DISASSEMBLING THE BLENDER
Note:
Before disassembling the blender, the blending jar must be empty and
clean.
1. Remove the lid A19 from the blending jar A20.
2. Turn the blending jar upside down
3. Use one hand to grasp the handle of the blending jar and with the other hand
release the removable blade assembly A21 by turning it anticlockwise, see fig. C2.
4. In the event that the blending jar cannot be released manually, fasten it into the hub
A11 of the blending hub A9 and put the lid A19 on to the blending jar, see fig. C3.
5. With one hand, gently push down on the lid A19 from above and with the other
hand turn the blending jar clockwise so that it is slightly released from the hub A9,
see fig C4.
6. Take the blending jar off the hub A9.
7. Remove the blade assembly A21 by repeating steps 1 to 3.
USING THE SMOOTHIE BLENDER
1. The smoothie blender is intended for preparing fruit and vegetable smoothie drinks.
2. Add the liquids and food that you wish to blend into the nutri-bottle A22. Larger
ingredients must be first cut into cubes measuring approximately 2 cm. When filling
the nutri-bottle A22, follow all the safety instructions and the maximum amounts
of ingredients as specified for the respective type of accessory in subchapter Quick
guide to processing ingredients. The maximum capacity of the nutri-bottle A22 is
0.6 litres. Never fill it past the maximum mark.
3.
Put the blade assembly A23 on to the neck of the nutri-bottle A22 so that the chopping
blades point into the nutri-bottle A22 and screw it in tightly, see figure B2.
Warning:
When handling the blade assembly A23, in order to prevent
injury, it is necessary to be especially careful. Do not touch the
blade edge.
4. Make sure that the appliance is turned off and disconnected from the power socket.
The arm A12 must be tilted down to the horizontal position, the shaft of the hub
A9 must be without attachments A1 to A4 and the stainless steel bowl A7 must be
seated in the base unit A8. Remove the cover A10 from the arm A12.
5. Turn the assembled nutri-bottle A22 over so that the blade assembly A23 is at the
bottom. As shown in figure B4, place the assembled nutri-bottle on to the hub A11
and turn it clockwise all the way. The appliance is now assembled and ready for use.
6. Set the speed control knob A15 to the smoothie mode.
7. Adhere to the maximum amount of food, processing times and speed settings as
specified in the table in the Quick guide to processing ingredients. The maximum
continuous operating time is 1 minute.
Attention:
The shaft of hub A9 will move when the smoothie blender is
used.
8. After you have finished using the appliance, set the speed control knob A15 to
position 0 (off) and disconnect the power cord plug from the power socket. Before
disconnecting it from the power socket, wait until the moving parts come to astop.
9. To disassemble proceed in the reverse sequence. The smoothie blender must be
taken off the appliance very carefully so as not to loosen the blade assembly A23
from the neck of the nutri-bottle A22.
10. If you wish to use the bottle A22 as adrink bottle, attach the lid A24 to the neck
of the nutri-bottle A22, see figure B5. Make sure that the drinking spout is properly
closed so as not to spill the bottle‘scontents when carrying it.
ADVICE AND TIPS FOR BLENDING
■ First cut food with afirm consistency such as fruit and vegetables into smaller pieces
measuring 2 to 3 cm and only then blend it.
■ First, blend asmaller amount of ingredients and then gradually add more ingredients
through the hole in the lid A19 while blending. In this way, you will achieve better
results than by adding all ingredients into the blending jar A20 at once.
■ If you need to blend food of a solid consistency together with liquids, we
recommend that you first blend the food of solid consistency with asmaller amount
of the liquids. Then gradually add the remaining liquids through the hole in the lid
A19 while blending. While blending, always use your hand to hold down the lid from
above.
■ To blend very thick liquids, we recommend using the pulse level so that the blade
assembly A21 does not get jammed too often. Start the blender repeatedly in short
intervals.
■ Ice cubes must be processed immediately upon being removed from the freezer.
When the ice starts to melt, the ice cubes will stick together and it will not be
possible to blend them.
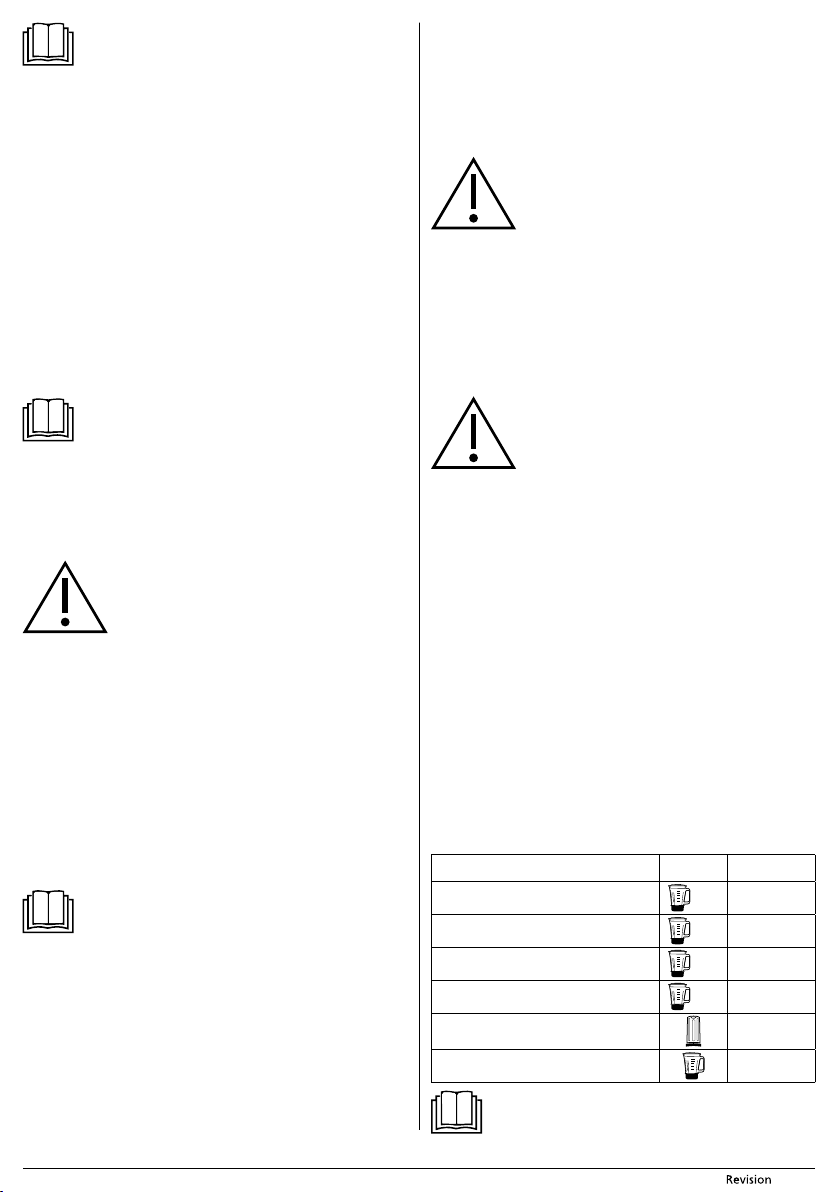
QUICK GUIDE TO PROCESSING INGREDIENTS
Ingredients
Speed
selection
Recommended
blending time
Fruit, vegetables cut into smaller pieces
or 5-6
30 s
Baby food
or 5-6
40 s
Spreads, dressings, marinades
or 5-6
30 s
Soups
or 5-6
30 s
Smoothies and cocktails
40 s
Ice cubes
As necessary
Note:
The above food processing times are only a reference. The actual
blending time depends on the size of the ingredients, their amount
and the required final consistency.
Loading ...
Loading ...
Loading ...