Owner's Manual
ManualDel Propietario
@
Vacuum Cleaner
Aspiradora
Model, Modelo
116.24212
116.24213
CAUTION:
Read and follow all
safety and operating
instructionsbefore first
use of this product.
CUIDADO:
Lea y siga todas las
instrucciones de operaci6n
y seguridad antes del uso de
este producto.
Sears, Roebuck and Co., Hoffman Estates, IL 60179 U.S.A.
www.sears.com
Printed in U.S.A.
Part No, C_IZCHZ1QUalD-KC_IZCHZZ_U_ Impreso en EUA
Before Using Your New Vacuum ....... 2
Kenmore Vacuum Cleaner Warranty.., 2
Important Safety Instructions ......... 3
Parts and Features ................. 4.5
Assembly Instructions ............. 6-7
use ................................ B
How toStart ........................ 8
Vacuuming Tips ..................... 9
Suggested Pile Height Settings ......... 9
Attachments ....................... 10
Attachment Use Chart ............... 10
Performance Features ............... 11
How Your Vacuum Works ............ 12
Canister Care ...................... 12
Bag Changing ..................... 12
Cleaning Exterior and Attachments ..... 13
Motor Safety Filter Changing .......... 13
Exhaust Filter Changing .............. 14
Power.Mate ° Care .................. 14
Light Bulb Changing ................. 15
Belt Changing and Brush Cleaning .,. 15-16
Agitator Servicing ................... 17
Troubleshooting .................... 18
Requesting Assistance
Or Service .................. Back Cover
Please read this guide. It will help you assemble and operate your new Kenmore vacuum in
the safest and most effective way.
For more information about vacuum cleaner care and operation, call your nearest Sears store.
You will need the complete model and serial numbers when requesting information. Your vacu-
um's model and serial numbers are located on the Model and Serial Number Plate.
Use the space below to record the model number and serial number of your new Kenmore
vacuum,
Model No.
Serial No.
Date of Purchase
Keep this book and your sales check (receipt) in a safe place for future reference.
LIMITED ONEYEAR WARRANTY ON KENMORE VACUUM CLEANER
This warranty is for one year from the date of purchase, and includes only private household
vacuum cleaner use. During the warranty year, when this vacuum cleaner is operated and
maintained according to the owner's manual instructions, Sears will repair any defects in
material or workmanship free of charge.
This warranty excludes vacuum bags, belts, light bulbs, and filters, which are expendable parts
and become worn during normal use.
For warranty service, return this vacuum cleaner to the nearest Sears Service Center in
the United States.
This warrantyapplies only while this productisin use inthe United States. This warrantygives
you specific legal rights, and you may also have other rights which vary from state to state.
Sears, Roebuck and Co., D/817 WA, Hoffman Estates, IL 60179
Yoursafetyis importantto us.Toreducethe riskof fire,electricalshock,injury
to personsor damagewhenusingyour vacuumcleaner,followbasicsafetypre-
cautions including the following:
Read this manual before assembling or
usingyourvacuumcleaner.
Use your cleaner only as described in this
manual. Use only with Sears recommended
attachments.
To reduce the risk of electrical shock - Do
not use outdoors or on wet surfaces.
Disconnect electrical supply before servic-
ing or cleaning out brush area. Failure to
do so could result in electrical shock or
brush suddenly starting.
Always turn off and unplug the cleaner
before connecting or disconnecting either
hose, Handi-Mate Jr.®(if applicable) or
nozzle.
Always turn cleaner off before unplugging.
Do not unplug by pulling on cord. To
unplug, grasp the plug, not the cord.
Hold plug when rewinding onto cord reel.
Do not allow plug to whip when rewinding.
Do not use with damaged cord or plug. If
cleaner is not working as it should, has
been dropped, damaged, left outdoors, or
dropped into water, return it to a Sears
Service Center.
Do not pull or carry by cord, use cord as a
handle, close door on cord, or pull cord
around sharp edges or corners. Do not run
cleaner over cord. Keep cord away from
heated surfaces.
Do not leave cleaner when plugged in.
Unplug from outlet when not in use and
before servicing.
Do not allow to be used as a toy. Close
attention is necessary when used by or
near children.
Do not handle plug or cleaner with wet
hands.
Do not put any objects into openings.
Do not operate the cleaner with a punc-
tured hose. The hose contains electrical
wires. Replace if cut or worn. Avoid picking
up sharp objects.
Do not use with any opening blocked; keep
free of dust, lint, hair and anything that may
reduce air flow.
Keep hair, loose clothing, fingers, and all
parts of body away from openings and mov-
ing parts.
Donot usecleaner withoutdust bag and/or
filters in place.
Always change the dust bag after vacuum-
ing carpet cleaners or freshener, powders
and fine dust. These products clog the bag,
reduce airflow and can cause the bag to
burst. Failure to change bag, could cause
permanent damage to the cleaner.
Do not use the cleaner to pick up sharp
hard objects, small toys, pins, paper clips,
etc. They may damage the cleaner or dust
bag.
Do not pick up anything that is burning or
smoking, such as cigarettes, matches, or
hot ashes.
Do not use cleaner to pick up flammable or
combustible liquids (gasoline, cleaning flu-
ids, perfumes, etc.), or use in areas where
they may be present. The fumes from these
substances can create a fire hazard or
explosion.
Use extra care when cleaning on stairs. Do
not put on chairs, tables, etc. Keep on floor.
You are responsible for making sure that
your vacuum cleaner is not used by anyone
unable to operate it properly.
Do not operate without exhaust filter or
exhaust filter cover installed.
SAVE THESE INSTRUCTIONS
Proper assembly and safe use of your vacuum cleaner are your responsibilities. Your cleaner
is intended only for household use. Read this Owner's Manual carefully for important use and
safety information. This guide contains safety statements under warning and caution symbols.
Please pay special attention to these boxes and follow any instructions given. WARNING
statements alert you to such dangers as fire, electrical shock, burns and personal injury. CAU.
TION statements alert you to such dan,qers as personal inlurY and/or propertydama,qe.
3
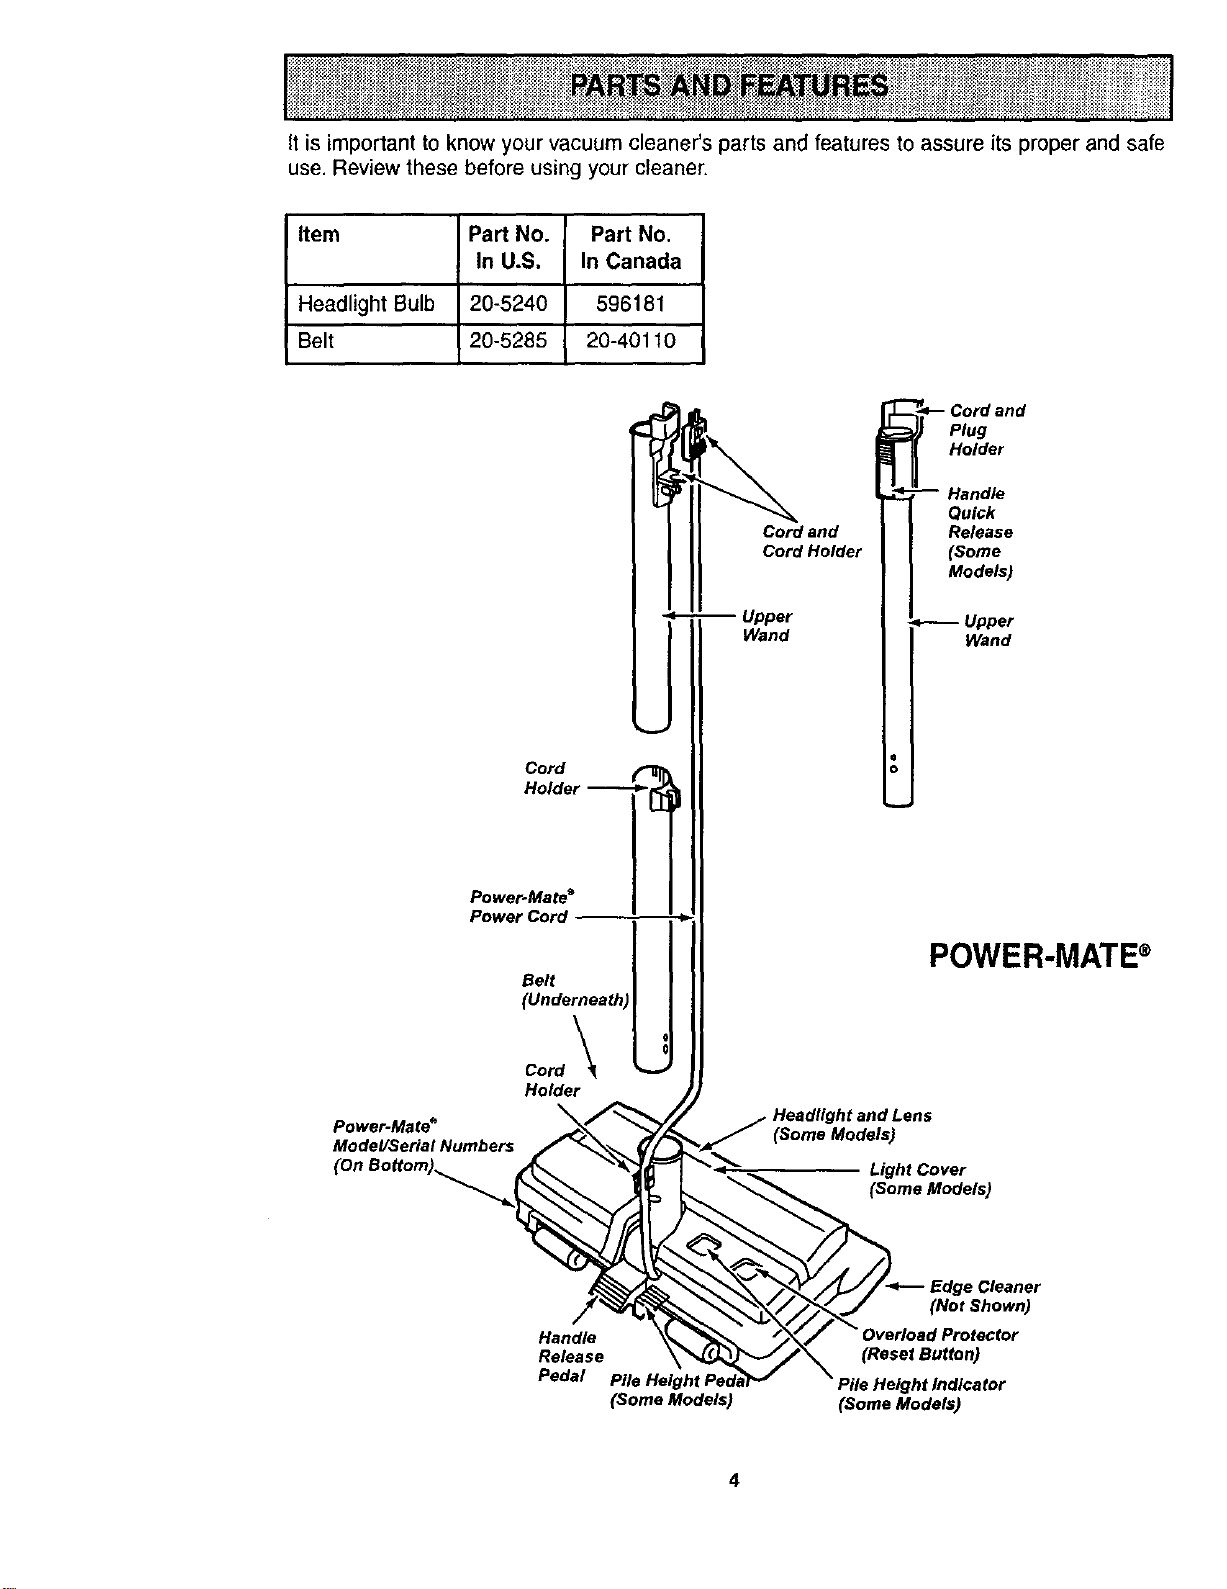
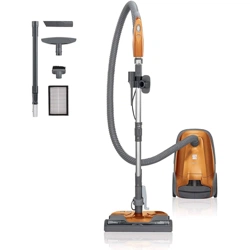
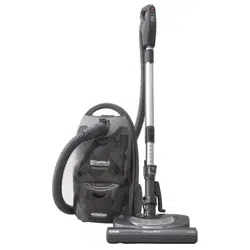
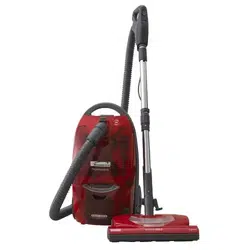
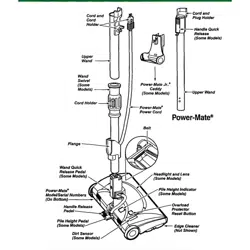
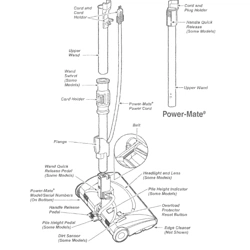
It is important to know your vacuum cleaner's parts and features to assure its proper and safe
use. Review these before using your cleaner,
Item Part No. Part No.
In U.S. In Canada
Headlight Bulb 20-5240 596181
Belt 20-5285 20-401 f 0
Cord
Holder --
Power*Mate _
Power Cord
Belt
(Underneath
Cord _
Holder
\
Power-Mate*
ModeYSerial Numbers
(on
Cord and
Cord Holder
Upper
Wand
Cord and
Plug
Holder
POWER-MATE®
Headlight and Lens
(Some Models)
Light Cover
(Some Models)
Hand_
Re_ase
Pedal
(Some Models)
(Not Shown)
(Reset Button)
Pile Height Indicator
(Some Models)
4
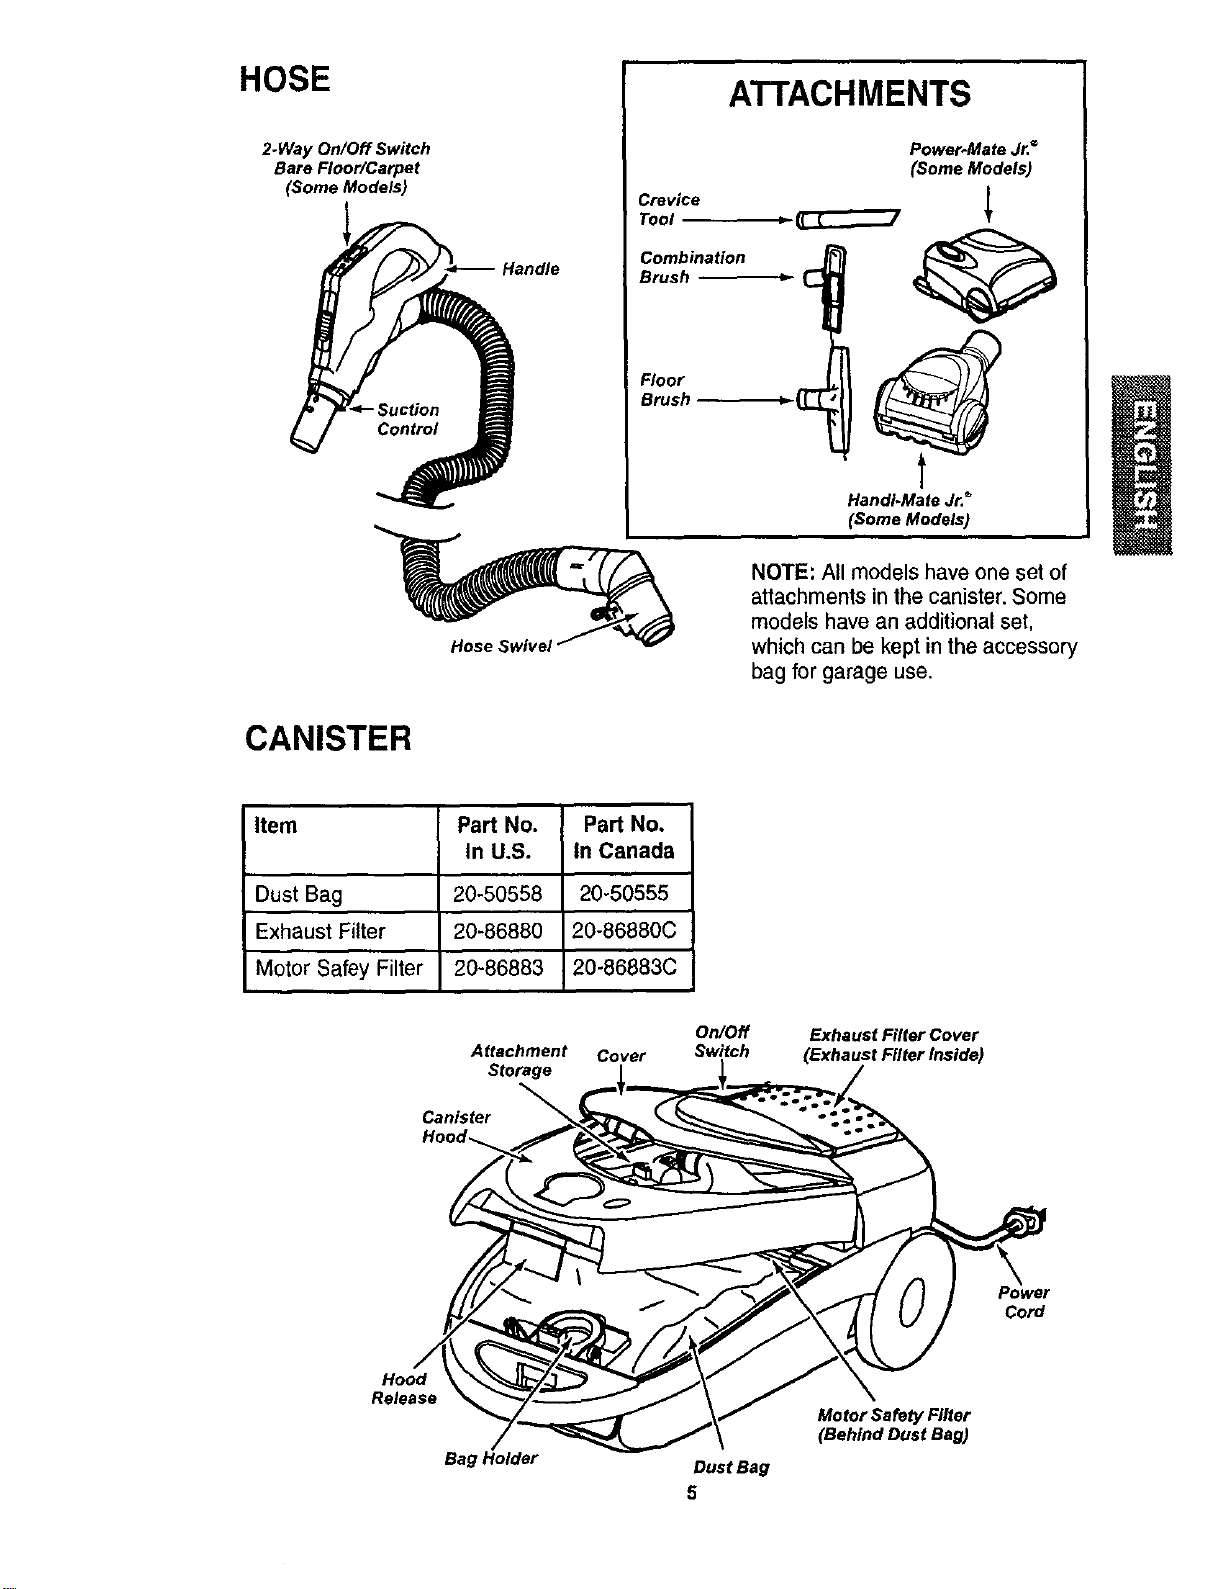
HOSE
2.Way On/Off Switch
Bare Floor/Carpet
(Some Models)
Handle
Crevice
Tool
Combination
Brush
Floor
Brush
ATTACHMENTS
Power_Mate Jr.®
(Some Models)
Handi.Mate Jr.6
(Some Models)
NOTE: All models have one set of
attachments in the canister. Some
models have an additional set,
which can be kept in the accessory
bag for garage use.
CANISTER
Item Part No. Part No.
In U.S. In Canada
Dust Bag 20-50558 20-50555
Exhaust Filter 20-86880 20-86880C
Motor Safey Filter 20-86883 20-86883C
Attachment Cover
Storage
Canister
On/Off
Switch
Exhaust Filter Cover
(Exhaust Filter Inside)
Power
Cord
Hood
Release
Bag
Dust Bag
5
Motor Safety Filter
(Behind Dust Bag)
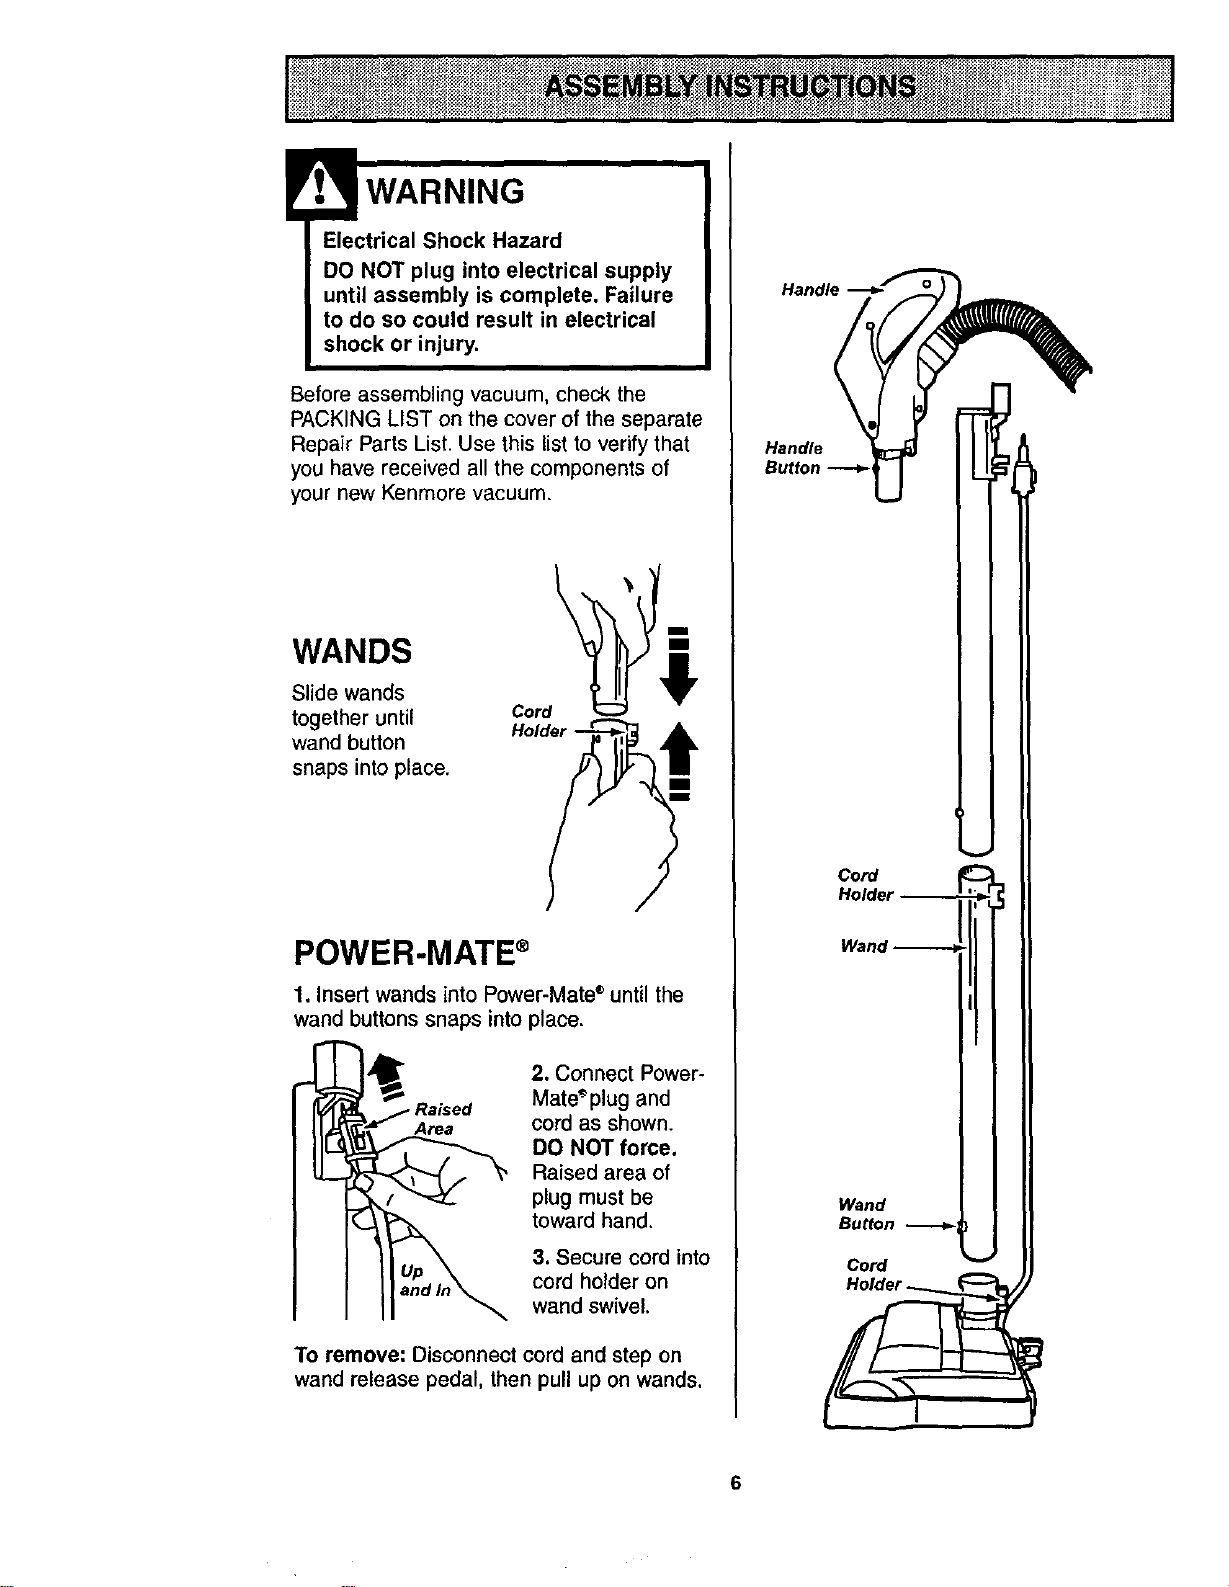
Electrical Shock Hazard
DO NOT plug into electrical supply
until assembly is complete. Failure
to do so could result in electrical
shock or injury.
Before assembling vacuum, check the
PACKING LIST on the cover of the separate
Repair Parts List. Use this list to verify that
you have received all the components of
your new Kenmore vacuum.
WANDS
Slide wands
together until
wand button
snaps into place.
Holder_
/ /
POWER-MATE ®
1, Insertwands into Power-Mate" until the
wand buttons snaps intoplace.
2. Connect Power-
Raised Mate_plug and
cord as shown.
DO NOT force.
. _, Raised area of
plug must be
toward hand.
3. Secure cord into
cord holder on
wand swivel.
To remove: Disconnectcord and step on
wand release pedal, thenpull upon wands,
Handle
Handle
6
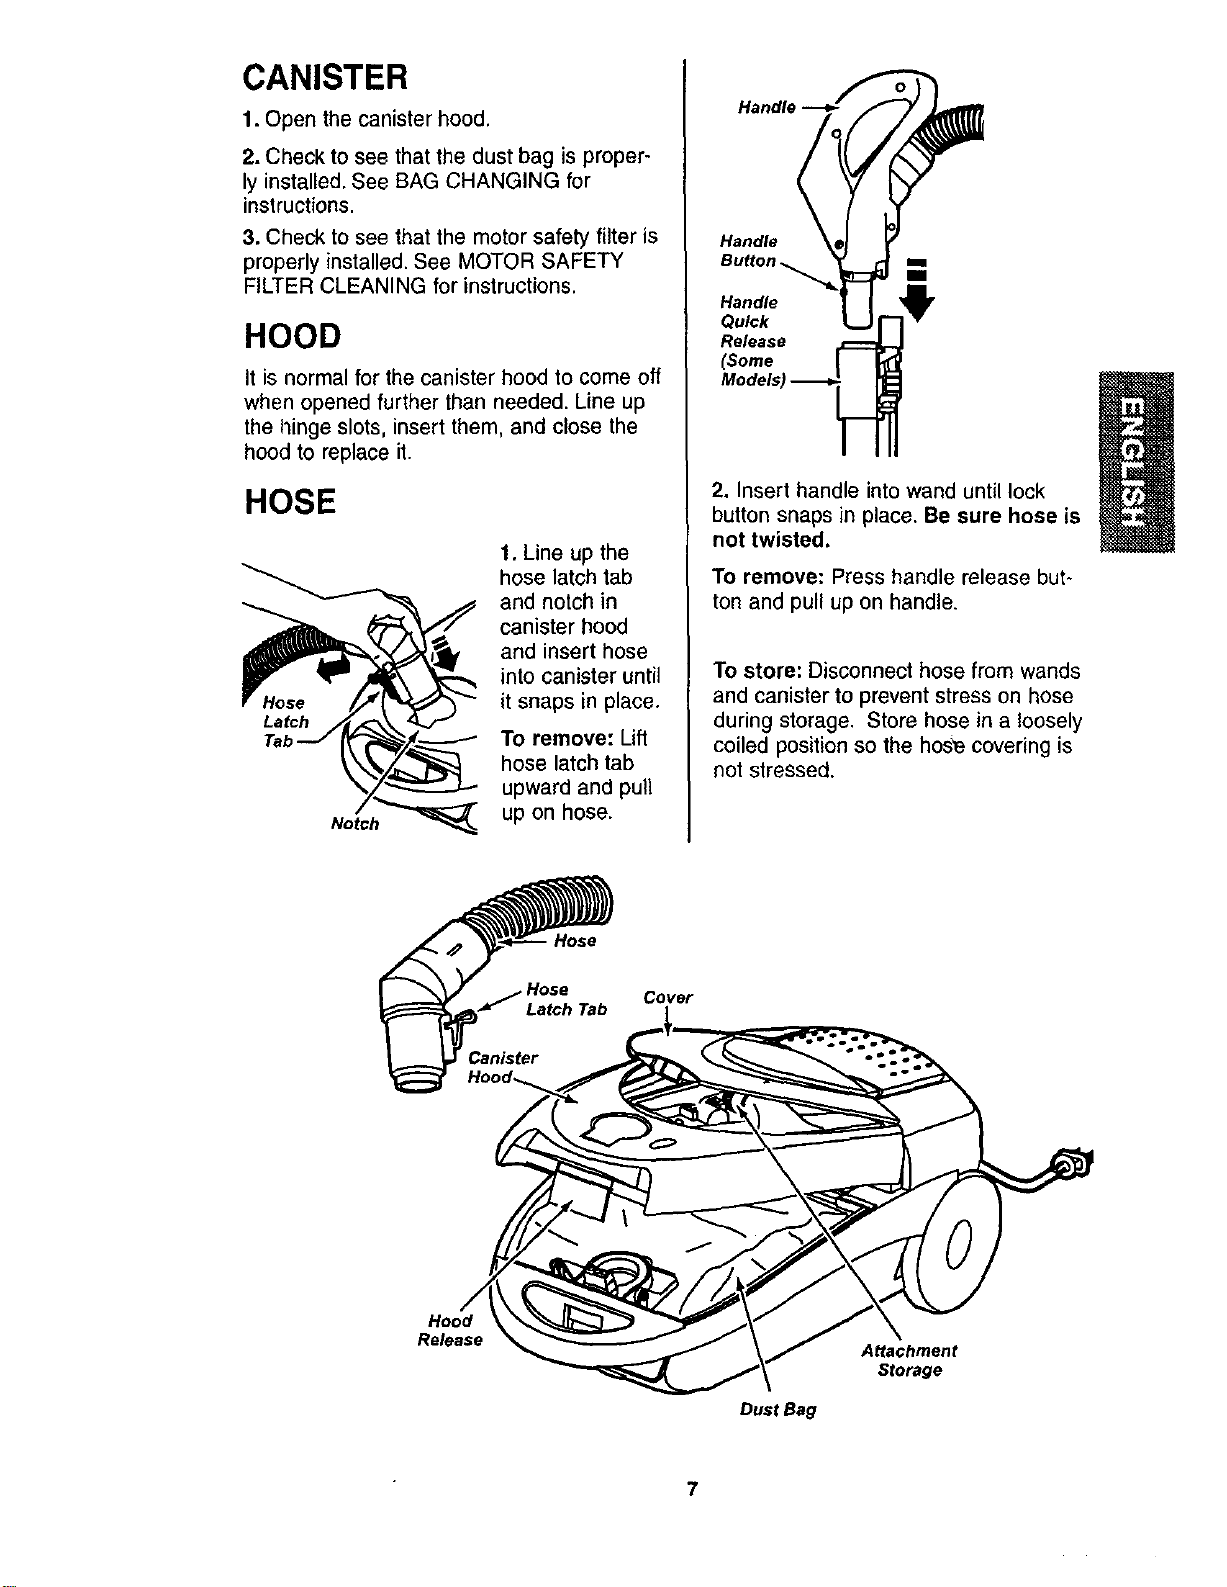
CANISTER
1. Open the canister hood.
2. Check to see that the dust bag is proper-
ly installed. See BAG CHANGING for
instructions.
3. Check to see that the motor safety filter is
properly installed. See MOTOR SAFETY
FILTER CLEANING for instructions.
HOOD
It is normal for the canister hood to come off
when opened further than needed. Line up
the I_inge slots, insert them, and close the
hood to replace it.
HOSE
Latch
Notch
1. Line up the
hose latch tab
and notch in
canister hood
and insert hose
into canister until
it snaps in place.
To remove: Lift
hose latch tab
upward and pull
up on hose.
Handle
BB
Handle
Qu_k
Re_ase
_ome
2. Insert handle into wand until lock
button snaps in place. Be sure hose is
not twisted.
To remove: Press handle release but-
ton and pull up on handle.
To store: Disconnect hose from wands
and canister to prevent stress on hose
during storage. Store hose in a loosely
coiled position so the hose covering is
not stressed.
Hose
_._ Hose Cover
Latch Tab
Hood
Re_ase
Dust Bag
Attachment
Storage
7
HOW TO START
! WARNING
Personal Injury and Product Damage
Hazard
• DO NOT plug in if switch is in ON
position. Personal injury or
damage could result.
• The cord moves rapidly when
rewinding. Keep children away
and provide a clear path when
rewinding the cord to prevent
personal injury.
DO NOT use outlets above
counters. Damage from cord to
items in surrounding area
could occur.
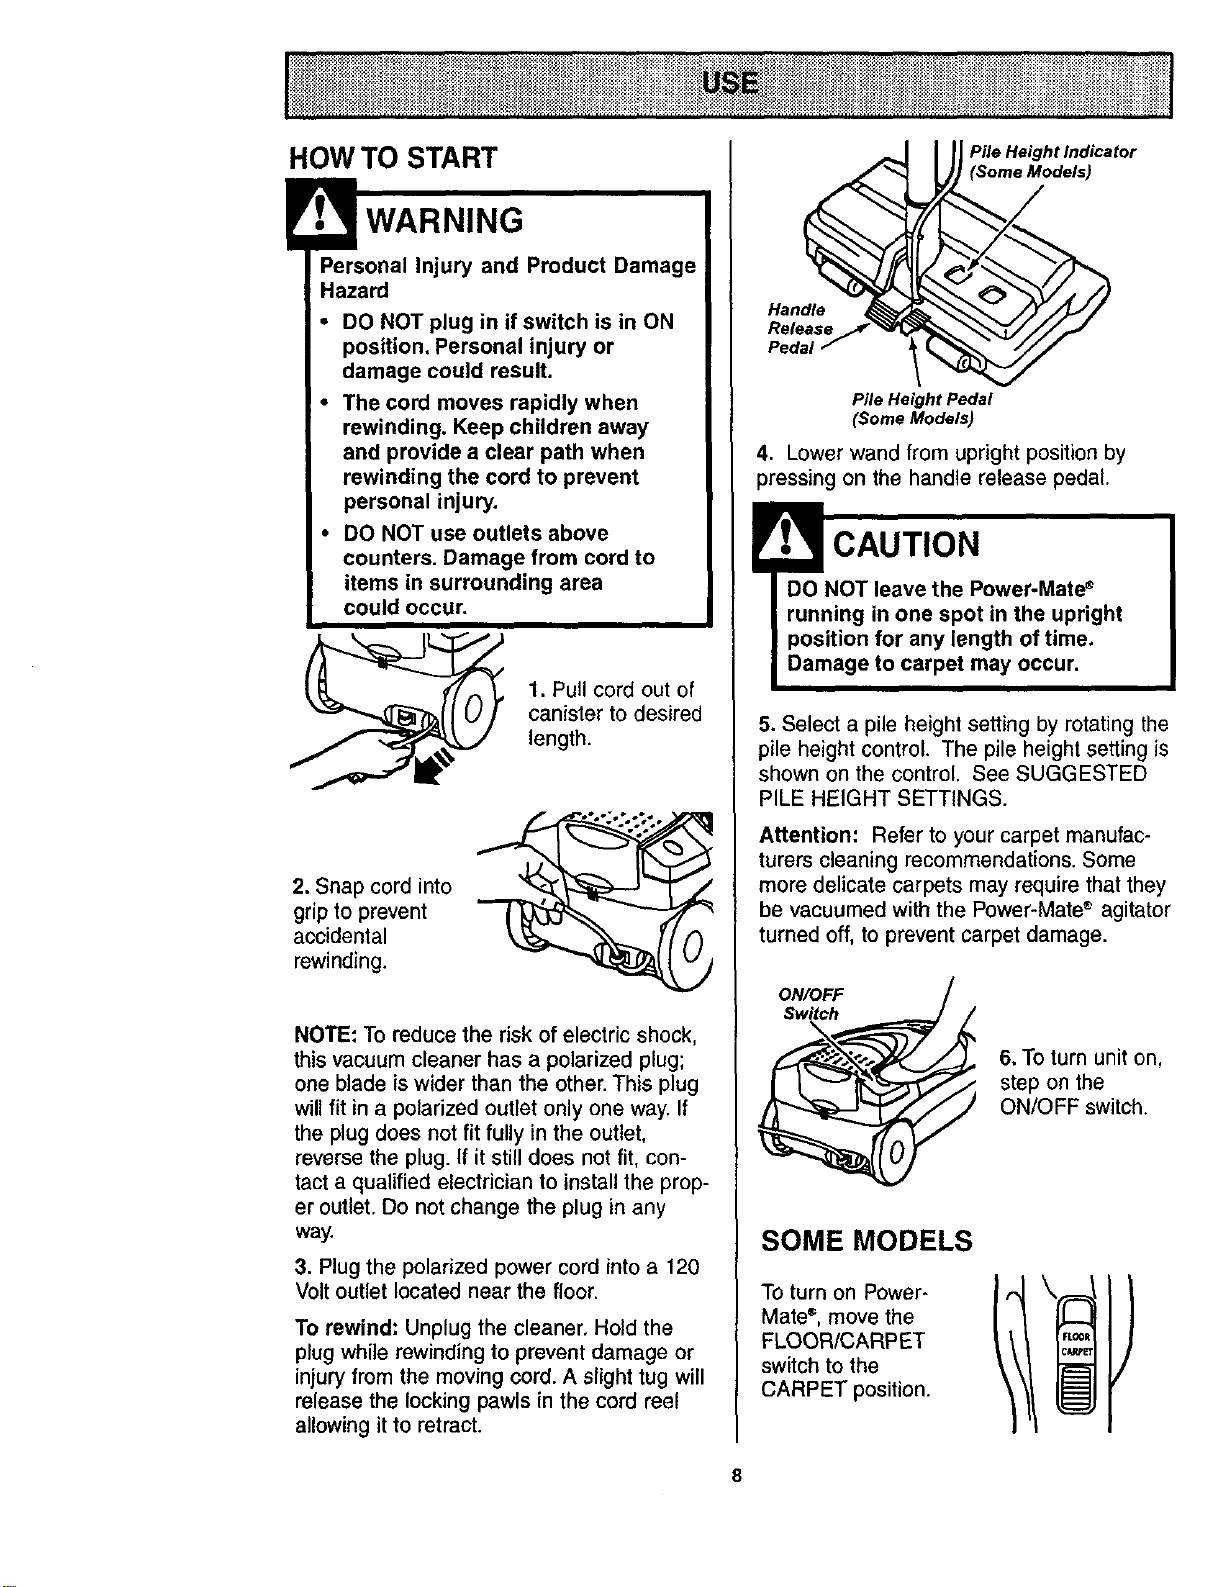
1. Pull cord out of
canister to desired
length.
2. Snap cord into
grip to prevent
accidental
rewinding.
NOTE: To reduce the risk of electric shock,
this vacuum cleaner has a polarized plug;
one blade is wider than the other. This plug
will fit in a polarized outlet only one way. If
the plug does not fit fully in the outlet,
reverse the plug. If it still does not fit, con-
tact a qualified electrician to install the prop-
er outlet. Do not change the plug in any
way.
3. Plug the polarized power cord into a 120
Volt outlet located near the floor.
To rewind: Unplug the cleaner. Hold the
plug while rewinding to prevent damage or
injury from the moving cord. A slight tug will
release the locking pawls in the cord reel
allowing it to retract.
Pile Height Indicator
Handle
Release
Pedai
Pile Height Pedal
(Some Models)
4. Lower wand from upright position by
pressing on the handle release pedal.
1 CAUTION
DO NOT leave the Power-Mate *
running in one spot in the upright
position for any length of time.
Damage to carpet may occur.
5. Select a pile height setting by rotating the
pile height control. The pile height setting is
shown on the control. See SUGGESTED
PILE HEIGHT SETTINGS.
Attention: Refer to your carpet manufac-
turers cleaning recommendations. Some
more delicate carpets may require that they
be vacuumed with the Power-Mate * agitator
turned off, to prevent carpet damage.
ON/OFF
6. To turn unit on,
step on the
ON/OFF switch.
SOME MODELS
TO turn on Power-
Mate", move the
FLOOR/CARP ET
switch to the
CARPET position.
[ FLOOI
I CA_PE
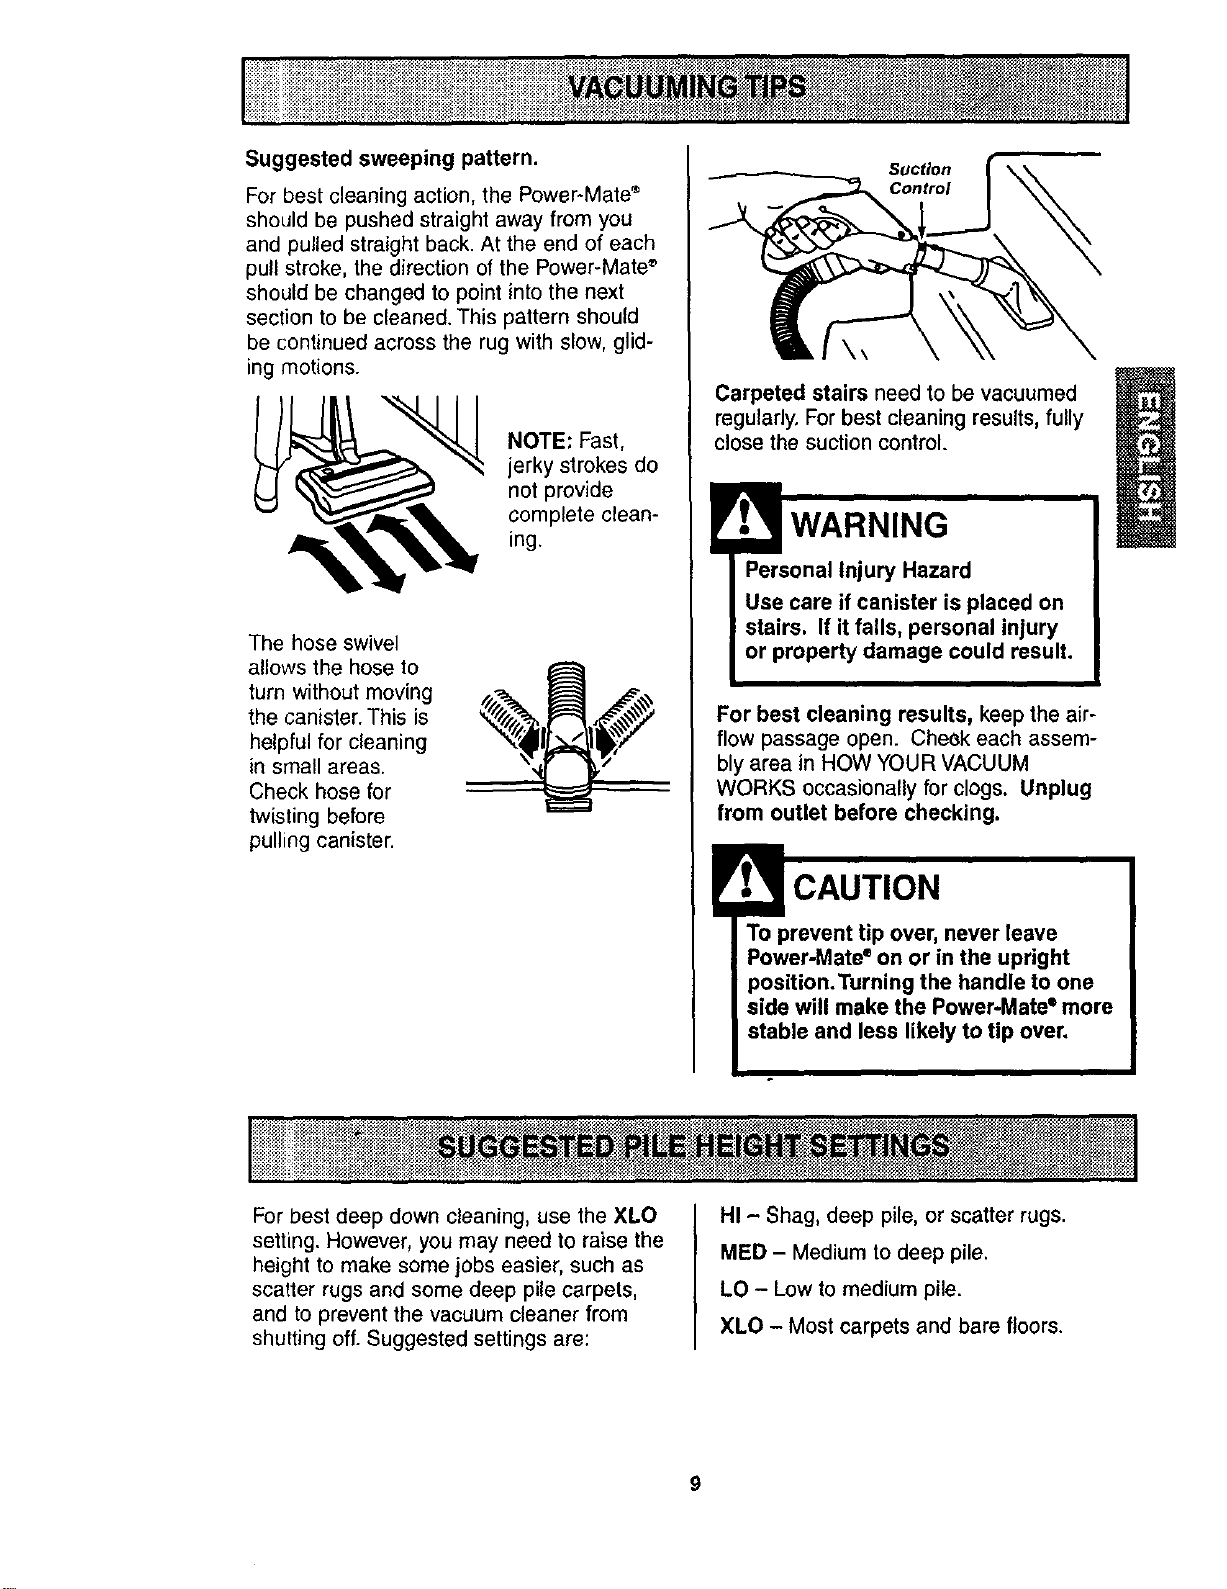
Suggested sweeping pattern.
For best cleaning action, the Power-Mate"
should be pushed straight away from you
and pulled straight back. At the end of each
pull stroke, the direction of the Power-Mate *
should be changed to point into the next
section to be cleaned. This pattern should
be continued across the rug with slow, glid-
ing motions.
NOTE: Fast,
jerky strokes do
not provide
complete clean-
ing.
The hose swivel
allows the hose to
turn without moving
the canister. This is
helpful for cleaning
in small areas.
Check hose for
twisting before
pulling canister.
Suction
Control
\\
Carpeted stairs need to be vacuumed
regularly. For best cleaning results, fully
close the suction control.
WARNING
Personal Injury Hazard
Use care if canister is placed on
stairs, If it falls, personal injury
or property damage could result,
For best cleaning results, keep the air-
flow passage open. Cheok each assem-
bly area in HOW YOUR VACUUM
WORKS occasionally for clogs. Unplug
from outlet before checking.
CAUTION
To prevent tip over, never leave
Power-Mate eon or in the upright
position.Turning the handle to one
side will make the Power-Mate ° more
stable and less likely to tip over.
For best deep down cleaning, use the XLO
setting. However, you may need to raise the
height to make some jobs easier, such as
scatter rugs and some deep pile carpets,
and to prevent the vacuum cleaner from
shutting off. Suggested settings are:
HI - Shag, deep pile, or scatter rugs.
MED - Medium to deep pile.
LO - Low to medium pile,
XLO - Most carpets and bare floors.
9
! CAUTION
DO NOT attach or remove handle or
wands while cleaner is ON. This
could cause sparking and damage
the electrical contacts.
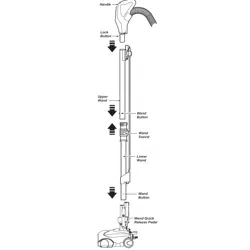
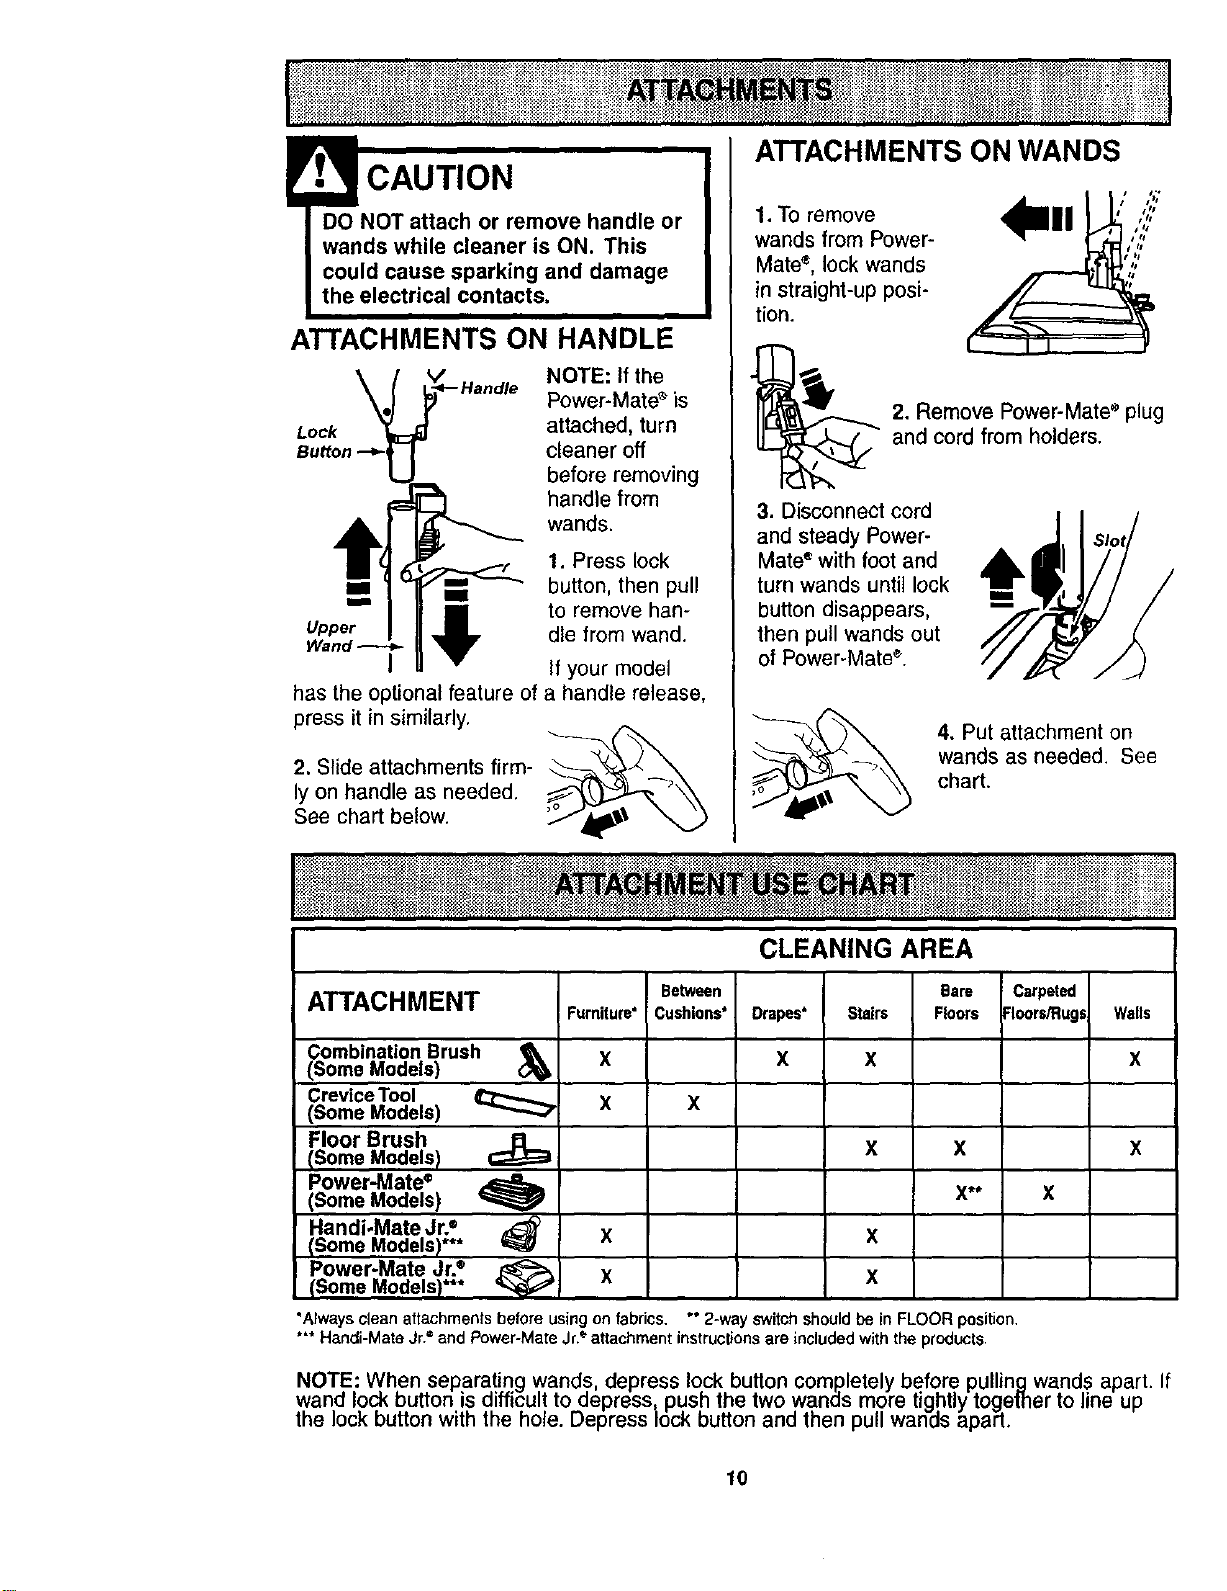
ATTACHMENTS ON HANDLE
Lock
Button
NOTE: If the
Power-Mate s is
attached, turn
cleaner off
before removing
handle from
wands.
1. Press lock
" i button, then pull
'== to remove han-
Upper die from wand.
I If your model
has the optional feature of a handle release,
press it in similarly.
2. Slide attachments firm- __
ly on handle as needed.
See chart below.
ATTACHMENTS ON WANDS
1. To remove
wands from Power-
Mate`*, lock wands
in straight-up posi-
tion.
II ' ,,:;:'
2. Remove Power-Matee plug
and cord from holders.
3. Disconnect cord
and steady Power-
Mate '_with foot and A
turn wands until lock
t
button disappears, ==
then pull wands out
of Power-Mate *.
4. Put attachment on
wands as needed. See
chart.
ATTACHMENT Furniture"
Combination Brush &
(Some Models) X
Crevice Tool
(Some Models) _ X
Floor Brush
(Some Models)
Power-Mate`*
(Some Models)
Handi.Mate Jr.'*
(Some Models)*** _ X
Between
Cushions*
CLEANING AREA
Drapes*
X
Stairs
X
Bare
Floors
Carpeted
Floors/Rug_
Walls
X
x
x x x
x** x
x
Power-Mate Jr.®
4_i X x
(Some Models)***
"Alwayscleanattachmentsbefore usingonfabrics, ** 2-way switchshouldbe in FLOOR position.
Handi-MateJr. and Power-MateJr. attachmentinstructionsare includedwith the products,
NOTE: When separat!ng wands, depress lock button completely before pullingwands apart.
wand Io_ outton is airricul! to aepress_ push the two wanas more tightly togemer to line up
the lock outton with the no_e. uepress lock button and then pull wanas apart.
If
lO
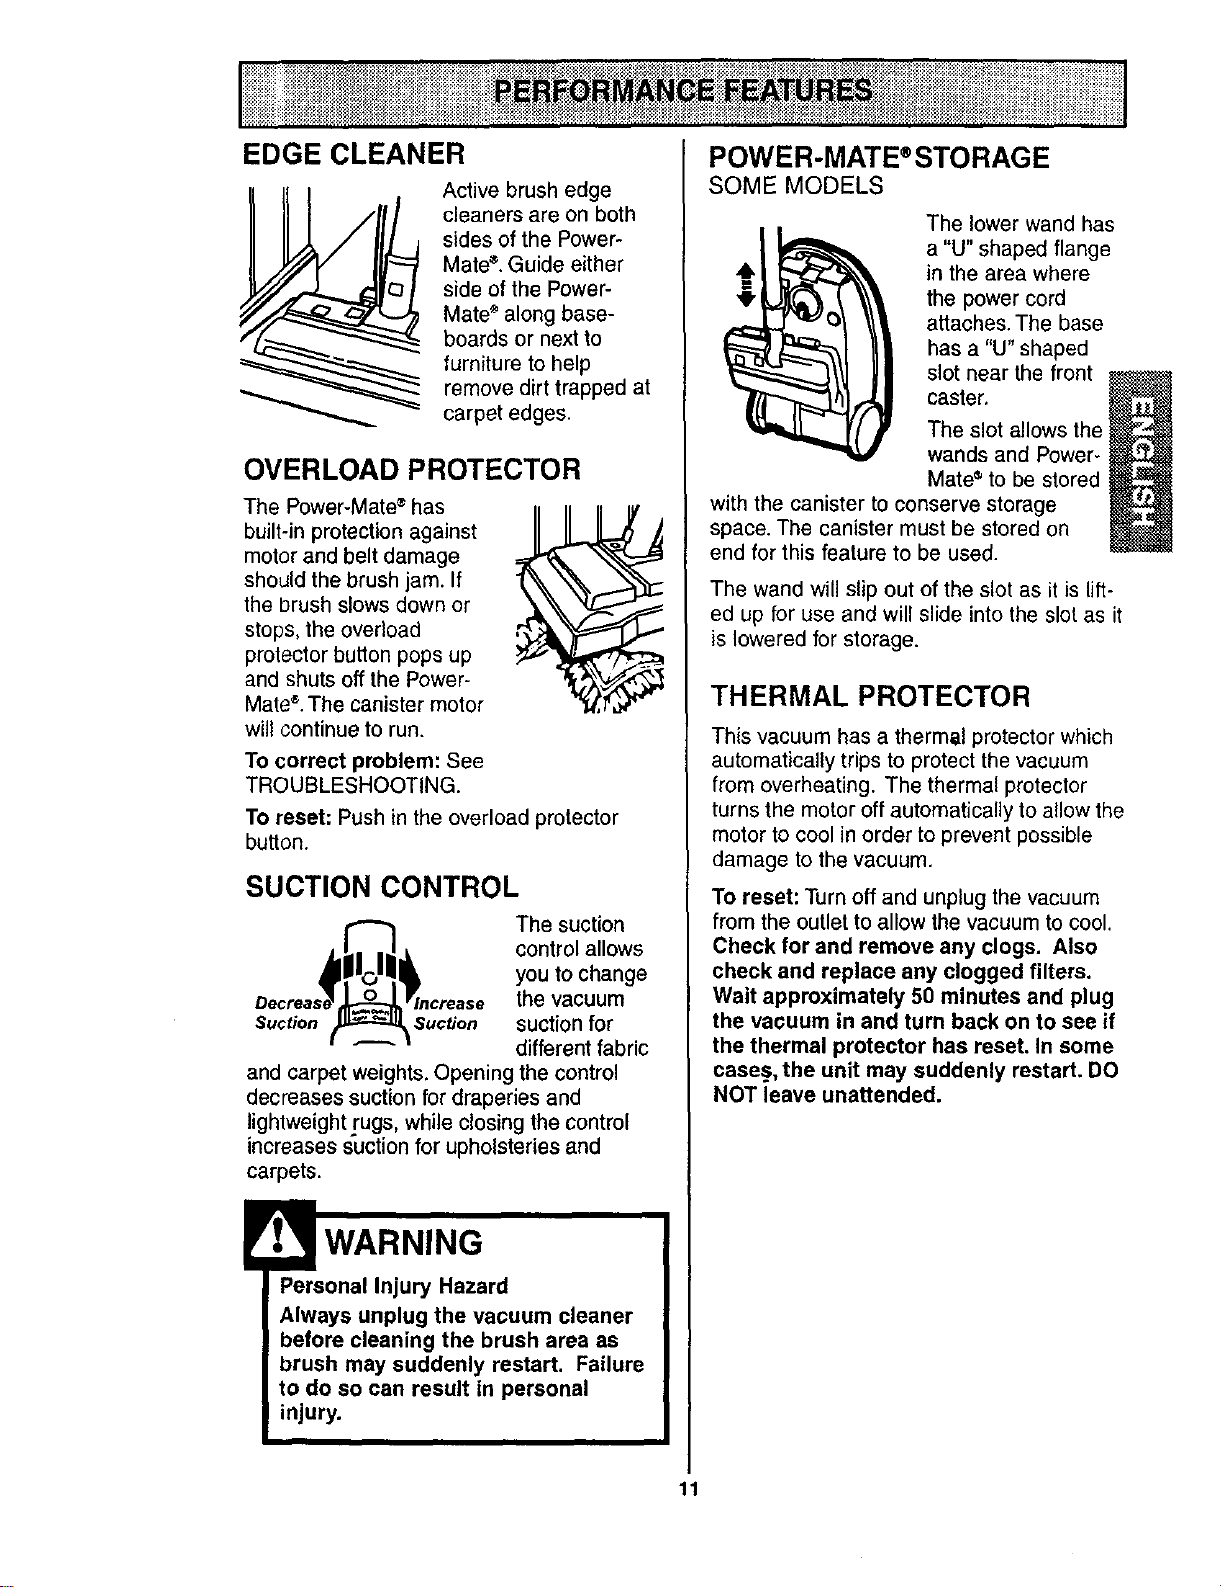
EDGE CLEANER
Active brush edge
cleaners are on both
sides of the Power-
Mate". Guide either
side of the Power-
Mate s along base-
boards or next to
furniture to help
remove dirt trapped at
carpet edges.
OVERLOAD PROTECTOR
The Power-Mate ®has
built-in protection against
motor and belt damage
should the brush jam. If
the brush slows down or
stops, the overload
protector button pops up
and shuts off the Power-
Mate _.The canister motor
will continue to run,
To correct problem: See
TROUBLESHOOTING,
To reset; Push in the overload protector
button.
SUCTION CONTROL
The suction
control allows
you to change
the vacuum
Suction _Suction suction for
different fabric
and carpet weights. Opening the control
decreases suction for draperies and
lightweight rugs, while closing the control
increases suction for upholsteries and
carpets.
Personal Injury Hazard
Always unplug the vacuum cleaner
before cleaning the brush area as
brush may suddenly restart. Failure
to do so can result in personal
injury.
POWER-MATE®STORAGE
SOME MODELS
The lower wand has
a "U" shaped flange
in the area where
the power cord
attaches. The base
has a "U" shaped
slot near the front
caster,
The slot allows the
wands and Power-
Mate _ to be stored
with the canister to conserve storage
space. The canister must be stored on
end for this feature to be used.
The wand will slip out of the slot as it is lift-
ed up for use and will slide into the slot as it
is lowered for storage.
THERMAL PROTECTOR
This vacuum has a thermal protector which
automatically trips to protect the vacuum
from overheating. The thermal protector
turns the motor off automatically to allow the
motor to cool in order to prevent possible
damage to the vacuum.
To reset: Turn off and unplug the vacuum
from the outlet to allow the vacuum to cool.
Check for and remove any clogs. Also
check and replace any clogged filters.
Wait approximately 50 minutes and plug
the vacuum in and turn back on to see if
the thermal protector has reset. In some
cases, the unit may suddenly restart. DO
NOT leave unattended.
11
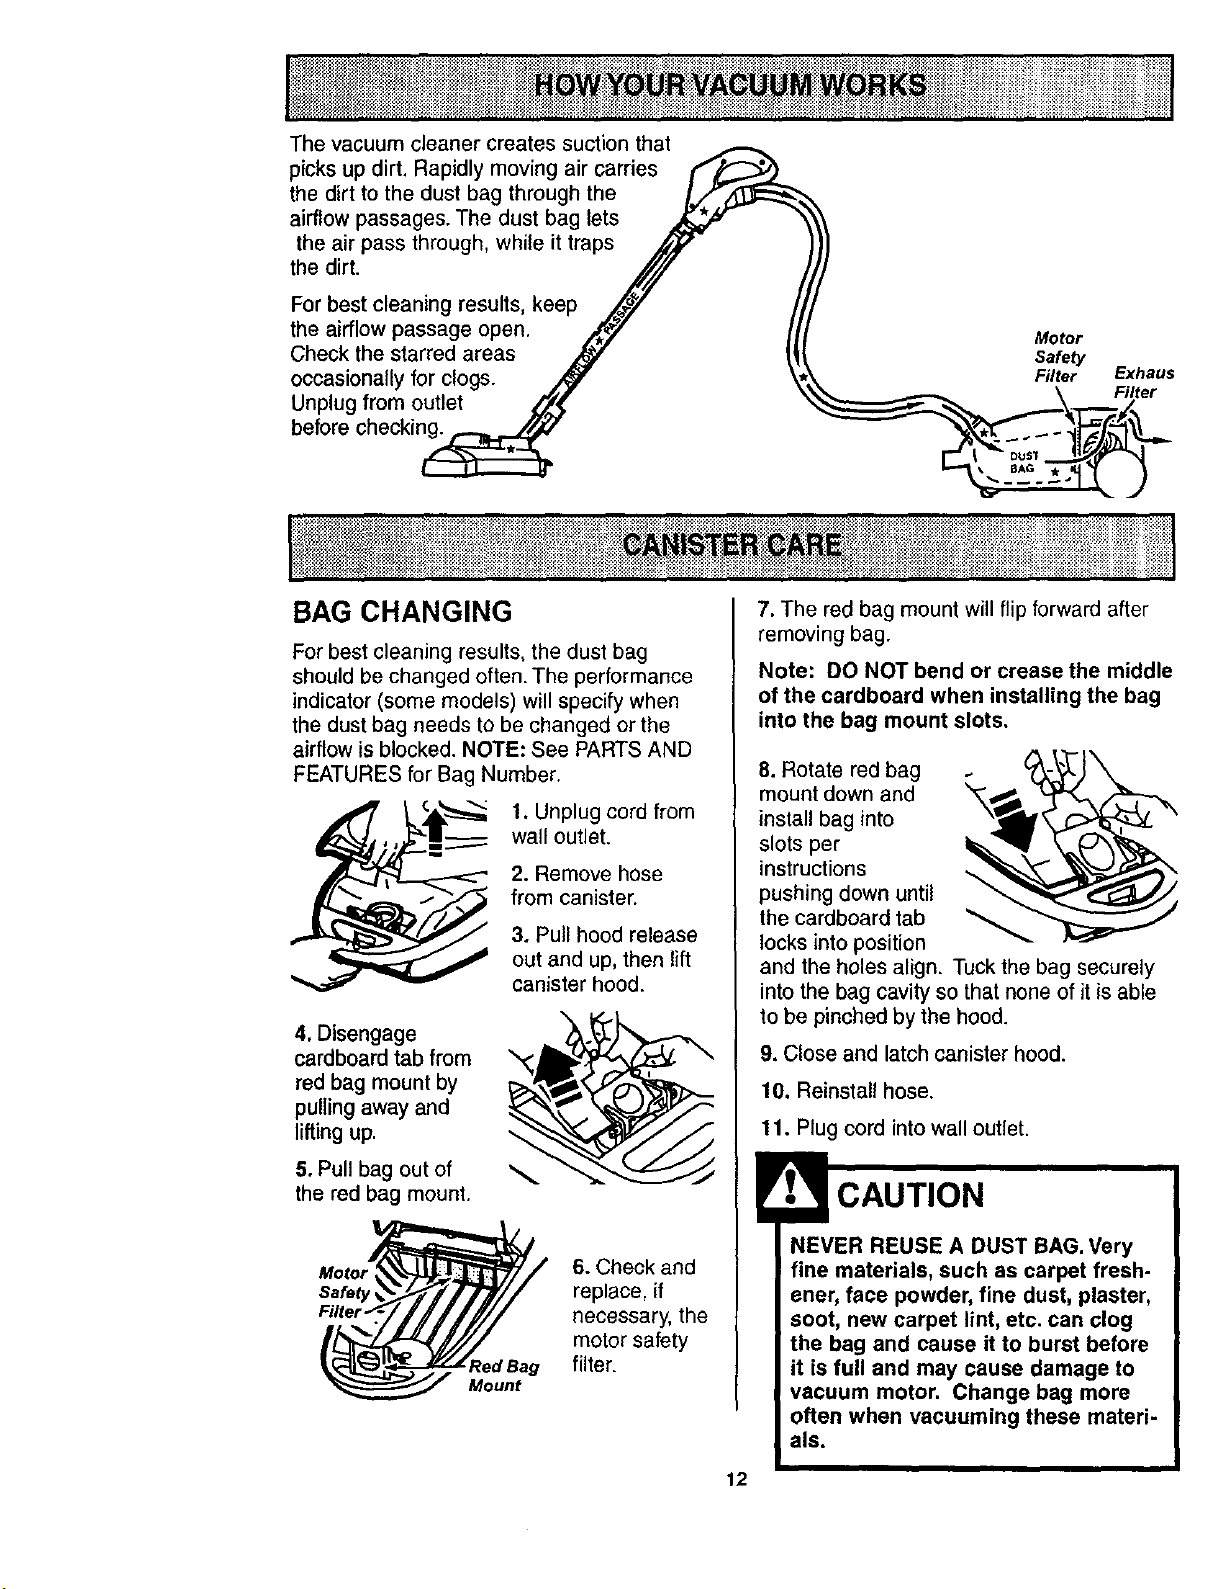
The vacuum cleaner creates suction that
picks up dirt. Rapidly moving air carries
the dirt to the dust bag through the /./F_=:::_
airflow passages. The dust bag lets _ _'
the air pass through, while it traps _'_
the dirt. /// ,
For best cleaning results, keep _,_,/7" /
the airflow passage open. _,7 It
Check the starred areas _ I_
occasionally for clogs. M \
Unplug from outlet _
before checkin_
t tl _"
Motor
Safety
Filter Exhaus
BAG CHANGING
For best cleaning results, the dust bag
should be changed often. The performance
indicator (some models) will specify when
the dust bag needs to be changed or the
airflow is blocked. NOTE: See PARTS AND
FEATURES for Bag Number.
1. Unplug cord from
wall outlet.
2. Remove hose
from canister.
3. Pull hood release
out and up, then lift
canister hood.
4. Disengage
cardboard tab from
red bag mount by
pulling away and
lifting up.
5. Pull bag out of
the red bag mount.
Motor
Safety
ted Bag
Mount
6. Check and
replace, if
necessary, the
motor safety
filter.
7. The red bag mount will flip forward after
removing bag.
Note: DO NOT bend or crease the middle
of the cardboard when installing the bag
into the bag mount slots.
8. Rotate red bag
mount down and
install bag into
slots per
instructions ,...
pushing down until
the cardboard tab _.
locks into position
and the holes align. Tuck the bag securely
into the bag cavity so that none of it is able
to be pinched by the hood.
9. Close and latch canister hood.
10. Reinstall hose.
11. Plug cord into wall outlet.
NEVER REUSE A DUST BAG. Very
fine materials, such as carpet fresh-
ener, face powder, fine dust, plaster,
soot, new carpet lint, etc. can clog
the bag and cause it to burst before
it is full and may cause damage to
vacuum motor. Change bag more
often when vacuuming these materi-
als.
12
1. Unplug cord from wail outlet. DO NOT
drip water on cleaner.
2. Clean exterior using a clean, soft cloth
that has been dipped in a solution of mild
liquid detergent and water, then wrung dry.
Wipe dry after cleaning.
3. To reduce static electricity and dust build-
up, wipe outer surface of cleaner and
attachments.
• CAUTION
Do not use attachments if they
are wet. Attachments used in
dirty areas, such as under a
refrigerator, should not be used
on other surfaces until they are
washed. They could leave marks.
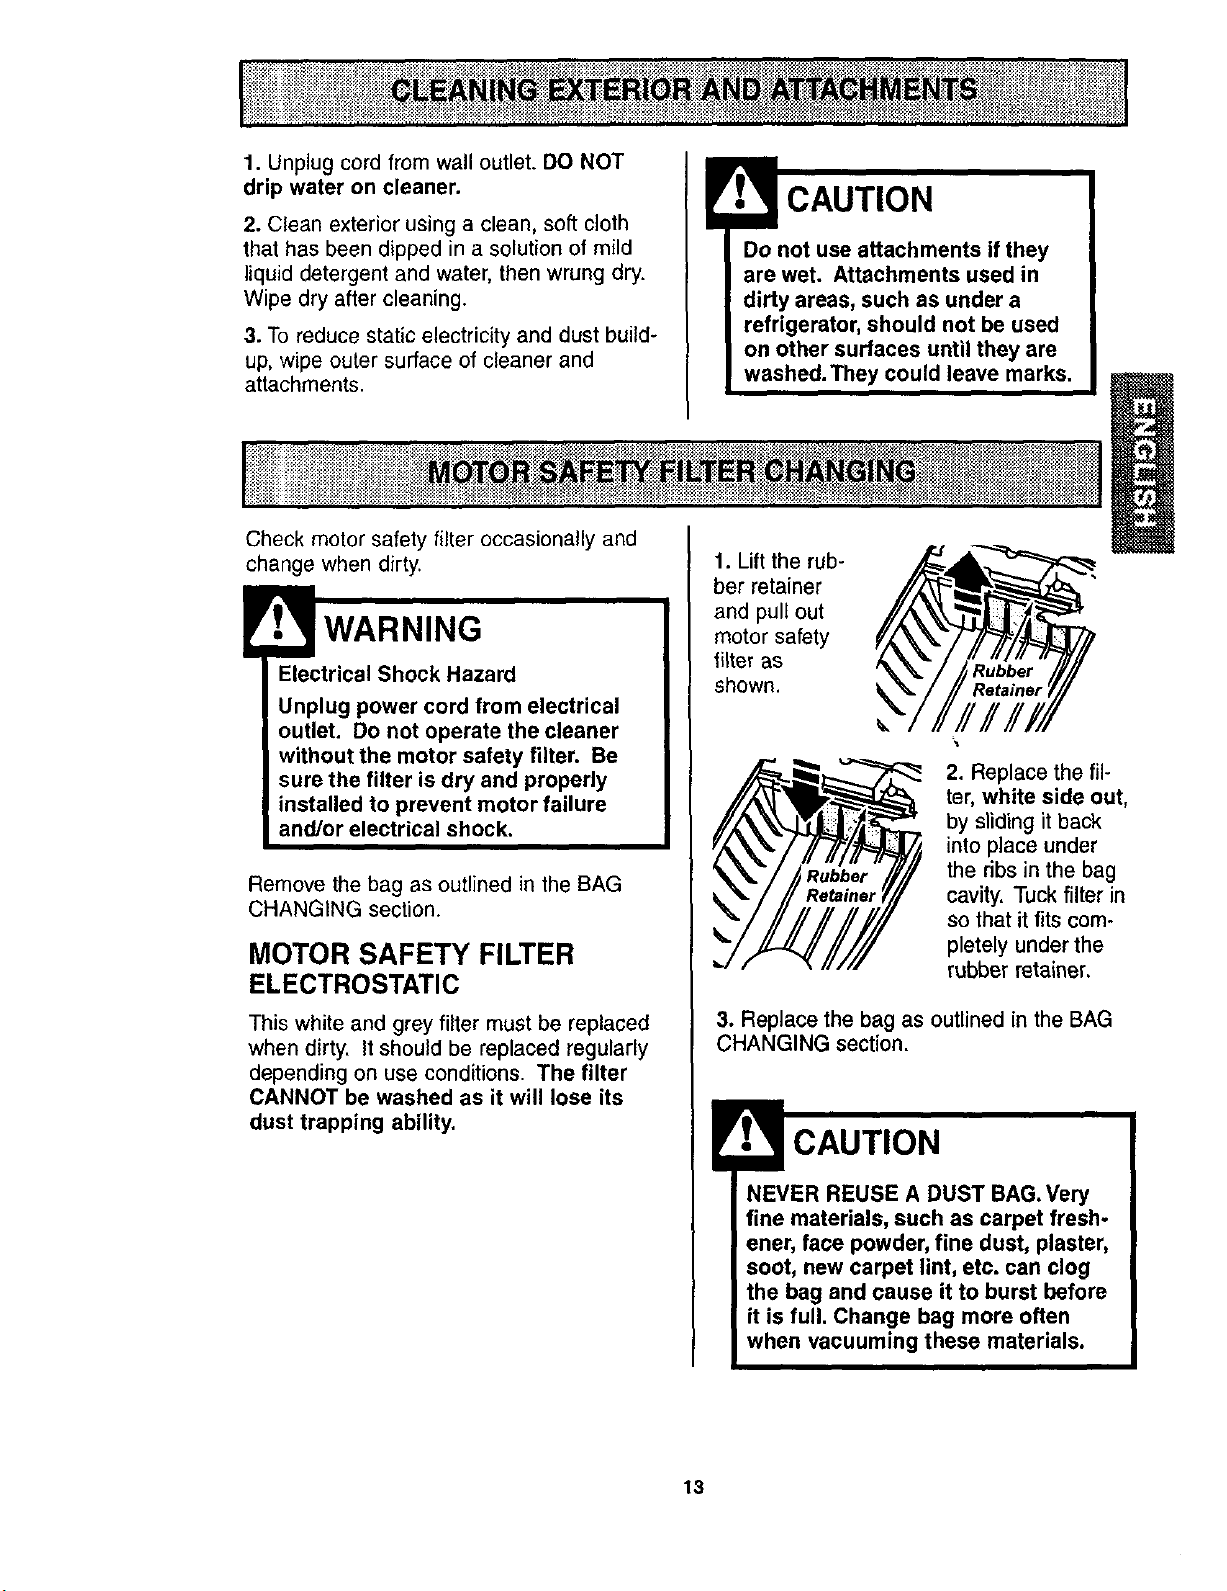
Check motor safety filter occasionally and
change when dirty.
Electrical Shock Hazard
Unplug power cord from electrical
outlet. Do not operate the cleaner
without the motor safety filter. Be
sure the filter is dry and properly
installed to prevent motor failure
and/or electrical shock.
Remove the bag as outlined in the BAG
CHANGING section.
MOTOR SAFETY FILTER
ELECTROSTATIC
This white and grey filter must be replaced
when dirty. It should be replaced regularly
depending on use conditions. The filter
CANNOT be washed as it will lose its
dust trapping ability.
1. Lift the rub-
ber retainer
and pull out
motor safety
filter as
Shown.
2. Replace the fil-
ter, white side out,
by sliding it back
into place under
the ribs in the bag
cavity. Tuck filter in
so that it fits com-
pletely under the
rubber retainer.
3. Replace the bag as outlined in the BAG
CHANGING section.
NEVER REUSE A DUST BAG. Very
fine materials, such as carpet fresh-
ener, face powder, fine dust, plaster,
soot, new carpet lint, etc. can clog
the bag and cause it to burst before
it is full. Change bag more often
when vacuuming these materials.
13
WARNING
Fire and/or Electrical Shock Hazard
Do not operate with a clogged
exhaust filter or without the exhaust
filter or exhaust filter cover installed.
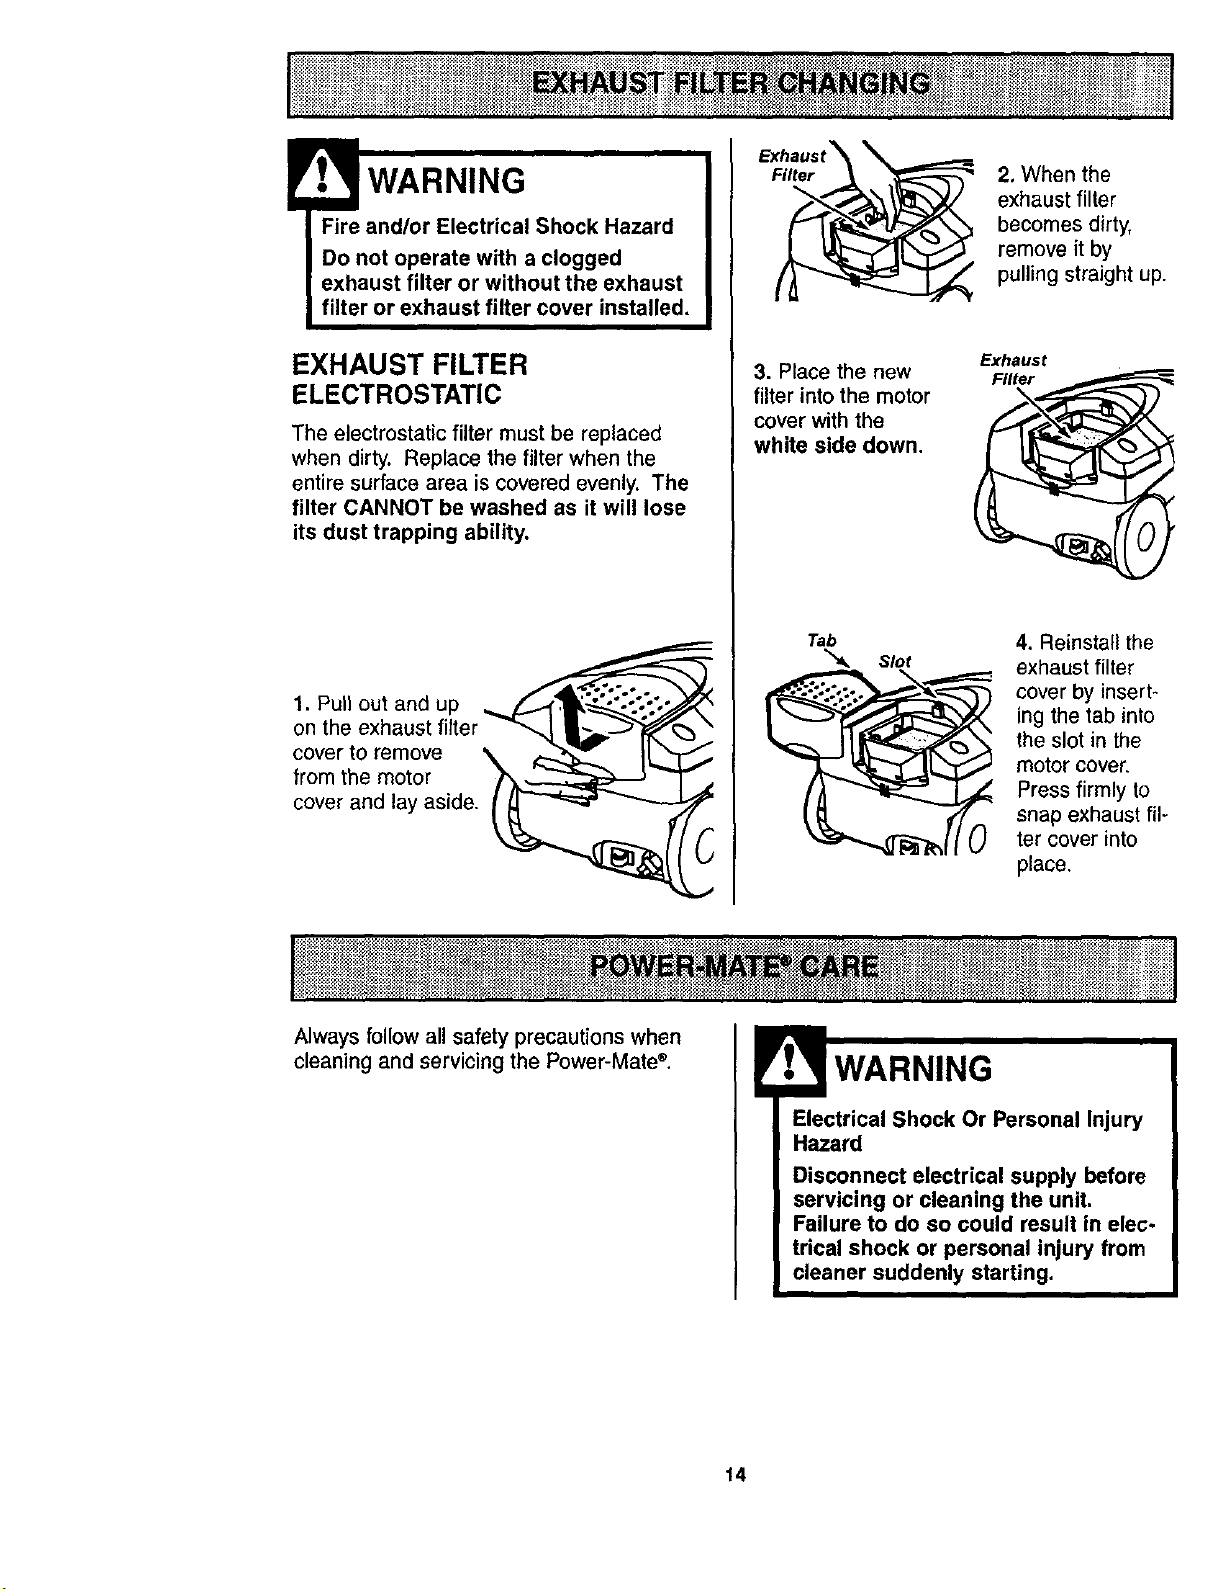
EXHAUST FILTER
ELECTROSTATIC
The electrostatic filter must be replaced
when dirty. Replace the filter when the
entire surface area is covered evenly. The
filter CANNOT be washed as it will lose
its dust trapping ability.
1. Pull out and up
on the exhaust filter
cover to remove
from the motor
cover and lay aside.
Exhaust_
Filter
3. Place the new
filter into the motor
cover with the
white side down.
Tab
_,, Slot
2. When the
exhaust filter
becomes dirty,
remove it by
pulling straight up.
Exhaust
4. Reinstall the
exhaust filter
cover by insert-
ing the tab into
the slot in the
motor cover.
Press firmly to
snap exhaust ill-
') ter cover
into
place.
Always follow all safety precautions when
cleaning and servicing the Power-Mate ®.
Electrical Shock Or Personal Injury
Hazard
Disconnect electrical supply before
servicing or cleaning the unit.
Failure to do so could result in elec-
trical shock or personal injury from
cleaner suddenly starting.
14
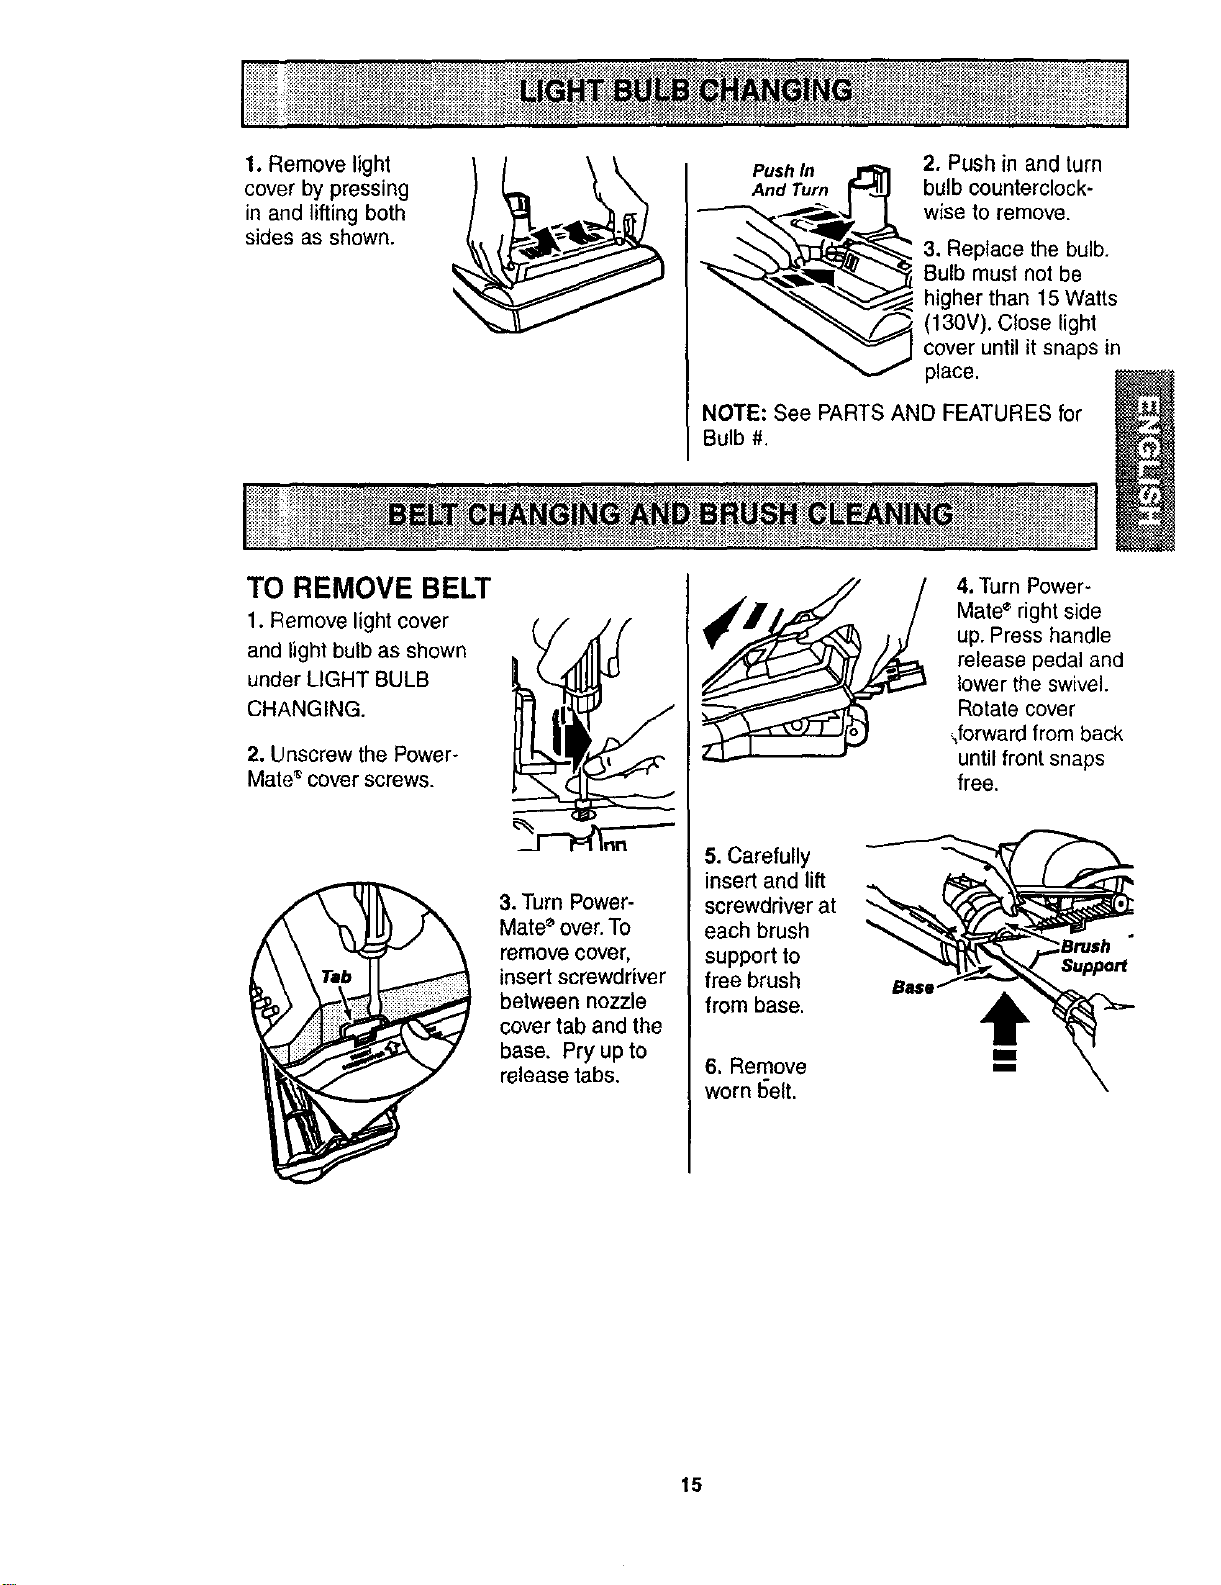
1. Remove light
cover by pressing
in and lifting both
sides as shown.
Push In
And Turn _"'JJ_
2. Push in and turn
bulb counterclock-
wise to remove.
3. Replace the bulb.
Bulb must not be
higher than 15 Watts
(130V). Close light
cover until it snaps in
place.
NOTE: See PARTS AND FEATURES for
Bulb #.
TO REMOVE BELT
1. Remove light cover
and light bulb as shown
under LIGHT BULB
CHANGING.
2. Unscrew the Power-
Mate s cover screws.
3. Turn Power-
Mate _ over. To
remove cover,
insert screwdriver
between nozzle
cover tab and the
base. Pry up to
release tabs.
5. Carefully
insert and lift
screwdriver at
each brush
support to
free brush
from base.
6. Remove
worn 15elt.
4. Turn Power-
Mate ®right side
up. Press handle
release pedal and
lower the swivel.
Rotate cover
-,forward from back
until front snaps
free.
Suppo_
15
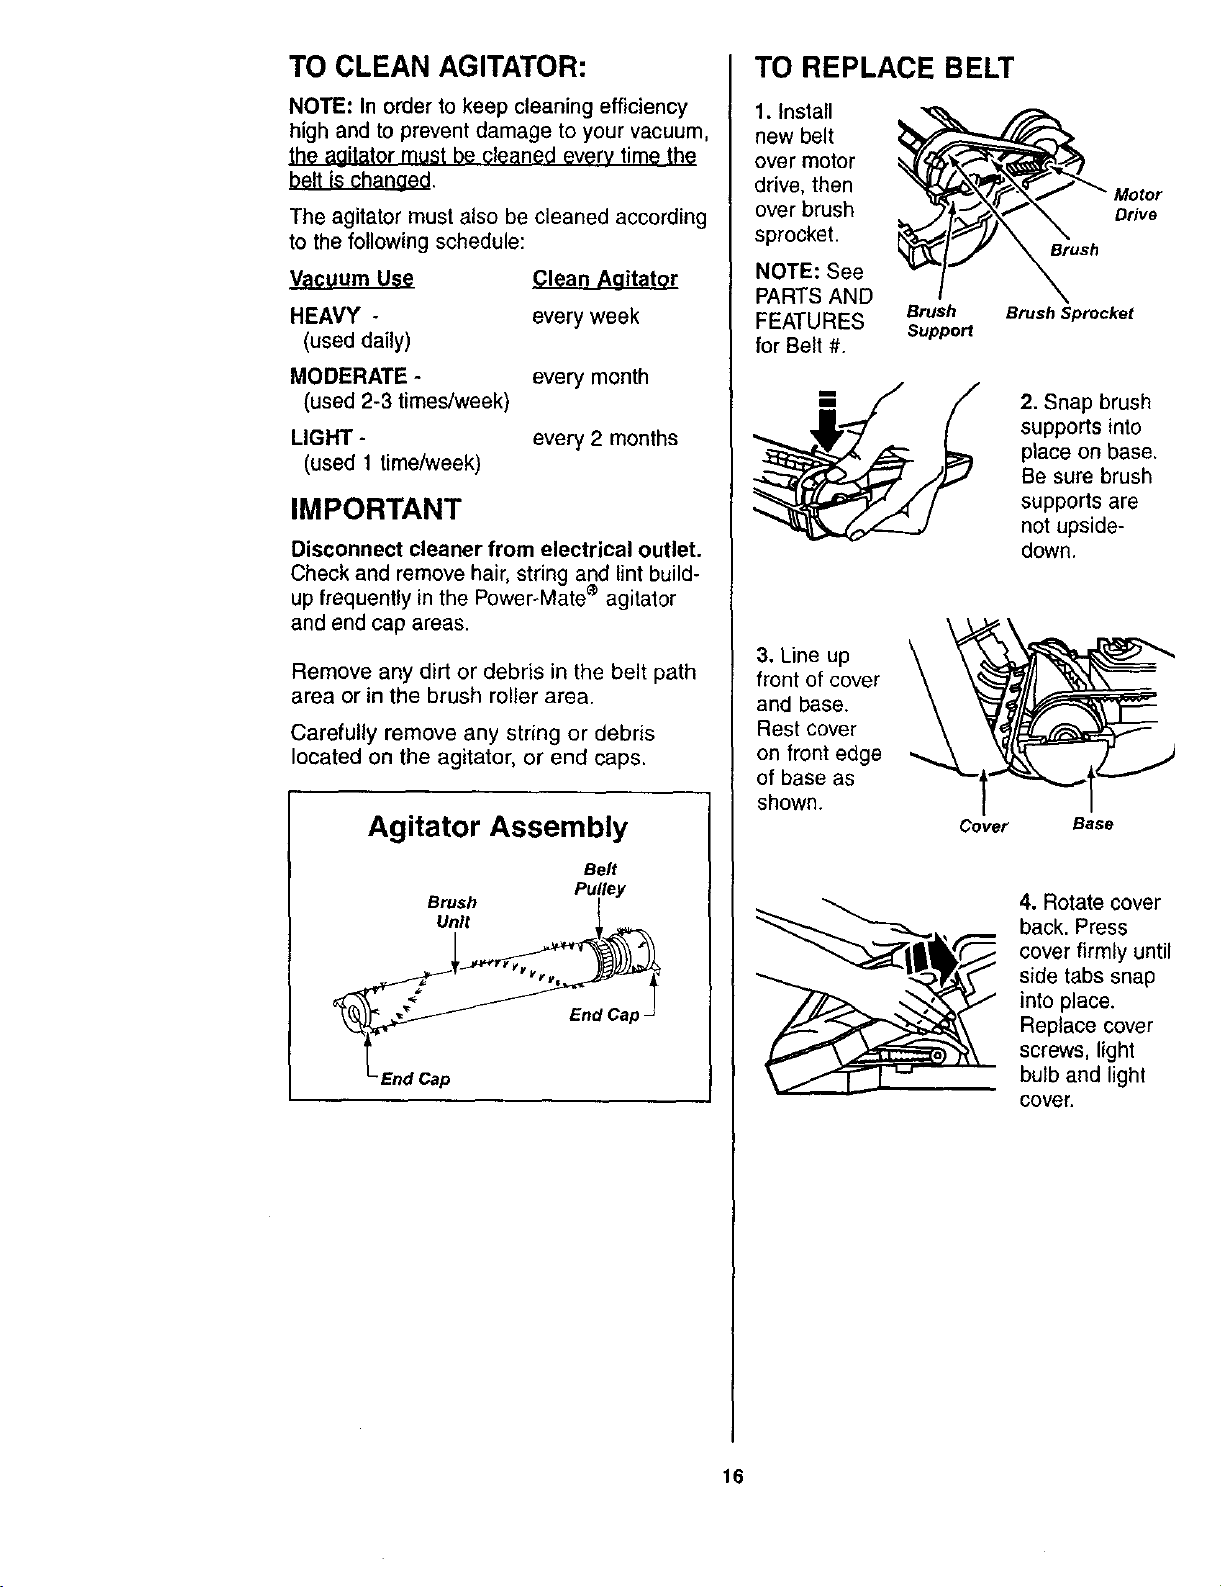
TO CLEAN AGITATOR:
NOTE: In order to keep cleaning efficiency
high and to prevent damage to your vacuum,
the agitator must be cleaned every time th_
belt is changed.
The agitator must also be cleaned according
to the following schedule:
Vf_¢uum Use
HEAVY -
(used daily)
MODERATE -
(used 2-3 times/week)
LIGHT -
(used 1 time/week)
Clean Aaitatqr
every week
every month
every 2 months
IMPORTANT
Disconnect cleaner from electrical outlet.
Check and remove hair, string and lint build-
up frequently in the Power_Mate _ agitator
and end cap areas.
Remove any dirt or debris in the belt path
area or in the brush roller area.
Carefully remove any string or debris
located on the agitator, or end caps.
Agitator Assembly
BeR
Pulley
Brush
TO REPLACE BELT
1. Install
new belt
over motor
drive, then
over brush
sprocket.
NOTE: See
PARTS AND
FEATURES
for Belt #.
Brush
Suppo_
D_ve
Brush
Brush Sprocket
2. Snap brush
supports into
place on base.
Be sure brush
supports are
not upside-
down.
3, Line up
front of cover
and base.
Rest cover
on front edge
of base as
shown.
Cover
Base
4. Rotate cover
back. Press
cover firmly until
side tabs snap
into place.
Replace cover
screws, light
bulb and light
cover.
16
!:,.,_:.:::::: :::: _:::;. ;_:,,.,_.:.::::::::::: ::- :::; ........ ::>:_ :;::_,:: : _._ :_: _ _._._._:_,._ _. 9::: ,. _::-_ ,,.,:. .: ;,,,_;:::.:::::_:;;;_: ::: ...........
iiiiiiiiiiiiiiiiiiiiiiiiiiiii iiiiii!i iiiiiliiii!iii iiiill iiii!iiiiiiiiiiii iiiiii! iii iiiiii!ii i iiiiili i ! @ii i i i l@ l i iill ii @iil
I
Electrical Shock Or Personal Injury
Hazard
Disconnect electrical supply before
servicing or cleaning the unit.
Failure to do so could result in elec-
trical shock or personal injury from
cleaner suddenly starting.
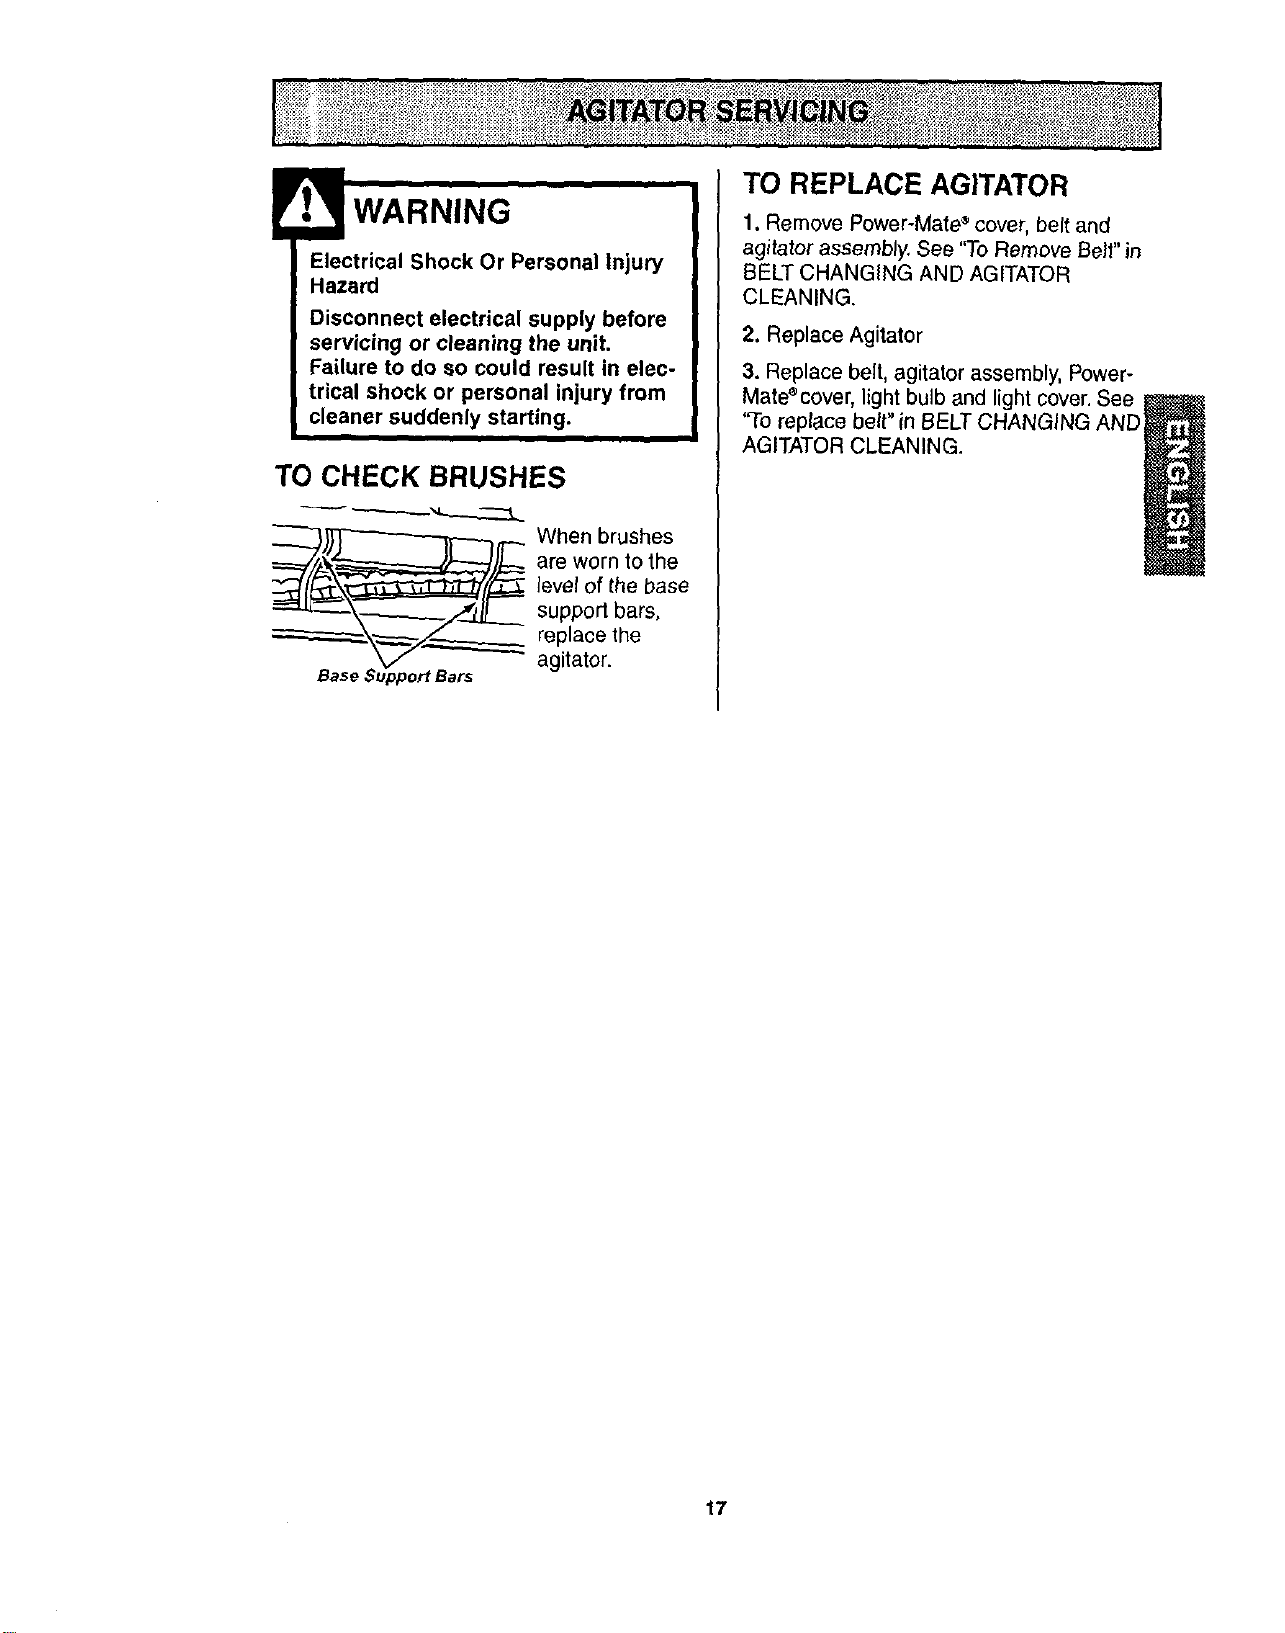
TO CHECK BRUSHES
When brushes
are worn to the
level of the base
support bars,
replace the
agitator.
TO REPLACE AGITATOR
1. Remove Power-Mate • cover, belt and
agitator assembly, See "To Remove Bell" in
BELT CHANGING AND AGITATOR
CLEANING.
2. Replace Agitator
3. Replace belt, agitator assembly. Power-
Mate®cover, light bulb and light cover. See
"To replace belt" in BELT CHANGING AND
AGITATOR CLEANING.
17
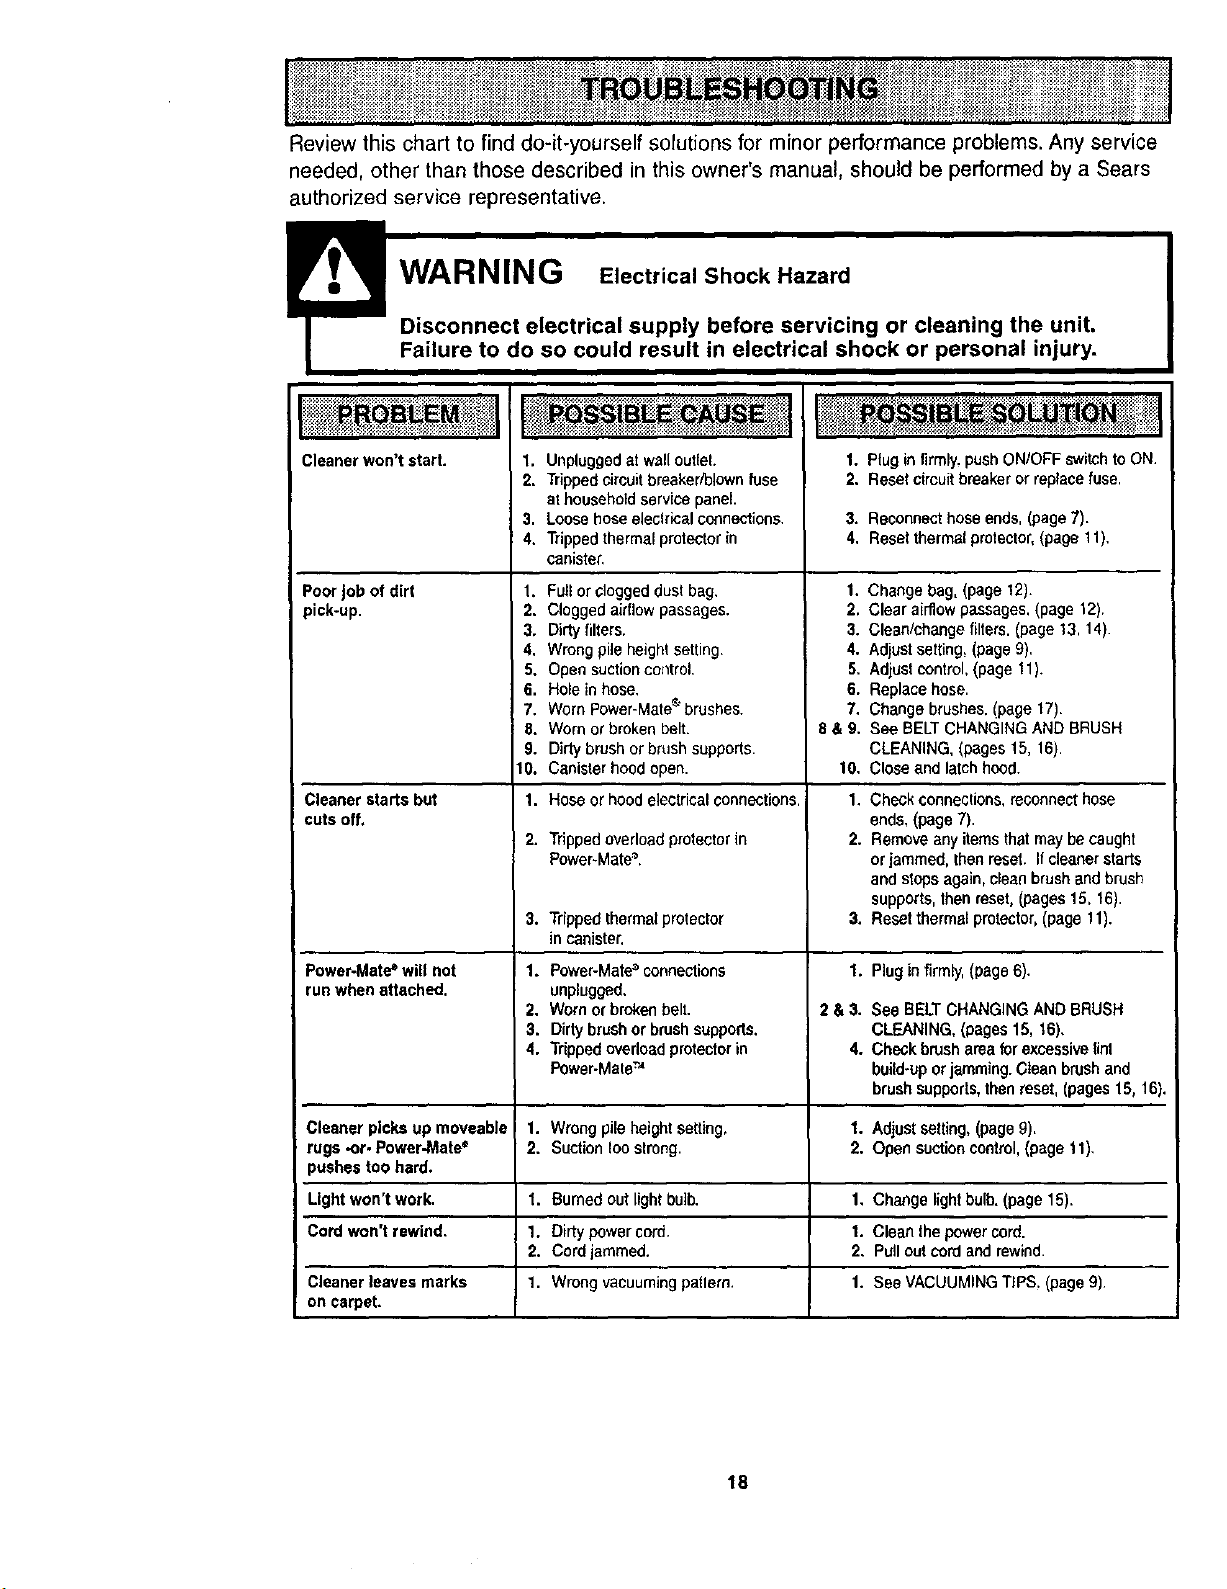
Review this chart to find do-it-yourself solutions for minor performance problems. Any service
needed, other than those described in this owner's manual, should be performed by a Sears
authorized service representative.
!
Cleaner won't start.
PoorJobofdirt
pick-up.
Cleaner starts but
cutsoff,
@
1. Unpluggedatwal[out(eL
2, Trippedcircuit breaker/blownfuse
at householdservice panel.
3. Loose hoseeleclricalconnections.
4, Trippedthermal protectorin
canister,
1. Fufior cloggeddust bag,
2. Clogged airflow passages.
3. Dirty filters.
4. Wrong pileheightsetting.
5. Opensuctionco_treL
6. Holein hose,
7. Worn Power-Mate_brushes.
1. P{uginfirmly,push ONIOFF switchto ON.
2. Resetcircuitbreakeror replacefuse.
3, Reconnecthose ends, (page7).
4. Reset thermalprotector,(page 11),
1, Changebag,(page 12),
2. Clear airflow passages,(page 12),
3. Cleanibhangefilters. (page 13, 14).
4. Adjust setting, (page9).
5, Adjustcontrol,(page 11).
6. Replacehose.
7, Change brushes.(page 17).
6.
9.
tO.
1,
2.
See BELTCHANGINGANDBRUSH
CLEANING, (pages15, 16),
Close and latchhood.
Worn or brokenbelt. 8 & 9.
Dirty brush orbrushsupports.
Canisterhood open. 10,
Hose or hood electricalconnections. 1.
Trippedoverloadprotectorin 2.
Power,Mate_.
Trippedthermalprotector 3.
in canister,
Power-MaW'connections 1.
unplugged.
Wornor brokenbelt, 2& 3.
Dirty brushor brush supports.
Trippedoverloadprotectorin 4.
Power-MateTM
Wrongpileheightsetting, 1.
Suctiontooslreng. 2.
Burnedout lightbulb, 1,
Dirtypowercord. 1.
Cordjammed. 2,
Wrongvacuumingpatlern, 1.
Checkconnections,reconnecthose
ends,(page7).
Removeany items thatmay becaught
or jammed, thenreset. Ifcleanerstarts
and stopsagain, cleanbrush and brush
supports,thenreset,(pages15.16).
Resetthermal protector,(page11).
3.
Power-Mate_will not 1. Plugin firmly,(page 6).
runwhenattached.
2. See BELTCHANGINGAND BRUSH
3. CLEANING,(pages15, 16),
4. Check brush areaforexcessivelint
build-uporjamming.Cleanbrushand
brushsupports,thenreset, (pages15, 16).
Cleaner picks up moveable 1. Adjustsetting,(pageg),
rugs ..or-Power-Mate" 2. Opensuctioncontrol,(page 11),
)usheetoo bard.
Lightwon't work. 1. Changelightbulb.(page 15).
Cordwon't rewind. 1. Cleanthepowercord.
2. Pulloutcordandrewind.
Cleanerleavesmarks 1. SeeVACUUMINGTIPS, (page9)
on carpel
18
Antes de usar su aspiradora nueva ..... 1
Garantia de la aspiradora de Kenmore,,. 1
Instrucciones importantes de
seguridad ............................ 2
Piezas y caracterfsticas .............. 3-4
Instrucciones de ensemblado ......... 5-6
USO .................................. 7
Paracomenzar ....................... 7
Sugerencias para aspirar ............... 8
Sugerenciassobre el ajuste de nivel de
pelo de laalfombra .................... 8
Accesorios ........................... 9
Uso de los accesorios .................. 9
Caracteristicasde rendimiento ........... 10
Funcionamiento de su aspiradora ...... 11
Cuidado del receptdculo .............. 11
Cambio de la bolsa ................... 11
Limpieza del exteriory de los accesorios .., 12
Cambio del filtrode seguridaddel motor ... 12
Cambio delfiltrode escape ............. 13
Cuidado de la Power-Mate ° ............ 13
Cambto de la bombilla ................. 14
Cambio de la correay limpieza
del cepillo ........................ 14-15
Cuidado del agitador .................. 16
Reconocimiento de problemas ......... 17
Informaci6n de
assistancia o servicio ..... PosteriorCubierta
Por favorlea esta guia que le ayudara a assemblary operar su aspiradoranueva de Kenmoreen una manera
m_.ssegura y effectiva
Para masinformaci6n acerca del cuidadoy operaci6n de esta aspirador,Ilamea su tiendaSears mas cercana.
Cuandoprequnte pot informaci6n usted ne¢isitard el n_merocompleto de serie y modelo de la aspiradoraque
est& rocadoen la placade los ndmeros de modelo y serie.
Use el espaciode abajo para registrar el nSmerode modeloy serie para su nuevaaspiradora de Kenmore.
N0mero de Modelo_
N0mero deSerie
Fechade Compra
Matenga estelibro y surecibo en u lugar seguropara referenciasfuturas.
GARANTIAtlMITADA DE UN ANO DELA ASPIRADORAKENMORE
Estagarantia es porun aSodesde la fechade compra,e incluyesolamenteel usode la aspiradoraen
hogares privados.Durante el aSode garantia, cuando la aspiradoraes operada y mantenida deacuerdo al
manualde instruccionesdel dueSo,Sears reparard cualquierdefecto en materialeso fabricaci6ntibrede cargo.
Esta garantia excluyelas bolsas decolecci6n, correas, lamparillas,y filtros, lascualesson partes gastablesque
se deteriorancon e/uso normal.
Parael servicio de garant(a, retorne esta aspiradora al Centrode Servicio Searsrods cercanoen los
Estados Unidos.
Esta garantia se aplica solamente mientraseste productoesta en usoen los Estados UnJdos.Esta garantfale
da a ustedderechos legales especificos, y usted puede tener tambi_n otrosderechos los cuales varfan de
estado a estado.
Sears, Roebuckand Co., D/817WA, HoffmanEstates,IL 60179
ADVERTENCIA
igoriideasdi6escorUpYdrmlPo°r_antoesp_rati_i°z_S°trs°SasPparra_erdaUC_rcte_ri_:g° udeer_nc_ndnip;e_ha_ nes
bdsicasde seguridad,entre elias:
Lea estemanualantesde armaro utilizarsuaspira-
dora.
Usesu aspiradora0nicamenteen laforma descrita
en estemanual.Use0nicamenteconacceaorios
recomendadosper Sears,
Parareducirel riesgodechequeel_ctrico,no use
suaspiradoraal airelibre nisobresuperficiesmoja-
das.
Descoeecteel cord6nelectricoantes decomposer
o limpiarel &teadel cepillo.De]ocontrario,elcepillo
_odrfaarrancarde form imprevistaopodrfa
producirseun chequeelectrico.
Siempreapagu_y desconectelaaspiradoraantes
de conectaro desconectarla rnanguera,Handi-Mate
Jr.® (si aplicable),o la boquilla,
Siempredebe apagarsuaspiradoraantesdedes-
conectarla.
No desconectela aspiradoratirandodel cordon
el_ctrieo.Paradesconectarla>haleel enchufe,noel
cord6n,
Sujete elenchufeconla maneal enrollarel cord6n
_l_ctrico.Paradesconectada,hale en enchufe,no et
cord6n.
No usela aspiradorasiel cord6no el enchufeest,.
dahado.Si laaspiradoranoesta funcionandoade-
cuadamenteo siseha dejado caer,est_daRada,se
ha dejadoexpuestaa la intemperieo se hadejado
caeren agua,devu61valaa un Centrede serviciode
Sears.
NOhale ni transportsla aspiradoraper elcord6n;no
useel cord6ncome mango;no cierrepuertassobre
elcord6n;no haleel cord6nsobrerebordesagudos
niesquinas.Nopasela aspiradorasobreel cord6n.
Mantengaelcord6nale[adode superficiescalientes.
Noabandonela aspiradoracuandoeste conectada.
Desconectelacuandono la est_usandoy antesde
darleservicio.
No permitaquesea utilizadacomejuguete.Se
requieretenermayorcuidadocuandoseautilizada
en laproximidaddeniSoso per niSos.
No toquela aspiradorani el enehufeconlasmanes
mojadas.
No uselaaspiradorasiIs mangueraest_ rota.La
mangueracontienealambreseleclricos.Cambielasi
esta rotao desgastada.Eviteaspirarobjetos
agudos.
Nocoloqueobjetosen lasaberturas.
Noutilicela aspiradorasi algunaaberturaest_blo-
queada;rnant_ngalalibrede polvo,pelusa,cabelles
y cualquieracosaque podria disminuirel flujode
airs.
Mantengaelcabello,ropasuella,dedosy todaslas
partesdel cuerpoalejadosde lasaberturasy 10iezas
mecanicas.
No usela aspiradorasintenerinstatadala bolsa
parapolvoy/o losfiltros.
Cambiesiemprela bolsaparapolvodespu6sde
aspirarlimpiadoresde alfombraso desedorantes,
talcosy pelvesfines.Estosproductosatascanla
bolsa,reducenel flujode airey puedencausarque
6stase rompa.Si no cambiala bolsapodriaocasio-
nardaSopermanentsa laaspiradora.
No usela aspiradoraparalevantarobjetosagudos,
juguetes pequehos>affileres,sujetapapeles,etc.
PoddandaSarla aspiradorao labolsaparapolvo.
No levanteningunacosa quase est_quemandoo
emitiendohumo.come cigarrillos,cerilloso cenizas
catientes.
No usela aspiradoraparaaspirarliquidosinflama-
hieso combustibles(gasolina,tiquidosparalim-
pieza, perfumes,etc.)nilauseen lugaresdonde
_stospodrianestarpresentes.Losvaporesde estas
sustanciaspuedencrearun peligrode incendioo
explosi6n.
Tenga cuidadoespecial al utitizarla aspiradoraen
escalones.NolacoloqaesobresUlas,mesas,etc.
Mant_ngalaen el piso.
Ustedes responsablsde asegurarque suaspira-
dorano sea utilizadaper ningunapersonaque no
puedamanejarlacorrectamente.
No opere sin el filtrode escape ni lacubierta del ilt-
tro de escapeinstalados.
GUARDE ESTAS INSTRUCClONES
El armado y use seguro desu aspiradorason su reeponsabilidad.Estaaspiradora ha side disefiada
exclusivamentepara use dom_stico.La aspiradoradeber8almacenarse en unlugar secoyen el interior.
Lea este Manualdelpropietario detenidamente, puescontiene informaci6nimportante sobreseguridady
use. Estaquia contiene inlormaci6n sobre seguridad debajo de simbolos de advertienciacuidado. Per
favor pongaatenci6n especial a estasinstrucciones dadas. Advertencla: Este informacibnle alertar_,con
el poligrode fuego,cheques electricos,quemadas y lesiones. Culdado: Este informaci6nle alertara a
peli_roscomelesiones y daSosde propiedad.
2
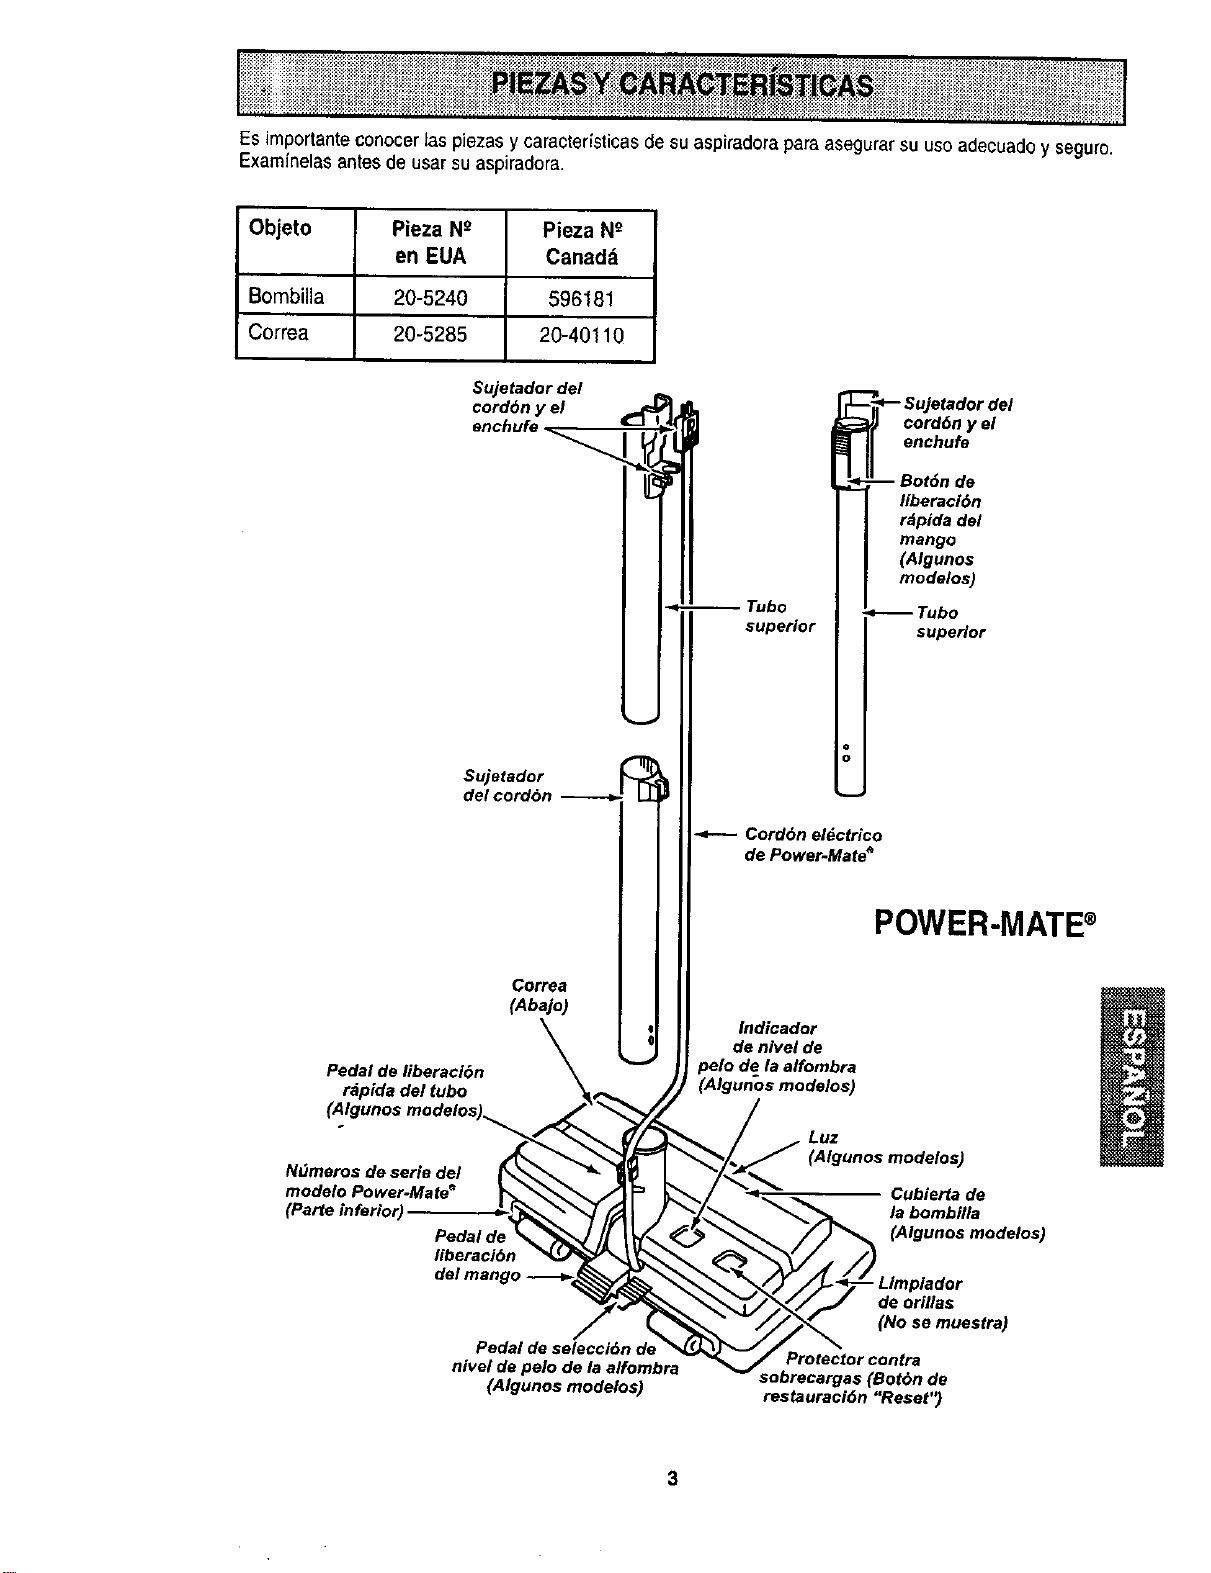
Es importanteconocer las piezas y caracter_sticasde su aspiradora para asegurar su uso adecuadoy seguro.
Exam{nelasantes de usar su aspiradora.
Objeto Pieza N_ Pieza Ng
en EUA Canad_
Bombilla 20-5240 596181
Correa 20-5285 20-40110
Sujetador del
cord6n y el
Sujetador
del cordon
Tubo
supeHor
r
o
Cord6n el_ctrico
de Power-Mate _
I-'- Sujetador del
cord6n y el
enchufe
--Bot6nde
I_era_6n
rdpida del
mango
(Algunos
mode_
_Tubo
supeHor
POWER-MATE®
Correa
(Abajo)
\ Indicador
de nivel de
pelo de la alfombra
Pedal de Iiberacl6n _, .., - _ . .
rapida del tubo _._ , (Algunos mooelos)
(Aigunos modelos) ..,_'*_,_ //
{Algunos modeloa)
N_meros de aerie de/ p,,_ _ _) _/._
modeioeowe,-Mate° _._'_/J F" _ / ",_ .= c.bie._de
(Parle inferior) "J_" "_1 (',_ I , _./_ _ la bombilla
del mango -._._'_ _,_ /'_/_ /.__./ Limpiador
_.._,_//_" ,Jeor,laa
P dal de a lecci6n de _J'_-J/D, - -
edal de selecci6n de "
• Hrotec_or con_ra
ravel de pelo de le alfombra -- _ _obrecargas (Botbn de
(Algunos modelos) restauraci6n "Reset")
3
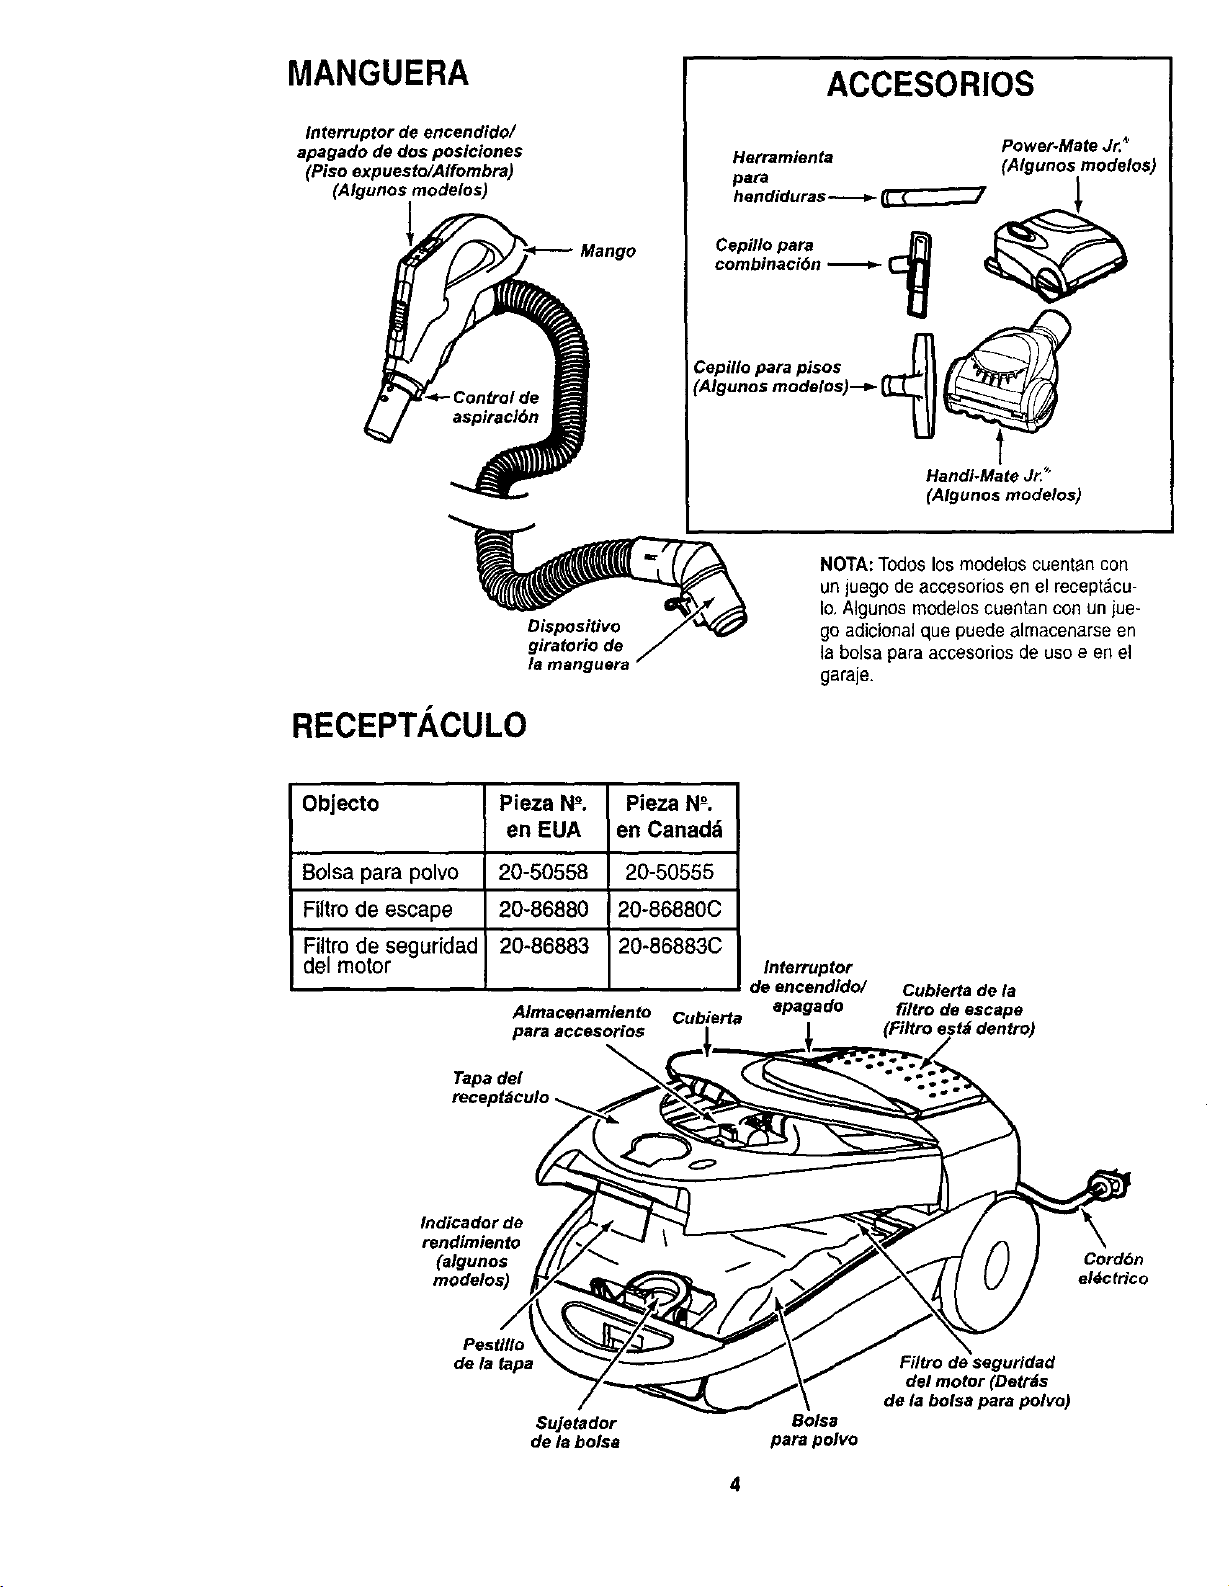
MANGUERA
Interruptor de encendido/
apagado de dos poslciones
(Piso expuesto/Affombra)
(Algunos modelos)
ACCESORIOS
Power-Mate Jr._'
Herramienta (Algunos modelos)
Cepfllo para _
combinaci6n ._,_.- _
Cepilloparapisos .._'_
'Algunos modetos)--_-_ _ _
Handi-Mat _Jr."
(Algunos modelos)
DisposiUvo
giratoriode
lamanguera
RECEPT. CULO
NOTA:Todoslosmodeios cuentan con
un juego deaccesorios en el receptdcu-
Io,Algunos modeloscuentan con un iue-
go adicional quepuede almacenarse en
la bolsa para accesorios de usoe en el
garaje.
Objecto Piezal_P. PiezaN _.
en EUA en Canadd
20-50558 20-50555
20-86880 20-86880C
20-86883 20-86883C
Bolsa para polvo
Filtro de escape
Filtro de seguridad
del motor
Almacenamlen_ Cubie_a
para accesorios
Tapa del
recept_culo
Intertluptor
de encendldo/
apaga do
Cubierta de la
filtro de escape
(Filtro est_ dentro)
Indicador de
rendimiento
(algunoa
modelos)
Cordbn
eldctrtco
Pestlllo
de la tapa
Sujetador
de la bolsa
Boise
para polvo
Filtro de segurldad
de/motor (Detr_s
de la bolsa para polvo)
4
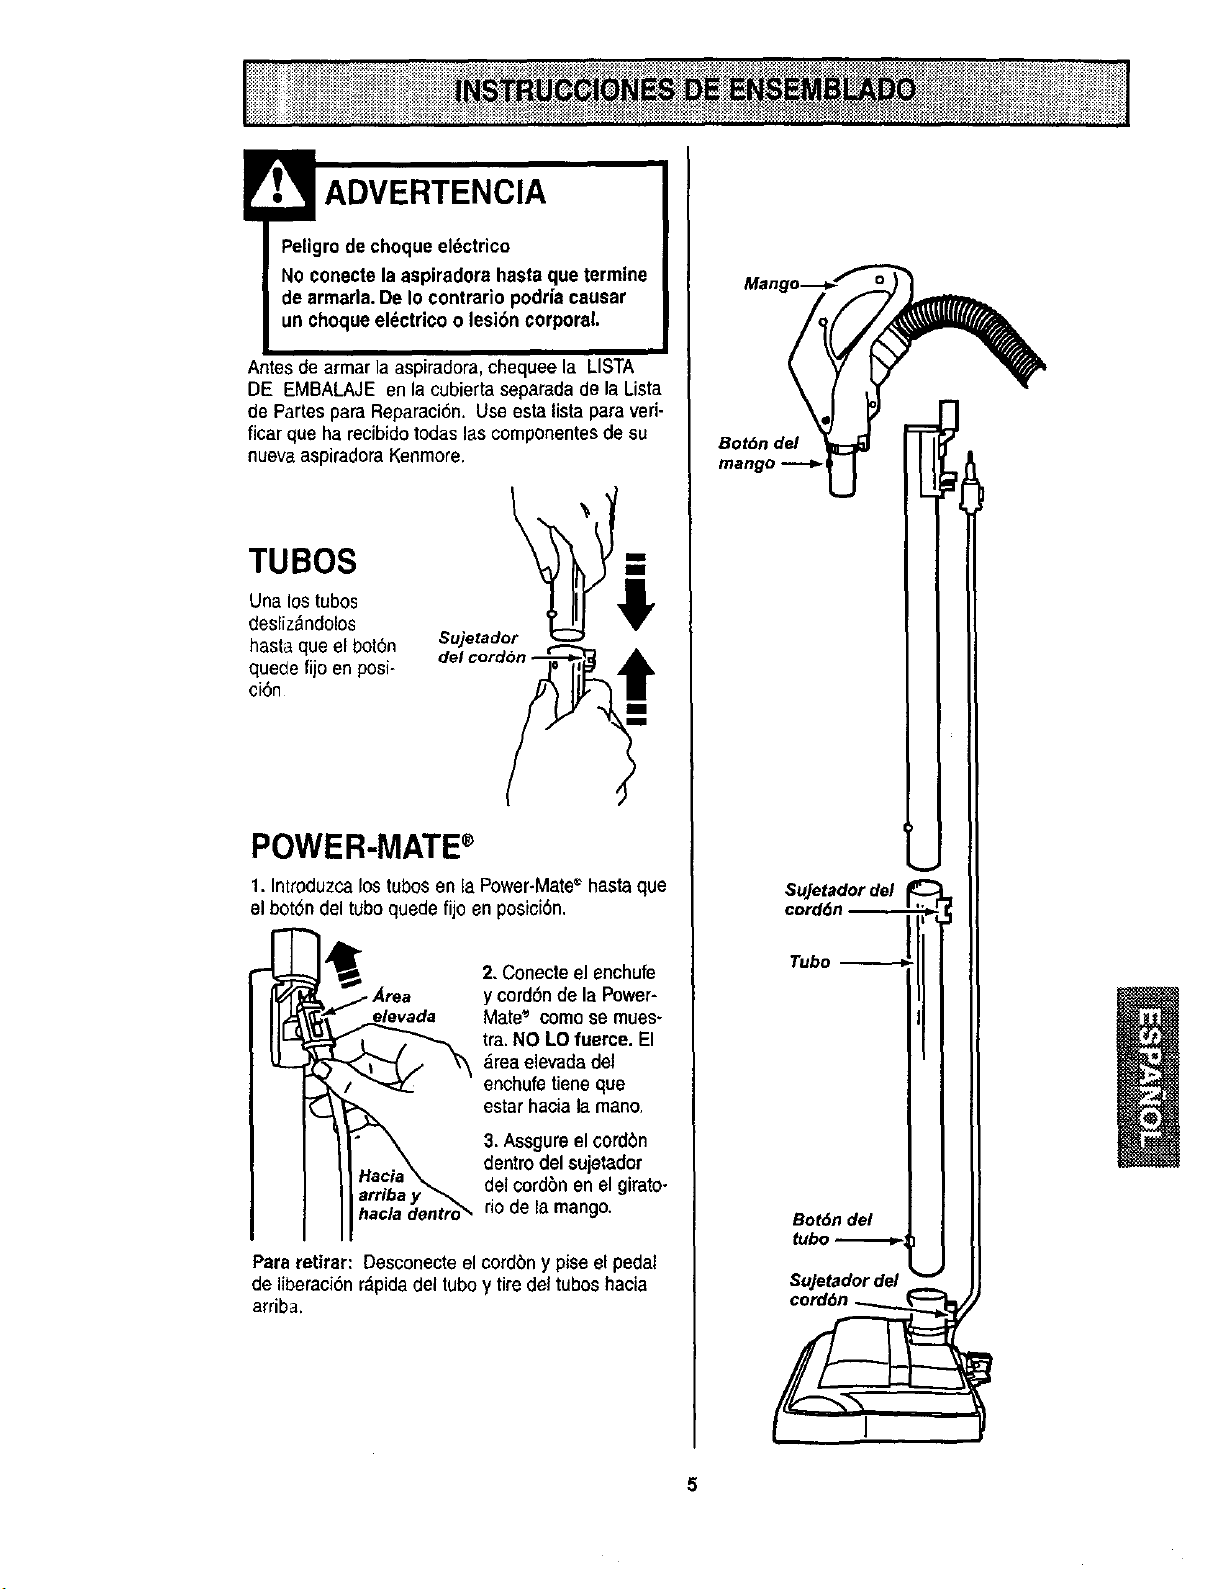
ADVERTENCIA
Peligrode choqueel_ctrico
No conectela aspiradora hastaque termine
dearmada. De Io contrario podriacausar
un choqueeldctricoo lesi6n corporal.
Antes de armarla aspiradora, chequee la LISTA
DE EMBALAJE enla cubierta separadade la Lista
de Partes para Reparaci6n. Useesta lista para veri-
ficar que ha recibido todaslas componentes de su
nuevaaspiradoraKenmore.
TUBOS
Una lostubos
desliz_ndolos
hasta que el botbn
queclefijo en posi-
ci6n
Vi
Sujetador
del cord_n_!
POWER-MATE®
1.Introduzca los tubosen la Power-Mate" hasta que
el bot6ndel tubo quedefijo en posici6n.
• Area
elevada
hacla ¢lentro_"
2. Conecteel enchufe
y cord6n de la Power-
Mate': como se mues-
tra. NO LO fuerce. El
_rea elevadadel
enchufe tiene que
estar hacia la mano.
3. Assgureelcord6n
dentro del sujetador
delcord6nen elgirato-
rio de la mango.
Para retlrar: Desconecte elcordbn y pise el pedal
de liberaci6nr_pidadel tubo y tire del tubos hacia
arriba.
B°a_;od!Mango-__
SuJetadordel
cord6n
Tubo
Bot6ndel
tubo
SuJetadorde/
cord6n _
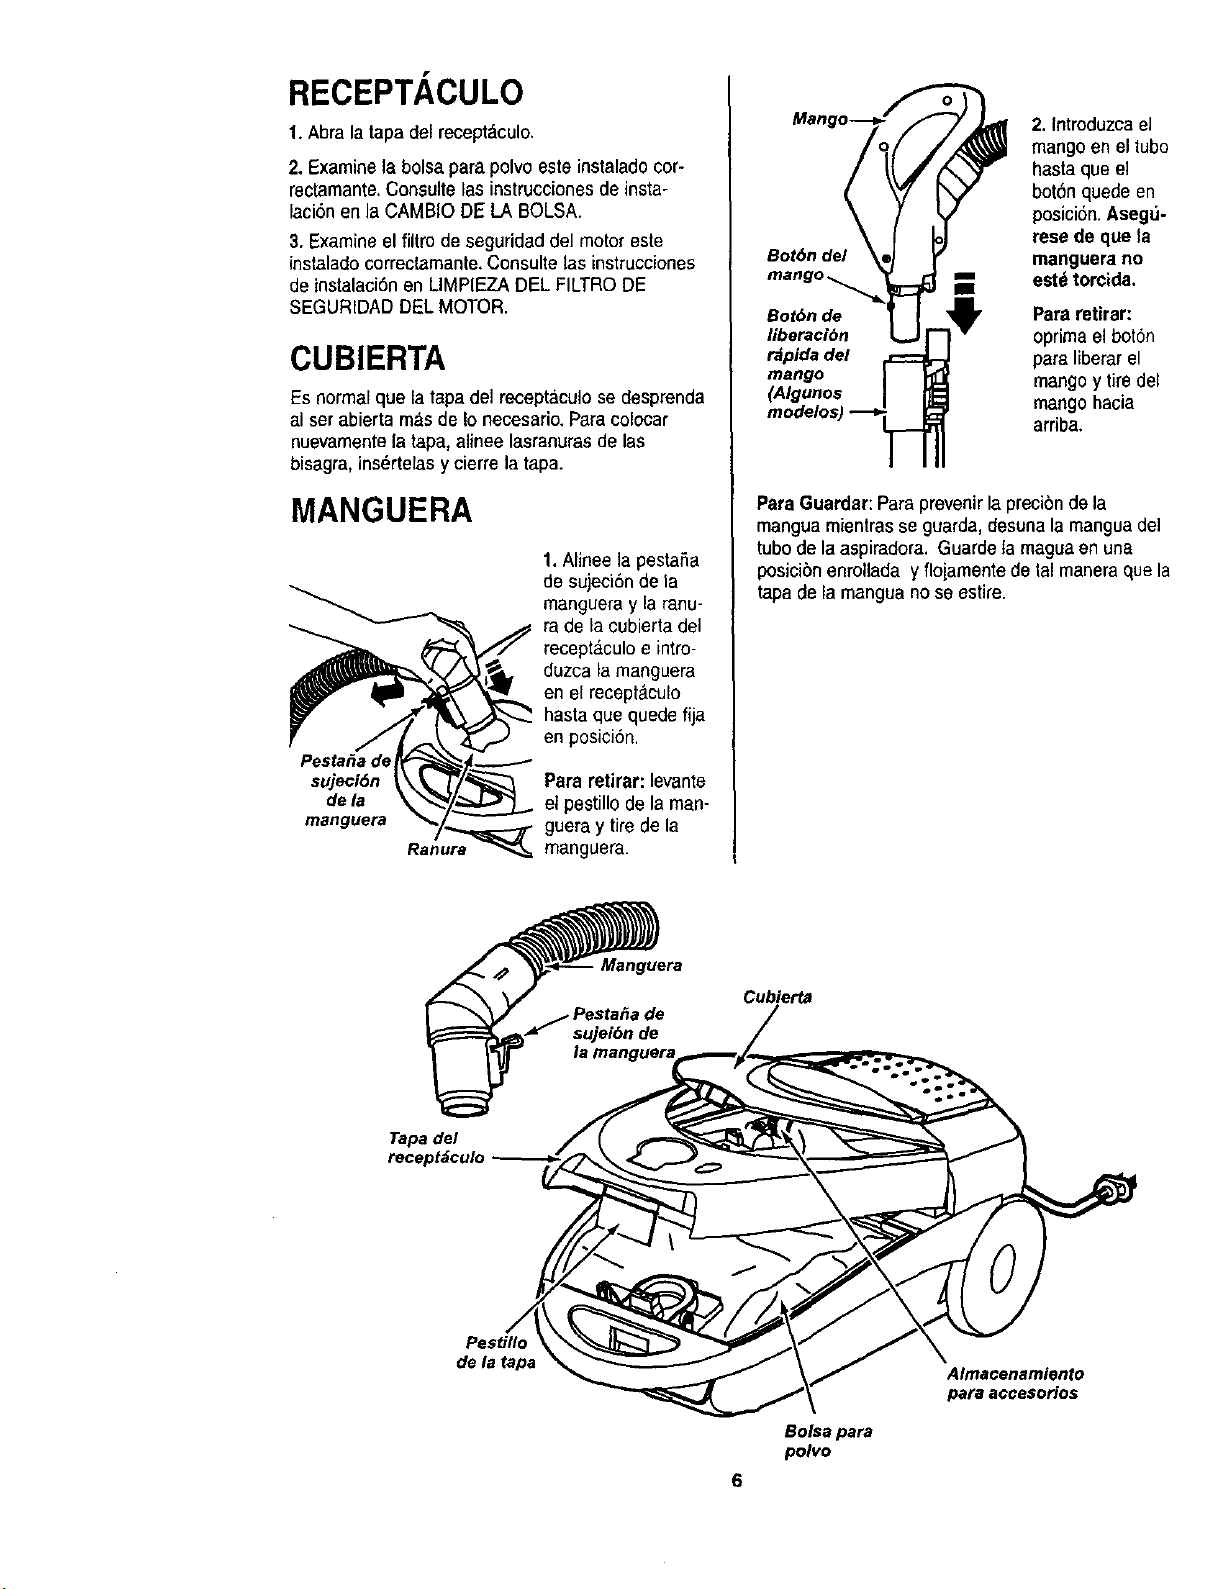
RECEPTACULO
1. Abra latapadel recept_culo.
2. Examinela bolsa pare polvo este instaladocor-
rectamante.Consulte las instruccionesde insta-
laciSnen la CAMBIO DE LA BOLSA.
3. Examine el filtro de seguridad del motor este
instalado correctamante.Consulte las instrucciones
de instalaci6nen LIMPIEZA DEL FILTRODE
SEGURIDADDF:LMOTOR.
CUBIERTA
Es normalque la tapa del recept_.culose desprenda
al ser abierta mas deIo necesario.Para colocar
nuevamentela tapa, alineelasranuras de las
bisagra, ins_rtelas y cierre la tape.
MANGUERA
Ranura_
1. Alinee la pestafia
de su)eci6nde la
manguera y la ranu-
ra de la cubierta del
recept_culoe intro-
duzca la manguera
en el recept_.culo
hasta que quedefija
en posiciSn.
Para retirar: levante
et pestillode la man-
gueray tirede la
manguera.
Bot6n de/
Bot6n de
llberacibn
r_pida del
mango
(Algunos
2. Introduzcael
mangoen el tubo
hasta que el
bot6n quede en
posiciSn.Aseg_-
rese de que la
manguera no
est_ torcida.
Para retirar:
oprima el boton
pare liberar el
mangoy tiredel
mango hacia
arriba.
ParaGuarder: Paraprevenirla precibnde la
mangua mientrasse guarda,desuna la mangua del
tubo de la aspiradora. Guarde lamaguaen una
posicibn enrollada y flojamentede lalmaneraque la
tapade la mangua nose estire.
Manguera
Cubierta
Tape del
mcept_culo
Pestillo
de la tapa
Almacenamiento
pare a¢cesorios
Boise para
polvo
6
m_:_:_:_:::_::::::i:ii::_:::_::_::::::::::ii:_:::::;:::_:_;_:_:_:;:_:::_::_:_::::;_::_:::_:_:i:i:_:_i:i:i:i:i:!:::::T:_:_:_:+:................................................;::::.:.;.:.;:.;.:.:;_.:.::;:._.:::;:.:.:,::,:,:.::,:,:,__:.:.:..........,:_,_:.:_,>:.7:.::.:._::.:;;.:.:,.,..._:,:,::_"_:.......................::.;.;... ,.,...... _...;..,..... _..,.......;.$:::: _ _'.*.'.'.'.''-.w *.*.*.,,,._;_ .........................::_ ..................... |
I
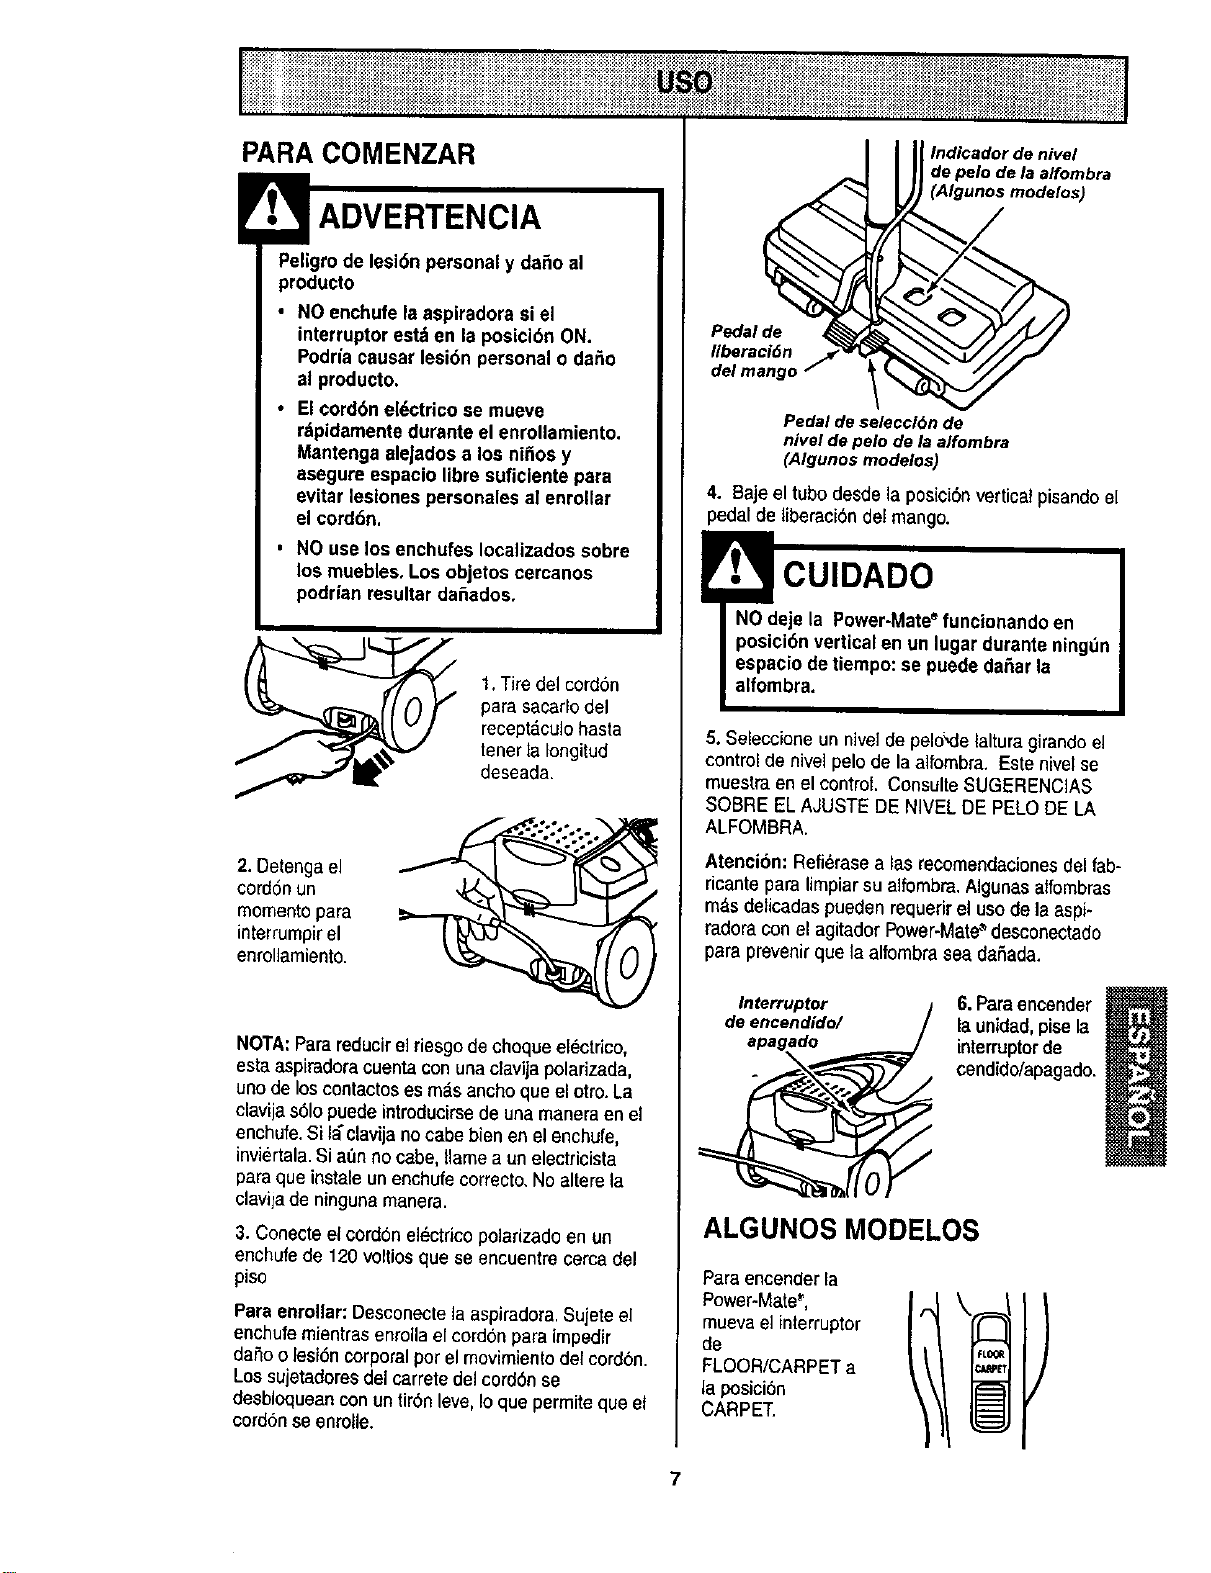
PARA COMENZAR
!
ADVERTENCIA
Peligrode lesibn personal y da_o al
produeto
• NOenchufe la aspiradora si el
interruptorest_ en la posicibn ON.
Podriacausar lesi6n personal o da_o
al producto.
• Elcordoneldctrico se mueve
rdpidamentedurante el enrollamiento.
Mantenga aleJadosa los ni_os y
asegure espacio Ubresuficlente para
evitar leslones personales al enrollar
el cord6n.
• NO use los enchufes Iocalizados sobre
los muebles, Los objetos cercanos
podrian resultar da_ados.
1. Tiredel cordbn
para sacarlodel
recept&culohasta
tenertaIongitud
deseada.
2. Detenga el
cordSnun
mementopara
interrumpir el
enrollamiento.
NOTA:Para reducirel riesgode choque el_ctrico,
estaaspiradoracuentaconunaclavijapolarizada,
unodeloscontactoses rods anchoque elotto.La
clavijas6lopuedeintroducirsede unamaneraen el
enchufe.Sila*clavijanocabebien en elenchufe,
inviertala.Siat_nno cabe, llamea unelectricista
paraque instaleunenchufecorrecto.No alterela
claviiade ningunamanera.
3. Coneete el cordonel_ctdco polarizadoen un
enchufe de 120 voltios que se encuentre cercadel
piso
Paraenrollar: Desconectela aspiradora.Sujete el
enchufe mientras enrolla el cordon para impedir
daSoo lesiSncorporal pot el movimiento del cordon.
Lossujetadoresdel carrete delcordbn se
desbloqueancon un tirSnleve, Ioque permite que et
oordSnse enrolle.
_ (_/ulndicadordenivel
de pelo dela alfombra
nos modelos)
delmang°/ 1_
Pedal deseleccl_nde
niveldepelo dela alfombra
(Algunos modelos)
4. Baje el tubo desde la posiciSnvertical pisando el
pedal de liberaci5ndel mango.
CUIDADO
5. Seleccione unnivel de peld_delalturagirando el
control de nivel pelo de laalfombra. Este nivel se
muestra en el control. Consulte SUGERENC]AS
SOBRE ELAJUSTE DE NIVEL DE PELO DE LA
ALFOMBRA.
Atencibn: Refi_rase alas recomendacionesdelfab-
ricante para limpiar su alfombra.Algunas alfombras
m_s delicadas puedenrequerir el usode la aspi-
radora conel agitador Power-Mate®desconectado
para prevenir quela alfombra sea daSada.
Interruptor
de encendido/
apagado
X
6. Paraencender
la unidad, pisela
interruptorde
cendido/apagado,
ALGUNOS MODELOS
Para encender la
Power-Mate_',
muevael interruptor
de
FLOOR/CARPETa
la posici_n
CARPET.
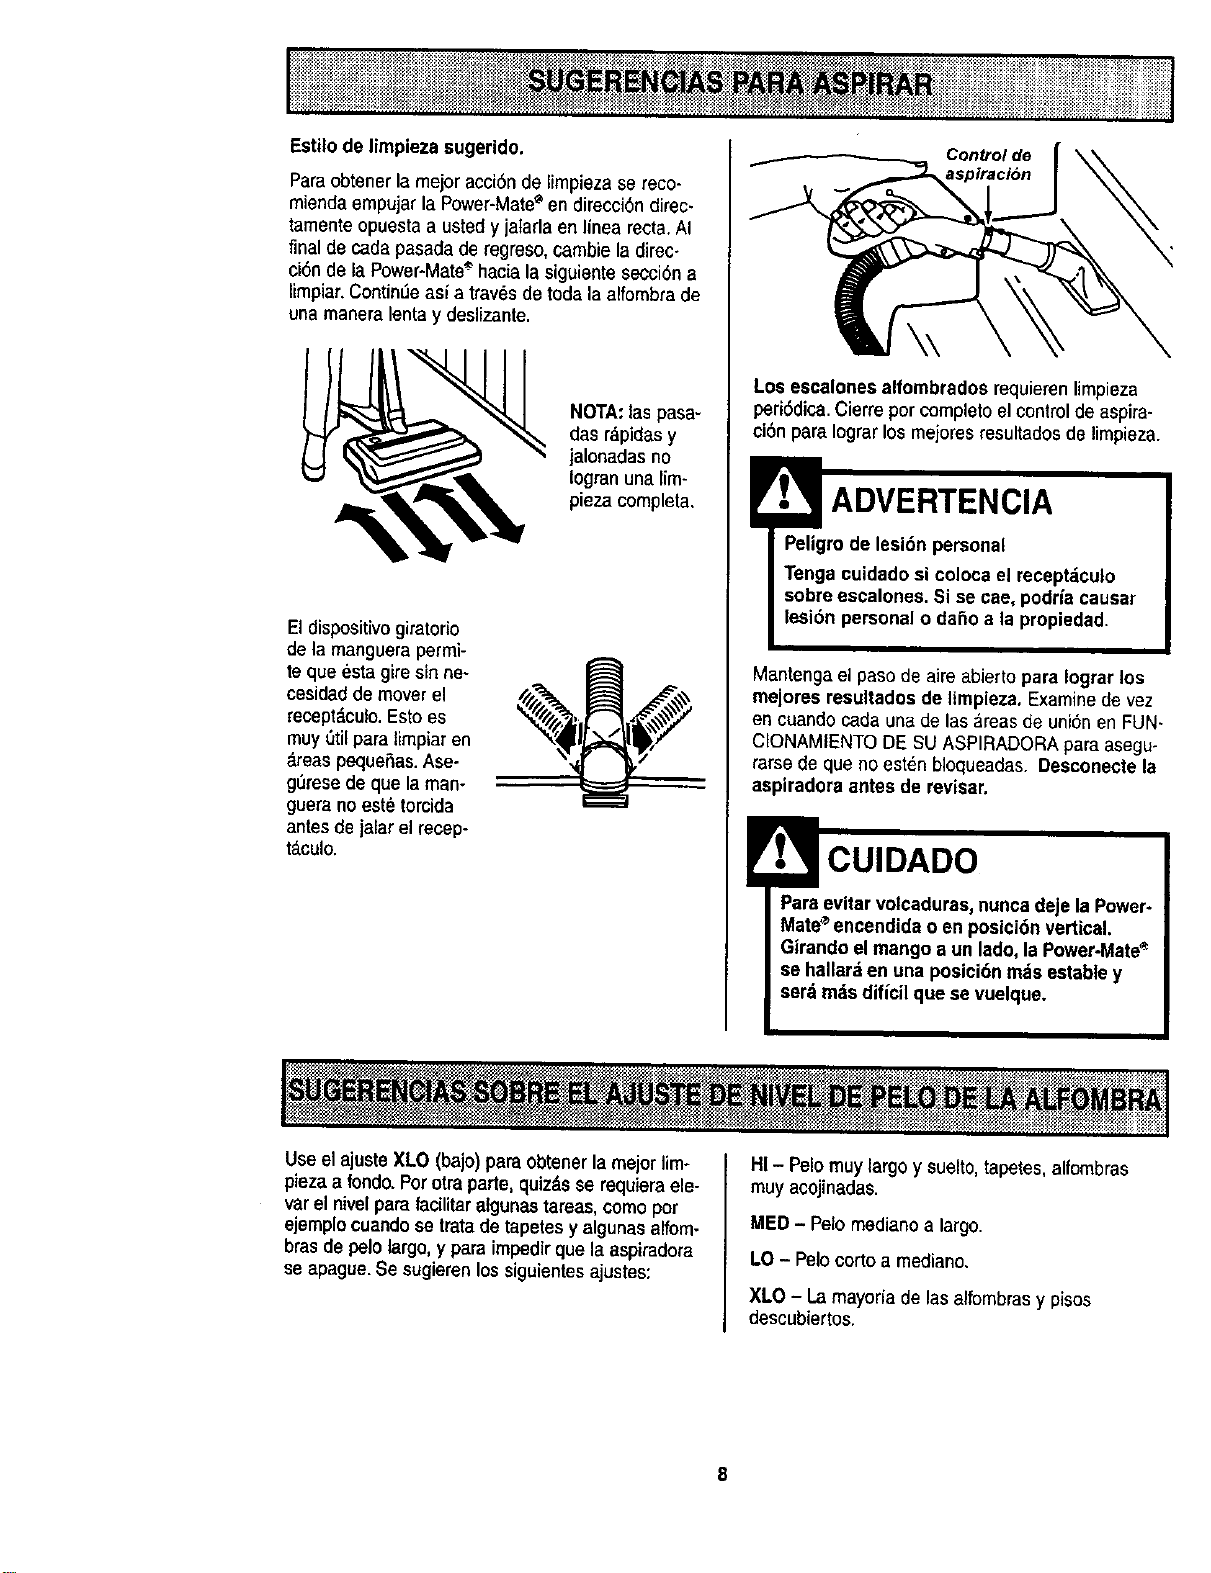
Estilode limpiezasugerido.
Paraobtener la mejor acciSnde limpieza se reco-
mienda empujar la Power-Mate'_en direcci6ndirec-
tamente opuesta a usted y jatarlaen linea recta.AI
t_r_al_ carlapasada de regreso,cambie la dirac-
ci6n de la Power_Mate_hacia la siguiente seccibn a
limpiar.ContinUeasl a tray,s de toda la alfombra de
una manera lentay deslizante.
NOTA"las pasa-
das r,_pidasy
jalonadasno
Iogranuna lim-
pieza completa.
El dispositivogiratorio
de la manguera permi-
te que esta giresin ee-
cesidad de moverel
recept_culo.Esto es
muy _til paratimpiar ee
_reaspeque_as. Ase-
geresede que la man-
goera noest6 torcida
antes dejalar el recep-
t_.culo.
Control de
Los esealones alfombrados requieren limpieza
peri6dica.Cierre potcompletoelcontrol de aspira-
ci6npara Iograrlosmejoresresultados delimpieza,
ADVERTENCIA
Peligrode lesi6n personal
Tenga cuidadosi coloca el receptdculo
sobreescalones. Si se cae, podrlacausar
lesi6n personalo dafioa la propiedad.
Mantenga el pasode aire abiertopara Iograr los
mejores resultadosde limpieza. Examinede vez
en cuando cada una de las ;_reasde uni6nen FUN-
CIONAMIENTODE SU ASPIRADORA paraasegu-
rarse de que no est_nbloqueadas. Desconectela
aspiradora antes de revisar.
Paraevitar votcaduras,nunca deje la Power*
Mates encendidao en posici6nvertical.
Glrando elmango a un lado, laPower-Mate_
se hallarden una posici6nrods estable y
serf,mztsdilici| que se vuetque.
Useelajuste XLO (bajo) paraobtenerla rnejor lim*
pieza a rondo.Por otra parte, quiz&sse requiera ele-
var el nivelpara facilitaralgunas tareas,comopor
ejemplocuandose trata de tapetes y algunas alfom-
brasde pelo largo, y paraimpedirque la aspiradora
se apague.Se sugieren lossiguientes ajustes:
HI - Pelomuy largo y suelto, tapetes, alfombras
muy acojinadas.
MED - Pelo medianoa largo.
LO- Pelo corto a mediano.
XLO - La mayorla de las alfombrasy pisos
descubieftos.
[_'_..................................................................iiii.......................................iiTiiiiiiTili!Ti!H_........._"___'',_............................................__ .........._ii _'_°_iiiliiiiilili_l_iii!iiiiiiiiiiiiiii_i_iJi_iil.............................................iiii!iiiii!i!il_iiiiili!iiiliiiiiiiiliiii_J__i__iiiiiiiiiiii__i!iI
......................................... ,,,,,_:+:,_:_:_:.:.:::_:,:,:............................ . ,,--,,. *,., ,,,. ,,,,_ ,,, _,, ._ ,., **3, .,,,.,:,.,.:.................................... ,:,_,,,,:,_,_:_:_:.r_:.:.:_:.:,:................
:::::::::r::::::::::::::::::::z:::::_ : :::;:;: ::: :::::::::::::::::::::;:r::: :_::::::::::::::;:;:;:::::::_:;:::_:::; • ..: .. : . : _ • . _#_,; ::: : >:_ _: :: :::_:;:_::::::::::::::_::::::::r::::::r ::::::::::::;:_:::::::::r_:;:r:r:_:::::::::
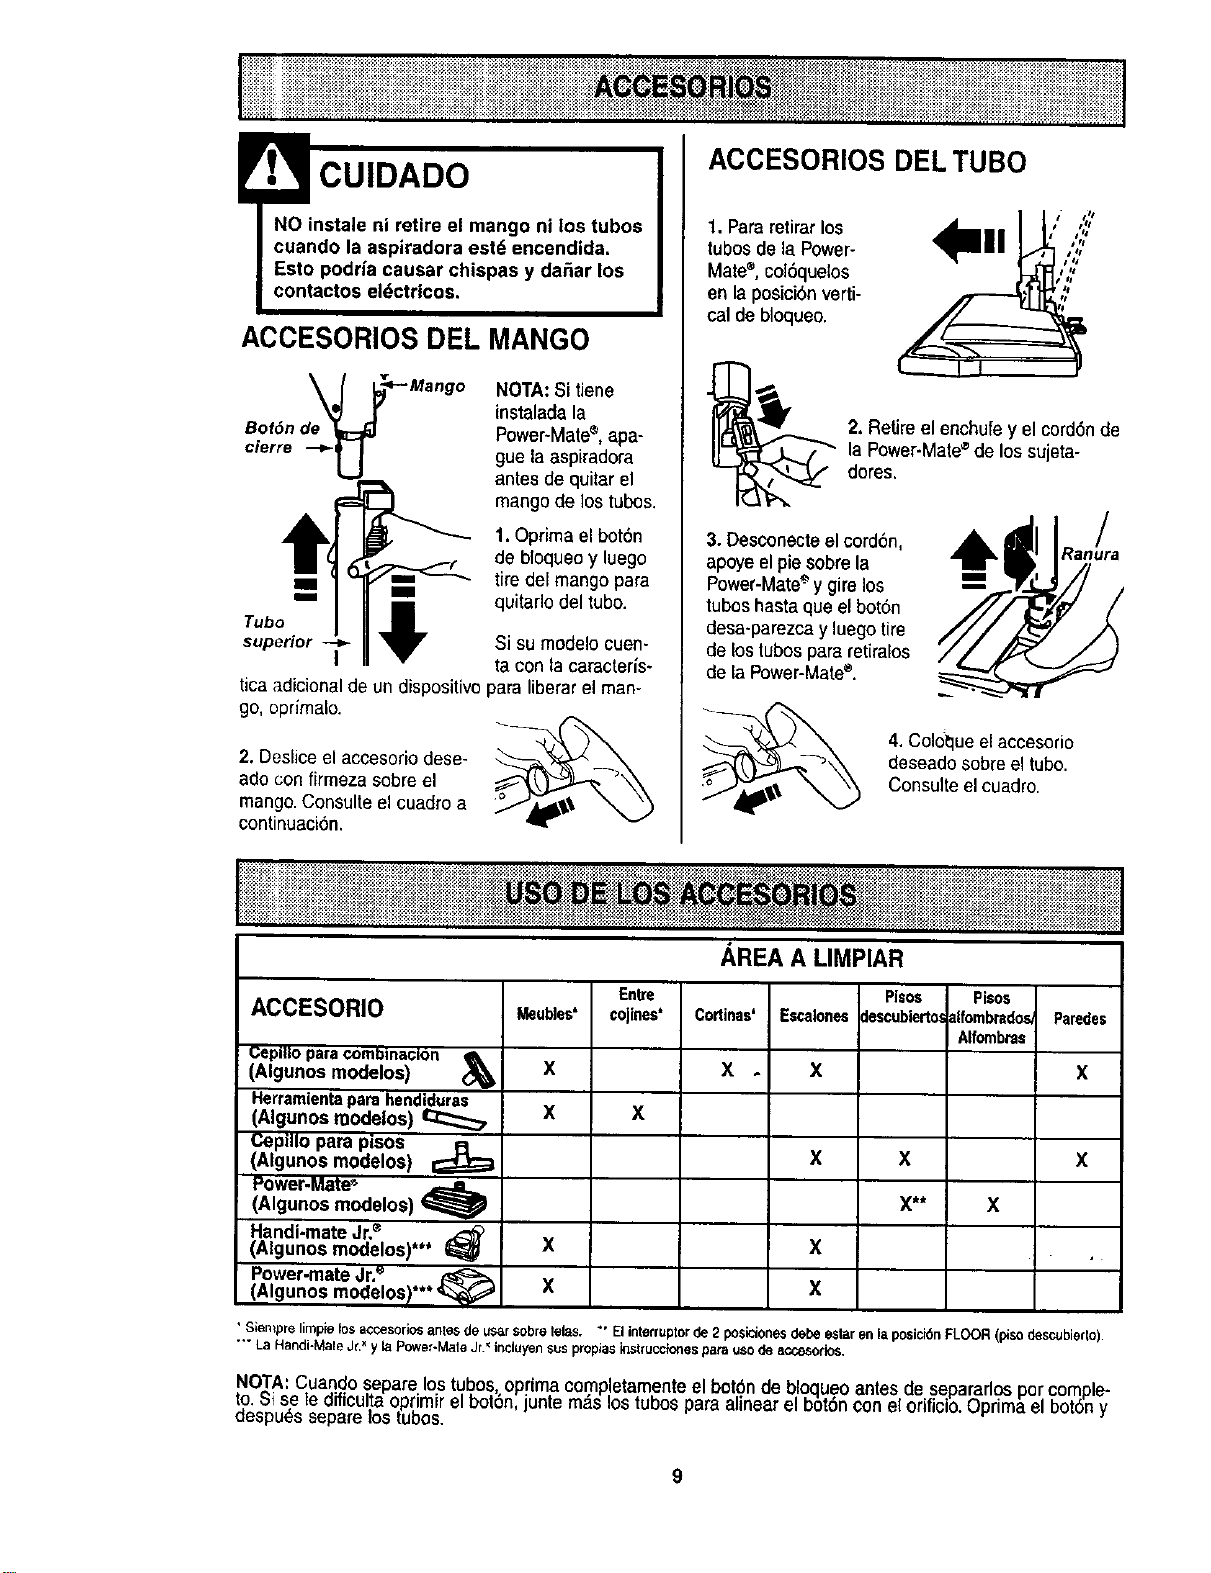
CUIDADO
ACCESORIOS DEL MANGO
Bof6n
cierre --_
NOTA:Si tiene
instaladala
Power-Matee,apa-
gue laaspiradora
antes de quitar el
mango de los tubes.
1. Oprima el botbn
de bloqueoy luego
tire del mango para
quitarlo del tube.
Si su modelo cuen-
ta con la caracterJs-
tica adicionalde un dispositivo paraliberar el man-
go, oprimalo.
2. Deslice el accesorio dese-
ado con firmeza sobreel
mango.Consulte el cuadro a
continuaci6n.
ACCESORIOS DELTUBe
1, Para retirarlos
tubes dela Power-
Mate®,col6quelos
en la posieibnverti-
cal de bloqueo.
i" /Is
,, ,,,,,';
2, Retire el enchufe y el cord6nde
la Power-Mate®de los sujeta-
dotes.
3. Desconecteel cord6n,
apoyeelpie sobre la
Power-Mate_ y girelos
tubes hasta queel bot6n
desa-parezcay luego tire
de los tubespara retiralos
de la Power-Mate_.
Ranu/ra
4.Coldhue el accesorio
deseadosobre el tube.
Consulteel cuadro.
AREA A LIMPIAR
Entre Plsos Pisos
ACCESORIO cojines* Cortinas' Escaloneslescubiertos31fombradosParedes
Alfombras
X . X X
Cepilio paracomblna¢lon
(Algunos modelos)
Herramientapara hendiduras
(Algunos modelos)
Cepillo pare pisos
,(Algunos modelos)
Power-Mate',
(Algunos modelos) t_
Handi-mate Jr?
(Algunos modelos)*** 1_
Power-mateJr?
(Algunos modelos!***
Meubles'
X
X x
x x x
x** x
X X
X X
• Siempre limpie los accesorios antes de _r sobre lelas. "' El interrupter de 2 posiciones debe estar en la posici_n FLOOR (piso descubierto).
"'" La Handi-Male Jr." y la Power-Mate Jr._incluyen sus propias inst_ucciones para use de 8ccesorios,
NOTA:Cuando separe los tubes oprimacompetamenteel bot6n de boqueo antes de separarlosper comple-
te.Si se ledificultaoprimirel boron,juntem_.sostubesparaalinearel bot6nconelorificio.Oprima el botSny
despu_s separelos tubes.
9
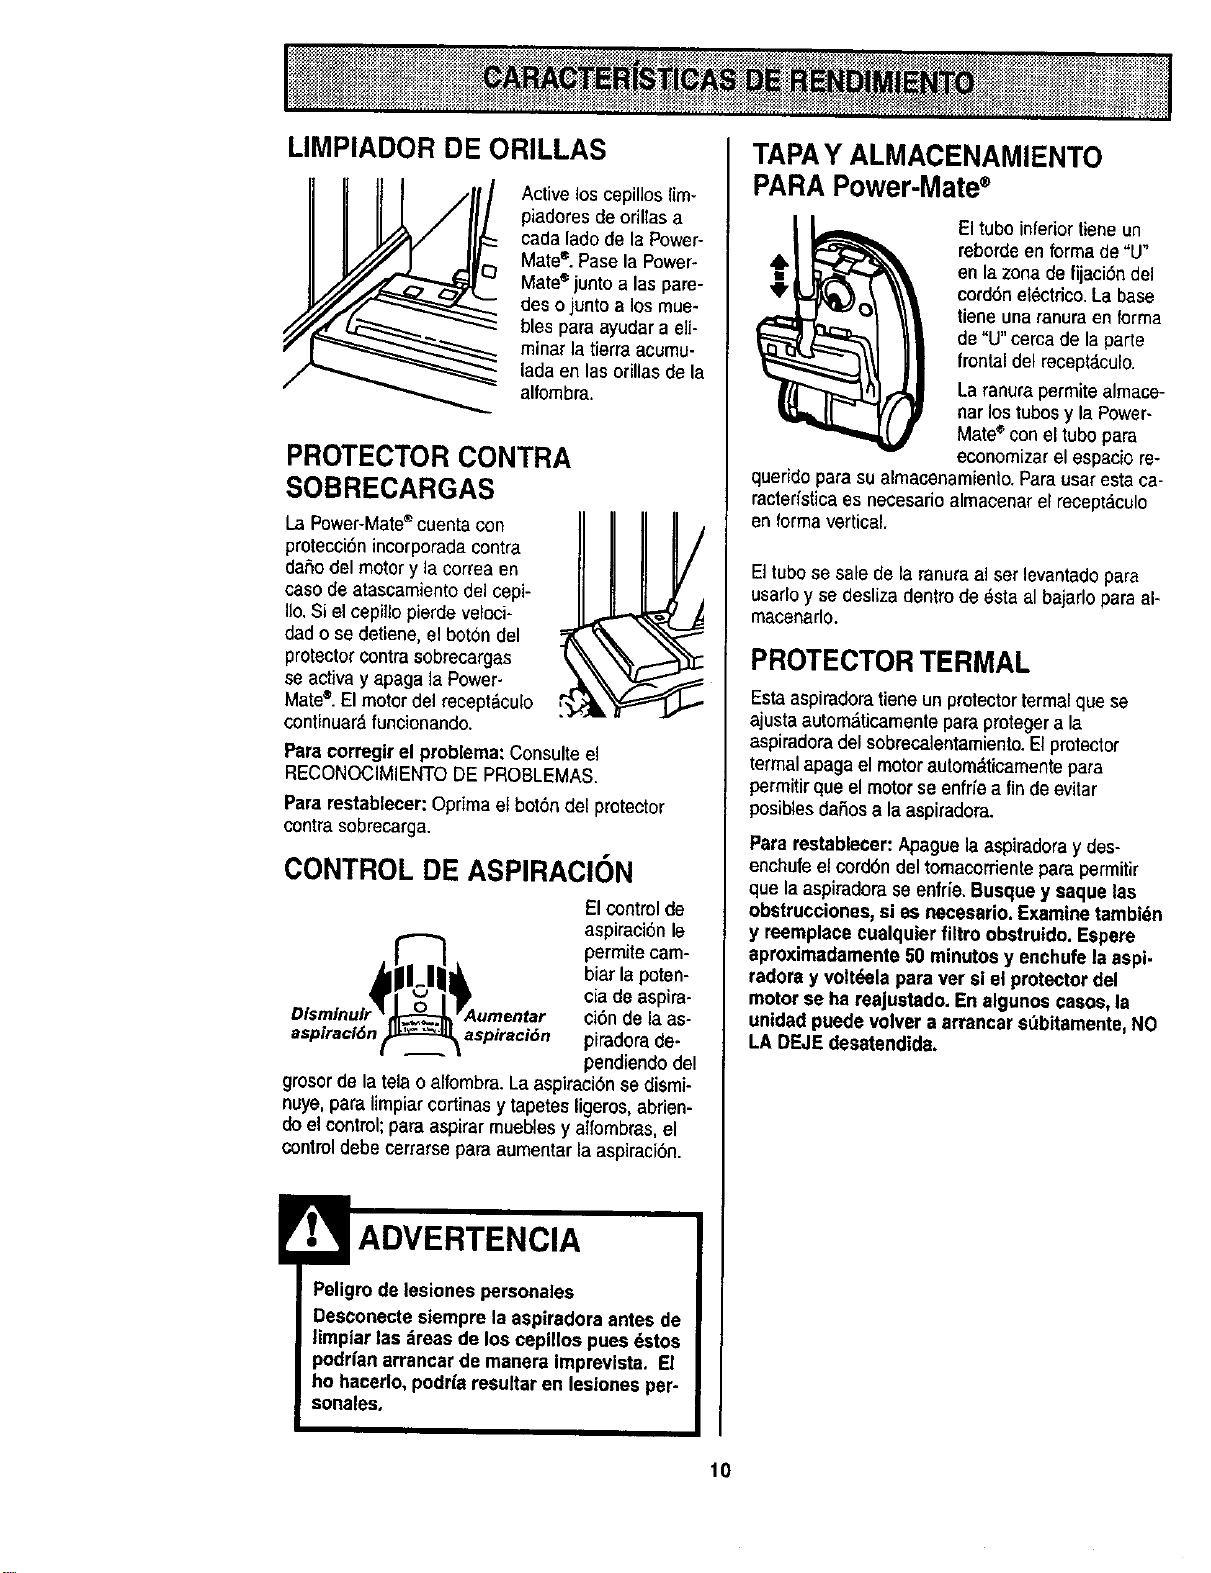
LIMPIADOR DE ORILLAS
Active los cepillos lim-
piadores de oriltas a
cada lado de la Power-
Mate_.Pase la Power-
Mate'_junto alas pare-
des o junto a los mue-
hies para ayudar a eli-
minar la tierra acumu-
!adaen lasorillasde la
alfombra.
PROTECTOR CONTRA
SOBRECARGAS
La Power-Mate®cuentacon
protecci6nincorporada contra
da_o del motor y la correa en
caso de atasoamientodel cepi-
IIo.Si elcepillo pierde velcoi-
dad o se detiene,el boton del
protectorcontra sobrecargas
seact'lvay apaga la Power-
Mate®.El motor del recept&culo
continuar_,funcionando.
Parscorregir el problema:Consulteel
RECONOCIMIENTODE PROBLEMAS.
Para restablecer:Oprima O bot6n del protector
contra sobrecarga.
CONTROL DE ASPIRACION
/
El control de
aspiraci6n te
permitecam-
biar la poten-
¢ia de aspira-
ci6n de la as-
aspiracl6n aspiraci6n piradorade-
pendiendodel
gros0rde latelao alfombra.La aspiraci6nse dismi-
nuye,pars limpiarcortinas y tapetesligeros, abrien-
do el control;parsaspirar mueblesy alfombras,el
control debecerrarsepars aumentarla aspiracibn.
Peligro de tesiones personales
Desconectesiempre la aspiradora antes de
limplar las dreas de los eepillos pues 6stos
podrianarrancar de manera Imprevista. El
ho hacerlo,podrfa resultar en lesiones per-
sonales.
TAPAY ALMACENAMIENTO
PARA Power-Mate®
El tubo inferiortiene un
rebordeen forma de "U"
en la zonade fijaci6ndel
cordon electrico. La base
tiene una ranuraen lorma
de "U"cerca de la parte
frontal del recept_.culo.
La ranura permitealrnace-
nar los tubosy la Power-
Mate'_con el tubo para
economizar el espaciore-
querido para su almacenamiento.Parausar esta ca-
racteristicaes neCesadoalmacenarel reoeptacolo
en formavertical.
El tubose sale de la ranuraal ser levantado pare
usarloy se desliza dentro deesta al bajarlo para al-
macenarlo.
PROTECTOR TERMAL
Estaaspiradoratlene unprotectortermal que se
ajusta automaticamenteparaprotegera la
aspiradoradel sobrecalentamiento.El protector
termal apagael motor autom&ticamentepara
permitir que elmotor se enfrie a finde evitar
posib_esdafiosa la aspiradora.
Pararestablecer: Apaguela aspiradoray des-
enchufe el cordbn del tomacordente para permitir
que la aspiradorase enfrie. Busquey saque las
obstrucciones,si es necesario.Examinetambi_n
y reemplececualquler _tro obstruido. Espere
aproximadamente50 minutos y enchufe laaspi-
rsdora y volt_,elapara ver siel protectordel
motorse hareajustado. En algunos oasos,la
unidadpuedevolver a arrancar sObitamente,NO
LA DEJEdesatendida.
lO
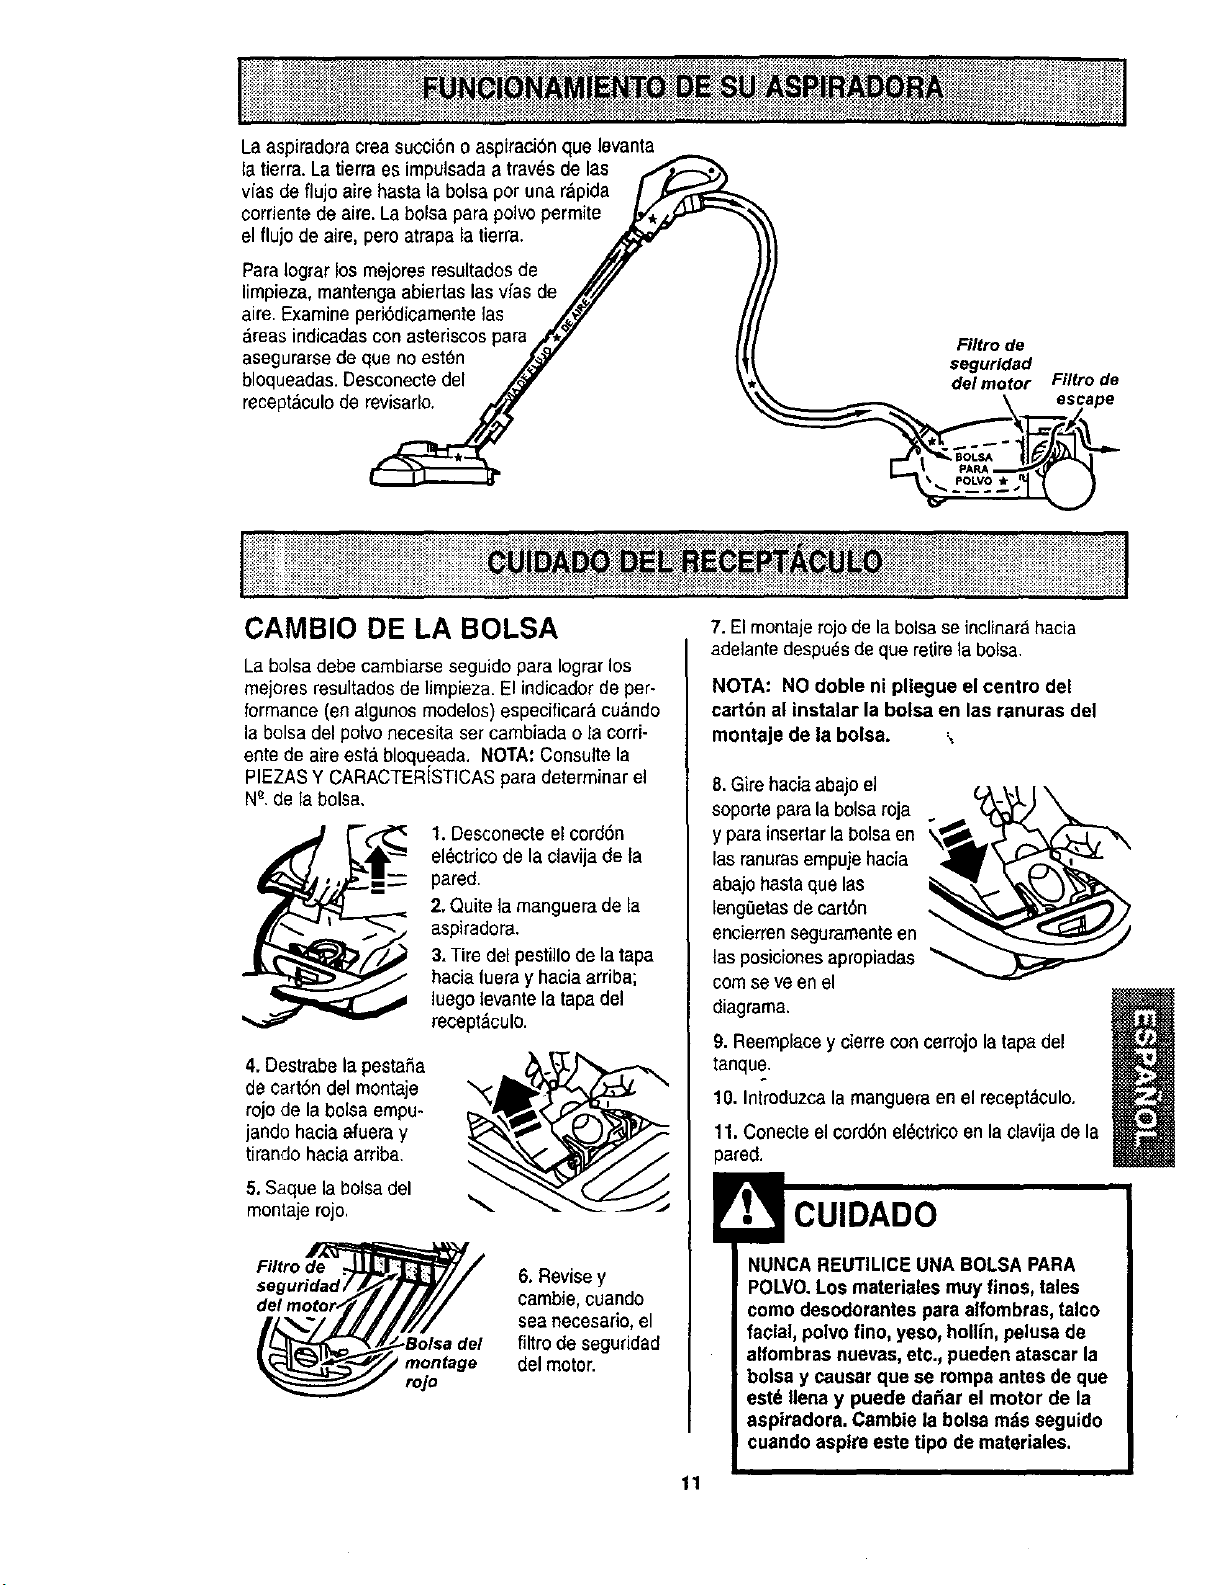
La aspiradoracrea succi6n o aspiraci6n que levanta
la tierra. Latierra es impulsadaa trav6s de las
vfas de flujo aire hasta la bolsaper una rapida ] _
corriente de aire.La bolsa parapolvo permite y,_
el flujo de aire. pero atrapa latierra.
Para lograrlos mejores resultadosde _//
limpieza, mantengaabiertas las vias de ._J/
aire. Examine peri6dicamente las X'_7 /
_reas indicadas con asteriscos para Z*_ /A
asegurarse de queno est6n _'¢_v" _
bloqueadas.Desconecte del ,_ \
recept,_culode revisarlo, ,,_
I II t/"
Filtrode
seguridad
del motor Filtrode
: :::::: ::: :::::::: : :: :::::;_:::::: : ::::::,.::.:...:;,..:::2... :+:<_ _¢_:.,_...:..._..:...:_:. :,....;:.._.< _:.....::::.:_.,..:+:....+.<:_:.::: ..::+..: _ .:: .:.:....: _ ::_ :::: : :::_::::: :::::::; _:::::: :::_:
I
GAMBle DE LA BOLSA
La bolsa debecambiarse seguido para Iograrlos
mejeres resultados delimpieza. El indicadorde per-
formance (en algunos modelos) especificar_ cu&ndo
la bolsa del polvo necesita setcambiada o la cord-
ente de aire esta.bloqueada, NOTA: Consulte la
PIEZAS YCARACTERISTICASpara determinar el
Ne,de la bolsa,
1. Desconecteet cord6n
el6ctricode la clavija de la
pared.
2, Quite la manguerade [a
aspiradora.
3,Tire del pesti]lo dela tapa
hacialuera y hacia arriba;
luego levantela tapa del
recept_.culo.
4. Destrabe la pesta_a
de cart6n del montaje %
rojo de labolsa empu-
jando hacia afuera y
tirando hacia arriba.
5,Saque la bolsa del
montaje rojo,
Filtro de ._
seguridad /
montage
rojo
6. Revisey
cambie,cuando
sea necesario,el
filtro deseguridad
del motor.
7. El montajerojo de la bolsase inclinarahacia
adelante despu_sde que retirela bolsa.
NOTA: NO doble ni pliegue el centre del
cart6n al instalar la bolsa en las ranuras del
montaje de la bolsa.
8.Gire haciaabajo el
soporte parala bolsa roja
y para insertarla bolsa en
las ranurasempujehacia
abajo basraque las
lengOetasdecart6n
encierrenseguramenteen
las posicionesapropiadas
cornse veen el
diagrama.
9. Reemplacey cierre con ¢errojo la tapadel
tanque.
10. Introduzca la manguera en el recept_.culo,
11.Conecte el cord6n el6ctrico enla clavija de la
pared.
NUNCAREUTILICE UNA BOLSA PARA
POLVO.Los materiales muyfines, tales
come desodorantes para alfombras,talco
facial, polvo fine, yeso_holffn,pelusade
alfombras nuevas,etc. pueden atascar la
bolsa y causar que se rompaantes de que
est6 Ilena y puede dafiar el motor de la
aspiradora. Cambie la bolsa m_isseguido
! cuando aspireeste tipo demateriales.
11
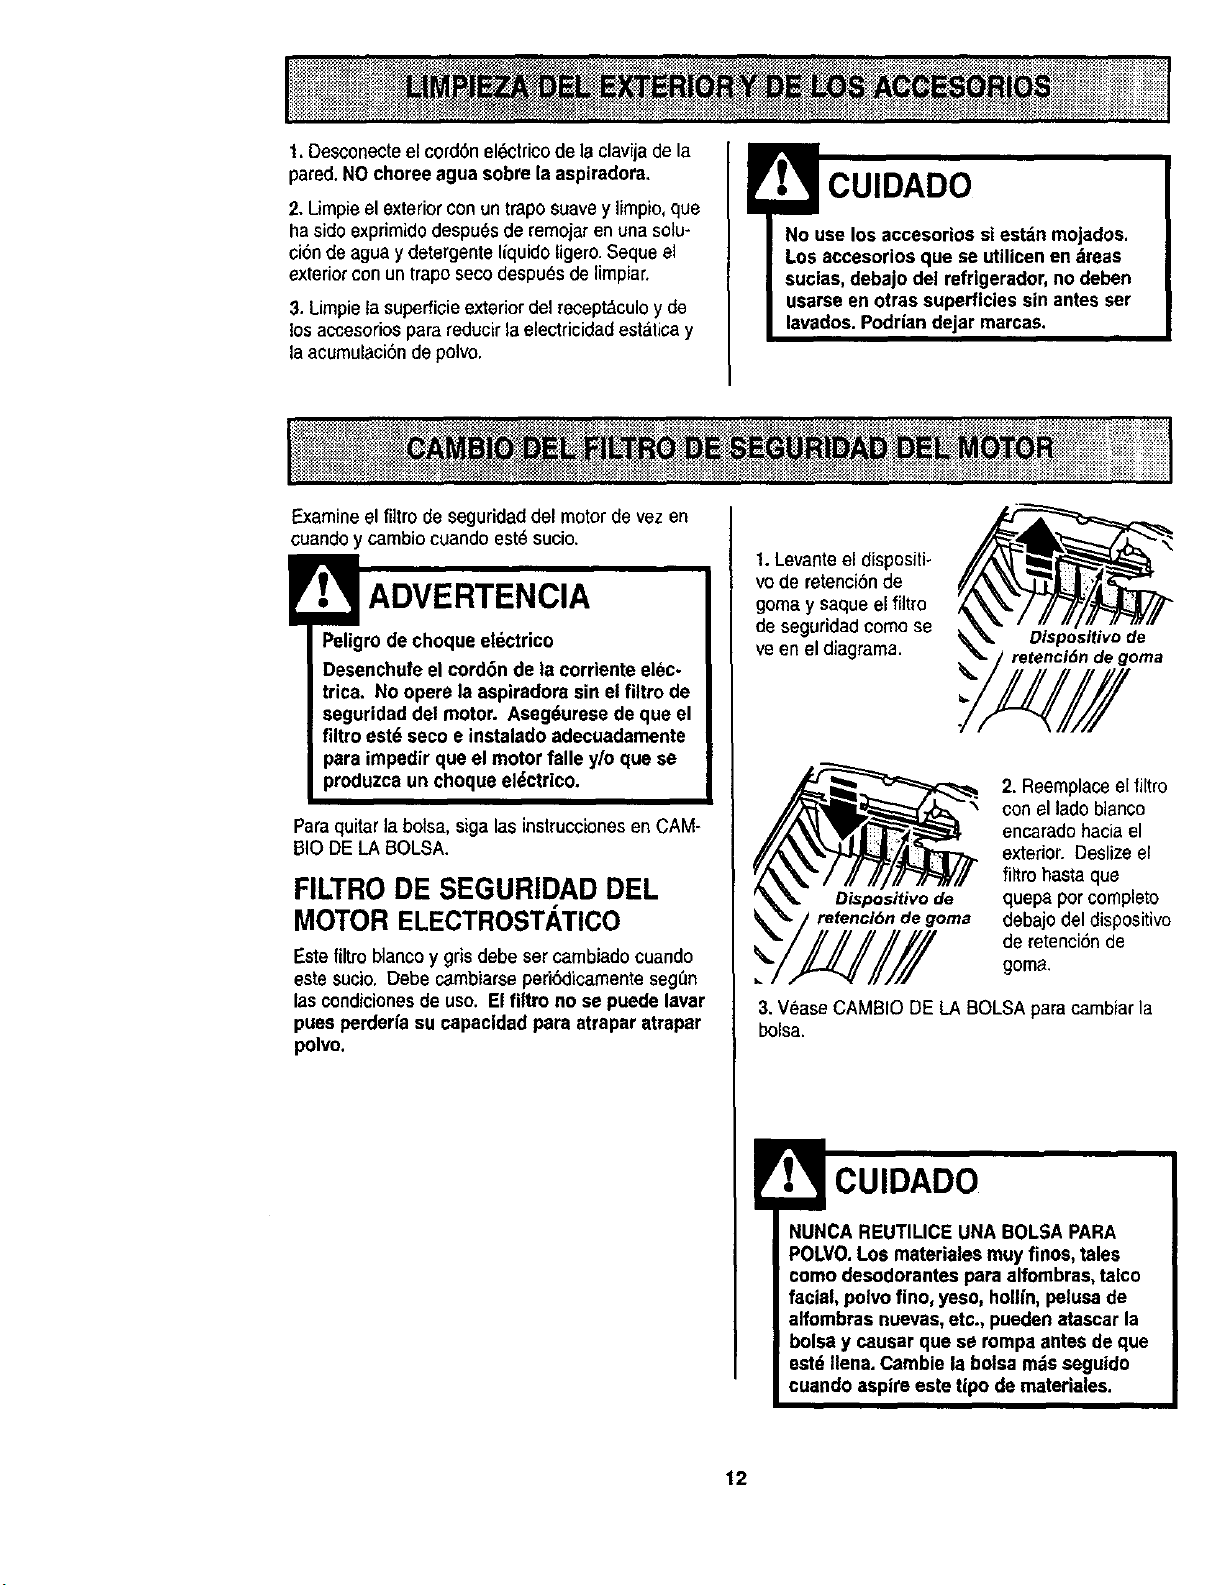
f, Desconecteel cordonel6ctricode la clavijade la
pared.NOchoree agua sobre laaspiradora.
2. Limpieel exterior conun trapo suavey limpio,que
haside exprimido despu6s de remojaren una solu-
ci6n de aguay detergente ffquidoligero.Seque el
exterior conun traposeco despu_sde limpiar.
3.Limpieta superfioieexterior del receptdculoy de
tosaccesorios para reducir laelectricidadest_.ticay
la acumulaciSnde polvo.
CUIDADO
No use los accesorios si estdn mojados.
Los accesorios que se utilicenen dreas
sucias, debajo del refrigerador,no deben
usarse en otras superficies sin antesser
lavados.Podrian dejar marcas.
Examineelfiitro de seguridaddel motor devez en
ouandoy cambiocuandoest6sucio.
Peligrode cheque eldctrico
Desenchufe el ¢ord6n de ta cordente elec-
trica. No opere la aspiradora sin el fittro de
seguridad del motor. Aseg_urese de que el
filtro est6 secoe instalado adecuadamente
para impedirque el motorfalle y/o que se
produzcaun chequeel_ctrico.
Paraquitar la boisa, siga lasinstruccionesen CAM-
BIO DE LA BOLSA.
FILTRO DE SEGURIDAD DEL
MOTOR ELECTROSTATICO
Este filtroblancoy gris debesercambiado cuando
estesucio. Debe cambiarse peribdicamenteseg,'m
lascondiciones deuse. Elfiltro no se puede lavar
pues perdeHasu capacldad para atrapar atrapar
polvo.
1.Levante el dispositi-
vode retencionde
gomay saque el filtre
de seguridad come se
veen el diagrama.
Dispositivode
degoma
%
Dispositivo de
goma
2. Reemplaceel liltro
conel ladeblanco
encarado haciael
exterior. Deslize el
fi_trohasta que
quepa per complete
debajo del dispositive
de retenciSnde
goma.
3. VeaseCAMBIO DE LA BOLSA paracambiarla
bolsa.
NUNCA REUTILICE UNA BOLSAPARA
POLVO.Los materialesmuy fines, tales
come desodorantes para alfombras,talco
facial, polvo fine, yeso, hollfn,pelusade
alfombras nuevas,etc., pueden atascarla
bolsa y causar que se rompaantes de que
estd Ilena. Cambie la bolsa m_isseguido
cuando aspireeste tipo de materiales.
12

I ADVERTENCIA
Peligro de choque el_ctrico
No opera con un filtro de escape bloqueado
o sin el filtro de escape o la cubierta del fll-
tro de escape instalados.
FILTRO DE ESCAPE
ELECTROSTATICO
Este tiltro electrost,_ticose tiene que cambiareste
sucio. Cambieel liltmcuando el _[reasuperficial
este cubiertaporcompleto,El filtro no se puede
lavar pues prderiasu capacidad para atrapar
altrapar polvo,
Repuestosde los filtros de extracci6n est_n
disponibles a trav,_sdel centro de servicio de
sears bajo el no. De parte 8175258.Ver
"lnformacidnde assistancia o servicio"
1. Tirehaciaafuera y _ 1)
arriba de lacubierta __4L?-._:;;.;:_.-.. _ k_
del filtro de escape _-_'_'_ \\ _;_
para removerde la "_'_- ['_. _ "_.,
cubiertadel motor _ ]L,,,_ I f
yoo, q.e,oauo d/
Filtro de_
escape
3. Coloque el
nuevofiltro an la
cubiertadel motor
conel ladoblanco
haciaabajo.
2.Cuando el filtro
est_ sucio,tire del
filtro hacia arriba,
Filfro de
4. Reinstale la
cubiertadel filtro
de escape inser-
tando la lengOeta
en la ranurade la
cubierta del motor.
Apriete firme-
mente paracalzar
la cubierta del ill-
tro de escape en
su lugar,
Siempre deber&n seguirse todas las precau-
ciones de seguridad al limpiar y dar servicio a
la Power-M,_te®.
ADVERTENCIA
Peligrode choque eldctricoo lesibn
corporal
Desconecte la unidad antes de lim.
piarla o darle servicio. De Io contrario
podria producirse un choque eldctrico
o causar lesidn corporal st la aspira-
dora arranca de manera imprevista.
13
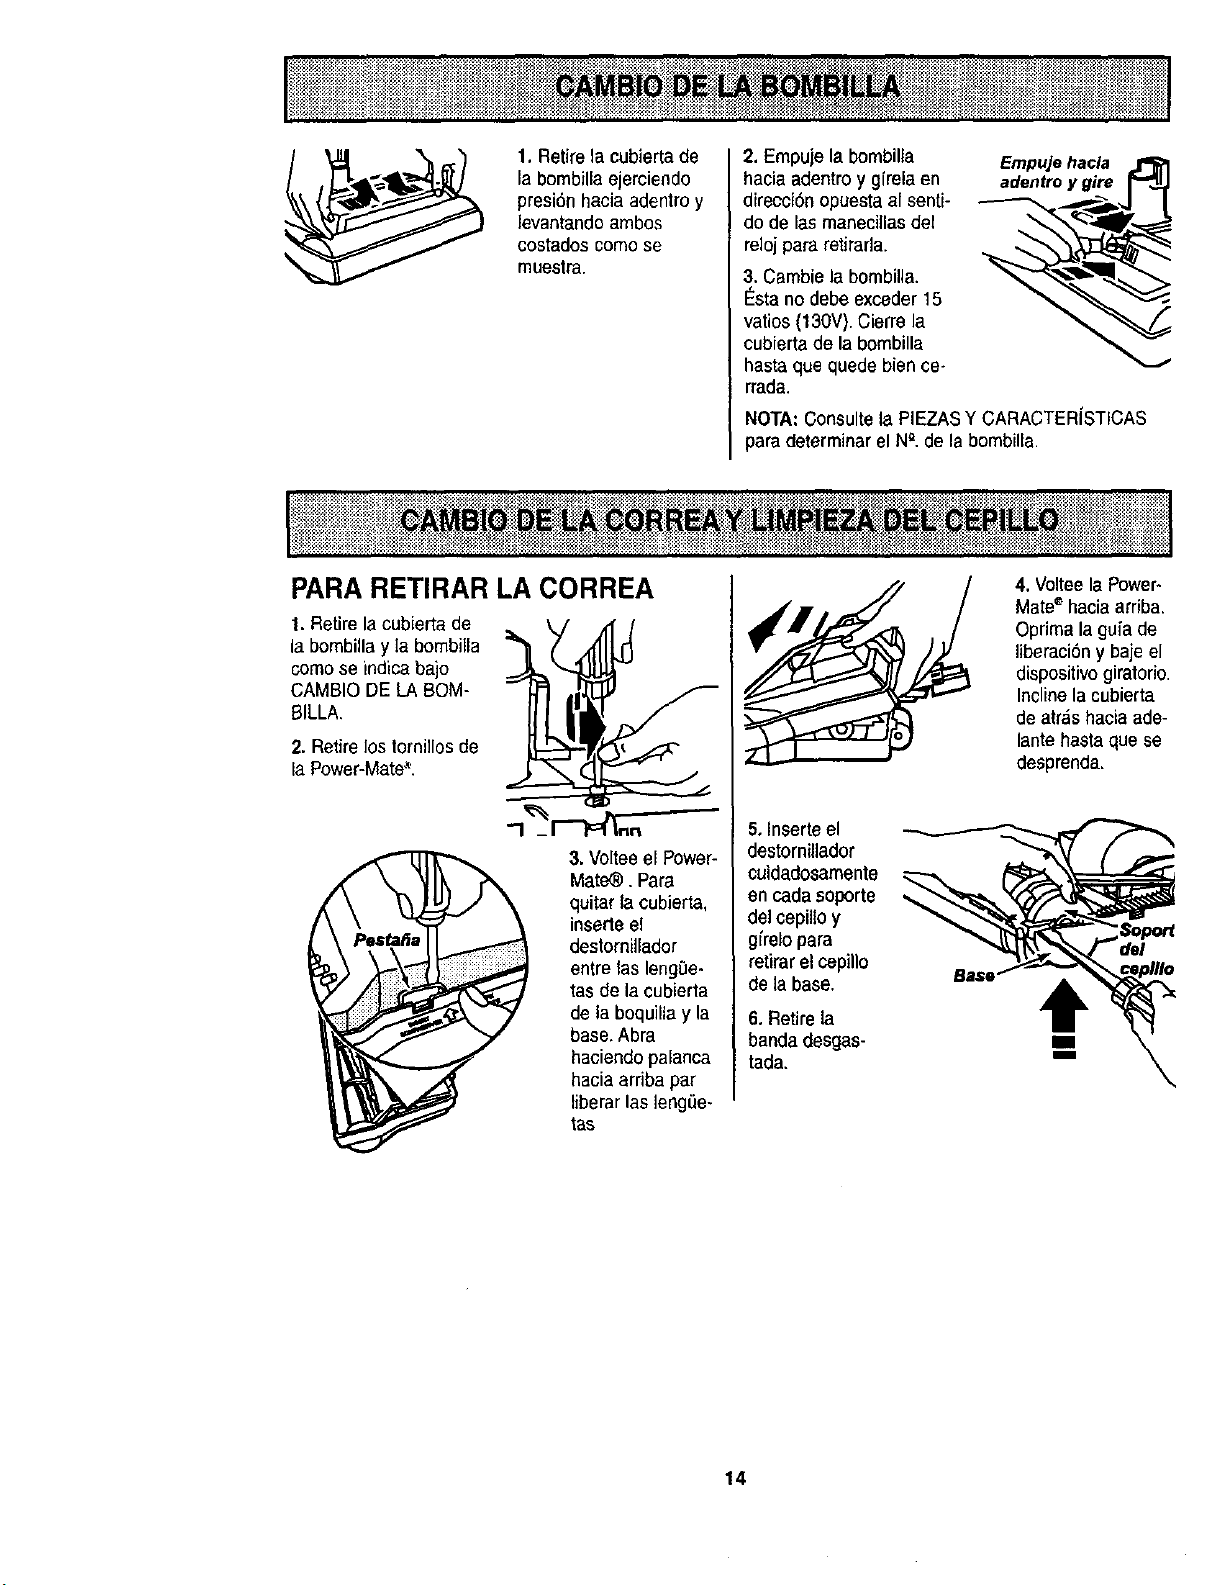
1. Retire la cubiertade
la bombillaejerciendo
presi6n hacia adentroy
levantandoambos
costados como se
muestra.
2. Empuje la bombilla
hacia adentroy gfrela en
direcciSn opuestaal senti-
do de las manecillasdel
reloj para retirarla.
3. Cambie la bombilla.
I_stano debe exceder 15
vatios (130V).Cierre la
cubierta de la bombilla
hasta que quedebien ce-
rrada.
Empuje hacla
adentro y gire
NOTA:Consultela PIEZASY CARACTER{STICAS
para determinar el N_.de labombilla,
PARA RETIRAR LA CORREA
1. Retire la cubierta de
la bombUlay la bombilla
como se indica bajo
CAMBIO DE LA BOM-
BILLA.
2. Retire lostornillosde
la Power-Mate_.
3. Volteeel Power-
Mate_. Para
quitar la cubierta,
inserte el
destornillador
entre las lengGe-
tasde la cubierta
de la boquillay la
base. Abra
haciendo palanca
hacia arriba par
liberar las lengLie-
tas
5. Inserteel
destornillador
cuidaclosamente
en cada soporte
del cepilloy
gfrelopara
retirarel cepillo
de la base.
6. Retire la
banda desgas-
tada.
4. Volteela Power-
Mate®hacia arriba.
Oprima la gu{ade
liberacidny baje el
dispositivogiratorio.
Inclinela cubierta
de atr_.shacia ade-
lantehasta que se
desprenda.
14
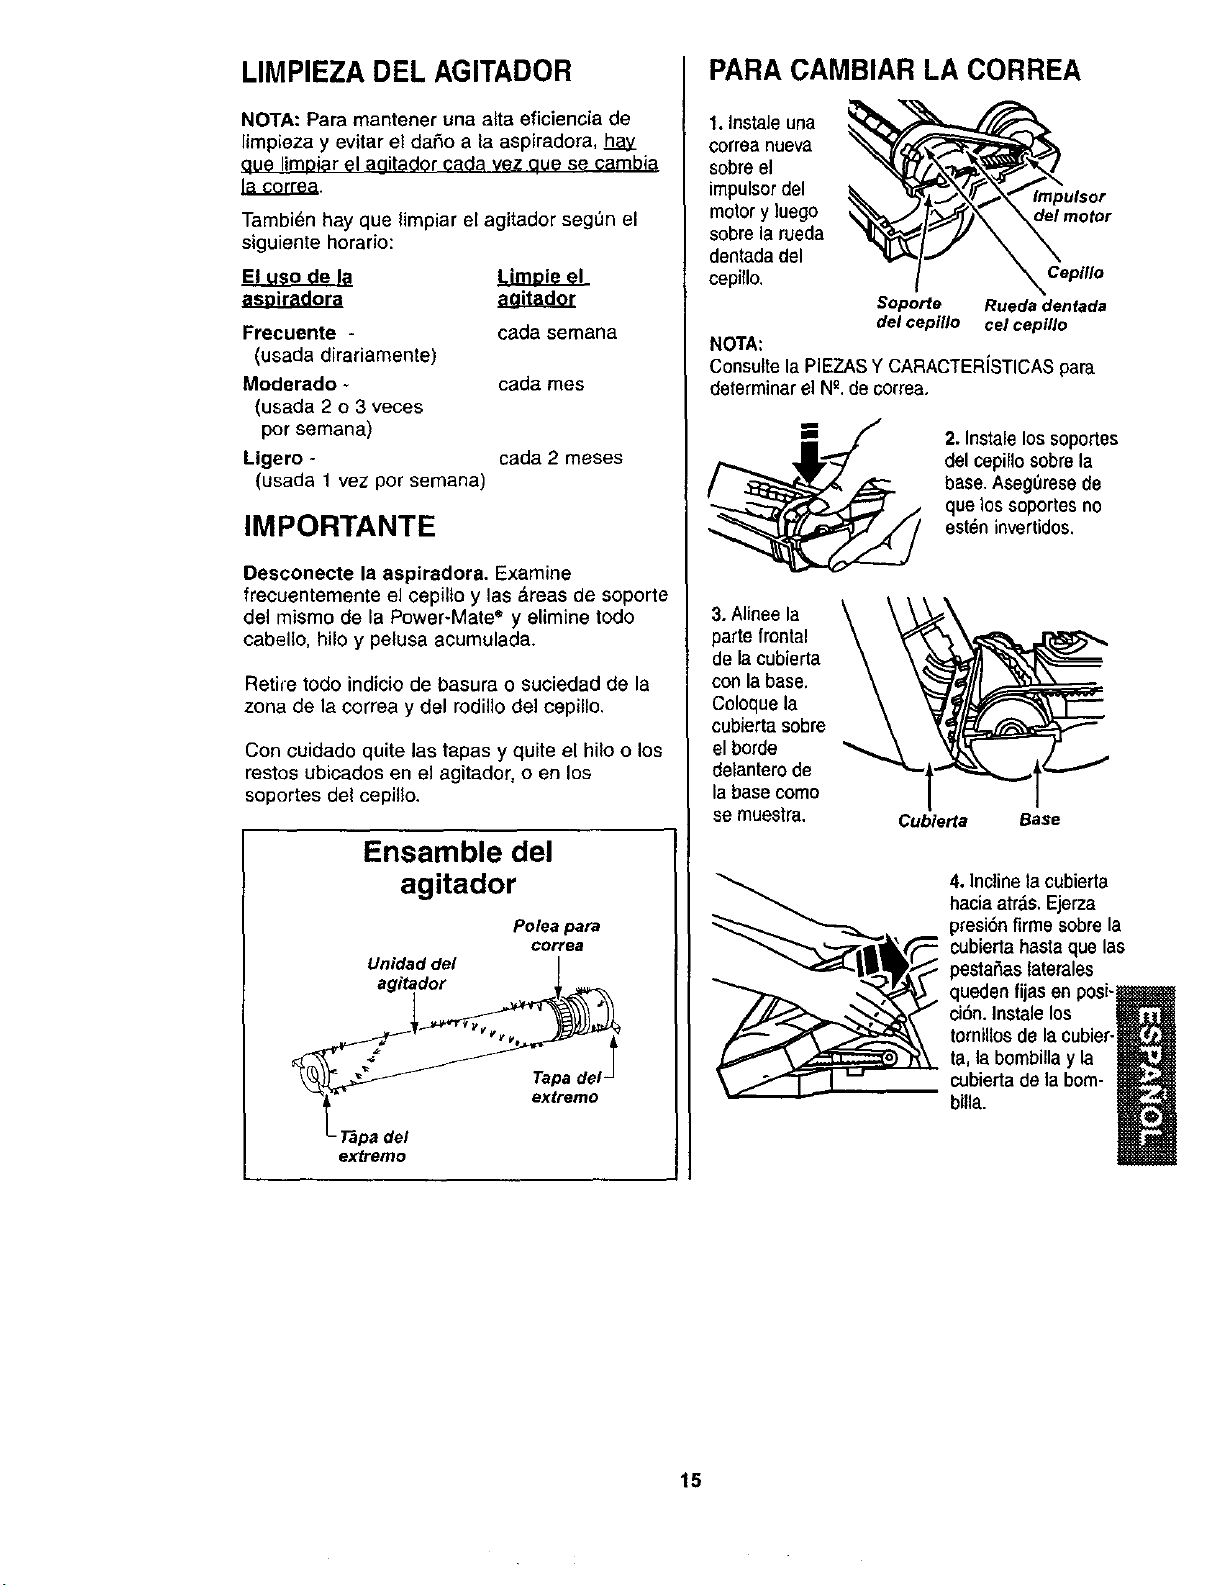
LIMPIEZA DEL AGITADOR
NOTA: Para mantener una alta eficiencia de
limpieza y evitar el da£to a la aspiradora, hay
aue limDiar el aaitador cada vez aue se cambia
la correa.
Tambi_n hay que limpiar el agitador segun el
siguiente horario:
E! _o de Ip
Frecuente -
(usada dirariamente)
Moderado
(usada 2 o 3 veces
porsemana)
cada semana
cada mes
Ligero - cada 2 meses
(usada 1 vez por semana)
IMPORTANTE
Desconecte la aspiradora. Examine
frecuentemente el cepilto y las &teas de soporte
del mismo de la Power-Mate'* y elimine todo
cabelio, hilo y pelusa acumulada.
Retire todo indicio de basura o suciedad de la
zona de la correa y del rodillo del cepillo.
Con cuidado quite las tapas y quite el hilo o los
restos ubicados en el agitador, o en los
soportes del cepillo.
Ensamble del
agitador
Poleapara
correa
Unidad del |
agitador _,_,_
extremo
PARA CAMBIAR LA CORREA
1. Instale una
correa nueva
sobre el
impulsor del
motor y luego
sobre larueda
dentada del
cepillo.
Impulsor
del motor
Cepillo
Soporte Rueda denfada
del cepillo cel cepillo
NOTA:
Consutte la PIEZASY CARACTERJSTICASpara
determinar el N". de correa.
2. Instalelos soportes
del cepillo sobrela
base. Aseg_resede
que lossoportes no
est_n invertidos.
3.Alinee la
pafte frontal
de la cubierta
con la base.
Coloque la
cubierta sobre
el horde
delantero de
la base como
se muestra.
Cubierta
Base
4. Inclinela cubierta
haciaatrds. Ejerza
presi6nfirme sobre la
cubierta hasta quelas
pestaSaslaterales
queden fijas en posi.iS
ci6n. Instale los
n
tornillos de la cubier,
ta, la bombilla y la
cubierta de la born-
billa.
15
_1ADVERTENCIA
Peligrode choque el_ctrico o lesi6n corpo-
ral
Desconectela unidadantes de limpiarla o
darle servicio.De Io contrario podria pro-
ducirse un choque el_ctrico o causar
lesi6n corporal si la aspiradora arranca de
manera imprevista.
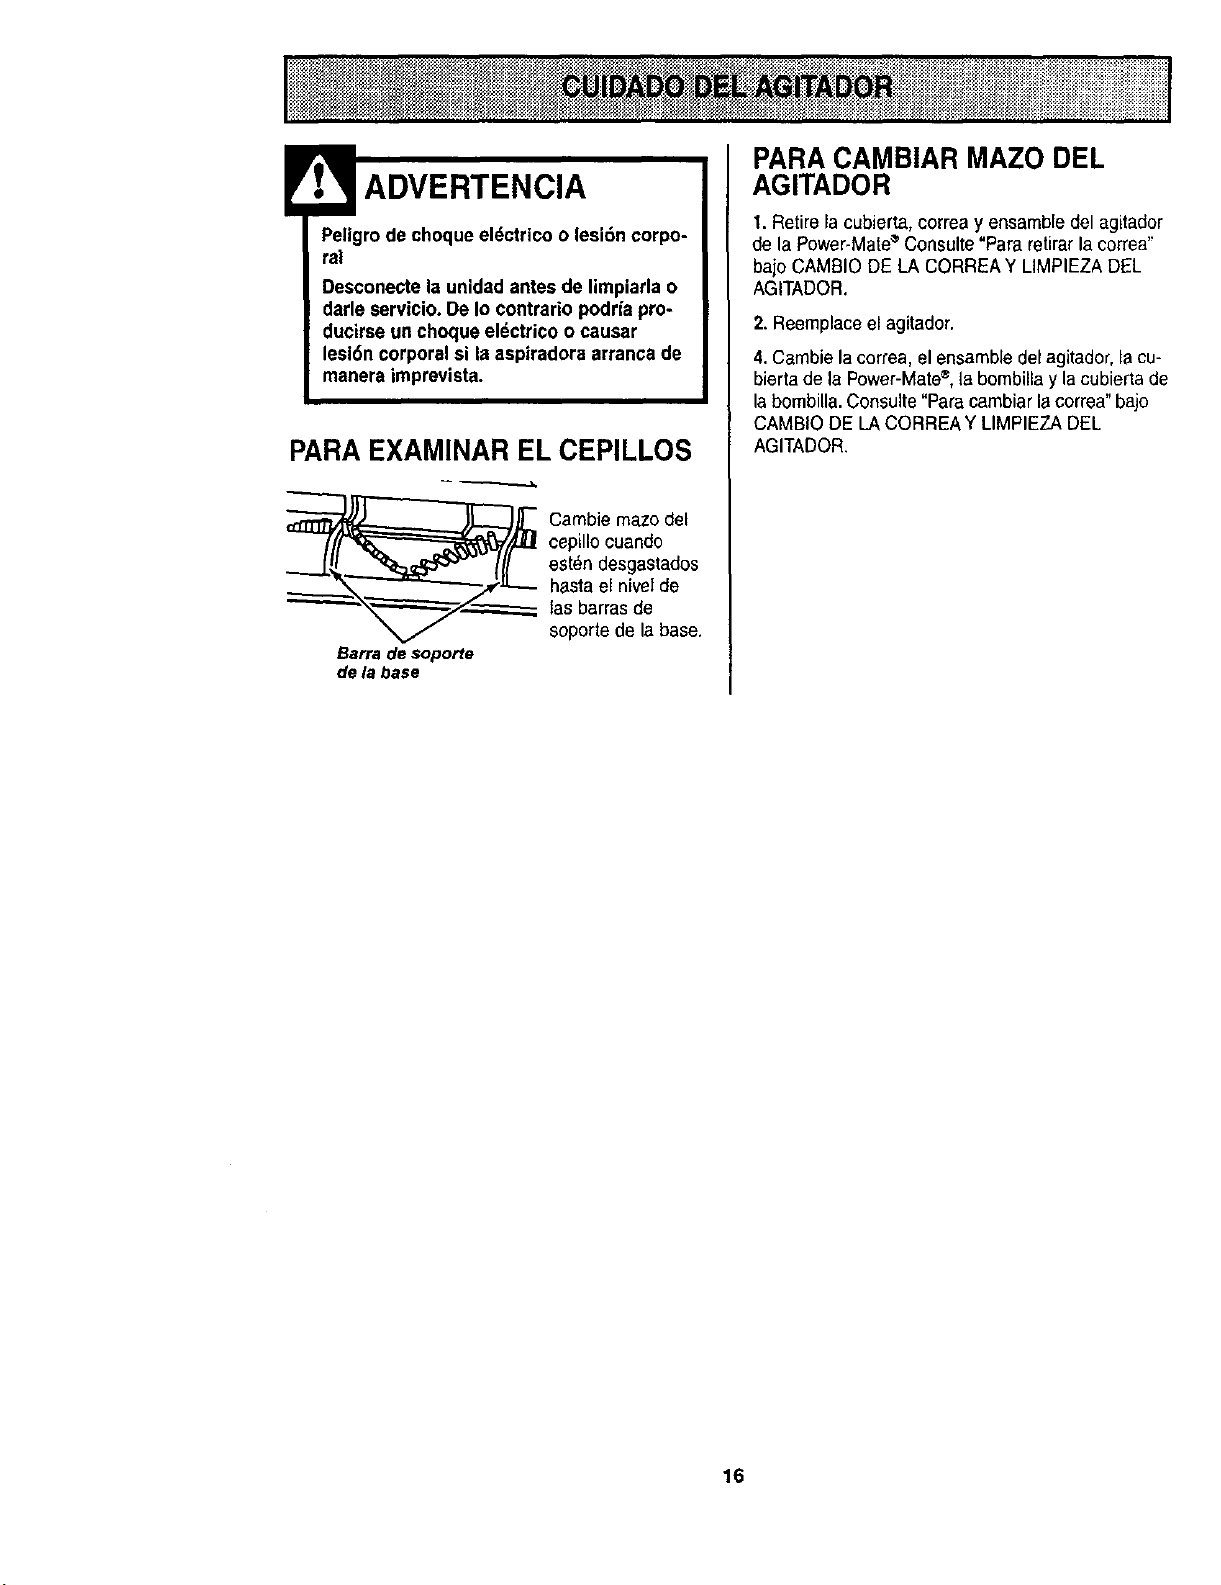
PARAEXAMINAR EL CEPILLOS
_._ ambie maze del
cepillocuando
est_n desgastados
hastael nivelde
iasbarrasde
soporte de la base.
Barra de soporte
dela base
PARA CAMBIAR MAZO DEL
AGITADOR
1. Retirela cubierta, correa y ensamble del agitador
de la Power-Mate_'Consulte"Para retirar la correa"
bajo CAMBIO DE LA CORREAY LIMPIEZA DEL
AGITADOR.
2. Reemplaceel agitador.
4. Cambie lacorrea, el ensamble detagitador, la cu-
biertade la Power-Matee,la bombillay la cubierta de
la bombiUa.Consulte "Paracambiar lacorrea" bajo
CAMBIODE LA CORREAY LIMPIEZA DEL
AGITADOR,
16
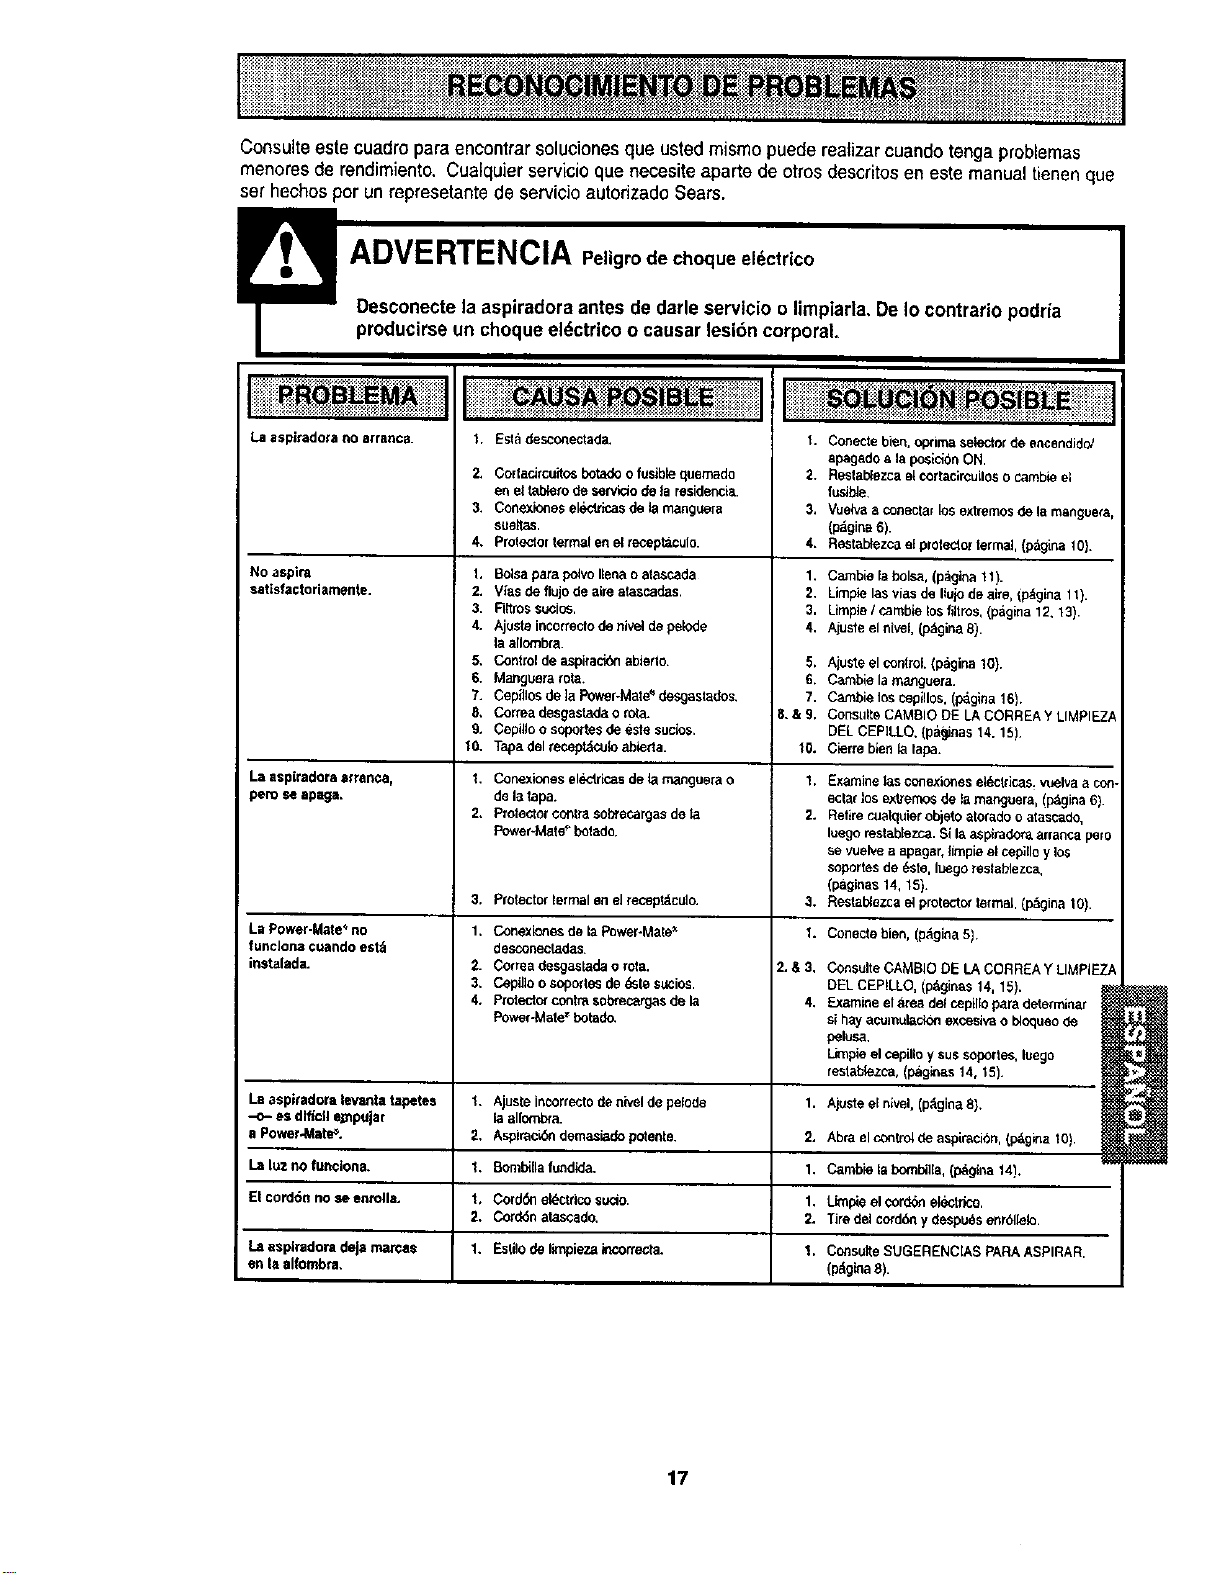
Consulteestecuadro para encontrar soluciones que usted mismo puedereatizar cuando tengaproblemas
menores derendimiento. Cualquierservicio que necesite aparte de otros descritosen este manualtienen que
set hechos por un represetantede servicio aulorizado Sears.
No aspira
satisfactoriameflte.
La aspiradoraafral'_ca,
pero seapaga.
La Power-Mate*no
funelonacuandoest_
instalada.
La aspiradora levanta tapetes
-c- es dlfic]l eXnpujar
a Power.Ma_.
La luzno funcions.
El €ord6n no se entolla,
LaesplmdoradeJamarcas
en la alfombra.
i;!iii;;;ili'!- ""!'i'" .... _ .. "iiii!ii!ii;
1. Est_ dest:onectada.
2, Cortaci_cuitosbotadoo fusiblequemado
en eltablerodeservleiodele residencia.
3. Conexlenesel_'tdcasde lamanguera
sueltas.
4, Protectortermalenetreceptaculo.
1, Bolsaparapo_voIlenaoatascada
2. V_asdeflujodeaimatascades.
3. Rttrossucios.
4. Ajuste incerreclode nivel depelede
la allombra.
5. Controlde as_iraci_ ablerto.
6. Manguera rota.
7. Cepillosde ]aPower-Mate"desgastados.
8, Correa desgastadao rota.
9. Cepilloo soportesde estesucles.
10. Tapadelrecept,_culoableda.
1. Conexionesel_*tricasdela rnanguerao
de lalapa.
2. Protectorcc_trasobrecargasdela
Power-Mate_"hotade.
3. Protector termal en el recept_culo.
1, Conexic_es de la Power-Mate_
desconeotadas.
2. Correa desgaelada o rota.
3. Copil]o o soportes de _sle s_cios.
4. Protector contm sobrecargas de la
Power-Male = botado,
1. Ajusteincorrectodenivel de pelode
le allombra.
2, AspimckSndemasledopoteote.
1. Bombiilafundida.
t. Cord_ electdcosucio.
2. Cord6natascado.
1. Estilode limpiezaincorreota.
1. Conecte bien, optima selector de encendidel
apagado s la posle_6nON.
2. Reslablezca st ¢ortacircuilos o camble el
lusib_e,
3, Vuek,a a conactar los exlremos de la manguera,
(pdgina 6).
4. Restablezcae[prolec_or termel, (pagina 10}.
1, Camble le bolsa, (pagina 11).
2, Lim_e las vias de Ilejo de aim, (pdgina 11).
3, Limpielcamblelesfiltros,(pagina12.13).
4, Ajuste el nivel, (p&gina 8).
5. Ajuste elcontrol(p&gina10).
6. Cambielama.._guera.
7. Cambieloscepillos.(p_glea16).
B.&9, Consutle CAMBIODE LACORREAY LIMPIEZI
DELCEP]LLO,(patinas 14.15).
fO. Clerrebienle lapa,
1,
2.
I.
Examinelasconexlonesel_ctdcas,vuelvaa con
eclatlosextrernosdele manguera,(p_gina6).
Relirecuelquierobjetoatoradeo atascade,
luegorestablezca.S(laaspiraderaarrancapero
sevuelvea apagar,Iimpleelcepilloylos
soportesde _ste,luegoreslablezca,
(paginas14,15).
Reelablezcaelprotectorretinal (p_,gina10).
Conecte bien, (p._gina 5).
2.&3.
4.
Consulte CAMBIO DE LA CORREA Y LIMPIEZJ
DEL CEPILLO, (pdginas 14, 15).
EXamine el area del cepillo para determlna.r
si hay acumula_b_ exceslva o I_oqueo de
delusa.
Limpie el cepille y sus soportes, luego
restablezca, (l_gleas 14, 15).
1, Ajusteeln_vel, (p_gina8).
2. Abra el control de asplracide, (p&gina 10).
1, Camble le bombiile, (p&gina 14).
1. Umpieel cordenelectrico.
2. Tiredelcord6ny despu0senr611elo.
1. ConsulteSUGERENCIA$PARAASPIRAR.
(pdglea8).
17
iiiiiiii!iiiiiiiiiiii!
iiiiiiiiiiiiiiiiiiiiiil
• H
iiiiiiiiiiiiiiiiiiii
Your Home
For repair - in your home - of all major brand appliances,
lawn and garden equipment, or heating and cooling systems,
no matter who made it, no matter who sold it!
For the replacement parts, accessories and
owner's manuals that you need to do-it-yourself.
For Sears professional installation of home appliances
and items like garage door openers and water heaters.
1-800-4-MY-HOM E® Anytime,day or night
(1-800-469-4663) (U.S.A. and Canada)
www.sears.com www.sears.ca
:::::::::::::::::::::::::::::::::::::::::::::: ;:::.: :.::.:.:::.:.:.::: :: :::+::, _: :+:::.__:: :.:.:._ ::x :_>: :::::.:: : :: :::.:.:
Our Home
For repair of carry-in products like vacuums, lawn equipment,
and electronics, call or go on-line for the nearest
Sears Parts and Repair Center.
1-800-488-1222 Anytime, day or night (U.S.A. only)
w_N.s_ar s.P..,om
To purchase a protection agreement (U.S.A.)
:%:::::::::::
iiiililiiiiiiiiiiiiiiiii
ii!iii!ilili_iiii!iiiiii
!i!ili!ililiiiiiiiiii!ii
iiiiiiiiiiiiiiiiiililili
::::::::::::
::::::::::::::::::::::
:::::::::::::::::::::
iiiiiiiiiiiiiiilililiiii
iiiiiiiiiii_ii!iiiiiiiii
or maintenance agreement (Canada) on a product serviced by Sears: :i:iiiiiiii!iii:ili
:::::::::::::::::::::
1-800-.827-6655 (U.S.A.)
P_ra pedir serviciode reparacibn
a domicilio, y para ordenasr_iezas:
1-888-SUJ,-IOGAR
(1-888-784-6427)
Au Canada pourservice en fran_,ais:
1-800-LE-FOYER _c
(1-800-533-6937)
www.sea rs.c_
© Sears, Roebuckand Co.
® Registered Trademark / T_Trademark / sMService Mark of Sears, Roebuck and Co.
® Marca Registrada / TMMama de Fdbrica/ sMMarca de Servicio de Sears, Roebuckand Co.
acMarque de commerce / MDMarque d_posde de Sears, Roebuckand Co.