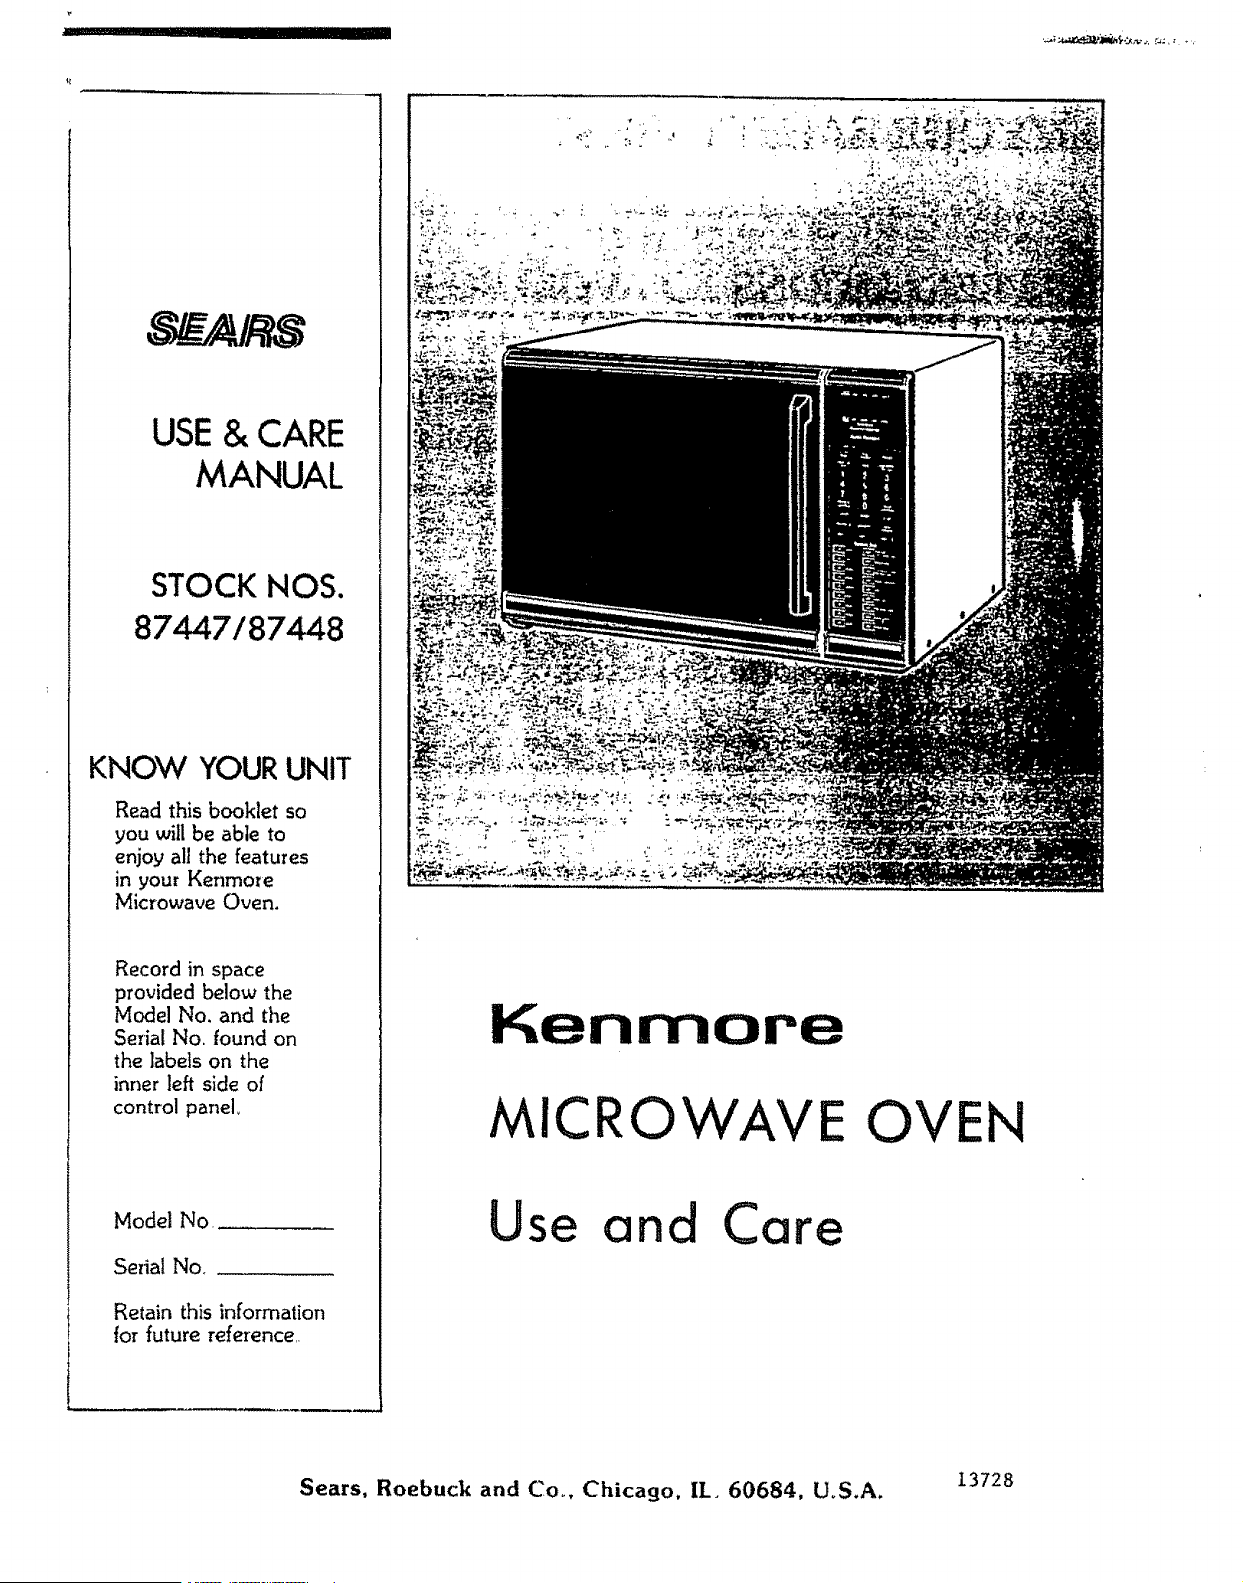
R
USE& CARE
MANUAL
STOCK NOS.
87447/87448
KNOW YOUR UNIT
Read this booklet so
you will be able to
enjoy all the features
in your Kenmore
Microwave Oven.
Record in space
provided below the
Model No. and the
Serial No. found on
the labels on the
inner left side of
control panel_
Model No..
Serial No,
Retain this information
for future reference,.
Kenmore
MICRO
Use and Care
E OVEN
Sears, Roebuck and Co_, Chicago, II_ 60684, UoS.A. 13728
YOUR SAFETY FIRST
2
The Sears Kenmore Microwave Oven, though simple to use, is not a toy° Respect it as an electric cooking
appliance. Become familiarwith microwave energy, its usesand limitations.
PRECAUTIONS TO AVOID POSSIBLE EXPOSURE
TO EXCESSIVE MICROWAVE ENERGY
(a) DO NOT ATTEMPT to operate this oven with the door open since open-door operation can
result in harmful exposure to microwave energy. It is important not to defeat or tamper with the
safety interlocks.
(b) ' DO NOT PLACE any object between the oven front face and the door or allow soil or cleaner
residue to accumulate on sealing surfaces.
(c) DO NOT OPERATE the oven if it is damaged. ]t is particularly important that the oven door
close properly and that there is no damage to the:
(!) DOOR (bent)
(2) HINGES AND LATCHES (broken or loosened)
(3)DOOR SEALSAND SE.AL.INGSURFACES.
(d) THE OVEN SHOULD NOT BE ADJUSTED OR REPAIRED BY AhP!ONE EXCEPT
PROPERLY QUAE!FIED SERVICE PERSONNEL
IMPORTArffr--FOR PROPER AND SAFE USE OF YOUR OVEN
• The oven mustbe level,
• The glass tray must be in the oven during cooking,
• Place the cookwaregently on the glass tray and handle the tray carefullyto avoid pasta'alebreakage._
• When a browning d_shis used, the browning dish bottom mustbe at least 3/16 in_above cookingtray°
Carefully read and follow the instructions for the brown_ins dish. incorrect usagemay causethe glass tray
to break.
• The oven should be thoroughly checked by a trained service technician, should it be dropped or
damaged, before it is operated asain_
• The electrical power cord must be kept dry and must not be pinched or crushed in any way_
• The oven has severalbuilt-in safetyswitchesto make sure the power remains offwhen the door is open.
DO NOT try to defeatthese switches°
DON'TS
* DO NOT attempt to operate this oven with the door open.
- DO NOT run the oven empty without food in it.
, DO NOT cook bacon directly on the slags tray to avoid excessive local heating of the glass tray.
, DO NOT ieave the temperature probe unplugged in the cavity when operating the oven_
, DO NOT let the temperature probe touch the side walls, glass tray or door of the cavity when in use.
o DO NOT plug the pointed end of the temperature probe into the socket inside the cavity_
, DO NOT use the temperature probe in a regular oven,. 'This probe is designed for microwave oven
only,
= DO NOT store burnable material, such as food, in your microwave oven_
, DO NOT heat any types of baby bottles or baby food,, Uneven heating may occur and possibly cause
personal injury.
o DO NOT heat small-necked containers, such as syrup bottles, in the microwave oven..
" DO NOT use this microwave oven for commercial purposes. This Sears Kenmore Microwave Oven is
made for household use only,
SAFETY CERTIFICATION
The Sears Kenmore Microwave Oven is designed and thoroughly tested to meet exactin 9 safety standards,. It
meets UL and FCC requirements and complies with safety performance standards of the U,S Department of
Health and Human Services.,
IMPORTANT SAFETY INSTRUCTIONS
When using electrical appliances basic safety precautions should be followed, includin9 the following:
I 17A'r111_ TTI_ T,I"_
W._I_INII'NL.3--To reduce the risk of
bums, electric shock, fire, injury to persons or
exposure to excessive microwave energy:
5, Install or locate this appliance only in
accordance with the provided installation
instructions.
io Read all instructions before using the appliance_
2. Read and follow the specific "PRECAUTIONS
TO AVOID POSSIBLE EXPOSURE TO EX
CESSIVE MICROWAVE ENERGY" found on
Page 2o
3,. As with most cooking appliances, close
supervision is necessary to reduce the risk of a
fire in the oven cavity.
6_
Some products such as whole eggs, water with
oil or fat, sealed containers and closed glass jars
for example may explode and should not be
heated in this oven_
7 Use this appliance only for its intended use as
described in this manua!.
8, As with any appliance, dose supervision is
necessary when used by children.
NOTE: If a fire should start:
*KEEP THE OVEN DOOR CLOSED
*TURN THE OVEN OFF
*AND DISCONNECT THE POWER CORD
OR SHUT OFF POWER AT THE FUSE OR
CIRCUIT BREAKER PANEL..
a,, Do NOT grossly overcook foods_ As many
grossly overcooked foods will cause fires in
the oven cavity, carefully attend the oven;
especially, if paper, plastic, or other
combustibles are placed inside the oven.
b_
Do NOT store combustible items such as,
bread, cookies, etc. inside the oven because if
lightning strikes the power lines it may cause
the oven to turn ON.
9. Do not operate thisappliance if it has a damaged
cord or plug, if it is not working properly, or if it
has been damaged or dropped.
]'his appliance should be serviced only by
qualified service personnel. Contact nearest
authorized service facility for examination,
repair or adjustmenL
Ii. Do not cover or block any openings on the
appliance.
12 Do not use outdoors,
13. Do not immerse cord or plug in water°
14. Keep cord away from heated surfaces.
C_
Do not use wire twist-ties in the oven. Be sure
to inspect purchased items for wire twist-ties
and remove them before the item is placed in
the ovem
4. ]'his appliance must be grounded Connect only
to properly 9rounded out]eL See "GROUND.
tNG INSTRUC'['IONS" found on Page 6.
15,,
16.
Do not let cord hang over edge of table or
counter.
Whe_l cleaning surfaces of door and oven that
come together on closing the door, use only.
mild, nonoabrasive soaps or detergents applied
with a sponge or soft cloth. (See "Care and
Cleaning" instructions on Page 3!0)
SAVE THESE INSTRUCTIONS
3
TABLE OF CONTENTS
General Instructions
[] Location of Model Number Label 5
S IMPORTANT -- Electrical Grounding Instructions ............................................................ 6
Ill Installation .................................................................................................... 7
n Setting "Time of Day" .......................................................................................... 7
[] Names of Oven Paris ........................................................................................... 8
II Oven Control Panel................................................................................................ 9
Use Instructions
[]EasyUse Chart...................................................................................................10
[] Recall and Change of Settings........................................................................................ II
[] Pause Between Stages ........................................................................................... 11
[] Regular Timer ....................................................................... .,........................ 12
[] Hold Warm ..................................................................................................................... 12
Detailed Directions
n Cooking Guide for "Multi-Power" Settings......................................................................... 13
HI "Hi-Power"/"Mutti-Power" Cooking ............................................................................... !4
[] '¢Temperature Controlled" Cooking .......................................................................... 15--]7
m Temperature Controlled "HI-PoweF'/"Malti-Power" Cooking ............................................ 18
[] Automatic Defrost ................................................................................................... 19--20
II Mtdti,Stage Cooking ............................................................................................. 21--22
[]Delay Start Cooking...................................................................................................23
[]Whole Meal Cooking .................................................................................................23
[] Preset Recipe Cooking ...................................................................................................24--25
*Use of Quantity Key ................................................ ;.......................................................... 24
[] Programming Blew Recipes ................................................................................ 26--29
Utensils ..................................................................................................................... 30
Care and Cleaning .............................................................................................. 31
Questions and Answers............................................................................................... 32--33
Before Calling for Service................................................................................................. 34
Sears Service .............................................................................................................................. 35
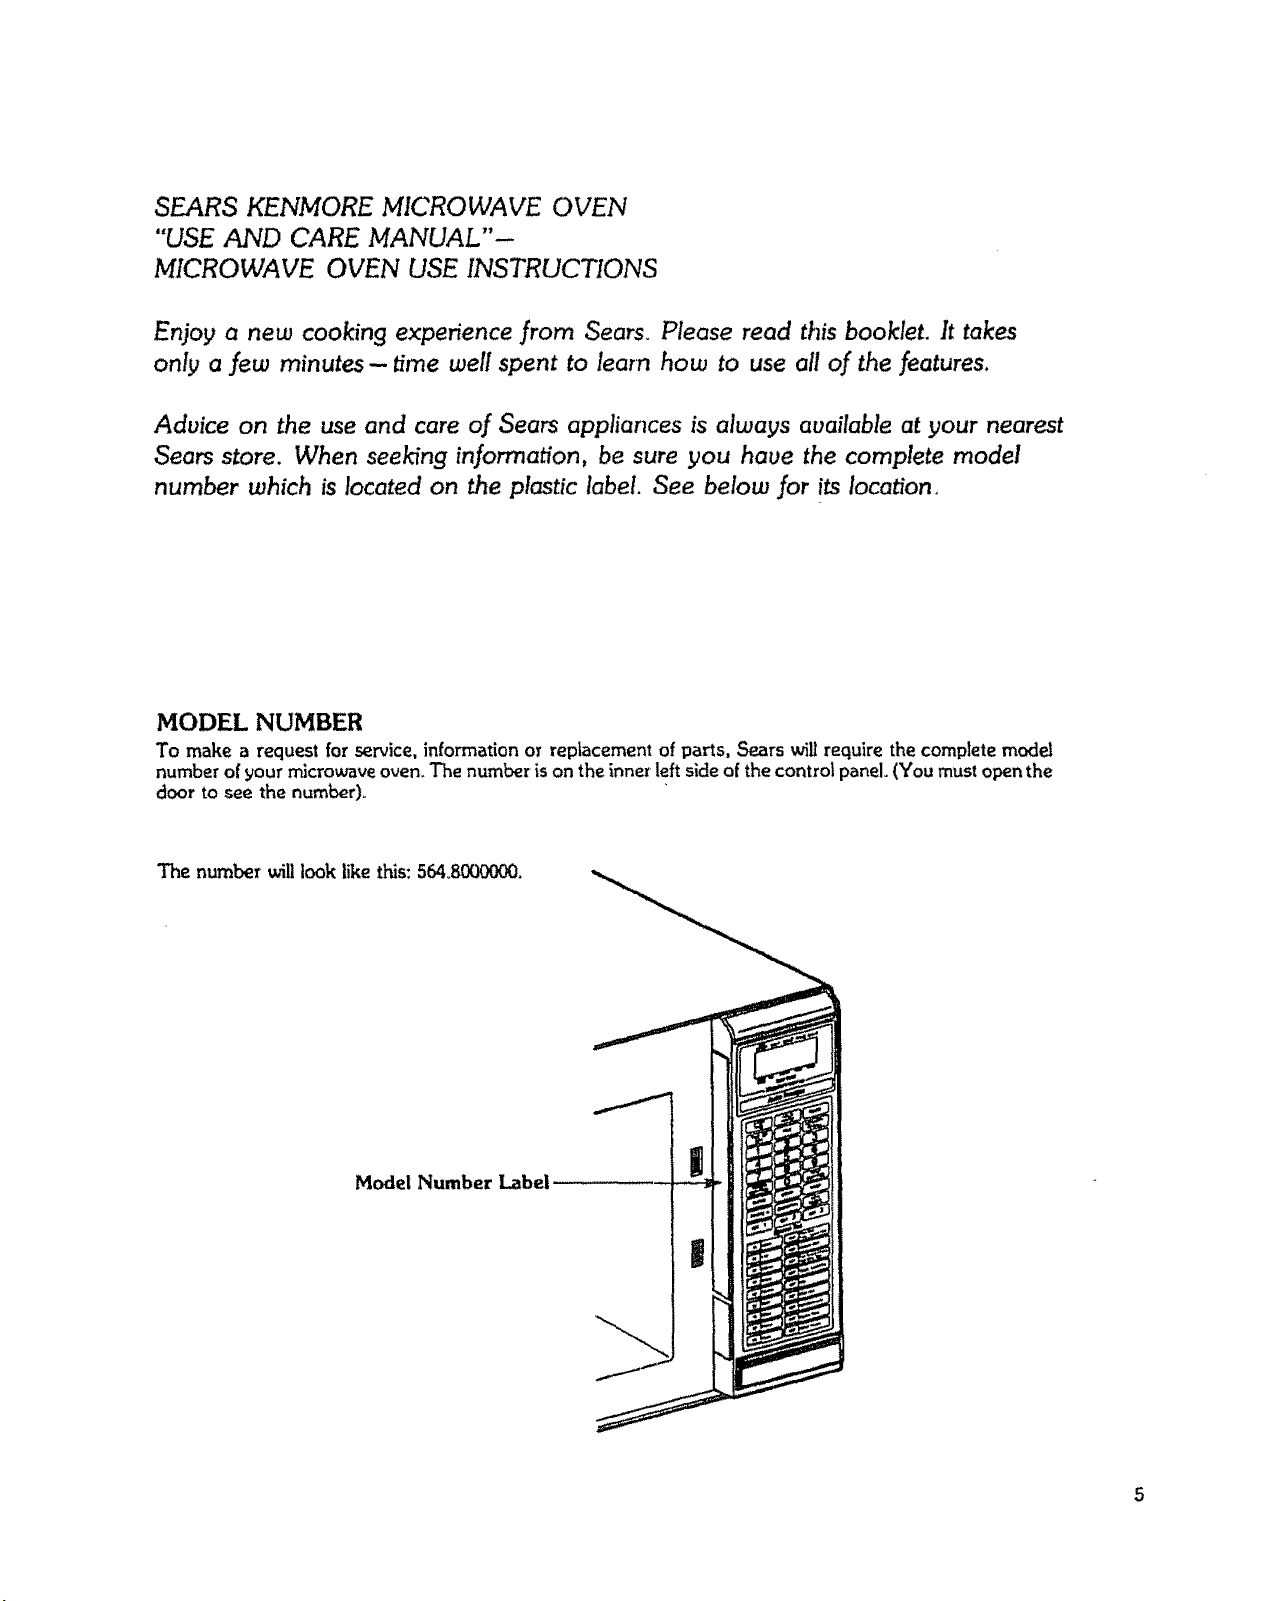
SEARS KENMORE MICROWAVE OVEN
"USE AND CARE MANUAL"-
MICROWAVE OVEN USE INSTRUCTIONS
Enjoy a new cooking experience from Sears. Please read this booklet. It takes
only a few minutes - time well spent to learn how to use all of the features.
Aduice on the use and care of Sears appliances is always available at your nearest
Sears store. When seekT"nginformation, be sure you haue the complete model
number which is located on the plastic label. See below for its location.
MODEL NUMBER
To make a request for service, information or replacement of parts, Sears ,,viii require the complete model
number of your microwave oven. The number is on the inner left side of the control panel. (You must open the
door to see the number).
The number will took like this:564.8000000.
Model Number Label
|
IMPORTANT--
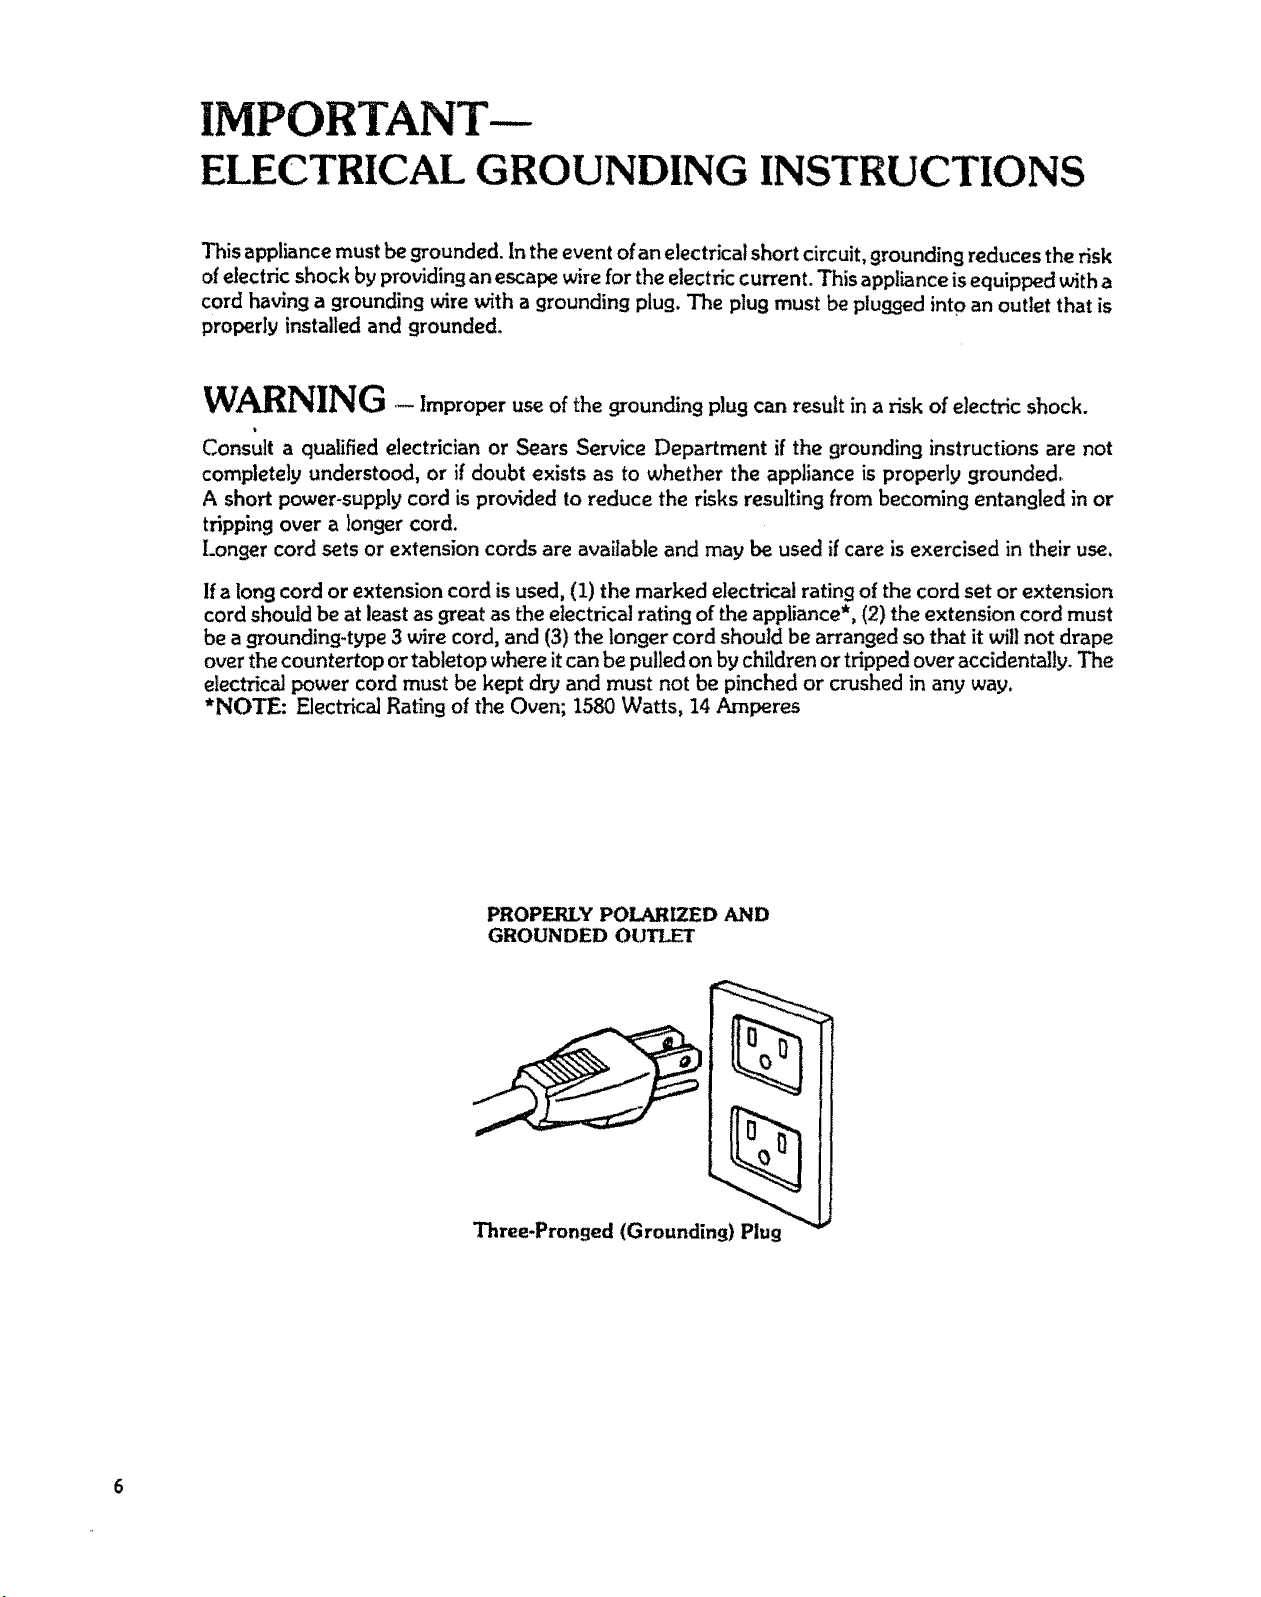
ELECTRICAL GROUNDING INSTRUCTIONS
This appliance must be grounded. In the event of an electrical short circuit, grounding reduces the risk
of electric shock by providing an escape wire for the electric current° This appliance is equipped with a
cord having a grounding wire with a grounding plug. The plug must be plufl.qed into an outlet that is
properly installed and grounded°
WARNING - Improper use of the grounding plug can result in a risk of electric shock.
Consult a qualified electrician or Sears Service Department if the flrounding instructions are not
completely understood, or if doubt exists as to whether the appliance is properly grounded_
A short power-supply cord is provided to reduce the risks resulting from becoming entangled in or
tripping over a longer cord.
Longer cord sets or extension cords are available and may be used if care is exercised in their use.
Ifa long cord or extension cord is used, (1) the marked electrical rating of the cord set or extension
cord should be at least as great as the electrical rating of the appliance*, (2) the extension cord must
be a grounding4!,rpe 3 wire cord, and (3) the longer cord should be arranged so that it will not drape
over the countertop or tabletop where it can be pulled on by children or tripped over accidentally_ The
electrical power cord must be kept dry and must not be pinched or crushed in any way.
*NOTE: Electrical Rating of the Oven; 1580 Watts, 14 Amperes
PROPERLY POLARIZED AND
GROUNDED OUTLET
Three-Pronged (Grounding) Plug
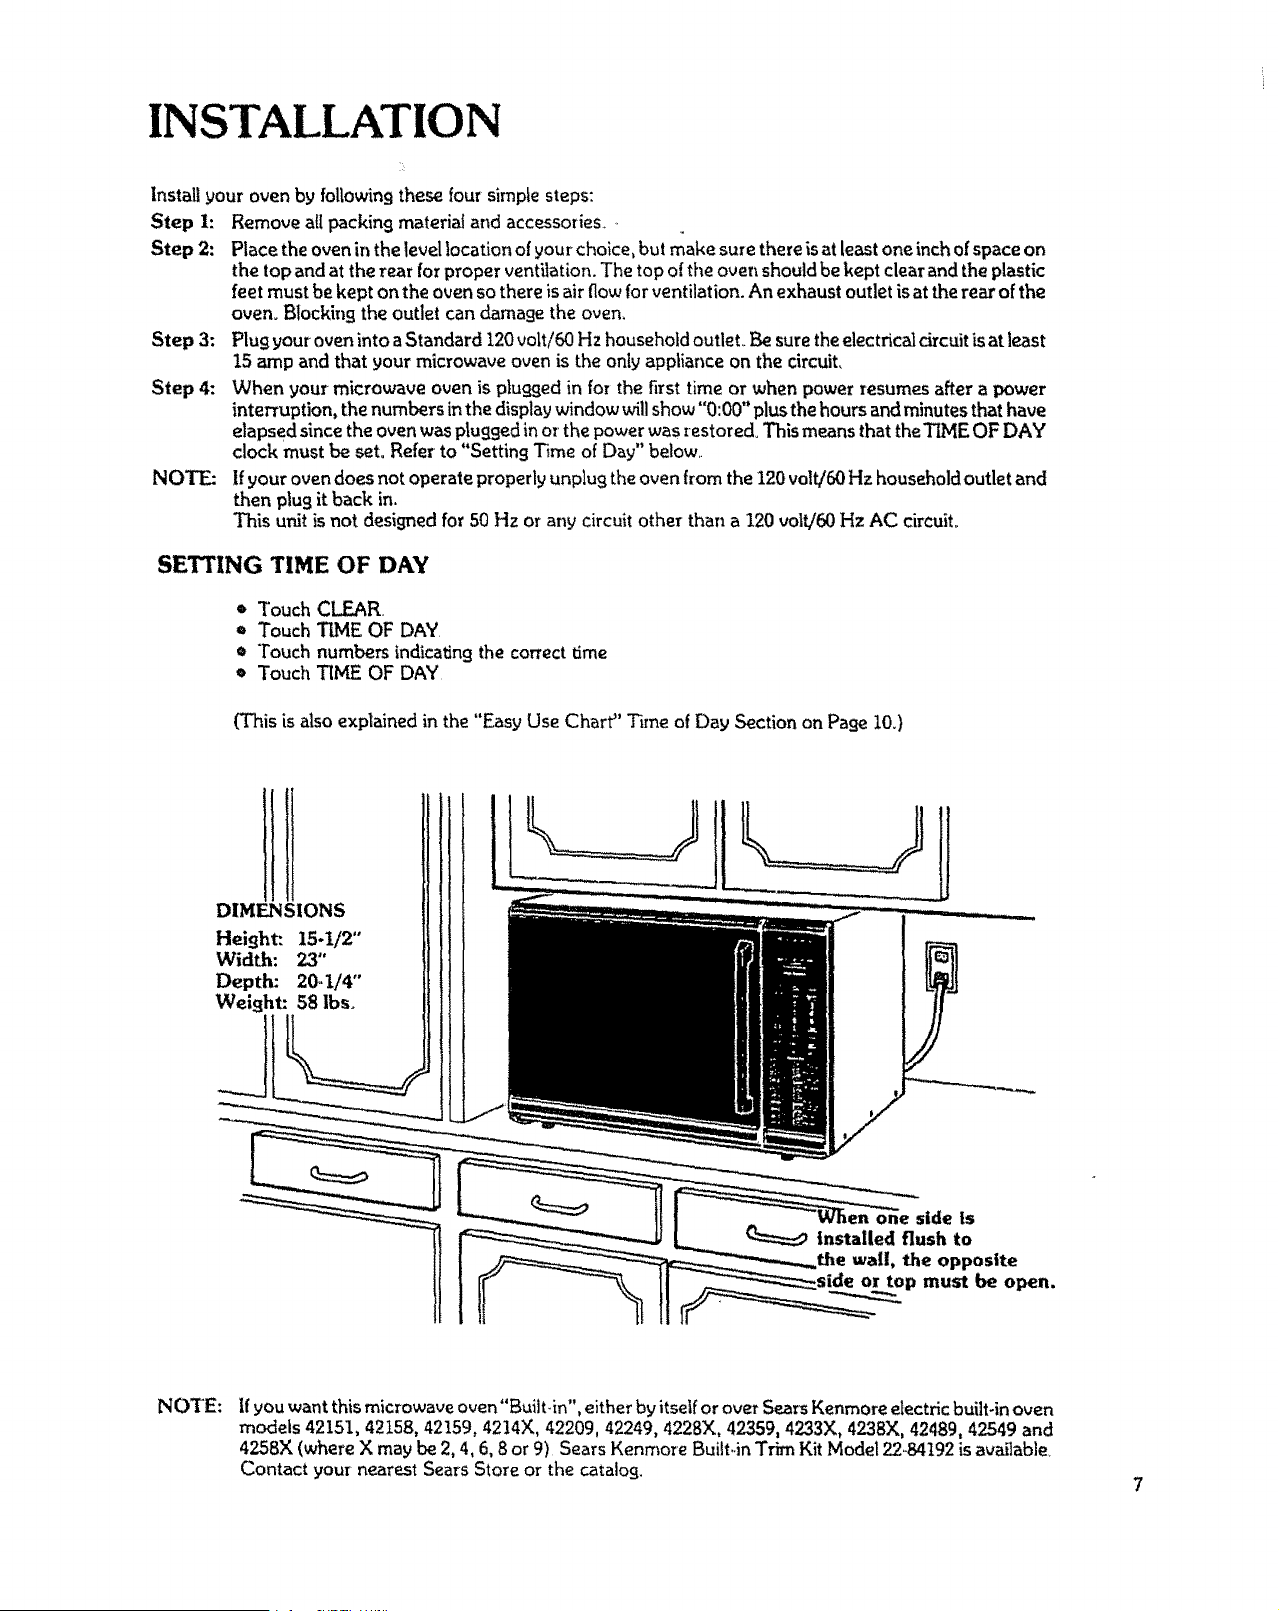
INSTALLATION
Install your oven by following these four simple steps:
Step i: Remove all packing material and accessories
Step 2: Place the oven in the level location of your choice, but make sure there is at least one inch of space on
the top and at the rear for proper ventilation. The top of the oven should be kept clear and the plastic
feet must be kept on the oven so there is air flow for ventilation. An exhaust outlet is at the rear of the
oven, Blocking the outlet can damage the oven.
Step 3: Plug your oven into aStandard 120 volt/60 Hz household outlet. Be sure the electricai drcuit is at least
15 amp and that your microwave oven is the only appliance on the circuit.
Step 4: When your microwave oven is plugged in for the first time or when power resumes after a power
interruption, the numbers in the display window will show "0:00" plusthe hours and minutes that have
elapsed since the oven was plugged in or the power was restored° This means that theTLMEOF DAY
clock must be seL Refer to "Setting T_me of Day" below
NOTE: If your oven does not operate properly unplug the oven from the 120 volt/60 Hz household outlet and
then plug it back in.
This unit is not designed for 50 Hz or any circuit other than a 120 volt/60 Hz AC circuit°
SETTING TIME OF DAY
* Touch CLEAR
* Touch TIME OF DAY
* Touch numbers indicating the correct time
= Touch TIME OF DAY
(This is also explained in the "Easy Use Chart" Time of Day Section on Page I0.)
DIMENSIONS
Height:. 15-1/2"
Width: 23"
Depth: 20_1/4"
Weight: 58 lbs.
NOTE:
If you want this microwave oven"Built-in", either by itsetf or over Sears Kenmore electric built-in oven
models 42151, 42158, 42159, 4214X, 42209, 42249, 4228X, 42359, 4233X, 4238)(, 42489, 42549 and
4258X (where X may be 2, 4, 6, 8 or 9) Sears Kenmore Built-in Trim Kit Model _9,84t92 is available_
Contact your nearest Sears Store or the catalog.
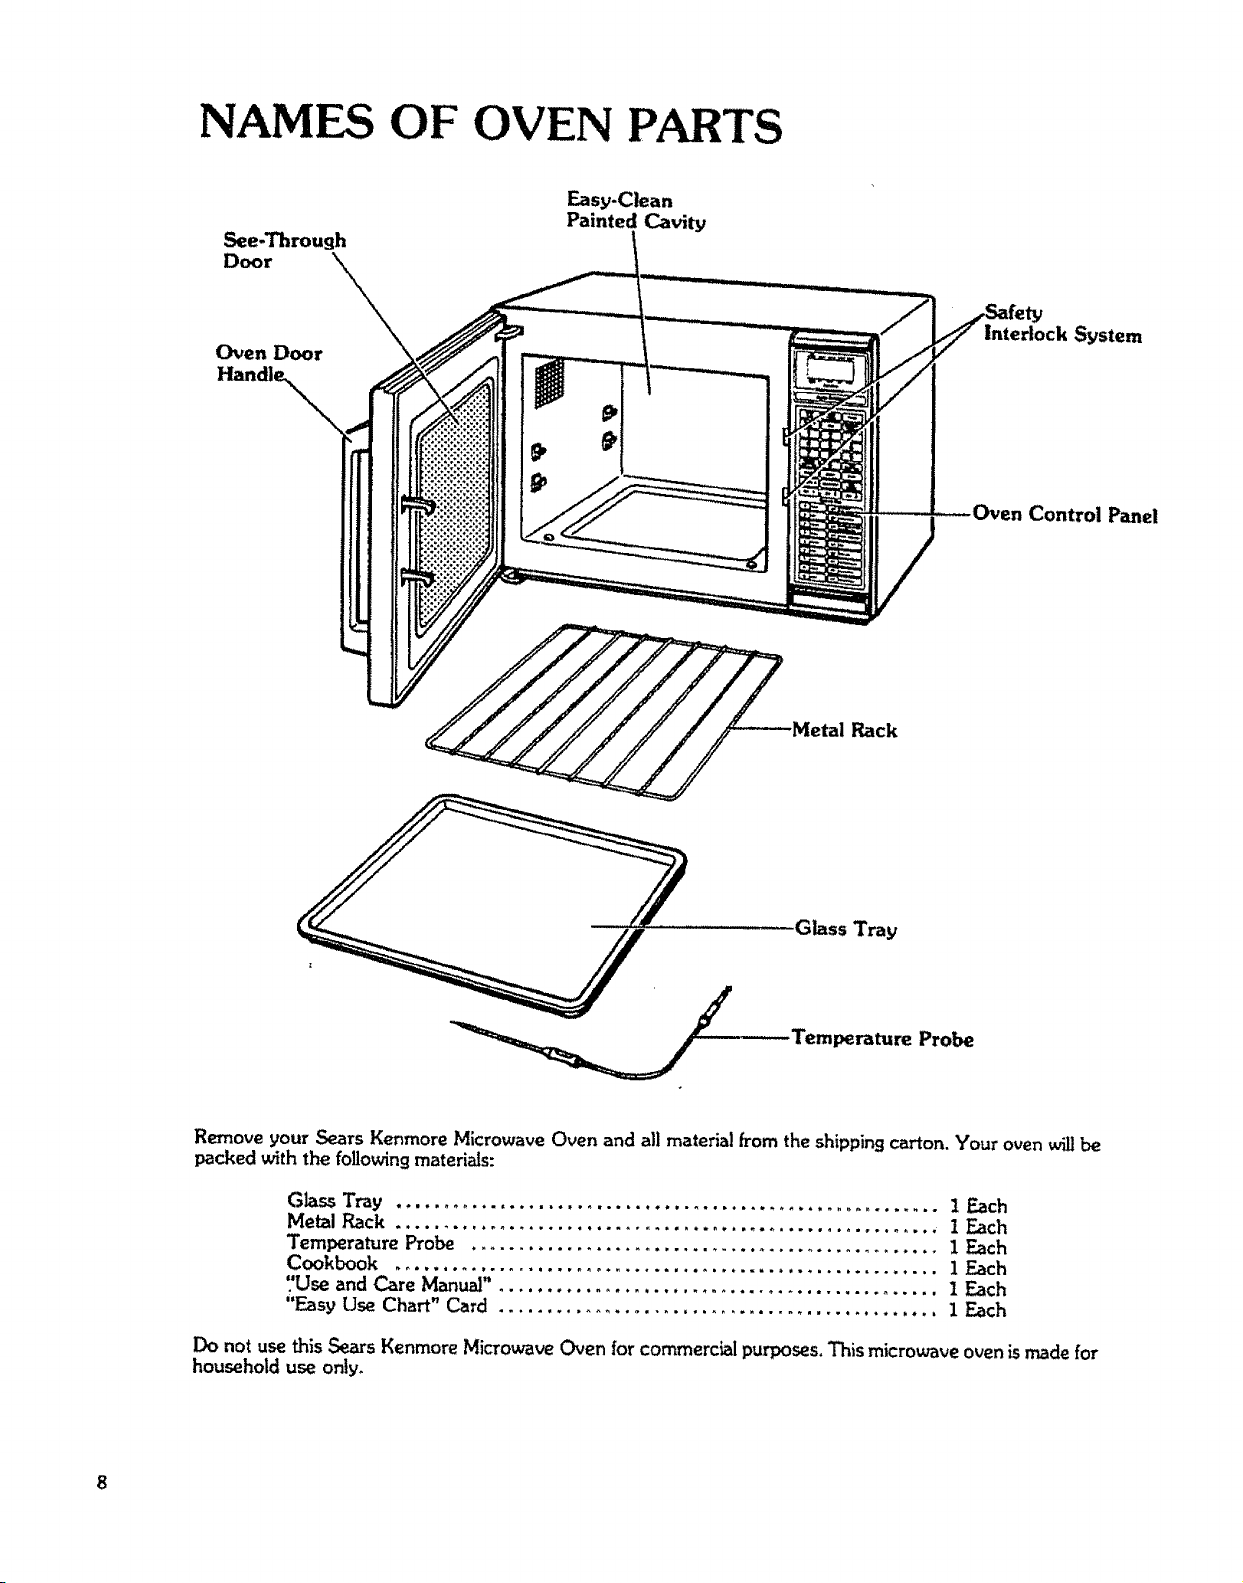
NAMES OF OVEN PARTS
See-Through
Door X_
Oven Door
Easy-Clean
Painted Cavity
Interlock System
Control Panel
_ _Metal Rack
Glass Tray
Temperature Probe
Remove your Sears Kenmore Microwave Oven and all material from the shippingcarton. Your oven willbe
packed with the followingmaterials:
Glass Tray ......................................................... t Each
Metal Rack ......................................................... I Each
Temperature Probe ................................................. I Each
Cookbook ......................................................... i Each
7Use and Care Manual". ............................................. 1 Each
"Easy Use Chart" Card .............................................. 1 Each
Do not use this Sears Kenmore Microwave Oven for commercial purposes. This microwave oven is made for
household use only.
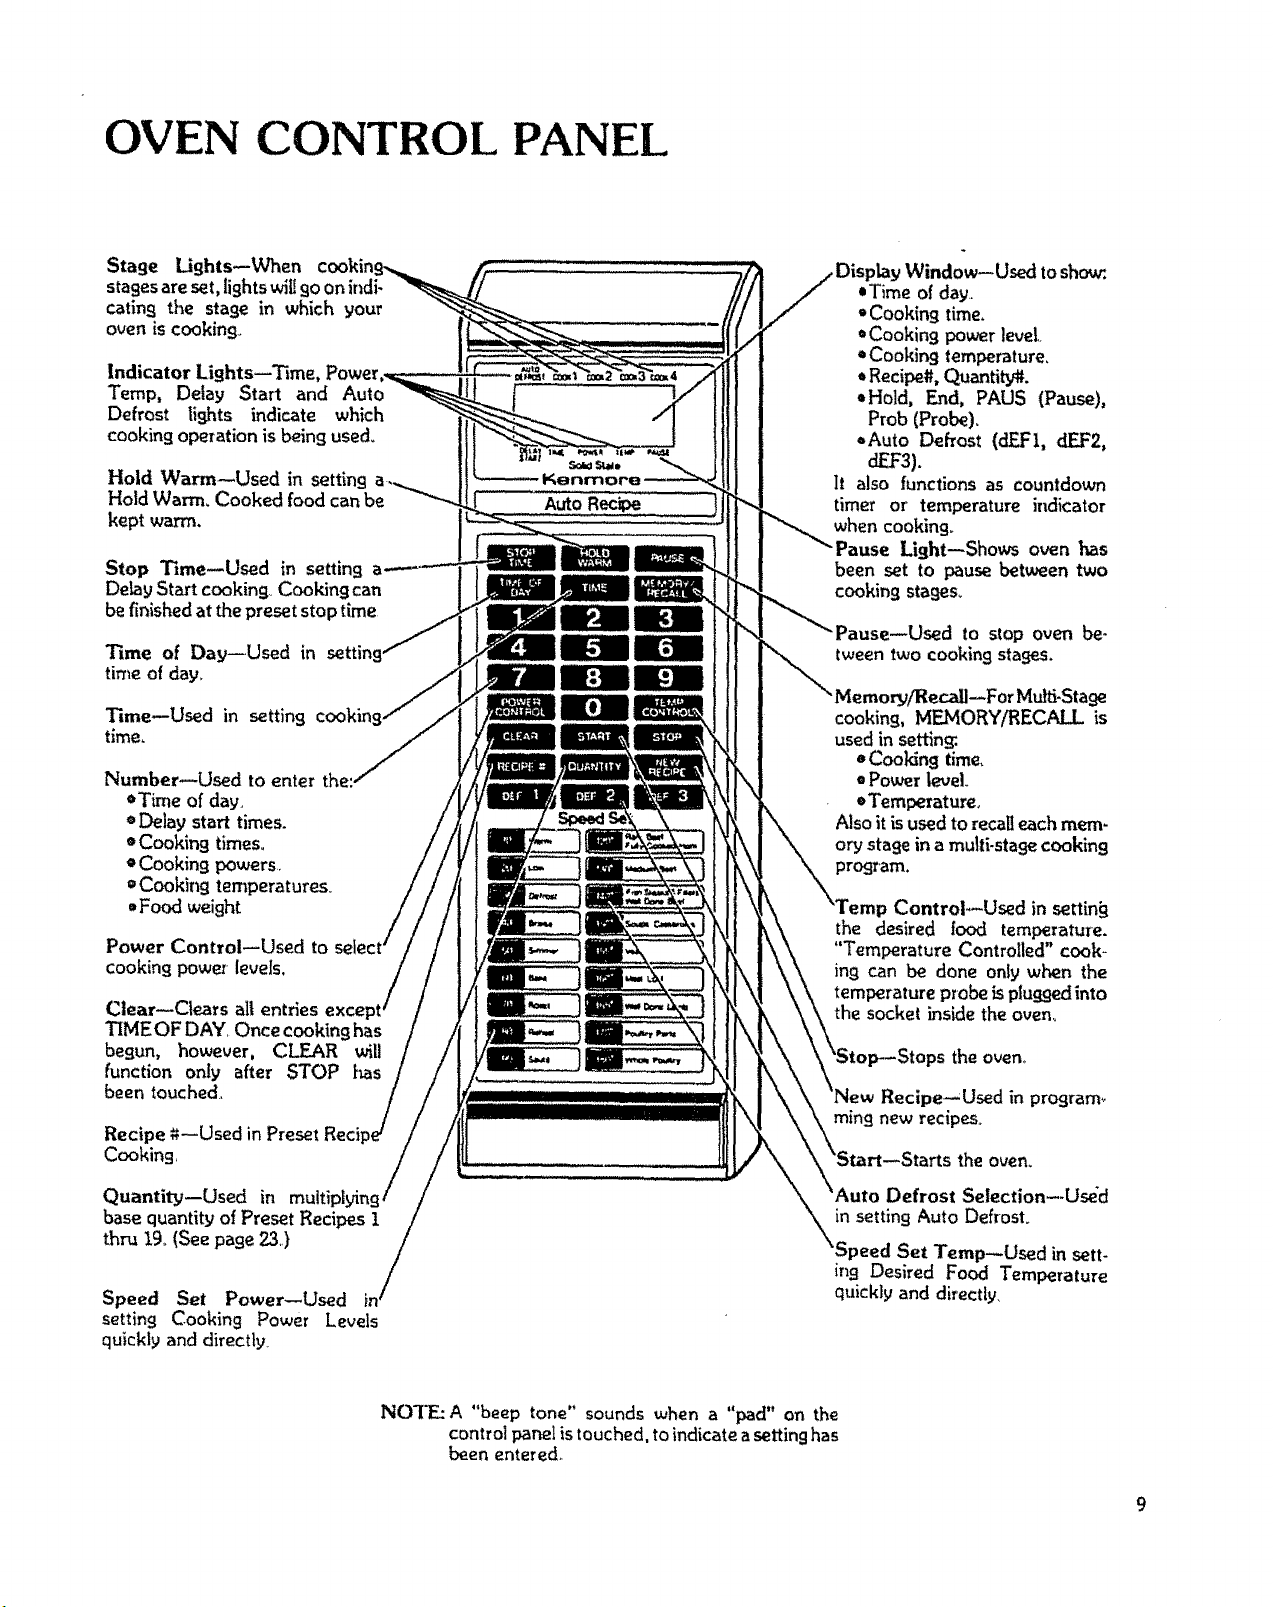
OVEN CONTROL PANEL
Stage Lights--When co,kin
stages are set, lights wiUgo on indi-
cating the stage in which your
oven is cooking.
Indicator Lights--Time,
Temp, Delay Start and Auto
Defrost lights indicate which
cooking operation is being used.
Hold Warm--Used in setting
Hold Warm. Cooked food can be
kept warm.
Stop Time--Used in setting
Delay Start cooking, Cooking can
be finished at the preset stop time
Time of Day--Used in settin
time of day°
[0]
Time--Used in setting
time,
Number--Used to enter the..
• Time of day.
¢ Delay start times.
• Cooking times.
o Cooking powers
=Cooking temperatures,
, Food weight
Power Control--Used to
cooking pow_ levels,
Clear--Clears all entries
TIMEOF DAY Once cooking has
begun, however, CLEAR will
function only after STOP has
been touched.
Recipe *t--Used in Preset Reci
Cooking,
Quantity--Used in multi
base quantity of Preset Recipes 1
thru 19.(See page 23,)
Speed Set Power--Used
setting Cooking Power Levels
quickly and directly
AutoRecipe )
,Window--Used to sh_.
,Time of day
"Cooking time.
*Cooking power love[
, Cookin9 temperature,
, Recipe#. Quantity_.
,Hold, End, PAUS (Pause),
Prob (Probe).
_,Auto Defrost (dEF1, dEF2,
dEF3).
It also functions as countdown
timer or' temperature indicator
when cooking_
Light--Shows oven has
been set to pause between two
cooking stages_
z--Used to stop oven be-
tweentwo cooking stages.
ForMulfi-Stafle
cooking, MEMORY/RECALL is
used in setting:.
=Cooking time,
• Power level.
=Temperature,
Also it is used to recalleachmere-
or,,/stage in a multi-stage cooking
JControl--Used in settin_
the desired |ood temperatme.
"Temperature Controlled" cook-
ing can be done onlyw_'anthe
temperatureprobeispluggedinto
the socket inside the oven,,
the oven_
Recipe--Used in program_
rain9 new recipes
theoven,
Defrost Selection--Used
in setting Auto Defrost
'Speed Set Temp_Osed in sett-
in9 Desired Food Temperature
quickly and directly.
NOTE: A "beep tone" sounds when a "pad" on the
control panel is touched, to indicate a setting has
been entered.
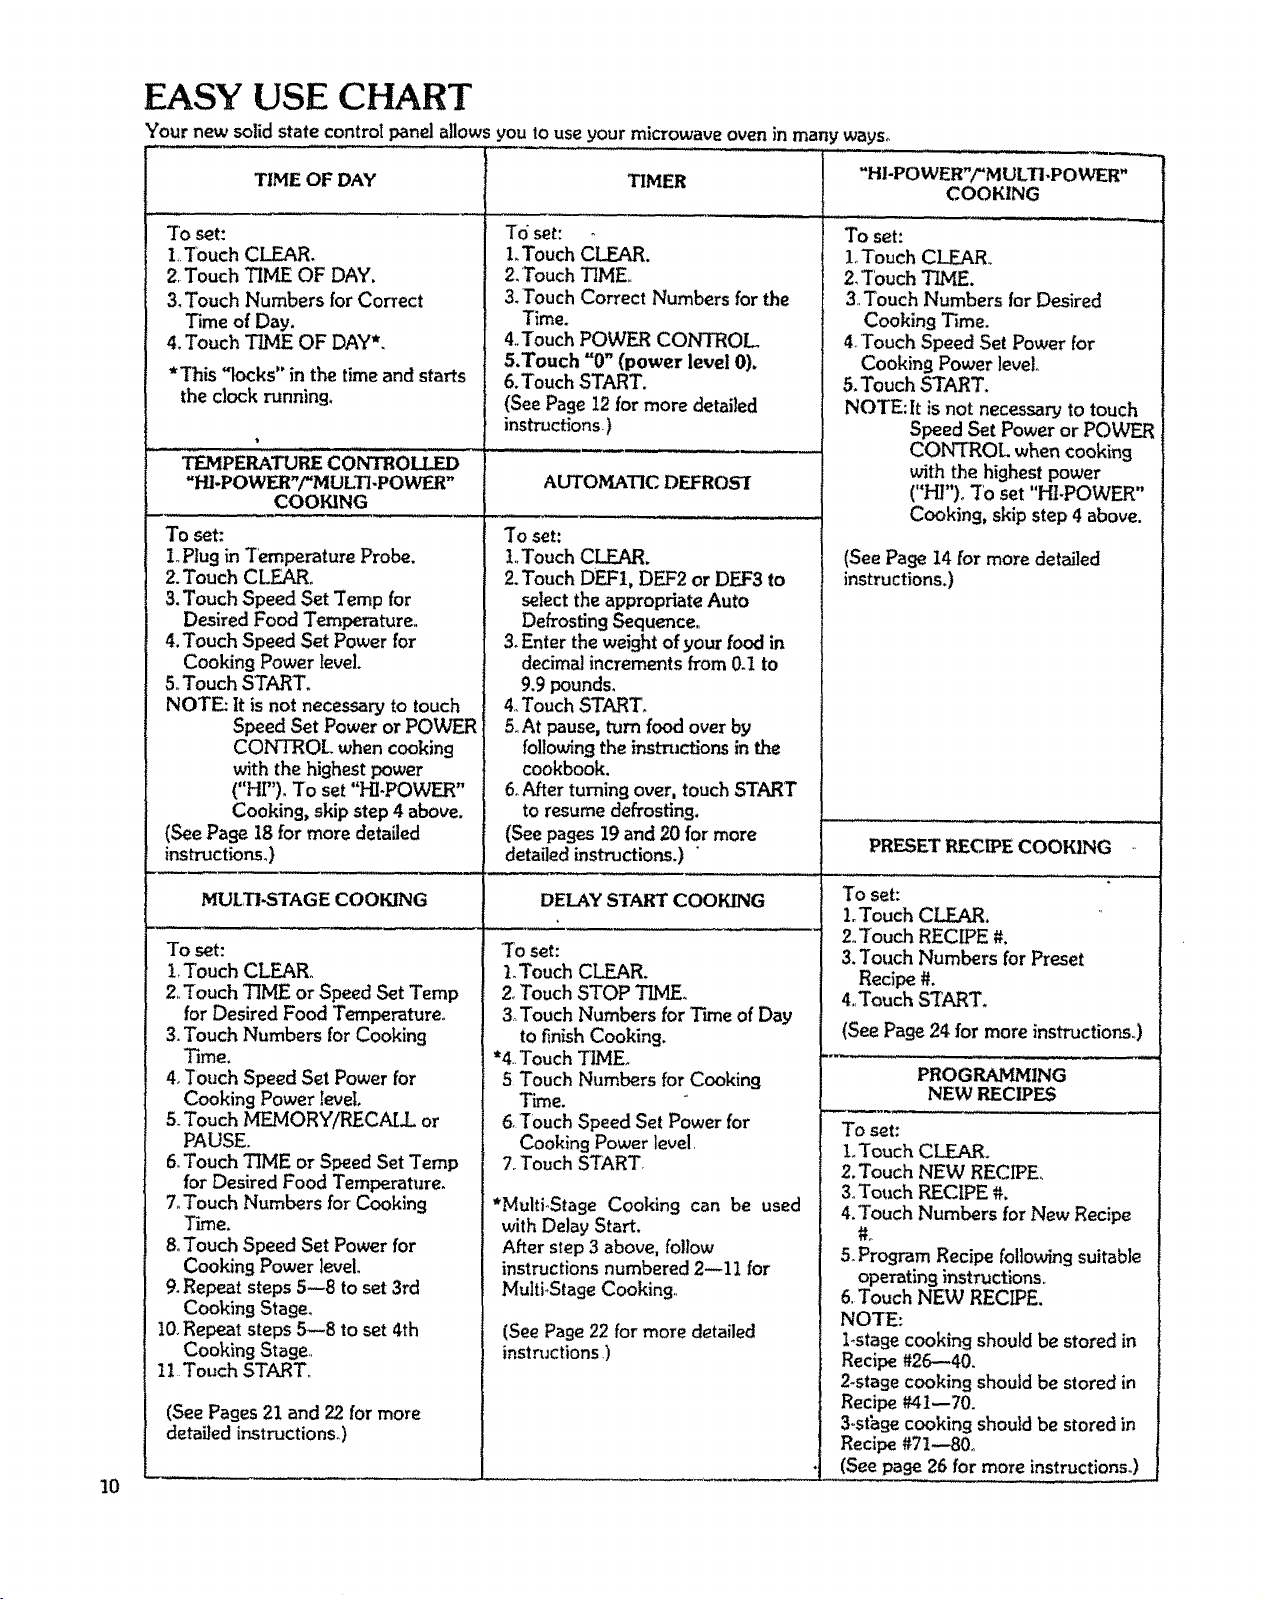
EASY USE CHART
Your new solid state controlpanelallows you touse your microwaveoven in manyways_
10
TIME OF DAY
To set:
1,Touch CLEAR,
2.Touch TBALEOF DAY.
3,Touch Numbers for Correct
Time of Day.
4,Touch TIME OF DAY*,
*This "locks" in the time and starts
the clock running.
TEMPERATUP_ECONTROLLED
"HLPOWF_"/"MUKTLPOWER"
COOKING
To set:
1oPlug in Temperature Probe.
2.Touch CLEARo
3.Touch Speed Set Temp for
Desired Food Temperature,,
4. Touch Speed Set Power for
Cooking Power level.
5.,Touch START.
NOTE: It is not necessary to touch
Speed Set Power or POWER
CONTROL when cooking
with the highest power
("HF'), To set "HI-POWER"
Cooking, skip step 4 above.
(See Page 18 for more detailed
instructions.)
MULTI-STAGE COOKING
To set:
1.Touch CLEAR°
2,,Touch "lIME or Speed Set Temp
for Desired Food Temperature.
3.Touch Numbers for Cooking
Time.
4.Touch Speed Set Power for
CookingPower level
5.Touch MF-MORYARECALL or
PAUSE.
6.Touch TIME or Speed Set Temp
for Desired Food Temperature.
7_Touch Numbers for Cooking
TLme.
8.Touch Speed Set Power for
CookingPower level.
9.Repeat steps5--8 to set 3rd
Cooking Stage.
10.Repeat steps 5--8 to set 4th
Cooking Stage.,
11 Touch START.,
(See Pages 21 and 22 for more
detailed instructions°)
TIMER
To set:
1.Touch CLEAR,
2,Touch TIME,
3,Touch Correct Numbers for the
Time.
4.,Touch POWER CONTROL
5,Touch "0" (power level 0).
6.Touch START.
(SeePage 12 for more detailed
instructions.)
AUTOMATIC DEFROS'I
To set:
l..TouchCLEAR.
2.Touch DEF1, DEF2 or DEF3 to
selectthe appropriate Auto
Defrosting Sequence.
3.Enter the weightof your food in
decimal increments from 0d to
9.9 pounds.
4.Touch START,
5,At pause,turn food over by
following the inst-mctions in the
cookbook.
6oAfter turning over, touchSTART
to resume defrosting.
(See pages19 and 20 for more
detailed instructions.) "
DELAY START COOKING
"Toset:
1.Touch CLEAR.
2,Touch STOP 3_VIE,
3 Touch Numbers for Time of Day
to finish Cooking.
*4.Touch TIME,
5 Touch Numbers for Cooking
Time.
6,Touch Speed Set Power for
Cooking Power level.
7. Touch START,
*MultioStage Cooking can be used
with Delay Start.
After step 3 above, follow
instructions numbered 2--11 for
MultioStageCooking..
(See Page22 for more detailed
instructions )
"HI-POWER"/"M ULTI-POWER"
COOKING
To set:
1oTouch CLEAR..
2, 'TouchTIME,
3 Touch Numbers for Desired
Cooking Time.
4_Touch Speed SetPower for
CookingPower level,
5. Touch START,
NOTE: It is not necessary to touch
Speed Set Power or POWER
CONTROL whencooking
with the highest power
("HP')o7'o set "HI-POWER"
Cooking,skip step 4 above.
PRESET R_ECIPE COOKING
To set:
L Touch CLEAR.
2, Touch RECIPE #.
3. Touch Numbers for Preset
Recipe#.
4,,Touch START,
(See Page 24 for more instructions.,)
PROGRAMJ_ING
NEW PJECIPES
To set:
L Touch CLEAR,
2,Touch NEW RECIPE,
3,Touch RECIPE #.
4,Touch Numbers for New Recipe
5_Program Recipe following suitable
operating instructions,
6, Touch NEW RECIPE.
NOTE:
Lstage cooking shouldbe stored in
Recipe #26--40.
2-stage cooking shouldbe stored in
Recipe #41--70.
3,,sthgecooking should be stored in
Recipe#71--80_
(See page 26 for more instructions.)
(See Pa_e 14 for more detailed
instructions,)
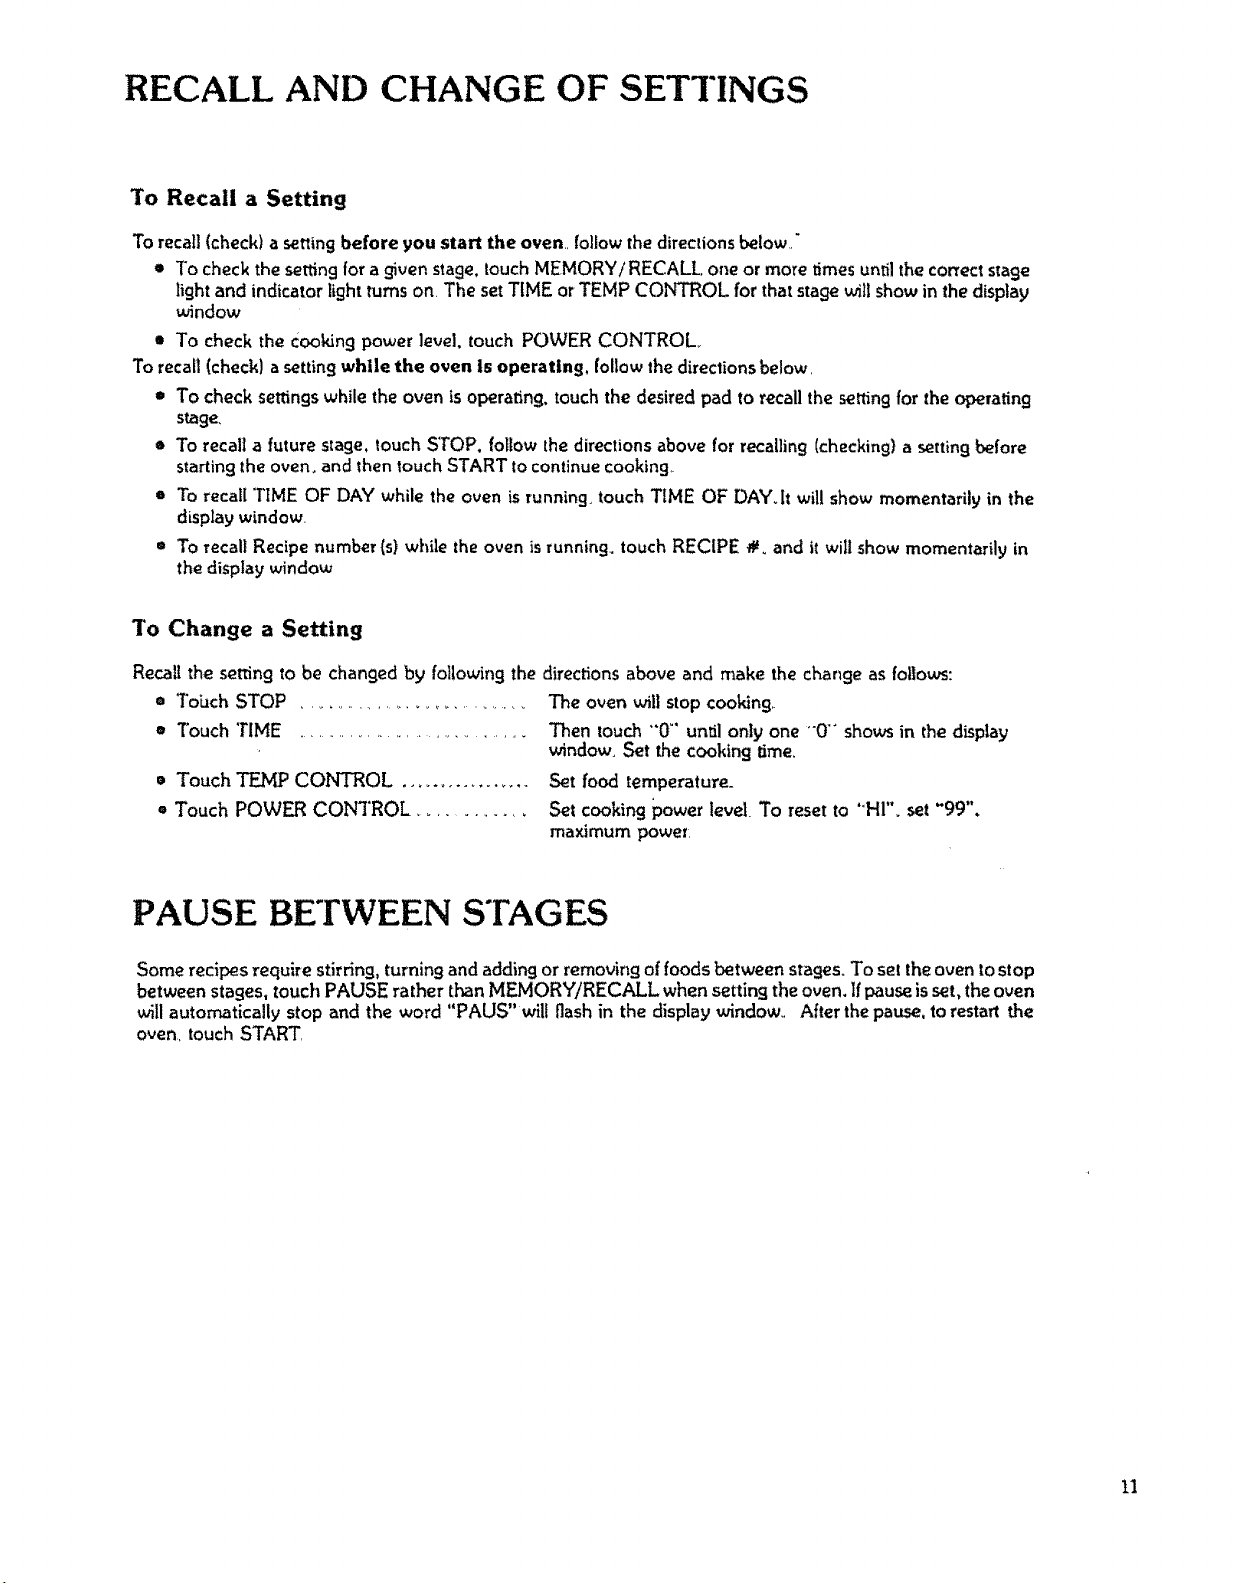
RECALL AND CHANGE OF SETTINGS
To Recall a Setting
To recall(check) a setting before you start the oven follow the directionsbelow_,"
* To check the setting for a given stage,touch MEMORY/RECALL one or more times until the correct stage
light and indicator lightturns on. The setTIME or TEMP CONTROL for that stage will show in thedisplay
window
* To check the Cooking power level, touch POWER CONTROL
To recall (check) a setting while the oven Is operating, follow the directions below,
* To check settings while the oven is operating, touch the desired pad to recall the retting for the operating
stage,
o To recall a future stage, touch STOP. follow the directions above for recalling (checking} a setting before
starting the oven. and then _ouch START to continue cooking
* To recall TIME OF DAY while the oven is running touch TIME OF DAY.It will show momentarily in the
display window.
= To recall Recipe number (s) while the oven is running, touch RECIPE #. and it will show momentarily in
the display window
To Change a Setting
* Touch TEMP CONTROL .................
* Touch POWER CONTROL .............
Recall the setting to be changed by following the directions above and make the change as follows:
= Tobch STOP ............................... The oven will stop cooking..
* Touch 'rIME ................................... Then touch "0 °' until only one "0"" shows in the display
window. Set the cooking time.
Set food temperature_
Set cooking power level. To reset to "HI"_ set "99",
maximum power.
PAUSE BETWEEN STAGES
Some recipes require stirring, turning and adding or removing of foods between stages. To set the oven to stop
between stages, touch PAUSE rather than MEMORY/RECALL when setting the oven. If pause is set, the oven
will automatically stop and the word "PAUS" will flash in the display window.. After the pause, to restart the
oven,,touch START
11
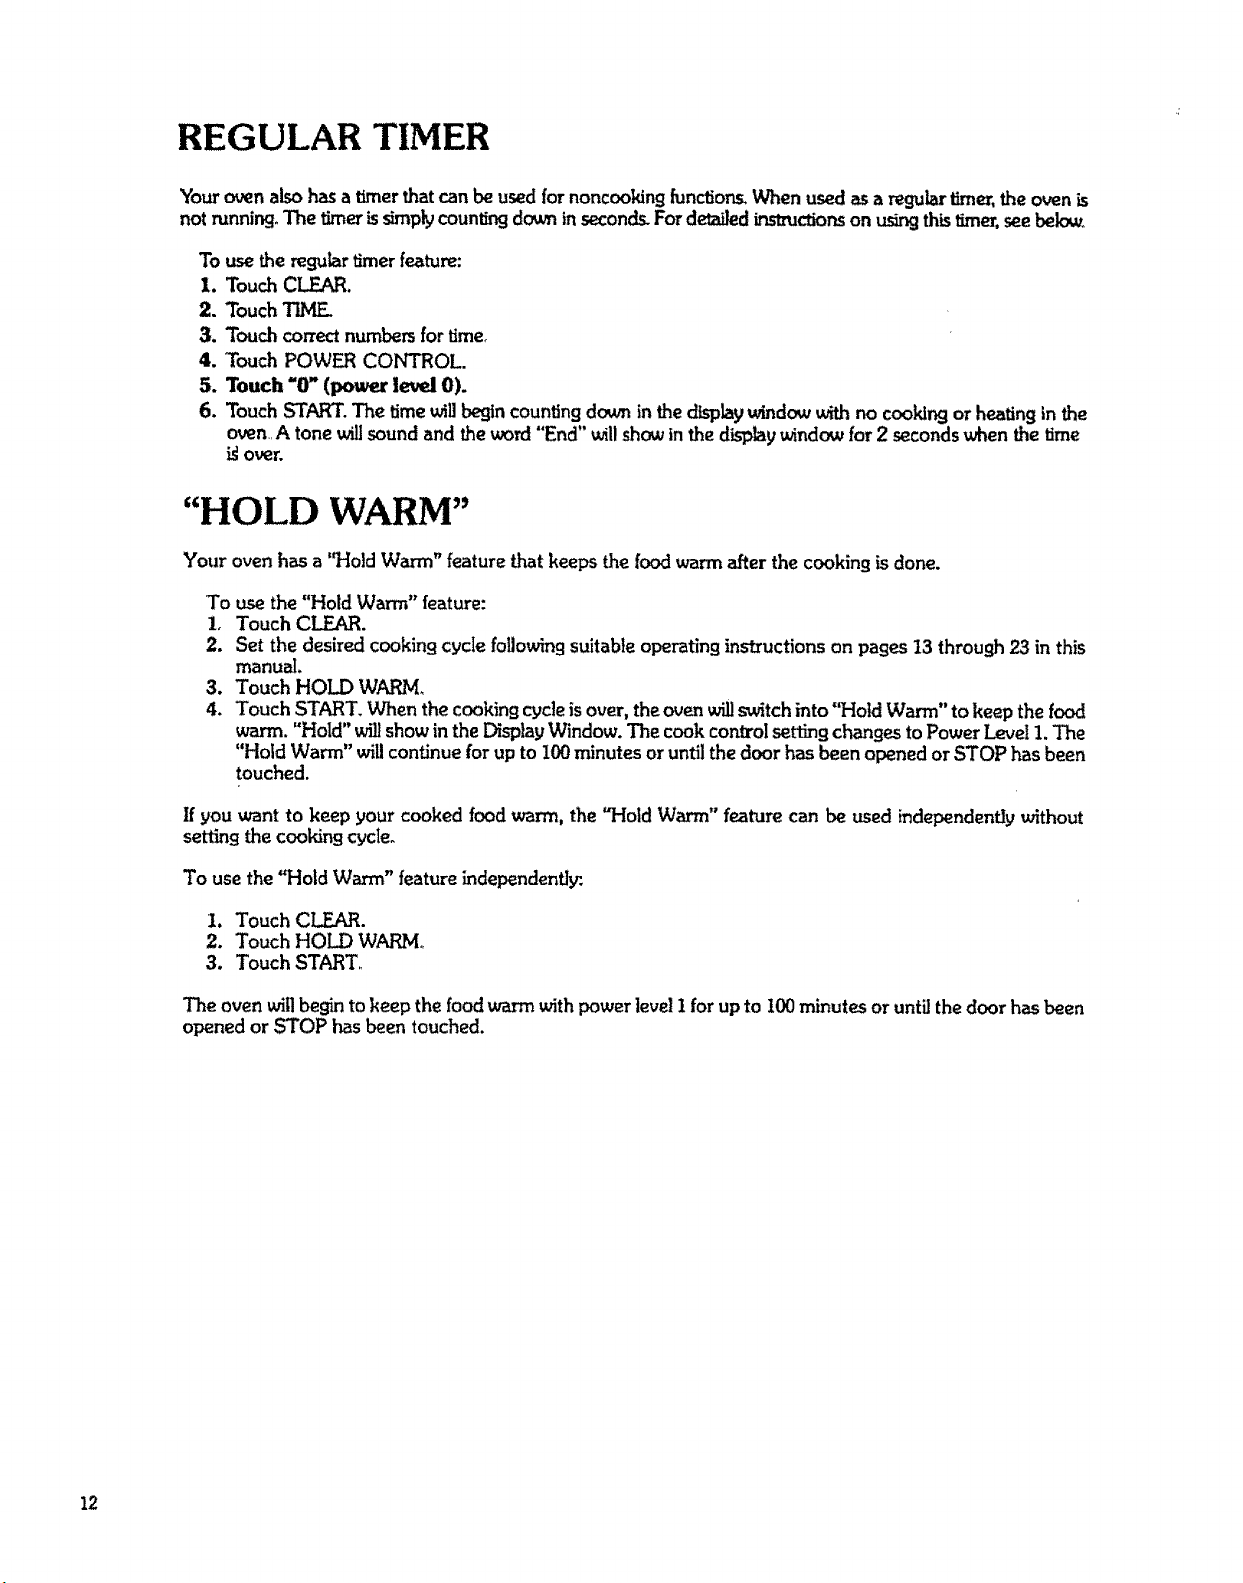
REGULAR TIMER
Yourovenalsohasa timerthatcanbe usedfornoncooking[unctions,When usedasa regulartimer,theovenis
notrunning.The timerissimplycountingdc_,ninseconds.FordetailedLrLst_ctionson usingthis timer,seebelow.
To use the regular timer feature:
1. Touch CLEAR.
2. Touch TIME.
3. Touch correct numbers for time.
4. Touch POWER CONTROL.
5. Touch "O"(power level0).
6. TouchSTART. The time willbegin countingdown in the displaywindow with no cooking or heating in the
oven A tone willsoundand the word"End" willshow in the displaywindowfor 2 secondswhen thetime
igover.
"HOLD WARM"
Your oven has a "Hold Warm" feature that keeps the food warm after the cooking is done.
To use the "Hold Warm" feature:
i. Touch CLEAR.
2. Set the desired cooking cycle following suitable operating instructions on pages t3 through 23 in this
manual.
3. Touch HOLD WARM.
4. Touch START. When the cooking cycle is over, the _Jen willswitch into "Hold Warm" to keep the food
warm. "Hold" willshow in the Di_tav Window. The cook control setting changes to Power Level 1. "The
"Hold Warm" will continue for up to 100 minutes or until the door has been opened or STOP has been
touched.
If you want to keep your cooked foodwarm, the "HoldWarm" feature can be used independendy without
settingthe cookingcycle.
To use the "Hold Warm" feature independentt!r.
I. Touch CLEAR.
2. Touch HOLD WARM,
3. Touch START,
The oven will begha to keep the food wasm with power level I for up to I00 minutes or until the door has been
opened or STOP has been touched.
12
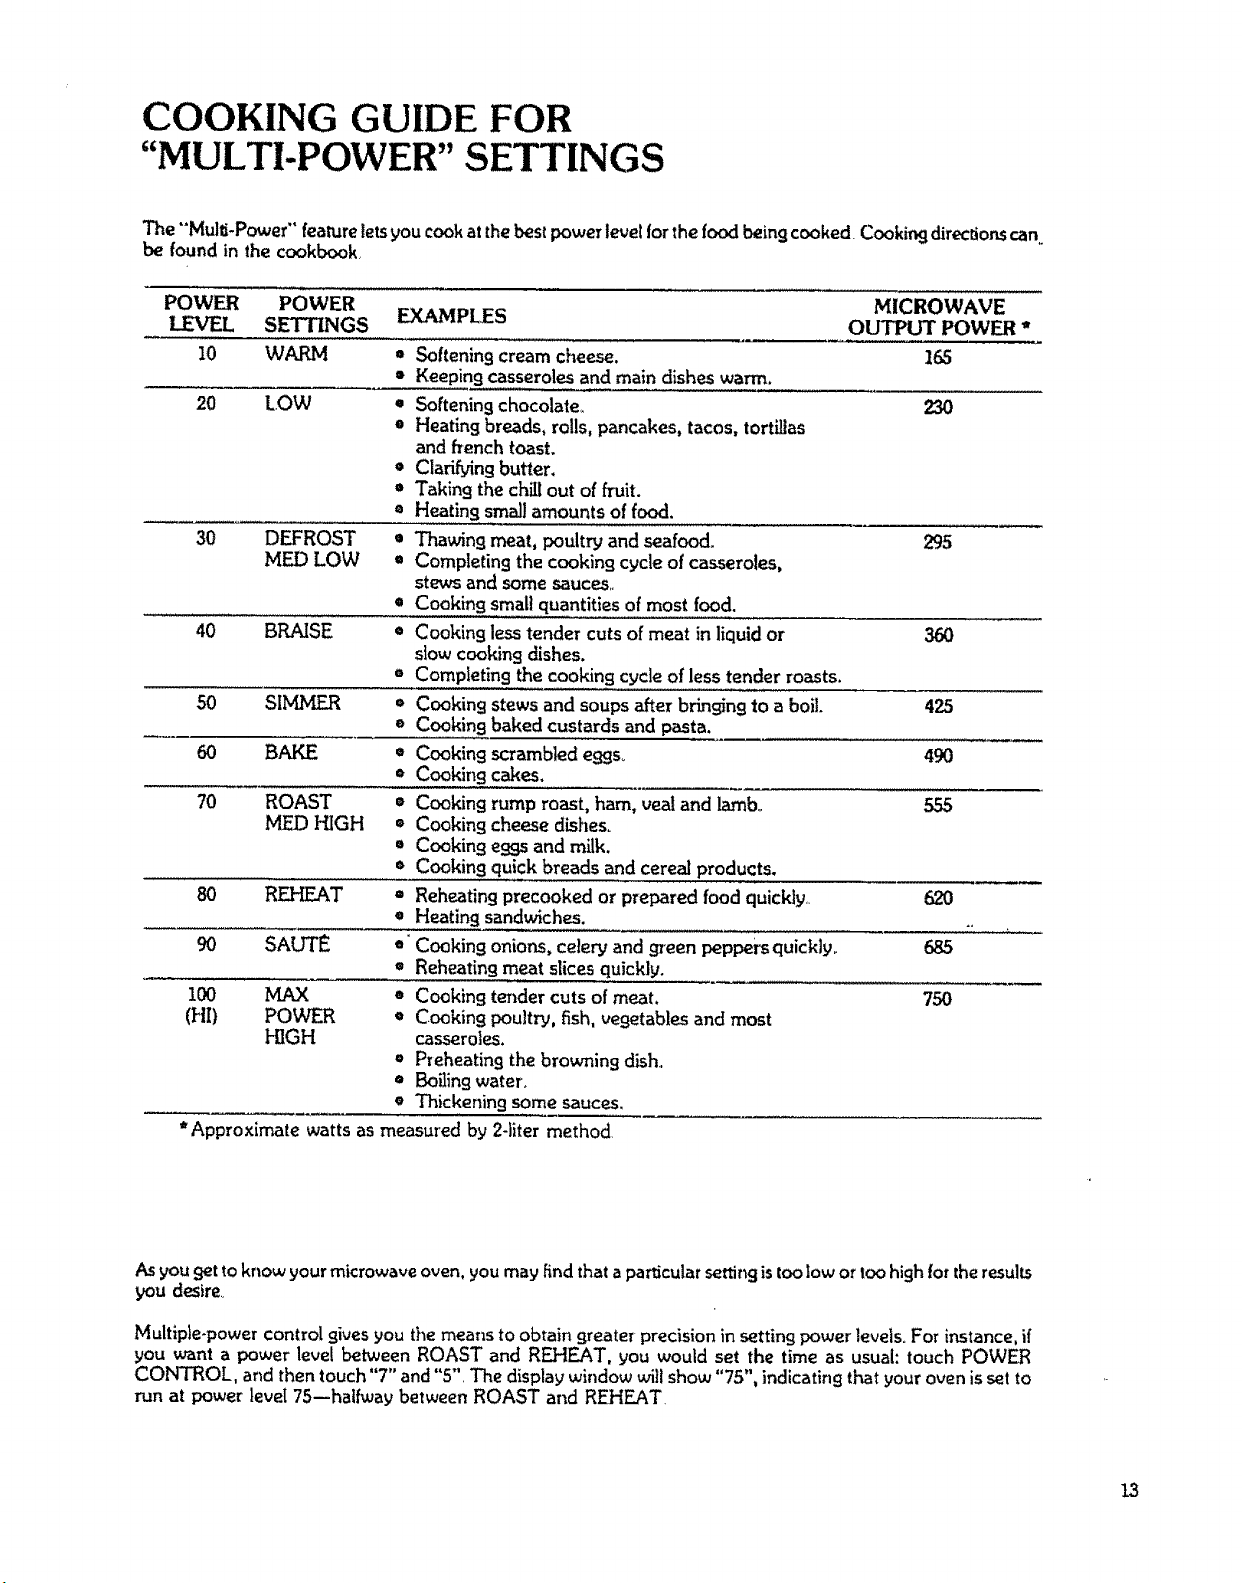
COOKING GUIDE FOR
"MULTI-POWER" SETTINGS
The "'Mulli-Power" featureletsyou cookatthe bestpower level for the food beingcooked Cookingdirection.scan
be found in thecookbook
POWER POWER MICROWAVE
LEVEL SETTINGS EXAMPLES
OUTPUT POWER *
10 WARM • Softening cream cheese. 165
• Keeping casserolesand main dishes warm.
20 LOW * Softening chocolate_ 230
• Heatingbreads, rolls, pancakes, tacos, tortillas
andfrench toast.
• Clarifying butter.
= Taking the chill out of fruit.
= Heating smallamounts offood.
30 DEFROST • Thawing meat, poultry and seafood. 295
MEI) LOW * Completing the cooking cycle of casseroles,
stews and somesauces,,
e Cooking small quantitiesof most food,
40 BRAISE * Cooking less tender cuts of meat in liquid or 360
slow cooking dishes.
=' Completing the cooking cycle of lesstender roasts.
50 SIIVLMER * Cookingstews and soups after bringingto a boil. 425
e Cookingbaked custards and pasta.
60 BAKE * Cooking scrambled eggs,. 490
• Cookir!gcakes.
70 ROAST = Cooking rump roast, ham, vealand lamb. 555
MED HIGH = Cooking cheese dishes_
• Cooking e99s and milk.
• Cookingquick breadsand cereal products.
80 REHEAT = Reheating precooked or prepared food quickly.. 620
• Heating sandwiches. ..
90 SAUTE *' Cooking onions, celery and green peppers quickly. 685
• Reheating meat slicesquickly.
100 MAX * Cooking tender cutsof meat, 750
(HI) POWER * Cooking poultry, fish, vegetables and most
HIGH casseroles.
• Preheating the browning dish.
• Boiling water,
• Thickening some sauces,
• Approximate watts as measured by 2-liter method.
As you get to know your microwave oven, you may find that aparticular setting is too low or too high for the results
you desire,
Multiple-power control gives you the means to obtain greater precision in setting power levels, For instance, if
you want a power level between ROAST and REHEAT, you would set the time as usual: touch POWER
CONTROL, and then touch "7" and "5", The display window will show "75", indicating that your oven is set to
run at power level 7S--halfway between ROAST and REHEAT,
13
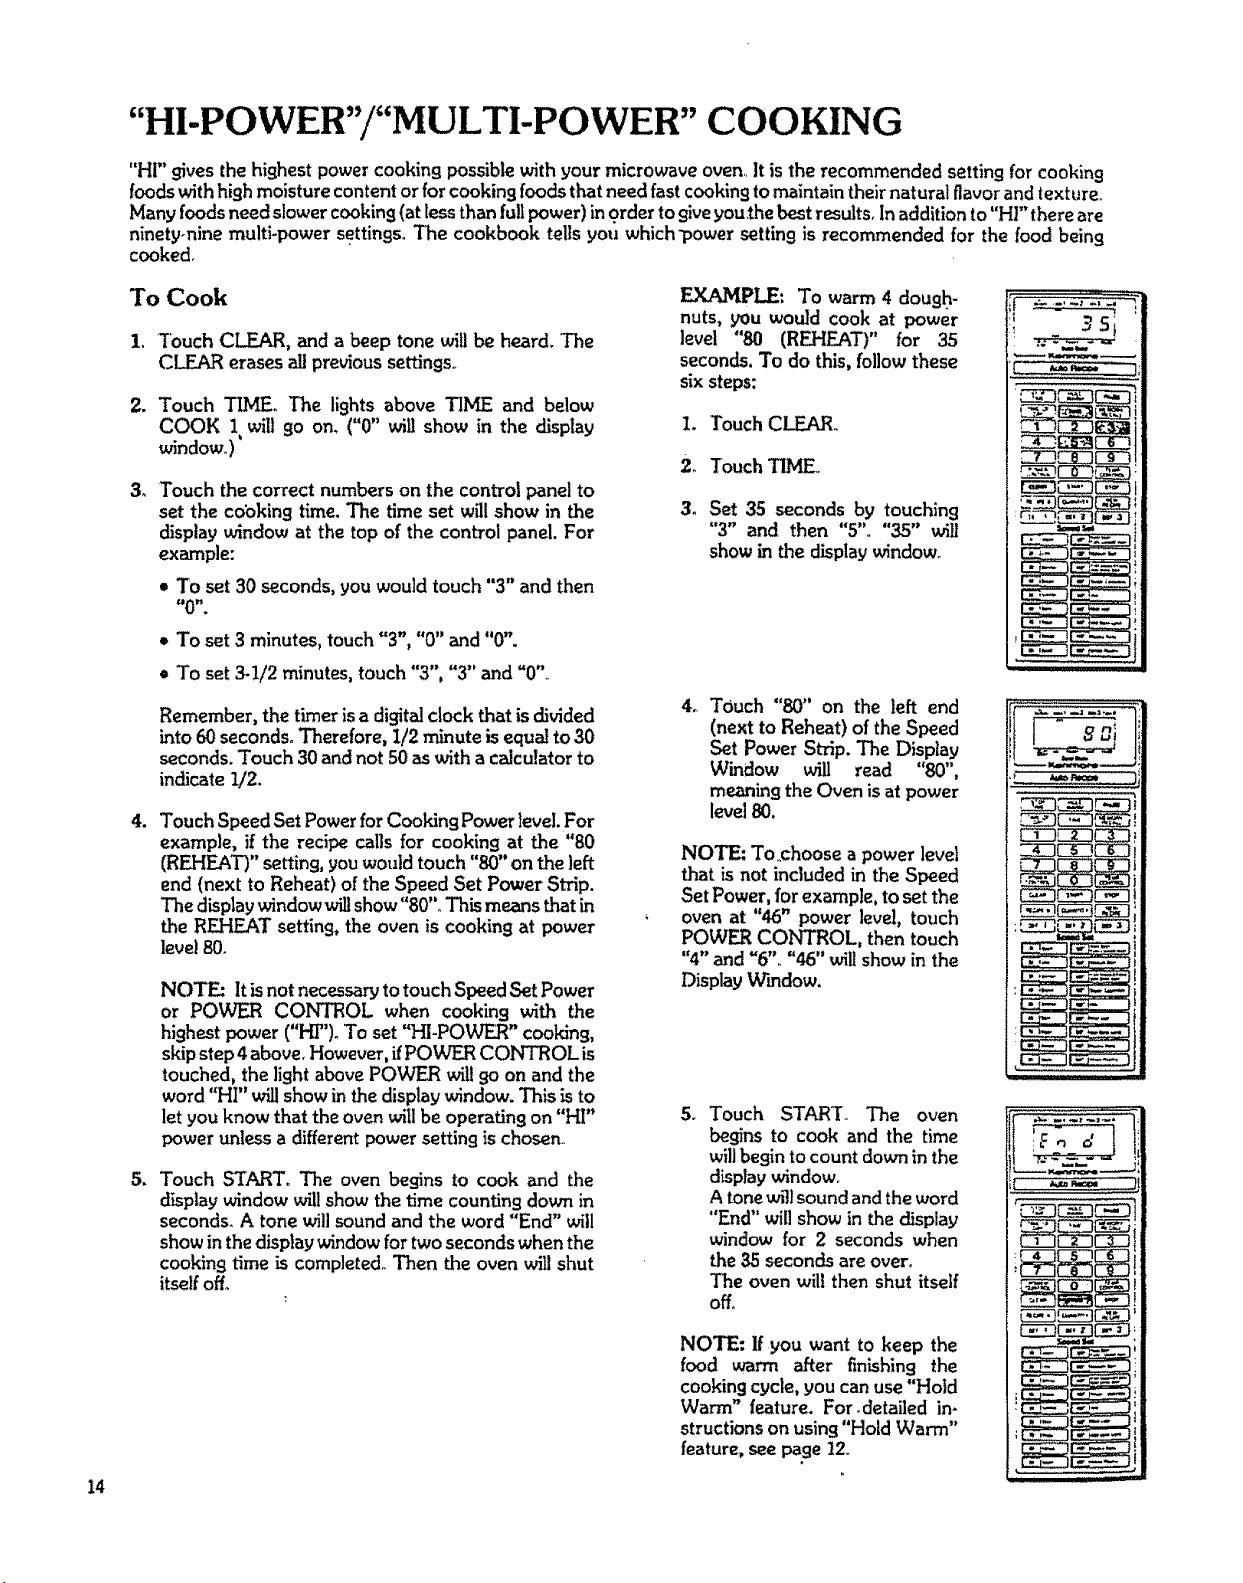
"HI-POWER"/"MULTI-POWER" COOKING
"HI" gives the highestpowercookingpossiblewith your microwave oven. It is the recommended settingfor cooking
foods with high moisture content or for cooking foods that need fast cooking to maintain their natural flavor and texture+
Many foods need slower cooking (at tess than full power) in order to giveyouthe best results+ In addition to "HI" there are
ninety-nine multi-power settingsoThe cookbook tells you which_powersetting is recommended for the food being
cooked+
To Cook
1. Touch CLEAR, and a beep tone will be heard. The
CLEAR erases all previoussettings+
2. Touch T_V[Eo The lights above TIME and below
COOK 1 will go on. ("0" wig show in the display
window.)'
3_
Touch the correct numberson the control panelto
set the cooking time. The time set will show in the
display window at the top of the control panel. For
example:
= To set 30 seconds,you would touch "3" and then
• To set 3 minutes,touch"3", "0" and "0".
e To set 3-1/2 minutes, touch "3", "3" and "0"
Remember, the timer isa digital clock that isdivided
into 60 seconds. Therefore, I/2 minute isequal to 30
seconds.Touch 30and not 50 aswith a calculatorto
indicate !/2.
.
Touch Speed SetPower forCooking Power level. For
example, if the recipe calls for cooking at the "80
(REHEAT)" setting, youwould touch"80"on the left
end (next to Reheat) of the Speed Set Power Strip.
The displaywindow willshow"80".+This means that in
the REHEAT setting, the oven is cooking at power
level 80.
NOTE: It isnot necessaryto touchSpeedSet Power
or POWER CONTROL when cooking with the
highest power ("HT'). To set "HI-POWER" cooking,
skip step 4 above, However, ifPOWER CONTROL is
touched, the light above POWER wilt9o on and the
word "HI" willshow in the display window. This is to
let you know that the oven will be operating on "HI"
power unless a different power settingis chosen+
Touch START° The oven begins to cook and the
display window will show the time counting down in
seconds. A tone will sound and the word "End" will
show in the display window for two seconds when the
cooking time is completed,+Then the oven willshut
itself off+
EXAMP_: To warm 4 dough-
nuts, you would cook at power
level "80 (REHEAT)" for 35
seconds.To do this, follow these
sixsteps:
1. Touch CLEAR+
2+ Touch TIME+
3. Set 35 seconds by touching
"3" and then "5"+ "35" will
showin the display window.
4_
TOuch "80" on the left end
(next to Reheat) of the Speed
Set Power Strip.The Display
Window will read "80",
meaning the Oven is at power
level 80.
NOTE: To+choose a power level
that is not included in the Speed
Set Power, for example, to set the
oven at "46" power level, touch
POWER CONTROL, then touch
"4"and "6", "46" will show in the
Display Window.
5.
Touch START. The oven
begins to cook and the time
will begin to count down in the
display window.
A tonewfJ]sound and the word
"End" will show in thedisplay
window for 2 seconds when
the 35 seconds are over.
The oven wilt then shut itself
off.
NOTE: Ifyou want to keep the
food warm after finishing the
cooking cycle, you can use"Hold
Warm" feature. For.detailed in-
structions on using "Hold Warm"
feature, see page12+
_ :.._; ._,._
,_ ,,K,m=,_
CZ_CZ_
_r-_---q_
.........it
Eo d
I4

"TEMPERATURE CONTROLLED" COOKING
The temperature probe is used to judge doneness when
cooking or reheating food. Set the desired food tempera-
ture with the TEMP CONTROL and the desired power
leue! with the POWER CONTROL. When"Hold Warm"
is set, after completing the cooking cycle the oven will
hold the food warm up to 100 minutes_
TEMPERATURE SETTING &
DISPLAY TEMPERATURE
Temperatures from 90_F to 200 ° F can be chosen and set
in the oven. Temperature can be set in one-degree
increments, and the Display will show the rise in food
temperature in one, degree increments, Display Window
wilt not accurately show food temperature below 90°F..
Sensitive
__ Area
Temperature
Probe Temperature
Probe
Sensor
MEATS
Ill Choose only fresh, completely thawed meat.
IIi Place meat fat side down on the microwave roasting
rack in a glass baking dish.
n Microwave cook on the first "multi-power" setting for
half ofthe totalcooking time. (See"Temperature Con-
trolled" Meat Cooking Guide on Page 16.)
II Turn meat to fat side up and:
,
3.
Place the temperature probe sensor into the meat with
the first Inch of the sensor in the center of the meal
The sensor should not touch the bone or fat pocket
The sensor should be put in from the side or from the
front--it should not be put in from the top of the meat.
Plug the temperature probe into the socket on the side
of the oven wall
Choose the doneness temperature from the chart on
Page 16, Set the temperature with the TEMP
CONTROL°
4. Microwave cook the meat on the second "multi-
power" setting. The microwave oven will turn itself
off when the preset temperature is reached, Take the
food out of the oven as soon as the display window
shows "End".
5. Remove the temperature sensoryLet the meat stand,
covered with foil for about 10 minutes before _r'
The temperature will rise about 15°F during standing
time..
NOTE: It is normal for meats to become slightly over-
cooked in a small circular area in the immediate vicinityof
the hole made by the meat probe.
DEFINITIONS
Microwave Roasting Rack Temperature Probe
"IEMPERATURE PROBE SENSOR: The pointed metal
portion of the probe which is placed into the food,
SENSITIVE AREA OF SENSOR: The first inch, or tip,
of the temperature probe sensor.
PLUG: The end of the temperature probe that is plugged
into the oven socket.
SOCKET: The outlet on the side of the oven wall.
CAUTION: Do not plug the pointed end of the
temperature probe into the socket
DISPLAY WINDOW: Shows the cooking tempera-
ture rising as the food is cooking_ Chosen temperature
may be seen during cookin9 by touching TEMP
CONTROL.
When "Hold Warm" is set, after completing the cooking
the Display will show "Hold" for 100 minutes or until the
door is opened or STOP is touched.
Glass Baking Dish
15
"TEMPERATURE CONTROL" POINTS TO REMEMBER
DO
• Place the temperature probe sensor into the thickest
part of the meat or in the center of the food to be
reheated. Avoid touchin 9 bone or [at
• Check that the first inch of the sensor is in the densest
part of the food to be cooked,
• Remove the temperature probe from the oven after
USe.
• Be sure to turn meat between first and second settings,
• Refer to cookbook for other information.
DO NOT
• Do not operate the oven empty with the temperature
probe plu99ed in+
• Do not leave the temperature probe unplugged in the
cavity when operating the oven.
+ Do not let the temperature probe touch the side
walls, glass tray or door of the cavity when in use+
• Do not l:_Ug the pointed end of the temperature
probe into the socket inside the cavity.
• Do not use the temperature probe in a regular oven.
This probe is designed for microwave oven only.
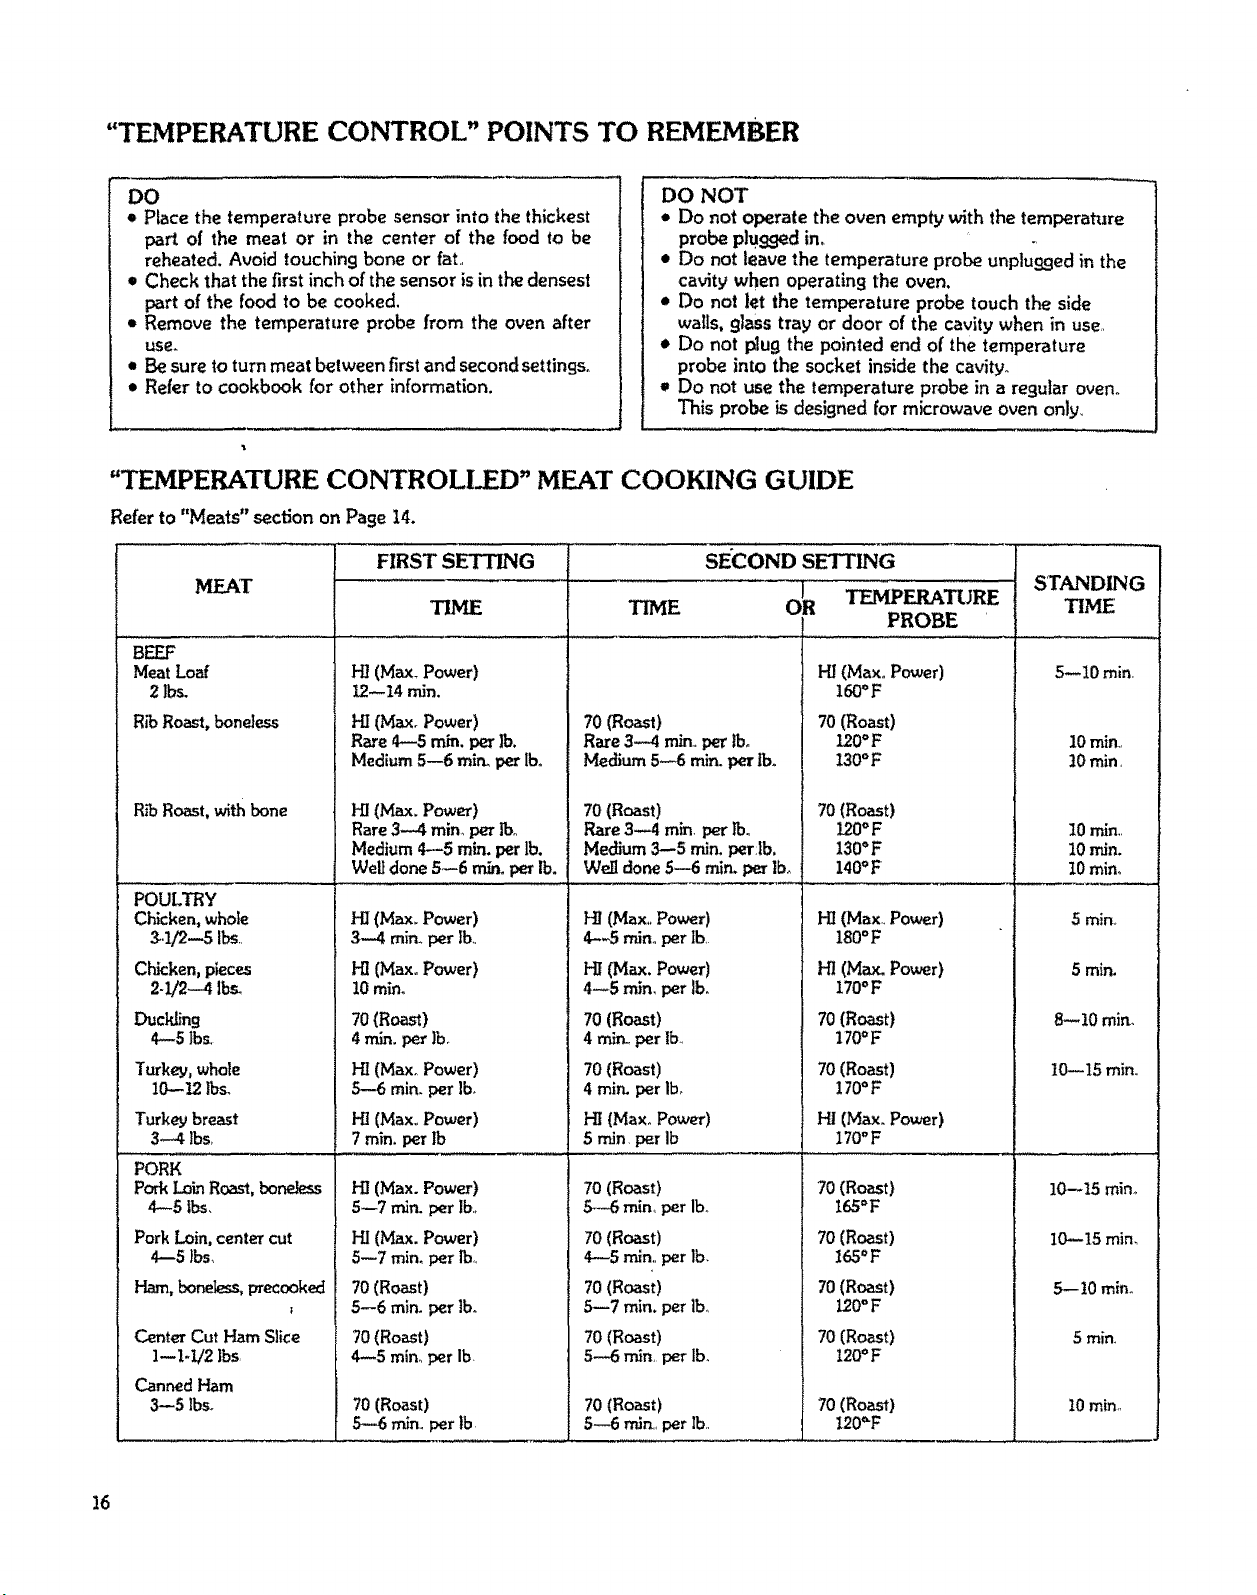
"TEMPERATURE CONTROLleD" MEAT COOKING GUIDE
Refer to "Meats" section on Page 14.
MEAT
BEEF
Meat Loaf
2 Ibs.
R_ Roast, bone}ass
R_ Roast, with bone
POULTRY
Chicken,whole
_.1/2--5 It_,,
Chicken,pieces
2-1/2-4 I_
Turkey, whole
10--!2 Ibs.
Turkey breast
3-4 lbs_
PORK
Pork Lain Roast,bo_
4-5 tbs,
Pork Loin, center cut
4--5 lbs,
Ham, boneless,precooked
I
Center Cut Ham Slice
1--1-1/2 ]bs,
Canned Ham
3--5 Ibs+
HI (Max. Power)
12--14 rain.
HI (Max. Power)
Raze 4--5 rain. per lb.
Medium 5--6 mir_ per lbo
HI (Max.Power)
Rare3--4 rain,per lb,
Medium4---5rain.per lb,
Weltdone 5--6 m/n,per lb.
H! (Max+ Power)
3--.4 rain+per lb.,
HI {Max+Power)
10 rain+
70(Roast)
4 mL_.perlb.
HI(Max+Power)
5--6 rain. per ]b,
HI(Max,,Power)
7rain. per lb
HI (Max. Power)
5--7 rrfirLper lb.+
HI(Max. Power)
TITHE
SECOND SETfLNG
O_ TEMPERATURE
PROBE
70 (Roast)
Rate 3--4 rain.,per lbo
Medium 5-6 rain. per lb.
70 (Roast)
Rare 3--4rain. per rv,
Medium 3--5iron,perJb.
Walldone 5--6rain.perIbo
HI(Max,,Power)
4--5 min, per tb,,
HI (Max.Power)
4--5rain,per lb.
70 (Roast)
4 mir_, per lb,
70(Roast)
4 rain. per lb0
Ill (Max_Power)
5 rain, per Ib
70 (Roast)
5.--6rain, per lb.
70(Roast)
HI(Max°Power)
160°F
70 (Roast)
120°F
130°F
70 (Roast)
120°F
130°F
140°F
H! (Max.. Power)
180°F
HI (Max. Power)
170OF
70(Roast)
170°F
70 (Roast)
170°F
H! (Max. Power)
170°F
70 (Roast)
t65°F
70 (Roast)
5--7 rain, per rb°
70(Roast)
5--6 rain. per tbo
70 (Roast)
4--5 min_per Ib
70 (Roast)
5--6 rnin. per lb
4--5 rain.,per Ib,
70(Roast)
5-7 rain. per lb,
70 (Roast)
5-6 rnin per lb.
70 (Roast)
5--6 rain. per lb.
165°F
70 (Roast)
120=F
70 (Roast)
120°F
70 (Roast)
I20,_F
STANDING
TIME
,5--10 min_
10 rain,
10rain,
10 rain,,
10 rain.
t0 min,+
5 min+
5 mir,.
8--10min,
10--15 rain,,
10--15rain+
I0--15mira
5,--10rain+
5 rain.
I0 rain+,
!6
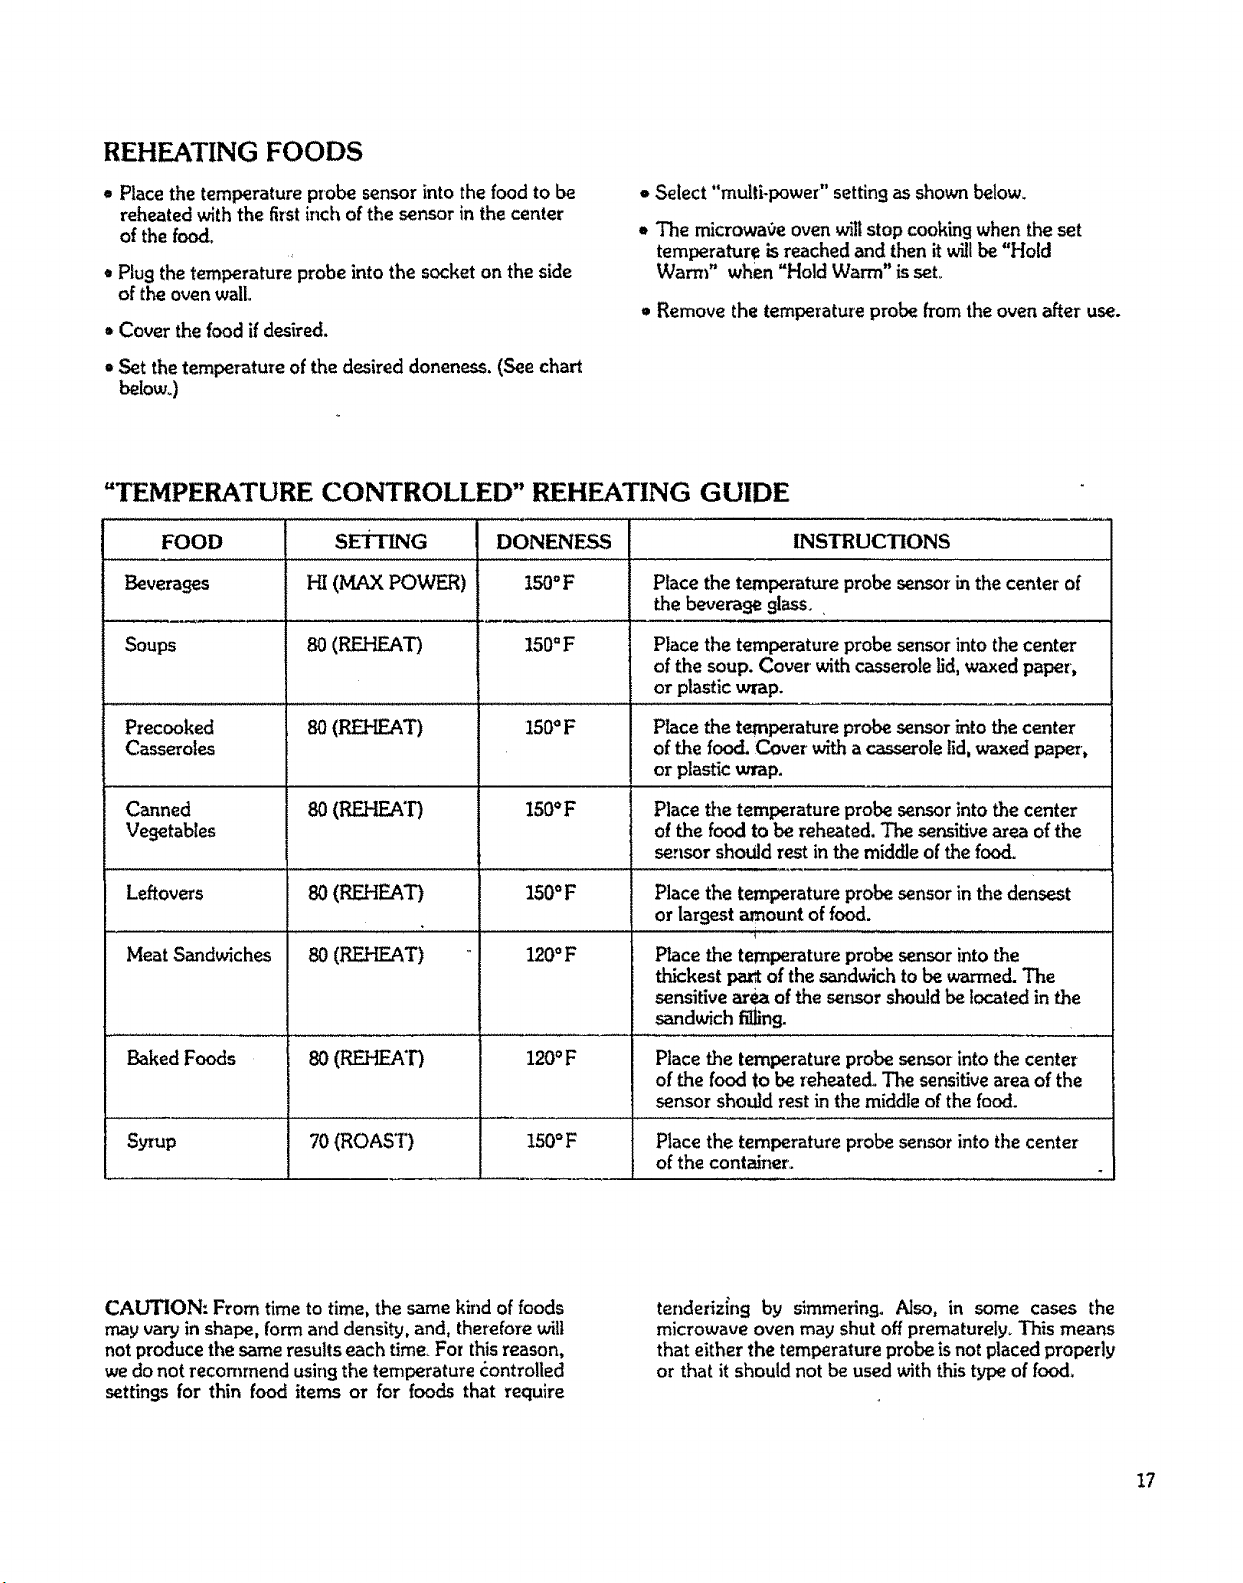
REHEATING FOODS
• Placethe temperatureprobe sensorinto the foodto be
reheatedwith the firstinch ofthe sensorin thecenter
of the food.
• Plu9the temperature probe into the socket on the side
of theovenwall.
• Cover the food if desired.
• Set thetemperature of the desired doneness. (See chart
below.)
e Select "multi-power" settin9 as shown below.
e The microwa0e ovea wilt stop cookingwhen the set
temperature isreached and then itwillbe"Hold
Wam_" when "Hold Warm" isset_
• Remove the temperature probe fromtheoven after use.
"TEMPERATURE CONTROLLED" REHEATING GUIDE
FOOD SETTING
Beverages Hi (MAX POWER)
Soups 80(REHF_'r)
Precooked
Casseroles
Canned
Vegetables
Leftovers
Meat Sandwiches
Baked Foods
80 (REHEAT)
so (REHEAT)
8O(REHEA'D
8O(P_.HEAT)
8O(REHEAT)
DONENESS INSTRUCTIONS
150°F Place the temperature probesensor in the center of
the beverage 9lass. ,
150°F
150OF
150°F
150°F
120°F
120°F
Placethe temperature probesensor into thecenter
ofthe soup. Covet withcasserole lid,waxed paper,
or plastic wrap.
Place the temperature probesensorinto the center
of the food. Cover with a casserolelid,waxed papez-,
or plasticwrap.
Place t_zetemperature probe sensor into the center
o! the food to be reheated.The sensitivearea ofthe
sensor should rest inthe middle of the food.
Place the temperatureprobe sensorin the densest
or largest amount offood.
Place the temperatureprobe sensorintothe
thickest par of the sandwichto be warmed.The
sensitivearea of the ser_sorshouldbe located in the
sandwich fillins.
Place the temperature probe sensor into the center
of the food to be reheated° The sensitive area of the
sensor should rest in the middle of the food.
Syrup 70 (ROAST) 150°F Place the temperature p_obe sensor into the center
of the container.
CAUTION: From time to time, the same kind of foods
may vary in shape, form and density, and, therefore will
notproduce the sameresults each time_For thisreason,
we donot recommend usin9the temperature _ontrolled
settingsfor thin food items or for foods that require
tenderizlns by simmering. Also, in some cases the
microwave oven may shut off prematurely° This means
that either the temperature probe is not placed properly
or that it should not be used with this type of food,
I7
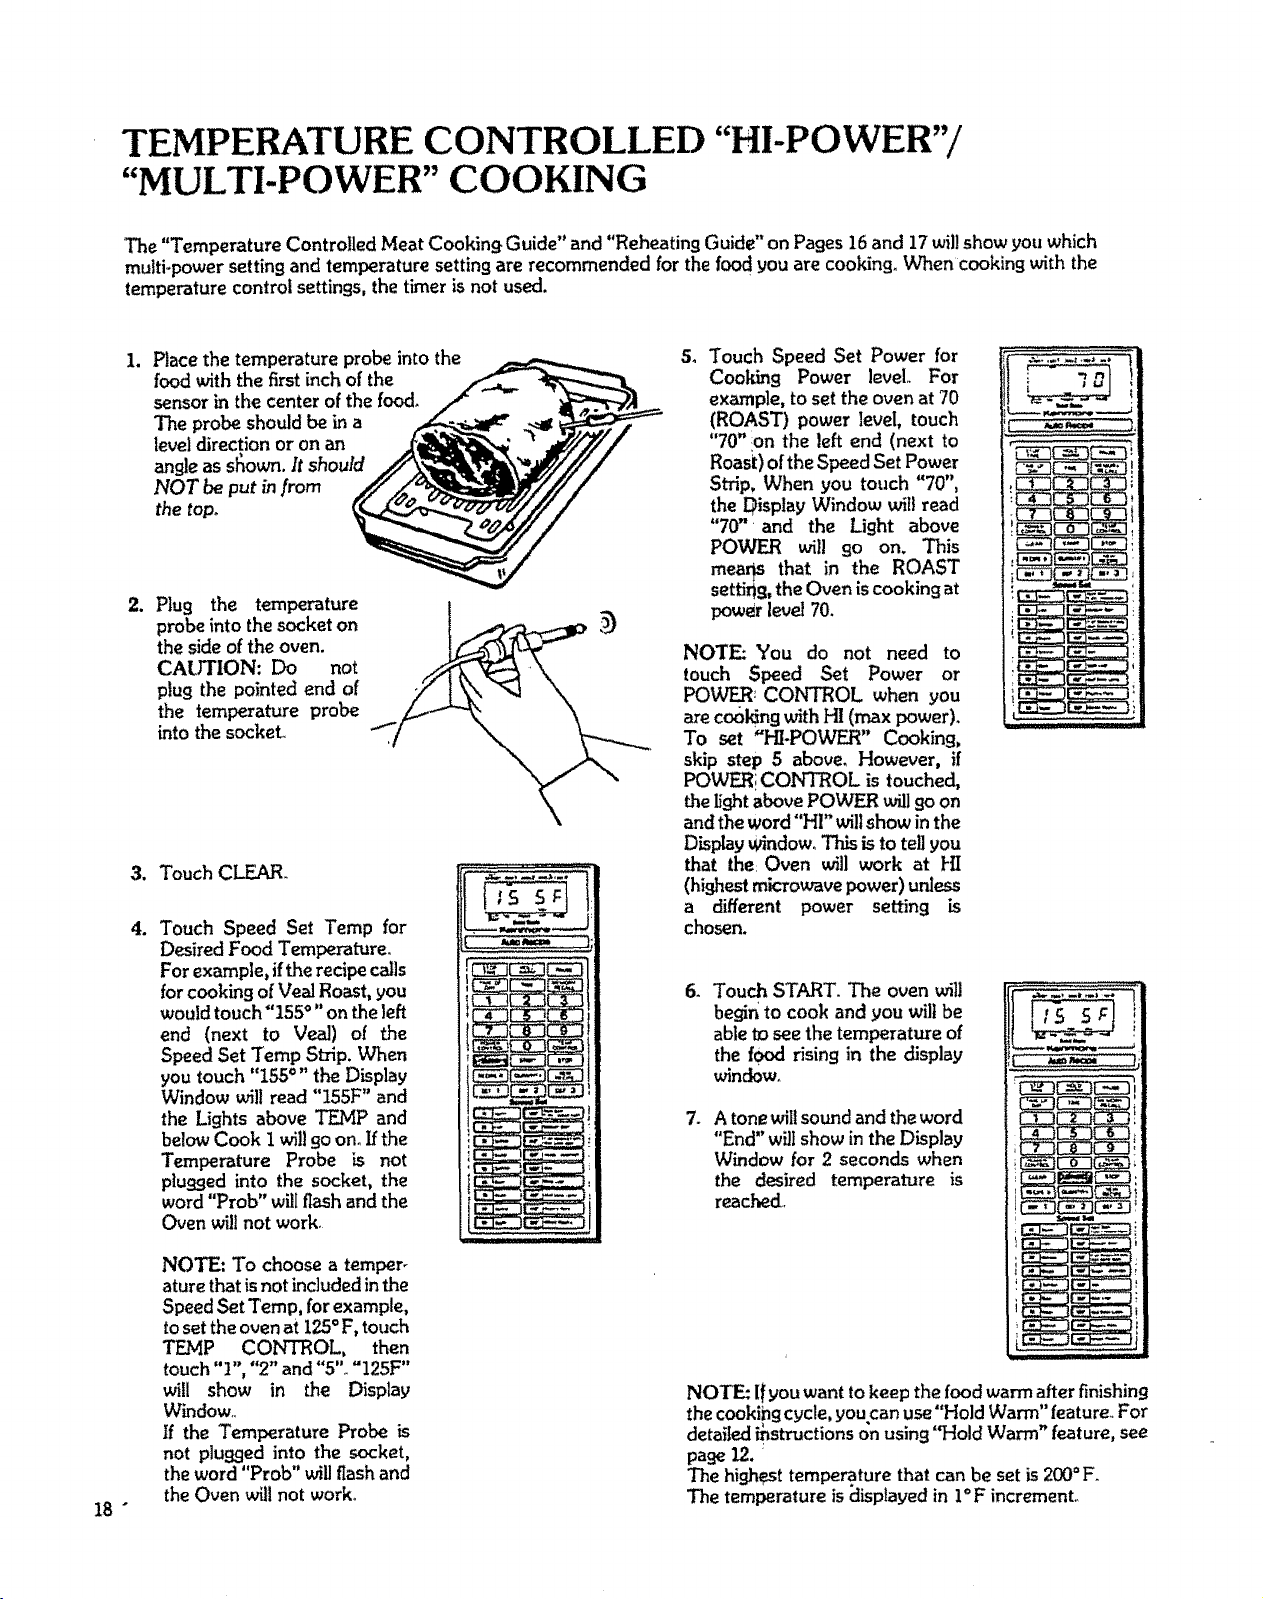
TEMPERATURE CONTROLLED "HI-POWER"/
"MULTI-POWER" COOKING
The "Temperature Controlled Meat Cooking Guide" and "Reheating Guide" on Pages !6 and 17 willshow you which
multi-power setting and temperature setting are recommended for the foodyou are cooking. When cooking with the
temperature controlsettings, the timer is not used.
18"
1. Place the temperature probe into the
food with the first inch of the
sensor in the center of the food.
The probe should be in a
level direction or on an
angle as sfiown, It should
NOT be put in from
the top.
od.
2. Plug the temperature
probe into the socket on
the sideof the oven.
CAlfHON: Do not
plug the pointed end of
the temperature probe
into the socket
3. Touch CLEAR.
° Touch Speed Set Temp for
Desired Food Temperature_
Forexample,if therecipe ceils
for cookingofVeal Roast,you
would touch"iS5 °" on the left
end (next to Vead) of the
Speed Set Temp Strip. When
you touch "155°" the Display
Window will read "155F" and
the Lights above TEMP and
belowCook Iwill goon. Ifthe
Temperature Probe is not
plugged into the socket, the
word "Prob" will flash and the
Oven wi!lnot work.
NOTE: To choose a temper.
ature that is not included in the
SpeedSet Temp, for example,
toset the ovenat 125°F, touch
TF_MP CONTROL, then
touch"1", "2" and "5". "125F"
will show in the Display
Window_,
If the Temperature Probe is
not p]ufl.qed into the socket,
the word "Prob" will flash and
theOven willnot work°
54
Touch Speed Set Power for
Cooking Power level.. For
example, to setthe oven at 70
(ROAST) power level,touch
"70" :on the left end (next to
Roasi:)oftheSpeed Set Power
Strip, When you touch "70",
the Display Window wii! read
"70" and the Light above
POWER wil! 9o on. This
meaqs that in the ROAST
settirig, the Oven is cooking at
power level 70.
NOTE: You do not need to
touch Speed Set Power or
POWER: CONTROL when you
are codking with HI (max power).
To set "HI.POWF_" Cooking,
skip step 5 above, However, if
POWERi CONTROL is touched,
the light above POWER will go on
and the word "HI" willshow in the
Display u_ndowoThis isto tell you
that the:Oven will work at HI
(highest microwave power) unless
a different power setting is
chosen.
6_
7_
Touch START. The oven will
begin to cook and you will be
able tDseethe temperature of
the food rising in the display
window_
Atone willsound and the word
"End" wiltshow in the Display
Window for 2 secondswhen
the desired temperature is
reached.
NOTE: l! you want tokeep the food warm after finishing
the cookibg cycle, you can use"Hold Warm" feature. For
detailed instructions on using "Hold Warm" feature, see
pale 12.
The highest temperature that canbe set is 200=F.
The temperature is displayed in I°F increment.
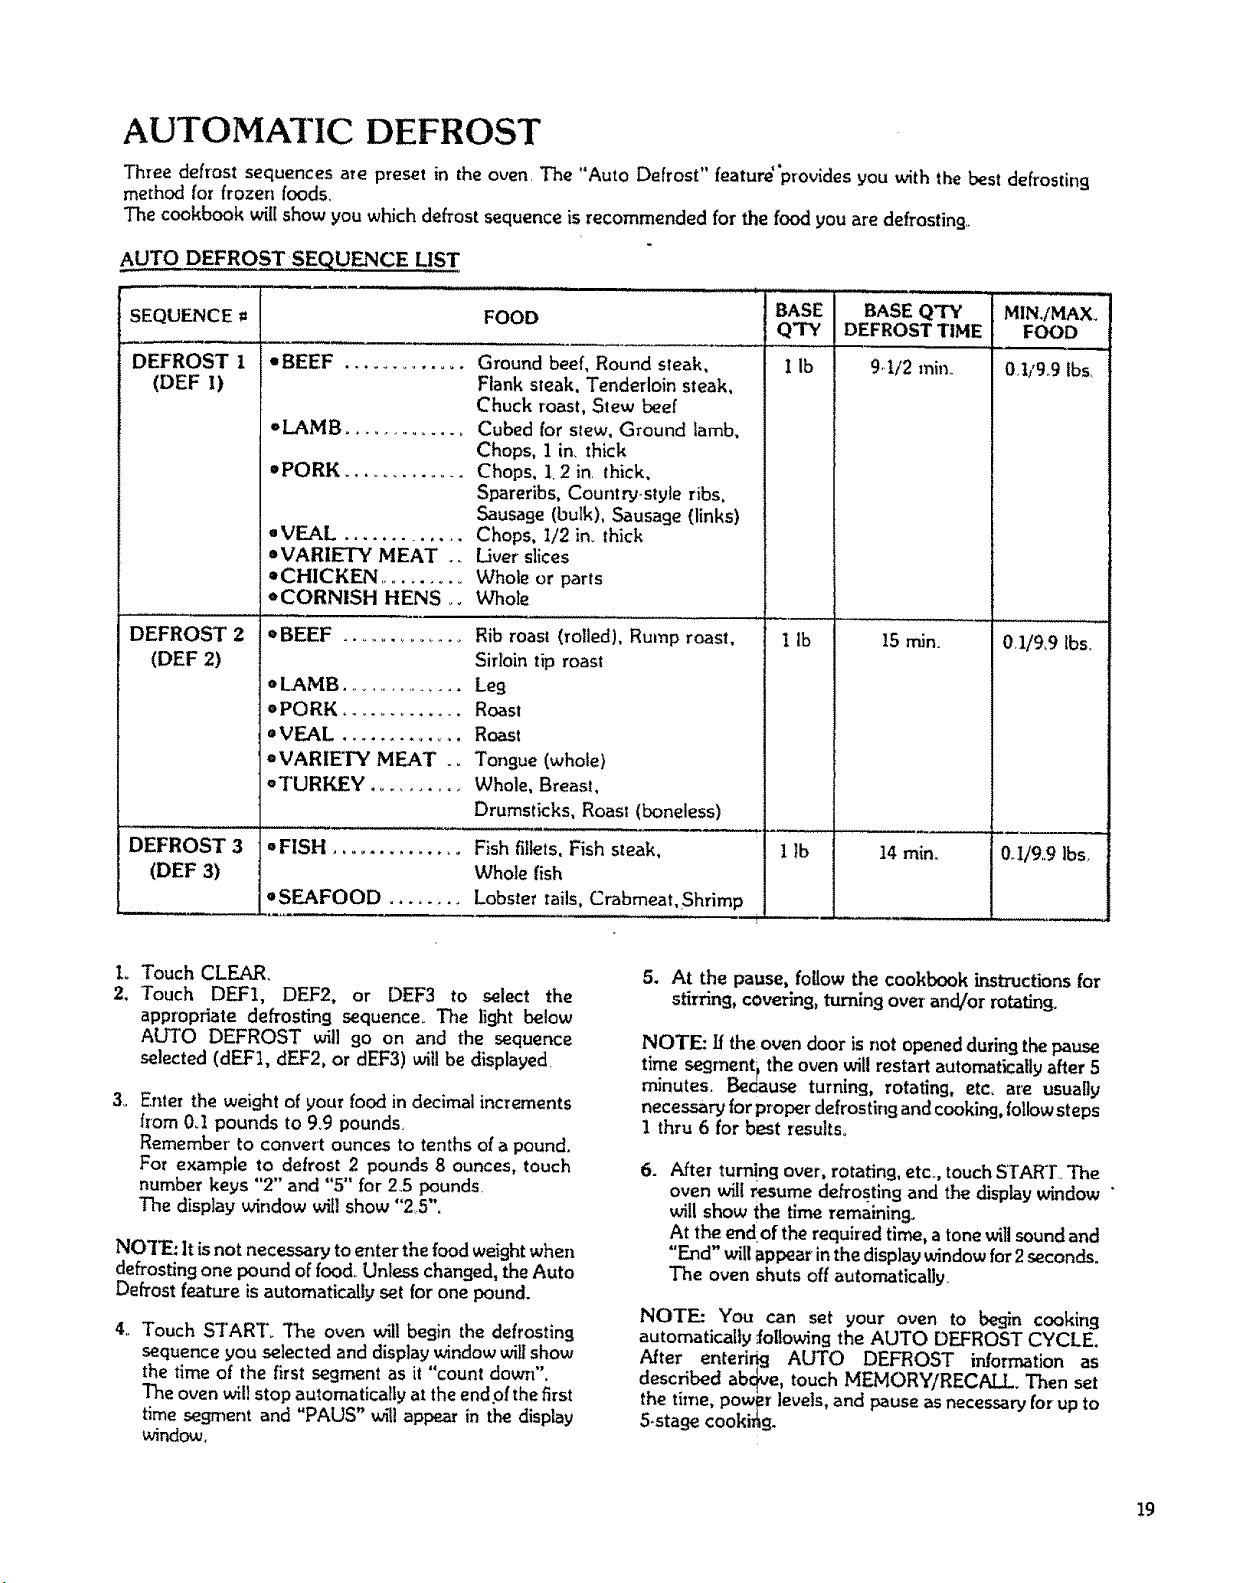
AUTOMATIC DEFROST
Three defrost sequences ate preset in the oven. The "Auto Defrost" featur_'prouides you with the best defrosting
method for frozen foods_
The cookbook will show you which deft'=st sequence is recommended for the food you are defrosting..
AUTO DEFROST SEQUENCE LIST
,u,.,..,,.
FOODSEQUENCE =
DEFROST 1
(DEF I)
DEFROST 2
(DEF 2)
DEFROST 3
(DEF 3)
=BEEF .............
=LAMB ..............
=PORK .............
=VEAL ..............
=VARIETY MEAT ..
=CHICKEN ..........
=CORNISH HENS o.
=BEEF .................
o LAMB ................
¢PORK .............
oVEAL .............
=VARIETY MEAT .o
=TURKEY ..........
Ground beef, Round sleak,
Flank steak, Tenderloin steak,
Chuck roast, Stew beef
Cubed for stew, Ground lamb,
Chops, ] in, thick
Chops, 1.2 in. lhick,
Spareribs, Country-style ribs,
Sausage (bulk), Sausage (links)
Chops, I/2in,,thick
Liver slices
Whole or parts
Whole
Rib roast (rolled), Rump roast,
Sirloin tip roast
Leg
Roast
Roast
Tongue (whole)
Whole, Breast,
Drumsticks, Roast (boneless)
• FISH .............. Fish fillets,Fish steak,
Whole fish
=SEAFOOD ........ Lobster tails, Crabmeat,Shrimp
BASE
Q'TY
I ib
I Ib
1 Ib i
,,,,,, ,
BASE QTY MIN,fMAX.
DEFROST TIME FOOD
9,.tt2 rain,. 0,1/9,,9 lbs,
!5 min.
14 rain,,
0,1/9,9 lbs,
0,I/9,9 Ibs.
L Touch CLEAR,
2, "Touch DEF1, DEF2, or DEF3 to select the
appropriate defrosting sequence_ The light below
ALTO DEFROST _t] 9o on and the sequence
selected (dEFt, dEF2, or dEF3) willbe displayed.
3,_
Enter the weight of your food in decimal increments
flora 0_1 pounds to 9_9 pounds.
Remember to convert ounces to tenths of a pound.
For example to defrost 2 pounds 8 ounces, touch
number keys "2" and "5" for 2,5 pounds.
The display window will show "25".
NO'I_ It is not necessary to enter the food weight when
defrosting one pound of food,,Unless changed, the Auto
Defrost feature is automatically set for one pound.
4,, Touch STAR"['. The oven will begin the defrosting
sequence you selected and display window will show
the time of the first segment as it "count down".
The oven wil! stop automatically at the end of the first
time seg"ment and "PADS" wil! appear in the display
window_
5. At the pause, follow the cookbook Lnstructions for
stirring, covering, turning over and/or rotating°
NOTE: If the. oven door is not opened during the pause
time segment i the oven will restart automatically after 5
minutes. Bedause turning, rotating, etc, are usually
necessary for proper defrosting and cooking, follow steps
1 thru 6 for best resuks.
=
After tur!!n9 over, rotating, etc..,touch START..The
oven will resume defrosting and the display window "
will show the time remaining.
At the end:ofthe required time, a tonewitlsound and
"End" willappearin thedisplay windowfor2seconds.
The oven shutsoff automatically_
NOTE: Y'ou can set your oven to begin cooking
automatically Jollowing the AUTO DEFROST CYCLE,
After enterir_ AUTO DEFROST informationas
described ab(_Me,touch MEMORY/RECP, I !. Then set
the time, powBr levels,and pause asnecessaryfor-up to
S-stase cookirhg.
19
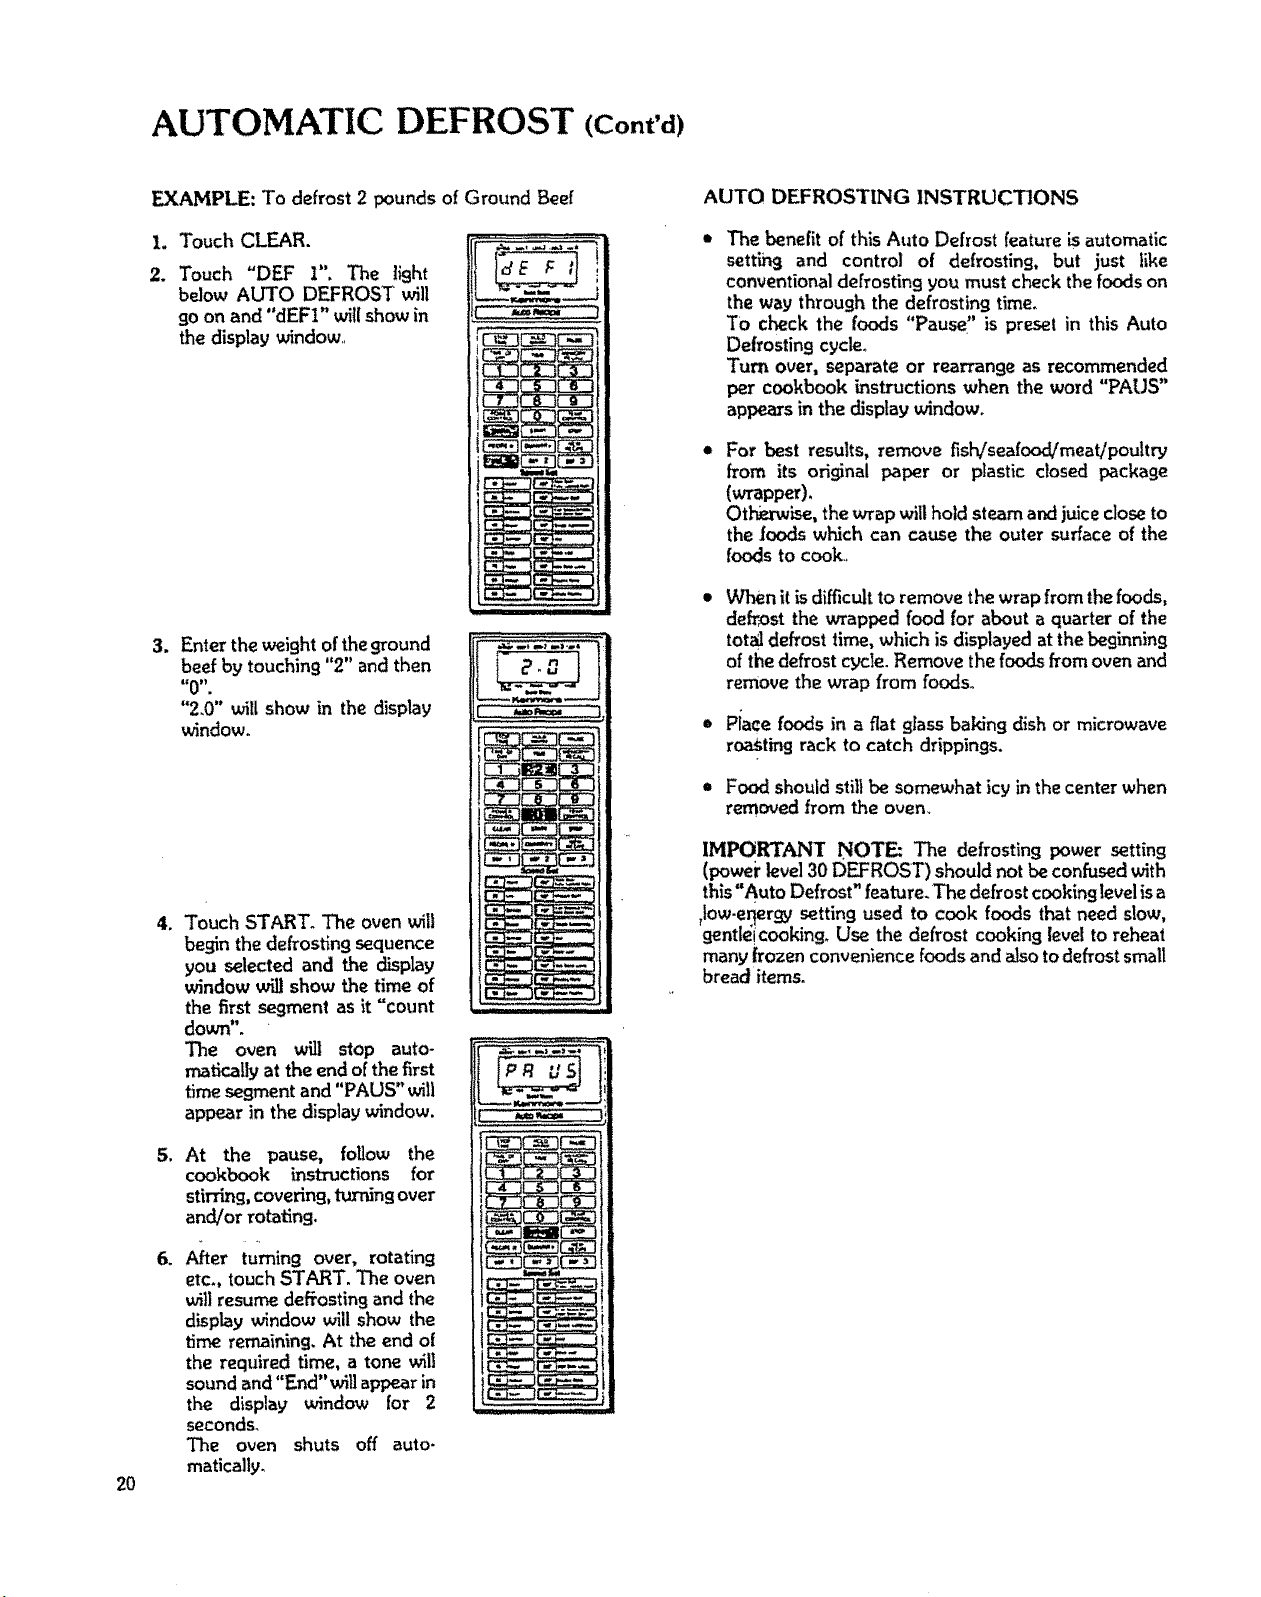
AUTOMATIC DEFROST (Cont'd)
2O
EXAMPLE: To defrost 2 pounds of Ground Beef
L Touch CLEAR.
. Touch "DEF I", The light
below AUTO DEFROST will
go on and "dEFI" will show in
the display window_,
3.
Enter the weight of the ground
beef by touching "2" and then
_€0 _,
"2.0" _II show in the display
window.
,
5_
,
Touch START. The ovenwill
beginthedefrostingsequence
you selected and the display
window will show the time of
the first segment as it "count
down".
The oven will stop auto-
mafically at the endof the first
time segment and "PAUS" will
appear in thedisplay window.
At the pause, foUow the
cookbook instructions for
stirring, covering, turning over
and/or rotating.
Aher turning over, rotating
etc., touchSTART. The oven
wit]resume defrosting and the
display window will show the
time remaining. At the end o[
the required time, a tone will
soundand "End" witl appear in
the display window for 2
seconds,
The oven shuts off auto.
matically,
AUTO DEFROSTING INSTRUCTIONS
The benefit of this Auto Defrost feature is automatic
setting and control of defrosting, but just like
conventional defrostingyou mustcheck the foodson
the way throughthe defrosting time.
TO check the foods "Pause" is preset in this Auto
Defrosting cycle°
Turn over, separate or rearrange as recommended
per cookbook instructions when the word "PAUS"
appe_s in the display window.
For best results, remove fish/seafood/meat/poultry
from its original paper or plastic closed package
(wrapper),
Othm-wise,the wrap wilthold steam and juicecloseto
the (oods which can cause the outer surface of the
foods to cook.
When it is difficult to remove the wrap from the foods,
defrost the wrapped food for about a quarter of the
total defrost time, which is displayed at the beginning
of the defrostcycle.Remove the foods fromoven and
remove the wrap from foods.
Piece foods in a flat glass baking dish or microwave
roastingrack to catch drippings.
,= Food shouldstill be somewhat icy in the center when
removed from the oven.
IMPORT&ANT NOTE: The defrosting power setting
(poweirlevel30 DEFROST) should not be confused with
this"Auto Defrost" feature. The defrost cooking level isa
,low-er{ergy setting used to cook foods that need slow,
flentleicooking, Use the defrost cooking level to reheat
many frozen convenience foods and also to defrost small
bread items.

MULTI-STAGE COOKING
Multi-Stage cookingallows you to set the oven to cook in one stage at a certain power level for a chosen time or
temperature and then in a second, a thirdand a fourth stages at a different power level for a chosen time or temperature.'-
The cooking processcan be setfor five memory stageswhen Auto Defrost isincluded asthe firststage.The stagesare
set before cookingand will follow automatically when oven is started.
L Touch CLEAR.
2. Touch TIME or Speed Set Temp for Cooking
Temperature° Lights above TIME or TEIvLPand
below COOK 1 goon.
When you touch TIME, "0" willshow in the Display
Window.
Touch Numbers for time of the first cootdn9 stage.
3. Touch Speed Set Power for Cooking Power level.
4. Touch MEMORY/RECALL or PAUSE, Light below
COOK 2 goeson. Display Window willread "0".
5. Touch TiME or Speed Set Temp for Desired Food
Temperature,,
6. Touch Numbers foe time of the second cooking
stage.
7. Touch Speed Set Power for Cooking Power level in
the second cooking stage (ifother than"HI"),
8A. Touch START for two-stage cooking.
8B. Ifthree-stage or four.stage cooking is desired, touch
MEMORY/RECALL or PAUSE The light below
COOK 3will go on. The display window willshow"0"o
Repeat steps 5-7 above to set the third cooking stage
at the same or a different power ]eve] for a chosen
timeor temperature.,
9A. Touch START for three.stage cooking.
9B_ If four-stagecooking is desired, touch MEMORY/
RECALL or PAUSE. The light below COOK 4 wiltgo
on,. The display window will show "0".
Repeat steps 5-7 above to set the fourth cooking
stage at the same or a different power level for a
chosentime or temperature.
10, Touch START_
EXAMPL!_" (Four.stage cooking)
All-American Meat Balls
(10 minutes, powerlevel 70) (PAUSE)
(3 minutes, ,power level70) (PAUSE)
(2 minutes, power level 70)
(MEMORYfRECAI I )
(5 minutes, power level 0)
Tim following stepsexplain how
to set the oven.
First Sta,,q_(10 minutes:
level70)
1. Touch CLEAR.
2_ Touch TIME.
3,. Set 10 minutes by touching
"1", "0"_ "0" and "0". "1000"
will show in the display window.
;tO cBJ
h=,rw=== ]
MULTI-STAGE COOKING WITH AUTO
DEFROST
If you want to cook after using the Auto Defrost, before
setting the above multi.stage cooking, set the Auto
Defrost and touch MEMORY/RECALL, then follow the
above instructions numbered 2-10,, See pages 19 and 20
for the detailed instructions of Auto DefrosL The cooking
process can be set up to five stages when Auto Defrost is
one of the stages
To pause between stages
To set the oven to stop between stages, touch PAUSE
when setting the oven See page i1 for more detailed
directions.
NOTE: If you touch MEMORY/RECALL instead of
PAUSE, the oven will not stop but will remember the
next stage and continue working,
4. Touch "70" on the left end
(next to lRoast) of the Speed
Set Power Strip "70" willshow
in the Display Window. The
first stag_ has been set.
21
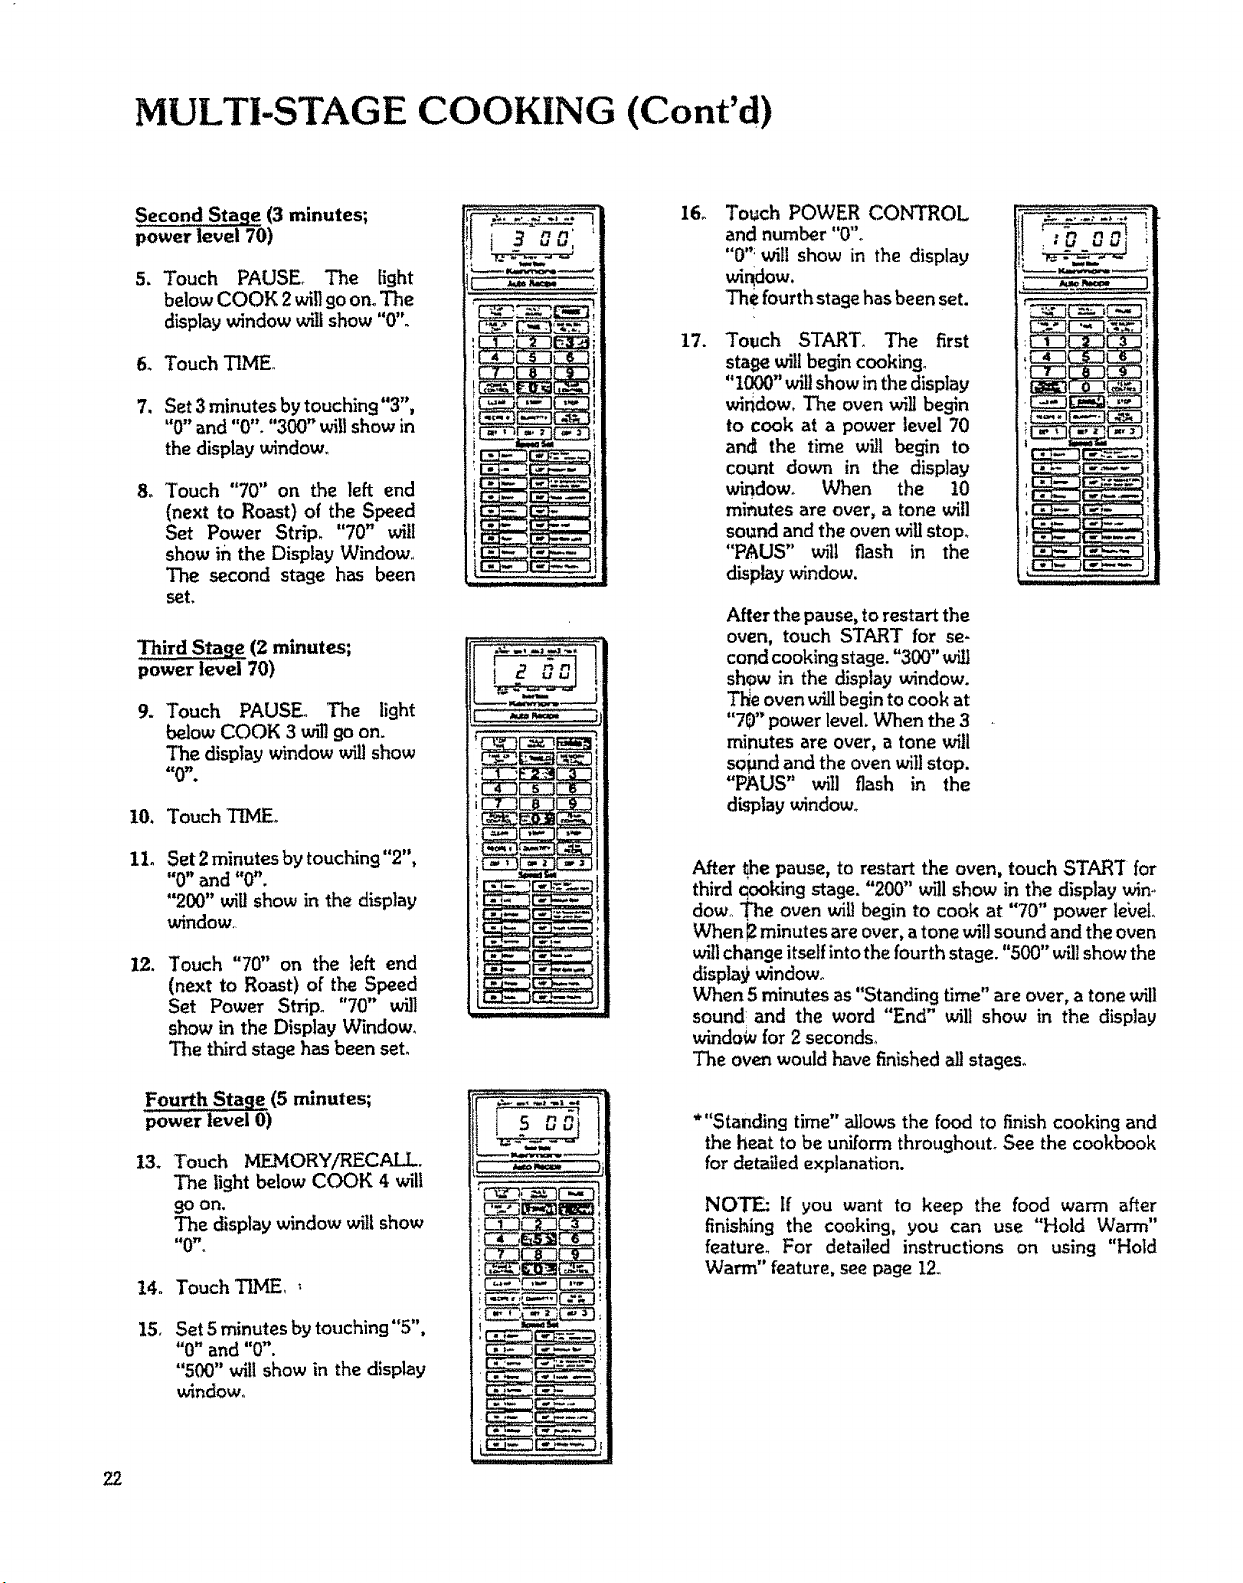
MULTI-STAGE COOKING (Cont'd)
Second Stage (3 minutes;
power level 70)
5. Touch PAUSE. The fight
below COOK 2willgo on. The
display window willshow"0"°
6. TouchTIME_
7. Set3 minutes by touching"3",
"0" and "0". "300" will show in
the display window.
8_ Touch "70" on the left end
(next to Roast) of the Speed
Set Power Strip. "70" will
show ih the Display Window..
The second stage has been
set.
Third Stage (2 minutes;
power level 70)
9.
Touch PAUSE. The light
below COOK 3 willgo on.
The displaywindow wig show
=cOY' *
10. Touch TIMEo
11.
Set 2minutes by touching"2",
"0" and "0".
"200" will show in the display
window,.
12. Touch "70" on the left end
(next to Roast) of the Speed
Set Power Strip_ "70" wi]]
show in the Display V_ndow_
The third stagehas been seL
Fourth Stage (5 minutes;
power level O)
13. Touch MEMORY/RECALL
The light below COOK 4 will
9oon.
The display window will show
t_0W _
14o Touch T]HE,_
15, Set 5 minutesby touching"5",
"0" and "0".
"500" will show in the display
window,
i 30o:'
16o
17.
Touch POWER CONTROL
and number "0".
"0"; wil! show in the display
wh_ow.
The fourth stagehasbeen set.
Touch START_ The first
stage will begin cooking°
"1000"wilt show inthe display
window, The oven will begin
to cook at a power level 70
an_ the time will begin to
count down in the display
window, When the 10
minutes are over, a tone will
soundand the ovenwigstop.
"PAUS" will flash in the
display window.
After the pause,torestart the
oven, touch START for se-
cond cooking stage. "300" will
show in the display window.
Tl_e oven willbegin to cook at
"70" power level. When the 3
minutes are over, a tone will
sopnd and the oven willstop.
"PAUS" will flash in the
display window°
............_A'-t"._
After _hepause, to restart the oven, touch START for
third qooking stage. "200" w_31show in the display win-,
dow.,The ovenwillbegin to cook at "70" power le_'et..
When 12minutes are over, atone will sound and the oven
will change itself intothe fourth stage. "500"willshow the
displa9window°
When 5 minutes as"Standing time" are over,a tonewill
sound and the word "End" will show in the display
window for2 seconds,
The ovenwouldhavefinishedallstages,
*"Standing time" allows the food to finish cooking and
the heat to be uniform throughouL See the cookbook
for detailed explanation.
NOTE: If you want to keep the food warm after
finishing the cooking, you can use "Hold Warm"
feature. For detailed instructions on using "Hold
Warm" feature, seepage 12,
22
DELAY START COOKING
DelayStart Cooking lets you start and finish the cooking
at a preset time,.
1, Touch CLEAR....
2. Touch STOP TLME.
Light below DELAY START
goes on. Display Window will
read "0:00".
3. Touch numbers for the Time
of Day to finish cooking. For
example, touch numbers "7",
"3"then"0" for the cooking to
be finished at "7:30", and
"7:30" will show inthe Display
Window°
4_
5.
6_
,
Touch TIME
Touch numbers for Cooking
Time,,
Touch Speed Set Power for
Cooking Power level..
Touch START.
The Time of Day will show in
the Display Window and Light
below DELAY STARTgoes
om As soon as the clock
shows the Cook Start Time
which has been subtracted
from the Cook Finish Trine,
the Oven will start cooking
and the cooking time counts
down in the Display Window.
When the Cook Finish Time
(or "7:30") comers, the Oven
will shut itself off.
NOTE.: A preset delay time
must be less than 12 hours.
I
The displayshows
thetime ofclay..
For example:
ahalf past two,
*Multi-Stage Cooking can be used with Delay Start.
After Step 3 above, follow instructions numbered 2..10
for Multi-Stage Cooking.
*'['he Delay Start cooking is controlledby time.
When "Temperature Controlled" cooking is set in a
stage,cooking may be finished atthe setting time witha
slight time difference_
*Fresh food should not stand at room temperature over
four hours prior to cooking.,
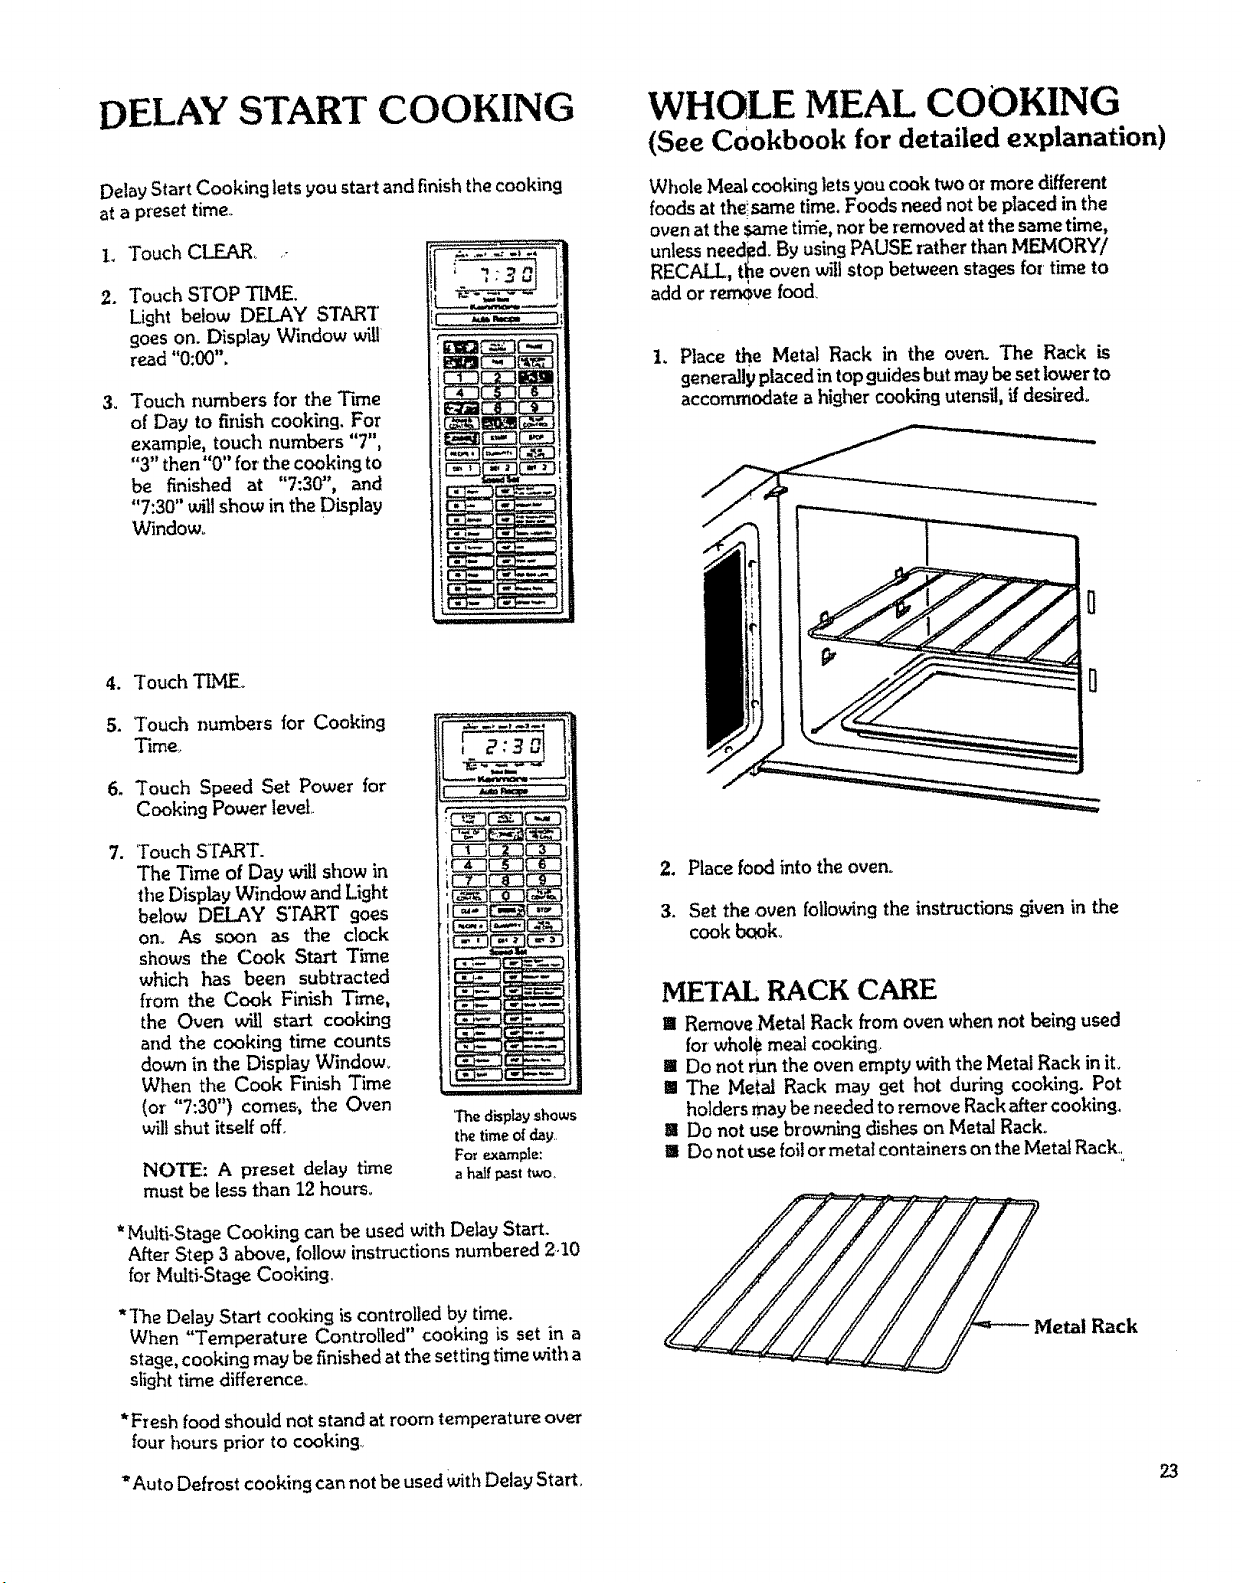
WHOLE MEAL COOKING
(See Cookbook for detailed explanation)
Whole Meal cookinglets you cook twoor more different
foodsat thelsametime. Foods neednot beplacedin the
ovenat the same tinie, nor be removedat thesametime,
unless needFd.By using PAUSE r_ther than MFJvIORY/
RECALL, the oven w_l stop between stagesfor time to
add or ren_ve food_
1. Place Lhe Metal Rack in the oven. The Rack is
generally placedin top guides but maybesetlower to
accommodate a higher cooking utensil, if desired°
2. Place food intothe oven°
3. Set the oven followingthe instructions givenin the
cook book.
METAL RACK CARE
11iRemove.Metal Rack from oven when not being used
forwhole meal cookin.q,
!11Do not danthe oven empty withthe Metal Rack in it.
!1 The Metal Rack may get hot during cookin 9. Pot
holdersmaybeneeded to remove Rackafter cooking.
I Do not use browning dishes on Metal Rack.
Ii!1Do not usefoil or metal containers on theMetal Rack.,
Metal Rack
"Auto Defrost cooking cannot be usedwithDelay Start. 23
PRESET RECIPE COOKING
You can set the oven for cooking 80 recipes by sh'nply
touching RECIPE#, the numberscorrespondingwith the
desired preset recipe, then START,
The presetcontrolsystemintheoven contains25 recipes
thathave been preseLThe Times or Temperatures and
Power Levels for these recipes cannot be changed.
However theamountoffood cookedin presetrecipes#1
through 17 can be increased up to 5.9 times the preset
quantity, and up to 2,9 times in recipes #18 and 19. To
increasethequantityintheserecipes,followthedirection
on this page, Refer to the cookbook for detailed
instructionson the 25 preset recipes.
You canpresetfavorite recipesoftenused°These can be
assignedas Recipes _6--80°
I stage recipes should be stored in #26--40°
2 stage recipes should be stored in #41--70o
3 stage recipes should be stored in #71--80
Directions for settingnew recipes ison page26.
To cook one of these preset recipes, simplyfollow the
stepsbelow.
1. Touch CLEAR.
2, Touch RECIPE #.
"0" will show in the Display V_ndowo
3. Touch Number(s) for Preset Recipes, by following
PresetRecipes List on the cookbook.
EXAMPLE: If you cook BrownieMix of Recipe #19,
touch "1" then "9". "19" will show in the display
window.
4. Touch START_
Time of the first cooking stage willshow in the Display
Window and you can see the time counting down. As
soon as the first cooking stage is over, the second
cooking stagebegins°When thesecond cooking stage
isover, a tone willsoundand theoven w_ shut itself
off.
USE OF QUANTITY KEY
To Increase Quantity of Recipes #1--#19
I. TouchCLEAR.
2. Touch RECIPE#.
3, Touch Numbers for thePreset Recipe_
4. Touch QUANTH'Y.
"0.0":v_ show in theDisplayWindow.
5.Touch numbersforthemultiplicationfactor.
To doubletherecipe,touch_" and "0"o
To tripletherecipe,touch"3"and "0"o
6.Touch START°
NOTES: The range of multiplication is 1,1 times to 59
times (Recipes #i--17) and to 2.9 times (Recipes
#18 and 19) of the Base Quantity which is preset
inthe oven, Increment within the above range is
O.L Multiplication can be used in Recipes #1--
19. When you set the multiplication of Base
Quantity beyond the range of 1.1--5.9 (Recipes
#I.--17) or I.I--2,9 (Recipes #18 and 19), the
oven willnot startevenif you touch START.
EXAMPt_..:
To cook three hotdogsper Recipe#4.
i,Touch CLEAR,
2.Touch RECIPE #.
3.Touch "4".
4. Touch QUANTIFY.
5.Touch "3" and "0".
6. Touch START,
Ifyou havenot storeda recipeinRecipe#26
to Recipe_80, the Display Window wiltflash
and tells you that no preset recipe has been
stored in theovenfor that recipe number.
24
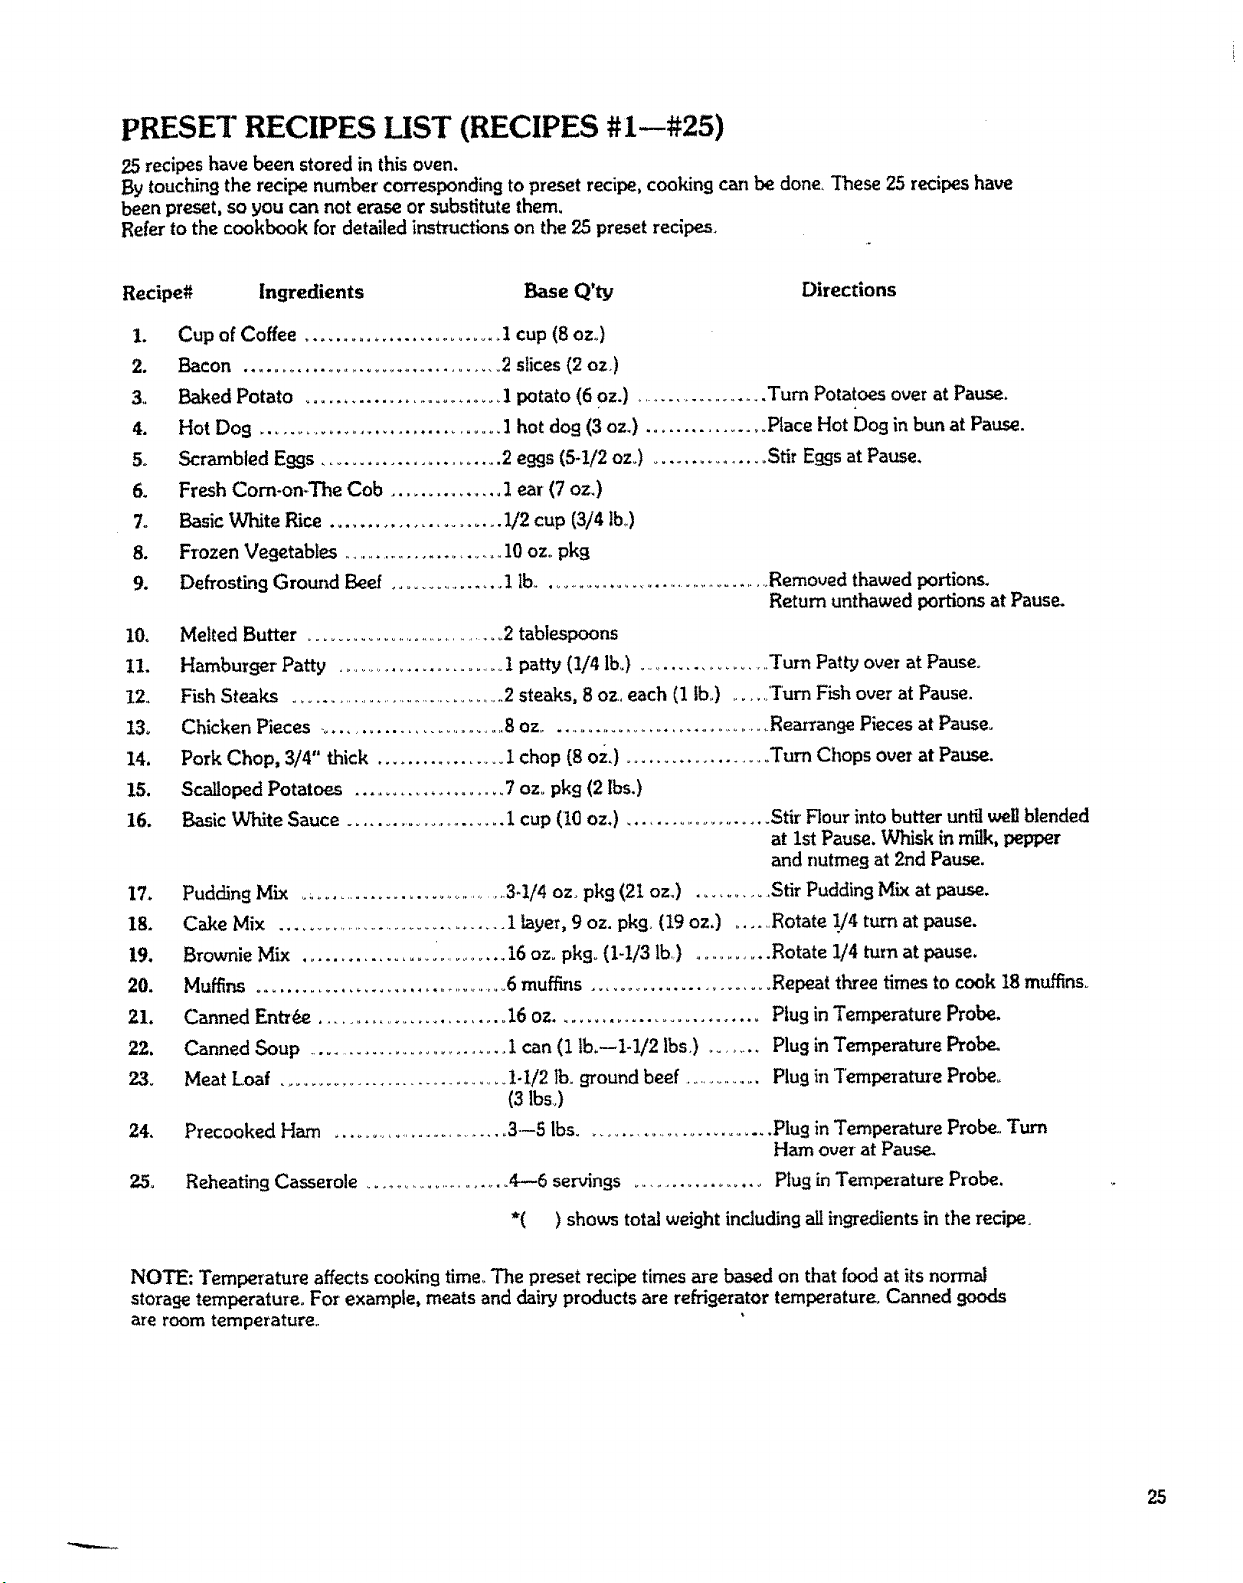
PRESET RECIPES LIST (RECIPES #1--#25)
25 recipes have been stored in this oven,
By touching the recipe number corresponding to preset recipe, cooking can be done_ These 25 recipes have
been preset,so you can not eraseor substitutethem.
Refer to the cookbook for detailedinstructions on the 25 presetrecipes_
Recipe# Ingredients Base Q'ty Directions
1. Cup of Coffee ........................... 1 cup (8 ozo)
2. Bacon ..................................... 2 slices(2 oz.)
3. Baked Potato ............................. 1 potato (6 0z.) ....................... Turn Potatoes over at Pause.
4. Hot Dos ................................. 1hot dog (3 oz.) ................ Place Hot Dog in bunat Pause.
5. Scrambled Eggs ........................ 2 eggs(5-1/2 oz.) ............... Stir Eggsat Pause.
6. Fresh Corn-on-The Cob ............... 1ear (7 oz.)
7. Basic White Rice ........................ 1/2 cup (3/4 th.)
8. Frozen Vegetables ............................... 10 oz. pkg
9. Defrosting Grow_d Beef ................. 1 lb.......................................... Removed thawedportions.
Return unthawed portions at Pause.
10° Melted Butter ...................................... 2
11. Hamburger Patty.......................... 1
12. FLshSteaks ......................................... 2
13. Chicken Pieces _.......................... 8
14, Pork Chop, 3/4" thick ................. 1
15. Scalloped Potatoes ..................... 7
16. Basic White Sauce .......................... 1
tablespoons
patty (1/4 lb.) ..................... Turn Patty over at Pause.
steaks,8 oz. each(1 lb.) ......."['urnFish over at Pause.
oz.................................... Rearrange Piecesat Pause.
chop (8 oz.) .................... Turn Chops over at Pause.
oz_ pkg (2 lbs.)
cup (10 oz.) ..................... Stir Flour into butter untilwellblended
at 1st Pause. _._nisk inmilk, pepper
and nutmeg at 2nd Pause.
17. Pudding Mix .................... ............... 3-I/4 ozo pk9 (21 oz.) ........... Stir Pudding MIXat pause.
18. Cake Mix ..................................... 1 layer, 9 oz. pkg, (19 oz.) ...... Rotate I/4 turn at pause.
19. Brownie Mix .................. . ........... 16 oz. pkgo (I-I/3 Ib) ............ Rotate 1/4 turn at pause.
20. Muffins ..................................... 6muffins .......................... Repeat three times to cook 18muffins°
21. Canned Entr_.e ......................... 16oz........................... Plug in Temperature Probe.
22. Canned Soup ............................ 1 can(1 lb.--t-1/2 lbs.) ......... Plug inTemperature Probe.
23. Meat Loaf ............................... 1-I/2 lb. 9"round beef ............... Plug in Temperatme Probe.
(3 lbs.)
24. Precooked Ham ............................ 3--5 lbs........................... Plug in Temperature Probe. Turn
Ham over at Pause-
25° Reheating Casserole ......................... 4--6 servings ...................... Plug in Temperature Probe.
*( ) shows total weightincluding all ingredients in the recipe.
NOTE: Temperature affects cooking time. The preset recipe times are based on that food at its norma!
storage temperature. For example, meats and dairy productsare refrigeratortemperature,Canned goods
are room temperature
25
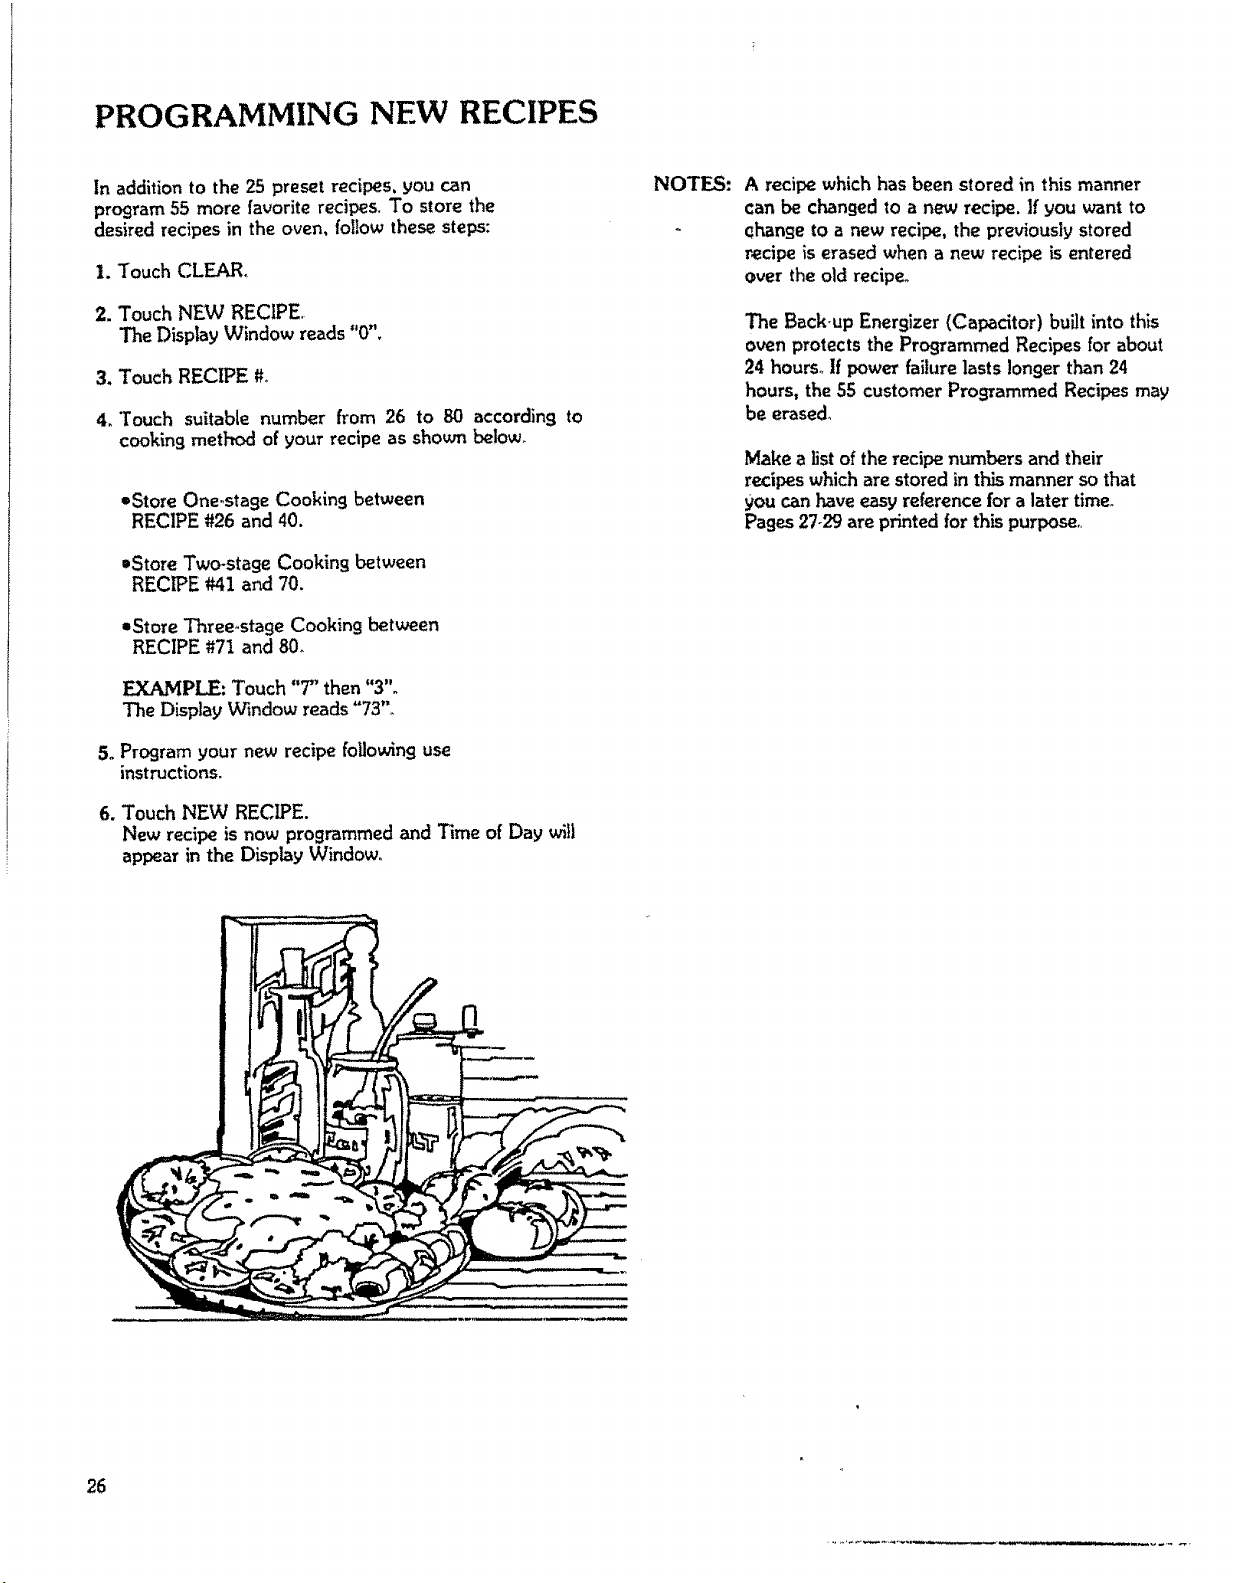
PROGRAMMING NEW RECIPES
In addition to the 25 preset recipes, you can
program 55 more favorite recipes. To store the
desired recipes in the oven, folIow these steps:
1. Touch CLEAR,
2. Touch NEW RECIPE.
The Display Window reads "0",
3, Touch RECIPE ft,
4. Touch suitable number from 26 to 80 according to
cooking method of your recipe as shown below.
=Store One.stage Cooking between
RECIPE #26 and 40.
restore Two-stage Cooking between
RECIPE #41 and 70.
.Store Three,.stage Cooking between
RECIPE #71 and 80.
EXAMPLE: Touch "T' then "3"°
The Display Window reads "73"°
5. Program your new recipe foilowinguse
instructions.
6. Touch NEW RECIPE.
New recipe is now programmed and Time of Day vail
appear in the Display Window.
NOTES: A recipe which has been stored in this manner
can be changedto a new recipe. If you w-antto
change to a new recipe, the previously stored
r_cipe is erased when a new recipe is entered
over theold recipe.
The Back-up Energizer (Capacitor) built into this
oven protectsthe Programmed Recipes for about
24 hours° If power failure lasts longer than 24
hours, the 55 customer Programmed Recipesmay
be erased°
Make a list of the recipe numbers and their
recipes which are stored in this manner so that
you can ]',aveeasyreference for a later time_
Pages27°29are printed for this purpose,.
26
NEW RECIPES
Recipe # Name Directions
26
27
28
29
3O
31
32
33
34
35
Recipe #
36
37
38
39
40
41
42
43
44
45
Name Directions
27
NE_ RE
Recipe t_ Name
46
47
48
49
5O
51
53
55
28
Directions
Recipe #
56
57
58
59
6O
61
.,,: H 62
63
64
65
Name Directions
NEW RECIPES
Recipe # Name Directions
"-66
68
69
7O
71
72
73
74
75
Recipe #
76
77
78
79
8O
Name
Directions
29
UTENSILS
3O
MATERIALS TO USE
IN YOUR MICROWAVE OVEN
OVENPROOF GLASS
Ovenware(treated for high-intensRy heat), suchasutility
dishes, bread dishes, pie plates, cake plates, liquid
measuringcups, casserolesand bowls without metallic
trimming_
CHINA
Bowls, cups',servingpieces,plates and ptatters without
metanlc trimming,
POTTFJRY
Dishes, cups,mugs and serving pieceswithout metallic
trimming,,
PLASTIC
Plasticwrap may be usedasa cover..Lay theplasticwrap
loosely over thedish and press it to the sides.The dish
shouldbe deep enough sothatplasticwrapwillnottouch
thefood. As thefood heats, it may causethewrap tomelt
wherever it touches the food. Plastic dishes, cups,
semirigidfreezercontainersand plasticbagsareusablefor
short.timecooking.Usewithcareassomesofteningofthe
plastic may occurwith heat from the food,
PAPER
Paper towels,waxed paper, paper napkins and paper
platesare usable.
UTENSIL TEST: A simpleway to find out ff autensilcan
beusedfor microwave cookingistoplaceit empty onthe
cooking tray. Close the door and set the time to 30
seconds(1/2 minute)° Then touchSTART, Ifthe utensiJis
warm at the end of this time, it should not be used for
microwave cooking.
CAUTION: Always make sure that dosed utensils are
opened and plastic pouchesof vegetables(or otherfood
items) are piercedbefore cooking.Tightly closedutensils
could explode,
-'---'---x..._
MATERIALS TO AVOID USING
IN YOUR MICROWAVE OVEN
METAL UTENSILS
Metal utenSRsare not recommended because the metal
shields the food from microwave energy on the bottom
and on the sides,causinguneven cooking results.Metal
utensils will also cause arcing and con damage the micro-
wave oven,
METAL DECORATION
Metal-trimmed or metal-banded dinnerware, casserole
dishes,etc_shouldnotbe used The metaltriminterferes
with normal cookingand may damage thedish,,
CENTURA ®TABLEWARE
Coming Glassdoes not recommend the useo{ itsCen-
tufa_ tablewareor Corelle®dosed handle cupsfor micro-
wave coo_-
ALUMINUM FOIL
Largesheetsor pieces o!aluminumfoil shouldbe avoided
because theywill hinder cookingand may causeharmful
ardng. H_,uever, smaller piecesmay be used to cover
areassuchas poultrylegsand wings.,Any aluminum .foil
usedshoutd be atleast I inchfrom the sidewalls ofoven_
WOOD
Wooden bowls and boards willdry out when used in the
microwaveoven and may splitor crack.
OTHER
Avoidusingbrown paperandcracked,flawedorchipped
utensils, i_.luding ovenproofglassware._
CAUTION: Do not usemetal ties on any paper or plastic
bags: the ties become hot and could cause a fire.
CARE AND CLEANING
Wipe the microwave inside and outside with a soft cloth and a milddetergent solution, The rinse and wipe dry,
This should be done on a weekly basis--more often if needed. Never use rough powders or pads,_
REMOVABLE PARTS
• The following removable parts may be removed as desoibedo They should be washed in warm (not hot} water
with a mild detergent and a soft cloth. Once they are dean, rinse them weU and dry _th a soft cloth Never use
rough cleaning powders, steel wool or rough cleaning pads_
• Aftereachuseof thetemperature proberitmustbe removed from thesocket.Usepotholder, asthewire,plug
and sensorsections may be hot. Wipe food or liquid from the ser,.sorwith a soft damp cloth,
= Theglosstray may be removed forcleaning at the sink.Wipe up spi_overswith a paper towelor clothbefore
removalof thetray. Be carefulnot tochipor scratchthe edgesofthe tray asthismay causethe tray to break
dudrK3 use
* The oven insidetop (stirrer shield) canbe gentlywit_d inplaceorremovedforwashingat thesink. Excessive
oil spatters on the inside top (stirrer shield)will make them difficult to refllove,if left for many days.
Wipe them with a wet paper towel especiallyafter cookingchicker_or bacon°
The stirzer shield sets in slots alonf:the sides and in the rear of the oven and is held by three tabs in front. Pull
the front edgedown and forward to remove_Wash onlyin warm (Mothot) detergent water, rinse and wipe
dry. Avoid hitting or bending the metal st_'er blade, as this could cause uneven cooking ormicrowave power
loss. To replace shield,slide it into thesideand rear slots, and fit the front edgeof the shield with the three
tabs. After replacingit, make sure that it fitssecurely in place_
SPECIAL CARE
For best performance and safety, the inner door panel andthe ovenfront frame should be freeof foodor9_ease
buildup. Wipe both often with a mild detergent. Then rinse andwipe dry. Never use rough powders or pads.
After cleaning the control panel, touch CLEAR. This will clear any entries that might have been entered
accidentally whilecleaningthe panel
31
QUESTIONS AND ANSWERS
OPERATION
Q What is wrong when the oven light will not glow during cooking or when the oven door is open?
A. There may be several reasons why the oven light will not _towoPerhaps:
• Door is not closedand locked, Push doorfirmty to be sure that door is lockedproperly.
• The light bulb has burned out.
QWhy does steam come out of the air exhaust vent?
A. Steam isnormally produced during cooking_ The microwaue oven has beendesigned to vent this steam
out the rear vent.
Q.Will the microwave oven be damaged if it operates empty?
A Yes. Never operate the oven empty or without the glass tray.
Q_Does microwave energy pass through the viewing screen in the door?
A_No,, The metal screen bounces back the energy to theoven cauity.The holes (or ports) are made to
allow light to pass through. They do not let microwave energy pass through,
Q_Why does the "beep tone" sound when a "pad" on the control panel is touched?
A, The "beep tone" soundsto assure that the setting is being properly entered.
Q. Why does the disptayshow "0:00'?
Ao This indicates that there has been a temporary loss of electrica/power to the oven, and the TIME OF
DAY must be reset. Prolonged/ass of power can also resu!_ in loss of programmable recipes,_ Be sure
they are properly recorded, _o that they can be reentered.
Q.Can my microwave oven be dan=agedif food is cooked for too long a period of time?
A, Like any other cooking appliance, it is possible to ouercook Jood to the point of destruction which may
result in the food creating smoke and euen possible fire damqge to the inside of the oven. It is always best
to attend the oven while it is in the cooking process, See ,/mportanl Safety Instructions on Page 3,
QWhen the ovenis plugged into awall outlet for the first time, it might not work properly,rWhat iswrong?
A.. Only when the oven _s plugged in for the first time or when power resumes after o power interruption,
the microcomputer used in the oven control assembly may temporarily become scrambled and fail to
function as programmed_
Unplug the oven from the 120ovo/l household outlet and then plug it back inoThe microcomputer will be
reset for proper/'unction thereafter_,
Q, Why do ! see light reflection around the outer case?
A_This light is from the ouen light which is located outside the oven cavity,,
32
QUESTIONS AND ANSWERS (Cant'd)
FOODS
Q.What is wrong when baked foods have a hard, dry, brown spot?
AoA hard, dry, brown spot shows overcooking. Shorten the cooking or reheating time.
Q,Why do eggs sometimes pop?
A. When baking, .frying or poaching eggs, the yolk may pop due to steam build.up inside the yolk
membrane, To prevent this, simply pierce the yolk with a toothpick before cooking it.
CAUTION: Never microwave cook eggs in the shell,
QoWhy are scrambled eggs sometimes a little dry after cooking?
A_Eggs dry out if they are overcooked Though the same recipe isusedeachtime, one may need to vary
the cooking time for one of these reasons:
• Eggs vary in size,.
• Eggs are at room temperature one time and at refrigerator temperature another time,
• The shapes of utensils vary, thereby making it necessary to vary the cooking time,
• Eggs continue cooking during standing time..
Q, is it possible to pop corn in a microwave oven?
A. Yes, if using one of the tu_omethods described below.
(1) Microwave.popping devices designed specifically for" this type of microwave cooking or
(2) Prepackaged commercial microwave popcorn that contains specifictimes and power outputs
needed for an acceptable final product.
FOLLOW EXACT DIRECTIONS GIVEN BY EACH MANUFAGTURER FOR THE_ POPCORN
POPPING PRODUCT AND DO NOT LEAVE TilE OVEN U_TTENDED WI_L_ THE CORN IS
BEING POPPED°
IF CORN FAILS TO POP AFTER THE SUGGESTED TIMES, DBCONT_UE COOKING.
OVERCOOK/NG COULD RESUL T IN AN OVEN FIRE,,
CAUTION: NEVER USE A BROWN PAPER BAG FOR POPPt_,]G COP_{,
Q, What is wrong when three potatoes bake thoroughly and the fourth one is still not cooked?
A. The fourth potato may be slightly heavier' than the other's and should be cooked30 to 50 seconds longer°
Remember to allow space around each potato when baking ALso, for more even cooking, put potatoes
in a circle,
Q Why do baked apples sometimes burst during cooking?
A, The peeling has not beenremoved from the top half of eachapple,to allow for expansion of theinterior of
the apple during cooking_As in regular cooking methods, the interior of the apple expands during the
cooking process.
Q How are boil-overs avoided?
K When cooking foods that tend to boil over, use a larger utensil than usualforcookin9. If you open the
oven door or touch STOP, the food will stop boiling. (Remember to touch START agaln after closing the
door to restart the cooking cycle,,)
Q, Why iS a standing time recommended after' microwave cooking is over?
A Standing time is recommended after microwave cooking is ouer. This is to allow foods to continue
cooking euenty throughout for a few moments after the actuat microwave oven cooking cycler The
amount of standing time depends upon the density of the food.
QoWhy is an additional time required for cooking food stored in reffiferator?
A As in conventional cooking, the initial temperature of food affects total cooking time_ More time is
needed to cook the food just taken out o] a refrigerator than food at a,,room temperature
33
BEFORE CALLING FOR SERVICE
You can often correct operating problemsyourself rf your microwave oven falls to work properly, locate the
operating problem in the chart below and try the solutions marked for each problem
tf the microwave oven stilldoes not work properly,contact the nearest SearsService Center. SearsService
Centers are fullyequipped to handle your servicerequirements,
PROBLEM
Oven Will Not Start
_rcing or Sparking
Time of Day Incorrect
Probe Light Rashes
Unevenly Cooked Foods
Overcooked Foods
UndercookedFoods
Improper Defrosting
:_:',_'_ -*',_;I _..':..._.............I.*_ _ _"-:le ',_i_
. , ....'_" '_" " i _ _
SOt.U'nON ] _ 1
Is power cordpluggedin?
Is door closed?--J
Cool,3ngtime not seL
Tempe,at'are not set _ probe not p_ugged in_-
Use approved cookware only.-
Properly position tempe_t_._re probe.,-
Do not operate with oven empty.,-
Resettime of day**--
Is temperatureprobe propedy ptt_ggedin?-
Suppliedglasstray must be used-
Turn or stirfood....
Completely defrost food,-
Use correct Time/Power Control setting,-
Use correct Temp Control setting+.--
Check to see that oven ventilafior_--
ports are not res_cted.
34
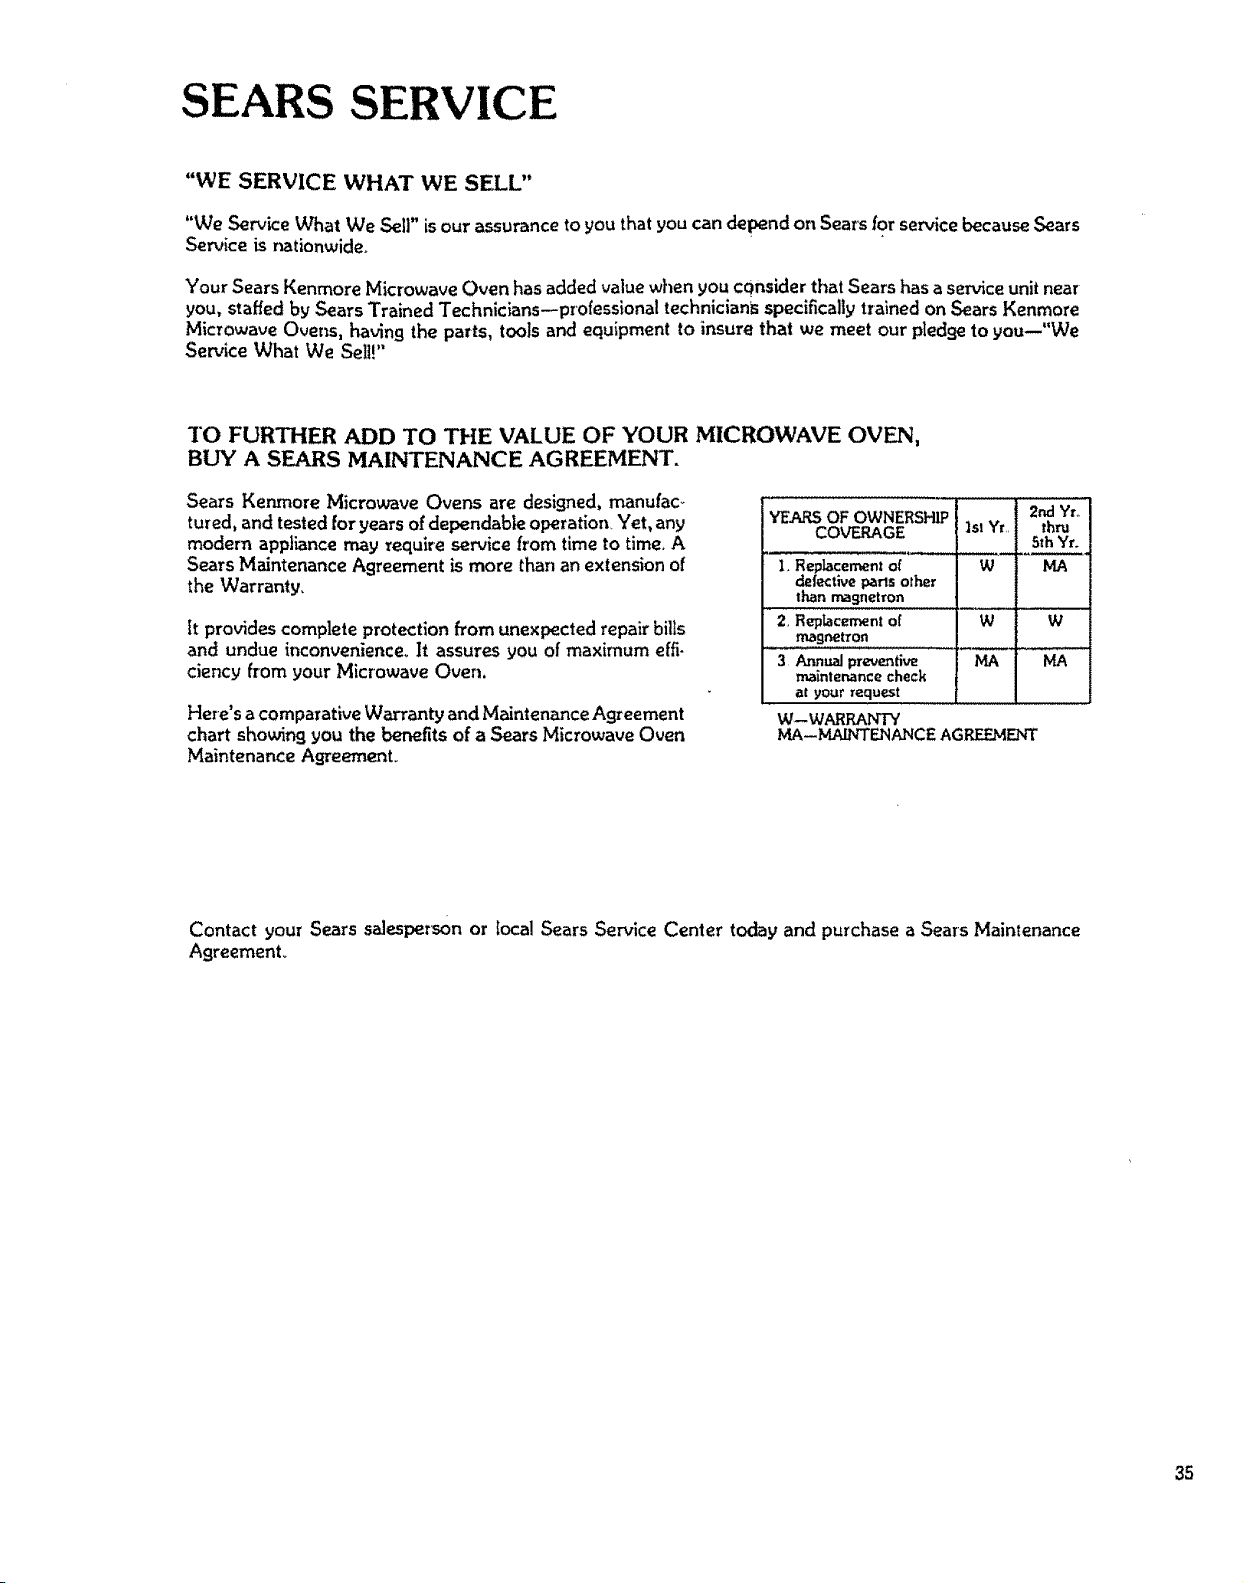
SEARS SERVICE
"WE SERVICE WHAT WE SELL"
"We Servk:e What We Sell" isour assurance to you that you candepend on Sears for service because Sears
Service is nationwide.
Your SearsKenmore Microwave Oven has added value when you considerthat Searshasa service unit near
you, staffed by Sears Trained Technicians--professional technicians specificallytrained on Sears Kenmore
Microwave Ovens, having the parts, tools and equipment to insure thai we meet our pledge to you--"We
Service What We Sell!"
TO FURTHER ADD TO THE VALUE OF YOUR MICROWAVE OVEN,
BUY A SEARS MAINTENANCE AGREEMENT.
Sears Kenmore Microwave Ovens are designed, manufaco
tu_ed, and tested for yearsofdependable operation_Yet, any
modern appliance may require service from timeto time, A
SearsMaintenanceABreementismore thananextensionof
the Warranty,
tt provides complete protection from unexpectedrepair bills
and undue inconvenience_ ]t assures you of maximum effi-
ciency from your Microwave Oven.
Here's a comparative Warranty and Maintenance Agreement
chart showing you the benefits of a Sears Microwave Oven
Maintenance Agreement.
2M Yr,,
"_.ARS OF OWNERSHIP
COVERAGE ]st Yr,, thru
5th Yr.
1,. Replacement of W MA
defective parts other
than magnetron
2, RepLacemento[ W W
magnet,'on
3 Annual preventive MA M.A
maintenance check
at your request
W--WARRAt, TI'Y
IvlA--_ENANCE AGREEMENT
Contact your Sears salesperson or local Sears Service Center today and purchase a Sears Maintenance
Agreement°
35

USE& CARE
MANUAL
STOCK NOS.
87447/87448
Kenmore
MICROWAVE OVEN
W. RRANTY
FULL ONE YEAR W_NTY ON MICROWAVE OVEN
FOR ONE YEAR FROM Th_ DATE OF PURCHASE, IF THIS
KENMORE MICROWAVE OVEN FALLS DUE TO A DEFECT IN
MATERIAL OR WORKMANSHIP, SEARS WILL REPAIR IT, FREE OF
CHARGE
FUll FIVE YEAR WARRANTY OF THE MAGNETRON
FOR FIVE YEARS FROM THE DATE OF PURCHASE. IF THE
MAGNETRON [NTHIS KENMORE MICROWAVE OVEN FAILS DUE TO A
DEFECT IN MATERIAL OR WORKMANSHIP. SEARS WILL REPAIR rro
FREE OF CHARGE.
THE ABOVE WARRANTY (_OVERAGE APPLIES ONLY TO
MICROWAVE OVENS WHICH ARE USED FOR PRIVATE HOUSEHOLD
PURPOSES,
WARRANTY SERVICE IS AVAILABLE BY SIMPLY
CONTACTING THE NEAREST SEARS STORE OR
SERVICE CENTER IN THE UNITED STATES.
THIS WARRANTY APPLIES ONLY WHILE THIS PRODUCT IS IN USE IN
THE UNITED STATES,
THIS WARRANTY GIVES YOU SPECIFIC LEGAL RIGHTS, AND YOU
MAY ALSO HAVE OTHER RIGHTS WHICH VARY FROM STATE TO
STATE
SEARS, ROEBUCK AND CO.,
DEPT. 698/731A, SEARS TOWER, CHICAGO, IL 60684
Part NO, 13728
Sears. Roebuck and CoN, Chicago, 1l. 60684 U.S.A.
Revised 6/'86 Printed in Japan