

8 CUP FOOD PROCESSOR
Instruction Manual
90111 Bella Pro Food Processor_IM R1.indd 190111 Bella Pro Food Processor_IM R1.indd 1 2020-05-19 10:22 AM2020-05-19 10:22 AM

Thank You for your purchase
Register & sign up for special
announcements and trendy recipes!
Tell us what you think!
Rate, review or ask us a question.
@bellahousewares.com
#getinspired
BellaLife BellaLifestyle
90111 Bella Pro Food Processor_IM R1.indd 290111 Bella Pro Food Processor_IM R1.indd 2 2020-05-19 10:22 AM2020-05-19 10:22 AM

Important Safeguards ......................................................................................................2-3
Additional Important Safeguards ...................................................................................... 4
Notes on the Plug ................................................................................................................4
Notes on the Cord ................................................................................................................5
Plasticizer Warning ..............................................................................................................5
Electric Power .......................................................................................................................5
Getting To Know Your 8 Cup Food Processor ..............................................................6 -7
Before Using For The First Time........................................................................................8
Assembly Instructions ...................................................................................................8-10
Operating Instructions .................................................................................................10-11
Automatic Thermal Protector........................................................................................... 11
Food Processing Hints ................................................................................................. 11-13
Food Processing Guide ..................................................................................................... 13
Attachments for Food Processing .............................................................................. 14-15
User Maintenance Instructions ........................................................................................15
Care & Cleaning Instructions ......................................................................................15-16
Storing Instructions ...........................................................................................................16
Recipes ..........................................................................................................................17-21-
Warranty ........................................................................................................................22-23
TABLE OF CONTENTS
90111 Bella Pro Food Processor_IM R1.indd 190111 Bella Pro Food Processor_IM R1.indd 1 2020-05-19 10:22 AM2020-05-19 10:22 AM

2
IMPORTANT SAFEGUARDS
When using electrical appliances, basic safety precautions should always
be followed including the following:
1. READ ALL INSTRUCTIONS.
2. To protect against risk of electrical shock, do not put cord, plug,
or appliance in water or other liquid.
3. Close supervision is necessary when any appliance is used by
or near children. This appliance is not suitable for use by children.
Children should be supervised to ensure that they do not play
with the appliance.
4. This appliance is not intended for use by persons (including children)
with reduced physical, sensory or mental capabilities, or lack of
experience and knowledge, unless they have been given supervision
or instruction concerning use of the appliance by a person responsible
for their safety.
5. Turn the Food Processor OFF, then unplug from outlet when
not in use, before putting on or taking off attachments,
and before cleaning.
6. To unplug, grasp the plug and pull from the outlet. Never pull from
the power cord.
7. CAUTION: AVOID CONTACT WITH MOVING PARTS.
8. Do not operate any appliance with a damaged cord or plug or after
the appliance malfunctions, or is dropped or damaged in any manner.
Contact consumer service for examination, repair or adjustment.
9. The use of attachments not recommended or sold by the
manufacturer may cause re, electric shock or injury.
90111 Bella Pro Food Processor_IM R1.indd 290111 Bella Pro Food Processor_IM R1.indd 2 2020-05-19 10:22 AM2020-05-19 10:22 AM

3
10. The processing bowl must be properly assembled and in place before
operating the appliance.
11. Do not use outdoors.
12. Do not let cord hang over edge of table or counter.
13. Do not let cord contact any hot surface, including the stove.
14. To disconnect, turn the speed control dial to OFF.
Then remove plug from wall outlet.
15. Keep hands and utensils away from moving blades or disc while
processing food to reduce the risk of severe injury to persons or
damage to the Food Processor. A scraper or spatula may be used, but
must be used only when the Food Processor is not running.
16. Blades are sharp. Handle carefully.
17. To reduce the risk of injury, never place processing blade or disc onto
the base without rst tting the spindle onto the drive shaft. putting
processing bowl and then the spindle, properly in place.
18. Be certain lid is securely locked in place before operating appliance.
19. Never feed food by hand. Always use food pusher.
20. Do not attempt to defeat either the base/bowl or the
lid/bowl interlock.
SAVE THESE INSTRUCTIONS
FOR HOUSEHOLD USE ONLY
90111 Bella Pro Food Processor_IM R1.indd 390111 Bella Pro Food Processor_IM R1.indd 3 2020-05-19 10:22 AM2020-05-19 10:22 AM

4
ADDITIONAL IMPORTANT
SAFEGUARDS
IMPORTANT: To maintain peak performance, do not use your
Food Processor for the following: grinding grain, coffee beans or hard
spices such as nutmeg; slicing frozen meat; or crushing ice.
1. All users of this appliance must read and understand this manual
before operating or cleaning this appliance.
2. The cord to this appliance should be plugged into a 120V AC electrical
outlet only.
3. Do not leave this appliance unattended during use.
4. If this appliance begins to malfunction during use, immediately turn
the speed control dial to OFF to cease operation and unplug the cord.
Do not use or attempt to repair the malfunctioning appliance.
5. If this appliance falls or accidentally becomes immersed in water,
unplug it immediately. Do not reach into the water! Do not use this
appliance after it has fallen into or becomes immersed in water.
6. To reduce the risk of injury to persons or property, never use this
appliance in an unstable position.
7. Do not use this appliance for other than its intended use.
NOTES ON THE PLUG
This appliance has a polarized plug (one blade is wider than the other).
To reduce the risk of electric shock, this plug will t in a polarized outlet
only one way. If the plug does not t fully into the outlet,
reverse the plug. If it still does not t, contact a qualied electrician.
Do not modify the plug in any way.
90111 Bella Pro Food Processor_IM R1.indd 490111 Bella Pro Food Processor_IM R1.indd 4 2020-05-19 10:22 AM2020-05-19 10:22 AM

5
NOTES ON THE CORD
A. A short power-supply cord (or detachable power-supply cord) is to be
provided to reduce the risk resulting from becoming entangled in or
tripping over a longer cord.
B. Longer detachable power-supply cords or extension cords are
available and may be used if care is exercised in their use.
C. If a long detachable power-supply cord or extension cord is used :
1. The marked electrical rating of the cord or extension cord should be
at least asgreat as the electrical rating of the appliance;
2. If the appliance is of the grounded type, the extension cord should
be a grounding-type3-wire cord; and
3. The longer cord should be arranged so that it does not drape over
thecountertop or table top where it can be pulled on by children or
trippedover unintentionally.
PLASTICIZER WARNING
CAUTION: To prevent Plasticizers from migrating to the nish
of the counter top or table top or other furniture, place NON-PLASTIC
coasters or place mats between the appliance and the nish of the
counter top or table top. Failure to do so may cause the nish to darken;
permanent blemishes may occur or stains can appear.
ELECTRIC POWER
If the electrical circuit is overloaded with other appliances,
your appliance may not operate properly. It should be operated
on a separate electrical circuit from other appliances.
90111 Bella Pro Food Processor_IM R1.indd 590111 Bella Pro Food Processor_IM R1.indd 5 2020-05-19 10:22 AM2020-05-19 10:22 AM
6
PULSE
OFF
LOW
HIGH
MLCUPS
2
5
3
1
4
250
500
750
1000
MAX LIQUID FILL
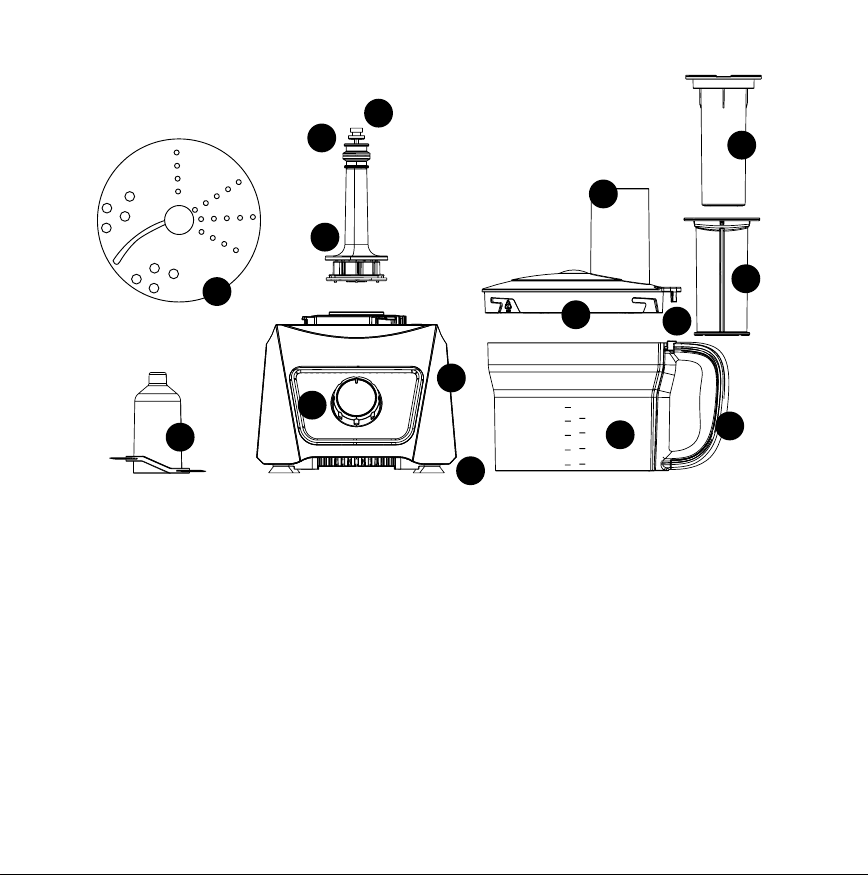
Getting To Know Your 8 Cup Food Processor
Product may vary slightly from illustration
1. Base
2. Nonslip Feet
3. Speed Control Dial
4. Base/Bowl Inter
lock Channel
5. Drive Shaft
6. Spindle
7. 8 cup food processing
work bowl
8. Work bowl handle
9. Stainless Steel Processing
Blade (Sabatier Blade)
10. Reversible Slicing/
Shredding Disc
11. Lid
12. Lid/Bowl Interlock Channel
13. Feed Chute
14. Food Pusher
15. 3 oz. Food Pusher Cup
1
2
5
3
12
14
4
6
8
9
7
11
10
13
15
90111 Bella Pro Food Processor_IM R1.indd 690111 Bella Pro Food Processor_IM R1.indd 6 2020-05-19 10:22 AM2020-05-19 10:22 AM
7
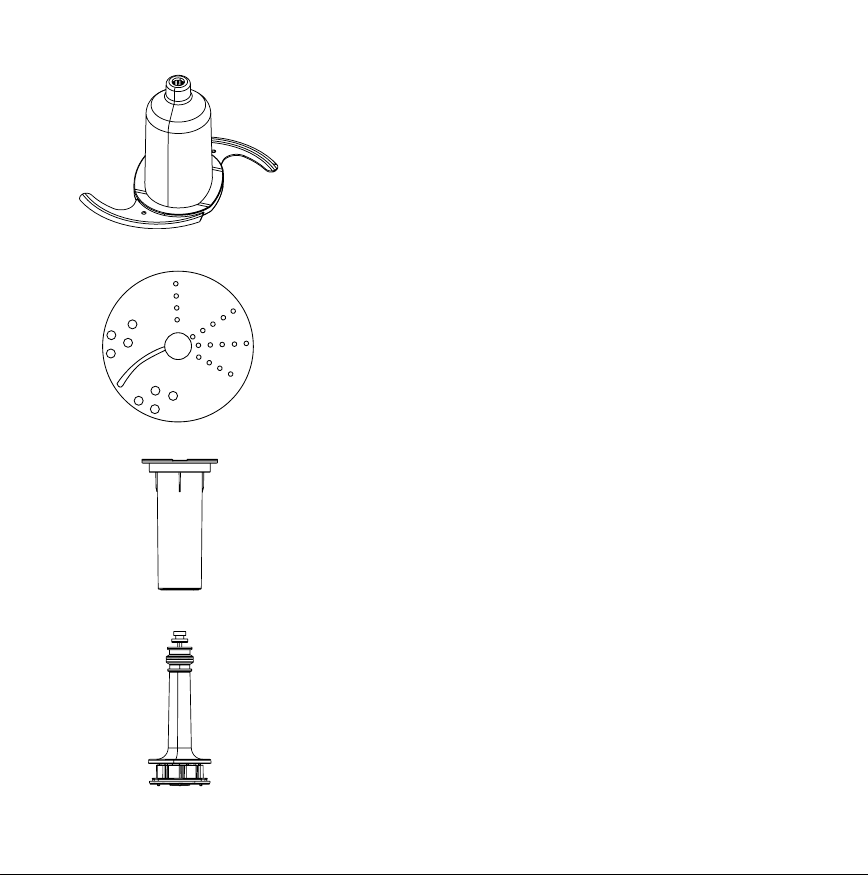
Processing Blade (Sabatier Blade)
Stainless steel chopping/mixing/dough blade designed
to chop, mix, blend, knead doughs, whisk, crumb,
and emulsify. Ideal for chopping raw and cooked meat, grating
Parmesan cheese, cake and pastry making, preparing pate, dips,
pureed soups.
IMPORTANT: The texture of processed foods (such as grated
Parmesan cheese) is determined by processing speed
and time.
Reversible Slicing/Shredding Disc
Install the processing disc with the slicing blade UP to slice or
the shredding blade UP to shred. Ideal for soft cheeses or hard
vegetables. Easily slice fresh potatoes, cabbage, cucumber,
zucchini, onions, beets, carrots, radishes.
Simply reverse the blade to shred.
Food Pusher Cup
The food pusher cup can be used to pour small quantities
(up to 3 oz.) of liquids such as oil or water to thin the
processed mixture. When not in use, the food pusher cup nests
convenientlyinside the top of the food pusher.
Spindle
The spindle ts over the drive shaft and must be used when
assembling blade or disc for processing
PULSE
OFF
LOW
HIGH
ml
2
5
3
1
4
250
500
750
1000
MAX LIQUID FILL
PULSE
OFF
LOW
HIGH
ml
2
5
3
1
4
250
500
750
1000
MAX LIQUID FILL
90111 Bella Pro Food Processor_IM R1.indd 790111 Bella Pro Food Processor_IM R1.indd 7 2020-05-19 10:23 AM2020-05-19 10:23 AM
8
Before Using For The First Time
WARNING: Blade and disc attachments are very sharp. Use extreme care when handling blades
and disc. Failure to do so can result in personal injury.
1. Carefully unpack the Food Processor and remove all packaging materials.
2. Wash the processing bowl, lid with feed chute, food pusher, food pusher cup,
spindle, processing blade and reversible slicing/shredding disc in warm soapy water.
3. Wipe the Food Processor base with a soft, moistened cloth.
WARNING: Never immerse the Food
Processor base in water or any other liquid.
4. Rinse and dry each part thoroughly before
use.
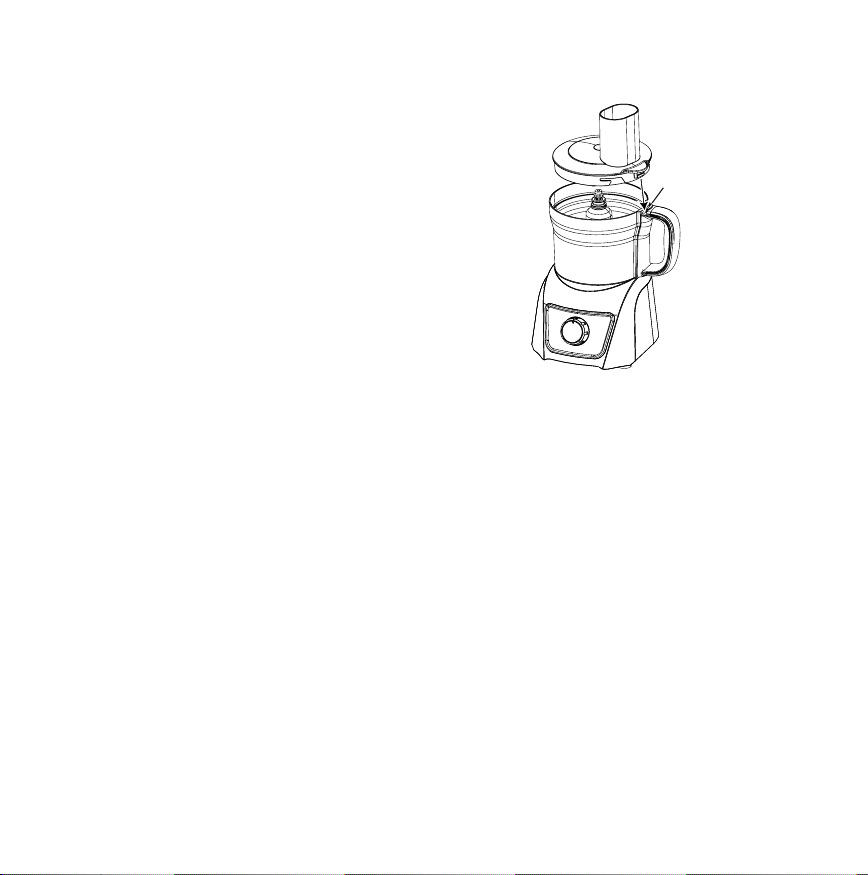
Assembly Instructions
Base/Bowl Assembly
1. Before assembling and using the Food
Processor,
make sure that the power cord is
unplugged.
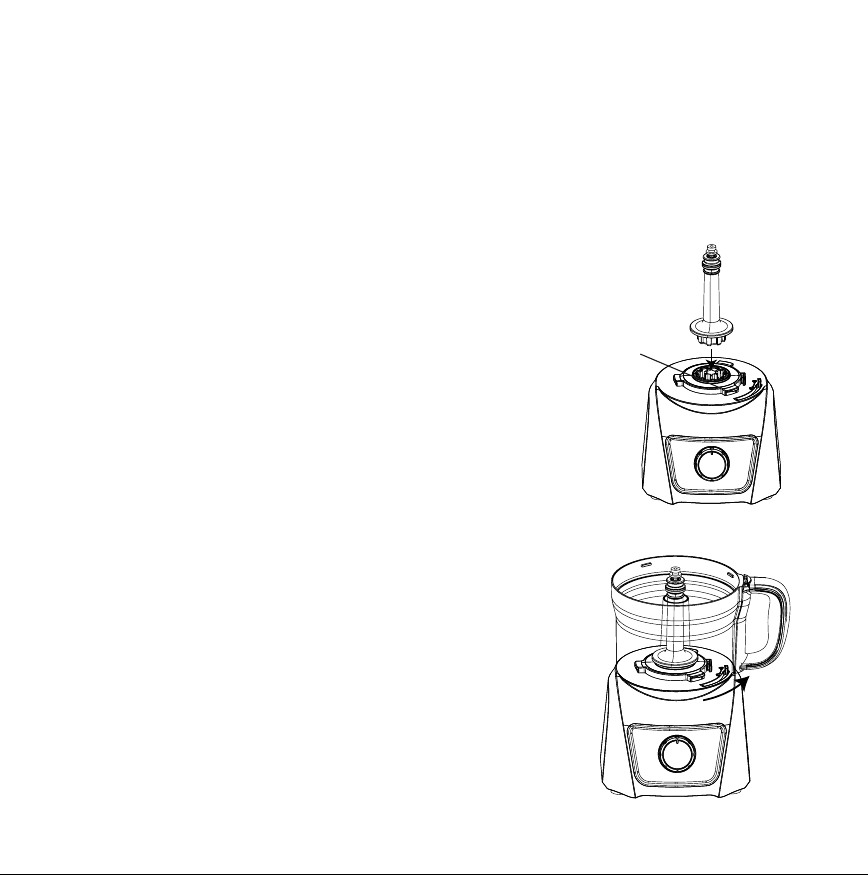
2. Place the base facing you on a dry, level surface.
3. Fit the spindle securely into the drive shaft. (See Figure 3.)
4. Place the processing bowl onto the base. Position the handle
directly over the base/bowl interlock channel. (See Figure 3.)
5. Rotate the handle counter-clockwise; the handle will lock onto
the right side as the base/bowl interlock engages.
(See Figure 4.)
NOTE: If the base/bowl interlock is not properly engaged,
the Food Processor will not operate.
Figure 3
Base/Bowl
Interlock
Channel
Figure 4
90111 Bella Pro Food Processor_IM R1.indd 890111 Bella Pro Food Processor_IM R1.indd 8 2020-05-19 10:23 AM2020-05-19 10:23 AM
9
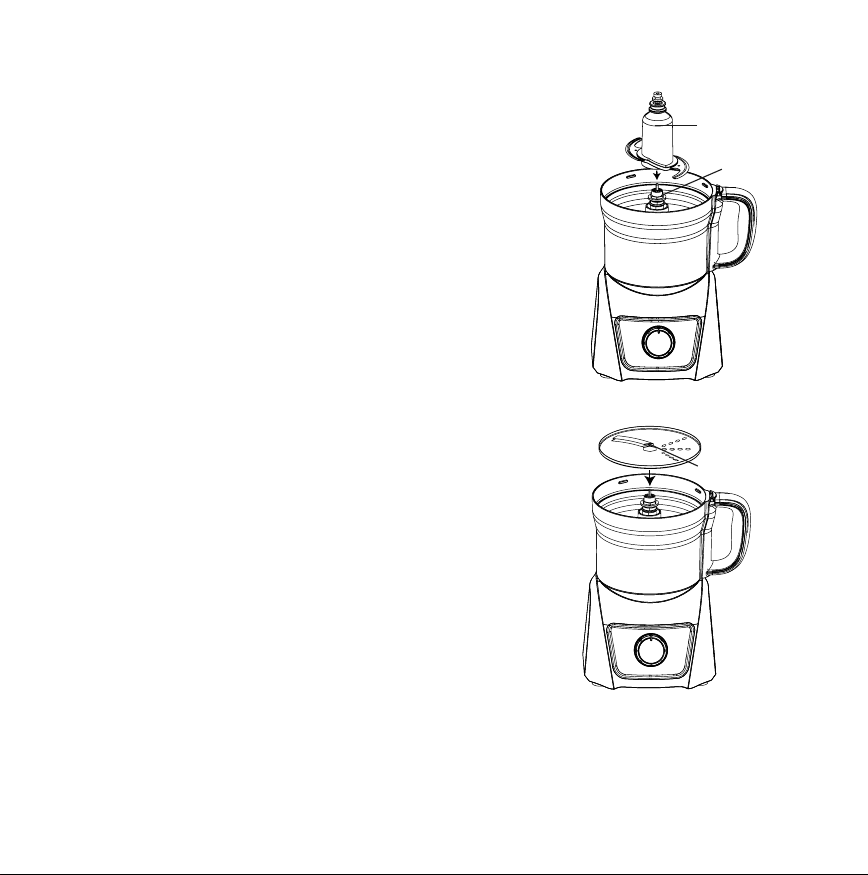
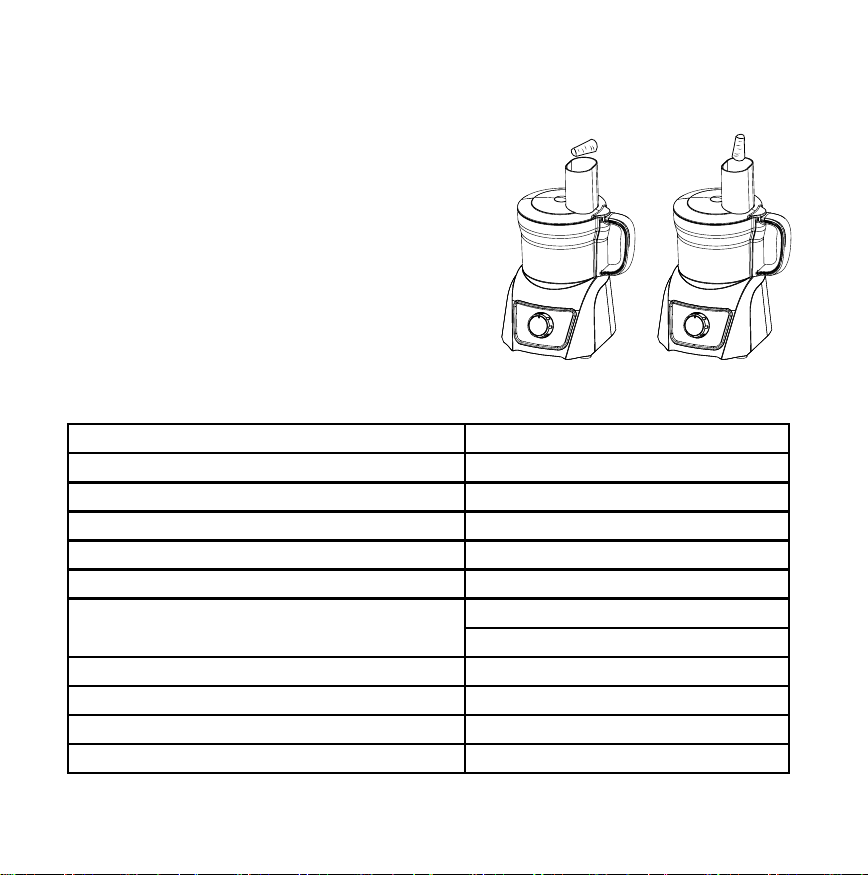
Attaching the Stainless Steel Processing Blade
WARNING: Blade attachment is very sharp. Use extreme care
to always grasp the center hub when handling the blade.
Failure to do so can result in personal injury.
1. Fit the processing blade’s center hole over the spindle.
(See Figure 5.) Turn the blade until it drops to the bottom
of the processing bowl and is securely fastened.
2. Place food to be processed into the processing bowl.
3. Attach and lock the lid following the Lid Assembly
Instructions.
Attaching the Reversible Slicing/Shredding Disc
WARNING: Both sides of this disc are very sharp. Use extreme
care to always grasp the center hub when handling the disc.
Failure to do so can result in personal injury.
1. Grasping the center hub, hold the disc with the slicing
blade UP to slice. Turn the disc over with the shredding
blade UP to shred
2. Fit the disc’s center hole over the spindle. Turn disc until
it easily drops down onto the top of the spindle and is
securely fastened. (See Figure 6.)
3. Attach and lock the lid following the Lid Assembly
Instructions.
Figure 4
Figure 5
Center Hub
Spindle
Figure 6
Center Hub
90111 Bella Pro Food Processor_IM R1.indd 990111 Bella Pro Food Processor_IM R1.indd 9 2020-05-19 10:23 AM2020-05-19 10:23 AM
10
Lid Assembly
1. Align the large tab on the lid to that it sits slightly directly
over the lid/bowl interlock channel,
slightly to the left of the handle.
2. Holding the handle of the processing bowl with
one hand, grip the feed chute with the other hand and
rotate the lid counter-clockwise; an audible click can be
heard as the lid locks into place.
NOTE: If the lid interlock is not properly engaged,
the Food Processor will not operate.
3. Insert the food pusher with food pusher cup nested
into the feed chute.
4. Plug the cord into a 120V AC power outlet.
5. The Food Processor is now ready for use.
Operating Instructions
1. Attach and lock the lid following the Lid Assembly Instructions.
2. Add the food pusher to the feed chute before use. Nest the food pusher cup inside
the food pusher.
3. Plug the cord into a 120V AC electrical wall outlet.
4. Turn the speed control dial to PULSE or LOW begin operation.
5. Use LOW speed to prepare doughs and batters. HIGH speed is ideal for most
other chopping, mixing, and processing tasks. Use HIGH or LOW when slicing/shredding.
NOTE: PULSE will stop when the dial is released.
6. If it becomes necessary to add additional ingredients to the processing bowl, simply remove
the food pusher and/or the food pusher cup. Use the cup provided to pour
small amounts of oil or other liquids through the feed chute while processing.
Figure 7
Lid/Bowl
Interlock
Channel
90111 Bella Pro Food Processor_IM R1.indd 1090111 Bella Pro Food Processor_IM R1.indd 10 2020-05-19 10:23 AM2020-05-19 10:23 AM

11
CAUTION: Never use ngers or utensils to push food down the feed chute.
Always use the food pusher.
7. Use even, constant pressure on the food pusher to feed food into the feed chute.
8. For best results, do not ll processing bowl to maximum. Limit food quantity to 5 cups for
optimal food processing performance.
NOTE: When processing multiple ingredients for one recipe, avoid over-processing foods at
the bottom of the bowl by chopping small batches of each ingredient.
9. When processing is complete, turn the speed control dial to OFF. Unplug the unit.
10. Grasping the feed chute and the processing bowl handle, rotate the lid clockwise to unlock.
Remove lid.
11. Use the center hub to lift the processing blade or slicing/shredding disc up and off
the spindle.
12. Grasping the processing bowl handle rmly, rotate the bowl clockwise to unlock.
Lift to remove the processing bowl from base. Then remove the spindle.
13. Use a spatula to carefully remove processed food from the blade and the
processing bowl.
Automatic Thermal Protector
This product is equipped with an Automatic Resettable Thermal Protector to protect the motor. If
the motor shuts down, turn the control speed dial to Off position, and then unplug the blender.
Let the blender rest for approximately one hour. Once the resetting period has elapsed, plug the
power cord back into the outlet and turn the control speed dial to the desired setting to continue
processing.
Food Processing Hints
• For best results, do not ll processing bowl to maximum. Limit liquids to 4 cups/1000 ml.
and solids up to 5 cups for optimal food processing performance.
• Dough Preparation: Use the processing blade on LOW speed to prepare doughs
and batters.
90111 Bella Pro Food Processor_IM R1.indd 1190111 Bella Pro Food Processor_IM R1.indd 11 2020-05-19 10:23 AM2020-05-19 10:23 AM

12
IMPORTANT: When adding almond extract or avorings to mixtures, avoid contact
with the processing bowl to avoid permanent marking.
• Chop/Mince: Pre-cooked meat should be cut into cubes approximately 1-inch square before
processing.
• Fruits and Vegetables: Before processing fruits and vegetables, clean and cut into
2-inch x 1-inch pieces.
• Mix: Quantities that can be processed in the processing bowl will vary depending upon the
density of the ingredients being used.
• Adding liquid ingredients: Pour liquid ingredients through the feed chute in the lid while the
Food Processor is in operation. The food pusher cup is useful when adding small quantities
of liquids such as oil or water to thin the processed mixture.
• Adding dry ingredients: Add dry ingredients such as our directly into the processing bowl.
There is no need to sift ingredients.
NOTE: When processing sauces or semi-liquid ingredients, it may be necessary
to periodically scrape down the processing bowl with a spatula.
• Using the feed chute: The most important factor for successful slicing and shredding
is the way in which the food is packed into the feed chute. The feed chute should always
be packed rmly to allow each piece of food to support the others.
NOTE: There will always be a small portion of food left unprocessed between
the food pusher and the processing disc.
CAUTION: Never use ngers or utensils to push food down the Feed Chute.
Always use the food pusher.
• Slicing/Shredding: Cut all ingredients to a size that ts comfortably into the feed chute
(no larger than 2-inches x 1-1/2 inches). Pack the feed chute and, while holding food steady
and upright with the food pusher, press down evenly until all ingredients are sliced or
shredded. Do not use excessive force or you may damage the Food Processor.
• Long Slices: Pack up to 2-inch wide food items horizontally in feed chute. (See Figure 8.)
• Short Slices: Pack food items vertically in feed chute. (See Figure 9.)
90111 Bella Pro Food Processor_IM R1.indd 1290111 Bella Pro Food Processor_IM R1.indd 12 2020-05-19 10:23 AM2020-05-19 10:23 AM
13
• Slicing/Shredding: For best results remember
that softer foods such as cheese (Cheddar, mozzarella or Swiss) should be well chilled
before processing. Harder foods such
as Parmesan or Romano cheese should
be at room temperature before grating
or shredding.
NOTE: When grating hard foods, do not apply
excessive pressure to the food pusher.
Food Processing Guide
Food Processing Bowl Capacity
Pureed/Chopped Meat, Fish, or Seafood 3/4 lb. (12 oz.)
Sliced or Shredded Fruit, Vegetables, or Cheese 4 - 5 cups
Chopped Fruit, Vegetables, or Cheese 2 cups
Pureed Fruit, Vegetables, or Cheese 3 cups cooked
Liquids: Soups, Salad Dressings, Sauces, etc. 4 cups
Cake Batter 8-inch cheesecake
1 (15.25 oz.) boxed cake mix
Cookie Dough 2-1/2 dozen average-sized cookies
White Bread 2 cups all-purpose or bread our
Pizza Dough 2 cups all-purpose or bread our
Nut Butter 2 cups nuts
Figure 8 Figure 9
90111 Bella Pro Food Processor_IM R1.indd 1390111 Bella Pro Food Processor_IM R1.indd 13 2020-05-19 10:23 AM2020-05-19 10:23 AM

14
Attachments for Food Processing
Stainless Steel Processing Blade
Push food from sides of processing bowl with spatula when necessary.
NOTE: Grating foods such as cheese or vegetables can be achieved by using the processing
blade. The length of time and processing speed will determine the nal consistency.
FOOD SPEED
Apple PULSE
Breadcrumbs (crumbed) PULSE, then HIGH
Cabbage PULSE or LOW
Carrots PULSE or LOW
Celery PULSE
Crackers (crumbed) PULSE, then HIGH
Dough LOW
Eggs, hard boiled PULSE
Garlic PULSE
Mushrooms PULSE
Onions PULSE
Parmesan, Romano (grated) PULSE, then HIGH
Parsley or other Herbs PULSE or LOW
Peppers PULSE
Potatoes PULSE
Walnuts PULSE
90111 Bella Pro Food Processor_IM R1.indd 1490111 Bella Pro Food Processor_IM R1.indd 14 2020-05-19 10:23 AM2020-05-19 10:23 AM

15
Reversible Slicing/Shredding Disc
NOTE: Cut food to t feed chute.
For best results: Use PULSE, then LOW Speed to process.
FOOD DISC/SIDE
Apple Slicing/Shredding
Carrots Slicing/Shredding
Cheese, soft or semi-soft Cheddar, Mozzarella, Swiss Shredding
Mushrooms Slicing/Shredding
Parmesan, Romano Shredding
Potatoes Slicing/Shredding
Summer Squash/Zucchini Slicing/Shredding
User Maintenance Instructions
This appliance requires little maintenance. It contains no user-serviceable parts.
Any servicing requiring disassembly other than cleaning must be performed by
a qualied appliance repair technician.
Care & Cleaning Instructions
1. Unplug the Food Processor before cleaning.
2. The processing bowl, lid, food pusher, food pusher cup, processing blade and disc
are top-rack dishwasher-safe, or they may hand washed in hot soapy water.
WARNING: Blade and disc attachments are very sharp. Use extreme care when handling
blades and disc. Failure to do so can result in personal injury.
PLEASE NOTE: Some foods, essences or avorings may discolor the plastic processing
bowl. This will not harm the plastic or affect the avor of your food.
3. Add a dab of vegetable oil to a clean kitchen cloth and rub over the area
to remove discoloration.
90111 Bella Pro Food Processor_IM R1.indd 1590111 Bella Pro Food Processor_IM R1.indd 15 2020-05-19 10:23 AM2020-05-19 10:23 AM

16
4. Wipe the Food Processor base with a soft, moistened cloth.
WARNING: Never immerse the Food Processor base in water or any other liquid.
5. Rinse and dry each part thoroughly before next use.
Storing Instructions
1. Never store the Food Processor while it is wet. Make sure all parts are clean and dry before
storing.
2. Assemble with the spindle and processing blade in position with the lid securely locked
in position.
3. Keep the clean food processing disc in a protective covering such as a kitchen or paper
towel, conveniently located near the Food Processor for later use.
4. Do not put any stress on cord where it enters unit, as this could cause cord to fray
and break.
5. Store appliance in its box or in a clean, dry place.
5. BREW THE VINEGAR SOLUTION again, allowing all the cleaning solution to empty into the
carafe. After dripping has stopped, discard contents of the carafe.
6. Allow Coffee Maker to cool for 15 minutes, rinse by brewing a carafe full of cold water.
Insert the clean permanent coffee lter into the removable lter holder before brewing.
7. At end of brew cycle, press the ON/OFF button to turn Coffee Maker OFF. Discard water in
the carafe. Wash carafe, permanent coffee lter, and removable lter holder in hot sudsy
water. Dry parts thoroughly.
8. When Coffee Maker has cooled, wipe exterior with a dry cloth.
Storing Instructions
1. Unplug unit and allow to cool.
2. Store Coffee Maker in its box or in a cool, dry place.
3. Never store unit while it is still plugged in.
90111 Bella Pro Food Processor_IM R1.indd 1690111 Bella Pro Food Processor_IM R1.indd 16 2020-05-19 10:23 AM2020-05-19 10:23 AM

17
Recipes
Sheet Pan Ranch Potato Chips
A healthy alternative to French fries: baked white and sweet potato chips are easy to make and a
family favorite. Using the slicing blade, home-made Baked Ranch Potato Chips are ready to eat in
under 30 minutes. Other sheet pan potato chip options are: BBQ (use dry bar-b-que seasoning),
Parmesan (mix equal parts onion powder, garlic powder, Parmesan), Buffalo (drizzle with hot
sauce and melted butter. Serve with blue cheese.)
Serves 2 - 4
• 2 medium russet or Idaho potatoes,
scrubbed
• 1/4 cup melted butter
• 1/4 cup olive oil
• 1 package Ranch Salad Dressing
1. Cut potatoes in half lengthwise to t feed chute.
2. Make sure Food Processor is unplugged.
3. Assemble Food Processor with slicing side of the disc installed.
4. Lock lid into position on the food processor bowl.
5. Plug cord into electric outlet.
6. PULSE or use LOW speed to slice potatoes.
7. Remove lid, place sliced potatoes into a large plastic zipper bag.
8. Add melted butter and olive oil and mix all potatoes in the bag until well coated.
9. Arrange potato slices in single layer on a sheet pan.
10. Preheat oven to 450ºF. Bake 7 minutes.
11. Flip potatoes and continue baking until potatoes are crisp and browned around edges,
about 7 to 10 minutes.
12. Transfer baked potato chips to a serving plate. Sprinkle Ranch Salad Dressing onto
the hot chips. Cover to keep warm.
13. If necessary, cover potatoes with an inverted plate and warm for 10 to 30 seconds in
the microwave before serving.
90111 Bella Pro Food Processor_IM R1.indd 1790111 Bella Pro Food Processor_IM R1.indd 17 2020-05-19 10:23 AM2020-05-19 10:23 AM

18
Recipes
Artichoke Hummus
Enjoy as a dip with falafel, as a sandwich spread, or serve alongside vegetable crudités.
Makes 3 cups
• 1 cup cannellini beans,
drained and rinsed
• 1 cup canned chickpeas,
drained and rinsed
• 1 cup jarred marinated artichoke hearts,
drained
• 5 tablespoons artichoke marinade liquid
• 1 handful fresh basil
• 4 tablespoons tahini paste
• 4 tablespoons olive oil, or more to thin
• 2 garlic cloves
• 1/2 teaspoon salt
• 1 tablespoon ground cumin
• Water, to thin
1. Make sure Food Processor is unplugged.
2. Assemble Food Processor; add the processing blade to the spindle.
3. Add all ingredients to the processing bowl.
4. Lock lid into position on the food processor bowl.
5. Plug cord into electric outlet.
6. PULSE to combine hummus ingredients. Continue to process on LOW until the desired
consistency is achieved.
90111 Bella Pro Food Processor_IM R1.indd 1890111 Bella Pro Food Processor_IM R1.indd 18 2020-05-19 10:23 AM2020-05-19 10:23 AM

19
Recipes
Mango Slaw
Sweet & crunchy good. Serve on top of tacos, sandwiches, as a side salad, over sh.
Great with sausages, pulled pork, beef short ribs. Makes 3-1/2 cups
Serves 4
• 1 large beet
• 1 medium jicama
• 1 handful red radishes, cleaned
• 1 carrot
Dressing
• 1 handful fresh cilantro
• 1/2 small ripe mango
• 1/4 cup olive oil
• 1 tablespoon whole grain Dijon mustard
• 1 tablespoon honey
• 1 teaspoon Sriracha, more to taste
• 1 tablespoon apple cider vinegar
• Water, to thin
• 1/2 cup slivered toasted almonds, garnish
1. Make sure Food Processor is unplugged.
2. Trim outer skin from beet and jicama. Cut into 2-inch x 1-inch pieces to t feed chute.
3. Assemble Food Processor with shredding side of the disc installed.
4. Lock lid into position on the food processor bowl.
5. Plug cord into electric outlet.
6. PULSE to shred beet, jicama, radishes and the carrot.
7. Remove lid, place 3-1/2 cups shredded vegetables into a large salad bowl and set aside.
8. Remove the disc and add the processing blade to the spindle.
9. Add all dressing ingredients to the food processing bowl. Assemble and lock lid into
position on the food processor bowl. Use the food pusher cup to add water to thin dressing.
10. Process dressing on HIGH until a thin consistency is achieved.
11. Toss slaw with dressing; mix well and chill. Garnish with slivered almonds and a sprig
of cilantro.
Recipes
90111 Bella Pro Food Processor_IM R1.indd 1990111 Bella Pro Food Processor_IM R1.indd 19 2020-05-19 10:23 AM2020-05-19 10:23 AM

20
Recipes
Light Egg Salad
Skip the mayo! We’ve replaced the full fat with light and tangy Greek yogurt.
Briny capers and fresh dill brighten the avor. Add hot sauce to taste.
Serves 4-6
• 12 extra-large eggs, hard boiled
• 1/2 medium red onion
• 2 stalks celery with leaves
• 1 handful fresh dill
• 2 tablespoons capers
• 1/3 cup Greek yogurt, plain
• 2 tablespoons dijon mustard
• 1 tablespoon Worcestershire sauce
• 1 tablespoon hot sauce, optional
• 1 teaspoon kosher salt
• 1 handful fresh dill, plus sprigs for garnish
• fresh ground black pepper to taste
1. Make sure Food Processor is unplugged.
2. Assemble Food Processor; add the processing blade to the spindle.
3. Add onion, celery and dill to the processing bowl.
4. Lock lid into position on the food processor bowl.
5. Plug cord into electric outlet.
6. PULSE the onion, celery, and dill until coarsely chopped. Add the capers through
the feed chute and PULSE twice.
7. Unlock and remove the lid. Add the cooled hard boiled eggs to the processing bowl.
8. PULSE 3 to 6 times to break up the eggs.
CAUTION: Do not over-process. Stop when the eggs look uffy.
9. Transfer the chopped egg, onion, celery, dill and caper mixture to a bowl and add
the remaining ingredients. Use a fork to combine well.
10. Add hot sauce, salt and black pepper to taste.
Recipes
90111 Bella Pro Food Processor_IM R1.indd 2090111 Bella Pro Food Processor_IM R1.indd 20 2020-05-19 10:23 AM2020-05-19 10:23 AM

21
Recipes
Green Pesto
Perfect for breakfast or a light lunch… Enjoy avocado toast dabbed with this fresh and vibrant
Green Pesto. Try poached eggs and Green Pesto, Green Pesto salad dressing, Green Pesto
chicken salad, Green Pesto pizza, or liven up your day with a Green Pesto burger!
Makes: 1-1/2 cups
• Parmesan cheese wedge, 2-inch piece
• 1/2 cup olive oil
• 2 cloves garlic
• 1/2 teaspoon crushed red pepper
• 1/4 cup toasted salted shelled
pumpkin seeds (pepitas)
• 1 cup packed, de-veined kale leaves
• 1 cup packed fresh basil
• 1/2 cup packed fresh cilantro
• Salt to taste
1. Make sure Food Processor is unplugged.
2. Assemble Food Processor; add the processing blade to the spindle.
3. Place a 2-inch piece of Parmesan cheese into the processing bowl.
4. Lock lid into position on the food processor bowl.
5. Plug cord into electric outlet.
6. PULSE 10 times. Continue to process on LOW to grate the cheese into a ne consistency.
7. Remove the lid and the cheese. Set aside.
8. Add the remainder of the ingredients to the food processor bowl, oil rst.
9. Assemble and lock lid into position on the food processor bowl.
10. Begin to PULSE very slowly until greens are combined. Use the food pusher cup
to add water if needed. Use a spatula to scrape down the sides, if needed.
11. Process pesto on LOW until the desired consistency is achieved.
Fold in grated Parmesan.
12. Store in a tightly covered glass container in the refrigerator.
90111 Bella Pro Food Processor_IM R1.indd 2190111 Bella Pro Food Processor_IM R1.indd 21 2020-05-19 10:23 AM2020-05-19 10:23 AM

Limited Two-Year Warranty
SENSIO Inc. hereby warrants that for
a period of TWO YEARS from the date
of purchase, this product will be free
from mechanical defects in material
and workmanship, and for 90 days in
respect to non-mechanical parts. At its
sole discretion, SENSIO Inc. will either
repair or replace the product found to
be defective, or issue a refund on the
product during the warranty period.
The warranty is only valid for the
original retail purchaser from the date
of initial retail purchase and is not
transferable. Keep the original sales
receipt, as proof of purchase isrequired
to obtain warranty validation. Retail
stores selling this product do not have
the right to alter, modify, or in any way
revise the terms and conditions of the
warranty.
Exclusions:
The warranty does not cover normal
wear of parts or damage resulting
from any of thefollowing: negligent
use of the product, use of improper
voltage or current, improper routine
maintenance, use contrary to the
operating instructions, disassembly,
repair, or alteration by anyone other than
qualied SENSIO Inc. personnel. Also,
the warranty does not cover
Acts of God such as re, oods,
hurricanes, or tornadoes.
SENSIO Inc. shall not be liable for any
incidental or consequential damages
caused by the breach of any express
or implied warranty. Apart from the
extent prohibited by applicable law, any
implied warranty of merchantability or
tness for a particular purpose is limited
in time to the duration of the warranty.
Some states, provinces or jurisdictions
do not allow the exclusion or limitation
of incidental or consequential damages,
or limitations on how long an implied
warranty lasts, and therefore, the above
exclusions or limitations may not apply
to you. The warranty covers specic
legal rights which may vary by state,
province and/or jurisdiction.
22
90111 Bella Pro Food Processor_IM R1.indd 2290111 Bella Pro Food Processor_IM R1.indd 22 2020-05-19 10:23 AM2020-05-19 10:23 AM

23
How To Obtain Warranty Service:
You must contact Customer Service at
our toll-free number: 1-866-832-4843.
A Customer Service Representative
will attempt to resolve warranty issues
over thephone. If the Customer Service
Representative is unable to resolve the
problem, you will be provided with a
case number and asked to return the
product to SENSIOInc. Attach a tag to
the product that includes: your name,
address, daytime contact telephone
number, case number, and description of
the problem.
Also, include a copy of the original sales
receipt. Carefully package the tagged
product with the sales receipt, and send
it (with shipping and insurance prepaid)
to SENSIO Inc.’s address. SENSIO Inc.
shall bear no responsibility or liability
for the returned product while in transit
to SENSIO Inc.’s Customer Service
Center.
90111 Bella Pro Food Processor_IM R1.indd 2390111 Bella Pro Food Processor_IM R1.indd 23 2020-05-19 10:23 AM2020-05-19 10:23 AM

90111 Bella Pro Food Processor_IM R1.indd 2490111 Bella Pro Food Processor_IM R1.indd 24 2020-05-19 10:23 AM2020-05-19 10:23 AM

90111 Bella Pro Food Processor_IM R1.indd 2590111 Bella Pro Food Processor_IM R1.indd 25 2020-05-19 10:23 AM2020-05-19 10:23 AM

For customer service questions or comments
1-866-832-4843
bellahousewares.com
90111 R.0
Sensio Inc.
New York, NY 10016/USA
90111 Bella Pro Food Processor_IM R1.indd 2690111 Bella Pro Food Processor_IM R1.indd 26 2020-05-19 10:23 AM2020-05-19 10:23 AM