User Manual Kenmore 10676233402 top-mount refrigerator
REFRIGERATOR CARE
CLEANING
Both the refrigerator and freezer sections defrost automatically. However, clean both sections about once a month to prevent odors from building up. Wipe up spills immediately.
To Clean Your Refrigerator:
1. Unplug refrigerator or disconnect power.
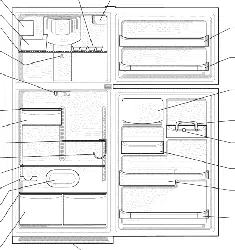
2. Remove all removable parts from inside, such as shelves, crispers, etc.
3. Hand wash, rinse, and dry removable parts and interior surfaces thoroughly. Use a clean sponge or soft cloth and a mild detergent in warm water.
- Do not use abrasive or harsh cleaners such as window sprays, scouring cleansers, flammable fluids, cleaning waxes, concentrated detergents, bleaches or cleansers containing petroleum products on plastic parts, interior and door liners or gaskets. Do not use paper towels, scouring pads, or other harsh cleaning tools. These can scratch or damage materials.
- To help remove odors, you can wash interior walls with a mixture of warm water and baking soda (2 tbs. to 1 qt. [26 g to 0.95 L] of water).
4. Determine whether your refrigerator exterior is painted metal, TM Ultra Satin (stainless look) finish, brushed aluminum or stainless steel, and choose the appropriate cleaning method.
NOTE: Ultra Satin (stainless look) finish has a smooth, uniform color with a glossy finish that resists fingerprints. Stainless steel has a distinct grainy texture with variation in color that is natural to steel.
Painted metal: Wash exteriors with a clean sponge or soft cloth and a mild detergent in warm water. Do not use abrasive or harsh cleaners, or cleaners designed for stainless steel. Dry thoroughly with a soft cloth. For additional protection against damage to painted metal exteriors, apply appliance wax (or auto paste wax) with a clean, soft cloth. Do not wax plastic parts.
Brushed aluminum: Wash with a clean sponge or soft cloth and a mild detergent in warm water. Do not use abrasive or harsh cleaners, or cleaners designed for stainless steel. Dry thoroughly with a soft cloth
Ultra Satin (stainless look) finish: Wash with a clean sponge or soft cloth and a mild detergent in warm water. Do not use abrasive or harsh cleaners, or cleaners designed for stainless steel, Dry thoroughly with a soft cloth
Stainless steel finish: Wash with a clean sponge or soft cloth and a mild detergent in warm water. Do not use abrasive or harsh cleaners. Dry thoroughly with a soft cloth.
- To keep your stainless steel refrigerator looking like new and to remove minor scuffs or marks, it is suggested that you use the manufacturer's approved Stainless Steel Cleaner & Polish. To order the cleaner, see "Accessories."
- Do not allow the Stainless Steel Cleaner & Polish to come into contact with any plastic parts such as the trim pieces, dispenser covers or door gaskets. If accidental contact does occur, clean plastic part with a sponge and mild detergent in warm water. Dry thoroughly with a soft cloth.
5. There is no need for routine condenser cleaning in normal home operating environments. If the environment is particularly greasy or dusty, or there is significant pet traffic in the home, the condenser should be cleaned every 2 to 3 months to ensure maximum efficiency.
If you need to clean the condenser:
- Remove the base grille. See "Base Grille" graphic or "Base Grille" section.
- Use a vacuum cleaner with a soft brush to clean the grille, the open areas behind the grille and the front surface area of the condenser.
- Replace the base grille when finished.
6. Plug in refrigerator or reconnect power.
CHANGING THE LIGHT BULBS
NOTE: Not all bulbs will fit your refrigerator. Be sure to replace the bulb with one of the same size, shape, and wattage
1. Unplug refrigerator or disconnect power.
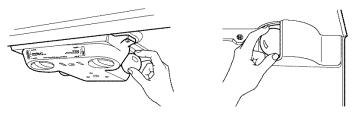
2. Remove the bulb from behind the control panel in the refrigerator or from behind the light shield in the freezer (on some models). Replace it with a bulb of the same wattage.
3. Plug in refrigerator or reconnect power.
POWER INTERRUPTIONS
If the power will be out for 24 hours or less, keep the door or doors closed (depending on your model) to help food stay cold and frozen.
If the power will be out for more than 24 hours, do one of the following:
- Remove all frozen food and store it in a frozen food locker.
- Place 2 Ibs. (907 g) of dry ice in the freezer for every cubic foot (28 L) of freezer space. This will keep the food frozen for 2 to 4 days.
- If neither a food locker nor dry ice is available, consume or can perishable food at once.
REMEMBER: A full freezer stays cold longer than a partially filled one. A freezer full of meat stays cold longer than a freezer full of baked goods. If you see that food contains ice crystals, it may be refrozen, although the quality and flavor may be affected. If the condition of the food is poor, dispose of it.
VACATION AND MOVING CARE
Vacations
If You Choose to Leave the Refrigerator On While You're Away:
1. Use up any perishables and freeze other items.
2. If your refrigerator has an automatic ice maker:
- Raise wire shutoff arm to OFF (up) position or move the switch to the OFF (right) setting.
- Shut off water supply to the ice maker.
3. Empty the ice bin.
If You Choose to Turn the Refrigerator Off Before You Leave:
1. Remove all food from the refrigerator.
2. If your refrigerator has an automatic ice maker:
- Turn off the water supply to the ice maker at least one day ahead of time.
- When the last load of ice drops, raise the wire shutoff arm to the OFF (up) position or move the switch to the OFF (right) setting.
3. Depending on the model, turn the Thermostat Control or Refrigerator Control to OFR See "Using the Controls."
4. Clean refrigerator, wipe it, and dry well.
5. Tape rubber or wood blocks to the tops of both doors to prop them open far enough for air to get in. This stops odor and mold from building up.
Moving
When you are moving your refrigerator to a new home, follow these steps to prepare it for the move.
1. If your refrigerator has an automatic ice maker:
- Turn off the water supply to the ice maker at least one day ahead of time.
- Disconnect the water line from the back of the refrigerator.
- When the last load of ice drops, raise the wire shutoff arm to the OFF (up) position or move the switch to the OFF (right) setting.
2. Remove all food from the refrigerator and pack all frozen food in dry ice.
3. Empty the ice bin.
4. Depending on the model, turn the Thermostat Control or Refrigerator Control to OFR See "Using the Controls."
5. Unplug refrigerator.
6. Empty water from the defrost pan.
7. Clean, wipe, and dry thoroughly.
8. Take out all removable parts, wrap them well, and tape them together so they don't shift and rattle during the move.
9. Depending on the model, raise the front of the refrigerator so it rolls more easily OR screw in the leveling legs so they don't scrape the floor. See "Adjust the Doors."
10. Tape the doors closed and tape the power cord to the refrigerator cabinet.
When you get to your new home, put everything back and refer to the "Installation Instructions" section for preparation instructions. Also, if your refrigerator has an automatic ice maker, remember to reconnect the water supply to the refrigerator.
TROUBLESHOOTING
The refrigerator will not operate
- Is the power cord unplugged? Plug into a grounded 3 prong outlet.
- Has a household fuse blown, or has a circuit breaker tripped? Replace the fuse or reset the circuit breaker.
- Is the Refrigerator Control turned to the OFF position? See "Using the Control(s)," depending on the model.
- Is the refrigerator defrosting? Recheck to see whether the refrigerator is operating in 30 minutes. Your refrigerator will regularly run an automatic defrost cycle
The lights do not work
- Is the power cord unplugged? Plug into a grounded 3 prong outlet.
- Is a light bulb loose in the socket or burned out? See "Changing the Light Bulb(s)," depending on the model.
There is water in the defrost drain pan
- Is the refrigerator defrosting? The water will evaporate. It is normal for water to drip into the defrost pan.
- Is it more humid than normal? When it is humid, expect that the water in the defrost pan will take longer to evaporate.
The motor seems to run too much
- Is the room temperature hotter than normal? The motor will run longer under warm conditions. At normal room temperatures, your motor will run about 40% to 80% of the time. Under warmer conditions, it will run even more.
- Has a large amount of food just been added to the refrigerator? Adding a large amount of food warms the refrigerator. The motor normally will run longer to cool the refrigerator back down.
- Are the doors opened often? The motor will run longer when this occurs. Conserve energy by getting all items out at one time, keeping food organized, and closing the door as soon as possible.
- Is the control set correctly for the surrounding conditions? See "Using the Control(s)," depending on the model.
- Are the doors closed completely? Close the doors firmly. If they do not close completely, see "The doors will not close completely" later in this section.
- Are the condenser coils dirty? This prevents air transfer and makes the motor work harder. Clean the condenser coils. See "Cleaning."
The refrigerator seems to make too much noise
- The sounds may be normal for your refrigerator. See "Normal Sounds."
The ice maker is not producing ice or not enough ice
- Has the ice maker just been installed? Wait 72 hours for full ice production to begin. Once your refrigerator is cooled, the ice maker should produce 70-120 cubes every 24 hours.
- Is the freezer temperature cold enough to produce ice? Wait 24 hours after hookup for ice production. See "Using the Control(s)," depending on the model.
- Is the wire shutoff arm in the OFF (arm up) position? Lower the wire shutoff arm to the ON (arm down) position. See "Ice Maker."
- Is the water line shutoff valve to the refrigerator turned on? Turn on the water valve. See "Connect the Water Supply."
- Does the ice maker mold have water in it or has no ice been produced? Be sure your refrigerator has been connected to a water supply and the supply shutoff valve is turned on. See "Connect the Water Supply."
- Is an ice cube jammed in the ejector arm? Remove the ice from the ejector arm with a plastic utensil. See "Ice Maker."
- Is an ice cube jammed in the ejector arm? Remove the ice from the ejector arm with a plastic utensil. See "Ice Maker."
- Is the control set correctly? If too little ice is produced, see "Using the Control(s)," depending on the model.
- Is there a water filter installed on the refrigerator? The filter may be full or incorrectly installed. Depending on your model, remove the water filter cartridge. See "Water Filtration System." Operate the dispenser. If the water flow increases noticeably, your filter is full and needs to be replaced.
- Is a reverse osmosis water filtration system connected to your cold water supply? See "Water Supply Requirements,"
Off-taste, odor or gray color in the ice
- Are the plumbing connections new, causing discolored or off-flavored ice? Discard the first few batches of ice.
- Have the ice cubes been stored too long? Throw old ice away and make a new supply.
- Has food in the refrigerator been wrapped properly? See "Refrigerator Features."
- Do the freezer and ice bin need to be cleaned? See "Cleaning."
- Does the water contain minerals (such as sulfur)? A filter may need to be installed to remove the minerals
- Is there a water filter installed on the refrigerator? Gray or dark discoloration in ice indicates that the water filtration system needs additional flushing, Run additional water through the water dispenser to flush the water filtration system more thoroughly, at least 2 to 3 gal, (8 to 12 L) or 5 minutes initially. Discard discolored ice,
The water dispenser will not operate properly
- Has the water system not filled? The water system needs to be filled the first time it is used, Use a sturdy container to depress the water dispenser until water begins to flow. Dispense and discard 2 to 3 gal. (8 to 12 L) of water. This will take approximately 5 minutes and will help clear air from the line. Additional flushing may be required in some households. See "Water Dispenser."
- Is the water shutoff valve not turned on or the water line connected at the source? Be sure the water shutoff valve is turned on and the water source is connected to the refrigerator. See "Connect the Water Supply."
- Is the water shutoff valve clogged or incorrectly installed? See "Connect the Water Supply." If clogging or installation is not a problem, call for service or contact a plumber.
- Is there a kink in the home water source line? If you find or suspect a kink in the water line, contact a licensed, qualified plumber,
- Is there a water filter installed on the refrigerator? The filter may be clogged or incorrectly installed, First, check the filter installation instructions to ensure that the filter was installed correctly and is not clogged. If installation or clogging is not a problem, call for service.
- Is a reverse osmosis water filtration system connected to your cold water supply? See "Water Supply Requirements."
Water flow from the dispenser decreases noticeably
- Is there a water filter installed on the refrigerator? The filter may be full or incorrectly installed, Depending on your model, remove the water filter cartridge, See "Water Filtration System." Operate the dispenser. If the water flow increases noticeably, your filter is full and needs to be replaced.
Water leaking from the dispenser
- Is the glass not being held under the water dispenser long enough? Hold the container under the water dispenser 2 to 3 seconds after releasing the dispenser lever. Water may continue to dispense during this time.
The dispenser water is not cool enough
- Has the refrigerator been newly installed? Allow 24 hours for the refrigerator to cool completely.
- Has a large amount of water been recently dispensed? Allow 24 hours for the water to cool completely,
- Has water not been recently dispensed? The first glass of water may not be cool. Discard the first glass of water,
The divider between the two compartments is warm
- The warmth is probably due to normal operation of the automatic exterior moisture control.
Temperature is too warm
- Are the air vents blocked in either compartment? This prevents cold air movement between the compartments, Move objects away from the air vents. See "Ensuring Proper Air Circulation" for air vent locations,
- Are the door(s) opened often? The refrigerator will warm when this occurs. Keep the refrigerator cool by getting all items out at one time, keeping food organized, and closing the door as soon as possible.
- Has a large amount of food just been added to the refrigerator or freezer? Adding a large amount of food warms the refrigerator. It can take several hours for the refrigerator to return to the normal temperature.
- Are the controls set correctly for the surrounding conditions? See "Using the Control(s)," depending on your model.
There is interior moisture buildup
- Are the air vents blocked in the refrigerator? Remove any objects from in front of the air vents. See "Ensuring Proper Air Circulation" for air vent locations.
- Are the door(s) opened often? Avoid humidity buildup by getting all items out at one time, keeping food organized, and closing the door as soon as possible.
- Is the room humid? It is normal for moisture to build up inside the refrigerator when the room air is humid.
- Is the food packaged correctly? Check that all food is securely wrapped. Wipe off damp food containers before placing them in the refrigerator.
- Is the control set correctly for the surrounding conditions? See "Using the Control(s)," depending on your model.
- Was a self-defrost cycle completed? It is normal for droplets to form after the refrigerator self-defrosts.
The doors are difficult to open
- Are the gaskets dirty or sticky? Clean gaskets and the surface that they touch. Rub a thin coat of paraffin wax on the gaskets following cleaning.
The doors will not close completely
- Are food packages blocking the door open? Rearrange containers so that they fit more tightly.
- Is the ice bin out of position? Push the ice bin in all the way.
- Are the crisper cover, pans, shelves, bins, or baskets out of position? Put these items into their correct positions. See "Refrigerator Features" for more information.
- Are the gaskets sticking? Clean gaskets and the surface that they touch. Rub a thin coat of paraffin wax on the gaskets following cleaning.
- Does the refrigerator wobble or seem unstable? Level the refrigerator. See "Adjust the Doors.
- Were the doors removed during product installation and not properly replaced? Remove and replace the doors according to "Refrigerator Doors," or call a qualified service technician.