
Loading ...
Loading ...
Loading ...
Afterconnectingtherefrigeratortoawatersource,flushthe
watersystem.Useasturdycontainertodepressandholdthe
waterdispenserpadfor5seconds,thenreleaseitfor
5seconds.Repeatuntilwaterbeginstoflow.Oncewater
beginstoflow,continuedepressingandreleasingthe
dispenserpad(5secondson,5secondsoff)foranadditional
5minutes.Thiswillflushairfromthefilterandwater
dispensingsystem.Additionalflushingmayberequiredin
somehouseholds.Asairisclearedfromthesystem,water
mayspurtoutofthedispenser.
Allow24hoursfortherefrigeratortocooldownandchill
water.
Allow24hourstoproducethefirstbatchofice.Discardthe
firstthreebatchesoficeproduced.
Thedisplayscreenonthedispensercontrolpanelhasa
backlight,whichwillturnoffautomaticallywhenthecontrols
havenotbeenusedfor2minutesormore.Whenthebacklight
isoff,thefirstpressofacontrolbuttonorthedisplayscreen
willonlyreactivatethebacklight,withoutchangingany
settings.Within2minutesafterthebacklighthasbeen
reactivated,additionalpressesofcontrolbuttonsorthe
displayscreenwillchangetheapplicablesettings.
The Water Dispenser
IMPORTANT: Dispense enough water every week to maintain a
fresh supply.
The default display unit for water dispensing is ounces. The units
can be changed to cups or liters.
To Dispense Water (Standard):
1. Press a sturdy glass against the water dispenser pad OR
place the glass below the water dispenser and press the water
dispenser button.
Y
WATER
2. Remove the glass OR release the button to stop dispensing.
To Dispense Water (Measured Fill}:
Measured Fill allows you to dispense a specified amount of water
with the touch of a few buttons.
NOTE: The amount of water you select will be dispensed. Be sure
that the container is empty and can hold the entire volume. If ice is
in the container, you may need to adjust your selection.
1. Press WATER on the display screen to turn the feature on.
NOTE: The dispenser will automatically exit the Measured Fill
screen after 15 seconds of inactivity.
2. You can dispense water by the ounce, cup, or liter. Press
UNITS to select your desired setting. Minimum and maximum
volumes are listed below.
Units Minimum Maximum
Ounces 1 128
Cups 1/4 16
Liters 0.05 4
3.
Press the up and down arrows to adjust the volume as
desired.
NOTE: Most coffee cups (commonly 4 to 6 oz [118 to 177 mL]
per cup) are not the same size as a measuring cup (8 oz
[237 mL]). You may need to adjust the volume to avoid
unintentionally overfilling coffee cups.
4. To dispense water, press a sturdy glass against the water
dispenser pad OR place the glass below the water dispenser
and press the water dispenser button.
5.
bJ
WATER
NOTE: While dispensing water, the digital display will count
down how much water remains to be dispensed, according to
the volume you selected. The flow of water will automatically
stop once the desired volume has been dispensed.
To stop dispensing before the selected volume has been
dispensed, remove the glass from the dispenser pad OR press
the water dispenser button a second time.
NOTE: If you stop dispensing before the desired volume has
been dispensed, the digital display will continue to show how
much water remains to be dispensed. The display will exit the
Measured Fill screen after 15 seconds of inactivity.
To select a new volume or select the same volume again, you
must first finish dispensing the selected volume, or turn off the
Measured Fill feature and then turn it back on.
Preset Volumes
The dispenser can store up to three preset water volumes, for
easy dispensing into commonly used containers.
• To store presets, press WATER, then PRESET. Locate a blank
or unwanted preset on the display screen. Press and hold that
preset for 3 seconds, and the preset adjustment menu will
appear on the display screen. Adjust the units and volume of
water as desired, as instructed in steps 2 and 3 of the
previous section. Press PRESET to save the preset.
• To use presets, press WATER, then PRESET, then press and
release the desired preset. Dispense water as instructed in
steps 4 and 5 of the previous section.
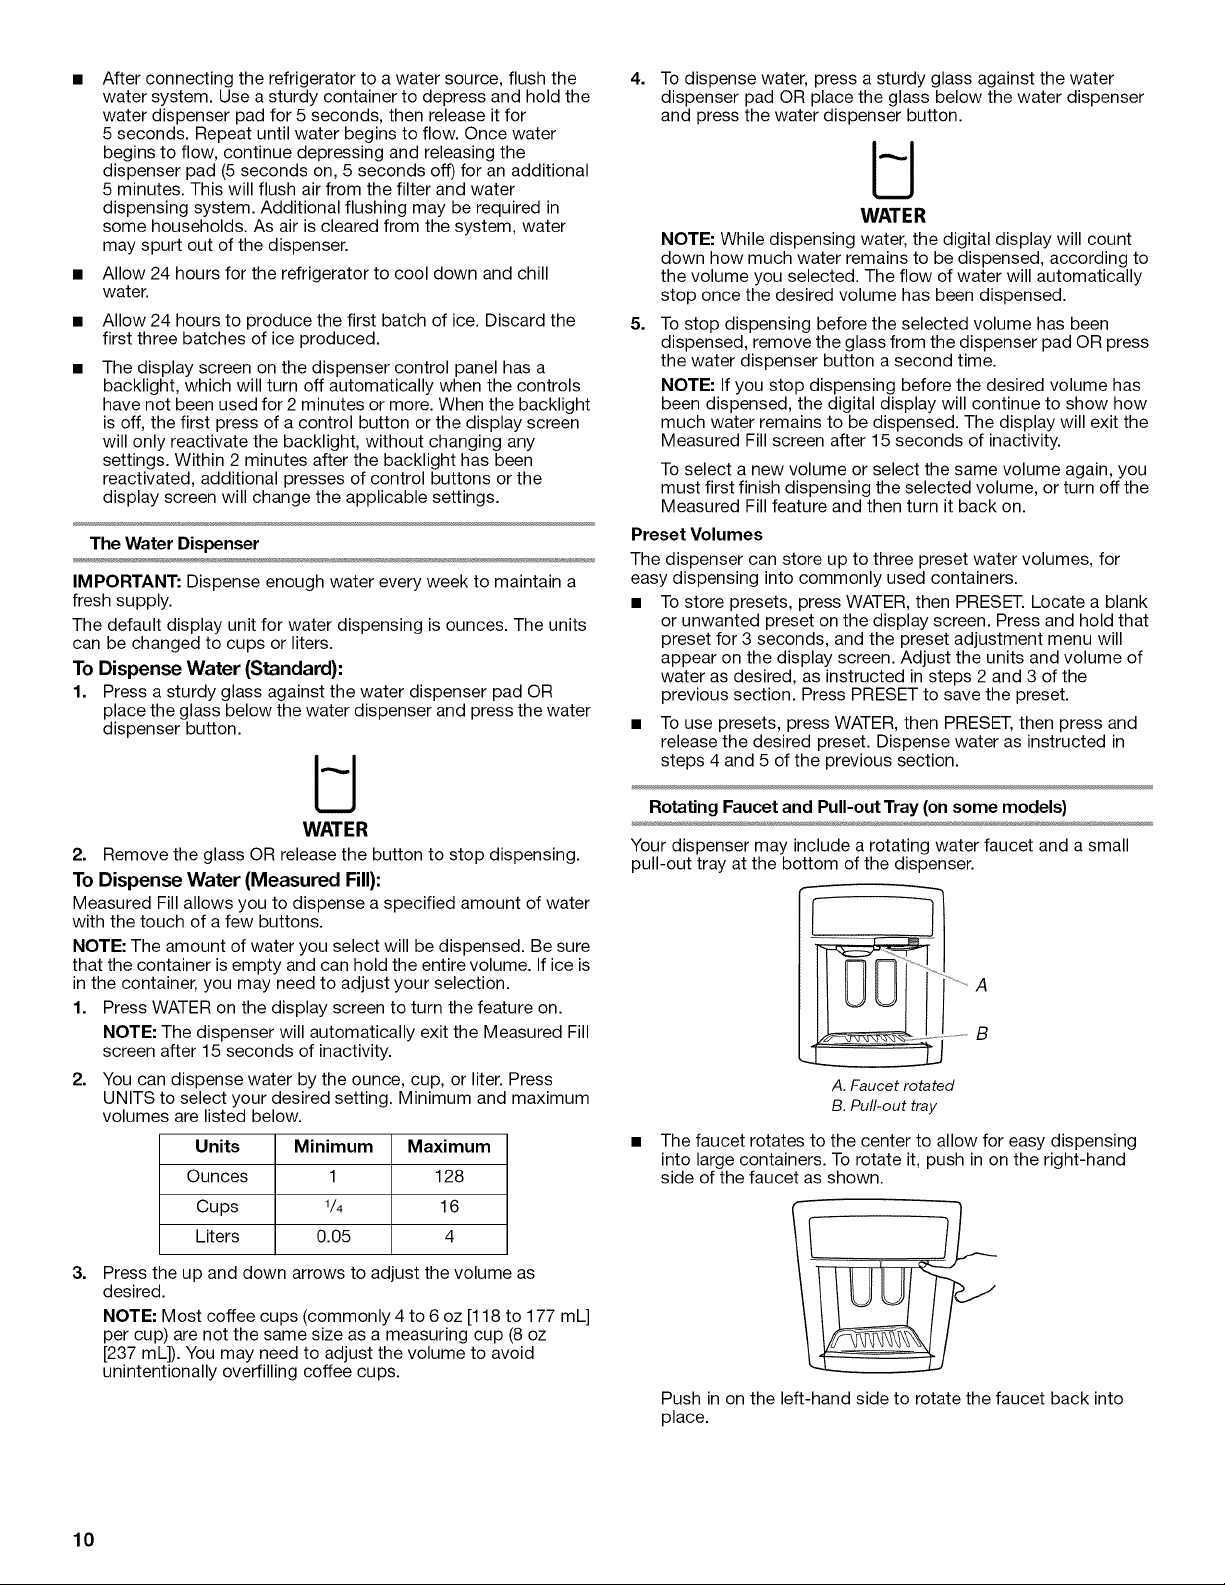
Rotating Faucet and Pull-out Tray (on some models)
Your dispenser may include a rotating water faucet and a small
pull-out tray at the bottom of the dispenser.
A. Faucet rotated
B. Pull-out tray
The faucet rotates to the center to allow for easy dispensing
into large containers. To rotate it, push in on the right-hand
side of the faucet as shown.
Push in on the left-hand side to rotate the faucet back into
place.
10
Loading ...
Loading ...
Loading ...