Loading ...
Loading ...
Loading ...
Install
Range
Hood
Liner
The
hood
liner
attaches
to
the
hood
support
using
four
mounting
screws
and
washers.
NOTE:
Hood
support
must
be
capable
of
supporting
75
lb
(34
kg).
1.
Using
2
or
more
people,
lift
the
hood
liner
into
place.
2.
Install
the
hood
liner using
four
5
x
45
mm
screws
to
the
hood
support
and
tighten
securely.
.-'-I'"
j.'"
'f
i
B
C
NOTE:
Your
hood
liner requires
you
to
purchase
either
an
internal
type
or
an
in-line
(external
type)
blower
motor
system.
See
“
Blower
Motor
System
”
in
the
“
Accessories
”
section.
The
internal
blower
system
can
be
mounted
for
top
venting
or
rear
venting.
For
top
venting,
the
mounting
bracket
and
spring
clip
that
come
with
the
blower
system
will
mount
to
the
top
panel
of
the
hood
liner.
For
rear
venting,
the
mounting
bracket
and
spring
clip
that
come
with
the
blower
system
will
mount
to
the
rear
panel
of
the
hood
liner.
Prepare
the
Internal
Blower
System
IMPORTANT:
Perform
steps
1-4
before
mounting
the
hood
liner.
1.
Remove
grease
filters
from
hood
liner.
See
the
“
Range
Hood
Care
”
section
in
the
Use
and
Care
Guide.
2.
Install
the
motor
support
bracket
using
three
4.2
x
8
mm
screws.
Screw
bracket
to
the
inside
top
or
back
(alternate
location
on
some
models),
toward
the
left
side
of
the
hood
liner.
3.
Install
motor
spring
clip
using
two
4.2
x
8
mm
screws.
Screw
spring
clip
to
the
inside
top
or
back
(alternate
location
on
some
models)
of
the
hood
liner
at
the
proper
location
for
the
selected
motor
system.
Slide
the
mounting
tab
of
the
spring
clip
through
the
slot
in
the
panel
and
secure
with
the
screws.
Use
the
inside
set
of
mounting
holes
for
the
single
motor
system.
Use
the
outside
set
of
mounting
holes
for
the
dual
A
motor
system.
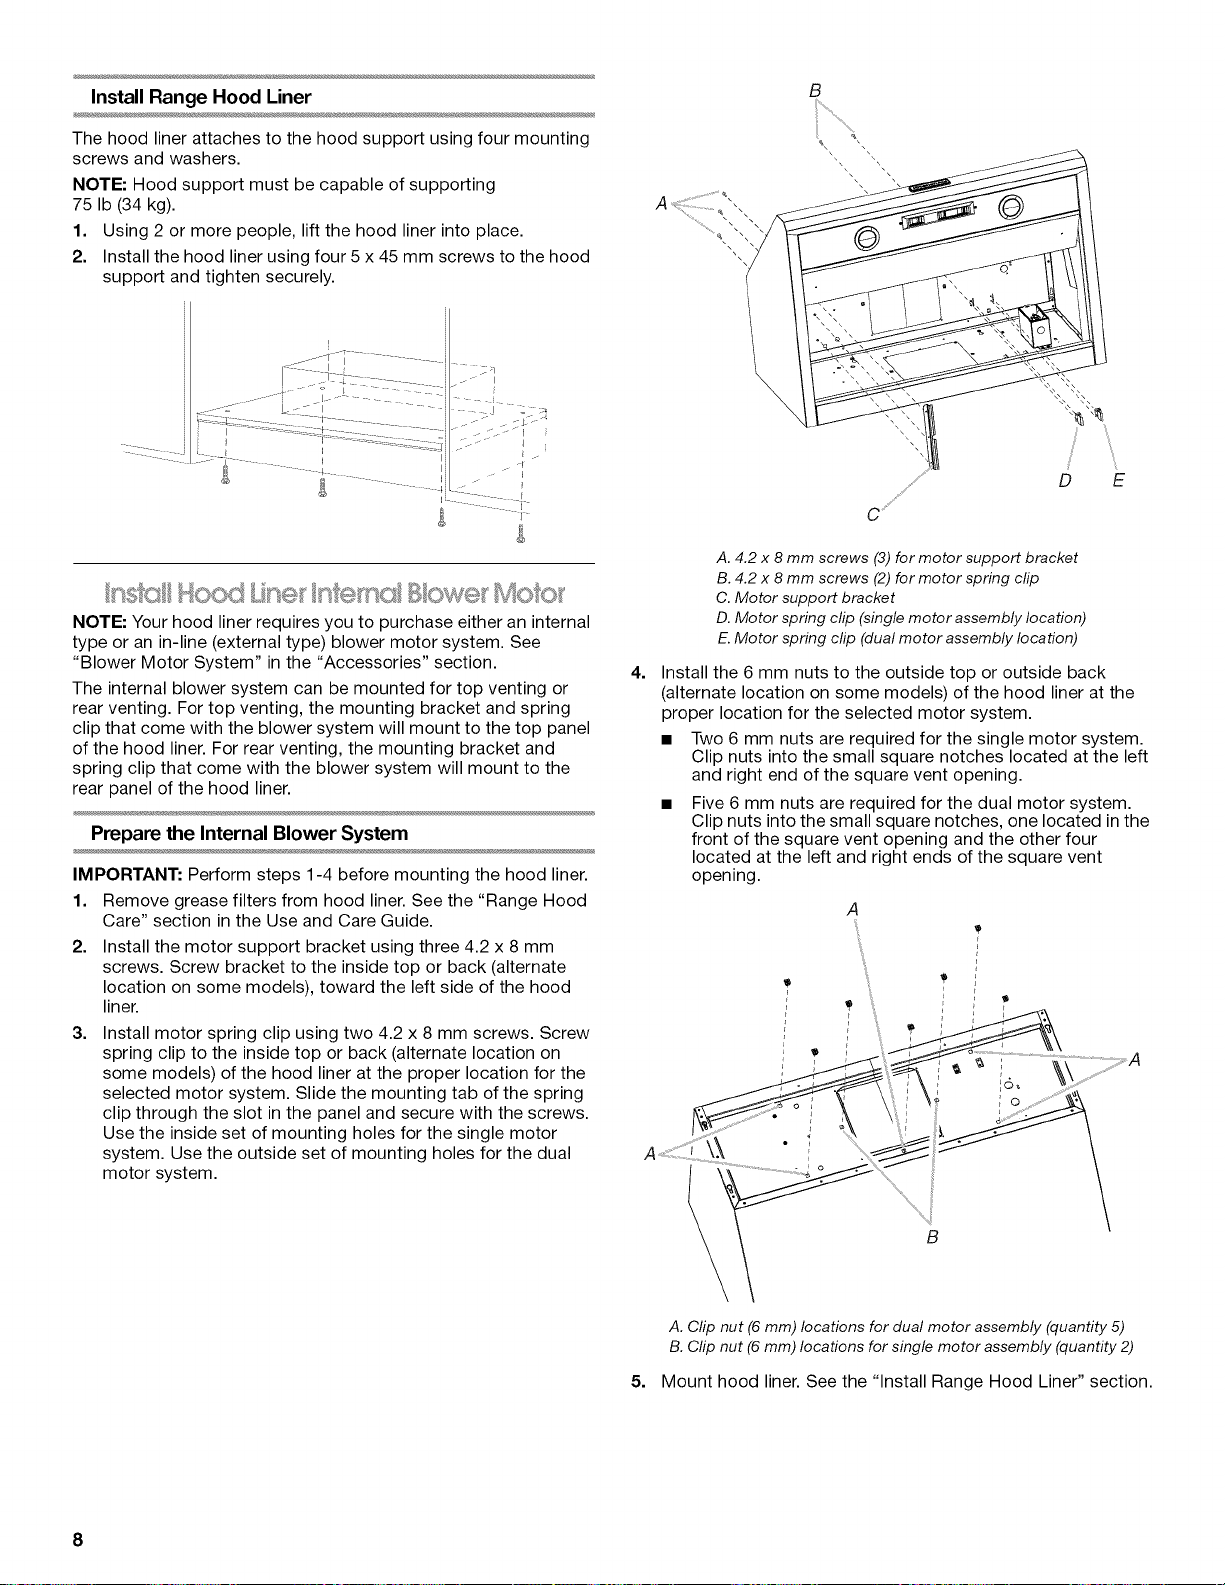
A.
4.2
X
8
mm
screws
(3)
for
motor
support
bracket
B.
4.2
X
8
mm
screws
(2)
for
motor
spring
clip
C.
Motor
support
bracket
D.
Motor
spring
clip
(single
motor
assembly
location)
E.
Motor
spring
clip
(dual
motor
assembly
location)
4.
Install
the
6
mm
nuts
to
the
outside
top
or
outside
back
(alternate
location
on
some
models)
of
the
hood
liner
at
the
proper
location
for
the
selected
motor
system.
■
Two
6
mm
nuts
are
required
for
the
single
motor
system.
Clip
nuts
into
the
small
square
notches
located
at
the
left
and
right
end
of
the
square
vent
opening.
■
Five
6
mm
nuts
are
required
for
the
dual
motor
system.
Clip
nuts
into
the
small
square
notches,
one
located
in
the
front
of
the
square
vent
opening
and
the
other
four
located
at
the
left
and
right
ends
of
the
square
vent
opening.
A
A.
Clip
nut
(6
mm)
locations
for
dual
motor
assembly
(quantity
5)
B.
Clip
nut
(6
mm)
locations
for
single
motor
assembly
(quantity
2)
5.
Mount
hood
liner.
See
the
“
Install
Range
Hood
Liner
”
section.
8
Loading ...
Loading ...
Loading ...