EN FREEZER /REFRIGERATOR USE AND CARE GUIDE
FR REFRIGERATEUR /CONGELATEUR GUIDE D:UTILISATIQN ET D'ENTRETIEN
iiiiiiiiiiiiiiiiiiiiiiiiiiiiiiiiiiiiiiiiiiiiiiiiiiiiiiiiiiiiiiiiiiiiiiiiiiiiiiiiiiiiiiiiii
809209301 October 2013
Finding information
::::::::::::::::::::::::::::::::::::::::::::::::::::::
iiiiiiiiiiiiiiiiiiiiiiiiiiiiiiiiiiiiiiiiiiiiiiiiiiiiiil
iiiiiiiiiiiiiiiiiiiiiiiiiiiiiiiiiiiiiiiiiiiiiiiiiiiiiil
iiiiiiiiiiiiiiiiiiiiiiiiiiiiiiiiiiiiiiiiiiiiiiiiiiiiiillPlease read and save this Table of contents
.......................................................guide
iiiiiiiiiiiiiiiiiiiiiiiiiiiiiiiiiiiiiiiiiiiiiiiiiiiiii!_Thankyouforchoosing Electrolux, ournew
iiiiiiiiiiiiiiiiiiiiiiiiiiiiiiiiiiiiiiiiiiiiiiiiiiiiii!_ premium brand in home appliances. This
iiiiiiiiiiiiiiiiiiiiiiiiiiiiiiiiiiiiiiiiiiiiiiiiiiiiiiilUse & Care Guide is part of our commitment
iiiiiiiiiiiiiiiiiiiiiiiiiiiiiiiiiiiiiiiiiiiiiiiiiiiiii!ito customer satisfaction and product quality
_ throughout the service life of your new appliance
iiiiiiiiiiiiiiiiiiiiiiiiiiiiiiiiiiiiiiiiiiiiiiiiiiiiiiii
Keep a record for quick
:iii i reference
Purchase date
Electrolux model number
Electrolux serial number
i
iiiiiiiiiiiiiiiiiiiiiiiiiiiiiiiiiiiiiiiiiiiiiiiiiiiiiiiii
iiiiiiiiiiiiiiiiiiiiiiiiiiiiiiiiiiiiiiiiiiiiiiiiiiiiiiiii
iiiiiiiiiiiiiiiiiiiiiiiiiiiiiiiiiiiiiiiiiiiiiiiiiiiiiiiii
iiiiiiiiiiiiiiiiiiiiiiiiiiiiiiiiiiiiiiiiiiiiiiiiiiiiiiiii
iiiiiiiiiiiiiiiiiiiiiiiiiiiiiiiiiiiiiiiiiiiiiiiiiiiiiiiii
iiiiiiiiiiiiiiiiiiiiiiiiiiiiiiiiiiiiiiiiiiiiiiiiiiiiiiiiiQuestions?
iiiiiiiiiiiiiiiiiiiiiiiiiiiiiiiiiiiiiiiiiiiiiiiiiiiiiiiiiFortoll-freetelephonesupport inthe U.S. and
iiiiiiiiiiiiiiiiiiiiiiiiiiiiiiiiiiiiiiiiiiiiiiiiiiiiiiiiiCanada:1-877-4ELECTROLU×
iiiiiiiiiiiiiiiiiiiiiiiiiiiiiiiiiiiiiiiiiiiiiiiiiiiiiiiii(1-877-435-3287/
iiiiiiiiiiiiiiiiiiiiiiiiiiiiiiiiiiiiiiiiiiiiiiiiiiiiiiiiiFor online support and product information
iiiiiiiiiiiiiiiiiiiiiiiiiiiiiiiiiiiiiiiiiiiiiiiiiiiiiiiiivisit http://www.electroluxappliances.com
iiiiiiiiiiiiiiiiiiiiiiiiiiiiiiiiiiiiiiiiiiiiiiiiiiiiiiiii
iiiiiiiiiiiiiiiiiiiiiiiiiiiiiiiiiiiiiiiiiiiiiiiiiiiiiiiii
iiiiiiiiiiiiiiiiiiiiiiiiiiiiiiiiiiiiiiiiiiiiiiiiiiiiiiiii
iiiiiiiiiiiiiiiiiiiiiiiiiiiiiiiiiiiiiiiiiiiiiiiiiiiiiiiii
iiiiiiiiiiiiiiiiiiiiiiiiiiiiiiiiiiiiiiiiiiiiiiiiiiiiiiiii
iiiiiiiiiiiiiiiiiiiiiiiiiiiiiiiiiiiiiiiiiiiiiiiiiiiiiiiii
iiiiiiiiiiiiiiiiiiiiiiiiiiiiiiiiiiiiiiiiiiiiiiiiiiiiiiii_
Finding Information .................................... 2
Safety .......................................................... 3
Feature Overview ........................................ 5
Installation .................................................. 6
Removing the Doors ................................. 10
Installing Door Handles ............................ 12
Connecting the Water Supply .................. 13
Controls .................................................... 15
Automatic Ice Maker ................................ 17
Storage Features ...................................... 18
Storing Food and Saving Energy ............. 23
Normal Operating Sounds & Sights ......... 24
Changing the Water and Air Filters .......... 25
Care and Cleaning .................................... 27
Common Solutions for Concerns ............ 31
Warranty .................................................... 36
Cautionbasedontherisktype.
Definitions
_This is the safety alert symbol. It is
used to alert you to potential personal injury
hazards. Obey all safety messages that follow
this symbol to avoid possible injury or death.
Safety
Important safety General Safety
instructions
i
Y
Do not attempt to nsta or operate your un t
until you have read the safety precautions mew el i_ _ r. ......................................................
in this manual. Safety items throughout this
manual are labeled with a Danger, Warning, or • Do not store or use gasoline or other
flammable liquids near this or any other
appliance. Read product labels for
warnings regarding flammability and
other hazards.
• Do not operate the refrigerator in the
presence of explosive fumes.
• Avoid contact with any moving parts of
the automatic ice maker.
Remove all staples from the carton to
avoid injury. Staples can also damage
finishes if they come in contact with
other appliances or furniture.
Child Safety
Packing Materials:
= Packing cartons covered with rugs,
bedspreads, plastic sheets, or stretch
wrap may become airtight chambers and
can quickly cause suffocation.
• Destroy or recycle the product's carton,
plastic bags, and any other exterior
wrapping material immediately after the
refrigerator is unpacked. Children should
never play with these items.
Child Entrapment and Suffocation:
• These problems are not limited to the
past. Whether junked, abandoned, or
temporarily stored (even for a few hours),
unattended refrigerators and freezers are
dangerous. Please take the precautions
listed below.
Proper Disposal of Refrigerators/
Freezers
Safety
iiiiiiiiiiiiiiiiiiiiiiiiiiiiiiiiiiiiiiiiiiiiiiiiiiiiiii_
iiiiiiiiiiiiiiiiiiiiiiiiiiiiiiiiiiiiiiiiiiiiiiiiiiiiiiii
iiiiiiiiiiiiiiiiiiiiiiiiiiiiiiiiiiiiiiiiiiiiiiiiiiiiiii •
iiiiiiiiiiiiiiiiiiiiiiiiiiiiiiiiiiiiiiiiiiiiiiiiiiiiiiii
iiiiiiiiiiiiiiiiiiiiiiiiiiiiiiiiiiiiiiiiiiiiiiiiiiiiiiii
iiiiiiiiiiiiiiiiiiiiiiiiiiiiiiiiiiiiiiiiiiiiiiiiiiiiiil •
iiiiiiiiiiiiiiiiiiiiiiiiiiiiiiiiiiiiiiiiiiiiiiiiiiiiiiJ
iiiiiiiiiiiiiiiiiiiiiiiiiiiiiiiiiiiiiiiiiiiiiiiiiiiiiiii
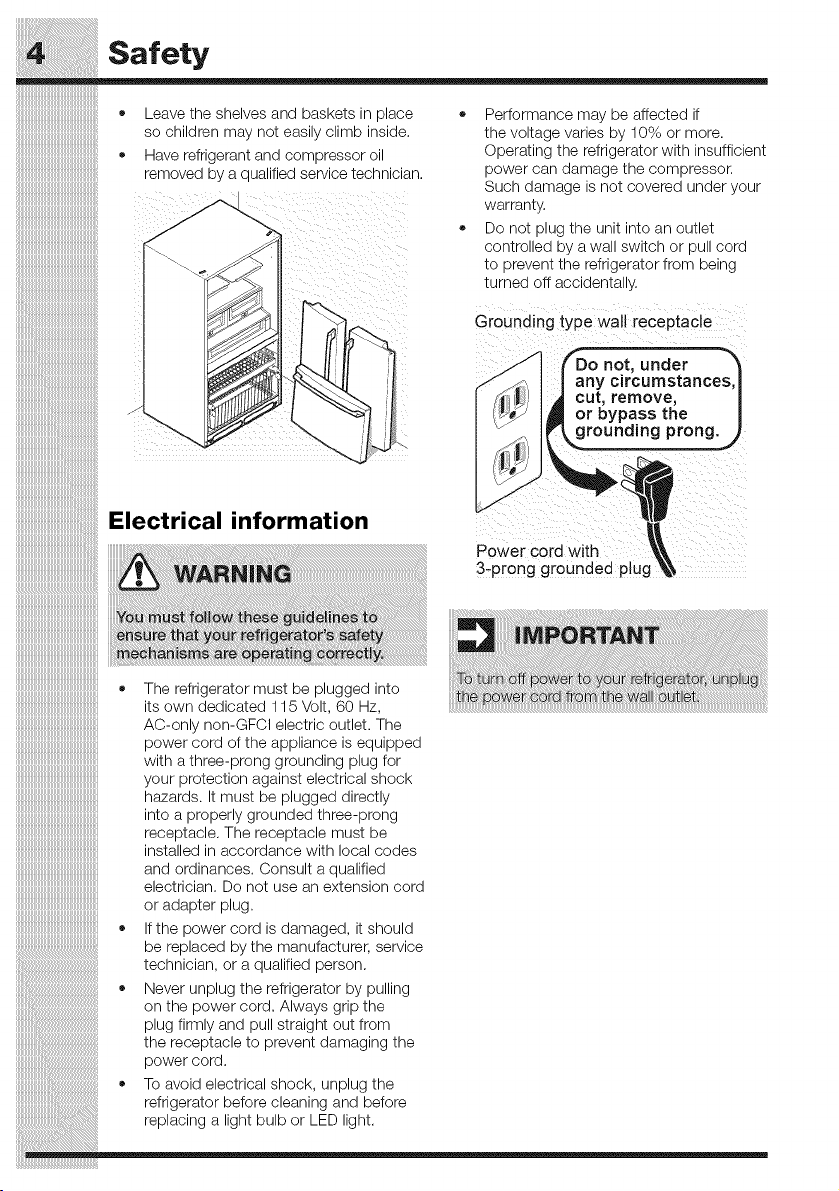
Leave the shelves and baskets in place
so children may not easily climb inside.
Have refrigerant and compressor oil
removed by a qualified service technician.
* Performance may be affected if
the voltage varies by 10% or more.
Operating the refrigerator with insufficient
power can damage the compressor.
Such damage's no_ :overea unaer j _ur
ivarran_y.
* Do not plug _ne unE q_o ar OU_le_
conl[rOlleCl Dy 9. Wall SWll[Cn _r ou .3orci
_c oreven_ _ne refrigerator from De,no
_urned off accidenta ,.
Grounding type wall receptacle
.._ FDo not, under _"_
,._J;_ I I any circumstances,_
I _I IJ_ I _ cut, remove, |
I i'_ I_ or bypass the |
3-'prong grounded ptug_
iiiiiiiiiiiiiiiiiiiiiiiiiiiiiiiiiiiiiiiiiiiiiiiiiiiiiiiii• The refrigerator must be plugged into
iiiiiiiiiiiiiiiiiiiiiiiiiiiiiiiiiiiiiiiiiiiiiiiiiiiiiiiiiitsowndedicated 115Volt, 60 Hz,
iiiiiiiiiiiiiiiiiiiiiiiiiiiiiiiiiiiiiiiiiiiiiiiiiiiiiiiiiAC-only non-GFCl electric outlet. The
iiiiiiiiiiiiiiiiiiiiiiiiiiiiiiiiiiiiiiiiiiiiiiiiiiiiiiiiipowercord oftheappliance is equipped
iiiiiiiiiiiiiiiiiiiiiiiiiiiiiiiiiiiiiiiiiiiiiiiiiiiiiiiiiwith athree-prong grounding plug for
iiiiiiiiiiiiiiiiiiiiiiiiiiiiiiiiiiiiiiiiiiiiiiiiiiiiiiiiiyourprotection againstelectrical shock
iiiiiiiiiiiiiiiiiiiiiiiiiiiiiiiiiiiiiiiiiiiiiiiiiiiiiiiiihazards. It must be plugged directly
iiiiiiiiiiiiiiiiiiiiiiiiiiiiiiiiiiiiiiiiiiiiiiiiiiiiiiiiiintoaproperlygroundedthree-prong
iiiiiiiiiiiiiiiiiiiiiiiiiiiiiiiiiiiiiiiiiiiiiiiiiiiiiiiiireceptacle. The receptacle must be
iiiiiiiiiiiiiiiiiiiiiiiiiiiiiiiiiiiiiiiiiiiiiiiiiiiiiiiiiinstalledinaccordancewithlocalcodes
iiiiiiiiiiiiiiiiiiiiiiiiiiiiiiiiiiiiiiiiiiiiiiiiiiiiiiiiiand ordinances. Consult a qualified
iiiiiiiiiiiiiiiiiiiiiiiiiiiiiiiiiiiiiiiiiiiiiiiiiiiiiiiiielectrician. Do not use an extension cord
iiiiiiiiiiiiiiiiiiiiiiiiiiiiiiiiiiiiiiiiiiiiiiiiiiiiiiiiioradapterplug.
iiiiiiiiiiiiiiiiiiiiiiiiiiiiiiiiiiiiiiiiiiiiiiiiiiiiiiiii" If the power cord is damaged, it should
_' be replaced by the manufacturer, service
i!i_i!_!___!!_i!_i!_i!_i!_i!_i!_i!_i!_i!_i!_i!_i!_i!_i!_i!_i!_i!_i!_i!_i!_i!_i!_i!_i!_i!_i!_i!_i!_i!_i!_i!_i!_i!_i!_i!_i!_i!_i!_i!_i!_i!_i!_i!_i!_i!_i!_i!_i!_i!_i!_i!technician, oraqualified person.
• Never unplug the refrigerator by pulling
on the powercord. Always gripthe
_i_i_i_i_i_i_i_i_i_i_i:iiii_iiiiiiiiiiiiiiiiiiiiiiiiiiiiiiiiiiiiiiiiiiiiiiiiiiiiiiiiiiiiiiiiiiiiiiiiiiiiiiiiiiiiiiiiiiiiiiiiiiiiiiiiiiiiiiiiiiiiiiiiiiplug firmly and pull straight out from
the receptacle to prevent damaging the
powercord.
iiiiiiiiiiiiiiiiiiiiiiiiiiiiiiiiiiiiiiii_i:i_i__i!iiiiiiiiiiiiiiiiiiiiiiiiiiiiiiiiiiiiiiiiiiiiiiiiiiiiiiiiiiiiiiiiiiiiiiiiiiiiiiiiiiiiiiiiii• Toavoidelectricalshock, unplugthe
refrigeratorbeforecleaning and before
replacing a light bulborLEU light.
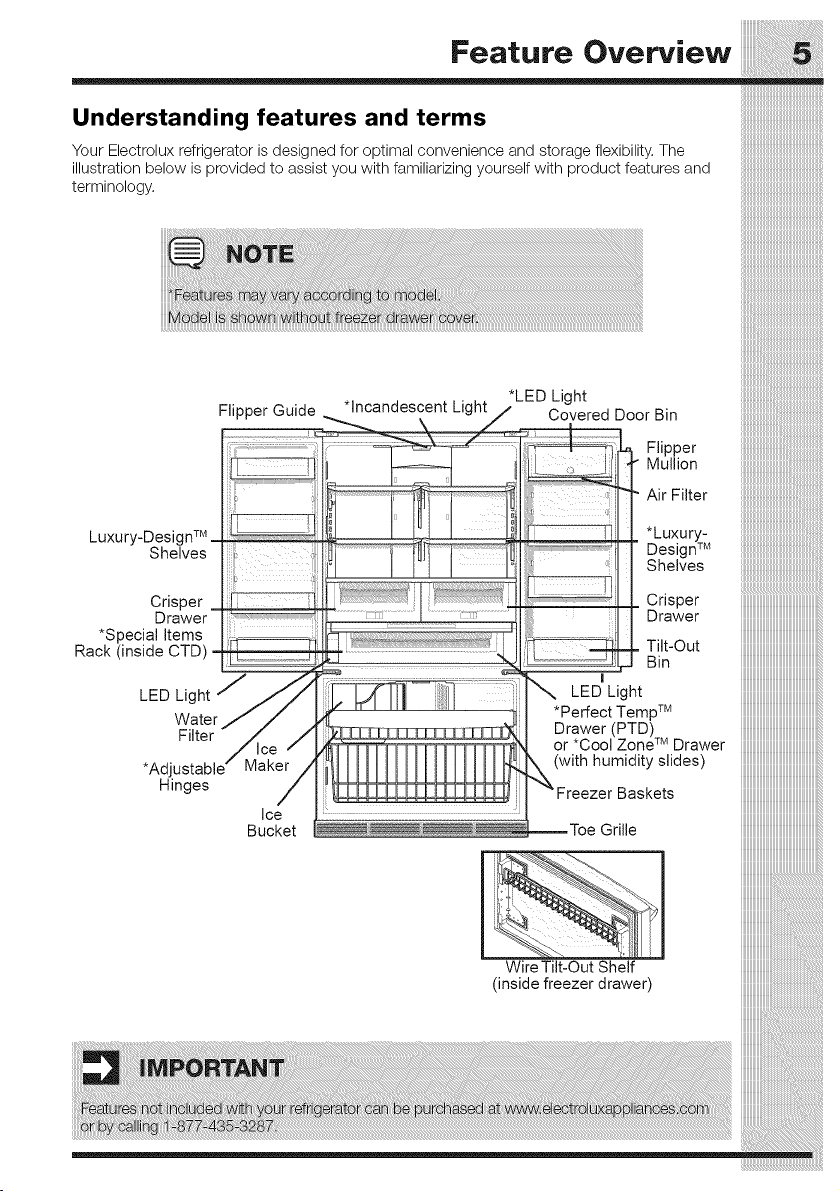
Feature Overview
Understanding features and terms
Your Electrolux refrigerator is designed for optimal convenience and storage flexibility. The
illustration below is provided to assist you with familiarizing yourself with product features and
terminology.
*LED Light
|nstallation
iiiiiiiiiiiiiiiiiiiiiiiiiiiiiiiiiiiiiiiiiiiiiiiiiiiiii__
iiiiiiiiiiiiiiiiiiiiiiiiiiiiiiiiiiiiiiiiiiiiiiiiiiiiii_i
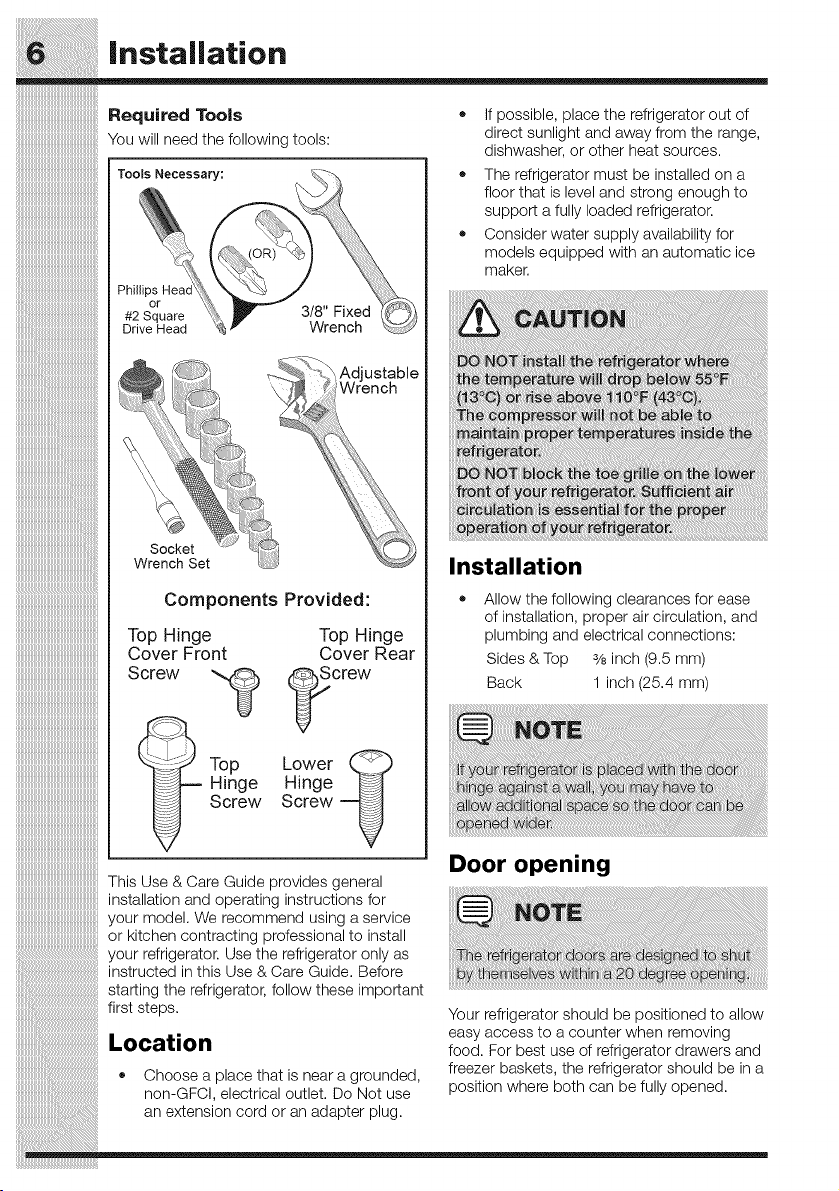
.......................................................Required Tools
:::::::::::::::::::::::::::::::::::::::::::::::::::::::
iiiiiiiiiiiiiiiiiiiiiiiiiiiiiiiiiiiiiiiiiiiiiiiiiiiiiiilYouwill needthefollowingtools:
iiiiiiiiiiiiiiiiiiiiiiiiiiiiiiiiiiiiiiiiiiiiiiiiiiiiii!_
iiiiiiiiiiiiiiiiiiiiiiiiiiiiiiiiiiiiiiiiiiiiiiiiiiiiiiilT°°'sNecessary:
iiiiiiiiiiiiiiiiiiiiiiiiiiiiiiiiiiiiiiiiiiiiiiiiiiiiii_:,_
iiiiiiiiiiiiiiiiiiiiiiiiiiiiiiiiiiiiiiiiiiiiiiiiiiiiiill
iiiiiiiiiiiiiiiiiiiiiiiiiiiiiiiiiiiiiiiiiiiiiiiiiiiiii_:,
iiiiiiiiiiiiiiiiiiiiiiiiiiiiiiiiiiiiiiiiiiiiiiiiiiiiii: _
> Adjustable
\ Wrench
iiiiiiiiiiiiiiiiiiiiiiiiiiiiiiiiiiiiiiiiiiiiiiii,,Socket
iiiiiiiiiiiiiiiiiiiiiiiiiiiiiiiiiiiiiiiiiiiiiiiiiiWrench Set
Components Provided:
Top Hinge
Cover Front
Top
Hinge
Screw
iiiiiiiiiiiiiiiiiiiiiiiiiiiiiiiiiiiiiiiiiiiiiiiiiiiiiiiii
iiiiiiiiiiiiiiiiiiiiiiiiiiiiiiiiiiiiiiiiiiiiiiiiiiiiiiiiiScrew
iiiiiiiiiiiiiiiiiiiiiiiiiiiiiiiiiiiiiiiiiiiiiiiiiiiiiiiii
iiiiiiiiiiiiiiiiiiiiiiiiiiiiiiiiiiiiiiiiiiiiiiiiiiiiiiiii
iiiiiiiiiiiiiiiiiiiiiiiiiiiiiiiiiiiiiiiiiiiiiiiiiiiiiiiii
iiiiiiiiiiiiiiiiiiiiiiiiiiiiiiiiiiiiiiiiiiiiiiiiiiiiiiiii
iiiiiiiiiiiiiiiiiiiiiiiiiiiiiiiiiiiiiiiiiiiiiiiiiiiiiiiii
iiiiiiiiiiiiiiiiiiiiiiiiiiiiiiiiiiiiiiiiiiiiiiiiiiiiiiiii
iiiiiiiiiiiiiiiiiiiiiiiiiiiiiiiiiiiiiiiiiiiiiiiiiiiiiiiii
Top Hinge
Cover Rear
crew
Lower __
Hinge
Screw
If possible, place the refrigerator out of
direct sunlight and away from the range,
dishwasher, or other heat sources.
The refrigerator must be installed on a
floor that is level and strong enough to
support a fully loaded refrigerator.
Consider water supply availability for
models equipped with an automatic ice
maker.
Installation
Allow the following clearances for ease
of installation, proper air circulation, and
plumbing and electrical connections:
Sides & Top 3/8inch (9.5 ram)
Back 1 inch (25.4 ram)
Door opening
Installation
iiiiiiiiiiiiiiiiiiiiiiiiiiiiiiiiiiiiiiiiiiiiiiiiiiiiiiiii
iiiiiiiiiiiiiiiiiiiiiiiiiiiiiiiiiiiiiiiiiiiiiiiiiiiiiiiii
Leveling Freezer Drawer Tolevelthecabinetusingt.e frontro,ers:
(if necessary) 1 Slightly open freezer drawer. Liftthe toe
grille and gently pull forward (see illustration).
1 Check gasket seal around top, bottom, 2 You can raise or lower each door. Use
and sides of freezer drawer, a 3/8inch socket wrench to turn the
2 If gasket is not sealed, open drawer and adjustment screws (1 per side).
slightly loosen four drawer screws (two ......
on each side) to allow drawer to rotate.
3 Close drawer and recheck the seal
on the gasket (A). Open the drawer
grabbing by the sides in the center (B).
Be careful not to rotate the drawer.
Remove hex RemoVe hex
head drawer ys ... head drawer
screw _ J _ _--\._ screw
-i- _f _,-_.
/d'T'_.,P'R_qDo Not Remove I_P_
__11 |Remo've
_"a_d DrsHwex
Screw Screw
4
5 Recheck gasket seal.
Tighten four drawer screws.
Against
Freezer
Drawer
_Toe Grille Must_
/ ._I' \ Fit in Slot On / t,_,
I p"_ _} Anti-tiP Bracket L _!-I
\ f_'._',_ I_ ScrewRVasher _1;,,_¢_
Assembly
_L___ (3) Retaining Clips
3
4
To raise: turn adjustment screw clockwise.
To lower: turn adjustment screw
counterclockwise.
Ensure both doors are bind-free with
their seals touching the cabinet on all
four sides and that cabinet is stable.
After unit is leveled, lower anti-tip leg
until it contacts the floor.
° ' Door
iiiiiiiiiiiiiiiiiiiiiiii
iiiiiiiiiiiiiiiiiiiiiiii
iiiiiiiiiiiiiiiiiiiiiiiiiii
iiiiiiiiiiiiiiiiiiiiiiiiiiiiiiiiiiiiiiiiiiiiiiiiiiiiiiiiii
t iiiiiiiiiiiiiiiiiiiiiiiiiiiiiiiiiiiiiiiiiiiiiiiiiiiiiiiiii
i11111111111111111111111111111111111111111111111111111111
iiiiiiiiiiiiiiiiiiiiiiiiiiiiiiiiiiiiiiiiiiiiiiiiiiiiiiiii
iiiiiiiiiiiiiiiiiiiiiiiiiiiiiiiiiiiiiiiiiiiiiiiiiiiiiiiii
iiiiiiiiiiiiiiiiiiiiiiiiiiiiiiiiiiiiiiiiiiiiiiiiiiiiiiii
iiiiiiiiiiiiiiiiiiiiiiiiiiiiiiiiiiiiiiiiiiiiiiiiiiiH!!!
iiiiiiiiiiiiiiiiiiiiiiiiiiiiiiiiiiiiiiiiiiiiiiiiiii
iiiiiiiiiiiiiiiiiiiiiiiiiiiiiiiiiiiiiiiiiiiiiiiiiiiiii
o
Door'
=
Grab
D rawer
at Center
Ili from Both
Sides
Then
=lli Drawer
Out
Level Refrigerator & Adjust
Doors (if necessary)
Guidelines for final positioning of your
refrigerator:
All four corners of the cabinet must rest
firmly on the floor.
The sides should tilt _Ainch (6 mm) from
front to back (to, ensure that doors close 5 Install the toe grille by fitting into place.
and seal propeny/.
Doors should align with each other and
be level.
Most of these conditions can be met by
raising or lowering the adjustable front rollers.
Installation
To adjust the door stop:
Door stop is adjustable between 85 to 145
degrees.
5 Retighten screw.
Stop
_i screwS
c DoOr
li top Re-tighten
Screw
in Retighten Screw
Den _ 6 Ensure door stops in desired location
before resuming normal use,
To level the doors using the adjustable
lower hinge (select models):
Adjustable Door Stop 1 Remove all food items from door bins on
1 Open door to provide access to screw, door being adjusted.
2 Loosen screw. 2 Open doorsto 90 degrees.
3 Adjust door to desired location. 3 Loosen or remove screw.
Loosen or Remove
screw j
O eo 1
Door 't
Rotate W_. 90 "__'iJ _ _1
\ Door to Des rec \ _ Jegrec _ ',il
_ Location _, _1_
\ _ [ Bottom oiDoor
\ Loosen/Remove Screw (where applicable)
Adjusting Door
4 Rotate doorstop until it makes contact _ NOT_
with the lower hinge,
Adju_ab e hinge _hou d 0n y b_ used after
doGrs have been leveled wi'_h rollers.
|nstallation
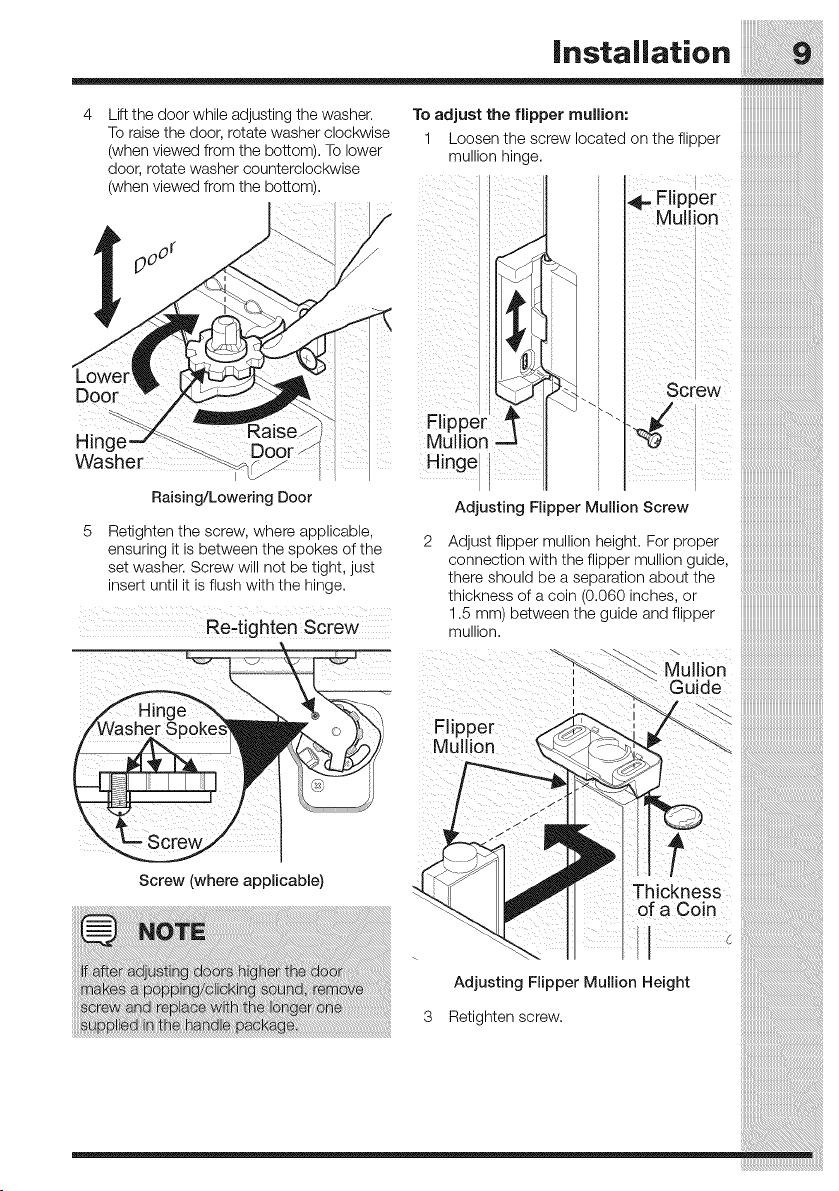
Lift the door while adjusting the washer.
To raise the door, rotate washer clockwise
(when viewed from the bottom). To lower
door, rotate washer counterclockwise
(when viewed from the bottom).
Door
Hinc
Washer /S_
Raising/Lowering Door
Retighten the screw, where applicable,
ensuring it is between the spokes of the
set washer. Screw will not be tight, just
insert until it is flush with the hinge.
Re-tighten Screw
To adjust the flipper mullion:
1 Loosen the screw located on the flipper
mullion hinge.
I
_...Flipper
Mu on ........
Mullion
H!nge
Adjusting Flipper Mullion Screw
Adjust flipper mullion height. For proper
connection with the flipper mullion guide,
there should be a separation about the
thickness of a coin (0.060 inches, or
1.5 mm between the guide and flipper
muIIIOR
I
i
I
Flipper
Mullion
Screw (where applicable)
Adjusting Flipper Mullion Height
3 Retighten screw.
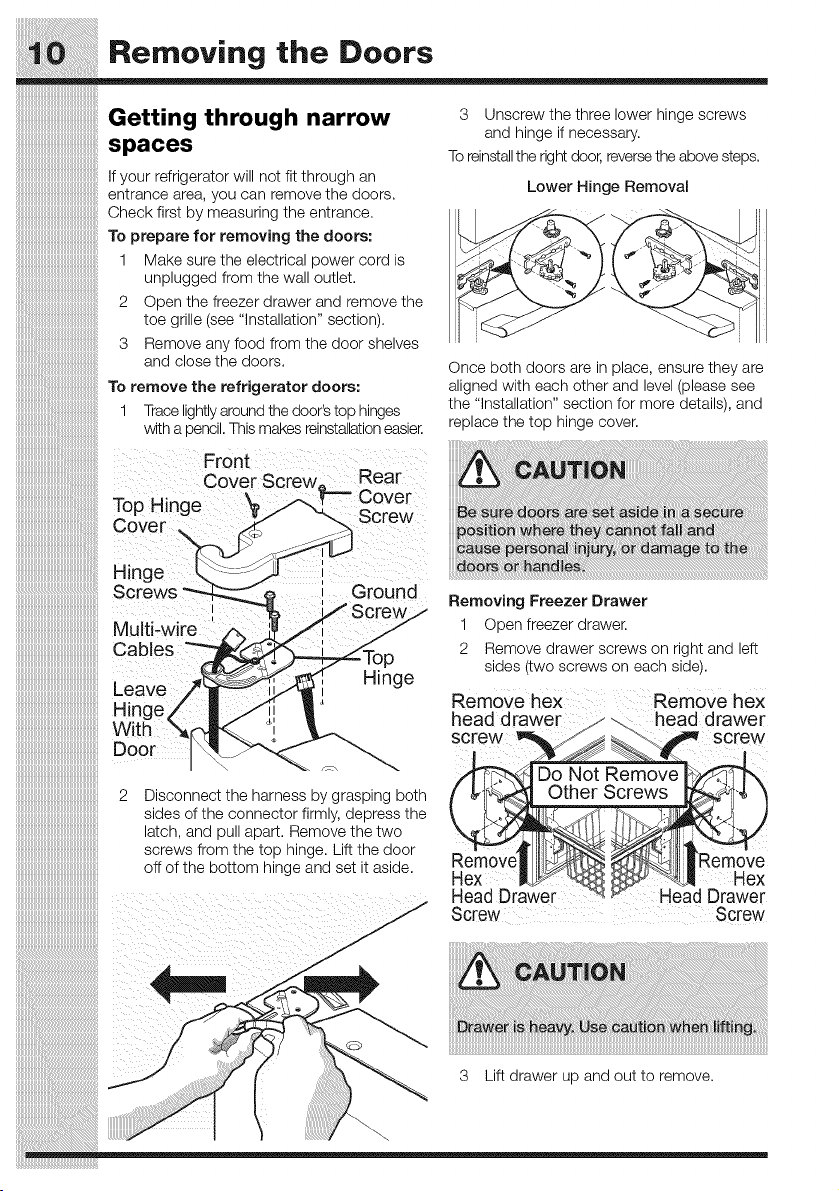
Removing the Doors
Getting through narrow s Unscrew the three lower hinge screws
and hinge if necessary.
spaces
To reinstallthe right door, reversethe above steps.
if your refrigerator will not fit through an
entrance area, you can remove the doors. Lower Hinge Removal
Check first by measuring the entrance. __
To prepare for removing the doors:
1
unplugged from the wall outlet,
2 Open the freezer drawer and remove the
toe grille (see "installation" section).
3 Remove any food from the door shelves
and close the doors.
To remove the refrigerator doors:
1 Trace lightly around the door's top hinges
with a pencil. This makes reinstallationeasier.
Front
Cover Screw,, Rear
To i e _ Cover
p H ng __ Screw
£;over
Hinge
Screws round
crew./
Multi-w
Cables _p
Leave _._,[ Hinge
Hinge/ | /ii |'_
With "_(f-_. °i
Make sure the electrical power cord is
Once both doors are in place, ensure they are
aligned with each other and level (please see
the "installation" section for more details), and
replace the top hinge cover.
Removing Freezer Drawer
Ooen freezer drawer,
Remove arawer screws on rlgnt ana eft
slaes two screws on each slae..
Remove hex
head drawer
Do Not Remove
2 Disconnect the harness by grasping both
sides of the connector firmly, depress the
latch, and pull apart. Remove the two
screws from the top hinge. Lift the door
off of the bottom hinge and set it aside.
Remove
Hex Hex
HeadDrawer Head Drawer
Screw Screw
3 Lift drawer up and out to remove.
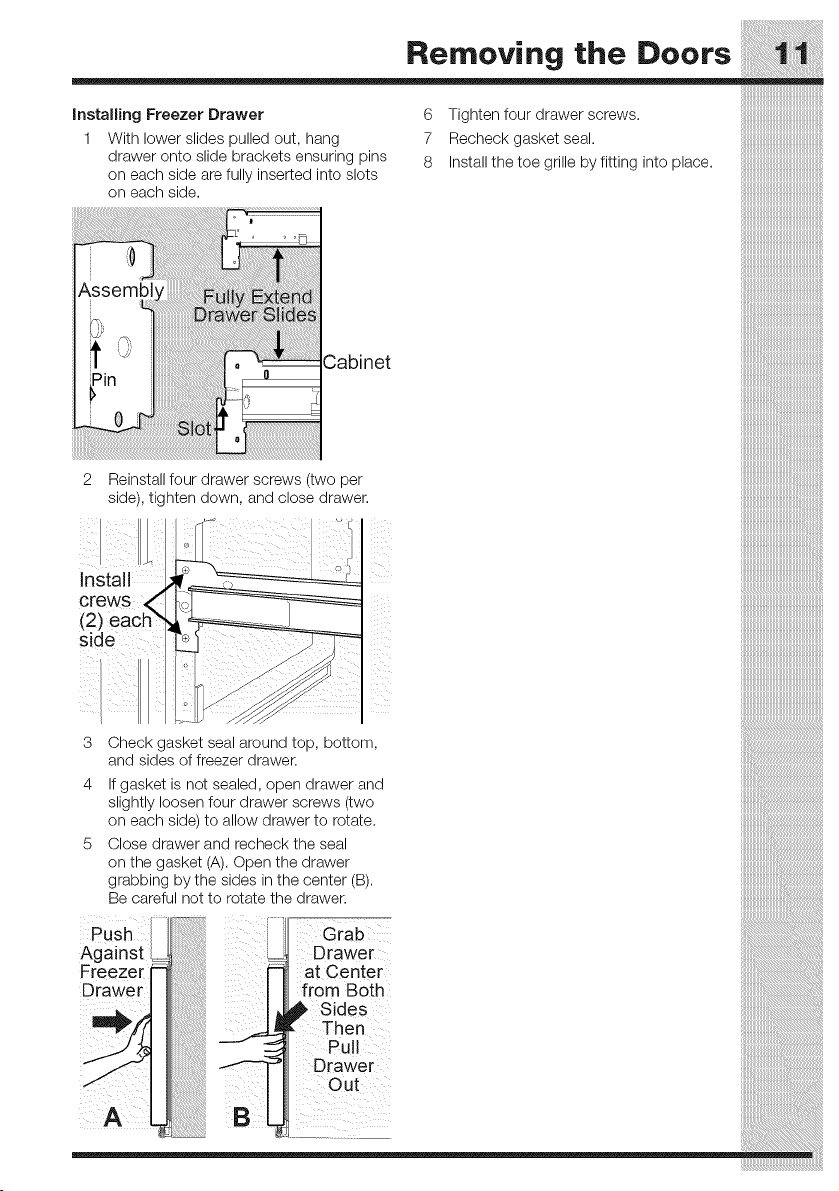
Removing the Doors
Installing Freezer Drawer
1 With lower slides pulled out, hang
drawer onto slide brackets ensuring pins
on each side are fully inserted into slots
on each side.
6 Tighten four drawer screws.
7 Recheck gasket seal.
8 Install the toe grille by fitting into place.
Cabinet
2
LII
Install
Reinstall four drawer screws (two per
side), tighten down, and close drawer.
3 Check gasket seal around top, bottom,
and sides of freezer drawer.
4 If gasket is not sealed, open drawer and
slightly loosen four drawer screws (two
on each side) to allow drawer to rotate.
5 Close drawer and recheck the seal
on the gasket (A). Open the drawer
grabbing by the sides in the center (B).
Be careful not to rotate the drawer.
Posh
Against
Freeze[ =
Drawer
Grab
Drawer
at Center
from Both
_ Sides
, Then
Pull
Drawer
Out

Installing Door Handles
Door Handle Mount-
ing Instructions
Remove handles from
protective packaging.
Position fresh food handle
end caps (A) over upper
and lower pre-installed
shoulder bolts (B) that
are fastened into door,
ensuring the holes for
the set screws are facing
towards the opposite door.
3 While holding handle firmly
against door, fasten upper
and lower Allen set screws
(O) with supplied Allen
wrench.
Mounting Refrigerator Handles
Repeat steps 2 and 3 to
install opposite handle.
Ensure the holes for the set
screws are facing towards
the first door.
Mounting Freezer Handle
5 Position freezer handle end
caps over left and right
iiiiiiiiiiiiiiiiiiiiiiiiiiiiiiiiiiiiiiiiiiiiiiiiiiiiiiiiipre-installed shoulder bolts
iiiiiiiiiiiiiiiiiiiiiiiiiiiiiiiiiiiiiiiiiiiiiiiiiiiiiiiiithatarefastened tothe
iiiiiiiiiiiiiiiiiiiiiiiiiiiiiiiiiiiiiiiiiiiiiiiiiiiiiiiiidrawer, ensuringthe holes
iiiiiiiiiiiiiiiiiiiiiiiiiiiiiiiiiiiiiiiiiiiiiiiiiiiiiiiiiforthesetscrewsare
iiiiiiiiiiiiiiiiiiiiiiiiiiiiiiiiiiiiiiiiiiiiiiiiiiiiiiiiifacingdown.
iiiiiiiiiiiiiiiiiiiiiiiiiiiiiiiiiiiiiiiiiiiiiiiiiiiiiiiii6 While holding handle firmly
iiiiiiiiiiiiiiiiiiiiiiiiiiiiiiiiiiiiiiiiiiiiiiiiiiiiiiiiiagainstdrawer, fasten left
iiiiiiiiiiiiiiiiiiiiiiiiiiiiiiiiiiiiiiiiiiiiiiiiiiiiiiiiiand rightAIlen setscrews
iiiiiiiiiiiiiiiiiiiiiiiiiiiiiiiiiiiiiiiiiiiiiiiiiiiiiiiii(C) withsuppliedAIlen
iiiiiiiiiiiiiiiiiiiiiiiiiiiiiiiiiiiiiiiiiiiiiiiiiiiiiiiiiwrench.
iiiiiiiiiiiiiiiiiiiiiiiiiiiiiiiiiiiiiiiiiiiiiiiiiiiiiiiii
iiiiiiiiiiiiiiiiiiiiiiiiiiiiiiiiiiiiiiiiiiiiiiiiiiiiiiiii
iiiiiiiiiiiiiiiiiiiiiiiiiiiiiiiiiiiiiiiiiiiiiiiiiiiiiiiii
iiiiiiiiiiiiiiiiiiiiiiiiiiiiiiiiiiiiiiiiiiiiiiiiiiiiiiiii
iiiiiiiiiiiiiiiiiiiiiiiiiiiiiiiiiiiiiiiiiiiiiiiiiiiiiiiii
iiiiiiiiiiiiiiiiiiiiiiiiiiiiiiiiiiiiiiiiiiiiiiiiiiiiiiiii
iiiiiiiiiiiiiiiiiiiiiiiiiiiiiiiiiiiiiiiiiiiiiiiiiiiiiiiii
Connecting the Water Supply
iiiiiiiiiiiiiiiiiiiiiiiiiiiiiiiiiiiiiiiiiiiiiiiiiiiiiiii_
iiiiiiiiiiiiiiiiiiiiiiiiiiiiiiiiiiiiiiiiiiiiiiiiiiiiiiii_
add approximately 7feet (2.1 meters), iiiiiiiiiiiiiiiiiiiiiiiiiiiiiiiiiiiiiiiiiiiiiiiiiiiiiiiiii
so the refrigerator can be moved out for iiiiiiiiiiiiiiiiiiiiiiiiiiiiiiiiiiiiiiiiiiiiiiiiiiiiiiiiii
cleaning(asshown), iiiiiiiiiiiiiiiiiiiiiiiiiiiiiiiiiiiiiiiiiiiiiiiiiiiiiiiiii
• A shutoff valve to connect the water iiiiiiiiiiiiiiiiiiiiiiiiiiiiiiiiiiiiiiiiiiiiiiiiiiiiiiiiii
supply line to your household water iiiiiiiiiiiiiiiiiiiiiiiiiiiiiiiiiiiiiiiiiiiiiiiiiiiiiiiiii
system. DO NOTuseaself-piercing type iiiiiiiiiiiiiiiiiiiiiiiiiiiiiiiiiiiiiiiiiiiiiiiiiiiiiiiiii
shutoffvalve, iiiiiiiiiiiiiiiiiiiiiiiiiiiiiiiiiiiiiiiiiiiiiiiiiiiiiiiiii
• Do not reuse compression fitting or use iiiiiiiiiiiiiiiiiiiiiiiiiiiiiiiiiiiiiiiiiiiiiiiiiiiiiiiiii
threadsealtape, iiiiiiiiiiiiiiiiiiiiiiiiiiiiiiiiiiiiiiiiiiiiiiiiiiiiiiiiii
• A compression nut and ferrule (sleeve) iiiiiiiiiiiiiiiiiiiiiiiiiiiiiiiiiiiiiiiiiiiiiiiiiiiiiiiiii
forconnecting acopperwatersupply iiiiiiiiiiiiiiiiiiiiiiiiiiiiiiiiiiiiiiiiiiiiiiiiiiiiiiiiii
line to the ice maker inletvalve, iiiiiiiiiiiiiiiiiiiiiiiiiiiiiiiiiiiiiiiiiiiiiiiiiiiiiiiiii
!!!!!!!!!!!!!!!!!!!!!!!!!!!!!!!!!!!!!!!!!!!!!!!!!!!!!!iii!

Connecting the Water Supply
another half turr wltn a wrencr : DO NOT
over[ignten. See Egure 1.
/ou Jse s]:alnless s]:eel _:Ulolng- The nu_
ano ferrule are _lrea% _tssemlolea on ;:ne
_uDInQ.Slide compression nu_ onto vawe
nle_ and finger _lgn_en compression nu_
onto valve. - _nten another half turr wl_n
a wrencn: DO NOT over[ign_en. See
Figure 2.
5. With steel c_amo anq _crew. secure
wa_er supply line/copper _uulng only _o
_ear 9ane_ _f refrioera_or as snown.
6. Coil excess Namerstgp_y ne fODDer
_uDino ond/, aDOU_21/pturns. Denlna
refrigerator as snown _no arrange coils
so _ne'_do no_vlura_e or wear agalns_
any other surface
7, TurnON water supply at shutoff valveand
_:lgn]:enant .;onnec]:lons_:na_leaK.
8, Reconnect refrigerator_oelec_ncaloower
source.
9. To turn :e maKer on. lower wire signal arm
Teezer ice maKer or se_:_:neice maker's On/
Off power swl_cnto the "ON" position i_rest
food ice maker).
Plastic water tubin_
to ice maker
_--Staintess
steel
water line
bracket
lve inlet
6 ft. stainless steel water line
from household water supply
Figure 2
Plastic watei Tubing , Steel
Ker p
I Tube rass
:)resslon
lut
JIB
(sleeve)
)er
ine
, Water Valve
_e
...-._- from household
__ln lude :ii i !ate!su_pil
( € e ighubg Op
allow moving refrigerator out
f0r c!eaning)
Figure 1
Controls
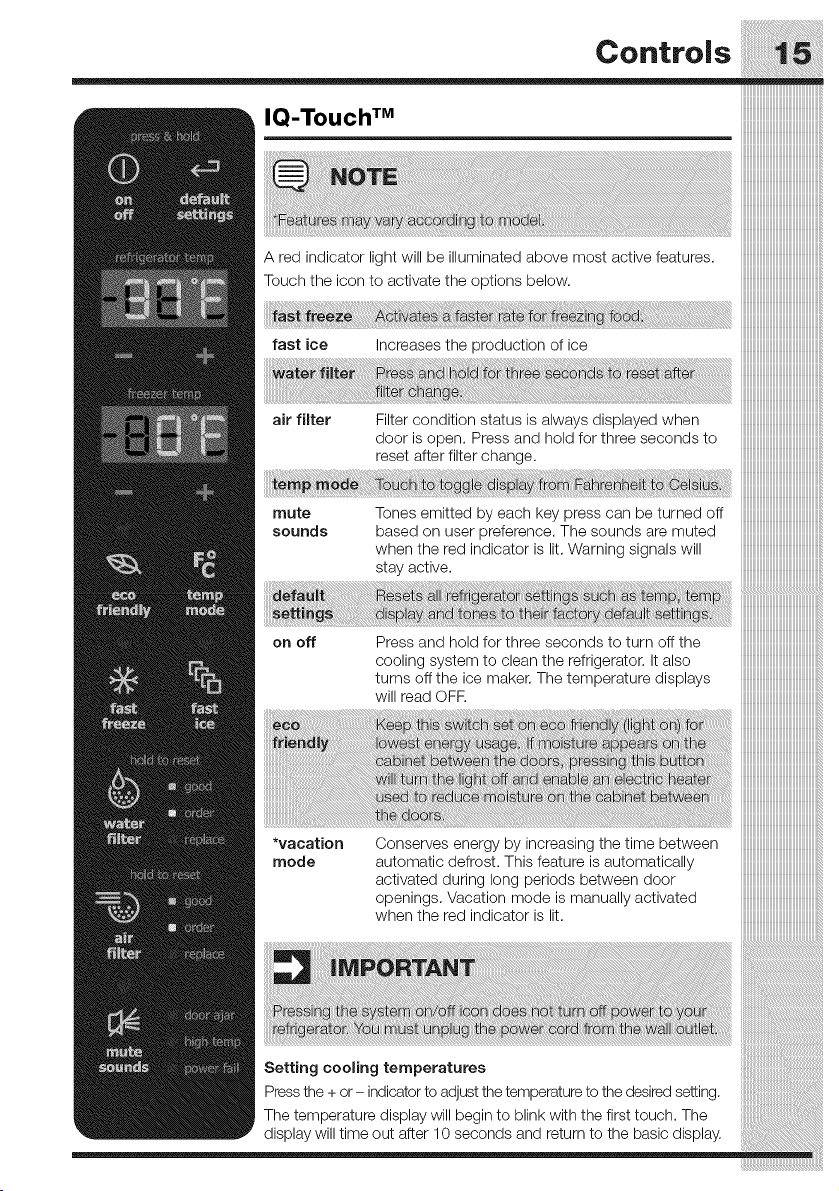
air filter Filter condition status is always displayed when iiiiiiiiiiiiiiiiiiiiiiiiiiiiiiiiiiiiiiiiiiiiiiiiiiiiiiiiii
doorisopen. Pressand holdforthreesecondsto iiiiiiiiiiiiiiiiiiiiiiiiiiiiiiiiiiiiiiiiiiiiiiiiiiiiiiiiii
reset after filter change, iiiiiiiiiiiiiiiiiiiiiiiiiiiiiiiiiiiiiiiiiiiiiiiiiiiiiiiiii
iiiiiiiiiiiiiiiiiiiiiiiiiiiiiiiiiiiiiiiiiiiiiiiiiiiiiiiiii
iiiiiiiiiiiiiiiiiiiiiiiiiiiiiiiiiiiiiiiiiiiiiiiiiiiiiiiiii
mute Tonesemitted byeach key presscan beturned off iiiiiiiiiiiiiiiiiiiiiiiiiiiiiiiiiiiiiiiiiiiiiiiiiiiiiiiiii
sounds based on userpreference. Thesoundsare muted iiiiiiiiiiiiiiiiiiiiiiiiiiiiiiiiiiiiiiiiiiiiiiiiiiiiiiiiii
when the red indicator is lit. Warning signals will iiiiiiiiiiiiiiiiiiiiiiiiiiiiiiiiiiiiiiiiiiiiiiiiiiiiiiiiii
stayactive, iiiiiiiiiiiiiiiiiiiiiiiiiiiiiiiiiiiiiiiiiiiiiiiiiiiiiiiiii
!!!!!!!!!!!!!!!!!!!!!!!!!!!!!!!!!!!!!!!!!!!!!!!!!!!!!!iii!
on off Press and hold forthree seconds to turn offthe iiiiiiiiiiiiiiiiiiiiiiiiiiiiiiiiiiiiiiiiiiiiiiiiiiiiii
cooling system to clean the refrigerator. It also iiiiiiiiiiiiiiiiiiiiiiiiiiiiiiiiiiiiiiiiiiiiiiiiiiiiii
turnsoffthe ice maker. Thetemperaturedisplays iiiiiiiiiiiiiiiiiiiiiiiiiiiiiiiiiiiiiiiiiiiiiiiiiiiiii
wiHreadOFF, iiiiiiiiiiiiiiiiiiiiiiiiiiiiiiiiiiiiiiiiiiiiiiiiiiiiii
*vacation Conservesenergybyincreasingthetimebetween iiiiiiiiiiiiiiiiiiiiiiiiiiiiiiiiiiiiiiiiiiiiiiiiiiiiii
mode automatic defrost. This feature is automatically iiiiiiiiiiiiiiiiiiiiiiiiiiiiiiiiiiiiiiiiiiiiiiiiiiiiii
activated during long periods between door iiiiiiiiiiiiiiiiiiiiiiiiiiiiiiiiiiiiiiiiiiiiiiiiiiiiii
openings. Vacation mode is manually activated iiiiiiiiiiiiiiiiiiiiiiiiiiiiiiiiiiiiiiiiiiiiiiiiiiiiii
whentheredindicatorislit, iiiiiiiiiiiiiiiiiiiiiiiiiiiiiiiiiiiiiiiiiiiiiiiiiiiiii
iiiiiiiiiiiiiiiiiiiiiiiiiiiiiiiiiiiiiiiiiiiiiiiiiiiiii
Setting cooling temperatures i
Press the + or- indicatorto adjust the temperature to the desired setting.
The temperature display will begin to blink with the first touch. The
display will time out after 10 seconds and return to the basic display.
co°,,ol,
High In the event of a high temperature
Temp condition, the temperature display
will blink and display "HI". After
20 minutes, the alarm will sound
and the high temp indicator will
be red on the bottom of the
control panel. The mute sounds
icon will illuminate until pressed,
acknowledging the alarm, at which
time the highest temperature
reached will be displayed and the
refrigerator will resume normal
operation. In case the high temp
alarm is not acknowledged at the
first alarm sound time out, when
iiiiiiiiiiiiiiiiiiiiiiiiiiiiiiiiiiiiiiiiiiiiiiiiiiiiiiiii
the door is first opened, the alarm
........................sound wi!! be [ePeated. ..............
Fail :faili J
:::::::6_iih :i m: :ac w _:
: i rai:
::::::::::::::::::: i ayi:6: iat
IQ-Touch TM
"Sabbath Mode"
In the Sabbath Mode, the High Temp alarm is
active for health reasons. If a high temperature
alarm is activated during this time, for
example due to a door left ajar, the alarm will
sound intermittently for about two minutes.
The alarm will then silence on its own and a
red high temperature icon will display. The
high temp icon will continue to display, even
if the door is closed, until the Sabbath mode
is exited and the icon reset. The refrigerator
will function normally once the door is closed,
without any violation of the Sabbath/Holidays.
For further assistance, guidelines
for proper usage and a complete
list of models with the Sabbath
feature, please visit the web at
http:\\www.star-k.org.
T_
Sabbath Mode and the Perfect Temp Drawer
The Perfect Temp TM Drawer should be
turned oft for the Sabbath/Holidays. Before
putting the refrigerator into the Sabbath
TM
mode, turn the Perfect Terap Drawer oft by
pressing the drawer on/oft button. The display
will show "OFF" and the drawer will turn oft.
Then enter the Sabbath mode function on the
main refrigerator display. See the IQ-Touch
"Sabbath Mode" section. When in Sabbath
mode, the display will not illuminate and the
drawer will remain oft. The drawer can still be
used as a non-temp controlled drawer in this
mode. When the refrigerator is taken out of
The Sabbath Mode is a feature that disables Sabbath mode the Perfect Terap TM Drawer
portions of the refrigerator and its controls for will have to be turned back on.
IQ-Touch TM in accordance with observance
of the weekly Sabbath and religious holidays
within the Orthodox Jewish community.
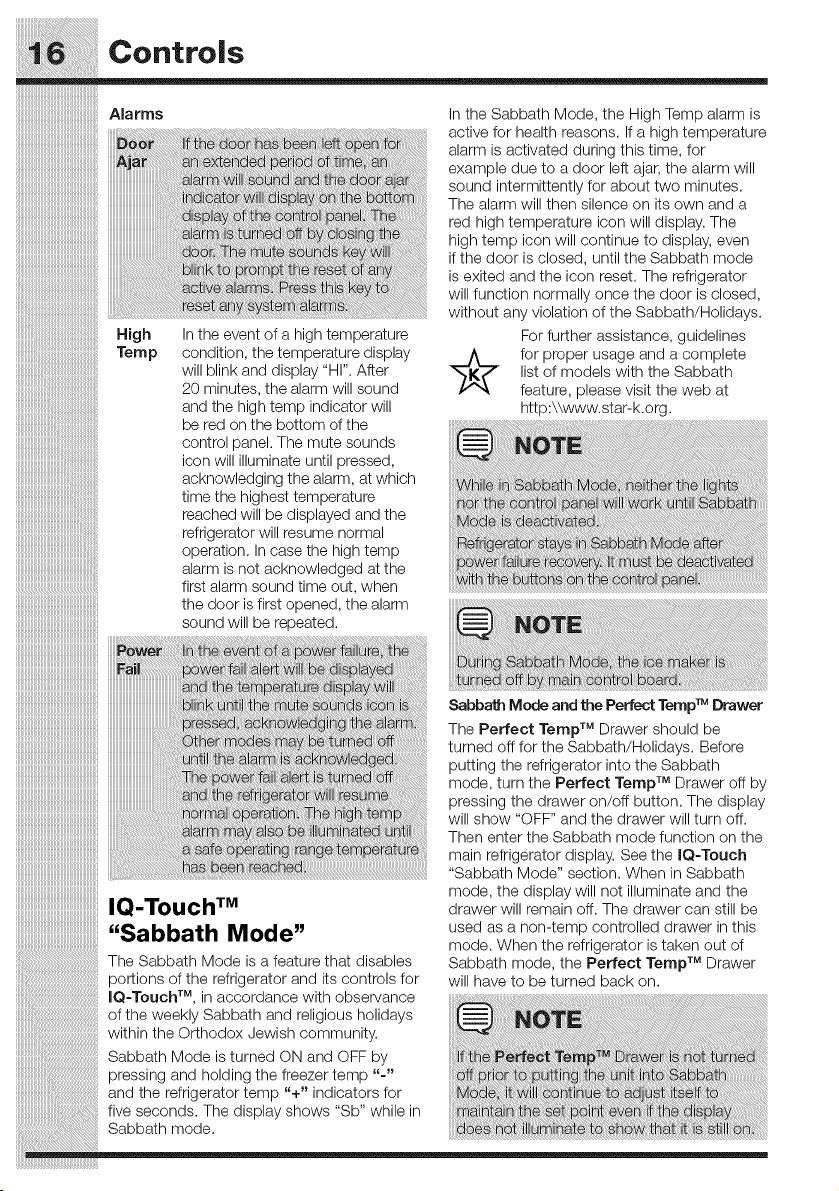
Sabbath Mode is turned ON and OFF by i_ _Te_ _ i
pressing and holding the freezer temp "- off i
and the refrigerator temp "+" indicators for iii st
five seconds. The display shows "Sb" while in i i
Sabbath mode. at : w i
Automatic ice Maker
iiiiiiiiiiiiiiiiiiiiiiiiiiiiiiiiiiiiiiiiiiiiiiiiiiiiiiiiii
iiiiiiiiiiiiiiiiiiiiiiiiiiiiiiiiiiiiiiiiiiiiiiiiiiiiiiiiii
Ice maker operation & care •
After the refrigerator is installed properly, the ice
maker can produce ice within 24 hours. It can
completely fill an ice bin in about three days.
When using the ice maker for the first time and
in order for the ice maker to work properly, it is
necessary to clear air from water filter tubing.
Once ice maker begins making ice, allow the
bucket to fill completely, then discard the first
TWO FULL buckets of ice. It will take at least
two days to completely fill the bucket on regular
ice making mode or 11/_days on fast ice mode.
The ice maker produces approximately four
pounds of ice every 24 hours depending on
usage conditions.
Thefollowing soundsare normal when iiiiiiiiiiiiiiiiiiiiiiiiiiiiiiiiiiiiiiiiiiiiiiiiiiiiiiiiii
theicemakerisoperating: iiiiiiiiiiiiiiiiiiiiiiiiiiiiiiiiiiiiiiiiiiiiiiiiiiiiiiiiii
iiiiiiiiiiiiiiiiiiiiiiiiiiiiiiiiiiiiiiiiiiiiiiiiiiiiiiii_
Motorrunning iiiiiiiiiiiiiiiiiiiiiiiiiiiiiiiiiiiiiiiiiiiiiiiiiiiiiiiiii
bedroppingintoicebin iiiiiiiiiiiiiiiiiiiiiiiiiiiiiiiiiiiiiiiiiiiiiiiiiiiiiiiiii
iiiiiiiiiiiiiiiiiiiiiiiiiiiiiiiiiiiiiiiiiiiiiiiiiiiiiiii_
Watervalveopeningorclosing iiiiiiiiiiiiiiiiiiiiiiiiiiiiiiiiiiiiiiiiiiiiiiiiiiiiiiiiii
Runningwater iiiiiiiiiiiiiiiiiiiiiiiiiiiiiiiiiiiiiiiiiiiiiiiiiiiiiiiiii
• Icecubesstoredtoo long maydevelop iiiiiiiiiiiiiiiiiiiiiiiiiiiiiiiiiiiiiiiiiiiiiiiiiiiiiiiiii
an odd flavor. Emptythe ice bin as iiiiiiiiiiiiiiiiiiiiiiiiiiiiiiiiiiiiiiiiiiiiiiiiiiiiiiiiii
explainedbelow, iiiiiiiiiiiiiiiiiiiiiiiiiiiiiiiiiiiiiiiiiiiiiiiiiiiiiiiiii
rost,coFunction iiiiiiiiiiiiiiiiiiiiiiiiiiiiiiiiiiiiiiiiiiiiiiiiiiiiiiiiii
¥ourrefrigeratorisequippedwitha"Sma_" Fast iiiiiiiiiiiiiiiiiiiiiiiiiiiiiiiiiiiiiiiiiiiiiiiiiiiiiiiiii
Ice Function, that will, if activated at your user iiiiiiiiiiiiiiiiiiiiiiiiiiiiiiiiiiiiiiiiiiiiiiiiiiiiiiiiii
interface, allow an increase in ice production. You iiiiiiiiiiiiiiiiiiiiiiiiiiiiiiiiiiiiiiiiiiiiiiiiiiiiiiiiii
do not need to deactivate it, if not needed, your iiiiiiiiiiiiiiiiiiiiiiiiiiiiiiiiiiiiiiiiiiiiiiiiiiiiiiiiii
refrigerator will operate on normal conditions, iiiiiiiiiiiiiiiiiiiiiiiiiiiiiiiiiiiiiiiiiiiiiiiiiiiiiiiiii
iiiiiiiiiiiiiiiiiiiiiiiiiiiiiiiiiiiiiiiiiiiiiiiiiiiiiiiiii
iiiiiiiiiiiiiiiiiiiiiiiiiiiiiiiiiiiiiiiiiiiiiiiiiiiiiiiiii
iiiiiiiiiiiiiiiiiiiiiiiiiiiiiiiiiiiiiiiiiiiiiiiiiiiiiiiiii
iiiiiiiiiiiiiiiiiiiiiiiiiiiiiiiiiiiiiiiiiiiiiiiiiiiiiiiiii
iiiiiiiiiiiiiiiiiiiiiiiiiiiiiiiiiiiiiiiiiiiiiiiiiiiiiiiiii
iiiiiiiiiiiiiiiiiiiiiiiiiiiiiiiiiiiiiiiiiiiiiiiiiiiiiiiiii
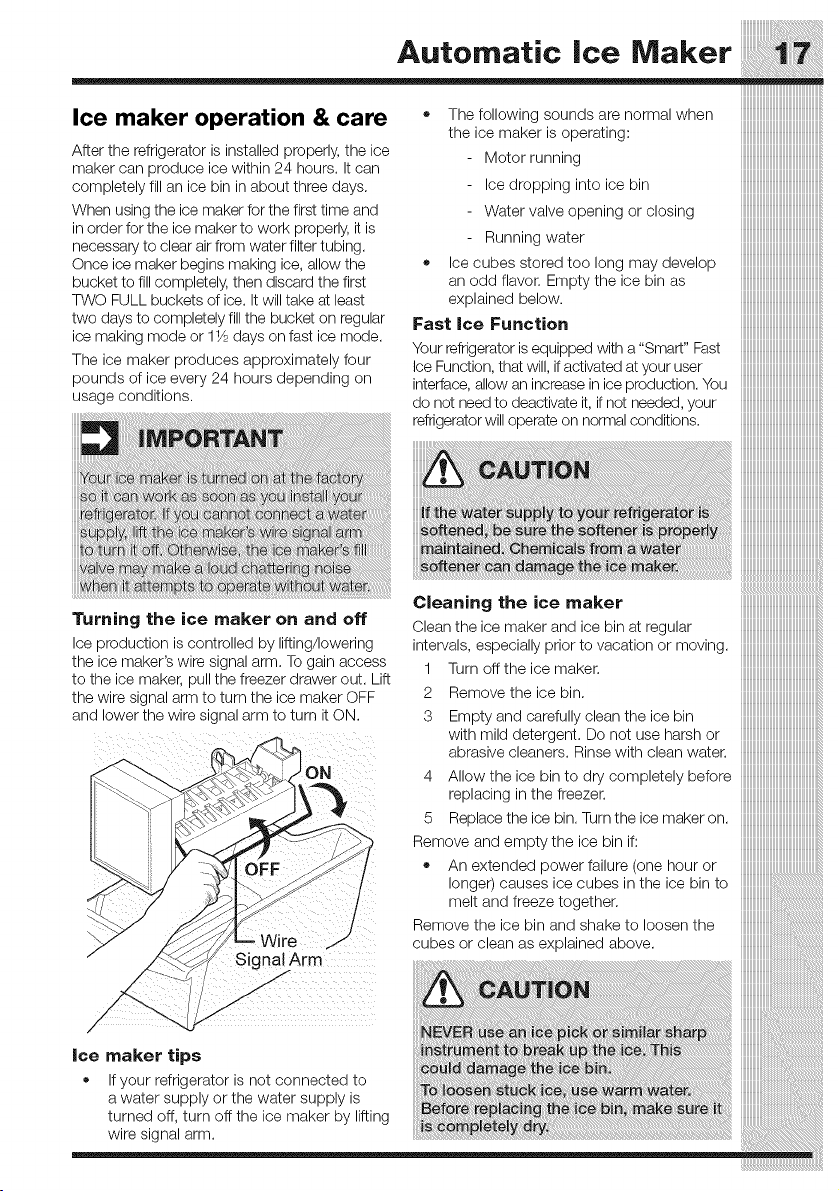
Turning the ice maker on and off
Ice production is controlled by lifting/lowering
the ice maker's wire signal arm. To gain access
to the ice maker, pull the freezer drawer out. Lift
the wire signal arm to turn the ice maker OFF
and lower the wire signal arm to turn it ON.
Cleaningtheico.,ak r iiiiiiiiiiiiiiiiiiiiiiiiiiiiiiiiiiiiiiiiiiiiiiiiiiiiii....
Cleantheice makerand ice binatregular iiiiiiiiiiiiiiiiiiiiiiiiiiiiiiiiiiiiiiiiiiiiiiiiiiiiii
intervals, especially prior to vacation or moving, iiiiiiiiiiiiiiiiiiiiiiiiiiiiiiiiiiiiiiiiiiiiiiiiiiiiii
1 Turnofftheicemaker. iiiiiiiiiiiiiiiiiiiiiiiiiiiiiiiiiiiiiiiiiiiiiiiiiiiiii
iiiiiiiiiiiiiiiiiiiiiiiiiiiiiiiiiiiiiiiiiiiiiiiiiiiiii
2 Removetheicebin. iiiiiiiiiiiiiiiiiiiiiiiiiiiiiiiiiiiiiiiiiiiiiiiiiiiiii
3 Emptyandcarefullycleantheicebin iiiiiiiiiiiiiiiiiiiiiiiiiiiiiiiiiiiiiiiiiiiiiiiiiiiiii
with mild detergent. Do not use harsh or iiiiiiiiiiiiiiiiiiiiiiiiiiiiiiiiiiiiiiiiiiiiiiiiiiiiii
abrasivecleaners. Rinsewithcleanwater. iiiiiiiiiiiiiiiiiiiiiiiiiiiiiiiiiiiiiiiiiiiiiiiiiiiiii
4 AIIowthe ice binto drycompletelybefore iiiiiiiiiiiiiiiiiiiiiiiiiiiiiiiiiiiiiiiiiiiiiiiiiiiiii
replacinginthefreezer, iiiiiiiiiiiiiiiiiiiiiiiiiiiiiiiiiiiiiiiiiiiiiiiiiiiiii
5 Replacetheicebin. Turntheicemakeron. iiiiiiiiiiiiiiiiiiiiiiiiiiiiiiiiiiiiiiiiiiiiiiiiiiiiii
Removeandemptytheicebinif: iiiiiiiiiiiiiiiiiiiiiiiiiiiiiiiiiiiiiiiiiiiiiiiiiiiiii
• An extended power failure (one hour or iiiiiiiiiiiiiiiiiiiiiiiiiiiiiiiiiiiiiiiiiiiiiiiiiiiiii
_///////////////////////////////////////////////////////_
Drawers
Your refrigerator includes a variety of storage
drawers. These drawers are located in fixed
positions at the bottom of the fresh food
compartment.
Crispers
Crisper drawers are designed for storing fruits,
vegetables, and other fresh produce.
Your refrigerator includesglass shelves that are
designed to catch and hold accidental spills.
You can easily adjust shelf positions in the fresh
food compartments to suit your needs. The
shelves have mounting brackets that attach to
slotted supports at the rear of each compartment.
To change the position of a shelf:
1 Before adjusting a shelf, remove all food,
2 Lift the front edge up and pull the shelf out,
3 Replace by inserting the mounting bracket
hooks into the desired support slots,
4 Lower the shelf and lock into _osition.
J
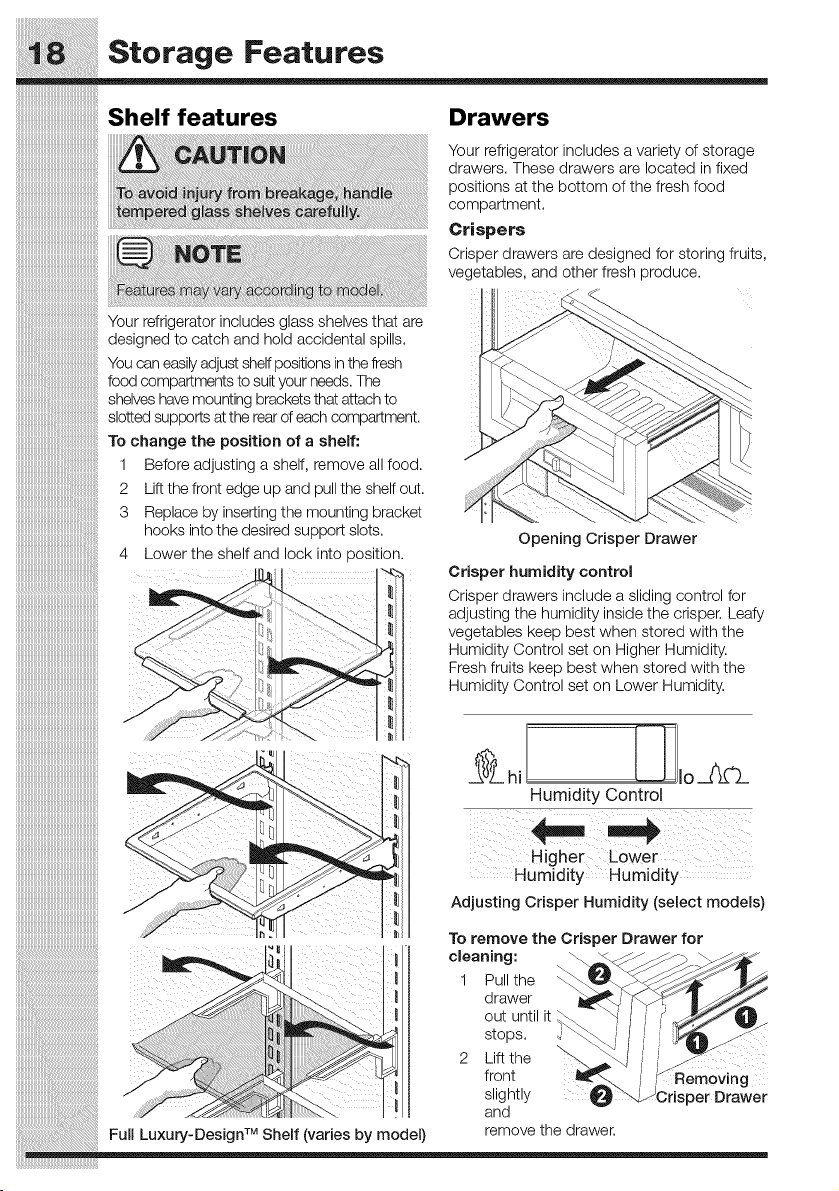
Opening Crisper Drawer
Crisper humidity control
Crisper drawers include a sliding control for
adjusting the humidity inside the crisper. Leafy
vegetables keep best when stored with the
Humidity Control set on Higher Humidity.
Fresh fruits keep best when stored with the
Humidity Control set on Lower Humidity.
Humidity Control
iiiiiiiiiiiiiiiiiiiiiiiiiiiiiiiiiiiiiiiiiiiiiiiiiiiiiiiii
iiiiiiiiiiiiiiiiiiiiiiiiiiiiiiiiiiiiiiiiiiiiiiiiiiiiiiiii_ Higher Lower
iiiiiiiiiiiiiiiiiiiiiiiiiiiiiiiiiiiiiiiiiiiiiiiiiiiiiiiii Humidity Humidity .......
iiiiiiiiiiiiiiiiiiiiiiiiiiiiiiiiiiiiiiiiiiiiiiiiiiiiiiiii AdjustingCrisperHumidity(seleotmodels)
__ To remove the Crisper Drawer for
..... _ _ 1 Pu the
_<.. _ drawer
iiiiiiiiiiiiiiiiiii:iii_iiiiiiiiiiiiiiiiiiiiiiiiiiiiiiiiiiiiiiiiiiiiiiiiiiiiiiiiiiiiiiiiiiiiiiiiiiiiiiiiiiiiiiiiiiiiiiiiiiiiiiiiiiiiiiiiiiiiiiiiiiiiiiiiiioutuntilit
j stops
iiiiiiiiiiiiiiiiiiiiiiiiiiiiiiiiii:iiii_i!iiiiiiiiiiiiiiiiiiiiiiiiiiiiiiiiiiiiiiiiiiiiiiiiiiiiiiiiiiiiiiiiiiiiiiiiiiiiiiiiiiiiiiiiiiiiiiiiiiiiiii 2 hiftthe
front A Removing
_-_\_ Ii slightly _ risperDrawer
"_'_ I !! and
TM remove the drawer
FullLuxury-Design Shelf(variesbymodel)
Storage Features
mmmmmmmmmmmmmmmmmmii_
mmmmmmmmmmmmmmmmmmii_
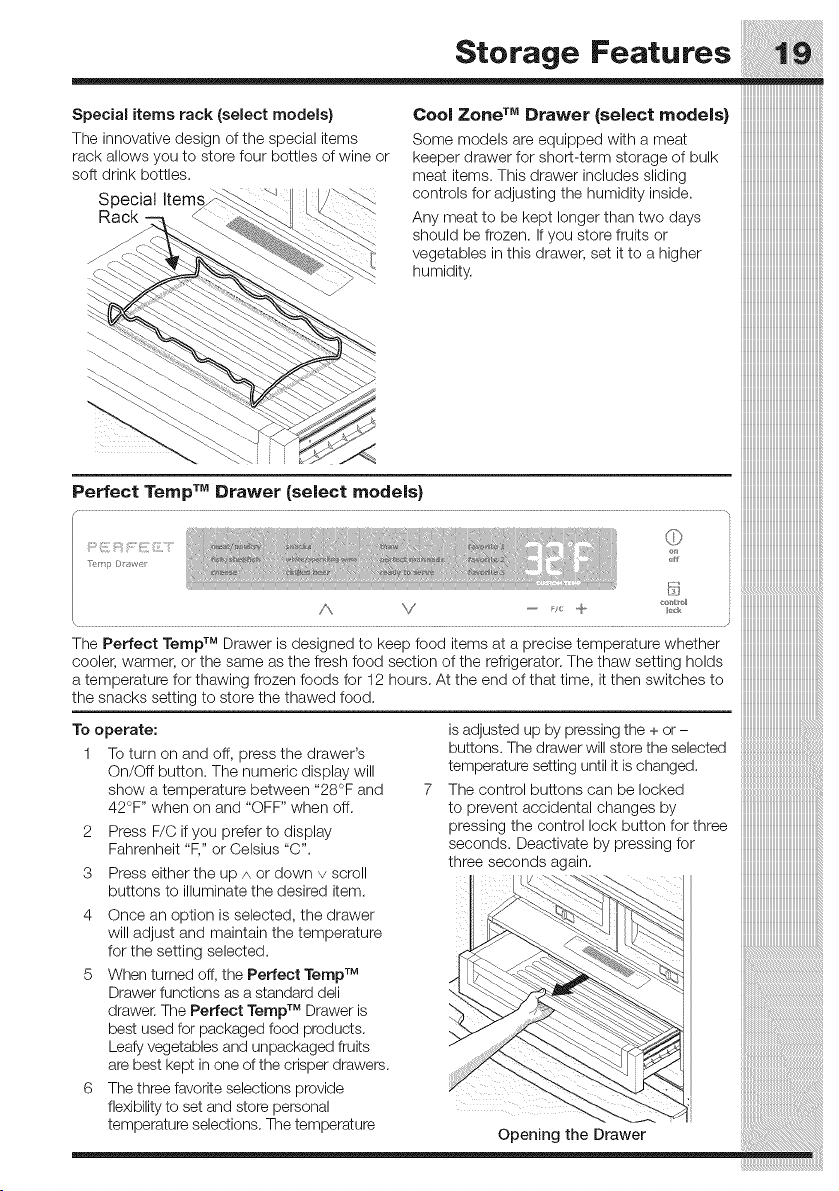
Specie, temsrackIse,ectmode ) CoolZo.eT"Dr--orCsol otmodols)
The innovative design of the special items Some models are equipped with a meat
rack allows you to store four bottles of wine or keeper drawer for sholt-term storage of bulk
soft drink bottles, meat items. This drawer includes sliding
Special controls for adjusting the humidity inside.
Rack Any meat to be kept longer than two days
should be frozen. If you store fruits or
vegetables in this drawer, set it to a higher
humidity.
:: .... (;p
iiiiiiiiiiiiiiiiiiiiiiiiiiiiiiiiiiiiiiiiiiiiiiiiiiiiii
The Perfect Ternp TM Drawer is designed to keep food items at a precise temperature whether iiiiiiiiiiiiiiiiiiiiiiiiiiiiiiiiiiiiiiiiiiiiiiiiiiiiii
cooler, warmer, or the same as the fresh food section of the refrigerator. The thaw setting holds iiiiiiiiiiiiiiiiiiiiiiiiiiiiiiiiiiiiiiiiiiiiiiiiiiiiii
a temperature for thawing frozen foods for 12 hours. At the end of that time, it then switches to iiiiiiiiiiiiiiiiiiiiiiiiiiiiiiiiiiiiiiiiiiiiiiiiiiiiii
the snacks setting to store the thawed food. iiiiiiiiiiiiiiiiiiiiiiiiiiiiiiiiiiiiiiiiiiiiiiiiiiiiii
iiiiiiiiiiiiiiiiiiiiiiiiiiiiiiiiiiiiiiiiiiiiiiiiiiiiii
TO operate: is adjusted up by pressing the + or-
1 To turn on and oft, press the drawer's buttons. The drawer will store the selected
On/Oft button. The numeric display will temperature setting until it is changed.
show a temperature between "28°F and 7 The control buttons can be locked
42°F '' when on and "OFF" when oft. to prevent accidental changes by
2 Press F/C if you prefer to display pressing the control lock button for three
Fahrenheit "F," or Celsius "C". seconds. Deactivate by pressing for
three seconds again.
3 Press either the up A or down v scroll
buttons to illuminate the desired item.
4 Once an option is selected, the drawer
iiiiiiiiiiiiiiiiiiiiiiiiiiiiiiiiiiiiiiiiiiiiiiiiiiiiii
will adjust and maintain the temperature
for the setting selected.
5 When turned off, the Perfect Temp TM
Drawer functions as a standard den
TM
drawer. The Perfect Ternp Drawer is
best used for packaged food products.
Leafy vegetables and unpackaged fruits
are best kept in one of the crisper drawers.
6 The three favorite selections provide
flexibility to set and store personal
temperature selections. The temperature Opening the Drawer
mmmmmmmmmmmmmmmmmm
Storage Features
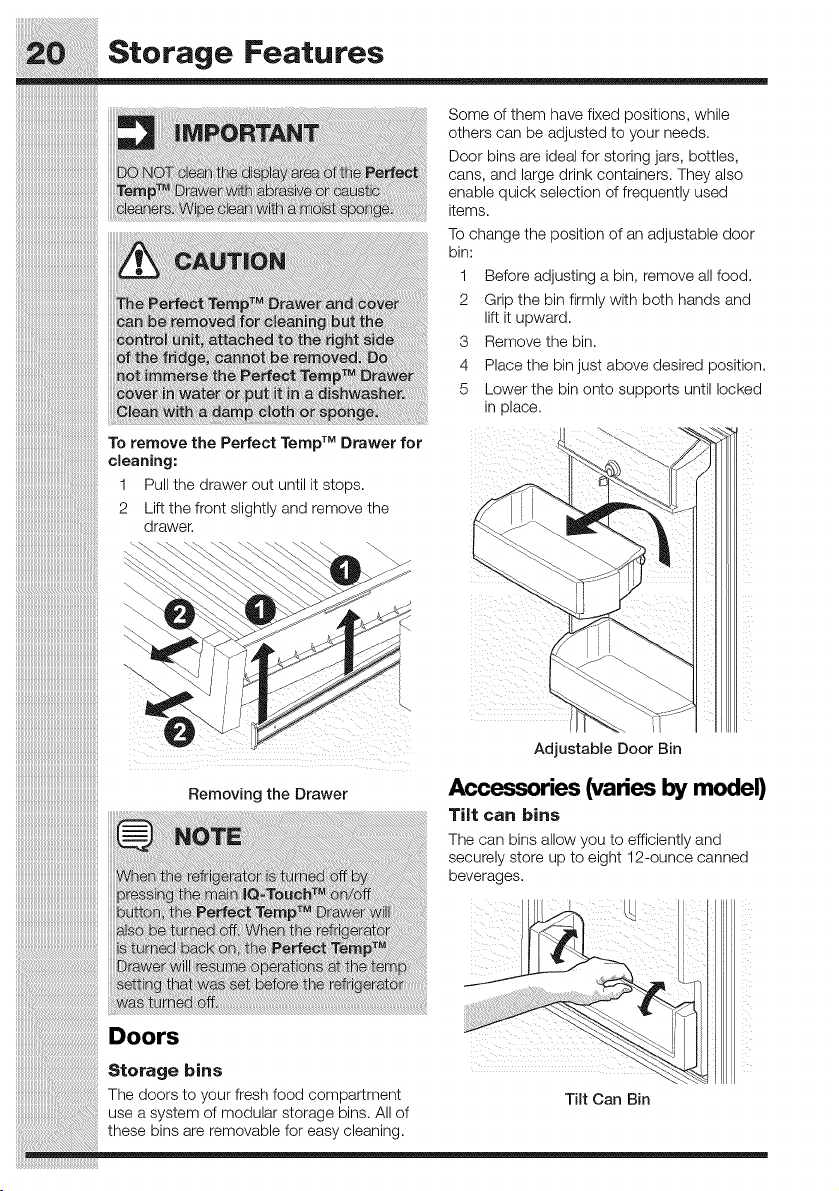
Some of them have fixed positions, while
others can be adjusted to your needs.
Door bins are ideal for storing jars, bottles,
cans, and large drink containers. They also
enable quick selection of frequently used
items.
To change the position of an adjustable door
bin:
1 Before adjusting a bin, remove all food.
2 Grip the bin firmly with both hands and
lift it upward.
3 Remove the bin.
4 Place the bin just above desired position.
5 Lower the bin onto supports until locked
in place.
To remove the Perfect Temp TM Drawer for
cleaning:
1 Pull the drawer out until it stops.
2 Lift the front slightly and remove the
drawer.
iTM
J
iTM
l
Adjustable Door Bin
Removing the Drawer
Accessories (varies by model)
Tilt can bins
The can bins allow you to efficiently and
securely store up to eight 12-ounce canned
beverages.
Doors
storage E! l!l
The doors Tilt Can Bin
use a syst_
these bins
Storage bins
The doors to your fresh food compartment
use a system of modular storage bins. All of
these bins are removable for easy cleaning.
Storage Features
iiiiiiiiiiiiiiiiiiiiiiiiiiiiiiiiiiiiiiiiiiiiiiiiiiiiil
:::::::::::::::::::::::::::::::::::::::::::::::::::::
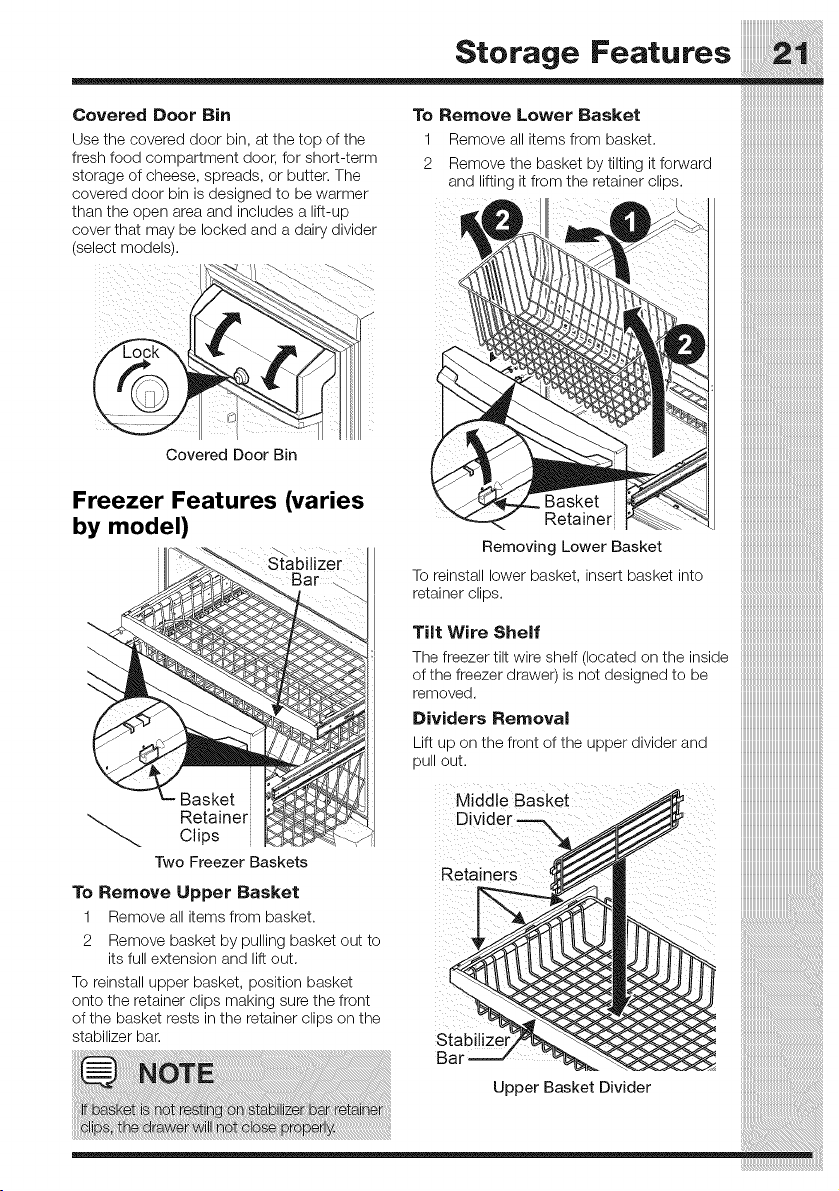
Covered Door Bin To Remove Lower Basket
Use the covered door bin, at the top of the 1 Remove all items from basket.
fresh food compartment door, for short-term 2 Remove the basket by tilting it forward ]
storage of cheese, spreads, or butter. The and lifting it from the retainer clips.
covered door bin is designed to be warmer
than the open area and includes a lift-up
cover that may be locked and a dairy divider ]
(select models).
i
Covered Door Bin
Freezer Features (varies Basket
by model) Retainer
Removing Lower Basket
Stabilizer
To reinstall lower basket, insert basket into
retainer clips.
Tilt Wire Shelf
The freezer tilt wire shelf (located on the inside
of the freezer drawer)is not designed to be
removed.
Dividers Removal
Lift up on the front of the upper divider and
pull out.
Basket Middle Basket
Retainer Divider -==X
Clips
Two Freezer Baskets Retainers
To Remove Upper Basket
1 Remove all items from basket.
2 Remove basket by pulling basket out to
its full extension and lift out.
To reinstall upper basket, position basket
onto the retainer clips making sure the front
of the basket rests in the retainer clips on the
stabilizer bar. Stabilize
Ba
Upper Basket Divider
Storage Features
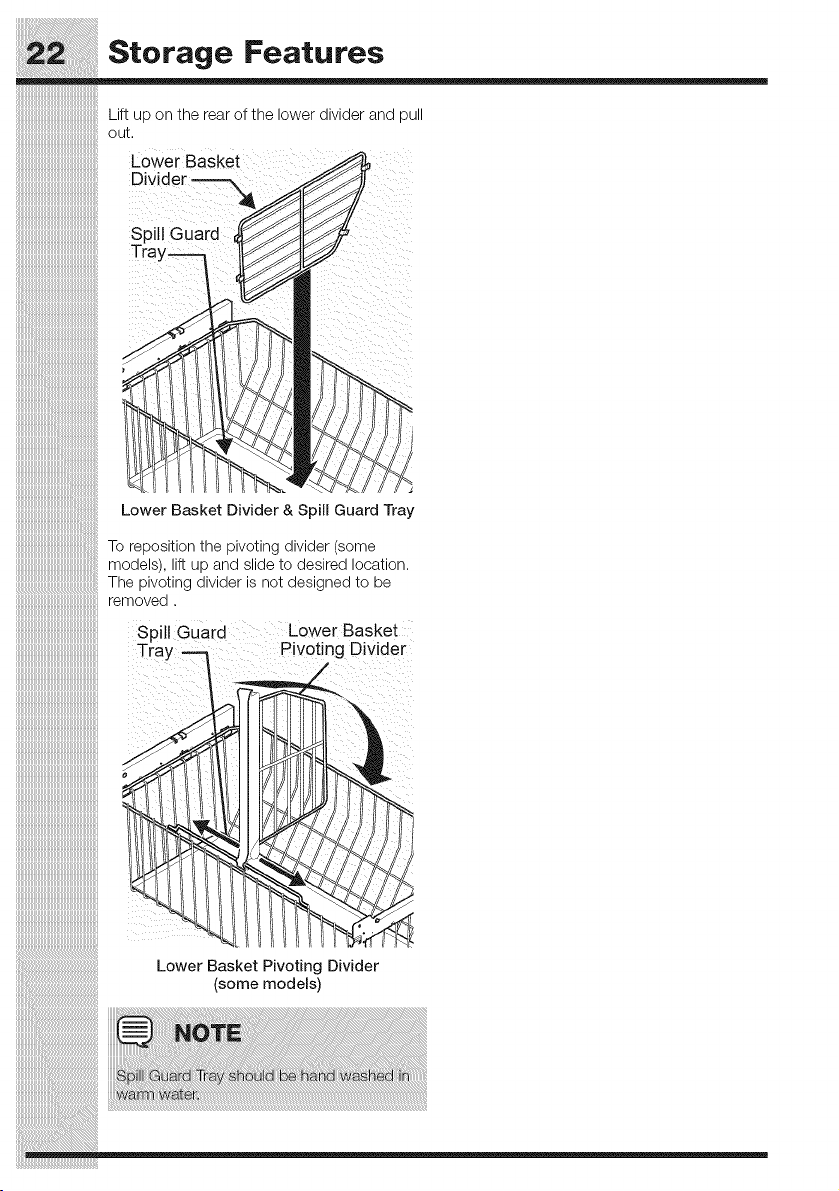
Lift up on the rear of the lower divider and pull
out.
Lower Basket
Divider
Spill Guard
Tray--_
Lower Basket Divider & Spill Guard Tray
To reposition the pivoting divider (some
models), lift up and slide to desired location.
The pivoting divider is not designed to be
removed.
Spill Guard Lower Basket
Tray Pivoting Divider
Lower Basket Pivoting Divider
(some models)
Storing Food and Saving Energy
Ideas for storing foods
Fresh food storage
• Keep the fresh food compartment
between 34_'Fand 40_'Fwith an
optimum temperature of 37°R
• Avoid overcrowding the refrigerator
shelves, which reduces air circulation
and causes uneven cooling.
Fruits and vegetables
= Store fruits and vegetables in crisper
drawers, where trapped moisture helps
preserve food quality for longer time
periods.
• Wash items and remove excess water.
Wrap any items that have strong odors
or high moisture content.
Meat
Wrap raw meat and poultry separately
and securely to prevent leaks and
contamination of other foods or surfaces.
• Use the Cool Zone TM or Perfect
Ternp TM drawer and set to meat/poultry
setting for short-term storage. Any meat
to be kept longer than two days should
be frozen.
Frozen food storage
= Keep the freezer compartment at 0_'For
lower.
• A freezer operates most efficiently when
it is at least % full.
Packaging foods for freezing
= To minimize food dehydration and quality
deterioration, use aluminum foil, freezer
wrap, freezer bags, or airtight containers.
Force as much air out of the packages
as possible and seal them tightly.
Trapped air can cause food to dry out,
change color, and develop an off-flavor
(freezer burn).
Wrap fresh meats and poultry with
suitable freezer wrap prior to freezing.
• Do not refreeze meat that has completely
thawed.
Loading the freezer
= Prior to grocery shopping, activate
"fast freeze" so that on your return
you can ensure your newly purchased
food designated for the freezer will be
preserved as quickly as possible.
your freezer more efficiently maintain the
selected temperature after placing new
purchases with pre-existing frozen foods.
Avoid adding too much warm food to
the freezer at one time. This overloads
the freezer, slows the rate of freezing,
and can raise the temperature of frozen
foods.
Leave a space between packages, so
cold air can circulate freely, allowing food
to freeze as quickly as possible.
Ideas for saving energy
Installation
= Locate the refrigerator in the coolest part
of the room, out of direct sunlight, and
away from heating ducts or registers.
Do not place the refrigerator next to
heat-producing appliances such as a
range, oven, or dishwasher. If this is not
possible, a section of cabinetry or an
added layer of insulation between the
two appliances will help the refrigerator
operate more efficiently.
• Level the refrigerator so that the doors
close tightly.
Temperature settings
= Refer to the "Controls" section for
procedures on temperature settings.
Food storage
= Avoid overcrowding the refrigerator or
blocking cold air vents. Doing so causes
the refrigerator to run longer and use
more energy.
Cover foods and wipe containers dry
before placing them in the refrigerator.
This cuts down on moisture build-up
inside the unit.
• Organize the refrigerator to reduce door
openings. Remove as many items as
needed at one time and close the door
as soon as possible.
Do not place a hot container directly
on a cold shelf. Remember, such an
extreme temperature change may
damage the glass.
Normal Operating Sounds
iiiiiiiiiiiiiiiiiiiiiiiiiiiiiiiiiiiiiiiiiiiiiiiiiiiiii!i
_,, Understanding the sounds
::::::::::::::::::::::::::::::::::::::::::::::::::::::::
_, you may hear
iiiiiiiiiiiiiiiiiiiiiiiiiiiiiiiiiiiiiiiiiiiiiiiiiiiiii!_
iiiiiiiiiiiiiiiiiiiiiiiiiiiiiiiiiiiiiiiiiiiiiiiiiiiiii!_ Your new, high-efficiency refrigerator may
iiiiiiiiiiiiiiiiiiiiiiiiiiiiiiiiiiiiiiiiiiiiiiiiiiiiiiilintroduceunfamiliarsounds.Thesesounds
iiiiiiiiiiiiiiiiiiiiiiiiiiiiiiiiiiiiiiiiiiiiiiiiiiiiiiii_normallyindicateyourrefrigeratorisoperating
iiiiiiiiiiiiiiiiiiiiiiiiiiiiiiiiiiiiiiiiiiiiiiiiiiiiii!icorrectly. Some surfaces or-,floors, walls, and
iiiiiiiiiiiiiiiiiiiiiiiiiiiiiiiiiiiiiiiiiiiiiiiiiiiiii!_ kitchen cabinets may make these sounds
iiiiiiiiiiiiiiiiiiiiiiiiiiiiiiiiiiiiiiiiiiiiiiiiiiiiii:more noticeable.
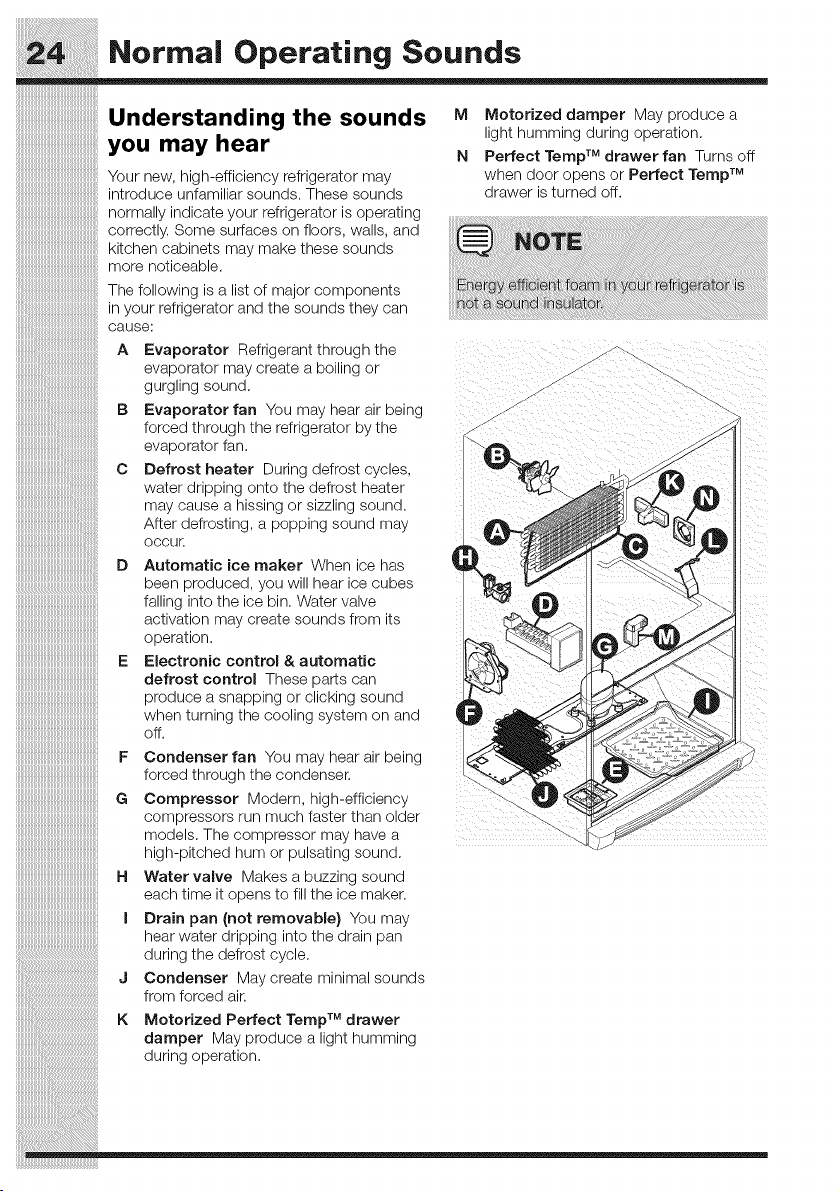
M Motorized damper May produce a
light humming during operation.
N Perfect Temp TM drawer fan Turns off
when door opens or Perfect Temp TM
drawer is turned off.
The following is a list of major components
in your refrigerator and the sounds they can
cause:
A Evaporator Refrigerant through the
evaporator may create a boiling or
gurgling sound.
IB Evaporator fan You may hear air being
forced through the refrigerator by the
evaporator fan. _.
C Defrost heater During defrost cycles,
water dripping onto the defrost heater
may cause a hissing or sizzling sound.
After defrosting, a popping sound may
OCCUr.
D Automatic ice maker When ice has
been produced, you will hear ice cubes
falling into the ice bin. Water valve
activation may create sounds from its
operation.
E Electronic control &automatic
defrost control These parts can
produce a snapping or clicking sound
when turning the cooling system on and
off.
F Condenser fan You may hear air being
forced through the condenser.
G Compressor Modern, high-efficiency
compressors run much faster than older
models. The compressor may have a
high-pitched hum or pulsating sound.
H Water valve Makes a buzzing sound
each time it opens to fill the ice maker.
I Drain pan (not removable} You may
hear water dripping into the drain pan
during the defrost cycle.
J Condenser Maycreate minimal sounds
from forced air.
K Motorized Perfect Temp TM drawer
damper May produce a light humming
during operation.
Changing the Water and Air Filters
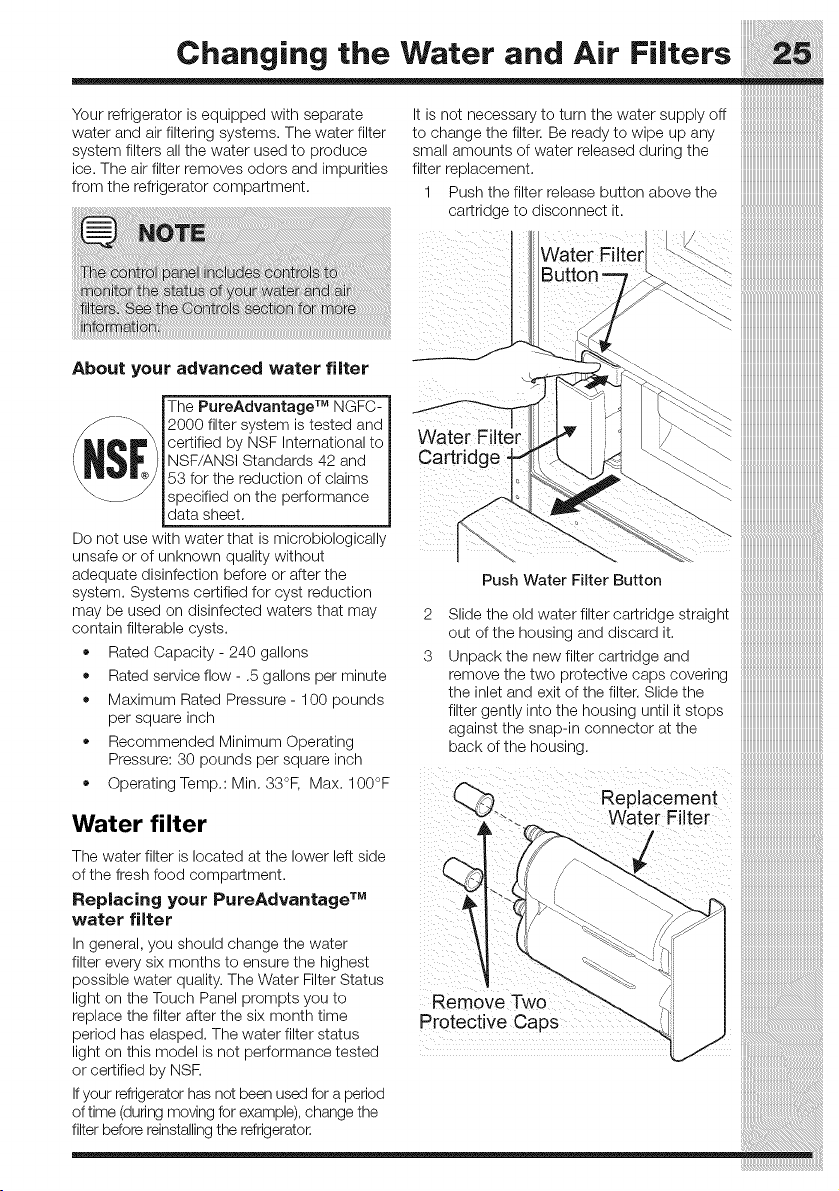
Your refrigerator is equipped with separate It is not necessary to turn the water supply off
water and air filtering systems. The water filter to change the filter. Be ready to wipe up any
system filters all the water used to produce small amounts of water released during the
ice. The air filter removes odors and impurities filter replacement.
from the refrigerator compartment. 1
Push the filter release button above the
cartridge to disconnect it.
About your advanced water filter
IThe PureAdvantage TM NGFC-
-_ 12000 filter system is tested and
/ L_= \ _certified by NSF International to
_'_ I_NSF/ANSI Standards 42 and
_mm,_w.. _ _53 for the reduction of claims
__.J _specified on the performance
data sheet.
Do not use with water that is microbiologically
unsafe or of unknown quality without
adequate disinfection before or after the
system. Systems certified for cyst reduction
may be used on disinfected waters that may
contain filterable cysts.
• Rated Capacity- 240 gallons
Rated service flow - .5 gallons per minute
Maximum Rated Pressure - 100 pounds
per square inch
Recommended Minimum Operating
Pressure: 30 pounds per square inch
Operating Temp.: Min. 33°F, Max. 100°F
Water filter
The water filter is located at the lower left side
of the fresh food compartment.
Replacing your PureAdvantage TM
water filter
In general, you should change the water
iiiiiiiiiiiiiiiiiiiiiiiiiiiiiiiiiiiiiiiiiiiiiiiiiiiiiiii_
"> iiiiiiiiiiiiiiiiiiiiiiiiiiiiiiiiiiiiiiiiiiiiiiiiiiiiiiiiii
iiiiiiiiiiiiiiiiiiiiiiiiiiii
iiiiiiiiiiiiiiiiiiiiiiiiiiii
iiiiiiiiiiiiiiiiiiiiiiiiiiii
iiiiiiiiiiiiiiiiiiiiiiiiiiii
iiiiiiiiiiiiiiiiiiiiiiiiiiiiiiiiiiiiiiiiiiiiiiiiiiiiiiiiii
iiiiiiiiiiiiiiiiiiiiiiiiiiiiii
_ iiiiiiiiiiiiiiiiiiiiiiiiiiiiiiiiiiiiiiiiiiiiiiiiiiiiiiiiii
2
3
Push Water FiLter Button
Slide the old water filter cartridge straight
out of the housing and discard it.
Unpack the new filter cartridge and
remove the two protective caps covering
the inlet and exit of the filter. Slide the
filter gently into the housing until it stops
against the snap-in connector at the
back of the housing.
Replacement
Water Filter
iiiiiiiiiiiiiiiiiiiiiiiiiiiiiiiiiiiiiiiiiiiiiiiiiiiiiii_
_iiiiiiiiiiiiiiiiiiiiiiiiiiiiiiiiiiiiiiiiiiiiiiiiiiiiii_
_iiiiiiiiiiiiiiiiiiiiiiiiiiiiiiiiiiiiiiiiiiiiiiiiiiiiii_
_iiiiiiiiiiiiiiiiiiiiiiiiiiiiiiiiiiiiiiiiiiiiiiiiiiiiii_
_iiiiiiiiiiiiiiiiiiiiiiiiiiiiiiiiiiiiiiiiiiiiiiiiiiiiii_
_iiiiiiiiiiiiiiiiiiiiiiiiiiiiiiiiiiiiiiiiiiiiiiiiiiiiii_
_iiiiiiiiiiiiiiiiiiiiiiiiiiiiiiiiiiiiiiiiiiiiiiiiiiiiii_
_iiiiiiiiiiiiiiiiiiiiiiiiiiiiiiiiiiiiiiiiiiiiiiiiiiiiii_
_iiiiiiiiiiiiiiiiiiiiiiiiiiiiiiiiiiiiiiiiiiiiiiiiiiiiii_
_iiiiiiiiiiiiiiiiiiiiiiiiiiiiiiiiiiiiiiiiiiiiiiiiiiiiii_
_iiiiiiiiiiiiiiiiiiiiiiiiiiiiiiiiiiiiiiiiiiiiiiiiiiiiii_
_///////////////////////////////////////////////////////_
Changing the Water and Air Filters
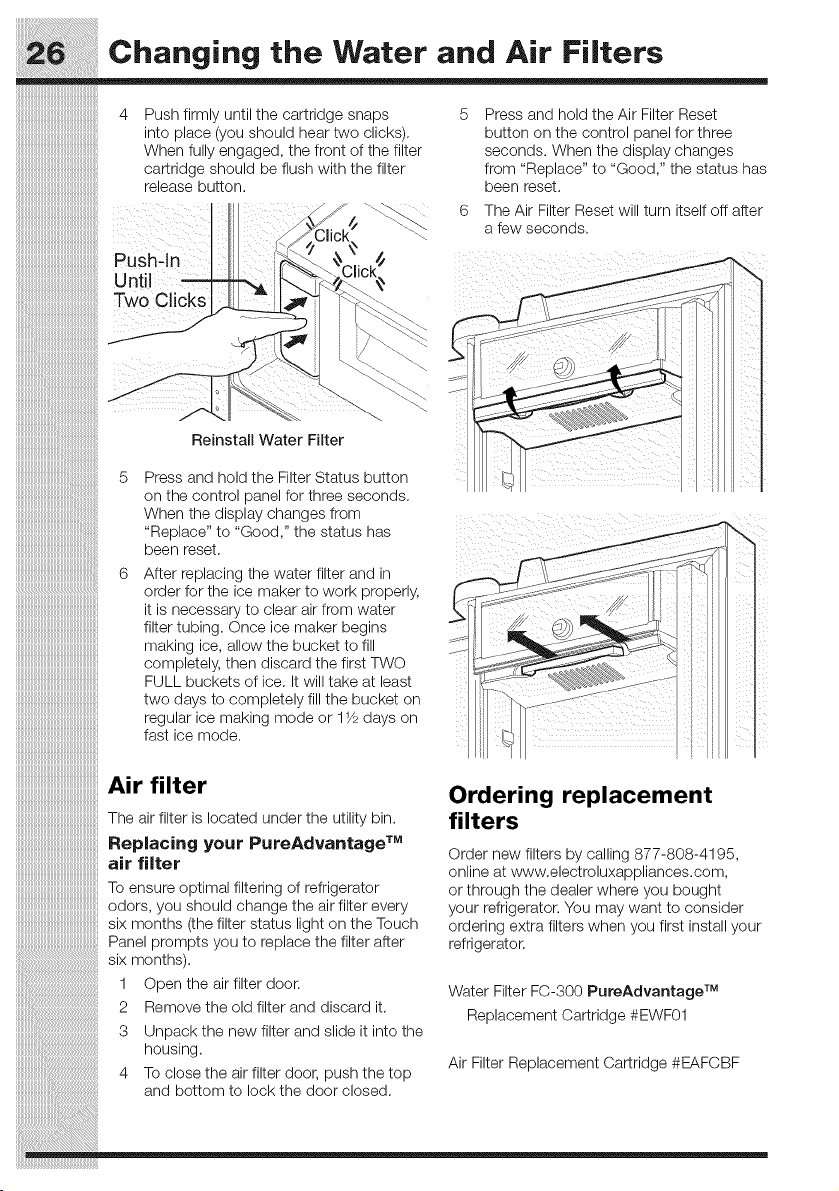
4 Push firmly until the cartridge snaps 5
into place (you should hear two clicks)•
When fully engaged, the front of the filter
cartridge should be flush with the filter
release button.
Pushqn
Two Clicks
Reinstall Water Filter
Press and hold the Air Filter Reset
button on the control panel for three
seconds. When the display changes
from "Replace" to "Good," the status has
been reset•
The _i_ Filter Reset will turn itself off after
a fe_Aseconos.
Ordering replacement
filters
Panel prompts you to replace the filter after
six months).
1 Open the air filter door• Water Filter FC-300 PureAdvantage TM
2 Remove the o d f ter and d scard t Re lacement Cartrid e #EWF01
• p g
3 Unpack the new filter and slide it into the
housing.
............. Air Filter Replacement Cartridge #EAFCBF
4 io ClOSe_:neair Tiixerdoor, pusn _:ne_:op
and bottom to lock the door closed•
Order new filters by calling 877-808-4195,
online at www.electroluxappliances.com,
or through the dealer where you bought
your refrigerator. You may want to consider
ordering extra filters when you first install your
refrigerator•
Press and hold the Filter Status button
on the control panel for three seconds•
When the display changes from
"Replace" to "Good," the status has
been reset•
Care and Cleaning
::::::::::::::::::::::::::::::::::::::::::::::::::::::
iiiiiiiiiiiiiiiiiiiiiiiiiiiiiiiiiiiiiiiiiiiiiiiiiiiiii
iiiiiiiiiiiiiiiiiiiiiiiiiiiiiiiiiiiiiiiiiiiiiiiiiiiiii
Protectingyourinvestment iiiiiiiiiiiiiiiiiiiiiiiiiiiiiiiiiiiiiiiiiiiiiiiiiiiiii
Keepingyourrefrigeratordeanmaintainsitsappearanceandpreventsodorbuild-up.Wipeup iiiiiiiiiiiiiiiiiiiiiiiiiiiiiiiiiiiiiiiiiiiiiiiiiiiiii
anyspi,simmediatelyandoleanthefreazerandfreshfoodcompa_mentsatleasttwiceayear,iiiiiiiiiiiiiiiiiiiiiiiiiiiiiiiiiiiiiiiiiiiiiiiiiiiiii
iiiiiiiiiiiiiiiiiiiiiiiiiiiiiiiiiiiiiiiiiiiiiiiiiiiiii
iiiiiiiiiiiiiiiiiiiiiiiiiiiiiiiiiiiiiiiiiiiiiiiiiiiiii
iiiiiiiiiiiiiiiiiiiiiiiiiiiiiiiiiiiiiiiiiiiiiiiiiiiiii
iiiiiiiiiiiiiiiiiiiiiiiiiiiiiiiiiiiiiiiiiiiiiiiiiiiiii
iiiiiiiiiiiiiiiiiiiiiiiiiiiiiiiiiiiiiiiiiiiiiiiiiiiiii
• Never use metallic scouring pads, brushes, abrasive cleaners, or strong alkaline solutions iiiiiiiiiiiiiiiiiiiiiiiiiiiiiiiiiiiiiiiiiiiiiiiiiiiiii
onanysurface iiiiiiiiiiiiiiiiiiiiiiiiiiiiiiiiiiiiiiiiiiiiiiiiiiiiii
• Neveruse CmLORIUEorcleanerswith bleachto clean stainlesssteel, iiiiiiiiiiiiiiiiiiiiiiiiiiiiiiiiiiiiiiiiiiiiiiiiiiiiii
• Donotwashanyremovableparfsinadishwasher. iiiiiiiiiiiiiiiiiiiiiiiiiiiiiiiiiiiiiiiiiiiiiiiiiiiiii
• Always unplug the electrical power cord from the wall outlet before cleaning, iiiiiiiiiiiiiiiiiiiiiiiiiiiiiiiiiiiiiiiiiiiiiiiiiiiiii
o
o
Remove adhesive labels by hand. Do not use razor blades or other sharp instruments
which can scratch the appliance surface.
Do not remove the serial plate. Removal of your serial plate voids your warranty.
Before moving your refrigerator, raise the anti-tip brackets so the rollers will work correctly.
This will prevent the floor from being damaged.
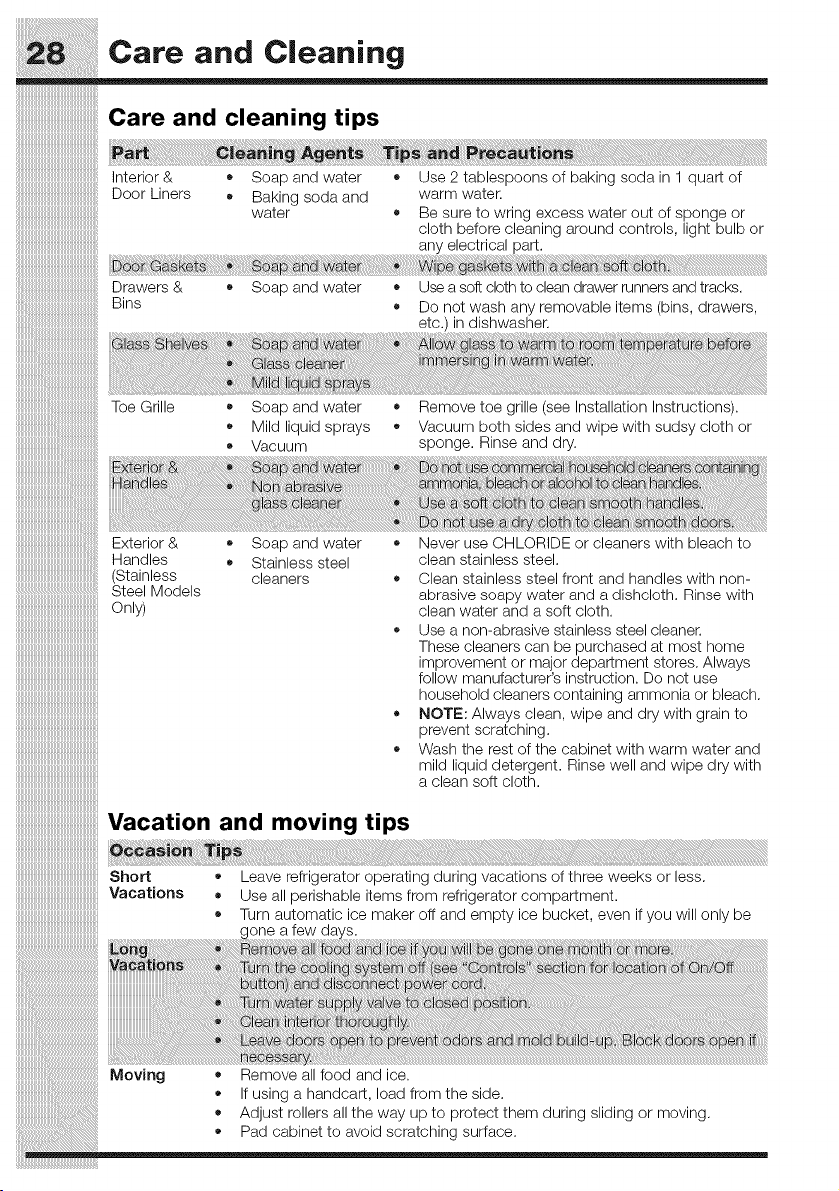
Care and Cleaning
Care and cleaning tips
Interior & * Soap and water * Use 2 tablespoons of baking soda in 1 quart of
Door Liners • Baking soda and warm water.
water • Be sure to wring excess water out of sponge or
cloth before cleaning around controls, light bulb or
any electrical part.
Drawers & • Soap and water • Use a soft cloth to clean drawer runners and tracks.
Bins • Do not wash any removable items (bins, drawers,
etc.) in dishwasher.
Toe Grille
Soap and water • Remove toe grille (see Installation Instructions).
Mild liquid sprays • Vacuum both sides and wipe with sudsy cloth or
• Vacuum sponge. Rinse and dry.
Exterior & • Soap and water
Handles • Stainless steel
(Stainless cleaners
Steel Models
Only)
Never use CHLORIDE or cleaners with bleach to
clean stainless steel.
Clean stainless steel front and handles with non-
abrasive soapy water and a dishcloth. Rinse with
clean water and a soft cloth.
Use a non-abrasive stainless steel cleaner.
These cleaners can be purchased at most home
improvement or major department stores. Always
follow manufacturer's instruction. Do not use
household cleaners containing ammonia or bleach.
NOTE: Always clean, wipe and dry with grain to
prevent scratching.
Wash the rest of the cabinet with warm water and
mild liquid detergent. Rinse well and wipe dry with
a clean soft cloth.
Vacation and moving tips
Short • Leave refrigerator operating during vacations of three weeks or less.
Vacations • Use all perishable items from refrigerator compartment.
• Turn automatic ice maker off and empty ice bucket, even if you will only be
onea
Remove all food and ice.
If using a handcart, load from the side.
Adjust rollers all the way up to protect them during sliding or moving.
Pad cabinet to avoid scratching surface.
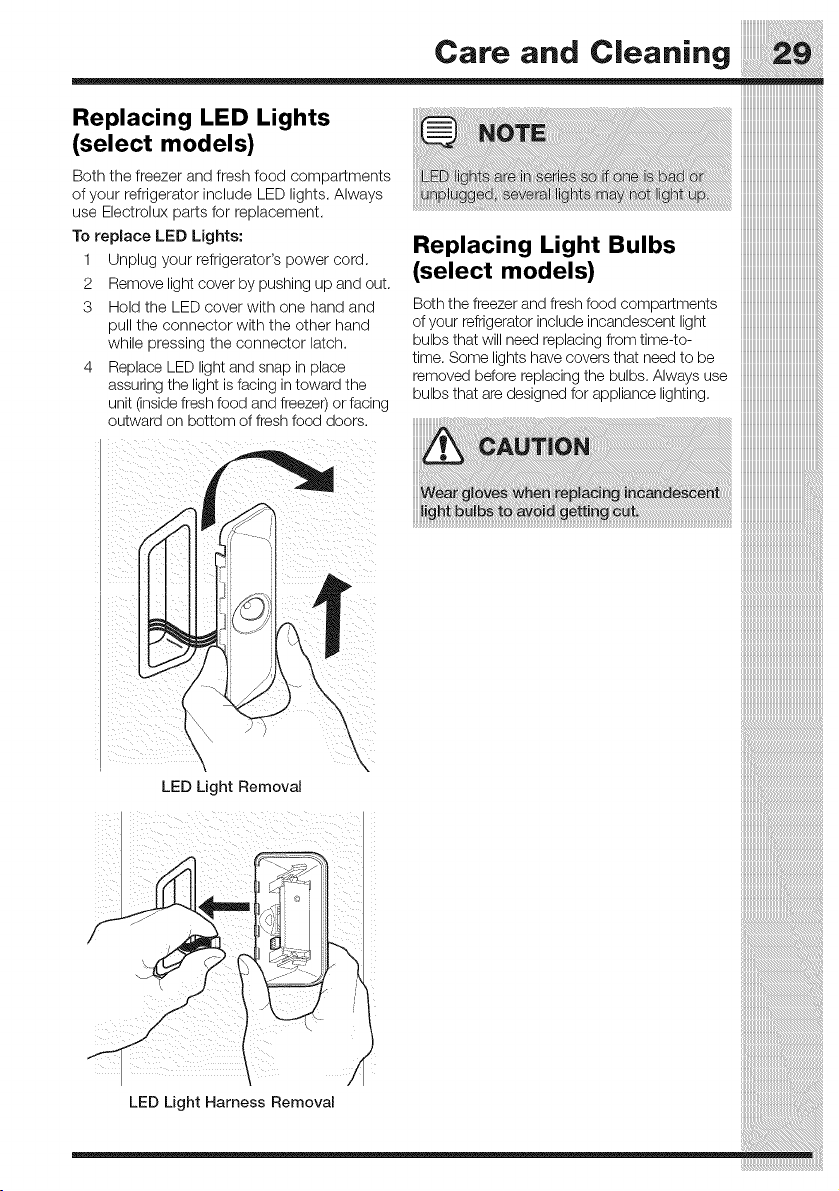
(select models)
Both the freezer and fresh food compartments
of your refrigerator include LED lights. Always
use Electrolux parts for replacement.
To replace LED Lights:
1 Unplug your refrigerator's power cord.
2 Remove light cover by pushing up and out.
3 Hold the LED cover with one hand and
pull the connector with the other hand
while pressing the connector latch.
4 Replace LED light and snap in place
assuring the light is facing in toward the
unit (inside fresh food and freezer) or facing
outward on bottom of fresh food doors.
iiiiiiiiiiiiiiiiiiiiiiiiiiiiiiiiiiiiiiiiiiiiiiiiiiiiii
Replacing Light Bulbs iiiiiiiiiiiiiiiiiiiiiiiiiiiiiiiiiiiiiiiiiiiiiiiiiiiiii
(select models) iiiiiiiiiiiiiiiiiiiiiiiiiiiiiiiiiiiiiiiiiiiiiiiiiiiiii
Boththefreezerandfreshfoodcompartments iiiiiiiiiiiiiiiiiiiiiiiiiiiiiiiiiiiiiiiiiiiiiiiiiiiiii
ofyourrefrigeratorincludeincandescentlight iiiiiiiiiiiiiiiiiiiiiiiiiiiiiiiiiiiiiiiiiiiiiiiiiiiiii
bulbs that will need replacing from time-to- iiiiiiiiiiiiiiiiiiiiiiiiiiiiiiiiiiiiiiiiiiiiiiiiiiiiii
time, Some lights have covers that need to be iiiiiiiiiiiiiiiiiiiiiiiiiiiiiiiiiiiiiiiiiiiiiiiiiiiiii
removed before replacingthe bulbs. Alwaysuse iiiiiiiiiiiiiiiiiiiiiiiiiiiiiiiiiiiiiiiiiiiiiiiiiiiiii
bulbs that are designed for appliance lighting, iiiiiiiiiiiiiiiiiiiiiiiiiiiiiiiiiiiiiiiiiiiiiiiiiiiiii
LED Light Removal
LED Light Harness Removal
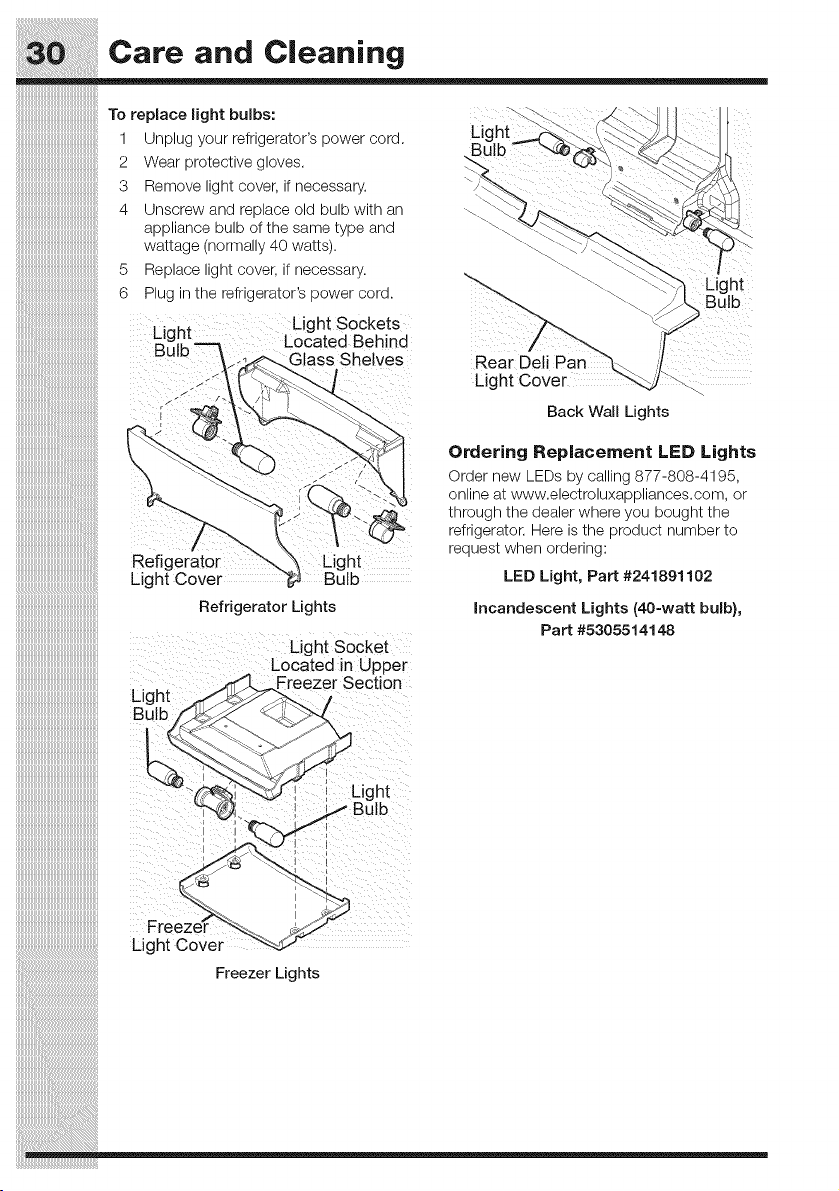
........c.,o..d _____
iiiiiiiiiiiiiiiiiiiiiiiiiiiiiiiiiiiiiiiiiiiiiiiiiiiiii_i
iiiiiiiiiiiiiiiiiiiiiiiiiiiiiiiiiiiiiiiiiiiiiiiiiiiiii;_To replace light bulbs:
_ Light
Unplug your refrigerator's power cord.
Wear protective gloves.
Remove light cover, if necessary.
Unscrew and replace old bulb with an
appliance bulb of the same type and
wattage (normally 40 watts).
5 Replace light cover, if necessary.
6 Plug in the refrigerator's power cord .....
¢i_h t Light Sockets
.... _ Located Beh nd
But_ ass Shelves Rear
Lig
i !
Light
',ulb
Back Wail Lights
Refig_ Light
Light Cover
iiiiiiiiiiiiiiiiiiiiiiiiiiiiiiiiiiiiiiiiiiiiiiiiiiiiiiiii
iiiiiiiiiiiiiiiiiiiiiiiiiiiiiiiiiiiiiiiiiiiiiiiiiiiiiiiii RefrigeratorLights
iiiiiiiiiiiiiiiiiiiiiiiiiiiiiiiiiiiiiiiiiiiiiiiiiiiiiiiiii Light SoCket
iiiiiiiiiiiiiiiiiiiiiiiiiiiiiiiiiiiiiiiiiiiiiiiiiiiiiiiii LocatedinUpper
iiiiiiiiiiiiiiiiiiiiiiiiiiiiiiiiiiiiiiiiiiiiiiiiiiiiiiiiiLight :reezerSection,
iiiiiiiiiiiiiiiiiiiiiiiiiiiiiiiiiiiiiiiiiiiiiiiiiiiiiiiiiBolb
iiiiiiiiiiiiiiiiiiiiiiiiiiiiiiiiiiiiiiiiiiiiiiiiiiiiiiiii
iiiiiiiiiiiiiiiiiiiiiiiiiiiiiiiiiiiiiiiiiiiiiiiiiiiiiiiii
iiiiiiiiiiiiiiiiiiiiiiiiiiiiiiiiiiiiiiiiiiiiiiiiiiiiiiiii I Light
iiiiiiiiiiiiiiiiiiiiiiiiiii °'b
iiiiiiiiiiiiiiiiiiiiiiiiiiiiiiiiiiiiiiiiiiiiiiiiiiiiiiiii I
Ordering Replacement LED Lights
Order new LEDs by calling 877-808-4195,
online at www.electroluxappliances.com, or
through the dealer where you bought the
refrigerator. Here is the product number to
request when ordering:
LED Light, Part #241891102
incandescent Lights(40-wa_ bulb},
Part #5305514148
iiiiiiiiiiiiiiiiiiiiiiii:_i_i__' , ,
iiiiiiiiiiiiiiiiiiiiiiiiiiiiiiiiiiiiiiiiiiiiiiiiiiiiiiiii__ i
iiiiiiiiiiiiiiiiiiiiiiiiiiiiiiiiiiiiiiiiiiiiiiiiiiiiiiiiiii_ _
ii_i_i_i___i__i!iiiiiiiiiiiiiiiiiiiiiiiiiiiiiiiiiiiiiiiiiiiiiiiiiiiiiiiiiiiiiiiiiiiiiiiiiiiiiiiiiiiiiiiiiiiiiiiiiiiiiiiiiiiiiiiiiiiiiiiiiiiiiiiiiiiiiiiiiiiiiiiiiii_FreezerLights
Commo.Sol.rio.,fo,Co.o m,
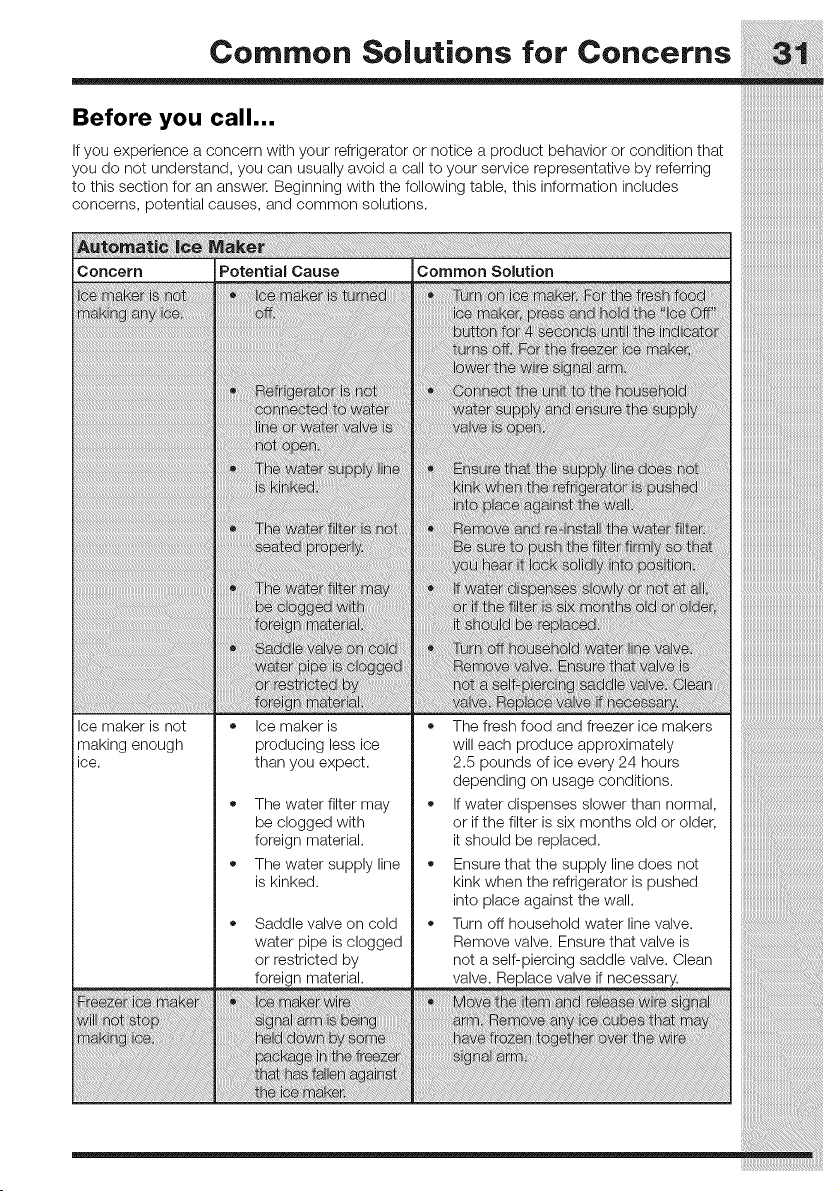
Before you call...
If you experience a concern with your refrigerator or notice a product behavior or condition that
you do not understand, you can usually avoid a call to your service representative by referring
to this section for an answer. Beginning with the following table, this information includes
concerns, potential causes, and common solutions.
Concern Potential Cause
at
re i
fo ii
Common Solution
re
i :v
; re,hfo :;
_ii!ii!_ii_!i!i_!!ii!i!i!i!i!!i!_i_i_ii!iii_i__!iiii!!iiiiilili_il¸¸
i
i
:o
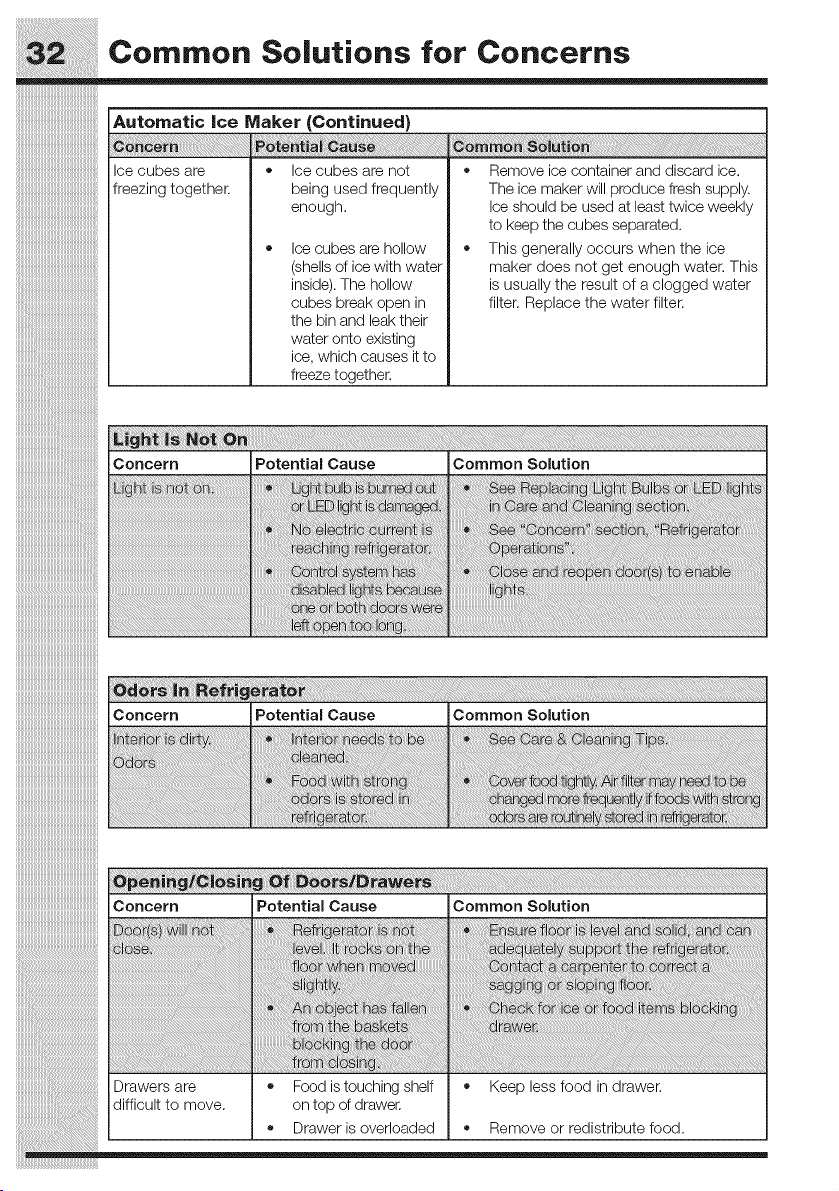
Automatic ice Maker (Continued)
Ice cubes are
freezing together.
• Ice cubes are not
being used frequently
enough.
• Ice cubes are hollow
(shells of ice with water
inside).The hollow
cubes break open in
the bin and leak their
water onto existing
ice, which causes it to
freeze together.
• Remove ice container and discard ice.
The ice maker will produce fresh supply.
Ice should be used at least twice weekly
to keep the cubes separated.
• This generally occurs when the ice
maker does not get enough water. This
is usually the result of a clogged water
filter. Replace the water filter.
Concern
i
Drawers are
difficult to move.
Potential Cause Common Solution
Food istouching shelf • Keep less food in drawer.
on top of drawer.
• Drawer is overloaded • Remove or redistribute food.

CommonSolutionsfor Concerns SS
iConcern Potential Cause Common Solution
Refrigerator runs = Room or outside = It's normal for the refrigerator to work
too much or too weather is hot. longer under these conditions.
long. • Refrigerator has • It takes 8-12 hours for the refrigerator
to cool down completely. ..............................................
recently been
disconnected for a
period of time.
Automatic ice maker
is operating.
Doors are opened too
frequently or too long.
Refrigerator/freezer
door may be slightly
o
o
o
;;;;;;;;;;;;;;;;;;;;;;;;;;;;;;;;;;;;;;;;;;;;;;;;;;;;;;;;;
Ice maker operation causes refrigerator
to run slightly more.
Warm air entering the refrigerator causes
it to run more. Open doors less often.
Ensure refrigerator is level. Keep food
and containers from blocking door. See '
Concern Potential Cause Common Solution
Refrigerator • Refrigerator control is
temperature too set too cold.
cold. Freezer
temperature is
satisfactory.
• Set refrigerator control to a warmer
setting, Allow 24 hours for temperature
to stabilize.
Food stored in
Meat Keeper
freezes (select
models).
Meat Keeper
temperature control is
set too cold.
Adjust Meat Keeper temperature
control to a warmer setting. Meat
should be stored at a temperature just
below the freezing point for maximum
fresh storage time. It is normal for ice
crystals to form due to the moisture
content of meat.
¸III
Concern Potential Cause Common Solution
_i_!_!i6!_i_!_i_!_!_!_i_!_i_i_i_ii_i_iiiiiiiiiiiiiii_i!ii!ii!ii!ii!ii!ii!ii!ii!i_i_iiiii_iiiii!i!iiiiiiiiiiiii_!_i__i_i_i_i_i_i_i_i_i_i_!_!!_!!_!!_!!_!!_!!_!!_!!_!!_!!_!_!_:i_!ii_!_!_i_!_i_!_i_i_!_i_!_i_!i!i!!!_i_i¸
! i ! iii !! !! !! ! ! i ii ii ii ii ii ii ii ii ii ii ii ii ii ii ii ii ii ii ii ii ii ii ii ii ii ii ii ii ii ii ii ii ii ii ii ii ii ii ii ii ii i i ! i ! ! !i}iiiiiiiiiii
Freezer • Freezer control is set
temperature is too too warm.
warm. Refrigerator
temperature is
satisfactory.
m at i
ez8
at
Temperature in the * Temperature control
Cool Zone TM or is set too warm.
Perfect Temp TM
Drawer is too warm
(select models).
Set freezer control to a colder setting.
Allow 24 hours for temperature to
stabilize.
Adjust temperature control to a colder
setting.
CommonSolutionsfor Concerns S5
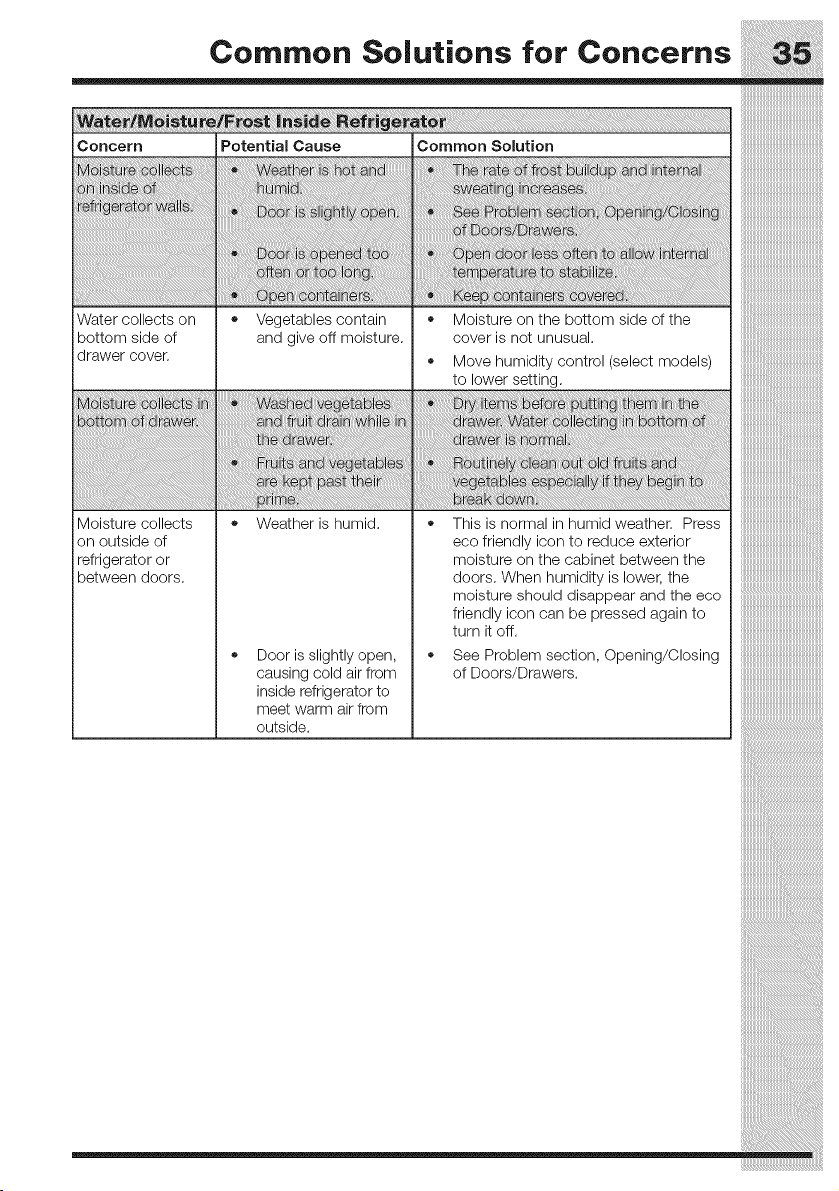
Concern Potential Cause Common Solution
Water collects on * Vegetables contain * Moisture on the bottom side of the
ibottom side of and give off moisture, cover is not unusual.
drawer cover. * Move humidity control (select models)
to lower setting.
i i ta
m r. ra Or. at i _ : to
i
kept i ! i
Moisture collects * Weather is humid. * This is normal in humid weather. Press
on outside of eco friendly icon to reduce exterior
refrigerator or moisture on the cabinet between the
between doors, doors. When humidity is lower, the
* Door is slightly open,
causing cold air from
inside refrigerator to
meet warm air from
outside.
moisture should disappearand the eco iiiiiiiiiiiiiiiiiiiiiiiiiiiiiiiiiiiiiiiiiiiiiiiiiiiiiiiii
friendly icon can be pressed againto iiiiiiiiiiiiiiiiiiiiiiiiiiiiiiiiiiiiiiiiiiiiiiiiiiiiiiiii
turnitoff, iiiiiiiiiiiiiiiiiiiiiiiiiiiiiiiiiiiiiiiiiiiiiiiiiiiiiiiii
See Problem section, Opening/Closing iiiiiiiiiiiiiiiiiiiiiiiiiiiiiiiiiiiiiiiiiiiiiiiiiiiiiiiii
ofDoors/Drawers iiiiiiiiiiiiiiiiiiiiiiiiiiiiiiiiiiiiiiiiiiiiiiiiiiiiiiiii
iiiiiiiiiiiiiiiiiiiiiiiiiiiiiiiiiiiiiiiiiiiiiiiiiiiiiiiii
::::::::::::::::::::::::::::::::::::::::::::::::::::::::
Major Appliance Warranty information
::::::::::::::::::::::::::::::::::::::::::::::::::::::::
Your appliance is covered by a one year limited warranty. For one year from your original date of purchase,
Electrolux will repair or replace any parts of this appliance that prove to be defective in materials or
workmanship when such appliance is installed, used, and maintained in accordance with the provided
instructions. In addition the cabinet liner and sealed refrigeration system (compressor, condenser,
evaporator, dryer or tubing) of your appliance is covered by a two through five year limited warranty. During
the 2r'dthrough 5 thyears from your original date of purchase, Electrolux will repair or replace any parts in the
cabinet liner and sealed refrigeration system which prove to be defective in materials or workmanship when
such appliance is installed, used, and maintained in accordance with the provided instructions.
Exclusions
This warranty does not cover the following:
f. Productswithoriginalserialnumbersthathavebeenremoved,alteredorcannotbereadilydetermined.
2, Product that has been transferred from its original owner to another party or removed outside the
USA or Canada.
3. Rust on the interior or exterior of the unit.
4. Products purchased "as-is" are not covered by this warranty.
5. Food loss due to any refrigerator or freezer failures.
6. Products used in a commercial setting.
7, Service calls which do not involve malfunction or defects in materials or workmanship, or for appliances
not in ordinary household use or used other than in accordance with the provided instructions.
8. Service calls to correct the installation of your appliance or to instruct you how to use your appliance.
9. Expenses for making the appliance accessible for servicing, such as removal of trim, cupboards, shelves,
etc., which are not a part of the appliance when it is shipped from the factory.
10. Service calls to repair or replace appliance light bulbs, air filters, water filters, other consumables,
or knobs, handles, or other cosmetic parts.
11. Pickup and delivery costs; your appliance is designed to be repaired in the home.
12. Surcharges including, but not limited to, any after hour, weekend, or holiday service calls, tolls, ferry
trip charges, or mileage expense for service calls to remote areas, including the state of Alaska.
13. Damages to the finish of appliance or home incurred during transportation or installation, including
but not limited to floors, cabinets, walls, etc.
14. Damages caused by: services performed by unauthorized service companies; use of parts other than
genuine Electrolux parts or parts obtained from persons other than authorized service companies; or
external causes such as abuse, misuse, inadequate power supply, accidents, fires, or acts of God.
DISCLAIMER OF IMPLIED WARRANTIES; LIMITATION OF REMEDIES
CUSTOMER'S SOLE AND EXCLUSIVE REMEDY UNDER THIS LIMITED WARRANTY SHALL BE REPAIR
OR REPLACEMENT AS PROVIDED HEREIN. CLAIMS BASED ON IMPLIED WARRANTIES, INCLUDING
WARRANTIES OF MERCHANTABILITY OR FITNESS FOR A PARTICULAR PURPOSE, ARE LIMITED
TO ONE YEAR OR THE SHORTEST PERIOD ALLOWED BY LAW, BUT NOT LESS THAN ONE YEAR.
ELEOTROLUX SHALL NOT BE LIABLE FOR CONSEQUENTIAL OR INCIDENTAL DAMAGES SUCH
AS PROPERTY DAMAGE AND INCIDENTAL EXPENSES RESULTING FROM ANY BREACH OF THIS
WRITI-EN LIMITED WARRANTY OR ANY IMPLIED WARRANTY. SOME STATES AND PROVINCES DO
NOT ALLOW THE EXCLUSION OR LIMITATION OF INCIDENTAL OR CONSEQUENTIAL DAMAGES,
OR LIMITATIONS ON THE DURATION OF IMPLIED WARRANTIES, SO THESE LIMITATIONS OR
EXCLUSIONS MAY NOT APPLY TO YOU, THIS WRITI-EN WARRANTY GIVES YOU SPECIFIC LEGAL
RIGHTS. YOU MAY ALSO HAVE OTHER RIGHTS THAT VARY FROM STATE TO STATE.
If YOU Need Service
Keep your receipt, delivery slip, or some other appropriate payment record to establish the warranty period should
service be required. If service is performed, it is in your best interest to obtain and keep all receipts. Service under
this waiTanly must be obtained by contacting Electrolux at the addresses or phone numbers below.
This warranty only applies in the USA, Puerto Rico and Canada, In the USA and Puerto Rico, your
appliance is warranted by Electrolux Major Appliances North America, a division of Electrolux Home
Products, Inc. In Canada, your appliance is warranted by Electrolux Canada Corp. Electrolux authorizes
no person to change or add to any obligations under this warranty. Obligations for service and parts under
this warranty must be performed by Electrolux or an authorized service company. Product features or
specifications as described or illustrated are subject to change without notice.
USA Canada
1-877-435-3287 1-800-265-8352
Electrolux Major Appliances North America Electrolux Canada Corp.
10200 David Taylor Drive 5855 Terry FoxWay
Charlotte NC 28262 iVllSSlSsauga, un_arlo,
Canada LSV 3E4


