Loading ...
Loading ...
Loading ...
when the room is warm. To set the temperature required, turn the thermostat
knob clockwise until the required setting is reached. Alternatively to heat a
cold room quickly, turn the thermostat knob up fully. When the room has
reached the desired temperature, turn the thermostat knob anti-clockwise
until the thermostat just clicks off. The heater will now automatically operate
at this temperature.
The thermostat also has a frost protection setting marked ‘ ’. This setting is
useful in areas such as garages, to prevent frost damage. If the thermostat
is set to its minimum setting ‘ ’, the heater will cycle on and off to maintain
a temperature of approximately 5° to help protect against frost.
Note: Should the heater fail to come on when the thermostat is at a low
setting, this may be due to the room temperature being higher than the
thermostat setting.
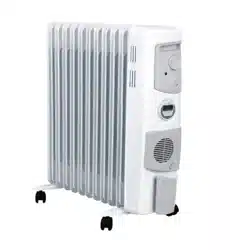
Heat Selector Switches (see Fig.5)
Selector switches located on the control panel provide a choice of heat output
to suit varying conditions and for economy of operation.
Table 1
Model Switch Switch
OFC1200/OFC1200TI 650W 1200W
OFC1500/OFC1500TI/OFC1500TIF 800W 1500W
OFC2000/OFC2000TI 1100W 2000W
OFC2400/OFC2400TI/OFC2400TIF 1200W 2400W
Fan Heater (see Fig.6)
To accelerate room heating, a fan heater with a selector switch (S1) can be
switched on.
Digital Timer Operation (see Fig.7)
MPORTANT: Remember to observe all safety warnings when operating the
heater on auto setting, either attended or unattended.
The timer allows you to select ‘AUTO’ or ‘MAN ON’ by pressing the ‘MODE’
button until the required MODE appears at the bottom of the timer display.
‘MAN OFF’ MODE heat is permanently off. This is also the default screen.
‘MAN ON’ MODE allows power to the heater uninterrupted by the program
settings.
‘AUTO DLY’ switches the heater ON and OFF every day according to a set
daily program.
‘AUTO BLK’ switches the heater ON and OFF according to a set of programs
for weekdays only or weekends only.
Initial Operation
Note: Timer Memory Back Up Batteries – Once the heater has been left
plugged in with the socket switched on for at least 72 hours the timer’s
memory back up batteries will be fully charged.
In the event of a power cut or disconnection from the mains, the timer
will continue to function and all programmed settings will be retained
for up to six months providing the timer batteries are fully charged.
If however the timer batteries have not been charged fully, or if the
heater is deprived of power for longer than six months, then the time
and programme settings are likely to be lost and you may therefore need
to reset the time and programme before using the ‘AUTO’ MODE again.
For initial use, plug the heater into a regular household power point and turn
the power on. The timer is now ready to be set up for use.
Setting Time
1. Press the ‘PROGRAM’ button ONCE. The clock symbol appears on the
top left hand side of the screen. The user can now set the clock.
2. The hour digit will ash. To adjust the hour use the ‘-‘ & ‘+’ buttons. Conrm
the hour digit by pressing ‘ENTER’.
3. Once ‘ENTER’ has been pressed the minutes will ash. To adjust the
minutes use the ‘-‘ & ‘+’ buttons. Conrm the minute digit by pressing ‘ENTER’.
4. The timer now returns to the default display.
5. To reset incorrect time, repeat previous steps.
Once the correct time is set, a total of four ON/OFF time programs can be
set for operation.
Setting Programmes
OPTION 1; Daily (‘DLY’ on display): This is a daily program function, Monday
to Sunday with four ON/OFF program options available.
OPTION 2; Block (‘BLK’ on display): This is a block program function, Monday
to Friday with four ON/OFF program options or Saturday to Sunday with four
ON/OFF program options.
Press the ‘PROGRAM’ key twice to set the programs starting with ‘Daily
ON’ P1.
Setting P1 On Time
1. To set the hour use the ‘-’ & ‘+’ buttons. Conrm the hour digit by pressing
ENTER.
2. To set the minutes use the ‘-’ & ‘+’ buttons. Conrm the minute digit by
pressing ENTER.
Note: The minutes can only be set in 10 minute blocks.
Setting P1 Off Time
3. To set the hour use the ‘-’ & ‘+’ buttons. Conrm the hour digit by pressing
ENTER.
4. To set the minutes use the ‘-’ & ‘+’ buttons. Conrm the minute digit by
pressing ENTER.
Repeat steps 1 to 4 to programme P2, P3 and P4. After programming P4
you automatically enter the BLOCK programme option. Repeat steps 1 to 4
to programme P2, P3 and P4. After programming P4 you automatically exit
the BLOCK programme option.
At any time while programming the timer you can press the PROGRAM button
to exit to the default display.
NOTE: You can cycle quickly from daily mode to block modes by pressing
the MODE button.
The Advance Function
When in AUTO MODE, if the ‘+’ button is pressed for longer than 2 seconds
the programme will ADVANCE to the next setting programmed and will
only revert back to the program when the subsequent programme time is
reached. When the ADVANCE function is running the ADVANCE segment
will be displayed on the LCD screen. If the ‘-‘ button is pressed for longer
than 2 seconds when the ADVANCE programme is running the ADVANCE
feature will automatically be cancelled and the programme will run as normal.
e.g. If the present time is 14:00 and P1 ON is at 17:00 and P1 OFF is 19:00,
if ‘+’ is held for 2 seconds and remains on until 19:00. ADVANCE disappears
from the screen at 17:00 as set program is then running.
Key Lock
To lock the keypad press ENTER and MODE simultaneously. The key symbol
will appear on the screen when the keypad is locked. To unlock the keypad
repeat the action above.
Safety in use
This appliance incorporates a number of safety devices. In addition to the
‘Important Safety Advice’ section your attention is drawn to the following;
Tilt Switch
The tilt switch will prevent the heater from working if it is accidentally tipped
over on its side. If the radiator is tipped over while it is hot, disconnect the
power and allow it to cool, then stand the radiator back upright. Reconnect
the power - normal operation should be resumed.
Safety Overheat Protection
The heater is tted with a thermal safety cut-out which will switch off the heater
should it overheat for any reason. If the cut-out operates it is the result of
abnormal overheating, and customer services should be contacted for further
advice - see ‘After Sales Service’.
Storage
If the radiator is not required for long periods, for example during the summer,
it should be stored in a dry place and preferably covered to prevent the
accumulation of dirt and dust. The supply cord should be neatly coiled around
the cable wrap (see Fig. 1) and the plug should be inserted in to the plug pin
holes provided in the cable wrap.
IMPORTANT
Prolonged storage/mains disconnection periods may cause the timer to lose its
programmed settings and may require reprogramming, see initial operation
Cleaning
WARNING:ALWAYS DISCONNECT THE POWER SUPPLY BEFORE
CLEANING THE HEATER.
Do not use detergents, abrasive cleaning powder or polish of any kind on the
body of the heater. Allow the heater to cool, then wipe with a dry cloth to remove
dust and a damp cloth (not wet) to clean off stains. Be careful not to allow
moisture in to the heater.
Recycling
For electrical products sold within the European Community. At the
end of the electrical products useful life it should not be disposed
of with household waste. Please recycle where facilities exist.
Check with your Local Authority or retailer for recycling advice
in your country.
After Sales Service
Should you require after sales service or should you need to purchase any
spares, please contact the retailer from whom the appliance was purchased.
Please do not return a faulty product to us in the rst instance as this may
result in loss or damage and delay in providing you with a satisfactory service.
The ns of this heater are lled with a precise quantity of special oil. Repairs
requiring opening of the oil container are only to be made by the manufacturer
or its service agent. For further advice if an oil leak is suspected please contact
the retailer from whom the appliance was purchased. Regulations concerning
the disposal of oil when scrapping the appliance must be followed. Please
retain your receipt as proof of purchase.