Owner's Manual
CRRFTSMRW
Two Speed / Reversible
10 mm (318 in.) CORDLESS
DRILL
Stock No.
_922073
Model No.
315.220730
Save this manual for
future reference
a, CAUTION: Read and
follow all Safety Rules and
Operating InstruclJons
before first use of this
product.
Sold by: Sears Canada Inc., Toronto M5B 2B8
972000-425
12-97
• Warranty ......................................................................................................................................................... 2
• Introductionand ProductSpecifications......................................................................................................... 2
• Rules ForSafe Operation........................................................................................................................... 3-5
A. ImportantSafety RulesFor BatteryTools.............................................................................................. 4
B. ImportantSafety InstructionsForCharger............................................................................................. 4
C, ImportantInformationFor RechargingHot Batteries............................................................................. 5
• Features ......................................................................................................................................................... 6
• Operation................................................................................................................................................... 7-12
• Maintenance................................................................................................................................................. 13
• ExplodedViowand Repair Parts List........................................................................................................... 15
• Parts Ordering/ Service............................................................................................................................... 16
FULL "RNO YEAR WARRANTY ON CRAFTSMAN TOOL
If thisCIIRFTSMRN Toolfails to operatewithintwoyears from thedata of purchase,ratum it tothe nearest
Sears Canada Inc. ("Sears') store and =Sears"will repairit,free of charge.
If thistoolis usedfor commercialor rentalpurposesthiswarrantyappliesfor only90 daysfrom the date of
purchase.
ThiswaKa_y isin additionto any statutorywarranty,
Sears Canada Inc., Toronto M5B 2B8
Yourddll has manyfeatures for makingddllJng
operationsmore pleasant and enjoyable.Safety,
performanceand dependabilityhave been giventop
pdodtyinthe design ofthisdrillmaking it easy to
maintainand operate.
_, CAUTION: Carefullyread throughthisentire
owners manual beforeusingyour newddll.Pay
close attentionto the RulesFor Safe Operation,
Warningsand Cautions. Ifyou useyourddll
pmpedy and onlyfor what it isintended,you will
enjoyyears of safe, reliableservice.
SPECIFICATIONS:
ChuckCapacity
Motor
Charger Rating
No LoadSpeed
Switch
Charge Rate
10 mm (3/8 in.)
7.2 VoltsDC
120 Volts,60 Hz,AC Only
300 / 600 RPM
TwoSpeed - Reversible
3 Hours
2
The purpose of safety symbols is to attract your attention to possible dangora. The ssfoly symbols, and
the explanations with them, deserve your careful attention and understanding. The safety warnings do
not by themselves eliminate any danger. The instructions or warnings they give are not substitutes for
proper accident prevention measures.
SYMBOL MEANING
&
SAFETY ALERT SYMBOL:
Indicatescautionor warning.May be used inconjunctionwithothersymbolsor pictographs,
A
WARNING: Failuretoobey a safetywarningcan resultin serious Injurytoyoumelforto others.
Alwaysfollowthe safety precautionsto reducethe dskoftire, electricshockand personalinjury,
&
CAUTION: Failuretoobey a safetywarningmay resultin propertydamage or personal injuryto
yourselfor toothers.Alwaysfollow the safety precautionsto reducethe riskof fire,electdcshock
and personal injury.
NOTE: Advisesyou of informationor instructionsvitalto theoperationor maintenanceofthe equipment.
,_ WARNING: Do not attempttooperatethis tool
untilyou have read thoroughlyand understand
completely all instructions,safety rules,etc,
contained in thismanual, Failureto comply can
resultin accidentsinvolvingfire, electdc shock,
or sadous personal injury.Save owner'smanual
and review frequently for continuingsafe
operation,and instructingotherswho may use
thistool.
READ ALL INSTRUCTIONS
KNOW YOUR POWER TOOL. Rood owner's
manualcarefully.Learn itsapplicationsand
limitationsaswell as the specificpotential
hazards related to thistool.
GUARD AGAINST ELECTRICAL SHOCK by
preventingbodycontactwith gmundeqsurfaces,
For example: Pipes, radiators,ranges, refrigera-
tor enclosures,
• KEEP WORK AREA CLEAN. Clutteredareas
and benches Invite accidents.
• AVOID DANGEROUS ENVIRONMENT. Don't
usepowertoolin damp or wet locations or
exposeto rain. Keep work area well lit, •
• KEEP CHILDREN AND VISITORS AWAY. All
visitorsshouldwear safetyglasses and be kepta
safe distancefromwork area, Do not letvisitors •
contact toolor extensioncord.
STORE IDLE TOOLS. When notin usatools
shouldbe stored in a dry and highor locked-up
place - out ofthe reach ofchildren,
DON'T FORCE TOOL. Itwilldo thejob better
and saferat the rate for whichitwas designed.
USE RIGHT TOOL. Don'tforce smalltool or
attachmentto do thejobof a heavydutytool.
Don'tuse toolfor purposenetintended- for
example- A circularsaw shouldneverbe used
for ct._ingtree limbsor logs.
WEAR PROPER APPAREL. Do not wear loose
clothingor jewelrythat can get caught intool's
movingpartsand cause personal injury,Rubber
glovesand nonskidfootwearare recommended
when workingoutdoors.Wear protectivehair
covetingtocontain longhairand keep itfrom
being drawn intonearbyairvents,
ALWAYS WEAR SAFETY GLASSES. Everyday
eyeglasses have onlyimpact-resistantlenses;
they are NOT safety glasses,
PROTECT YOUR LUNGS. Wear a face mask or
dustmask if operationisdusty.
PROTECT YOUR HEARING. Wear hoofing
protectiondudngextendedperiodsof operation.
SECURE WORK. Use clamps or a visa tohold
work.It's saferthan usingyour handand itfrees
bothhandstooperate tool.
DON'T OVERREACH. Keep properfooting and
balance at all times.Do net use ona ladder or
unstable support.
MAINTAIN TOOLS WITH CARE. Keep tools
sharpat all times, and cleanfor bestand safest
performance. Followinstructionsfor lubricating
and changingaccessories.
REMOVE ADJUSTING KEYS AND
WRENCHES. Formhabitofcheckingto see that
keys and adjustingwrenchesare removedfrom
tool before turningit on.
3
RULES FOR SAFE OPERATION (Continued)
M
M
m
M
NEVER USE IN AN EXPLOSNE ATMO-
SPHERE. Normal sparkingofthe motorcould
igniteflammableliquids,gases, or fumes.
M
KEEP HANDLES DRY, CLEAN, AND FREE M
FROM OIL AND GREASE. Always usea clean
clothwhen cleaning.Never use brakefluids. M
gasoline, petroleum-basedproductsor any
strongsolventsto clean yourtool.
STAY ALERT. Watch what you are doingand
use commonsense, Do not operatetoolwhen
you ara tired, Do not rush,
M
M
CHECK DAMAGED PARTS. Beforafurther use
ofthe tool,a guard or otherpart thatis damaged
shouldbe carefullychecked todeterminethat it
willoperate properlyand performits intended
function.Chockfor alignmentof movingparts, •
bindingofmoving parts, breakage of parts,
mounting,and anyother conditionsthat may
affect itsoperation.A guard or otherpartthat is
damaged shouldbe pmparlyrepairedor M
raplaced byan authorizedservice center unless
indicatedelsewhere in thisinstructionmanual,
M
DO NOT USE TOOL IF SWITCH DOES NOT
TURN IT ON AND OFF. Have defective switches
replaced by an authorizedservice center,
DRUGS, ALCOHOL, MEDICATION. Do not
operatetoolwhile under the influenceof drugs,
alcohol,or any medication,
DRILLING OR DRNING SCREWS INTO
ELECTRICAL WIRING IN WALLS, CEILINGS,
OR OTHER AREAS CAN CAUSE THE BIT OR
CHUCK TO BECOME ELECTRICALLY LIVE.
Do nottouchmetal parts when drillingintoa wall;
grasponlythe insulatedhandle(s)or plastic
housingwhen usingthistool, Make surehidden
electdcalwiring,water pipes,and mechanical
hazardsare not inthe path oftha bitwhen
drillingintoa wall.
B INSPECT FOR and removeall nailsfrom lumber
beforedrilling,
IMPORTANT SAFETY RULES FOR BATrlERY
TOOLS
Batterytoolsdo not hoveto be pluggedintoan
electrical outlet;therefore, theyare always in
operatingcondition. Be aware of possible
hazards when not usingyour batterytoolor
when changingaccessodes.
M USE ONLY THE CHARGER PROVIDED WITH
YOUR BATTERY TOOL, Do not substituteany
othercharger. Use ofanother chargercould
cause bettedes toexplode causingpossible
serious injury.
DO NOT PLACE BAI-FERY TOOLS OR THEIR
BAI"FERIEB NEAR FIRE OR HEAT. They may
explode.
DO NOT CHARGE BATTERY TOOL IN A
DAMP OR WET LOCATION.
Your batterytoolshouldbe charged ina location
where the temparatumis morethan 50°F but
lessthan 100°F,
Under extreme usageor temperatureconditions,
battery leakage may occur.If liquidcomes in
contactwithyourskin,wash immediatelywith
soap and water, then neutralizewith lemonjuice
or vinegar.If liquidgets inyoureyes, flushthem
with cleanwater for at least 10 minutes, then
seek immediatemedical attention.
Ifcarrying yourbatterytoolat yourside, make
sureit isnotrunning and yourfingeris noton the
switch.Avoid accidentalstarting.
SECURE WORK beforeapplyingpower, NEVER
holdworkpieceinyour handoracrossyour legs,
WHEN SERVICING USE ONLY IDENTICAL
CRAFTSMAN REPLACEMENT PARTS.
IMPORTANT SAFETY INSTRUCTIONS FOR
CHARGER
• SAVE THESE INSTRUCTIONS. Thismanual
containsimportantsafetyand operating
instructionsfor batterychargerpart number
999555-008.
M
Before usingbatterycharger, read allinstructions
and cautionary maddngsin this manual, on
battery charger,and productusingbattery
charger,
_i, WARNING: To reduceriskof injury,chargeonly
nickel.cadmiumtype rachargeablebatteries.
Other typesof pattedes may burstcausing
personalinjuryand damage.
m
M
M
Do note_pose chargerto rain or snow.
Use of an attachmentnot recommendedor sold
by the batter/chargermanufacturermay result
in a dskoffire, electricshock,or injuryto
parsons.
To reduce dskof damage to chargerbodyand
cord, pullby chargerbodyratherthan cord when
disconnectingcharger,
Make sure cord islocatedsothat it willnot be
steppedon,tdppadover, or othe_visesubjected
to damage or stress.
4
RULESFORSAFEOPERATION(ConUnued)
An extensioncordshouldnot be used unless
absolutelynecessary.Usa of improper
extensioncordcouldresultin a riskoffire and
electdc shock.Ifextensioncordmust be used,
make sure:
a, That pinson plugofextensioncordare the
same number,size and shape asthoseof
plug on charger.
b. That extensioncordis propedywiredand in
goodelectricalcondition; and
c. That wire size is largeenough for AC
ampere ratingofcharger as specified
below:
Cord Length(Feet) 25ft, 50ft, 100ft. 150ft,
Cord Size (AWG) 16 16 16 14
Note: AWG =Amedoan Wire Gage
• DO NOT OPERAI_ CI'IARGER WITH A
DAMAGED CORD OR PLUG. Ifdamaged,have
replacedimmediatelybya qualifiedserviceman.
Do notoperatecharger if it has receiveda
sharpblow, been dropped,or otherwise
damaged in anyway; take itto a qualified
serviceman,
Do not disassembJecharger,take itto a
qualifiedservicemanwhen sawice or repairis
required. Incorrectreassemblymay resultina
riskofelectricshockor fire,
To reducedsk ofelectdc shock,unplugcharger
from outletbefore attemptingany maintenance
or cleaning.Turningoffcontrols will notreduce
thisrisk.
• Do notuse chargeroutdoors.
• Disconnectchargerfrom powersupplywhen
not in use.
SAVE THESE INSTRUCTIONS. Refer tothem
frequently and usethem to instructotherswho
may usethistool. Ifyou loansomeone thistool,
loanthem these instructionsalso.
A Look for this symbol to point out important safety precautions. It means attentionlll Your
safety is involved.
IMPORTANT INFORMATION FOR RECHARGING HOT BA'n'ERIES
When usingyourdrillcontinuously,the hattedes in
your batterypackwillbecome hot.You shouldlet a
hot batterypeck cool downfor appreximately30
minutesbefore attemptingto recharge,
Note; Thissituationonlyoccurswhen continuoususa
ofyourdrillcausesthe batteriesto become hot. It
does notoccurunder normalciroumstances.Refer to
"CHARGING BA'rrERY PACK" for normalrecharg-
ingof batteries,Ifthe chargerdoes notcharge your
battery peck undernormalcircumstances,ratum both
the batterypackand chargerto yournearest Soars
repair centerfor electricalchock.
A WARNING:
The operationof any powertoolcan resultinforeign objectsbeingthrownintoyoureyes,
whichcan resultin severeeye damage. Beforebeginningpower tcol operation,alwayswear
safetygogglesor safety glasseswith side shieldsand a full face shieldwhen needed, We
recommendWide VisionSafety Maskfor useovereyeglasses or standard safetyglasses
with sideshields,availableat Sears Retail Stores.
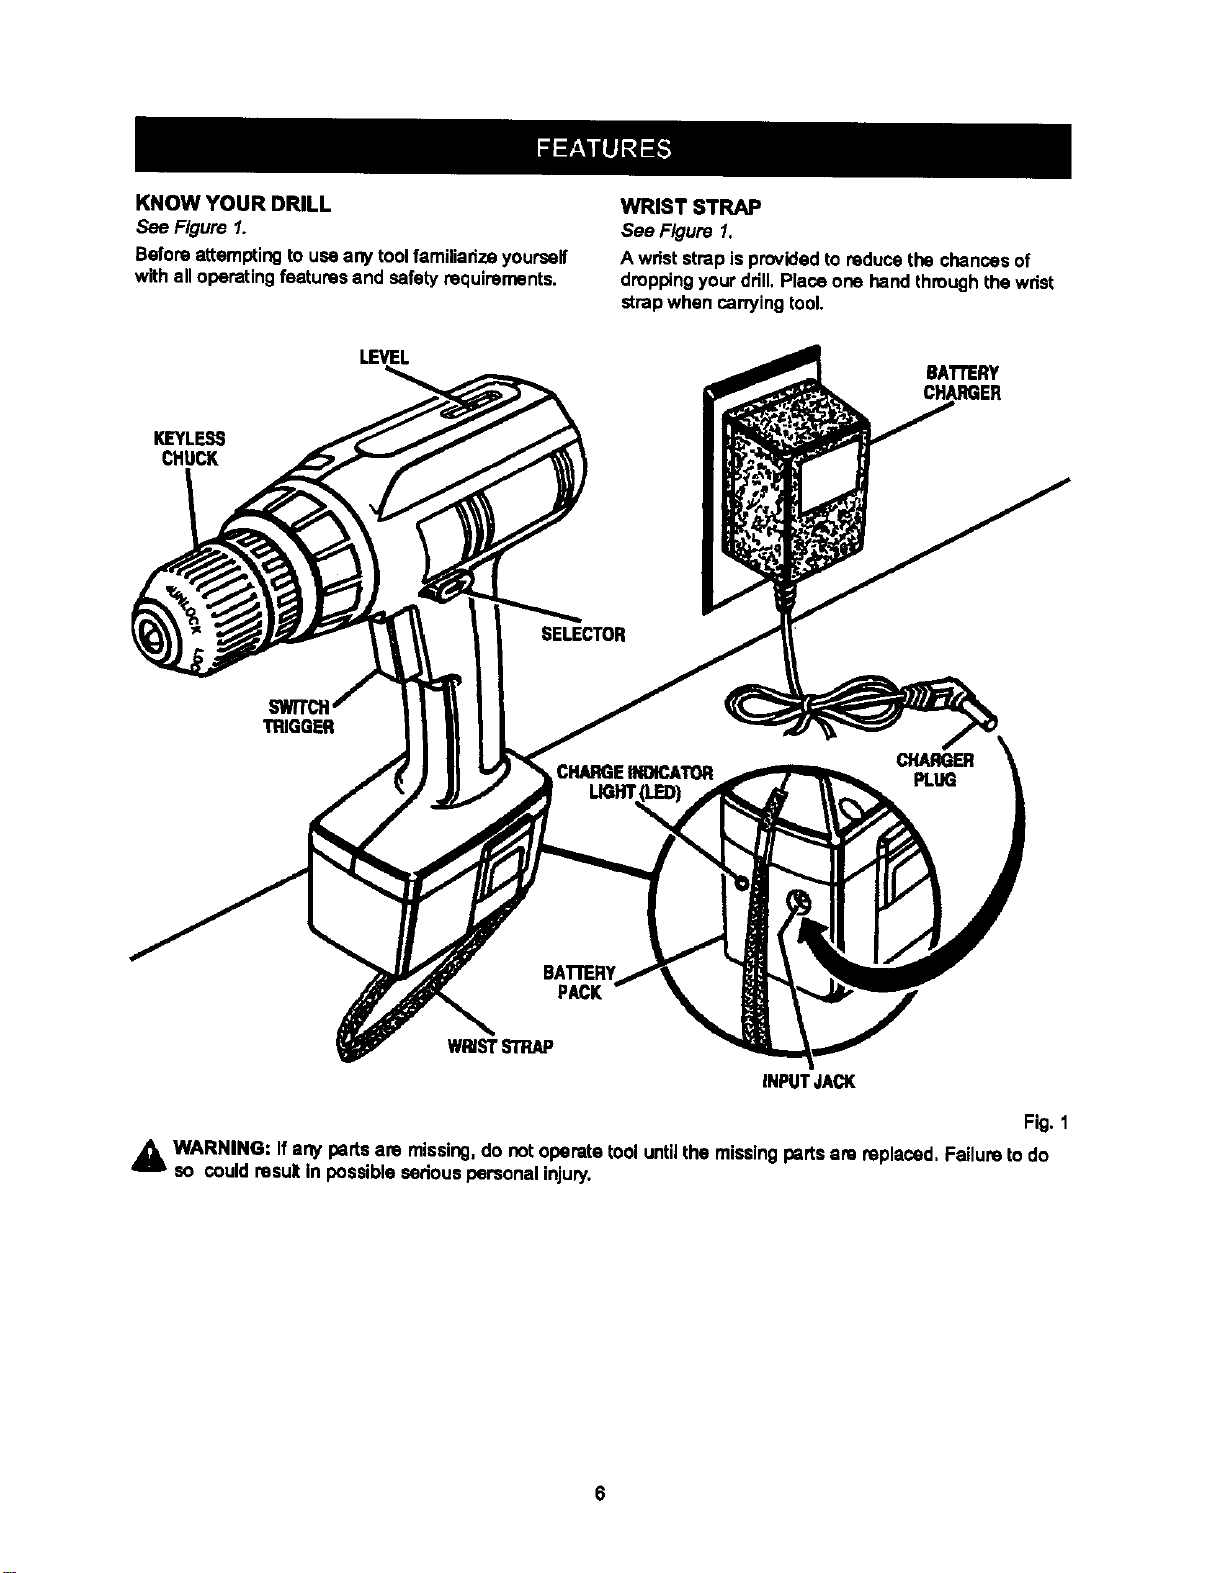
KNOW YOUR DRILL
See Figure 1.
Beforeattemptingto usaany toolfamiliarizeyourself
withall operatingfeatures and safetyrequirements,
WRIST STRAP
See Figure 1.
A wrist strapis providedto reducethe chancesof
droppingyour drill.Placeone handthroughthe wrist
strapwhen carryingtool.
KIEYLESS
CHUCK
LEVEL
BAI"rERY
CHARGER
TRIGGER
BATrERY
PACK
WRISTSTRAP
INPUTJACK
Fig. 1
WARNING: If any partsare missing,do notoperatetooluntilthe missingparts are replaced, Failuretodo
so couldresultin possibleseriouspersonal injury.
A WARNING: Always wear safetygogglesor
safetyglasseswith side shieldswhen operating
tools. Failuretodo socouldresultin objects
beingthrownIntoyoureyes, resultingin possible
sodous injury,
_k WARNING: Do not allowfamiliaritywithyour
drillto make you careless. Rememberthat a
saraless fraction of a secondissufficientto inflict
severe injury.
CHARGING BATTERY PACK
The batterypack for thistool hasbeen shippedin a
lowcharge conditionto preventpossible problems.
Therefore, you shouldcharge itat least5 hoursprior
to use,
Note: Batterieswillnot reach full chargethe firsttime
they are charged,Allow several cycles (drilling
followed by recharging)for themto become fully
charged,
TO CHARGE
• Charge batterypeck onlywiththe charger
provided,
• Make sure power supply is normal house
voltage, 120 volts, 60 Hz, AC only.
• Connect chargerto batterypack byinserting
charger plugintoinputJack.As showninfigure 1,
inputjack islocatedon the beck side ofbattery
pack.
Note: Batterypackcan remainon yourddllor be
removedwhilecharging.When battery peck Jsout
ofthe ddll,be carefulnotto touch beth terminals
witha metal object.Touchingbothterminalswitha
metal objectwillshortout the batterypack.
• Make surecharger plugand inputjackare properly
connected.
• Connectchargerto power supply,
• When properlyconnected, the red lighton battery
peck willturnon,
• Note: Ifcharger does notcharge batterypack,
returnbatterypack and chargertoyour nearest
Sears Repair Centerfor electricalcheck.
• Afternormal usage,3 hours of chargingtime is
requiredto be fullycharged.A minimumcharge
timeof5 hoursis requiredtorecharge a completely
dischargedtool.
• The batterypack willbecome slightlywarmto the
touchwhilecharging.This isnormaland does not
indicatea problem.
• Do not operatethe toolwhile it isconnected tothe
charger.The drivingabilitywillnot increase.
• Do not place charger inan area ofextreme heator
cold.It willwork bestat normalroomtemperature.
_. CAUTION: Your drilrsbattery pack contains
specialhightemperaturebettedes to helpprevent
batterydamage when lefton chargefor extended
pedodsof time. However, oncethe bettedes
becomefullycharged,we recommendthatyou
unplugyourchargerfrom power supplyand
disconnectitfrom the batterypack.
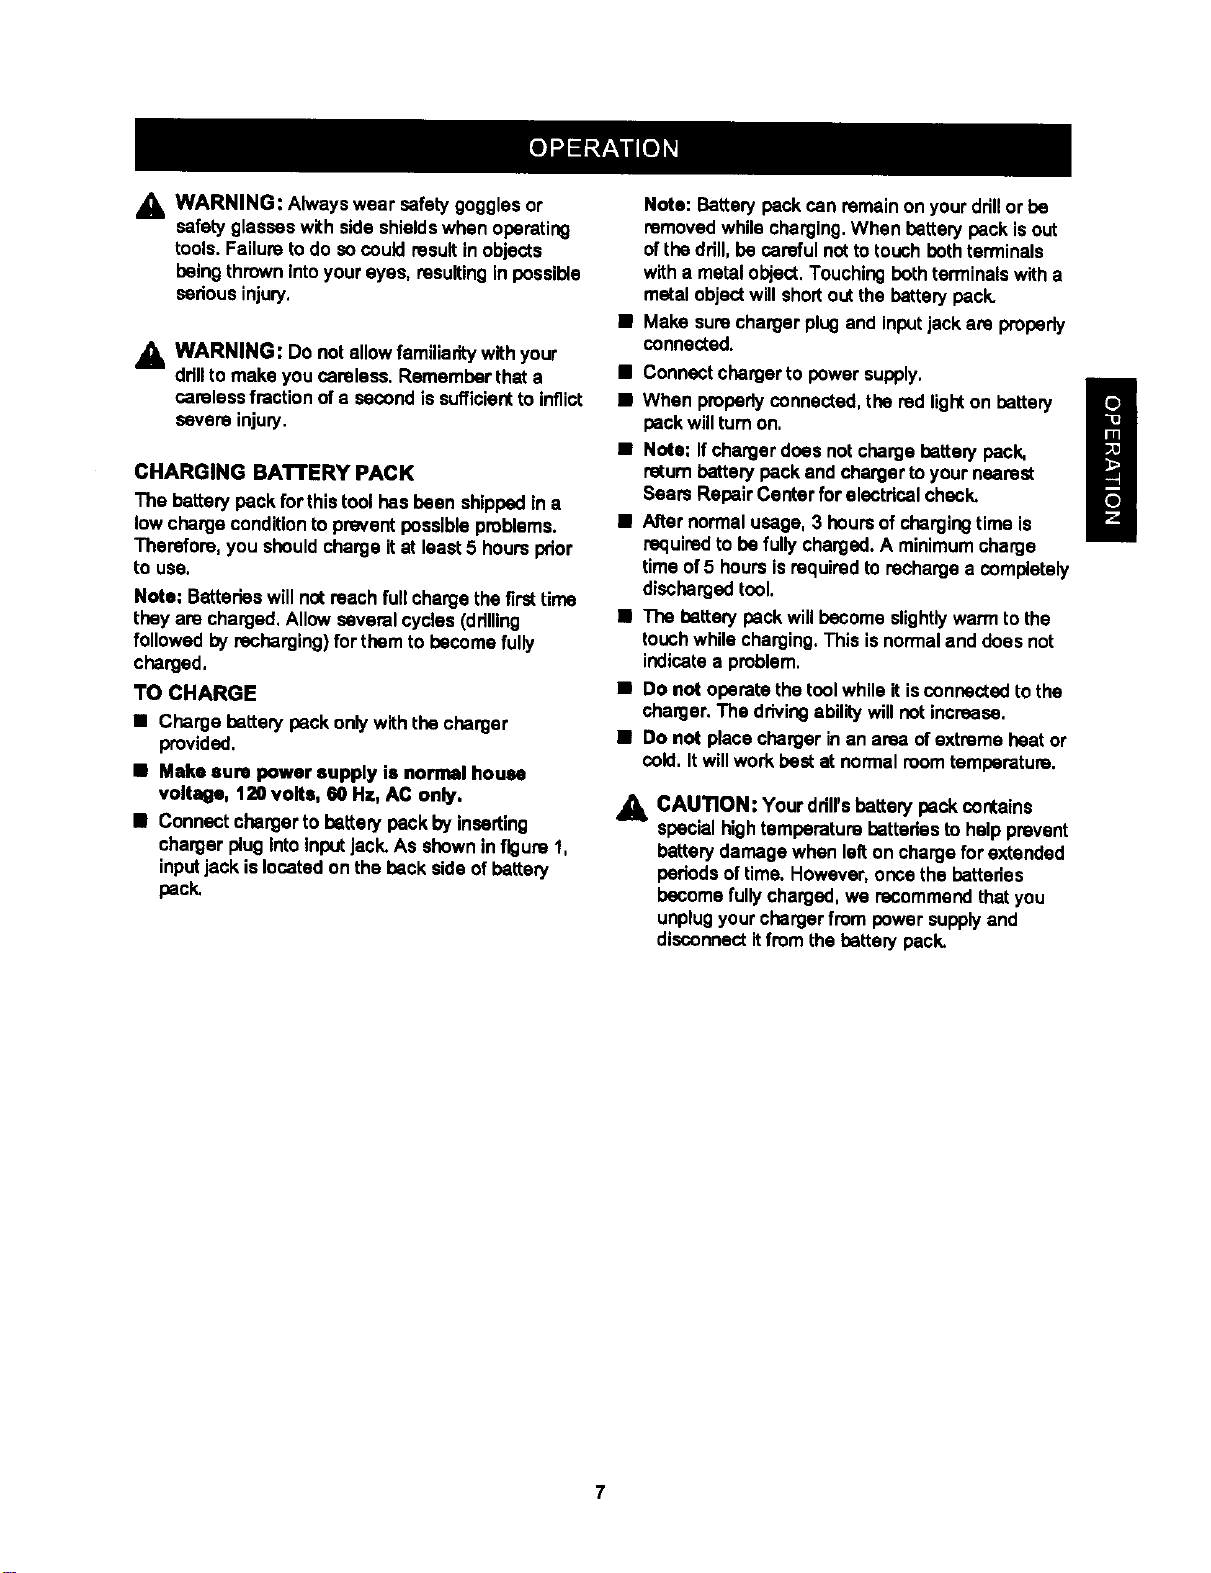
SWITCH
See Figure2.
To turnyourdrillON, depressthe switchtdgger. To
turnitOFF, releasethe switch trigger.
SELECTOR
CENTERPosmoN
(LOCK)
TRIGGER
Fig. 2
TWO SPEED
Your drillhasa two speedfeature inthe switch.
Depressthe switchtriggerhalfwayfor drivingscrews
at low speed. Depressthe switch triggerall theway
for normaldrilling,Release the switch triggertoturn
drilloff.
Noto: When changingfrom lowto highspeed, you
may noticea dead spot inthe tdgger switch.Thisis
partofthe design ofthe switchend there is nothing
wrongwith yourddll.Continueto pullthe switch
triggeruntilhigh speeddrillingbegins.
SWITCH LOCK
See Figure3.
The switch tdgger can be lockedinthe OFF position.
Thisfeature can be usedto preventthe possibiliLyof
accidentalstartingwhen not in use, To lockswitch
trigger, placethe directionof rotationselector in
center position.
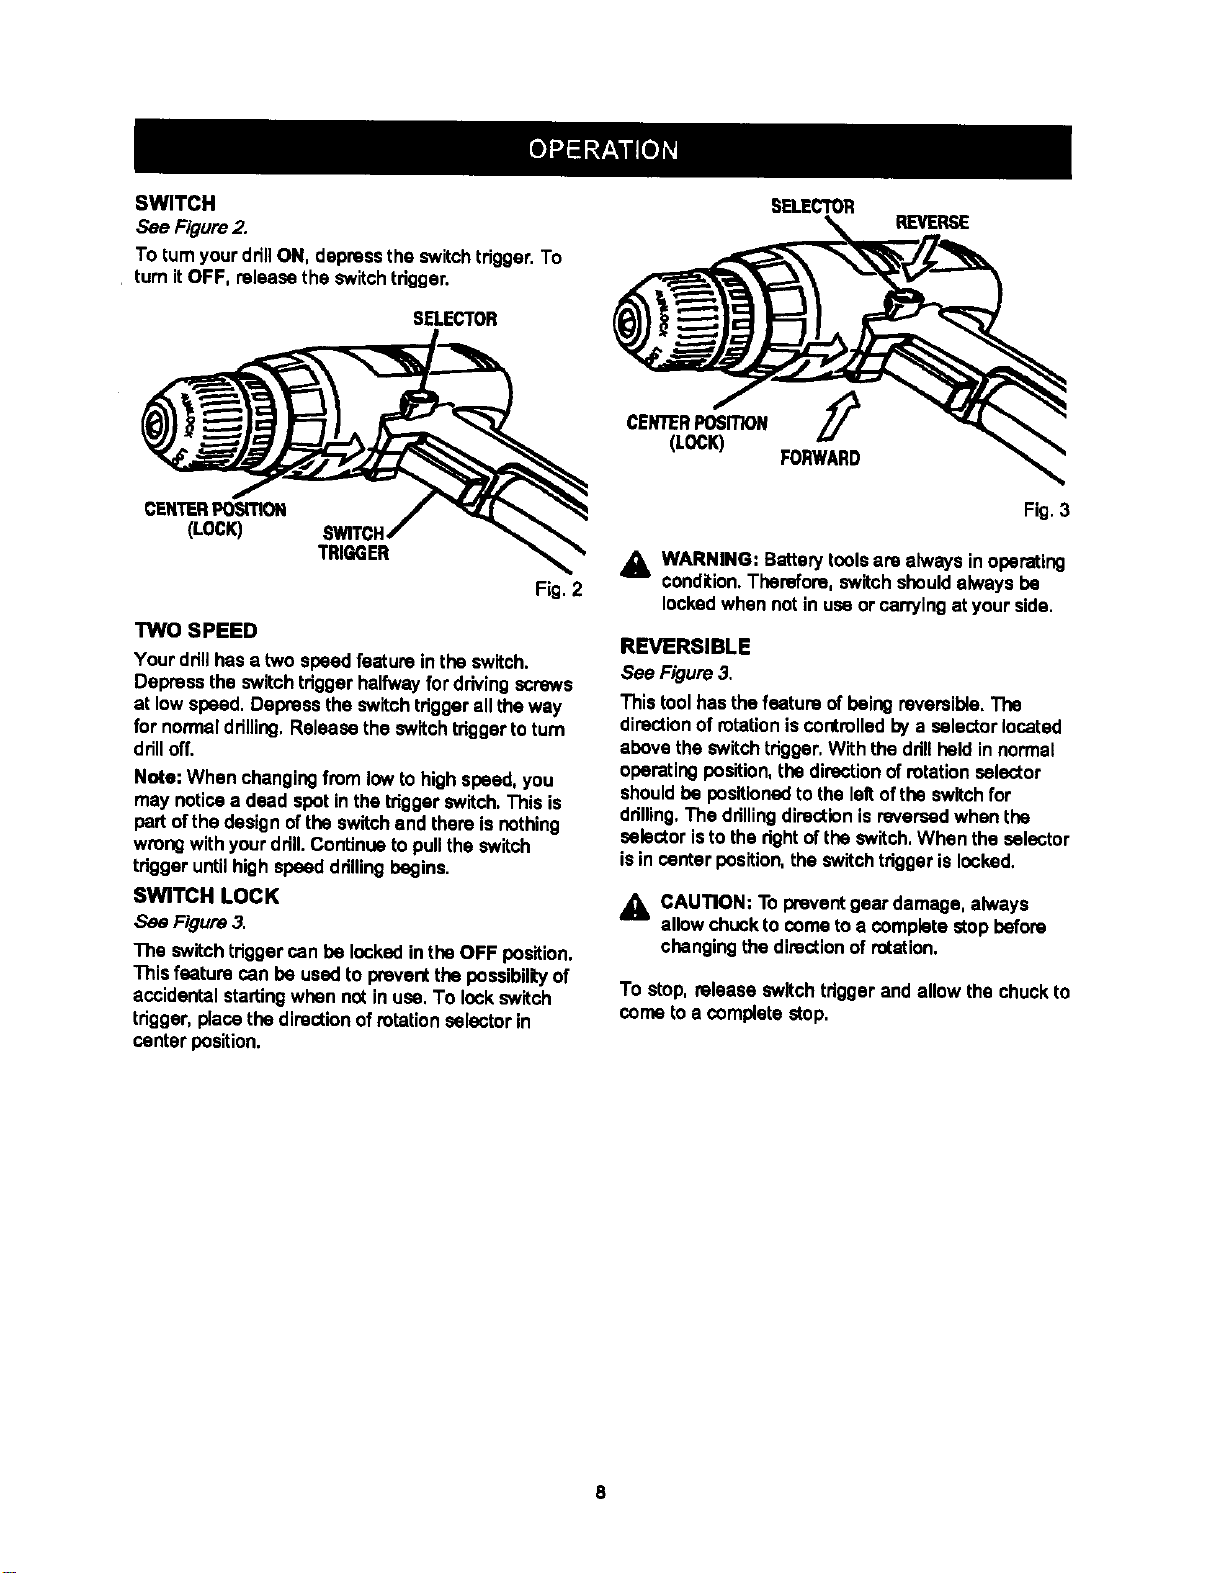
SELECTOR
REVERSE
CENTERPOSITION ,_
(LOCK)
FORWARD
Fig, 3
_k WARNING: Battery toolsare always inoperating
condition.Therefore, switch shouldalwaysbe
lockedwhen not inuseor carryingat yourside.
REVERSIBLE
See Figure3.
This toolhasthefeature of being reversible,The
directionof rotationiscontrolledbya selector located
above the switchtrigger,With the ddllheld in normal
operatingposition, the directionof rotationselector
shouldbe positionedto the leftofthe switchfor
drilling,The drillingdirectionis reversedwhen the
selector isto therightof the switch, When the selector
is in center position,the switch triggeris locked.
,_ CAUTION: To preventgear damage,always
allowchuckto come toa completestopbefore
changingthe directionof rotation.
To stop, release switchtriggerand allow the chuckto
come toa complete stop,
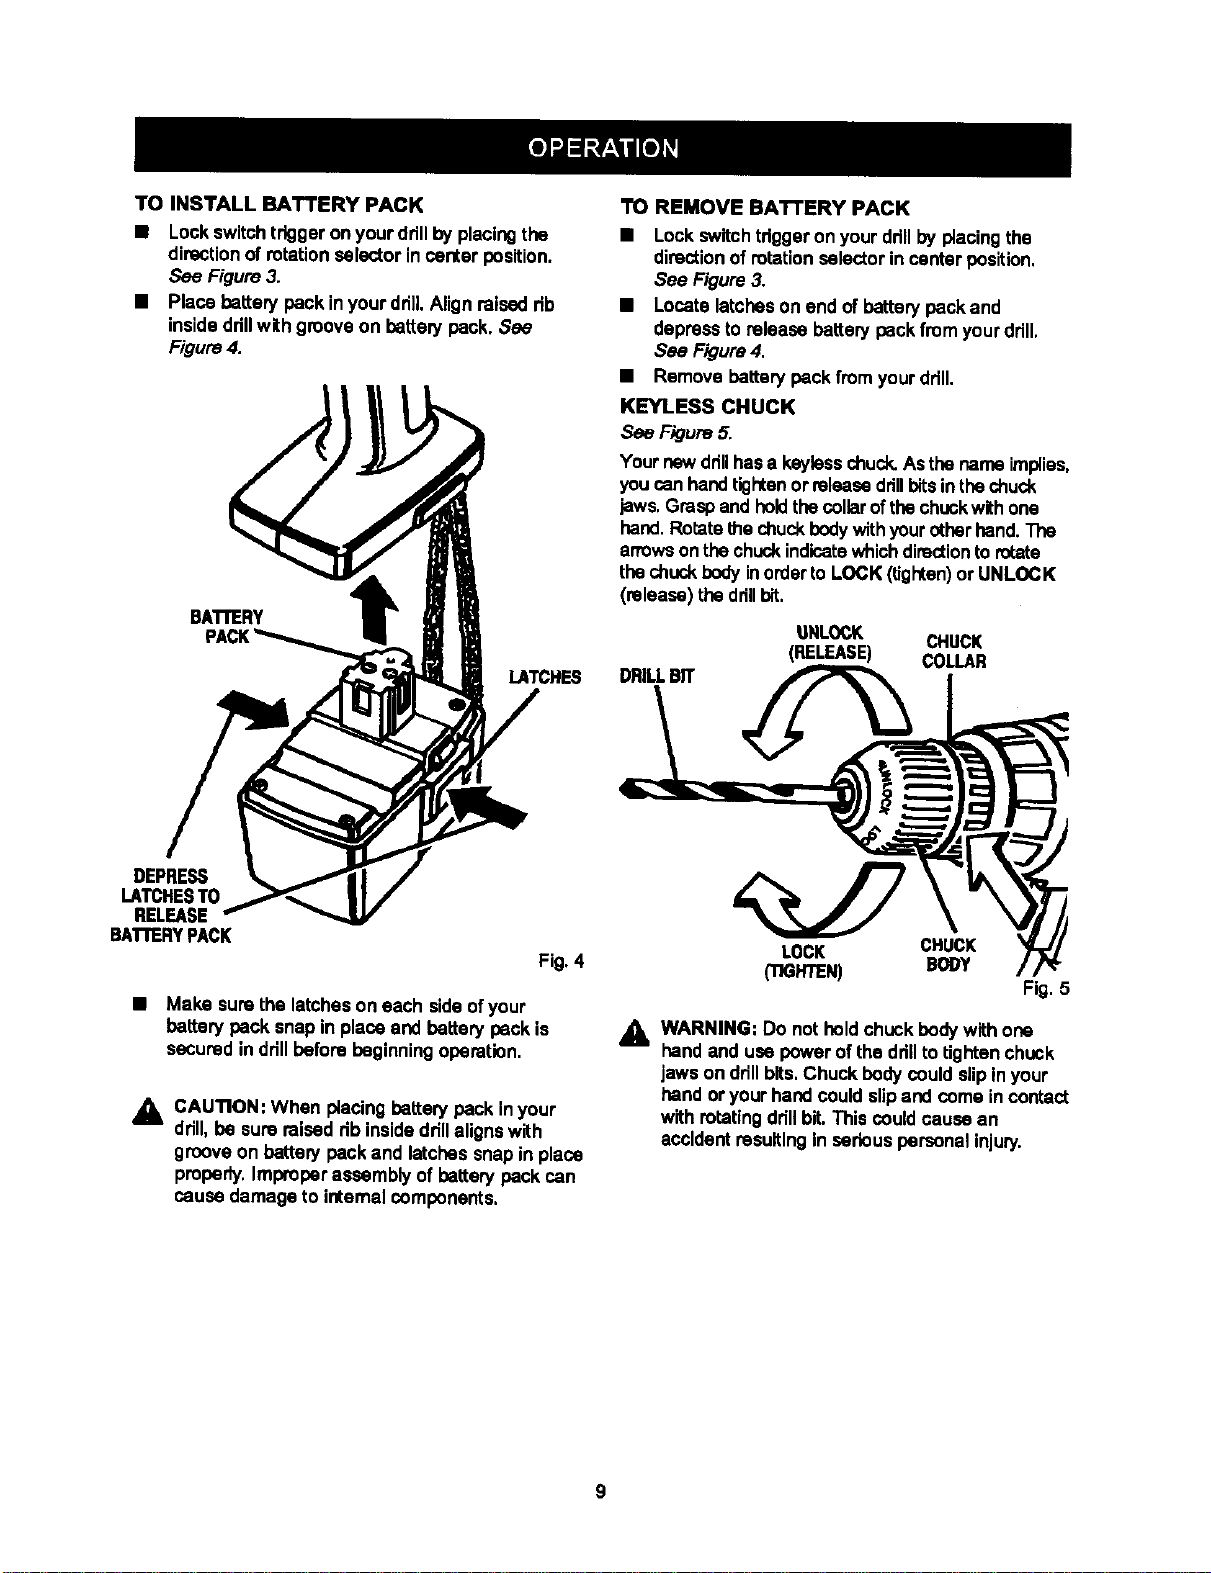
TOINSTALLBATTERYPACK
• Lockswitchtriggeron yourddll byplacingthe
directionof rotation selectorincanter position.
See Figure3.
• Place battery backinyour drill.Alignraisedrib
insidedrillwithgroove on battery back. See
Figure4.
BATrERY
LATCHES
TO REMOVE BATTERY PACK
• Lockswitchtriggeron your drillby placingthe
directionof rotation selector in canter position,
See Figure3.
• Locate latcheson end of batterybackand
depresstorelease batterypackfrom yourddll,
See Figure4.
• Remove battery back from yourddll.
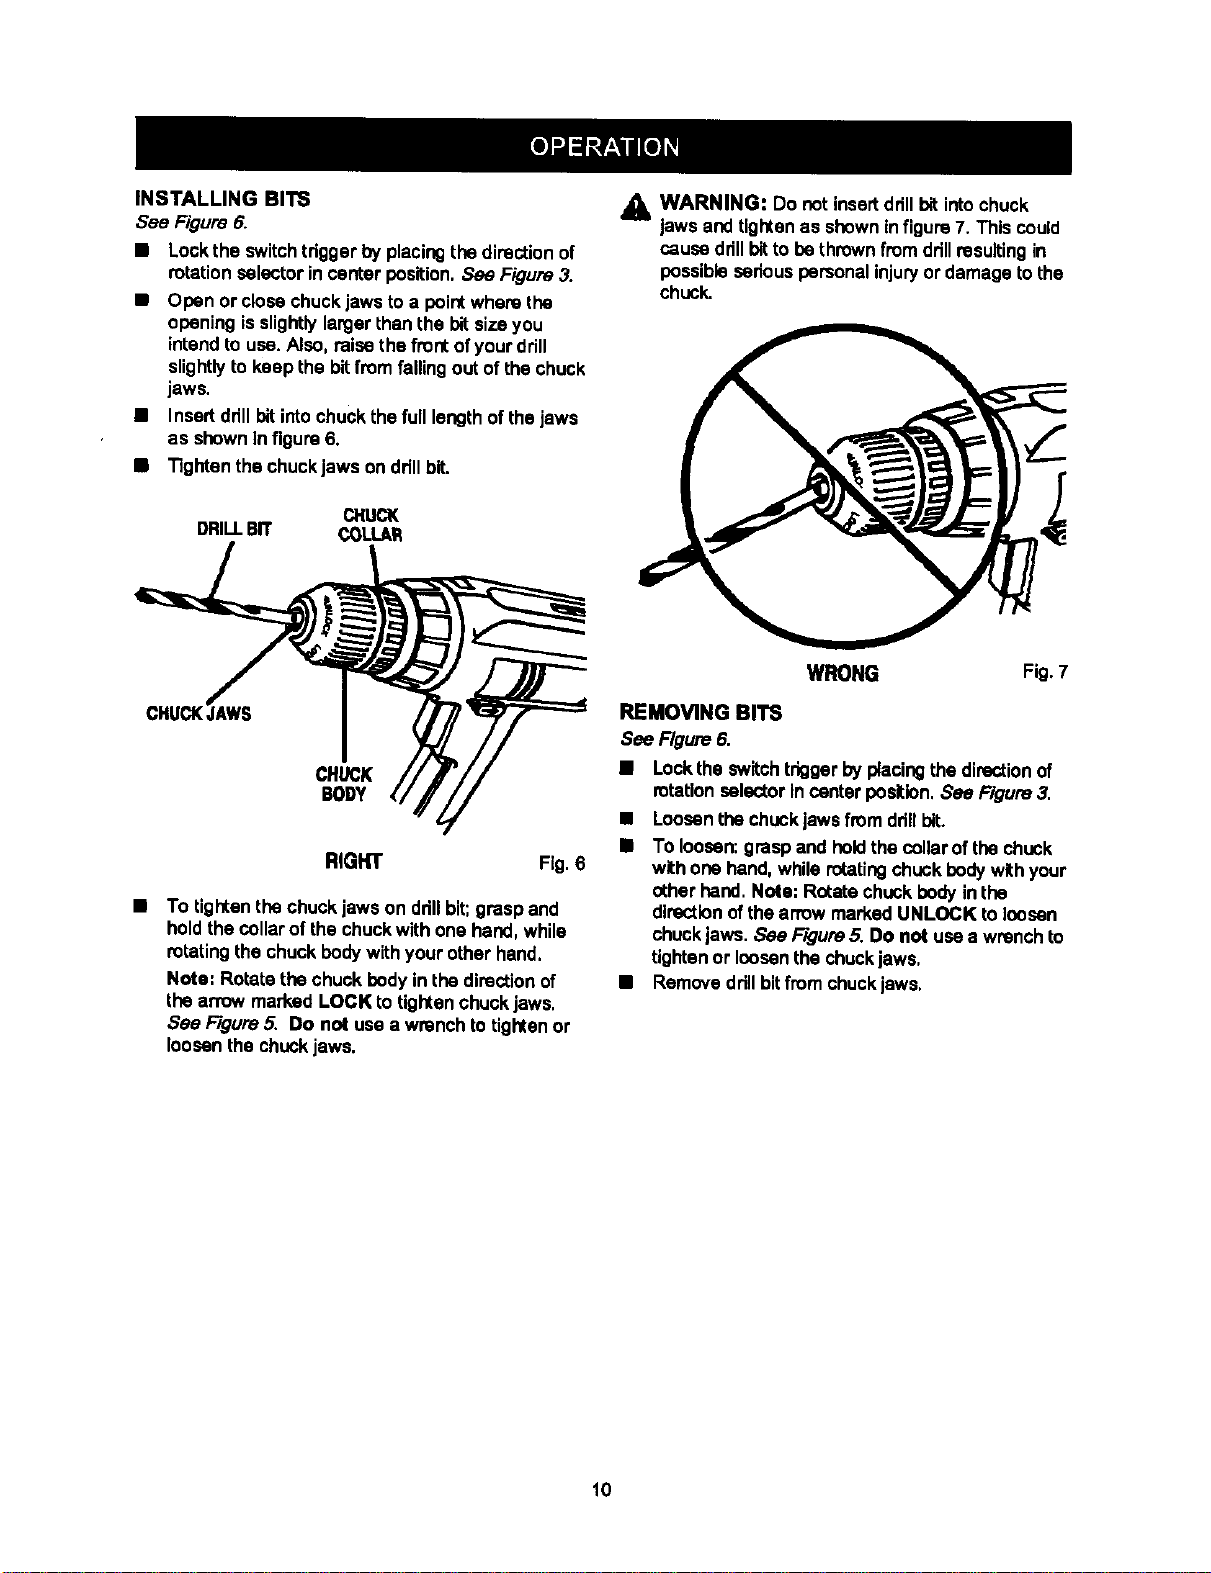
KEYLESS CHUCK
See Figure5.
Yournewdrillhasa keylasschuck.Asthenameimplies,
youcan handtightenor releasedrillbitsinthechuck
jaws,Graspand held thecollarofthechuckwithone
hand.Rotatethechuck bodywithyourotherhand.The
arrowsonthechuckindicatewhichdirectiontorotate
thechuck bodyinordertoLOCK (tighten)orUNLOCK
(release) thedrillbit,
DRILLBIT
UNLOCK CHUCK
(RELEASE) COLLAR
DEPRESS
LATCHESTO
RELEASE
BAI"rERYPACK
Fig.4
• Make surethe latcheson each sideofyour
battery back snap in place and battery back is
securedin ddllbefore beginningoperation.
,_ CAUTION: When placing battew back inyour
drill,be sure raisedribinsidedrillalignswith
grooveon battery back and latchessnap in place
properly,Improperassembly of battery back can
causedamage to internalcomponents,
LOCK CHUCK
('I1GFffEN) BODY
Fig, 5
_k WARNING: Do notholdchuck bodywithone
handand usepowerof thedrillto tightenchuck
jawson ddllbits,Chuckbodycould slipin your
handor yourhandcould slipand coma incontact
withrotatingdrillbit.Thiscould cause an
accidentresulting in serious personalinjury.
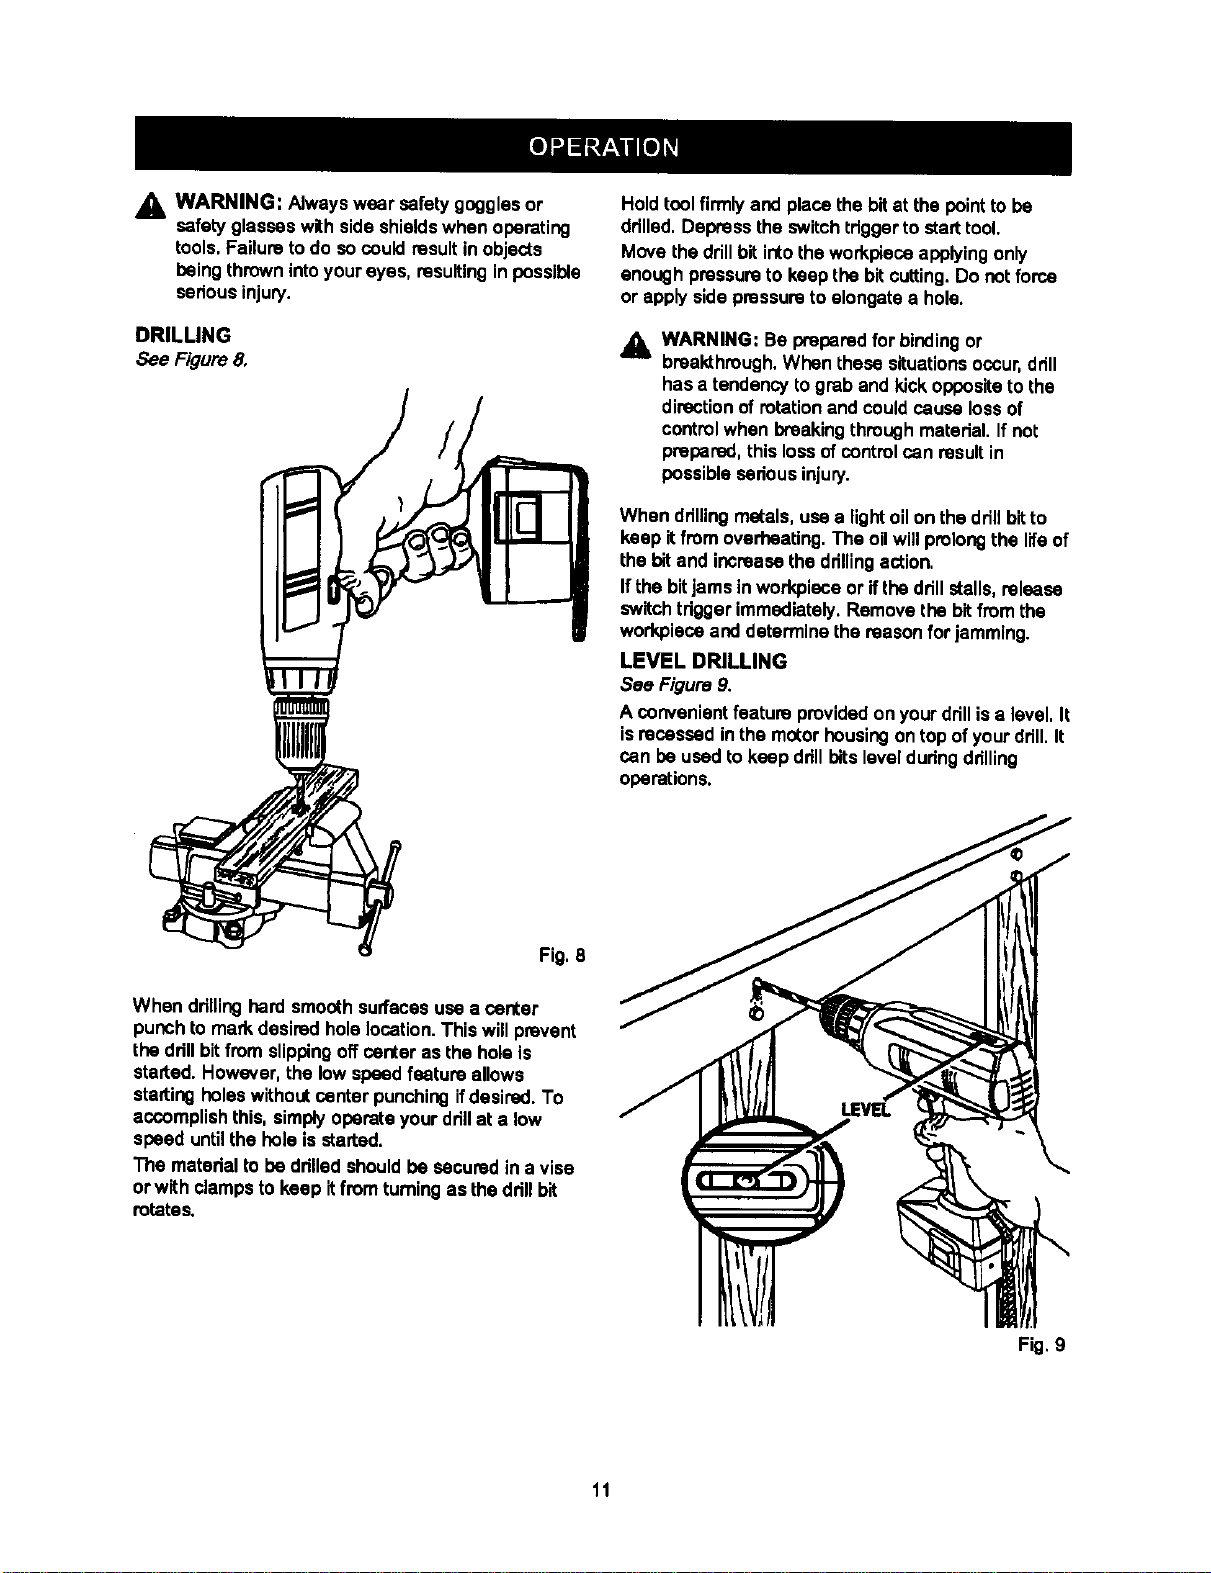
INSTALLINGBITS
See Figure6.
• Lockthe switchtdgger byplacingthe directionof
rotationselectorin canter position.See Figure3.
• Open or closechuck jawsto a pointwhere the
opening isslightlylargerthan the bit sizeyou
intendtouse. Also, raise thefront ofyourdrill
sUghtlyto keep the bitfrom fallingout ofthe ohuck
jaws.
• Insertddll bitintochuckthefull lengthof theJaws
as shownInfigure 6.
• Tightenthe chuckjaws ondrillbit.
CI'tUCK
DRILLBIT COLI.AR
CHUCK
BODY
RIGHT Fig. 6
• To tighten thechuck jawson ddllbit;graspand
holdthe collarofthe chuckwith one hand,while
rotating thechuck bodywithyour otherhand,
Note: Rotate thechuck bodyin thedirectionof
the anow marked LOCK to tightenchuck jaws.
See F/gum 5. Do not usea wrenchtotightenor
loosen thechuckjaws.
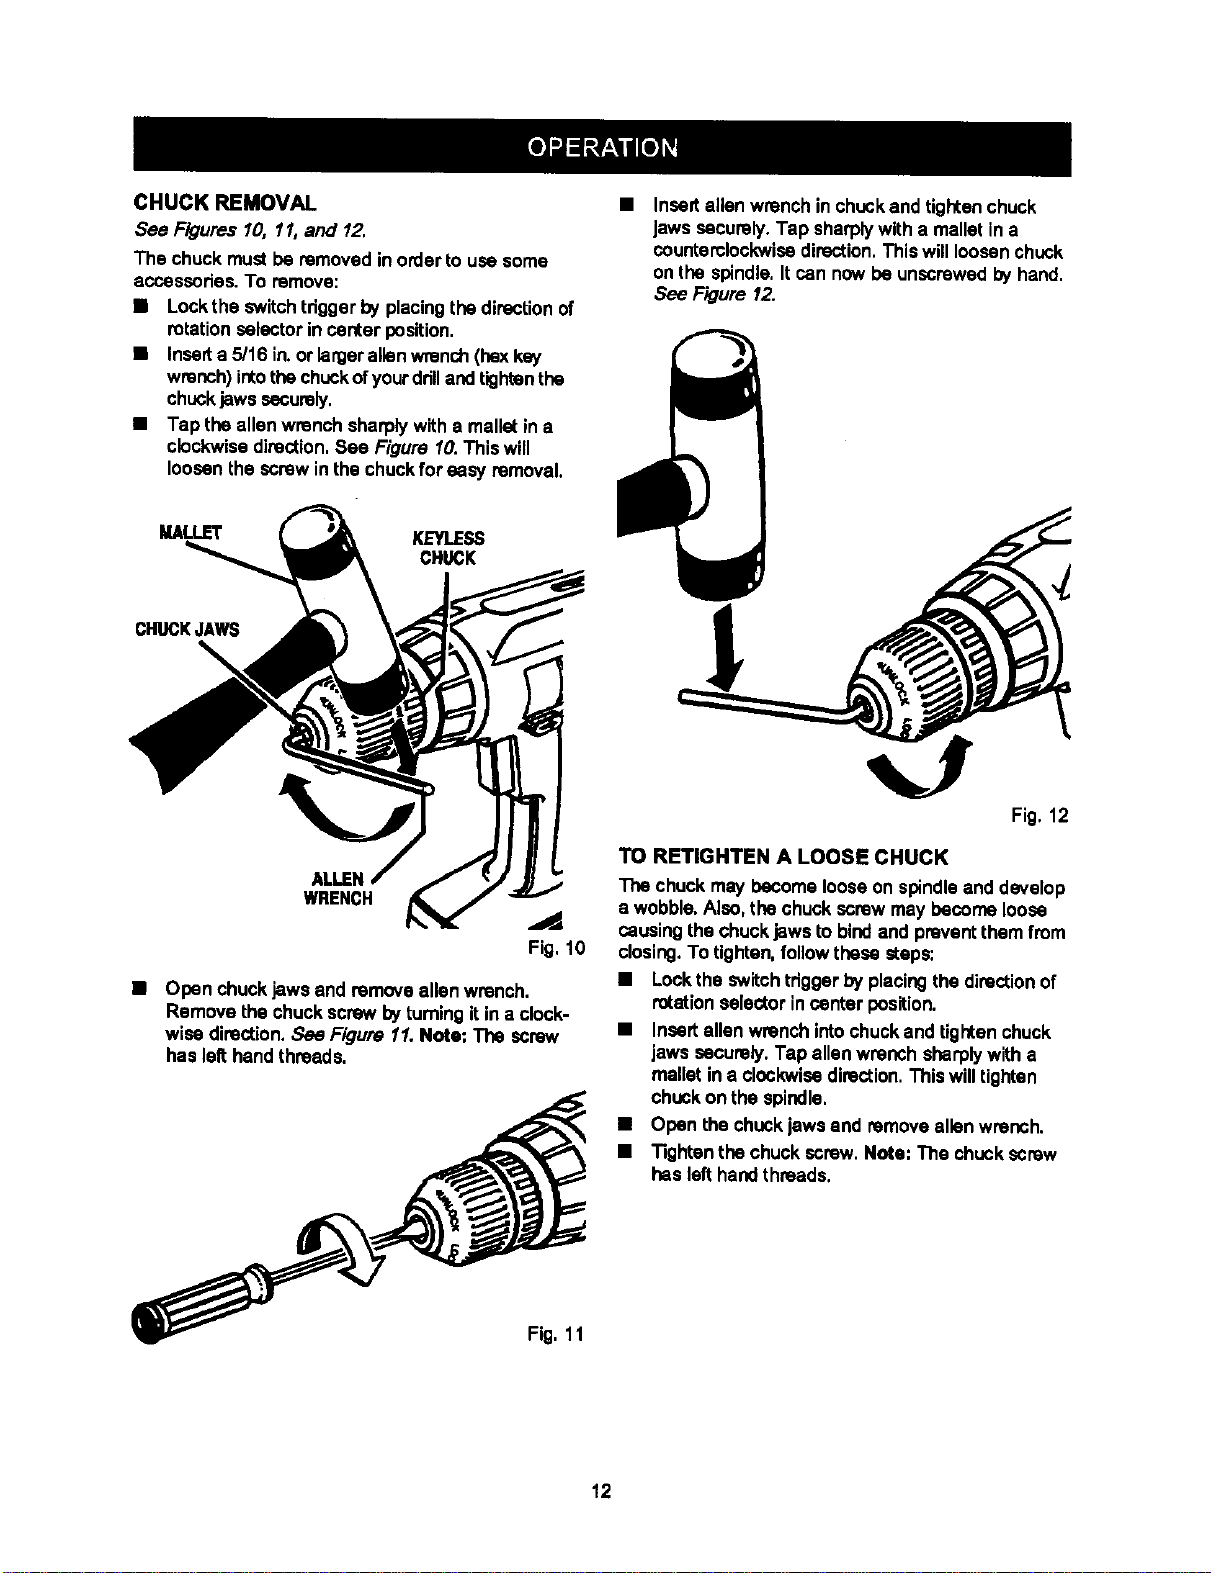
A WARNING: Do notinsertdrillbit intochuck
laws and tlgtCenas shownin figure7. This could
causedrillbitto bethrownfrom drillresultingin
possible sedous personal injuryor damage to the
chuck.
WRONG Fig. 7
REMOVING BITS
See Figure6.
• Locktha switchtriggerbyplacingthe directionof
rotation selector In centerposition. See Figure3.
• Loosenthe chuckjawsfrom dflllbit.
• To loosen:graspand hell the collarof thechuck
withone hand,while rotatingchuck body withyour
otherhand. Note; Rot_e chuckbodyin the
directionof thearrow marked UNLOCK toloosen
chuckjaws. See F/gum5. Do not usea wrenchto
tightenor loosenthe chucklaws.
• Removedrillbitfromchuck jaws.
10
,_ WARNING: Alwayswear safety gogglesor
safetyglasses withside shieldswhen operating
tools, Failuretodo socouldresultin objects
beingthrownintoyoureyes, resultingin possible
seriousinjury.
DRILLING
See Figure8.
Holdtoolfirmlyand placethe bit at the pointtobe
ddlled.Depress theswitchtdggerto starttool.
Move the drillbit into(he workpiecaapplyingonly
enoughpressureto keep the bitcutting.Do notforce
or applyside pressureto elongatea hole.
_. WARNING: Be preparedfor bindingor
bmaldhrough.When these situationsoccur,drill
hasa tendencytograband kickoppositeto the
directionofrotationand couldcause lossof
controlwhen breakingthroughmaterial. Ifnot
preparad,thisloss of control can resultin
possibleseriousinjury.
When ddllingmetals,usea lightoilon the drillbitto
keep itfrom overheating,The oilwillprolongthe lifeof
the bit and increasethe ddllingaction,
Ifthe bitjams inworkpiece orifthedrillstalls,release
switch tdggerimmediately.Remove thebit from the
workplecaand determinethe reason for jamming.
LEVEL DRILLING
See Figure9.
A convenient feature providedon yourdrillis a level,It
isrecessed inthe motorhousingontop of yourdrill. It
can be used tokeep ddll bitslevelduringdrilling
operations.
Fig. 8
When drillinghardsmoothsurfacesusea canter
punch tomarkdesired holelocation.Thiswill prevent
the ddll bitfrom slippingoffcanter as the holeis
started. However,the low speedfeature allows
startingholeswithoutcenter punchingifdesired.To
accomplishthis,simplyoperateyour drillat a low
speed untilthe hole isstarted.
The matedal to be ddlledshouldbe sacured in a vise
or with clampsto keep itfrom turningas theddnbit
rotates.
Fig, 9
11
CHUCK REMOVAL
See Figures 10, 11,and 12.
The chuck must be removedin orderto use some
accasscdes. To remove:
• Leckthe switchtrigger byplacingthe direcUonof
rotationselector in center position.
• Inserta 5/16 in.or lergerallenwrench(hexkey
wrench)intothe chuckofyourdrilland tightenthe
chuckjawssecurely.
• Tap the allenwrenchsharplywith a mallet in a
clockwisedirection.See Figure 10.This will
loosen thescrew inthe chuckfor easy removal.
Insertallenwrenchin chuckand tightenchuck
Jawssecurely.Tap sharplywith a mallet in a
countemlockwisedirection,Thiswill loosenchuck
on the spindle,Itcan now be unscrewedbyhand.
See Figure 12.
MALLET
KEYLESS
CHUCK
CHUCKJAWS
\
ALLEN
WRENCH
..d
Fig, 10
• Open chuckjaws and remove allenwrench.
Remove the chuckscrew byturningit in a clock-
wise direction,See Figure 11.Note: The screw
hasleR handthreads.
Fig, 11
Fig. 12
TO RETIGHTEN A LOOSE CHUCK
The chuck may become looseon spindleand develop
a wobble.Also,the chuck screw may become loose
causingthe chuckjaws to bindand preventthemfrom
closing.To tighten,follow these steps:
• Lockthe switchtdggerby placingthe directionof
rotationselectorincanter position.
• Insertallen wrenchintochuckand tightenchuck
jaws securely. Tap allenwrench sharplywith a
mallet in a clockwisedirection.This willtighten
chuckon the spindle,
• Open thechuckjawsend removeallenwrench.
• Tightenthe chuck screw. Note; The chuckscrew
has lefthandthreads.
12
_k WARNING: When servicing,useonlyIdentical
Craftsmanreptacementparts.Use of anyother
part may create a hazard or cause product
damage,
Avoid usingsolventswhen cleaningplasticparts,
Most plasticsare susceptibleto damage from vadous
types ofcommemlalsolventsand may be damaged
bytheir use, Use clean clothsto remove dirt,dust,oil,
grease, etc,
A WARNING: Do notat anytime tatbrake fluids,
gasoline, petroleum-basedproducts,penetrating
oils,etc. come in contactwith plasticparts,They
contain chemicalsthat can damage, weaken or
destroyplastic.
Do not abuse powertools.Abusivepracticescan
damage toolas well as workpieca.
Only the parts shownon partslist,page fifteen,are
intendedto be repairedor rapiacad bythe customer,
All otherparts shouldbe rapleced by a qualified
service technicianat an authodzeqservicefacility.
_L WARNING: Do not attempttomodifythis toolor
create accessoriesnot recommendedfor use
withthistool. Any suchalterationor modification
ismisuse and couldresult in e hazardous
conditionleadingto possibleserious personal
injury.
BATTERIES
Your ddn'sbatterypack is equippedwith6 nickel-
cadmium rechargeable batteries,Lengthofservice
from each chargingwilldepend on thetype ofwork
you are doing.
The batteriesin thistoolhave been designedto
providemaximum troublefree llfe. However, likeall
batteries,theywilleventuallywear out, Do tlot
disassemblebattery pack and attemptto replacethe
batteries, Handlingof these bettedes, especiallywhen
weadng dngsand jewelry,couldresultina serious
bum.
To obtainthe longestpossildebatterylife,we snggest
the following:
B Store and chargeyourbatteries In a coolarea,
Temperaturesabove normal roomtemperature
willshortenbattery life.
B Never store batteriesin a dischargedcondition.
Rechargethem immediatelyalterthey are
discharged.
M All batteriesgraduallylosetheir charge.The
higherthe temperaturethe quickerthey losetheir
charge. Ifyou storeyourtool for longpariods of
timewithoutusingit, rechargethe batteries every
monthor two.This practicewill prolongbattery.
I FOR A COMPLETE SELECTION OF 1
ACCESSORIES FOR THIS AND OTHER
CRAFTSMAN POWER AND BENCH TOOLS,
VISIT YOUR NEAREST SEARS RETAIL STORE.
DO NOT EXPOSEH
TORAINORUSEIN
DAMP LOCATIONS [J
/////|
13

14
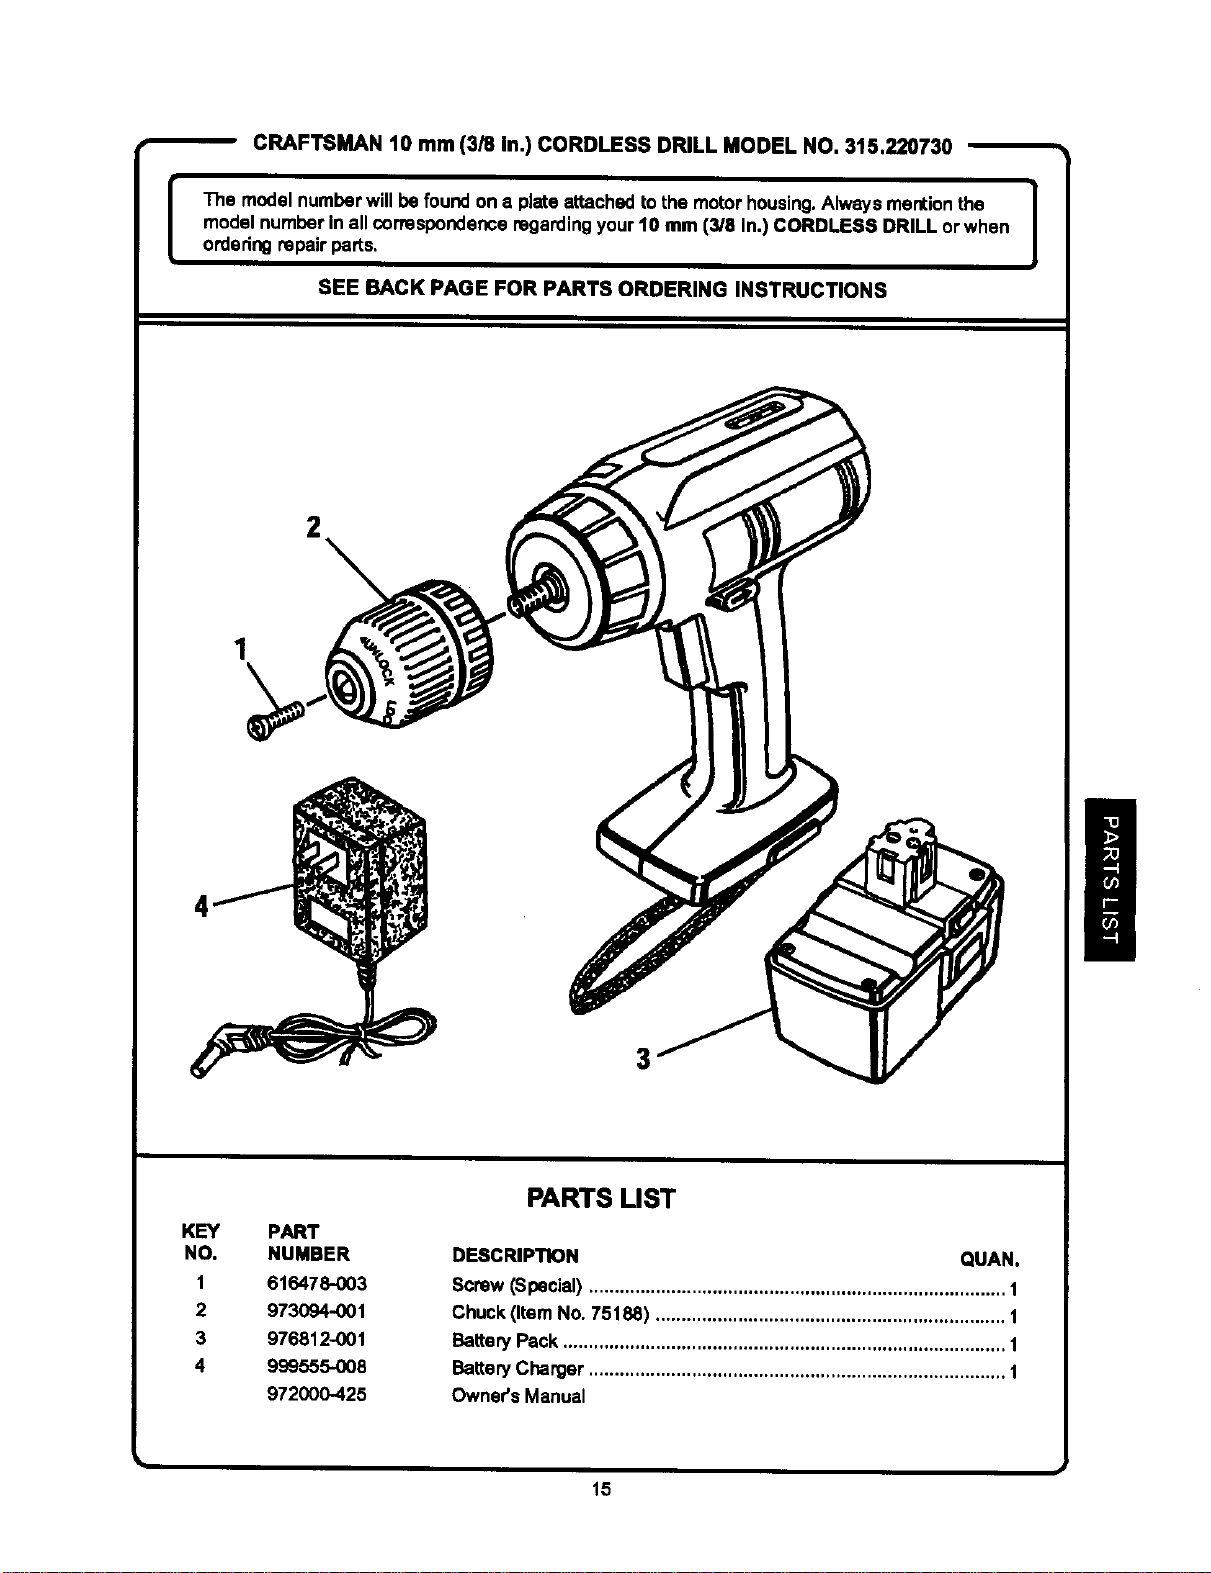
CRAFTSMAN 10 mm (3/8 In.) CORDLESS DRILL MODEL NO. 315.220730
[
The model numberwill be foundon a plate attached tothe motorhousing.Always mentionthe I
modelnumber in all correspondenceregardingyour10 mm (3/8 In.) CORDLESS DRILL or when
I
orderingrepair parts,
SEE BACK PAGE FOR PARTS ORDERING INSTRUCTIONS
2
1
KEY PART
NO. NUMBER
1 616478-003
2 973094-001
3 976812-001
4 999555-008
972000-425
PARTS LIST
DESCRIPTION QUAN.
Screw(Special) ................................................................................. 1
Chuck(Item No. 75188) .................................................................... 1
BatteryPack ...................................................................................... 1
BatteryCharger ................................................................................. 1
Owner's Manual
15
Owner's Manual
STOCK NO. a 22073
MODEL NO. 315.220730
Sears service is available at or through
your Sears Retail Store
or Catalogue Sales Office.
How to order repair parts
SERVICE AND REPAIR PARTS
CALL 1-800-665-4455"
Keep this number handyshouldyou requirea
servicecall or need to order repairpars.
Iforderingparts,make sure you havethe name, make and
modelno.of the merchandiseand the name and number
ofthe partyou wish toorder.
*If calling locally, please use one of the following numbers:
Regina - 566-5124 Montreal - 333-5470
Toronto - 744 4900 Halifax - 454-2444
Kitchener - 894-7590 Ottawa - 738-4440
Vancouver - 420-8211
When orderingrepairparts
always give:
1.The Part Number
2. The Part DescdptJon
3. The Model Number.
315.220730
4. The nameofthe item:
10 mm (3/8 in,)
CordlessDrill
WE SERVICE WHAT WE SELL.
WE MAKE THIS PLEDGE BECAUSE OUR CONCERN FOR OUR CUSTOMERS DOES NOT END
WITH THE SALE. TO HONOR OUR PLEDGE, WE HAVE DEVELOPED A TOP-NOTCH SERVICE
PROGRAM STAFFED BY HIGHLY TRAINED SPECIALISTS. THEIR KNOWt.EDGE OF OUR NEW
PRODUCTS IS CONSTANTLY UPGRADED. THEY USE ONLY PARTS SPECIFICALLY DESIGNED
FOR YOUR FINE SEARS PRODUCTS.
Sold by: SEARS CANADA INC., TORONTO M5B 2B8