Offset LED
Patio Umbrella
Owner’s Manual
Model: EO-PU22021
DESIGNED IN NEW YORK
Question? Comments?
Reach out to us to get expert support!
support@eastoak.com
eastoak.com
1-833-EAST-OAK (USA)
(1-833-327-8625)
eastoak.com
1EASTOAK.COM OWNER’S MANUAL
IMPORTANT CAUTION
SAFETY GUIDE
Please check all parts and components to ensure that there are no damages
or missing items before starting the construction of the product. If you have any
problems or discover any missing parts, please contact customer service at
support@eastoak.com
• Some parts may contain sharp edges. Wear protective gloves if necessary
during assembly.
• When using power tools, please adjust the gear to the minimum, otherwise it
will cause damage to the parts.
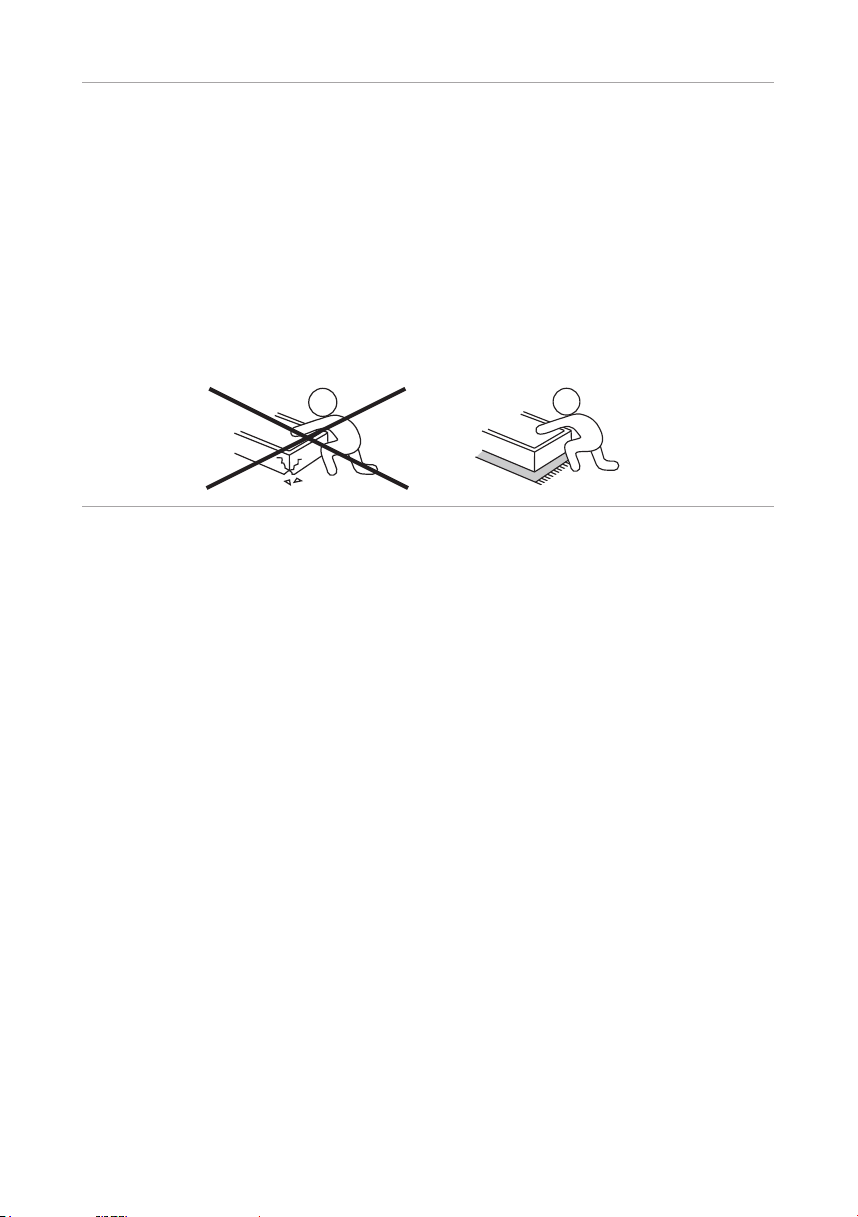
• Assemble on a soft surface such as a drop sheet or rug to avoid scratching.
• Offset patio umbrellas are designed to provide protection from the sun NOT
the wind.
• NEVER open or operate this umbrella in wind conditions greater than 5mph
(8kph).
• NEVER use the tilt function in any wind (even a light breeze).
• NEVER use excessive force on the crank handle to open or close the umbrella.
• ALWAYS close and secure the umbrella when not in use or during any strong
wind event, especially gusting wind and rain.
• ALWAYS close the umbrella when unattended or not in use. If you are not
sitting under it, the umbrella should be closed.
• ALWAYS use the Velcro straps to properly secure the canopy to the frame
when the umbrella is closed.
• Base weights are required (additional purchase) to secure this umbrella.
• NEVER open or operate the umbrella without rst placing base weights in
each open section of the cross base. It is important to use a correctly weighted
base; more weight is always better than less weight. This model requires a
MINIMUM base weight of 192 lbs (88 kg).
FAILURE TO CAREFULLY OBSERVE THESE SAFETY WARNINGS CAN
RESULT IN CATASTROPHIC DAMAGE TO YOUR UMBRELLA, POTENTIAL
PERSONAL INJURY, AND OR PROPERTY DAMAGE.

2 OFFSET LED PATIO UMBRELLA
If the umbrella is showing ANY signs of stress, or IF the umbrella begins to move
around excessively even when properly weighted it indicates the wind is too
strong and the umbrella must be closed and secured immediately.
• To help extend the life of the polyester fabric and reduce the effects of fading,
we strongly advise using a protective storage cover whenever the umbrella is
not being used.
• During extended periods of bad weather (especially through winter months),
your umbrella should be stored inside in a dry place.
• The polyester fabric has been treated to make it dirt and shower-resistant
(not waterproof). If your umbrella gets wet, please allow it to fully dry before
storing it away. The fabric can be cleaned with a soft brush, then use a damp
cloth and mild detergent to remove any stubborn stains.
CARE AND MAINTENANCE
IMPORTANT INFORMATION
3EASTOAK.COM OWNER’S MANUAL
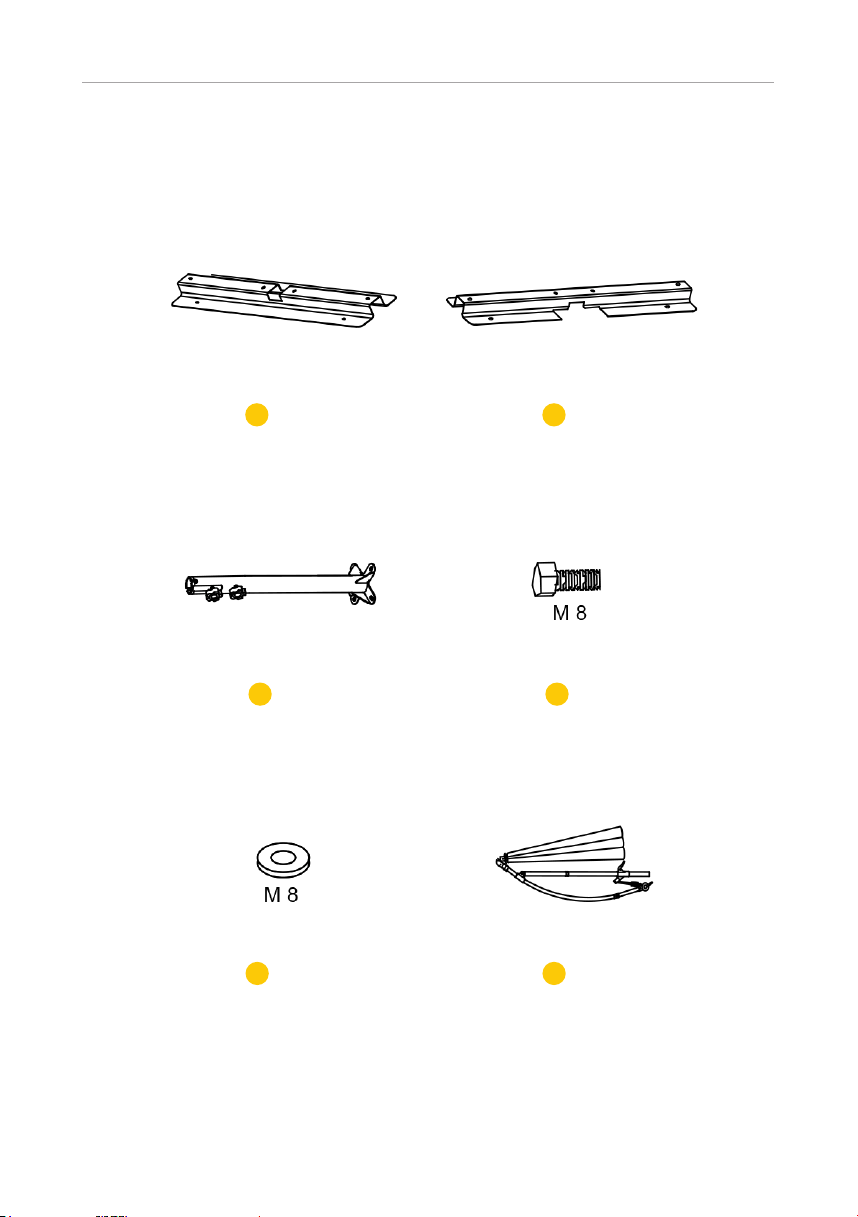
PARTS LIST
Lower Cross Base
A (X1) B (X1)
Upper Cross Base
C (X1)
Central Spigot Hex Bolt M8*20mm
D (X4)
E (X4)
Washer M8 Main Frame and Canopy
F (X1)
4 OFFSET LED PATIO UMBRELLA
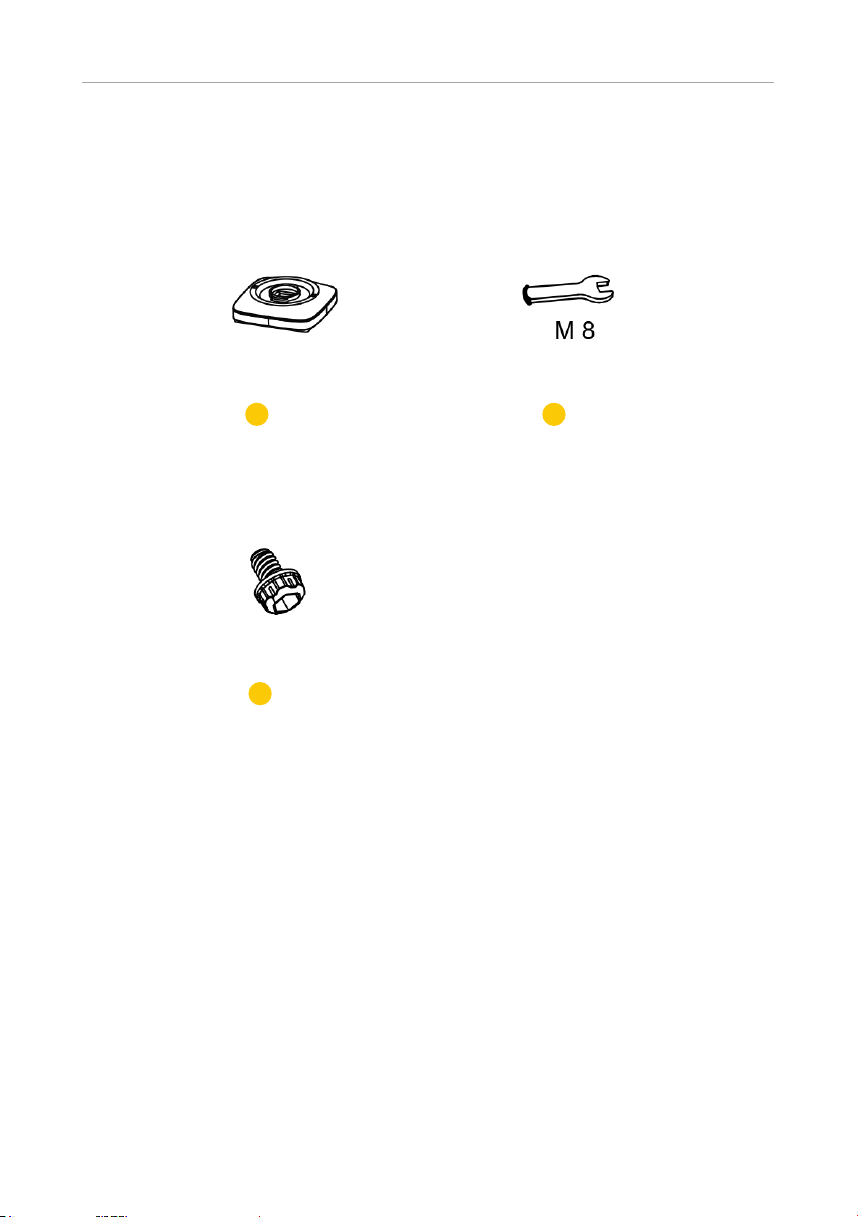
PARTS LIST
Solar Panel
G (X1) H (X1)
I (X3)
Spare LED Light Covers
Wrench M8
5EASTOAK.COM OWNER’S MANUAL
ASSEMBLY INSTRUCTIONS
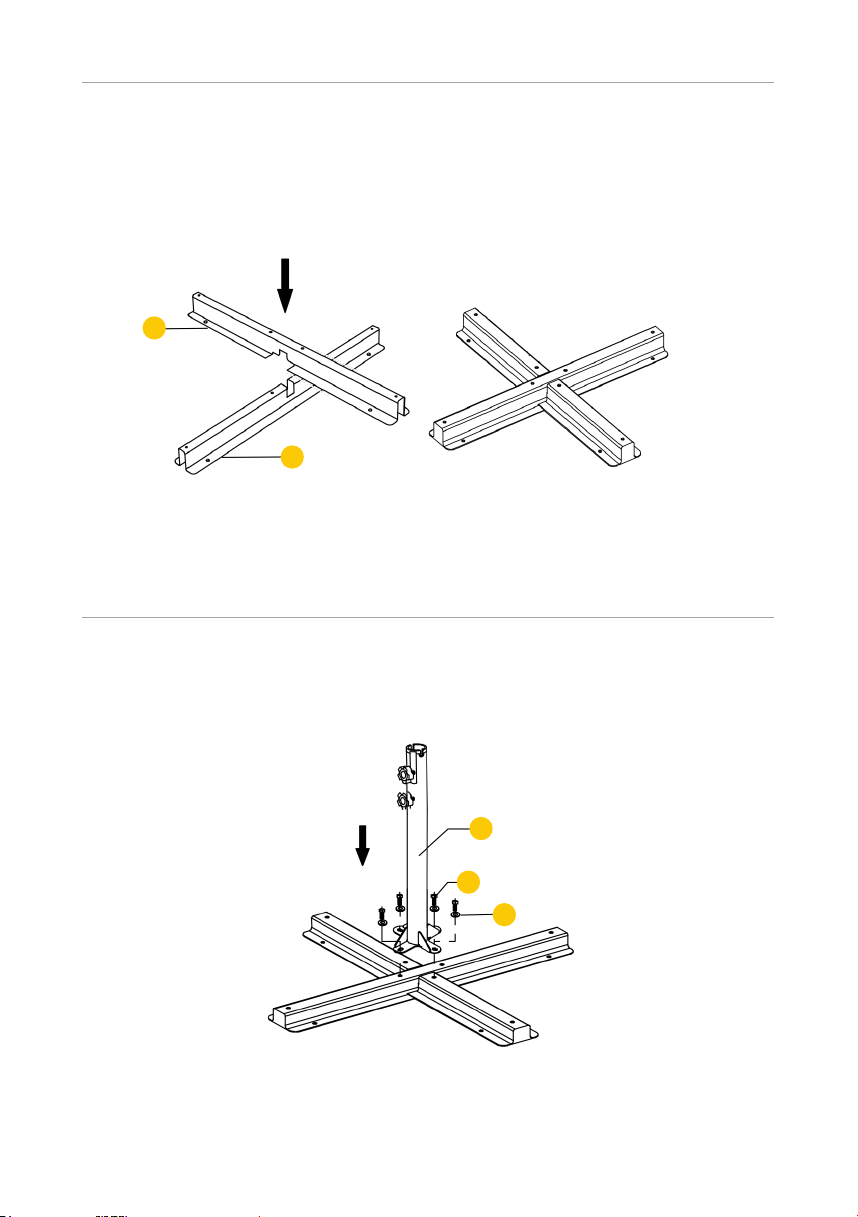
1
Place the upper cross base (B) over the lower cross base (A).
2
Using the M8 wrench x the central spigot to the assembled cross base with
20mm M8 hex bolts and M8 washers. Tighten rmly.
A
B
C
D
E
6 OFFSET LED PATIO UMBRELLA
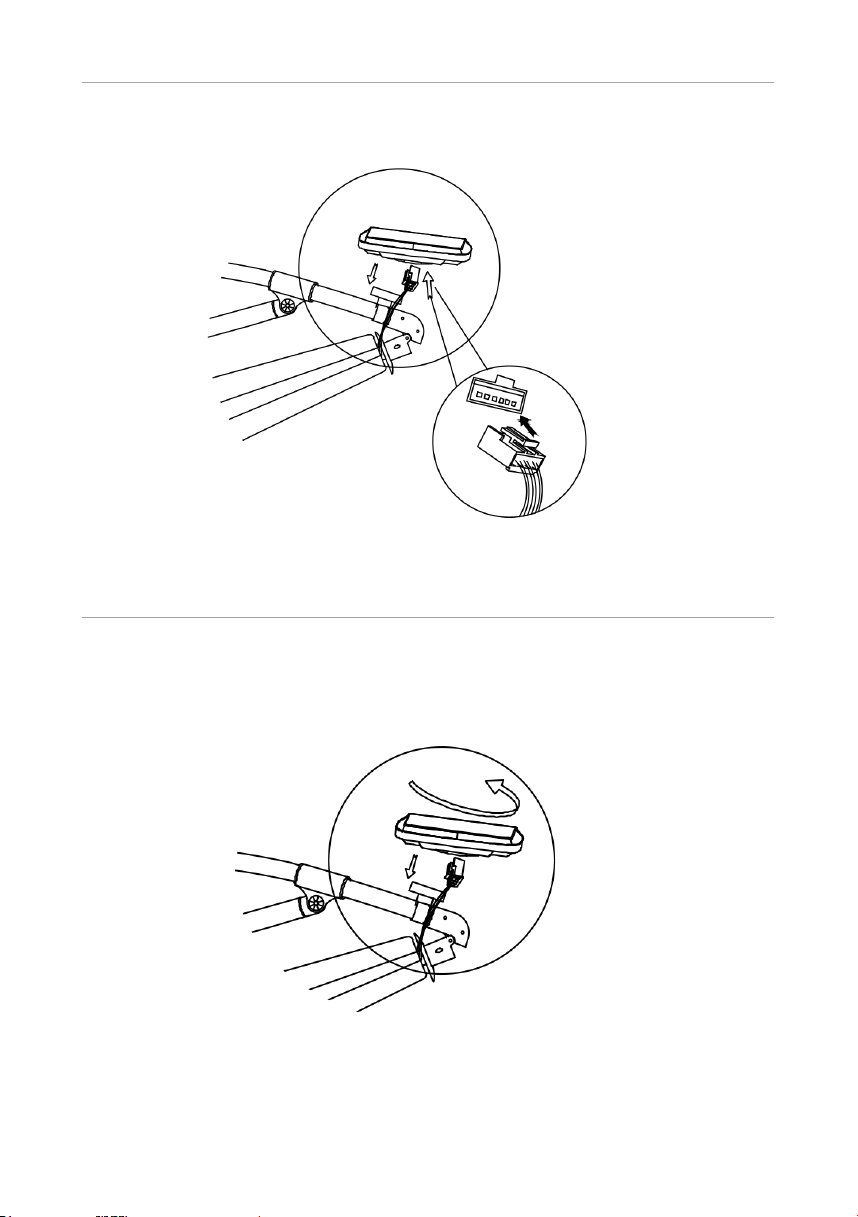
3
Locate the plug at the top of the umbrella. Carefully insert the plug into the
socket located on the underside of the solar panel.
4
Place the solar panel on the top of the umbrella, taking care to conceal the
wires inside the gap at the top of the umbrella, then gently turn the solar
panel in a clockwise direction to attach it to the umbrella. Take care, not over
tighten as this may damage the umbrella and/or the solar panel.
7EASTOAK.COM OWNER’S MANUAL
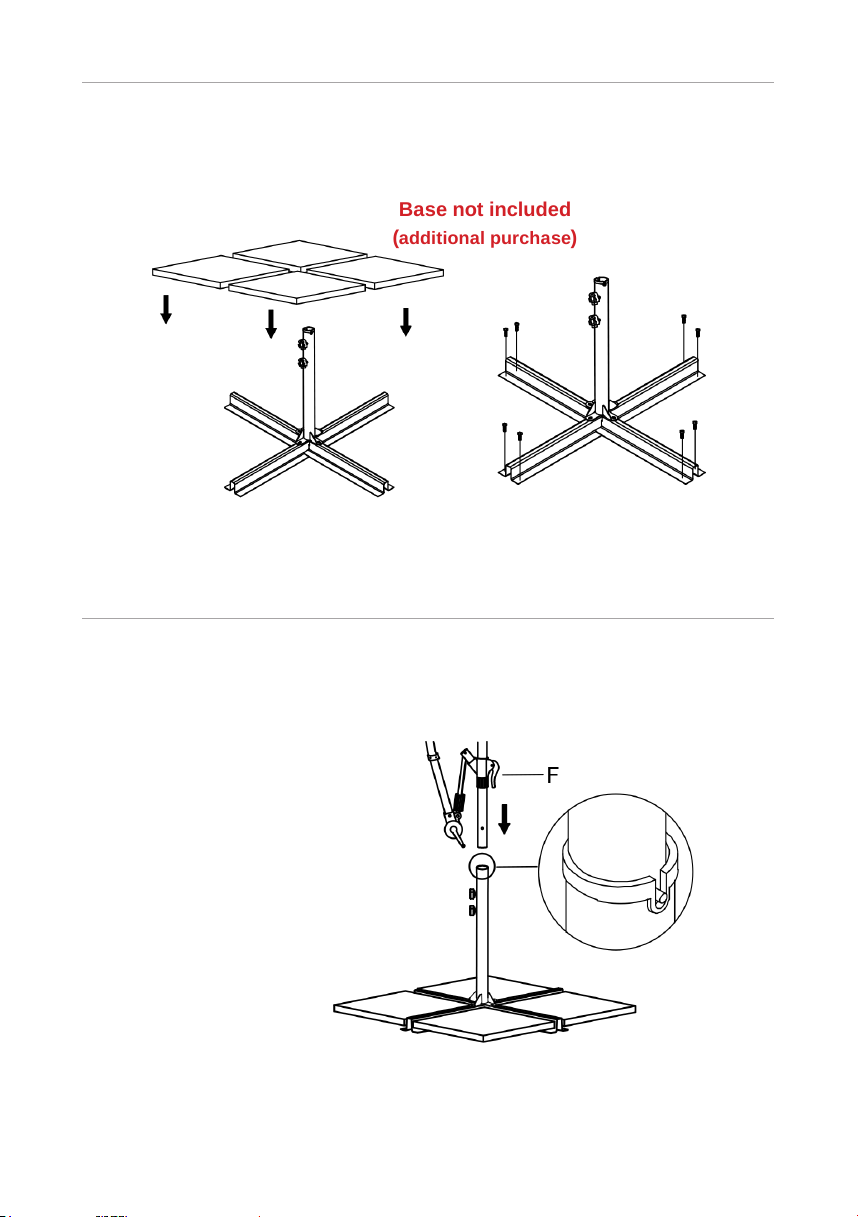
Base not included
(additional purchase)
6
Attach the main frame and canopy to the central spigot. Ensure that the
locating pin is positioned into the cutout in the top of the central spigot
Tighten the two tension screws rmly.
5
Place the assembled cross base in your preferred location then follow the
'Cross Base Installation Tips' on page 16-17.
NOTE: The central spigot is
designed with a reverse angle to
ensure the canopy sits level once
assembled. It is very important to
correctly locate the crank winder
directly above the tension screws
as shown.
8 OFFSET LED PATIO UMBRELLA
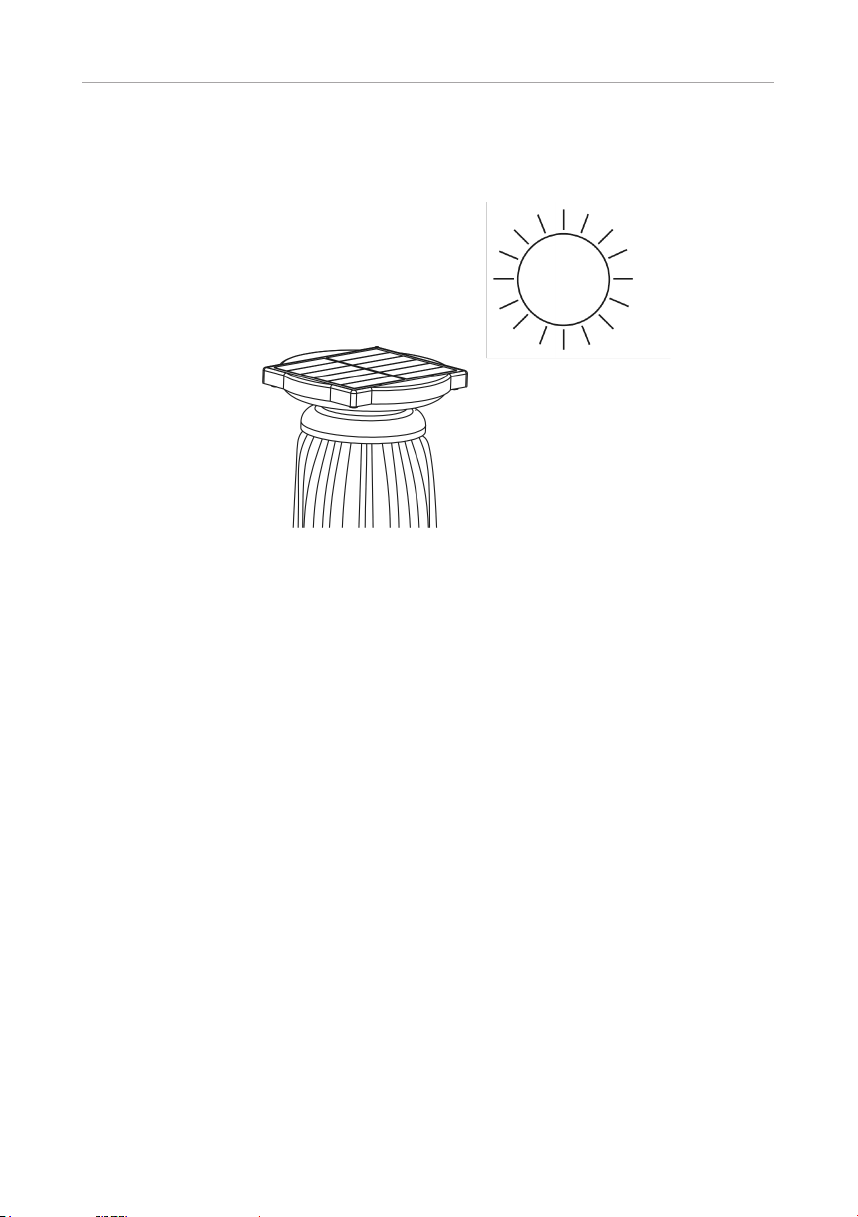
7
Locate the umbrella in direct sunlight to charge the batteries before rst use.
IMPORTANT NOTE: Charge the batteries for at least 8 hours in direct sunlight
before rst use. Failing to follow this step will shorten the lifespan of the
rechargeable batteries and decrease the performance of the lights. Make sure
both the switches on the rib are set to the “OFF” ‘O’ position during charging.
9EASTOAK.COM OWNER’S MANUAL
OPERATING INSTRUCTIONS
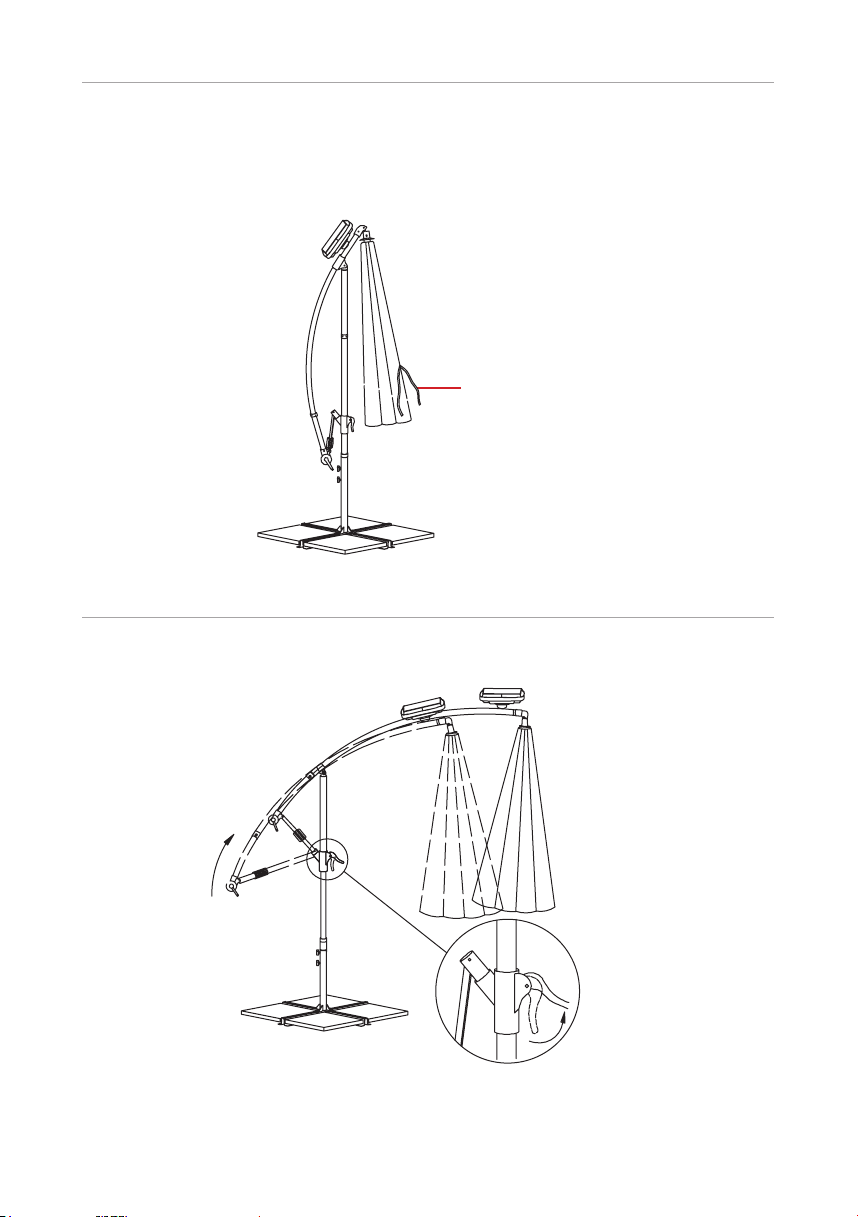
1
Unfasten the Velcro storage straps from the canopy and main frame.
2
Unlock the lift clamp. Gently slide the arm upwards to extend the umbrella
fully.
Storage
Straps
10 OFFSET LED PATIO UMBRELLA
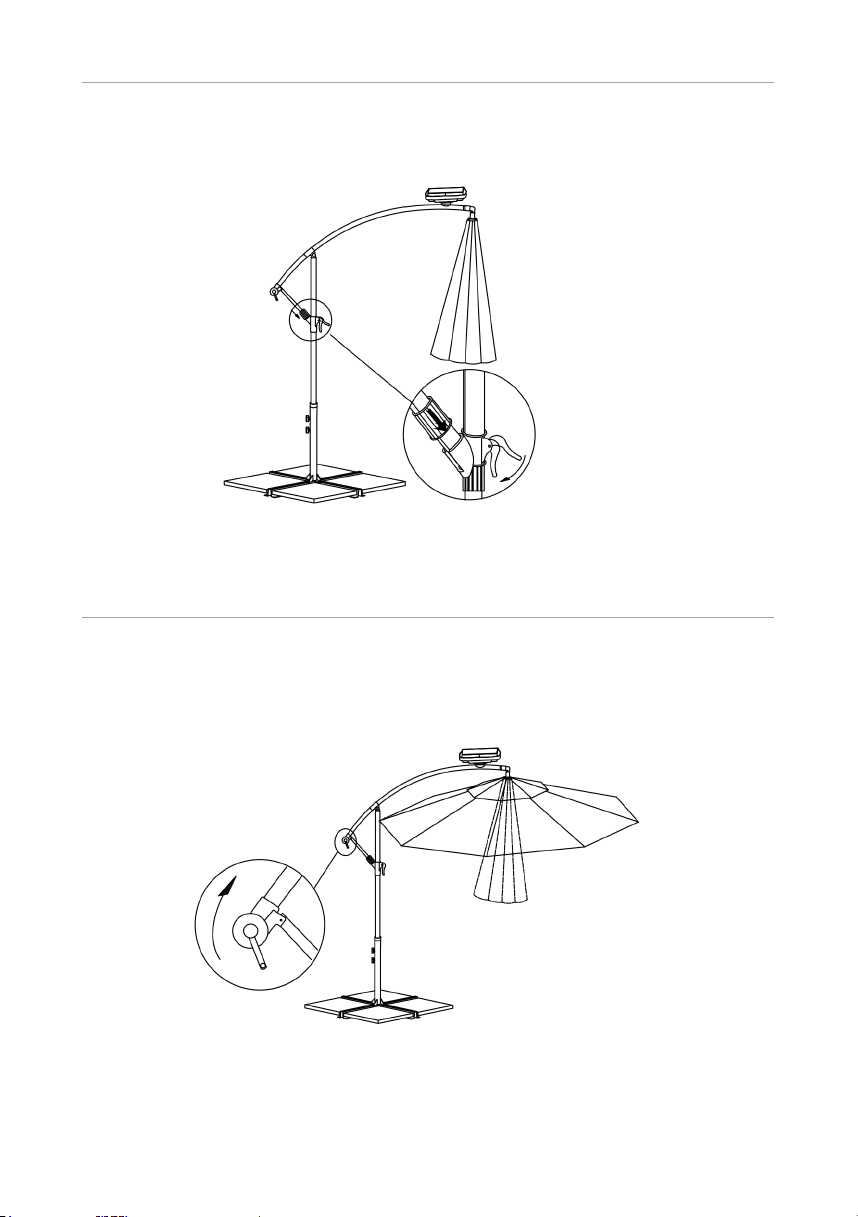
3
When the umbrella arm is fully extended, lock the lift clamp and slide the
lock cover into place as shown.
4
Turn the crank handle in a clockwise direction to open the canopy (take care
not to keep winding the crank handle once the canopy is fully opened).

11EASTOAK.COM OWNER’S MANUAL
5
To close the umbrella, rst, undo the tie strings and then wind the crank
handle gently in a counterclockwise direction until the canopy is fully closed.
CRITICAL STEP: Always remember to slide the lock cover away from the
vertical lift mechanism BEFORE lowering the umbrella arm. Unlock the lift
clamp and gently slide the arm downwards to lower the umbrella fully. Fasten
the Velcro storage straps around the canopy and main frame.
NOTE: A regular application of silicone spray to the sliding mechanisms will
assist with smooth operation.
OPERATING THE LIGHTS
To operate the lights, turn the switches (located on the end of one rib) to the
ON (‘I’) position. Ensure both switches are set to the OFF (‘O’) position when
the lights are not being used.
IMPORTANT: If the lights are accidentally left on during the day, the batteries
will NOT charge and the lights will not operate at night.
1
12 OFFSET LED PATIO UMBRELLA
REPLACING THE BATTERIES
The batteries in your LED umbrella must be replaced at least once every year (or
when you feel that the light is fading more quickly). You can purchase replacement
batteries at specialty retailers. You will need 3 pieces AA size 1.2v 800mAh NIMH
rechargeable batteries which are the same as have been supplied from new.
Failure to insert batteries in the correct polarity, as indicated in the battery
compartment, may shorten the life of the batteries or cause them to leak.
• NEVER dispose of batteries in the re. Batteries must be recycled or disposed
of as per state and local guidelines.
• NEVER mix old and new batteries.
• NEVER mix Alkaline, Standard (Carbon-Zinc) or rechargeable (Nickel
Cadmium), or (Lithium) batteries together in the solar panel.
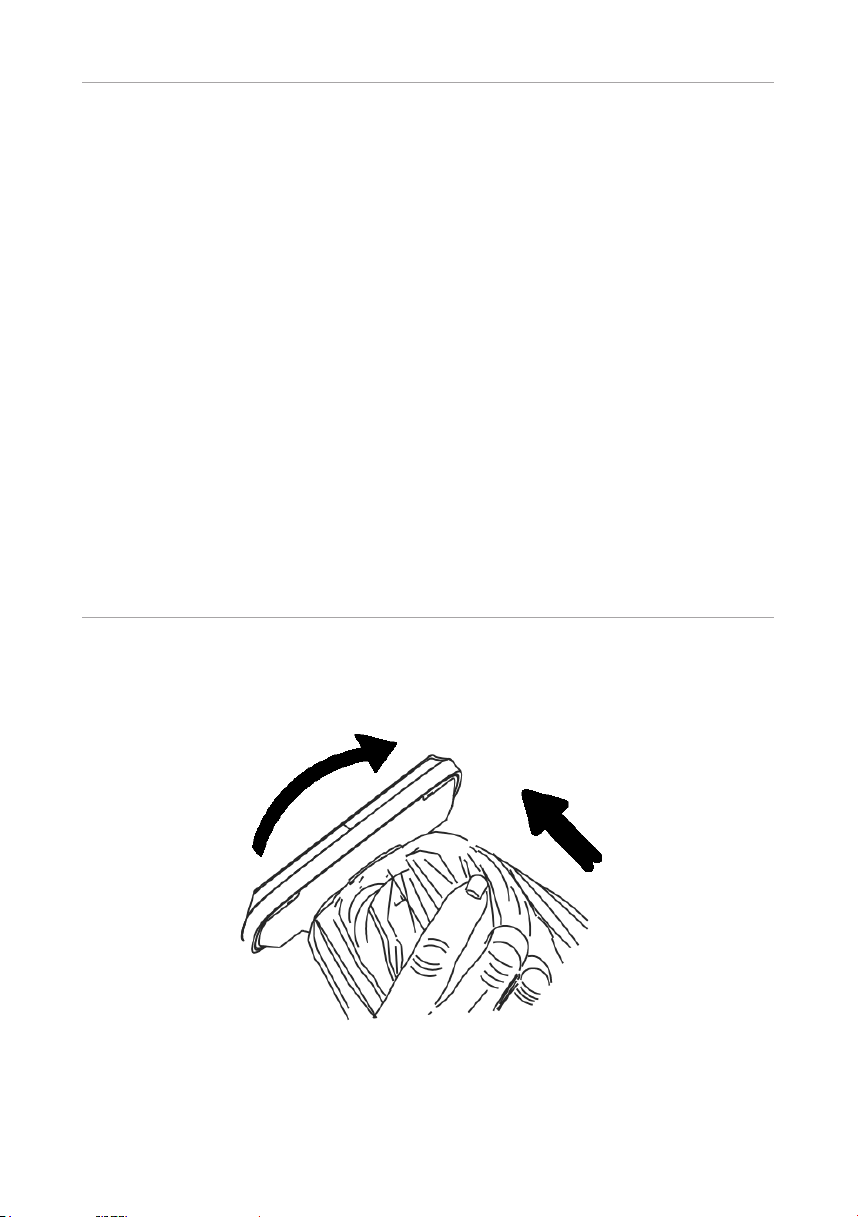
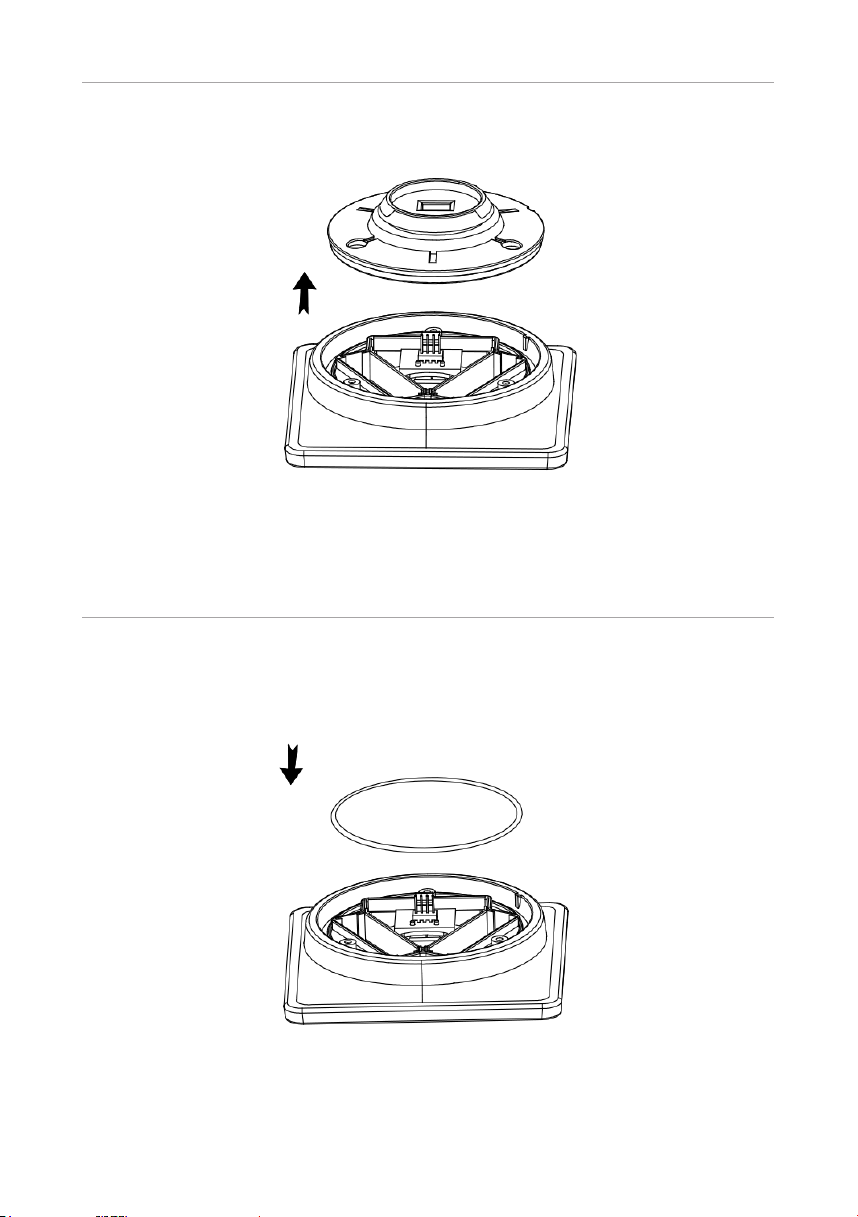
1
Twist the solar panel counterclockwise and remove it from the top of the
umbrella.
13EASTOAK.COM OWNER’S MANUAL
2
Carefully pull the plug out of the socket under the solar panel.
IMPORTANT: Do not pull the wire to remove the plug.
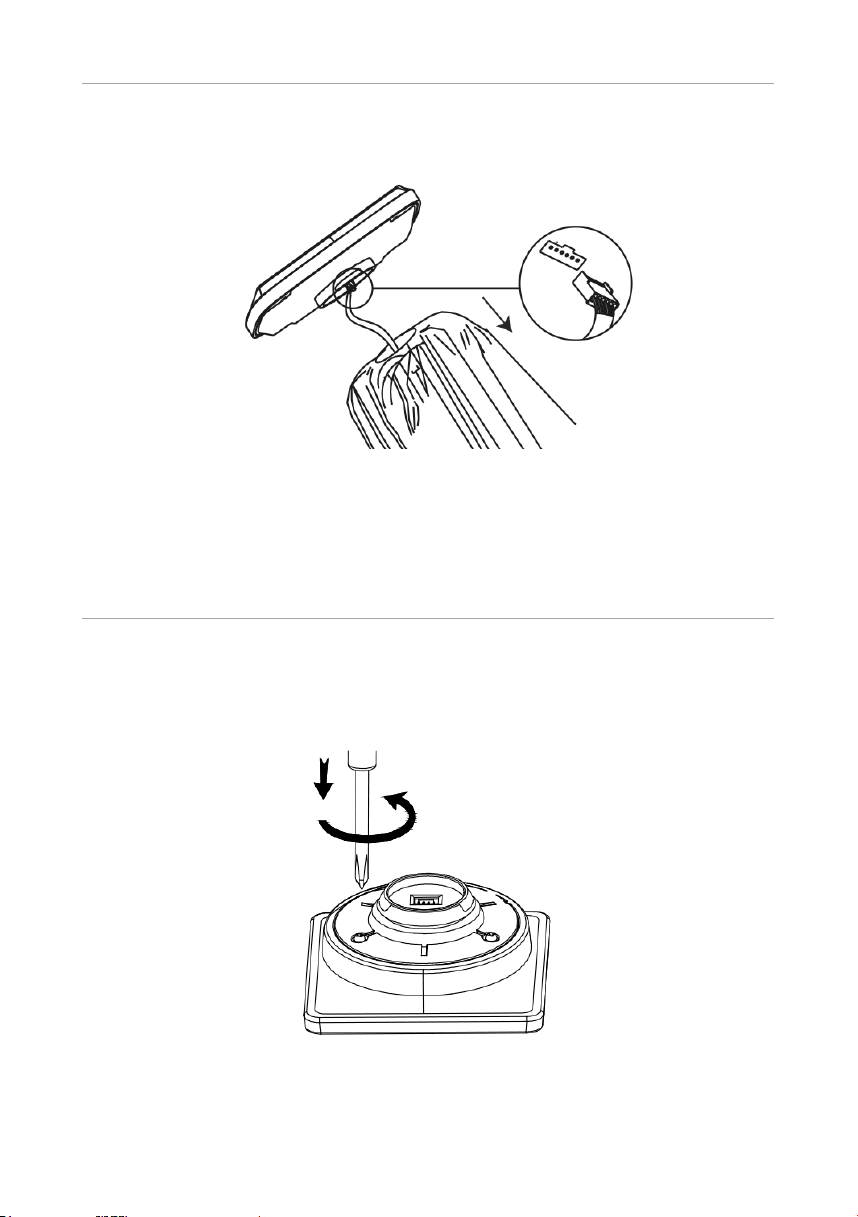
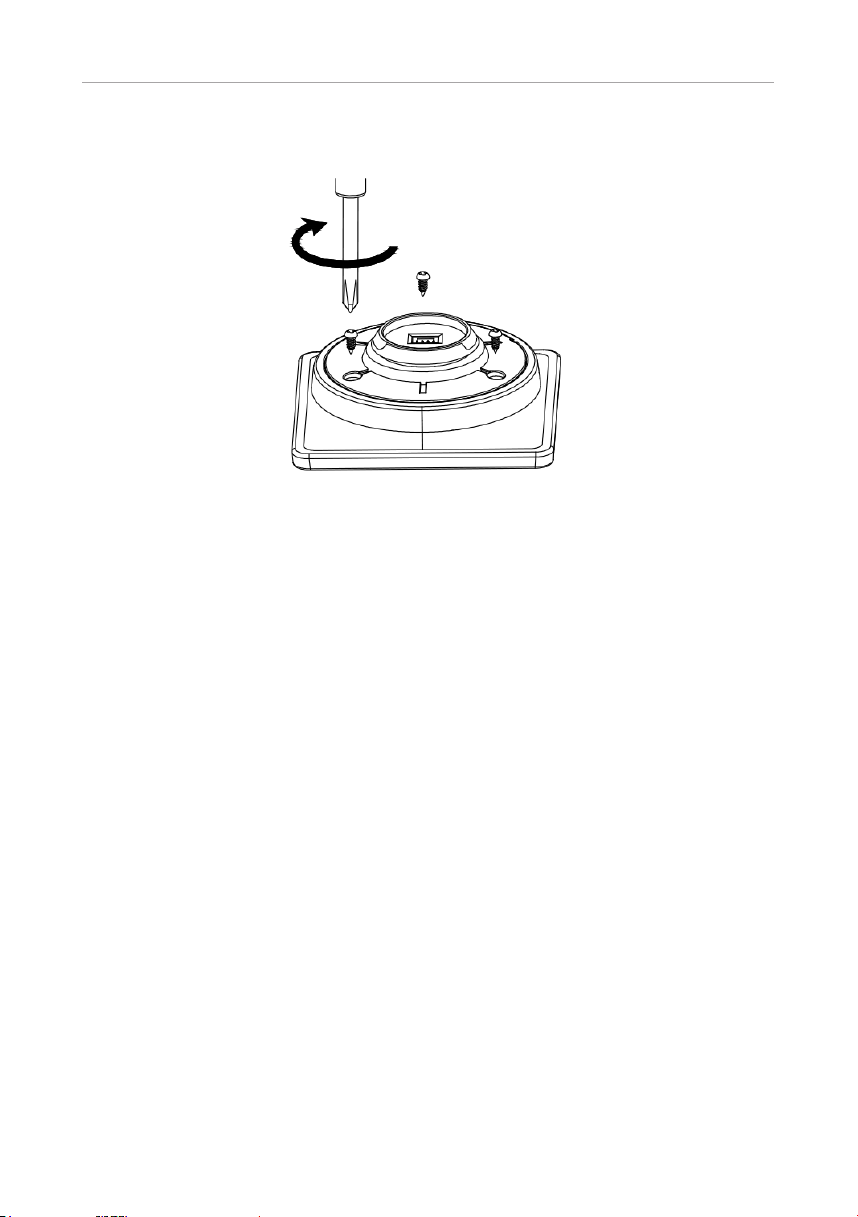
3
Set the solar panel upside down on a soft, clean surface to avoid scratching.
Loosen all three screws on the bottom of the solar panel.
14 OFFSET LED PATIO UMBRELLA
4
Carefully open the solar panel. Replace the batteries, matching the +/- on the
battery with the +/- on the battery case.
5
Make sure the O ring is correctly located before replacing the cover.
15EASTOAK.COM OWNER’S MANUAL
6
Re-assemble the solar panel. Do not over-tighten the screws.
16 OFFSET LED PATIO UMBRELLA
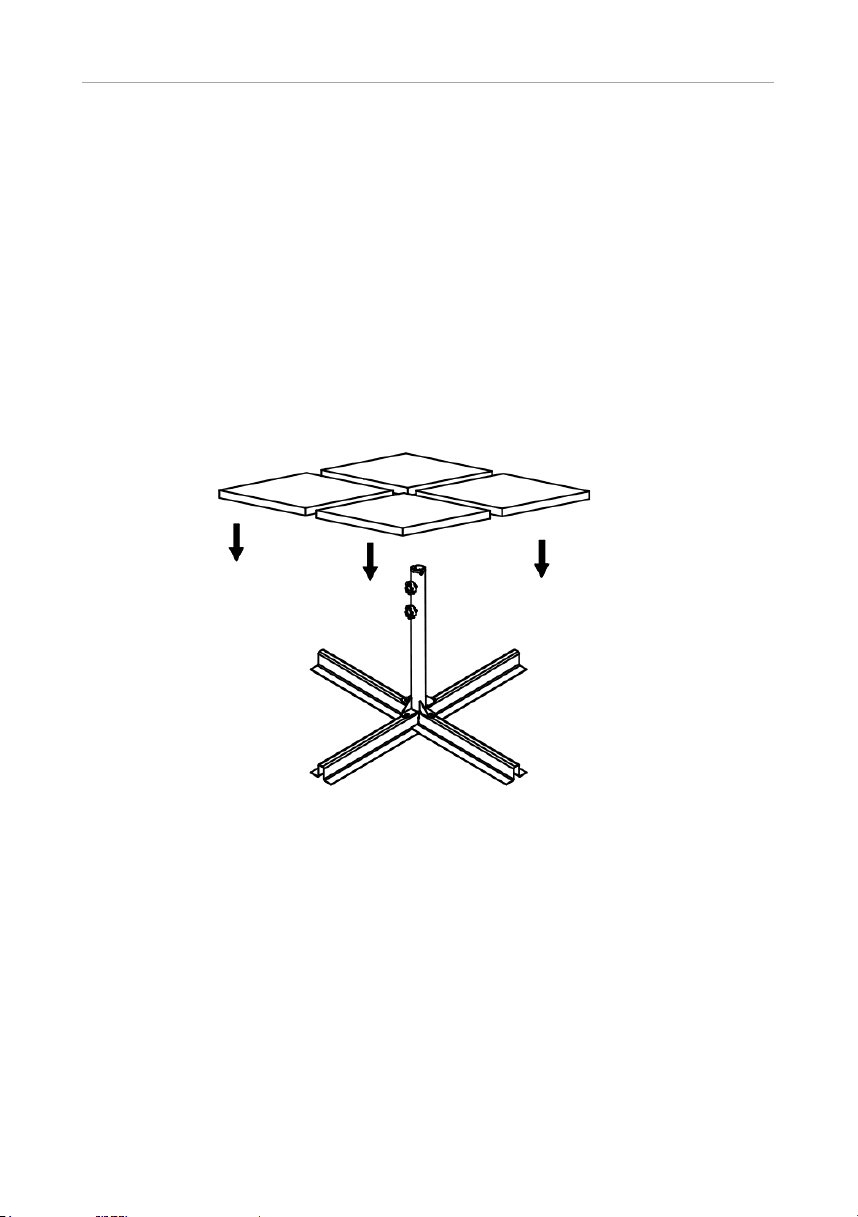
OFFSET UMBRELLA BASE TIPS
STANDARD INSTALLATION
• The cross base supplied with this offset umbrella requires 4 individual
base weights at least 48 lbs (22 kg) each for a minimum combined
weight of 192 lbs (88 kg) to provide the necessary support and
stability. As a general rule, the more weight the better the umbrella
will be supported.
• Failing to use the minimum base weight will damage the umbrella and
may also cause personal injury.
17EASTOAK.COM OWNER’S MANUAL
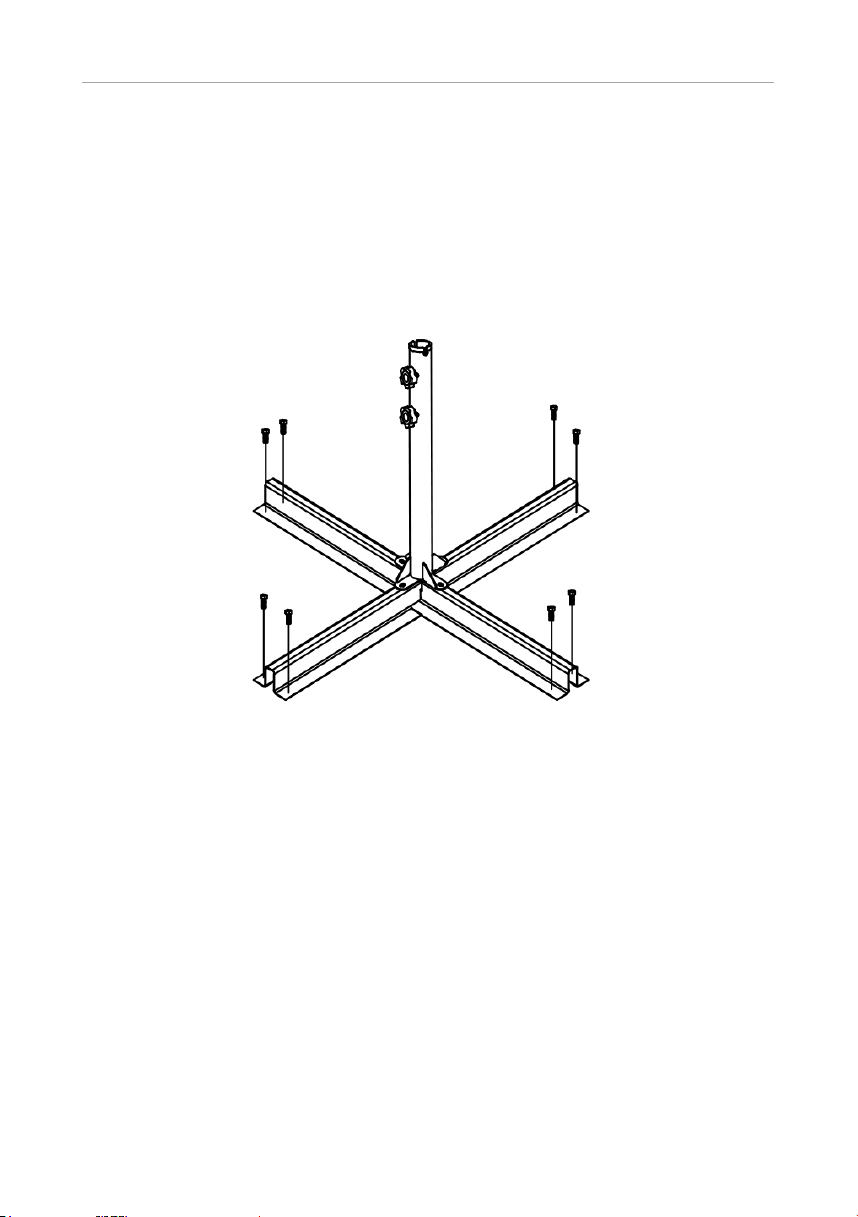
SPECIAL INSTALLATION
• If you have a suitable timber deck, the cross base can be secured to it
using 2” (5cm) M8 coach bolts or deck screws (not supplied). Ensure
the xing points are made into joists or bearers, not just the decking
boards. If using this option, extreme care must be taken to ensure the
umbrella is never opened or used in the wind greater than 5mph (8kph).

18 OFFSET LED PATIO UMBRELLA
FEATURES
WHAT’S IN THE BOX
• 1 X Lower Cross Base
• 1 X Upper Cross Base
• 1 X Central Spigot
• 4 X Hex Bolt M8*20mm
• 4 X Washer M8
• 1 X Main Frame and Canopy
• 1 X Solar Panel
• 1 X Wrench
• 3 X Spare LED Light Covers
• 1 X Owner's Manual
• SOLAR-POWERED LIGHTS: Use it day or night, built-in 40 solar LED lights,
and center LED light, can run for 6-7 hours simultaneously.
• HIGH-DURABILITY FABRIC: The umbrella is made of 100% polyester fabric,
fade-resistant, UV protection, water repellent to keep the people under the
umbrella enjoying food or drink with no concern.
• EXCELLENT FUNCTION: This umbrella with 10 feet diameter give you
enough shade and applies to the courtyard, patio, outdoor garden, beach, or
any other outdoors.
• STURDY STRUCTURE: 1.89 in diameter Ferro pole and 8 heavy-duty ribs
with rust-free powder-coated steel frame, strong wind resistance, hard to
break, stand up to the sun. The umbrella added a wind vent top for airow
and reduced wind pressure to enhance stability.
• EASY TO USE: For more exibility, this item easily inclines, making it easy
for you to adjust its angle according to the sun’s position. Crank handle for
easy opening and closing, which makes it easy to raise and lower the canopy.
19EASTOAK.COM OWNER’S MANUAL
TECHNICAL SPECS
WARRANTY AND SERVICE
• Construction Materials: 180g Polyester Canopy, Steel Pole, and
Steel Ribs.
• Assembly Time: 5-10 minutes
• Product Size:
◦ Umbrella Ribs: 8 steel ribs
◦ Umbrella Pole Diameter: 1.89”
Default 12-Month Warranty
Thank you for choosing East Oak. This product is covered with East Oak
product and labor warranty for 12 months from the date of its original purchase.
Extend Your Warranty
Extend your warranty by registering your new product on our website
eastoak.com/warranty.

support@eastoak.com
eastoak.com
1-833-EAST-OAK (USA)